If you’ve got a lump of air dry clay and a little garden space (even just a windowsill planter), you’re basically holding a ticket to instant charm. These air dry clay garden ideas are all about quick wins that look magical nestled into real plants—and still feel totally doable.
Plant Markers and Herb Labels
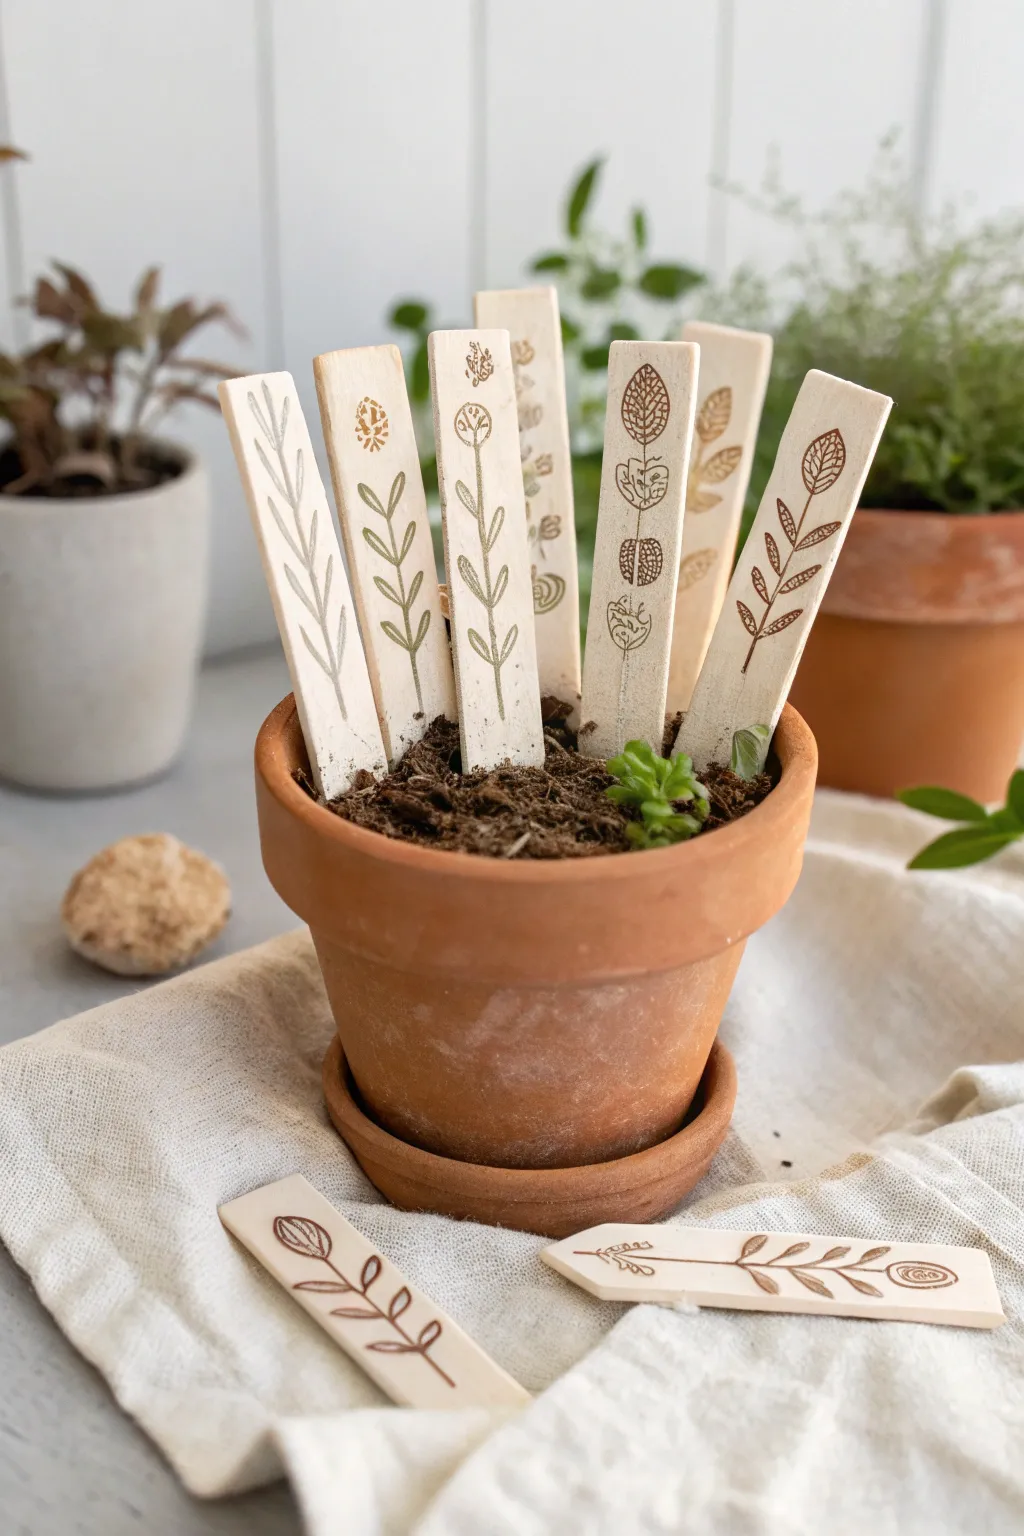
Elevate your indoor garden with these rustic, handmade plant markers that combine the earthy texture of air-dry clay with delicate botanical illustrations. Stamped with simple leaf and flower motifs, they offer a charming and permanent way to identify your seedlings and herbs.
Step-by-Step Tutorial
Materials
- White or cream air-dry clay
- Rolling pin
- Sharp crafting knife or clay blade
- Ruler
- Botanical rubber stamps (leaves, flowers, stems)
- Brown and olive green ink pads (pigment or archival ink)
- Fine-grit sandpaper
- Matte spray varnish or sealant
- Smooth work surface or silicone mat
Step 1: Shaping the Clay
-
Condition and Roll:
Begin by taking a chunk of air-dry clay and kneading it in your hands until it is warm and pliable. Roll it out on a smooth surface to an even thickness of about 1/4 inch (4-5mm). If the clay sticks, you can lightly dust your surface with cornstarch. -
Measure Strips:
Using your ruler as a guide, lightly score vertical lines into the clay to mark out your stakes. Aim for strips that are approximately 1 inch wide and 5-6 inches long. -
Cut Out Markers:
Use your sharp crafting knife or clay blade to cut along the scored lines. Make clean, decisive cuts to avoid dragging the clay, which can create ragged edges. -
Create Pointed Tips:
On one end of each strip, make two diagonal cuts to form a pointed arrow shape. This will make it much easier to insert the marker into the soil later. -
Smooth the Edges:
Dip your finger in a tiny bit of water and run it along the cut edges of each marker to smooth out any roughness or sharp corners. This gives them a finished, professional look. -
Initial Drying:
Let the strips sit for about 15-20 minutes. I like to let the surface firm up just slightly so the clay isn’t too squishy when we start stamping.
Stamp Cleanliness
Clean stamps immediately after use. Ink can dry into the rubber crevices quickly; a wet wipe usually does the trick before the ink sets permanently.
Step 2: Stamping Designs
-
Ink the Stamps:
Select a tall, thin botanical stamp. Press it firmly onto your brown or olive green ink pad, ensuring the raised design is evenly coated but not pooling with ink. -
Make the Impression:
Carefully position the stamp over a clay strip. Press down directly and firmly, but don’t push so hard that you deform the shape of the marker. Lift the stamp straight up to avoid smudging. -
Vary the Patterns:
Repeat the stamping process for each marker, switching between different leaf patterns and alternating between brown and green inks for visual variety. -
Touch-ups:
If a stamp didn’t impress deeply enough, you can very carefully go over the lines with a minimal amount of ink on a fine-point marker, though the faded, rustic look adds to the charm.
Watercolor Wash
Before sealing, lightly paint a diluted watercolor wash over the stamped indentation to add a soft tint of color to the leaves or petals.
Step 3: Finishing and Sealing
-
Full Dry Phase:
Place the stamped markers on a wire rack or a clean, flat surface to dry completely. This usually takes 24-48 hours depending on humidity. Flip them over halfway through to ensure they dry evenly and don’t curl. -
Sand for Perfection:
Once fully hard and white, use fine-grit sandpaper to gently buff away any remaining rough spots on the edges or back. Be careful not to sand over your stamped design. -
Weatherproofing:
Since air-dry clay dissolves in water, sealing is crucial. Take the markers to a well-ventilated area. -
Apply Sealer:
Spray a light, even coat of matte varnish over the front, back, and sides of the markers. Let it dry completely. -
Second Coat:
Apply a second coat of sealant, paying special attention to the pointed tip that will be buried in the soil. This ensures the moisture from the dirt won’t disintegrate your work.
Pop these finished markers into your favorite potted plants to add a lovely botanical touch to your collection


Mini Succulent Planters
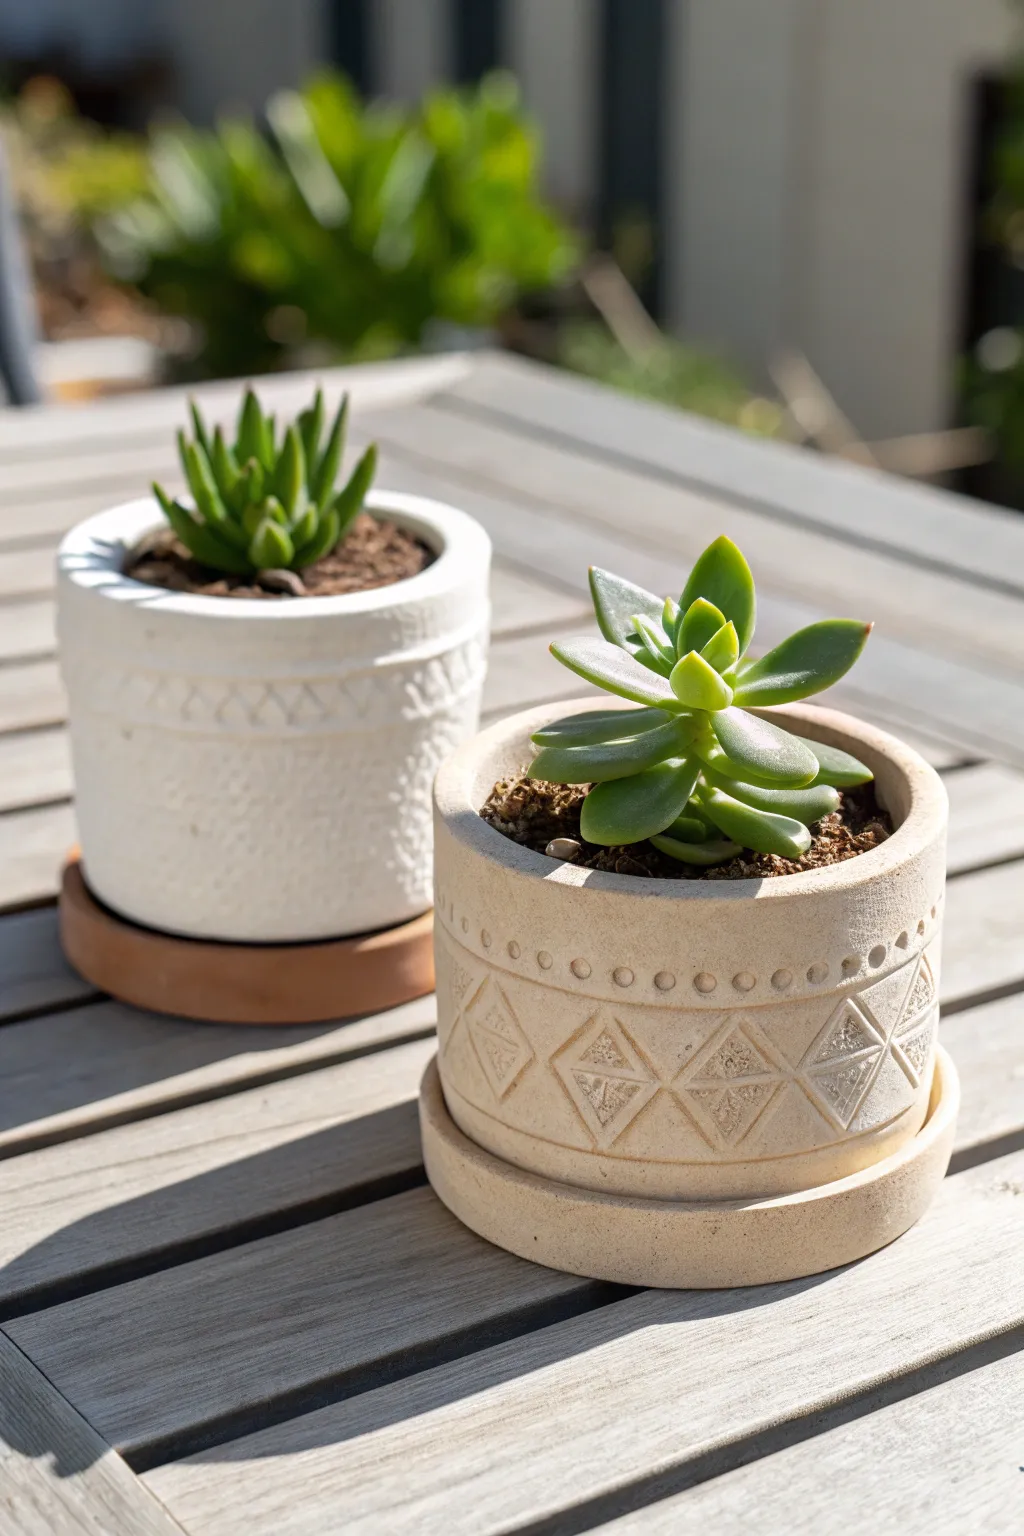
These charming, textured pots bring an earthy, artisanal vibe to your succulent collection using nothing more than air dry clay and simple tools. The intricate-looking patterns are easily achieved with stamping techniques, creating a high-end ceramic look for a fraction of the cost.
How-To Guide
Materials
- White or terracotta air dry clay (approx. 500g)
- Small rolling pin
- Empty plastic container or tin can (to use as a mold)
- Craft knife or clay cutter
- Small bowl of water
- Sandpaper (fine grit)
- Clay sculpting tools or a flat stick
- Assorted texture tools (e.g., pen caps, patterned buttons, carved stamps, or drinking straw)
- Clear acrylic sealant (matte finish)
Step 1: Forming the Base
-
Prepare your clay:
Start by kneading a large ball of air dry clay until it is pliable and warm. If you want the beige look shown in the foreground pot, you can mix a small amount of acrylic paint into white clay or choose a terracotta-colored variety. -
Roll out the slab:
Roll your clay out on a smooth surface to an even thickness of about 1/4 inch. Aim for a long rectangular shape, ensuring the width is slightly taller than your chosen mold container. -
Cut the base:
Place your mold (like an empty tin can) onto the remaining flat clay and trace a circle around the bottom. Cut this circle out with your craft knife; this will serve as the floor of your pot. -
Wrap the walls:
Wrap your rectangular clay slab around the mold. Identify where the ends overlap and cut a clean vertical line through both layers of clay to create a seamless join. -
Join the seam:
Score the raw edges of the seam with cross-hatch marks and apply a little water. Press the edges together firmly. I like to use a flat sculpting tool here to smooth the clay downward until the line disappears completely. -
Attach the base:
Score and wet the bottom edge of your cylinder wall and the outer edge of your circular base. Press them together gently, smoothing the clay from the wall down onto the base to create a watertight seal.
Cracks Appearing?
Mix a tiny amount of clay with water to create a paste (slip). Fill any drying cracks with this paste, smooth it over with a finger, and let it dry again.
Step 2: Adding Texture & Details
-
Remove the mold:
Carefully slide your plastic container or tin can out of the clay cylinder. If it sticks, gently twist it as you pull. -
Create the rim detail:
For the beige pot’s design, use a small, round object like the end of a paintbrush handle or a drinking straw to press a row of circles about half an inch below the rim. -
Mark geometric guides:
Lightly trace a zigzag line around the middle of the pot using a needle tool. This will guide your diamond shapes and ensure they stay relatively even as you stamp. -
Imprint the pattern:
Use a specialized clay stamp or carve a simple diamond shape into a raw potato or eraser. Press this stamp firmly into the clay following your zigzag guide, creating the recessed diamond pattern. -
Cross-hatching texture:
Inside each diamond indentation, simply use a needle tool to scratch small cross-hatch lines. This adds that rough, stone-like texture seen in the reference image. -
Adding the lower detail:
For the darker pot, repeat the circular dot pattern near the bottom edge to frame the central design. For the white pot, use a tool with a serrated edge or a comb to press vertical texture bands around the top third.
Better Release
Wrap your mold object in a single layer of parchment paper before wrapping the clay around it. The cylinder will slide off effortlessly without deformation.
Step 3: Finishing Touches
-
Create the saucer:
Roll out a smaller slab of clay. Cut a circle slightly larger than your pot’s base. U-turn the edges slightly upward to create a shallow lip for the saucer. -
Smooth imperfections:
Dip your finger in water and run it over the rim and any sharp edges to soften them. Be careful not to smudge your stamped details. -
Let it dry:
Allow the pots to air dry completely for 24-48 hours. Turn them occasionally to ensure the bottom dries evenly. -
Sand it down:
Once fully dry, take your fine-grit sandpaper and gently buff away any rough spots on the rim or the seams for a professional finish. -
Seal for protection:
Apply two coats of matte acrylic sealant inside and out. Since air dry clay isn’t waterproof, this step is vital before adding soil and plants.
Place your favorite succulents inside and enjoy your handmade desert oasis


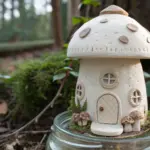
Classic Toadstool Mushroom Stakes
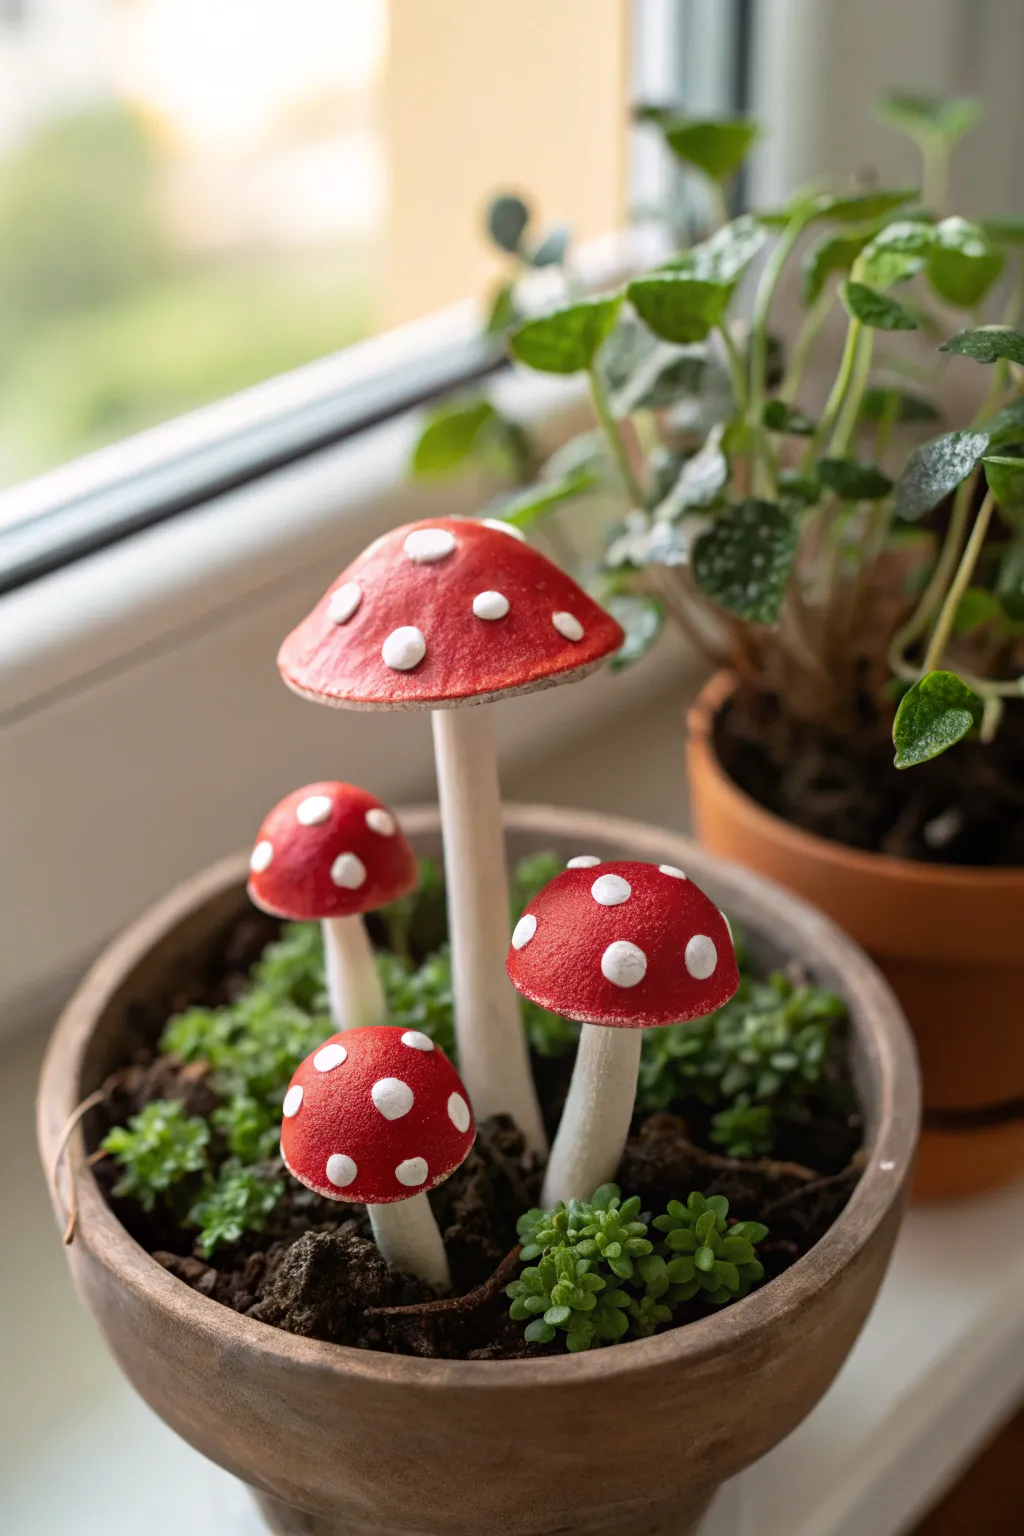
Bring a touch of fairy-tale magic to your indoor plants with these charming, handcrafted mushroom stakes. With their classic red caps and sturdy white stems, they add a perfect pop of color and unexpected delight to any potted arrangement.
Step-by-Step
Materials
- Air dry clay (white or terracotta)
- Wooden skewers or sturdy floral wire
- Acrylic paint (bright red, titanium white)
- Small flat paintbrush
- Detail paintbrush or dotting tool
- Clear acrylic varnish (matte or satin)
- Water cup
- Rolling pin
- Aluminum foil
- Craft knife or sculpting tool
- Fine-grit sandpaper
Step 1: Sculpting the Stems
-
Prepare the armature:
Cut your wooden skewers or wire to the desired height for each mushroom. Leave an extra inch at the bottom to stake into the soil later. -
Wrap the core:
Take a small ball of clay and roll it into a snake. Wrap this clay around the top two-thirds of the skewer, leaving the bottom bare for staking. -
Shape the stalk:
Roll the clay-covered skewer gently on your work surface to smooth it out. Taper it slightly so it’s wider at the base and narrower at the top where the cap will sit. -
Create a collar:
To mimic the ‘annulus’ or ring found on real toadstools, pinch a tiny bit of clay and wrap it around the upper part of the stem, smoothing the bottom edge down into the stalk while leaving the top edge slightly flared. -
Dry the stems:
Set the stems upright in a piece of styrofoam or a jar to dry completely. This ensures they don’t flatten on one side.
Cracked Clay?
If cracks appear while drying, don’t panic. Mix a small amount of fresh clay with water to make a paste and fill in the cracks. Smooth it over and let it dry again.
Step 2: Forming the Caps
-
Create a foil core:
For the larger mushroom, scrunch a piece of aluminum foil into a dome shape. This saves clay and reduces drying time. -
Cover with clay:
Roll out a slab of clay about 1/4 inch thick. Drape it over your foil dome (or shape a solid ball of clay into a dome for the smaller mushrooms). -
Smooth the shape:
Trim any excess clay from the bottom. Wet your finger slightly to smooth out any cracks or bumps on the surface of the cap. -
Add texture:
Flip the cap over. Use a craft knife or a sculpting tool to gently score lines radiating from the center to the edge, creating the look of gills underneath. -
Attach to stem:
Once the stems are semi-dry but the caps are fresh, create a small indentation under the cap. Apply a slip (clay mixed with water) to the top of the stem and press the cap firmly onto it. -
Final drying:
Let the fully assembled mushrooms dry for at least 24-48 hours. I usually rotate them occasionally so they dry evenly.
Glow in the Dark
Mix glow-in-the-dark pigment powder into your white paint for the spots. Your tiny mushroom garden will become a magical nightlight when the sun goes down.
Step 3: Painting and Finishing
-
Sand for smoothness:
Once bone dry, use fine-grit sandpaper to gently buff away any fingerprints or rough textures on the caps. -
Base coat the stems:
Paint the stems and the underside of the caps with titanium white acrylic paint. It might need two coats for solid coverage. -
Paint the caps:
Carefully paint the top of the mushroom caps with bright red acrylic. Keep a steady hand near the white stem edge. -
Add the spots:
Dip the handle of a paintbrush or a dotting tool into white paint. Press gently onto the dry red cap to create the classic polka dots. Vary the sizes for a natural look. -
Add shadows:
For extra realism, you can dry-brush a tiny bit of brown paint near the base of the stem to make it look like dirt. -
Seal the work:
Once the paint is fully cured, apply a coat of clear acrylic varnish. This protects the clay from moisture in your plant pot. -
Plant your garden:
Push the exposed wooden skewer into the soil of your favorite houseplant, arranging the mushrooms in a small cluster.
Enjoy your new miniature landscape as these sturdy little fungi brighten up your windowsill all year round


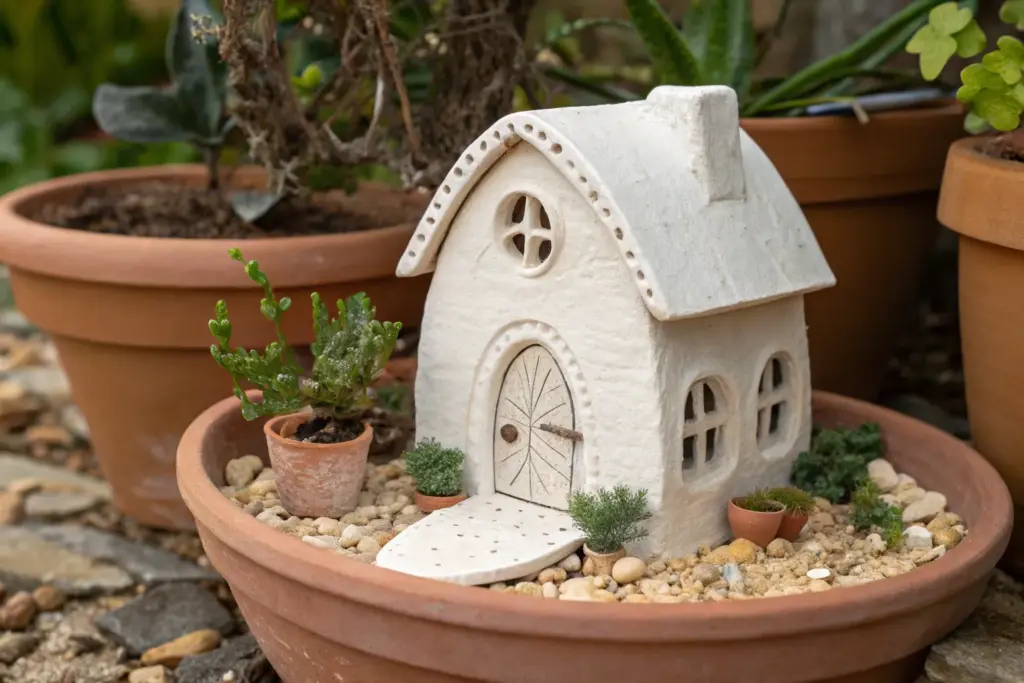
Fairy Doors for Flower Pots
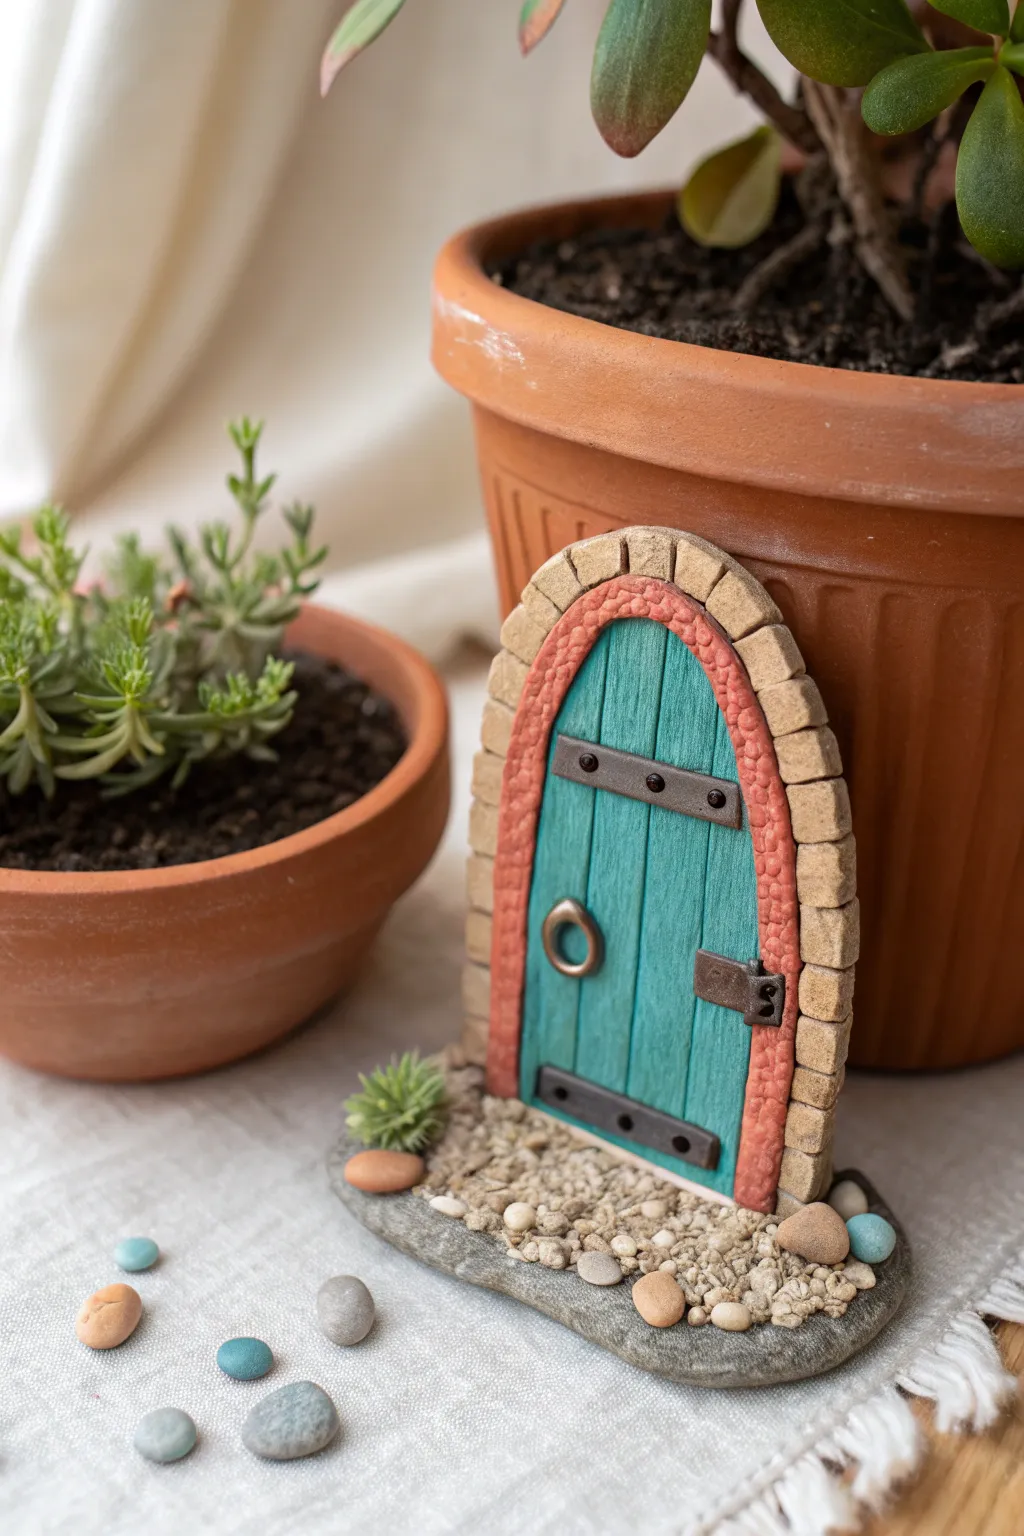
Bring a touch of magic to your indoor garden with this charming handcrafted fairy door, completely self-standing on its own pebble base. Featuring a rustic arched stone frame and turquoise wood-grain texture, it fits perfectly nestled against a terracotta pot.
Detailed Instructions
Materials
- White or terracotta air dry clay
- Large, flat river stone (for the base)
- Small pebbles or coarse sand
- Acrylic paints (turquoise, terracotta orange, beige, dark brown, bronze/gold)
- Mod Podge or clear matte varnish
- Sculpting tools (needle tool, flat blade tool)
- Rolling pin
- Fine grit sandpaper
- Strong craft glue (e.g., E6000 or tacky glue)
Step 1: Sculpting the Door
-
Prepare the base slab:
Roll out a slab of air dry clay to about 1/4 inch thickness. Place your chosen river stone base in front of it to gauge the width, then cut a tall arch shape with a flat bottom. -
Create the wood plank texture:
Using a needle tool or a dull knife, score vertical lines down the door surface to resemble wooden planks. Make the lines slightly uneven for a rustic, aged look. -
Add wood grain details:
Lightly scratch shorter, wavy lines and small knots between the main plank lines to mimic the natural grain of wood. -
Form the inner frame:
Roll a long, thin snake of clay. Flatten it slightly and attach it around the curved edge of your door using a little water to score and slip the connection. -
Texture the inner frame:
Use a toothbrush or a stippling sponge to press a rough texture into this new border, giving it a stucco or rough-hewn stone appearance. -
Build the stone arch:
Roll a thicker snake of clay and flatten it into a ribbon about 1/2 inch wide. Attach this over the textured inner frame to create the outer stone arch. -
Detail the stonework:
Use a blade tool to press distinct indentations into the outer arch, dividing it into individual ‘stone’ blocks. Soften the edges of each block with your finger. -
Craft the hardware:
Sculpt two tiny horizontal strips for hinges and a small circle for the handle ring. Attach these to the door surface with a dab of water. -
Dry the sculpture:
Lay the door flat on a piece of parchment paper. I like to let this dry for at least 24-48 hours, flipping it halfway through to ensure even drying.
Fixing Warped Clay
If the door curls up while drying, lightly mist the back with water and place it under a heavy book (with parchment paper) for a few hours to flatten.
Step 2: Painting and Assembly
-
Base coat the door:
Paint the inner wood planks with a vibrant turquoise acrylic paint. Apply two coats if necessary for solid coverage. -
Paint the frames:
Color the inner textured frame with a terracotta orange. For the outer stone arch, use a beige or sandstone color. -
Antiquing wash:
Mix a very watery dark brown paint. Brush it over the entire piece (especially the stones and wood grooves) and immediately wipe away the excess with a paper towel to highlight the textures. -
Detail the hardware:
Carefully paint the hinges and handle ring with a dark bronze or metallic gold paint to make them look like aged metal. -
Prepare the base:
Clean and dry your large river stone. Apply a strong craft glue to the bottom edge of your finished clay door and press it firmly onto the center of the stone. -
Add the gravel path:
Spread a layer of glue on the stone base in front of the door. Sprinkle small pebbles or coarse sand over the glue to create a walkway. -
Add a greenery accent:
If you have a tiny plastic shrub or a bit of dried moss, glue a small tuft to one side of the doorstep for a touch of life. -
Seal the project:
Once all paint and glue feels dry, coat the entire door (front and back) with a matte varnish or Mod Podge to protect it from moisture.
Glow-in-the-Dark Magic
Mix glow-in-the-dark powder into your beige paint for the outer stones. At night, the archway will illuminate your plant shelf softly.
Place your finished portal near a succulent pot and imagine who might move in

What Really Happens Inside the Kiln
Learn how time and temperature work together inside the kiln to transform clay into durable ceramic.
Mini Garden Quote Signs
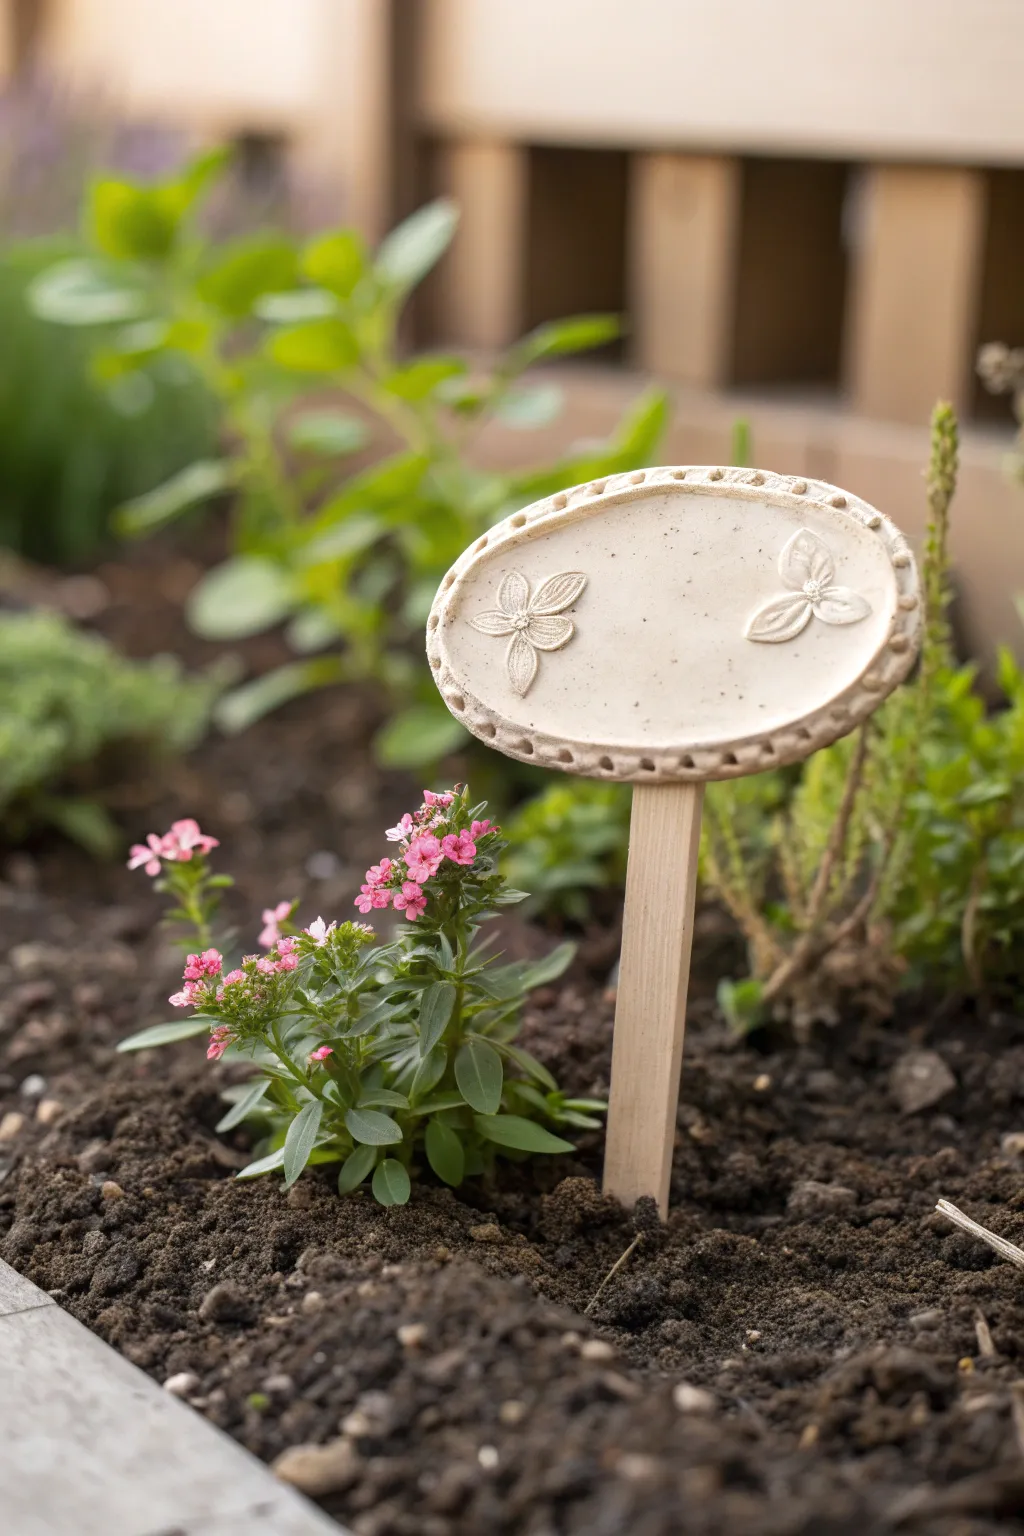
These charming garden markers add a touch of whimsy to your flower beds with their creamy matte finish and delicate embossed details. The project features a simple oval shape adorned with handcrafted floral motifs and a dotted border, perfect for labeling your favorite blooms.
How-To Guide
Materials
- Air dry clay (white or cream)
- Wooden craft sticks or dowels
- Rolling pin
- Oval cookie cutter (approx. 3-4 inches wide)
- Clay sculpting tools or a toothpick
- Small cup of water
- Sandpaper (fine grit)
- Clear outdoor waterproof sealant (spray or brush-on)
- Strong craft glue (optional)
Step 1: Shaping the Base
-
Prepare the clay:
Start by kneading a handful of air dry clay until it becomes soft, pliable, and free of cracks. If it feels too dry, dip your fingers in water and work it in. -
Roll out the slab:
Use your rolling pin to flatten the clay into an even slab, aiming for a thickness of about 1/4 inch. You want it sturdy enough to hold its shape outdoors. -
Cut the shape:
Press your oval cookie cutter firmly into the rolled clay to create the main sign, then peel away the excess clay. -
Smooth the edges:
Dip your finger in a little water and gently run it along the cut edges of the oval to smooth out any roughness from the cutter.
Pattern Imprinting
Instead of sculpting by hand, press real leaves or lace into the wet clay for instant, intricate texture before cutting your oval shape.
Step 2: Adding Details
-
Create the border texture:
Using a small ball-tipped tool or the blunt end of a skewer, press small dimples evenly around the entire perimeter of the oval to create a decorative dotted border. -
Sculpt the flower petals:
Pinch off five tiny balls of fresh clay. Flatten them into teardrop shapes to form petals and arrange them in a circle on the left side of the oval. -
Add petal details:
Use a sculpting tool or toothpick to press a central line down the middle of each petal, securing them to the base while adding texture. -
Make the leaf motif:
On the right side of the oval, create three slightly larger teardrop shapes for leaves. Arrange them so their points meet in the center. -
Detail the leaves:
Just like the flower, press a central vein into each leaf. I find that pressing firmly helps bond the added clay to the base without needing extra slip. -
Insert the stake:
Carefully insert your wooden craft stick into the bottom edge of the oval, pushing it upright into the clay about 1 inch deep. Pinch the clay around the stick to seal the opening.
Step 3: Finishing Touches
-
Let it dry:
Place the sign on a flat surface lined with parchment paper. Let it dry completely for 24-48 hours, flipping it once halfway through for even drying. -
Sand imperfections:
Once fully cured and hard, use fine-grit sandpaper to gently buff away any fingerprints or rough spots on the surface or edges. -
Secure the stick (optional):
If the stick feels loose after drying, carefully pull it out, add a dab of strong craft glue to the tip, and re-insert it. -
Apply sealant:
This step is crucial for garden use. Apply 2-3 coats of a waterproof outdoor sealant to the entire piece, including the back and the wooden stick, allowing drying time between coats.
Cracking Clay?
If small cracks appear while the clay dries, mix a tiny bit of fresh clay with water to make a paste and smooth it over the cracks like spackle.
Now you have a custom, durable marker ready to organize your garden beds
Gnome Figurines for Garden Corners
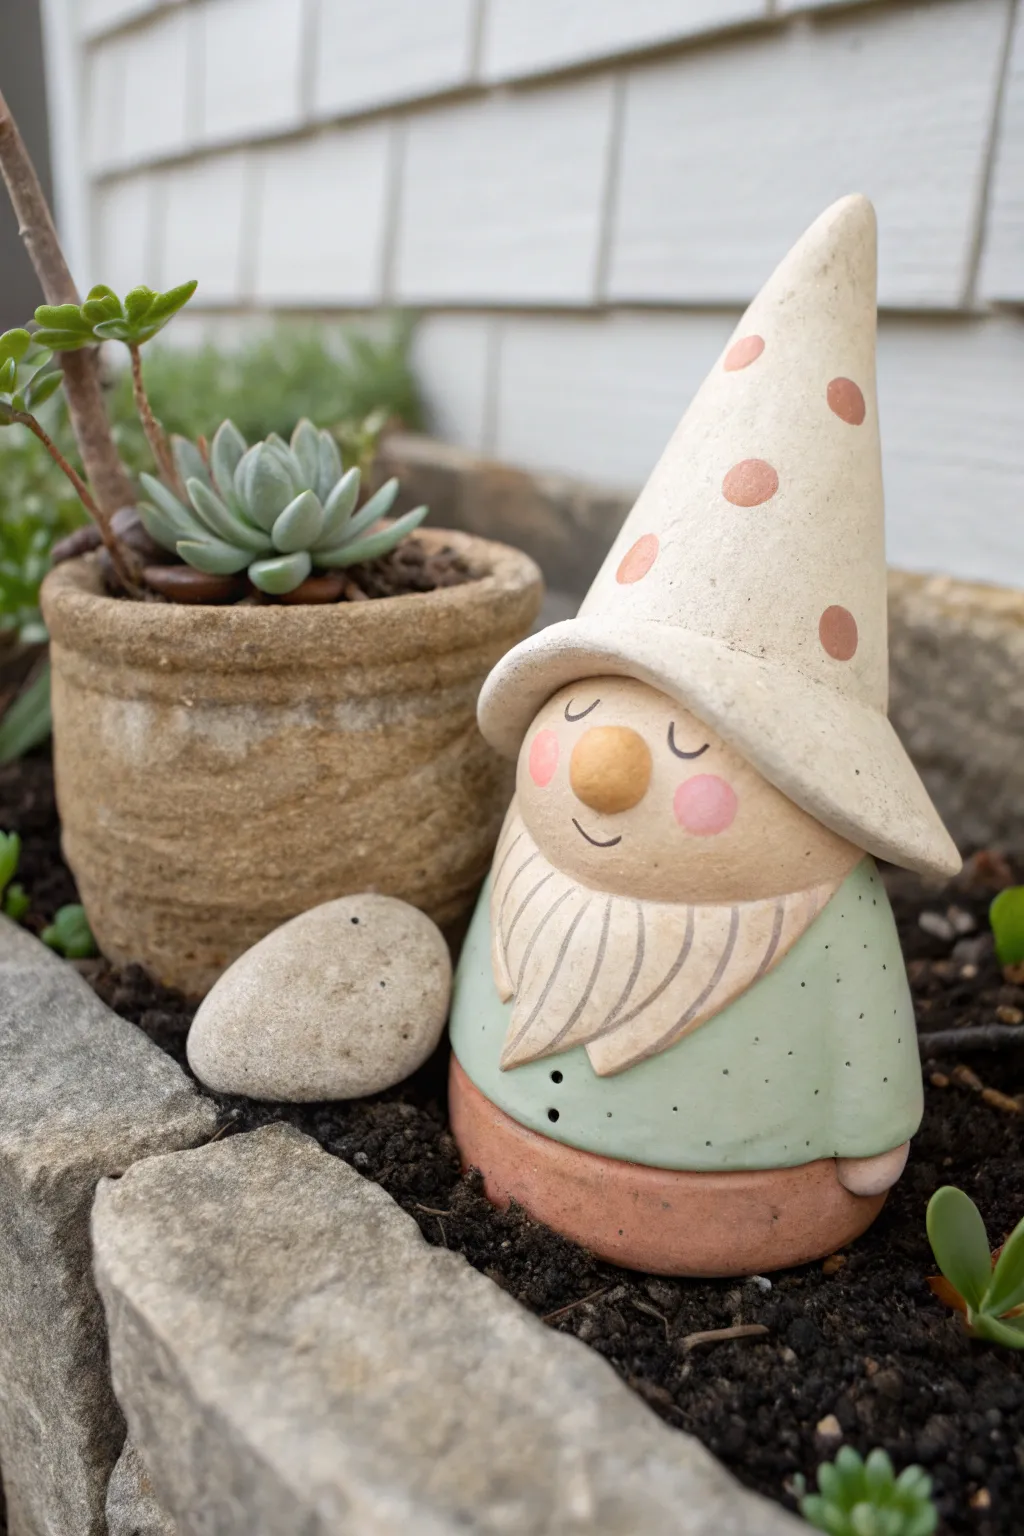
Add a touch of playful charm to your garden with this adorable air-dry clay gnome featuring a tall, polka-dotted hat. Its smooth, rounded forms and soft pastel colors give it a gentle, modern look perfect for nestled corners.
Step-by-Step Guide
Materials
- Air-dry clay (white or terra cotta)
- Water and sponge for smoothing
- Clay sculpting tools (needle tool, modeling tool)
- Aluminum foil (for armature)
- Acrylic paints (cream, sage green, terra cotta, pink, golden yellow, black)
- Paintbrushes (detail and flat shader)
- Outdoor matte varnish or sealant
Step 1: Sculpting the Base Form
-
Create the Armature:
Crumple a piece of aluminum foil into a cone shape to serve as the core. This reduces drying time and clay usage while keeping the gnome lightweight. -
Form the Body:
Roll a smooth ball of clay and flatten the bottom slightly so it sits securely. This will be the gnome’s tunic and trousers area. -
Shape the Head:
Form a smaller sphere for the head. Score and slip (scratch the surface and add water) the bottom of the head and the top of the body to join them securely. -
Blend the Seams:
Use your thumb or a modeling tool to smooth the clay where the head meets the body until the seam disappears completely.
Smooth Seams
Keep a small bowl of water nearby. Dip your finger frequently to smooth cracks as you work, which prevents structural weakness later.
Step 2: Adding Character Details
-
Form the Beard:
Flatten a teardrop shape of clay and attach it to the face area. Use a needle tool to gently score vertical lines to simulate hair texture. -
Refine the Beard shape:
Curl the bottom tip of the beard slightly to one side for a bit of movement and personality. -
Add the Nose:
Roll a small ball of clay for the nose. I like to make this slightly oversized for cuteness. Attach it firmly right above the beard using a bit of water. -
Sculpt the Arms:
Roll two small sausage shapes for arms. Attach them to the sides of the body, blending the shoulders into the torso seamlessly. -
Attach the Hands:
Add tiny balls of clay at the ends of the sleeves to represent hands peeking out.
Metallic Touch
Mix a tiny amount of gold paint into the yellow for the nose or the hat dots to give the gnome a magical, subtle shimmer in the sunlight.
Step 3: Crafting the Hat
-
Shape the Cone:
Roll out a large cone of clay. Hollow out the base slightly so it fits over the head rather than just perching on top. -
Create the Brim:
Pinch and flare the bottom edge of the hat outwards to create a wide brim that will cast a shadow over the eyes. -
Attach the Hat:
Place the hat onto the head, pulling it down low until it touches the top of the nose. Blend the clay at the back if you want a seamless look, or leave it distinct. -
Final Smooth:
Dip a sponge in water and gently wipe the entire figure to remove fingerprints and create that ceramic-like finish. Let dry completely for 24-48 hours.
Step 4: Painting and Finishing
-
Base Coat:
Paint the bottom section in a warm terra cotta color to mimic a clay pot base. -
Paint the Tunic:
Apply a soft sage green to the body area. Once dry, use a toothpick or fine brush to add tiny black dots for texture. -
Detail the Face:
Paint the nose a golden yellow and add soft pink circles for rosy cheeks. Use a fine liner brush to paint two simple U-shapes for sleeping eyes and a tiny smile. -
Decorate the Hat:
Paint the hat a creamy off-white. Once the base is dry, add large terra cotta polka dots randomly around the cone. -
Highlight the Beard:
Paint the beard a pale cream color. If you want depth, mix a tiny bit of brown with water and wash over it, wiping away the excess to highlight the grooves. -
Seal for Outdoors:
Apply 2-3 coats of outdoor matte varnish to protect your work from moisture, ensuring it is fully waterproof before placing it in the garden.
Nestle your new friend among some succulents for a cozy garden display


The Complete Guide to Pottery Troubleshooting
Uncover the most common ceramic mistakes—from cracking clay to failed glazes—and learn how to fix them fast.
Ladybugs and Bees on Garden Rocks
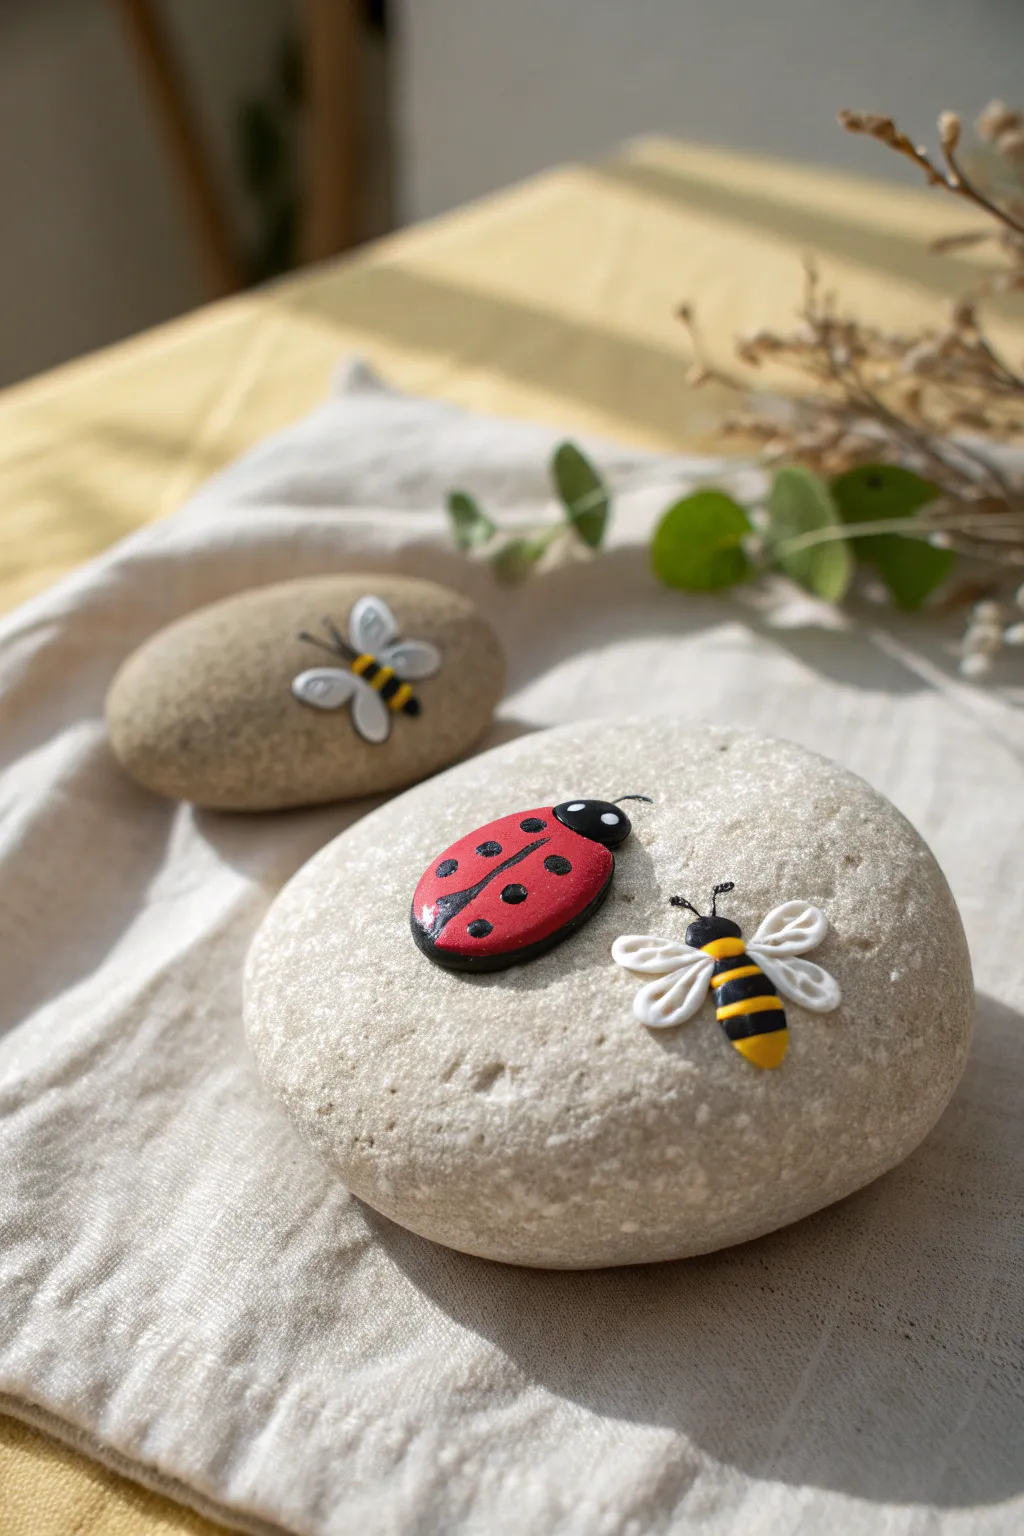
Transform ordinary river stones into lively garden accents with these adorable raised relief clay insects. The bright, 3D nature of the ladybug and bee creates a charming pop of character that looks like it just landed on the rock.
Step-by-Step
Materials
- Smooth river stones (clean and dry)
- Air dry clay (white or terracotta)
- Acrylic paints (bright red, sunshine yellow, black, white)
- Fine detail paintbrushes (sizes 0 and 2)
- Clay sculpting tools or a toothpick
- Strong craft glue (e.g., E6000 or heavy-duty PVA)
- Clear outdoor sealant spray (matte or satin finish)
- Water cup and paper towels
Step 1: Sculpting the Shapes
-
Prep your surface:
Ensure your river stones differ slightly in size if making a pair; wash them thoroughly with soapy water and let them dry completely so the glue will adhere properly later. -
Form the ladybug body:
Pinch off a small piece of air dry clay about the size of a marble. Roll it into a smooth ball between your palms, then gently press it flat on one side to create a dome shape. -
Add the ladybug head:
Create a much smaller sphere of clay, about a third of the body size. Press this gently against one end of your dome shape, smoothing the seam with a tiny bit of water so they become one solid unit. -
Create the bee body:
For the bee, roll an oval or pill-shaped piece of clay. Like the ladybug, flatten the bottom slightly so it will sit flush against the rock later. -
Shape the bee wings:
Roll four tiny balls of clay. Flatten each into a teardrop shape. Attach two to each side of the bee’s body, pressing them gently onto the back so they fan out slightly. -
Imprint details:
I like to use a toothpick or a small sculpting tool to lightly press an indentation down the center of the ladybug’s back to suggest wings, and to add texture to the bee’s wings. -
Dry thoroughly:
Set your clay insects aside on a piece of parchment paper. Let them dry completely according to the package instructions, usually 24-48 hours depending on humidity.
Step 2: Painting and Assembly
-
Base coat the ladybug:
Paint the main dome of the ladybug with bright red acrylic. You may need two thin coats for full opacity, letting the first dry before applying the second. -
Paint the bee stripes:
Paint the bee’s body yellow first. Once dry, carefully paint thick black stripes horizontally across the body using your finest brush. -
Adding black details:
Paint the ladybug’s head black. Using the very tip of your brush or a dotting tool, add the characteristic black spots to the red wings and a thin line down the center indentation. -
Highlighting wings:
Paint the bee’s clay wings pure white. If you made the background butterfly shown in the inspiration photo, paint those wings white with grey or black detailing. -
Touch up eyes and antennas:
Use a white paint pen or a toothpick dipped in white paint to add tiny gleam dots to the ladybug’s head. Use black paint to draw very fine antennae directly onto the clay if raised, or wait to paint them on the rock. -
Glue to stones:
Once all paint is perfectly dry, apply a dab of strong craft glue to the flat bottom of each insect. Press them firmly onto your river stones in your desired arrangement. -
Final antennae details:
If your clay sculptures didn’t include physical antennae, use a fine black liner brush to paint delicate, curved antennae directly onto the stone surface emanating from the insect heads. -
Seal for protection:
To make these garden-ready, take the stones outside and spray them with two light coats of clear outdoor sealant to protect the clay and paint from moisture.
Smooth Finishes
Dip your finger in water and smooth the clay before drying to remove fingerprints. Sand lightly after drying for a porcelain-like look.
Clay Shrinkage
If the bottom of the bug curves while drying, gently sand it flat against a piece of sandpaper so it sits flush on the stone.
Now you have a set of cheerful, buzzing stone friends to hide among your flower pots
Hanging Wind Chimes and Garden Mobiles
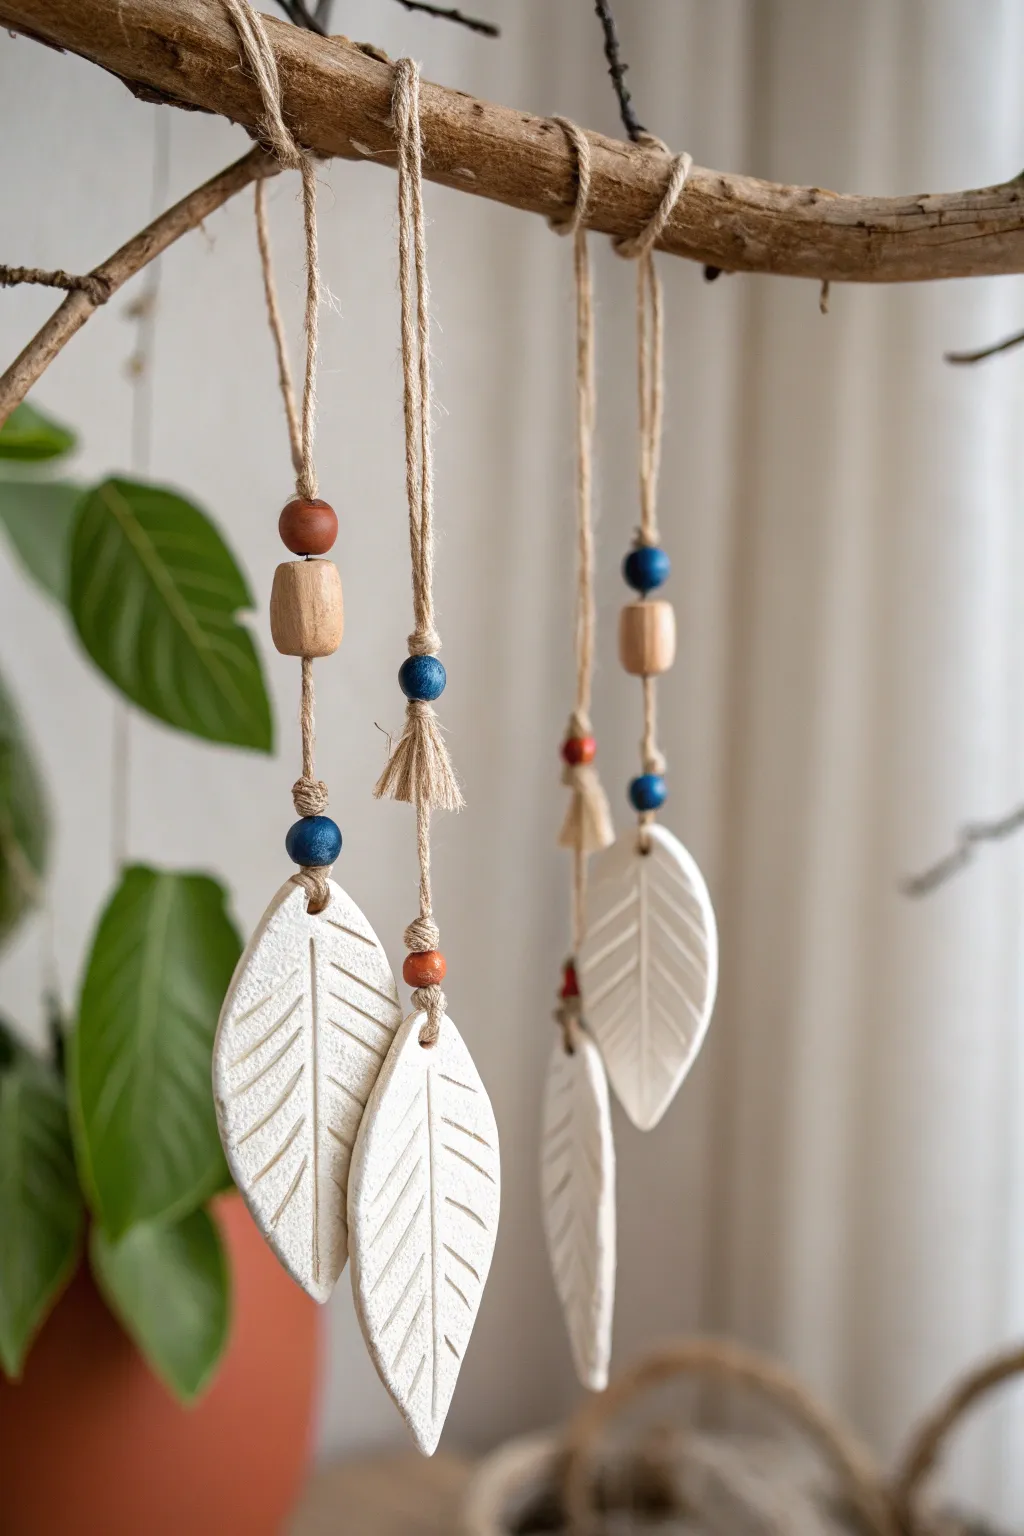
Bring a touch of organic serenity to your porch or garden room with this beautiful hanging clay mobile. Featuring hand-carved clay leaves and earthy wooden beads suspended from a rustic branch, this project perfectly blends natural textures with minimalist design.
Detailed Instructions
Materials
- Air dry clay (white)
- Thick, sturdy tree branch (approx. 1-2 inches diameter)
- Leaf-shaped cookie cutter (optional)
- Rolling pin
- Jute twine or hemp cord
- Wooden beads (assorted sizes: barrel and round)
- Small round beads (blue and terracotta/red)
- Needle tool or toothpick
- Craft knife or clay sculpting tool
- Fine grit sandpaper
- Clear matte varnish or sealant (waterproof)
- Scissors
Step 1: Shaping the Clay Leaves
-
Roll the clay:
Begin by conditioning a chunk of air dry clay in your hands until it is pliable. Roll it out on a smooth surface to an even thickness of about 1/4 inch. -
Cut the shapes:
Using a leaf-shaped cutter or a craft knife, cut out four large leaf shapes. Hand-cutting gives them a slightly more organic, imperfect look which suits this style perfectly. -
Soften edges:
Dip your finger in a little water and gently smooth the cut edges of each leaf to remove any sharpness or burrs. -
Carve the veins:
Take your needle tool or a sharp clay tool and lightly carve a central vein down the middle of each leaf, stopping just short of the tip. -
Add detail:
Carve diagonal lines branching off the center vein to create the leaf’s texture. Press firmly enough to leave a clear impression, but be careful not to slice all the way through. -
Create hanging holes:
Use a straw or a tool to punch a hole at the very top of each leaf stem. Make sure the hole is large enough for your jute twine to pass through easily. -
Dry thoroughly:
Place the leaves on a wire rack or clean paper towel to dry. This usually takes 24-48 hours depending on humidity; flip them occasionally to prevent curling.
Keep it Straight
To stop larger leaves from curling while drying, place a light book or flat board gently on top of them once they are leather-hard (partially dry).
Step 2: Prep and Assembly
-
Sand and seal:
Once bone dry, lightly sand any rough spots with fine sandpaper. Then, apply a coat of clear matte varnish to protect the clay from moisture, especially if hanging outdoors. -
Cut the twine:
Cut four lengths of jute twine. Vary the lengths slightly—between 18 and 24 inches—to create a staggered effect when they hang. -
Attach the leaves:
Thread a piece of twine through a leaf hole. Secure it with a simple overhand knot or a lark’s head knot right at the top of the clay piece. -
Thread the first bead:
Slide a small accent bead (like the terracotta or blue ones shown) down the twine until it rests just above the knot at the leaf. -
Add nature beads:
Thread a larger natural wooden barrel bead or round bead next. I find that mixing shapes keeps the strand visually interesting. -
Space the beads:
Tie a small knot in the twine a few inches above your first bead group if you want gaps, or simply stack another small accent bead (blue/red) directly on top. -
Create a tassel (optional):
For added texture, you can create a mini tassel with jute scraps and slide it onto the middle of one strand, securing it with a bead above and below. -
Attach to branch:
Wrap the top end of each twine strand securely around your drift wood or tree branch. Space them out evenly along the wood. -
Secure knots:
Tie tight double knots around the branch. You can add a drop of super glue to the knots to ensure they never slip. -
Create the hanger:
Cut a final, long piece of sturdy twine. Tie each end to the far edges of the branch to create the main hanging loop for your mobile.
Color Pop
Instead of bare clay, watermark the dried leaves with diluted acrylic paint in sage green or terracotta before sealing for a washed, pottery-glaze effect.
Hang your new mobile where it can sway gently and catch the light.

TRACK YOUR CERAMIC JOURNEY
Capture glaze tests, firing details, and creative progress—all in one simple printable. Make your projects easier to repeat and improve.
Leaf-Imprint Garden Medallions
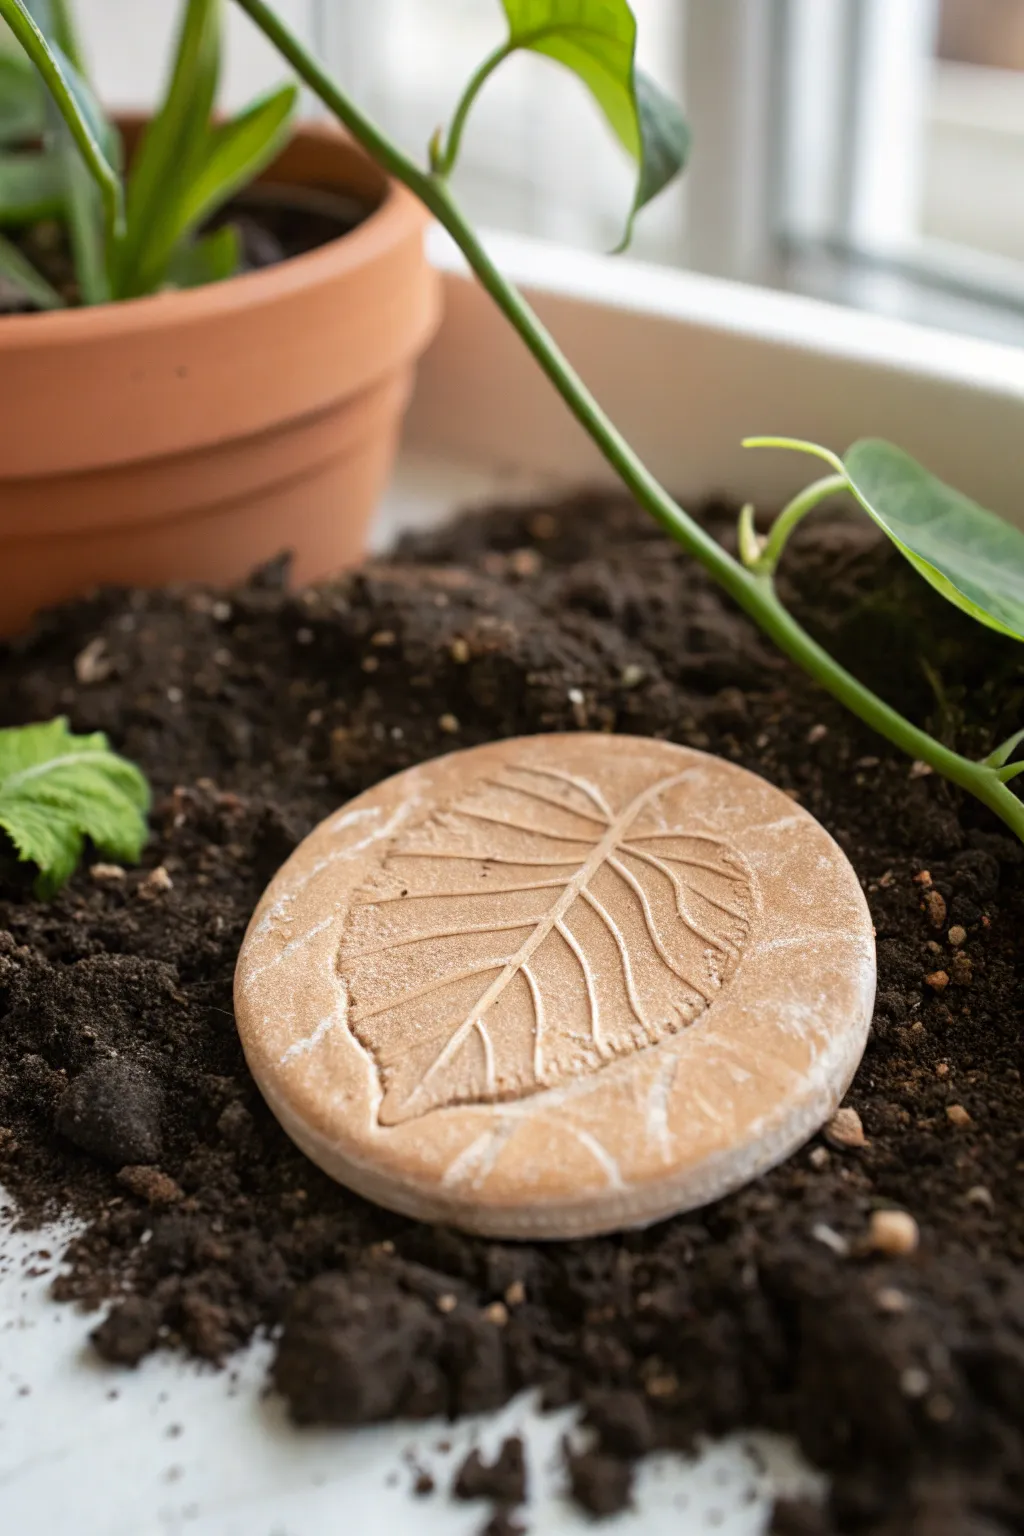
Capture the delicate veins of your favorite garden foliage forever with these charming clay discs. These rustic, earth-toned medallions make perfect decorative accents for potted plants or thoughtful handmade gifts for nature lovers.
Step-by-Step
Materials
- Air-dry clay (terracotta or white)
- Small rolling pin or glass jar
- Circle cutter (or a large drinking glass)
- Fresh leaves with prominent veins (avoid dried leaves)
- Parchment paper or a smooth work mat
- Small sponge
- Water
- Fine-grit sandpaper
- Acrylic sealer or waterproof varnish
Step 1: Preparation and Rolling
-
Select your leaf:
Begin by foraging for the perfect leaf. Look for a specimen that is sturdy and has very thick, raised veins on the underside, like the one shown in the image. Leaves that are too thin or delicate won’t leave a deep enough impression. -
Condition the clay:
Take a handful of air-dry clay and knead it in your hands for a minute. This warms it up and makes it pliable, reducing the chance of cracks forming later. -
Flatten the base:
Place your clay ball onto a sheet of parchment paper. Using the palm of your hand, press it down into a thick pancake shape. -
Roll to thickness:
Use your rolling pin to roll the clay out evenly. Aim for a thickness of about a quarter-inch (approx. 6mm). If it’s too thin, the medallion will be fragile; too thick, and it will take ages to dry. -
Smooth the surface:
Dip your finger in a tiny bit of water and gently smooth out any surface imperfections or cracks on the top of your clay slab.
Step 2: Creating the Impression
-
Position the leaf:
Place your chosen leaf face-down onto the clay slab. The vein side needs to be against the clay to get the texture shown in the photo. -
Embed the texture:
Gently roll your rolling pin over the leaf. Apply firm, even pressure—you want to push the leaf flush with the clay surface but not distort the overall shape of the slab. -
Check the edges:
I like to carefully press around the perimeter of the leaf with a fingertip just to ensure the edges are distinct before removing it. -
Reveal the design:
Find the stem of the leaf and slowly peel it back from the clay to reveal the imprinted design. -
Cut the shape:
Center your circle cutter or glass over the leaf impression. Press straight down to cut out your medallion, then lift away the excess clay from the outside.
Vein Definition
Choose leaves with thick, woody veins like hydrangeas or fig leaves. If the veins are subtle, the clay won’t pick up the detail.
Step 3: Refining and Finishing
-
Smooth the edges:
Dip your finger in water again and run it along the cut edge of the circle. This rounds off the sharp angles left by the cutter for a more finished, stone-like look. -
Initial drying:
Let the medallion dry on a flat surface away from direct heat or sunlight. Flip it over every few hours to prevent curling. This process usually takes 24 to 48 hours depending on humidity. -
Sanding:
Once fully cured and hard, use fine-grit sandpaper to buff away any rough spots on the rim or the back. A light touch is key here. -
Enhance with wash (optional):
To recreate the dusty, white-washed look in the photo, dilute a tiny drop of white acrylic paint with water. Brush it over the textured grooves, then immediately wipe the surface with a damp sponge, leaving paint only in the deep veins. -
Seal the piece:
Since air-dry clay creates a porous surface that hates moisture, apply 2-3 coats of a waterproof outdoor varnish or sealant if you plan to place this on soil.
Make it a Marker
Before drying, use letter stamps to press the plant name into the clay near the leaf, turning this decor into a functional garden marker.
Now you have a permanent piece of botanical art ready to nestle among your plants
Tiny Fairy Garden Fence Pieces

Transform a simple shallow planter into a whimsical landscape with this delightful miniature garden tutorial. By crafting a custom air-dry clay fence to encircle tiny mossy hills, you can create a peaceful little world that fits right on your windowsill or patio.
Step-by-Step Tutorial
Materials
- White or terracotta air-dry clay
- Rolling pin
- Craft knife or clay cutter
- Ruler
- White acrylic paint
- Small paintbrush
- Black acrylic paint or fine-tip marker
- Florist wire or toothpicks (for structural support)
- Shallow terracotta planter or bowl
- Potting soil
- Live moss or preserved craft moss
- Small succulents or baby tears plant
- Small gravel or aquarium pebbles
- Super glue or heavy-duty craft glue
Step 1: Crafting the Clay Fence
-
Roll the clay:
Begin by conditioning your air-dry clay until it is soft and pliable, then use a rolling pin to flatten it into an even sheet about 1/8 inch thick. -
Cut vertical slats:
Use a ruler and craft knife to cut narrow vertical strips for the fence pickets. You will need roughly 10-12 strips, each about 2 to 2.5 inches tall. -
Shape the pickets:
Trim the top of each vertical strip into a point or rounded shape to mimic traditional picket fencing. -
Make the gate main post:
Create one thicker, rectangular post to serve as the main gate hinge. Roll a small ball of clay and press it onto the top of this post to create a finial cap. -
Cut horizontal rails:
Cut two long, thin strips of clay that will serve as the horizontal rails connecting your pickets. -
Curve the rails:
Before assembling, gently curve these long horizontal strips to match the curvature of your specific planter bowl so the fence fits perfectly inside the rim. -
Assemble the fence panels:
Lay the curved rails flat and press your vertical pickets onto them at even intervals. Use a tiny dab of water or liquid clay (slip) to bond the pieces together securely. -
Dry the structure:
Let the fence assembly dry completely according to the clay package instructions. I find propping it against the outside of the pot helps it keep the correct curve while drying.
Step 2: Painting and Detailing
-
Paint the first coat:
Once hardened, paint the entire fence structure with white acrylic paint. You may need two coats to get a crisp, clean finish. -
Add gate details:
Using a very fine brush and black paint, or a fine-tip marker, draw small rectangular hinges on the main gate post and the adjacent picket to create the illusion of a swinging gate. -
Seal the fence:
Apply a clear satin or matte varnish to the painted fence to protect it from moisture, which is crucial since it will be sitting in soil.
Straighten Up
If your fence warps while drying, you can gently sand the back flat once it’s hard, or glue supportive toothpicks to the back of the posts before painting.
Step 3: Assembling the Landscape
-
Prepare the base:
Fill your shallow terracotta bowl with potting soil, leaving about an inch of space from the rim. -
Install the fence:
Gently press the base of your clay fence into the soil along the back edge of the pot. If needed, glue short lengths of floral wire to the back of the fence posts and push those into the dirt for extra stability. -
Create the terrain:
Pack the soil slightly higher behind the fence line and slope it down towards the front center to create a dynamic landscape. -
Add greenery:
Plant your small succulents or baby tears near the fence line, then cover the surrounding soil areas with lush green moss. -
Lay the path:
In the front center gap where the moss ends, pour small gravel or pebbles to create a miniature walking path or dry creek bed effect. -
Final touches:
Use a soft brush to sweep any stray soil off the white fence or moss, and give the plants a gentle mist of water.
Make it Shine
Embed tiny battery-operated LED fairy lights under the moss layer before planting. The soft glow peaking through the greenery adds magic to the scene at night.
Enjoy the serene view of your handcrafted garden landscape every time you pass by
Miniature Garden Path Pebbles
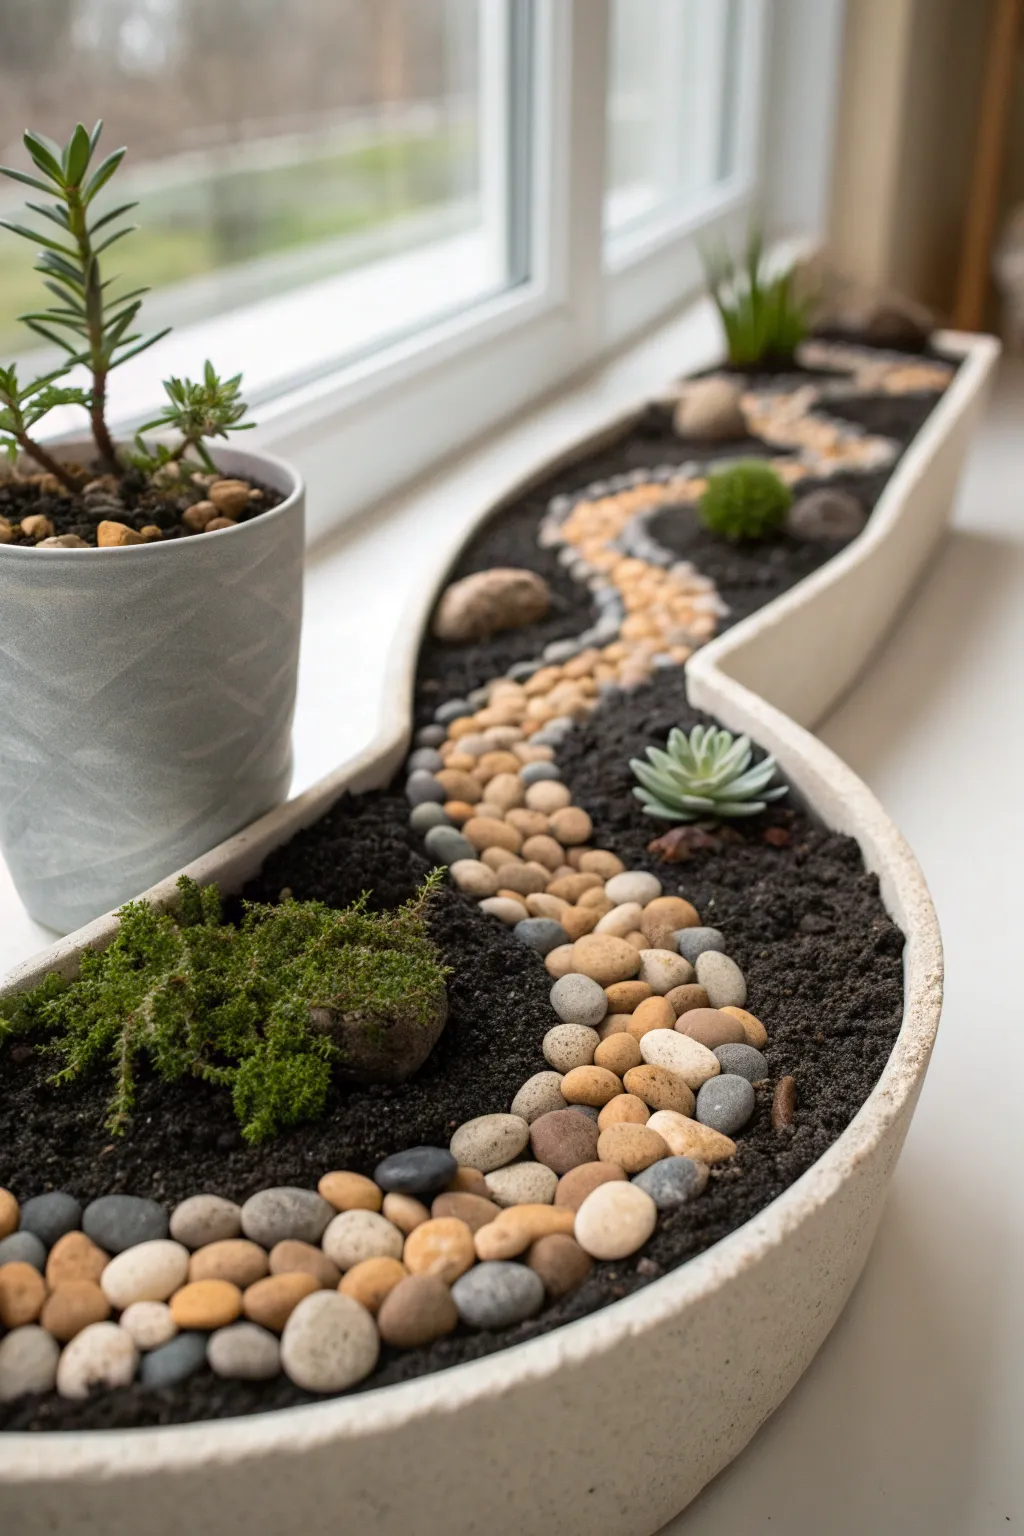
Create a serene miniature landscape with this wavy air-dry clay planter that mimics the flow of a river. The winding path of smooth pebbles against rich dark soil creates a stunning contrast perfect for small succulents and moss.
Detailed Instructions
Materials
- White or light grey air-dry clay (approx. 1-2 kg)
- Rolling pin
- Clay knife or craft knife
- Small bowl of water
- Sponge or fine sandpaper
- Waterproof sealant or varnish (matte finish)
- Small pebbles in varying earth tones (tan, grey, white)
- Potting soil mixed with sand
- Small succulents (e.g., Echeveria), moss, or faux plants
- Template paper and pencil (optional)
Step 1: Sculpting the Base
-
Shape the base slab:
Begin by rolling out a long, rectangular slab of air-dry clay to about 1/4 inch thickness. Use a rolling pin to ensure it is even throughout. -
Cut the wavy form:
Using a craft knife, cut the clay slab into a gentle, elongated ‘S’ shape or wavy curve. This will be the bottom of your planter. Smooth the cut edges with a damp finger. -
Prepare the walls:
Roll out long snake-like coils of clay or cut long strips from a rolled slab to create the walls. These strips should be consistent in height, roughly 1.5 to 2 inches tall. -
Attach the walls:
Score the edges of your base and the bottom of your wall strips. Apply a little water or slip (clay mixed with water) to the scored areas. -
Secure and smooth:
Press the walls firmly onto the base, following the wavy curve. Use your thumb or a modeling tool to blend the clay of the wall down into the base on both the inside and outside seams so they become one solid piece. -
Refine the rim:
Run a damp sponge along the top rim of the planter to soften any sharp edges and ensure the height is relatively uniform. -
Drying time:
Let the clay dry completely. This usually takes 24-48 hours depending on thickness and humidity. Rotate it occasionally so the bottom dries evenly.
Sealant Strategy
For maximum durability against moisture, use a waterproof polyurethane varnish. Apply at least three thin coats inside the planter.
Step 2: Finishing and Planting
-
Sand imperfections:
Once fully dry, use fine-grit sandpaper to gently smooth out any bumps on the exterior walls for a clean, modern look. -
Seal the refined clay:
Apply two coats of waterproof sealant to the entire planter, paying special attention to the inside. Since air-dry clay is water-soluble, this step is critical if you plan to use real plants. -
Add the soil base:
Fill the planter with your potting soil mix, leaving about half an inch of space from the rim. Pat it down gently but don’t pack it too tight. -
Trace the river path:
Use your finger or a small stick to lightly draw a winding line through the center of the soil, mirroring the curve of the planter itself. -
Lay the pebble foundation:
Begin placing your larger pebbles along the center of your traced path. I find it easiest to work from one end to the other to maintain flow. -
Fill in the gaps:
Fill around the larger stones with smaller pebbles and gravel. Varied sizes make the path look more natural and organic. -
Place focal plants:
Select spots in the ‘bends’ of the river for your main plants. Dig small divots and nestle a succulent or moss clump into the dark soil. -
Final touches:
Brush away any stray soil granules from the pebbles or the white rim of the planter using a clean, dry paintbrush.
Level Up Your Scene
Add tiny accessories like a miniature bridge made of twigs crossing the pebble river or a small bench to create a story within the scene.
Place your creation on a sunny windowsill where the light can highlight the textures of the stone and clay
Snails and Frogs as Planter Pals
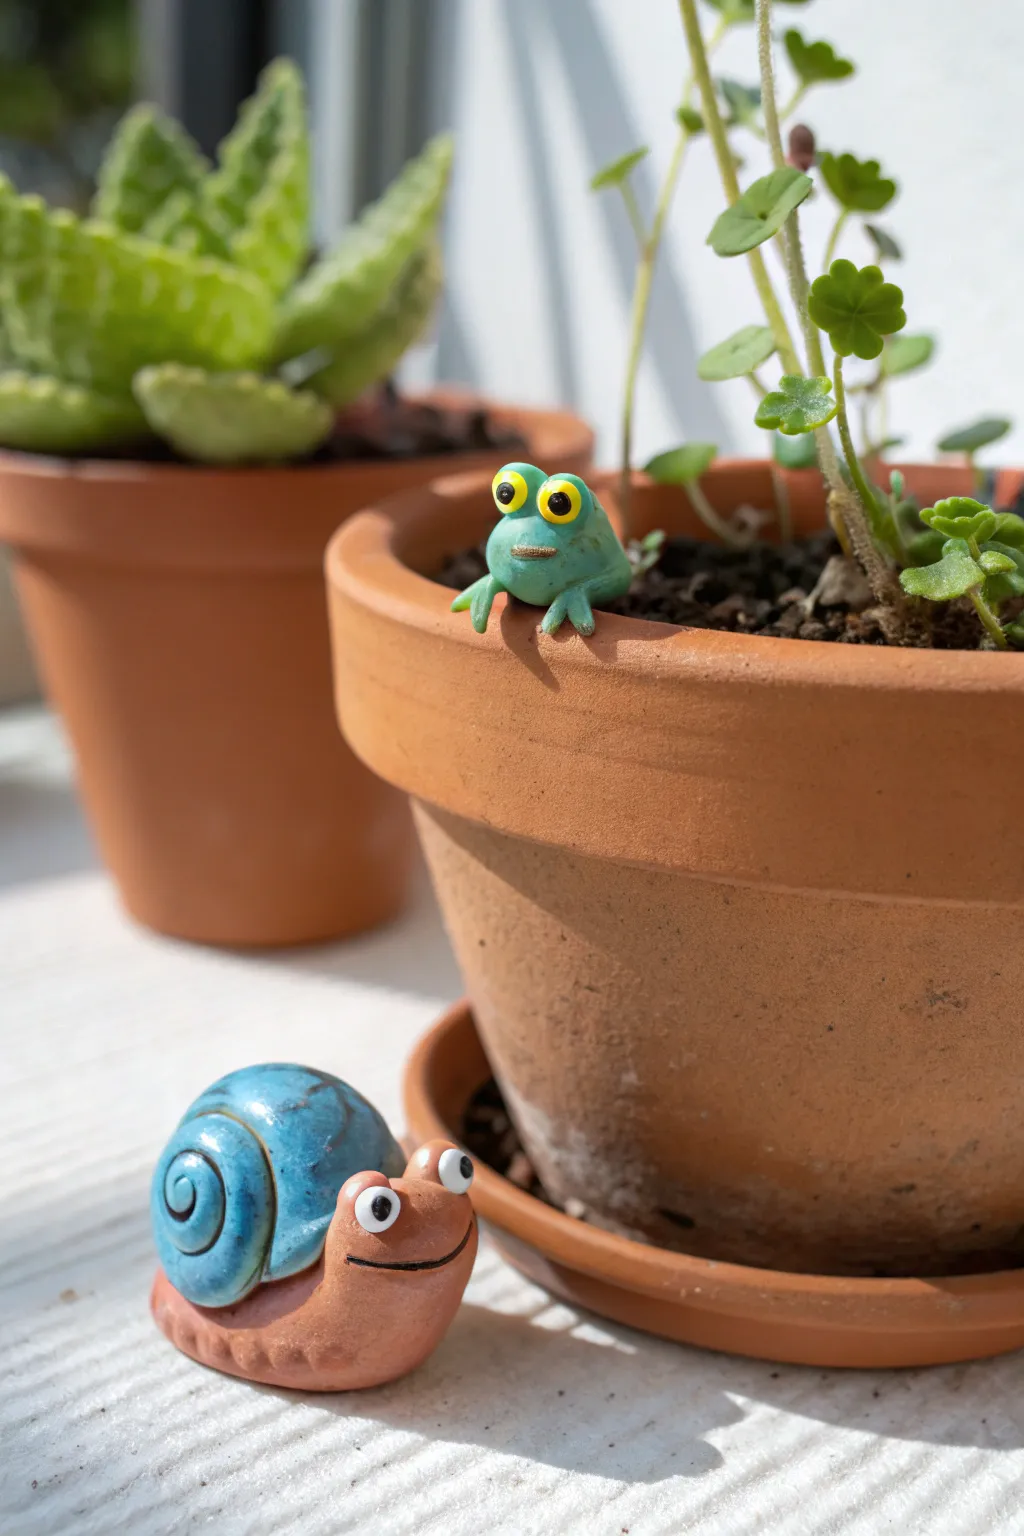
These charming little characters bring personality to any potted plant arrangement. You’ll create a goofy-eyed frog that perches perfectly on a pot rim and a cheerful snail with a swirled shell to keep him company.
Step-by-Step Tutorial
Materials
- White air dry clay (or polymer clay)
- Acrylic paints (Leaf green, lemon yellow, brilliant blue, terracotta/brown, white, black)
- Glossy varnish or clear sealant (waterproof)
- Small detail paintbrushes
- Sculpting tool or toothpick
- A terracotta pot (for testing the fit)
- Water cup (for smoothing)
Step 1: Sculpting the Pot-Hugging Frog
-
Form the body base:
Start with a walnut-sized ball of clay. Roll it until smooth, then gently shape it into a rounded, slightly flattened gumdrop shape. This will be the main body of your frog. -
Create the hugging indentation:
While the clay is still pliable, press the bottom front of the frog body against the rim of your actual terracotta pot. You want to create a generic curve underneath so he sits securely on the edge later. -
Add the legs:
Roll four small, thin logs for the limbs. Attach two to the back sides folded against the body, and drape the front two legs right over the curve you just made, so they look like they are dangling into the pot. -
Shape the eyes:
Roll two generous pea-sized balls for the eyes. Adhere them side-by-side on the very top of the head. Use a tiny bit of water or slip to secure the join so they don’t pop off later. -
Carve the expression:
Using your toothpick or sculpting tool, press a simple, straight horizontal line across the face for a mouth. Add tiny texture marks or ridges above the mouth if you want him to look a bit grumpy or serious.
Cracking Up?
If small cracks appear as the clay dries, mix a tiny bit of fresh clay with water to make a paste and smooth it over the crack before painting.
Step 2: Crafting the Smiling Snail
-
Roll the body coil:
Take a piece of clay and roll it into a thick, tapering snake shape. The fat end will be the head, and the tapered end is the tail. Curve the head upward slightly. -
Create the shell:
Roll a larger ball of clay into a long, even rope. Tightly coil this rope into a classic spiral shape to form the shell. Flatten the bottom of the spiral slightly so it sits flush. -
Assemble the snail:
Score the back of the snail body and the bottom of the shell (scratching up the surface). Add a dab of water and press the shell firmly onto the body. -
Add facial features:
Like the frog, attach two small balls for eyes on top of the head. Use a tool to carve a deep, curved smile into the side of the face.
Step 3: Painting and Finishing
-
Dry completely:
Let your creatures dry for at least 24-48 hours. If they feel cold to the touch, they still have moisture inside. I like to flip them over halfway through to ensure the bottoms dry evenly. -
Base coat the frog:
Paint the entire frog body a soft, leafy green. You might need two coats for full opacity. -
Detail the frog eyes:
Paint the protruding eye balls bright yellow. Once dry, use the handle end of a paintbrush dipped in black paint to dot the pupils. -
Base coat the snail:
Mix a warm terracotta or light brown shade for the snail’s body. Paint the shell a vibrant blue, letting the paint settle into the spiral creases for depth. -
Add snail highlights:
Once the blue is dry, you can dry-brush a lighter blue or white on the raised parts of the spiral to make the texture pop. -
Paint the snail eyes:
Paint the snail’s eye balls white. Add small black dots for pupils, making them look slightly different directions for a goofy look. -
Define the mouths:
Use a very fine brush with diluted black or dark brown paint to fill in the carved mouth lines on both creatures. -
Seal for protection:
Since these will live near plants and water, apply two coats of waterproof glossy varnish. This gives them that ceramic-like shine shown in the photo.
Glazing Illusion
For a true ceramic look without a kiln, use a ‘Triple Thick’ gloss glaze. It creates a glass-like finish that mimics fired pottery perfectly.
Place your new friends around your favorite succulents and enjoy the cheerful company
Birdbath Dishes for Mini Gardens
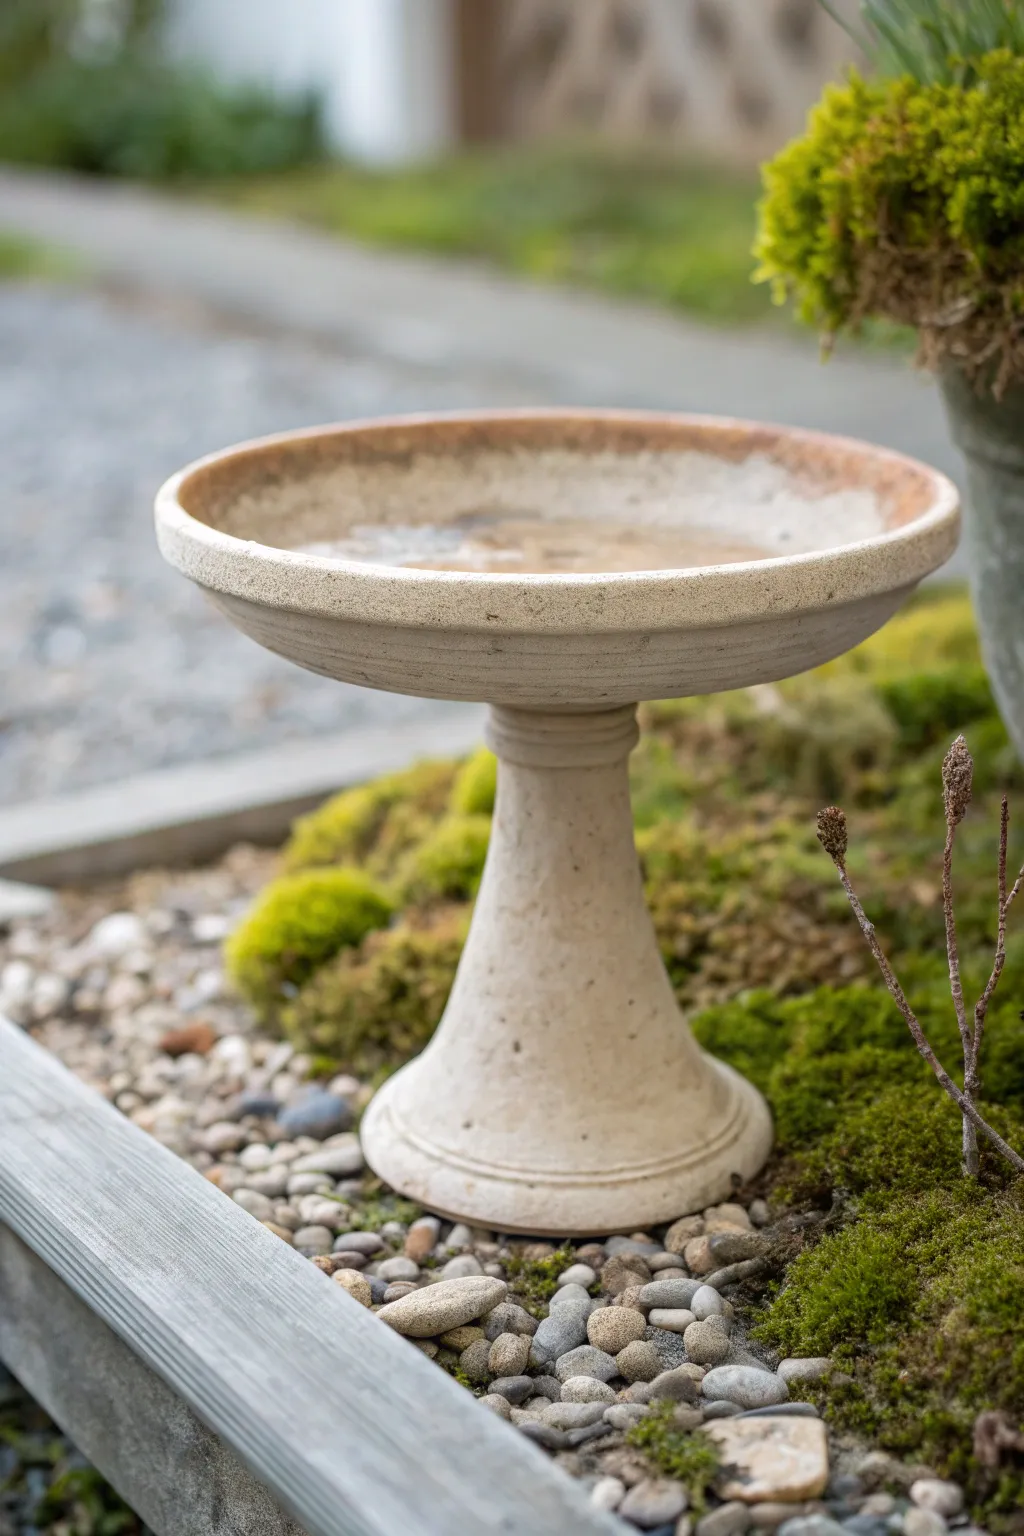
Create a charming focal point for your mini garden with this faux-stone birdbath that looks like it has weathered the seasons. Using simple air-dry clay and some clever texturing techniques, you’ll sculpt a classic pedestal design that adds a sense of scale and history to your potted landscapes.
Detailed Instructions
Materials
- Air-dry clay (white or light grey)
- Small rolling pin
- Circle cutters (various sizes) or bottle caps
- Clay sculpting tools (knife tool, needle tool)
- Water in a small cup
- Sandpaper (fine and medium grit)
- Acrylic paints (beige, diluted espresso brown, terracotta/rust)
- Old toothbrush or stippling brush
- Matte waterproof varnish or sealant
Step 1: Sculpting the Base
-
Form the Pedestal Core:
Begin by rolling a small ball of clay into a cylinder about 1.5 inches tall. Gently pinch the middle to create a subtle hourglass curve, making the pedestal taper slightly inward before flaring out at the top and bottom. -
Create the Footing:
Roll a small ball of clay and flatten it into a thick disc, slightly wider than the base of your cylinder. Score the bottom of the cylinder and the top of the disc with a needle tool, add a dab of water, and press them firmly together. -
Smooth the Join:
Use a sculpting tool or your finger to smooth the clay where the cylinder meets the base disc, blending the seam until it disappears completely. -
Add Decorative Ridges:
Roll two very thin snakes of clay. Wrap one around the base of the pedestal and another near the top neck. Gently press them onto the form and smooth the edges slightly so they look like carved stone molding rather than stuck-on pieces.
Step 2: Forming the Basin
-
Shape the Bowl:
Roll a larger ball of clay into a smooth sphere, then flatten it into a thick pancake. Use your thumbs to gently press into the center, working your way outward to create a shallow concave dish shape while keeping the rim relatively thick. -
Refine the Rim:
Place the dish on a flat surface and tap the top rim gently with a ruler or flat tool to create a clean, uniform edge. The rim should look substantial, similar to cast concrete. -
Texture the Surface:
Before the clay hardens, take a dry toothbrush or a piece of crumpled foil and tap it all over the basin and the pedestal. This creates a pitted, stone-like texture that will catch the paint later. -
Attach Basin to Pedestal:
Score the top of the pedestal and the underside center of the basin. Apply a small amount of water or clay slip, then press the basin firmly onto the pedestal. Check from all angles to ensure it is level. -
Final Shaping:
Reinforce the connection under the bowl by smoothing a small coil of clay into the joint for stability. Let the entire structure dry completely for 24-48 hours until it is rock hard.
Wobbly Birdbath?
If your dried birdbath won’t stand straight, tape a piece of coarse sandpaper to a table. Rub the bottom of the base against it in a circular motion until completely flat.
Step 3: Painting and Finishing
-
Sand for Imperfections:
Once fully dry, lightly sand any sharp peaks or unwanted fingerprints. Don’t over-sand, as you want to keep that lovely pitted texture you added. -
Base Coat:
Paint the entire birdbath with a coat of beige or off-white acrylic paint. Let this dry completely. -
Apply a Wash:
Mix a very small amount of dark brown paint with plenty of water to create a thin wash. Brush this over the entire piece, letting the dark pigment settle into the textured pits and crevices. -
Wipe Back:
Immediately wipe the surface with a paper towel or rag. This removes the brown from the high points but leaves it in the texture, instantly creating an aged stone look. -
Add Weathering Details:
I like to dry-brush a tiny amount of terracotta or rust-colored paint specifically around the inner rim and the base. This mimics the accumulated mineral deposits or algae staining often seen on real vintage garden ornaments. -
Spatter Effect:
Load a stiff brush with diluted grey paint and flick the bristles to send tiny microscopic speckles onto the surface for a granite-like finish. -
Seal for Outdoors:
Since this will hold water or sit in damp soil, apply at least 2-3 coats of a matte, waterproofing varnish. Pay special attention to the inside of the bowl to ensure it is watertight.
Mini Garden Magic
Make it look ancient by dabbing a little craft glue in the crevices and sprinkling fine green flocking powder or dried tea leaves to simulate moss growth.
Place your new miniature birdbath among some low-growing moss to see your tiny garden scene come to life
Decorative Pot Wraps and Textured Bands
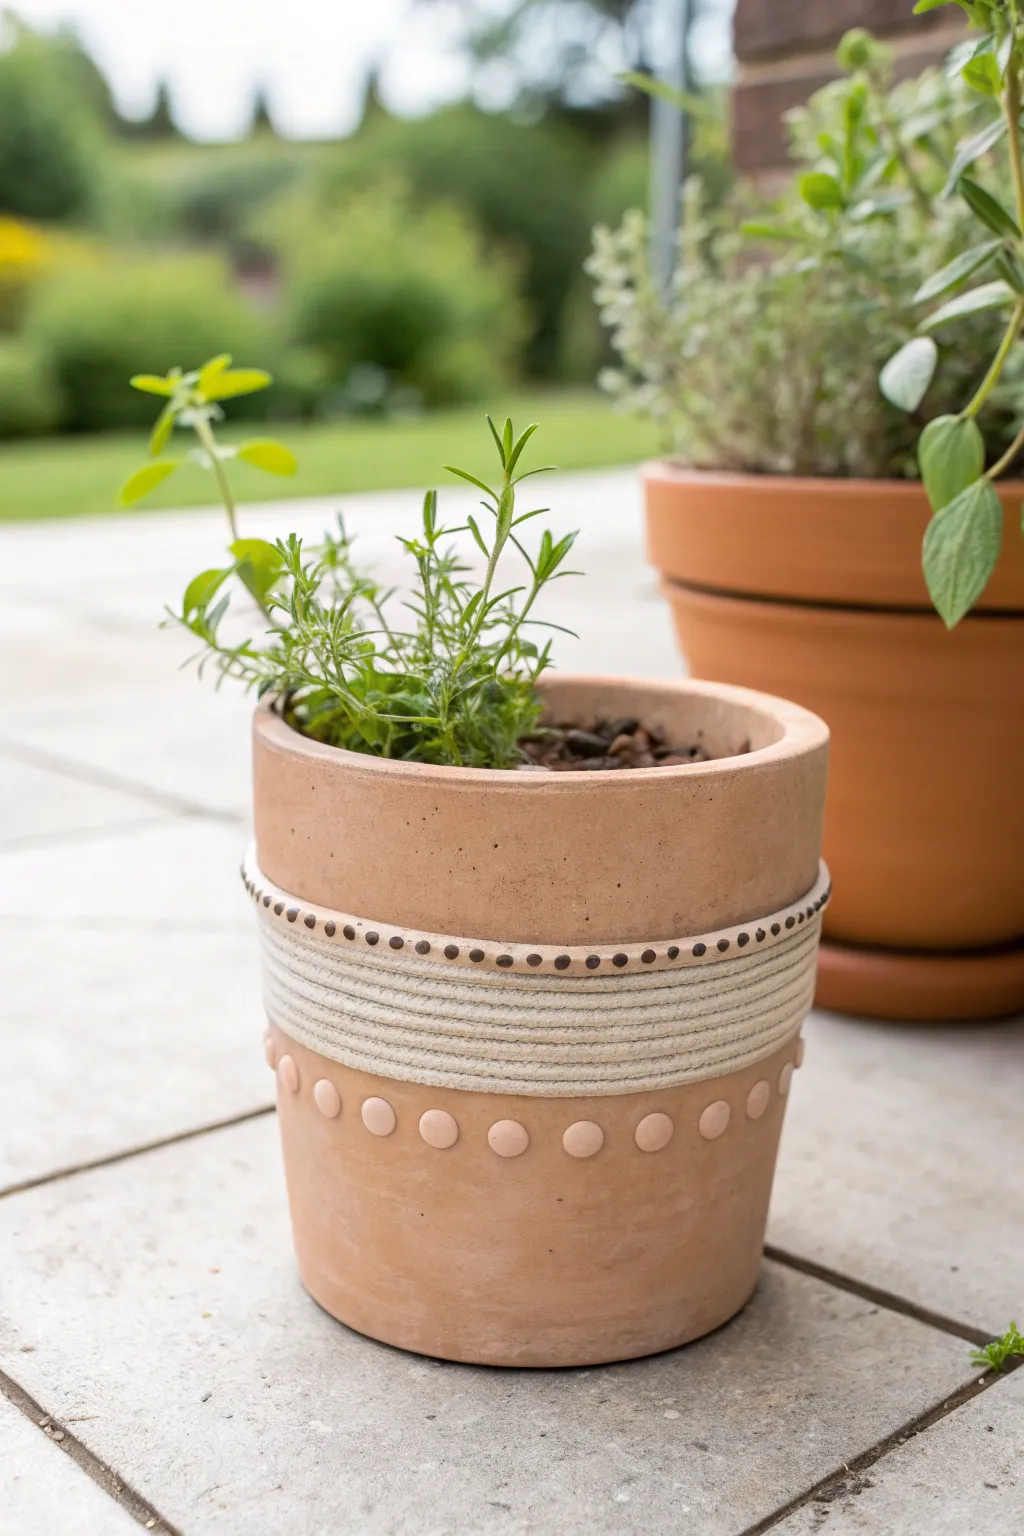
Transform a plain terracotta pot into a chic, bohemian garden accent with this air dry clay wrap technique. By adding rope-like textures and simple geometric details, you’ll give your container garden a custom, handcrafted feel that looks much more expensive than it is.
Step-by-Step Tutorial
Materials
- Plain terracotta pot (medium size)
- White or light beige air dry clay
- Rolling pin
- Clay sculpting tools (or a butter knife)
- Comb (for texture)
- Small round object for stamping (like a marker cap)
- Parchment paper or non-stick mat
- Craft glue or strong adhesive
- Water in a small cup
- Small paintbrush
- Clear matte sealant spray (outdoor rated)
Step 1: Preparation and Base Layer
-
Clean surface:
Begin by wiping down your terracotta pot with a damp cloth to remove any dust or dirt. Let it dry completely so the clay adheres properly. -
Condition clay:
Take a handful of air dry clay and knead it well in your hands until it becomes soft, pliable, and free of cracks. -
Roll the sheet:
On a piece of parchment paper, roll out a long, rectangular strip of clay to a thickness of about 1/4 inch. Ensure the strip is long enough to wrap entirely around the circumference of your pot. -
Trim edges:
Use a straight edge and a knife or clay tool to trim the top and bottom of the clay strip, creating a clean, straight band that is roughly 2-3 inches wide.
Clay cracking?
If the clay band cracks significantly while drying, it likely shrank too fast. Fill large cracks with a ‘slip’ mixture of clay and water, then let dry slowly under a loose plastic bag.
Step 2: Creating the Texture
-
Apply adhesive:
Brush a thin layer of craft glue around the middle of the pot where you intend to place the clay band. -
Attach the band:
Carefully lift the clay strip and wrap it around the glued section of the pot. Press it down gently to secure it, smoothing the seam where the ends meet with a little water on your finger. -
Create rope texture:
Using a clay tool or a fine-toothed comb, drag horizontal lines across the center portion of the clay band to mimic the look of wrapped rope or twine. -
Define the borders:
Leave a smooth border of about half an inch at both the top and bottom of the textured ‘rope’ section. Use a flat tool to sharpen the line between the smooth border and the textured center. -
Add dot details:
For the upper rim of the clay band, use a small, blunt tool (like the end of a paintbrush) to press tiny, evenly spaced indentations all the way around.
Step 3: Adding the Lower Studs
-
Roll small spheres:
Pinch off small pieces of clay and roll them into pea-sized balls. You will need enough to circle the pot, spaced about an inch apart. -
Flatten slightly:
Gently press each ball against a flat surface to create a uniform disc shape, resembling a rivet or stud. -
Mark placement:
I like to lightly mark the pot with a pencil first to ensure my spacing is even before gluing anything down. -
Attach the studs:
Apply a dot of glue to the back of each clay disc and press them firmly onto the pot, positioned just below the main textured band. -
Smooth the edges:
Dip your finger in water and run it very lightly over the edges of the studs to ensure they bond flush with the terracotta surface.
Go Geometric
Instead of round studs, cut small triangles or diamond shapes from a flattened sheet of clay using a craft knife for a sharper, more modern geometric pattern.
Step 4: Finishing Up
-
Initial drying:
Allow the pot to sit in a dry, room-temperature area away from direct sunlight for at least 24 hours. -
Check for cracks:
Inspect the clay as it dries. If small cracks appear, mix a tiny bit of fresh clay with water to make a paste and fill them in. -
Seal the moisture:
Once fully cured (hard and white), take the pot outside and apply two coats of clear matte sealant spray. -
Interior sealing:
Don’t forget to seal the inside of the terracotta pot as well, which prevents moisture from seeping through to the clay from the inside when watering your plants.
Once sealed and planted, this textured pot adds a wonderful tactile element to your patio display
Butterfly and Dragonfly Fence Plaques
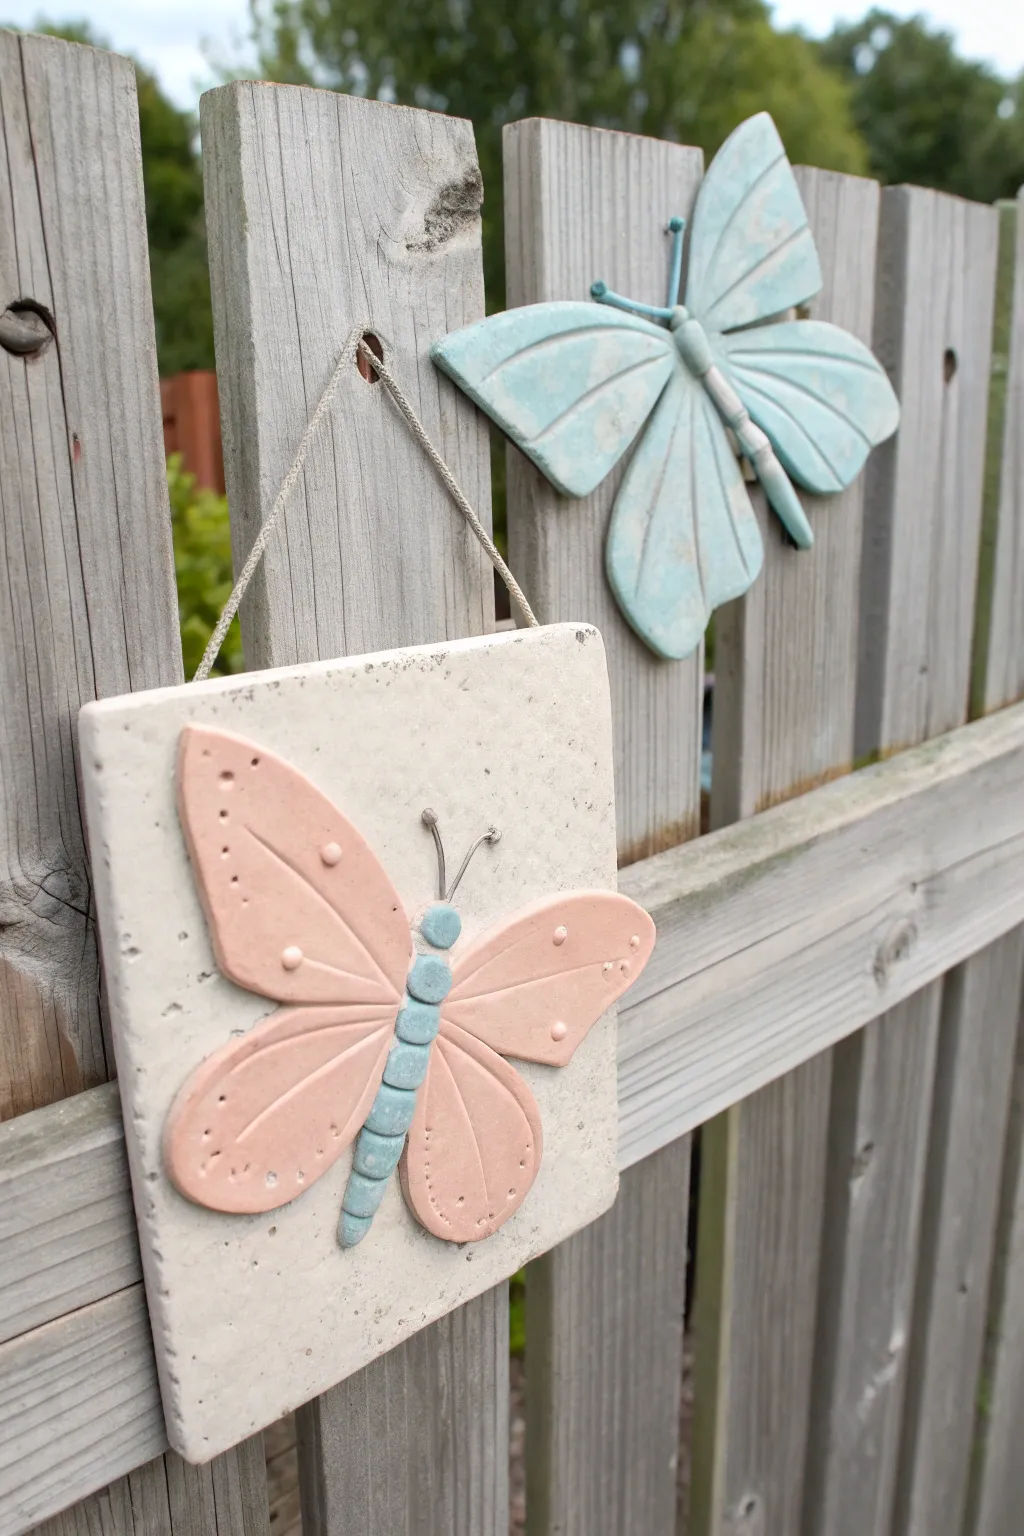
Bring a soft, pastel charm to your garden fence with these delightful clay relief tiles. This project combines a simple square base with a raised, dimensional butterfly design for a lovely textured effect that weathers beautifully outdoors.
Step-by-Step Guide
Materials
- Air dry clay (white or terracotta)
- Rolling pin
- Square cookie cutter or knife and ruler
- Clay sculpting tools (or a toothpick and spoon)
- Textured sponge or stone (optional)
- Acrylic paints (pastel pink, pale blue, white)
- Small paintbrushes
- Baling twine or jute string
- Strong craft glue or slip (clay water mixture)
- Outdoor varnish or sealant (matte finish)
- Wire (fine gauge for antennae)
Step 1: Creating the Base
-
Roll the slab:
Begin by conditioning your air dry clay and rolling it out to a uniform thickness of about 1/4 inch. I find that using guide sticks on either side helps keep the surface perfectly level. -
Texture the surface:
Before cutting the shape, gently press a textured sponge or a rough stone into the clay surface. This gives it that lovely weathered stone look rather than being perfectly smooth. -
Cut the square:
Use a square cutter or a sharp knife with a ruler to cut a perfect square, approximately 4×4 or 5×5 inches. Smooth the edges with a damp finger to remove any sharp burrs. -
Add hanging holes:
While the clay is still wet, use a straw or the end of a paintbrush to punch two holes near the top corners. Ensure they are large enough for your twine to thread through later.
Step 2: Sculpting the Butterfly
-
Form the body:
Roll five or six small balls of clay, graduating in size from small to tiny. flatten them slightly and arrange them in a line down the center of your tile to form the beautiful segmented body. -
Shape the wings:
Roll out a thinner piece of clay for the wings. Cut four teardrop shapes—two larger for the top wings and two slightly smaller for the bottom wings. -
Attach the wings:
Score the back of the wings and the tile surface where they will sit. Apply a little slip (clay and water paste) and press the wings firmly onto the tile, tucking the inner edges slightly under the segmented body. -
Detail the wings:
Use a toothpick or sculpting tool to gently impress lines radiating from the body outward on each wing. Add tiny indented dots along the wing edges for extra decoration. -
Add antennae:
Cut two short lengths of fine wire. Curl the ends slightly and press them into the top of the clay body (you may need a tiny dab of glue here). Let the entire piece dry completely for 24-48 hours.
Smooth Seams
Use a damp paintbrush to smooth the clay where the wings join the tile. This creates a seamless bond and prevents cracking as the clay shrinks during drying.
Step 3: Painting and Finishing
-
Base wash:
If you want a unified look, give the whole dried tile a very watered-down wash of cream or off-white paint, wiping most of it back so it settles in the texture. -
Paint the wings:
Paint the wings in a soft pastel pink. You can dry-brush a lighter shade of pink over the raised areas to highlight the texture you created earlier. -
Paint the body:
Use a delicate pale blue for the segmented body balls. A fine liner brush helps keep the edges crisp where the blue meets the pink wings. -
Highlight details:
Dip a toothpick in white paint and carefully fill the tiny decorative dots on the wings to make them pop. -
Seal for outdoors:
Since this is for the garden, apply 2-3 coats of a robust outdoor matte varnish. Ensure you coat the back and inside the hanging holes as well. -
String it up:
Cut a length of natural baling twine. Thread the ends through the holes from front to back and knot them securely on the reverse side.
Bead Accents
Before the clay dries, press small glass beads or faux pearls into the wings instead of indenting dots for a touch of sparkle that catches the sunlight.
Hang your new plaque on a fence post or gate and enjoy the handmade charm it adds to your outdoor space
Clay Lantern Cottages for Glowing Nooks
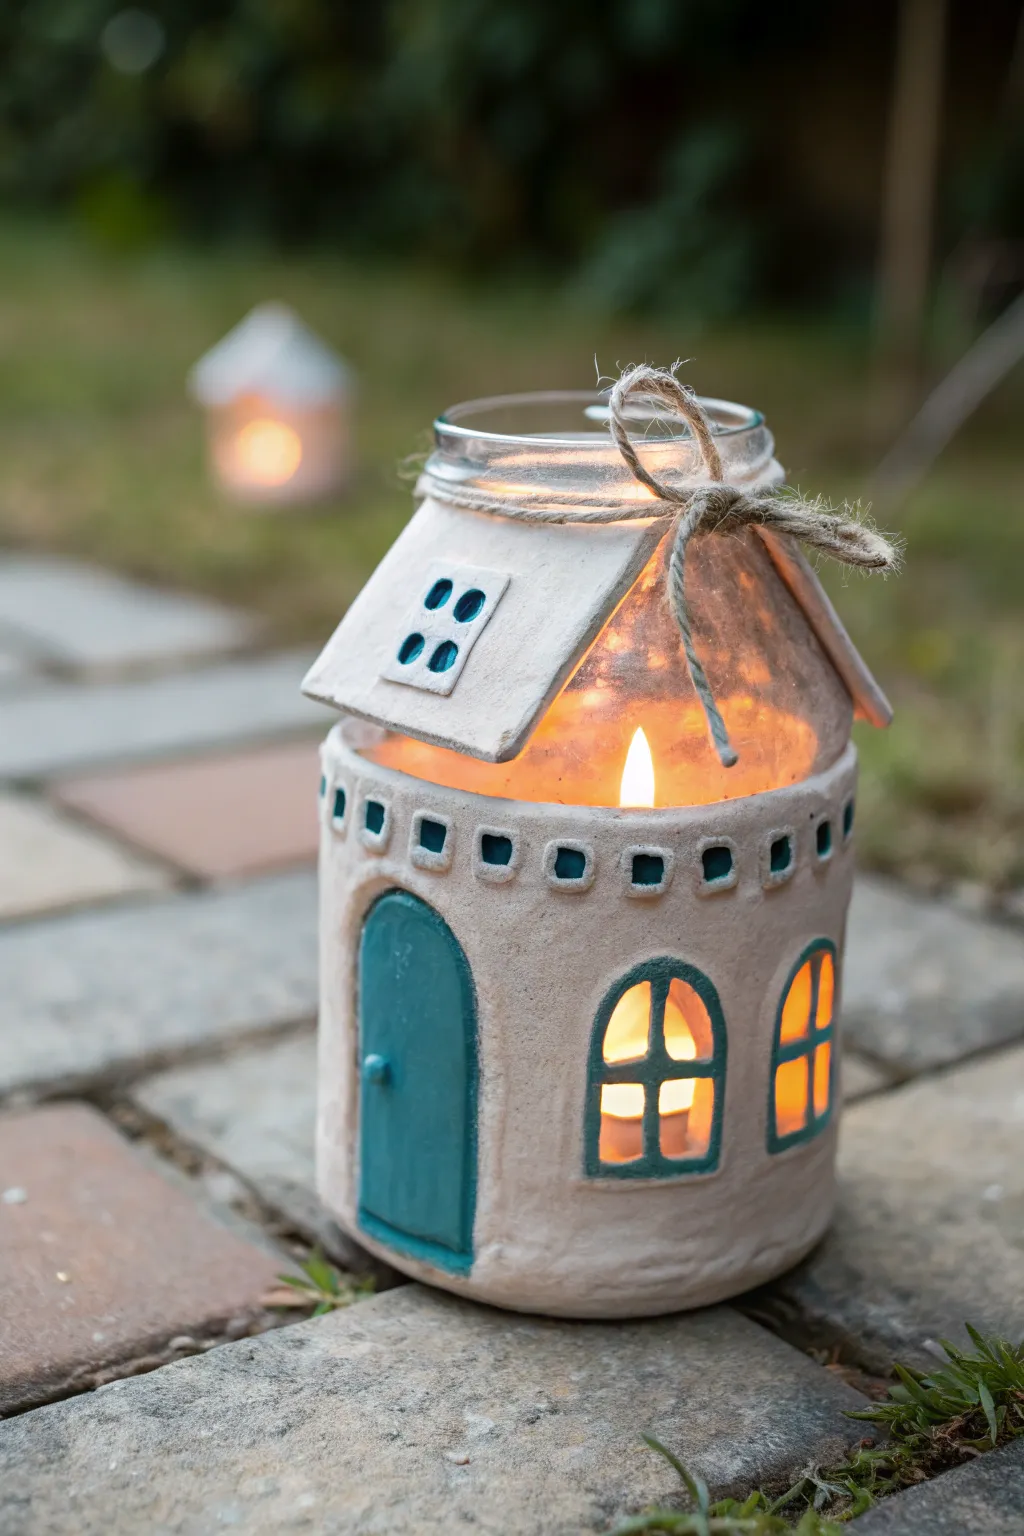
Transform a simple glass jar into an enchanting, glowing lantern that looks straight out of a fairy tale. Using air-dry clay, you’ll sculpt a charming white cottage facade complete with teal accents and warm window cutouts perfect for cozy garden nooks.
How-To Guide
Materials
- Clean glass jar (jam or mason jar style)
- White stone-effect air-dry clay (or standard white clay)
- Rolling pin
- Craft knife or scalpel
- Teal acrylic paint
- Fine detail paintbrush
- Jute twine
- Water in a small cup
- Sandpaper (fine grit)
- Mod Podge or waterproof varnish (if using outdoors)
- Tea light candle (real or LED)
Step 1: Preparation & Base Layer
-
Prep the jar:
Ensure your glass jar is clean and completely dry. Remove any sticky labels or residue so the clay adheres properly to the surface. -
Roll the clay slab:
Take a large chunk of air-dry clay and knead it slightly to warm it up. Roll it out on a flat surface into a long rectangular slab, about 1/4 inch thick. Make sure the strip is long enough to wrap around the circumference of your jar and tall enough to cover the bottom two-thirds. -
Wrap the jar:
Carefully lift the clay strip and wrap it around the clean jar. Join the two ends together by smoothing the clay with a wet finger until the seam disappears. Trim any excess clay from the bottom so the jar sits flat.
Clay Sliding?
If the clay keeps sliding down the smooth glass while wet, wrap a rubber band around the clay to hold it in place while it sets, or scuff the glass with sandpaper first.
Step 2: Sculpting the Details
-
Carve the windows:
Using your craft knife, gently cut out arched window shapes. Start by lightly tracing the outline, then cut deeper to remove the clay piece, revealing the glass underneath. -
Add window frames:
Roll thin ‘snakes’ of clay. Place these around the borders of your window cutouts and add a cross shape in the middle to create panes. Press them gently to adhere, using a tiny bit of water as glue if needed. -
Create the decorative rim:
Roll a thicker coil of clay and wrap it around the top edge of the base layer, creating a distinct rim where the ‘roof’ line begins. Flatten it slightly against the jar. -
Punch decoration holes:
Use the back of a paintbrush or a small square tool to press indented notches (or cut tiny squares) all along that upper rim for a castle-battlement look. -
Sculpt the door:
Fashion a flat, arched piece of clay for the door. Press it onto the jar surface (don’t cut the glass out here). Roll a tiny ball of clay for the doorknob and attach it securely.
Make a Village
Create a whole fairy village by using jars of different heights and shapes (like olive jars or pickle jars) and painting the doors in different pastel colors.
Step 3: The Roof Piece & Finishing
-
Form the roof tile:
Roll out a smaller, separate slab of clay and cut it into a trapezoid or rectangle shape. This will be the attached ‘roof’ section on the front. -
Decorate the roof:
Cut out four small square windows in a grid pattern on this roof piece. I find it adds character if these aren’t perfectly symmetrical. -
Attach the roof:
Press this roof slab onto the upper, exposed glass portion of the jar, angling it slightly so it rests on the rim you created earlier. Ensure the clay grips the glass; you might need to leave the jar horizontal while this initial bond sets. -
Dry completely:
Let the project dry for at least 24-48 hours. Keep it away from direct heat sources to prevent cracking. -
Sand smooth:
Once bone dry, use fine-grit sandpaper to gently smooth out any fingerprints or rough edges on the window frames and door. -
Paint details:
Using a fine brush and teal acrylic paint, carefully paint the door, the window frames, and the inside of the square cutouts on the rim. Leave the main walls natural white. -
Seal for protection:
Apply a coat of waterproof varnish or Mod Podge over the clay parts, especially if this will live on a patio. This protects the clay from moisture and gives it a finished sheen. -
Add the twine:
Wrap a length of jute twine around the threaded neck of the jar several times and tie it off in a rustic bow. -
Light it up:
Place a tea light inside the jar and enjoy the warm glow through your handcrafted windows.
Watching the candlelight flicker through the little windows creates such a peaceful atmosphere in the evening garden
Rain Chain Charms for Downspouts
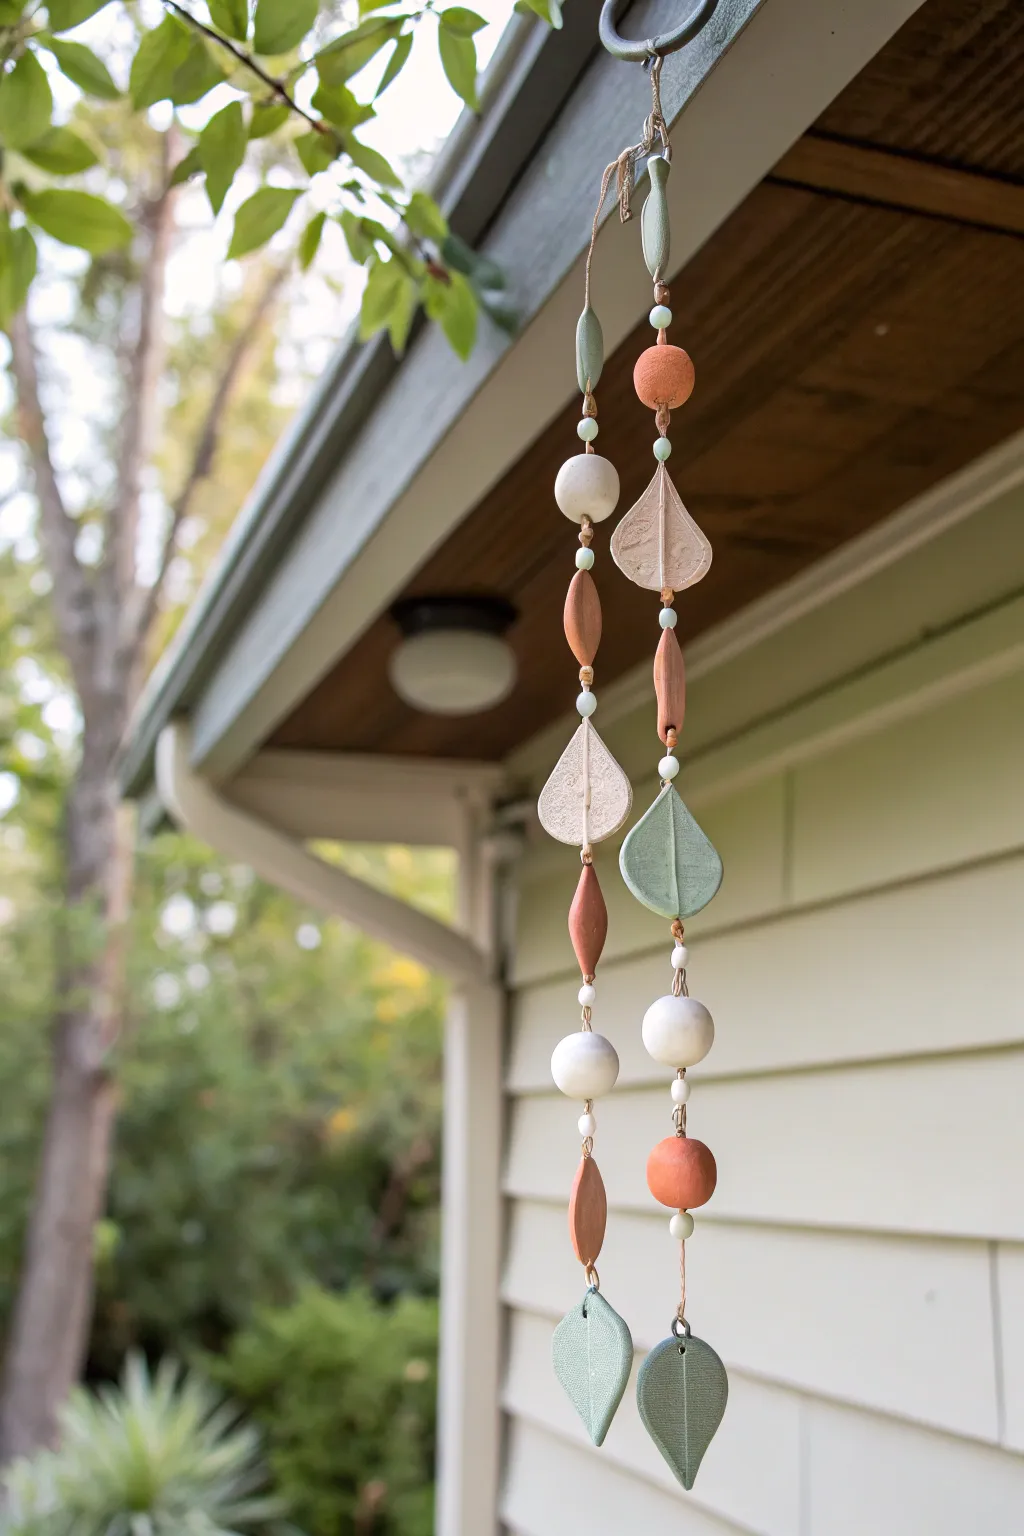
Transform a simple downspout into a mesmerizing visual feature with this handcrafted clay rain chain. Using earthy tones of terracotta, sage, and cream, these cascading beads and leaves create a rhythmic, natural aesthetic that sways gently in the breeze.
Step-by-Step Tutorial
Materials
- Air dry clay (white or natural)
- Acrylic paints (terracotta, sage green, cream/off-white)
- Hemp twine or jute cord
- Rolling pin
- Clay carving tools or a butter knife
- Leaf-shaped cookie cutters (optional)
- Toothpick, skewer, or drinking straw (for piercing holes)
- Fine-grit sandpaper
- Clear waterproof outdoor sealant (spray or brush-on)
- Metal ring or carabiner (for hanging)
Step 1: Shaping the Clay Elements
-
Roll out the slab:
Begin by conditioning your air dry clay until it is soft and pliable, then use a rolling pin to flatten a portion into a slab about 1/4 inch thick. This flat canvas will be used for your larger focal pieces. -
Cut leaf shapes:
Use a leaf-shaped cutter or freehand a teardrop leaf shape with a knife to cut out several large flat charms. For the specific look in the photo, create a mix of pointed teardrops and wider leaf shapes. -
Add texture:
While the clay is still wet, use a needle tool or small knife to gently score a central vein line down the middle of each leaf shape. You can also press a real leaf into the clay to imprint natural veins. -
Form the round beads:
Pinch off chunks of clay and roll them between your palms to create perfect spheres. Aim for a diameter of roughly 1 inch to match the visual weight of the leaves. -
Create geometric accents:
Fashion smaller accent beads by rolling clay into small balls and then gently shaping them into ovals or bicones (tapered at both ends) for variety. -
Pierce vertical holes:
Using a skewer or drinking straw, pierce a hole completely through the center of every bead and through the top and bottom of your flat leaf shapes. Make sure the holes are wide enough to accommodate your twine comfortably.
Cracking Issues?
If you see tiny cracks forming as the clay dries, mix a small amount of fresh clay with water to make a paste (slip) and fill them in before painting.
Step 2: Finishing and Assembly
-
Dry thoroughly:
Allow all your clay pieces to dry completely. This usually takes 24-48 hours depending on humidity; turn them over halfway through to ensure even drying. -
Sand edges:
Once bone dry, take fine-grit sandpaper and gently smooth away any rough edges on the beads or the rims of the leaves to give them a polished, professional look. -
Paint earthy tones:
Paint your pieces in alternating colors. Use a deep terracotta for the bicones and some beads, a soft sage green for the leaves, and a creamy off-white for the large round beads. -
Seal for outdoors:
This is the most critical step for a garden project: apply two to three coats of a high-quality waterproof outdoor sealant to every single piece. I always double-check the insides of the bead holes to prevent moisture from sneaking in. -
Prepare the hanging strands:
Cut two long lengths of hemp twine, determining the length based on how far down you want the chain to hang from your eave. Tie them securely to your metal ring or carabiner. -
Start stringing:
Begin threading your dried and sealed components. Create a pattern—for example, a small spacer bead, a large round bead, a bicone, and then a flat leaf. -
Secure with knots:
Between key sections or heavier beads, tie a simple overhand knot in the twine to keep components in place and create visual spacing between the elements. -
Attach the leaves:
When attaching the flat leaves, thread the twine through the top hole, runs it down the back of the leaf, and out through the bottom hole to ensure it hangs vertically without spinning wildly. -
Finish the bottom:
Once you reach the desired length, tie a heavy, secure double knot at the very bottom. You can add a heavy final bead here to act as a weight, helping the chain hang straight even in wind.
Level Up: Sound Effects
Incorporate tiny metal bells or glass beads inside the hollow spaces between clay components to create a gentle chinking sound when the wind blows.
Hang your new creation from a sturdy hook and enjoy the beautiful way it guides rainwater down to the ground.
Garden Totems With Stacked Shapes
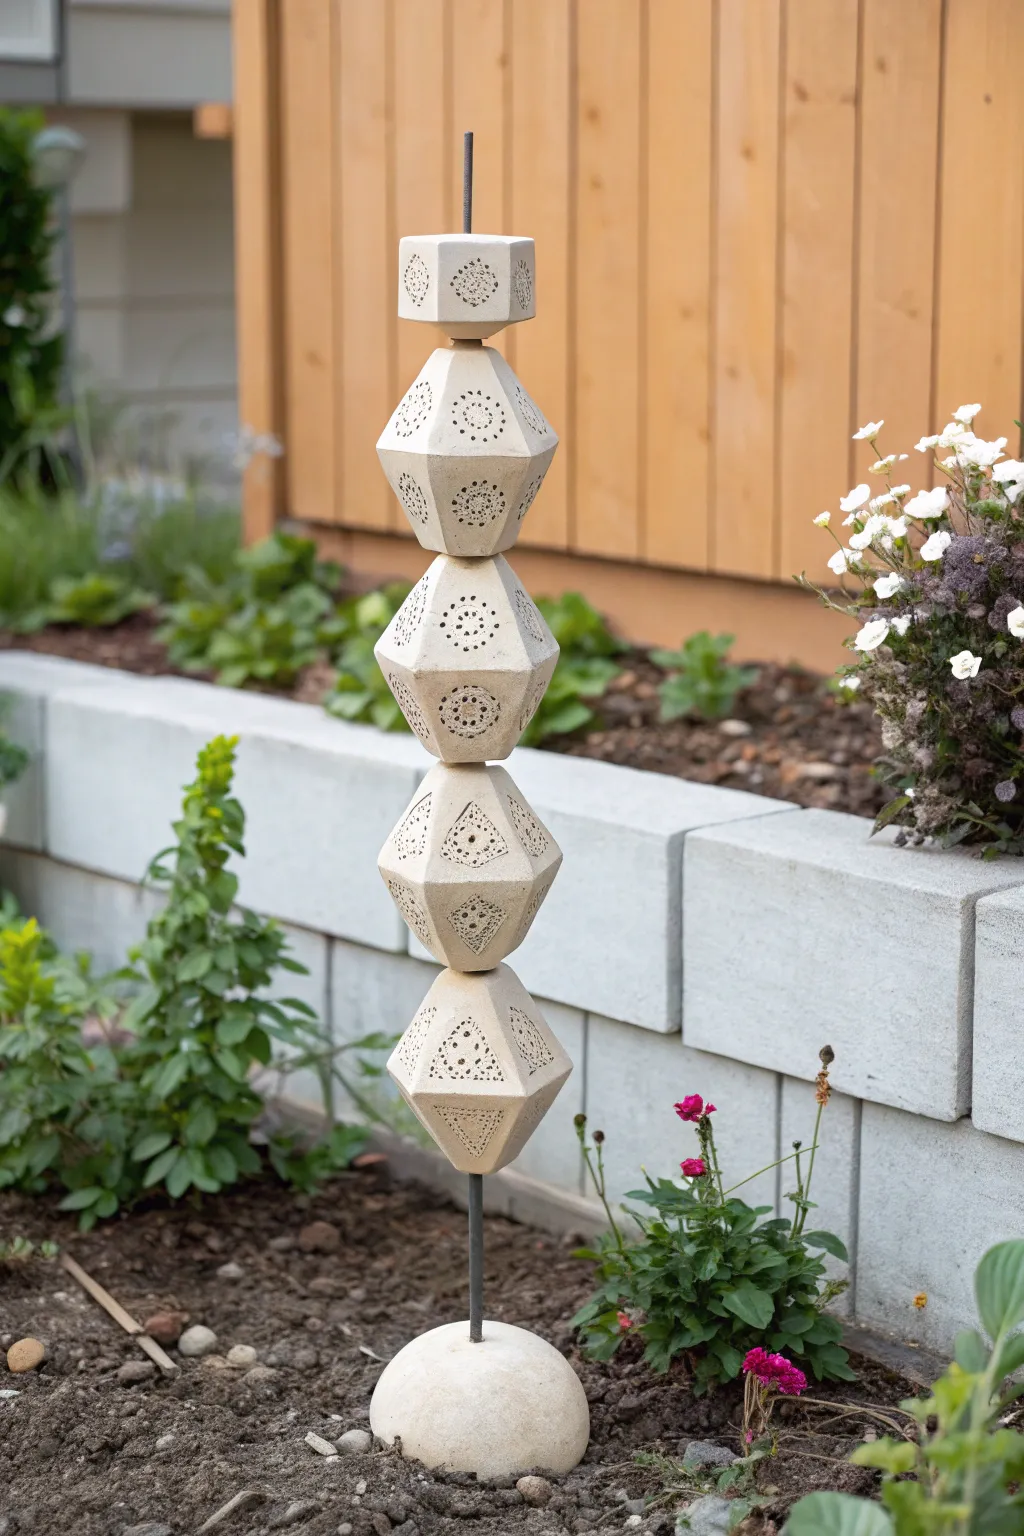
Add an architectural touch to your flower beds with this stunning stacked totem featuring intricate, lace-imprinted facets. The weathered stone look and delicate pierced designs create a beautiful contrast against soft garden foliage.
Step-by-Step
Materials
- High-quality outdoor air dry clay (or polymer clay)
- Metal garden stake or rebar (approx. 3-4 feet)
- Rolling pin
- Lace doilies or textured stamps
- Sharp craft knife or clay blade
- Paper templates (triangle, pentagon, or hexagon shapes)
- Straw or small circular cutters
- Sponge and water
- Sandpaper (fine grit)
- Outdoor sealant or varnish (matte finish)
- Epoxy adhesive (optional for securing)
- Large spherical mold or bowl (for base)
Step 1: Shaping the Geometric Beads
-
Prepare your workspace:
Clear a large, flat surface and cover it with parchment paper or a canvas cloth to prevent sticking. Have your metal rod nearby to check sizing references as you work. -
Roll out the clay slab:
Take a large chunk of clay and roll it out until it is about 1/4 inch thick. Aim for a consistent thickness to ensure the geometric sides fit together cleanly later. -
Apply texture:
Gently press a lace doily or textured stamp into the clay surface. Roll over it once lightly with the rolling pin to imprint the pattern without thinning the clay too much. -
Cut geometric panels:
Using paper templates, cut out multiple identical shapes. For the biconal beads shown, you will essentially need two pyramids joined at the base; cut triangular panels that will form these sides. -
Construct the hollow form:
Join the triangular panels together by scoring the edges and applying a little water or slip (clay slurry). Build the bottom half of the bead first, then construct the top half. -
Seal the seams:
As you join the panels, smooth the seams from the inside and outside to strengthen the bond. I find using a slightly damp sponge helps blend the edges seamlessly. -
Pierce the design:
before closing the shape entirely, use a straw or small cutter to punch holes in the center of the patterned areas. This creates the ‘pierced’ look that lets light through. -
Create the rod channel:
Ensure there is a hole at the very top and very bottom of your geometric bead large enough for your metal rod to pass through. Do this while the clay is still pliable. -
Repeat for variety:
Make 4-5 large beads. vary the shapes slightly—try a cube for the top or elongated diamonds for the middle section—to create visual interest.
Cracked Seams?
If seams crack while drying, fill them immediately with a mix of fresh clay and vinegar (creates specific slip). Smooth over and cover tightly to dry again.
Step 2: Creating the Base and Finishing
-
Mold the base:
For the bottom anchor, drape a thick slab of clay over a large bowl or spherical mold to create a half-sphere. Smooth it out and punch a center hole for the rod. -
Slow drying process:
Let all pieces dry very slowly away from direct heat or sunlight. Drape plastic wrap loosely over them for the first 24 hours to prevent cracking at the seams. -
Sanding imperfections:
Once bone dry, use fine-grit sandpaper to gently smooth any sharp edges or rough seams. Be careful around the delicate pierced holes. -
Seal for outdoors:
Apply 2-3 coats of a high-quality outdoor sealant. A matte varnish works best to maintain that natural, stone-like appearance shown in the photo. -
Install the rod:
Drive your metal rod securely into the ground where you want the totem to stand. Ensure it is straight and stable. -
Stack the elements:
Thread the half-sphere base onto the rod first, flat side down against the soil. Then, carefully stack your geometric beads one by one. -
Secure the stack:
If you live in a windy area, you can use a dab of epoxy between the beads or use rubber washers hidden between them to keep them snugly in place.
Internal Support Structure
Crumple newspaper inside your hollow geometric shapes while building them. It supports the walls from collapsing and will burn off or biodegrade later.
Step back and admire how your new architectural sculpture transforms the garden space with height and elegance
Fairy Garden Furniture Mini Sets
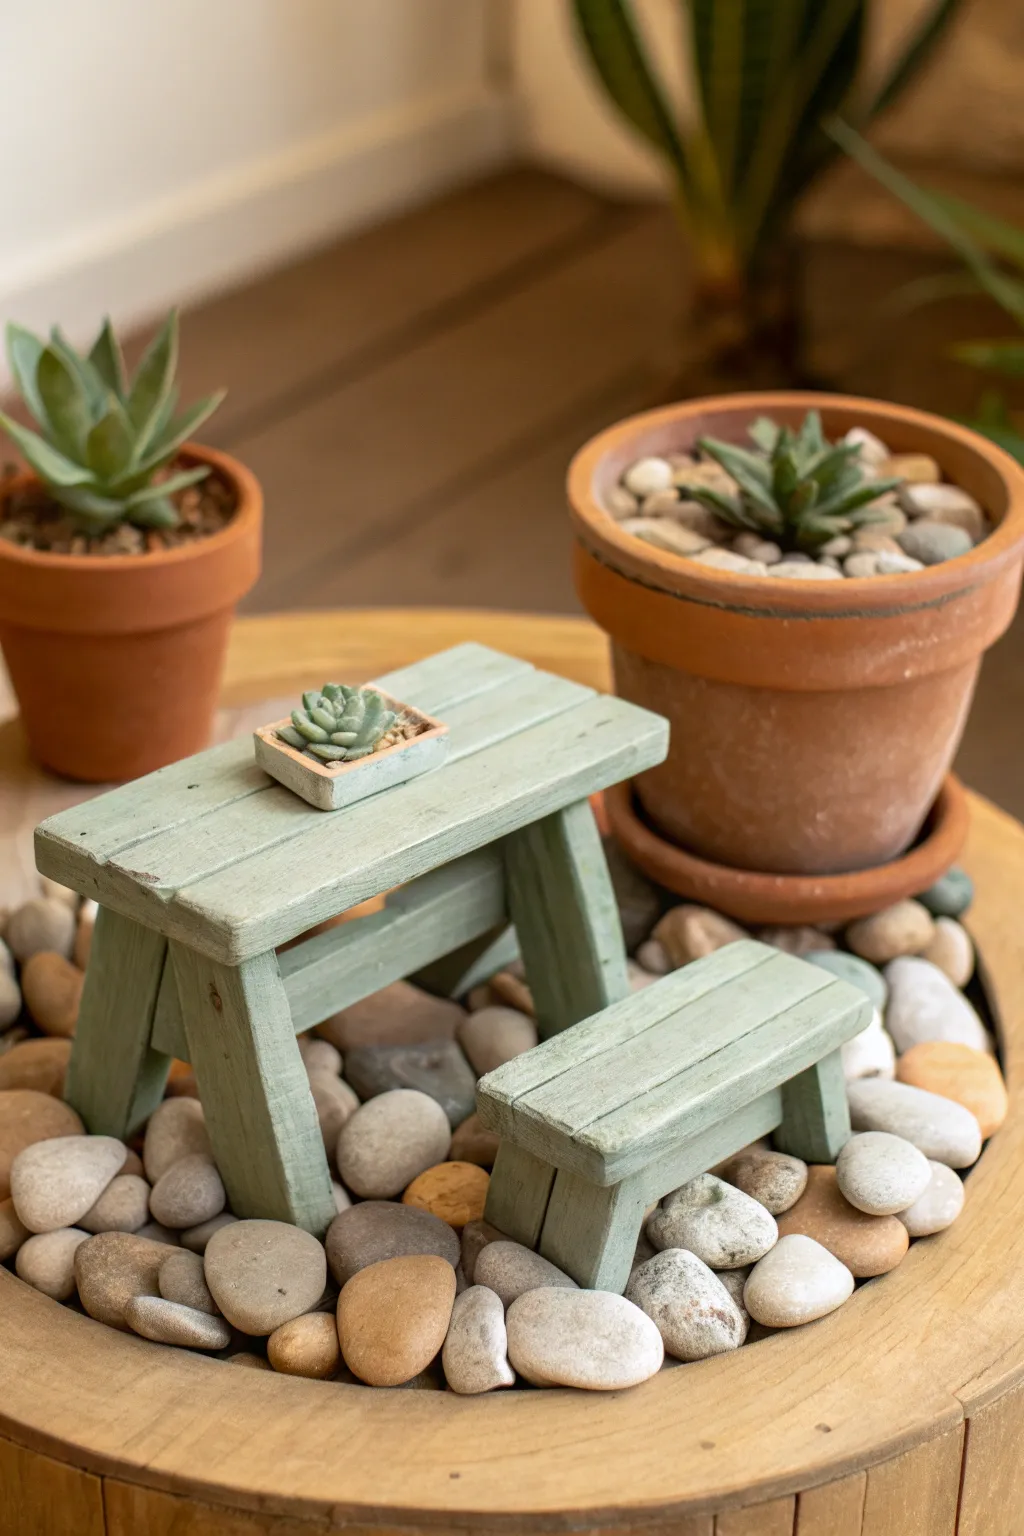
Bring a touch of whimsy to your planters with this adorable sage-green picnic table and bench set. Sculpted from air dry clay to mimic worn wood planks, this weather-resistant miniature scene is the perfect resting spot for your tiny garden visitors.
Step-by-Step Guide
Materials
- Air dry clay (stone or wood effect preferred, or standard white)
- Rolling pin
- sharp craft knife or blade
- Ruler
- Toothpicks or needle tool
- Water in a small cup
- Craft glue or slip (clay mixed with water)
- Acrylic paint (Sage Green, Dark Brown/Black, White)
- Matte spray varnish or outdoor sealant
- Fine grit sandpaper
Step 1: Forming the Planks
-
Roll the clay:
Begin by conditioning your clay until it is pliable. Roll it out into an even slab, approximately 1/4 inch thick. Try to assist the evenness by placing two identical craft sticks on either side of the clay as you roll. -
Cut the tabletop planks:
Using your ruler and knife, cut three equal rectangular strips for the table top. A good size is about 3 inches long by 0.75 inches wide per slat. -
Texture the wood:
Before the clay dries, use a toothpick or a wire brush to gently scratch wood grain lines into the surface. Don’t worry about being perfect; slight wiggles look more organic. -
Create the bench seat:
Cut a single, wider rectangle for the bench seat. It should be slightly shorter than the table length, approximately 2.5 inches long and 1 inch wide. Add the same wood grain texture. -
Distress the edges:
Gently tap the edges of your cut planks to round them slightly, removing the sharp fresh-cut look. I like to make small nicks on the corners to mimic wear and tear.
Fixing Wobbly Legs
If your table wobbles after assembly, glue a small piece of sandpaper face-up on a flat surface and gently rub the long leg over it until level.
Step 2: Sculpting the Legs
-
Cut the leg supports:
Cut four sturdy legs for the table and two solids block-style supports for the bench. The table legs should be angled at the top and bottom (about 45 degrees) to create that classic A-frame picnic look. -
Make the cross-braces:
Cut two shorter strips that will connect the A-frame legs underneath the table top, and a long center support beam that will run underneath the table for stability. -
Dry flat:
Lay all your components flat on a piece of parchment paper or a drying rack. Let them dry completely, which usually takes 24-48 hours depending on humidity. Flipping them halfway through helps prevent warping.
Step 3: Assembly & Finishing
-
Sand components:
Once fully dry, lightly sand any rough burrs or sharp edges. If your planks warped slightly, sand the bottom contact points so they sit flush. -
Assemble the table frame:
Glue the A-frame legs together first using strong craft glue. Let these dry before attaching them to the underside of your tabletop planks. -
Attach the top planks:
Glue the three tabletop planks onto the leg structures, leaving a tiny gap between each plank for realism. Glue the bench seat onto its block supports. -
Apply base coat:
Paint the entire set with a dark brown acrylic paint. Get into all the textured grooves. Let this dry completely—this dark layer will act as our shadow. -
Apply main color:
Paint the sage green layer over the brown. Use a lighter hand here so some of the dark brown remains visible in the deep grain lines. -
Dry brushing:
Dip a dry brush into a tiny amount of white paint, wipe most of it off on a paper towel, and lightly graze the raised edges and corners. This highlights the texture immensely. -
Seal the furniture:
Since this is for a garden, apply 2-3 coats of a matte outdoor sealer or spray varnish to protect the clay from moisture. -
Add the mini planter (Optional):
Create a tiny square of excess clay, hollow it out slightly, paint it terracotta, and glue a tiny faux succulent inside. adhere this to the tabletop for the final detail.
Pro Tip: Realistic Texture
Press a real piece of rough bark or a stiff wire brush into the wet clay instead of drawing lines one by one for an instant, complex wood grain effect.
Place your finished set on a bed of pebbles and watch your miniature garden scene come to life.
Outdoor Sealing for Weather-Resistant Decor
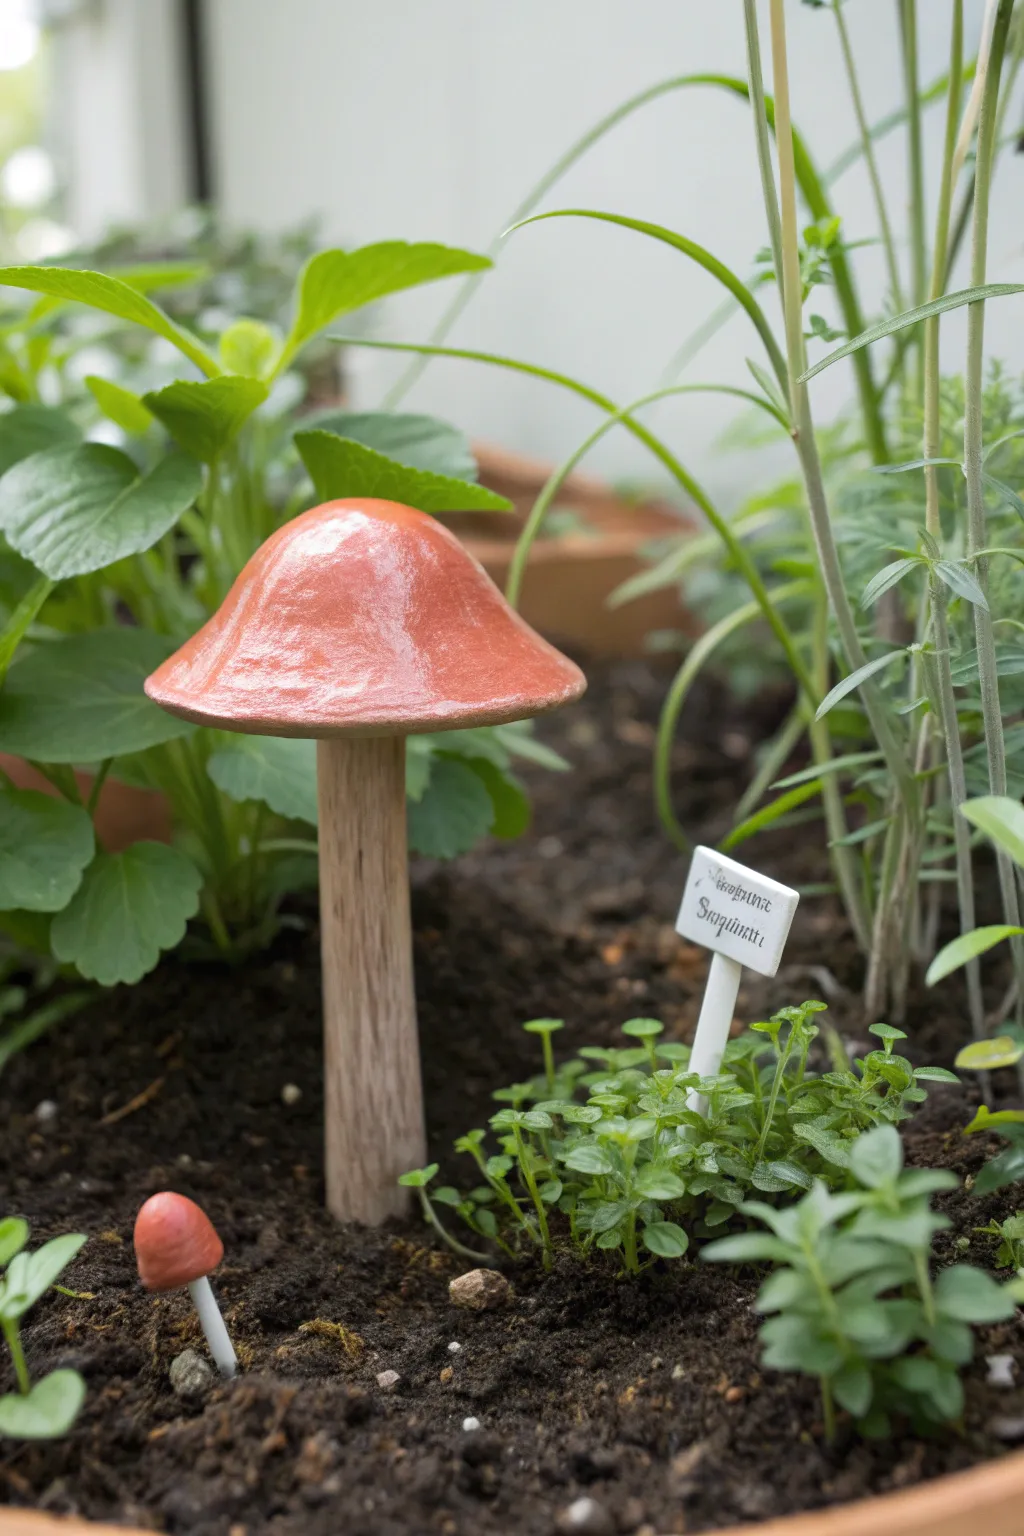
These charming garden accents mimic the look of glazed ceramic pottery without needing a kiln, bringing a pop of earthy red and natural wood tones to your planter boxes. The project features a large focal mushroom and a tiny companion, perfect for adding whimsy to your indoor or sheltered outdoor greenery.
How-To Guide
Materials
- Air dry clay (white or terracotta)
- Wooden dowel (approx. 3/4 inch thick for large stem)
- Thin wooden skewer or lollipop stick (for small stem)
- Acrylic paints (terracotta/red-orange, beige, dark brown)
- High-gloss outdoor spar varnish or polyurethane sealant
- Sandpaper (medium and fine grit)
- Aluminum foil
- Strong craft glue or epoxy
- Sculpting tools or a craft knife
- Paintbrushes (flat and fine detail)
Step 1: Sculpting the Caps
-
Form the armature:
Start by scrunching a piece of aluminum foil into a rough dome shape. This saves clay and keeps the sculpture lightweight while drying. -
Roll the clay:
Condition your air dry clay by kneading it until pliable, then roll it out into a slab about 1/4 inch thick. This thickness is durable but won’t take weeks to dry. -
Cover the foil:
Drape the clay sheet over your foil dome, smoothing it down the sides. Trim away excess clay at the bottom rim with a craft knife. -
Shape the large cap:
Refine the shape with your fingers. Aim for a slightly imperfect, organic curve rather than a perfect geometric semi-circle. Smooth the surface with a little water to remove fingerprints. -
Create the mini mushroom:
Roll a very small ball of clay, about the size of a marble, and press your thumb into the bottom to create a tiny cap shape. No foil core is needed for this one due to its size. -
Make connection points:
Flip the large cap over. Use the thick dowel to press an indentation into the underside center—this ensures the stem fits perfectly later. Do the same for the mini mushroom using the thin skewer. -
Allow to dry:
Let the caps dry completely for 24-48 hours. I find flipping them occasionally helps the underside dry evenly.
Smoother Surfaces
dip your finger in water and smooth the raw clay surface repeatedly before drying. The smoother the clay starts, the glassier the final glaze will look.
Step 2: Preparing the Stems
-
Cut the wood:
Cut your thick wooden dowel to your desired height (around 4-5 inches looks proportional). Cut the thin skewer to about 1.5 inches for the baby mushroom. -
Texturize the main stem:
To make the wooden dowel look like a natural mushroom stalk, use coarse sandpaper to scratch vertical lines up and down the wood. You can even whittle small notches with a craft knife for a more rustic look. -
Paint the large stem:
Mix a beige acrylic with a tiny drop of brown. Apply a wash of this color over the dowel, wiping off excess immediately so the textured grain shows through. -
Paint the small stem:
Paint the thin skewer completely white for a classic toadstool look.
Rustic Detailing
Before the clay dries, gently press a piece of rough linen or canvas onto the cap surface to imprint a subtle texture that looks beautiful under glaze.
Step 3: Painting and Assembly
-
Sand the caps:
Once the clay is fully dry, gently sand the caps to remove any sharp edges or rough texture. Wipe away the dust with a damp cloth. -
Apply base color:
Paint the tops of both caps with a vibrant terracotta or reddish-orange acrylic paint. You will likely need two coats for opaque coverage. -
Add dimension:
While the orange paint is still tacky, lightly dab a lighter orange or peach color on the very center of the dome to create a subtle highlight. -
Glue the pieces:
Apply strong craft glue or two-part epoxy into the indentations underneath the caps. Insert the prepared wooden stems and hold them straight until the glue grabs. -
Create the ‘ceramic’ glaze:
This is the most crucial step for weatherproofing. Apply a thick coat of high-gloss outdoor varnish to the painted caps. Do not paint the wooden stems with this high gloss; keeping them matte adds realistic contrast. -
Seal for outdoors:
Apply a second, and potentially third, coat of varnish to the caps, letting each layer dry completely. Ensure the underside where the clay meets the wood is well-sealed to prevent moisture entry.
Now you have a durable, shiny set of faux-ceramic mushrooms ready to brighten up your potted plants