If you’ve got a plain terracotta pot sitting around, you’ve basically got a blank canvas waiting for a glow-up. These clay pot ideas are the kind of projects I keep coming back to when I want something cute, useful, and totally doable in an afternoon.
Classic Painted Terracotta Pots
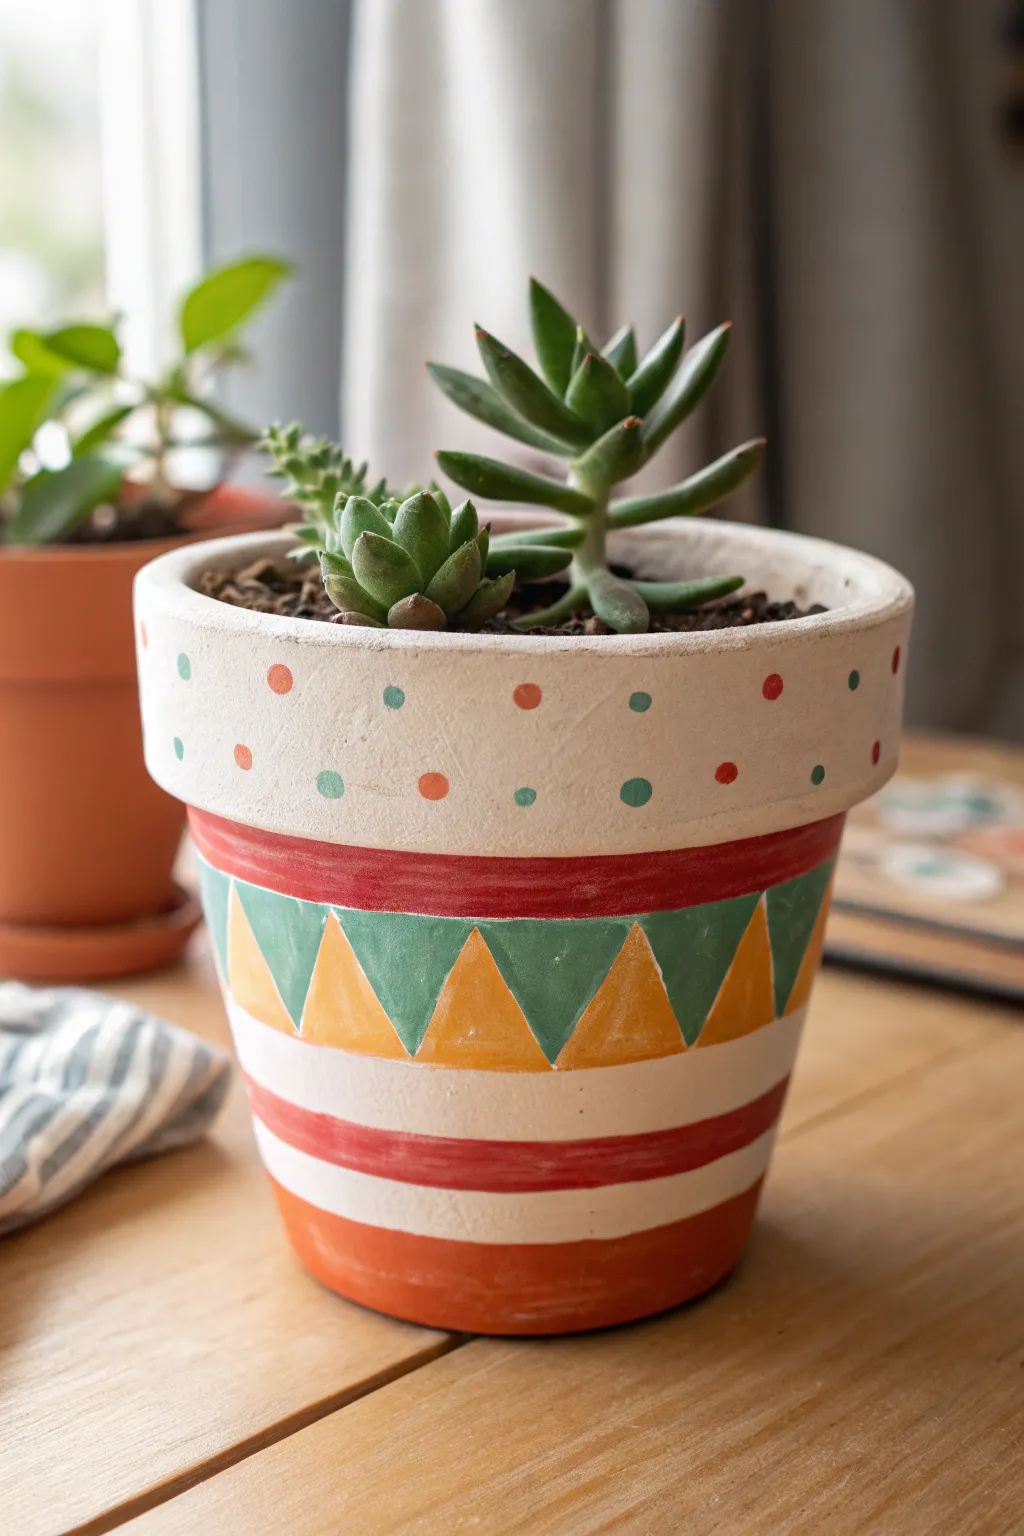
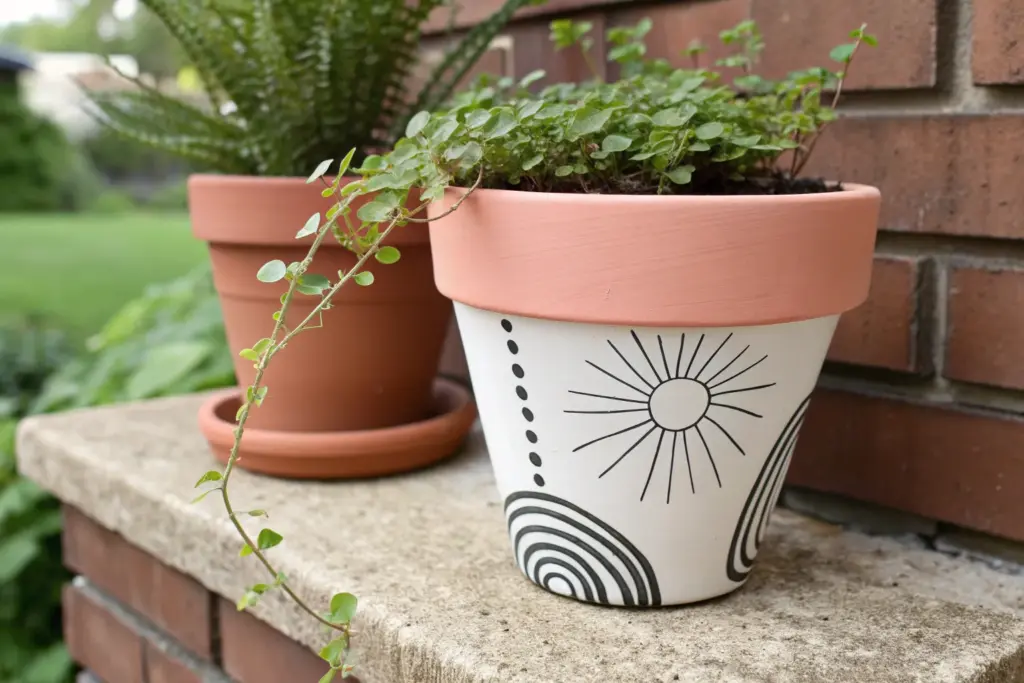
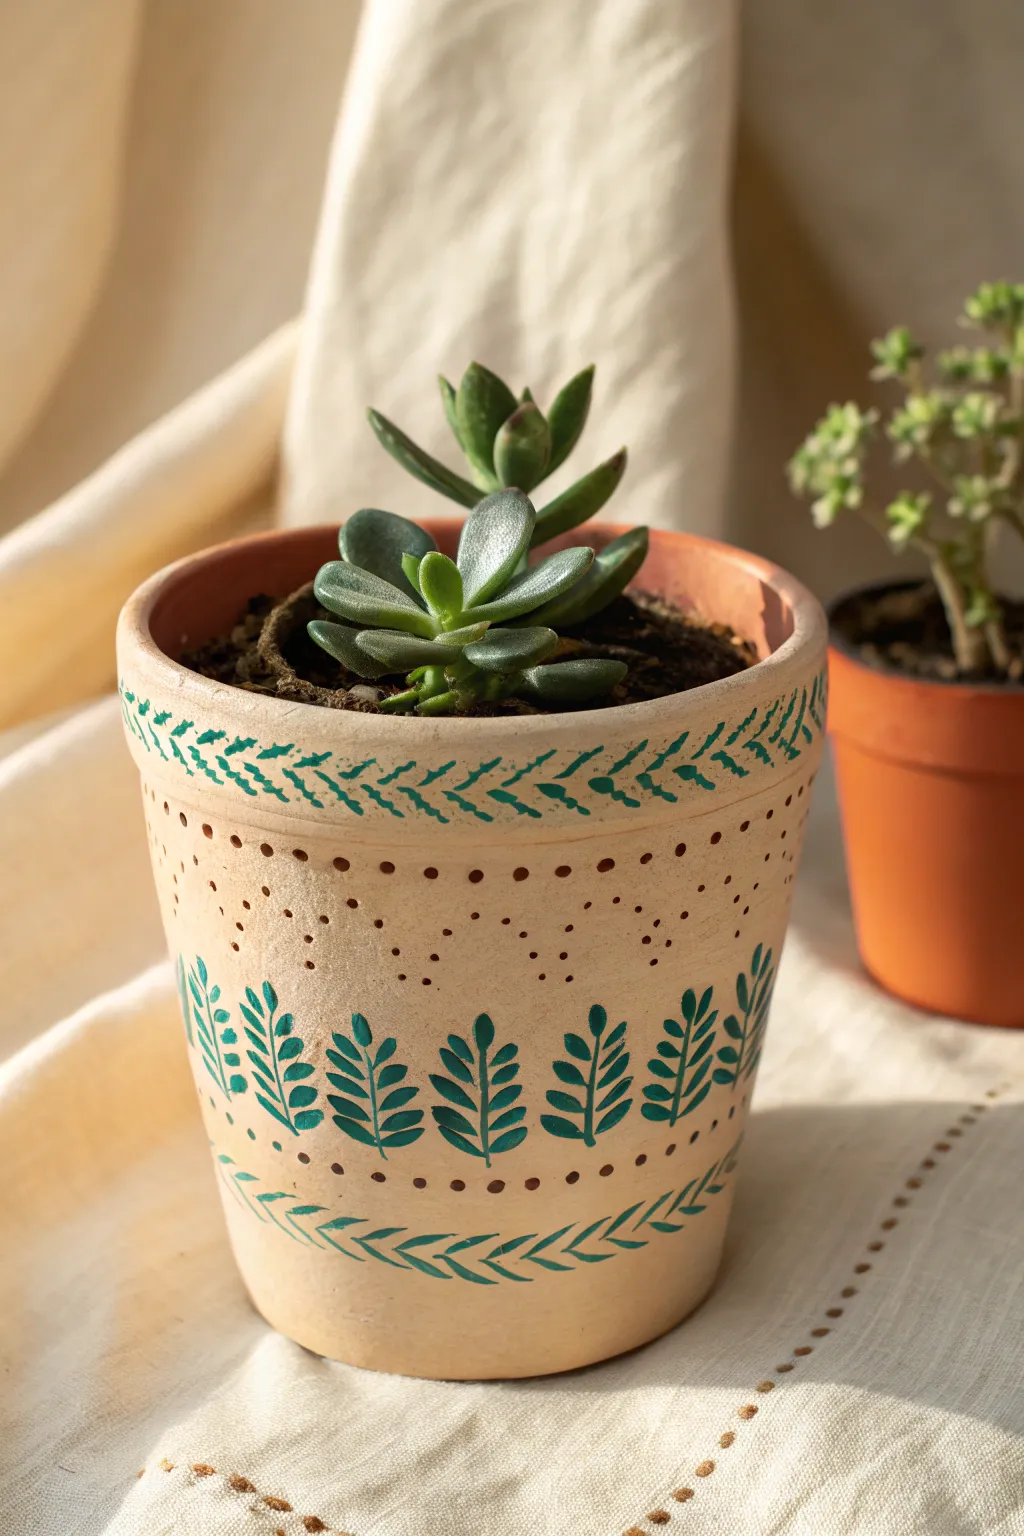
Transform a plain clay planter into a vibrant home for your succulents with this cheerful geometric design. Combining classic terracotta texture with playful dots and zig-zags creates a warm, bohemian accent piece perfect for any windowsill.
Step-by-Step Tutorial
Materials
- Standard terracotta pot (approx. 4-6 inch diameter)
- Acrylic craft paints: Cream/Off-white, Burnt Orange, Teal Green, Mustard Yellow, Red
- Flat paintbrush (medium width)
- Small round paintbrush (fine tip)
- Painter’s tape or masking tape (optional but helpful)
- Pencil
- Clear matte or satin sealant spray
- Water cup and paper towels
Step 1: Preparation & Base Design
-
Clean the surface:
Before starting, ensure your terracotta pot is thoroughly clean and dry. Wipe away any dust with a damp cloth and let it air dry completely, as moisture can trap bubbles under the paint. -
Paint the upper rim background:
Using your flat brush and the cream or off-white acrylic paint, coat the entire exterior of the upper rim. You may need two coats to get a solid, opaque finish that hides the clay color beneath. -
Create the lower white band:
Paint a wide horizontal band of the same cream color around the lower middle section of the pot. leave some raw terracotta showing above and below this band for now. -
Add the orange base:
Paint the very bottom section of the pot with burnt orange paint. I like to carefully follow the natural curve of the pot to keep the line straight without needing tape.
Perfect Polka Dots
Instead of a brush, use the eraser end of a standard pencil as a stamp. Dip it in paint and press straight down for perfectly round, uniform dots on the rim.
Step 2: Geometric Patterns
-
Draft the triangles:
Once the base layers are fully dry, lightly use a pencil to draw a zig-zag line around the middle section (between the rim and the white band). This will create your alternating upward and downward pointing triangles. -
Paint green triangles:
Fill in the downward-pointing triangles with teal green paint. Use a small round brush for this step to get crisp, sharp corners. -
Paint yellow triangles:
Fill in the upward-pointing triangles with mustard yellow paint. Take your time at the edges where the yellow meets the green to ensure a neat transition. -
Add the top red stripe:
Paint a thin, consistent red stripe right below the rim of the pot. This acts as a border between the dotted rim and the geometric middle section. -
Add the lower red stripe:
Paint a second red stripe below the white band, separating it from the orange base. Try to keep this line parallel to the one above it.
Fixing Wobbly Lines
If your triangular lines aren’t straight, don’t worry. Once dry, use a fine-tip permanent marker or paint pen to outline the shapes, hiding any uneven edges instantly.
Step 3: Details & Finishing
-
Plan the rim dots:
Visualize the spacing for the polka dots on the cream rim. You want them alternating in both color and position. -
Paint orange dots:
Using the handle end of a paintbrush or a small round brush, dab small orange dots onto the rim. Space them out generously to leave room for the teal ones. -
Paint teal dots:
Fill in the empty spaces on the rim with teal dots. Creating a slightly staggered or random pattern often looks more charming than a perfect grid. -
Touch up lines:
Inspect your geometric shapes. If the cream background shows through the triangles or stripes, add a second coat of color for vibrancy. -
Clean up edges:
If any paint smudged onto the raw terracotta interior, wipe it away with a damp cloth seamlessly. -
Dry completely:
Allow the entire pot to dry for at least 2-3 hours. The paint should feel hard to the touch, not tacky. -
Seal the artwork:
Take the pot to a well-ventilated area and spray it with a clear matte sealant. This protects your design from water damage when you water your plants.
Once sealed and dry, your patterned pot is ready to showcase your favorite succulents in style


Minimal Line Art Face Pots
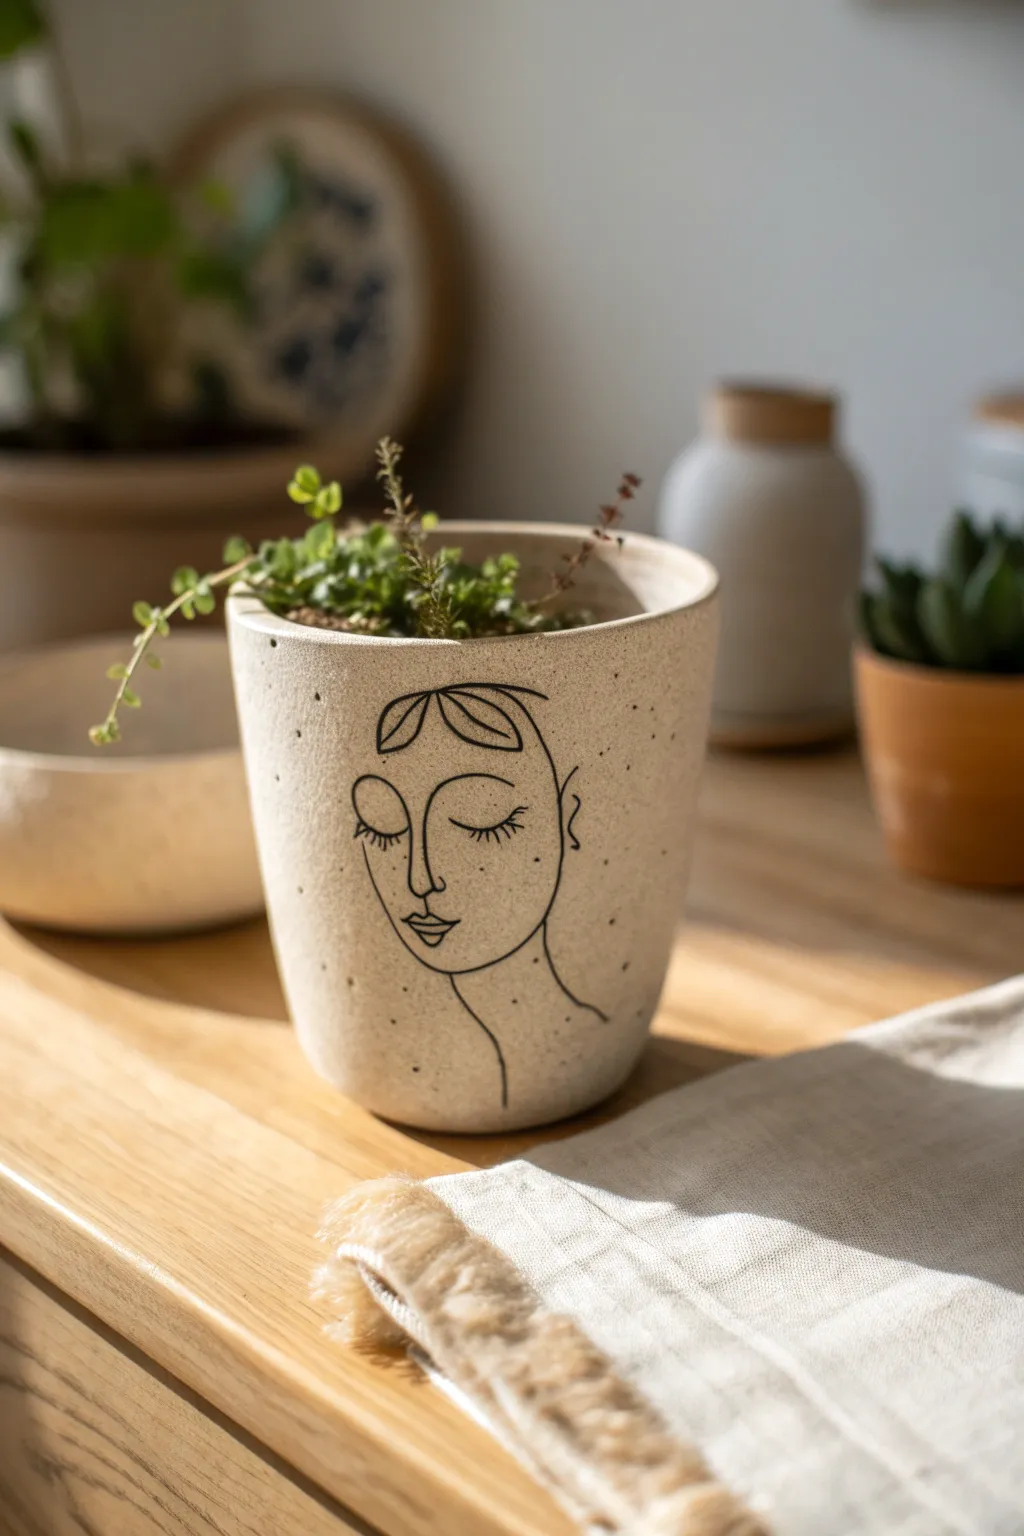
Transform a plain planter into a trendy piece of décor with this minimalist line art design. The combination of simple, flowing black lines against a speckled beige background creates an effortlessly chic and calming aesthetic for your houseplants.
Step-by-Step
Materials
- Raw terracotta or ceramic pot (cylindrical shape)
- Beige or cream acrylic paint (matte finish)
- Speckle medium or brown/black acrylic paint for splatter
- Old toothbrush (for speckling)
- Black oil-based paint pen (fine tip)
- Pencil
- Eraser
- Matte spray sealer
- Paintbrush (wide flat brush)
Step 1: Base Preparation
-
Clean the Pot:
Start with a clean, dry pot. If you are using a terracotta pot, wipe it down with a damp cloth to remove any dust that might interfere with paint adhesion. -
Apply Base Coat:
Paint the entire exterior of the pot with your beige or cream acrylic paint using a wide flat brush. Brush in smooth, horizontal strokes for an even finish. -
Dry and Repeat:
Let the first coat dry completely (usually 20-30 minutes). Apply a second or third coat until the original color of the pot is fully covered and opaque. -
Create Texture:
To mimic the speckled stoneware look from the inspiration photo, you’ll need to add texture. Dilute a tiny amount of dark brown or black paint with water until it’s very fluid. -
Speckle Technique:
I like to take an old toothbrush, dip it in the diluted dark paint, and run my thumb over the bristles to flick tiny specks onto the pot. Practice on a piece of cardboard first to control the spray. -
Speckle Drying:
Allow the speckles to dry thoroughly. This step is crucial because any moisture will cause the paint pen markers to bleed later.
Step 2: Drawing the Design
-
Sketch the Face Shape:
Lightly sketch the outline of the face using a pencil. Start with a long U-shape for the chin and jawline, keeping the lines fluid and elongated. -
Add Facial Features:
Mark key points for the eyes, nose, and mouth. The nose usually connects directly to the brow line in this abstract style. Draw the closed eyelids as simple curved arch shapes. -
Detail the Hair:
Sketch the hairline using loose leaf-like shapes at the top of the forehead. This doesn’t need to be realistic; think abstract and geometric. -
Refine the Neck:
Extend a single curved line down from the right side of the face to suggest a graceful neck. -
Trace with Pen:
Once you are happy with your pencil sketch, take your black oil-based paint pen. Shake it well to get the ink flowing. -
Inking the Lines:
Trace over your pencil marks with slow, deliberate strokes. Try not to lift the pen too often to keep the lines looking continuous and smooth like wire art. -
Adding Eyelashes:
Carefully add small, evenly spaced vertical ticks along the eyelid arches to create the eyelashes. -
Clean Up:
Let the black ink dry for at least an hour. Once fully set, gently erase any visible pencil marks that weren’t covered by the ink.
Steady Hand Trick
Rest your pinky finger against the pot surface while drawing with the paint pen. This anchors your hand and prevents shakiness for smoother curves.
Step 3: Finishing Touches
-
Seal the Artwork:
To protect your design from water damage when watering your plant, finish with a clear matte spray sealer. Hold the can 8-10 inches away and apply a light, even mist. -
Final Cure:
Allow the sealer to cure for 24 hours before potting any soil or plants into your new creation.
Add Dimension
Instead of painted speckles, mix baking soda into your beige base paint. This creates a rough, gritty texture that mimics real stone or concrete.
Now your serene planter is ready to house your favorite greenery.


Daisy Chain Rim Detail Pots
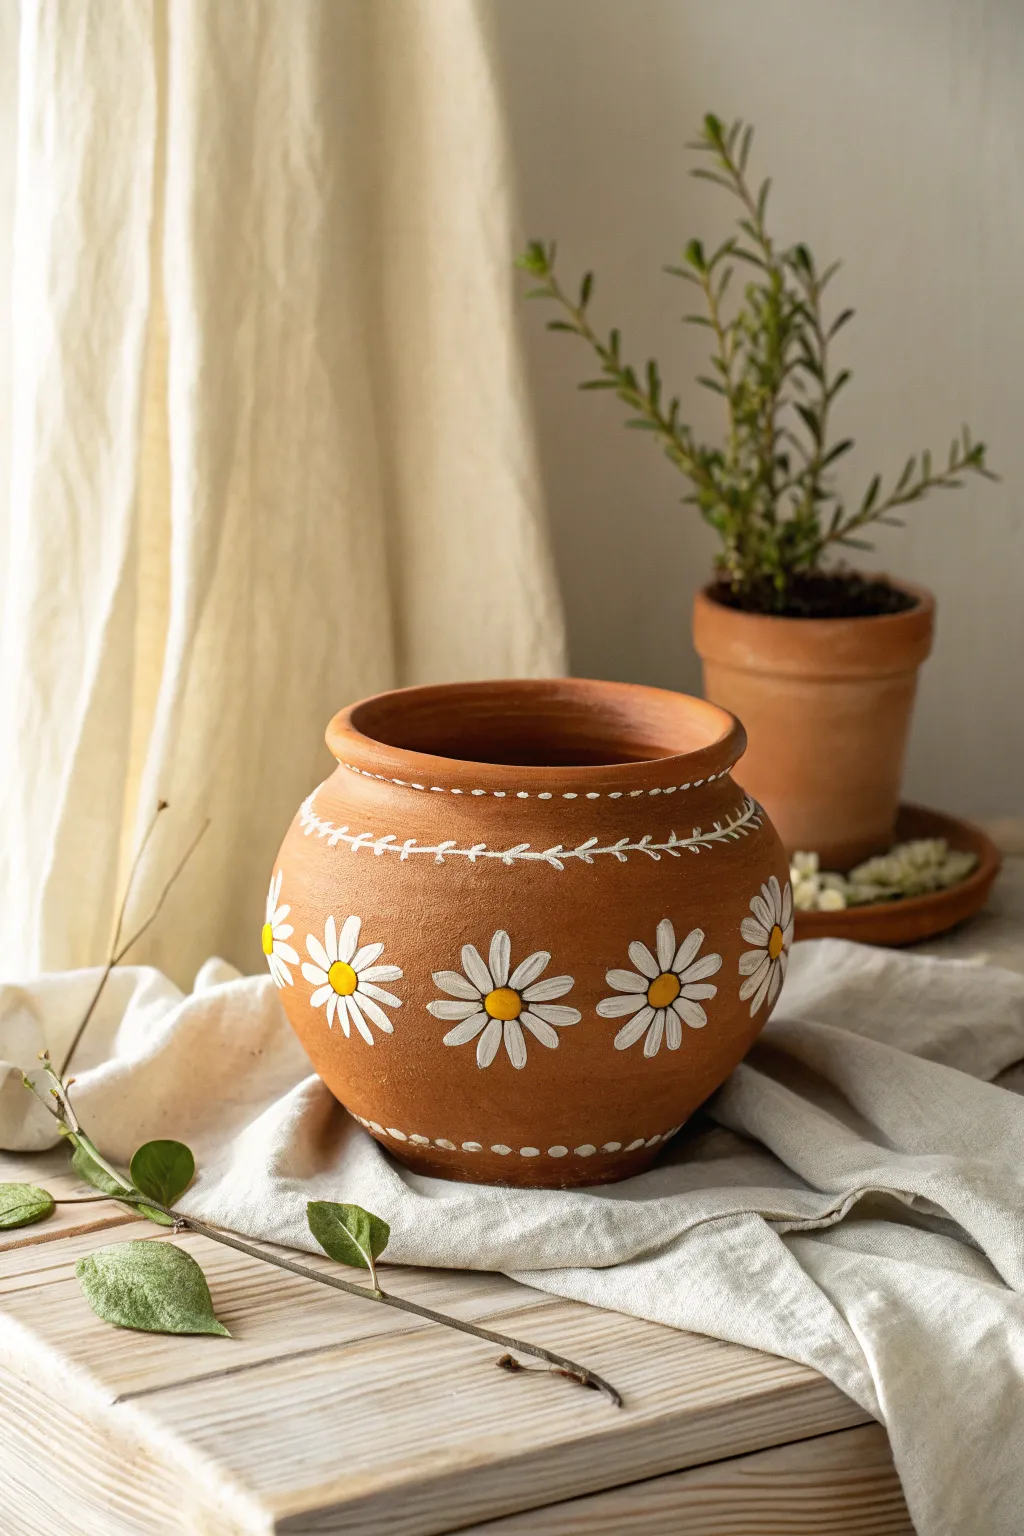
Transform a simple terracotta vessel into a charming garden staple with this bright floral design. The white daisies and delicate vine details pop beautifully against the natural clay background, creating a cheerful home for your favorite plants.
Detailed Instructions
Materials
- Round terracotta pot (bulbous shape preferred)
- White acrylic craft paint
- Yellow acrylic craft paint
- Small round paint brush (size 2 or 4)
- Fine liner or detail paint brush (size 0 or 00)
- Small sponge or cotton swab (optional for centers)
- Matte or satin clear sealant spray
- Palette or paper plate
- Water cup and paper towels
Step 1: Preparation and Base
-
Clean the Surface:
Before you begin painting, ensure your terracotta pot is clean and dry. Wipe it down with a damp cloth to remove any dust or debris, which helps the acrylic paint adhere smoothly to the clay surface. -
Sketch the Layout:
Lightly visualize where your daisies will sit. You can use a white chalk pencil to mark small dots around the widest part of the pot’s belly to ensure even spacing for your flowers.
Step 2: Painting the Daisies
-
Paint First Centers:
Dip your small round brush or the tip of a sponge dauber into the yellow paint. Press gently onto the clay to create the round centers of your daisies at the intervals you marked earlier. -
Start the Petals:
Load your small round brush (size 2 or 4) with white acrylic paint. Starting at the 12 o’clock position above a yellow center, press the brush down and pull it inward toward the yellow dot to form a teardrop shape. -
Complete the Circle:
Continue painting petals in a clock-like fashion—3, 6, and 9 o’clock first—then fill in the gaps between them. This technique helps keep the flower symmetrical. -
Second Coats:
Terracotta is porous and soaks up paint quickly. I find that letting the first layer dry for about 10 minutes and then applying a second coat of white makes the petals look truly opaque and bright. -
Refine the Centers:
Once the white petals are dry, touch up the yellow centers if they got covered by stray white paint. Make them nice and round.
Petal Perfection
If your petals look streaky, mix a tiny bit of white gesso into your acrylic paint. It increases opacity and coverage on porous clay.
Step 3: Adding Delicate Details
-
Paint the Upper Vine:
Switch to your fine liner brush (size 0). Dip it in white paint and carefully draw a horizontal line encircling the pot, just below the neck or rim area. -
Add Vine Leaves:
Along this white line, paint tiny ‘v’ shapes or small dashes that angle outwards, mimicking small leaves on a vine. Keep your hand steady and light for thin lines. -
Create the Dotted Rim:
Using the handle end of a paintbrush, dip it into white paint and dot it along the very top edge of the rim. Space the dots evenly for a classic border effect. -
Bottom Border:
Repeat the dotting technique near the base of the pot. Create a simple row of white dots around the bottom edge to frame the floral design. -
Clean Up Edges:
Look over your design. If you need to sharpen the tips of the petals or fix a smudge, use a slightly damp cotton swab or a clean damp brush to gently wipe away mistakes before the paint fully cures.
Pastel twist
Swap the classic yellow centers for pastel pink or lavender to soften the look, or add tiny ladybugs on the vine for extra cuteness.
Step 4: Finishing Touches
-
Allow to Cure:
Let your decorative pot dry completely for at least 24 hours. The acrylic needs to be fully set before sealing. -
Seal the Design:
Take the pot to a well-ventilated area and spray it with a clear matte or satin sealant. Apply two light coats, waiting 15 minutes between sprays. This protects the paint from water damage when you water your plants.
Now your daisy pot is ready to bring a touch of eternal spring to your windowsill


Trendy Terrazzo Speckle Pots
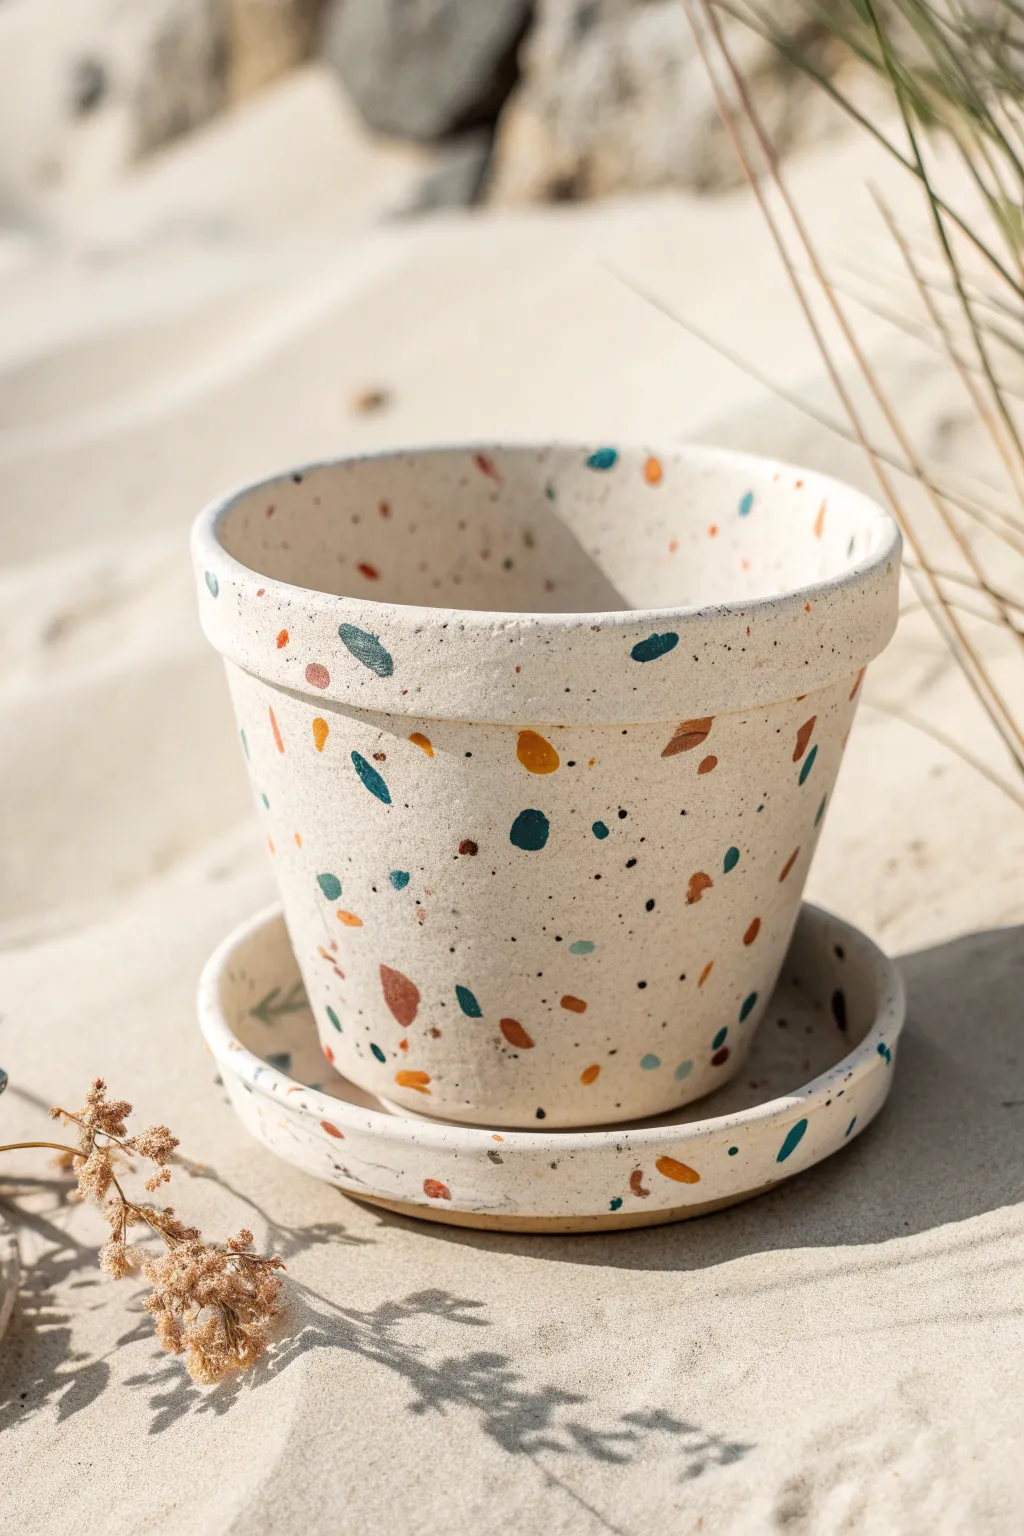
Bring the high-end look of terrazzo stone to your indoor garden without the heavy price tag using just a few simple paints. This project transforms a standard terra cotta planter into a chic, speckled masterpiece that mimics the organic beauty of composite stone.
Step-by-Step
Materials
- Terra cotta pot and saucer
- Primer spray paint (white or grey)
- Cream or off-white acrylic craft paint (matte finish)
- Acrylic craft paints in terrazzo colors (teal, rust orange, mustard yellow, dark brown)
- Black acrylic paint (for fine speckles)
- Flat paintbrushes (medium and small)
- Fine detail brush or old toothbrush
- Matte clear sealant spray
- Paper plate or palette
- Water cup and paper towels
Step 1: Base Preparation
-
Clean the surface:
Before starting, wipe down your terra cotta pot and saucer with a damp cloth to remove any dust or sticker residue. Let them dry completely, as moisture will prevent the primer from adhering properly. -
Apply the primer:
Take your pot outside or to a well-ventilated area. Apply a thin, even coat of primer spray paint to both the pot and saucer. This creates a barrier so the clay doesn’t soak up all your acrylic paint. -
Paint the base color:
Once the primer is dry, use a medium flat brush to apply your cream or off-white acrylic paint. You’ll likely need 2-3 coats to get a solid, opaque finish that hides the terracotta color underneath. Allow the paint to dry fully between coats.
Uneven Coverage?
If your large color shapes look streaky, don’t just pile on thick paint. Let the first layer dry fully, then apply a second thin coat on top for a smooth, flat stone appearance.
Step 2: Creating the Terrazzo Shapes
-
Mix your palette:
Squeeze dime-sized amounts of your teal, rust, mustard, and brown paints onto your palette. I find it helpful to look at a reference photo of real terrazzo to get a feel for the color balance before I start painting. -
Paint the first color shapes:
Start with your boldest color, perhaps the teal. Using a small flat brush, paint irregular, geometric shards scattered randomly around the pot. Avoid perfect circles or squares; think chipped stone fragments. -
Rotate and assess:
Turn the pot frequently as you work ensuring the shapes are evenly distributed but not perfectly patterned. Don’t forget to wrap some shapes over the rim or near the bottom edge for a realistic look. -
Layer the second color:
Switch to your rust orange color. Paint similar jagged shapes in the empty spaces. Vary the sizes—make some tiny and some distinctly larger to create visual interest. -
Add the third color:
Introduce the mustard yellow shapes now. Look for any large gaps in your design and fill them in, keeping the spacing somewhat random. -
Detail with dark tones:
Use the dark brown paint sparingly to add smaller chips. These darker accents help ground the lighter colors and add depth to the faux stone effect. -
Don’t forget the saucer:
Repeat the same pattern process on the saucer rim and interior, matching the density of shapes to the main pot.
Level Up: Texture
Mix a teaspoon of baking soda into your cream base paint before applying. This adds a gritty, sandy texture that feels like real stone when you touch the finished pot.
Step 3: Adding Texture and Speckles
-
Prepare the splatter paint:
Mix a small amount of black paint with a few drops of water to make it inky and fluid. This is crucial for getting fine dots rather than globs. -
Splatter technique:
Dip a stiff brush or an old toothbrush into any of the colored paints. Hold it near the pot and flick the bristles with your thumb to spray fine mist-like dots across the surface. This mimics the grit found in cement. -
Layering fine details:
Repeat the splatter technique with black paint and maybe a bit of the original cream base color. The overlapping tiny dots tie the larger shapes together and make the surface look truly like composite material. -
Hand-paint tiny specks:
If the splatter feels too messy or sparse, use your finest detail brush to manually dot tiny black specks in open areas. This controls the density where you need it most.
Step 4: Finishing Touches
-
Let it cure:
Allow all your paint layers to dry completely, ideally overnight. The thicker blobs of paint used for the shapes might take longer to dry than the base coat. -
Seal the deal:
Finish with a matte clear spray sealant. Apply 2-3 light coats to protect your artwork from water damage and scratching when you pot your plants. Glossy sealants tend to ruin the stone effect, so stick to matte.
Now your trendy planter is ready to house your favorite greenery and add a splash of artistic flair to your shelf

The Complete Guide to Pottery Troubleshooting
Uncover the most common ceramic mistakes—from cracking clay to failed glazes—and learn how to fix them fast.
Boho Whitewashed Clay Pot Look
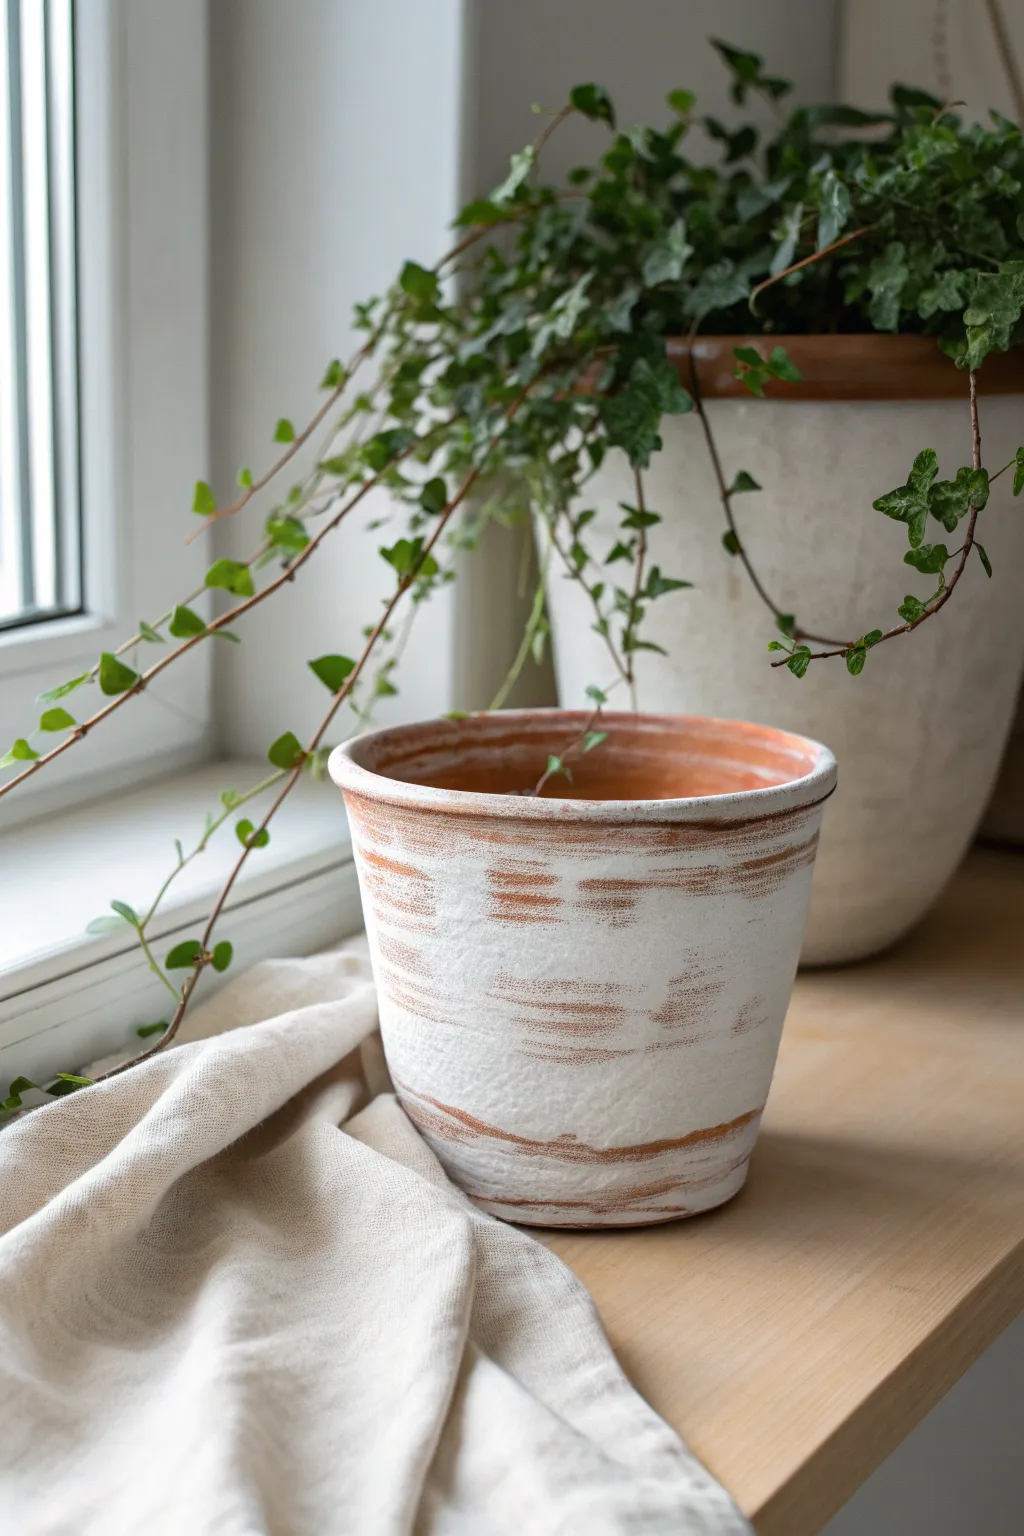
Transform a standard terra cotta planter into a vintage-inspired piece with this simple dry brushing technique. The result is a beautifully weathered, textured look that perfectly complements trailing houseplants and adds organic charm to any windowsill.
How-To Guide
Materials
- Unseal terra cotta pot (clean and dry)
- White acrylic paint (chalky finish preferred)
- Wide, flat bristled paintbrush (an old or cheap one is perfect)
- Paper plate or palette
- Paper towels
- Clear matte sealer spray (optional)
- Water
Step 1: Preparation
-
Clean and Dry:
Before starting, ensure your terra cotta pot is completely clean and free of dust or price tag residue. If you’ve washed it, let it dry for at least 24 hours so the moisture doesn’t trap inside the porous clay. -
Prepare Your Palette:
Squeeze a small amount of white acrylic paint onto your paper plate. You don’t need much; this project uses surprisingly little paint. -
Load the Brush:
Dip just the very tips of your dry, wide paintbrush into the white paint. The brush must be dry—do not dip it in water first. -
Offload Excess Paint:
This is the most crucial step: wipe the brush back and forth on a clean section of the paper plate or a paper towel until the brush looks almost completely dry and out of paint. You only want a tiny amount of pigment remaining on the bristles.
Too Much Paint?
If you accidentally apply a thick blob of white, don’t panic. Quickly wet a paper towel and wipe it off firmly. The residue left behind will look like a natural stain.
Step 2: Dry Brushing
-
First Horizontal Stroke:
Hold the brush perpendicular to the pot. Using light pressure, drag the brush horizontally across the middle of the pot. You should see a scratchy, uneven streak of white. -
Check the Texture:
Assess your first stroke. If the paint is too solid or opaque, wipe your brush off more on the paper towel. If it’s barely visible, pick up just a tiny bit more paint. -
Build the Layers:
Continue painting in horizontal bands around the pot. I like to work in sections, spinning the pot as I go. Keep your strokes loose and specifically aim for imperfection. -
Focus on the Rim:
Apply the same technique to the rim of the pot. Since the rim often catches the eye first, you might want slightly heavier coverage here, but still let that warm clay peek through. -
Add Variation:
Go back over certain areas with a slightly heavier hand to create the solid white patches seen in the photo. Leave other areas with just a whisper of white to create depth. -
Create the Streaks:
To mimic the specific pattern in the image, ensure your brush strokes are strictly horizontal. Avoid vertical or swirling motions, as the side-to-side movement creates that spun pottery look. -
Detailed Distressing:
If you apply too much paint in one spot, immediately use a damp paper towel to wipe some away while it’s wet. This ‘erase’ technique helps achieve the weathered aesthetic perfectly. -
Inside the Pot:
Don’t forget to paint just inside the top rim, about an inch down. This ensures the clay color doesn’t look jarring against the soil line once you fill it.
Level Up: Mud Wash
For an even grittier, aged look, rub actual garden dirt over the dried white paint, then wipe it off with a cloth. The dirt will settle into the distinct brush grooves.
Step 3: Finishing Touches
-
Drying Time:
Because you used the dry brush technique, the acrylic paint should dry very quickly—usually within 10 to 15 minutes. -
Sanding (Optional):
Once fully dry, take a piece of fine-grit sandpaper (around 220 grit) and lightly scuff the surface. This removes any raised paint ridges and makes the finish feel authentic and worn. -
Sealing:
If you plan to use this pot outdoors, spray it with a matte clear sealer. For indoor use, sealing is optional but can help the finish last longer against water splashes.
Now you have a charming, custom planter ready to showcase your favorite greenery
Soft Ombre Painted Pot Fade
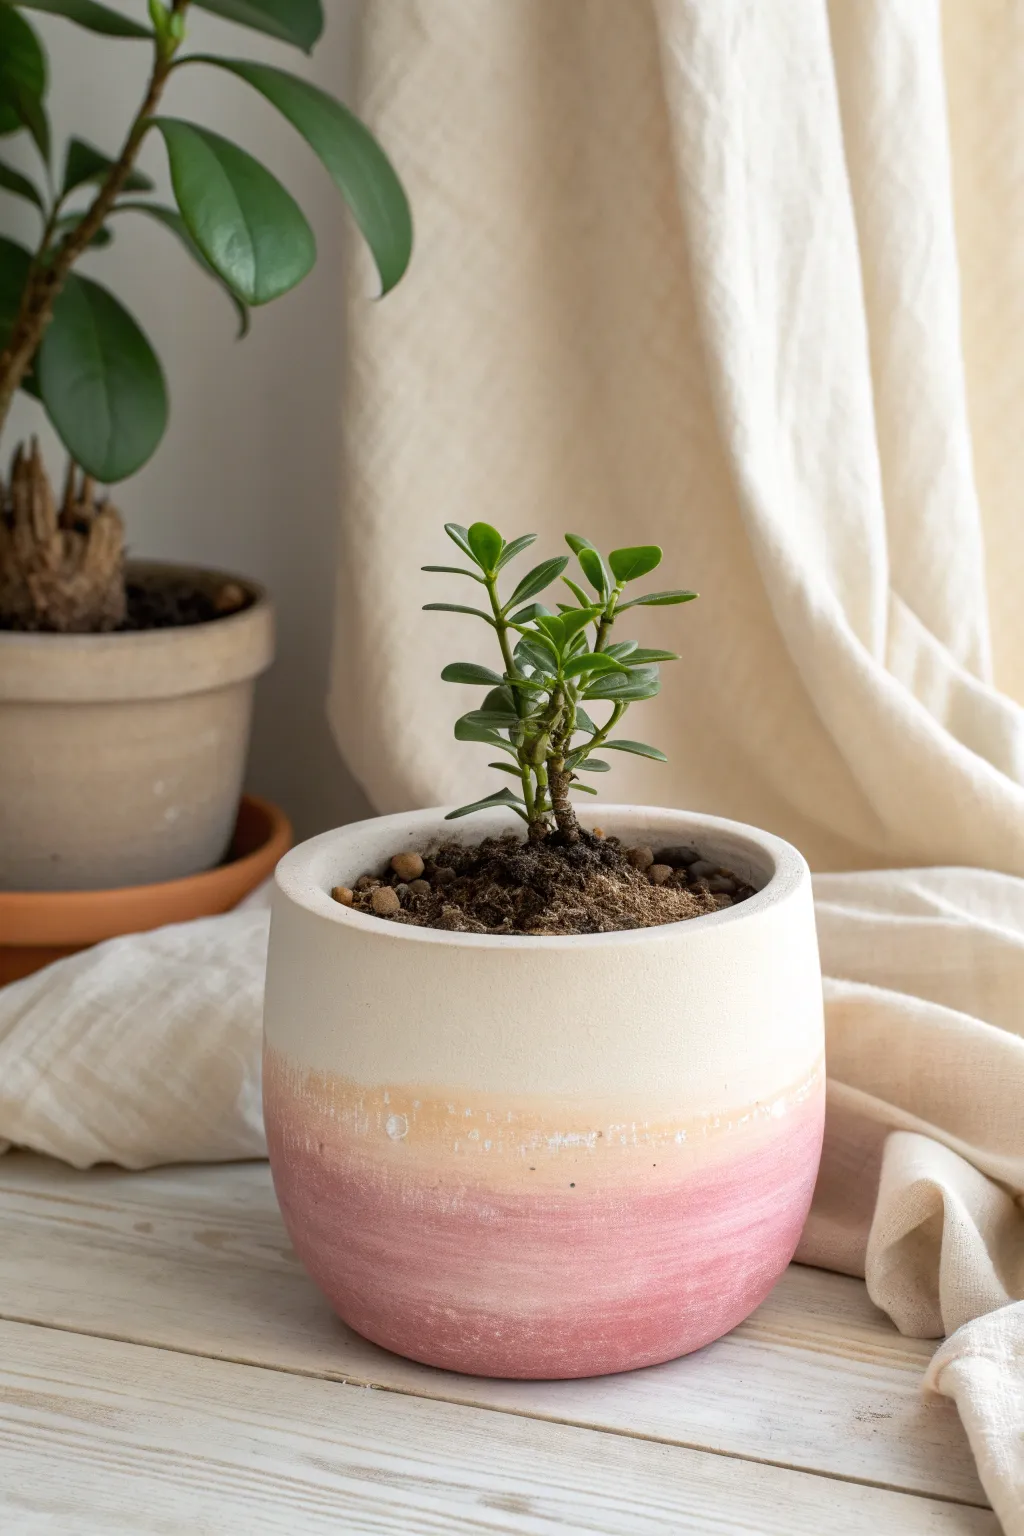
Capture the soft, fleeting hues of dusk with this gentle ombre painted pot. The design blends creamy white, warm peach, and dusty rose into a seamless gradient that adds a touch of calm to any plant display.
Step-by-Step Tutorial
Materials
- Small round ceramic or terracotta pot (clean and dry)
- White or cream matte acrylic paint
- Soft peach or light coral acrylic paint
- Dusty rose or mauve acrylic paint
- Paint mixing palette or paper plate
- Medium flat synthetic paintbrush
- Sponge dabber or small makeup sponge (for blending)
- Water cup and paper towels
- Matte clear sealant spray (optional)
Step 1: Preparation & Base Coat
-
Clean the surface:
Ensure your pot is completely free of dust and dirt. Wipe it down with a damp cloth and let it dry thoroughly before you begin painting. -
Apply the base color:
Paint the entire upper third of the pot with your cream or white paint. Don’t worry about a perfect bottom edge yet, but make sure the rim is fully covered for a clean look. -
Let it dry:
Allow this first layer to dry completely. If the original pot color shows through, apply a second coat of the cream paint for full opacity.
Step 2: Creating the Ombre Gradient
-
Paint the bottom section:
Take your dusty rose paint and cover the bottom third of the pot. Bring the paint up towards the middle, keeping the layer smooth and even. -
Add the middle tone:
While the bottom pink is still slightly tacky or just dry, paint a band of the soft peach color around the middle section of the pot, leaving a small gap between it and the white top. -
Mix the transition colors:
On your palette, mix a little bit of the dusty rose with the peach to create a bridge color. Do the same with the peach and the cream for the upper transition. -
Blend the bottom transition:
Using a slightly damp sponge or a dry brush, lightly dab the transition line between the rose bottom and the peach middle. Use a stippling motion to blur the hard line. -
Blend the top transition:
Repeat the blending process for the top line where the peach meets the cream. I find that using a very light touch here prevents the colors from becoming muddy. -
Refine the gradient:
Step back and look at your fade. If the transition feels too abrupt, lightly dry-brush a tiny amount of the lighter color downwards over the darker section to soften it further. -
Add texture (optional):
To mimic the slightly weathered look in the photo, you can gently scuff the transition areas with a dry, coarse brush before the paint fully sets, dragging a bit of white texture horizontally.
Wet-on-Wet Blending
For the smoothest gradient, keep your paints wet while blending. If they dry too fast, mist the pot very lightly with water.
Step 3: Finishing Touches
-
Check the rim:
Inspect the top rim of the pot. If any color accidentally smudged onto the cream area, touch it up with a small detail brush and your white paint. -
Allow to cure:
Let the pot sit undisturbed for several hours. Acrylics dry fast to the touch, but a longer cure time ensures durability. -
Seal the work:
For longevity, especially if you plan to water the plant heavily, spray the exterior with a matte clear sealant. This protects the paint from water damage and fading. -
Pot your plant:
Once fully dry, add some potting soil and your favorite small plant, like the Jade plant shown in the example.
Metallic Accent
Add a thin line of gold leaf or metallic gold paint right at one of the transition lines for a chic, modern twist.
Your new planter is ready to add a soft pop of color to your windowsill display


What Really Happens Inside the Kiln
Learn how time and temperature work together inside the kiln to transform clay into durable ceramic.
Modern Abstract Blob Pattern Pots

Transform a standard garden center staple into a piece of modern art with this earthy, botanical-inspired design. The contrast of raw terracotta beats against creamy white and bold charcoal leaves for a look that is both organic and contemporary.
Step-by-Step
Materials
- Standard terracotta pot (clean and dry)
- Acrylic paint (Cream/Off-White)
- Acrylic paint (Charcoal or Soft Black)
- Acrylic paint (Tan, Blush, or Terracotta-match)
- Flat paintbrush (medium size)
- Round paintbrush (small for details)
- Painter’s tape (optional)
- Pencil
- Water cup and paper towels
- Matte spray sealer (optional)
Step 1: Preparation and Base Coat
-
Prep the surface:
Ensure your terracotta pot is completely clean and dry. If it’s an old pot, scrub away any salt deposits or dirt. For a new pot, a quick wipe with a damp cloth to remove dust is sufficient. -
Mark the boundaries:
Decide how much of the raw clay rim and base you want to leave exposed. You can use painter’s tape to mask off the top rim and the very bottom inch, or if you have a steady hand, you can freehand these lines later. -
Mix the background color:
You want a soft, chalky background. If your white paint is too stark, mix in a tiny drop of yellow ochre or brown to warm it up into a creamy off-white. -
Paint the middle section:
Using your flat brush, paint the broad middle band of the pot with your cream color. Don’t worry about perfect opacity on the first go; terracotta is thirsty and often absorbs the first layer quickly. -
Refine the edges:
Carefully paint up to the rim line and down to the base line. I find that rotating the pot on a lazy susan or a plate makes getting a straight horizontal line much easier than moving my hand around the curve. -
Apply a second coat:
Once the first layer is dry to the touch (usually about 15-20 minutes), apply a second coat of cream paint to get a solid, opaque finish where no orange clay shows through.
Step 2: Sketching and Blocking Shapes
-
Sketch the design:
Lightly use a pencil to map out your design directly on the dried cream paint. Draw large, curving stems and oversized leaf shapes. Add a few organic ‘blob’ shapes in the background areas. -
Mix the accent color:
Prepare your tan or blush color. You want something that complements the raw terracotta but is distinct enough to show up. A mix of white, orange, and a touch of brown works well here. -
Paint the organic blobs:
Using a smaller flat brush or a large round brush, fill in the abstract background shapes with your tan mix. These don’t need to be perfect circles; irregular, organic forms look best. -
Let accents dry:
Allow these tan shapes to dry completely. Since you will be painting leaves over or near them, you don’t want the wet paints to smear together.
Clean Lines Hack
To get a crisp line on the textured clay without tape, place the pot on a turntable. Hold your brush hand steady against a stack of books and spin the table.
Step 3: Adding the Botanical Details
-
Prepare the dark paint:
Load a round brush with your charcoal or soft black paint. If the paint is very thick, thin it slightly with a drop of water to help it flow smoothly for the stems. -
Paint the stems:
Start by painting the thin, curving lines for the stems. Let them flow naturally across the pot, overlapping some of the tan shapes you painted earlier. -
Outline the leaves:
Using the tip of your brush, outline the leaf shapes attached to the stems. Keep the shapes simple—think almonds or elongated tear drops. -
Fill in the leaves:
Fill in the leaf outlines with the dark paint. For a more painterly, hand-crafted look, it’s okay if the brushstrokes are slightly visible or the edges aren’t laser-sharp. -
Check for balance:
Step back and look at the pot. If there are large empty white spaces that feel unbalanced, add a small floating leaf or another small tan shape to fill the void. -
Clean up lines:
If you went over the rim or base lines, use a damp Q-tip or a stiff brush with a little water to scrub the paint off the raw terracotta before it fully cures. -
Seal the deal:
Once the entire design is bone dry (give it at least an hour), take the pot outside and apply a clear matte spray sealer. This protects the paint from water damage when you water your plants.
Textured Finish
Mix baking soda into your cream acrylic paint (1:1 ratio) for the base coat. It creates a ceramic-like texture that mimics high-end pottery.
Now you have a stylish home for your favorite succulent that looks like it came from a boutique shop
Stamped Pattern Clay Pots
Transform a plain terra cotta pot into a charming bohemian accent with simple leaf motifs and delicate stippling. This project uses a beautiful teal green against a creamy beige base to create a relaxed, earthy look perfect for displaying your favorite succulents.
Step-by-Step Guide
Materials
- Standard terra cotta pot (6-inch)
- Cream or beige acrylic craft paint
- Teal or deep sea green acrylic craft paint
- Brown acrylic paint (for the dots)
- Foam brush or wide flat paintbrush
- Narrow detailing brush (size 0 or 1)
- Leaf rubber stamp (small vine or fern design)
- Secondary leaf stamp (slightly larger, upright design)
- Small dotting tool or toothpick
- Matte spray sealer
Step 1: Base Preparation
-
Clean the surface:
Before starting, wipe down your terra cotta pot with a damp cloth to remove any warehouse dust or oils. Let it dry completely so the paint adheres properly. -
Apply the base coat:
Using a foam brush, apply a layer of cream or beige acrylic paint over the entire exterior of the pot. Don’t forget to paint about an inch down inside the rim for a finished look. -
Let it dry:
Allow the first coat to dry for about 20 minutes. Terra cotta is porous and absorbs paint quickly, so you’ll likely need a second coat to get that smooth, opaque finish seen in the photo. -
Apply second coat:
Paint a second layer of the cream color. Ensure your brush strokes are even to avoid texture buildup. Let this dry fully for at least an hour before stamping.
Clean Stamp Trick
Keep a damp paper towel nearby to clean your rubber stamp immediately after every 3-4 impressions. Dried acrylic paint builds up quickly and will ruin the crisp detail of future stamps.
Step 2: Stamping the Borders
-
Prepare the vine stamp:
Take your vine-patterned rubber stamp. Instead of pressing it into an ink pad, I prefer to lightly brush the teal green paint directly onto the stamp face using a flat brush. This gives you crispier lines on the curved surface. -
Test your pressure:
Practice stamping once or twice on a scrap piece of paper or cardboard to gauge how much pressure you need for a clear transfer. -
Stamp the top rim:
Carefully stamp the vine pattern horizontally around the upper rim of the pot. Connect the end of one stamp to the start of the next to create a continuous band. -
Stamp the bottom border:
Repeat this process near the bottom of the pot, leaving about an inch of space from the base. Try to keep the band parallel to the bottom edge. -
Touch up gaps:
If the stamp missed a spot due to the curve of the pot, use your fine detailing brush and a tiny bit of teal paint to manually connect the lines.
Step 3: Detailed Patterns
-
Stamp the central leaves:
Switch to the upright leaf or fern stamp. Apply the same teal paint to the stamp face. Press these vertically around the lower-middle section of the pot, spacing them evenly apart. -
Create the dot arches:
Dip a small dotting tool or the blunt end of a toothpick into the brown paint. Create a small arch of dots above each vertical leaf stamp, following the curve of the leaf tips. -
Add floating dots:
Add a few random, tiny dots in the space between the top vine border and the leaf arches to fill the negative space without overcrowding it. -
Add rim details:
Using the dotting tool again, place evenly spaced brown dots in a straight line just under the top vine border.
Smudged Paint?
If you smudge a stamp, don’t panic. Let the mistake dry completely, then paint over it with a small dab of your cream base color. Once that dries, you can re-stamp the area.
Step 4: Finishing Touches
-
Dry completely:
Let all the paint work dry for at least 2-3 hours. If basic acrylic paint isn’t dried fully before sealing, it can smear. -
Seal the pot:
Take the pot to a well-ventilated area and spray it with a clear matte sealer. This protects the design from water damage when you water your plant. -
Plant:
Once the sealer is dry, fill your new custom pot with soil and your favorite succulent.
Now you have a stylish, custom planter that looks like it came straight from a boutique garden shop

TRACK YOUR CERAMIC JOURNEY
Capture glaze tests, firing details, and creative progress—all in one simple printable. Make your projects easier to repeat and improve.
Wrapped Rope Clay Pot Planter
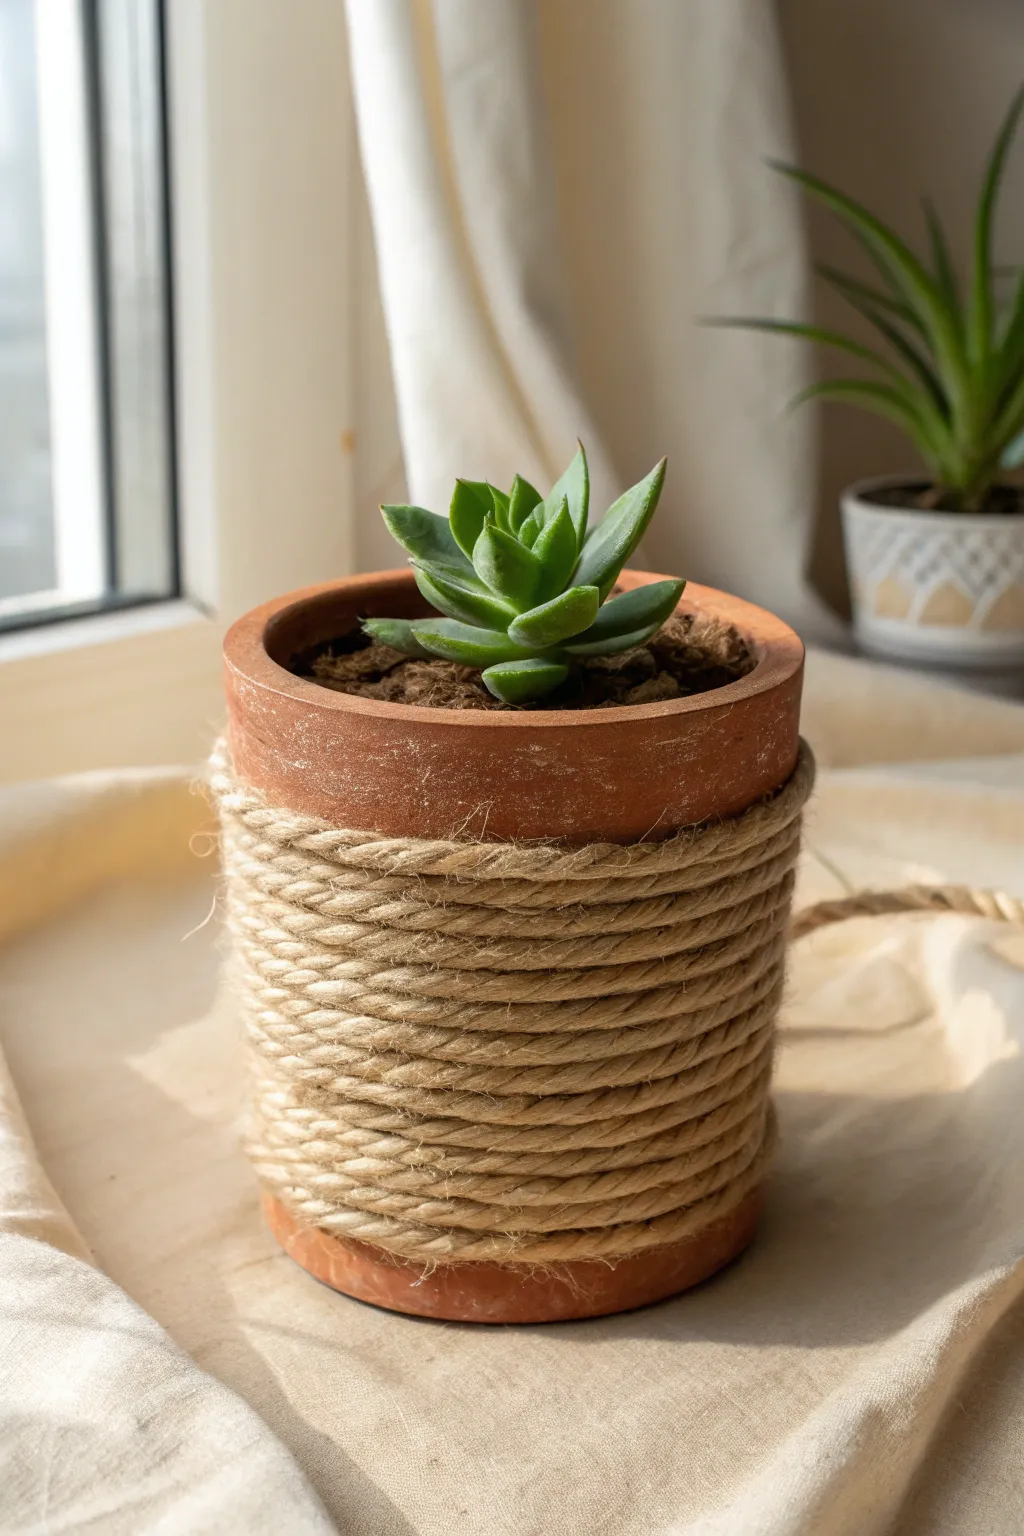
Transform a plain terracotta pot into a charming, boho-chic planter with just a bit of texture. This simple rope-wrapping technique adds warmth and a natural touch that perfectly complements succulents or small houseplants.
Step-by-Step Tutorial
Materials
- Standard terracotta clay pot (approx. 4-6 inches)
- Thick natural jute rope or sisal twine (approx. 6-8mm thickness)
- Hot glue gun and clear glue sticks
- Scissors
- Small succulent plant
- Potting soil mixed with perlite or cactus mix
- Damp cloth (for cleaning the pot)
Step 1: Preparation and Base Layer
-
Clean surface:
Begin by wiping down your terracotta pot with a damp cloth to remove any dust or sticker residue. Let it dry completely so the glue adheres properly. -
Mark your starting point:
Decide where you want the rope section to begin. In the reference image, there is an exposed clay rim at the top, roughly an inch wide. You can use a pencil to lightly mark a level line around the circumference if you’re worried about keeping it straight. -
Secure the rope end:
Apply a generous dab of hot glue on your starting line. Press the raw end of the jute rope firmly into the glue, holding it for a few seconds until it sets to prevent unraveling. -
Begin the wrap:
Apply a thin line of hot glue about two inches long, directly next to your starting point, following the horizontal line of the pot. -
Attach the first row:
Press the rope into this line of glue, ensuring it stays level. This first round is crucial because it sets the trajectory for the rest of the wrapping.
Tame the Fray
Apply a tiny amount of clear glue or Mod Podge to the cut ends of the rope before gluing them down. This prevents the jute strands from unraveling over time.
Step 2: Wrapping the Body
-
Continue winding:
Rotate the pot slowly while feeding the rope. You don’t need to glue every single inch, but applying a dot of glue every quarter turn helps keep the tension tight and the rope secure. -
Tight packaging:
As you wind the rope around the pot, use your fingers to push each new row snugly against the previous one. You want to eliminate any gaps so the terracotta doesn’t peek through the rope section. -
Handling the taper:
Since terracotta pots are tapered, the rope will naturally want to slide up. Keep checking that your rows are parallel and gently force them down if they start to angle upward. -
Midway check:
Pause halfway down to inspect your work. If the rope looks twisted, untwist the coil in your hand before continuing to wrap. -
Approaching the bottom:
Continue wrapping until you are close to the bottom edge. In the example project, a small rim of clay is left exposed at the base, similar to the top rim.
Ombré Effect
Dip-dye the bottom half of your finished rope wrap in a diluted acrylic paint or fabric dye for a colorful, modern dipped look.
Step 3: Finishing Touches
-
Secure the end:
When you’ve reached your desired stopping point, cut the rope with sharp scissors. I find that cutting at a slight angle helps hide the blunt end better. -
Glue down the tail:
Apply a final, strong bead of hot glue to the spot where the rope ends. Press the cut end firmly into the glue, tucking it slightly under the row above if possible for a cleaner look. -
Clean up stray fibers:
Jute rope can be quite hairy. Use scissors to trim away any long, stray fibers sticking out from the wrapping to give it a neater appearance. -
Add drainage layer:
Place a small layer of rocks or broken pottery pieces at the bottom of the pot to ensure good drainage for your succulent. -
Planting time:
Fill the pot partway with your cactus or succulent soil mix. Gently remove your succulent from its nursery container, loosening the roots slightly. -
Position the plant:
Place the succulent in the center of the pot. Fill in the gaps around the root ball with more soil, pressing down gently but firming the soil to support the plant. -
Final clean:
Brush off any loose soil from the rope or the pot’s rim using a dry paintbrush or soft cloth.
Place your newly wrapped pot on a sunny windowsill where the natural textures can catch the light
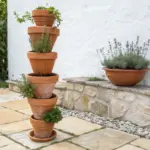
Stacked Tiered Clay Pot Herb Tower

Transform a simple collection of clay pots into a stunning, space-saving vertical garden that serves as both a functional herb station and a beautiful patio centerpiece. This tiered structure creates a cascading effect of greenery, making it perfect for small balconies or sunny kitchen corners.
Step-by-Step
Materials
- 1 Large terra cotta pot (approx. 14 inch)
- 1 Medium-large terra cotta pot (approx. 10 inch)
- 1 Medium terra cotta pot (approx. 8 inch)
- 1 Small terra cotta pot (approx. 6 inch)
- 1 Large terra cotta saucer (to fit the largest pot)
- Quality potting mix
- Assorted herb plants (Basil, Thyme, Oregano, Mint, etc.)
- Small plastic nursery pot (empty) or a brick (for internal support)
- Watering can
- Gardening gloves
- Trowel
Step 1: Base Assembly
-
Position the saucer:
Begin by selecting the final location for your tower, as it will be heavy to move once filled. Place the large terra cotta saucer on a flat, stable surface. -
Set the foundation:
Place your largest clay pot into the saucer. Ensure it is perfectly centered and stable before adding any soil. -
Create the internal lift:
To ensure the second pot sits at the right height and doesn’t sink over time, place an overturned plastic nursery pot or a brick inside the bottom of the large pot. -
Fill the base:
Fill the large pot with potting mix, packing it around your internal support object until the soil level is about two inches below the rim.
Step 2: Stacking the Tiers
-
Position the second pot:
Place the medium-large pot directly onto the center of the soil in the large pot. Wiggle it slightly to nestle it firmly into the dirt and ensure it rests on the internal support. -
Fill and stabilize:
Fill this second pot with soil. I find it helpful to pack the soil slightly firmer in the center where the next pot will sit. -
Add the third tier:
Center the medium-sized pot on top of the soil in the second tier. Check from a distance to ensure the stack looks straight and isn’t leaning. -
Secure the top tier:
Fill the third pot with soil, then place the smallest pot on the very top. This creates the final crowning tier for your tower. -
Final soil top-up:
Fill the top pot with soil and go back to check the exposed rings of soil on the lower tiers. Add more mix if settling has occurred during stacking.
Leaning Tower?
If the pots feel unstable, drive a rebar or dowel rod through the drainage holes of all pots straight down into the ground for an invisible spine.
Step 3: Planting and Finishing
-
Select your plants:
Choose trailing herbs like thyme or oregano for the middle tiers, and bushy herbs like basil for the wider bottom tier. -
Plant the bottom ring:
Using a trowel or your fingers, dig small pockets in the exposed soil ring of the bottom pot. Gently insert your plants, angling them slightly outward. -
Plant the middle tiers:
Repeat the process for the middle tiers. Since the space is tighter here, you might need to gently tease apart the root balls of your herbs to fit them snugly. -
Crown the tower:
Plant a standout herb, such as a tall rosemary or a full bushy thyme, in the very top pot to give the tower height and completion. -
Clean the pots:
Brush off any loose soil that may have spilled onto the terra cotta rims during planting to give the project a crisp, finished look. -
Water carefully:
Water each tier slowly, starting from the top. A gentle trickle prevents the soil from washing out over the edges of the pots.
Moisture Pro Tip
Soak your terra cotta pots in a bucket of water for an hour before planting. This prevents the dry clay from wicking all the moisture away from your new plants.
With regular watering and sun, your stacked garden will soon fill in to become a lush column of edible greenery
Clay Pot People Garden Sculptures
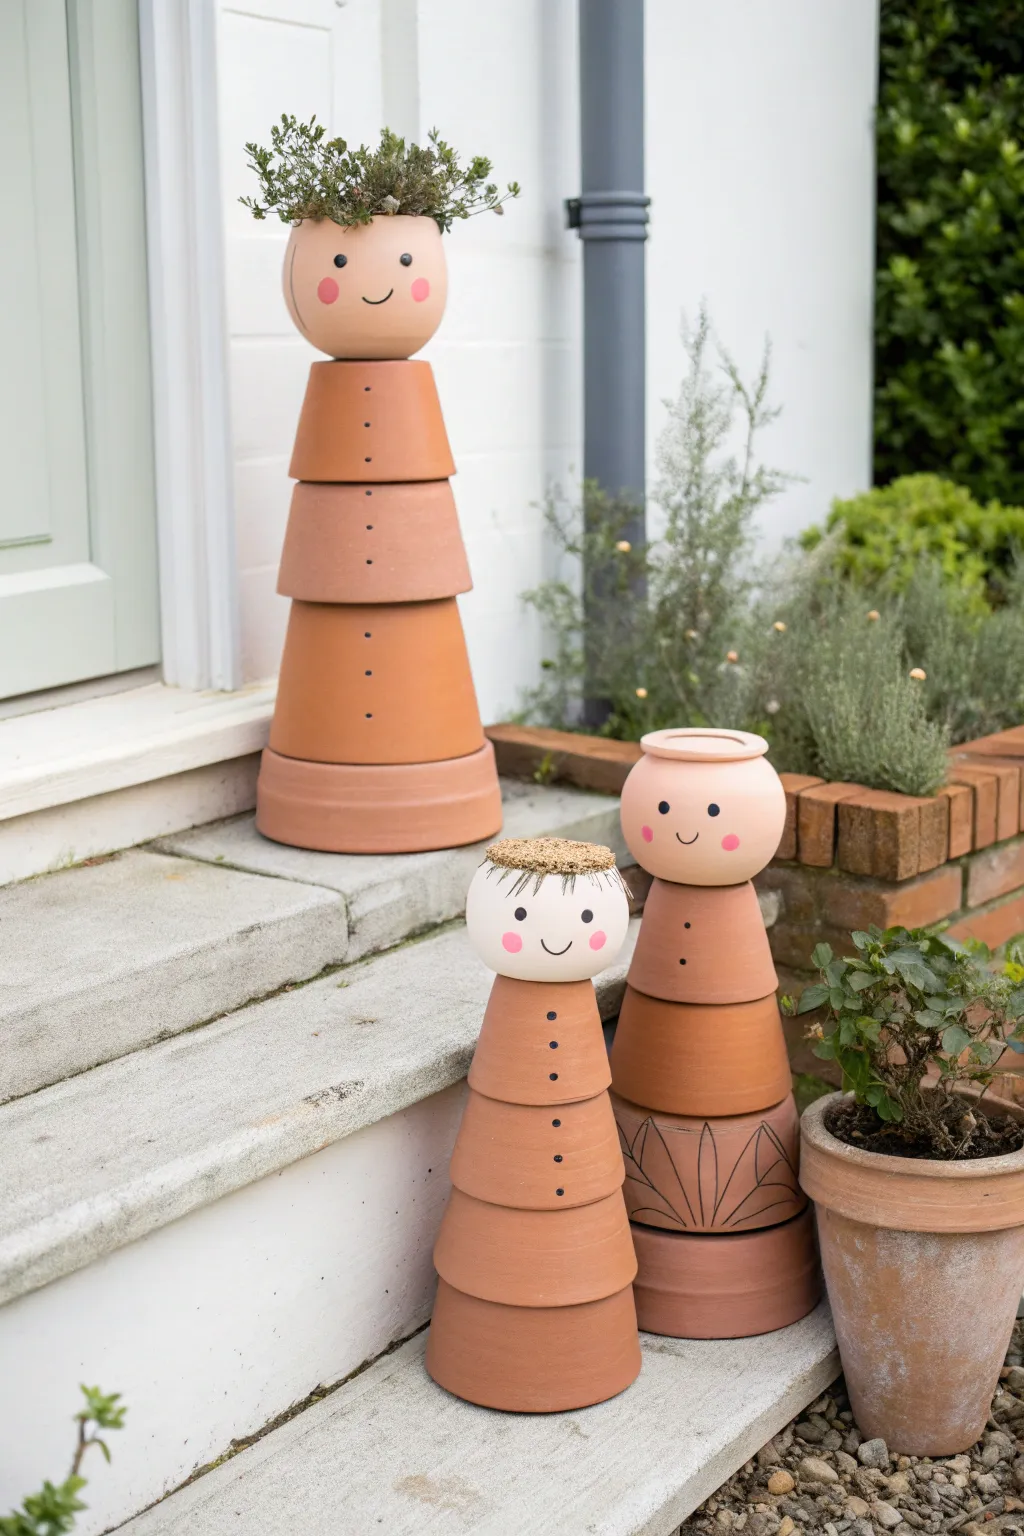
Transform ordinary terracotta pots into charming garden characters with sweet, painted faces and earthy outfits. This stacked sculpture project creates a delightful trio of figures to welcome guests on your patio or steps.
Detailed Instructions
Materials
- Various sizes of terracotta pots (standard shape)
- Spherical garden ornaments or round finials (for heads)
- Strong outdoor adhesive (e.g., E6000 or construction adhesive)
- Small black buttons (flat back)
- Acrylic craft paint (flesh tones, black, pink)
- Paintbrushes (detail brush and small sponge dauber)
- Straw, twine, or dried moss (for hair/hats)
- Small potted plants (optional, for the tallest figure)
- Pencil
- Outdoor clear sealant spray (matte)
Step 1: Planning the Structure
-
Gather and Arrange:
Begin by test-fitting your pots. For each figure, you’ll need 3-4 graduated pots for the body. The largest pot goes at the bottom (inverted), and subsequent pots stack upside-down on top of it to form a tapered body shape. -
Select the Heads:
Choose spherical objects for the heads. Round terracotta balls work perfectly, or you can use a small pot turned right-side-up (like the tallest figure in the photo) if you plan to plant hair inside. -
Clean the Surface:
Wipe down all terracotta surfaces with a damp cloth to remove dust and warehouse grime. Let them dry completely to ensure the glue and paint adhere properly.
Stay Centered
When gluing the stacked pots, look down from directly above to ensure all the drainage holes are perfectly aligned. This keeps your sculpture straight.
Step 2: Painting the Faces
-
Base Coat the Heads:
Paint the spherical head pieces with a flesh-toned acrylic paint. I find it usually takes two or three thin coats to get solid coverage over the red clay, letting each layer dry in between. -
Draft the Features:
Once the base coat is fully dry, very lightly sketch the facial features with a pencil. Place the eyes wide apart and the smile low for that cute, innocent look seen in the example. -
Paint the Eyes:
Using a fine detail brush or the handle end of a paintbrush dipped in black paint, dot on two small, solid black eyes. -
Add Rosy Cheeks:
Use a small sponge dauber or a very dry stiff brush to apply pink circles for cheeks. Dab off excess paint on a paper towel first to keep the circles soft and uniform. -
Draw the Smile:
With your finest brush and thinned black paint, carefully trace the simple, U-shaped mouth line connecting the cheeks. -
Seal the Faces:
Before assembling, spray the painted heads with a matte outdoor clear sealer to protect the artwork from rain and sun fading.
Wobbly Heads?
If the round head rolls too much while the glue sets, use a roll of masking tape as a temporary stand to hold it steady while drying.
Step 3: Assembly and Decoration
-
Stack and Glue the Bodies:
Start with the largest base pot. Apply a generous ring of strong outdoor adhesive to the bottom rim. Place the next smallest pot upside down on top of it. Repeat until the body stack is complete. -
Attach the Buttons:
Glue small black buttons vertically down the front of the stacked pots to mimic a coat or dress. Space them evenly, spanning across the different pot levels. -
Add Decorative Details:
For variety, you can use a black marker or paint to draw simple leaf patterns or geometric lines on the bottom-most pot of one figure, just like the character on the right. -
Secure the Heads:
Apply adhesive to the top of the highest body pot and firmly press the painted head into place. Allow the entire structure to cure for at least 24 hours. -
Create Hairstyles:
Glue dried moss, straw, or twine to the top of the solid heads to create hair or hats. Get creative with textures to give each character personality. -
Plant the Tall Figure:
If you made the tallest figure with an open pot for a head, fill it with potting soil and add a spiky or trailing plant to serve as ‘living hair.
Set your new clay family on a sturdy step or shelf where they can greet your garden visitors
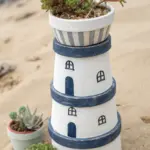
Whimsical Toad House Clay Pot
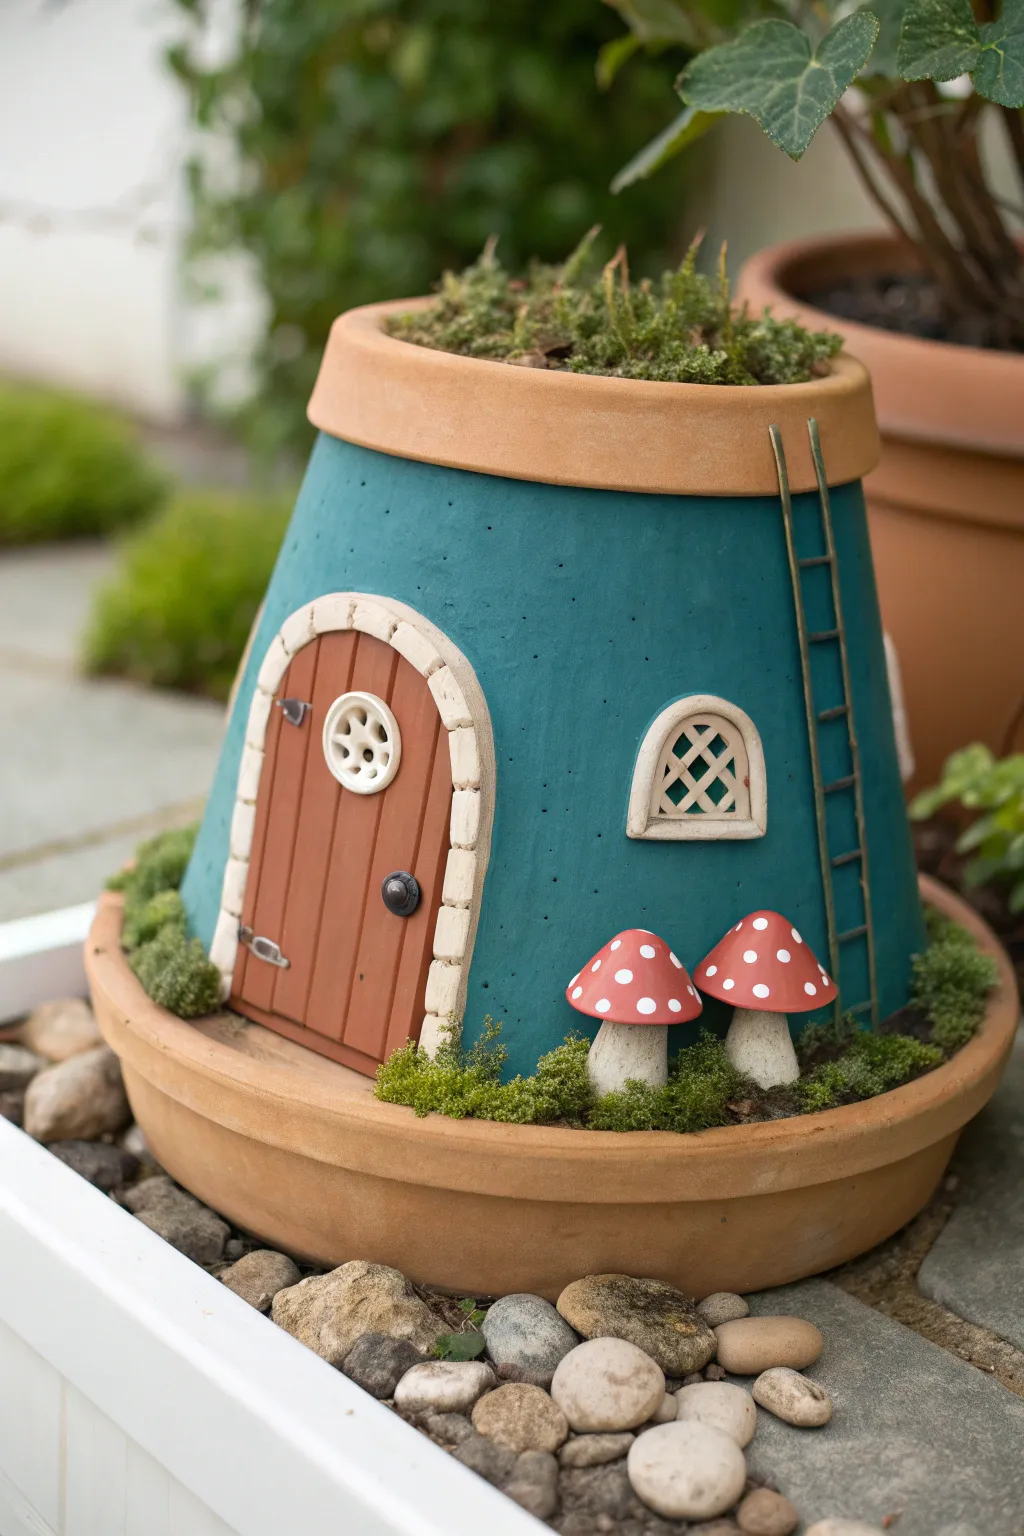
Transform a standard terra cotta pot into a magical garden dwelling complete with an arched door, tiny window, and spotted mushrooms. This charming DIY adds a splash of teal and storybook fantasy to any flowerbed or patio corner.
Step-by-Step Tutorial
Materials
- Medium-sized terra cotta pot (standard shape)
- Terra cotta saucer (slightly larger than the pot’s base)
- Polymer clay (white, brown, red)
- Acrylic outdoor craft paint (teal/turquoise, cream/off-white)
- Small paintbrushes (flat and fine liner)
- Strong waterproof adhesive (e.g., E6000) or outdoor silicone sealant
- Preserved craft moss or live sheet moss
- Small twigs or balsa wood strips (for the ladder)
- Sculpting tools or a toothpick
- Outdoor clear sealer spray (matte or satin)
- Potting soil and small succulents or creeping thyme (optional topper)
Step 1: Base Painting
-
Prepare the pot:
Clean your terra cotta pot thoroughly to remove dust and let it dry completely. Turn it upside down so the drainage hole is at the top. -
Apply base color:
Paint the main body of the pot with a rich teal or turquoise acrylic paint. You may need two or three coats for solid, opaque coverage. -
Preserve the rim:
Leave the heavy rim of the pot unpainted to maintain that classic clay aesthetic, or use painter’s tape to get a clean line if you have a shaky hand. -
Seal the paint:
Once the teal paint is fully dry, spray the entire pot with an outdoor clear sealer to protect the color from fading in the sun.
Sticky Situation?
If clay pieces slide down while the glue dries, use masking tape or rubber bands to hold them in place against the curved pot surface until set.
Step 2: Sculpting Details
-
Shape the door:
Roll out brown polymer clay to create a rounded door shape. Use a sculpting tool or knife to score vertical lines, mimicking wood planks. -
Add door hardware:
Create tiny hinges and a doorknob from scrap clay (painted silver later) or dark grey clay, and attach them to your wood-textured door. -
Form the doorframe:
Roll white polymer clay into small bricks or a long snake. Wrap this around the brown door to form an arched stone frame. Press a texture tool into each ‘stone’ for realism. -
Create the peephole:
Cut a small circle near the top of the door. Fill it with a lattice pattern made of thin white clay coils to make a cute window. -
Design the side window:
Form a secondary arched window frame from white clay. Fill the negative space with a crisscross lattice pattern similar to the door’s peephole. -
Make the mushrooms:
Sculpt two mushroom stems from white clay and two caps from red clay. Press the caps onto the stems firmly. -
Bake the clay:
Bake all your clay pieces (door, window, mushrooms) on a baking sheet according to the package instructions—usually around 275°F for 15-20 minutes.
Level Up: Night Light
Place a small, battery-operated LED tea light underneath the pot before setting it on the saucer to make the windows glow at night.
Step 3: Assembly and Finishing
-
Detail packing:
Paint white dots onto the red mushroom caps using the tip of a paintbrush handle or a dotting tool. -
Attach the features:
Using a strong waterproof adhesive, glue the baked door securely to the front of the teal pot. Attach the separate window piece to the side. -
Build the ladder:
Glue small twigs or thin balsa wood strips together to form a rustic ladder. Lean and glue this against the side of the pot, reaching toward the rim. -
Prepare the saucer base:
Place the painted pot onto the terra cotta saucer. You can leave it loose for easy moving, or glue the pot rim to the saucer floor for stability. -
Plant the yard:
Tuck preserved moss or live sheet moss into the saucer around the base of the pot to create a lush, green ‘lawn’. -
Plant the mushrooms:
Nestle the clay mushrooms into the moss near the door, securing them with a dab of glue on the bottom of the stems if needed. -
Roof garden:
The bottom of the upturned pot acts as a planter bowl. Fill this cavity with soil and plant small succulents or creeping sedum to mimic a living roof.
Now you have a charming garden accent ready to welcome local fairies and toads alike
Broken Clay Pot Fairy Garden Terrace
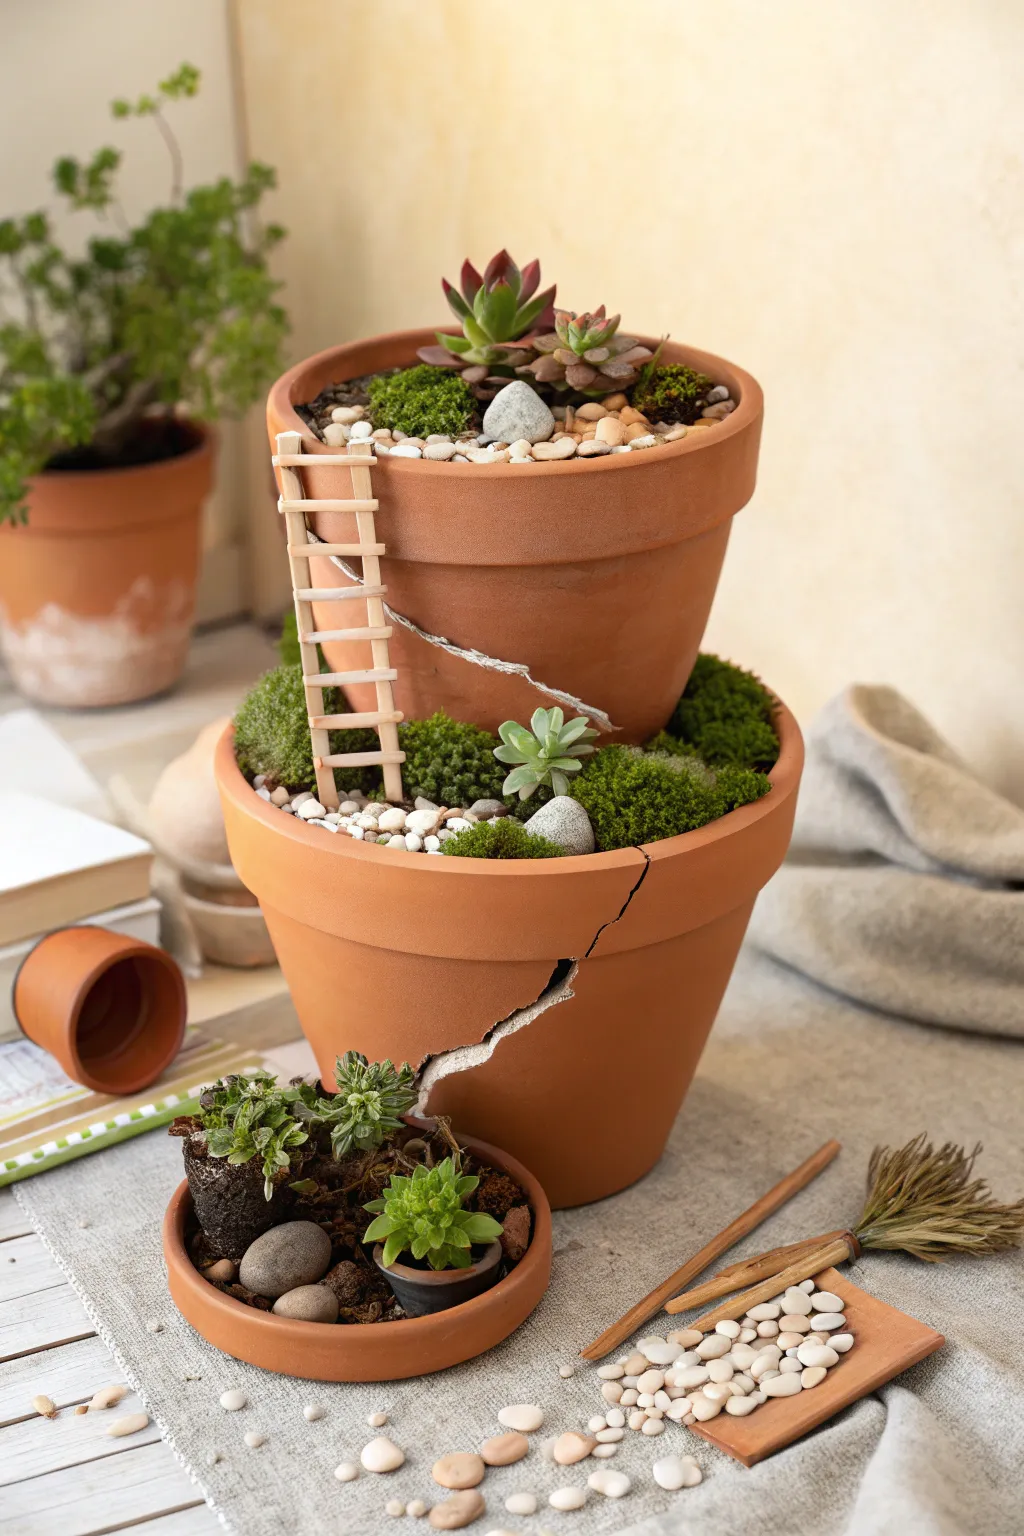
Transform ordinary terra cotta into a whimsical tiered landscape with this broken pot fairy garden. This project uses strategic stacking and simple landscaping materials to create a charming, multi-level home for your favorite succulents.
Step-by-Step Guide
Materials
- One large terra cotta pot (approx. 8-10 inches)
- One medium terra cotta pot (approx. 5-6 inches)
- Small shallow terra cotta dish or saucer
- Succulent potting soil (cactus mix)
- Assorted succulents (e.g., Echeveria, Sempervivum)
- Sheet moss or cushion moss
- Small white river pebbles or pea gravel
- Larger decorative stones
- Small wooden craft ladder (pre-made or craft sticks to build one)
- Hammer and safety glasses (if breaking a pot manually)
- Sandpaper (optional)
Step 1: Preparing the Base Structure
-
Select your vessels:
Gather your large base pot and the medium pot. If your medium pot is brand new and whole, you will need to create the ‘broken’ effect. Put on safety glasses, wrap the pot in a towel, and gently tap the rim with a hammer to chip away a section, creating a jagged, sloping opening. -
Smooth the edges:
If the shards you created are too sharp, use a piece of coarse sandpaper to gently smooth the raw terra cotta edges. I like to keep a few of the larger shards aside to use as dividers or decoration later. -
Fill the base:
Fill the large bottom pot with succulent soil until it is about three-quarters full. Pack it down lightly to create a stable foundation for the next tier. -
Position the second tier:
Nestle the medium (broken) pot into the center of the large pot. Tilt it slightly so the broken opening faces forward and downward, creating an open terrace effect. -
Secure the stack:
Add more soil around the base of the medium pot inside the large pot to lock it into place. Ensure the soil level in the bottom, outer ring is high enough to plant in.
Don’t Crack Under Pressure
To get a clean break on your pot, score a guideline with a file or a masonry bit before tapping it with the hammer. This guides the crack where you want it.
Step 2: Planting and Landscaping
-
Plant the top tier:
Fill the top (medium) pot with soil. select a focal point succulent, like a larger Echeveria with reddish tips, and plant it slightly off-center near the back. -
Add secondary plants:
Add smaller succulents around the main plant in the top tier. Tucking a small clump of sedum or a rosette near the rim adds nice texture. -
Landscape the middle ring:
Moving down to the soil ring in the large base pot, plant low-growing greenery. Mounds of cushion moss work perfectly here to create a lush, grassy look. -
Insert filler plants:
In the moss ring, poke a hole through the moss and plant a few small succulent cuttings. This integrates the green layers. -
Create the pebble path:
Pour small white river pebbles over any exposed soil in the top tier to create a clean, finished surface. You can let a few spill slightly over the edge for a natural look.
Level Up: Fairy Cottage
Add a tiny ceramic house to the top tier instead of a main plant to turn the tower into a literal fairy home residence with a mossy front yard.
Step 3: Adding the Mini Garden Details
-
Install the ladder:
Take your small wooden ladder and position it so it connects the lower tier (the moss ring) to the upper tier. Push the legs gently into the soil so it stands firm. -
Place decorative stones:
Add a few larger, grey stones among the moss and near the base of the ladder to simulate boulders in a landscape. -
Prepare the side saucer:
If you are including the small side dish shown in the project, fill a shallow terra cotta saucer with a mix of soil and dark rocks. -
Plant the side garden:
Plant three or four tiny succulent pups in this saucer. These can be the ‘nursery’ plants that haven’t made it into the main tower yet. -
Final arrangement:
Place the newly planted saucer at the foot of the main tower. Use a soft brush to sweep away any stray soil grains from the leaves of the succulents or the rim of the pots.
Place your new miniature world in a sunny spot and water sparingly to keep the succulents thriving
Rim-Embellished Clay Pot With Mini Mushrooms
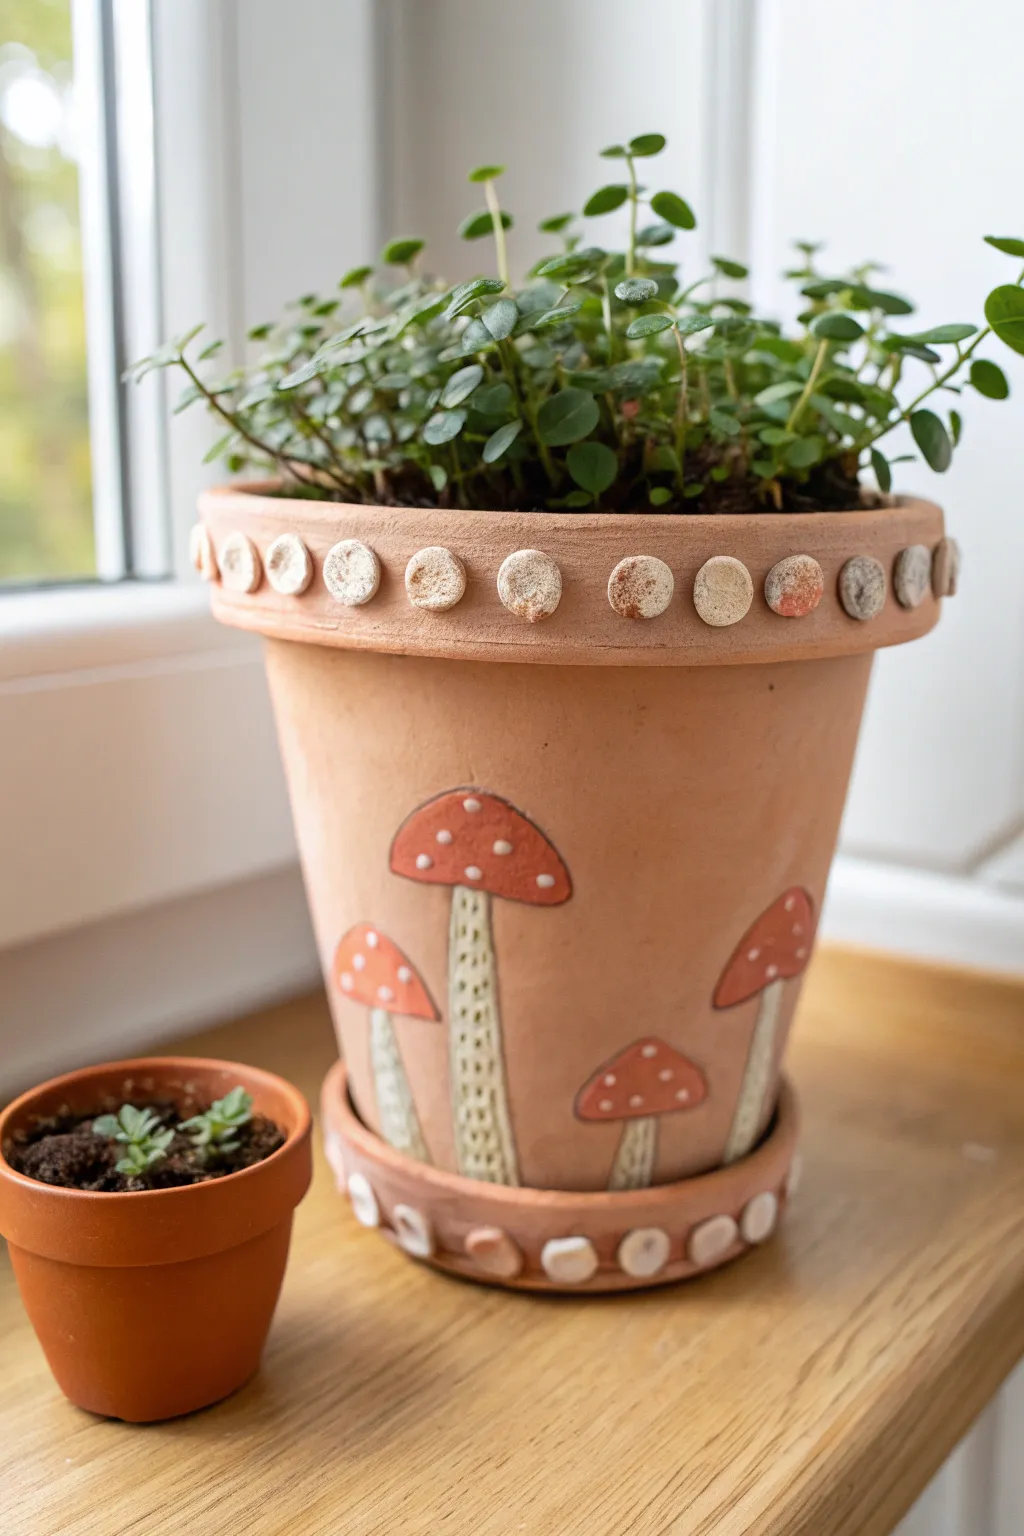
Bring a touch of whimsical woodland charm to your windowsill with this adorable relief-style planter project. By adding air-dry clay embellishments to a standard terracotta pot, you can create a unique, textured home for your favorite trailing plant.
Detailed Instructions
Materials
- Standard terracotta pot (approx. 6-8 inch)
- Matching terracotta saucer
- Air-dry clay (white or terracotta colored)
- Acrylic paints (terracotta orange, warm white, light beige)
- Small fine-point paintbrushes
- Super glue or strong craft adhesive
- Sculpting tools or a toothpick
- Water cup
- Gloss or matte varnish spray (optional)
Step 1: Prepping and Sculpting
-
Clean the surface:
Before adding anything, ensure your terracotta pot and saucer are completely clean and dry to help the clay adhere properly. -
Roll the rim details:
Take small pinches of air-dry clay and roll them into uniform little balls, roughly the size of a pea. -
Flatten and texture:
Gently press each ball flat onto a work surface to create small discs. Use a rough stone or a textured sponge to press a subtle, pitted texture into the surface of each disc. -
Sculpt mushroom caps:
Shape slightly larger pieces of clay into semi-circles or domes to form the mushroom caps. Vary the sizes slightly to make a more natural-looking grouping. -
Create the stems:
Roll out thin snakes of clay for the mushroom stems. Flatten them slightly so they aren’t fully round, as they need to sit flush against the pot wall. -
Add stem details:
Using a needle tool or toothpick, gently scratch cross-hatch or vertical textures onto the stems to mimic fibrous plant material.
Step 2: Assembly
-
Plan your layout:
Dry-fit your mushroom pieces against the side of the pot to decide on spacing. I like to group them in odd numbers, like three or five large ones around the base. -
Glue the rim dots:
Apply a small dab of strong adhesive to the back of your textured discs and press them firmly around the upper rim of the pot, spacing them evenly. -
Attach the base dots:
Repeat the previous step with the saucer, gluing a ring of textured discs around the vertical edge of the saucer rim. -
Attach the mushrooms:
Glue the stems first, then place the caps on top so they slightly overlap the stems. Press firmly to ensure good contact with the terracotta surface. -
Let it cure:
Allow the adhesive and clay to fully dry and cure according to the package instructions—usually at least 24 hours.
Clay Cracking?
If the clay shrinks and cracks away from the pot as it dries, fill the gaps with a paste made of clay and water, then re-paint over the seam.
Step 3: Painting and Finishing
-
Match the base color:
Mix an acrylic paint color that matches your terracotta pot (typically burnt orange mixed with a little white). Paint the clay rim dots and saucer dots this color so they look like part of the original pot. -
Paint the caps:
Paint the mushroom caps a warm, earthy red-orange. It doesn’t have to be perfectly solid; a little translucency adds character. -
Detail the stems:
Paint the stems a creamy beige or warm white. Let the paint settle into the textured grooves you carved earlier to highlight the depth. -
Add the spots:
Using the tip of a small brush or a dotting tool, dab small white spots onto the red mushroom caps. -
Distress the dots:
Once the rim dots are dry, lightly dry-brush them with a tiny bit of white paint to highlight their rough texture. -
Seal the work:
Spray the entire exterior of the pot with a clear varnish to protect the paint and clay from water damage when you water your plants.
Smoother Caps
Before drying, dip your finger in water and gently rub the mushroom caps to remove fingerprints for a professional porcelain look.
Pop in a cascading plant like a Peperomia or Ivy to complete your charming woodland display
Upcycled Clay Pot Bird Bath
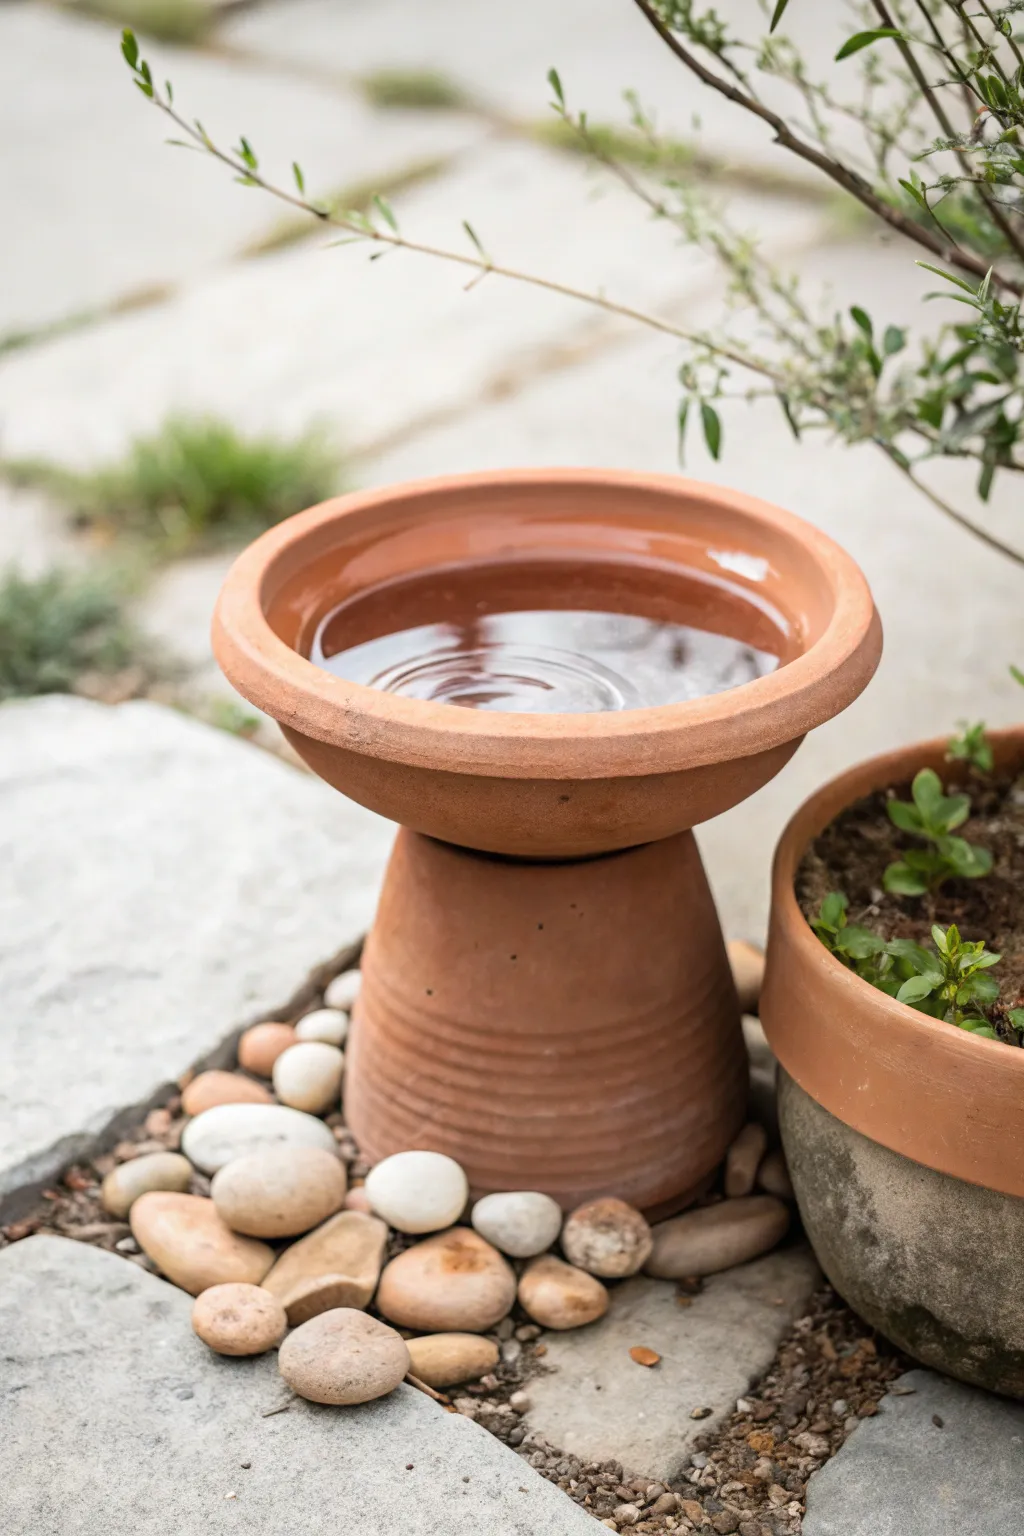
Transform two simple garden staples into an elegant, functional water feature for your feathered friends. This minimalist bird bath uses the natural warmth of terracotta to create a welcoming garden focal point that looks far more expensive than it is.
Step-by-Step Guide
Materials
- 1 large terracotta pot (approximately 8-10 inches tall)
- 1 extra-large terracotta saucer (wider than the pot base)
- Waterproof outdoor adhesive (e.g., E6000 or marine epoxy)
- Selection of smooth river stones or decorative pebbles
- Clean cloth or rag
- Isopropyl alcohol
- Water and mild soap
- Clear matte polyurethane sealer (optional but recommended)
Step 1: Preparation & Cleaning
-
Select your pieces:
Choose a terracotta pot that is sturdy and heavy enough to act as a base. Find a saucer that is significantly wider than the pot’s bottom to serve as the basin. -
Test the fit:
Before doing anything permanent, flip the pot upside down. Place the saucer on top of the inverted pot’s base to ensure it sits flat and stable. -
Clean the terracotta:
Terracotta is dusty by nature. Wash both the pot and the saucer thoroughly with mild soap and water to remove any garden center grime. -
Dry completely:
Allow the clay pieces to dry fully in the sun. Moisture trapped in the clay can prevent the adhesive from bonding correctly. -
Wipe contact points:
Take a cloth with a bit of isopropyl alcohol and wipe down the bottom of the pot (which is now the top of your base) and the underside center of the saucer. This removes invisible oils.
Step 2: Assembly & Bonding
-
Position the base:
Place your inverted pot on a level work surface where it won’t need to be moved for several hours. -
Apply adhesive:
Squeeze a generous ring of waterproof outdoor adhesive onto the flat surface of the inverted pot’s base. Keeping it about a half-inch from the edge prevents messy oozing. -
Place the saucer:
Carefully lower the saucer onto the adhesive ring, ensuring it is perfectly centered. I prefer to eyeball this from above and then check from the sides. -
Add weight:
Place a heavy object, like a brick or a stack of books, gently inside the saucer to press it down while the glue cures. -
Curing time:
Let the adhesive cure according to the manufacturer’s instructions. This is usually at least 24 hours for a permanent detailed bond.
Stay Centered
To ensure your saucer is perfectly centered, measure the diameter of the pot’s base and mark a corresponding circle on the bottom of the saucer with a pencil before gluing.
Step 3: Finishing Touches & Setting the Scene
-
Seal the basin (optional):
If you want to prevent water from soaking into the clay too quickly, creating a dark wet look, spray the inside of the saucer with a clear matte sealer. Let it dry completely. -
Prepare the ground:
Find a flat spot in your garden or patio. Level the soil slightly if placing it directly on the ground to prevent tipping. -
Create a gravel bed:
Spread a small layer of gravel or sand where the pot will sit to help with drainage and stability. -
Position the bath:
Place your finished bird bath onto the prepared spot. -
Arrange the stones:
Surround the base of your bird bath with smooth river stones, as seen in the photo. This not only looks beautiful but helps stabilize the base and keeps mud from splashing up during rain. -
Add water:
Fill the shallow basin with fresh water. The depth should be no more than 1-2 inches, which is ideal for small birds.
Add a Perch
Place a large, flat river stone inside the water basin. This gives smaller birds distinct island to land on so they can drink without getting wet if they don’t want a bath.
Enjoy watching the local wildlife discover your new garden addition
Pot-Stack Clay Lantern Decor
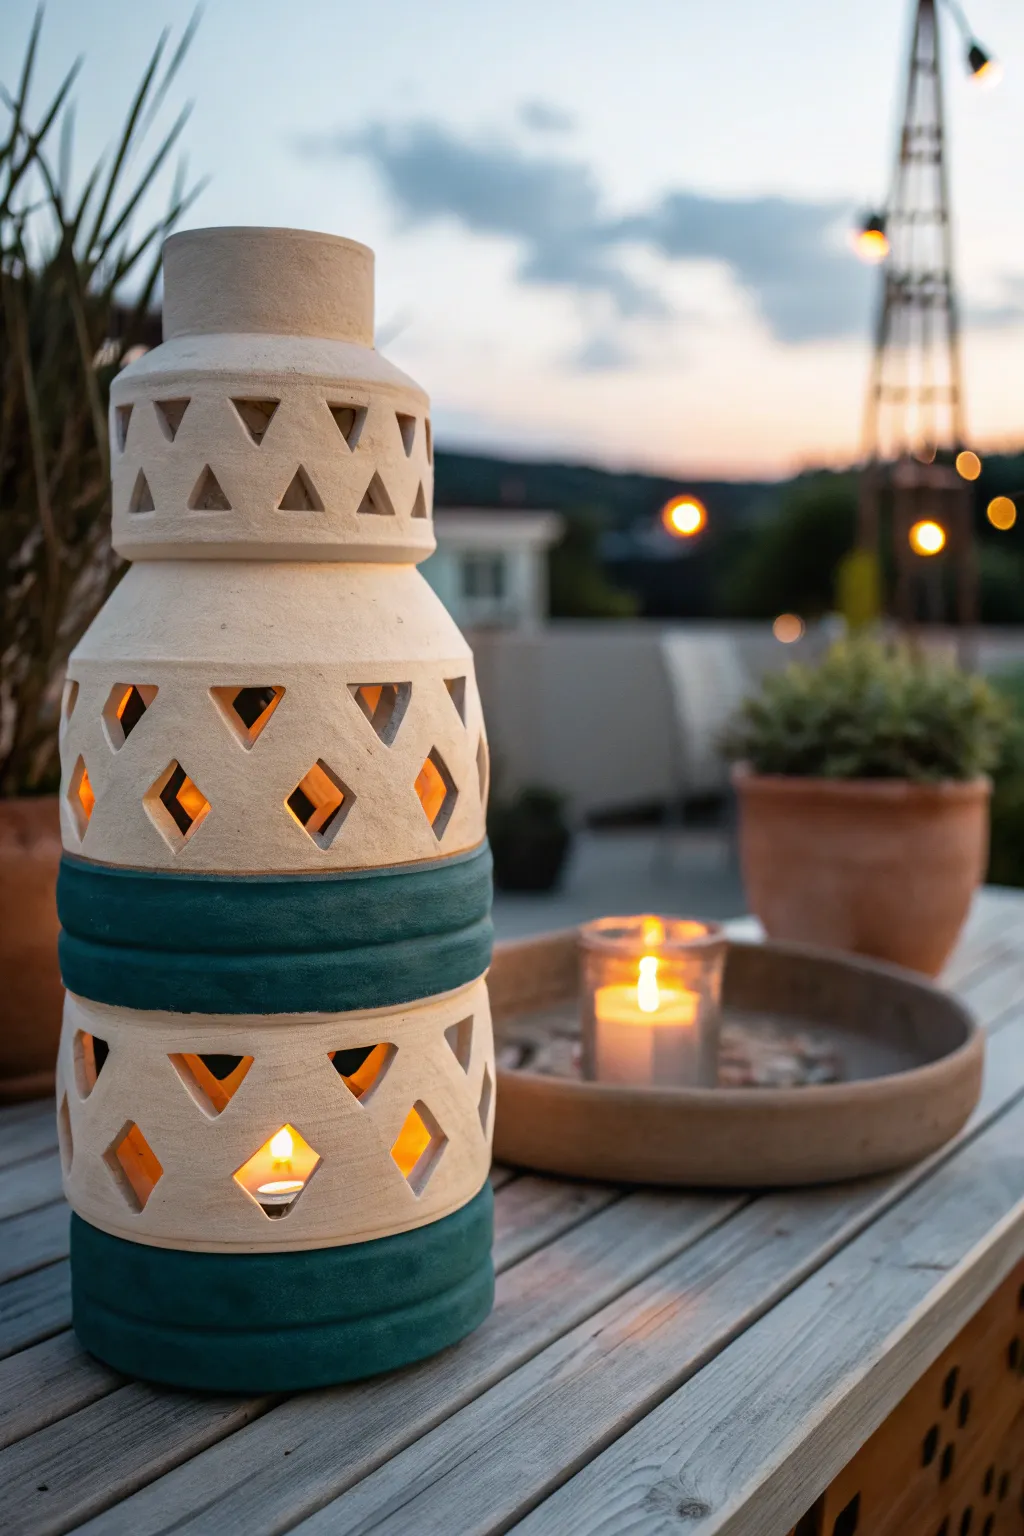
Transform ordinary terracotta or bisque pots into a stunning architectural light feature for your patio. This tiered lantern combines earthy textures with bold teal stripes and geometric cutouts that cast mesmerizing shadows when lit.
Step-by-Step Tutorial
Materials
- 3 unglazed clay/bisque vessels (varying shapes: nesting bowls or straight-sided cylinders that stack well)
- Pencil
- Ruler or measuring tape
- Rotary tool (e.g., Dremel) with diamond cutting wheel and sanding bits
- Painter’s tape (1-inch width)
- Teal acrylic craft paint or chalk paint
- Ivory or cream chalk paint (optional, for the base color)
- Medium flat paintbrush
- Strong construction adhesive (e.g., E6000) or epoxy
- Fine-grit sandpaper (220 grit)
- Protective eyewear and dust mask
- Votive candles or LED tea lights
Step 1: Preparation & Planning
-
Clean the Vessels:
Begin by wiping down your clay pots with a damp cloth to remove any kiln dust or debris. Let them dry completely before starting any work. -
Dry Stack the Design:
Experiment with stacking your three vessels to find the most stable and aesthetically pleasing arrangement. Usually, placing them rim-to-rim or base-to-rim creates interesting silhouettes. -
Mark the Grid:
Using a pencil and a flexible measuring tape, lightly draw a horizontal guideline around the circumference where you want your pattern to sit. I find it helpful to mark vertical tick marks every 2 inches to keep spacing even. -
Sketch the Cutouts:
Draw your geometric shapes onto the clay surface. For the look in the photo, alternate between row of small triangles heavily spaced, and rows of larger diamond shapes.
Step 2: Cutting & Refining
-
Safety Gear Up:
Put on your protective eyewear and a dust mask. Cutting clay creates fine silica dust that you definitely don’t want to inhale. -
Initial Cuts:
Using a rotary tool with a diamond cutting wheel, carefully plunge-cut into the center of your drawn shapes. Outline the straight edges first, moving slowly to prevent the clay from cracking. -
Connect the Lines:
Gently connect your plunge cuts to form the full triangle or diamond shape. Don’t force the tool; let the speed of the wheel do the work. -
Remove the Centers:
Once the outline is cut, the center piece of clay should pop out. If it sticks, carefully undercut the corners again until it releases. -
Sand the Edges:
Switch your rotary tool bit to a small sanding drum or grinding stone. Smooth out the rough internal edges of your cutouts to make them look uniform and professional. -
Surface Sanding:
Use a piece of 220-grit sandpaper to manually smooth the outside surface of the pots, removing any stray pencil marks or jagged bits from the cutting process.
Crack Prevention
To stop pots from cracking while cutting, keep the clay surface slightly damp with a spray bottle, and use a high RPM speed on your rotary tool without heavy pressure.
Step 3: Painting & Assembly
-
Base Coat (Optional):
If your pots are standard orange terracotta and you want the beige look shown, apply two coats of ivory chalk paint to the entire exterior. Allow to dry fully. -
Tape the Bands:
Apply painter’s tape to mask off the areas that will remain unpainted. Focus on creating thick horizontal bands at the bottom of the larger vessels. -
Apply Teal Accents:
Paint the exposed bands with a deep teal acrylic paint. Use a pouncing motion with your brush to get into the texture of the clay. -
Remove Tape:
Peel off the painter’s tape while the paint is still slightly tacky to ensure a crisp, clean line without chipping. -
Final Assembly:
Apply a strong construction adhesive to the rims or bases where the pots connect. Press them together firmly and wipe away any excess glue immediately. -
Cure Time:
Let the adhesive cure for at least 24 hours (or per package instructions) before moving the lantern. -
Lighting:
Place a tea light or small pillar candle inside the bottom section. If you glued the sections permanently, ensure you can drop a light in from the top or use a long match.
Solar Power Upgrade
Skip the candles and glue a solar garden light stake cap into the top opening. It charges by day and creates an automatic heavy glow at night.
Enjoy the warm, patterned glow of your new custom lantern as the sun goes down