When I’m craving a feel-good project, I always reach for a cute clay teapot idea—because it’s functional pottery with instant personality. Below are my go-to designs that turn a simple teapot shape into something totally charming and display-worthy.
Strawberry Teapot With Leafy Lid
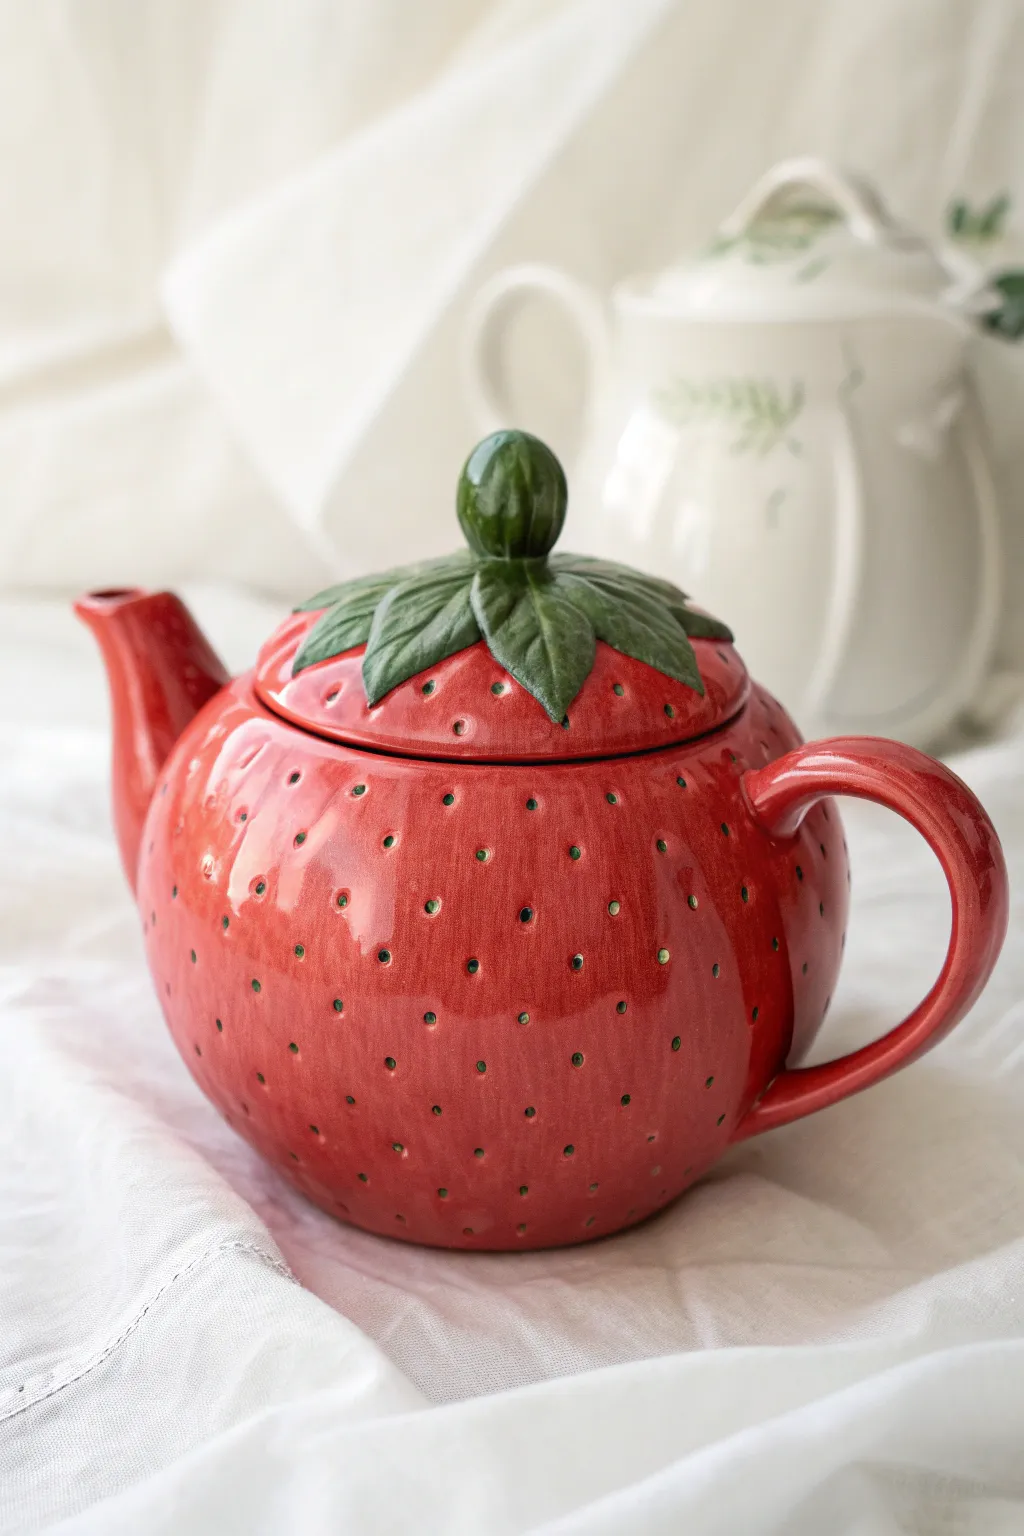
Transform a lump of clay into this delightful, glossy strawberry teapot that looks freshly picked from a fairytale garden. The design combines a classic rotund teapot shape with charming sculpted details like leafy greens and tiny seed indentations.
Step-by-Step Guide
Materials
- White earthenware or stoneware clay
- Pottery wheel (or coil building tools)
- Rib tools (rubber and metal)
- Needle tool
- Small loop tool or drill bit (for seeds)
- Underglazes: Bright Red, Forest Green, Dark Green
- Clear glossy glaze
- Score and slip tool
- Sponge
- Kiln
Step 1: Forming the Body
-
Throw the base:
Begin by wedging your clay thoroughly. Throw a sphere-like body on the wheel, aiming for a chubby, rounded bottom that tapers slightly toward the top opening, mimicking a berry shape. -
Create the gallery:
Form a gallery (a small internal ledge) at the rim of the opening. This is crucial for the lid to sit securely inside rather than sliding off. -
Trim the foot:
Once leather hard, trim a curved foot ring that follows the contour of the strawberry shape so the pot feels lifted but stable. -
Pull the spout:
Throw or pull a small spout. For this design, keep it relatively short and sturdy, attaching it lower on the belly and angling it upwards. -
Form the handle:
Pull a strap handle. Attach it opposite the spout, creating a C-curve that mimics a vine. Ensure the attachment points are smoothed seamlessly into the body using slip.
Step 2: Sculpting the Top
-
Throw the lid:
Measure your gallery using calipers. Throw a simple domed lid that fits perfectly into the teapot’s opening. -
Shape the knob:
Roll a small ball of clay into an oval shape for the stem knob. Attach this securely to the center of the lid. -
Adding leaves:
Roll out a thin slab of clay and cut out 5-6 teardrop leaf shapes. Score and slip them onto the lid, radiating from the central stem knob over the red dome. -
Detailing the veins:
Use a needle tool or a small carving tool to scratch vein textures into each leaf. I like to gently lift the tips of the leaves slightly so they look alive.
Seed Spacing Trick
Don’t align the seeds in straight grid lines. Offset each row slightly (like bricks in a wall) to create a more natural, organic berry appearance.
Step 3: Texture and Color
-
Create seed pockets:
Using a small loop tool or even the back of a drill bit, press small, shallow dimples all over the red body of the teapot. Space them evenly but not perfectly. -
Bisque fire:
Allow the entire piece to bone dry slowly to prevent cracking, then bisque fire it according to your clay body’s specifications. -
Base coat red:
Apply 3 coats of bright red underglaze to the main body and the underside of the lid. Leave the leaves and stem bare for now. -
Painting the greens:
Paint the leaves and stem knob with a forest green underglaze. For depth, wash a darker green into the carved veins and wipe back slightly to highlight the texture. -
Filling the seeds:
This step requires a steady hand: Use a fine-point brush to dab a tiny dot of dark green inside every single seed indentation. It makes the texture pop. -
Glazing:
Once the underglaze is dry, dip or brush the entire piece (except the foot ring) in a clear glossy glaze. -
Final firing:
Fire the piece again to glaze temperature. The clear coat will make the red vibrant and give the berry that juicy, wet look.
Berry Blossom
Sculpt a tiny white strawberry blossom and attach it near the handle or on the lid for an extra hit of botanical charm and color contrast.
Now you have a functional piece of art ready for your next garden tea party


Rosebud Teapot With Petal Layers
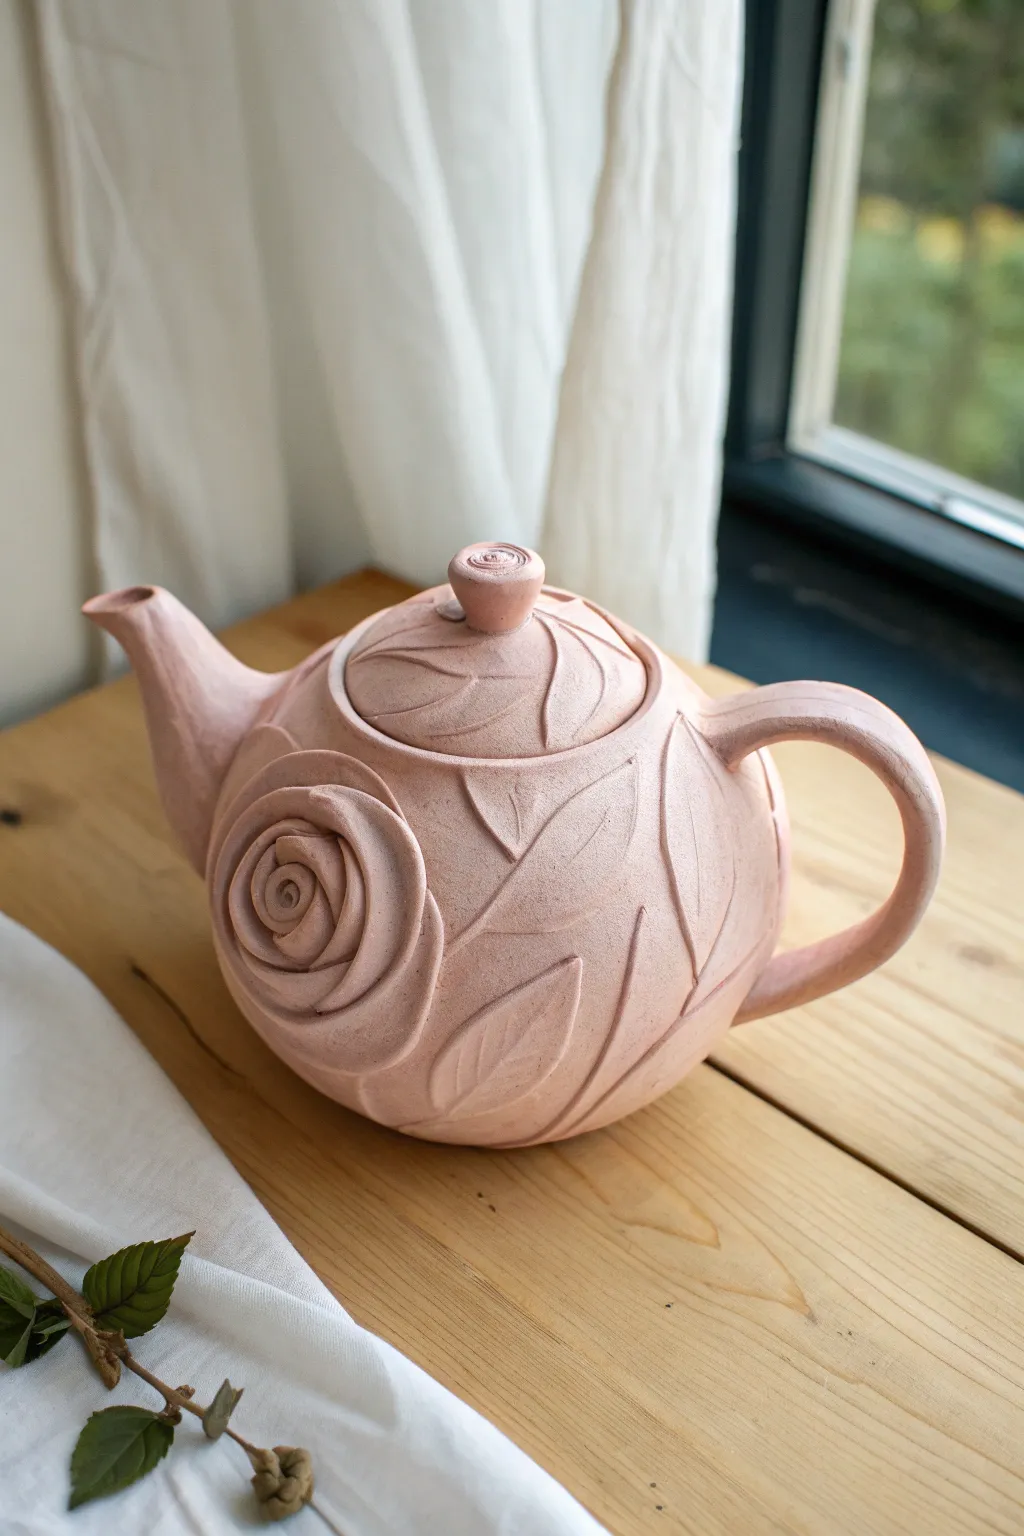
Embrace the romance of a secret garden with this stunning hand-built teapot, defined by its dramatic rose relief and sprawling leaf motifs. The dusty pink clay body offers a rustic, stonelike finish that feels as cozy as the tea you’ll brew inside.
Step-by-Step Tutorial
Materials
- Pink stoneware clay or terracotta clay (low grog)
- Pottery wheel (optional, can be hand-built)
- Rolling pin and guide sticks
- Needle tool
- Rib tool (kidney)
- Sculpting tools (loop tool, blending tool)
- Slip and scoring tool
- Sponge
- Wooden paddle
- Kiln
Step 1: Forming the Body and Lid
-
Construct the main vessel:
Start by creating a spherical body using a pinch pot method (joining two pinch pots) or throwing a round form on the wheel. You want a plump, round shape about the size of a grapefruit. Smooth the exterior with a rib tool to remove fingerprints, but keep a slightly matte texture. -
Create the lid opening:
Once the body is leather-hard, carefully cut a circular opening at the top using your needle tool. Save the cutout piece of clay; I like to trim this slightly to use as the base for the lid, ensuring a perfect fit. -
Throw or model the spout:
Design a classic S-curve spout. Ensure the base is wide enough to attach securely to the body, tapering gently to the tip. Attach it by scoring and slipping, blending the seam until it’s invisible. -
Attach the handle:
Pull or roll a coil for the handle, creating a C-shape that balances the visual weight of the spout. Attach it opposite the spout, smoothing the connection points so it looks like it grew naturally from the pot.
Crack Prevention
If the rose petals start pulling away while drying, wrap the specific area in damp plastic and dab joined seams with vinegar to re-hydrate and bond the clay.
Step 2: Sculpting the Rose
-
Mark the placement:
Decide where you want your main rose feature. Lightly sketch a circle on the side of the pot to guide your placement. -
Create the center bud:
Roll a small coil of clay into a tight spiral to form the very center of the rose. Score the pot surface and attach this spiral securely in the middle of your marked circle. -
Form individual petals:
Flatten small balls of clay between your thumb and forefinger to create organic, slightly thick petals. They shouldn’t be paper-thin; a little thickness adds to the rustic stone look. -
Layer the bloom:
Attach the petals around the center spiral, overlapping them slightly. Start small and increase the petal size as you move outward, using a blending tool to meld the bottom of each petal into the teapot body. -
Refine the edges:
Use your fingers or a soft tool to gently curl the edges of the outer petals outward, giving the flower a blooming, three-dimensional effect.
Ombré Effect
After bisque firing, wipe a darker oxide wash (like iron oxide) into the crevices of the rose and leaves, then sponge off the high points to accentuate depth.
Step 3: Leaf Details and Finishing
-
Outline the leaves:
Using a needle tool, lightly incise large, sweeping leaf shapes directly onto the teapot’s surface and the lid. These leaves should curve around the form, filling the negative space. -
Carve the relief:
Instead of adding clay, carve away the background around your drawn leaves to make them stand out in low relief. Alternatively, trace the shapes with thin coils and blend them inwards to create raised areas. -
Add vein textures:
Use a sharp tool to carve the center veins and smaller branching veins into each leaf. Keep the lines crisp and deliberate. -
Sculpt the lid knob:
Create a miniature version of the main rose to serve as the lid handle. Make a tiny spiral bud and attach it securely to the center of the lid. -
Texture the surface:
Gently tap the entire surface (avoiding the smooth rose petals) with a stiff brush or sponge. This gives the ‘background’ clay a sandy, stony texture that contrasts with the smooth floral elements. -
Dry slowly:
Cover the teapot loosely with plastic to let it dry very slowly. This is crucial to prevent the added rose elements from cracking away from the body. -
Fire the piece:
Bisque fire the piece. For the finish shown in the image, apply a matte pink underglaze or a satin matte glaze, or leave unglazed if using a high-quality colored clay body.
Now you have a timeless vessel that turns tea time into a serene garden escape

Daisy Pattern Teapot on a Dark Base
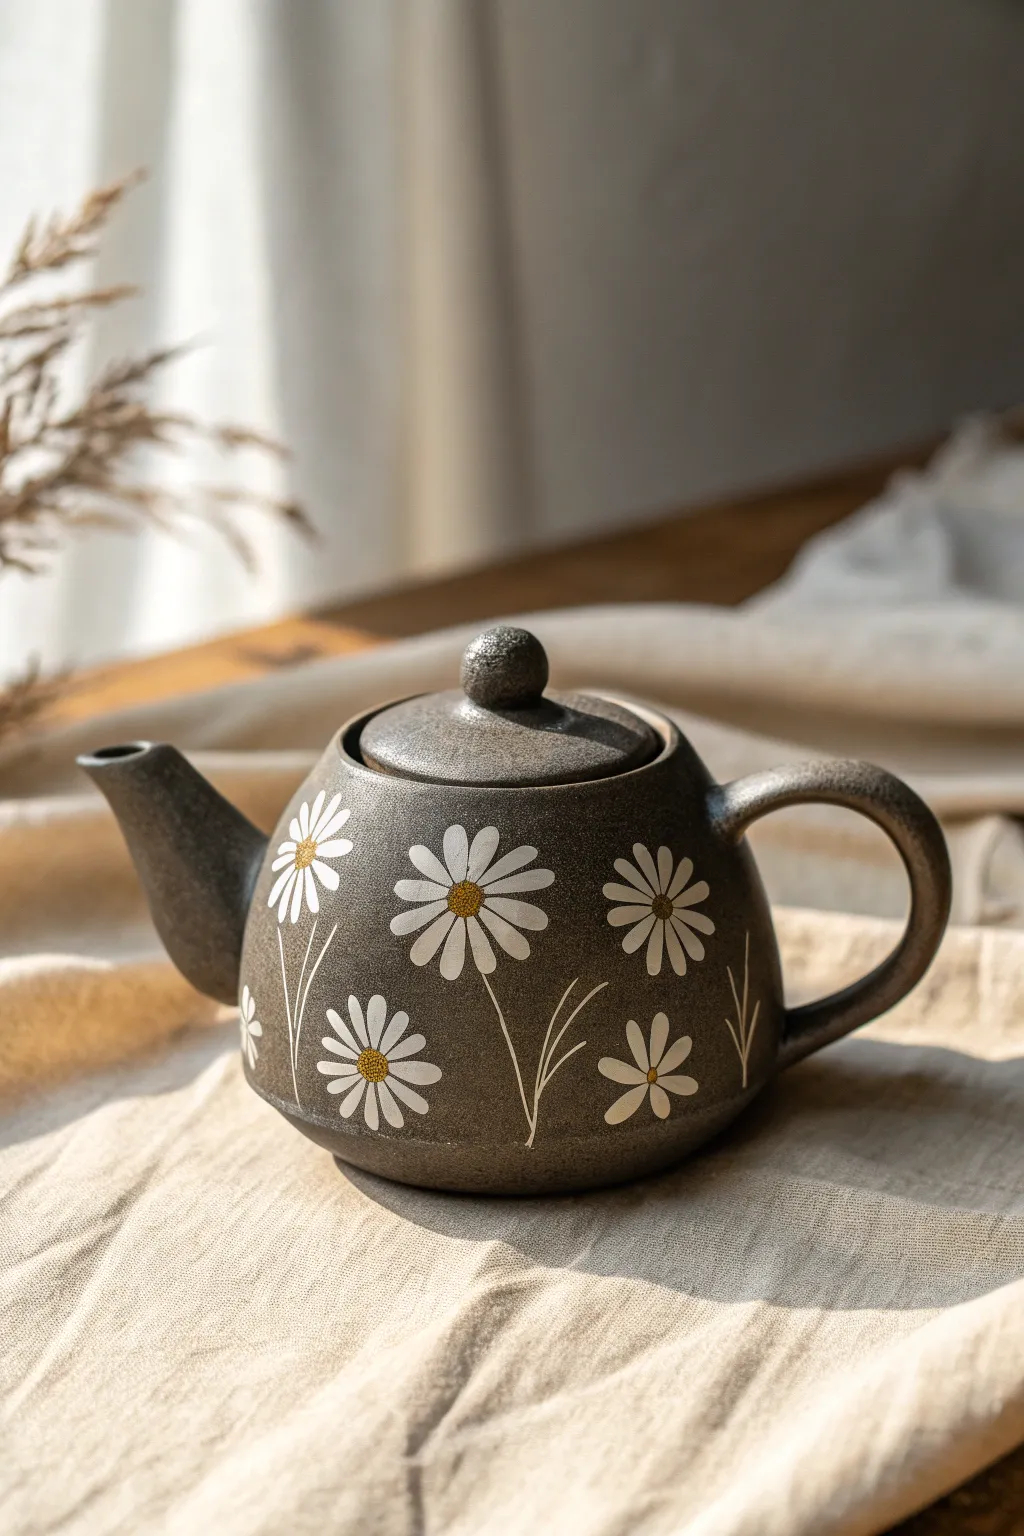
This charming project features a rustic, dark clay teapot adorned with playful hand-painted daisies. The contrast between the speckled dark stoneware and the bright white petals creates a cozy, cottage-core aesthetic perfect for afternoon tea.
Step-by-Step
Materials
- Dark speckled stoneware clay or premade bisque teapot
- Underglazes: Bright White, Golden Yellow, Sage Green
- Clear matte or satin glaze (food safe)
- Small round paintbrushes (sizes 0 and 2)
- Fine liner brush
- Pottery wheel (if throwing) or slab roller (if hand-building)
- Teapot trimming tools
- Sponge
- Kiln
Step 1: Forming the Teapot Base
-
Prepare the clay:
Begin by wedging your dark stoneware clay thoroughly to remove air bubbles. You want a clay body that fires to a dark gray or chocolate brown to achieve that rich background contrast. -
Throw the body:
On the pottery wheel, throw a round, bulbous belly for the teapot. Aim for a smooth curve that tapers slightly at the top for the lid gallery. -
Shape the spout and handle:
Throw a small spout, keeping the base wide enough to attach securely. Pull or extrude a simple C-shaped handle that feels comfortable in the hand. -
Create the lid:
Throw a lid that fits snugly into your gallery. Add a small, round knob on top for easy lifting. -
Assemble the parts:
Once the components are leather hard, score and slip the spout and handle onto the main body. Ensure the spout tip is level with the lid gallery so the pot doesn’t drip. -
Smooth and refine:
Use a damp sponge to smooth all attachment points and refine the surface. I like to leave a little of the clay’s natural grit visible for texture.
Step 2: Painting the Daisy Pattern
-
First firing:
Bisque fire your assembled teapot to Cone 04 (or your clay’s specific bisque temperature) to prepare it for glazing. -
Wipe down:
Wipe the bisque ware with a damp sponge to remove any dust, which ensures the underglaze adheres properly. -
Outline the petals:
Using a size 2 round brush loaded with Bright White underglaze, paint the long, slender petals of the daisies. Start pressure heavy at the center and lift off as you pull outward to create tapered tips. -
Layering the white:
Let the first coat dry, then apply a second coat of white to the petals. The dark clay will want to show through, so a second or even third layer ensures the flowers pop. -
Add the centers:
Dip a smaller brush into Golden Yellow underglaze and dab a textured circle in the center of each flower. Stippling the brush slightly adds a pollen-like texture. -
Paint stems and leaves:
Use your fine liner brush and Sage Green underglaze (or a mix of white and a tiny bit of green/brown for a subtle look) to paint thin, wavy stems and simple grassy leaves anchoring the flowers. -
Add side details:
Don’t forget to add a few smaller, partial flowers or just petals drifting near the bottom or handle area to make the pattern feel organic and flowing.
Uneven Petals?
If your petals look transparent after firing, the white underglaze was too thin. Apply three coats next time, letting each dry fully between layers.
Step 3: Glazing and Final Firing
-
Dry completely:
Allow the underglaze decoration to dry fully, ideally overnight, to prevent smearing during the glazing process. -
Apply clear glaze:
Dip the entire teapot into a clear matte or satin glaze. A glossy glaze works too, but a satin finish complements the rustic dark clay beautifully. -
Clean the foot:
Wipe the bottom (foot) of the teapot completely clean of glaze with a wax resist or a damp sponge so it doesn’t fuse to the kiln shelf. -
Final fire:
Glaze fire the piece to the maturity temperature of your clay body (likely Cone 5 or 6 for stoneware).
Pro Tip
For sharper petal tips, slightly dampen your brush before loading the underglaze. This helps the pigment flow off the bristles for a crisp point.
Now you have a beautiful, functional piece of art ready for your favorite tea blend

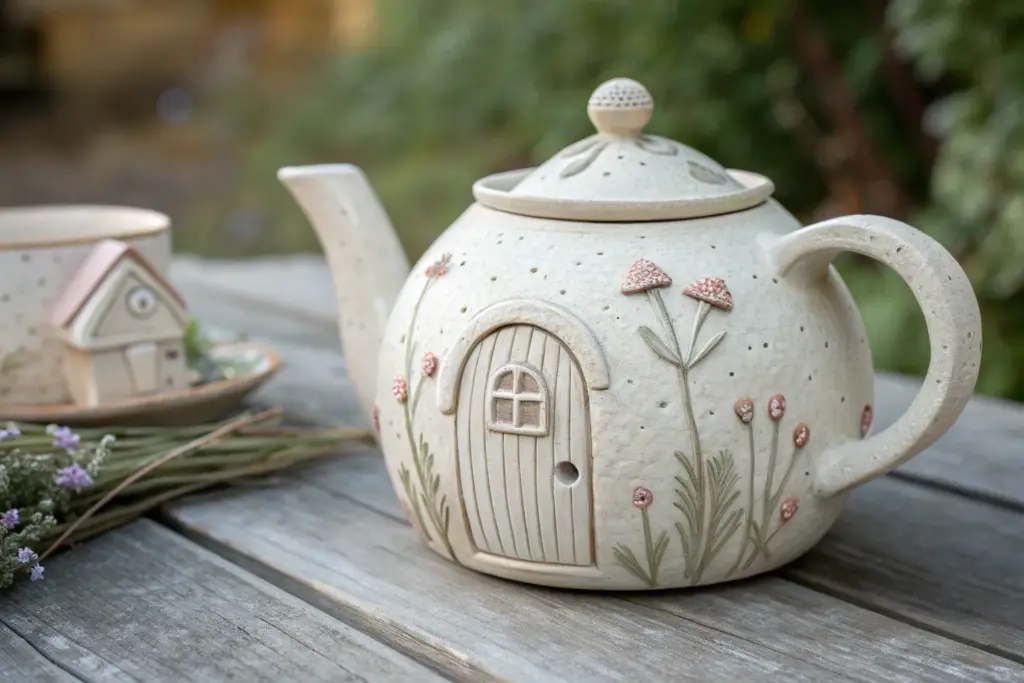
Fairy Cottage Teapot With Tiny Windows
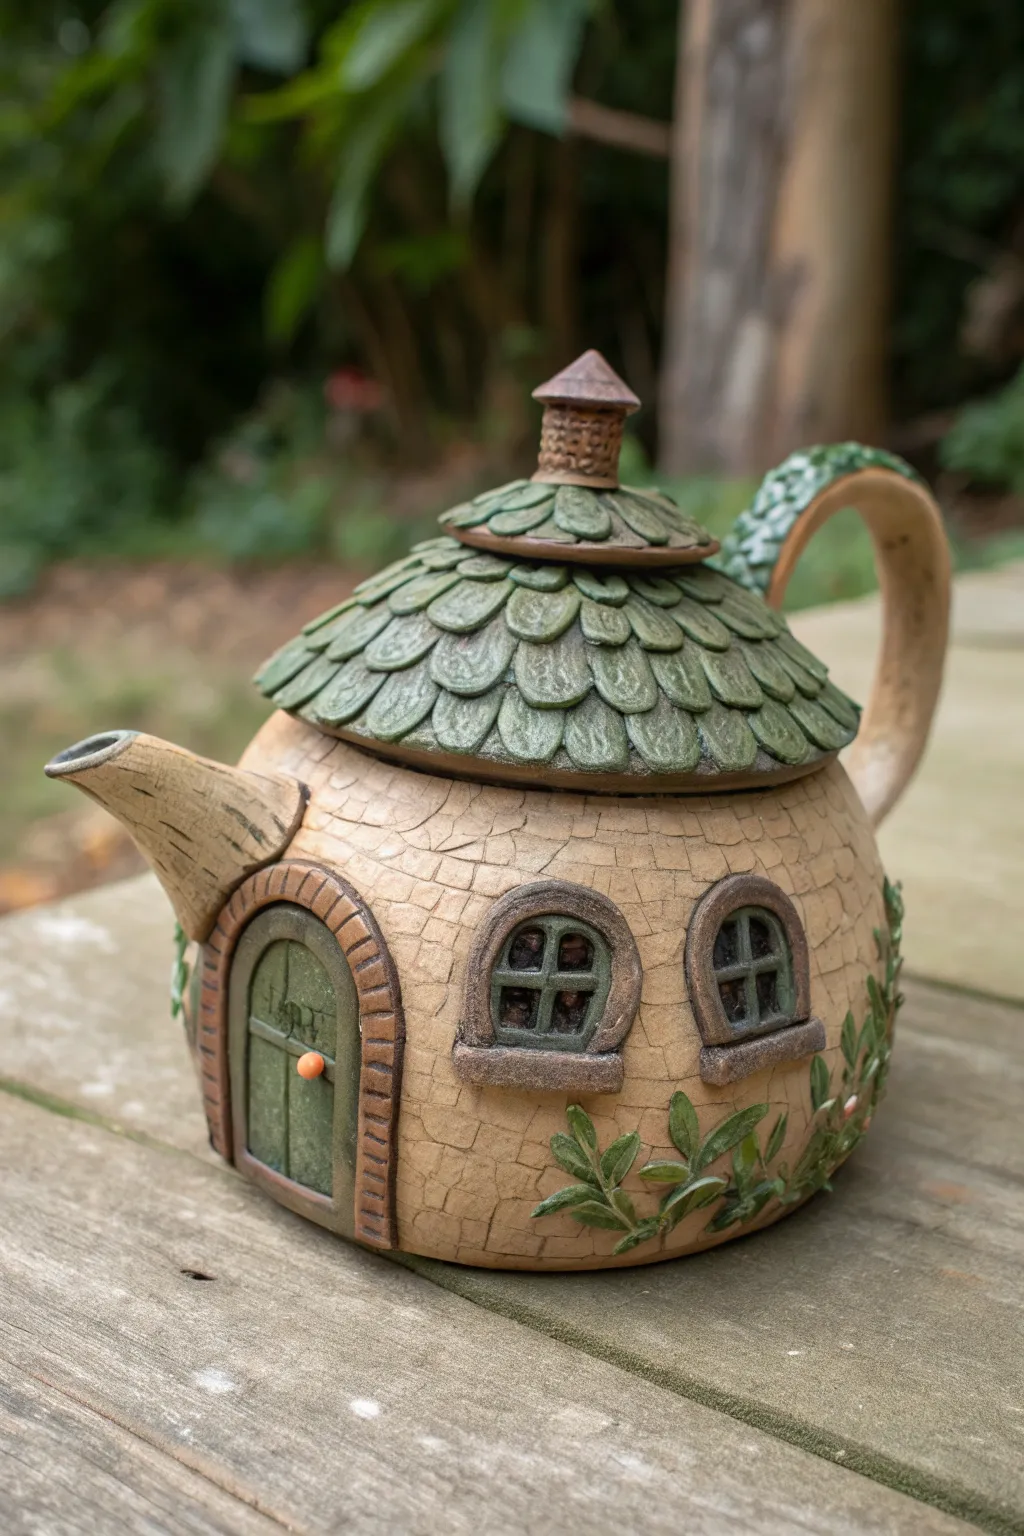
Transform a slab of clay into this enchanting functional sculpture that resembles a cozy woodland dwelling. The textured stone walls, leafy roof lid, and charming architectural details make this teapot truly one-of-a-kind.
Detailed Instructions
Materials
- High-firing stoneware clay (tan or buff body)
- Pottery wheel (optional, can be hand-built)
- Rolling pin and guide sticks
- Fettling knife and needle tool
- Serrated rib and smoothing sponge
- Slip and scoring tool
- Underglazes: dark green, light green, orange, brown, grey
- Clear glaze (food safe)
- Sculpting tools (wooden modeling tools)
- Leaf cutter (optional)
Step 1: Forming the Body and Lid
-
Create the base form:
Begin by throwing a rounded, bulbous belly on the wheel, approximately 6-7 inches wide. Alternatively, build this form using the pinch pot method or coil building, smoothing the walls until you have a uniform thickness. -
Shape the gallery:
Carefully form a gallery rim at the top opening where the lid will sit. Ensure the opening is perfectly round so your lid fits snugly later. -
Texture the walls:
While the clay is leather-hard but still malleable, gently press a textured stone mat or use a carving tool to create the cracked stone facade effect across the entire exterior surface. -
Form the lid structure:
Create a doomed lid that fits your gallery. It should have a slightly steep pitch to mimic a cottage roof. Add a small chimney-like knob at the very top for lifting.
Step 2: Adding Architectural Details
-
Construct the spout:
Roll a tapered coil for the spout. Use a texture tool to drag lines lengthwise, giving it the appearance of wood bark or a hollow log. -
Attach the spout:
Cut the spout at an angle and attach it to the body using slip and scoring. Ensure the tip of the spout is higher than the max water level of the belly. -
Create the vine handle:
Roll a thick coil for the handle. Flatten it slightly and add leaf textures or small wrapped vine details. Attach securely to the back of the pot, reinforcing the connection points. -
Build the door:
Roll a small slab and cut out an arch shape. Texture it to look like wood planks. Create a frame of tiny clay bricks around the arch and attach this entire assembly to the front. -
Sculpt the windows:
Fashion two small arched window frames. Add a cross-bar inside for the panes. Attach these symmetrically on the side of the pot using slip. -
Add climbing vines:
Roll very thin, noodle-like coils and attach them snaking up the sides of the ‘stone’ walls. Press small flat bits of clay onto these vines to create leaves, particularly around the base.
Lid Fit Troubleshooting
If the lid is wobbly after firing, use a small dab of grinding paste on the rim and twist the lid back and forth to grind them into a perfect match.
Step 3: Roofing and Finishing
-
Methodical roofing:
Roll a thin sheet of clay and cut dozens of small, tongue-shaped shingles. You can use a leaf-shaped cutter for consistency if you prefer. -
Layer the shingles:
Starting at the bottom edge of the lid, attach the shingles in overlapping rows using slip. Work your way up to the chimney, staggering the seams. -
Add texture to shingles:
Use a needle tool or small knife to draw a central vein on each roof shingle, enhancing the leaf-like appearance. -
Refine the chimney:
Add tiny texture marks to the chimney knob to make it look like woven basketry or brickwork. -
Bisque fire:
Allow the piece to dry slowly under loose plastic to prevent the handle or spout from cracking. Bisque fire to cone 04 once bone dry.
Making Textures Pop
Use a dark wash (black oxide or dark underglaze) over the ‘stone’ texture before the main glaze. Wipe it away so it stays only in the deep cracks.
Step 4: Glazing
-
Apply underglazes:
Paint the roof shingles in varying shades of green. Use brown for the spout, handle, and window frames. Paint the door green, the doorknob orange, and carefully wash the stone walls with a diluted grey/tan to highlight the texture. -
Wipe back:
I like to gently wipe the stone wall area with a damp sponge after applying the wash; this leaves color in the cracks while keeping the high points lighter. -
Clear coat:
Dip or brush the entire piece in a clear food-safe glaze. -
Final fire:
Glaze fire the teapot to the temperature appropriate for your clay body (likely cone 5 or 6).
Enjoy serving tea from your magical little cottage that looks straight out of a fairytale storybook

The Complete Guide to Pottery Troubleshooting
Uncover the most common ceramic mistakes—from cracking clay to failed glazes—and learn how to fix them fast.
Hobbit Hole Hill Teapot
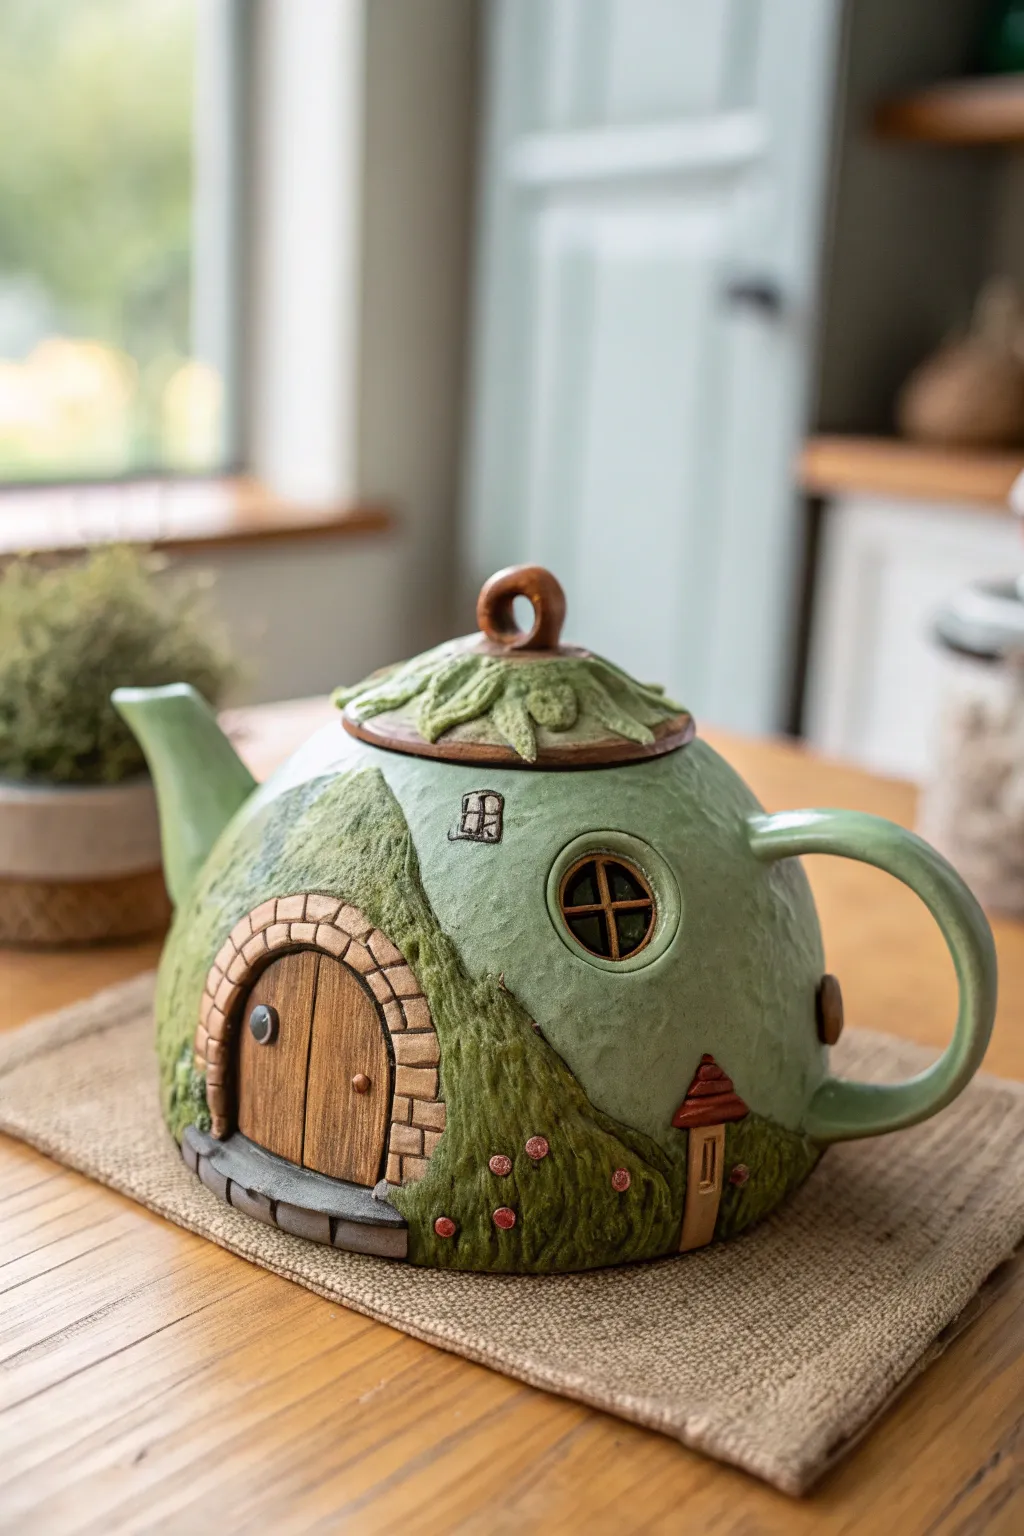
Transport yourself to Middle Earth with every cup of tea using this whimsical ceramic project. This teapot combines wheel-throwing and hand-building techniques to create a cozy, grassy hill home complete with a classic round door.
Step-by-Step Tutorial
Materials
- Cone 5-6 Stoneware clay (smooth)
- Pottery wheel
- Throwing tools (ribs, sponge, wire)
- Needle tool and fettling knife
- Scoring tool or serrated rib
- Slip
- Carving tools (loop tool, cleanup tool)
- Underglazes (Moss Green, Forest Green, Brick Red, Sandstone, Brown, Black)
- Clear glaze (food safe)
- Detail brushes
Step 1: Forming the Base Structure
-
Isolate the clay:
Begin by wedging about 2-3 lbs of clay. Center it on the wheel and open it as if you were making a large, enclosed jar or bowl. -
Throw the body:
Pull the walls up and curve them inward to create a semi-sphere or dome shape. You want a rounded belly that tapers significantly at the top to form the hill shape. -
Create the gallery:
Before closing the form too much, use a wooden rib or finger to create a distinct gallery (ledge) for the lid to sit on. Trim the rim so it is smooth. -
Throw the spout and handle:
Using smaller balls of clay, throw a tapered spout and pull a sturdy handle. Curve the handle into a comfortable ‘C’ shape and set them aside to stiffen to leather-hard. -
Make the lid:
Throw a shallow, domed lid that fits perfectly into the gallery you created earlier. Measure twice with calipers to ensure a snug fit.
Step 2: Building the Hobbit Home
-
Attach appendages:
Once all parts are leather-hard, score and slip the spout and handle onto the main body. Ensure the spout tip is level with the lid gallery so the teapot doesn’t overflow. -
Sculpt the door frame:
Roll a small slab and cut out a round door shape. Attach this to the front of the pot. Roll little coils or small bricks of clay to build a stone archway around the door. -
Add grassy texture:
Mix a small amount of thick slip or soft clay. Apply this to the main body (the ‘hill’) and use a stiff bristle brush or a needle tool to scratch in vertical lines, mimicking grass texture. -
Carve details:
Use a needle tool to incite wood grain onto the door. Carve the stone texture around the door frame deeper to make the ‘rocks’ pop. -
Install windows:
Create small round window frames with clay coils. Attach them to the ‘hillside’ and add tiny cross-bars for the panes. I like to press these in firmly so they look embedded in the earth. -
Little chimney detail:
Model a tiny chimney pot and attach it near the base or side of the hill for extra charm. -
Decorate the lid:
On the lid, add slabs cut into leaf shapes. Layer them overlapping from the center outwards. Add a small looped coil in the center to serve as the handle.
Texturing Tip
For realistic grass, twist several needle tools together or use a serrated rib. Dragging this upwards creates natural-looking tufts rather than uniform lines.
Step 3: Glazing and Finishing
-
Bisque fire:
Allow the entire piece to dry slowly under plastic to prevent cracks, then bisque fire to Cone 04. -
Base coat scenery:
Apply a mossy green underglaze to the grassy areas. Use a darker forest green in the textured crevices to create depth and shadows. -
Architectural details:
Point the door with a warm wood-brown underglaze. Paint the stone archway in varied sandstone and grey tones, wiping back slightly to highlight the grout lines. -
Final touches:
Add tiny dots of red or pink underglaze on the hill to represent wildflowers. Paint the window frames brown and the panes black or dark yellow. -
Clear coat:
Dip or brush a clear, food-safe glaze over the entire interior and exterior. Wipe the foot clean. -
Final firing:
Glaze fire to Cone 5 or 6 depending on your clay body specifications.
Make it Shine
Add 22k gold luster to the tiny doorknob after the glaze firing. It requires a third, low-temperature firing (around cone 018) but adds a magical touch.
Once cooled, brew your favorite blend and enjoy a peaceful moment in the Shire
Mushroom Forest Teapot With Mini Toadstools
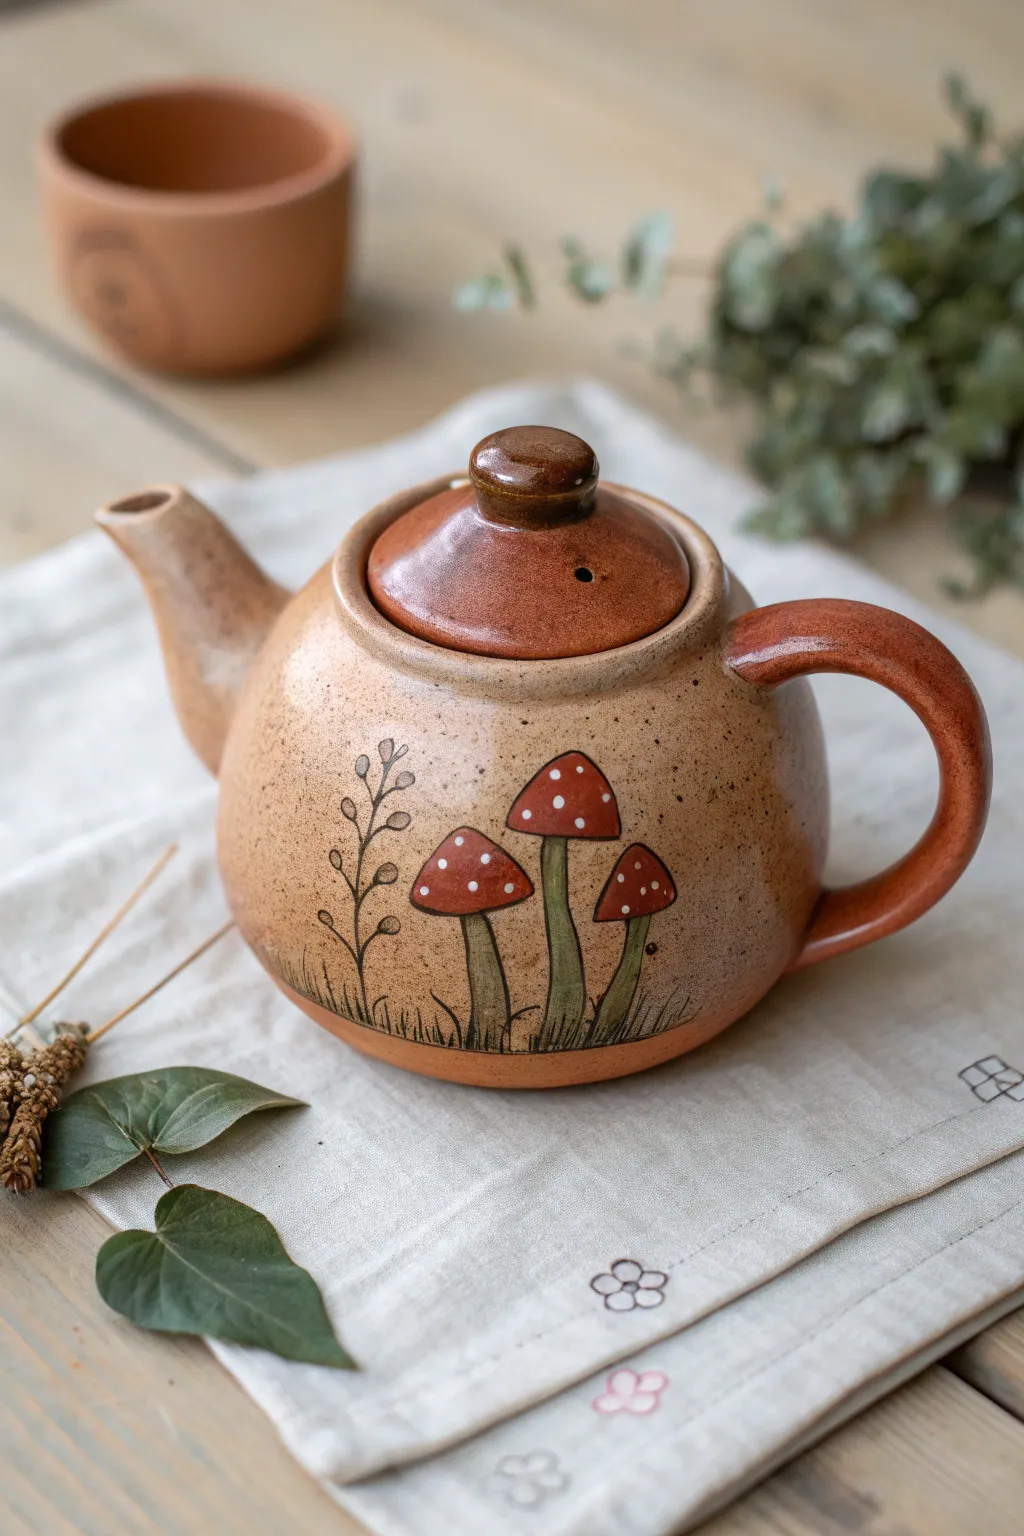
Bring a touch of fairy-tale charm to your tea time with this handcrafted ceramic teapot featuring playful red toadstools. The warm, speckled clay body combined with earthy glazes creates a cozy, rustic aesthetic perfect for cottagecore lovers.
How-To Guide
Materials
- Stoneware clay (speckled or buff)
- Pottery wheel (or slab roller/hand-building tools)
- Rib tools (wood and metal)
- Needle tool
- Trimming tools
- Underglazes: Red, Green, White, Black (or dark brown)
- Clear glaze (transparent)
- Terracotta or rust-colored glaze (for accents)
- Detail brushes (fine liner and small round)
- Sponge
- Scoring tool and slip
Step 1: Throwing the Body
-
Center and open:
Begin by wedging about 2-3 lbs of speckled stoneware clay. Center it firmly on the wheel and open the mound, pulling the floor flat but leaving enough thickness for trimming later. -
Pull the walls:
Pull the walls upward into a cylinder first to establish height. Once you have the height, begin to shape the belly of the teapot by pushing gently from the inside with one hand while supporting the outside with the other. -
Refine the shape:
Collar the neck in slightly to create a gallery for the lid. Use a metal rib on the exterior to smooth the surface and compress the clay, which also helps bring those beautiful speckles to the surface.
Clean Lines Only
If your black outline becomes too thick or smudges, use a stiff brush dampened with clean water to gently ‘erase’ or push the underglaze back into place before it dries.
Step 2: Crafting Attachments
-
Throw the lid:
Using a smaller amount of clay (about 0.5 lb), throw a lid that fits the gallery measurement of your pot. Create a simple, rounded knob on top while throwing, or attach a separate one later. -
Create the spout:
Throw a tapered spout on the wheel. It should be wider at the base and narrow at the pouring tip. Cut it off the wheel and let it firm up to leather-hard. -
Pull the handle:
Pull a clay handle directly from a lump of clay or roll a coil and flatten it slightly. Curve it into an ear shape and set it aside to stiffen slightly until it holds its arch.
Step 3: Assembly
-
Trim the body:
Once the body is leather-hard, trim the foot ring. While the pot is inverted, you can also smooth the bottom curve. -
Attach components:
Cut the spout at an angle to fit the body’s curve. hold it up to check the placement; the tip should be level with the lid gallery. Score and slip the contact points for both the spout and handle, pressing them firmly into place. -
Pierce the strainer:
Before the spout is permanently set, reach inside or use a drill tool to poke several holes in the teapot wall behind where the spout attaches to act as a built-in tea strainer.
Spout Flow
To prevent dripping, ensure the very tip of your spout has a sharp edge rather than a rounded rim. This cuts the water flow cleanly after pouring.
Step 4: Decoration & Glazing
-
Sketch the design:
On the leather-hard surface, lightly sketch the outline of three mushrooms and a sprig of foliage using a pencil. The graphite will burn off in the kiln. -
Apply underglaze base:
Paint the mushroom caps with a rich red underglaze. Use 2-3 coats for opacity. Paint the stems with a muted olive green underglaze. -
Add fine details:
Using a very fine liner brush and black underglaze (or a dark oxide wash), outline the mushrooms and stems. Draw the gills under the caps and add the delicate grass blades and leafy sprig to the left. -
Dot the caps:
Dip the back end of a paintbrush into white underglaze and gently dot the red caps to create the classic toadstool look. -
Bisque fire:
Let the teapot dry completely (slowly, to avoid cracking at attachments) and bisque fire to Cone 04. -
Apply accent glaze:
Dip the lid, the handle, and the very bottom rim of the teapot into a rust or terracotta-colored glaze. Wipe away any drips. -
Clear coat and final fire:
Dip the main body (where the illustration is) into a clear transparent glaze. This seals the clay and makes the underglaze pop. Fire to your clay body’s maturity temperature (likely Cone 5 or 6).
Once cooled, your charming new teapot is ready to brew your favorite blend


What Really Happens Inside the Kiln
Learn how time and temperature work together inside the kiln to transform clay into durable ceramic.
Pumpkin Patch Teapot With Curling Stem
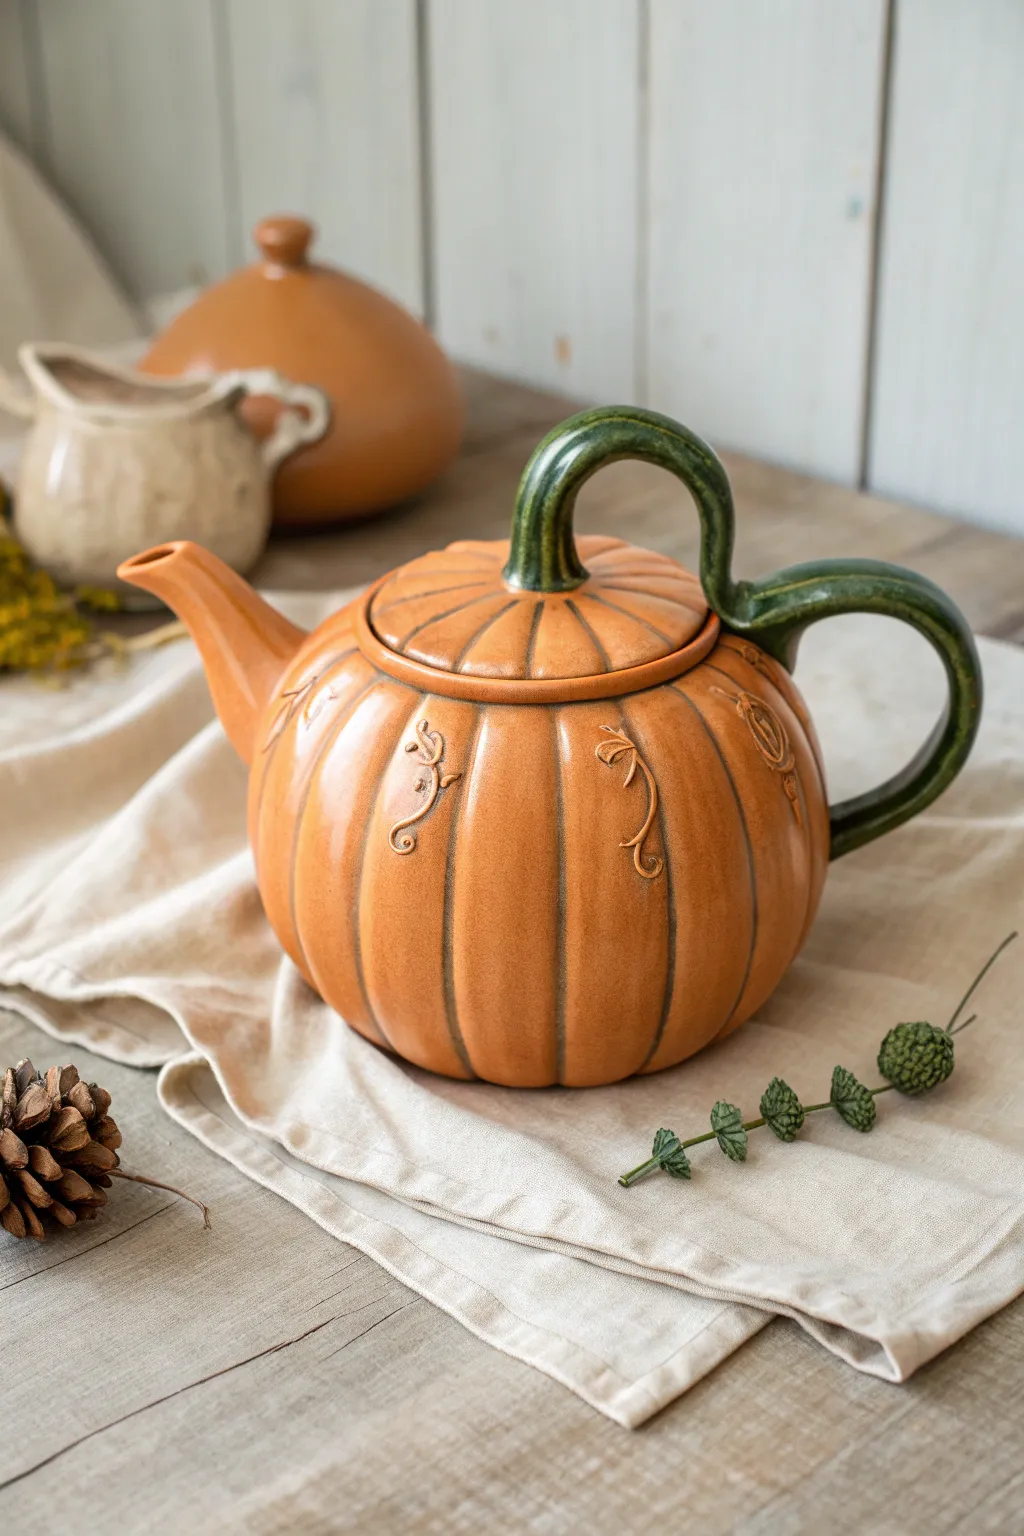
Embrace the harvest season with this charming ceramic project that transforms a simple sphere into an elegant pumpkin teapot. Featuring deep vertical ribs, delicate vine relief details, and a graceful sweeping green stem handle, this functional piece brings warmth to any autumn table setting.
Detailed Instructions
Materials
- Stoneware clay (smooth orange or buff body)
- Pottery wheel (optional, can be coil built)
- Rib tools (metal and wood)
- Needle tool
- Modeling tool for vines
- Slip and scoring tool
- Fettling knife
- Sponge
- Clear glaze
- Orange glaze (if using buff clay)
- Dark green glaze for stem/handle
- Oxide wash (optional for crevices)
Step 1: Forming the Body and Lid
-
Throw the base form:
Begin with about 3-4 pounds of wedged clay on the wheel. Center it and throw a rounded, voluminous sphere with a relatively narrow neck, ensuring the walls are even but sturdy enough to support alteration. -
Establish the gallery:
Create a deep, inset gallery at the rim where the lid will sit. This needs to be precise so the lid fits flush with the curve of the pumpkin later. -
Throw the lid:
Measure the gallery diameter with calipers. Throw a domed lid separately that matches this measurement perfectly, leaving a small amount of extra clay at the center top for attaching the stem later. -
Alter the shape:
Once the body has stiffened to a soft leather-hard stage, gently push the walls outward from the inside while supporting the outside to exaggerate the round, pumpkin-like fullness. -
Create the ribs:
Using a modeling tool or the edge of a wooden rib, press vertical indentations from the base to the rim at regular intervals. Smooth the spaces between these lines to create the bulging sections characteristic of a pumpkin.
Clean The Spout
To ensure a smooth pour without dripping, use a small drill bit or hole cutter to clean up the strainer holes inside the teapot body before the clay is bone dry.
Step 2: Adding the Spout and Handle
-
Form the spout:
Throw or hand-build a tapered spout. I prefer to bend it slightly while the clay is plastic to give it an organic, upward curve. -
Attach the spout:
Score and slip the attachment point on the body. Cut the spout base at an angle to fit the curve, attach it firmly, and clean up the seam so it looks like it’s growing from the pumpkin. -
Pull the handle stem:
Pull a thick, long handle from a lug of clay. This will serve as both the handle and the connecting stem, so it needs significant length and a distinct taper. -
Attach the handle base:
Attach the thicker end of your pulled handle to the lower back of the teapot body. Curve it upward in a generous C-shape. -
Connect to the lid:
This is the unique part: instead of attaching the top of the handle to the body, curve it down to touch the center of the lid. Create a faux attachment here that acts as the lifting knob, or if functional design permits, create a locking mechanism where the handle hovers over the lid stem. -
Shape the stem knob:
On the center of the lid, model the clay to look like the cut stem of a pumpkin, blending it perfectly with the green handle section that effectively ‘becomes’ the stem.
Step 3: Detailing and Surface Decoration
-
Enhance the ribs:
Go back over your vertical indentations with a damp sponge to soften sharp edges, ensuring the ribs look organic and plump rather than mechanically cut. -
Add vine reliefs:
Roll tiny, thin coils of clay. Score and slip them onto the shoulder of the pumpkin in curling, scroll-like patterns to mimic creeping vines. -
Refine the vines:
Use a small modeling tool to flatten the vines slightly and add texture, ensuring they are fully adhered so they don’t pop off during firing. -
Dry slowly:
Cover the entire piece loosely with plastic. Because of the variable thickness between the body and the added details, slow drying is crucial to prevent cracking.
Lid Fit Issues?
If the lid rattles after bisque firing, apply a grinding paste to the gallery and twist the lid back and forth to grind them into a perfectly tight fit before glazing.
Step 4: Glazing and Finishing
-
Bisque fire:
Fire the bone-dry piece to roughly Cone 04 to prepare it for glazing. -
Wax resist:
Apply wax resist to the foot of the pot and the gallery where the lid sits to prevent the lid from fusing to the pot during the glaze firing. -
Apply base color:
Dip or spray the body of the teapot in a glossy, warm orange glaze. Wipe away any glaze that got onto the handle area. -
Glaze the stem:
Carefully brush a rich, dark green glaze onto the handle, the spout tip (optional), and the stem knob on the lid. Allow the green to overlap slightly onto the orange for a natural transition. -
Highlight the vines:
If your glaze breaks over texture, the vines will naturally highlight. Otherwise, you can lightly brush a bit of iron oxide wash into the vine crevices before glazing to make them pop. -
Final firing:
Glaze fire the piece to the maturity temperature of your clay and glaze (typically Cone 5 or 6 for stoneware).
Once cooled, your durable stoneware pumpkin is ready to brew a comforting batch of tea for a cozy autumn afternoon
Lemon Drop Teapot With Citrus Texture
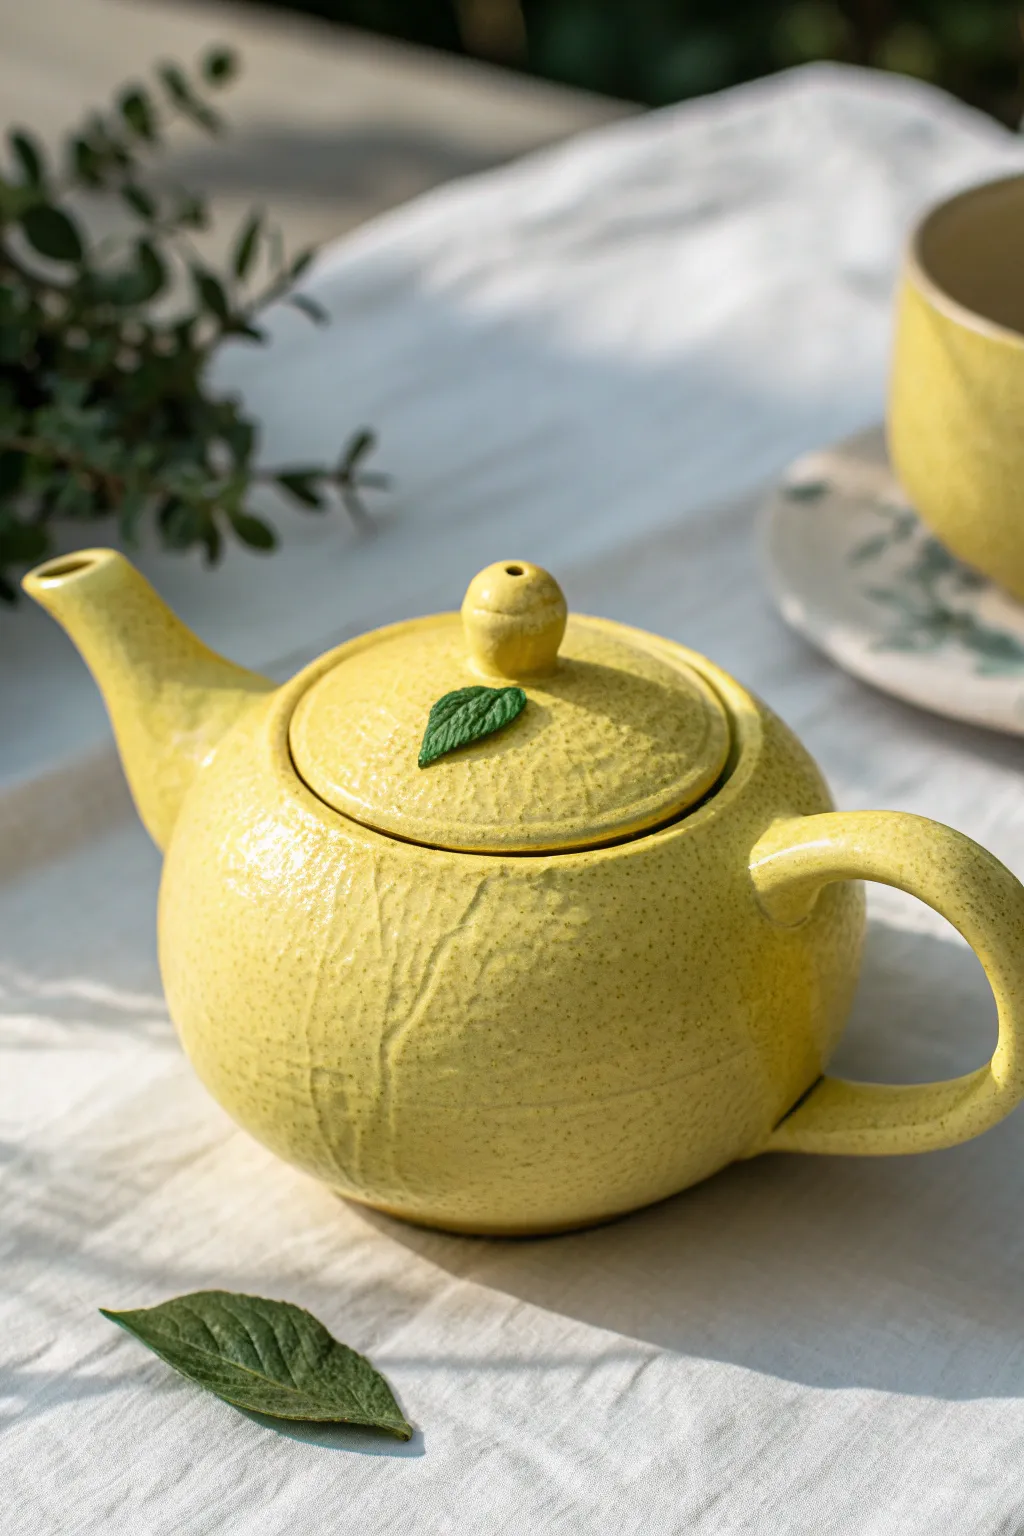
Bring a burst of citrus sunshine to your tea table with this delightful lemon-inspired teapot. Featuring a realistic rind texture and a charming green leaf accent, this project turns simple clay into a cheerful, functional piece of art.
Step-by-Step Guide
Materials
- White stoneware or earthenware clay
- Pottery wheel (optional, can be hand-built)
- Small sponge with coarse texture
- Pin tool or needle tool
- Rib tool (kidney)
- Scoring tool or serrated rib
- Slip (liquid clay)
- Underglazes: Lemon Yellow, Bright Green
- Clear variation glaze (food safe)
- Kiln
- Basic clay modeling tools
- Small paintbrush for details
Step 1: Forming the Body
-
Throw the base:
Begin with a ball of wedged clay on the wheel. Center it and open it up to create a rounded, bulbous form. Aim for a slightly flattened sphere shape to mimic the squat profile of a lemon. -
Shape the gallery:
At the rim, create a recessed gallery where the lid will eventually sit. Use a rib tool to smooth the inside curve while keeping the walls consistent in thickness. -
Create the lid:
Measure the gallery diameter carefully with calipers. Throw a small, domed lid that fits snugly into your teapot’s gallery, adding a small knob at the top center. -
Trim the foot:
Once leather hard, flip the teapot body over and trim a neat foot ring. This elevates the pot and gives it a finished look.
Step 2: Adding Appendages
-
Pull the handle:
Pull a strap of clay for the handle. Allow it to firm up slightly into a curve that mimics the natural ‘C’ shape shown in the image. -
Form the spout:
Roll a tapered coil or throw a small spout on the wheel. Gently bend it to create a graceful curve ensuring the tip is higher than the lid gallery so tea doesn’t spill when full. -
Attach the spout:
Hold the spout up to the body to check the angle. Score and slip both the attachment point on the body and the base of the spout, then press firmly to join. Blend the seam smooth with a modeling tool. -
Attach the handle:
Score and slip the back of the pot directly opposite the spout. Attach the handle securely, blending the clay at the top and bottom joins so they look seamless.
Uneven Texture?
If the sponge texture looks too uniform, try using a stiff bristle brush to stipple random areas. Varying the pressure creates a more organic, natural fruit rind look.
Step 3: Textures and Details
-
Create the citrus texture:
This is the crucial step for the ‘lemon’ look. Take a coarse sponge and damp it slightly. Press it repeatedly all over the leather-hard exterior of the pot and lid to create a pitted, rind-like surface. -
Refine the surface:
I like to go back over any areas where the handle or spout joins were smoothed and re-texture them gently so the orange-peel effect is continuous. -
Sculpt the leaf:
Hand-model a small, flat teardrop shape from clay. Use a needle tool to draw veins into it, creating a realistic mint or lemon leaf. -
Attach the leaf:
Score and slip the area on the lid next to the knob. Press the leaf onto the lid, curling the edges upward slightly for a dynamic, natural look. -
Dry slowly:
Cover the teapot loosely with plastic to let it dry very slowly. This prevents the spout or handle from cracking away from the body as they shrink.
Make it a Set
Create matching teacups by pinching small balls of clay into cup shapes and adding the same citrus texture. Glaze the interiors white for a clean contrast.
Step 4: Glazing and Firing
-
Bisque fire:
Fire the bone-dry piece to cone 04 (or your clay’s bisque temperature) to prepare it for glazing. -
Apply base color:
Brush three coats of Lemon Yellow underglaze over the entire exterior of the teapot and lid, ensuring you get into all the textured pits. -
Paint the leaf:
Carefully paint the sculpted leaf with Bright Green underglaze. You can wipe back a tiny bit on the veins to highlight the texture if desired. -
Sponge technique:
To enhance the texture, you can dab a slightly darker yellow or watered-down orange very lightly over the surface with a sponge, leaving the deeper pits bright yellow. -
Glaze and final fire:
Dip or brush a clear, food-safe glaze over the entire piece (except the foot ring). Fire to the final temperature appropriate for your clay body (e.g., Cone 5/6).
Now brew your favorite tea and enjoy serving it from your cheerful handmade creation

TRACK YOUR CERAMIC JOURNEY
Capture glaze tests, firing details, and creative progress—all in one simple printable. Make your projects easier to repeat and improve.
Honeycomb Teapot With Tiny Bees
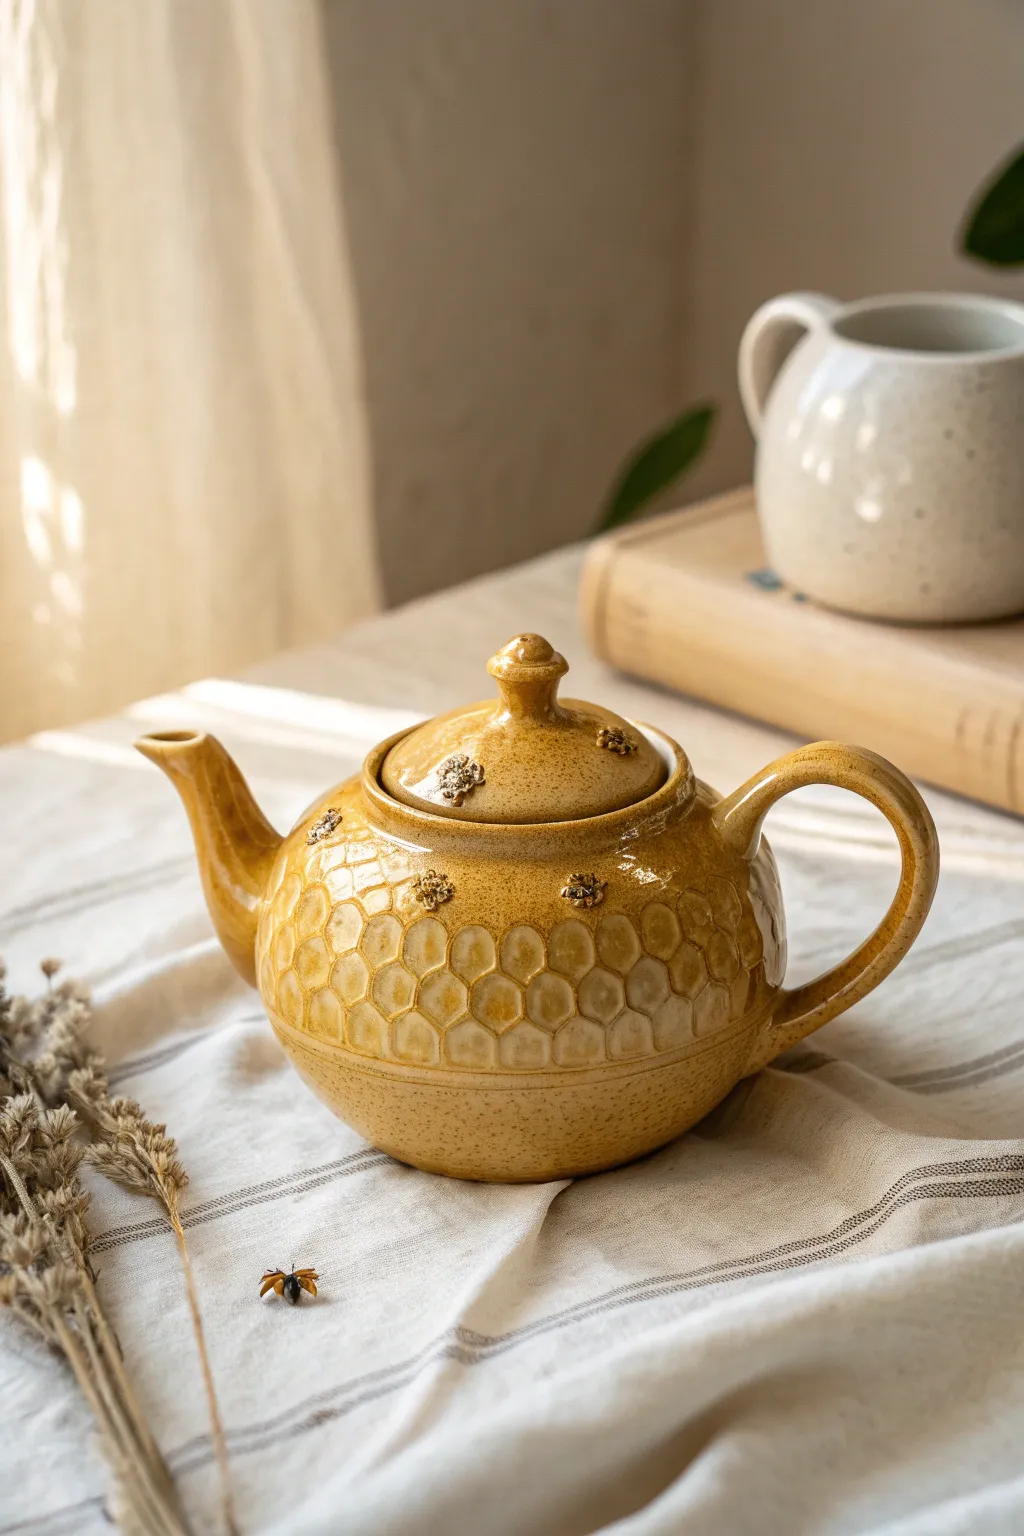
Bring the warmth of a summer afternoon to your tea table with this delightful handmade teapot featuring a tactile honeycomb texture and tiny sculpted bees. This project uses intermediate hand-building techniques to create a functional piece of art glazed in a rich, speckled honey-yellow hue.
How-To Guide
Materials
- Stoneware clay (smooth, light-colored body)
- Pottery wheel (optional, can be hand-built)
- Rib tools (metal and rubber)
- Hexagon texture roller or stamp
- Scoring tool and slip
- Needle tool
- Sponge
- Honey-yellow stoneware glaze (food safe)
- Dark oxide wash (iron oxide or manganese)
- Small detail brushes
- Ceramic kiln
Step 1: Forming the Body
-
Prepare the clay:
Begin by wedging your stoneware clay thoroughly to remove any air bubbles, ensuring a smooth consistency for throwing or coil building. -
Throw the base form:
Use a wheel to throw a round, bulbous belly for the teapot. If you are hand-building, create two pinch pots and join them, or coil build a rounded vessel shape. Aim for a wall thickness of about 1/4 inch. -
Refine the shape:
While the clay is leather hard, trim away excess weight from the base and refine the curve of the pot using a metal rib to ensure a smooth transition from the foot to the belly. -
Cut the lid opening:
Use calipers to measure and cut a circular opening at the top for the lid. Save the excess clay to form the lid gallery or throw a separate gallery directly on the pot rim.
Clean Texture
When pressing the honeycomb texture, support the teapot wall from the inside with your hand or a sponge to prevent the form from collapsing inward.
Step 2: Texture and Details
-
Apply the honeycomb texture:
Once the pot is leather-hard but still receptive to impressions, carefully press a hexagonal texture roller or individual stamp into the central band of the teapot belly. Leave the very bottom and the shoulder area smooth for contrast. -
Create the spout:
Fashion a spout by rolling a tapered coil or throwing a small cylinder on the wheel. Bend it gently to create a pouring curve and cut the attachment angle to fit the pot’s curve. -
Form the handle:
Pull a strap of clay for the handle. Shape it into a classic ear curve that complements the roundness of the pot. Ensure it’s thick enough to support the weight of a full pot. -
Attached appendages:
Score the attachment points on the body, spout, and handle deeply. Apply slip generously and press the parts firmly into place. Smooth the seams with a modeling tool or wet finger, blending the clay for a secure bond.
Step 3: Sculpting the Lid and Bees
-
Make the lid:
Create a domed lid that fits snugly into your gallery. Add a small, knob-like finial on top for easy lifting. -
Sculpt tiny bees:
Roll very tiny balls of clay for the bee bodies. Add minuscule wings by flattening tiny teardrop shapes. I like to use a needle tool to scratch subtle stripes onto their backs. -
Attach the bees:
Score and slip the tiny bees onto various spots—some on the smooth shoulder, some crawling over the honeycomb texture, and one or two on the lid. Press them on gently but firmly so they don’t pop off during firing. -
Dry slowly:
Cover the teapot loosely with plastic to let it dry very slowly. This is crucial for teapots to prevent the spout or handle from cracking away from the body.
Bee Gold Luster
For extra luxury, apply a genuine gold overglaze (luster) to the bees’ wings after the glaze firing and refire at a low temperature (cone 018).
Step 4: Glazing and Firing
-
Bisque fire:
Once bone dry, fire the piece to bisque temperature (usually cone 04 or 06) to prepare it for glazing. -
Apply oxide wash:
Brush a dark oxide wash (like iron oxide) into the crevices of the honeycomb texture and the details of the bees. Wipe away the excess with a damp sponge, leaving the dark color only in the deep recesses to enhance depth. -
Glaze application:
Pour a food-safe, honey-yellow glaze into the interior and swirl to coat. Dip or brush the exterior with the same glaze. If you want the bees to stand out more, you can carefully wipe the glaze off their bodies or use a tiny bit of dark underglaze on their stripes before the main glaze. -
Glaze firing:
Fire the teapot to the maturity temperature of your clay and glaze (typically cone 5 or 6 for stoneware). Allow the kiln to cool completely before opening. -
Final check:
Sanding the bottom of the foot ring if it feels rough ensures it won’t scratch your table.
Now you have a charming vessel perfect for brewing your favorite herbal blends.
Cute Cat Face Teapot With Whisker Details
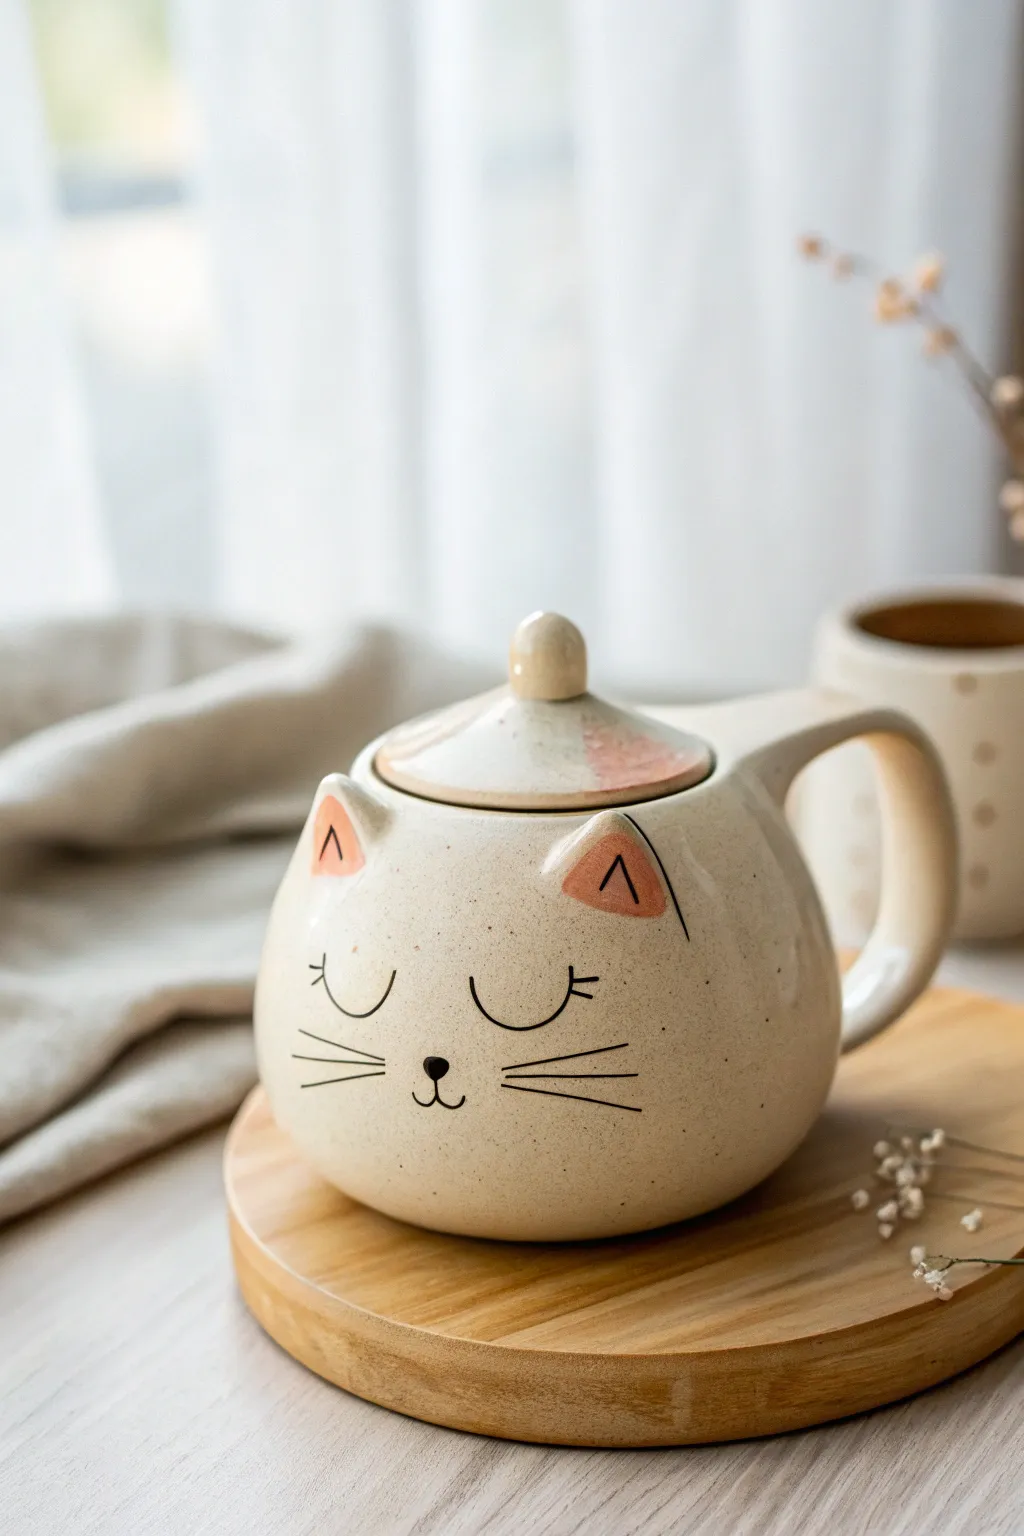
This adorable handmade teapot features a rounded cat face with serene, sleeping eyes and raised ear details, perfect for a cozy afternoon tea. Crafted from speckled clay with a smooth glaze finish, it combines functional pottery with whimsical character design.
Detailed Instructions
Materials
- Speckled stoneware clay (approx. 2-3 lbs)
- Pottery wheel (or rolling pin for hand-building)
- Rib tool and sponge
- Pin tool or clay knife
- Loop tool for trimming
- Slip and scoring tool
- Underglazes (Black and Soft Pink)
- Small detail paintbrush
- Clear food-safe glaze
- Kiln
Step 1: Throwing the Body & Lid
-
Center the clay:
Start with a well-wedged ball of speckled clay on your wheel. Center it firmly, creating a wide, low mound rather than a tall cylinder to support the round shape. -
Open and pull the walls:
Open the clay and pull the walls outward to create a bulbous, spherical shape. Keep the rim slightly thickened to support a gallery for the lid. -
Shape the belly:
Use a rib tool on the exterior while pushing gently from the inside to create a full, round ‘belly’ for the cat’s face. Narrow the neck slightly at the top. -
Form the gallery:
At the rim, use a creating tool or your fingers to press a small ledge (gallery) inside the opening where the lid will eventually sit. -
Throw the lid:
Using a smaller ball of clay, throw a simple domed lid that fits your gallery measurements. I like to throw the knob directly on top as a small, rounded nub.
Step 2: Sculpting Features
-
Trim the base:
Once leather hard, trim the bottom of the teapot to create a clean foot ring. Check the lid fit and trim if necessary. -
Pull the handle:
Pull a thick strap handle from a lug of clay. It should have a gentle, high specific curve to mimic a cat’s tail or arched back. -
Attach the handle:
Score and slip the back of the pot and the handle ends. Attach firmly, smoothing the seams so it looks like it grows out of the pot. -
Form the snout:
Roll a very small coil of clay for the spout. Attach it opposite the handle, blending it seamlessly into the body. -
Sculpt the ears:
Cut two triangular shapes from a clay slab. Curve them slightly to give them dimension. -
Attach the ears:
Score and slip the ears onto the upper shoulder of the pot, near the rim but leaving room for the lid to lift off easily. Smooth the connection points.
Sticky Lids?
If you fire the lid on the pot, apply a generous layer of alumina hydrate or wax resist mixed with alumina on the gallery ledge to prevent them fusing together.
Step 3: Decoration & Glazing
-
Paint the ears:
Using pink underglaze, paint a triangle inside each sculpted ear to define the inner ear details. -
Draft the face:
Lightly sketch the facial features with a pencil. The graphite will burn off in the kiln, so don’t worry about mistakes. -
Paint facial details:
With a fine liner brush and black underglaze, paint two ‘U’ shapes for sleeping eyes. Add eyelashes, a small nose, mouth, and three long whiskers on each cheek. -
Bisque fire:
Once fully bone dry, fire the piece to cone 04 (or your clay’s specific bisque temperature). -
Apply clear glaze:
Dip the entire teapot and lid into a clear, food-safe glaze. Wipe the foot ring clean with a sponge. -
Final firing:
Glaze fire the piece to maturity (usually cone 6 for stoneware). Ensure the lid is fired separately or with kiln wash to prevent sticking.
Make it a Set
Create matching teacups by throwing small cylinders and adding just the painted face and whiskers—skip the sculpted ears to keep them stackable.
Now you have a charming, functional piece of art ready for your favorite herbal blend
Bunny Lid Teapot With Floppy Ears
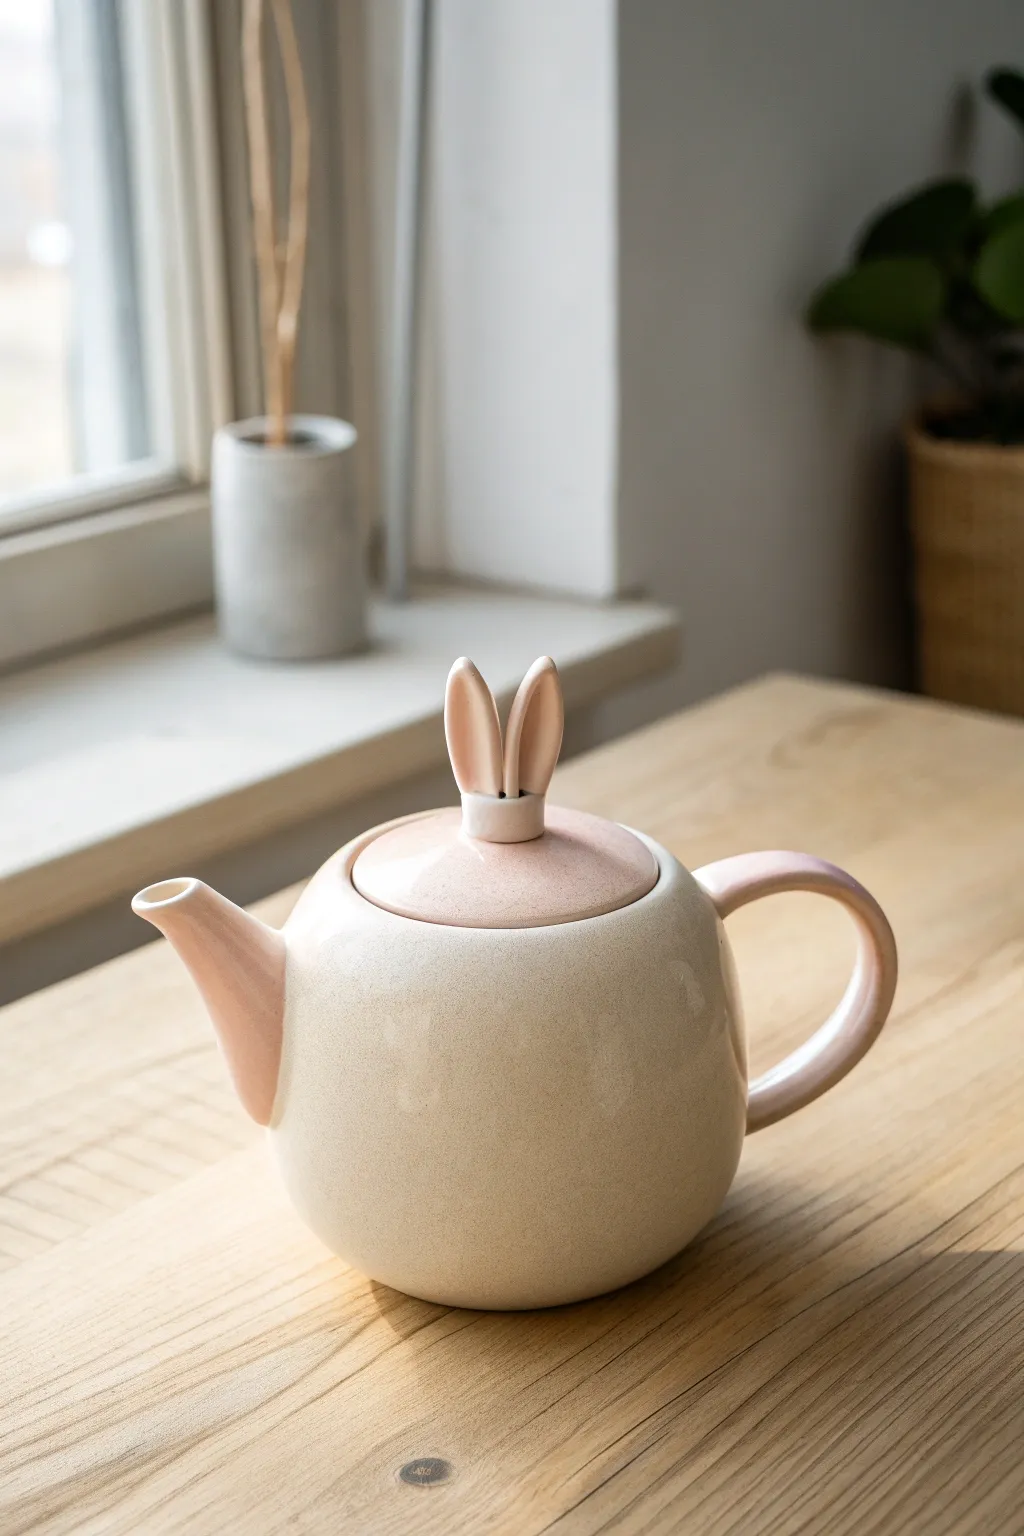
This adorable ceramic project features a rounded, creamy teapot crowned with a playful set of bunny ears on the lid. With soft pink accents on the spout, handle, and ears, it brings a gentle, storybook charm to your tea service.
How-To Guide
Materials
- Stoneware clay (smooth white or speckled)
- Pottery wheel (optional, can be hand-built)
- Rib tool
- Wire cutter
- Needle tool
- Sponge
- Scoring tool
- Slip
- Underglaze (soft pastel pink)
- Clear or creamy white glaze (glossy)
- Kiln
Step 1: Forming the Body and Lid
-
Center and open the clay:
Begin with a ball of clay on the wheel, centering it completely. Open the clay to create the floor of your pot, keeping it slightly thicker than usual to support the rounded shape. -
Pull the walls:
Pull the clay up into a cylinder first. Once you have height, use a rib tool on the outside and your hand on the inside to gently push the belly of the pot outward to create a bulbous, apple-like roundness. -
Collar the neck:
Gently collar the top rim inward to create a defined gallery for the lid to sit on. Smooth the rim with a chamois for a comfortable finish. -
Throw the lid:
Measure the gallery diameter with calipers. Throw a small, flat lid matching this measurement, ensuring it has a slight dome shape to mimic the curve of the pot. -
Let it firm up:
Allow both the pot and lid to dry to a leather-hard state where they are firm enough to handle without deforming but still workable.
Ear Stability Tip
Make the bunny ears fairly thick at the base where they attach to the lid. Thin ears are fragile and more likely to warp or snap off during use.
Step 2: Adding the Bunny Details
-
Pull the handle:
Pull a strap of clay for the handle. While it’s still pliable, curve it into an elegant ‘C’ shape that complements the round body. Allow it to stiffen slightly. -
Create the spout:
Throw a small spout on the wheel or hand-build a cone shape. Trim the base at an angle so it fits flush against the curve of the teapot’s body. -
Attach the spout and handle:
Use a needle tool to poke strainer holes in the body where the spout will go. Score and slip the contact points, then firmly attach the spout and handle. Smooth the seams with a damp sponge until they are invisible. -
Sculpt the ears:
Roll two small, tapered coils of clay for the ears. Flatten them slightly and use your thumb to create a shallow inner ear depression. -
Form the lid knob:
Create a small, cylindrical base for the ears to sit on. Attach the two ears to this base, slightly separated. -
Attach ears to lid:
Score the center of your leather-hard lid and the base of the ear assembly. Apply slip and press the bunny ears firmly onto the lid. I like to blend the clay around the base with a modeling tool for a seamless look.
Step 3: Glazing and Firing
-
Bisque fire:
Let the teapot dry slowly and completely under loose plastic to prevent cracking. Once bone dry, fire it in the kiln to bisque temperature (usually cone 04). -
Apply pink underglaze:
Using a soft brush, apply three coats of pastel pink underglaze specifically to the spout, the handle, the top surface of the lid, and the bunny ears. Leave the main body unpainted. -
Wax resist:
Apply wax resist over the pink areas if you want them to remain matte, or simply to protect your lines if you plan to dip the pot. -
Glaze the body:
Dip the teapot body into a creamy white or transparent glaze. If you used a speckled clay body, a transparent glaze will let those lovely speckles show through. -
Clean the foot:
Wipe the bottom of the teapot and the rim where the lid sits with a clean sponge to remove any glaze drips. -
Final fire:
Fire the piece again to your glaze temperature (typically cone 5 or 6). Let the kiln cool completely before retrieving your new bunny friend.
Texture Twist
Before the clay dries, gently press a piece of lace or fabric into the white body of the teapot for a subtle texture that catches the glaze beautifully.
Now you have a charming, hand-crafted vessel perfect for serving springtime tea
Whale Teapot With a Curved Tail Handle
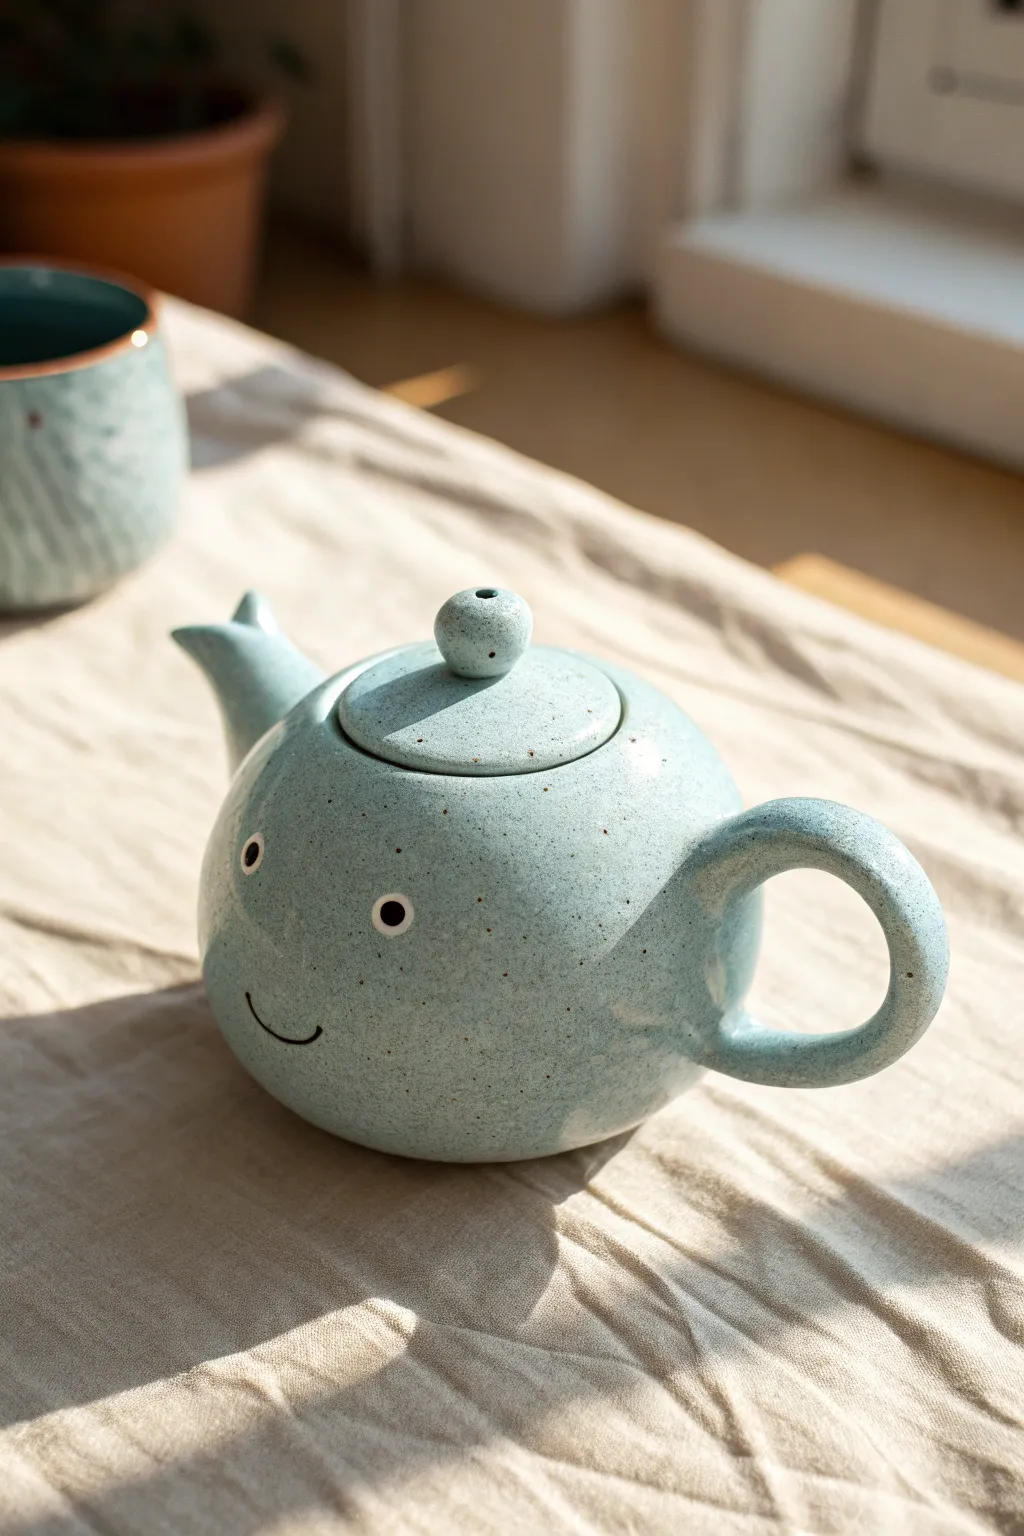
Bring the ocean to your tea table with this adorable whale-shaped teapot featuring a uniquely curved tail handle. Its speckled blue glaze and minimalist smiling face give it a modern yet playful character perfect for cozy afternoons.
Step-by-Step Guide
Materials
- Stoneware clay (approx. 2-3 lbs)
- Pottery wheel (or can be hand-built with pinch/coil method)
- Rib tool
- Needle tool
- Loop tool for trimming
- Scoring tool or serrated kidney
- Slip
- Sponge
- Speckled light blue stoneware glaze
- Black underglaze (for the face)
- Fine detail brush
- Calipers (optional but helpful)
Step 1: Forming the Body and Lid
-
Throw the body:
Begin by centering about 1.5 lbs of clay on the wheel. Open the clay and pull the walls into a bulbous, spherical shape, ensuring the opening at the top is narrow enough to support a lid gallery. -
Shape the curve:
Use a rib tool on the outside while gently pushing from the inside to create a smooth, round ‘belly’ for the whale. Smooth the surface with a sponge to remove throwing lines. -
Create the gallery:
At the rim, use a wooden tool or your finger to press a small ledge (gallery) into the inside of the rim where the lid will sit. -
Throw the lid:
With a smaller ball of clay, throw a lid that fits your caliper measurement of the gallery. Include a small, solid knob in the center. -
Trim the pieces:
Once leather hard, trim the bottom of the teapot to create a defined foot ring. Trim the underside of the lid to ensure a snug fit and remove excess weight.
Airflow is Key
Poke a tiny steam hole in the lid’s knob or near the rim. This prevents the lid from rattling when pouring hot tea.
Step 2: Sculpting the Features
-
Pull the spout:
Pull a short, stout spout from a small lump of clay. It should be wide at the base and taper slightly. Cut the attachment angle to match the curve of the body. -
Create the tail handle:
Roll a thick coil of clay. Taper one end slightly and bend it into a deep ‘C’ shape or loop. At the ‘tail’ end (the top of the handle), flatten the clay slightly to suggest flukes. -
Attach the spout:
Score the body and the spout base aggressively. Apply slip and press the spout firmly onto the front. Smooth the seam completely so it looks like one continuous piece. -
Attach the tail handle:
Score and slip the back of the pot. Attach the bottom of the coil and the top part, arching it high. The ‘tail’ fluke should attach near the rim, creating a sturdy loop for gripping. -
Refine the shape:
I always take a moment here to revisit the handle connection points, adding tiny coils of clay to reinforce the joints if they look thin. -
Drill the strainer:
Using a drill tool or needle tool, poke several holes through the body wall inside the area where the spout is attached to act as a tea strainer.
Handle Drooping?
If the tail handle sags while wet, prop it up with a piece of foam or a dry sponge until the clay reaches leather-hard stage.
Step 3: Decorating and Glazing
-
Bisque fire:
Let the piece dry slowly under plastic to prevent handle cracks, then bisque fire to cone 04 (or your clay’s specific temperature). -
Paint the face:
Using a fine detail brush and black underglaze, paint two small circles for eyes and a wide, simple ‘U’ shape for the smile on the front lower belly. -
Wax resist:
Apply wax resist over the painted face details and the foot ring to prevent glaze from adhering to these spots. -
Apply glaze:
Dip or brush the entire teapot (lid separate) in a speckled light blue glaze. The speckles in the glaze give the whale a lovely organic texture. -
Clean the contact points:
Wipe away any glaze from the gallery rim and the edge of the lid where they touch to prevent them from fusing together in the kiln. -
Final firing:
Glaze fire the piece to the maturity temperature of your clay and glaze (typically Cone 5 or 6 for stoneware).
Once cooled, your charming whale teapot is ready to serve your favorite brew with a splash of fun
Cloud Teapot With Raindrop Charm Dangles
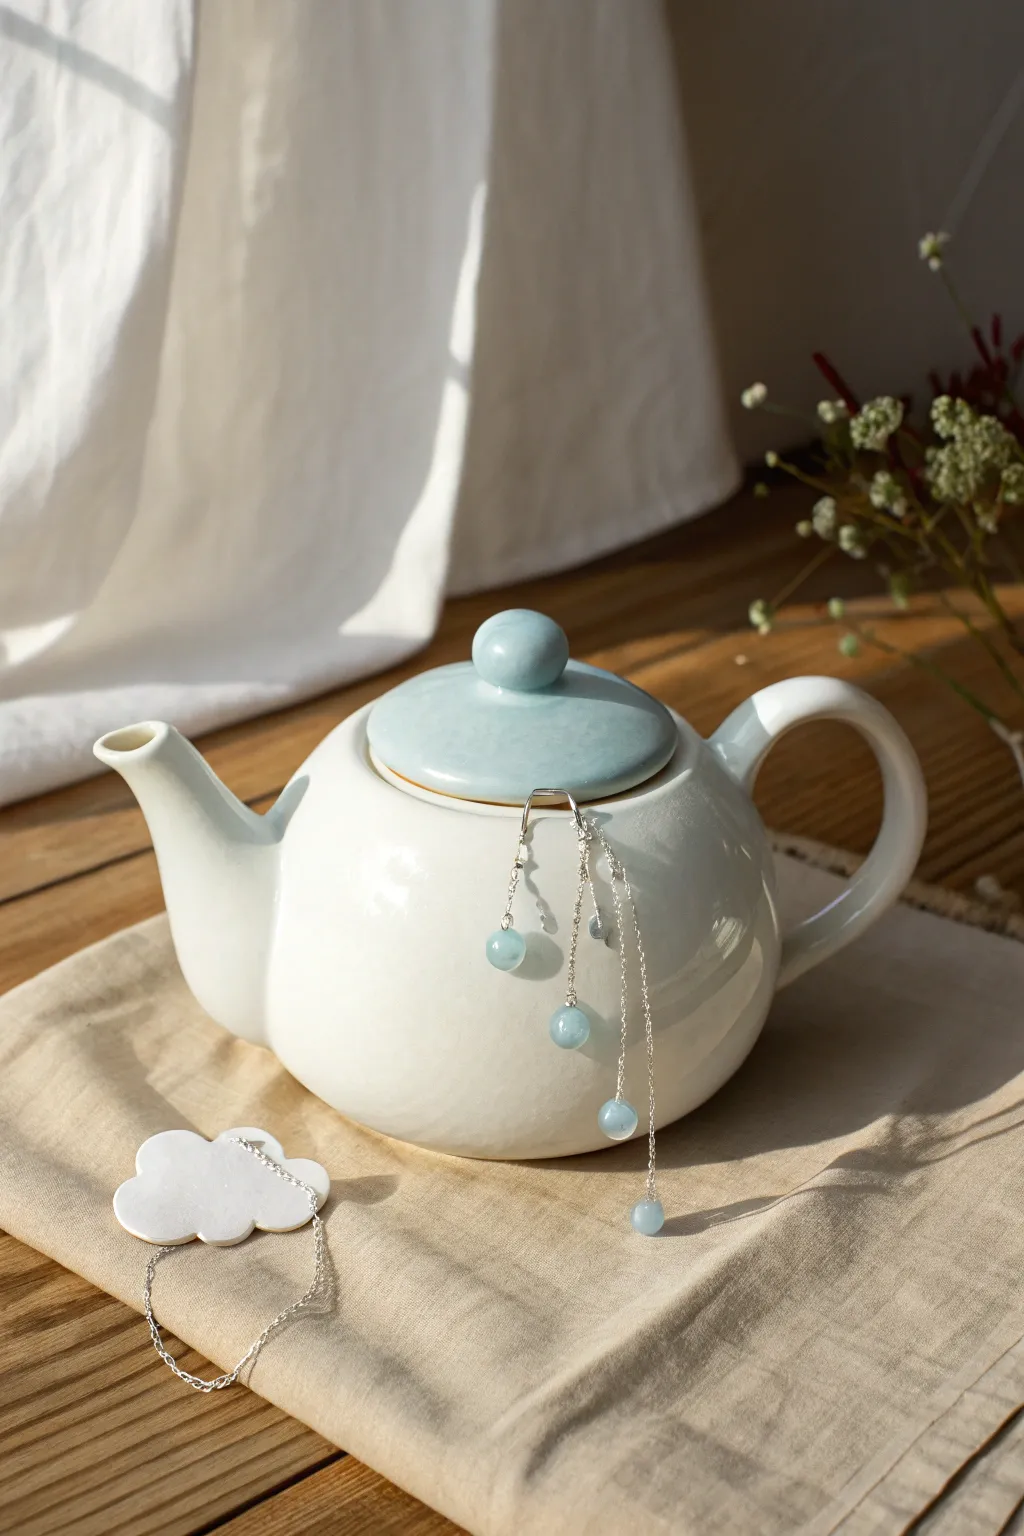
Transform a tea ritual into a moment of calm with this charming ceramic set featuring a fluffy white cloud charm and delicate raindrop dangles. The soft white glaze and powder blue accents create a serene, airy aesthetic perfect for a cozy afternoon.
Step-by-Step Tutorial
Materials
- White stoneware clay
- Pottery wheel (or slab roller for hand-building)
- Small cloud-shaped clay cutter (or needle tool)
- Glossy white glaze
- Light powder blue glaze
- Sterling silver chain (fine gauge)
- 4-5 Light blue glass or gemstone beads (6-8mm)
- Silver headpins
- Jump rings
- Needle tool
- Sponge
- Rib tool
- Small drill bit (for fired ceramic) or needle tool (for wet clay)
- Jewelry pliers (round nose and flat nose)
- Wire cutters
Step 1: Crafting the Teapot Body
-
Throw the Body:
Begin by centering a ball of white stoneware clay on your wheel. Open it up and pull the walls into a classic rounded shape about 4-5 inches tall, keeping the belly full and the rim slightly narrowed to hold a lid. -
Trim and Smooth:
Once leather hard, trim the foot of the pot to give it a slight lift. Use a damp sponge to smooth away any throwing lines for that sleek, modern finish seen in the photo. -
Create the Spout:
Throw a small, separate cylinder for the spout, tapering it gently. Cut the attachment angle and join it securely to the body, ensuring the tip is level with the rim to prevent dripping. -
Pull the Handle:
Pull a strap handle and attach it opposite the spout. Aim for a comfortable, curved loop that mimics the roundness of the pot.
Glaze Filled The Hole?
If glaze seals your tiny holes during firing, don’t panic. Use a very fine diamond drill bit with a Dremel tool and water (to reduce dust) to gently re-open them after firing.
Step 2: Making the Lid & Cloud Charm
-
Measure the Opening:
Use calipers to measure the inside of your teapot rim. Throw a lid to fit this measurement snuggly, adding a small, rounded knob on top. -
Cut the Cloud:
Roll out a small slab of clay, roughly 1/4 inch thick. Use a cloud-shaped cutter or freehand a fluffy cloud shape with a needle tool. -
Pierce Attachment Holes:
While the cloud is leather hard, use your needle tool to pierce one small hole at the top (for hanging) and three tiny holes along the bottom edge (for the rain chins). Wiggle the tool slightly to ensure the glaze won’t fill them later. -
Pierce the Lid Knob:
Carefully drill a horizontal hole through the lid knob while it is leather hard. This allows you to thread the chain through later. -
Bisque Fire:
Allow all pieces to bone dry completely, then load them into the kiln for a bisque firing.
Level Up: Stormy Weather
Swap the white porcelain for a speckled clay body and use a grey-blue glaze. Use faceted dark blue crystals for the rain to create a moody, storm-cloud aesthetic.
Step 3: Glazing Process
-
Wax Resist:
Apply wax resist to the foot of the teapot and the rim where the lid will sit to prevent sticking during firing. -
Glaze the Body:
Dip the teapot body and the cloud charm into a glossy white glaze. Wipe away any drips immediately with a sponge. -
Glaze the Lid:
Dip or brush the lid with a soft, powder blue glaze. The contrast between the white body and blue lid is essential for the sky-inspired look. -
Refine the Holes:
Before the glaze dries completely, use a pin to double-check that the holes in the cloud charm and lid knob are clear of glaze. -
Glaze Fire:
Fire all pieces again to the temperature required by your specific clay and glaze bodies.
Step 4: Assembly
-
Create Bead Links:
Slide a light blue bead onto a headpin. Trim the excess wire and use round-nose pliers to create a closed loop at the top. Repeat for all your ‘raindrops’. -
Cut the Rain Chains:
Cut your silver chain into varying lengths (e.g., 2 inches, 3 inches, and 4 inches) to create a staggered, natural rain effect. -
Connect Raindrops:
Use small jump rings to attach one beaded link to the bottom of each chain length. -
Attach to Cloud:
Open the jump rings at the top of these chains and attach them to the holes along the bottom of your ceramic cloud. -
Thread the Lid:
Thread a longer piece of chain through the hole in the lid knob. Attach one end to the top hole of the cloud charm using a jump ring, securing the charm to the teapot.
Pour a warm cup of tea and enjoy the gentle clinking of your handmade rain chains.
Candy Gloss Pastel Teapot in Ombre
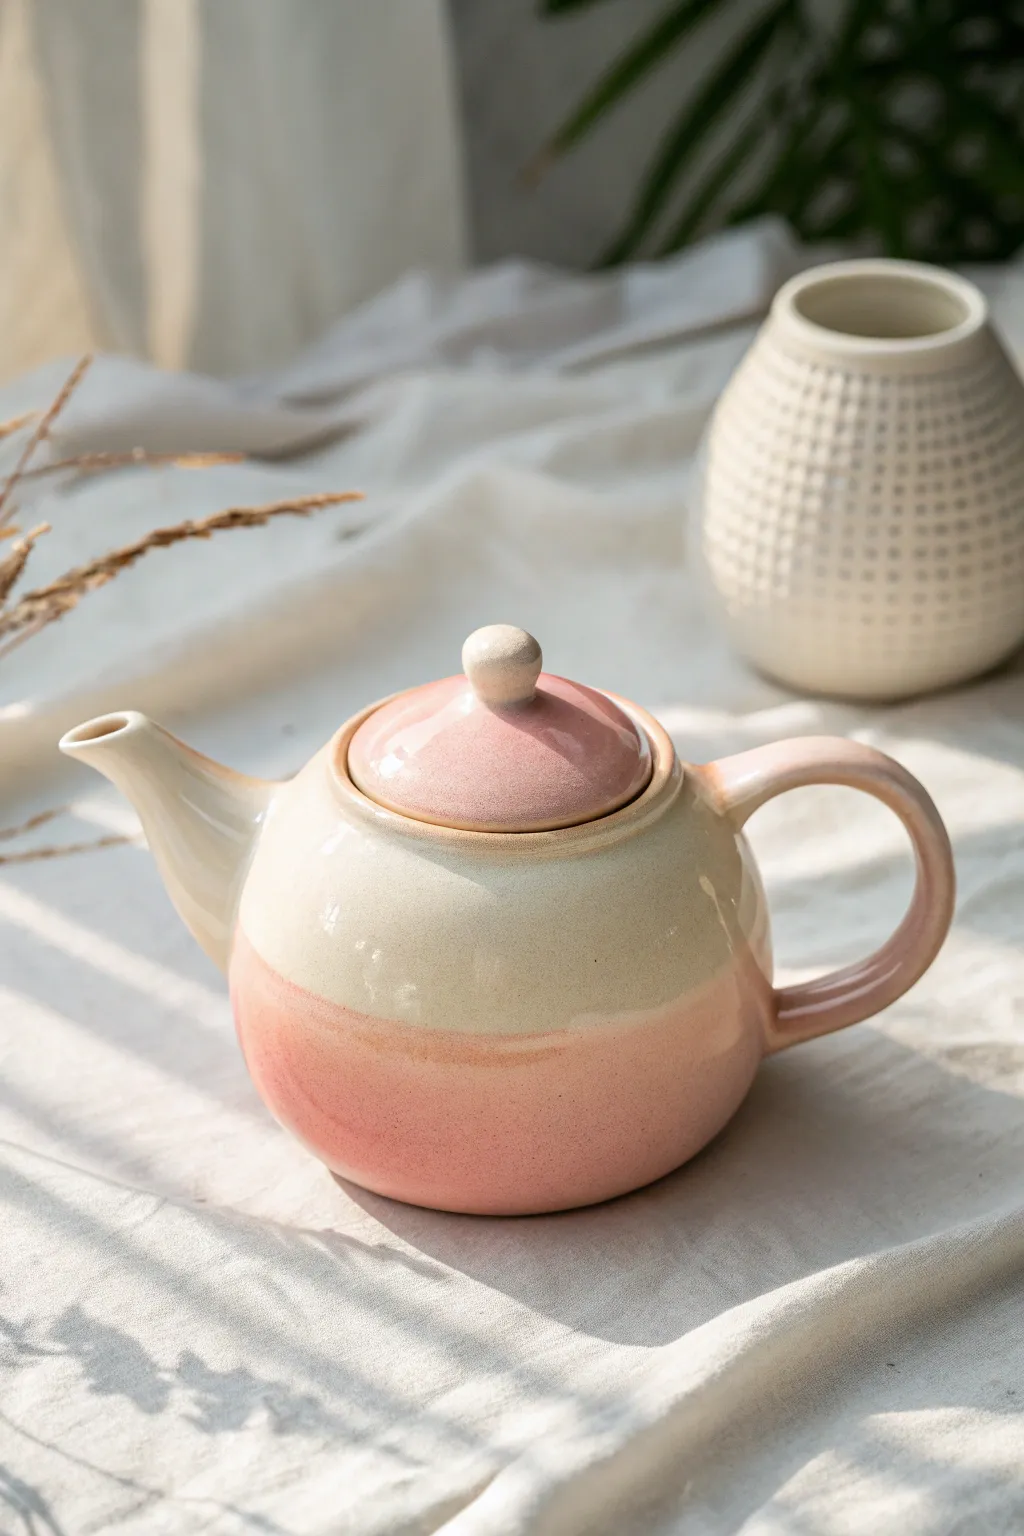
Soft and sweet like spun sugar, this ceramic teapot showcases a gentle two-tone ombre effect that transitions from creamy white to blushing pink. The high-gloss finish gives it a polished, professional look perfect for afternoon tea or as a charming shelf display.
Step-by-Step Guide
Materials
- Stoneware or white earthenware clay (approx. 2-3 lbs)
- Pottery wheel (or coil-building supplies for hand-building)
- Pottery tools (rib, needle tool, wire cutter, trimming tools)
- Sponge
- Slip and scoring tool
- Underglaze in pastel pink
- Clear dipping glaze (cone 5/6 or suitable for your clay)
- Cream/White breaking glaze (optional, for top layer)
- Soft fan brush
- Kiln access
Step 1: Throwing the Body
-
Center the clay:
Start by wedging your clay thoroughly to remove air bubbles, then secure a 1.5-2 lb ball on your wheel head. Use steady pressure and water to center the clay until it spins without wobbling. -
Open and widen:
Press your thumbs into the center to open the form, leaving about a half-inch floor. Gently pull the clay outward to create a flat inside bottom before pulling up the walls. -
Pull the walls:
Using even pressure between your inside and outside fingers, pull the cylinder walls upward. Aim for a consistent thickness of about 1/4 inch throughout the height. -
Shape the belly:
Once you have height, use a rib tool on the outside and your hand on the inside to gently push the belly of that pot outward, creating that classic rounded teapot curve. -
Collar the neck:
Gently squeeze inwards at the top rim to collar the neck in slightly. Use a caliper to measure the opening size so you can make a perfectly fitting lid later.
Smooth Pour Specialist
When attaching the spout, ensure the tip sits slightly higher than the rim of the teapot body. This simple alignment trick prevents the tea from spilling out when the pot is filled to the top.
Step 2: Components and Trimming
-
Throw the spout:
Using a smaller amount of clay (about 0.5 lb), throw a tall, narrow cone shape. Flare the top rim slightly to create a good pouring lip. -
Create the lid:
Throw a small lid off the hump or as a standalone piece, measuring it frequently against your caliper setting. Add a small, rounded knob to the top for easy lifting. -
Pull the handle:
Pull a strap of clay using water and tension, creating a smooth, C-shaped curve. Let it stiffen slightly on a board until it holds its shape. -
Trim the foot:
Once the body is leather hard, flip it over and center it on the wheel. Trim away excess weight from the bottom and carve a neat foot ring for stability.
Glaze Running?
If the glaze runs too much where the colors overlap, your application might be too thick. Use a thinner layer at the overlap point or verify that your glazes are stable and not ‘runny’ recipes.
Step 3: Assembly and Handling
-
Attach the spout:
Hold the spout up to the body to find the right angle. Cut the spout base to fit the curve, trace the outline, and drill straining holes inside the traced area. Score, slip, and firmly attach the spout. -
Attach the handle:
Score and slip the attachment points opposite the spout. Press the handle firmly onto the body, smoothing the joints with a wooden tool or damp sponge to make them seamless. -
Check lid fit:
Before the clay dries completely, check the lid fit one last time. If it’s too tight, gently sand or trim the contact points while still leather hard. -
Bisque fire:
Allow the entire teapot to dry slowly under plastic to prevent cracking. Once bone dry, bisque fire it in the kiln to prepare it for glazing.
Step 4: Glazing the Ombre
-
Apply base color:
Wax the foot ring. Dip the bottom half of the teapot into a pastel pink glaze or underglaze. I find wiping the edge immediately helps soften the line for the next step. -
Glaze the top:
Dip the top half into a cream or milky white glaze, overlapping slightly with the pink section to create a soft transition rather than a hard line. -
Glaze the lid:
Dip the lid in the pink glaze, letting the very top knob remain slightly lighter or cream-colored if desired to echo the body’s design. -
Final smooth:
If you used brush-on glazes instead of dipping, use a slightly damp sponge to carefully dab the meeting point of the two colors to blend the gradient. -
Glaze fire:
Load the kiln carefully, ensuring the lid is fired separately or with a wax resist on contact points to prevent sticking. Fire to the maturity temperature of your clay and glaze.
Once cooled, your teapot is ready to brew a warm cup and brighten up your kitchen table
Mandala Dot Art Teapot With Bright Pops
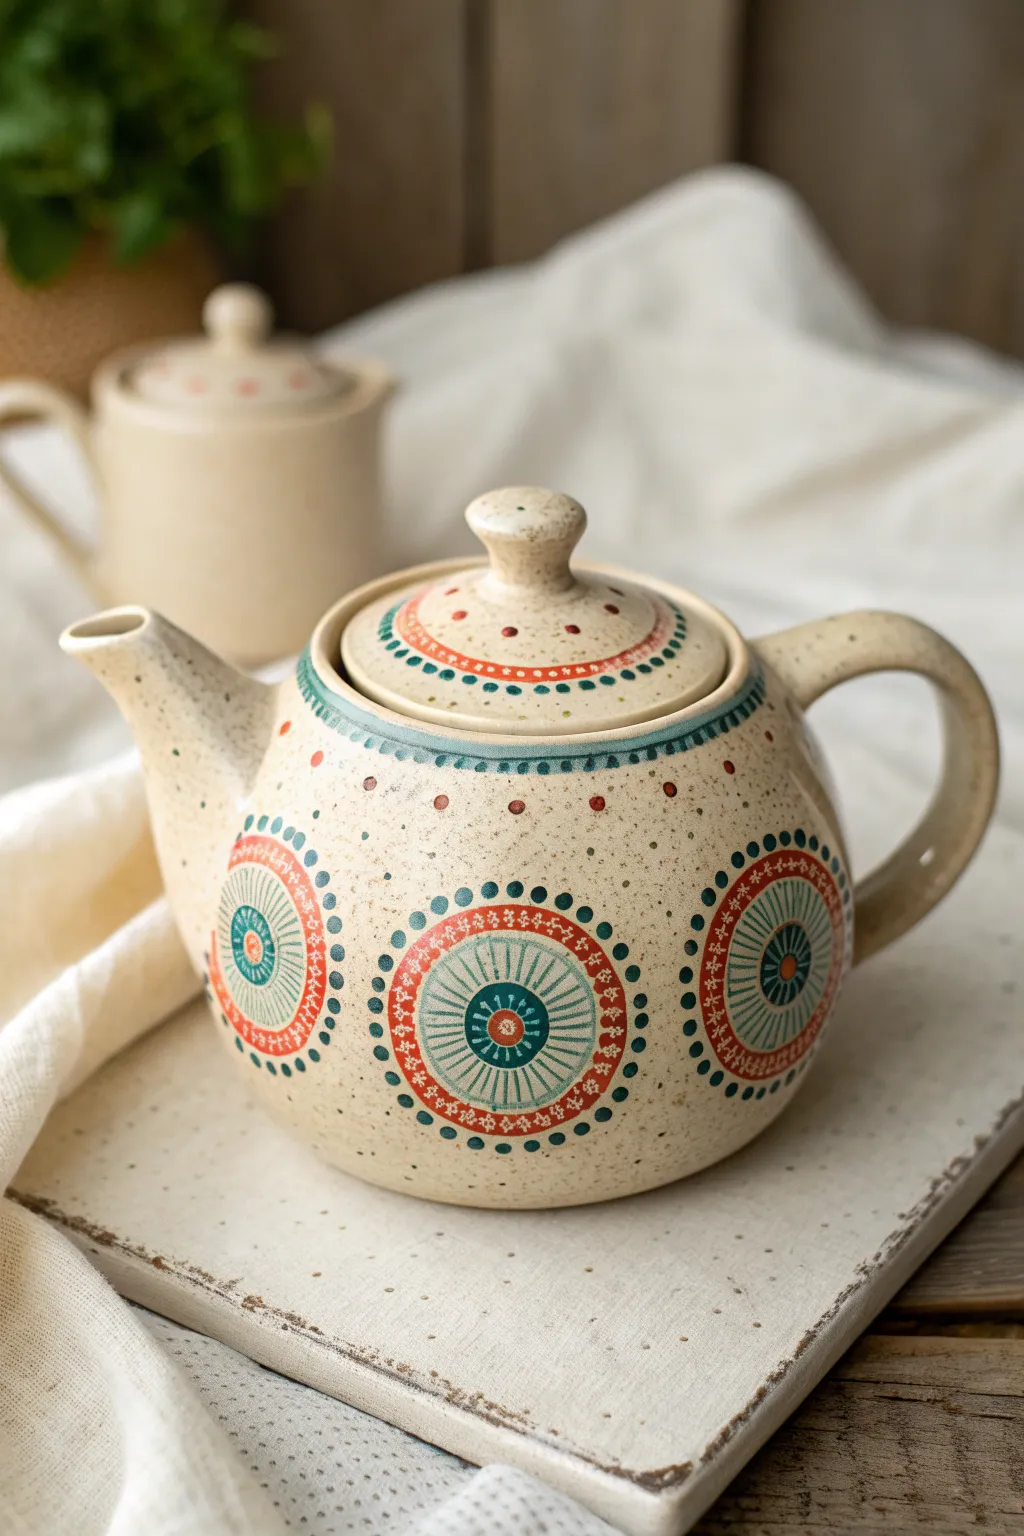
Transform a plain ceramic teapot into a piece of folk art with this detailed mandala design project. Featuring earthy cream speckles and vibrant teal and rust-orange patterns, this hand-painted look brings a cozy, artisanal charm to tea time.
Step-by-Step Tutorial
Materials
- Plain ceramic teapot (bisque or glazed cream)
- Acrylic paints (Teal, Rust/Burnt Orange, Dark Blue-Grey, Cream/White)
- Flecked/Speckled medium or brown paint for the base effect
- Fine detail brushes (liners and rounds, sizes 000, 0, 1)
- Dotting tools (various sizes)
- Compass or round stencils (optional)
- Pencil for sketching
- Ceramic sealant or varnish (food-safe if painting near spout/lid areas)
Step 1: Base Preparation
-
Clean surface:
Begin by thoroughly cleaning your teapot with rubbing alcohol to remove any oils or dust. This ensures the paint adheres properly. -
Apply base color:
Paint the entire teapot with a warm cream or off-white acrylic paint. Apply two to three thin coats for solid coverage, letting each layer dry completely. -
Add speckles:
To create the stoneware pottery look, dip a toothbrush into thinned brown or grey-brown paint. Use your thumb to flick fine spray speckles all over the teapot and lid. Let this dry fully for at least an hour.
Steadier Hands
Rest your pinky finger on the teapot surface while painting intricate lines. It acts as an anchor to stop your hand from shaking.
Step 2: Main Mandala Motifs
-
Mark positions:
Lightly mark three or four evenly spaced circles around the belly of the teapot using a pencil. These will be the centers for your large mandala medallions. -
Paint center circles:
In the center of each marked area, paint a small solid teal circle about the size of a dime. -
Add central details:
Once the teal circle is dry, use a fine liner brush to paint a tiny rust-orange starburst or flower shape right in the middle. -
Create the first ring:
Paint a thin cream outline around the teal circle, then add radiating lines moving outward like spokes on a wheel. -
Paint the teal band:
Create a wider band of teal paint around your radiating lines. This defines the main body of the medallion. -
Add rust border:
Surround the teal band with a thick ring of rust-orange paint. Keep your hand steady to maintain an even circle. -
Detail the rust ring:
Using a very fine brush and cream paint, add small ‘x’ or cross-stitch patterns inside the rust-orange ring for a textile-inspired texture. -
Dotting the perimeter:
Switch to your dotting tool. Dip it in dark blue-grey paint and place evenly spaced dots around the outside edge of the rust ring. -
Second dot row:
Add a final ring of smaller teal dots just outside the blue-grey ones to finish the main medallions.
Wonky Circles?
If your painted circles look uneven, let them dry completely, then use the background cream color to carefully ‘cut in’ and reshape the edges.
Step 3: Lid and Accents
-
Lid striping:
On the lid, paint concentric circles radiating from the knob. Start with a rust-orange ring, followed by a cream space, and then a teal ring. -
Lid details:
Use your smallest dotting tool particularly here. Add tiny teal dots within the rust ring and blue-grey dots in the spaces between the rings. -
Upper rim border:
Paint a horizontal teal stripe around the upper rim of the teapot’s body, just below where the lid sits. -
Rim accents:
I like to add small vertical dashes or simple geometric shapes in dark blue-grey along this rim stripe to frame the design. -
Filler dots:
Look for large empty spaces between the main medallions. Add solitary rust-orange dots in the negative space to balance the composition. -
Sealing:
Once all paint is cured (usually 24 hours), apply a clear, food-safe ceramic sealer or glaze. This protects your intricate work from chipping during use.
Now you have a stunning, hand-painted centerpiece ready for your next tea gathering
Patchwork Quilt Teapot With Stamped Squares
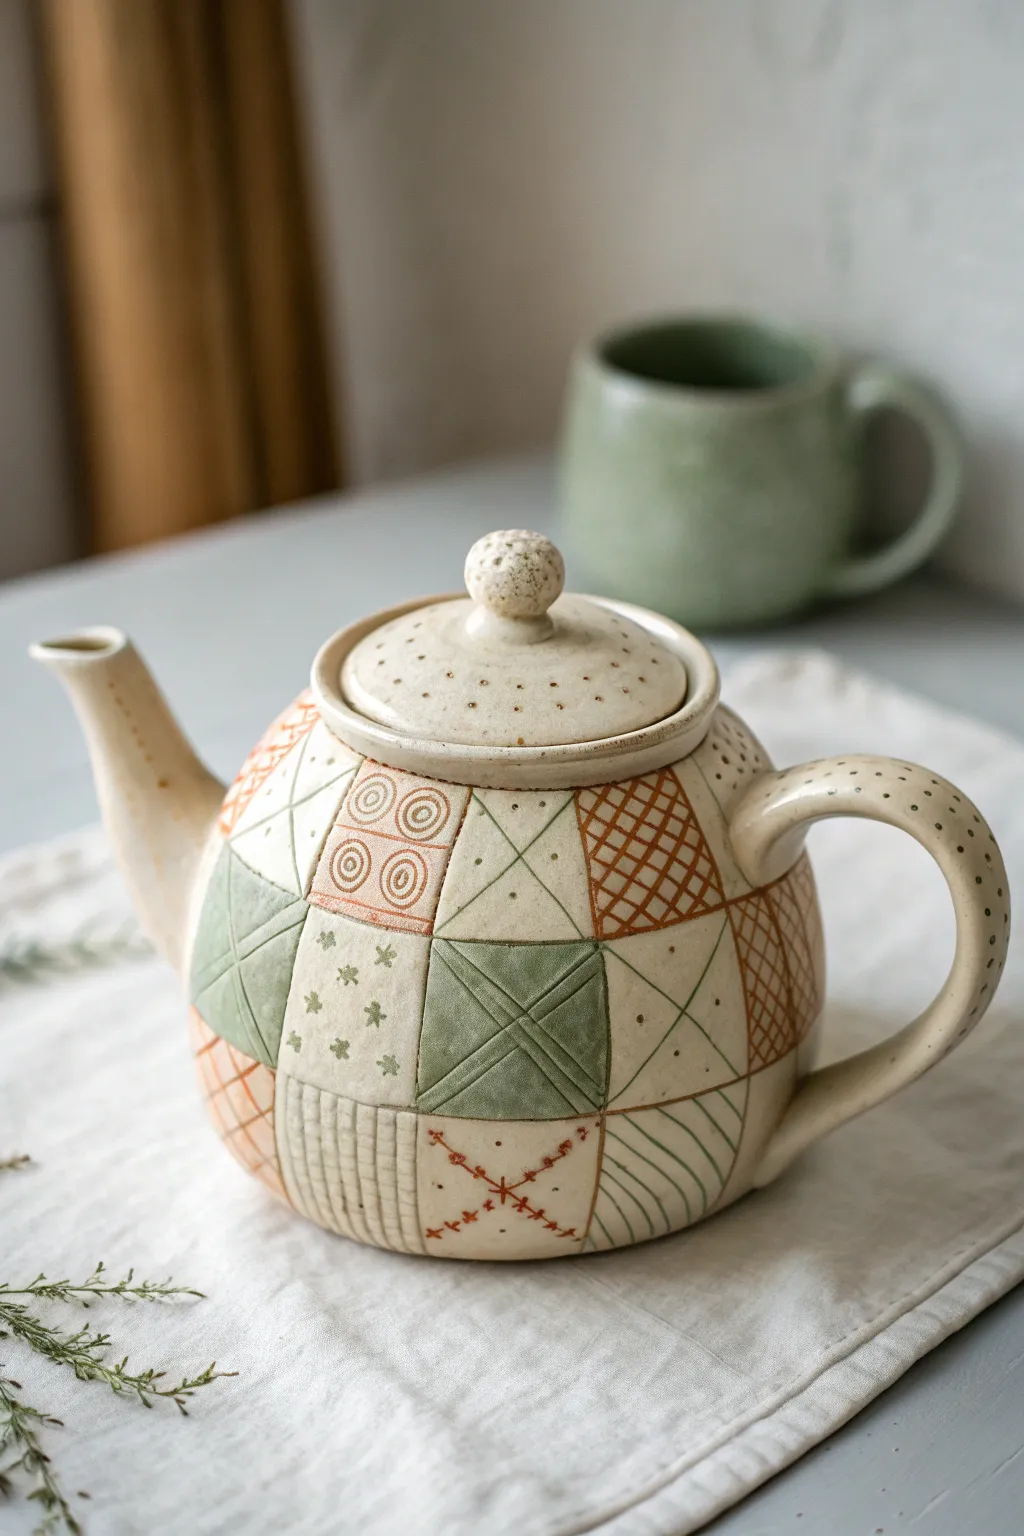
Bring the warmth of a handmade quilt to your tea table with this charming ceramic teapot project. Featuring a patchwork design of stamped squares in earthy creams, muted greens, and terracottas, the surface mimics the texture of stitched fabric, making every cup feel extra comforting.
Step-by-Step
Materials
- Stoneware clay (smooth or lightly speckled)
- Pottery wheel (or materials for coil/pinch building)
- Rib tools (wooden and flexible metal)
- Fettling knife
- Serrated rib or scoring tool
- Slip
- Underglazes (terracotta, sage green, cream/white)
- Needle tool
- Small carving tools (or a worn dental tool)
- Banding wheel
- Fine-grit sponge
- Clear matte or satin food-safe glaze
Step 1: Forming the Body
-
Shape the vessel:
Begin by throwing a round, bulbous body on the wheel. You want a closed form shape that feels full and generous, slightly wider at the bottom third. If you prefer handbuilding, use the pinch pot method to join two large pinch pots together for a similar spherical shape. -
Refine the surface:
Once the clay is leather hard, trim the foot ring. While it’s spinning or on a banding wheel, use a smooth metal rib to ensure the sides are perfectly rounded and free of finger ridges, creating a blank canvas for your patchwork. -
Create the lid gallery:
Carefully cut the opening for your lid. Caliper the measurement so you can throw or handbuild a lid that fits snugly inside this gallery. Fashion a simple, rounded knob for the top of the lid, adding small texture dots with a needle tool. -
Attach appendages:
Pull a handle that has a strong C-curve and attach it opposite a curved, tapered spout. Ensure the spout tip is level with the lid gallery to prevent spilling. Smooth all connection points seamlessly.
Step 2: Creating the Quilt Pattern
-
Grid the surface:
With the pot on a banding wheel, lightly scratch a grid pattern onto the body using a needle tool. The squares don’t have to be mathematically perfect—a little variation adds to the textile look—but try to keep them relatively uniform in size. -
Carve the seams:
Deepen the lines of your grid slightly to define the separate ‘fabric’ patches. This creates a physical boundary that will help contain your underglazes later. -
Sketch the textures:
Plan your ‘fabrics’. Use a pencil or needle tool to lightly sketch different patterns into the squares: cross-hatching, diagonal stripes, small flowers, concentric circles, and Xs. Alternate the patterns so no two identical designs touch. -
Detailing the stitches:
Go over your sketches with a finer carving tool. For some squares, press small indentations to mimic thread stitches. For the diagonals, firm, clean lines work best. -
Add texture to solid squares:
Leave some squares without heavy patterns, but perhaps add a subtle texture or tiny impressed dots, like the ones on the lid and handle, to tie the whole piece together.
Stitching Reality
Use a specialized ‘stitch tool’ or a modified fork with tines bent back to press consistent dotted lines into the clay. This mimics real sewing machine stitches better than freehand poking.
Step 3: Painting and Glazing
-
Bisque fire:
Slowly dry the teapot to prevent cracking, especially around the handle and spout attachments, then bisque fire it to cone 04. -
Apply base colors:
Using a small brush, fill in the squares with your underglazes. Use a muted sage green for the solid and cross-hatched squares, and a warm terracotta for the checked and stitched patterns. Leave the background cream or white. -
Highlight the carving:
I like to wash a thin, dark stain or diluted terracotta underglaze over the carved lines and then sponge it back. This makes the ‘stitches’ and grid lines pop, enhancing the quilted effect. -
Detail the handle and spout:
Add small dots of the sage or dark wash along the handle and the top of the spout to echo the texture on the lid knob. -
Clear glaze application:
Dip or spray the entire teapot with a clear matte or satin glaze. A glossy glaze might obscure the subtle textures, so a softer finish usually looks more fabric-like. -
Final firing:
Fire the piece to maturity (Cone 5 or 6 depending on your clay body). Ensure the lid is fired separately or with localized wax resist to prevent it from fusing to the pot.
Pattern Play
Look at vintage quilts for inspiration. Try incorporating traditional quilt block patterns like ‘Log Cabin’ or ‘Flying Geese’ into your grid for an authentic heirloom aesthetic.
Once cooled, your teapot is ready to serve a warm brew wrapped in the visual comfort of a handmade quilt
Vine Handle and Leaf Spout Teapot
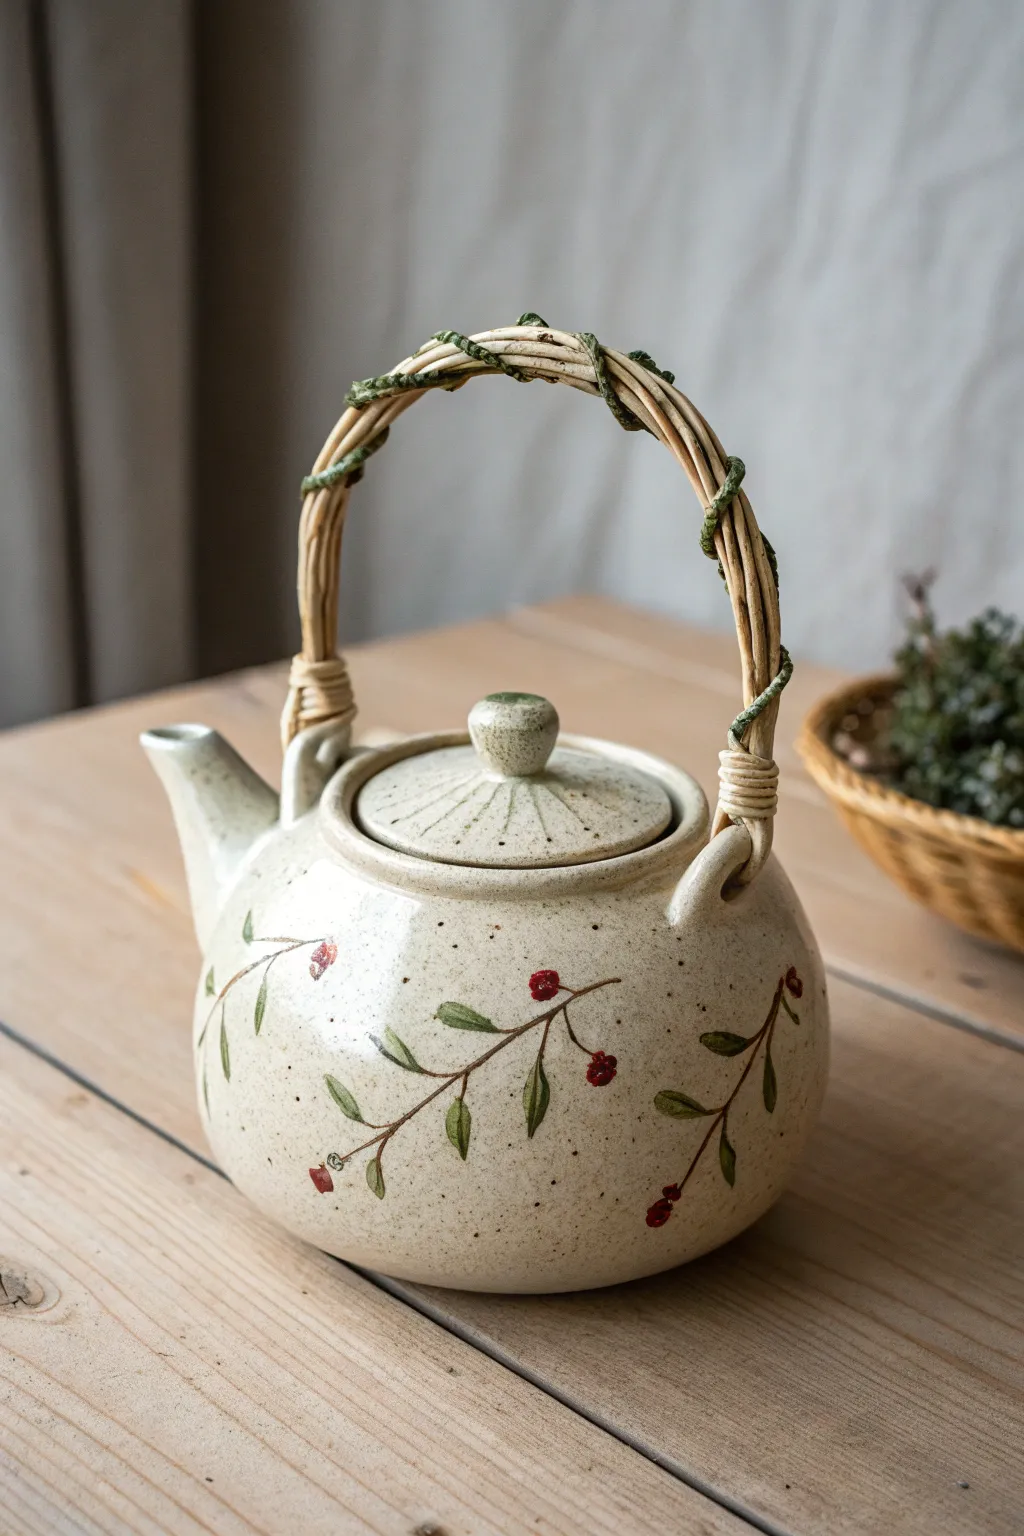
This charming project combines classic pottery techniques with nature-inspired elements to create a functional piece of art. With its speckled cream glaze and delicate hand-painted berries, this teapot feels like a cozy cottage garden treasure.
Step-by-Step Tutorial
Materials
- Stoneware clay (speckled or buff)
- Pottery wheel (or slab roller/hand-building tools)
- Ribs, sponge, and needle tool
- Loop trimming tools
- Natural vine or thick rattan for handle
- Thin florist wire
- Faux greenery garland or green floral tape
- Underglazes (Deep Red, Olive Green, Brown)
- Fine detail brushes
- Clear or transparent cream stoneware glaze
- Epoxy adhesive (optional)
Step 1: Forming the Body
-
Throw the base:
Begin by centering about 2-3 lbs of clay on your wheel. Open the mound and pull the walls into a rounded, bulbous belly shape. Unlike a mug, you want the volume to sit low and wide. -
Create the gallery:
At the rim, use your thumb or a specialized tool to create a recessed gallery. This ledge is crucial as it will hold the lid securely in place later. -
Throw the spout:
Using a smaller amount of clay (about 1/2 lb), throw a small, tapered cylinder. Shape it so it curves slightly outward, creating a gentle pouring angle. -
Throw the lid:
Measure the gallery diameter carefully with calipers. Throw a small, domed lid that matches this measurement perfectly, adding a small knob at the center for lifting.
Step 2: Assembly & Detail
-
Trim the pieces:
Once leather hard, trim the excess clay from the bottom of the teapot to create a clean foot ring. Trim the lid to ensure a snug fit. -
Attach the spout:
Cut the base of the spout at an angle. Hold it against the pot body to check the fit, then score and slip both surfaces. Press firmly to attach and smooth the seam completely. -
Create lug attachments:
Roll two small coils of clay and form them into loops. Attach these ‘lugs’ to the shoulder of the pot on opposite sides; these will anchor your vine handle later. -
Detailing the lid:
Using a needle tool, gently score radiating lines from the knob of the lid outwards, creating a sunburst texture. -
Bisque fire:
Allow the entire assembly to dry slowly and completely before firing it in the kiln to bisque temperature (usually Cone 04).
Dribble Defense
If your spout drips, the edge might be too blunt. Before firing, sharpen the very tip of the spout’s underside to cut the flow of water cleanly.
Step 3: Decorating & Glazing
-
Initial sketch:
Lightly sketch your vine pattern onto the bisque ware using a standard pencil. The graphite will burn off in the kiln, leaving only your painted design. -
Painting vines:
Load a fine linear brush with brown underglaze. Paint thin, winding branches connecting the pencil lines, varying pressure to make the stems look organic. -
Adding leaves:
With olive green underglaze, add small, almond-shaped leaves along the branches. I find a single press-and-lift motion with a round brush creates the most natural leaf shape. -
Berry details:
Dot small clusters of deep red underglaze near the leaf junctions to create the berries. -
Apply glaze:
Dip the teapot and lid into a transparent cream or clear glaze. Clean the foot ring thoroughly to prevent sticking. -
Final firing:
Fire the piece to the maturity temperature of your clay body (typically Cone 5 or 6 for stoneware).
Function First
Before attaching the spout, drill multiple small holes (a strainer) into the body clay behind where the spout attaches, rather than one big hole, to catch tea leaves.
Step 4: Handle Construction
-
Preparing the vine:
Take several strands of flexible natural vine or soaked rattan. Twist them together to form a sturdy arch that spans the distance between the clay lugs. -
Attaching the ends:
Thread the vine ends through the ceramic lugs. Wrap thin wire or smaller pieces of rattan around the base of the handle where it meets the lug to secure it tightly. -
Weaving the greenery:
Entwine a strand of artificial greenery or waxed floral tape (twisted to look like a stem) around the main vine handle structure for that fresh-from-the-garden aesthetic.
Brew a pot of your favorite herbal blend and enjoy the rustic charm of your handmade creation.
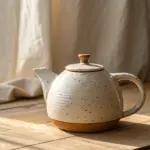
Wonky Storybook Teapot With Swirly Spout
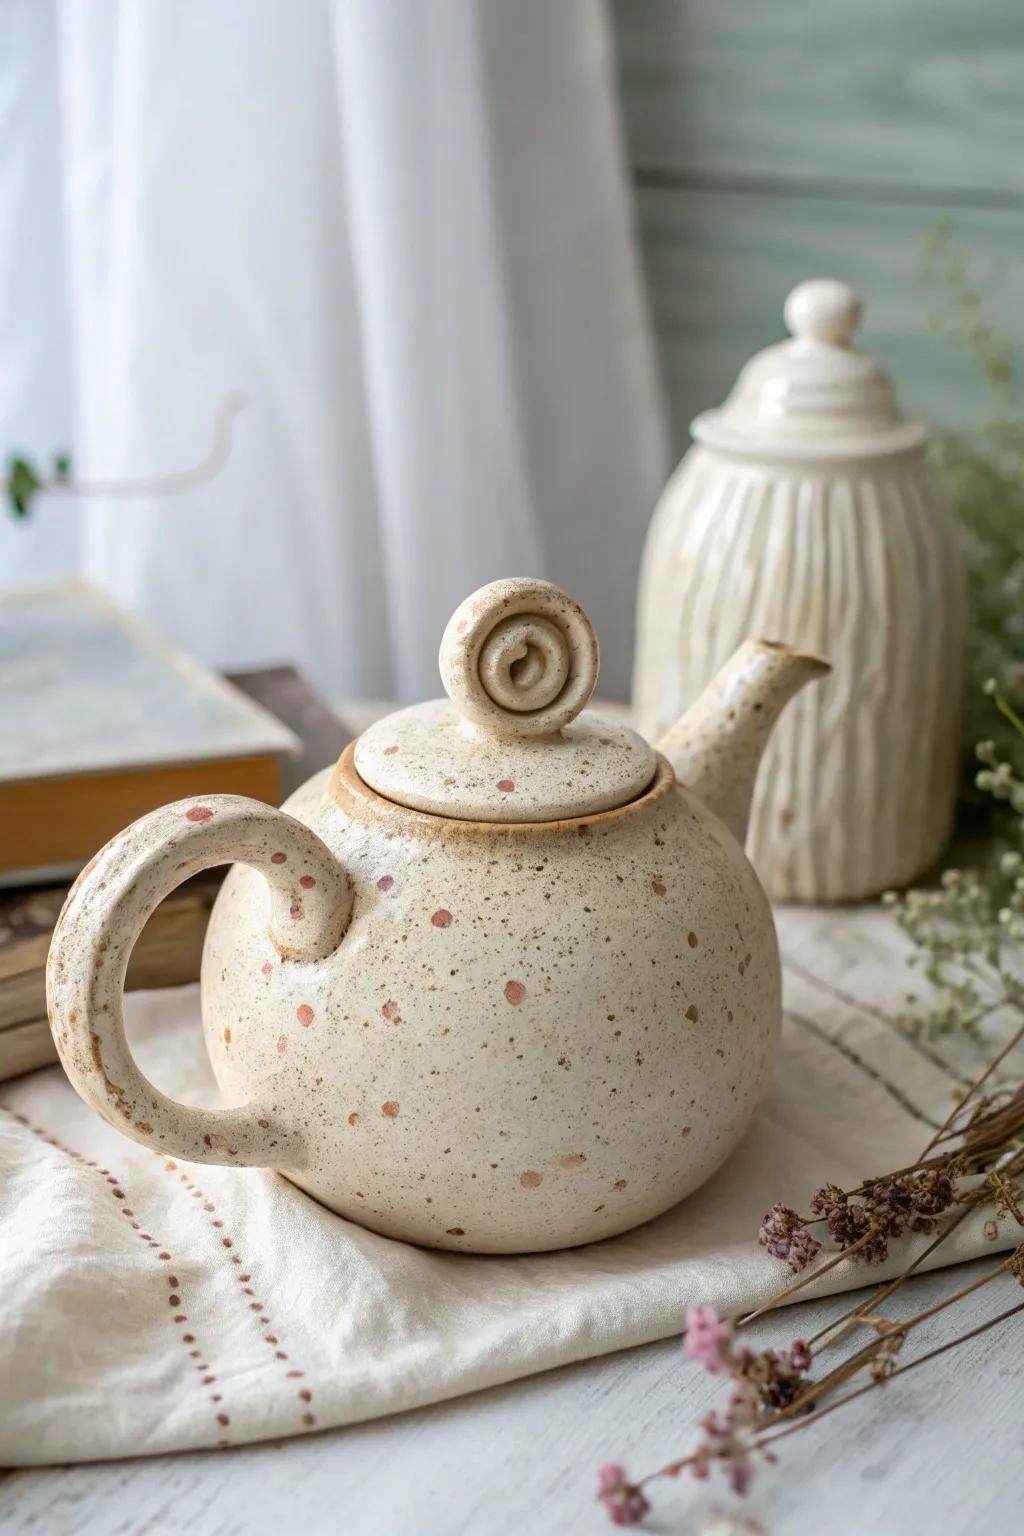
This charming, handmade teapot features a comforting round body and a delightfully subtle speckled glaze that evokes cozy cottage afternoons. With its distinctive swirled lid knob and earthy, reddish-brown accents, it feels like a treasure pulled straight from a fairy tale kitchen.
Detailed Instructions
Materials
- Stoneware clay (speckled or buff)
- Pottery wheel (optional, can be hand-built)
- Rib tool
- Pin tool
- Sponge
- Scoring tool or fork
- Slip (liquid clay)
- Underglaze (warm reddish-brown)
- Creamy white matte or satin glaze
- Small round paintbrush
- Kiln
Step 1: Forming the Body
-
Throw or Build the Base:
Begin by wedging about 2-3 pounds of speckled clay. If wheel-throwing, center the clay and open it wide to create a belly. If hand-building, create two pinch pots and join them together, or coil-build a rounded sphere shape. -
Shape the Belly:
Push the walls outward gently from the inside to create a voluminous, rounded shape. Use a rib tool on the exterior to smooth the curve and compress the clay, ensuring a nice, plump silhouette. -
Refine the Gallery:
At the top opening, create a gallery (a small internal ledge) where the lid will eventually sit. Ensure the rim is smooth and slightly thickened for durability. -
Trim the Foot:
Once the body is leather hard, trim a neat foot ring at the bottom to give the pot a slight lift and a professional finish.
Uneven Drying?
Teapots have varying thicknesses (spout vs body). Dry slowly under loose plastic for 2-3 days to equalize moisture and prevent the handle or spout from cracking at the seams.
Step 2: Adding the Appendages
-
Pull the Handle:
Pull a strap of clay for the handle. I like to make it slightly thick to match the rustic vibe. Curve it into a question-mark shape or a simplified ‘C’ shape, ensuring it has enough clearance for your hand. -
Form the Spout:
Throw a small, tapering cylinder on the wheel or hand-build a cone. Gently bend it while the clay is plastic to give it a slight, whimsical curve. Cut the attachment angle to fit the curve of the pot’s belly. -
Attach Components:
Score and slip the attachment points on the body, handle, and spout thoroughly. Press the pieces firmly onto the body. Smooth the seams with a modeling tool so they disappear into the main form. -
Refine the Spout Opening:
Check the pouring edge of the spout. Sharpen the edge slightly with your finger or a tool to ensure a clean pour without dripping.
Make It a Set
Use the same coil-knob technique to create matching lids for a sugar bowl or honey pot. Vary the knob size slightly for a cohesive but organic village collection.
Step 3: Creating the Lid
-
Measure and Make Lid:
Measure the gallery opening you created earlier. Throw or build a simple domed lid that fits snugly into this space. Flip it over and trim the underside once leather hard. -
Sculpt the Swirly Knob:
Roll a small coil of clay. Spiral it tightly into a snail-shell shape to create the unique knob seen in the image. This is the signature ‘storybook’ detail. -
Attach the Knob:
Score and slip the center of the lid and the bottom of your clay spiral. Press the spiral onto the lid, blending the bottom edge slightly to secure it.
Step 4: Glazing and Surface Design
-
Bisque Fire:
Allow the entire piece to dry slowly and completely. Bisque fire according to your clay body’s specifications (usually Cone 04 or 06). -
Apply Speckles:
Before dipping in the main glaze, mix a small amount of warm reddish-brown underglaze. Using a stiff brush or a toothbrush, test the splatter on paper first, then gently flick large and small speckles across the bisque ware. -
Add Polka Dots:
For the larger, specific dots, dip a brush or the back end of a small drill bit into the reddish-brown underglaze and dab random, slightly larger spots onto the surface. -
Dip in Cream Glaze:
Once the underglaze decoration is dry, dip the entire teapot (and lid separately) into a creamy white semi-matte glaze. The iron speckles in the clay and your underglaze spots should bleed through slightly or interact with the glaze. -
Rim Detail:
If desired, carefully wipe the glaze off just the very rim of the lid or handle edges to reveal the raw clay color, or paint a thin oxide wash there for definition. -
Final Firing:
Glaze fire the piece to the maturity temperature of your clay and glaze (often Cone 5 or 6 for stoneware). Let the kiln cool completely before opening.
Brew a pot of your favorite herbal tea and enjoy the cozy warmth of your handmade creation