Whenever I’m teaching kids in the studio, air dry clay is my go-to because it’s easy, forgiving, and full of instant wins. These ideas are all kid-friendly, super doable with simple shapes, and cute enough to make everyone want to keep crafting.
Simple Ball-Shaped Clay Animals
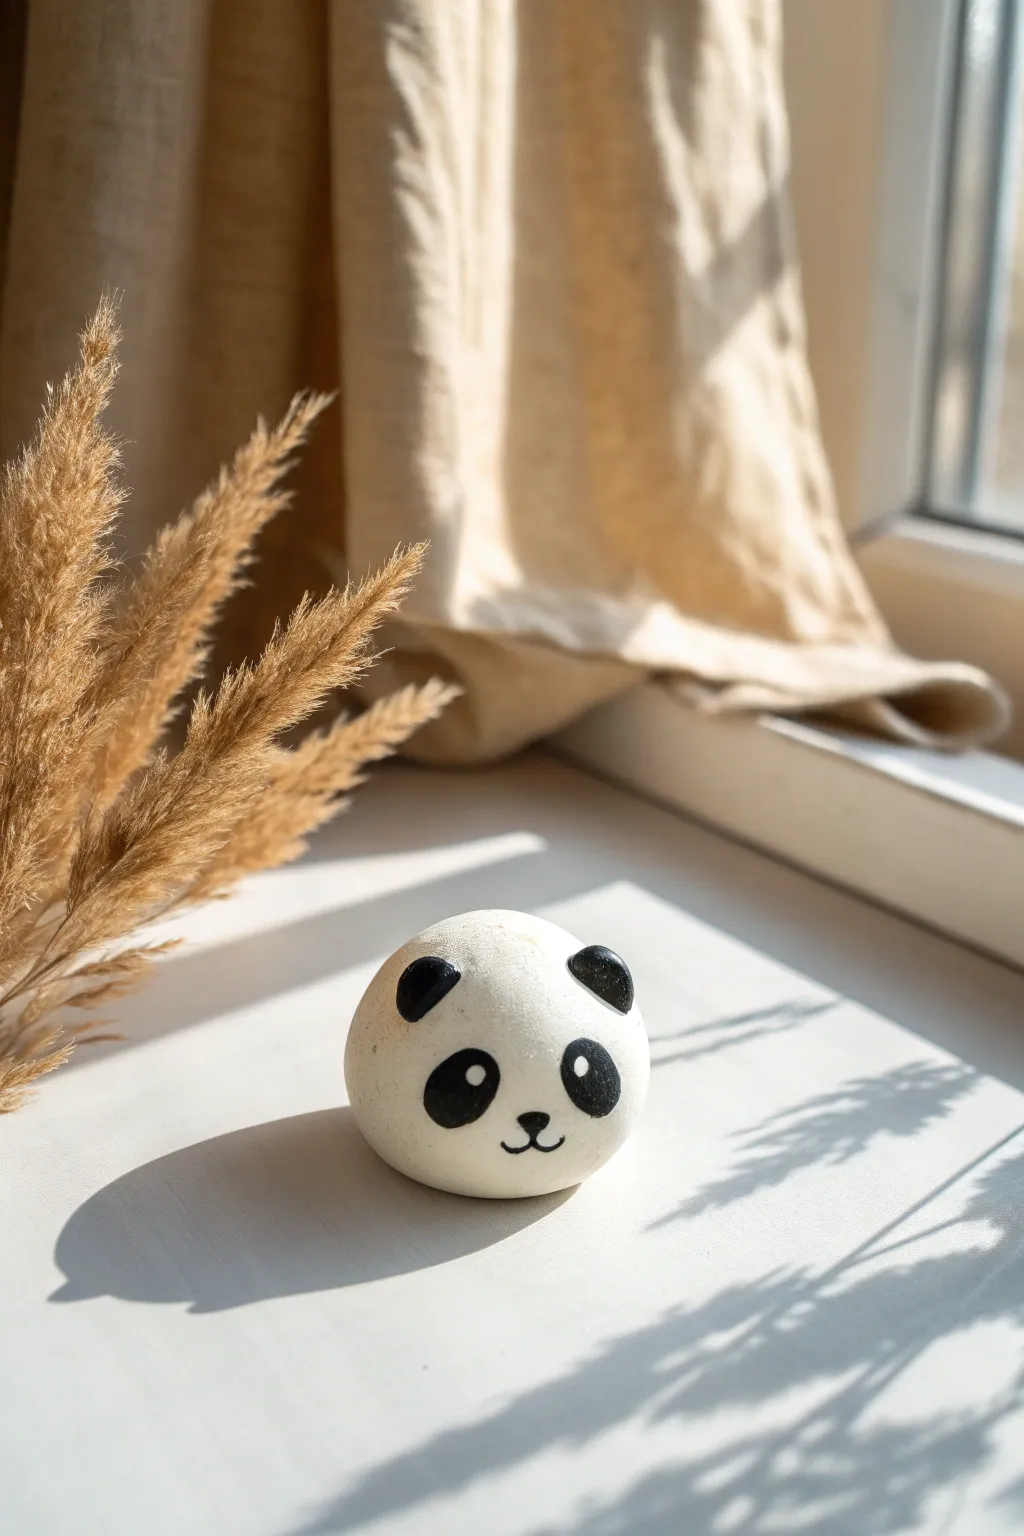
This adorable little project transforms a simple sphere of clay into a smiling panda face that fits perfectly in the palm of your hand. Its minimalist design relies on a smooth, round base and a few careful strokes of black paint to bring its character to life.
Detailed Instructions
Materials
- White stone clay or air-dry clay
- Water (for smoothing)
- Black acrylic paint
- Fine-point paintbrush
- Pencil (optional, for sketching)
- Clear matte varnish or sealant (optional)
- Small bowl of water
- Sandpaper (fine grit)
Step 1: Shaping the Base
-
Portion the clay:
Start by grabbing a chunk of white air-dry clay roughly the size of a golf ball or a small tangerine. Make sure your hands are clean so the white clay stays pristine. -
Roll a sphere:
Roll the clay firmly between your palms to create a tight ball. Apply even pressure to eliminate any cracks or folds in the material. -
Refine the shape:
Continue rolling until the ball is smooth. While it doesn’t need to be mathematically perfect, a nice symmetrical roundness is the goal here. -
Create a base:
Gently tap the bottom of the ball against your work surface. This creates a tiny flat spot so the panda will sit nicely without rolling away. -
Smooth with water:
Dip your finger into a little water and gently run it over the surface of the clay. This acts like a polish, removing fingerprints and smoothing out any tiny imperfections. -
Allow to dry:
Set your clay ball in a safe, dry place. Depending on the brand of clay and humidity, this could take 24 to 48 hours. Turn it over once halfway through to ensure the bottom dries thoroughly. -
Sand for perfection:
Once completely dry and hard, inspect the surface. If there are any rough bumps, use a piece of fine-grit sandpaper to gently buff them away until the surface feels like a smooth stone.
Smoother Surfaces
Before drying, use a slightly damp sponge rather than just fingers to smooth the clay. It erases fingerprints instantly and leaves a professional, stone-like finish.
Step 2: Painting the Features
-
Plan the face:
Looking at the front of your smooth ball, visualize where the features will go. The eyes should sit slightly below the midline to give it a cute, ‘chibi’ look. -
Sketch lightly:
If you are nervous about painting directly, use a pencil to very faintly sketch the oval eye patches and the small ears near the top. Keep the lines light so they don’t show through the paint. -
Paint the eye patches:
Dip your fine-point brush into black acrylic paint. Paint two large, tilted ovals for the panda’s characteristic eye patches. They should angle slightly inward toward the nose area. -
Add the ears:
Paint two small, semi-circles near the top sides of the sphere for the ears. Position them wide apart to enhance the roundness of the face. -
Paint the nose and mouth:
Using just the very tip of your brush, place a small black dot or soft triangle between the eye patches for the nose. Then, draw two tiny curved lines extending downward to form the classic ‘w’ mouth shape. -
Add the eye shine:
Here I prefer to wait until the black paint is fully dry. Once it is, use a toothpick or a clean detail brush to add a white dot inside each black eye patch. This ‘glint’ brings the panda to life. -
Clean up edges:
If any black paint lines are wobbling, you can carefully scrape them away with a craft knife or paint over them with white paint once dry. -
Seal the work:
To protect your panda from dust and moisture, apply a thin coat of clear matte varnish over the entire piece once the paint is fully cured.
Cracking Clay?
If small cracks appear as the clay dries, don’t panic. Mix a tiny bit of fresh clay with water to make a paste (slip) and fill in the cracks, then sand smooth when dry.
Now you have a charming little desk buddy that brings a sense of calm to any space


Ladybug Pebble Magnets
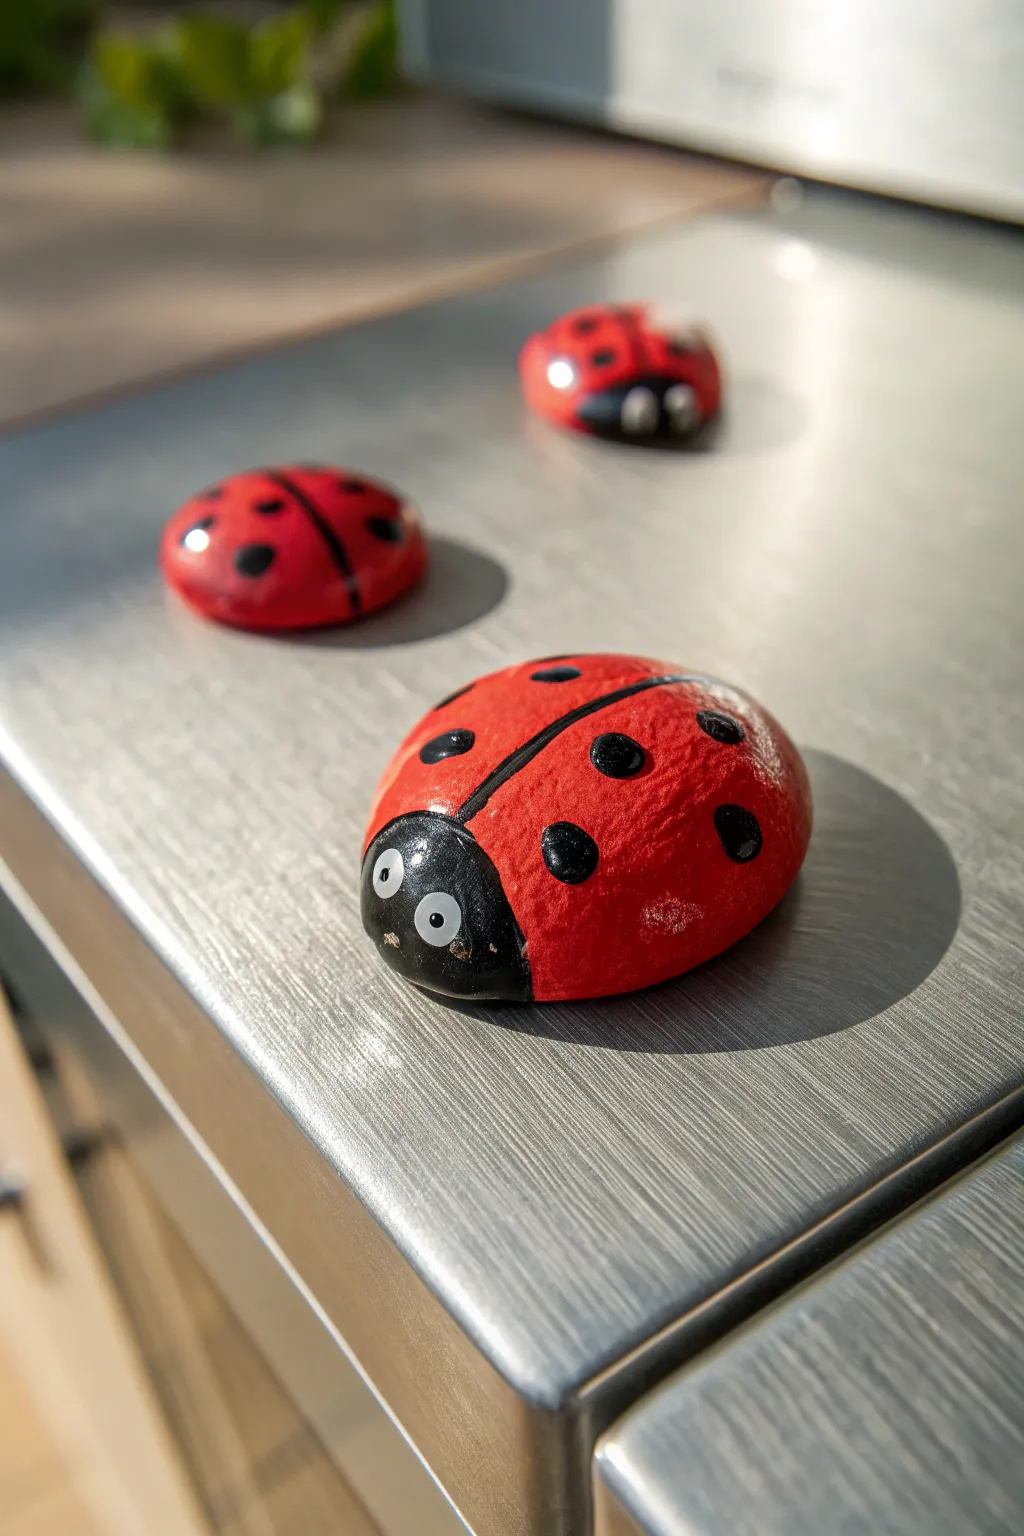
Transform simple smooth stones into charming little garden friends that can brighten up your fridge. These glossy insect magnets are painted with vibrant red and deep black acrylics, giving them a polished, professional finish that kids will love to display.
Step-by-Step Guide
Materials
- Smooth oval river stones or air dry clay shaped into ovals
- Red acrylic paint (glossy finish preferred)
- Black acrylic paint
- White acrylic paint
- Medium flat paintbrush
- Small round detail brush
- Round disc magnets (ceramic or neodymium)
- Strong craft glue (e.g., E6000) or hot glue gun
- Clear acrylic gloss sealer (spray or brush-on)
- Pencil
- Cup of water and paper towels
Step 1: Base Coat & Body
-
Prep your surface:
Begin by washing your stones with soap and water to remove any dirt or dust. Let them dry completely, as paint won’t stick well to a dusty surface. -
Apply the red base:
Using your medium flat brush, paint the top surface of the stone entirely red. You don’t need to paint the flat bottom. -
Check for opacity:
If your stone is dark, the first coat of red might look a bit transparent. Let it dry for about 10 minutes, then apply a second coat for a bright, solid red color. -
Outline the head:
Once the red paint is dry to the touch, use a pencil to lightly sketch a curved line near the front of the stone to separate the head from the body. -
Paint the head:
Fill in the front section you just marked with black acrylic paint. Use the smaller round brush for this to get a clean edge against the red. -
Create the wings:
Using the small brush and black paint, draw a straight line down the center of the red body, starting from the black head section and going all the way to the back tail.
Paint Slipping off?
If the stone is too smooth, the paint might streak. Try lightly sanding the surface or applying a coat of matte medium or white primer first to handle the slick texture.
Step 2: Details & Finish
-
Add the spots:
Reload your small round brush with black paint. Carefully dab small circles onto the red wings. Try to make them different sizes for a natural look—some large, some tiny. -
Paint the eyes:
Clean your small brush thoroughly or grab a toothpick. Dip it into white paint and place two small dots on the black head section for the eyes. -
Add pupils:
Wait for the white eye dots to dry completely. Then, using the very tip of a brush or a toothpick, add a tiny black dot inside each white circle to bring the ladybug to life. -
Let it cure:
Allow the painted stones to dry completely. I usually leave them for at least an hour to ensure the thick layers of paint are solid. -
Seal the surface:
Apply a coat of clear acrylic gloss sealer over the entire painted top. This gives the ladybug that shiny, wet beetle look seen in the photo and protects the paint from chipping. -
Attach the magnet:
Flip the dry stone over. Apply a strong dab of glue to the center of the flat bottom. -
Secure the backing:
Press a round magnet firmly into the glue. If using heavy stones, make sure you use a strong ceramic or neodymium magnet so it doesn’t slide down the fridge. -
Final dry time:
Let the glue set according to the manufacturer’s instructions (usually 24 hours for maximum strength) before sticking your new pets to the refrigerator.
Perfect Circles
Instead of a brush, use the eraser end of a pencil dipped in paint to stamp perfect black spots, and a cotton swab or toothpick for the smaller eye details.
Your vibrant little insect magnets are now ready to crawl onto your fridge and hold up your important notes


Coil Snakes and Caterpillars
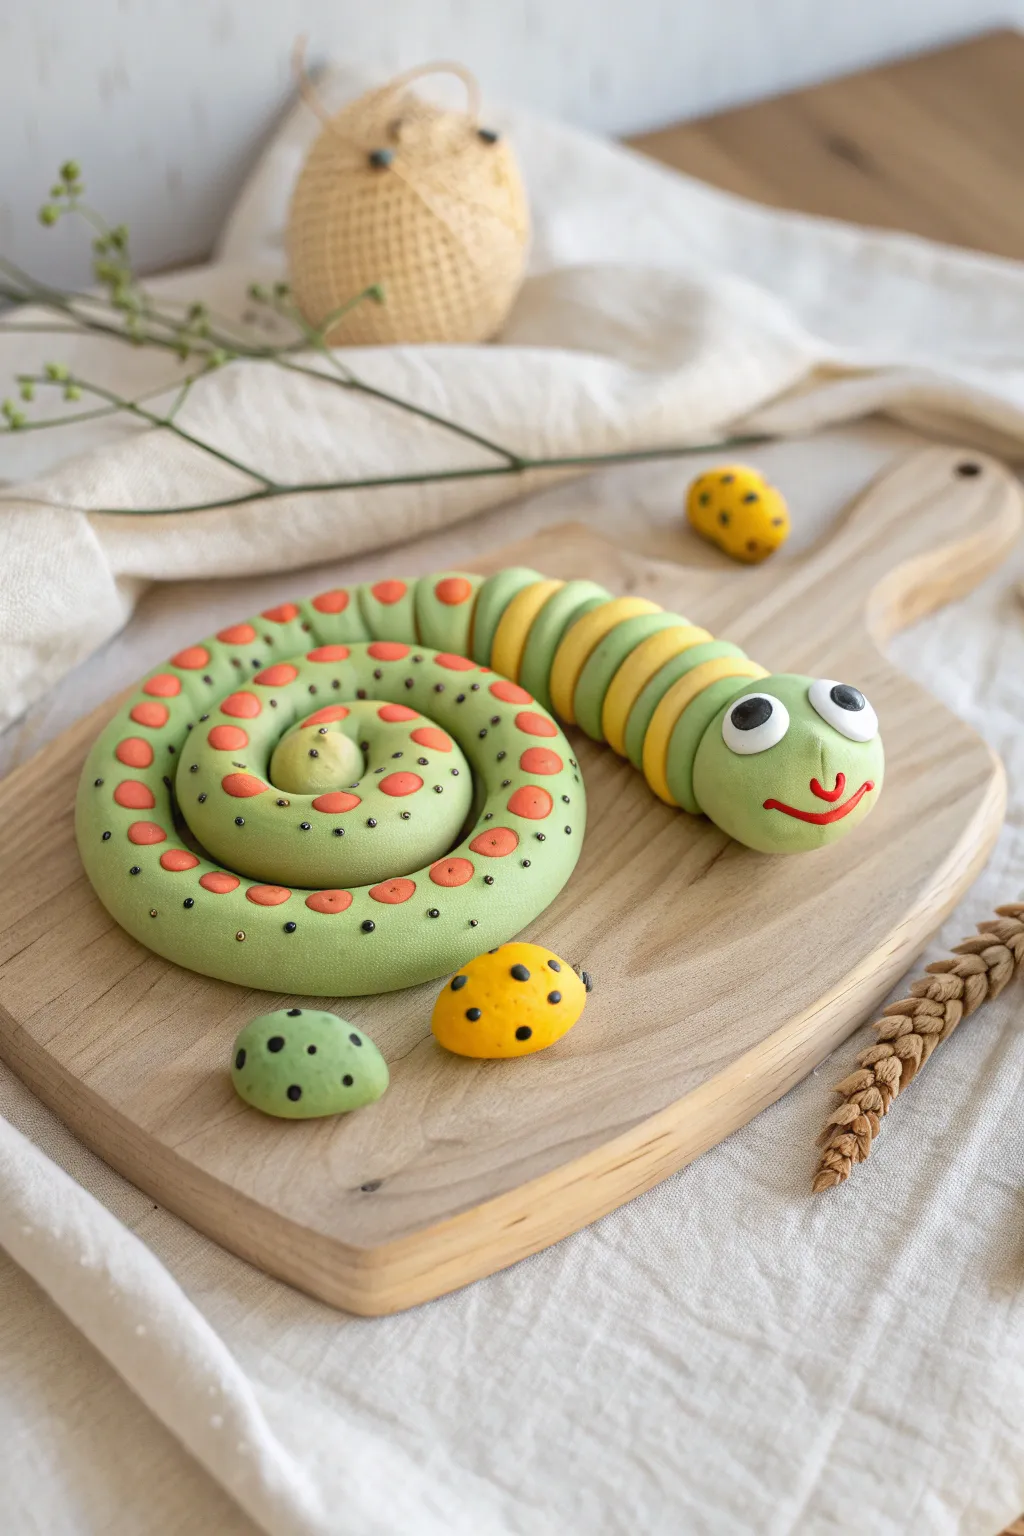
Twist and roll your way to an adorable garden friend with this coiled caterpillar project. Featuring a textured body, bright spots, and a segmented tail, this creation is perfect for practicing your clay rolling techniques while making something truly charming.
Step-by-Step Tutorial
Materials
- Air dry clay (white)
- Acrylic paints (light green, yellow, orange/red, black, white)
- Paintbrushes (medium flat, small detail)
- Clay roller or smooth rolling pin
- Small dotting tool or toothpick
- Water cup (for smoothing)
- Clay knife or plastic intricate tool
Step 1: Preparing the Body
-
Mix Your Base Green:
Start by mixing a generous amount of light green clay. If you only have white clay, knead in a small amount of green acrylic paint until the color is uniform and vibrant. -
Roll the Main Coil:
Take about two-thirds of your green clay and roll it into a long, even snake. Aim for it to be slightly thicker at one end (for the head) and gradually taper it down towards the tail. -
Shape the Spiral:
Starting from the thinner end, begin coiling the snake into a loose spiral. Keep the coil flat against your work surface. You want to make about two full loops, leaving the thicker head section sticking out straight. -
Create the Head:
Gently shape the end of the coil into a rounded, bulbous head. Smooth out any cracks with a tiny drop of water on your finger to ensure a nice, clean finish.
Step 2: Adding the Segmented Tail
-
Prepare Yellow Clay:
Mix a portion of clay with yellow paint or use pre-colored yellow clay. You’ll need this for the alternating segments on the tail section. -
Create Colored Discs:
Roll small balls of both yellow and your remaining green clay. Flatten them slightly into thick discs or ‘coins’ that match the diameter of the caterpillar’s body just behind the head. -
Assemble the Segments:
Attach these discs to the body section behind the head, alternating colors (green, yellow, green, yellow). Press them firmly together so they bond, using a little water as slip if needed. -
Smooth the Joints:
Gently run your finger along the sides of the segmented area to fuse them slightly while keeping the ridged texture visible.
Cracking Clay?
If you see hairline cracks forming while coiling, dip your finger in water and smooth them out immediately. Keep clay covered when not in use.
Step 3: The Spotted Details
-
Mix Orange Paint:
Prepare a bright orange or coral red paint shade. This will contrast beautifully with the green body. -
Paint the Large Spots:
Using a small brush, paint a row of oval-shaped spots running down the center of the green coiled body. Keep the spacing consistent. -
Add Tiny Dots:
Dip a toothpick or a very fine dotting tool into black paint. Carefully place tiny black dots around the orange spots to add texture and detail. -
Make the Ladybug Companions:
With leftover clay, form small oval shapes (one yellow, one green) to act as little stones or ladybugs. Paint black spots on them to match the theme.
Glaze It Up
Once fully dry, coat the eyes and spots with a high-gloss varnish or clear nail polish to make them shine and stand out against the matte body.
Step 4: Bringing it to Life
-
Form the Eyes:
Roll two small balls of white clay and press them gently onto the face area. Flatten two tiny discs of black clay and place them on top for pupils. -
Paint the Smile:
Using a very fine detail brush and red paint, carefully draw a ‘U’ shape for the mouth. Add small ticks at the corners for a cheerful expression. -
Highlight the Eyes:
Add the tiniest speck of white paint to the black pupils to give the eyes a spark of life. -
Texture the Skin:
I like to take a dry, stiff brush and gently stipple the green areas of the clay before it fully dries to give it a matte, skin-like texture. -
Final Dry:
Set your caterpillar aside on a piece of parchment paper to dry completely for at least 24 hours.
Place your finished caterpillar on a desk or shelf to add a whimsical touch to your room


Pinch Pot Treasure Bowls
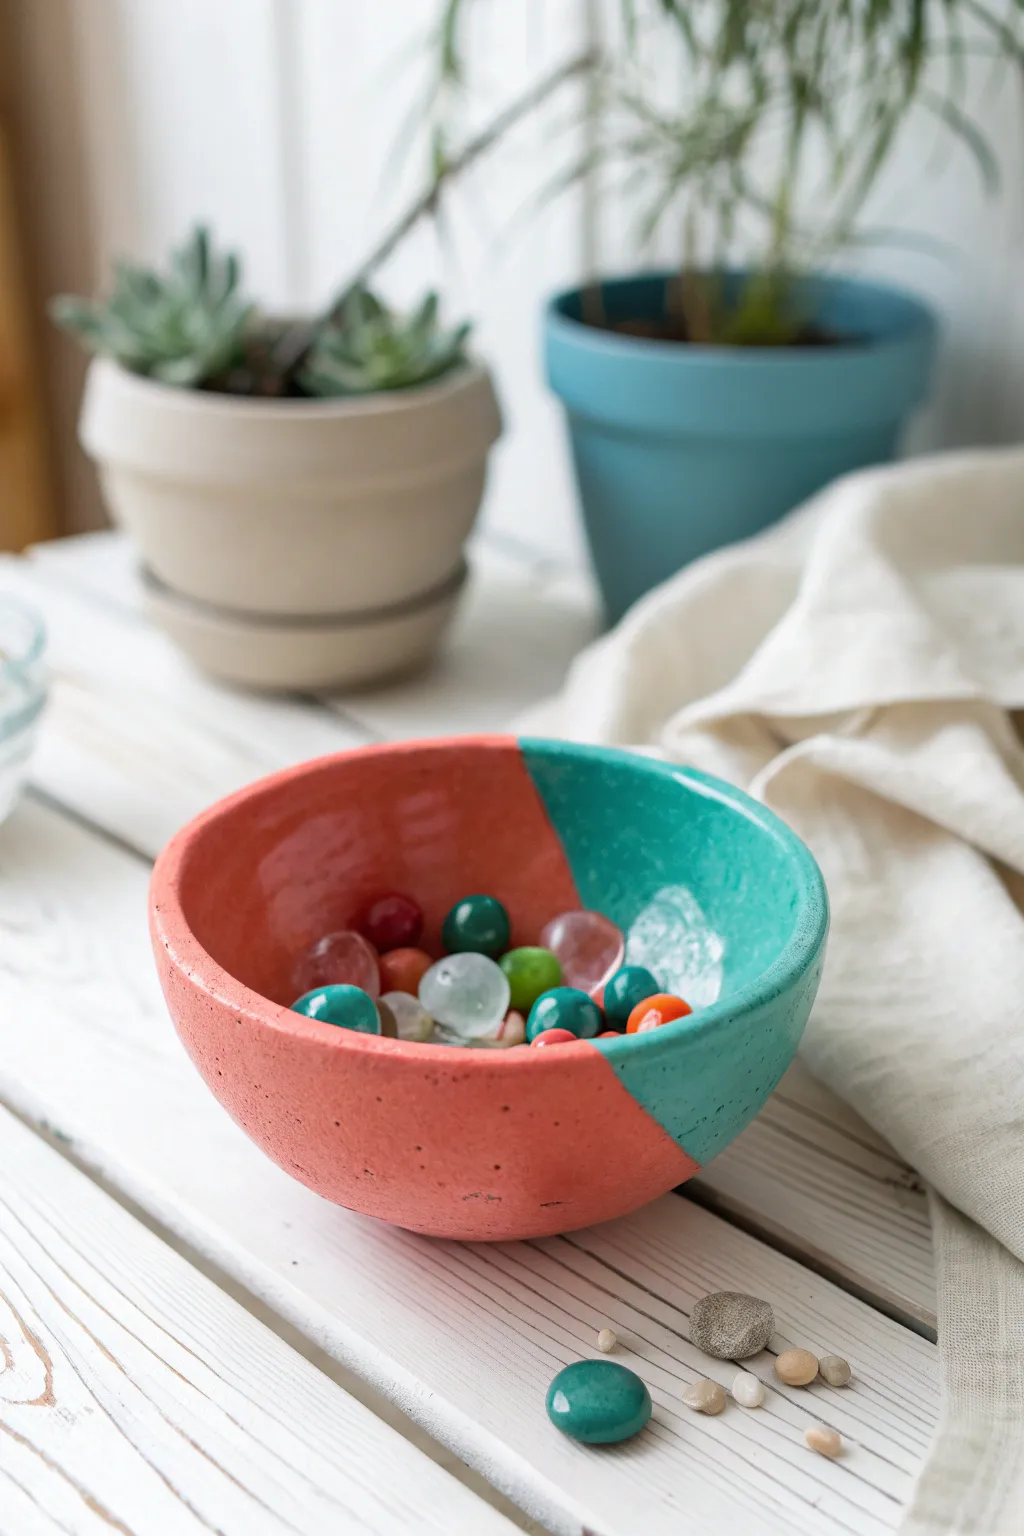
This charming little treasure bowl combines a classic clay technique with a modern, color-blocked design. It features a soft matte texture and a playful split between coral pink and teal, perfect for holding small trinkets like marbles or jewelry.
Detailed Instructions
Materials
- Air dry clay (white or grey)
- Acrylic paints (Coral Pink and Teal/Turquoise)
- Clear matte varnish or sealant
- Paintbrushes (medium flat brush and small detail brush)
- Small bowl of water
- Sponge or paper towel
- Fine-grit sandpaper (optional)
- Rolling pin (optional)
- Painter’s tape or masking tape
Step 1: Forming the Bowl
-
Prepare the Clay:
Start by taking a chunk of air dry clay about the size of a tennis ball. Knead it in your hands for a minute or two to warm it up and make it pliable, ensuring there are no air bubbles hidden inside. -
Roll a Sphere:
Roll the clay between your palms or on a table surface until you have a smooth, round ball. Try to get it as spherical as possible, as this sets the base shape for your bowl. -
Start the Pinch:
Hold the ball in one hand and gently press your thumb into the center of the clay. Push down about halfway to three-quarters of the way through, being careful not to push all the way to the bottom. -
Pinch the Walls:
Using your thumb on the inside and your fingers on the outside, gently pinch and rotate the clay. Work your way around the sphere in a spiral, slowly thinning out the walls as you go. -
Shape the Curve:
Aim for an even thickness of about a quarter-inch throughout the create a sturdy rim. If cracks appear on the rim, dip your finger in a little water and smooth them out immediately. -
Flatten the Base:
Once you are happy with the bowl shape, gently tap the bottom of the bowl on a flat surface. This creates a small, flat base so the bowl will sit steadily without tipping over. -
Smooth the Surface:
Wet your finger or a slightly damp sponge and run it over the entire surface of the bowl. Focus on smoothing out fingerprints and bumps to get that sleek, modern finish seen in the photo. -
Initial Drying:
Set the bowl aside in a safe, dry place. Let it dry for at least 24 to 48 hours. The clay will turn white and feel lighter when it is completely dry.
Smooth Operator
To get a super polished look, keep a small bowl of water nearby while shaping. A wet finger is the best tool for erasing fingerprints!
Step 2: Refining and Painting
-
Sand for Perfection:
Once fully dry, inspect your bowl. If there are any rough spots or uneven ridges, use a piece of fine-grit sandpaper to gently buff the surface until it feels smooth to the touch. -
Dust Off:
Wipe the bowl with a dry cloth or paper towel to remove any clay dust from sanding. This ensures the paint will stick properly. -
Plan the Design:
Visualise a diagonal line cutting across your bowl. This project relies on a sharp contrast between two colors, but you don’t need to be mathematically perfect. -
Apply Tape:
Use painter’s tape to mark off the diagonal line. Press the tape down firmly, especially at the rim, to prevent paint from bleeding underneath. Cover one half of the bowl completely with tape or paper. -
Paint the First Color:
Load your brush with the coral pink acrylic paint. Apply a smooth, even coat to the exposed half of the bowl, painting both the outside and the inside surfaces. -
Add a Second Coat:
Let the first coat dry for about 10-15 minutes. Apply a second coat of coral pink to ensure the color is opaque and vibrant. I find two thin coats are always better than one thick, gloopy on. -
Remove and Re-tape:
Once the pink paint is completely dry, gently peel off the tape. Now, carefully apply new tape over the pink painted edge to protect it, leaving the unpainted white clay exposed. -
Paint the Second Color:
Paint the remaining half with your teal or turquoise acrylic paint. Just like before, paint both the exterior and interior surfaces, ensuring you get right up to the tape line. -
Wait and Reveal:
Allow the teal paint to dry slightly but not fully—peeling tape while paint is slightly tacky often gives a cleaner line. Carefully remove the tape to reveal your crisp, two-tone design. -
Touch Ups:
If any paint bled through, use a very small detail brush to tidy up the line where the two colors meet. -
Seal the deal:
Finish by applying a coat of clear matte varnish over the entire bowl. this protects the paint from chipping and gives the bowl a finished, professional look.
Go Metallic
Paint a thin strip of gold leaf liquid or metallic gold paint right along the line where the two colors meet for a chic, high-end accent.
Now you have a stylish, handmade vessel ready to display your favorite tiny treasures

The Complete Guide to Pottery Troubleshooting
Uncover the most common ceramic mistakes—from cracking clay to failed glazes—and learn how to fix them fast.
Handprint Keepsake Dish
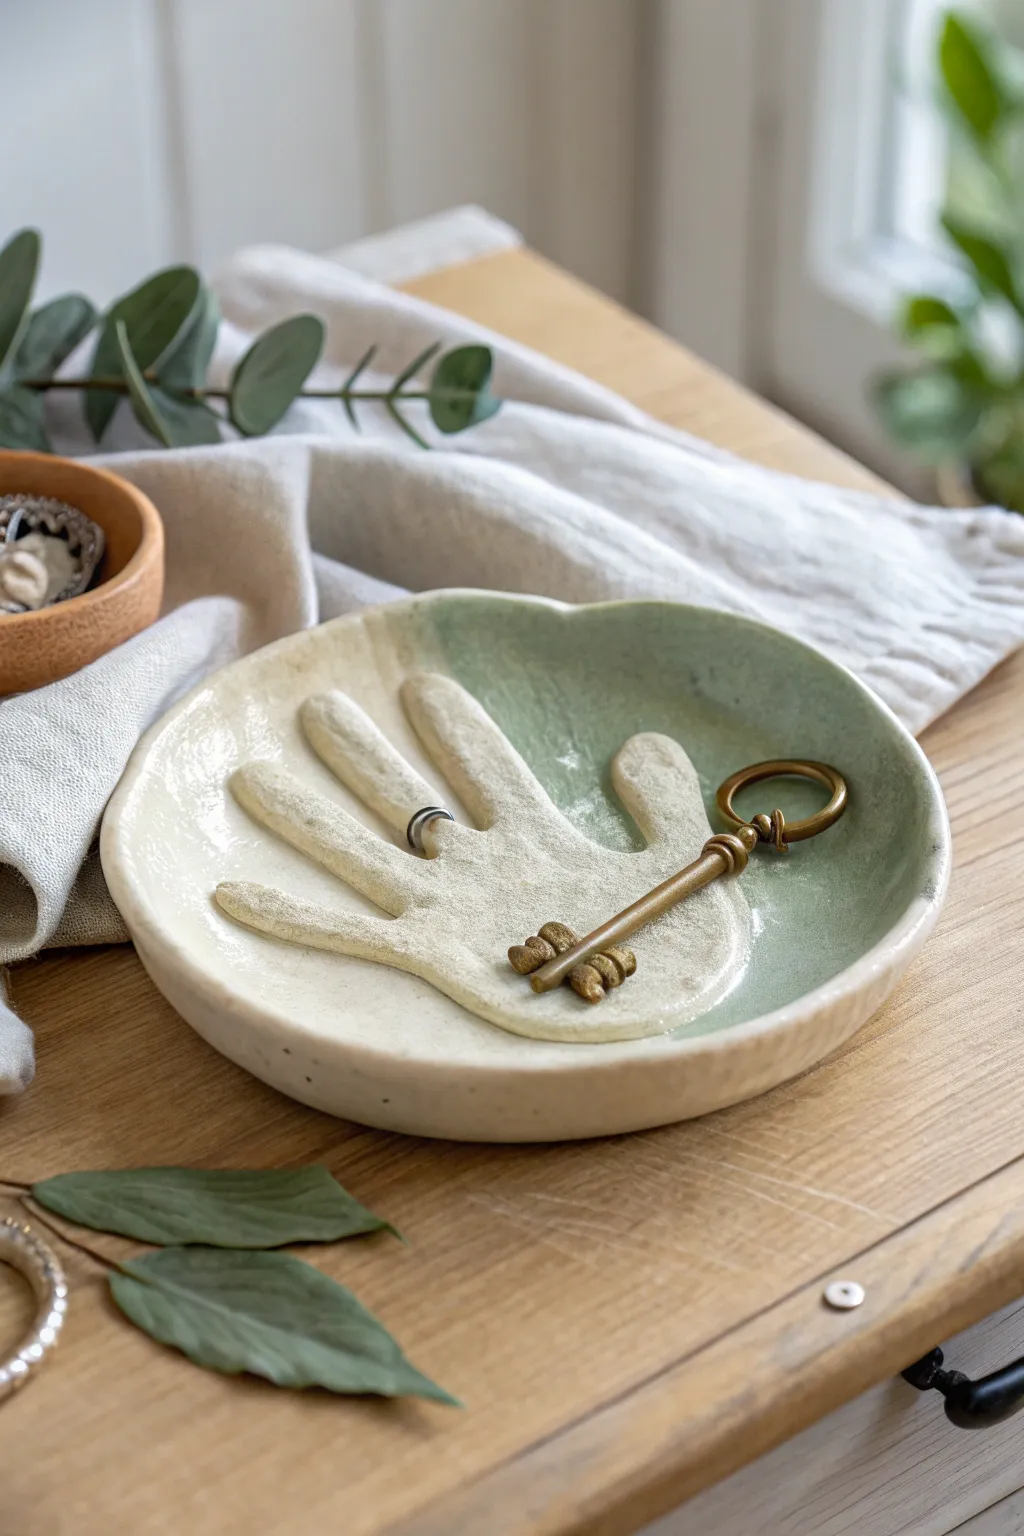
Immortalize a moment in time with this elegant, functional dish featuring a raised handprint design. The finished piece combines the warmth of natural clay with a soft, sea-foam green glaze effect, perfect for holding keys or jewelry.
How-To Guide
Materials
- White air dry clay
- Rolling pin
- Circular bowl or plate (for use as a mold/template)
- Craft knife or clay cutting tool
- Small sponge
- Water bowl
- Sandpaper (fine grit)
- Acrylic paints (Cream/Off-white and Pale Sage Green)
- Glossy varnish or sealant (Mod Podge works well)
- Paintbrushes (soft bristle)
Step 1: Shaping the Clay Base
-
Prepare the Clay:
Start by kneading a large ball of air dry clay until it is warm and pliable. This prevents cracks later on. -
Roll the Slab:
Roll out the clay on a smooth surface or canvas mat to a thickness of about 1/4 inch (6-7mm). Aim for an even thickness throughout. -
Cut the Circle:
Place a circular bowl or template (about 6-7 inches wide) onto the rolled clay. Use your craft knife to trace around it, cutting out a perfect circle. -
Smooth the Edges:
Dip your finger in a little water and run it along the cut edge of the circle to smooth out any roughness from the knife.
Preventing Cracks
If you see hairline cracks appearing while drying, smooth a tiny amount of fresh, wet clay (mixed into a paste with water) into the crack immediately.
Step 2: Creating the Hand Relief
-
Separate Clay for the Hand:
Take the excess clay scraps from your cutout and knead them together. Roll this into a smaller slab, slightly thinner than your base. -
Trace the Hand:
Have the child place their hand on this smaller slab. While they hold still, carefully trace around their fingers with a dull tool or toothpick. If tracing is too ticklish, you can lightly press their hand into the clay just enough to leave an outline, then cut along that line. -
Cut and Refine:
Carefully cut out the hand shape. Smooth the edges of the fingers with a damp finger or sponge so they aren’t sharp or jagged. -
Score and Slip:
This is a crucial ceramic technique. Use a needle tool or toothpick to scratch hatched lines (scoring) onto the center of your circle base and the back of the clay hand. Dab a little water (slip) onto the scratched areas. -
Attach the Hand:
Press the clay hand firmly onto the center of the circle base. Run a damp modeling tool or your finger around the seam where the hand meets the base to blend them together slightly, ensuring a strong bond.
Step 3: Forming and Drying
-
Shape the Dish:
Lift your clay circle and gently place it inside a shallow bowl lined with plastic wrap or parchment paper. This will give the dish its curved, concave shape as it dries. -
Refine the Form:
Press the clay gently into the bowl form, making sure the hand shape conforms to the curve without distorting the fingers too much. -
Dry Completely:
Let the project dry for 24-48 hours. I find it helps to flip the clay out of the bowl after the first 24 hours so the bottom can air out. -
Sand for Smoothness:
Once fully hard and white, use fine-grit sandpaper to gently smooth the rim of the dish and any rough spots on the hand.
Level Up: Antique Look
For an aged look, wipe a diluted brown paint wash over the dried hand texture and wipe it back off immediately, leaving dark pigment only in the crevices.
Step 4: Painting and Finishing
-
Base Coat:
Paint the entire dish, including the hand, with a cream or off-white acrylic paint. This unifies the surface color. -
Apply the Green Tint:
Mix a very watery wash of pale sage green paint. Brush this loosely over one half of the dish, letting it pool slightly around the fingers and wrist area to create that organic, dip-dyed look seen in the photo. -
Blend the Transition:
While the paint is still wet, use a clean, damp sponge to dab the edge where the green meets the cream, creating a soft, blurry fade rather than a hard line. -
Seal the Dish:
After the paint is bone dry, apply two coats of glossy varnish or sealant. This protects the clay from moisture and gives it that ceramic-like shine.
Place this beautiful dish on an entryway table to greet you every time you come home
Beaded Heart Ornaments
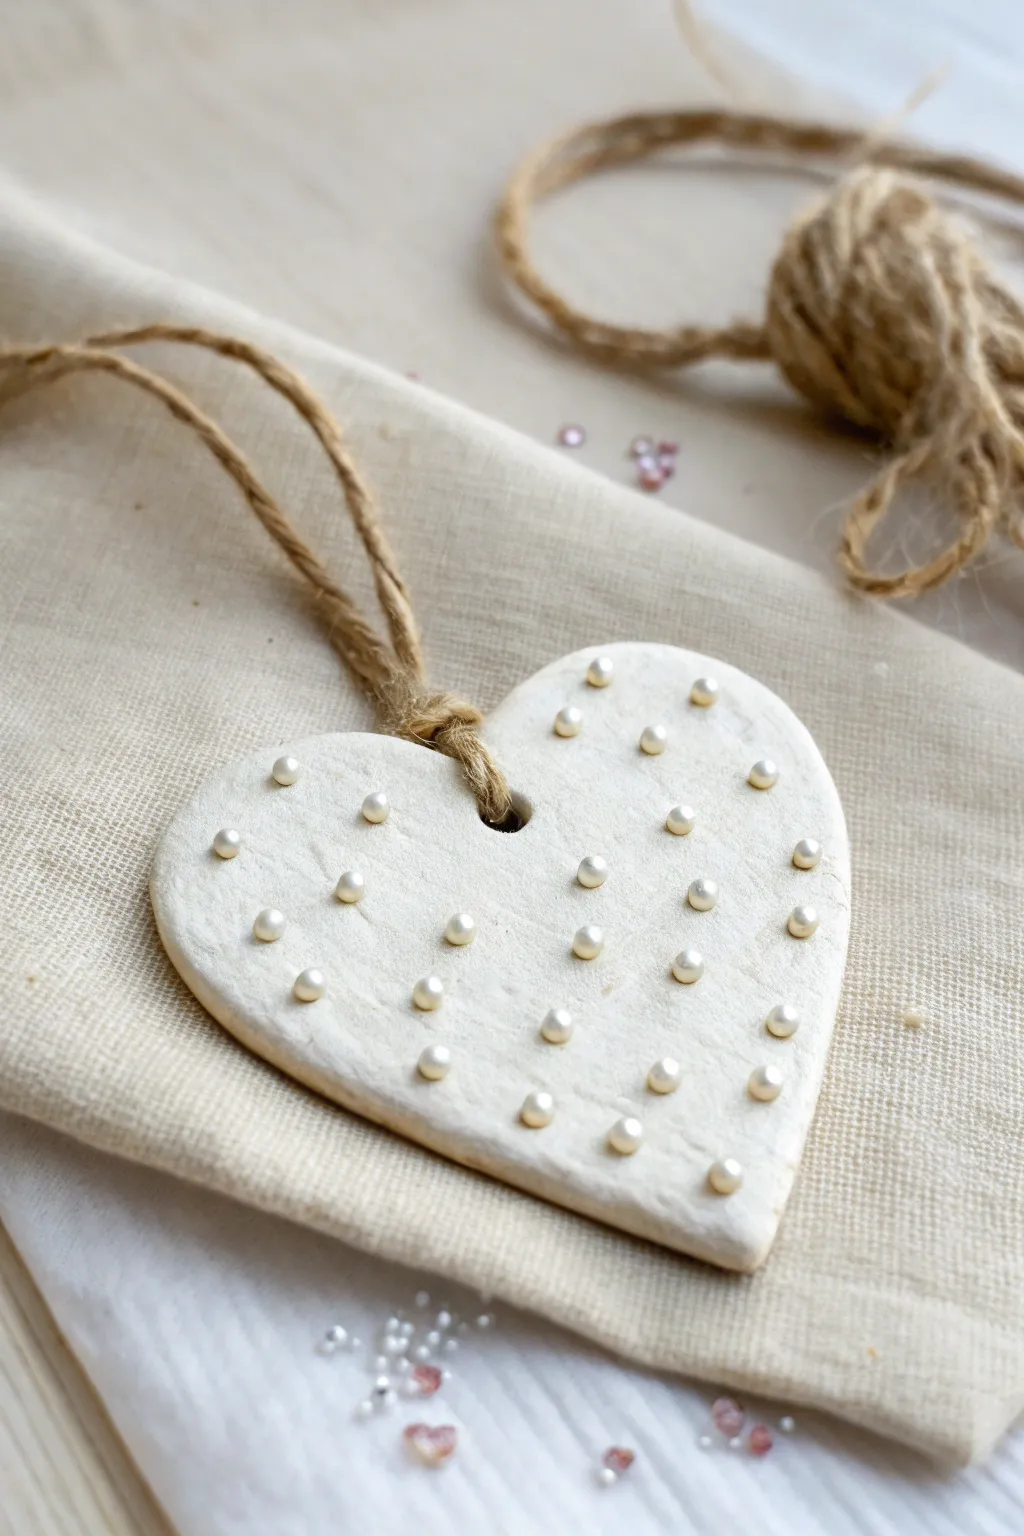
These elegant heart ornaments combine the earthy texture of air dry clay with the delicate shimmer of pearl beads. The scattered bead arrangement creates a sophisticated, boutique-style look that is surprisingly simple for little hands to master.
Step-by-Step
Materials
- White air dry clay
- Small heart-shaped cookie cutter (approx. 3-4 inches)
- Rolling pin
- Small faux pearl beads (4mm or 5mm size)
- Natural jute twine
- Plastic straw or skewer (to make the hole)
- Parchment paper or non-stick craft mat
- Small bowl of water
- Fine-grit sandpaper (optional)
Step 1: Shaping the Base
-
Prepare your workspace:
Lay down a sheet of parchment paper or a non-stick craft mat to protect your table and prevent the clay from sticking. -
Condition the clay:
Take a handful of white air dry clay and knead it gently in your hands until it feels soft, warm, and pliable. This helps prevent cracks later on. -
Roll it out:
Place the clay ball on your mat and use a rolling pin to flatten it. Aim for an even thickness of about 1/4 inch (6mm). If it’s too thin, it might crack; too thick, and it will be heavy. -
Cut the heart shape:
Press your heart-shaped cookie cutter firmly into the rolled clay. Give it a tiny wiggle to ensure a clean cut, then lift the cutter away. -
Remove excess clay:
Peel away the extra clay surrounding your heart shape, ball it up, and save it for the next ornament. -
Smooth the edges:
Dip your finger in a little bit of water and run it gently along the cut edges of the heart to smooth out any roughness or loose bits. -
Create the hanging hole:
Use a plastic straw to punch a neat hole near the top center of the heart, right in the ‘V’ dip. A straw removes the clay cleanly, unlike poking with a stick.
Step 2: Adding the Sparkle
-
Plan your bead placement:
Before pressing them in, decide on your pattern. The example uses a random, scattered look, which feels organic and charming. -
Press perfectly:
Take a small pearl bead and press it gently but firmly into the wet clay. You want it embedded about halfway so it stays put when dry. -
Continue beading:
Add the rest of your beads across the surface. Leave a little space around the edges and the hanging hole so the clay structure stays strong. -
Secure the beads:
I find it helpful to give each bead one final gentle tap to ensure the clay is hugging it tightly.
Loose Beads?
If beads pop out as the clay shrinks during drying, don’t panic. Just add a tiny dab of super glue or strong white craft glue to the indentation and press the bead back in.
Step 3: Finishing Up
-
Let it dry completely:
Place the heart on a clean, flat surface to dry. This typically takes 24-48 hours depending on humidity. Flip it over halfway through the drying time to ensure the back dries evenly. -
Check for loose beads:
Once fully dry, check the beads. If any feel loose, add a tiny dot of craft glue underneath them to secure them permanently. -
Optional sanding:
If there are any rough spots on the edges, you can very lightly sand them with fine-grit sandpaper for a professional finish. -
Cut the twine:
Cut a piece of natural jute twine, about 8-10 inches long. -
Thread the loop:
Fold the twine in half. Push the folded loop end through the hole in the heart from front to back. -
Secure with a lark’s head knot:
Open the loop you just pushed through, and pull the two loose tail ends of the twine through that loop. Pull tight to secure the knot against the top of the heart. -
Finish the hanger:
Tie the two loose ends of the twine together in a simple overhand knot to create the hanging loop.
Add Color
Mix a tiny drop of acrylic paint into your white clay before rolling it out to create pastel pink or blue hearts, or paint the dry clay with a gloss varnish for extra shine.
Hang these charming hearts on gift bags or branches for a sweet handmade touch everyone will admire


What Really Happens Inside the Kiln
Learn how time and temperature work together inside the kiln to transform clay into durable ceramic.
Rainbow Hanging Garland Tags
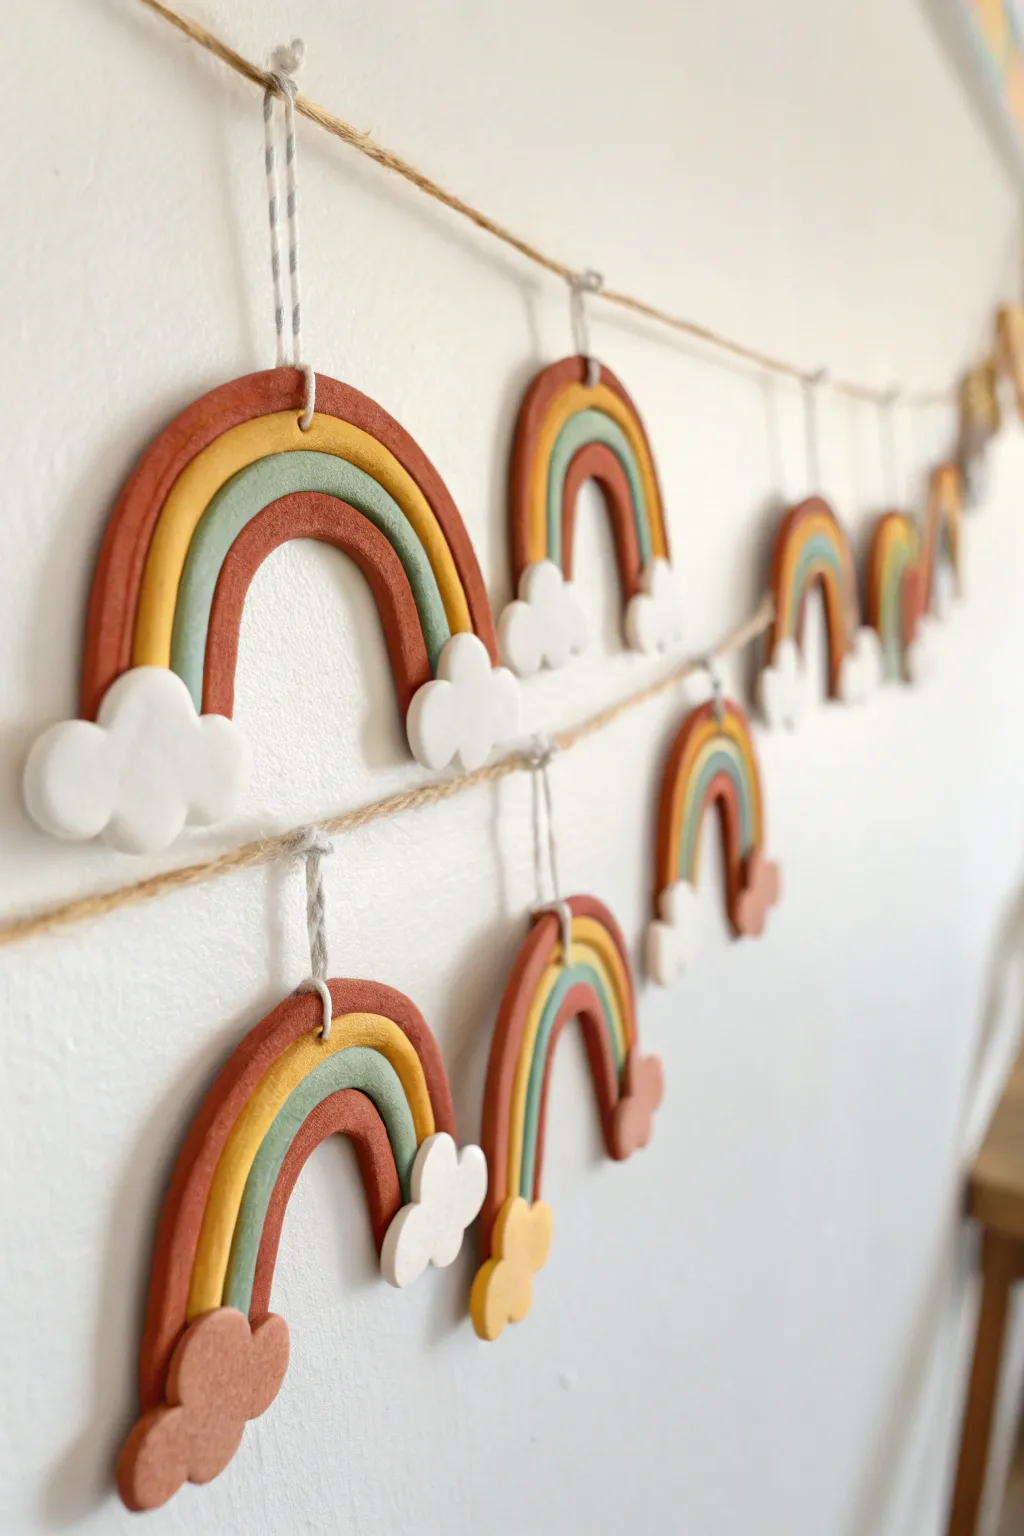
Bring a warm, earthy charm to any room with this handmade rainbow garland, featuring muted tones of terracotta, mustard, and sage. These adorable arched tags are crafted from air-dry clay and strung together to create a delightful piece of nursery or playroom decor.
Detailed Instructions
Materials
- Air dry clay (white)
- Acrylic paints (Terracotta, Mustard Yellow, Sage Green, White)
- Rolling pin
- Clay knife or craft knife
- Round cookie cutters (various sizes) or a drinking glass
- Small paintbrush
- Twine or jute string
- Strong craft glue or super glue
- Toothpick or skewer
- Parchment paper or non-stick mat
Step 1: Prepping and Coloring the Clay
-
Prepare your workspace:
Lay down parchment paper or a non-stick mat to prevent the clay from sticking to your table. Clean hands are key here to keep the white clay pristine. -
Divide the clay:
Separate your air dry clay into four equal portions. You will keep one portion white for the clouds. -
Mix your colors:
Add a small dab of acrylic paint to each of the other three clay balls—one terracotta, one mustard, and one sage. -
Knead until uniform:
Fold and knead the clay repeatedly until the color is completely uniform and streak-free. If the clay feels sticky, let it sit for a few minutes or dust your hands lightly with cornstarch.
Cracking Clay?
If you see tiny cracks forming as it dries, mix a tiny bit of water with fresh clay to make a paste and smooth it over the crack with your finger.
Step 2: Shaping the Rainbow Arches
-
Roll out the coils:
Take a pinch of the terracotta clay and roll it into a long, even snake or coil on your work surface. Aim for about the thickness of a pencil. -
Repeat for all colors:
Repeat this process with the mustard and sage clays, trying to keep the thickness consistent across all three colors. -
Form the outer arch:
Curve the terracotta coil into a U-shape to form the largest, outer arch found on the rainbows. -
Nest the middle arch:
Place the mustard coil snugly inside the curve of the terracotta arch, pressing them gently together side-by-side so they stick. -
Add the inner arch:
Fit the sage green coil into the very center to complete the three-stripe rainbow design. -
Trim the ends:
Use your clay knife or craft knife to slice across the bottom of the arches, creating a straight, flat edge where the clouds will attach.
Step 3: Adding Clouds
-
Shape clay balls:
For the clouds, take your white clay (or colored clay if you prefer variety) and roll several tiny balls of varying sizes. -
Cluster the clouds:
Press three or four of these tiny balls together into a flat cluster at the base of each rainbow leg, pressing them firmly onto the arches to adhere. -
Smooth the seams:
Flip the rainbow over gently and smooth the clay on the back where the clouds meet the arches to ensure a strong bond.
Seal the Deal
For a glossy finish and extra durability, coat your dried rainbows with a layer of Mod Podge or water-based polyurethane varnish.
Step 4: Assembly and Finishing
-
Create hanging holes:
Use a toothpick or skewer to poke a hole through the top center of the outermost (terracotta) arch. Make sure the hole is wide enough for your twine. -
Dry thoroughly:
Let your rainbows dry flat on the parchment paper for at least 24-48 hours. I find turning them over halfway through drying helps keep them perfectly flat. -
Sand edges (optional):
Once fully hard, you can use a fine-grit sandpaper to gently smooth out any rough edges or fingerprints. -
Cut the twine:
Measure a long length of jute twine for your main garland line, and then cut shorter pieces (about 4-5 inches each) for the individual hangers. -
Attach the loops:
Thread a short piece of twine through the hole in a rainbow, tie it into a loop, and then tie that loop onto the main long garland string. -
Space them out:
Repeat for all your rainbows, spacing them evenly along the main string to complete your garland.
Hang your beautiful new garland in a sunny spot and enjoy the handmade warmth it adds to your space
Cute Clay Emoji Faces
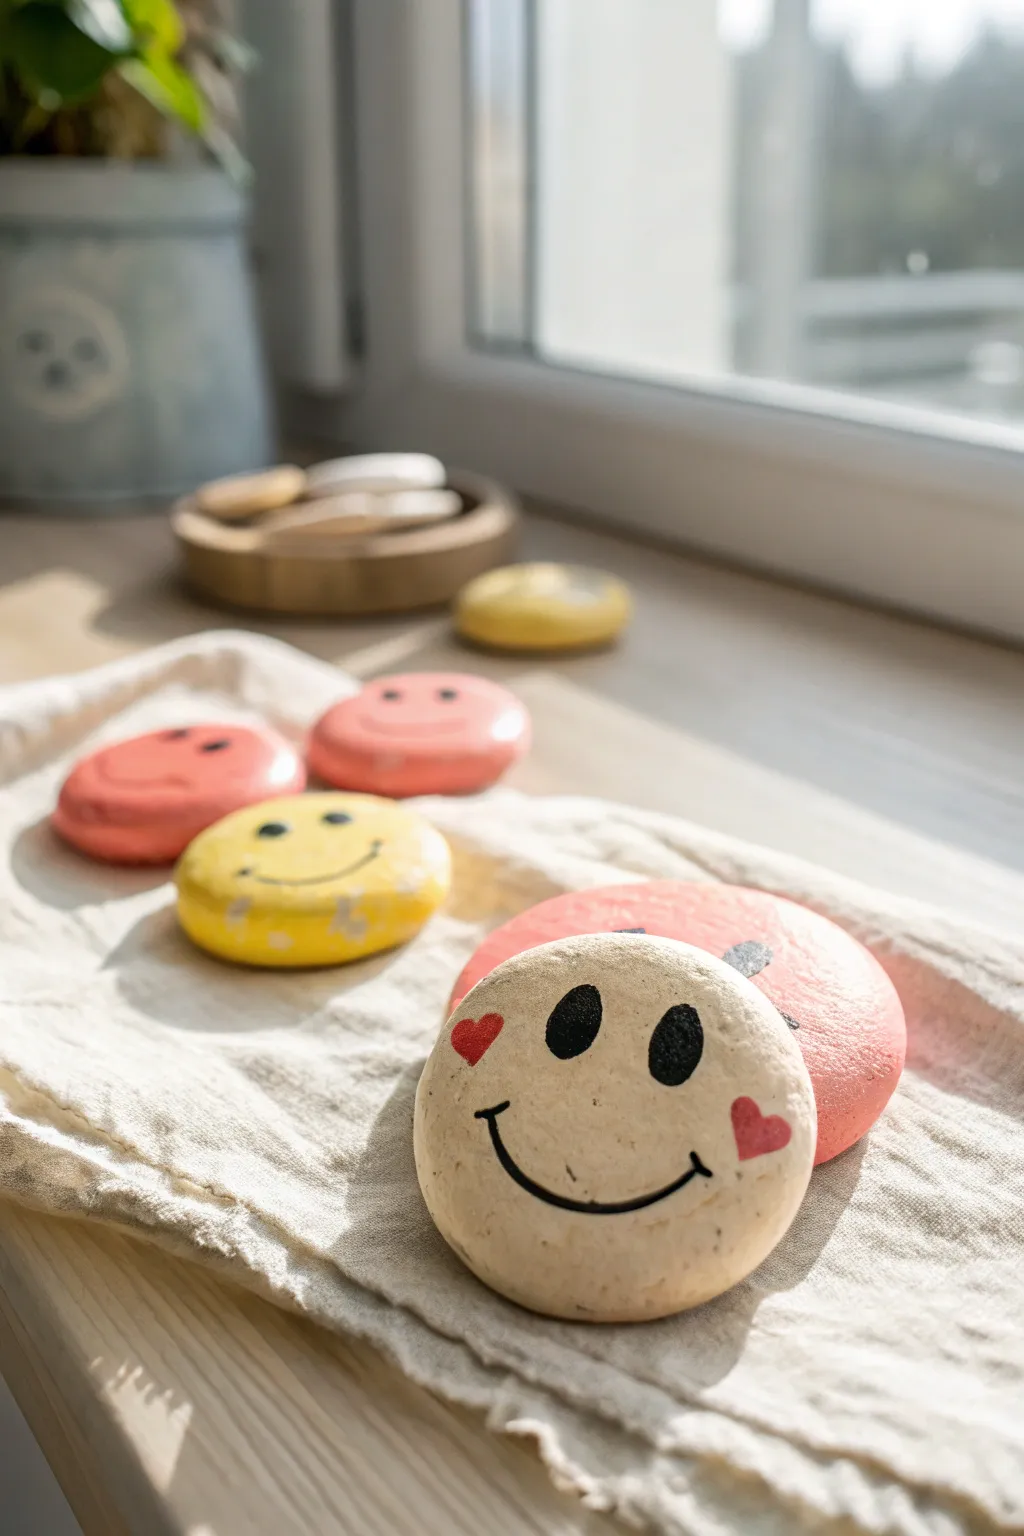
Spread a little happiness with these adorable, smooth-finished emoji stones that are perfect for beginning sculptors. They feature cheerful expressions painted on rounded, pebble-like clay forms, making them wonderful pocket pals or desk decorations.
How-To Guide
Materials
- Air dry clay (white or terracotta)
- Acrylic paints (pastel yellow, pink, peach, black, red)
- Fine detail paintbrush
- Medium flat paintbrush
- Water cup and palette
- Fine-grit sandpaper (optional)
- Mod Podge or clear acrylic sealer (matte or satin)
- Rolling pin (optional)
- Circle cutter or small cup (optional)
Step 1: Shaping the Base
-
Condition the clay:
Take a handful of air dry clay and knead it warm in your hands until it becomes soft, pliable, and free of cracks. -
Check portion sizes:
Pinch off ping-pong ball sized pieces of clay. You want each piece to be roughly the same volume so your set looks uniform. -
Roll spheres:
Roll each piece between your palms to create a smooth, tight sphere. Try to eliminate any fold lines now, as they are harder to fix later. -
Flatten into discs:
Gently press the sphere down onto your work surface with your palm. You want a thick, rounded disc shape—think of a macaron or a smooth river stone, not a flat pancake. -
Smooth the edges:
Dip your finger in a tiny bit of water and run it around the circumference of the clay disc to smooth out any tiny cracks or rough textures. -
Let them dry:
Place your clay stones on a clean surface or wire rack to dry. Depending on thickness and humidity, this usually takes 24-48 hours. Flip them halfway through to ensure the bottom dries evenly. -
Sand for perfection:
Once fully dry and hard, you can use a piece of fine-grit sandpaper to buff away any uneven spots, creating a professional, stone-like finish.
Smooth Surface Secret
Use a tiny amount of water on your fingertip to burnish the clay before drying. It seals micro-cracks and makes painting much easier later.
Step 2: Adding Color & Character
-
Apply base coats:
Using a medium flat brush, paint the entire surface of each stone. I like to use soft pastel shades like butter yellow, coral pink, and peach to match the gentle vibe in the photo. -
Check coverage:
Air dry clay can be porous, so you will likely need a second coat of paint. Let the first layer dry completely before adding the second for a solid, opaque color. -
Draft the faces:
If you’re nervous about freehanding, use a pencil to very lightly sketch the eyes and smile onto the painted surface. -
Paint the eyes:
Switch to your fine detail brush. Dip it in black acrylic paint and carefully fill in the oval eye shapes. For the winking face, simply paint a small curved line instead of a filled oval. -
Add the smile:
Using the very tip of your detail brush, paint a wide, U-shaped line for the smile. Keep your hand steady and use a confident, sweeping motion. -
Add cheek details:
For the feature emoji (the front one), paint two small red or deep pink hearts at the ends of the smile line to create rosy cheeks. -
Let paint cure:
Allow the painted details to dry completely. Black paint can smear easily, so give it plenty of time. -
Seal the deal:
Protect your artwork with a coat of Mod Podge or clear acrylic sealer. A matte finish looks very natural, while a gloss finish will make them look like ceramic.
Make Them Useful
Glue a strong magnet to the back of finished stones to turn your emojis into cheerful fridge decoration.
Arranging your finished emoji stones on a sunny windowsill brings a pop of joy to any room

TRACK YOUR CERAMIC JOURNEY
Capture glaze tests, firing details, and creative progress—all in one simple printable. Make your projects easier to repeat and improve.
Dinosaur Footprint Fossils
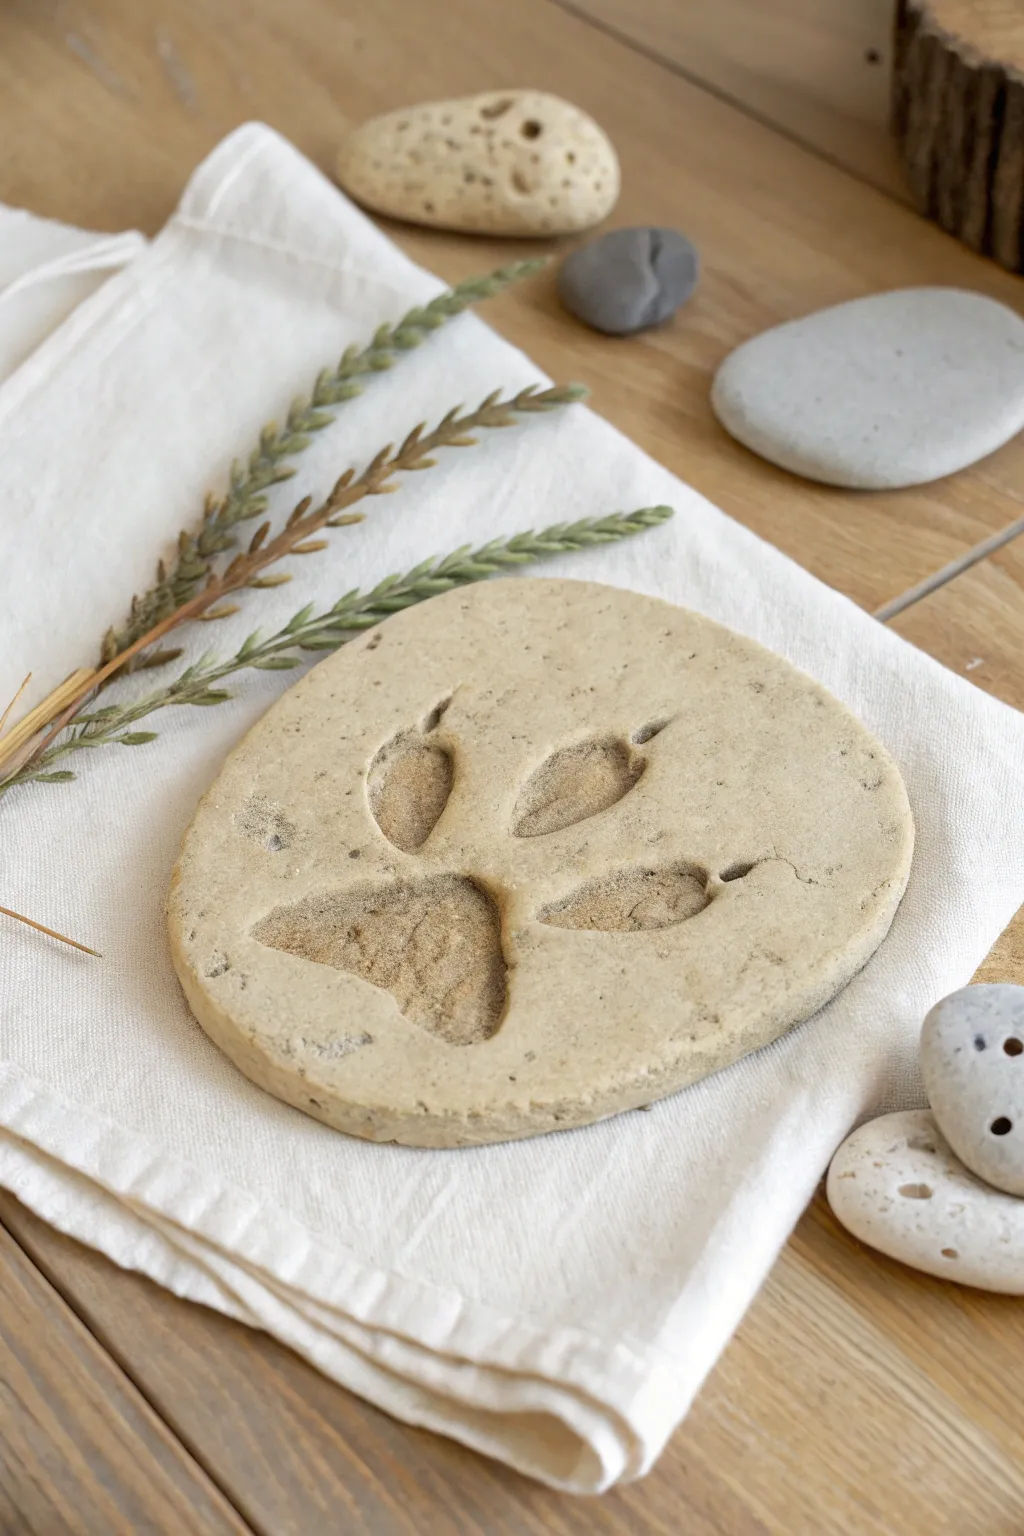
Step back in time by crafting your very own prehistoric artifact using simple materials. This project captures the rustic, stony look of a real dinosaur footprint discovered on an excavation site, perfect for budding paleontologists.
Detailed Instructions
Materials
- Air dry clay (stone or grey color)
- Small toy dinosaur (with feet)
- Small rolling pin
- Parchment paper or work mat
- Real garden stones or textured rocks (cleaned)
- Modeling tool or dull butter knife
- Small bristle brush (optional)
- Coffee grounds or sand (optional)
Step 1: Shaping the Base
-
Prepare your dough:
Start with a chunk of air dry clay about the size of a tennis ball. Knead it in your hands for a minute to warm it up and make it pliable. -
Roll it out:
Place the clay on your parchment paper. Using your palm or a small rolling pin, flatten the ball into a thick disc. -
Check thickness:
Aim for a thickness of about half an inch to three-quarters of an inch. You want it substantial enough to take a deep impression without cracking. -
Soften the edges:
The edges shouldn’t look perfectly round like a cookie. Gently press and tap the sides with your fingers to create an uneven, natural stone shape.
Step 2: Adding Texture
-
Gather texturing tools:
Find actual rocks from the garden or even a crumpled ball of aluminum foil. These will help simulate the rough surface of fossilized earth. -
Press for texture:
Gently press your rocks or foil all over the surface of the clay disc. Don’t press too hard; just enough to ruin the smooth, manufactured look of the fresh clay. -
Add grit:
I like to sprinkle a tiny pinch of sand or dried coffee grounds onto the clay and press them in lightly for extra speckling and realism.
Fossil Finders Tip
Work quickly! Air dry clay starts to form a ‘skin’ after about 15 minutes, which can make it harder to get clean, deep impressions without cracking.
Step 3: Making the Fossil Mark
-
Position the foot:
Take your toy dinosaur or use a modeling tool to manually sculpt the print. If sculpting manually, imagine a three-toed theropod foot. -
Create the main pad:
Press a thumb or the rounded end of a tool firmly into the lower center of the disc to create the main heel pad. -
Form the middle toe:
Press an oval indentation extending upwards from the heel pad. Make it slightly deeper near the claw tip. -
Form the side toes:
Add two more oval indentations on either side of the middle toe, angling them slightly outward. -
Add claw marks:
At the very tip of each toe impression, use a sharp tool or toothpick to make a tiny, narrow gouge where the claws would have dug in. -
Refine the edges:
Smooth the clay inside the footprint slightly with your finger or a wet brush, so the print looks worn by time rather than freshly cut.
Excavation Mode
Before the clay dries, bury a few small beads or tiny clean bones deep inside the clay ‘stone’ for kids to excavate later with tools.
Step 4: Finishing and Drying
-
Initial drying:
Leave the fossil on the parchment paper in a safe place. Air dry clay typically needs 24-48 hours to fully cure, depending on thickness. -
Flip it over:
After about 12 hours, I find it helpful to gently flip the disc over so the bottom side gets exposed to air, ensuring even drying. -
Simulate age:
Once fully dry, you can lightly brush the surface with diluted brown watercolor paint, wiping it off quickly with a paper towel. -
Highlight the print:
Allow some of the darker wash to settle into the deep recesses of the footprint, which makes the fossil shape pop against the lighter surface.
Display your ancient artifact along with some field notes for a museum-worthy exhibit
Ocean Starfish and Shell Tiles
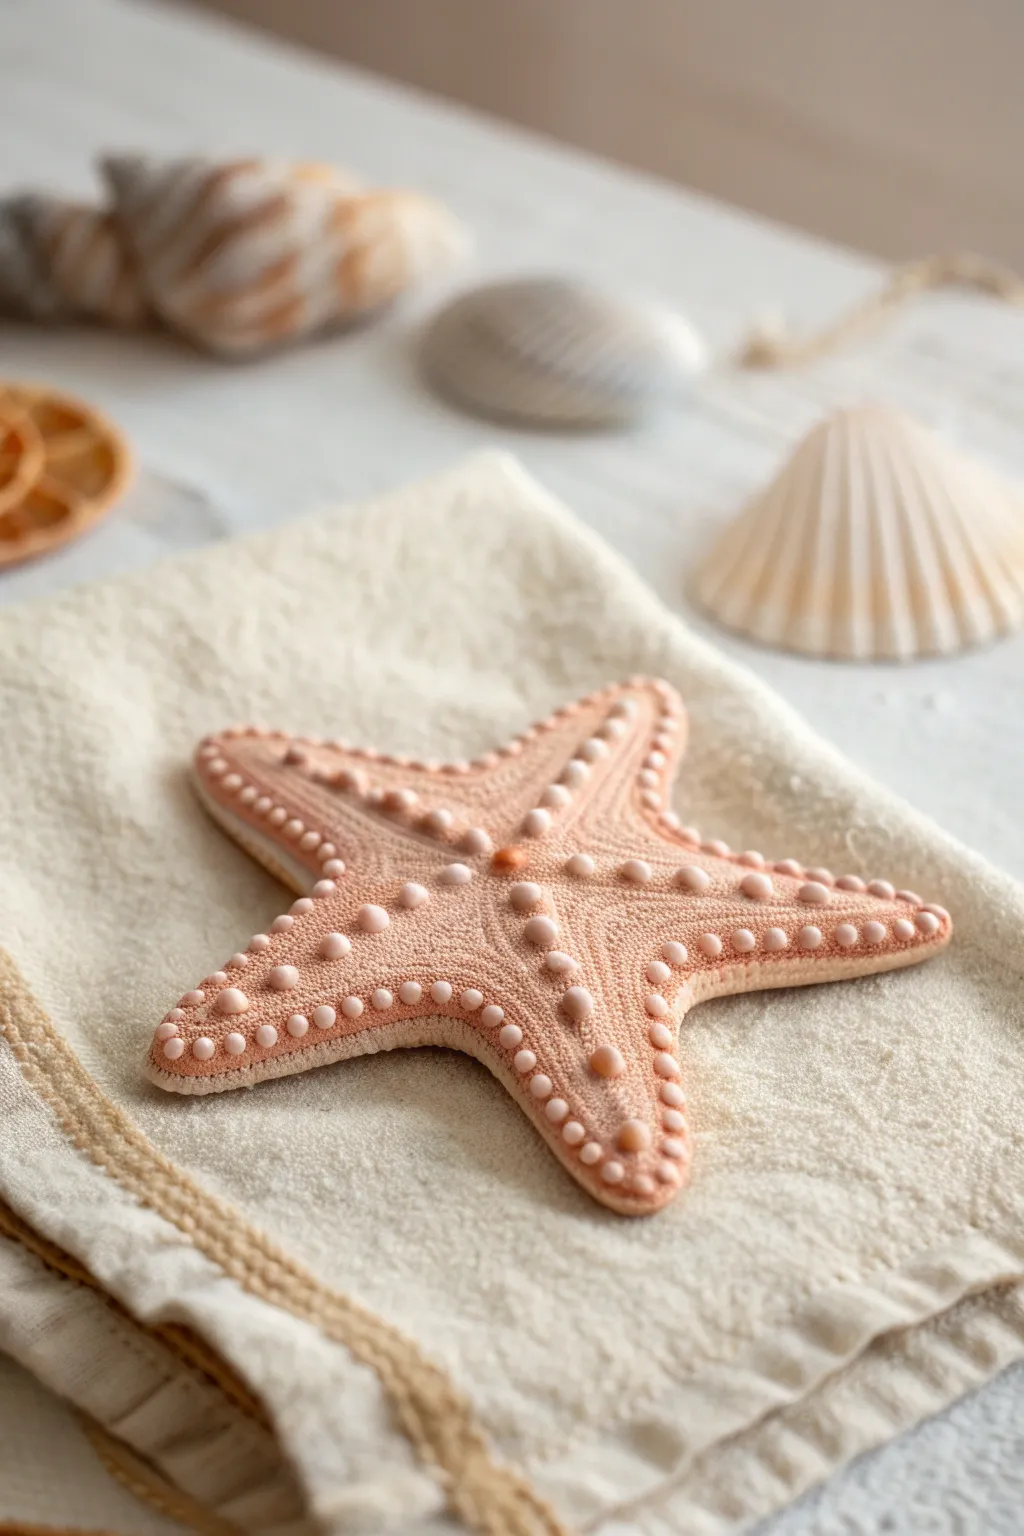
Bring a piece of the beach home with this incredibly lifelike starfish sculpture. Using simple tools and air dry clay, you’ll create a textured, peachy-pink sea star that looks as if it just washed ashore on a sandy tide. This project focuses on realistic detailing and delicate bead-like textures.
Step-by-Step Guide
Materials
- White air dry clay
- Rolling pin
- Starfish template (printed or hand-drawn)
- Craft knife or plastic clay tool
- Ball tool (small and medium sizes)
- Old toothbrush or stiff bristle brush
- Acrylic paints: Peach, Soft Pink, White, Light Brown
- Paintbrushes (soft synthetic fan brush and fine detail brush)
- Water cup
- Sponge
Step 1: Shaping the Base
-
Condition the Clay:
Start by taking a handful of air dry clay and kneading it in your hands until it is warm, soft, and pliable. This prevents cracks later on. -
Roll the Slab:
Roll out the clay to a uniform thickness of about 1/4 inch. You want it substantial enough to hold its shape but not too chunky. -
Cut the Shape:
Place your paper star template over the clay slab and carefully trace around it with a craft knife to cut out the five-point star shape. Alternatively, you can hand-cut it for a more organic, imperfect look. -
Soften the Edges:
Dip your finger in a little water and gently run it along the cut edges of the starfish to smooth out any sharp angles. The arms should look rounded and natural, not blocky. -
Shape the Arms:
Gently pinch the center of each arm to create a very subtle ridge, tapering down towards the tips. The center of the starfish should be the highest point.
Step 2: Adding Texture and Details
-
Create Surface Texture:
Take an old toothbrush or a stiff bristle brush and firmly tap it all over the surface of the clay. This stippling creates that realistic, sandy skin texture found on real sea stars. -
Mark the Rays:
Using a blunt tool or the back of a butter knife, lightly impress a centered line running from the central disk down the middle of each arm to act as a guide for your bumps. -
Form Key Bumps:
Roll tiny spheres of clay, varying slightly in size. You will need a lot of these! I usually roll about 20 at a time so the clay doesn’t dry out. -
Attach Central Bumps:
Place a line of slightly larger clay balls down the center ridge of each arm. Use a tiny dot of water or slip (clay mixed with water) to help them adhere securely. -
Add Secondary Rows:
Add parallel rows of smaller clay balls on either side of the central ridge. These should be slightly smaller than the center ones. -
Indent the Bumps:
Take your small ball tool and gently press into the center of each little clay sphere you just attached. This flattens them slightly and creates a ring-like appearance. -
Let it Dry:
Allow the sculpture to dry for at least 24-48 hours. Turn it over halfway through simply to ensure the bottom dries evenly.
Natural Curve Trick
Before drying, place scrunched-up foil under the tips of two arms. This gives the starfish a subtle, lifelike wave rather than lying perfectly flat.
Step 3: Bringing it to Life with Color
-
Base Coat:
Mix peach paint with a tiny drop of light brown and white to get a natural sandy-pink tone. Paint the entire starfish, getting into all the textured crevices. -
Highlight the Bumps:
Once the base coat is dry, mix a very pale pink (mostly white with a dot of pink). Using a fine brush, carefully paint just the tops of the raised bumps. -
Add Center Detail:
Mix a slightly darker orange-brown shade and paint the very center bump where the five arms meet to create a focal point. -
Final White Dry Brush:
Dip a dry brush into pure white paint, wipe almost all of it off on a paper towel, and excessively lightly dust over the highest points of the texture. This emphasizes the sandy feel.
Cracks while rolling?
If the clay sphere cracks while you make the tiny bumps, add a drop of water to your palm and re-roll. Clay needs moisture to stay smooth.
Place your finished starfish on a shelf or use it as a centerpiece for a coastal vibe
Butterfly and Bee Garden Critters
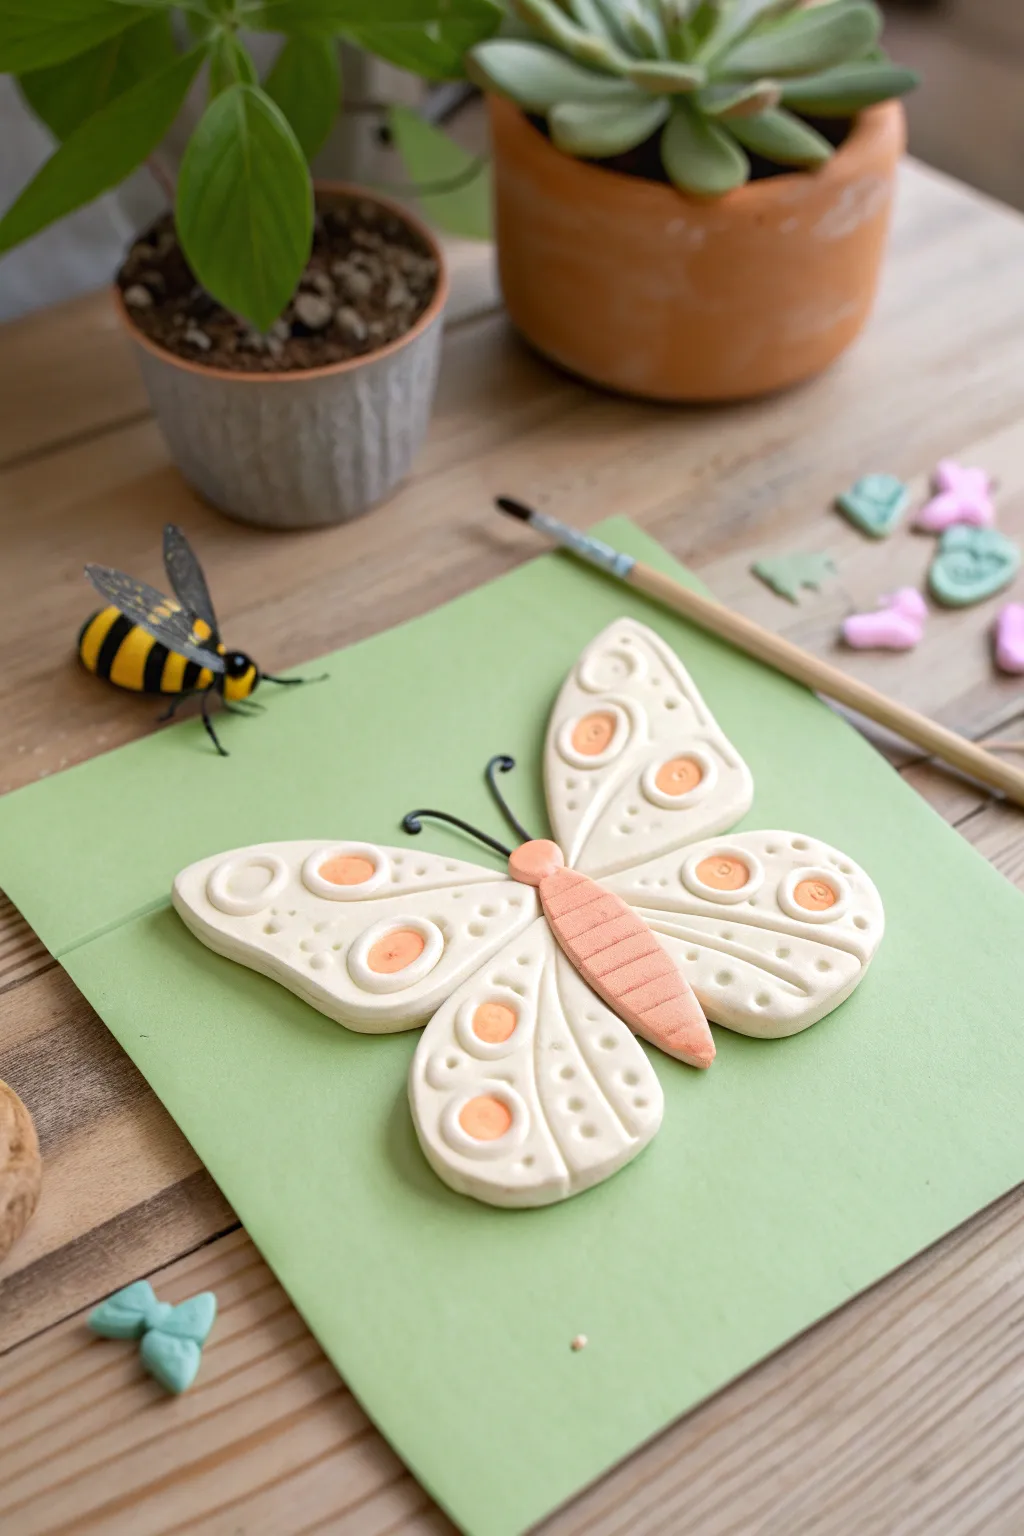
Create a cheerful garden scene right on your greeting cards with this textured air-dry clay butterfly project. The raised white wings contrast beautifully with soft orange accents, making for a keepsake that is as fun to touch as it is to look at.
How-To Guide
Materials
- White smooth air-dry clay
- Light orange or peach air-dry clay (or food coloring to tint white clay)
- Thick green cardstock or craft foam sheet
- Basic sculpting tools (knife tool, small dotting tool)
- Black jewelry wire or thin coated wire
- Rolling pin
- Craft glue
- Small paintbrush
- Water for smoothing
Step 1: Shaping the Wings
-
Create the base shapes:
Start with your white clay. Condition it by kneading until soft, then divide it into four balls: two larger ones for the upper wings and two slightly smaller ones for the lower wings. -
Form teardrops:
Roll each ball into a smooth sphere, then pinch one end to create a teardrop shape. -
Flatten the wings:
Gently press each teardrop flat onto your work surface with your palm or a rolling pin. Aim for a thickness of about 1/4 inch so they are sturdy but not too heavy. -
Refine the edges:
Use your fingers and a little water to smooth out any cracks on the edges. Shape the larger wings to be slightly rounded triangles and the lower wings to be circular teardrops. -
Arrange the composition:
Place the four wing pieces directly onto your green cardstock backing to check the spacing, leaving a small gap in the center for the body.
Step 2: Adding the Body and Texture
-
sculpt the body:
Take a piece of peach or light orange clay and roll it into a long, tapered worm shape for the abdomen. -
Create the thorax:
Roll a small ball of the same orange clay and attach it to the top of the body piece. Together, place this in the center gap between the wings. -
Score the body:
Using a plastic knife tool, gently press horizontal lines across the abdomen to create a segmented insect look. -
Add wing details:
Using a small sculpting tool or the back of a thin paintbrush, press three parallel lines radiating from the body outward on each wing section. -
Make the decorative spots:
Roll tiny balls of the orange clay. You will need one for each wing section. -
Embed the spots:
Press a small indentation into the center of each white wing. Place an orange clay ball into the dent and flatten it flush with the surface. -
Add distinct circles:
Take a small circle cutter or the open end of a pen cap and press a ring shape into the white clay around each orange spot. This frames the color beautifully. -
Creating texture dots:
I like to use a small dotting tool here to poke random patterns of tiny holes around the wings, focusing on the outer edges for a lacy effect.
Clay Shrinkage
Air-dry clay shrinks slightly as it dries. If gaps appear between wings and body, fill them with tiny bits of fresh wet clay before painting.
Step 3: Finishing Touches
-
Insert antennae:
Cut two short lengths of black wire. Curve them slightly at the ends. -
Secure the sensors:
Gently push the wire ends into the top of the rounded head piece while the clay is still damp. -
Final drying:
Let the butterfly dry completely on the flat card surface. This usually takes 24 hours depending on humidity. -
Glue in place:
Once fully hard, carefully lift the pieces. Apply a strong craft glue to the back of each section and adhere them permanently to the green cardstock. -
Optional bee friend:
If you have leftover yellow and black clay, you can roll a simple oval with stripes and attach pre-made plastic wings or paper wings to create a buzzing companion for the corner.
Sparkle & Shine
Mix glitter into the white clay before sculpting for a magical shimmer, or brush a coat of gloss varnish over the finished orange spots.
Display your textured art piece on a shelf or gift it to a nature lover for a lasting smile
Mini Monster Pencil Toppers
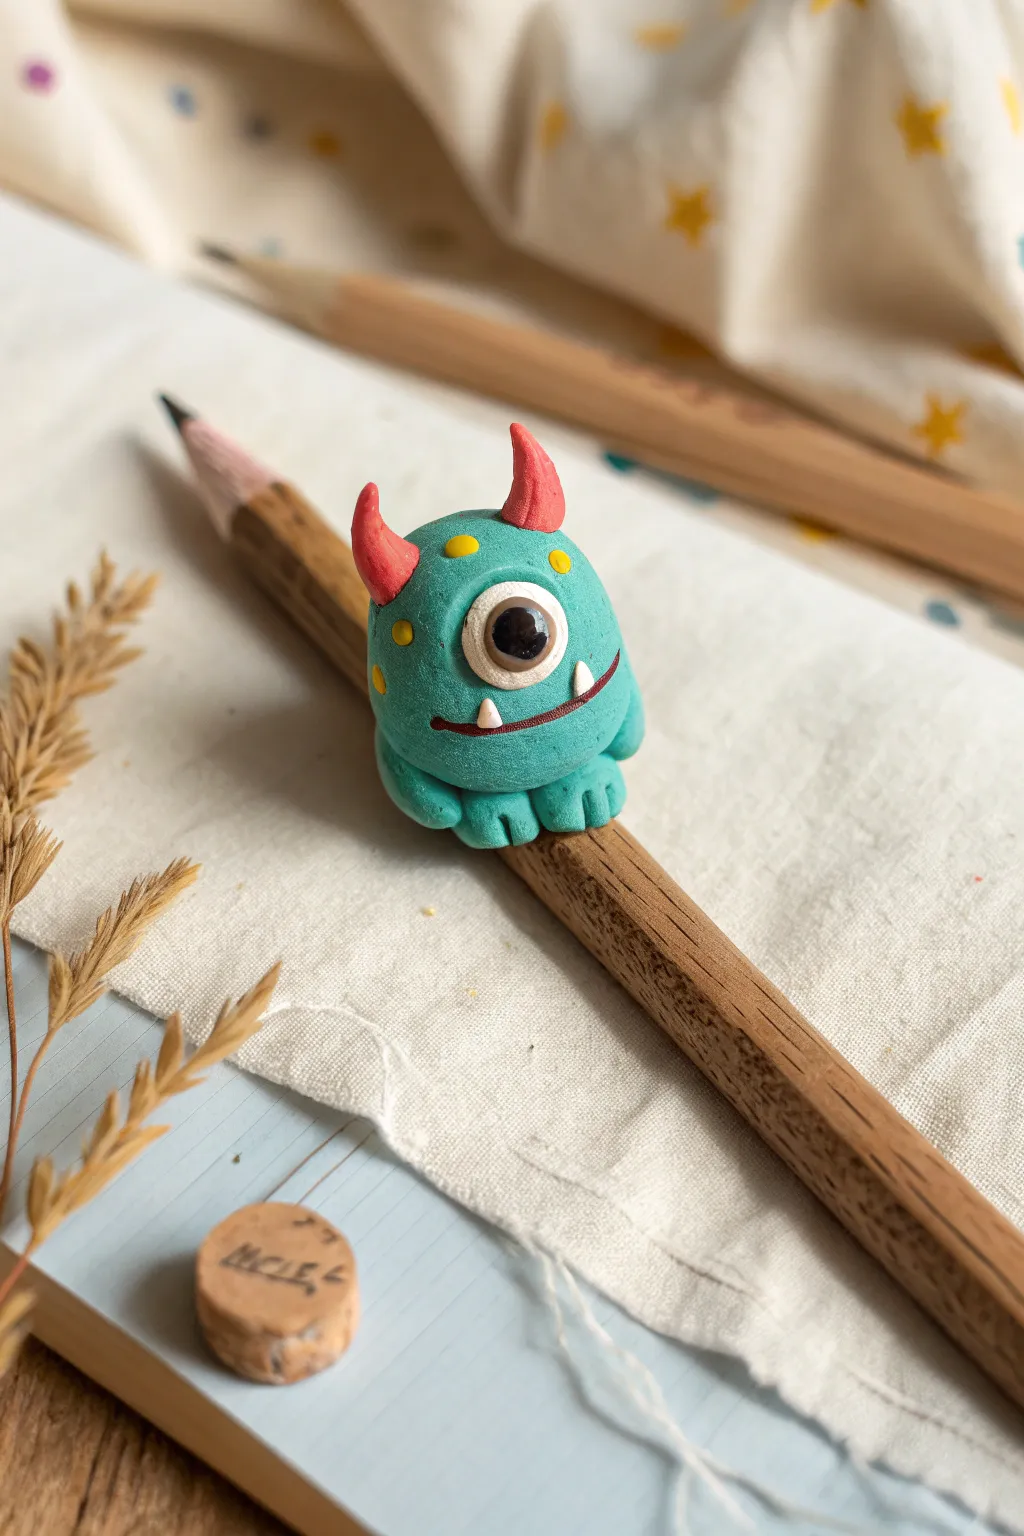
Transform a plain pencil into a friendly writing buddy with this adorable one-eyed monster topper. With his teal skin, tiny red horns, and big expressive eye, he’s the perfect companion for making homework a little more fun.
Step-by-Step
Materials
- Teal or turquoise air dry clay
- White air dry clay
- Red or coral air dry clay
- Black air dry clay
- Yellow air dry clay or yellow paint pen
- Wooden pencil (for sizing)
- Clay sculpting tools (or a toothpick)
- Small rolling pin
- Water (for attaching pieces)
Step 1: Shaping the Body
-
Prepare the pencil:
Pick out the pencil you want to use. Since air dry clay shrinks slightly as it dries, we will build directly on the pencil but remove it carefully later if needed, or just let it dry permanently in place. -
Roll the main ball:
Take a walnut-sized chunk of teal clay. Roll it between your palms until it is a smooth sphere with no cracks. -
Form the oval shape:
Gently press the sphere into a slightly taller, fat oval shape. This will be the monster’s main body. -
Create the pencil hole:
Push the pencil gently into the bottom center of the oval. Don’t go all the way through; stop about halfway up the body so the monster sits securely on top. -
Refine the shape:
While the pencil is inserted, gently pat the clay to ensure it hugs the wood snuggly, maintaining that nice round monster tummy.
Step 2: Adding the Face
-
Make the eye base:
Roll a small ball of white clay and flatten it into a thick disc. This brings the monster’s character to life immediately. -
Attach the eye:
Press the white disc firmly into the upper center of the teal body. If the clay feels dry, dab a tiny drop of water on the back to help it stick. -
Add the pupil:
Roll a very small ball of black clay. Flatten it slightly and press it into the center of the white eye. -
Add that sparkle:
Take a microscopic speck of white clay and place it near the top edge of the black pupil. This ‘catchlight’ makes him look shiny and alive. -
Define the eyelid:
Roll a thin snake of teal clay. Wrap it over the top edge of the white eye to create a heavy eyelid, blending the top edge into the head so it looks seamless. -
Carve the mouth:
Use a clay tool or a toothpick to gently press a curved line below the eye for a smile. -
Insert the smile line:
Roll a very thin thread of dark brownish-red (or black) clay and gently press it into the groove you just carved for a defined mouth. -
Add teeth:
Shape two tiny triangles of white clay. Attach them pointing upwards on the mouth line for cute little fangs.
Smooth Seams
To keep your monster from falling apart, use a tiny bit of water on your finger to smooth out the seams where you join clay pieces, like the eyelid or horns.
Step 3: Horns, Arms, and Details
-
Shape the horns:
Roll two small pieces of red clay into cone shapes that curve slightly at the tips. -
Mount the horns:
Press the horns onto the top of the monster’s head, spacing them out on either side of the eye. -
Make the feet:
Create two small flattened balls of teal clay for feet. -
Add toes:
Use your toothpick to press two indentations into each foot to create three little toes, then attach the feet to the bottom front of the body. -
Add spots:
Roll tiny balls of yellow clay and press them flat onto the monster’s skin around the eye and head, or wait until the clay is dry and paint them on with a yellow marker.
Wild Hair
Give your monster a punk rock look by pushing short lengths of crafting wire or colorful yarn into the head before the clay dries completely.
Let your new little friend dry upright on the pencil for 24 hours before taking him to school
Cactus Pencil Cup Buddy
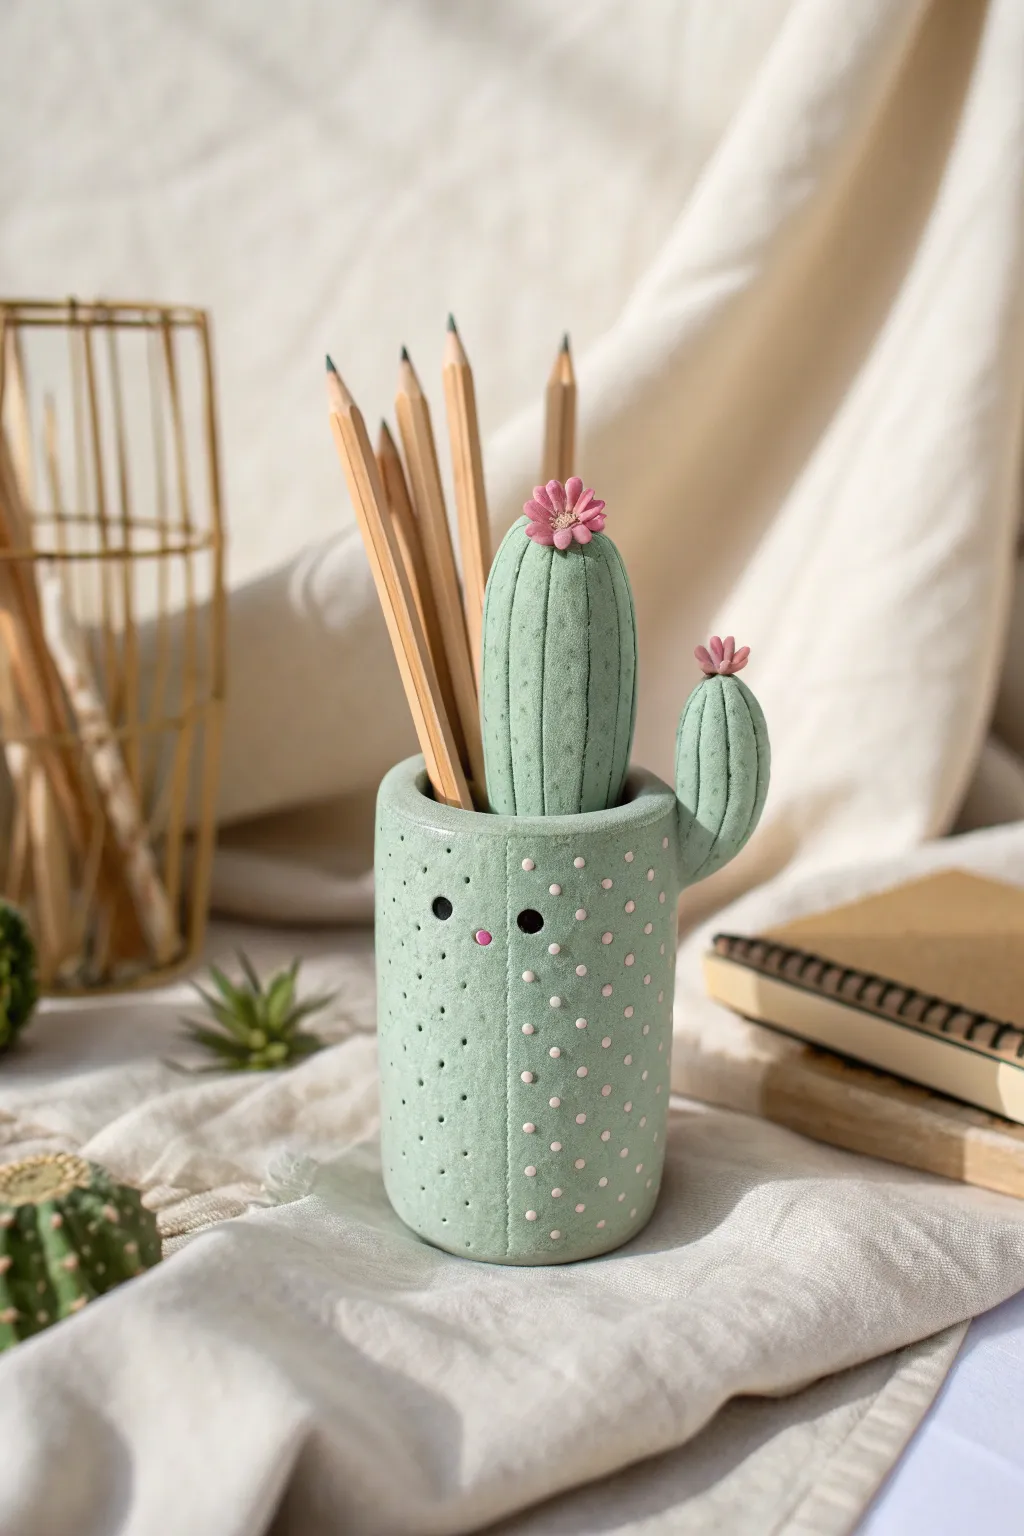
Keep your desk organized with this adorable desert friend that doubles as a pencil holder. With its sweet face, spotted texture, and blooming pink flowers, this clay project adds a touch of playful nature to any workspace.
Step-by-Step Tutorial
Materials
- Air dry clay (white or pre-colored green and pink)
- Acrylic paint (sage green, light pink, black, white)
- Clean empty tin can or sturdy cardboard tube (for structure)
- Rolling pin
- Clay knife or plastic cutting tool
- Water cup and sponge
- Small paintbrush
- Toothpick or clay needle tool
- Varnish or sealant (optional)
Step 1: Building the Base
-
Prepare the core:
Clean and dry your tin can or cardboard tube thoroughly to ensure the clay adheres well. This hidden core will give your pencil holder perfect stability. -
Roll out the clay:
Take a large portion of clay and roll it into a flat, even slab about 1/4 inch thick. Aim for a long rectangle that is slightly taller and wider than your core container. -
Wrap the container:
Apply a tiny bit of water to the outside of your can, then wrap the clay slab around it. Cut off any excess clay where the ends meet. -
Seal the seam:
Smooth the vertical seam where the clay edges join by dragging your finger or a tool across the line until it disappears. Fold the excess clay at the top over the rim and smooth it down inside. -
Create the base:
Roll a small ball of clay flat for the bottom. Place your wrapped cylinder on top of it and blend the clay upwards from the base to join the two pieces securely.
Fixing Cracks
If small cracks appear while drying, don’t panic. Mix a tiny bit of fresh clay with water to make a paste (slip) and fill in the cracks, then smooth over.
Step 2: Adding Cactus Details
-
Form the main shoot:
Roll a thick, rounded log of clay that is slightly taller than your base. This will act as the taller cactus stalk emerging from the back. Flatten the bottom and attach it firmly to the inside back rim of your cup using a little water. -
Make the side arm:
Create a smaller, thumb-shaped log for the cactus arm. Attach this to the side of the main body, smoothing the connection point so it looks like it grew naturally from the side. -
Add texture lines:
Using a toothpick or clay knife, gently press vertical lines running up the length of the tall stalk and the side arm to mimic the ribs of a cactus. -
Create the flowers:
Roll tiny balls of pink clay (or white clay you’ll paint later) and flatten them. Layer five or six small petal shapes in a circle, placing a textured center in the middle. Make two of these. -
Attach the blooms:
Score the top of the tall stalk and the side arm with a needle tool. Add a drop of water and press your flowers gently onto the tips.
Level Up: Texture
Before the clay dries, gently press a clean piece of sandpaper or a rough fabric against the surface to give the cactus a realistic, grainy skin texture.
Step 3: Decorating and Drying
-
Initial drying:
Let your sculpture sit for 24-48 hours until completely hard. I find it helps to rotate it occasionally so air reaches all sides evenly. -
Base coat painting:
If you used white clay, paint the entire cactus body a soft sage green. Let this coat dry completely before moving on. -
Adding the face:
Use the back of a paintbrush handle dipped in black paint to stamp two perfectly round eyes on the front of the cup. Add a tiny pink nose just below and between them. -
Adding spots:
Using a fine-tip brush or a toothpick, dot small pink or white specks all over the lower half of the cup to create a cute, patterned texture. -
Painting the texture:
For the upper cactus parts, use a darker green or black wash to very lightly trace inside the vertical grooves you made earlier, giving the cactus depth. -
Final touches:
If you haven’t used colored clay, paint the flowers a vibrant pink with a lighter center. Once all paint is dry, apply a coat of varnish to protect your new desk buddy.
Now you have a sturdy and stylish spot to keep your favorite pencils ready for your next drawing session
Animal Photo Holders
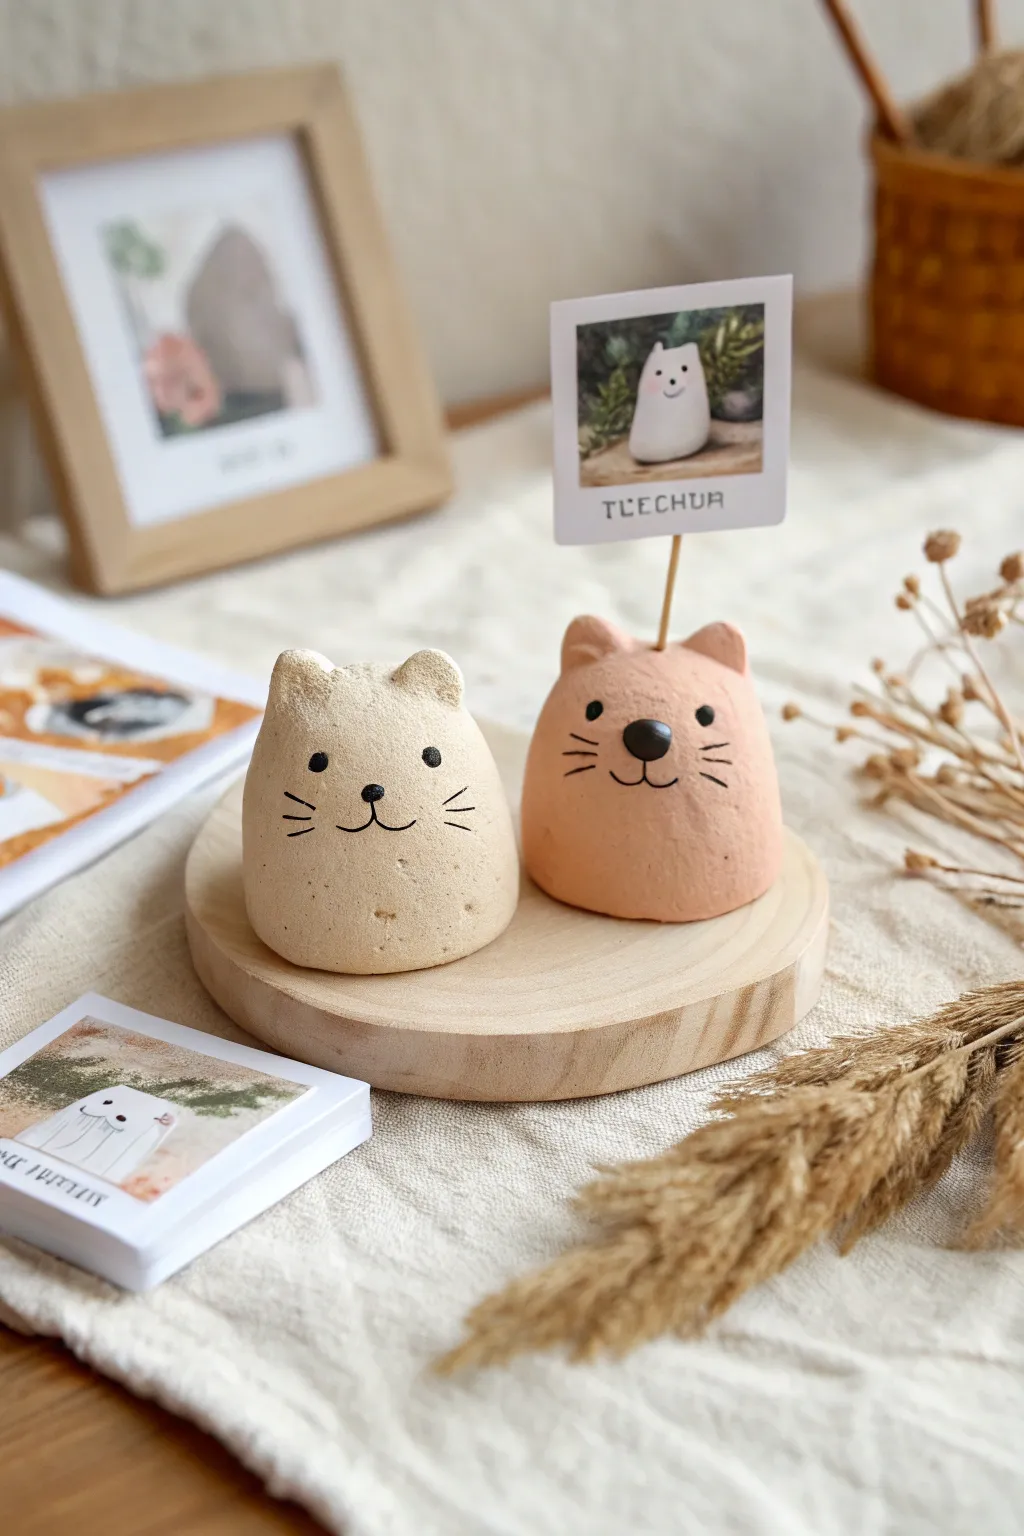
These adorable, minimalist cat sculptures double as functional photo holders, adding a touch of whimsy to any desk or shelf. With their smooth, stone-like texture and sweet painted faces, they are a simple yet rewarding project for crafters of all ages.
Detailed Instructions
Materials
- Air dry clay (white and terracotta/pink)
- Small bowl of water
- Acrylic paint (black)
- Fine detail paintbrush
- Thin crafting wire or stiff floral wire
- Wire cutters
- Sandpaper (fine grit)
- Clear matte varnish (optional)
Step 1: Shaping the Base
-
Prepare the clay:
Start by taking a handful of air dry clay. Knead it well in your hands to warm it up and make it pliable, which helps prevent cracks later on. -
Form a ball:
Roll the clay between your palms to create a smooth, tight sphere about the size of a tangerine. -
Create the base shape:
Gently tap the bottom of the sphere against your work surface to flatten it so it sits stably without rolling. -
Refine the dome:
Use your fingers to smooth out the sides, creating a soft, gumdrop-like dome shape. Keep the surface as smooth as possible using a little water if needed.
Step 2: Adding Features
-
Pinch the ears:
At the top of the dome, use your thumb and forefinger to gently pinch up two small triangles to form the cat’s ears. -
Smooth the transitions:
Rub your finger along the base of the ears to blend them seamlessly back into the head, ensuring they aren’t too thin or fragile. -
Insert the wire holder:
Cut a piece of wire (about 3-4 inches long). Insert one end deeply into the top center of the head, between the ears. Wiggle it slightly to ensure it’s secure. -
Add a nose (Optional):
For the pink cat, roll a tiny ball of black clay or paint a raised bump later. Press it gently onto the center of the face for a dimensional nose. -
Final smoothing:
Dip your finger in water and give the entire piece a final polish, smoothing out any fingerprints or rough textures.
Cracks while Drying?
If small fissures verify appear as the clay shrinks, mix a tiny bit of fresh clay with water to make a paste (slip) and fill the cracks, then smooth over.
Step 3: Finishing Touches
-
Let it dry:
Set your cats aside in a dry, ventilated area. Depending on the thickness, this can top 24-48 hours. Turn them occasionally so the bottom dries too. -
Sand for texture:
Once fully hard, gently rub the surface with fine-grit sandpaper. This gives it that lovely, matte stone-like finish seen in the photo. -
Paint the face:
Using a very fine brush and black acrylic paint, add two small dots for eyes. -
Add whiskers and mouth:
Paint three short lines on each cheek for whiskers and a small ‘w’ shape for the mouth. Keep the lines thin and delicate. -
Seal the piece:
If you want to protect the paint, apply a thin coat of matte varnish, though leaving it raw maintains the natural clay look. -
Prepare the photo clip:
Create a small spiral or loop at the top of the exposed wire to hold your picture, or simply tape the photo to the wire back if you prefer a hidden look.
Mix It Up
Try marbling two colors of clay together before shaping the ball to create a calico cat effect, or use grey clay for a totally different stone look.
Place your favorite instant photo in the holder and enjoy your new desk companion
Cute Plant Marker Stakes
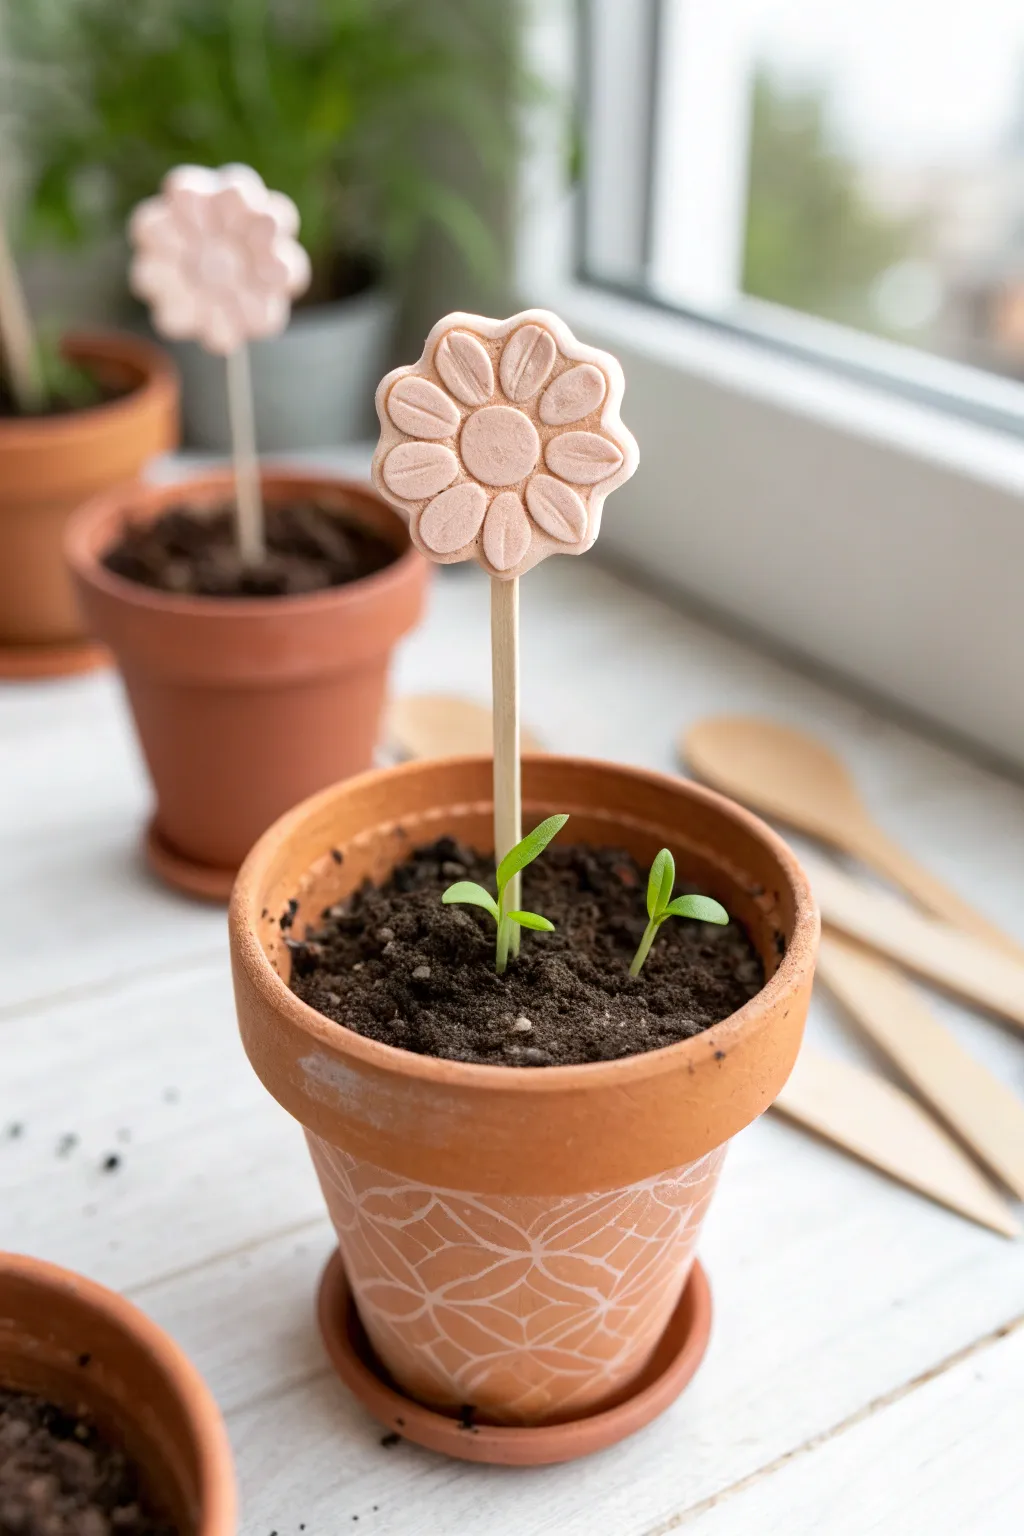
Brighten up your indoor garden with these delightful flower-shaped plant markers, perfect for labeling your seedlings. The soft peach tone of the air dry clay complements terracotta pots beautifully, adding a rustic yet playful touch to your windowsill.
Step-by-Step Tutorial
Materials
- Air dry clay (white or pre-colored pale peach)
- Acrylic paint (peach or light pink) if using white clay
- Popsicle sticks or thin wooden dowels
- Rolling pin
- Flower-shaped cookie cutter (small)
- Small round cutter (or a bottle cap)
- Modeling tool or toothpick
- Craft glue or hot glue
- Clear matte varnish (optional)
Step 1: Shaping the Flower Head
-
Condition the Clay:
Start by kneading a small ball of air dry clay in your hands until it becomes warm, soft, and pliable without any cracks. -
Roll it Out:
Using a rolling pin, flatten the clay on a smooth surface to a thickness of about 1/4 inch (6mm). You want it thick enough to be sturdy but not too heavy for the stick. -
Cut the Shape:
Press your flower-shaped cookie cutter firmly into the clay. Wiggle it slightly to ensure a clean cut, then lift the cutter and push the clay flower out gently. -
Smooth the Edges:
Dip your finger in a tiny bit of water and run it along the cut edges of the flower to smooth down any roughness left by the cutter.
Pro Tip: Tinting Clay
Knead a drop of acrylic paint directly into white air dry clay before rolling. This creates a solid, uniform color that won’t chip off later.
Step 2: Adding the Details
-
Create the Center:
Take a very small ball of clay, flatten it slightly into a disc, and attach it to the center of your flower. Use a drop of water as ‘glue’ to help it stick. -
Define the Petals:
Use a modeling tool or the side of a toothpick to press an indentation down the center of each petal, radiating from the center disc to the outer edge. -
Texture the Center:
If you want extra detail, gently stipple the center disc with a toothbrush or needle tool to give it a pollen-like texture, or leave it smooth like the example. -
Insert the Stake Channel:
While the clay is still wet, carefully press the end of your wooden stick into the bottom edge of the flower to create a slot, then remove the stick. This ensures a perfect fit later. -
Let it Dry:
Place the clay flower on a piece of parchment paper or a drying rack. Allow it to air dry for 24-48 hours, flipping it over halfway through to ensure even drying.
Step 3: Assembly and Finishing
-
Sand Imperfections:
Once fully dry, lightly sand any rough edges with fine-grit sandpaper for a polished, professional look. -
Paint (If Necessary):
If you used white clay, mix a soft peach color using acrylic paints and apply an even coat. I find that dabbing the paint into the crevices ensures the best coverage. -
Attach the Stick:
Apply a generous dab of craft glue or hot glue into the slot you created earlier or simply to the back of the flower. -
Secure the Bond:
Insert the wooden stick firmly into the glued area. If gluing to the back, lay it flat and let it set completely so the flower doesn’t slide off. -
Seal for Protection:
Since these will be near watered plants, brush on a coat of clear matte varnish or Mod Podge to protect the clay from moisture and humidity. -
Plant Your Stake:
Once the sealer is dry, gently push the wooden stake into your soil next to your sprout.
Troubleshooting: Cracking
If small cracks appear while drying, mix a tiny bit of fresh clay with water to make a paste and smooth it over the crack like spackle.
Now your little sprout has a charming companion to watch over it as it grows
Story Stones for Make-Believe Games
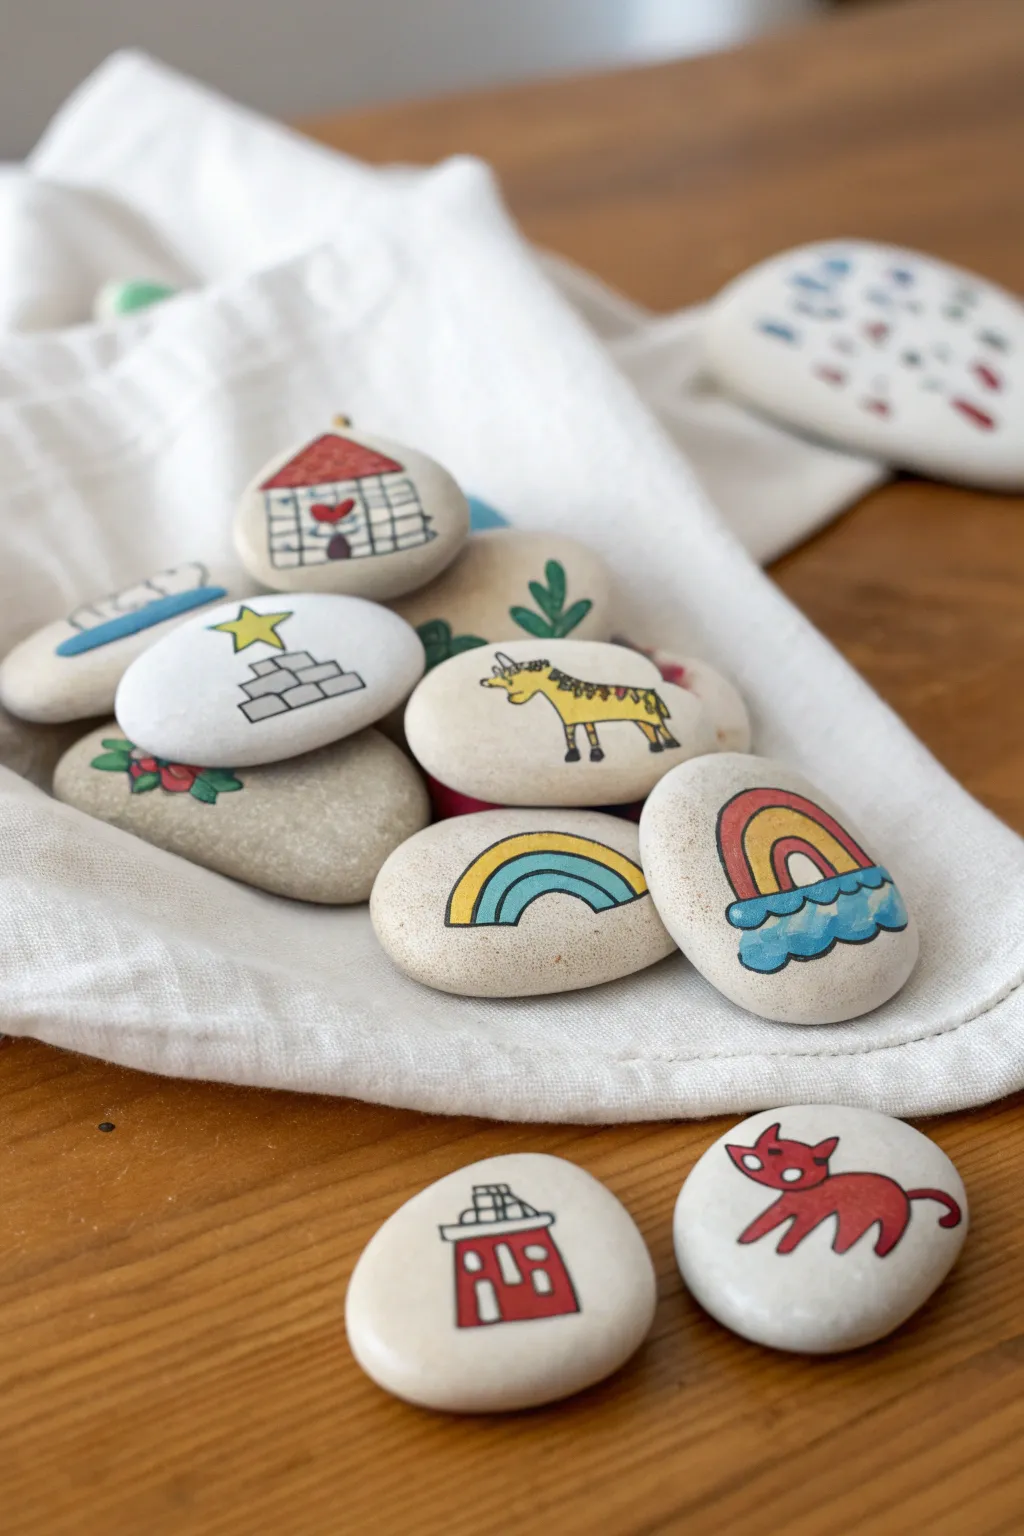
Transform simple lumps of clay into a pocket-sized library of imagination with these smooth, durable story stones. Each stone features a unique, hand-painted icon—from soaring rainbows to friendly creatures—perfect for sparking endless make-believe adventures.
Step-by-Step
Materials
- White or grey air-dry clay
- Rolling pin
- Small cup with water
- Fine grit sandpaper (optional)
- Acrylic paints (primary colors, plus black and white)
- Fine detail paintbrushes (sizes 0 and 1)
- Black fine-tip permanent marker or paint pen
- Clear matte or satin varnish/sealer
Step 1: Shaping the Canvas
-
Portion the Clay:
Start by pulling off pieces of air-dry clay roughly the size of a golf ball or slightly larger. Knead each piece in your hands for a minute to warm it up and make it pliable. -
Roll into Spheres:
Roll each piece between your palms to create a smooth, tight ball. Aim for a sphere free of deep cracks or folds. -
Flatten into Stones:
Gently press each sphere down onto your work surface using your palm or a rolling pin. You want them to look like river stones—flattened but with soft, rounded edges, about 1/2 inch thick. -
Smooth the Edges:
Dip your finger into a little water and run it along the edges and top surface of each clay stone. This melts away small fingerprints and cracks for a polished finish. -
Let Them Dry:
Place your formed stones on a wire drying rack or clean parchment paper. Allow them to dry completely for 24-48 hours, flipping them over halfway through so the bottoms dry evenly.
Step 2: Painting the Icons
-
Sand Impurities:
Once fully dry, check your stones. If there are any rough spots, lightly buff them with fine-grit sandpaper until the surface feels smooth to the touch. -
Sketch the Designs:
Use a pencil to very lightly sketch your story icons onto the center of each stone. Simple shapes work best: a house, a star on steps, a cat, or a rainbow. -
Block in Base Colors:
Using a small brush, fill in the main shapes of your designs with acrylic paint. For the rainbow, paint the arches; for the house, block in the red walls and grey roof. -
Layering Details:
Let the base colors dry for about 10 minutes. Then add secondary details, like the yellow giraffe body or the blue cloud beneath the rainbow. -
Refining Edges:
If your paint edges look a little uneven, don’t worry. You can tidy them up with a second coat of paint once the first is dry, focusing on creating distinct blocks of color. -
Adding the Outlines:
This is the crucial step for that illustrative look seen in the photo. Once the paint is bone dry, use a black fine-tip paint pen or permanent marker to outline every shape. -
Drawing Fine Details:
Use the same black pen to draw internal details: the grid on the house roof, the stripes on the giraffe, the cat’s eyes, and the bricks on the star’s pedestal. -
Allow Ink to Set:
Let the ink sit for at least an hour to ensure it won’t smear during the sealing process.
Smoother Surfaces
Use a wet finger to smooth the clay ‘stones’ continuously while shaping. The smoother the wet clay, the less sanding needed later.
Step 3: Sealing and Finishing
-
Apply Varnish:
Brush a thin coat of clear matte or satin varnish over the entire painted side of the stone. This protects the artwork from chipping during play. -
Seal the Back:
Once the top is dry to the touch, flip the stones and seal the bottom and sides. I like to do two thin coats rather than one thick one to avoid brush strokes. -
Final Cure:
Let the varnish cure fully according to the bottle instructions (usually overnight) before putting them into a play bag.
Marker Problems
If your black marker stops working over the paint, the paint might still be damp or clogging the tip. Scribble on scrap paper to clear it.
Gather your finished stones in a drawstring bag and get ready to tell some wonderful stories
Fairy House Door and Windows
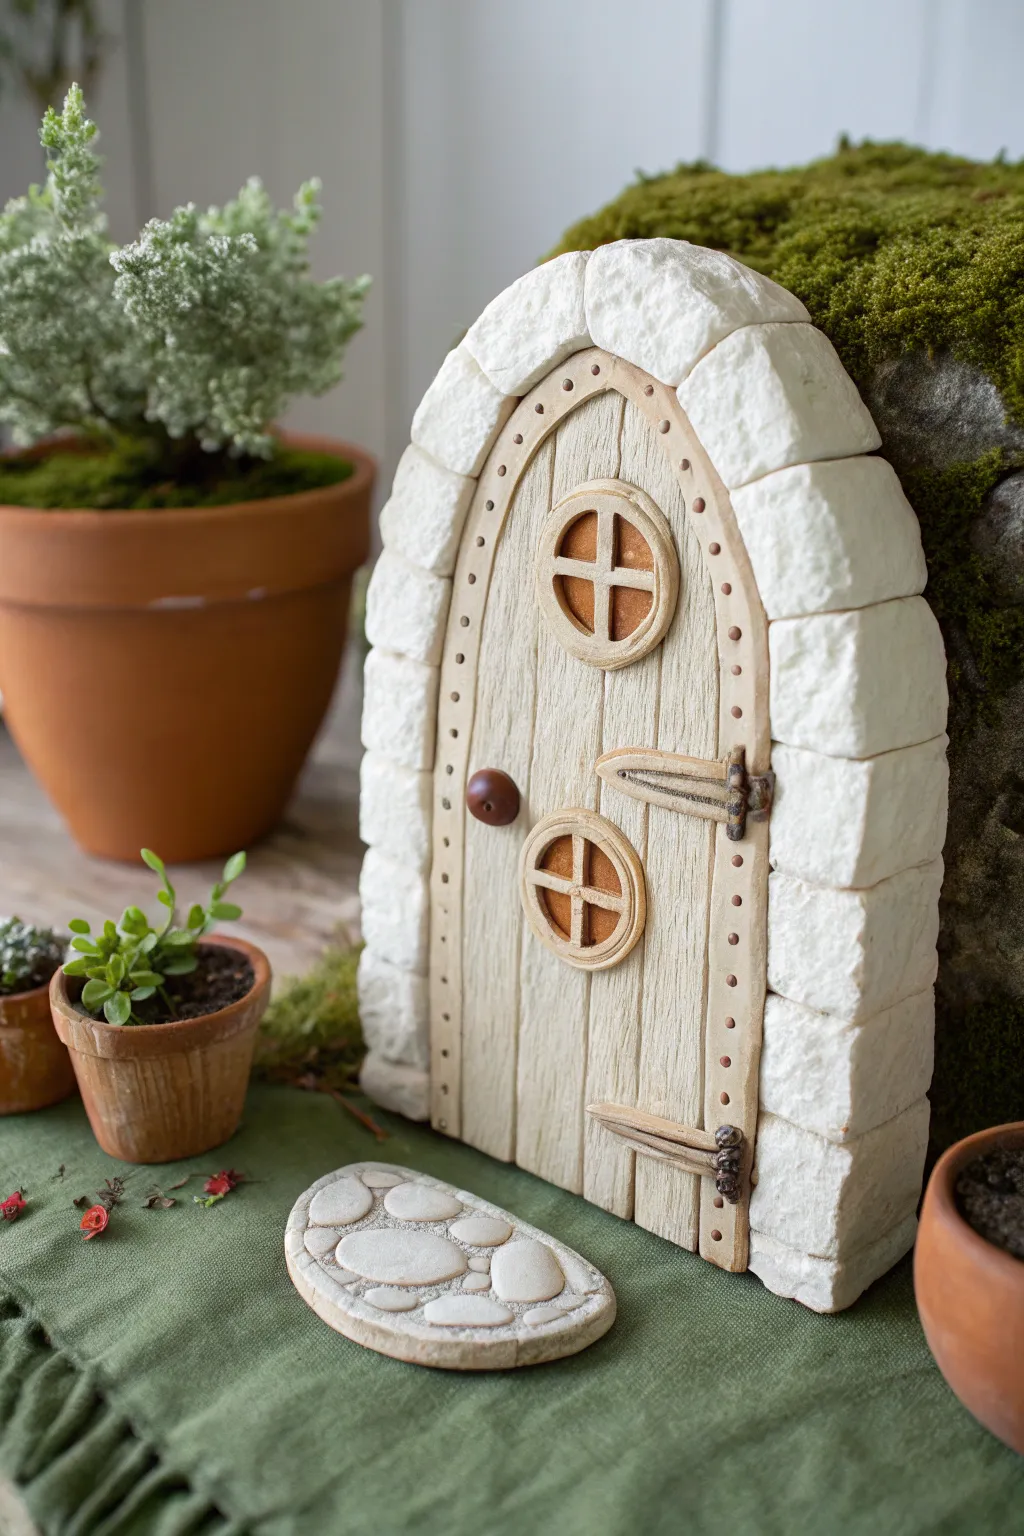
Bring a touch of magic to your garden or bookshelf with this enchanting freestanding fairy door. Featuring a rustic wood-grain texture and a sturdy white stone archway, this project creates a captivating portal for imaginary forest friends.
How-To Guide
Materials
- White air dry clay (approx. 500g)
- Rolling pin
- Clay carving tools or a dull butter knife
- Texture tool (toothpick, old toothbrush, or needle tool)
- Small circular cutters (or bottle caps)
- Acrylic paints (Cream, Tan, Brown, White, Metallic Bronze/Dark Grey)
- Fine detail paintbrush and flat wash brush
- Strong craft glue or PVA glue
- Aluminum foil (for core structure)
- Water cup
Step 1: Shaping the Core Structure
-
Form the Base:
Start by creating a thick, rectangular slab of aluminum foil that is rounded heavily at the top to form an arch shape. This saves clay and keeps the door lightweight. -
Roll the Clay:
Roll out a large slab of white air dry clay to about 1/4 inch thickness. Make it large enough to cover the front and sides of your foil core. -
Cover the Core:
Drape the clay over the foil arch. Smooth it down the sides and back, trimming away excess from the bottom so it stands flat. If seams appear, dip your finger in a little water to smooth them out completely.
Cracks while drying?
Mix a tiny bit of fresh clay with water to make a paste (slip). Fill any cracks with this paste and smooth it over with a damp finger.
Step 2: Creating the Door Texture
-
Define the Frame:
Use a needle tool or knife to lightly score an inner arch shape about 1 inch from the outer edge. This separates the ‘wood’ door from the ‘stone’ frame. -
Sculpt Wood Planks:
Inside that inner arch, use your knife to draw vertical lines to mimic wooden planks. Don’t use a ruler; slightly wavy, hand-drawn lines look more organic and aged. -
Add Wood Grain:
Use a toothpick or a dragging tool to scratch fine lines and knots into the vertical planks. Varied pressure creates realistic depth. -
Create the Stone Arch:
On the outer border, press horizontal lines into the clay to separate individual stones. Add a vertical line in the center of the top arch for a keystone look, then stagger vertical lines on the sides. -
Texture the Stone:
Take a ball of crumpled foil or an old toothbrush and firmly press it all over the stone border to give it a rough, pitted rock texture.
Realistic Stonework
For better stone texture, press a real rock from your garden directly into the soft clay border instead of using foil.
Step 3: Adding Details
-
Craft the Windows:
Roll a small coil of clay and form two small circles. Attach these to the upper door area using a dab of water (slip). Add tiny cross-pieces inside the circles for window panes. -
Add the Hardware:
Roll a tiny ball for the doorknob and press it onto the left side. Create two elongated triangle shapes for hinges and attach them on the right side, adding tiny dots to mimic nails. -
Make the Doorstop:
With leftover clay, form a flat oval pancake. Press smaller, flat ovals onto it to look like a cobbled stepping stone path. Let the door and the stepping stone dry completely for 24-48 hours.
Step 4: Painting and Finishing
-
Base Coat the Door:
Paint the inner wooden door section with a creamy light tan color. Be sure to get paint into the deep grain grooves. -
Highlight the Wood:
Once the base is dry, use a ‘dry brush’ technique with darker brown paint. Wipe most paint off your brush, then lightly drag it over the raised wood grain to accentuate the texture. -
Paint the Stones:
Paint the outer stone arch white or very pale grey. If you want depth, mix a tiny drop of brown into water (a wash) and paint it over the stones, wiping it off quickly so it stays only in the cracks. -
Detail the Hardware:
Carefully paint the hinges, doorknob, and window interiors. Bronze or dark iron grey works best here. A tiny dot of lighter rust color adds an aged metal effect. -
The Dotted Frame:
Using a toothpick dipped in brown paint, add tiny, evenly spaced dots along the archway border where the wood meets the stone for a decorative nail-head trim. -
Seal (Optional):
If this will live outside, coat the entire piece in a rigorous outdoor waterproof varnish. For indoor shelves, a matte acrylic spray works perfectly.
Place your finished door near a mossy rock or potted plant to invite a little enchantment into your home
Mosaic Clay Plaque With Recycled Bits

This charming little tile project combines the fun of rolled clay with the satisfaction of puzzle-making. It features a speckled clay base adorned with soft pastel geometric tiles and textured leaf impressions, creating a tactile piece of art that looks lovely on a shelf or desk.
Step-by-Step Guide
Materials
- White or speckled air-dry clay (stone effect works great)
- Colored air-dry clay (terracotta, light blue, sage green, yellow, pink)
- Rolling pin or smooth glass jar
- Square cookie cutter (approx. 4×4 inches) or ruler and craft knife
- Small geometric cutters (triangles, squares) or a knife
- Textured objects for pressing (lace, real leaves, fabric scraps)
- Small bowl of water
- Fine-grit sandpaper (optional)
- Parchment paper or craft mat
Step 1: Preparing the Tiles
-
Roll out colors:
Begin by rolling out small balls of your colored clay. You want these quite thin, about 1/8th of an inch thick. You’ll need colors like dusty pink, sage green, pale yellow, and a darker terracotta. -
Create shapes:
Using a small knife or tiny geometric cutters, slice the colored clay sheets into small squares, rectangles, and triangles. They don’t need to be perfect; irregular shapes add character. -
Textured leaves:
Take small bits of white or cream clay and press real leaves or textured fabric into them. Cut these textured pieces into leaf shapes or organic ovals. -
Pre-drying:
Let these small mosaic pieces sit out for about 15-20 minutes. This firms them up slightly, making them easier to handle without squishing their shape.
Step 2: Making the Base
-
Roll the base:
Take a large chunk of your speckled or white clay. Roll it out on parchment paper until it is a uniform slab, roughly 1/2 inch thick. -
Cut the square:
Use your large square cutter or a ruler and craft knife to cut a clean, perfect square from the slab. Smooth the edges with a wet finger to remove any burrs.
Crack Control
If small cracks appear around the mosaic pieces as it dries, make a ‘slurry’ of clay and water. Rub this paste into the cracks with your finger to seal them seamlessly.
Step 3: Assembling the Mosaic
-
Dry fit designs:
Before committing, arrange your small colored pieces on the table next to your base. Playing with the composition here prevents mistakes on the wet clay. -
Start placing:
Begin gently pressing your colored tiles into the wet base. Start near the center and work outward to ensure a balanced design. -
Embed firmly:
Press each piece down firmly enough that it sits flush with or slightly recessed into the base clay. You want them to feel like they are *in* the tile, not just resting on top. -
Add texture:
Intersperse your colored geometric shapes with the textured white leaf pieces you made earlier. The contrast between smooth and textured is key to the look. -
Leave gaps:
Leave a tiny bit of space between each mosaic piece. This ‘grout line’ allows the base clay to frame each color. -
Edge check:
Ensure your design doesn’t spill over the edge. Keep a nice clean border of the white base clay around the entire perimeter. -
Final smooth:
If any corners of your mosaic pieces have lifted, dip your finger in water and gently smooth them back down.
Level Up: Magnet Magic
Instead of one large tile, make four smaller 2-inch tiles. Once dry, glue strong ceramic magnets to the back for a custom refrigerator set.
Step 4: Finishing Up
-
Slow drying:
Place the finished tile on a wire rack or clean parchment paper in a cool, dry place. Avoid direct sunlight, which can cause cracking. -
Flip occasionally:
Because the base is thick, flip the tile over carefully once a day to ensure even drying on both sides. -
Sanding:
Once fully cured (usually 2-3 days), you can gently run fine-grit sandpaper over the edges to soften them.
Once dry, this modern mosaic makes a beautiful paperweight or a unique coaster for your favorite mug
Tiny “Small World” Play Set Figures
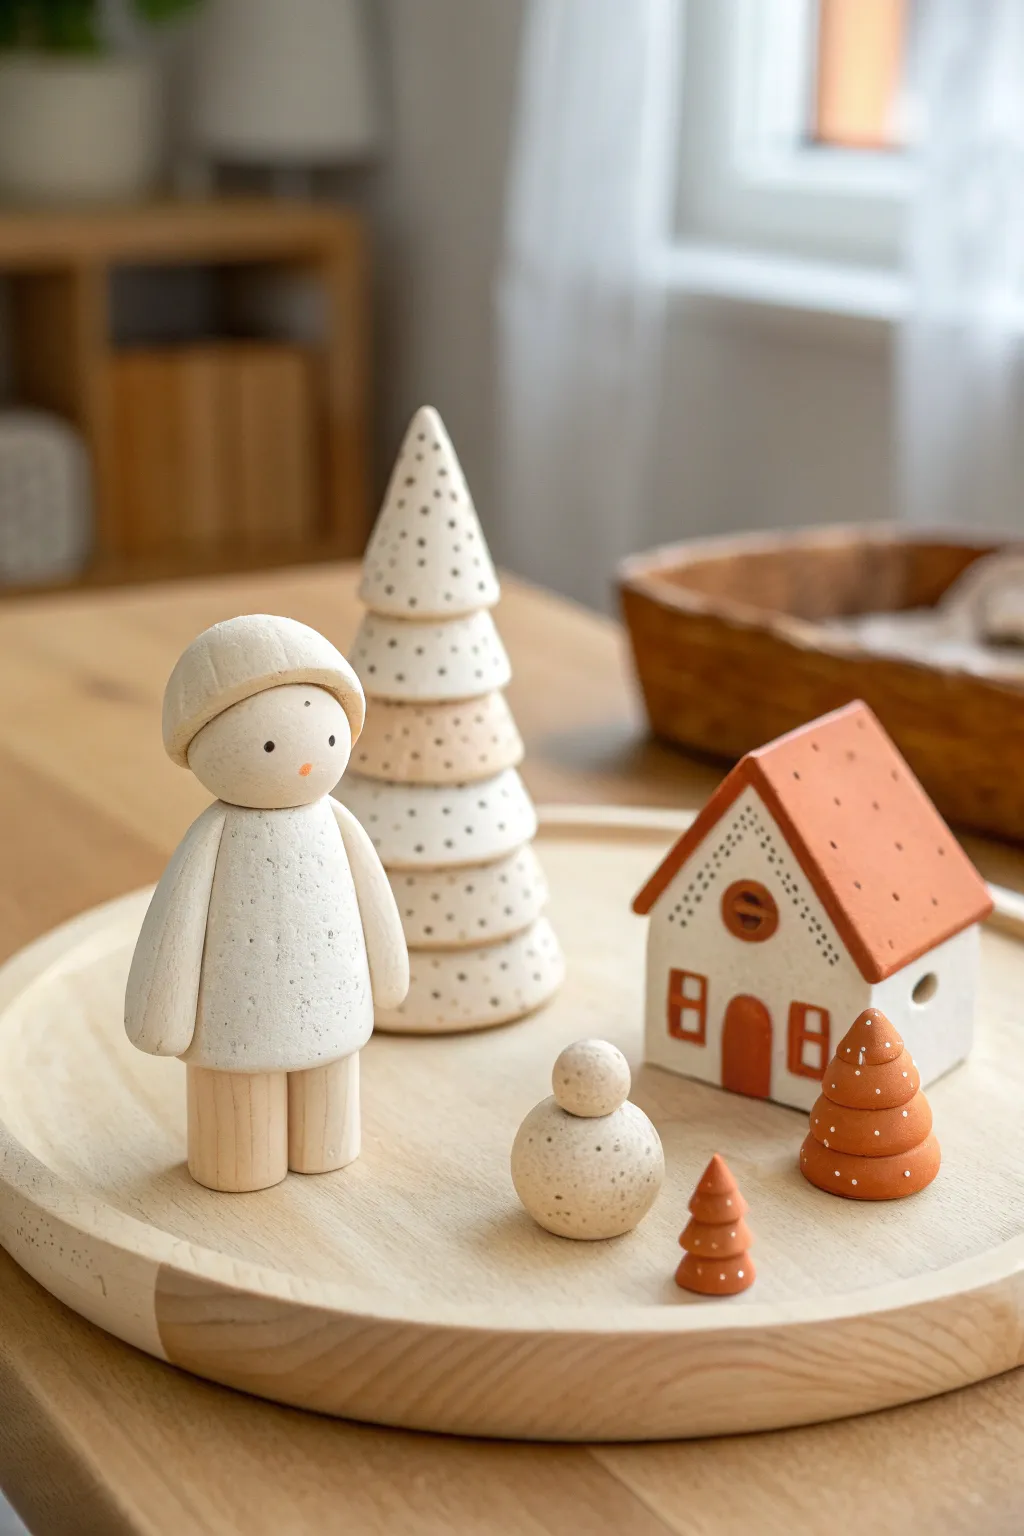
Create a serene, Scandinavian-inspired play set that sparks imaginative storytelling with simple shapes and gentle colors. These charming figures—from the cozy winter wanderer to the tiny speckled trees—have a smooth, matte finish that feels wonderful in little hands.
Step-by-Step
Materials
- White smooth air dry clay
- Terra cotta or reddish-brown air dry clay
- Needle tool or toothpick
- Rolling pin
- Small craft knife or clay tool
- Water in a small cup
- Sandpaper (fine grit)
- Acrylic paints (black, orange, white)
- Fine detail paintbrush
- Matte sealant or varnish (optional)
Step 1: Sculpting the Winter Wanderer
-
Form the body:
Start with a chunk of white clay and roll it into a sturdy cylinder about 2.5 inches tall. Unlike standard cylinders, taper the top slightly to form rounded shoulders. -
Add the head:
Roll a smooth sphere of clay that fits proportionally on the shoulders. Use a little water or ‘slip’ (clay mixed with water) to attach it securely to the top of the body cylinder. -
Create the hat:
Flatten a small circular piece of clay and mold it over the top of the head sphere to create a beanie. Smooth the edges down so it looks like a snug hat. -
Attach the arms:
Roll two sausage shapes for arms. Flatten one end of each slightly and attach them to the sides of the body, blending the clay at the shoulder joint so they hang naturally. I find blending with a wet finger helps hide the seam. -
Define the legs:
Instead of separate legs, use a knife tool to score a vertical line halfway up the bottom of the cylinder, visually separating the ‘legs’ while keeping the base stable.
Step 2: Building the Snowy Trees & Snowman
-
Shape the tall tree base:
Take a larger amount of white clay and roll it into a tall cone shape. Tap the bottom on the table to ensure it stands flat. -
Add tree tiers:
Using a knife or sculpting tool, carve horizontal grooves around the cone to create tiered sections, mimicking the layers of a pine tree. -
Make the snowman:
Roll two balls of clay, one slightly larger than the other. Stack the smaller one on top of the larger one, securing with a dab of water. Slightly flatten the bottom so it doesn’t roll away. -
Create mini terracotta trees:
Using the terra cotta clay, form small cones about an inch tall. Like the large tree, etch horizontal rings around them to create texture.
Smooth Seams Tip
When attaching arms or heads, dip your finger in water and smooth the clay across the joint until the seam disappears entirely. This makes the figure stronger.
Step 3: Constructing the Cottage
-
Form the house block:
Shape a block of white clay into a cube or rectangular prism. Press the top sides in to form a pointed triangle peak for the roofline. -
Add a terracotta roof:
Roll out a thin slab of terra cotta clay. Cut a rectangle large enough to drape over the house peak. Drape it over and secure with water. -
Detail the cottage:
Use your needle tool or knife to carve out windows and a door arch on the front. You can fill the door arch with a small piece of terra cotta clay for contrast.
Texture Play
Before drying, press real pine needles or fabric into the snowy tree layers to add subtle natural textures that little fingers will love to explore.
Step 4: Finishing Touches
-
Allow to dry:
Let all your creation air dry completely. This usually takes 24-48 hours depending on humidity; turn them occasionally so the bottoms dry. -
Sand for smoothness:
Once bone dry, gently rub the surfaces with fine-grit sandpaper to remove fingerprints and rough bumps. -
Add speckles:
For the characteristic speckled look seen in the photo, you can flick thinned brown paint onto the white figures using an old toothbrush, or use a fine-tip marker to add tiny dots. -
Paint the face:
Use the tip of a toothpick dipped in black paint to add two tiny eyes. Add the smallest dab of orange for a nose. -
Decorate the house and trees:
Using a very fine brush or toothpick, add white dots to the terracotta roof and trees to simulate falling snow. Paint the window frames terra cotta color. -
Seal:
Protect your play set with a coat of matte varnish to prevent the clay from absorbing moisture and dirt.
Arrange your tiny village on a wooden tray or shelf and watch an adorable winter scene come to life.