
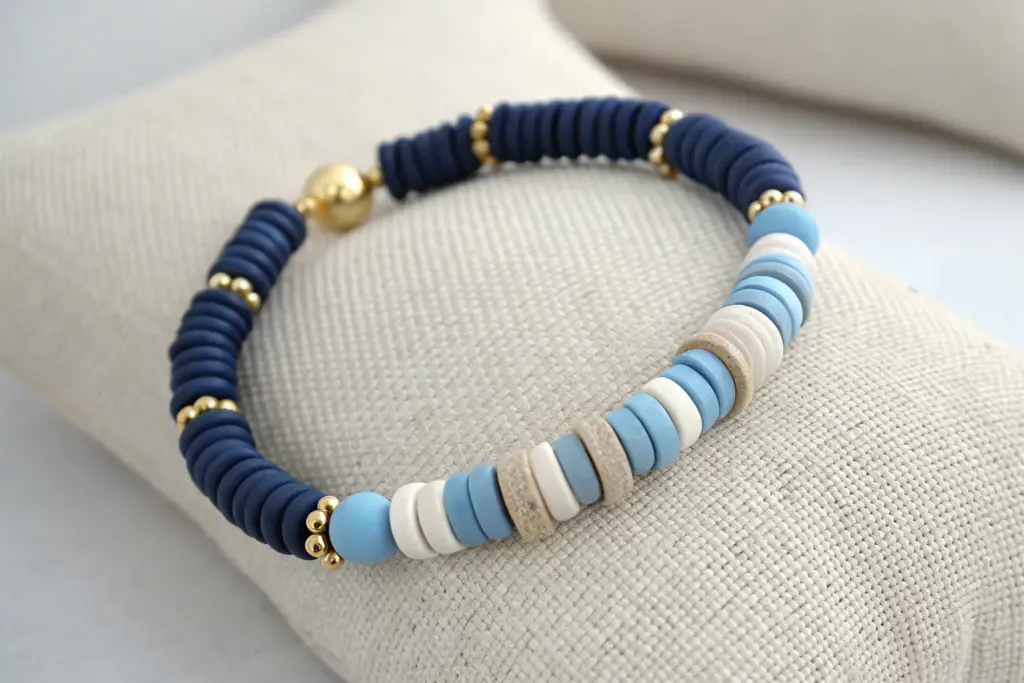
Whenever I’m craving a calm, put-together palette, I reach for blue clay beads—they somehow feel both classic and fresh at the same time. Here are my favorite blue design ideas you can mix, match, and repeat into stacks you’ll actually want to wear.
Classic Blue Ombre Stack
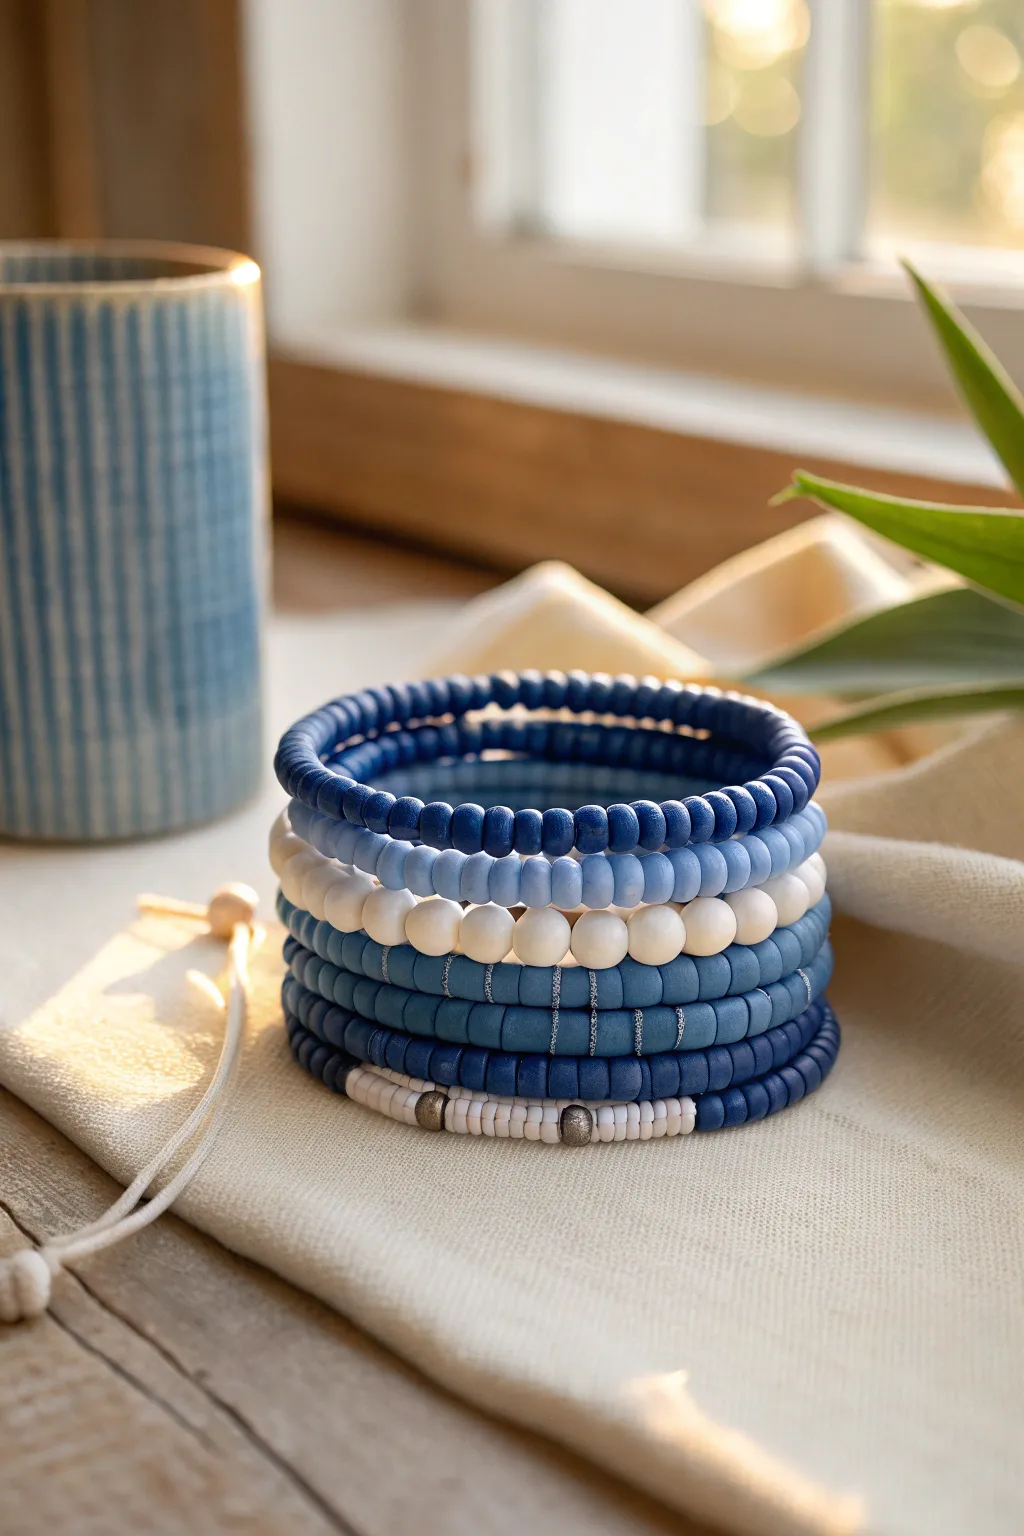
Capture the serene transition of ocean depths to white foam with this stunning seven-strand bracelet stack. This design mixes classic clay heishi discs with larger round beads for varied texture and a professional, layered look.
Detailed Instructions
Materials
- 6mm Polymer clay heishi beads (navy blue, royal blue, sky blue, light blue)
- 6mm Polymer clay heishi beads (white)
- 8mm Round wooden beads (white)
- 6mm Round wood or matte beads (denim blue)
- Small silver spacer beads (globe or nugget style)
- 0.8mm clear elastic stretch cord
- Super glue or E6000 jewelry glue
- Scissors
Step 1: The Solid Strands
-
Measure and cut:
Begin by measuring your wrist circumference. Cut a length of elastic cord about 12 inches long for each bracelet to ensure you have plenty of room for tying knots. -
Pre-stretch:
Give your elastic cord a few firm tugs before stringing. This pre-stretching technique prevents the bracelets from sagging immediately after you wear them. -
Create the Navy Base:
For the first bracelet, string only the darkest navy blue heishi beads. Continue until the beaded length matches your wrist measurement exactly. -
Create the Royal Blue Strand:
Repeat the process for the second bracelet using the royal blue clay beads. This solid block of color helps establish the ombre gradient. -
Tie off the solids:
Secure each solid strand with a surgeon’s knot: cross right over left, then left over right and loop it through twice. Pull tight, add a dab of glue to the knot, and let dry before trimming.
Knot Security
Hide your knot inside one of the larger beads (like the white round ones) rather than the thin clay discs. The larger bore hole accommodates the bulk of the knot much better.
Step 2: The Mixed Textures
-
Sky Blue Transition:
For the third bracelet, use sky blue heishi beads. This lighter shade begins the upward visual lift of the stack. -
The White Accent:
Create the focal point bracelet using large white 8mm round decorative beads. These are larger than the clay discs, adding necessary height and texture variation to the middle of the stack. -
Striped Detail:
For the fifth bracelet, use mid-tone blue round beads. I like to call this the ‘denim’ layer. Look closely at the reference: many of these have faint lighter striations or texture. -
Securing the middle layers:
Tie off these three textured bracelets using the same sturdy surgeon’s knot method as before. Ensure the knots are tight enough that the beads touch but don’t buckle.
Stack won’t sit flat?
If your bracelets twist or bunch up, they might be too tight. Make them slightly looser (add 1-2 extra beads) than your exact wrist size so they can roll over each other easily.
Step 3: The Detailed Finish
-
Patterned Navy:
For the sixth bracelet (second from the bottom), return to your dark navy heishi beads. This time, every 10-15 beads, insert a very thin silver spacer or a lighter blue disc to create subtle stripes. -
The Hybrid Strand:
The final bottom bracelet is unique. Start by stringing about 2 inches of navy heishi beads. -
The Focal Bar:
Switch to white heishi beads for a 2-inch section. In the center of this white section, place two antique silver spacer beads about half an inch apart. -
Complete the Hybrid:
Finish the strand with more navy heishi beads until you reach the desired length. The white bar should sit on the top of your wrist when worn. -
Final Glue and Trim:
Tie your final knots. Once the glue has fully cured (usually 24 hours for maximum hold), clip the excess elastic tails as close to the knot as possible. -
Hide the Knots:
Gently gently slide an adjacent bead over your knot to hide it inside the bead hole for a seamless finish.
Slip these on your wrist and enjoy the cool, calming blues of your new handmade jewelry collection
Ocean Blue and White Mix
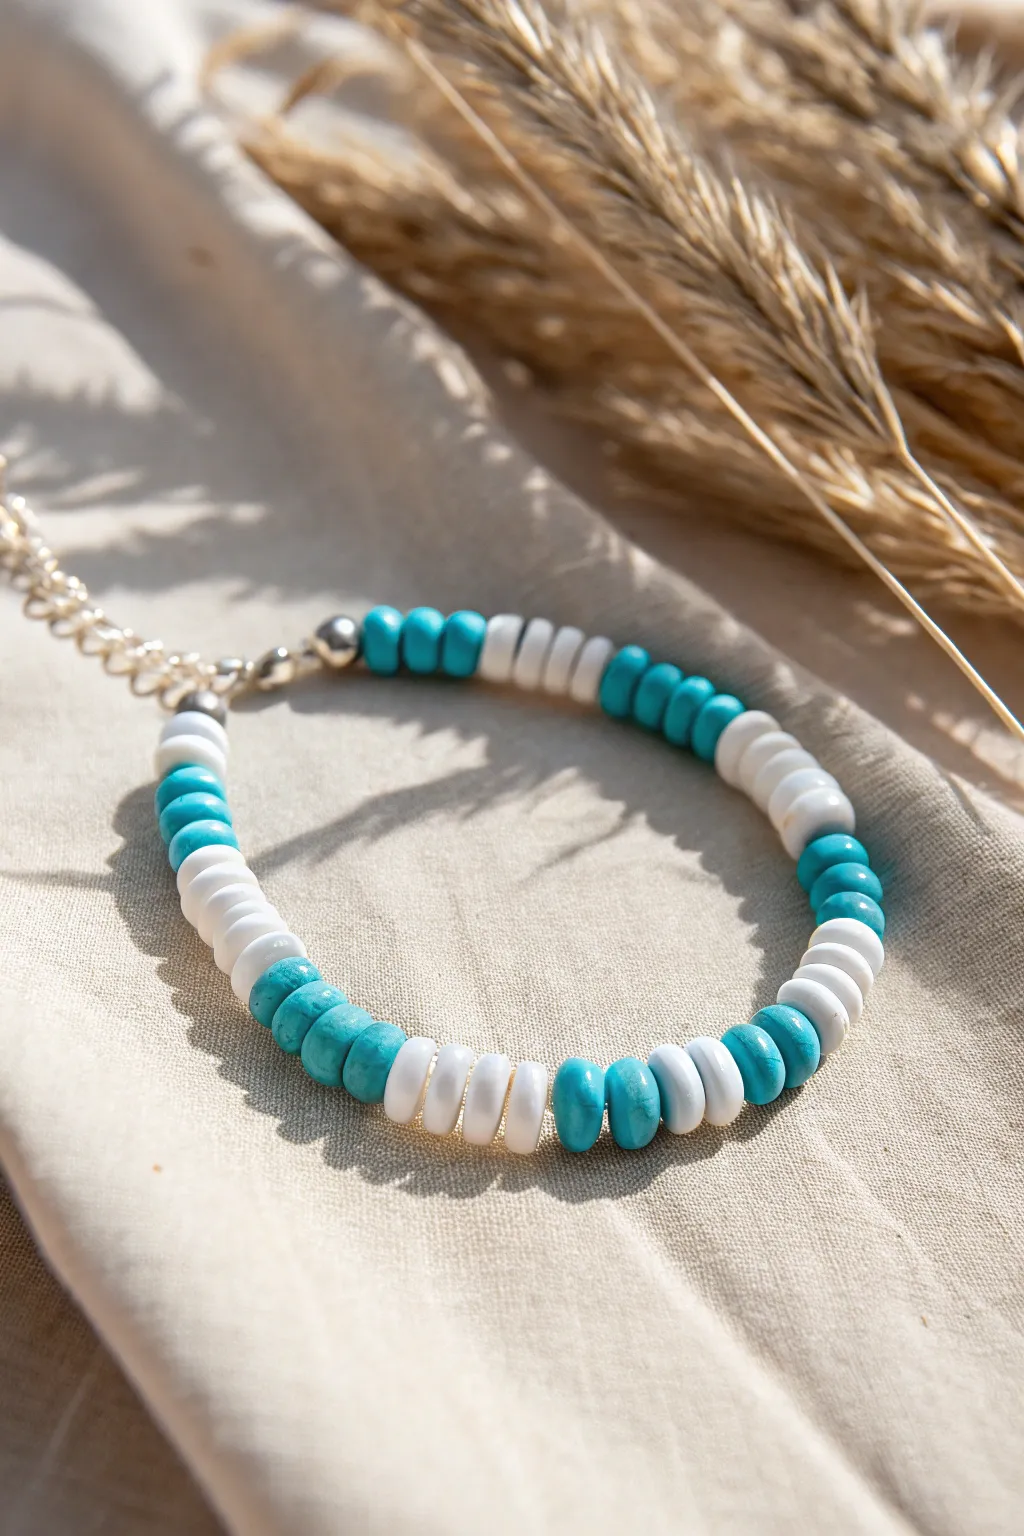
Capture the essence of crashing ocean waves with this simple yet striking clay bead pattern. By alternating blocks of vibrant turquoise and crisp white heishi beads, you’ll create a refreshing accessory perfect for summer beach days.
Step-by-Step Tutorial
Materials
- 6mm turquoise blue polymer clay heishi beads
- 6mm white polymer clay heishi beads
- Strong beading wire (0.38mm or 0.45mm)
- 2 crimp beads (silver)
- 2 bead tips or clamshell covers (silver)
- 2 jump rings (4mm or 5mm)
- Lobster clasp
- Extension chain (silver)
- Pliers (chain nose and flat nose)
- Wire cutters
- Bead design board or ruler
Step 1: Planning and Starting
-
Measure your materials:
Begin by measuring your wrist size. Cut a length of beading wire that is roughly 4 inches longer than your wrist measurement to allow plenty of room for finishing the ends. -
Secure the first end:
Thread one silver crimp bead onto the wire, followed by the small hole of a bead tip (clamshell covering). The open cup of the bead tip should face away from the crimp bead. -
Flatten the crimp:
Use your flat nose pliers to squash the crimp bead firmly so it doesn’t slide. Trim any tiny excess wire tail sticking out past the flattened crimp. -
Close the bead tip:
Slide the bead tip up so it covers the flattened crimp bead. Gently use your pliers to close the clamshell halves together, hiding the crimp inside for a professional finish.
Uneven Beads?
Heishi beads often vary in thickness. Instead of counting beads, measure your color blocks (e.g., 1cm blue, 0.5cm white) for a more consistent visual pattern.
Step 2: Creating the Pattern
-
Start with turquoise:
Thread on a block of turquoise blue beads. For this specific look, aim for a section that is about 1cm long, which is usually around 8-10 thin heishi beads depending on their thickness. -
Add a white contrast:
Follow the blue section with a slightly shorter block of white beads. Use approximately 5-6 white beads to create a distinct stripe that isn’t quite as heavy as the blue. -
Alternate colors:
Return to the turquoise beads, adding another 1cm block. Stringing tension matters here; keep them snug but not so tight that the wire kinks. -
Create a larger white section:
To mimic the random nature of waves, vary the pattern slightly here. Add a larger block of white beads, perhaps matching the 1cm length of the initial blue section. -
Mix up the rhythm:
Continue the pattern by alternating blue and white. Don’t feel pressured to make every block identical. As you can see in the design, some blue sections are split by very thin white spacers (just 2-3 beads). -
Check the central design:
Focus on the middle of the bracelet. Create a ‘hero’ section with a longer run of white beads flanked by two solid blocks of turquoise to draw the eye. -
Continue stringing:
Keep stringing until you reach about 0.5 inches short of your total desired length. The clasp assembly will add the final length needed. -
Check consistency:
Hold the bracelet up in a U-shape. Ensure the beads are sitting flat against each other and there are no accidental gaps or crossed beads.
Add a Splash
Incorporate a single silver or gold spacer bead in the center of your largest white sections. The metallic flash looks like sunlight hitting the water’s foam.
Step 3: Finishing the Ends
-
Prepare the final end:
Thread on your second bead tip (cup facing the beads) and then the second crimp bead. -
Tighten the strand:
Pull the wire taut so the beads sit flush against the first bead tip. I like to leave just a hair of breathing room—about 1mm—so the bracelet remains flexible and doesn’t get stiff. -
Secure the crimp:
Flatten the final crimp bead with your pliers as close to the bead tip as possible without losing your tension. -
Trim and close:
Trim the excess wire flush against the crimp bead. Slide the bead tip over the crimp and gently pinch it closed with your pliers. -
Attach the hardware:
Open a jump ring by twisting it sideways. Hook it onto the loop of one bead tip and attach your lobster clasp. Close the jump ring securely. -
Add the extension:
On the other end, use the second jump ring to attach the extension chain to the loop of the bead tip. This chain allows for adjustable sizing.
Fasten your new bracelet and enjoy wearing a piece of the seaside wherever you go
Turquoise Poolside Pop
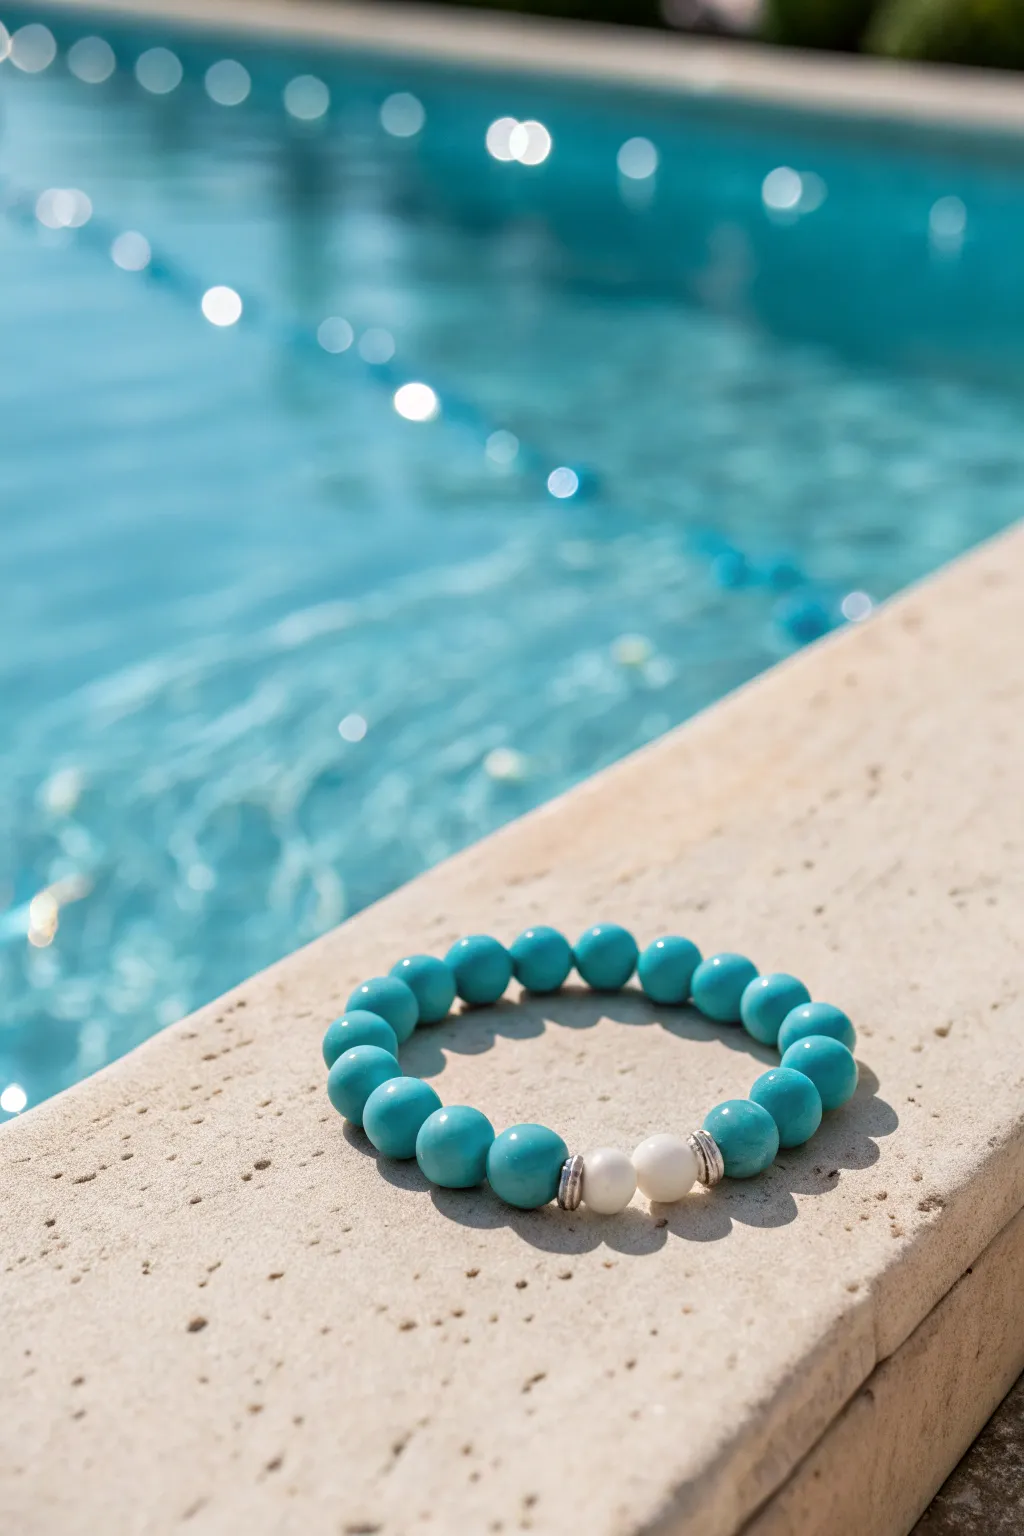
Capture the refreshing vibes of a summer swim with this vibrant beaded bracelet. Featuring a soothing turquoise palette accented by creamy white and silver touches, this accessory is a perfect beginner-friendly project that mimics the look of natural stone.
Detailed Instructions
Materials
- 20-22 round turquoise polymer clay beads (approx. 8mm or 10mm)
- 2 round white or cream accent beads (same size as turquoise beads)
- 2 decorative silver spacer beads or rondelles
- Clear elastic bead cord (0.7mm or 0.8mm thickness)
- Super glue or jewelry cement (e.g., G-S Hypo Cement)
- Scissors
- Bead stopper or a small piece of tape
- Measuring tape or ruler
Step 1: Preparation
-
Measure your wrist:
Before you begin stringing, wrap a flexible measuring tape around your wrist to find your size. Add about 0.5 inches to this measurement to ensure the bracelet fits comfortably without being too tight. -
Cut the cord:
Cut a piece of elastic cord roughly 10-12 inches long. Having extra length makes tying the final knot much easier than struggling with short ends. -
Pre-stretch the elastic:
Hold the cord at both ends and give it a few gentle tugs. Pre-stretching the elastic helps prevent the bracelet from sagging or loosening permanently after the first few times you wear it. -
Secure the end:
Attach a bead stopper to one end of your cut cord. If you don’t have a stopper, a piece of masking tape folded over the end works perfectly to keep beads from sliding off.
Knot Slipping?
If your elastic knot keeps untying before you can glue it, try rubbing the cord ends with a little beeswax or roughening them slightly with sandpaper for better grip.
Step 2: Stringing the Design
-
Start the turquoise base:
Begin threading your turquoise clay beads onto the elastic. You’ll want to add about half of your total turquoise beads first. -
Add the first spacer:
Once your first section of turquoise is on, slide on one silver spacer bead. This metallic accent will frame the focal point beautifully. -
Create the focal point:
Thread on the two white or cream accent beads next. These sit side-by-side to create a bright contrast against the sea of blue. -
Complete the frame:
Slide on the second silver spacer bead immediately after the white beads to close the focal section. -
Finish the turquoise loop:
Thread on the remaining turquoise beads. Check the length against your wrist periodically to ensure you don’t make it too loose. -
Double check the fit:
Wrap the unfinished strand around your wrist one last time. The ends should touch comfortably with a little bit of slack.
Pro Tip: Bead Selection
Look for clay beads with slight marbling or color variations. Imperfections mimic real turquoise stone better than perfectly uniform solid colors.
Step 3: Finishing Touches
-
Prepare to knot:
Remove the bead stopper or tape carefully, holding both ends of the elastic firmly so no beads escape. -
Tie the first knot:
Cross the ends and tie a simple overhand knot. Pull it tight, bringing the beads together until they touch snugly but aren’t bunching up. -
Tie a surgeon’s knot:
For extra security, tie a surgeon’s knot. Cross the ends, loop one end through the circle twice (instead of once), and pull tightly. -
Secure with glue:
Apply a tiny drop of jewelry cement or super glue directly onto the knot. I like to let this dry briefly for about a minute before moving on. -
Hide the knot:
While the glue is still slightly tacky but not wet, gently pull the elastic so the knot slides inside the hole of one of the adjacent beads. This hides the mechanics for a professional finish. -
Trim the excess:
Once the glue is fully cured (check your glue’s instructions), use your scissors to trim the excess cord ends close to the bead hole. Be careful not to nick the main cord.
Slip on your new bracelet and enjoy that splash of cool color on your wrist

Navy and White Nautical Stripes
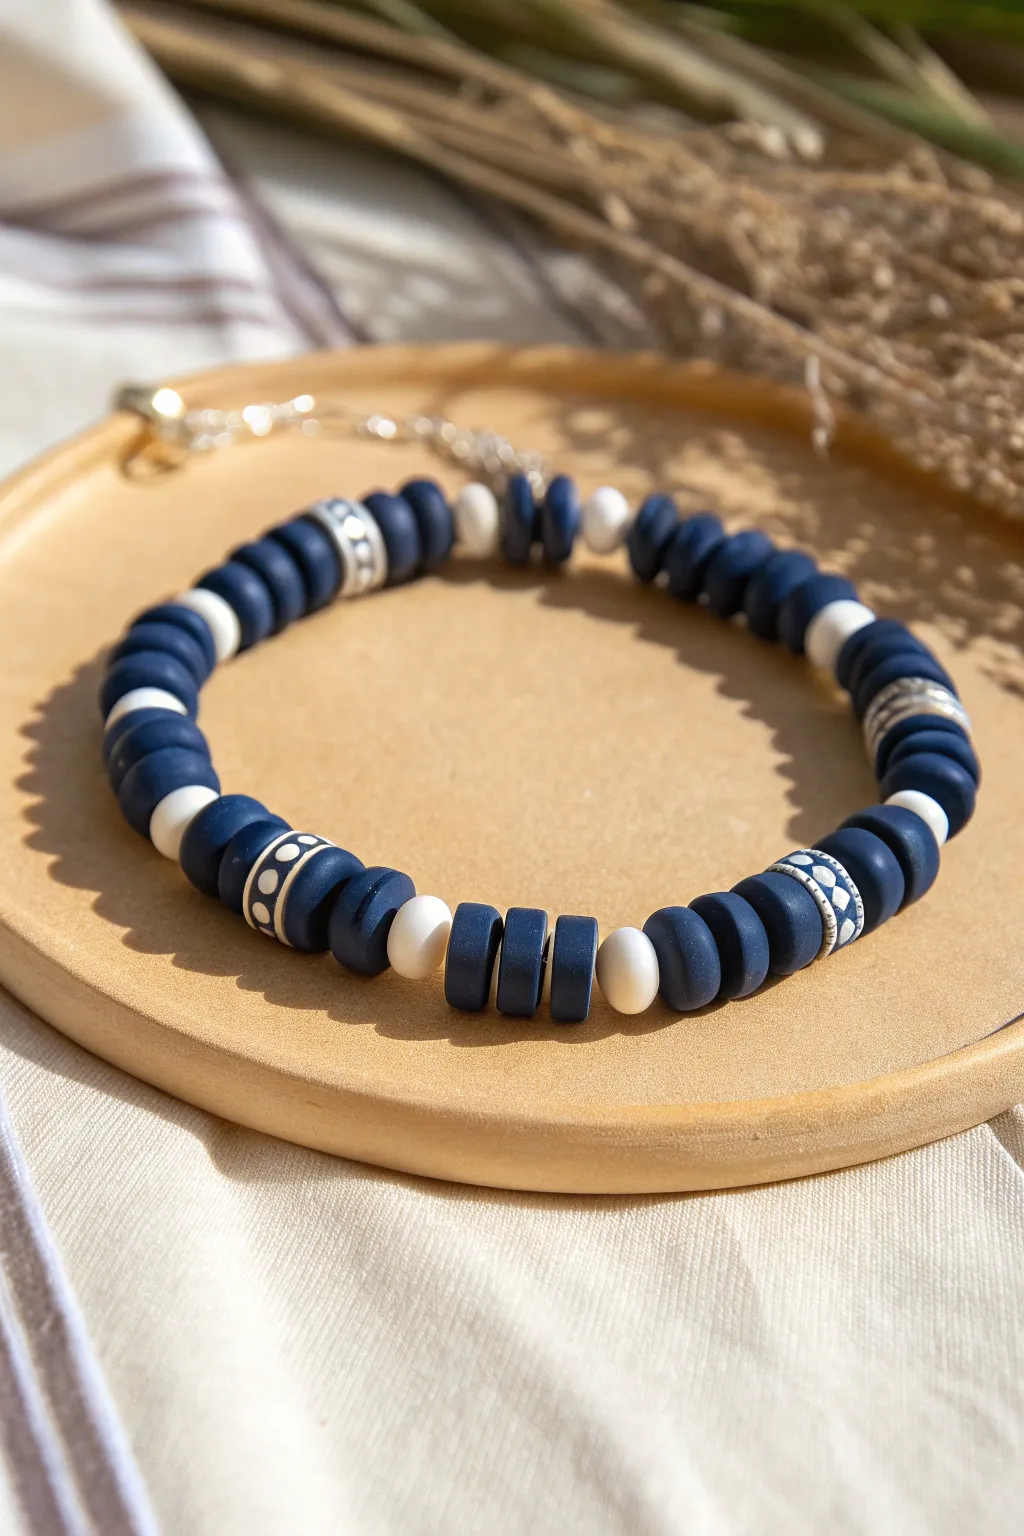
This sophisticated bracelet combines the casual charm of clay heishi beads with intricate accent pieces for a refined nautical look. The deep navy blue disks contrasted with crisp white accents create a timeless accessory perfect for summer wear or resort style.
Step-by-Step Guide
Materials
- Navy blue polymer clay heishi beads (flat disk beads, approx. 6mm)
- White or cream round accent beads (small, approx. 4mm)
- Patterned ceramic or polymer accent spacer beads (navy with white dots/patterns)
- Silver tone textured spacer rings
- Strong elastic sparkling cord (0.8mm or 1mm)
- Jewelry glue or clear nail polish
- Scissors
- Bead layout board (optional but helpful)
- Masking tape
Step 1: Setting Up and Initial Pattern
-
Prepare your workspace:
Cut a piece of elastic cord about 10-12 inches long. This gives you plenty of extra room for tying knots later. Tape one end of the cord down to your table or bead board so your beads don’t slide off while you work. -
Sorting your beads:
Pour out a small pile of your navy heishi beads. Having them loose makes it unique easier to pick them up quickly. Separate your white round beads and the special patterned accent beads into their own small piles so you can grab them without searching. -
Start the center sequence:
Begin the threading pattern that sits opposite the clasp area. Thread on three navy heishi beads, followed by one white round bead. -
Building the first block:
After the white bead, thread on three more navy heishi disks. This sets up a simple 3-1-3 rhythm that forms the quieter parts of the design.
Step 2: Creating the Patterned Sections
-
First accent placement:
Slide on one of your larger patterned spacer beads. In the photo, these are navy beads with white dotted or geometric details. This acts as a focal point for this section. -
Repeat the base sequence:
Thread on a new sequence of navy disks. Aim for a slightly longer block here—about 5 or 6 navy beads—before adding another white round bead. -
Adding texture:
After your next small block of navy beads, slide on a silver textured spacer ring. These metallic elements add a touch of shine and break up the matte finish of the clay. -
Establishing the rhythm:
The key to this design isn’t perfect symmetry, but balanced repetition. Continue threading keeping the ratio roughly: small block of navy (3-5 beads) -> white accent -> small block of navy -> large patterned bead or silver spacer. -
Mid-point check:
Wrap the strand around your wrist to check the length. You want the patterned beads to be distributed fairly evenly around the circumference.
Loose Beads?
If your pattern looks gapped when worn, you may have tied it too loosely. Ensure the beads are snug against each other before knotting, slightly compressing the elastic.
Step 3: Completing the Loop
-
Finishing the strand:
Continue the pattern until the bracelet reaches your desired length. Standard adult wrist size is usually around 7 inches. Make sure your final bead is a navy disk so it blends well when tied to the start. -
Pre-stretching the cord:
Before tying, I always give the ends of the elastic a gentle but firm pull. This ‘pre-stretches’ the cord so the bracelet won’t sag immediately after you wear it. -
Tying the knot:
Remove the tape and bring the two ends together. Tie a standard surgeon’s knot (right over left, left over right) and pull tight. The elastic should compress slightly. -
Securing the finish:
Apply a tiny dot of jewelry glue or clear nail polish directly onto the knot. This prevents the elastic from slipping over time. -
Hiding the mechanics:
Once the glue is tacky or dry, trim the excess tail of the cord closely. If the hole of a neighboring bead is large enough, gently tug the knot inside it to hide it completely.
Perfect Polished Look
Sandwich your silver spacer rings between two navy disks rather than accent beads. The dark blue background makes the silver pop much more effectively.
Slip on your new nautical bracelet and enjoy the crisp, clean style it adds to any outfit
The Complete Guide to Pottery Troubleshooting
Uncover the most common ceramic mistakes—from cracking clay to failed glazes—and learn how to fix them fast.
Gold Spacer Rhythm in Blue
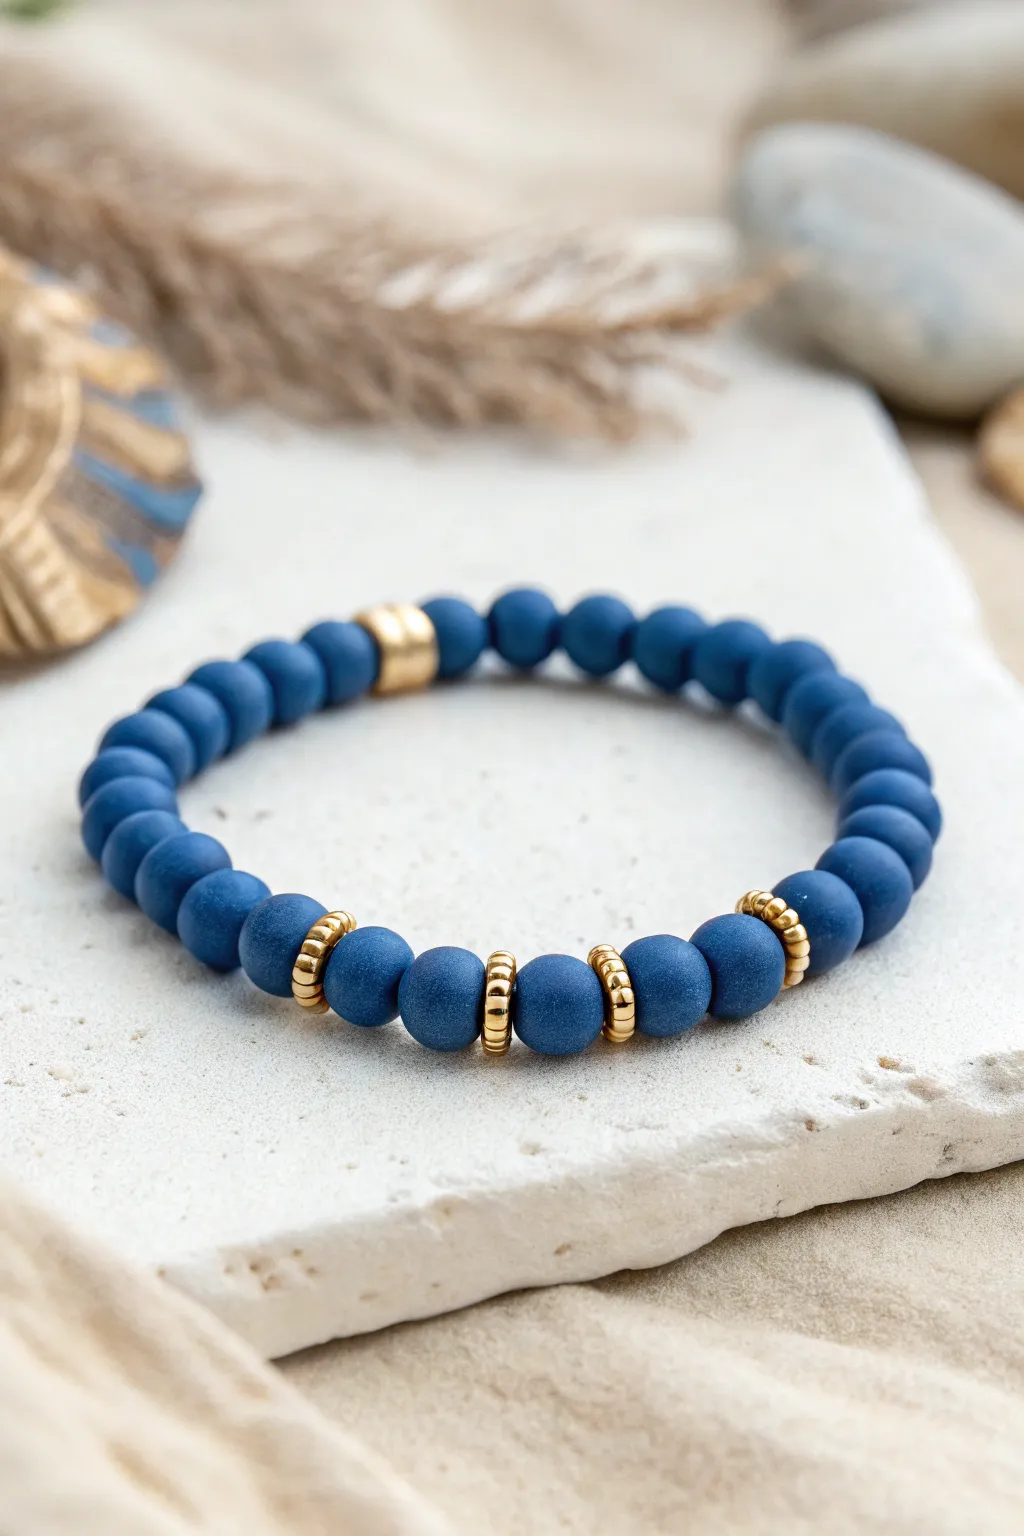
This elegant bracelet balances the soft, uniform texture of matte blue beads with the sharp gleam of gold metal accents. By creating a rhythmic pattern of double gold spacers, you elevate a simple strand into a sophisticated accessory that works for both casual and dressy occasions.
Detailed Instructions
Materials
- Matte blue round beads (approx. 8mm)
- Gold tone metallic spacer beads (rondelle or disc shape)
- Elastic cord (0.8mm or 1mm thickness)
- Jewelry glue or clear nail polish
- Scissors
Step 1: Preparation
-
Measure your wrist:
Wrap a piece of string or a soft measuring tape around your wrist to find your exact size. Add about half an inch to this measurement to ensure the bracelet fits comfortably without pinching. -
Cut the elastic:
Cut a length of elastic cord about 10-12 inches long. Having this extra length makes it much easier to tie the final knot securely without fumbling with tiny ends. -
Pre-stretch the cord:
Hold the elastic firmly between your hands and give it a few gentle tugs. Pre-stretching prevents the material from loosening up later, so your bracelet stays snug over time. -
Layout your design:
Before stringing, lay your beads out on a bead board or a soft towel to visualize the pattern. For this design, you’ll need a main section of solid blue, followed by a patterned section.
Step 2: Stringing the Beads
-
Start with the solid section:
Begin threading the matte blue beads onto the cord. You will thread approximately 16 to 18 blue beads in a row, depending on your wrist size, leaving the patterned section for the front. -
Begin the gold rhythm:
Slide on one gold spacer, followed immediately by a second gold spacer. This double-spacer technique creates a thicker, more deliberate gold band than a single bead would. -
Add a focal blue bead:
Thread one single blue bead after your first set of gold spacers. This bead will be framed by the gold accents. -
Continue the pattern:
Add another pair of gold spacers, followed by one blue bead. Repeat this sequence—two gold, one blue—until you have four distinct gold sections framing three blue beads. -
Finish the focal area:
Complete the pattern by adding a final pair of gold spacers. You should now have a symmetric focal section featuring four sets of gold rings. -
Check the fit:
Carefully wrapt the strand around your wrist to check the sizing. If it feels too tight, add one or two more blue beads to the solid back section; if it’s too loose, remove one.
Spacer Slip-Ups
If your gold spacers are slipping inside the holes of the blue beads, your blue beads may have holes that are too large. Try using slightly larger spacers or adding a tiny seed bead between them.
Step 3: Finishing Touches
-
Prepare the knot:
Bring the two ends of the elastic cord together. Tie a simple overhand knot, pulling it gently but firmly so the beads sit snug against each other with no gaps. -
Tie a surgeon’s knot:
For extra security, tie a surgeon’s knot—this is like a standard square knot, but you loop the elastic through twice before pulling tight. This extra friction helps hold slippery elastic in place. -
Apply adhesive:
Place a tiny drop of jewelry glue or clear nail polish directly onto the knot. I find this step crucial for longevity, ensuring the knot doesn’t slowly work itself loose. -
Hide the knot:
While the glue is still slightly tacky, gently pull the elastic so the knot slides inside the hole of the nearest blue bead. If the hole is too small, just ensure the knot is nestled tightly between beads. -
Final trim:
Once dry, use your scissors to trim the excess elastic tails as close to the bead as possible without nicking the knot itself.
Style Shift
Swap the matte blue for matte black onyx or white howlite for a monochrome look, or use rose gold spacers instead of yellow gold for a warm, modern twist on the design.
Enjoy wearing your sophisticated new bracelet stack or gifting it to a friend
Blue Evil Eye Centerpiece
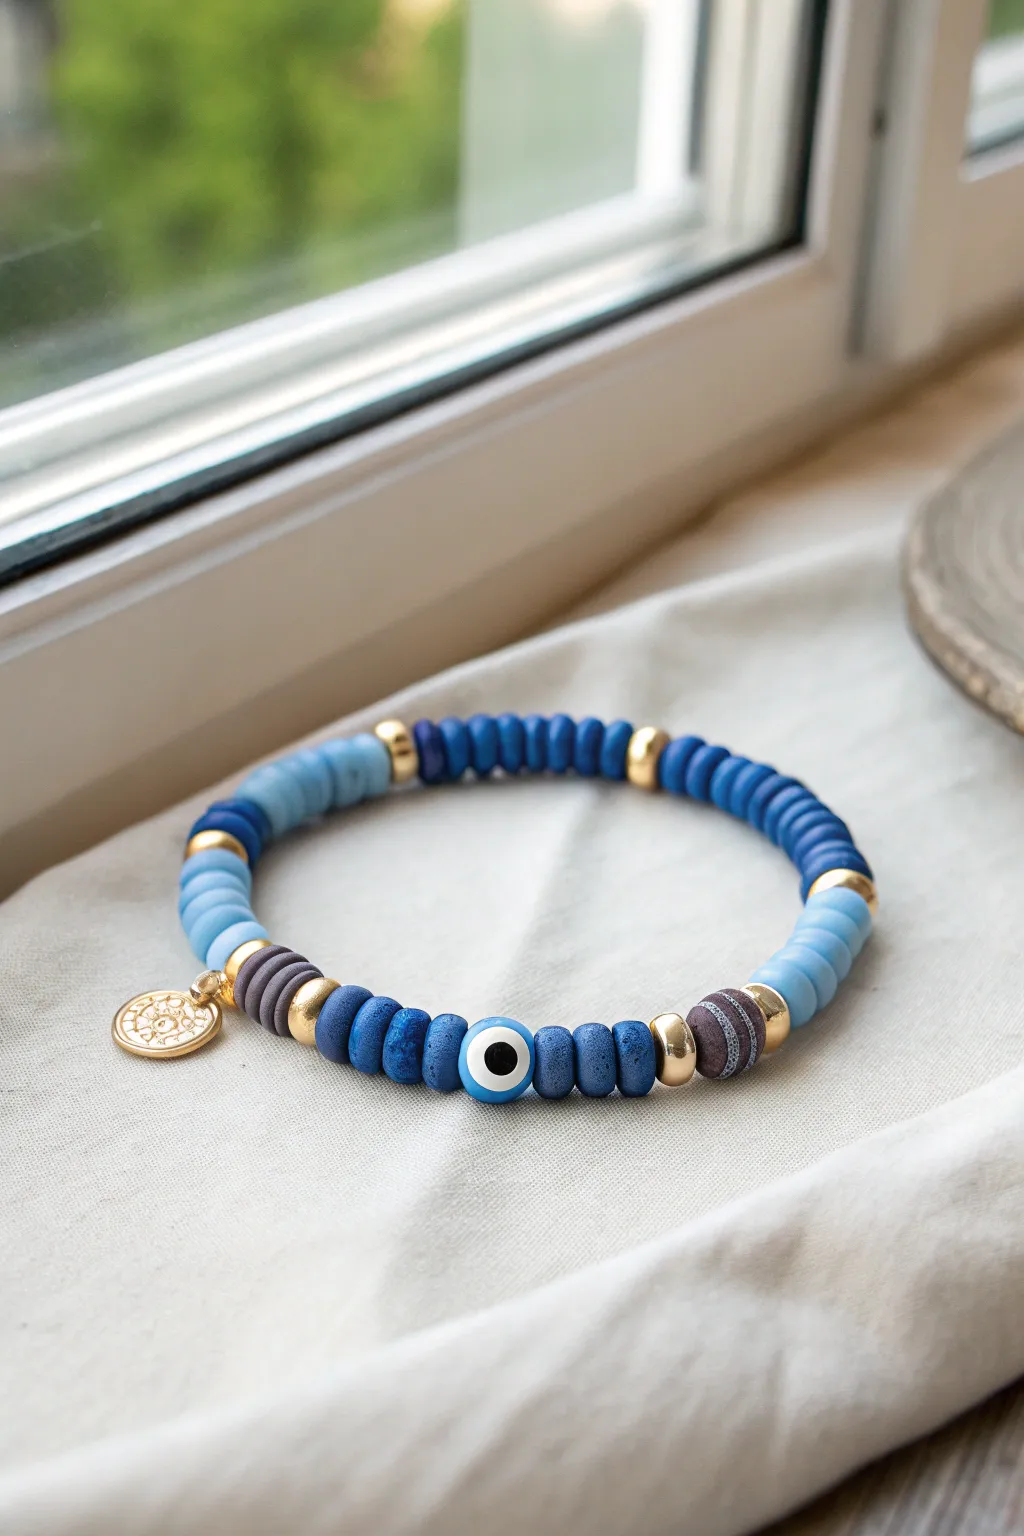
Embrace the protective symbolism and serene ocean hues with this stunning clay bead bracelet. Centered around a captivating Evil Eye bead, this design mixes textures and gradients of blue for a sophisticated yet bohemian accessory.
How-To Guide
Materials
- Polymer clay Heishi beads (royal blue)
- Polymer clay Heishi beads (light sky blue)
- Polymer clay Heishi beads (charcoal/dark grey)
- 10mm round glass Evil Eye bead (blue/white/black)
- Gold tone metallic spacer beads (rounded/donut shape)
- Small gold charm (sun or mandala design)
- Gold jump ring (4-6mm)
- Elastic beading cord (0.8mm clear)
- Jewelry crafting glue (e.g., G-S Hypo Cement)
- Scissors or jewelry snips
- Chain nose pliers
- Bead stopper or tape
Step 1: Preparation & Centerpiece
-
Measure & Cut:
Begin by cutting a piece of elastic cord about 10-12 inches long. This generous length gives you plenty of room to tie knots later without straining your fingers. -
Secure the End:
Attach a bead stopper to one end of the cord, or simply tape it firmly to your work surface. This prevents your beads from sliding off while you design. -
String the Focal Bead:
Thread the round glass Evil Eye bead onto the cord first. Let it slide down to the center of your working length so you can build the pattern outwards symmetrically. -
Frame the Eye:
On both the left and right sides of the Evil Eye bead, thread three royal blue clay Heishi beads. These act as a textural transition from the smooth glass.
Sticky Situation
If the knot keeps slipping before you can glue it, ask a friend to hold his or her finger on the first loop of the knot while you tie the second one.
Step 2: Building the Pattern
-
Add Metallic Accents:
Next, place a gold spacer bead on each side after the initial royal blue clay beads. This gold touch highlights the centerpiece beautifully. -
Introduce Contrast:
String three charcoal or dark grey clay beads on each side. I find this darker shade grounds the design and prevents it from looking too monochromatic. -
Second Gold Spacer:
Add another gold spacer bead on both the left and right sides, sandwiching the dark grey section. -
The Gradient Shift:
Now, begin the lighter section. Thread approximately 5-6 light sky blue Heishi beads on both sides. This creates a soft gradient effect moving away from the bold center. -
Third Gold Spacer:
Place a third gold spacer bead on each side to cap off the light blue section.
Step 3: Completing the Loop
-
Fill the Rest:
Fill the remaining length of the bracelet using the royal blue clay beads. Continue adding them to both sides until the total beaded length matches your wrist size (usually around 6.5 to 7 inches). -
Attach the Charm:
Open a jump ring using your chain nose pliers. Slide your gold sun charm onto the ring. -
Placement:
Locate where you want the charm to hang—usually near the knot or opposite the eye works best. Slide the jump ring onto the cord between two royal blue beads and close the ring securely. -
Check fit:
Wrap the strand around your wrist to ensure it fits comfortably. It should be snug but not tight. Remove or add royal blue beads as needed.
Variation Idea
Swap the royal blue Heishi beads for white or cream ones on the back half of the bracelet to create a starker ‘summer vacation’ contrast.
Step 4: Finishing Touches
-
Pre-stretch:
Gently pull on both ends of the elastic cord to pre-stretch it. This crucial step prevents the bracelet from drooping or loosening immediately after you wear it. -
Tie the Knot:
Remove the bead stopper and tie a surgeon’s knot (right over left, left over right). Pull the strands tight. -
Secure with Glue:
Apply a tiny dot of jewelry glue directly onto the knot. Let it dry for a few minutes to ensure a permanent bond. -
Conceal:
Once dry, trim the excess cord ends close to the knot. If the hole of a nearby bead is large enough, carefully slide the bead over the knot to hide it.
Slip on your new bracelet and enjoy the handcrafted protection and style it brings to your daily outfit
What Really Happens Inside the Kiln
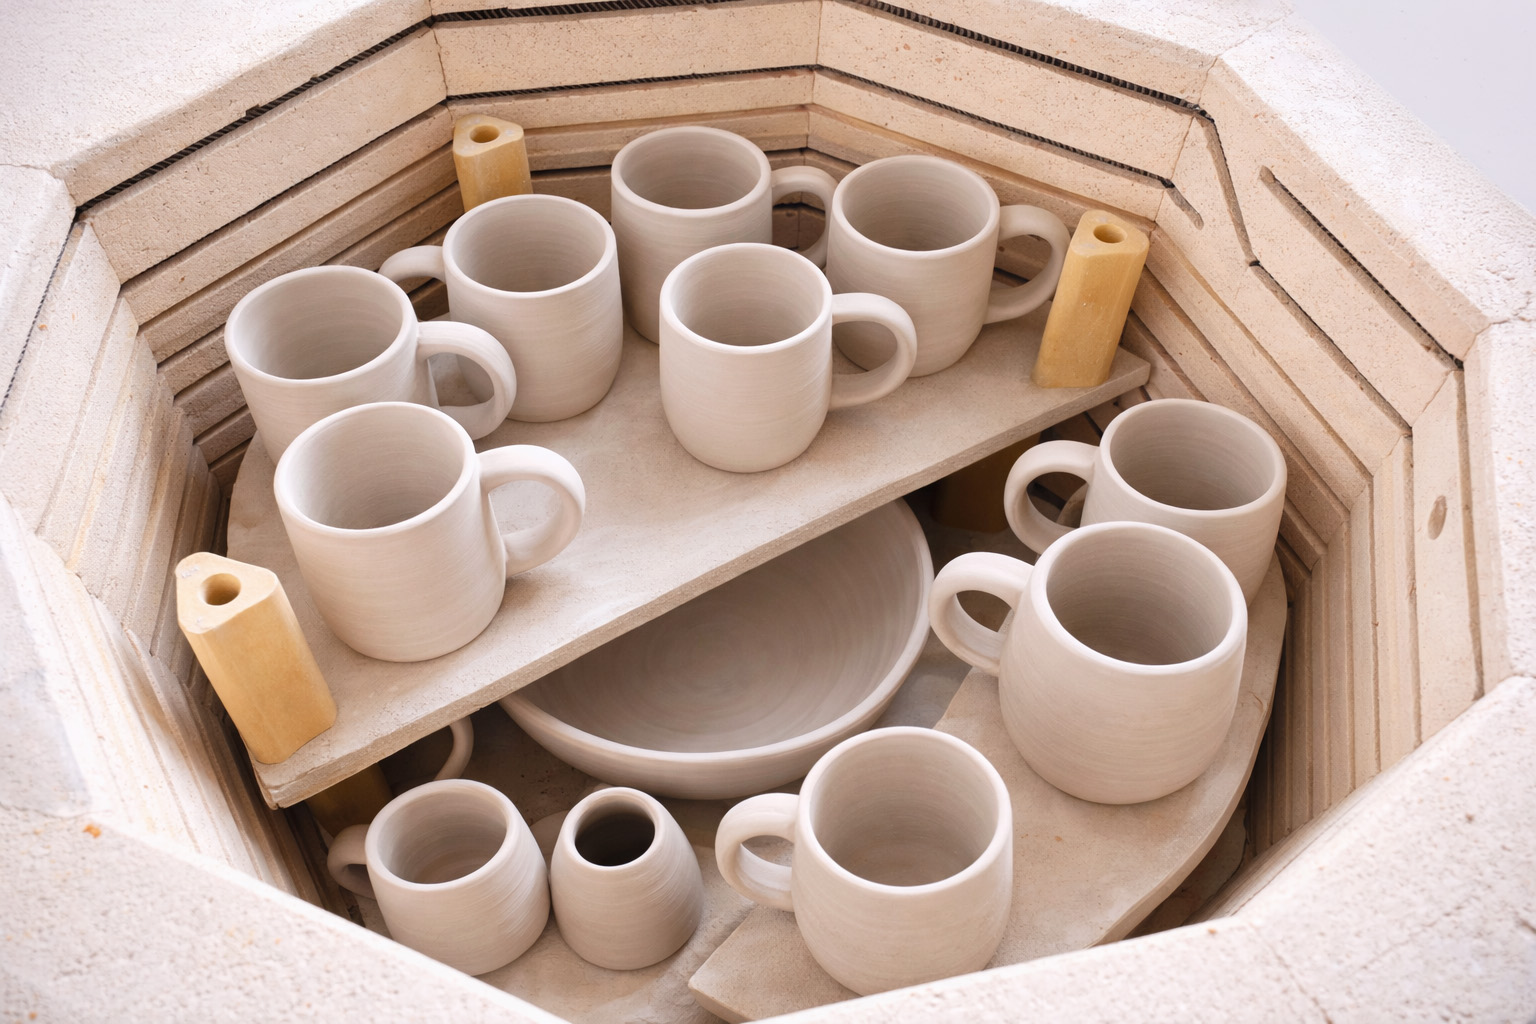
Learn how time and temperature work together inside the kiln to transform clay into durable ceramic.
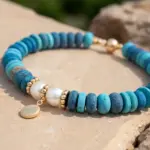
Blue Beads With Pearl Pops
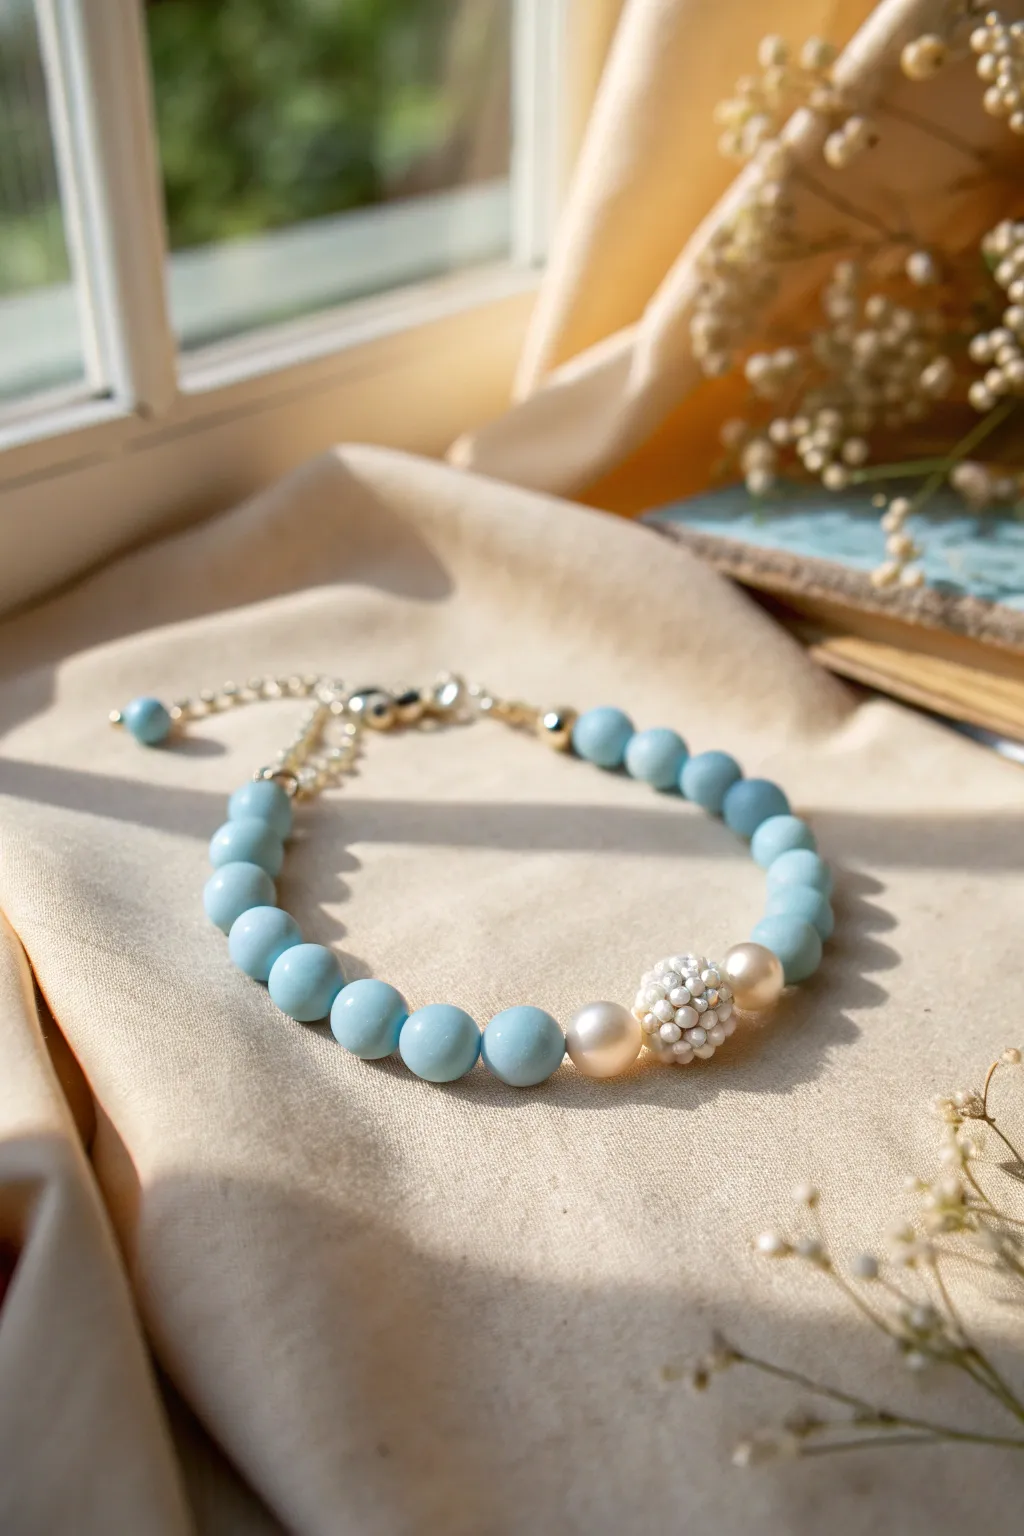
This elegant design pairs soft blue round beads with lustrous pearl accents for a sophisticated yet easy-to-wear accessory. The textured centerpiece adds a touch of intricate detail that elevates the entire piece from simple stringing to boutique jewelry.
Step-by-Step Guide
Materials
- Light blue round beads (approx. 8-10mm, ceramic or polymer clay)
- Two large freshwater or faux pearls (approx. 10mm)
- One textured cluster bead or disco ball bead (white/cream)
- Two small gold spacer beads
- Beading wire (flexible nylon-coated)
- Small gold crimp beads (2x)
- Gold crimp bead covers (2x, optional)
- Gold jump rings
- Gold lobster clasp
- Gold extender chain
- Two bead tips or clamshell covers
- Wire cutters
- Chain nose pliers
- Flat nose pliers
Step 1: Planning and Preparation
-
Measure the wire:
Cut a length of beading wire approximately 10-12 inches long. This gives you plenty of slack to work with on both ends, preventing beads from sliding off while you crimp. -
Prepare the layout:
Lay out your beads on a bead board or velvet mat. Place the textured white cluster bead in the exact center. -
Add pearly accents:
Place one large smooth pearl on immediate left and right sides of the center cluster bead. -
Check the balance:
Arrange the light blue beads extending outward from the pearls on both sides until you reach your desired bracelet length (usually about 6.5 to 7 inches for the beaded portion). -
Incorporate gold details:
Place a small gold spacer bead between the last blue bead and the clasp hardware on each end to give it a professional finish.
Use a Bead Stopper
Clip a bead stopper or a piece of tape to one end of your wire before you start stringing. This prevents beads from rolling off the table if you haven’t attached the clasp yet.
Step 2: Stringing the Design
-
Secure the first end:
Thread one end of your wire through a crimp bead and then through a wire guardian or directly into a jump ring attached to the clasp. -
Create the loop:
Loop the wire back down through the crimp bead. Use flat nose pliers to squash the crimp bead flat and secure the wire. -
Cover the mechanics:
If you are using a crimp cover, place it over the flattened crimp bead and gently close it with pliers so it looks like a round gold bead. -
Begin stringing:
Thread the first half of your blue beads onto the wire, sliding them down to cover the short tail of the wire left from crimping. -
Add the focal section:
Slide on the first large pearl, followed by the textured cluster bead, and then the second large pearl. -
Finish the bead sequence:
String the remaining blue beads onto the wire, ensuring the pattern matches the first side perfectly.
Step 3: Finishing Touches
-
Add the final gold spacer:
Slide the last gold spacer bead onto the wire. -
Prepare the second crimp:
Thread on a crimp bead and pass the wire through the closed loop of your extender chain. -
Tighten the slack:
Pass the wire back down through the crimp bead and into the last few blue beads. Pull the wire tight enough to remove gaps, but leave just a tiny bit of wiggle room so the bracelet stays flexible. -
Secure the end:
Flatten the crimp bead with your pliers firmly. Check that the connection is secure. -
Trim excess wire:
Use flush cutters to trim the excess wire tail close to the beads so it doesn’t poke the wearer. -
Optional dangle:
For an extra cute detail seen in the photo, you can attach a single blue bead to the end of the extender chain using a headpin.
Mix Up The Blues
Instead of uniform blue beads, try using beads with slight color variations or a subtle marble effect to add depth and make the solid color sections more organic.
Once the ends are secure, your serene blue and pearl bracelet is ready to compliment any outfit
Cowrie Shell and Blue Disc Stack
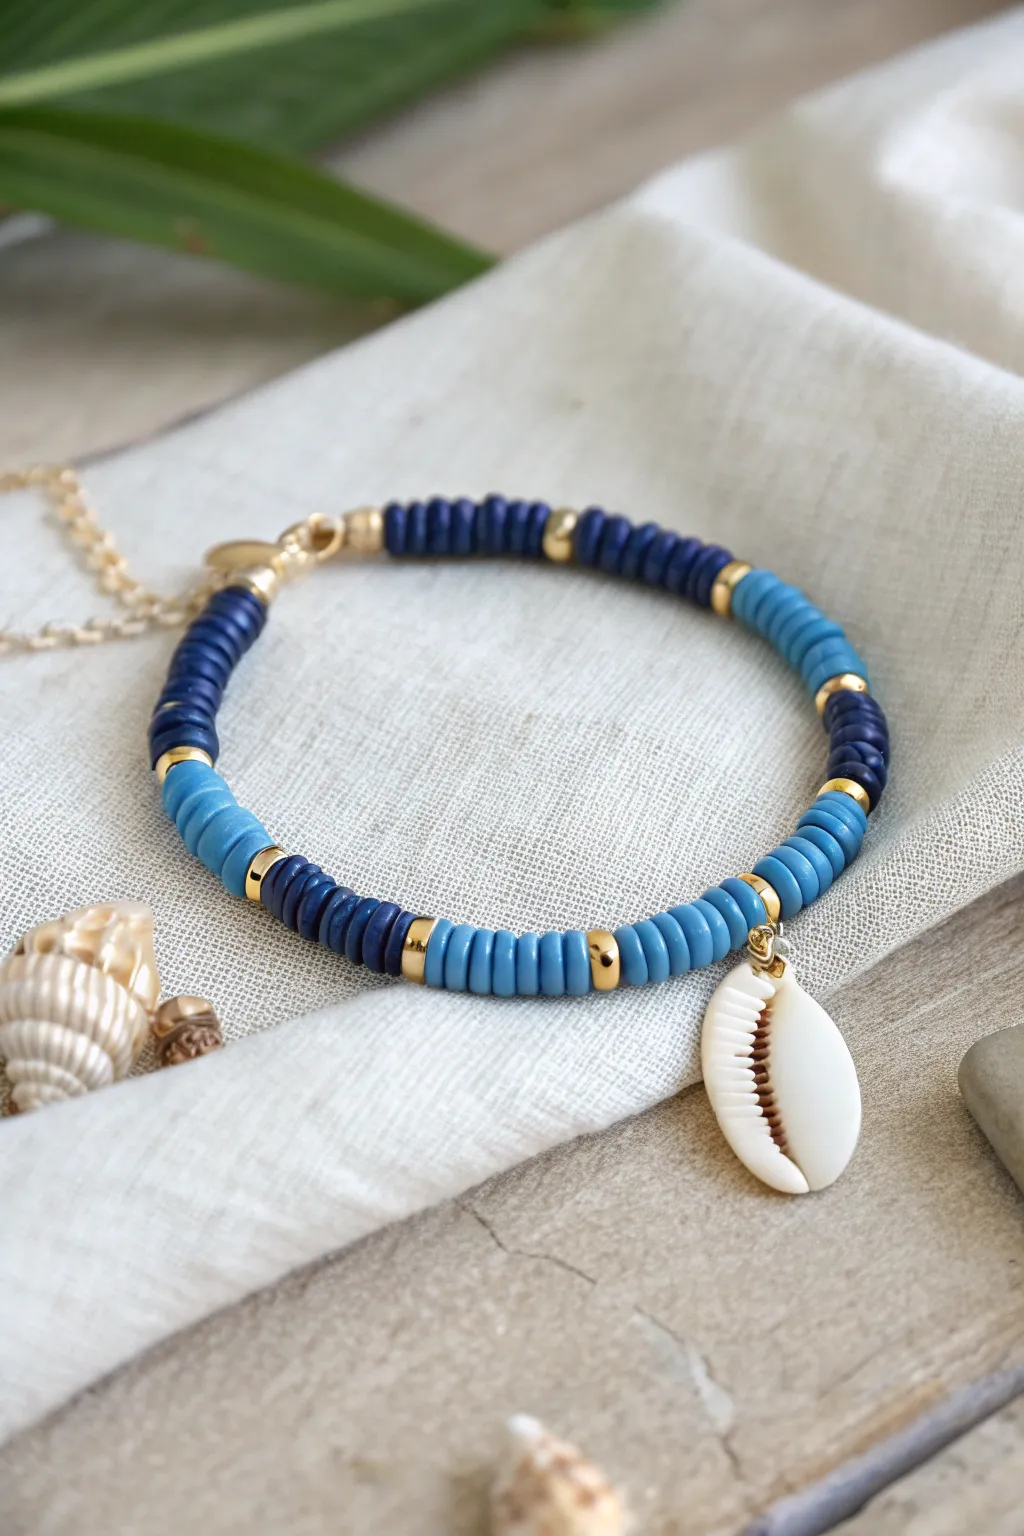
Capture the essence of a beach vacation with this elegant stack of deep navy and sky-blue heishi beads. Accented with golden spacers and a genuine cowrie shell charm, this bracelet evokes the soothing rhythm of ocean waves.
Step-by-Step Tutorial
Materials
- Navy blue polymer clay heishi beads (approx 6mm)
- Medium sky-blue polymer clay heishi beads (approx 6mm)
- Gold round spacer beads (approx 3-4mm)
- Natural cowrie shell charm with gold bail loop
- Gold jump rings (4mm and 6mm)
- Gold lobster clasp
- Gold extension chain
- Beading wire (such as Tiger Tail or elastic cord)
- 2 Crimp beads
- Wire cutters
- Flat nose pliers
Step 1: Planning the Pattern
-
Measure your wrist:
Before you begin stringing, wrap a piece of string around your wrist to determine your desired length. Standard bracelets are usually around 7 inches, but add an extra half-inch for wiggle room. -
Lay out the design:
Visualize the alternating block pattern. The design consists of segments of about 10-12 heishi beads separated by a single gold spacer bead. -
Establish the color rhythm:
To match the photo, plan for blocks of navy blue to alternate with blocks of sky blue. Notice how the colors switch after every gold spacer.
Stay Gold
Use gold-filled or high-quality plated spacer beads to prevent tarnishing, especially if you plan to wear this bracelet near water or while swimming.
Step 2: Stringing the Beads
-
Prepare the wire:
Cut a length of beading wire about 10 inches long. This gives you plenty of excess to work with when adding the clasp later. -
Attach the first clasp end:
Thread a crimp bead onto one end of the wire, followed by the jump ring attached to your extension chain loops. Feed the wire back through the crimp bead to create a loop. -
Secure the start:
Use your flat nose pliers to flatten the crimp bead firmly, securing the wire. Trim the very short tail of the wire if it’s too long, or tuck it into the first few beads. -
Begin with navy:
Thread on approximately 10-12 navy blue heishi beads. I like to double-check the length of this block against my wrist to ensure the proportions feel right. -
Add a gold accent:
Slide on one gold round spacer bead. -
Switch to sky blue:
Thread on a matching segment of 10-12 sky-blue heishi beads followed by another gold spacer. -
Continue the pattern:
Repeat this alternating pattern—Navy block, gold spacer, Sky Blue block, gold spacer—until you reach the center point of your bracelet.
Ocean Ombre
Add a third shade of bead—like a pale turquoise or white—to create a gradient fade effect between the navy and sky blue sections for more depth.
Step 3: Adding the Feature Charm
-
Identify the center block:
The cowrie shell hangs from the center of a blue block. Stop when you have threaded about 5 or 6 beads of a sky-blue segment. -
Attach the shell:
Slide the jump ring holding your cowrie shell charm directly onto the beading wire. Ensure the shell faces outward. -
Complete the center block:
Thread the remaining 5 or 6 sky-blue beads to finish that specific color segment. The shell should now sit nestled in the middle of the blue section. -
Finish the strand:
Continue the alternating pattern (Gold spacer, Navy block, Gold spacer, Sky Blue block) until you reach your measured length.
Step 4: Finishing Touches
-
Prepare the final crimp:
Slide a crimp bead onto the end of the wire. -
Add the clasp:
Thread the wire through the loop of your gold lobster clasp. -
Loop back:
Feed the wire back through the crimp bead and pull it snug. Leave just enough slack so the beads can move slightly and the bracelet remains flexible. -
Secure the end:
Flatten the crimp bead tightly with your pliers. Thread the excess wire tail back through the last few heishi beads to hide it. -
Trim excess:
Use your wire cutters to snip off any remaining wire tails flush against the beads for a clean, professional finish.
Now you have a stunning piece of jewelry that brings the calm of the sea to your everyday outfits

TRACK YOUR CERAMIC JOURNEY
Capture glaze tests, firing details, and creative progress—all in one simple printable. Make your projects easier to repeat and improve.
Blue Smiley and Heart Accents

Brighten your day with this playful beaded bracelet featuring cheerful smiley faces and a sweet heart charm. The combination of marbled blue stone beads and matte gray accents creates a stylish texture that elevates the fun clay icons.
Step-by-Step Tutorial
Materials
- Elastic stretch cord (0.7mm or 0.8mm)
- Blue clay smiley face beads (flat round disc shape)
- Blue clay heart bead (solid color)
- Matte gray round stone beads (8mm)
- Blue marbled round stone beads (8mm)
- Solid blue round stone beads (8mm)
- Beading glue or clear nail polish
- Scissors
Step 1: Planning Your Pattern
-
Measure your wrist:
Cut a piece of elastic cord about 10-12 inches long. This gives you plenty of extra room to tie knots without feeling cramped. -
Lay out the design:
Before restringing, I always lay my beads out on a bead board or a towel to visualize the pattern so they don’t roll away. -
Identify the focal point:
Place one blue smiley bead in the center. This will be the main attraction of your bracelet. -
Establish the symmetry:
On either side of the center smiley, place one matte gray bead, then a blue marbled bead, then another matte gray bead.
Step 2: Creating the Bead Sequence
-
Add side accents:
Next to your initial sequence, place two blue marbled beads on the left side to create a textured block. -
Insert the second smiley:
On the right side of your layout, place a second blue smiley face bead followed by a matte gray bead. -
Position the heart charm:
On the far left side, after a gray bead, place your solid blue heart bead. Orient it so the point faces inward toward the rest of the beads. -
Fill in the back:
Complete the rest of the circle with an alternating mix of solid blue round beads, matte gray beads, and the remaining marbled beads until you reach your desired length.
Knot Hiding Trick
If the knot won’t fit into the clay smiley bead, pull it into one of the stone beads instead. They usually have larger holes.
Step 3: Stringing and Finishing
-
Begin stringing:
Hold one end of the elastic cord securely (or use a bead stopper) and start threading your beads carefully, following the layout you created. -
Check the smiley orientation:
Ensure all your smiley face beads are threaded facing the same direction so they aren’t upside down when worn. -
Verify the sizing:
Wrap the strung beads around your wrist to check the fit. It should sit comfortably without gaps but not slide differently. -
Pre-stretch the cord:
Once all beads are on, give the ends of the elastic a gentle pull. This ‘pre-stretching’ prevents the bracelet from loosening up later. -
Tie the knot:
Tie a surgical knot or a square knot. Pull it tight, ensuring no slack remains between the beads. -
Secure with glue:
Place a tiny drop of beading glue or clear nail polish directly onto the knot to seal it permanently. -
Hide the knot:
Trim the excess cord ends and gently tug the layout so the knot slides inside the hole of the nearest large bead.
Add Gold Accents
Insert small gold spacer discs between the stone beads and clay icons for an upscale, trendy metallic shimmer.
Slip on your new creation and enjoy the happy vibes it brings to your outfit
Blue and Green Coastal Garden
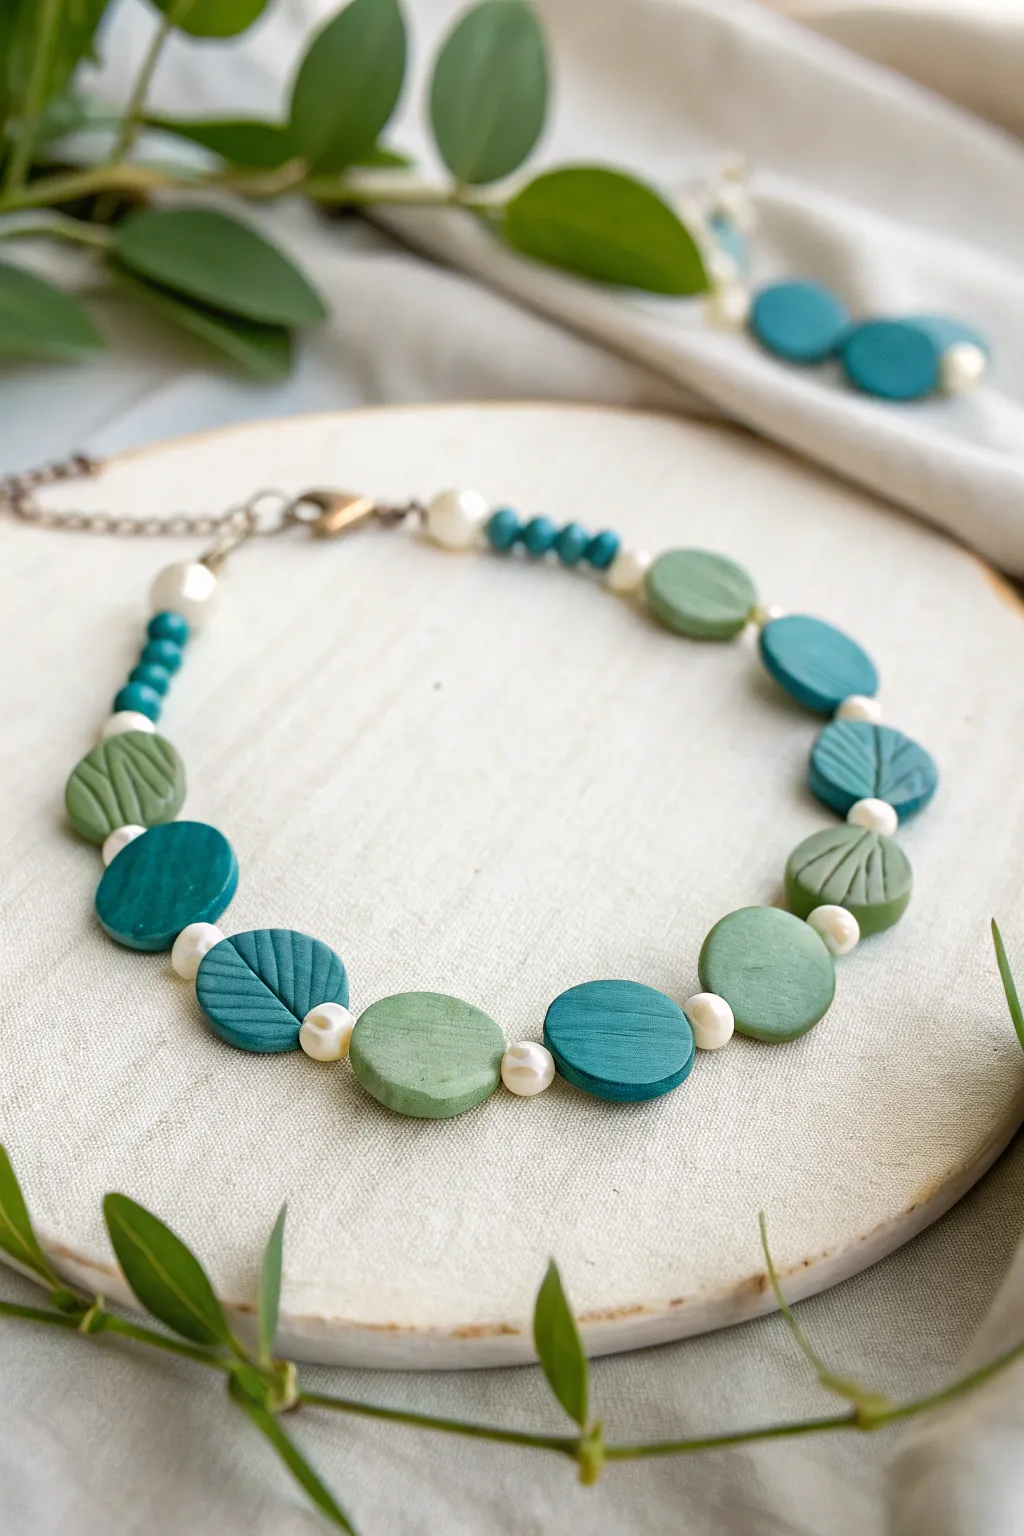
Capture the serene beauty of a seaside garden with this elegant polymer clay necklace. Featuring a mix of textured leaf-impressed beads and smooth rounds in calming shades of sage, teal, and blue-green, it’s accented with pearly white spacers for a sophisticated finish.
Step-by-Step Guide
Materials
- Polymer clay in teal, sage green, and blue-green
- Small round pearl beads (approx. 4-6mm)
- Small teal seed beads or rondelles
- Jewelry wire or beading cable
- Crimp beads and crimp covers
- Clasp (lobster claw) and jump rings
- Extension chain (optional)
- Acrylic roller or pasta machine
- Small round clay cutter (approx. 1.5 cm diameter)
- Needle tool or toothpick
- Clear varnish or gloss glaze (optional)
- Oven for baking
- Beading pliers (crimping, flat nose)
Step 1: Creating the Clay Beads
-
Condition the Clay:
Begin by conditioning your polymer clay. Knead the teal, sage, and blue-green blocks separately until they are soft and pliable. If the colors are too bright, you can mute them slightly by mixing in a tiny pinch of beige or grey clay. -
Roll out Sheets:
Using an acrylic roller or a pasta machine, roll each color into a sheet of uniform thickness, approximately 3mm to 4mm thick so the beads are sturdy but not heavy. -
Cut the Shapes:
Use your small round cutter to punch out roughly 12-14 circles from the various colored sheets. Aim for an equal distribution of colors for a balanced look. -
Create Leaf Textures:
Select about half of your clay circles to be textured. Using a needle tool, gently press a center line across the circle to mimic a leaf’s midrib. Then, make angled indentations outward from the center line to create veins. -
Refine the Textures:
Go back over your impressed lines if necessary to ensure they are deep enough to show up after baking, but be gentle so you don’t distort the round shape of the bead. -
Smooth the Edges:
Pick up each bead and gently run your finger around the rim to soften the sharp cut edge. -
Pierce the Beads:
Carefully pierce a hole through the side of each bead using your needle tool. I find it helps to twist the tool gently as you push through to avoid squashing the clay. Make sure the hole is centered and wide enough for your beading wire. -
Bake the Beads:
Arrange your beads on a baking sheet lined with parchment paper. Bake according to the manufacturer’s instructions for your specific brand of clay (usually around 275°F/130°C for 15-30 minutes). Let them cool completely before handling.
Step 2: Assembly
-
Prepare the Wire:
Cut a length of jewelry wire or beading cable approximately 18-20 inches long, or slightly longer if you want more room to work. -
Secure the First End:
Thread a crimp bead onto one end of the wire, followed by one half of your clasp. Loop the wire back through the crimp bead and use crimping pliers to squash it flat securely. Add a crimp cover over it for a professional finish. -
Start Beading with Spacers:
Begin threading your beads. Start with a sequence of small teal seed beads or rondelles—about 5-7 of them—followed by a single pearl bead. -
Add the Clay Beads:
Now, thread on your main clay beads. Alternate between the smooth beads and the textured leaf beads. Place a single white pearl bead between each clay disc to act as a spacer and add light to the design. -
Arrange Colors:
Pay attention to your color pattern. Try a random organic mix (e.g., teal, sage, blue-green) rather than a strict pattern to mimic the natural variation found in a garden. -
Finish the Sequence:
Once all your large clay beads are strung, finish the sequence on the other side symmetrically: add a final pearl bead followed by the same number of small teal seed beads you used at the start. -
Secure the Second End:
Thread on a crimp bead and the jump ring (or extension chain) for the other side of the clasp. Loop the wire back through the crimp bead and pull tight, leaving just a tiny bit of slack so the necklace isn’t stiff. -
Final Crimp:
Flatten the crimp bead with your pliers, trim the excess wire using flush cutters, and cover the crimp with a crimp cover.
Clean Cuts Only
Before baking, use a baby wipe or a Q-tip dipped in rubbing alcohol to gently smooth away any fingerprints or lint on your raw clay beads for a flawless, professional surface.
Add a Little Sparkle
Rub a tiny amount of metallic mica powder (gold or copper) into the leaf impressions before baking. The powder will cling to the veins, highlighting the texture beautifully.
Now you have a stunning, nature-inspired piece that brings a calm coastal vibe to any outfit
Denim Wash Blue Gradient
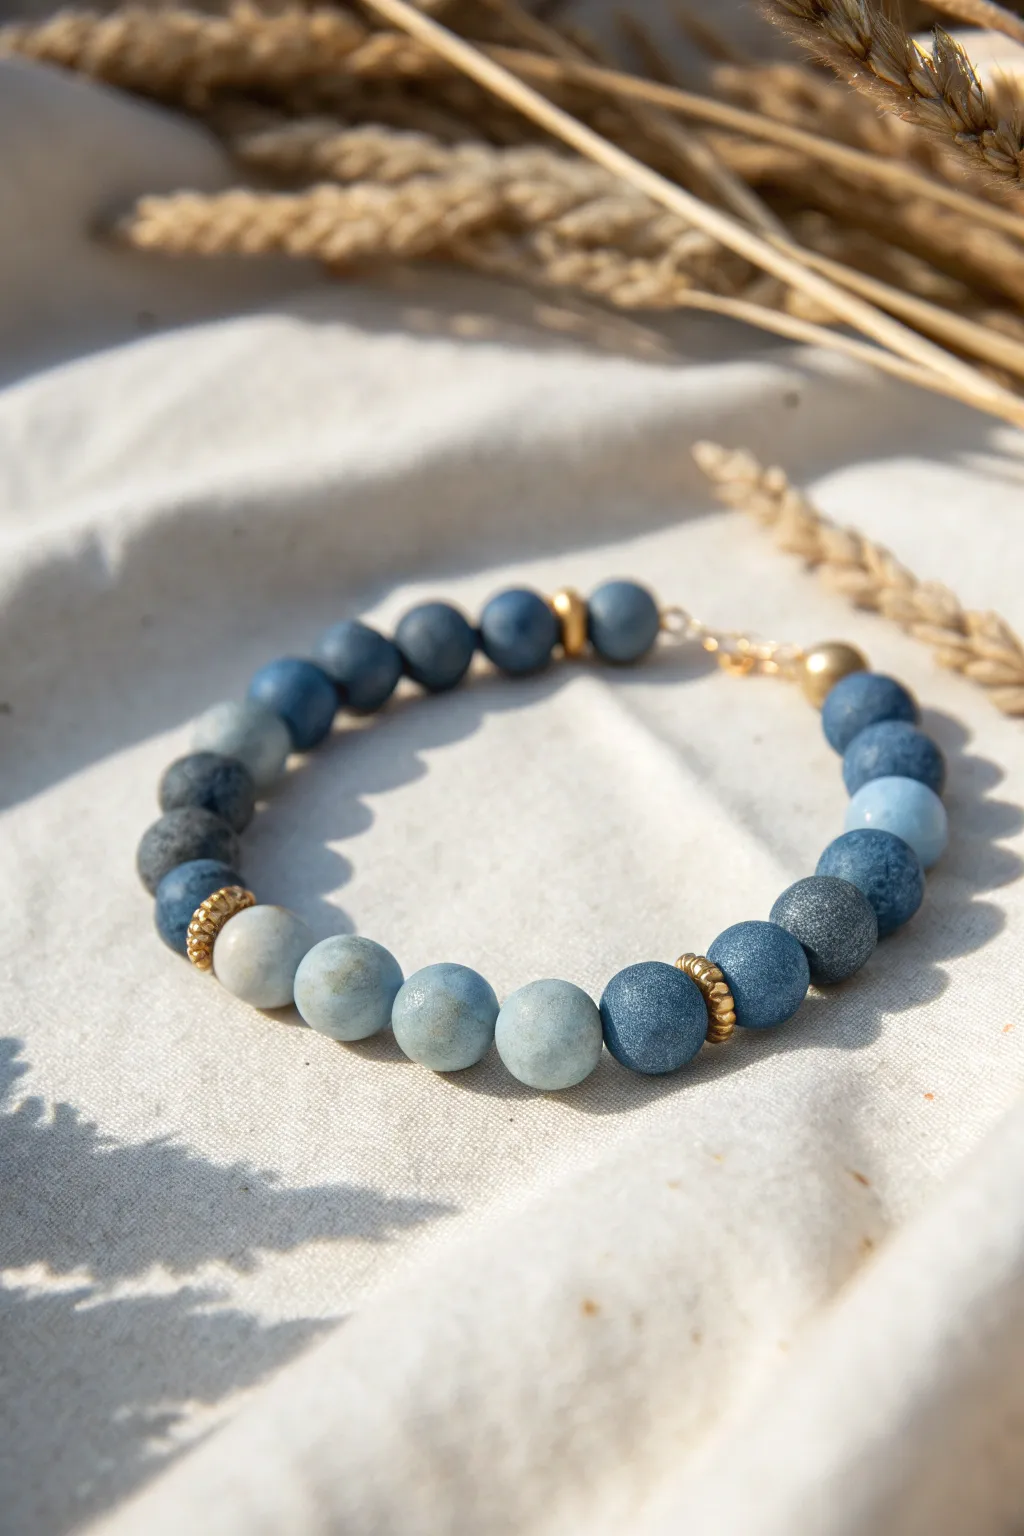
Capture the effortlessly cool vibe of your favorite pair of jeans with this stunning gradient bracelet. Using a mix of matte blue tones ranging from deep indigo to soft stonewash, this accessory adds a touch of casual elegance to any outfit.
Step-by-Step Tutorial
Materials
- Matte round beads (8mm or 10mm) in dark slate blue
- Matte round beads (8mm or 10mm) in medium denim blue
- Matte round beads (8mm or 10mm) in pale sky blue or grey-blue
- Gold wavy disc spacer beads
- Small gold round beads or crimp covers
- Gold lobster clasp and jump ring
- Beading wire (flexible nylon-coated steel wire)
- 2 Crimp tubes
- Crimping pliers
- Wire cutters
- Bead design board (optional)
Step 1: Planning the Gradient
-
Sort your blues:
Begin by separating your blue beads into three distinct piles based on their darkness: dark indigo, medium denim, and light stonewash. -
Lay out the pattern:
On a bead board or a soft towel, arrange the beads in a circle to visualize the gradient. The goal is an ombré effect where colors transition smoothly. -
Create the sequence:
Start with a cluster of the darkest beads on one side. Transition into the medium blues, and finish the opposite side with your lightest pale blue beads. -
Insert gold accents:
Identify the transition points where the colors shift (e.g., from dark to medium). Place a gold wavy disc spacer between these color blocks to define the sections. -
Fine-tune the arrangement:
Look closely at the layout. If the transition feels too abrupt, mix one medium bead into the dark section near the border to soften the look.
Gaps appearing?
If you see gaps between beads after crimping, you likely didn’t pull the wire tight enough. Restring and pull snug, but keep flexibility.
Step 2: Stringing the Bracelet
-
Cut the wire:
Cut a piece of beading wire approximately 10-12 inches long. This gives you plenty of extra room to work with the clasp. -
Secure the first end:
Slide a crimp tube onto one end of the wire, followed by a jump ring. Loop the wire back through the crimp tube. -
Crimp the tube:
Use your crimping pliers to flatten the tube securely, locking the loop in place. I always give a gentle tug to ensure it’s tight. -
Hide the tail:
String your first bead (a dark blue one) and slide it over the short tail of the wire to tuck it away neatly. -
String the dark section:
Thread on your dark indigo beads until you reach the point planned for your first gold accent. -
Add first gold spacer:
Slide on a gold wavy disc spacer. Ensure the texture of the spacer is visible against the matte beads. -
String the light section:
Change to your lightest pale blue beads. String this entire section, placing them opposite the dark section in your circular design. -
Transition back to dark:
Add the second gold wavy spacer after the light beads, then finish stringing with any remaining medium or dark beads to complete the loop.
Step 3: Finishing Touches
-
Check the fit:
Wrap the strung beads around your wrist. The ends should meet comfortably without large gaps, but not be tight. -
Prepare the clasp end:
Slide a crimp tube onto the end of the wire, followed by the gold lobster clasp. -
Create the final loop:
Thread the wire back through the crimp tube and though the last bead you strung to form a loop around the clasp. -
Tighten the wire:
Pull the wire tail until the beads are snug against each other. Be careful not to make it rigid; the bracelet needs to drape. -
Secure the crimp:
Use the crimping pliers to flatten the final crimp tube securely. -
Trim excess wire:
Using your flush cutters, trim the remaining wire tail as close to the bead hole as possible so it doesn’t poke the skin. -
Add crimp covers (optional):
If you want a polished look, gently close a gold crimp cover over each crushed crimp tube to make them look like small gold beads.
Make it matte
If you can only find glossy beads, gently buff them with very fine steel wool or high-grit sandpaper to achieve that authentic denim matte finish.
Enjoy styling your new bracelet with everything from casual weekend wear to office chic
Marbled Blue Swirl Beads
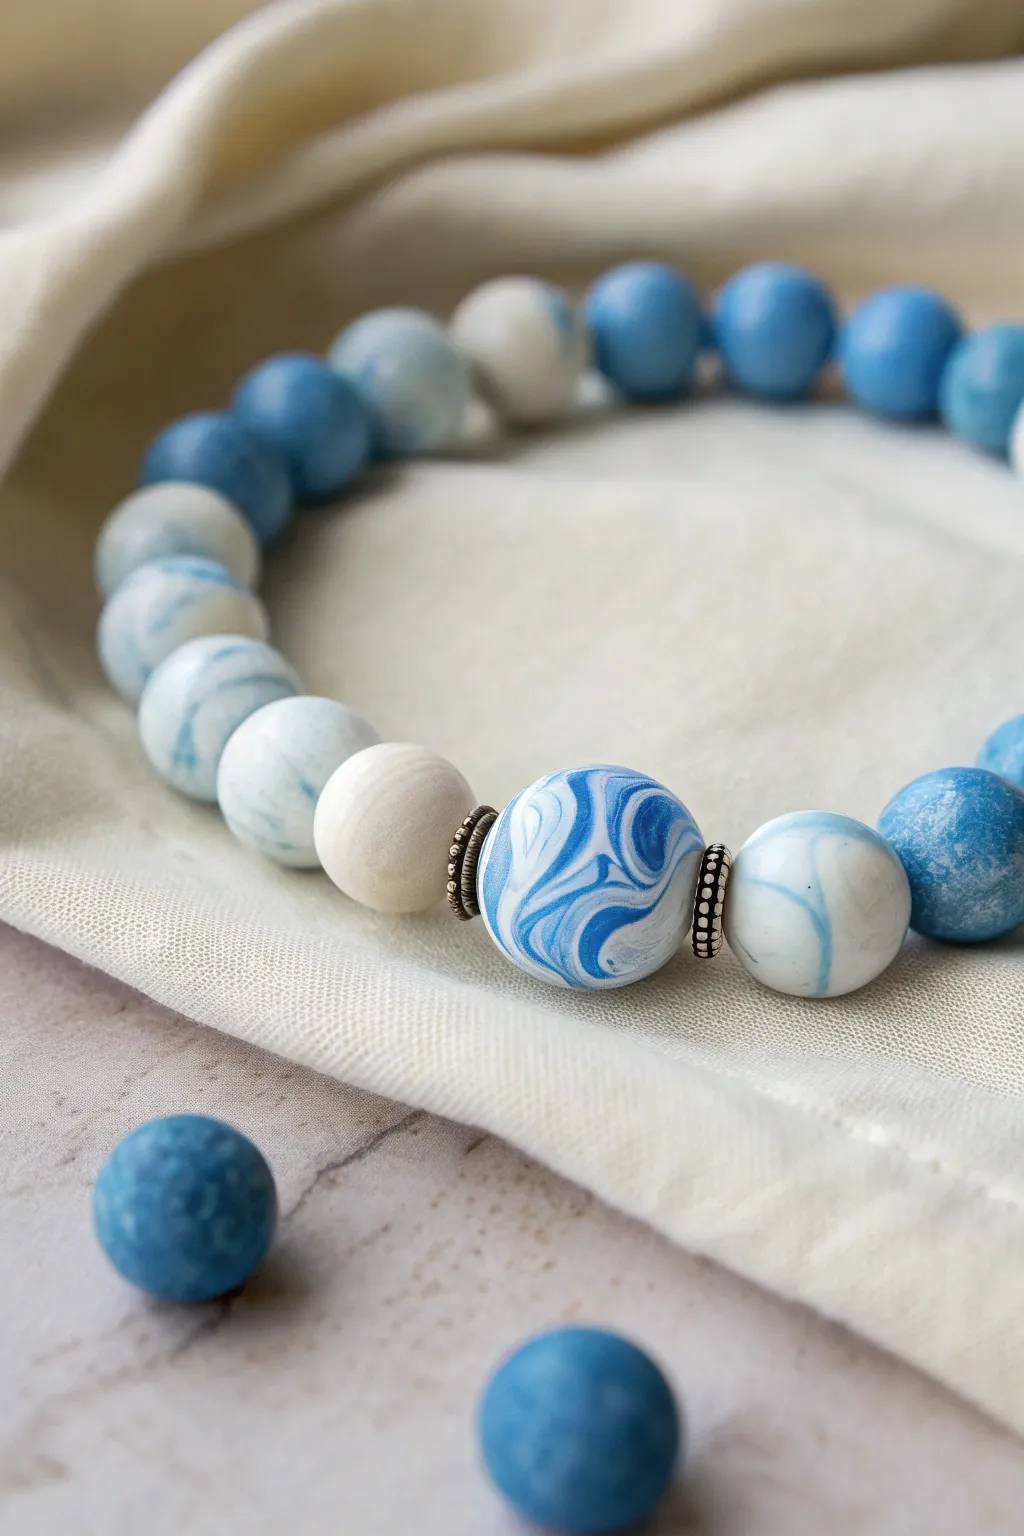
Capture the movement of waves with these stunning marbled clay beads, featuring a mesmerizing blend of white, sky blue, and deep ocean tones. The swirling effect created by mixing polymer clays makes each bead entirely unique, adding an artisanal touch to your jewelry collection.
Step-by-Step Guide
Materials
- Polymer clay (White, Light Blue, Medium/Royal Blue)
- Clay roller or pasta machine
- Tissue blade or craft knife
- Bead piercing pins or toothpicks
- Silver spacer beads (daisy or rondelle style)
- Stretch cord (0.8mm or 1mm)
- Jewelry glue (e.g., E6000 or GS Hypo Cement)
- Gloss glaze or polyurethane varnish (optional)
- Sandpaper (400, 600, 1000 grit) – optional for finishing
- Oven for baking
Step 1: Preparing the Clay
-
Condition the clay:
Start by taking chunks of your white, light blue, and medium blue polymer clay. Knead each color separately in your hands until they are soft, pliable, and warm to the touch. -
Form logs:
Roll each conditioned color into a separate long, snake-like log. Aim for logs that are roughly the same length and thickness, about 1/4 inch in diameter. -
Twist the colors:
Hold the three logs together and twist them tightly into a single rope. The more you twist, the finer the striations of color will become. -
Double and roll:
Fold the twisted rope in half and roll it on your work surface to smooth it back into a single log. This begins the marbling process.
Step 2: Creating the Marbled Pattern
-
Repeat the twist:
Twist the new combined log again. I like to stop before the colors become muddy—you want distinct swirls of white and blue rather than a solid light blue color. -
Check the cross-section:
Slice the log in half with your tissue blade to check the pattern inside. If the swirls aren’t intricate enough, fold and twist one more time. -
Portion the clay:
Once satisfied with the marble, roll the log to a consistent thickness. Use your blade to cut equal-sized segments. The size of the segment determines the size of the finished bead.
Clean Hands are Key
White clay picks up everything! Wipe your hands and work surface with a baby wipe or alcohol before handling the white clay to keep your swirls bright and pure.
Step 3: Shaping and Piercing
-
Roll into spheres:
Take a clay segment and roll it between your palms using a gentle circular motion. Apply light pressure initially, then ease up to smooth out any fingerprints. -
Ensure smoothness:
inspect the bead for any air bubbles or cracks. Gently smooth these out with your finger. Repeat for all cut segments to create a full set of beads. -
Pierce the bead hole:
Hold a bead gently between your thumb and forefinger. Slowly twist a bead piercing pin or toothpick through the center. Twisting while pushing prevents the bead from squashing. -
Re-shape if needed:
After piercing, the exit hole might have a small rough edge. Gently roll the bead again or pat the hole ends to reshape them perfectly round.
Level Up: Glossy Finish
After baking, apply a coat of UV resin or polymer clay gloss varnish. This deepens the blue contrast and gives the beads a wet, ceramic-like shine.
Step 4: Baking and Assembly
-
Bake the beads:
Arrange your beads on a baking sheet lined with parchment paper or cardstock. Bake according to the manufacturer’s instructions for your specific brand of clay (usually around 275°F/135°C for 15-30 minutes). -
Cool down:
Allow the beads to cool completely in the oven before handling. This annealing process makes the polymer clay stronger. -
Optional sanding:
For a super professional finish, wet-sand the cooled beads under water using 400 grit, then 600, then 1000 grit sandpaper to remove any fingerprints. -
Design the layout:
Lay out your marbled beads on a bead board or soft cloth. Determine where you want the focal point—perhaps the largest, most swirled bead in the center. -
Add metal accents:
Place silver spacer beads on either side of your central focal bead to make it pop, just like in the example image. -
String the beads:
Cut a length of stretch cord about 10-12 inches long. Pre-stretch the cord by pulling it firmly a few times to prevent sagging later. Thread your beads onto the cord. -
Knot and secure:
Tie a surgeon’s knot (right over left twice, then left over right). Pull tight, apply a tiny drop of jewelry glue to the knot, and trim the excess cord once dry.
Enjoy wearing your handcrafted ocean-inspired jewelry and watch how the unique swirls catch the light
Blue Tie-Dye Disc Beads
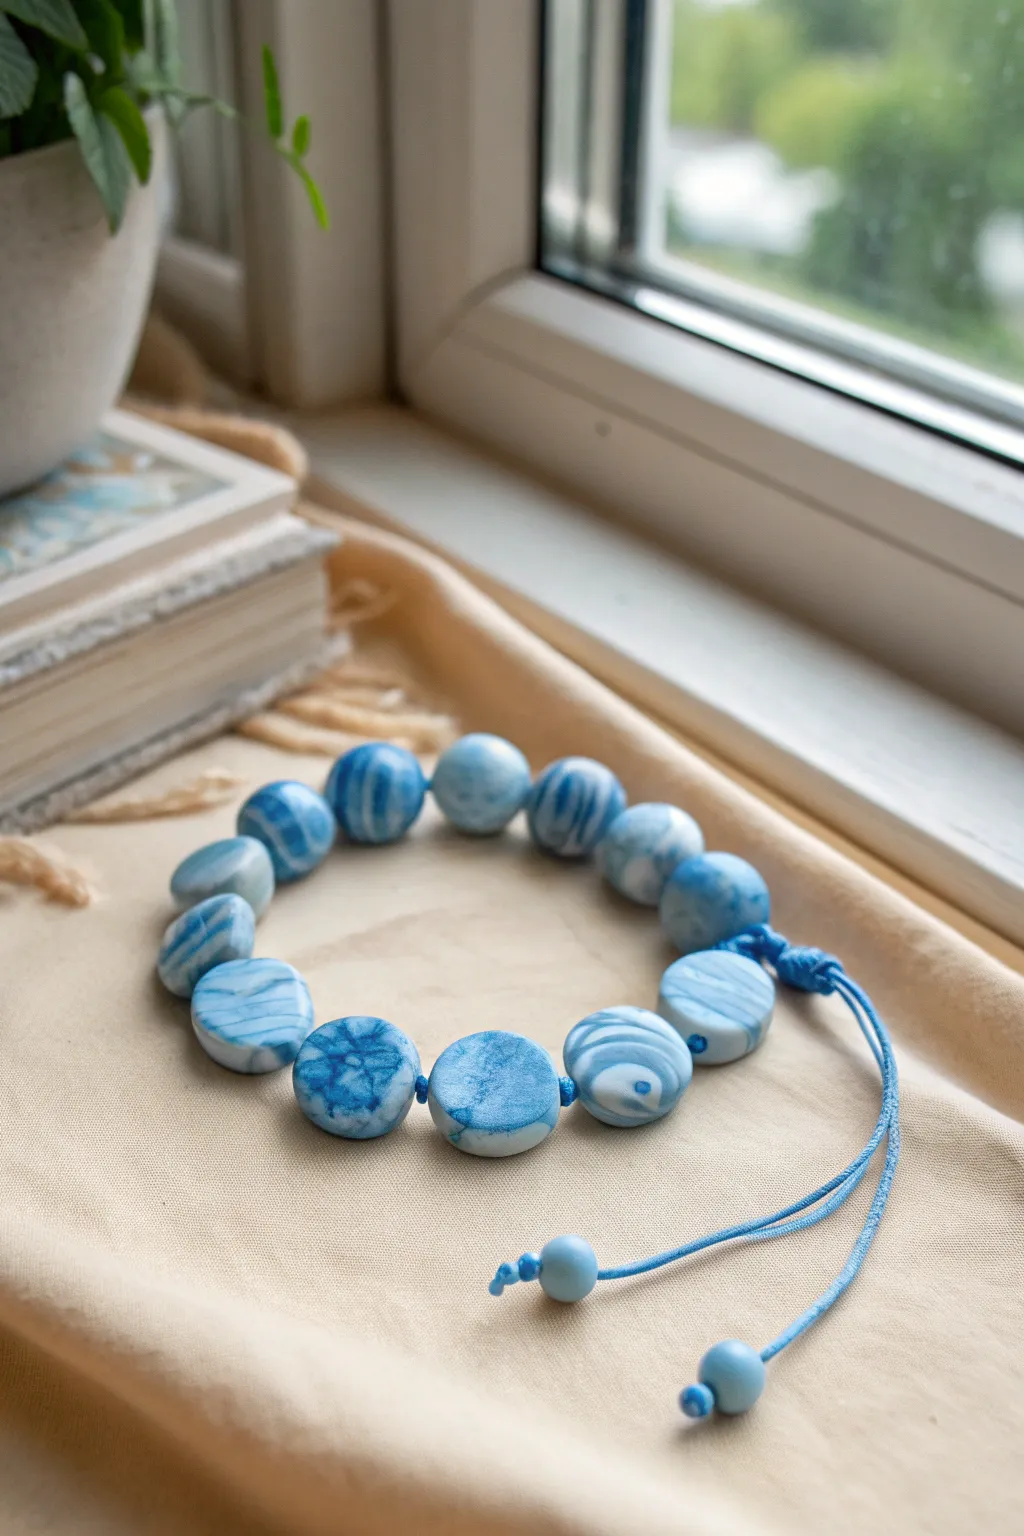
Capture the fluid beauty of ocean waves with these marbled blue and white clay beads. This project uses polymer clay to create unique, tie-dye inspired patterns on flat disc beads, finished with a casual knotted cord closure.
Step-by-Step Tutorial
Materials
- Polymer clay (White, different shades of blue)
- Blue waxed cotton or nylon cord (approx. 1mm thick)
- Acrylic roller or pasta machine
- Small round clay cutter (approx. 1.5 cm diameter)
- Toothpick or bead piercing tool
- Baking sheet and parchment paper
- Oven
- Scissors
- Lighter (if using nylon cord) or glue
Step 1: Creating the Marbled Cane
-
Condition the clay:
Begin by thoroughly kneading your white polymer clay and 2-3 shades of blue clay until they are soft and pliable. Warm clay mixes better and prevents cracking. -
Form logs:
Roll each color into a long, thin snake or log roughly the same length. You should have one white log and several blue logs of varying intensity. -
Twist together:
Bundle the logs together and twist them tightly like a candy cane. This action begins the marbling process. -
Fold and roll:
Fold the twisted log in half and roll it out again into a snake. I usually repeat this step 3-4 times, but be careful not to over-mix, or the colors will turn muddy instead of distinct swirls. -
Ball up the clay:
Once you are happy with the intricate lines of blue and white, roll the entire snake into a solid ball.
Too Mushy?
If your clay colors are blending into a single light blue color rather than distinct swirls, chill the clay in the fridge for 10 minutes before the final rolling and cutting.
Step 2: Shaping the Beads
-
Flatten the sheet:
Using your acrylic roller or pasta machine, flatten the marbled ball into a sheet about 4-5mm thick. You want these beads to have a nice, chunky visual weight. -
Cut the discs:
Press your round cutter into the clay sheet to punch out circles. Try to position the cutter over the most interesting swirl patterns. -
Smooth the edges:
Gently pick up each disc and run your finger along the cut edge to soften any sharpness or irregularities from the cutter. -
Pierce the holes:
Using a toothpick or piercing tool, poke a hole directly through the center of the disc’s flat side (side-to-side piercing) so the beads will lay flat against the wrist. Wiggle the tool slightly to ensure the hole is large enough for your cord.
Clean Cuts
To prevent fingerprints on your pristine white clay sections, wipe your hands and tools with a baby wipe or alcohol swab frequently during the shaping process.
Step 3: Baking and Assembly
-
Bake carefully:
Arrange the beads on a parchment-lined baking sheet. Bake according to your clay manufacturer’s instructions, typically around 275°F (135°C) for 15-30 minutes. -
Cool down:
Allow the beads to cool completely before handling. They harden optimally as they return to room temperature. -
Prepare the cord:
Cut a length of blue cord approximately 12 inches long. This will be the main strand for your bracelet. -
String the beads:
Thread your cooled beads onto the cord. Arrange them so the varied patterns balance each other nicely. -
Create the main knot:
Tie a simple overhand knot at each end of the beaded section to keep the beads centered, leaving long tails on both sides. -
Adjustable closure:
Overlap the two tail ends. Using a separate piece of cord (about 5 inches), tie a series of square knots (macramé style) around both fluctuating tails to create a sliding closure. -
Finish the ends:
Tie a small knot at the very end of each tail cord. Add a small leftover clay bead here if desired for a polished look. -
Trim excess:
Trim any excess cord from your knots. If using nylon, carefully singe the tips with a lighter to seal them; otherwise, use a dab of glue.
Enjoy wearing your new bracelet that looks like it was washed up from the sea
Midnight Galaxy Blues
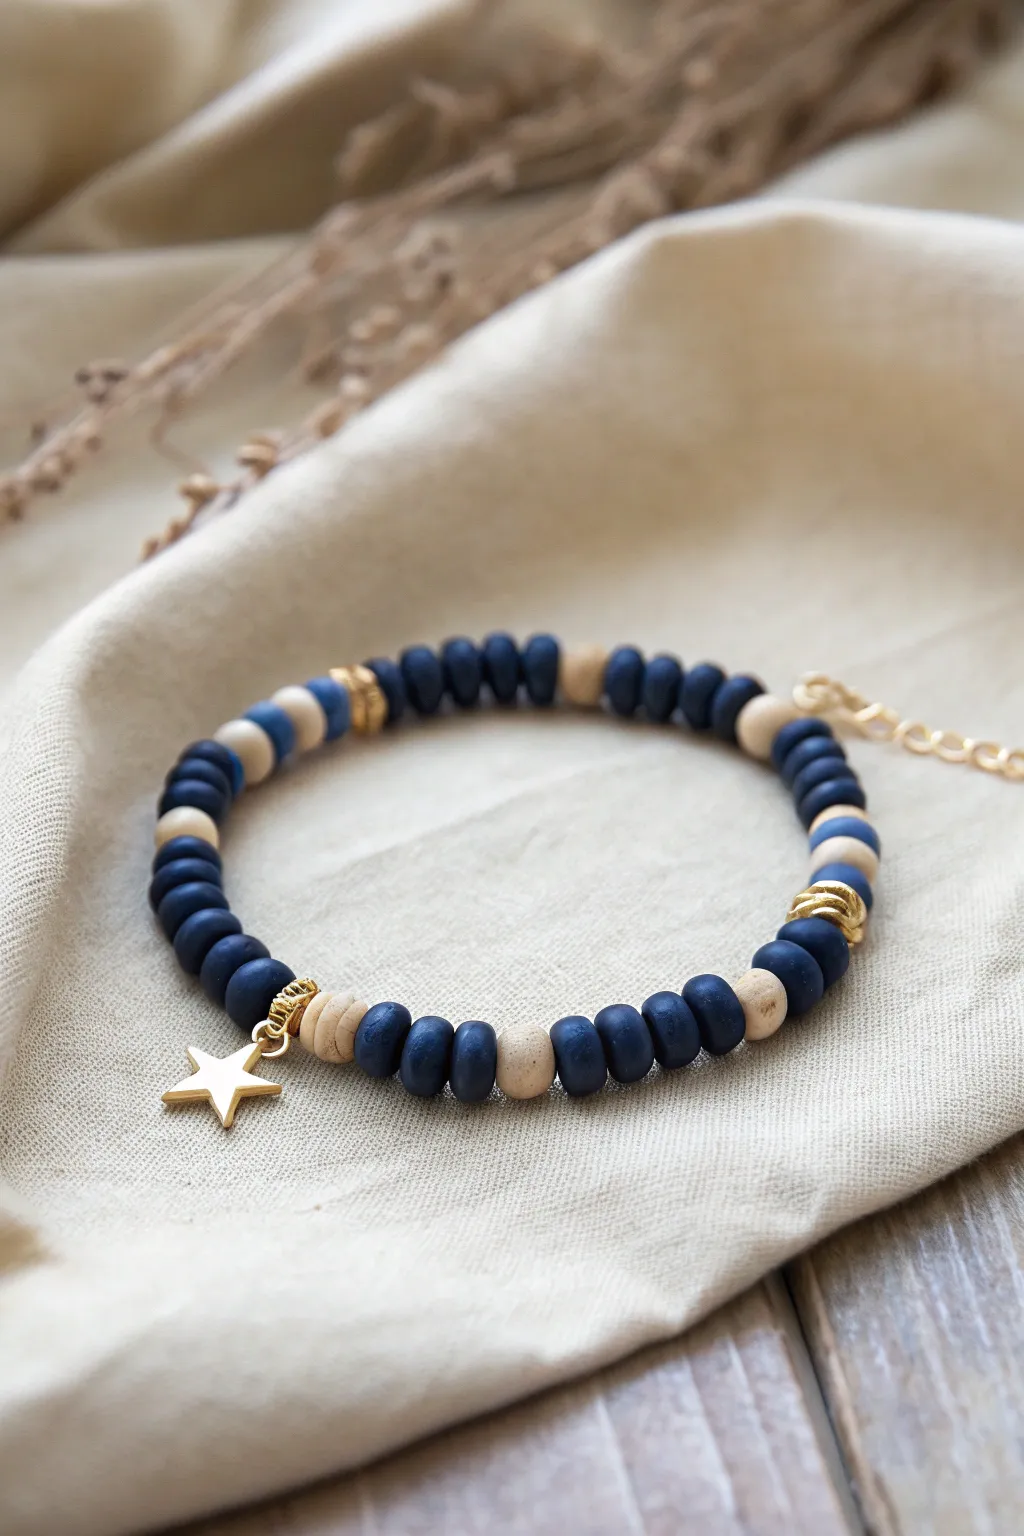
Capture the serene beauty of a clear night sky with this elegant bracelet featuring deep matte blue clay beads accented by natural wood tones and touches of gold. The star charm adds a celestial focal point, making it a dreamy accessory for everyday wear.
Step-by-Step
Materials
- Matte dark navy blue polymer clay heishi beads (approx. 6mm)
- Natural light wood rondelle beads (6-8mm)
- Gold star charm with jump ring
- Gold spacer beads or twisted rings (approx. 6-8mm)
- Gold crimp beads and covers
- Gold lobster clasp and extension chain
- Wire guardians (optional but recommended)
- Beading wire (0.38mm or 0.45mm)
- Jewelry pliers (chain nose, round nose)
- Crimping tool or flat nose pliers
- Wire cutters
- Bead design board or masking tape
Step 1: Planning the Pattern
-
Measure your wrist:
Before cutting any wire, wrap a measuring tape around your wrist to determine your size. Add about 1/2 to 1 inch to this measurement comfortably to allow for the bulk of the beads. -
Prepare the wire:
Cut a piece of beading wire approximately 10-12 inches long. This extra length gives you plenty of room to work with the clasp ends without frustration. -
Secure one end:
Place a piece of masking tape or a bead stopper on one end of your wire so your beads don’t slide off while you design. -
Lay out your design:
Using a bead board or a soft cloth, lay out your beads to visualize the pattern. For this look, focus on long sections of the dark blue clay beads separated by singular wood beads or gold accents.
Step 2: Stringing the Beads
-
Start the sequence:
Begin stringing with a small section of blue heishi beads. I like to start with about 5-6 blue beads to cover the wire near the clasp area nicely. -
Add a gold accent:
Slide on one of your textured gold spacer rings followed by a natural wood bead. -
Create the main pattern:
String a longer section of blue beads—about 8 to 10 disks—followed by a single wood bead. Repeat this ‘block’ pattern as you move toward the center of the bracelet. -
Prepare the center focal point:
When you reach the approximate middle of your bracelet strand, string a single gold twisted spacer ring. This will anchor your charm. -
Attach the star charm:
Carefully open the jump ring attached to your star charm using two pairs of pliers. Hook it onto the gold spacer ring you just added, then close the jump ring securely so the star hangs freely. -
Mirror the design:
Continue stringing the second half of the bracelet, mirroring exactly what you did on the first side. If you had a wood bead before the center, place one after the center spacer, followed by the long blue section. -
Check the fit:
Wrap the unfinished strand around your wrist to check the length. Remember that the clasp components will add about half an inch to the final length, so adjust by adding or removing a few blue beads at the ends if needed.
Stiffness Fix
If the bracelet feels stiff or won’t drape naturally, you likely crimped it too tightly. Remake it, leaving a tiny 1-2mm gap of exposed wire before the final crimp to allow flexibility.
Step 3: Finishing Touches
-
Prepare the first crimp:
Remove the tape from the starting end. Slide on a crimp bead, followed by a wire guardian. Thread the wire through the loop of the lobster clasp, back through the guardian, and down through the crimp bead. -
Secure the start:
Pull the wire snug (but not too tight) and use your crimping tool to flatten or fold the crimp bead securely. Trim the excess short tail of wire. -
Cover the crimp:
Place a crimp cover over the now-flattened crimp bead. Gently squeeze it closed with pliers until it looks like a round gold bead. -
Prepare the second crimp:
On the other end of the bracelet, slide on a crimp bead and a wire guardian. Thread the wire through the first link of your extension chain. -
Loop back:
Pass the wire back through the guardian and down into the crimp bead. Slide the crimp bead snugly against the last beads, but leave a tiny bit of wiggle room so the bracelet stays flexible. -
Secure and trim:
Crimp the bead firmly to lock everything in place. Trim the excess wire tail as close as possible without cutting your main wire. -
Final cover:
Apply the last crimp cover over the second crimp bead, rounding it gently with your pliers for a professional finish.
Pro Tip: Matte Magic
To maintain that velvety matte finish on the clay beads, avoid getting lotions or oils on them, which can turn them shiny over time. Gently wipe with a dry cloth to clean.
Now you have a stunning midnight blue accessory ready to stack or wear solo.
Delft-Inspired Blue Florals
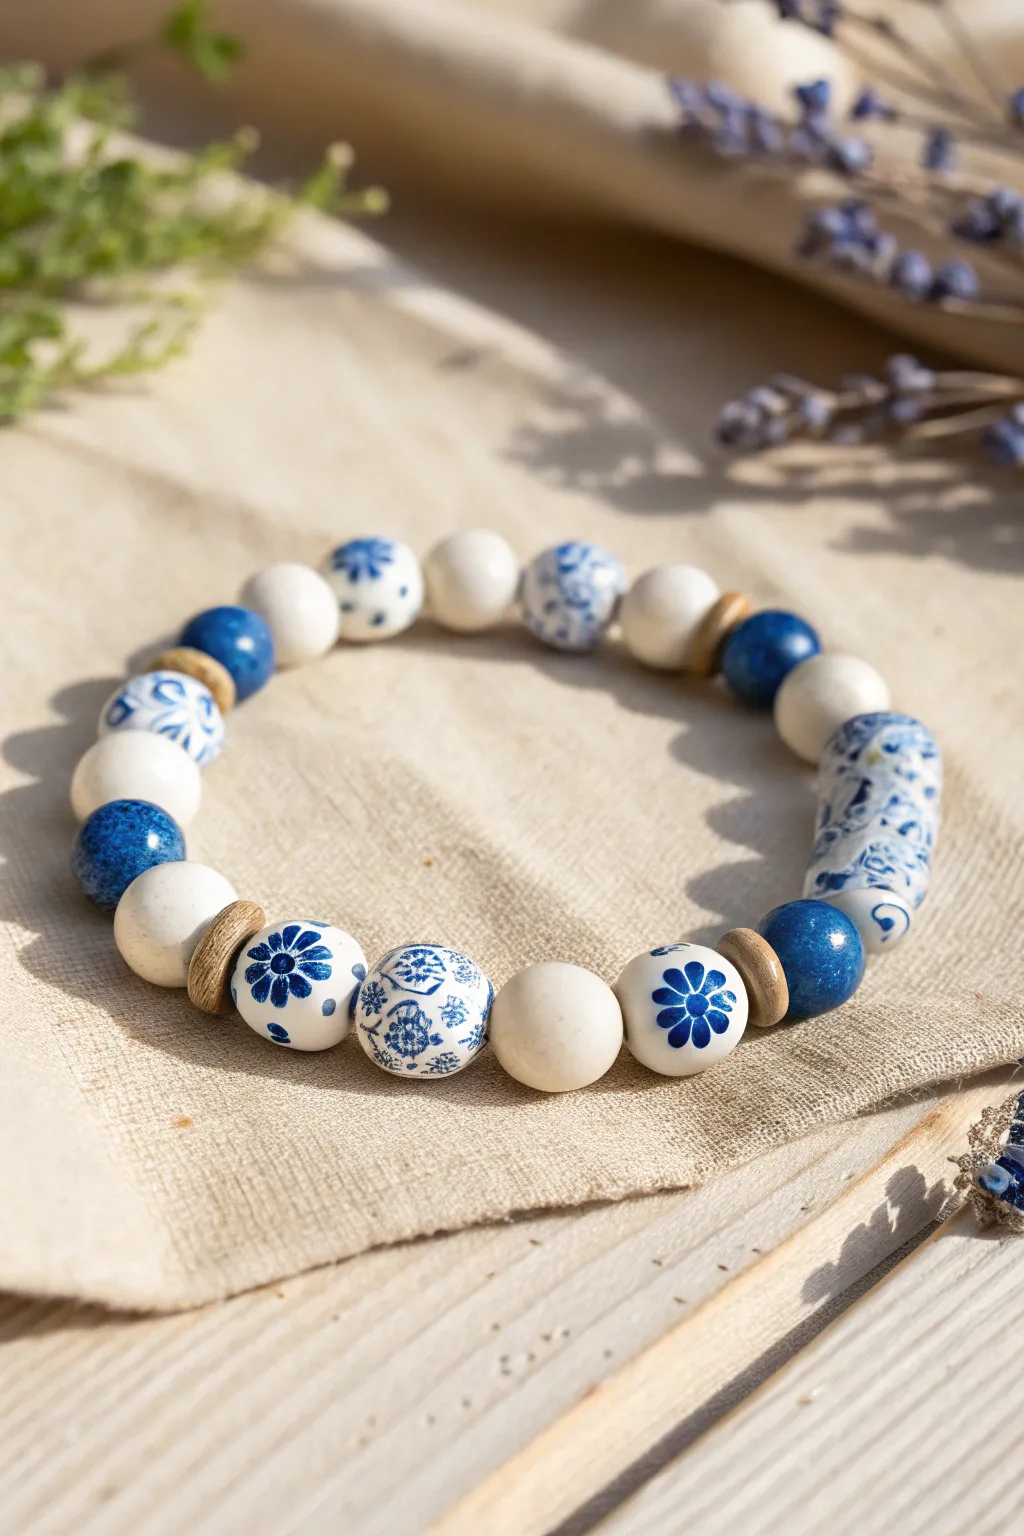
Capture the classic elegance of Delftware pottery with this stunning blue and white clay bead bracelet. Combining solid colors, intricate hand-painted floral motifs, and rustic wooden accents, this piece feels both timeless and perfectly handmade.
Step-by-Step Tutorial
Materials
- White polymer clay
- Translucent liquid polymer clay (optional but recommended)
- Acrylic paint (Cobalt Blue, Ultramarine Blue)
- Fine detail paintbrush (00 or 000 size)
- Bead roller or acrylic block
- Wooden spacers or raw wood beads (small)
- Thick elastic jewelry cord (0.8mm or 1mm)
- Jewelry glue (E6000 or similar)
- Gloss glaze or polyurethane varnish
- Toothpicks or beading pins for baking
- Sandpaper (wet/dry, 400-800 grit)
Step 1: Shaping the Base Beads
-
Condition the Clay:
Begin by conditioning your white polymer clay until it is soft and pliable. This prevents cracking later and ensures a smooth surface for painting. -
Portion the Clay:
Cut the clay into uniform chunks. For this design, you will need approximately 14-16 standard round beads (roughly 10-12mm diameter) and one longer, cylindrical focal bead. -
Roll the Spheres:
Roll each chunk into a smooth ball. I prefer using an acrylic block or a dedicated bead roller to get them perfectly spherical, but rolling between your palms works well too if you are gentle. -
Form the Cylinder:
For the focal bead, take two portions of clay and roll them together into a log shape about 1 inch long. Tap the ends on your work surface to flatten them slightly. -
Pierce the Holes:
Use a toothpick or bead pin to pierce a hole through the center of every bead. Twist the pin as you push to avoid distorting the bead’s shape.
Pro Tip: Faux Ceramic Texture
Mix a tiny pinch of white embossing powder into your gloss glaze before applying. It creates subtle speckles that mimic real kiln-fired pottery.
Step 2: Painting the Delft Designs
-
Pre-Bake (Optional):
You can paint on raw clay, but baking the white beads first creates a hard canvas that is easier to handle. Bake according to package directions and let cool completely. -
Prepare Your Palette:
Squeeze out a small amount of Cobalt Blue acrylic paint. You want a consistent, opaque blue that mimics traditional ceramic glazes. -
Paint Solid Accent Beads:
Select 3-4 beads to be solid blue. Depending on the desired texture, you can either paint them solid cobalt or sponge the paint on for a ‘mottled’ ceramic look. -
Create the Floral Pattern:
On 4-5 other beads, use your finest brush to paint simple five-petal flowers. Start with a center dot, then pull small teardrop shapes outward. Keep the design simple; the charm is in the hand-painted imperfection. -
Detail the Cylinder:
For the long cylindrical bead, paint a dense pattern of vines and florals. It acts as the anchor of the piece, so don’t be afraid to fill the white space with swirling blue leaves. -
Add Swirl Accents:
On the remaining round beads, paint swirled organic shapes or abstract vine patterns to tie the solid beads and floral beads together. -
Seal the Design:
Once the paint is completely dry, apply a coat of gloss glaze. This is crucial for achieving that shiny, porcelain-like finish of Delftware. -
Final Bake (If needed):
If you painted on raw clay, bake the beads now according to manufacturer instructions. If you pre-baked, let the glaze cure fully.
Level Up: Mix & Match
Carve grooves into the solid blue beads before baking to expose the white clay underneath, creating a ‘sgraffito’ pottery effect.
Step 3: Assembly
-
Layout the Design:
Arrange your beads on a bead board or towel. Alternate between the white, solid blue, and patterned beads to create a balanced rhythm. -
Insert Wooden Spacers:
Place the small wooden spacers strategically between the larger clay beads. These warm tones break up the cool blues and add a natural texture. -
String the Beads:
Cut a length of elastic cord about 10 inches long. Pre-stretch the cord by pulling it firmly a few times to prevent sagging later. -
Thread the Pattern:
String your arranged beads onto the elastic. I like to place the large cylindrical focal bead in the center opposite the knot for balance. -
Tie the Knot:
Tie a surgeon’s knot (right over left, left over right, pulled tight). Add a tiny dot of jewelry glue to the knot for extra security. -
Hide the Knot:
Once the glue is tacky but not fully hard, pull the knot inside the hole of the nearest large bead to hide it.
Slip on your beautiful new bracelet and enjoy the compliments on your hand-painted pottery art.
Blue Mosaic Tile Statement
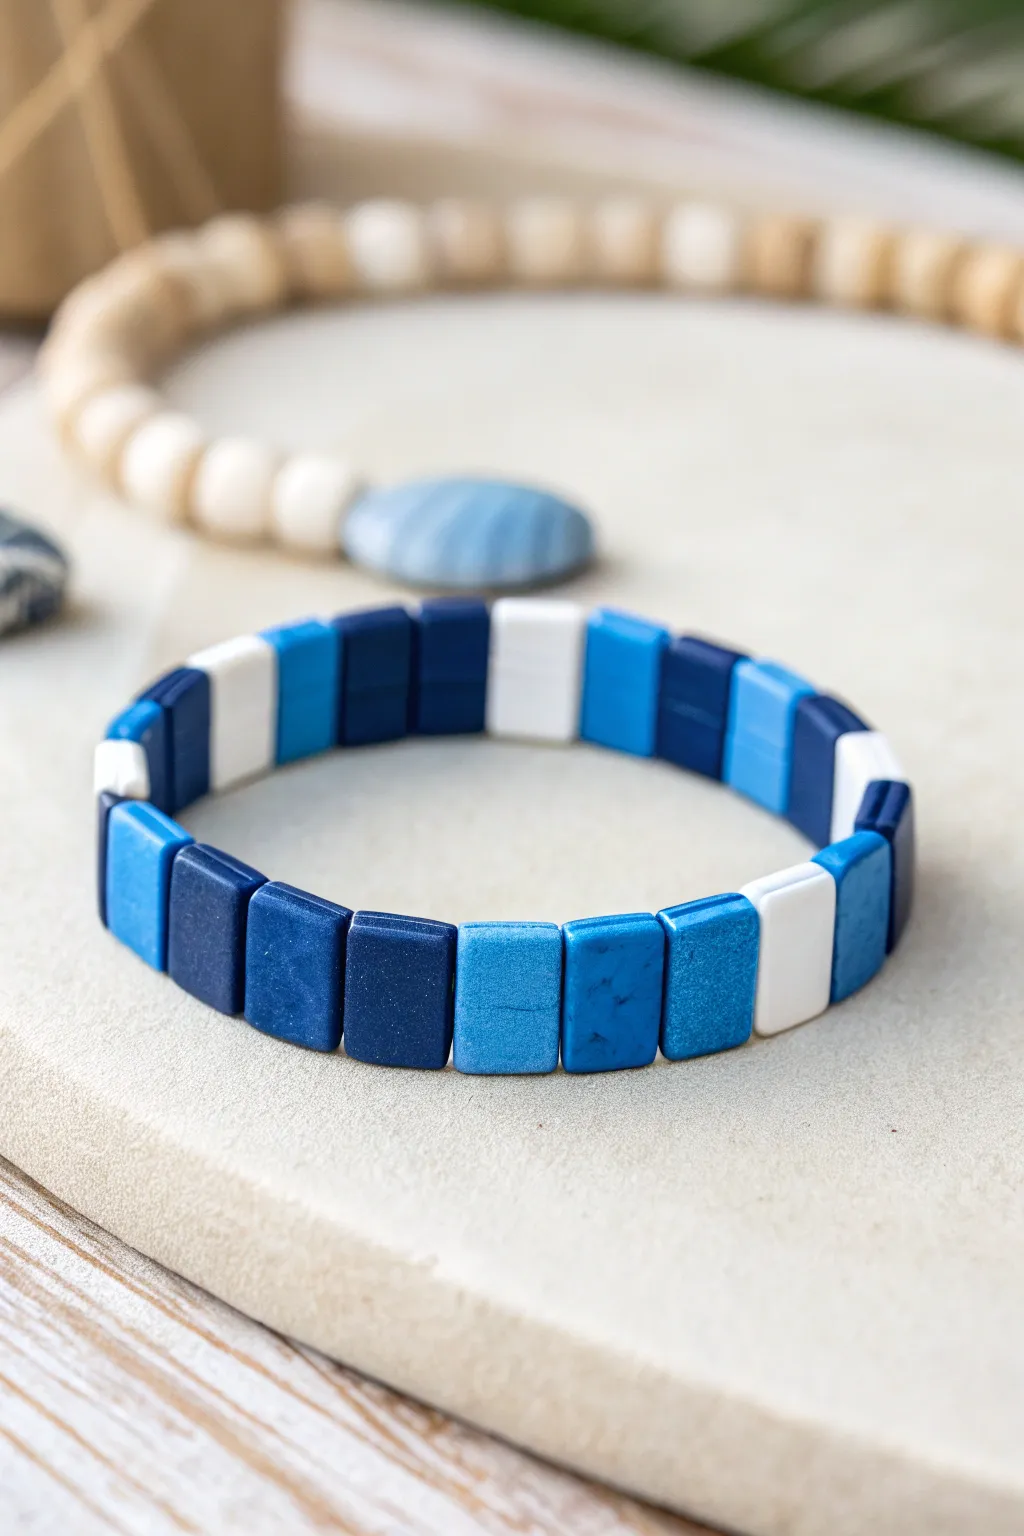
Capture the essence of the ocean with this sleek, mosaic-style bracelet featuring rectangular tile beads in varying shades of blue. The flat, uniform shape of these beads creates a sophisticated, continuous band that looks polished and modern on the wrist.
Detailed Instructions
Materials
- Rectangle two-hole tile beads (approx. 5mm x 5mm or 5mm x 2mm depending on brand, often called Tila or similar)
- Colors: Dark navy blue (matte), medium royal blue, light aqua/mottled blue, and opaque white
- 0.5mm or 0.8mm clear elastic stretch cord (strong quality)
- Jewelry adhesive (e.g., E6000 or GS Hypo Cement)
- Scissors
Step 1: Setting Up Your Workspace
-
Sort your beads:
Begin by separating your tile beads by color piles: dark navy, royal blue, light aqua, and white. This makes the patterning process much smoother. -
Check for obstructions:
Quickly inspect the holes of your beads before stringing. Sometimes coating or clay residue can block them, and it’s frustrating to find this out mid-stringing. -
Prepare the cord:
Cut two lengths of elastic cord, each about 10-12 inches long. Since tile beads usually have two parallel holes, you will be stringing two parallel lines simultaneously.
Knot Security
When tying off parallel elastic cords, tie the top strands together and the bottom strands together separately. Don’t cross-tie top to bottom or the bracelet will twist.
Step 2: Establishing the Pattern
-
Start the first segment:
Hold your two cords parallel. Thread a white bead onto them, passing one cord through the top hole and the other through the bottom hole. -
Add the blues:
Follow the white bead with a sequence of blue shades. Thread on a dark navy bead, then a royal blue bead. -
Create the gradient:
Continue the pattern by adding a light aqua or mottled blue bead next. This creates a ombre-like transition. -
Repeat the block:
To match the reference image, create a block of color. Add another light aqua, then go back to royal blue, then dark navy. -
Insert the spacer:
After your block of blues is complete, add a single white bead to act as a crisp ‘spacer’ between your color sections.
Level Up: Texture Mix
Mix finishes for visual depth! Use matte beads for the dark navy sections and glossy or pearlescent beads for the light blue and white sections to catch the light.
Step 3: Building the Bracelet
-
Check the fit:
Continue repeating this pattern—dark, medium, light, medium, dark, white—until the strand is long enough to wrap comfortably around your wrist. -
Monitor tension:
Ensure the beads are sitting flat against each other. I find that giving the cord a gentle tug every few inches helps keep the tiles aligned without buckling. -
Make final adjustments:
Before tying off, wrap it around your wrist one last time. The tiles shouldn’t pinch your skin, but there shouldn’t be large gaps between them either.
Step 4: Finishing Touches
-
Pre-stretch the cord:
gently pull firmly on the ends of the elastic. This ‘pre-stretching’ prevents the bracelet from sagging immediately after you wear it. -
Tie the first knot:
Tie the top two cord ends together using a simple overhand knot. Do not pull it fully tight yet. -
Tie the second knot:
Repeat the process with the bottom two cord ends. Now, tighten both knots gradually, ensuring the last and first beads meet flush. -
Secure with a surgeon’s knot:
For extra security, tie a surgeon’s knot (looping the line through twice before pulling tight) on both the top and bottom strands. -
Apply adhesive:
Dab a tiny amount of jewelry glue onto the knots to seal them permanently. Let this dry for at least 15 minutes. -
Hide the knots:
Once dried, trim the excess tail of the cord. If the holes are large enough, gently tug the bracelet to slide the knot inside the adjacent bead to hide it.
Slip on your new bracelet and enjoy the cool, calming tones of your handmade accessory