I keep coming back to purple clay beads because they can look soft and dreamy or bold and moody just by shifting the shades. Here are my go-to purple clay bead ideas for easy, good-looking heishi-style bracelets you’ll actually want to wear on repeat.
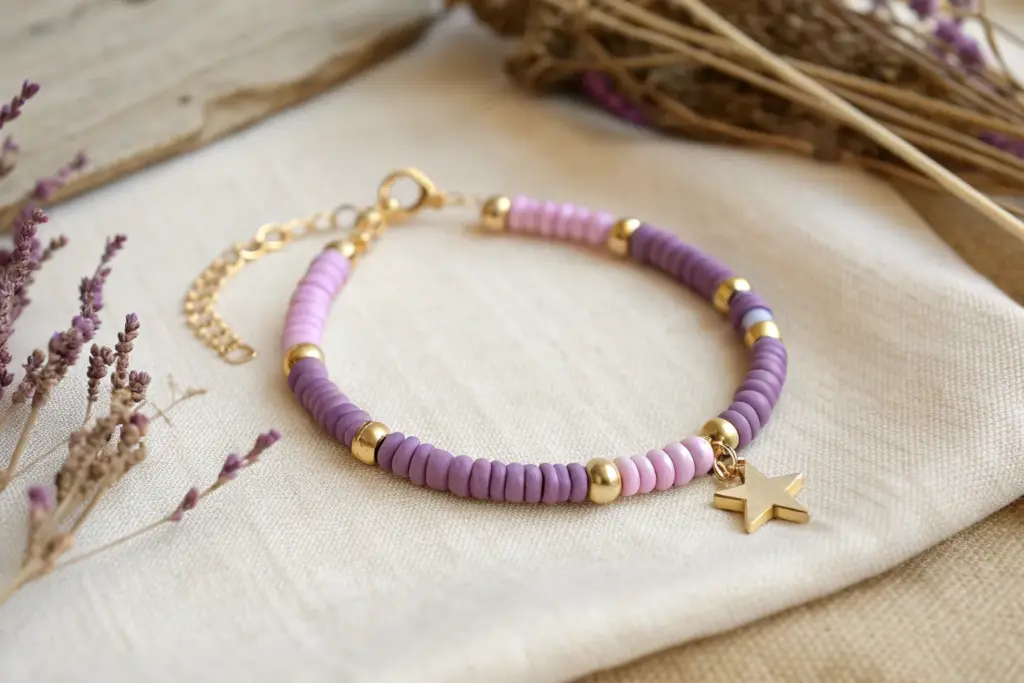
Classic Purple Ombre Heishi Bracelet

This elegant stack focuses on a statement piece featuring flat clay heishi beads in a stunning ombre gradient. Ranging from deep royal purple to soft lilac, accented with sparkling textured gold spacers, this bracelet brings a sophisticated pop of color to any wrist.
Step-by-Step
Materials
- Polymer clay heishi beads (6mm or 8mm) in 4 distinct shades: Dark Plum/Purple
- Medium Purple heishi beads
- Lilac/Lavender heishi beads
- Pale Pink-Lavender/White heishi beads
- Gold-plated textured spacer beads (drum or rondelle shape)
- Strong elastic cord (0.8mm or 1mm recommended)
- Jewelry glue or clear nail polish
- Scissors
Step 1: Planning and Sorting
-
Measure your wrist:
Before cutting any string, wrap a piece of string or a soft measuring tape around your wrist to determine the desired length. Add about half an inch for a comfortable fit. -
Cut the elastic:
Cut a piece of elastic cord about 10-12 inches long. Having this extra length makes tying the final knots much easier than struggling with short ends. -
Pre-stretch the cord:
Take your cut piece of elastic and give it a few firm tugs. This pre-stretching prevents the bracelet from sagging or loosening immediately after you wear it. -
Arrange your palette:
Lay out your beads on a bead board or a soft towel. Organize them by shade: Dark Plum, Medium Purple, Lilac, and Pale Pink. This visual guide will help keep your pattern consistent. -
Secure the end:
Tape one end of your elastic cord to your table or attach a bead stopper/binder clip. This simple step saves you the heartbreak of beads sliding right off the other side.
Keep It Uniform
Count your beads exactly for the mirror image sections. Having 10 lilac beads on one side and 14 on the other will make the bracelet look lopsided.
Step 2: Creating the Ombre Pattern
-
Start with the darkest shade:
Begin threading the Dark Plum heishi beads first. Add roughly 15-20 beads to establish a solid base section of the deepest color. -
Transition to medium purple:
Now, switch to the Medium Purple beads. Thread on approximately 10-12 beads. You want enough to see the distinct color shift, but slightly fewer than the base section. -
Add the first gold accent:
Slide on one of your textured gold spacer beads. This metallic break serves as a visual marker between color transitions. -
Thread the lilac section:
Add your Lilac/Lavender beads next. Thread about 8-10 of these lighter beads. As the colors get lighter, I shorten the sections slightly to create a tapering effect. -
Insert the lightest shade:
Thread 3-5 of the Pale Pink-Lavender beads. This is the highlight of your ombre gradient and sits right in the center of the transition. -
Add the second gold accent:
Place your second textured gold spacer bead immediately after the pale section to frame the lightest color. -
Reverse the gradient:
Now, mirror your work backwards. Add the Lilac section (8-10 beads), followed by the Medium Purple section (10-12 beads). -
Finish with dark base:
Switch back to your Dark Plum beads and continue threading until the bracelet reaches your desired length. The two dark ends will meet at the knot, creating a seamless loop.
Add a Focal Point
For a personalized touch, replace the 3-5 pale center beads with a single gold letter bead to display an initial, or a small freshwater pearl for texture.
Step 3: Finishing Touches
-
Check the fit:
Carefully wrap the un-knotted strand around your wrist. Ensure there are no gaps between beads but that the bracelet isn’t too stiff to curve naturally. -
Tie the surgeon’s knot:
Remove the tape or clip. Cross the right end over the left, loop it under, and pull tight. Then, cross left over right, loop it under twice, and pull tight again to secure. -
Apply adhesive:
Dab a tiny drop of jewelry glue or clear nail polish directly onto the knot. This ensures the elastic won’t slip over time. -
Hide the knot:
While the glue is still tacky, gently slide the nearest Dark Plum bead over the knot to hide it inside. Let the glue dry completely before trimming excess string close to the bead.
Now you have a stunning gradient accessory ready to stack or wear solo.


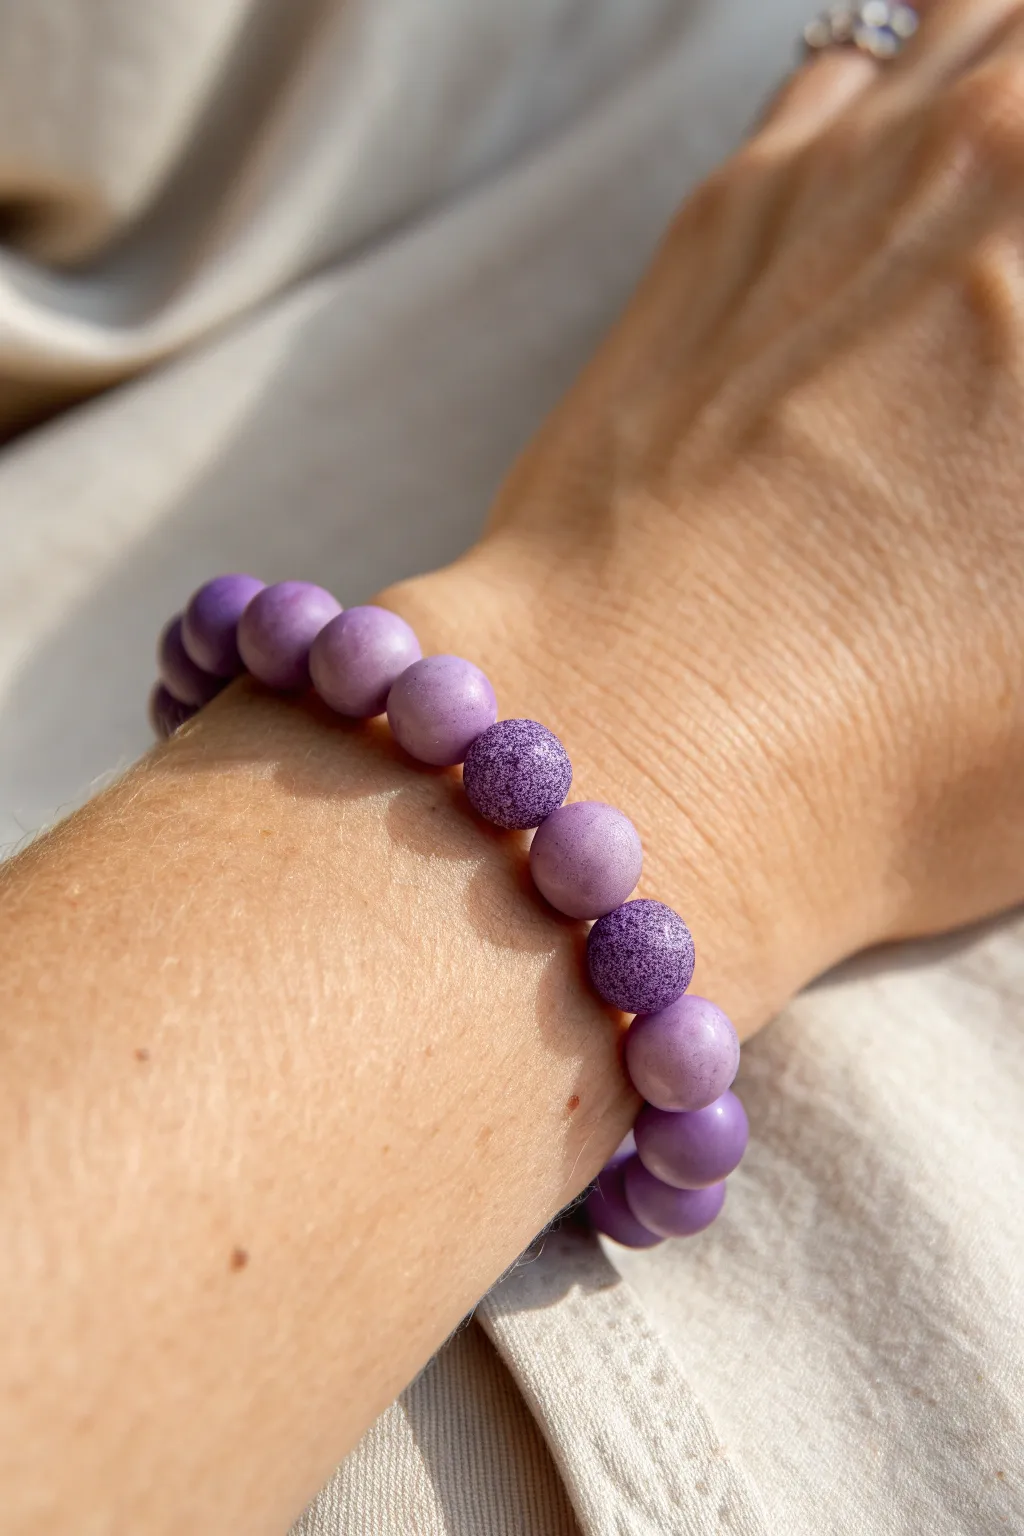
Monochrome Purple Stack With Mixed Shades
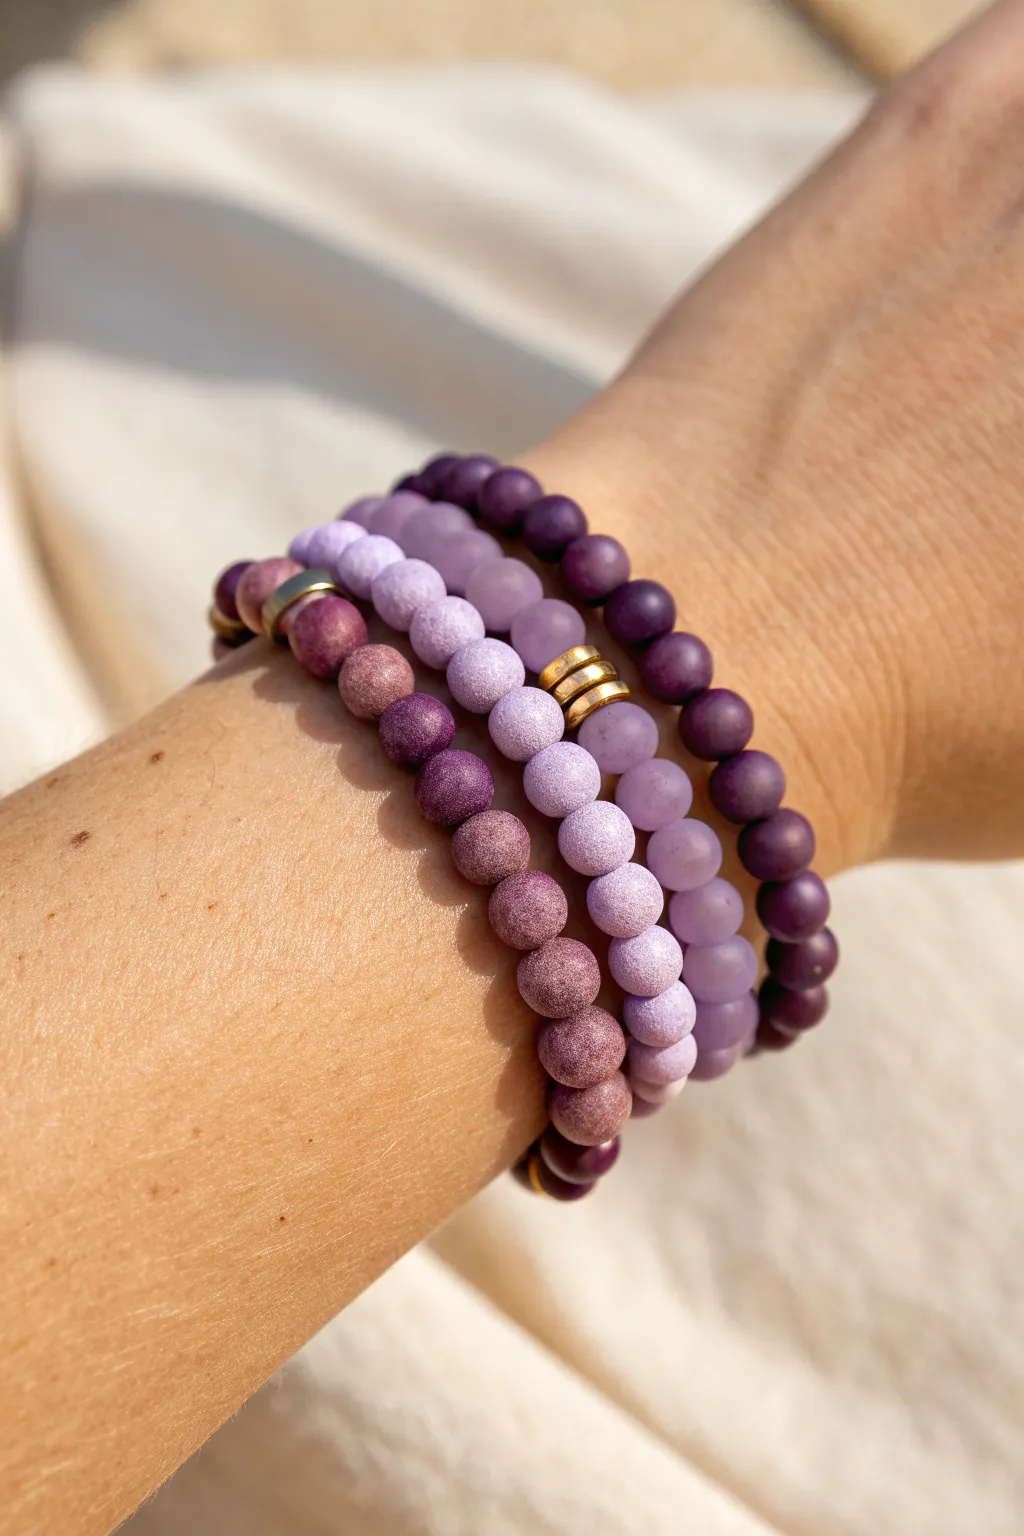
Embrace the soothing spectrum of purple with this elegant four-piece bracelet stack. By mixing matte textures, deep plums, and soft lilacs with touches of gold, you create a sophisticated monochrome look that feels both earthy and luxurious.
Step-by-Step Tutorial
Materials
- Matte violet clay or stone beads (8mm)
- Deep plum purple round beads (8mm)
- Speckled lavender/mauve clay beads (8mm)
- Light lilac frosted beads (6-8mm)
- Gold disc spacer beads (heishi style)
- Elastic stretch cord (0.8mm or 1mm)
- Jewelry glue or clear nail polish
- Scissors
- Beading needle (optional but helpful)
- Bead stopper or tape
Step 1: Preparation & Sizing
-
Measure your wrist:
Wrap a piece of string around your wrist to find your comfortable size, then add about half an inch to that measurement. -
Cut the cord:
Cut four pieces of elastic cord, making sure each is at least 3-4 inches longer than your target wrist size to allow ample room for tying knots. -
Pre-stretch the elastic:
Hold each end of the cut cord and give it several firm tugs. Pre-stretching prevents the bracelets from sagging or loosening after you’ve worn them a few times. -
Secure the ends:
Place a bead stopper or a piece of tape on one end of each cord so your beads don’t slide off while you work.
Step 2: Deep Plum Strand
-
Select the darkest beads:
Gather your deep plum purple beads. This bracelet acts as the dark anchor for the lighter shades in the stack. -
String the beads:
Thread the plum beads onto the first cord until you reach your desired length. -
Optional spacing:
If you want to break up the color, you can add a single gold spacer bead near the knot, but the reference image keeps this strand solid and simple.
Knot Security Tip
When tightening your final knot, pull on the elastic strand itself, not just the tails. This ensures the tension is locked between the beads for a snug fit.
Step 3: Matte Mauve & Gold Accent Strand
-
Start the mixed strand:
Using the speckled mauve or brownish-purple matte beads, begin stringing about half of the bracelet length. -
Add the focal point:
String on three gold disc spacer beads. These flat metal beads add a touch of shine and separate the textures beautifully. -
Finish the strand:
Continue adding the speckled mauve beads until the strand matches the length of your first bracelet.
Texture Play
Enhance the stack primarily by varying finishes. Mix high-gloss glass beads with porous lava stone or matte clay to create visual depth without changing colors.
Step 4: Translucent Lilac Strand
-
Choose the lightest beads:
Take your light lilac, slightly translucent or frosted beads. These add a dreamy, airy quality to the heavy matte textures. -
Create the pattern:
These can be strung solidly, or you can check the reference to see they are nestled between the darker strands. String them simply without spacers for a clean look. -
Check consistency:
Hold this strand up against the first two to ensure the length is consistent before tying off.
Step 5: Medium Violet Matte Strand
-
Select the mid-tone:
This final bracelet uses the medium violet matte beads, bridging the gap between the dark plum and the light lilac. -
String the beads:
String the beads onto your final cord. I like to double-check the fit on my wrist periodically to ensure the stack sits comfortably together.
Step 6: Finishing the Stack
-
Tie the surgeon’s knot:
For each bracelet, remove the tape and cross the ends. Tie a standard overhand knot, then tie a second knot, looping the cord through the loop twice before pulling tight. -
Secure with glue:
Place a tiny drop of jewelry glue or clear nail polish directly onto the knot. This is crucial for longevity. -
Hide the knot:
If hole size permits, gently tug the elastic so the glued knot slides inside the nearest bead to hide it. -
Trim excess cord:
Once the glue is fully dry (wait at least 15 minutes), trim the excess elastic tails close to the bead, being careful not to cut the main cord.
Slip on your new monochromatic stack and enjoy the cohesive yet varied look on your wrist


Purple and Gold Spacer Rhythm
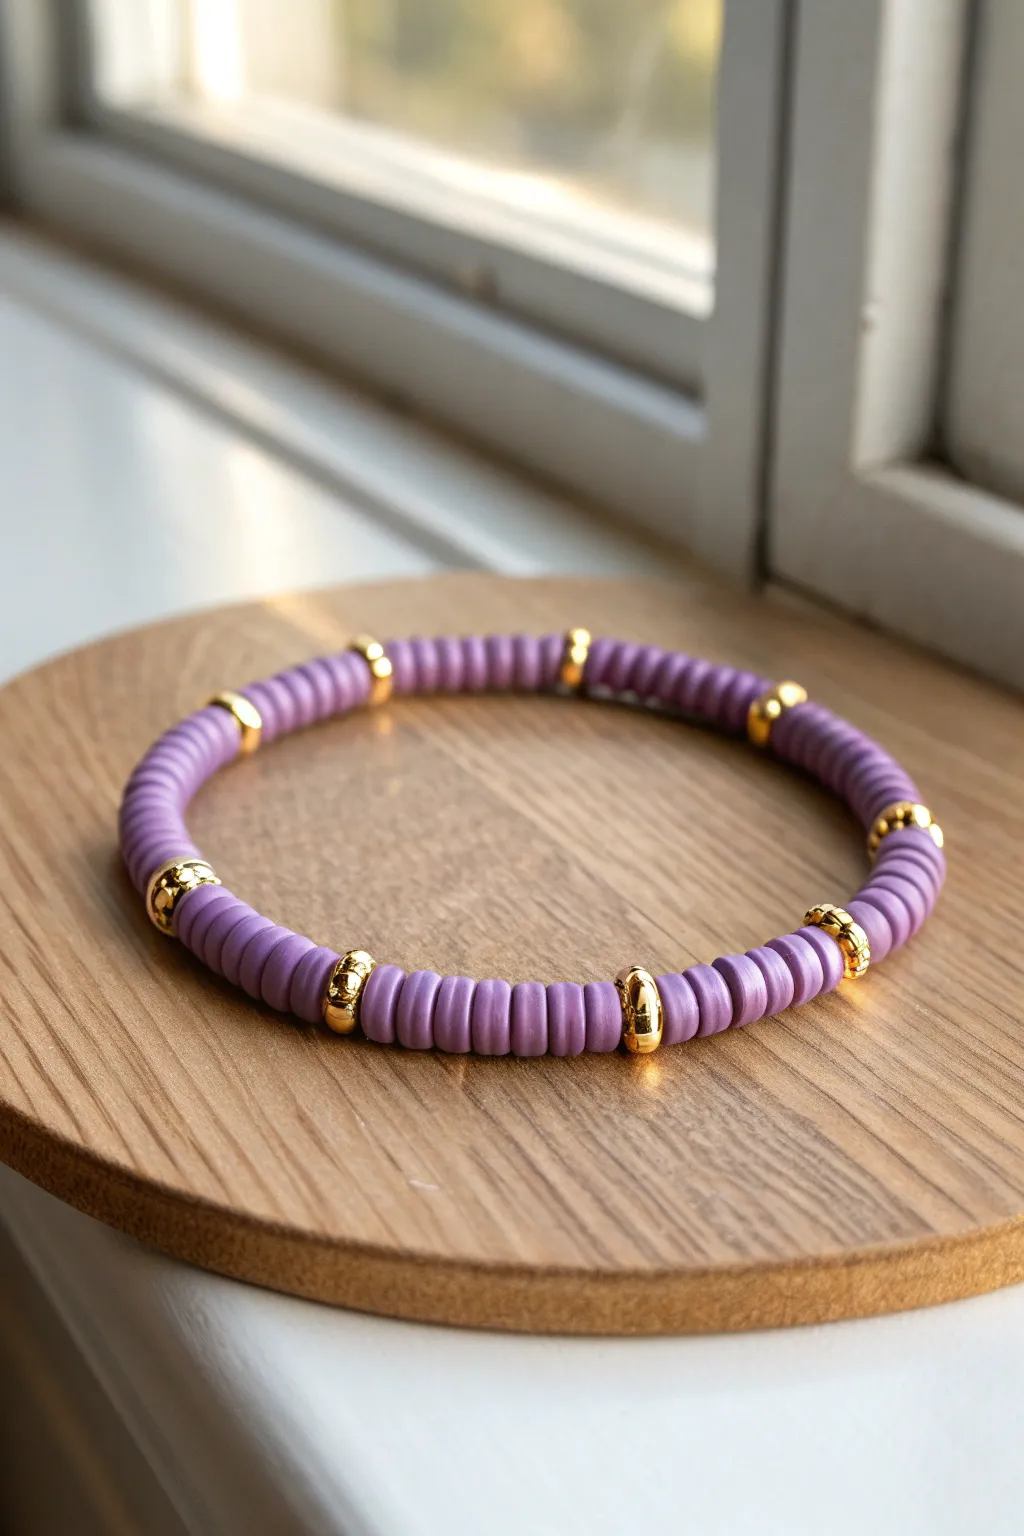
This elegant bracelet balances the matte texture of purple polymer clay discs with the brilliant shine of gold accents. The rhythmic spacing creates a sophisticated look that feels custom-made but is wonderfully simple to assemble.
Detailed Instructions
Materials
- Purple flat polymer clay beads (Heishi beads, approx. 6mm)
- Gold tone rondelle spacer beads (approx. 6mm)
- Elastic jewelers cord (0.8mm clear)
- Super glue or jewelry cement
- Scissors
- Bead stopper or binder clip
- Tape measure
Step 1: Preparation and Design
-
Measure your wrist:
Before cutting any string, wrap a measuring tape comfortably around your wrist. Note this measurement and add about 2-3 inches to give yourself plenty of room for tying the knots later. -
Cut the cord:
Snip your elastic cord to length. I always prefer to cut a little extra than to struggle with short ends at the finish line. -
Secure the end:
Attach a bead stopper or a simple binder clip to one end of the cord. This crucial step prevents your beads from sliding right off onto the floor as you work. -
Pre-stretch the elastic:
Gently give the elastic cord a few pulls. Pre-stretching helps prevent the bracelet from sagging or becoming loose after you wear it a few times.
Step 2: Stringing the Pattern
-
Start with purple:
Begin by threading the purple clay discs onto the cord. For the specific rhythm shown in the photo, you will want a substantial block of color, so string about 12 to 15 purple beads. -
Add the first gold accent:
Slide on one gold rondelle spacer bead. Ensure the gold bead sits flush against the clay stack; these spacers usually have a larger hole, so they nestle nicely. -
Repeat the purple block:
Add your next set of purple clay beads. Count them carefully to match your first block exactly, maintaining that consistent 12-15 bead count for visual symmetry. -
Continue the pattern:
Slide on another gold spacer, followed by another block of purple. Continue alternating these sections until the strand reaches your desired length. -
Check the fit:
Wrap the unfinished strand around your wrist to check the sizing. The ends should touch comfortably without stretching the elastic too much. -
Adjust the final block:
If the size is slightly off, add or remove a few purple beads from the very last or first section so the pattern looks seamless when connected.
Fixing Gaps
If you see gaps between beads after tying, you didn’t pull the elastic tight enough during the first knot. You want the elastic stretched slightly when knotting.
Step 3: Finishing Touches
-
Prepare for the knot:
Remove the bead stopper or clip while carefully holding both ends of the elastic cord tight to keep the tension on the beads. -
Tie the first knot:
Cross the ends and tie a simple overhand knot. Pull it tight, allowing the elastic to stretch slightly as you snug the beads together. -
Tie a surgeon’s knot:
For extra security, tie a surgeon’s knot. Cross the lines again, loop one end through twice instead of once, and pull firmly. -
Apply adhesive:
Dab a tiny drop of super glue or jewelry cement directly onto the knot. This prevents the slick elastic from slowly untying itself over time. -
Hide the knot:
While the glue is still slightly tacky but set, gently pull the elastic so the knot slides inside the hole of the nearest gold spacer bead if possible. -
Trim the excess:
Once the glue is fully dry, use your scissors to trim the excess cord tails as close to the knot as possible without snipping the knot itself.
Mix It Up
Try using two gold spacers side-by-side for a bolder metallic look, or vary the purple sections (e.g., 5 beads, then 10) for an asymmetrical pattern.
Now you have a stylish stackable bracelet ready to wear or gift to a friend


Purple and White Pop Pattern
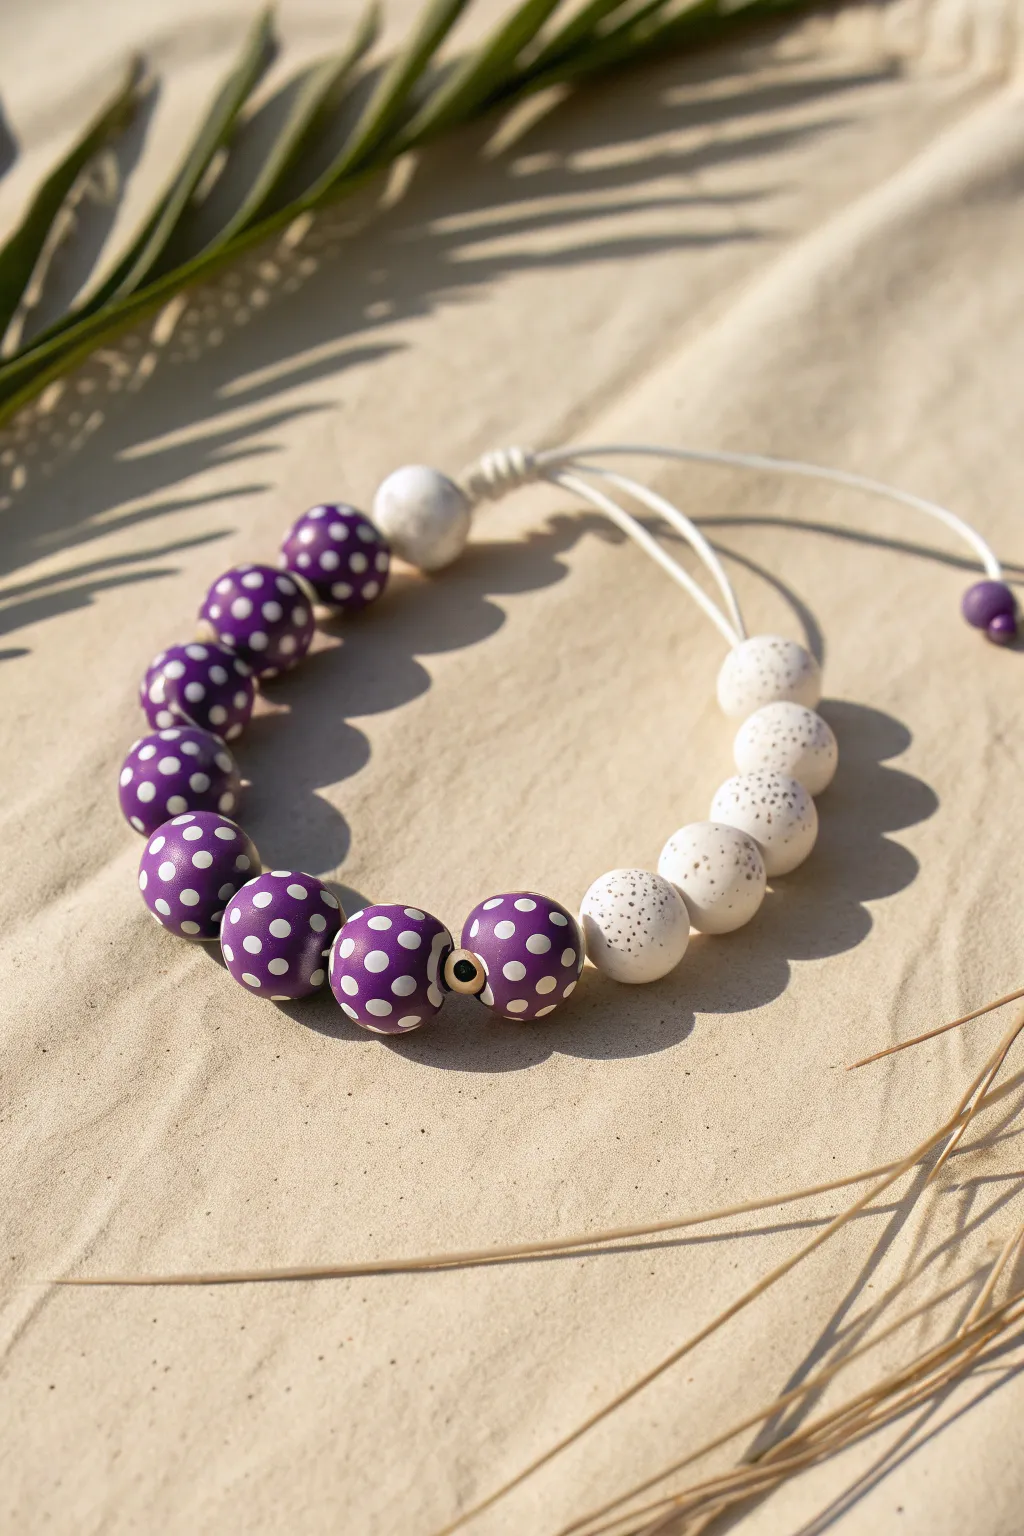
Embrace a playful, retro aesthetic with this striking beaded bracelet that balances bold polka dots with earthy textures. The contrast between the deep purple speckled beads and the organic white clay rounds creates a wearable piece of art perfect for summer days.
Step-by-Step
Materials
- Polymer clay (Deep Purple, White)
- White or cream waxed cord (1mm)
- Clay roller or pasta machine
- Small round cutter or circle piping tip (for dots)
- Needle tool or bead piercing pins
- Sandpaper or texture sponge (such as a sanding block or stiff toothbrush)
- Black acrylic paint (optional, for speckling)
- Old toothbrush (for speckling)
- One small gold spacer bead
- Jewelry pliers
- Oven for baking clay
Step 1: Crafting the Beads
-
Form the Base Beads:
Start by conditioning your purple and white polymer clay separately. Roll the purple clay into a log and slice off equal sections to create about 8 or 9 medium-sized spheres. Repeat with the white clay to make 5 or 6 slightly smaller spheres. -
Create the Polka Dots:
Roll a thin sheet of white clay. Use a very small round cutter, a drinking straw, or piping tip to punch out tiny circles. Carefully press these white dots onto the purple clay spheres in a random, evenly spaced pattern. -
Smooth the Surface:
Gently roll the dotted purple beads between your palms. Use light pressure to ensure the white dots flatten and become flush with the purple surface, creating a seamless sphere. -
Texturize the White Beads:
Take your white clay spheres and gently roll them over a piece of coarse sandpaper or tap them with a stiff-bristled brush. This gives them that lovely, stone-like organic texture seen in the photo. -
Add Speckles (Optional):
To mimic the speckled look on the white beads, distinct from the texture, dip an old toothbrush in watered-down black acrylic paint. Run your thumb over the bristles to flick tiny droplets onto the white clay. Let dry completely. -
Pierce the Holes:
Using a needle tool or bead pin, carefully pierce a hole through the center of each bead. I find twisting the tool as you push through helps prevent the bead from squishing out of shape. -
Bake the Clay:
Arrange your beads on a baking sheet or bead rack. Bake according to your clay manufacturer’s instructions (usually around 275°F or 130°C for 15-30 minutes). Let them cool completely before handling.
Smudged Dots?
If your white dots look smeared after rolling, chill the beads in the fridge for 10 minutes before rolling. This hardens the clay slightly, keeping edges crisp.
Step 2: Assembly & Finishing
-
Prepare the Cord:
Cut a length of white waxed cord, approximately 12-14 inches long. Fold it in half to create a loop at one end if you prefer a loop-closure, or keep it single for an adjustable knot. -
Start Stringing:
Begin threading your cooled beads onto the cord. Start with the smaller white textured beads. Thread all 5 or 6 white beads first. -
The Transition:
After the white section, slide on the purple polka dot beads. Keep threading until you have a full strand that fits comfortably around your wrist. -
Insert the Gold Accent:
Place the small gold spacer bead between the last two purple beads. This subtle metallic touch breaks up the pattern and adds a professional finish. -
Create the Adjustable Closure:
Bring the two ends of the cord together, overlapping them. Cut a separate shorter piece of cord (about 4 inches) and tie a square knot or macramé sliding knot over the overlapped section. -
Finish the Ends:
Tie simple overhand knots at the very tips of your dangling cord ends. You can add a tiny scrap clay bead to each end for extra decoration, just like in the image. -
Secure and Trim:
Tighten all knots securely. Trim any excess cord from your sliding knot and carefully melt the tips with a lighter or use a dab of glue to prevent fraying.
Scent Infusion
Use porous lava stone beads instead of clay for the white section. Add a drop of lavender essential oil to them for a relaxing, scented aromatherapy bracelet.
Now you have a stunning, handmade accessory that combines fun patterns with natural textures for a truly unique look

What Really Happens Inside the Kiln
Learn how time and temperature work together inside the kiln to transform clay into durable ceramic.
Purple and Navy Contrast Stripes
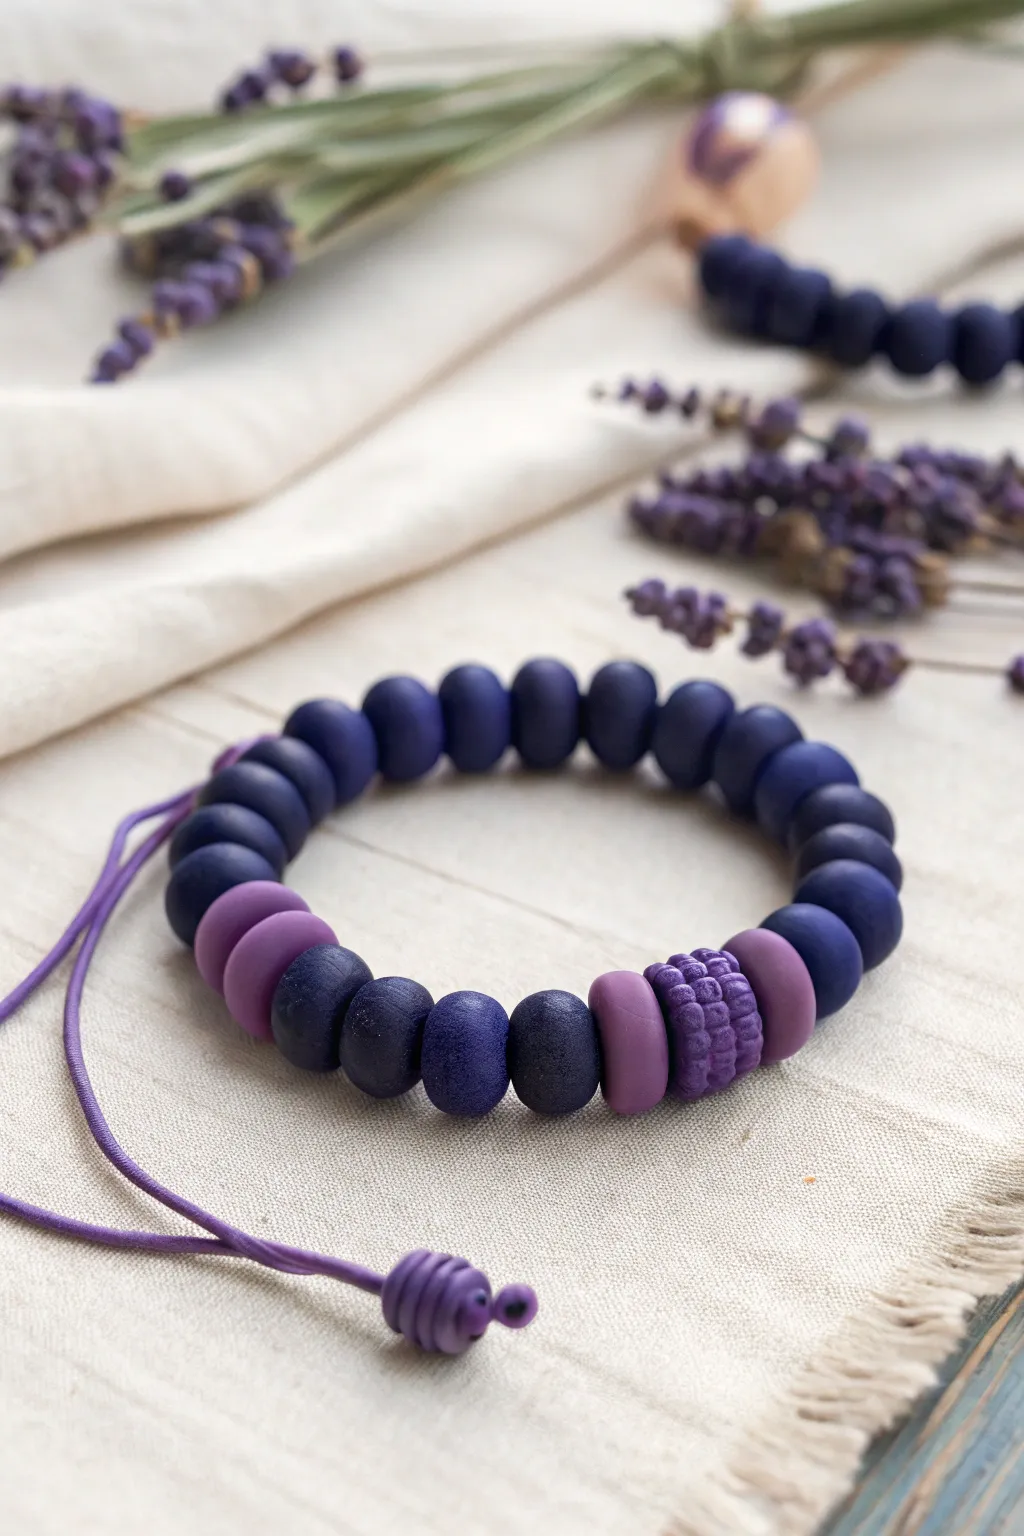
Embrace the soothing tones of a lavender field with this chunky beaded bracelet project featuring a mix of deep navy and soft purple hues. The varying textures between smooth matte beads and detailed specialty beads create a tactile accessory that feels as good as it looks.
Step-by-Step Guide
Materials
- Polymer clay in deep navy blue
- Polymer clay in soft lavender purple
- Waxed cotton cord or elastic beading cord (purple)
- Bead roller (optional but helpful for size consistency)
- Clay carving tools or a needle tool
- Sandpaper (fine grit)
- Oven for baking clay
- Acrylic paint in navy (if staining wood beads) or just use navy clay
- Skewer or toothpick for piercing holes
- Varnish (matte finish, optional)
Step 1: Creating the Navy Base Beads
-
Condition the navy clay:
Start by warming the deep navy polymer clay in your hands until it is soft and pliable. This conditioning step is crucial to prevent cracks later on. -
Portion the clay:
Pinch off uniform pieces of the navy clay. For this design, you’ll need about 18-20 medium-sized portions to form the main bulk of the bracelet. -
Roll spheres:
Roll each portion of navy clay between your palms to create smooth, round spheres. Aim for a slightly flattened, rondelle shape rather than a perfect ball for a more organic look. -
Create the matte texture:
Lightly tap the surface of these beads with a piece of sandpaper or a rough sponge before baking to give them a stone-like, matte texture similar to the image. -
Pierce the holes:
Use a skewer or needle tool to carefully pierce a hole through the center of each bead. Rotate the tool as you push through to keep the shape intact.
Clean Fingerprints
Before baking, lightly brush your raw clay beads with a little cornstarch or baby powder. This smooths out fingerprints and helps achieve that soft, matte finish.
Step 2: Crafting the Lavender Accent Beads
-
Condition lavender clay:
Soften your lavender-colored clay just as you did with the navy. You will need enough for about 4-5 beads. -
Form the smooth accents:
Roll three or four pieces into flattened disc shapes or rondelles similar in diameter to your navy beads. -
Create the textured focal bead:
Take one piece of lavender clay and roll it into a thick cylinder. This will be your textured focal point. -
Add surface detail:
Using a needle tool or small ball stylus, stipple the surface of this cylinder bead heavily to create a bumpy, berry-like texture. Leave the ends smooth for a clean finish. -
Pierce holes:
Carefully create bead holes in all lavender components, ensuring the hole is wide enough for your chosen cord.
Step 3: Baking and Finishing
-
Bake the beads:
Arrange all your beads on a baking sheet lined with parchment paper. Bake according to the manufacturer’s instructions for your specific brand of polymer clay. -
Cool and refine:
Allow the beads to cool completely. If there are any rough nuances around the holes, I usually smooth them out quickly with a bit of fine-grit sandpaper. -
Arrange the pattern:
Lay out your beads on a table. The pattern in the image features a block of four textured/lighter beads (two smooth lavender, one textured lavender, one more smooth lavender) flanked by four textured navy beads, with the rest of the bracelet composed of smooth navy beads.
Distorted Holes?
If your bead holes squish while piercing, let the clay sit for 15 minutes to firm up, or try piercing halfway from one side and meeting in the middle.
Step 4: Assembly
-
Prepare the cord:
Cut a length of purple waxed cord or elastic that is about 12 inches long to give yourself plenty of working room. -
String the beads:
Thread your beads onto the cord following your laid-out pattern. If you used waxed cotton cord, you might need a large-eye needle to help guide it through. -
Create the closure (Option A):
If using elastic, tie a secure surgeon’s knot, pull it tight, and hide the knot inside a bead hole with a dab of superglue. -
Create the closure (Option B – Adjustable):
For the pictured sliding closure look, cross the two ends of the cord and create a sliding macramé square knot or simple adjustable loops. -
Finish cord ends:
Thread a small stopper bead onto each tail end of the cord and tie a simple overhand knot to secure it, trimming any excess length.
Wear your new bracelet stacked with other textures or let it stand alone as a beautiful handmade statement piece
Purple Letter-Bead Message Center
This sweet, minimalist bracelet set combines the soothing hue of lavender clay beads with a bold yet simple message. The pair features one solid purple strand accented by a single metallic bead, complemented by a second strand showcasing white letter beads floating amidst the purple tones.
Step-by-Step
Materials
- Purple polymer clay disc beads (heishi beads)
- White cube beads with black letters (L, O, V, E)
- One gold or silver round spacer bead (approx. 4-6mm)
- Elastic stretch cord (0.8mm recommended)
- Jewelry glue or clear nail polish
- Scissors
- Tape or a bead stopper clip
Step 1: Planning and Sizing
-
Measure your wrist:
Wrap a piece of string around your wrist comfortably, then measure that length against a ruler. Add about half an inch to this measurement to ensure the bracelets aren’t too tight. -
Prepare the cord:
Cut two pieces of elastic cord, each about 10-12 inches long. This generous length gives you plenty of room to knot the ends securely without struggling. -
Secure the ends:
Place a piece of tape or a bead stopper clip on one end of each cord. This prevents your beads from sliding right off while you work.
Step 2: Creating the Accent Strand
-
Start beading:
Begin threading the purple heishi beads onto your first cord. I find it easiest to pick up several clay discs at once with the end of the string if they are aligned well. -
Check the midpoint:
Continue adding purple beads until you reach the halfway point of your desired length. -
Add the metallic accent:
Slide on the single gold or silver round spacer bead. This creates a simple, elegant focal point on the plain bracelet. -
Finish the strand:
Fill the rest of the cord with purple clay beads until the total length matches your wrist measurement. -
Double check fit:
Wrap the strand around your wrist to verify the fit before tying any knots.
Knot Control
If the knot won’t hide inside a bead hole, widen the hole slightly using a bead reamer or a thick needle, but be gentle with clay beads.
Step 3: Crafting the Message Strand
-
Calculate spacing:
For the ‘LOVE’ bracelet, lay out your beads first to determine how many purple beads you need on either side of the letters to center the word. -
String the first half:
Thread the purple clay beads onto the second cord until you reach the center minus the width of your letter beads. -
Spell it out:
Thread the letter cubes in the correct order: L, O, V, E. Double-check that they are facing the right direction so the word isn’t upside down. -
Complete the loop:
Add the remaining purple beads to the other side to balance the design.
Heart of Gold
Replace the ‘O’ in LOVE with a gold heart bead to match the metallic accent on the first bracelet for a cohesive mixed-metal look.
Step 4: Finishing Touches
-
Pre-stretch the cord:
Gently pull on the ends of the elastic cord a few times. Pre-stretching helps prevent the bracelet from sagging or loosening after you wear it. -
Tie the surgeon’s knot:
Cross the ends, wrap one side over twice, and pull tight. This extra loop makes the knot much more secure than a standard square knot. -
Secure with adhesive:
Dab a tiny drop of jewelry glue or clear nail polish onto the knot. Let it dry completely before moving to the next step. -
Hide the knot:
Once the glue is dry, trim the excess cord close to the knot. Carefully slide a neighboring bead over the knot to conceal it inside the hole.
slip these bracelets on your wrist for an instant pop of color and positivity


The Complete Guide to Pottery Troubleshooting
Uncover the most common ceramic mistakes—from cracking clay to failed glazes—and learn how to fix them fast.
Purple Flower Focal Bead Moment
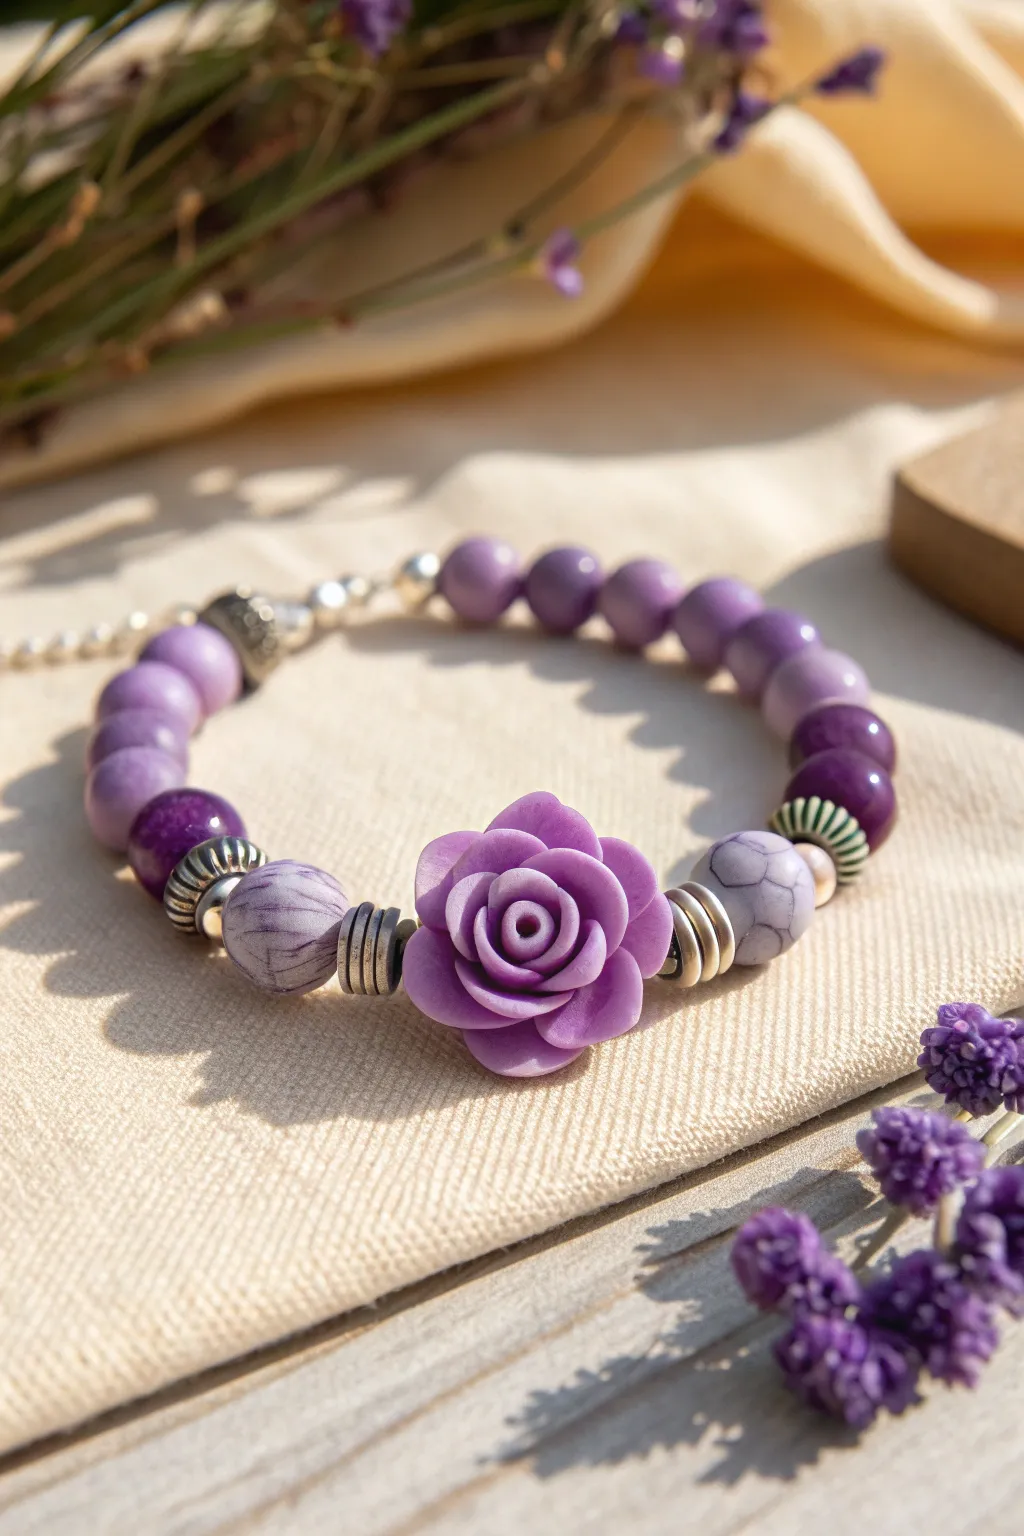
This elegant bracelet design centers around a sculptural clay rose, framed by a gradient of amethyst and matte lilac tones. The combination of highly textured clay work and smooth stone beads creates a sophisticated accessory perfect for spring.
Step-by-Step Guide
Materials
- Purple polymer clay (approx. 1/4 block, Premo or Fimo Soft recommended)
- Beading wire (flexible 7-strand or 19-strand, 0.015-0.018 inch diameter)
- 2 Crimp beads (2mm, sterling silver or silver-plated)
- 2 Crimp bead covers (3mm, silver)
- 2 Wire guardians/protectors (silver)
- Lobster clasp and jump ring (silver)
- 4 Large silver spacer rings (flat, heavy gauge)
- 2 Decorative silver bead caps or textured ring spacers (ribbed design)
- 2 Marbled distinct purple stone beads (8-10mm, matte finish)
- 2 Dark purple agate or jade beads (8mm, glossy)
- 2 Striped resin or glass accent beads (green/white stripes or similar patterned)
- 12-14 Lavender/lilac round beads (6-8mm, can be dyed jade or glass)
- Needle tool or toothpick
- Baking tile or parchment paper
- Flush cutters
- Crimping pliers
Step 1: Sculpting the Clay Rose Focal
-
Prepare the clay:
Begin by conditioning your purple polymer clay until it is soft and pliable. Roll it into a smooth log about 1/4 inch thick. -
Create the center bud:
Pinch off a tiny piece of clay and roll it into a teardrop shape. Flatten it slightly and curl it into a tight spiral to form the very center of the rose. -
Form the petals:
Pinch off about 12-15 small balls of clay, graduating them slightly in size. flatten each ball between your thumb and forefinger to create thin, circular petals. I like to keep the edges slightly thinner than the center for realism. -
Assemble the inner layers:
Take your smallest flattened petal and wrap it around the center bud spiral. Place the next petal opposite the opening of the first one, overlapping slightly. -
Build the bloom:
Continue adding petals in a spiral pattern, working outward. As you add the larger outer petals, gently flare the edges backward with your finger to simulate an open bloom. -
Piercing the bead:
Once satisfied with the flower size (aim for about 20mm wide), gently reshape the back to be somewhat flat but thick enough to hold a hole. Carefully pierce through the side of the base with a needle tool to create the stringing channel. Rotate the tool to ensure the hole is clean. -
Bake the focal:
Place the rose on a baking tile or parchment paper. Bake according to your clay manufacturer’s instructions (usually 275°F/130°C for 15-30 minutes). Let it cool completely before handling.
Clay Texture Tip
Before baking, gently press a piece of coarse sandpaper or a toothbrush against the clay petals. This removes fingerprints and adds a realistic, velvety petal texture.
Step 2: Stringing the Design
-
Prepare the wire:
Cut a length of beading wire approximately 10-12 inches long. This gives you plenty of room to work comfortably. -
Start the clasp:
Thread a crimp bead and a wire guardian onto one end. Loop the wire through the guardian and attach your lobster clasp. Feed the tail back through the crimp bead and use crimping pliers to secure it flat. -
Cover the crimp:
Place a crimp cover over the flattened crimp bead and gently close it with pliers until it looks like a round silver bead. -
Begin the bead pattern:
String approximately 6-7 of the smaller lavender round beads. Follow this with one dark purple glossy bead. -
Add accent textures:
Add your striped accent bead, followed by a ribbed silver spacer or bead cap. This creates a visual transition to the larger beads. -
Frame the focal:
Slide on the large matte marbled purple bead. Next add two flat silver spacer rings. These metallic elements will flank the rose and make the color pop. -
Place the rose:
Thread your cooled clay rose focal bead onto the wire. Ensure the flower faces outward correctly. -
Mirror the design:
Repeat the previous sequence in reverse: two flat silver spacer rings, the large matte marbled bead, the ribbed silver spacer, the striped accent bead, and the dark purple glossy bead. -
Finish the strand:
Finish stringing with the remaining lavender round beads to match the length of the first side. -
Secure the end:
Thread on a crimp bead and wire guardian. Attach a jump ring (or soldering ring) to the guardian. Feed the wire back through the crimp and a few adjacent beads. Pull everything taut but not stiff—the bracelet needs a little wiggle room to drape. -
Final crimp:
Flatten the final crimp bead securely, trim the excess wire with flush cutters, and cover the crimp with your second crimp cover.
Gradient Effect
Mix a tiny amount of translucent clay into your purple for the outer petals. This mimics how real rose petals become slightly more sheer at the edges.
Now you have a stunning, romantic accessory that captures the beauty of a permanent bloom for your wrist
Purple Smiley Accent for Playful Vibes
Add a cheerful pop of color to your wrist stack with this sweet, purple-themed bracelet featuring a prominent smiley face charm. The mix of matte, translucent, and metallic gold beads creates a sophisticated yet playful accessory perfect for everyday wear.
Step-by-Step
Materials
- Purple polymer clay smiley face bead (approx. 10mm)
- Matte lilac seed beads or small glass beads (size 6/0 or 8/0)
- Translucent pale amethyst or quartz gemstone beads (approx. 4mm)
- Small gold-plated rondelle spacer beads or heishi beads
- Gold lobster clasp and jump rings
- Gold extender chain with teardrop charm (optional)
- Beading wire (flexible, 7-strand or 49-strand)
- 2 Gold crimp beads
- 2 Gold crimp covers (optional but recommended)
- Wire cutters
- Crimping pliers
Step 1: Preparation
-
Measure and Cut:
Start by measuring your wrist to determine the needed length. Cut a piece of beading wire about 3-4 inches longer than this measurement to give yourself plenty of room to work with the clasps. -
Secure One End:
Thread a crimp bead onto one end of the wire, followed by a jump ring or the loop of your extender chain. Loop the wire back through the crimp bead. -
Crimp the End:
Use your crimping pliers to flatten the crimp bead securely, locking the loop in place. Trim the short tail of the wire close to the crimp. -
Hide the Crimp:
If you are using crimp covers, gently place one over the flattened crimp bead and close it with your pliers until it looks like a round gold bead.
Step 2: Stringing the Pattern
-
Start the Sequence:
Begin stringing your beads. Start with a section of the matte lilac beads. String about 8 to 10 of these, depending on your wrist size. -
Add a Gold Accent:
Slide on one gold rondelle spacer bead. This metallic pop breaks up the color blocks nicely. -
Transition to Translucent:
Add a small section of the translucent amethyst or quartz beads. Use about 3 to 4 of these beads. -
Second Gold Spacer:
Place another gold rondelle spacer bead on the wire. -
Center Bead Preparation:
Thread on about 3 more matte lilac beads to lead into the centerpiece. -
Add the Smiley:
Slide on your central purple smiley face bead. Ensure it is facing ‘outward’ relative to how the bracelet will sit on your wrist. -
Mirror the Pattern:
Now, recreate the pattern in reverse order. String 3 matte lilac beads to match the other side of the smiley face.
Sticky Smiley?
If the hole in your clay smiley bead is blocked or jagged, gently twist a small bead reamer or a thick needle through it to smooth the path before stringing.
Step 3: Finishing the Design
-
Continue the Mirror:
Add a gold spacer, followed by the section of 3-4 translucent gemstone beads. -
Final Gold Accent:
Slide on the next gold spacer bead. -
Finish the Strand:
Complete the beading by adding the final section of 8-10 matte lilac beads. Check the length against your wrist now to ensure it fits comfortably. -
Add Final Crimp:
Thread a crimp bead onto the end of the wire, followed by the lobster clasp. -
Secure the Clasp:
Loop the wire back through the crimp bead and pull tight, but leave just a tiny bit of slack so the bracelet remains flexible and isn’t stiff. -
Final Crimp and Trim:
Flatten the crimp bead with your pliers. I usually give it a firm tug to test security before trimming the excess wire tail flush. -
Cover and Polish:
Add a crimp cover over this final crimp bead if desired, rounding it out gently with your pliers for a professional finish.
Design Tip
Vary bead textures for a high-end look. Mixing the matte finish of the clay with the shiny transparency of the quartz and the metallic gold makes the design pop.
Now you have a charming, handmade accessory ready to brighten up any outfit

TRACK YOUR CERAMIC JOURNEY
Capture glaze tests, firing details, and creative progress—all in one simple printable. Make your projects easier to repeat and improve.
Purple Star Centerpiece With Metallics
Capture the magic of a twilight sky with this elegant beaded bracelet, featuring a mix of textured and smooth purple clay beads accented by warm gold spacers. The centerpiece is a striking gold star charm that dangles playfully, making this accessory perfect for adding a touch of celestial shimmer to your outfit.
Step-by-Step Guide
Materials
- Polymer clay in various purple shades (deep plum, lavender, lilac)
- Polymer clay in translucent or white (for marbling)
- Small gold spacer beads (round)
- Gold focal bead (large, round)
- Gold star charm
- Gold jump ring
- Elastic stretch cord (0.7mm or 0.8mm)
- Bead reamer or toothpick
- Super glue or jewelry adhesive
- Scissors
Step 1: Crafting the Clay Beads
-
Prepare your clay colors:
Begin by conditioning your polymer clay blocks until they are soft and pliable. You’ll need distinct shades: a deep plum for the base, a softer lavender, and a very light lilac. -
Create solid beads:
Roll small balls of the solid plum and lavender clay. Aim for a consistent size, roughly 8mm in diameter, by measuring the clay pieces before rolling them in your palms. -
Make the speckled beads:
Take a small ball of light lilac clay. Using a needle tool or toothpick, gently poke tiny, shallow indentations all around the surface to create a subtle dotted texture, or mix in some coarse sand or glitter before baking for a faux stone look. -
Texture the ‘lava’ beads:
For the darker, textured beads that resemble lava stone, roll a ball of deep purple clay. Press loop side of a small piece of Velcro or use a crumpled ball of aluminum foil against the raw clay to impress a rough, organic surface texture. -
Create marbled beads:
Twist a small amount of white or translucent clay together with deep purple clay. Roll it into a snake, fold it, and twist again—but don’t overmix. Roll this blend into balls to create beautiful swirls that mimic natural stone. -
Add holes for stringing:
Carefully pierce the center of each bead with a bead reamer or a thick needle. Rotate the tool as you push through to prevent the bead from squishing out of shape. -
Bake the beads:
Arrange your raw beads on a baking sheet or tile. Bake them according to the temperature and time instructions on your specific brand of polymer clay packaging. I usually tent them with foil to prevent scorching. -
Cool and finish:
Allow the beads to cool completely. If any holes closed up slightly during baking, use a small drill bit or bead reamer to clean them up.
Step 2: Assembling the Bracelet
-
Cut the elastic cord:
Cut a piece of elastic cord about 10-12 inches long. This gives you plenty of extra slack for tying the knot later without struggling. -
Lay out your design:
Before stringing, arrange your beads on a bead board or soft cloth. Place the star charm and its adjacent beads in the center, and plan a symmetrical pattern radiating outward, alternating the textured, smooth, and marbled beads. -
Apply the spacer beads:
Place small gold spacer beads between your clay beads. Notice in the design how they act as separators, particularly flanking the textured beads to make them pop. -
String the beads:
Start stringing your beads onto the elastic. I find it easiest to start from the back of the bracelet (opposite the charm) so the knot will eventually be hidden there. -
Attach the charm:
When you reach the center point of your design, slide on the gold star charm using a jump ring if the charm’s loop is small, or string it directly if the loop is large enough to sit comfortably between beads. -
Complete the circle:
Continue stringing the remaining beads until you have achieved the desired bracelet length (usually about 6.5 to 7 inches for an average wrist). -
Tie the knot:
Bring the two ends of the elastic together. Tie a surgeon’s knot (looping the elastic through twice on the first pass) and pull it tight. The elastic should be stretched slightly to ensure tension. -
Secure the knot:
Place a tiny drop of super glue or jewelry cement directly onto the knot. Let it dry for a few moments. -
Hide the knot:
Trim the excess cord ends, leaving about 2mm. Gently tug the bracelet so the knot slides inside the hole of one of the larger adjacent beads to hide it.
Sticky Situation
If your bead holes are too small for the knot to hide inside, use a bead reamer to gently enlarge the hole of the bead next to the knot after baking.
Celestial Shine
Brush a light coat of pearl mica powder onto the smooth purple beads before baking to give them an ethereal, shimmering finish that catches the light.
Now you have a stunning, handmade accessory that combines rustic textures with celestial elegance, ready to wear or gift.
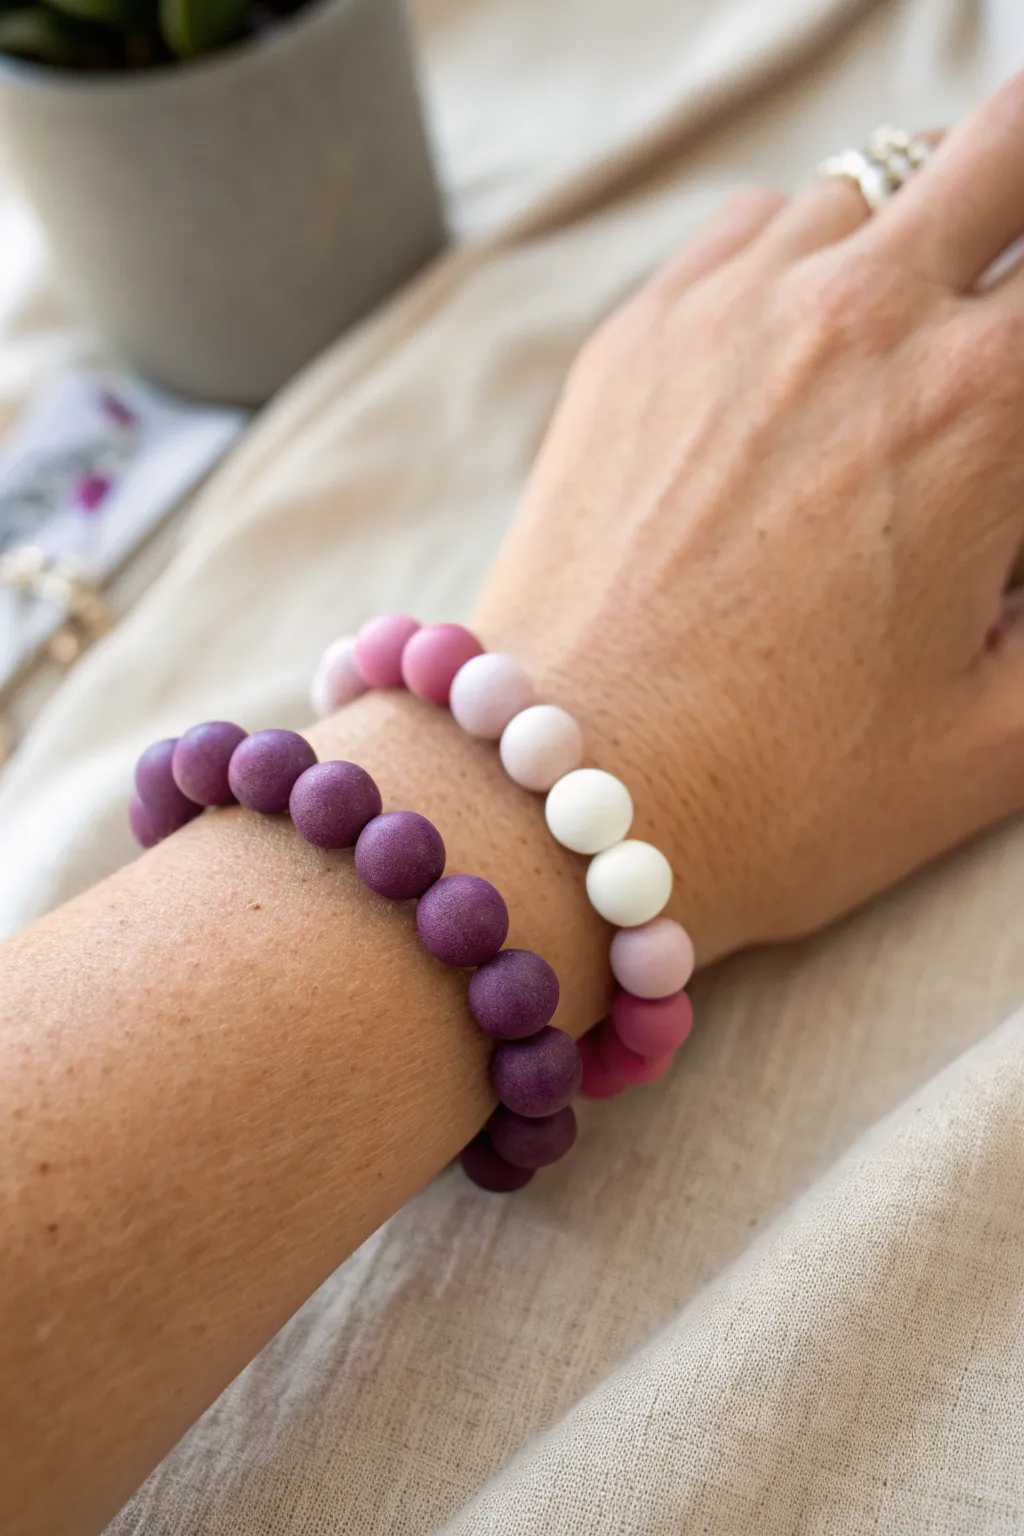
Purple Heishi and Pearl Mix
Achieve a timeless and dainty aesthetic with this dual-bracelet project that balances the rich luster of purple beads with the classic purity of freshwater pearls. This design creates a stacked look that feels both organic and thoughtfully curated, perfect for dressing up a casual outfit.
Step-by-Step
Materials
- 4mm round purple luster beads (glass or polished clay)
- 6mm-8mm irregular freshwater pearls (white)
- 0.8mm clear elastic stretch cord
- Jewelry glue or clear nail polish
- Scissors
Step 1: Planning and Measuring
-
Wrist Measurement:
Start by wrapping the elastic cord around your wrist to approximate the size. Leave about 3-4 inches of extra cord on each end to make tying the final knot easier. -
Cut the Cord:
Cut two lengths of elastic cord based on your measurement. I usually cut them around 10 inches total to be safe. -
Pre-Stress the Elastic:
Gently pull tightly on both ends of your cut elastic strands several times. This ‘pre-stretching’ helps prevent the bracelet from sagging or stretching out permanently after the first wear.
Step 2: Creating the First Strand
-
Secure the End:
Place a piece of tape over one end of your first elastic string or attach a bead stopper so your beads don’t slide off while you work. -
Initial Bead Sequence:
Thread on approximately 8 to 10 purple round beads to start the pattern. -
Add a Pearl Accent:
Slide on one freshwater pearl. Because these are natural pearls, orient it so the flattest side sits against the purple beads if possible, though irregularity is part of the charm. -
Continue the Pattern:
Add another section of 8 to 10 purple beads, followed by another pearl. Repeat this until the beaded length wraps comfortably around your wrist without pinching.
Knot Slipping?
If your elastic knot feels loose, try a drop of GS Hypo Cement. It has a precision tip perfect for beads and stays flexible when dry, unlike superglue which can make elastic brittle.
Step 3: Creating the Second Strand
-
Establish Variation:
For the second bracelet, you want the pearls to sit in different spots than the first so they nestle together nicely. Thread your stopper on the second string. -
Offset Start:
Start with a shorter segment of purple beads—maybe 4 or 5—before adding your first pearl. -
Main Beading Rhythm:
Resume the standard pattern of 8-10 purple beads between each pearl. -
Check the Fit:
Wrap both unfinished strands around your wrist together. Ensure the pearls are staggered and not lining up perfectly straight, which creates that effortless, organic look.
Make it Luxe
Swap the white freshwater pearls for gold spacer beads or tiny gold-filled charms every third interval to add a metallic warmth that complements the purple tones beautifully.
Step 4: Finishing Touches
-
The Surgeon’s Knot:
Remove the tape/stopper. Cross the right end over the left, wrap it under, and pull tight. Then cross left over right, wrap under twice, and pull tight again to secure the knot. -
Secure with Glue:
Apply a tiny dab of jewelry glue directly onto the knot. I like to continuously pull the elastic slightly taut while the glue sets for a few seconds. -
Hide the Knot:
Once dry, trim the excess elastic close to the knot. If the hole of a neighboring pearl or bead is large enough, gently tug the knot inside to hide it completely.
Wear your new stack with a flowing white blouse to let the purple pop against the fabric
Marbled Lavender-and-Plum Swirl Beads
Marbled polymer clay is a versatile technique that transforms simple blocks of color into sophisticated, stone-like designs. This bracelet showcases an elegant spectrum of purple—from pale lavender swirls to deep, speckled plum—punctuated by warm gold accents for a polished look.
Step-by-Step Guide
Materials
- Polymer clay in three colors: White, deep plum/eggplant, and lavender
- Translucent polymer clay (optional, for depth)
- Small gold space beads (approx. 3-4mm)
- Strong elastic cord (0.8mm or 1mm)
- Clay roller or pasta machine
- Tissue blade or craft knife
- Bead piercing pins or metal skewers
- Oven thermometer
- Baking sheet and parchment paper
- Gloss varnish or resin (optional)
- Wet/dry sandpaper (400-1000 grit)
- Small round cutter (approx. 1/2 inch) or ruler for measuring
- Super glue (gel formula recommended)
Step 1: Creating the Clay Canes
-
Condition the Clay:
Begin by thoroughly kneading each color of polymer clay separately until it is soft, pliable, and warm to the touch. This conditioning step is crucial to prevent cracking later. -
Mix the Marbling Colors:
To achieve the swirled bead look, create ‘logs’ of clay. Roll a thick snake of white clay and thinner snakes of lavender and deep plum. If you want a more complex look, mix a tiny bit of translucent clay into the lavender. -
Form the Marbled Log:
Twist the different colored snakes together into one large rope. Fold this rope in half, twist again, and roll it out on your work surface. Repeat this ‘fold, twist, roll’ process until you see fine streaks of color, but stop before the colors muddy into a single shade. -
Create the Speckled Blend:
For the solid-colored speckled beads, take a portion of the deep plum clay. Using a coarse grit sandpaper or a cheese grater dedicated to clay, grate a tiny amount of baked white or lighter lavender clay into the raw plum clay and mix well to create a speckled texture.
Clean Hands, Clean Clay
White clay picks up everything! Keep baby wipes nearby and clean your hands and work surface thoroughly before touching the white or lavender portions to keep the swirls crisp.
Step 2: Fomring the Beads
-
Portion Control:
To ensure your beads are uniform in size, roll your marbled log and your solid colors into snakes of the same thickness. Use your tissue blade to slice off equal-sized segments from each log. -
Roll Spheres:
Take each segment and roll it between your palms. Use a gentle circular motion. I find that cupping my hands slightly helps create a perfect sphere without flat spots. -
Refine the Shape:
Inspect each bead. The marbled ones should show interesting swirls. If a bead looks too plain, you can gently slice it, twist the halves, and re-roll it to bring more pattern to the surface. -
Pierce the Holes:
Hold a bead gently between your thumb and forefinger. Using a bead pin or needle, carefully drill a hole through the center with a twisting motion rather than pushing straight through, which can flatten the sphere. -
Bake the Clay:
Arrange the beads on a parchment-lined baking sheet. Bake according to your specific clay manufacturer’s instructions (usually 275°F/130°C for 15-30 minutes). Use an oven thermometer to ensure the temperature is accurate.
Avoid Flat Beads
If your beads flatten while piercing, let the raw clay sit in the fridge for 15 minutes before drilling. The firmer clay holds its shape much better against the pressure of the tool.
Step 3: Finishing and Assembly
-
Cool and Sand:
Let the beads cool completely. Once cool, take your wet/dry sandpaper and smooth out any fingerprints or rough spots under running water. This reveals the true pattern of the marbling. -
Optional Buffing:
For a sheen like the beads in the photo, buff the beads vigorously with a soft denim cloth or apply a very thin coat of gloss varnish. -
Design the Pattern:
Lay out your beads on a bead board or soft cloth. Create a pleasing rhythm by alternating the marbled swirl beads with the solid speckled ones. -
Stringing:
Cut a piece of elastic cord about 10-12 inches long. Begin stringing the beads, placing a gold spacer bead between every clay bead. Pre-stretching the elastic gently before stringing helps the bracelet hold its shape better. -
Tie the Knot:
Once all beads are strung and the size fits your wrist, tie a secure surgeon’s knot (right over left, left over right, and loop through an extra time). Pull the knot tight. -
Secure the End:
Place a tiny drop of super glue on the knot. Let it dry for a moment, then trim the excess elastic. I like to gently pull the knot inside one of the larger clay beads to hide it completely.
This sophisticated bracelet coordinates effortlessly with both casual denim and dressier outfits, proving that polymer clay can look just as refined as natural gemstones
Speckled Terrazzo Purple Beads
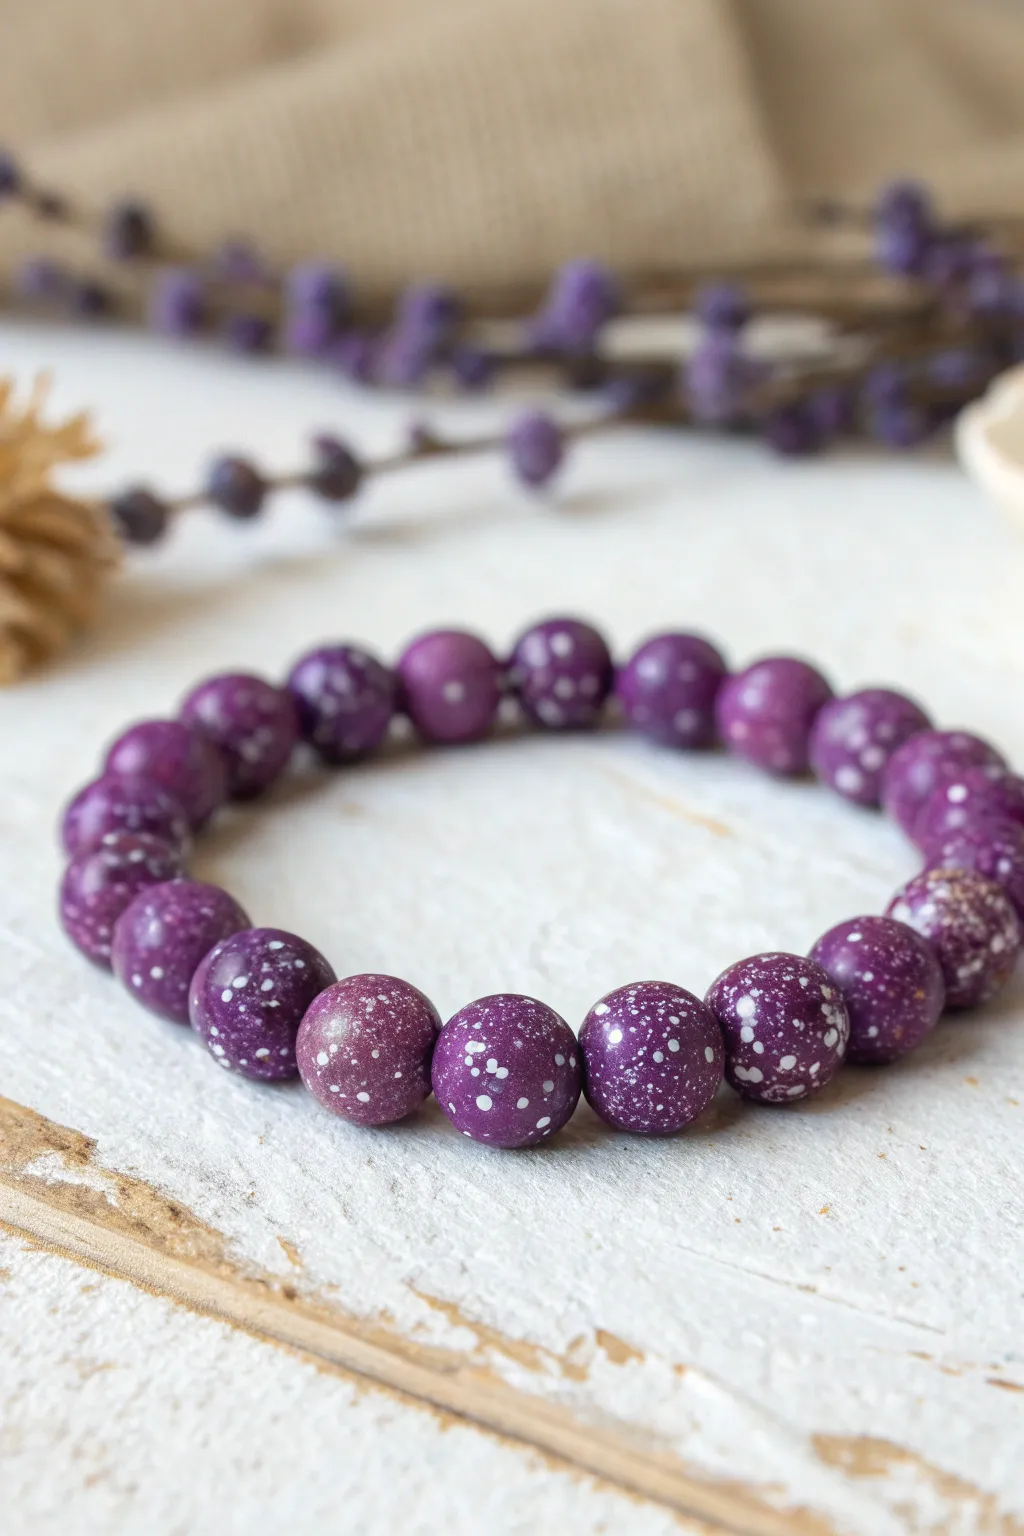
These rich, violet-hued clay beads feature a delicate white speckling that mimics a starry night sky or a terrazzo floor. The finish is smooth and organic, perfect for adding a touch of sophisticated fun to your jewelry collection.
Step-by-Step
Materials
- Deep purple polymer clay
- White or translucent white polymer clay
- Grated white clay dust (optional)
- Acrylic rolling pin
- Tissue blade or craft knife
- Needle tool or bead piercing pins
- Bead baking rack (or parchment paper)
- Wet/dry sandpaper (400, 600, and 1000 grit)
- Polishing cloth (denim or micro-mesh)
- Elastic cord
- Super glue (gel type)
Step 1: Prepping the Clay Base
-
Condition the purple clay:
Begin by thoroughly conditioning your deep purple polymer clay. Knead it in your hands until it becomes soft, pliable, and warm to the touch. -
Roll out a sheet:
Using your acrylic roller or a pasta machine on a medium/thick setting, flatten the purple clay into a smooth, even sheet. -
Prepare the speckles:
Take a very small amount of white clay. You want to chop this into extremely tiny, irregular bits with your tissue blade. Aim for crumbs rather than chunks for that fine terrazzo look. -
Apply the speckles:
Scatter the white clay crumbs evenly across the surface of your purple clay sheet. I like to press them down gently with my finger first to make sure they stick. -
Embed the pattern:
Run your acrylic roller over the sheet again. This will force the white crumbs into the purple base, creating a flat, integrated surface.
Smudged Speckles?
If your white dots look smeared like streaks instead of spots, the clay was too soft or rolled too aggressively. Let the diced clay rest in the fridge for 10 minutes before rolling.
Step 2: Forming the Beads
-
Create a log:
Roll the speckled sheet up tightly into a log shape. Ensure there are no air bubbles trapped inside the layers. -
Reduce to size:
Gently roll the log on your work surface to lengthen and thin it out until it’s about the thickness of your thumb (or your desired bead size). -
Portion the clay:
Use your tissue blade to slice the log into equal segments. Keeping the slices even now ensures your beads will be the same size later. -
Roll into spheres:
Take each segment and roll it between your palms. Use a circular motion to shape them into perfect spheres. The warmth of your hands helps smooth out any seams. -
Check surface quality:
Inspect each bead. If the white speckles have distorted too much, you can gently pinch and re-roll the bead to redistribute the pattern.
Step 3: Piercing and Baking
-
Pierce the holes:
Using a needle tool, gently bore a hole through the center of each bead. To avoid flattening the sphere, twist the tool as you push, rather than just pressing straight through. -
Refine the exit hole:
When the needle starts to poke through the other side, stop and pull it out. Turn the bead around and pierce back through the exit point to ensure a clean hole on both sides. -
Set up baking rack:
Place your beads on a bead baking rack. Suspending them on pins prevents flat spots from forming during the curing process. -
Bake the clay:
Bake according to your polymer clay manufacturer’s instructions (usually around 275°F or 130°C for 15-30 minutes). Let them cool completely before handling.
Galaxy Glitter
Mix a pinch of fine silver mica powder or holographic glitter into the purple clay before adding the white speckles. This adds a subtle, deep-space shimmer to the matte finish.
Step 4: Finishing and Assembly
-
Wet sand for smoothness:
Once cool, submerge the beads in a bowl of water with a drop of dish soap. Sand them lightly with 400 grit, then 600, and finally 1000 grit sandpaper to remove fingerprints and reveal the white speckles clearly. -
Buff to a sheen:
Vigorously rub the dry beads with a piece of denim or a polishing cloth. This creates that lovely organic satin finish seen in the photo without needing varnish. -
String the beads:
Measure your elastic cord around your wrist and cut it with a little extra length for tying. Thread your polished beads onto the cord. -
Tie the knot:
Tie a secure surgeon’s knot (right over left, left over right). Pull it tight to secure the bracelet structure. -
Secure the knot:
Add a tiny drop of gel super glue to the knot. Let it dry, then trim the excess cord ends and tuck the knot inside a bead hole if possible.
Slip your bracelet on and enjoy the modern, handcrafted look of your new speckled terrazzo accessories.
Glitter-Dusted Purple Statement Stack
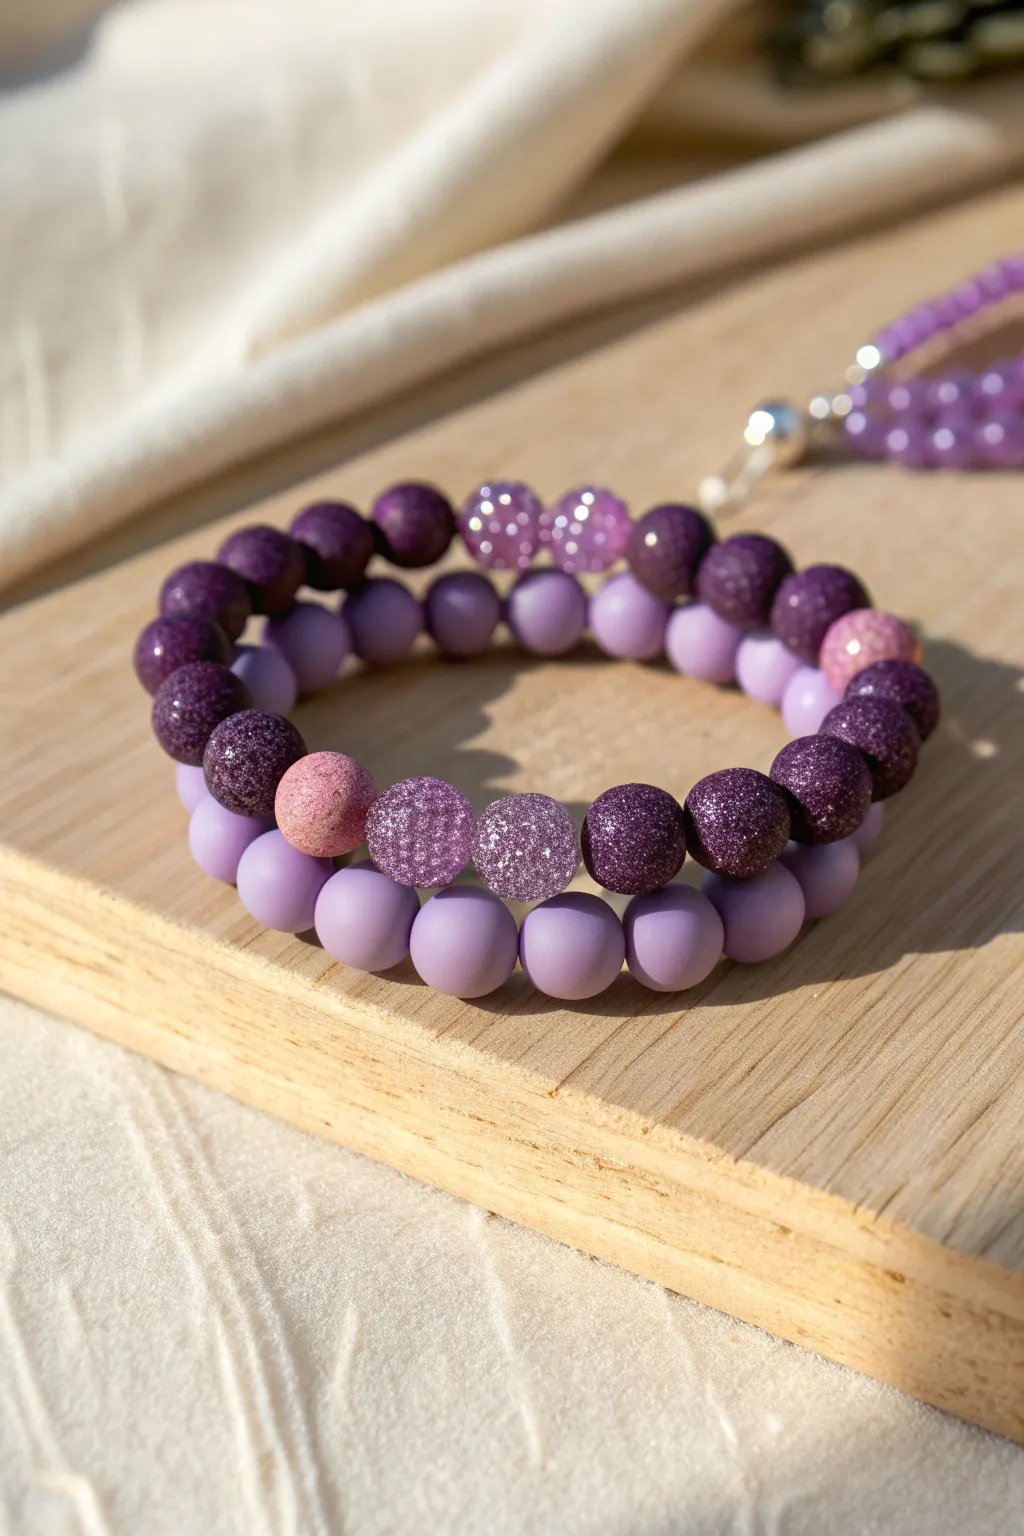
Elevate your accessory game with this stunning duo of purple bracelets that balances matte sophistication with dazzling texture. By combining smooth, soft-touch lilac beads with deep purple glittering accents, you create a tactile experience that looks as good as it feels.
How-To Guide
Materials
- 8mm matte lilac polymer clay or acrylic beads (approx. 25-30 beads)
- 8mm dark purple stardust/glitter beads (approx. 10-12 beads)
- 8mm textured mauve or pinkish-purple accent beads (2-3 beads)
- 8mm lighter lilac crystal disco ball beads (2 beads)
- 0.8mm clear elastic stretch cord
- Jewelry adhesive or clear nail polish
- Scissors
- Bead stopper or tape
- Ruler or measuring tape
Step 1: Preparation & Sizing
-
Measure your wrist:
Start by wrapping a measuring tape around your wrist where you want the bracelets to sit. Add about half an inch to this measurement for a comfortable fit that isn’t too tight. -
Cut the cord:
Cut two lengths of your elastic cord, each about 10-12 inches long. Is usually like to cut more than I need because having extra slack makes the final knot-tying process much less frustrating. -
Pre-stretch the elastic:
Hold the ends of your cut cord and give it a few firm tugs. This pre-stretching step prevents the bracelet from sagging or loosening up immediately after you wear it. -
Secure the end:
Place a bead stopper or simply a piece of masking tape on one end of each cord to prevent your beads from sliding off while you design your pattern.
Step 2: Creating the Matte Base Layer
-
Inspect the matte beads:
Sort through your matte lilac beads. Discard any with chipped coating or irregular holes to ensure a professional finish. -
String the beads:
Begin threading the matte lilac beads onto your first cord. You will need approximately 22-25 beads depending on your wrist size. -
Check the length:
Wrap the strand around your wrist to check the fit. The ends should touch comfortably without stretching the elastic yet. -
Tie the knot:
Remove the stopper and tie a surgeon’s knot (right over left, left over right twice). Pull the elastic tight until the knot is secure. -
Secure and trim:
Dab a tiny drop of jewelry glue on the knot. Let it dry, then trim the excess cord, tucking the knot inside a bead hole if possible.
Knot Security Tip
When tightening your elastic knot, pull purely on the elastic ends first, then pull on the beads adjacent to the knot to cinch it down tightly from all angles.
Step 3: Designing the Statement Strand
-
Plan the pattern:
Lay out your beads on a flat surface before stringing. The featured design uses a mix, so try alternating groups of dark stardust beads with single matte lilac spacers. -
Create the focal point:
Arrange the two lighter lilac crystal disco ball beads in the center of your layout to catch the light. -
Add texture variation:
Incorporate the pinkish-mauve textured beads on either side of your focal section to break up the purple monochrome. -
Start stringing:
Thread your pattern onto the second cord. I find it easiest to mirror the pattern from the center outwards to keep it symmetrical. -
Balance the colors:
Ensure you have a good distribution of dark purple stardust beads versus the lighter matte ones. The contrast is what makes this piece pop. -
Final sizing check:
Compare this strand against the completed matte bracelet to ensure they are exactly the same size. -
Knot the statement piece:
Tie off this bracelet using the same surgeon’s knot technique used on the first one. -
Reinforce the knot:
Apply adhesive to the knot, allowing it to fully cure before trimming the tails. -
Hide the mechanics:
Gently pull the knot inside the hole of one of the larger stardust beads to conceal it completely.
Add a Charm
Elevate the look by attaching a silver star or moon charm on a jump ring between two beads on the patterned bracelet for extra celestial flair.
Now you have a dazzling set of stacked bracelets ready to add a touch of royal elegance to your day
Galaxy Purple With Tiny White Dots
Capture the magic of deep space in a wearable accessory with this galaxy-inspired clay bead bracelet. By blending deep purples with flickers of white paint, you’ll create a mesmerizing, starry-night effect that looks stunning next to silver accents.
Step-by-Step Tutorial
Materials
- Polymer clay (Deep Purple, Lavender, and White)
- Acrylic paint (White)
- Toothbrush or stiff bristle brush
- Bead piercing pins or toothpicks
- Baking sheet and parchment paper
- Flex wire or elastic beading cord (0.8mm)
- Silver spacer beads (small rounds and daisy spacers)
- Silver lobster clasp and jump rings
- Crimp beads and crimp tool (if using wire)
- Clay roller or pasta machine
- Gloss glaze or polyurethane varnish
- Small paintbrush
Step 1: Creating the Galaxy Beads
-
Condition the clay:
Start by thoroughly kneading your deep purple polymer clay until it is soft and pliable. You can mix a tiny amount of black into the purple if you want a darker, more ‘deep space’ background. -
Optional marbling:
For added depth, mix a very small amount of lavender clay into your dark purple, stopping before it’s fully blended to leave subtle swirls. -
Roll spheres:
Pinch off uniform pieces of clay and roll them between your palms to create smooth spheres about 10-12mm in diameter. Aim for roughly 12-14 purple beads for a standard bracelet. -
Make the patterned spacers:
Roll white clay into a thick log and slice off small cylinders. You can gently press a textured stamp or lace into the surface to create the subtle relief pattern seen in the reference image. -
Pierce the beads:
Carefully insert a bead pin or toothpick through the center of each bead while twisting gently to avoid flattening the shape. leave them on the pins for easier handling during the next step.
Step 2: Adding the Stars
-
Prepare the splatter:
Dilute a small drop of white acrylic paint with water until it is thin but pigment-rich. -
Apply the galaxy effect:
Dip a toothbrush or stiff brush into the paint, then use your thumb to flick the bristles over the purple beads. This creates the tiny, random speckles that mimic distant stars. -
Add larger stars:
Use the very tip of a toothpick or a dotting tool to add a few larger, deliberate white dots on some beads to represent planets or brighter stars. -
Let the paint dry:
Allow the acrylic paint to dry completely on the raw clay before moving to the oven. -
Bake the beads:
Place your beads on a parchment-lined baking sheet and bake according to your polymer clay package instructions (usually 275°F/130°C for 15-30 minutes). -
Cool and glaze:
Once baked and cooled, brush a coat of gloss glaze over the purple beads to make the colors pop and protect the paint. Leave the white cylinder beads matte for contrast.
Starry Splatter Tip
Test your paint flicking technique on a piece of paper first. If the dots are too big, your paint is too watery; if nothing comes off, it’s too thick.
Step 3: Assembly
-
Cut the cord:
Measure your wrist and cut a length of beading wire or elastic about 3 inches longer than you need to allow for tying or crimping. -
Start the pattern:
Begin threading your beads. A nice rhythm is: one galaxy bead, a small silver spacer, another galaxy bead, a silver spacer. -
Insert feature beads:
Every third or fourth bead, swap a purple sphere for one of your white textured cylinder beads to break up the color. -
Check the fit:
Wrap the unfinished strand around your wrist to ensure the length is comfortable, adding or removing beads as necessary. -
Attach the clasp:
Feed one end of the wire through a crimp bead and onto the lobster clasp loop. Feed the wire back through the crimp bead and use crimping pliers to flatten it securely. -
Finish the loop:
Repeat the process on the other end, attaching a jump ring instead of a clasp. Trim any excess wire close to the crimp bead.
Distorted Holes?
If piercing the clay deforms your sphere, let the beads chill in the fridge for 10 minutes before making the hole. The firmer clay holds its shape better.
Wear your new celestial jewelry with pride and enjoy the compliments on your handmade galaxy
Checkerboard Purple and Cream Sections
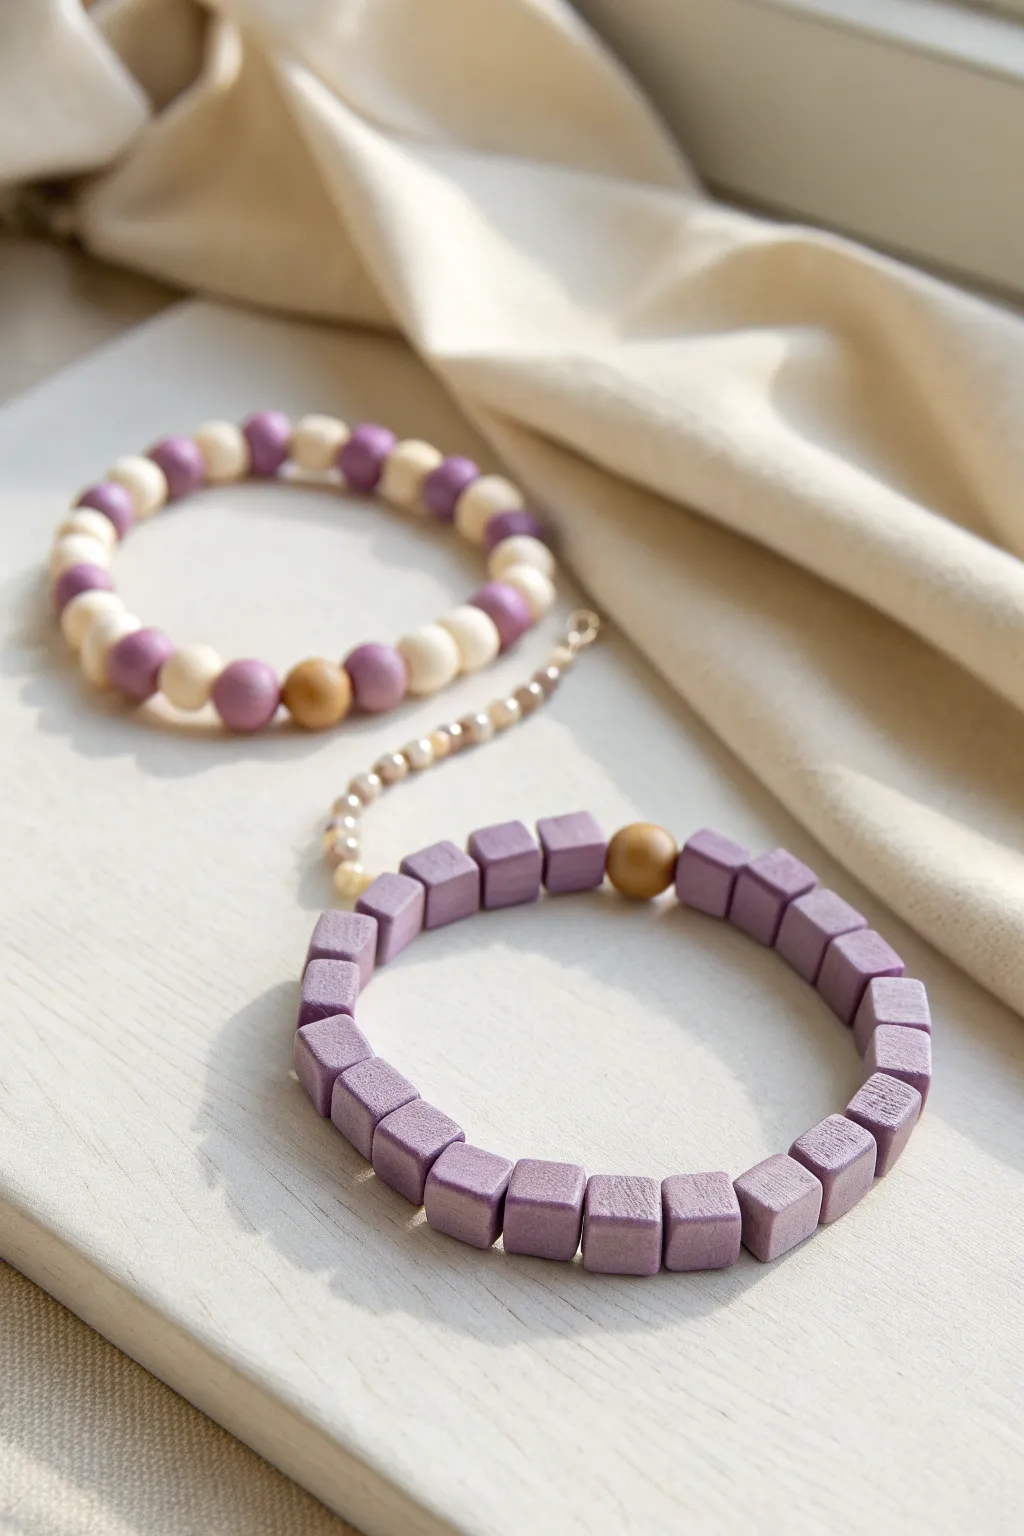
Embrace the soft elegance of lavender with this pair of complementary bracelets that mix shapes and textures. Featuring a playful round beaded pattern and a modern cube geometric design, this set adds a sophisticated touch of purple to any outfit.
Detailed Instructions
Materials
- Purple polymer clay (lavender/mauve shade)
- Cream or off-white polymer clay
- Gold or natural wood spherical accent beads (approx. 8mm)
- Elastic beading cord (0.8mm clear)
- Clay roller or pasta machine
- Small round bead roller tool (optional but helpful)
- Square clay cutter or sharp blade
- Bead piercing pin or needle tool
- Ruler
- Super glue or jewelry cement
Step 1: Crafting the Cube Beads
-
Condition the purple clay:
Start by warming up your purple polymer clay in your hands until it is soft and pliable, ensuring there are no air bubbles. -
Form a thick slab:
Roll the conditioned purple clay into a thick, even slab. For cubes, the thickness of the slab determines the size of your bead, so aim for about 8mm to 1cm thick. -
Cut into strips:
Using a sharp blade or tissue blade, slice the slab into long strips that are exactly as wide as the slab is thick (e.g., if the slab is 8mm thick, cut 8mm strips). -
Cube the strips:
Turn your strips and cut them crosswise at the same interval to create perfect little cubes. -
Soften the edges:
Gently tap the sharp corners of each cube against your work surface or smooth them very lightly with your fingertip to give them the soft, matte look seen in the photo. -
Pierce the cubes:
Carefully insert your bead piercing pin through the center of each cube. Twist the pin gently as you push to avoid squishing the square shape.
Step 2: Creating the Round Beads
-
Portion the clay:
Roll out snakes of both the purple and cream clay. Cut them into equal small segments to ensure all your round beads end up the same size. -
Roll spheres:
Roll the small clay segments into smooth balls between your palms. I find using a bead roller tool here helps make them perfectly uniform. -
Create holes:
Pierce each round bead with your pin tool, checking to ensure the hole is large enough for your elastic cord. -
Bake the beads:
Arrange all your pierced cubes and round spheres on a baking sheet or tile. Bake according to your brand of polymer clay instructions (usually around 275°F/135°C for 30 minutes). -
Cool down:
Let the beads cool completely before handling them, as the clay hardens fully only after cooling.
Fingerprint Freedom
To avoid leaving fingerprints on your geometric cubes, handle the raw clay lightly or wear latex finger cots. You can also lightly brush them with cornstarch before baking to smooth the surface.
Step 3: Assembly
-
Measure the cord:
Cut two lengths of elastic cord, adding about 3-4 inches excess for easier knotting. -
String the cube bracelet:
Thread the purple clay cubes onto the first cord. In the middle of the strand, add one gold or wood spherical accent bead to break up the geometry. -
String the round bracelet:
Pattern the round beads on the second cord, alternating two or three purple beads with two cream beads. Add a single gold accent bead as a focal point. -
Tie the knots:
Pre-stretch the cord slightly, then tie a secure surgeon’s knot (right over left, left over right) for each bracelet. -
Secure and trim:
Add a tiny drop of super glue to the knot to secure it. Allow it to dry, then trim the excess cord ends close to the knot. -
Hide the knot:
If hole size permits, gently tug the cord to slide the knot inside one of the adjacent beads for a seamless finish.
Wonky Cubes?
If your cubes squish while piercing, let the raw clay rest in the fridge for 15 minutes to firm up. Cold clay holds its shape much better against the pressure of the needle tool.
Enjoy styling these versatile purple bracelets together as a stack or wearing them individually for a pop of color
Matte vs Glossy Purple Bead Mix
This elegant bracelet balances smooth, matte lavender beads with eye-catching, darker textured accents. It’s a perfect beginner project that highlights how mixing finishes can elevate a simple beaded design.
Step-by-Step Tutorial
Materials
- Polymer clay in lavender (or light purple)
- Polymer clay in dark purple
- Coarse sea salt or sugar (for texturing)
- Bead roller (optional, but helpful for uniformity)
- Elastic beading cord (0.7mm or 0.8mm)
- Beading needle (optional)
- Super glue or jewelry cement
- Toothpick or bead piercing tool
- Oven for baking clay
- Sandpaper (fine grit)
Step 1: Creating the Smooth Lavender Beads
-
Condition the Clay:
Begin by thoroughly conditioning your lavender polymer clay until it is soft and pliable. This prevents cracking later. -
Portion Control:
Roll the clay into a long snake with an even thickness. Use a blade to slice equal-sized segments to ensure your beads will be uniform. -
Roll the Spheres:
Take each segment and roll it between your palms to form a smooth ball. I like to use a circular motion to get them perfectly round. -
Pierce the Holes:
Using your toothpick or piercing tool, gently poke a hole through the center of each bead. Twist the tool as you push to avoid squashing the sphere. -
Check the Shape:
After piercing, the bead might be slightly distorted. Give it a gentle roll between your fingers to correct the shape while keeping the hole open. -
Refine the Surface:
Gently rub each bead with your finger to smooth out any fingerprints. The goal is a flawless matte finish.
Step 2: Crafting the Textured Accent Beads
-
Prepare Dark Clay:
Condition your dark purple clay just as you did before. Portion out a few segments slightly larger than your lavender ones if you want them to stand out, or keep them the same size. -
Apply Texture:
Pour some coarse salt or sugar onto your work surface. Roll your dark purple clay balls in the granules, pressing gently so they embed into the surface. -
Secure the Texture:
Roll the bead between your palms again lightly. This pushes the granules deeper and creates that pitted, stone-like texture without losing the round shape. -
Pierce Carefully:
Pierce holes in these textured beads. proceed slowly, as the embedded granules can make the clay a bit more fragile during this step.
Sticky Texture?
If the salt/sugar isn’t sticking to the raw clay, lightly mist the clay ball with water before rolling it in the granules to help them adhere.
Step 3: Baking and Assembly
-
Bake the Beads:
Arrange all beads on a baking sheet or in a bead rack. Bake according to your customized clay package instructions (usually 275°F/135°C for 15-30 minutes). -
Dissolve the Texture:
Once baked and cooled, soak the textured dark beads in warm water. The salt or sugar will dissolve, leaving behind a unique pitted surface. -
Sand for Matte Finish:
For the smooth lavender beads, lightly buff them with fine-grit sandpaper if they look too shiny or have fingerprints. This enhances the matte clay look. -
Plan the Design:
Lay out your beads on a table. Create a pattern alternating the smooth lavender beads with the textured ones spaced intermittently for contrast. -
String the Beads:
Cut a length of elastic cord about 10 inches long. Thread your beads onto the cord in your chosen pattern. -
Check the Fit:
Wrap the strand around your wrist to check the size. Add or remove lavender beads as needed for a comfortable fit. -
Tie the Knot:
Tie a secure surgeon’s knot (right over left, left over right). Pull the elastic tight to secure the tension. -
Secure and Hide:
Add a tiny drop of super glue to the knot. once dry, trim the excess cord and gently pull the knot inside one of the bead holes to hide it.
Add Subtle Sparkle
Mix a tiny pinch of mica powder into the dark purple clay before texturing. The recessed pits will remain matte while the high points shimmer.
Now you have a custom textural bracelet that adds a sophisticated pop of purple to any outfit
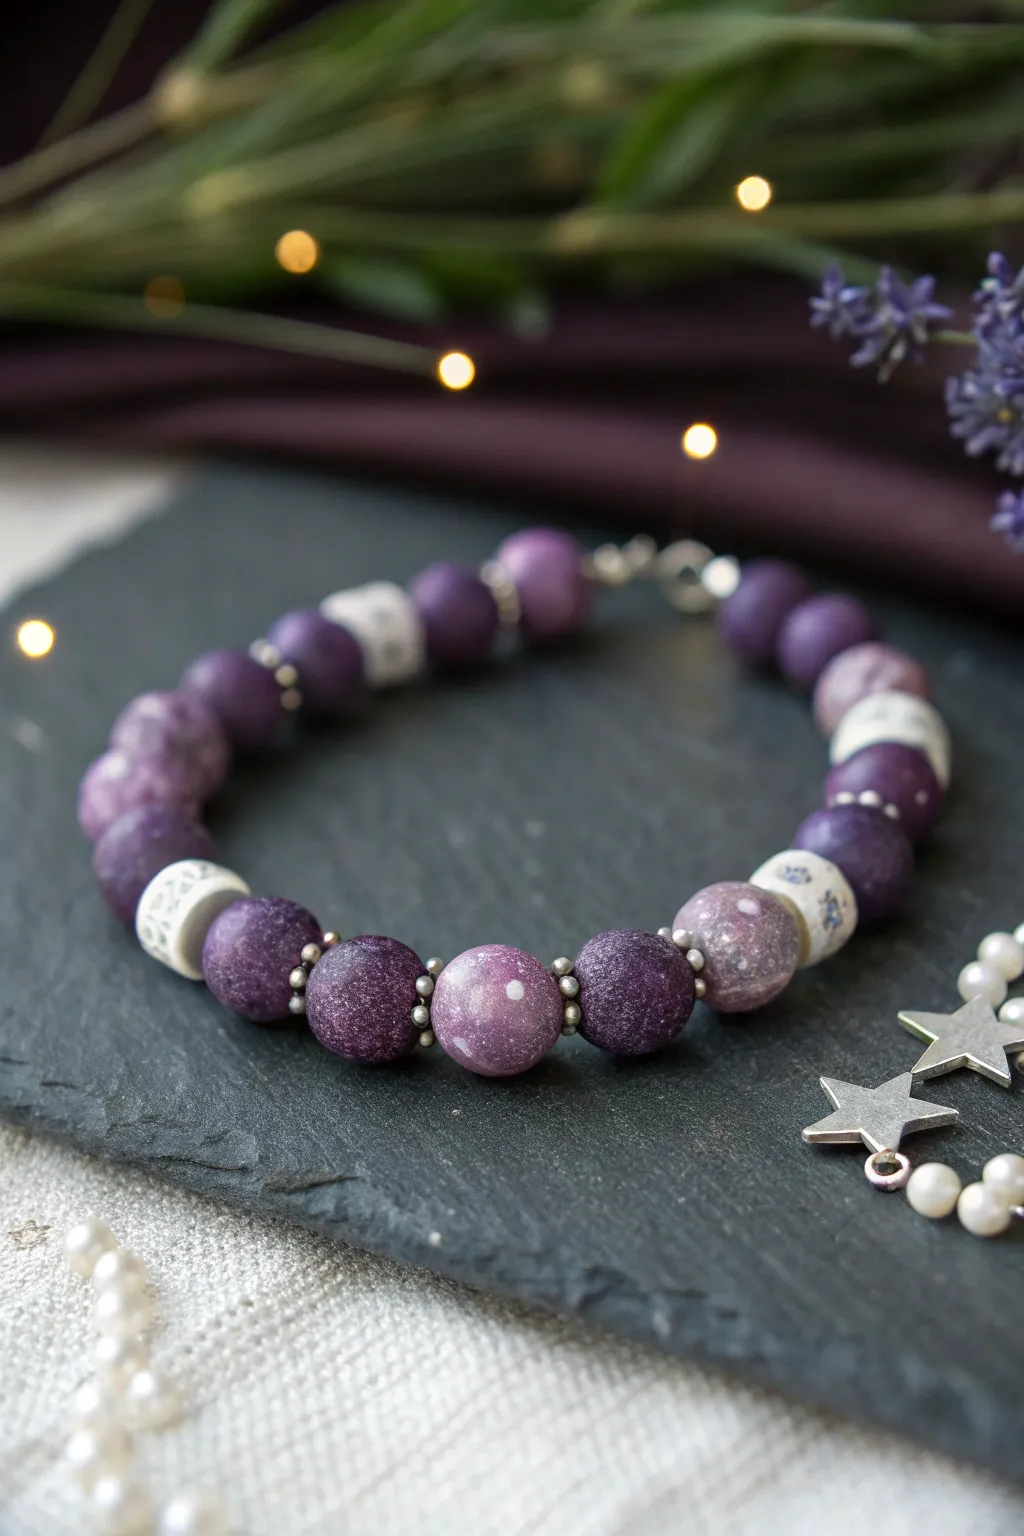
Purple Spooky Spider Accent Bracelet
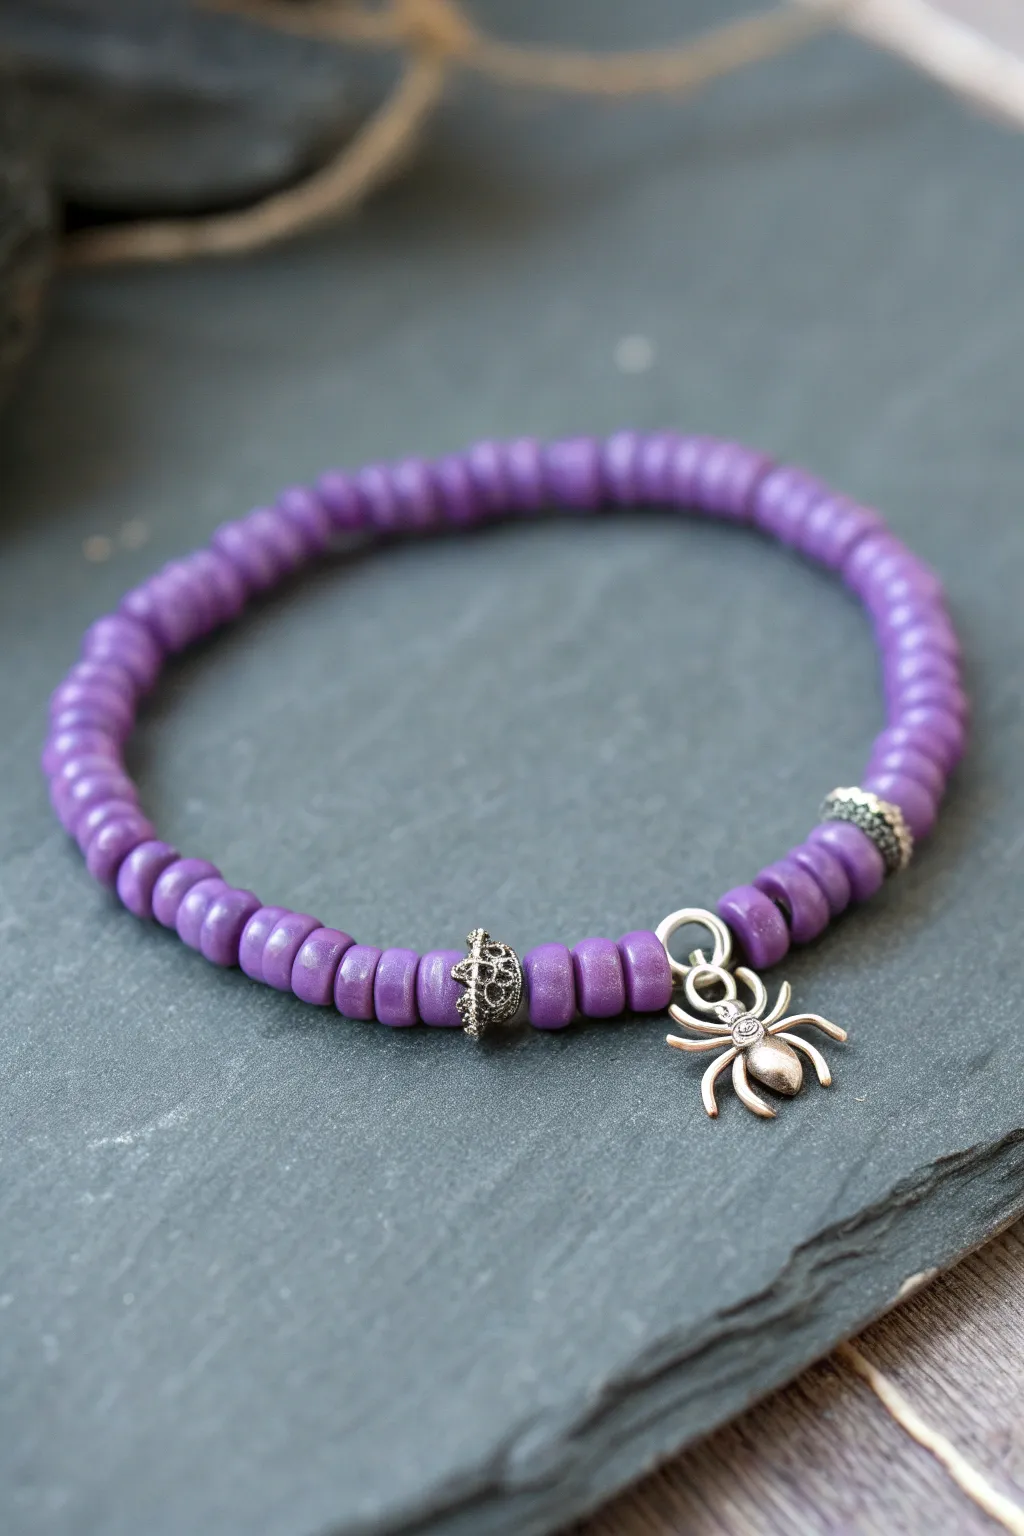
Embrace the eerie elegance of Halloween or add a touch of gothic charm to your everyday look with this simple yet striking accessory. Featuring rich royal purple heishi beads and a distinctive silver spider charm, this bracelet balances fun and sophistication perfectly.
Detailed Instructions
Materials
- Purple polymer clay heishi (disk) beads (approx. 6mm)
- Silver spider charm with attached jump ring
- 2 ornate silver spacer beads or bead caps (antique finish)
- Elastic stretch cord (0.8mm recommended)
- Jewelry glue (e.g., G-S Hypo Cement)
- Scissors or jewelry snips
- Bead stopper or masking tape
- Measuring tape
Step 1: Preparation
-
Measure your wrist:
Wrap a measuring tape comfortably around your wrist to determine the desired length, then add about 1/2 inch to account for the bulk of the larger beads. -
Cut the cord:
Cut a piece of elastic cord roughly 10-12 inches long. Having this extra length makes the final tying process much less frustrating than working with short ends. -
Pre-stretch the elastic:
Give the cord a few gentle tugs to pre-stretch it. This crucial step prevents the bracelet from sagging or loosening immediately after you finish making it. -
Secure the end:
Place a bead stopper on one end of the cord, or tape it down to your work surface, so your beads don’t slide off while you string them.
Step 2: Stringing the Design
-
Start with purple beads:
Begin threading on your purple clay heishi beads. You’ll want to string enough to cover about one-third of your total bracelet length. -
Add the first spacer:
Slide on one of the ornate silver spacer beads. This adds a nice break in the texture and frames the focal point we are about to create. -
Create the focal section:
Thread on approximately 4-6 more purple clay beads. This small cluster creates space between the spacer bead and the charm. -
Attach the spider charm:
Slide the spider charm onto the cord by threading through its jump ring or bail. Ensure the spider is facing outward if the charm is one-sided. -
Complete the center:
Add another cluster of 4-6 purple clay beads to match the other side of the charm exactly. -
Add the second spacer:
Slide on the second ornate silver spacer bead to close the decorative focal section. -
Finish the strand:
Continue stringing the remaining purple heishi beads until the bracelet reaches your measured length. Wrap it around your wrist to double-check the fit before tying.
Knot Slipping?
If the elastic feels too slick for a knot to hold, try roughing up the very ends with sandpaper before tying, or use a crimp bead cover over the knot for extra security.
Step 3: Finishing Touches
-
Remove the stopper:
Carefully remove the bead stopper or tape, holding both ends of the elastic firmly to prevent any bead spills. -
Tie the knot:
Tie a surgeon’s knot (which is like a square knot but with an extra loop through in the first step) and pull it tight. You should feel the elastic stretch slightly as you secure it. -
Apply adhesive:
I like to place a tiny dot of jewelry glue right on the knot to ensure it never slips undone. Let this dry for a moment. -
Hide the knot:
If suitable, gently pull the knot inside the hole of one of the neighboring clay beads to conceal it for a professional finish. -
Trim excess:
Once the glue is fully set, trim the excess elastic ends close to the beads, being careful not to snip the main cord.
Add Subtle Texture
Mix in a few rubberized or matte-finish black beads alongside the purple clay ones to give the bracelet more depth and a darker, moodier vibe.
Now you have a charmingly spooky accessory ready to wear for the season
Sunset Gradient: Purple to Pink to White
Capture the soft, fading hues of twilight with this beautiful pair of polymer clay bead bracelets. One bracelet anchors the look with a rich, matte eggplant purple, while the other mimics a sunset sky fading from berry tones into pinks and soft white.
Step-by-Step
Materials
- Polymer clay (Deep Purple, Magenta, White)
- Acrylic rolling pin or clay machine
- Circle cutters (small, approx. 6mm-8mm)
- Bead rolling tool (optional but helpful for uniform size)
- Toothpicks or bead piercing pins
- Baking tray and parchment paper
- Fine-grit sandpaper (400-800 grit)
- Elastic beading cord (0.7mm or 0.8mm)
- Super glue or jewelry adhesive
- Scissors
Step 1: Mixing and Forming Beads
-
Condition the base clay:
Start by warming up your deep purple, magenta, and white clay blocks in your hands until they are soft and pliable. -
Create the solid color beads:
For the solid dark bracelet, roll out a sheet of the deep purple clay. Use your circle cutter to punch out enough uniform circles to fit your wrist size (usually about 20-25 pieces). -
Mix the gradient colors:
To create the ombré effect for the second bracelet, you’ll need to mix intermediate shades. Combine magenta and white in varying ratios: 100% magenta, 75% magenta/25% white, 50/50, 25% magenta/75% white, and 100% pure white. -
Portion the gradient clay:
Roll out sheets for each of your 5 mixed gradient colors. Use the same circle cutter to punch out 4-5 circles of each shade to ensure every bead starts with the same volume of clay. -
Roll the spheres:
Take each punched circle and roll it firmly between your palms. I like to use a clear acrylic block or a bead roller here to get them perfectly round and smooth. -
Pierce the holes:
Gently hold a bead and insert a toothpick or piercing pin through the center. Twist the pin slightly as you push to avoid squashing the sphere shape.
Smooth Roll Tip
Refrigerate your rolled clay balls for 10 minutes before piercing. The slightly harder clay resists deformation, keeping your spheres perfectly round.
Step 2: Baking and Finishing
-
Bake the beads:
Arrange your pierced beads on a baking tray lined with parchment paper. Bake according to your brand’s specific package instructions (usually around 275°F/135°C for 15-30 minutes). -
Cool and inspect:
Let the beads cool completely before handling. Check for any fingerprints or sharp edges around the holes. -
Sand for a matte finish:
The beads in the photo have a lovely matte texture. Lightly buff each bead with fine-grit sandpaper under running water to remove shine and imperfections. -
Clean the holes:
Use a small bead reamer or a needle tool to clear out any clay debris from inside the bead holes to ensure the cord passes through smoothly.
Texture Play
Before baking, roll your raw clay beads in coarse salt or sugar. After baking, wash the beads to dissolve the crystals for a unique pitted lava-stone texture.
Step 3: Assembly
-
Layout the gradient:
Lay out the beads for the ombré bracelet on a bead board or towel. Arrange them from darkest magenta to lightest pink, ending with the white, then mirroring back or repeating the pattern. -
String the first bracelet:
Cut a piece of elastic cord about 10 inches long. Pre-stretch the elastic by pulling on it gently a few times; this prevents the bracelet from stretching out later. -
Feed the beads:
Thread your arranged gradient beads onto the elastic. Check the length around your wrist to ensure a comfortable fit. -
Secure the knot:
Tie a surgeon’s knot (loop the elastic through twice on the first pass). Pull it tight. -
Glue and hide:
Add a tiny drop of super glue to the knot. Once dry, trim the excess cord and gently tuck the knot inside the hole of a neighboring bead. -
Assemble the solid bracelet:
Repeat the stringing and tying process with your solid deep purple beads to complete the matching set.
Enjoy wearing your custom handmade jewelry set that brings a touch of sunset warmth to any outfit