If you love that satisfying, clicky stack of flat beads, you’re going to have so much fun with these heishi bracelet ideas. I pulled together my favorite “color recipes” and focal tricks for a heishi clay bead bracelet that looks intentional, not accidental.
Classic Rainbow Order
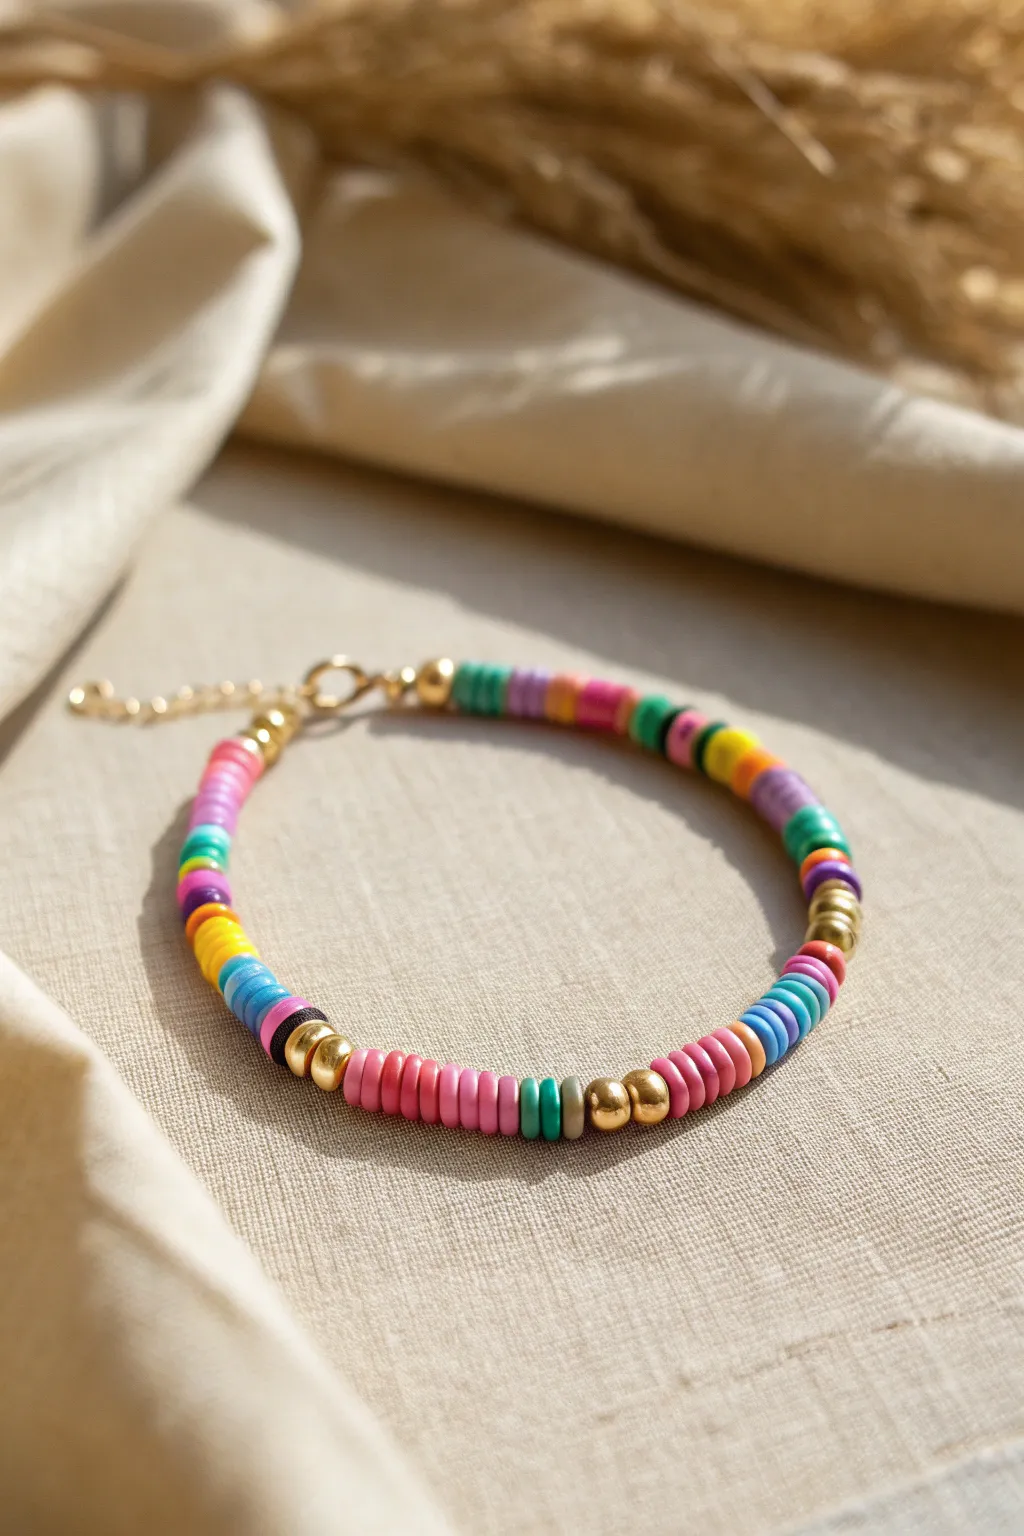
Embrace the vibrant energy of summer with this cheerful heishi bead bracelet, featuring a mix of flat polymer clay discs and elegant gold accents. The design uses asymmetrical color blocking rather than a strict rainbow gradient, giving it a relaxed, artisanal feel perfect for stacking.
Step-by-Step
Materials
- 6mm varied polymer clay heishi beads (pink, turquoise, yellow, purple, blue, green, orange)
- 3-4mm gold metallic spacer beads (round)
- Gold tone crimp beads
- Gold tone jump rings (4mm or 5mm)
- Gold tone lobster clasp
- Gold tone extension chain (optional but recommended)
- Elastic cord (0.8mm) or beading wire (Tiger Tail)
- Jewelry pliers (chain nose and flat nose)
- Scissors or wire cutters
- Bead stopper or tape
Step 1: Preparation & Planning
-
Measure your wrist:
Wrap a flexible measuring tape around your wrist to find your size. Add about 0.5 inches to this measurement to ensure the bracelet fits comfortably without being too tight. -
Cut the cord:
Cut a piece of beading wire or elastic cord about 9-10 inches long. Having extra length makes it much easier to tie knots or attach clasps later. -
Secure the end:
Place a bead stopper or a piece of masking tape on one end of your cord to prevent beads from sliding off while you work.
Step 2: Creating the Pattern
-
Start with gold:
Begin by threading a gold crimp bead onto the wire, followed by your first gold spacer bead. (If using elastic, you can just start knotting, but for this professional look, we are using wire and a clasp). -
The pink section:
Based on the image, start your main pattern with a block of pink beads. Thread on about 8 to 10 pink heishi discs. -
Add a gold accent:
Slide on one gold round spacer bead. These gold accents break up the color and add a touch of shine. -
Turquoise touch:
Add a very short section of turquoise or teal—just 2 or 3 beads—followed by a grey or neutral bead. -
Double gold:
Add two gold spacer beads side-by-side here for a slightly heavier metallic focal point. -
Pink and purple mix:
Continue with a section of pink beads (about 5), then transition into purple or coral tones. -
Build the rainbow:
Continue adding blocks of color separated occasionally by single or double gold spacers. Mimic the photo by using blocks of blue, yellow, purple, and green. Keep the block sizes irregular—some long (10 beads), some short (3 beads)—for that organic look. -
Check the length:
Periodically wrap the beaded wire around your wrist. Stop beading when you are about 0.5 to 1 inch short of your final desired length to account for the clasp.
Pro Tip: Bead Stopper Hack
If you don’t have a dedicated bead stopper, a simple binder clip works perfectly to keep your beads safe on the wire while you design the pattern.
Step 3: Finishing Touches
-
Thread the crimp bead:
Slide a crimp bead onto the end of the wire, followed by a jump ring or the loop of your extension chain. -
Create the loop:
Take the tail end of the wire and thread it back through the crimp bead and into the first few beads of your design. -
Secure the crimp:
Use your flat nose pliers to squash the crimp bead flat, securing the wire in place. I always give a gentle tug here to make sure it’s solid. -
Attach the clasp:
Repeat the crimping process on the other end of the bracelet (the starting end), but this time attach the lobster clasp. -
Trim excess wire:
Use your wire cutters or sharp scissors to trim any excess wire sticking out from the beads as close as possible without cutting the main strand. -
Add extension chain:
If you didn’t attach the chain directly to the wire loop, use a jump ring and pliers to attach the extension chain to the loop ring now.
Level Up: Charm It Up
Attach a small gold seashell or starfish charm to the extension chain or jump ring for an extra beach-ready summery vibe.
Now slip on your colorful creation and enjoy the customized pop of joy on your wrist


Simple Color-Block Stripes
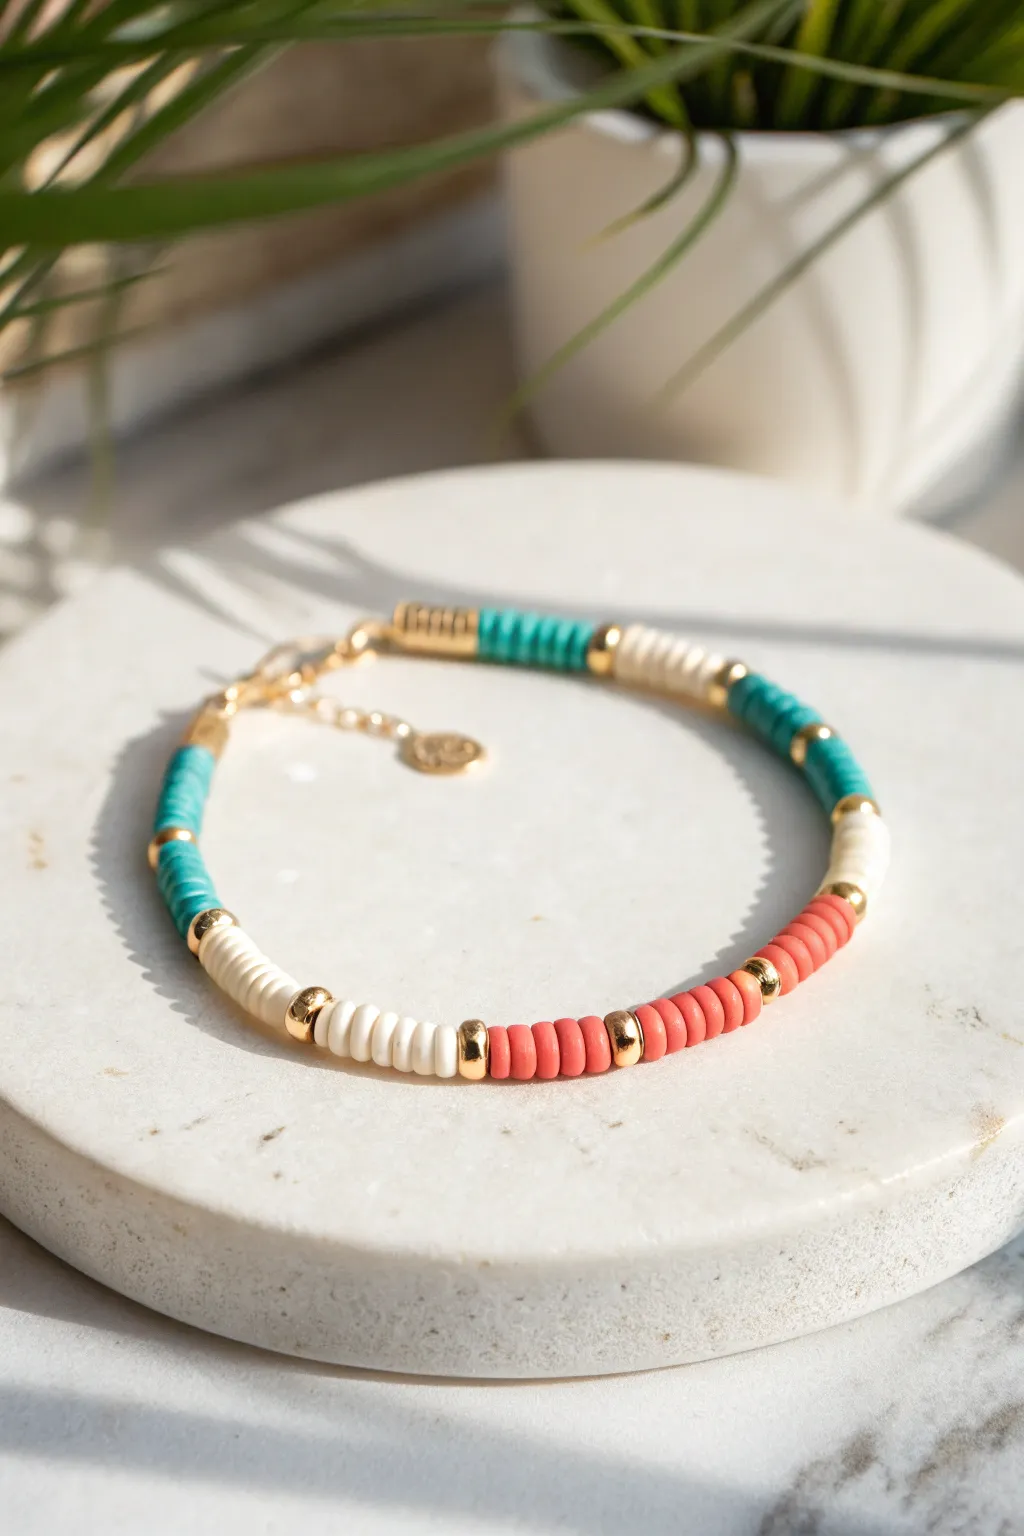
Embrace the effortless style of summer with this geometric heishi bead bracelet. Featuring a classic color-blocking technique in turquoise, cream, and coral, this accessory balances vibrant hues with elegant gold accents for a polished finish.
Step-by-Step Guide
Materials
- 6mm Heishi polymer clay disc beads (Turquoise, Coral, Cream/Off-White)
- Small gold nugget spacer beads or gold ball beads (approx. 3-4mm)
- Elastic beading cord (0.7mm or 0.8mm)
- Gold crimp bead covers (optional but recommended)
- Gold jump rings (4mm)
- Gold lobster clasp
- Gold extender chain with charm (optional)
- Jewelry glue (e.g., E6000 or G-S Hypo Cement)
- Scissors or jewelry wire cutters
- Chain nose pliers
- Bead stopper or tape
Step 1: Preparation & First Section
-
Measure the cord:
Cut a piece of elastic cord about 10-12 inches long. This generous length gives you plenty of room to tie knots comfortably. -
Secure the end:
Attach a bead stopper or a piece of tape to one end of the cord to prevent your beads from sliding off while you work. -
Start the pattern:
Begin stringing with your first gold bead. This will act as the cap for your first color section. -
String the turquoise block:
Thread on approximately 10 to 12 turquoise heishi beads. Aim for a section length of about 3/4 of an inch. -
Add a gold accent:
Slide on another gold spacer bead to close the turquoise section.
Uneven Blocks?
Heishi beads vary slightly in thickness. Instead of counting beads, measure each color block against a ruler to ensure all sections are exactly the same visual length.
Step 2: Building the Pattern
-
Create the cream section:
Switch colors and string on about 10 to 12 cream or off-white heishi beads, matching the length of your turquoise section. -
Add a gold separator:
Place a gold spacer bead after the cream section. These gold accents are crucial for giving the bracelet that high-end look. -
Add the coral block:
String on your coral heishi beads. Again, use roughly 10-12 beads to maintain symmetry with the previous blocks. -
Cap with gold:
Finish this sequence with a gold spacer bead. -
Repeat the sequence:
Continue the pattern: Turquoise section, Gold bead, Cream section, Gold bead, Coral section, Gold bead. Repeat until the beaded portion measures about 6 to 6.5 inches, or your desired wrist size.
Step 3: Finishing Touches
-
Check the fit:
Wrap the strand around your wrist to check the size. Remember that the clasp and extender will add a little extra length. -
Prepare for closure:
Instead of a simple knot, we’ll add hardware for a professional finish. Thread one end of the cord through a crimp bead (if using wire) or prepare to tie directly onto jump rings. -
Attaching the clasp:
Tie the elastic cord firmly onto a jump ring using a surgeon’s knot (right over left, left over right, looping the second knot twice). I prefer to add a dab of jewelry glue to the knot for extra security. -
Hide the knot:
If possible, slide the knot inside the hole of the adjacent gold bead or cover it with a crimp cover using your pliers. -
Attach the other side:
Repeat the tying process on the other end of the bracelet, attaching it to the lobster clasp component. -
Add the extender:
Open a jump ring with your pliers and attach the extender chain to the ring loop opposite the lobster clasp. This makes the bracelet adjustable. -
Final trim:
Once the glue is fully dry, trim any excess cord tails close to the beads.
Level Up: Texture Mix
Swap the smooth gold spacer beads for textured, stardust, or faceted gold beads. This adds a subtle sparkle that catches the light differently than the matte clay.
Now you have a stunning, stackable accessory ready to wear with your favorite outfits


All-White With Gold Pops
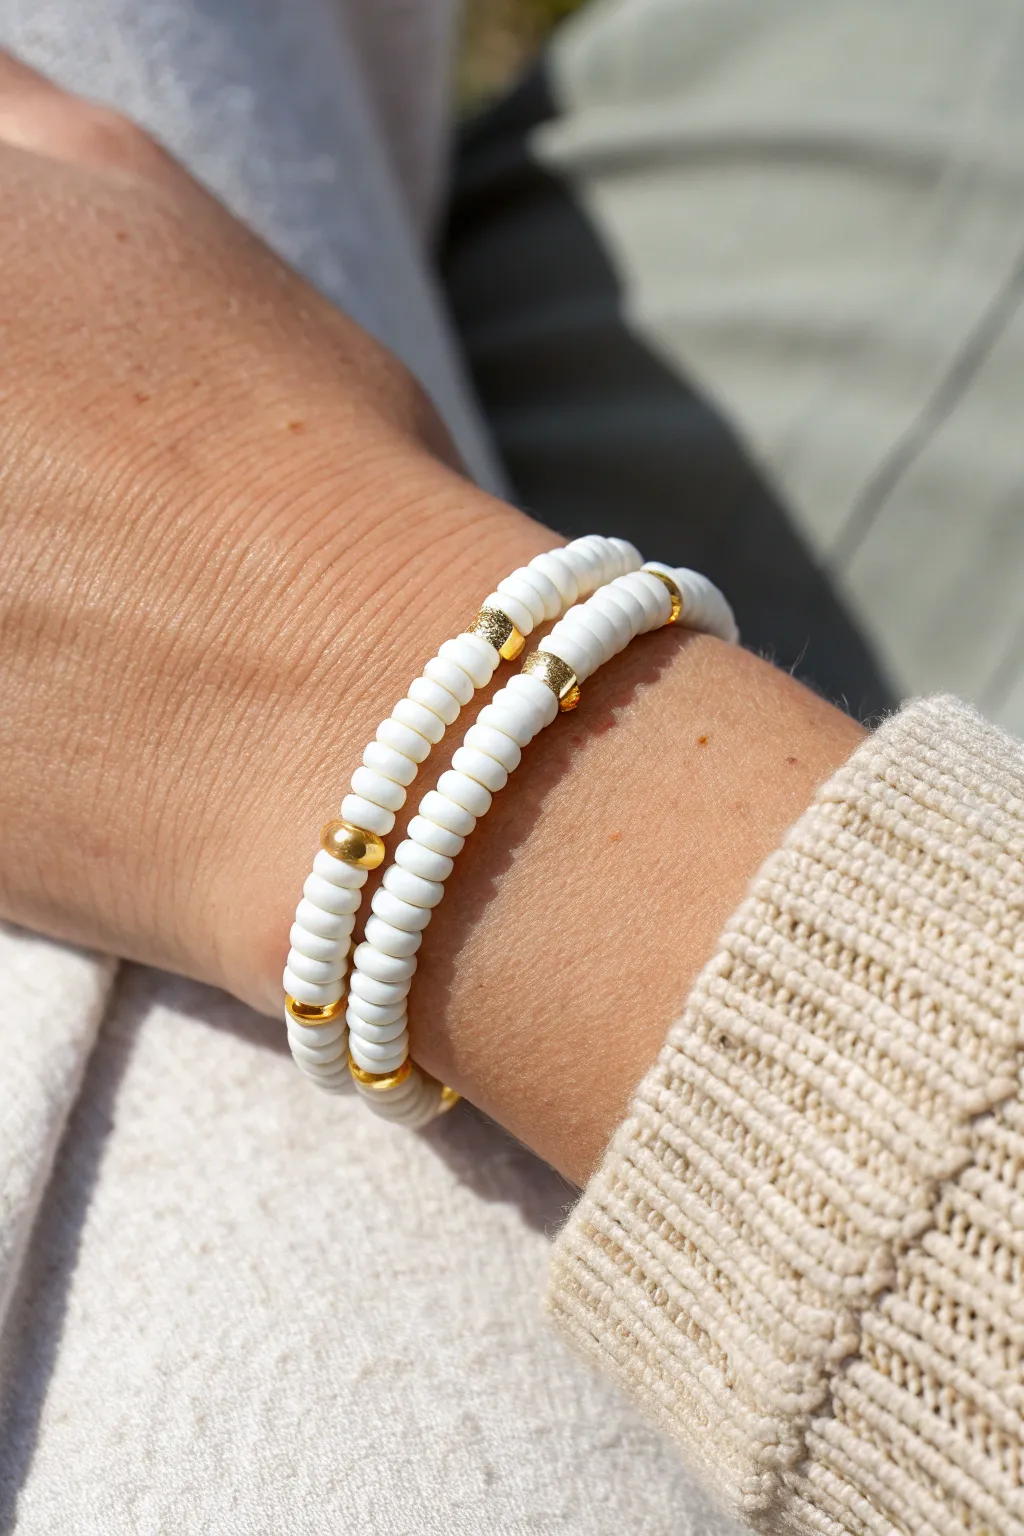
These elegant twin bracelets combine crisp white heishi beads with warm gold accents for a versatile, sunny-day accessory. The design relies on irregular spacing of metallic spacers to create an effortless, organic look that isn’t too rigid.
Step-by-Step
Materials
- 4mm or 5mm white polymer clay heishi beads (flat disc beads)
- Gold tone spacer beads (various flat discs or rounded nuggets)
- Strong elastic cord (0.7mm or 0.8mm clear stretch cord)
- Super glue or jewelry cement
- Scissors
Step 1: Planning and Stringing
-
Measure your wrist:
Wrap a flexible measuring tape around your wrist bone to determine the final size. For a comfortable fit with heishi beads, you’ll generally want to add about half an inch to your actual wrist measurement. -
Cut the cord:
Cut a piece of elastic cord about 10-12 inches long. Having this extra length is crucial—it prevents beads from sliding off the other end while you work and gives you plenty of room to tie a secure knot later. -
Pre-stretch the elastic:
I always pre-stretch my elastic before adding a single bead. Give the cord a few firm tugs; this relaxes the material now so your bracelet doesn’t stretch out and become loose after wearing it a few times. -
Start with white beads:
Thread on about 10 to 15 white heishi beads to begin. Starting with a solid block of the base color helps hide the knot later on. -
Add first gold accent:
Slide on your first gold spacer bead. You can use a flat gold disc for a subtle look or a slightly thicker, rounded gold bead for more dimension. -
Establish the pattern:
Continue threading white beads. Instead of a strict pattern (like every 10 beads), vary the spacing slightly. Try a section of 20 white beads, then a gold one, then perhaps a shorter section of 8 white beads. -
Mix gold textures:
If you have different gold spacers, alternate them. Use a smooth gold disc for one accent and a textured or faceted gold nugget for the next to add visual interest. -
Check the length:
Periodically wrap the strand around your wrist to check the fit. The ends should touch comfortably without stretching the cord tight. -
Finish the strand:
Ensure you end with a section of white beads that matches the length of your starting section, so the pattern looks continuous when joined.
Knot Security
Use a needle or toothpick to apply the glue precisely. Too much glue can stiffen the surrounding cords and make the beads brittle.
Step 2: Finishing the Stack
-
Prepare the knot:
Bring the two ends of the elastic together carefully. Remove any slack so the beads are touching, but ensure they aren’t bunched up tightly, or the bracelet will buckle. -
Tie a surgeon’s knot:
Tie a regular overhand knot, but loop the end through the hole a second time before pulling it tight. This friction helps hold the elastic in place. -
Secure the knot:
Pull the knot tight from all four directions—pull the two tail ends, and pull the bracelet loop itself. This seats the knot firmly. -
Apply adhesive:
Place a tiny drop of super glue or jewelry cement directly onto the knot. Let it dry for a minute or two to ensure it doesn’t slip. -
Hide the knot:
Once the glue is tacky but not fully hard, trim the excess tail ends close to the knot. Gently slide an adjacent heishi bead over the knot to conceal it inside the bead hole. -
Create the twin:
Repeat the entire process to create a second bracelet. For the best ‘stacked’ look, vary the placement of the gold beads on the second bracelet slightly so they don’t line up perfectly with the first.
Level Up: Texture Pop
Replace one gold spacer with a single freshwater pearl or a piece of natural shell for a beachy, high-end organic variation.
Slip on your new stack of bracelets for an instant touch of summer elegance that pairs perfectly with any outfit


Neutral Boho Stack in Cream and Tan
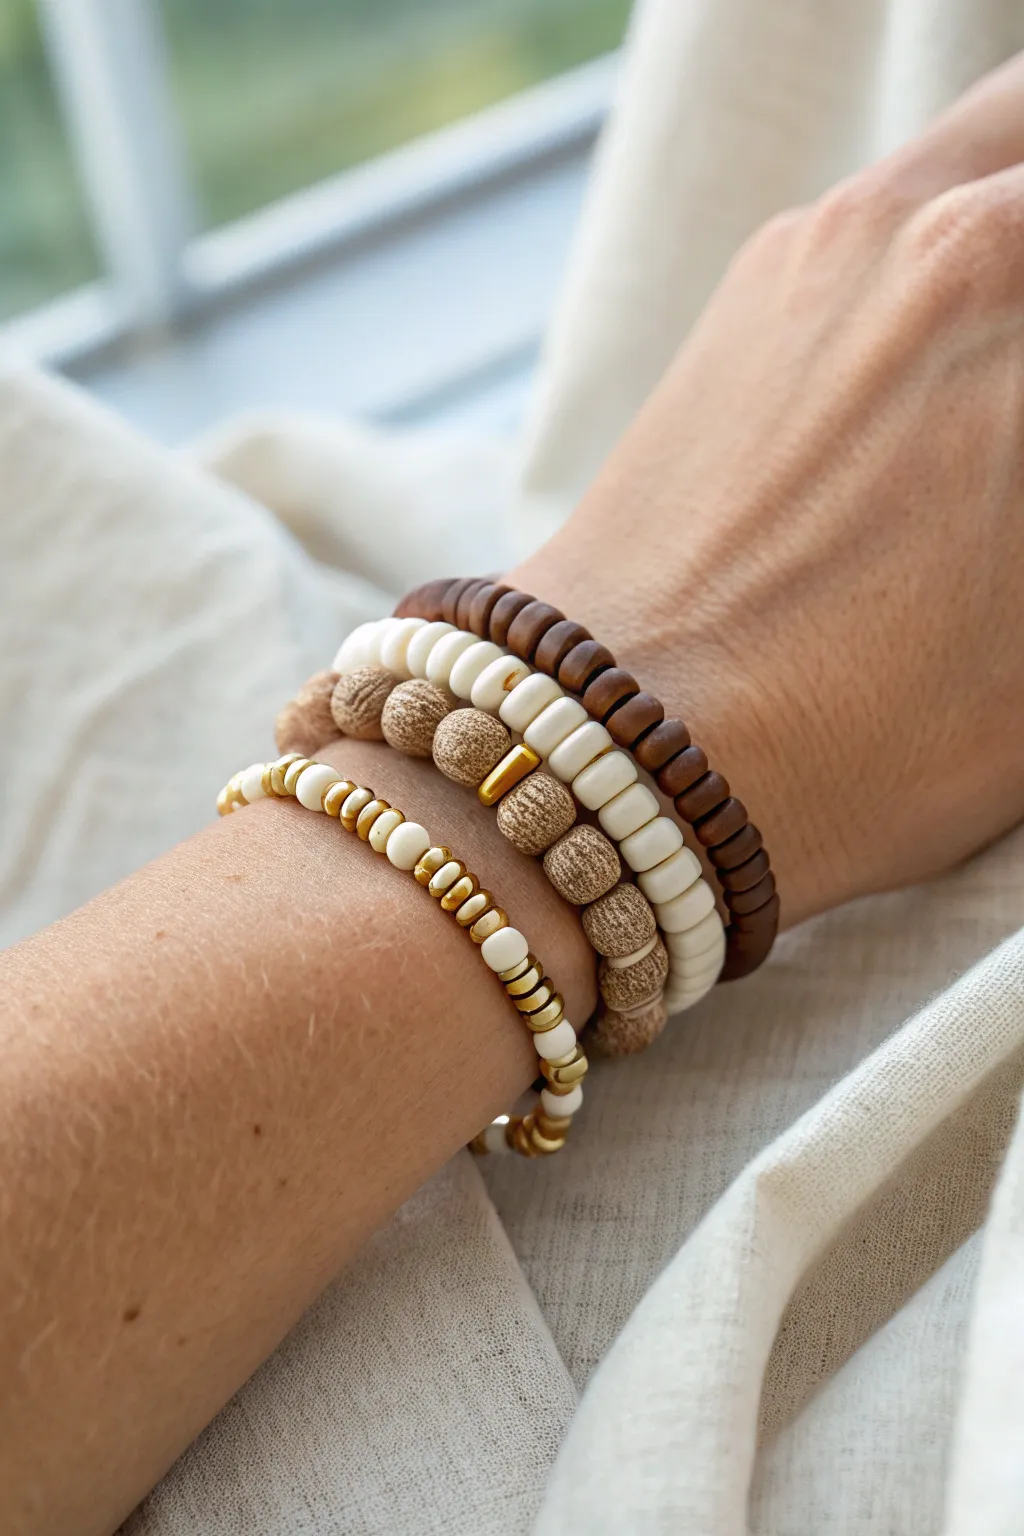
This sophisticated stack combines the warmth of natural wood, the texture of sandstone, and the smoothness of cream beads for a perfectly balanced neutral boho look. It features four distinct yet harmonious strands that elevate any casual outfit with their rich, earthy tones.
How-To Guide
Materials
- Dark wood disc beads (approx. 6-8mm)
- Creamy white rounded beads (synthetic stone or heavy acrylic)
- Textured sandstone or speckled tan round beads (approx. 8mm)
- White seed beads or tiny heishi beads
- Gold hematite or brass spacer beads (flat disc shape)
- Gold tube bead (approx. 4-5mm)
- Strong elastic cord (0.7mm or 0.8mm)
- Bead stopper or masking tape
- Jewelry glue (e.g., G-S Hypo Cement)
- Scissors
Step 1: Strand 1: The Gold & White Accent
-
Prepare your cord:
Cut a piece of elastic cord roughly 10 inches long. Pre-stretch it by pulling firmly on both ends a few times to prevent the bracelet from loosening later. -
Secure the end:
Place a bead stopper or a piece of tape on one end to keep your beads from sliding off while you work. -
Start the pattern:
Thread on two small gold disc spacer beads followed by two white seed beads. -
Build the sequence:
Continue this alternating pattern—two gold, two white—until you reach your desired wrist size. I find that this duality creates a lovely shimmer that catches the light. -
Tie it off:
Tie a surgeon’s knot (right over left twice, then left over right), add a dot of jewelry glue, and trim the excess cord once dry.
Knot Security
Hide your knot inside a larger bead hole (like the sandstone ones) for a professional finish that won’t scratch your skin.
Step 2: Strand 2: Textured Sandstone
-
Set up the texture strand:
Cut and pre-stretch another length of elastic cord, securing the end as before. -
Thread the focal beads:
String your textured sandstone or speckled tan beads. These larger beads provide the ‘chunky’ element of the stack. -
Insert the centerpiece:
Midway through the strand, slide on a single gold tube bead to act as a sleek metallic focal point amidst the rougher textures. -
Finish the texture strand:
Complete the loop, check the fit against your wrist, and secure with a glued knot.
Natural Scents
Use sandalwood beads for the dark wood strand. They release a calming, subtle fragrance as they warm up against your skin.
Step 3: Strand 3: Creamy Minimalism
-
Begin the cream strand:
Prepare your third piece of elastic cord. -
Create the simple line:
String the smooth, creamy white rounded beads. This strand acts as a visual palate cleanser between the gold and the wood. -
Check consistency:
Ensure all beads are uniform in size for a clean look, discarding any with obvious defects. -
Close the loop:
Tie off this strand securely, hiding the knot inside one of the bead holes if possible.
Step 4: Strand 4: Dark Wood Anchor
-
Prep the final cord:
Cut your last piece of elastic, giving it a good stretch. -
String the wood:
Thread the flat, dark wood disc beads. The natural grain of the wood adds essential depth to the stack. -
Ensure density:
Because these are flat discs, you’ll need many more of them than round beads. Pack them tightly enough so there are no gaps, but not so tight the bracelet kinks. -
Final knot:
Tie your final surgeon’s knot, glue, and trim. Once dry, stack all four together for the complete look.
Now you have a versatile, textured stack that pairs perfectly with linen and denim pieces

The Complete Guide to Pottery Troubleshooting
Uncover the most common ceramic mistakes—from cracking clay to failed glazes—and learn how to fix them fast.
Single-Color Minimalist Matte
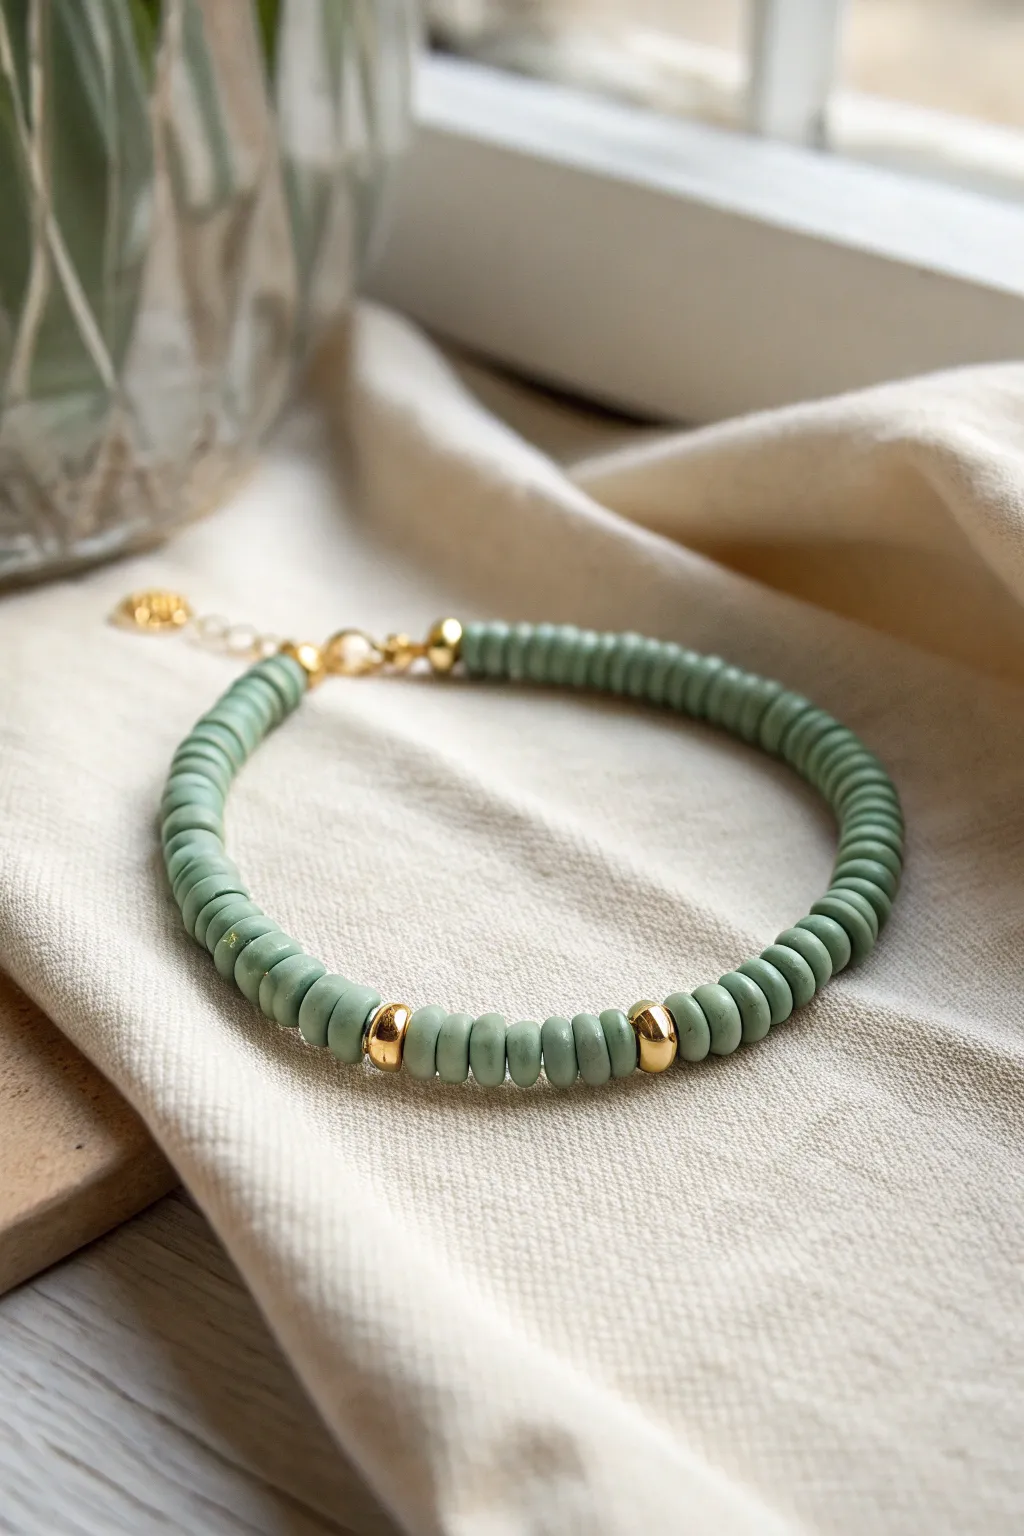
This elegant bracelet pairs the serene, earthy tone of sage green polymer clay with the luxurious warmth of gold accents. The matte finish of the heishi beads creates a modern, sophisticated texture that looks effortless on its own or stacked with other pieces.
Detailed Instructions
Materials
- Sage green polymer clay heishi beads (approx. 4-6mm diameter)
- Gold tone spacer beads (approx. 3-4mm, resembling small nuggets or rounded donuts)
- Strong elastic beading cord (pref. 0.5mm clear)
- Jewelry glue or clear nail polish
- Scissors or jewelry snips
- Beading needle (optional but helpful for elastic)
- Tape or binder clip (to secure the end)
Step 1: Preparation
-
Measure your wrist:
Before cutting any cord, wrap a measuring tape comfortably around your wrist. Add about a half-inch to this measurement for a comfortable fit, or a bit more if you prefer a looser drape. -
Prepare the cord:
Cut a length of elastic cord about 10-12 inches long. This extra length is crucial for tying a secure knot later without struggling with tiny ends. -
Pre-stretch the elastic:
Gently pull the elastic cord a few times to pre-stretch it. This simple trick prevents the bracelet from drooping or stretching out permanently after wearing it for the first time. -
Secure the end:
Attach a piece of tape or a binder clip to one end of your cord. This acts as a stopper so your beads don’t slide right off while you work.
Step 2: Stringing the Design
-
Start with the main color:
Begin threading the sage green heishi beads onto the elastic. I like to string about half of the total length needed for the bracelet during this first pass. -
Check the density:
As you string, check that the flat discs are sitting flush against each other without twisting. Heishi beads look best when stacked neatly like a roll of coins. -
Add the first gold accent:
Once you have reached the halfway point of your design, slide on the first gold spacer bead. This will act as part of the central focal feature. -
Create the spacer gap:
Unlike typical patterns where spacers are isolated, add a small cluster of heishi beads here. Thread on exactly five or six sage green beads to create a small bridge of color. -
Add the second gold accent:
Slide on the second gold spacer bead. This completes the subtle ‘double gold’ focal point shown in the image. -
Finish stringing:
Continue adding the rest of your sage green heishi beads until you reach your desired total length. Wrap it around your wrist to double-check the fit before tying.
Sticky Situation
If your glue makes the nearby beads stick together, use a scrap piece of paper to shield the beads next to the knot while applying the adhesive.
Step 3: Finishing Touches
-
Remove the stopper:
Carefully remove the tape or clip from the end of the cord, ensuring you keep a firm grip on both ends so no beads escape. -
Tie a surgeon’s knot:
Cross the ends, wrap one end around and under twice, and pull tight. This extra loop provides significantly more grip than a standard square knot. -
Tighten the knot:
Pull the cords firmly but gently. You want the beads to touch snugly, but not so tight that the bracelet puckers or sits stiffly. -
Secure with adhesive:
Dab a tiny drop of jewelry glue or clear nail polish directly onto the knot. Allow it to dry completely before trimming anything. -
Hide the knot (optional):
If one of your beads has a slightly larger hole (often the gold spacers do), try to slide the knot inside it for a completely seamless finish. -
Trim the ends:
Using sharp scissors, trim the excess cord ends close to the knot, leaving just a millimeter or two for security.
Pattern Play
Try varying the number of sage beads between the gold spacers. A larger gap of 10-15 beads creates a totally different, asymmetrical rhythm.
Slip on your new bracelet and enjoy the subtle pop of color and shine on your wrist
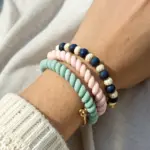
Confetti Mix “Grab Bag” Pattern
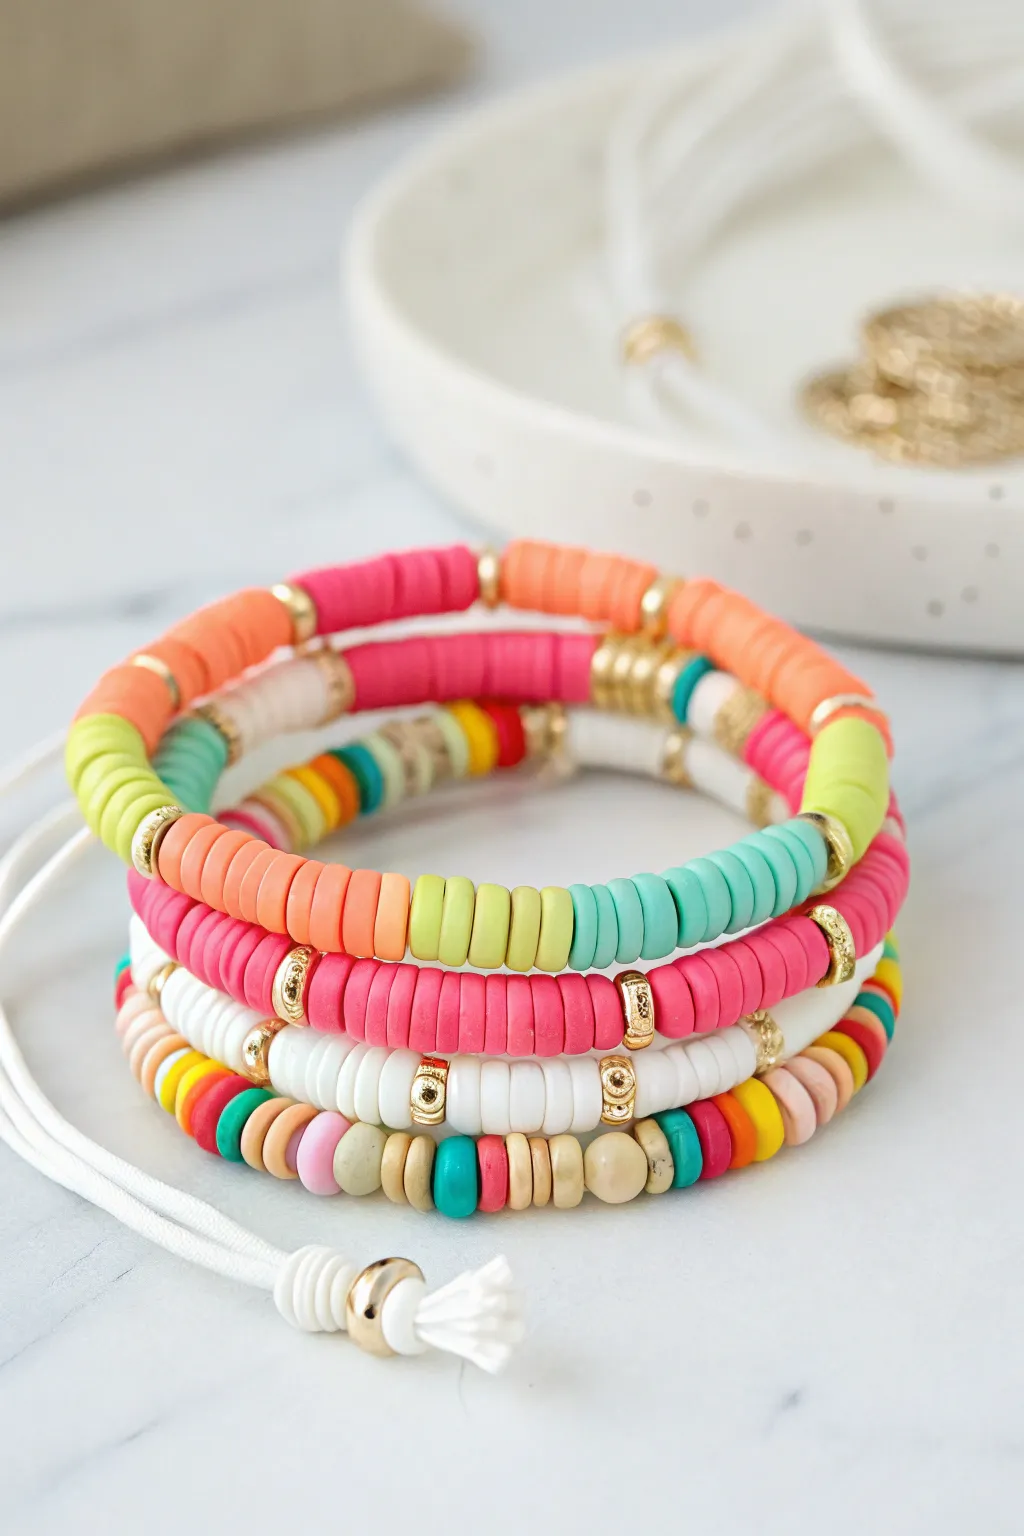
These vibrant, playful bracelets combine solid color blocking with random confetti-style patterns for a look that screams summer fun. The mix of flat clay disc beads and gold accents creates a polished stack that feels both curated and carefree.
How-To Guide
Materials
- Polymer clay heishi beads (6mm) in: bright pink, coral orange, teal, lime green, white, yellow, navy blue
- Gold spacer beads (6mm, round disc or waffle shape)
- Strong elastic cord (0.7mm or 0.8mm)
- Jewelry glue or clear nail polish
- Scissors
- Tape or binder clip
- Bead stopper (optional)
Step 1: Preparation and Sizing
-
Measure your wrist:
Wrap a piece of string around your wrist to find your size, then add about half an inch for a comfortable fit. Cut your elastic cord to about 12 inches per bracelet to give yourself plenty of room for tying knots. -
Secure the end:
Attach a piece of tape or a binder clip to one end of your elastic cord. This prevents beads from sliding off while you design the pattern. -
Pre-stretch the cord:
Give the elastic a few gentle tugs before you begin beading. This helps ‘set’ the stretch so the finished bracelet doesn’t gap later on.
Knot Slipping?
If your elastic knot feels loose, try pulling the cord ‘taut’ (stretching it away from the knot) while tightening. This locks the knot fibers.
Step 2: Creating the Solid Block Designs
-
Start the color-blocked bracelet:
For the bracelet with large sections of color, begin by threading about 1.5 inches of coral orange beads. -
Add gold accents:
Slide on a gold spacer bead to separate the color blocks. I find that using varied gold spacers—like waffle discs versus smooth rounds—adds nice texture. -
Continue the pattern:
String 1.5 inches of bright teal beads, followed by another gold spacer. Repeat this process with the lime green beads. -
Create the pink stripe bracelet:
For the predominantly pink bracelet seen in the stack, thread roughly 2 inches of hot pink beads. -
Insert metallic details:
Place three gold spacers in a row to create a thicker metallic band, then switch to the next color block.
Pro Tip: Bead Soup
Don’t hand-pick every bead for the confetti strand. Scoop them blindly with the cord tip for a truly authentic, random pattern.
Step 3: Creating the Confetti Mix Pattern
-
Prepare your bead soup:
For the bottom bracelet in the stack, mix a small handful of different colored beads (yellow, pink, teal, white, wood-tone, blue) into a bowl. -
Random stringing:
Without analyzing the order too much, thread these mixed beads onto the cord. The goal is a random ‘grab bag’ look, so don’t worry about symmetry. -
Integrate neutrals:
Interject occasional beige or wood-toned beads among the bright colors to ground the design and break up the neon tones. -
Check the length:
Periodically wrap the strand around your wrist. Stop adding beads once the ends meet comfortably without stretching the elastic tight.
Step 4: Finishing and Knotting
-
Tie the first knot:
Remove the tape or clip. Bring the two ends together and tie a simple overhand knot, pulling it tight against the beads. -
Secure with a surgeon’s knot:
Tie a second knot, but this time loop the end through the circle twice before pulling tight. This extra pass prevents the elastic from slipping. -
Apply adhesive:
Dab a tiny drop of jewelry glue or clear nail polish directly onto the knot. Let it dry for a minute to ensure it bonds securely. -
Hide the knot:
Trim the excess elastic ends close to the knot. Gently pull the bracelet so the knot slides inside the hole of a nearby bead, hiding it from view. -
Optional tassel addition:
If creating the white bracelet with the tassel, thread both tail ends of the elastic through a large gold bead and a pre-made white tassel before tying your final knots.
Enjoy mixing and matching these cheerful stacks to brighten up any outfit


What Really Happens Inside the Kiln
Learn how time and temperature work together inside the kiln to transform clay into durable ceramic.
Sunset-to-Sea Gradient
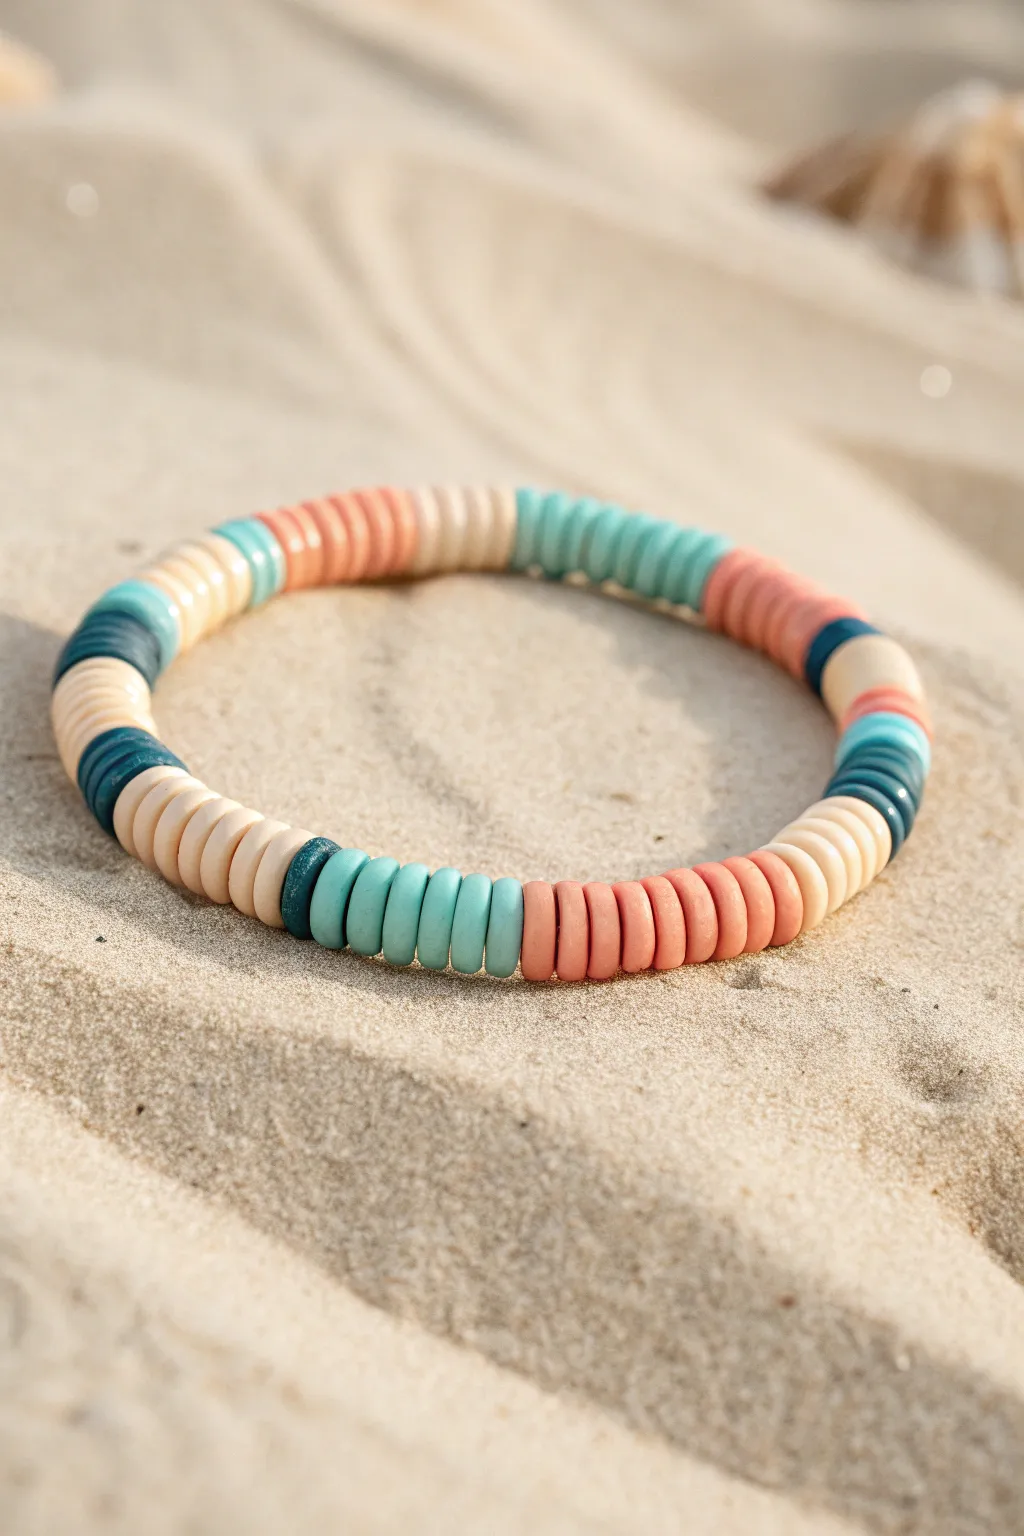
Capture the laid-back essence of a beach day with this soothing heishi bead bracelet. The alternating blocks of warm coral, sandy beige, and cool teal create a balanced rhythm that feels like sunset on the dunes.
Step-by-Step Guide
Materials
- 6mm flat disc heishi beads (polymer clay) in Coral/Peach
- 6mm flat disc heishi beads (polymer clay) in Light Sandy Beige/Cream
- 6mm flat disc heishi beads (polymer clay) in Teal/Aqua
- 6mm flat disc heishi beads (polymer clay) in Deep Ocean Blue or Navy
- 0.8mm clear elastic stretch cord
- Jewelry glue or clear nail polish
- Scissors
- Beading needle (optional, but helpful)
- Bead stopper or tape
Step 1: Preparation and Setup
-
Measure the cord:
Cut a piece of elastic cord about 10-12 inches long. You want plenty of extra length to make tying the knot easier at the end. -
Pre-stretch the elastic:
Give your cut piece of cord a few firm tugs. This pre-stretching helps prevent the bracelet from loosening up significantly after your first wear. -
Secure the end:
Place a bead stopper or simply a piece of masking tape on one end of the cord so your beads don’t slide right off while you work. -
Lay out the pattern:
Before threading, lightly arrange your bead piles. This design relies on color blocking rather than random mixing, so having your colors separated makes the process smoother.
Knot Slipping?
If your elastic knot keeps untying, try rubbing the cord ends with a little beeswax or even clear nail polish before tying. The texture helps the slick elastic grip itself better.
Step 2: Creating the Color Blocks
-
Start with the focal section:
Begin by threading 6 to 7 beads of the Teal/Aqua color. This establishes the first cool-toned block. -
Add a sandy transition:
Thread on 2 beads of the Sandy Beige. This acts as a short separator. -
Introduce the dark accent:
Add 3 to 4 beads of the Deep Ocean Blue. This dark contrast really makes the lighter colors pop. -
Return to sand:
Thread on another 3 beads of the Sandy Beige color. -
Create a warm block:
Now string on about 8 beads of the Coral/Peach color. This should be slightly longer than your first teal section. -
Add a large neutral stretch:
Follow the coral with a longer run of Sandy Beige—about 5 or 6 beads. -
Repeat the cool tone:
Add another block of Teal/Aqua, using roughly 6 to 7 beads. -
Insert a pattern break:
Thread 3 Deep Ocean Blue beads followed immediately by 3 Sandy Beige beads. -
Build the second warm section:
Add another block of Coral/Peach. I usually make this one consistent with the first, using about 8 beads. -
Check the fit:
Wrap the strand around your wrist. If it needs more length, continue adding sandy beige or teal beads until it fits comfortably without squeezing.
Add Some Shine
Elevate the beachy look by swapping one of the ‘Deep Ocean Blue’ sections for gold or brass disc spacers. The metallic flash looks fantastic against the matte clay.
Step 3: Finishing Touches
-
Prepare to knot:
Remove the tape or bead stopper carefully while holding both ends of the elastic securely. -
Tie a surgeon’s knot:
Cross the ends like a regular finish knot, loop the top strand through twice, and pull tight. This extra loop adds significant security. -
Secure with glue:
Dab a tiny drop of jewelry glue directly onto the knot. Be careful not to get glue on the visible parts of the beads. -
Hide the knot:
Before the glue dries completely, pull the knot gently inside the hole of the nearest heishi bead to conceal it. -
Trim the excess:
Once the glue is fully set, use your scissors to trim the remaining cord tails as close to the bead as possible.
Enjoy wearing your new bracelet stack on your next sunny getaway
Pearl-and-Heishi Soft Contrast
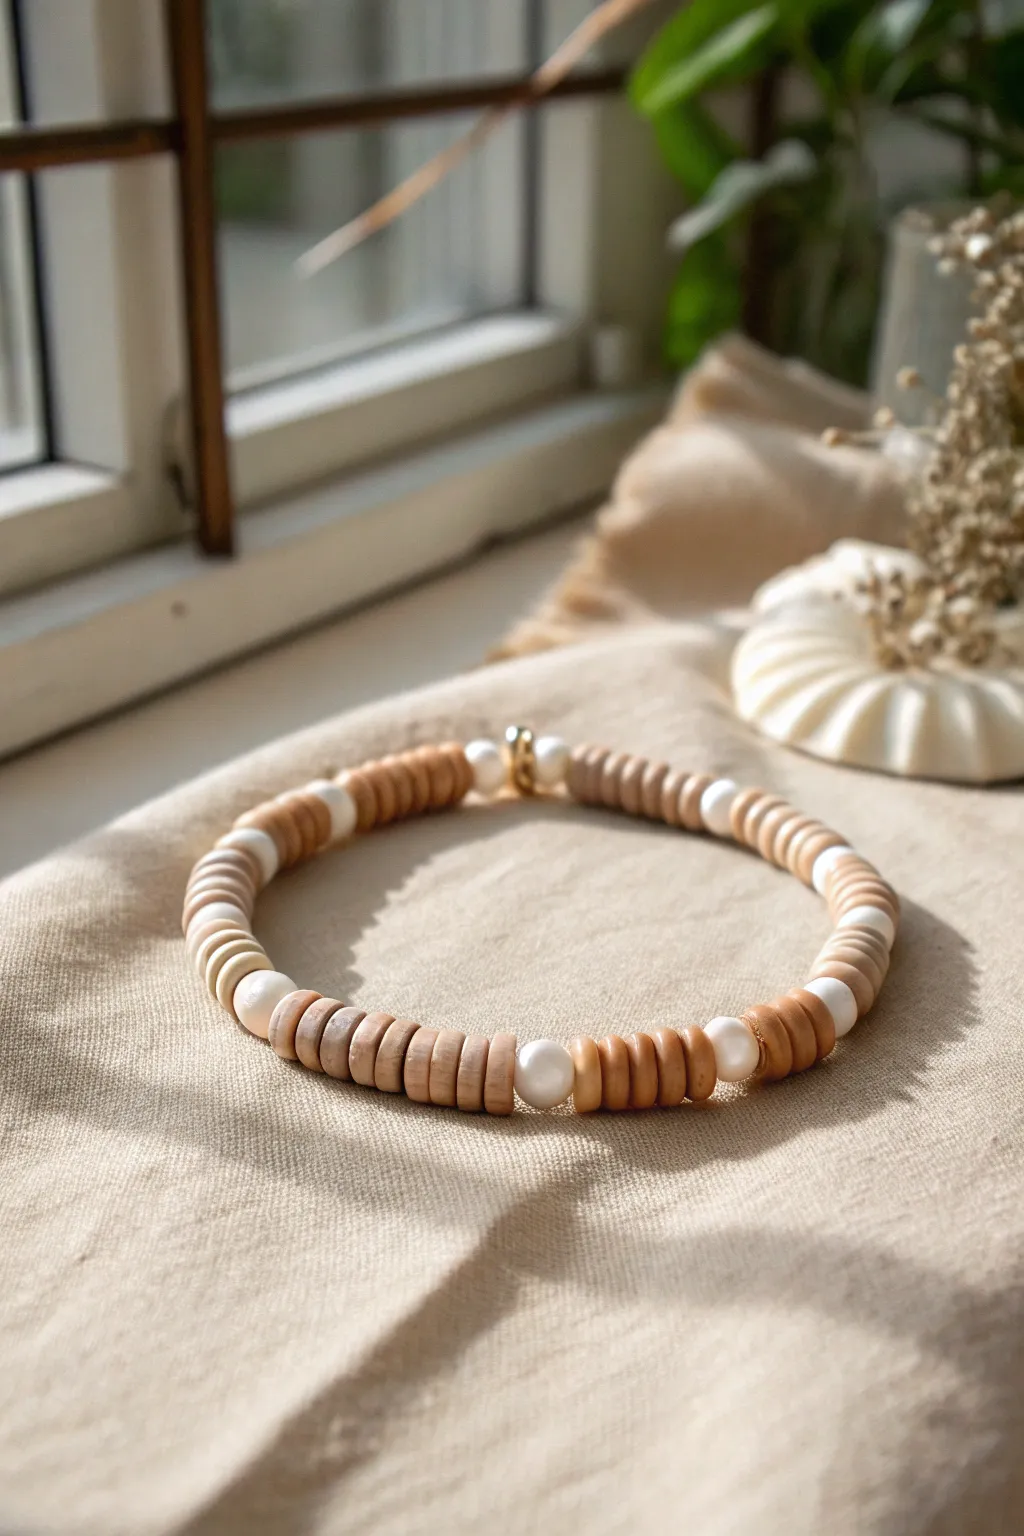
This elegant bracelet balances rustic, matte textures with the soft sheen of pearls for a sophisticated neutral accessory. Ideally suited for everyday wear, the design uses a repeating rhythm of beige heishi discs and luminous round beads to create a calming, warm aesthetic.
Step-by-Step Tutorial
Materials
- Beige or light wood heishi beads (approx. 6mm diameter)
- Faux pearl round beads (6-8mm diameter)
- Small gold spacer beads (optional)
- Beading elastic cord (0.7mm or 0.8mm)
- Jewelry glue or clear nail polish
- Scissors
- Tape or binder clip
Step 1: Preparation
-
Measure your cord:
Cut a piece of elastic cord about 10-12 inches long. This generous length gives you plenty of room to tie off the knot later without struggling. -
Pre-stretch the elastic:
Hold the cord firmly at both ends and give it a few gentle but firm tugs. This pre-stretching prevents the finished bracelet from sagging after you wear it a few times. -
Secure the end:
Place a piece of tape or a binder clip on one end of your cord so your beads don’t slide right off while you work.
Loose Pattern?
If gaps appear between beads, you didn’t tighten the knot enough. Tugging the knot firmly before glueing is crucial for that seamless, professional look.
Step 2: Creating the Pattern
-
Start the sequence:
Begin by threading on a single round pearl bead. This will act as your anchor point for the pattern. -
Add the heishi section:
Thread on five to six beige heishi beads. I like to check that they sit flat against each other to create that solid ‘bar’ look. -
Repeat unit:
Add the next round pearl bead followed by another set of five to six heishi beads. Keep the number of heishi beads consistent between each pearl for a balanced look. -
Check the fit:
Continue this alternating pattern until the beaded section measures the circumference of your wrist. Wrap it around your wrist occasionally to gauge the fit—it should sit comfortably without pinching. -
Add the focal point:
Near the center (or wherever you want the ‘clasp’ look to be), thread on a small gold spacer bead or a gold crimp cover bead to add a touch of metallic shine, just like in the reference image.
Golden Accent
Swap every third pearl for a brushed gold round bead. The mix of matte heishi, pearlescent shine, and gold metal creates a high-end boutique feel.
Step 3: Finishing
-
Prepare to tie:
Once your length is perfect, remove the tape or clip. Bring both ends of the elastic together carefully. -
The surgeon’s knot:
Cross the ends like a normal knot, but loop the top strand through twice before pulling tight. This extra loop creates friction that holds the elastic secure. -
Tighten the knot:
Pull the cords firmly to tighten the knot. You want the beads to touch snugly, but not so tight that the bracelet puckers or twists. -
Secure with glue:
Dab a tiny drop of jewelry glue or clear nail polish directly onto the knot. Let this dry completely before moving on. -
Hide the knot:
Trim the excess cord ends to about 2mm. Gently pull the elastic so the knot slides inside the hole of the adjacent pearl bead to hide it from view.
Slide on your new bracelet and enjoy the subtle warmth it adds to your outfit

TRACK YOUR CERAMIC JOURNEY
Capture glaze tests, firing details, and creative progress—all in one simple printable. Make your projects easier to repeat and improve.
Tiny Charm Cluster Centerpiece
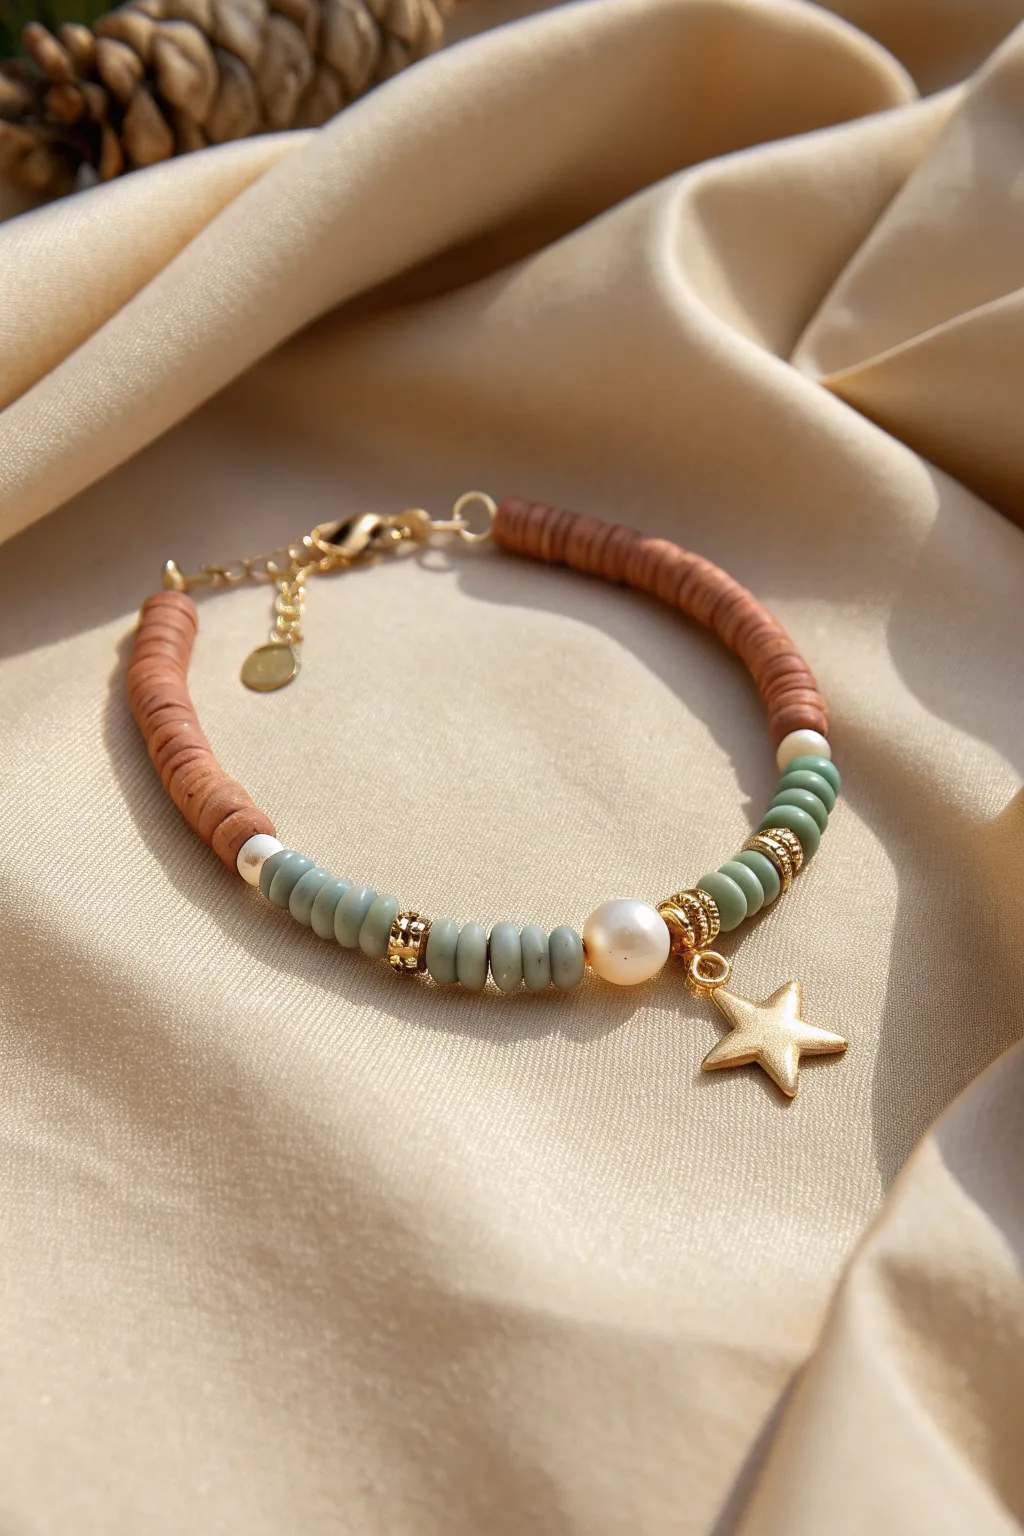
Embrace earthy elegance with this delicate heishi bead bracelet, featuring a calming blend of terracotta and sage tones. A lustrous pearl and a golden star charm create a playful focal point, making it a perfect accessory for everyday wear or layered stacking.
Step-by-Step Tutorial
Materials
- Terracotta brown polymer clay heishi beads (6mm)
- Sage green polymer clay heishi beads (6mm or similar size)
- Gold tone spacer rondelle beads (textured/granulated design)
- Freshwater potato pearl (approx. 8mm)
- Small gold star charm
- Gold tone jump ring (4mm or 5mm)
- Gold tone lobster clasp
- Gold tone extender chain with tag
- 2 Gold tone crimp beads
- 2 Gold tone crimp covers (optional but recommended)
- Beading wire (0.38mm or 0.45mm)
- Wire cutters
- Flat nose pliers
- Crimping pliers
Step 1: Setting the Foundation
-
Measure and cut:
Cut a length of beading wire approximately 10 inches long. This gives you plenty of room to work with the clasp without things getting tight. -
Secure the first end:
String a crimp bead onto one end of the wire, followed by the loop of your lobster clasp. Thread the wire back through the crimp bead to create a loop. -
Crimp firmly:
Slide the crimp bead close to the clasp (leaving a tiny bit of wiggle room) and use your crimping pliers to flatten and secure it. If you have a crimp cover, place it over the flattened bead and gently round it closed for a polished look.
Uneven Charm Hanging?
If the star charm sits awkwardly or twists incorrectly, try using a slightly larger jump ring or adding a tiny 2mm round gold bead on either side of the jump ring to give it space to rotate.
Step 2: Beading the Pattern
-
Start with terracotta:
Begin threading the terracotta brown heishi beads onto the wire. You’ll want a section about 1.5 to 2 inches long depending on your total wrist size. -
Add a gold accent:
Before transitioning colors, slide on a small white or cream spacer bead if you have one, followed immediately by the first sage green heishi bead. -
Transition to sage:
String about 5 to 7 sage green heishi beads. -
Insert first gold spacer:
Place one of the textured gold rondelle spacers onto the wire. This adds a metallic break in the matte clay texture. -
Continue the green section:
Add another short segment of sage green beads, approximately 5 to 6 beads.
Make It Luxe
Swap the polymer clay heishi beads for genuine gemstones like bronzite (brown) and aventurine (green) heishi cuts. This adds weight and a natural, semi-precious feel to the design.
Step 3: Creating the Centerpiece
-
Add the pearl:
Slide the freshwater potato pearl onto the wire. It sits right next to the green beads to start the focal cluster. -
Suspend the charm:
Open your jump ring using two pairs of pliers (twist, don’t pull). Attach the gold star charm to the jump ring, then slide the jump ring directly onto the beading wire next to the pearl. -
Balance the center:
Add a second textured gold rondelle spacer immediately after the charm. This frames the centerpiece and keeps the charm from sliding too far up the plain beads. -
Mirror the green side:
Thread a segment of 5 to 6 sage green heishi beads to match the section before the center. -
Add the symmetrical spacer:
Place another textured gold rondelle spacer, mirroring the one on the other side. -
Finish the green section:
Add your final segment of 5 to 7 sage green beads.
Step 4: Finishing Touches
-
Complete the length:
Switch back to the terracotta brown heishi beads. Add enough beads to reach your desired bracelet length (usually mirroring the length of the first terracotta section). -
Prepare to close:
String on your second crimp bead and the link of your extender chain. -
Loop and secure:
Pass the tail of the wire back through the crimp bead and into the last few heishi beads. Pull the wire tight enough to remove gaps, but leave it loose enough so the bracelet drapes flexibly. -
Final crimp:
Use your crimping pliers to flatten the crimp bead securely. I always double-check here to ensure the wire didn’t slip. -
Trim excess wire:
Using your flush cutters, snip off the excess beading wire as close to the beads as possible without nicking your thread.
Enjoy the gentle jingle of the charm as you wear your new custom creation
Metallic Spacer Rhythm Recipes
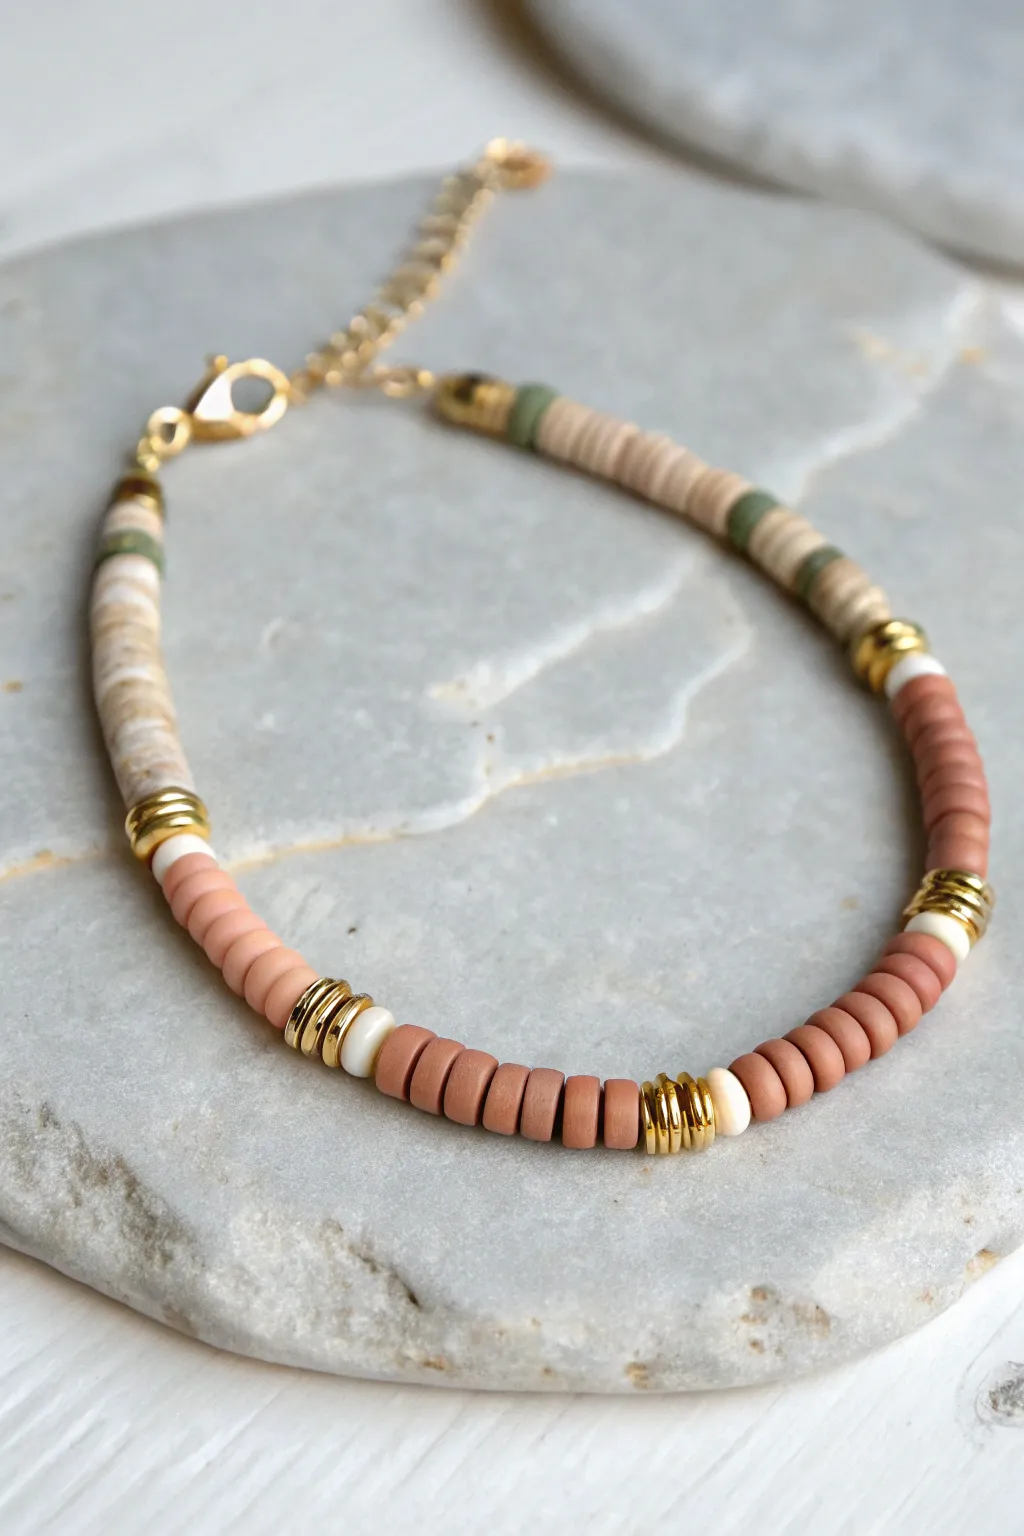
Embrace a warm, organic palette with this sophisticated heishi bracelet that pairs desert-tone clay beads with striking gold accents. The rhythmic spacing of metallic discs creates a polished, high-end look perfect for layering or wearing solo.
Detailed Instructions
Materials
- 6mm Heishi polymer clay beads (terracotta/rust color)
- 6mm Heishi polymer clay beads (light beige/sand color)
- 6mm Heishi polymer clay beads (olive green color)
- 6mm Heishi polymer clay beads (cream/white color)
- Small gold disc spacer beads (heishi style)
- Elastic stretch cord (0.8mm recommended)
- Jewelry glue or clear nail polish
- Scissors
- Gold tone crimp bead covers (optional)
- Gold tone lobster clasp and extension chain (optional)
Step 1: Setting the Stage
-
Measure and Cut:
Begin by measuring your wrist and adding about 3-4 inches to that length. This extra length ensures you have plenty of room to knot the elastic securely later. -
Pre-stretch the Cord:
Give your cut piece of elastic cord a few gentle tugs. Pre-stretching helps prevent the bracelet from sagging or becoming loose after you wear it a few times. -
Secure the End:
Place a piece of tape over one end of the cord or attach a bead stopper to prevent your design from sliding off as you work.
Spacer Slip
If your thin gold spacers keep sliding over the knot, try adding a small crimp bead cover over the knot first, or ensure the knot is tucked firmly inside a clay bead instead of a metal one.
Step 2: Designing the Pattern
-
Start with Symmetry:
Creating a balanced pattern often looks best. I like to lay out my beads on a bead board or a towel first to visualize the rhythm before threading. -
The Centerpiece:
Focus on the main section: a long run of the terracotta/rust beads. Thread about 12-15 of these beads onto the cord to form the boldest block of color. -
First Transition:
After the rust section, slide on a single cream/white bead. This acts as a bright separator. -
Add Metallic Pop:
Thread on three to four gold disc spacer beads. These should sit flush against each other to create a solid metallic band effect. -
Second Transition:
Add another single cream/white bead to cap off the gold section, mirroring the other side. -
Shift to Neutral:
Thread on a section of the beige/sand beads. Use fewer here than the rust section—aim for about 8-10 beads for contrast in segment length. -
Repeat the Gold:
Create another metallic break: one cream bead, three to four gold spacers, and one cream bead. -
Introduce Green:
Thread a small section of olive green beads, perhaps just 4-6 beads, followed by another sand/beige section. Varying the segment lengths keeps the design dynamic. -
Continue the Rhythm:
Repeat the gold spacer pattern (cream-gold-cream) between every color change until you reach your desired length.
Step 3: Finishing Touches
-
Check the Fit:
Wrap the unfinished strand around your wrist to ensure it fits comfortably without pinching. -
Tie the Knot:
Remove the tape or stopper. Bring the two ends together and tie a surgeon’s knot—this is like a standard square knot, but you loop the elastic through twice on the first pass for extra grip. -
Secure with Glue:
Apply a tiny drop of jewelry glue or clear nail polish directly onto the knot. Let it dry completely before moving it. -
Hide the Knot:
If possible, gently tug the elastic so the knot slides inside the hole of one of the larger beads to conceal it. -
Trim Excess:
Once the glue is fully set, trim the excess elastic tails close to the bead, being very careful not to nick the main knot. -
Add Hardware (Optional):
For the professional finish shown in the photo, attach a gold lobster clasp to one end and an extension chain to the other using jump rings and crimp beads instead of just knotting the elastic.
Texture Twist
Swap the smooth gold spacers for textured or faceted gold beads. The light will catch them differently, adding a bit of sparkle to the matte finish of the clay.
Slide on your new creation and enjoy the sophisticated rhythm of your custom pattern
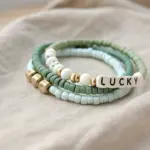
Mixed-Thickness Heishi Stack
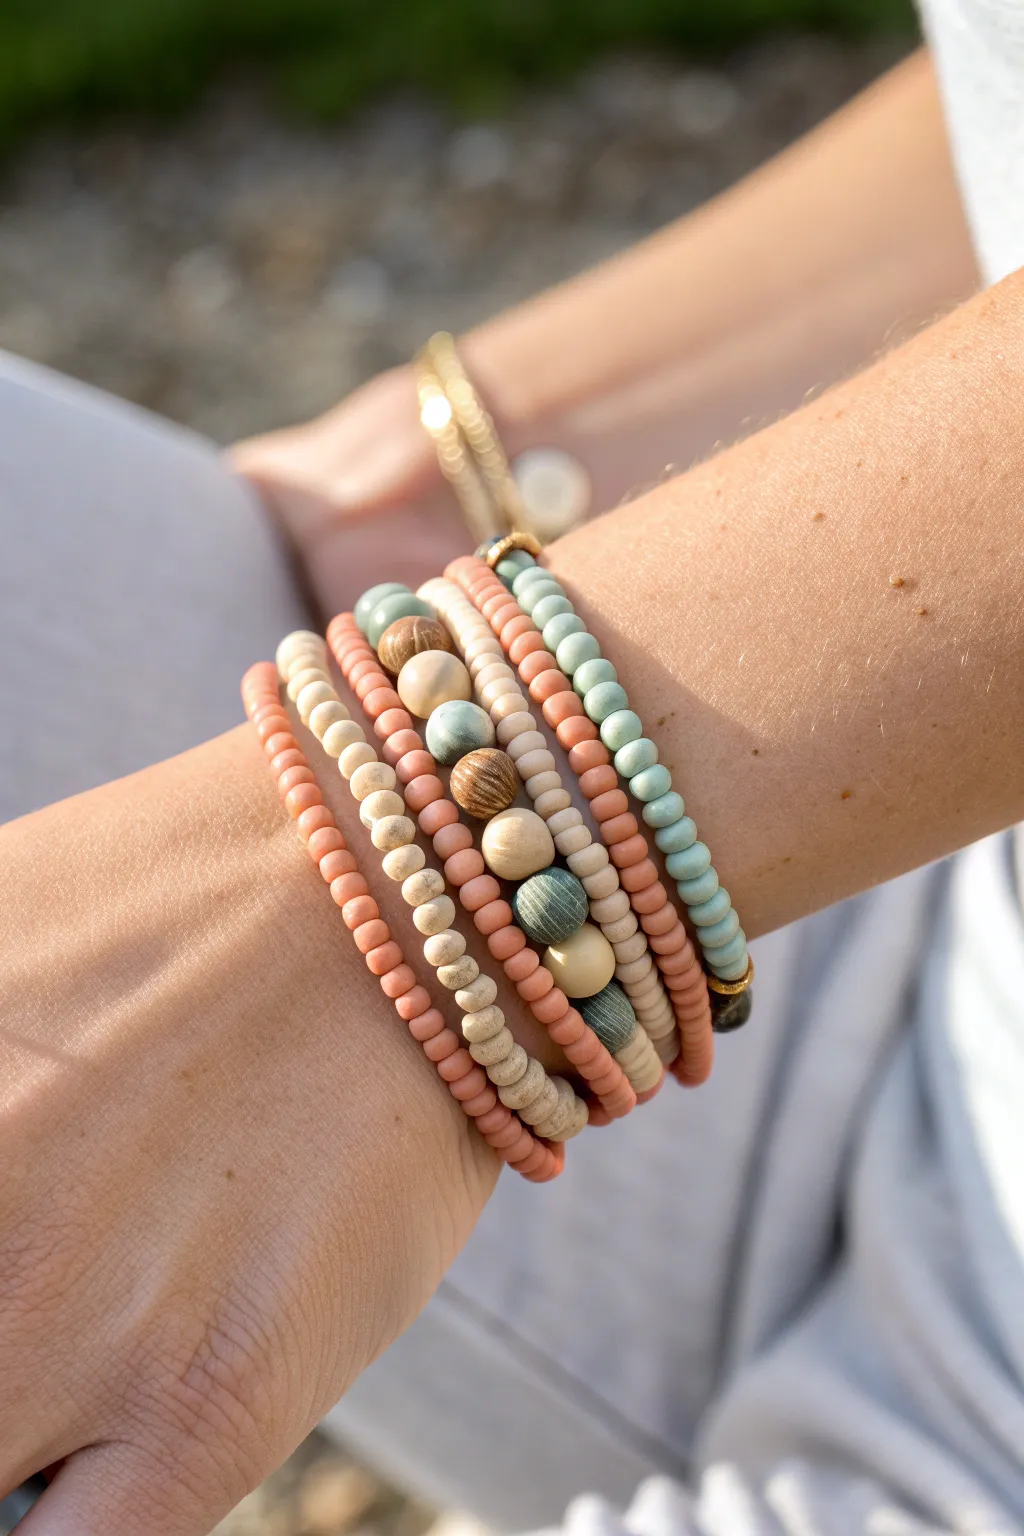
This five-bracelet set combines matte finishes, organic tones, and mixed bead sizes for a sophisticated, bohemian look. By staggering heishi clay beads with larger wooden and stone accents, you achieve a beautifully layered wristscape that feels both grounded and stylish.
Step-by-Step Guide
Materials
- Elastic stretch cord (0.7mm or 0.8mm)
- Small pink/clay heishi beads (approx 4mm)
- Small dusty mint/sage heishi beads (approx 4mm)
- Small cream/beige heishi beads (approx 4mm)
- Assorted wooden round beads (various natural stains: light, medium, dark)
- Matte round stone/acrylic beads (sage green, cream, grey)
- Small gold disc spacer beads
- Jewelry glue or clear nail polish
- Scissors
Step 1: Planning Your Stack
-
Measure your wrist:
Before cutting any cord, wrap a measuring tape around your wrist comfortably. Add about 0.5 inches to this measurement for the finished size, but cut your elastic strands to about 10-12 inches to give yourself plenty of room for tying knots. -
Lay out the design:
To keep the eclectic look organized, lay your beads out on a bead board or a towel first. This project consists of five distinct strands: two solid clay heishi strands, one mixed-texture focal strand, one wood-heavy strand, and one pattern-alternating strand.
Bead Board Brilliance
Don’t have a bead board? Use a folded hand towel. The grooves in the terry cloth stop round beads from rolling away while you plan your pattern.
Step 2: Strand 1: The Solid Pink Base
-
String the pink heishi:
Begin with the simplest bracelet. Thread your clay-pink heishi beads onto the first piece of elastic. Fill the strand until it matches your desired wrist length. -
Check the fit:
Wrap the unfinished strand around your wrist to ensure it isn’t too tight; heishi beads sit flat, so they sometimes need a little extra slack compared to round beads.
Scent Infusion
Since this stack relies heavily on raw wooden beads, add a drop of essential oil (like sandalwood or lavender) to the wood for a wearable diffuser.
Step 3: Strand 2: The Mint Accent
-
Create the mint strand:
Similar to the first, string your sage or mint green heishi beads onto a new cord. Create a small pattern break near where your knot will be by adding three small gold disc spacers for a subtle metallic touch.
Step 4: Strand 3: The Cream & Wood Mixer
-
Alternate textures:
For the third bracelet, create an alternating pattern. Thread about 1 inch of cream heishi beads, followed by one medium-sized natural wood bead. -
Repeat the pattern:
Continue this pattern around the entire length. The contrast between the sleek cream discs and the grain of the wood adds crucial depth to the stack.
Step 5: Strand 4: The Mixed-Bead Focal
-
Start with pink spacers:
This bracelet is the thickest of the bunch. Begin by threading sections of pink heishi beads, roughly 15-20 beads per section. -
Insert large focal beads:
Between the pink heishi sections, add your largest round beads. I like to alternate between a large wooden bead, a matte sage stone bead, and a cream bead to keep the palette cohesive. -
Add separation:
Place a single gold disc spacer on either side of these large focal beads to help them stand out against the clay heishi segments.
Step 6: Strand 5: The Chunky Wood Row
-
String the beige heishi:
Start this final strand with sections of light beige or cream heishi beads. -
Interject wood accents:
Use your medium-toned wooden beads here. Instead of single beads, try grouping them in pairs or placing them more frequently than in the previous strands to create a different rhythm.
Step 7: Finishing the Set
-
Pre-stretch the cords:
Before tying, give each bracelet a gentle tug. This ‘pre-stretching’ prevents the elastic from sagging the first time you wear it. -
Tie the surgeon’s knot:
For each bracelet, tie a surgeon’s knot (right over left, left over right twice). Pull the elastic tight until the beads touch firmly. -
Secure and trim:
Dab a tiny drop of jewelry glue or clear nail polish on the knot. Let it dry completely before trimming the excess elastic tails close to the knot. -
Hide the knot:
If possible, gently tug the knot inside the hole of a neighboring large bead or one of the heishi beads to conceal it for a professional finish.
Slide on your new stack to add an instant touch of earthy elegance to any outfit
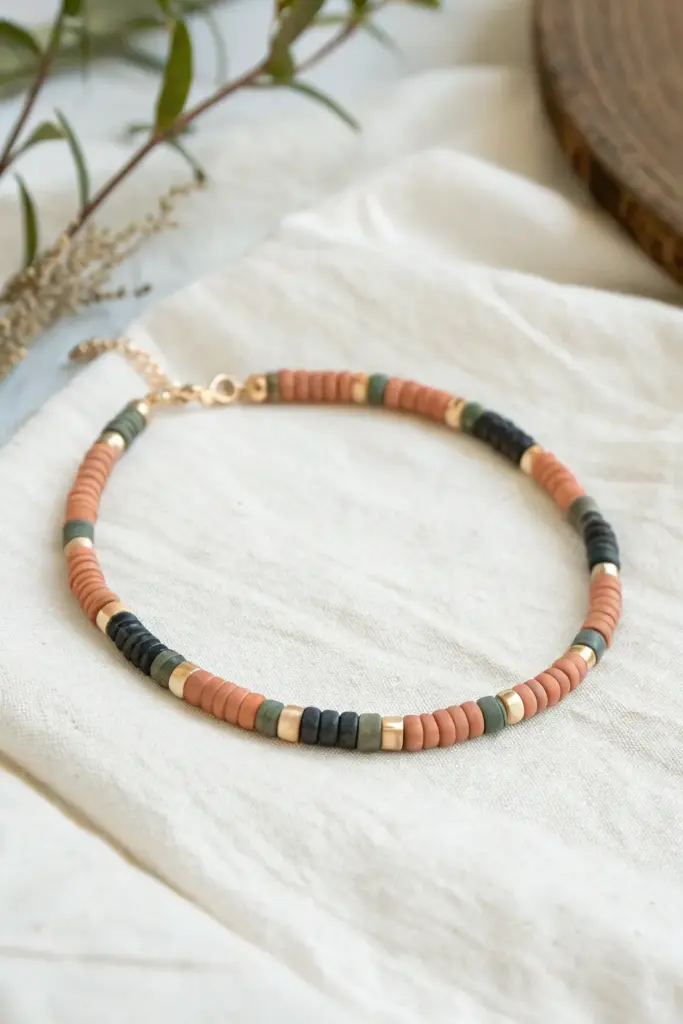
Patterned “Tile” Look With Mini Heishi
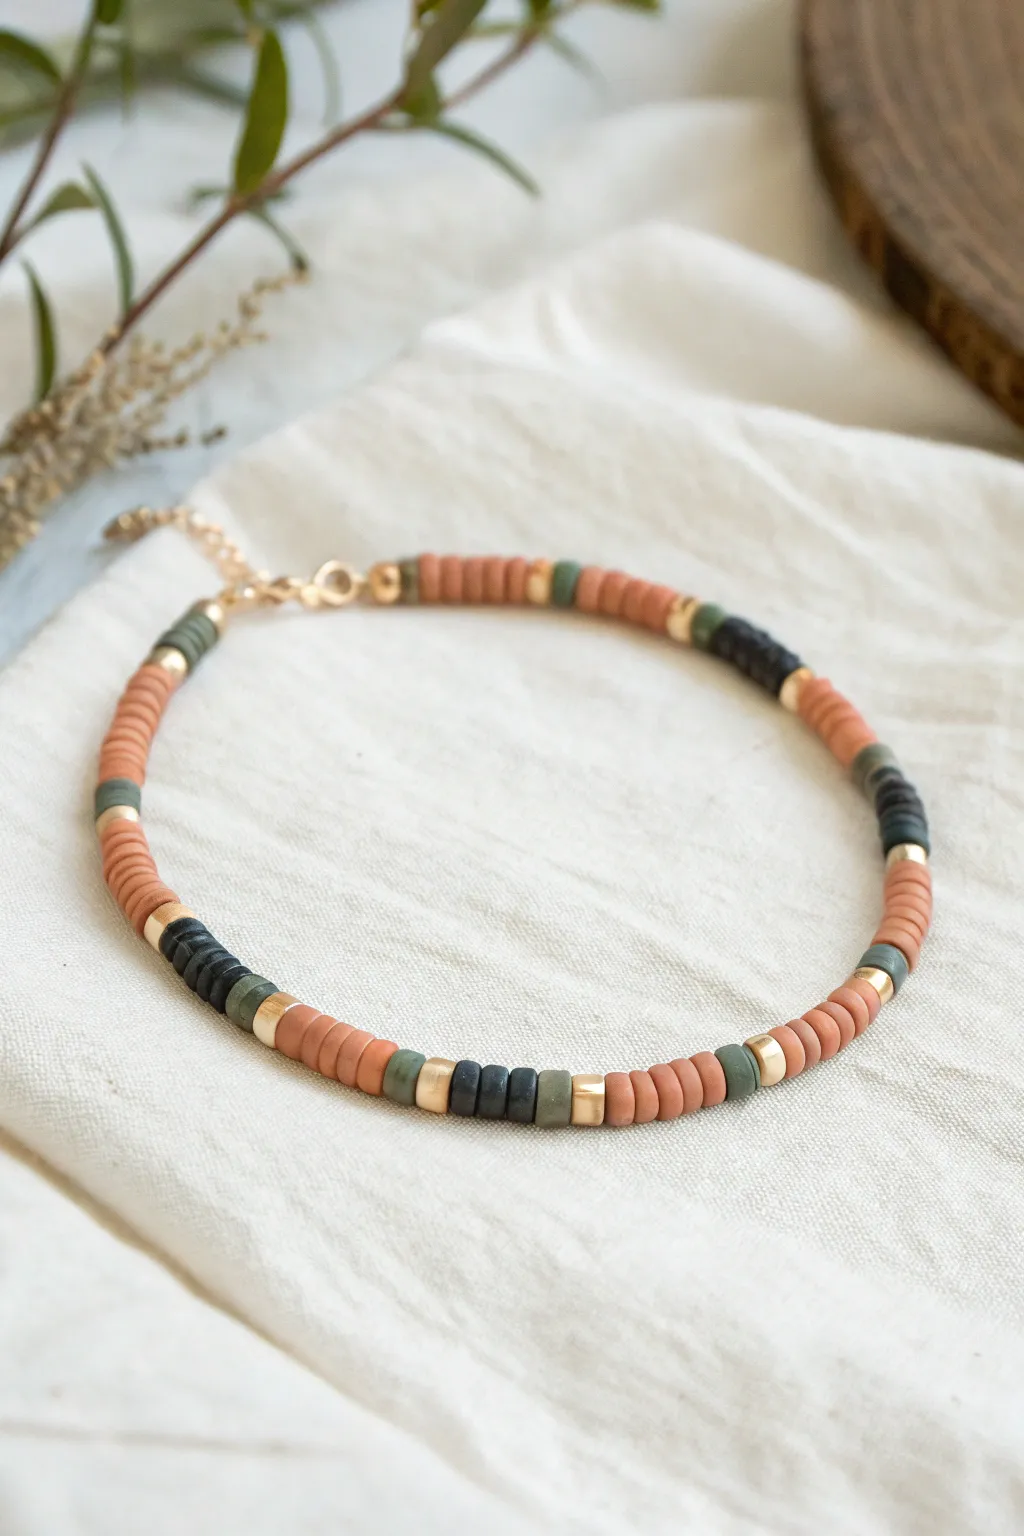
Embrace organic tones with this sophisticated beaded bracelet that mixes warm terracotta, deep charcoal, and olive green heishi beads. The occasional gold accent bead breaks up the matte clay texture, giving it a polished, rhythmic look reminiscent of mosaic tiling.
Step-by-Step Tutorial
Materials
- 4mm or 6mm heishi polymer clay beads (Terracotta/Clay Orange)
- 4mm or 6mm heishi polymer clay beads (Charcoal/Black)
- 4mm or 6mm heishi polymer clay beads (Olive Green/Sage)
- Small gold spacer beads (heishi disc shape or small rounds)
- Gold tone crimp beads
- Gold tone crimp covers
- Gold tone jump rings (4mm or 5mm)
- Gold tone lobster clasp
- Beading wire (flexible, 7-strand or similar high quality)
- Short length of gold chain (extender)
- Wire cutters
- Flat nose pliers
- Crimping pliers
Step 1: Preparation & Planning
-
Measure your wrist:
Wrap a flexible measuring tape around your wrist to find your size. Add about 0.5 to 1 inch to this measurement to account for the thickness of the beads and ease of movement. -
Cut the wire:
Using your wire cutters, snip a piece of beading wire that is roughly 4-5 inches longer than your target bracelet length. This extra length prevents beads from sliding off while you work. -
Stop the end:
Place a piece of tape or a bead stopper clip on one end of the wire. This is crucial for keeping your pattern intact while you string.
Step 2: Stringing the Pattern
-
Start the sequence:
Begin stringing with a block of the Terracotta beads. The bracelet shown uses roughly 10-15 discs for the main orange sections, but you can adjust this based on how spaced out you want your pattern to be. -
Add a definition bead:
Slide on a single Olive Green heishi bead to signal the end of the long Terracotta section. -
Insert the gold accent:
Add one gold spacer bead. This metallic pop is essential for achieving the ’tile’ look and separating the matte colors. -
Create the dark contrast block:
String 3 to 5 Charcoal/Black heishi beads. This creates a bold, dark stripe that grounds the lighter colors. -
Close the dark block:
Add another generic Olive Green bead followed by another gold spacer to mirror the previous transition. -
Repeat the pattern:
Return to your main Terracotta block of 10-15 beads. Continue repeating this full sequence: Terracotta block -> Green -> Gold -> Charcoal block -> Green -> Gold. -
Check length frequently:
As you build the pattern, periodically wrap the wire around your wrist. The pattern doesn’t have to end perfectly symmetrically; just ensure the length fits comfortably.
Fixing Gaps
If you see wire showing between beads after crimping, attach a jump ring cover or simply add one extra gold spacer bead at the very end before crimping tight.
Step 3: Finishing Touches
-
Add the first crimp:
Once beaded to length, slide a gold crimp bead onto one end of the wire, followed by a jump ring or the lobster clasp directly (depending on your preference). -
Secure the loop:
Thread the wire back through the crimp bead and pull tight, creating a small loop around your clasp or jump ring. Use crimping pliers to flatten or fold the crimp bead securely. -
Cover the crimp:
I like to place a gold crimp cover over the flattened crimp bead and gently close it with pliers to make it look like a regular round bead. -
Trim excess wire:
Snip off the tail end of the wire as close to the bead as possible without cutting your main strand. -
Finish the second end:
Repeat the crimping process on the other end. Attach a jump ring and a short piece of gold chain here to serve as an extender, allowing for adjustable sizing.
Varying Textures
Mix in one or two matte black lava stone beads instead of clay for the dark sections. It adds a subtle texture shift that feels very high-end.
Now you have a chic, earth-toned accessory perfect for stacking or wearing solo