Whenever you want that satisfying “I made this” feeling without any fancy equipment, air dry clay is my go-to. Here are my favorite easy air dry clay ideas that look polished, stay beginner-friendly, and actually fit into real life.
Classic Trinket Dish Bowls
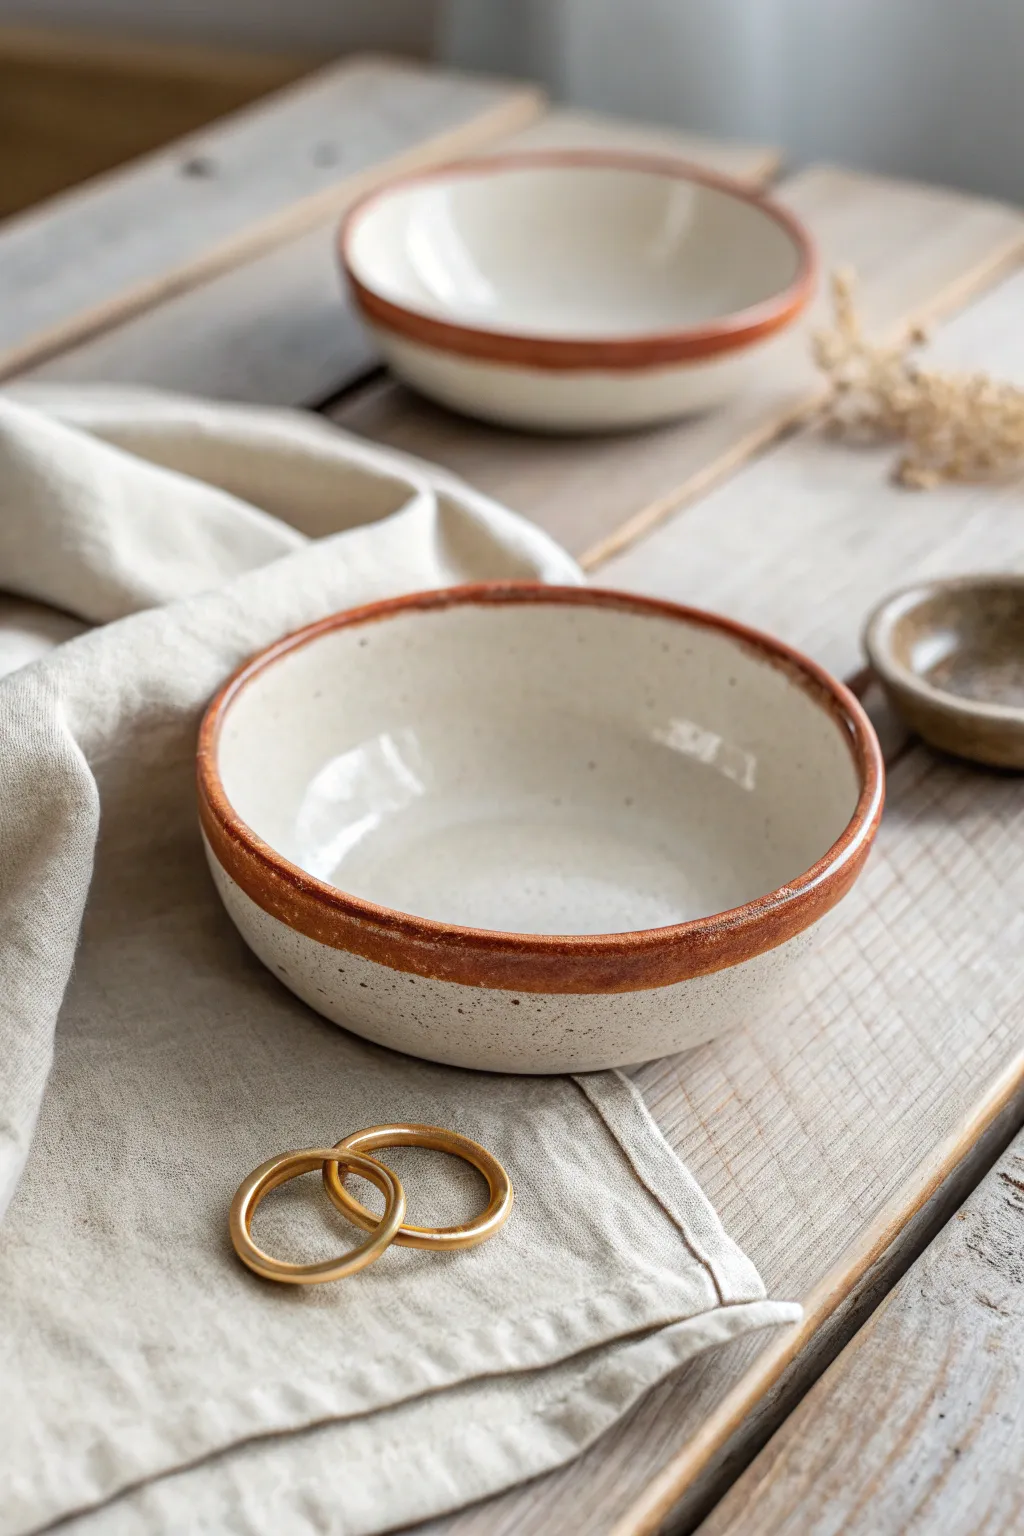
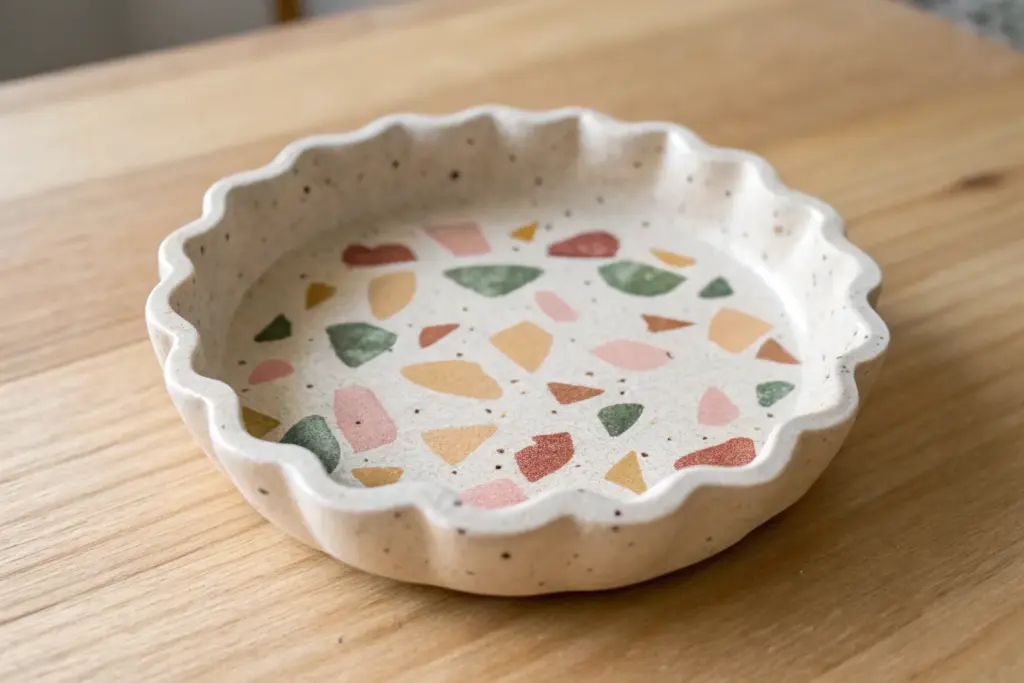
Recreate the rustic charm of wheel-thrown pottery using simple air dry clay and a clever painting technique. This project results in a beautiful, classic trinket dish characterized by its creamy speckled finish and warm terracotta-hued rim.
Step-by-Step Tutorial
Materials
- White air dry clay
- Rolling pin
- Small bowl (to use as a mold)
- Plastic wrap
- Sandpaper (fine grit)
- Acrylic paints: Cream/Off-white, Burnt Sienna (rust), Black or Dark Brown
- Old toothbrush
- Soft paintbrushes
- Gloss varnish or sealant
- Bowl of water
- Sponge
Step 1: Shaping the Bowl
-
Prepare the Clay:
Cut off a chunk of white air dry clay roughly the size of a tennis ball. Knead it in your hands for a minute until it feels soft, warm, and pliable. -
Roll the Slab:
On a clean, flat surface, roll the clay out into a slab about 1/4 inch thick. Aim for an even thickness throughout to prevent cracking later. -
Cut the Circle:
Place a circular template (like a breakfast bowl upside down) onto your clay slab. Using a clay knife or butter knife, carefully cut around the template to get a perfect circle. -
Prep the Mold:
Take the small bowl you are using as a mold and wrap the inside smoothly with plastic wrap. This step is crucial so your clay doesn’t stick to the bowl as it dries. -
Form the Dish:
Gently lift your clay circle and lay it inside the mold. Press it lightly against the bottom and sides, taking care not to stretch the clay too thin. -
Smooth the Edges:
Dip your finger in a little water and run it along the rim of the clay. Smooth out any roughness or sharp edges created during cutting. -
Initial Drying:
Let the clay sit in the mold for about 24 hours until it holds its shape firmly but isn’t bone dry. -
Remove and Finish Drying:
Carefully lift the clay dish out of the mold using the plastic wrap. Remove the wrap and place the dish on a wire rack to dry completely, usually another 24-48 hours. I find flipping it over halfway through helps the bottom dry evenly.
Step 2: Painting and Finishing
-
Sanding:
Once bone dry, use fine-grit sandpaper to gently smooth the rim and any bumps on the surface. Wipe away the dust with a slightly damp sponge. -
Base Coat:
Paint the entire bowl—inside and out—with a cream or warm off-white acrylic paint. You may need two coats for full opacity. -
Create the Speckles:
Dilute a tiny amount of black or dark brown paint with water. Dip an old toothbrush into it, and running your thumb over the bristles, flick a fine mist of speckles over the bowl to mimic stoneware clay. -
Painting the Rim:
Mix a warm ‘rust’ color using Burnt Sienna with a touch of red or orange. Using a small brush, carefully paint a band roughly 1/4 inch thick along the top rim, letting the line be naturally imperfect. -
Lower Rim Detail:
Add a second, thinner band of the rust color just below the rim on the outside if you want to match the reference photo exactly. -
Sealing:
Allow the paint to dry completely. Apply a coat of gloss varnish to give the piece that shiny, glazed ceramic look. -
Final Coat:
Apply a final coat of varnish for durability, ensuring you cover the rim well.
Fixing Cracks
If small cracks appear while drying, don’t panic. Mix a small amount of fresh clay with water to make a paste (‘slip’) and fill the cracks, then sand smooth once dry.
Go for Gold
For a luxe twist, paint the rim with liquid gold leaf instead of the rust color. It creates a stunning contrast against the speckled pot.
Place your finished dish on a linen cloth to organize your rings and enjoy the handmade warmth it adds to your easy air dry clay ideas collection


Simple Ring Cone Holder
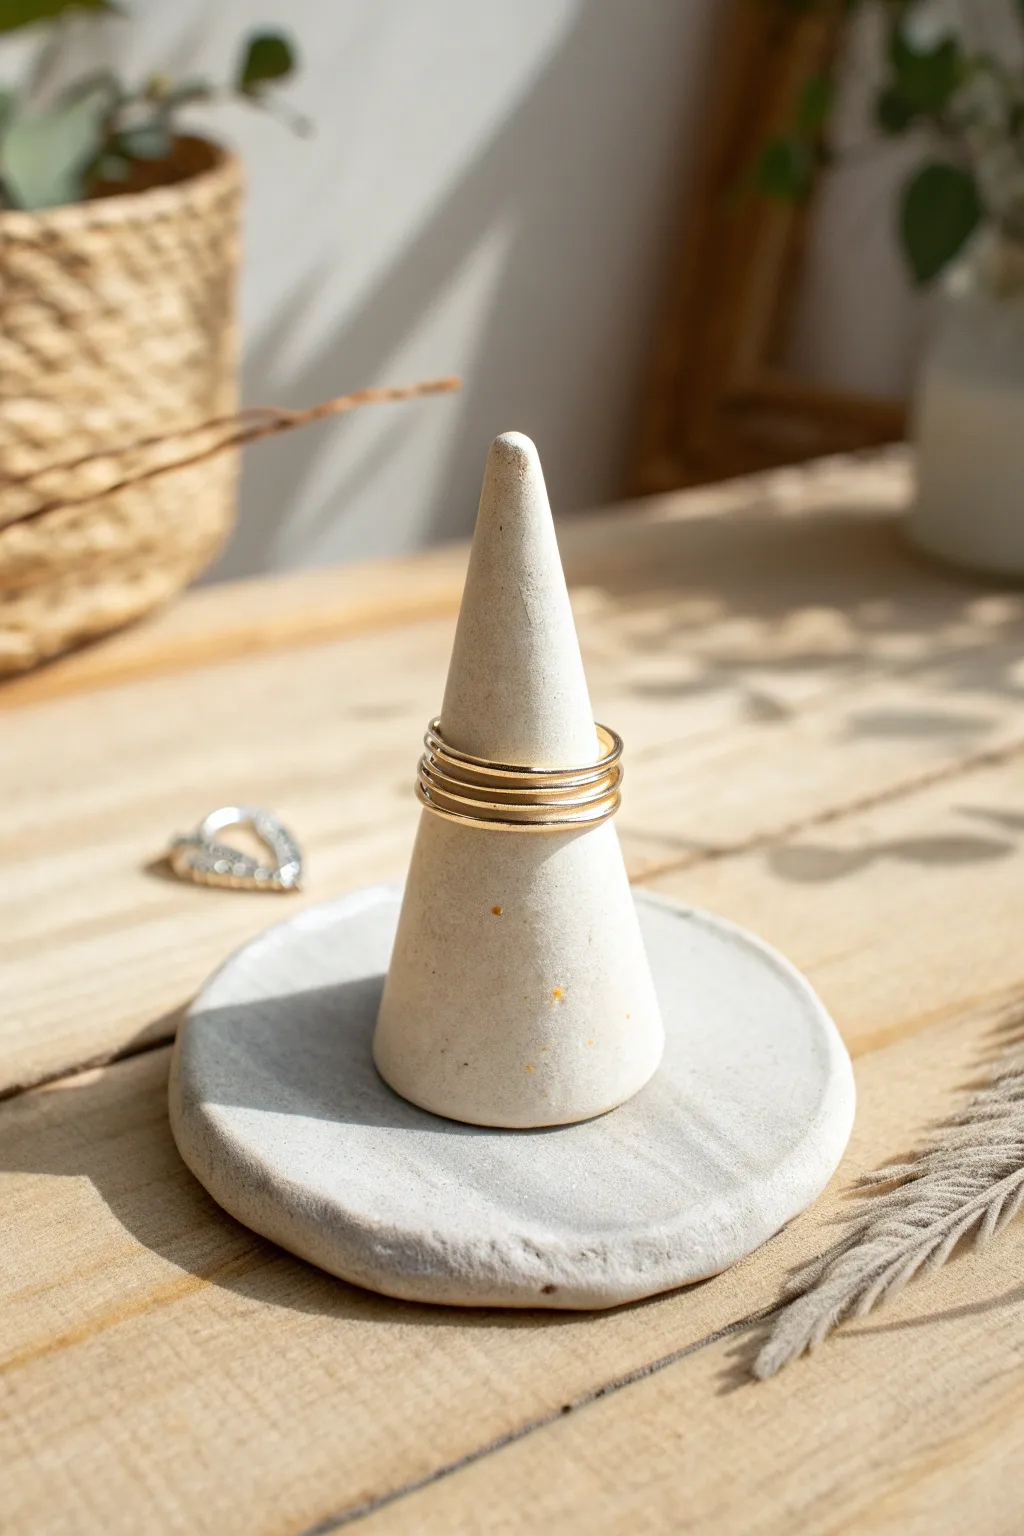
Keep your jewelry organized with this chic, cone-shaped ring holder sitting atop a simple circular dish. Its natural matte finish and speckled detail give it an upscale, boutique feel that looks beautiful on any nightstand.
Step-by-Step
Materials
- White air-dry clay
- Rolling pin or smooth glass jar
- Clay cutting tool or X-Acto knife
- Round cookie cutter (approx. 3-4 inches)
- Small bowl or cup (for water)
- Fine-grit sandpaper (220-400 grit)
- Sponge or soft paintbrush
- Acrylic sealer (matte finish, optional)
Step 1: Forming the Base
-
Prepare the Clay:
Start by grabbing a handful of white air-dry clay. Knead it in your hands for a minute or two until it feels warm, pliable, and free of air bubbles. -
Roll Out the Slab:
Place the clay on a smooth, non-stick surface. Use your rolling pin to flatten it into an even slab, aiming for a thickness of about 1/4 inch. -
Cut the Circle:
Press your round cookie cutter firmly into the clay slab to create a perfect circle. If you don’t have a cutter, trace around a glass and cut it out with your knife. -
Remove Excess Clay:
Peel away the extra clay from around the circle and set it aside for the cone part. Keep the circle flat on your work surface so it doesn’t warp. -
Smooth the Edges:
Dip your finger in a little bit of water and run it gently around the rim of the clay circle to smooth out any sharp edges or cutting marks. -
Create Texture (Optional):
If you want that slightly organic, handmade look seen in the photo, gently tap the surface with your fingertips or a slightly textured cloth to remove the perfectly smooth manufactured look.
Cracks Appearing?
If small cracks appear while drying, mix a tiny bit of fresh clay with water to make a paste. Fill the cracks, smooth it over, and let it dry again.
Step 2: Shaping the Cone
-
Roll a Ball:
Take a walnut-sized piece of the remaining clay and roll it into a smooth, crack-free ball between your palms. -
Form the Cone:
Place the ball on your surface and begin rolling it back and forth while applying more pressure to one side. This asymmetrical rolling will naturally create a tapered cone shape. -
Refine the Shape:
Stand the cone up and check its height. I find that a height of about 2 to 3 inches works best for most rings. Gently tap the base of the cone on the table to flatten the bottom. -
Adjust the Tip:
With damp fingers, smooth the cone from bottom to top, slightly rounding off the very tip so it isn’t dangerously sharp. -
Score the Surfaces:
Use your needle tool or knife to scratch a crosshatch pattern (‘scoring’) onto the bottom of the cone and the center of your circular base. -
Apply Slip:
Dab a small amount of water or liquid clay (slip) onto the scratched areas. This acts as the glue to bond the two pieces together. -
Attach the Cone:
Press the cone firmly onto the center of the base. Wiggle it slightly to ensure a suction bond is formed between the scored surfaces.
Make it Marbled
Knead a small drop of grey or beige acrylic paint into your white clay but stop before it’s fully blended for a luxe marble effect.
Step 3: Refining and Finishing
-
Seam Smoothing:
Use a damp paintbrush or your finger to smooth out the seam where the cone meets the base. You want it to look like one continuous piece of clay. -
Final Surface Check:
Inspect the piece for any stray fingerprints or nail marks. A barely damp sponge wiped over the surface works wonders for erasing these final imperfections. -
Drying Phase:
Set your ring holder in a cool, dry place away from direct sunlight. Let it dry for at least 24-48 hours. Turn it occasionally if possible to help the bottom dry evenly. -
Sanding:
Once bone dry, use fine-grit sandpaper to gently buff away any rough spots, focusing on the rim of the dish and the tip of the cone. -
Speckled Effect (Optional):
To achieve the speckled stone look from the image, dip a stiff brush into diluted brown or grey paint and flick the bristles to spatter tiny dots onto the white clay. -
Sealing:
Finish by applying a coat of matte acrylic sealer. This protects the clay from moisture and oils from your hands or jewelry.
Now you have a stylish spot to keep your favorite rings safe and displayed beautifully


Easy Pinch Pot Mini Bowls
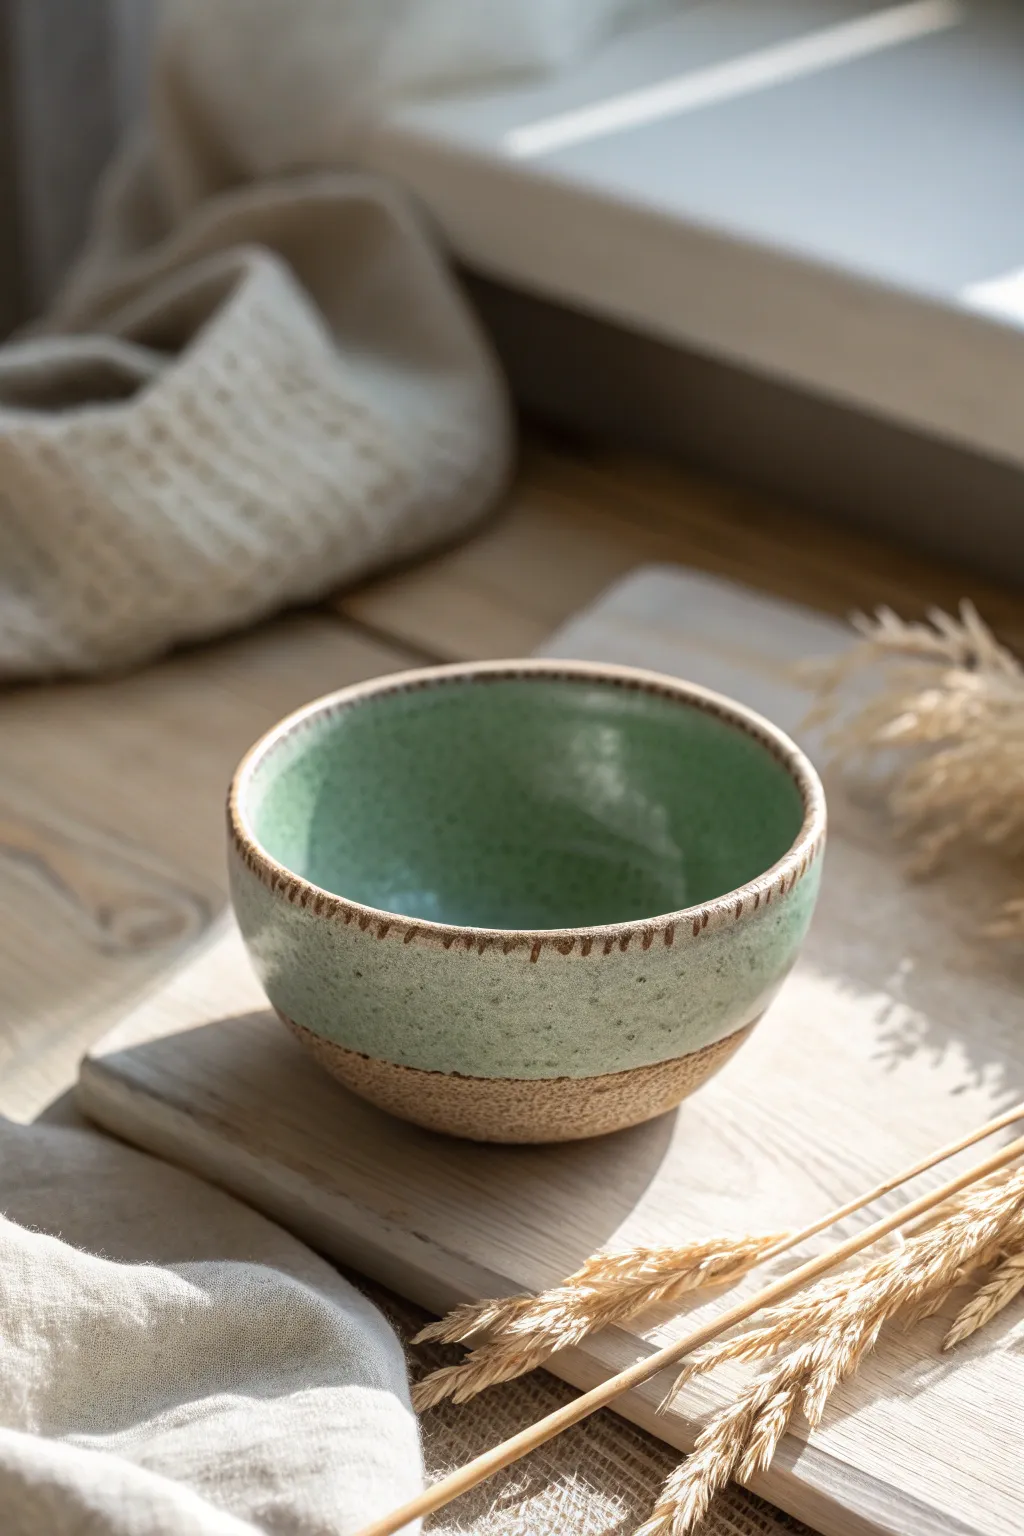
Create the look of high-fire stoneware without a kiln using this simple air dry clay technique. This pinch pot features a beautiful faux-glazed finish, combining a textured raw clay base with a smooth, speckled sage green interior and upper exterior.
Step-by-Step Guide
Materials
- Air dry clay (white or terracotta)
- Acrylic paints (sage green, white, burnt umber, tan/beige)
- Glossy varnish or clear coat (Mod Podge or spray)
- Old toothbrush
- Fine grit sandpaper
- Small sponge
- Bowl of water
- Sculpting tool or plastic knife
Step 1: Forming the Base
-
Prepare your clay ball:
Start with a ball of air dry clay about the size of a tennis ball. Roll it firmly between your palms until it is completely smooth and free of major cracks. -
Open the pot:
Hold the ball in one hand and firmly press your thumb into the center, stopping before you break through the bottom. You want a base thickness of about a quarter inch. -
Pinch the walls:
Gently pinch the clay between your thumb on the inside and fingers on the outside. Rotate the ball as you pinch, working your way from the bottom up to the rim. -
Even out the thickness:
Continue pinching and rotating until the walls are an even thickness all around, aiming for a sturdy but delicate profile similar to the reference photo. -
Define the rim:
Tap the rim gently against your work surface to flatten it slightly, or use wet fingers to smooth it into a perfect circle. The rim in the image has a soft, rounded edge. -
Create the exposed texture:
To mimic the raw clay bottom shown in the photo, take a stiff-bristled brush or a balled-up piece of aluminum foil and gently press texture into the bottom third of the bowl’s exterior. This section will remain unpainted later. -
Create the rim detail:
Using a small sculpting tool or the edge of a plastic knife, press small, vertical indentations just below the rim on the outside. These little notches add instant handmade character. -
Smooth the upper surface:
Dip your finger in a little water and smooth out the inside of the bowl and the upper two-thirds of the exterior. The smoother this area is, the better your faux glaze will look. -
Let it dry completely:
Allow your bowl to air dry for 24-48 hours. Flip it occasionally so the bottom dries evenly. It is ready when it feels room temperature and looks chalky white.
Step 2: Painting the Faux Glaze
-
Base coat the raw clay:
Mix a tan or beige acrylic paint that resembles sandy stoneware. Paint the textured bottom third of the exterior with this color. I find using a sponge helps get paint into the texture. -
Paint the ‘glazed’ areas:
Paint the interior and the upper smooth section of the exterior with your sage green acrylic paint. Apply 2-3 coats for opaque, solid coverage. -
Add the rim accent:
Dip a fine brush into watered-down burnt umber paint. Carefully dry-brush the very top edge of the rim and the little vertical notches you made earlier. This mimics the way glaze breaks over sharp edges. -
Create the speckled effect:
Dilute a small amount of dark brown or black paint with water. Dip an old toothbrush into this mixture, aim it at the green painted areas, and run your thumb over the bristles to flick tiny speckles onto the surface. -
Wait for paint to set:
Allow the speckles and base coats to dry completely before sealing. If you seal too soon, you might smear the delicate dots. -
Apply the glossy finish:
This is the secret to the ceramic look. Apply a thick coat of high-gloss varnish or Mod Podge only over the green painted areas. Leave the tan bottom matte to enhance the contrast between ‘glazed’ and ‘raw’ clay.
Glaze Illusion
For a super realistic ceramic effect, do 3-4 coats of gloss varnish on the green parts. Thick gloss creates depth that looks just like kiln-fired glaze.
Bottoms Up
Before the clay dries, stamp your initials or a small symbol into the bottom center. It makes the piece feel like professional pottery.
Display your beautiful faux-ceramic creation on a sunny windowsill or use it to hold your favorite trinkets


Leaf-Pressed Coasters
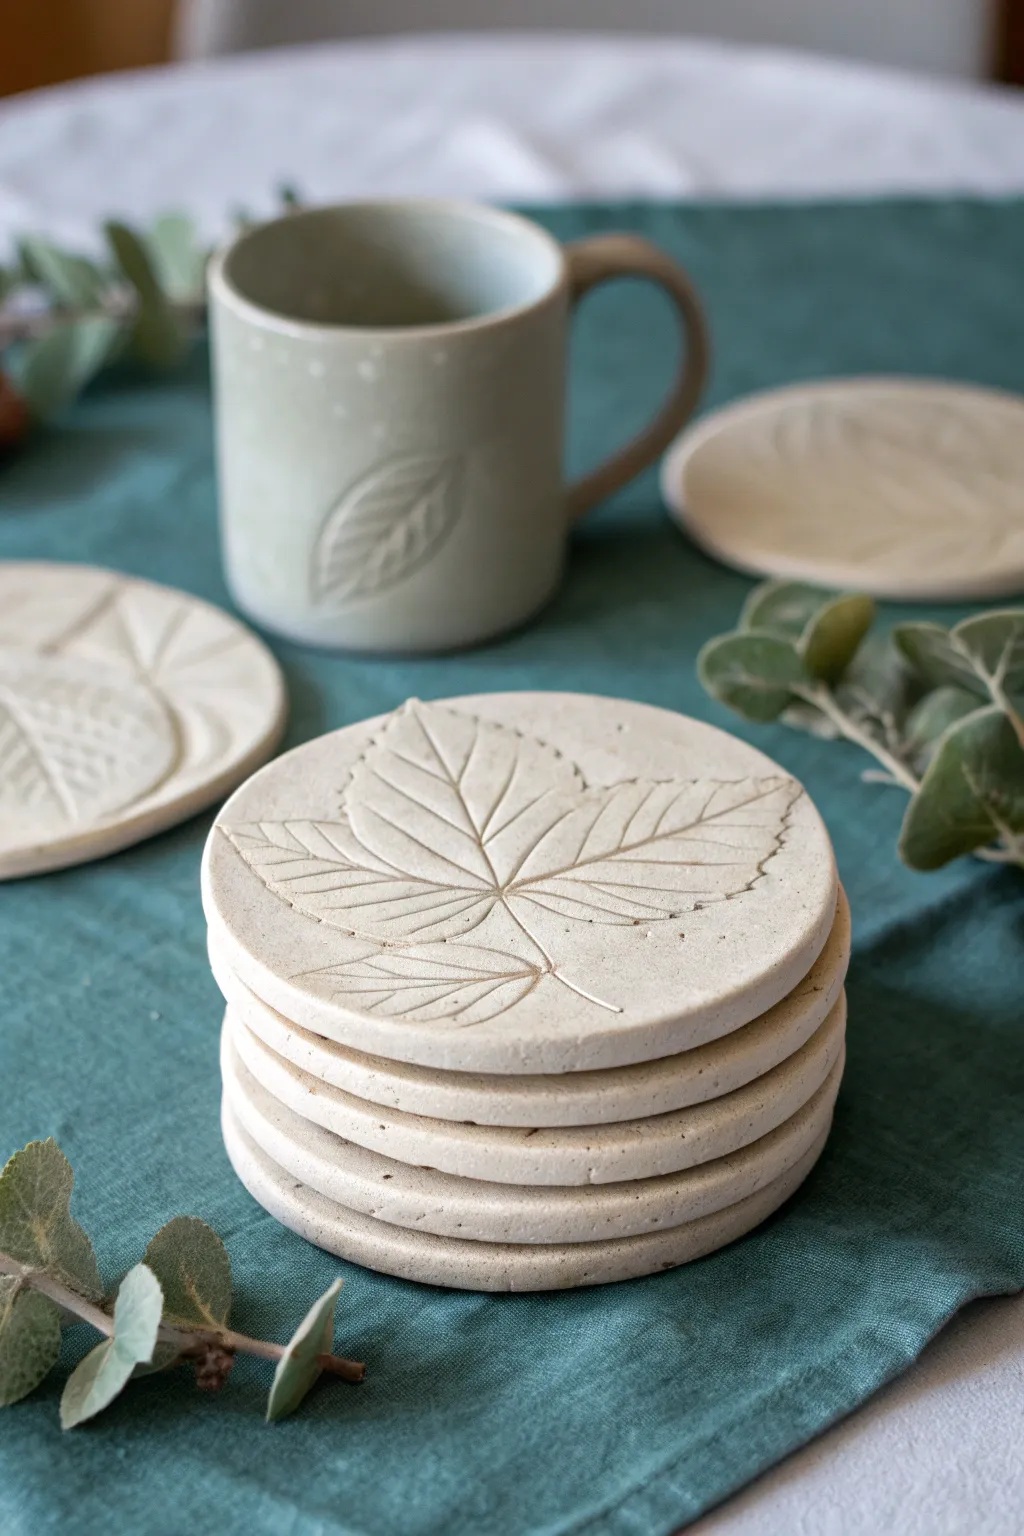
Capture the delicate details of nature with these elegant air-dry clay coasters. The minimalist leaf impression creates a subtle, tactile relief that brings an organic, earthy charm to your coffee table setting.
How-To Guide
Materials
- White or cream air-dry clay (smooth texture)
- Fresh leaves with prominent veins (e.g., hydrangea, beech, or maple)
- Round cookie cutter (approx. 4-inch diameter)
- Rolling pin with guide rings (1/4 inch thickness)
- Canvas mat or parchment paper
- Small bowl of water
- Craft knife or needle tool
- Fine-grit sandpaper (220-400 grit)
- Clear matte acrylic sealer or varnish
- Felt pads (optional for bottom)
Step 1: Preparing and Shaping
-
Condition the Clay:
Begin by taking a handful of smooth air-dry clay and kneading it in your hands until it feels pliable and warm. You want to remove any air pockets but avoid overworking it to the point of cracking. -
Roll Out the Slab:
Place your clay on a canvas mat or parchment paper to prevent sticking. Using a rolling pin, roll the clay out evenly. I find using 1/4 inch guide rings on the rolling pin ensures a perfectly uniform thickness for durability. -
Select and Place Leaves:
Choose a fresh leaf with thick, defined veins on the back side. Place it vein-side down onto your rolled clay slab, positioning it exactly where you want the impression to be. -
Press the Design:
Gently but firmly roll over the leaf with your rolling pin once or twice. Use enough pressure to embed the veins into the clay surface, but be careful not to thin the slab too much further. -
Remove the Leaf:
Find the stem of the leaf and very carefully peel it away from the clay. Do this slowly to ensure you don’t pull up bits of clay or tear the delicate edges of the impression. -
Check the Impression:
Inspect the imprinted design. If there are any stray bits of leaf material left behind, use a needle tool or tweezers to gently lift them out without marring the surface.
Step 2: Cutting and Refining
-
Cut the Shape:
Center your round cookie cutter over the leaf impression. Press down firmly and evenly to cut the coaster shape. Rotate the cutter slightly before lifting to ensure a clean release. -
Release the Coaster:
Lift away the excess clay from around the circle first, then carefully peel your clay circle off the work surface. Handle it gently to avoid distorting the circular shape. -
Smooth the Edges:
Dip your finger into a small bowl of water and run it along the cut edge of the coaster. Smooth out any roughness or sharp corners created by the cutter, giving it a soft, finished look. -
Flatten for Drying:
Place the wet coaster on a clean, flat surface or a wire rack covered with parchment paper. If you notice any warping, gently press it flat with a small book or board for the first hour of drying. -
Let it Dry:
Allow the clay to dry completely for 24-48 hours. Turn the coasters over halfway through the drying process to ensure even airflow and prevent curling edges.
Fixing Curled Edges
If coasters curl while drying, slightly dampen the concave side with a sponge and place heavy books on top for a few hours to flatten them out.
Step 3: Finishing Touches
-
Sand Imperfections:
Once the clay is bone dry and hard, use fine-grit sandpaper to buff away any remaining sharp edges or bumps on the rim. Wipe away the dust with a dry cloth or soft brush. -
Apply Sealer:
Using a soft brush, apply a thin coat of clear matte acrylic sealer or varnish. This protects the clay from moisture, which is crucial for a coaster. -
Protect the Veins:
When sealing over the leaf impression, use light brush strokes to avoid pooling the varnish in the deep crevices of the veins, which could obscure the detail. -
Final Coat:
Allow the first coat to dry, then apply a second coat for extra durability. Don’t forget to seal the bottom and sides as well. -
Add Base Protection:
Stick small adhesive felt pads or a circle of cork to the bottom of the coaster to protect your table surfaces and prevent slipping.
Rustic Wash Effect
Mix a tiny amount of brown acrylic paint with water. Brush it into the leaf veins and wipe the surface clean to darken the details for an antique look.
Now you have a stunning set of botanical coasters ready to gift or enjoy with your morning coffee

What Really Happens Inside the Kiln
Learn how time and temperature work together inside the kiln to transform clay into durable ceramic.
Terrazzo-Style Slab Coasters
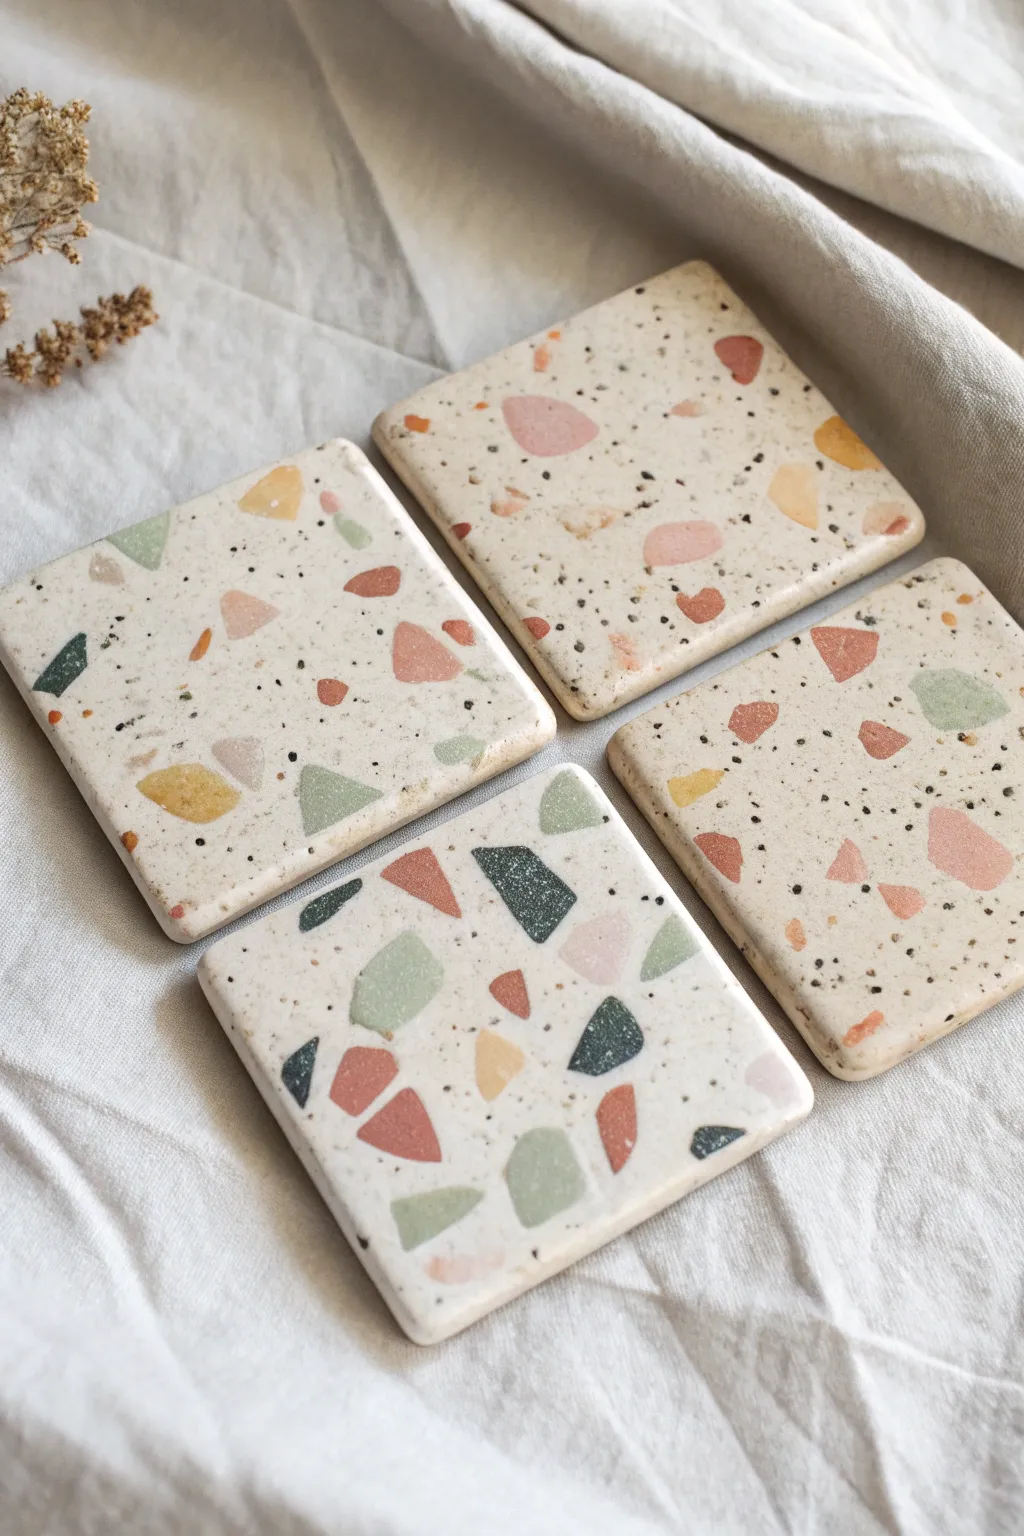
These trendy coasters feature a classic terrazzo look using contrasting colored clay chips embedded into a creamy white slab. The finished pieces have a smooth, matte stone-like feel that brings a sophisticated touch of color to your coffee table.
Step-by-Step Guide
Materials
- White or cream air dry clay (bulk)
- Air dry clay in assorted colors (terracotta, sage green, blush pink, dark teal/gray)
- Rolling pin
- Square cookie cutter (approx. 4×4 inches) or ruler and craft knife
- Parchment paper or non-stick craft mat
- Small bowl of water
- Fine grit sandpaper (200-400 grit)
- Sealant (Matte varnish or resin)
- Acrylic rolling rod (optional, for smoother finish)
Step 1: Creating the Terrazzo Chips
-
Roll Colored Clay:
Begin by taking small amounts of your colored clays—terracotta, sage green, blush pink, and dark teal. Roll each color out into a very thin sheet, roughly 1-2mm thick. These need to be quite thin so they embed easily later. -
Initial Drying:
Set these thin colored sheets aside on parchment paper to dry partially. You want them to be leathery or semi-dry, which makes them easier to tear or cut into irregular shards without squishing. -
Break Into Shards:
Once leathery, tear or cut the colored sheets into irregular, jagged chips of varying sizes. Aim for a mix of larger ‘statement’ chunks and tiny flecks to mimic real stone aggregate. -
Organize Chips:
Keep your piles of colored chips separate but accessible. Having them prepped and ready is crucial for the next phase.
Uneven Surface?
If your chips stick out after rolling, lay plastic wrap over the clay and roll again firmly. The plastic prevents the roller from dragging the chips.
Step 2: Forming the Base
-
Prepare White Clay:
Take a large handful of white or cream air dry clay. Knead it thoroughly to remove air bubbles and warm it up, ensuring it is pliable and smooth. -
Roll the Slab:
Roll the white clay out on a non-stick surface into a slab that is slightly thicker than your desired final coaster thickness—about 1/4 inch or slightly more is good to start.
Speckled Effect
For realistic detail, mix dried coffee grounds or black pepper into your white clay base before rolling. It adds a subtle granite texture.
Step 3: Embedding the Pattern
-
Scatter the Chips:
Randomly sprinkle your colored clay chips over the surface of the wet white slab. Don’t overthink the placement; randomness looks more natural. -
Create Depth:
Gently press the chips down with your fingers first. If there are large gaps, fill them with smaller flecks of color. I like to add a few very tiny specks of black or dark gray here for contrast. -
Embed with Roller:
Use your rolling pin to roll over the slab again. This forces the colored chips into the white base and creates a flush, singular surface. Roll in different directions to distribute the clay evenly.
Step 4: Shaping and Drying
-
Cut the Squares:
Using your square cookie cutter or a ruler and craft knife, cut out your coaster shapes from the patterned slab. Make sure to cut cleanly through the embedded chips. -
Smooth Edges:
Dip your finger in a little water and run it along the cut edges of each square to smooth out any roughness or sharp corners. A slightly rounded corner looks more professional. -
Dry Slowly:
Place the coasters on a flat surface to dry. To prevent curling, flip them over every 12 hours. This process usually takes 24-48 hours depending on humidity.
Step 5: Finishing
-
Sand the Surface:
Once fully bone dry, sand the top surface lightly with fine-grit sandpaper. This step is vital—it reveals the crisp edges of your colored chips and removes any hazy white clay film covering them. -
Dust Clean:
Wipe away all sanding dust with a slightly damp cloth or a soft brush. The colors should look much brighter now. -
Seal:
Apply a coat of matte varnish or a waterproof sealant to protect the clay from moisture, as coasters will encounter condensation.
Enjoy styling these modern, architectural pieces in your living space
Earrings in Easy Cutout Shapes
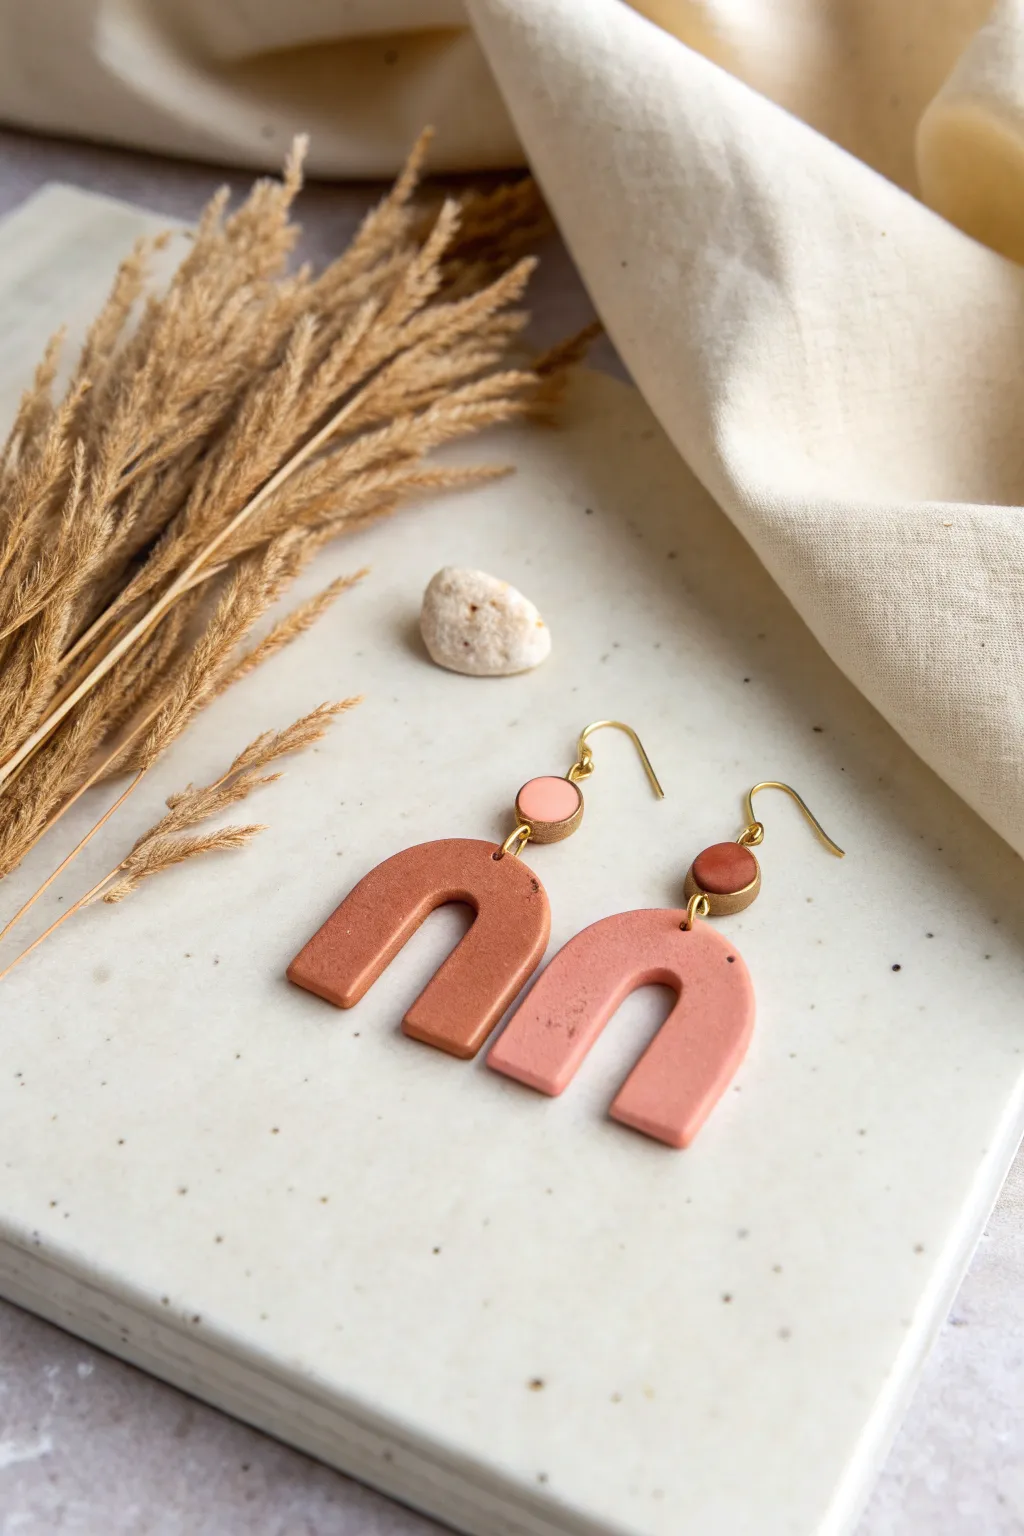
These elegant arch earrings combine warm terracotta tones with soft blush hues for a stylish, minimalist accessory. The simple geometric shapes are easy to cut freehand, making this a perfect beginner-friendly project that looks impressively high-end.
How-To Guide
Materials
- Air-dry clay (white)
- Acrylic paints (terracotta/burnt sienna, blush pink, gold)
- Clay rolling pin or smooth jar
- Craft knife or X-Acto blade
- Sandpaper (fine grit)
- Gloss or matte varnish (optional)
- 2 Earring hooks (gold-tone)
- 4 Jump rings (gold-tone)
- Jewelry pliers
- Small round cutter or straw (for connector circles)
- Needle tool or toothpick
- Parchment paper or non-stick mat
Step 1: Prepping and Shaping the Clay
-
Condition the clay:
Begin by taking a chunk of your white air-dry clay. Knead it in your hands until it feels soft, warm, and pliable. This conditioning step helps prevent cracks later on. -
Roll out the slab:
Place the clay on parchment paper or a non-stick mat. Using your rolling pin, roll the clay out evenly to a thickness of about 3-4mm. Try to keep the thickness consistent so your earrings hang straight. -
Cut the arch shapes:
Use your craft knife to cut out two identical U-shapes or arches. They should be roughly 1.5 inches tall. I like to cut a paper template first and trace around it lightly on the clay to ensure symmetry. -
Create the connector circles:
Using a very small round cutter, the end of a straw, or even a pen cap, punch out two small circles of clay. These will sit between the hook and the main arch. -
Smooth the edges:
Dip your finger in a tiny bit of water and gently run it along the cut edges of your arches and circles. This smooths out any jagged bits or knife marks before drying. -
Pierce holes for hardware:
While the clay is still wet, use a needle tool or toothpick to make holes. You’ll need one hole at the top center of each arch, and two holes in each small circle (one at the top, one at the bottom), depending on how you want them to connect. Make sure the holes are big enough for your jump rings.
Step 2: Drying and Refining
-
Let them dry thoroughly:
Place your clay pieces on a flat surface away from direct heat. Let them air dry for at least 24-48 hours. Flip them over halfway through the process to ensure both sides dry evenly. -
Sand for a professional finish:
Once fully dry and hard, take your fine-grit sandpaper and gently sand the edges. Focus on curves and corners to make them look polished and refined.
Clay Cracking?
If you see tiny hairline cracks as the clay dries, mix a tiny bit of fresh wet clay with water to make a paste (slip) and conduct a ‘patch job’ by rubbing it into the cracks with your finger.
Step 3: Painting and Assembly
-
Mix your colors:
Prepare your palette. For the look in the photo, you want a deep terracotta for one arch (mix burnt sienna with a touch of red) and a soft dusky pink for the other (mix pink with a tiny drop of brown or grey). Or, create a two-tone look like the image suggests. -
Paint the main arches:
Apply smooth coats of acrylic paint to the arches. In the photo, one arch is a rusty brown and the other is a soft pink-clay color. You may need 2-3 thin coats for opaque coverage. -
Paint the connector circles:
Paint the small circular pieces in contrasting or matching colors. Notice how the photo shows mismatched pairs—a pink circle on a brown arch, and a brown circle on a pink arch. This adds a playful, modern touch. -
Add gold details:
If you want the edges of your connector circles to shine like the photo, use a fine detail brush to carefully paint the sides (the thickness) of the small circles with gold acrylic paint. -
Seal the pieces:
To protect the paint and give a finished look, apply a layer of varnish. A matte varnish keeps the natural clay look, while gloss makes them shine. Let this dry completely. -
Attach the jump rings:
Using two pairs of jewelry pliers, twist open a jump ring. Thread it through the top hole of the main arch and the bottom hole of the connector circle. Close the ring securely. -
Attach the earring hooks:
Open the loop at the bottom of your earring hook (or use another jump ring if needed) and attach it to the top hole of the connector circle. Close it tight. Repeat for the second earring.
Texture Play
Before the clay dries, gently press a piece of lace or a textured leaf into the surface of the arch to create an embossed pattern, then paint over it later for a relief effect.
Wear your new handmade statement earrings with pride or gift them to a friend who loves unique accessories


The Complete Guide to Pottery Troubleshooting
Uncover the most common ceramic mistakes—from cracking clay to failed glazes—and learn how to fix them fast.
Cute Mini Magnets With Faces
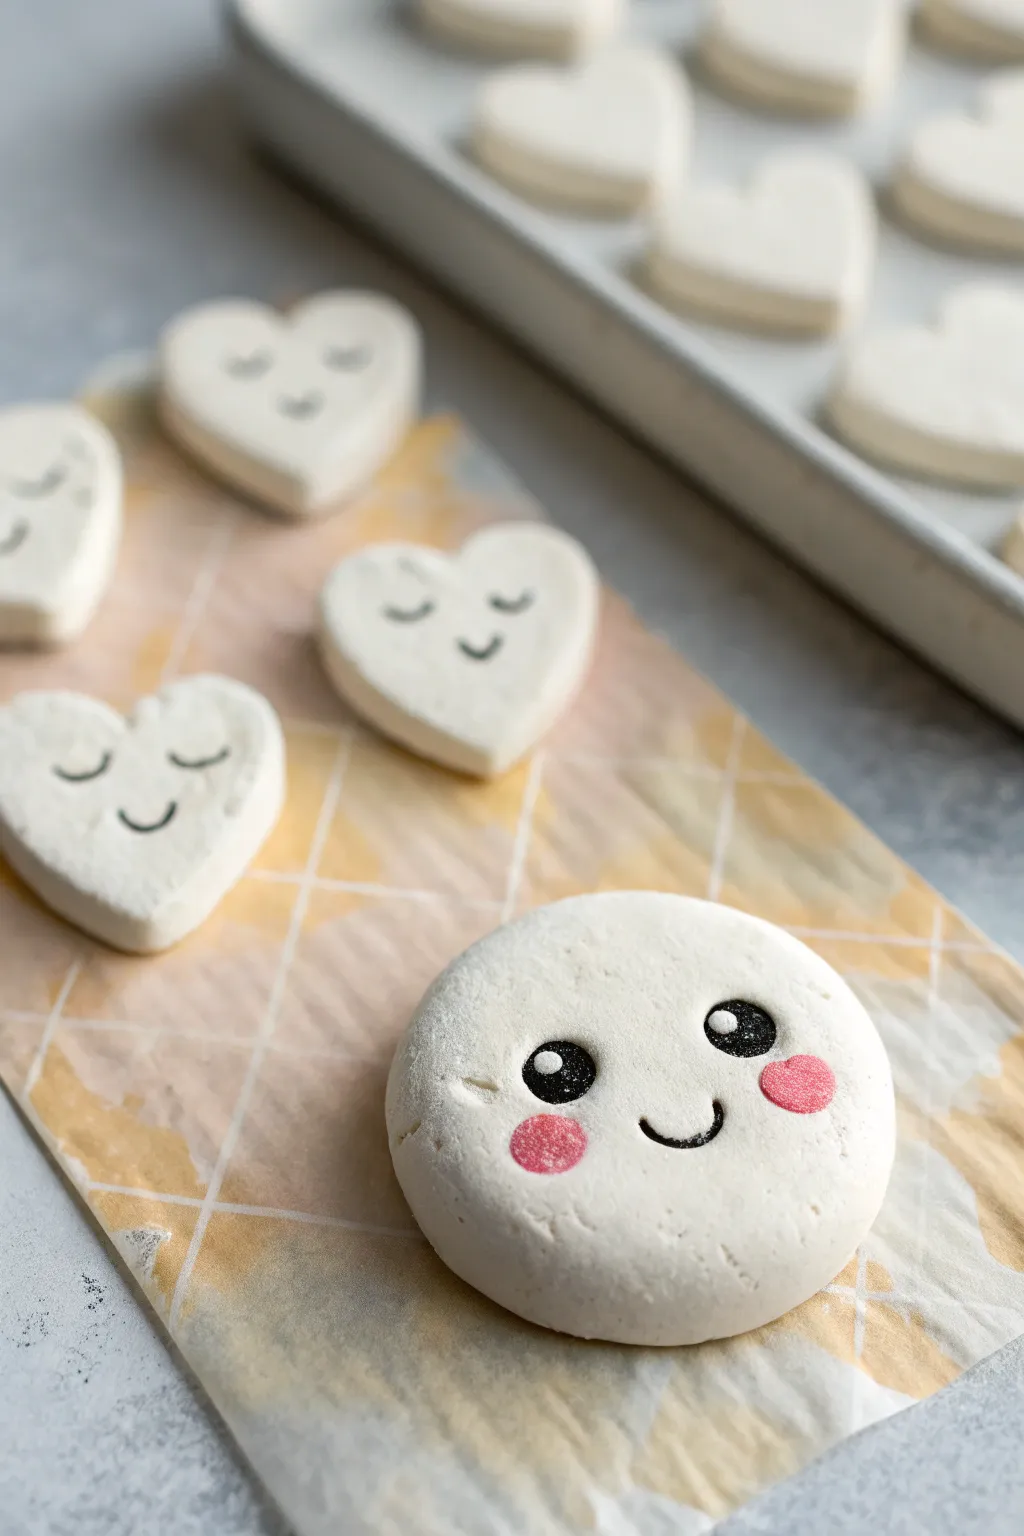
These adorable little magnets bring a touch of sweetness to any fridge or magnetic board. Featuring smooth white clay discs with expressive, blushing faces, they are surprisingly simple to shape and customize.
How-To Guide
Materials
- White air dry clay (smooth uniform texture)
- Rolling pin
- Circle cookie cutter (approx. 2 inches)
- Heart cookie cutter (optional, for variations)
- Fine-grit sandpaper
- Black acrylic paint or extra-fine tip permanent marker
- Pink acrylic paint
- Small detail paintbrush
- Dotting tool or toothpick
- Strong craft magnets
- Super glue or E6000 adhesive
- Parchment paper
Step 1: Shaping the Clay Base
-
Prepare your workspace:
Lay down a sheet of parchment paper on a smooth, flat surface to prevent sticking. -
Condition the clay:
Take a chunk of white air dry clay and knead it in your hands until it is pliable and warm, removing any air bubbles. -
Roll the slab:
Using your rolling pin, roll the clay out into a slab. Aim for a thickness of about 1/4 inch so the magnets have enough sturdiness without being too heavy. -
Cut the shapes:
Press your circle cutter firmly into the clay slab to create the main round face. If you want to make the background hearts shown in the image, use a heart cutter as well. -
Smooth the edges:
Dip your finger in a tiny bit of water and run it along the cut edges of the clay to smooth out any roughness or sharp corners. -
Dry completely:
Place the shapes on a clean sheet of parchment paper and let them air dry. This usually takes 24-48 hours depending on humidity; flip them halfway through for even drying.
Step 2: Refining and Painting
-
Sand for smoothness:
Once bone dry, gently rub the surface and edges with fine-grit sandpaper to achieve that professional, porcelain-like finish visible in the photo. -
Draft the face:
Lightly sketch the position of the eyes and mouth with a pencil if you feel unsure about freehand painting. -
Paint the eyes:
Dip a small dotting tool or the handle end of a paintbrush into black acrylic paint. Press two large, solid dots onto the upper half of the circle for the eyes. -
Add the eye shine:
Wait for the black paint to dry completely. Then, using a tiny pin or the very tip of a toothpick with white paint, add a minuscule white dot inside the black area to create a ‘sparkle’. -
Draw the mouth:
Using an extra-fine brush or a permanent marker, draw a small, U-shaped smile right between and slightly below the eyes. -
Create the blush:
Dip a clean fingertip or a round foam pouncer into pink acrylic paint. Dab most of the paint off onto a paper towel until it’s almost dry. -
Apply the cheeks:
Gently press the pink pigment onto the clay just below the outer edges of the eyes to create soft, rosy cheeks. -
Create variations:
For the heart shapes, simply draw two small closed U-shapes for ‘sleeping’ eyes and a tiny smile, skipping the blush for a minimalist look. -
Seal the surface:
Apply a thin coat of matte varnish or Mod Podge to protect the paint and clay from moisture.
Smooth Surface Secret
Use a barely damp sponge to wipe the wet clay surface before drying. This reduces sanding time later and creates a flawless ‘skin’ for painting.
Step 3: Assembly
-
Attach the magnet:
Flip the dried and painted clay piece over. -
Glue securely:
Place a dab of strong adhesive like E6000 on the back center. Press the magnet firmly into the glue. -
Final cure:
Let the glue cure according to the package instructions before sticking your new creation onto the fridge.
Make Them 3D
Before drying, punch a small hole at the top to turn these into gift tags or ornaments instead of magnets, or glue on a pin back for a cute brooch.
Now you have a set of cheerful companions to brighten up your kitchen.
Tiny Bud Vases for Dried Stems
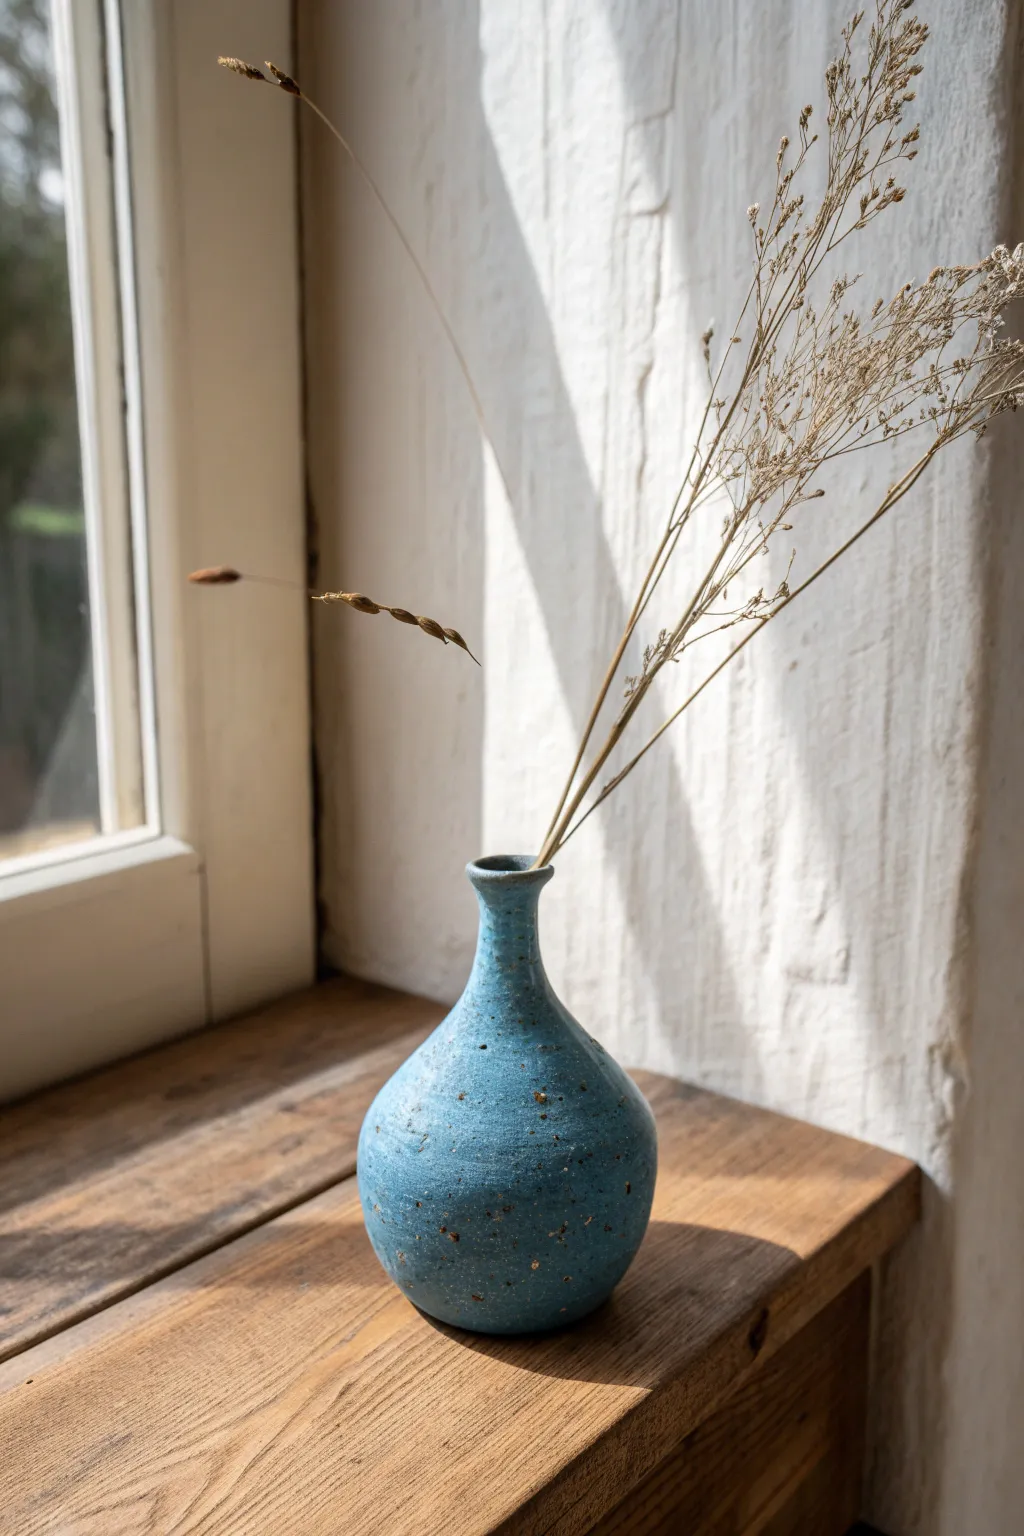
This charming, rustic bud vase captures the look of wheel-thrown pottery using humble air-dry clay. With its bulbous base, narrow neck, and faux-ceramic speckled finish, it makes a perfect home for delicate dried stems on your windowsill.
Step-by-Step Guide
Materials
- Air-dry clay (white or grey)
- Small rolling pin
- Modeling tools (or a blunt knife and spoon)
- Sponge and water bowl
- Fine-grit sandpaper
- Acrylic paints (Teal, White, Brown/Black)
- Small paintbrush
- Old toothbrush (for speckling)
- Matte or satin varnish
Step 1: Shaping the Form
-
Prepare the Clay:
Start by conditioning a ball of clay about the size of a tennis ball. Knead it in your hands until it is warm, pliable, and free of cracks. -
Form the Base:
Roll the clay into a smooth sphere. Gently tap the bottom of the sphere onto your work surface to create a flat, stable base so the vase won’t wobble. -
Start the Pinching Process:
Hold the sphere in one hand and use your thumb to press a hole into the center of the top, stopping about a half-inch from the bottom. -
Hollow the Body:
Using a pinching motion with your thumb inside and fingers outside, gently rotate the clay to widen the opening and thin the walls. Aim for a rounded, bulbous belly shape while keeping the walls even. -
Create the Neck:
Instead of widening the top rim, begin gently squeezing the clay inwards as you move up. You want to choke the opening to make it narrower than the body. -
Refine the Neck Height:
If you need more height for the neck, take a small coil of clay, score and slip it onto the rim, and smooth it upwards. Keep the neck narrow and slightly flared at the very top lip. -
Smooth the Surface:
Dip your finger or a slightly damp sponge into water and smooth out any fingerprints or cracks on the exterior. I like to spend extra time here to make it look professionally thrown. -
Dry Completely:
Set the vase aside in a cool, dry place. Let it dry for at least 24-48 hours. Turn it occasionally so the bottom dries evenly.
Step 2: Finishing and Painting
-
Sand for Perfection:
Once fully dry and hard, use fine-grit sandpaper to buff away any remaining lumps or uneven textures. Wipe away the dust with a barely damp cloth. -
Mix the Base Color:
Mix a teal blue acrylic paint. You may want to mute it slightly with a drop of grey or white to achieve that natural, stonewear look seen in the photo. -
Apply Base Coat:
Paint the entire exterior of the vase. You might need two coats to get full, opaque coverage. Let the paint dry completely between layers. -
Create the Speckle Effect:
Dilute a small amount of dark brown or black acrylic paint with water until it is inky. Dip an old toothbrush into this mixture. -
Splatter the Vase:
Hold the toothbrush near the vase and run your thumb across the bristles to flick tiny droplets of paint onto the surface. Rotate the vase to get even coverage. -
Add Texture Details:
If you want the larger golden-brown spots seen in the image, use a fine-tip brush to manually dot on a few larger speckles using a raw sienna or gold-brown paint. -
Seal the Project:
Protect your paint job with a coat of matte or satin varnish. This mimics a ceramic glaze and adds durability. -
Style and Display:
Once the varnish is cured, arrange a few stems of dried grass or wildflowers inside to complete the rustic window display.
Smooth Operator
Use a barely damp makeup sponge to smooth the raw clay. It removes fingerprints better than fingers alone and prevents adding too much water.
Glossy Glaze Look
For a high-end ceramic look, swap the matte varnish for a high-gloss Mod Podge or clear resin to mimic a kiln-fired glaze finish.
Place your finished vase in a spot with natural light to highlight the lovely speckled texture you created

TRACK YOUR CERAMIC JOURNEY
Capture glaze tests, firing details, and creative progress—all in one simple printable. Make your projects easier to repeat and improve.
Desk Tray Organizer Tiles
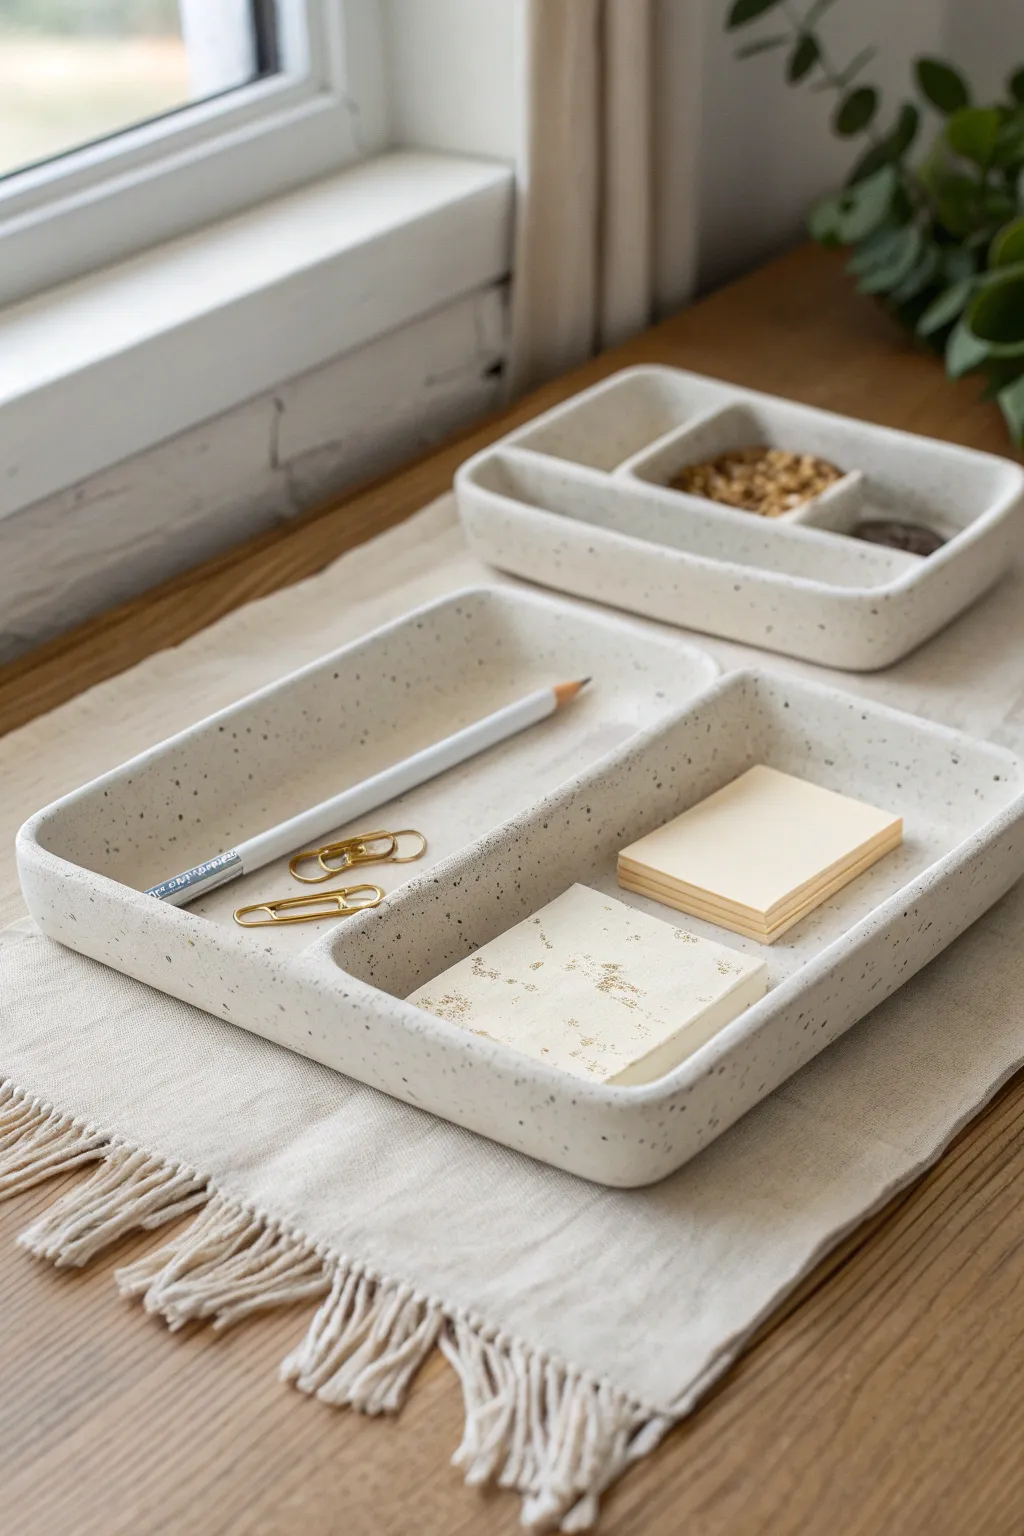
Bring calm organization to your workspace with this sleek, minimalist tray featuring a trendy speckled finish. Modeled to look like high-end ceramic or terrazzo, it offers dedicated compartments for your pens, sticky notes, and clips.
Step-by-Step Tutorial
Materials
- White smooth air dry clay (approx. 1 kg)
- Rolling pin
- Fettling knife or craft knife
- Rolling guides or two thin wooden slats (0.5 cm thick)
- Ruler
- Small bowl of water
- Sponge
- Fine-grit sandpaper (220-400 grit)
- Acrylic paint (black or dark brown)
- Old toothbrush or stiff bristle brush
- Matte spray varnish or sealant
- Can of cornstarch (optional but helpful for non-stick rolling)
Step 1: Shaping the Base
-
Prep your surface:
Cover your workspace with canvas or a silicone mat. If your clay is sticky, lightly dust the surface with a small amount of cornstarch. -
Roll the main slab:
Take a large portion of clay and roll it out into an even rectangle. Use your wooden slats on either side of the clay to guide the rolling pin, ensuring the entire slab is uniform and about 0.5 cm to 0.7 cm thick. -
Cut the base:
Using your ruler and craft knife, cut a clean rectangle for the base. For the organizer in the image, aim for approximately 25cm x 15cm. -
Smooth the foundation:
Dip your finger in water and gently rub the surface of your base slab to remove any canvas textures or fingerprints. A smooth start is crucial.
Step 2: Building Walls and Dividers
-
Prepare wall strips:
Gather the excess clay and re-roll it to the same thickness as your base. Cut long strips that are about 2.5 cm or 3 cm wide using your ruler. -
Score and slip:
Score (scratch cross-hatch marks) the outer perimeter of your base slab and the bottom edge of your clay strips. Apply a little water or liquid clay slip to these rough areas. -
Attach the outer walls:
Place the strips along the edge of the base to form the outer walls. Press down firmly to adhere. Where strips meet at the corners, cut them at a 45-degree angle for a neat mitered joint. -
Blend the seams:
This is the most important structural step. Use a modeling tool or your thumb to drag clay from the wall down onto the base on the inside, and from the base up onto the wall on the outside. Smooth until the seam is invisible. -
Create the layout:
Decide on your internal compartments. The design pictured features one long section for pencils and two smaller square sections. Cut inner divider strips to fit these measurements. -
Install dividers:
Score, slip, and attach the internal divider walls just as you did the outer ones. I find it easiest to work from the center outwards to avoid bumping into my own work. -
Refine the edges:
Once all walls are attached, use a damp sponge to consistently round off the top lips of the walls. Harsh, sharp edges tend to chip easier once dry.
Clean Corners Pro-Tip
For super sharp interior corners, use the square end of a chopstick or a paintbrush handle to smooth the clay right into the tight angles where your walls meet the base.
Step 3: Finishing and Speckling
-
Slow drying:
Place the tray away from direct heat or sunlight. Let it dry slowly for 24-48 hours. Turn it over gently halfway through so the bottom dries evenly. -
Sanding:
Once fully dry and bone-white, gently sand the entire piece. Focus on the corners and the top rim to get that soft, stone-like appearance seen in the photo. -
Wipe clean:
Remove all sanding dust with a slightly damp cloth or a dry brush. The surface must be dust-free for the effect to work. -
Prepare the splatter:
Dilute a small amount of black or dark brown acrylic paint with water until it has an inky consistency. -
Apply the faux-stone speckles:
Dip an old toothbrush into the thinned paint. Hold it over the tray and drag your thumb across the bristles to flick tiny droplets onto the clay. Practice on paper first to control the spray. -
Build density:
Apply the speckles lightly at first, then add a second pass if you want a denser pattern. Let the droplets dry completely. -
Seal the piece:
Finish with two light coats of matte spray varnish to protect the clay from moisture and stains without adding unwanted shine.
Terrazzo Twist
Instead of paint speckles, knead tiny chunks of dried colored clay or even small cleaned rocks into your wet clay before rolling out the slab for a true terrazzo texture.
Now you have a custom organizer that perfectly blends style and function to keep your desk tidy
Moon and Star Wall Garland
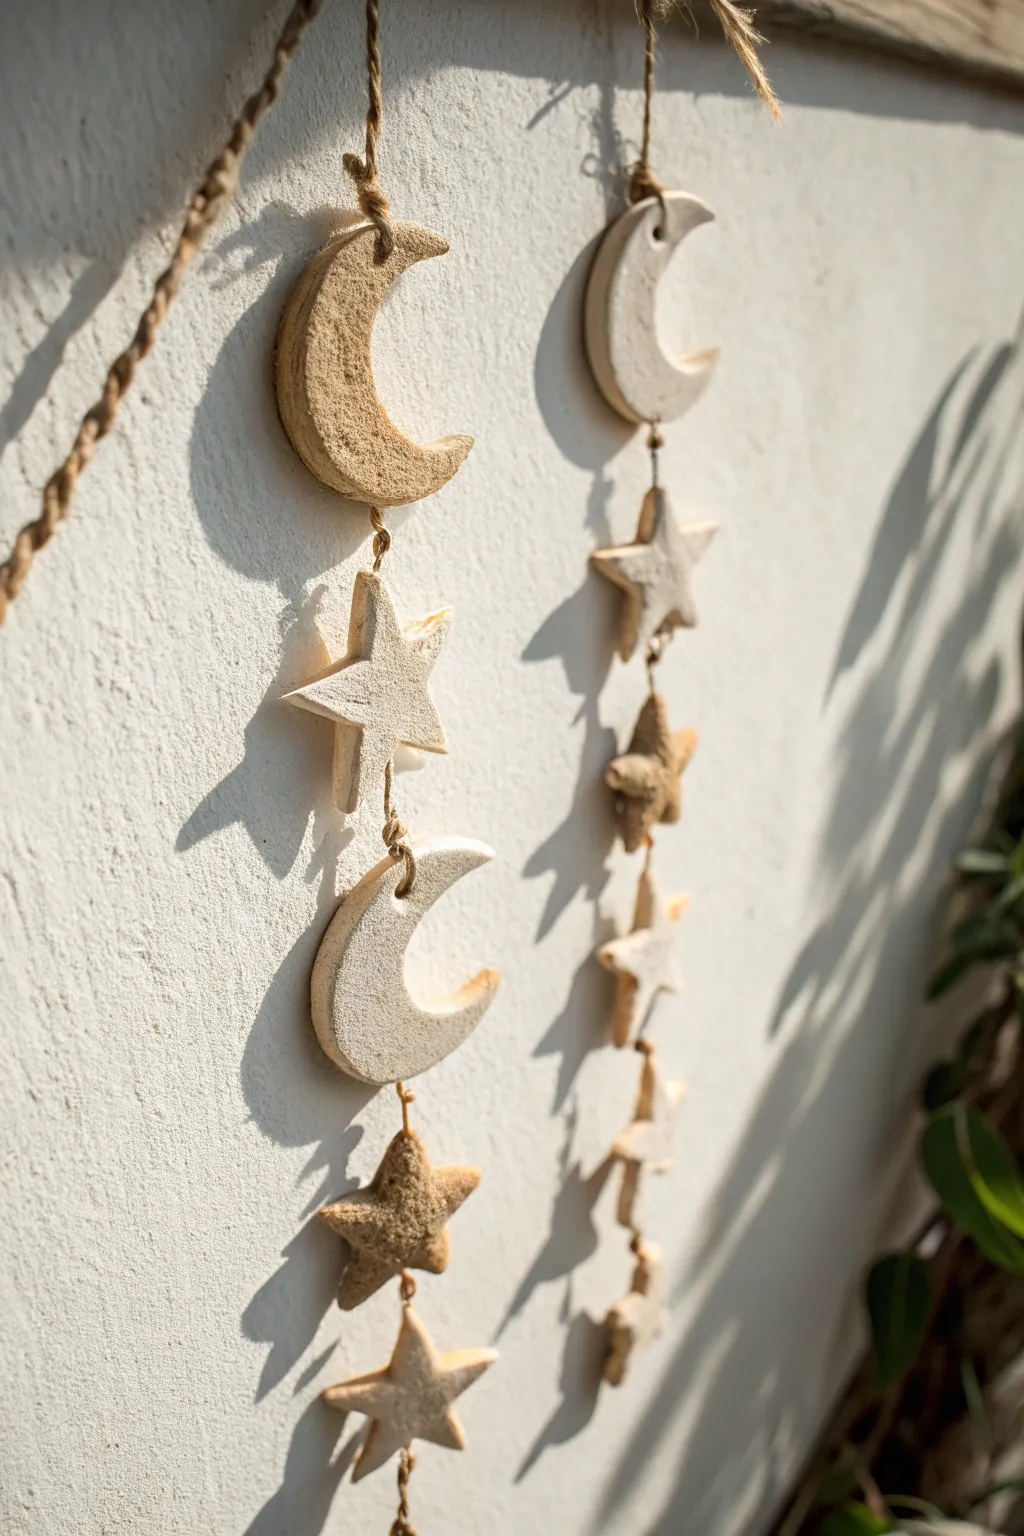
Bring the night sky indoors with this charming mobile featuring textured moons and stars strung on rustic twine. The natural, sandy finish of the clay catches the light beautifully, making it a perfect bohemian accent for a nursery or cozy reading nook.
Step-by-Step Guide
Materials
- Air dry clay (white or natural stone color)
- Rolling pin
- Star cookie cutter (medium size)
- Round cookie cutter (or a glass)
- Texture tool (old toothbrush or sandpaper)
- Jute twine or hemp cord
- Wooden skewer or toothpick
- Sandpaper (fine grit)
- Parchment paper or craft mat
- Water in a small cup
- Scissors
Step 1: Shaping the Heavens
-
Prepare your workspace:
Lay down parchment paper or a craft mat to protect your table and prevent the clay from sticking. Knead a handful of air dry clay until it is soft, pliable, and free of cracks. -
Roll it out:
Using a rolling pin, flatten the clay to an even thickness of about 1/4 inch (6mm). If you want the pieces to feel substantial like the ones in the photo, don’t roll them too thin. -
Cut the moon shapes:
To make a crescent moon, press your round cutter into the clay to cut a circle. Then, move the cutter slightly to the side (overlapping the first circle) and cut again. The remaining piece will be a perfect crescent shape. -
Cut the star shapes:
Use your star-shaped cookie cutter to punch out several stars. To match the garland shown, you’ll need roughly equal numbers of moons and stars. -
Smooth the edges:
Dip your finger in a little water and gently run it along the cut edges of your shapes to smooth out any roughness or burrs left by the cutters. -
Add texture:
For that rustic, sandy look seen in the image, lightly tap the surface of the wet clay with an old toothbrush or a piece of crumpled foil. Focus on the centers, leaving edges slightly smoother.
Natural Stone Look
Mix a small amount of used coffee grounds or sand into your white clay before rolling it out. This creates a speckled, stone-like texture naturally without painting.
Step 2: Prepping for Assembly
-
Create holes:
While the clay is still wet, use a wooden skewer to poke a hole through the top and bottom of each shape. Ensure the holes are large enough for your twine to pass through easily. -
Check hole placement:
Make sure your holes aren’t too close to the edge to prevent the clay from breaking later. Roughly 1/4 inch from the edge is a safe distance. -
Let them dry:
Place your finished shapes on a flat surface lined with clean parchment paper. Let them air dry for 24-48 hours. I usually flip them over halfway through to ensure even drying on both sides. -
Sand and refine:
Once fully dry and hard, use fine-grit sandpaper to gently smooth any sharp edges or unwanted bumps. Wipe away any dust with a dry cloth.
Add Some Sparkle
Once the clay is dry, paint the edges of the stars and moons with metallic gold paint. It adds a subtle shimmer that catches the sunlight wonderfully.
Step 3: Stringing the Mobile
-
Cut the twine:
Measure a piece of jute twine to your desired length, adding a few extra inches for loops and knots. Create a loop at the very top for hanging. -
Thread the first piece:
Take your first clay shape (a moon is a nice starter) and thread the twine through the top hole. Secure it by tying a simple overhand knot right above the hole so the shape rests on it, or thread it through and knot underneath depending on the look you prefer. -
Continue the pattern:
Leave a gap of about 2-3 inches, tie a knot, and thread your next shape (a star). The knot will act as a stopper, keeping the shape from sliding down. -
Complete the strand:
Continue alternating moons and stars until your garland is complete. Finish by tying a secure knot after the final piece at the bottom. -
Trim excess:
Snip off any remaining tail of twine at the bottom, or fray it slightly for a decorative, tassel-like finish.
Hang your beautiful celestial garland near a window to watch the shadows play throughout the day
Rainbow Arch Shelf Decor
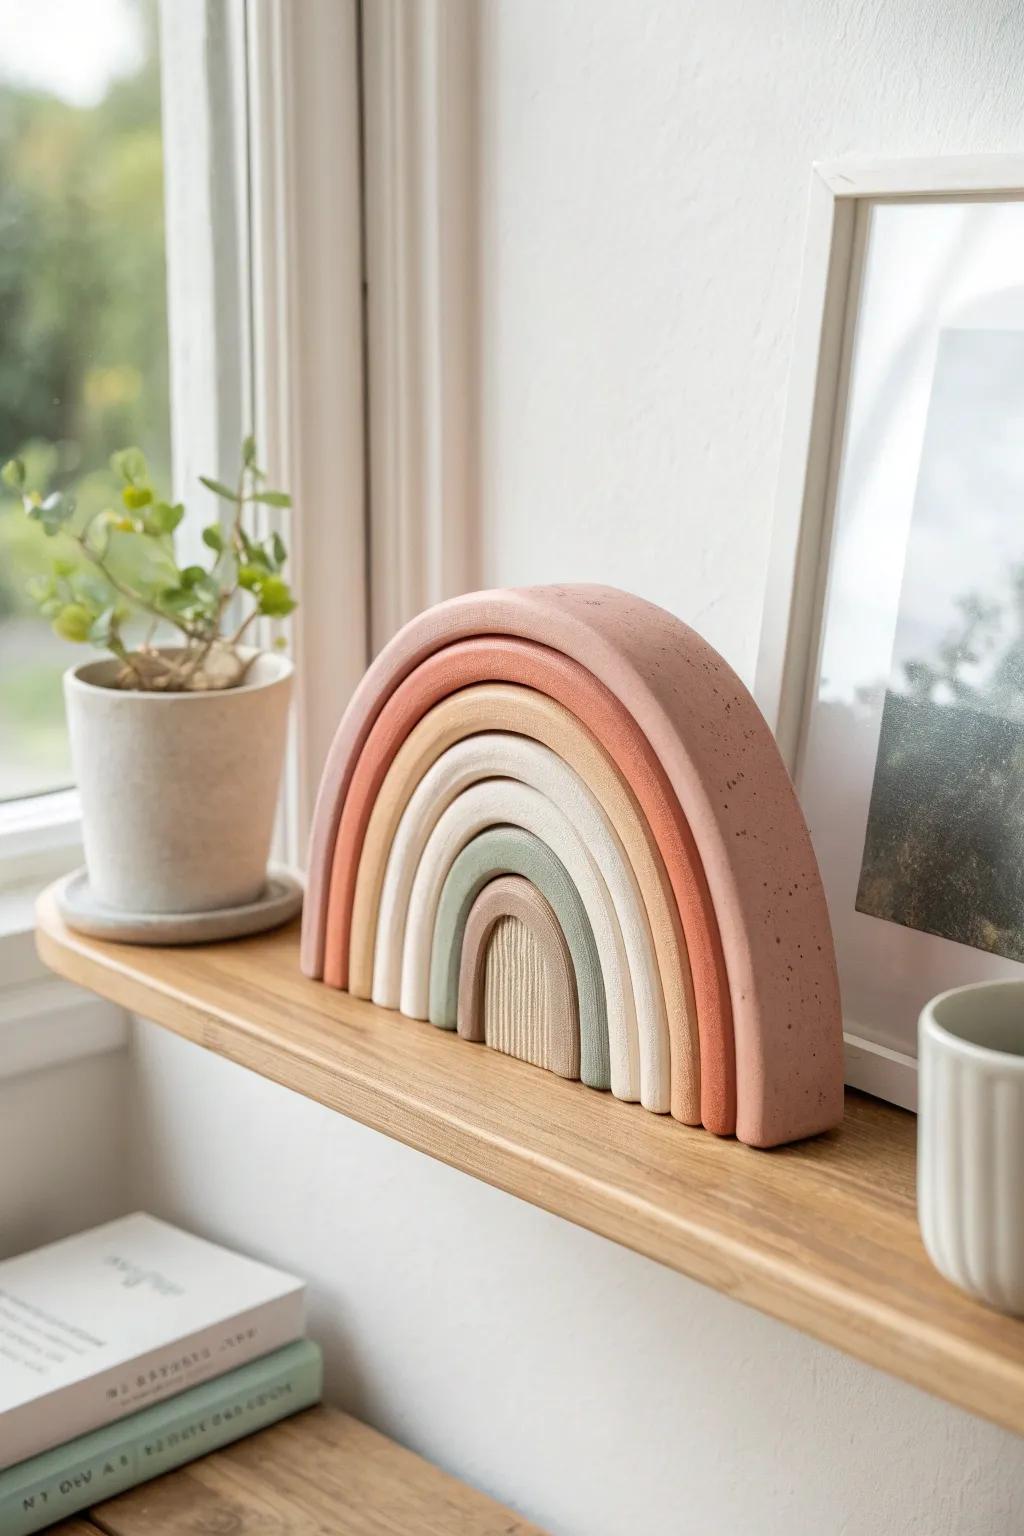
Bring warmth to your shelves with this earthy, minimalist rainbow arch sculpture. Its organic texture and muted color palette give it a sophisticated, high-end pottery look without needing a kiln.
Detailed Instructions
Materials
- Air dry clay (white or terra cotta)
- Rolling pin
- Sharp craft knife or clay cutter
- Acrylic paints (terracotta, peach, beige, sage green, taupe)
- Baking soda (for texture)
- Small mixing cups
- Fine grit sandpaper
- Water and sponge
- Cardboard or cardstock (for templates)
- Ruler
Step 1: Shaping the Arches
-
Create templates:
Before touching the clay, draw a set of nested arches on cardstock. The largest arch should be about 6-7 inches wide at the base. Draw 6 concentric arches, each about 0.75 inches thick, leaving a tiny gap between them in your drawing so they won’t stick together later. -
Cut the templates:
Cut out each individual arch shape from your cardstock to use as a guide. This step ensures perfect symmetry. -
Roll out the clay:
Flatten your air dry clay on a clean surface to an even thickness of about 0.75 to 1 inch. You want these to be chunky and self-standing, so don’t roll it too thin. -
Cut the largest arch:
Place your largest cardstock template onto the clay. Use your craft knife to trace around it, cutting cleanly downwards to keep the edges sharp. Remove the excess clay. -
Cut the remaining arches:
Repeat the process for the remaining 5 smaller arches. If you have extra clay left over, keep it wrapped in plastic so it doesn’t dry out while you work. -
Smooth the edges:
Dip your finger in a little water and run it along the cut edges of each arch to smooth out any roughness or loose clay bits. Keep the front and back flat. -
Initial drying:
Lay the arches flat on a drying rack or a piece of parchment paper. Let them dry for 24-48 hours. I usually flip them over halfway through the process to prevent warping. -
Sanding:
Once fully dry and hard, use fine-grit sandpaper to gently smooth the surface. Focus on the outer curves to get a nice, clean silhouette.
Step 2: Texturing and Painting
-
Mix textured paint:
To mimic the stone-like finish in the photo, mix your acrylic paints with baking soda. use a ratio of roughly 1 part baking soda to 2 parts paint. It should feel fluffy and slightly gritty. -
Color selection:
Prepare your palette: Terracotta for the largest arch, followed by a muted peach, warm beige, cream/off-white, sage green, and finally a taupe or light brown for the tiny center arch. -
Paint the first coat:
Apply the textured paint mixture to each arch individually. Use a dabbing motion with your brush rather than long strokes to build up that speckled, ceramic look. -
Let it set:
Allow the first coat to dry completely. The baking soda mixture dries faster than regular paint, so keep an eye on it. -
Add speckles (optional):
For extra detail, load an old toothbrush with slightly watered-down brown paint. Run your thumb over the bristles to flick tiny speckles onto the painted arches. -
Assembly check:
Once everything is dry, stand the arches up and nest them together. You can leave them loose to rearrange later, or glue them together for a permanent sculpture. -
Applying adhesive:
If gluing, apply a strong craft glue or epoxy to the inner curve of the larger arches and press the smaller ones inside. Wipe away excess glue immediately.
Stone Effect Secret
Add used coffee grounds to your paint mixture instead of baking soda for a darker, more dramatic speckled granite texture.
Level Up: Metallic Touch
After the matte paint dries, paint a very thin line of gold leaf or metallic gold paint along just the front edge of one or two arches.
Place your beautiful new sculpture near a window where the natural light can highlight the lovely texture you created
Tiny Kawaii-Style Animals
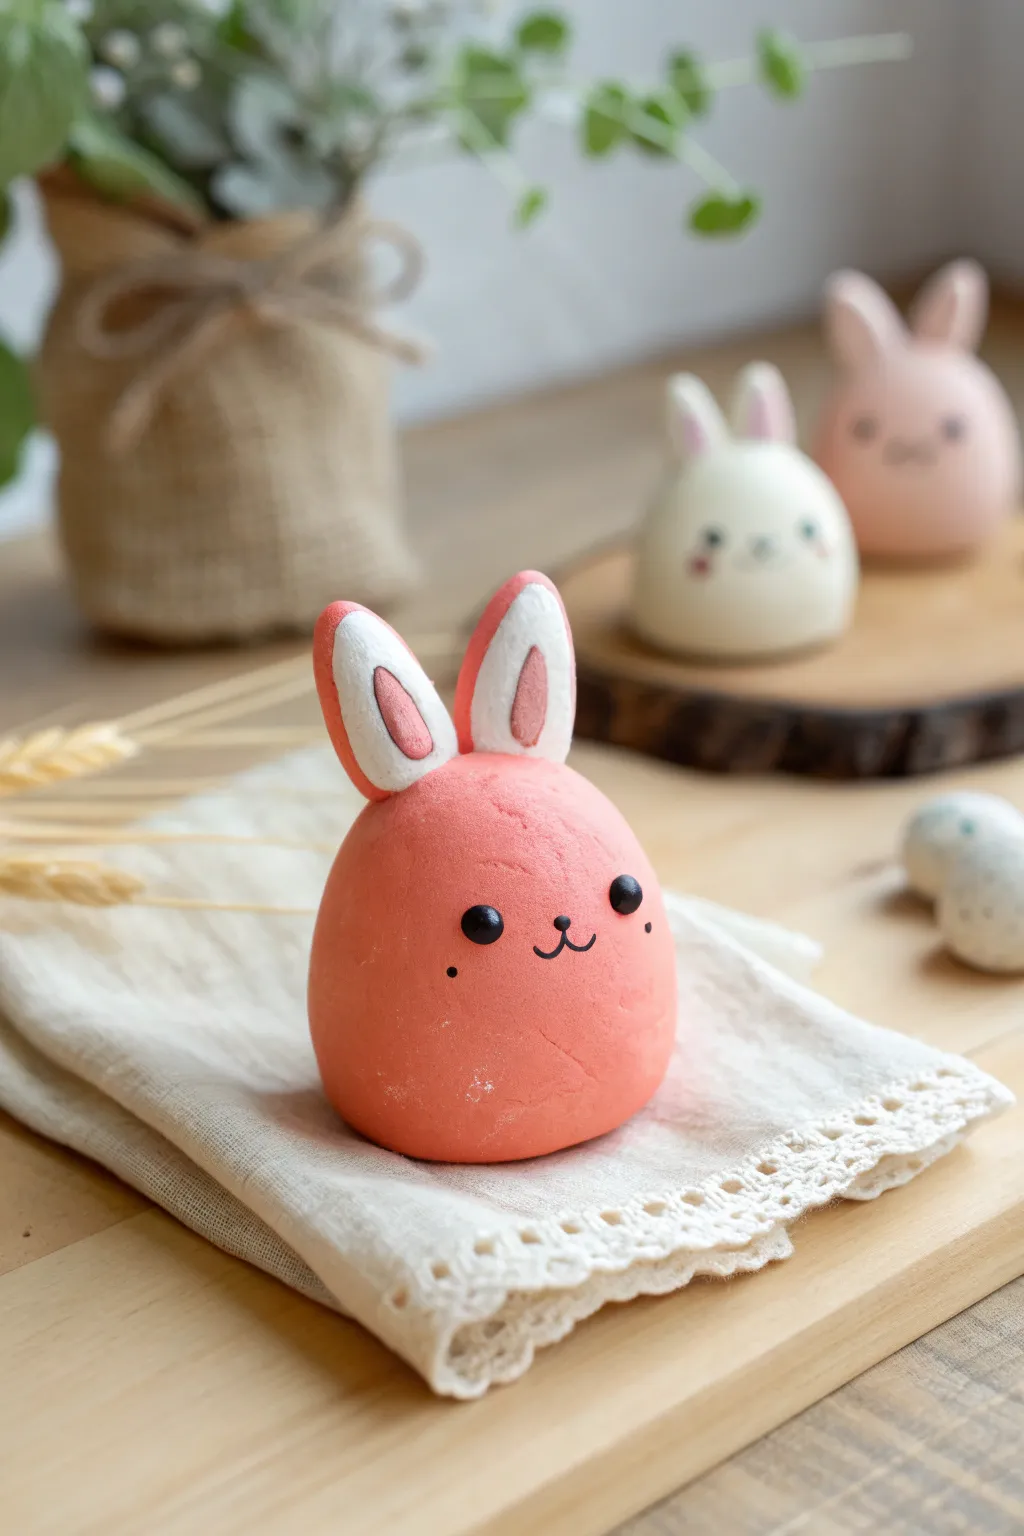
This adorable, egg-shaped bunny captures the essence of kawaii design with its simple curves and gentle expression. It is a perfect beginner project that turns a simple ball of clay into a charming desk companion.
Step-by-Step Tutorial
Materials
- Air dry clay (white)
- Acrylic paint (pink, white, black)
- Simple sculpting tools (or a toothpick)
- Small paintbrush
- Water cup
- Parchment paper or non-stick mat
Step 1: Shaping the Body
-
Prepare the clay:
Start by conditioning a chunk of air dry clay until it is soft and pliable. If the clay feels dry, I like to dampen my fingers slightly with water to smooth it out. -
Coloring the base:
Mix a small amount of pink acrylic paint into the white clay. Knead it thoroughly until you have a uniform, soft pink color like strawberry ice cream. -
Form the main shape:
Roll the pink clay between your palms to create a smooth ball. Slowly adjust your hand pressure to taper the top slightly, creating a rounded egg shape for the body. -
Surface smoothing:
Check for any cracks or fingerprints. Dip your finger in a tiny bit of water and gently buff the surface until the dome is perfectly smooth. -
Flatten the base:
Gently tap the bottom of your egg shape onto your work surface. This creates a flat base so the bunny stands up securely without wobbling.
Cracks Appearing?
If small drying cracks form, mix a tiny bit of fresh clay with water to make a paste. Fill the cracks, smooth over, and let dry again.
Step 2: Creating the Ears
-
Portion the ears:
Take two small balls of the remaining pink clay, roughly the size of large peas. Ensure they are equal in volume to keep the ears symmetrical. -
Shape the ears:
Roll each ball into a teardrop or carrot shape, roughly 1 inch long. Flatten them slightly between your thumb and forefinger to create the ear paddle. -
Mix the inner ear color:
Take a tiny bit of white clay—or use white paint later—and make flattened, smaller teardrops. Press these white shapes onto the center of your pink ear pieces. -
Add detail:
If you want that defined look like in the photo, add a very thin strip of darker pink clay inside the white area, or plan to paint this later for crisp definition. -
Attach the ears:
Score the bottom of the ears and the top of the head slightly with a toothpick. Add a dab of water or liquid clay (slip) and press the ears firmly onto the head. -
Blend the seams:
Use a small sculpting tool or your finger to smooth the clay where the ears meet the head, ensuring they look like one continuous piece rather than just stuck on.
Make it Matte
To get the velvety texture seen in the photo, finish your piece with a spray matte varnish instead of a glossy glaze.
Step 3: Painting facial details
-
Allow to dry:
Let the figurine sit undisturbed for at least 24 hours (or per package instructions) until it is completely hard and dry to the touch. -
Paint the inner ears:
If you didn’t use colored clay for the details, now paint the white oval inside the ear, and once dry, add a smaller, darker pink oval inside that white space. -
Paint the eyes:
Dip the handle end of a paintbrush into black acrylic paint. Dot two wide-set eyes onto the face, about halfway down the body. -
Refine the eyes:
Once the black dots are tacky, you can gently shape them to look slightly oval if desired, or keep them perfectly round for a classic look. -
Draw the mouth:
Using a very fine liner brush or a black paint pen, draw a tiny ‘w’ shape between the eyes to form the nose and mouth. -
Add blush and freckles:
Use a toothpick to add two tiny black freckles under the eyes. For cheeks, you can dilute pink paint with water and wash a faint circle below the eyes.
Enjoy displaying your sweet, round bunny alongside a few friends on your shelf