If you’ve been itching to make a cute dinosaur with air dry clay, you’re in the right zone—these projects are all about simple shapes and big personality. I’m sharing my favorite beginner-friendly dinosaur ideas that look adorable on a shelf, desk, or gift stack without needing fancy tools.
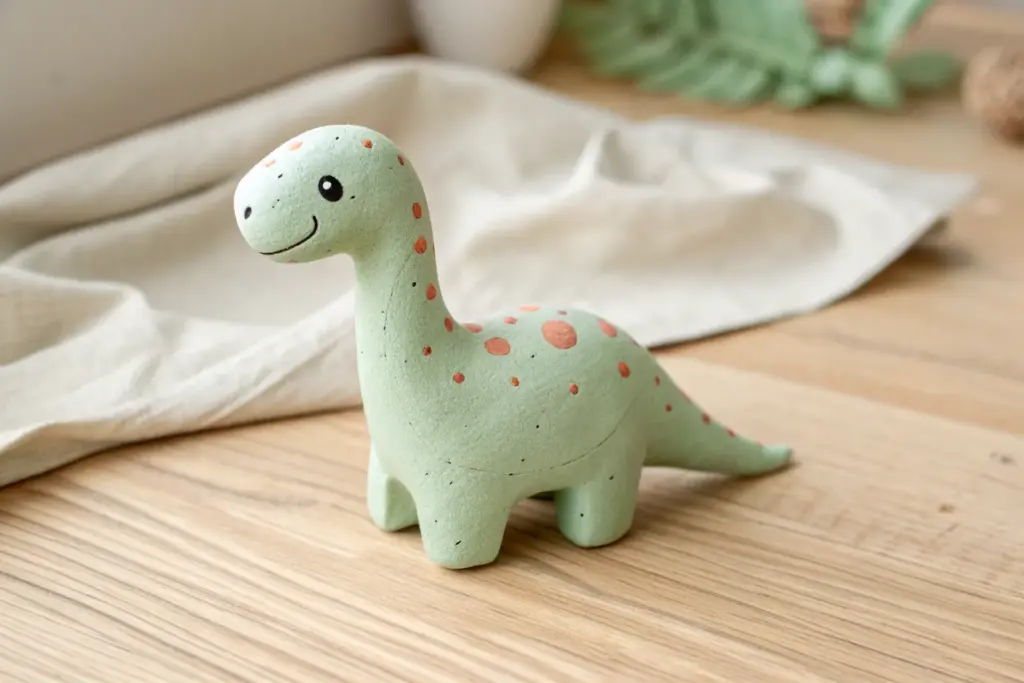
Chibi Long-Neck Dino Figurine
Create this adorable, slightly wobbly-looking dinosaur figurine that captures the charm of a vintage papier-mâché toy. With its elongated neck, distinctive spotted back, and gentle mint green hue, it makes for a delightful desk companion or nursery decoration.
Detailed Instructions
Materials
- Air-dry clay (paper-based or stone clay recommended for texture)
- Aluminum foil
- Masking tape
- Armature wire (around 16-18 gauge)
- Acrylic paints: Mint green, dark brown/black, white
- Paintbrushes (medium flat, small detail)
- Sculpting tools (needle tool, smoothing sponge)
- Fine-grit sandpaper
Step 1: Building the Armature
-
Wire skeleton:
Cut a piece of wire roughly 12 inches long. Bend it into an L-shape to form the neck and spine. Twist thinner pieces of wire at the bottom to create four simple legs. -
Bulk up the body:
Crumple aluminum foil tightly around the wire frame. Build a large egg shape for the body and a thinner, tapering cylinder up the neck wire. Add a small bulb of foil at the top for the head. -
Secure the foil:
Wrap the entire foil structure tightly with masking tape. This smooths out sharp foil edges and gives the clay something to grip onto. Ensure the legs are sturdy and the neck curve is gentle.
Step 2: Sculpting the Form
-
apply base layer:
Roll your air-dry clay into thin sheets or flatten chunks in your palms. Cover the entire armature, pushing the clay firmly into the masking tape to avoid air pockets. -
Refine the legs:
Add extra clay to the legs to make them thick and stumpy. You want them to blend seamlessly into the body without harsh joints. Press the feet flat against your work surface so the dino stands straight. -
Shape the neck and head:
Smooth the clay up the long neck, keeping it relatively uniform in thickness. Round off the head, giving it a slightly boxy, friendly snout shape. -
Create the texture:
Instead of smoothing the clay perfectly with water, leave a bit of natural texture. You can dab it lightly with a sponge or a crumpled paper towel to mimic the paper-pulp look seen in the photo. -
Add the seams:
Using a needle tool, gently score a vertical line running down the center of the chest and underbelly. Add tiny perpendicular hatch marks along this line to simulate stitching. -
Let it dry completely:
Set your dinosaur aside to dry. Depending on your clay brand and thickness, this could take 24-48 hours. Turn it occasionally so the bottom of the feet dry too.
Cracking Clay?
If cracks appear during drying, make a ‘slip’ by mixing a little scrap clay with water until it’s a paste. Fill the cracks with this paste and smooth over.
Step 3: Painting and Finishing
-
Sand imperfections:
Once bone dry, use fine-grit sandpaper to knock off any sharp spikes or rough patches, but keep the overall uneven texture intact. -
Base coat:
Paint the entire figure with a solid coat of mint green acrylic paint. I usually apply two thin coats rather than one thick one to maintain the clay’s texture. -
Paint the spots:
Mix a dark brown or charcoal grey paint. Using a round brush, dab uneven circular spots onto the dinosaur’s back. Vary the sizes and make them look organic rather than perfect circles. -
Detail the face:
With a fine detail brush, paint two white ovals for the eyes on the sides of the head. Once dry, add small black pupils looking upward or forward. -
Add the smile:
Use the very tip of your detail brush or a fine-tip paint pen to draw a long, thin smile line the curves up the snout. -
Finishing touches:
Paint small triangular claws on the toes using the dark brown color. If you want to accentuate the ‘stitching’ line you carved earlier, run a very watered-down wash of dark paint over it, then wipe away the excess.
Make it Prehistoric
Before the clay dries, press real leaves or lace into the dinosaur’s back to create a fossil-like texture, then dry-brush with a lighter green to highlight it.
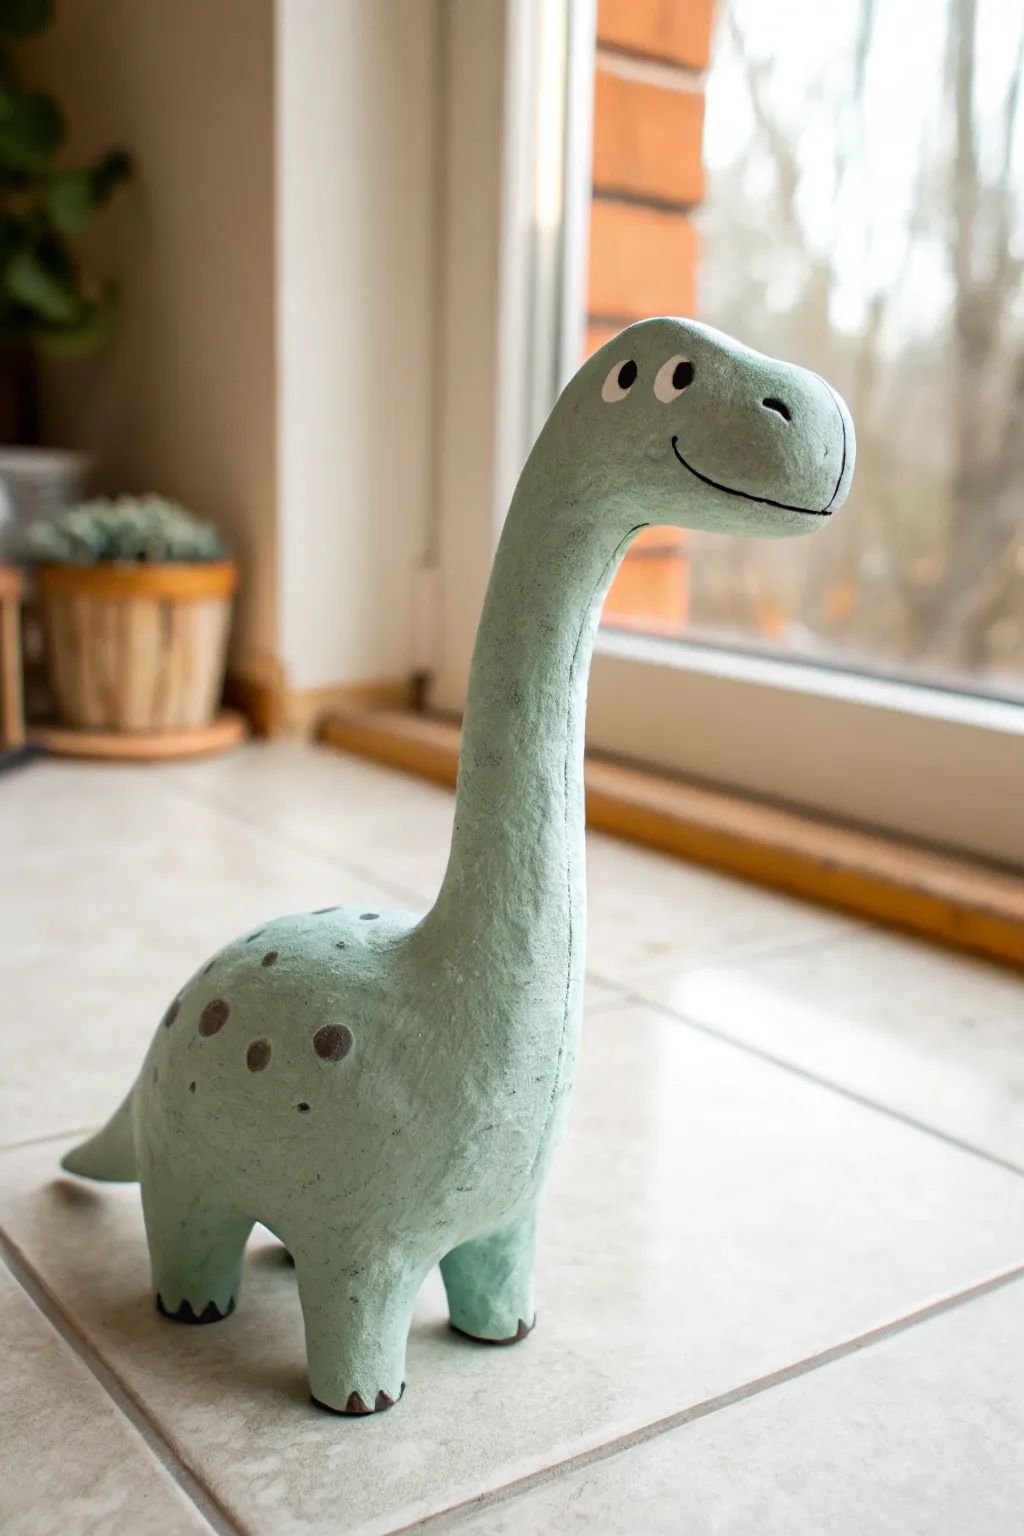
Now you have a charming, primitive-style dinosaur ready to guard your windowsill


Chubby Sitting T-Rex Buddy
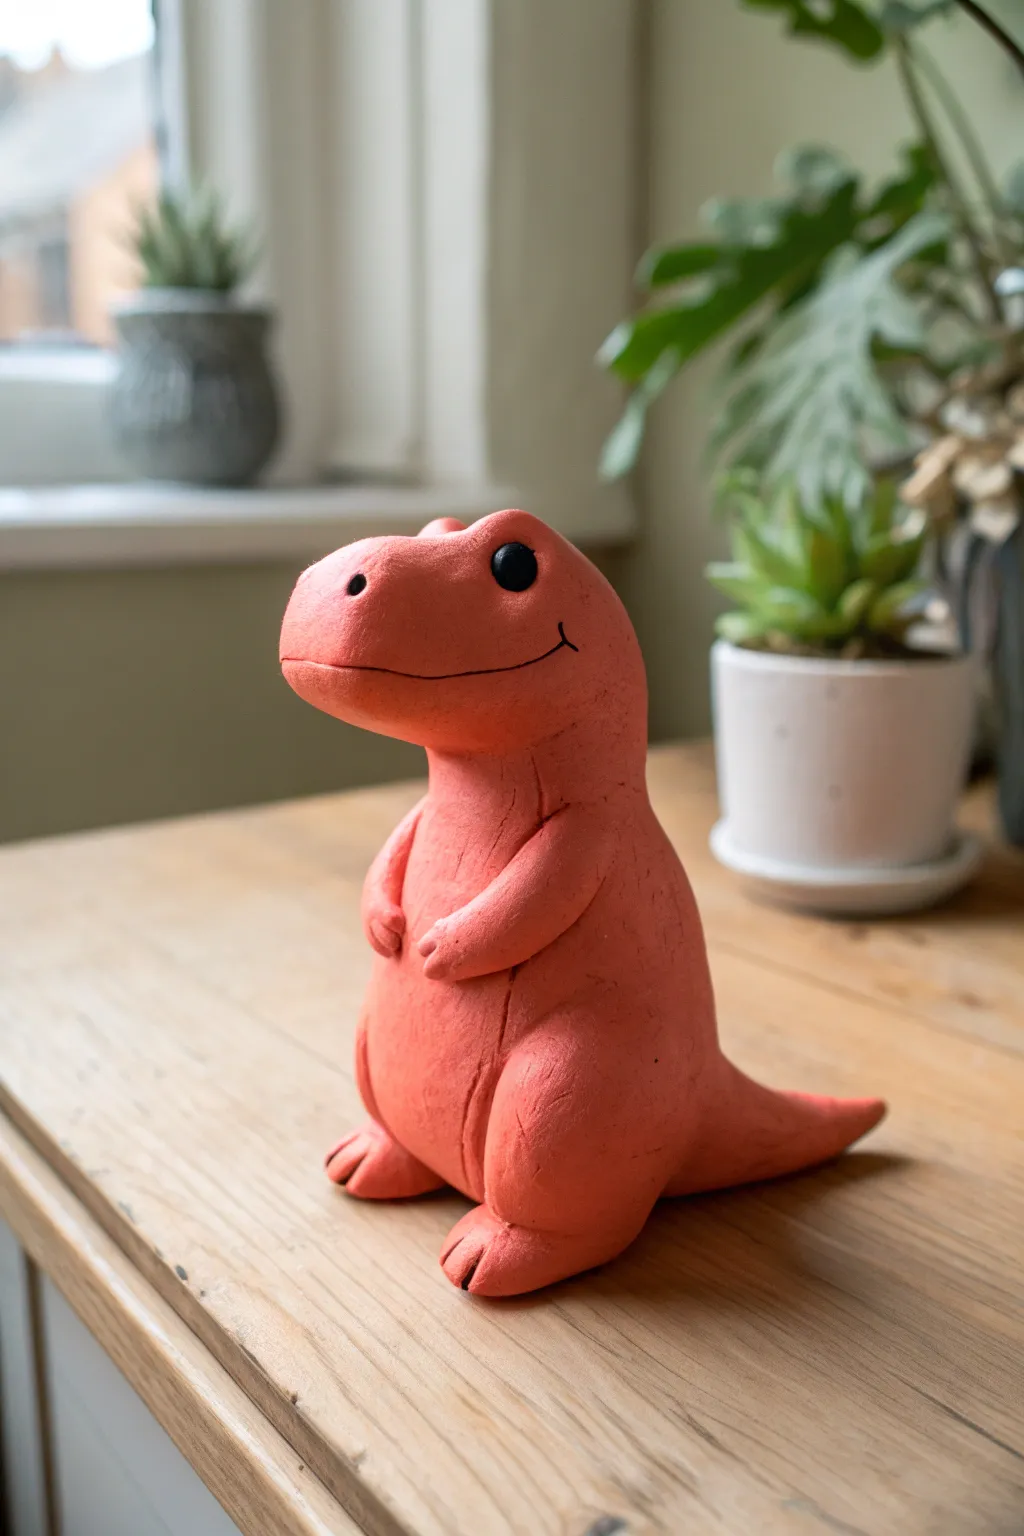
This adorable T-Rex trades ferocity for cuteness with a rounded, chubby body and a friendly smile. Using a coral-pink air dry clay, you’ll sculpt a smooth, sturdy companion perfect for sitting on a shelf among your houseplants.
Step-by-Step Guide
Materials
- Air dry clay (coral or salmon pink)
- Black acrylic paint
- Fine detail paintbrush or permanent marker
- Two small black beads (optional, for eyes)
- Sculpting tools (specifically a smoothing tool and a needle tool)
- Small cup of water
- Aluminum foil (for the core)
Step 1: Forming the Base Structure
-
Create the foil armature:
Begin by crumpling a piece of aluminum foil into a pear shape. This will be the core of the dinosaur’s body, helping it stand upright while saving clay and speeding up drying time. -
Prepare the clay:
Knead a large ball of coral-pink clay until it is warm and pliable. Divide it, setting aside about a third for the limbs and tail, and keep the larger portion for the body. -
Cover the body:
Flatten the larger piece of clay and wrap it fully around your foil pear. Roll it gently between your palms to smooth out any seams until you have a seamless, chubby teardrop shape. -
Shape the head:
Take a medium-sized ball of clay and shape it into a rounded oval. Attach this to the top of the body piece. Since the neck is thick and chubby, you want to blend the clay downwards so the head flows seamlessly into the chest.
Smooth Operator
Use a minuscule amount of water on your finger to ‘erase’ fingerprints. If the clay gets too slimy, let it sit for 5 minutes before continuing.
Step 2: Adding Appendages
-
Form the tail:
Roll a cone of clay that is thick at one end and tapered at the other. Press the wide end against the lower back of the body. -
Blend the tail seam:
Using your thumb or a smoothing tool, drag clay from the tail onto the body to bond them securely. Smooth the join with a little water until invisible. -
Make the legs:
Roll two equal-sized balls of clay into stout cylinders for the legs. These need to be thick to support the ‘sitting’ posture shown in the photo. -
Attach the legs:
Press the legs onto the bottom sides of the body. Blend the upper thigh area into the main body, but leave the feet distinct. -
Sculpt the toes:
Use a needle tool or knife to gently press two or three indentations into the front of each foot to create simple toes. -
Create the arms:
Roll two very small sausage shapes for the T-Rex’s tiny arms. Slightly curve them so they hug the belly area. -
Attach the arms:
Score the clay slightly on the chest area, add a dab of water, and press the arms on. Blend the shoulder connection tightly so they don’t fall off.
Accessories
Before the clay dries, create a tiny top hat or a party hat out of contrasting clay to balance on his head for extra personality.
Step 3: Facial Features and Finish
-
Add definition lines:
Reference the image and lightly etch a subtle line separating the leg from the belly area to emphasize the chubby thigh. -
Create the eye sockets:
Use a ball-ended tool to press two small indents on either side of the head where the eyes will go. -
Insert the eyes:
Roll two tiny balls of black clay (or use beads) and press them firmly into the sockets. If you are painting the eyes later, just leave the smooth indentations for now. -
Carve the mouth:
Use a sharp tool to carve a long, horizontal smile line that curves up at the cheek. Deepen the line slightly so it’s visible even after drying. -
Refine the snout:
Use a small tool to poke two nostrils at the very front of the snout. -
Final smoothing:
I like to dip my finger in water and give the entire sculpture one last rub-down to remove fingerprints and ensure a matte finish. -
Dry completely:
Let the figure sit undisturbed for at least 24-48 hours. Turn it occasionally so the bottom dries evenly. -
Paint the details:
Once fully dry, use a fine liner brush with black acrylic paint to darken the smile line and fill in the eyes if you didn’t use beads. Add a tiny white highlight dot to the eyes for life.
Place your new prehistoric pal on a sunny windowsill and enjoy his cheerful company


Simple Triceratops With Cone Horns
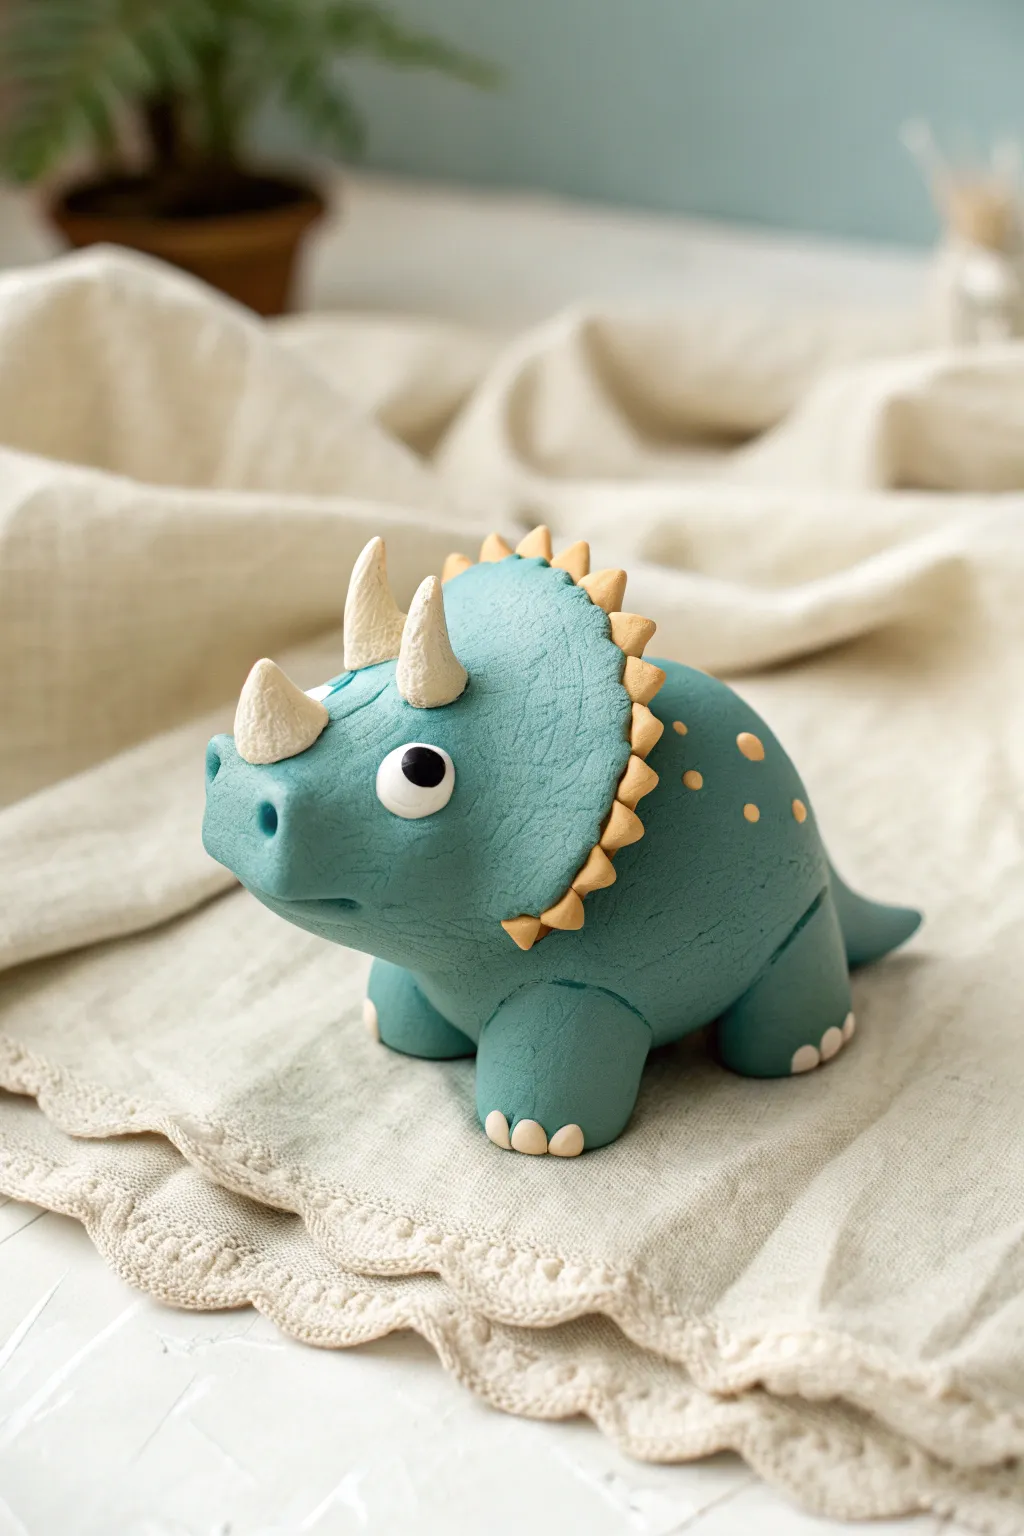
This adorable dinosaur friend is crafted with a soft, matte teal finish and charming textured details. Its stout body, cone-shaped horns, and playful expression make it a perfect beginner project for aspiring dino sculptors.
Step-by-Step Tutorial
Materials
- Teal air dry clay (or white clay mixed with teal acrylic paint)
- Cream or pale yellow air dry clay
- Small amount of black clay (for the eyes)
- Small amount of white clay (for eyes and highlights)
- Small ball tool and needle tool
- Sponge or texture mat (optional)
- Water for smoothing
Step 1: Shaping the Base
-
Body formation:
Start with a large ball of teal clay. Gently roll it into a thick pear shape, keeping one end slightly larger for the rear and pulling the front slightly forward to form the base of the head area. -
Define the head:
Instead of attaching a separate head, sculpt it directly from the front of your pear shape. Pinch and smooth the clay to create a distinct, boxy snout that flows seamlessly into the neck. -
Create the frill base:
Flatten a separate piece of teal clay into a semi-circle or fan shape. This will be the bony frill behind the head. -
Attach the frill:
Press the straight edge of the frill onto the back of the head area. Use a sculpting tool to blend the seam completely so it looks like part of the main body, smoothing with a little water.
Step 2: Legs and Tail
-
Make the legs:
Roll four equal-sized balls of teal clay. Flatten the bottoms slightly to create sturdy cylinders for the legs. -
Attach the legs:
Press the legs firmly onto the underside of the body. Use your thumb or a modeling tool to smooth the clay from the top of the legs onto the belly to secure the bond. -
Add toes:
Form tiny balls of cream-colored clay. Slightly flatten them and press three onto the botton front edge of each foot to create cute little toenails. -
Form the tail:
Roll a small cone of teal clay. Attach the wider end to the rear of the body, blending the seam until it disappears and curving the tip upward just a bit.
Seamless Blending
When attaching heavy parts like the tail or legs, use a cross-hatch pattern on both surfaces before joining to ensure they don’t fall off while drying.
Step 3: Adding Texture and Face
-
Skin texture:
Let the clay firm up for a few minutes. I find it helpful here to use a textured sponge or a crumpled piece of foil to gently press against the skin, giving it that realistic leathery look seen in the photo. -
Create the mouth:
Use a knife tool to carve a simple, horizontal smile line low on the snout. Use a ball tool to make a small indentation for the nostril. -
Eye sockets:
Press a medium ball tool into the sides of the head to create shallow sockets for the eyes. -
Assemble the eyes:
Place a small white ball into the socket, followed by a slightly smaller black circle in the center. Add a tiny white speck for a highlight.
Prehistoric Pedicure
Instead of cream toes, try painting the toenails gold or silver after the clay dries for a whimsical, magical creature look.
Step 4: Horns and Spikes
-
Main horns:
Roll two medium cones of cream clay. Position them on the forehead, just above the eyes, pointing slightly upward. -
Nose horn:
Roll a shorter, stouter cone of cream clay and attach it to the center of the snout. -
Horn texture:
Use a needle tool or knife to gently score horizontal rings around the horns, giving them a rugged, organic texture. -
Frill spikes:
Create many small triangles from cream clay. Arrange them along the curved outer edge of the head frill. -
Polka dots:
Finish by pressing small, flattened circles of cream clay onto the dinosaur’s back and sides for a patterned effect.
Allow your triceratops to dry completely for at least 24 hours before moving him to his new home on your shelf


Cute Stegosaurus With Easy Back Plates
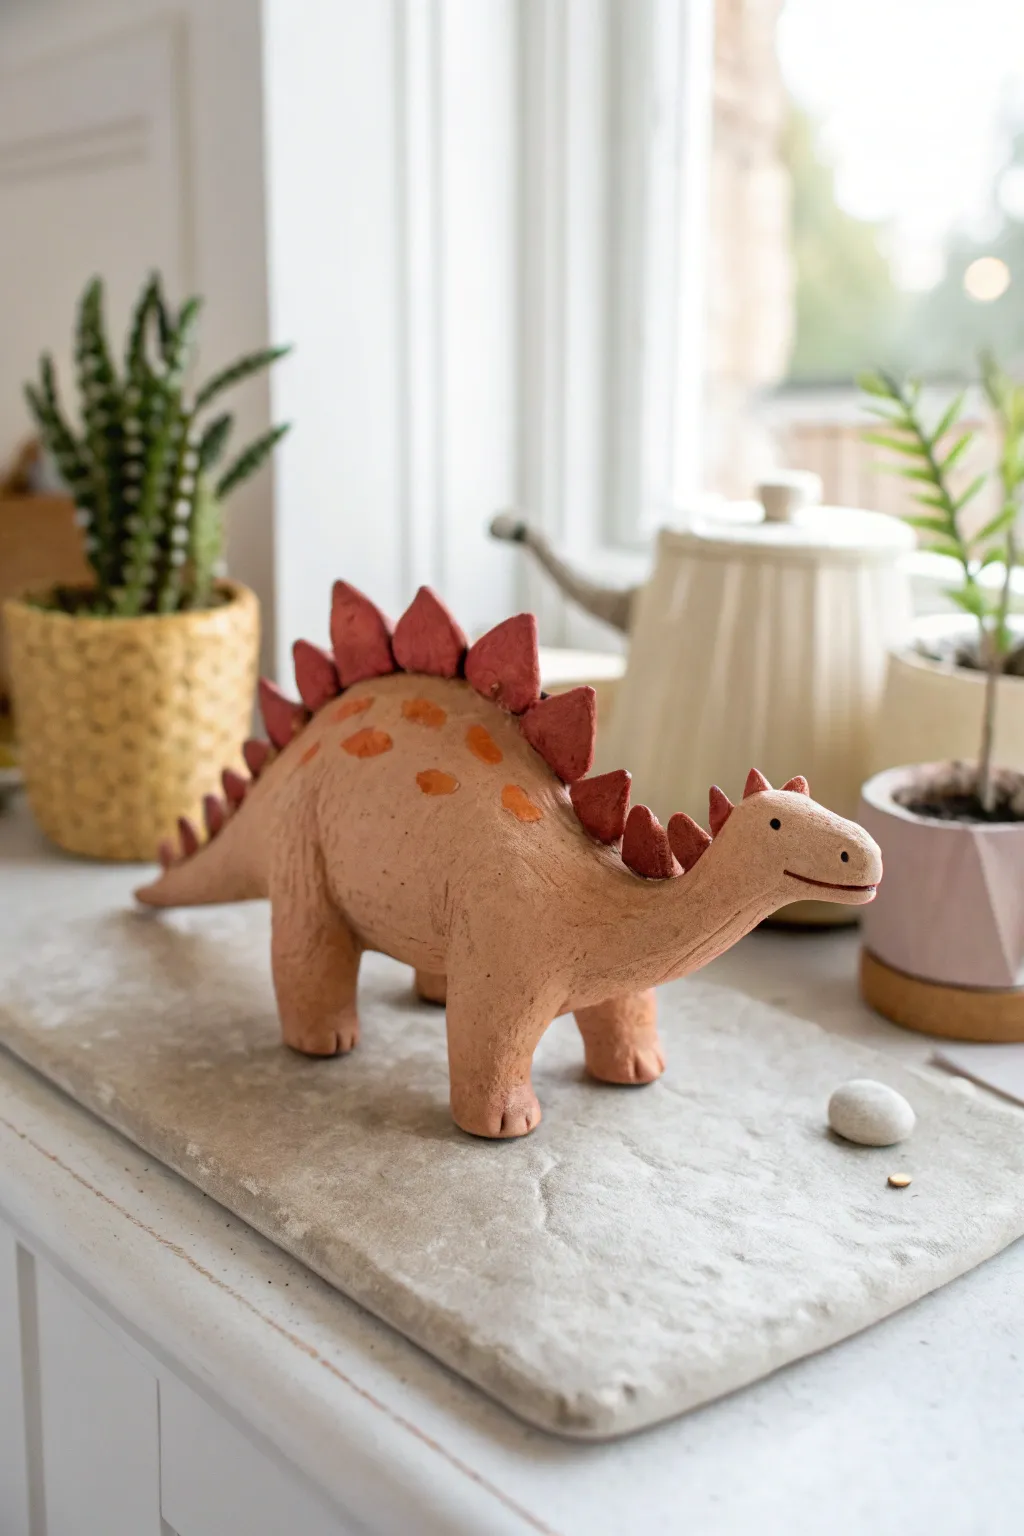
This friendly stegosaurus brings prehistoric charm to your shelf with its warm terracotta tones and playful painted spots. The simplified, rounded shapes make this project approachable for beginners while capturing the dinosaur’s iconic silhouette.
How-To Guide
Materials
- Air dry clay (terracotta color)
- Acrylic paints (dark red, bright orange, black, white)
- Small paintbrush
- Sculpting tools or a craft knife
- Small bowl of water
- Toothpick or wire for structural support (optional)
- Matte varnish (optional)
Step 1: Sculpting the Body
-
Form the main torso:
Start with a large ball of air dry clay, roughly the size of a tennis ball. Roll it between your palms to smooth out any cracks, then gently elongate it into a thick oval shape to form the dinosaur’s main body. -
Create the legs:
Pinch off four smaller, equal-sized pieces of clay. Roll each piece into a short, thick cylinder. These will be the sturdy legs that support your dino. -
Shape the neck and tail:
Gently pull and smooth clay from one end of the torso to create a tapered tail. Do the same on the opposite end, but pulling upwards and forwards to form the neck. Keep the neck thick enough to support the head. -
Form the head:
Refine the end of the neck into a rounded, slightly elongated head shape. Smooth the transition between the neck and head with a wet finger so it looks like one continuous piece. -
Attach the legs:
Score the top of each leg and the underside of the body where they will attach. Apply a tiny bit of water or slip (clay mixed with water) to the scored areas and press the legs firmly onto the body. -
Blend the seams:
Use a modeling tool or your finger to smooth the clay where the legs meet the body. Blending the clay downwards ensures a strong bond so your stegosaurus stands securely. -
Add toe details:
Once the dinosaur is standing nicely, use a small tool or a knife to gently press little vertical indents into the bottom of each foot to suggest toes. -
Refine the face:
Use a tool or simply your fingers to gently pinch the snout area. Use a toothpick or small tool to carve a simple, smiling mouth line on one side of the face.
Legs Keep Sinking?
If the body is too heavy for the wet legs, prop the belly up on a small object (like a matchbox) while it dries. This takes the weight off the legs until they harden.
Step 2: Adding the Iconic Plates
-
Prepare the back plates:
Roll out a small slab of clay or flatten small balls between your fingers. Cut or shape roughly 8-10 triangles of varying sizes. You’ll want smaller ones for the neck and tail, and larger ones for the middle of the back. -
Attach the plates:
Starting at the neck, score the bottom of a small triangular plate and the spine of the dinosaur. Press it gently into place. Continue down the back, placing the largest plates in the center and tapering down to small ones near the tail tip. -
Smooth the connections:
Carefully blend the base of each plate into the back using a small tool, being careful not to squish the triangle shapes you just made. -
Add final texture:
Before the clay dries, give the whole piece a once-over. You can use a damp sponge to smooth out fingerprints, or tap lightly with a stiff brush if you prefer a rougher, skin-like texture. -
Let it dry completely:
Set your stegosaurus in a safe, dry place away from direct sunlight. Depending on humidity and thickness, this usually takes 24 to 48 hours. The clay will lighten in color and feel hard when ready.
Step 3: Painting and Finishing
-
Paint the plates:
Using a dark red or rust-colored acrylic paint, carefully paint the triangular plates on the back. You don’t need to be perfectly neat at the base; a little blending looks natural. -
Add the spots:
Mix a bright orange paint. Dip your small brush and dab random, organic spots along the upper sides of the dinosaur’s body, just below the plates. -
Paint the eyes:
Dip the very tip of a paintbrush handle or a toothpick into black paint. Dot a small eye onto the face. I prefer placing it slightly low on the head for a cuter look. -
Seal (Optional):
If you want to protect your dino, apply a coat of matte varnish. This keeps the natural clay look without making it too shiny.
Prehistoric Texture
Before drying, gently press a piece of rough fabric or a rock against the skin to create a cool, pebbled dinosaur skin texture instead of leaving it smooth.
Now you have a charming little prehistoric companion to guard your houseplants

The Complete Guide to Pottery Troubleshooting
Uncover the most common ceramic mistakes—from cracking clay to failed glazes—and learn how to fix them fast.
Dinosaur Track Stepping Stones
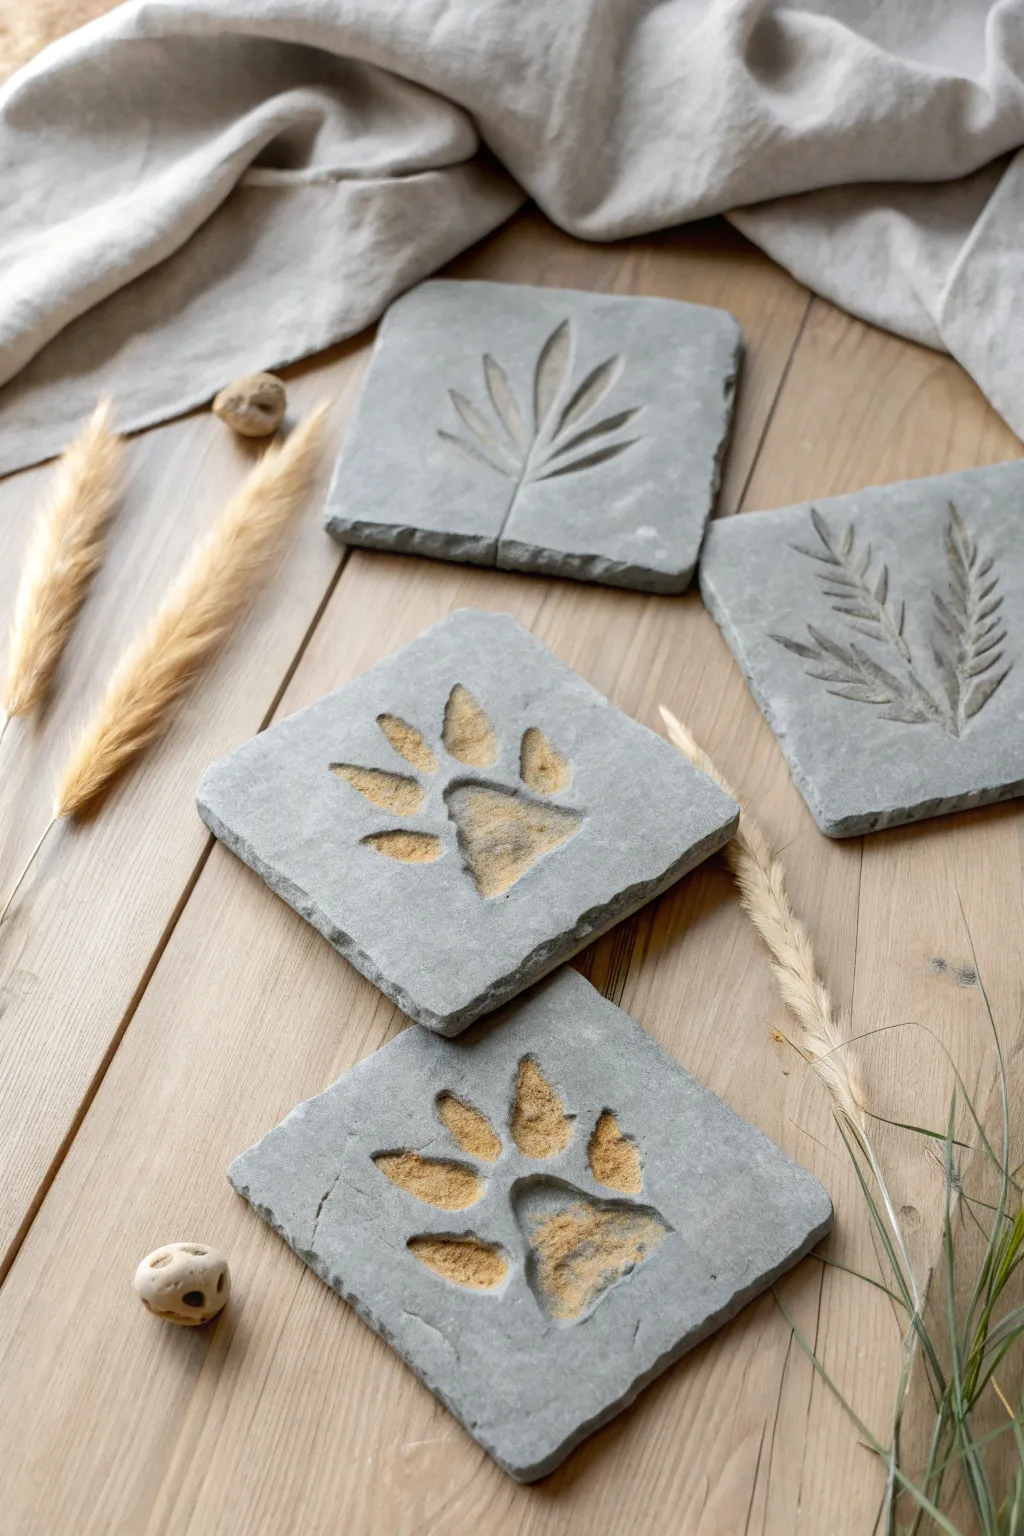
Step back in time by crafting these realistic dinosaur track and plant fossil tiles, perfect for dinosaur enthusiasts or a rustic home decor accent. Using simple air dry clay, you’ll create the look of ancient, weathered stone complete with sandy sediment trapped in the footprints.
Step-by-Step
Materials
- Air dry clay (stone gray or concrete color)
- Rolling pin
- Square cookie cutter (approx 4×4 inches) or knife and ruler
- Plastic toy dinosaur (with distinct feet)
- Artificial fern leaves or sturdy dried grass stems
- Texture sponge or crumpled aluminum foil
- Fine craft sand or beige pigment powder
- Matte sealant spray or Mod Podge
- Small soft paintbrush
- Non-stick work mat or parchment paper
- Water in a small cup
Step 1: Shaping the Base
-
Condition the clay:
Begin by taking a substantial chunk of gray air dry clay and kneading it in your hands until it becomes soft, pliable, and free of cracks. -
Roll out the slab:
Place the clay on your parchment paper or non-stick mat. Use a rolling pin to flatten it into a slab that is roughly 1/2 to 3/4 inch thick. You want it substantial enough to take a deep impression without tearing. -
Cut the squares:
Using your square cutter or a ruler and knife, cut out uniform square tiles. Lift away the excess clay, which you can re-roll for the next tile. -
Soften the edges:
Dip your finger in a little water and gently run it along the sharp cut edges of the square. Round them off slightly to mimic the look of worn, natural stone rather than a freshly cut block. -
Add surface texture:
Before adding the main designs, press a texture sponge or a ball of crumpled foil lightly over the entire surface. This gives the ‘stone’ a realistic, pitted grain.
Natural Stone Texture
Mix a tiny amount of used coffee grounds or black pepper into your clay before rolling it out. This creates natural speckling that looks exactly like real granite.
Step 2: Creating the Fossils
-
Position the plant stems:
For the plant fossils, select a fern frond or sturdy grass stem. Lay it carefully diagonally across one of your clay squares. -
Press the botanical impression:
Use the rolling pin to gently roll over the plant material, pressing it firmly into the soft clay. Ensure the stem and leaves leave a deep mark, then carefully peel the plant away to reveal the design. -
Make the track marks:
For the dinosaur tracks, take your plastic dinosaur toy. Press one foot firmly into the center of a fresh clay square. Rock the foot slightly to ensure the toes and heel make a deep, clean indentation. -
Refine the print:
If the edges of the footprint pulled up slightly, use a damp fingertip or a clay sculpting tool to smooth down any jagged ridges around the toes. -
Detailing the impression:
I like to use a small tool or the end of a paintbrush to slightly deepen the very center of the print, mimicking the weight distribution of a heavy creature.
Curling Corners?
If tile corners curl upward while drying, weigh them down gently with a heavy book placed on top of a piece of paper towel once the surface is dry to the touch.
Step 3: Finishing Touches
-
Apply the sediment:
While the clay is still wet, take a pinch of fine craft sand or beige pigment powder. sprinkle it strictly into the deep crevices of the footprint or the veins of the plant leaves. -
Press the grit:
Gently tap the sand with your finger to embed it into the moist clay so it won’t just brush off later. This creates that excavated, sandy look shown in the photo. -
Initial drying:
Allow the tiles to dry flat in a cool, dry place. Flip them over carefully after about 12 hours ensuring the bottom dries evenly. -
Inspect for cracks:
Once fully dry (usually 24-48 hours depending on thickness), check for any unwanted structural cracks. Small hairline cracks actually add to the fossil aesthetic, so don’t worry too much. -
Seal the work:
Spray the tiles with a matte sealant. This protects the clay from humidity and helps lock that sandy sediment into place.
Display your ancient artifacts on a shelf or use them as unique coasters to bring a touch of the Jurassic era to your room
Tiny Dinosaur Fridge Magnets Set
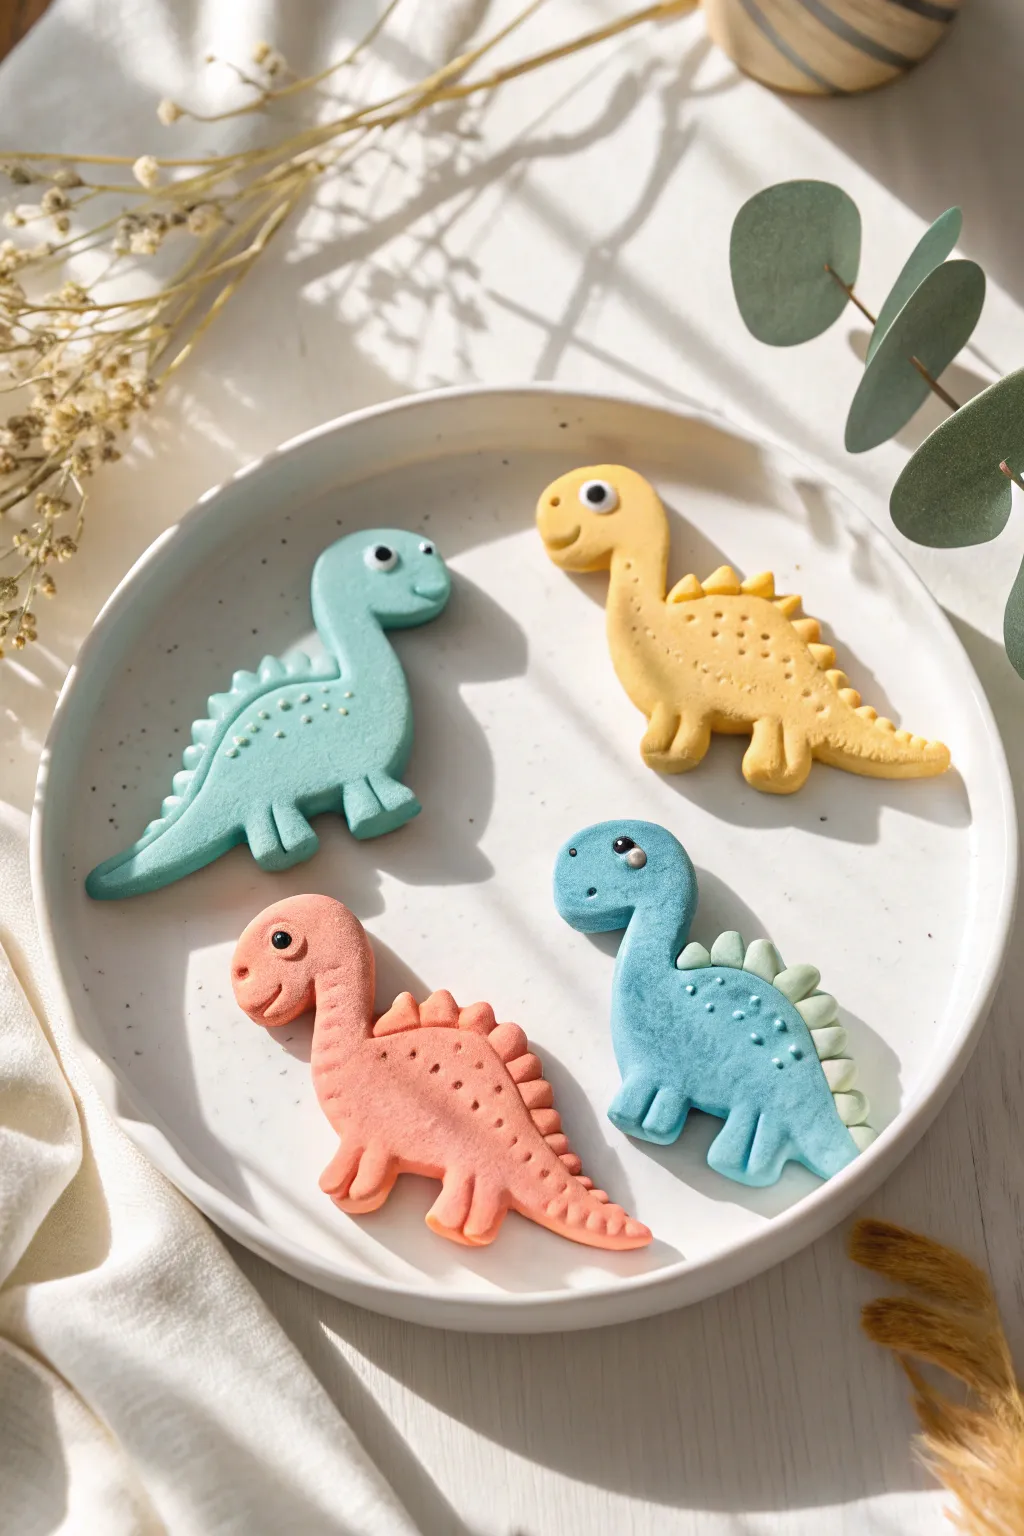
Create a herd of adorable dinosaur magnets using soft pastel air dry clay, featuring distinct textures and sweet expressions. These chunky little dinos are perfect for adding a touch of whimsy to your fridge or magnetic board.
Step-by-Step Tutorial
Materials
- Air dry clay (pastel yellow, light blue, teal, coral/salmon, white)
- Black round beads or small black clay balls (for eyes)
- Small magnets
- Superglue or strong craft glue
- Needle tool or toothpick
- Ball stylus tool (small)
- Clay roller or smooth round jar
- Clay knife or plastic cutting tool
- Water (for smoothing)
Step 1: Shaping the Bodies
-
Mix your colors:
Start by preparing your clay colors. If you only have primary colors, mix white into them to achieve the soft, milky pastel shades shown in the photo: a sunny yellow, a coral pink, a teal, and a sky blue. -
Roll the base thickness:
Take a portion of your first color (let’s start with teal) and roll it out until it is about 1/4 inch thick. You want these to be chunky and durable. -
Cut the basic shape:
Using a plastic knife or clay cutter, cut out a simple dinosaur silhouette. Focus on a long curving neck for the brachiosaurus type, or a stout body for the T-Rex type. Don’t worry about perfection; round the edges with your finger. -
Smooth the edges:
Dip your finger in a tiny bit of water and run it along the cut edges of your dinosaur to soften them, giving the clay that puffed, cookie-like appearance.
Cracks Appearing?
If you see tiny fissures as the clay dries, mix a small amount of fresh clay with water to make a paste and fill the cracks. Smooth over with a damp finger.
Step 2: Adding Legs and tails
-
Attach the legs:
Roll two small sausage shapes of clay in the matching color. Press them onto the bottom of the body to form chubby legs. Use a sculpting tool to blend the seam where the leg meets the body so it looks like one solid piece. -
Define the toes:
Using a knife tool, gently press two or three vertical indentations into the bottom of each foot to create toes. -
Refine the tail:
Pinch and gently pull the tail end to taper it into a point, smoothing it upwards or downwards depending on the dino’s pose.
Smooth Seams
Use a little water on your fingertip or a brush to erase fingerprints and seamlessly join attached parts like legs or spikes before drying.
Step 3: Spikes and Textures
-
Create back plates:
For the teal dinosaur, roll tiny balls of the same color clay. Press them onto the curve of the back, flattening them slightly to create spinal ridges. -
Add contrasting spikes:
For the blue stegosaurus-style dino, create small triangles of a lighter mint green clay. Attach these in a row along the back, blending the base so they stick firmly. -
Texture the skin:
I find using a needle tool here really brings them to life. Gently poke shallow holes in clusters along the back or sides to simulate scales or spots. Keep the pattern random for a natural look. -
Add ridge details:
For the yellow dino, use the needle tool to press small lines into the jagged back ridge to give it more definition.
Step 4: Bringing them to Life
-
Insert the eyes:
While the clay is still soft, press a small black bead into the head for the eye. If you don’t have beads, roll a tiny ball of black clay and press it in. Add a microscopic dot of white paint later for a highlight. -
Carve the smile:
Use a small curved tool or the side of a straw to impress a gentle, curved smile near the snout. -
Final drying:
Lay your dinosaurs flat on parchment paper. Let them dry completely for 24-48 hours. Flip them over halfway through to ensure the back dries evenly.
Step 5: Magnetizing
-
Check the back:
Once fully hard, check that the back surface is relatively flat. If it warped slightly, you can gently sand it down. -
Attach the magnet:
Apply a drop of superglue to the back of the dinosaur and press a strong magnet into it. Hold it for 30 seconds to set.
Now your fridge is guarded by the cutest prehistoric creatures around


What Really Happens Inside the Kiln
Learn how time and temperature work together inside the kiln to transform clay into durable ceramic.
Mini Dino Planter With a Tail
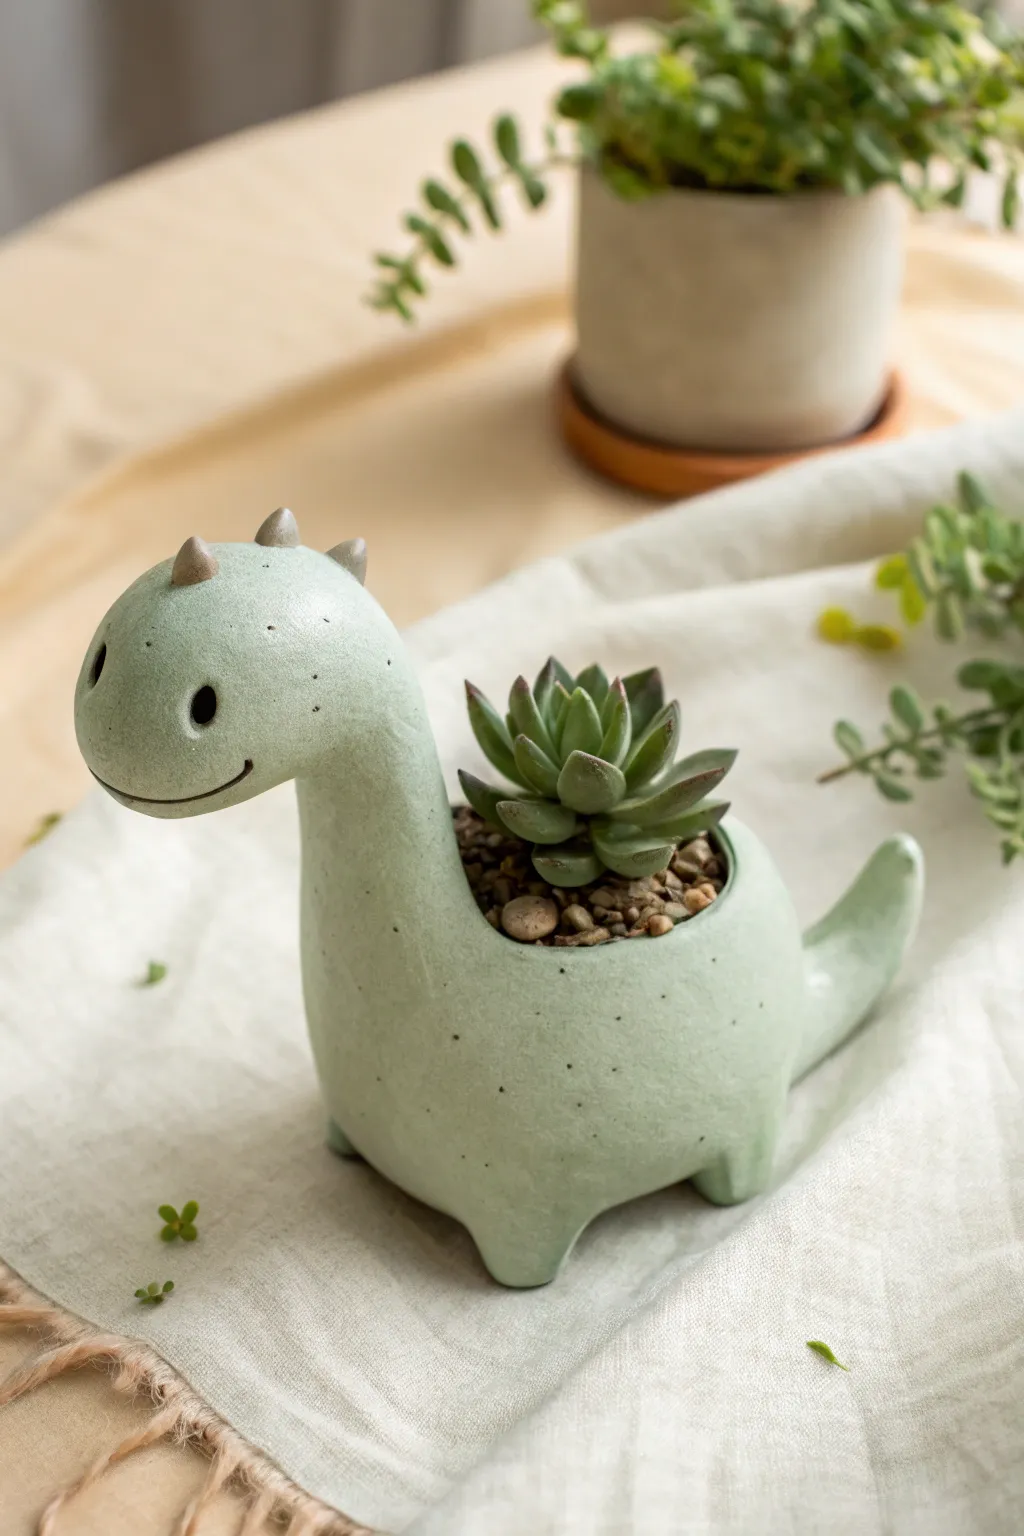
This adorable dinosaur planter combines the whimsy of a prehistoric creature with functional home decor, featuring a gentle sloping neck and a small cavity perfect for a mini succulent. The finished piece has a charming speckled green glaze look that mimics high-end ceramic stoneware.
Step-by-Step Tutorial
Materials
- Air dry clay (white or light grey)
- Acrylic paints (sage green, dark grey, brown)
- Glossy varnish or sealant (waterproof is essential)
- Clay sculpting tools (needle tool, smoothing sponge)
- Small rolling pin
- Water cup
- Sandpaper (fine grit)
- Old toothbrush (for texture)
Step 1: Shaping the Beast
-
Form the base body:
Start with a large ball of clay roughly the size of a tennis ball. Gently flatten the bottom against your work surface to create a stable base, then elongate the shape slightly into an oval to form the dinosaur’s torso. -
Create the planter cavity:
Using your thumb or a large ball tool, press deeply into the top center of the oval. Widen this hole until the walls are about 1/4 inch thick, ensuring you leave enough solid clay at the bottom so it doesn’t crack. -
Sculpt the neck and head:
Roll a thick coil of clay for the neck, tapering it slightly towards the top. Bend the top portion forward to create the head shape. Attach this to one end of the body using the score and slip method—scratching both joining surfaces and adding water—to ensure a strong bond. -
Smooth the transition:
Use a damp finger or a clay smoothing tool to blend the clay from the neck onto the body. The seam should disappear completely so the neck looks like it flows naturally from the torso. -
Add the tail:
Form a smaller cone shape for the tail. Attach it to the rear of the body, curving the tip slightly upward for a playful look. Blend the seams thoroughly just as you did with the neck. -
Attach the legs:
Roll four small, equal-sized balls of clay. Flatten them slightly and attach them to the four corners of the underbelly. Press the planter down gently to ensure it stands level on all four legs.
Cracking Up?
If you see hairline cracks while drying, mix a tiny bit of fresh clay with water to make a paste (slip) and fill them in immediately. Smooth with a damp finger.
Step 2: Details & Drying
-
Refine the face:
Use the back of a paintbrush or a ball tool to indent two eye sockets on the sides of the head. Use a needle tool to carve a wide, shallow, curving smile line that wraps around the snout. -
Add the spikes:
Roll three tiny cones of clay. Attach them in a row starting at the top of the head and going slightly down the back of the neck. These should be quite small and rounded at the tips. -
Final smoothing:
Dip a sponge in a little water and wipe down the entire surface to remove fingerprints and harsh tool marks. The goal is a very smooth, stone-like finish. -
Allow to cure:
Let the planter dry completely. Depending on humidity and clay thickness, this can take 24 to 72 hours. Turn it occasionally to ensure the bottom dries too.
Waterproofing Pro Tip
For extra longevity, line the inside of the dry planter with a thin layer of decoupage glue or epoxy resin before adding soil, making it truly water-resistant.
Step 3: Painting & Finishing
-
Sand imperfections:
Once fully dry, use fine-grit sandpaper to gently buff away any remaining rough spots or bumps. -
Apply base color:
Paint the entire dinosaur with a soft sage green acrylic paint. You may need two coats for opaque coverage. -
Create the speckled effect:
Mix a small amount of dark grey paint with water until it’s inky. Dip an old toothbrush into this mixture and flick the bristles with your thumb to spray tiny speckles all over the green body. -
Detail the spikes and eyes:
Paint the three spikes on the head with a soft taupe or light brown color. Fill in the indented eye sockets with solid black paint to give them depth. -
Seal for protection:
Since this will hold a plant, apply 2-3 coats of a waterproof varnish or heavy-gloss sealant inside the cavity and all over the outside. This protects the clay from moisture.
Pop in a small succulent or air plant to bring your gentle dinosaur friend to life
Flat Dinosaur Ornaments for a Garland
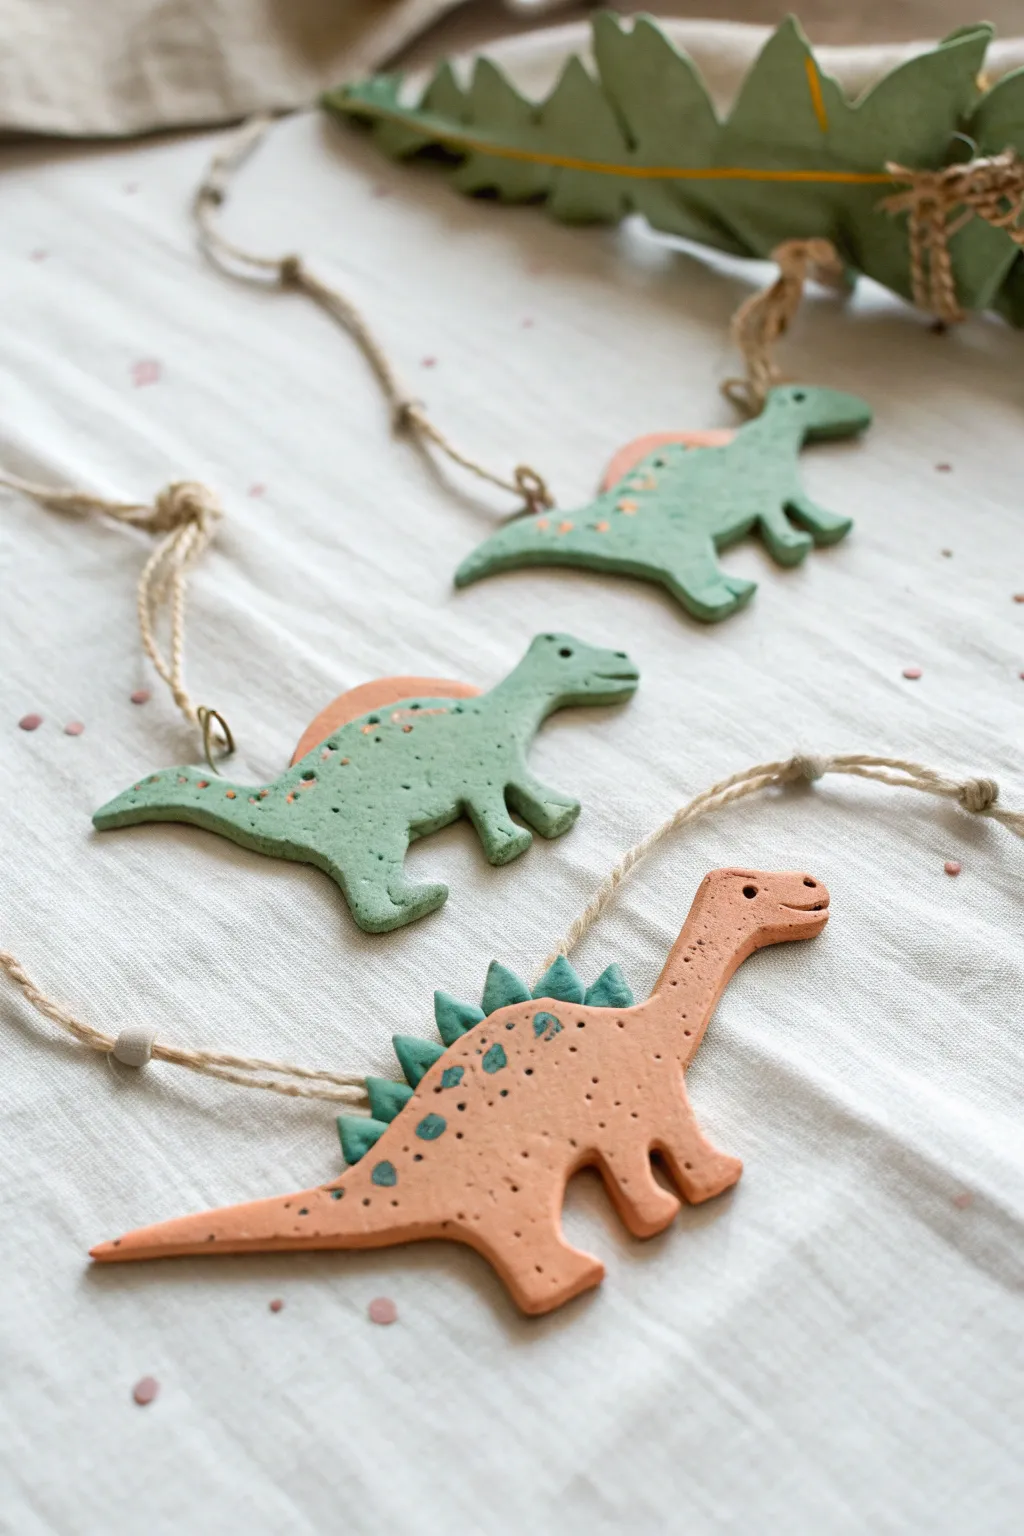
Bring the Jurassic era to your home decor with these charming, earthy-toned clay dinosaurs. Strung together on rustic twine, their playful shapes and dotted details create a sweet, handmade touch for nurseries or party decorations.
Step-by-Step Guide
Materials
- Air dry clay (white or pre-colored)
- Acrylic paints (muted sage green, terracotta/peach)
- Rolling pin
- Dinosaur cookie cutters (or a craft knife and paper template)
- Small paintbrush (fine tip)
- Toothpick or needle tool
- Jute twine or hemp cord
- Parchment paper or craft mat
- Small straw or skewer (for hole punching)
- Water bonding slip (clay mixed with water)
Step 1: Shaping the Dinos
-
Roll the clay:
Begin by kneading your air dry clay until it is soft and pliable. Roll it out on a piece of parchment paper to an even thickness of about 1/4 inch. If the clay sticks to your roller, dust it lightly with a tiny bit of cornstarch. -
Cut out the shapes:
Press your dinosaur cookie cutters firmly into the clay slab. If you are working freehand without cutters, lay a paper template over the clay and carefully trace around it with a craft knife to get clean outlines. -
Smooth the edges:
Dip your finger in a little water and gently run it along the cut edges of each dinosaur to smooth out any ragged bits or roughness from the cutting process. -
Punch a hanging hole:
While the clay is still wet, use a small straw or skewer to poke a hole near the top center of the dinosaur’s back. wiggle it slightly to ensure the hole is large enough for your twine to pass through later. -
Add texture and details:
Using a toothpick or a needle tool, gently poke a small hole for the eye. Then, press random, shallow little dots across the body to mimic scales or skin texture.
Step 2: Adding 3D Features
-
Create the spines:
For the stegosaurus or spined dinosaurs, roll out a tiny separate strip of clay. Cut small triangles for spikes or a smooth curved shape for a fin-like ridge. -
Score and slip:
To attach these additions securely, scratch the attachment points on the main body and the new piece with your needle tool (scoring). Add a drop of water or clay slip to the scratched area. -
Attach the features:
Press the spikes or ridge gently onto the dinosaur’s back. Smooth the seam where the two pieces of clay meet using a damp tool or your finger so they become one solid unit. -
Dry completely:
Lay the finished shapes flat on parchment paper to dry. This usually takes 24-48 hours depending on humidity. Flip them over halfway through the drying time to prevent curling.
Cracking Up?
If you see small cracks forming as the clay dries, mix a tiny bit of fresh clay with water to make a paste and smooth it into the cracks with your finger.
Step 3: Painting and Assembly
-
Base coat colors:
Once fully hard, paint the dinosaurs using muted, earthy tones. I like to paint the main body one color (like sage green) and the spikes or ridge a contrasting color (like terracotta). -
Enhance the texture:
Use a contrasting paint color and a very fine brush to dab paint into the little indented dots you made earlier. Alternatively, dilute the paint with water and do a ‘wash’ over the texture, wiping away the excess so paint stays in the holes. -
Add the eye:
Use a dark brown or black paint on the tip of a toothpick to carefully fill in the eye indentation, bringing your dinosaur to life. -
Seal the piece (optional):
If you want extra durability or a slight sheen, apply a thin layer of matte or satin varnish over the dried paint. -
Cut the twine:
Cut lengths of jute twine or hemp cord, approximately 12 inches for each ornament, or longer if you are making one long continuous garland. -
Tie the loops:
Ideally, thread the twine through the hole in the dinosaur’s back. Tie a secure knot or a decorative bow at the top, leaving enough length to hang it up. -
Final arrangement:
If making a garland, tie the dinosaurs at equal intervals along a long main string, ensuring they are all facing the same way for a cohesive look.
Fossil Find
Press a real fern leaf or a piece of lace into the wet clay before cutting out your shapes to create intricate, realistic fossil textures instantly.
Hang your prehistoric garland on a wall or shelf to enjoy a touch of whimsy every day

TRACK YOUR CERAMIC JOURNEY
Capture glaze tests, firing details, and creative progress—all in one simple printable. Make your projects easier to repeat and improve.
Starry Night Dinosaur With Painted Spots
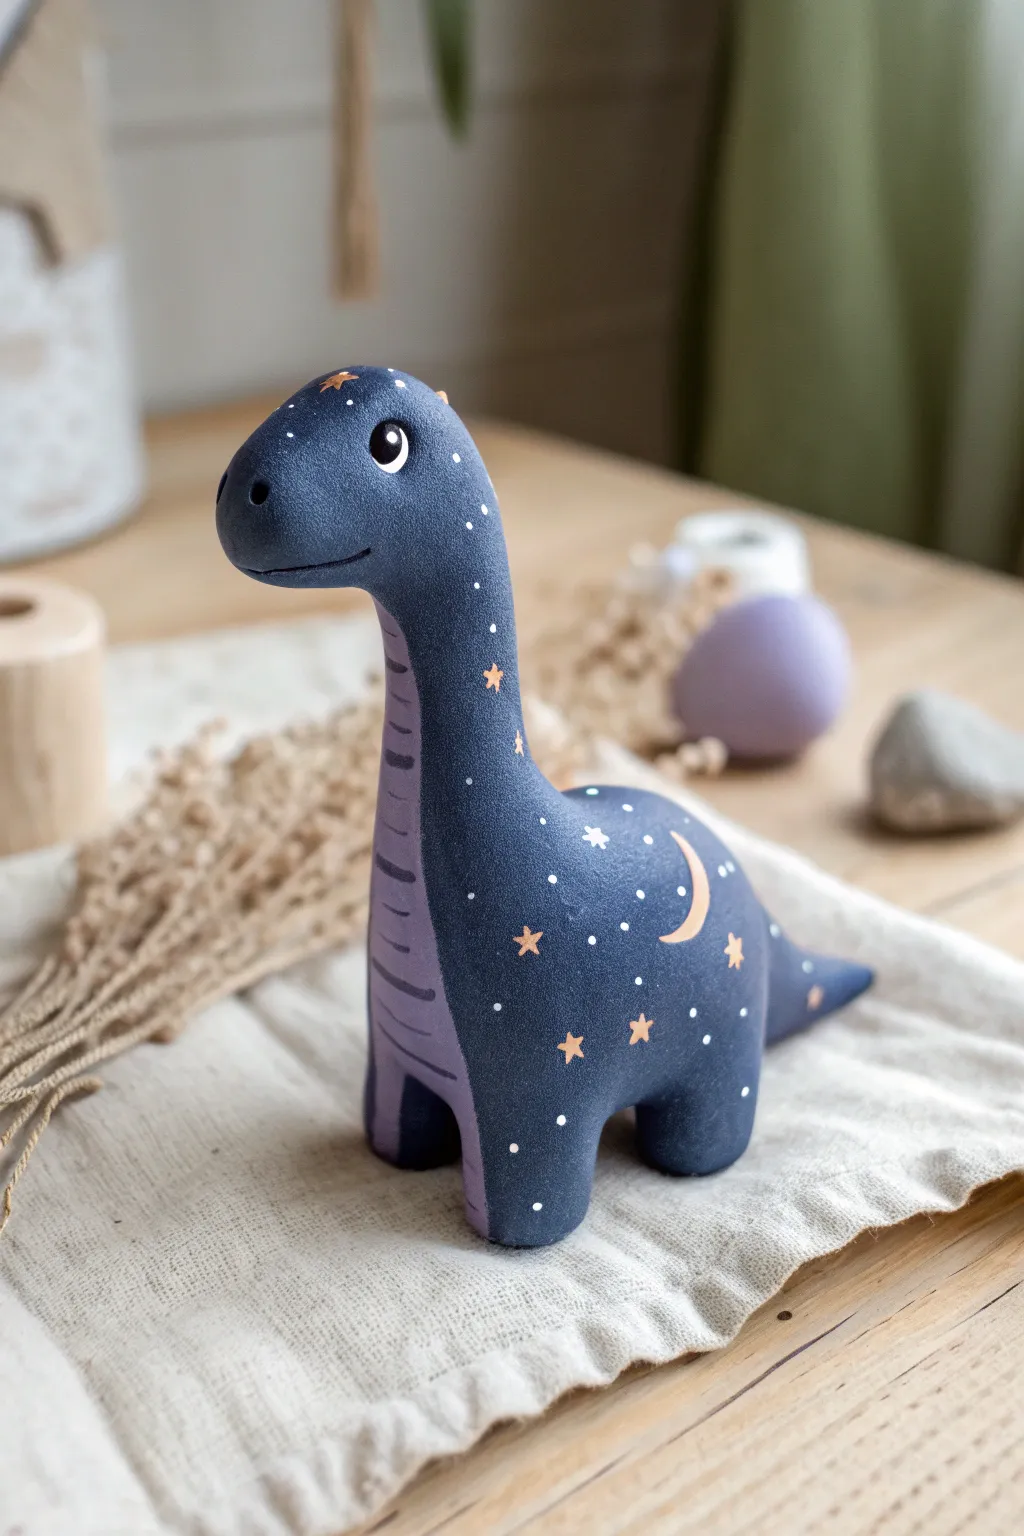
This whimsical dinosaur brings the magic of a starry night to life with its deep midnight blue body and scattered constellations. It features a charming long neck, a soft lavender tummy, and delicate gold and white painted details perfect for a nursery or desk companion.
Step-by-Step Guide
Materials
- Air dry clay (white or grey)
- Acrylic paints (dark navy blue, soft lavender, white, metallic gold)
- Fine grit sandpaper
- Aluminum foil (for armature)
- Bowl of water
- Sculpting tools (needle tool, smoothing tool)
- Fine detail paintbrush (size 0 or 00)
- Medium flat paintbrush
- Matte or satin varnish
Step 1: Sculpting the Form
-
Build the core armature:
Crumple a piece of aluminum foil into an egg shape for the body and a smaller snake-like shape for the neck and head. Connect them securely. This saves clay and keeps the figure lightweight. -
Cover the body:
Roll out a sheet of air dry clay about 1/4 inch thick. Wrap it around your foil egg body, smoothing the seams together with a bit of water on your finger. -
Form the neck:
Wrap clay around the neck armature, blending it seamlessly into the body. Ensure the neck has a gentle, natural curve looking slightly backward or straight up. -
Shape the head:
Refine the top of the neck into a rounded head shape. Use your thumb to create a slight indentation for the snout area to give it character. -
Add the legs:
Roll four short, thick cylinders of clay. Attach them to the bottom of the body by scoring both surfaces (scratching hatch marks) and adding a dab of water (slip). Blend the clay edges upward into the body so they are seamless. -
Attach the tail:
Roll a cone of clay for the tail. Attach it to the rear of the body, blending the join completely smooth so it looks like one continuous piece. -
Refine the face:
Use a small ball tool or the end of a paintbrush to gently press eye sockets into the sides of the head. Use a needle tool to carve a very faint, happy mouth line. -
Smooth and dry:
Dip your finger in water and run it over the entire sculpture to remove fingerprints. Let the dinosaur dry completely in a safe spot for 24-48 hours, turning it occasionally.
Cracking Clay?
If small cracks appear as the clay shrinks during drying, create a ‘slurry’ paste by mixing a bit of fresh clay with water. Fill the cracks, smooth it over, and let it dry again
Step 2: Painting and Detailing
-
Sand imperfections:
Once fully dry and hard, use fine-grit sandpaper to gently buff away any lumps or rough texture. Wipe away the dust with a slightly damp cloth. -
Base coat:
Paint the entire dinosaur in a deep, dark navy blue. You may need two coats to get an opaque, solid finish. Let this dry completely. -
Paint the belly:
Mix a soft lavender color (purple + white). Paint a long strip starting from the underside of the neck, going down the chest, and ending between the front legs. Add horizontal stripe details on the neck belly area for texture. -
Add the stars:
Using your smallest detail brush and metallic gold paint, paint tiny five-pointed stars randomly across the body. I like to add a crescent moon on the flank for a focal point. -
Create the galaxy effect:
Dip the tip of a needle tool or toothpick into white paint. Dot tiny ‘stars’ in the empty spaces between your gold stars to create a dense, starry sky look. -
Paint the eyes:
Paint the inside of the eye sockets white. Once dry, add a large black pupil, leaving a tiny white reflection dot to make the eyes look alive. -
Seal the work:
Protect your painting with a coat of matte or satin varnish. This will unify the finish and keep the paint from chipping.
Glow Up
Swap the white acrylic paint for glow-in-the-dark paint for the tiny dots. Your dinosaur will transform into a glowing nightlight companion when the lights go out
Place your finished starry dinosaur on a shelf where it can dream among the clouds
Dino Terrarium Scene on a Clay Base
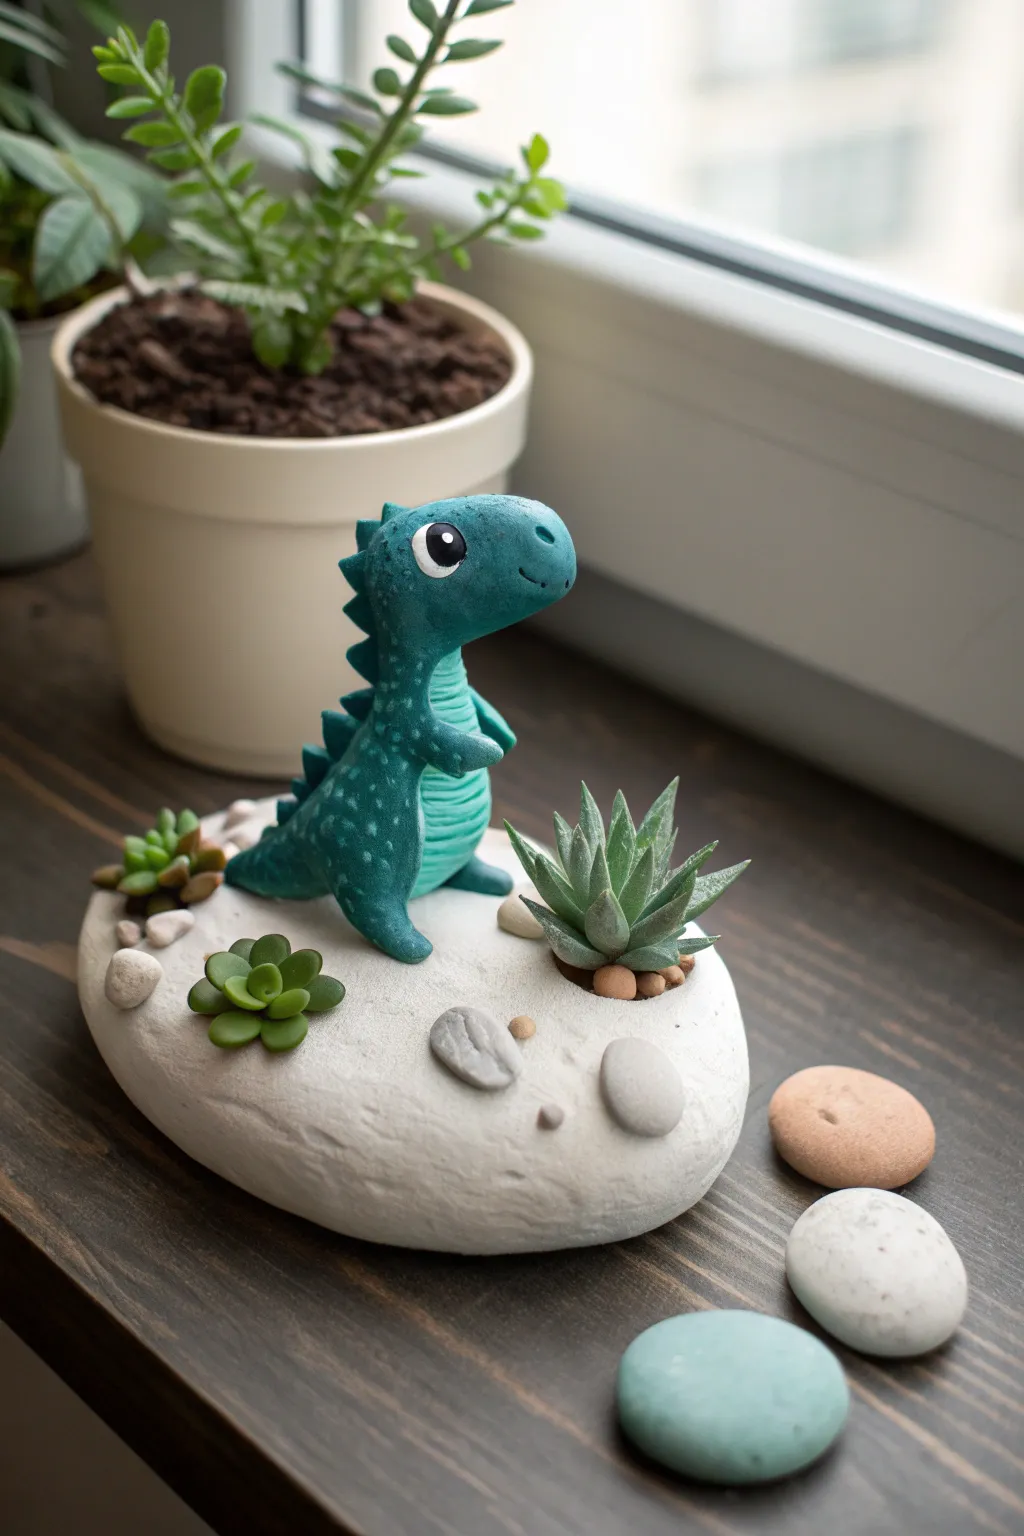
Bring a touch of the Jurassic to your windowsill with this adorable dinosaur terrarium scene. This project combines a smooth, white clay base with a sculpted teal dinosaur and faux succulents for a low-maintenance, high-charm decoration.
How-To Guide
Materials
- White air dry clay
- Teal acrylic paint (or pre-colored clay)
- Light teal or mint acrylic paint
- Black and white acrylic paint
- Faux miniature succulents
- Small smooth pebbles (various colors)
- Sculpting tools (needle tool, ball tool)
- Water in a small cup
- Rolling pin
- Varnish or sealant (matte or satin)
- Strong craft glue
Step 1: Sculpting the Base
-
Form the main base:
Start with a large ball of white air dry clay, roughly the size of a grapefruit. Flatten it gently with your palm or a rolling pin until it forms an organic, thick oval shape about 1 inch high. Keep the edges slightly rounded for a smooth, stone-like appearance. -
Create planting pockets:
Decide where you want your succulent to sit—usually off to one side looks best. Press a real or fake succulent pot base (or a large ball tool) into the wet clay to create a deep indentation where the plant will eventually go. -
Embed pebble details:
While the clay is still receptive, press a few small, real pebbles into the surface to create natural-looking depressions. Remove the pebbles for drying; you’ll glue them back in later to ensure they stay secure. -
Smooth the texture:
Dip your finger in a little water and run it over the entire surface of the base to erase fingerprints and superficial cracks. I like to sponge it lightly for a natural texture.
Step 2: Crafting the Dinosaur
-
Shape the body:
Mix teal paint into white clay until uniform, or use pre-colored teal clay. Roll a teardrop shape for the body, keeping the bottom wide for stability and tapering slightly toward the neck. -
Form the head:
Roll a slightly smaller oval for the head. Attach it to the tapered neck of the body. You may need a small piece of wire or toothpick inside the neck for internal support. -
Add the belly patch:
Take a small amount of lighter teal or mint-colored clay. Flatten it into a thin oval and press it onto the front of the dinosaur’s belly. Use a needle tool to score horizontal lines across this patch for ribbed texture. -
Attach limbs:
Roll two small sausages for legs and attach them to the bottom sides of the body so the dinosaur sits flat. Add two tiny arms higher up on the chest. -
Create the tail:
Roll a cone of teal clay and blend it smoothly onto the back of the body, curving it slightly to the side for a dynamic pose. -
Add dorsal spikes:
Create a series of tiny triangles from the teal clay. Attach them in a row running down the back of the head, along the spine, and down the tail. -
Face details:
Use a dotting tool to indent eye sockets. Roll tiny balls of white clay, press them in, and add smaller black pupils on top. Use a tool to carve a simple, happy smile. -
Texturizing:
Before the clay dries, use the point of a needle tool to gently stipple the dinosaur’s skin, giving it a slightly rough, bumpy texture reminiscent of scales.
Cracks in the Clay?
Make a ‘slip’ paste by mixing a tiny bit of clay with water. Smear this into any cracks that appear during drying, smooth it out with a damp finger, and let it dry again.
Step 3: Assembly and Finish
-
Dry thoroughly:
Allow both the base and the dinosaur to dry completely. This can take 24-48 hours depending on humidity and thickness. Rotate the pieces occasionally for even airflow. -
Attach the dinosaur:
Once dry, apply strong craft glue to the feet and tail of the dinosaur and press it firmly onto the white base. -
Plant the greenery:
Glue your main faux succulent into the large indentation you created earlier. Add smaller succulent buds or leaves directly to the flat surface of the base for variety. -
Place the stones:
Glue the small, smooth pebbles into their specific indentations or scatter a few extra on the surface for a balanced look. Included a mix of grey, tan, and white stones adds visual interest. -
Seal the piece:
Apply a coat of matte or satin varnish over the dinosaur and the white base to protect the clay from moisture and dust.
Add Some Sparkle
For a magical touch, lightly dry-brush a tiny amount of metallic silver or iridescent paint onto the tops of the dinosaur’s spine spikes to catch the light.
Now you have a charming prehistoric scene that needs no watering and brightens up any corner