If you love turning snacks into tiny art, clay food miniatures are the sweetest little rabbit hole to fall into. Here are my go-to clay art food ideas—starting with the classics everyone wants to make first, then drifting into the fun, quirky stuff that really makes a collection feel like your own.
Mini Burgers With Layered Toppings
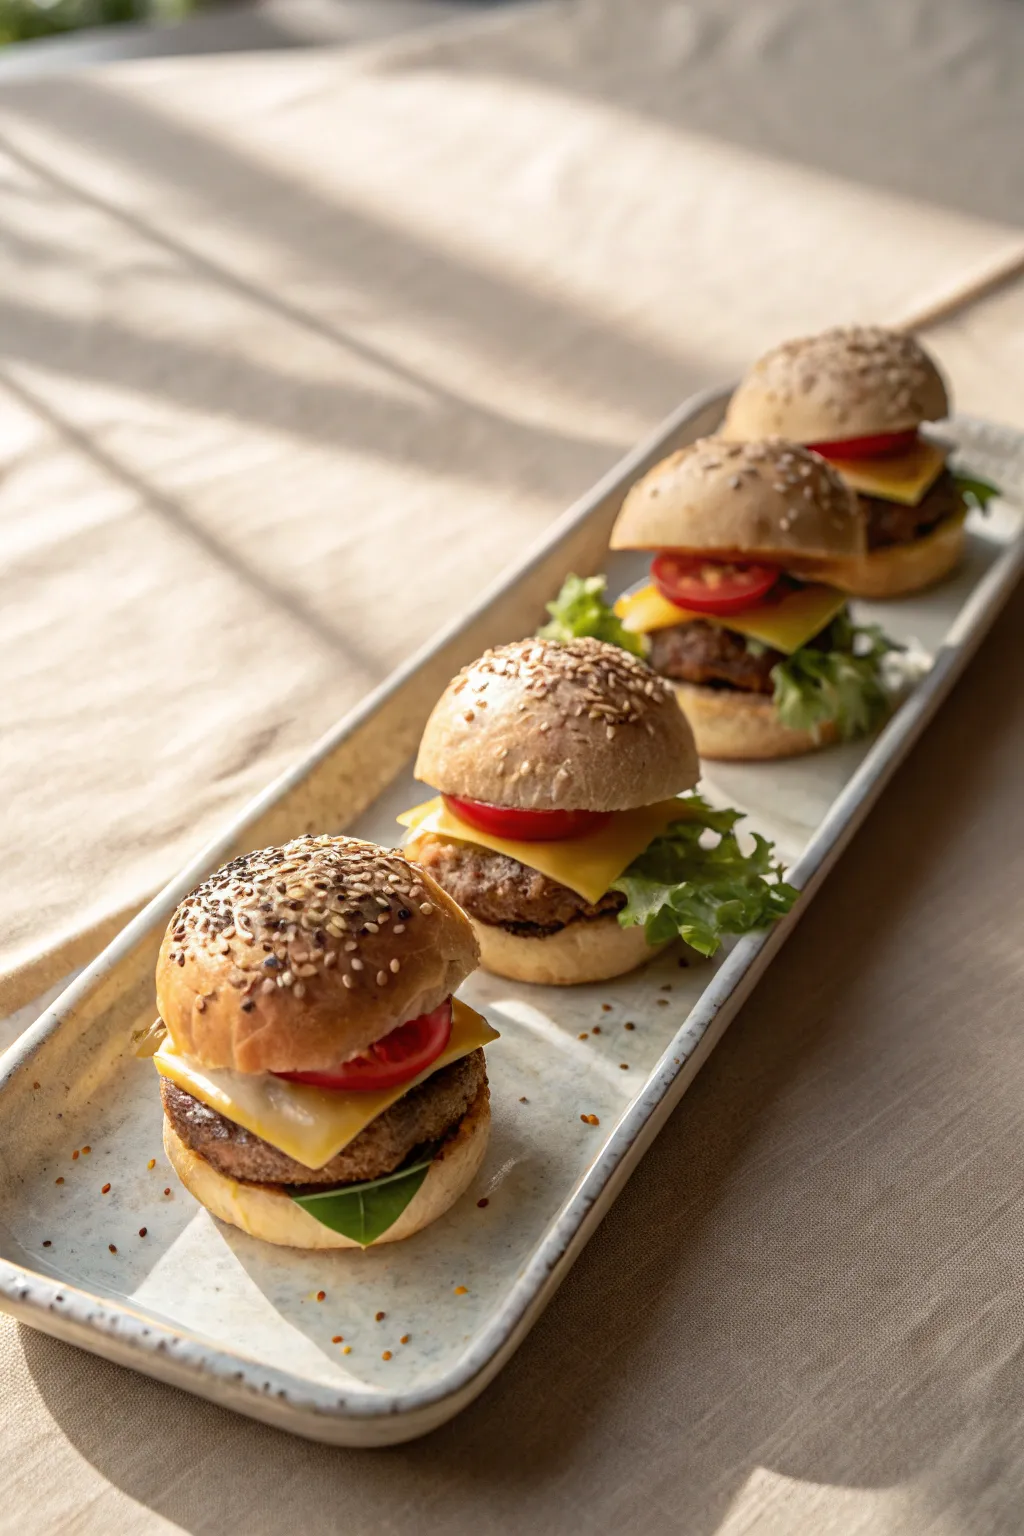
These miniature burger sliders look good enough to eat, featuring impeccably textured buns and delicately layered fillings. Perfect for a dollhouse display or a quirky magnet set, this project focuses on achieving hyper-realistic food textures.
How-To Guide
Materials
- Polymer clay (beige, translucent, white, brown, red, green, yellow)
- Soft pastels (brown, ochre, orange) for shading
- Liquid polymer clay (Fimo liquid or TLS)
- Texture tools (toothbrush, needle tool, aluminum foil)
- Small circle cutter
- Hobby knife
- Rolling pin
- Gloss varnish
- Matte varnish
Step 1: Baking the Buns
-
Mix the perfect dough color:
Combine beige clay with a small amount of white and a tiny pinch of translucent clay. This mixture creates a realistic ‘bread’ opacity rather than a flat plastic look. -
Form the bun shapes:
Roll four equal-sized balls for the bottom buns and four slightly larger, domed shapes for the tops. Gently flatten the bottoms of the top buns so they sit flush. -
Create bread texture:
Using an old toothbrush or a ball of crumpled aluminum foil, tap the entire surface of the buns firmly. Don’t be afraid to rough them up; smooth clay looks artificial. -
Shade the crusts:
I like to use a soft makeup brush to apply shaved ochre pastel dust first, followed by burnt orange, and finally brown on the very tops. This mimics the gradient of baked bread. -
Add sesame seeds:
Roll extremely tiny teardrops of white/beige clay or use real poppy seeds. Dab a tiny bit of liquid clay on the top buns and press the seeds on gently. -
Pre-bake the buns:
Bake just the bun parts according to your clay package instructions (usually 15 minutes) to harden them before assembly. This prevents you from squishing the texture later.
Step 2: Creating the Fillings
-
Form the patties:
Mix dark brown clay with a touch of black and translucent. Texture heavily with a needle tool, picking at the clay to create the rough, crumbly look of ground beef. -
Make the cheese slices:
Roll yellow clay (mixed with a tiny bit of orange) very thinly. Cut into small squares. If you want a melted look, gently drape the raw clay over the textured patty so the corners droop down. -
Slice the tomatoes:
Roll a cane of red translucent clay wrapped in a thin skin of opaque red. Slice thin rounds. Using a small dotting tool, press lightly into the center to mimic the seeds and fleshy interior. -
Prepare the lettuce:
Roll green translucent clay paper-thin. Tear the edges with a needle tool to make them ragged, then ruffle the clay, folding it back on itself to create volume and crunch.
Sticky Cheese?
If your cheese clay is too soft and sticking to tools, leach it by placing the rolled sheet between two pieces of printer paper for 20 minutes to absorb excess oil.
Step 3: Assembly & Finishing
-
Stack the layers:
On the pre-baked bottom bun, apply a smear of liquid clay as ‘glue’. Stack your lettuce, patty, cheese, and tomato in your desired order. -
Secure the top bun:
Add a final drop of liquid clay to the top of your stack and press the pre-baked top bun down firmly. Ensure the fillings are peeking out nicely from the sides. -
Add ‘condiments’:
Mix liquid clay with yellow or red pastel dust to make mustard or ketchup. Using a toothpick, apply tiny drips oozing out between the cheese and the bun. -
Final bake:
Bake the assembled burgers again for the full recommended duration to cure the raw fillings and liquid clay glue. -
Varnish for realism:
Once cool, brush a specifically gloss varnish onto the tomato slices and the ‘juicy’ parts of the meat. Keep the bread and lettuce matte for textural contrast.
Pro Tip: Translucency
Always mix a little translucent clay into your lettuce and tomato colors. Solid opaque colors look like plastic toys; translucency allows light to pass through like real veggies.
Display your freshly grilled creations on a miniature ceramic plate and enjoy the compliments on your tiny culinary skills


Pizza Slices With Melty Cheese Texture
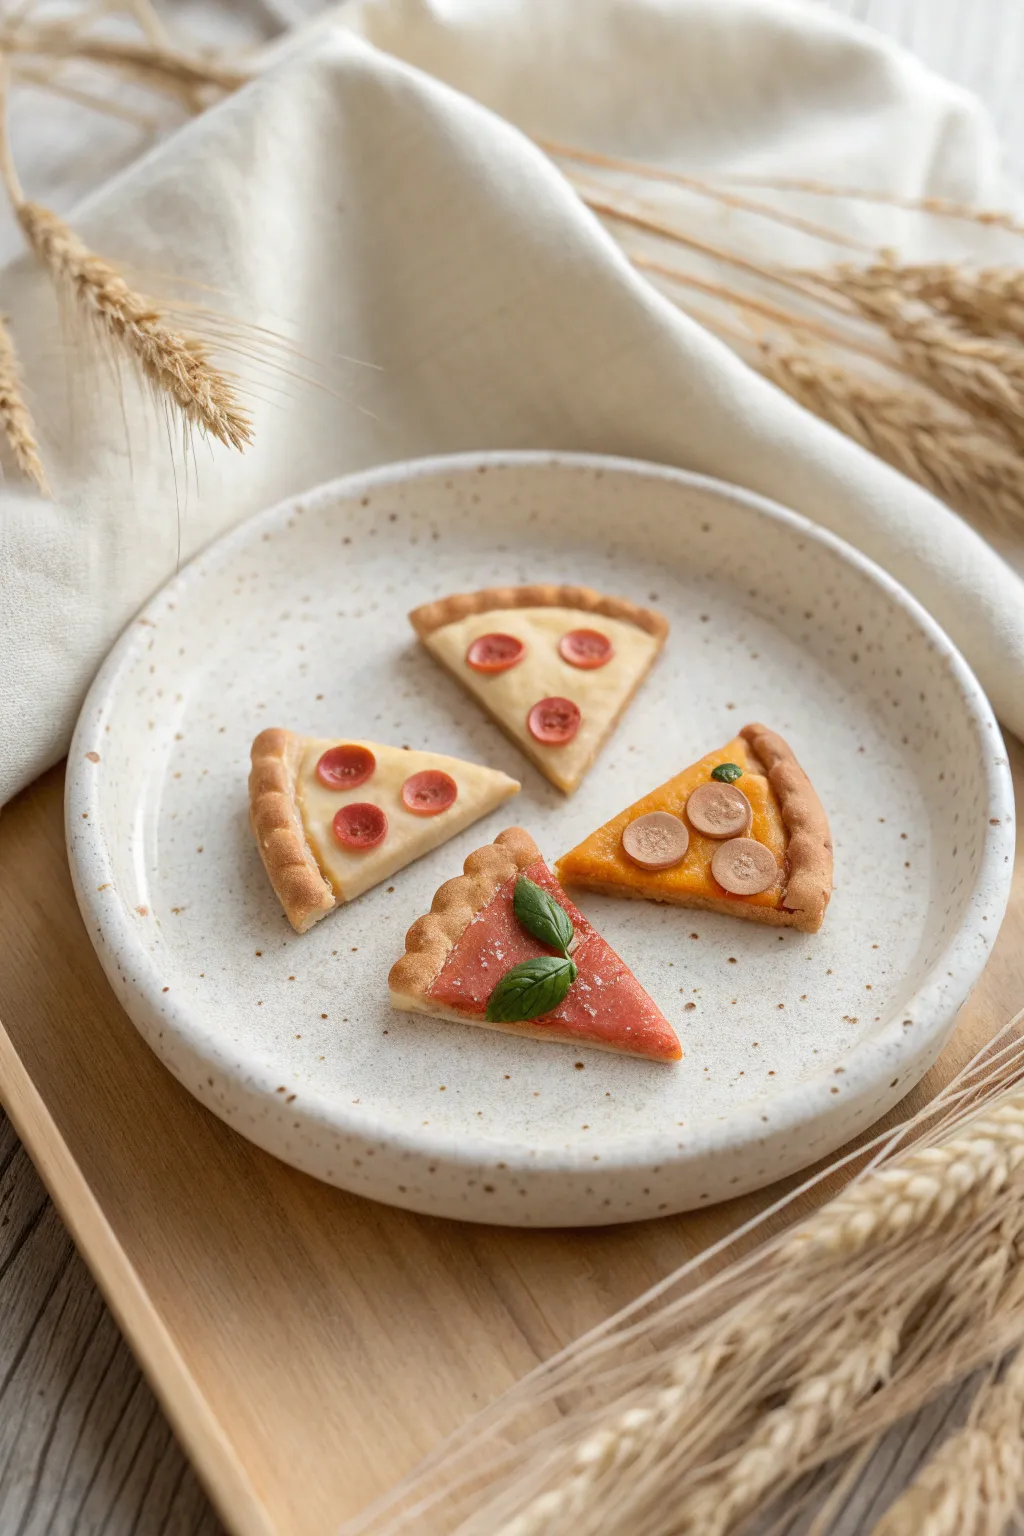
Create a feast for the eyes with these four distinct miniature pizza slices, each showcasing a different topping style. From classic pepperoni to savory sausage and fresh margarita, this project focuses on realistic crust textures and varied cheese effects.
Detailed Instructions
Materials
- Polymer clay (beige/tan, translucent white, yellow, red, brown, green)
- Liquid polymer clay (Translucent Liquid Sculpey or Fimo Liquid)
- Chalk pastels (ochre, orange, brown)
- Texture tools (toothbrush, needle tool, ball stylus)
- Small round cutter or straw
- Craft knife or scalpel
- Gloss glaze or UV resin (optional)
- Rolling pin or pasta machine
Step 1: Crafting the Crust Base
-
Mix the dough color:
Start by mixing beige polymer clay with a tiny amount of translucent and white to create a realistic dough shade. It shouldn’t be too dark yet, as we will shade it later. -
Shape the wedges:
Roll the clay into a thick circle, roughly 2-3 inches in diameter. Using a sharp blade, cut the circle into even triangular slices. You will need four slices for this set. -
Form the crust edge:
On the curved outer edge of each slice, gently roll and push the clay back slightly to form a raised rim. Pinch and smooth the transition so it looks like puffed dough. -
Add baked texture:
Take a stiff toothbrush or a ball of aluminum foil and tap it all over the crust edges and the bottom of the slices. This mimics the porous texture of baked bread. -
Shade the crust:
Scrape some ochre and light brown chalk pastel into a powder. Use a soft brush to dust these colors onto the raised crust edges to give them a golden-baked look.
Texturing Tip
Use a crumpled ball of aluminum foil to texture the sausage slices. Rolling it gently over the raw clay creates a perfect, uneven meat texture instantly.
Step 2: Saucing and Cheesing
-
Create the sauce base:
Mix a small amount of red clay with liquid polymer clay until you have a spreadable paste. Apply a very thin layer of this ‘sauce’ to the center of each slice, avoiding the raised crust. -
Mix the cheese color:
Combine translucent clay with a tiny speck of yellow and white. You want a creamy, off-white color that will turn slightly sheer when baked. -
Apply the cheese layer:
Flatten thin sheets of your cheese mixture and lay them over the sauce. Gently tear the edges or use a needle tool to drag the clay slightly, creating a melted look. -
Make the cheddar variant:
For the sausage slice shown in the image, mix more yellow and a little orange into your cheese blend to create a cheddar appearance, applying it to one of the slices.
Step 3: Topping Creation
-
Make mini pepperoni:
Mix red and translucent clay. Roll it into a very thin snake, let it chill in the fridge for firmness, and then slice incredibly thin discs. Pressed them onto two of the mozzarella slices. -
Create sausage slices:
Mix light brown clay with a touch of tan. Roll a small log and slice thick rounds. Use a needle tool to poke tiny, random texture holes in the cut surface of the ‘meat’ for realism. -
Assemble the meat lover’s slice:
Place the sausage rounds onto the cheddar-colored slice. Press them down gently so they look embedded in the cheese. -
Simulate tomato jam:
For the fourth slice, mix translucent liquid clay with red chalk pastel or alcohol ink. Spread a generous, glossy layer over the triangular area to look like a thick tomato glaze or jam. -
Sculpt basil leaves:
Take a tiny bit of green clay, flatten it into a teardrop shape, and curl the edges slightly. Use a needle tool to draw a central vein. Place two leaves on the tomato glaze slice.
Make it a Magnet
Before baking, embed a small neodymium magnet into the back of each slice. Cover it with a thin layer of ‘dough’ clay, clean up the seams, and bake as usual.
Step 4: Final Touches and Baking
-
Indent the pepperoni:
Use a small ball tool to press the center of each pepperoni slice slightly. This makes the edges curl up, just like real cooked pepperoni does. -
Add grated parmesan:
I like to take a scrap of baked white clay and use a fine grater or sandpaper to sprinkle tiny ‘cheese’ dust over the finished slices before baking. -
Bake the pieces:
Bake the slices according to your clay manufacturer’s instructions (usually 275°F/130°C for 15-30 minutes). Let them cool completely. -
Glaze for moisture:
For an extra touch of realism, apply a semi-gloss varnish to the pepperoni and the tomato glaze slice to make them look juicy and oily.
Arrange your finished slices on a tiny plate or turn them into charming jewelry pieces.


Farmers Market Produce Minis in Little Baskets
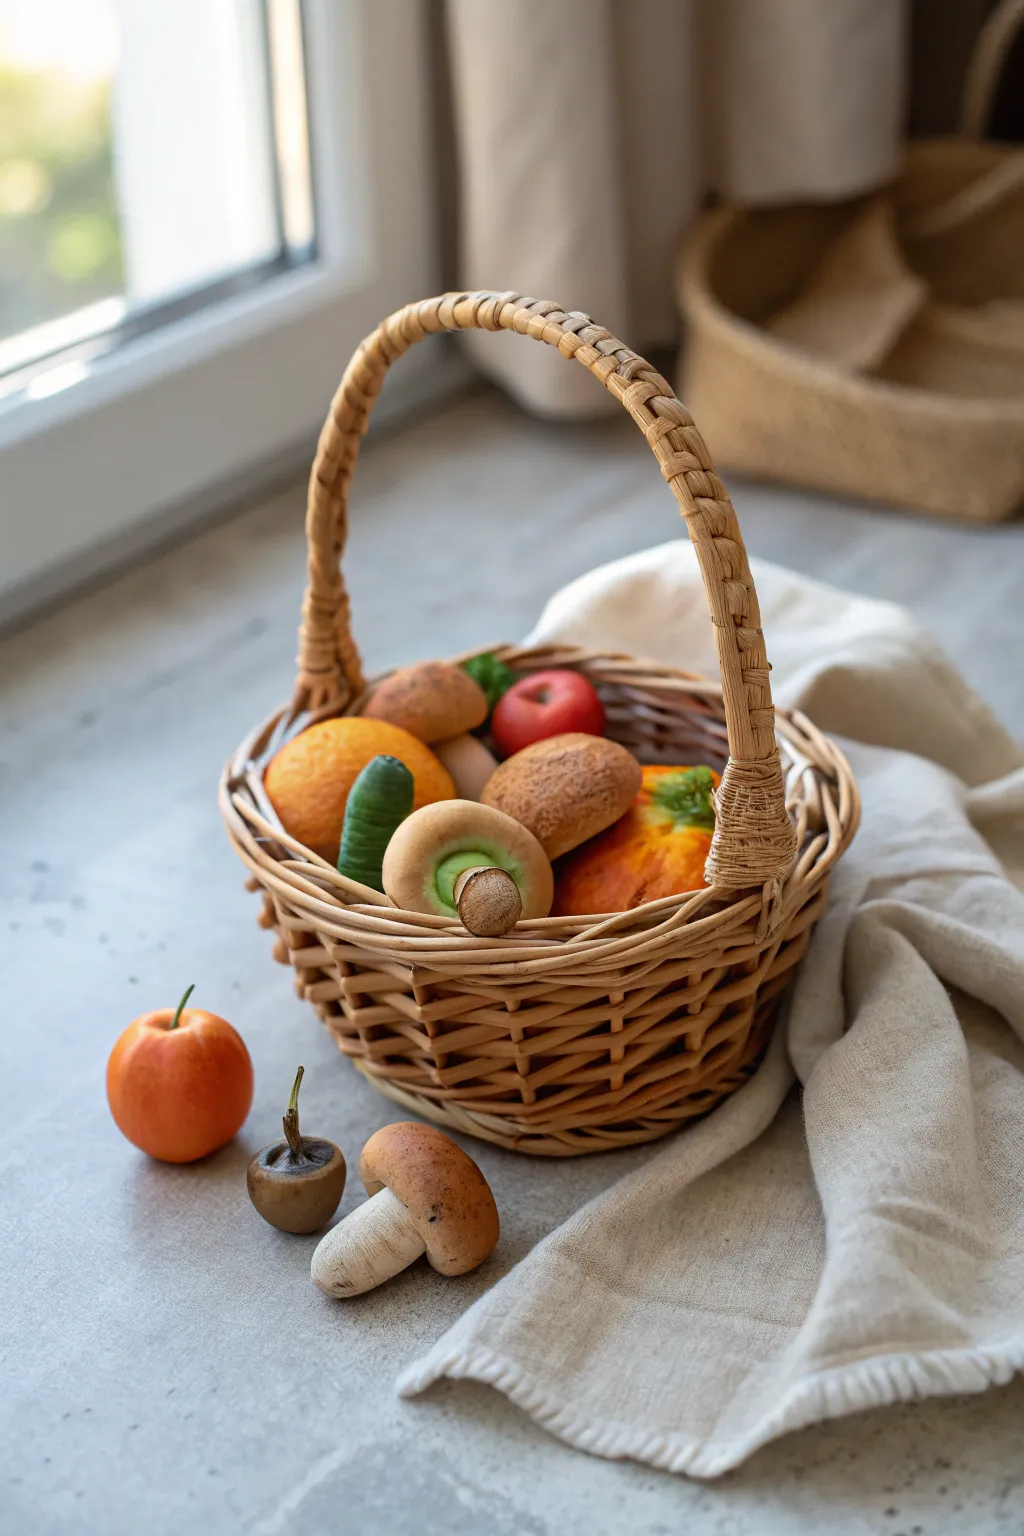
Capture the charm of a rustic farmers market with this delightful collection of clay produce tucked into a tiny woven basket. Using polymer or air-dry clay, you’ll sculpt and texture realistic mushrooms, apples, and pumpkins to create a cozy autumn vignette.
Step-by-Step Tutorial
Materials
- Polymer clay (white, beige/tan, red, orange, green, brown)
- Small wicker basket (approx. 4-6 inches)
- Pastel chalks or acrylic paints for shading
- Sculpting tools (needle tool, ball stylus)
- Toothbrush or tinfoil ball (for texturing)
- Clear matte varnish
- Soft paintbrushes
- Small piece of linen or cotton fabric
Step 1: Sculpting the Mushrooms
-
Form the Stems:
Start with white or light beige clay. Roll thick cylinders for the stems, tapering them slightly at the top. For variety, make some stems curved or bulbous at the base. -
Create the Caps:
Shape balls of light brown or tan clay and flatten them gently into domes. Use your thumb to create an indentation underneath where the stem will attach. -
Add Texture:
Press a real mushroom stem or a stiff brush into the clay stems to create earthy vertical lines. I like to dirty up the bottoms slightly with brown chalk dust before baking for realism. -
Assemble:
Attach the caps to the stems, blending the clay seams if you want them smooth, or leaving a distinct edge for a classic mushroom look.
Use Nature’s Texture
Roll a real lemon or orange peel against your clay citrus items to imprint an incredibly realistic skin texture instantly.
Step 2: Creating the Apples & Citrus
-
Shape the Apples:
Roll balls of red and reddish-orange clay. Using your finger or a ball stylus, make a deep indentation at the top and a smaller one at the bottom. -
Insert Stems:
Roll tiny snakes of dark brown clay or use real dried apple stems. Insert a small piece into the top indentation of each fruit. -
Make the Oranges:
Form spheres of bright orange clay. Roll these gently over a piece of sandpaper or press with a toothbrush to create the pitted rind texture synonymous with citrus. -
Shade with Pastels:
Before baking, brush a little soft red or brown pastel dust onto the ‘blush’ side of the apples and near the stem cavities to add depth.
Step 3: Vegetables & Greens
-
Form the Cucumber:
Roll a cylinder of deep green clay. Taper the ends to be rounded but blunt. Use a needle tool to scratch delicate longitudinal lines and tiny bumps along the surface. -
Sculpt the Pumpkin:
Flatten a ball of orange clay slightly. Use a needle tool to press vertical lines from top to bottom, dividing the pumpkin into segments. -
Detail the Pumpkin:
Smooth the ridges of the segments with your finger so they look puffy. Add a twisted green stem on top.
Tiny Price Tags
Create miniature ‘farmers market’ signs using tiny rectangles of craft paper and a toothpick to stick into the basket arrangement.
Step 4: Baking and Finishing
-
Bake the Clay:
Arrange your sculpted pieces on a baking tile or parchment paper. Bake according to your specific clay manufacturer’s instructions (usually 275°F for 15-30 minutes). -
Cool Down:
Allow all pieces to cool completely before handling. The clay is fragile while hot and hardens as it returns to room temperature. -
Enhance with Paint:
Once cool, use diluted brown acrylic paint as a wash. Brush it over the textured areas (like the mushroom stems and orange rinds) and quickly wipe it off to highlight the crevices. -
Seal the Work:
Apply a coat of clear matte varnish to protect the surface. Avoid glossy finishes unless you want a ‘waxed fruit’ appearance. -
Arrange the Basket:
Line your small wicker basket with the linen cloth, letting the edges drape over the side. Pile your clay produce inside, letting some items tumble out naturally.
Display your miniature harvest on a sunny windowsill or shelf to bring a touch of rustic warmth to your home


Kawaii Food Charms With Tiny Faces
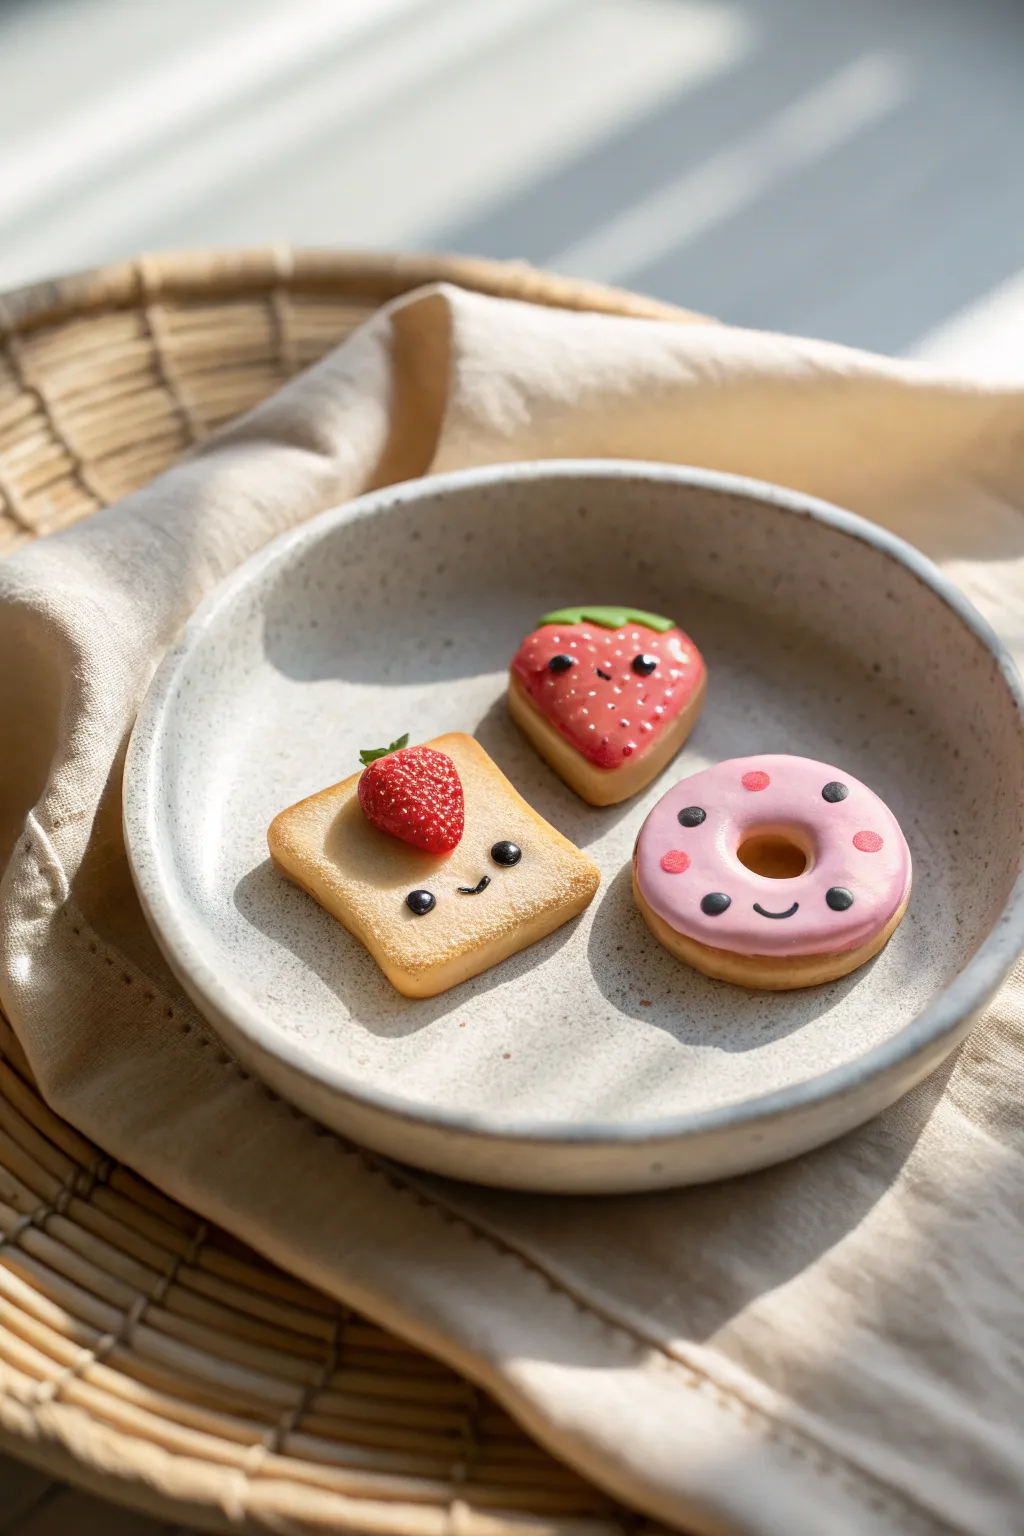
These miniature clay charms mimic the sweetness of a bakery display, featuring a happy slice of strawberry toast, a cheerful berry, and a blushing donut. Their smooth matte finish and adorable, minimalist faces give them a distinctively modern and heartwarming aesthetic.
Step-by-Step
Materials
- Polymer clay (beige/tan, white, pink, red, green, black)
- Liquid polymer clay (red and pink)
- Clay roller/pasta machine
- Small square cutter (for toast)
- Small heart or teardrop cutter (for strawberry)
- Circle cutters (various sizes for donut)
- Dotting tools or ball stylus
- Needle tool
- Soft pastel chalks within shades of orange/brown
- Paintbrush for shading
- Oven for baking
- Glaze (optional, matte or satin)
Step 1: Shaping the Happy Toast
-
Base shape:
Condition your beige or tan clay and roll it out to a thickness of about 5mm. Use a square cutter to cut the base shape, then gently press the top edge inwards with your finger to create the ‘dip’ distinctive of a bread slice. -
Toasting technique:
Scrape some orange and brown soft pastel chalk into a fine powder. Using a soft, dry paintbrush, gently dust the edges of the bread slice to give it a realistic ‘baked’ gradient. -
Strawberry topping:
Form a small teardrop from red clay. Texture the surface by gently poking it repeatedly with a needle tool to mimic seeds, then press a tiny fan of green clay onto the top for leaves. Attach this to the top center of your toast slice. -
Face details:
Roll two very tiny snakes of black clay for the eyes and a whisper-thin curve for the mouth. Position these on the lower half of the toast. I find using a needle tool helps place these without smudging.
Step 2: Crafting the Berry & Donut
-
Strawberry base:
Roll out a sheet of beige clay (thicker, like a cookie) and cut a heart shape, softening the point to look more like a strawberry silhouette. -
Icing application:
Mix red clay with a little liquid clay (or use pre-made liquid clay) to create a thick ‘icing.’ Spread this onto the strawberry base, leaving a small crust border visible. -
Berry decorations:
While the icing is wet, add white specks with a needle tool for seeds. Add a green clay stem at the top. Place two black micro-balls for eyes and a tiny mouth directly into the red icing layer. -
Donut formation:
Roll a ball of tan clay and flatten it slightly. Use a small tool or straw to punch a hole in the center, smoothing the cut edges with your finger. -
Pink glaze:
Cut a circle of pink clay slightly smaller than the donut. Use a scalloped cutter or your fingers to make the edges wavy, then drape it over the donut base. -
Donut personality:
Press two black clay balls into the pink icing for eyes and add a tiny black smile. Use a dotting tool with deeper pink clay (or paint) to add blush spots on the cheeks and polka dots around the ring.
Clean Clay Tip
Keep baby wipes or hand sanitizer nearby. Clean your hands thoroughly when switching from the red or black clay back to the light beige to avoid staining your dough.
Step 3: Final Touches
-
Texture check:
Inspect all three pieces. For the toast specifically, you can use a clean toothbrush to gently tap the surface (avoiding the face) to create a bread-like sponge texture. -
Baking:
Place your trio on a ceramic tile or parchment paper. Bake according to your specific brand of clay’s instructions (usually 275°F/135°C for 15-30 minutes). -
Finishing:
Once completely cool, you can leave them matte for a natural look as seen in the photo, or apply a very thin layer of matte varnish to protect the surface, especially the pastel shading.
Turn Them into Jewelry
Before baking, screw a tiny eye pin into the top of each charm. Once baked and cooled, you can attach jump rings to turn these into earrings or a charm bracelet.
Arrange your tiny bakery creations on a saucer and enjoy the permanent sweetness they bring to your desk

The Complete Guide to Pottery Troubleshooting
Uncover the most common ceramic mistakes—from cracking clay to failed glazes—and learn how to fix them fast.
Tiny Pantry Foods Like Jars, Cartons, and Bottles
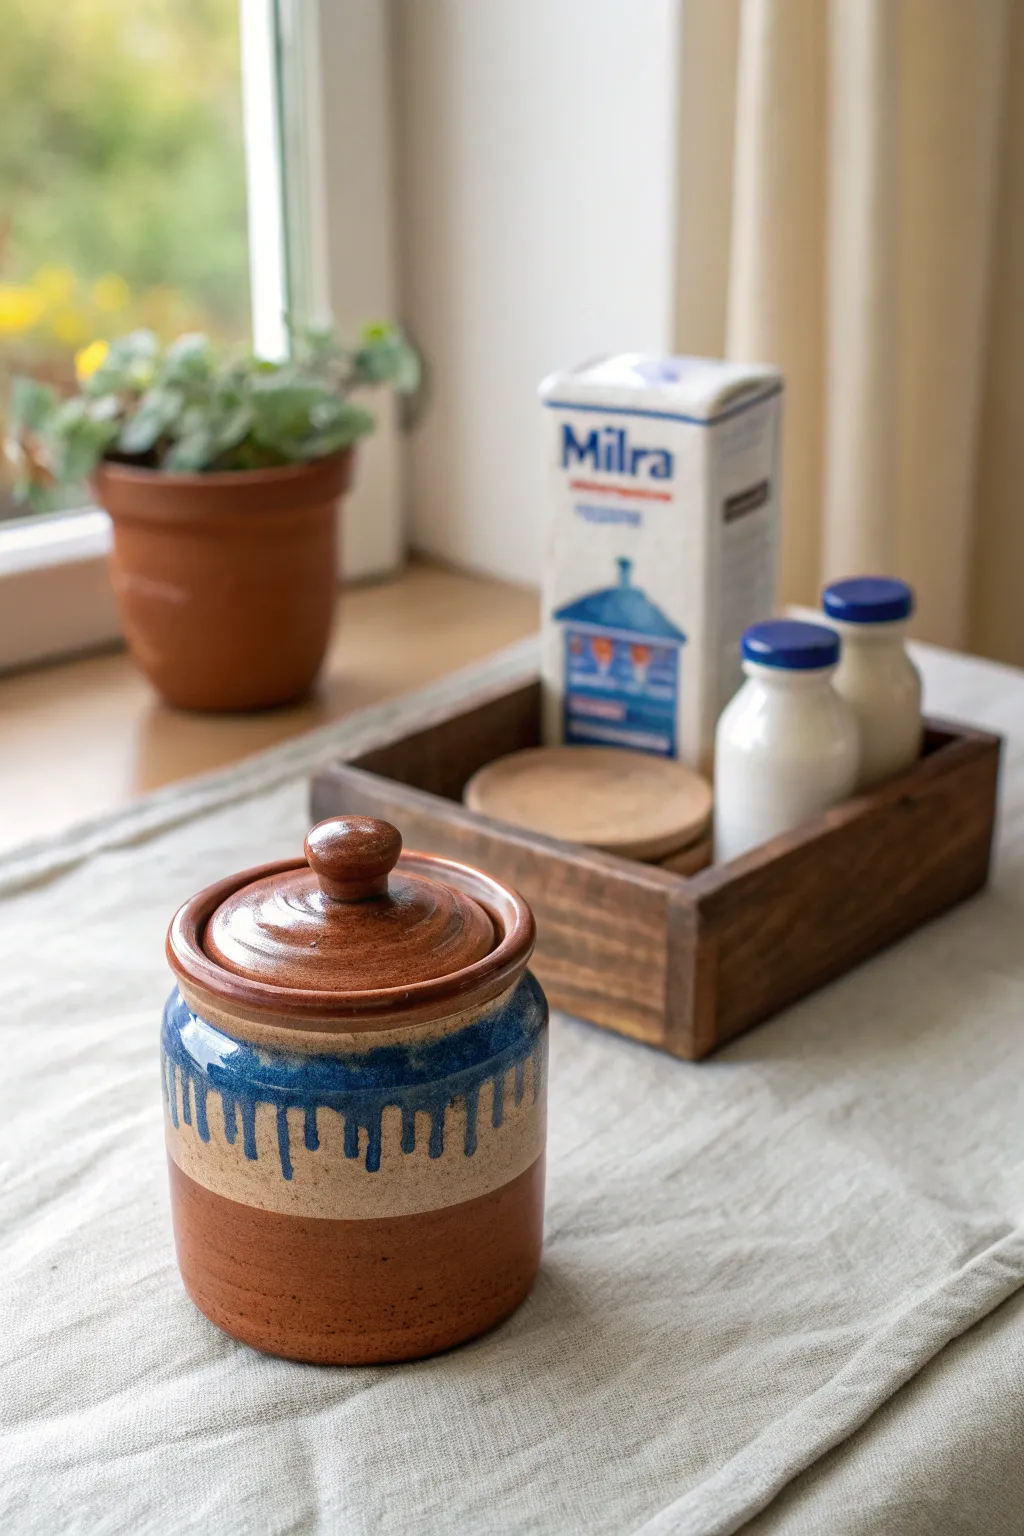
Recreate the charm of stoneware pottery in miniature form with this delightful polymer clay project that mimics a glazed ceramic jar. The finished piece features a realistic dripping glaze effect and earthy tones, perfect for stocking a tiny farmhouse pantry.
Step-by-Step Tutorial
Materials
- Polymer clay (terracotta/burnt orange color)
- Polymer clay (beige or sand color)
- Polymer clay (translucent liquid)
- Chalk pastels (dark brown, blue)
- Gloss glaze or UV resin
- Small round clay cutter (approx. 2cm)
- Needle tool
- Ball stylus tool
- Acrylic rolling pin
- Paintbrush (fine detail)
- Acrylic paint (deep blue)
Step 1: Forming the Base Vessel
-
Condition the base clay:
Start by conditioning a chunk of terracotta-colored clay until it is soft and pliable. Roll it into a smooth ball free of cracks. -
Shape the cylinder:
Gently press the ball onto your work surface and roll it into a thick cylinder shape. This will be the main body of your canister. -
Add the upper section:
Roll out a strip of beige or sand-colored clay. Wrap this around the upper third of your terracotta cylinder, blending the seam where the two colors meet so it looks like a single continuous piece. -
Hollow the jar (optional):
If you want the jar to be functional, use a large ball tool to press into the top center, gently widening the opening while maintaining the cylindrical shape. -
Refine the shape:
Roll the entire piece gently on the table to ensure the sides are straight and the beige clay is flush with the terracotta. Tap the bottom to create a flat base.
Step 2: Creating the Lid
-
Cut the lid base:
Roll out a sheet of terracotta clay to about 2mm thickness. Use your round cutter to punch out a circle that fits the top of your jar. -
Add dimension:
Roll a smaller ball of terracotta clay and flatten it slightly onto the center of the lid circle to create a tiered effect. -
Sculpt the handle:
Form a tiny, bead-sized ball of clay for the knob. Press it onto the very top center of the lid. -
Texture the lid:
Place the lid on your work surface. Spin the needle tool gently against the clay while rotating the lid to create concentric circles, mimicking wheel-thrown pottery lines.
Wheel-Thrown Texture
Use a record player or makeshift pottery wheel to spin the piece while hold holding a tool against it for perfect spiral lines.
Step 3: Glazing and Finishing
-
Mix the faux glaze:
On a palette, mix a small amount of liquid polymer clay with deep blue acrylic paint or shaved blue chalk pastels until you have an opaque, gooey consistency. -
Apply the drip band:
Using a needle tool or fine brush, carefully apply the blue mixture around the very top edge of the jar body, right where the lip would be. -
Create the drips:
Drag the liquid clay downwards at uneven intervals to simulate a glaze that has dripped during firing. Vary the length of the drips for realism. -
Texture the base:
Use a toothbrush or crumpled foil to lightly texture the terracotta section, giving it a raw clay feel. I like to dust a little dark brown chalk pastel here to weather it. -
Bake the pieces:
Bake the jar and lid according to your polymer clay package instructions. Usually, this is around 275°F (130°C) for 15-30 minutes. -
Cool down:
Allow the pieces to cool completely before handling to prevent fingerprints or distortion. -
Apply final gloss:
Coat the blue drip section and the beige band with a high-gloss glaze or UV resin to make it look like fired glass. Leave the terracotta bottom matte for contrast.
Globa Glaze Fix
If your liquid clay glaze is too runny and drips too far, let it sit for 10 minutes to thicken slightly before applying.
Now you have a charming miniature crock ready to hold imaginary cookies or flour.
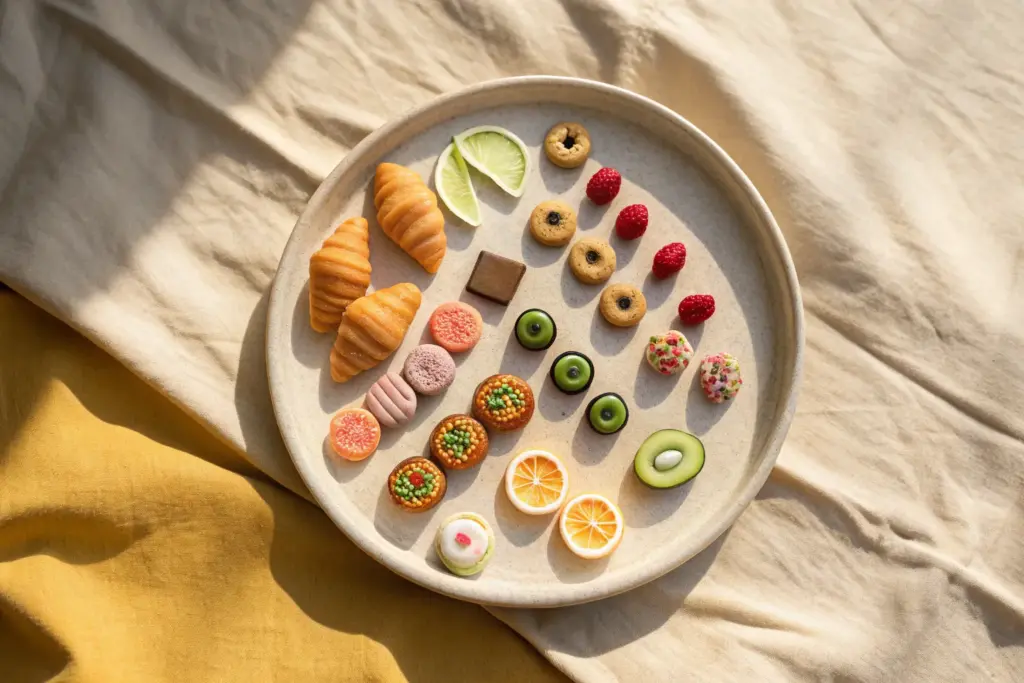
Mini Food “Sampling Platter” Scenes for Max Variety

This delightful project captures the fun of a fast-food cheat meal in miniature form, featuring a tiny burger, pizza slice, donut, cookie, and fries arranged on a speckled platter. The realistic textures and warm, golden tones make this tiny spread look good enough to eat, perfect for dollhouse displays or quirky desk decor.
Detailed Instructions
Materials
- Polymer clay (colors: white, translucent, yellow ochre, chocolate brown, red, green, beige)
- Liquid polymer clay (translucent and white)
- Chalk pastels (yellow ochre, burnt sienna, dark brown)
- Soft paintbrush for shading
- Texture tools (toothbrush, needle tool, ball stylus)
- Craft knife or scalpel
- Rolling pin or pasta machine
- gloss and matte polymer clay glazes
- Fine sandpaper
- Oven for baking
Step 1: Crafting the Platter & Fries
-
Form the platter base:
Mix white clay with a tiny speck of black sand or ground pepper to mimic speckled ceramic. Roll it into a long oval slab, approximately 3-4 inches long. -
Shape the rim:
Gently lift the edges of the oval to create a shallow rim, smoothing any fingerprints with a drop of baby oil. Bake this base piece first according to your clay’s instructions so you have a solid surface to work on. -
Mix the fry color:
Create a ‘fried potato’ color by mixing translucent clay with a small amount of yellow ochre and white. It should look slightly waxy and pale. -
Cut the fries:
Roll the potato-colored clay into a thin sheet (about 2mm thick) and use your craft knife to slice narrow, uneven strips. -
Color and arrange:
Dust the raw fries with yellow ochre and burnt sienna pastels to simulate golden-brown edges. Arrange a messy pile of them on the top left of your cooled platter.
Step 2: Building the Burger & Donut
-
Create the buns:
Mix beige clay and roll two small domes. Flatten the bottom one slightly. Texture the top bun with a toothbrush to mimic baked bread. -
Add burger fillings:
Form a textured brown disc for the patty, a thin yellow square for cheese (melt the corners down slightly), and thin green ruffles for lettuce. Stack them between the buns. -
Finish the burger:
Add tiny bits of chopped white clay on top for sesame seeds and shade the bun tops with burnt sienna pastel. -
Form the donut:
Roll a small snake of light cocoa-colored clay and join the ends to form a ring. Texture the ‘cut’ middle section with a needle tool to look like fluffy cake. -
Glaze the donut:
Mix liquid clay with dark brown chalk pastel to make a chocolate glaze. Carefully apply a ring of this glaze around the center of the donut.
Fixing “Raw” Looking Clay
If your bread or fries look too plastic, use more translucent clay in your mix and brush heavily with chalk pastels before baking to add depth and a ‘baked’ effect.
Step 3: Sculpting Pizza & Cookie
-
Shape the pizza slice:
Cut a triangle from a sheet of pale beige clay. pinch the wide end to form a crust and texture the pores with a needle tool. -
Add toppings:
Spread a mixture of red pastel and liquid clay for sauce, then top with shredded white clay for cheese and tiny red discs for pepperoni. -
Make the cookie:
Press a small ball of golden-beige clay flat. Indent the center with a ball stylus to create a thumbprint cookie shape. -
Fill the center:
Fill the indentation with red liquid clay to simulate jam, and texture the cookie edges with a toothbrush. -
Final Bake and Varnish:
Arrange all remaining food items on the platter. Bake the entire piece again. Once cool, brush gloss varnish on the ‘wet’ items like the jam, pizza sauce, and burger cheese.
Level Up: Grease Stains
For hyper-realism, brush a tiny amount of baby oil or gloss glaze on the paper liner under the pizza or fries to mimic grease soaking through.
Display your miniature feast on a tiny table or turn it into a unique magnet for your fridge