When I need a quick creative win, I grab a little lump of air-dry clay or polymer clay and make something tiny. These small clay craft ideas are sweet, doable in an afternoon, and perfect for using up small scraps of clay you already have.
Tiny Ring Dishes
This charming little jewelry holder combines the rustic warmth of terracotta with a creamy, speckled glaze finish. Its gentle scalloped edges give it a floral feel, making it perfect for keeping your favorite rings safe on a bedside table.
Step-by-Step Tutorial
Materials
- Terracotta air-dry clay or polymer clay
- Rolling pin
- Circle cutter (approx. 3-4 inches) or a glass
- Small round tool (like a marker cap, paintbrush handle, or dowel)
- Sponge or small bowl of water
- White acrylic paint (matte or satin)
- Speckled glaze medium or brown paint for faux speckles
- Glossy varnish or sealant (optional but recommended)
- Fine grit sandpaper
- Paintbrushes
Step 1: Shaping the Clay Base
-
Condition the clay:
Begin by taking a ball of terracotta clay about the size of a golf ball and kneading it in your hands until it becomes soft, pliable, and free of cracks. -
Roll it out:
On a clean, flat surface, use your rolling pin to flatten the clay. Aim for a consistent thickness of about 1/4 inch (approx. 6mm) so the dish feels substantial but not chunky. -
Cut the circle:
Press your circle cutter or the rim of a drinking glass firmly into the clay to create a perfect round disc. Remove the excess clay from around the edges. -
Smooth the edges:
Dip your finger slightly in water and run it along the cut edge of the circle to smooth out any roughness or sharp ridges left by the cutter.
Cracking Up?
If you see tiny cracks forming while air-dry clay dries, mix a tiny bit of fresh clay with water to make a paste and smooth it into the cracks like spackle.
Step 2: Creating the Scalloped Rim
-
Establish the indents:
Take your small round tool (a marker cap works wonderfully) and press it gently into the side of the clay disc to create a semi-circle indentation. Don’t press all the way through; just shape the edge. -
Repeat the pattern:
Move the tool slightly over and make the next indentation. Continue this all around the circumference of the circle until you have a flower-like, scalloped border. -
Lift the edges:
Gently cup the clay disc in your palm. Use your thumb to press the center down slightly while curling the scalloped edges upward to create a shallow bowl shape. -
Refine the shape:
Go around the rim once more, using your fingers to pinch and define the peaks of the scallops so they look crisp and stand upright. -
Let it dry:
Place your dish in a safe spot to dry completely. For air-dry clay, this usually takes 24-48 hours. If using polymer clay, bake according to the package instructions.
Step 3: Painting and Finishing
-
Sand for smoothness:
Once fully dry (and cool, if baked), use fine-grit sandpaper to gently buff the interior surface. This ensures your glaze will look smooth and professional. -
Paint the interior base:
Apply a coat of creamy white acrylic paint to the inside of the dish. I like to leave the very top rim unpainted to let that beautiful terracotta color frame the piece. -
Add a second coat:
Allow the first layer to dry, then add a second coat of white paint to ensure solid, opaque coverage inside the bowl. -
Create the speckled effect:
To mimic ceramic glaze, dip an old toothbrush or stiff brush into slightly watered-down brown or grey paint. Run your thumb over the bristles to flick tiny speckles onto the white painted area. -
Clean the rim:
If any paint or speckles accidentally got onto the terracotta rim, wipe them away quickly with a damp cloth or scrape them off gently once dry. -
Apply varnish:
To give the interior that ‘fired glaze’ look, apply a generous coat of high-gloss varnish over the painted white section. -
Seal the exterior (optional):
For a natural look, leave the outside matte. If you want more durability, apply a matte varnish to the exposed terracotta areas.
Glaze Hack
Use ‘Clear Glaze’ specifically made for clay (like Triple Thick) instead of standard varnish. It’s much thicker and mimics the glass-like look of a kiln-fired piece perfectly.
Place this lovely dish on your vanity and enjoy the satisfaction of seeing your handmade pottery every day


Simple Mini Clay Earrings
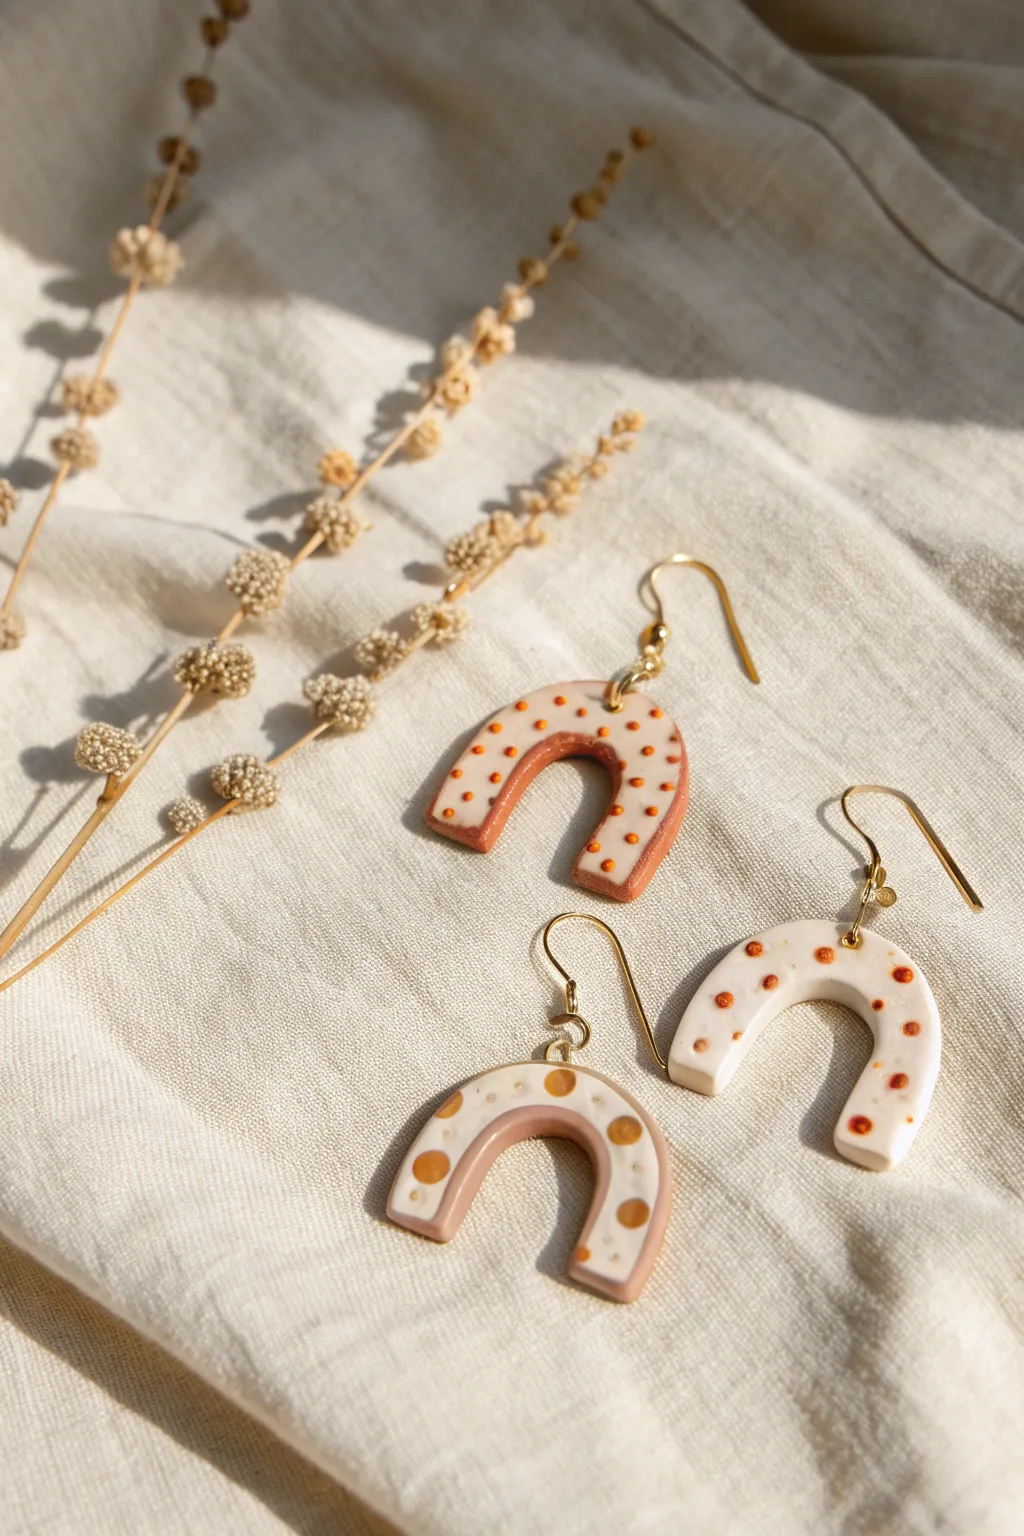
These charming mini arch earrings combine earthy terracotta tones with delicate speckled details for a perfect bohemian accessory. The design features a layered slab technique that creates a clean, professional finish with minimal effort.
Step-by-Step Guide
Materials
- Polymer clay in terracotta/burnt orange
- Polymer clay in white or translucent white
- Acrylic rolling pin or pasta machine
- U-shaped or arch clay cutter (approx. 1 inch)
- Small dotting tool or toothpick
- Detail needle tool
- Smooth ceramic tile or glass work surface
- Parchment paper
- Oven for baking
- 4mm or 6mm jump rings (gold finish)
- Earring hooks (gold finish)
- Jewelry pliers (round nose and flat nose)
- Hand drill or very small hole punch cutter
- Sandpaper (optional, 400-1000 grit)
Step 1: Creating the Clay Slabs
-
Condition the base color:
Begin by warming up the terracotta-colored clay in your hands until it is pliable. Roll it out into a smooth sheet about 3mm thick. This will be your base layer. -
Prepare the top layer:
Clean your hands or surface to avoid color transfer, then condition the white clay. Roll this sheet out slightly thinner than the base, perhaps around 2mm thick. -
Layer the sheets:
If you are making the layered design, gently place the white sheet directly on top of the terracotta sheet. Use your rolling pin to gently press them together so they bond without distorting the shape too much. -
Create the polka dot slab:
For the white pair with large dots, roll a single thick slab of white clay. Roll tiny balls of terracotta clay, place them randomly on the white surface, and roll over the slab again to flatten the dots flush with the surface.
Bubbles in your clay?
If you see air bubbles after rolling your slabs, gently pierce them with a sharp needle tool and smooth the air out with your finger before cutting your shapes.
Step 2: Cutting and Texturing
-
Cut the shapes:
Place a piece of plastic wrap over the clay if you want rounded edges, or cut directly into the clay with your U-shaped cutter for sharp edges. Cut out as many shapes as you need, ensuring you have matching pairs. -
Add surface details:
For the layered terracotta/white arches, take your small dotting tool. Gently press small indentations or apply tiny dots of terracotta liquid clay (or soft clay bits) onto the white surface in a polka-dot pattern. -
Clean the edges:
Before baking, use your fingertip or a silicone tool to gently smooth any rough edges left by the cutter. It’s much easier to fix imperfections now than after the clay has hardened. -
Pierce holes:
Using a needle tool or a very small circular cutter, make a hole at the very top center of each arch. Ensure the hole is large enough for your jump rings to pass through freely.
Step 3: Baking and Assembly
-
Bake the pieces:
Transfer your arches onto a ceramic tile or baking sheet lined with parchment paper. Bake according to your brand of polymer clay instructions—typically 275°F (135°C) for about 30 minutes. -
Cool and finish:
Allow the pieces to cool completely in the oven or on a wire rack. If you notice any jagged spots on the edges, lightly sand them with fine-grit wet/dry sandpaper under running water. -
Open the jump rings:
Using two pairs of pliers, twist a jump ring open sideways rather than pulling the ends apart. This maintains the circle’s strength and shape. -
Attach the hardware:
Thread the open jump ring through the hole in the top of the clay arch. Before closing it, slide the loop of the earring hook onto the jump ring as well. -
Secure the closure:
Twist the jump ring back into a closed position using your pliers. I like to give it a tiny squeeze to ensure the gap is completely flush so the hook won’t slip out. -
Repeat for the set:
Repeat the assembly process for the second earring. Hold both up to ensure they hang at the same length and the front faces are oriented correctly.
Gloss it up
For a ceramic look, apply a thin coat of UV resin or glossy polyurethane varnish to the baked pieces. Cure or dry fully for a high-shine, durable finish.
Enjoy styling these versatile, lightweight earrings with your favorite casual outfits


Charm Keychains You Can Personalize
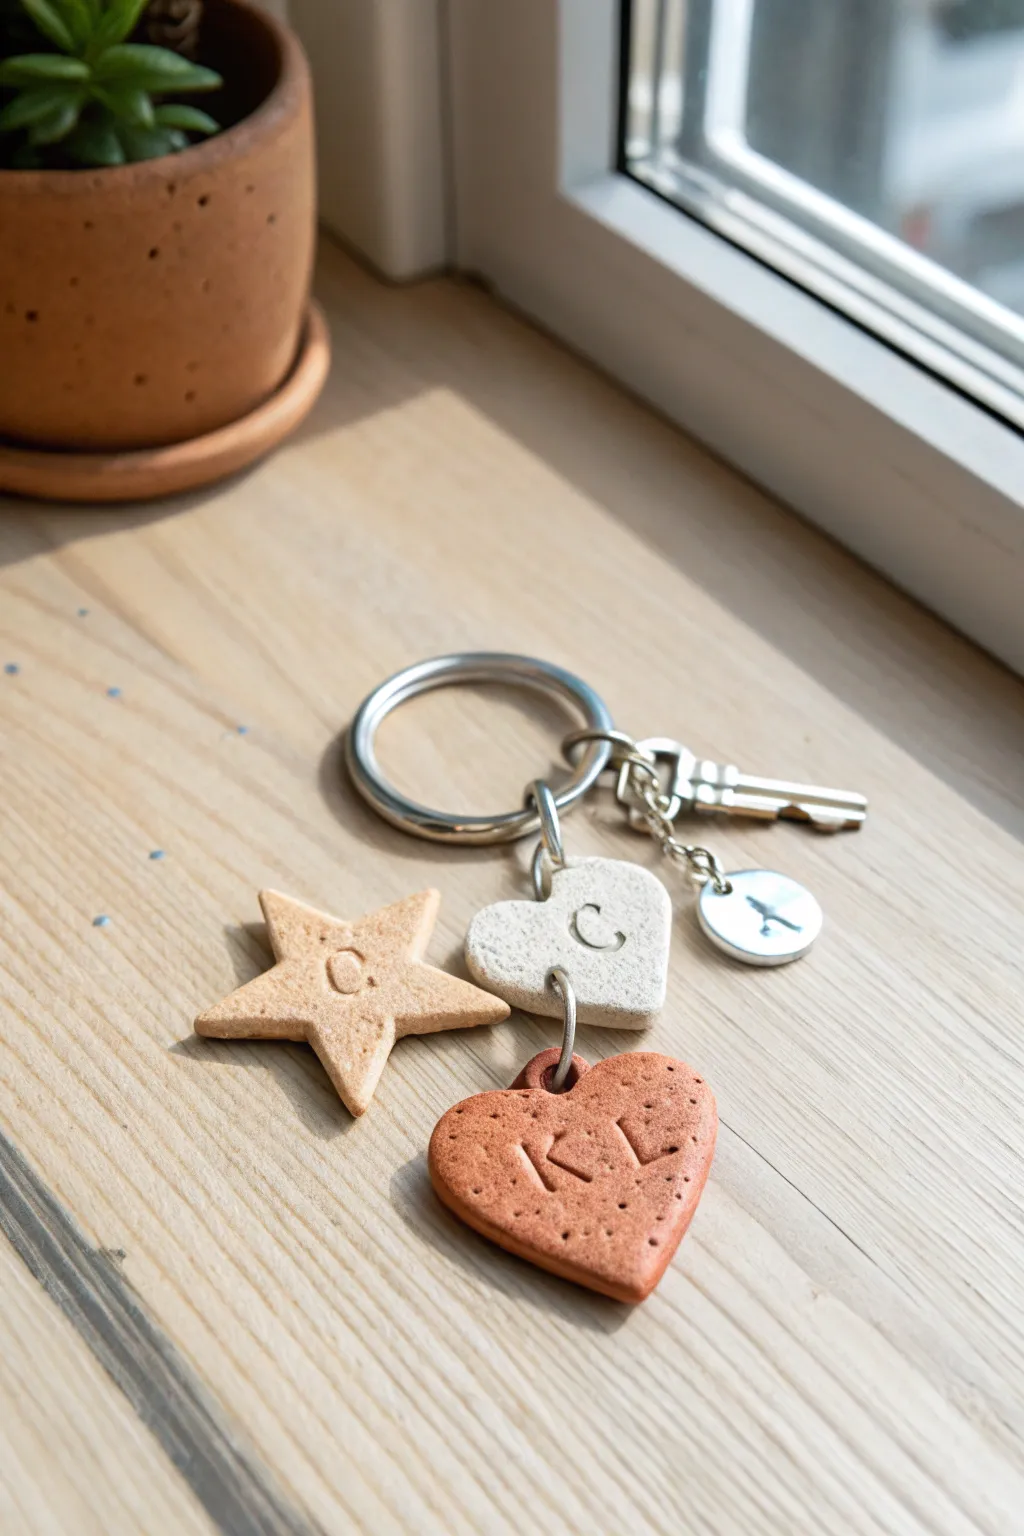
Create a personalized set of durable charms that look just like artisan cookies but are made to last. These textured clay pieces feature stamped initials and varied natural tones, making them perfect for custom gifts or organizing your own keys.
Detailed Instructions
Materials
- Polymer clay (white, beige, and terracotta colors)
- Small cookie cutters (star and heart shapes)
- Letter stamp set (small size)
- Rolling pin or smooth glass bottle
- Parchment paper
- Jump rings (6mm or 8mm)
- Keyring hardware
- Silver metal charm (optional, like a key)
- Toothpick or needle tool
- Fine-grit sandpaper
- Silver acrylic paint (optional)
- Small detail brush
Step 1: Shaping the Clay
-
Condition the clay:
Begin by warming up small amounts of your polymer clay in your hands. Knead the white, beige, and terracotta colors separately until they are soft and pliable but not sticky. -
Roll it out:
Place a ball of clay between two sheets of parchment paper to prevent sticking. Roll it out to an even thickness of about 1/4 inch (6mm). You want them substantial enough to hold up as a keychain. -
Add texture:
To achieve the stone-like or cookie texture seen in the photo, gently dab the surface of the rolled clay with a clean toothbrush or crumpled aluminum foil. Light pressure is all you need. -
Cut the shapes:
Using your small cookie cutters, press firmly into the textured clay to cut out your hearts and stars. Wiggle the cutter slightly to ensure a clean cut before lifting. -
Smooth the edges:
After popping the clay shapes out of the cutters, gently run your finger along the edges to soften any harsh ridges or loose bits of clay.
Uneven Stamping?
If your letter stamps aren’t making a deep enough impression, the clay might be too cool. Warm it up slightly with your hands again before rolling and stamping.
Step 2: Personalizing & Baking
-
Stamp the initials:
Select your desired letters from the stamp set. Press the stamp firmly into the center of each shape. For the ‘KL’ heart, align the letters carefully before pressing. -
Create the hole:
Using a toothpick or a needle tool, pierce a hole at the top of each charm. Make sure the hole is large enough for your jump rings to fit through freely, and not too close to the edge to prevent breaking. -
Check the back:
Flip the charm over and gently smooth down any clay that pushed out around the exit hole so the back remains flat. -
Bake the pieces:
Arrange your charms on a parchment-lined baking sheet. Bake according to your brand of polymer clay instructions (usually around 275°F or 135°C for 15-30 minutes). -
Cool down:
Let the pieces cool completely on the baking sheet. They will harden as they cool.
Make it Speckled
Knead tiny pinches of black pepper or dried coffee grounds into your beige clay before rolling to create a realistic faux-stone or ceramic speckle effect.
Step 3: Finishing Touches
-
Sand edges:
Once fully cool, use a piece of fine-grit sandpaper to lightly buff the edges or the back of the charms if there are any sharp spots. -
Highlight the letters:
For the white heart charm, dip a fine brush in silver acrylic paint and carefully fill in the stamped ‘C’. Wipe away any excess on the surface immediately with a damp cloth, leaving paint only in the indentation. -
Attach jump rings:
Use pliers to open your jump rings. Slide one ring through the hole of each clay charm and close it securely. -
Assemble the keychain:
Slide the jump rings onto the main keyring loop. I find it looks best to stagger them slightly. -
Add accent charms:
If you have a metal accent charm, like the small key shown in the image, attach it to the ring as well to add a contrasting texture.
Now clip your new personalized charms onto your keys and enjoy your handmade accessory


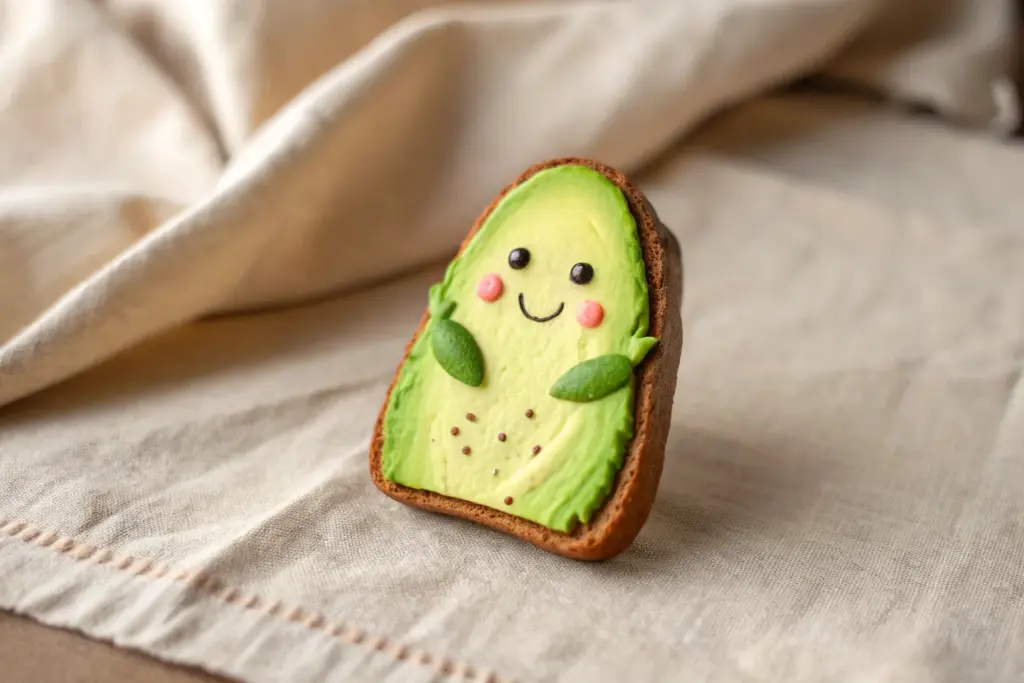
Cute Clay Magnets
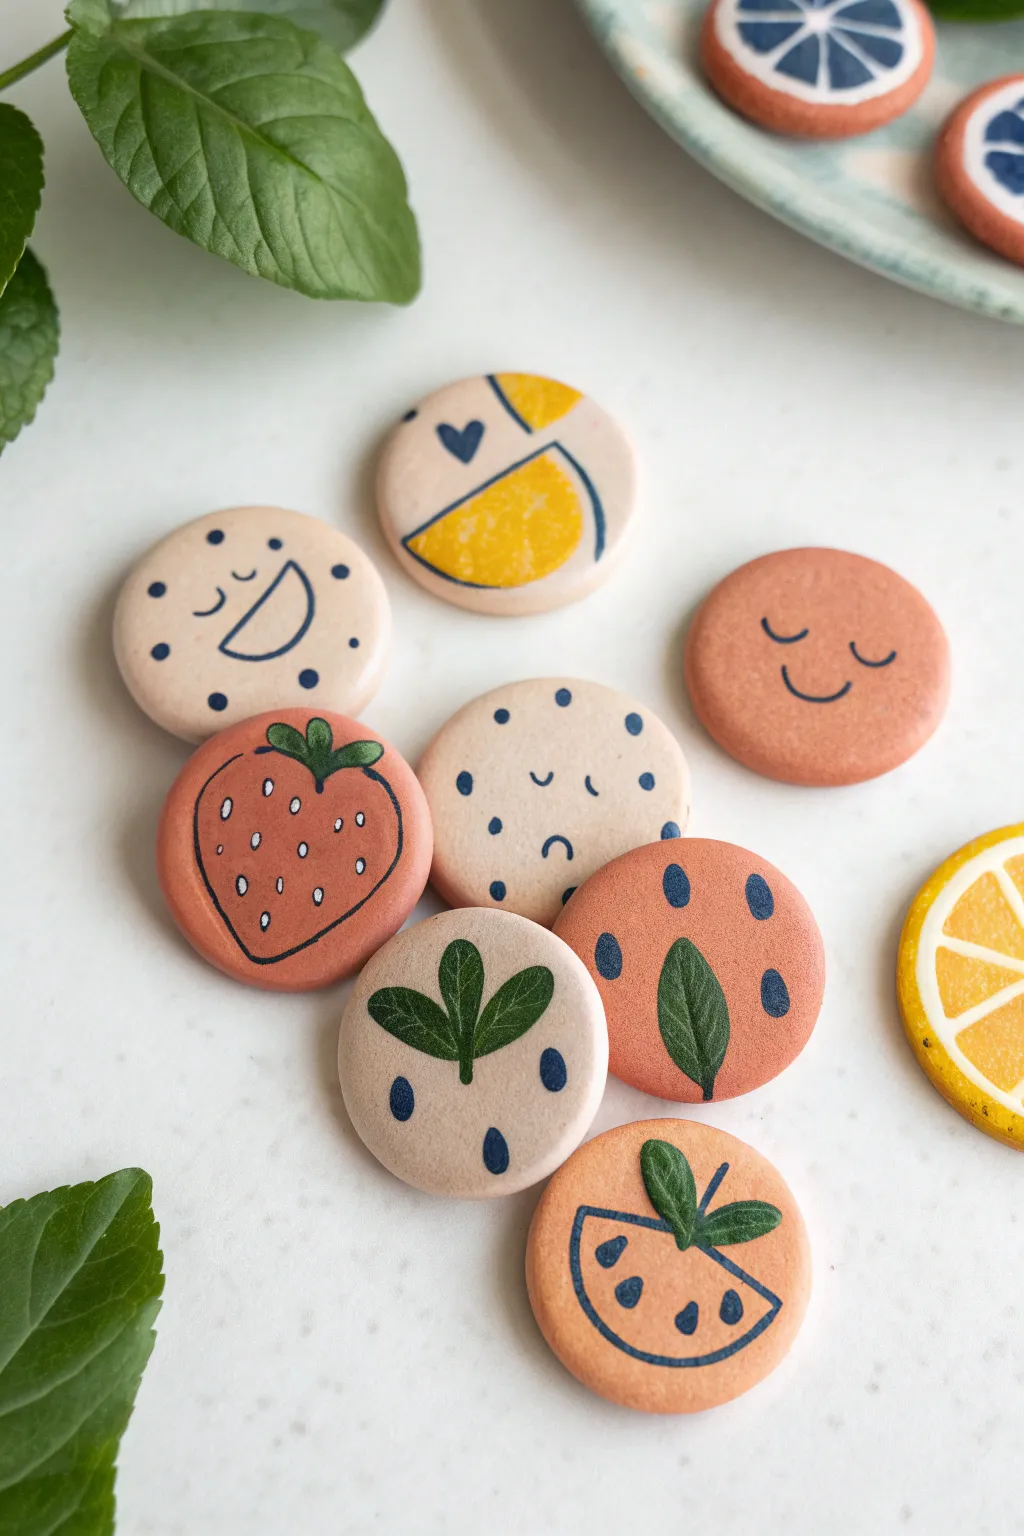
These charming little magnets look just like glazed ceramic cookies but are easily made at home with polymer clay. Featuring minimalist fruit designs and happy expressions, their matte finish and earthy tones add a touch of whimsy to any fridge or locker.
Step-by-Step Tutorial
Materials
- Polymer clay in light beige/sand and terracotta/salmon colors
- Rolling pin or pasta machine
- Small round circle cutter (approx. 1-1.5 inch)
- Acrylic paint (navy blue, yellow, white, black, dark green)
- Fine detail paintbrushes (size 0 or 00)
- Small real leaves (e.g., boxwood) or faux greenery for stamping/embeds (optional)
- Clear matte varnish or sealant
- Strong craft glue (E6000)
- Small round magnets
- Parchment paper and baking sheet
Step 1: Shaping the Base
-
Condition the clay:
Start by kneading both your beige and terracotta clays separately until they are soft, pliable, and free of any air bubbles. Warm clay interacts better with tools and prevents cracking. -
Roll it out:
Roll the clay onto a smooth surface to an even thickness of about 1/4 inch (6mm). You want them thick enough to be sturdy but thin enough to hold a magnet. -
Cut the circles:
Using your small circle cutter, punch out rounds from both clay colors. Gently push the clay out of the cutter to avoid warping the circle shape. -
Smooth the edges:
Lightly run your finger along the rim of each circle to soften the sharp cut edge, giving it that smooth, fired-ceramic look. -
Add texture (optional):
If you want to include the botanical element seen in the photo, gently press a small, veined leaf into the surface of a few rounds, or secure a tiny preserved leaf using a dab of liquid clay before baking.
Step 2: Baking and Prep
-
Bake the batch:
Arrange your clay rounds on a parchment-lined baking sheet. Bake according to your specific clay package’s instructions—usually around 275°F (135°C) for 15-30 minutes. -
Cool down completely:
Let the pieces cool fully on the baking sheet. Painting on warm clay can make the acrylics gummy and hard to manage. -
Prepare your palette:
Squeeze out small amounts of navy blue, yellow, and white paint. I like to mix a tiny bit of water into the paint to get a fluid, ink-like consistency for the fine lines.
Uneven Surfaces?
If fingerprints are visible before baking, lightly brush the raw clay with a little baby oil or cornstarch to smooth them out instantly.
Step 3: Painting the Designs
-
Paint the fruit slices:
For the lemon or orange designs, paint a semicircle or wedge shape in yellow or orange on the beige clay. Let this base layer dry completely. -
Outline the details:
Using your finest brush and navy blue paint, carefully outline the fruit wedge and add the interior segment lines. Keep your hand steady and use only the very tip of the bristles. -
Create the strawberry:
On a terracotta round, paint a loose strawberry outline in navy blue. Add tiny white or light pink teardrops inside for seeds, and a green leafy top. -
Add happy faces:
For the character magnets, use the navy blue paint to draw simple ‘U’ shapes for closed eyes and small curved smiles. Vary the expressions—some winking, some sleeping. -
Paint geometric patterns:
For abstract fruit patterns, paint small navy seeds or teardrops scattered across the surface. These simple repetitive marks look great on both clay colors. -
Let the paint cure:
Allow all your painted details to dry thoroughly for at least an hour to prevent smearing during the sealing process.
Line Art Trick
Struggling with a brush? Use ultra-fine tip acrylic paint markers (0.7mm) for the navy blue lines. It offers way more control than a brush.
Step 4: Finishing Touches
-
Apply varnish:
Brush a thin coat of clear matte varnish over the top and sides of each piece. This protects the paint and enhances that soft, unglazed pottery aesthetic. -
Dry the varnish:
Allow the varnish to dry completely according to the bottle instructions, ensuring no tacky spots remain. -
Attach the magnets:
Flip the clay pieces over. Apply a strong dot of E6000 glue to the center of the back and press a round magnet firmly into it. -
Final cure:
Let the glue cure undisturbed for 24 hours to ensure the magnets won’t pop off when you stick them to the fridge.
Now you have a sweet set of faux-ceramic magnets ready to organize your notes

The Complete Guide to Pottery Troubleshooting
Uncover the most common ceramic mistakes—from cracking clay to failed glazes—and learn how to fix them fast.
Mini Pinch Pots for Trinkets
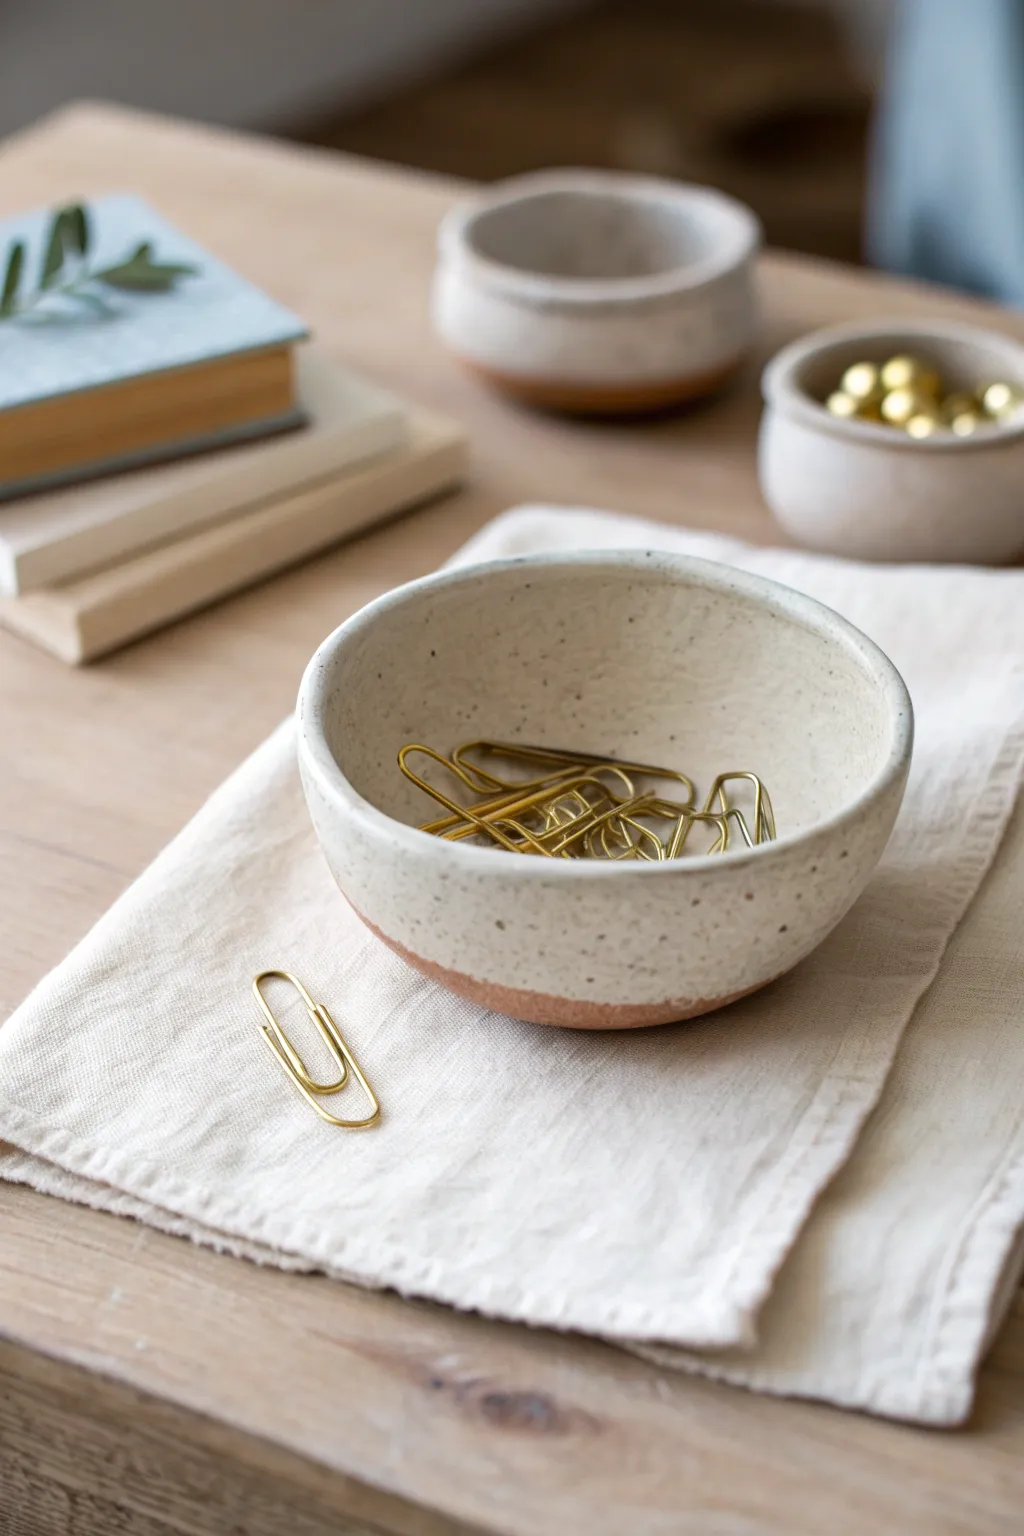
Create a set of charmingly rustic organizers perfect for holding paperclips, jewelry, or desktop treasures. These two-tone pinch bowls feature a warm terracotta base contrasted with a creamy, speckled glaze for a modern farmhouse aesthetic.
Detailed Instructions
Materials
- Terracotta or red earthenware clay
- Cream or antique white dipping glaze (low-fire)
- Speckle additive (optional, if not in glaze)
- Small bowl of water
- Sponge
- Potter’s needle tool or wooden skewer
- Rib tool or old credit card
- Kiln access (or use air-dry clay + acrylics for a decorative-only version)
Step 1: Shaping the Base
-
Prepare the clay:
Start with a ball of clay roughly the size of a tangerine. Pat it back and forth between your hands to round it out and ensure there are no air bubbles. -
Open the form:
Hold the clay ball in your non-dominant hand. Press your thumb into the center, pushing down until you are about a quarter-inch from the bottom. Be careful not to push all the way through. -
Pinch the walls:
With your thumb inside and fingers on the outside, gently pinch the clay while rotating the ball in your hand. Start at the bottom and work your way up to the rim. -
Even out the thickness:
Continue pinching and rotating until the walls are an even thickness of about 1/4 inch. Aim for a gentle, open bowl shape rather than straight vertical walls. -
Smooth the surfaces:
Dip a small sponge in water and wring it out well. Gently wipe the interior and exterior to smooth any cracks or deep fingerprint marks. -
Flatten the bottom:
Gently tap the pot on your work table to create a small, flat base so it sits securely without wobble. -
Refine the rim:
Use your fingers or a moist piece of chamois leather to compress and smooth the rim. I find this extra attention makes the finished lip feel much nicer to the touch. -
Dry partially:
Let the pot sit until it reaches a ‘leather-hard’ state, where it is firm but still cold to the touch and able to be acted upon without deforming.
Keep it clean
Wipe the unglazed bottom with a clean, damp sponge just before firing. Any invisible glaze dust left usually fires white and ruins the raw clay look.
Step 2: Firing and Glazing
-
Refine the shape (optional):
If surface irregularities are too pronounced, use a rib tool or an old credit card to scrape the exterior walls smooth while leather-hard. -
Bisque fire:
Allow the pots to dry completely (bone dry). Fire them in a kiln to bisque temperature (usually barely cone 04) to prepare them for glazing. -
Prepare the glaze:
Mix your cream-colored glaze well. If your glaze doesn’t come with speckles, mix in a pinch of granular ilmenite or iron oxide speckle additive. -
Wax the bottom (optional):
Apply wax resist to the bottom third of the exterior if you want a very precise line; otherwise, we will rely on a steady hand or cleaning technique. -
Dip the pot:
Hold the pot by the foot (or bottom area). Dip it straight down into the glaze bucket, submerging the entire interior and the top two-thirds of the exterior. -
Lift and drain:
Lift the pot out and hold it upside down for a few seconds to let excess glaze drip off. Give it a gentle shake to settle the surface. -
Clean the line:
If you didn’t use wax resist, use a damp sponge to wipe away any glaze from the bottom third of the exterior. You want to reveal that beautiful raw clay color. -
Dry completely:
Let the glaze dry thoroughly before handling again to avoid smudging the surface. -
Glaze fire:
Place the pots back in the kiln for the final glaze firing according to your clay and glaze specifications (likely cone 5 or 6 for stoneware durability).
Faux Ceramic Hack
No kiln? Use air-dry clay. Once dry, paint the top 2/3 with cream acrylic mixed with sand for texture, and seal with a matte varnish.
Once cooled, fill your new handmade vessels with small trinkets to bring warmth and order to any tabletop
Little Incense Holders
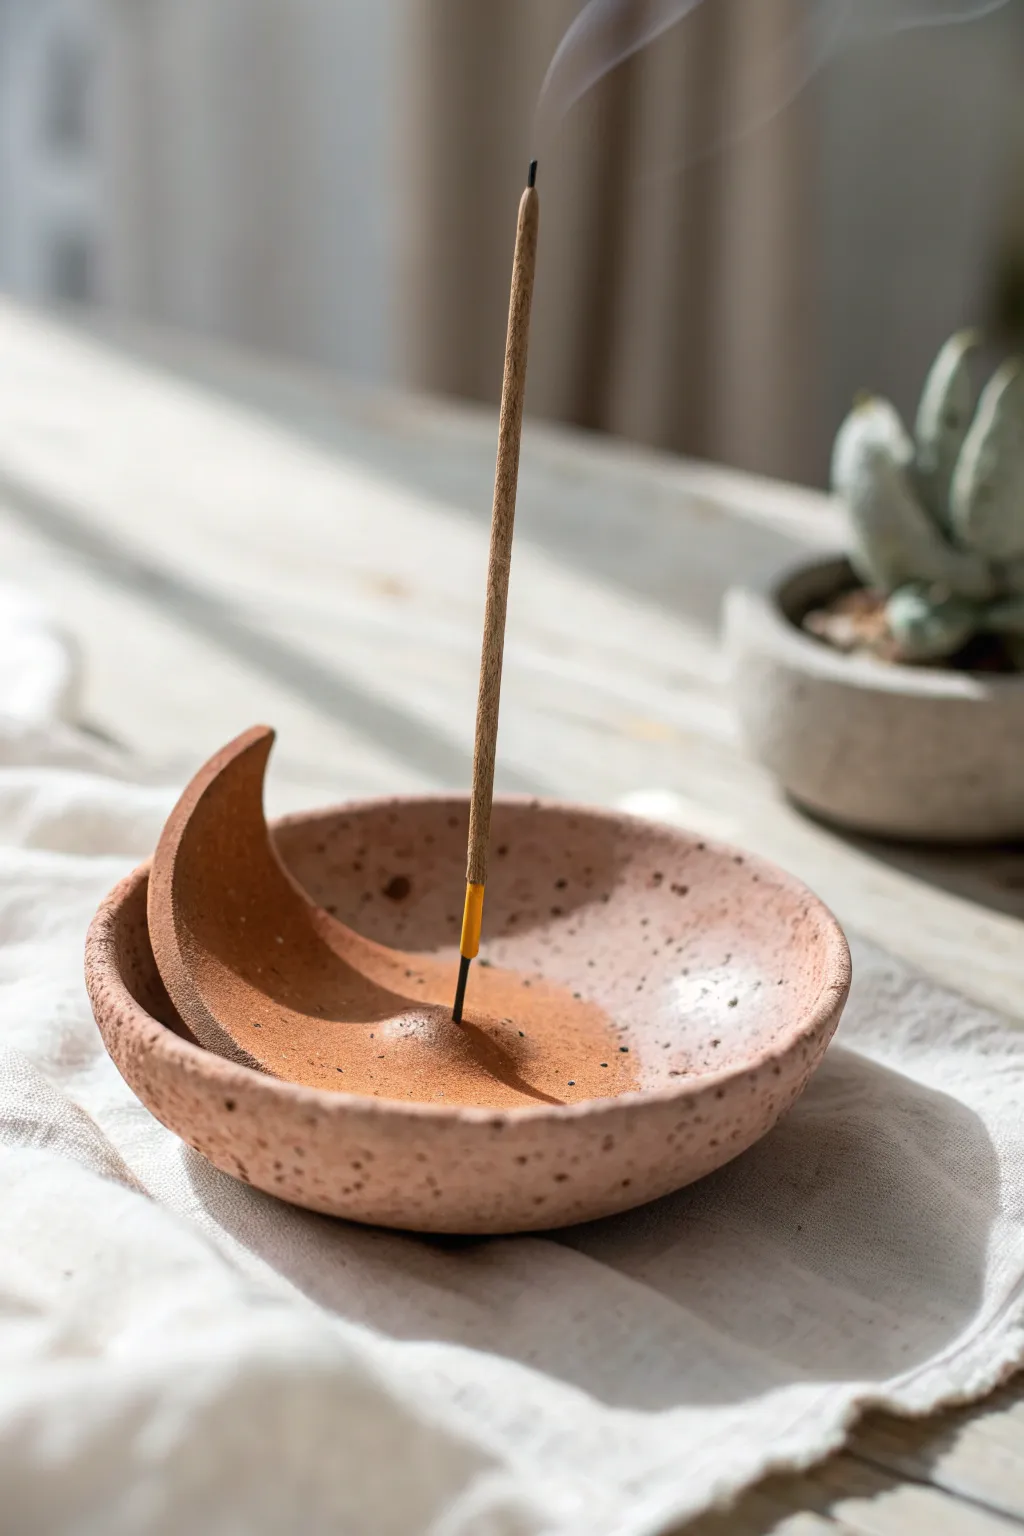
Embrace a calming atmosphere with this two-part incense holder featuring a gentle crescent moon nested in a shallow bowl. The speckled faux-stone finish creates an earthy, modern aesthetic perfect for any meditation corner.
Step-by-Step Tutorial
Materials
- Air-dry clay or polymer clay (terracotta or peach color)
- Dried coffee grounds or coarse black pepper (for speckling)
- Rolling pin
- Circle cookie cutter (approx. 4-5 inches)
- Small craft knife or clay blade
- Small bowl (for shaping)
- Water and sponge (for smoothing)
- Incense stick (for sizing)
- Fine-grit sandpaper
- Matte sealant or varnish
Step 1: Preparing the Clay Body
-
Conditioning:
Start by kneading a fist-sized ball of clay until it is warm and pliable. If you want that beautiful speckled look shown in the photo, this is the moment to mix in textures. -
Adding Texture:
Sprinkle a teaspoon of dried coffee grounds or coarse black pepper onto your flattened clay. Fold the clay over itself and knead thoroughly until the specks are distributed evenly throughout the entire mass. -
Rolling Out:
Roll the clay out on a clean, flat surface to a consistent thickness of about 1/4 inch. I find using guides (like wooden craft sticks) on either side of the roller helps keep the thickness perfectly even.
Step 2: Forming the Base Dish
-
Cutting the Circle:
Use your circle cutter or trace around a small bowl to cut out the main base shape. Remove the excess clay but keep it nearby for the moon piece. -
Shaping the Curve:
Gently lift the clay circle and place it inside a small bowl lined with plastic wrap. Press it down lightly so it takes on a shallow, curved dish shape rather than staying flat. -
Smoothing Edges:
Dip your finger or a small sponge in water and run it along the rim of the dish to erase any sharp cutting lines or cracks. The rim should look soft and rounded.
Loose Incense?
If the dried hole feels too loose for your incense stick, simply drop a tiny bead of glue into the bottom of the hole, or push a small bit of fresh clay in to tighten the fit.
Step 3: Creating the Crescent Moon
-
Cutting the Moon:
Roll out your remaining clay scraps. Use the same circle cutter to cut a round shape, then shift the cutter about an inch to the side and cut again to slice out a perfect crescent moon sliver. -
Checking Proportion:
Place the crescent temporarily into the drying base dish to ensure it fits comfortably without touching the raised edges. Trim the tips slightly if it feels too large. -
Adding Dimension:
Gently pinch the outer spine of the crescent to give it a slightly triangular cross-section, making the bottom wider for stability and the top edge thinner. -
Making the Hole:
Take an actual incense stick and press it into the center of the crescent’s inner curve. Wiggle it slightly to create a hole that goes all the way through. Ensure the angle is vertical or tilted slightly inward so the ash falls into the bowl.
Pro Tip: Weight Matters
Make the crescent moon slightly thicker at the base than at the tip. This ‘pyramid’ structure lowers the center of gravity so the holder won’t tip over with a long incense stick.
Step 4: Assembly and Finish
-
Scoring and Slipping:
Use a needle tool or toothpick to scratch up the bottom of the crescent moon and the spot in the center of the dish where it will sit. Dab a little water (or liquid clay if using polymer) on both scratched areas. -
Attaching:
Press the moon firmly onto the center of the dish. Use a modeling tool to blend the seam where the clay meets, ensuring a seamless transition between the moon and the bowl. -
Final Smoothing:
Give the entire piece one last wipe with a damp sponge to remove fingerprints. Check the incense hole again to make sure it didn’t close up during attachment. -
Drying:
Let the piece dry completely. For air-dry clay, this takes 24-48 hours. If using polymer clay, bake according to the package instructions. -
Sanding:
Once fully cured and dry, gently sand any rough spots or sharp edges with fine-grit sandpaper for a professional finish. -
Sealing:
Apply a coat of matte varnish to protect the surface and keep the speckles visible without making it too shiny.
Now you have a serene little sanctuary for your favorite scents to drift from


What Really Happens Inside the Kiln
Learn how time and temperature work together inside the kiln to transform clay into durable ceramic.
Modern Photo Holders
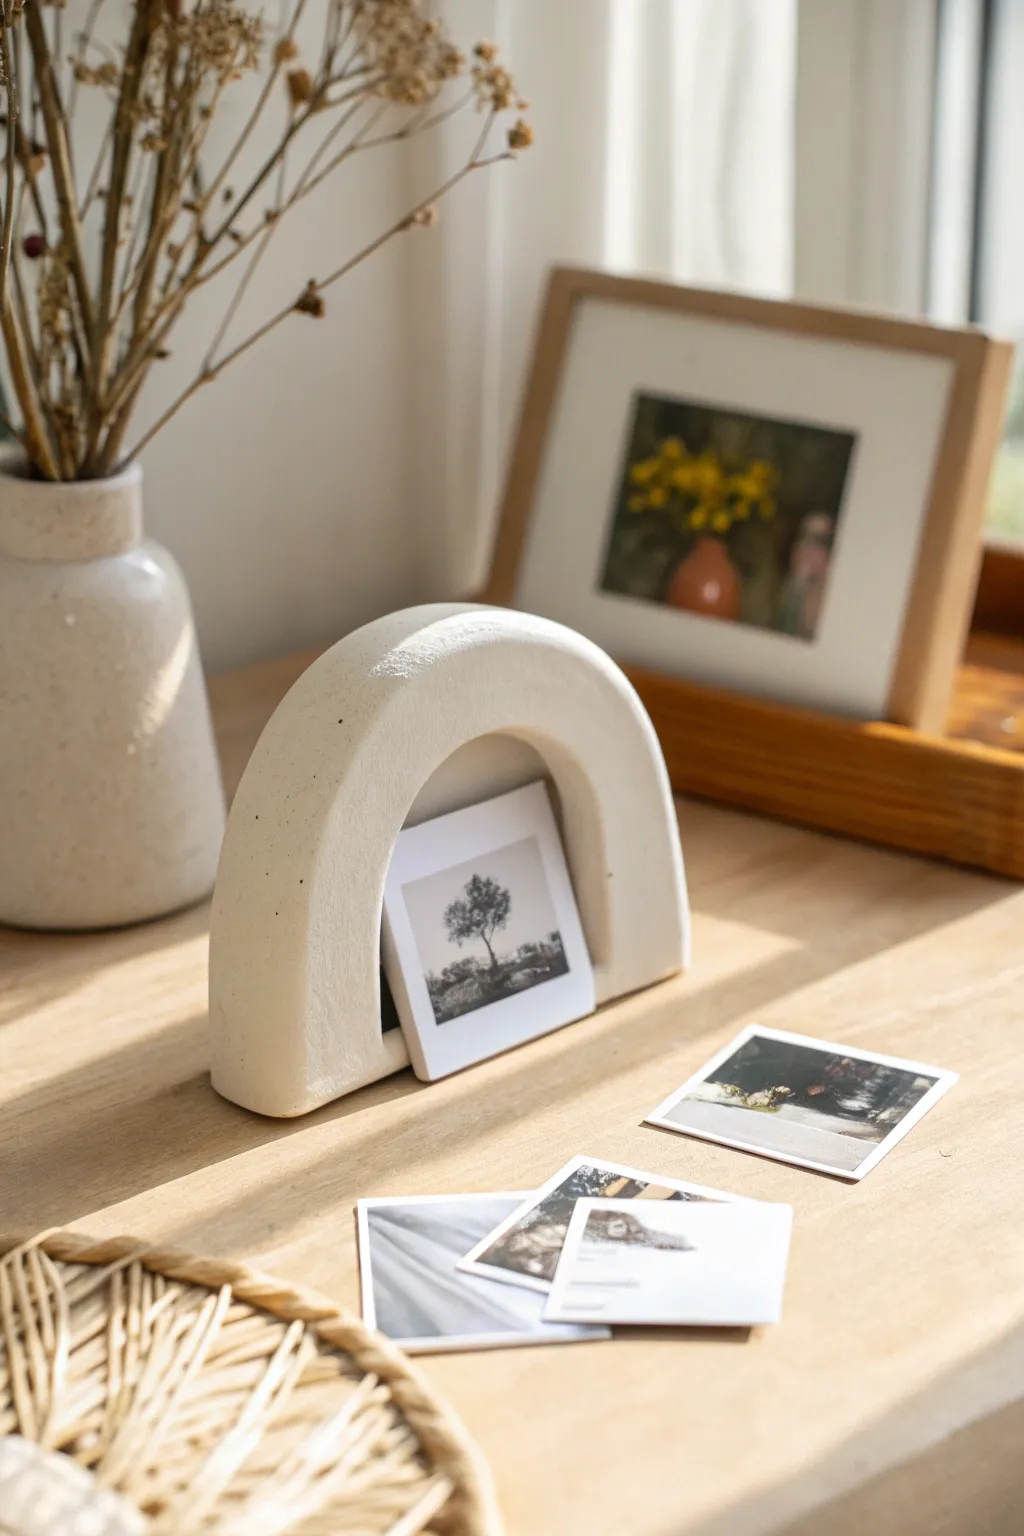
Embrace the ‘japandi’ aesthetic with this serene, architectural photo display. Using simple air-dry clay and a clever texturing technique, you’ll create a piece that looks like high-end carved limestone but costs pennies to make.
Step-by-Step Guide
Materials
- White or terracotta air-dry clay (about 500g)
- Rolling pin
- Sharp crafting knife or clay wire
- Cardboard (for templates)
- Small bowl of water
- Baking soda
- White acrylic paint
- Rough bristled paintbrush or old toothbrush
- Sandpaper (medium grit)
- Ruler
Step 1: Preparation & Shaping
-
Create the template:
Begin by sketching an arch shape on a piece of cardboard. Aim for about 5 inches wide and 4 inches tall to match the photo, but feel free to adjust. Cut this shape out to use as your guide. -
Condition the clay:
Take a substantial chunk of air-dry clay and knead it in your hands until it is warm and pliable. This prevents internal air bubbles from causing cracks later. -
Roll the slab:
Roll out your clay on a smooth surface to a thickness of approximately 1.5 inches. This project relies on a chunky, substantial look, so don’t go too thin. -
Cut the arch:
Place your cardboard template onto the clay slab. Using your sharp knife, cut vertically down around the template to create a clean, thick block in the shape of an arch. -
Smooth the edges:
Dip your finger in a little water and run it along the cut edges to smooth out any sharpness or dragging marks left by the knife. You want a rounded, organic feel rather than sharp corners.
Fixing Cracks
If hairline cracks appear while drying, don’t panic. Mix a tiny bit of fresh clay with water to make a paste (slip) and fill the cracks, then sand smooth once dry.
Step 2: Creating the Holder mechanism
-
Measure the slit:
Find the center point of the arch’s base. You need to create a groove that will hold the photo. Mark a line across the bottom width of the arch regarding where the photo will sit. -
Cut the groove:
With a thin tool or the back of a knife, press a deep line into the center of the base. Alternatively, if creating a hollow arch like the reference, ensure the inner cutout is wide enough to balance a photo leaning against the back rim. -
Refining the inner arch:
For the specific look in the photo, you are actually creating a tunnel. Use a smaller arch template to cut out the center of your clay block, leaving a sturdy frame about 1 inch thick all around. -
Stabilize the form:
Once the center is removed, the clay might sag slightly. Gently reshape it with your hands to ensure the arch remains symmetrical and stands flat on the table. -
The photo rest:
To keep the photo upright, create a very shallow groove or notch on the inside bottom surface of the arch. This acts as a ‘stop’ for the bottom edge of your picture.
Step 3: Drying & Texturing
-
Initial drying:
Let the piece dry slowly away from direct heat or sunlight. For a piece this thick, flip it gently every 6-8 hours to ensure even drying. -
Sand imperfections:
Once bone dry (usually 24-48 hours), use medium-grit sandpaper to buff away any major bumps, focusing on the flat front and back faces. -
Prepare the faux-stone mix:
I like to mix white acrylic paint with a generous amount of baking soda. You want a consistency that feels like gritty frosting or textured paste. -
Apply the first coat:
Using a rough brush or an old toothbrush, stipple the paint mixture onto the clay. Don’t brush it smooth; dab it on to build up a peaked, stone-like texture. -
Add dimension:
While the first layer is tacky, add a tiny drop of beige or light grey to your white mixture and dab it randomly on a few spots for natural stone variation. -
Final texture layer:
Apply a second coat of the baking soda paint to ensure full coverage and maximum grit. This hides any clay imperfections perfectly. -
Final dry:
Let the paint mixture dry completely. It will harden into a satisfyingly rough, matte finish that mimics limestone.
Terrazzo Twist
Mix dried, crushed clay chips of different colors into your wet clay block before rolling it out. Sand heavily after drying to reveal a speckled terrazzo pattern.
Place your favorite Polaroid or postcard in the center and enjoy your sleek new display piece
Textured Mini Coasters
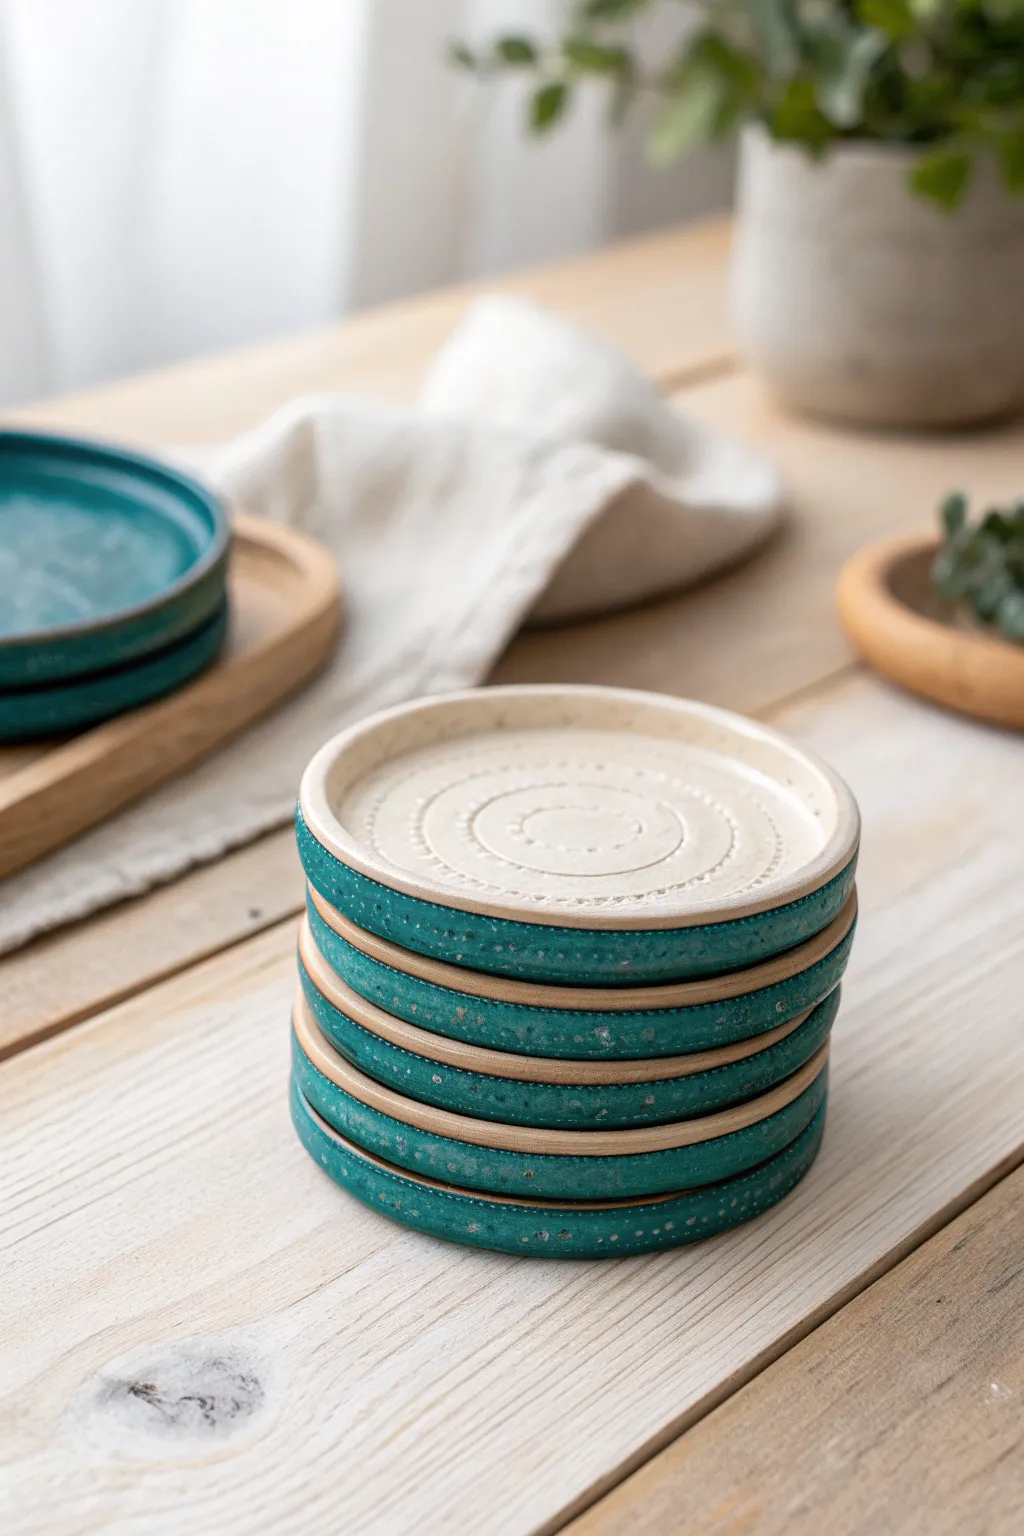
Create a stunning set of functional decor with these dual-tone ceramic coasters, featuring subtle concentric stamping and a vibrant teal band. The earthy unglazed center pairs perfectly with the glossy, speckled rim for a piece that feels both rustic and refined.
Step-by-Step
Materials
- Polymer clay (beige/sand granite effect) or air-dry clay
- Rolling pin
- Circle cookie cutter (approx. 3.5 inches)
- Small circular stamps or found objects (bottle caps, tiny textured buttons)
- Teal acrylic paint (gloss finish) or ceramic glaze if firing
- Dark speckle medium or diluted black paint (for speckling)
- Fine grit sandpaper
- Pottery sponge
- Sculpting tool or old credit card
- Clear matte varnish (waterproof seal)
Step 1: Shaping and Stamping
-
Condition the clay:
Begin by kneading your beige clay until it is soft and pliable. If you are using polymer clay, ensure there are no air bubbles trapped inside. -
Roll the slab:
Roll the clay out onto a clean work surface to a consistent thickness of about 1/4 inch. Use depth guides or stacked playing cards on either side of your roller to ensure an even surface. -
Cut the circles:
Firmly press your 3.5-inch circle cutter into the slab. Cut as many coasters as you desire for your set, plus one extra for testing your stamping technique. -
Smooth the edges:
Use a damp pottery sponge or your finger to gently soften the sharp top edge of the cut circle. You want a slightly rounded, organic rim rather than a sharp mechanical cut. -
Create the recessed center:
Using a slightly smaller flat object (like the bottom of a glass) or just your thumbs, gently press down the center area of the coaster, leaving a slightly raised rim around the outside edge to catch condensation. -
Stamp the pattern:
Starting from the absolute center, press your smallest circular stamp into the clay. Work your way outward with concentric rings of dotted or textured patterns. I like to rotate the coaster as I work to keep the spacing even.
Improvised Stamps
No stamps? No problem. Use the caps of markers, the end of a straw, or the head of a screw to create the varied concentric dot patterns shown in the image.
Step 2: Finishing and Coloring
-
Dry or bake:
If using air-dry clay, let the coasters dry for 24-48 hours on a wire rack. If using polymer clay, bake according to the manufacturer’s instructions (usually 275°F for 15-30 minutes). -
Sand imperfections:
Once fully cured or dry, lightly sand the outer vertical edge to ensure it is perfectly smooth for painting. Wipe away any dust with a damp cloth. -
Paint the rim base:
Apply a coat of teal acrylic paint specifically to the vertical side edge and just barely over the bottom lip. Leave the top surface and the top of the rim unpainted to maintain the clay look. -
Add visual texture:
To mimic the ceramic glaze look in the photo, mix a tiny drop of black paint with water. Dip an old toothbrush in it and flick very fine speckles over the teal painted area. -
Define the top groove:
While the paint is wet, carefully wipe the very top edge if any paint spilled over. You want a crisp line where the teal meets the beige clay. -
Seal the piece:
Apply a waterproof matte varnish over the entire coaster. This is crucial for functionality, as it prevents moisture from drink condensation from damaging the clay. -
Apply extra gloss:
For that glazed ceramic effect, go back over just the teal colored band with a high-gloss varnish or a second coat of gloss sealer. -
Add cork backing:
Ideally, cut a circle of adhesive cork or felt slightly smaller than the coaster and attach it to the bottom to protect your furniture.
Uneven Drying?
If air-dry clay coasters start curling up at the edges while drying, gently flip them over every few hours to ensure both sides lose moisture at the same rate.
Stack your finished set on the coffee table and enjoy the handmade warmth they bring to your space

TRACK YOUR CERAMIC JOURNEY
Capture glaze tests, firing details, and creative progress—all in one simple printable. Make your projects easier to repeat and improve.
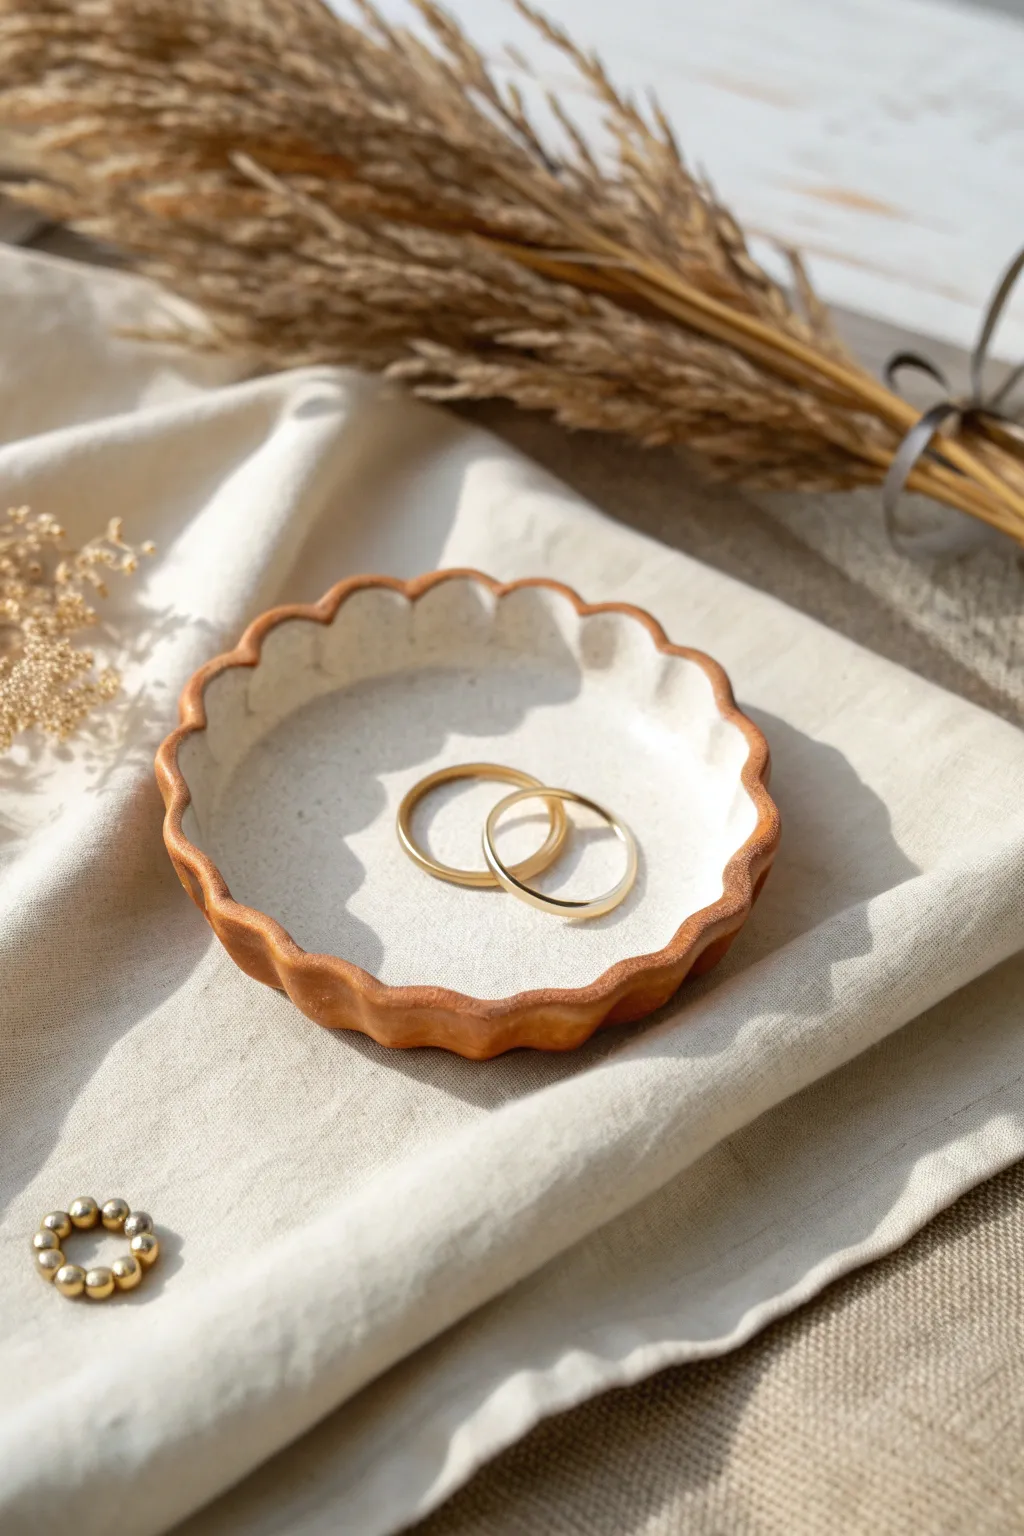
Beaded-Rim Trinket Bowls
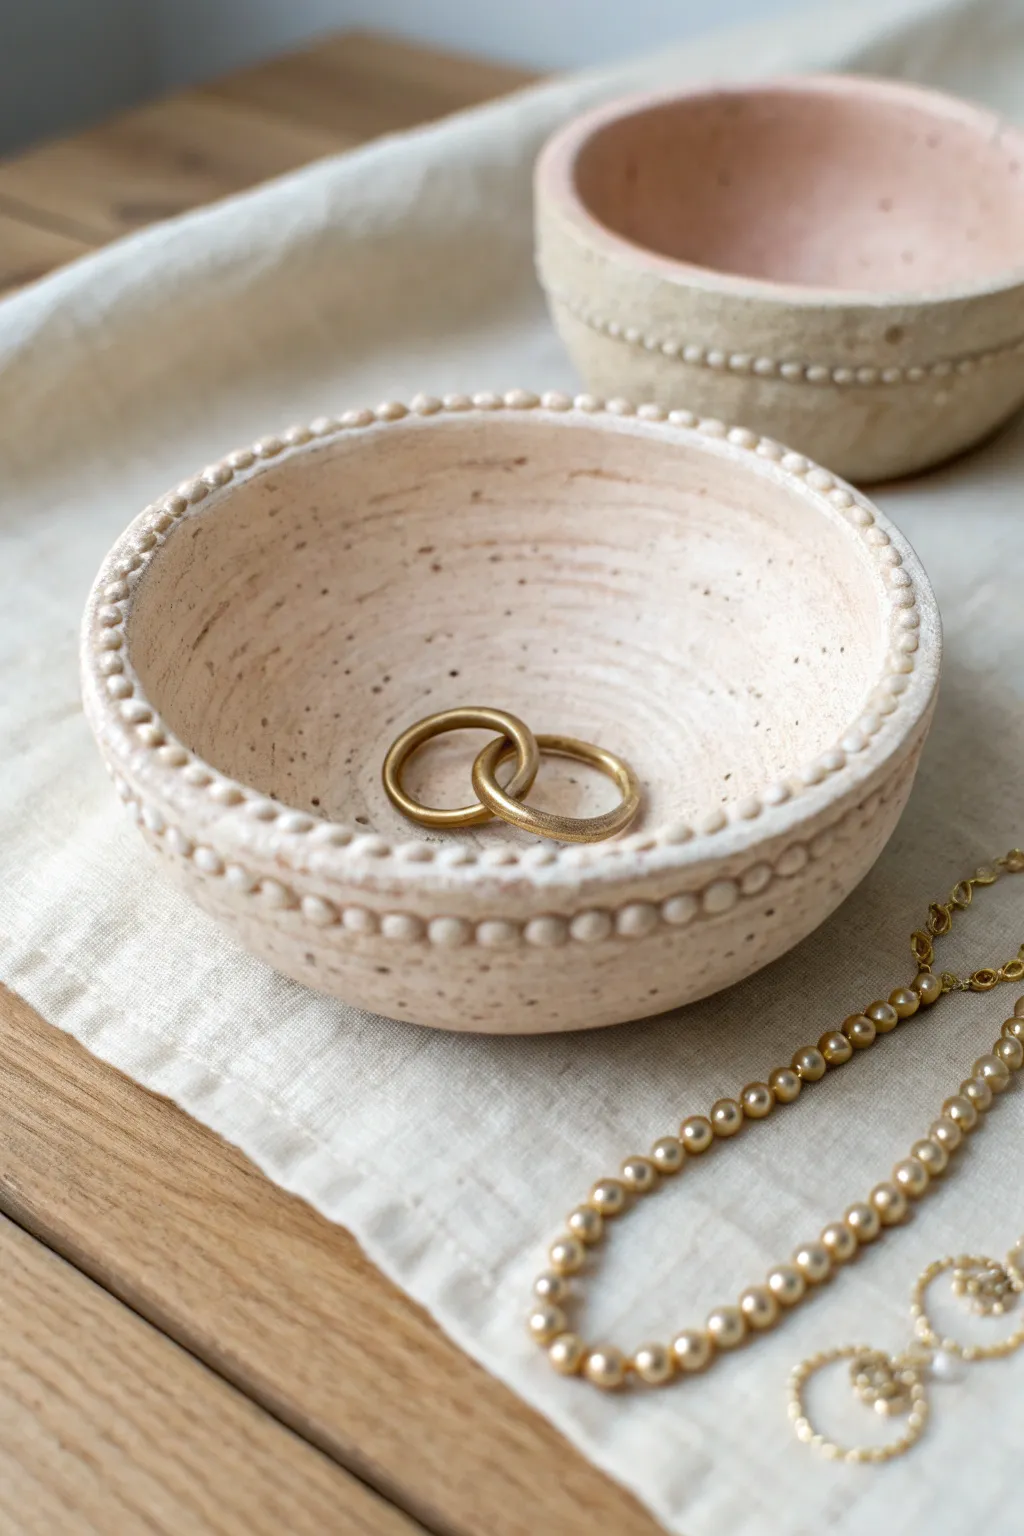
Create a charming, artisanal home for your favorite rings and jewelry with this speckled clay bowl project. The earthy texture and delicate beaded rim mimic the look of high-end stoneware without needing a pottery wheel.
Step-by-Step Tutorial
Materials
- Air-dry clay (stone or speckled finish preferred)
- Small bowl (to use as a mold)
- Plastic wrap or cling film
- Rolling pin
- Small craft knife or clay tool
- Small sponge
- Bowl of water
- Fine-grit sandpaper (optional)
- Matte sealant or varnish
Step 1: Forming the Base
-
Prepare your mold:
Select a small kitchen bowl that has the shape you want. Flip it upside down or drape the inside with plastic wrap to prevent sticking, ensuring the plastic is as smooth as possible. -
Condition the clay:
Take a handful of air-dry clay and knead it in your hands until it becomes pliable and warm. If you are using plain clay and want speckles, you can mix in dry coffee grounds or black pepper now. -
Roll out the slab:
Use your rolling pin to flatten the clay into an even slab, aiming for a thickness of about 1/4 inch (6mm). Keep the thickness consistent to prevent cracking during drying. -
Cut the circle:
Place your guide bowl upside down on the clay slab and trace around it with a knife, leaving an extra half-inch border if you want a deeper bowl, or cut exactly to size for a shallow dish. -
Shape the bowl:
Gently press the clay circle into (or over) your prepared mold. Smooth the clay with your fingers so it conforms to the curve of the bowl. -
Smooth the interior:
Dip a small sponge into water—squeeze it out well so it’s just damp—and gently wipe the inside surface of the clay to remove fingerprints and create subtle turning lines.
Keeping Size Consistent
To ensure every bead is the same size, roll a long, thin ‘snake’ of clay first, then cut it into equal segments before rolling them into balls.
Step 2: Creating the Beaded Rim
-
Roll tiny spheres:
Pinch off very small pieces of clay and roll them between your fingers to create tiny spheres. You will need enough to circle the entire rim of your bowl. -
Score the edge:
Use your knife or a needle tool to scratch up the top rim of the clay bowl. This rough texture, called scoring, helps the beads attach securely. -
Apply slip or water:
Dab a tiny amount of water or clay slip (clay mixed with water to a paste consistency) onto the scored rim to act as glue. -
Attach the first beads:
Press the small spheres onto the rim one by one. I find it helps to gently push them down slightly so they flatten just a bit on the bottom for better contact. -
Complete the circle:
Continue adding beads all the way around the rim. Try to keep them as close together as possible without squishing their shape. -
Blend hidden seams:
With a very small tool or your fingernail, gently smudge the underside of each bead into the bowl rim. This reinforces the bond so they don’t pop off later. -
Refine the texture:
Once all beads are attached, lightly tap the tops of them with a flat finger to make them uniform. You can sponge the bowl again to add a bit of rustic texture to the sides.
Troubleshooting Cracks
If tiny cracks appear while drying, mix a small amount of fresh clay with water to make a paste and fill them in immediately, then smooth over.
Step 3: Finishing Touches
-
Initial drying:
Let the bowl dry inside the mold for at least 12-24 hours. This helps it hold its curved shape while the clay creates a ‘shell’. -
Remove from mold:
Carefully lift the clay bowl out of the mold. Peel away the plastic wrap gently. -
Final drying:
Place the bowl upside down on a drying rack for another 24 hours to let the bottom dry completely. Uneven drying can cause warping, so patience is key here. -
Sand imperfections:
If there are any sharp or rough edges on the rim or bottom once fully dry, gently smooth them away with fine-grit sandpaper. -
Seal the piece:
Apply a coat of matte sealant or varnish to protect the clay from moisture and give it a finished, professional look.
Once sealed and dry, set your lovely new bowl on a dresser to catch your rings and everyday treasures
Mini Salt Spoons
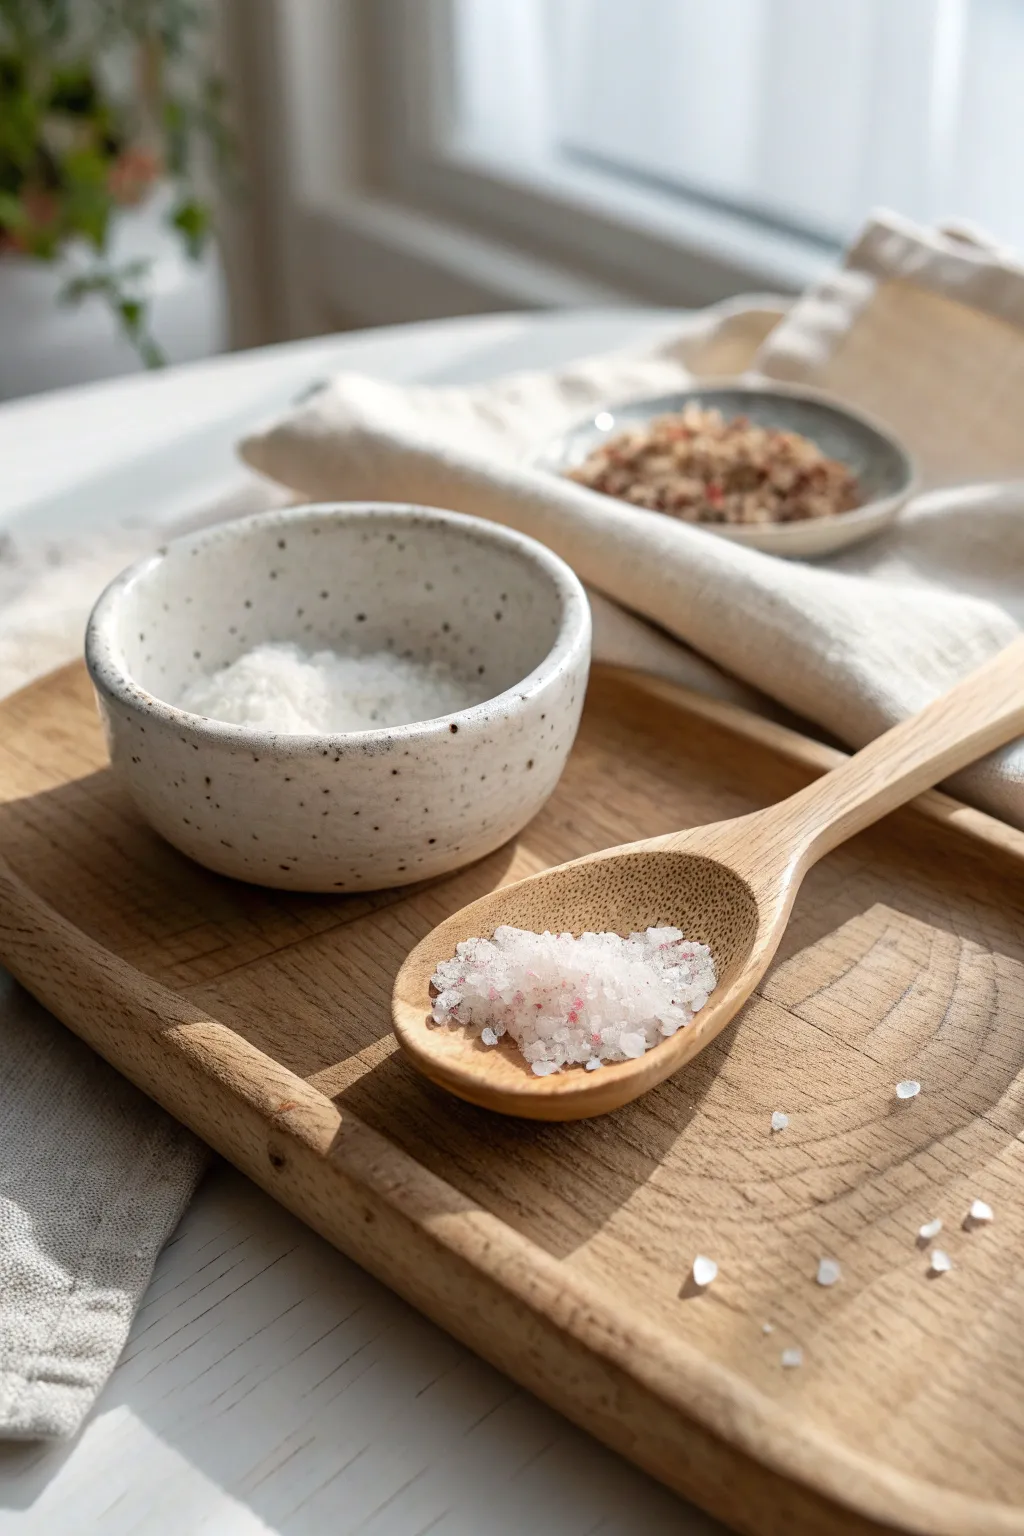
These charming mini spoons look like hand-carved wood but are actually crafted from polymer clay, making them perfect for scooping bath salts or spices. The natural wood grain effect, achieved with simple tools, adds a rustic and organic touch to your bathroom or kitchen decor.
How-To Guide
Materials
- Light tan or beige polymer clay (wood tone)
- Small amount of darker brown polymer clay
- Clay roller or pasta machine
- Spoon template (cardstock)
- Craft knife or scalpel
- Needle tool or toothpick
- Wire texture brush or stiff bristle brush
- Small ball tool
- Sanding sponge (fine grit)
- Matte varnish or sealant
Step 1: Creating the Faux Wood Blend
-
Condition the clay:
Begin by conditioning the light tan clay until it is soft and pliable. Do the same with a very small amount of the darker brown clay. -
Create logs:
Roll the tan clay into a thick cylinder. Roll the dark brown clay into several very thin, long snakes. -
Assemble the stack:
Place the thin brown snakes lengthwise along the tan cylinder, spacing them out unevenly to mimic natural grain lines. -
Twist and fold:
Twist the entire log like a candy cane, then fold it in half. Roll it back into a smooth log. Repeat this twisting and folding process 2-3 times, but be careful not to over-mix; you want distinct streaks. -
Roll out the sheet:
Flatten the marbleized log and run it through a pasta machine or use a roller to create a sheet approximately 3-4mm thick. The streaks should now look like wood grain.
Grain Direction
Always cut your spoon shape so the ‘grain’ lines run lengthwise down the handle. This mimics real wood construction and makes the faux effect much more convincing.
Step 2: Shaping the Spoons
-
Cut the shape:
Place your spoon template onto the clay sheet. Using a sharp craft knife, carefully cut around the outline, creating a long handle and a rounded scoop area. -
Refine the edges:
Lift the cut shape and gently smooth the sharp cut edges with your fingertip so they look rounded and worn, rather than sharp and mechanical. -
Form the scoop:
Place the rounded end of the spoon into the palm of your hand. Gently press a ball tool into the center to create the concave bowl of the spoon. -
Curve the handle:
I like to give the handle a slight arch for elegance. Lay the spoon on your baking surface and prop up the middle of the handle slightly with a scrap piece of clay or foil.
Broken Handles?
If the clay handle snaps after baking, it might be too thin. Reinforce future spoons by embedding a piece of strong wire inside the handle during the shaping phase.
Step 3: Detailing and Finishing
-
Add wood texture:
Lightly drag a wire texture brush or a stiff toothbrush along the length of the spoon, following the direction of your colored grain lines. This adds physical texture to match the visual grain. -
Mark the bowl:
Inside the scoop, create subtle concentric circles or scratch marks with a needle tool to mimic lathe-turning marks often seen on wooden wares. -
Bake carefully:
Bake the spoons according to your specific clay manufacturer’s instructions. Usually, this is around 275°F (135°C) for 15-30 minutes. -
Cool down:
Let the spoons cool completely before handling them. They are fragile while warm. -
Sand edges:
Use a fine-grit sanding sponge to buff away any fingerprints or rough spots on the edges, reinforcing that smooth, tumbled-wood feel. -
Seal:
Finish with a coat of matte varnish. This brings out the depth of the ‘wood’ colors and protects the clay from moisture, especially if used near bath salts.
Fill your new spoon with pretty pink salts and display it proudly on your vanity
Small Candle Holders
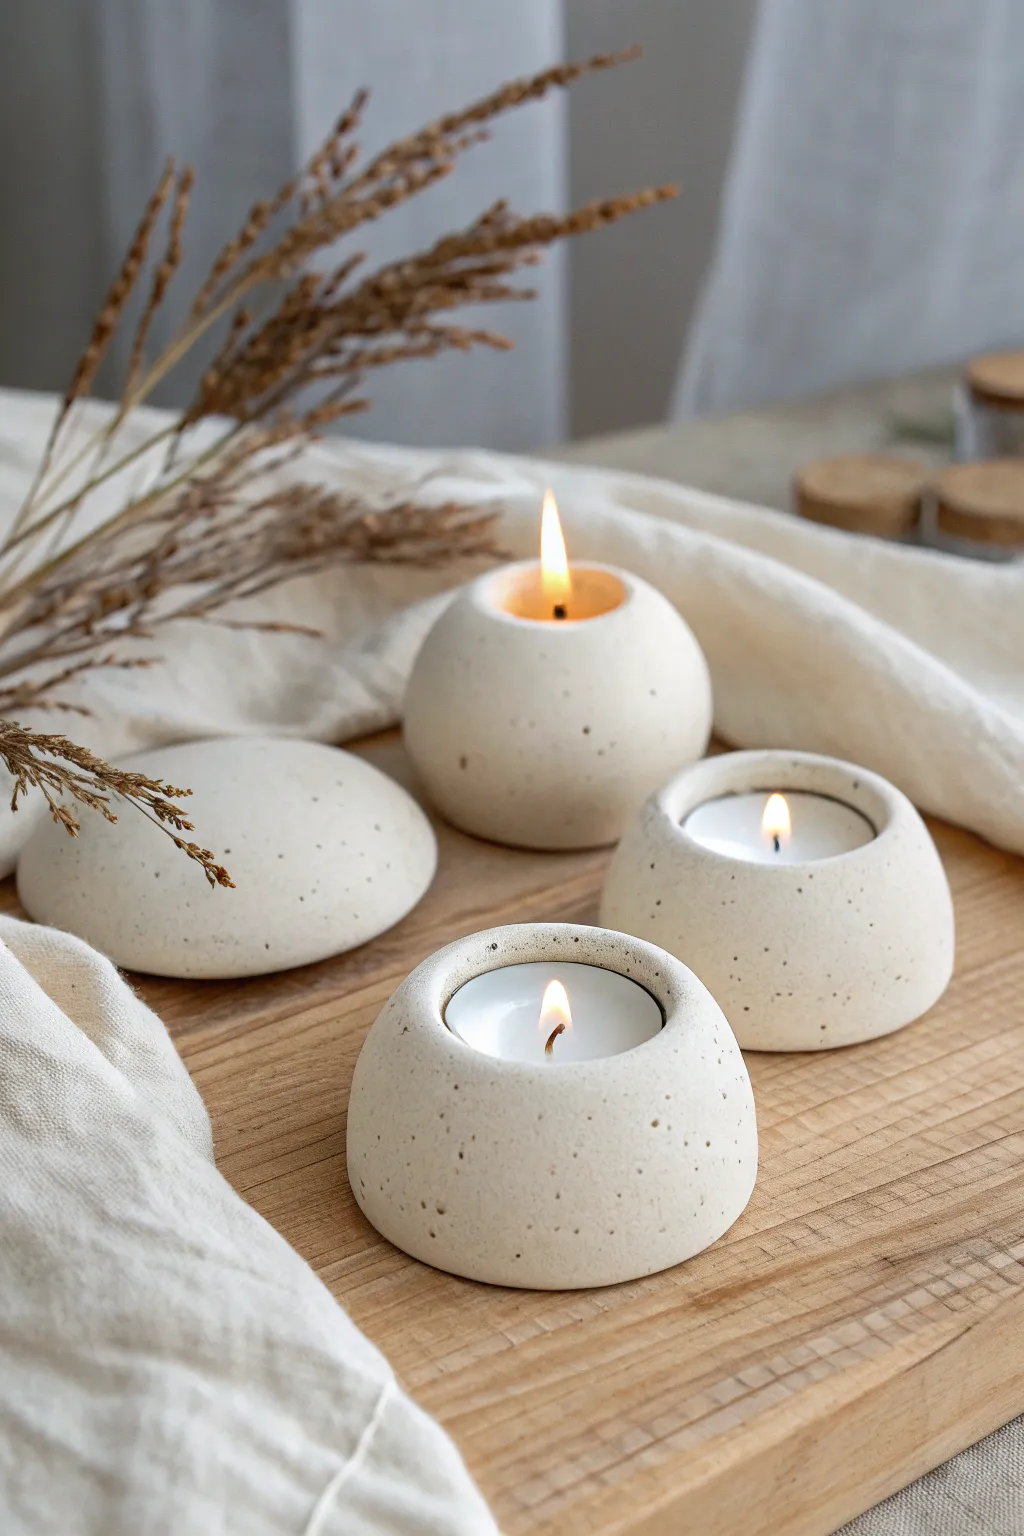
These serene, stone-effect candle holders bring a touch of Zen simplicity to any space with their organic shapes and speckled finish. Mimicking the look of smoothed river rocks, they are surprisingly lightweight and easy to craft using air-dry clay.
Detailed Instructions
Materials
- White or cream air-dry clay (approx. 500g)
- Tea light candles (for sizing)
- Used coffee grounds or fine black sand
- Rolling pin
- Small bowl of water
- Sponge or soft cloth
- Fine-grit sandpaper (220 grit)
- Matte sealant or clear acrylic varnish
Step 1: Preparing the Clay
-
Mix in texture:
Begin by taking a large chunk of white air-dry clay. Flatten it slightly and sprinkle a small pinch of dried coffee grounds or fine black sand into the center. -
Knead thoroughly:
Fold the clay over the grounds and knead it well. You want to distribute the speckles evenly throughout the clay to achieve that faux-stone look. -
Check consistency:
If the clay feels too dry or cracks while kneading, dip your fingers in water and work the moisture back in until it’s pliable and smooth. -
Portion the clay:
Divide your prepared clay into three or four equal portions. Each portion will become one pebble holder.
Cracking Clay?
If you see hairline cracks while drying, mix a tiny bit of fresh clay with water to make a paste (slip) and fill the cracks. Smooth it over and let it dry again.
Step 2: Shaping the Pebbles
-
Roll spheres:
Take one portion and roll it between your palms to create a smooth, tight ball. Aim for a shape free of major seams or cracks. -
Create the dome:
Gently press the ball onto your work surface to flatten the bottom. For the open holders, press slightly on the top to create a flattened dome shape, rather than a perfect sphere. -
Insert the guide:
Take a spare tea light candle (metal casing included) and press it gently into the center of your clay dome. -
Form the well:
Push the candle down until it sits flush with the clay surface. Be careful not to push all the way through the bottom. -
Adjust the fit:
Wiggle the tea light slightly to widen the hole just a fraction—clay shrinks as it dries, so you need a little extra room. -
Create the enclosed variation:
For the taller, rounder holder shown in the back, keep the overall shape more spherical. Instead of pressing a whole tea light in, use a circular cutter or tool to create a deeper, narrower well just for the wick and flame to peek through, or hollow it out carefully from the bottom. -
Refine the edges:
Remove the tea light. Dip your finger in water and smooth the rim of the indentation you just made to remove any sharp ridges. -
Smooth the exterior:
Go over the entire outside surface with a damp sponge. This removes fingerprints and brings the ‘stone’ texture to the surface.
Step 3: Finishing
-
Slow drying:
Place your holders in a cool, dry spot away from direct sunlight. Let them dry for 24-48 hours. Turn them over halfway through to ensure the bottoms dry completely. -
Sanding:
Once bone dry, use fine-grit sandpaper to buff the surface. I prefer to do this outside, as it creates dust. Smooth out any remaining uneven spots. -
Clean up:
Wipe away all sanding dust with a slightly damp cloth or a dry paintbrush. -
Seal for safety:
Apply a coat of matte sealant. This protects the clay from moisture and gives the ‘stone’ a finished, professional look. -
Final test:
Once the sealant is dry, insert your tea lights to ensure they fit perfectly before lighting them.
Pro Tip: Weighted Feel
To make them feel like real heavy stones, hide a small, flat rock or a heavy washer in the very bottom layer of the clay before shaping the dome.
Now you have a set of custom, tranquil candle holders ready to warm up your home
Cute Toothbrush Holders
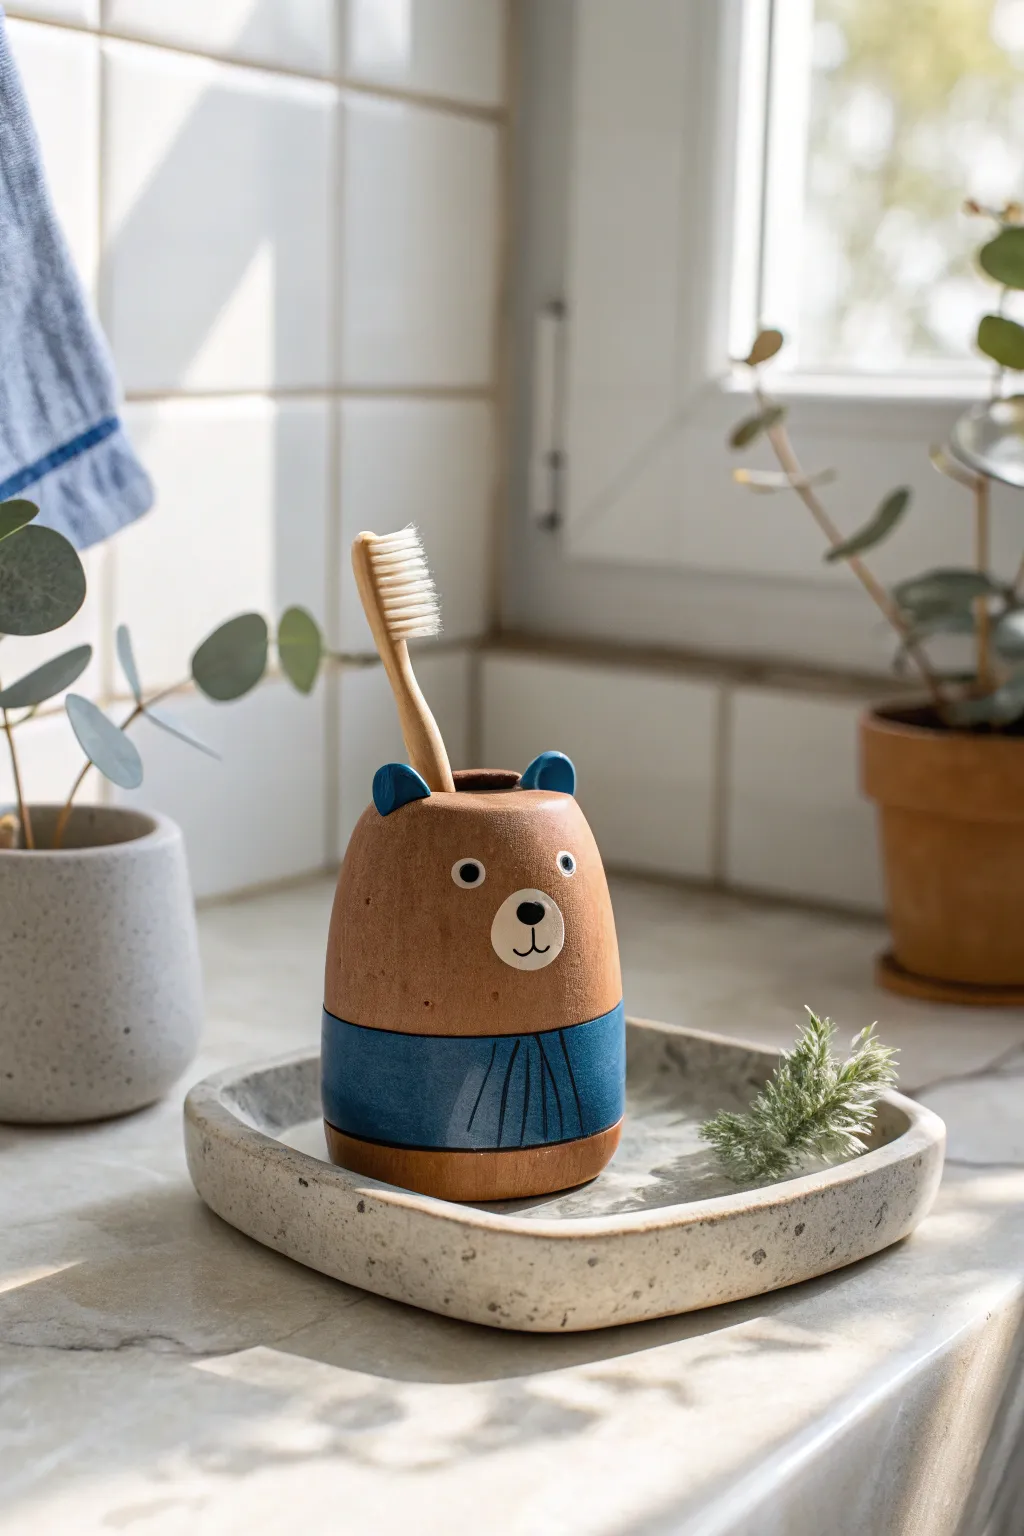
Transform your bathroom vanity with this adorable, nature-inspired bear toothbrush holder. This project combines simple organic shapes with minimalist painted details to create a functional piece that looks like high-end boutique decor.
Step-by-Step Tutorial
Materials
- Polymer clay (terracotta or wood-effect color)
- Acrylic rolling pin
- Sculpting tools (needle tool, ball stylus)
- Wide drinking straw or toothbrush (for sizing)
- Aluminum foil
- Acrylic paints (navy blue, white, black)
- Fine detail paintbrushes
- Gloss varnish or polyurethane sealer
- Sandpaper (fine grit)
Step 1: Sculpting the Base
-
Prepare the core:
Crumple a ball of aluminum foil into a rough egg shape. This saves clay and keeps the holder lightweight. Ensure the top is somewhat flat. -
Form the body:
Condition your clay until pliable. Roll it into a thick sheet (about 1/4 inch) and wrap it completely around your foil core, smoothing the seams until invisible. -
Shape the bear:
Gently roll the clay-covered form on your work surface to create a smooth, rounded pillar shape. It should taper slightly inward toward the top. -
Create the opening:
Use a wide straw or the actual handle of an old toothbrush to press a deep vertical hole into the center of the top. Wiggle it slightly to ensure the opening is wide enough for your brush. -
Flatten the bottom:
Tap the bottom of the bear firmly against your table to create a stable, flat base so it won’t tip over. -
Add ears:
Roll two small pea-sized balls of clay. Press them gently onto the top corners of the head and use a blending tool to smooth the clay downward into the main body so they are securely attached.
Waterproofing Logic
Don’t skip the varnish! Polymer clay is plastic and won’t rot, but acrylic paint will peel if constantly exposed to bathroom humidity without a good sealer.
Step 2: Refining and Baking
-
Smooth the surface:
Dip your finger in a little rubbing alcohol (or baby oil) and lightly buff the surface of the clay to remove any fingerprints or lint. -
First bake:
Bake the piece according to you clay manufacturer’s instructions. Usually, this is around 275°F (135°C) for 30 minutes per 1/4 inch of thickness. -
Cool and sand:
Allow the bear to cool completely in the oven. Once cold, use fine-grit sandpaper to buff away any remaining imperfections.
Bottom Is Uneven?
If your bear wobbles after baking, wet-sand the bottom on a piece of sandpaper placed on a flat surface. Use a figure-8 motion until it sits perfectly flat.
Step 3: Painting and Finishing
-
Mark the shirt line:
Using a pencil, lightly draw a horizontal line around the bottom third of the bear to mark where the blue sweater will go. -
Paint the sweater:
Plan out your blocks of color. Paint the bottom section navy blue. I usually need two coats here to get a solid, opaque finish. -
Paint the ears:
Use a small brush to paint the front of the ears with the same navy blue color. -
Add sweater details:
Mix a tiny drop of black into your blue to create a shadow shade. Paint thin vertical lines on the sweater to mimic ribbing or folds. -
Paint the snout:
Use white acrylic paint to create a small oval in the center of the face for the muzzle. -
Add facial features:
Using a very fine liner brush or a toothpick, paint two small black dots for eyes. Add a small nose and smile line on top of the dried white muzzle. -
Catchlights:
Dip the tip of a toothpick in white paint and add a tiny speck to each black eye to bring the bear to life. -
Seal the piece:
Since this will live in a bathroom, apply two to three thin coats of waterproof varnish or polyurethane, letting each coat dry fully in between.
Now you have a charming little bathroom companion ready to hold your toothbrush in style
Tiny Plant Pots and Air-Plant Pods
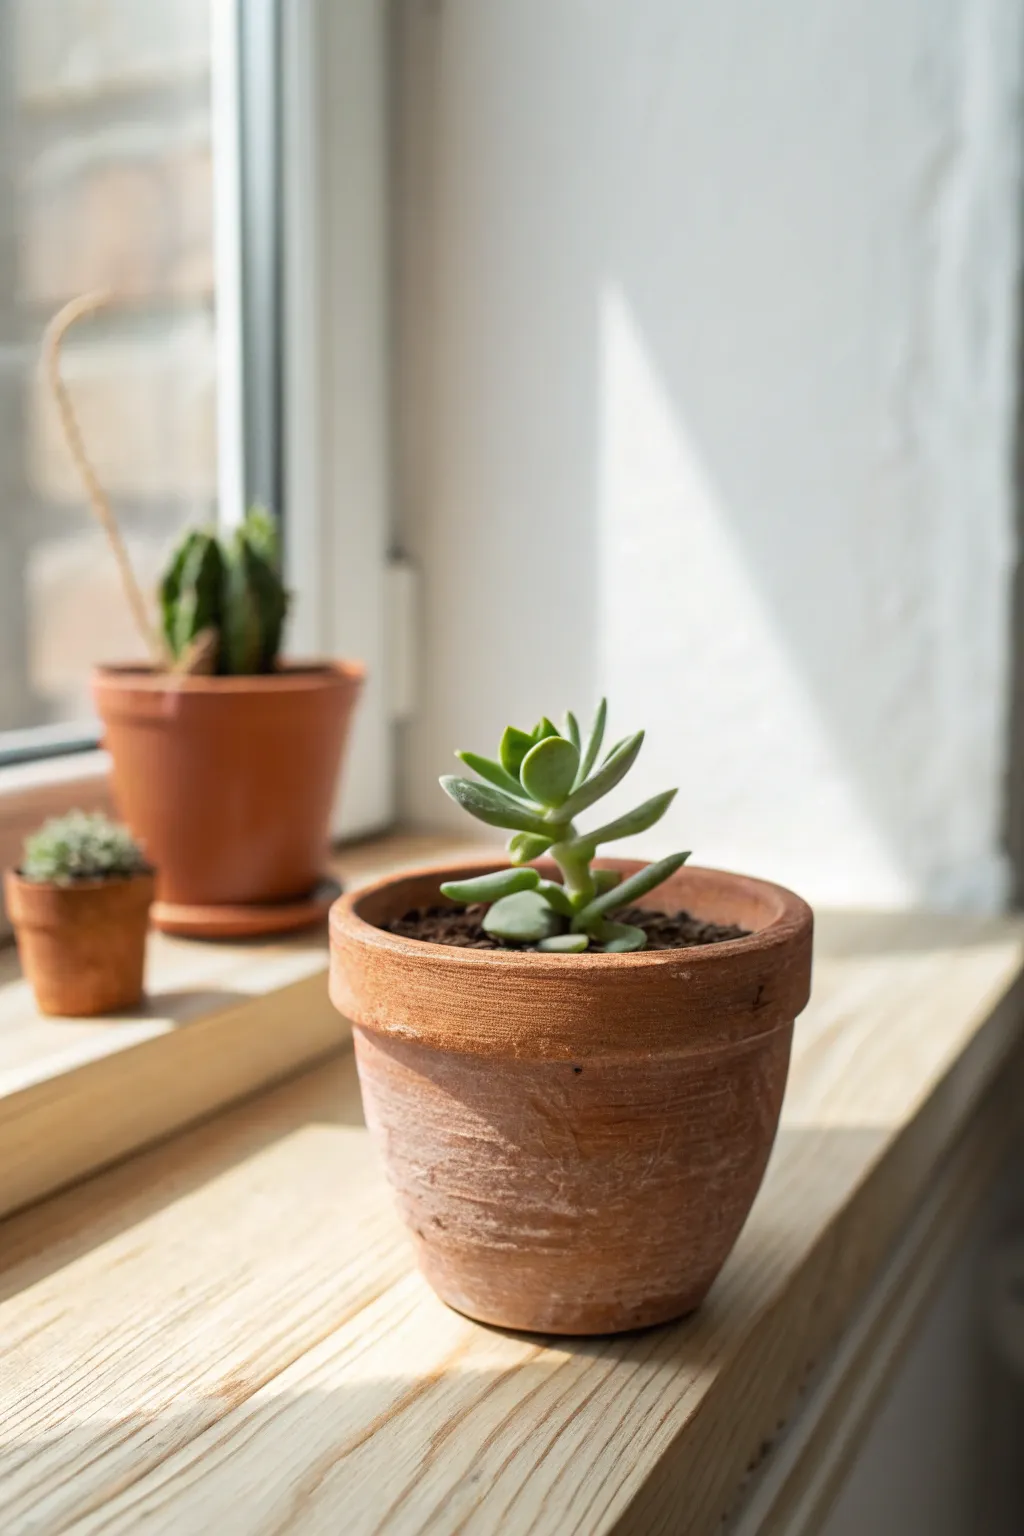
Capture the rustic charm of a windowsill garden with this handmade clay pot project. By shaping and texturing standard terracotta clay, you can create a perfectly imperfect vessel that looks like it has been baking in the sun for years.
Step-by-Step Guide
Materials
- Terracotta air-dry clay or oven-bake polymer clay (terracotta color)
- Small rolling pin
- Circle cutter (approx. 3-inch diameter)
- Fettling knife or craft blade
- Small bowl of water (for smoothing)
- Stylus tool or toothpick
- Fine-grit sandpaper
- Coarse sponge or toothbrush (for texture)
- Acrylic matte varnish (optional)
Step 1: Forming the Base
-
Prepare the Clay:
Start by conditioning a clump of terracotta clay in your hands until it becomes warm and pliable. If using air-dry clay, keep your fingers slightly damp to prevent cracking. -
Roll the Base:
Roll out a portion of the clay to a uniform thickness of about 1/4 inch. Use your circle cutter to create a clean, round disc which will serve as the bottom of your pot. -
Create the Walls:
Roll a long snake or coil of clay, approximately the same thickness as your base. Alternatively, roll a flat rectangular slab if you prefer the slab-building method, measuring enough length to wrap around the circumference of your base. -
Assemble the Cylinder:
Score the edges of the base and the contact points of your wall piece with a needle tool. Add a dab of water (slip) and press the wall onto the base, smoothing the seam completely with your thumb or a blending tool.
Cracking Up?
If air-dry clay cracks while drying, mix a small amount of fresh clay with water to make a paste (slip) and fill in the fissures, then sand smooth.
Step 2: Shaping and Refining
-
Build Height:
Gently pinch and pull the walls upward. I like to keep the walls slightly thicker than a standard plastic pot to emulate that heavy, traditional earthenware look. -
Taper the Shape:
As you build up, angle the walls slightly outward so the top opening is wider than the base. This classic tapered silhouette is crucial for the traditional pot aesthetic. -
Form the Rim:
Roll a thinner snake of clay and flatten it slightly. Attach this band around the very top edge of your pot to create the distinct, protruding rim seen in the photo. Blend the bottom edge of this rim into the pot, but leave the top edge distinct. -
Smooth the Surfaces:
Dip your finger in water and run it over the exterior and interior to remove major fingerprints, but don’t over-polish; a little unevenness adds character.
Pro Tip: Dust It Up
Rub a tiny bit of real flour or cornstarch onto the cured surface. It settles into the textures and looks exactly like salt deposits from hard water.
Step 3: Texturing and Finishing
-
Add Weathered Texture:
Before the clay dries, take a coarse sponge or an old toothbrush and dab it gently against the sides. This creates the porous, slightly rough surface typical of aged terracotta. -
Create Kinetic Marks:
Use fine sandpaper or a dry stiff brush to drag horizontal striations around the body of the pot. These faint lines mimic the marks left by a potter’s wheel. -
Simulate Chips (Optional):
For a well-loved look, use your craft knife to gently nick the rim in one or two spots, softening the sharp edges of the cut with your finger. -
Drying or Baking:
Follow the instructions for your specific clay type. Air-dry clay usually needs 24-48 hours, while polymer clay requires baking at specific temperatures. -
Whitewash Effect:
Once fully cured, dilute a tiny drop of white acrylic paint with a lot of water. Brush it over the textured areas and immediately wipe most of it off with a paper towel. This leaves a dusty, mineral residue look in the crevices. -
Final Sealing:
If you plan to put a real plant inside, seal the interior with a waterproof varnish. Leave the exterior matte to maintain the natural clay appearance.
Now you have a charming little vessel ready to house your favorite tiny succulent
Mini House Ornaments

Create a charming pair of miniature houses with a rustic, speckled finish that captures the cozy essence of Scandinavian decor. These simple clay structures feature sweet cutout windows and soft pastel accents, making them perfect for a windowsill display.
Step-by-Step Tutorial
Materials
- White air-dry clay or polymer clay
- Rolling pin
- Craft knife or scalpel
- Ruler
- Sandpaper (fine grit)
- Acrylic paints (terracotta orange, sage green, off-white)
- Small flat paintbrush and fine detail brush
- Toothbrush (for speckling)
- Brown watercolor or diluted acrylic paint
- Clear matte varnish
Step 1: Shaping the Structure
-
Roll the clay:
Start by conditioning your clay until it is soft and pliable. Roll it out into a slab that is approximately 1/4 inch thick to ensure your houses will be sturdy enough to stand on their own. -
Cut the facade:
Using your ruler and craft knife, cut out a long rectangular strip. This strip will form the four walls of your house. Decide on the width of your house (e.g., 2 inches per side) and lightly score lines where the corners will be. -
Shape the roofline:
Instead of a simple box, cut the two end sections of your strip into pentagons (a square with a triangle on top) to create the pitched roof shape directly on the walls. -
Assemble the walls:
Stand the strip up and fold it at your scored corners to create a hollow box shape. Join the two ends together by scoring the edges, adding a dab of water (for air-dry clay), and smoothing the seam with your finger or a clay tool. -
Create the roof:
Roll out a separate, slightly thinner slab of clay. Cut a rectangle long enough to drape over the pitch of your roof with a slight overhang. Gently press this onto the angled tops of your walls. -
Add a chimney:
Fashion a very small cube of clay. Attach it to the peak of the roof, slightly off-center, blending the bottom of the cube into the roof for a seamless connection.
Clean Cuts
Wait about 30 minutes after rolling the clay before cutting windows. If the clay is too wet, the walls will warp or squish as you press the knife down.
Step 2: Adding Details
-
Carve the windows:
While the clay is still leather-hard, use your craft knife to carefully cut out small square holes for the windows. For the four-pane window, cut a larger square and leave a cross of clay in the middle, or cut four tiny individual squares close together. -
Detail the door:
Slightly carve an arched or rectangular outline for the door. You don’t need to cut all the way through; instead, recess the area slightly to give it depth. -
Imprint decorative holes:
Use the end of a paintbrush handle or a skewer to poke small circular ventilation holes near the peak of the roof for extra character. -
Smooth and dry:
Dip your finger in a little water and run it over all sharp edges to soften them. Let the houses dry completely, which usually takes 24–48 hours depending on the clay type.
Step 3: Painting and Finishing
-
Sand imperfections:
Once fully dry, use fine-grit sandpaper to gently smooth out any rough bumps or fingerprints, paying special attention to the window corners. -
Base coat:
Paint the entire house with an off-white acrylic paint. I like to do two thin coats rather than one thick one to maintain the clay’s texture. -
Accent the features:
Using a fine brush, paint the recessed door area and the inner frames of the windows. Use a terracotta shade for one house and a muted sage green for the other. -
Add speckles:
Dilute a small amount of brown paint or watercolor with water. Dip an old toothbrush into the mixture and run your thumb across the bristles to flick tiny speckles onto the houses, simulating a stone texture. -
Seal the work:
Finish with a coat of clear matte varnish to protect the paint and give the surface a finished, ceramic-like look.
Cracking Seams?
If seams crack while drying, mix a tiny bit of fresh clay with water to make a paste (slip) and fill the crack. Smooth it over and sand once dry.
Enjoy styling your little clay village on a sunny shelf or mantelpiece
Stamped Clay Tags for Gifts
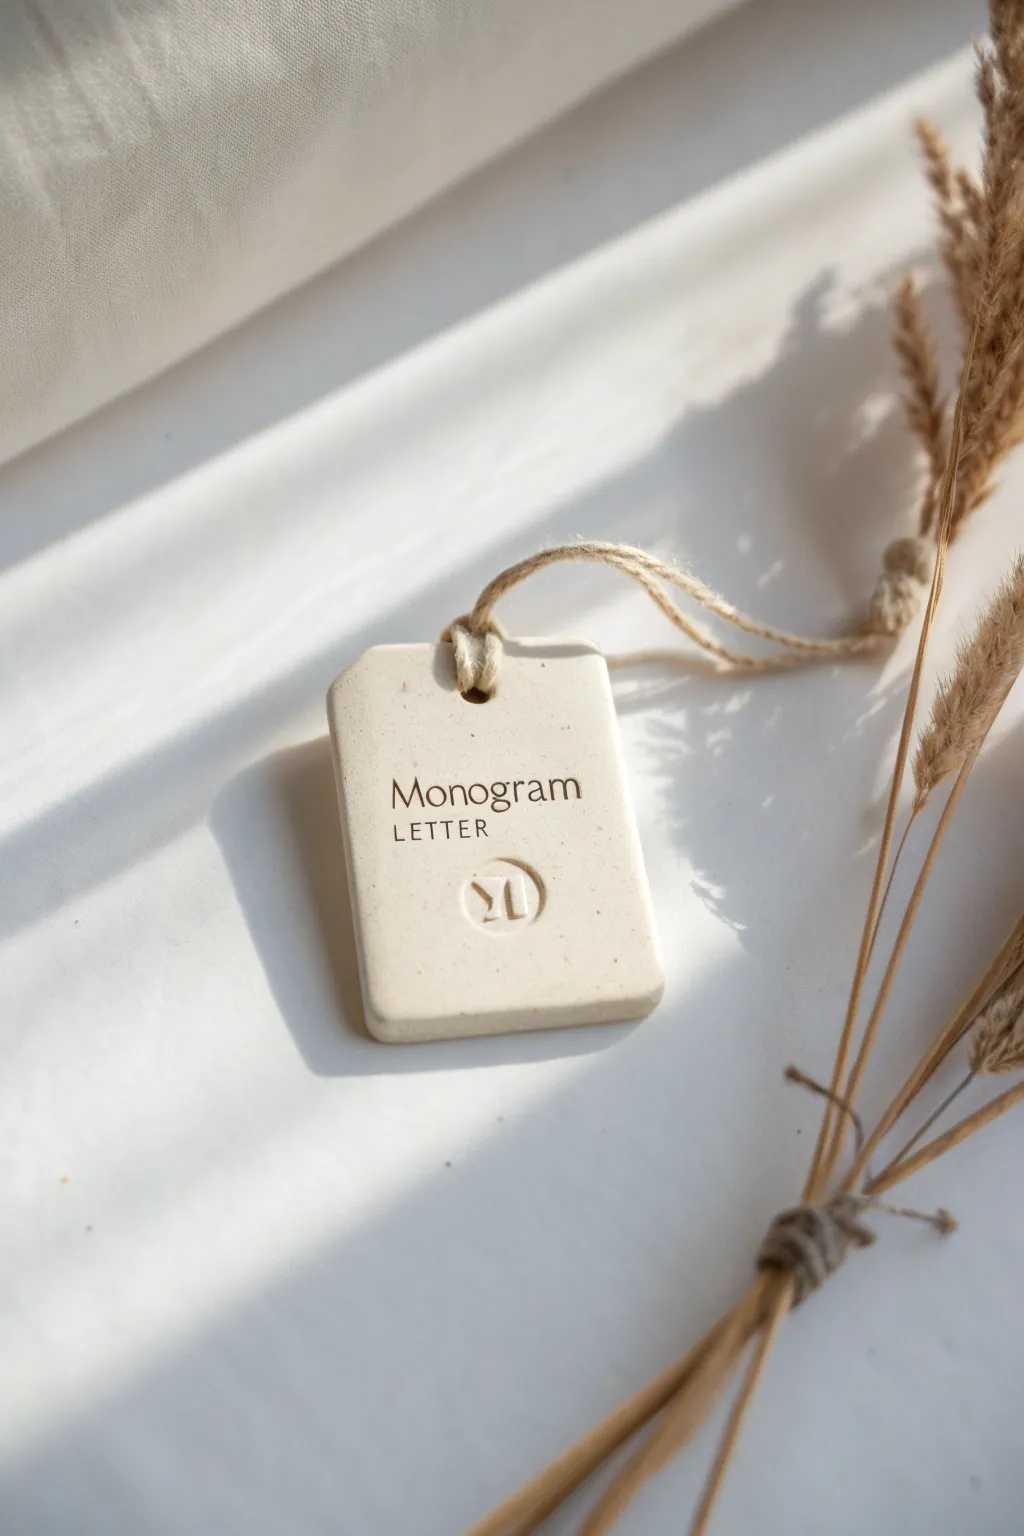
These elegant, creamy-white clay tags are the perfect way to personalize a gift or organize your home with a touch of sophistication. Their smooth, matte finish and crisp stamped lettering create a high-end look that is surprisingly simple to achieve at home.
How-To Guide
Materials
- Air-dry clay (white or cream)
- Small rolling pin
- Rolling guides or wooden slats (approx. 5mm thick)
- Rectangular cookie cutter or a sharp craft knife
- Letter stamp set (serif font)
- Circular monogram stamp or custom logo stamp
- Straw or small circular cutter (for the hole)
- Fine-grit sandpaper (400-600 grit)
- Natural jute twine
- Parchment paper or silicone mat
- Small bowl of water
- Acrylic sealer (matte finish, optional)
Step 1: Shaping the Base
-
Prepare your workspace:
Lay down your silicone mat or a sheet of parchment paper to prevent sticking. This ensures the back of your tag remains as smooth as the front. -
Condition the clay:
Take a handful of air-dry clay and knead it in your hands until it becomes warm, soft, and pliable. Getting rid of air bubbles now is crucial for a smooth finish later. -
Roll out the slab:
Place the clay between your rolling guides. Roll it out evenly until you have a slab of uniform thickness, roughly 5mm (1/4 inch). -
Cut the shape:
Use a rectangular cookie cutter to press firmly into the clay. If you are using a knife, use a ruler to cut a precise rectangle, approximately 2 inches by 3 inches. -
Refine the corners:
To mimic the tag in the image, carefully slice off the top two corners of your rectangle at a 45-degree angle using your craft knife. -
Smooth the edges:
Dip your finger into a little water and gently run it along the cut edges. This softens the sharp lines just slightly for a more polished, ceramic look.
Clean Stamp Trick
To prevent the clay from sticking inside your detailed stamps, lightly dust the stamp face with cornstarch or brush on a tiny amount of baby oil before pressing.
Step 2: Stamping and Detailing
-
Create the hanging hole:
Use a sturdy straw or a small circular cutter to punch a hole centered near the top edge. Twist the tool gently as you lift it to get a clean cut. -
Plan your spacing:
Before stamping, lay your letter stamps gently on top of the clay without pressing to visualize the alignment. The text ‘Monogram’ should be centered in the upper third. -
Stamp the main text:
Press the letters for ‘Monogram’ into the clay first, using steady, even pressure. Below that, stamp ‘LETTER’ in a slightly smaller point size if available, or simply use spacing to create hierarchy. -
Add the logo:
Position your circular monogram stamp in the lower third of the tag. Press straight down and lift straight up to avoid blurring the circular impression. -
Final smooth:
If the stamping process pushed up any small ridges of clay around the letters, gently pat them down with a damp fingertip.
Step 3: Finishing Touches
-
Dry the tag:
Place the tag on a clean flat surface to dry. I prefer to flip the tag over after about 12 hours so both sides dry evenly, preventing curling. -
Sand for perfection:
Once fully dry (usually 24-48 hours), take your fine-grit sandpaper and very gently buff the edges and surface. This removes any fingerprints and gives that soft, stone-like texture. -
Dust off:
Wipe the tag with a dry, soft cloth or brush to remove all white sanding dust, especially from the deep grooves of the stamped letters. -
Seal (Optional):
Lightly brush on a matte acrylic sealer if you want to protect the clay from moisture, though leaving it raw preserves the natural chalky aesthetic shown in the photo. -
Attach the twine:
Cut a length of natural jute twine. Fold it in half, push the loop through the hole, and pull the loose ends through the loop to create a lark’s head knot.
Add Subtle Color
For a marbled stone effect, knead a tiny drop of brown or grey acrylic paint into the white clay, stopping before it is fully blended.
Your sophisticated clay tags are now ready to elevate your gift wrapping or serve as unique place settings
Tiny Clay Letter Tiles
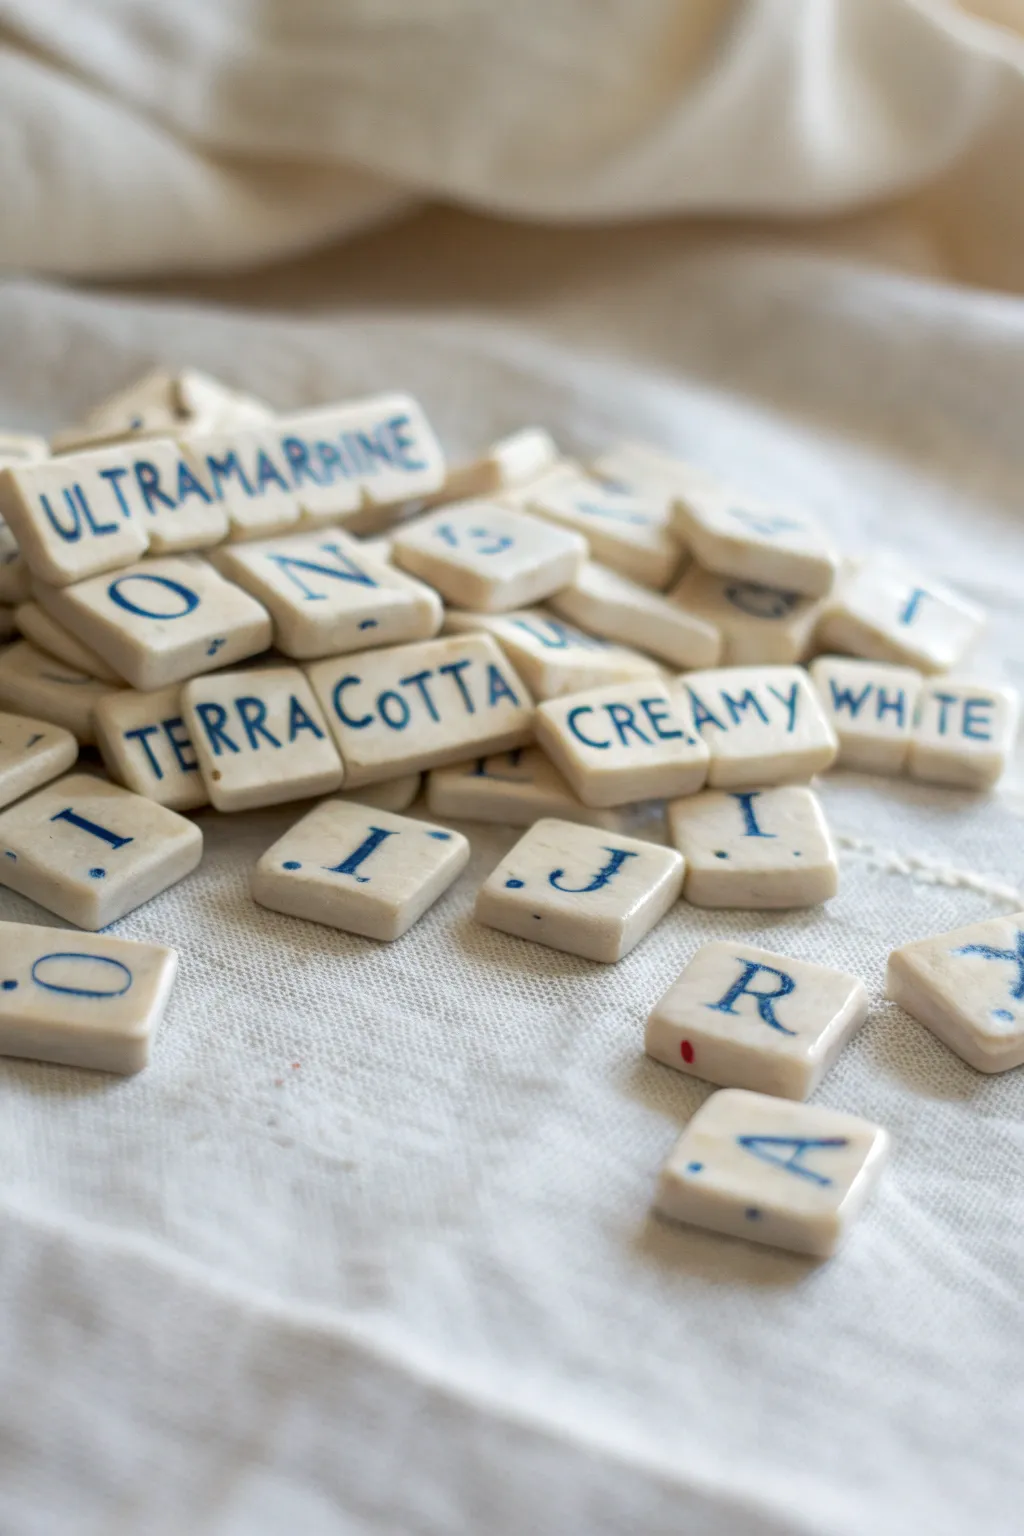
Create your own rustic, touchable alphabet with these charming clay letter tiles. Finished with a classic creamy glaze and ultramarine lettering, they are perfect for personalized magnets, jewelry components, or unique decorative accents.
Detailed Instructions
Materials
- White or cream-colored polymer clay (or air-dry clay)
- Rolling pin or acrylic roller
- Small square clay cutter (approx. 0.5 – 0.75 inch)
- Small alphabet rubber stamps
- Cobalt blue acrylic paint
- Paper towels or soft cloth
- Sandpaper (fine grit)
- Parchment paper
- Gloss or satin varnish (optional)
Step 1: Shaping the Tiles
-
Condition the clay:
Begin by kneading your white or cream clay until it is soft, pliable, and free of cracks. Warm clay is much easier to work with and results in smoother edges. -
Roll out the slab:
Place the clay on a sheet of parchment paper. Use your roller to flatten it into an even slab, aiming for a thickness of about 1/4 inch (6mm). Using depth guides or playing cards stacked on either side can help ensure the thickness is uniform. -
Cut the squares:
Press your small square cutter firmly into the clay slab to create your individual tiles. Try to arrange your cuts close together to minimize waste. -
Smooth the edges:
Once cut, gently pick up each tile. Use your finger to softly tap down and round over the sharp cut edges. Hand-smoothing gives them that wonderfully tactile, vintage pottery feel seen in the photo. -
Create rectangular bars:
To make the longer word bars like ‘TERRACOTTA,’ cut a strip of clay the same height as your squares but long enough to fit the specific word you have in mind.
Paint Smearing?
If the blue paint smears too much when wiping, let it dry for just 30-60 seconds longer so it ‘skins’ over. Ensure your wiping cloth is flat and tight against your finger.
Step 2: Stamping and Curing
-
Prepare the stamps:
Lay out the alphabet stamps you need. If using new rubber stamps, tap them lightly on a scrap piece of clay first to ensure they aren’t sticking. -
Stamp the letters:
Press the stamps into the soft clay. You want a clear impression, but be careful not to push all the way through the tile. Wiggle the stamp very slightly before lifting to release the suction. -
Detailing the long bars:
For the longer word tiles, space your letters evenly. I usually start with the middle letter and work outward to keep the word centered. -
Bake the clay:
Arrange all your tiles on a parchment-lined baking sheet. Bake according to your brand of polymer clay’s package instructions (usually around 275°F/135°C for 15-30 minutes). -
Cool down:
Allow the tiles to cool completely before moving to the next step. Hardening happens as the clay cools.
Step 3: Finishing the Look
-
Sand for texture:
Lightly sand the edges and surface of the cooled tiles with fine-grit sandpaper to remove any fingerprints or sharp corners, enhancing the weathered stone look. -
Apply the paint:
Squeeze out a small amount of cobalt blue acrylic paint. Using a brush, dab paint generously into the stamped letter impressions. -
Wipe the surface:
Before the paint dries completely, take a slightly damp paper towel or cloth and wipe strictly across the surface of the tile. This removes the surface paint while leaving the color trapped deep inside the stamped letters. -
Clean up:
If smudges remain on the white surface, use a cotton swab dipped in a tiny bit of rubbing alcohol to clean around the letters precisely. -
Seal the tiles:
For a ceramic-like sheen, apply a thin coat of gloss or satin glaze over the tiles. This step is optional but protects the paint and mimics the glazed look of the original inspiration.
Go Magnetic
Turn these into a functional fridge poetry set by gluing small, strong neodymium magnets to the back of each cured tile using E6000 or strong super glue.
Now you have a collection of custom ceramic-style tiles ready to spell out your favorite messages
Pocket-Size Pinch Pot Whistles
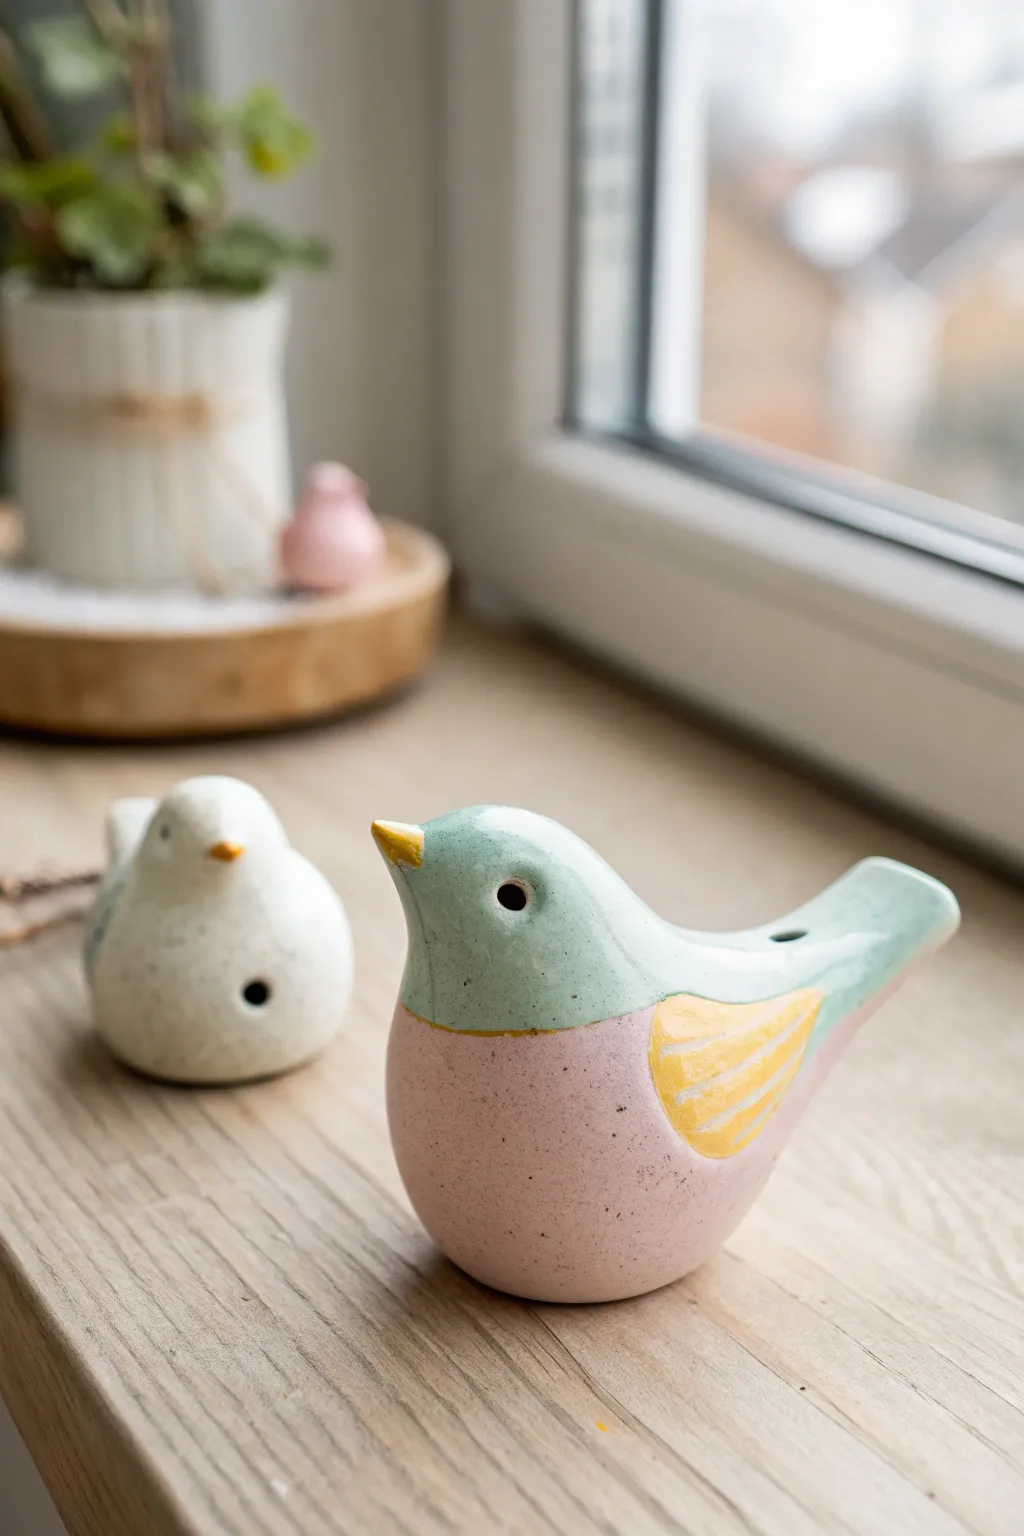
Transform a humble pinch of clay into a charming, functional instrument that sings. These pocket-sized bird whistles feature a smooth, rounded body and a sweet, pastel glaze finish that looks lovely perched on a sunny windowsill.
How-To Guide
Materials
- White earthenware or stoneware clay
- Wooden modeling tool or popsicle stick
- Fettling knife
- Small sponge
- Needle tool
- Underglazes (Pastel pink, mint green, and yellow)
- Clear transparent glaze
- Kiln access (or air-dry clay alternatives, though sound quality differs)
Step 1: Forming the Body
-
Prepare the Clay:
Start with a ball of clay roughly the size of a golf ball or slightly larger, ensuring it is well-wedged to remove air bubbles. -
Create the Pinch Pot:
Press your thumb into the center of the ball and gently pinch the walls while rotating the clay, aiming for an even thickness of about a quarter-inch. -
Close the Shape:
Gently curve the walls inward until they meet at the top, trapping air inside to form a hollow sphere or egg shape. -
Seal and Smooth:
Score the edges where the clay meets, apply a dab of slip, and press them together firmly. Smooth the seam completely with your thumb or a rib tool. -
Shape the Bird:
Massage the hollow form into a bird silhouette by pulling a small section for the head and beak, and tapering the opposite end to create a tail.
Step 2: Building the Whistle Mechanism
-
Flatten the Tail:
Gently flatten the tail area slightly where the mouthpiece will go, ensuring it remains hollow inside. -
Create the Airway:
Using a flat popsicle stick or a rectangular modeling tool, push it into the end of the tail to create a straight airway channel into the hollow chamber. -
Cut the Window:
Remove the stick. On the underside of the tail (or top, as shown in the background bird), cut a small rectangular ‘window’ that intersects the end of the airway channel you just made. -
Refine the Bevel:
This is the crucial step: use your knife to create a sharp 45-degree angle on the distinct edge of the window hole closest to the body. This sharp edge splits the air to create sound. -
Test the Sound:
Blow gently through the tail. If it doesn’t whistle, adjust the angle of the bevel or clear any debris from the airway. Sometimes I find a tiny adjustment to the mouthpiece angle makes all the difference. -
Add Details:
Once the whistle works, use a needle tool to poke small eyes on the head and gently sculpt a defined beak.
Clear the Airway
Glaze can easily clog the whistle hole and ruin the sound. Use a wax resist on the bevel edge or clear the hole with a needle tool after dipping.
Step 3: Design and Decoration
-
Dry to Leather Hard:
Let the bird dry until it is leather hard—firm enough to handle but still carved easily. -
Carve the Wings:
Use a loop tool or needle to lightly carve a teardrop shape on the side for the wing, adding three or four internal lines for feather texture. -
Bisque Fire:
Allow the piece to bone dry completely before firing it in a bisque kiln according to your clay body’s specifications. -
Apply Underglaze:
Paint the bottom half of the bird with pastel pink and the top half (head and back) with mint green, creating a separation line that curves gently. -
Accent Painting:
Fill in the carved wing area with a bright yellow underglaze and add a touch of orange or yellow to the beak. -
Clear Glaze and Final Fire:
Dip the entire bird in a clear transparent glaze to seal the surface and make the colors pop, then fire for the final glaze firing.
Silent Bird?
If the whistle stops working after smoothing, the clay likely slumped. Re-insert your stick tool to redefine the sharp splitting edge inside the window.
Listen to the cheerful chirps of your new ceramic flock as you display them proudly
Tiny Bell Charms
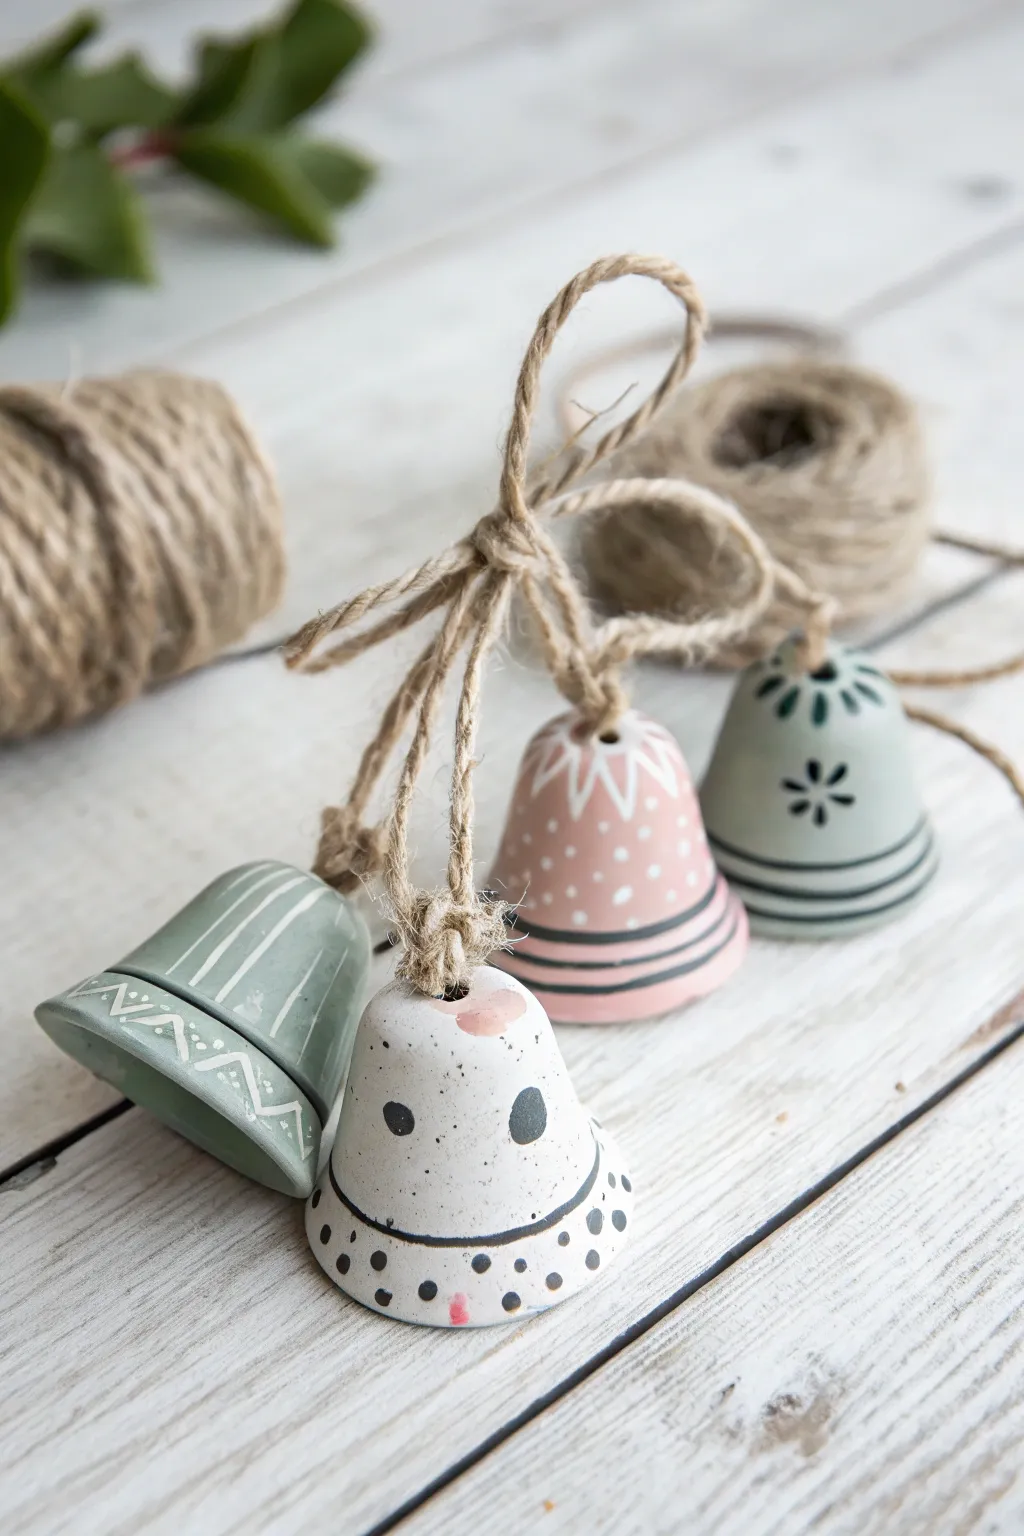
These delightful miniature bell charms add a rustic, artisanal touch to any gift wrap or holiday decor. With their muted pastel tones and delicate hand-painted patterns, they look like cherished ceramic heirlooms but are surprisingly simple to craft at home using air-dry clay.
Detailed Instructions
Materials
- White air-dry clay (or polymer clay)
- Small rolling pin
- Egg carton (for drying shape)
- Drinking straw or skewer
- Acrylic paints (pastel pink, sage green, off-white, black)
- Fine detail paintbrush (size 0 or 00)
- Medium paintbrush
- Jute twine
- Medium grit sandpaper
- Matte varnish or sealant (optional)
- Small circle cutter or bottle cap (approx. 2-inch diameter)
Step 1: Shaping the Bells
-
Condition the Clay:
Start by kneading a chunk of your air-dry clay until it is warm, pliable, and free of cracks. If it feels too dry, dip your fingers in water and work the moisture in. -
Roll it Out:
Roll the clay onto a flat surface to a thickness of about 3-4mm. Aim for an even slab to ensure the bells have a uniform weight. -
Cut Circles:
Use a small circle cutter or a rigid bottle cap to punch out four circles. These will be the base for your bell shapes. -
Form the Dome:
Gently drape a clay circle over the tip of your finger or thumb to create a cup shape. Smooth down the sides, flaring the bottom edge slightly outward to mimic a classic bell silhouette. -
Pierce the Top:
While the clay is still soft, use a drinking straw or a skewer to poke a hole directly through the top center of each bell. This needs to be wide enough for your twine to pass through later. -
Refine the Shape:
Smooth out any fingerprints with a slightly damp finger. I like to let these dry upside down on the spikes of an egg carton—it keeps the dome shape perfectly round without flattening the top. -
Dry Completely:
Leave the bells to cure fully according to your clay package instructions, usually 24-48 hours. They should be hard and chalky white when ready. -
Sand for Smoothness:
Once dry, gently gently sand any rough edges, particularly around the bottom rim and the hanging hole, to create a professional finish.
Step 2: Painting & Decoration
-
Base Coats:
Apply a base coat of acrylic paint to each bell. For the set in the photo, paint one sage green, one pastel pink, one off-white, and leave one mostly unpainted or a very pale grey. -
Add Stripes:
For the bells with horizontal stripes, mix a darker shade of your base color or use black. Hold the brush steady and rotate the bell to paint clean rings around the bottom rim. -
Paint the Floral Patterns:
On the green bell, use a fine tip brush to add a simple eight-point star flower in black ink or paint near the top. Add dashed lines around the shoulder of the bell. -
Stipple the Dots:
Create the polka-dot effect on the pink bell by dipping the non-brush end of your paintbrush into white paint and dotting it randomly over the surface. Paint a zigzag collar near the top. -
Detail the White Bell:
For the speckled white bell, paint a black ring near the rim. Add large black polka dots and smaller speckles using a stiff brush to flick paint, or carefully dot them on. -
Geometric Lines:
On the final green bell, paint thin vertical white lines down the sides. Near the bottom rim, add a horizontal band decorated with a white zigzag pattern. -
Set the Paint:
Allow all paint to dry completely. If you want durability, apply a coat of matte varnish now to seal your designs.
Uneven Drying?
If your bells crack while drying, you can repair them by mixing a tiny bit of wet clay into a paste (slip) and filling the crack. Smooth it over and let it re-dry.
Step 3: Assembly
-
Cut the Twine:
Cut four lengths of jute twine, each about 8-10 inches long. You can vary the lengths slightly if you want them to hang at staggered heights. -
Knot the Bells:
Fold a piece of twine in half and thread the looped end through the top of a bell from the outside in. Feed the loose ends through the loop and pull tight, or simply tie a large knot on the inside of the bell so it doesn’t slip through. -
Final Arrangement:
Gather all four strings together. Tie them into a loose, collective bow knot about 3 inches above the bells to create a cluster, leaving a loop at the very top for hanging.
Add a Clapper
Before knotting the twine inside, thread a small bead onto the end of the string. It will act as a clapper and make a soft sound when the bell moves.
Hang your charming new bells on a door handle or a seasonal branch arrangement to enjoy their rustic beauty
Mini Diorama Scenes in a Little Box

Transform a simple cardboard box into a cozy, miniature boho sanctuary complete with tiny plants and textured furniture. This delightful diorama project combines simple woodworking, clay modeling, and textile crafting to create a peaceful little world.
Step-by-Step
Materials
- Small cardboard box (roughly 6×6 inches)
- Balsa wood or popsicle sticks
- Air-dry clay (terracotta and green colors)
- Jute twine or thick brown thread
- Scrap fabric (neutral linen and patterned cotton)
- Brown kraft paper or cardstock
- White or cream paint
- Tacky glue or hot glue gun
- Scissors and X-acto knife
- Fine-grit sandpaper
- Paintbrush
Step 1: Preparing the Room
-
Box Prep:
Select a sturdy cardboard box and remove the top flaps completely using scissors or an X-acto knife. You want a clean, open cube shape. -
Clean Edges:
If basic cutting left rough edges on the front face, use tiny pieces of masking tape or extra strips of kraft paper to wrap and seal the raw corrugated edges for a polished look. -
Wall Art Creation:
Cut a small rectangle from kraft paper or a leftover piece of the box. Using white or rust-colored paint, sketch a simple arch or sunburst design to mimic boho wall art. -
Mounting the Art:
Glue the artwork to the back wall of the box, positioning it slightly off-center to leave room for future wall plants.
Glue Ghosting
If using super glue, be careful of white residue on the cardboard. Use clear-drying tacky glue for paper parts to keep the finish matte and clean.
Step 2: Crafting the Furniture
-
Chair Frame Construction:
Cut balsa wood strips: two longer pieces for the back legs, two shorter for the front legs, and several small slats for the seat and backrest. -
Assembling the Seat:
Glue the seat slats across two side rails. I find it easiest to let this flat section dry completely before attaching the legs to ensure it stays square. -
Finishing the Chair:
Attach the back rest slats and the legs. Use wider strips of wood for the armrests. Once dry, lightly sand any rough ends. -
Sewing the Pillow:
Cut two tiny squares of linen fabric. Glue or sew three sides together, stuff with a pinch of cotton or fabric scrap, and seal the final side. -
Making the Ottoman:
Shape a flattened sphere or ‘puck’ shape out of air-dry clay or aluminum foil to act as a base. -
Wrapping the Ottoman:
Coat the Ottoman base in glue. Starting at the very center top, coil the jute twine in a tight spiral, working your way down the sides until the base is fully covered.
Texture Trick
To make the chair look like rattan, lightly score the balsa wood with a wire brush or coarse sandpaper before assembling to mimic wood grain.
Step 3: Adding Greenery & Details
-
Clay Pots:
Roll small balls of terracotta-colored clay. Press your thumb (or a tool handle) into the center to create a cup shape. Make various sizes: tiny ones for the wall and medium ones for the floor. -
Sculpting Plants:
Using green clay, roll tiny snakes to make succulent leaves or broad, flat shapes for leafy plants. Stick these securely into the clay pots while the clay is still wet. -
Wall Planters:
For the wall-mounted succulents, glue two tiny clay pots directly onto your painted wall art background. Hold them in place for a few seconds until the glue tacks. -
Creating the Rug:
Cut a rectangle of patterned fabric. Fray the edges by pulling out the horizontal threads on the short sides to create a miniature fringe effect. -
Final Assembly:
Arrange your scene. Place the rug down first, then position the chair with its pillow, the jute ottoman, and your potted plants to create a balanced, inviting layout.
Place your finished diorama on a shelf where the light catches those tiny details