If you love clay like I do, the best projects are the ones you actually reach for every single day. Here are my go-to functional clay ideas—from beginner-friendly basics to a few clever pieces that feel like a little studio magic.
Trinket Dish for Daily Drop Zones
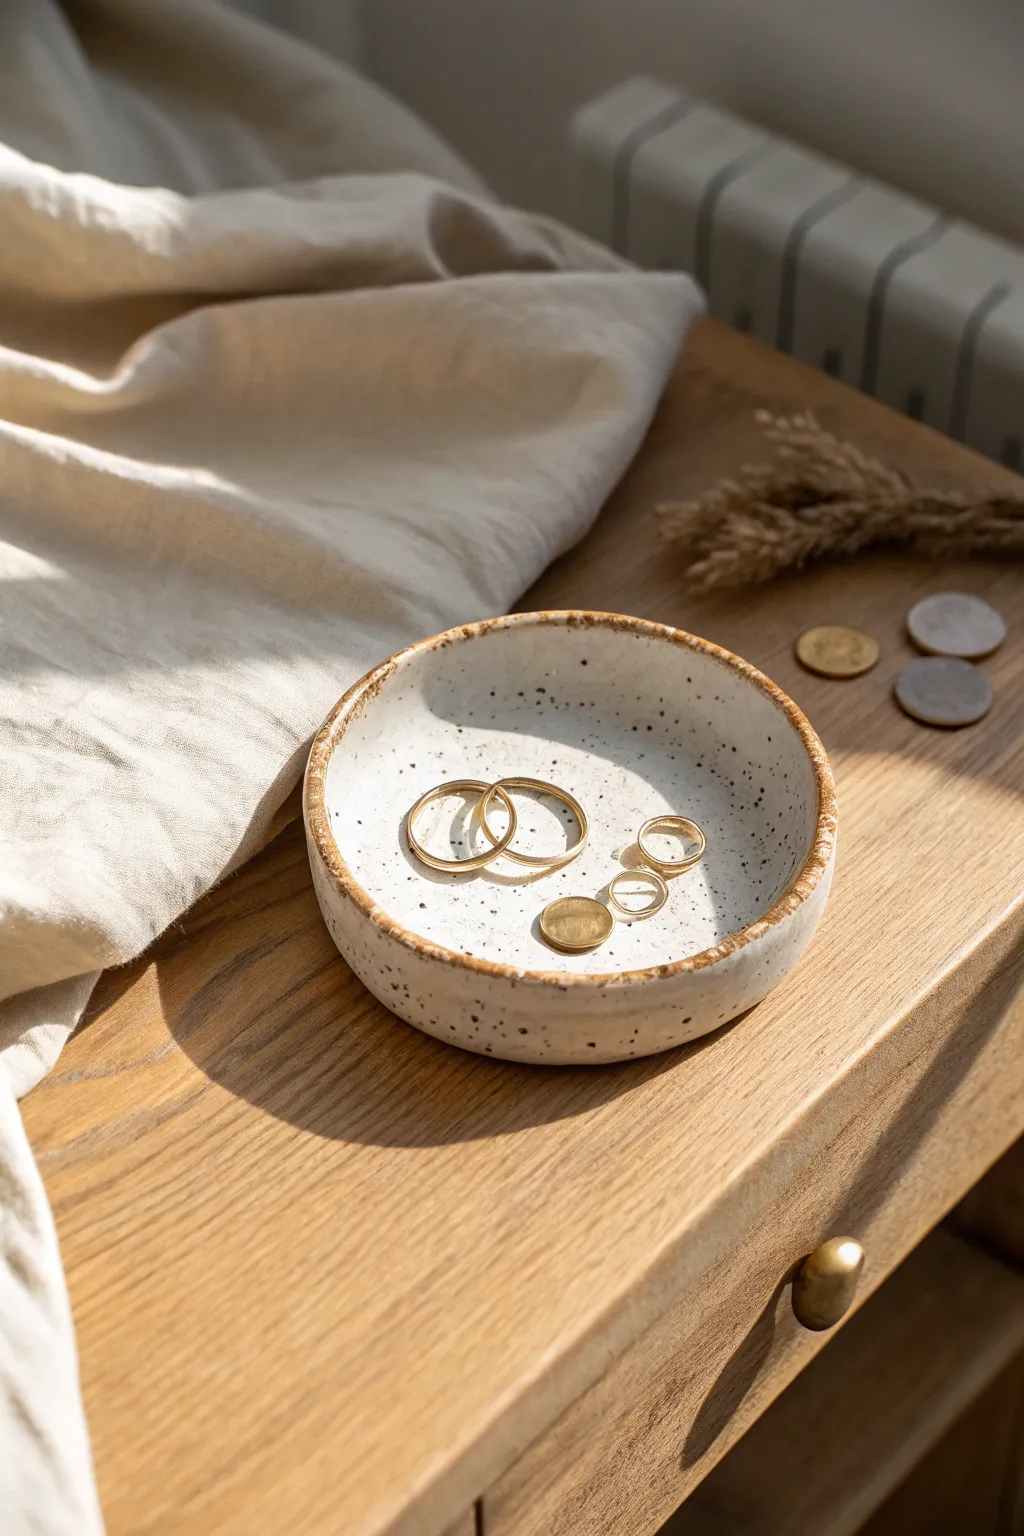
This charming, rustic trinket dish combines a minimal speckled glaze with an earthy, exposed rim for a perfectly organic look. It serves as an elegant catch-all for your daily jewelry, keeping rings and coins organized on your bedside table.
How-To Guide
Materials
- Speckled buff stoneware clay (or white clay with grog)
- Pottery wheel (or rolling pin for hand-building)
- Rib tool (wooden or silicone)
- Needle tool
- Wire cutter
- Trimming tools
- Sponge
- Glossy white glaze
- Wax resist (optional)
- Kiln
Step 1: Shaping the Form
-
Wedge the Clay:
Begin by wedging a small ball of speckled stoneware clay, about the size of a tennis ball or slighty smaller, to remove air bubbles and ensure consistency. -
Center on the Wheel:
Throw the ball of clay onto your wheel head and center it using firm pressure and water; centering is crucial for a symmetrical bowl shape. -
Open the Clay:
Press your thumbs into the center of the spinning clay to open it, leaving about 1/4 to 1/2 inch of thickness at the bottom for stability. -
Pull the Walls:
Gently pull the clay outward and slightly upward to create a low, wide bowl shape. The walls should be relatively thick to match the rustic aesthetic. -
Refine the Curve:
Use a rib tool on the inside of the dish to smooth the curve, ensuring there is a gentle transition from the floor to the walls. -
Define the Rim:
Compress the rim with a piece of chamois or your sponge to make it smooth and rounded; keep it distinct as this will remain unglazed later. -
Cut and Remove:
Run a wire cutter under the base of the dish and carefully lift it off the wheel head, placing it on a ware board to stiffen to leather-hard.
Step 2: Trimming and Drying
-
Center for Trimming:
Once leather-hard, place the dish upside down on the wheel and secure it with small clay lugs or a gripping tool. -
Trim the Foot:
Use a trimming tool to carve away excess weight from the bottom, creating a clean, flat base or a slight foot ring depending on your preference. -
Smooth the Edge:
I like to run a damp sponge or a smooth stone over the trimmed areas to burnish the clay slightly, removing any sharp grog particles. -
Bisque Fire:
Allow the piece to dry completely (bone dry) before loading it into the kiln for a bisque firing, typically to Cone 04 or 06.
Iron Spot Magic
To get those beautiful dark specks, ensure you buy ‘Reduction Fired’ look clay or specifically ‘Speckled Buff’ clay bodies that contain iron or manganese nodules.
Step 3: Glazing and Finishing
-
Clean the Bisqueware:
Wipe the fired piece with a damp sponge to remove any dust that might prevent the glaze from adhering properly. -
Mask the Rim:
Carefully apply wax resist to the very top edge of the rim if you want a precise line, or rely on distinct pouring techniques for a more organic edge. -
Pour the Glaze:
Pour a glossy white glaze into the interior of the bowl, swirl it to coat the inside walls fully, and pour the excess back out efficiently. -
Clean the Exterior:
If any glaze dripped over the rim onto the outside, wipe it away immediately with a sponge; the goal is to leave the rim and exterior raw. -
Expose the Rim:
Take a clean, damp sponge and wipe the very top edge of the rim again to ensure the speckled clay body shows through clearly, creating that beautiful contrast. -
Glaze Fire:
Load the glazed dish into the kiln for the final glaze firing, usually Cone 5 or 6 depending on your clay and glaze specifications. -
Final Inspection:
Once cool, check the bottom for any sharp spots and sand them lightly with wet-dry sandpaper if needed to protect your furniture.
Rim Variation
Instead of a simple wipe, dip the very edge of the rim into a diluted iron oxide wash before glazing the inside for a darker, more dramatic halo effect.
Now you have a beautifully bespoke dish ready to hold your daily treasures.


Ring Cone or Ring Tower
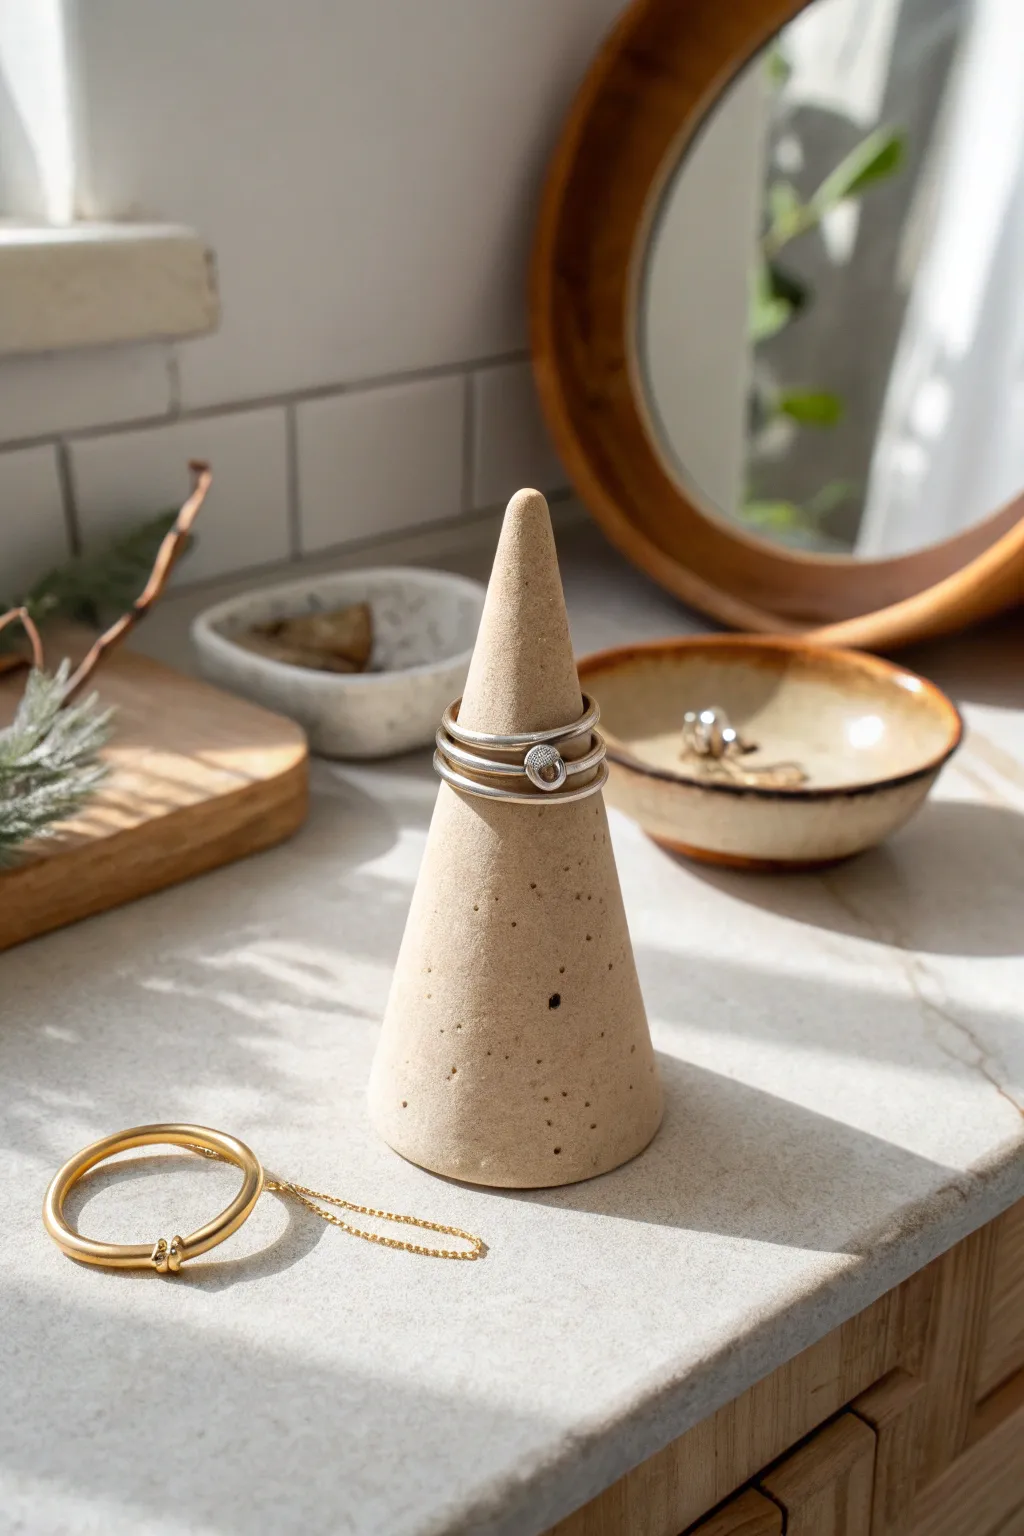
This minimalist ring cone combines simple geometry with organic texture, creating a modern display for your favorite jewelry. Its tall, tapered shape accommodates multiple stacked rings while the subtle speckled finish mimics the look of natural stone.
Detailed Instructions
Materials
- Speckled buff stoneware clay or polymer clay with granite effect
- Rolling pin
- Fettling knife or craft knife
- Cardstock or stiff paper (for template)
- Tape
- Small bowl of water
- Vinegar (or slip if using ceramic clay)
- Rib tool or old credit card
- Sponge
- Sandpaper (fine grit)
- Small paintbrush
Step 1: Preparation and Template
-
Create the cone template:
Cut a quarter-circle shape out of your cardstock. A 6-inch radius works well for a standard ring holder, but you can adjust the size depending on how tall you want your final tower to be. -
Test the fit:
Curl the cardstock cutout into a cone shape to test the proportions. Secure it loosely with tape to visualize the height and width before committing to clay. -
Prepare the clay:
Wedge a ball of speckled clay to remove air bubbles. Even if you’re using polymer clay, kneading it warms it up and makes it pliable for rolling.
Seamless Finish
To fix a stubborn seam that keeps cracking open, wrap a thin coil of fresh clay along the join line and blend it outward until it vanishes.
Step 2: Forming the Cone
-
Roll out a slab:
Use your rolling pin to flatten the clay into a slab about 1/4 inch thick. Aim for an even thickness throughout the slab to ensure the cone stands straight later. -
Cut the clay shape:
Place your cardstock template onto the clay slab. Carefully trace around the edge with your fettling knife or craft knife and remove the excess clay. -
Score the edges:
Score the straight edges of your quarter-circle slab using a needle tool or serrated rib to create a rough texture. This texturing helps the seam bond securely. -
Apply slip or adhesive:
Dab a small amount of slip (or vinegar for ceramic clay; liquid clay for polymer) onto the scored edges. Connect the two straight edges to form the cone shape. -
Seal the seam:
Gently press the seam together from bottom to top. I like to use a small wooden tool to smooth the clay over the join line on both the inside (as far as you can reach) and the outside so the seam disappears completely.
Slumping Issues?
If your cone starts to slump or bend while working, stuffing the inside with crumpled newspaper or plastic wrap helps hold the shape until the clay firms up.
Step 3: Refining and Texture
-
Check for wobbles:
Stand the cone on a flat surface. If it leans or wobbles, gently tap the base against the table to flatten it, or trim the bottom edge with your knife to make it perfectly level. -
Refine the surface:
Use a damp sponge or a flexible rib tool to smooth out the cone’s surface. Remove any fingerprints or uneven bumps while preserving that nice conical silhouette. -
Create the speckled look:
If your clay isn’t pre-speckled, you can flick diluted dark brown or black acrylic paint (or underglaze) onto the surface using a toothbrush for that faux-stone effect. -
Add subtle imperfections:
The piece in the photo has a distinct, organic feel. You can lightly prick the surface with a needle tool in random spots to mimic natural pitting found in stone.
Step 4: Finishing Touches
-
Final smoothing:
Run your finger or a very slightly damp sponge around the pointy tip to ensure it isn’t too sharp. A rounded tip is safer for your delicate rings. -
Drying (Ceramic Clay):
Allow the cone to dry slowly under plastic for a day, then uncover until bone dry. Fire according to your clay’s specific firing schedule. -
Baking (Polymer Clay):
If using polymer clay, bake according to package instructions, usually around 275°F (135°C) for 15-30 minutes depending on thickness. -
Sanding:
Once fired or baked and cooled, use fine-grit sandpaper to buff the bottom edge so it won’t scratch your furniture. -
Sealing (Optional):
Leave the surface matte for a raw stone look, or apply a very thin coat of matte varnish if you want extra protection against oils from your hands.
Place your finished tower on your vanity and enjoy the organized elegance it brings to your daily routine


Pinch Pot Mug With a Cozy Handle

Embrace the imperfect beauty of hand-building with this charming, rustic mug featuring a raw clay base and a creamy, speckled glaze. Its rounded, organic shape fits perfectly in cupped hands, making it an ideal vessel for your morning coffee or tea rituals.
How-To Guide
Materials
- Stoneware clay (speckled or buff)
- Pottery wire cutter
- Serrated rib tool or fork
- Rubber kidney rib
- Sponge
- Small container of water or slip
- Needle tool
- Wooden modeling tool
- Cream or white speckled matte glaze
- Wax resist (optional)
Step 1: Forming the Body
-
Prepare the Clay:
Cut a softball-sized piece of stoneware clay and wedge it thoroughly to remove air bubbles. Pat it into a smooth, round ball in your hands. -
Open the Pot:
Hold the ball in one hand and press your thumb into the center, stopping about a half-inch from the bottom. This thickness is crucial for that sturdy, weighted base we want. -
Pinch the Walls:
Begin pinching the clay between your thumb and fingers, rotating the ball as you go. Work from the bottom upward, trying to keep an even thickness of about 1/4 inch throughout the walls. -
Build Height:
To get the tall mug shape, gently coax the clay upward rather than just outward. If the rim gets uneven, don’t worry—we will trim it later, or you can leave it wavy for character. -
Refine the Shape:
Use a rubber kidney rib on the inside and outside to smooth the pinch marks and compress the clay. Gently push the belly of the mug outward from the inside to create that lovely rounded curve near the bottom. -
Level the Rim:
If the top edge is very uneven, use a needle tool to trim a thin strip off the top while slowly spinning the pot (easiest if you have a banding wheel, but fine to do by hand).
Cracked Handle?
Handles often crack because they dry faster than the body. Wrap the handle tightly in plastic while leaving the body exposed for a few hours to equalize the moisture content before final drying.
Step 2: Adding the Handle
-
Pull a Handle:
Take a separate small lump of clay and roll it into a thick carrot shape. Using wet hands, stroke the clay downward to elongate it into a flat, comfortable strap. -
Shape the Curve:
Curve the strap into a ‘C’ shape or ear shape that looks proportional to your mug. I like to let this stiffen up for about 20 minutes so it doesn’t flop over when attached. -
Score and Slip:
Mark the attachment points on the mug body and the ends of the handle with a serrated tool. Apply a dab of water or slip to the scored areas. -
Attach Firmly:
Press the handle onto the mug firmly. Use a wooden modeling tool to blend the clay from the handle onto the mug body, ensuring there is no visible seam. -
Smooth the Joints:
Take a damp sponge and wipe around the attachment points to clean up any messy slip and ensure a smooth transition.
Smooth Rim Tip
For a lip-friendly rim, drape a small piece of thin plastic wrap over the top edge and run your finger over it. This compresses the clay and creates a perfectly rounded drinking edge.
Step 3: Finishing and Glazing
-
Dry Slowly:
Cover the mug loosely with plastic and let it dry slowly to the leather-hard stage, then uncover to let it become bone dry. This prevents the handle from cracking away from the body. -
Bisque Fire:
Fire the bone-dry mug in a kiln to cone 04 (or your clay body’s bisque temperature). -
Wax the Base:
Apply wax resist to the bottom inch of the mug’s exterior. This creates the raw clay ‘dipped’ look shown in the photo and protects your kiln shelves. -
Dip into Glaze:
Stir your cream speckled glaze well. Hold the mug by the foot (or use dipping tongs) and submerge it into the glaze, stopping right where the wax line begins. -
Clean the Line:
If any glaze bead dripped onto the waxed area, wipe it away cleanly with a damp sponge. -
Glaze Fire:
Fire the mug again to the maturation temperature of your clay and glaze (typically cone 5 or 6 for stoneware). Let the kiln cool completely before unloading.
Enjoy the warmth of your handmade mug, knowing no other cup in the world looks exactly like yours


Small Bowl Set for Snacks and Prep
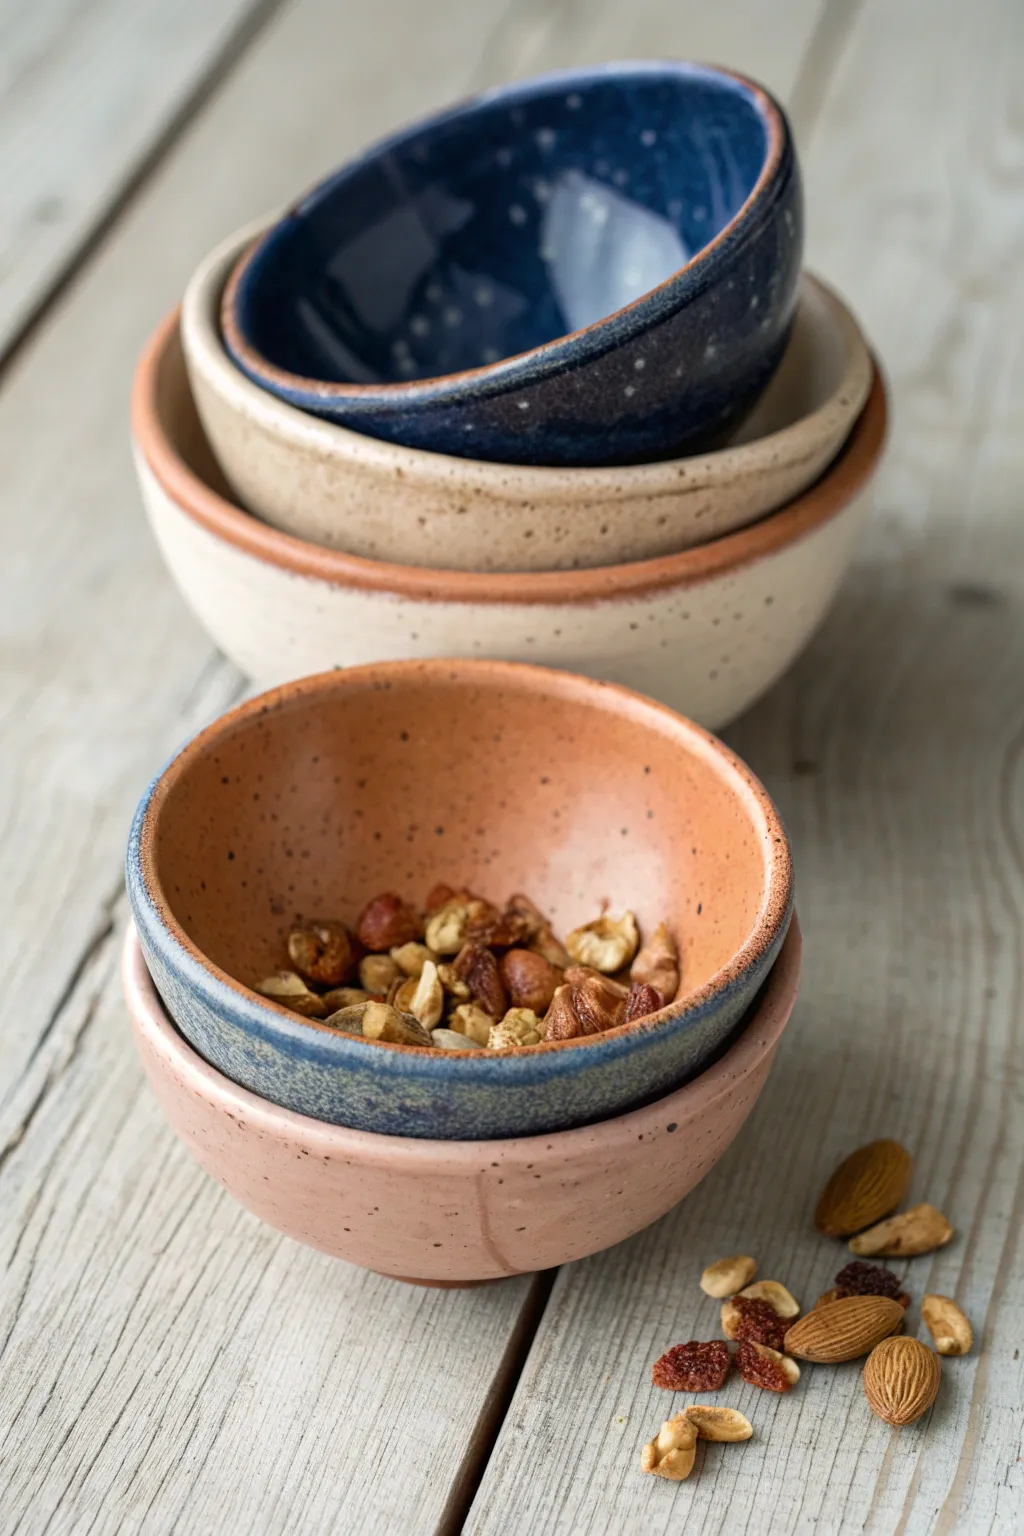
These charming, rustic nesting bowls are perfect for serving nuts, olives, or prepping ingredients in the kitchen. The focus is on simple, organic curves and a lovely interplay between raw, speckled clay and glossy, colorful glazes.
Step-by-Step Tutorial
Materials
- Speckled stoneware clay body (e.g., Laguna Speckled Buff or similar)
- Potter’s wheel (or banding wheel for hand-building)
- Throwing sponge
- Pin tool
- Wooden rib tool
- Wire cutter
- Trimming tools (pear-shaped loop tool)
- Glazes: Glossy Navy Blue, Clear (or transparent warm grey), and a satin Oatmeal/Tan
- Wax resist
- Kiln
Step 1: Throwing the Forms
-
Prepare your clay balls:
Since these are nesting bowls, weigh out your clay balls in graduating sizes. Try 1 lb for the largest, 0.75 lb for the medium, and 0.5 lb for the smallest bowl. -
Center the clay:
Secure the largest ball of clay on the wheel head. Use water and steady pressure to center the clay until it runs smooth without wobbling. -
Open the vessel:
Drill your thumbs into the center, leaving about a quarter-inch of clay at the bottom for the foot. Pull the floor outward, keeping it curved like the inside of a sphere rather than flat. -
Pull the walls:
Slowly pull the walls upward. Unlike a cylinder, you want to maintain a gentle, continuous curve from the floor to the rim. -
Refine the curve:
Use a wooden rib on the inside of the bowl to compress the clay and define that smooth, hemispherical shape. The rib helps remove throwing lines for a cleaner interior. -
Finish the rim:
Compress the rim with a piece of chamois or your sponge to round it off softly. Avoid sharp edges, as these are meant to be held in the hand. -
Cut and repeat:
Wire the bowl off the bat and set it aside to stiffen to leather hard. Repeat the process for the smaller clay balls, aiming to match the curve of the first bowl so they nestle well together.
Wobbly Rims?
If your rims are knocking off-center during throwing, you are likely pulling too fast or your wheel speed is too high. Slow down near the top and compress the rim after every pull.
Step 2: Trimming and Finishing
-
Center for trimming:
Once the bowls are leather hard (stiff but still cold to the touch), center them upside down on the wheel head. I like to use small clay lugs to hold them in place. -
Define the foot ring:
Use a sharp loop tool to carve away excess clay from the base. Carve a distinct foot ring that elevates the bowl slightly, creating a shadow line at the table surface. -
Smooth the exterior:
Use a metal rib or the back of a spoon to burnish the exterior slightly if you want a smoother texture, or leave it a bit rough for a more rustic tactile feel. -
Bisque fire:
Allow the bowls to dry completely—this usually takes a few days. Load them into the kiln for a bisque firing (usually Cone 04 or 06).
Level Up: Exposed Rim
Wipe the glaze off the very top edge of the rim with a damp sponge before firing. This creates a thin line of raw, toasted clay that highlights the circle and frames the glaze color.
Step 3: Glazing
-
Clean the bisque:
Wipe the fired bowls with a damp sponge to remove any kiln dust. This ensures the glaze adheres properly. -
Apply wax resist:
Brush liquid wax resist slightly up the side of the foot and across the entire bottom of the foot ring to prevent glaze from sticking to the kiln shelf. -
Glaze the interior (Blue Bowl):
For the dark bowl, pour a glossy navy blue glaze inside, roll it around to coat, and pour out the excess. Dip the rim about half an inch deep into the same blue glaze. -
Glaze the interior (Warm Bowls):
For the lighter bowls, use a transparent glaze or a warm oatmeal satin. Pour inside, coat, and pour out. Leave the exterior raw to show off the speckled clay body. -
Create the two-tone look:
For the bottom bowl in the stack, dip the exterior bottom half in a blue glaze or underglaze to create that distinct horizon line, leaving the top half of the exterior bare clay. -
Glaze fire:
Load the glazed bowls into the kiln. Make sure they aren’t touching each other. Fire to the maturity temperature of your clay and glaze (typically Cone 5 or 6). -
Check the fit:
Once cooled, sand the bottoms if necessary to ensure they are smooth, and stack them up to admire your nesting set.
Enjoy using your new handmade set for everything from morning prep to evening snacks

The Complete Guide to Pottery Troubleshooting
Uncover the most common ceramic mistakes—from cracking clay to failed glazes—and learn how to fix them fast.
Soap Dish With Drainage Ridges
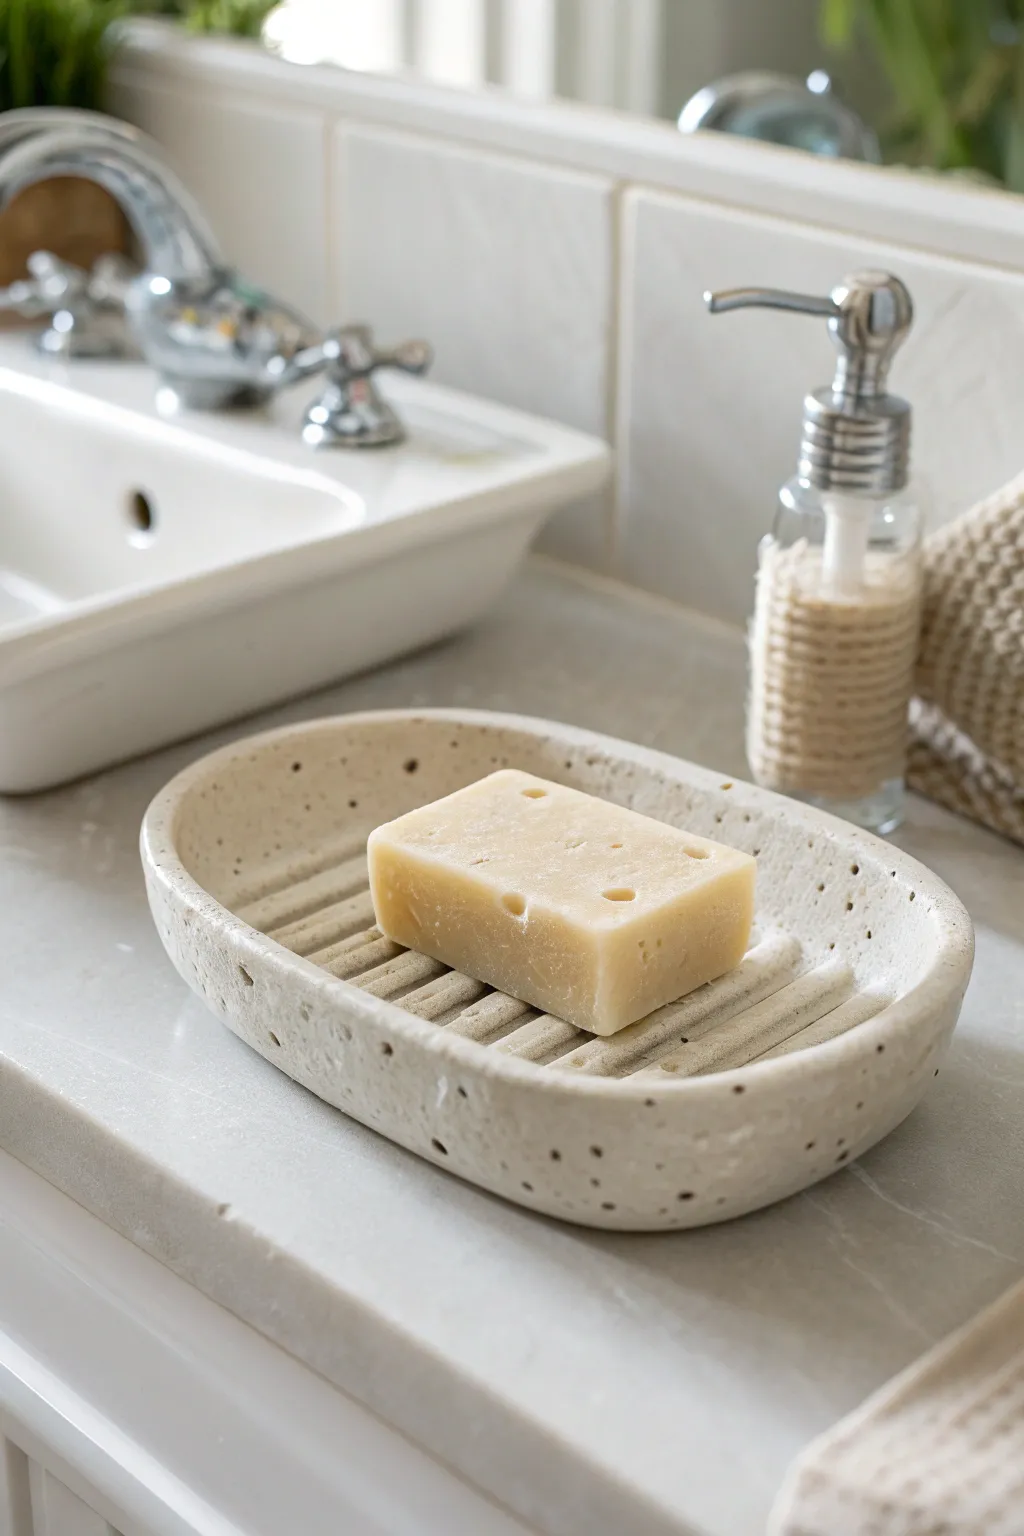
Create a spa-like atmosphere in your bathroom with this elegant, functional soap dish. Featuring a beautiful speckled clay body and deep drainage ridges, this piece keeps your artisan soaps dry while adding a touch of minimalistic charm to your sink area.
Step-by-Step
Materials
- Speckled stoneware clay (white or light grey)
- Rolling pin
- Canvas or slab mat
- Oval paper template
- Needle tool or fettling knife
- Wooden modeling tool or flat rib
- Small loop tool or carving tool
- Sponge
- Transparent or semi-opaque white glaze
- Kiln
Step 1: Forming the Base
-
Prepare the slab:
Begin by rolling out a slab of speckled stoneware clay to a thickness of approximately 3/8 of an inch. Ensure the thickness is even throughout to prevent warping during drying. -
Cut the shape:
Place your oval paper template onto the slab. Using a needle tool or fettling knife, cut around the template to create your base shape. -
Smooth the edges:
Run a damp sponge or your finger along the cut edges to soften any sharpness and compress the clay particles. -
Curve the rim:
Gently lift the edges of the oval slab with your fingers to create a shallow, concave dish shape. You can rest it in a foam mold or use a small bag of sand to support the curve while it stiffens slightly.
Step 2: Building the Interior
-
Mark the ridges:
Once the dish is leather hard but still workable, lightly sketch parallel lines across the interior bottom where your drainage ridges will go. Leave about a half-inch border smooth around the rim. -
Create coils:
Roll out several thin, even coils of clay, about the thickness of a pencil. These will become the raised ridges. -
Score and slip:
Score the marked lines on the dish base and the underside of your clay coils. Apply a small amount of slip to the scored areas on the base. -
Attach the coils:
Press the coils firmly onto the scored lines. I prefer to gently wiggle them into place to ensure a solid bond without trapping air bubbles. -
Refine the ridges:
Use a wooden modeling tool to smooth the connection points where the coil meets the base floor. The goal is to make the ridges look integral to the dish, not just stuck on. -
Flatten the tops:
Gently press a flat wooden rib along the tops of the ridges to level them out. This ensures your soap bar will sit flat rather than wobbling on rounded coils.
Clean Lines
Use the rounded end of a paintbrush to run along the ‘valleys’ between ridges. It creates a perfect uniform curve that’s hard to get with tools.
Step 3: Detailing and Finishing
-
Add texture (optional):
If your clay isn’t naturally speckled, you can flick iron oxide or manganese wash onto the surface with a stiff brush now to mimic the stone look in the photo. -
Smooth the interior:
Use a small, damp sponge to wipe between the ridges, smoothing away any tool marks or rough bits of slip. A clean finish here makes cleaning soap scum easier later. -
Refine the rim:
Give the outer rim one final pass with a damp chamois or sponge. It should feel smooth and rounded to the touch. -
Dry slowly:
Cover the dish loosely with plastic. Allow it to dry slowly to prevent the rim from warping as the clay shrinks. -
Bisque fire:
Once bone dry, fire the piece to cone 04 (or your clay’s specific bisque temperature). -
Glaze application:
Dip or brush on a transparent or semi-opaque white glaze. If you used speckled clay, a transparent glaze will allow those lovely spots to shine through. -
Wipe the bottom:
Clean off any glaze from the foot or bottom surface of the dish to prevent it from sticking to the kiln shelf. -
Glaze fire:
Fire the piece again to the maturation temperature of your clay body and glaze.
Warped Rim?
If the oval shape distorts while drying, place a small weight (like a sandbag) in the center. This holds the base flat while the rim stiffens up.
Place your finished dish by the sink and enjoy the satisfaction of using something handmade every day
Spoon Rest That Actually Catches Drips
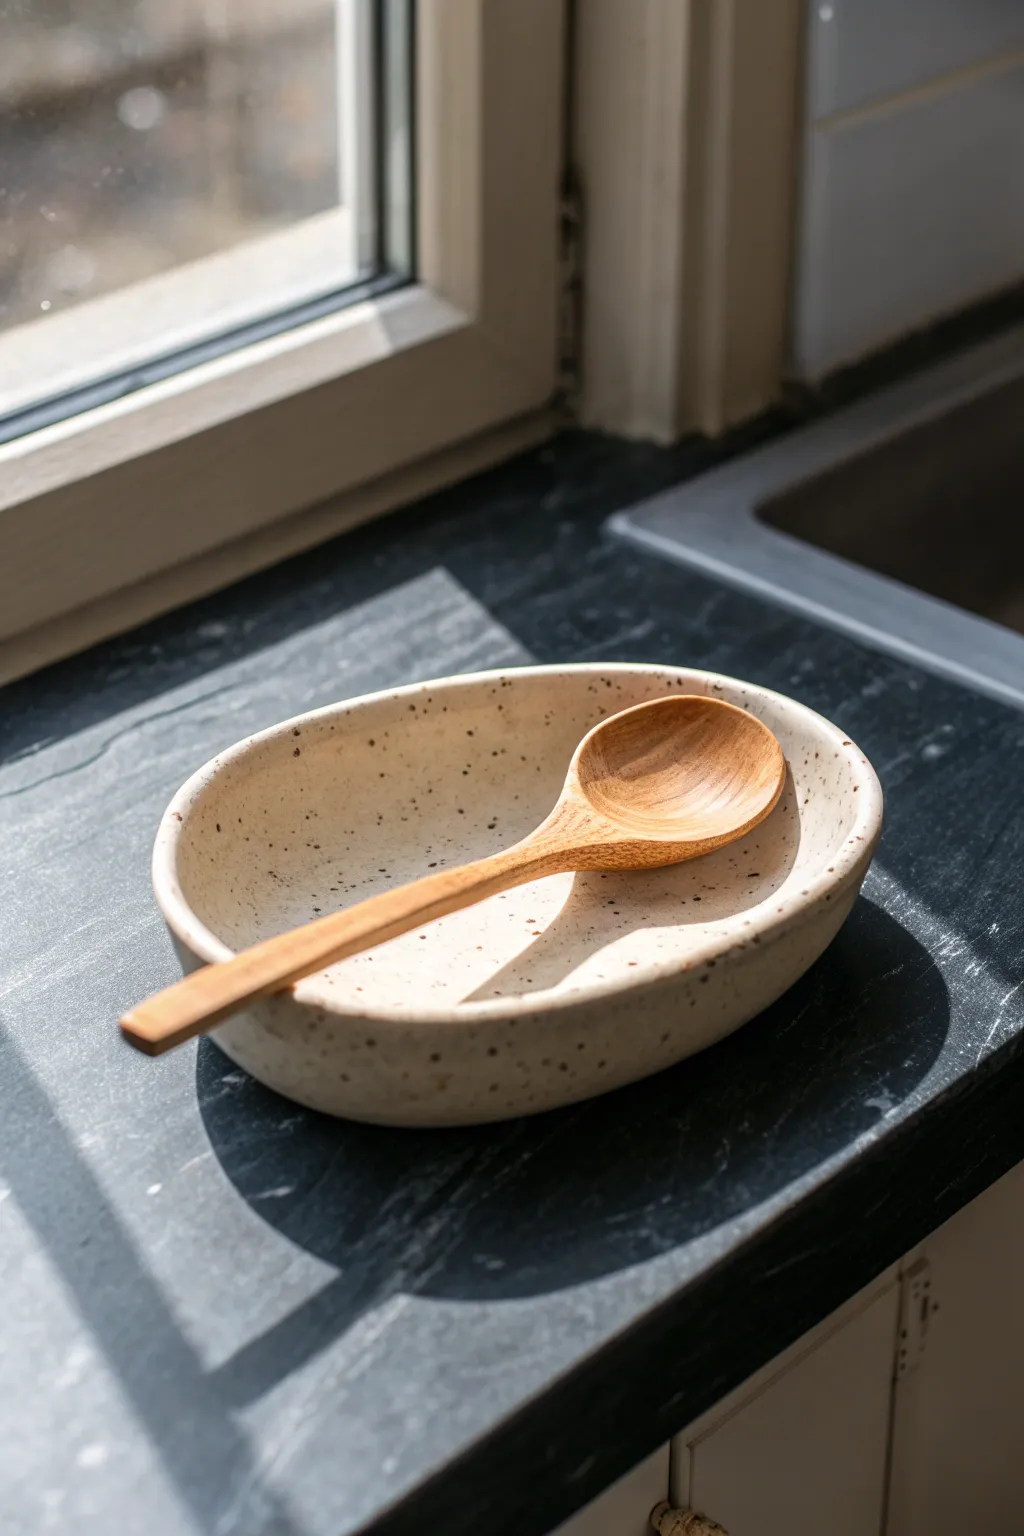
Move beyond the typical flat spoon rests with this deep, oval vessel that keeps every stray drip contained. Its speckled cream finish and organic shape bring a modern yet rustic warmth to your kitchen countertop.
Step-by-Step Guide
Materials
- Stoneware clay (Speckled Buff or similar)
- Rolling pin
- Canvas working surface
- Oval template (paper or cardboard)
- Fettling knife or needle tool
- Rib tool (flexible rubber)
- Sponge
- Clear or translucent white glaze (cone 5/6 recommended)
Step 1: Forming the Base
-
Roll the slab:
Begin by wedging your clay to remove air bubbles, then throw it onto your canvas. Roll it out into an even slab approximately 1/4 inch thick. I like to roll it in multiple directions to compress the clay particles well. -
Cut the shape:
Place your oval template onto the slab. Using your fettling knife or needle tool held vertically, cut around the template to create the base shape of your spoon rest. -
Smooth the rim:
Before building upwards, take a damp sponge or your finger to gently round over the sharp cut edge of your oval base. This prevents stress cracks later.
Warping Woes?
Ovals love to warp into circles as they dry. To prevent this, dry very slowly under loose plastic, or gently weight the rim with a board during the leather-hard stage.
Step 2: Building the Walls
-
Prepare the coils:
Roll out a long, even coil of clay, roughly the thickness of your pinky finger. You will need enough length to go around the circumference of your oval base once or twice, depending on how tall you want the walls. -
Score and slip:
Thoroughly score the perimeter of the base and one side of your coil. Apply clay slip or vinegar to the scored areas to act as glue. -
Attach the first coil:
Place the coil onto the base’s edge, pressing it down firmly. overlap the ends slightly, cutting through both at a diagonal to create a seamless join. -
Blend downwards:
Using your thumb or a modeling tool, drag the clay from the coil down onto the base on the inside of the vessel. Repeat this process on the exterior, dragging the coil clay down to merge with the slab edge. -
Add height (optional):
If you want a deeper bowl like the one pictured, repeat the scoring and slipping process with a second coil on top of the first. Stagger the seam location so it isn’t directly above the first join.
Pro Tip: Compression
Spend extra time compressing the inside floor with your rib. This not only smooths the surface for easy spoon cleaning later but also aligns clay particles to prevent S-cracks.
Step 3: Refining and Shaping
-
Pinch and pull:
Gently pinch the walls between your thumb and fingers to thin them out and pull them slightly upward. Aim for an even thickness consistent with the base. -
Define the curve:
Use a flexible rubber rib on the inside of the dish. Press outward against your supporting hand on the outside to create that gentle, continuous curve from the floor to the wall. -
Level the rim:
Check the rim’s height. If it’s uneven, use a needle tool to slice off the excess or a surform tool (once leather hard) to level it. Then, use a chamois or damp sponge to compress and round the lip smoothly. -
Refine the exterior:
Smooth the outside walls with your rib tool, ensuring no coil lines are visible. The transition from the side to the bottom should be soft and rounded, not a sharp 90-degree angle. -
Slow drying:
Cover the piece loosely with plastic to let it dry slowly to the leather-hard stage. This is crucial for preventing warping in oval shapes.
Step 4: Finishing
-
Bisque fire:
Once fully bone dry, fire the piece in the kiln to a bisque temperature (usually cone 04). -
Glazing:
wipe the bisque ware with a damp sponge to remove dust. Pour a clear or milky white translucent glaze inside, roll it around to coat, and pour out the excess. Dip or brush the exterior to match. -
Reveal the speckles:
The key to the look in the photo is using a clay body that has manganese or iron speckles (like Speckled Buff). The translucent glaze allows these spots to show through beautifully after the final firing. -
Final firing:
Fire the glazed piece to the maturity temperature of your clay (typically cone 5 or 6 for stoneware) to finish the project.
Enjoy your new kitchen essential that is as beautiful as it is practical


What Really Happens Inside the Kiln
Learn how time and temperature work together inside the kiln to transform clay into durable ceramic.
Coaster Set With Pressed Texture

Bring a touch of nature to your coffee table with these elegant, minimalist coasters featuring delicate fern impressions. The sandy, speckled clay body gives them an organic warmth that perfectly complements the crisp botanical relief.
How-To Guide
Materials
- Speckled stoneware clay (mid-fire recommended)
- Fresh fern leaves or similar flat botanicals
- Rolling pin
- Canvas or heavy fabric working surface
- Two wooden guide slats (approx. 1/4 inch thick)
- Round cookie cutter (approx. 4 inches diameter) or a needle tool and circular template
- Small sponge
- Ware board for drying
- Clear matte glaze (optional, for fully sealing)
Step 1: Preparing the Clay Slabs
-
Wedge the clay:
Start by thoroughly wedging your speckled stoneware clay to remove any air bubbles. This ensures a uniform texture and prevents cracking during firing. -
Set up your workspace:
Lay down your canvas or heavy fabric working surface to prevent the clay from sticking. Place your wooden guide slats on either side of the clay ball—these will help you roll a perfectly even slab. -
Roll the slab:
Using your rolling pin, roll the clay out until the pin rests on the guide slats. Roll in multiple directions to compress the clay platelets, which helps prevent warping later. -
Smooth the surface:
Take a damp sponge or a rubber rib tool and gently smooth the surface of the clay slab. You want a pristine, flat canvas for your botanical prints.
Step 2: Creating the Impressions
-
Arrange the botanicals:
Select fresh fern leaves that are relatively flat. Lay them carefully onto the smoothed clay slab, thinking about the composition within a circular frame. -
Press the leaves:
This is the satisfying part—use a small pony roller or gently go over the leaves with your rolling pin just once. Apply firmn, even pressure to embed the veins and stem into the clay. -
Check the depth:
Lift a tiny corner of a leaf to peek at the impression. You want the texture to be deep enough to catch glaze or shadows, but not so deep it weakens the coaster. -
Remove the leaves:
Carefully peel the fern leaves off the clay. Do this slowly to keep the fine details of the fronds crisp and sharp.
Warping Woes?
If coasters curl up while drying, flip them over every few hours during the leather-hard stage. Drying them sandwiched between two pieces of drywall ensures perfect flatness.
Step 3: Cutting and Refining
-
Cut the circles:
Position your round cutter over the botanical impression to frame it perfectly. Press down firmly to cut the coaster shape. If using a needle tool, trace around your circular template. -
Release the coasters:
Remove the excess clay from around the cut circles first, then carefully lift the coasters. I find sliding a thin wire or fettling knife underneath can help release them without distortion. -
Flip and smooth edges:
Gently turn the coasters over or hold them in your palm. Use a slightly damp finger or sponge to round off the sharp bottom edges and rim. This makes the finished piece much nicer to handle. -
Create a slight rim (optional):
If you want the raised lip seen in the photo, gently run your thumb around the very edge of the circle, pressing slightly to define a border while leaving the center flat.
Highlight the Veins
Rub a small amount of dark oxide (like iron oxide or a stain) into the leaf impression and wipe back the surface with a sponge. This makes the botanical details pop visually.
Step 4: Drying and Firing
-
Controlled drying:
Place the coasters on a ware board. To prevent warping—the enemy of flat coasters—place a sheet of newsprint over them and lightly weigh down the edges with another board if needed. Dry slowly away from drafts. -
Bisque fire:
Once bone dry, bisque fire the coasters to cone 04 (or per your clay body’s instructions). -
Glazing decisions:
For the look in the photo, the clay is left unglazed to show off the raw texture. However, for functionality, apply a thin coat of clear matte glaze, or just glaze the recessed leaf area to highlight the design. -
Final firing:
Fire the coasters to the maturity temperature of your clay (typically cone 5 or 6 for stoneware). Ensure they are placed on a completely flat shelf to maintain their level surface. -
Sand the bottoms:
After the final firing, use sandpaper or a grinding stone to smooth the bottom of the coasters so they won’t scratch table surfaces.
Stack your finished set on a side table to enjoy the subtle, earthy beauty of your handmade botanical art
Mini Bud Vase for Tiny Blooms
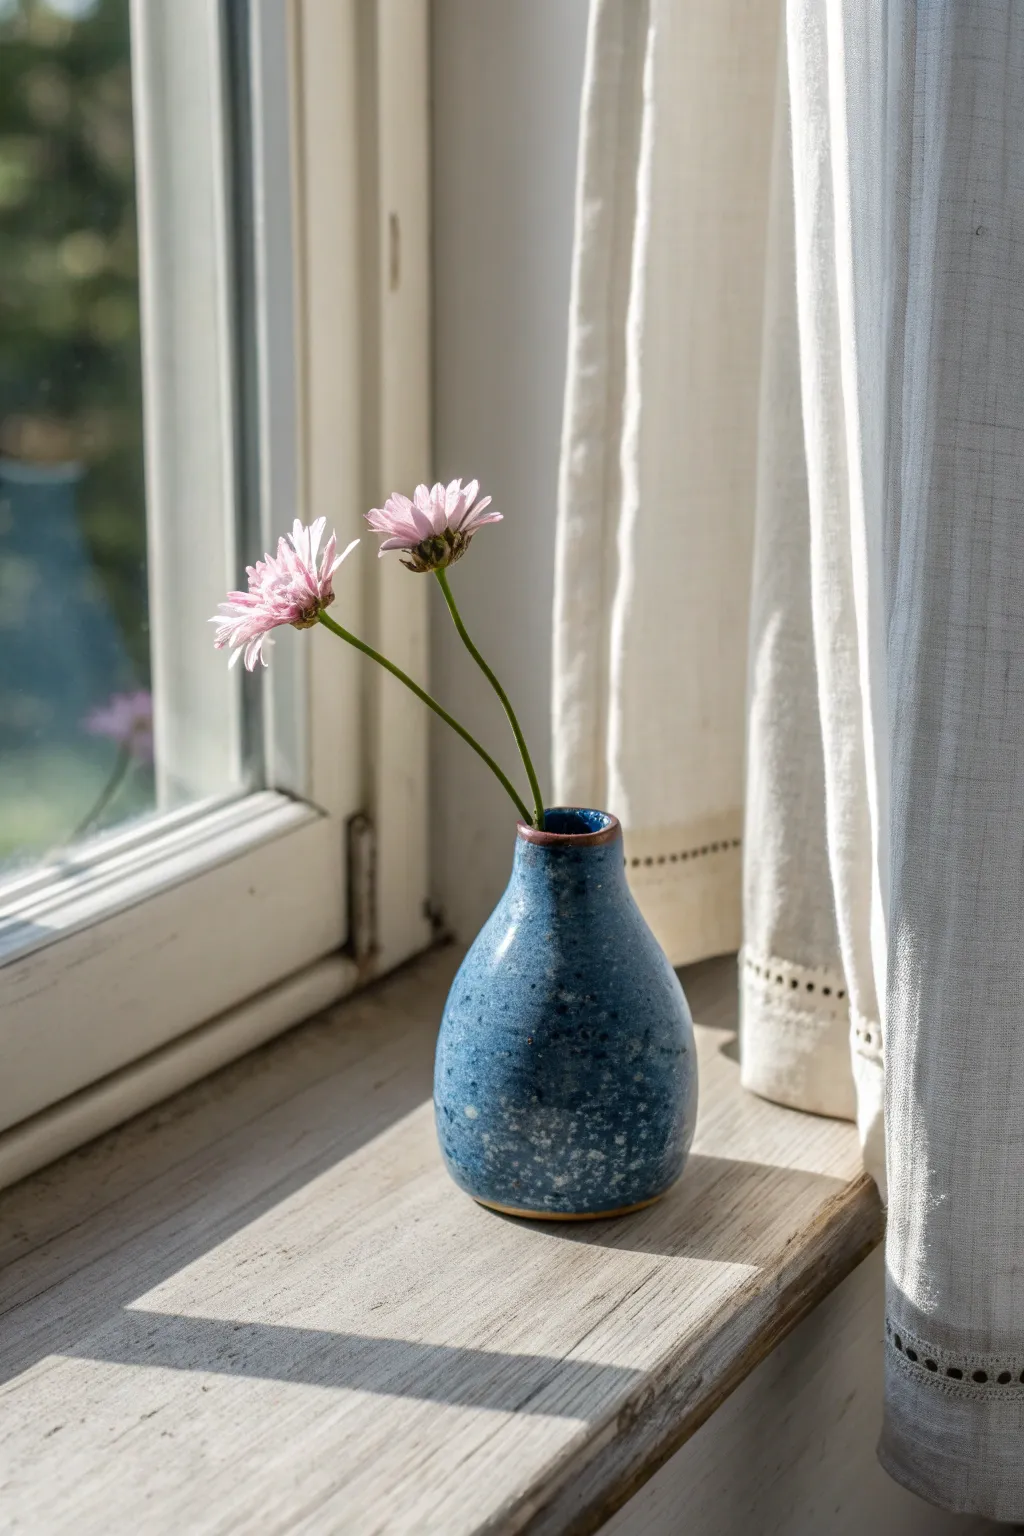
This charming wheel-thrown bud vase features a gentle pear shape and a rich, speckled blue glaze that catches the sunlight beautifully. Perfectly sized for just a stem or two, it brings a touch of handmade elegance to any small corner of your home.
Step-by-Step Guide
Materials
- Stoneware clay (approx. 1 lb)
- Pottery wheel
- Sponge
- Pin tool
- Rib tool
- Wire cutter
- Small trimming tools
- Speckled blue glaze (e.g., Floating Blue or similar)
- Clear or glossy finish glaze (optional overcoat)
- Wax resist
- Kiln
Step 1: Throwing the Form
-
Prepare the Clay:
Wedge your clay thoroughly to remove air bubbles. Since this is a miniature piece, start with a small ball, roughly the size of a tennis ball or smaller. -
Center on the Wheel:
Secure the clay to the wheel head and center it perfectly. This is crucial for a narrow-necked vessel to prevent it from wobbling later. -
Open the Clay:
Create your opening, but do not go too wide. Keep the floor narrow, about 1.5 to 2 inches, to support the delicate bud vase shape. -
Pull the Cylinder:
Pull the walls up into a tall, narrow cylinder. Ensure the walls are even in thickness from bottom to top. -
Shape the Belly:
Using a rib tool or your fingers inside the pot, gently push the belly out from the inside. Concentrate the volume in the lower half to create that sturdy, bulbous base. -
Collar the Neck:
Use both hands to gently squeeze the upper section of the cylinder inward (collaring). Do this in several passes, wetting your hands slightly to reduce friction. -
Refine the Opening:
Continue collaring until the neck is quite narrow. Use a small sponge or chamois to smooth the rim, creating a slight flare or a defined ring at the very top. -
Remove from Wheel:
Use your wire cutter to slice effortlessly under the base. Carefully transfer the wet vase to a ware board to dry to leather-hard.
Collaring Collapse?
If the neck walls buckle while narrowing, the clay is too thin or dry. Leave the top rim slightly thicker during the pulling phase to support the stress of collaring inward.
Step 2: Trimming and Bisque
-
Trim the Base:
Once leather-hard, center the vase upside down on the wheel. Trim away excess clay from the bottom to create a clean specific foot ring or a flat, smooth bottom. -
Smooth the Surface:
Wipe the exterior with a barely damp sponge to remove any trimming marks or rough texture, ensuring the glaze will flow smoothly. -
Bisque Fire:
Load the bone-dry vase into the kiln and fire to your clay body’s bisque temperature (usually verify Cone 04-06).
Step 3: Glazing and Final Fire
-
Clean the Bisqueware:
Wipe the fired vase with a damp sponge to remove kiln dust, which helps prevent glaze defects like crawling. -
Apply Wax Resist:
Paint a uniform layer of wax resist on the bottom of the foot and about 1/8 inch up the side to keep the base clean. -
Glaze the Interior:
Pour a small amount of glaze inside the vase, swirl it around to coat the inner walls completely, and pour out the excess. -
Glaze the Exterior:
Hold the vase by the foot (or use tongs) and dip it into your speckled blue glaze. Hold for 3 seconds to get good coverage without running. -
Highlight the Rim:
I like to double-dip just the very rim into a darker blue or let the glaze thin slightly there to create that lovely reddish-brown break where the clay shows through. -
Clean Up:
Sponge off any glaze droplets that may have stuck to the waxed bottom. -
Glaze Fire:
Fire the kiln to the maturity temperature of your clay and glaze (often Cone 5 or 6). Allow the kiln to cool completely before opening.
Dual-Tone Magic
Layer a second, lighter glaze just on the neck area. Because of the vertical surface, it will run down slightly into the blue, creating beautiful variegated drips.
Pop a few tiny wildflowers into your finished vase and enjoy the simple beauty of natural forms

TRACK YOUR CERAMIC JOURNEY
Capture glaze tests, firing details, and creative progress—all in one simple printable. Make your projects easier to repeat and improve.
Succulent Planter With a Drainage Tray
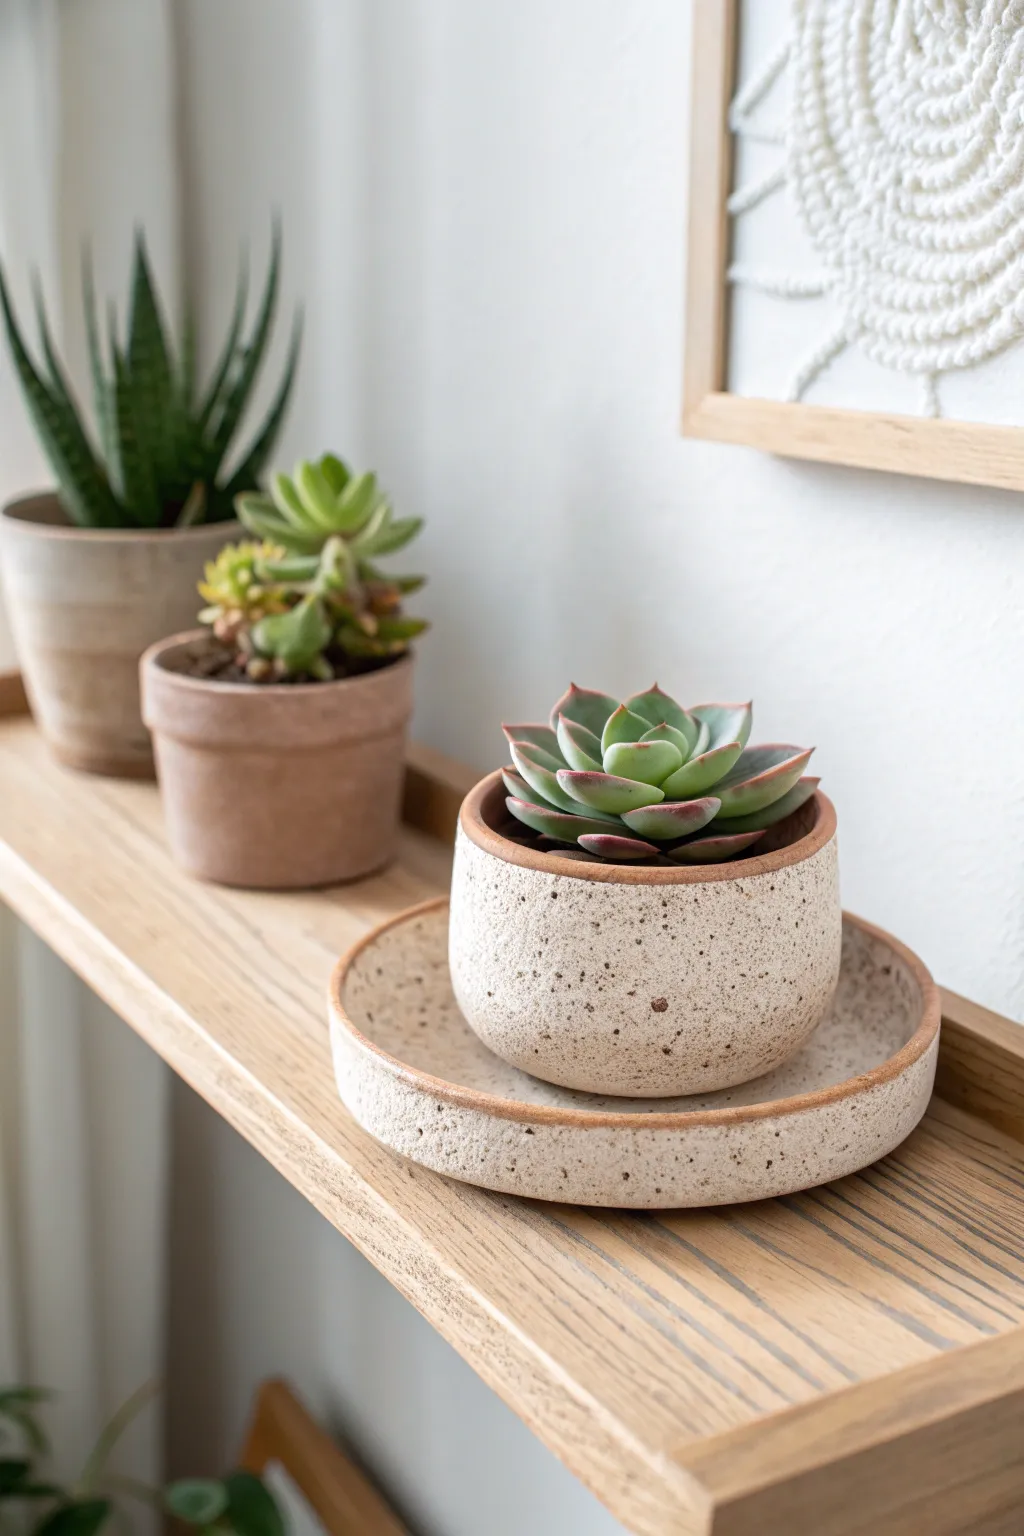
This charming project features a minimalist planter and matching saucer made from speckled buff clay. The natural, raw finish showcases the clay’s beautiful texture while providing a cozy home for your favorite succulent.
How-To Guide
Materials
- Speckled buff stoneware clay
- Rolling pin
- Canvas work surface
- Fettling knife or needle tool
- Potter’s rib (rubber or wood)
- Sponge
- Slip (clay slurry)
- Scoring tool or fork
- Clear matte glaze (optional for interior)
Step 1: Forming the Planter Body
-
Prepare the Base:
Begin by rolling out a slab of speckled clay to about a 1/4 inch thickness. Use a round cookie cutter or a template to cut out a circle roughly 3 inches in diameter for the base of your pot. -
Cut the Walls:
From the same slab, cut a long rectangular strip. The length should be the circumference of your base circle plus a little extra for overlap, and the height should be about 2.5 to 3 inches. -
Score and Slip:
Thoroughly score the outer edge of your circular base and the bottom edge of your rectangular strip. Apply a generous amount of slip to these roughened areas. -
Attach the Wall:
Carefully wrap the rectangular strip around the base circle. Press the scored edges together firmly to create a seal. Where the ends of the wall meet, bevel cut them at a 45-degree angle for a cleaner seam, score, slip, and join. -
Smooth the Seams:
Use your fingers or a wooden tool to blend the clay across the seams on both the inside and outside. I like to support the wall from the inside with one hand while smoothing the outside with the other to maintain the shape. -
Refine the Shape:
Use a potter’s rib to smooth the exterior walls. Gently press outwards from the inside to create a slight curve or belly to the pot if desired, mirroring the rounded form in the image. -
Finish the Rim:
Use a damp sponge or a piece of chamois leather to compress and smooth the top rim. Ensure it is level and rounded for a professional look. -
Add Drainage:
Use a small hole cutter or a drill bit to create a central drainage hole in the bottom of the pot. This is crucial for succulent health.
Step 2: Creating the Saucer
-
Cut the Saucer Base:
Roll out another slab of clay, slightly thicker than the pot walls. Cut a circle that is about 1 inch wider in diameter than your finished pot. -
Create the Rim:
You can either pinch the edges of this circle up gently to form a lip, or use the coil method. For the coil method, roll a thin snake of clay. -
Attach the Coil:
Score and slip the outer edge of the saucer base. Place the coil on top, acting as a low wall. -
Blend the Coil:
Smear the clay from the coil down onto the base on the inside, and from the base up onto the coil on the outside. This unifies the pieces. -
Refine the Saucer:
Use your rib tool to smooth the interior and exterior of the saucer, ensuring the bottom is perfectly flat so it doesn’t wobble.
Clean Edges
To get that crisp, defined rim seen in the photo, run a damp sponge lightly over the rim while the pot spins on a banding wheel.
Step 3: Drying and Firing
-
Slow Dry:
Place both pieces on a board and cover them loosely with plastic. Let them dry slowly over several days to prevent warping. -
Refine Dry Ware:
Once bone dry, use a slightly damp sponge to wipe away any sharp edges or burrs. Do not oversaturate. -
Bisque Fire:
Fire the pieces to bisque temperature (usually cone 04 or 06, depending on your clay). -
Final Finish:
The pot in the image has a raw clay exterior. If you want it waterproof, glaze the interior of the pot and the interior of the saucer with a clear matte glaze, leaving the speckled exterior bare. -
Glaze Fire:
Fire the pieces again to the maturity temperature of your clay body (likely cone 5 or 6 for stoneware).
Warping Walls?
If your cylinder walls slump while building, the clay is too wet. Use a heat gun briefly or let the slab stiffen up to ‘leather hard’ before assembling.
Once fired, pot your favorite echeveria and enjoy the rustic elegance of your handmade creation
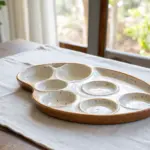
Toothbrush Holder for a Tidy Counter
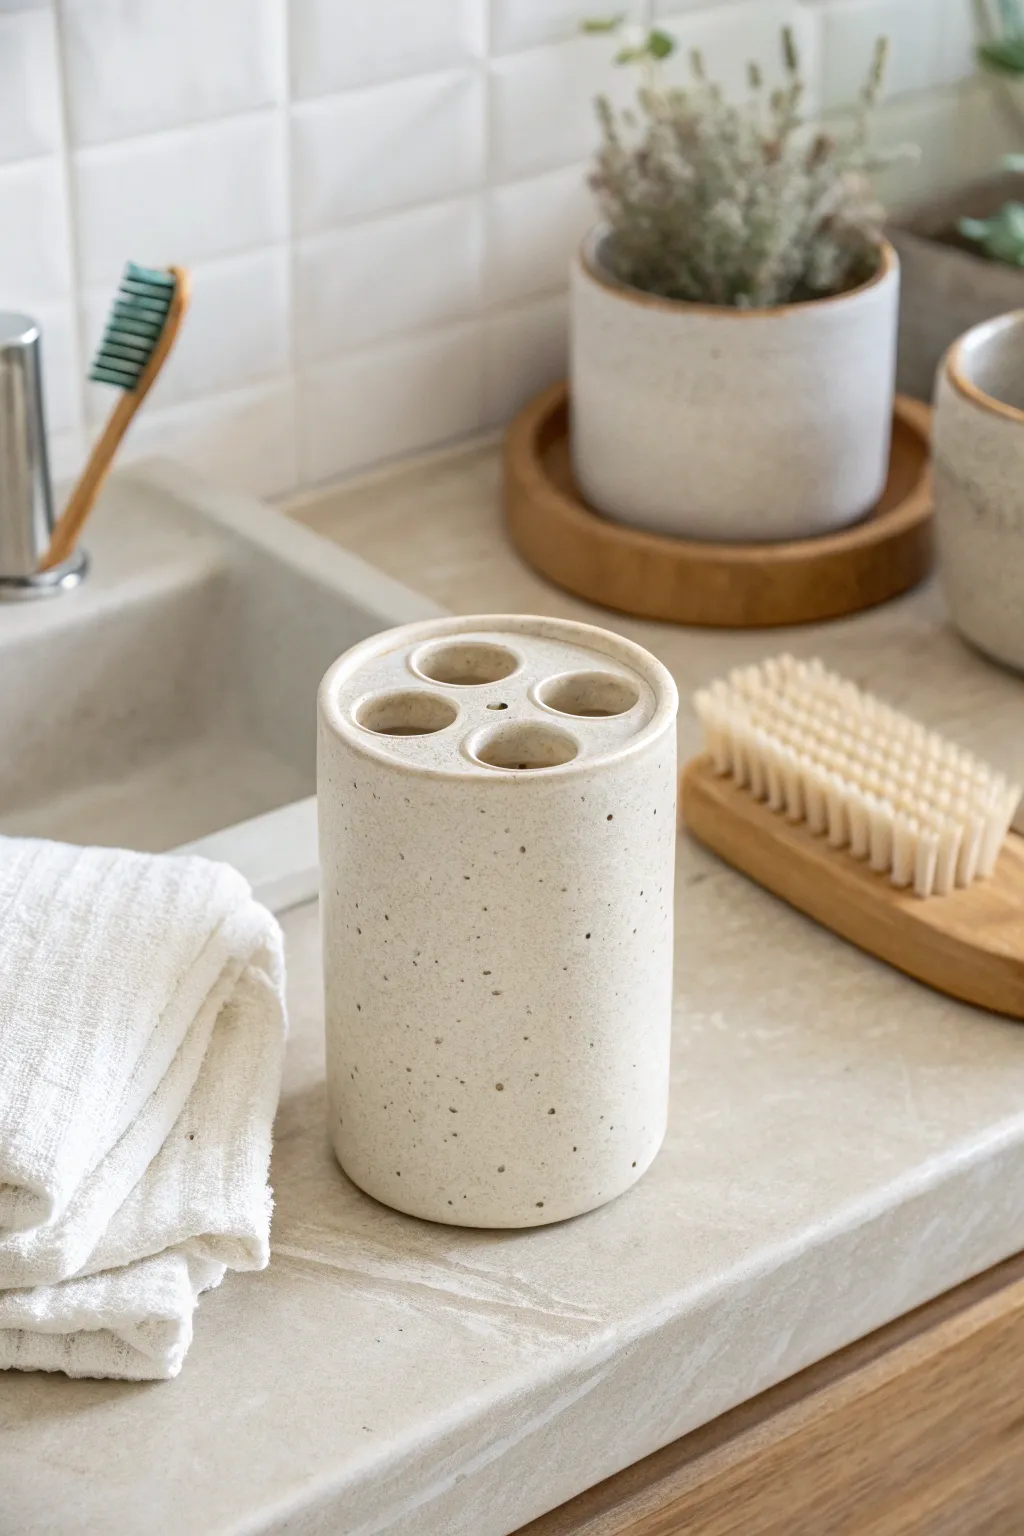
Bring the calming aesthetic of a spa into your bathroom with this minimalist toothbrush holder. Its clean cylindrical shape and speckled stone glaze offer a modern, organized home for your daily essentials.
Detailed Instructions
Materials
- White stoneware clay (preferably with grog for stability)
- Rolling pin
- Canvas working mat or slab roller
- Fettling knife
- Ruler
- Circular cookie cutters (one ~3 inch for base/lid, one ~0.5 inch for holes)
- Scoring tool or serrated rib
- Slip (clay and water mixture)
- Smoothing sponge
- Wooden modeling tool
- Matte speckled white glaze (e.g., ‘Speckled Buff’ or similar)
Step 1: Forming the Cylinder
-
Roll the slab:
Begin by wedging your clay to remove air bubbles, then roll it out into an even slab about 1/4 inch thick. I like to flip the slab halfway through rolling to ensure smoothness on both sides. -
Measure and cut:
Cut a rectangle from your slab. For a standard holder, measure approximately 10 inches long by 4.5 inches tall. This will form the walls of your cylinder. -
bevel the edges:
Using your knife at a 45-degree angle, bevel the two short ends of the rectangle. Cut one bevel facing up and the other facing down so they overlap seamlessly when rolled. -
Form the tube:
Carefully stand the rectangle up and curve it into a cylinder. Score the beveled edges thoroughly and apply slip. -
Seal the seam:
Press the scored edges together firmly. Use a wooden modeling tool to blend the clay across the seam on both the inside and outside until the join is invisible. -
Cut the base:
Roll out a fresh piece of clay or use scraps to cut a circle that matches the diameter of your cylinder (roughly 3 inches). -
Attach the bottom:
Score and slip the bottom edge of your cylinder and the outer rim of the base circle. Press them together, smoothing the clay upward from the base onto the wall to secure it.
Step 2: Creating the Interior Lid
-
Cut the top disc:
Cut a second circle slightly larger than the cylinder’s diameter. This will become the top surface holding the brushes. -
Bevel the Disc:
Flip the circle over and gently bevel the bottom edge inward. This helps the lid sit snugly inside the cylinder walls rather than just balancing on top, creating a recessed look. -
Punch the holes:
Using the smaller 0.5-inch circular cutter, punch four evenly spaced holes into the disc. You can arrange them in a cross pattern or a square formation depending on preference. -
Refine the edges:
Use a damp sponge to round off the sharp edges of the four holes. This is crucial so your toothbrushes slide in smoothly without catching on sharp ceramic bits. -
Attach the lid:
Score the top rim of your cylinder and the underside edge of your prepared lid. Place the lid onto the cylinder. -
Recess and blend:
Gently press the lid down so it sits slightly below the rim of the cylinder walls. Blend the seam where the lid meets the inner wall until it looks like one solid piece. -
Create the drainage hole:
Don’t forget to poke a very small hole in the center of the lid (between the brush holes). This prevents air from being trapped inside during firing, which could cause an explosion. -
Final smoothing:
Wait for the piece to become leather-hard. Then, use a damp sponge to wipe down the entire piece, removing any fingerprints or rough texture.
Clean Cuts
Let the clay dry to ‘leather hard’ before punching the toothbrush holes. If the clay is too soft, the pressure of the cutter will warp the flat surface of the lid.
Step 3: Glazing and Firing
-
Bisque fire:
Once bone dry, fire the piece in the kiln to cone 04 (or your clay’s specific bisque temperature). -
Apply glaze:
Pour your matte speckled glaze inside the cylinder first, swirl it around to coat the bottom, and pour it out. Then dip or brush the exterior. -
Clean the holes:
Double-check that glaze hasn’t clogged the small air hole or formed thick drips inside the toothbrush holes. Wipe them back slightly if needed. -
Final fire:
Fire the piece to cone 5/6 (or your glaze’s specific temperature). The speckles often come from iron content in the clay or the glaze reacting during this high fire.
Level Up: Drainage
Add a hidden drainage hole in the very bottom and create a matching saucer. This makes the holder easier to wash and prevents stagnant water buildup.
Place your brushes in their new home and enjoy the sleek update to your morning routine
Utensil Crock or Brush Cup
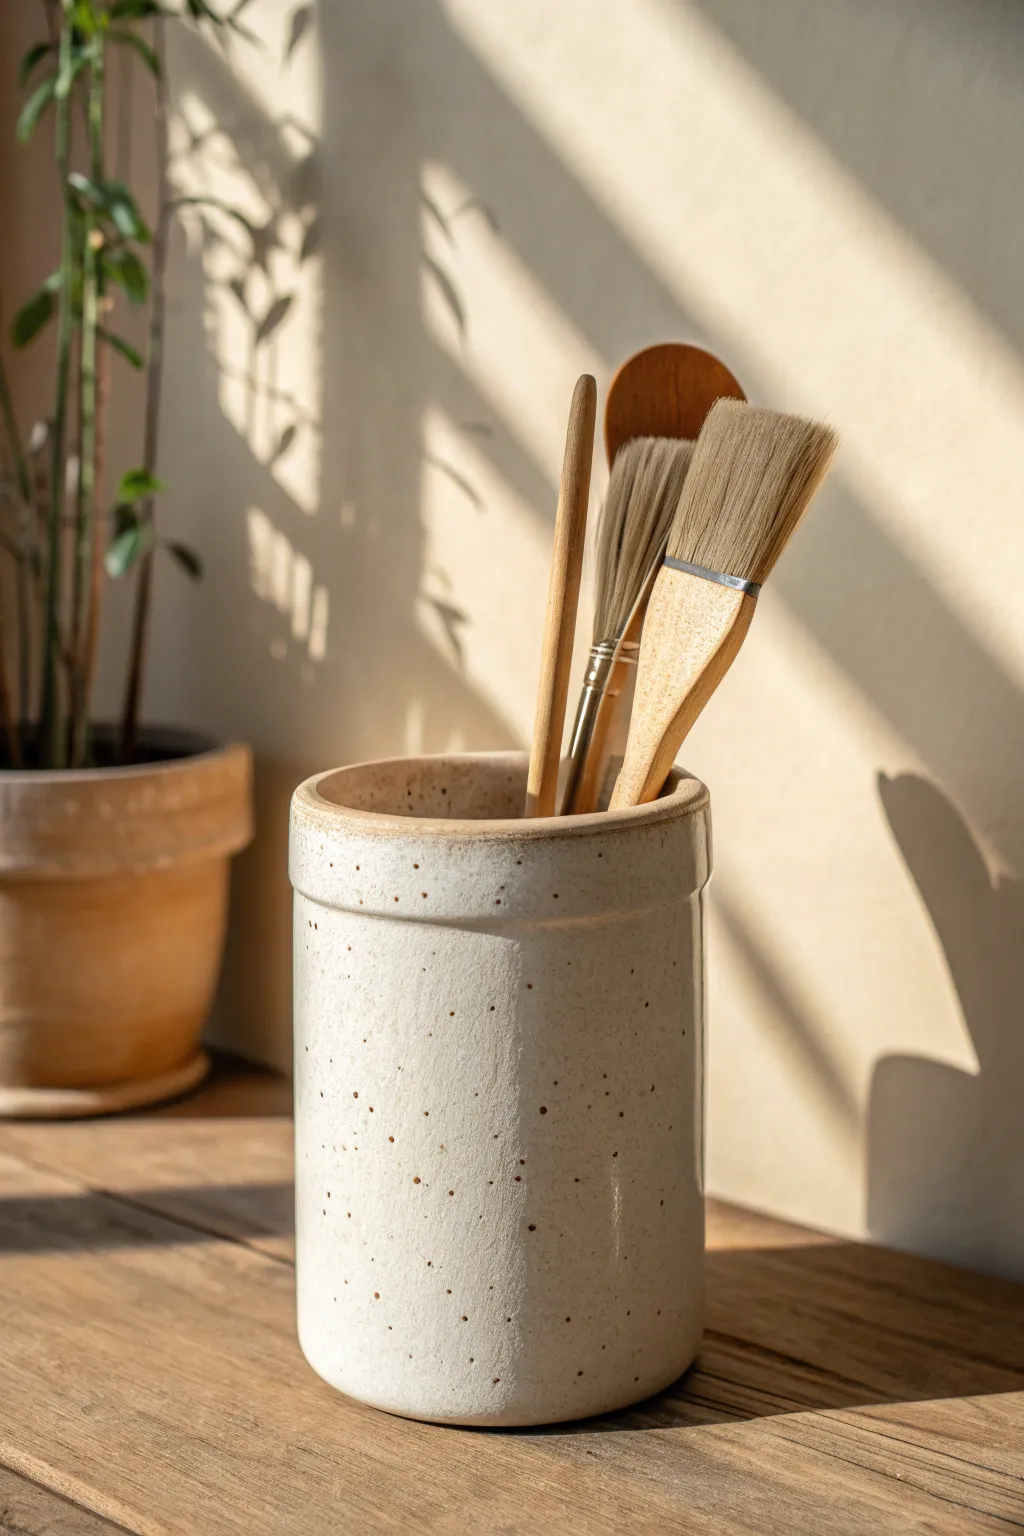
This minimalist utensil crock features a crisp cylindrical form and a charming speckled finish that adds warmth to any studio or kitchen. The unglazed rim detail provides a subtle earthy contrast, highlighting the natural clay body beneath a smooth matte glaze.
How-To Guide
Materials
- Stoneware clay (buff or white with speckles)
- Pottery wheel
- Throwing tools (sponge, needle tool, rib, wire cutter)
- Trimming tools
- Matte white or cream glaze
- Wax resist
- Kiln
Step 1: Throwing the Form
-
Center the Clay:
Begin with about 2-3 pounds of wedged stoneware clay. Secure it firmly onto the wheel head and center it using water and steady pressure. -
Open the Cylinder:
Drill your thumb or fingers into the center to open the clay, stopping about a half-inch from the bat to leave a sturdy floor. -
Establish the Floor:
Pull outwards to widen the base to your desired diameter—aim for about 4-5 inches wide for a utensil crock. Compress the floor thoroughly with a sponge or rib to prevent cracking. -
First Pull:
Slow the wheel down slightly. With lubricated hands, squeeze the clay wall and pull upwards, maintaining a straight, vertical line. -
Gain Height:
Continue pulling the walls up in subsequent passes. Focus on keeping the walls an even thickness from bottom to top, aiming for a height of roughly 5-6 inches. -
Refine the Profile:
Use a straight metal or wooden rib on the exterior while supporting the interior with your hand. Run the rib up the side to remove throwing lines and ensure the walls are perfectly straight and cylindrical. -
Define the Rim:
Use a chamois or a wet sponge to compress and round the rim gently. For the look in the photo, create a slightly distinct, flattened bead at the very top. -
Cut and Dry:
Wire the pot off the bat and let it dry to a leather-hard state. I usually cover it loosely with plastic so the rim doesn’t dry out too fast.
Step 2: Trimming & Glazing
-
Secure for Trimming:
Once leather hard, center the pot upside down on the wheel. Secure it with clay lugs or a chuck if necessary. -
Trim the Base:
Trim away excess weight from the bottom walls. Carve a neat foot ring or trim the bottom flat with a slight bevel, depending on your preference. Smooth the trimmed area with a damp sponge. -
Bisque Fire:
Allow the pot to dry completely to the bone-dry stage. Load it into the kiln and bisque fire it to cone 04 (or your clay’s specific bisque temperature). -
Apply Wax Resist:
Once cooled, wipe the pot down with a damp sponge to remove dust. Apply wax resist to the bottom foot and, crucially, a thin line across the top rim if you want that exposed clay detail shown in the image. -
Glaze Application:
Mix your matte white or cream glaze well. Pour glaze inside the crock, swirl to coat, and pour out. Then, dip the exterior or pour glaze over it to achieve an even coat. -
Clean the Rim:
If you didn’t wax the rim, use a damp sponge to wipe the glaze off the very top edge now. This reveals the clay body and creates that nice border definition. -
Glaze Fire:
Load the glazed crock into the kiln. Fire to the maturity temperature of your clay and glaze (typically cone 5 or 6 for stoneware). -
Sanding:
After the kiln has cooled and you’ve unloaded, check the bottom. Briefly sand the unglazed foot with sandpaper or a diamond pad to ensure it won’t scratch your table.
Warped Walls?
If your cylinder ovalizes while throwing, you might be squeezing too hard or the wheel is spinning too fast. Slow down and use lighter pressure.
Make it Speckled
If you don’t have speckled clay, mix a small amount of granular manganese or ilmenite into your white clay body before wedging.
Now your brushes and tools have a beautiful handmade home that keeps your workspace tidy
Incense Tray With an Ash Catch
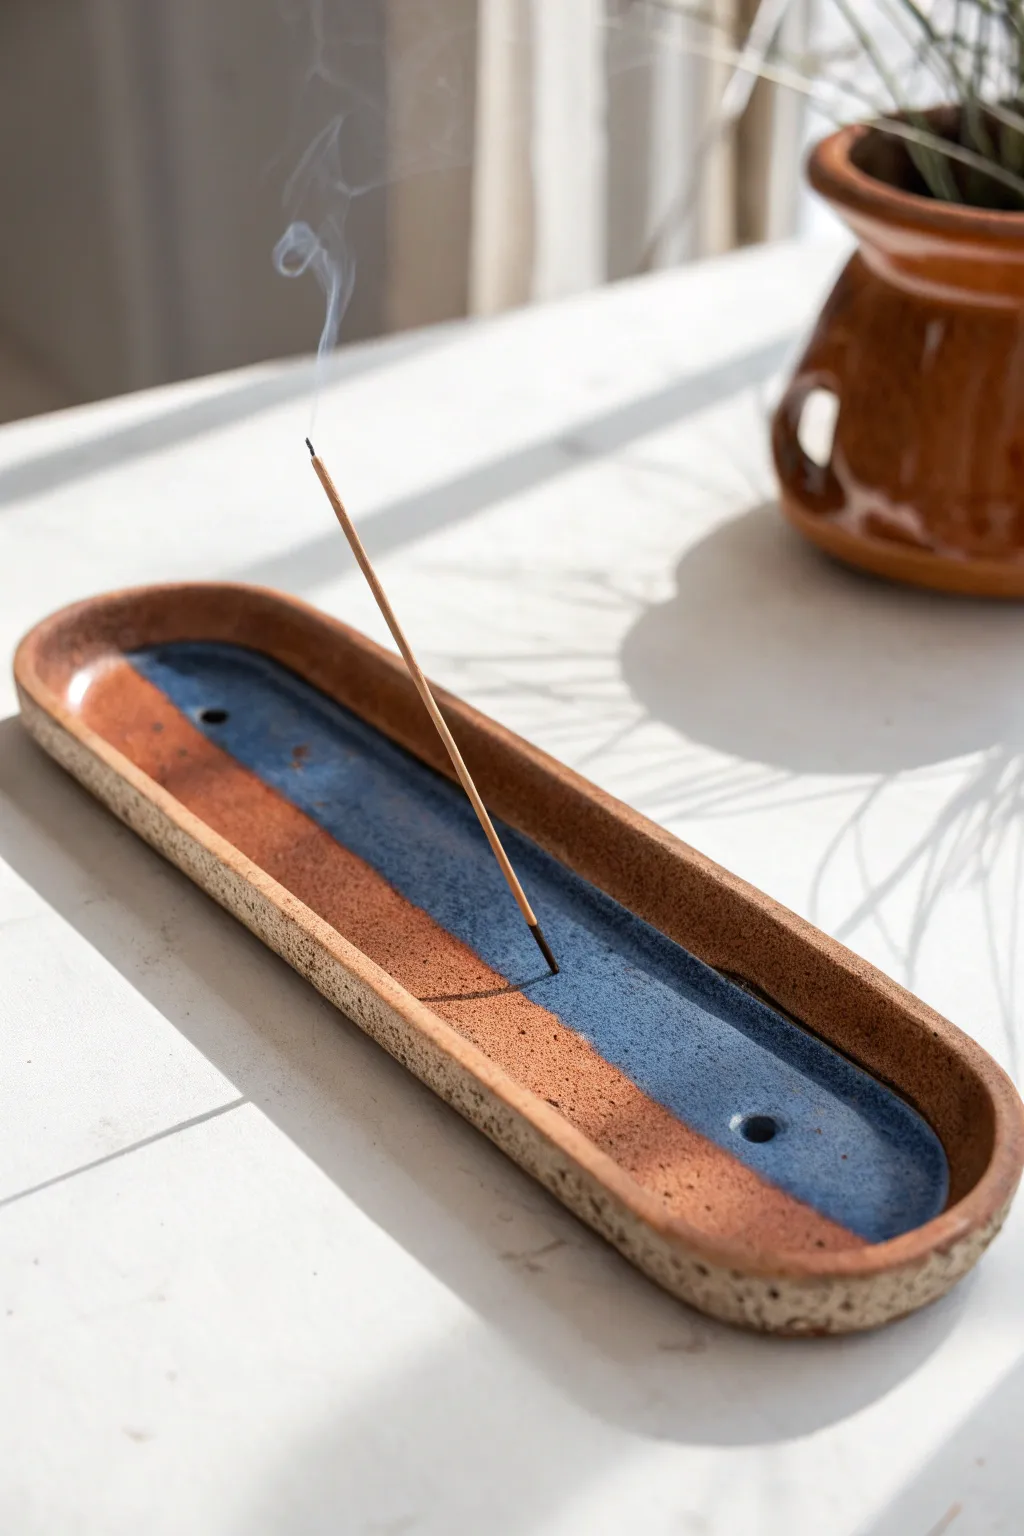
This elegant stoneware project combines the raw, earthy texture of unglazed clay with a splash of glossy blue to catch falling ash. Its long, oval shape is perfect for standard incense sticks, keeping your surfaces clean while adding a moment of zen to your decor.
Step-by-Step Tutorial
Materials
- Speckled stoneware clay (mid-fire)
- Oval template (paper or cardstock)
- Slab roller or rolling pin with thickness guides
- Pin tool or fettling knife
- Rib tool (rubber or metal)
- Sponge
- Small drill bit tool or piercing tool
- Scoring tool
- Slip
- Blue stoneware glaze
- Masking tape or wax resist
- Kiln
Step 1: Forming the Tray Base
-
Prepare your clay:
Begin by wedging a pound of speckled stoneware clay to remove air bubbles. Roll it out into an even slab about 1/4 inch thick. I like to use wooden thickness strips here to ensure the slab is perfectly uniform. -
Cut the shape:
Place your paper oval template (approx. 10 inches long by 3 inches wide) onto the slab. Trace around it carefully with a pin tool or fettling knife to cut out the base shape. -
Smooth the surface:
Before manipulating the clay further, run a rubber rib gently over the surface to compress the clay particles and remove any canvas texture from your rolling surface. -
Prepare the coils:
Roll out a separate long coil of clay, roughly the thickness of a pencil. This will become the raised wall of your tray. -
Score the perimeter:
Take a scoring tool or a serrated rib and rough up the top outer edge of your oval base. Do the same to one side of your coil. -
Attach the wall:
Apply a small amount of slip to the scored areas. Place the coil onto the edge of the base, pressing down firmly to ensure a strong bond.
Angle Advice
When piercing the hole for the stick, test the angle with a matchstick or toothpick while the clay is soft to ensure it points toward the center of the tray.
Step 2: Refining and detailing
-
Blend the seams:
Use a modeling tool or your thumb to smear the clay from the coil down into the base on the inside of the tray. Repeat this on the outside, blending the coil down to hide the seam completely. -
Shape the rim:
Pinch the wall gently to thin it out slightly, ensuring it stands upright. Use a slightly damp sponge to smooth the rim, rounding over any sharp edges. -
Create the incense holder:
Decide where you want the incense stick to stand. Near one end, create a small mound or thickening in the clay base if needed, then pierce it at an angle using a needle tool or small drill bit. The angle is crucial so the ash falls *into* the tray. -
Refine the surface:
Go over the entire piece with a damp sponge to remove fingerprints and smooth out any remaining rough spots. Pay special attention to the bottom edge so it sits flat. -
Bisque fire:
Let the piece dry slowly under plastic to prevent warping. Once bone dry, fire it to bisque temperature (usually cone 04).
Step 3: Glazing and Finishing
-
Clean the bisque:
Wipe the fired bisque piece with a damp sponge to remove any kiln dust that might interfere with glaze adhesion. -
Mask the design:
To achieve the split-tone look, apply a strip of masking tape diagonally across the length of the tray. Press it down firnly. -
Apply wax resist (alternative):
Alternatively, you can paint wax resist on the half you want to remain unglazed. Let the wax dry completely before proceeding. -
Glaze application:
Pour a glossy blue glaze into the side of the tray intended for color. Swirl it to coat evenly or brush it on carefully. If using tape, remove the tape immediately while the glaze is still wet to get a crisp line. -
Clean up:
Use a damp sponge to wipe away any glaze that may have splashed onto the section intended to remain raw clay or onto the bottom of the tray. -
Final Fire:
Load the tray into the kiln for the glaze firing (check your clay and glaze specs, typically cone 5 or 6 for stoneware).
Level Up: Texture Contrast
Before firing, gently sand the unglazed half of the dry clay for an ultra-smooth finish that contrasts beautifully with the shiny glaze.
Once the kiln cools, your stylish incense catcher is ready to bring a calming atmosphere to your home
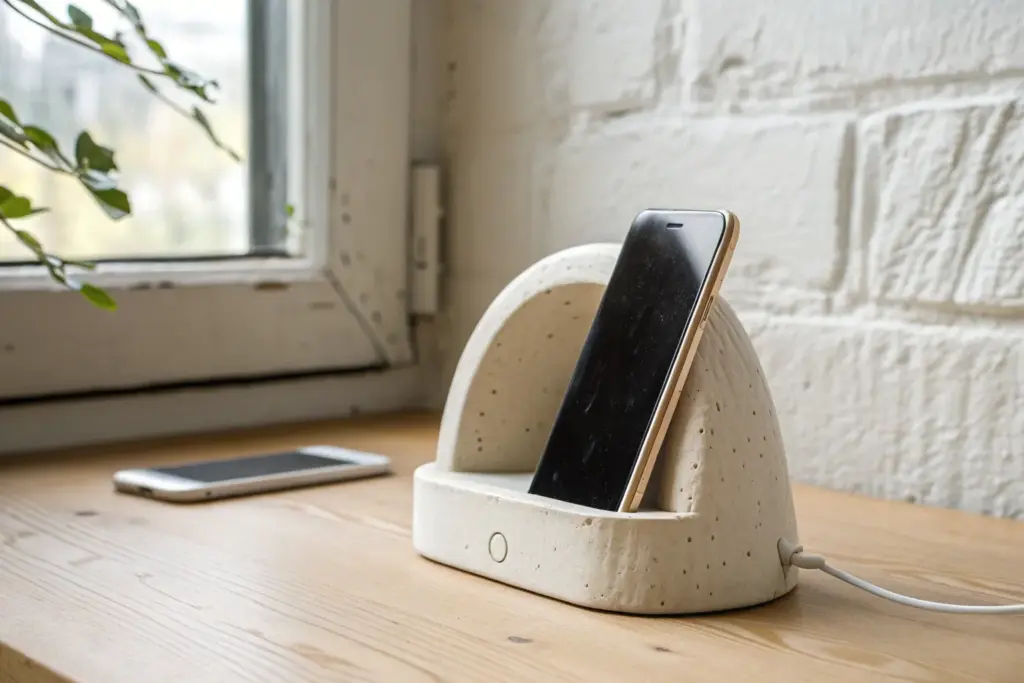
Phone Stand With a Sound-Boosting Curve
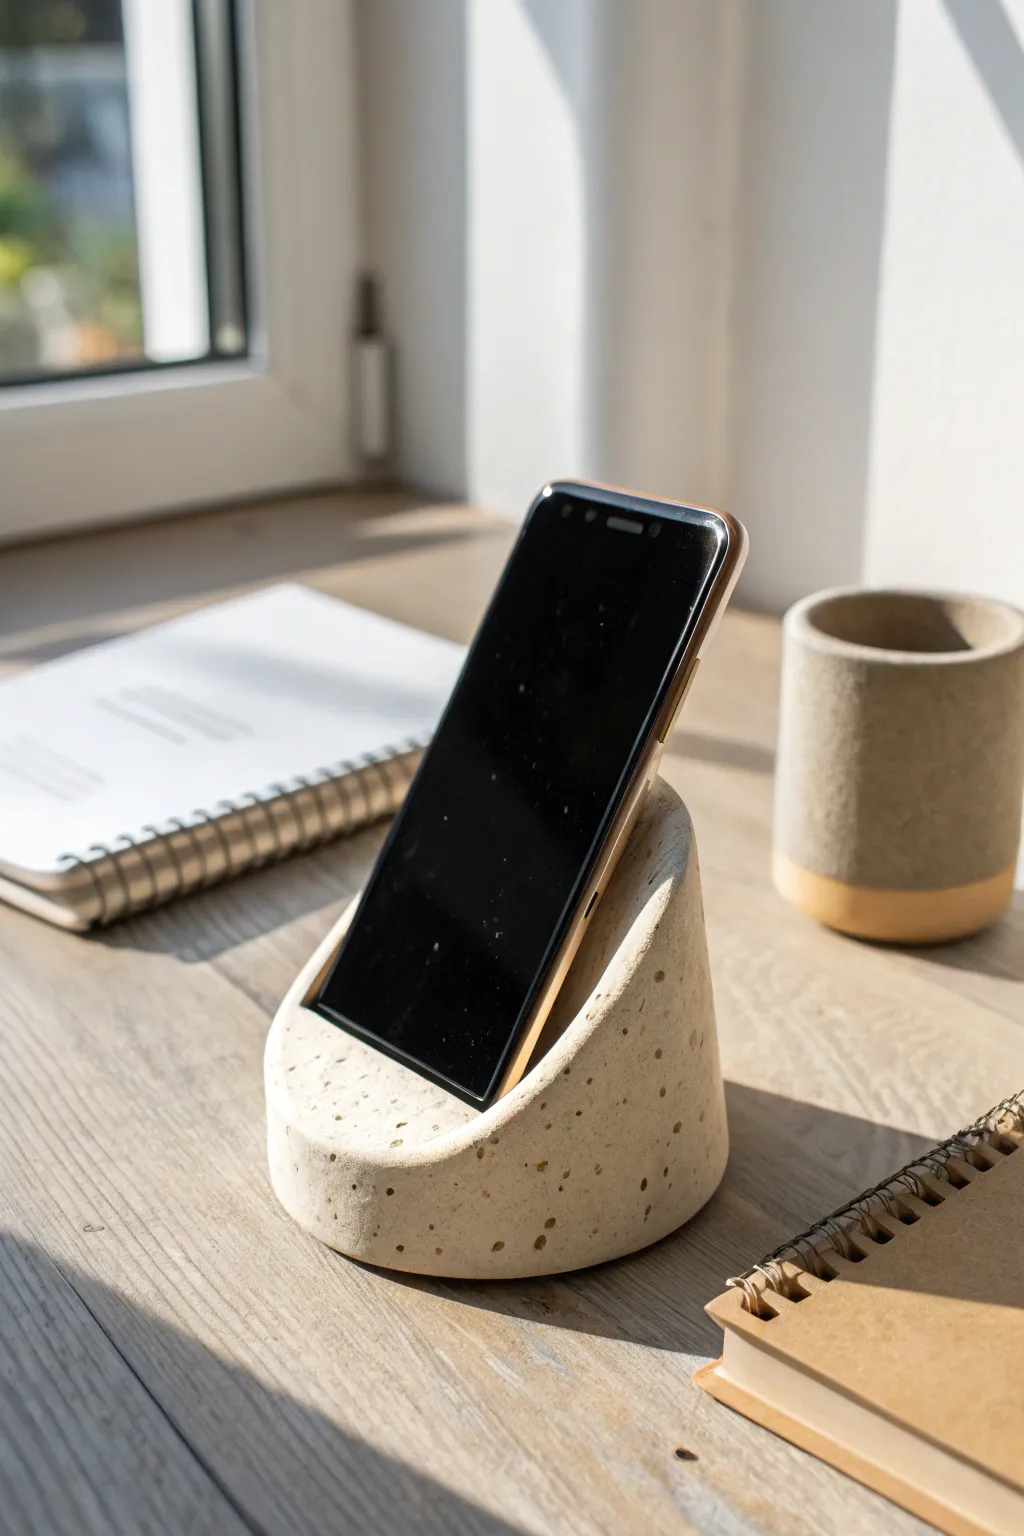
This minimalist phone stand combines sleek geometry with a natural, speckled finish that mimics raw stone. Its angled design not only holds your device securely but naturally amplifies sound through its concave shape, making it as functional as it is stylish.
How-To Guide
Materials
- White air-dry clay or polymer clay
- Coarse sand or dried coffee grounds (for speckling)
- Circular cookie cutter or a dedicated mold (approx. 4-inch diameter)
- Craft knife or clay wire cutter
- Sandpaper (medium and fine grit)
- Rolling pin
- Ruler
- Piece of thick cardboard (for a template)
- Water and sponge (for smoothing)
- Matte sealant spray
Step 1: Preparing the Base Form
-
Conditioning the Clay:
Begin by thoroughly kneading your clay to remove air bubbles and warm it up. If you want that stone-like speckled effect shown in the photo, mix in a teaspoon of coarse sand or dried coffee grounds during this stage. -
Creating the Cylinder:
Roll the clay into a thick log. You are aiming for a solid cylinder shape that is about 4 inches in diameter and roughly 4-5 inches tall. You can shape this by hand or pack the clay into a cylindrical mold if you have one. -
Smoothing the Sides:
Roll the cylinder gently on your work surface to ensure the sides are perfectly round and smooth. Tap the top and bottom against the table to flatten them. -
Drafting the Slice Line:
To get that distinctive angled slope, you need to cut the cylinder diagonally. Use a ruler to mark a point on one side of the top rim, and a point on the opposite side about 2 inches down from the top.
Step 2: Sculpting the Phone Slot
-
Making the Main Cut:
Using a wire cutter or a long, sharp blade, slice through the cylinder connecting your two marked points. This will create the primary viewing angle for the stand. Save the excess clay for another project. -
Testing the Angle:
Stand the clay piece on its flat base. The newly cut angled face should be facing up. Check it from the side to ensure the slope isn’t too steep for a phone to rest safely. -
Creating the Groove Template:
Cut a small rectangle of cardboard roughly the thickness of your phone. Press this template gently into the center of the slanted face to mark where the slot will go. -
Carving the Slot:
Use a craft knife or a loop tool to carve out a rectangular groove where you marked. It needs to be deep enough to hold the phone securely—aim for about 0.5 to 0.75 inches deep. -
Checking the Fit:
Carefully test the slot with your phone wrapped in plastic wrap (to keep it clean). Ensure the phone sits at a comfortable viewing angle and doesn’t tip backward.
Cracks appeared?
If small drying cracks form, mix a tiny bit of fresh clay with water to make a paste (slip). Fill cracks, smooth over, and let dry again slowly.
Step 3: Refining and Finishing
-
Adding the Acoustic Curve:
Slightly hollow out the area directly in front of where the phone sits. I find that gently pressing a spoon into the clay here creates a subtle concave shape that helps project sound forward. -
smoothing Imperfections:
Dip a sponge in a little water and wipe down the entire surface. Focus on the sharp edges of your cut and the rim of the phone slot to soften them slightly. -
First Drying Phase:
Let the piece dry slowly away from direct sunlight or heat sources. Turn it occasionally to ensure even drying, which helps prevent cracks. -
Sanding for shape:
Once the exterior is firm but not bone dry (leather hard), use medium-grit sandpaper to refine the cylindrical shape and perfect the flatness of the angled face. -
Final Sanding:
When completely dry, switch to fine-grit sandpaper. Polish the entire piece until it feels smooth to the touch. This creates that professional, stone-cast look. -
Sealing the Stand:
Wipe away all dust with a damp cloth. Finish by spraying a light coat of matte sealant over the stand to protect it from moisture and fingerprints.
Level Up: Terrazzo Style
Mix colored clay chips into your main block before rolling. Once sanded, colorful terrazzo flecks will be revealed for a trendy, unique finish.
Now you have a stylish, handmade accessory ready to grace your desk or bedside table
Desk Organizer Tray With Sections
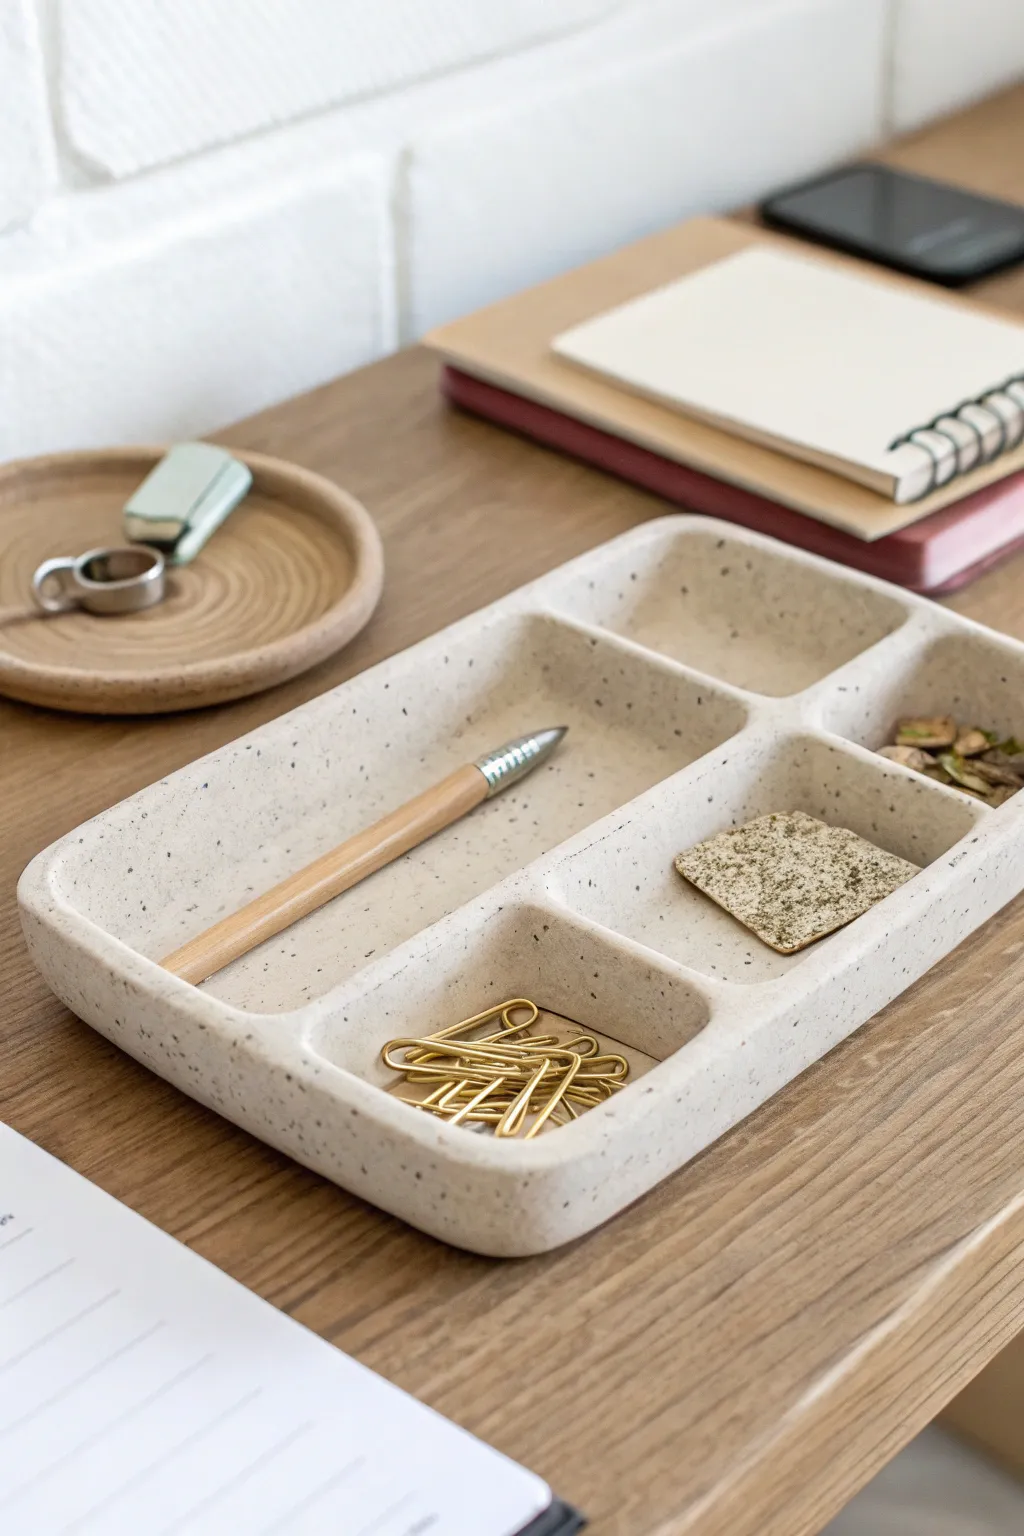
Bring harmony to your workspace with this sleek, minimalist desk tray featuring four distinct sections for all your odds and ends. The finish mimics the look of natural stone or terrazzo, achieved through a specific clay body or clever surface decoration technique.
Step-by-Step Tutorial
Materials
- Speckled stoneware clay (or white air-dry clay)
- Black pepper or dried coffee grounds (if simulating speckles)
- Rolling pin with guides (approx. 1/4 inch)
- Template (paper or cardstock)
- Fettling knife or X-Acto blade
- Ruler
- Sponge
- Clay slip or vinegar
- Serrated rib or scoring tool
- Sandpaper (fine grit)
- Matte clear sealant or glaze
Step 1: Preparation & Base Construction
-
Prepare your clay:
Start by wedging your clay to remove air bubbles. If you are using plain white clay but want the look in the photo, knead in a small amount of coarse black pepper or dried coffee grounds to create that speckled texture. -
Roll out the slab:
Roll your clay out into a large, even slab. Use 1/4 inch wooden guides on either side of your rolling pin to ensure the thickness is consistent throughout the entire piece. -
Cut the base:
Using a ruler and your knife, cut out a large rectangle for the base. For the size shown, aim for approximately 10 inches by 6 inches, though you can adjust this to fit your specific desk space. -
Smooth the surface:
Take a damp sponge and gently wipe the surface of the slab to remove any canvas texture or imperfections. This is much easier to do now while the clay is flat than later when walls are attached.
Clean Corner Trick
Use a damp paintbrush to smooth the inside corners where dividers meet walls. It reaches spots your fingers can’t.
Step 2: Creating the Outer Walls
-
Cut wall strips:
From the remaining slab foundation, cut long strips of clay that are about 1 inch tall. You will need enough length to go around the entire perimeter of your base. -
Score the perimeter:
Rough up the outer edge of your base slab using a serrated rib or scoring tool. Do the same to the bottom edge of your wall strips. -
Apply slip:
Dab a generous amount of slipping clay or vinegar onto the scored areas. This acts as the glue that bonds the pieces together. -
Attach the walls:
Press the wall strips onto the base. Where the strips meet at the corners, cut them at a 45-degree angle (miter cut) for a seamless look, or simply butt them together and blend well. -
Reinforce the seams:
Use a small coil of soft clay along the inside interior seam where the wall meets the floor. Smooth this coil down to ensure a strong bond and a rounded interior corner.
Step 3: Adding the Dividers
-
Measure the inserts:
Based on the photo, you need one long horizontal divider and two shorter vertical ones. Measure the interior length of your tray to cut a strip that fits snugly from left to right. -
Install the long divider:
Score, slip, and insert the long strip. Position it slightly off-center to create a larger ‘pen’ area in the front and smaller compartments in the back. -
Install vertical dividers:
Cut two smaller pieces for the vertical dividers. Place one in the back section to split it into two squares, and one in the front section to create a smaller square compartment on the right side. -
Blend connections:
Carefully smooth the clay everywhere a divider meets a wall or the floor. A small modeling tool or the back of a paintbrush works well for getting into these tight corners.
Make it Terrazzo
Mix small chips of colored dried clay into your wet white clay before rolling. Sanding later reveals a colorful terrazzo effect.
Step 4: Refining & Finishing
-
Round the edges:
Once the basic structure is built, use a damp sponge or your finger to gently round over the top sharp edges of all the walls. This gives the piece that soft, molded look seen in the reference. -
Dry slowly:
Cover the tray loosely with plastic. Because of the internal walls, uneven drying can cause warping. Let it dry very slowly over several days. -
Sand for smoothness:
When completely bone dry (or cured if using air-dry clay), gently sand any rough spots. Wear a dust mask for this step. -
Seal the piece:
Finish with a matte clear glaze (if firing) or a matte varnish (if using air-dry clay) to protect the surface while keeping that natural, stony appearance.
Now you have a custom organizer ready to keep your desk beautifully clutter-free
Wall Hook With a Whimsical Face
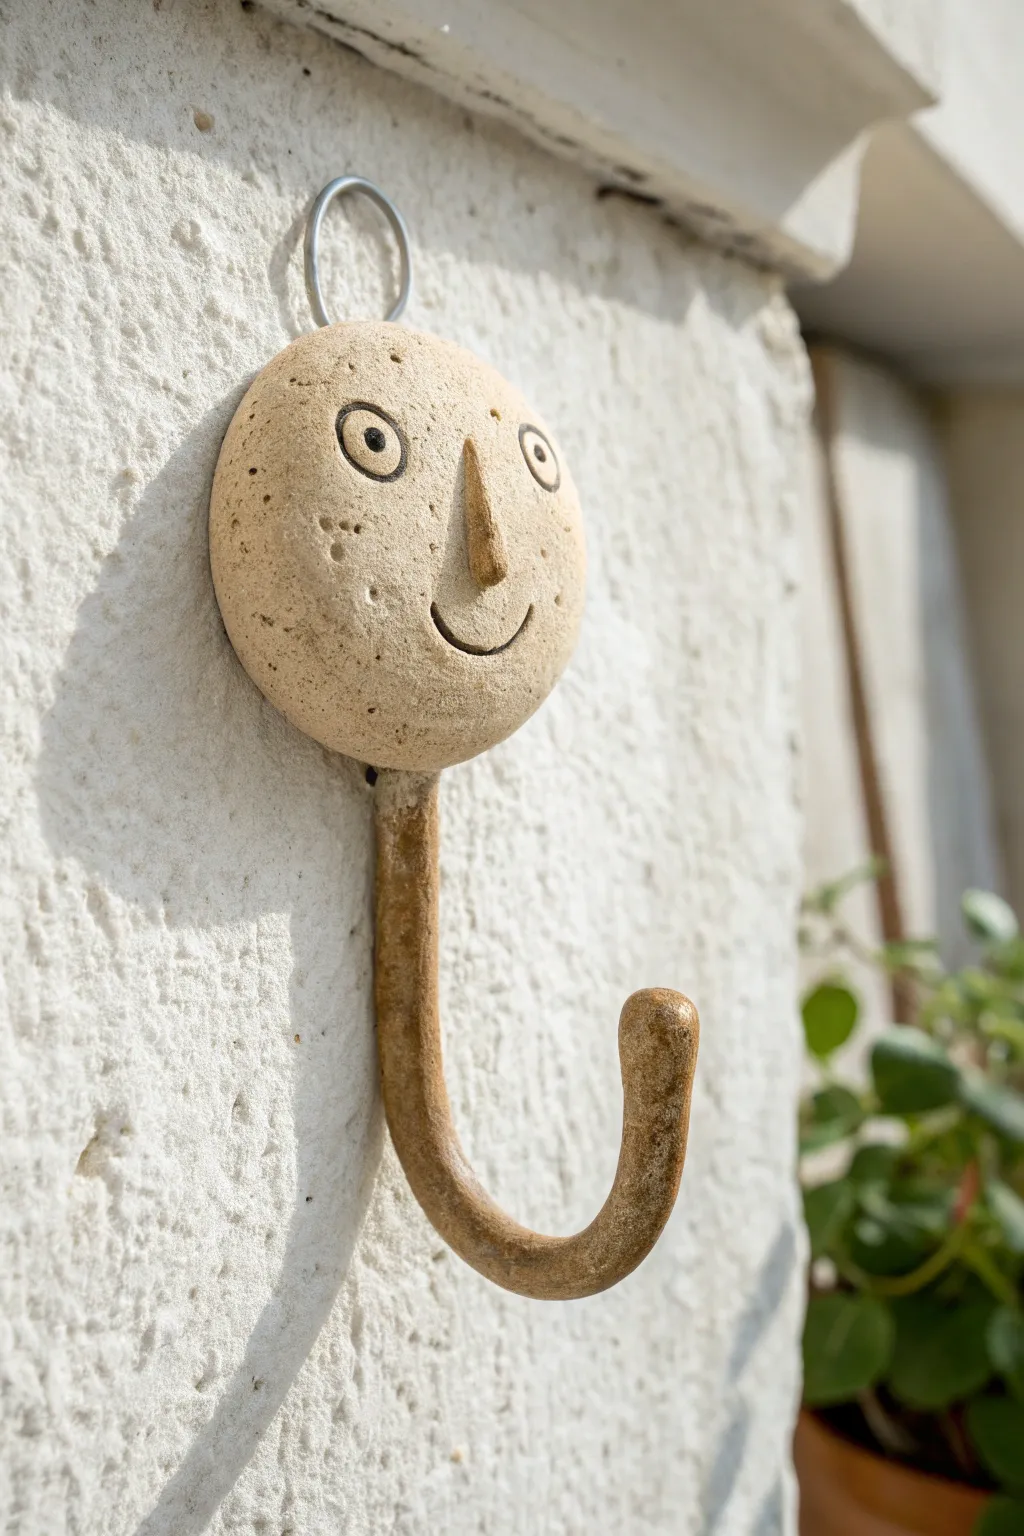
Add personality to your vertical storage with this charming wall hook featuring a polite, smiling face sculpted from speckled clay. This functional piece combines a warm, stony texture with simple, stylized features for a delightful handcrafted look that is sturdy enough to hold keys or tea towels.
Detailed Instructions
Materials
- Speckled stoneware clay (mid-fire or high-fire)
- High-temperature hanging wire (nichrome)
- Small rolling pin
- Fettling knife or needle tool
- Loop tool or small carving tool
- Slip and scoring tool (serrated rib)
- Sponge
- Black underglaze
- Fine-point paintbrush
- Matte transparent glaze (optional)
- Kiln
Step 1: Sculpting the Head
-
Prepare the Clay:
Begin with a ball of speckled stoneware clay slightly larger than a golf ball. Wedge it thoroughly to remove air bubbles, ensuring a smooth, consistent texture. -
Form the Base Shape:
Gently flatten the ball into a thick, rounded disc. You want it to be substantial—about 3/4 inch thick—so it has a nice visual weight and durability. -
Smooth the Edges:
Use a slightly damp sponge to round over the edges of the disc. The goal is to make it look like a river stone, so eliminate any sharp angles or flat spots. -
Add the Wire Loop:
Cut a 2-inch length of high-temp wire and bend it into a ‘U’ shape. Insert the cut ends deeply into the top of the clay disc until only the loop remains visible, twisting the ends slightly inside the clay for better anchorage.
Wire Woes?
If the wire loop feels loose after bisque firing, the clay shrank away from it. Apply a drop of kiln-safe adhesive or a tiny bit of glaze into the hole before the final firing to secure it.
Step 2: Creating the Face
-
Mark Eye Placement:
Using a needle tool, lightly mark two circles where the eyes will sit. Place them relatively high on the face to give it a slightly innocent, quirky expression. -
Form the Nose:
Roll a very small, thin cone of clay. Score and slip the area between the eyes, then attach the cone, smoothing the edges downward into the face to blend it seamlessly. -
Detail the Eyes:
Carve out the eye circles slightly or impress a small ring tool into the clay. Add tiny pupils by poking the center with a blunt needle tool or the back of a paintbrush. -
Carve the Smile:
With a needle tool, carve a simple, curved line for the smile. I like to make the ends of the smile tick upward just slightly to enhance the friendly character. -
Refine the Surface:
Gently sponge the face again to soften any burrs created by the carving tools. The texture should remain somewhat rustic, but not scratchy.
Step 3: Forming the Hook
-
Pull a Coil:
Roll a sturdy coil of clay, approximately the thickness of your index finger. It needs to be thick enough to support weight without cracking. -
Shape the Curve:
Bend the coil into a ‘J’ shape. Ensure the bottom curve is wide enough to hold items securely, and round off the tip of the hook so it doesn’t snag fabrics. -
Attach the Hook:
Score the bottom edge of the head and the top of the coil deeply. Apply slip generously to both surfaces. -
Blend the Seam:
Press the coil firmly onto the head. Using a modeling tool or your thumb, drag clay from the hook up onto the head (and vice versa) to knit the two pieces together, then smooth the join completely. -
Dry Slowly:
Place the piece on its back to dry. Because the hook protrudes, you may need to prop the head up on a piece of foam so the hook hanging off the edge doesn’t get flattened.
Make It a Family
Create a row of hooks with different expressions—one sleeping, one surprised, one whistling. Vary the nose shapes (button, long, crooked) to give each hook a distinct personality.
Step 4: Decoration and Firing
-
Bisque Fire:
Once bone dry, fire the piece to bisque temperature (usually Cone 06 or 04) to prepare it for glazing. -
Apply Underglaze:
Using a fine-point brush, carefully paint the carved lines of the eyes, pupils, and mouth with black underglaze. Wipe away any excess on the surface with a damp sponge so the color remains only in the recesses. -
Glaze Application:
You can leave the raw clay for a matte stone look, or apply a very thin coat of matte transparent glaze to seal it while keeping the natural texture visible. -
Final Firing:
Fire the piece to the maturity temperature of your clay body (likely Cone 5 or 6 for stoneware). Ensure the hanging wire is clean of any glaze before firing.
Hang your friendly new helper on the wall and enjoy the smile it brings every time you reach for your keys
Chunky Bookends With Simple Geometry
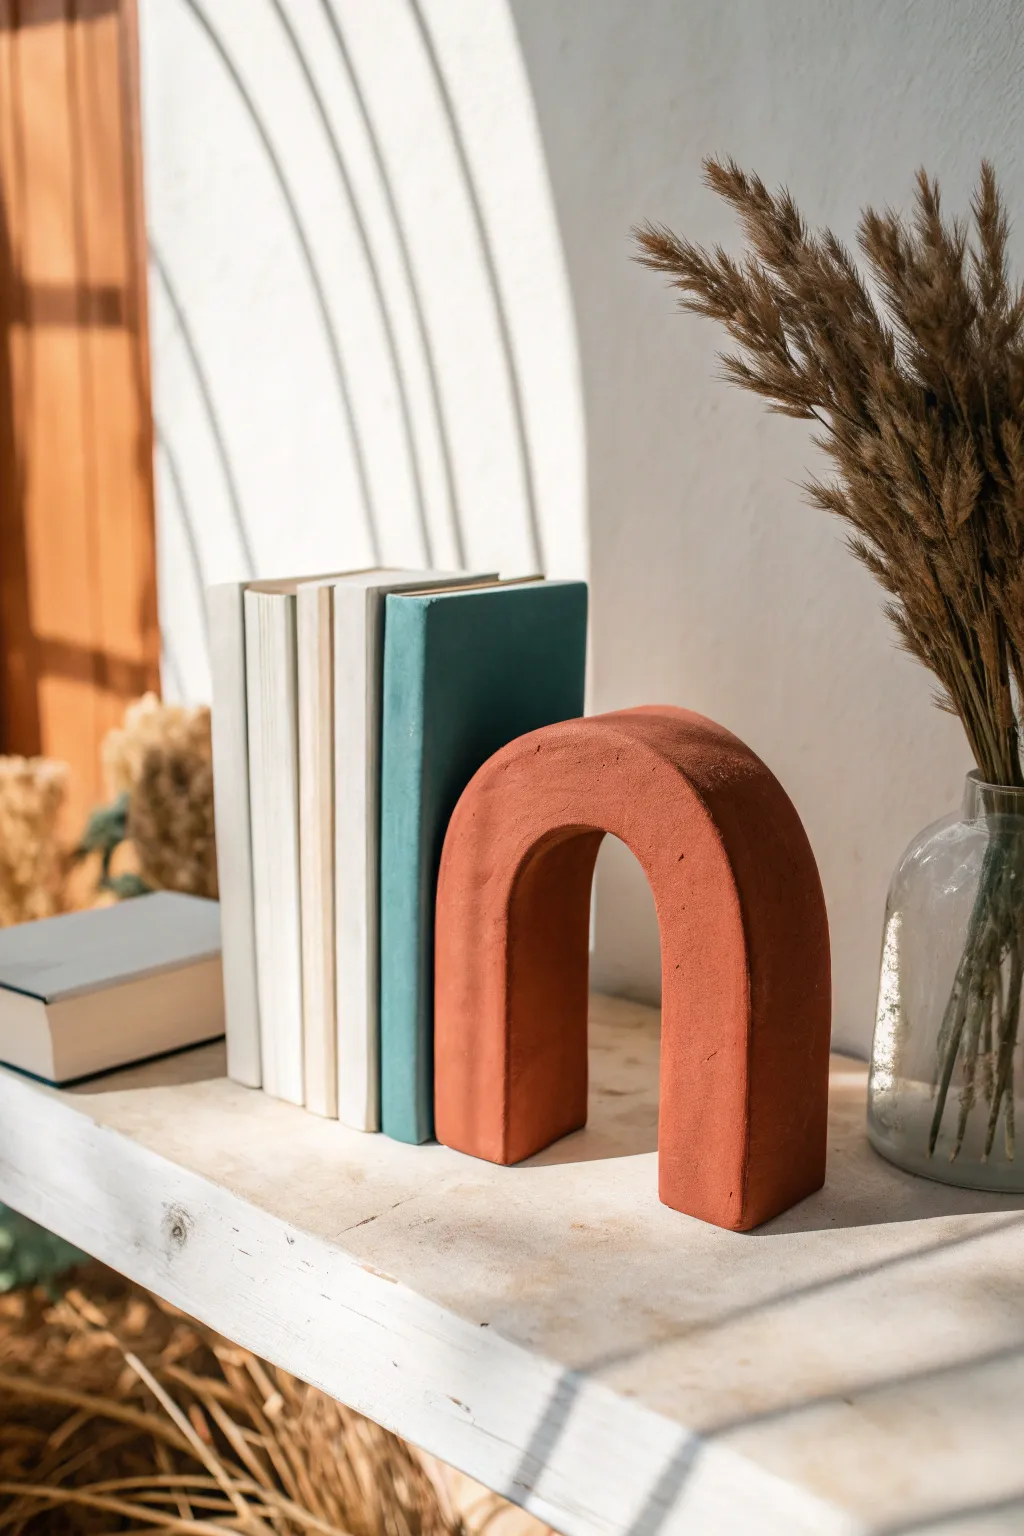
This project combines striking geometric simplicity with functionality, resulting in a substantial U-shaped arch that anchors your favorite reads. The finished piece features a warm, terracotta finish and a pleasingly chunky profile that adds architectural interest to any shelf.
Step-by-Step
Materials
- Air-dry clay or polymer oven-bake clay (approx. 2-3 lbs)
- Rolling pin
- Two guide sticks for thickness (approx. 1 inch)
- Flexible ruler or measuring tape
- Sharp clay knife or X-Acto blade
- Smoothing sponge and bowl of water
- Sandpaper (medium and fine grit)
- Terracotta acrylic paint
- Matte spray sealant
- Cardboard or cardstock for template
Step 1: Planning and Forming the Base
-
Outline your template:
Begin by sketching a thick U-shape on a piece of cardboard or sturdy cardstock. Aim for the legs to be about 2-3 inches wide, with an overall height of around 6-7 inches to ensure it’s heavy enough to hold books. -
Cut the template:
Cut your paper arch out precisely. This template is crucial for keeping your clay shape symmetrical during the building process. -
Condition the clay:
Take a large chunk of clay and knead it thoroughly on your work surface until it is warm, pliable, and free of air bubbles. Air bubbles now mean cracks later. -
Roll the slab:
Place your guide sticks on either side of the clay. Use the rolling pin to flatten the clay into a very thick slab, ideally around 1 to 1.5 inches thick. This thickness gives the bookend its necessary weight. -
Position the template:
Lay your cardboard cutout gently onto your thick slab of clay. Press it down just enough so it doesn’t slide around.
Cracking Up?
If cracks appear while air-drying, mix a small amount of fresh clay with water to make a paste (slip). Fill the cracks, smooth over, and let dry again.
Step 2: Shaping and Refining
-
Slice the profile:
Holding your knife perfectly vertical, cut around the template. Move slowly to avoid dragging or warping the thick walls of the clay. -
Remove excess:
Peel away the scrap clay and set it aside. Carefully lift the template off the surface. -
Smooth the cut edges:
Dip your finger into a bit of water and run it along the sharp cut edges to round them slightly. You want to erase the ‘sliced’ look and integrate the sides with the face. -
Refine the curve:
Pay special attention to the inner curve of the arch. If the knife left any jagged marks, use a slightly damp sponge to buff them smooth. -
Flatten the base:
Stand the arch up on its legs to ensure it sits perfectly flat. If it wobbles, gently press it down onto the table or lightly drag the feet across a piece of sandpaper to level them. -
Final smooth:
Give the entire piece one last wipe with a damp sponge or your fingertips to remove fingerprints. Let the surface become pristine before drying.
Make it Heavy
For extra stability with heavy books, hollow out the bottom of the legs slightly before drying and glue in metal washers or fishing weights after curing.
Step 3: Drying and Finishing
-
Dry partially:
Allow the piece to dry for about 24 hours. I usually like to flip it gently halfway through this period so the bottom gets air exposure too. -
Complete drying or baking:
If using air-dry clay, let it sit for another 24-48 hours until fully chalky white and hard. If using polymer clay, assume baking instructions per the package, generally at low heat for a longer duration due to the thickness. -
Sand imperfections:
Once fully cured, take your medium grit sandpaper to smooth out any bumps. Finish with fine grit for a velvety texture. -
Wipe clean:
Use a dry cloth or tack cloth to remove all sanding dust. The surface needs to be dust-free for the paint to adhere properly. -
Apply base coat:
Paint the entire arch with your terracotta acrylic paint. Use long, even strokes to avoid brush marks. -
Create texture (optional):
To mimic the stone-like look in the photo, you can dab a second layer of paint on with a sponge rather than a brush, or mix a tiny pinch of baking soda into the paint for grit. -
Seal the piece:
Finish with a matte spray sealant to protect the paint from chipping while preserving that earthy, non-glossy aesthetic.
Place your new architectural sculpture on the shelf and enjoy the modern warmth it brings to your collection
Page Holder for One-Hand Reading
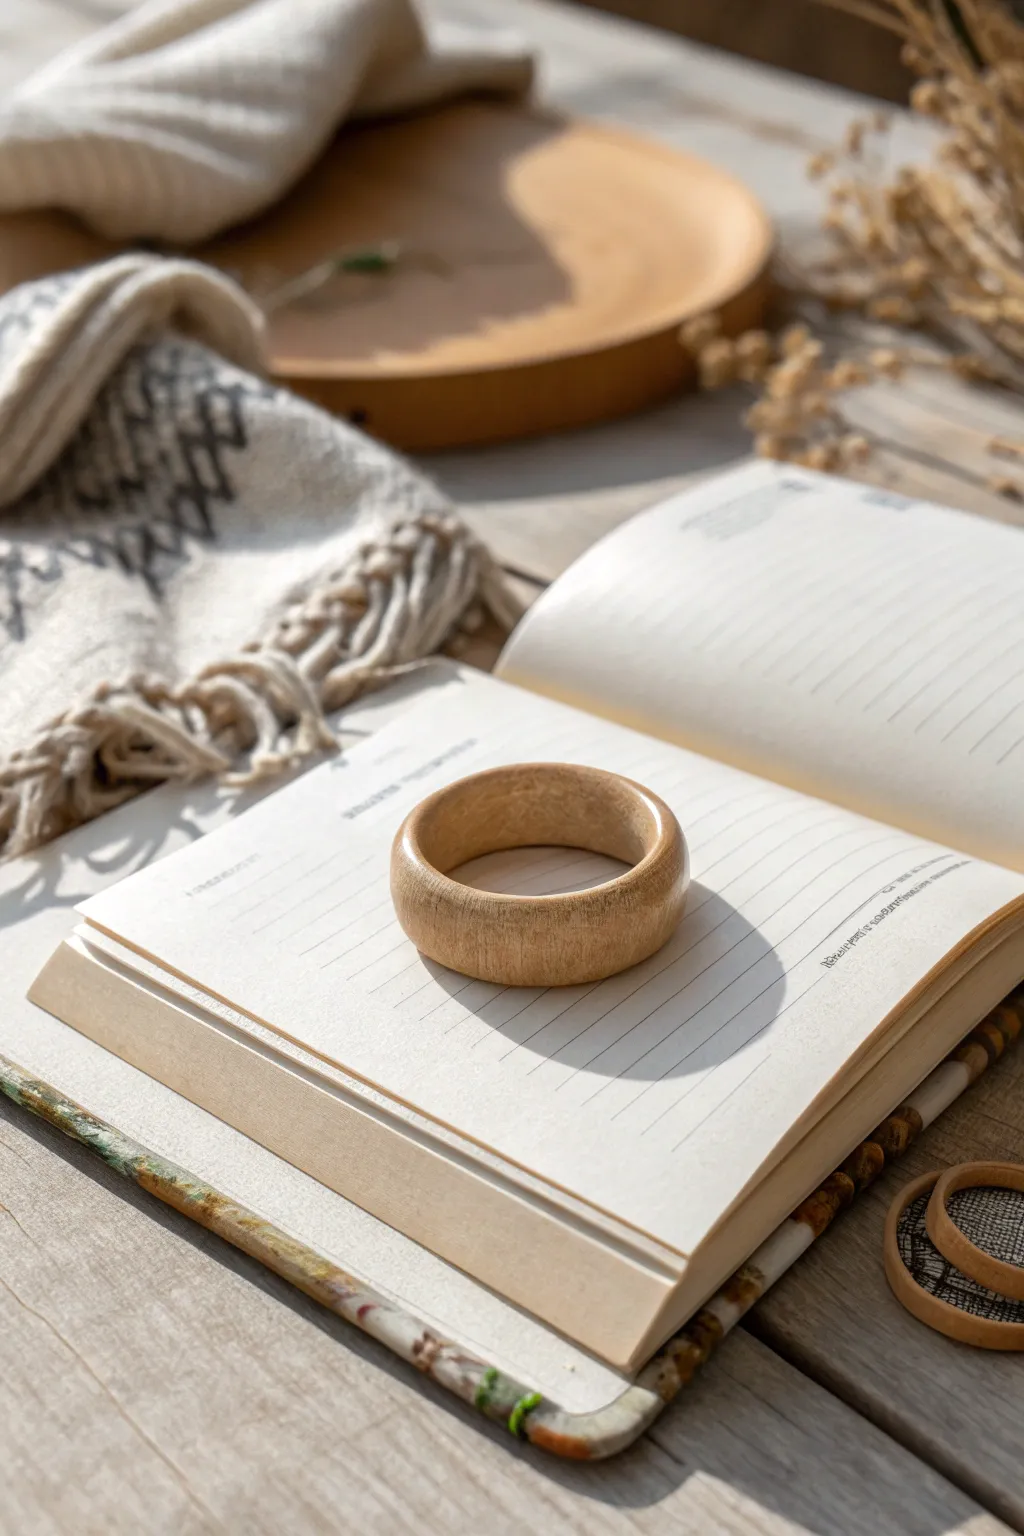
This clever little tool slips onto your thumb to hold book pages open comfortably with just one hand. Designed to look like polished natural wood, this polymer clay project combines rustic aesthetics with practical functionality for avid readers.
How-To Guide
Materials
- Beige or tan polymer clay
- Dark brown polymer clay
- Translucent polymer clay
- Acrylic roller
- Ruler
- Detailed craft knife or tissue blade
- Circle cutter (sized to your thumb)
- Sandpaper (various grits: 400, 800, 1000)
- Matte or satin varnish
- Soft paintbrush
- Oven
Step 1: Creating the Wood Grain Cane
-
Condition the Clay:
Begin by thoroughly conditioning your beige, dark brown, and translucent clays separately until they are soft and pliable. -
Form Layers:
Roll each color into a sheet. You’ll want the beige to be the thickest, followed by the translucent, with the dark brown being very thin sheets. -
Stack the Colors:
Stack the sheets in a random order, but generally aim for beige, thin brown, translucent, beige. Repeat this until you have a stack about 1 inch high. -
Create Distortion:
Cut the stack in half and stack it again to double the layers. Gently press down to secure them. -
Add Grain Texture:
Using the back of a paintbrush or a knitting needle, press vertical indentations deeply into the side of the stack to disturb the straight lines. -
Twist and Roll:
Gently squeeze and roll the stack into a cylinder shape. I like to give it a slight twist here to create more natural-looking swirls in the grain.
Grain perfection
For a ‘knotted wood’ look, push a small ball of dark clay into your stack before compressing. When sliced, it creates concentric eye-like ring patterns.
Step 2: Shaping the Ring
-
Slice the Pattern:
Slice the cylinder lengthwise to reveal the faux wood grain pattern inside. Select the slice with the most pleasing streaks. -
Create the Base Strip:
Roll out a strip of scrap clay or plain beige clay to the desired width of your ring (about 3/4 inch is usually comfortable) and long enough to wrap around your thumb. -
Apply the Veneer:
Place your wood-grain slice over the base strip, gently rolling over it with an acrylic roller to bond them together and smooth out any seams. -
Size the Ring:
Wrap the strip around a mandrel or a tube that roughly matches your thumb size. If you don’t have one, form a loop and check the fit on your actual thumb, ensuring it’s loose enough to slide off easily. -
Join the Ends:
Cut straight through both overlapping ends of the clay loop simultaneously. Remove the excess pieces and push the cut edges together. -
Smooth the Seam:
Gently rub the seam with your finger or a smoothing tool to blend the clay so the join becomes invisible and follows the grain pattern. -
Round the Edges:
Use your fingers to gently curve the top and bottom edges of the ring inward. A rounded edge will be much more comfortable against your book pages than a sharp one.
Step 3: Carving and Finishing
-
Specific Carving (Optional):
While many reading rings have a pointed ‘wing’ shape, this simple bangle style works by weight and friction. However, if you want the classic ‘page holder’ shape, gently pinch one side of the ring into a dull point before baking. -
Bake:
Bake the ring according to your polymer clay manufacturer’s instructions. Usually, this means around 275°F (130°C) for 30 minutes for this thickness. -
Cool Down:
Allow the ring to cool completely in the oven or on a wire rack before handling. -
Sand for Smoothness:
Once cool, wet sand the ring under running water. Start with 400 grit to remove fingerprints, then move to 800 and 1000 grit for a silky feel. -
Buffing:
Drying the ring completely, then buff it vigorously with a piece of denim or a soft cloth to bring out a natural sheen. -
Seal:
Apply a very thin coat of matte or satin varnish to protect the surface and enhance the depth of the translucent clay layers.
Make it ergonomic
Before baking, lightly flare out the bottom rim of the ring. This subtle trumpet shape sits more securely on the knuckle and prevents slipping during reading.
Slide this beautiful faux-wood tool onto your thumb and enjoy your next reading session comfortably