I love how polymer clay can turn an everyday pen into a tiny, functional art piece you actually want to use. Here are my favorite polymer clay pen ideas—starting with the classics and drifting into the fun, quirky stuff once you’re warmed up.
Classic Marbled Wrap
Elevate your stationery collection with this sophisticated polymer clay pen featuring organic marbled swirls of sage green, burnt orange, and pearlescent white. This project transforms a standard pen kit into a custom writing instrument that looks like polished stone.
Step-by-Step Tutorial
Materials
- Twist pen kit (gold or brass finish)
- Pen turning mandrel and bushings
- Polymer clay (Sage Green, Burnt Orange/Terracotta, Pearl White)
- Brass tube (from the pen kit)
- Liquid polymer clay or bake-and-bond
- Tissue blade
- Acrylic roller
- Wet/dry sandpaper (400 to 2000 grit)
- Buffing wheel or denim cloth
- Cyanoacrylate (CA) glue (super glue)
- Pen press or vice
- Oven
Step 1: Preparing the Blank
-
Prep the brass tube:
Take the brass tube from your pen kit and rough up the exterior surface with 150-grit sandpaper. This scratching creates a ‘key’ for the clay to grip onto so it doesn’t spin freely later. -
Apply adhesive:
Coat the roughened brass tube with a thin layer of bake-and-bond or liquid polymer clay. Set it aside on a tile or work surface while you prepare your clay mixture. -
Condition clay:
Condition your three blocks of clay—sage green, burnt orange, and pearl white—until they are soft and pliable. Use the acrylic roller to flatten them into sheets of roughly equal thickness.
Step 2: Creating the Marbling
-
Stack and cut:
Stack the three colored sheets on top of each other. Using your tissue blade, cut the stack in half, place one half on top of the other, and compress slightly to create layers. -
Twist the log:
Roll the stacked clay into a cylinder or ‘cane’ shape. Gently twist the cylinder like a candy cane to begin swirling the colors together. -
Accordion fold:
Compress the twisted log from both ends, squishing it into a shorter, fatter block. This technique, sometimes called an accordion fold, disrupts the distinct lines and creates organic waves. -
Roll to size:
Roll the marbled block out into a thin sheet, about 2-3mm thick. The goal is a sheet long enough to wrap around the brass tube completely with a slight overlap. -
Check the pattern:
Examine your sheet. If the marbling looks too chunky, fold it and roll it once more. I like to stop before the colors blend into mud—you want distinct veins of that beautiful copper against the sage.
Seams Splitting?
If the clay seam pulls apart during baking, ensure you didn’t trap air between the clay and brass. Poke tiny holes with a needle before baking to release trapped air pockets.
Step 3: Assembly and Baking
-
Wrap the tube:
Place the brass tube on the edge of your clay sheet. Carefully roll the tube, wrapping the clay around it. Slice off the excess with the tissue blade where the clay meets, creating a butt joint. -
smooth the seam:
Gently gently rub the seam with your finger or a sculpting tool to blend the clay together until the join is invisible. Roll the tube on your work surface to ensure it is perfectly round and the clay is adhered well. -
Trim the ends:
Slice away any clay that hangs over the ends of the brass tube. It is critical that the brass ends are flush with the clay so the metal pen fittings will seat correctly later. -
Bake carefully:
Slide the clay-covered tube onto a baking rack or stand it upright. Bake according to your clay manufacturer’s instructions (usually around 275°F/130°C for 30 minutes). Let it cool completely.
Add Some Sparkle
Mix a tiny pinch of gold leaf flakes or embossing powder into the translucent or white clay before marbling. It adds a subtle metallic shimmer that catches the light.
Step 4: Finishing and Polishing
-
Sand the barrel:
Once cool, mount the barrel on a pen mandrel if you have a lathe, or simply hold it by hand. Wet sand starting with 400 grit to remove imperfections, progressing through 600, 800, and up to 2000 grit. -
Apply finish (Optional):
For a high-gloss glass look, apply a few coats of thin CA glue (super glue) while the barrel spins on a lathe, sanding lightly between coats. For a matte look, skip this. -
Buff to shine:
Buff the barrel using a buffing wheel with polishing compound or vigorously rub it with a heavy denim cloth to bring out the depth in the pearlescent clay. -
Assemble the pen:
Lay out your pen kit parts: the tip, transmission, clip, and cap. Using a pen press or a vice with padded jaws, slowly press the components into the ends of your finished tube. -
Final check:
Ensure the ink refill extends and retracts smoothly when twisted. If the mechanism is stiff, you may need to gently clear any excess glue from inside the tube.
Now you have a stunning, bespoke writing instrument that is perfect for journaling or as a thoughtful handmade gift.


Jelly Roll Spiral Stripes
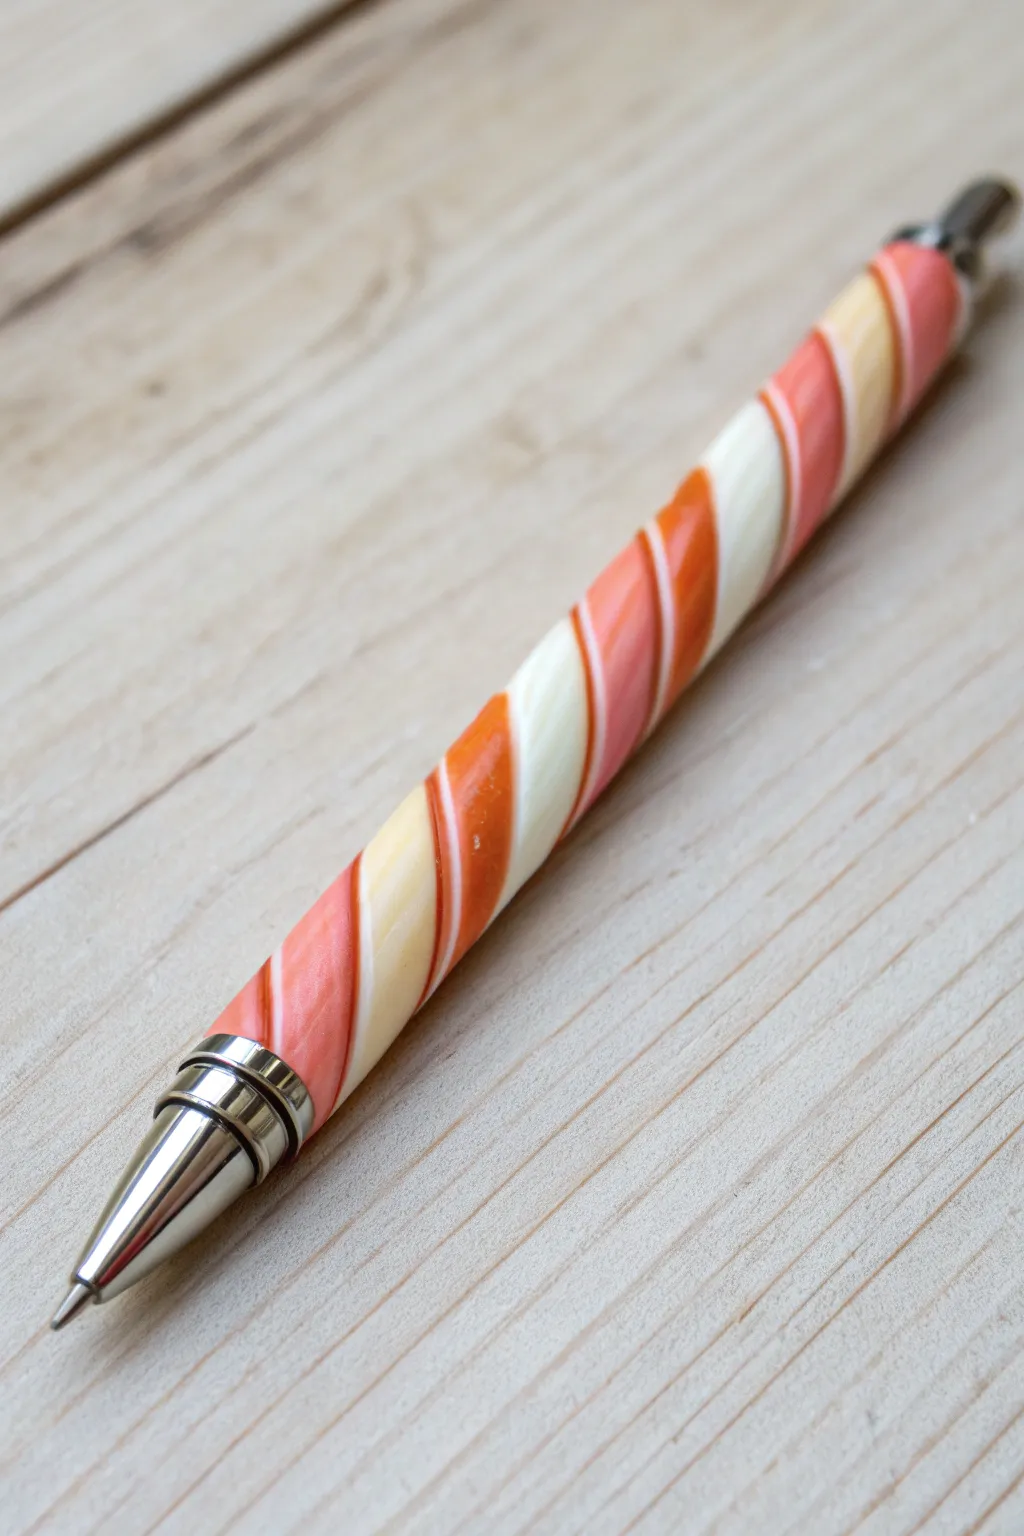
Capture the nostalgic sweetness of a classic candy shop with this twisting, spiraled pen design. Using a simple jelly roll technique, you’ll blend coral, orange, and cream clays into a seamless diagonal pattern that feels as good as it looks.
Detailed Instructions
Materials
- Polymer clay (coral/salmon, bright orange, white, translucent)
- Pen kit (Slimline or similar style) or a basic ballpoint pen barrel
- Clay roller or pasta machine
- Tissue blade or sharp craft knife
- Smooth work surface (ceramic tile or glass)
- Oven for baking
Step 1: Creating the Jelly Roll Cane
-
Condition the Clay:
Begin by thoroughly conditioning your coral, orange, and white polymer clays until they are soft and pliable. You want them to be roughly the same consistency to prevent uneven stretching later. -
Mix Custom Shades:
To achieve that creamy, candy-like finish seen in the photo, mix a small amount of translucent clay into your white clay. This gives it a less stark, more edible appearance. -
Roll Flat Sheets:
Roll each color into a flat sheet of equal thickness, roughly 2-3mm thick. You can use a pasta machine on a medium setting or a hand roller with depth guides. -
Stack the Sheets:
Layer the sheets on top of one another. The order will determine the stripe sequence; try placing the white between two colored layers for high contrast. -
Trim Edges:
Use your tissue blade to trim the ragged edges of your stack created a neat rectangle. This ensures your spiral starts cleanly. -
Roll the Log:
Starting from one short end, carefully roll the stack up like a jelly roll or sleeping bag. Ensure no air bubbles get trapped between the layers as you roll. -
Reduce the Cane:
Gently squeeze and roll the log on your work surface to lengthen it and reduce its diameter. Aim for a snake that is slightly thicker than your pen barrel.
Twist Tactic
Make the twisting motion slow and deliberate. If you twist too fast, the outer layer of clay may tear. Let the clay rest for 5 minutes if it gets too soft.
Step 2: Applying the Twist
-
Prepare the Pen Barrel:
If you are using a metal pen tube from a kit, scuff it lightly with sandpaper to help the clay adhere. For a standard plastic barrel, ensure it’s clean and oil-free. -
Twist the Cane:
Hold opposite ends of your clay snake and twist your hands in opposite directions. This creates the candy-cane spiral effect on the outside of the log. -
Flatten Slightly:
Here I prefer to gently roll over the twisted snake with an acrylic roller just once to flatten it slightly. This makes it easier to wrap around the cylindrical barrel. -
Wrap the Barrel:
Place the flattened strip lengthwise along the pen barrel. Gently press it down so it adheres to the tube. -
Cut and Seam:
Wrap the clay around the circumference of the barrel. Slice off the excess clay where the edges meet, creating a butt joint. Do not overlap the clay; just push the edges together. -
Smooth the Seam:
Use your finger or a clay modeling tool to blend the seam line until it is invisible. Rolling the pen gently on your work surface helps smooth this join.
Step 3: Finishing Touches
-
Roll Smooth:
Roll the entire pen back and forth on your clean work surface to ensure the barrel is perfectly round and the thickness is even throughout. -
Trim Ends:
Slice off any excess clay hanging off the ends of the tube. Ensure the clay is flush with the metal/plastic edge so the pen hardware will fit correctly later. -
Bake:
Bake the pen barrel according to your clay manufacturer’s instructions. Usually, this means arranging it on a batting or paper accordion to prevent flat spots. -
Cool and Sand:
Let the barrel cool completely. Wet sand with high-grit sandpaper (400 up to 1000) to remove fingerprints and achieve a satin finish. -
Assemble:
Once dry, press the pen hardware components (tip, clip, and twist mechanism) into your beautifully spiraled barrel.
Uneven Stripes?
If your stripes look wonky after wrapping, keep rolling the pen on your desk. The pressure naturally evens out distorted lines and straightens the spiral.
Enjoy using your custom writing instrument that looks good enough to eat


Flower Cane Slice Pen
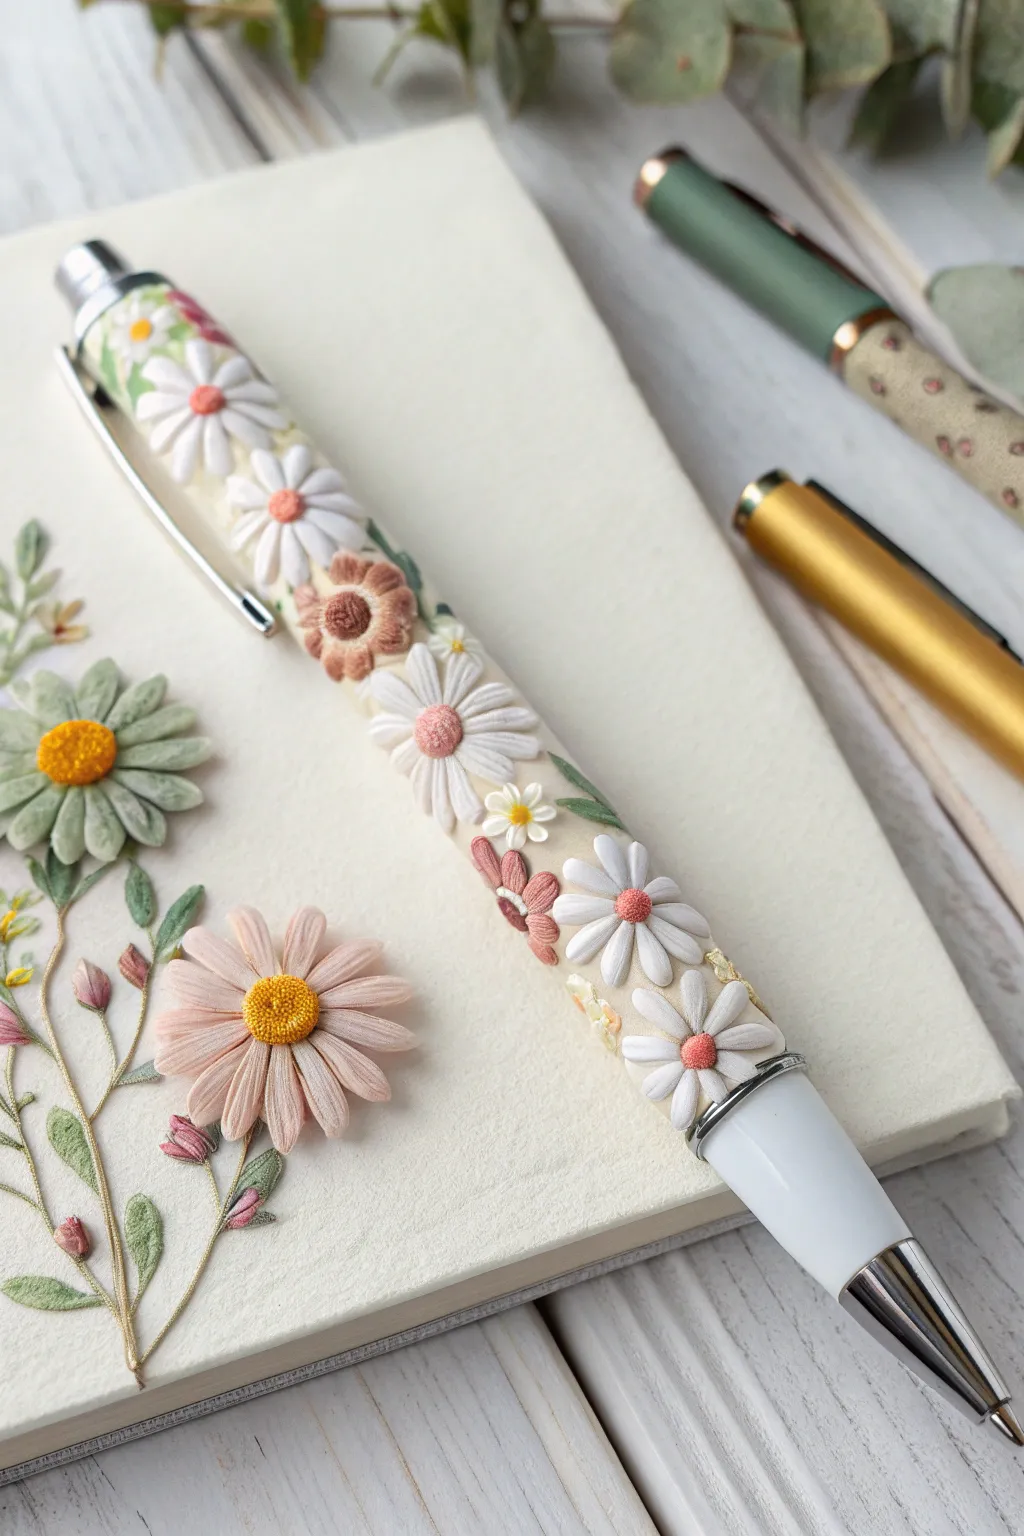
Transform a simple pen barrel into a blooming garden with this polymer clay project that mimics the texture and charm of delicate hand embroidery. By layering small, textured clay pieces, you’ll create a stunning 3D floral effect that feels just as lovely to hold as it is to look at.
Step-by-Step Tutorial
Materials
- High-quality polymer clay (white, beige, muted pinks, greens, yellow)
- Pen kit (click mechanism type)
- Liquid polymer clay (translucent or white)
- Needle tool or sharp toothpick
- Small ball stylus tool
- Precision craft knife
- Acrylic rolling pin or pasta machine
- Texture sponge or sandpaper (optional)
- Clay oven/toaster oven
Step 1: Prepping the Base
-
Prepare the Barrel:
Disassemble your pen kit and take the metal tube barrel. Scuff the surface gently with sandpaper to help the clay adhere better. -
Roll the Base Layer:
Condition a piece of beige or off-white clay. Roll it into a thin, even sheet, roughly 1-2mm thick. This will be the canvas for your floral design. -
Wrap the Barrel:
Apply a very thin layer of liquid polymer clay to the brass tube. Carefully wrap your beige clay sheet around the tube, trimming the excess with a blade so the edges butt up against each other perfectly without overlapping. -
Smooth the Seam:
Gently roll the covered tube on your work surface to smooth out the seam. Use a light touch to ensure the clay is even all around. -
Add Texture:
To mimic fabric, gently press a piece of fine sandpaper or a texture sponge onto the uncured clay surface. This gives it that authentic embroidered cloth look.
Sticky Situation?
If clay keeps sticking to your needle tool while texturing, dip the tool tip into a bit of cornstarch or baby powder before pressing into the petals.
Step 2: Sculpting the Petals
-
Create Tiny Teardrops:
To make the daisy petals, condition white and soft pink clay. Pinch off minuscule amounts and roll them into tiny teardrop shapes, about 3-4mm long. -
Flatten and Attach:
Press a needle tool into the center of a teardrop to flatten it slightly and create a central vein impression. Place this petal onto the pen barrel. -
Form the Flowers:
Continue placing petals in a circular pattern to form a flower. Don’t worry about perfect symmetry; a natural, organic look mimics hand-stitched thread best. -
Texturize the Petals:
use your needle tool to drag tiny lines from the center of the petal outward. I find this specific step crucial for replicating the look of satin-stitch embroidery thread.
Step 3: Adding Centers and Foliage
-
Make French Knot Centers:
take a tiny ball of yellow or burnt orange clay. Press it into the center of your flower. Use a needle tool to poke several tiny holes into it, creating the texture of a ‘French knot’ stitch. -
Create Leaves:
Roll tiny logs of green clay. Flatten them onto the barrel near the flowers to act as stems or leaves. -
Variety is Key:
Mix up your flower styles. Create some daisies fully open, and others as side-view profiles by clustering petals on just one side of a stem. -
Fill the Gaps:
Add tiny filler flowers or solitary petals in empty spaces to balance the composition. Small dots of white clay can mimic seed stitch or buds.
Level Up: Textile Depth
Before baking, lightly brush a tiny amount of mica powder or chalk pastel (in a darker shade) into the crevices to accentuate the ‘stitching’ shadows.
Step 4: Finishing Touches
-
Rim Clean-up:
Double-check the ends of the brass tube. Carefully slice away any clay overhang so the pen hardware will fit flush during assembly. -
Baking:
Place your pen barrel on a tile or a bead rack. Bake according to your clay manufacturer’s instructions (usually 275°F/130°C for 30 minutes). -
Cool Down:
Let the clay cool completely before handling. It is fragile while warm. -
Assembly:
Once cool, follow your pen kit instructions to press the nib, clip, and mechanism into the barrel.
Now you have a writing instrument that looks like a piece of handcrafted textile art


Geometric Cane Mosaic
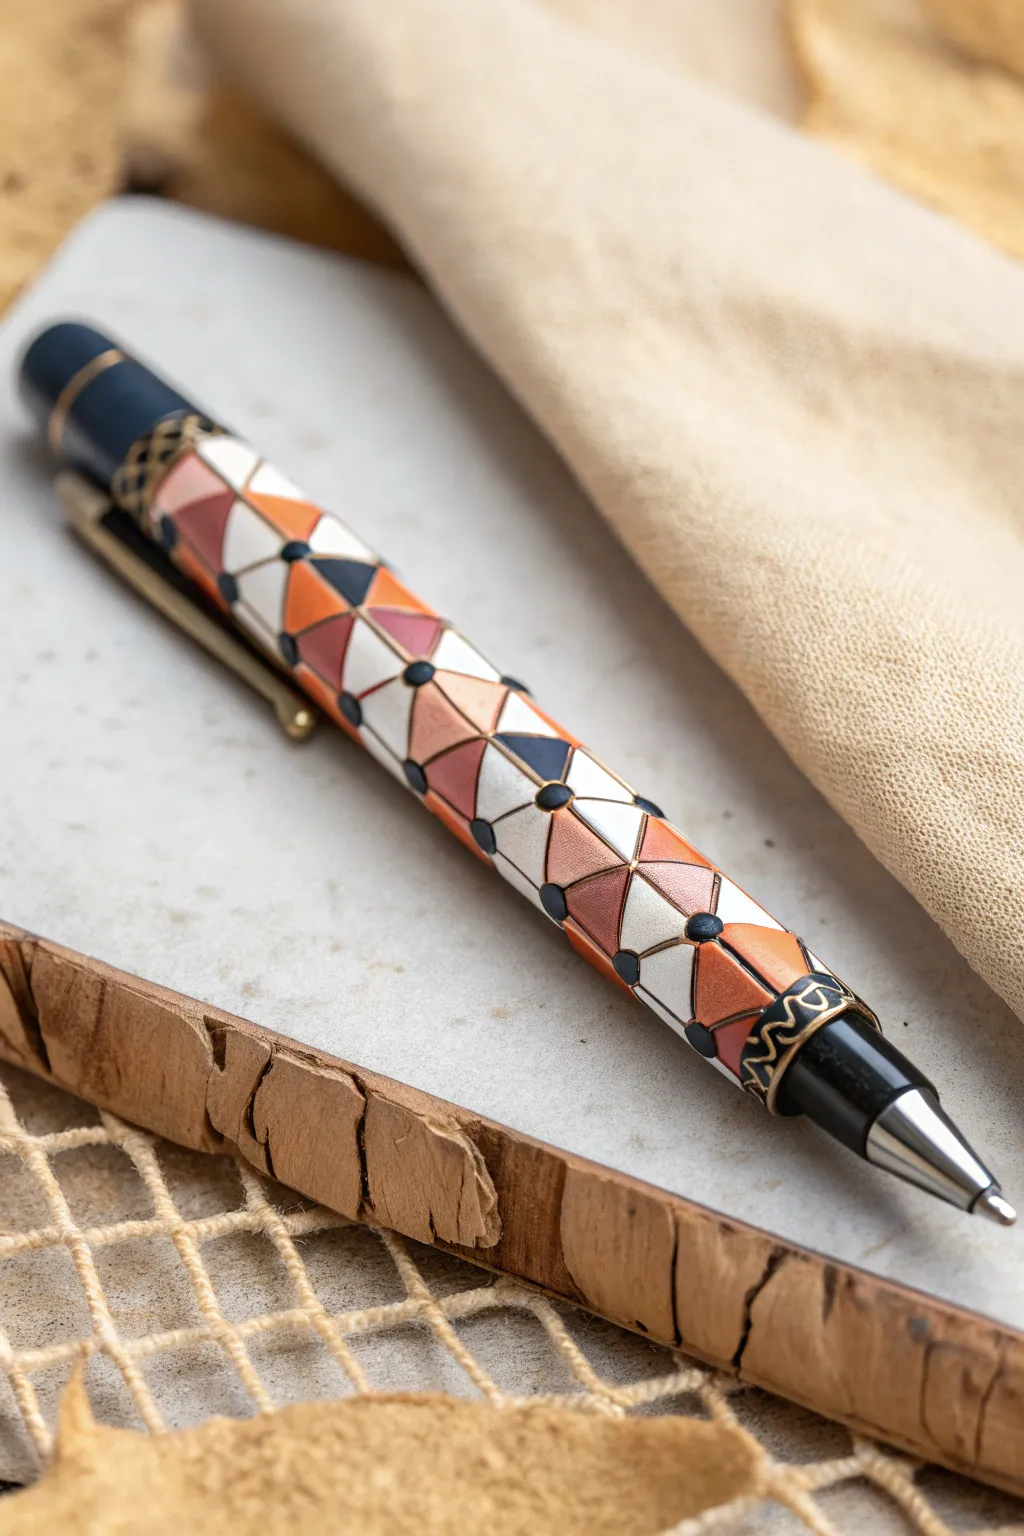
Transform a standard pen kit into a sophisticated writing instrument using the precise art of geometric millefiori. This design features a tessellating triangle pattern in warm autumn hues, accented by bold back linework and dot details for a modern mosaic look.
Step-by-Step
Materials
- Polymer clay in White, Orange, Rust/Terracotta, and Black
- Metal pen kit (ballpoint style with twist mechanism)
- Brass tube (from the pen kit)
- Caning blade or tissue blade (flexible and sharp)
- Acrylic roller or pasta machine
- Extruder with small circular disc (optional but helpful)
- Cyanoacrylate (CA) glue or Bake and Bond
- Sandpaper (various grits from 400 to 1200)
- Buffing wheel or denim cloth
- Oven thermometer
- Ceramic tile or glass work surface
- Needle tool or small ball stylus
Step 1: Creating the Component Canes
-
Prepare the Colors:
Condition your polymer clay thoroughly. You will need roughly equal amounts of white, orange, and terracotta, plus a larger block of black for outlining. Run the colored clays through your pasta machine on a thick setting to create smooth slabs. -
Form Triangular Logs:
Shape your white, orange, and terracotta clay into long triangular prisms. You can do this by pinching a round snake into a triangle shape or shaping a square log and cutting it diagonally. Aim for equilateral triangles about 1/2 inch wide. -
Wrap for Definition:
Roll out a very thin sheet of black clay on the second thinnest setting of your pasta machine. Wrap the long sides of each colored triangular prism with this black sheet. Trim away excess overlap to ensure clean, crisp lines when sliced. -
Reduce the Canes:
Gently stretch and reduce these triangular canes until they are much smaller, approximately 1/4 inch per side. I find it helps to pull from the middle and let the ends follow to avoid distortion. Let the canes rest for about 30 minutes to firm up before slicing.
Sticky Situation?
If your triangles distort while slicing, stick the canes in the fridge for 15 minutes. Cold clay cuts cleanly without squishing the sharp geometric corners.
Step 2: Assembling the Mosaic
-
Prepare the Pen Barrel:
Take the brass tube from your pen kit and rough it up slightly with sandpaper to help the clay adhere. Apply a thin layer of Bake and Bond or liquid clay to the brass tube. -
Slice the Tiles:
Using your sharpest tissue blade, slice thin, uniform tiles from your reduced triangular canes. You will need enough slices to cover the entire circumference of the brass tube. -
Begin the Pattern:
Place the triangular slices onto the adhesive-coated tube. Alternate the colors (white, orange, terracotta) and orientations (point up vs. point down) to create a continuous tessellated pattern. Press them gently but firmly against the tube. -
Close the Gaps:
Once the tube is fully covered, gently roll the pen barrel on your work surface to ensure the tiles bond together and to the tube. The black outlines should merge to form a grid. -
Add Decorative Dots:
Roll tiny balls of black clay, or use a small circular extruder to create a thin snake and slice off tiny bits. Place these dots at the intersections where the points of the triangles meet. -
Create End Caps:
For the top and bottom edges of the clay barrel, roll a thin snake of black clay. Wrap this around the circumference at both ends to create a neat border. You can add a golden wavy line or texture to this border if desired.
Step 3: Finishing and Assembly
-
Bake carefully:
Place the clay-covered tube on a bed of batting or cornstarch to prevent flat spots. Bake according to your clay manufacturer’s instructions, typically at 275°F (135°C) for about 30-45 minutes. -
Cool and Sand:
Allow the piece to cool completely. Sanding while warm can drag the clay. Use wet/dry sandpaper under running water, starting with 400 grit to level the surface and moving up to 1200 grit for smoothness. -
Buff to a Sheen:
Dry the barrel thoroughly. Buff the surface vigorously with a piece of heavy denim or a buffing wheel on a rotary tool to achieve a soft satin gloss. Avoid clear varnish for this project; the natural buffed clay feels better in the hand. -
Trim the Ends:
If any clay overhangs the ends of the brass tube, use a barrel trimmer (often included with pen turning tools) or carefully sand it flush. The ends must be perfectly square for the pen hardware to fit. -
Press the Hardware:
Follow the assembly instructions for your specific pen kit. Use a pen press or a clamp with soft jaws to gently press the tip, twist mechanism, and clip cap into the brass tube.
Level Up: Gold Leaf
Before wrapping the colored triangles in black, apply a tiny fleck of gold leaf to the corners of the orange clay. It adds a subtle, high-end shimmer.
Now you have a custom writing instrument that looks professional and feels wonderful to hold

What Really Happens Inside the Kiln
Learn how time and temperature work together inside the kiln to transform clay into durable ceramic.
Pastel Confetti Speckle

Transform a plain pen into a piece of stationery art with this dual-textured design. Featuring a creamy barrel dotted with sweet-colored speckles and a cap section bursting with a dense, impressionist floral-style confetti pattern, this pen brings a soft, romantic aesthetic to your daily writing.
Step-by-Step Tutorial
Materials
- Polymer clay (White, Pastel Pink, Pastel Yellow, Mint Green, Baby Blue, Lilac)
- Metal pen kit (ballpoint mechanism) or a dissectible stick pen
- Pasta machine or acrylic roller
- Precision craft knife
- Small dotting tool or toothpick
- Needle tool
- Liquid polymer clay (Translucent or White)
- Ceramic tile or glass work surface
- Polymer clay oven
- Fine-grit sandpaper (400, 600, 1000 grit) – optional
- Polymer clay glaze (gloss or satin)
Step 1: Base Preparation
-
Pen Disassembly:
Begin by carefully taking apart your pen kit. You only need the metal tubes (the brass barrels) for the clay application. Set the clip, nib, and twist mechanism aside safely. -
Tube Prep:
Rough up the surface of the metal tubes slightly with sandpaper to help the clay adhere. Wipe them clean to remove any dust or oils. -
Sheet the White Clay:
Condition your white polymer clay until it is soft and pliable. Roll it into a thin, even sheet directly on your work surface using your roller or pasta machine on a medium-thin setting. -
Covering the Barrels:
Cut a strip of white clay that is the exact length of your metal tubes. Wrap the clay around each tube, carefully slicing the excess for a perfect butt joint seam. Smooth the seam gently with your finger until it disappears.
Fixing Gaps
If you see small gaps between your confetti pieces in the clay, fill them with tiny dabs of white liquid clay before baking to ensure a solid, crack-free surface.
Step 2: Creating the Polka Dot Section
-
Mixing Colors:
Prepare tiny amounts of your pastel colors: mint, yellow, pink, and lilac. Condition them well. -
Making Micro-dots:
Roll extremely thin snakes of each pastel color. Using your precision knife, slice off tiny, flat discs from these snakes. -
Applying Large Dots:
Take the lower barrel (the longer writing section) and gently press the colored discs onto the white clay surface. Space them out randomly, avoiding a rigid grid pattern. -
Adding Speckles:
For the tiniest speckles seen in the design, use a needle tool to pick up microscopic bits of colored clay and press them into the white background between the larger dots. -
Smoothing the Surface:
Once you are happy with the placement, gently roll the barrel on your work surface to embed the dots flush with the white clay, ensuring a smooth writing grip.
Gold Flake Accent
Add sophistication by mixing small pieces of gold leaf into your confetti crumb pile. The metallic flecks will catch the light beautifully once the pen is sanded and glazed.
Step 3: The Confetti Cap Design
-
Creating the ‘Confetti’:
For the upper barrel (the cap section), we want a much denser pattern. Chop your remaining pastel clay bits into a fine, crumbly mix using your blade. It should look like colorful sprinkles. -
Apply Liquid Clay:
Brush a very thin layer of liquid polymer clay over the raw white clay on the upper barrel. This acts as an adhesive for the confetti. -
Rolling the Pattern:
Roll the wet barrel through your pile of chopped pastel clay crumbs until it is completely coated. Don’t worry if it looks messy initially. -
Consolidating the Pattern:
Gently roll the confetti-covered barrel on your smooth surface. As you roll, the crumbs will smash together and flatten, creating a dense, terrazzo-like floral mosaic effect. -
Refining Edges:
Check the ends of both barrels. Use your blade to trim away any clay overhanging the metal tube openings so the pen hardware fits back in later.
Step 4: Finishing Touches
-
Baking:
Place your barrels on a ceramic tile or baking rack. Stick them on a dedicated bead pin if you have one to prevent flat spots. Bake according to your clay manufacturer’s instructions (usually 275°F/130°C for 15-30 minutes). -
Cooling:
Let the pieces cool completely inside the oven or on the counter before handling. Polymer clay is fragile when hot. -
Sanding:
For an ultra-smooth finish, wet sand the cured barrels starting with 400 grit and working up to 1000 grit. This reveals the clarity of the confetti pattern best. -
Glazing:
Apply a thin coat of gloss varnish to protect the design and give it that high-end porcelain shine. -
Assembly:
Once the glaze is fully dry, press the pen mechanism parts back into the barrels. A pen press or a gentle clamp with soft jaws works best for this.
Enjoy using your custom stationery or wrap it in tissue paper for a truly thoughtful handmade gift
Minimal Color-Block Bands
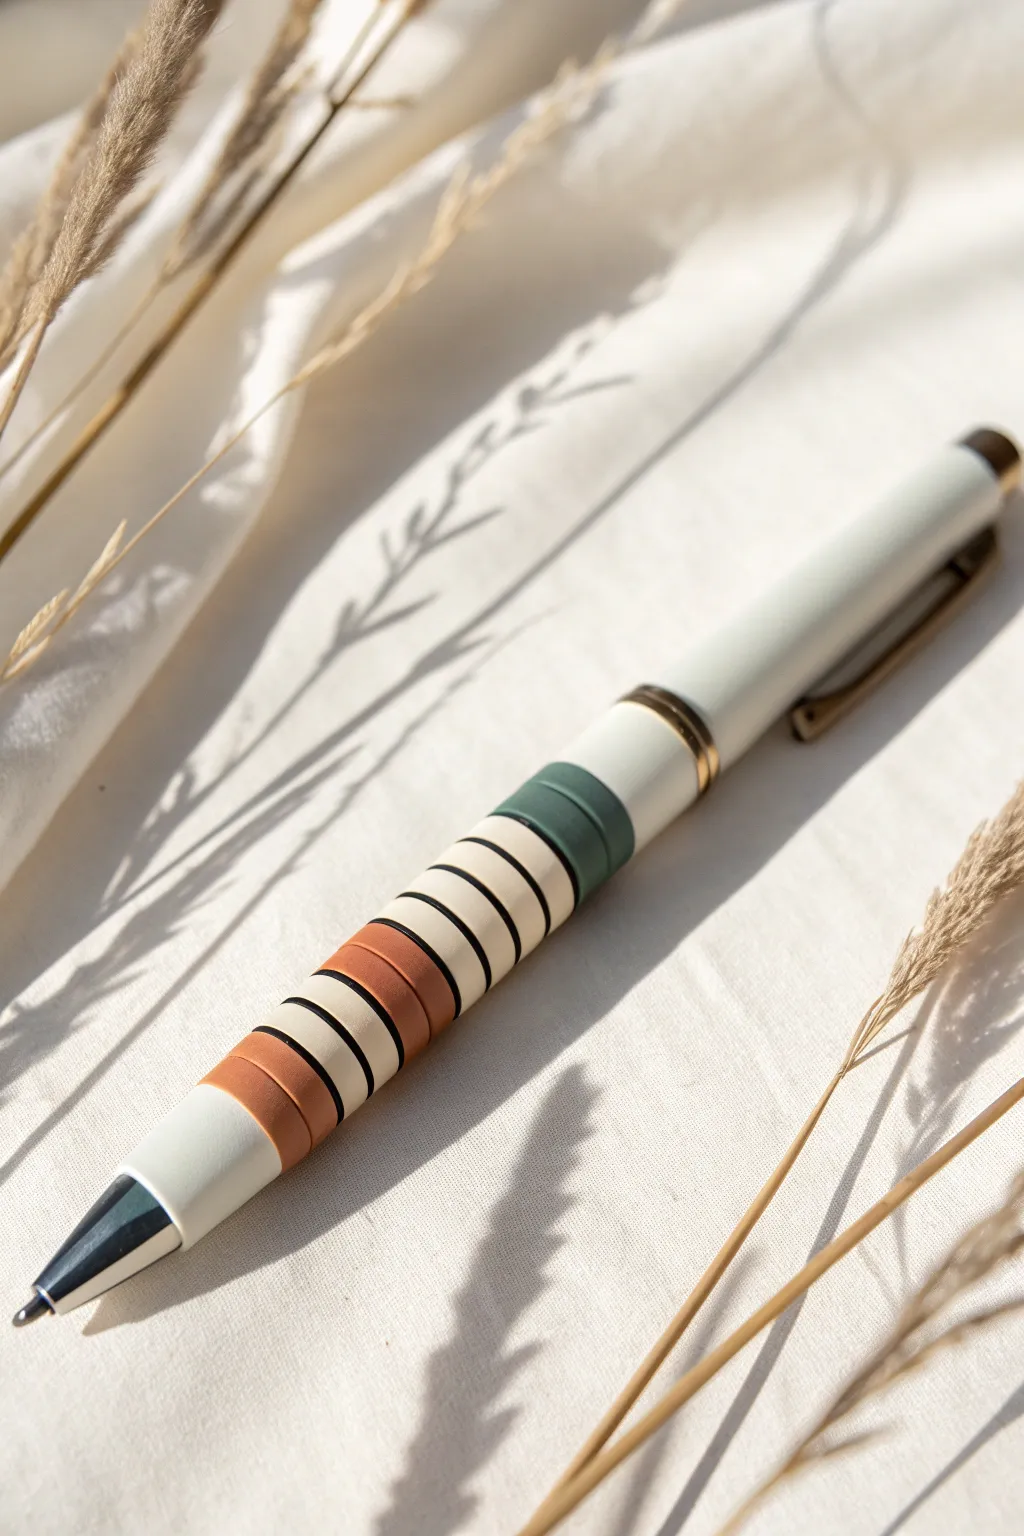
Transform a plain pen into a stylish, minimal accessory using soft earth tones and crisp stripes. This project combines cream, terracotta, and deep green clay for a sophisticated color-blocked look that feels great in the hand.
How-To Guide
Materials
- Refillable metal pen blank (disassembled)
- Polymer clay in cream/off-white
- Polymer clay in terracotta/burnt orange
- Polymer clay in forest green
- Polymer clay in black
- Pasta machine or acrylic roller
- Tissue blade or X-Acto knife
- Oven or toaster oven dedicated to clay
- Smooth work surface (glass or tile)
Step 1: Base Preparation
-
Disassemble the pen:
Begin by taking apart your metal pen blank. Remove the ink cartridge, spring, and clip mechanism so you are left with just the plain metal tube that will serve as the core. -
Condition the base clay:
Take your cream-colored clay and condition it thoroughly until it is soft and pliable. Use your pasta machine on a medium-thin setting to create a uniform sheet. -
Cover the tube:
Wrap the cream clay sheet around the metal tube. Trim the excess carefully with your blade so the edges butt up against each other perfectly without overlapping. -
Smooth the seam:
Gently roll the covered tube on your work surface to smooth out the seam until it disappears completely. The clay layer should be thin and even across the entire barrel.
Clean Seams Secret
When wrapping clay bands around the tube, cut the excess clay at a 45-degree angle rather than a straight vertical cut. This slanted overlap creates a stronger bond and hides the seam much better.
Step 2: Creating the Color Blocks
-
Roll accent colors:
Condition small amounts of terracotta, green, and black clay. Roll the terracotta and cream into thick sheets (about 2-3mm), and the black clay into a very thin sheet (Setting 7 or 8 on a pasta machine). -
Cut the terracotta bands:
Using your tissue blade, cut two strips of terracotta clay. They should be wide enough to form the substantial orange bands seen in the design. -
Cut the cream bands:
Cut strips of the thick cream clay to match the width of your terracotta bands. Uniformity helps create that clean, graphic look. -
Prepare the green accent:
Cut a single strip of the forest green clay. This will serve as the visual anchor near the top of the design. -
Create the black dividers:
From your paper-thin black sheet, cut very narrow strips—almost like threads. These will become the crisp separation lines between the thicker colored blocks.
Step 3: Assembly
-
Apply the bottom cream section:
Leave the bottom section of the pen (near the tip) covered in the original base cream layer. I like to leave about an inch exposed here for a clean grip area. -
Layer the first terracotta band:
Wrap a terracotta strip around the pen barrel, placed just above the exposed cream base. Use your blade to cut the ends flush so they join seamlessly. -
Add a separator line:
Carefully wrap a thin black strip directly against the top edge of the terracotta band. Press it gently to ensure it adheres without squishing the shape. -
Continue the pattern:
Repeat the process by adding a cream band, a black separator, another terracotta band, a black separator, and another cream band. -
Finish with green:
Add the final green band near the top section, followed by the remaining white space leading to the clip area. -
Roll for uniformity:
Once all bands are applied, gently roll the entire pen on your smooth surface again. This fuses the bands together and ensures the outer surface is perfectly flush.
Matte Magic
After baking, lightly sand the pen with ultra-fine grit sandpaper (1000+) to give it a velvety, matte finish that feels like expensive stone rather than plastic.
Step 4: Baking and Finishing
-
Check for lint:
Before baking, inspect the white clay for any dust or lint. You can wipe it gently with a baby wipe or a tiny bit of rubbing alcohol to clean it up. -
Bake the pen:
Place the pen tube on a index card or tile in your oven. Bake according to your clay manufacturer’s instructions (usually around 275°F/135°C for 30 minutes). -
Cool down:
Let the pen cool completely inside the oven or on the counter. Do not try to reassemble it while the metal is hot, as the clay is still slightly soft. -
Reassemble:
Insert the ink cartridge, spring, and screw on the top and bottom metal components. Your custom pen is now ready to use.
Enjoy the smooth feel of your new custom pen as you jot down your next big idea


The Complete Guide to Pottery Troubleshooting
Uncover the most common ceramic mistakes—from cracking clay to failed glazes—and learn how to fix them fast.
Terrazzo Chip Barrel
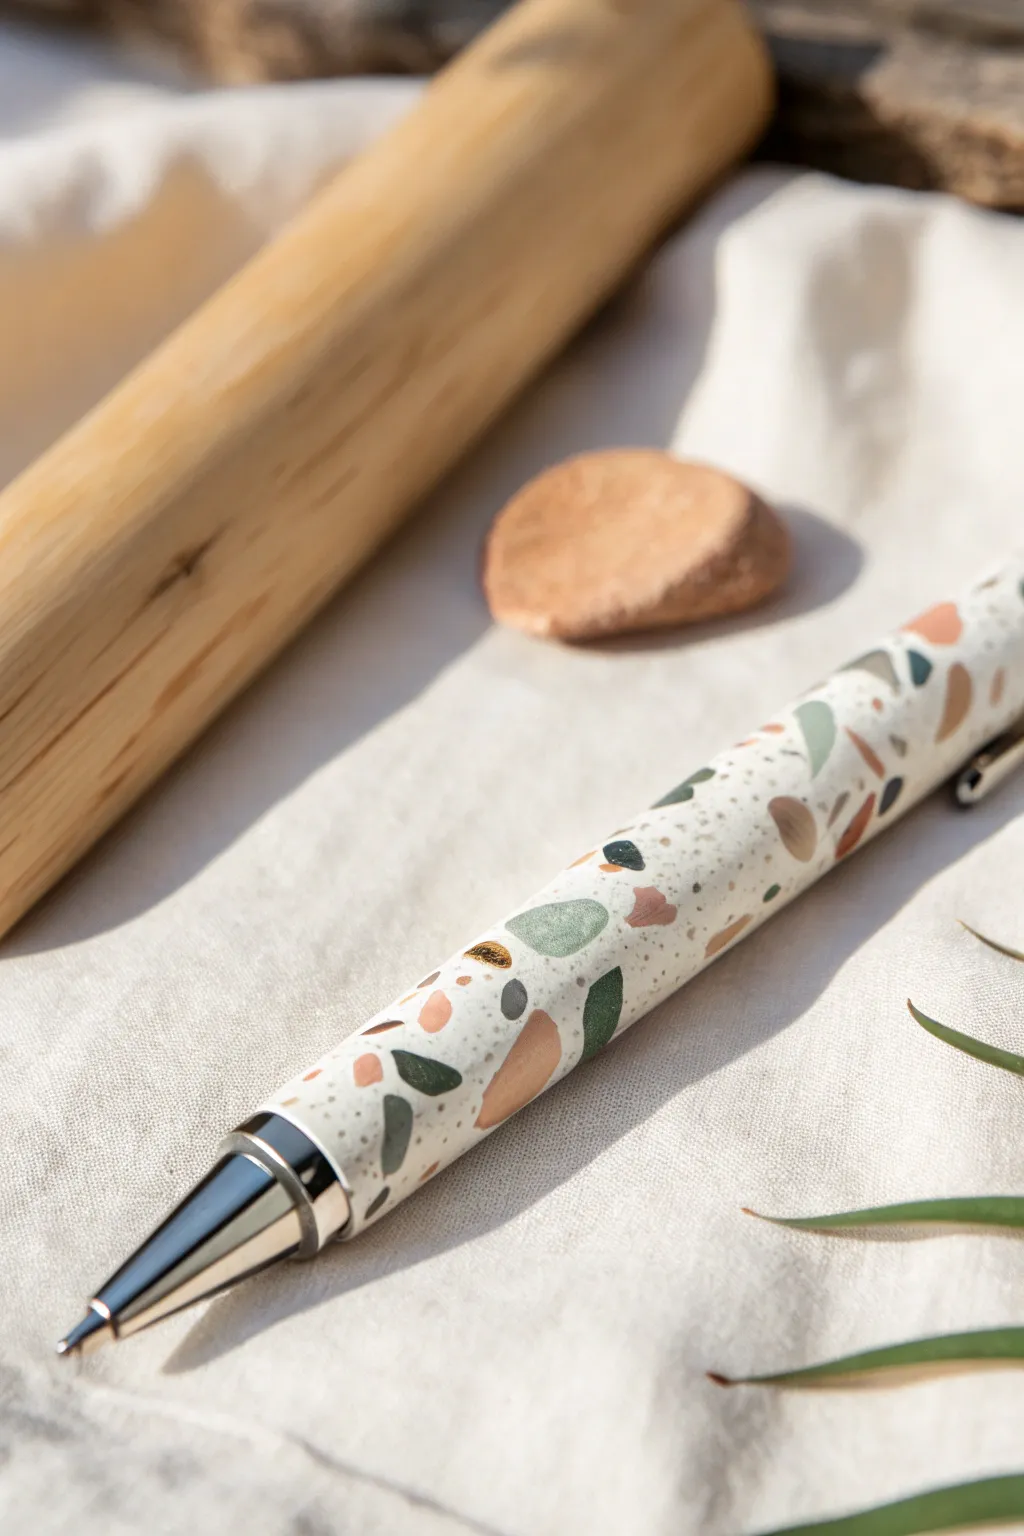
Transform a simple pen kit into a modern art piece with this elegant terrazzo design. By embedding custom-colored clay chips into a creamy white base, you’ll achieve a sophisticated stone-like finish that feels wonderful to hold.
Step-by-Step Tutorial
Materials
- Polymer clay (white, beige, terracotta/rust, sage green, dark forest green)
- Pen kit (twist mechanism type, often sold as ‘Slimline’ or ‘7mm’ kits)
- Brass tube (included in pen kit)
- Polymer clay blade or craft knife
- Acrylic rolling pin or pasta machine
- Liquid polymer clay (translucent or white)
- Sandpaper (wet/dry, various grits from 400 to 2000)
- Buffing wheel or denim cloth
- Oven thermometer
- Tile or glass baking surface
Step 1: Creating the Chips
-
Condition the colors:
Start by thoroughly conditioning small amounts of your accent colors: terracotta, beige, sage green, and dark forest green. They should be pliable but not sticky. -
Flatten the clay:
Roll each colored piece into a very thin sheet. If using a pasta machine, use the second thinnest setting; if rolling by hand, aim for cardstock thickness. -
Bake the sheets:
Place these thin colored sheets on your baking tile and bake them for about 10-15 minutes at the manufacturer’s recommended temperature. Let them cool completely. -
Chop into fragments:
Once cool, use your blade to chop the baked sheets into jagged, irregular pieces. Aim for a mix of sizes, from tiny specks to larger triangles, to mimic the authentic look of terrazzo.
Step 2: Assembling the Barrel
-
Prepare the tube:
Take the brass tube from your pen kit and rough up the sides with low-grit sandpaper. This creates a ‘tooth’ for the clay to grip onto. -
Apply adhesive:
Smear a thin, even layer of liquid polymer clay over the entire surface of the brass tube. -
Sheet the base color:
Roll out your white clay into a medium-thick sheet. It needs to be long enough to wrap around the brass tube and thick enough to embed chips without hitting the metal. -
Add texture:
Sprinkle some real black pepper or tiny specks of black clay onto the white sheet and roll over it once to create a speckled stone effect. -
Embed the chips:
Scatter your baked colored chips onto the raw white sheet. Gently roll over the sheet with your acrylic roller to press the chips flush into the white clay. -
Wrap the tube:
Carefully wrap the chip-embedded sheet around the brass tube. Trim the excess clay cleanly where the edges meet, creating a butt joint rather than an overlap. -
Smooth the seam:
Gently rub the seam with your finger or a sculpting tool to blend the white clay together until the join is invisible. -
Roll to consolidate:
Roll the clay-covered tube back and forth on your work surface to ensure it is perfectly round and the clay is firmly adhered to the brass.
Clean Cupping
When wrapping the tube, cut the clay ends at a slight bevel rather than straight down. This creates a wider surface area for the seam to bond, making it stronger and easier to hide.
Step 3: Finishing Touches
-
Final bake:
Bake the wrapped tube according to your clay’s instructions, usually for 30 minutes. Tent with foil to prevent white clay from scorching. -
Trim the ends:
Once cooled, the clay might extend past the brass tube. Carefully sand or trim the ends until the brass ring is visible and flush with the clay. -
Wet sanding:
Begin wet sanding the barrel starting with 400 grit to remove bulk and smooth the surface. I like to sand under running water to keep dust down. -
Refine the surface:
Move progressively through 600, 800, 1000, and up to 2000 grit sandpaper. You will see the terrazzo pattern become clearer and the colors pop as the surface gets smoother. -
Buff to a shine:
Vigorously rub the barrel with a piece of denim or use a buffing wheel on a rotary tool to achieve a satin matte sheen or a high gloss. -
Assemble the pen:
Using a pen press or a clamp with soft jaws, press the pen mechanism parts into the brass tube following your kit’s specific diagram.
Metallic Flecks
Add luxurious dimension by mixing small flecks of gold leaf into your raw white background clay or pressing them in alongside the colored chips before the final roll.
Enjoy writing with your bespoke stationery piece that looks just like polished stone
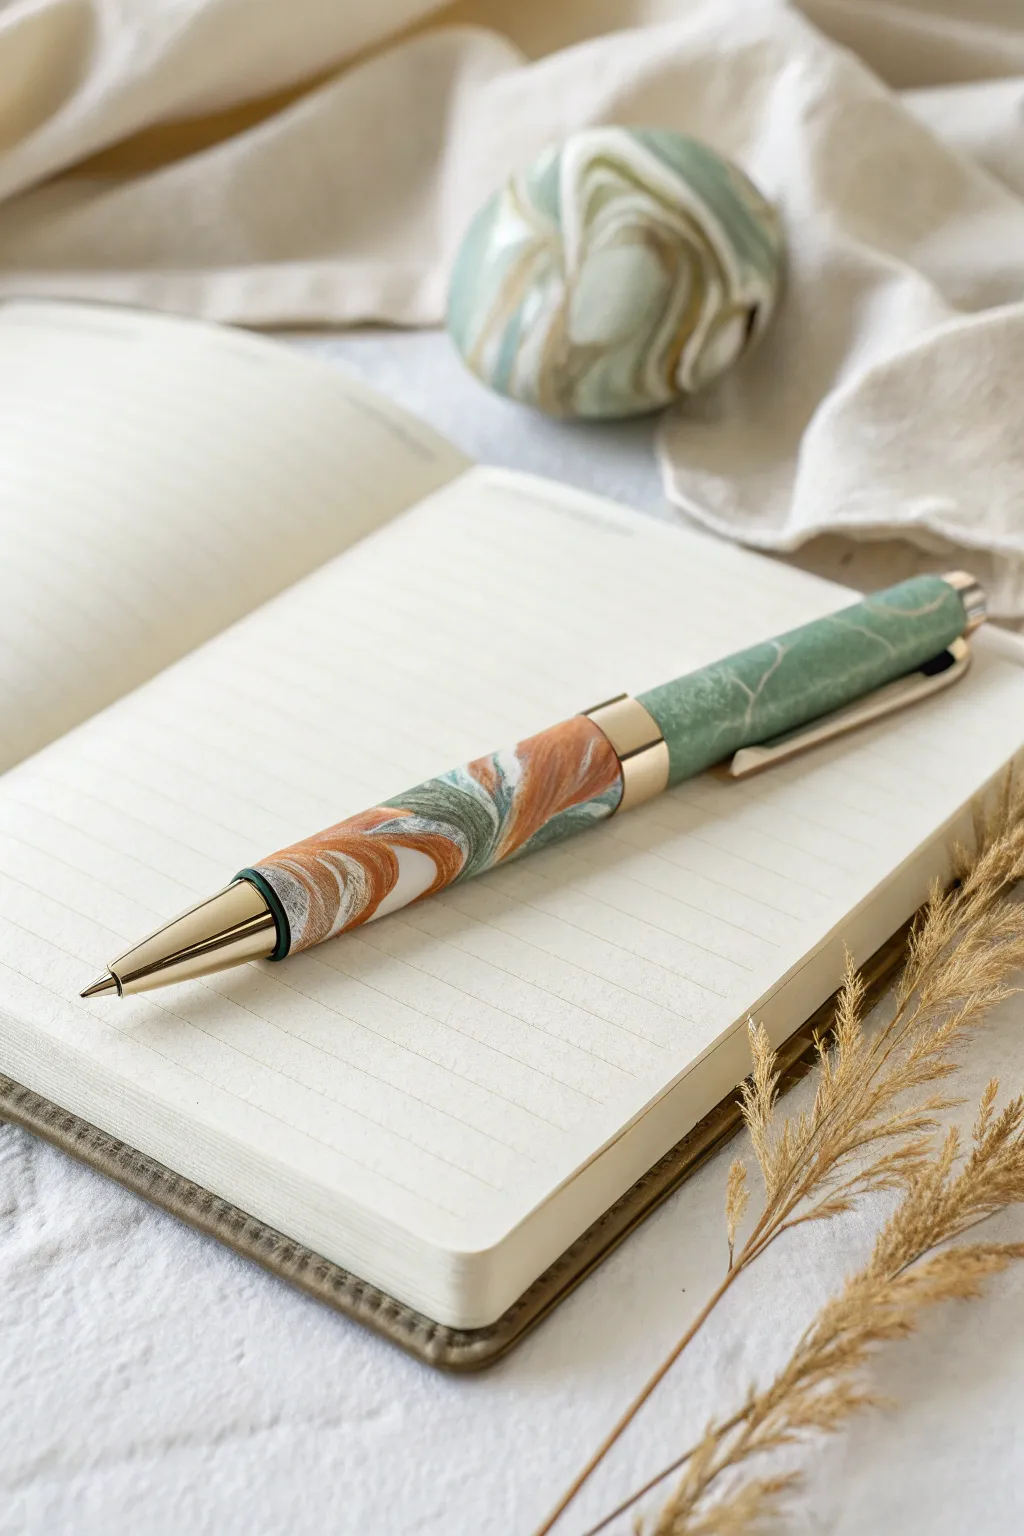
Faux Stone and Agate Swirls
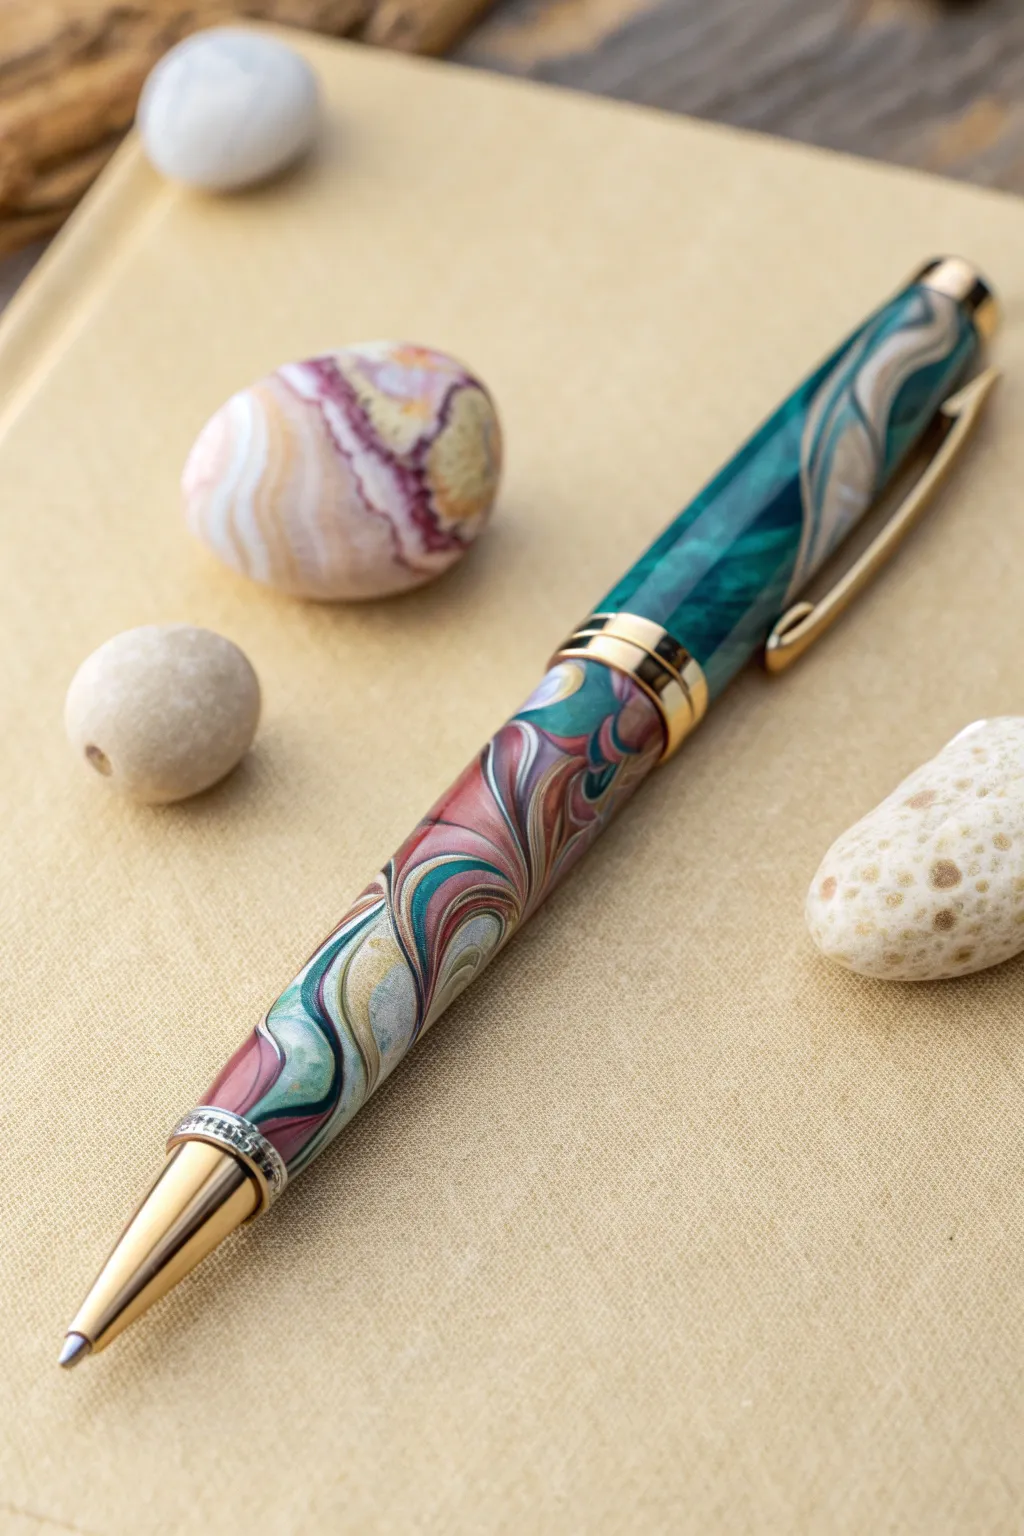
Transform a simple pen kit into a sophisticated writing instrument featuring the elegance of faux stone. This project uses marbling techniques to blend deep teals, moody mauves, and soft creams into a stunning, agate-inspired finish.
How-To Guide
Materials
- Slimline or Euro-style ballpoint pen kit (gold plated)
- Pen turning mandrel and bushings
- 7mm brass tubes (included in kit)
- Polymer clay: Teal/Emerald, Maroon/Mauve, White, Translucent, Gold metallic
- Polymer clay blade (tissue blade)
- Pasta machine or rolling pin
- Sandpaper (various grits from 150 to 600)
- Micro-mesh pads (1500 to 12000 grit)
- Cyanoacrylate (CA) glue (thin and medium)
- Lathe (for sanding/finishing) or a variable speed drill
- Gloss glaze or resin (optional)
Step 1: Preparing the Blanks
-
Prepare the Tubes:
Scuff the surface of your brass tubes with 150-grit sandpaper to give the clay something to grip. Apply a thin layer of liquid polymer clay or Bake & Bond to the tubes and set them aside. -
Mix the Colors:
Condition your clay blocks. To get the specific look in the photo, you’ll want to create some custom mixes. Mix emerald with a touch of translucent for depth. Mix maroon with a tiny bit of white to soften it. Keep the gold metallic pure for striking veins. -
Stack the Clay:
Flatten each color into thin sheets. Stack them in an alternating pattern: Teal, White, Maroon, Gold, Teal, Translucent. Don’t worry about being too precise; organic variation is key here. -
Create the Cane:
Compress the stack into a block. Using your tissue blade, slice thin, varied cross-sections from the block. You can twist the block slightly before slicing to encourage swirling patterns.
Depth Perception
Add more translucent clay between opaque layers. When sanded and polished, these clear windows allow you to see ‘deep’ into the stone, creating a realistic mineral effect.
Step 2: Faux Agate Application
-
Apply to Tubes:
Take your thin slices of marbled clay and carefully wrap them around the prepared brass tubes. Ensure the seams overlap slightly and press them down firmly to remove air pockets. -
Smooth the Surface:
Roll the tubes gently on your work surface to smooth out the joins and ensure an even thickness. The clay should be slightly thicker than the bushings you will use later. -
Refine the Pattern:
I prefer to gently manipulate the surface with my thumbs here, pushing the colors to create those characteristic agate ‘drifts’ and swirls seen in the example. -
Bake Instructions:
Place the tubes on a dedicated baking tile or rack. Bake according to your clay manufacturer’s instructions (usually 275°F/130°C for at least 30 minutes) to ensure durability. -
Cool Down:
Allow the tubes to cool completely before determining if they need a second bake or any filling of gaps.
Step 3: Turning and Finishing
-
Mount on Mandrel:
Once cool, square the ends of the tubes (trimming excess clay) so they are flush with the brass. Mount the blanks onto your lathe mandrel using the appropriate bushings for your pen kit. -
Initial Sanding:
With the lathe running at a medium speed, start sanding with 150 or 220 grit dry sandpaper. Shape the clay until it is perfectly flush with the bushings on both ends. -
Wet Sanding:
Move to wet sanding with Micro-mesh pads. Start at 1500 and work your way up to 12000. Keep the pads wet and wipe the pen down between each grit to avoid scratching. -
Polishing:
Once you hit 12000 grit, the clay should look glassy. Apply a plastic polish or buffing compound using a soft rag while the lathe spins to bring out the deep shine of the translucent layers. -
Assembly:
Remove the blanks from the mandrel. Follow your pen kit’s specific instructions to press the gold tip, clip end, and transmission mechanism into your finished faux stone barrels.
Gilded Veins
Before baking, gently slice into the raw clay with a razor and press real gold leaf into the crevices. Roll smooth to seal for an ultra-luxurious, high-end finish.
Once assembled, the polished finish and intricate swirls make this pen a truly impressive handmade gift

TRACK YOUR CERAMIC JOURNEY
Capture glaze tests, firing details, and creative progress—all in one simple printable. Make your projects easier to repeat and improve.
Granite Salt-and-Pepper Texture
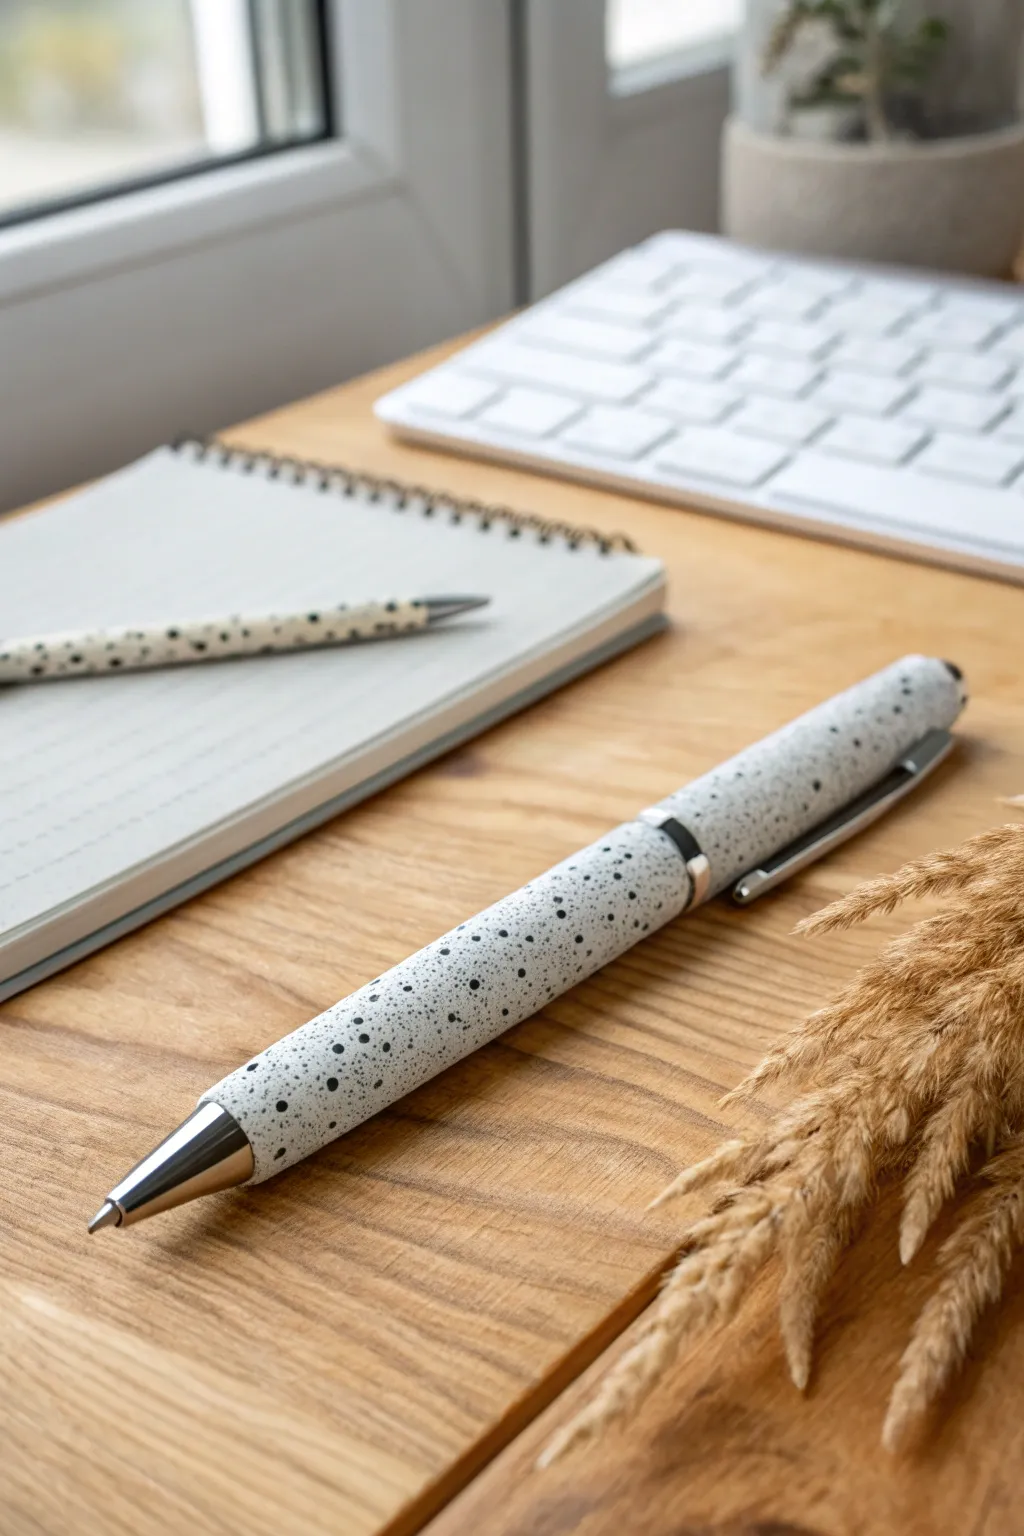
Transform ordinary ballpoint pens into elegant, minimalist desk accessories with this faux granite technique. By mixing fine black glitter or spices with white polymer clay, you achieve a sophisticated salt-and-pepper stone effect that looks expensive but is incredibly simple to make.
Step-by-Step
Materials
- White or translucent white polymer clay
- Fine black glitter or embossing powder
- Ballpoint pens with removable ink cartridges (stick pens usually work best)
- Small rolling pin or acrylic roller
- Sharp craft knife or scalpel
- Sandpaper (various, from 400 to 1200 grit)
- Oven for baking
- Optional: Black pepper (for an organic alternative)
- Matte or satin varnish
Step 1: Preparing the Clay Mix
-
Condition the clay:
Start by taking a block of white polymer clay and kneading it thoroughly in your hands until it becomes soft, warm, and pliable. -
Add the speckles:
Flatten the white clay into a pancake shape. Sprinkle a generous pinch of fine black glitter or embossing powder into the center. Start with less than you think you need; you can always add more. -
Knead vigorously:
Fold the clay over the speckles and knead repeatedly to distribute the black particles evenly throughout the white base. -
Inspect the distribution:
Roll the clay into a ball and slice it in half. Check if the speckle density looks like natural granite. If it feels too sparse, add a tiny bit more black material and knead again. -
Sheet the clay:
Roll your mixed granite clay into a flat, even sheet, roughly 2-3mm thick. I prefer using playing cards stacked on either side of my roller as guides to ensure a consistent thickness.
Uneven Speckles?
If glitter clumps during kneading, flatten the clay into a really thin sheet, tear it into tiny pieces, stack them randomly, and compress. This redistributes pockets of glitter.
Step 2: Applying to the Pen
-
Prep the pen body:
Disassemble your pen, removing the ink cartridge and end cap. You just want the plastic barrel. -
Measure and cut:
Place the plastic barrel on your clay sheet. Use your craft knife to cut a rectangle of clay that is simply the length of the barrel and just wide enough to wrap around it once. -
Wrap the barrel:
Carefully lift the clay rectangle and wrap it around the pen barrel. Ensure there are no air bubbles trapped between the plastic and the clay. -
Create the seam:
Where the two edges of clay meet, gently push them together. Using your finger or a smoothing tool, blend the seam until it disappears completely. -
Trim the ends:
Slice off any excess clay hanging over the ends of the barrel. Gently round the edges inwards slightly with your finger so the pen components will fit back in later. -
Smooth the surface:
Roll the clay-covered pen gently on your work surface to ensure it is perfectly round and smooth.
Step 3: Finishing Touches
-
Bake the pens:
Place the pen barrels on a baking sheet or tile. Bake according to your brand of polymer clay instructions (usually around 275°F/135°C for 15-30 minutes). -
Cool down:
Let the pens cool completely inside the oven or on a rack. Do not try to assemble them while warm, as the clay is still slightly soft. -
Initial sanding:
Once cool, wet sand the surface starting with 400 grit sandpaper. This removes any fingerprints and makes the ‘stone’ texture feel incredibly smooth. -
Polish for stone effect:
Work your way up through higher grits (600, 800, then 1200). The higher you go, the more it will feel like polished river stone. -
Seal the surface:
Apply a very thin coat of matte varnish to protect the surface without making it look plasticky and shiny. -
Reassembly:
Slide the ink cartridge back in and press the end cap into place to finish your custom tool.
Level Up: Color Flecks
Add microscopic amounts of gold leaf flakes or translucent amber clay shavings into the white mix. This mimics veins found in real luxury quartz or marble.
Enjoy writing with your sophisticated new stationery that feels as good as it looks
Mokume Gane Veneer Wrap
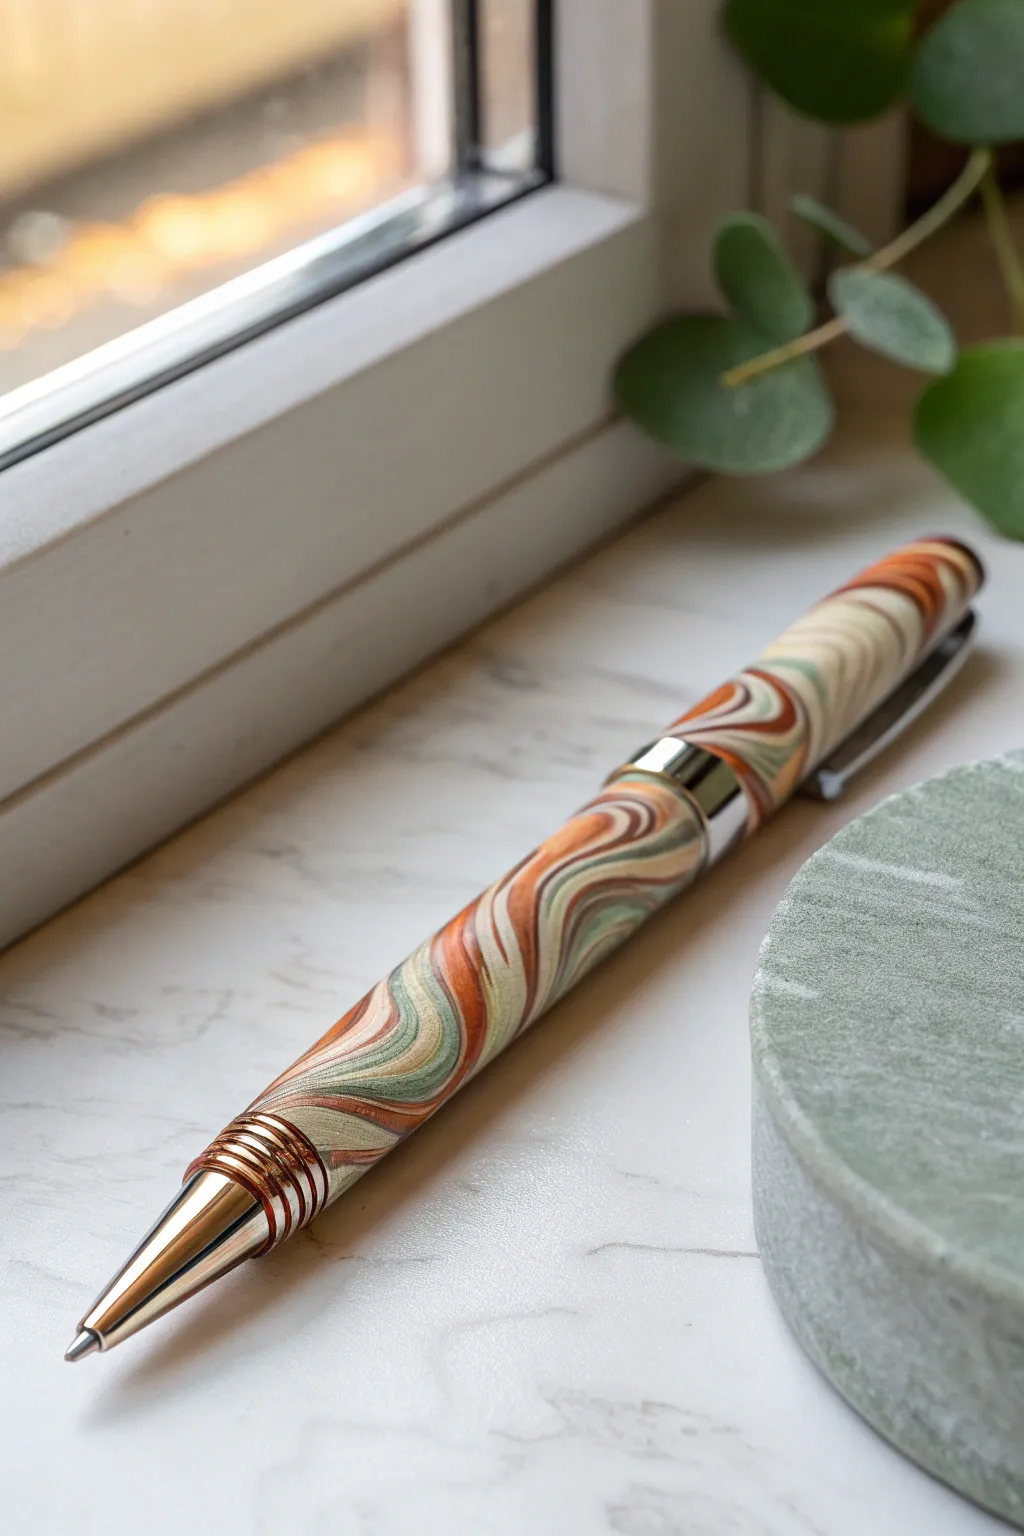
Transform a standard pen kit into a sophisticated writing instrument with this technique that mimics the ancient Japanese metalworking art of Mokume Gane. By layering and distorting sheets of polymer clay, you’ll uncover organic swirls of sage green, burnt orange, and cream that look like polished stone.
Step-by-Step Tutorial
Materials
- Polymer clay in Sage Green, Burnt Orange/Terracotta, Pearl/White, and Metallic Copper
- Pen kit (Euro style or similar, with tubes)
- Tissue blade or very sharp craft knife
- Acrylic roller or pasta machine
- Texture tools (knitting needle, small cutters, or a dedicated Mokume Gane stamp)
- Translucent Liquid Sculpey (TLS) or Bake and Bond
- Wet sandpaper (grids 400 to 1200)
- Buffing wheel or soft cloth
- Cyanoacrylate (CA) glue (optional for final finish)
Step 1: Prepping the Clay Stack
-
Condition and Flatten:
Begin by conditioning all your clay colors until they are pliable. Roll each color out into sheets of equal thickness, aiming for a medium setting on your pasta machine or about 1.5mm thick with a roller. -
Leaf the Metals:
To add extra shimmer, apply a very thin layer of gold or copper leaf to the top of your translucent or white clay sheet before stacking, though this step is optional if using metallic clay. -
Stack the Colors:
Layer the sheets on top of each other. A good order for this look is: White, Copper, Sage Green, then Burnt Orange. Repeat this sequence until you have a block about 1/2 inch thick. -
Compress the Block:
Use your acrylic roller to gently compress the layers together, ensuring no air bubbles are trapped between the sheets.
Pattern Is Too Blurry?
If your slices look muddy, your clay might be too soft. Pop the stacked block in the fridge for 20 minutes before slicing. Cold clay slices cleaner and keeps the distinct lines of the Mokume Gane.
Step 2: Creating the Mokume Gane Pattern
-
Distort the Layers:
This is the fun part where the pattern emerges. Take your texture tools—like the back of a paintbrush or a small circle cutter—and press them deeply into the stack, going about 3/4 of the way down. Do not cut all the way through. -
Heal the Punctures:
Once the block is heavily textured, push the sides back together gently to close up the holes you just made. You can also run it lightly through the pasta machine on a thick setting to smooth the top. -
Slice the Veneer:
Using your flexible tissue blade, carefully slice extremely thin horizontal layers off the top of the stack. As you slice, you will see the beautiful, distorted bullseye patterns appear. -
Select Your Slices:
Lay your best patterned slices onto a piece of plain scrap clay sheet or directly onto a piece of paper to help arrange them. Choose pieces that have a nice mix of the orange and green swirls.
Add Metallic Depth
Before distorting your stack, dust a layer of fine mica powder between the clay sheets. When you slice through later, you’ll get shimmering metallic veins running through the swirls.
Step 3: Applying to the Pen Barrel
-
Prep the Tubes:
Take the brass tubes from your pen kit and rough them up slightly with sandpaper to help the clay adhere. Wipe them clean. -
Apply Bonding Agent:
Smear a thin layer of Bake and Bond or TLS onto the brass tubes. -
Wrap the Tubes:
Carefully wrap your Mokume Gane veneer slices around the tubes. I usually overlap the seams slightly and then slice through both layers with a blade to create a perfect butt joint. -
Smooth the Seams:
Gently roll the clay-covered tube on your work surface to smooth out the seam and ensure the clay is firmly bonded to the brass. -
Trim the Ends:
Trim the excess clay flush with the ends of the brass tubes. Be careful not to leave clay overhanging the ends, or the hardware won’t fit later.
Step 4: Finishing
-
Bake:
Bake the tubes according to the polymer clay manufacturer’s instructions. I typically bake vertically on a dedicated bead rack to prevent flat spots. -
Sand Smooth:
Once cool, wet sand the tubes starting with 400 grit and working your way up to 1200 grit or higher. This reveals the depth of the pattern. -
Buff or Coat:
For a high-gloss finish seeing the example, apply distinct coats of CA glue (super glue), sanding lightly between coats, or simply buff the clay to a high sheen using a soft wheel. -
Final Assembly:
Press the pen hardware parts into the tubes using a pen press or a clamp with soft jaws, following the specific diagram for your pen kit model.
Enjoy the smooth feel of your custom pen as you write your next masterpiece
Embossed Texture Grip Patterns
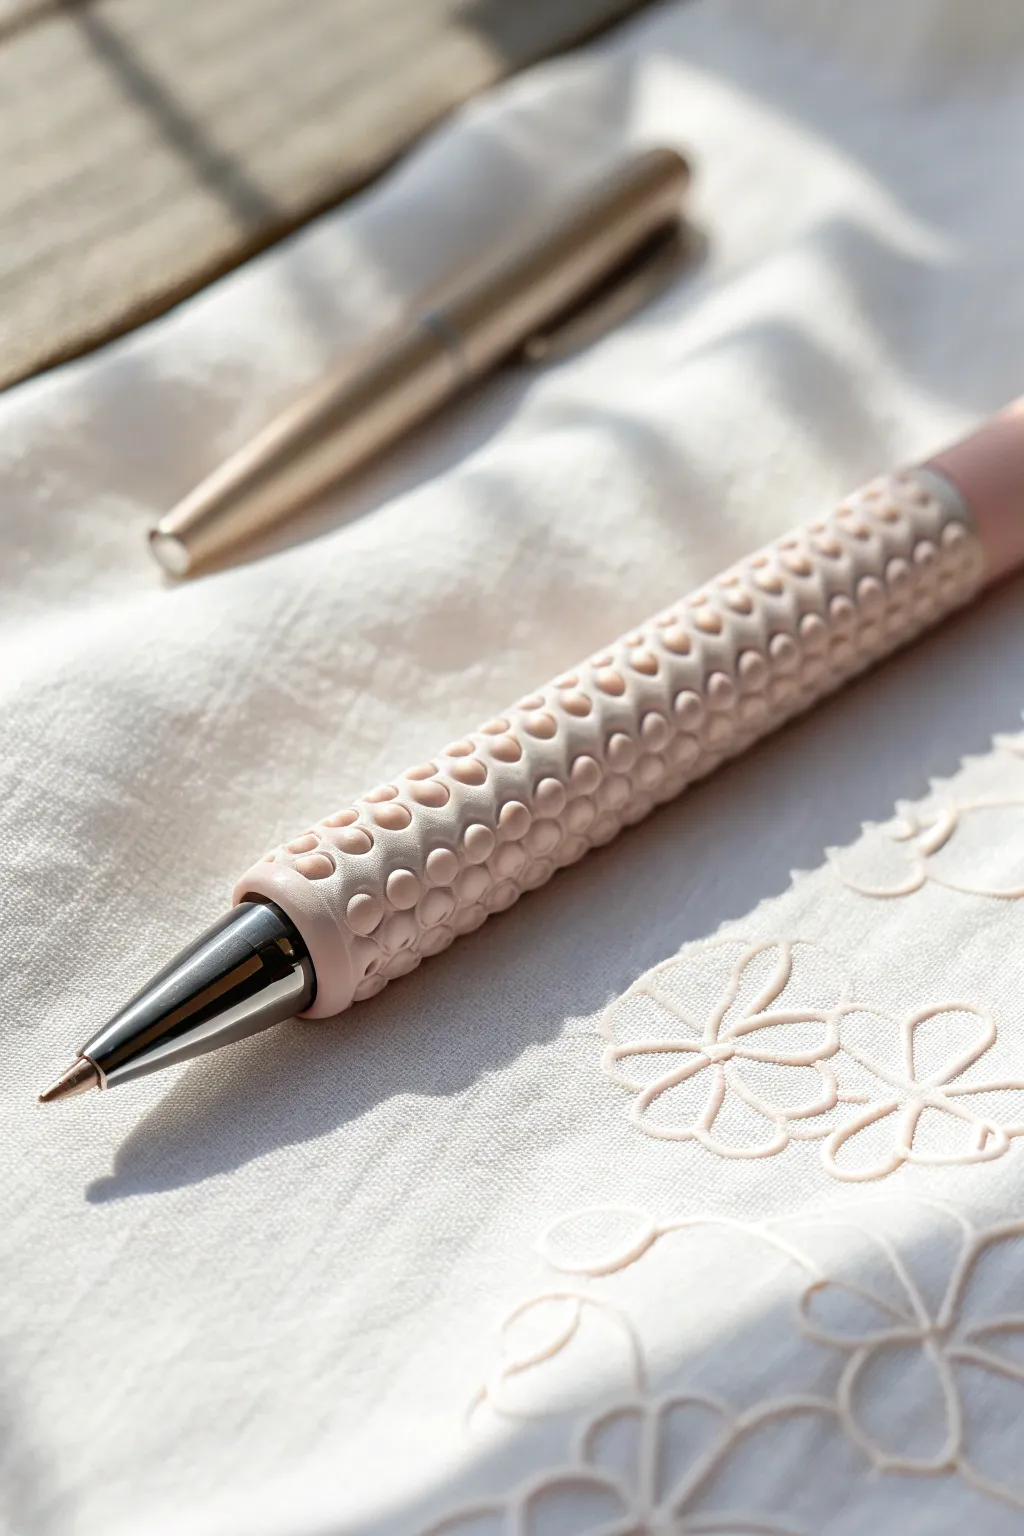
Transform a standard stick pen into a tactile writing instrument with this sophisticated bubbly texture. This project uses soft peach polymer clay and a repetitive embossing technique to create a grip that is as satisfying to hold as it is to look at.
Detailed Instructions
Materials
- Standard stick ballpoint pen (like a Bic Round Stic)
- Polymer clay in light peach or blush pink
- Liquid polymer clay (optional, for adhesion)
- Acrylic roller
- Precision craft knife
- Small ball stylus tool (medium size)
- Smooth work surface (ceramic tile or glass)
- Baking sheet
- Cardstock or parchment paper
Step 1: Preparation & Base Layer
-
Pen Prep:
Begin by removing the ink cartridge and the end cap from your stick pen barrel. You cannot bake the ink, so set the cartridge aside safely. Pliers might be helpful if the end cap is stubborn. -
Clean the Barrel:
Wipe the plastic barrel down with a little rubbing alcohol to remove oils or manufacturing residue, which helps the clay stick better. -
Condition the Clay:
Take roughly half a block of your peach clay and condition it thoroughly in your hands. Knead it until it is warm, pliable, and free of any cracks. -
Roll the Sheet:
On your smooth work surface, roll the clay into an even sheet. You want it to be about 2-3mm thick—thick enough to emboss deeply but not so bulky that the pen becomes heavy. -
Trimming:
Use your craft knife to cut a clean rectangle from the clay sheet. The length should match the pen barrel (leaving room for the tip), and the width should be just enough to wrap around the diameter once. -
Apply Adhesive:
I find that adding a very thin smear of liquid polymer clay to the plastic barrel helps prevent the clay from twisting later, though this is optional. -
Wrap the Pen:
Carefully wrap the clay rectangle around the plastic barrel. Butt the two long edges together to form a seam. -
Smooth the Seam:
Gentle rub the seam with your finger or a clay tool until it disappears completely. Roll the pen gently on your work surface to ensure it is perfectly round and the clay is evenly distributed. -
Refine Ends:
Trim any excess clay from the top and bottom ends. Smooth the edges down so they curve slightly inward towards the barrel opening, creating a finished look.
Step 2: Creating the Texture
-
Marking Guides (Optional):
If you struggle with straight lines, lightly mark vertical guidelines with a needle tool, but freehand usually works well for this organic bubbly look. -
First Impressions:
Take your ball stylus tool. Starting at the bottom near the tip, press the tool firmly into the clay to create a circular indentation. Don’t push all the way to the plastic; go about halfway deep. -
Creating the Row:
Continue pressing dots in a vertical line running up the length of the pen. Keep the spacing consistent, leaving a tiny wall of raised clay between each divot. -
Offset Pattern:
Start your second vertical row next to the first. For a honeycomb-like effect, try to position the new dots in the spaces between the dots of the previous row. -
Cover the Surface:
Continue this process around the entire circumference of the pen. Rotate the barrel carefully as you work to avoid squished dots on the underside. -
Texture Check:
Inspect your work. If any dots look shallow or distorted from handling, gently redefine them with the stylus now. -
Final Smoothing:
Lightly brush your finger over the surface to soften any sharp ridges created by the stylus, giving the texture that soft, bubbly appearance seen in the photo.
Smudged texture?
If handling the pen is smashing your earlier dots, slide the pen onto a knitting needle or wooden skewer. This lets you hold the tool and rotate the pen without touching the soft clay surface.
Step 3: Baking & Assembly
-
Baking Setup:
Preheat your oven according to the clay manufacturer’s instructions (usually 265°F / 130°C). Place the pen on a bed of folded cardstock or parchment paper to prevent flat spots. -
Baking:
Bake the clay-covered barrel for 30 to 45 minutes. Longer baking makes the clay stronger, which is important for a functional item. -
Cooling:
Allow the pen barrel to cool completely inside the oven or on a wire rack. Do not try to reassemble whilst warm. -
Reassembly:
Once cool, slide the ink cartridge back into the barrel. If the fit is tight due to slight clay shrinkage, use a small drill bit or round file to clear the opening.
Level Up: Ombré Effect
Create a gradient by blending two colors of clay before wrapping the barrel. As you emboss firmly, the color shift adds amazing depth to the valleys and peaks of the bubbly texture.
Enjoy the rhythmic feeling of writing with your custom-textured pen
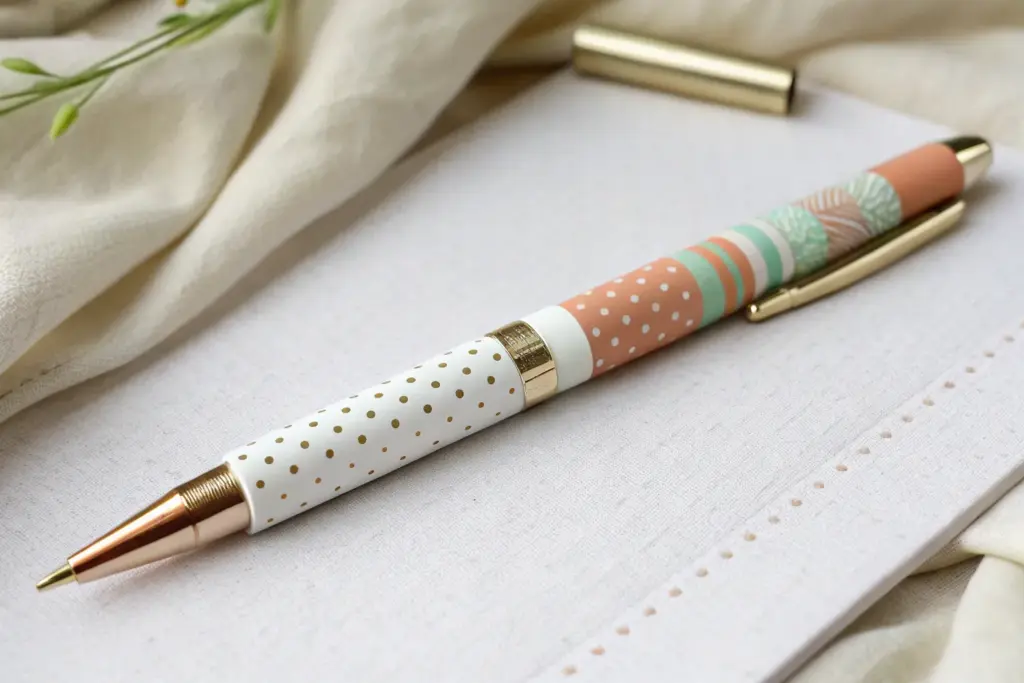
Stamped Initial or Name Band
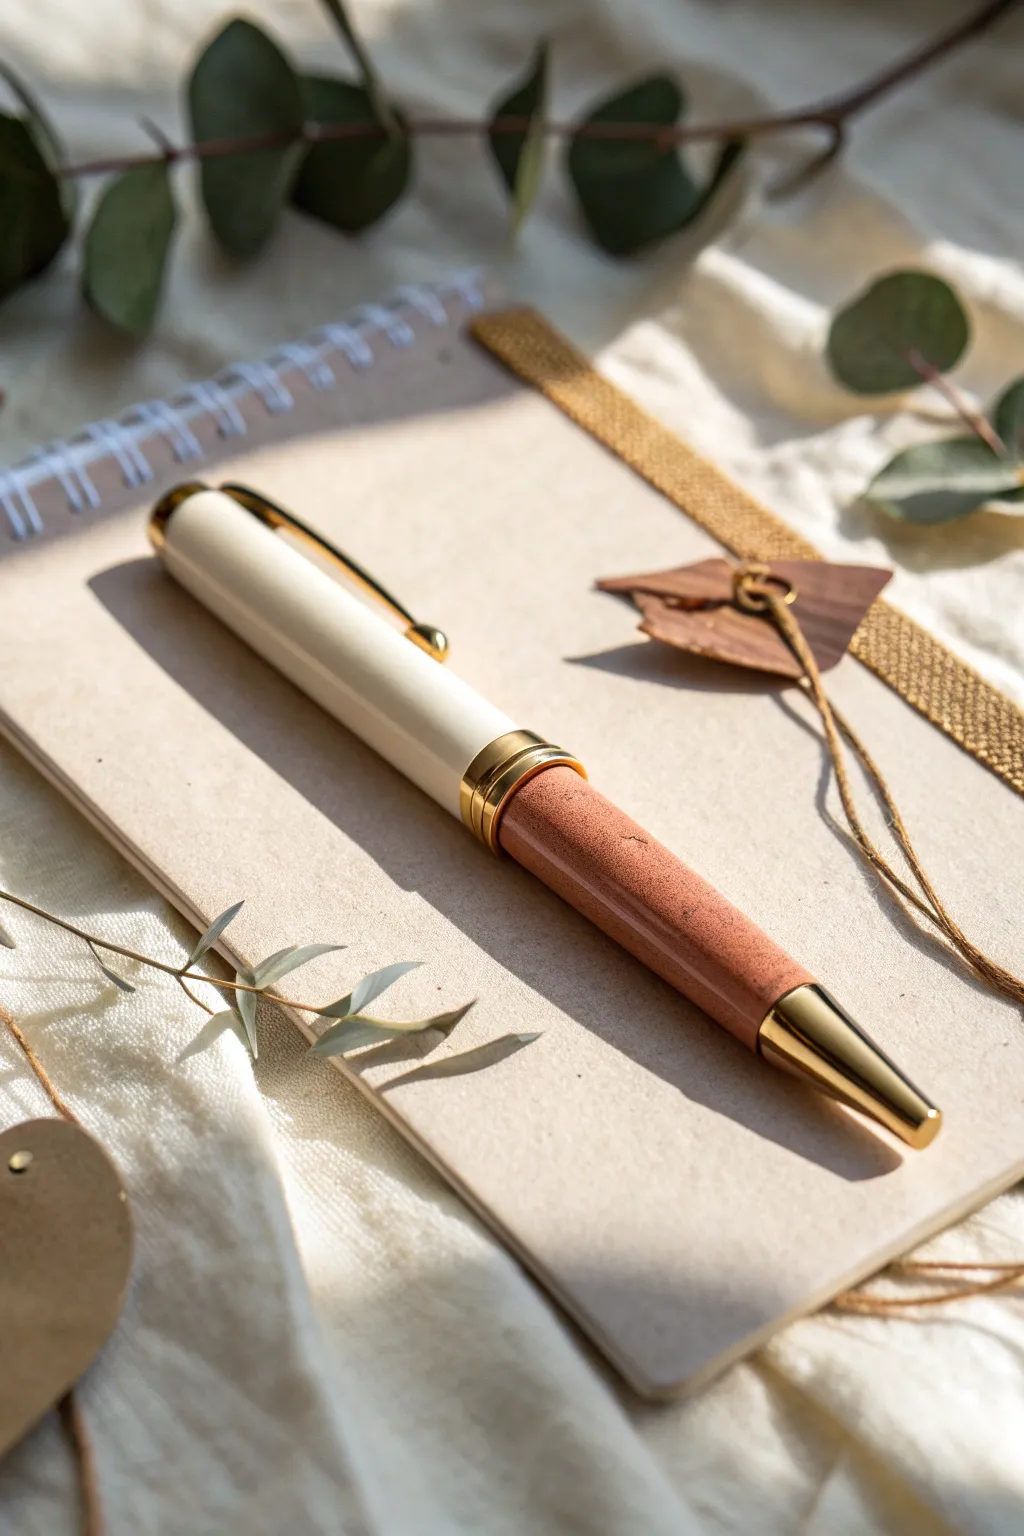
Transform a simple pen kit into a sophisticated writing instrument featuring a barrel that mimics the texture of pink granite or sandstone. The combination of the warm, speckled clay body and touches of gold hardware creates a timeless, professional look that is surprisingly achievable for beginners.
Step-by-Step
Materials
- Slimline pen kit (gold or brass finish)
- Pen mandrel for turning
- Polymer clay (terracotta or dusty rose color)
- Polymer clay (translucent)
- Black pepper or black embossing powder (for speckles)
- Fine glitter (gold or bronze, optional)
- Pasta machine or rolling pin
- Selecting blade / tissue blade
- Wet/Dry sandpaper (various grits: 400, 600, 800, 1000)
- Polishing compound or buffing wheel
- Cyanoacrylate (CA) glue / Super glue
- Drill bit (7mm or size matching kit)
- Pen press or clamp
Step 1: Preparing the Faux Stone Mix
-
Mix the base colors:
Begin by conditioning the terracotta or dusty rose clay until it is soft and pliable. Mix in a small amount of translucent clay—about a 4:1 ratio of color to translucent—to give the final piece a sense of depth similar to real stone. -
Add texture elements:
Flatten your clay mixture and sprinkle a pinch of ground black pepper or black embossing powder over the surface. For a subtle shimmer, you can add a tiny dusting of gold or bronze fine glitter. -
Blend the inclusions:
Fold the clay over the inclusions and pass it through your pasta machine or roll it out by hand. Repeat the folding and rolling process several times until the speckles are evenly distributed throughout the clay but haven’t disappeared completely. -
Form the raw sheet:
Sheet the mixed clay to a medium thickness, roughly 8mm to 10mm, ensuring it is thick enough to cover the brass tube from your pen kit with some excess for turning.
Step 2: Applying to the Tube
-
Prepare the brass tube:
Take the lower brass tube from your pen kit and rough up the exterior surface with 400-grit sandpaper. This scratching helps the clay adhere better to the smooth metal. -
Clean and glue:
Wipe the tube down to remove sanding dust. Apply a thin layer of liquid polymer clay or a specifically designed heat-bakeable adhesive to the outside of the brass tube. -
Cut the clay strip:
Using your tissue blade, cut a strip of your conditioned faux-stone clay that is the exact length of the brass tube and wide enough to wrap around it fully. -
Wrap the tube:
Carefully wrap the clay around the tube, pressing firmly to eliminate air bubbles between the brass and the clay. Join the seam by gently smoothing the clay over itself. -
Compact the clay:
Roll the clay-covered tube on a smooth surface with gentle pressure. This ensures the clay is uniform and fully adhered. The diameter should be slightly larger than your bushings to allow for finishing.
Clean Seams
To make the seam invisible, slice the clay at a 45-degree angle where the ends meet. Gently stroke the clay across the join rather than pinching it.
Step 3: Baking and Finishing
-
First bake:
Place the tube on a baking tile or in a bed of baking soda to prevent flat spots. Bake according to your clay manufacturer’s instructions for the time required for that thickness (usually 20-30 minutes). -
Trim the ends:
Once cool, use a barrel trimmer or a sharp craft knife to carefully square off the ends of the clay so they are perfectly flush with the brass tube ends. This is crucial for a gap-free assembly. -
Turn on the mandrel:
Mount the tube onto your pen turning mandrel with the appropriate bushings. If you don’t have a lathe, you can mount it in a drill press or hand drill secured in a vise. Use sandpaper or a file to shape the barrel down to meet the bushings. -
Sand for smoothness:
Begin wet sanding with 400-grit paper, moving progressively up through 600, 800, and 1000 grits. I prefer to sand laterally with the lathe off between grits to remove circular scratches. -
Polish (optional):
For a high gloss like the pen shown, apply a friction polish or buff the barrel on a buffing wheel with a fine compound until it shines like polished stone.
Level Up: Texture
Before baking, gently roll the clay over coarse sandpaper or a stone tile. This imitates the pitted texture of real sandstone for a tactile grip.
Step 4: Assembly
-
Organize parts:
Lay out your pen kit parts: the tip, the twist mechanism, the center band, the clip, and the cap (which in this image is a solid cream color resin or commercial blank, contrasting the stone barrel). -
Press the tip:
Using a pen press or a woodworking clamp, gently press the gold decorative tip into the bottom end of your faux-stone barrel. -
Insert mechanism:
Press the twist mechanism into the other end of the stone barrel up to the indentation line. Test the ink refill extension before pressing it further. -
Assemble the top:
Press the clip and end cap into the upper barrel (the cream colored one shown). If you made both barrels from clay, follow the same steps, but the image shows a mixed material design. -
Join the halves:
Slide the center band over the specialized coupler and push the two halves of the pen together.
You now have a beautifully sophisticated writing tool that feels great in the hand.
Tiny Daisy Topper Pen
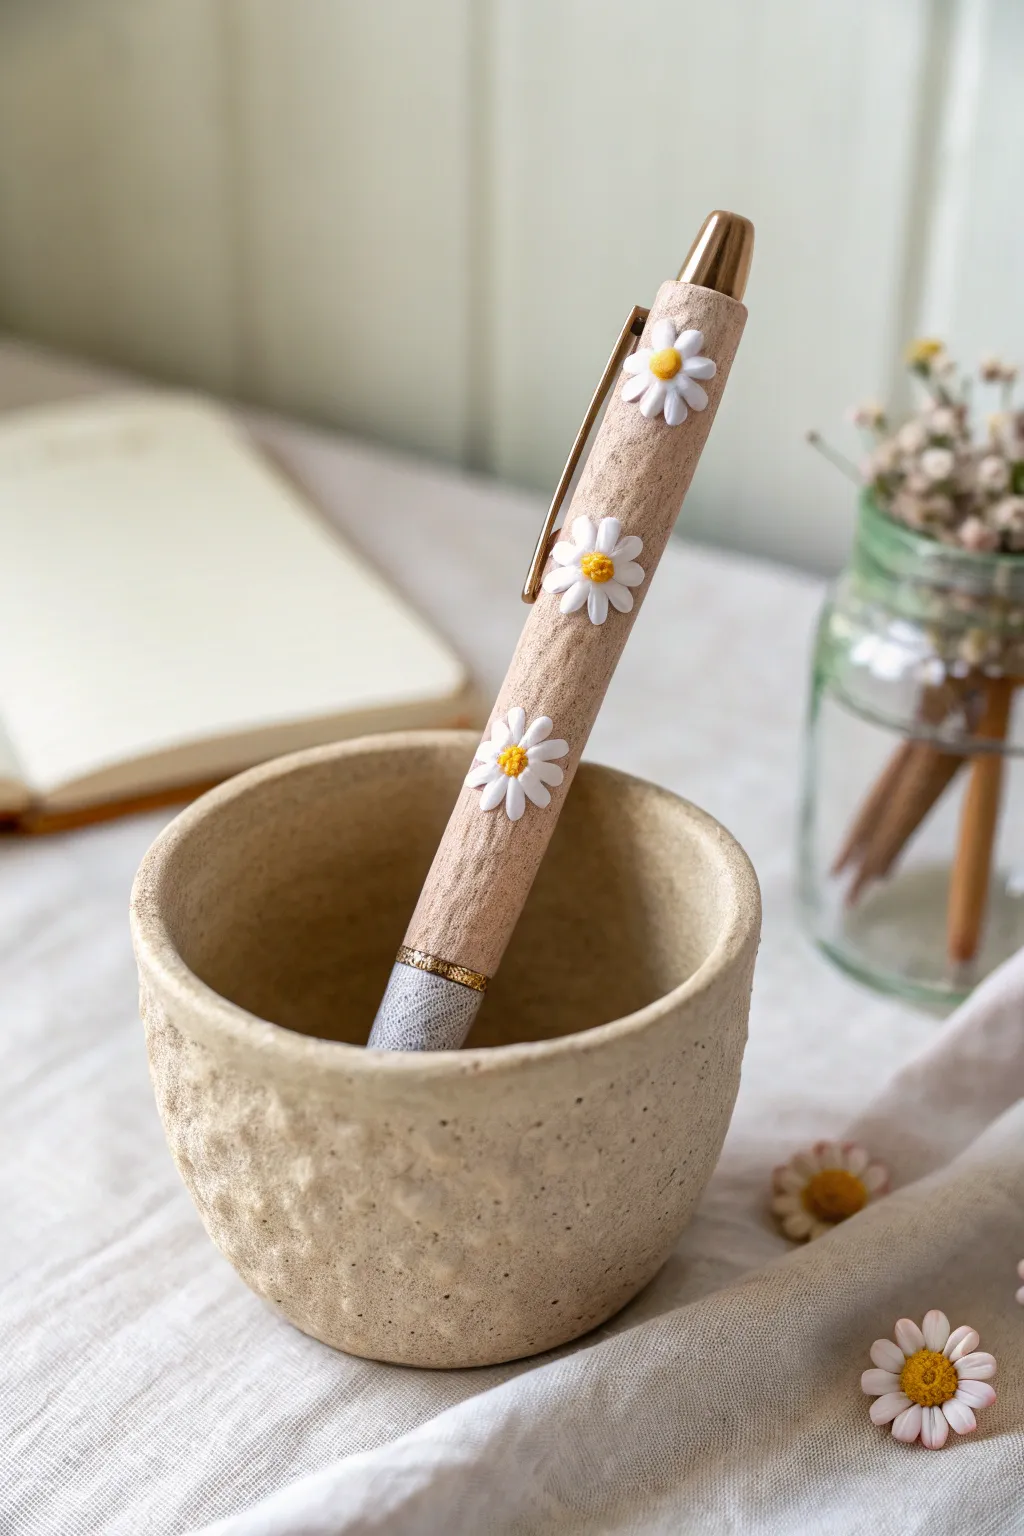
Transform a standard ballpoint pen into a charming piece of stationery art featuring a textured, sandy finish and delicate white daisies. This project combines a natural, pottery-inspired look with playful floral accents for a writing tool that feels wonderful in the hand.
How-To Guide
Materials
- Retractable ballpoint pen (metal body preferred)
- Beige or biscuit-colored polymer clay
- White polymer clay
- Yellow polymer clay
- Texturing tool (stiff toothbrush, coarse sandpaper, or commercial texture sponge)
- Needle tool or toothpick
- Liquid polymer clay (Translucent or Bake & Bond)
- Craft knife
- Acrylic roller
- Gloss varnish (optional)
Step 1: Preparing the Base
-
Disassemble the Pen:
Begin by taking apart your ballpoint pen. Unscrew the barrel and remove the ink cartridge and spring. You only want the metal or heat-safe plastic tube that forms the main body. -
Condition the Base Clay:
Take your beige or biscuit-colored clay and condition it in your hands until it is soft and pliable. Roll it into a smooth, even log. -
Roll a Sheet:
Use your acrylic roller to flatten the beige log into a thin, even sheet. Aim for a thickness of about 2mm. -
Wrap the Pen Barrel:
Apply a very thin layer of liquid polymer clay to the pen barrel to act as glue. Carefully wrap the beige clay sheet around the barrel, ensuring it covers the top two-thirds where the design will sit. -
Seam Smoothing:
Where the edges of the clay meet, gently push them together and smooth the seam with your finger or a clay tool until the join is invisible. Trim any excess from the ends with your craft knife.
Clean Clip Tip
Before baking, ensure you’ve trimmed the clay away from where the pen clip rests. If the clay is too thick under the clip, it won’t slide onto a notebook cover.
Step 2: Texturing and Details
-
Create the Stone Texture:
To achieve that rustic, pottery-like surface, firmly press a stiff toothbrush or a texture sponge all over the beige clay. Don’t be afraid to press hard enough to leave distinct pits and marks. -
Add the Lower Grip:
If you want the dual-tone look shown in the image, cut a clean line around the barrel about two inches from the tip. Remove the beige clay below this line and replace it with a thin sheet of grey or textured white clay for the grip section. -
Detail the Transition:
Roll a very thin snake of clay or use a small metal jewelry spacer ring to cover the transition line between the beige body and the lower grip section. This hides the seam and adds a metallic touch.
Pastel Petals
Instead of classic white daisies, try mixing tiny amounts of pink or lavender into your white clay for a soft, pastel wildflower look.
Step 3: Adding the Daisies
-
Form Flower Petals:
Roll tiny balls of white clay, barely the size of a peppercorn. Flatten each one into a small teardrop shape to form individual petals. -
Assemble the First Flower:
Apply a tiny dot of liquid clay near the middle of the pen barrel. Arrange 5-7 white teardrops in a circle, pressing the pointed ends toward the center. -
Add the Center:
Roll a tiny ball of yellow clay and press it firmly into the center of your petal ring. Use a needle tool to poke tiny dots into the yellow center for a realistic pollen texture. -
Populate the Pen:
Repeat the flower creation process, spacing about 3 or 4 daisies randomly up the length of the pen barrel. I find odd numbers usually look more aesthetically pleasing. -
Refine the Petals:
Use your needle tool to gently press a central indentation down the length of each white petal, giving them a more organic, cupped shape.
Step 4: Final Steps
-
Baking:
Place the pen barrel on a ceramic tile or baking sheet. Bake according to your polymer clay package instructions—usually around 275°F (135°C) for 15-30 minutes. -
Cooling:
Allow the pen to cool completely inside the oven. This tempering process helps prevent cracking. -
Assembly:
Once fully cool, reassemble your pen mechanism. Insert the spring, ink cartridge, and screw the parts back together. -
Finishing Touch:
If desired, apply a matte varnish to the beige areas to protect the texture, or leave it bare for a natural stone feel.
Enjoy writing your daily notes with your beautiful, handcrafted floral pen
Spring Garden Bug Pens
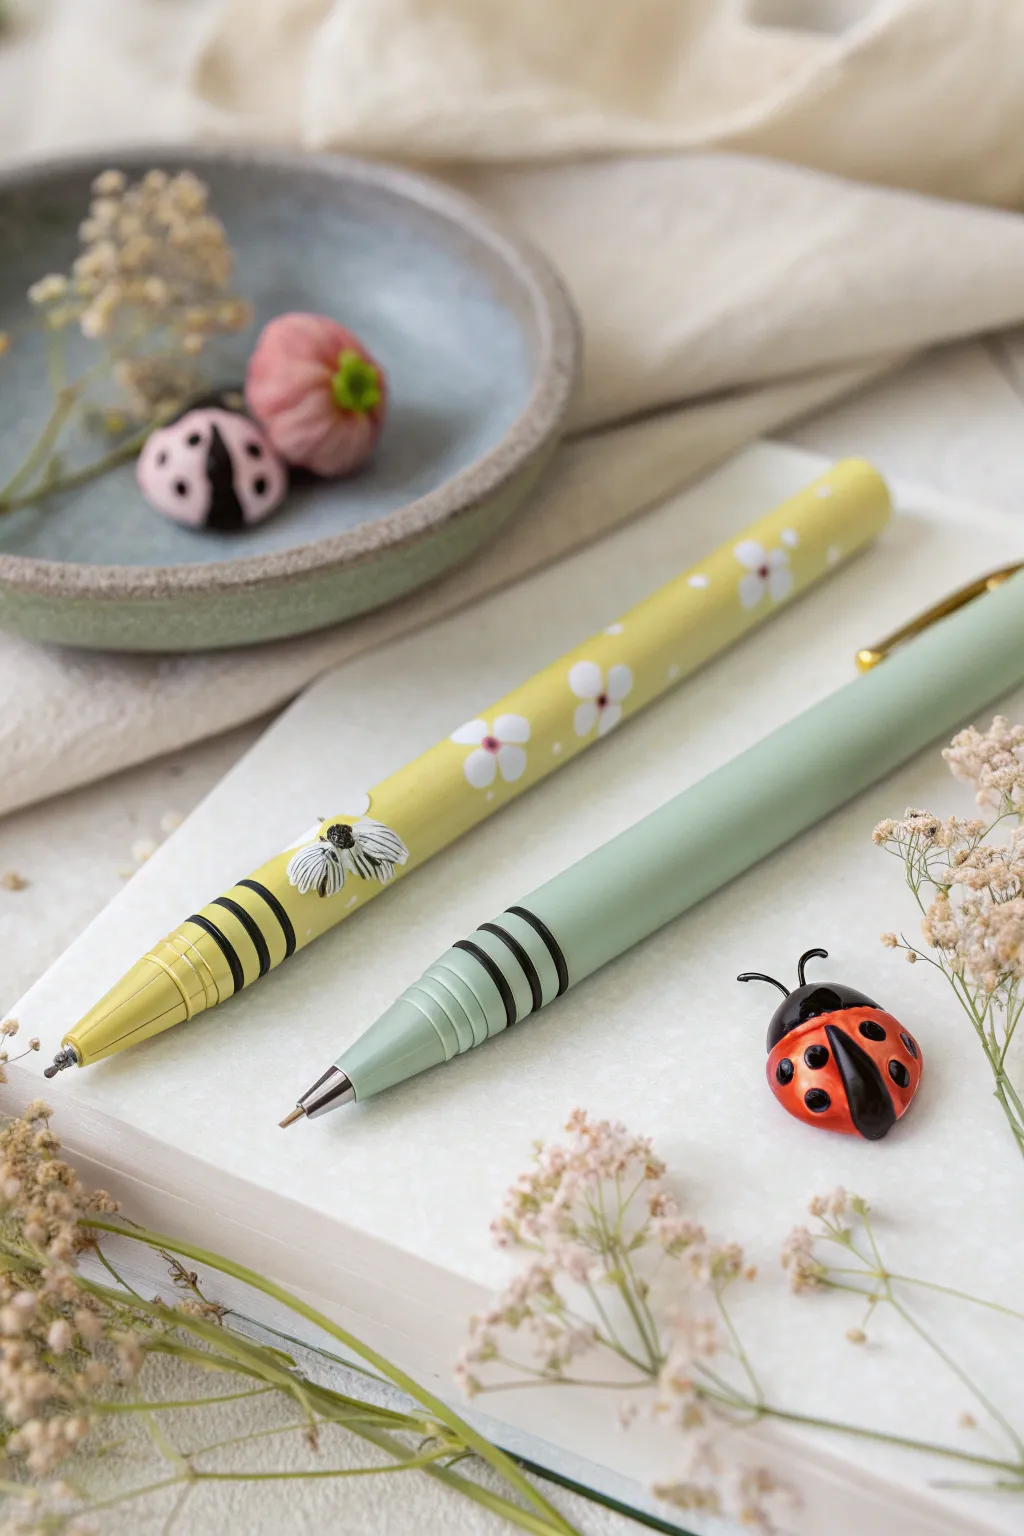
Celebrate the return of spring with these charming, nature-inspired pen coverings featuring soft pastels and tiny garden friends. These pens transform standard writing instruments into delightful accessories covered in buttery yellow and sage green clay, adorned with hand-painted bees and delicate white blossoms.
Step-by-Step Guide
Materials
- Standard metal or plastic stick pens (remove ink cartridge before baking)
- Polymer clay (Soft Yellow, Sage Green, Black, Translucent White)
- Liquid polymer clay (clear)
- Acrylic paints (White, Black, Yellow)
- Fine detail paintbrush (size 0 or 00)
- Clay roller or pasta machine
- Scalpel or sharp craft knife
- Needle tool
- Gloss glaze or UV resin (optional for the bug eyes/wings)
- Oven
Step 1: Base Preparation
-
Disassemble the pen:
Before starting, remove the ink cartridge and tip mechanism from your pen barrel. You only want the empty tube to bake in the oven so the ink doesn’t explode. -
Condition the base colors:
Thoroughly condition your soft yellow and sage green polymer clay blocks until they are pliable and smooth. This prevents cracks later on. -
Roll the sheets:
Roll out thin sheets of both colors using a pasta machine on a medium-thin setting (around #3 or #4) or use a hand roller to achieve an even 1-2mm thickness. -
Measure and cut:
Wrap the clay sheet around the pen barrel to measure the circumference, then trim a clean rectangle that will cover the length of the barrel. -
Wrap the pens:
Carefully wrap the clay around each pen barrel. Smooth the seam together with your finger or a clay tool until it disappears, ensuring there are no trapped air bubbles.
Step 2: Adding Bug Stripes
-
Create black stripes:
Roll out a very thin -
Apply the rings:
Wrap three thin black strips around the lower section of the pen (near the grip area). Space them evenly, leaving a small gap of the base color showing between each black ring. -
Smooth the transition:
Gently roll the pen on your work surface to embed the black stripes into the base clay so they sit flush rather than protruding too much.
Sticky Situation?
If fingerprints are ruining your smooth finish before baking, lightly brush the raw clay with a little baby oil or cornstarch to smooth them away.
Step 3: Floral & Bee Details
-
Positioning the bee:
For the yellow pen, create a tiny flattened oval of black clay for the bee’s body and press it gently onto the barrel above the gripe lines. -
Sculpting wings:
Form two tiny teardrops using translucent white clay. Press these onto the bee’s body to create wings. You can use a needle tool to impress slight texture into the wings. -
Adding flowers:
For the floral pattern on the yellow pen, you can either paint them later or use tiny circles of white clay pressed flat onto the barrel now. I prefer applying clay flowers for a slight 3D texture. -
First bake:
Bake the pen barrels according to your clay manufacturer’s instructions (usually 275°F/130°C for 15-30 minutes). Support them in an accordion-folded index card so they don’t get flat spots.
Make it a Set
Use leftover clay to sculpt matching charms like the ladybug shown. Embed a small eye pin before baking to turn it into a zipper pull or planner dangle.
Step 4: Painting & Finishing
-
Cool down:
Let the pens cool completely before painting. The clay must be room temperature for the acrylics to adhere properly. -
Painting the flowers:
Using your smallest brush and white acrylic paint, create five-petal flowers scattered across the upper part of the yellow pen. Add a tiny dot of corresponding base color in the center. -
Bee details:
Use fine white lines to detail the bee’s wings and tiny yellow stripes on the black bee body if you didn’t do this with clay previously. -
Seal the work:
Once the paint is fully dry, apply a thin coat of matte varnish over the whole pen to protect it. For the bee’s eyes or wings, a drop of UV resin or glossy glaze adds a nice ‘wet’ insect look. -
Reassembly:
Slide the ink cartridge and tip mechanism back into your decorated barrel. If the clay made the fit tight, you might need to sand the opening slightly.
Enjoy writing your spring to-do lists with your adorable new garden pens
Whimsical Veggie Character Pens

Transform a boring writing utensil into this vibrant orange friend that’s bound to brighten your desk. With its textured body, leafy green topper, and irresistibly cute kawaii face, this carrot pen is a fantastic project for learning polymer clay textures.
Detailed Instructions
Materials
- Orange polymer clay
- Dark green polymer clay
- Ballpoint pen kit or heat-safe metal pen barrel
- Liquid polymer clay (bakeable adhesive)
- Black acrylic paint
- White or pale pink acrylic paint
- Fine detail paintbrush or dotting tool
- Needle tool or toothpick
- Clay roller or pasta machine
- Craft knife
- Satin or matte glaze (optional)
Step 1: Preparing the Base
-
Disassemble the Pen:
If using a standard pen, remove the ink cartridge and any plastic parts that might melt. You only want the metal barrel or heat-safe ceramic tube. -
Prepare the Adhesive:
Apply a thin, even layer of liquid polymer clay over the entire surface of the pen barrel. I find this ensures the clay doesn’t slip off after baking. -
Condition the Clay:
Condition your orange clay until it is soft and pliable. Roll it into a smooth sheet about 2-3mm thick. -
Wrap the Barrel:
Wrap the orange clay sheet around the pen barrel. Trim the excess with a craft knife so the edges meet perfectly without overlapping. -
Smooth the Seam:
Gently roll the covered pen on your work surface to smooth out the seam and ensure the clay adheres tightly to the barrel.
Pro Tip: Fingerprints
Before baking, lightly brush the untextured areas with a tiny amount of baby oil or cornstarch to smooth away accidental fingerprints.
Step 2: Shaping and Texturing
-
Taper the Form:
Roll the clay gently with your fingers, applying slightly more pressure towards the bottom to create the classic tapered carrot shape. Ensure the tip is rounded but narrow. -
Create the Top Rim:
At the top (near the clicker or cap area), flatten the clay slightly to create a clean, flat surface where the leaves will sit. -
Add Ring Textures:
Using a needle tool or the back of a craft knife, gently press horizontal indented lines around the carrot body. -
Detail the Indentations:
Make these indentations slightly irregular. Instead of continuous perfect circles, press short, dashed lines in horizontal rows to mimic real carrot ridges. -
Refine the Surface:
Lightly brush your finger over the texture to soften any sharp ridges created by the tool, keeping the look organic.
Step 3: Adding the Greens
-
Form the Leaves:
Take three small balls of dark green clay and roll them into teardrop shapes. Flatten them slightly. -
Texture the Leaves:
Use a needle tool or knife to press a central vein and vertical lines into each leaf for realistic texture. -
Attach the Topper:
Press the three leaves together at their bases. Apply a dot of liquid clay to the top of the carrot and press the leaf cluster firmly onto the flat top. -
Insert Clip (Optional):
If your pen kit came with a metal clip, carefully insert it now if the construction allows, or leave a space to slide it on after baking.
Troubleshooting: Runny Paint
If your acrylic paint is too thin and spreads into the clay pores, let it thicken on your palette for a few minutes before applying.
Step 4: Baking and Face Detailing
-
Bake the Pen:
Bake the pen according to your clay manufacturer’s instructions. Usually, this is around 275°F (130°C) for 15-30 minutes. Let it cool completely. -
Map the Face:
Identify a smooth area near the top third of the carrot for the face. Visualizing the placement helps prevent crooked eyes. -
Paint the Eyes:
Using a fine brush or dotting tool dipped in black acrylic paint, create two solid black circles for eyes. -
Add the Mouth and Brows:
With the finest brush tip, paint a tiny ‘u’ shape for a smile between the eyes. Add small, curved eyebrows above the eyes for expression. -
Add Highlights:
Once the black paint is dry, add a tiny white dot in the upper corner of each eye to bring the character to life. -
Add Cheeks:
Dip a larger dotting tool into pale pink or white paint (mixed with a touch of orange) and dab two rosy cheeks just below the eyes. -
Final Assembly:
Reassemble the ink cartridge and pen mechanics once the paint is fully dry.
Now you have a charming vegetable companion to make your note-taking a little more joyful
Storybook Caterpillar Pen
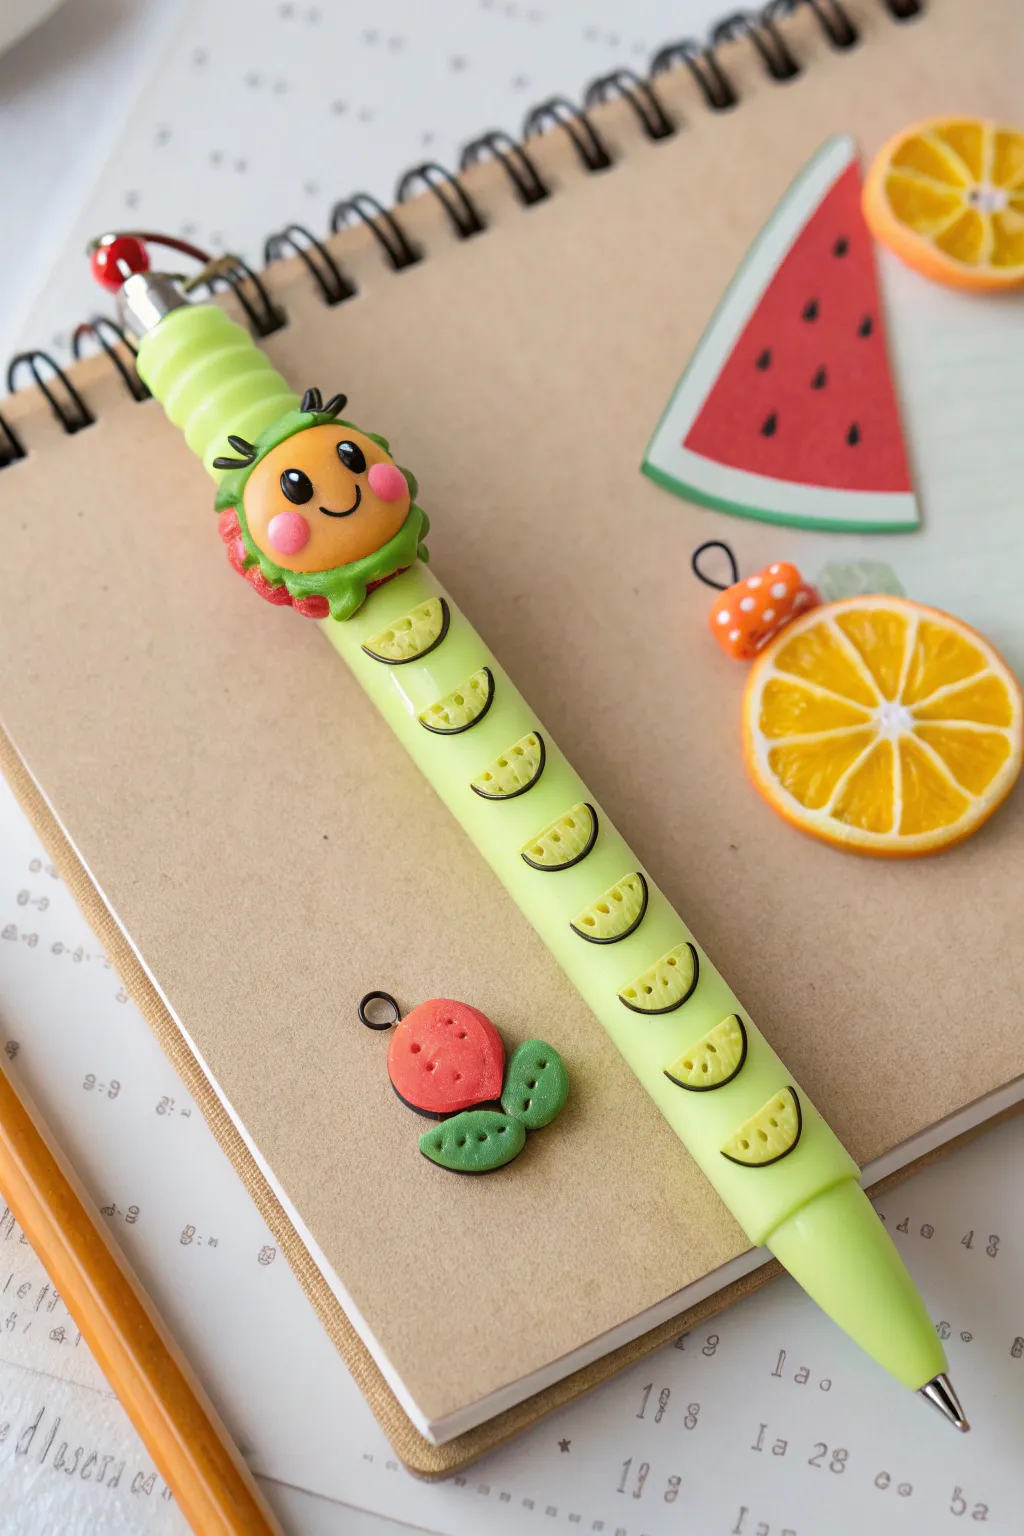
Bring a beloved storybook character to life with this delightful polymer clay pen project. Featuring a cheerful caterpillar head and segmented body made of playful citrus slices, this writing tool is as fun to make as it is to use.
Step-by-Step Guide
Materials
- Retractable ballpoint pen with a smooth, round barrel (green preferred)
- Polymer clay (Bright Green, Leaf Green, Red, Flesh/Peach, Black, Translucent White/Yellow)
- Liquid polymer clay or Bake & Bond
- Acrylic rolling pin or pasta machine
- Exacto knife or flexible clay blade
- Small ball tool and needle tool
- Gloss glaze or UV resin
- Small paintbrush
- Oven for baking
Step 1: Preparing the Base
-
Disassemble the pen:
Before starting, verify that your pen can be disassembled. Remove the ink cartridge and the spring. You only want to bake the plastic barrel, not the ink mechanism. -
Sand the barrel:
Lightly sand the surface of the green plastic barrel to give it some ‘tooth.’ This helps the clay adhere better. Wipe away any dust with a damp paper towel or alcohol wipe. -
Apply adhesive:
Brush a very thin layer of liquid polymer clay onto the upper section of the pen where the caterpillar head will sit, and down the barrel where the fruit slices will go.
Keep it Clean
Work with light colors (yellow, white) first and dark colors (black, green) last. Clean your hands with baby wipes between colors to avoid muddying the bright citrus tones.
Step 2: Sculpting the Head
-
Form the head base:
Roll a ball of flesh or peach-toned clay, about the size of a marble. Press this gently onto the top section of the pen barrel, slightly flattening the back so it sits flush. -
Create the leafy ruff:
Mix your leaf green clay. Roll out a small strip and scallop the edges—I usually just pinch them with my fingers. Wrap this around the base of the peach head to look like a collar. -
Add face details:
For the eyes, create two flat ovals of yellow clay, then add smaller green ovals on top for pupils. Press these onto the face. Roll a tiny snake of black clay for the smile. -
Pink cheeks and antennae:
Place two small flattened circles of pink clay for rosy cheeks. Finally, add two small stalks of purple or dark green clay to the top of the head for antennae. -
Texture the red collar:
Add a small ring of red clay underneath the green leaf collar to mimic the caterpillar’s neck. Use a needle tool to stipple it for texture.
Step 3: Creating the Fruit Body
-
Make a citrus cane:
To make the repetitive slices, build a simple cane. Roll a log of translucent yellow clay. Wrap it in a thin sheet of white clay, then cut this log into 6-8 wedges. -
Reassemble the cane:
Put thin sheets of white clay between the wedges to form the pith, and reassemble them into a cylinder. Wrap the entire cylinder in a thin sheet of green clay for the rind. -
Reduce and slice:
Gently roll and squeeze the cane to reduce its diameter until it matches the width of your pen barrel. Slice thin, half-circle pieces from the cane. -
Attach the segments:
Starting just below the head, press the half-circle slices onto the pen barrel in a descending line. Ensure the curved ‘rind’ side faces downward. -
Outline the slices:
Roll an incredibly thin thread of dark green or black clay. Carefully outline the curved bottom edge of each fruit slice to make them pop visually. -
Add seed details:
Using a needle tool, gently poke small indentations into the ‘pulp’ of the fruit slices to simulate seeds and texture.
Loose Segments?
If the fruit slices pop off after baking, they didn’t bond to the plastic. Pop them off completely, add a drop of superglue (cyanoacrylate), and press them back into place.
Step 4: Finishing Touches
-
Smooth fingerprints:
Dip a brush in a little baby oil or clay softener and lightly brush over your work to remove any unintentional fingerprints before baking. -
Bake the project:
Place the pen barrel on a baking sheet lined with parchment paper or cardstock. Bake according to your clay package instructions (usually 275°F/135°C for 15-30 minutes). -
Cool and glaze:
Let the pen cool completely inside the oven. Once cool, apply a coat of gloss glaze or UV resin to the fruit slices and eyes to give them a wet, shiny look. -
Reassemble:
Slide the ink cartridge and spring back into your newly decorated barrel. Test the retractable mechanism to ensure the clay doesn’t obstruct movement.
Enjoy using your whimsical new pen for journaling or sketching your next big idea
Rainbow Gradient Pen Set
Transform ordinary stationery into a stunning spectrum of color with this polymer clay project. This tutorial guides you through creating a seamless, matte-finish rainbow gradient that turns a simple set of pens into a cohesive work of art.
Detailed Instructions
Materials
- Set of simple stick ballpoint pens (smooth barrel, retractable)
- Polymer clay in rainbow colors (red, orange, yellow, green, blue, purple)
- White polymer clay (for mixing tints)
- Pasta machine or rolling pin
- Craft knife or scalpel blade
- Small metal alphabet stamps or tiny texture tools
- White acrylic paint (optional)
- Smooth work surface (ceramic tile or glass)
- Sandpaper (various grits from 400 to 1000)
- Oven for baking
Step 1: Preparation and Color Mixing
-
Prep the pens:
Disassemble your pens completely. Remove the ink cartridge and the spring. You will only be covering the main plastic barrel. If the barrel has a clip, carefully snap or saw it off and sand the nub down until the barrel is perfectly round and smooth. -
Condition the clay:
Begin conditioning your primary colors. Knead each block of clay until it is soft, pliable, and warm. This prevents cracking later. I like to wipe my hands with a baby wipe between colors to avoid smudging. -
Create custom shades:
To achieve the specific 12-pen gradient shown in the finished piece, you can’t just use straight colors. Mix intermediate shades: red-orange, yellow-orange, yellow-green, teal, and indigo. Add a tiny pinch of white to the lighter colors (yellows and greens) to increase opacity. -
Check the palette:
Roll a small ball of each mixed color and line them up in order. Ensure the transition looks smooth and ‘rainbow-like’ before you commit to rolling out sheets.
Seamless Rolling
To avoid flat spots while rolling the seam smooth, place a sheet of clean sandpaper on your table and roll the pen over it. The slight texture helps grip the clay for an even round shape.
Step 2: Covering the Barells
-
Roll sheets:
Using a pasta machine on a medium-thin setting (or a rolling pin with spacers), roll out sheets of your prepared colors. The clay needs to be thick enough to be sturdy but thin enough that the pen mechanism will still work. -
Cut to size:
Lay a pen barrel on the clay sheet to measure. Use your craft knife to cut a rectangle that is the length of the barrel and just wide enough to wrap around it once. -
Wrap the barrel:
Carefully wrap the clay rectangle around the pen barrel. Press the cut edges together to form a seam. Don’t overlap the clay; try to butt the edges up against each other perfectly. -
Smooth the seam:
Gently roll the clay-covered pen on your smooth work surface. Use the flat of your finger to smooth out the seam line until it disappears completely. The clay should bond to itself, creating a seamless tube. -
Trim the ends:
The clay likely stretched a bit during rolling. Use your sharp blade to trim the excess clay flush with the top and bottom openings of the plastic barrel. Ensure no clay obstructs the openings. -
Repeat for the gradient:
Repeat this process for every color in your spectrum, cleaning your work surface and hands between colors to keep the bright tones pristine.
Step 3: Detailing and Finishing
-
Add texture:
While the clay is still raw, use small metal alphabet stamps or texture tools to gently press designs near the top (clicker end) of the pen. You can stamp words, simple geometric shapes, or faux ‘brand’ names as seen in the inspiration photo. -
Refine the surface:
Inspect each pen for fingerprints. Lightly roll them on a piece of paper or gently buff with a little cornstarch on your finger to create a matte, imperfection-free surface. -
Bake:
Arrange the barrels on a baking sheet lined with cardstock or a polyester batting to prevent flat spots. Bake according to your polymer clay manufacturer’s instructions (usually 275°F/135°C for 30 minutes). -
Cool and inspect:
Let the pens cool completely inside the oven or on a rack. Once cool, they will be hard and durable. Check the ends to ensure the clay hasn’t shrunk or warped over the openings. -
Highlight the text:
If you want the stamped details to pop, run a wash of white acrylic paint over the stamped area. Before it dries, wipe the surface with a damp paper towel. The white paint will stay in the recessed letters but wipe off the surface. -
Final sanding:
For that ultra-smooth, professional matte finish shown in the photo, wetsand the barrels under running water. Start with 400 grit and work up to 1000 grit. This creates a velvety touch. -
Reassembly:
Once fully dry, reinsert the spring and ink cartridge. Screw the pen tip back on. Test the click mechanism to make sure the clay isn’t too thick near the moving parts.
Sticky Clicker?
If the click button sticks after baking, the clay might be too thick at the very top. Use a craft knife to carefully shave a tiny bevel on the inner rim of the clay at the opening.
Arrange your beautiful new set on your desk and enjoy the creative spark each color brings to your writing
Charm and Bead Dangle Pen
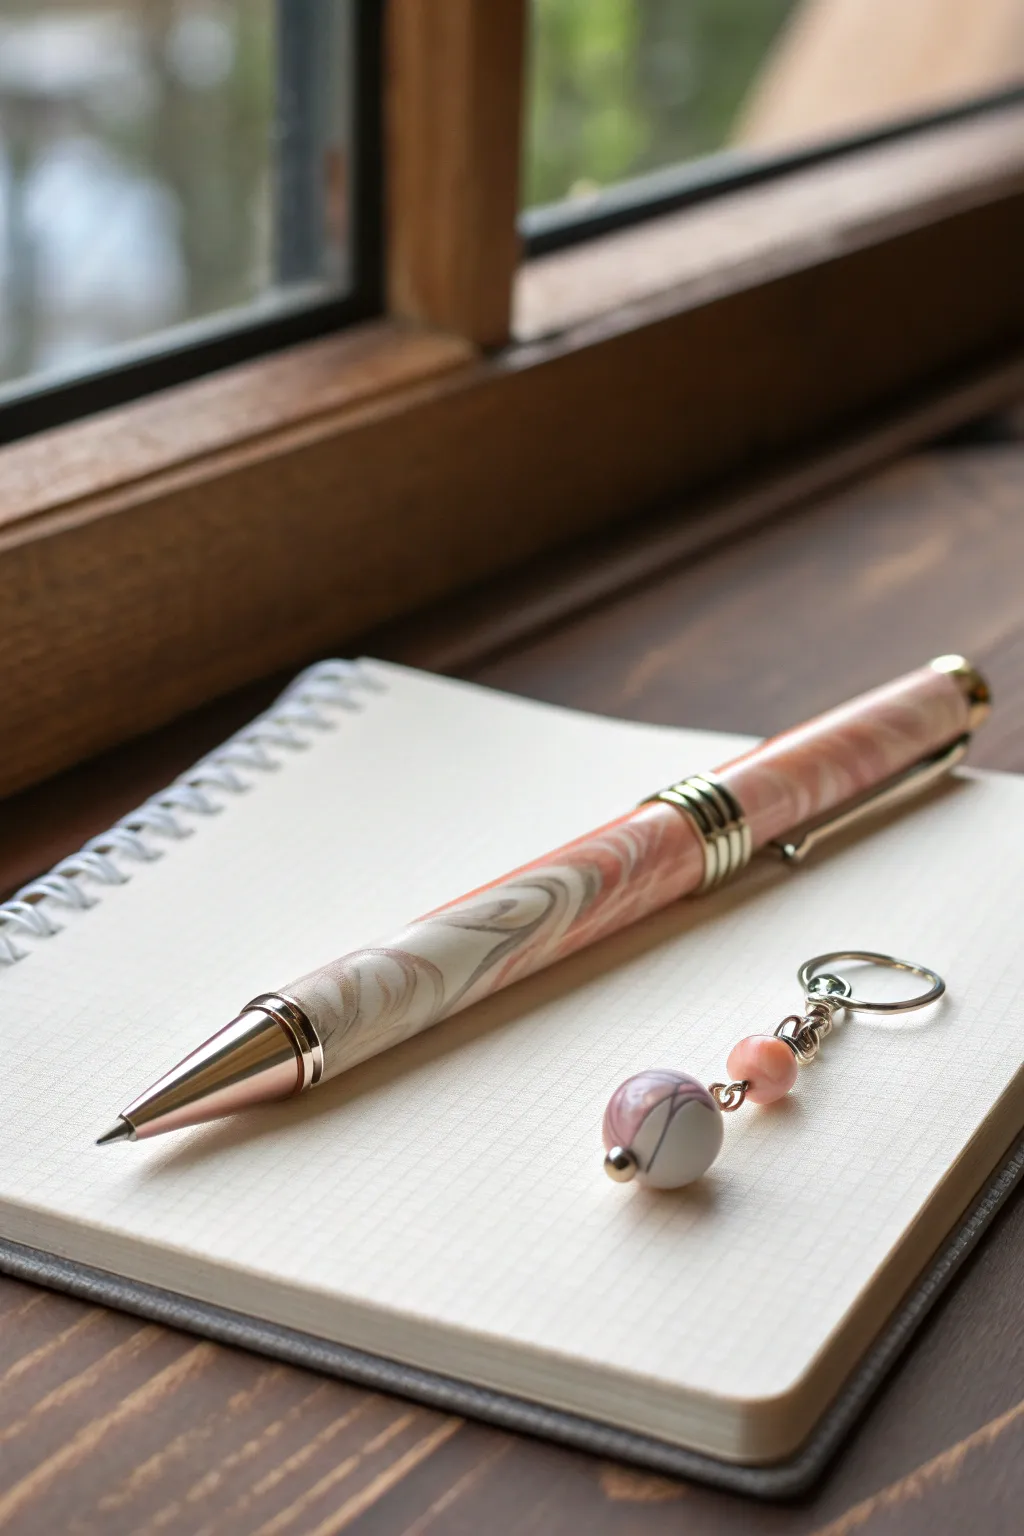
Elevate your writing experience with a sophisticated polymer clay pen featuring soft swirls of peach, cream, and taupe. This project combines a classic faux-stone effect with a delicate matching bead charm for a truly personalized stationery set.
Step-by-Step Tutorial
Materials
- Polymer clay (peach, translucent white, beige/taupe)
- Pen kit (twist mechanism, rose gold or gold hardware)
- Brass tube (included in pen kit)
- Cyanoacrylate (CA) glue or strong epoxy
- Sandpaper (grits from 400 to 12000 micro-mesh)
- Lathe or drill press with sanding mandrel
- Clay slicer or craft knife
- Pasta machine or rolling pin
- Jewelry eye pin and jump rings
- Small jewelry pliers
- Assorted beads (one large focal bead matching the clay, one accent bead)
Step 1: Prepping the Clay Blank
-
Condition the Clay:
Begin by conditioning your peach, translucent white, and taupe polymer clay separately until they are soft and pliable. Use a pasta machine or rolling pin to flatten them into sheets of relatively equal thickness. -
Stack and Roll:
Stack the colored sheets on top of each other. Roll them together gently into a log, then twist the log like a candy cane to start blending the colors. Fold it in half and twist again to create natural-looking striations. -
Create the Pattern:
Compress the twisted log into a solid block. Slice thin cross-sections off the block using your tissue blade; you should see beautiful swirls. Reassemble these slices around the brass tube from your pen kit to check the pattern, ensuring you have enough material. -
Prepare the Tube:
Before applying clay, scuff the surface of the brass tube with coarse sandpaper to help the clay adhere. Apply a very thin layer of liquid polymer clay or Bake & Bond to the tube. -
Apply the Clay:
Wrap your clay slices or a sheet of your swirled pattern smoothly around the brass tube. Overlap the seams slightly and blend them with your fingers so no air is trapped. Roll the tube gently on your work surface to ensure it is round and even. -
Bake the Blank:
Place the clay-covered tube on a baking sheet or tile. Bake according to the manufacturer’s instructions for your specific brand of clay, usually at 275°F (130°C) for about 30 minutes. Let it cool completely.
Air Bubble Blues?
If you find tiny air pockets after turning the clay on the lathe, fill them with a drop of medium CA glue mixed with clay dust, let dry, and sand smooth.
Step 2: Shaping and Finishing the Pen
-
Mount on Lathe:
Once cool, use a pen mill or crafted sander to square the ends of the clay to the brass tube. Mount the tube onto your lathe mandrel using the appropriate bushings for your pen kit. -
Turn to Size:
Using sharp turning tools, carefully turn the clay down. I find that light, shallow cuts work best to prevent chipping. Turn until the clay is flush with the bushings. -
Sand Smooth:
Sand the spinning pen blank, starting with 400 grit sandpaper. Work your way up through finer grits (600, 800) and then switch to micro-mesh pads up to 12000 grit for a glass-like finish. -
Assembly:
Remove the finished barrel from the lathe. Assemble the pen parts (tip, twist mechanism, clip, and cap) according to your kit’s instructions, pressing them firmly into the brass tube.
Pro Tip: Depth & Shine
For an ultra-glossy, durable finish that mimics stone, apply several thin coats of CA glue to the spinning pen blank before your final micro-mesh polishing.
Step 3: Crafting the Charm
-
Create a Matching Bead:
Use leftover scraps from your pen blank to roll a small round bead, about 10mm in diameter. Pierce it with a bead pin or needle to create a hole. -
Bake the Bead:
Bake the bead alongside your pen blank or separately. Once cooled, you can water-sand it slightly if you want a high shine to match the pen. -
Prepare the Focal Bead:
Slide your handmade clay bead onto a jewelry headpin or eye pin. If you like, adhere metal bead caps to the top and bottom with a dab of glue for a finished look. -
Add Accent Beads:
Thread a smaller coordinating bead (like the coral-colored one in the image) onto a separate eye pin. Create a simple wire loop at the top using round-nose pliers. -
Connect the Components:
Use a small jump ring or the wire loops to connect the main swirled bead to the accent bead. Attach a split ring or lobster clasp to the top so it can be clipped onto a planner or keyring.
Now you have a stunning, cohesive writing set ready to grace your desk or be gifted.