If you’ve got a plain clay pot and a few colors of acrylic paint, you’ve got everything you need for a seriously cute upgrade. These ideas are all about simple shapes and low-stress techniques that still look polished when you pop a plant inside.
Classic Tape-Crisp Stripes
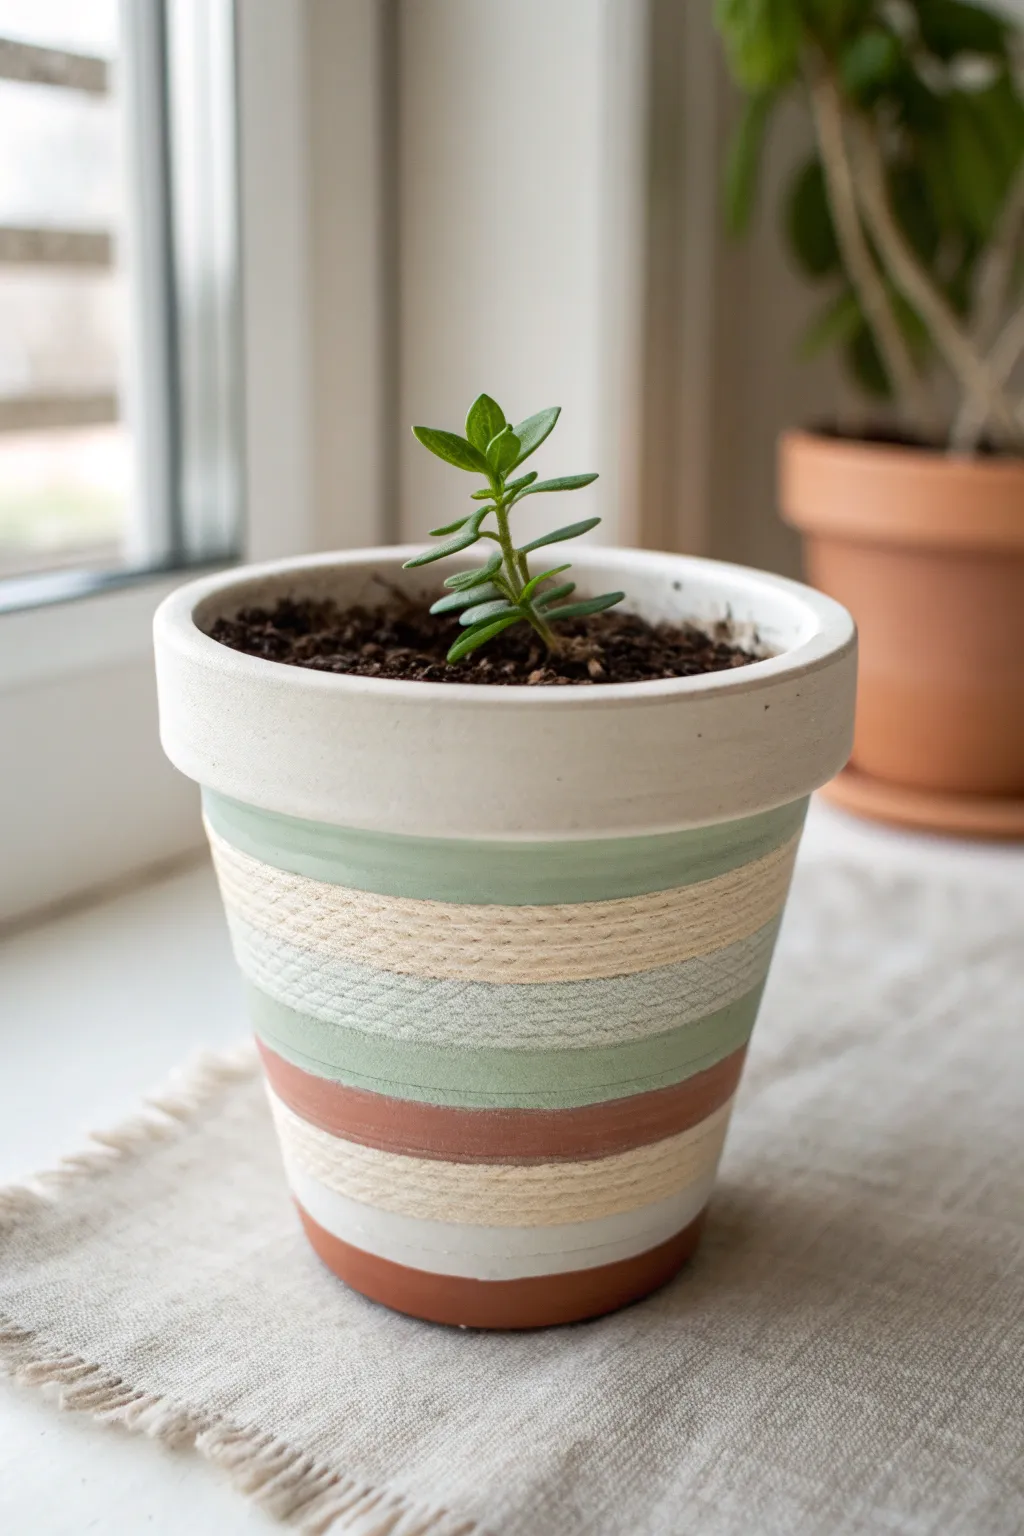
Transform a plain terracotta pot into a chic, muted piece of decor using distinctive horizontal stripes. By mixing smooth painted bands with textured, twine-wrapped sections, you achieve a sophisticated look that pairs beautifully with minimalist greenery.
How-To Guide
Materials
- Small terracotta pot (clean and dry)
- White acrylic paint (matte finish)
- Sage green acrylic paint
- Terracotta or warm brown acrylic paint (optional, if you want to emphasize the base color)
- Painter’s tape or masking tape (various widths)
- Flat paintbrush (medium size)
- Small detail brush
- Jute twine or thick cotton yarn (cream or beige)
- Craft glue or hot glue gun
- Scissors
Step 1: Preparation & Base Coat
-
Clean surface:
Begin by wiping down your terracotta pot with a damp cloth to remove any dust or oils. Let it dry completely so the paint adheres properly. -
White rim:
Paint the top rim of the pot with your matte white acrylic paint. This thick upper band frames the design nicely. -
Inner rim detail:
Extend the white paint just inside the top of the pot, roughly an inch down, so the soil line looks neat once planted. -
Base stripe:
Paint a band of white near the bottom third of the pot as well, leaving space for the natural clay color at the very bottom if desired. Let these white layers dry fully.
Clean Lines
For ultra-crisp stripes, seal the edge of your painter’s tape with a tiny amount of the *base* color first. This blocks leaks before you apply the new color.
Step 2: Creating the Painted Stripes
-
Taping guide:
Once the white base is bone dry, use painter’s tape to mark off horizontal sections. You want to create a crisp line separating the top white rim from the body of the pot. -
Green band:
Apply a coat of sage green paint directly below the white rim. This band should be roughly an inch wide to balance the design. -
Second coat:
Sage pigments can sometimes be sheer, so apply a second coat of green if needed for opacity. Allow this to dry slightly before carefully peeling off the tape while the paint is still tacky to ensure a sharp edge. -
Lower bands:
Paint a thinner band of green further down the pot, followed by a band of terracotta or warm brown near the bottom. If you prefer a natural look, you can leave the raw clay exposed for the brown stripe instead of painting it.
Step 3: Adding Texture & Finishing
-
Prep for texture:
Identify the unpainted spaces between your green and terracotta stripes where the textured material will go. -
Start gluing:
Apply a small dot of craft glue (or a thin line of hot glue) at the start of one of these empty bands. -
Wrapping twine:
Press the end of your cream twine or yarn into the glue. Begin wrapping it horizontally around the pot, keeping the coils tight against each other so no pot shows through. -
Securing the wrap:
Continue wrapping until the band is filled. I like to secure the end with another small dab of glue on what will be the ‘back’ of the pot. -
Repeat wrapping:
Repeat the wrapping process for any other bands you want textured. In this design, there is a second, thinner band of twine near the bottom. -
Clean up details:
Use a small detail brush to touch up any paint lines that might have gotten messy near the twine. -
Final dry:
Allow all glue and paint to cure fully for at least a few hours before potting your plant.
Level Up: Texture Play
Mix clear sand or baking soda into your sage green paint before applying it. This creates a gritty, stone-like texture that complements the matte terracotta.
Place your favorite succulent inside and enjoy the earthy, handmade charm of your new pot


Easy Confetti Polka Dots
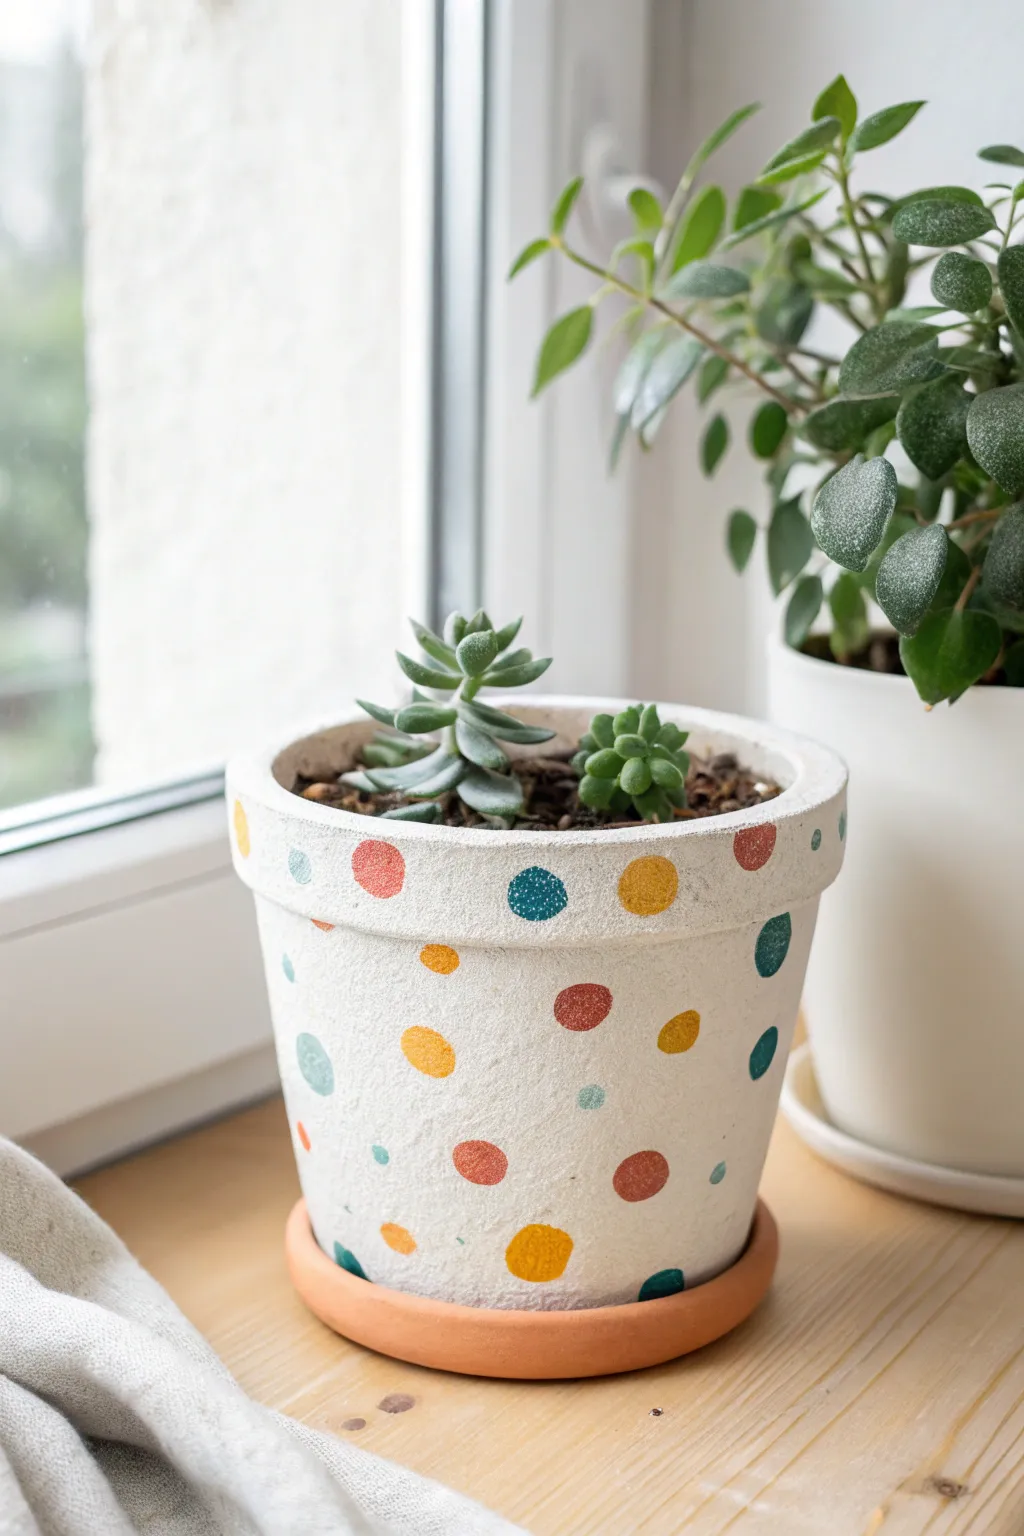
Turn a plain terracotta pot into a cheerful home for your succulents with this easy confetti polka dot design. The white base coat makes the colorful, randomly placed dots pop for a playful and modern look.
Step-by-Step
Materials
- Terracotta pot (4-6 inch diameter)
- White acrylic paint or chalk paint
- Acrylic paints in various colors (mustard yellow, teal blue, coral red)
- Medium flat paintbrush
- Small round sponge dabbers or pouncers (varying sizes)
- Small detail paintbrush
- Paper plate or palette
- Water cup and paper towels
- Clear matte sealant spray (optional)
Step 1: Base Preparation
-
Clean the pot:
Start by wiping down your terracotta pot with a damp cloth to remove any dust or loose clay particles. Let it dry completely. -
Apply the first base coat:
Using your medium flat brush, apply a layer of white paint to the exterior of the pot. Don’t forget to paint the top inch of the inside rim where soil won’t cover. -
Let it dry:
Allow the first coat to dry to the touch, which usually takes about 15-20 minutes. -
Add a second coat:
Apply a second layer of white paint to ensure solid, opaque coverage so the terracotta color doesn’t peek through. I usually find two coats are plenty, but add a third if needed. -
Smooth the texture:
If you see heavy brushstrokes, lightly smooth them out with the brush while the paint is still wet, or dab with a sponge for a textured stone look. -
Dry completely:
Let the white base coat dry thoroughly for at least an hour before starting the dots to prevent smudging.
Uneven Circles?
If your sponge leaves a ring of heavy paint with a bare center, wait for it to dry slightly, then use a small brush to fill in the center with a thin layer of matching paint.
Step 2: Creating the Confetti
-
Prepare your palette:
Squeeze small amounts of your mustard yellow, teal blue, and coral red paints onto your paper plate. -
Load the sponge dabber:
Press a round sponge dabber into your first color—let’s start with the mustard yellow. Dab it on a clean part of the plate a few times to ensure an even coating without globs of paint. -
Stamp the large dots:
Press the sponge firmly onto the pot to create perfectly round circles. Scatter them randomly around the pot, leaving plenty of white space between them. -
Switch colors:
Wipe off your dabber or switch to a fresh one, then repeat the process with the teal blue paint. Try to place these dots in the empty spaces, avoiding patterns. -
Add the third color:
Repeat with the coral red paint. By now, the pot should look quite festive, but we still want some variation in size. -
Hand-paint smaller dots:
Using the small detail paintbrush, dip into your colors and manually paint smaller circles or dots in the gaps between the larger stamped circles. -
Vary the saturation:
For a textured, organic look like in the photo, don’t worry if some dots are slightly more translucent or ‘stamped’ looking than others. -
Check the rim:
Don’t forget to add a few partial dots overlapping the rim of the pot for a continuous, wrapped artwork effect. -
Review spacing:
Spin the pot around and check for any large empty white spaces that feel unbalanced. Add a tiny dot of color there if needed.
Step 3: Finishing Touches
-
Allow to cure:
Let the polka dots dry completely. Acrylics dry fast, but give it about an hour to be safe. -
Seal the pot:
Take the pot outdoors or to a well-ventilated area and spray it with a clear matte sealant. This protects the paint from water damage when you water your plants. -
Plant:
Once dry, fill with soil and add your succulents.
Keep it Random
To avoid accidentally creating a grid pattern, try rotating the pot constantly as you stamp, and intentionally place dots at different ‘latitudes’ or heights.
Your vibrant confetti pot is now ready to brighten up any windowsill


Simple Two-Color Blocking
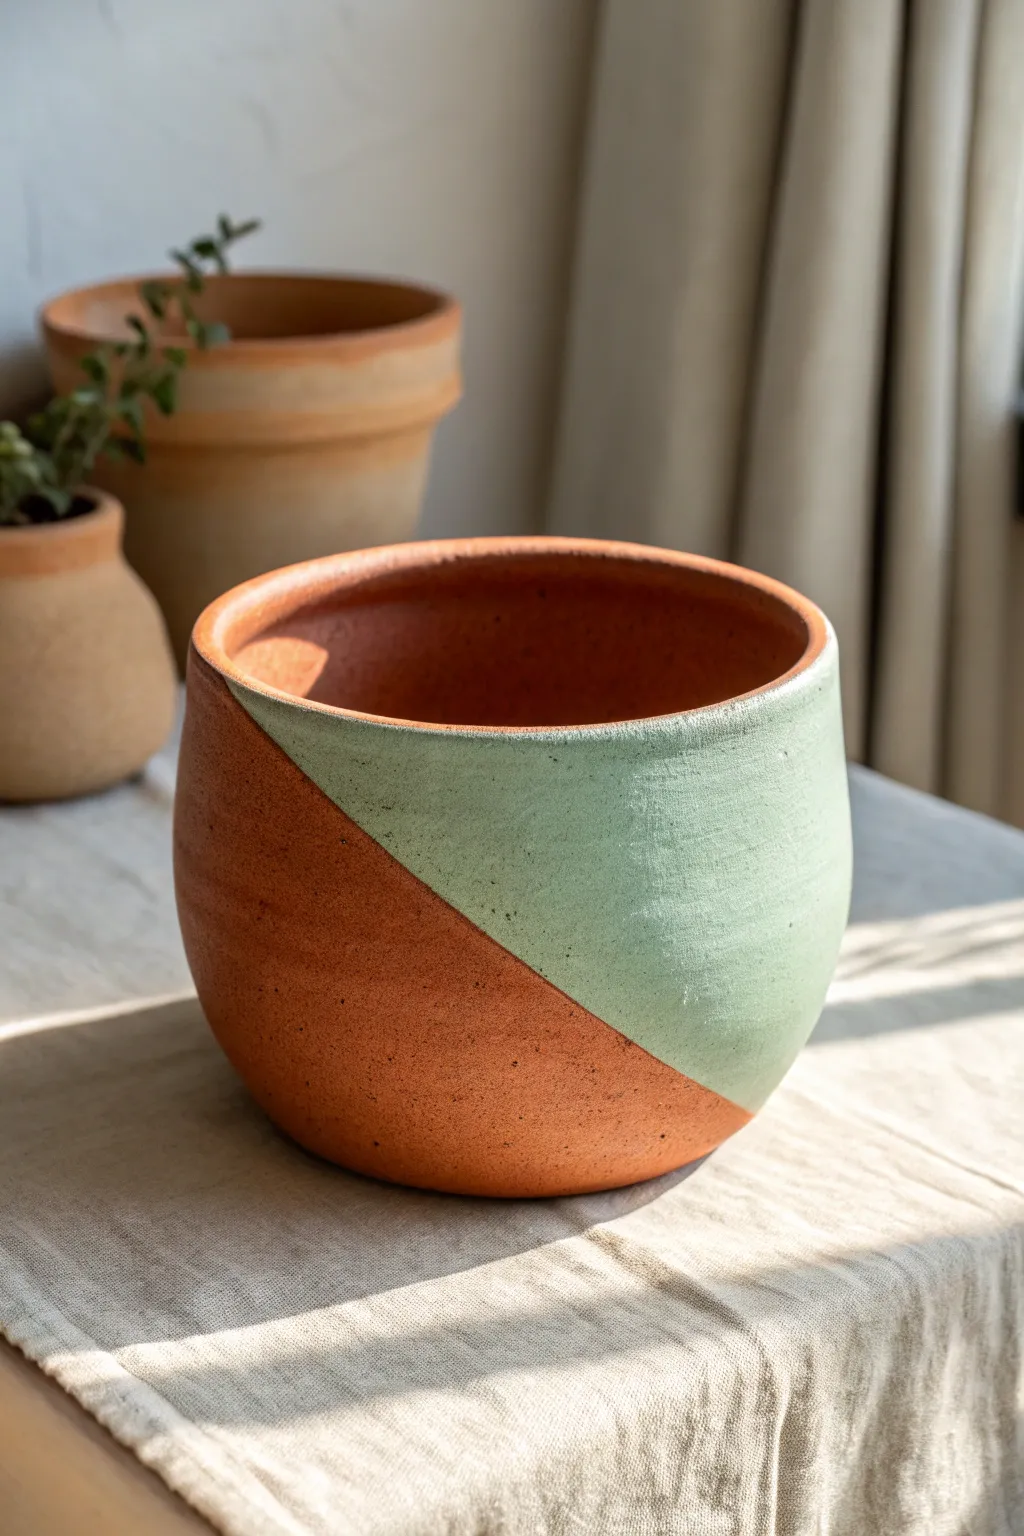
Embrace minimalism with this striking geometric design that balances raw earthy texture with a soft pop of colour. By taping off a bold diagonal section, you create a modern two-tone look where the natural warmth of the terracotta is just as important as the paint itself.
How-To Guide
Materials
- Terracotta pot (clean and dry)
- Painter’s tape or flexible masking tape
- Soft sage green or mint acrylic craft paint
- White acrylic paint (optional, for priming)
- Medium flat synthetic brush
- Small detail brush (for edge correction)
- Matte spray sealer or outdoor varnish
- Pencil
- Paper plate or palette
- Water cup and paper towels
Step 1: Preparation & Design
-
Clean surface:
Ensure your terracotta pot is thoroughly clean and completely dry. If it’s brand new, wipe it down with a damp cloth to remove any fine dust that might prevent the tape from sticking. -
Mark the curve:
Visualize a diagonal line cutting across the pot. Using a pencil, lightly sketch a gentle curve starting from one side of the rim and ending near the bottom of the opposite side. -
Apply tape:
Carefully apply your painter’s tape along the pencil line. For a curved line like the one shown, use shorter pieces of tape slightly overlapped, or use flexible masking tape designed for curves. -
Seal the edge:
Press down firmly along the edge of the tape with your fingernail or a credit card to ensure a tight seal. This is crucial for preventing paint bleed on the textured clay surface.
Step 2: Painting
-
Prime (optional):
If you want the green to be very opaque without many layers, paint a thin base coat of white acrylic just within the area you plan to color. Let this dry completely. -
Mix your shade:
Pour out your sage green acrylic paint. If the green feels too bright, mix in a tiny drop of brown or grey to mute it down to that earthy tone shown in the image. -
First coat application:
Load your flat brush and apply the first coat of green paint. Stroke away from the tape edge rather than underneath it to further minimize bleeding. -
Cover the rim:
Don’t forget to paint the inside rim of the pot within the taped section so the design flows seamlessly over the top edge. -
Let it dry:
Allow the first coat to dry for about 15-20 minutes. Terracotta is porous and soaks up paint quickly, so it might dry faster than expected. -
Second coat:
Apply a second layer of paint to ensure rich, solid coverage. If the texture of the pot is very rough, use a dabbing motion to get paint into the little crevices. -
Check opacity:
Hold the pot up to the light to see if there are any thin spots. Add a third light coat if necessary for a completely solid finish.
Clear Coat Trick
Before painting the green, brush a little clear matte medium along the tape edge. This seals the gap, so any bleed is invisible clear coat, giving you a razor-sharp line.
Step 3: Finishing Touches
-
Remove tape:
While the final coat is still slightly tacky (not fully cured), carefully peel back the painter’s tape at a 45-degree angle. Pulling slowly helps prevent the paint from lifting. -
Clean up edges:
If there was any minor bleeding under the tape, use a slightly damp detail brush or a craft knife to gently scrape or wipe away the excess paint while it’s fresh. -
Soften the texture:
To mimic the matte, slightly rustic look in the photo, you can lightly sand the painted area with fine-grit sandpaper once fully dry, though this is optional. -
Erase guidelines:
If any pencil marks are visible on the unpainted terracotta section, gently erase them now. -
Seal the work:
Spray the entire pot (both painted and unpainted exteriors) with a matte clear sealer. This protects the clay from water damage and keeps the paint from chipping.
Paint Peeling Off?
If paint lifts when removing tape, you likely waited too long. Score the edge gently with a craft knife before pulling to separate the dry paint from the tape.
Place your favorite succulent inside and enjoy the modern contrast you’ve created


Dipped Bottom Color Pop
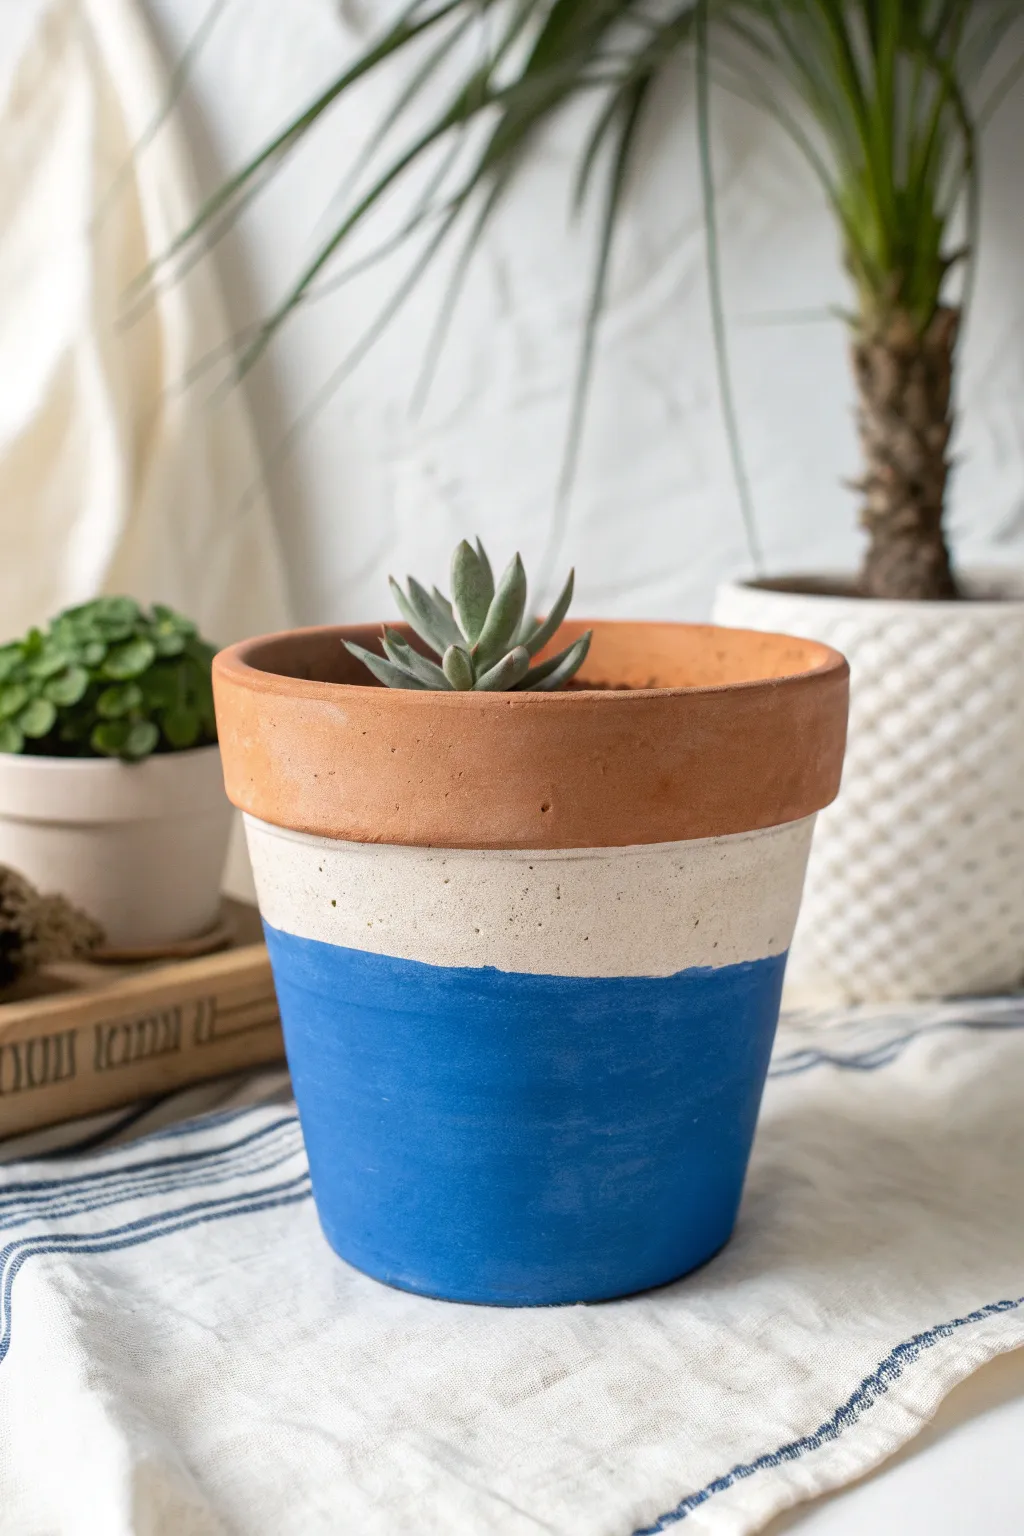
Achieve a modern, minimalist look by transforming a basic terracotta pot with this graphic color-blocking technique. The crisp lines between the raw clay, creamy white, and bold blue create a striking contrast that updates any plant collection.
Step-by-Step
Materials
- Standard terracotta pot (clean and dry)
- Painter’s tape (high quality)
- White acrylic craft paint or chalk paint
- Cobalt blue acrylic craft paint or chalk paint
- Foam brush
- Small flat synthetic paintbrush
- Measuring tape (optional)
- Matte spray sealer (optional)
Step 1: Setting the First Line
-
Clean surface:
Begin with a terracotta pot that is completely free of dust or dirt oils. If you washed it, ensure it has dried for at least 24 hours so moisture doesn’t trap under the paint. -
Measure the rim:
Decide how wide you want your raw terracotta rim to be. For the look in the photo, this is roughly just below the natural collar of the pot. -
Apply first tape line:
Apply a strip of painter’s tape horizontally around the pot, just beneath the thick collar rim. Press the edges of the tape down firmly with your fingernail to prevent paint bleed.
Step 2: The Middle White Layer
-
Load the brush:
Pour a small amount of white chalk or acrylic paint onto a palette. Load your foam brush lightly. -
Paint the middle section:
Apply the white paint below your tape line. You don’t need to paint all the way to the bottom, just enough to cover the middle band where the blue won’t be. -
Watch the coverage:
Terracotta is thirsty and absorbs paint quickly. Apply a second coat of white if the clay color is showing through too much. -
Let it cure:
Allow this white layer to dry completely. It must be fully hard to the touch before you can tape over it.
Crisp Line Secret
Paint a thin layer of the base color (here, white) over the tape edge before applying the blue. This seals the tape so no blue can bleed under.
Step 3: Adding the Blue Bottom
-
Mask the white:
Once the white paint is bone dry, place a second ring of painter’s tape around the pot. Position this tape over the white paint, leaving the bottom section exposed. -
Check the seal:
I always run my finger securely along the bottom edge of this new tape strip to ensure a super crisp line. -
Apply blue base coat:
Using a flat synthetic brush or a fresh foam brush, paint the bottom section in your cobalt blue shade. -
Perfect the bottom edge:
Don’t forget to paint underneath the curve of the pot slightly, just in case it sits on a raised saucer and the underside is visible. -
Layer up:
The blue is a strong color but can streak. Apply two to three thin coats rather than one thick one, allowing dry time in between.
Texture Twist
Mix baking soda into your acrylic paint (1 tsp per tablespoon of paint) to give your pot a textured, ceramic-like finish.
Step 4: The Reveal
-
Remove tape carefully:
While the final coat of blue is still slightly tacky (not fully cured), slowly peel back the lower tape strip at a 45-degree angle. -
Remove top tape:
Peel off the top strip of tape that was protecting the raw terracotta rim. -
Touch up:
Inspect your lines. If any paint bled under the tape, use a fine-tip brush or even a toothpick to gently scrape or paint over the mistake. -
Seal (Optional):
If this pot will live outdoors, spray the painted areas with a matte clear sealer to protect the finish from moisture.
Pop your favorite succulent inside and enjoy the fresh splash of color on your shelf

The Complete Guide to Pottery Troubleshooting
Uncover the most common ceramic mistakes—from cracking clay to failed glazes—and learn how to fix them fast.
Soft Ombre Fade
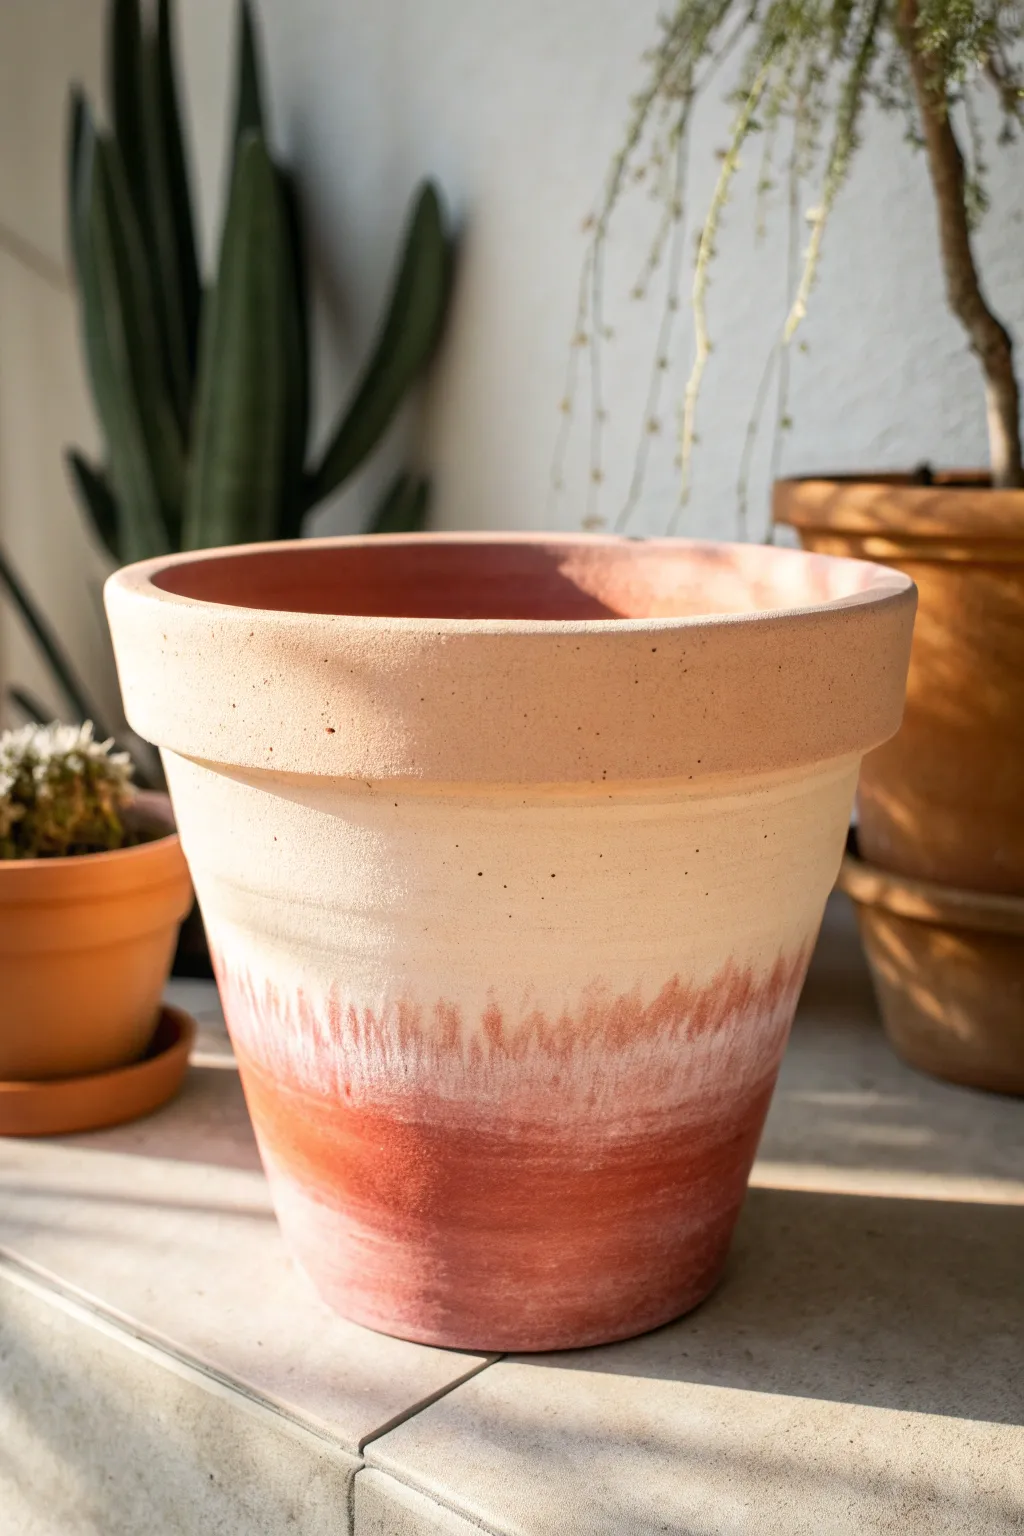
Bring a touch of warm, desert sunset vibes to your plant collection with this subtle and sophisticated ombré technique. This project uses the natural color of the clay itself as the base and rim, creating a soft, sun-bleached transition that looks effortlessly chic.
Detailed Instructions
Materials
- Terracotta pot (clean and dry)
- Cream or off-white acrylic paint (matte finish)
- White acrylic paint
- Burnt sienna or terracotta-colored acrylic paint (optional, for blending)
- Medium flat paintbrush
- Large dry bristle brush or chip brush
- Paper plate or palette
- Lint-free cloth or rag
- Cup of water
- Sealer (matte clear coat)
Step 1: Preparation and Base
-
Clean surface:
Ensure your terracotta pot is completely free of dust and debris. If it’s an old pot, scrub it well and let it dry fully, as trapped moisture can bubble the paint later. -
Mix the mid-tone:
On your palette, create a soft, warm cream color. I like to mix a large dollop of off-white with just a tiny speck of burnt sienna to warm it up so it isn’t too stark against the clay. -
Establish the boundaries:
Decide where you want your fade to begin. For this look, the rim remains unpainted natural clay. Start painting about an inch below the rim.
Pro Tip: The Damp Sponge
Use a damp natural sea sponge instead of a brush for the transition areas. Dabbing creates a softer, cloud-like gradient that blends effortlessly into the porous clay texture.
Step 2: Creating the Ombré
-
Apply the cream band:
Using your flat brush, paint a solid band of your cream mixture around the upper-middle section of the pot. Don’t worry about the edges being perfect yet. -
Feather the top edge:
While the paint is still wet, take a clean, slightly damp rag. Gently dab and wipe the upper edge of your cream paint line where it meets the unpainted rim to soften the harsh line. -
Begin the downward fade:
Dip your dry bristle brush or chip brush into the cream paint. Offload most of the paint onto a paper towel until the brush is almost dry. -
Dry brush technique:
Starting from your solid cream band, drag the brush downward towards the bottom of the pot. You want streaks and texture here, not solid coverage. -
Add white highlights:
Mix a little pure white into your cream paint. Apply this lighter shade horizontally right in the center of your cream band to create a ‘highlight’ zone. -
Blend downward:
Use the dry brush again to pull this lighter pigment down, overlapping with the previous layer. The goal is to see the grain of the brush strokes.
Step 3: Distressing and Refining
-
Create the texture:
To achieve that specific weathered look at the bottom, dip your brush lightly into water, then into a tiny amount of white paint. -
The vertical wash:
Lightly flick the brush vertically at the bottom transition area. You want to mimic the look of mineral deposits or salt stains often found on old pots. -
Soften the bottom edge:
Use the damp rag again to blot the bottom edge of the painted area. Press and lift rather than wiping to create a mottled, organic texture rather than a smear. -
Check transparency:
Step back and look at the gradient. You should see the orange clay peeking through the white paint at the bottom third. If it’s too solid, sand it lightly with fine-grit sandpaper. -
Enhance the rim shadow:
If the transition at the top looks too crisp, dry brush a very small amount of your cream paint upward, just stopping short of the actual rim lip.
Level Up: Faux Aging
Rub a tiny bit of dark brown wax or diluted brown paint into the crevices or brush strokes of the white section. This instantly makes the pot look like a vintage garden find.
Step 4: Finishing Up
-
Final dry:
Allow the pot to dry completely for at least an hour. The terracotta absorbs moisture quickly, so the paint might look different when fully dry. -
Seal the interior:
To protect your paint job from bubbling due to watering, seal the INSIDE of the pot with a waterproof sealer or clay pot sealer. -
Seal the exterior:
Apply a coat of matte clear sealer to the outside. This locks in that dusty, chalky look while protecting the paint from scratches.
Once sealed and dried, your pot will have that perfectly imperfect, sun-baked style that warms up any corner of your home
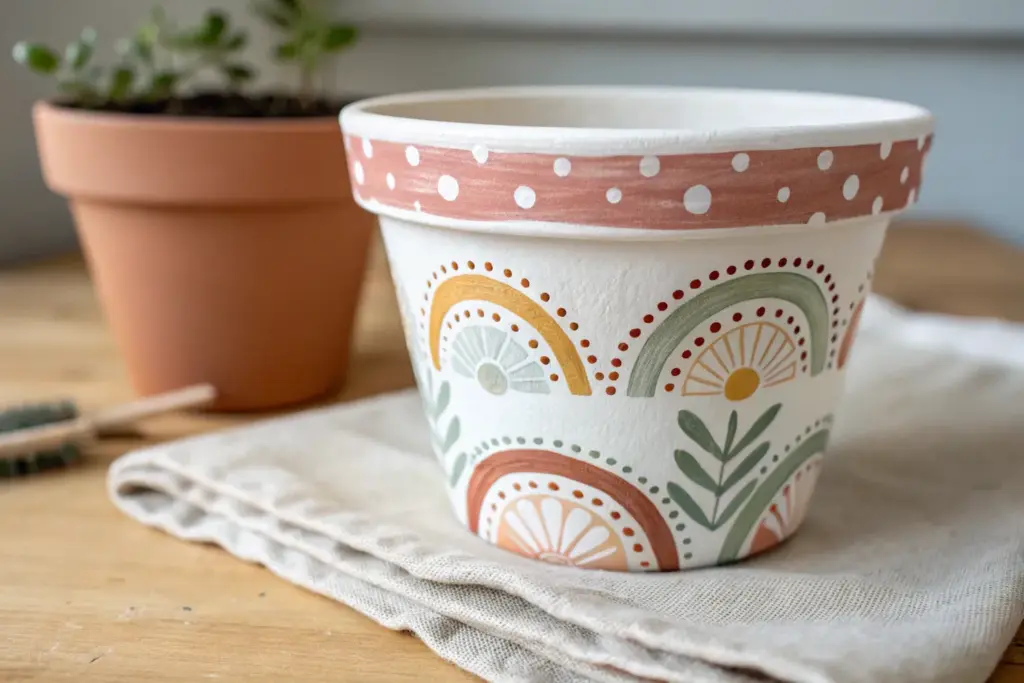
Minimal Rainbow Arches
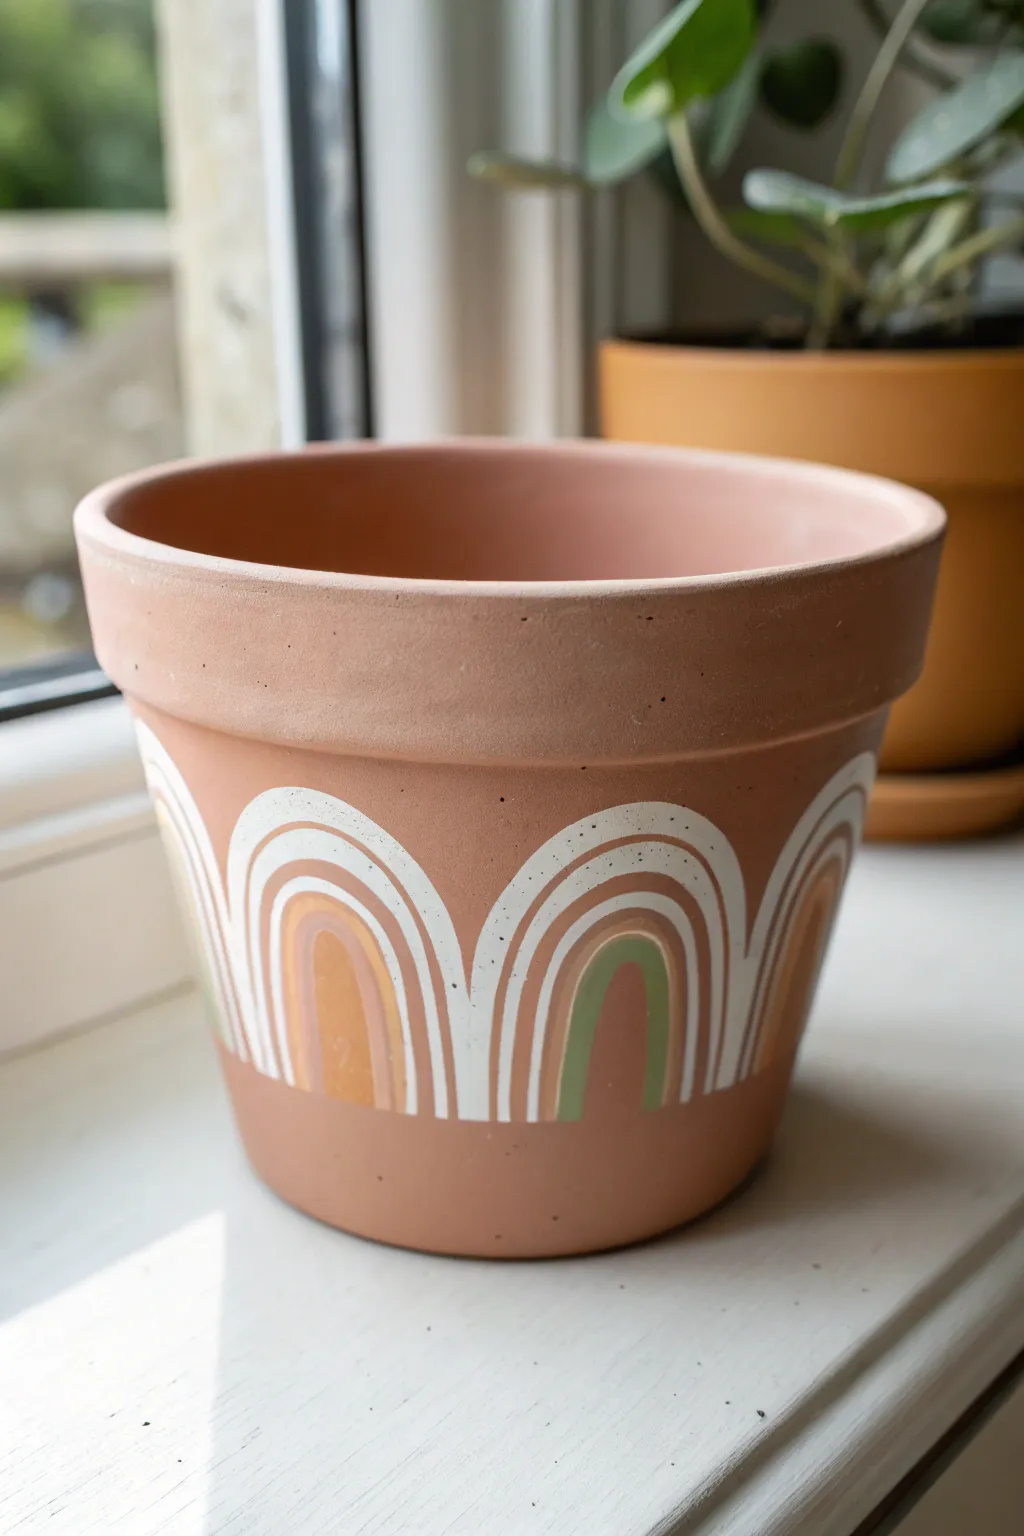
Transform a plain terracotta pot into a modern decor piece with these soothing, minimal rainbow arches. This project uses negative space and muted earthy tones to create a pattern that feels both organic and thoughtfully designed.
Step-by-Step Tutorial
Materials
- Terracotta pot (clean and dry)
- White acrylic paint (matte finish)
- Sage or light olive green acrylic paint
- Mustard or muted ochre acrylic paint
- Small flat brush (size 4 or 6)
- Fine detail brush (size 0 or 1)
- Pencil
- White eraser
- Palette or paper plate
- Cup of water and paper towels
Step 1: Preparation and Sketching
-
Clean the surface:
Ensure your terracotta pot is free of dust and stickers. Wipe it down with a slightly damp cloth and let it dry completely before starting. -
Mark the base points:
To space your arches evenly, lightly mark four or five equidistant points around the bottom edge of the pot’s rim with a pencil. This acts as a guide for where the center of each rainbow will sit. -
Sketch the outer arches:
Using your pencil marks as a center point, lightly sketch the largest, outermost arch for each rainbow. They should touch or slightly overlap near the bottom depending on your desired spacing. -
Rough in the inner details:
Lightly sketch the inner semi-circle shapes inside your main arches. Don’t worry about perfection; these pencil lines are just rough guidelines to help you visualize the pattern.
Wobbly Lines?
Don’t stress straight lines! If an arch looks uneven, wait for it to dry, then use the background color (or a toothpick to scrape excess wet paint) to reshape the edge.
Step 2: Painting the Base Arches
-
Load the white paint:
Squeeze a generous amount of matte white acrylic paint onto your palette. Using your small flat brush, load the paint so the bristles are coated but not dripping. -
Paint the first white curve:
Starting with the outermost arch, paint a thick, consistent white curved line. Use the flat edge of your brush to keep the line width steady as you sweep over the terracotta. -
Complete the white outlines:
Continue painting these large white arches around the entire circumference of the pot. Let this first layer dry for about 10 minutes. -
Add a second coat:
Terracotta is porous and soaks up paint, so go over your white arches with a second coat to ensure the color is solid and bright. -
Paint the inner white arch:
Once the outer arches are done, paint a second, smaller white arch nested well inside the first one. Leave a gap of exposed terracotta between them—this negative space is part of the design.
Step 3: Adding the Earth Tones
-
Select your color pattern:
The example image alternates the center colors. Decide if you want an alternating pattern (green center vs. mustard center) or a uniform look. -
Paint the solid centers:
Switch to your sage green paint. On every other arch, paint a solid semi-circle right in the center, underneath the smallest white arch. -
Fill the gaps:
Using the mustard/ochre paint, fill the solid centers of the remaining arches. I like to stabilize my hand against the pot rim while doing this for cleaner edges. -
Create the colored stripes:
Now, tackle the thin colored stripe that sits between the two white arches. For the green-centered rainbows, paint an ochre stripe in that gap. -
Finish the stripe pattern:
Conversely, for the ochre-centered rainbows, paint a sage green stripe in the gap. Use your fine detail brush here for precision.
Sprinkle Some Speckles
For a ceramic stoneware look, load an old toothbrush with diluted brown or black paint and flick fine speckles over the dried design before sealing it.
Step 4: Finishing Touches
-
Tidy up edges:
Clean your fine brush thoroughly. Dip it in the white paint and carefully touch up any jagged edges on your white arches to make the curves smooth. -
Erase guidelines:
Once the paint is 100% dry to the touch, gently run your white eraser over any visible pencil marks. -
Seal the pot (optional):
If you plan to use this outdoors, apply a coat of matte spray sealant. For indoor use, the bare acrylic is usually fine.
Place your favorite succulent inside and enjoy the warm, handcrafted vibe of your new planter


What Really Happens Inside the Kiln
Learn how time and temperature work together inside the kiln to transform clay into durable ceramic.
Sweet Daisy Scatter
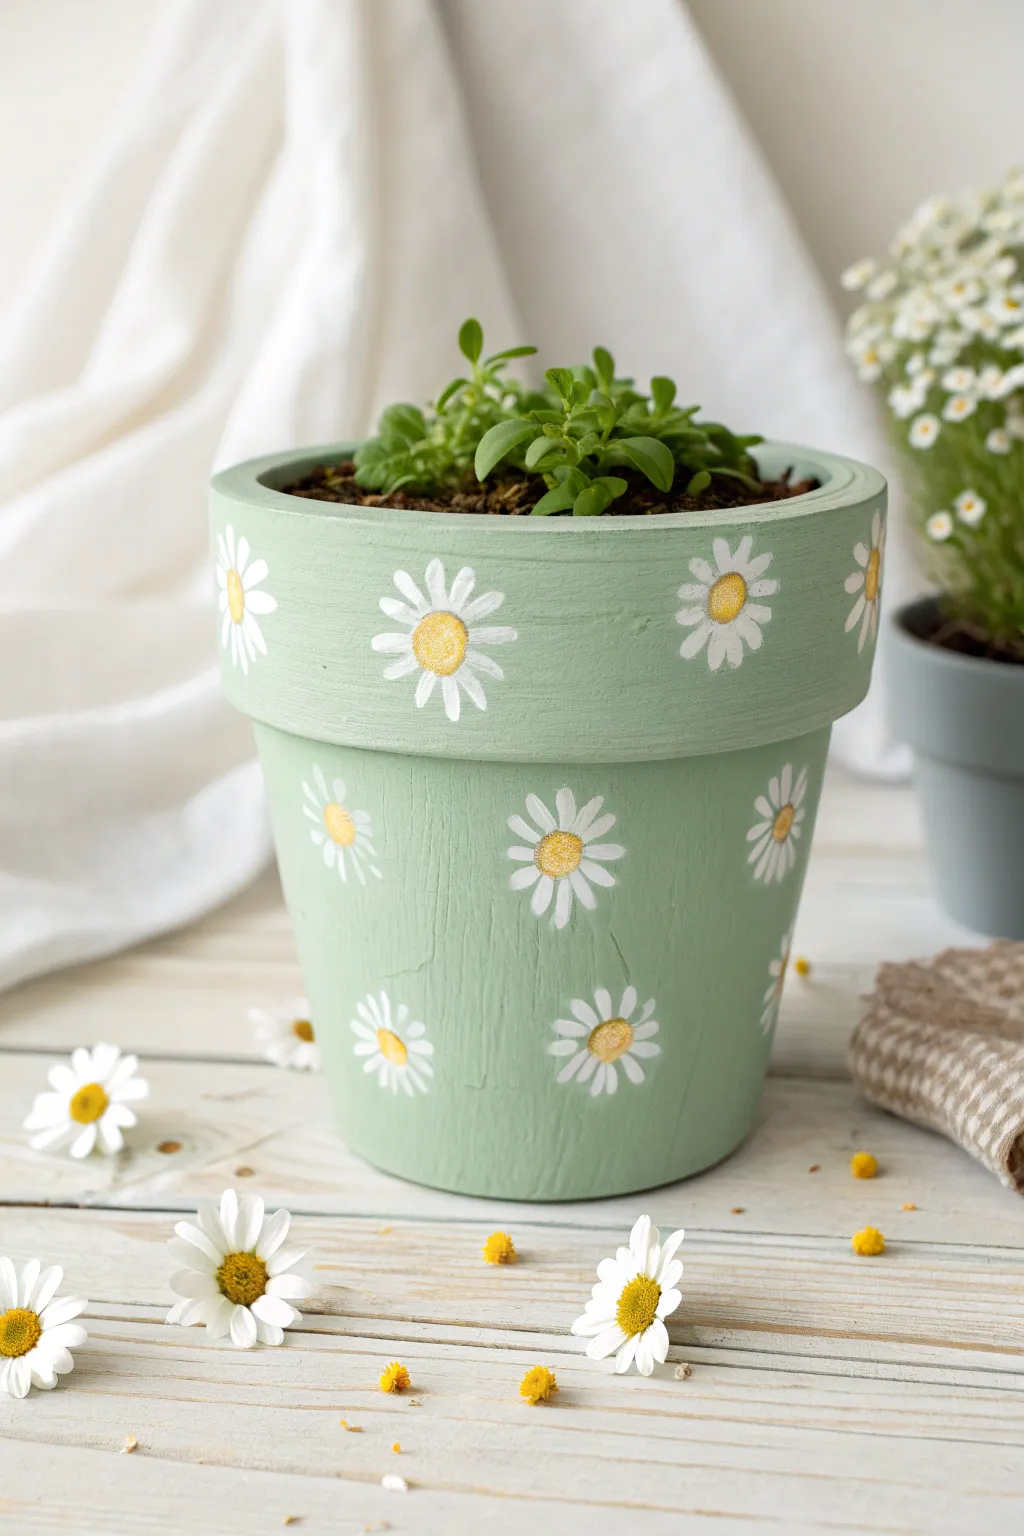
Bring the refreshing charm of a spring meadow indoors with this delightful sage green planter. The playful pattern of scattered daisies adds a whimsical, organic touch that perfectly complements succulents or fresh herbs.
How-To Guide
Materials
- Terracotta pot (standard size)
- Acrylic craft paint: Sage Green, Titanium White, Golden Yellow
- Flat paintbrush (medium, about 1 inch)
- Round paintbrush (small, size 2 or 4)
- Detail brush (very fine, size 0 or 00)
- Pencil for sketching (optional)
- Palette or paper plate
- Water cup and paper towels
- Matte sealant spray or Mod Podge (optional)
Step 1: Base Coat Preparation
-
Clean the surface:
Before dipping your brush, ensure the terracotta pot is clean and bone dry. Wipe away any dust or loose clay particles with a damp cloth and let it air dry completely. -
Mix the perfect green:
Pour a generous amount of sage green acrylic paint onto your palette. If the green feels too dark, mix in a tiny drop of white to soften it into that gentle, pastel hue shown in the photo. -
Apply the first coat:
Using the medium flat brush, paint the entire exterior of the pot. Use long, horizontal strokes for a smooth finish, covering the rim and the main body. -
paint the inner rim:
Don’t forget the inside! Paint the top 2 inches of the interior so the clay color doesn’t peek through once the soil is added. -
Dry and repeat:
Allow the first layer to dry for about 20 minutes. Terracotta is porous and soaks up paint, so applying a second coat is usually necessary for opaque, solid coverage. Let this dry fully before moving on.
Petal Perfection
Use a filbert brush (oval-shaped tip) instead of a round one. Ideally, press down and lift, letting the brush shape do the work for perfectly rounded petals every time.
Step 2: Painting the Daisy Petals
-
Plan the placement:
Visualize where your flowers will go. The goal is a random ‘scatter’ pattern, so space them irregularly—place some near the top rim, some in the middle, and others near the bottom. -
Start with a center dot:
Dip your small round brush into white paint. Make a very faint, tiny dot where each flower center will be. This acts as an anchor for your petals. -
Paint the first petals (North, South, East, West):
To keep the flower symmetrical, paint four petals first: top, bottom, left, and right. Press the brush down near the center and pull outward, lifting pressure at the end to create a rounded tip. -
Fill in the gaps:
Now paint additional petals in the spaces between your first four. A classic daisy usually has about 12-16 petals, but don’t worry about counting; just fill the circle until it looks lush. -
Create partial flowers:
For a natural, printed fabric look, paint ‘half flowers’ along the edges of the rim or the very bottom of the pot, as if the pattern is continuing off the edge. -
Layer the white:
White paint can be translucent. Once your first set of petals is dry to the touch, go back over them with a second layer of white to make them pop bright against the green background.
Bee Friendly Upgrade
Paint tiny bumblebees between the flowers! Use a small oval of yellow, add black stripes with a fine liner brush, and dot two tiny white wings for a buzzing addition.
Step 3: Adding the Centers and Details
-
Add yellow centers:
Switch to a clean small round brush. Dip it into the golden yellow paint and dab a round circle right in the middle of your white petals. -
Texture the center:
While the yellow is still wet, you can gently stipple it (tap up and down) to give it a slightly fuzzy, pollen-like texture. -
Create shadows:
Take your fine detail brush and pick up a tiny amount of watered-down grey or a darker yellow mix. Add very subtle strokes near the base of the petals where they meet the center to add depth. -
Highlight the center:
I like to add a tiny spec of white to the top-left curve of the yellow center. This little highlight makes the flower center look dimensional rather than flat. -
Final drying:
Let the entire design cure for at least 24 hours to ensure the paint has bonded well with the clay surface. -
Seal the deal:
If you plan to keep this outdoors or water it frequently, spray the entire pot with a matte sealant to protect your handiwork from moisture damage.
Pop in your favorite succulent or flowering plant and enjoy the eternal spring vibes
Easy Leafy Vine Wrap
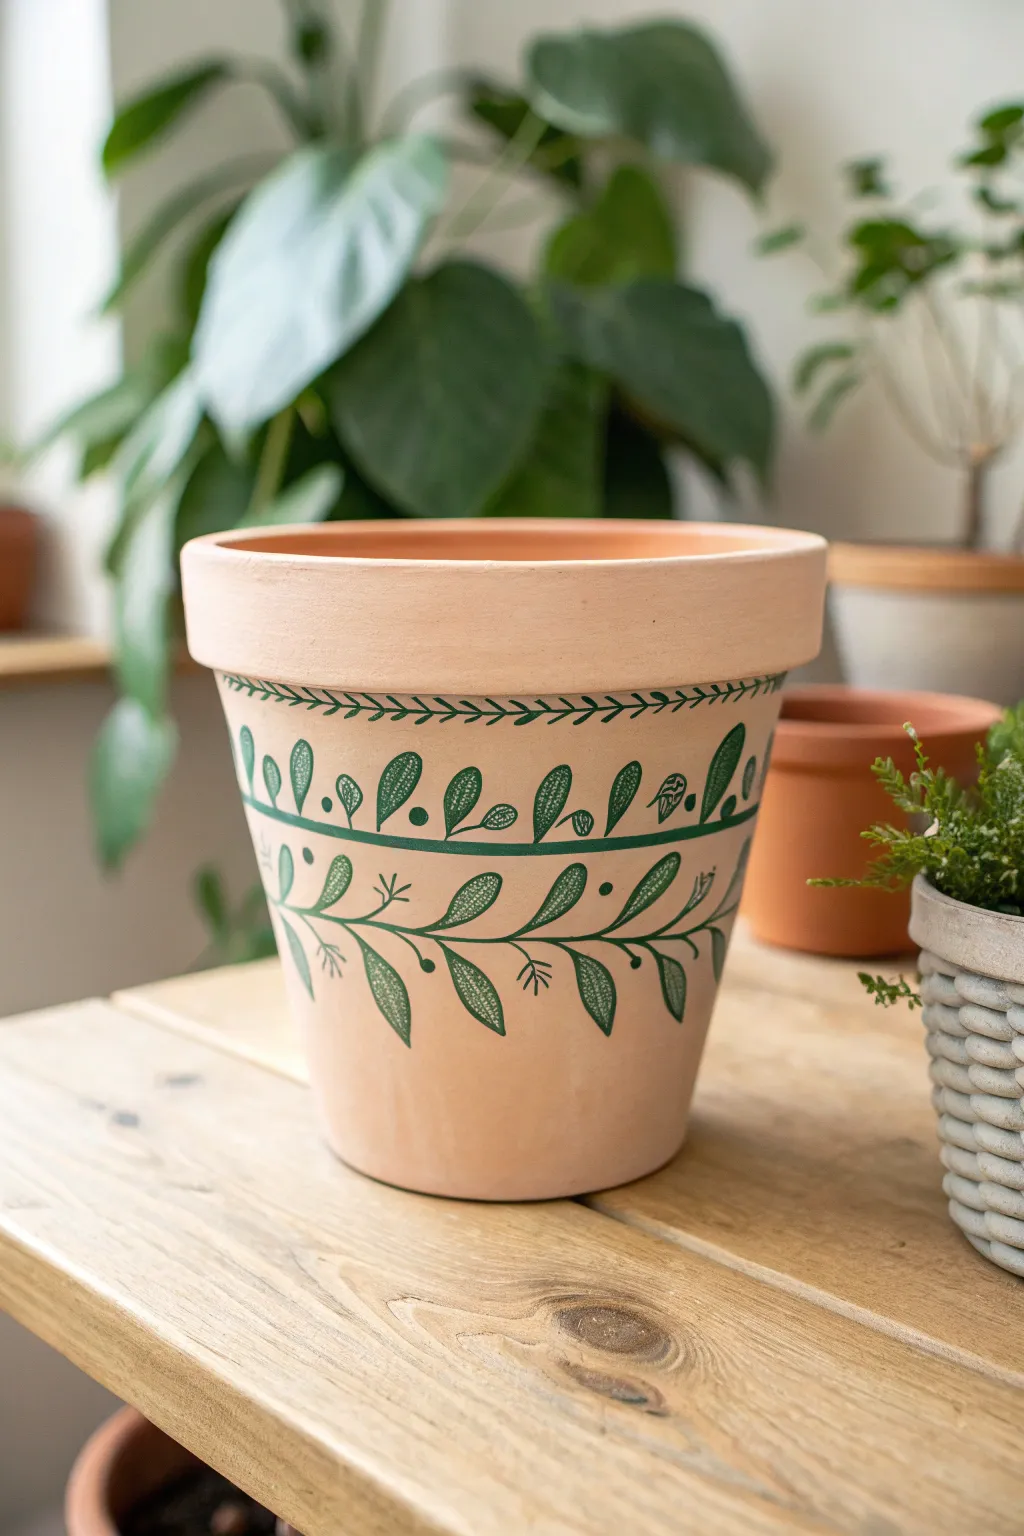
Transform a plain terracotta pot into a botanical beauty with this elegant three-tiered vine design. The natural clay background perfectly complements the deep forest green patterns, creating a sophisticated look that feels both modern and hand-crafted.
Detailed Instructions
Materials
- Medium-sized terracotta pot (8-10 inches)
- Acrylic paint in Deep Forest Green
- Fine liner paintbrush (size 0 or 00)
- Small round paintbrush (size 2)
- Pencil
- Eraser
- Ruler or measuring tape
- Water cup and paper towels
- Matte spray sealer (optional)
Step 1: Preparation and Mapping
-
Prepare the surface:
Wipe down your terracotta pot with a slightly damp cloth to remove any dust or debris. Let it dry completely so the paint adheres properly. -
Define the zones:
Using a pencil and a flexible ruler or measuring tape, lightly mark three horizontal sections on the main body of the pot, just below the rim. -
Draw the divider lines:
Connect your marks to create two parallel rings around the upper circumference of the pot. These lines will serve as the boundaries for your patterned bands.
Steady Hand Trick
Rest your pinky finger against the pot while painting detail work. This anchors your hand and acts as a pivot point for smoother curves.
Step 2: Painting the Top Bands
-
Paint the first border:
With your fine liner brush and Deep Forest Green paint, trace over the top pencil ring you drew. Keep your hand steady and try to maintain a consistent line thickness. -
Create the upper vine:
Directly above that painted line, closer to the rim, paint a delicate horizontal vine. Start with a thin central line, then add tiny ‘V’ shapes along it to mimic small leaves. -
Paint the second border:
Trace the second pencil ring below the first one to create the bottom boundary of your middle band. -
Fill the middle band:
Between the two green rings, paint a series of repeating loop shapes. Think of them as upside-down teardrops spaces evenly apart. -
Detail the loops:
Inside each loop, use your fine brush to add a few tiny dots or cross-hatching lines for texture, differentiating them from plain leaves.
Step 3: Creating the Main Vine Design
-
Sketch the main stems:
Lightly sketch a waving, undulating line around the bottom half of the pot with your pencil. This will be the main stem for your large leaves. -
Add leaf outlines:
Sketch large, pointed oval leaf shapes extending from both the top and bottom of your wavy stem line. -
Paint the stem:
Switch to the size 2 round brush. Load it with green paint and trace smoothly over your main wavy stem line, slightly thickening it compared to the upper bands. -
Outline the leaves:
Carefully outline your large leaf shapes. Instead of filling them in solid, we will use texture to define them. -
Fill with texture:
Using the fine liner brush again, fill the inside of each large leaf with tight cross-hatching or stippling. This gives the design a lighter, block-print aesthetic. -
Add decorative sprigs:
In the negative spaces between the large leaves, paint small, simple sprigs—just a short stem with three tiny lines at the end. -
Incorporate berries:
Add small solid dots near the detailed leaves to represent berries or buds, adding variety to the visual weight.
Uneven Lines?
If a painted line looks shaky, just thicken it slightly to smooth out the wobble. Varied line widths actually add to the handcrafted charm.
Step 4: Finishing Touches
-
Clean up:
Once the paint is fully dry to the touch, gently erase any visible pencil marks that weren’t covered by paint. -
Seal the work:
To protect your design from watering and handling, apply a clear matte spray sealer over the entire outside of the pot in a well-ventilated area.
Now your custom planter is ready to showcase your favorite indoor greenery

TRACK YOUR CERAMIC JOURNEY
Capture glaze tests, firing details, and creative progress—all in one simple printable. Make your projects easier to repeat and improve.
Bold Dot Mandala Band

Transform a standard flower pot into a chic, boho-inspired planter with clean lines and simple geometry. This design balances earthy sage and rust tones with crisp white accents for a look that feels both modern and handmade.
How-To Guide
Materials
- Terracotta pot (clean and dry)
- Acrylic paints: Sage green, cream/off-white, rust/terracotta orange, bright white
- Painter’s tape or masking tape (various widths)
- Foam styling brushes or flat paintbrushes
- Detail brush (fine point)
- Dotting tools (or the back end of paintbrushes/skewers)
- Sealer (matte or satin finish)
- Palette or paper plate
Step 1: Preparation & Base Layers
-
Prep the surface:
Begin by ensuring your terracotta pot is completely clean and dry. A quick wipe with a damp cloth gets rid of any dust that might interfere with paint adhesion. -
Tape the rim:
Apply a strip of painter’s tape just below the heavy rim of the pot. This protects the main body while we work on the top section first. -
Texture the rim:
For that textured, stony look on the rim, dab a mixture of cream paint and a tiny drop of beige using a sponge or dry brush. Don’t aim for perfect coverage; let some of the original clay texture peek through for a natural feel. -
Define the sections:
Once the rim is dry, remove the tape. Now, apply two new rings of tape around the body of the pot to create three distinct horizontal sections: top, middle, and bottom. -
Paint the top band:
Fill the top section (just under the rim) with your sage green acrylic paint. You may need two thin coats to get a solid, opaque color without brushstrokes showing. -
Paint the middle band:
Paint the middle section with your cream or off-white shade. This acts as a neutral separator between the colored top and bottom. -
Paint the bottom band:
Apply the rust or terracotta orange paint to the bottom section. I find that matching this color closely to the original clay pot gives a nice cohesive look, but make it vibrant enough to stand out. -
Remove tape:
Carefully peel off your painter’s tape while the paint is still slightly tacky to ensure crisp, clean edges between your color blocks.
Step 2: Adding Details & Patterns
-
Start the green dots:
Using a medium-sized dotting tool or the back of a paintbrush dipped in white paint, create the first row of dots along the top edge of the sage green band. -
Complete the green section:
Add two more rows of white dots below the first one on the green band. Try to stagger them like bricks for a classic polka dot pattern. -
Add stripes to the cream band:
With a very fine detail brush and your rust-colored paint, carefully paint two thin horizontal lines across the cream middle section. -
Speckle the middle:
Dip the tip of a stiff bristle brush or an old toothbrush into slightly watered-down rust paint. Run your thumb over the bristles to flick tiny speckles onto the cream band for texture. -
Dot the bottom band:
Switch back to your white paint. Create a series of dots on the rust-colored bottom section. Make the top row of dots smaller and the bottom row slightly larger for visual weight. -
Clean up edges:
If any paint bled under the tape earlier, use a small angled brush and the appropriate background color to carefully touch up the lines. -
Seal the deal:
Allow the pot to dry completely, ideally overnight. Finish by applying a coat of matte or satin sealer spray to protect your design from water damage and fading.
Tape Trick
To prevent paint bleed, press the edge of your painter’s tape down firmly using a credit card or fingernail. Apply a tiny bit of the base color over the tape edge first to seal it.
Gradient Effect
Mix a tiny bit of white into your sage green for the top row of dots, then pure white for the bottom, creating a subtle ombre effect within the dot pattern itself.
Now your pot is ready to be the perfect home for a new succulent or cactus
Tiny Hearts All Over
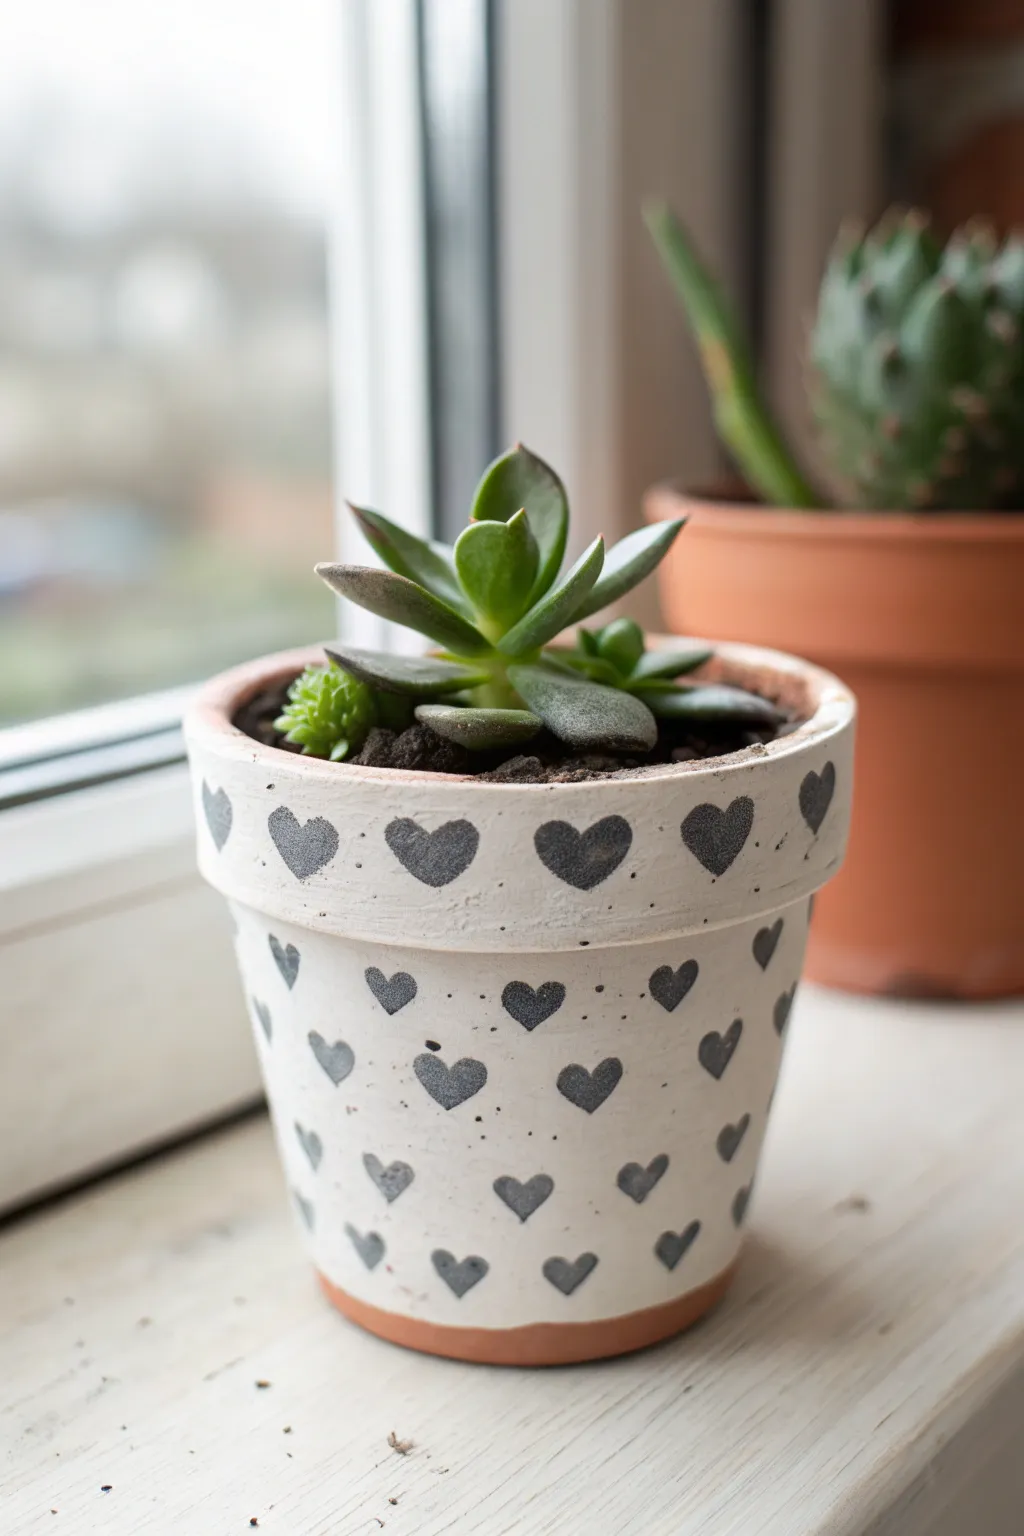
Transform a standard terracotta planter into a sweet home for your succulents with this minimalist heart design. The soft white background contrasting with slate-grey hearts creates a lovely, hand-painted look that feels both modern and cozy.
Detailed Instructions
Materials
- Small terracotta pot (clean and dry)
- White acrylic paint (matte or satin finish)
- Dark grey or slate blue acrylic paint
- Wide flat paintbrush (approx. 1 inch)
- Small round detail brush (size 1 or 2)
- Palette or paper plate
- Water cup and paper towels
- Clear matte sealer spray (optional)
- Pencil (optional)
Step 1: Preparing the Canvas
-
Clean surface:
Ensure your terracotta pot is completely clean and free of dust or sticker residue before starting. Wipe it down with a damp cloth and let it dry fully. -
Base coat application:
Squeeze a generous amount of white acrylic paint onto your palette. Using the wide flat brush, apply the first coat of white paint to the exterior of the pot. -
Painting the rim:
Don’t forget to paint the top rim of the pot. Bring the white paint just slightly inside the rim, about half an inch down, so the terracotta doesn’t show when filled with dirt. -
Drying time:
Allow this first layer to dry completely. Terracotta absorbs paint quickly, so it might dry within 15-20 minutes. -
Second coat:
Apply a second coat of white paint to ensure solid coverage. You want a creamy, opaque finish where the orange clay doesn’t peek through excessively, though a little texture is nice. -
Clean edge:
I like to leave the very bottom edge of the pot unpainted, creating a thin strip of exposed terracotta at the base for a nice visual anchor. Use a steady hand to keep this line crisp. -
Final dry:
Let the white base coat cure completely before moving on to the detailed work. If it’s cool to the touch, it’s ready.
Bleeding Lines?
If your grey paint is bleeding into the white, your base coat wasn’t fully dry. Wait longer, or use a hair dryer on a cool setting to speed up the process between layers.
Step 2: Painting the Hearts
-
Paint selection:
Prepare your dark grey paint. If you only have black and white, mix a little black into white until you achieve a deep slate grey tone. -
Rim pattern:
Start with the rim. Using your small detail brush, paint a row of evenly spaced hearts all around the thick band of the rim. These hearts should be slightly larger than the ones on the body. -
Heart technique:
To make a simple heart, paint a small ‘V’ shape first, then round out the two top bumps. Don’t worry about perfection; the hand-painted irregularities add charm. -
Body pattern row 1:
Move to the main body of the pot. Paint your first row of hearts just below the rim. Position them so they sit in the spaces between the hearts on the rim (staggered placement). -
Adding details:
Between the hearts on the rim and the body, add tiny incidental dots or specks with the tip of your brush to give it a speckled, pottery-glaze look. -
Body pattern row 2:
Paint the next row of hearts further down. Again, stagger them so each heart sits below the gap of the row above it. -
Body pattern row 3:
Continue this alternating pattern until you reach the bottom unpainted strip. The hearts can get slightly smaller as you go down if you wish. -
Spacing check:
Step back occasionally to check your spacing. Because the pot is tapered, your rows might curve slightly; just follow the natural line of the pot. -
Drying detail:
Let the grey hearts dry completely. This usually takes less time than the base coat. -
Sealing (Optional):
If this pot will live outdoors or be handled often, spray the entire exterior with a clear matte sealer to protect your artwork from water damage.
Heart Stamps
Struggling to paint consistent hearts? Cut a small heart shape out of a potato or a piece of craft fun-foam and use it as a stamp for uniform shapes.
Now you have a charming custom planter ready for your favorite small green friend
Simple One-Line Face

Transform a plain terracotta pot into a piece of modern art with this minimalist line drawing design. The serene, closed-eye expression and abstract pattern bring a calming, bohemian vibe to your plant shelf, requiring only a steady hand and a few basic supplies.
Step-by-Step Guide
Materials
- Terracotta pot (4-6 inch diameter)
- Acrylic paint (matte peach or light terracotta)
- Acrylic paint (black)
- Acrylic paint (soft pink or coral for cheeks)
- Fine liner brush (size 0 or 00)
- Small round brush (size 2-4)
- Pencil
- Eraser
- Palette or paper plate
- Clear sealant spray (matte finish)
Step 1: Base Preparation
-
Clean the surface:
Before you begin, ensure your terracotta pot is completely clean and dry. Wipe it down with a damp cloth to remove any pottery dust or sticker residue, as this helps the paint adhere smoothly. -
Mix your base color:
Mix a custom base shade using your peach or light terracotta acrylic paint. You want a color that closely matches the natural clay but provides a uniform, matte finish to hide imperfections. -
Apply the first coat:
Paint the entire exterior of the pot, including the rim. Use broad, horizontal strokes to minimize brush marks. Don’t worry about full opacity yet; just get good coverage. -
Let it dry:
Allow the first coat to dry completely for about 20-30 minutes. Terracotta is porous, so it might absorb the first layer quickly. -
Apply a second coat:
Apply a second layer of your base color to achieve a solid, opaque finish. Let this dry thoroughly—I prefer waiting at least an hour to ensure the surface is hard enough for sketching.
Wobbly Lines?
If your hand shakes, rest your pinky finger on the dry surface of the pot to stabilize your brush strokes while painting the fine details.
Step 2: Sketching the Face
-
Mark the center:
Lightly mark the vertical center of the pot with your pencil. This will guide the placement of the nose and ensure the face is symmetrical. -
Draw the nose and brows:
Start sketching the continuous line for the nose, bringing it up into the arches of the eyebrows. Keep your pencil pressure very light so markings don’t show through later. -
Add the eyes:
Sketch two semi-circles below the brow line for closed eyelids. Add small, vertical ticks for the eyelashes. -
Outline the face shape:
Draw the U-shaped jawline connecting from the outer edges of the eyes down to a rounded chin point below the mouth. -
Finish the sketch:
Sketch the lips below the nose and lightly mark two circles on the cheeks for the blush spots. Add the random circle pattern on the side of the pot.
Step 3: Painting the Details
-
Load your fine brush:
Thicken your black acrylic paint slightly if it’s too runny, or use it straight from the tube. Load your fine liner brush, rolling the tip to keep it sharp. -
Paint the main lines:
Carefully trace over your pencil lines for the nose, eyebrows, and jawline. Move your whole arm, not just your wrist, to keep the lines fluid and steady. -
Detail the eyes:
Using the very tip of the liner brush, paint the eyelids and add the delicate eyelashes. Take your time here—breath control helps steady your hand. -
Paint the mouth:
Trace the lips. You can vary the line thickness slightly to give the drawing more character and depth. -
Add the rosy cheeks:
Switch to your small round brush. Dip into the soft pink paint and fill in the circular cheek spots you sketched earlier. You might need two thin coats for vibrant color. -
Create the side pattern:
Using black paint, fill in the decorative elements on the right side. Alternate between solid black dots and open circles to recreate the playful pattern shown. -
Let details dry:
Allow all the painted details to dry for at least one hour. If you erase any visible pencil marks too soon, you risk smudging the black paint.
Make It Glossy
Swap the matte sealer for a high-gloss varnish to give your pot a ceramic-glazed look that contrasts beautifully with the raw clay texture.
Step 4: Finishing Touches
-
Erase pencil marks:
Once the paint is bone dry, gently erase any remaining visible pencil sketches. Be extremely gentle around the painted lines. -
Seal the artwork:
Take the pot to a well-ventilated area and apply a light coat of matte clear sealant spray. This protects your design from water damage when watering your plant.
Pop in your favorite trailing plant to give your new art piece a wild, green hairstyle
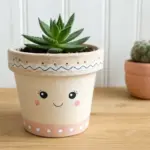
Quick Smiley Character Pot
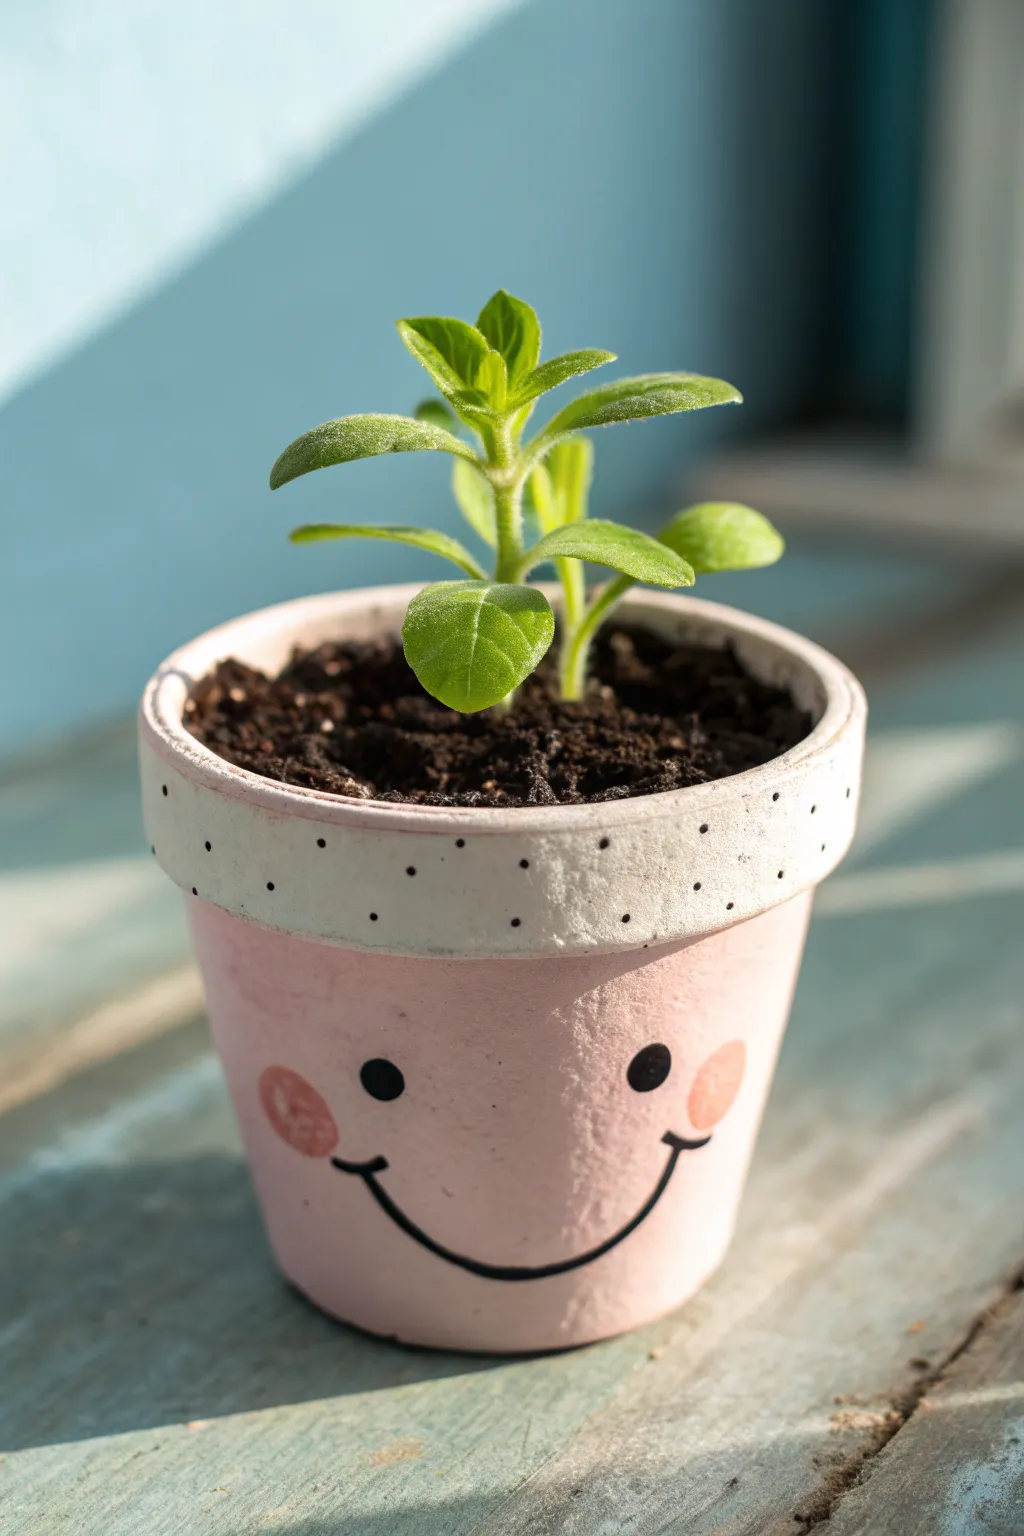
Transform a plain terracotta planter into a cheerful windowsill friend with soft pastel hues and a simple line illustration. This project uses minimalistic facial features and gentle rosy cheeks to create a personality-filled home for your favorite sprout.
How-To Guide
Materials
- Small terracotta pot (standard rim)
- White acrylic paint
- Light pink acrylic paint (pastel shade)
- Black acrylic paint or black paint marker
- Medium pink acrylic paint (for cheeks)
- Medium flat paintbrush
- Small round paintbrush
- Small detail brush or toothpick
- Clear matte sealer spray (optional)
- Water cup and palette
Step 1: Base Coat & Rim
-
Clean surface:
Before you begin painting, ensure your terracotta pot is clean, dry, and free of any loose dust or dirt, which can prevent the paint from sticking properly. -
Base coat:
Using your medium flat brush, apply a coat of white acrylic paint to the rim of the pot. Don’t worry about perfect opacity yet; we are just establishing a bright base. -
Pink body:
While the rim dries, paint the main body of the pot below the rim with your light pastel pink paint. Smooth out your brushstrokes horizontally for a clean finish. -
Second layers:
Once the first layers are dry to the touch, apply a second coat to both the white rim and the pink body. This ensures rich, solid color without the clay showing through. -
Rim texture:
For a rustic look like the image, I prefer to dab the white paint onto the rim slightly with a mostly dry brush, rather than painting perfectly smooth lines. Let everything dry completely.
Paint Slipping off?
Terracotta absorbs moisture quickly. If the paint soaks in too fast, apply a clear acrylic primer or a 50/50 mix of white glue and water first to seal the clay pores.
Step 2: Face & Details
-
Drafting:
Lightly sketch the position of the eyes and smile with a pencil if you feel unsure about freehanding. Keep the face low on the pot for a cuter proportion. -
Painting eyes:
Dip the handle end of a paintbrush into black acrylic paint. Press it gently onto the pot to stamp two perfectly round wide-set eyes. -
Drawing the smile:
Using a very fine detail brush or a black paint marker, draw a wide, U-shaped smile connecting the area below the eyes. Keep the line thickness consistent. -
Adding smile creases:
Add small, upward-curved tick marks at both ends of the smile to give the character deeper expression and joy. -
Rosy cheeks:
Mix a small amount of medium pink paint. Using your small round brush, paint soft oval shapes on the outer edges of the smile for the blushing cheeks. -
Cheek transparency:
If the cheek color looks too bold, you can dab it gently with a paper towel while wet to soften the look, letting the base pink show through slightly.
Step 3: Polka Dot Patterns
-
Dot tool:
Dip the very tip of a toothpick or a fine styling tool into your black paint. You need a very small amount for these delicate specks. -
Rim pattern:
Apply tiny black dots randomly around the white rim. Space them out generously so the pattern looks airy rather than cluttered. -
Bottom row:
Create a loose line of dots near the bottom edge of the rim specifically, creating a subtle border effect. -
Final dry:
Allow the entire pot to sit undisturbed for at least an hour to ensure the thick dots of paint are fully hardened. -
Sealing:
If this pot will live outdoors or hold a real plant requiring water, spray it with a clear matte sealer to protect your artwork from moisture damage.
Perfect Cheeks
Instead of a brush, use your pinky finger to stamp the cheek circles. The natural texture of your fingerprint creates a soft, blended look that mimics a real blush effect.
Pop in your favorite succulent or seedling to give your new little friend a fun green hairstyle
Strawberry Patch Pot
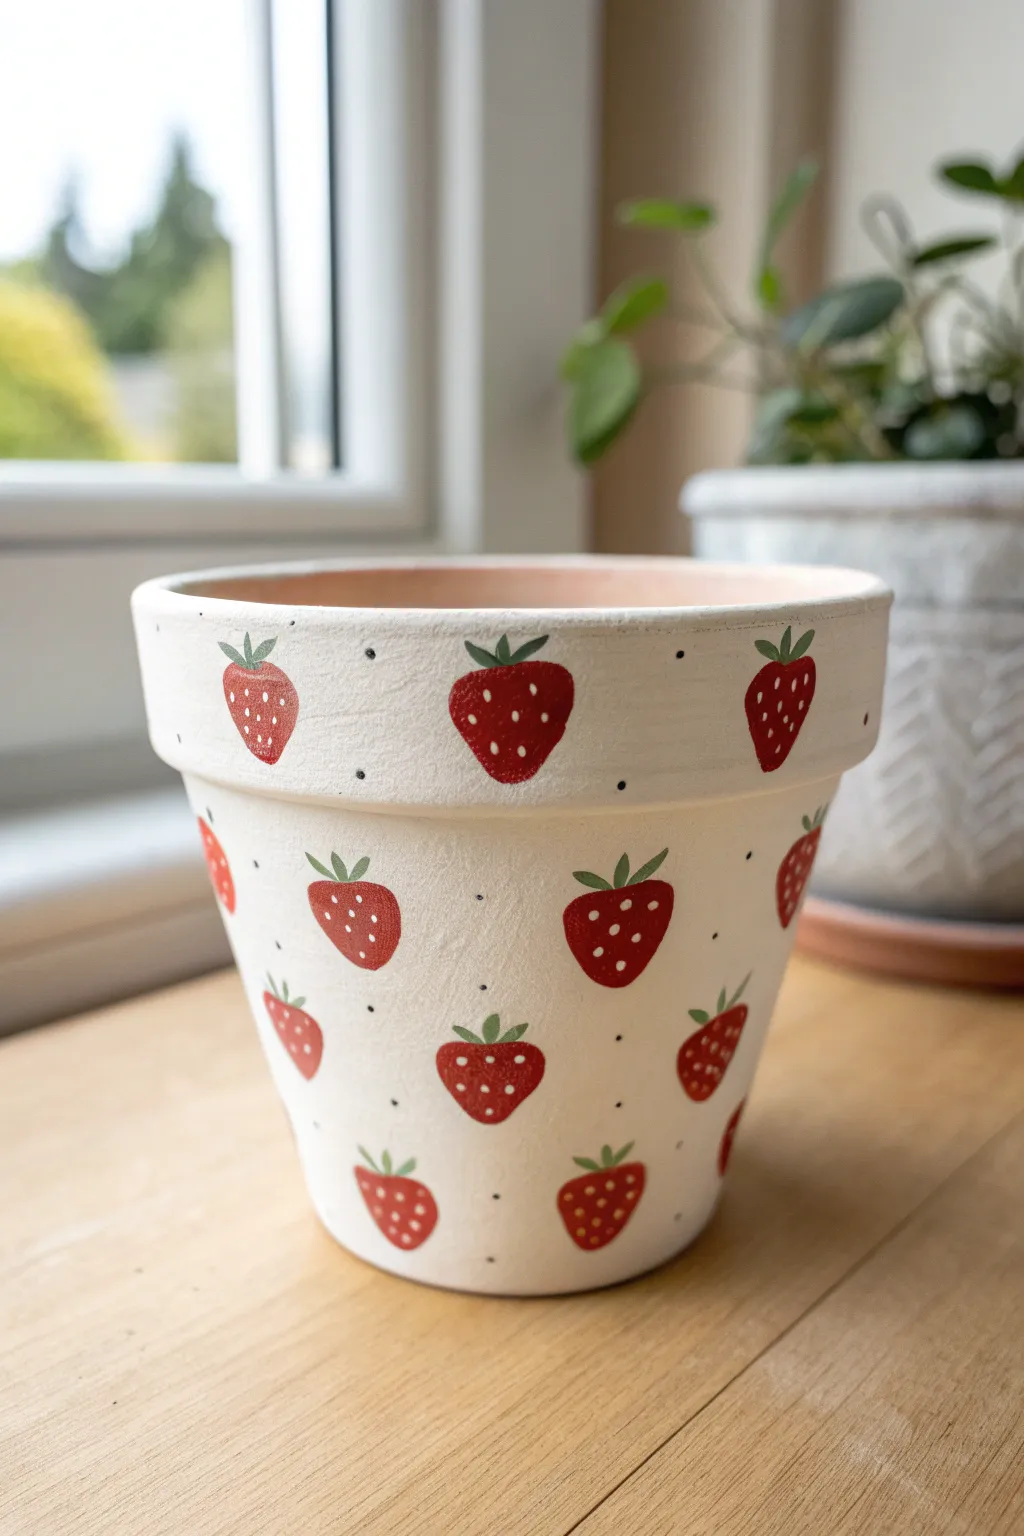
Brighten up your windowsill with this adorable hand-painted terracotta pot, featuring a scattered pattern of cheerful red strawberries and delicate black dots. The creamy white background gives it a fresh, modern look that makes the fruit design really pop.
Step-by-Step Guide
Materials
- Clean terracotta pot (standard size)
- White acrylic paint (priming and base coat)
- Red acrylic paint (strawberries)
- Green acrylic paint (leaves)
- Black acrylic paint or fine-point paint pen (seeds and dots)
- Flat paintbrush (medium width)
- Small round detail brush
- Water cup and paper towels
- Matte sealer or varnish (spray or brush-on)
Step 1: Preparation & Base Coat
-
Clean the surface:
Begin by wiping down your terracotta pot with a damp cloth to remove any dust or debris. Let it dry completely so the paint adheres properly. -
Prime the pot:
Apply a thin layer of white acrylic paint to the exterior of the pot, including the rim. Don’t worry if it looks streaky at first; this acts as a primer. -
Apply the second coat:
Once dry, paint a second layer of white. I find using a flat brush helps achieve a smoother finish. Continue adding layers (usually 3-4 total) until the terracotta orange is completely hidden and the white looks creamy and opaque. -
Paint the inner rim:
Bring the white paint just over the top edge and about an inch down the inside of the pot for a clean, professional finish.
Uneven Coverage?
If the white base coat looks streaky, sand lightly with fine-grit sandpaper between dried coats to create a perfectly smooth canvas.
Step 2: Painting the Strawberry Pattern
-
Plan the placement:
Visualize a diamond or grid pattern. You want the strawberries to be evenly spaced but slightly offset from row to row. -
Paint the rim strawberries:
Start with the rim. Using your small round brush and red paint, create strawberry shapes. Think of rounded, upside-down triangles with soft edges. Space them evenly around the circumference. -
Start the main body rows:
Move to the main body of the pot. Paint the next row of red strawberry shapes, positioning each one so it sits roughly below the gap between the two strawberries on the rim above it. -
Continue the pattern:
Work your way down the pot, maintaining that alternating placement. The strawberries near the bottom might be slightly smaller depending on the taper of your pot. -
Let the red dry:
Allow the red shapes to dry completely before adding green. If the red looks translucent, add a second coat for vibrancy.
Step 3: Adding Details
-
Paint the leaves:
Using the green paint and your smallest detail brush, press gently at the top of a red strawberry and flick outward to create small, leafy tufts. Three little leaves per berry usually looks best. -
Repeat for all berries:
Go around the entire pot adding these green caps to every red shape. -
Add the seeds:
Once the red and green are 100% dry, use a fine-point black paint pen or a very fine brush with black paint to dot small ‘seeds’ onto different parts of the strawberries. Keep them tiny and random. -
Create the background dots:
To fill the empty white space, add single, tiny black polka dots between the strawberries. This ties the whole design together and adds texture. -
Seal the artwork:
After the paint has cured for at least 24 hours, apply a clear matte sealer. This protects your hard work from water damage and chipping.
Precision Tip
For perfectly round background dots, dip the non-brush end (the handle) of a paintbrush into black paint and stamp it onto the pot.
Now your charming strawberry pot is ready to be the perfect home for a new plant
Watermelon Rim Band
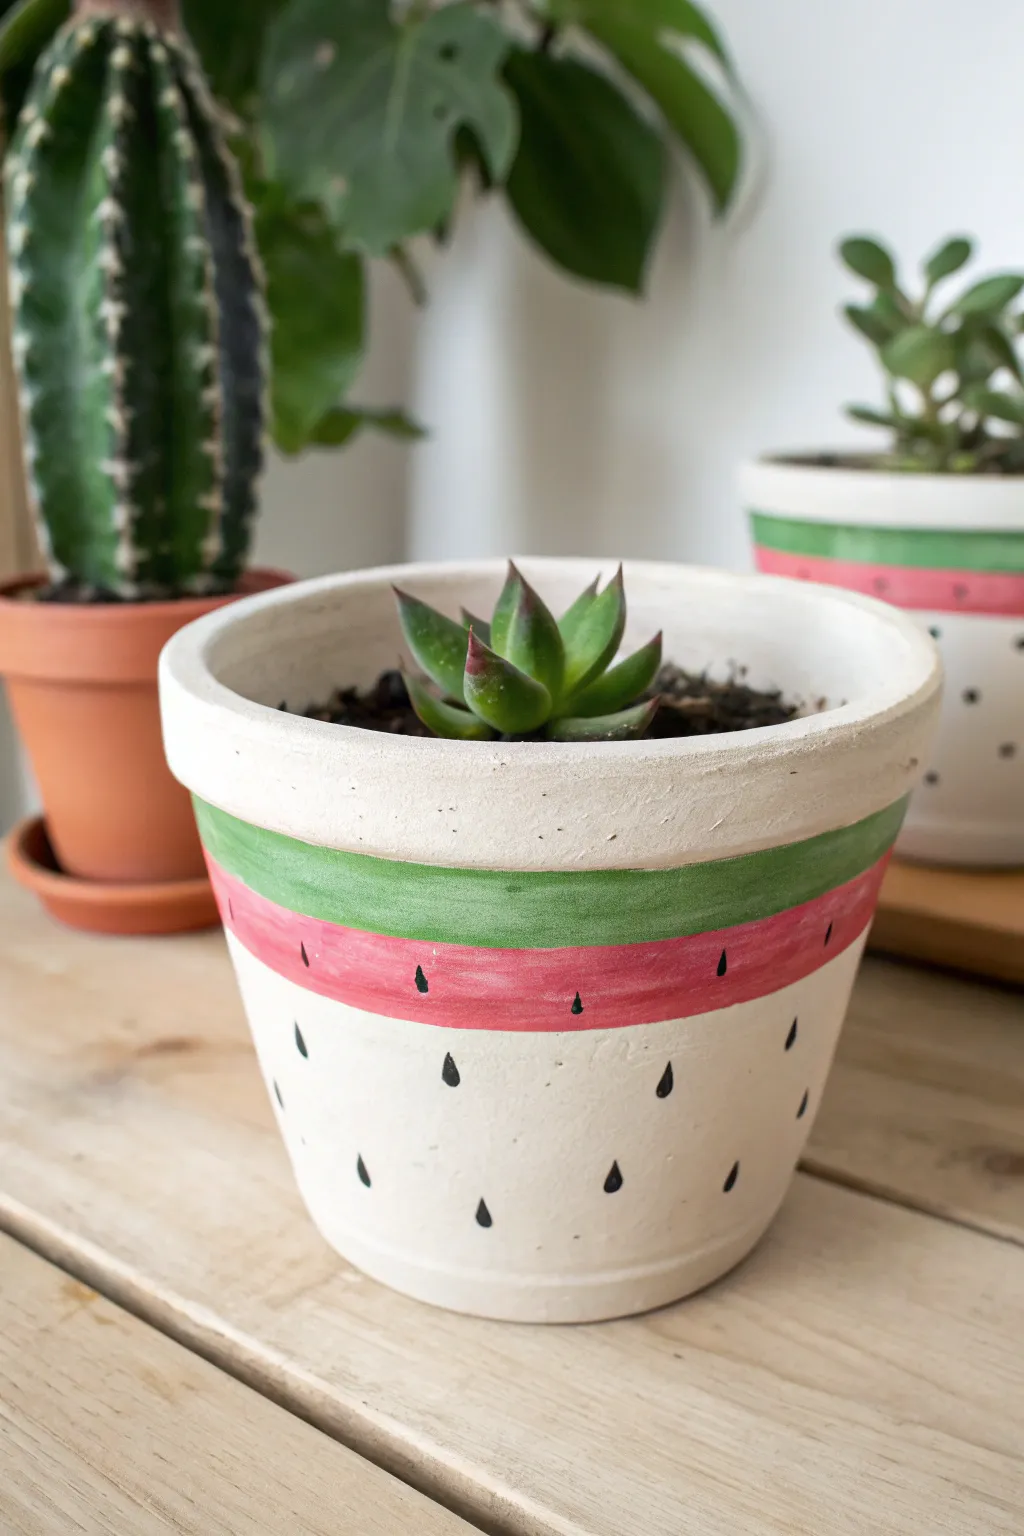
Transform a plain terracotta pot into a refreshing summer statement piece with this simple blocked design. Instead of painting the entire pot like a melon, this version keeps a clean, modern white base with a vibrant watermelon band around the rim.
Step-by-Step
Materials
- Terracotta pot (clean and dry)
- White acrylic paint (matte or satin)
- Green acrylic paint (medium shade)
- Pink or light red acrylic paint (watermelon shade)
- Black acrylic paint
- Paintbrushes (medium flat brush, small detail brush)
- Painter’s tape (optional)
- Clear acrylic sealer spray (matte finish)
Step 1: Base Coat Application
-
Clean surface:
Ensure your terracotta pot is completely clean and free of dust or price tag residue before starting. -
First white layer:
Using a flat brush, apply a generous coat of white acrylic paint to the exterior of the pot. -
Rim coverage:
Don’t forget to paint the top lip of the rim and just inside the top edge for a finished look. -
Drying time:
Allow the first coat to dry completely for about 20-30 minutes. -
Second coat:
Apply a second (and potentially third) coat of white paint until the orange terracotta color no longer shows through. -
Final dry:
Let the white base cure fully before moving on to the colored bands to prevent lifting.
Step 2: Painting the Bands
-
Green band placement:
Load your flat brush with green paint. Paint a horizontal band following the natural ridge of the pot’s collar. -
Steady hand or tape:
I usually freehand this since the pot has a natural indentation, but you can use painter’s tape if you want a razor-sharp edge. -
Green width:
Make the green stripe about half an inch wide, leaving the very top edge of the rim white. -
Pink band placement:
Immediately below the green band, paint a pink band of roughly the same width. -
Blending the meeting point:
Carefully ensure the pink paint meets the green line without leaving a white gap, but try not to overlap them too heavily to keep the colors distinct. -
Layering color:
The pink and green may need a second coat to look opaque and vivid against the white background.
Seed Shape Hack
Struggling to paint teardrops? Dip the round end of a paintbrush handle in black paint, press a dot, then drag it slightly upward with a toothpick.
Step 3: Adding the Seeds
-
Pink section seeds:
Using a very fine detail brush dipped in black paint, add small, vertical dashes or tiny teardrops along the pink band. -
Spacing the pink seeds:
Space them out regularly, perhaps every inch or so around the circumference. -
White section seeds:
Moving down to the main white body of the pot, paint larger black teardrop shapes to represent dispersed seeds. -
Staggered pattern:
Arrange these lower seeds in a staggered pattern rather than straight rows for a more organic look. -
Seed orientation:
Make sure the pointed end of the teardrop is facing upward toward the rim. -
Drift technique:
Keep the majority of seeds near the bottom half of the pot, leaving some white space just under the colorful rim.
Wobbly Lines?
If your horizontal bands look uneven, simply widen the stripe slightly to cover the mistake, or touch up the edges with white paint once dry.
Step 4: Finishing Touches
-
Full cure:
allow the entire design to dry for at least an hour or two. -
Sealing:
Take the pot to a well-ventilated area and spray it with a clear acrylic sealer. -
Sealer coats:
Apply two light coats of sealer to protect the paint from water damage when you water your plant.
Now you have a cheerful home for your succulents that feels like summer year-round
Cute Ladybug Spots
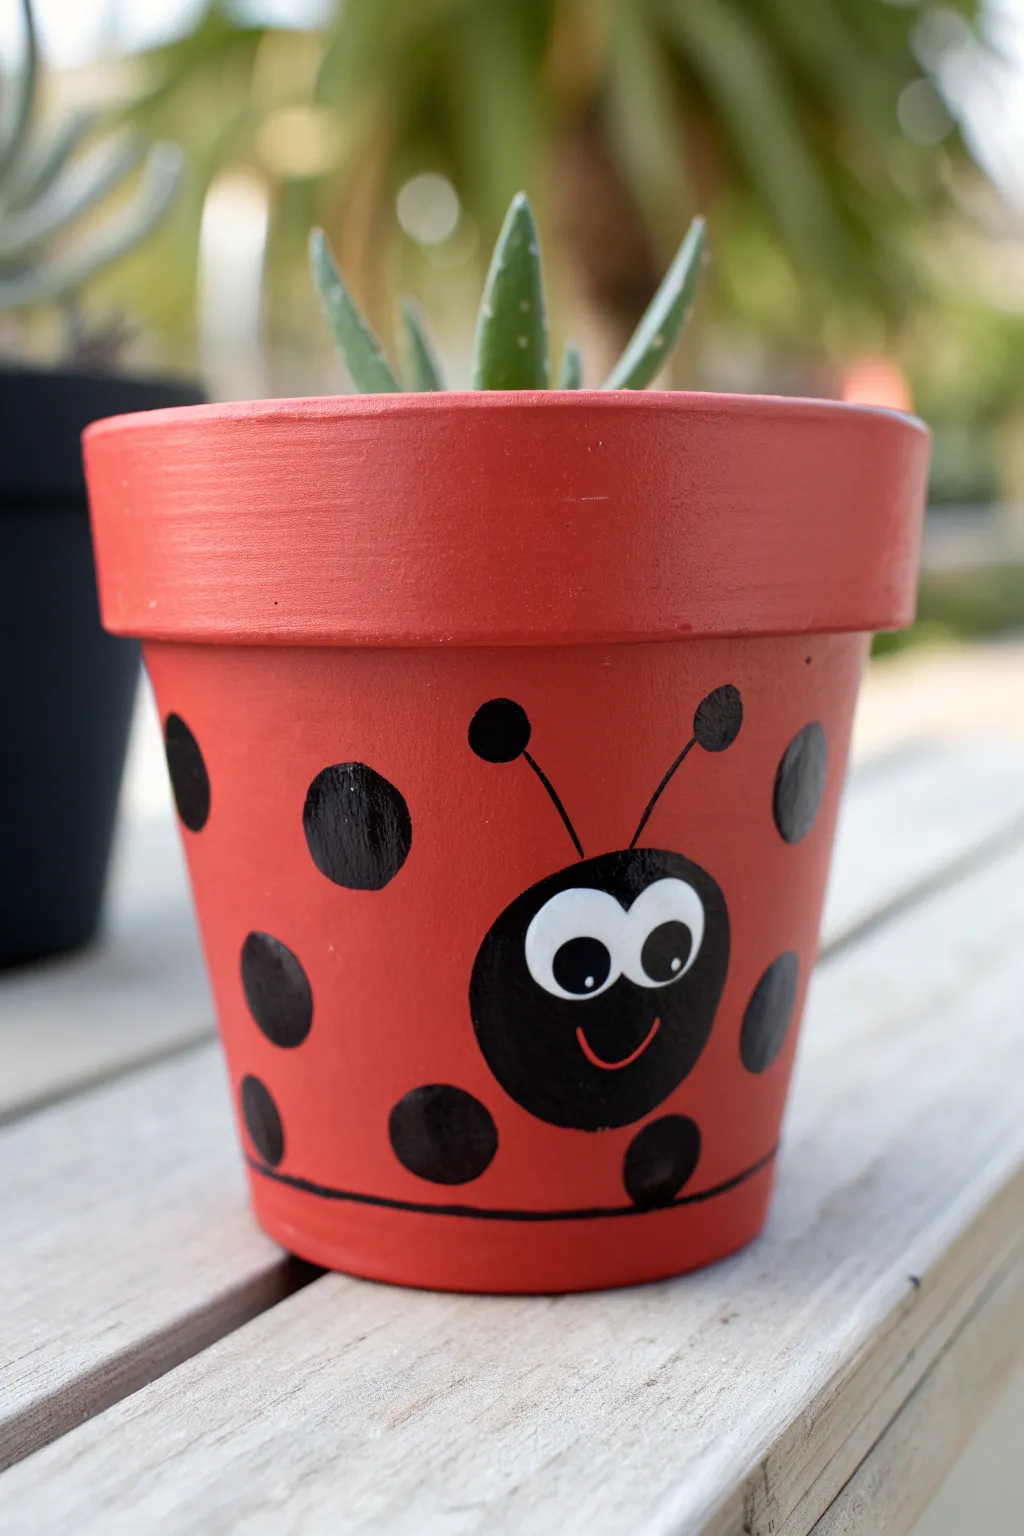
Transform a plain terracotta pot into a cheerful garden friend with this adorable ladybug design. The bright red base and bold black spots create a striking contrast, finished off with a sweet, smiling face that’s sure to bring character to your succulents.
Step-by-Step Tutorial
Materials
- Small or medium terracotta pot
- Red acrylic paint (bright scarlet or cardinal)
- Black acrylic paint
- White acrylic paint
- Flat paintbrush (medium width)
- Round detail brushes (fine and medium)
- Pencil
- Optional: Sealing spray or outdoor varnish
Step 1: Base Coat Application
-
Clean the surface:
Before you unscrew any paint caps, give your terracotta pot a quick wipe with a clean, slightly damp cloth to remove any warehouse dust or debris that might bump up your smooth finish. -
Apply the first red layer:
Using a medium-sized flat brush, apply a coat of bright red acrylic paint to the entire exterior of the pot, including the rim. Don’t worry if it looks streaky at first; terracotta is thirsty and soaks up the first layer quickly. -
Paint the inner rim:
Paint the top inch of the inside of the pot as well. This ensures that when you add soil later, no bare clay will be peeking out above the dirt line. -
Let it dry completely:
Allow the first coat to dry for about 15-20 minutes. It should be dry to the touch before you proceed. -
Add a second coat:
Apply a second layer of red paint to ensure vibrant, opaque coverage. Paint in smooth, horizontal strokes around the pot to minimize brush marks.
Uneven Circles?
If painting perfect circles is tricky, use circle foam pouncers or stampers dipped in black paint. You can even trace a bottle cap lightly with pencil first.
Step 2: Adding the Ladybug Details
-
Outline the head:
Once the red base is totally dry, use a pencil to lightly sketch a medium-sized circle towards the bottom half of the pot for the ladybug’s head. -
Sketch the spots:
Lightly draw scattered circles of varying sizes all around the rest of the pot. Don’t forget to add a couple of spots up on the rim for continuity. -
Fill in the head:
Using a medium round brush and black paint, carefully fill in the large circle you drew for the head. This needs to be solid black. -
Paint the spots:
Switching to the same black paint, fill in all your penciled spots. I personally like to rotatate the pot as I go to ensure I haven’t missed any angles. -
Add a bottom stripe:
Using a steady hand or a detail brush, paint a thin black line circling the very bottom edge of the pot to ground the design. -
Add antennae:
With your finest detail brush and black paint, draw two thin, curved lines extending upward from the top of the head. Add a small dot at the end of each line.
Level Up: 3D Antennae
Instead of painting the antennae, glue two black pipe cleaners to the inside of the rim so they poke out over the top for a fun, tactile 3D effect.
Step 3: Bringing the Face to Life
-
Paint the eyes:
Wait until the black head paint is completely dry. Then, paint two connected white circles in the upper center of the black head shape. You might need two coats of white to cover the black background perfectly. -
Add pupils:
Once the white is dry, use the handle end of a paintbrush dipped in black paint to stamp two small dots inside the white eyes. Placing them slightly off-center makes the expression look look playful. -
Paint the smile:
Using a fine detail brush and your red paint, add a delicate ‘U’ shape just below the eyes for a smile. The red paint ties the face back to the pot’s body color. -
Seal (Optional):
If this pot will live outside, apply a clear acrylic sealer or outdoor varnish once everything is bone dry to protect your artwork from the elements.
Pop in a spikey aloe vera or succulent to give your ladybug a fun green hairstyle
Bumblebee Stripe Wrap
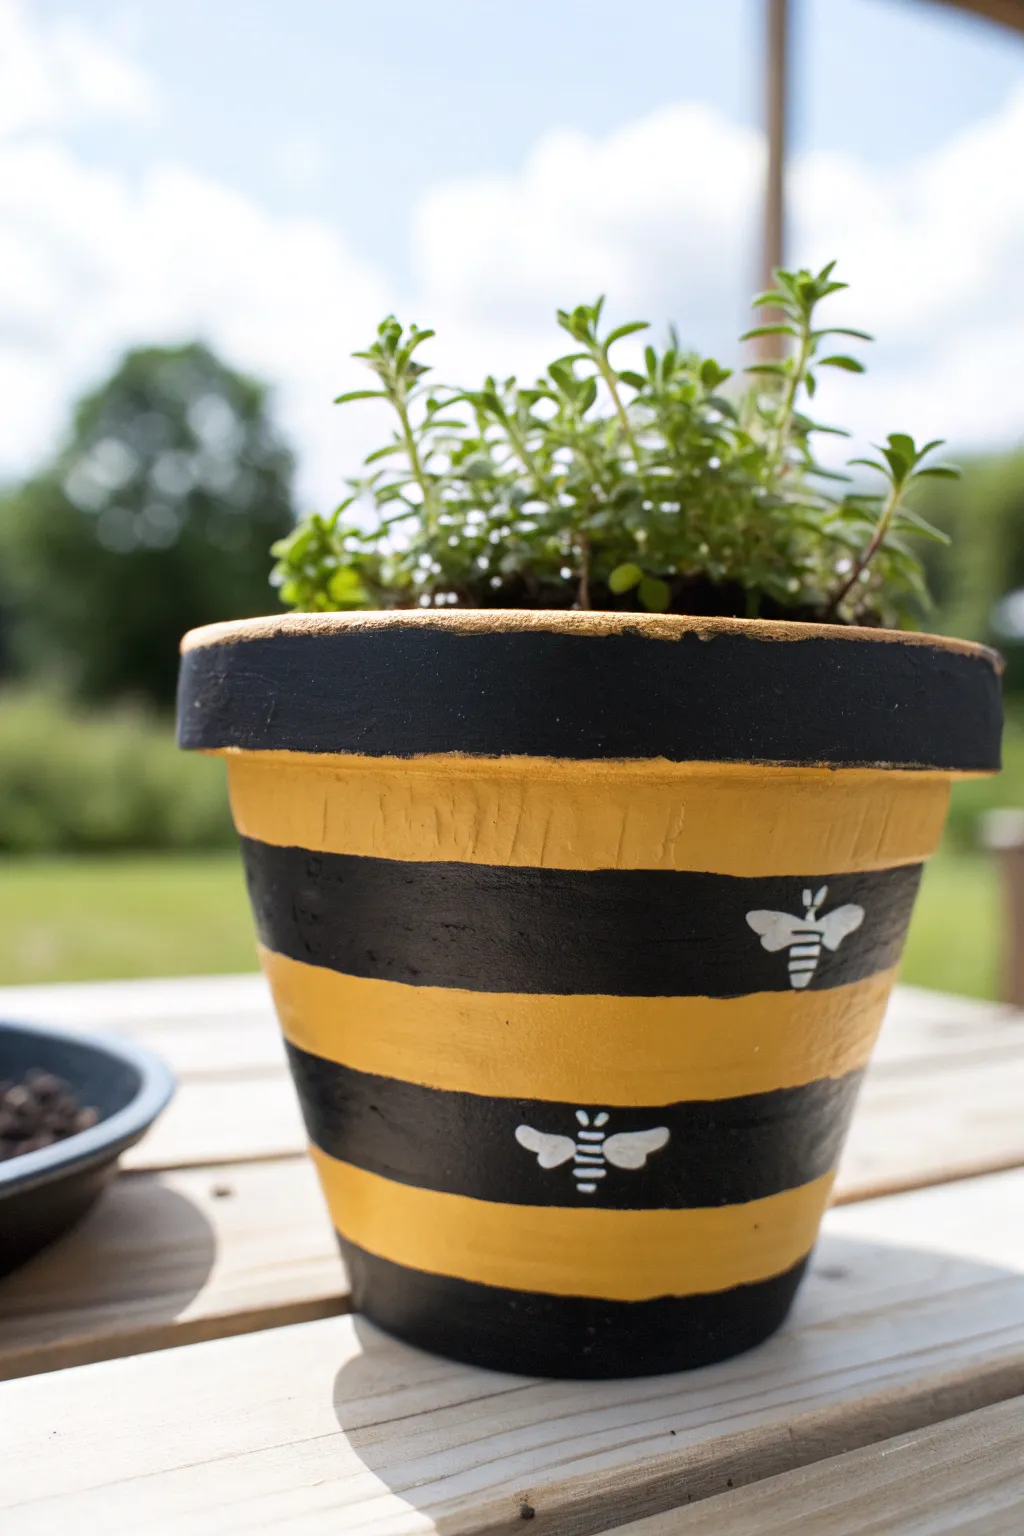
Transform a standard terracotta planter into a buzzing garden highlight with bold, contrasting stripes and charming bee motifs. This cheerful design combines classic bumblebee colors with simple graphics for a pot that looks just as sweet as the honey it mimics.
Detailed Instructions
Materials
- Terracotta pot (clean and dry)
- Black acrylic craft paint
- Yellow acrylic craft paint (primary or sunflower yellow)
- White acrylic paint
- Painter’s tape or masking tape (approx. 1 inch width)
- Flat paintbrush (medium size)
- Fine-tip liner brush or small detail brush
- Pencil (optional)
- Clear acrylic sealer spray (matte or gloss)
- Small stencil or bee stamp (optional)
Step 1: Base Preparation
-
Clean the Surface:
Ensure your terracotta pot is completely free of dust and dirt. Wipe it down with a damp cloth and let it dry fully before applying any paint to ensure good adhesion. -
Top Rim Painting:
Start by painting the thick upper rim of the pot with solid black acrylic paint. You may need two coats here to cover the clay color completely. -
Rim Drying Time:
Allow the top rim to dry completely. This is crucial because you don’t want to smudge this crisp edge while working on the body of the pot.
Paint Choice Expert Tip
Use ‘Multi-Surface’ acrylics rather than standard craft paint. They adhere better to porous terracotta and resist peeling when the pot gets damp from watering.
Step 2: Creating Stripes
-
First Yellow Band:
Paint a wide band of yellow directly underneath the black rim. Use a flat brush to keep your strokes horizontal and smooth. -
Define the Stripe Width:
Aim for a stripe width of about 1.5 to 2 inches, depending on the height of your pot. Don’t worry about perfect straight lines at the bottom edge yet. -
First Black Band:
Below the yellow band, paint a black stripe of equal width. I find it helpful to overlap the yellow slightly if needed to keep the line straight, as black covers yellow easily. -
Alternating Downward:
Continue this alternating pattern—yellow, then black again—until you reach the bottom of the pot. Most standard pots will accommodate about four main body stripes. -
Refining Edges:
Go back with a steady hand and your flat brush to touch up the lines where colors meet. If you prefer razor-sharp lines, you can use painter’s tape, but freehand painting gives a rustic, organic charm. -
Opacity Check:
Yellow paint is often translucent on terracotta. Apply a second or third coat to the yellow stripes to ensure the color pops vibrant and bright without streaks.
Glaze It Up
Mix a tiny drop of gold glitter paint into your yellow stripes for a subtle honeycomb shimmer that catches the sunlight.
Step 3: Adding the Bees
-
Locate Placement:
Identify the black stripes where you want your bee motifs to live. The dark background makes the white bee details stand out clearly. -
Bee Body Outline:
Using a very fine liner brush and white paint, carefully draw a small, horizontal oval shape to serve as the bee’s body guideline. -
Painting the Wings:
From the top of your oval, paint two teardrop shapes extending outward for wings. Make the front wing slightly larger than the back one for perspective. -
Definition Lines:
Instead of filling the bee body with solid white, paint horizontal white lines across the oval body shape. This creates a skeleton-style or negative-space bee effect. -
Antennae Details:
Add a tiny ‘V’ shape at the head of the bee for antennae. Keep these lines extremely thin for a delicate look. -
Repeat the Motif:
Paint 2-3 bees randomly spaced around the pot. Vary their placement so they aren’t perfectly aligned vertically.
Step 4: Finishing Touches
-
Final Cleanup:
Check the entire pot for any stray paint drips or uneven coverage and touch up as necessary. -
Sealing the Pot:
Once all paint is bone dry (wait at least 24 hours), take the pot to a well-ventilated area and spray it with a clear acrylic sealer. This protects the design from water damage and fading.
Fill your new planter with fragrant thyme or bright marigolds to complete the pollinator-friendly theme
Starry Night Sky Dots
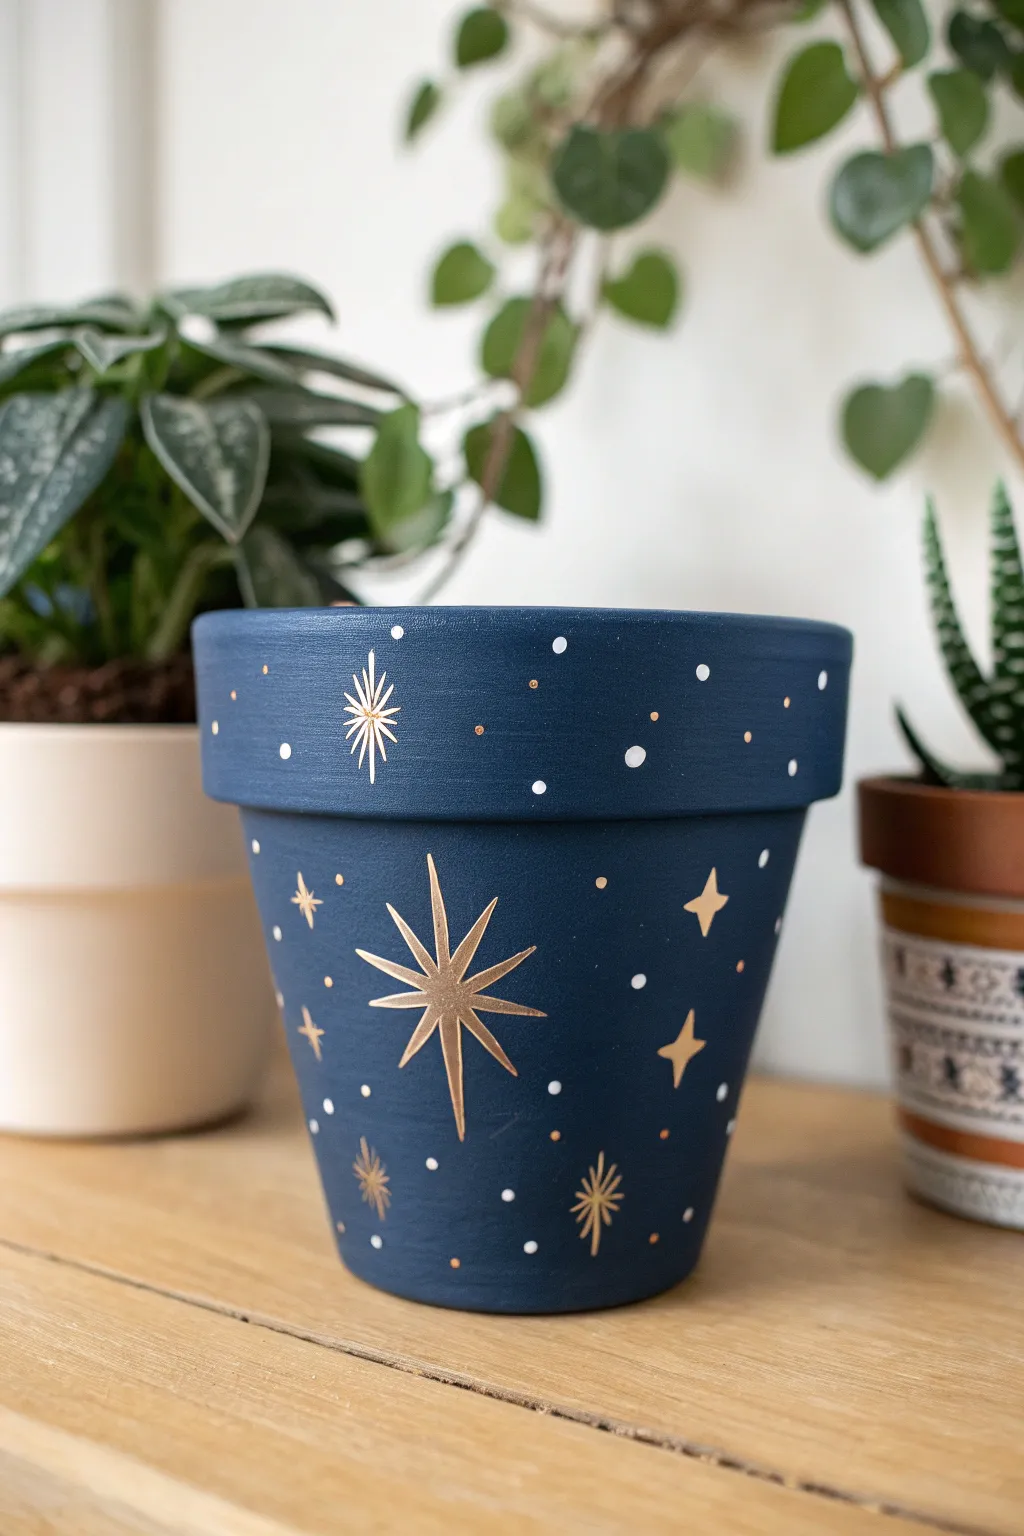
Transform a plain terracotta pot into a midnight masterpiece with this elegant starry sky design. The deep matte blue background makes the metallic gold stars and crisp white dots pop beautifully, creating a dreamy home for your favorite plant.
How-To Guide
Materials
- Terra cotta clay pot (standard size)
- Deep navy blue acrylic paint (matte finish)
- Metallic gold acrylic paint or paint pen
- White acrylic paint
- Wide flat paintbrush
- Fine liner paintbrush (size 0 or 00)
- Small dotting tool or toothpick
- Water cup and paper towels
- Clear matte sealant spray (optional)
Step 1: Setting the Midnight Scene
-
Prep the surface:
Begin by wiping your terracotta pot with a damp cloth to remove any dust or debris. Let it dry completely so the paint adheres properly. -
Apply the first base coat:
Using your wide flat brush, apply a generous layer of deep navy blue paint. Cover the entire exterior and paint about an inch down into the inner rim where the soil won’t cover. -
Let it dry completely:
Set the pot aside to dry. Terracotta is porous and soaks up paint, so this first layer might look streaky or uneven. -
Apply the second base coat:
Paint a second layer of navy blue to achieve a solid, opaque finish. An even, matte surface is key for making the gold details stand out later. -
Touch up the rim:
Ensure the top rim is fully coated and smooth, as this area frames your plant perfectly. Let this base layer dry for at least an hour before starting the details.
Wobbly Lines?
If painting fine stars with a brush is too difficult, switch to a gold metallic paint pen. The firm nib offers much better control for sharp star points.
Step 2: Painting the Gold Stars
-
Plan your main stars:
Visualize where you want your largest stars. Aim to place 3-4 large ‘North Star’ shapes around the main body of the pot, spacing them out unevenly for a natural look. -
Paint the central cross:
Using your fine liner brush and metallic gold paint, paint a thin vertical line about an inch long. Cross it with a horizontal line of the same length to create a simple plus sign. -
Extend the rays:
Thicken the center of the lines slightly, tapering them to sharp points at the ends. This creates the primary rays of your star. -
Add diagonal rays:
Paint a smaller ‘X’ shape through the center of your plus sign. These diagonal rays should be roughly half the length of the main rays. -
Create smaller four-point stars:
In the empty spaces between large stars, paint simpler four-point stars. These are just small diamond or cross shapes with tapered points, scattered randomly. -
Add tiny starbursts:
Use the very tip of your brush to add tiny asterisks or six-point stars on the pot’s rim. I like to keep the rim design slightly simpler than the main body.
Galaxy Glow
Before painting stars, sponge on faint patches of lighter blue or purple mist over the navy base. This creates a subtle nebula effect behind the gold.
Step 3: Adding the Constellation Details
-
Create large white dots:
Dip a large dotting tool or the handle end of a paintbrush into white acrylic paint. Place a few larger ‘planet’ dots randomly around the pot. -
Add medium detailing:
Switch to a smaller tool and add medium-sized white dots scattered among the gold stars. -
Sprinkle tiny stars:
Using a toothpick or very fine tool, add the smallest pin-prick white dots to fill in any large empty navy spaces, creating depth in your galaxy. -
Add gold accent dots:
For extra shimmer, place a few tiny gold dots near your white clusters. This adds warmth to the cool color palette. -
Protect your work:
Once all paint is fully cured (preferably overnight), spray the pot with a clear matte sealant. This protects your artwork from water damage when you water your plant.
Now you have a stunning piece of cosmic decor ready to hold your favorite greenery
Faux Terrazzo Speckles
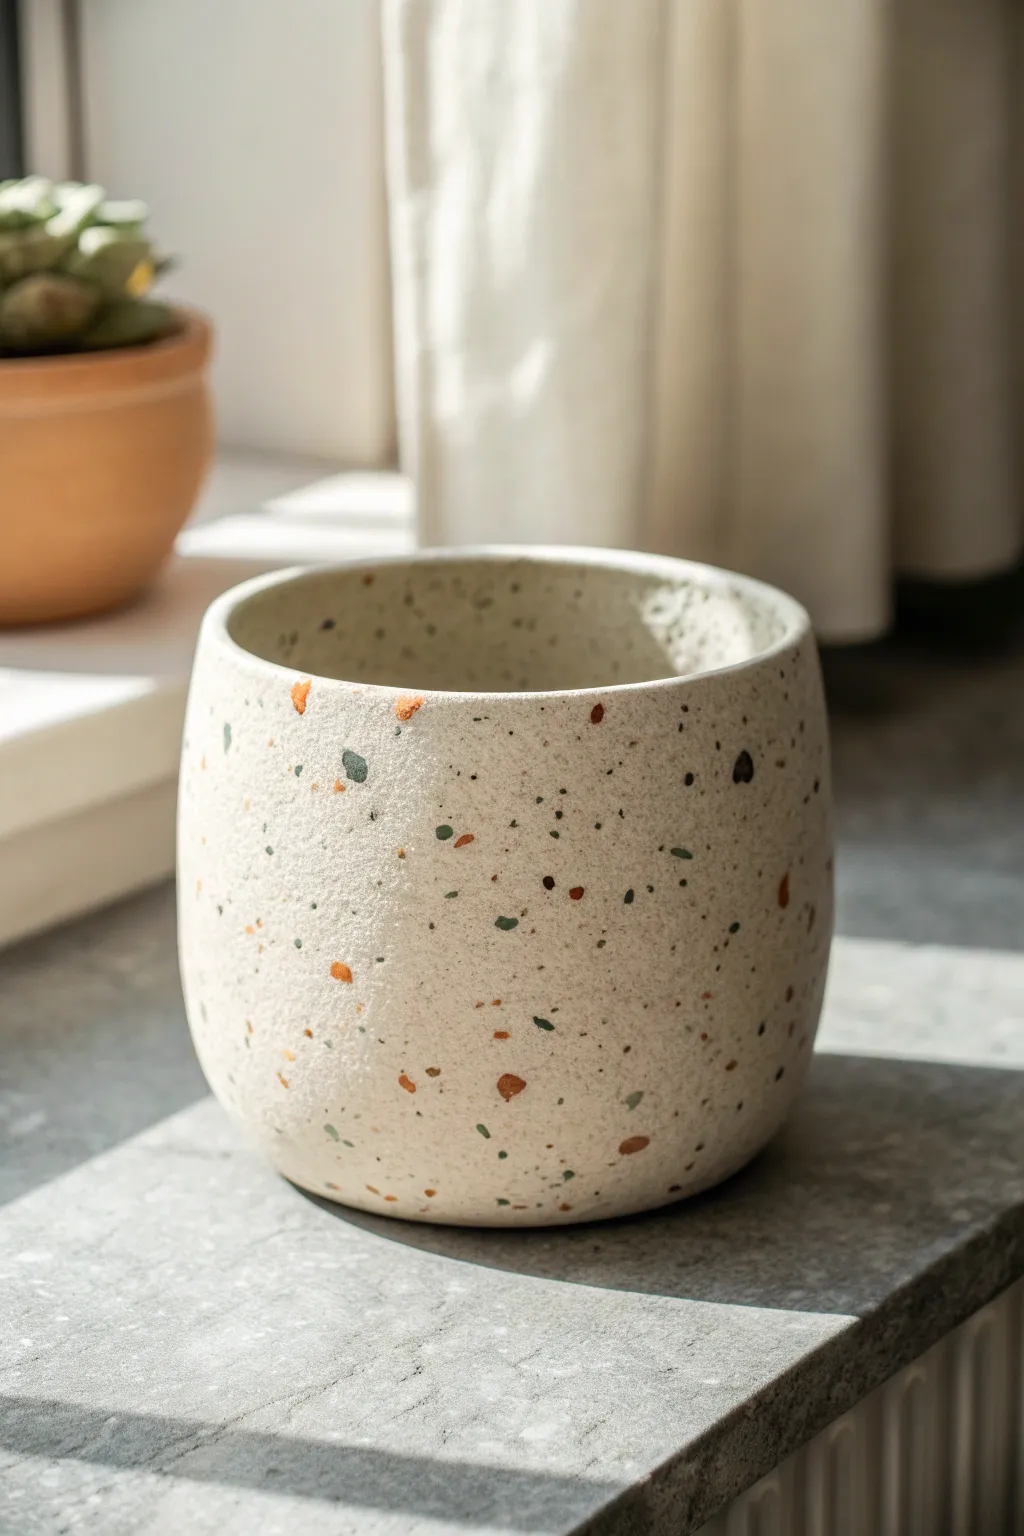
Transform a plain clay pot into a trendy piece of decor with this incredibly convincing faux terrazzo finish. Using layered speckling techniques, you’ll achieve that sought-after stone look without the heavy price tag.
Step-by-Step Tutorial
Materials
- Terracotta or ceramic plant pot
- Sandpaper (fine grit)
- White or cream spray paint (matte finish)
- Stone texture spray paint (optional, for grit)
- Acrylic paints (burnt orange, moss green, black/dark grey, mustard yellow)
- Small flat tip paintbrush
- Old toothbrush
- Paper plate or palette
- Water
- Matte clear sealant spray
Step 1: Prepping the Base
-
Clean surface:
Begin by wiping down your pot with a damp cloth to remove any dust or oils. If you are reusing an old pot, give it a good scrub with warm soapy water and let it dry completely. -
Sand imperfections:
Lightly run a piece of fine-grit sandpaper over the surface to smooth out any bumps in the clay, which helps the base coat adhere better. -
Prime the pot:
Apply a coat of white or cream matte spray paint. Hold the can about 8-10 inches away and use sweeping motions to avoid drips. Let this dry for about 15 minutes. -
Add texture (Optional):
For that authentic gritty stone feel, you can do a very light dusting of a stone-texture spray paint in a light color. Don’t cover it solidly; just add a little tooth to the surface. -
Final base coat:
Apply a second solid coat of your cream spray paint over the texture layer. This seals in the texture while creating a uniform, creamy canvas for your terrazzo chips. Let this dry fully for at least an hour.
Blobby Splatters?
If your toothbrush splatters are landing as big blobs, your paint is too watery. Dab the brush on paper towel before flicking to remove excess liquid.
Step 2: Painting the Terrazzo Chips
-
Mix the first color:
Start with your burnt orange acrylic paint. Squeeze a small amount onto your palette. You want the consistency to be thick enough to hold a shape, so don’t dilute it. -
Paint large chips:
Using a small flat brush, dab irregular, angular shapes onto the pot. Avoid perfect circles or squares; think of shattered stone shards. Space them out generously. -
Add second color:
Clean your brush and switch to the moss green paint. Fill in some of the empty spaces with similar irregular shapes, occasionally painting a shape quite close to an orange one to create a clustered look. -
Add dark accents:
Using the black or dark grey paint, add smaller, sharper flecks. I like to make these slightly more sparse than the colors, acting as contrast points. -
Review spacing:
Step back and look at the pot from a distance. If there are large empty patches, add a few more medium-sized chips in your chosen colors to balance the composition.
Level Up: Texture
Mix baking soda into your acrylic paints before applying the larger chips. This creates a raised, gritty texture that feels like real stone.
Step 3: Creating the Micro-Speckles
-
Prepare splatter paint:
Mix a small amount of black paint with a few drops of water on your palette. It should be inky and fluid, but not transparent. -
Load the toothbrush:
Dip the bristles of an old toothbrush into this watery mix. Test the splatter on a piece of scrap paper first to control the density. -
Flick the paint:
Hold the toothbrush near the pot and run your thumb across the bristles to flick tiny speckles onto the surface. This mimics the sandy cement between terrazzo stones. -
Layer with color:
Repeat the splatter process with a watered-down version of your burnt orange or mustard paint. This adds depth and makes the finish look less like a pattern and more like natural stone. -
Dry completely:
Allow all the paint to dry thoroughly. Since acrylics dry fast, 30 minutes should be sufficient, but touch the largest chips gently to be sure. -
Seal the deal:
Take the pot to a well-ventilated area and apply two thin coats of matte clear sealant. This protects your artwork from water damage when you water your plant.
Now you have a chic, modern planter ready to house your favorite succulents
Scalloped Edge Border
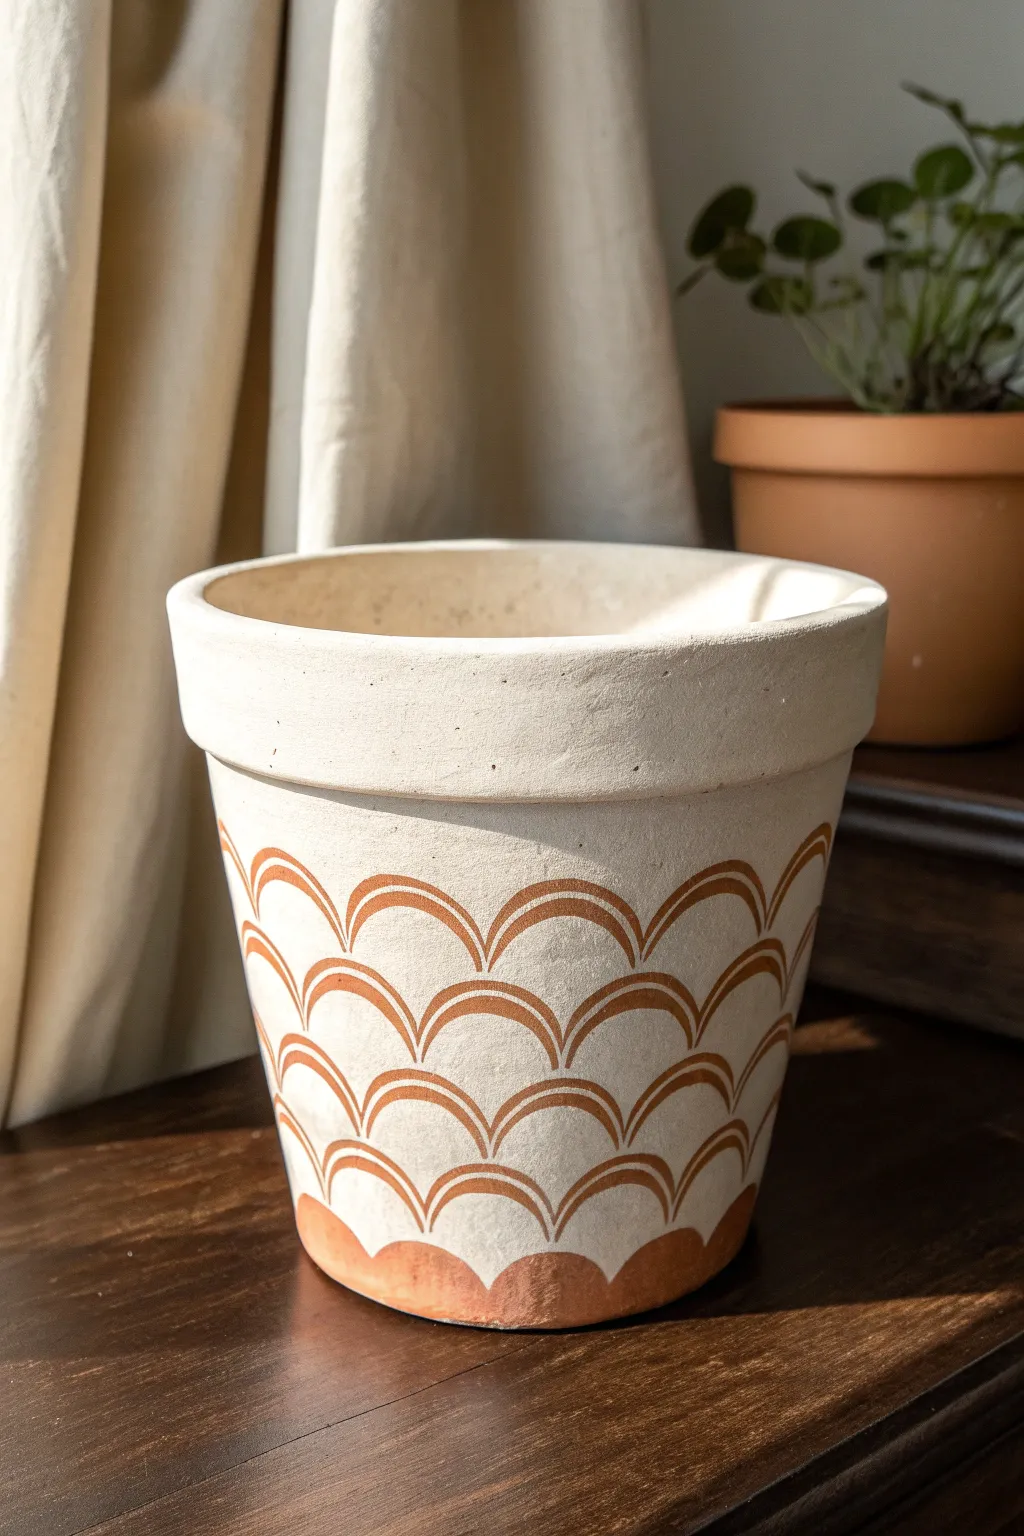
Transform a plain clay planter into a bohemian statement piece with this elegant scalloped scale design. The warmth of the natural terracotta peeking through the cream base creates a lovely, organic rhythm perfect for showcasing your favorite houseplants.
How-To Guide
Materials
- Standard terracotta flower pot (cleaned and dried)
- Cream or off-white acrylic paint (matte finish)
- Terracotta or warm rust acrylic paint
- Wide flat paintbrush (approx 1 inch)
- Small round paintbrush (size 2 or 4)
- Pencil
- Circle template, stencil, or a round object (like a bottle cap)
- Paper plate or palette
- Clear matte sealer spray
Step 1: Base Preparation
-
Clean surface:
Ensure your terracotta pot is thoroughly clean and free of dust or price tag residue. Wipe it down with a damp cloth and let it dry completely before starting. -
Apply base coat:
Using the wide flat brush, paint the entire exterior of the pot with your cream or off-white acrylic paint. You don’t need to paint the inside, but do paint the top rim and a few inches down the interior for a clean look. -
Layer up:
Terracotta is porous and drinks up moisture, so the first coat might look streaky. Apply 2-3 coats total, allowing about 15-20 minutes of drying time between each layer until you have an opaque, solid finish. -
Dry thoroughly:
Let the final base coat dry for at least an hour to ensure a hard surface for the next steps.
Step 2: Drafting the Design
-
Find your template:
Select a round object or circle stencil that matches the scale size you want. Based on the photo, a diameter of about 1.5 to 2 inches works well for a standard pot. -
Mark initial row:
Starting near the bottom, use a pencil to lightly trace semicircle shapes. These arches should touch each other side-by-side, creating a scalloped line around the base. -
Offset the second row:
For the row above, position the center of each new arch directly above the meeting point of the two arches below it. This ‘brick-lay’ offset pattern is key to the fish-scale look. -
Continue drafting:
Repeat this offset pattern, working your way up the pot until you reach the rim. Don’t worry if the top row gets cut off by the rim; that adds to the pattern’s continuity.
Wobbly Lines?
If freehand painting is tricky, try using a paint pen instead of a brush for the arches. It offers more control and keeps line thickness consistent.
Step 3: Painting the Scallops
-
Mix your color:
Pour some terracotta or rust-colored paint onto your palette. If the color feels too flat, I sometimes mix in a tiny drop of brown to deepen it. -
Outline the first arch:
Using your small round brush, carefully paint over your pencil line for one of the bottom arches. Keep your hand steady to maintain a consistent line thickness. -
Fill the bottom:
For the very bottom row, fill in the shape almost fully, leaving a small negative space curve at the top. This anchors the design visually. -
Paint the middle rows:
Move to the next row up. Paint the arched outline first. Then, paint a second, slightly smaller arch inside the first one to thicken the line, creating a bold, graphic look. -
Refine the thickness:
Ensure the lines are thickest at the top of the curve and taper slightly where they meet the neighboring scales. This mimics the natural overlap of petals or scales. -
Work upwards:
Continue painting row by row, moving upward. Rotate the pot as you go to prevent smudging wet paint with your hand. -
Handle the rim:
When you reach the top edge, simply paint the portion of the arch that fits. Treat the rim like a distinct border and stop the pattern cleanly underneath it. -
Touch ups:
Once the rust paint is dry, look for any wobbly edges. You can use a small brush with your original cream paint to ‘erase’ mistakes and sharpen the lines.
Pro Tip
Water down your acrylic paint just slightly—to the consistency of heavy cream. This helps the brush glide smoothly over the textured terracotta without skipping.
Step 4: Finishing
-
Erase markings:
If any pencil lines are still visible outside your painted areas, gently erase them once the paint is 100% dry. -
Seal the deal:
Take the pot outdoors or to a well-ventilated area. Apply a light coat of clear matte sealer spray over the entire exterior to protect your artwork from water damage and soil stains.
Place your favorite green plant inside and enjoy the warm, artisanal touch this adds to your home decor
Drippy Icing and Sprinkles
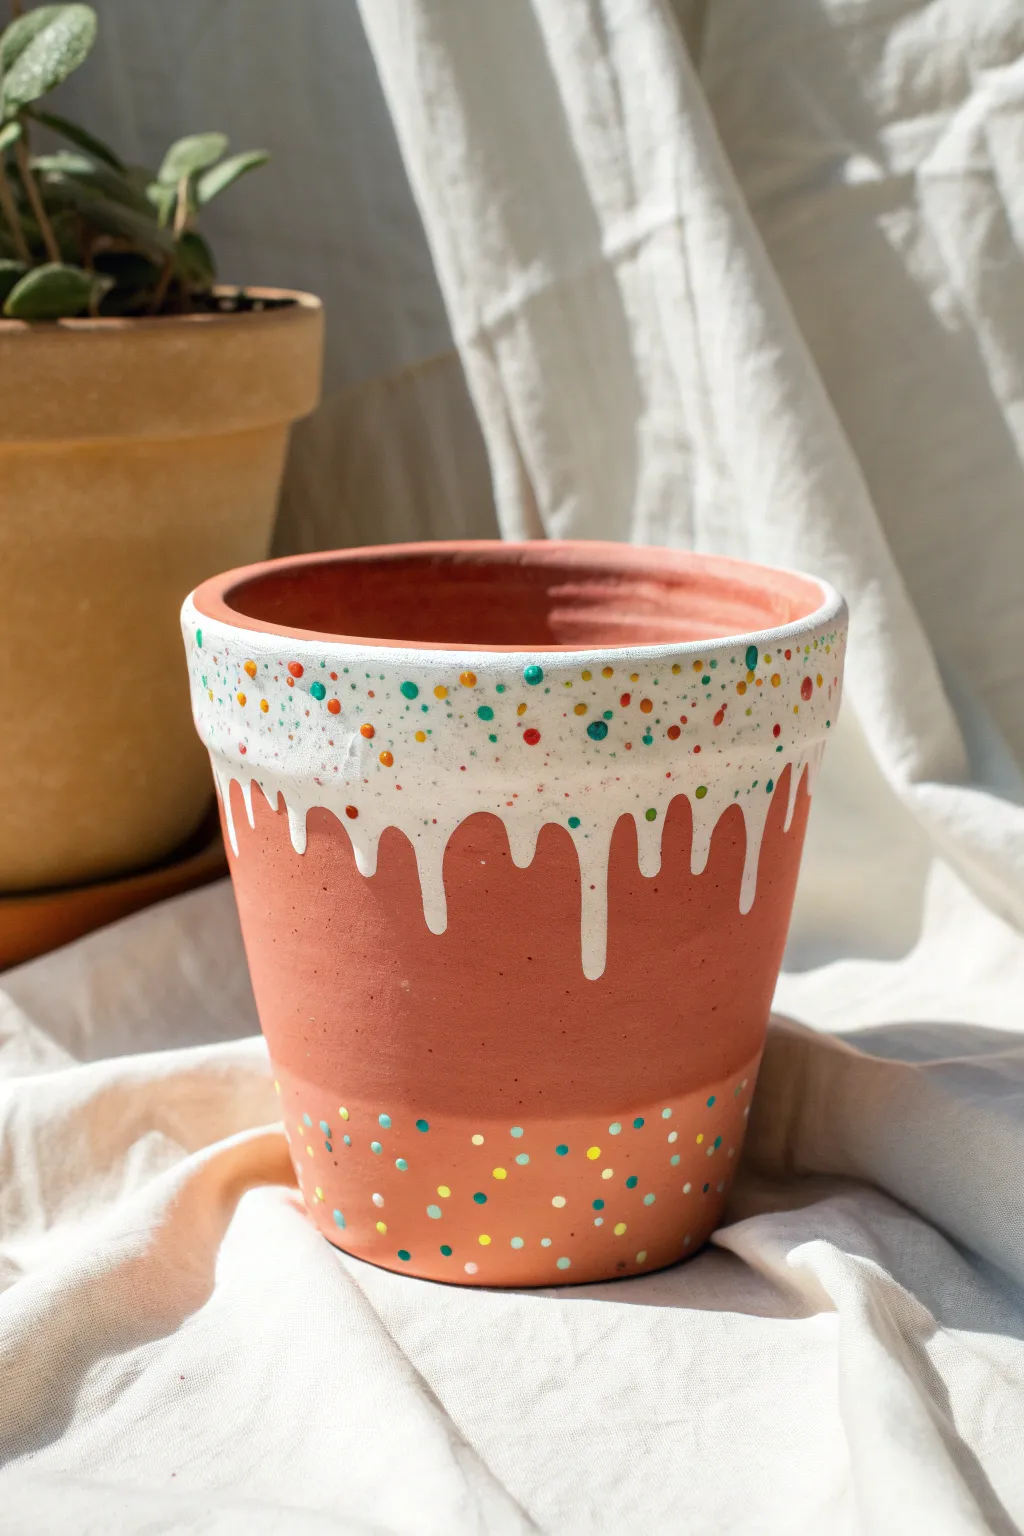
Transform a plain terracotta pot into a delightful dessert-inspired planter that looks good enough to eat. This playful design features a drippy white “icing” rim and colorful confetti dots that mimic sprinkles, adding a touch of whimsy to your indoor garden.
Step-by-Step
Materials
- Standard terracotta pot (clean and dry)
- White acrylic paint (high opacity)
- Assorted acrylic paints (teal, yellow, orange, red, blue)
- Flat paintbrush (medium size)
- Small round paintbrush or dotting tool
- Water cup
- Paper towels
- Palette or paper plate
- Clear acrylic sealant spray (matte or gloss)
Step 1: Preparation & Base
-
Clean surface:
Ensure your terracotta pot is completely free of dust and dirt. Wipe it down with a damp cloth and let it dry fully before starting. -
Load the white:
Squeeze a generous amount of white acrylic paint onto your palette. You want the consistency to be thick enough to cover the clay but fluid enough to manipulate. -
Paint the rim:
Using your flat brush, paint the entire top rim of the pot white. Don’t worry about the bottom edge being perfect yet, but ensure the top surface and the inside lip are covered.
Step 2: The Drippy Icing
-
Start the drips:
To create the icing effect, load your brush with a heavy amount of white paint. Press the brush against the painted rim and gently drag it downward. -
Vary the lengths:
Create drips of different lengths. Some should stop just below the rim, while others can extend an inch or two down the body of the pot. -
Round the bottoms:
Go back and round off the bottom of each drip with your brush to give them a natural, liquid appearance. They should look like bulbous drops of glaze. -
Fill the gaps:
Connect the drips at the top so the white paint forms a continuous, uneven line around the pot. It should look like the icing was poured from the top. -
Layer up:
If the terracotta color is showing through the white, let the first coat dry completely and apply a second coat to the icing area for a solid, opaque look. -
Dry time:
Allow the white icing section to dry fully. This is crucial so your colored sprinkles don’t smear into the white.
Don’t drip too much
If you don’t trust your freehand painting, pencil in the drip outlines lightly first. It helps you visualize the flow before committing with paint.
Step 3: Adding Sprinkles
-
Prepare colors:
Dispense small amounts of your sprinkle colors—teal, yellow, orange, red, and blue—onto your palette. -
Top sprinkles:
Dip a small round brush or a dotting tool into one color at a time. Create small, random dots all over the white icing area. -
Mix sizes:
I like to vary the pressure slightly to create different sized dots, keeping them fairly dense near the rim. -
Bottom border:
Move to the bottom third of the pot. Using the same colors, paint a scattered field of dots directly onto the terracotta surface. -
Create a gradient:
Concentrate more dots near the very bottom edge of the pot and space them out as you move upward, creating a fading effect. -
Check balance:
Step back and look at your color distribution. Add a few more dots in any empty spaces to balance out the festive look.
Real 3D Texture
Mix baking soda into your white paint to create puffy, textured icing that actually stands off the surface of the pot for a realistic 3D feel.
Step 4: Finishing Touches
-
Full dry:
Let all the paint dry completely. Acrylics usually dry to the touch quickly, but give it an hour to be safe. -
Seal the pot:
Take the pot to a well-ventilated area and spray it with a clear acrylic sealant. This protects the paint from water damage when you water your plant.
Now you have a charming, dessert-themed home for your favorite succulent or houseplant