Whenever you’ve got a little clay and a little time, you can turn it into something adorable and actually useful. These clay things ideas are my go-to projects in the studio—beginner-friendly, quick to finish, and ridiculously satisfying.
Easy Trinket Dishes
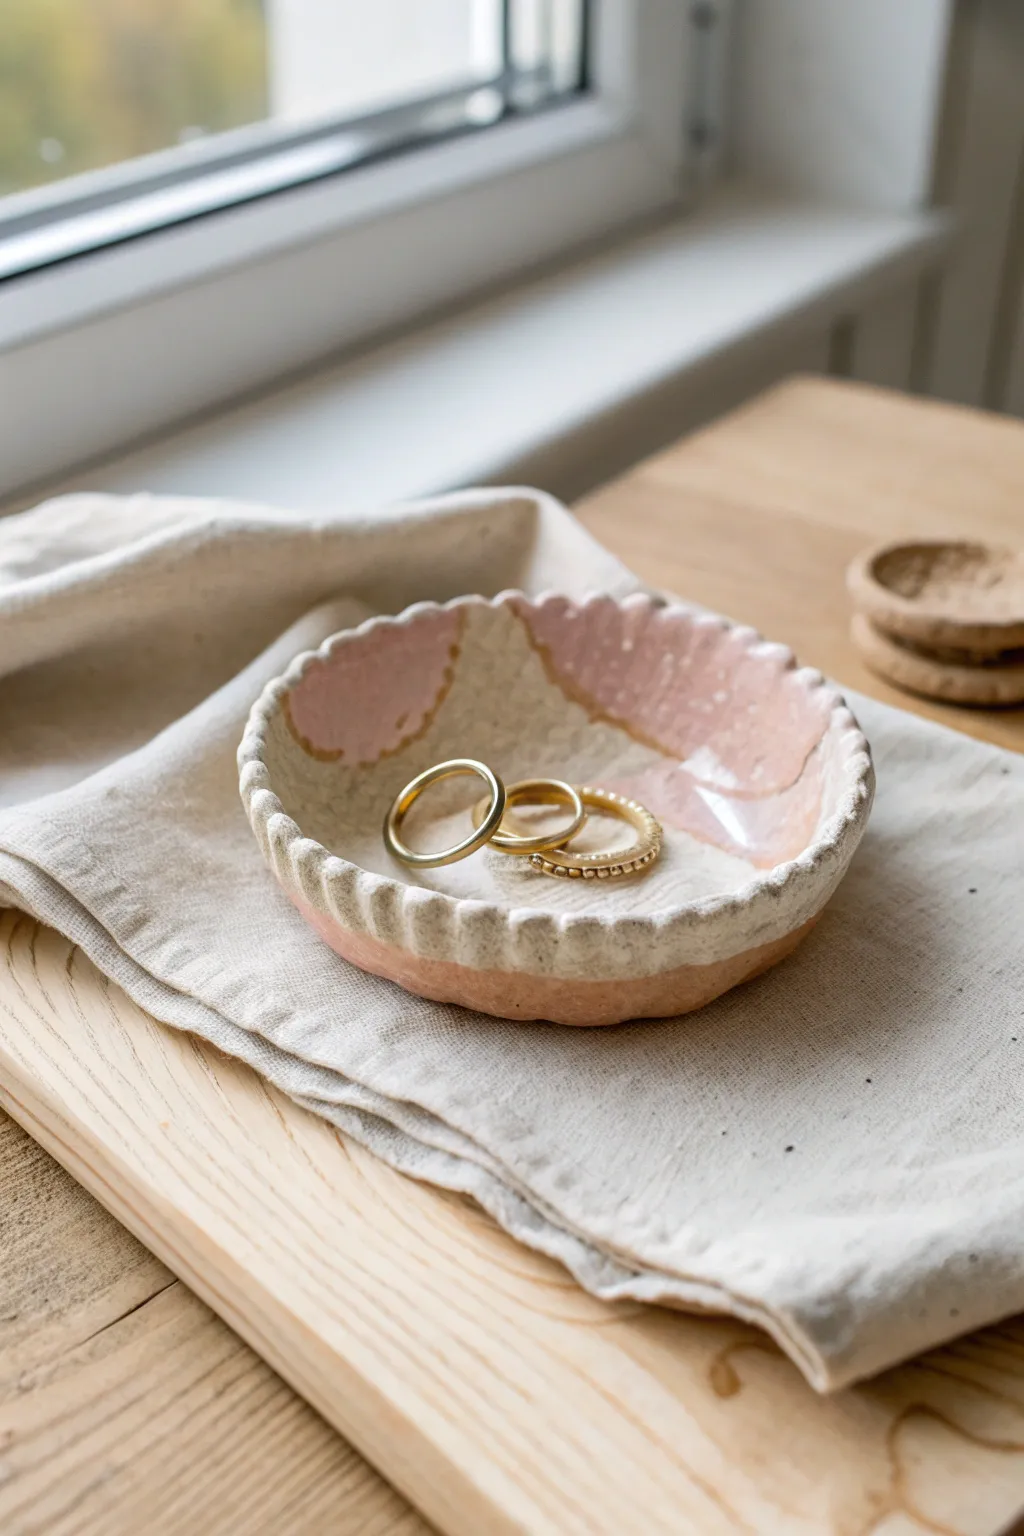
This charming, handmade dish features a delightfully organic shape with soft scalloped edges and a dreamy pink glaze. Its raw, textured finish gives it an earthy feel perfect for holding your favorite delicate gold rings.
Step-by-Step Guide
Materials
- Speckled stoneware clay (or polymer clay with faux speckles)
- Rolling pin
- Canvas mat or cloth
- Round cookie cutter (approx. 4 inches) or a bowl to trace
- Needle tool or fettling knife
- Small wooden modeling tool or paintbrush handle
- Sponge
- Bubblegum pink ceramic glaze (food safe if using for food)
- Clear glaze (optional for the unpainted areas)
- Kiln (if using ceramic clay) or Oven (if using polymer clay)
- Small soft paintbrush
Step 1: Shaping the Clay Base
-
Prepare the slab:
Begin by wedging a ball of speckled stoneware clay to remove air bubbles. Flatten it onto your canvas mat and roll it out until it is an even slab, approximately 1/4 inch thick. Aim for a consistent thickness to prevent warping later. -
Cut the circle:
Place your 4-inch round cutter or a small bowl onto the slab. Press down firmly or trace around the bowl with a needle tool to create a perfect circle. Lift away the excess clay. -
Soften the rim:
Dip your finger or a small sponge in a tiny bit of water and run it gently along the cut edge of the circle. This smooths out any sharp angles or burrs left by the cutting tool. -
Create the form:
Gently lift the edges of the clay circle upwards to create a shallow bowl shape. You can cup it in the palm of your hand or press it lightly into a foam mold to help it hold the curve.
Uneven Drying?
If the edges curl up or warp while drying, place a light bean bag or small weight in the center during the leather-hard phase to keep the bottom flat.
Step 2: Scalloping and Texturing
-
Mark the scallops:
Using the handle of a paintbrush or a rounded wooden tool, gently press indentations into the rim of the bowl at regular intervals. I find spacing them about half an inch apart works best for this size. -
Define the ridges:
Between each indentation, use your thumb and forefinger to pinch the clay slightly outward. This accentuates the ‘fluted’ look and creates the high points of the scallop. -
Refine the texture:
The charm of this piece is its rustic nature. If you want more texture, lightly tap the surface with a coarse sponge or a crumpled piece of foil to enhance the gritty, stone-like appearance. -
Initial Drying:
Let the dish dry slowly to the ‘leather hard’ stage. This usually takes a few hours to a day depending on humidity. Cover it loosely with plastic if you need to slow the drying process. -
Smoothing interior:
Once leather hard, check the interior for any rough fingerprints. Lightly sponge them away without removing the intentional texture you added earlier. -
Bisque Firing:
If using ceramic clay, allow the piece to become bone dry (completely chalky and light). Fire it in a kiln to cone 04 (or according to your clay’s bisque schedule).
Make it Luxe
After the final glaze firing, apply a gold luster overglaze to just the very tips of the scalloped rim and fire a third time for a touch of elegance.
Step 3: Glazing and Finishing
-
Wipe down:
After the bisque firing, use a damp sponge to wipe any dust off the piece. This ensures the glaze adheres properly to the surface. -
Apply pink glaze:
Using a soft brush, apply a bubblegum pink glaze to the interior of the bowl. Apply it in an abstract, organic shape, leaving some of the raw speckled clay visible near the rim and center. -
Layering glaze:
Let the first coat dry, then apply a second or third coat depending on the opacity of your specific glaze. You want a thick, glossy finish where the pink is. -
Clean the bottom:
Ensure no glaze has dripped onto the very bottom or foot of the dish. Wipe it clean with a sponge to prevent it from sticking to the kiln shelf. -
Final Firing:
Fire the piece again, this time to the maturity temperature of your clay and glaze (often Cone 5 or 6 for stoneware). If using polymer clay, bake according to package directions and varnish instead of firing.
Place this lovely little dish on your bedside table to keep your treasures safe


Ring Cone and Catchall Set
Create a serene, minimalist jewelry organizer featuring a sleek cone and a perfectly fitted catchall dish. This two-part set uses a speckled clay body to achieve that trendy, organic pottery studio look without needing a wheel.
Detailed Instructions
Materials
- Speckled stoneware clay (or polymer clay with faux granite effect)
- Rolling pin
- Fettling knife or craft blade
- Cardstock or heavy paper (for templates)
- Small sponge
- Rib tool (smooth kidney)
- Small bowl or round cutter (approx. 4 inches)
- Slip (clay slurry) and scoring tool
- Sandpaper (fine grit)
- Matte or satin clear glaze (if firing) or sealant
Step 1: Shaping the Cone
-
Prepare the template:
Cut a semi-circle out of your cardstock. A 4 to 5-inch diameter semi-circle creates a standard ring holder size, but feel free to adjust based on your ring collection. -
Roll the slab:
Roll out a portion of your speckled clay to an even thickness, roughly 1/4 inch thick. Smooth the surface with a rib tool to compress the clay particles. -
Cut the form:
Place your cardstock template onto the clay slab and carefully trace around it with a needle tool or fettling knife to cut out your semi-circle. -
Score and slip:
Take the straight edge of your semi-circle and gently score (scratch) one side of the straight edge and the opposite side on the back. Apply a dab of slip or water to these scored areas. -
Form the cone:
Gently curl the clay around your finger to bring the two straight edges together, overlapping the scored areas to form a cone shape. -
Blend the seam:
Using a wooden modeling tool or your finger, smooth the seam on the outside until it vanishes. I like to support the inside of the cone with a tool handle while blending so it doesn’t collapse. -
Refine the surface:
Stand the cone up and gently tap the base on the table to level it. Use a slightly damp sponge to wipe away any fingerprints and refine the point.
Seam Invisible Trick
When joining the cone seam, use a serrated rib tool to cross-hatch over the join line. This drags clay across the gap more effectively than smoothing alone.
Step 2: Creating the Catchall Dish
-
Cut the base:
Roll out another slab of clay to the same 1/4 inch thickness. Use your round cutter or trace a small bowl to cut a perfect circle for the dish base. -
Create the heavy rim:
Roll a coil of clay about the thickness of your pinky finger. This will become the wall of the catchall. -
Attach the wall:
Score the outer edge of your circular base and one side of the clay coil. Apply slip, then place the coil on top of the base edge. -
Blend the connection:
Using your thumb or a modeling tool, smear the clay from the coil down onto the base on the inside to fuse them. Repeat this on the outside for a solid seamless connection. -
Shape the profile:
Place the dish on a flat surface and use a flat edge or ruler held vertically against the outside wall while rotating the dish. This creates that cylindrical, modern straight-sided look. -
Smooth the rim:
Run a damp sponge over the top lip of the dish to soften any sharp edges, ensuring it looks polished and inviting.
Add a Gold Pop
Paint the very tip of the cone or the rim of the dish with liquid gold leaf or luster after your final seal for a luxe, boutique-style finish.
Step 3: Finishing Touches
-
Test the fit:
Gently place your cone into the center of the wet dish to ensure the proportions look balanced. Don’t press down—just check the visual sizing. -
Dry slowly:
Loosely cover both pieces with plastic wrap to let them dry slowly. This is crucial for avoiding cracks, especially where the cone seam joins. -
Sanding:
Once bone dry (if firing) or fully hardened (if using air-dry clay), gently sand any rough spots, paying special attention to the bottom of the dish. -
Seal or fire:
If using kiln-fire clay, bisque fire, then apply a matte clear glaze and glaze fire. If using polymer or air-dry, apply a matte sealant to protect the speckles and give it a finished sheen.
Place this elegant set on your vanity to keep your everyday rings safe and stylishly displayed


Stamped Clay Coasters
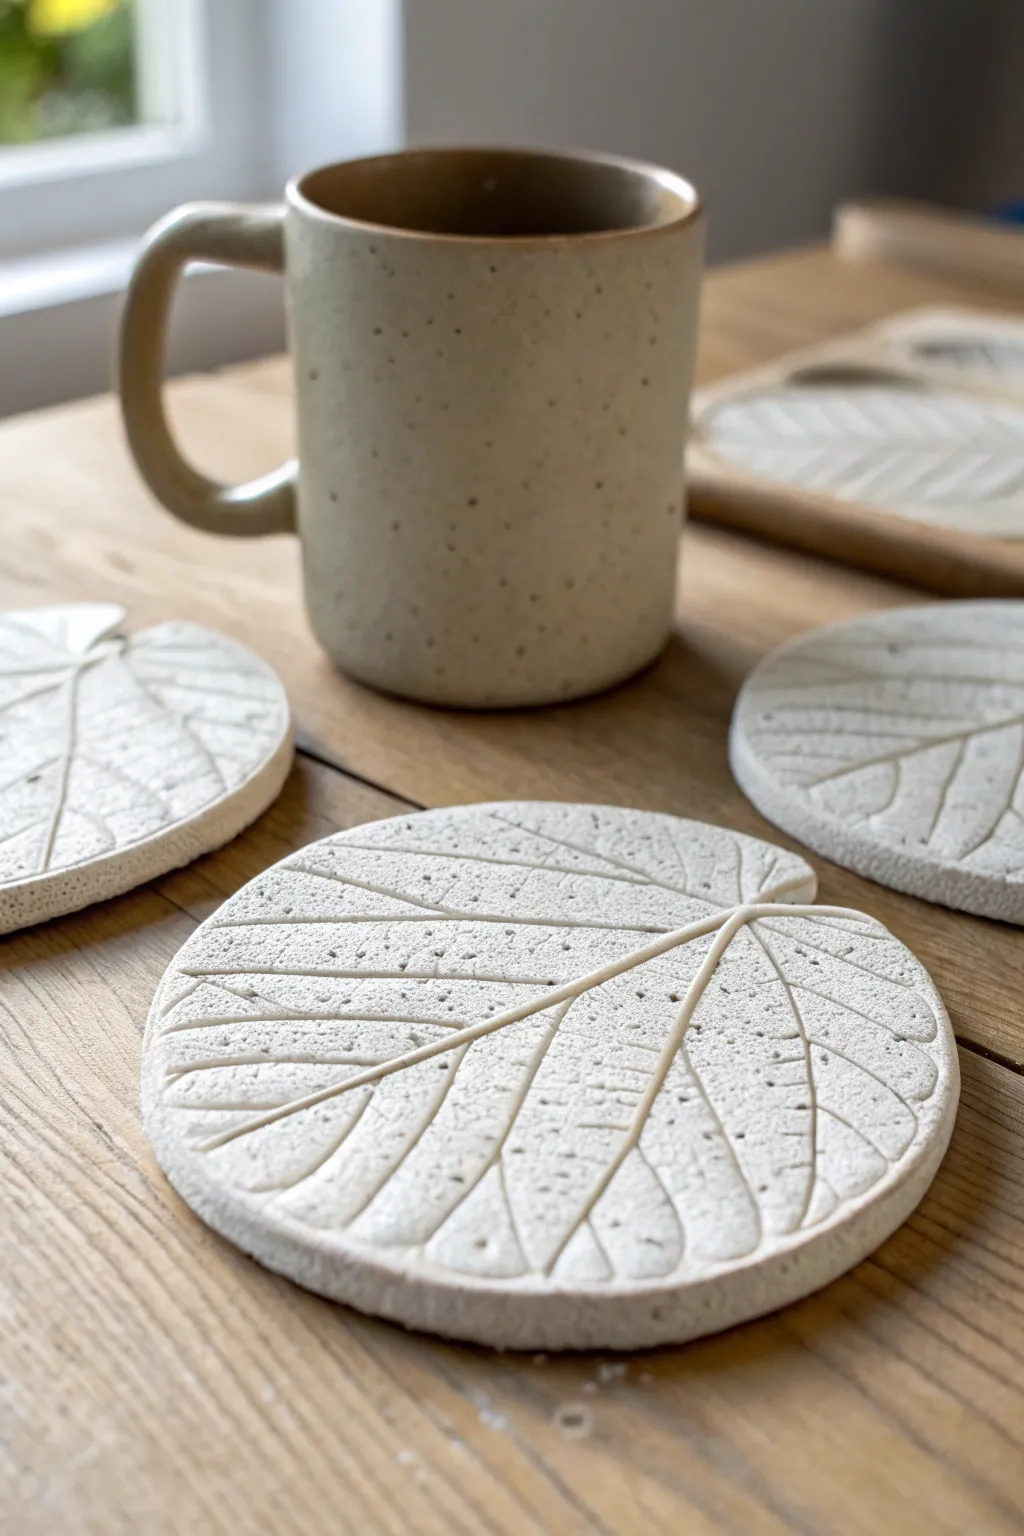
Bring a touch of nature to your coffee table with these elegant, minimalist coasters. Featuring a delicate raised leaf vein pattern and a smooth, stone-like finish, they perfectly balance organic texture with modern design.
Step-by-Step
Materials
- Air-dry clay (white or light grey)
- Rolling pin
- Large fresh leaves with prominent veins (e.g., hosta, hydrangea)
- Round cookie cutter (approx. 4 inches) or a bowl to trace
- Craft knife
- Fine-grit sandpaper
- Matte acrylic varnish or sealant
- Small sponge or brush for sealing
- Parchment paper
Step 1: Preparation & Rolling
-
Prepare your workspace:
Lay down a sheet of parchment paper on a flat surface. This prevents the clay from sticking and makes it easier to move the coasters later without warping them. -
Condition the clay:
Take a handful of air-dry clay and knead it in your hands until it becomes soft, pliable, and free of cracks. If it feels too dry, you can dampen your fingers slightly. -
Roll out the slab:
Place the clay on the parchment paper and use your rolling pin to create an even slab. Aim for a thickness of about 1/4 inch (6mm) to ensure the coasters are sturdy.
Fixing Cracks
If small cracks appear while drying, mix a tiny bit of fresh clay with water to make a paste (slip). Fill the crack, smooth it over, and let it dry again.
Step 2: Impressing the Texture
-
Select your leaf:
Choose a fresh leaf with thick, raised veins on the back side. The underside of the leaf usually provides the clearest impression. -
Position the leaf:
Place the leaf vein-side down onto your rolled clay slab. Arrange it so the pattern will sit nicely within the circle you plan to cut. -
Press the pattern:
Gently roll over the leaf with your rolling pin. Apply firm, even pressure to embed the veins into the clay, but be careful not to make the slab too thin. -
Reveal the design:
Carefully peel the leaf away from the clay by lifting the stem first. You should see a deep, intricate negative impression of the veins.
Step 3: Cutting & Shaping
-
Cut the circle:
center your round cutter or bowl over the leaf texture. Press down firmly to cut the coaster shape. If using a bowl, trace around it with a craft knife. -
Remove excess clay:
Peel away the extra clay from around the circle. You can ball this up and store it in an airtight container for future projects. -
Create the notch (optional):
To mimic the look of a real leaf like the one in the photo, use your craft knife to cut a small, V-shaped notch where the stem would naturally exit the leaf. -
Smooth the edges:
Dip your finger in a little water and gently run it around the cut edge of the coaster to smooth out any roughness or sharp creates.
Make it Speckled
To get the faux-stone look seen in the matching mug, flick diluted brown or black acrylic paint onto the dry clay using an old toothbrush before sealing.
Step 4: Finishing
-
Dry properly:
Let the coaster dry on the parchment paper for 24-48 hours. I find flipping them over gently halfway through the drying process helps prevent curling. -
Sand for perfection:
Once fully cured and hard, use fine-grit sandpaper to buff the edges and surface. This removes any lingering imperfections and achieves that stone-like feel. -
Seal the surface:
Apply a thin coat of matte acrylic varnish using a sponge or soft brush. This step is crucial to protect the clay from moisture from condensation. -
Add a second coat:
Allow the first layer of sealant to dry completely, then add a second layer for extra durability against heat and water. -
Final cure:
Let the sealant cure fully according to the bottle’s instructions before using your new coasters.
Enjoy your beautiful, nature-inspired coasters with your next warm cup of coffee


Mini Planters for Tiny Plants
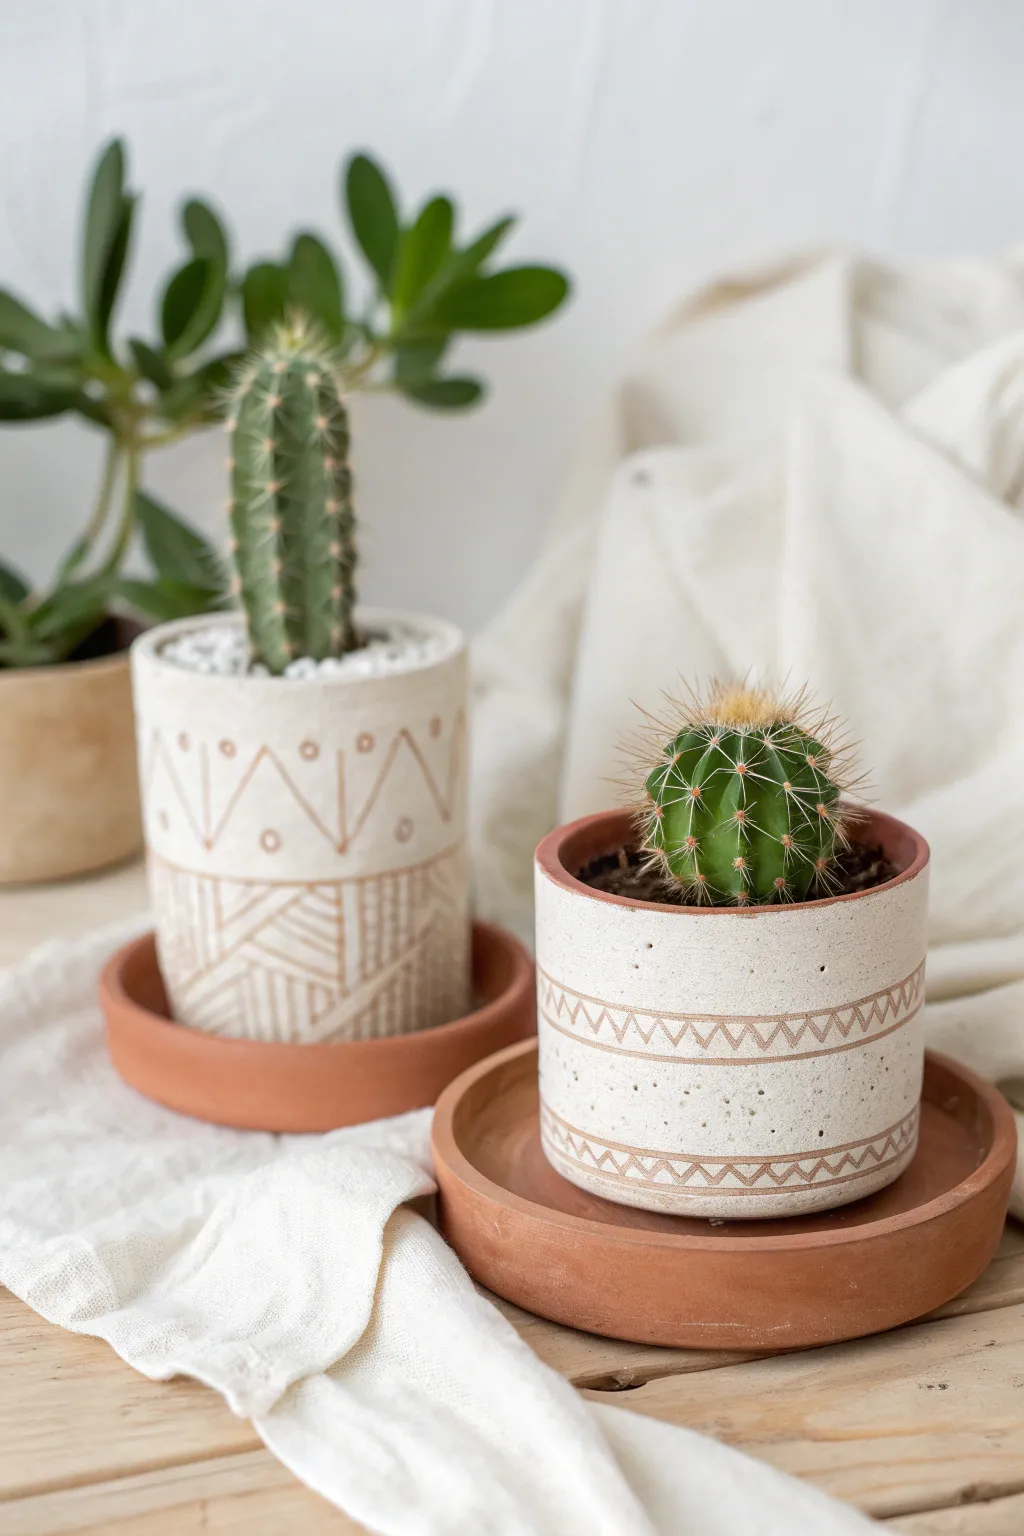
These mini planters combine a clean white aesthetic with earthy geometric patterns for a modern bohemian look perfect for succulents. The etched sgraffito-style designs reveal the raw clay body beneath a creamy glaze, creating a delightful texture that feels handmade and warm.
Step-by-Step Tutorial
Materials
- White or speckled stoneware clay (or polymer clay for a no-kiln version)
- Small cylindrical forms (like a spice jar or PVC pipe section) for rolling
- Rolling pin
- Fettling knife or craft knife
- Needle tool or scoring tool
- Clay slip (or liquid clay/bonding agent)
- Carving tool set (small loop tool, needle tool)
- White underglaze or white matte acrylic paint (depending on clay type)
- Matte clear sealant or glaze
- Paintbrushes (flat and fine liners)
- Sandpaper or sponge
Step 1: Forming the Planter Body
-
Prepare the slabs:
Begin by wedging your clay to remove air bubbles, then roll it out into an even slab about 1/4 inch thick. You’ll need enough surface area for the walls and the base of your planter. -
Cut the base:
Use a round cutter or trace a circle onto the clay slab to create the bottom of your pot. The size will determine the width of your planter—about 3-4 inches is ideal for mini cacti. -
Measure the walls:
Calculate the circumference of your base circle and cut a rectangular strip of clay that length plus a tiny overlap. The height of the strip will be the height of your pot. -
Assemble the cylinder:
Score the edges of your base and the bottom edge of your rectangular strip. Apply slip generously to the scored areas. -
Join the seam:
Wrap the rectangle around the base, pressing firmly. Where the vertical edges of the wall meet to form the cylinder, score, slip, and smooth them together until the seam disappears. I find using a wooden rib here helps keep the walls straight. -
Create the saucer:
Roll a second slab and cut a circle slightly larger than your planter base. Roll a thin coil and attach it to the rim of this circle to create a shallow lip for the saucer. -
Refine the surface:
Once assembled, smooth the rim and walls with a slightly damp sponge to remove fingerprints.
Step 2: Decorating and Finishing
-
Prepare for painting:
Let the clay dry to a ‘leather hard’ state. It should be firm enough to handle without warping but still cool to the touch. -
Apply the base color:
Paint the exterior walls with 2-3 coats of white underglaze (for kiln firing) or white acrylic paint (for air-dry/polymer). Leave the saucer unpainted for a nice contrast. -
Draft the design:
Lightly scratch your pattern ideas into the surface using a needle tool. For the taller pot, think zig-zags and dots; for the shorter one, horizontal bands with hatched triangles work well. -
Carve the sgraffito patterns:
Using a small carving tool, firmly etch or scratch through the white layer to reveal the darker clay body beneath. Create the diagonal cross-hatching on the bottom half of the tall planter. -
Add detail work:
For the shorter planter, carve parallel horizontal lines and fill the space between them with small zig-zags or triangles. Don’t worry about machine perfection; the wobbly hand-carved look adds character. -
Clean the lines:
After carving, use a soft, dry brush to sweep away the clay crumbs from your etched lines so the pattern is crisp. -
Dry and fire (or seal):
If using ceramic clay, bisque fire, apply a clear matte glaze to the inside (to make it waterproof), and glaze fire. If using polymer or air-dry clay, simply seal the painted areas with a matte varnish once fully dry. -
Final assembly:
Place your finished pot onto its matching terracotta saucer and it’s ready for planting.
Crumbly Lines?
If clay chips while carving, it’s too dry. Mist lightly with water, wrap in plastic for 30 mins, then try again when leather hard.
Color Pop
Instead of carving to reveal raw clay, paint the base layer a bright color like teal or mustard before adding the white top coat for colorful lines.
Fill your new planters with soil and your favorite prickly friends to complete this charming desert-inspired display

The Complete Guide to Pottery Troubleshooting
Uncover the most common ceramic mistakes—from cracking clay to failed glazes—and learn how to fix them fast.
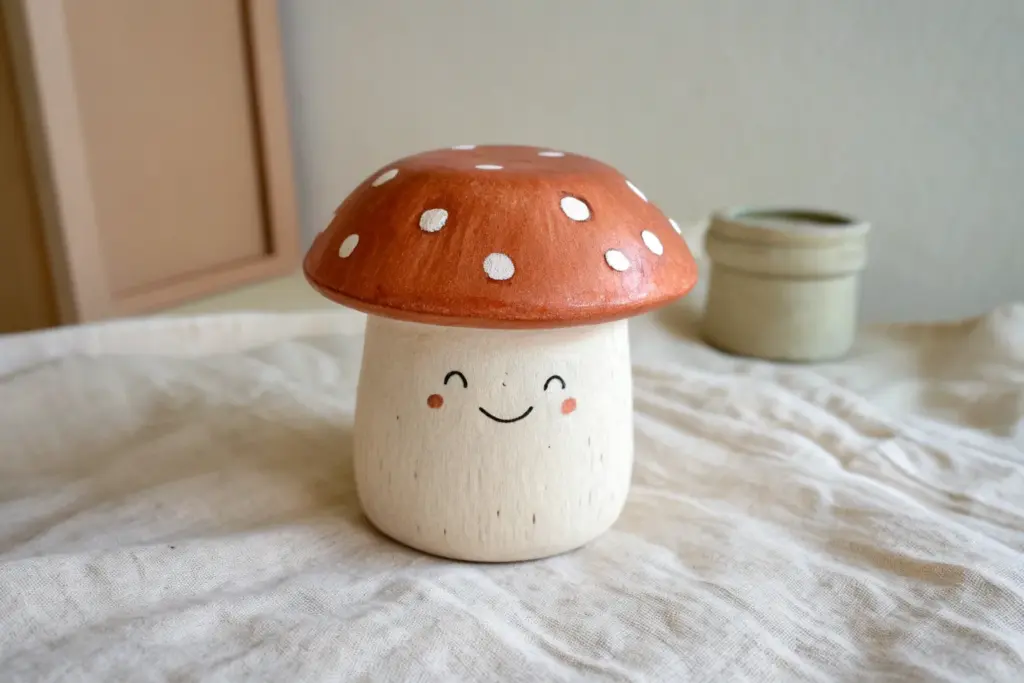
Cute Toothbrush Holder
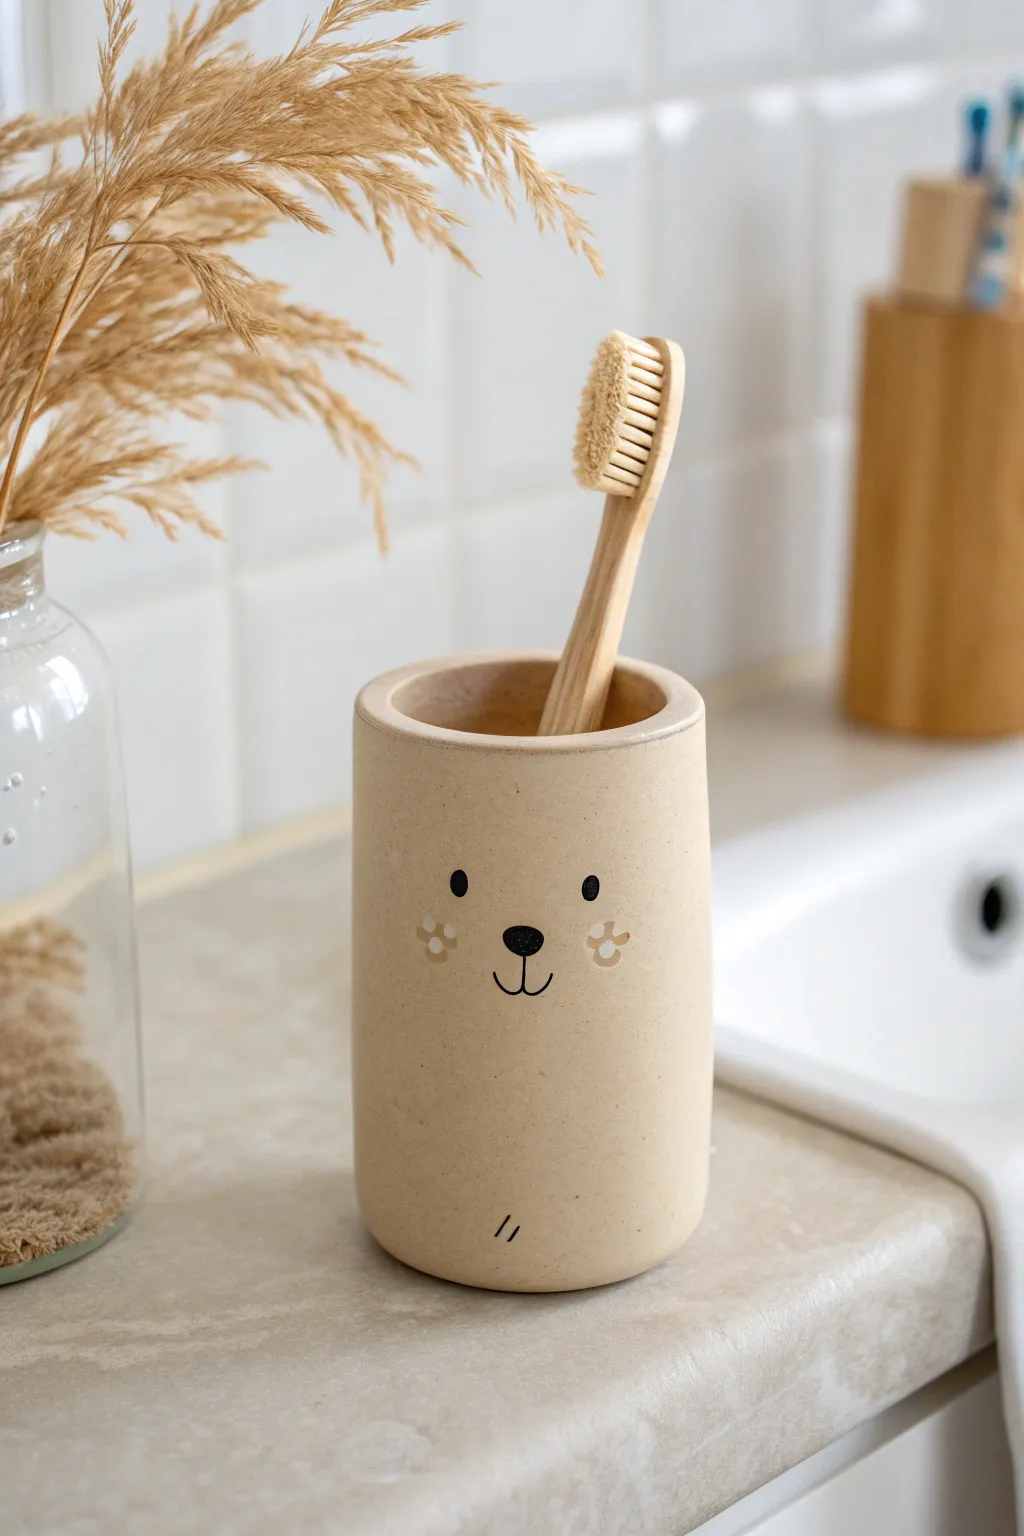
Brighten up your morning routine with this adorable, minimalist toothbrush holder featuring a sweet bear face. Its warm beige tone and smooth, matte finish give it a modern ceramic look that fits perfectly in any bathroom while keeping your bamboo toothbrush upright and dry.
Step-by-Step Guide
Materials
- Air-dry clay (stone or white color) or polymer clay (beige/tan)
- Acrylic rolling pin
- Rolling guides or wooden slats (approx. 5mm thick)
- Craft knife or clay blade
- Small circular cookie cutter or a clean jar base (for the bottom)
- Rectangular template (approx. 4” x 5” depending on desired height)
- Slip (clay mixed with water) for joining
- Smoothing tools (sponge, wooden modeling tool, or silicone rib)
- Fine-grit sandpaper (220 and 400 grit)
- Fine-point black paint marker or black acrylic paint with a 000 detail brush
- White or cream acrylic paint for cheek details
- Matte spray varnish or water-resistant sealer
Step 1: Shaping the Cylinder
-
Prepare your clay:
Begin by conditioning your clay. If you are using stone-colored air-dry clay, knead it until it’s pliable and free of air bubbles. If customizing polymer clay, mix white with a tiny dot of brown and yellow to achieve that warm beige hue. -
Roll out the slab:
Place your clay between rolling guides or wooden slats to ensure an even thickness. Roll it out into a smooth slab that is roughly 5mm thick. I find this thickness provides the best stability without looking chunky. -
Cut the walls:
Using your rectangular paper template, place it over the slab and carefully cut around the edges with your craft knife to create a clean rectangle. This will form the walls of your holder. -
Cut the base:
Use a small circular cutter or trace around a circular object to cut the base. Make sure the circumference of this circle roughly matches the length of your rectangle, or simply cut the circle slightly larger and trim it later. -
Form the tube:
Stand the rectangular slab up and curve it gently into a cylinder. Score the meeting edges with a needle tool (cross-hatching texture), add a dab of slip or water, and press the edges firmly together to create a seam. -
Smooth the seam:
Support the inside of the cylinder with one hand while using a modeling tool or your finger to smooth the vertical seam on the outside. Blend the clay until the join is invisible.
Step 2: Assembly and Refining
-
Attach the base:
Score the bottom edge of your cylinder and the outer rim of your circular base. Apply slip and place the cylinder onto the base. -
Blend the bottom:
Using a wooden tool or your thumb, drag the clay from the base up onto the wall of the cylinder to merge them. Do this all the way around, then smooth perfectly so it looks like one solid piece. -
Round the rim:
Moisten your fingers slightly and run them along the top rim of the holder. You want to soften the sharp cut edge into a gentle, rounded curve similar to the photo. -
Surface smoothing:
Before drying, take a slightly damp sponge and wipe down the entire exterior to remove fingerprints and bumps. This step is crucial for that modern, manufactured look. -
Drying process:
Let the piece dry slowly away from direct sunlight to prevent cracking. If using air-dry clay, this may take 24-48 hours. If using polymer clay, bake according to the package instructions.
Clean Seams Tip
To erase the vertical seam completely, roll the finished cylinder gently back and forth on a smooth table surface before attaching the base.
Step 3: Painting the Face
-
Sanding:
Once fully dry (and cool, if baked), use fine-grit sandpaper to buff away any remaining imperfections or rough spots on the rim and sides. -
Sketching the face:
Lightly mark the position of the eyes and nose with a pencil. Aim for the middle-upper section of the cylinder to give it a cute proportion. -
Painting the features:
Using a black paint pen or a fine brush, draw two small solid circles for eyes. Below them, draw a slightly larger oval for the nose. -
Adding the mouth:
Draw a thin, vertical line down from the nose, curving outward in opposite directions at the bottom to form the classic animal mouth shape. -
Cheek details:
Dip the end of a paintbrush handle or a dotting tool into cream-colored paint. Dot a flower pattern (five dots in a circle with an empty center) onto each cheek area. -
Final flourish:
Add two tiny hash marks (//) near the bottom of the holder for a little extra illustrative flair. -
Sealing:
Since this will live in a bathroom, apply two to three coats of a high-quality matte water-resistant sealer inside and out to protect it from moisture.
Level Up: Drainage
Before baking or drying, poke a small hole in the center of the base. This allows water to drain out, keeping your toothbrush cleaner!
Pop your favorite bamboo toothbrush inside and enjoy the extra dose of cuteness every time you brush your teeth.
Textured Pen Cup
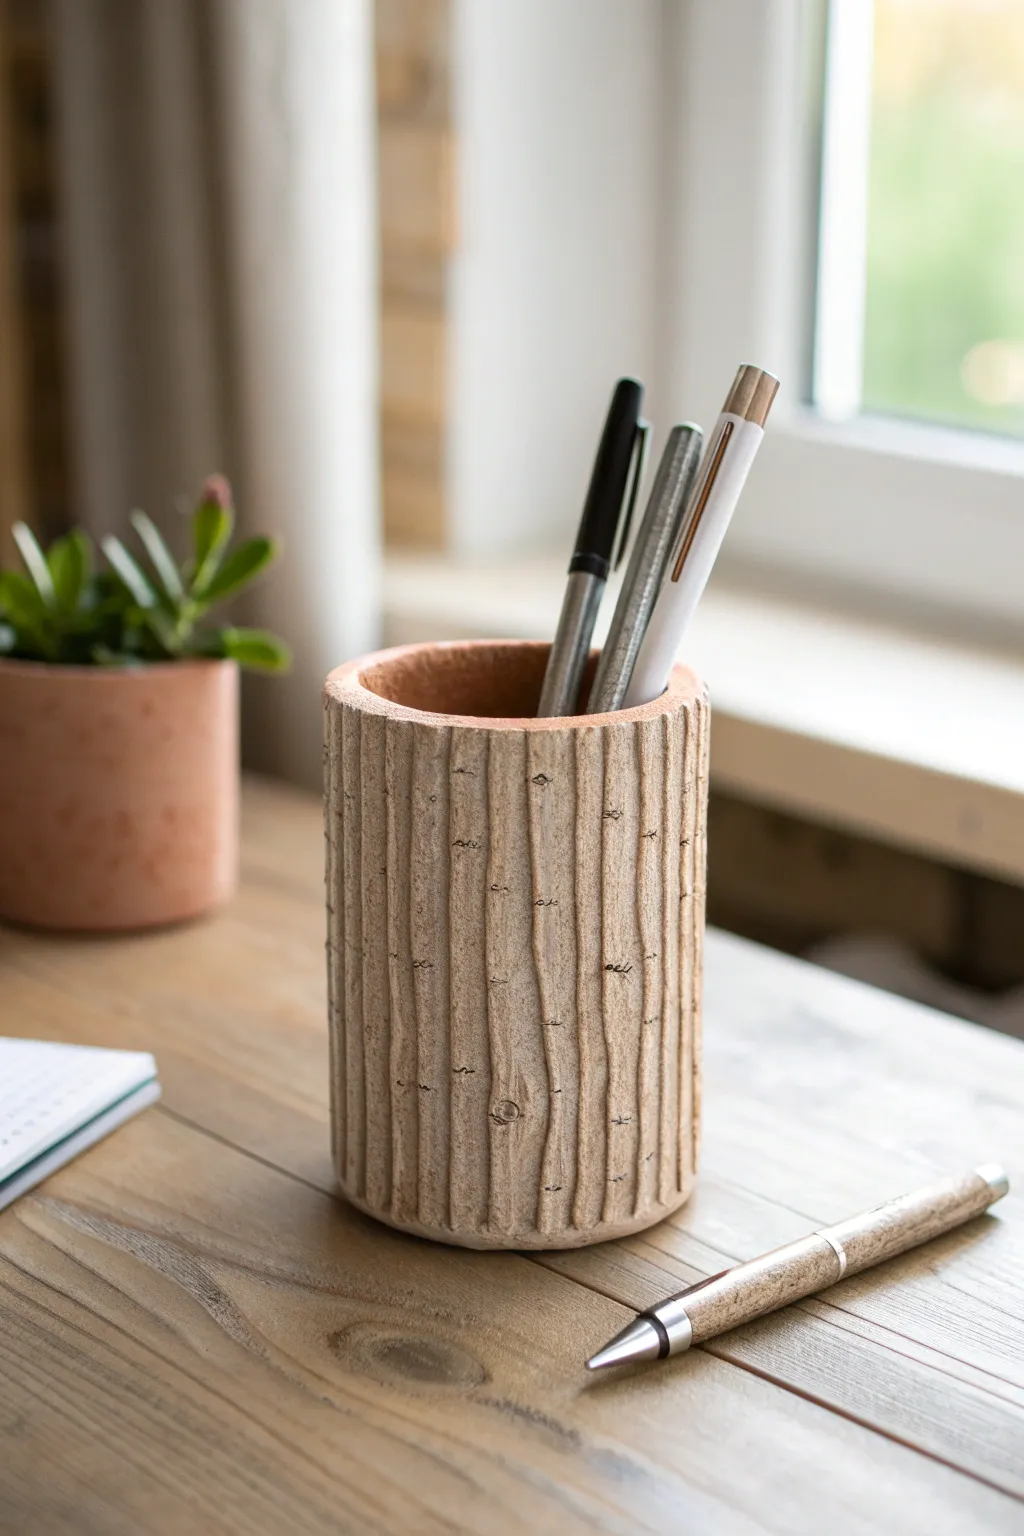
Bring a touch of the forest to your desk with this nature-inspired pen holder that mimics the organic texture of white birch bark. Using simple carving techniques and a clay wash, you’ll transform a basic cylinder into a functional faux-wood piece that feels beautifully rustic.
How-To Guide
Materials
- Earthenware or stoneware clay (terracotta or buff)
- Rolling pin
- Canvas or clay mat
- Clay knife or needle tool
- Slip (liquid clay slurry)
- Score tool or old toothbrush
- Cylindrical form (like a PVC pipe or rolling pin) for shaping
- Loop tool or carving tool
- White or cream underglaze
- Black or dark brown underglaze
- Sponge
- Small paintbrush
- Clear matte glaze (optional)
Step 1: Building the Form
-
Prepare the slab:
Start by wedging your clay to remove air bubbles. Roll it out on your canvas into a rectangular slab that is roughly 1/4 inch thick. You want it consistent so the walls of your cup are even. -
Measure and cut:
Determine the circumference needed for your pen cup. Measure your chosen cylinder form and add a little extra for the seam overlap. Cut a clean rectangle from your slab using a clay knife and a straight edge. -
Cut the base:
From the remaining scraps of your slab, cut a circle that matches the diameter of your intended cylinder. Use your shaping form as a template if helpful, cutting slightly wider than the form itself. -
Bevel the edges:
On the rectangular slab, cut the short ends at a 45-degree angle (beveling) in opposite directions. This allows the seam to overlap smoothly without creating a thick lump in the wall. -
Score and slip:
Score the beveled edges of the rectangle and the outer edge of your circular base. Apply a generous amount of slip to these rough areas. -
Assemble the cylinder:
Wrap the rectangular slab around your support form or just fold it upright to create a tube. Press the beveled edges together firmly to create a seam. Smooth the seam with your finger or a rib tool so it becomes invisible. -
Attach the base:
Place the cylinder on top of the scored base. Use a modeling tool to blend the clay from the cylinder wall down onto the base, sealing the join completely. Smooth the inside seam as well if possible.
Step 2: Texturing and Finishing
-
Establish the bark texture:
Once the cup is leather hard (stiff but still cool to the touch), use a loop tool or varying sizes of carving tools to carve vertical, slightly wavering lines down the exterior. I like to vary the depth and spacing here to avoid it looking too uniform. -
Add horizontal details:
Birch bark is famous for its horizontal lenticels. Use a sharp needle tool or a small knife to make short, random horizontal scratches or small eye-shaped marks across the vertical ridges. -
Create the knot features:
To make the ‘knots’ seen in the reference, press a small, blunt tool into the clay and carve a few concentric circles or rough patches around it. This breaks up the vertical pattern visually. -
Bisque fire:
Allow the piece to dry slowly and completely. Once bone dry, fire it in the kiln to a bisque temperature suitable for your specific clay body. -
Apply the base color:
Paint a coat of white or cream underglaze over the entire exterior of the cup. Wipe it back slightly with a damp sponge so the color stays in the carved crevices but reveals some raw clay on the high points. -
Accentuate the markings:
Use a fine liner brush with black or dark brown underglaze to carefully fill in the horizontal scratches and the small knot details you carved earlier. -
Enhance the depth:
If you want a more weathered look, you can apply a very watered-down wash of the dark underglaze over the vertical grooves and wipe it away immediately, leaving just a shadow in the depths. -
Final glaze firing:
For a natural, wood-like finish, leave the exterior unglazed or apply a thin matte clear glaze. If the inside needs to be waterproof, glaze the interior with a glossy liner glaze. Fire the piece again to the final glaze temperature.
Natural Imperfection
Don’t try to make straight lines. Real trees are organic and jagged. Creating slightly wobbly grooves will make your final piece look much more realistic.
Add a Branch
Attach a small coil or nub of clay to the side before carving to simulate a small branch knot protruding from the trunk for extra dimension.
Now you have a sturdy, woodland-inspired organizer ready to hold your favorite tools


What Really Happens Inside the Kiln
Learn how time and temperature work together inside the kiln to transform clay into durable ceramic.
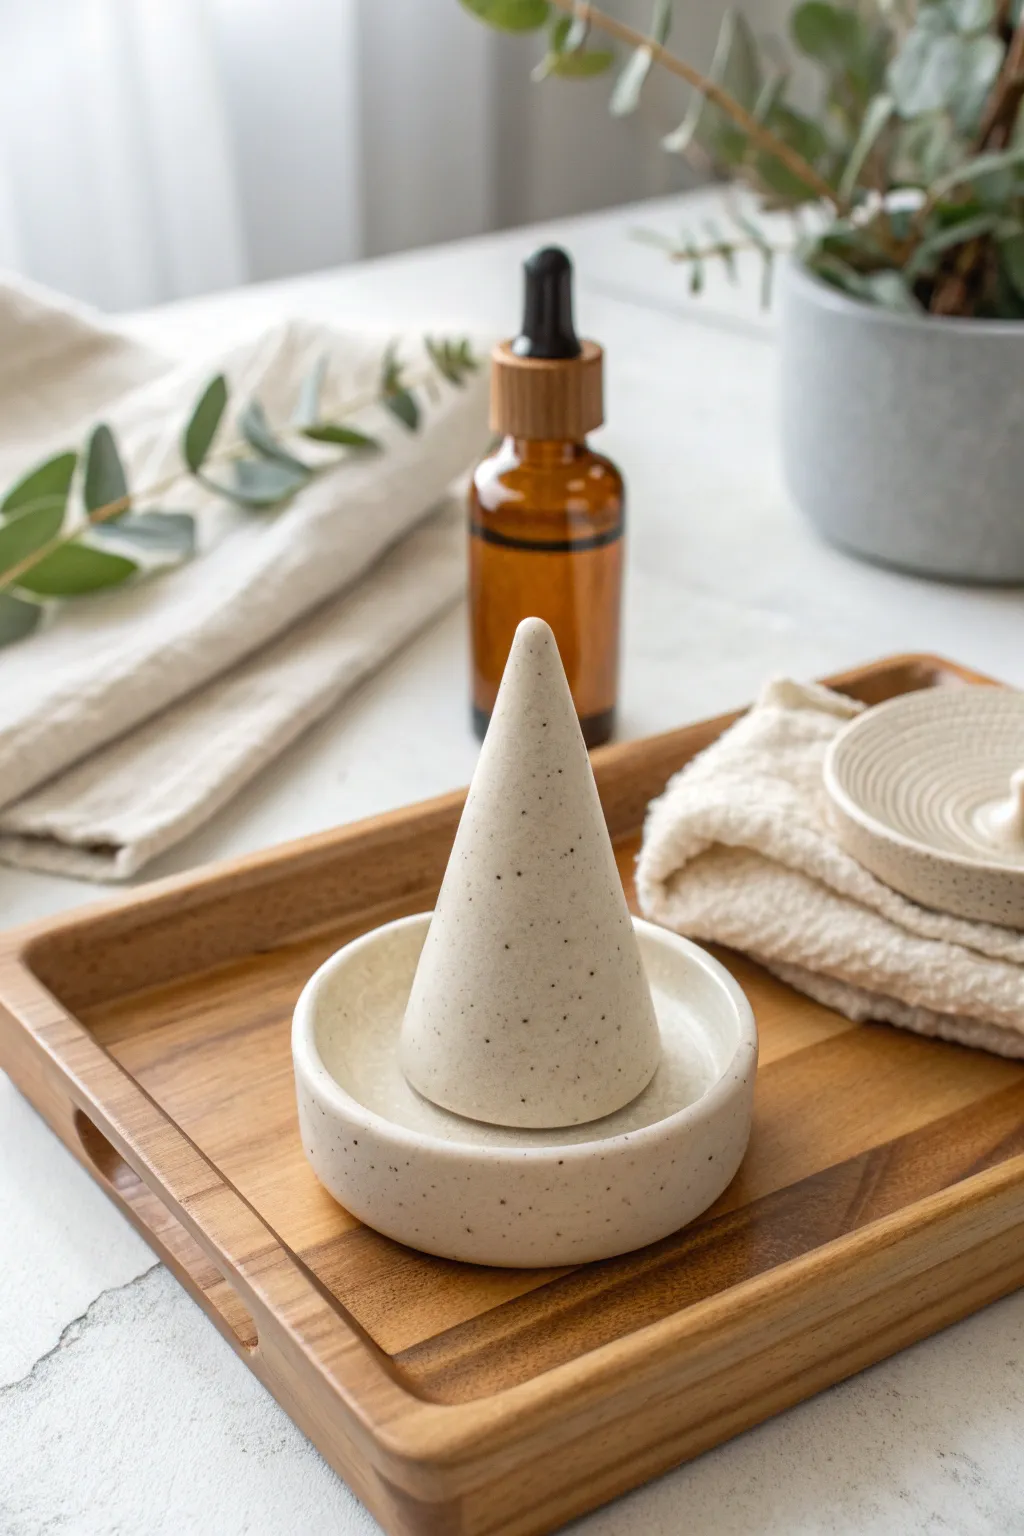
Minimal Incense Holder
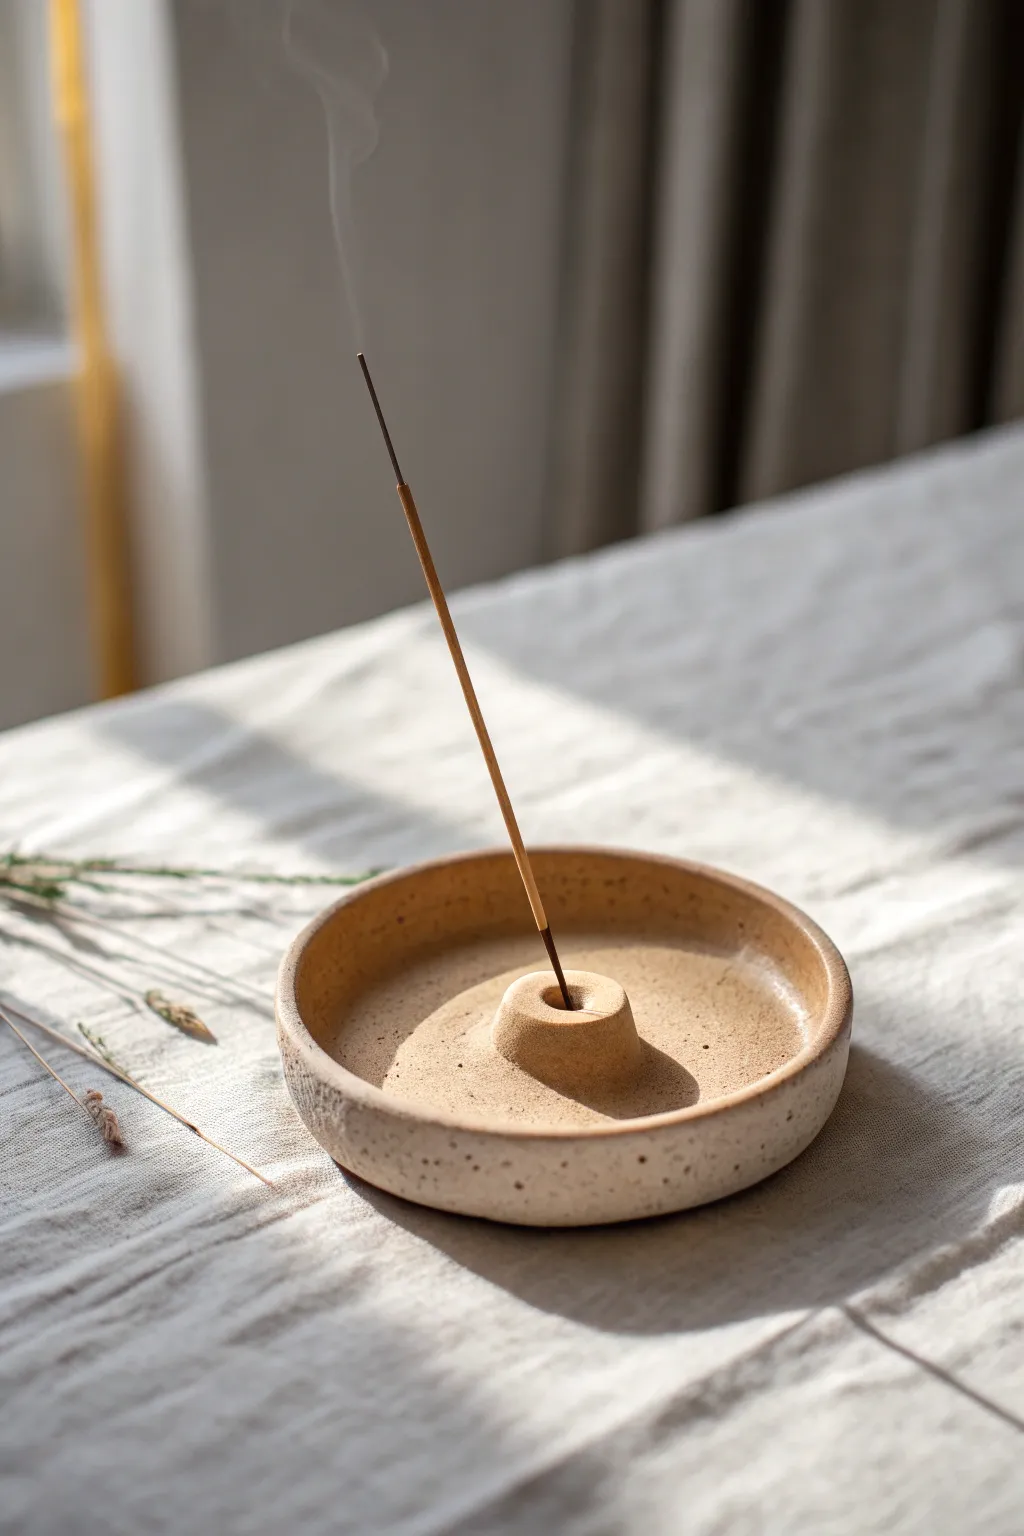
Embrace simplicity with this understated incense holder featuring a shallow basin and a distinct central mound. The speckled, earthy clay body and matte finish give it a modern yet organic feel perfect for meditative spaces.
Step-by-Step Tutorial
Materials
- Speckled buff stoneware clay (approx. 300g)
- Small rolling pin
- Circle cutter or circular template (approx. 4-5 inches)
- Fettling knife or needle tool
- Sponge
- Wooden modeling tool or rib
- Incense stick (for sizing)
- Clear matte glaze or satin beige glaze
Step 1: Forming the Base
-
Prepare the Clay:
Start by wedging your speckled clay thoroughly to remove air bubbles. This ensures a smooth, crack-free finish later on. -
Roll the Slab:
Using your rolling pin, roll out a slab of clay to an even thickness of about 1/4 inch. I like to use wooden guide strips on either side to keep it perfectly level. -
Cut the Circle:
Place your circle cutter or template onto the slab and cut out your base shape. Remove the excess clay and set it aside for the center piece. -
Smooth the Rim:
Gently run a damp sponge or your finger along the cut edge of the circle to soften the sharp angle and create a pleasant, rounded rim. -
Lift the Edges:
Cup the clay circle in your hand or place it on a foam mat. Gently press the center down while lifting the edges slightly to create a very shallow curve, just enough to catch ash.
Angle Check
Make your incense hole slightly deeper than you think you need. A shallow hole causes sticks to flop over; a deep channel holds them upright securely.
Step 2: Creating the Center Mound
-
Form the Mound:
Take a small ball of the leftover clay, roughly the size of a large marble or a grape. Roll it into a smooth sphere. -
Flatten the Bottom:
Tap the sphere onto your work surface to create a flat bottom. Shape the top slightly so it resembles a small, truncated cone or a rounded hill. -
Score the Surfaces:
Use a needle tool or serrated rib to scratch up the center of your dish and the bottom of your clay mound. This rough texture is crucial for a strong bond. -
Apply Slip:
Dab a small amount of water or clay slip (liquid clay) onto the scored areas. -
Attach the Mound:
Press the mound firmly into the center of the dish. Give it a tiny wiggle to lock the clay particles together. -
Blend the Seam:
Use a small wooden tool to smooth the clay where the mound meets the dish. You want a seamless transition so it looks like one continuous piece.
Step 3: Finishing and Firing
-
Create the Incense Hole:
While the clay is still workable but firm, take your needle tool or a bamboo skewer to pierce the center of the mound. -
Check the Angle:
Insert an actual incense stick briefly to test the fitting. wiggle it slightly to ensure the hole is just loose enough to accommodate shrinkage during firing. -
Refine the Surface:
Once leather hard, use a slightly damp sponge to wipe away any fingerprints or tool marks, revealing the beautiful speckled grain of the clay. -
Bisque Fire:
Allow the piece to dry slowly and completely before loading it into the kiln for a bisque fire (typically Cone 04). -
Glazing:
Apply a thin coat of clear matte or semi-transparent beige glaze. You want the natural speckles of the clay body to show through, so avoid heavy, opaque glazes. -
Final Fire:
Fire the piece again to the maturation temperature of your specific clay body (e.g., Cone 6 for stoneware) to finish the piece.
Stuck Sticks?
If glaze fills the tiny hole during firing, use a small diamond drill bit or a Dremel tool to gently re-open the channel after the piece has cooled.
Place your finished holder on a sunny table and enjoy the tranquil atmosphere it creates
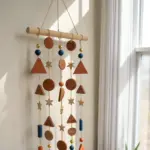
Simple Photo and Card Stand

This minimalist, earth-toned rainbow acts as both sculptural decor and a functional card holder. The distinct, warm terracotta and blush layers create a cozy, bohemian vibe perfect for displaying photos or affirmation cards.
Step-by-Step
Materials
- Air-dry clay (terra cotta, white, and ochre colors) OR polymer clay in similar shades
- Rolling pin
- Sharp craft knife or clay slicer
- Ruler
- Fine-grit sandpaper (around 220-400 grit)
- Small bowl of water (for smoothing)
- Parchment paper or non-stick craft mat
- Acrylic paints (burnt sienna, blush pink, cream, rust orange) – optional if using colored clay
- Matte sealant or varnish
Step 1: Preparing
-
Color Mixing:
Start by planning your five gradation shades. If using white air-dry clay, separate it into five balls. Knead acrylic paint directly into the wet clay to tint it before sculpting for a solid color look, or plan to paint later. Aim for a gradient: dark burnt orange, lighter rust, warm ochre, soft blush, and a deep terracotta center. -
Rolling:
Take your largest ball of clay (for the outermost arch) and roll it into a thick, even snake or log. Aim for a thickness of about 1 inch to ensure it’s sturdy enough to stand. -
Flattening:
Gently flatten the log with your hand or a rolling pin just slightly. You want it to have a rectangular cross-section with rounded edges rather than being perfectly round. This helps the arches stack flush against each other.
Step 2: Forming the Arches
-
Creating the Base Arch:
On your parchment paper, curve the first log into a smooth arch shape. Use a ruler to ensure the bottom feet of the arch are perfectly aligned. -
Sizing the Next Layer:
Roll out your second color into a log of similar thickness. Place it inside the first arch to measure the length needed, then cut off the excess with your craft knife. -
Snug Fit:
Press the second arch gently against the interior of the first arch. You want a snug fit without merging the clays entirely if you want them separable, or score and slip the touching surfaces if you want a solid block. -
Repeating the Process:
Continue rolling, flattening, and shaping the remaining three interior arches, working from largest to smallest. The center piece will be a small, solid semi-circle or a very tight arch. -
Trimming the Base:
Once all five layers are nested together, take a long, sharp blade and trim the bottom straight across. This step is crucial so the rainbow stands upright without wobbling. -
Creating the Slot (Crucial Step):
To make this a functional card stand, you need a slot. Use a thin ruler or the back of a knife to press a groove into the top center of the outermost arch. Alternatively, slice a thin gap between the first and second arch where a card can wedge in.
Cracking Clay?
If small cracks appear while drying, don’t panic. Make a paste of clay and water (slip) and fill the cracks, then smooth over. Dry slowly away from direct heat.
Step 3: Finishing Touches
-
Smoothing:
Dip your finger in a little water and smooth out any fingerprints, cracks, or rough edges on the face of the clay. I find this step remarkably relaxing and it makes a huge difference in the final professional look. -
Texture:
If you want the speckled, stone-like texture seen in the photo, you can use a stiff toothbrush to gently stipple the surface or press coarse sand into the wet clay. -
Drying:
Let the rainbow dry flat on the parchment paper. Air-dry clay takes 24-48 hours depending on thickness. Flip it over halfway through to ensure the back dries evenly. -
Sanding:
Once completely bone dry, use fine-grit sandpaper to smooth any sharp edges on the bottom or face. Wipe away the dust with a barely damp cloth. -
Painting (If Required):
If you didn’t tint the clay earlier, paint each arch now. Use matte acrylics in earth tones (rust, sandstone, apricot). Apply two thin coats for opaque coverage. -
Speckling:
To achieve the terrazzo look, mix a little dark brown paint with water. Dip a toothbrush in it and flick the bristles with your thumb to spray tiny speckles over the dried rainbow. -
Sealing:
Finish with a coat of matte varnish or sealant. This protects the clay from moisture and gives it a finished, durable surface suitable for handling.
Level Up: Card Integration
Make matching clay magnets! Use leftover clay to make small discs, attach magnets to the back, and use them to pin photos to the front of the rainbow.
Now you have a stunning, handmade piece to showcase your favorite memories or daily affirmations

TRACK YOUR CERAMIC JOURNEY
Capture glaze tests, firing details, and creative progress—all in one simple printable. Make your projects easier to repeat and improve.
Earring Display Tile
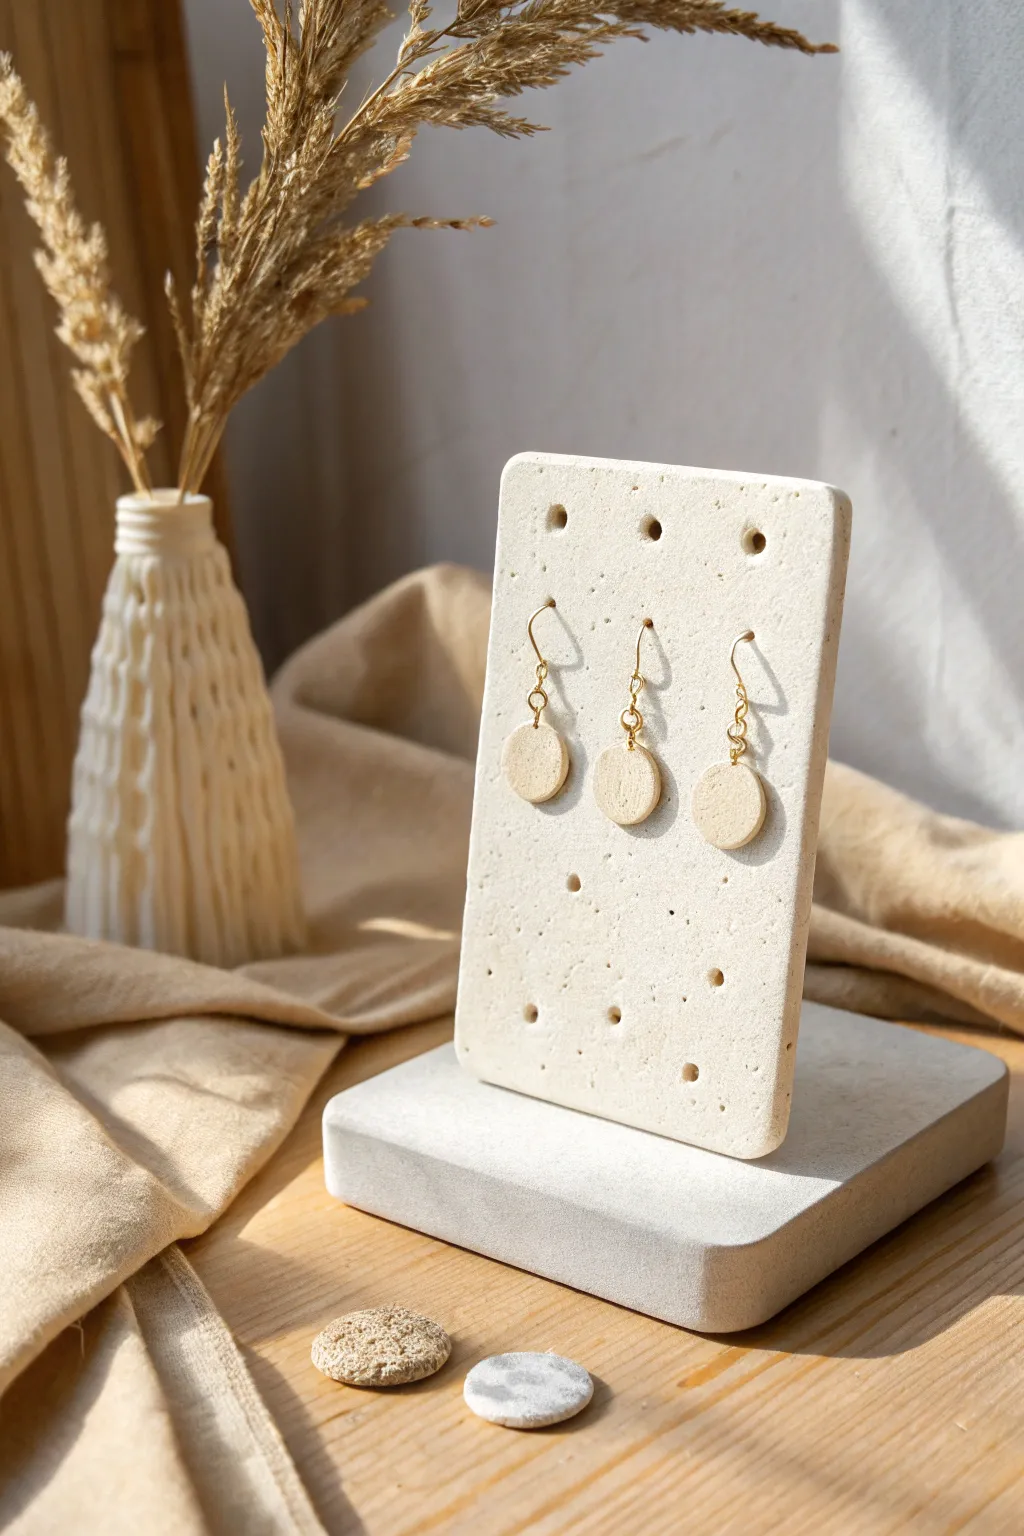
showcase your jewelry collection on this elegant, minimalist display stand that mimics the look of natural limestone or travertine. The subtle speckling and organic texture make this piece feel high-end, while the sturdy base keeps your favorite pairs perfectly poised.
Detailed Instructions
Materials
- Polymer clay (white or translucent)
- Small amount of brown and black clay (for speckling)
- Rolling pin or acrylic roller
- Sharp craft knife or tissue blade
- Ruler
- Medium grit sandpaper
- Straw or small round cutter (approx. 3-4mm)
- Oven for baking
- Strong craft glue (E6000 or similar)
- Parchment paper
Step 1: Preparing the Clay
-
Condition the Base:
Begin by thoroughly conditioning a large block of white polymer clay until it is soft and pliable. If you want a slightly more translucent, stone-like quality, mix in about 20% translucent clay. -
Create the Speckles:
Take a tiny amount of black and brown clay. Crumble it into very fine dust or chop it into minuscule bits with your blade. You want these particles to look like natural sediment, not large polka dots. -
Incorporate Texture:
Sprinkle the colored crumbs over your white clay slab. Fold the clay over and roll it out, then fold and roll again. Repeat this process until the speckles are deeply embedded and randomly distributed throughout the clay.
Stone Effect Secret
Mix varying sizes of ground black pepper into the clay instead of paint. The pepper bakes right in and creates an incredibly realistic, organic mineral texture instantly.
Step 2: Forming the Structure
-
Roll the Slab:
Roll your speckled clay out onto a sheet of parchment paper. Aim for a thickness of about 1/4 inch (6mm). This thickness is crucial so the vertical stand doesn’t warp during baking. -
Cut the Vertical Tile:
Using a ruler and your sharp blade, cut a neat rectangle. A good size for three pairs of earrings is approximately 3 inches wide by 5 inches tall. I like to round the corners slightly with my fingertips for a softer look. -
Cut the Base:
Roll a second slab, slightly thicker than the first if possible. Cut a rectangle that is wider and deeper than your vertical tile to ensure stability—around 4 inches by 3 inches works well. -
Create Texture:
Before the clay hardens, gently press medium-grit sandpaper or a stiff coarse sponge onto the surface of both pieces. This removes fingerprints and adds that realistic, stony matte finish. -
Punch Earring Holes:
Plan the spacing for your earrings. Use a straw or a small round cutter to punch holes in the vertical tile. Make sure the holes are large enough for earring hooks to pass through easily. -
Add Decorative Pits:
To enhance the travertine effect, use a toothpick or a small ball tool to create random, shallow indentations on the surface of the tile, focusing on areas away from the structural holes.
Level Up: Double Sided
Use a taller vertical slab and punch holes at different heights. This lets you display necklaces on the top tier and earrings below, maximizing your display space.
Step 3: Baking and Assembly
-
First Bake:
Place your clay pieces on a ceramic tile or baking sheet lined with parchment paper. Bake according to your brand’s instructions (usually 275°F/130°C) for at least 45 minutes to ensure strength. -
Cooling Down:
Allow the pieces to cool completely inside the oven or under a heavy book to prevent any warping as they harden. -
Sanding Edges:
Once cool, use a high-grit sandpaper to smooth out the cut edges of your rectangles. You can also lightly sand the surface again if you want an ultra-smooth stone feel. -
Prepare for Glue:
Identify exactly where the vertical tile will sit on the base. Lightly scratch this specific area on the base and the bottom edge of the vertical tile with sandpaper to create a ‘tooth’ for the glue. -
Glue Together:
Apply a strong adhesive like E6000 to the bottom edge of the vertical tile. Press it firmly onto the center of the base. -
Support While Drying:
Prop the vertical tile up with heavy objects (like jars or books) on either side to keep it perfectly at a 90-degree angle while the glue cures completely.
Now you have a chic, modern display ready to make your jewelry shine on any dresser or market table
Tiny Bud Vase Magnets
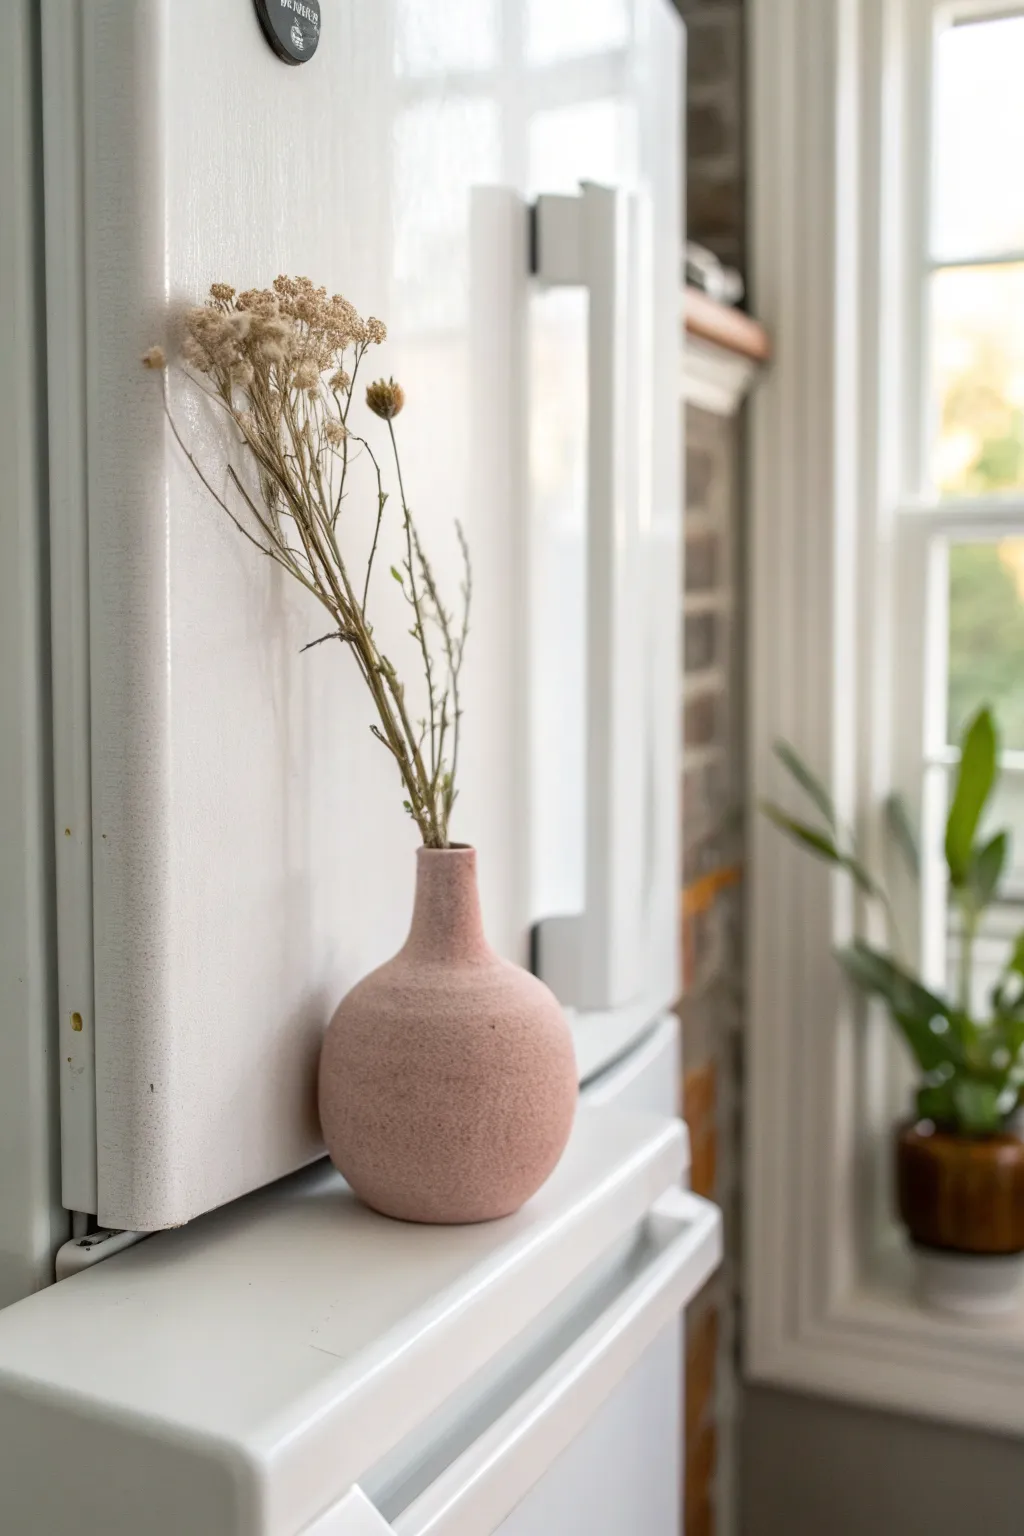
Bring a touch of organic warmth to your kitchen with this clever magnetic bud vase. Sculpted from clay and finished with a stone-like texture, this tiny vessel turns your refrigerator into a minimalist gallery for dried blooms.
Step-by-Step Tutorial
Materials
- Air-dry clay (white or terra cotta)
- Small rolling pin
- Mod Podge or craft glue
- Baking soda
- Acrylic paint (dusty rose or terra cotta color)
- Strong neodymium magnets (2-3)
- Super glue (gel based is best)
- Clay sculpting tools (or a toothpick)
- Sandpaper (fine grit)
- Paintbrush
- Dried flowers or grasses
Step 1: Shaping the Vessel
-
Prepare the base:
Start by pinching off a ball of air-dry clay roughly the size of a golf ball. This will form the main body of your vase. -
Form the pinch pot:
Press your thumb into the center of the ball, but not all the way through. Gently pinch and rotate the clay between your thumb and fingers to open up the hollow center, keeping the walls relatively thick for stability. -
Create the neck:
Roll a smaller coil of clay, about the thickness of your pinky finger. Score and slip (scratch the surfaces and add a bit of water) the top of your pinch pot and the bottom of the coil, then attach them to form the neck. -
Smooth the transition:
Using your thumb or a modeling tool, blend the clay from the coil downward into the pot so the seam disappears completely. The neck should look like it grew naturally out of the base. -
Flatten the back:
This is crucial for a magnet: gently press the back side of your vase against a hard, flat surface to create a flat plane. Check frequently to ensure you haven’t distorted the front shape too much. -
Refine the rim:
Tap the top rim of the neck gently to level it. You can use a bit of water on your finger to smooth out any cracks on the lip of the vase. -
Dry completely:
Set the vase aside to dry. I prefer to let it sit for at least 24-48 hours depending on humidity, flipping it occasionally so the flat back dries evenly.
Sliding down?
If the vase slides down the fridge, the magnets aren’t strong enough. Don’t use standard craft magnets; switch to heavy-duty neodymium (rare earth) magnets.
Step 2: Texturing and Finishing
-
Sand imperfections:
Once fully dry, use fine-grit sandpaper to smooth out any unintentional bumps, especially on the flat back. The back needs to be perfectly flush to hold the magnets securely. -
Mix the texture paint:
In a small cup, mix your acrylic paint with baking soda. Start with a 1:1 ratio; you want a thick, fluffy consistency that resembles frosting or wet sand. -
Apply the first coat:
Paint the mixture onto the vase using visible, dabbing strokes. This stippling motion creates that lovely faux-ceramic texture seen in the photo. -
Layer up:
Let the first coat dry for about 20 minutes, then apply a second coat if you want a rougher, more stone-like finish. Ensure the inside of the rim is painted, but don’t clog the opening. -
Attach magnets:
Apply a dot of super glue gel to your neodymium magnets. Press them firmly onto the flat back of the vase. Use two or three magnets aligned vertically to support the weight of the clay. -
Cure time:
Allow the glue to cure fully according to the package instructions before testing it on a metal surface. -
Style and display:
Select a few stems of dried grass or wildflowers. Trim them to size and arrange them in your new tiny vase.
Make it watertight
To hold fresh flowers instead of dried ones, seal the inside with two coats of waterproof varnish or resin before painting the exterior.
Now you have a charming piece of functional art ready to brighten up your kitchen space
Cheerful Fridge Magnets
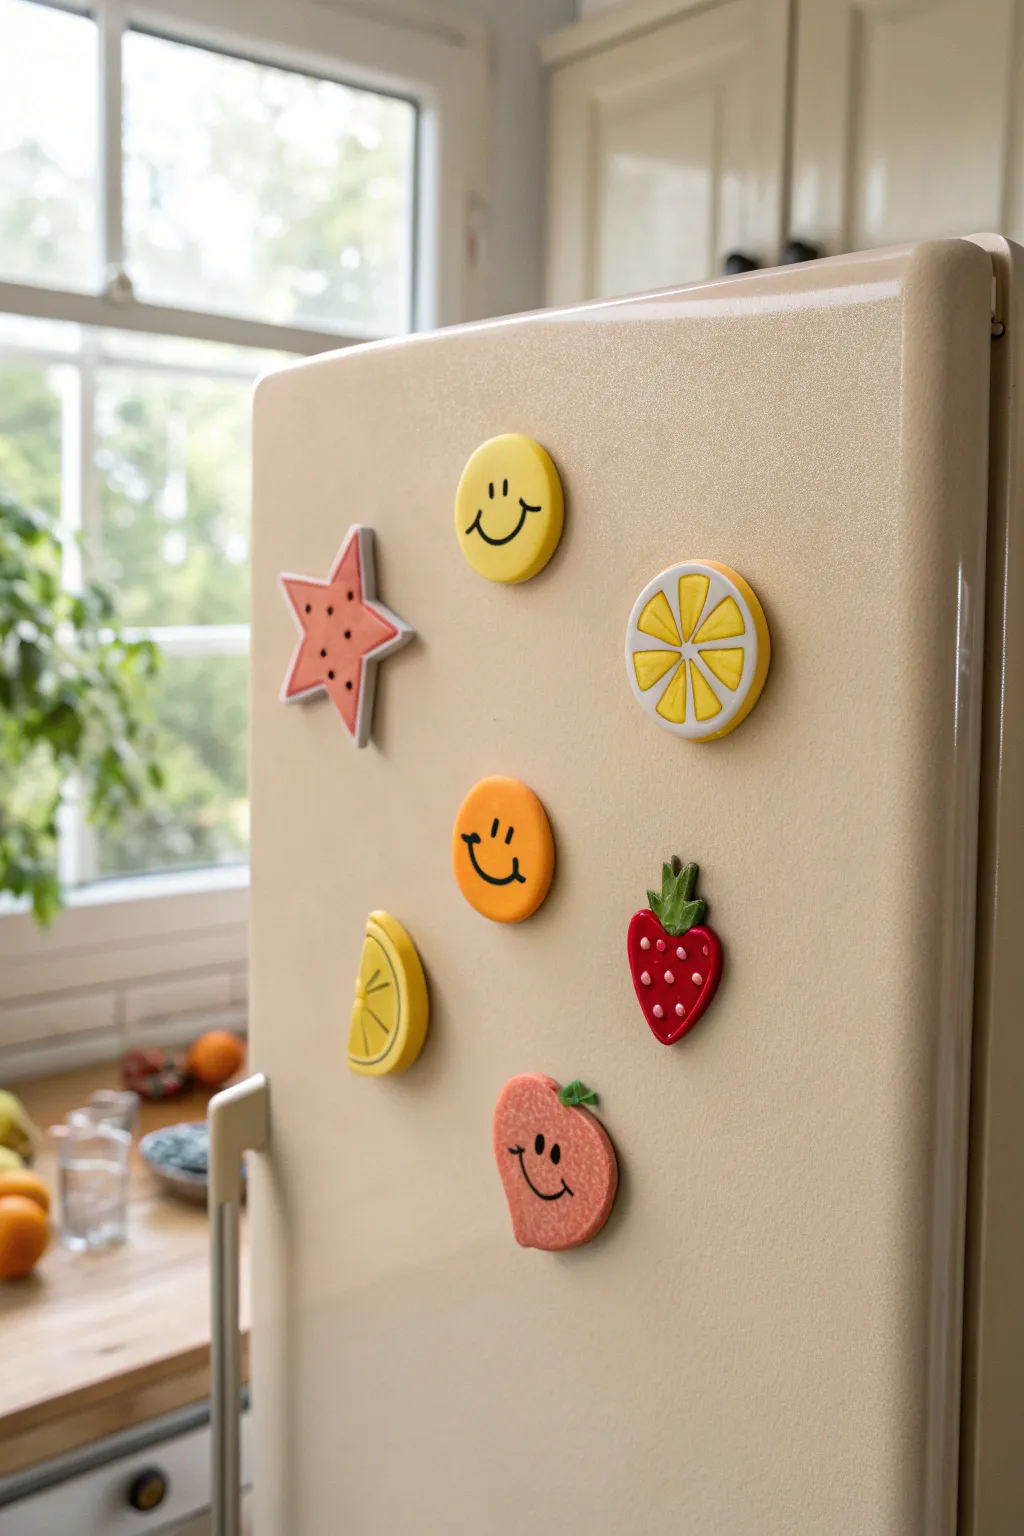
Brighten up your kitchen with these delightfully simple polymer clay magnets featuring happy fruits and sunny icons. The smooth, matte finish and playful faces give them a charming, retro-cartoon aesthetic.
Detailed Instructions
Materials
- Polymer clay (yellow, orange, red, pink, white, green, black)
- Small round cookie cutters (various sizes)
- Star-shaped cookie cutter
- Rolling pin or acrylic roller
- Needle tool or toothpick
- X-acto knife or clay blade
- Small magnets (neodymium or ceramic)
- Strong craft glue (E6000 or superglue)
- Baking sheet and parchment paper
- Oven
Step 1: Basic Shape Preparation
-
Condition the clay:
Start by kneading each color of clay individually until it is soft and pliable, ensuring there are no cracks when you flatten it. -
Roll out the base:
Roll your conditioned clay into slabs approximately 1/4 inch thick. I find this thickness is perfect—sturdy enough to hold a magnet but not too heavy. -
The smiley faces:
Use a medium round cutter to punch out circles from the yellow and orange clay slabs. -
The watermelon star:
Use a star cutter on the pink clay. Soften the points slightly with your fingertip so they aren’t too sharp. -
The fruit slices:
Cut a circle of white clay and a slightly smaller circle of yellow clay. Stack the yellow on the white, roll gently to adhere, and create a rim. -
Sculpt the strawberry:
Hand-shape a small ball of red clay into a rounded triangle or heart shape for the strawberry body. -
Sculpt the peach:
Form a ball of pinkish-peach clay into a heart-like shape, keeping the bottom rounded and creating a subtle cleft at the top.
Sticky Situation?
If your clay is getting too soft and sticky to handle, put it in the fridge for 10 minutes. This firms it up, making detailed work much easier.
Step 2: Adding Details & Faces
-
Lemon slice segments:
For the lemon wheel, take your yellow-and-white circle and use a knife to gently score shallow lines radiating from the center, creating the look of citrus segments. -
Strawberry leaves:
Cut tiny triangles of green clay and press them onto the top of your strawberry shape to create the leafy cap. -
Peach leaf:
Add a single, small green teardrop shape to the top cleft of the peach. -
Rolling facial features:
Roll extremely thin snakes of black clay for the smiles and tiny balls for eyes. This requires patience; the thinner, the better for that delicate look. -
Applying faces:
Gently press the black clay ropes into U-shapes on the yellow circle, orange circle, and peach. Add vertical dashes for eyes on the rounded faces. -
Seed details:
Roll tiny balls of white clay for the strawberry seeds and press them flat against the red body. Do the same with black clay for the watermelon star seeds. -
Final smoothing:
Go over each piece with your finger to ensure all added bits are flush and smooth, removing any fingerprints.
Clean Lines Pro-Tip
Before baking, wipe your clay pieces gently with a bit of rubbing alcohol on a q-tip or baby wipe. This removes lint, dust, and fingerprints instantly.
Step 3: Baking & Assembly
-
Preheat oven:
Set your oven to the temperature recommended on your specific brand of polymer clay (usually around 275°F or 130°C). -
Bake the pieces:
Place your clay shapes on a parchment-lined baking sheet and bake for about 15-20 minutes. Watch closely to ensure the lighter colors don’t scorch. -
Cool down:
Let the clay cool completely on the baking sheet. It will harden fully as it cools. -
Attach magnets:
Apply a dab of strong glue to the back of each shape and press a magnet firmly into the glue. -
Dry time:
Allow the glue to cure fully (usually 24 hours) before placing them on your fridge.
Enjoy arranging your cheerful new collection on the fridge door
Polymer Clay Beads and Charms
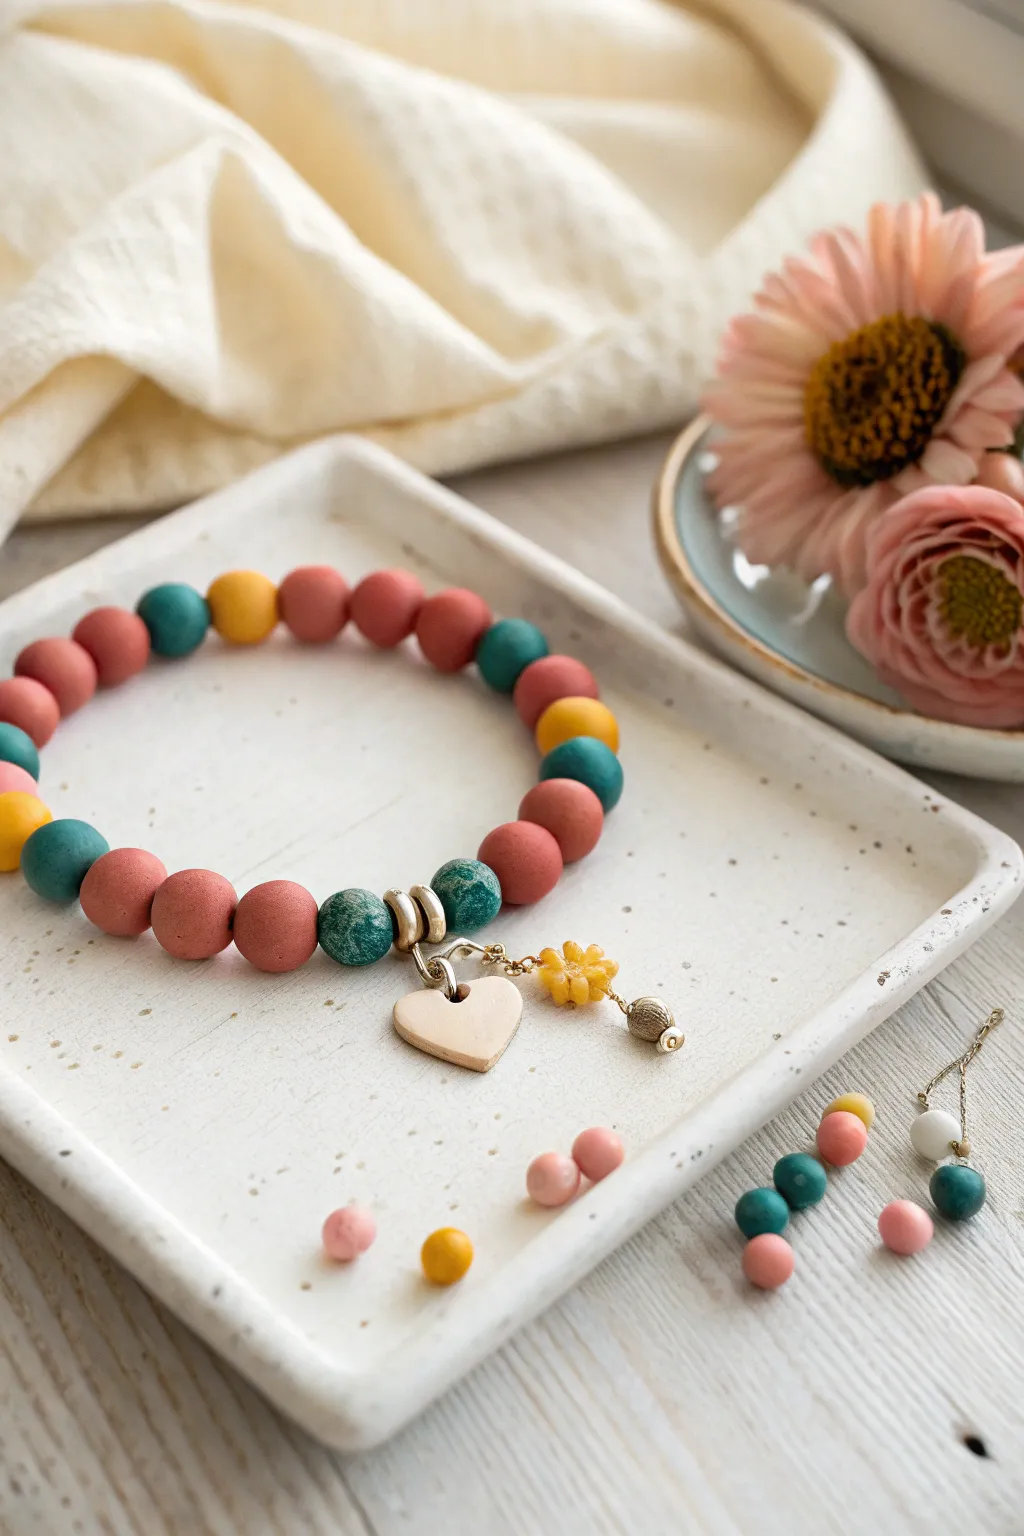
Embrace earthy tones and texture with this stunning handmade bead bracelet. Combining matte polymer clay beads in terracotta, teal, and mustard with a delicate heart charm creates a piece that feels both organic and polished.
How-To Guide
Materials
- Polymer clay (terracotta pink, teal/green, mustard yellow)
- Beige or cream polymer clay (for the heart charm)
- Small flower charm (yellow/gold)
- Small metal bead or charm
- Gold finish spacer beads or rings (approx. 4-5mm)
- Strong elastic jewelry cord (0.8mm or similar)
- Needle tool or toothpick
- Heart-shaped clay cutter (small)
- Small eye pin or jump rings
- Jewelry pliers
- Baking tile or tray
- Fine grit sandpaper (400-600 grit)
- Superglue (optional for knot security)
Step 1: Crafting the Clay Beads
-
Condition the Clay:
Begin by thoroughly kneading your polymer clay colors separately until they are soft and pliable. This prevents cracking later. You’ll need primarily the terracotta pink, followed by teal and mustard yellow. -
Portion the Beads:
Roll each color into a uniform snake/log shape. Use a tissue blade to cut equal-sized segments to ensure your beads will be consistent in size. -
Roll Spheres:
Take each segment and roll it between your palms to create a smooth, round sphere. Aim for a size of about 8-10mm in diameter. -
Focus on Quantity:
Create the majority of your beads in the terracotta pink shade. You will need fewer accent beads in teal and mustard yellow. Check the photo: create roughly two pink beads for every one accent bead. -
Pierce the Holes:
Gently insert a needle tool or toothpick through the center of each bead. Twist the tool as you push to avoid squashing the sphere. I like to pierce halfway through, pull it out, and pierce from the other side to keep the hole perfectly centered. -
Texture the Teal (Optional):
For a closer match to the image, lightly texture the teal beads by rolling them gently over a piece of coarse sandpaper or dabbing them with a stiff brush before baking.
Fixing Wonky Holes
If bead holes close up during baking, use a small hand drill or a heated needle to gently re-open them without cracking the bead
Step 2: Making the Heart Charm
-
Roll a Slab:
Roll out a small piece of beige or cream clay to a thickness of about 3mm. -
Cut the Shape:
Use your small heart cutter to punch out a clean shape. Smooth the edges with your fingertip to remove any stray clay bits. -
Add Attachment Point:
Carefully pierce a hole near the top of one of the heart’s lobes using your needle tool. Ensure the hole is large enough for your jump ring.
Step 3: Baking and Finishing
-
Bake the Pieces:
Arrange your beads and the heart charm on a baking tile. Bake according to your specific brand of clay’s instructions (usually around 275°F/135°C for 15-30 minutes). -
Cool Down:
Let the pieces cool completely before handling. They are fragile when hot. -
Buff for Matte Finish:
Once cool, lightly sand the beads with fine-grit sandpaper if there are fingerprints. This also enhances the soft, matte look shown in the image.
Level Up: Scented Clay
Mix a drop of essential oil into the clay during the conditioning phase to make a bracelet that doubles as an aromatherapy diffuser
Step 4: Assembly
-
Prepare the Elastic:
Cut a length of elastic cord about 10-12 inches long. Pre-stretch it by pulling it firmly a few times; this prevents the bracelet from loosening later. -
Plan the Pattern:
Lay out your design on a bead board or towel. A suggested pattern is: 1 Teal, 1 Pink, 1 Pink, 1 Teal, 1 Mustard, 1 Pink, 1 Pink. Repeat this rhythm, adjusting slightly to fit your wrist size. -
String the Beads:
Thread the beads onto the elastic according to your pattern. -
Add the Focal Point:
In the center of the design, add three gold spacer rings/beads. This creates a metallic break in the clay texture and serves as the anchor for the charms. -
Tie the Knot:
Bring the ends of the elastic together and tie a strong surgeon’s knot. Pull tight to close any gaps between beads. -
Secure the Knot:
Add a tiny drop of superglue to the knot. Once dry, thread the ends back into neighboring beads to hide them, then trim the excess. -
Attach Charms:
Using pliers, open a jump ring and attach the clay heart charm to the center gold spacer ring. Add the yellow flower charm and the small metal charm to the same ring or adjacent loops for a clustered look.
Wear your new bracelet stacked with others or let it shine as a solo statement piece
Mini Bakery Bites Charms
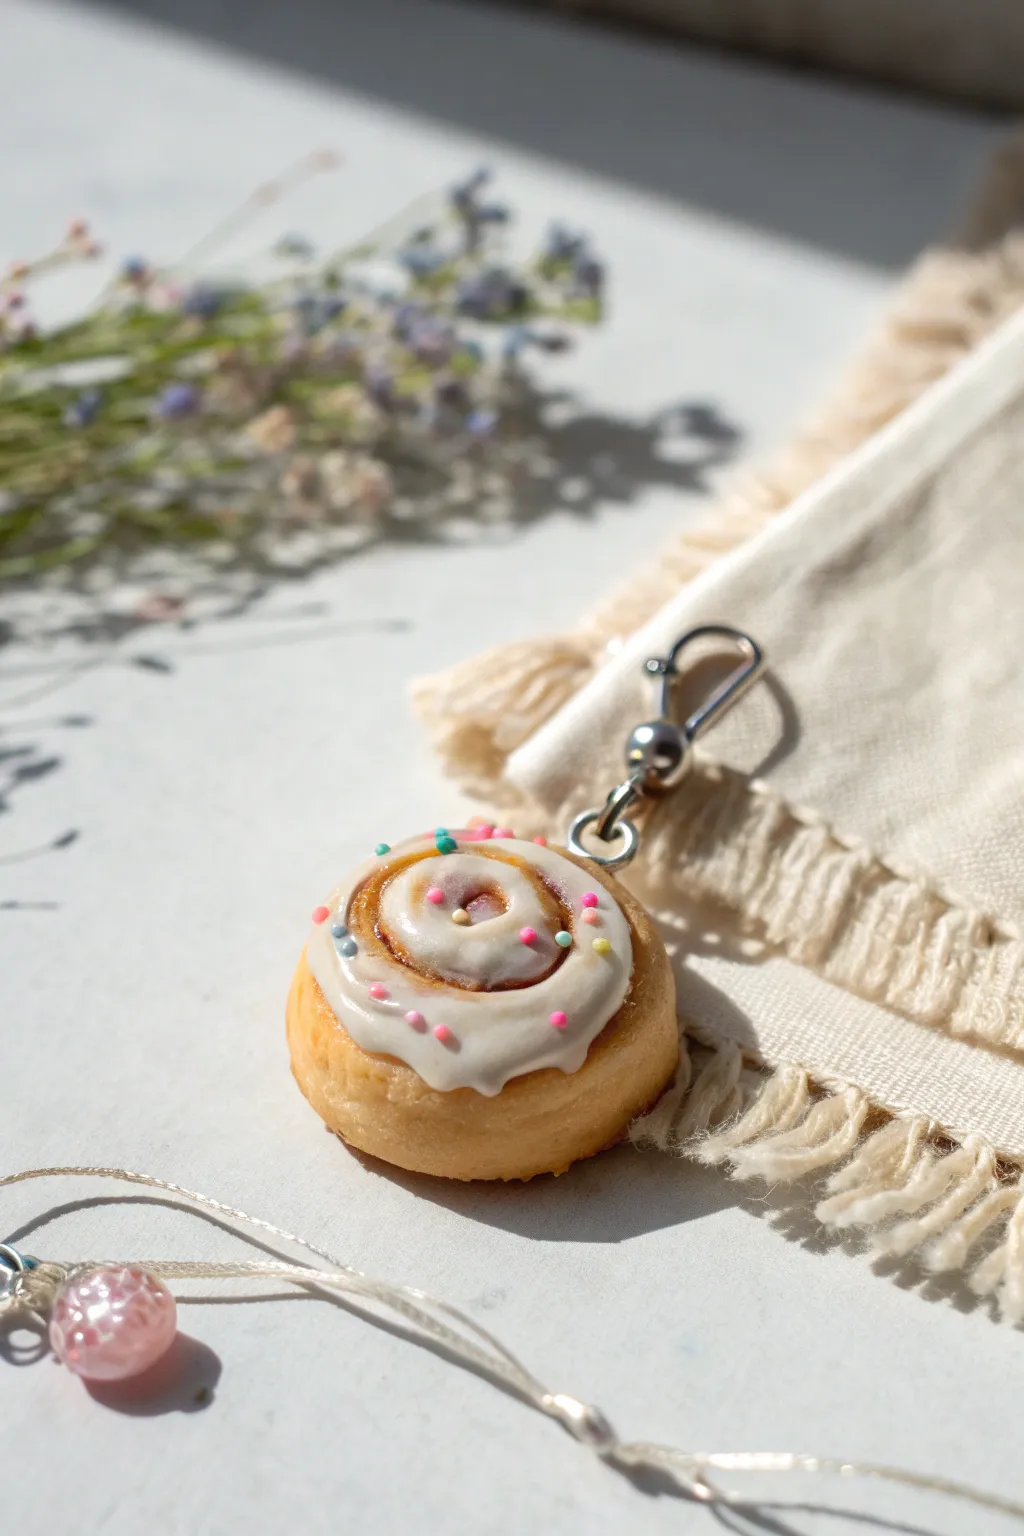
Capture the sweetness of a Sunday morning with this delightful miniature cinnamon roll charm. Featuring realistic golden-brown shading and glossy white icing topped with colorful sprinkles, this tiny treat looks almost good enough to eat.
Step-by-Step Guide
Materials
- Polymer clay (beige/tan, translucent, and various pastel colors for sprinkles)
- Liquid polymer clay (translucent or white)
- White polymer clay (for mixing icing)
- Soft pastel chalks (oranges, browns, yellow ochre)
- Paintbrush (soft bristle for shading)
- Needle tool or toothpick
- Ball tool (small)
- Eye screw pin
- Jump ring and lobster clasp
- Gloss glaze or UV resin (optional)
- Old toothbrush (for texture)
- Acrylic rolling pin or pasta machine
Step 1: Shaping the Dough
-
Mix the Dough Color:
Start by conditioning your beige polymer clay until it’s soft and pliable. I like to mix a tiny amount of translucent clay into the beige to give the pastry a more realistic, slightly airy look rather than a flat opaque color. -
Create the Filling Layer:
Take a small pinch of the beige clay and mix in some brown pastel chalk shavings or a tiny bit of brown clay to create a cinnamon-sugar color. Roll this into a very thin snake or flat strip. -
Roll the Basic Coil:
Roll your main beige clay into a long, even snake about 0.5cm thick. Flatten it slightly with your finger, then lay your thin ‘cinnamon’ strip on top of it. Roll the entire strip up into a spiral completely to form the classic bun shape. -
Secure the End:
Tuck the tail end of your clay spiral underneath the bun and blend the seam gently with a modelling tool so it doesn’t unravel during baking. -
Add Texture:
Gently tap the surface of the bun with an old toothbrush. This creates tiny pores that mimic the texture of baked bread.
Texturing Tip
Don’t over-texture the icing area! Keeping the bun rough but the icing area smooth before application helps the liquid clay settle naturally without unexpected bubbles.
Step 2: Baking Effect & Hardware
-
Prepare Shading dust:
Scrape some yellow ochre, orange, and reddish-brown pastel chalks into fine powders on a piece of paper. -
Apply the Golden Glow:
Using a soft dry brush, dust the yellow ochre all over the bun. Focus the darker browns on the edges and the top ridges of the spiral where a real pastry would brown the most in the oven. -
Insert Hardware:
Before baking or adding icing, insert your metal eye screw into the side or top of the bun. If the clay distorts, gently reshape it with your fingers. -
First Cure:
Bake the naked bun according to your clay manufacturer’s instructions (usually 275°F/130°C for 15 minutes) and let it cool completely.
Step 3: Icing & Sprinkles
-
Mix the Icing:
In a small container or on a tile, mix liquid polymer clay with a chunk of white solid clay until you have a thick, gooey consistency that resembles real icing. It should hold its shape but still flow slightly. -
Drizzle the Frosting:
Using a needle tool, carefully drag the liquid clay mixture over the top of your cooled bun. create realistic drips down the sides, but don’t cover the whole thing—let that beautiful golden-brown shading peek through on the edges. -
Create Sprinkles:
Roll extremely thin snakes of pink, blue, yellow, and green clay. Bake these raw snakes for just 3-5 minutes to harden them, then chop them into tiny bits with a blade to make realistic sprinkles. -
Decorate:
Using tweezers or slightly moist fingers, drop the tiny clay sprinkles onto the wet liquid clay icing. Press them down very gently so they sit securely in the frosting. -
Final Cure:
Bake the piece again for another 15 minutes to set the liquid clay icing. -
Finishing Touches:
Once cool, attach your jump ring and lobster clasp to the eye screw. -
Glaze (Optional):
For extra realism, brush a thin layer of satin or gloss glaze just over the white icing parts to make it look wet and sugary, leaving the bread part matte.
Fixing Runny Icing
If your liquid clay icing is too runny and dripping off, let it sit on a piece of paper for 10 minutes. The paper will leech out some plasticizer, thickening the mix.
Now you have a charming accessory perfect for a baker’s keychain or a sweet gift
Shell Critters With Clay Details
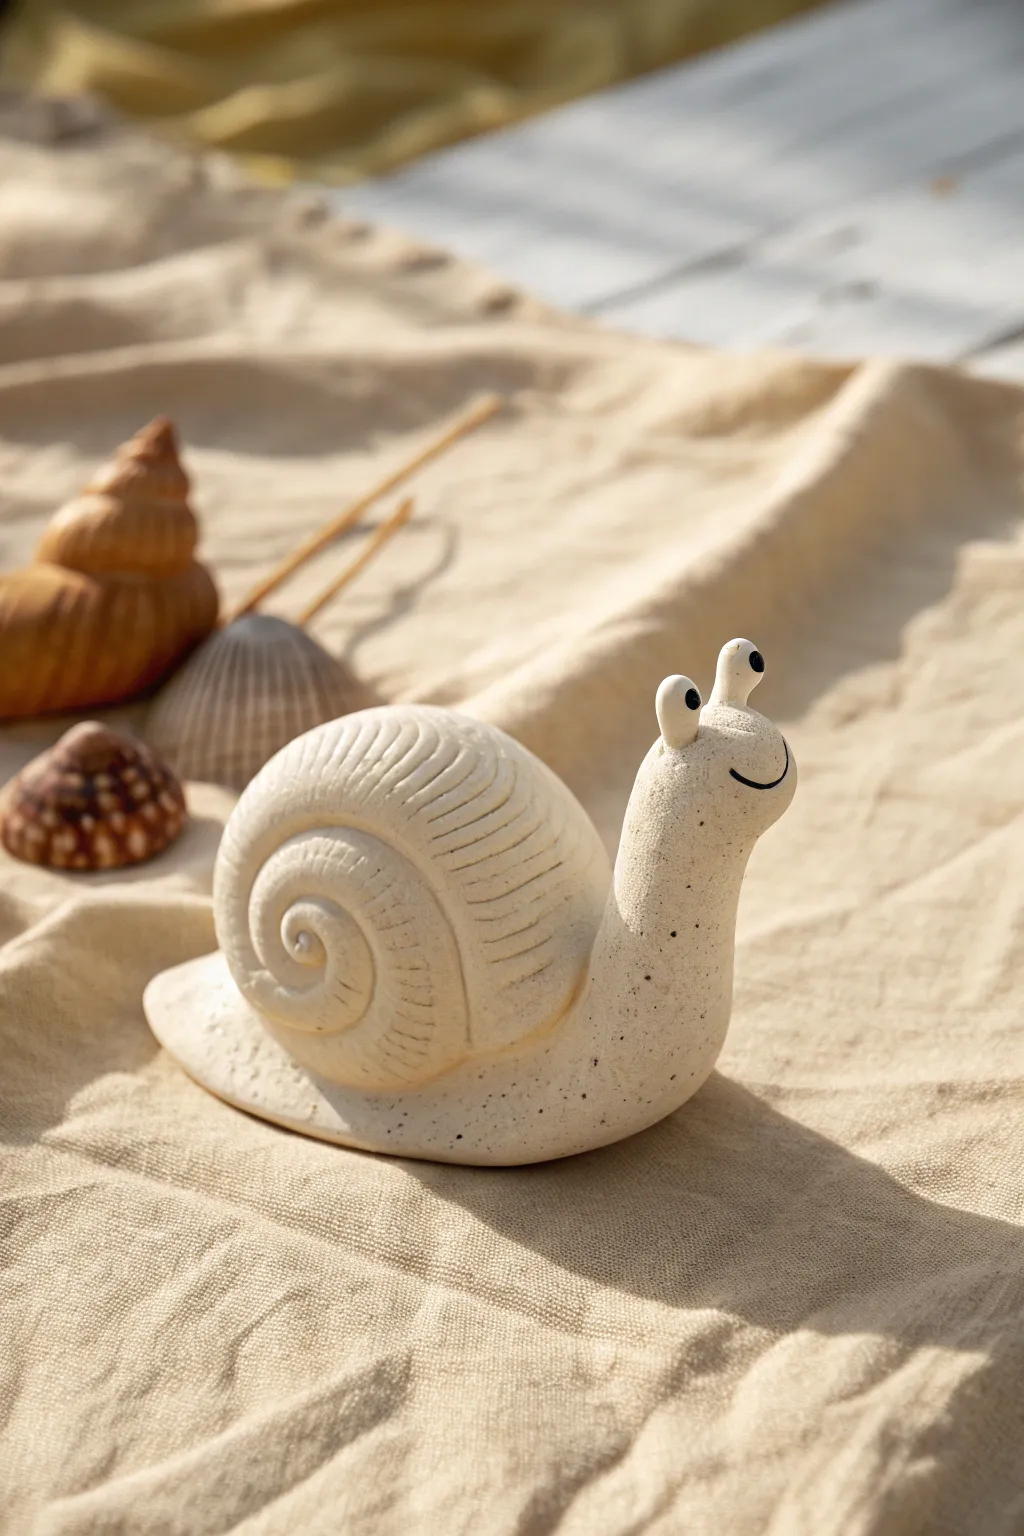
Create a charmingly minimalist snail companion with a rustic twist. This project combines simple coil techniques with subtle texturing to produce a friendly ceramic figure that feels both modern and organic.
Step-by-Step Tutorial
Materials
- Speckled buff stoneware clay (or polymer clay with faux speckles)
- Small rolling pin
- Pointed modeling tool or needle tool
- Scoring tool (or an old toothbrush)
- Slip (clay and water mixture)
- Black underglaze (or acrylic paint)
- White underglaze (or acrylic paint)
- Fine detail brush
- Sponge
Step 1: Forming the Body
-
Prepare the base:
Start by taking a medium-sized ball of clay and rolling it into a thick, elongated tapered log. One end should be thicker for the head, tapering down to a flatter, pointed tail. -
Shape the neck:
Gently bend the thicker end upwards to create the snail’s neck and head. Smooth the transition curve so it looks natural and upright. -
Flatten the foot:
Press the bottom of the log onto your work surface to create a flat, stable ‘foot’ for the snail. Use your thumb to gently flair the edges of the tail section slightly, giving it that gliding appearance.
Hollow it Out
If making a large ceramic version, scoop out the inside of the body and poke a tiny hidden air hole to prevent explosions in the kiln.
Step 2: Creating the Shell
-
Roll the coil:
Roll out a separate long, even snake of clay. It should be about the thickness of your finger and long enough to coil several times. -
Spiral the coil:
Begin rolling the snake into a tight spiral, starting from one end. Keep the coil tight against itself as you roll to form a disc shape. -
Shape the dome:
Instead of leaving the spiral flat, gently push the center of the coil outwards from the back to give the shell a domed, convex shape. -
Smooth the seams:
On the *back* side of the shell (the side that will attach to the body), use a modeling tool to blend the coils together completely. This creates a solid surface for attachment while keeping the spiral detail visible on the front. -
Add shell texture:
Using a needle tool or the edge of a spatula, gently press recurring curved lines along the spiral on the front side to mimic growth ridges. -
Attach the shell:
Score the side of the snail’s body and the back of the shell. Apply slip to both areas and press firmly to attach the shell to the body. -
Blend the join:
Use a small tool to smooth the clay around the connection point where the shell meets the body, ensuring a seamless and strong bond.
Garden Guardian
Coat your finished snail in a UV-resistant clear coat or outdoor varnish so it can live among your potted plants without fading.
Step 3: Adding Details
-
Make the eyes:
Roll two very small balls of clay for the eyes. Create two short stalks by pulling a tiny bit of clay up from the top of the head. -
Attach the eyes:
Score and slip the tops of the stalks and the small balls, then press them into place. I find blending the clay slightly at the neck of the eye stalk adds durability. -
Smooth everything:
Use a slightly damp sponge to wipe down the entire piece. This smooths out fingerprints and softens any harsh tooling marks.
Step 4: Finishing Touches
-
Dry or bake:
If using ceramic clay, let the piece dry slowly under plastic before bisque firing. If using polymer clay, bake according to package instructions. -
Paint the smile:
Using a very fine liner brush and black underglaze (or acrylic), paint a simple, curved line for the smile and two dots for pupils. -
Highlight the eyes:
Add a tiny dot of white to the black pupils to give the snail a lively, alert expression. -
Final wipe:
If using ceramic clay with speckles, wipe the surface with a damp sponge after the bisque fire to expose the grog/speckles before the final clear glaze firing. If using polymer, a matte varnish works best.
Place your happy little snail on a shelf or in a planter to bring a slow, steady calmness to your space
Secret-Lid Animal Trinket Box
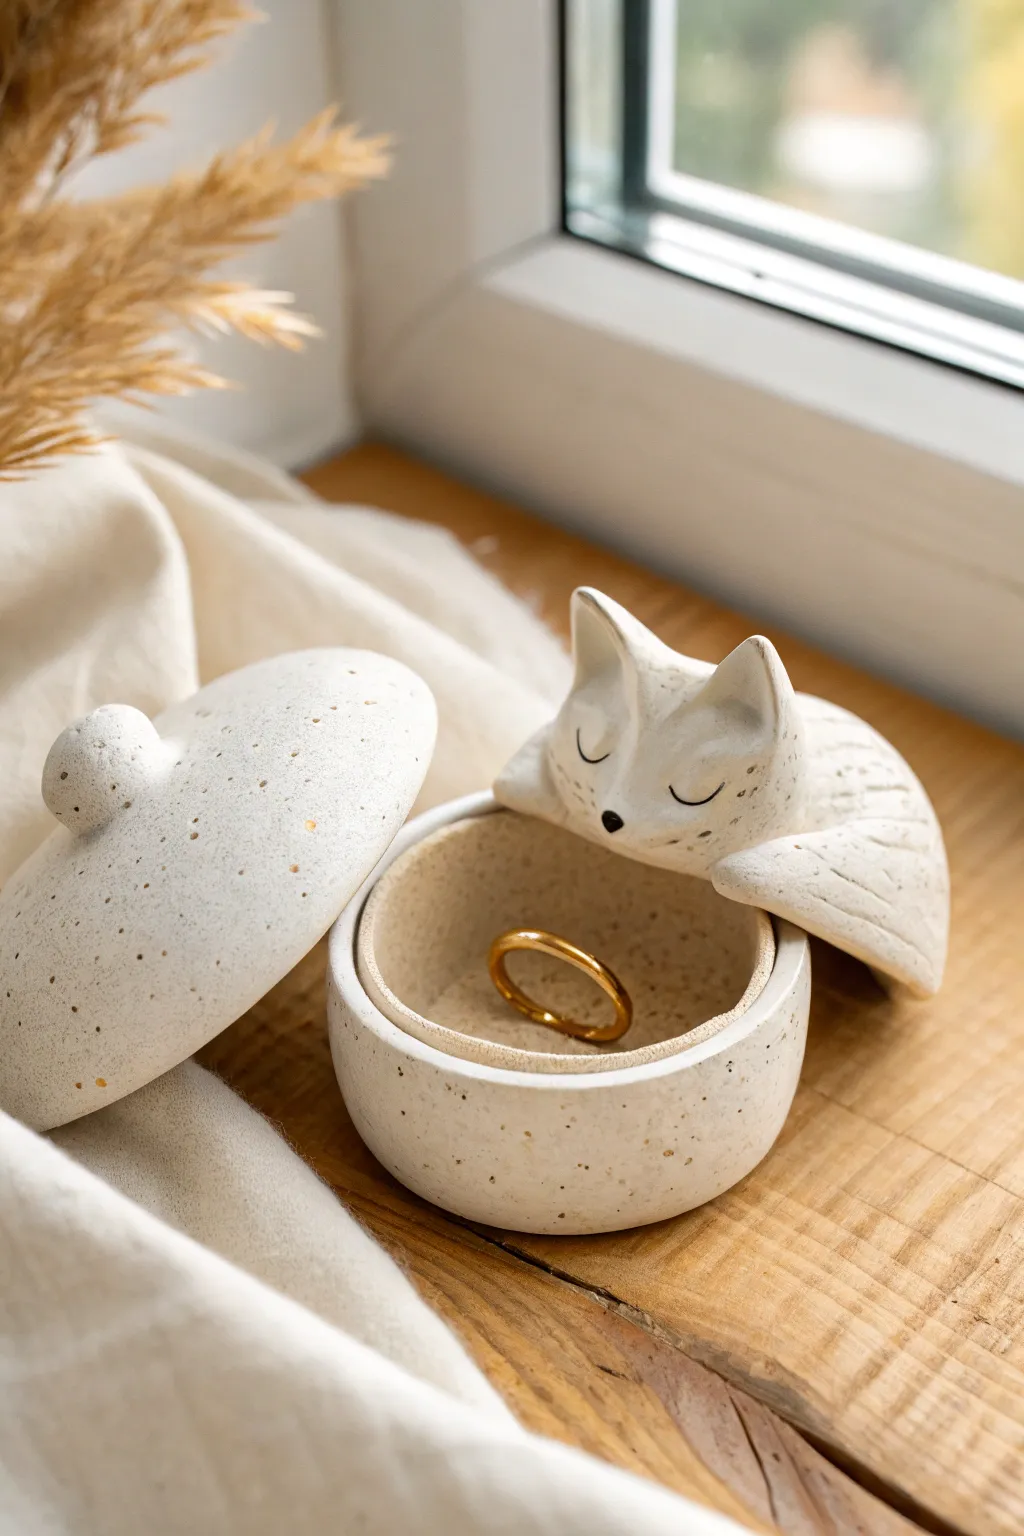
Create a charming, speckled stoneware trinket box that features a serene, sleeping fox resting on the rim. This unique design incorporates a dual-lid concept, combining a sculpted animal figure with a functional lidded vessel for a truly special keepsake.
Step-by-Step Guide
Materials
- Speckled cream stoneware clay (e.g., Laguna Speckled Buff)
- Pottery wheel (or slab roller/rolling pin for hand-building)
- Needle tool
- Rib tool (wood or rubber)
- Fettling knife
- Slip and scoring tool (serrated rib)
- Small sponges
- Loop trimming tools
- Clear matte glaze
- Black underglaze or oxide pencil
- Small fine-point liner brush
- Kiln
Step 1: Throwing or Building the Base Form
-
Center the clay:
Begin with about 1 lb of speckled clay. Center it firmly on the wheel head, ensuring it feels stable and even before opening. -
Open and pull the walls:
Open the clay to create a flat internal floor about 3-4 inches wide. Pull the walls straight up to a height of roughly 2 inches, keeping them relatively thick (about 1/4 inch) to support the future gallery. -
Create the gallery:
Using a wooden rib or modeling tool, carefully split the rim to create a gallery (an internal ledge) where the lid will sit. Compress the rim well to prevent cracking. -
Smooth and refine:
Use a flexible rib to remove throwing lines and smooth the exterior surface. Wire cut the pot from the bat and set it aside to stiffen to leather-hard. -
Make the lid:
With a smaller lump of clay (about 0.5 lb), throw a simple domed lid. Measure the diameter of your pot’s gallery carefully with calipers to ensure a snug fit. Add a small, rounded knob on top while throwing.
Shrinkage Issues?
If the lid no longer fits after drying, sand the edge of the lid gently with greenware sandpaper before bisque firing. Do not force it, or the dry clay will crack.
Step 2: Sculpting the Sleeping Fox
-
Shape the fox body:
Roll a coil of clay into a tapered crescent shape. This will form the sleeping body and tail of the fox. Flatten the bottom side slightly so it will rest securely on the rim. -
Sculpt the head:
Form a small, rounded triangle for the head. Pinch two smaller triangles of clay and attach them for the ears, smoothing the seams completely. -
Refine facial features:
Gently press indentations for the eyes and define the snout. I find using a small blending tool helps keep the curves soft and organic. -
Attach the head to the body:
Score and slip the neck area and attach the head to the crescent body. Position it so the fox looks like it is resting its chin on its paws or tail. -
Add texture:
Use a needle tool or a stiff brush to scratch light, short lines into the clay to mimic fur texture, particularly on the tail and cheeks.
Step 3: Assembly and Finishing
-
Trim the pot:
Once leather-hard, center the pot upside down on the wheel and trim the foot ring. Clean up the lid as well, ensuring it fits perfectly into the gallery. -
Fit the fox:
Place the sculpted fox onto the rim of the pot. Currently, the fox acts as a decorative element that hugs the edge. You may need to gently curve the fox’s body to match the radius of the bowl. -
Secure the fox (Optional):
Decide if the fox is permanently attached or a removable piece. If attaching, score and slip the contact points on the rim and the underside of the fox, then meld the seams. -
Bisque fire:
Let all pieces dry very slowly to prevent warping, especially if the fox is attached to the rim. Fire to cone 04 (or your clay’s bisque temperature). -
Detailing the face:
Using a fine liner brush and black underglaze, carefully paint two small U-shapes for sleeping eyes and a tiny dot for the nose. -
Glazing:
Dip or brush a clear matte glaze over the entire piece. Avoid getting glaze on the flange where the lid sits or the foot ring. Wipe back any glaze that covers the black underglaze details if your glaze is too opaque. -
Final firing:
Fire the kiln to the maturity temperature of your clay (usually cone 5 or 6 for stoneware). Ensure the lid is fired separately or with proper wadding to prevent sticking.
Add Gold Accents
After the final glaze firing, apply gold luster overglaze to the nose or lid knob. Following the product safety guides, re-fire at a low temperature (cone 018) for sparkle.
Place a small ring or treasure inside to test out your beautiful new guardian vessel
Mini Clay Diorama Keepsake
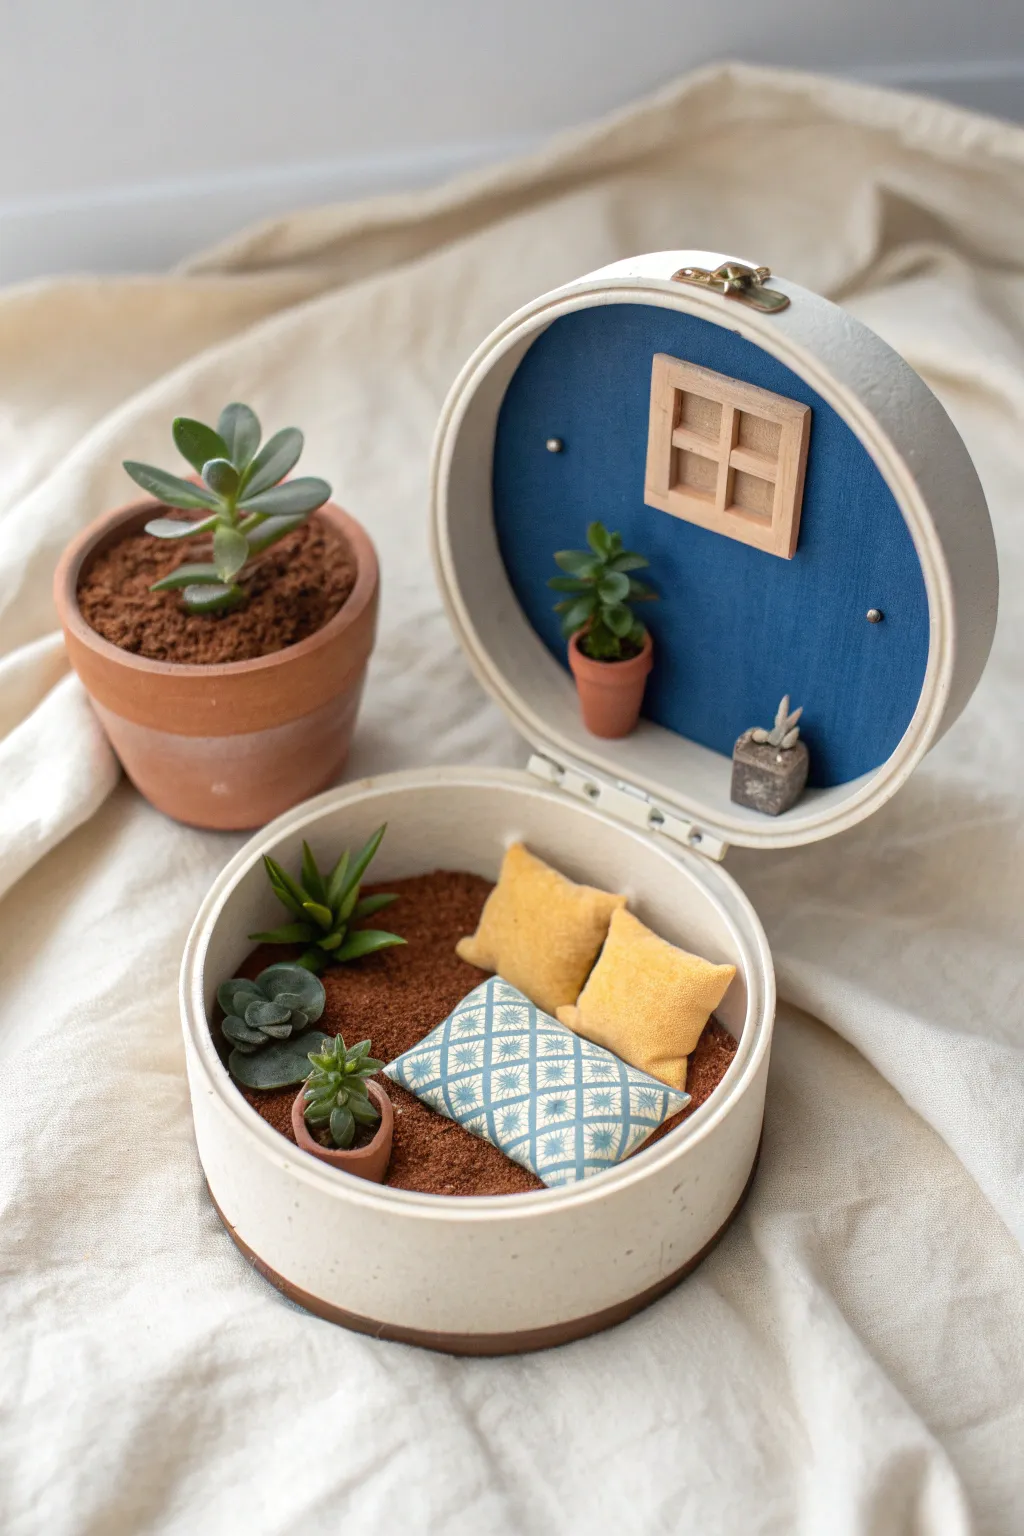
Transform a simple round box into a charming miniature world complete with tiny succulents and cozy pillows. This whimsical diorama captures the serenity of an indoor garden in a portable, palm-sized keepsake.
Step-by-Step Tutorial
Materials
- Small round wooden box with hinged lid (approx. 3-4 inches diameter)
- Polymer clay (green shades, terra cotta, grey, yellow, white/blue)
- Brown textured scenic sand or finely ground coffee grounds
- Tacky glue or strong craft adhesive
- Balsa wood scraps or craft matchsticks
- Dark blue acrylic paint or fabric scrap
- Mod Podge or varnish (matte)
- Exacto knife
- Small clay sculpting tools
- Patterned fabric scrap (for patterned pillow)
- Tweezers
Step 1: Preparing the Box Structure
-
Prep the base:
Begin with a clean, round wooden box. If the wood is rough, give it a light sanding. Paint the exterior a creamy off-white or leave it natural wood depending on your preference. Let it dry completely. -
Create the sky backdrop:
Cut a circle of dark blue cardstock or fabric to fit snugly inside the lid of the box. Alternatively, paint the interior lid directly with deep blue acrylic paint to simulate a night sky or a cozy wall color. -
Build the window:
Cut four small strips of balsa wood to create a square frame, and two smaller strips for the crossbars. Glue them together to form a rustic window. Once dry, adhere this to the upper right quadrant of the blue backdrop.
Texturing Tip
Before baking, lightly dust your clay succulents with soft pastel chalk shavings (purples or reds) using a dry brush to give the leaf edges a realistic, sun-stressed blush.
Step 2: Sculpting the Miniature Succulents
-
Mix your greens:
Condition your green polymer clays. Mix a few shades—some darker, some lighter—to add realism to your plants. A tiny bit of translucent clay mixed in can make leaves look waxy and real. -
Form the tiny pots:
Roll small balls of terra cotta colored clay. Flatten the bottoms and use a ball stylus tool to indent the top, creating a pot shape. Make one slightly larger than the other. -
Assemble the tall succulent:
For the lid plant, roll tiny teardrops of green clay. Press them together in layers, starting small in the center and working outward, stack them vertically to create a taller succulent shape. Place it gently into the smaller clay pot. -
Create the ground succulents:
For the base, sculpt two or three distinct succulents. One can be a flat rosette shape (echeveria style) and another a spiky, aloe-like plant. Vary the green shades here for contrast. -
Sculpt the stone planter:
Take a tiny cube of grey clay and texturize it with a toothbrush or sandpaper to look like concrete or stone. Add a tiny sprig of green clay or a dry twig to represent a dried plant.
Glue Trouble?
If elements won’t stick to the textured sand, scrape a tiny bit of sand away to expose the wood floor beneath. Glue the clay item directly to the wood for a permanent bond.
Step 3: Making the Cozy Accessories
-
Shape the yellow pillows:
Form two squares from yellow clay. Gently pinch the corners to soften them and press the center slightly to make them look plush and lived-in. -
Texture the pillows:
Gently press a piece of actual fabric or a fine sandpaper onto the raw yellow clay surface to impart a subtle textile texture, removing the fingerprint look. -
Create the patterned cushion:
Make a rectangle of white clay. You can either carefully paint a blue grid pattern after baking, or for a cleaner look, wrap the raw clay in a tiny scrap of real patterned fabric, gluing the edges on the underside. -
Bake the clay:
Arrange all your clay pieces (pots, plants, pillows, stone planter) on a tile or baking sheet. Bake according to your brand’s specific temperature instructions, usually around 275°F (135°C) for 15-20 minutes.
Step 4: Assembly & Finishing
-
Prepare the dirt floor:
Coat the bottom interior of the box with a thick layer of tacky glue. While wet, pour your brown scenic sand or dried coffee grounds over it. Press down gently and shake off excess once the glue grabs. -
Install the lid décor:
Using a strong super glue or epoxy, attach the small terra cotta pot with the tall succulent to the inside of the lid, slightly to the left. Glue the grey stone cube near the bottom edge of the lid rim. -
Arrange the garden floor:
Glue your larger succulents directly to the textured ‘dirt’ on the left side. I like to nestle them in slightly so they look planted rather than just sitting on top. -
Place the seating area:
Arrange the three pillows on the right side of the base. Stack the yellow ones slightly and place the patterned one in front to create an inviting lounge area. -
Final touches:
Use tweezers to remove any stray sand grains from the plants or pillows. Let that glue cure completely for 24 hours before trying to close the box keeps everything secure.
Now you have a secret tiny garden you can open up whenever you need a moment of calm