
Whenever students ask me what actually sells well, I always point them toward small, giftable clay pieces that feel both cute and useful. Here are my favorite clay ideas to sell—starting with the classics people snap up fast, then sliding into the more niche, “where did you get that?” kind of makes.
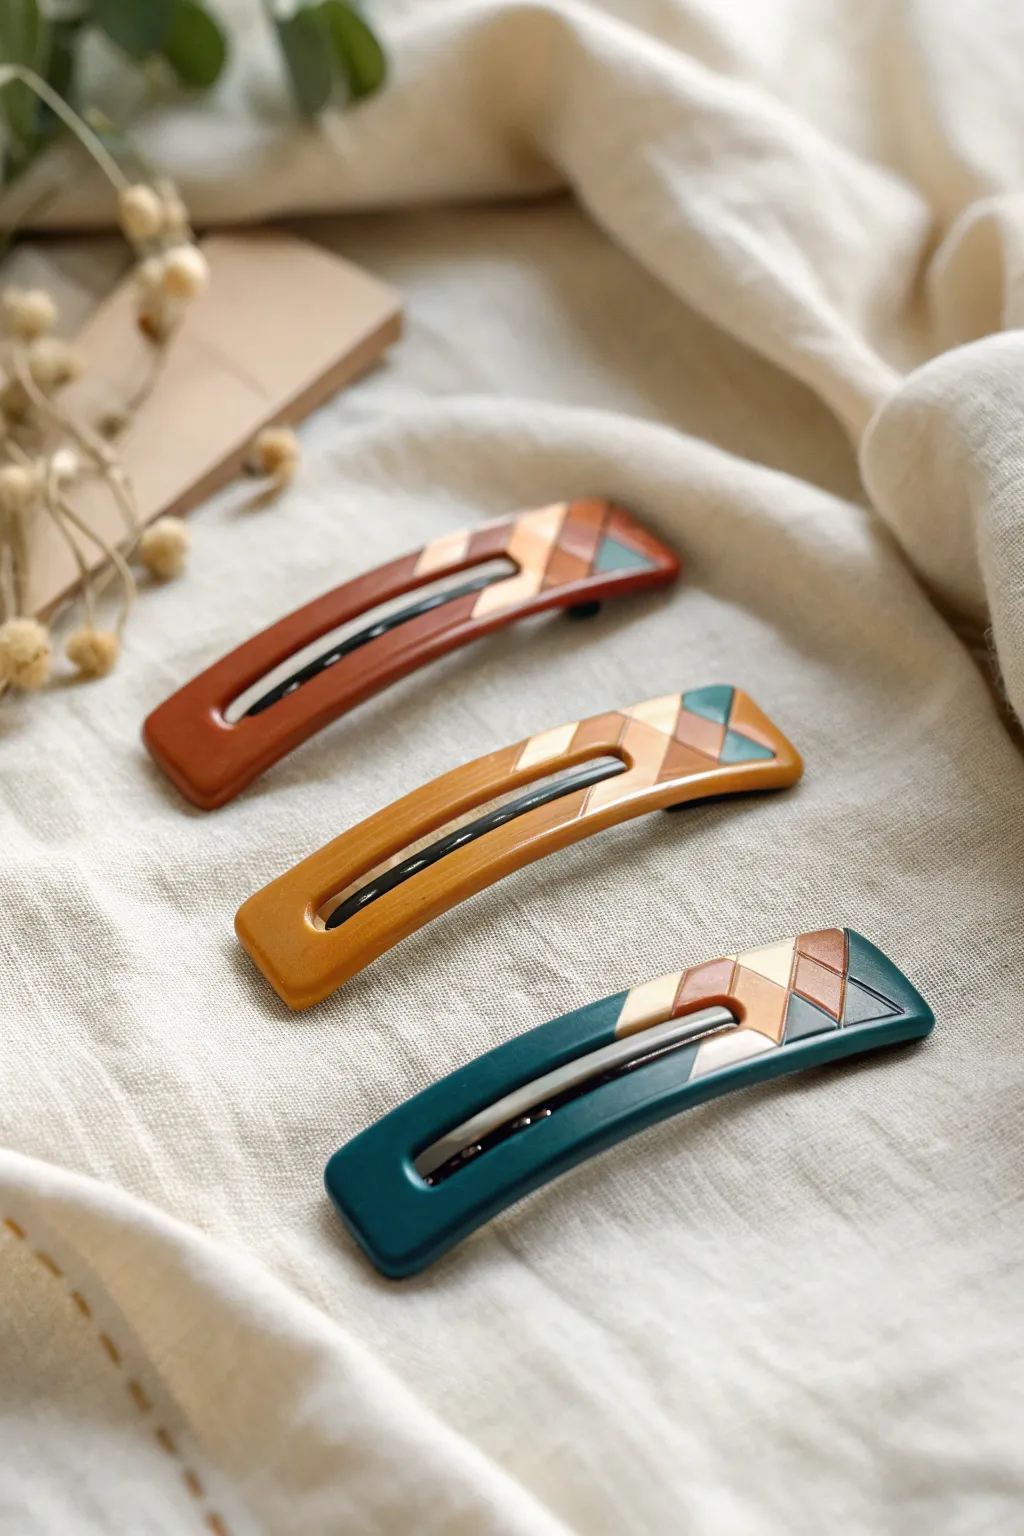
Trendy Polymer Clay Earrings
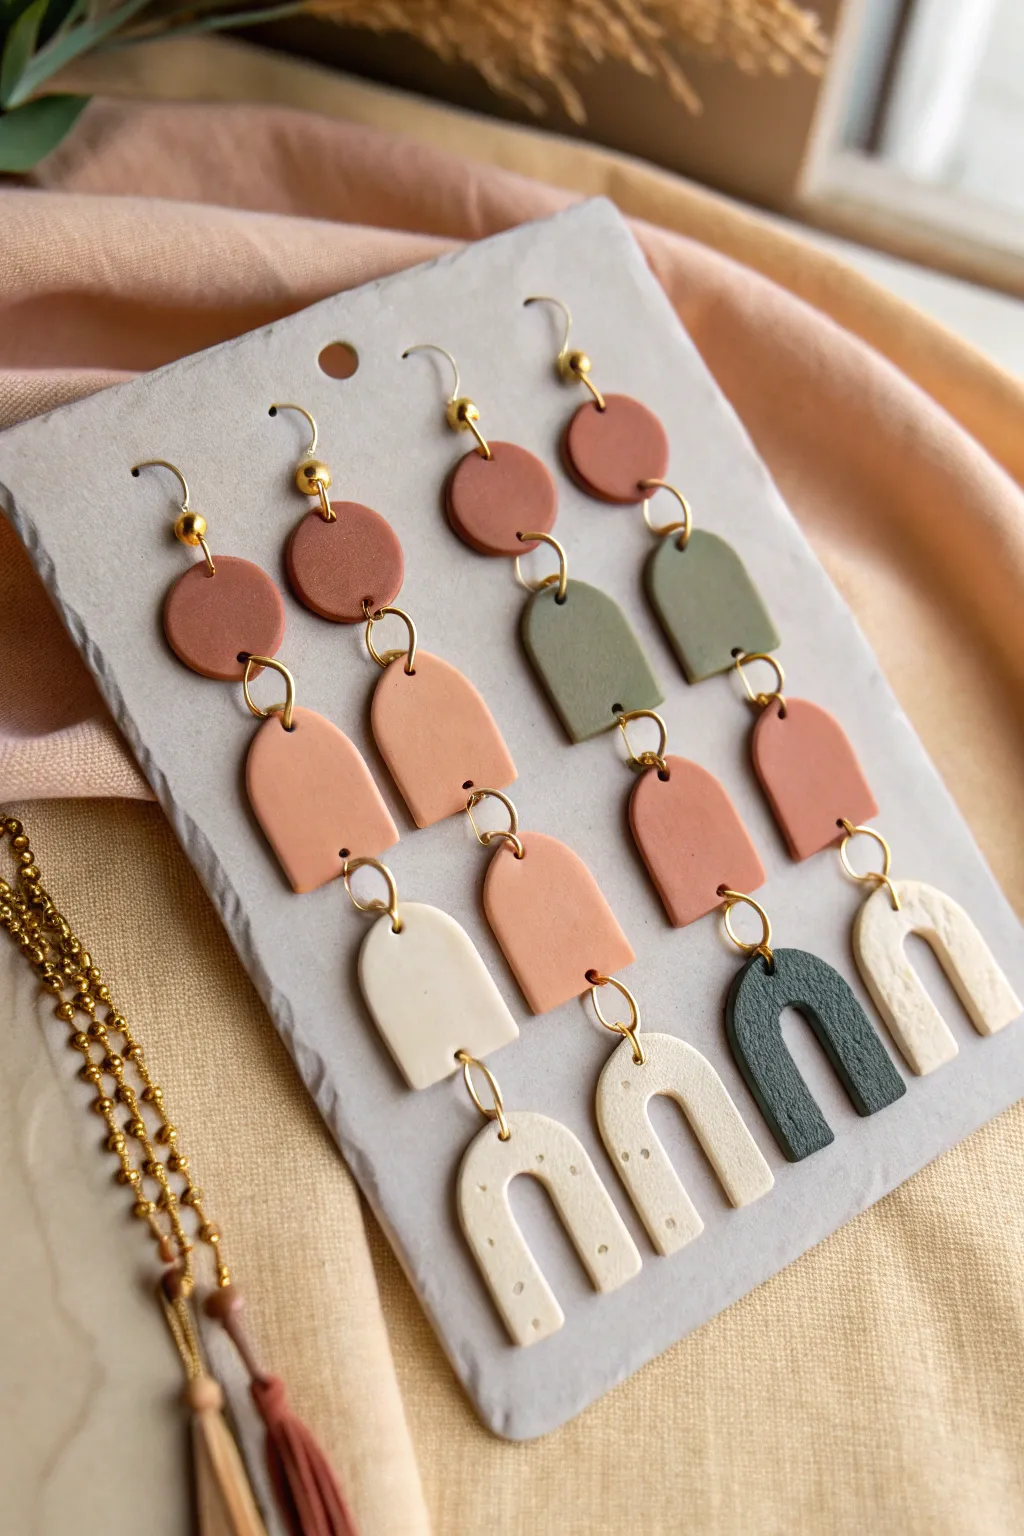
Create a statement with these stunning four-tier dangling earrings featuring muted earth tones and varied arch shapes. The combination of terracotta, sage, peach, and cream polymer clay gives these pieces a sophisticated, organic feel perfect for any modern wardrobe.
How-To Guide
Materials
- Polymer clay (Terracotta, Sage Green, Peach/Salmon, Cream/White)
- Clay roller or pasta machine
- Clay cutters (Small circle, small arch/tombstone, medium arch, U-shape)
- Jump rings (Gold, 6-8mm)
- Earring hooks (Gold)
- Needle tool or toothpick
- Jewelry pliers (flat nose and round nose)
- Needle tool or Awl
- Parchment paper or ceramic tile for baking
- Oven
Step 1: Preparation & Cutting
-
Condition the clay:
Begin by thoroughly kneading each color of clay separately until it is soft and pliable. This prevents cracking later. I like to wash my hands between colors to keep the lighter shades like cream pristine. -
Roll out slabs:
Roll each color into a flat, even slab, approximately 3mm thick. Using a pasta machine on a medium setting ensures consistency across all your pieces. -
Cut the top circles:
For the top tier, use your small circle cutter to punch out two circles from the terracotta clay and two from the sage green clay (if making the second variation). -
Cut the middle arches:
Using the small arch or tombstone-shaped cutter, cut two shapes from the peach clay and two from the sage green clay. Smooth any rough edges with your finger. -
Cut the lower arches:
Cut the third tier using the same arch cutter or a slightly varied size. For the left pair, cut two cream arches. For the right pair, cut two terracotta arches. -
Create the bottom U-shapes:
For the final tier, use a specialized U-shape cutter. Cut two from the cream clay and two from a dark green or charcoal clay for the second pair. -
Add texture details:
On the cream U-shapes for the left pair, use a needle tool to gently press a line of small dots following the curve of the shape. Don’t puncture all the way through; just create an impression.
Smooth Moves
Before baking, dip your finger in a tiny bit of acetone or baby oil and gently rub the surface of the clay. This removes fingerprints and dust for a professional finish.
Step 2: Baking & Assembly
-
Pierce holes:
Before baking, use a needle tool or awl to carefully pierce holes for the jump rings. Each middle piece needs a hole at the very top and very bottom. The bottom-most U-shape only needs a hole at the top. -
Double check positions:
Lay the pieces out on your tile in their final formation to ensure the holes align correctly for dangling. -
Bake the clay:
Place your clay pieces on a parchment-lined baking sheet or ceramic tile. Bake according to the manufacturer’s instructions for your specific brand of clay—usually around 275°F (135°C) for 30 minutes. -
Cool down:
Let the pieces cool completely inside the oven or on a wire rack. They are fragile while warm but harden as they cool. -
Open jump rings:
Using two pairs of pliers, twist your gold jump rings open. Always twist laterally (front to back) rather than pulling them apart to maintain the circle shape. -
Connect the tiers:
Start from the bottom. Loop a jump ring through the U-shape piece and the arch above it, then close the ring securely. -
Continue upward:
Connect the next arch to the one above it with another jump ring. Repeat until you reach the top circle. -
Attach the hook:
Finally, attach the earring hook to the top of the terracotta circle using a small jump ring or by opening the loop on the earring wire itself. -
Final check:
Hold the earrings up to check that all pieces face forward. If one twists, simply gently twist the jump ring or add a second small ring to correct the orientation.
Texture Play
Try pressing a piece of sandpaper or coarse fabric onto the unbaked clay slab to give the U-shapes a stone-like texture before cutting them out.
Now you have a gorgeous set of handmade earrings ready to wear or gift to a stylish friend


Marbled Trinket Dishes With Metallic Edges
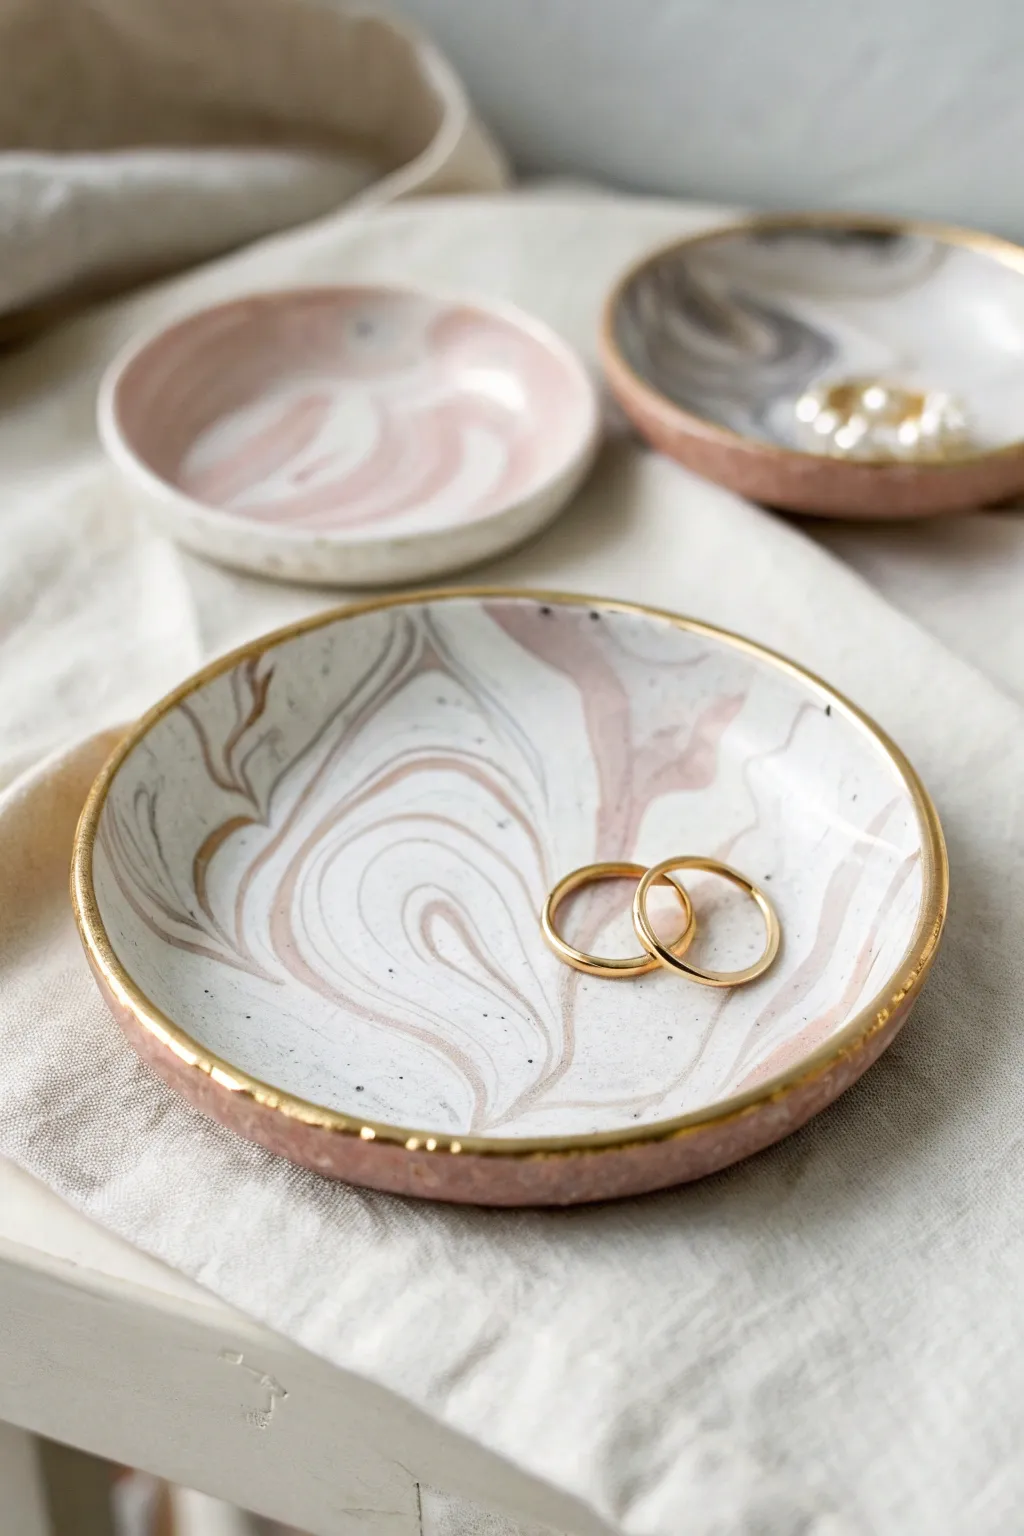
These sophisticated trinket dishes combine soft, organic marbling with a crisp metallic edge for a high-end boutique look. The swirling pink, grey, and white polymer clay creates a mesmerizing stone effect that makes each piece completely unique.
Detailed Instructions
Materials
- White polymer clay (approx. 2oz)
- Blush pink polymer clay (approx. 0.5oz)
- Grey/granite effect polymer clay (approx. 0.5oz)
- Acrylic rolling pin
- Round cookie cutter (approx. 3-4 inch diameter)
- Small oven-safe bowl or ramekin (for shaping)
- Liquid gold leaf or gold guilding paint
- Fine detail paintbrush
- Gloss glaze or polyurethane varnish
- Sandpaper (400 and 800 grit)
- Isostearic acid or baby oil (optional, for smoothing)
Step 1: Creating the Marbled Slab
-
Condition the clay:
Start by warming up each color of clay in your hands separately. Knead them until they are soft, pliable, and free of cracks. -
Form the base ropes:
Roll each color into a long, thin snake or rope. Since we want a white base, make the white rope significantly thicker than the colored ones. -
Twist together:
Ideally, gather the ropes into a bundle. Twist them together tightly until they look like a multicolor candy cane. -
Fold and roll:
Fold the twisted rope in half, then roll it out into a snake again. Repeat this twist, fold, and roll process 2-3 times. -
Check the pattern:
Be careful not to over-mix, or the colors will turn muddy. Look for distinct veins of color rather than a comprehensive blend. -
Create a ball:
Once satisfied with the marbling striations, roll the entire mixture into a smooth ball. -
Flatten the slab:
Using your acrylic rolling pin, roll the ball out into a flat sheet about 1/4 inch thick. Roll in different directions to stretch the marble pattern organically.
Cold Water Trick
To prevent fingerprints, dip your fingers in ice water before the final smoothing step. The cold shocks the clay surface slightly, making it resistant to prints without adding texture.
Step 2: Shaping and Baking
-
Cut the shape:
Press your round cookie cutter firmly into the most attractive section of your marbled slab to cut out the dish base. -
Smooth the edges:
Before lifting the circle, I like to gently run a finger dipped in a tiny bit of baby oil around the cut edge to smooth any roughness. -
Form the curve:
Gently lift the clay circle and place it inside your oven-safe bowl or turn the bowl upside down and drape the clay over it for a gentler curve. -
Ensure contact:
Press the center of the clay down gently so it sits flush with the bowl, ensuring the dish will have a flat bottom and won’t wobble later. -
Bake:
Bake the clay according to the manufacturer’s instructions (usually 275°F for 15-30 minutes, depending on brand and thickness). -
Cool down:
Remove from the oven and allow the clay to cool completely inside the bowl to maintain its shape as it hardens.
Step 3: Finishing Touches
-
Sand for perfection:
Once cool, use damp 400 grit sandpaper to smooth the rim, followed by 800 grit to polish the surface if needed. -
Wash and dry:
Rinse off any sanding dust and dry the dish thoroughly with a lint-free cloth. -
Paint the rim:
Shake your liquid gold leaf well. Using a fine detail brush, carefully paint a thin, uneven line along the top rim of the dish. -
Add organic details:
Allow the paint to dip slightly onto the inner or outer face of the rim in a few spots to mimic a natural, imperfect gilded stone look. -
Seal (Optional):
If you plan to use this for jewelry, a sealer isn’t strictly necessary, but a coat of gloss glaze will make the marble pattern pop and protect the gold rim.
Muddy Mired Colors?
If your colors are blending into a single muddy shade, you are over-working the twist. Stop folding sooner next time. You want distinct ropes, not a smoothie.
Place these delicate dishes near natural light to let that gold rim catch the sun


Minimal Ring Cones and Ring Holders
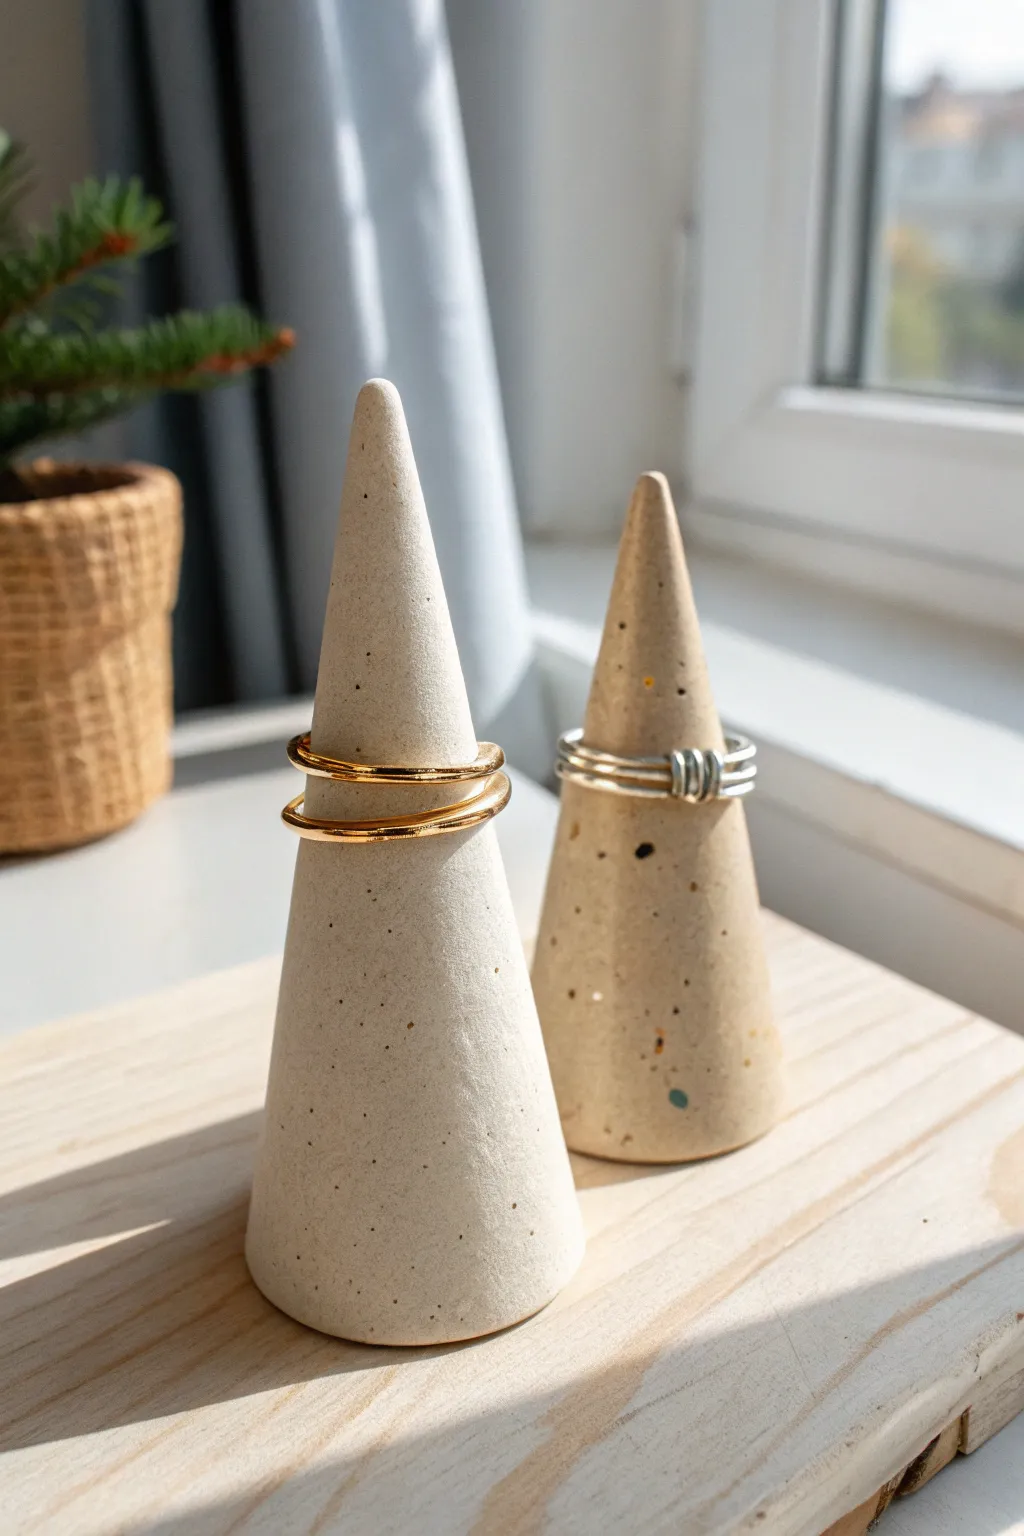
These minimalist ring cones combine modern simplicity with a natural, organic vibe thanks to their faux-stone finish. Creating these elegant displays is surprisingly easy, making them a perfect addition to your shop or vanity.
Step-by-Step Guide
Materials
- Polymer clay (white or beige base)
- Course black pepper or dried coffee grounds
- Gold or bronze mica powder (optional for speckles)
- Acrylic rolling pin
- Flexible cutting blade
- Smooth work surface (ceramic tile or glass)
- Oven thermometer
- Baking sheet with parchment paper
- Fine grit sandpaper (400-600 grit)
- Matte varnish (optional)
Step 1: Prepping the Clay
-
Condition the Clay:
Begin by warming up your base color polymer clay in your hands. Knead it thoroughly until it is soft, pliable, and free of cracks. -
Add Texture:
Flatten the conditioned clay slightly. Sprinkle a pinch of coarse black pepper or dried coffee grounds onto the surface. This creates that lovely organic, speckled stone look without needing expensive specialty clay. -
Fold and Knead:
Fold the clay over the inclusions and continue kneading. You want the specks to be distributed evenly throughout the entire lump, so keep folding and pressing until the mix looks uniform. -
Optional Metallic Touch:
If you want a hint of shimmer like real granite, mix in a tiny pinch of gold or bronze mica powder during the kneading phase. I find this catches the light beautifully on the finished piece.
Step 2: Shaping the Cones
-
Form a Ball:
Divide your clay into equal portions depending on how many cones you want to make. Roll one portion into a completely smooth ball between your palms, ensuring there are no seams. -
Create a Teardrop:
Place the ball on your work surface. angularly roll one side of the ball with the side of your hand or a flat tool to begin forming a teardrop or pear shape. -
Elongate the Cone:
Gently roll the clay back and forth on the table, applying slightly more pressure at the top and less at the bottom. The goal is to stretch the teardrop into a taller, tapered cone. -
Flatten the Base:
Once you are happy with the height, stand the cone up. Firmly tap the bottom against your work surface to create a flat, stable base so it won’t tip over. -
Refine the Silhouette:
Inspect the cone from all angles. Smooth out any finger marks by lightly gliding your finger up the sides. If the tip became too blunt, gently pinch and roll it specifically to sharpen the point. -
Check Stability:
Give the cone a gentle nudge. If it wobbles, press the base down firmly again on the flat surface to ensure it is perfectly flush.
Burnt Clay?
White clay yellows easily. If your oven has hot spots, tent a piece of aluminum foil over the cones while baking to protect them from direct heat.
Step 3: Baking and Finishing
-
Prepare for Baking:
Preheat your oven according to the manufacturer’s instructions on your specific package of clay. Use an oven thermometer to ensure the temperature is accurate, as spikes can scorch white clay. -
Bake:
Place your cones upright on a baking sheet lined with parchment paper. Bake for the recommended duration—usually 15 to 30 minutes depending on thickness. -
Cool Down:
Turn the oven off and let the cones cool down completely inside the oven or on a wire rack. Do not try to sand them while they are still warm. -
Sand the Surface:
Once cool, use fine-grit sandpaper to buff the surface. This removes any fingerprints and exposes the pepper flakes more clearly, enhancing the stone effect. -
Clean Up:
Wipe the cones with a slightly damp cloth to remove any sanding dust. -
Seal (Optional):
If you prefer a sealed finish, apply a thin coat of matte varnish. However, leaving the clay raw often maintains a more convincing stone texture.
Marbled Effect
Mix a tiny amount of grey or tan clay into your white base but stop kneading before fully blended to create subtle, realistic marble veins.
Now your chic ring cones are ready to organize your jewelry or be packaged up for your next craft market sale


Cute Clay Keychains and Bag Charms
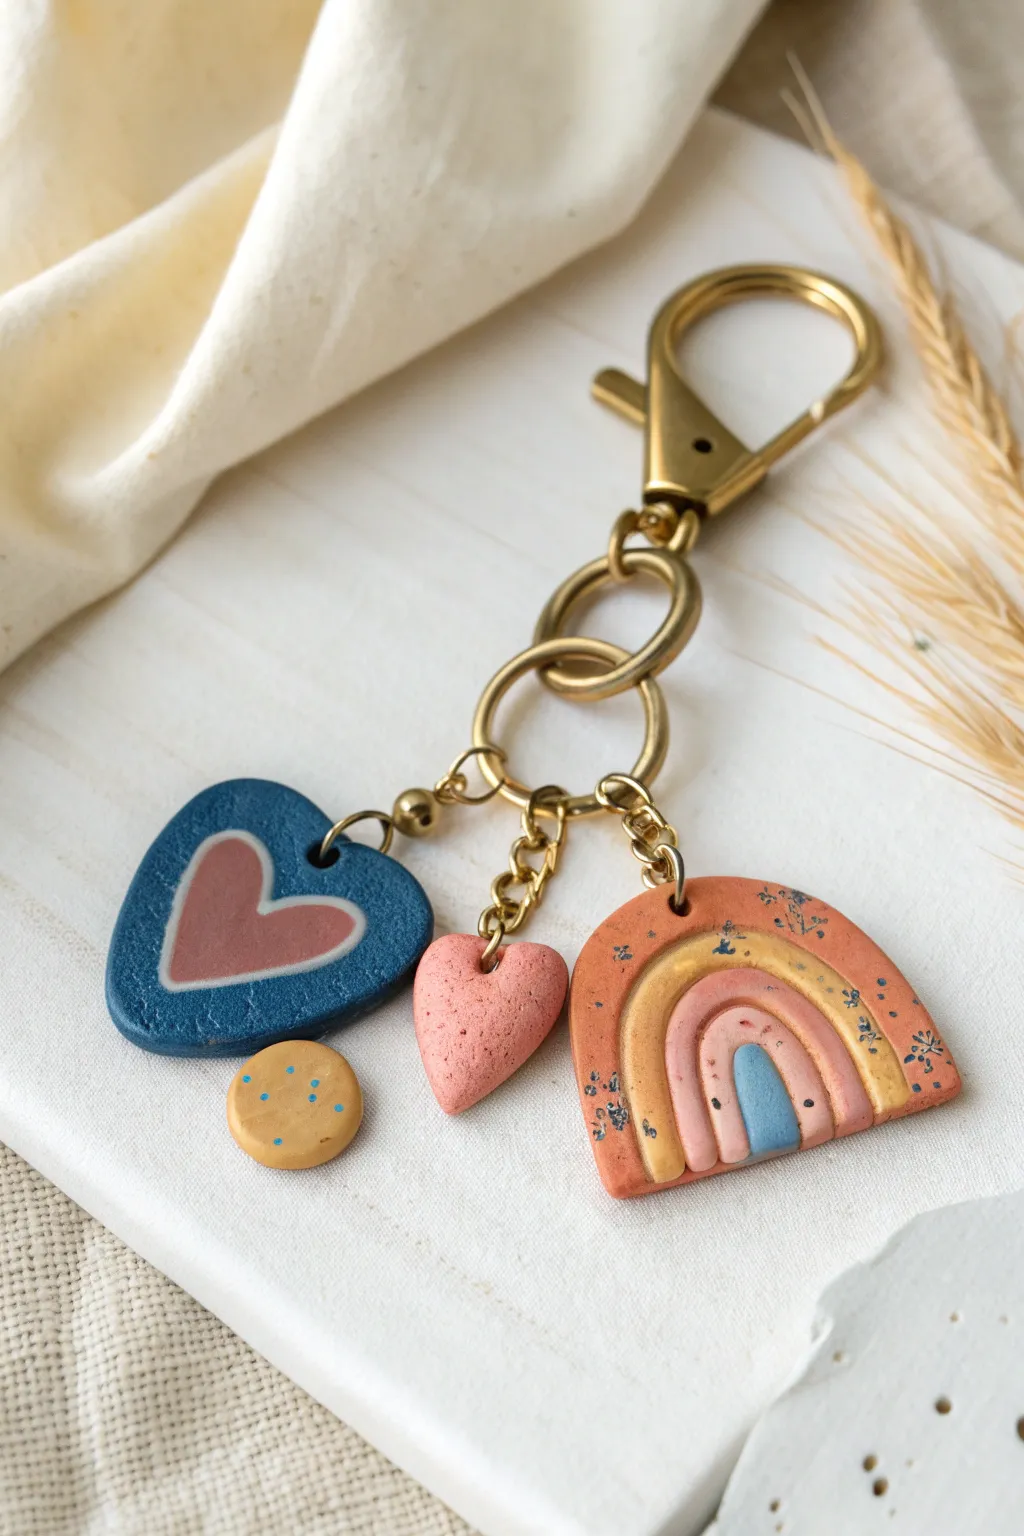
This charming keychain combines earthy tones with playful shapes to create a trendy, boho-chic accessory perfect for hanging on bags or organizing keys. The design features a stylized rainbow arch, two distinct heart charms, and a tiny textured accent piece, all assembled with elegant gold hardware.
Step-by-Step
Materials
- Polymer clay (Terracotta/Burnt Orange, Mustard Yellow, Dusty Pink, Slate Blue)
- Liquid polymer clay or bake-and-bond
- Gold keychain hardware (large lobster clasp, jump rings, small chain segments)
- Head pins or eyepins (gold)
- Needle tool or toothpick
- Small round cutter (approx. 1cm) or a straw
- Heart-shaped cutter (small and medium)
- Acrylic roller or pasta machine
- Jewelry pliers (round nose and flat nose)
- Acrylic paint (black or dark blue) and a fine brush for speckles
- Clay varnish (matte or satin finish)
Step 1: Creating the Boho Rainbow
-
Condition and Mix Colors:
Begin by conditioning all your clay colors until they are soft and pliable. If the colors are too bright, mix in a tiny bit of brown or beige to achieve that muted, earthy boho aesthetic. -
Roll the Arches:
Take the terracotta clay and roll it into a thick, even snake. Repeat this process with the mustard yellow, dusty pink, and slate blue clays, making each snake slightly thinner than the last. -
Shape the Rainbow:
Bend the slate blue snake into a tight ‘U’ shape to form the center arch. Wrap the pink snake snugly over it, followed by the yellow, and finally the terracotta snake on the outside. -
Trim the Base:
Use a sharp blade to trim the bottom of your rainbow straight across so all the arches are flush. Gently smooth the cut edges with your finger. -
Add Texture:
For the speckles, you can either mix ground pepper into the clay beforehand or wait until after baking to paint them. I prefer painting them later for more control, but you can gently poke small indents now if you want texture. -
Insert Hardware:
Carefully push a gold headpin or eyepin vertically through the center of the top terracotta arch. Ensure the loop at the top is oriented sideways for easy assembly later.
Smooth Seams Pro-Tip
Before baking the rainbow, gently brush a tiny bit of baby oil or clay softener over the arches. This smooths out fingerprints and helps the clay strands bond together seamlessly.
Step 2: Sculpting the Charms
-
Make the Large Heart:
Roll out a sheet of slate blue clay to about 4mm thickness. Use a medium heart cutter to cut out the base shape. -
Inlay the Detail:
Cut a smaller heart from the dusty pink clay. Carefully press this onto the center of the blue heart. Roll over it gently with your acrylic roller so the pink clay embeds flush into the blue surface. -
Pierce the Hole:
Use a needle tool or small straw to create a prominent hole near the top right lobe of the blue heart for the jump ring. -
Create the Puffy Heart:
Form a small ball of pink clay and shape it into a chubby heart by hand or with a cutter. Smooth the edges to potential rounded, puffy look. -
Add the Mini Accent:
Roll a tiny ball of mustard clay and flatten it slightly into a disc. Use a needle tool to add tiny dot textures or speckles on the surface. -
Final Hardware Prep:
Insert eye pins into the top of the puffy pink heart and the small mustard round charm. Ensure they are secure.
Hardware Pulling Out?
If an eyepin slides out after baking, pull it all the way out, put a drop of superglue on the metal shaft, and slide it back into the hole for a permanent hold.
Step 3: Baking and Assembly
-
Bake the Pieces:
Arrange all your clay components on a parchment-lined baking sheet. Bake according to your brand’s specific instructions (usually 275°F/135°C for 30 minutes). -
Cool and Speckle:
Let the pieces cool completely. If you didn’t add speckles earlier, dip an old toothbrush or stiff brush into diluted black or dark blue acrylic paint and flick it over the rainbow and charms for a stone-like effect. -
Varnish:
Once the paint is dry, apply a thin coat of matte or satin varnish to protect the surface and the paint speckles. -
Prepare the Main Ring:
Take your large gold split ring or lobster clasp setup. Attach two large jump rings to the main clasp to create length. -
Attach the Rainbow:
Using your pliers, open the loop on the rainbow’s eyepin and attach it to a small chain segment, then connect that to the main keyring assembly. -
Chain the Hearts:
Attach the puffy heart to a slightly shorter chain segment and the blue heart to the longest chain segment using jump rings. This staggered length creates a nice cluster effect. -
Final Connection:
Attach the small mustard charm to the chain near the blue heart. Hook all chain segments onto the main large jump ring and close it tightly with pliers.
Now you have a stylish, handcrafted accessory ready to organize your keys or gift to a friend

The Complete Guide to Pottery Troubleshooting
Uncover the most common ceramic mistakes—from cracking clay to failed glazes—and learn how to fix them fast.
Mini Clay Magnets That Pop
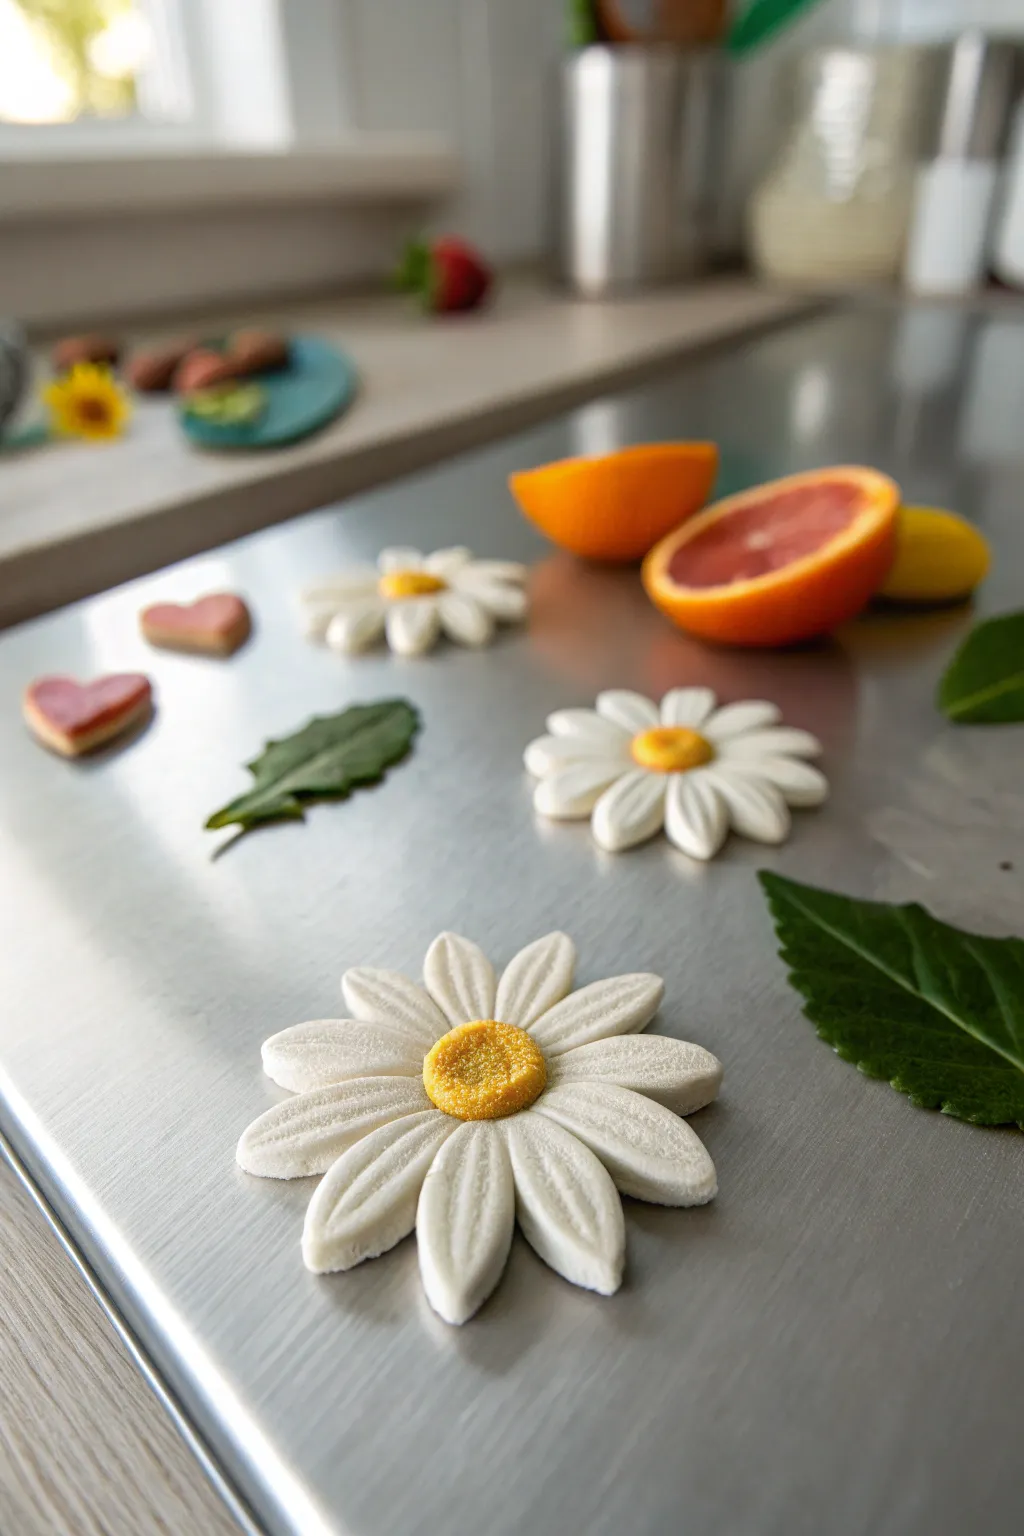
Bring a fresh burst of spring to your fridge with these charming, sculpted daisy magnets. Their textured white petals and sunny yellow centers create a delightful 3D effect that looks almost good enough to eat.
Step-by-Step Guide
Materials
- White polymer clay
- Yellow polymer clay
- Green polymer clay
- Pink polymer clay (optional for hearts)
- Clay sculpting tools (needle tool, ball stylus)
- Modeling tool or butter knife for petal indents
- Small round magnets (choose strong neodymium for best hold)
- Super glue (cyanoacrylate)
- Clean work surface or ceramic tile
- Baking sheet and oven (per clay instructions)
- Toothbrush or textured sponge (for center texture)
Step 1: Shaping the Flower Base
-
Condition the white clay:
Start by warming a chunk of white polymer clay in your hands. Knead and roll it until it becomes soft, pliable, and free of cracks. -
Create individual petals:
Pinch off small pieces of the conditioned white clay to form the petals. For the large flower, you will need about 10-12 pieces. Roll each one into a teardrop shape, keeping one end tapered and the other slightly rounded. -
Assemble the radial pattern:
On your work surface, arrange the teardrops in a circle with the tapered ends meeting in the center. Press them gently together so they stick, ensuring there is no large gap in the middle. -
Flatten the petals:
Gently press down on each petal to flatten them slightly. They should look like a classic daisy shape now, spreading outward from the center.
Clean Clay Pro-Tip
White clay attracts dust like a magnet! Keep a packet of baby wipes nearby to clean your hands and tools frequently, ensuring your white petals stay pristine.
Step 2: Adding Texture and Detail
-
Indent the petals:
Using a modeling tool or the back of a butter knife, press a single indentation line down the center of each white petal. Start from the center and drag outward towards the tip to create a uniform, sculpted look. -
Smooth the edges:
If the pressure from your tool distorted the petal shape, gently nudge the edges back into a rounded form with your fingertip. -
Create the yellow center:
Take a small ball of yellow clay, slightly smaller than a marble. Flatten it just a bit into a thick disc. -
Texture the pollen:
Before attaching it, give the yellow center a pollen-like texture. I usually press a clean toothbrush or a ball of aluminum foil gently onto the surface to create tiny divots. -
Attach the center:
Place the textured yellow disc directly onto the center of your white petals where the points meet. Press firmly enough to bond the clays but gently enough to preserve the texture. -
Shape the leaves (optional):
If you want to add greenery, roll green clay into a teardrop shape. Flatten it and use your needle tool to score veins, mimicking the serrated edges seen in the reference image.
Step 3: Making the Hearts (Bonus Shape)
-
Roll the pink clay:
Condition a small amount of pink clay and roll it into a thick sheet, about 1/4 inch thick. -
Cut the heart shape:
Use a small heart-shaped cutter or slice the shape freehand with a craft knife. Smooth the raw edges with your finger to round them over nicely.
Level Up: Scented Clay
Add a drop of essential oil to the back of the unbaked clay or verify if your clay works with scent additives. A floral scent makes these magnets a full sensory delight.
Step 4: Baking and Assembly
-
Pre-bake check:
Inspect your pieces for lint or fingerprints. Use a little rubbing alcohol on a brush to smooth away any unwanted marks before baking. -
Bake the clay:
Transfer your clay pieces to a baking sheet lined with parchment paper. Bake according to the manufacturer’s instructions for your specific brand of polymer clay—typically between 230°F and 275°F (110°C – 135°C). -
Cool completely:
Let the baked clay cool down fully. It is important not to rush this, as polymer clay is fragile while still warm. -
Attach the magnets:
Turn your flowers and hearts over. Place a drop of strong super glue onto the flat back of each piece. -
Secure the magnet:
Press a small round magnet into the glue. Hold it in place for 15-20 seconds to ensure it grabs securely. -
Final cure:
Allow the glue to cure completely for a few hours before sticking them to your fridge to prevent them from sliding.
Now you have a cheerful garden blooming right in your kitchen, perfect for holding up photos or grocery lists
Personalized Name Tags and Gift Tags
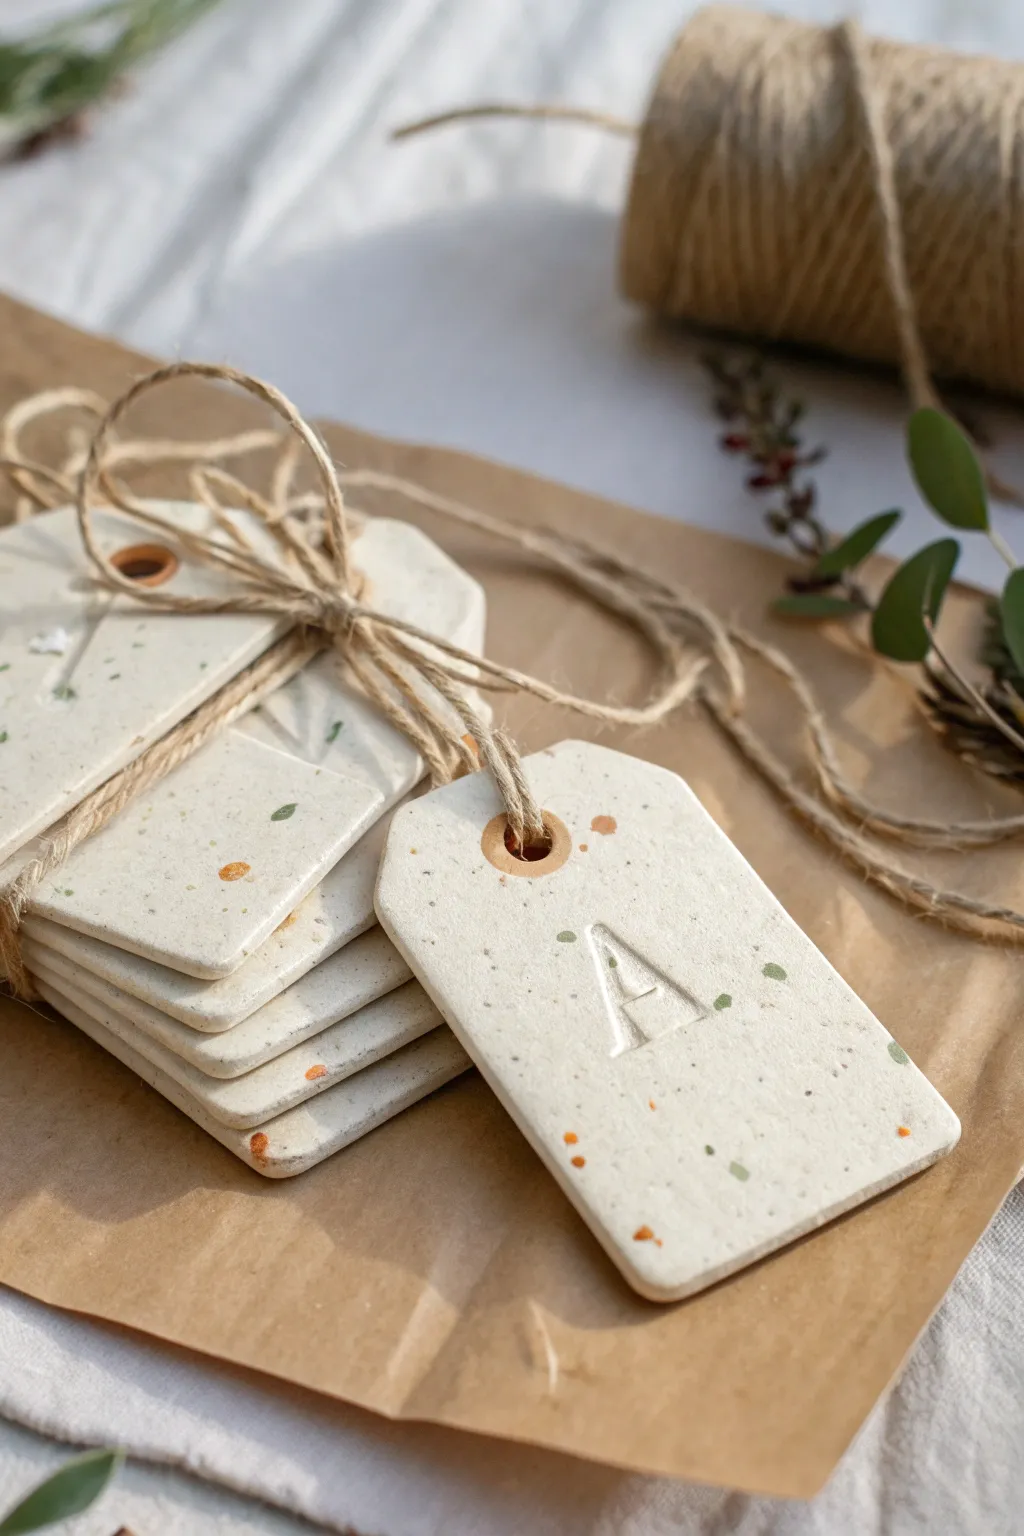
These elegant gift tags bring a touch of rustic sophistication to any present with their stone-like finish and clean monogram stamping. The subtle speckles and debossed letters create a timeless look that is perfect for holiday wrapping or personalized party favors.
Step-by-Step Tutorial
Materials
- White polymer clay (cernit or fimo soft)
- Speckle inclusions (crushed dried herbs, ground pepper, or pre-mixed granite effect clay)
- Acrylic rolling pin
- Tag-shaped cookie cutter (rectangular with clipped corners)
- Alphabet stamp set (serif font)
- Small circle cutter or straw (for the hole)
- Sandpaper (fine grit)
- Jute twine
- Acrylic paint (orange and green)
- Small stiff-bristle brush or old toothbrush
- Parchment paper
- Oven (for baking per clay instructions)
Step 1: Preparing the Clay Base
-
Condition the clay:
Start by warming the white polymer clay in your hands. Knead it thoroughly until it is soft, pliable, and free of cracks. This conditioning step is crucial for preventing breakage later. -
Create the stone effect:
If you aren’t using pre-mixed granite clay, incorporate your speckles now. Sprinkle a pinch of crushed black pepper or dried herbs into the white clay and fold it in repeatedly until the specks are evenly distributed. Don’t overdo it; a subtle look is best. -
Roll it out:
Place the clay between two sheets of parchment paper or on a smooth ceramic tile. Use the acrylic rolling pin to flatten the clay to an even thickness of about 1/4 inch (6mm). You want these tags to feel substantial, not flimsy. -
Smooth the surface:
Run your finger lightly over the surface to check for any air bubbles or uneven spots. If you find bubbles, prick them gently with a needle and smooth the clay back down.
Step 2: Cutting and Stamping
-
Cut the shapes:
Using your tag-shaped cutter, press firmly into the rolled clay. Wiggle it slightly to ensure a clean cut all the way through, then lift the cutter. Repeat for as many tags as you can fit on your slab. -
Punch the hole:
Use a small circle cutter or a sturdy straw to punch a hole centered near the top edge of each tag. This is where your twine will eventually loop through. -
Soften edges:
Dip your finger in a little bit of water (or baby oil if the clay is sticky) and gently run it along the cut edges of the tags to smooth out any sharpness or burrs left by the cutter. -
Stamp the initial:
Select your letter stamp. Press it firmly into the center of the tag to create a deep, clean impression. I like to rock the stamp ever so slightly to ensure the serif details catch the light, but be careful not to create a double image. -
Initial baking:
Transfer the tags (still on their parchment paper if possible to avoid warping) to a baking sheet. Bake according to your customized clay brand’s temperature and time instructions. Let them cool completely before handling.
Sticky Stamp Fix
If your stamp is pulling up the clay when you lift it, dust the stamp face lightly with cornstarch or dip it in water before pressing it into the clay surface.
Step 3: Finishing Details
-
Sand for perfection:
Once cool, inspect the edges. If there are any rough spots, gently buff them away with fine-grit sandpaper until the tag feels smooth like a river stone. -
Prepare the splatter paint:
Dilute a small drop of orange acrylic paint and a separate drop of green acrylic paint with water. You want a consistency that is fluid but still pigmented, similar to heavy cream. -
Apply the splatter:
Load your stiff brush or toothbrush with one color. Hold it over the tags and flick the bristles with your thumb to send tiny droplets onto the clay surface. Repeat sparingly with the second color. Less is more here to maintain the minimalist aesthetic. -
Protect the finish:
Allow the paint spatters to dry completely. If you plan to sell these, an optional coat of matte varnish will seal the paint and protect the clay from fingerprints. -
Bundle and tie:
Cut a length of natural jute twine. Loop it through the hole at the top of the tag. You can tie a simple knot or create a slip-knot loop. -
Stack them up:
To recreate the presentation in the photo, stack several tags together and wrap a longer piece of jute twine around the entire bundle, tying it off with a casual bow.
Add a Bronze Rim
Elevate the design by painting just the very edge of the tag and the inner rim of the hole with metallic gold or copper liquid leaf for a luxe finish.
These sturdy, personalized tags are now ready to add a custom charm to your product lineup or holiday gifts


What Really Happens Inside the Kiln
Learn how time and temperature work together inside the kiln to transform clay into durable ceramic.
Textured Air-Dry Clay Coasters
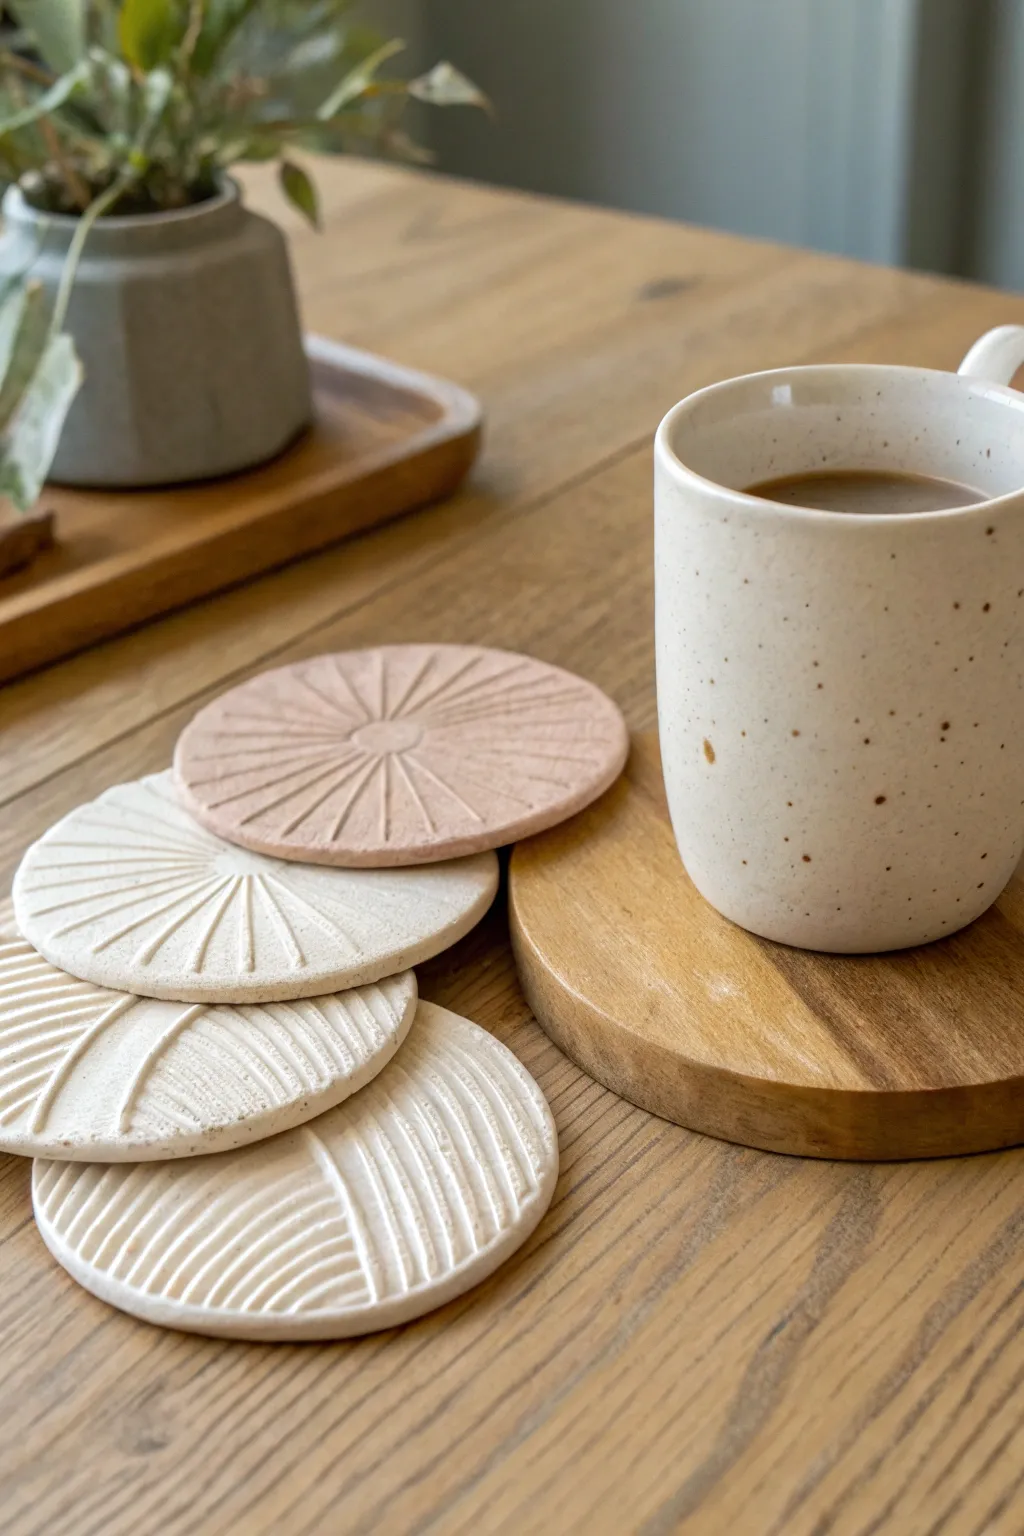
These understated yet stunning coasters bring a touch of earthy elegance to your coffee table with their textured, minimalist designs. Using simple air-dry clay, you can achieve a high-end ceramic look featuring delicate sunburst lines and satisfyingly smooth finishes.
Step-by-Step
Materials
- White or terracotta air-dry clay
- Rolling pin
- Circle cookie cutter (approx. 4 inches) or a round jar lid
- Fine-grit sandpaper (220 grit)
- Small stylus tool or a tapestry needle
- Ruler or straight edge
- Canvas mat or parchment paper (for rolling)
- Small bowl of water
- Acrylic matte varnish or sealant
Step 1: Shaping the Base
-
Prepare your workspace:
Lay down a canvas mat or parchment paper to prevent sticking. Take a handful of air-dry clay and knead it briefly until it is warm and pliable. -
Roll the clay:
Using your rolling pin, roll the clay out to an even thickness of about 1/4 inch. If you want them perfectly uniform, place wooden craft sticks on either side of the clay as guide rails for your rolling pin. -
Cut the circles:
Press your circle cutter or jar lid firmly into the clay to cut out your coaster shapes. Create as many as you’d like—typically a set of four is ideal. -
Clean the edges:
Dip your finger in a little water and gently run it around the cut edge of each circle to smooth out any roughness or loose bits of clay.
Smooth Moves
Keep a tiny sponge handy. Before the clay dries, lightly dab the textured lines to soften harsh ridges without erasing the design.
Step 2: Etching the Designs
-
Plan the sunburst pattern:
For the pink coaster style shown, find the center point. You can gently press a small circular object (like a marker cap) into the center to create the hub of the sunburst. -
Carve the rays:
Take your stylus tool or needle. Starting from the central hub, draw straight lines radiating outward toward the edge. Vary the length slightly or keep them uniform depending on your preference. -
Create the geometric pattern:
For the cream coasters, visualize the circle divided into three or four organic sections. Use your tool to draw the main dividing lines first. -
Fill with texture:
Fill each section with parallel lines. I find it helpful to rotate the coaster as I work to keep my hand steady and the angle consistent. -
Vary direction:
Change the angle of the parallel lines in adjacent sections. This intersecting hatching effect creates the dynamic, modern look seen in the photo. -
Clean up burrs:
As you carve, tiny crumbs of clay might pile up. Gently brush these away with a soft, dry brush or very lightly tap the coaster upside down.
Level Up: Color Pop
Mix acrylic paint directly into white clay before rolling to create custom stone-like colors without having to paint the surface later.
Step 3: Finishing Touches
-
Initial drying:
Place the coasters on a flat surface to dry. To prevent curling edges, I recommend placing a light book or a flat board on top of them once the surface is dry to the touch, usually after a few hours. -
Full cure time:
Let the clay dry completely for 24 to 48 hours. White air-dry clay will turn opaque and chalky when fully dry. -
Sand for smoothness:
Take your fine-grit sandpaper and gently sand the edges and the flat surfaces. Be careful not to sand away your etched texture, just knock down any sharp ridges. -
Dust off:
Wipe the coasters thoroughly with a dry cloth to remove all sanding dust. -
Seal the piece:
Apply a coat of matte varnish or acrylic sealant. This is crucial for coasters, as unsealed air-dry clay will dissolve if a wet mug sits on it. -
Final coat:
Once the first coat is dry, add a second layer of sealant for extra durability against moisture.
Now you have a set of chic, custom coasters ready to protect your surfaces in style
Small Planters for Succulents
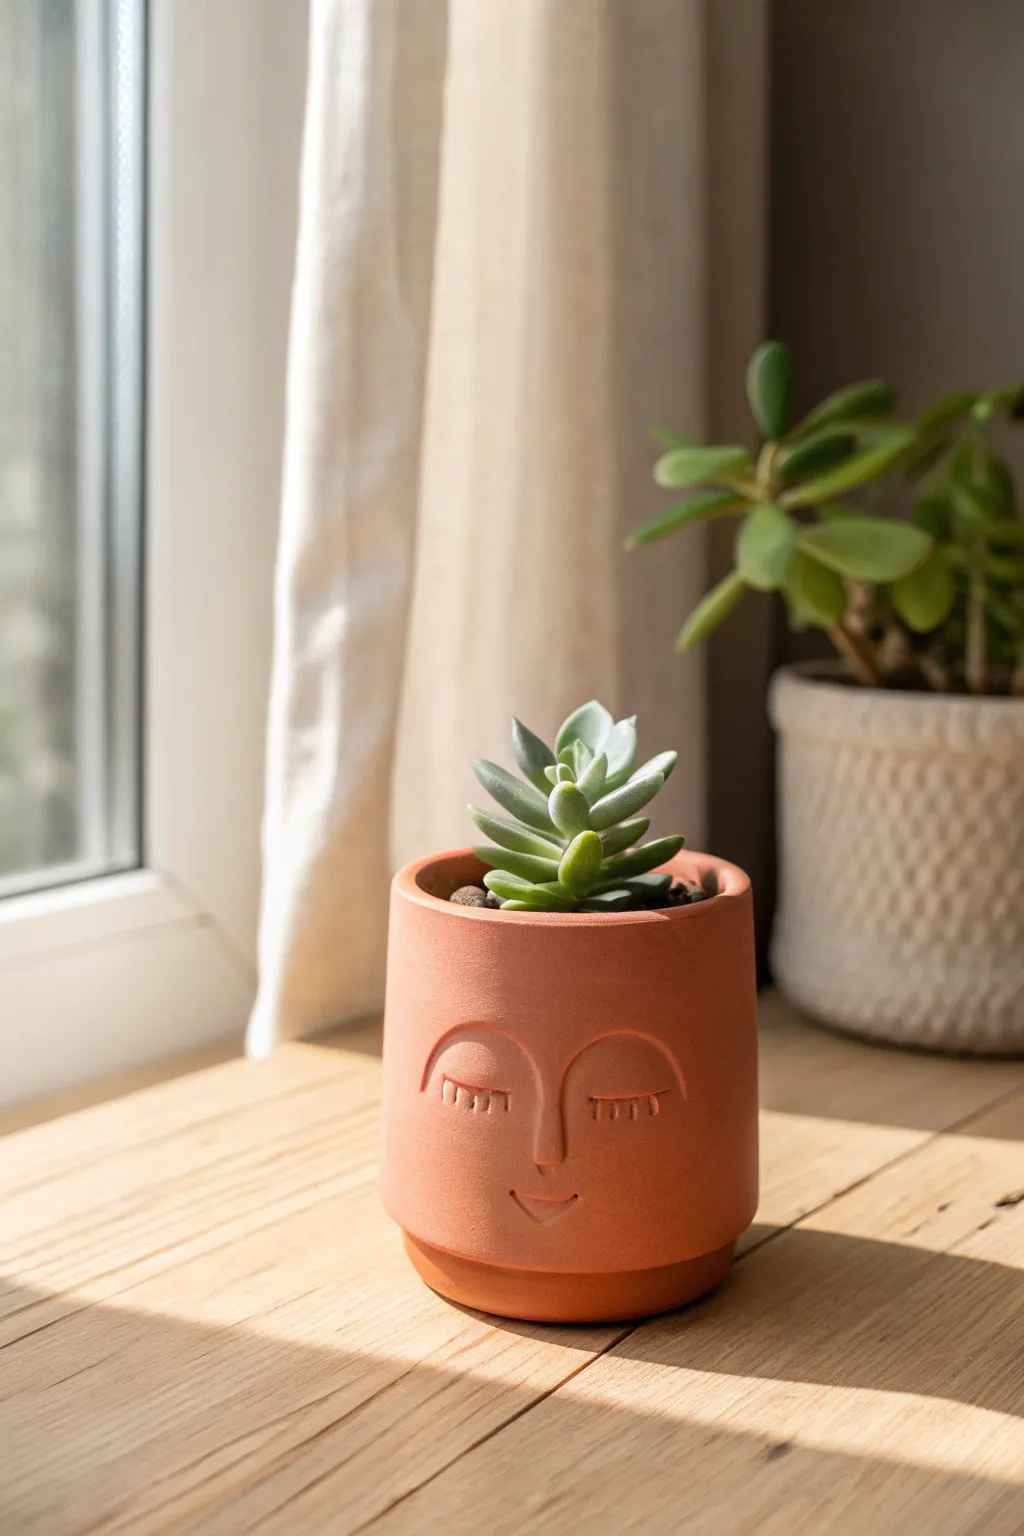
Bring a sense of calm to your windowsill with this serene, sleeping face planter that mimics the warmth of classic terracotta. The clean cylindrical shape combined with the gently carved facial features creates a modern yet whimsical home for your favorite small succulents.
Step-by-Step Tutorial
Materials
- Air-dry clay (terracotta color) or polymer clay
- Rolling pin
- Cylindrical mold (e.g., a glass jar or tin can)
- Clay knife or craft knife
- Needle tool or toothpick
- Small loop tool (optional, for carving)
- Water and sponge (for smoothing)
- Sandpaper (fine grit)
- Matte sealant or varnish
- Parchment paper
Step 1: Forming the Base
-
Prepare the slab:
Begin by conditioning your terracotta-colored clay until it is soft and pliable. Roll it out on a piece of parchment paper to an even thickness of about 1/4 inch (6mm). Aim for a long rectangular strip that will wrap around your chosen mold. -
Cut to size:
Measure the height of your mold—around 3-4 inches is perfect for small succulents. Use a ruler and your clay knife to cut a precise long rectangle from the slab. Save the excess clay for the base and facial details. -
Create the cylinder:
Wrap the rectangular strip around your cylindrical mold. If you are using a non-porous mold like a tin can, wrap the can in parchment paper first to prevent sticking. Join the two ends of the clay together. -
Seal the seam:
To ensure the pot doesn’t crack, merge the seam thoroughly. Use your finger or a modeling tool to smudge the clay across the join line, blending it until it disappears. Smooth it out with a damp sponge. -
Add the bottom:
Roll out a small piece of leftover clay. Place your cylinder on top of it and cut around the base to create a perfectly sized circle. Score (scratch) both the bottom edge of the cylinder and the edge of the circle, add a little water or slip, and press them firmly together. -
Create the footer:
Looking at the image, you’ll see a slight ‘step’ or footer at the base. Roll a thin coil or narrow strip of clay and attach it around the very bottom edge of the pot. Blend the upper seam of this strip into the main body, but leave the bottom edge distinct to create that slight recessed look.
Step 2: Sculpting the Face
-
Mark the features:
Before adding clay, lightly sketch the placement of the nose and eyes onto the cylinder using a needle tool. Center the nose vertically for balance. -
Form the nose:
Roll a small snake of clay for the nose bridge. Adhere it to the center of the face, blending the sides smoothly into the pot so it rises naturally from the surface rather than looking stuck on. I find it helpful to keep the bridge narrow and elegant. -
Build the brow line:
For the sleeping eyes, roll two thin, curved semicircles of clay. Attach them on either side of the nose bridge to form the upper eyelids/brow bone. Blend the top edges into the pot surface, leaving the bottom curve defined to create volume. -
Refine the eyelids:
Use a small loop tool or a damp finger to smooth the transition between the brow and the cheek area, ensuring the ‘eyes’ look closed and peaceful. -
Add the lashes:
Using a needle tool, carefully incise small, vertical hatch marks hanging down from the curved eyelid line. These represent the eyelashes. Keep the pressure light and even. -
Carve the mouth:
Press a small, curved line into the clay below the nose to create a subtle smile. You can use the edge of a spoon or a curved sculpting tool to get a clean, soft impression. -
Final smoothing:
Dip a sponge in water (squeezing it out well) and gently wipe over the entire piece. This removes fingerprints and softens any harsh tooling marks on the face.
Smooth Operator
Use a little baby oil on your fingertips when smoothing polymer clay. It eliminates fingerprints instantly and gives the ‘skin’ of the pot a professional finish.
Step 3: Finishing Touches
-
Drying:
Allow the pot to dry slowly. If using air-dry clay, keep it loosely covered with plastic for the first 24 hours to prevent cracking, then uncover to dry completely. If using polymer clay, bake according to package instructions. -
Sanding:
Once fully cured or dry, use fine-grit sandpaper to smooth out the rim and any rough spots on the surface. Be gentle around the sculpted facial features. -
Sealing:
Apply a matte sealant or varnish to protect the clay, especially if you plan to put real plants inside. Coating the inside with a waterproof sealer is essential for air-dry clay longevity.
Go Green
Make this a hanging planter! Poke three evenly spaced holes near the rim before the clay dries, then thread through leather cord or macrame twine.
Pop in your favorite succulent and enjoy the peaceful vibe this little face brings to your space

TRACK YOUR CERAMIC JOURNEY
Capture glaze tests, firing details, and creative progress—all in one simple printable. Make your projects easier to repeat and improve.
Tiny Bud Vases for Single Stems
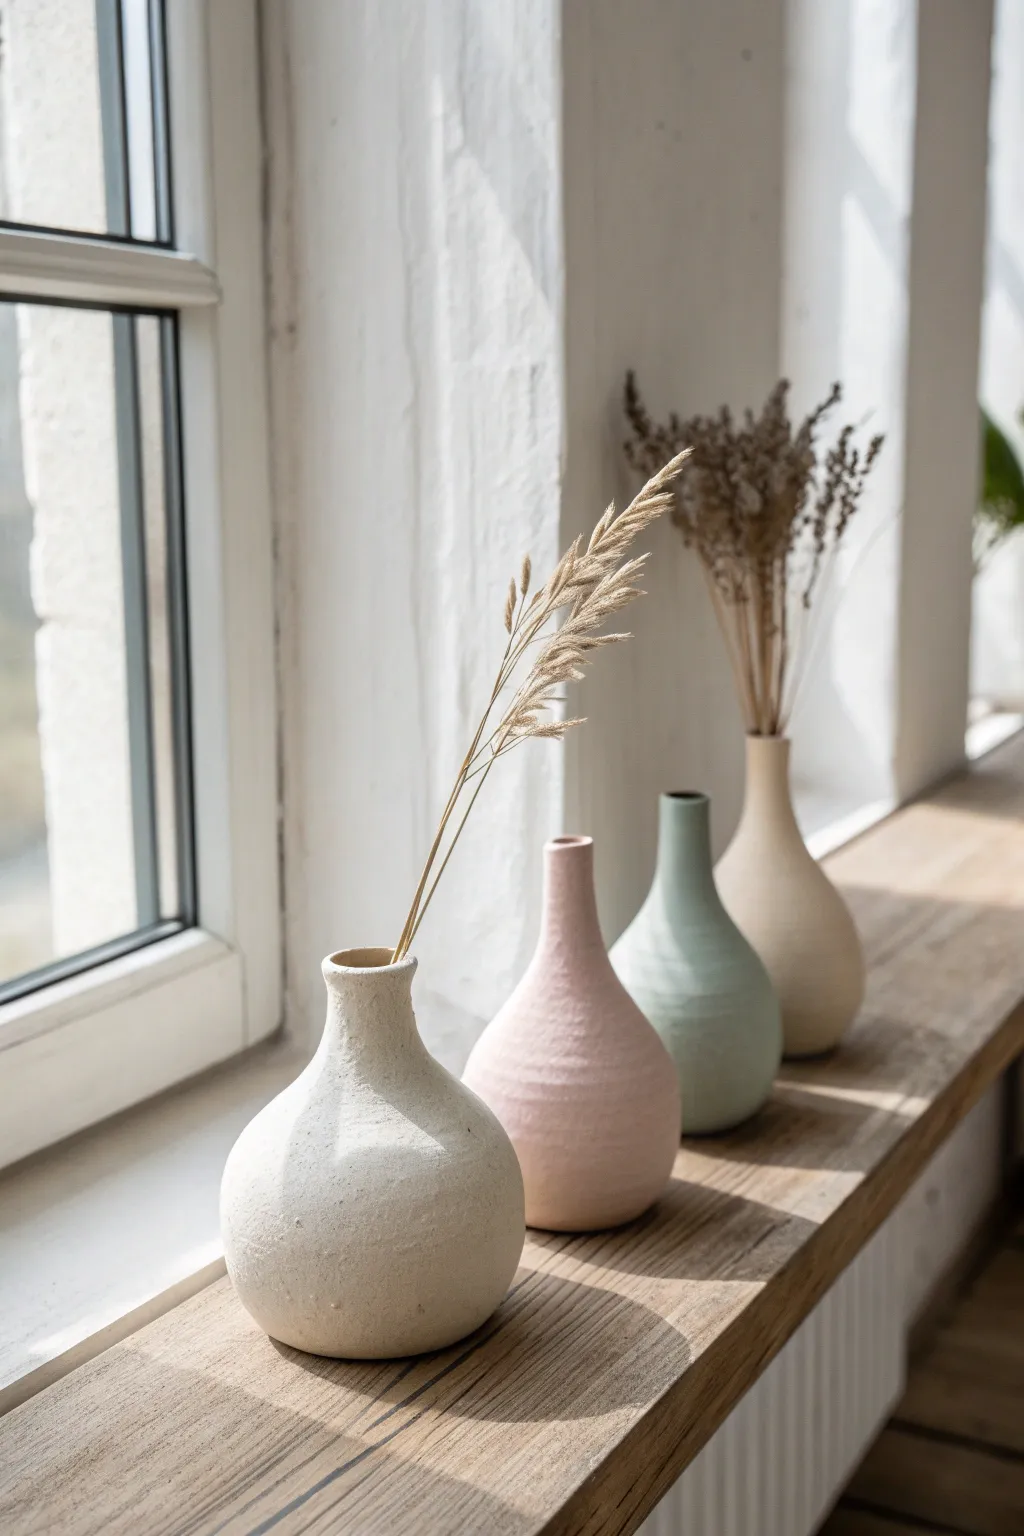
These charming, petite vases embrace a natural, imperfect aesthetic that highlights the raw beauty of clay. With their matte finishes and organic shapes, they serve as the perfect vessel for showcasing a single, delicate dried stem.
How-To Guide
Materials
- White tonal air-dry clay or stoneware clay
- Small rolling pin
- Needle tool or fettling knife
- Slip (clay and water mixture) or vinegar
- Sponge
- Sandpaper (medium and fine grit)
- Acrylic paints (muted white, blush pink, sage green, cream)
- Baking soda (to mix with paint for texture)
- Matte sealant spray
Step 1: Forming the Base
-
Prepare the Clay:
Start with a ball of clay roughly the size of a tennis ball. Knead it thoroughly to remove any air pockets and ensure a smooth consistency, which prevents cracking later. -
Create a Pinch Pot:
Push your thumb into the center of the ball, stopping about a half-inch from the bottom. Gently pinch the clay between your thumb and fingers, rotating the ball as you go to thin out the walls evenly. -
Shape the Belly:
Continue pinching until you have a round, bulbous shape for the base of the vase. Don’t worry about perfect symmetry; the organic look is part of the charm. -
Flatten the Bottom:
Gently tap the base against your work surface to create a flat, stable bottom so the vase stands upright without wobbling.
Step 2: Building the Neck
-
Roll a Coil:
Take a smaller piece of clay and roll it into a thick coil (snake) on your table. It should be slightly thicker than the desired width of the vase neck. -
Attach the Coil:
Score the top rim of your pinch pot and the bottom of your coil using a needle tool. Apply a little slip or vinegar to the scored areas and press the coil firmly onto the rim. -
Blend the Seams:
Use your thumb or a modeling tool to smooth the clay downward from the coil to the base on the outside, and upward on the inside, eliminating the seam completely. -
Refine the Neck:
Gently pinch and pull the neck upwards to elongate it. You can taper it slightly inward for a narrow opening or keep it straight, depending on your preference. -
Smooth the Rim:
Dip your finger in a little water and run it around the top rim to soften any sharp edges.
Stay Flexible
If the neck starts to droop while you are building it, insert a small roll of paper or a thick marker wrapped in parchment paper inside to support the shape while it stiffens.
Step 3: Refining and Finishing
-
Initial Smoothing:
Use a damp sponge to wipe away rough fingerprints, but avoid over-smoothing if you want to retain that handmade texture. -
Drying:
Let the vases dry completely. For air-dry clay, this usually takes 24-48 hours. I find that turning them upside down halfway through helps the bottoms dry evenly. -
Sanding:
Once bone dry, lightly sand any unwanted jagged areas or sharp peaks with medium-grit sandpaper, followed by fine-grit for a softer touch. -
Create Texture Paint:
Mix your acrylic paints with a ratio of 1 part baking soda to 2 parts paint. This creates a fluffy, plaster-like consistency that mimics the stone look in the photo. -
Painting the Base Coat:
Apply the textured paint mixture to the vases. Use varied brushstrokes—some horizontal, some vertical—to enhance the rustic feel. -
Adding Depth (Optional):
For the speckles seen on the white vase, dilute a tiny bit of brown or grey paint and flick it onto the surface with an old toothbrush. -
Sealing:
Since air-dry clay isn’t waterproof, apply a coat of matte sealant spray to protect the finish. Note that these are best for dried flowers, not fresh blooms requiring water.
Waterproofing Hack
To hold fresh flowers, hide a small glass vial or test tube inside the clay neck during the building phase, molding the clay directly around the glass insert.
Group your finished vases in a sunlit spot and fill them with dried grasses for an effortlessly chic display
Modern Candle Holders in Easy Shapes
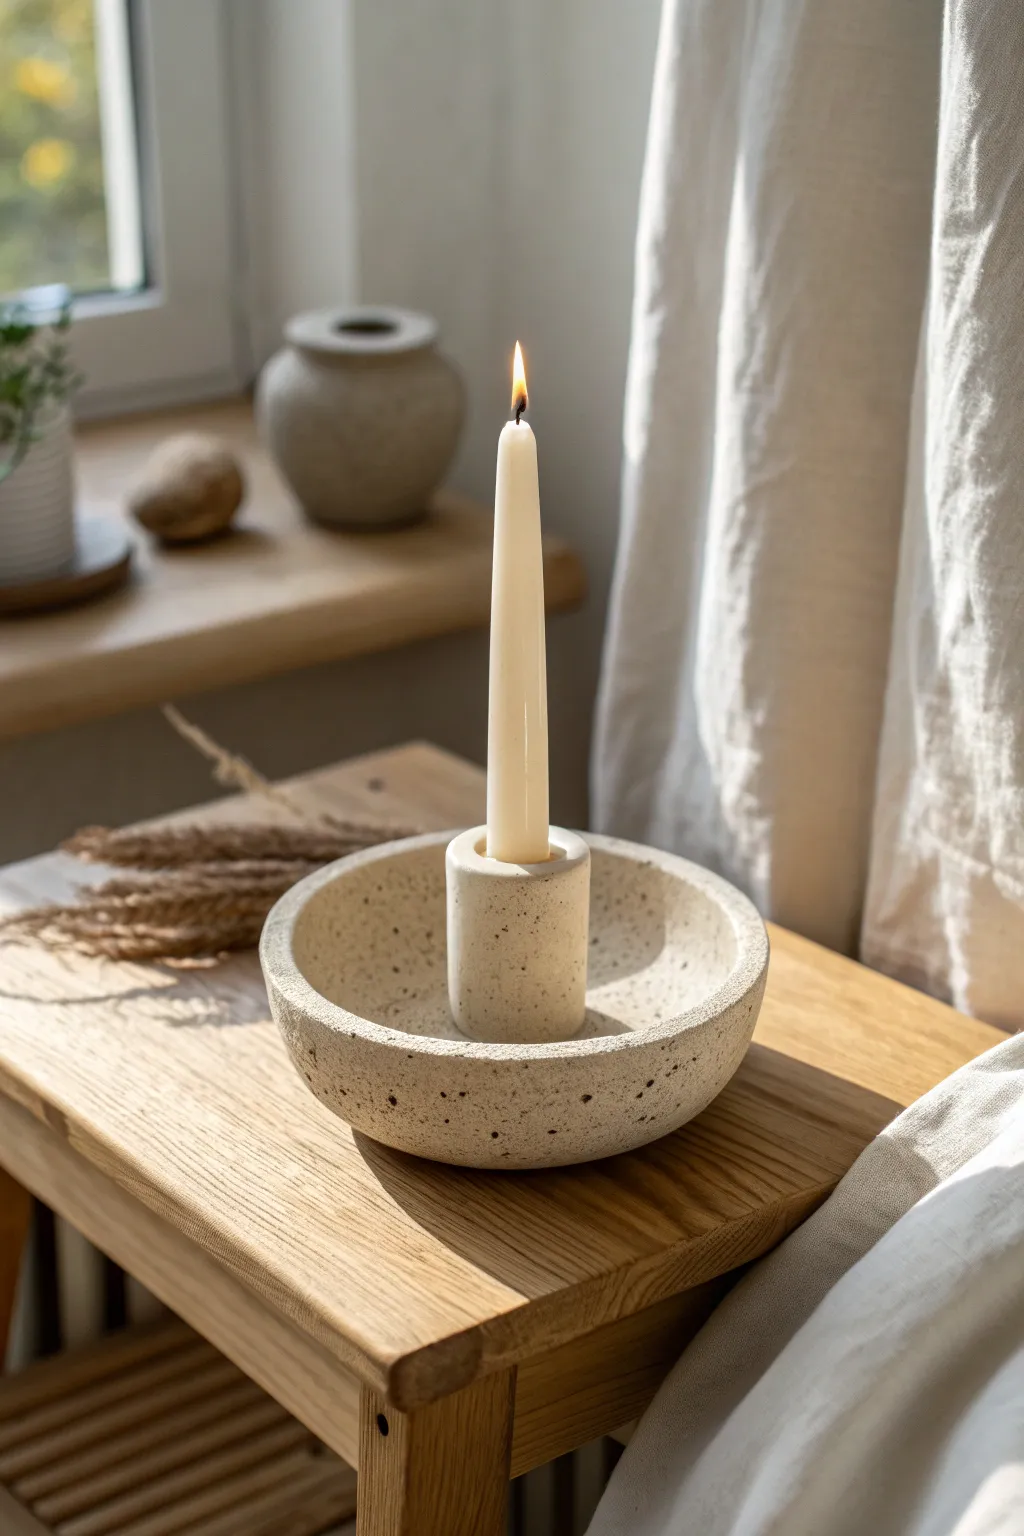
This minimalist candle holder combines a functional catch-all basin with a sleek central column, perfect for catching wax drips or holding small trinkets. The natural, speckled finish gives it a trendy, modern-rustic look that is incredibly popular in home decor right now.
Step-by-Step
Materials
- Air-dry clay or polymer clay (white or beige)
- Speckled clay additive (or coarse black pepper/sand)
- Rolling pin
- Circle cutter or bowl (approx. 5-6 inches diameter)
- Small circle cutter (approx. 1 inch diameter)
- Craft knife
- Slip (clay mixed with water) or liquid clay
- Smoothing sponge
- Sandpaper (fine grit)
- Matte sealant or varnish
- Standard taper candle (for sizing)
- Two wooden guide strips (1/4 inch thick)
Step 1: Preparing the Clay Base
-
Mix and Prep:
Begin by conditioning your clay. If you are using plain clay and want the speckled effect shown in the photo, knead in a small amount of speckle additive, black sand, or even coarse black pepper until it is evenly distributed throughout the batch. -
Roll the Slab:
Place your clay between two wooden guide strips on your work surface. Roll the clay out into a smooth, even slab that is approximately 1/4 inch thick. These guides ensure your bowl wall has a consistent thickness. -
Cut the Base:
Using a large circle cutter or a bowl as a template, cut out a circle roughly 5 to 6 inches in diameter. This will form the bottom of your catch-all basin. -
Form the Bowl Side:
Roll out a long snake of clay and flatten it into a strip about 1 inch tall. Alternatively, cut a long strip from your remaining slab. This strip needs to be long enough to wrap around the circumference of your base circle. -
Attach the Wall:
Score the outer edge of your base circle and the bottom edge of your strip. Apply a little slip or liquid clay to the scored areas. Wrap the strip around the base, pressing firmly to adhere them. -
Blend the Seams:
Use a modeling tool or your finger to blend the clay where the wall meets the base, both on the inside and the outside. I find that pulling the clay from the wall down onto the base creates the strongest seal.
Clean Rims
For a pro finish, place a piece of plastic wrap over the clay before cutting your circles. The plastic rounds the edges automatically as you press down, saving you sanding time later.
Step 2: Creating the Candle Column
-
Shape the Cylinder:
Take a fresh lump of clay and roll it into a thick log. You want this cylinder to be approximately 1.5 to 2 inches tall and slightly wider than your taper candle. -
Create the Socket:
Press your actual candle into the center of the cylinder to create the hole. Don’t push all the way through; leave about half an inch of solid clay at the bottom. Wiggle the candle slightly to make the hole just a hair larger than the candle to account for shrinkage. -
Refine the Shape:
Remove the candle and gently roll the cylinder on the table to smooth out any distortion caused by pressing the candle in. Use a craft knife to trim the top rim so it is perfectly flat and level. -
Center the Column:
Place the cylinder in the exact center of your bowl base to check the fit. Mark the spot lightly with a tool. -
Attach the Column:
Score the bottom of the cylinder and the marked spot in the center of the bowl. Apply your slip or adhesive generously. -
Secure and Blend:
Press the cylinder firmly into place. Use a small tool to blend the bottom edge of the cylinder into the floor of the bowl so it looks like one seamless piece.
Step 3: Finishing Touches
-
Smooth the Surfaces:
Dip a sponge in a little water and gently wipe over the entire piece. Focus on rounding the top rim of the bowl and the candle holder to get that soft, organic look shown in the image. -
Dry Slowly:
Let the piece dry away from direct sunlight or heat sources. Turn it occasionally to ensure even drying. This usually takes 24 to 48 hours depending on humidity. -
Sand:
Once bone dry or fully cured, use fine-grit sandpaper to buff away any fingerprints or rough texture, paying close attention to the rim. -
Seal:
Apply a coat of matte sealant or varnish to protect the surface. This creates a stone-like finish and protects the speckles.
Make it a Set
Create a tiered collection by making three holders with varying column heights (e.g., 2 inch, 3 inch, and 4 inch) but identical bowl sizes.
Now you have a stunning, boutique-worthy candle holder ready to light up your space
Seasonal Clay Ornaments and Keepsakes
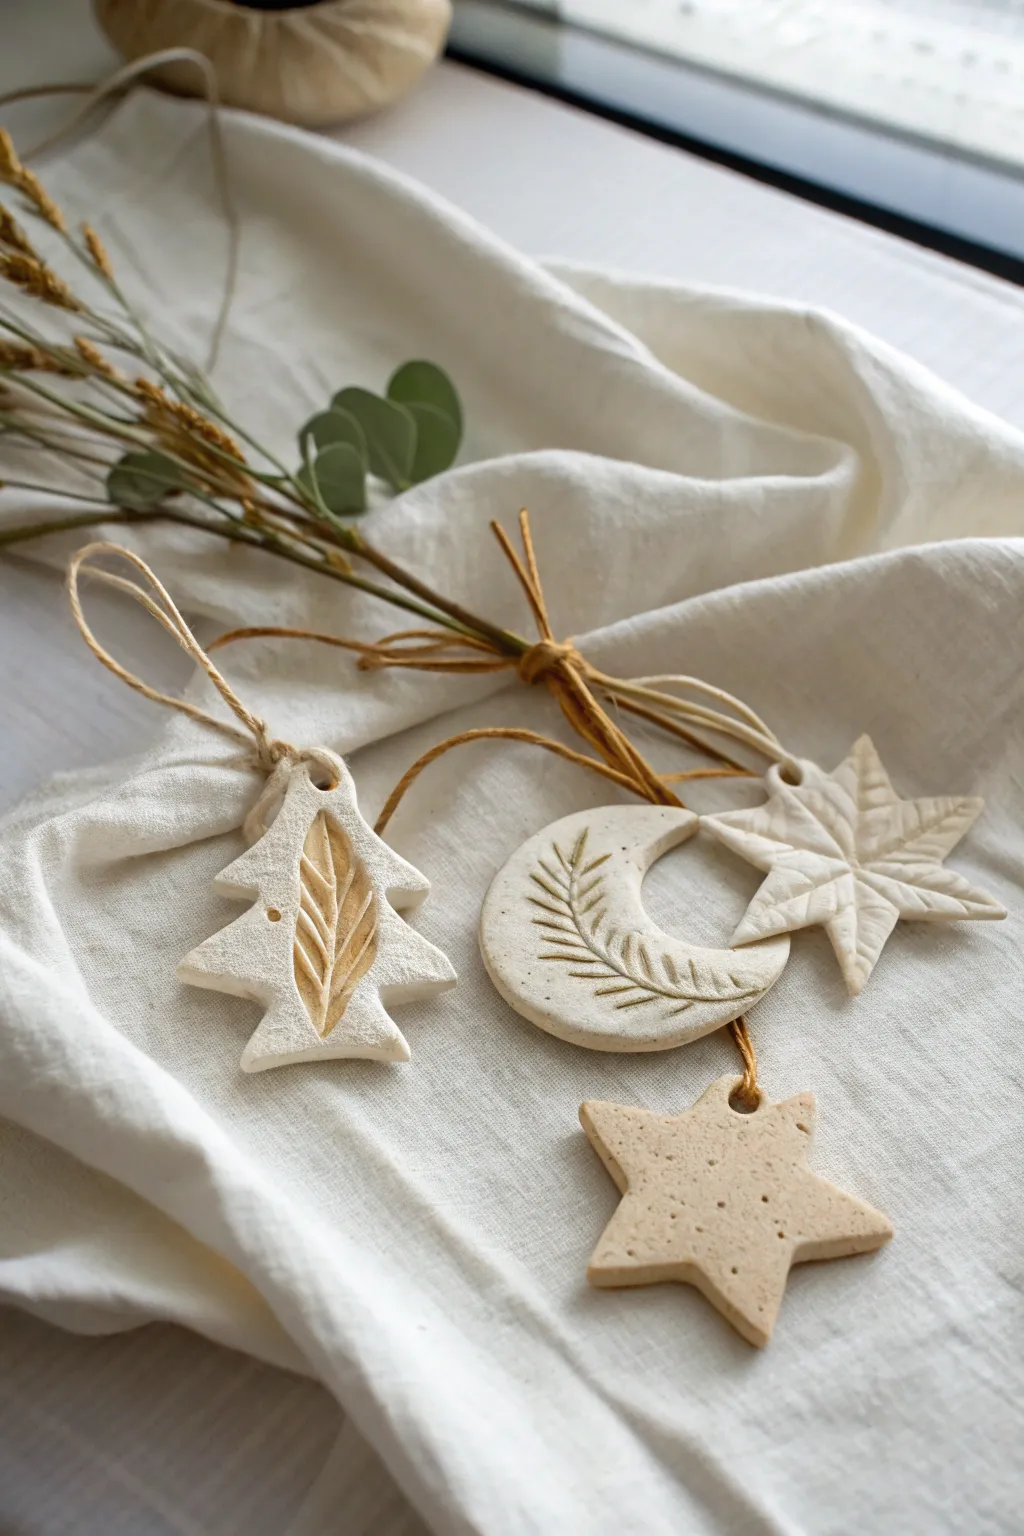
These charming clay ornaments capture a minimalist Scandinavian aesthetic with their natural tones and botanical textures. Perfect for holiday sales or personal keepsakes, they offer a tactile, handmade quality that is both simple to execute and endlessly customizable.
Detailed Instructions
Materials
- White air-dry clay (or polymer clay)
- Small rolling pin
- Cookie cutters (tree, crescent moon, star)
- Parchment paper or canvas mat
- Sculpting tools or toothpicks
- Fresh or dried evergreen sprigs (for texture)
- Jute twine or gold cord
- Drinking straw or small circular cutter
- Fine-grit sandpaper
- Small bowl of water
- Acrylic paint (gold or brown) – optional for detailing
Step 1: Prepping and Rolling
-
Condition the clay:
Begin by taking a handful of clay and kneading it in your hands until it becomes pliable and warm. If you are using air-dry clay, ensure it isn’t too dry; add a drop of water if it starts to crack. -
Set up your workspace:
Lay down a sheet of parchment paper or a canvas mat. This prevents the clay from sticking to your table and makes lifting the delicate shapes much easier later on. -
Roll the slab:
Roll your clay out to an even thickness, aiming for about 1/4 inch (6mm). Consistency is key here so they dry evenly and aren’t too fragile.
Fixing Curled Edges
If edges curl while drying, place a lightweight book or flat board on top of the ornaments once they are semi-dry (leather hard) to press them flat.
Step 2: Cutting and Texturing
-
Cut the shapes:
Press your cookie cutters firmly into the clay. For this set, cut out a Christmas tree, a crescent moon, and two stars. Gently jiggle the cutter before lifting to release the shape cleanly. -
Smooth the edges:
Dip your finger in a tiny bit of water and run it along the cut edges of your shapes to smooth out any rough burs or loose bits of clay left by the cutter. -
Create the hanging hole:
Use a drinking straw or a small circular tool to punch a hole near the top of each ornament. Ensure it is not too close to the edge, or the clay might snap when hung. -
tree texture: The center leaf:
For the tree ornament, use a needle tool or toothpick to carve a vertical line down the center. Then, carefully carve angled veins branching out to create a leaf-like skeleton pattern. -
Tree texture: Smoothing:
I like to gently press the carved lines with a slightly damp finger or round tool to soften the harsh edges, making the carving look more organic. -
Moon texture: Botanical impression:
For the crescent moon, create a similar botanical pattern. Carve a curved central stem following the moon’s shape, then add small, fern-like leaves branching off along the curve. -
Star texture: 3D lines:
For the textured star, use a knife tool to gently score lines from the center point out to the tip of each arm, and then into the crevices between the arms, creating a folded paper effect. -
Speckled star texture:
For the simpler star, use the bristles of an old toothbrush or a stiff brush to gently stipple the surface, giving it a stone-like, pitted texture.
Pro Tip: Release Agent
Before impressing textures or cutting shapes, lightly dust your clay or tools with cornstarch. This prevents sticking and keeps your detailed lines crisp.
Step 3: Finishing Touches
-
Drying duration:
Let the ornaments air dry on a wire cooling rack for 24 to 48 hours. Turn them over halfway through the process to ensure the backs dry evenly and to prevent curling. -
Sanding imperfections:
Once completely bone dry, take fine-grit sandpaper and very lightly buff the edges. This removes any tiny sharp points and gives the piece a professional, finished feel. -
Optional: Highlighting texture:
To make the carved designs pop, dilute a small amount of brown or gold acrylic paint with water. Brush it into the crevices and immediately wipe the surface with a damp cloth, leaving pigment only in the deeper lines. -
Prepare the twine:
Cut lengths of natural jute or hemp twine, approximately 8 inches long for each ornament. -
Stringing the ornaments:
Thread the twine through the hole you punched earlier. Tie a secure knot at the end to create a loop. -
Adding decorative flair:
Gather your finished ornaments into a bundle. Take a few sprigs of dried grass or faux eucalyptus and tie them together with the ornament strings for a beautiful presentation, just like the photo.
Now you have a stunning set of boutique-worthy ornaments ready to be gifted or sold
Clay Hair Clips With Simple Patterns
These stylish barrettes combine earthy tones with sleek geometric patterns for a modern, functional accessory. Using polymer clay, you can create a smooth, professional finish that looks just like expensive boutique hair clips.
How-To Guide
Materials
- Polymer clay in varying colors (terracotta, mustard, teal, cream, brown)
- Metal alligator clip or French barrette blanks (approx. 3 inches)
- Clay roller or pasta machine
- Precision craft knife (X-Acto)
- Tissue blade (flexible clay slicer)
- Liquid polymer clay (Wait, sculpey bake & bond)
- Sandpaper (400, 600, 1000 grit)
- Buffing cloth or dremel with buffing wheel
- Ceramic tile or glass work surface
- Oven
Step 1: Preparing the Base
-
Condition the Clay:
Start by warming up your main base color (terracotta, mustard, or teal) in your hands. Knead it until it is soft and pliable to prevent cracking during baking. -
Create the Base Sheet:
Roll out your conditioned clay into a thick sheet, roughly 3-4mm thick. This needs to be sturdy enough to hold the metal hardware later. Keep the surface smooth and free of air bubbles. -
Rough Cut the Shape:
Lay your metal hair clip gently on top of the clay sheet as a size guide. Using your precision knife, cut a rectangle slightly larger than the clip, leaving room for final trimming later. -
Create the Interior Cutout:
If you are making the style with the cutout center (like the photo), carefully mark the center slot. Use your craft knife to cut out a long, thin oval or rectangle in the middle where the clip mechanism will be visible.
Seamless Smoothness
To prevent fingerprints, lightly dust your fingertips with cornstarch before handling the raw clay, or wear latex finger cots during the final smoothing phase.
Step 2: Designing the Geometric Inlay
-
Prepare Pattern Colors:
Roll out thin sheets (about 1-2mm) of your contrasting colors—cream, brown, light tan, and teal. These will form the geometric mosaic. -
Cut Geometric Shapes:
Using a sharp blade, slice these thin sheets into small triangles, diamonds, and parallelograms. Try to keep your angles sharp for a tidy puzzle-like fit. -
Arrange the Mosaic:
At one end of your base clay rectangle, start arranging your geometric pieces. Press them gently onto the base clay so they stick. Create a pattern that spans about one-third of the clip length. -
Level the Surface:
Once your pattern is arranged, place a piece of parchment paper over the top. Use your roller to gently press the geometric pieces down so they become flush with the base clay surface. Do not press so hard that you distort the shape. -
Trim to Final Shape:
Now that the pattern is integrated, refine the outer edges. Use your tissue blade or precision knife to cut the final curved, rectangular silhouette of the barrette, ensuring the edges are crisp.
Add Texture
Before baking, gently press a piece of sandpaper or a textured fabric sponge onto the solid colored section to give it a stone-like or faux-leather finish.
Step 3: Baking and Assembly
-
First Bake:
Place your clay pieces on a ceramic tile. Bake according to your clay package instructions (usually 275°F/135°C for 30 minutes). I prefer to tent foil over them to prevent the lighter colors from scorching. -
Cool and Sand:
Let the clay cool completely. Once hard, wet sand the edges and the surface starting with 400 grit and moving up to 1000 grit. This removes fingerprints and makes the inlay look seamless. -
Buffing:
Rub the sanded piece vigorously with a denim cloth or use a buffing wheel. The friction heat will give the clay a beautiful, natural semi-matte sheen without needing varnish. -
Attach Hardware:
Apply a thin layer of liquid polymer clay or strong two-part epoxy to the back of the clay piece. -
Final Bond:
Press the metal clip into the adhesive. If using liquid clay, you must bake the piece again for about 15-20 minutes to set the bond. If using epoxy, simply let it cure for 24 hours.
Clip these into your hair for an instant pop of color and handcrafted charm
Wearable Clay Pins and Brooches
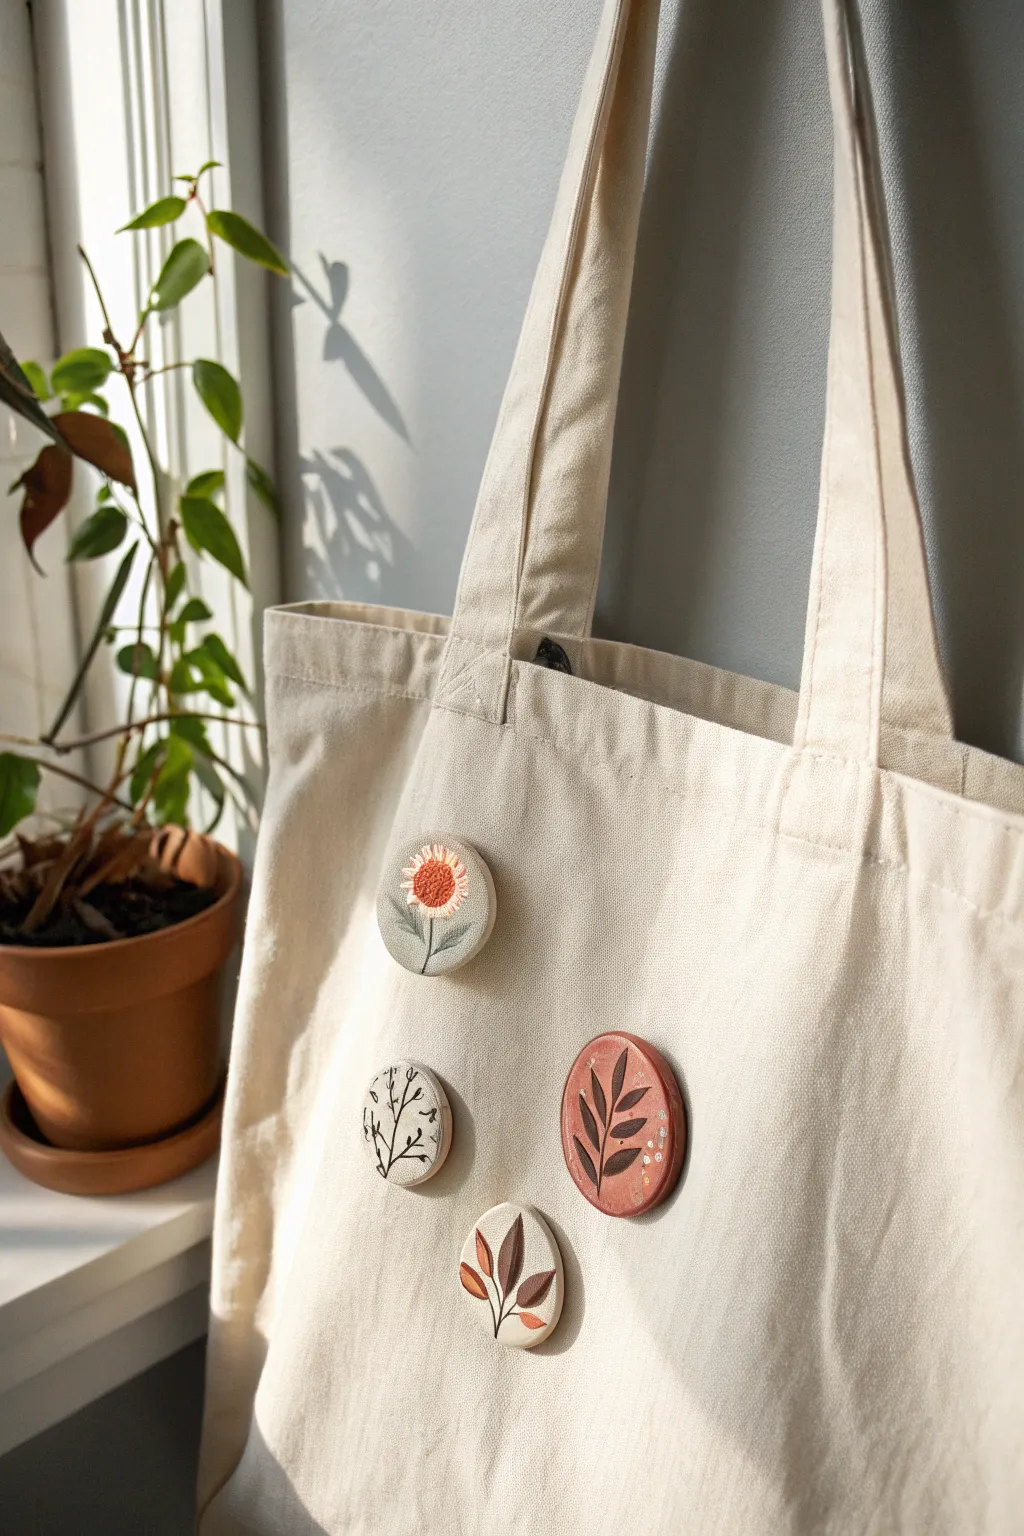
Create a charming set of polymer clay pins inspired by nature, featuring muted earth tones and delicate foliage designs. These simple round brooches add a touch of handmade whimsy to canvas totes, denim jackets, or backpacks.
Detailed Instructions
Materials
- Polymer clay (white, terracotta, olive green, brown)
- Circle clay cutters (approx. 1.5 – 2 inches)
- Acrylic rolling pin
- Detail needle tool or toothpick
- Acrylic paints (muted greens, browns, cream, black)
- Fine detail paintbrushes (size 00 or 000)
- Liquid clay or strong craft glue (E6000)
- Pin backs or brooch findings
- Gloss or matte varnish (optional)
- Sandpaper (fine grit)
Step 1: Shaping the Base
-
Condition the clay:
Start by warming up your polymer clay in your hands until it becomes soft and pliable. You can mix white with small amounts of colored clay to achieve those soft, muted pastel tones seen in the example. -
Roll out the slab:
Using your acrylic rolling pin, roll the clay out to a uniform thickness of about 1/4 inch (6mm). This thickness ensures the pins are sturdy but not too heavy for fabric. -
Cut the shapes:
Press your circle cutter firmly into the clay slab to punch out four distinct circles. If the edges are rough, gently smooth them with your finger or a little cornstarch. -
Create surface texture (Optional):
For the flower pin, you can gently press a piece of textured fabric or sandpaper onto the surface before baking to give it a canvas-like appearance.
Smooth Surface Trick
Before baking, gently wipe your raw clay with a brush dipped in a tiny bit of rubbing alcohol or baby oil. This removes fingerprints and dust instantly.
Step 2: Designing the Motifs
-
Sculpt the flower details:
For the sunflower pin, roll a tiny ball of terracotta clay and flatten it slightly in the center of a grey-green circle. Use a needle tool to stipple the center, creating a seed-like texture. -
Adding relief leaves:
For the designs with raised leaves (like the bottom pin), roll tiny teardrop shapes from brown and rust-colored clay. Press these flat onto the white clay base in a vine pattern. -
Carving negative space:
Alternatively, for the rust-colored pin, you can carve the leaf shapes directly into the raw clay using a needle tool or small linocut gouge for an engraved look. -
Bake the pieces:
Place your clay rounds on a parchment-lined baking sheet. Bake according to your brand of clay’s instructions—usually 275°F (135°C) for 15-30 minutes per 1/4 inch of thickness. -
Cool down:
Allow the pieces to cool completely in the oven with the door cracked open. This gradual cooling helps prevent cracking.
Step 3: Painting and Finishing
-
Sand the edges:
Once cool, use fine-grit sandpaper to gently buff the edges of your clay circles for a professional, smooth finish. -
Paint fine details:
Using a very fine brush (size 00), paint the delicate stems and leaves on the flower pin using diluted olive green paint. Keep your hand steady and use light strokes. -
Add line drawings:
For the white pin with black botanical sketches, use a fine tip black Posca marker or very thin black acrylic paint to draw simple twigs and berries. -
Highlight the engraved pin:
If you carved the rust-colored pin, you can fill the carved lines with a wash of darker brown paint, then wipe the surface clean to make the design pop. -
Seal the artwork:
Apply a thin coat of matte or gloss varnish to protect your painted designs from scratching or fading.
Why is my pin soft?
If your clay is still rubbery after cooling, it’s under-baked. You can put polymer clay back in the oven multiple times without harm; try another 15 minutes.
Step 4: Assembly
-
Attach the backing:
Turn your pins over. Apply a dab of strong glue (like E6000) or liquid clay to the back of a metal pin finding. -
Secure the pin:
Press the pin finding firmly onto the center back of the clay circle. If using liquid clay, you will need to bake the piece again for 10-15 minutes to bond it. -
Final cure time:
Let the glue cure for at least 24 hours before attaching the pins to your favorite tote bag or jacket to ensure maximum hold.
Pin your lovely new botanical creations onto a bag and enjoy showing off your wearable art
Stamped Herb Markers for Garden Gifts
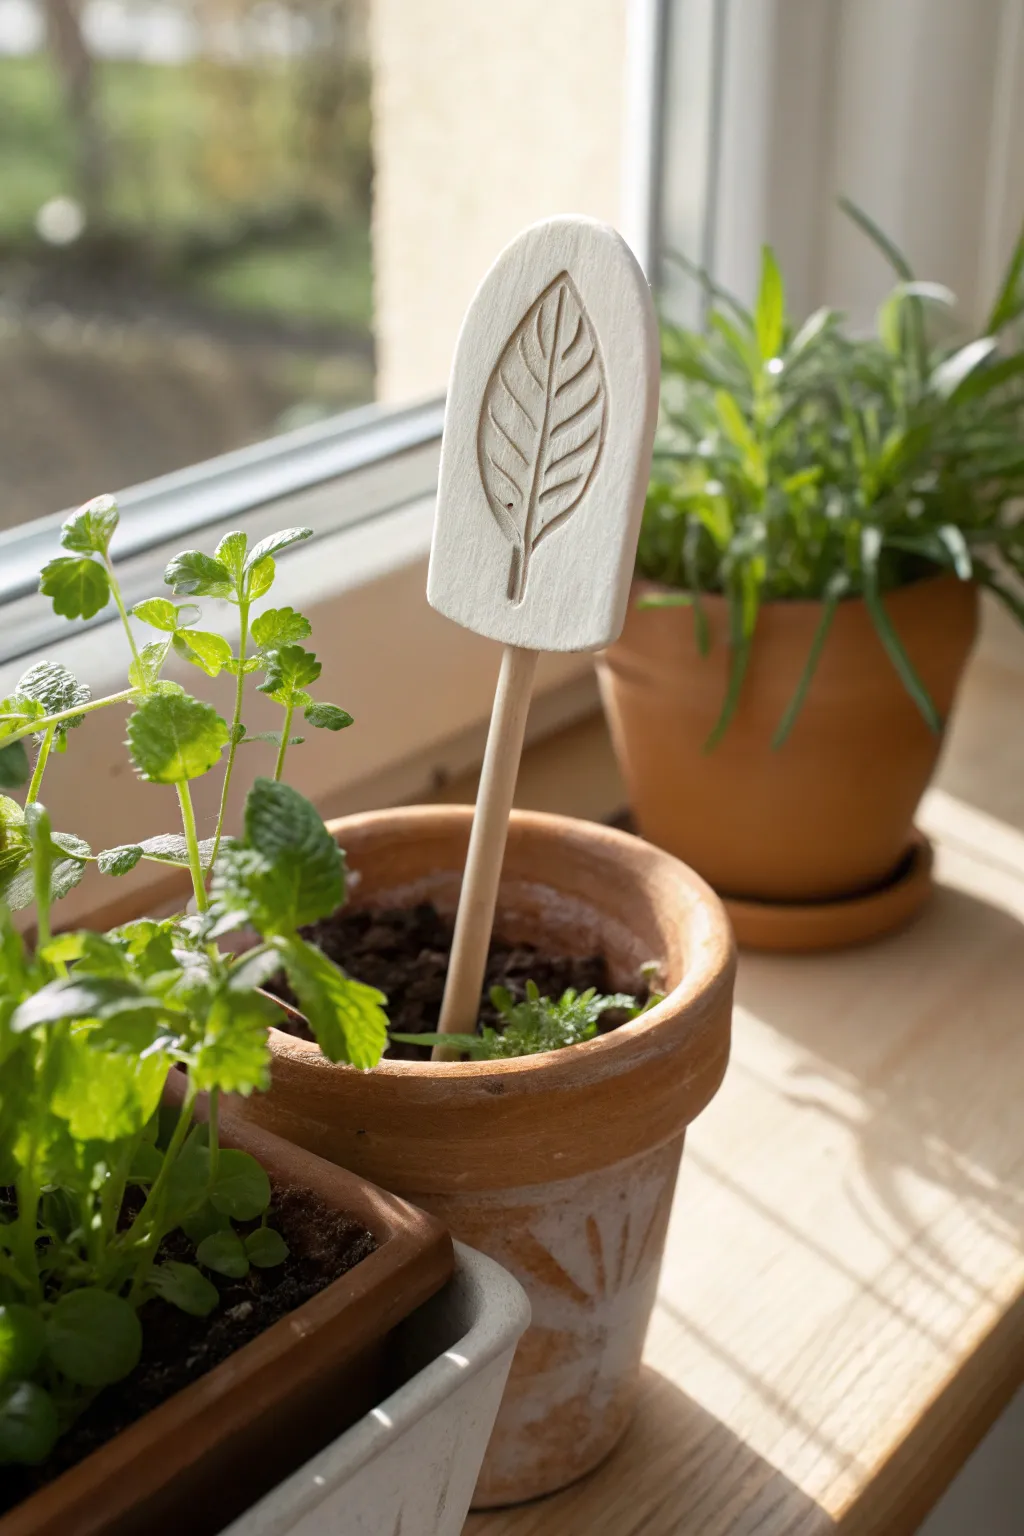
Brighten up your indoor garden with these minimalist, arched markers made from white clay. Featuring a simple, debossed leaf motif and mounted on a sturdy dowel, they offer a clean, organic look that makes identifying your herbs a joy.
Step-by-Step
Materials
- White air-dry clay (or white polymer clay)
- Wooden dowels (approx. 5mm diameter)
- Rolling pin
- Parchment paper or craft mat
- Craft knife or clay blade
- Small bowl of water
- Fine-grit sandpaper (220 grit)
- Leaf stamp or sculpting tool
- Strong craft glue (e.g., E6000 or wood glue)
- Small sponge
- Matte spray sealant (optional for longevity)
Step 1: Shaping the Clay Body
-
Prepare your workspace:
Lay down parchment paper or a non-stick craft mat to protect your table and prevent sticking. Clean surfaces are key for keeping white clay pristine. -
Condition the clay:
Take a chunk of clay about the size of a golf ball. Knead it in your hands until it feels warm, pliable, and free of cracks. -
Roll out the slab:
Using your rolling pin, flatten the clay to an even thickness of about 5-6mm. Being too thin makes it fragile, while too thick makes it heavy for the stick. -
Cut the arched shape:
Freehand or use a paper template to cut a rectangle with an arched top. Aim for a shape roughly 2 inches tall and 1 inch wide. -
Smooth the edges:
Dip your finger in a little water and gently run it along the cut edges. This softens the sharp angles left by the knife and gives it that finished, ceramic look.
Cracking Up?
If you see tiny hairline cracks as the clay dries, mix a tiny bit of fresh clay with water to make a paste (slip) and smooth it into the cracks with your finger.
Step 2: Adding the Design
-
Create the border:
For the specific look in the photo, lightly press a slightly smaller arched object (or use a sculpting tool) into the clay to create a subtle recessed border just inside the edge. -
Stamp the leaf:
Press your leaf stamp firmly into the center of the arch. If you don’t have a stamp, use a needle tool to hand-carve a central vein and angled side veins to mimic the image. -
Clean up details:
Check the impression. If the clay pushed up around the stamp lines, gently tap it back down with a finger or flat tool for a clean surface. -
Create the dowel hole:
Carefully insert your wooden dowel into the center of the straight bottom edge. twisting gently. Go in about half an inch to create a socket, then remove the dowel so the clay can dry.
Go Botanical
Instead of a generic leaf stamp, press actual herbs (like rosemary or sage leaves) from your garden into the clay for a uniquely realistic texture.
Step 3: Finishing and Assembly
-
Let it dry completely:
Place the clay flat on a clean surface. Allow it to air dry for 24-48 hours. Flip it over halfway through to ensure both sides dry evenly and prevent warping. -
Sand for perfection:
Once bone dry, take your fine-grit sandpaper and lightly buff the edges and surface. This removes any fingerprints or rough spots. -
Dust off:
Use a barely damp sponge to wipe away all the sanding dust to prepare the surface for sealing. -
Glue the stick:
Apply a drop of strong craft glue into the hole you made earlier and re-insert the wooden dowel. Wipe away excess glue immediately. -
Seal the piece:
To protect against garden moisture, give the clay head a light coat of matte spray sealant. I prefer doing two thin coats rather than one heavy one. -
Cure time:
Let the glue and sealant cure for the time recommended on their packaging before sticking the marker into damp soil.
Now you have a charming, handmade accent ready to watch over your growing herbs
Handmade Clay Knobs for Furniture Flips
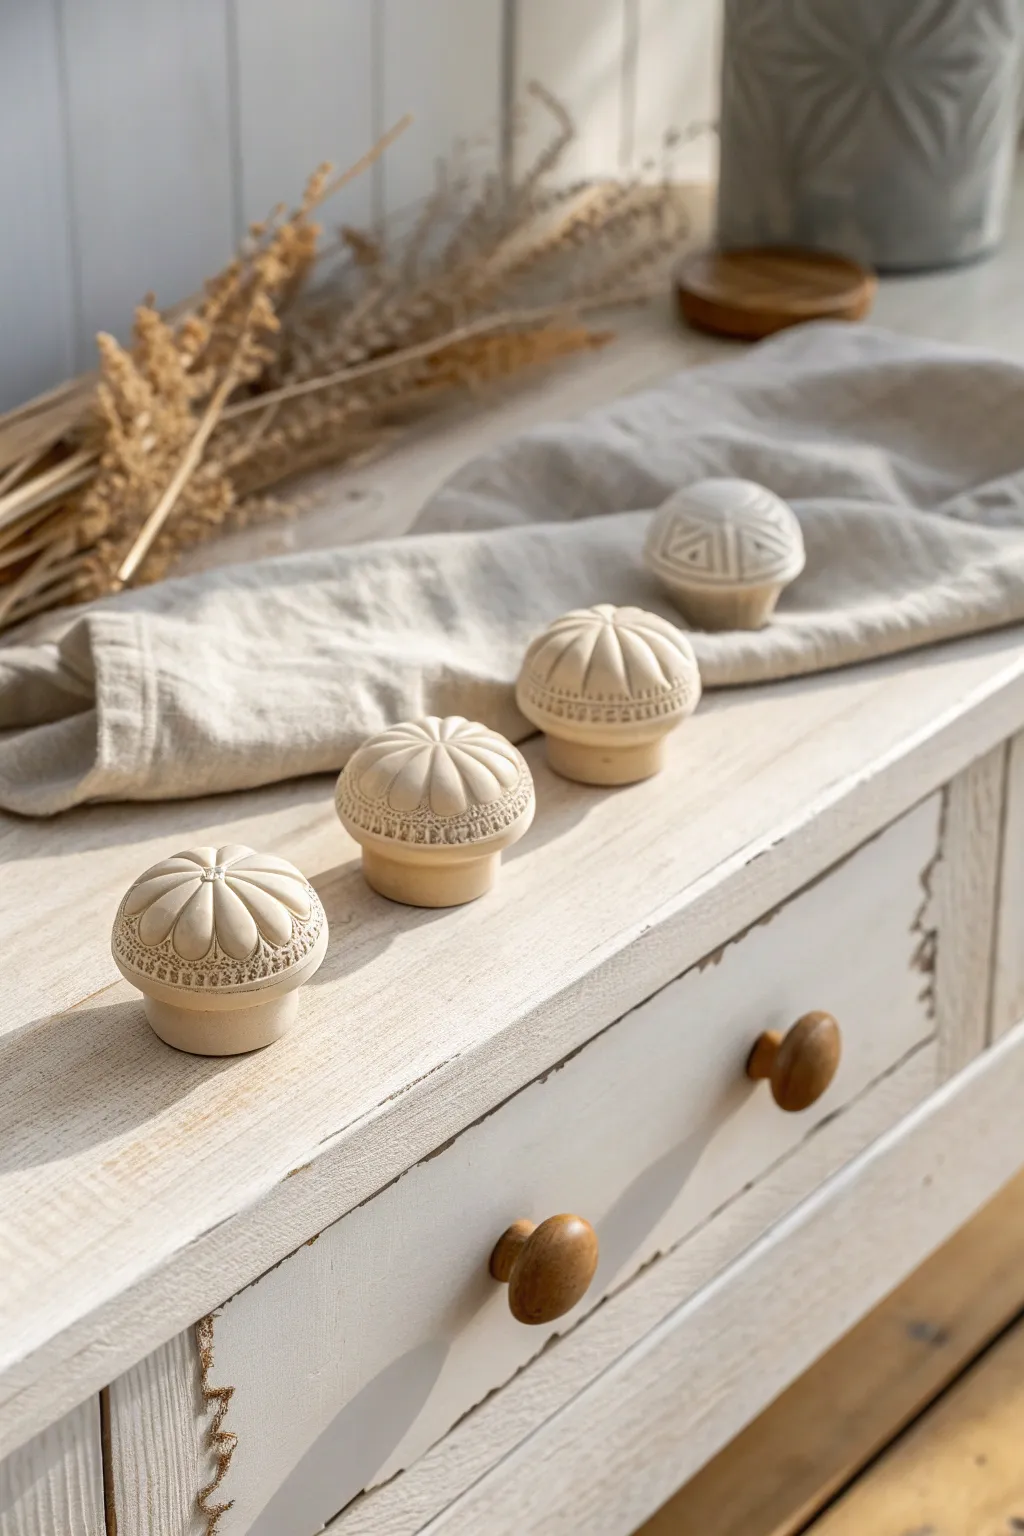
Transform ordinary furniture with these bespoke clay knobs that bring a touch of earthy elegance to any dresser or cabinet. Featuring raised petal designs and subtle geometric textures, these durable beige-toned handles offer a high-end, artisanal look at a fraction of the cost.
Step-by-Step Guide
Materials
- Polymer clay (beige, sand, or white)
- Wooden knob bases (flat-top, unfinished)
- Strong craft adhesive (E6000 or similar)
- Detail modeling tools (ball stylus, needle tool)
- Acrylic roller
- Cornstarch (for release agent)
- Textured fabric or mesh (for the rim)
- Gloss or satin clear varnish (optional)
- Oven and baking sheet
- Sandpaper (fine grit)
Step 1: Preparation and Base
-
Condition the Clay:
Begin by warming the polymer clay in your hands, kneading it until it is soft, pliable, and free of cracks. -
Prepare the Wooden Core:
Lightly sand the top surface of your unfinished wooden knob bases to create a better grip for the adhesive later. -
Roll Basic Spheres:
Divide your clay into equal portions, rolling each into a smooth ball slightly larger than the diameter of your wooden knob tops. -
Mount and Shape:
Press a clay ball firmly onto the top of a wooden knob, flattening the bottom side against the wood to create a mushroom-cap shape. -
Smooth the Form:
Use your fingers to smooth the clay down the sides of the knob head, ensuring it adheres well but doesn’t cover the screw hole at the bottom.
Pro Tip: Consistent Sizing
To ensure every knob is the exact same size, weigh each portion of clay on a kitchen scale before you start rolling and sculpting.
Step 2: Sculpting the Design
-
Create the Petal Divisions:
Using a needle tool or a dull knife, gently press indentations starting from the center and radiating outward to section the top into 8-10 equal slices, like a pie. -
Define the Petals:
Use a ball stylus tool to press gently into the center of each ‘slice’ near the outer edge, creating a concave, spoon-like shape for each petal. -
Refine the Center:
Press a small dot or create a tiny starburst pattern in the very center where all the petal lines meet. -
Add Texture to the Rim:
Take a strip of textured mesh or coarse fabric and press it gently around the vertical rim of the clay cap to create the stippled, band-like effect seen in the photo. -
Alternative Geometric Pattern:
For the geometric variation shown in the background, use a small flat tool to impress triangle shapes and parallel lines instead of the petal design. -
Final Surface Check:
Look over the piece for unwanted fingerprints. I find lightly brushing the surface with a bit of cornstarch can help smooth these out without ruining the texture.
Level Up: Faux Stone
Mix black pepper or dried tea leaves into white clay before sculpting to create a realistic speckled granite or sandstone effect.
Step 3: Baking and Finishing
-
Bake the Knobs:
Place the knobs on a baking sheet, clay side up. Bake according to the specific temperature and time on your clay package instructions. -
Cool Down:
Allow the knobs to cool completely inside the oven with the door cracked open to prevent thermal shock cracks. -
Secure the Core:
If the clay cap popped off the wood during baking, use a dab of strong adhesive like E6000 to permanently bond the baked clay cap back onto the wooden base. -
Light Sanding:
Once adhesive is cured, use extra fine sandpaper to smooth out any rough edges on the bottom rim where the clay meets the wood. -
Seal (Optional):
Apply a thin coat of matte or satin varnish to protect the clay from oils and dirt, though leaving it raw preserves the stony, matte finish.
Install your new custom hardware to instantly refresh your furniture with a unique handmade charm
Whimsical Mushrooms and Mini Fairy Houses

Bring a touch of woodland magic indoors with this enchanting miniature fairy dwelling set on a rustic wood slice. This project combines textured finishes with charming clay details like spotted mushrooms and a tiny arched door to create a scene straight out of a storybook.
Detailed Instructions
Materials
- Air-dry clay (white and terracotta/brown)
- Small plastic bottle or cardboard cone (for armature)
- Wood slice base (approx. 8-10 inches)
- Texture paste or white grout
- Acrylic paints (burnt sienna, cream, deep green, white)
- Modeling tools and sculpting knife
- PVA glue or strong craft glue
- Dried moss (sheet moss and loose bits)
- Small flat stones or grey clay for the path
- Matte sealant spray
Step 1: Building the House Structure
-
Prepare the armature:
Start by creating the core shape of your house. You can use a trimmed plastic bottle for the base and form a cone from cardstock for the roof slightly wider than the base. Glue these together securely. -
Cover with clay:
Roll out a thin sheet of white air-dry clay. Wrap this entirely around your base structure, pressing it firmly against the form. Smooth the seams with a little water on your fingertip to create a unified surface. -
Texture the walls:
Instead of smoothing the clay perfectly, tap a stiff bristle brush or a crumpled ball of foil over the wet clay to give it a stucco-like texture. Let the main structure dry completely, which may take 24 hours. -
Create the roof texture:
Apply a layer of texture paste or white grout over the roof cone. While wet, use a palette knife to create swirling, uneven peaks that mimic an organic, hand-built plaster look.
Cracked Clay?
If the clay shrinks and cracks while drying on the armature, fill the fissures with a mix of fresh clay and water (slip), then smooth over.
Step 2: Sculpting the Details
-
Shape the door:
Using terracotta or wood-colored clay, cut out an arched door shape. Use a needle tool to score vertical lines for wood planks and sculpt a raised frame around the edge. -
Add a handle:
Roll a tiny ball of black or dark brown clay and press it onto the door to serve as the doorknob. -
Make the windows:
Cut out two circular window frames from the same brown clay. Use a knife to remove the inner quarters, creating a cross-shaped muntin for each window. I prefer to let these dry flat separately so they don’t warp. -
Form the mushrooms:
Roll thick stems from beige or white clay. For the caps, shape domes from terracotta-colored clay. Attach the caps to the stems, smoothing the join underneath. -
Detail the mushrooms:
Once the mushrooms are firm, press tiny flattened dots of white clay onto the red caps. Vary the sizes of the dots for a natural look.
Illuminated Magic
Cut a hole in the bottom of the armature before building. Once finished, place the house over a battery-operated LED tea light for a warm glow.
Step 3: Assembly and Scenery
-
Attach architectural features:
Glue the dry door and circular windows onto the main white house structure. Ensure the door sits flush with the bottom edge. -
Mount the house:
Apply a generous amount of strong glue to the bottom of the house and position it towards the back of your wood slice base. -
Lay the path:
Create a walkway leading to the door using small grey clay circles or flat pebbles. Glue them down in an irregular stepping-stone pattern. -
Plant the mushrooms:
Glue the clay mushrooms in clusters around the sides of the house, varying their heights to create visual interest. -
Apply the moss:
Spread glue over the remaining exposed wood slice. Press sheet moss into the glue, tucking it tightly around the house, path, and mushrooms to hide any gaps. -
Roof greenery:
Drape a few strands of loose moss or dried creeping vines over the peak of the roof for an aged, overgrown appearance. -
Final touches:
Use a dry brush with a tiny amount of brown paint to weather the bottom of the house and the stone path. Seal the entire piece with a matte spray to protect the clay and keep the moss in place.
This charming piece is now ready to sell or gift to a fantasy lover