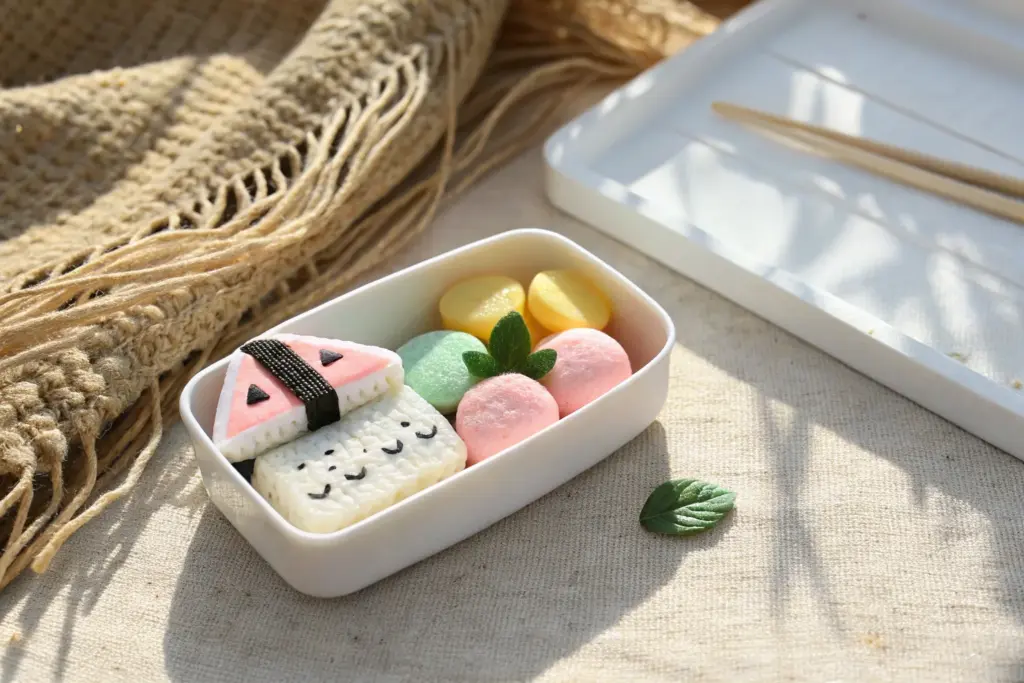
Whenever I need a quick creative win, I reach for mini clay projects—tiny enough to finish fast, but detailed enough to feel extra satisfying. If you love cute, polished makes, these mini clay ideas are exactly the kind of small-scale magic you’ll want to try next.
Mini Bakery Charms
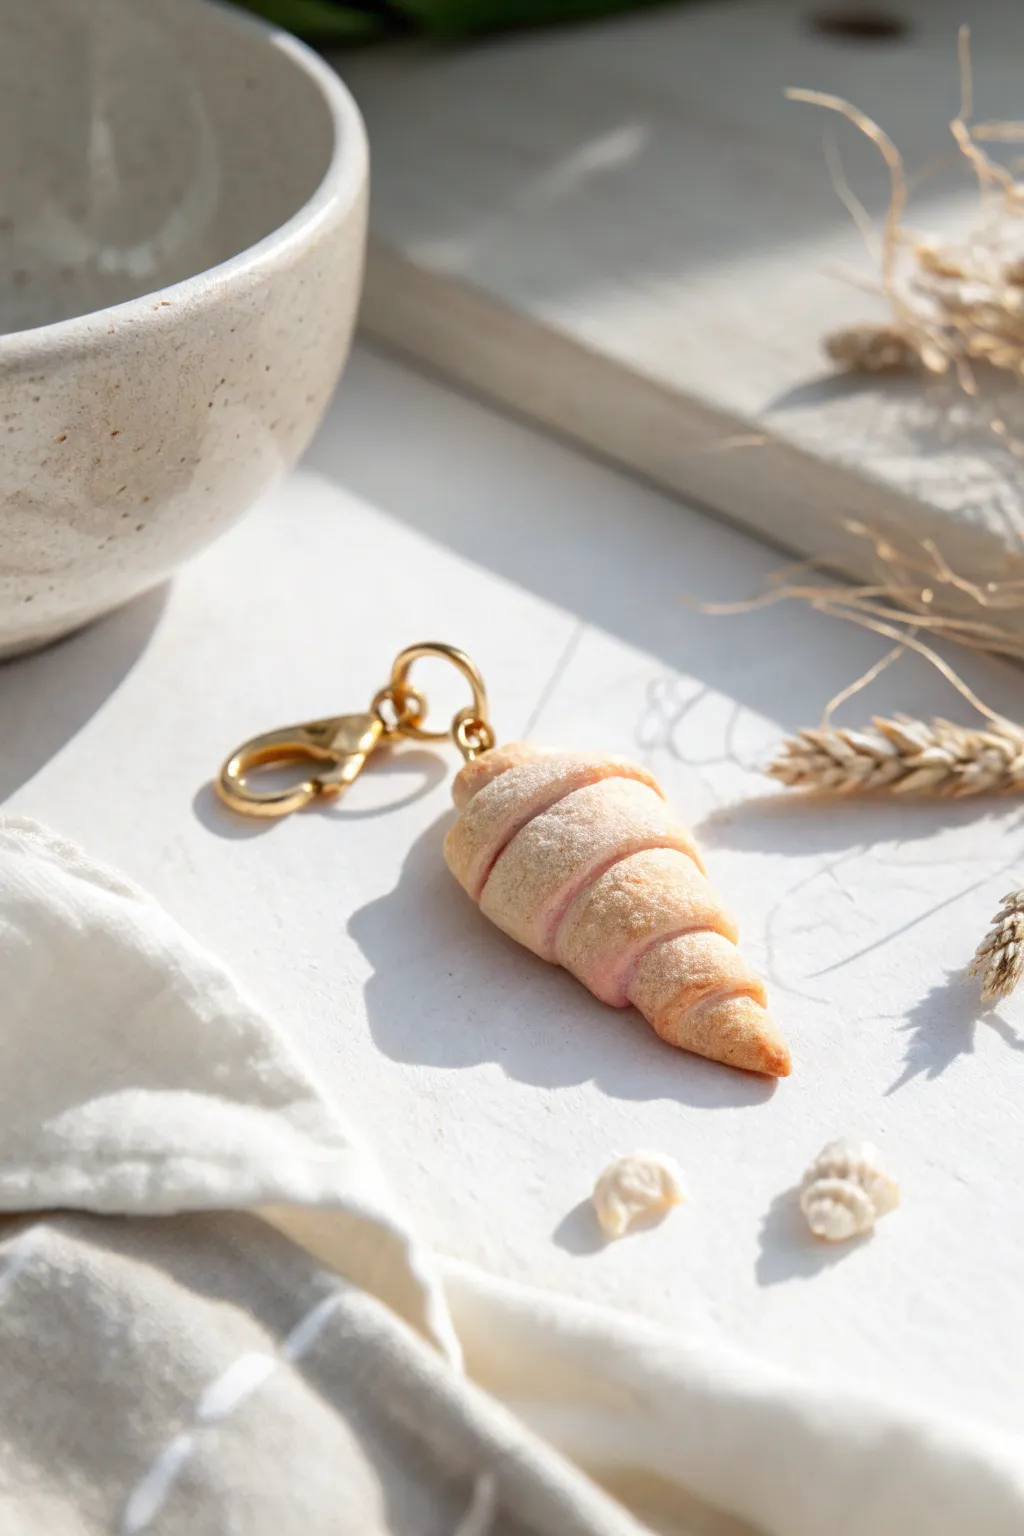
Capture the warmth of a fresh bakery with this ultra-realistic clay pastry charm, featuring delicate golden shading and a sugary textural finish. This tiny cornetto is the perfect accessory for keychains or stitch markers.
Step-by-Step
Materials
- Polymer clay (white, translucent, ochre/ecru)
- Soft pastel chalks (yellow ochre, burnt sienna, raw umber)
- Liquid polymer clay or translucent liquid sculpey
- Fine baking sugar or fine clear glitter (for texture)
- Gold eye screw pin
- Gold jump ring and lobster clasp
- Pointed sculpting tool or needle tool
- Soft paintbrush
- Blade or X-acto knife
- Needle nose pliers
- Craft oven
Step 1: Creating the Dough Base
-
Mix the color:
Start by mixing a ‘bakery dough’ base color. Combine a large portion of white polymer clay with a smaller amount of translucent clay, and add just a pinch of ochre to get a pale, unbaked dough shade. -
Roll the main cone:
Take a ball of your mixed clay (about the size of a marble) and roll it into a smooth cone shape. The base should be wider and taper to a soft point, roughly 1.5 inches long. -
Prepare the layering strip:
Roll out a separate piece of the same dough mixture into a long, flat ribbon. It should be thin but not paper-thin, approximately 1-2mm thick. -
Cut the ribbon:
Use your blade to cut a clean triangle from the flat ribbon. The base of the triangle should be wide enough to wrap around the top of your cone.
Pastel Pro Tip
Apply your pastel shading in many light layers rather than one heavy one. It’s much easier to darken a pale spot than to restart a burnt one.
Step 2: Wrapping and Texturing
-
Begin the wrap:
Starting at the widest end of your cone, place the wide end of the triangle strip over it. Begin winding the strip down the cone toward the tip. -
Create the segments:
As you wind, ensure the layers overlap slightly, creating distinct ridges that mimic the rolled puff pastry look unique to cornetto shapes. -
Refine the shape:
Once wrapped, gently roll the charm on your work surface to secure the layers without flattening them. Pinch the very tip slightly to sharpen it. -
Add surface texture:
Use a crumpled piece of aluminum foil or a stiff-bristled toothbrush to gently tap texture all over the clay. This removes fingerprints and adds a baked bread realism. -
Insert hardware:
While the clay is still raw, carefully screw the gold eye pin into the center of the wide top end. I find dipping the pin in a tiny bit of liquid clay helps it bond permanently during baking.
Go Berry Flavored
Tint your initial dough with a tiny speck of magenta clay to create a strawberry or raspberry flavored pastry variant.
Step 3: Shading and Finishing
-
Prepare the pastels:
Scrape your soft pastel chalks into fine powders. You need three distinct piles: yellow ochre, burnt sienna (red-brown), and raw umber (dark brown). -
Apply base shading:
Using a soft, dry brush, dust the yellow ochre powder lightly over the entire pastry. This gives it a ‘lightly baked’ undercoat. -
Deepen the ridges:
Take the burnt sienna powder and focus specifically on the raised ridges of the spiral. The recessed areas should remain paler to show depth. -
Add crispy tips:
Use a tiny amount of the raw umber powder just on the very tip of the cone and the edges of the widest ridge to simulate well-browned, crispy spots. -
Sugary effect:
Mix a small amount of liquid clay with white clay to make a thin frosting paste, or use clear liquid clay. Brush it very sparingly onto the middle section. -
Dusting:
Sprinkle your fine baking sugar (for texture) or clear fine glitter into the wet liquid clay areas for a sugared finish. -
Bake:
Bake the charm according to your clay package instructions (usually 275°F/135°C for 15-30 minutes). Let it cool completely. -
Assemble:
Using needle nose pliers, open the jump ring, attach the lobster clasp to the eye pin loop, and close the ring securely.
Clip this sweet little charm onto your bag or keys and enjoy your zero-calorie treat


Kawaii Blob Animals
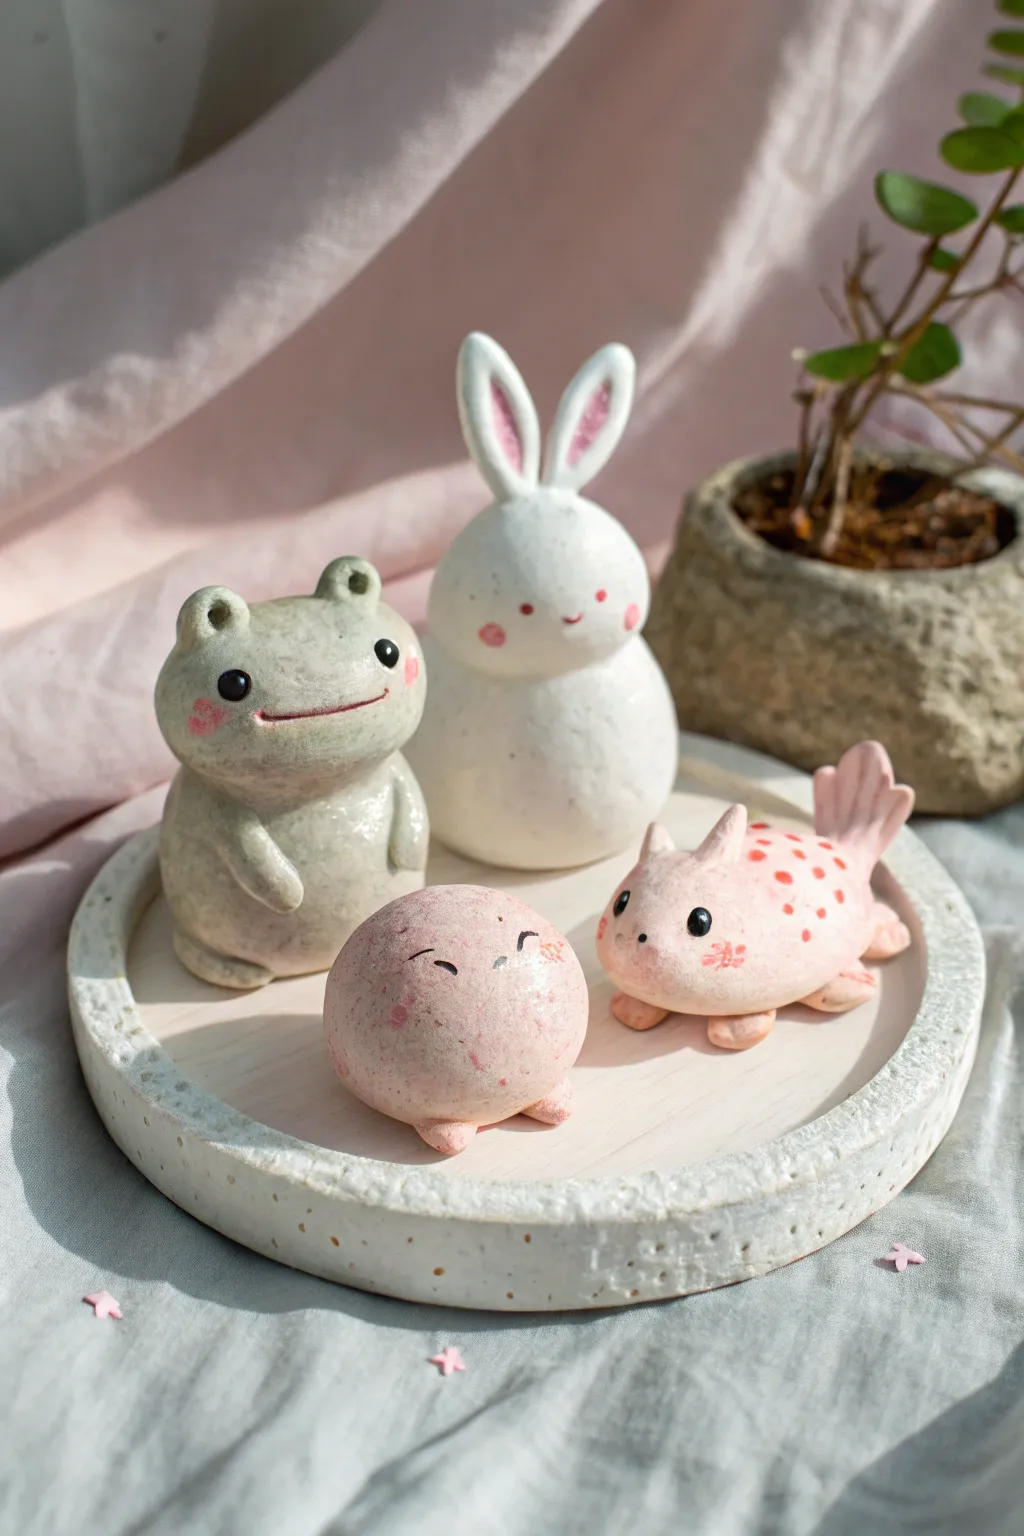
Create a charming set of four kawaii figurines featuring a frog, bunny, blob, and axolotl in soft, dreamy pastels. These miniature sculptures have a delightful handmade texture and a glossy finish that makes them perfect for desk companions or small gifts.
How-To Guide
Materials
- Polymer or air-dry clay (white base recommended)
- Acrylic paints (pastel green, pink, white, black, red)
- Fine-grit sandpaper (optional)
- Gloss varnish or UV resin
- Ball stylus tools
- Small paintbrush
- Needle tool or toothpick
- Water (for smoothing)
- Aluminum foil (for bulk/cores)
Step 1: Shaping the Bodies
-
Prepare the base shapes:
Start by conditioning your clay until it is soft and pliable. Divide your clay into four portions. Roll three of them into smooth, slightly tapered egg shapes for the frog, bunny, and axolotl bodies. Roll the fourth into a perfect sphere for the round blob character. -
Form the frog:
Take one egg shape and gently flatten the bottom so it stands upright. Pinch two small pieces of clay into teardrops for the arms and attach them to the ‘belly’ area, blending the seams upward. Add two small balls to the top of the head for the eye sockets. -
Sculpt the bunny:
For the bunny, keep the body as a simple snowman-like stack or a single pear shape. Roll two long, tapered logs for ears and attach them to the very top. Use a tool to gently indent the inside of each ear. -
Create the axolotl:
Take the third egg shape and lay it horizontally. Pinch out a small tail at the back. Add four tiny stubby legs underneath. Create a fan-shaped piece for the tail fin and attach it securely to the rear. -
Finish the round blob:
For the final sphere, attach two tiny, flattened balls to the bottom front to act as feet. Keep the shape very simple and round to maintain that ‘mochi’ aesthetic.
Clean Connections
Use a small amount of liquid clay (for polymer) or water/slip (for air-dry) as ‘glue’ when attaching ears and limbs to ensure they don’t pop off later.
Step 2: Refining Details
-
Add frog details:
Use a needle tool or the edge of a credit card to press a wide, gentle curve for the frog’s mouth. Smooth out any fingerprints with a drop of water. -
Detail the axolotl:
For the axolotl’s gills, make three tiny spikes on each side of the head, or simplify it with small ear-like protrusions. Use your stylus to create indentations for where eyes will be painted later. -
Texturize the surface:
To mimic the stone-like texture seen in the photo, lightly tap the surface of all figures with a toothbrush or a crumpled ball of aluminum foil. This gives them an organic feel rather than a plastic smoothness.
Step 3: Painting and Finishing
-
Base coats:
Once dry or cured (according to your clay’s instructions), paint the frog a muted sage green. Paint the bunny pure white. Mix a soft, fleshy pink for the round blob and the axolotl. -
Add blush:
Mix a diluted pink or coral paint. Using a dry brush technique or a cotton swab, gently dab rosy cheeks onto all four characters. Add pink inside the bunny’s ears and on the frog’s cheeks. -
Paint facial features:
Using a very fine detail brush or a toothpick dipped in black paint, add the classic wide-set eyes. For the round blob, paint two closed curved lines for happy eyes. Use red or dark pink to deepen the frog’s smile line. -
Axolotl patterns:
Dip a toothpick in dark pink or red paint and dot small spots along the axolotl’s back and tail for a speckled pattern. -
Gloss coat:
Finish by applying a coat of gloss varnish or UV resin over the eyes to make them shine. You can glaze the entire figure for a ceramic look or leave the bodies matte for contrast.
Cracking Clay?
If you see small cracks forming while air-dry clay cures, smooth a tiny bit of fresh, wet clay into the fissure with your finger and let it dry again.
Arrange your new little friends on a tray or shelf to enjoy their cheerful company


Tiny Fruit Slice Magnets
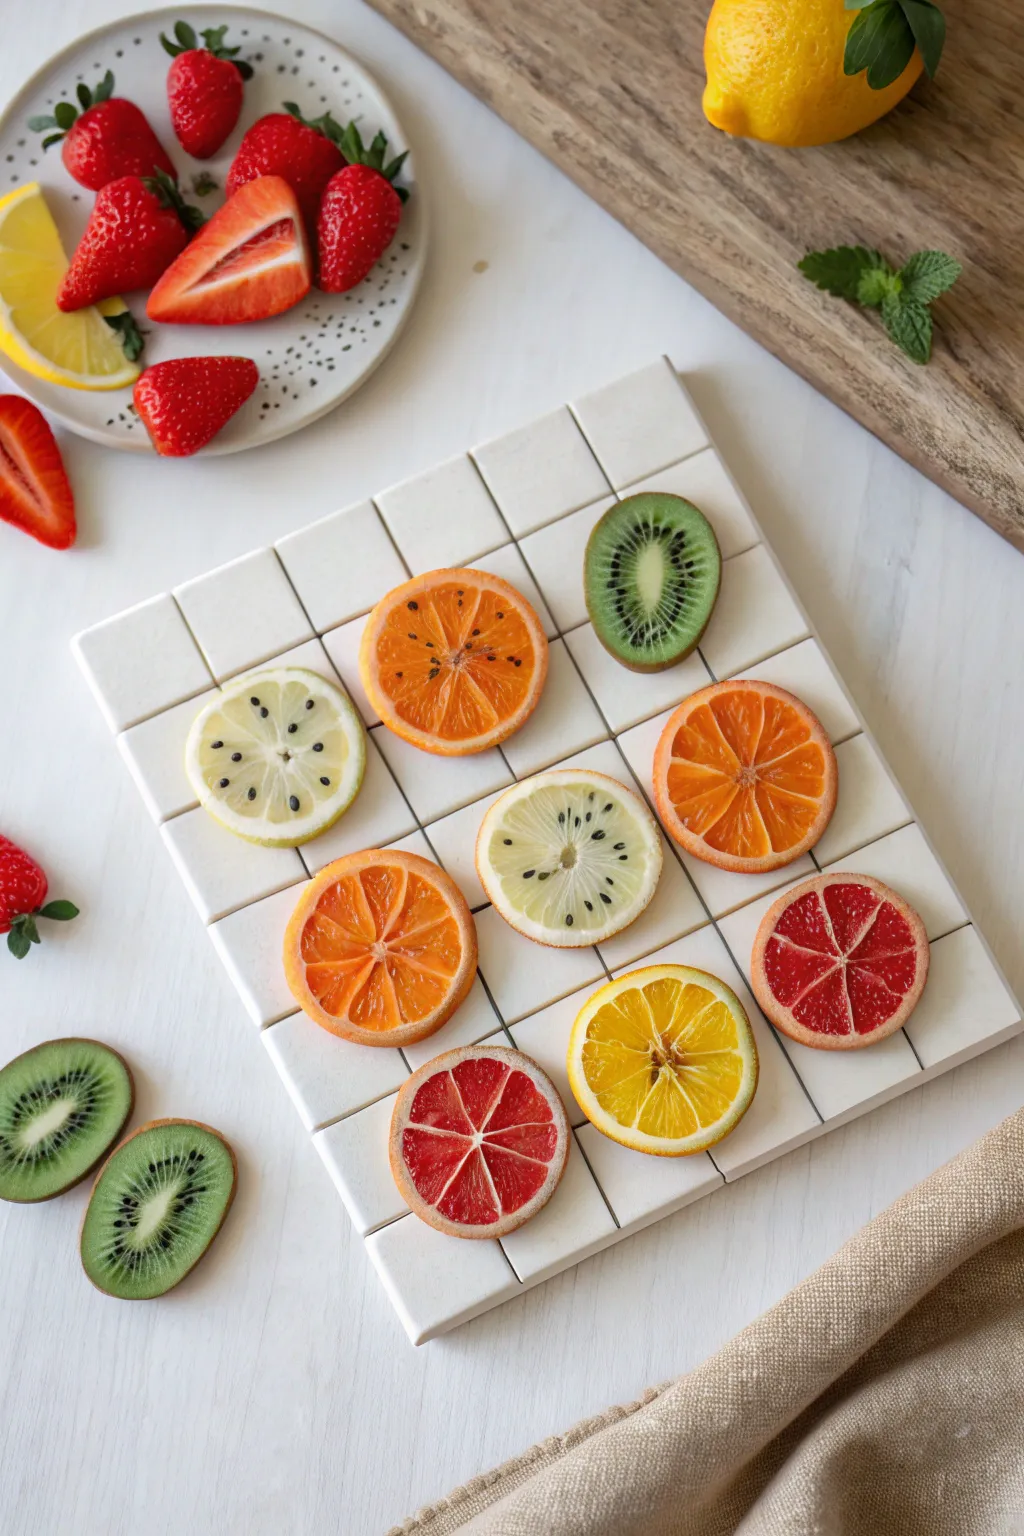
These miniature fruit slices are masters of deception, mimicking the translucency and texture of real citrus and kiwi with startling accuracy. Using polymer clay canes and clever texturing techniques, you can create a fresh-picked collection perfect for magnets or jewelry.
Step-by-Step
Materials
- Translucent polymer clay (white or colorless)
- Opaque polymer clay (white, yellow, orange, red, green, black)
- Liquid polymer clay (translucent)
- Acrylic rolling pin
- Tissue blade or very sharp craft knife
- Needle tool or toothpick
- Small round cutter (approx. 1-1.5 inches)
- Sandpaper (various grits)
- UV resin or gloss varnish
- UV lamp (if using resin)
- Small magnets and strong glue
Step 1: Creating the Citrus Canes
-
Mix the pith color:
Start by conditioning white opaque clay with a tiny amount of translucent clay. This creates a realistic ‘pith’ color that isn’t stark white but has a natural, organic milky tone. -
Prepare the fruit segments:
Choose your flavor—mix translucent clay with a tiny dot of colored clay (yellow for lemon, orange for orange, pink/red for grapefruit). You want the mix to remain mostly translucent; if it’s too opaque, it won’t look juicy later. -
Form the segments:
Roll your colored translucent clay into a thick log. Shape this log into a teardrop or triangular prism shape by pinching one side along the entire length. This forms the basic wedge of the fruit. -
Wrap slices in pith:
Roll out a very thin sheet of your white pith mixture. Wrap the individual colored triangular log in this thin white sheet. Repeat this process so you have 8-10 identical wrapped wedges. -
Assemble the cane:
Arrange the wrapped wedges in a circle, with the pointy ends meeting in the center. Gently press them together. You might need to add a tiny snake of white clay in the very center hole if there’s a gap. -
Final wrap:
Wrap the entire assembled circle in a slightly thicker sheet of the white pith clay. Then, add a final thin layer of colored clay (matching the fruit skin) around the outside for the zest. -
Reduce the cane:
Gently squeeze and pull the large cylinder to elongate it, reducing its diameter. Roll it on your work surface until it is the size of the cutter you plan to use later, or slice directly from the log for smaller versions.
Juicy Texture Tip
Before baking, brush the textured fruit segments with a tiny bit of baby oil. It smoothes the tool marks just enough to make the clay look organic and wet rather than scratched.
Step 2: Creating the Kiwi Cane
-
Build the center:
Roll a small cylinder of white clay for the kiwi core. Surround this core with tiny snakes of black clay or mix black seeds into a translucent green layer. -
Create the seed ring:
I prefer to mix poppy seeds or tiny black clay specks into translucent white clay and wrap this around the core for the most realistic seed layer. -
Add the flesh:
Wrap a thick layer of translucent green clay around the seed ring. Finish with a thin brown layer for the fuzzy skin. Reduce this cane just like the citrus ones.
Make Them Sparkle
Mix ultra-fine iridescent glitter or embossing powder into your translucent clay before making the canes. It mimics the way light catches real sugar crystals or juice sacs.
Step 3: Slicing and Texturing
-
Slice the canes:
Let your canes rest until cool and firm (pop them in the fridge for 15 minutes). Use your tissue blade to cut even slices. Keep them slightly thick, about 3-4mm, so they look like substantial fruit cuts. -
Texture the citrus:
Here is the secret to realism: use a needle tool to gently scratch radial lines into the translucent segments of the citrus slices. Disturb the clay just enough to mimic the juice sacs inside the fruit. -
Texture the kiwi:
For the kiwi, drag your needle tool from the center outward to create those radiating lines found in real kiwi flesh. -
Bake:
Bake the slices according to your clay manufacturer’s instructions. Usually, this is around 275°F (130°C) for 15-20 minutes.
Step 4: Finishing Touches
-
Sand the edges:
Once cool, lightly sand the flat surfaces if necessary to make them perfectly even, but be careful not to remove your texture. -
Add juice gloss:
Apply a thin layer of UV resin or glossy liquid polymer clay over just the ‘fleshy’ parts of the fruit, avoiding the white pith lines. This makes them look freshly cut and wet. -
Cure the finish:
Cure the resin under a UV lamp or bake the liquid clay layer briefly to set the gloss. -
Attach magnets:
Flip the slices over and use a strong adhesive like E6000 or super glue to attach a small disc magnet to the back of each fruit slice.
Now you can display your fresh, summery fruit slices on the fridge for a pop of color that never expires


Mini Mushroom Cluster
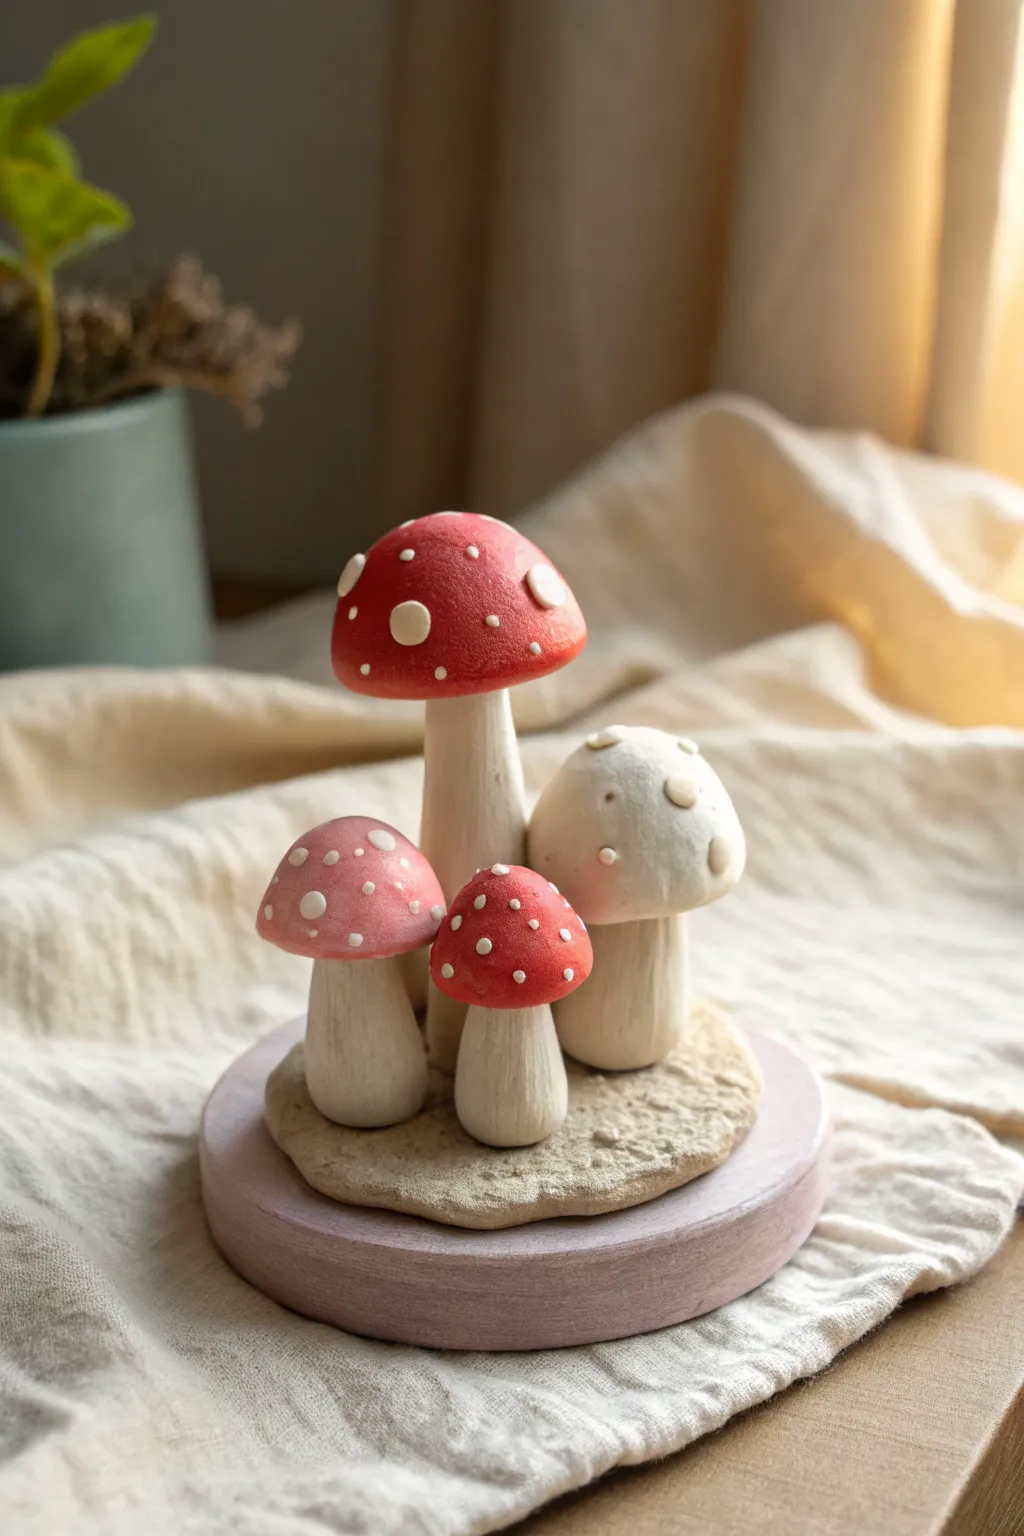
Create a charming desk companion with this miniature mushroom cluster, featuring four distinct fungi huddled together on a rustic base. The project combines soft, pastel tones with classic red toadstool vibes for a sweet, handcrafted aesthetic.
How-To Guide
Materials
- Polymer clay (White, Red, Light Pink, Beige/Tan)
- Small wooden round base (approx. 3-4 inches)
- Dotting tools or ball stylus (various sizes)
- Clay sculpting tools (needle tool/blade)
- Aluminum foil (for armature/bulking)
- Super glue or liquid clay
- Soft pastel chalks (optional, for shading)
- Matte varnish
- Acrylic paint (white) – optional if using clay for spots
Step 1: Forming the Base
-
Prepare the wooden mount:
Start by lightly sanding your small wooden round base. You can paint it a soft pastel pink or leave it natural, depending on your preference. -
Shape the ground:
Take a ball of beige or tan clay and flatten it into an irregular, organic pancake shape slightly smaller than your wooden base. -
Texture the terrain:
Press the clay onto a rough surface like sandpaper or use a stiff toothbrush to stipple the top, giving it a stony, earthy texture. -
Secure the foundation:
Place this textured clay pad centrally on your unbaked clay workspace; we will attach the mushrooms to this before baking.
Droopy shrooms?
If caps are too heavy and cause stems to bend, insert a piece of toothpick or thick wire inside the stem before baking for internal support.
Step 2: Sculpting the Stems
-
Create the main stem:
Roll a thick log of white or off-white clay for the largest mushroom. Taper it slightly so it is wider at the bottom for stability. -
Add stem detail:
Use a needle tool or blade to gently scratch vertical lines up the stem, mimicking the fibrous texture of a real mushroom stalk. -
Form the smaller stems:
Repeat the rolling and texturing process for three smaller stems of varying heights and thicknesses. -
Arrange the cluster:
Press the stems firmly onto your textured clay base. I like to group them tightly together so their caps will nestle or slightly overlap later.
Step 3: Crafting the Caps
-
Shape the large red cap:
Roll a ball of red clay and gently press your thumb into the center to create a dome shape. Smooth the edges until they are rounded. -
Shape the companion caps:
Create three more domes: a medium one in light pink, a medium one in white (or very pale cream), and a tiny one in red. -
Attach the caps:
Add a dab of liquid clay to the top of each stem and gently press the caps onto them. Tilt them at slight angles for a more natural, candid look. -
Add the spots:
Roll tiny, flat discs of white clay. Press these randomly onto the red and pink caps. Vary the sizes—some large, some like pinpricks. -
Texture the white cap:
For the all-white mushroom, use a large ball tool to press indentations into the cap instead of adding raised spots, creating a unique cratered texture.
Make it magical
Dust the red caps with a tiny bit of gold mica powder before baking for a subtle, fairy-dust shimmer.
Step 4: Finishing Touches
-
Refine the textures:
Check the connection points between stems and the base. Use a small tool to blend the clay slightly so they look like they are growing out of the ground. -
Bake the piece:
Bake the clay assembly according to your specific brand’s package instructions. Usually, this is around 275°F (135°C) for 15-30 minutes. -
Cool down:
Let the piece cool completely before handling. The clay is fragile while hot. -
Mount and seal:
Glue the baked clay narrative onto your painted wooden base using strong super glue. Finish the clay parts with a coat of matte varnish to protect them without making them too shiny.
Place your little fungal family near a plant pot or window sill to add a touch of woodland magic to your room

The Complete Guide to Pottery Troubleshooting
Uncover the most common ceramic mistakes—from cracking clay to failed glazes—and learn how to fix them fast.
Tiny Duck Pond Scene
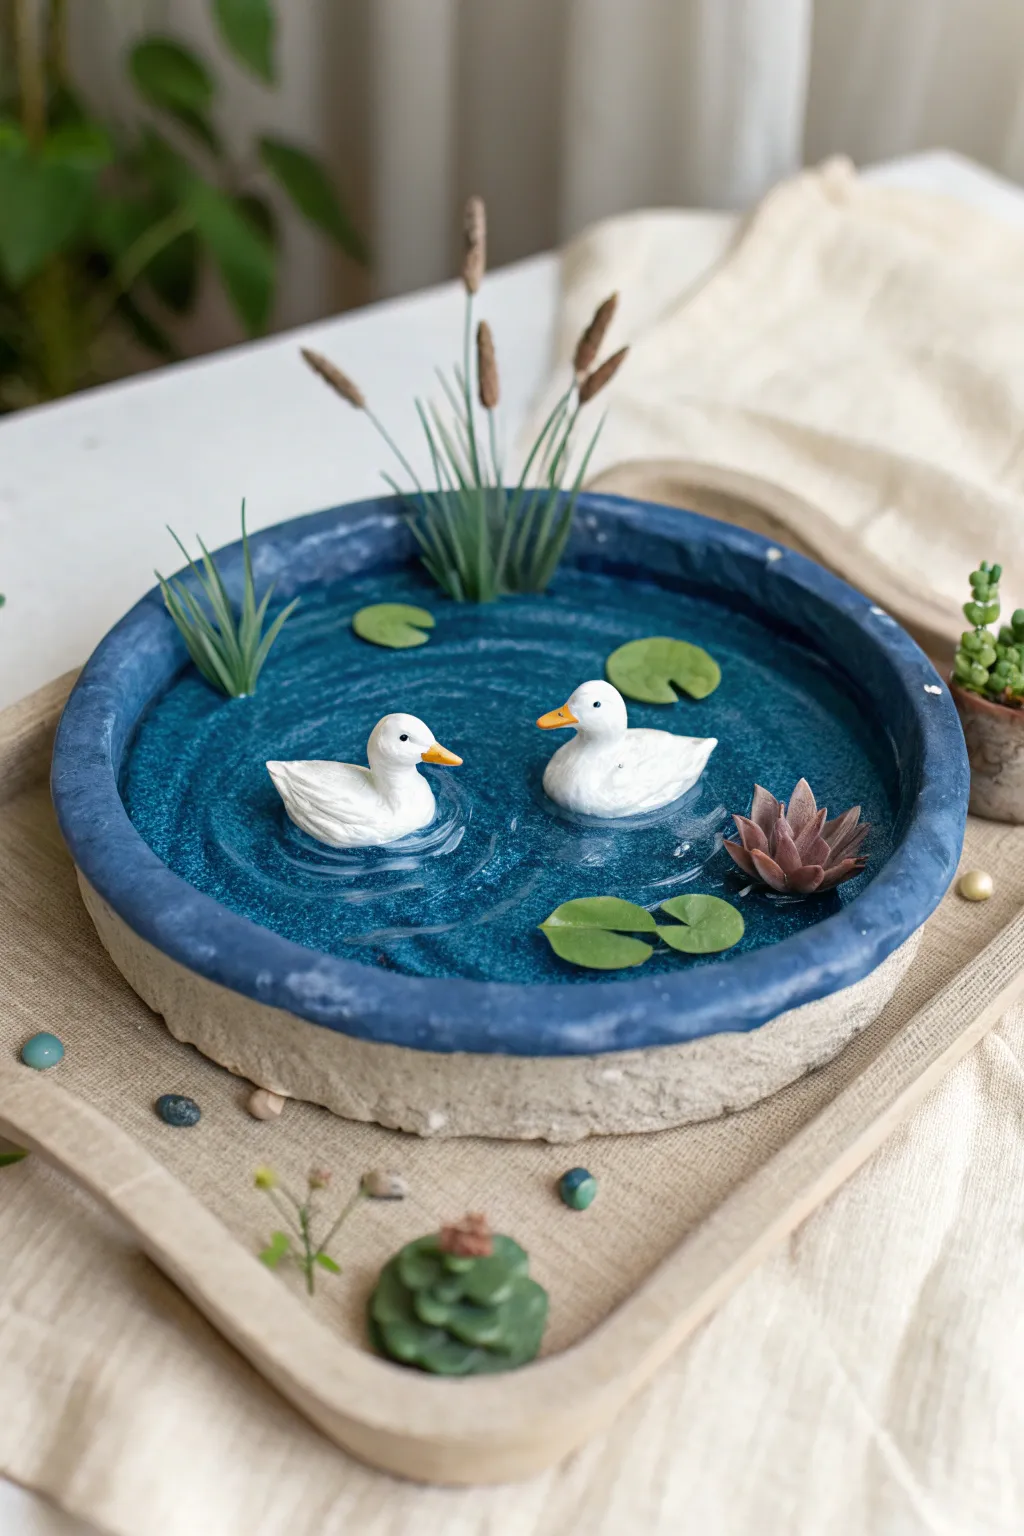
Capture the serenity of a lakeside afternoon with this charming miniature duck pond, featuring realistic ripples, floating lily pads, and delicate cattails. This mixed-media project combines the structure of polymer clay with the translucent beauty of resin to create a perfect calm water effect.
Step-by-Step
Materials
- White or Beige polymer clay (for the base)
- White polymer clay (for the ducks)
- Blue, Green, Yellow, and Brown acrylic paints
- Two-part epoxy resin
- Blue alcohol ink (or resin dye)
- Thin wire or floral wire
- Artificial grass/reeds or green paper
- Brown flocking or paint (for cattail tips)
- Small rolling pin
- Modeling tools (dotting tool, needle tool)
- Gloss varnish
- A small round cutter or jar lid (approx. 4-5 inches)
- Sandpaper
Step 1: Sculpting the Pond Basin
-
Prepare the Clay Base:
Condition your white or beige polymer clay by kneading it until it’s soft and pliable. Roll it out into a thick slab, about 1/4 inch thick preferably. -
Cut the Shape:
Use a round cutter or trace around a jar lid to cut out a circle. This will serve as the bottom of your pond. -
Build the Walls:
Roll a long snake of clay and wrap it around the edge of your circle base. Blend the seams together smoothly on both the inside and outside so it forms a seamless shallow dish. -
Texturing the Basin:
Gently tap the outside of the basin with a crumpled ball of aluminum foil or a stiff brush to give it a natural, stone-like texture. -
Painting the Interior:
Once the clay is baked according to package instructions and cooled, paint the inside bottom a deep blue. I like to blend a bit of darker teal in the center to suggest depth. Let this dry completely.
Ripple Effect Tip
Wait until the resin is the consistency of thick honey before making ripples. If it’s too runny, the ripples will flatten out immediately.
Step 2: Creating the Flora and Fauna
-
Sculpting the Ducks:
Take two small balls of white polymer clay. Shape one end into a teardrop for the body and pull a small neck and head from the other end. Use a needle tool to gently scribe wing details. -
Adding Beaks:
Attach tiny triangles of orange clay for the beaks, or bake the white clay figures first and paint the beaks orange later with acrylics. -
Making Lily Pads:
Roll out a very thin sheet of green clay. Cut out tiny irregular circles and cut a small ‘V’ notch into each one. Vary the sizes slightly for realism. -
Creating Cattails:
Cut short lengths of thin wire. Wrap green clay around the wire for the stem, or paint the wire green. Add a small sausage of brown clay at the top for the cattail head. -
Making the Lotus:
For the lotus flower, shape tiny teardrops of reddish-brown or pink clay. Assemble them in a radial pattern, starting with smaller petals in the center. -
Baking the Details:
Bake all your clay components—ducks, lily pads, cattails, and lotus—according to the clay manufacturer’s instructions.
Step 3: Pouring the Resin Water
-
Mixing Resin:
Mix a small batch of two-part epoxy resin. Add a single drop of blue alcohol ink to tint it transparent blue; you want to see the painted bottom through the resin. -
Initial Pour:
Pour the resin into your painted basin until it’s about halfway full. Use a toothpick to pop any bubbles that rise to the surface. -
Placing the Reeds:
While the resin is liquid but starting to thicken slightly (after about 20-30 minutes), gently place your cattails and grass clumps near the back edge. You may need to prop them up until the resin cures. -
Adding Floating Elements:
Carefully place the lily pads, the lotus flower, and the two ducks onto the resin surface. Arrange them naturally. -
Creating Ripples:
Once the resin is thick and gel-like (close to curing but still movable), use a toothpick or dotting tool to swirl circular ripples around the ducks and water edges. This creates the illusion of movement. -
Final Cure:
Allow the entire assembly to cure undisturbed for 24 hours in a dust-free area. -
Painting the Rim:
Finish by painting the top rim and outer edge of the basin with a stone-grey or blue-grey acrylic paint for a polished look.
Sticky Resin Fix
If your resin remains sticky after 24 hours, the mix ratio was likely off. You can coat it with a thin layer of brush-on gloss varnish to seal it.
Place this tranquil little pond on your desk or shelf for a permanent moment of peace
Pastel Star And Heart Charms
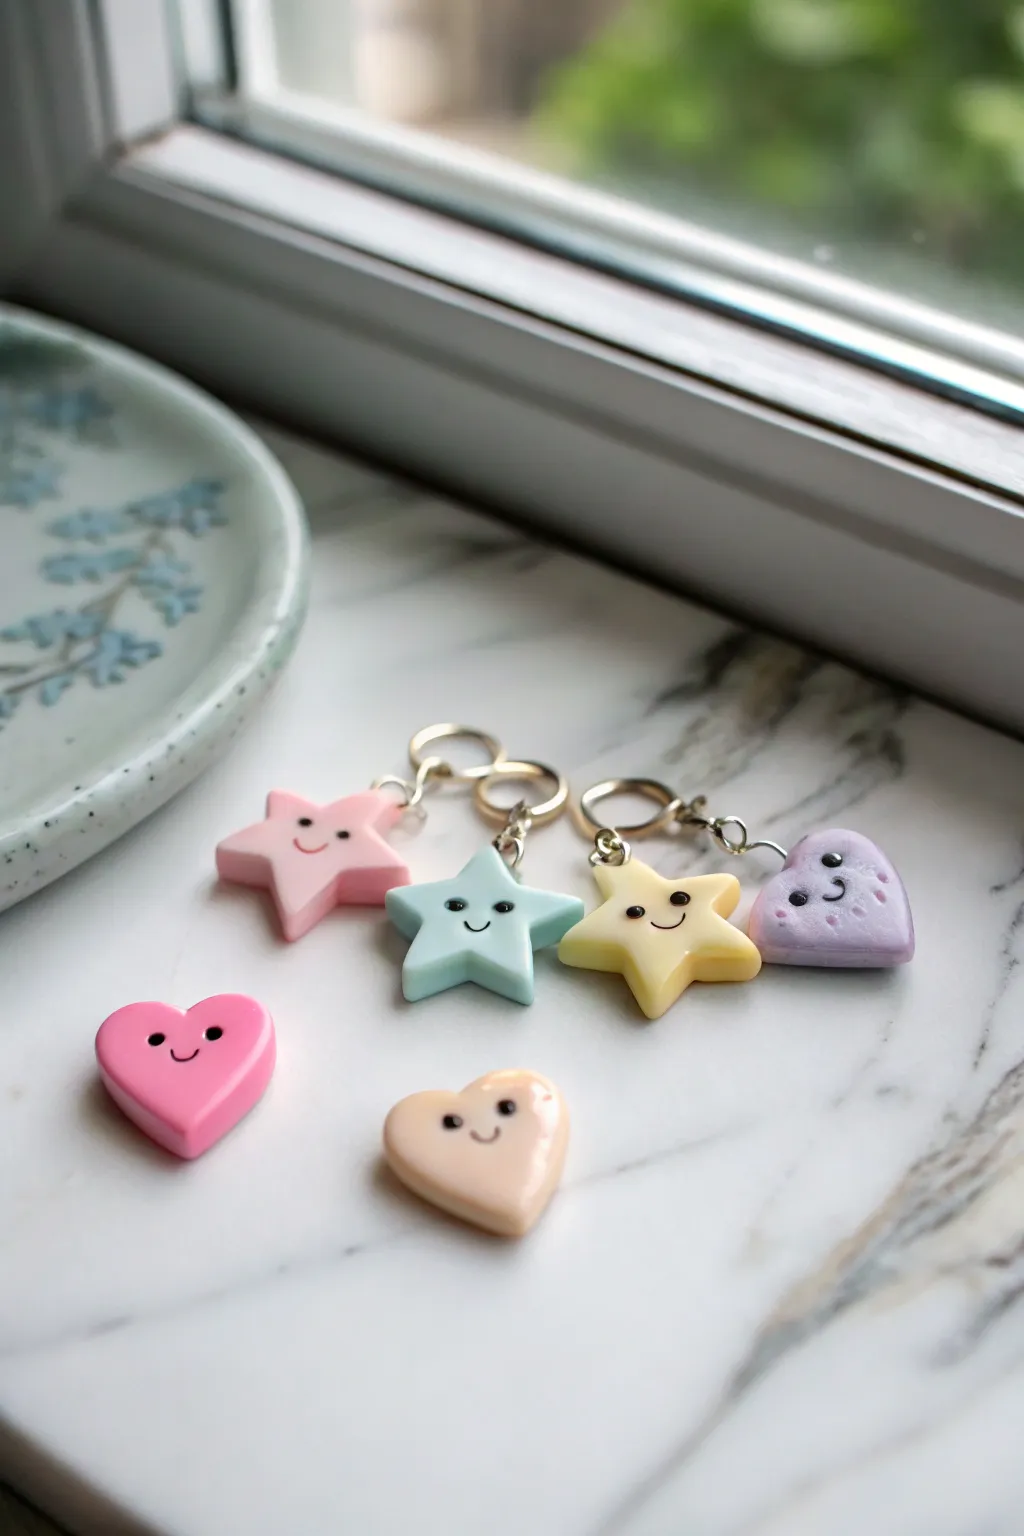
Brighten up your day with these adorable, pint-sized star and heart charms featuring sweet little faces. Their soft pastel hues and glossy finish make them perfect for zipper pulls, stitch markers, or cute earrings.
Step-by-Step Tutorial
Materials
- Polymer clay in pastel pink, blue, yellow, peach, and lavender
- Small star and heart clay cutters (approx. 1/2 inch to 3/4 inch)
- Black acrylic paint
- Very fine detail paintbrush or needle tool
- Glossy polymer clay glaze or UV resin
- Small eye pins or screw eyes (gold or silver)
- Jump rings (optional, for assembly)
- Ceramic tile or baking sheet
- Parchment paper
- Clay roller or pasta machine
- Oven
Step 1: Prepping the Clay Base
-
Condition the clay:
Begin by taking small amounts of your pastel polymer clay colors. Knead each color individually in your hands until it becomes soft, pliable, and warm to the touch. -
Roll it out:
Using a clay roller or a pasta machine, roll the clay out into an even slab. Aim for a thickness of about 4mm to 5mm; you want them thick enough to hold an eye pin securely but not too chunky. -
Cut the shapes:
Press your small heart and star cutters firmly into the clay slab. Wiggle them slightly before lifting to ensure a clean cut. -
Smooth the edges:
Gently pop the clay shapes out of the cutters. Use your fingertip, lightly dusted with cornstarch if sticky, to smooth down any rough edges or stray bits of clay around the perimeter. -
Check surface quality:
Inspect the surface of each shape for fingerprints. If you find any, lightly buff them away with a drop of baby oil on your finger.
Step 2: Adding Hardware & Baking
-
Insert eye pins:
For the shapes meant to be hanging charms (like the stars in the photo), take a small metal eye pin. If the stem is too long, trim it with wire cutters. -
Secure the pin:
Gently push the stem of the eye pin into the top center point of the star or heart. I like to add a tiny dab of liquid clay or Bake & Bond on the pin before inserting it for extra security. -
Create freestanding pieces:
If you want some pieces to be cabochons (flat-backed gems like the pink heart and peach heart shown), skip the eye pin step entirely. -
Arrange for baking:
Place all your cutout shapes onto a ceramic tile or a baking sheet lined with parchment paper, spacing them out so they don’t touch. -
Bake the clay:
Bake the pieces according to the temperature and time instructions on your specific brand of polymer clay (usually around 275°F or 135°C for 15-30 minutes). Let them cool completely before handling.
Fixing Smudged Grins
Make a mistake while painting the face? Don’t panic. While the paint is wet, quickly wipe it away with a wet cotton swab or a baby wipe, let it dry, and try again.
Step 3: Painting the Faces
-
Prepare the paint:
Squeeze a tiny dot of black acrylic paint onto a palette or scrap piece of paper. You need very little paint for these tiny features. -
Dot the eyes:
Dip the very tip of a fine detail brush or a ball stylus tool into the black paint. Carefully dab two small dots onto the center of the shape to create the eyes. -
Draw the smile:
Using the absolute finest brush you have (or even a toothpick), draw a tiny, shallow ‘U’ shape between and slightly below the eyes for the mouth. -
Optional freckles:
For the lavender heart, you can add tiny extra dots under the eyes to create sweet little freckles, giving it extra personality. -
Let paint dry:
Allow the acrylic paint to dry completely. This usually takes about 10-15 minutes, but ensure it is fully set so it doesn’t smear during glazing.
Glittery Galaxy
Mix a pinch of fine iridescent glitter into your pastel clay before rolling it out. This adds a subtle sparkle that looks magical once the glossy topcoat is applied.
Step 4: Glazing & Finishing
-
Apply glaze:
Brush a thin coat of glossy polyurethane varnish or UV resin over the front and sides of each charm to give it that shiny, ceramic-like finish visible in the photo. -
Seal the deal:
If using air-dry varnish, let it dry overnight. If using UV resin, cure it under a UV lamp for 1-2 minutes until hard and tack-free. -
Add jump rings:
Once the glaze is cured, use pliers to open a jump ring and thread it through the loop of the eye pin. -
Attach the clasp:
Before closing the jump ring, slide on a lobster clasp or attach it directly to a chain or earring hook, then close the ring securely.
Now you have a handful of smiling charms ready to be turned into the cutest jewelry or gifts imaginable


What Really Happens Inside the Kiln
Learn how time and temperature work together inside the kiln to transform clay into durable ceramic.
Mini Desk Buddy Totems
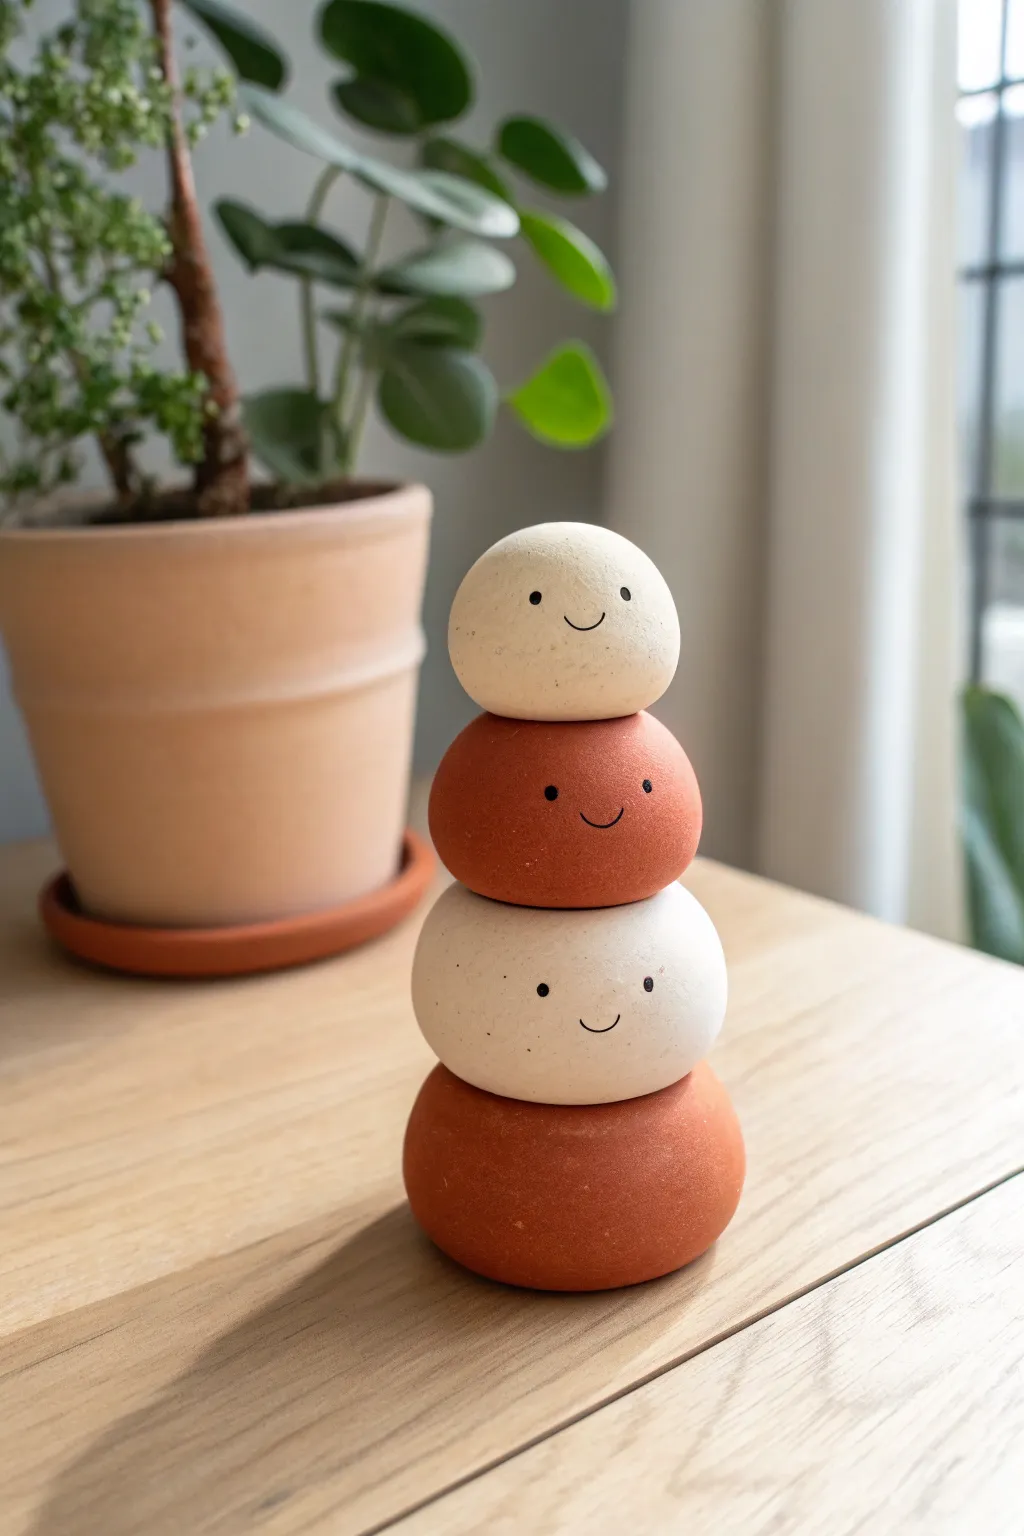
This adorable desk companion features a stack of four smooth, stone-like clay shapes in alternating cream and terracotta tones. With their minimalist faces and soothing earthy colors, this little totem brings a sense of calm and whmsy to any workspace.
How-To Guide
Materials
- Polymer clay (cream/white and terracotta/rust colors)
- Foil (for core, optional to save clay)
- Black acrylic paint or fine-point POSCA marker
- Fine detail paintbrush (if using paint)
- Acrylic roller or smooth glass jar
- Parchment paper or ceramic tile (surface)
- Oven (for baking)
- Sculpting tool or toothpick (optional for smoothing)
- Matte garnish or sealant (optional)
Step 1: Shaping the Base Elements
-
Condition the clay:
Start by warming up your polymer clay in your hands. Knead both the cream and terracotta colors separately until they are soft, pliable, and free of cracks. This conditioning step is crucial for achieving that smooth, stone-like finish later on. -
Portion the clay:
Divide your clay to make four balls. You’ll need two terracotta pieces and two cream pieces. Aim for slight graduation in size if you want a tapered look, or keep them relatively uniform like the example. The bottom piece should be the largest/heaviest to provide stability. -
Roll perfect spheres:
Roll each portion into a tight ball between your palms. Apply firm pressure to eliminate any air bubbles or seam lines. If you’re making larger totems, you can scrunch foil into a ball first and cover it with a layer of clay to keep it lightweight. -
Create the pebble shape:
Gently press each sphere down onto your work surface to flatten the bottom. Then, press slightly on the top to create a flattened, bun-like shape rather than a perfect circle. Smoothing the sides with your thumb helps create that organic, river-stone look. -
Test the stack:
Before baking, stack your raw clay pieces in the final alternating pattern (terracotta, cream, terracotta, cream) to check the balance. Gently press them together just enough to ensure they sit flat against each other, but don’t squish them out of shape. Unstack them for baking.
Step 2: Baking and Assembly
-
Prepare for baking:
Place your four shaped pieces on a ceramic tile or baking sheet lined with parchment paper. Ensure they aren’t touching each other. -
Bakie time:
Bake according to your specific polymer clay package instructions (usually around 275°F or 130°C for 15-30 minutes depending on thickness). I prefer to bake slightly longer at a lower temp to prevent scorching the light cream color. -
Cool down completely:
Let the pieces cool completely inside the oven with the door cracked open, or remove them and let them sit for at least an hour. They are fragile while hot, so patience is key here. -
Sand for smoothness (optional):
If you have fingerprints or bumps, wet-sand the cooled pieces using high-grit sandpaper (400-1000 grit) under running water. This gives that ultra-smooth, professional finish seen in the photo.
Smooth Surface Secret
Before baking, gently wipe your raw clay with a brush dipped in a tiny bit of rubbing alcohol or baby oil. This melts away fingerprints and dust instantly.
Step 3: Adding Personality
-
Plan the faces:
Look at your stack. Notice that in the example, the bottom terracotta piece is plain, while the top three have faces. Decide which side of each ‘stone’ is the smoothest to serve as the face. -
Paint the eyes:
Using a very fine dotting tool or the tip of a toothpick dipped in black acrylic paint, place two small, wide-set eyes on the top three pieces. Keep them relatively high up on the shape. -
Draw the smiles:
With a 000 detail brush or an ultra-fine paint marker, draw a tiny, shallow ‘U’ shape between the eyes. The lines should be extremely thin and delicate for that minimalist aesthetic. -
Dry and seal:
Allow the paint to dry fully. To protect the faces from rubbing off, apply a thin coat of matte varnish. Avoid glossy finishes if you want to maintain the natural, earthy clay texture. -
Final assembly:
You can leave the pieces loose as a fidget toy, or permanently glue them together with a strong adhesive like E6000 or superglue gel for a solid desk ornament.
Make it Functional
Flatten the top of the highest ball slightly more provided a stable surface to glue on a metal alligator clip. Now your totem is a cute photo holder.
Place your little clay friends near a plant or window to enjoy their cheerful company while you work
Tiny Plant Pots
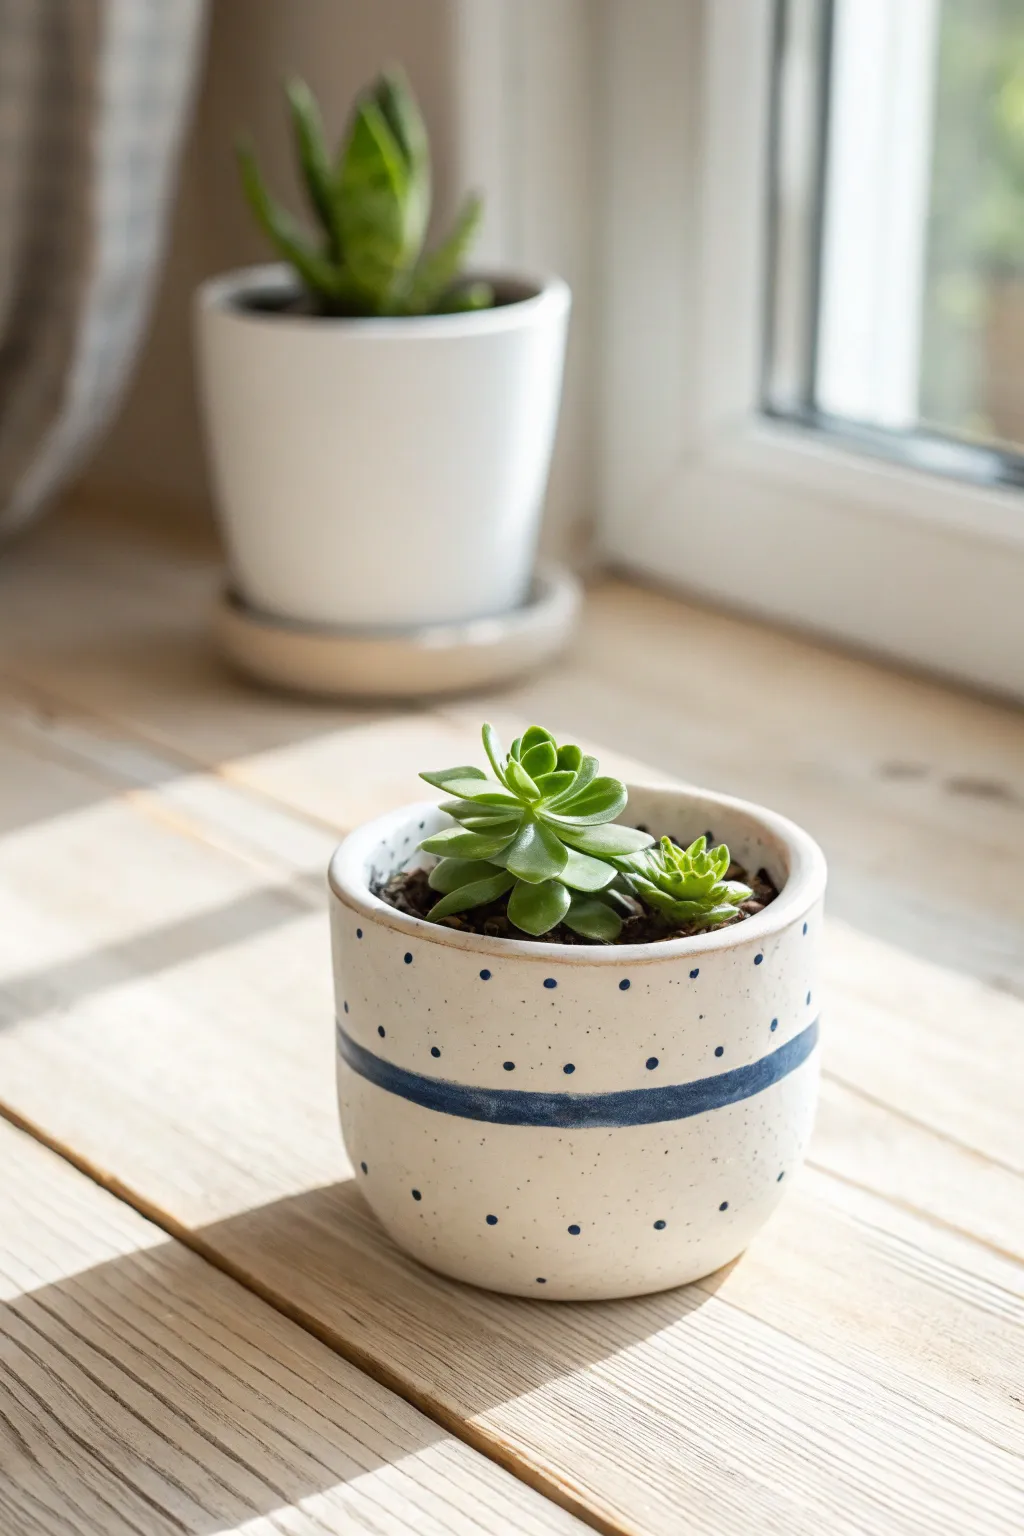
This charming little pot features a clean white base accented with a playful cobalt blue stripe and tiny, scattered polka dots. It’s the perfect size for housing small succulents and adds a fresh, handcrafted touch to any sunny windowsill.
Step-by-Step Guide
Materials
- White air-dry clay or polymer clay
- Rolling pin
- Small circular cookie cutter or a round glass (approx. 3-4 inches diameter)
- Craft knife or clay tool
- Small bowl of water (for smoothing)
- White acrylic paint (if using polymer clay or non-white air-dry clay)
- Cobalt blue acrylic paint
- High-gloss varnish or glaze (waterproof sealant)
- Fine-point paintbrush
- Medium flat paintbrush
- Sandpaper (fine grit)
Step 1: Shaping the Pot
-
Prepare the Base:
Start by rolling out a chunk of your white clay until it is about 1/4 inch thick. Use your circular cutter or glass to cut out a perfect circle, which will serve as the base of your pot. -
Create the Walls:
Roll out a long, rectangular strip of clay. The width of the strip dictates the height of your pot—about 2 to 2.5 inches is ideal for this mini size. Ensure the length is enough to wrap fully around the circumference of your base circle. -
Assemble the Form:
Wrap the clay strip around the circular base. Carefully join the two ends of the strip by scoring the edges slightly and pressing them together. Do the same where the wall meets the base. -
Smooth the Seams:
Dip your finger in a little water and gently rub the seams until they disappear completely. I like to spend extra time here to ensure the surface looks like one continuous piece of ceramic. -
Refine the Rim:
Use your fingers to round off the top rim of the pot so it isn’t sharp or uneven. Check the overall shape to ensure it is cylindrical and stands straight. -
Dry or Bake:
If using air-dry clay, let the pot sit in a dry, safe spot for 24-48 hours until completely hard. If using polymer clay, bake according to the manufacturer’s instructions on the package. -
Sanding:
Once fully cured and cooled, lightly sand any rough spots or fingerprints with fine-grit sandpaper to mimic the smoothness of fired ceramic.
Smoother Seams
Use a little bit of vinegar (for air-dry clay) or baby oil (for polymer clay) on your finger to melt seams together seamlessly.
Step 2: Painting & Glazing
-
Base Coat:
If your clay isn’t already a stark white, apply 1-2 thin coats of white acrylic paint to create a clean canvas. Let this dry completely before moving on. -
Mark the Stripe:
To get a straight line for the blue stripe, you can lightly wrap a piece of masking tape around the circumference of the pot, or just freehand it if you prefer an organic, handmade look. -
Paint the Stripe:
Load your medium flat brush with cobalt blue paint. Paint a horizontal band around the middle of the pot, keeping the pressure even to maintain the line width. -
Add Polka Dots:
Using the very tip of a fine-point brush or the back end of a paintbrush handle dipped in paint, dot small blue specks above and below the stripe. Scatter them randomly rather than in a grid for a more natural feel. -
Let Paint Cure:
Allow all the paint to dry thoroughly. This is crucial so that the colors don’t smear during the glazing step. -
Apply Varnish:
Apply a coat of high-gloss varnish or glaze over the entire outside and inside of the pot. This gives it that shiny, ceramic-like finish and protects the clay from moisture. -
Second Coat:
Once the first coat is tacky or dry (depending on product instructions), add a second coat of varnish for extra durability and shine. -
Final Drying:
Let the pot cure for at least 24 hours before introducing any soil or plants.
Drainage Hole
Before drying, use a straw to poke a hole in the center of the base. This is essential for keeping succulents healthy long-term.
Now you have a delightful handmade home for your favorite tiny succulent

TRACK YOUR CERAMIC JOURNEY
Capture glaze tests, firing details, and creative progress—all in one simple printable. Make your projects easier to repeat and improve.
Mini Tea Set Trinkets
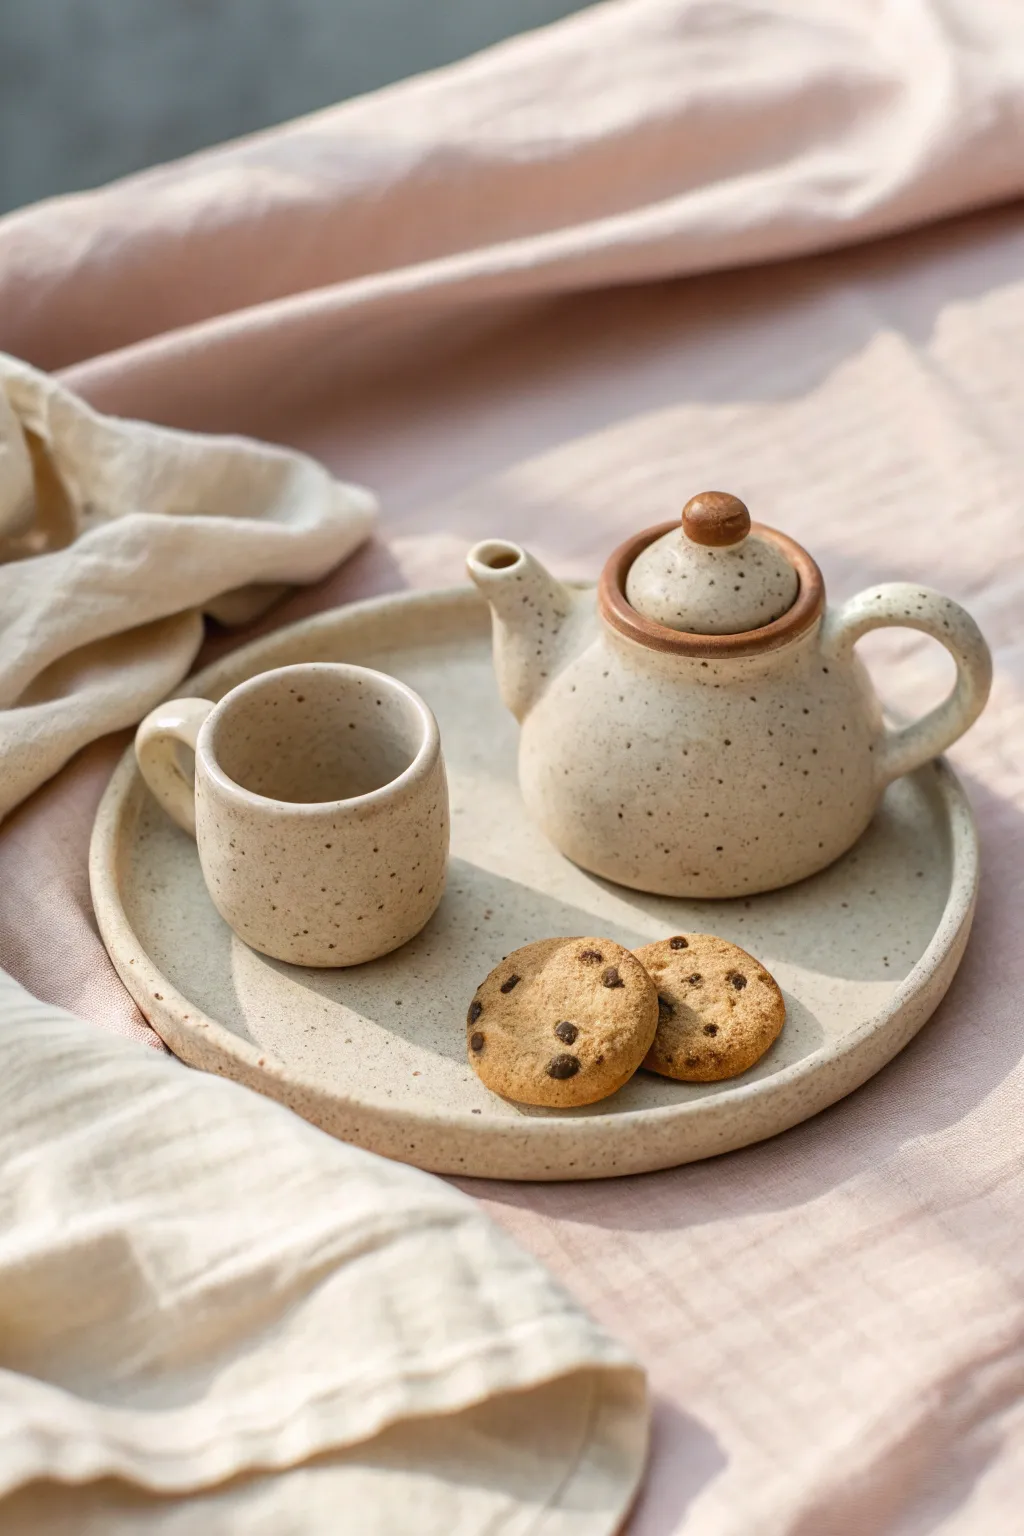
Recreate the rustic charm of handmade pottery on a miniature scale with this delightful tea set project. You’ll sculpt a tiny teapot, cup, and matching tray, finishing them with a faux-speckled glaze effect that looks just like real fired clay.
Step-by-Step Tutorial
Materials
- Beige or cream-colored polymer clay
- Brown acrylic paint (burnt umber or similar)
- Translucent liquid clay or bake and bond
- Glossy polyurethane varnish or glaze
- Old toothbrush or stiff bristle brush
- Needle tool and ball stylus tool
- Small circle cutter
- Fine sandpaper (optional)
- Small paintbrush
Step 1: Sculpting the Pot and Cup
-
Base Teapot Shape:
Start by conditioning a ball of beige clay about the size of a walnut. Roll it into a smooth sphere, then gently press the bottom against your work surface to create a flat base so it stands on its own. -
Hollowing the Body:
Use a large ball stylus to gently press into the top of the sphere, creating a shallow indentation for the lid. Don’t go too deep; you just want a suggestion of an opening. -
Forming the Spout:
Roll a small cone of clay. Gently curve the tip upwards and trim the wider end at a diagonal angle so it fits flush against the teapot body. -
Attaching the Spout:
Apply a tiny dab of liquid clay to the attachment point and press the spout onto the body. Use a silicone tool or your finger to smooth the seam completely until the clay merges seamlessly. -
Adding the Handle:
Roll a thin snake of clay. Curve it into a ‘C’ shape. Attach one end near the top rim and the other near the base, opposite the spout, smoothing the connections well. -
Creating the Lid:
Flatten a small disk of clay that fits the top indentation. Roll a tiny ball for the knob and attach it to the center. I like to flatten the knob slightly for a more authentic pottery look. -
Sculpting the Mug:
Roll a smaller cylinder of clay. Use a medium ball tool to hollow out the inside, leaving thick, rustic walls. Pinch the rim gently to round it off. -
Mug Handle:
Create a tiny ‘C’ shape from a thin snake of clay, similar to the teapot handle but smaller. Attach it securely to the side of the mug.
Speckle Trouble
If your paint speckles are too large or blobby, blot them immediately with a damp paper towel before they dry. Test your flicking technique on paper first.
Step 2: The Tray and Cookies
-
Tray Base:
Roll out a sheet of clay to about 3mm thickness. Use a large circle cutter or a jar lid to cut out a perfect circle. -
Raising the Rim:
Roll a long, thin snake of clay. Place it directly on top of the outer edge of your circle base. Blend the clay downwards onto the base on both the inside and outside to create a raised rim. -
Smoothing:
Use your finger or a smoothing tool to ensure the tray surface is flat and the rim is even. A little baby oil on your finger helps eliminate fingerprints here. -
Making Cookies:
Mix a tiny amount of brown paint into a pea-sized ball of beige clay to darken it slightly. Flatten two tiny circles and use a needle tool to scratch the surface for texture. -
Adding Chips:
Roll microscopic bits of dark brown clay and press them into the cookie tops.
Pro Tip
Mix a tiny pinch of real ground black pepper or sand into your translucent clay before sculpting. This creates internal texture that looks like authentic stone.
Step 3: Finishing Effects
-
Speckling Method:
Before baking, dilute a small drop of brown acrylic paint with water. Dip an old toothbrush into it and run your thumb across the bristles to flick tiny speckles over all the clay pieces. -
Rim Detail:
Use a fine brush to paint a thin, uneven line of brown paint around the rim of the teapot lid knob and the teapot opening to mimic exposed stoneware clay. -
Baking:
Bake all pieces according to your polymer clay package instructions. Let them cool completely. -
Glazing:
Apply a coat of glossy varnish to the teapot, cup, and tray to simulate a ceramic glaze. Leave the cookies matte for a realistic texture.
Arrange your tiny cookies on the tray and enjoy your miniature tea time display
Smiley Dumpling Minis
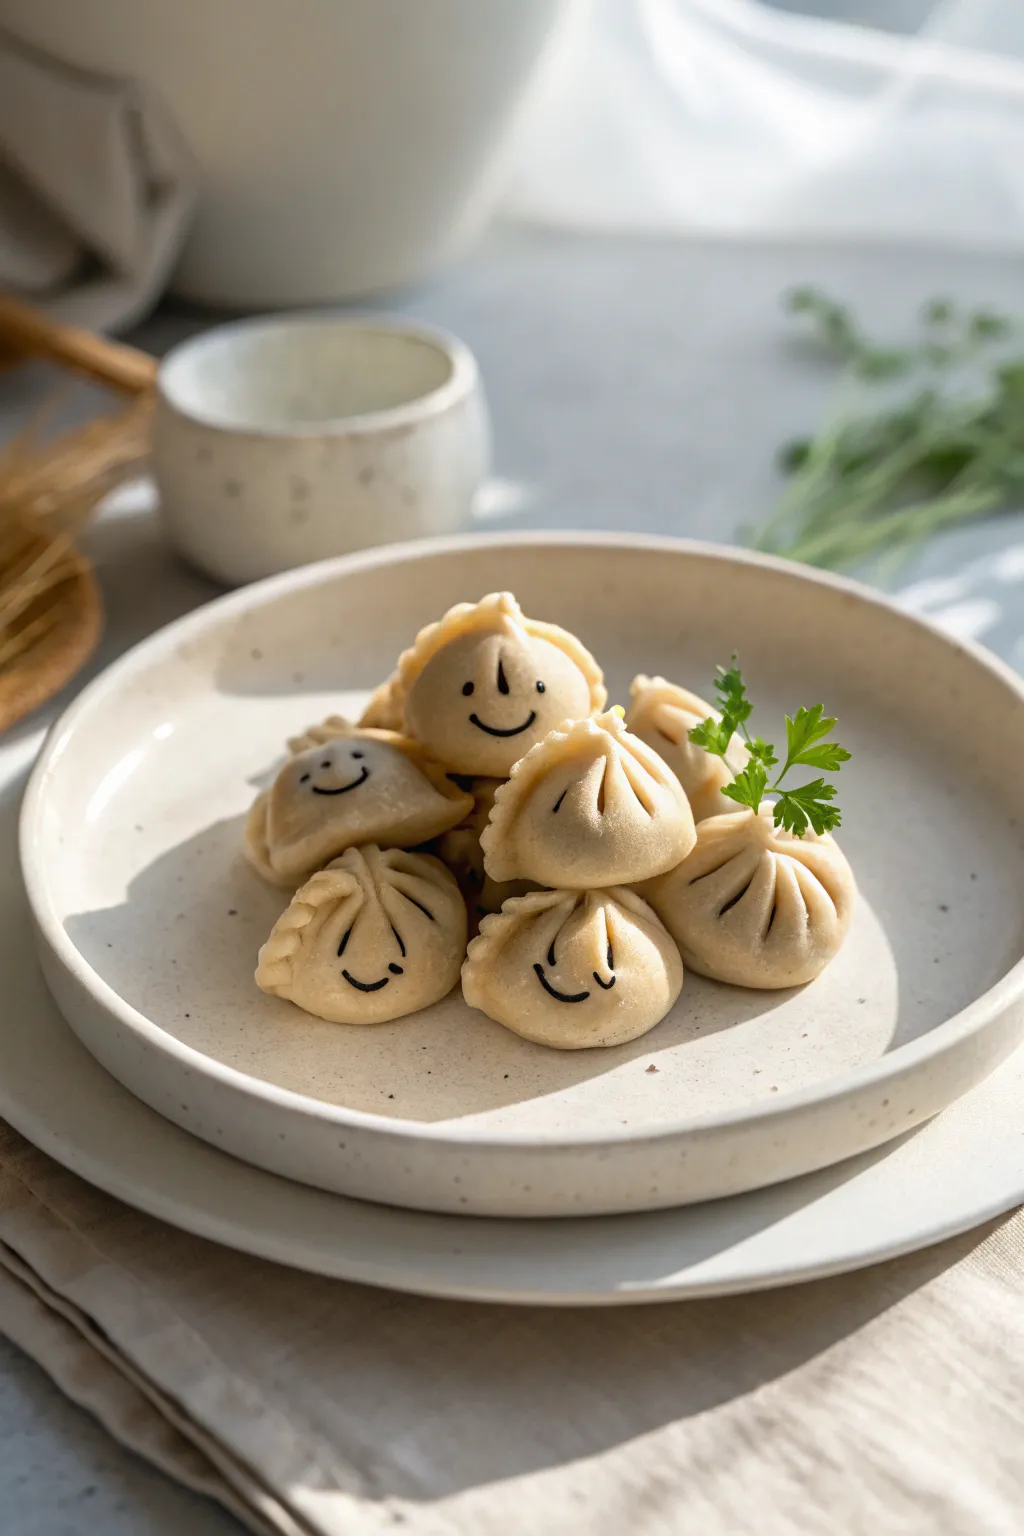
These adorable polymer clay dumplings are the perfect addition to a miniature food collection or a cute desk display. With their gentle beige dough tone and simple, happy expressions, they bring a sense of warmth and whimsy to any tiny kitchen scene.
How-To Guide
Materials
- Beige polymer clay (dough color)
- Translucent polymer clay
- White polymer clay
- Black acrylic paint or fine-tip permanent marker
- Small ball tool
- Needle tool or toothpick
- Toothbrush or balls of tin foil (for texturing)
- Soft artist pastels (brown/orange for shading)
- Small paintbrush
- Fimo liquid or liquid clay (optional for sheen)
- Miniature ceramic plate (optional for display)
Step 1: Mixing the Dough
-
Condition the clay:
Start by warming up your beige polymer clay in your hands until it is soft and pliable. -
Create the color blend:
Mix three parts beige clay with one part white and a tiny pinch of translucent clay. This creates a realistic, slightly cooked dough appearance rather than a flat plastic look. -
Form the base portions:
Roll the mixed clay into a long snake about 1/2 inch thick, then slice it into 6-8 equal segments to ensure your dumplings are uniform in size.
Step 2: Shaping the Dumplings
-
Roll spheres:
Take each segment and roll it into a smooth, seamless ball between your palms. -
Flatten the wrapper:
Gently press the ball down on your work surface to flatten the bottom slightly, keeping the top rounded like a filled dumpling. -
Pinch the edges:
For the traditional pleated look seen in the back dumplings, lightly pinch the very top edge of the dome into a thin ridge. -
Create pleats:
Using a needle tool, press small indentations along that pinched ridge to mimic the folds where dough is pressed together. -
Shape the bun tops:
For the rounder ‘bao’ style dumplings (seen in the front), pinch the clay at the very top center into a tiny point, then use your needle tool to draw curved lines radiating downward from that point. -
Add texture:
Gently tap the surface of each dumpling with a clean toothbrush or a balled-up piece of tin foil. I find this removes fingerprint marks and gives the clay a realistic floury texture.
Realism Pro Tip
Dust the raw clay with a little cornstarch or baby powder before texturing. It acts like real flour and prevents the clay from sticking to your tools.
Step 3: Adding Character
-
Plan the faces:
Decide which side of the dumpling looks smoothest to serve as the ‘face’ canvas. -
Shade the creases:
Scrape a little brown pastel into a powder. Use a dry brush to dust a tiny amount of this powder into the pleats and crevices to add depth and a ‘steamed’ look. -
Bake the batch:
Place your dumplings on a baking tile and bake according to your clay package instructions (usually 275°F/135°C for 15-30 minutes). -
Cool completely:
Allow the clay to cool fully before painting; painting on hot clay can cause the paint to clump or dry too fast.
Shaky Hands?
If painting tiny faces is hard, use a needle tip dipped in paint instead of a brush. It offers more control and creates perfect, tiny dots for eyes.
Step 4: Finishing Touches
-
Paint the eyes:
Using a very fine detail brush and black acrylic paint (or a fine-tip marker), place two tiny dots for eyes on the lower half of the dumpling. -
Draw the smile:
Connect the space between the eyes with a simple, thin ‘U’ shape for a smile. Keep the lines delicate for the cutest effect. -
Add noses (optional):
For the top dumpling, draw a tiny vertical dash between the eyes for a nose, giving it a playful personality. -
Seal the faces:
Once the paint is totally dry, dab a tiny amount of matte varnish over just the face area to protect the paint without making the whole dumpling look glossy. -
Arrange the plate:
Pile your finished minis onto a small ceramic dish, stacking them slightly haphazardly as if they were just served hot. -
Garnish:
Add a tiny sprig of preserved moss or green paper cut to look like cilantro for that final pop of color.
Now you have a heartwarming little serving of happiness that will never go bad
Tiny Book Stack Charms
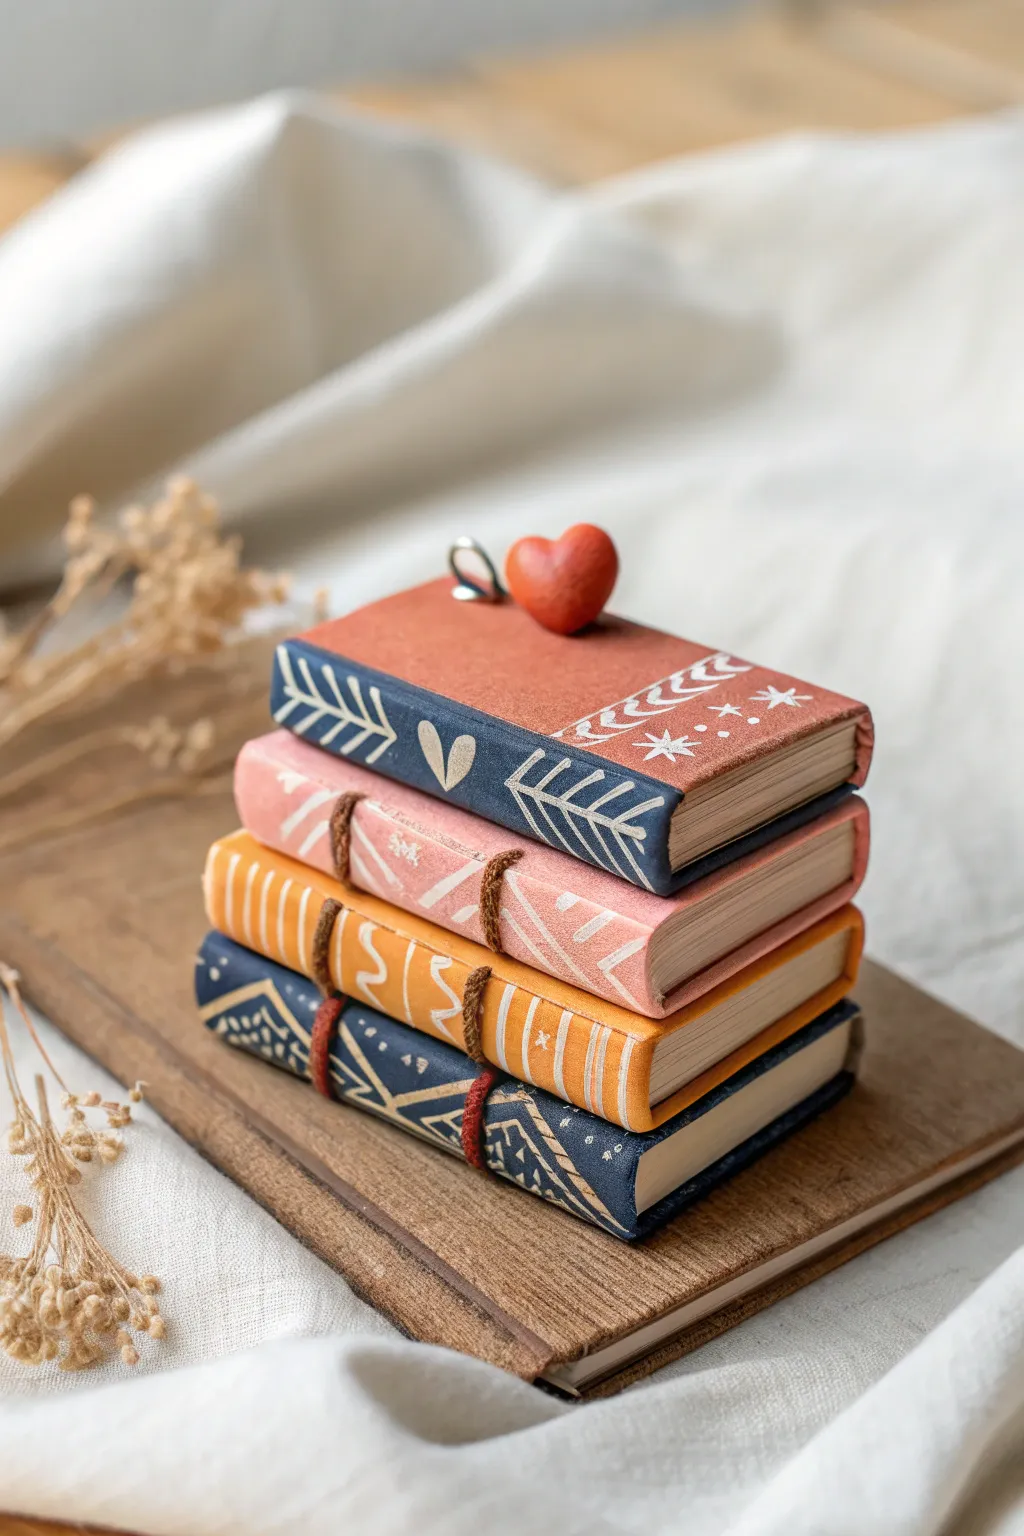
Capture the magic of a tiny library with this adorable stack of miniature clay books, complete with intricate cover details and realistic page textures. This charm features a rustic, hand-bound look topped with a sweet little heart, perfect for book lovers.
Step-by-Step Tutorial
Materials
- Polymer clay (white/beige for pages, plus burnt orange, dusty pink, mustard yellow, and navy blue)
- Acrylic craft paint (white and cream)
- Fine-detail paintbrush (size 0 or 00)
- Liquid clay or bake-and-bond
- Razor blade or clay slicer
- Needle tool or toothpick
- Brown embroidery floss or twine
- Small eye pin
- Gloss glaze (optional for the heart)
Step 1: Shaping the Book Blocks
-
Condition the page clay:
Start by conditioning your beige or white clay until it is soft and pliable. Roll it out into a thick, even slab, approximately 4-5mm thick. -
Cut the text blocks:
Using your razor blade, cut four identical rectangles from the beige slab. These will form the ‘paper’ insides of your books. Aim for rectangles about 1.5cm by 1cm, though you can adjust the scale to your liking. -
Create page texture:
Take your needle tool and gently drag lines horizontally across the three visible edges of each block (the long side and two short sides). This mimics layers of stacked paper. -
Shade the pages (optional):
For a vintage look, I sometimes brush a tiny amount of soft pastel chalk in a cream or light brown shade over these textured edges to make the paper look aged.
Needle Tool Trick
To make straight painted lines easier, gently score the design into the baked clay first with a needle, then simply fill the grooves with paint.
Step 2: Crafting the Covers
-
Roll cover colors:
Condition your colored clays (navy, pink, yellow, rust). Roll these out much thinner than your page blocks, aiming for about 1-2mm thickness. -
Cut cover strips:
Cut strips from the colored clay that are slightly wider and more than twice as long as your page blocks. You need one piece of cover clay for each book. -
Wrap the books:
Wrap a colored clay strip around one of the beige text blocks, covering the top, spine, and bottom. Trim any excess flush with the ‘paper’ edges so it looks neat. -
Round the spines:
Gently smooth the clay along the spine of each book with your finger to give it a slightly rounded, bound appearance rather than a sharp boxy edge. -
Make the heart topper:
Form a tiny heart shape from a scrap of the rust-colored clay. It should be small enough to sit comfortably on the top book.
Slippery Stack?
If the books slide around while you’re trying to stack them, insert a piece of uncooked spaghetti down the center of the stack as an internal dowel.
Step 3: Assembly and Detailing
-
Stack the books:
Arrange your four books in a slightly askew stack. Place the navy book at the bottom, followed by yellow, pink, and the rust-colored one on top (or follow the photo’s pattern). -
Secure the stack:
Add a drop of liquid clay between each book layer to ensure they bond permanently during baking. Press them together gently. -
Add the spine binding:
Take small strands of brown embroidery floss or very thin clay ropes. Press these vertically across the spines of the bottom three books to simulate binding cords. -
Attach the hardware:
Insert the eye pin through the center of the heart and push it deep into the top book. Add a dab of liquid clay to the pin’s shaft before inserting for extra hold. -
Bake the project:
Bake the stack according to your clay manufacturer’s instructions (usually 275°F/135°C for 15-30 minutes). Let it cool completely.
Step 4: Painting the Designs
-
Prepare your intricate designs:
Once cool, use your finest detail brush and white acrylic paint. You’ll be painting freehand geometric patterns. -
Paint the top cover:
On the top rust book, paint delicate laurel leaves or vine patterns on the corners, and perhaps a few tiny stars. -
Decorate the spines:
For the stacked books, paint symbols on the spines. Use simple lines, dots, zig-zags, and leaf shapes as seen in the reference image. The navy spine features a prominent heart and leaf framing. -
Refine the lines:
If your paint lines get too thick, you can gently scratch away the excess with a needle tool once the paint is fully creating sharper edges. -
Seal the charm:
Protect your painting with a thin layer of matte varnish over the covers. If you want the heart topper to shine, use a gloss glaze just on that piece.
Now you have a charming literary keepsake ready to become a necklace or keychain
Mini Texture Tiles
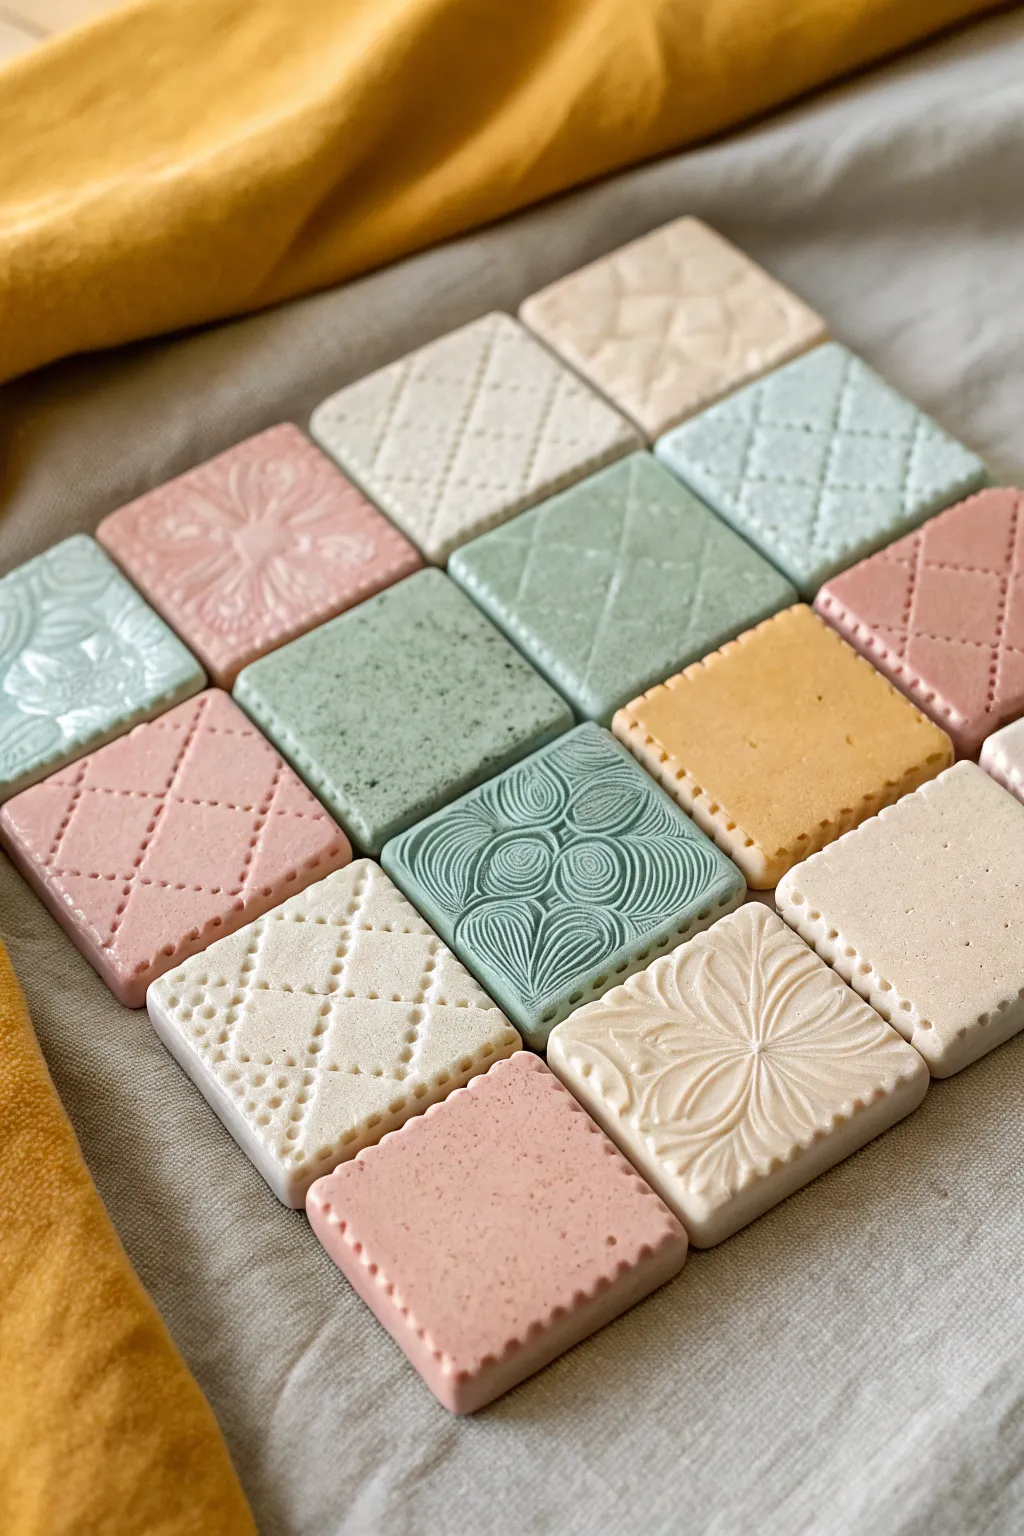
These charming miniature tiles combine soft pastel hues with delicate tactile textures to create a soothing mosaic effect. Perfect for magnets, jewelry components, or simply a decorative display, each square offers a unique exploration of pattern and relief.
Step-by-Step
Materials
- Polymer clay (white, blush pink, sage green, pale teal, butter yellow)
- Acrylic rolling pin or pasta machine
- Square clay cutters (rigid metal or printed)
- Texture sheets or stamps (florals, quilt patterns)
- Needle tool or toothpick
- Ball stylus tool
- Ceramic tile or glass sheet for baking
- Cornstarch or baby powder (as release agent)
- Blade or tissue blade
- Oven thermometer
Step 1: Color Mixing & Preparation
-
Condition the Clay:
Start by thoroughly kneading your white polymer clay until it is soft and pliable. This prevents cracking later on. -
Create Custom Pastels:
Mix small amounts of colored clay into the white base to achieve the soft, milky pastel tones seen in the image. Aim for a ratio of about 4 parts white to 1 part color for that delicate washed-out look. -
Roll Uniform Sheets:
Use your rolling pin or pasta machine to roll the conditioned clay out to a consistent thickness, roughly 1/8th of an inch (3mm). It’s crucial they are all the same height for a cohesive final grid.
Sticky Situation?
If clay gets stuck in deep texture stamps, pop the clay-filled stamp in the freezer for 5 minutes. The clay will harden and pop right out without ruining the detail.
Step 2: Texturing the Surfaces
-
Apply Powder Release:
Before texturing, lightly dust your stamps or texture sheets with cornstarch. I find this helps the clay release cleanly without distorting the pattern. -
Stamp Floral Motifs:
For the floral tiles, press a deep relief rubber stamp firmly into the clay sheet. Ensure you apply even pressure so the center detail is as crisp as the edges. -
Create Grid Patterns:
For the geometric designs, use a texture mat with a diamond or lattice pattern. Roll over it once firmly with your roller to transfer the impression. -
Simulate Stitching:
On some sections, create a ‘quilted’ look by gently pressing a needle tool into the lines of your grid pattern to mimic thread holes. -
Add Speckled Texture:
Leave some clay sheets un-patterned but use a toothbrush or stiff bristles to tap the surface, giving it a subtle stone-like or sandy finish. -
Emboss Swirls:
For the swirling detailed tile, use a specialized texture roller or a smaller, intricate metal stamp to create deeply grooved concentric circles.
Step 3: Cutting & Refining
-
Cut the Squares:
Place your square cutter over the textured areas. Press straight down and lift up. If the clay sticks, gently push it out from the corners. -
Detail the Edges:
For tiles with decorative edges, use a small ball stylus to press indentations along the perimeter of the square before baking. -
Smooth the Sides:
Gently tap the cut edges with your finger to remove any sharp burs or ‘dragging’ marks left by the cutter. The finish should look soft and honed.
Faux Ceramic Look
Mix translucent clay into your colored batches (1:1 ratio). When baked, this mimics the depth of porcelain rather than the flat look of plastic.
Step 4: Baking & Finishing
-
Arrange on Tile:
Transfer your cut squares to a ceramic tile or glass sheet. This surface goes directly into the oven, keeping the backs perfectly flat. -
Bake:
Bake according to your clay manufacturer’s instructions (usually 275°F/130°C for 15-30 minutes). Use an oven thermometer to ensure the intricate textures don’t scorch. -
Cool Down:
Let the tiles cool completely on the ceramic tile before attempting to move them. They are fragile while warm. -
Buffing (Optional):
If you want a matte finish like the image, no varnish is needed. You can lightly buff them with a soft denim cloth to deepen the pastel colors slightly.
Enjoy arranging your beautiful new collection of textured miniatures into different patterns and grids
Mini Theme Collection Grid

Create your own enchanting collection of tiny toadstools with this simple polymer clay project. These delightful red, teal, and amber mushrooms feature speckled caps and textured stems, perfect for miniature gardens or charming desk decor.
Step-by-Step Tutorial
Materials
- Polymer clay (white, red, teal, amber/orange)
- Small ball tool or dotting tool
- Pointed sculpting tool or toothpick
- Smooth ceramic or acrylic work surface
- Baking sheet and parchment paper
- Oven (for baking clay)
- White acrylic paint (optional, for dots if not using clay)
- Fine grit sandpaper
Step 1: Shaping the Stems
-
Prepare the White Clay:
Start by conditioning your white polymer clay until it is soft and malleable. Roll it into a smooth log about the thickness of a pencil. -
Cut Segments:
Cut the log into equal segments, approximately 1 inch long each. You will need about 12 segments for the full tray set. -
Form the Base Shape:
Roll each segment into a thick cylinder. Gently taper the top end slightly so it’s narrower where the cap will sit, while keeping the bottom flat so the mushroom can stand on its own. -
Add Texture:
Using a pointed sculpting tool or a toothpick, lightly score vertical lines up and down the length of the stem. This imitates the natural fibrous texture of a mushroom stalk. -
Refine the Stand:
Press the bottom of each stem firmly against your work surface to ensure it is perfectly flat and stable. I like to give them a gentle wiggle to make sure they won’t tip over easily.
Step 2: Crafting the Caps
-
Condition Colored Clay:
Condition your red, teal, and amber clays separately. Divide them into small balls—roughly four of each color if you are making a dozen mushrooms. -
Shape the Domes:
Press each colored ball into a rounded dome shape. Use the palm of your hand to smooth out any fingerprints. -
Create the Underside Indent:
Use the rounded end of a large ball tool or your pinky finger to create a depression in the flat bottom of each cap. This will help it sit securely on the stem. -
Attach Caps to Stems:
Place a cap onto each white stem. Press down gently but firmly to bond the clay. You can create a mix of colors or arrange them in specific patterns.
Clean Clay Tip
Keep baby wipes handy! Wipe your hands thoroughly between clay colors to prevent the red or teal pigments from staining your pristine white stems.
Step 3: Detailing and Baking
-
Make the Dots:
Roll very tiny, rice-grain-sized balls of white clay. You will need many of these for the speckles. -
Apply the Speckles:
Place the tiny white balls onto the mushroom caps in random patterns. Gently press them flat until they are flush with the cap’s surface. -
Final Smoothing:
Give the caps one final gentle rub with your finger to ensure the dots are seamlessly integrated into the colored clay. -
Pre-Bake Check:
Stand all your mushrooms on a parchment-lined baking sheet. Double-check that none are leaning and that all caps are secure. -
Bake:
Bake the mushrooms according to your specific brand of polymer clay instructions (usually around 275°F or 135°C for 15-30 minutes). -
Cool Down:
Allow the mushrooms to cool completely in the oven with the door cracked open to prevent cracking from thermal shock. -
Finishing Touches:
If the bottoms aren’t sitting perfectly flat after baking, lightly sand the base of the stems with fine-grit sandpaper until they are stable.
Gloss it Up
After baking and cooling, brush a coat of gloss polyurethane varnish or UV resin over just the colored caps to make them look wet and freshly sprouted.
Arrange your finished mushrooms in a divided ceramic dish or plant them in moss for a magical display