Air dry clay is basically the perfect teen craft: low-mess, no kiln drama, and you can make stuff you’ll actually use every day. Here are my favorite air dry clay ideas for teens that look trendy, feel personal, and totally belong on your desk, dresser, or wall.
Chunky Clay Bead Bracelet Stack
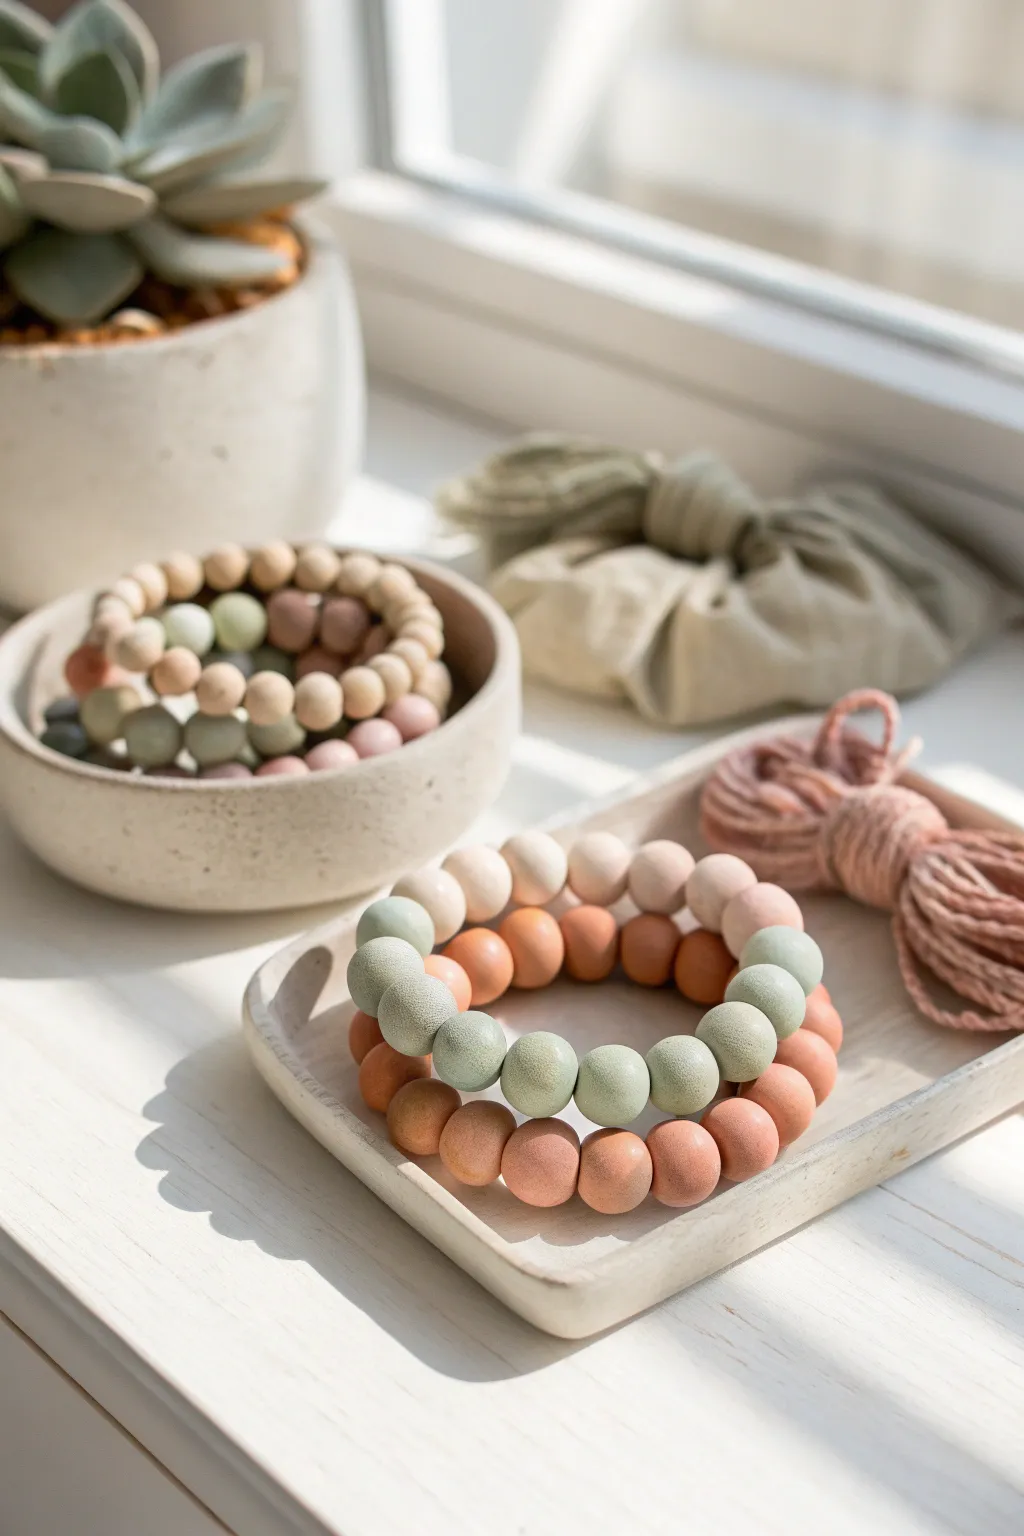
These simple yet sophisticated bracelets prove that bead-making isn’t just for little kids. By mixing earthy tones with a matte finish, you can create a stacked accessory that looks like it came from a high-end boutique.
Step-by-Step
Materials
- Air-dry clay (white or terracotta)
- Acrylic paints (terracotta, sage green, blush pink, cream)
- Small paintbrush
- Bamboo skewers or toothpicks
- Fine-grit sandpaper (320-400 grit)
- Elastic cord (.8mm or 1mm thickness)
- Scissors
- Super glue or jewelry glue
- Matte spray varnish (optional)
- Ruler
Step 1: Shaping the Beads
-
Prep your workspace:
Lay down a sheet of parchment paper or a silicone mat to prevent the clay from sticking to your table as you work. -
Portion the clay:
Pinch off small pieces of air-dry clay. Aim for pieces that are roughly the size of a large marble or a small grape to get that chunky look. -
Roll spheres:
Roll the clay pieces between your palms to form smooth, uniform spheres. Try to keep them as consistent as possible, but slight variations add to the organic charm. -
Create the hole:
Gently push a bamboo skewer or toothpick through the center of each sphere. If the bead gets squished, re-roll it gently while it’s still on the skewer. -
Widen the openings:
Wiggle the skewer slightly to ensure the hole is wide enough for your elastic cord to pass through later, keeping in mind the clay shrinks slightly as it dries. -
Smooth the edges:
Dip your finger in a tiny bit of water and smooth out any rough edges around the holes where the skewer entered and exited. -
Set to dry:
Leave the beads on the skewers and prop the skewers up between two books or a drying rack so the beads don’t develop flat spots. Let them dry for 24-48 hours.
Step 2: Refining and Painting
-
Sand for smoothness:
Once fully dry, remove the beads from the skewers. Use fine-grit sandpaper to gently buff away any fingerprints or ridges. -
Mix your palette:
Prepare your acrylic paints. For the look in the photo, you want a muted ‘earth tone’ palette: mix sage green with a bit of grey, and soften a terracotta orange with a touch of white. -
Paint the first coat:
Place a bead on a toothpick to hold it steady, then paint the entire surface. I find it helpful to paint one color batch at a time to stay organized. -
Let them dry:
Stick the toothpick back into a piece of styrofoam or clay to let the paint dry completely. -
Second coat:
Apply a second coat of paint to ensure opaque, solid coverage. This is crucial for hiding the white clay underneath. -
Seal the beads:
If you want extra durability, lightly mist the beads with a matte spray varnish. Avoid glossy finishes if you want to maintain that natural, stone-like aesthetic.
Cracked Beads?
If your beads crack while drying, you likely used too much water while smoothing. Next time, use a damp finger rather than a wet one, and let them dry away from direct heat.
Step 3: Assembly
-
Measure the elastic:
Wrap the elastic cord loosely around your wrist and add about 4 inches of extra length before cutting. -
Pre-stretch the cord:
Give the elastic cord a few firm tugs. This pre-stretching prevents the bracelet from drooping or loosening up immediately after you wear it. -
String the beads:
Thread your painted beads onto the elastic. You can create a pattern like the photo—alternating two sage, one cream, one terracotta—or do solid color blocks. -
Check sizing:
Wrap the strung beads around your wrist to check the fit. Add or remove beads until it sits comfortably without digging in. -
Tie the knot:
Tie a surgeon’s knot (right over left, left over right) and pull it tight. The elastic should stretch slightly as you secure it. -
Secure with glue:
Place a tiny dot of super glue or jewelry glue directly onto the knot to prevent it from slipping. -
Hide the knot:
Once the glue is dry, trim the excess cord close to the knot and gently tug the cord to slide the knot inside the hole of a neighboring bead.
Clean Lines Pro Tip
To get perfectly round beads, roll them under a flat clear acrylic block (or a clear CD case) on your table instead of just using your palms. This creates uniform pressure.
Enjoy wearing your new stack or gifting a set to a friend who loves earth tones


Statement Arch Dangle Earrings
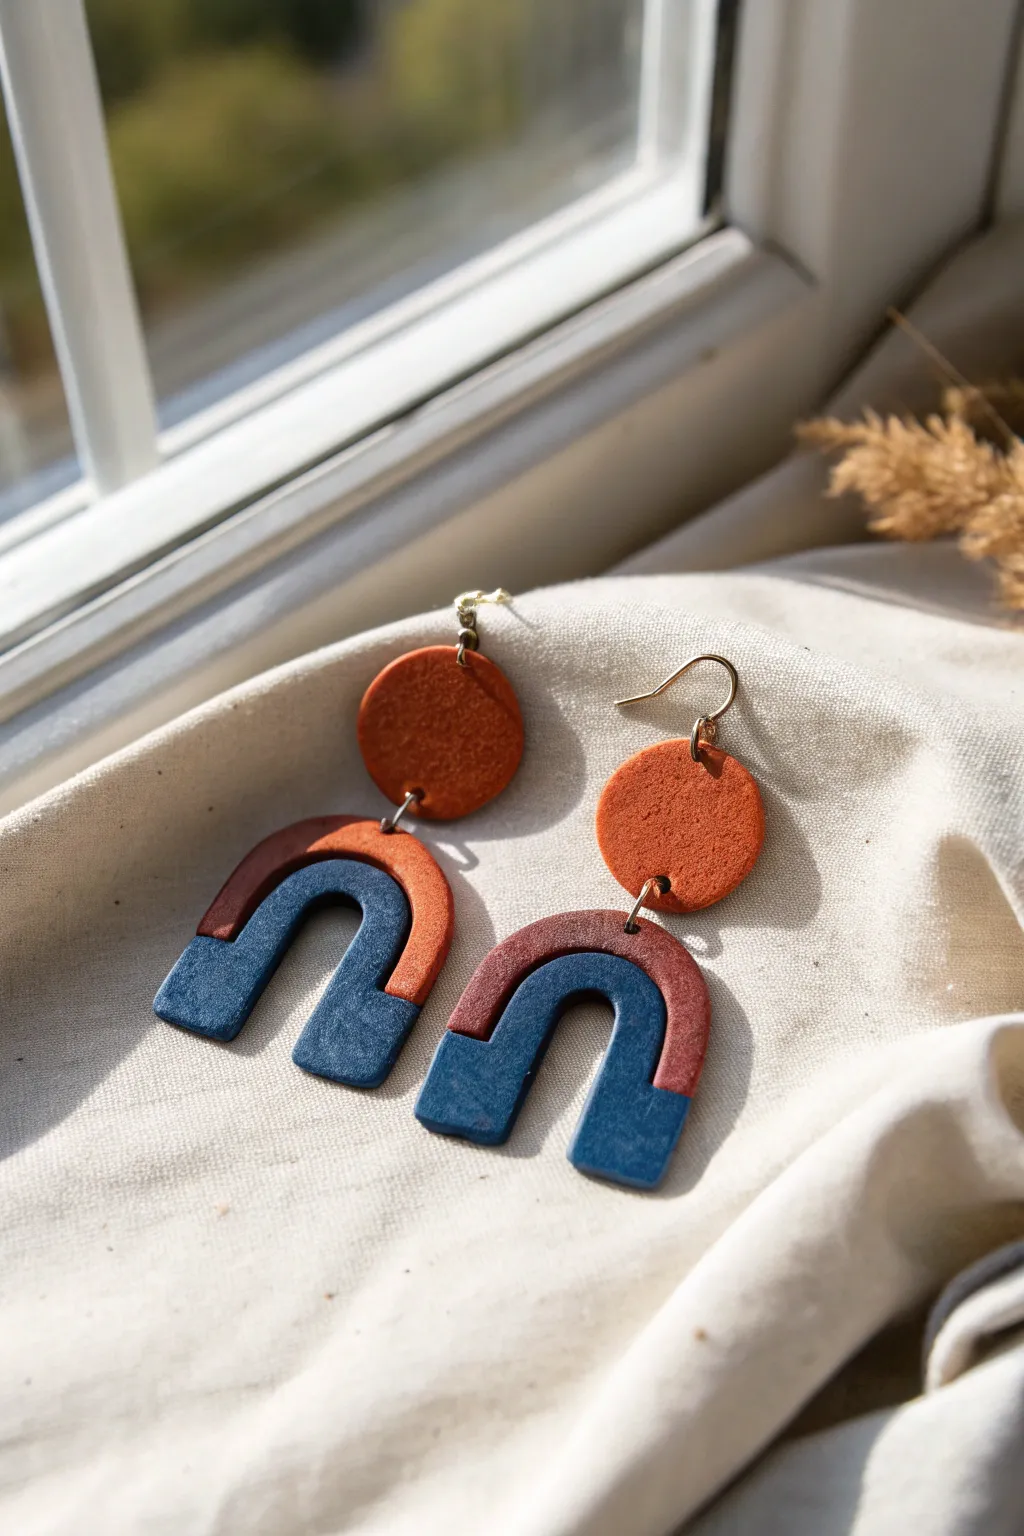
These trendy statement earrings combine earthy terracotta tones with a deep indigo blue for a sophisticated, modern look. The architectural arch shape creates striking movement while keeping the design lightweight and wearable.
Step-by-Step Tutorial
Materials
- Air dry clay (white)
- Acrylic paints (terracotta/burnt orange, dark navy blue)
- Rolling pin or acrylic roller
- X-acto knife or clay blade
- Small round circle cutter (approx. 1 inch)
- Sandpaper (fine grit)
- Jump rings (gold or brass, 6mm)
- Earring hooks (gold or brass)
- Needle tool or toothpick
- Paintbrushes (small flat and fine detail)
- Gloss or matte varnish (optional)
- Pliers (jewelry needlenose)
Step 1: Shaping the Clay
-
Condition and roll:
Begin by kneading a chunk of air dry clay until it is smooth and pliable. Roll it out on a flat surface to an even thickness of about 3-4mm. -
Cut the circles:
Use your small circle cutter to punch out two identical circles. These will become the top stud portion of the earrings. -
Cut the arches:
For the arches, you can either use a U-shaped cutter or freehand it. If freehanding, cut a rectangle first, then carefully carve out a smaller rectangle from the bottom center to create a U-shape. -
Refine the edges:
Dip your finger in a little water and gently smooth the edges of all your cut pieces to remove any sharp corners or clay burrs. -
Create holes:
Use a needle tool to poke holes for assembly. Place one hole at the bottom center of each circle piece. For the arches, pierce a hole at the very top center of the curve.
Uneven Paint Lines?
If you struggle to paint a straight line between the blue and orange sections, use a strip of washi tape or masking tape to block off the area for a perfectly crisp edge.
Step 2: Drying and Refining
-
Let them dry:
Place your clay pieces on a flat surface away from direct heat. Allow them to dry completely for 24-48 hours, flipping them occasionally to prevent warping. -
Sand for perfection:
Once fully cured, use fine-grit sandpaper to gently smooth the edges and flat surfaces. This is crucial for a professional finish. -
Dust off:
Wipe the pieces down with a slightly damp cloth or a dry brush to remove all sanding dust before painting.
Level Up: Texture
Before the clay dries, gently press a piece of sandpaper or coarse fabric onto the surface of the wet clay to give your earrings a stone-like texture similar to the photo.
Step 3: Painting the Design
-
Paint the top circles:
Mix a warm terracotta orange acrylic paint. Apply an even coat to the entire surface of both circular pieces, including the sides. -
Paint the arch base:
Using the same terracotta color, paint the top half of the arch shapes. Don’t worry about a perfect line yet; just cover the top curve. -
Add the blue block:
Mix a deep navy blue. Paint the bottom ‘legs’ of the arch. Use a flat brush to create a crisp horizontal line where the blue meets the orange. -
Touch ups:
Double-check the sides and back of your pieces to ensure full coverage. I often find the side edges need a second coat for opacity. -
Seal (optional):
If you want extra durability, apply a thin layer of matte or gloss varnish over the dried paint.
Step 4: Assembly
-
Open jump rings:
Use two pairs of pliers to gently twist open your jump rings. Never pull them apart; always twist sideways to preserve the circle shape. -
Connect pieces:
Loop an open jump ring through the hole in the blue-and-orange arch and the hole in the orange circle. Twist the ring closed securely. -
Attach earring hooks:
Depending on your hook style, you may need a second small jump ring or simply open the loop on the hook itself. Attach the hook to the top of the orange circle. -
Final check:
Give the earrings a little shake to make sure all connections are secure and the pieces dangle freely.
You now have a stunning pair of handmade earrings ready to wear or gift to a friend


Phone Stand With a Cute Cutout
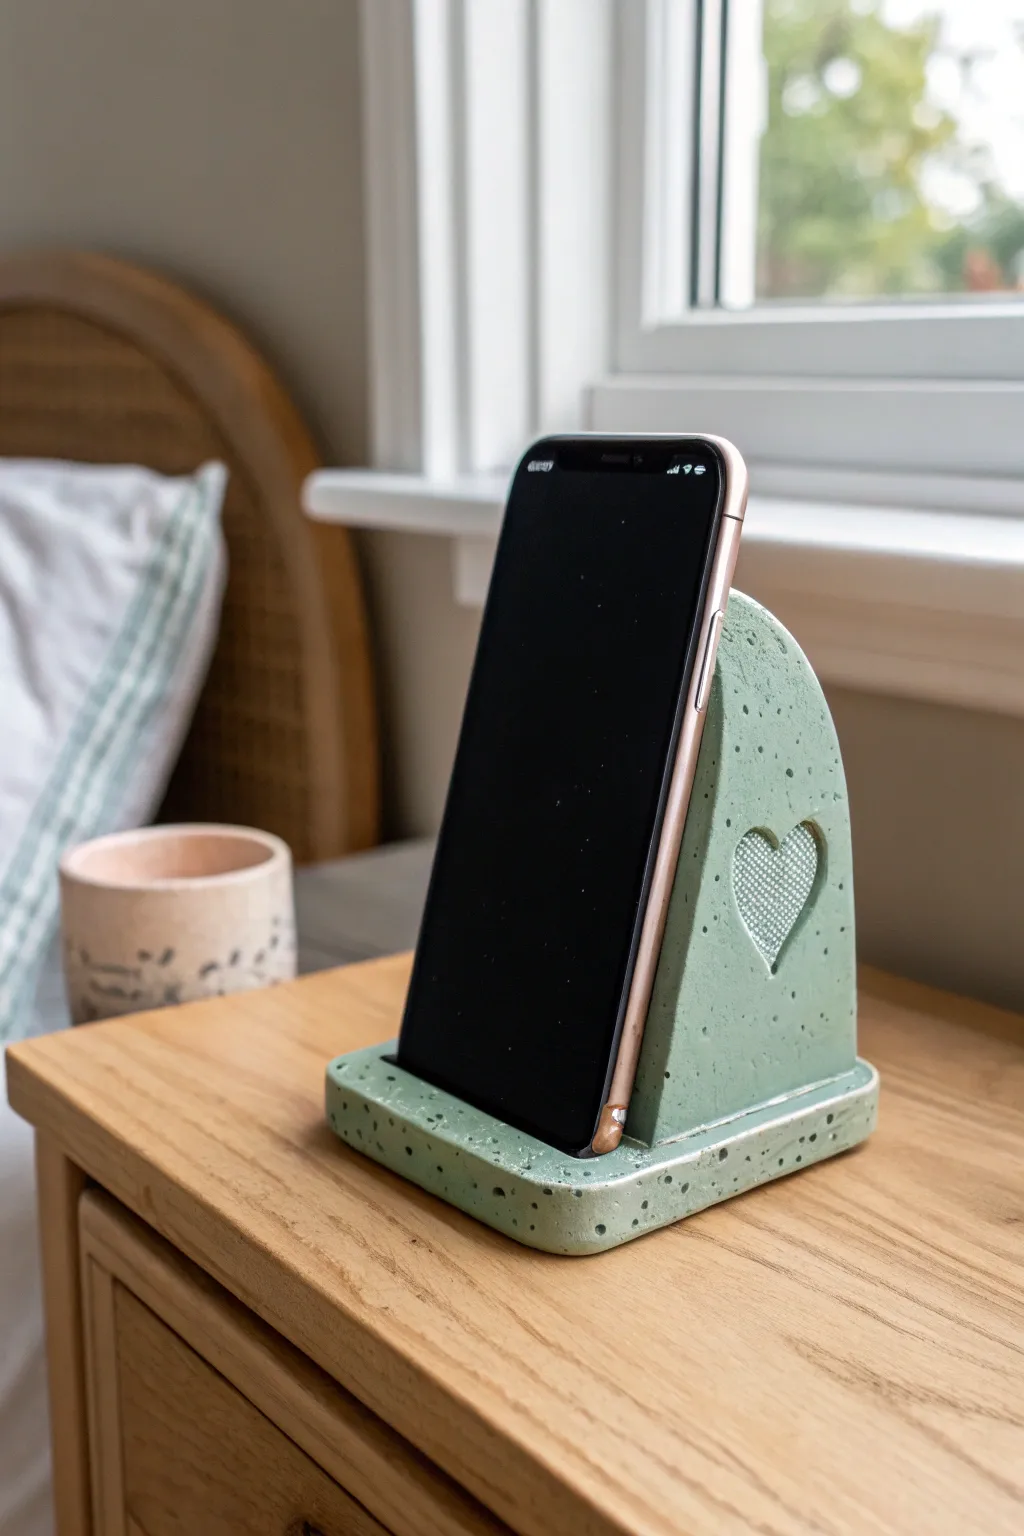
Keep your phone upright and stylish with this custom air dry clay phone stand featuring a smooth arched back and a sweet heart cutout. The faux concrete finish gives it a trendy, modern look that fits perfectly on any nightstand.
Step-by-Step Tutorial
Materials
- Air dry clay (white or light grey)
- Rolling pin
- Craft knife or clay cutter
- Ruler
- Small heart-shaped cookie cutter (optional)
- Sandpaper (medium and fine grit)
- Acrylic paint (mint green, white, black/dark grey)
- Paintbrush
- Old toothbrush (for speckling)
- Varnish or sealant (matte finish recommended)
- Water and sponge for smoothing
Step 1: Shaping the Base
-
Condition the clay:
Start by kneading a large handful of air dry clay until it is soft, pliable, and free of cracks. If it feels too dry, dip your fingers in water and work it in. -
Roll the slab:
Roll out the clay on a flat surface to an even thickness of about 1/2 inch (1.2 cm). You want it thick enough to be sturdy and support the weight of a phone. -
Cut the base:
Measure and cut a rectangle for the base. A good size is roughly 3.5 inches wide by 4 inches deep, but check your phone’s dimensions to be sure. -
Create the lip:
Roll a small snake of clay and attach it to the front edge of the base using the score-and-slip method (scratching both surfaces and adding water). This lip will stop the phone from sliding off. -
Smooth the seams:
Blend the lip into the base using a modeling tool or your finger so it looks like one solid piece.
Uneven Clay?
If your rolled slab has varying thickness, place two rulers or wooden dowels on either side of the clay as you roll. The rolling pin will rest on them, creating a perfectly even slab.
Step 2: Creating the Backrest
-
Cut the arch:
From your rolled clay slab, cut a tall arch shape. Make sure the base of the arch matches the width of your bottom piece. -
Add the cutout:
Use a small heart-shaped cutter or a craft knife to remove a heart shape from the side of the arch. -
Attach the back:
Score and slip the bottom edge of the arch and the back of the base piece. Press them firmly together. -
Reinforce the joint:
Roll a thin coil of clay and press it into the inner corner where the back meets the base to add structural integrity. Smooth it out completely. -
Refine edges:
Dip your finger in water and run it along all cut edges to round them off slightly and remove any sharpness. -
Dry completely:
Let the stand dry for 24-48 hours. I usually flip it gently halfway through to ensure the bottom dries evenly.
Step 3: Finishing and Painting
-
Sand for smoothness:
Once fully dry, use medium grit sandpaper to level out any bumps, then switch to fine grit for a silky smooth finish. -
Mix the base color:
Mix white acrylic paint with a small amount of green and a tiny drop of blue to create a soft pastel mint shade. -
Apply base coat:
Paint the entire stand with your mint color. Let it dry and add a second coat for full opacity. -
Create the speckles:
Dilute a small amount of dark grey or black paint with water. Dip an old toothbrush into the mixture. -
Splatter effect:
Hold the toothbrush over the stand and run your thumb across the bristles to flick tiny specks of paint onto the surface. Practice on paper first to control the spray. -
Seal the piece:
After the paint is completely dry, apply a coat of matte varnish to protect the finish and give it that realistic stone look.
Mesh Detail
Before the clay dries, gently press a piece of textured fabric or wire mesh into the heart cutout area to create a unique grid texture inside the shape.
Now you have a functional piece of decor that keeps your phone visible and your room looking artistic


Mini Succulent Planter With a Face
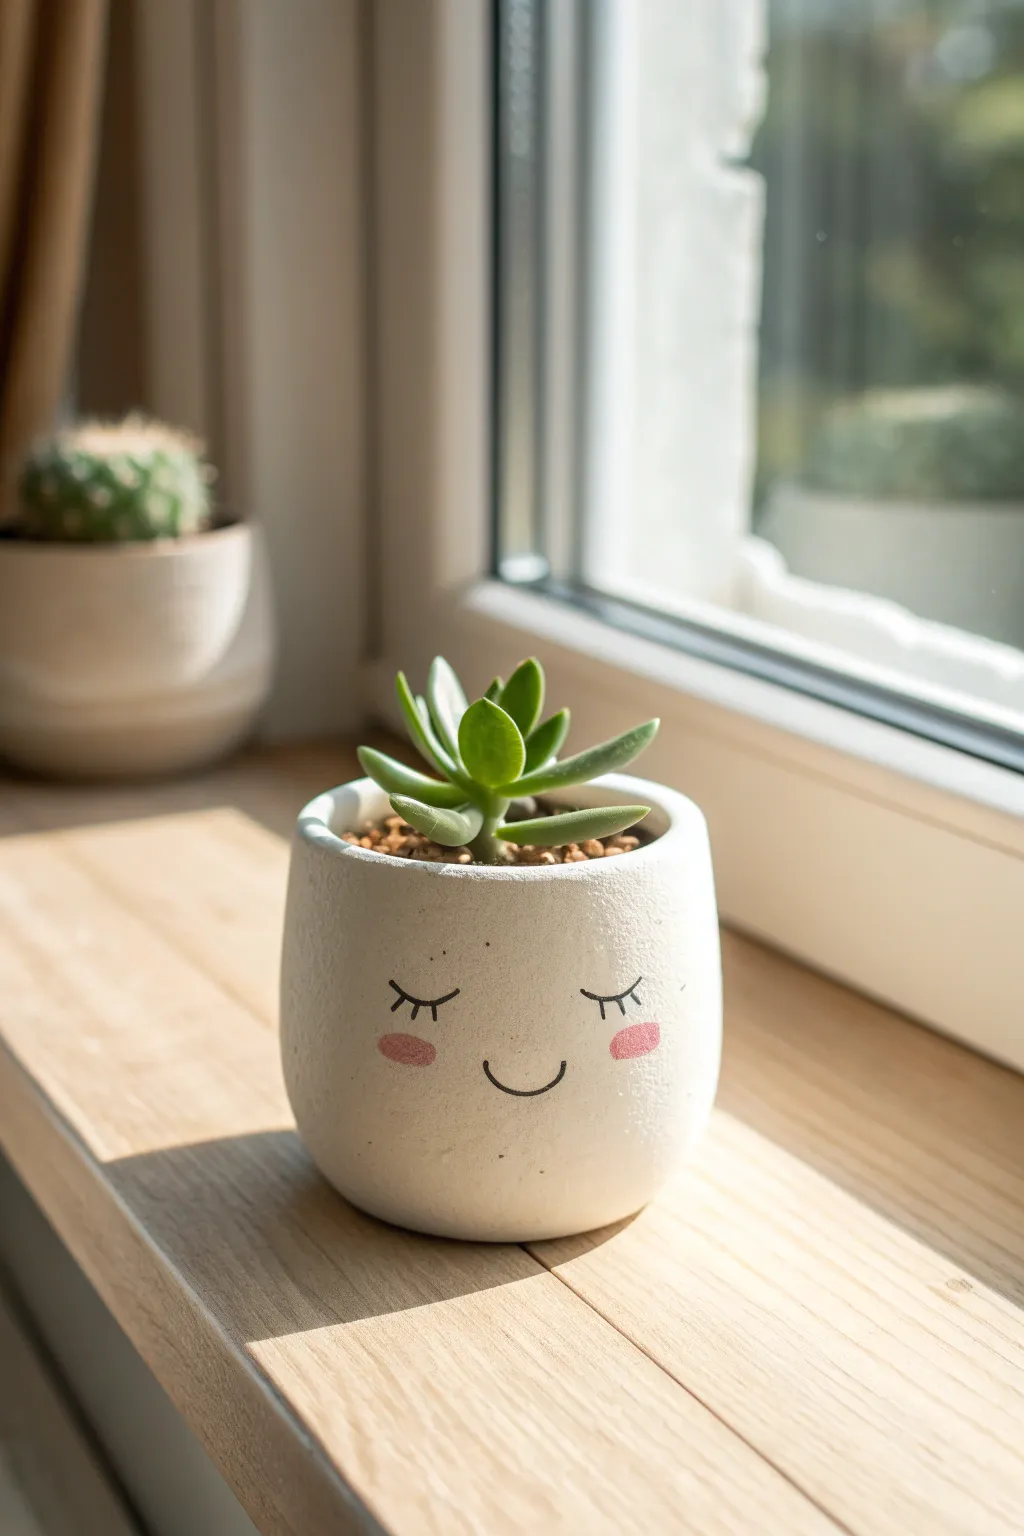
Add a touch of whimsy to your windowsill with this adorable, sleepy-faced succulent planter. The smooth, white finish and simple painted details give it a modern, minimalist look perfect for brightening up any teen’s bedroom.
Step-by-Step Guide
Materials
- White air-dry clay
- Rolling pin
- Small bowl or cup (for creating the base shape)
- Craft knife or clay cutter
- Water in a small cup
- Fine-grit sandpaper
- Black fine-tip permanent marker or acrylic paint pen
- Pink acrylic paint
- Small round paintbrush or Q-tip
- Matte clear sealant spray (optional but recommended)
- Small succulent and potting soil
Step 1: Shaping the Pot
-
Prepare the Clay:
Start by taking a handful of white air-dry clay. Knead it in your hands for a minute or two to warm it up and make it pliable, removing any air bubbles. -
Form the Base:
Roll your clay into a smooth ball about the size of a tennis ball. Press it down gently onto a clean, flat surface to create a flat bottom so your pot will stand stably. -
Create the Opening:
Use your thumb to press into the center of the ball. Create a well by pinching the clay between your thumb and fingers, rotating the ball as you go to expand the hole outward. -
Shape walls:
Work up the sides of the pot, aiming for an even thickness of about 1/4 inch all around. Keep the overall shape rounded and organic, rather than perfectly cylindrical. -
Drainage Hole:
If you plan to plant a real succulent directly inside, use a straw or a skewer to poke a small hole in the very bottom center for drainage. Skip this if you’re using a plastic nursery pot inside. -
Smooth the Surface:
Dip your finger in a little bit of water and run it over the exterior and the rim. Smooth out any cracks, fingerprints, or uneven bumps to get that sleek, ceramic-like finish visible in the photo.
Step 2: Drying and Refining
-
Let it Dry:
Place your pot in a dry, safe spot away from direct sunlight. Let it air dry for 24-48 hours. I find that flipping it upside down halfway through helps the bottom dry more evenly. -
Check for Dryness:
The clay should look chalky white and feel hard and room temperature (not cold) when it is fully cured. -
Sand for Perfection:
Take your fine-grit sandpaper and gently sand the outside of the pot. Rub away any rough textures or uneven spots, paying special attention to the rim to ensure it’s nice and smooth. -
Wipe Clean:
Use a dry cloth or a slightly damp paper towel to wipe away all the sanding dust. The surface needs to be completely dust-free before adding the face details.
Crack Control
If you see cracks forming while drying, mix a tiny bit of fresh clay with water to make a paste (slip) and fill them in smoothly.
Step 3: Adding the Personality
-
Draft the Face:
Lightly sketch the face design with a pencil first. Draw two closed, curved eyes with lashes and a small ‘U’ mouth centered lower on the pot. -
Draw the Features:
Using a black fine-tip permanent marker or a paint pen, carefully trace over your pencil lines. Draw the curved eyelids, add three small lashes to the outer corners, and trace the simple smile. -
Rosy Cheeks:
Dip a small round brush or a Q-tip into a tiny amount of pink acrylic paint. Dab most of the paint off onto a paper towel until the brush is almost dry. -
Apply Blush:
Gently dab oval-shaped pink spots onto the cheeks just below the outer corners of the eyes. The dry-brush technique gives it that soft, sweet look. -
Seal the Pot:
To protect your artwork and clay from moisture when watering, spray the entire pot with a matte clear sealant. Do two thin coats for best protection. -
Planting Time:
Once the sealant is dry, fill the pot with succulent soil and gently nestle your small plant inside. Brush off any loose dirt from the rim.
Level Up: Accessories
Before drying, mold tiny clay triangles and attach them to the ‘head’ to create cat ears, or add a small clay bow to the rim.
Now your new little green friend is ready to smile back at you every day

What Really Happens Inside the Kiln
Learn how time and temperature work together inside the kiln to transform clay into durable ceramic.
Terrazzo Coaster Set in Your Colors
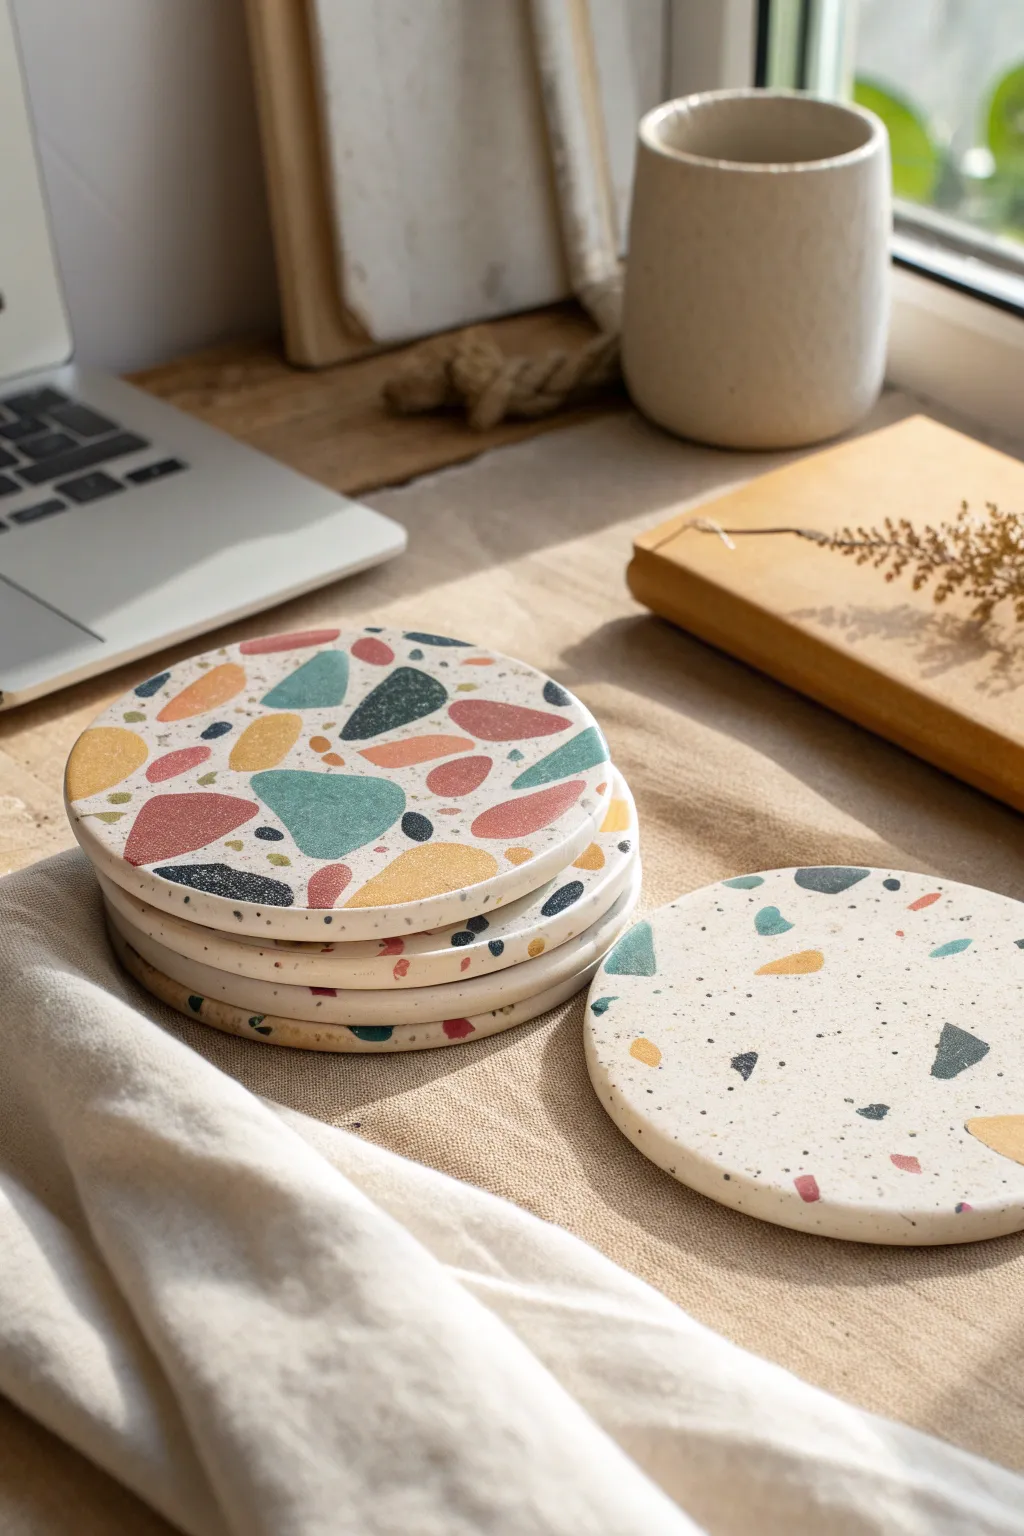
Bring the trendy look of Italian terrazzo into your room without the heavy cement work. These air-dry clay coasters feature a creamy base speckled with custom-colored chips, creating a sophisticated yet playful accessory for your desk setup.
Detailed Instructions
Materials
- White air-dry clay (approx. 500g)
- Acrylic paints (teal, ochre yellow, rust red, navy blue)
- Rolling pin
- Circle cookie cutter or a bowl approx. 4 inches wide
- Parchment paper or craft mat
- Sandpaper (fine grit, 220-400)
- Gloss or matte varnish/sealant (Mod Podge or spray acrylic)
- Craft knife or old credit card
- Small bowl of water
- Paintbrush
Step 1: Creating the Chips
-
Color mixing:
Start by pinching off four small balls of white clay, each about the size of a grape. Add a drop of acrylic paint to each ball—one teal, one ochre, one rust, and one navy—and knead until the color is solid and consistent. -
Flattening color patches:
Flatten each colored clay ball into a thin, uneven sheet on your parchment paper. Aim for about 2mm thickness; they don’t need to be perfect since you’ll be cutting them up. -
Drying the color sheets:
Let these colored sheets sit for about 15–20 minutes. You don’t want them bone dry, just firm enough to cut cleanly without smushing. -
Chopping the terrazzo:
Using a craft knife or an old credit card, chop the colored sheets into erratic, polygon shapes. Vary the sizes—make some larger chunky triangles and some tiny specks for a realistic terrazzo look.
Step 2: Forming the Base
-
Preparing the base clay:
Condition a large chunk of white clay by kneading it until it’s soft and pliable. If you want the speckled look seen in the photo, you can mix in tiny black sand or dried coffee grounds, but plain white works beautifully too. -
Rolling out:
Roll the white clay out onto parchment paper to a thickness of about 1/4 inch (6mm). Ensure it’s level so your cups won’t wobble later. -
Arranging the chips:
Gently press your colored clay chips onto the surface of the white slab. Scatter them randomly, ensuring you have a nice mix of colors without clustering too many of the same shade together. -
Embedding the chips:
Once you’re happy with the arrangement, lightly roll over the slab again with your rolling pin. This pushes the colored chips into the white base so they become flush with the surface.
Cracking Up?
If you see tiny hairline cracks as it dries, don’t panic. Mix a tiny bit of fresh white clay with water to make a paste and fill the cracks, then sand smooth once dry.
Step 3: Cutting and Refining
-
Cutting circles:
Use your circle cutter or a bowl as a template to cut out your coaster shapes. Press down firmly and twist slightly to get a clean edge. -
Smoothing edges:
Dip your finger in a little water and run it around the circumference of each coaster to smooth out any rough cutting marks. -
Slow drying:
Place the coasters on a flat surface away from direct heat. To prevent curling, I like to flip them over gently every few hours during the first day of drying. -
Wait time:
Allow the coasters to dry completely for 24 to 48 hours. The clay will turn from a cool grey-white to a chalky bone white when fully dry.
Pro Tip: Depth Effect
Sand deeper! The more you sand the surface layer down, the larger and more irregular the colored chips will appear, making it look much more like real stone.
Step 4: Finishing Touches
-
Sanding:
Once fully dry, take your fine-grit sandpaper and sand the surface in circular motions. This step is crucial—it reveals the crisp edges of your colored chips and makes the surface buttery smooth. -
Cleaning up:
Wipe away all the clay dust with a slightly damp cloth or paper towel. Ensure no dust remains in the crevices, or the varnish won’t stick properly. -
Sealing:
Apply a coat of varnish or sealant to protect the clay from moisture. Air-dry clay isn’t waterproof on its own, so this step ensures your cold drinks won’t ruin your hard work. -
Final coat:
Let the first coat dry, then add a second layer for extra durability. Let everything cure fully before placing your first mug on top.
Now you have a stunning set of custom coasters ready to protect your tabletops in style
Taper Candle Holder in a Funky Shape
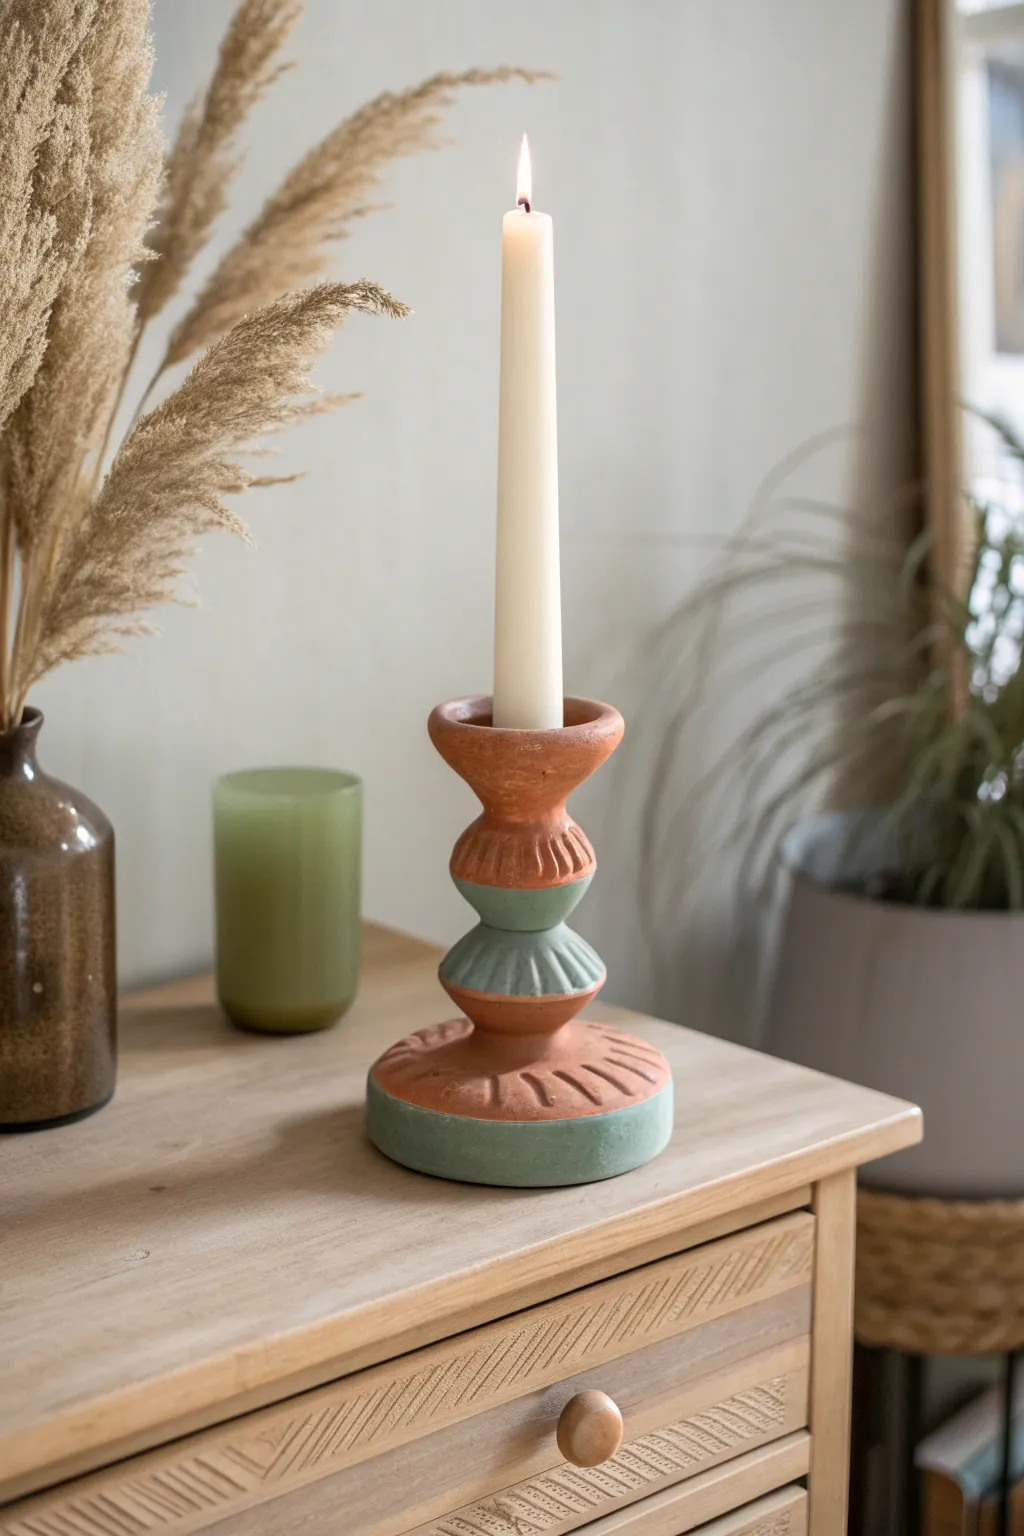
Bring some sculptural art into your room with this trendy terracotta-style taper candle holder. The stacked, geometric shape gives it a cool totem-pole vibe, while the muted green and clay tones keep it earthy and grounded.
Detailed Instructions
Materials
- Air-dry clay (terracotta color or white)
- Acrylic paints (terracotta/burnt orange and sage green)
- Rolling pin
- Taper candle (for sizing)
- Clay knife or plastic utensil
- Small cup of water
- Medium paintbrush
- Sandpaper (fine grit)
- Ruler
Step 1: Shaping the Components
-
Prepare your clay:
Start by kneading your air-dry clay until it is soft, pliable, and free of cracks. If it feels too dry, dip your fingers in water and work it in. -
Form the base:
Roll a large ball of clay, about the size of a tennis ball. Flatten it into a thick disc, approximately 4 inches wide and 1 inch tall. Roll the edges on your table to ensure they are smooth and vertical. -
Create the middle beads:
Roll two medium-sized balls of clay. Gently flatten them into squat, biconical shapes (like flattened diamonds or abacus beads). These should be slightly smaller in width than your base. -
Form the top cup:
Create a final ball of clay for the top section. Shape it into a chalice-like cup that flares out at the top rim. -
Size the candle hole:
While the clay is soft, gently press the base of your taper candle into the center of the top cup to make an indentation. Wiggle it slightly to ensure the hole is deep enough (about 1 inch) to hold the candle securely later.
Stay Straight
Slide a bamboo skewer or chopstick down through the center of all the pieces while stacking them. This acts like an internal spine to keep your tower from leaning while wet.
Step 2: Assembly and Texture
-
Stack and join:
Score the top center of the base disc and the bottom of your first bead with a knife (make scratch marks). Add a dab of water or clay slip, then press them firmly together. -
Continue stacking:
Repeat the scoring and slipping process to attach the second bead on top of the first, and finally the candle cup on the very top. Look from all angles to ensure your tower is straight. -
Smooth the seams:
Use a little water on your finger or a modeling tool to smooth the joins between the pieces. While I like the stacked look, you want them fused enough so they don’t pop apart when dry. -
Design the base texture:
Using the back of a knife or a clay tool, press radial lines into the top surface of the base disc. Space them evenly around the circumference. -
Add detail to the beads:
Press similar vertical indentations into the top slope of the first bead, the bottom slope of the second bead, and the underside of the top cup. This alternating texture creates a nice rhythm. -
Drying time:
Let the sculpture dry completely. This usually takes 24-48 hours depending on humidity. Rotate it occasionally so the bottom dries evenly.
Make it Glossy
Coat the finished, dry piece with a layer of Mod Podge or clear varnish. This seals the paint and gives it a ceramic-like sheen without needing a kiln.
Step 3: Finishing Touches
-
Sand imperfections:
Once fully dry, lightly sand any rough patches or sharp edges with fine-grit sandpaper to get a professional finish. -
Paint the base:
Mix a sage green acrylic paint. Paint the vertical side edge of the bottom disc solid green. -
Paint the bottom bead:
Use the same sage green to paint the first (bottom) bead shape completely. -
Paint the terracotta sections:
If you used white clay, paint the top surface of the base disc, the second bead, and the top cup with a terracotta or burnt orange paint. If you used terracotta clay, you can leave these raw or add a wash to enhance the color. -
Distress (Optional):
For a rustic look, lightly sand the painted areas after they dry to let some of the underlying clay texture peek through.
Now you have a custom piece of decor that looks like expensive pottery straight from a boutique shop


The Complete Guide to Pottery Troubleshooting
Uncover the most common ceramic mistakes—from cracking clay to failed glazes—and learn how to fix them fast.
Positive Word Plaque for Your Wall
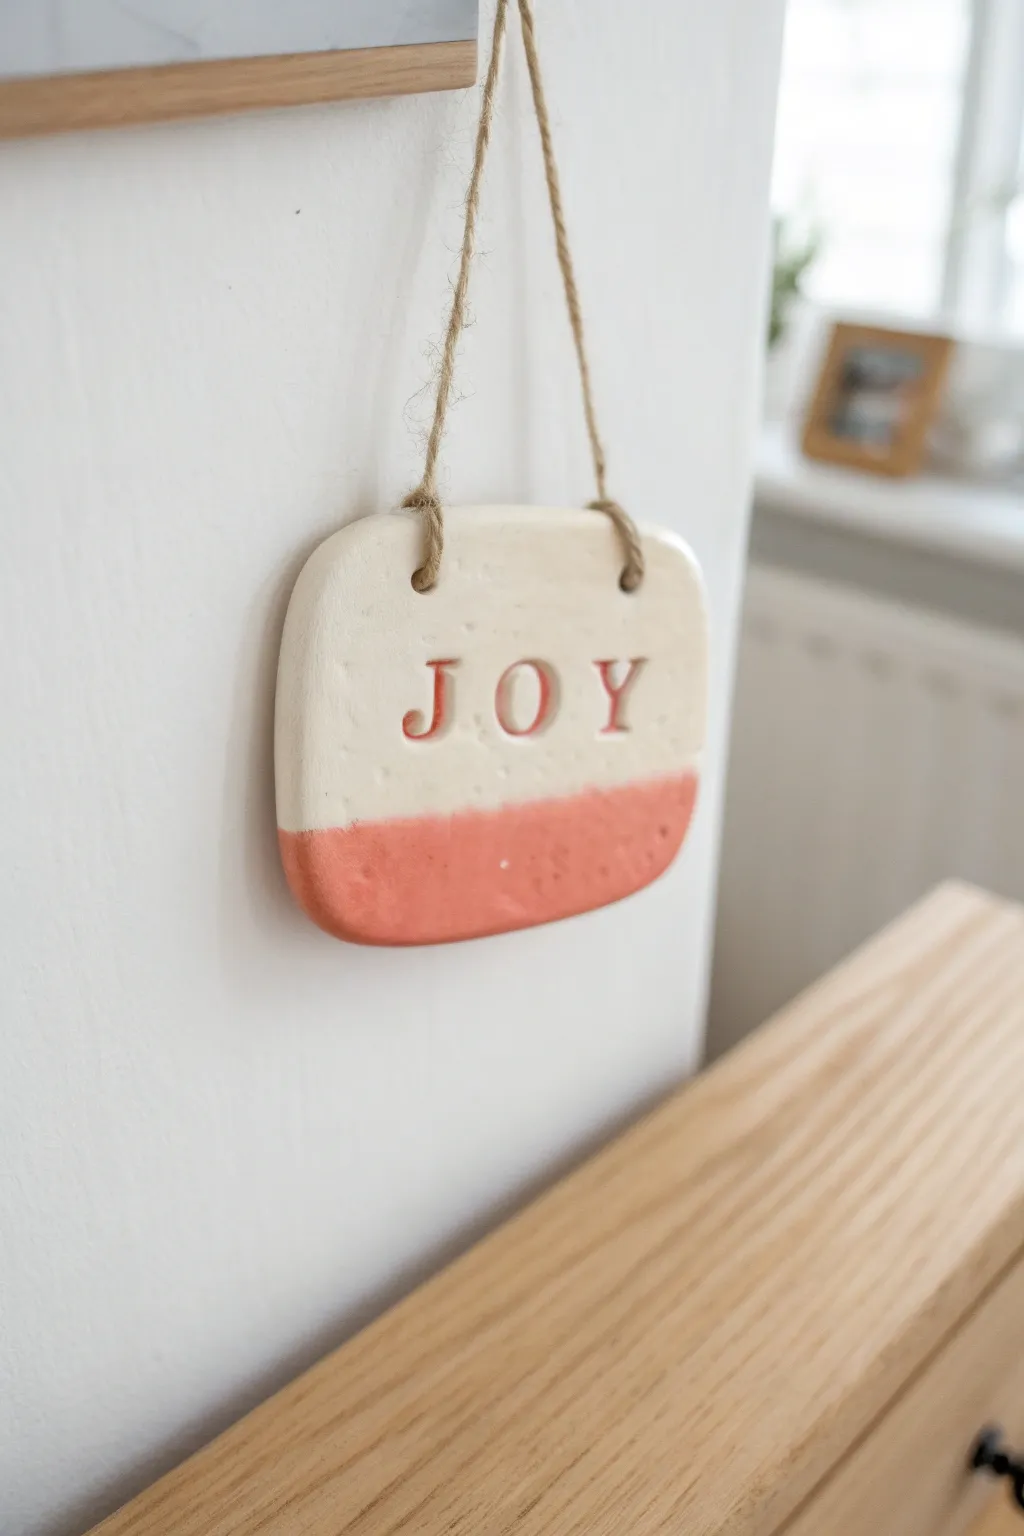
Add a simple touch of happiness to your room with this minimalistic dipped-paint effect plaque. The stamped letters give it a professional finish while keeping that handmade charm perfect for a gallery wall.
Step-by-Step
Materials
- White air dry clay
- Rolling pin
- Smooth work surface or mat
- Knife or clay cutting tool
- Alphabet stamp set
- Drinking straw or skewer
- Fine grit sandpaper
- Coral or salmon acrylic paint
- Small paintbrush
- Masking tape or painter’s tape
- Jute twine
- Scissors
Step 1: Shaping the Clay
-
Roll it out:
Begin by taking a handful of white air dry clay and kneading it slightly until pliable. Roll it out on your work surface to an even thickness of about 1/4 inch (6mm). -
Cut the shape:
Using a knife or clay tool, cut a rounded square or rectangle shape. For the look in the photo, aim for roughly 3 inches by 3.5 inches. -
Smooth the edges:
Dip your finger in a tiny bit of water and run it along the cut edges to smooth out any sharpness or roughness, creating a soft, rounded perimeter. -
Add hanging holes:
Take a drinking straw or a skewer and poke two holes near the top corners. Ensure they are evenly spaced and not too close to the edge to prevent cracking.
Cracked Clay?
If small cracks appear while drying, mix a tiny bit of fresh clay with water to make a paste (slip) and fill the cracks, then sand smooth once dry.
Step 2: Stamping and Drying
-
Align your letters:
Select the letters J, O, and Y from your stamp set. Before pressing them in, lay them gently on the clay surface to check your spacing. -
Stamp the word:
Press each stamp firmly into the center of the plaque. I like to wiggle the stamp very slightly to ensure a deep, clear impression. -
Final smooth:
If the stamping process pushed up any clay ridges around the letters, gently tap them down with your finger. -
Let it dry:
Place the piece on a drying rack or parchment paper. Let it air dry completely for 24-48 hours, flipping it over halfway through to ensure even drying. -
Sand imperfections:
Once fully hard and white, use fine-grit sandpaper to buff away any burrs on the edges or surface for a silky finish.
Add Texture
Before cutting your shape, press a piece of lace or a textured fabric into the wet clay to give the background a subtle, patterned surface.
Step 3: Painting and Assembly
-
Tape the line:
Apply a strip of masking tape horizontally across the plaque, covering the top two-thirds. Press the tape edge down firmly to prevent paint bleed. -
Paint the bottom:
Paint the exposed bottom section with coral acrylic paint. Don’t forget to paint the bottom edge and sides for a clean look. -
Paint the letters:
Using a very fine brush, carefully fill in the stamped ‘JOY’ letters with the same coral paint color. -
Reveal the line:
Wait until the paint is mostly dry, then slowly peel back the tape to reveal a crisp line between the painted and unpainted sections. -
Attach the hanger:
Cut a length of jute twine around 10 inches long. Thread the ends through the holes from front to back. -
Secure the twine:
Tie a secure double knot on the loose ends of the twine at the back of the plaque (or front, depending on your preference), trimming any excess.
Hang your new joy plaque in a spot where you’ll see it every morning to crave a little positivity
Moon Phase Garland for Your Room
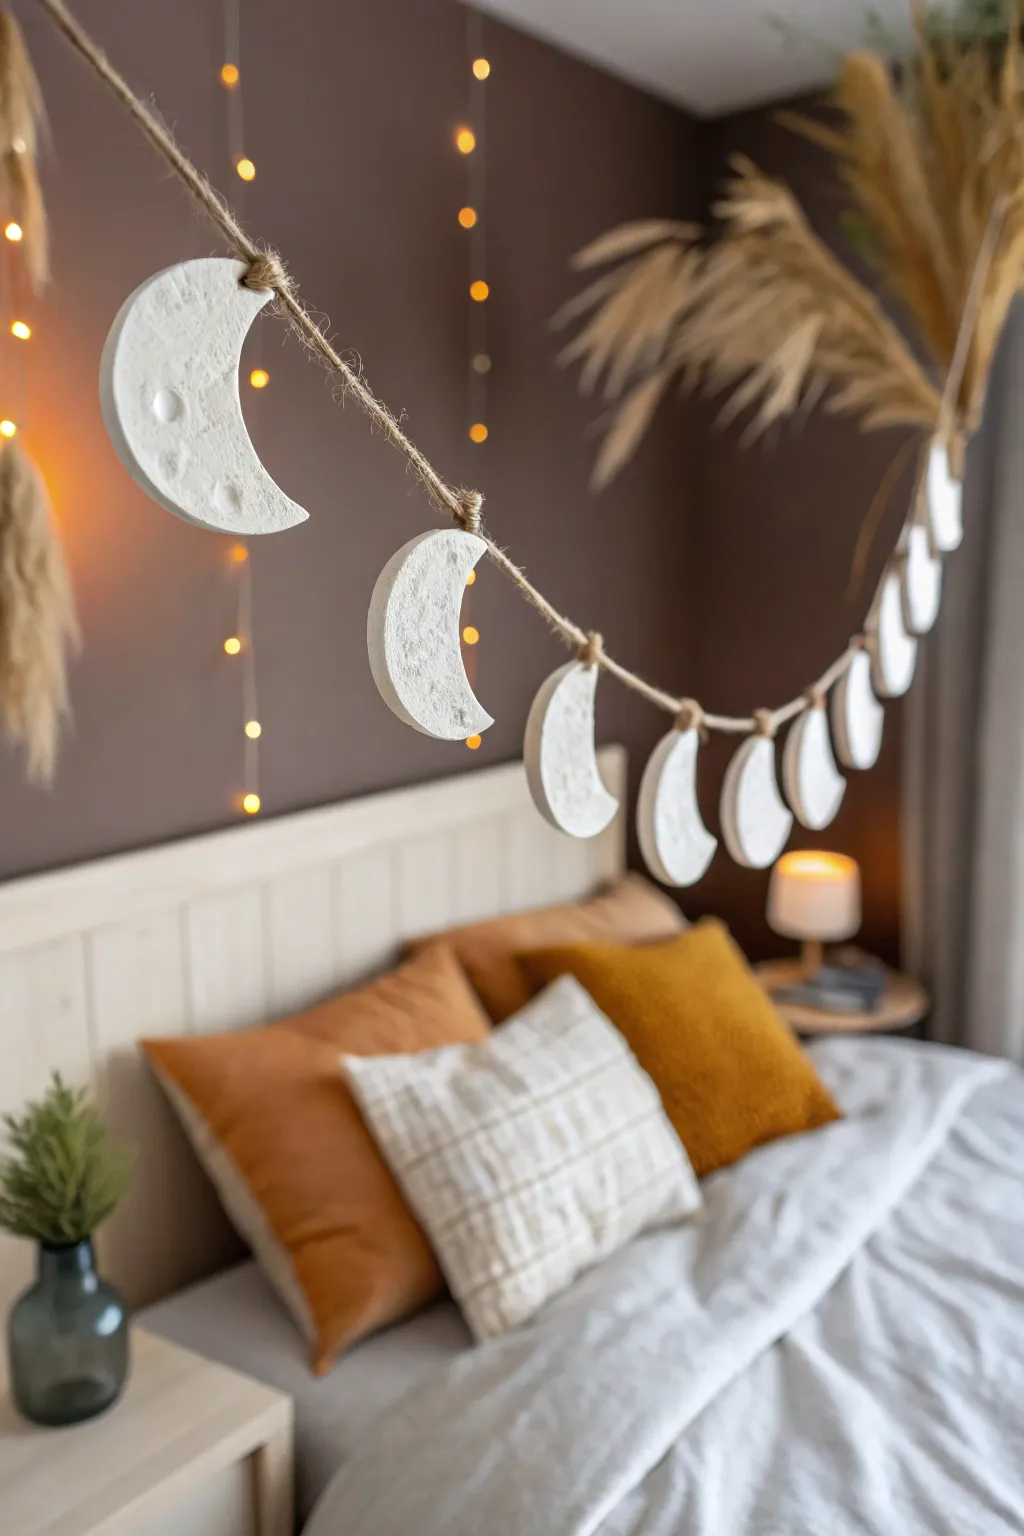
Transform your bedroom into a dreamy celestial escape with this minimalist moon phase garland. The textured white clay contrasts beautifully with rustic jute twine, creating a cozy and stylish accent piece that looks perfect draped over a bedframe or window.
Detailed Instructions
Materials
- White classic air dry clay (not foam clay)
- Circle cookie cutter (approx. 3 inches diameter)
- Non-stick rolling pin
- Parchment paper or craft mat
- Plastic straw or bamboo skewer
- Sandpaper (fine grit)
- Jute twine or hemp cord
- Small bowl of water
- Optional: Texture roller or crumpled foil
Step 1: Shaping the Moons
-
Prepare your workspace:
Lay down a sheet of parchment paper to protect your surface and prevent the clay from sticking. Tape the corners down so it doesn’t shift while you roll. -
Condition the clay:
Grab a large chunk of air dry clay and knead it in your hands until it feels warm and pliable. If it feels a bit dry or crumbly, dip your fingers in water and work it in. -
Roll the slab:
Roll your clay out to an even thickness, aiming for about 1/4 inch. If you want a perfectly uniform look, place two wooden rulers on either side of the clay as guide rails for your rolling pin. -
Add texture (optional):
For that cratered moon surface look shown in the photo, gently press a piece of crumpled aluminum foil or a texture sponge over the surface of the clay before cutting. -
Cut the circles:
Use your circle cookie cutter to punch out 7 to 9 full circles. These will become your various moon phases. -
Create the crescent shapes:
To make crescents, take the same circle cutter and overlap it over one of your clay circles, cutting away a portion to leave a crescent shape. Vary the thickness to mimic waxing and waning phases. -
Create half and gibbous moons:
Use a knife or the straight edge of a ruler to cut some circles in half. For gibbous moons (more than half full), simply trim a small slice off the edge. -
Smooth the edges:
Dip your finger in a little water and run it along the cut edges of every piece. This smooths out any jagged bits or crumbs left by the cutter.
Step 2: Drying and Assembly
-
Create hanging holes:
Using a plastic straw, punch a hole near the top of each moon shape. Position the hole about a half-inch from the edge so the clay doesn’t crack later. -
Angle the holes:
For the crescent shapes specifically, I find it helps to punch the hole slightly diagonally through the top tip so the moon hangs straight rather than tipping forward. -
Let them dry:
Place all your moon phases on a flat, clean surface to dry. This typically takes 24 to 48 hours depending on humidity. Flip them over halfway through so the backs dry evenly. -
Sand for finish:
Once fully bone-dry and white, use fine-grit sandpaper to gently buff away any rough spots on the edges or surface. -
Cut the twine:
Measure the space where you plan to hang the garland and cut a length of jute twine, adding an extra 12 inches on each end for tying loops. -
Arrange the layout:
Lay your twine on the floor and arrange your moons in order: waxing crescent, half, gibbous, full moon, gibbous, half, waning crescent. -
Attach the moons:
Thread the twine through the hole of the first moon. Tie a simple overhand knot right above the hole to keep the moon in place. -
Space them out:
Measure about 4-5 inches from the first knot, then thread and knot the next moon. Consistent spacing is key for that balanced look. -
Hang and adjust:
Put up your garland using small nails or command hooks. You can gently rotate the knots if any moons need to be turned to face forward perfectly.
Clay Curling Up?
If edges curl while drying, place a heavy book on top of them once they are leather-hard (semi-dry) to flatten them back out.
Make it Sparkle
Mix a tiny bit of silver iridescent paint or fine glitter into a clear glaze and brush it over the dry moons for a magical shimmer.
Now you have a serene piece of celestial decor ready to overlook your sweetest dreams

TRACK YOUR CERAMIC JOURNEY
Capture glaze tests, firing details, and creative progress—all in one simple printable. Make your projects easier to repeat and improve.
Hair Clips With Abstract Shapes
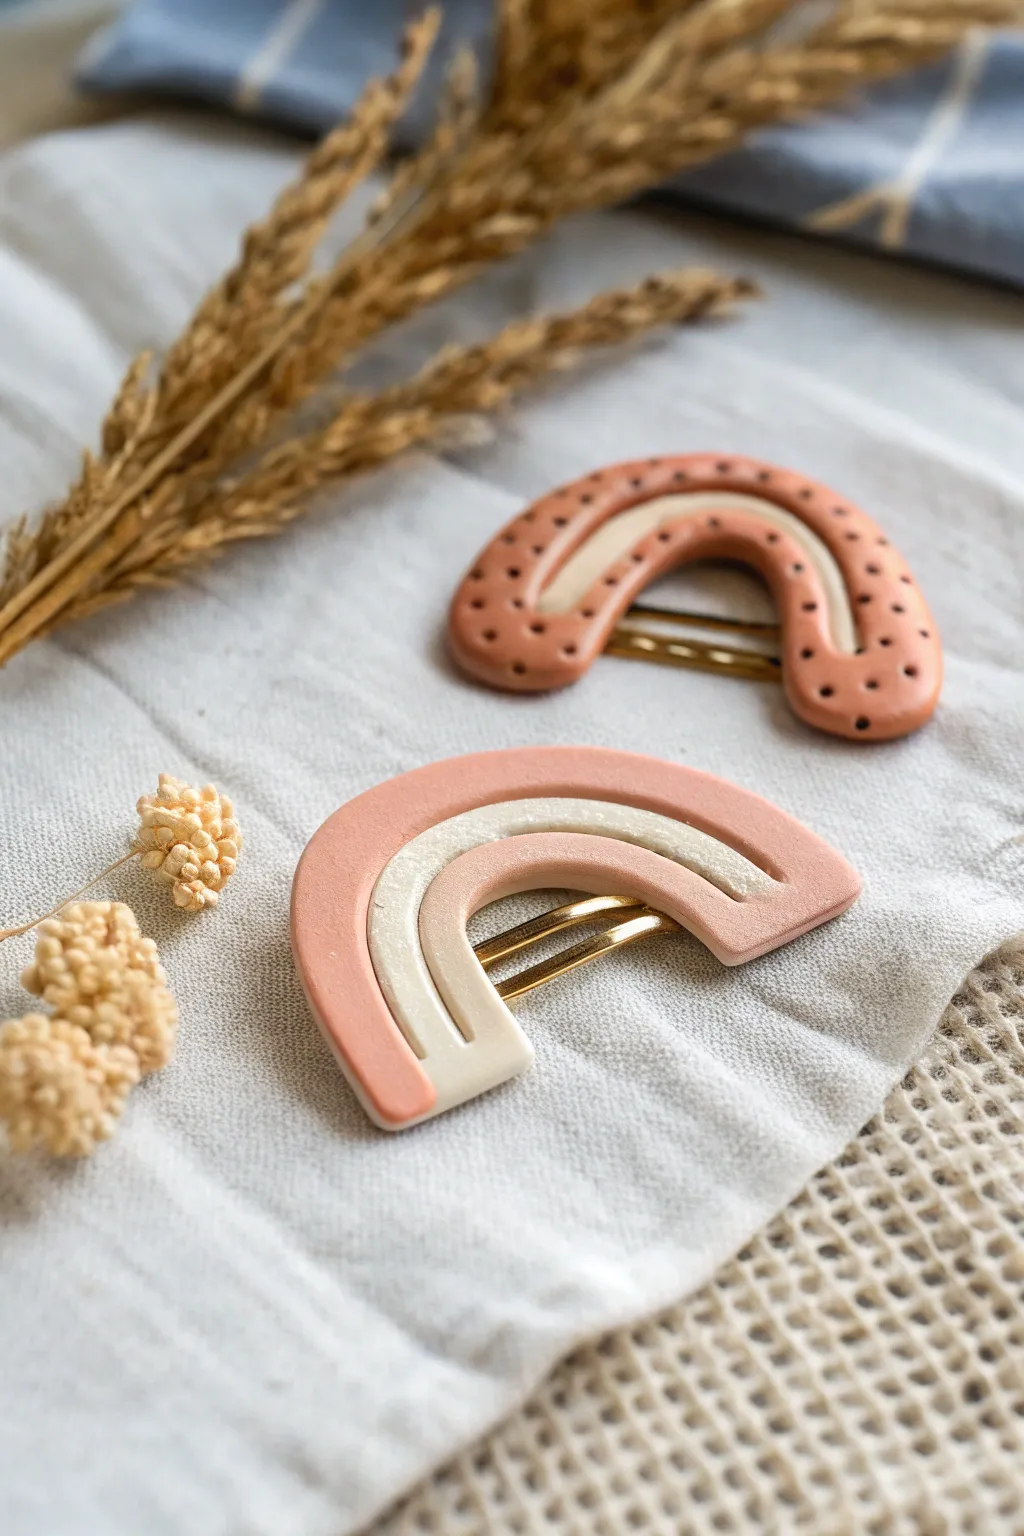
Embrace earthy tones and soft curves with these trendy rainbow hair clips. This project transforms simple air-dry clay into stylish, durable accessories that look like boutique ceramic pieces.
Step-by-Step Tutorial
Materials
- Air-dry clay (white or pre-colored)
- Acrylic paints (terracotta, dusty pink, cream, black)
- Small paintbrush
- Rolling pin or smooth glass jar
- Craft knife or clay cutter
- Circular cookie cutters (or small cups) in graduating sizes
- Gold metal hair clips (snap clips or alligator clips)
- Strong craft glue (E6000 or heavy-duty super glue)
- Fine-grit sandpaper
- Gloss or matte varnish (optional)
Step 1: Shaping the Rainbows
-
Condition the clay:
Begin by kneading a small handful of air-dry clay until it is soft, pliable, and free of cracks. If the clay feels dry, I like to dampen my fingers slightly to reintroduce moisture. -
Roll it out:
Use a rolling pin to flatten the clay into a slab. Aim for a consistent thickness of about 4-5mm (roughly 1/4 inch). You want it thick enough to be sturdy but not so heavy that it slides out of your hair. -
Cut the outer arch:
Find a round cutter or cup that fits the width of your metal hair clip. Press it into the clay slab to create circles or semicircles. -
Create the inner arch:
Using a slightly smaller cutter, remove the center of your semicircle to create the main arch shape. Alternatively, just use your craft knife to slice the bottom flat if you started with a full circle. -
Carve details:
Instead of building separate coils, achieve this sleek look by carving. Use a sculpting tool or the back of your knife to gently score a curved line following the rainbow’s shape. This divides the single piece into two visual ‘bands’ without separating them. -
Add texture (optional):
For the spotted clip variation, use a dotting tool or a toothpick to gently impress small, random dents into the clay surface while it’s still wet. -
Smooth the edges:
Dip your finger in a tiny amount of water and run it along the cut edges of your rainbow to smooth out any sharpness or roughness. -
Dry completely:
Place your shapes on a flat surface lined with parchment paper. Let them dry for 24-48 hours, flipping them halfway through to ensure even drying.
Smooth Surface Trick
Before drying, gently wipe the clay surface with a baby wipe or a damp sponge. This smooths out fingerprints instantly and reduces sanding time later.
Step 2: Decorating and Assembly
-
Sand for perfection:
Once bone dry, take fine-grit sandpaper and gently buff the edges and surface. This removes any fingerprints and creates a professional finish. -
Mix your palette:
Prepare your acrylic paints. For the dusty pink clip, mix a little brown or grey into regular pink to mute it. For the terracotta one, mix orange with a touch of brown. -
Paint the base:
Apply the main color to the larger outer arch section. Use a small, precise brush to keep the lines clean, especially near the scored groove. -
Paint the accent:
Paint the inner arch section in a contrasting cream or off-white color. You may need two coats for opaque coverage. -
Add the dots:
For the terracotta clip shown in the photo, use a very fine brush or toothpick tip dipped in black paint to add tiny dots all over the surface. -
Seal the deal:
When the paint is fully dry, apply a coat of matte or satin varnish. This protects the clay from moisture and gives it a finished look. -
Attach the hardware:
Flip the clay piece over. Apply a strong line of heavy-duty craft glue along the flat back of the clay. -
Set the clip:
Press the flat top of the metal hair clip firmly into the glue. Ensure the opening mechanism of the clip is facing the correct way and isn’t glued shut. -
Cure time:
Allow the glue to cure according to the package instructions (usually overnight) before wearing your new accessory.
Go Geometric
Not feeling rainbows? Use the same slab technique to cut triangles, semicircles, or free-form abstract blobs for a modern Memphis-design style.
Enjoy styling your hair with these beautiful, handcrafted earthy clips
Magnet Set of Tiny Icons and Charms
Customize your space with these adorable, Y2K-inspired magnet icons made from air dry clay. From glittery stars to expressive hearts and smiley faces, this collection adds a burst of personality to any magnetic surface.
Detailed Instructions
Materials
- White air dry clay
- Rolling pin
- Small clay cutters (star, heart, circle)
- Craft knife or clay needle tool
- Acrylic paints (yellow, pink, red, black, white, silver, gold)
- Fine detail paintbrush
- Glitter or metallic paint (optional)
- Small round magnets
- Super glue or E6000
- Gloss varnish or Mod Podge
- Sandpaper (fine grit)
Step 1: Shaping the Icons
-
Prep the clay:
Start by kneading a chunk of air dry clay until it’s smooth and pliable. You want to remove any air bubbles to prevent cracks later. -
Roll it out:
Roll the clay out on a clean surface to about a 1/4 inch thickness. Try to keep the thickness consistent so all your magnets have a uniform look. -
Cut the shapes:
Use your clay cutters to punch out several shapes. For this set, you’ll need two stars (one slightly larger if possible), two hearts, two circles for the smileys, and a guitar-pick shape for the white character. -
Refine the edges:
Dip your finger in a little water and gently smooth the rough edges of each cutout. This gives the final pieces a much more professional finish. -
Add texture (optional):
For the gold star, you can gently press a piece of sandpaper or a textured fabric onto the wet clay to give it a stippled surface before it dries. -
Create the Strawberry:
Hand-shape a small rounded triangle for the strawberry body. Mold tiny leaves from a separate small pinch of clay and gently press them onto the top of the berry shape. -
Let them dry:
Place all your shapes on a flat surface lined with parchment paper. Let them dry completely, which usually takes 24-48 hours depending on humidity. Flip them halfway through to ensure even drying.
Sticky Situation?
If your magnets slide down the locker, the clay might be too heavy. Try using two small magnets on the back instead of one to distribute the weight better.
Step 2: Painting and Details
-
Sand for smoothness:
Once bone dry, lightly sand any remaining rough spots or uneven edges with fine-grit sandpaper. Wipe away the dust with a barely damp cloth. -
Base coats:
Paint the base colors: bright yellow for the smiley faces, metallic gold for the textured star, silver or metallic blue for the second star, and soft pink for one of the hearts. -
Detailing the white character:
Paint the guitar-pick shape white. Once dry, use a very fine brush or a black paint pen to draw wide eyes and a smile. Add a tiny red heart for the mouth. -
Painting the Smiley Faces:
On the yellow circles, paint simple, bold black features. Do a classic smiley face on one and a simple dot-eye face on the other. -
The metallic heart:
For the second heart, mix a little copper or rose gold paint. Paint two small black dots in the center to look like buttons or eyes. -
Strawberry details:
Paint the strawberry body red and leaves green. I like to use a toothpick dipped in a lighter red or white to add tiny seed dots once the red paint is dry. -
Seal the deal:
Apply a coat of gloss varnish or Mod Podge to all the pieces. This not only protects the paint but gives them that plastic, store-bought charm look.
Make It Glossy
For a glassy, enamel-pin finish, use UV resin instead of varnish. Simply brush a thin layer on top and cure under a UV lamp for 2 minutes.
Step 3: Assembly
-
Attach magnets:
Flip all your painted charms over. Place a small dab of strong glue (like E6000) on the back of each piece. -
Press and hold:
Press a magnet firmly into the glue. Let the glue cure completely according to package instructions before sticking them to any metal surface.
Now you have a fully personalized set of charms to brighten up your locker or fridge
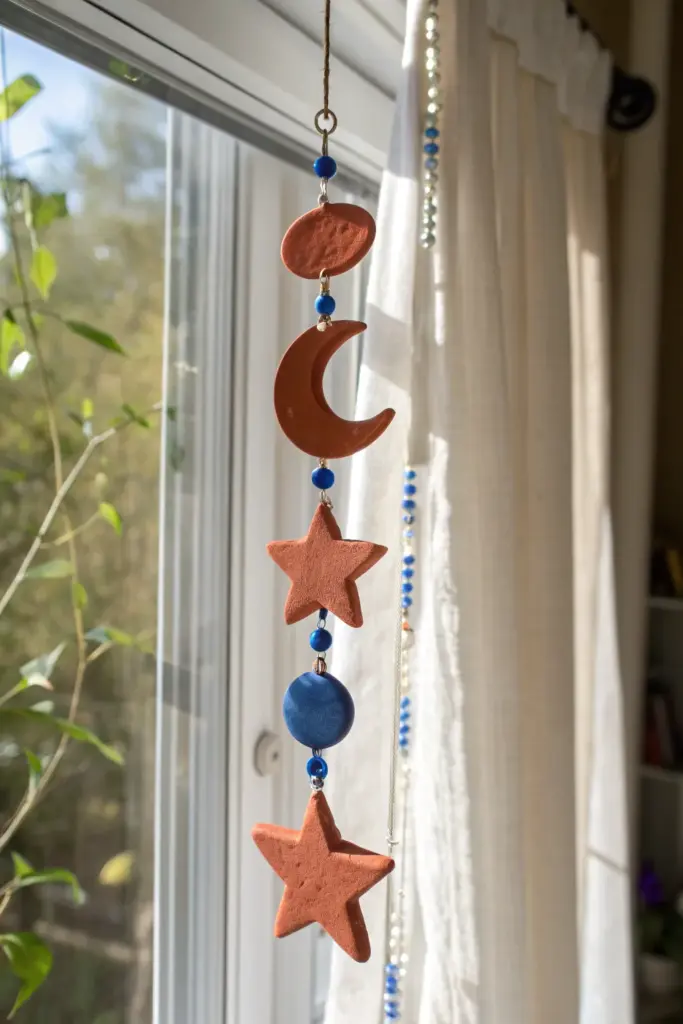
Mixed-Media Clay Suncatcher Shapes

This rustic, bohemian-style mobile combines the earthy warmth of terracotta-colored clay with striking pops of cobalt blue. It captures the light beautifully when hung in a window, making it a perfect handmade accent for a bedroom or sunny corner.
Step-by-Step
Materials
- Terracotta-colored air dry clay
- Dark blue air dry clay (or white clay + blue paint)
- Small rolling pin
- Clay cutters (oval, crescent moon, star, small circle)
- Sandpaper (fine grit)
- Eye pins (silver or gold tone)
- Jump rings
- Small glass beads (cobalt blue and clear/white)
- Jewelry pliers (needle nose and round nose)
- Jute twine or string for hanging
- Toothpick or needle tool
- Clear matte varnish (optional)
Step 1: Shaping the Elements
-
Prep your workspace:
Lay down parchment paper or a silicone mat to prevent the clay from sticking. Knead the terracotta clay in your hands until it’s soft, pliable, and free of cracks. -
Roll out the slab:
Use your rolling pin to flatten the terracotta clay to an even thickness, about 1/4 inch thick. Try to keep it consistent so all pieces dry at the same rate. -
Cut the shapes:
Using your cutters, punch out one oval, one crescent moon, and two stars from the terracotta clay. Clean up any ragged edges with your finger and a bit of water. -
Create the center bead:
Roll a small ball of the dark blue clay (or white clay you’ll paint later) and flatten it slightly into a thick coin shape. It needs to be sturdy enough to hold the weight of the bottom star. -
Add holes for hardware:
While the clay is still wet, carefully push a toothpick or eye pin vertically through the center of every piece *except* the top oval. For the oval, pierce it vertically from top to bottom. -
Refine the holes:
Make sure the holes go all the way through and are large enough for your eye pins or wire to pass through easily. Give the hole a little wiggle to widen it slightly, as clay shrinks when drying. -
Standard drying time:
Lay the pieces flat on a clean surface. Let them dry completely according to the package instructions, usually 24-48 hours. Flip them halfway through to prevent warping.
Step 2: Assembly & Finishing
-
Smooth the edges:
Once fully dry, lightly sand any rough spots or sharp edges with fine-grit sandpaper for a professional finish. Wipe away the dust with a barely damp cloth. -
Paint (if needed):
If you used white clay for the blue circle, paint it now with cobalt blue acrylic paint. You can also add a coat of clear matte varnish to all pieces to seal them. -
Connect the first link:
Insert an eye pin through the top oval. Use your round nose pliers to create a loop at the top if the pin is just straight wire. Attach a piece of jute twine to this top loop for hanging. -
Bead the connectors:
Cut short lengths of wire or use eye pins. Thread a small blue glass bead onto the pin, then form loops on both ends using your pliers. You’ll need four of these beaded connector links. -
Stringing the moon:
Attach a beaded link to the bottom of the oval using a jump ring. Then, connect the other end of that link to the top of the crescent moon. -
Adding the first star:
Repeat the process: attach a beaded link to the bottom of the moon, then connect the top of the first star to that link. -
Attaching the blue disc:
Add another beaded link below the first star. Connect this to your blue clay circle. The blue bead acts as a visual break in the terracotta pattern. -
Final assembly:
Attach the final beaded link to the bottom of the blue circle, and hang the last star at the very bottom. Double-check all your jump rings are closed tightly so nothing slips off.
Crumbly Edges?
If your clay edges look ragged or crumbly after cutting, dip your finger in a tiny bit of water and run it along the rim to smooth it out before drying.
Add Extra Sparkle
For a celestial ‘level_up’, gently press tiny seed beads or rhinestones directly into the wet clay surface of the stars before letting them dry.
Now hang your celestial creation in a sunny spot and enjoy the handmade vibes