If you’ve got air dry clay and a soft spot for anything magical, unicorns are basically the perfect project. I’m sharing my favorite air dry clay unicorn ideas—from super simple flat shapes to cute little sculptures that feel like tiny desk guardians.
Classic Unicorn Face Magnets
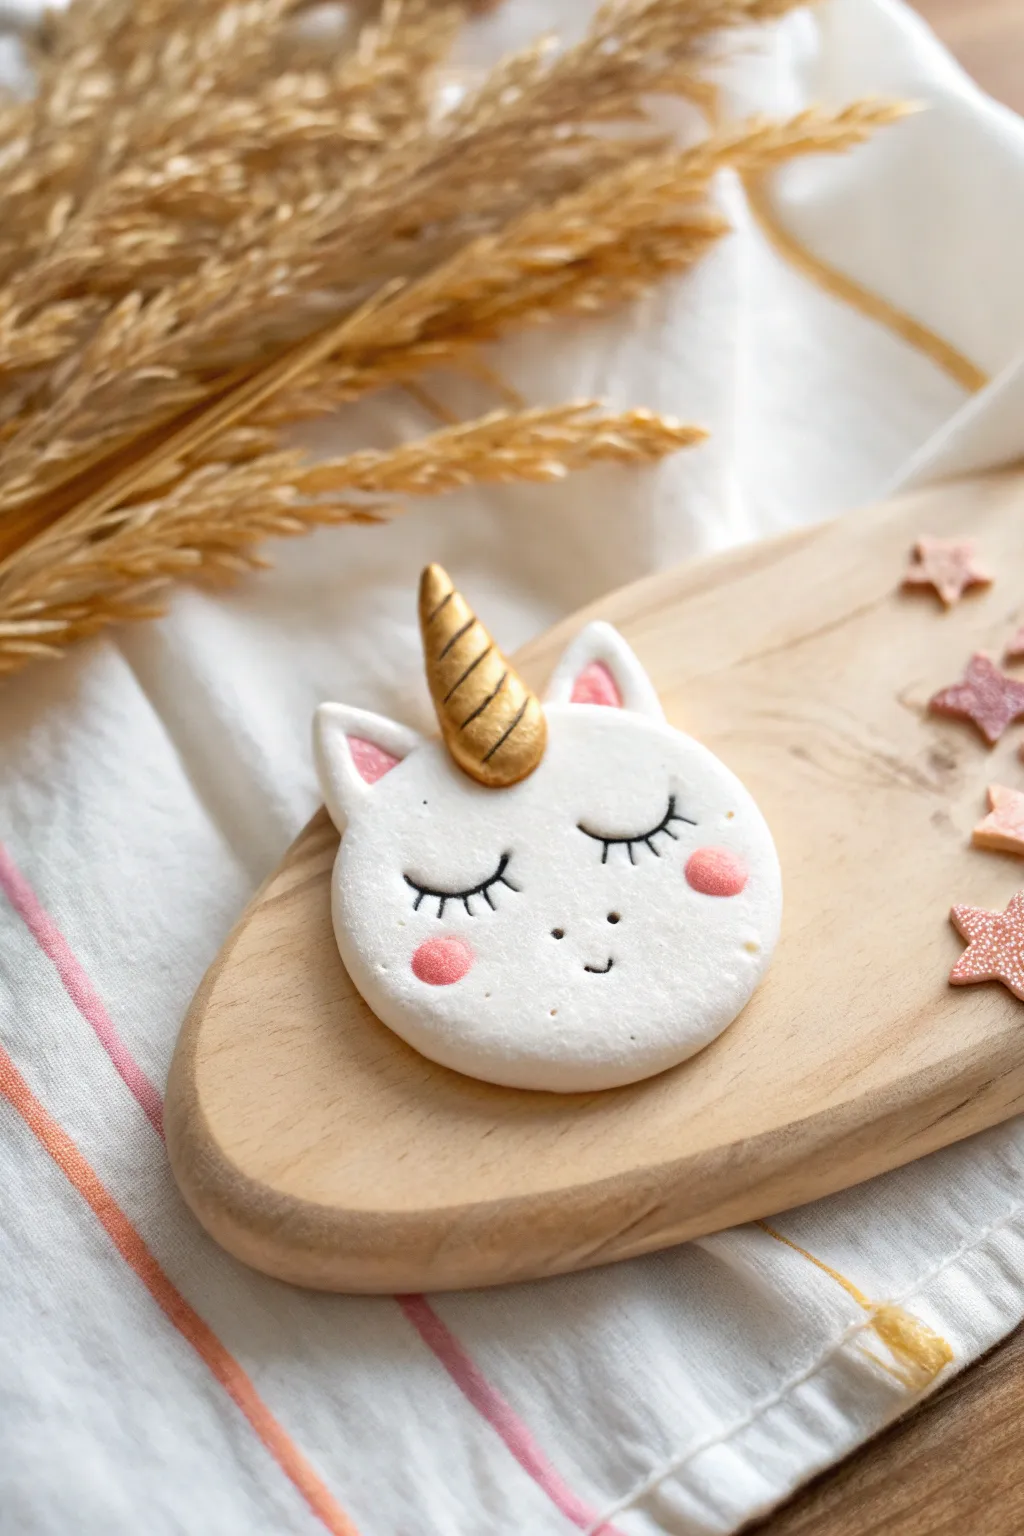
This whimsical project turns a simple ball of clay into an adorable, sleepy unicorn face magnet perfect for your fridge or locker. With its sparkling gold horn and sweet expression, it captures a charming, magical look that is easy to master.
Detailed Instructions
Materials
- White smooth air dry clay
- Rolling pin
- Round cookie cutter (approx. 2.5 – 3 inches)
- Small cup of water
- Modelling tools (or a toothpick)
- Gold acrylic paint
- Soft pink acrylic paint (or pastel chalk)
- Black fine-tip permanent marker or acrylic paint
- Small paintbrush
- Strong craft magnet
- Strong craft glue (E6000 or similar)
- Gloss varnish (optional)
Step 1: Shaping the Base
-
Condition the Clay:
Start by kneading a handful of white air dry clay until it feels warm, pliable, and smooth. This prevents cracks later on. -
Roll it Out:
Roll the clay into a smooth slab about 1/4 inch thick. Aim for an even surface without bumps. -
Cut the Circle:
Use your round cookie cutter to punch out a perfect circle. Gently smooth the cut edges with a finger dipped lightly in water to remove any sharp ridges. -
Create the Ears:
Pinch off two very small balls of leftover clay. Roll them into teardrop shapes, then flatten them slightly to form triangular ears. -
Attach the Ears:
Score the bottom of the ears and the top of the circle head where you want them to sit. Apply a tiny dab of water as ‘glue’ and press the ears firmly onto the head, smoothing the seam so they look seamless.
Step 2: Adding the Horn
-
Form the Horn Base:
Take a small worm of clay and roll it into a tapered cone shape. It should be proportional to the head, not too tall or heavy. -
Add Texture:
To get that classic twisted look, I like to gently press the side of a toothpick into the cone, spiraling upward from the base to the tip. -
Mount the Horn:
Score and wet the bottom of the horn and the center of the forehead. Press the horn into place, blending the clay at the very base just slightly into the forehead for stability.
Cracking Up?
If small cracks appear as the clay dries, mix a tiny bit of fresh clay with water to make a paste (slip) and fill them in.
Step 3: Painting and Details
-
Let it Dry:
Allow the unicorn to dry completely. Depending on humidity, this could take 24 to 48 hours. The clay should turn solid white and feel hard. -
Gild the Horn:
Using a small brush, carefully paint the spiral horn with metallic gold acrylic paint. You might need two coats for a solid metallic shine. -
Pink Inner Ears:
Paint the inner triangles of the ears with a soft pink paint. Keep a thin white border around the pink for dimension. -
Rosy Cheeks:
Dip a fingertip or a dry brush into pink paint (or even pink blush makeup!) and gently dab two round circles on the cheeks. -
Draw the Face:
Once the paint is dry, use a fine-tip black marker or a very thin liner brush with black paint to draw two U-shaped curves for the sleeping eyes. Add little lashes flicking outward. -
Final Expressions:
Add two tiny dots for nostrils and a very small curved smile near the bottom center. -
Seal (Optional):
If you want extra durability, brush a coat of matte or gloss varnish over the entire face once the ink is totally set. -
Magnetize:
Flip the dry face over. Apply a strong craft glue to the back of a magnet and press it firmly into the center of the clay back. Let the glue cure completely.
Make it Sparkle
Before the varnish dries, sprinkle ultra-fine iridescent glitter over the gold horn for an extra magical touch.
Now your fridge has a charming touch of fantasy to brighten your day


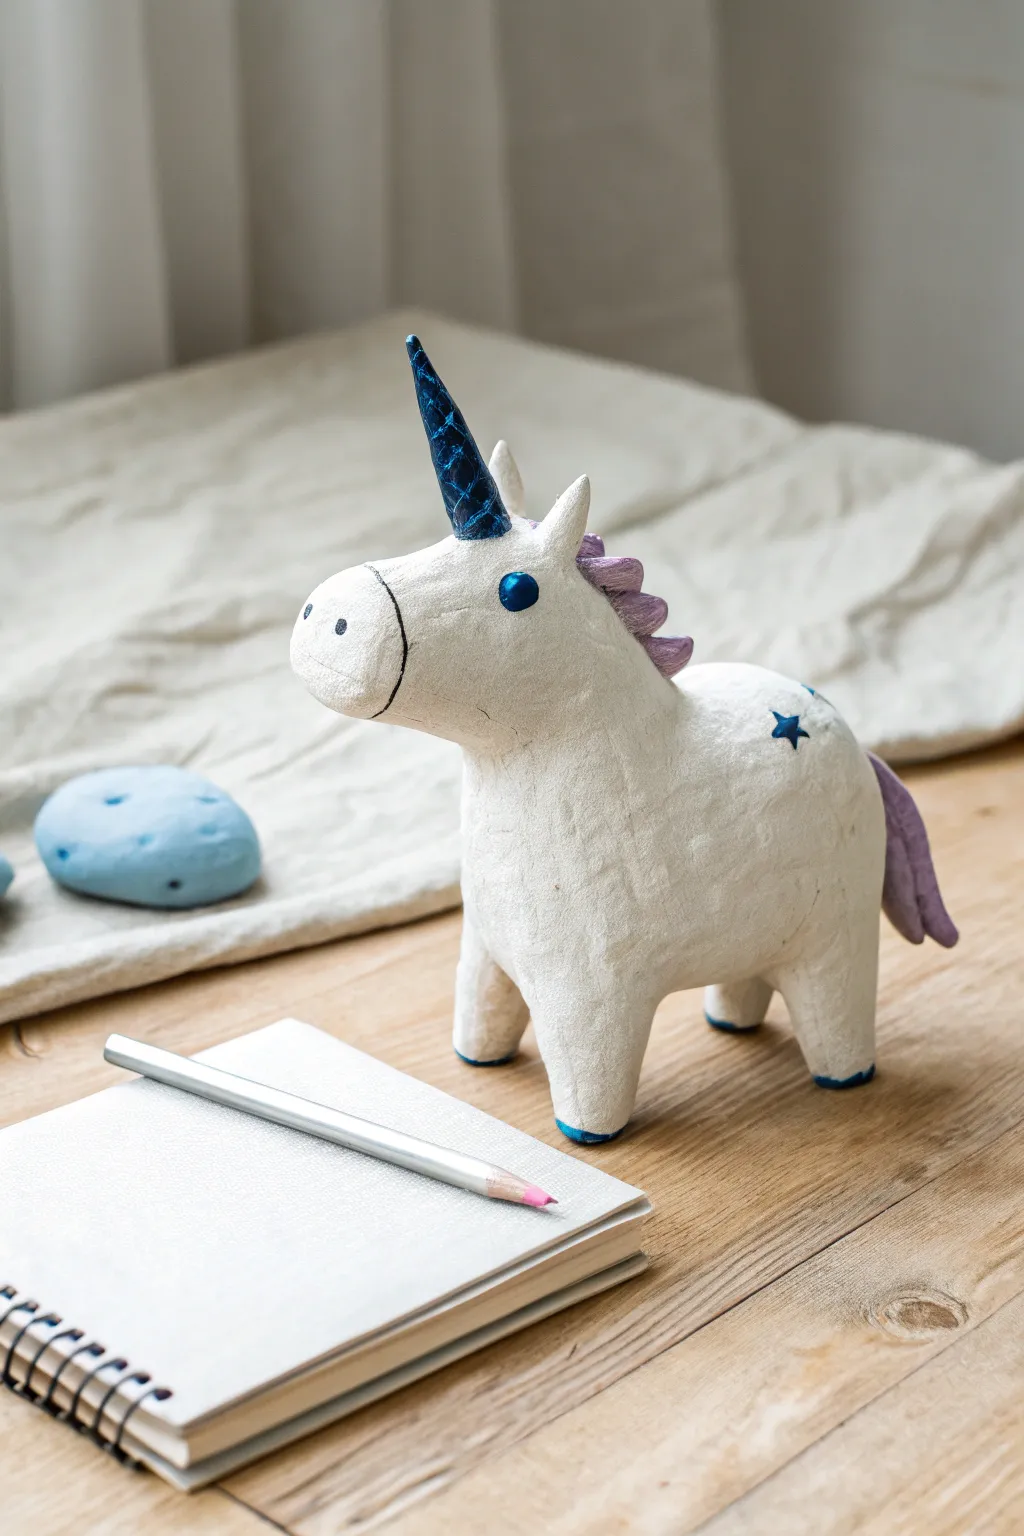
Sweet Unicorn Ornaments
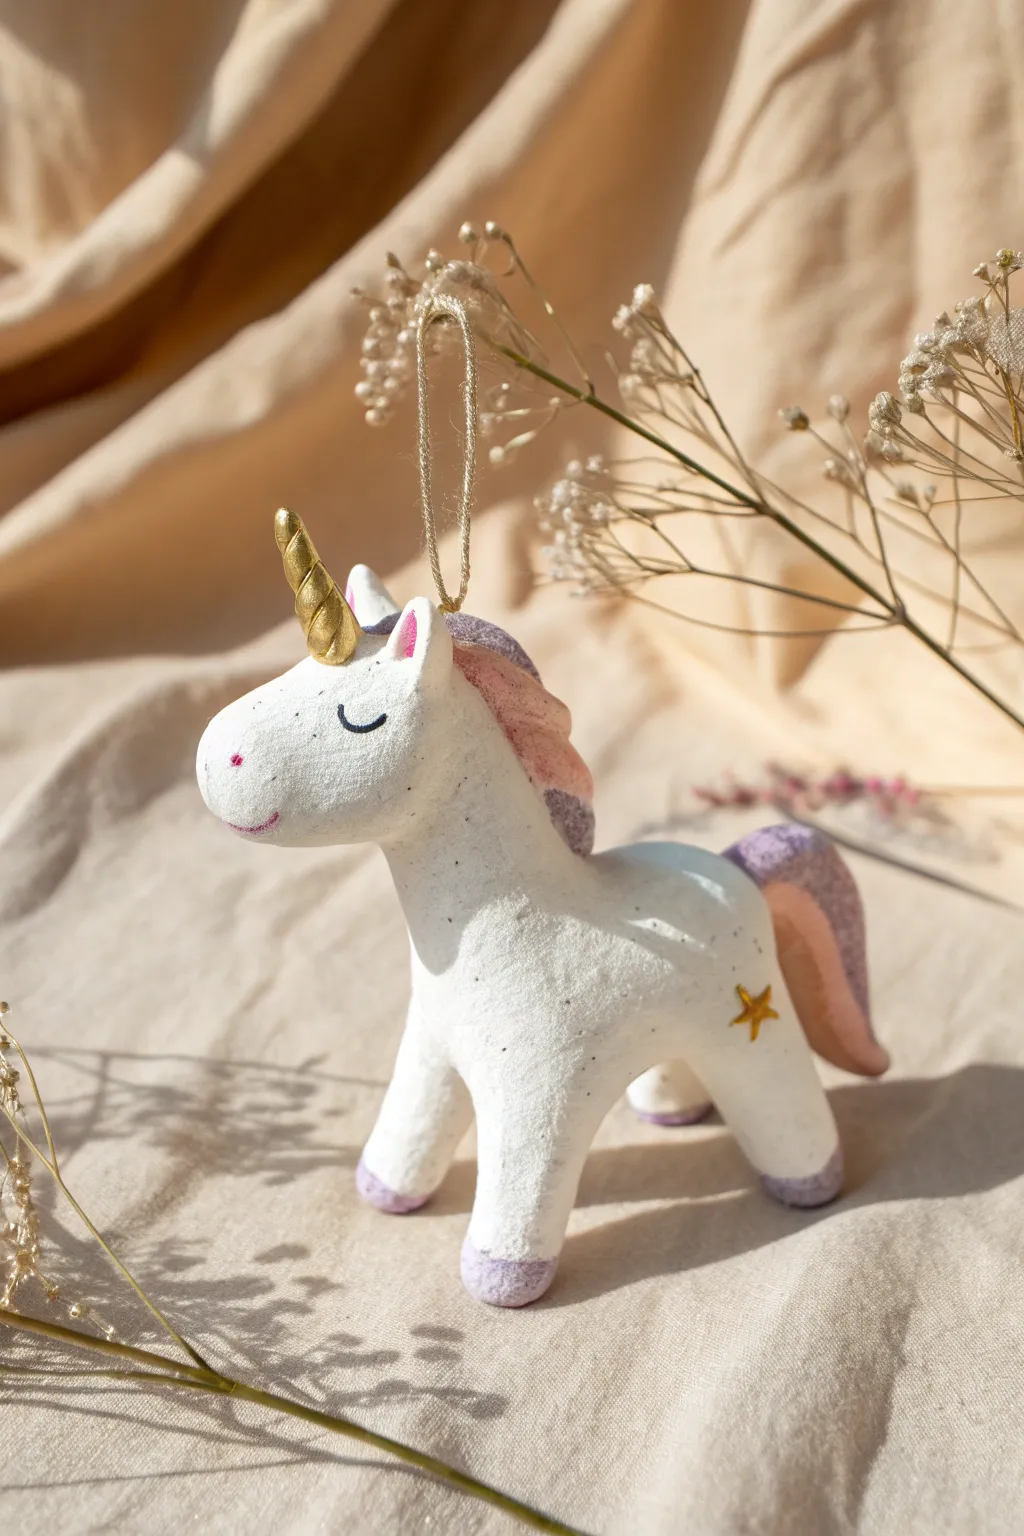
Capture a bit of magic with this serene, standing unicorn ornament that looks lovely hanging or perched on a shelf. Its simple white finish with touches of gold and pastel purple creates a gentle, dreamy aesthetic perfect for nurseries or holiday trees.
Step-by-Step Tutorial
Materials
- White air dry clay
- Rolling pin
- Small cup of water
- Modeling tools (simple knife tool, needle tool)
- Gold acrylic paint
- Pastel purple and pastel pink acrylic paint
- Black fine-liner pen or black paint
- Small screw eye hook
- Gold twine or ribbon
- Fine grit sandpaper
- Small paintbrushes
Step 1: Shaping the Body
-
Form the torso:
Start by conditioning a chunk of clay in your hands until it is pliable. Roll it into an oval cylinder shape, roughly the size of a large egg, to form the main body. -
Create the legs:
Roll four smaller, equal-sized sausages for the legs. They should be sturdy and not too thin, tapering slightly at the bottom. -
Attach the legs:
Score the clay (scratch cross-hatching marks) where the legs will join the body, add a dab of water (slip), and press the legs firmly onto the underside of the torso. Smooth the seams with your fingers or a modeling tool so the clay looks like one continuous piece. -
Shape the head and neck:
Create a teardrop shape for the head and a thicker cylinder for the neck. Using the score-and-slip method, attach the neck to the front of the torso, and then the head to the neck. -
Refine the pose:
Gently manipulate the head so the muzzle points slightly upward. Ensure the unicorn stands balanced on all four feet; adjust the leg positions slightly if it feels wobbly.
Loose Legs?
If legs keep falling off during sculpting, insert a toothpick pieces into the leg and body as an internal ‘bone’ for extra structural support.
Step 2: Adding Details
-
Add the ears:
Pinch two tiny triangles of clay. Attach them to the top of the head using a bit of water, pressing them gently into place. -
Sculpt the mane:
Roll a small snake of clay and flatten it slightly. Press this along the back of the neck, curving it to imply flowing hair. Use a knife tool to gently press lines into the clay for hair texture. -
Create the tail:
Form a larger teardrop shape for the tail. Flatten it slightly and curve the tip. Attach it to the rear of the body, blending the upper seam smooth. -
Twist the horn:
Take two very thin, tiny snakes of clay and twist them together to form a spiral horn. Trim the base flat and attach it to the center of the forehead with a dab of water. -
Insert the hanging hardware:
Carefully screw the eye hook into the center of the unicorn’s back while the clay is still wet. This ensures it sets securely as the clay shrinks around the threads. -
Drying time:
Let the unicorn dry completely. This usually takes 24-48 hours depending on humidity. I like to flip the figure over gently halfway through to ensure the belly dries evenly.
Adding Shimmer
Mix a tiny amount of pearl medium or white glitter into your purple paint for the mane and tail to give the unicorn an ethereal, sparkling finish.
Step 3: Painting and Finishing
-
Smooth the surface:
Once bone dry, check for any rough spots or fingerprints. Gently buff them away with fine-grit sandpaper until the finish is smooth. -
Paint the hooves and hair:
Mix a soft pastel purple paint. Carefully paint just the very tips of the feet to create hooves, and cover the mane and tail sections completely. -
Add pink accents:
Using pale pink paint, add a tiny blush spot to the inside of the ears and a small dab for the nose. -
Apply the gold:
Use metallic gold paint to color the twisted horn. Paint a small star shape on the unicorn’s flank for a magical touch. -
Draw the face:
With a fine brush and black paint (or a fine-liner pen), draw a simple curved line for the sleeping eye and gentle eyelashes. -
String it up:
Once the paint is fully dry, thread your gold twine through the eye hook and tie a loop for hanging.
Now you have a charming little keepsake ready to add a sprinkle of fantasy to your decor
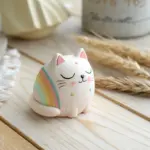


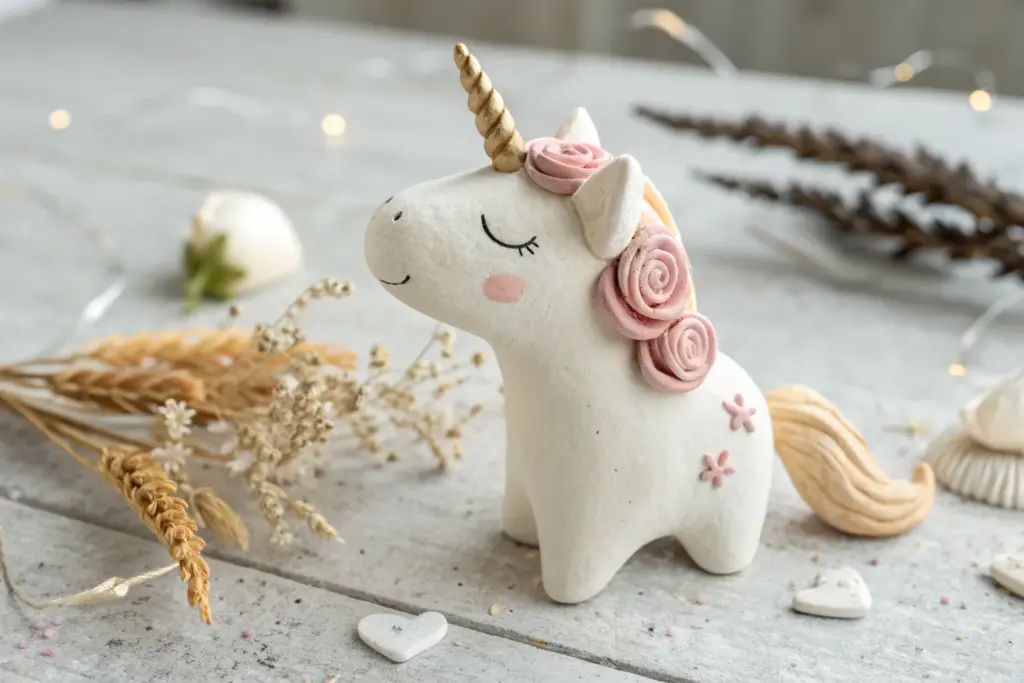
Mini Sitting Unicorn Figurines
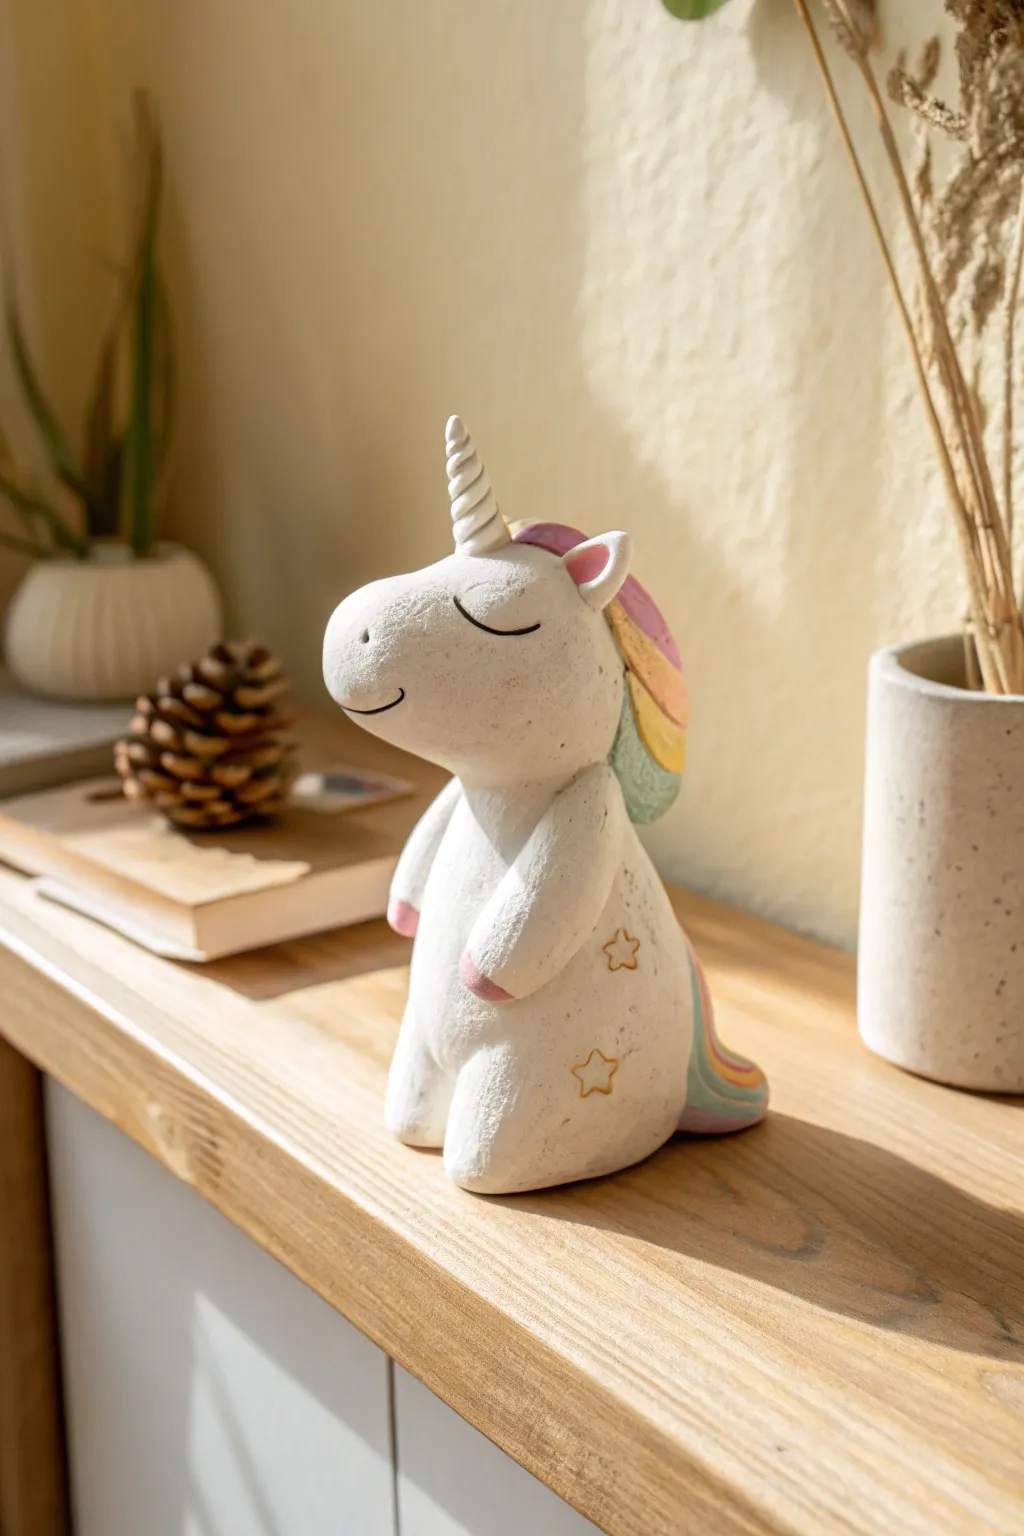
Create a serene atmosphere on any shelf with this charming sitting unicorn figurine, sculpted from air dry clay with a lovely rustic texture. Its closed eyes and soft pastel mane evoke a sense of calm magic perfect for a workspace or nursery.
Step-by-Step Guide
Materials
- White air dry clay (natural texture preferred)
- Set of sculpting tools (rubber shapers, needle tool)
- Acrylic paints (pastel pink, yellow, teal, gold, black)
- Fine detail paintbrush
- Water cup and sponge
- Sandpaper (fine grit)
Step 1: Sculpting the Body
-
Form the base:
Start by taking a generous handful of clay and rolling it into a smooth, thick teardrop shape. This will serve as the unicorn’s main body, with the wider bottom acting as the sitting base. -
Shape the head:
Roll a slightly smaller ball of clay and gently elongate one side to create a snout. Attach this head piece to the narrower top of your body teardrop using a little water to score and slip the connection points. -
Blend the seams:
Use a rubber shaper or your thumb to smooth the clay where the neck meets the body until the seam disappears completely, creating a continuous silhouette. -
Add the stubby legs:
Roll two small sausage shapes for the front legs and two shorter rounded shapes for the hind legs. Press the hind legs onto the lower sides of the body first, blending the edges so they look tucked in. -
Connect the arms:
Attach the front legs vertically on the belly, smoothing the shoulders into the main body. The paws should rest casually near the belly for that cute, relaxed posture.
Step 2: Adding Details
-
Create the horn:
Roll a thin snake of clay and twist it gently to form a spiral, tapering it to a point. Cut it to size and attach the horn firmly to the center of the forehead using a bit of water. -
Sculpt the ears:
Form two small triangles, create a slight indentation in the center of each, and attach them just behind the horn. I like to tilt them slightly forward for a sweet expression. -
Layer the mane:
Create the signature swooping mane by rolling a thick, curved slab of clay. Attach it starting from the forehead, going behind the ears, and sweeping down the side of the neck. -
Add the tail:
Fashion a curved tail shape similar to the mane but slightly thicker at the base. Attach it to the lower back, curling it around the side of the sitting unicorn so it’s visible from the front. -
Refine the texture:
While the clay is still damp, use a damp sponge to smooth out fingerprints, but don’t over-polish; the goal is a slightly matte, organic stone-like finish. -
Initial drying:
Let the figurine air dry completely for 24 to 48 hours. Keep it away from direct heat to prevent cracking.
Cracks Appearing?
If small hairline cracks appear while drying, mix a tiny amount of fresh clay with water to make a paste (slip) and conduct a ‘surgery’ to fill them in before painting.
Step 3: Painting and Finishing
-
Base coat touches:
If your dried clay has a grayish tint, paint the entire body with a matte white acrylic. If the clay dried a clean white, you can skip this to keep the natural texture. -
Paint the rainbow sections:
Paint the mane and tail in sections using pastel pink, yellow, and teal. Allow the colors to touch but not muddy together to keep the rainbow effect distinct. -
Gilding the horn:
Using a fine brush, carefully paint the spiral horn with metallic gold paint. Do the same for two small star shapes on the unicorn’s flank. -
Facial features:
With your finest brush and black paint, draw two simple ‘U’ shapes for the peacefully closed eyes, lashes pointing down. Add a tiny curved line for the mouth and nostrils. -
Rosy highlights:
Mix a very watery pink wash and lightly dab it onto the inner ears and the tips of the hooves for a soft, blushing effect. -
Sealing:
Once all paint is dry, apply a matte varnish to protect your work without adding unnatural shine.
Make it Sparkle
While the paint on the mane is still wet, sprinkle a pinch of ultra-fine iridescent glitter over the pastel sections for a magical, shimmering finish.
Place your little guardian on a bookshelf or desk where its peaceful presence can be enjoyed daily


Standing Unicorn Desk Buddy
Create a charming, textured desk buddy that feels like it stepped right out of a storybook. This standing unicorn features a lovely tactile finish, metallic accents, and a sweet, simple expression that adds character to any workspace.
How-To Guide
Materials
- White air-dry clay
- Aluminum foil
- Basic sculpting tools (or a toothpick and plastic knife)
- Water in a small cup
- Acrylic paints (White, Metallic Blue, Metallic Purple, Black)
- Small detail paintbrush
- Flat medium paintbrush
- Fine-grit sandpaper (optional)
- Matte varnish (optional)
Step 1: Building the Armature & Body
-
Create the foil core:
Crumple aluminum foil into two main shapes: a larger oval for the body and a smaller, slightly elongated oval for the head. This saves clay and makes the finished piece lighter. -
Connect head and body:
Use a toothpick to connect the head and body foil pieces. Leave a little space between them for the neck. -
Cover with clay:
Roll out a sheet of air-dry clay about 1/4 inch thick. Wrap it completely around your foil structure, using a bit of water to smooth the seams together. -
Form the legs:
Roll four sturdy cylinders of clay for the legs. They should be thick enough to support the weight of the body. -
Attach the legs:
Score (scratch) the top of the legs and the attachment points on the body. Apply a dab of water or clay slip, then press the legs firmly onto the underside of the body. -
Blend the seams:
Use your thumb or a modeling tool to drag clay from the legs onto the body, smoothing the transition until the join is seamless.
Keep it Upright
If the legs start to sag while working, prop the belly up on a small box or sponge until the clay begins to harden and can support its own weight.
Step 2: Sculpting Details & Texture
-
Add the ears:
Pinch two small, leaf-shaped pieces of clay. Attach them to the top of the head using the score-and-slip method. -
Create the horn:
Roll a thin cone of clay. Gently twist it to create a spiral effect, then attach it to the center of the forehead. -
Sculpt the mane:
Form several small, teardrop-shaped clumps of clay. Arrange them down the back of the neck, overlapping slightly to look like flowing hair. -
Add the tail:
Make a larger, curved teardrop shape for the tail. Attach it to the rear of the body, blending the top edge smoothly. -
Refine the surface:
Instead of smoothing everything perfectly, I like to gently tap the surface with a stiff brush or crumpled foil to give it a slightly rough, paper-mache texture. -
Define the face:
Use a needle tool or toothpick to lightly scribe a curved line separating the muzzle from the rest of the face. -
Dry completely:
Let your unicorn sit undisturbed for 24 to 48 hours until it feels room temperature to the touch and represents a solid white color.
Cosmic Variation
Instead of a plain white body, splatter-paint the dried white base with watered-down purple and blue paint for a ‘galaxy’ effect before painting the details.
Step 3: Painting & Finishing
-
Base coat:
Paint the entire unicorn with a layer of white acrylic paint to even out the clay color and provide a crisp background. -
Paint the horn:
Carefully paint the spiraled horn with metallic blue acrylic paint. A small brush helps stay within the lines here. -
Color the mane and tail:
Paint the sculpted mane and tail sections with metallic purple paint. You can dry-brush a little extra white on top if you want to highlight the texture. -
Add facial features:
Paint a round circle for the eye in metallic blue. Use a tiny dot of black for the nostril and trace the muzzle curve with a very thin black line. -
Add decorative stars:
Using your smallest brush, paint a simple five-pointed star on the unicorn’s flank or hip using the metallic blue paint. -
Paint the hooves:
Finish the painting process by adding metallic blue to the very bottom of each foot. -
Seal the work:
Once all paint is dry, apply a coat of matte varnish to protect your desk buddy from dust and handling.
Place your new magical friend next to your notebooks for a bit of daily inspiration

The Complete Guide to Pottery Troubleshooting
Uncover the most common ceramic mistakes—from cracking clay to failed glazes—and learn how to fix them fast.
Unicorn Ring Dish With Ears

Keep your favorite rings and trinkets safe in this enchanting unicorn dish featuring delicate gold accents. With its serene sleepy eyes and soft pastel touches, it’s a magical addition to any bedside table or vanity.
Detailed Instructions
Materials
- White smooth air-dry clay
- Rolling pin
- Small bowl (for use as a mold)
- Craft knife or clay tool
- Water (for smoothing)
- Fine-grit sandpaper
- Acrylic paints: Gold, Black, Soft Pink
- Small round paintbrush
- Fine detail brush
- Clear varnish or sealant (gloss or matte)
Step 1: Shaping the Base
-
Prepare the Clay:
Take a handful of white air-dry clay and knead it until it’s soft and pliable. This warms it up and helps prevent cracking later on. -
Roll It Out:
Roll the clay into a ball, then use a rolling pin to flatten it into an even circle, roughly 1/4 inch thick. Aim for a smooth surface without bumps. -
Mold the Dish Shape:
Gently press your clay circle into the inside of a small bowl to create a curved dish shape. Alternatively, you can drape it over the outside of an upside-down bowl for a more organic look. -
Smooth the Edges:
Dip your finger in a little water and run it along the rim of the clay to smooth out any rough edges or cracks that formed during shaping.
Smooth Operator
Keep a small dish of water nearby while working. If cracks appear while shaping, dab a wet finger on them immediately and smooth them out to prevent breakage.
Step 2: Adding Magical Features
-
Create the Head Shape:
Roll a smaller ball of clay and flatten it slightly into an oval or rounded triangle shape. Attach this to one side of the inner rim of your bowl using the score and slip method (scratch both surfaces and add wet clay ‘glue’). blended the seams carefully so it looks like one piece. -
Form the Ears:
Pinch off two tiny pieces of clay and shape them into small triangles. Using a clay tool, make a slight indentation in the center of each to create the inner ear. -
Attach the Ears:
Score the bottom of the ears and the top of the head piece. Press them firmly into place, blending the clay at the base with a tool or your finger for a seamless connection. -
Make the Horn:
Roll a small piece of clay into a thin cone shape. You can gently twist it to give it a spiral texture if you like, or keep it smooth like the example. Attach it securely between the ears. -
Final Smoothing:
Do one last check over the entire piece. Use a damp sponge or finger to smooth out fingerprints and ensure all attachments are secure before setting it aside.
Step 3: Finishing Touches
-
Dry Completely:
Let the dish dry for at least 24-48 hours. I find flipping it over halfway through helps the bottom dry evenly. -
Sand for Smoothness:
Once bone dry, gently sand any rough spots or uneven edges with fine-grit sandpaper until the surface feels polished. -
Paint the Horn:
Using a small brush, carefully paint the clay horn with metallic gold acrylic paint. You may need two coats for a solid, shiny finish. -
Add Ear Details:
Mix a tiny bit of water with soft pink paint to create a wash. Paint the inside indentations of the ears for a gentle, blushing effect. -
draw the face:
Using your finest detail brush and black paint, carefully paint two closed curved lines for the eyes. Add small lashes for a sleepy, peaceful expression. -
Seal the Project:
Protect your hard work by applying a coat of clear varnish over the entire dish. This will give it a nice sheen and protect the paint from chipping.
Uneven Drying?
If the edges curl up too much while drying, gently weigh down the center with a small bag of rice or sand to keep the bottom flat.
Now you have a charming spot to keep your treasures organized and safe
Rainbow Mane Trinket Tray
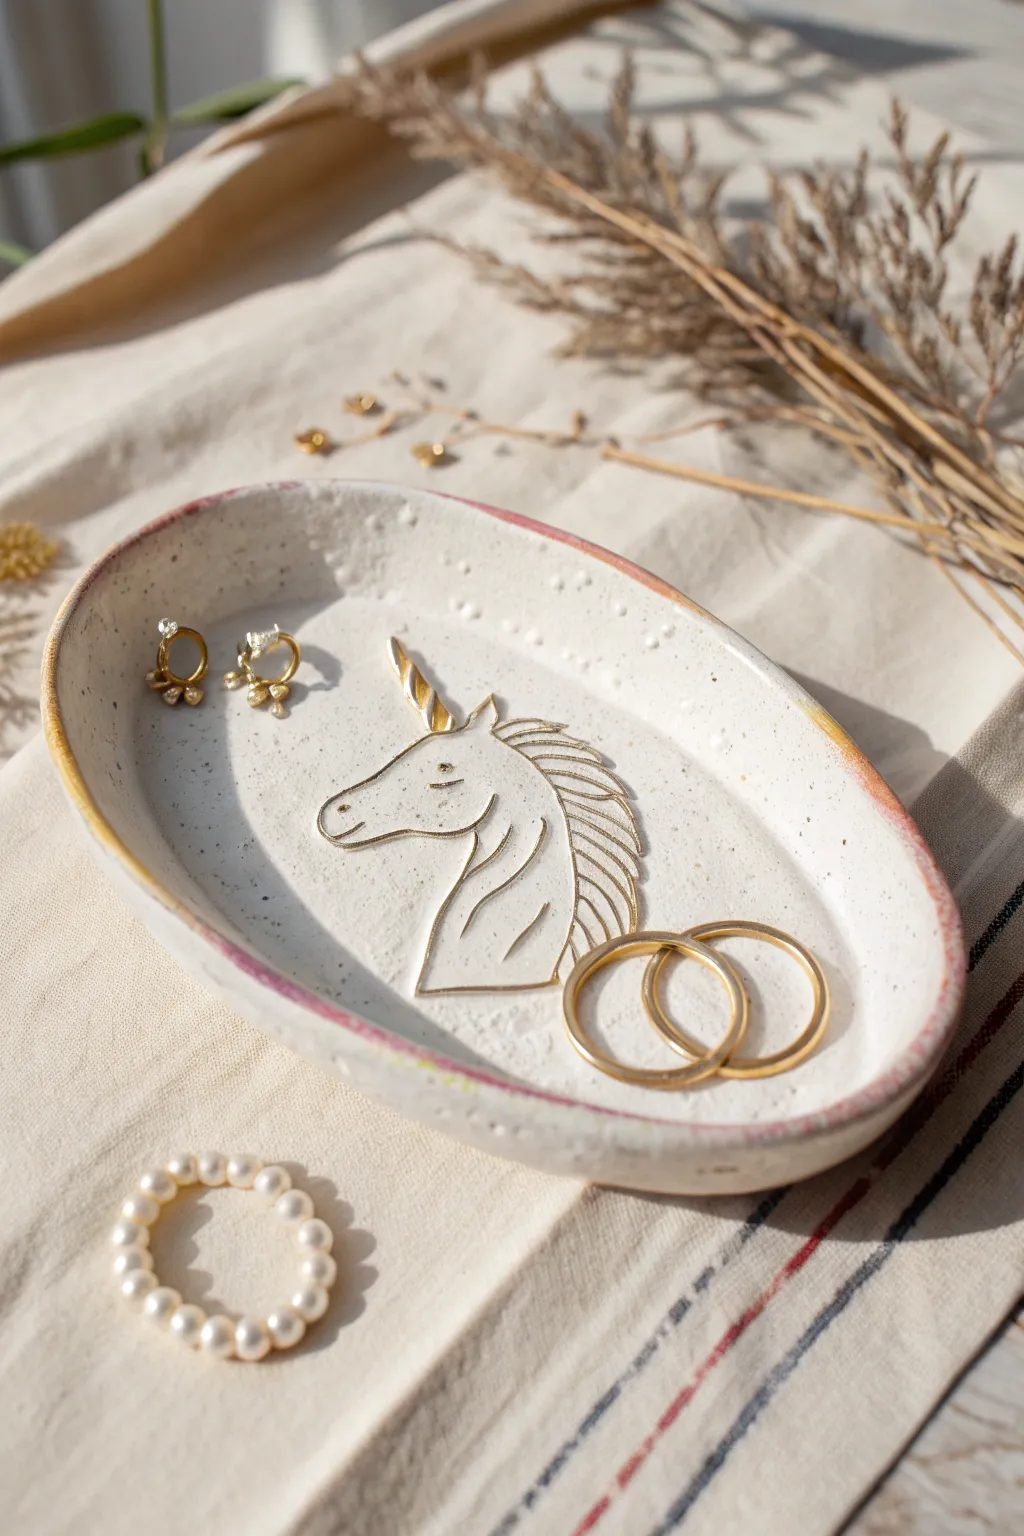
This elegant oval trinket dish combines the simplicity of organic, speckled clay with delicate line art. Featuring a regal unicorn profile outlined in gold, it’s the perfect bedside catch-all for your favorite rings and studs.
Step-by-Step Tutorial
Materials
- Air dry clay (white or cream)
- Course black pepper or dried coffee grounds (for speckling)
- Rolling pin
- Oval template or cookie cutter (approx 6 inches)
- Craft knife or clay needle tool
- Small bowl of water
- Sponge
- Gold metallic paint or liquid gold leaf
- Fine detail paintbrush (size 0 or 00)
- Pink or dusty rose acrylic paint (for the rim)
- Clear varnish or sealant (glossy or matte)
- Fine grit sandpaper
Step 1: Shaping the Base
-
Prepare Your Clay:
Start by conditioning a large ball of white air dry clay. To achieve that trendy speckled ceramic look without a kiln, knead in a small pinch of coarse black pepper or dried used coffee grounds until evenly distributed. -
Roll it Out:
Roll the clay slab out onto a clean surface or canvas mat until it is about 1/4 inch thick. Try to assist the shape into a rough oval as you roll to minimize waste. -
Cut the Oval:
Place your oval template onto the slab and trace around it with a craft knife to get a clean shape. Remove the excess clay. -
Create the Rim:
Dip your finger in water and gently run it along the edge of the oval to smooth any sharp cuts. Then, gently curve the outer edges upward to create a shallow lip, using your thumb to press the center down while your fingers pull the edge up. -
Refine the Form:
Use a damp sponge to smooth out the interior and exterior of the dish, erasing any fingerprints left from shaping the rim.
Use a Smooth Helper
If your hand is shaky while painting lines, rest your wrist on a clean, dry sponge placed next to the tray for stability.
Step 2: Sculpting the Design
-
Draft the Unicorn:
Lightly sketch the unicorn profile into the soft clay using a needle tool or a dull pencil. Start with the snout, move up to the horn, and flow down into the mane. -
Deepen the Lines:
Once you are happy with the placement, retrace your lines with slightly more pressure to create a distinct groove. This channel will help hold the gold paint later. -
Add Texture Details:
For the mane, make fluid, curved strokes to suggest hair. Don’t forget a small, closed eye and a nostril detail. -
Texturing the Background:
To mimic the handmade pottery feel, you can gently tap the handle of a paintbrush or a texturing tool into the empty negative space around the unicorn to create tiny divots. -
The Drying Phase:
Let the tray dry completely. I prefer to let this dry slowly over 24-48 hours away from direct heat to prevent warping. Flip it over halfway through the process. -
Sanding:
Once bone dry, use fine-grit sandpaper to smooth any rough spots on the rim or underside. Wipe away the dust with a barely damp cloth.
Add Dimension
Before drying, roll a tiny coil of clay and press it onto the horn area to make it actually 3D, rather than just painted.
Step 3: Painting & Finishing
-
Gilding the Unicorn:
Using a fine detail brush and liquid gold leaf or metallic gold paint, carefully fill in the engraved lines of the unicorn. The grooves you made earlier act as a helpful guide. -
Painting the Horn:
Fill in the horn area more solidly with the gold to make it a focal point. -
Painting the Rim:
Mix a diluted wash of dusty rose or pink acrylic paint. Run your brush along the very top edge of the rim, allowing the color to look slightly uneven and organic. -
Sealing the Piece:
Apply a coat of clear varnish over the entire dish to protect the clay and the paint. Let it cure fully according to the bottle instructions.
Place your delicate new dish on your dresser to admire the subtle shimmer every morning


What Really Happens Inside the Kiln
Learn how time and temperature work together inside the kiln to transform clay into durable ceramic.
Unicorn Keychain Charms
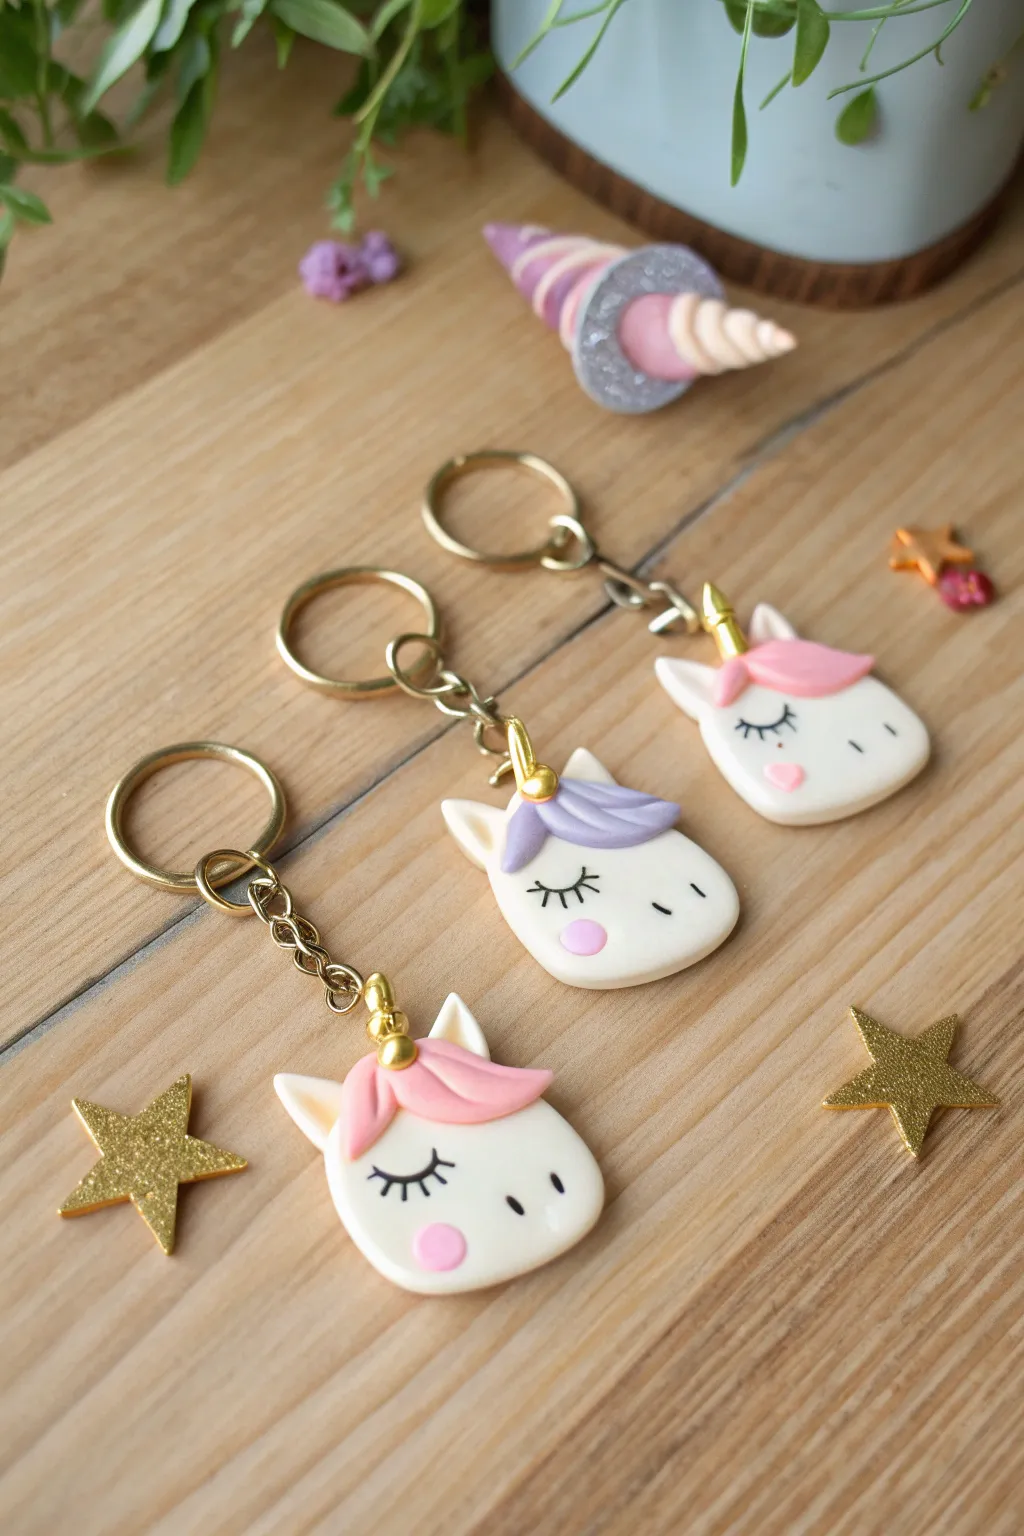
These adorable air dry clay unicorn keychains feature sweet sleepy faces and soft pastel manes, making them the perfect accessory for bags or keys. Their smooth, flat design is durable and easy to craft, even for beginners.
How-To Guide
Materials
- White polymer clay or sturdy air dry clay
- Pastel pink and purple clay (or acrylic paints to color white clay)
- Small clay rolling pin
- Clay knife or craft blade
- Needle tool or toothpick
- Teardrop or petal-shaped clay cutter (optional)
- Gold acrylic paint
- Fine-tipped black permanent marker or black acrylic paint
- Small eye pins (gold)
- Gold keychain rings with chains
- Clear gloss glaze or polyurethane varnish
- Superglue (optional)
Step 1: Shaping the Base
-
Condition the clay:
Start by kneading your white clay until it is soft, pliable, and free of cracks. Warm clay is much easier to work with and results in a smoother finish. -
Roll the base:
Roll the white clay out to a thickness of about 1/4 inch (6mm). You want it thick enough to hold an eye pin but not too heavy. -
Cut the face shape:
Use a wide teardrop cutter to punch out the head shape. If you don’t have a cutter, you can hand-cut a rounded triangle shape with softened corners using your craft knife. -
Smooth the edges:
Dip your finger in a tiny bit of water (for air dry clay) or baby oil (for polymer) and gently run it along the cut edges to smooth out any sharpness or irregularities.
Cracking Clay?
If you see tiny cracks forming as the air dry clay dries, smooth a small amount of water mixed with fresh clay (a slip) into the cracks to fill them seamlessly.
Step 2: Adding Details
-
Form the ears:
Pinch off two tiny balls of white clay. Shape them into small triangles and gently press them onto the top corners of the head. Use a modeling tool to blend the seam at the back so they stay attached. -
Create the horn:
Roll a small piece of white clay into a thin snake that tapers at one end. Twist it gently to create a spiral texture. -
Attach the horn:
Cut the twisted snake to the desired length and press it firmly onto the center top of the head. -
Make the mane:
Take your pastel pink or purple clay and flatten a small, irregular teardrop shape. This will be the swooping bangs. -
Add hair texture:
Press the colored clay onto the unicorn’s forehead, draping it slightly over one side. Use a needle tool to lightly score curved lines into the clay to mimic strands of hair. -
Insert hardware:
Carefully push a gold eye pin into the top center of the head, right behind the horn. Securing it with a dab of superglue on the shaft before insertion helps keep it permanent.
Sparkle Upgrade
Mix ultrafine iridescent glitter into your glaze before sealing the unicorn to give the white clay a magical, shimmering finish without loose glitter mess.
Step 3: Finishing Touches
-
Allow to dry:
Let your clay cure completely according to the package instructions. Air dry clay usually needs 24-48 hours; polymer clay will need to be baked. -
Paint the horn:
Once fully cured, use a small detail brush to paint the spiral horn with metallic gold acrylic paint. You might need two coats for opaque coverage. -
Draw the face:
Using a fine-tipped black marker or a very thin brush with black paint, draw two curved arches for closed eyes. Add three tiny lashes to each eye for that sleepy look. -
Add nostrils:
Place two small dots near the bottom of the face for the nose. -
Create rosy cheeks:
Paint a small pink circle on the cheek area. I like to use the back end of a paintbrush dipped in paint to stamp a perfect circle. -
Seal the charm:
Apply a coat of clear gloss glaze over the entire piece to protect the paint and give it a professional shine. -
Assemble the keychain:
Once the glaze is dry, use pliers to open the jump ring on your keychain hardware and attach it to the eye pin on the unicorn.
Your magical unicorn charms are now ready to add a dash of fantasy to any set of keys
Name Plaque With Unicorn Accent
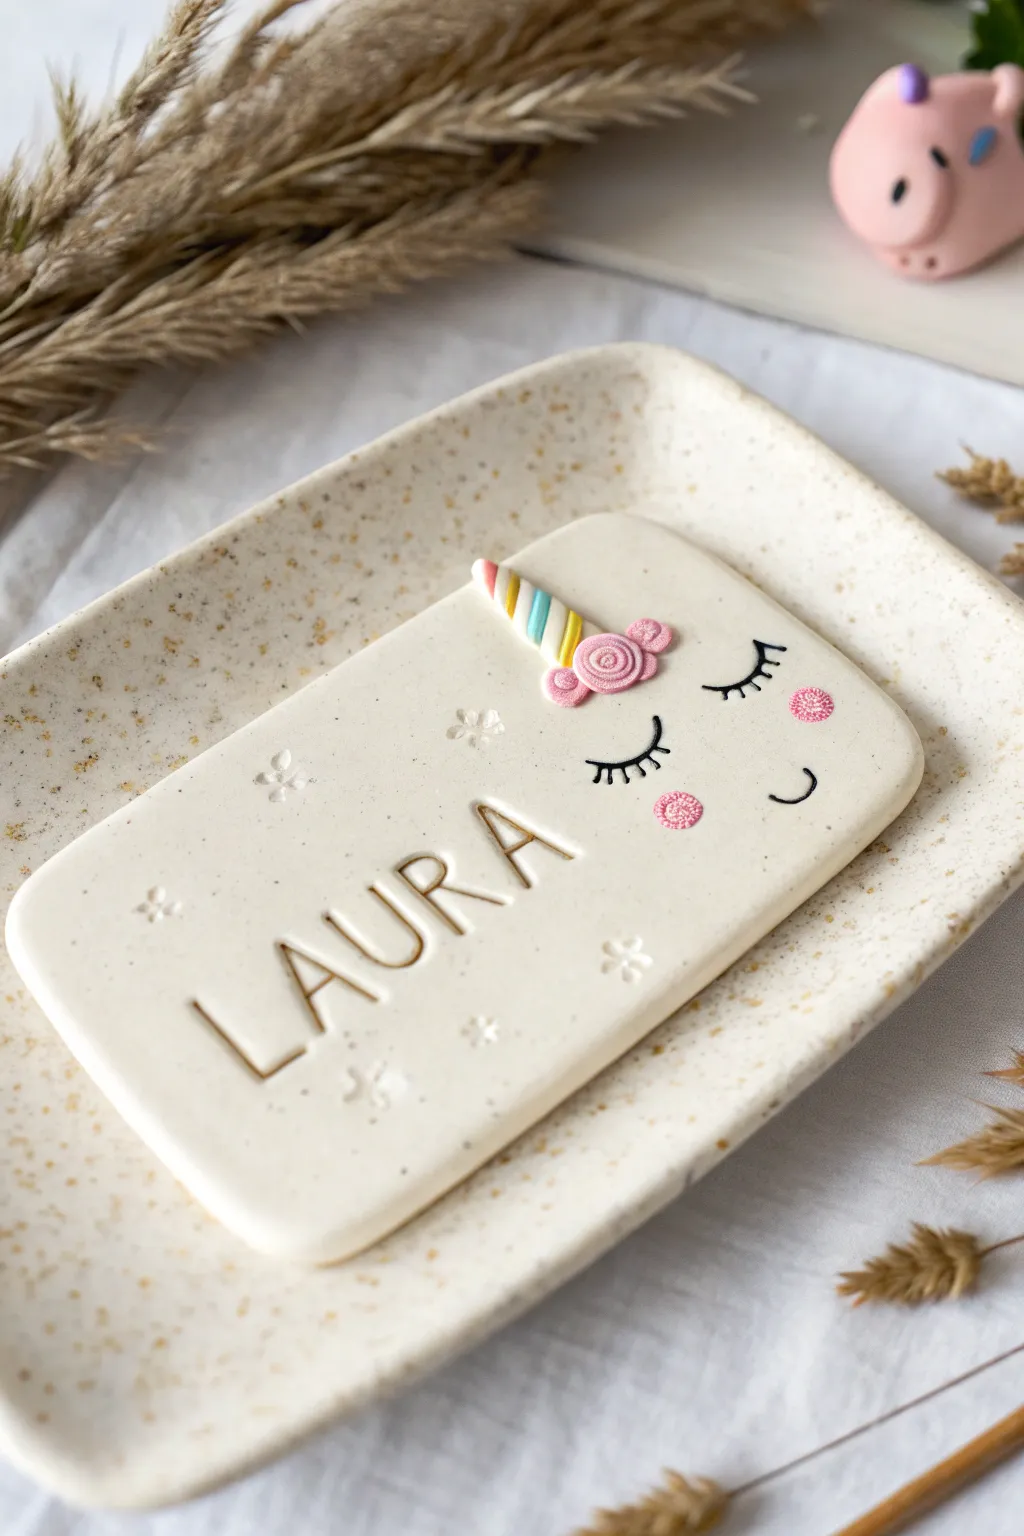
Create a personalized touch for a bedroom door or nursery with this charming unicorn name plaque. The smooth, white clay base perfectly highlights the stamped lettering and delicate pastel unicorn details for a sweet, minimalist finish.
Step-by-Step Guide
Materials
- White polymer clay or high-quality air dry clay (smooth finish)
- Acrylic rolling pin
- Rectangle clay cutter or craft knife and ruler
- Alphabet stamp set
- Pastel colored clay (pink, yellow, blue) for the horn and flowers
- Small flower silicone mold or fine-point modeling tools
- Fine-point black permanent marker or black acrylic paint
- Small dotting tool or toothpick
- Pink acrylic paint or chalk pastel (for cheeks)
- Sandpaper (fine grit)
- Matte or satin varnish (optional)
Step 1: Preparing the Base
-
Condition the clay:
Start by kneading your white clay thoroughly until it’s soft, pliable, and free of cracks. Warm hands help this process go faster. -
Roll out the slab:
Using your acrylic roller, flatten the clay into a smooth, even sheet about 1/4 inch (6mm) thick. Ensure the thickness is uniform so it dries or bakes evenly. -
Cut the rectangle:
Use a rectangular cutter for perfectly rounded corners, formed by gently pressing the cutter into the slab. Alternatively, cut a sharp rectangle with a craft knife and use your finger to manually smooth and round the corners. -
Smooth the edges:
Dip your finger in a tiny bit of water (for air dry) or baby oil (for polymer) and run it along the cut edges to erase any sharpness or roughness.
Clean Clay Pro Tip
White clay picks up dust easily! Wipe your work surface, rolling pin, and hands with a baby wipe or lint-free cloth before starting to keep your project pristine.
Step 2: Stamping and Decorating
-
Imprint the name:
Arrange your alphabet stamps to spell the desired name. Press them firmly into the lower half of the clay rectangle, ensuring even pressure for a crisp, legible imprint. -
Add subtle texture:
If you have small flower stamps or a tiny textured tool, gently press a few flower shapes scattered around the name for a whimsical background texture. -
Create the unicorn horn:
Roll thin snakes of yellow, blue, and white clay. twist them together tightly to form a rope, then taper one end to a point. Cut a small section to serve as the horn. -
Attach the horn:
Score the back of the horn lightly and press it onto the upper center of the plaque. Use a dab of liquid clay or water to ensure a strong bond. -
Mold the flowers:
Press pink clay into a small silicone flower mold to create defined blooms. Alternatively, roll a tiny strip of pink clay into a spiral shape to mimic a rose. -
Place the floral accent:
Attach two or three small pink flowers at the base of the unicorn horn to hide the connection point and add a pop of color.
Level Up: Gold Accents
After baking, paint inside the stamped name letters with liquid gold leaf or metallic acrylic paint to make the personalized text really shine and stand out.
Step 3: Finishing Touches
-
Dry or bake:
Follow the instructions for your specific clay type. If baking, place it on a ceramic tile or parchment paper. If air drying, let it sit for 24-48 hours, flipping occasionally. -
Sand the edges:
Once fully cured and hard, check the edges. If there are any rough spots, gently buff them away with fine-grit sandpaper for a professional finish. -
Draw the face:
Using a fine-point black marker or a very thin brush with black paint, carefully draw two curved lines for closed eyes and add delicate eyelashes. -
Add the smile:
Draw a tiny ‘u’ shape slightly off-center to create a sweet, crooked smile. -
Create rosy cheeks:
Dip a dotting tool into pink paint or use a blush brush with shaved pink pastel dust. Apply small dots or soft circles beneath the eyes for rosy cheeks. -
Seal the artwork:
To protect the marker and clay, apply a thin coat of matte or satin varnish over the entire piece, letting it dry completely.
Hang this lovely plaque on a wall or use a small easel to display it on a shelf to brighten up the room

TRACK YOUR CERAMIC JOURNEY
Capture glaze tests, firing details, and creative progress—all in one simple printable. Make your projects easier to repeat and improve.
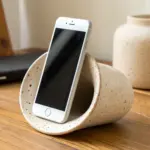
Unicorn Pencil Cup Wrap
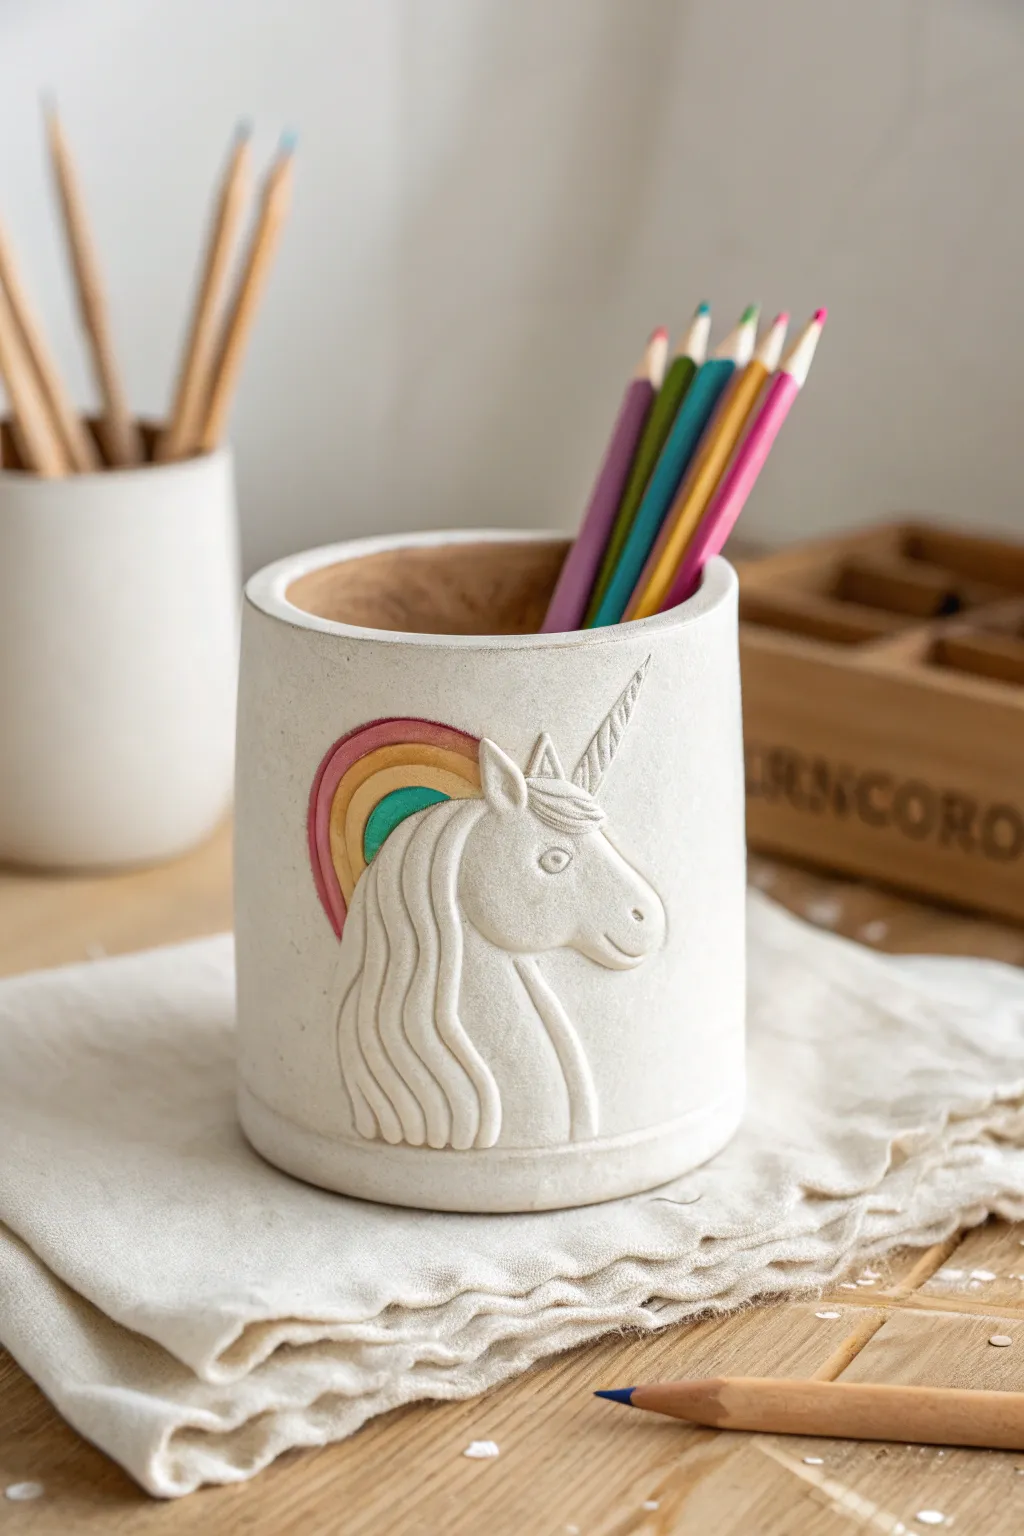
Transform a simple cylinder into a magical desk accessory with this textured unicorn pencil cup. The design features a raised-relief unicorn profile with a gently curved rainbow mane, all sculpted directly onto a smooth clay base for a minimalist yet enchanting look.
Step-by-Step
Materials
- White air-dry clay (fine grain)
- Small cylindrical container or cardboard tube (to use as a mold)
- Rolling pin
- Sculpting tools (needle tool, small ball stylus, modeling tool)
- Craft knife
- Water and a small sponge
- Acrylic paints (pastel pink, yellow, blue, teal)
- Fine-grit sandpaper
- Clear matte varnish or sealant
Step 1: Forming the Base
-
Prepare the clay slab:
Begin by rolling out a substantial amount of white air-dry clay into a smooth, even slab about 1/4 inch thick. Ensure it’s long enough to wrap completely around your chosen cylindrical mold. -
Wrap the cylinder:
Cut the slab into a rectangle that matches the height and circumference of your mold. Wrap the clay carefully around the form, joining the ends together. -
Smooth the seam:
Score the meeting edges with a needle tool and apply a little water. Blend the seam thoroughly with your fingers or a modeling tool so it disappears completely, creating a continuous surface. -
Create the base:
Roll a small ball of clay flat for the bottom. Place your cylinder on top of it, trace around the edge, cut out the circle, and attach it firmly to the bottom of the cylinder using the score-and-slip method.
Crack Prevention
If you see tiny hairline cracks appearing as it dries, smooth a slurry of clay and water (slip) into them immediately with your finger to patch them up.
Step 2: Sculpting the Unicorn
-
Outline the profile:
Using a needle tool, very lightly sketch the outline of a unicorn’s head and neck directly onto the side of the still-damp cup. This will serve as your guide for adding volume. -
Add volume to the head:
Take a small, flat piece of clay shaped like the unicorn head silhouette and press it onto your outline. Use your fingers to smooth the edges down onto the cup surface, leaving the center slightly raised for a relief effect. -
Define facial features:
Use a small ball stylus to press a circular indentation for the eye. Add a tiny dot of clay in the center for the pupil. Sculpt a soft nostril and a gentle mouth line with a curved modeling tool. -
Create hair texture:
Roll several thin coils of clay for the mane. Lay them in a flowing pattern curving down the unicorn’s neck. Use a needle tool to draw deep, flowing lines along these coils to mimic strands of hair. -
Form the horn:
Roll a small, tapered cone of clay for the horn. Attach it to the forehead. Use the side of your needle tool to press spiral indentations wrapping around the horn, giving it a twisted texture. -
Sculpt the rainbow:
Roll out three or four thin, flat strips of clay. Arc them over the unicorn’s mane area to create a rainbow shape. Blend the edges where they meet the head, but keep the ridges between the rainbow stripes distinct.
Step 3: Finishing Touches
-
Refine the surface:
Before the clay dries, take a slightly damp sponge and gently wipe the entire surface of the cup (avoiding the detailed sculpted areas) to remove fingerprints and create a stone-like texture. -
Allow to dry:
Let the project dry completely for 24-48 hours. If you used a non-porous mold, you might need to gently remove it when the clay is leather-hard to help the inside dry. -
Sand for perfection:
Once fully dry, use fine-grit sandpaper to lightly smooth the top rim of the cup and any rough patches on the exterior. -
Paint the rainbow:
Using a fine detail brush, paint the rainbow arches in soft pastel tones—pink, yellow, and teal. Keep the paint purely within the raised rainbow ridges. -
Add subtle contrast:
To enhance the depth, I sometimes use a very dilute grey wash around the edges of the mane and horn, wiping it away quickly so it only stays in the deepest crevices. -
Seal the piece:
Finish by applying a coat of clear matte varnish to protect the clay from scratches and moisture.
Glazed Look
For a glossy ceramic finish without a kiln, coat just the unicorn relief and rainbow with a high-gloss varnish, leaving the cup background matte.
Now your desk has a functional piece of art that keeps your creative tools organized
Sleepy Unicorn Pocket Token
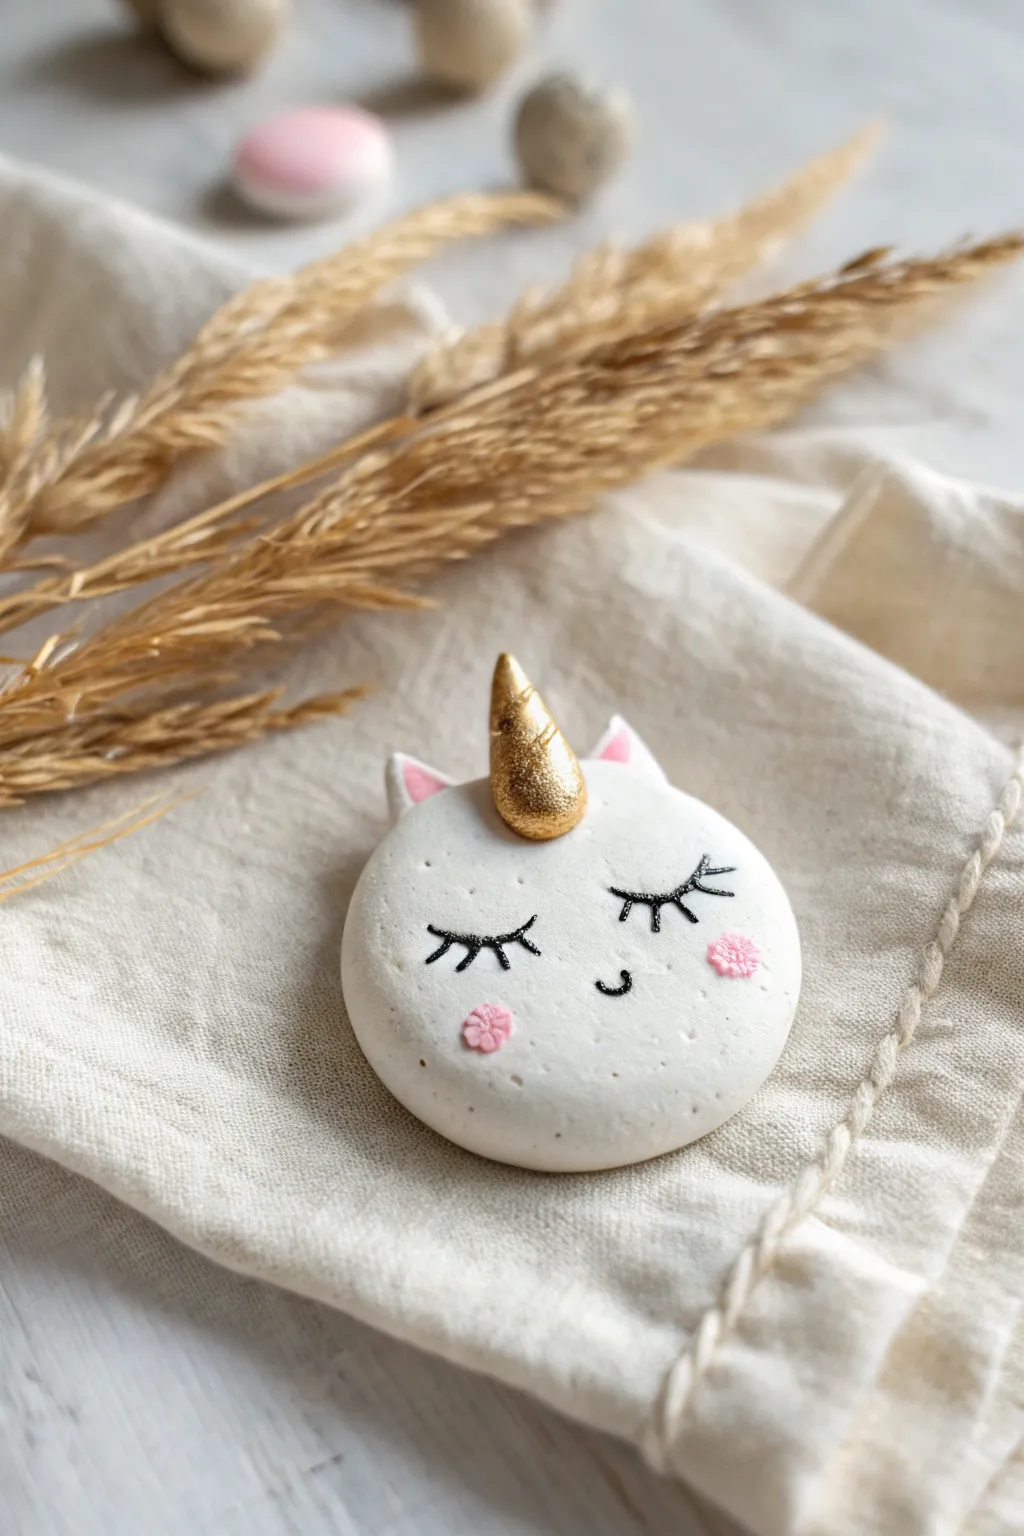
This adorable sleepy unicorn token works beautifully as a comforting pocket charm or a sweet decorative magnet. With its smooth white finish, golden twisted horn, and delicate painted details, it captures a sense of peaceful whimsy in a minimalist style.
Detailed Instructions
Materials
- White air dry clay
- Rolling pin
- Circle cookie cutter (approx. 2 inches)
- Small amount of water
- Clay modeling tools (or toothpick)
- Sandpaper (fine grit)
- Gold acrylic paint
- Black fine-point permanent marker or acrylic paint pen
- Pink acrylic paint
- Small fine-detail paintbrush
- Dotting tool or toothpick
- Matte varnish (optional)
Step 1: Sculpting the Base
-
Preparation:
Knead a chunk of white air dry clay until it is soft, pliable, and free of cracks. I find that warming it in my hands for a minute really helps prevent fissures later on. -
Roll out:
Roll the clay out on a smooth surface to an even thickness of about 1/4 inch (6mm). You want it substantial enough to be durable, but not too chunky. -
Cut the shape:
Using your circle cutter, press firmly into the clay to create a perfect round disc. Remove the excess clay and gently smooth the edges with a wet finger to round them off. -
Dry the base:
Set the circle aside on a flat surface to dry for about 30 minutes. It doesn’t need to serve fully yet, but firming up slightly makes attaching parts easier without deforming the circle.
Smooth Operator
To get that super smooth surface before drying, lightly brush the wet clay with a soft makeup brush dipped in water. It erases fingerprints like magic.
Step 2: Adding the Magical Details
-
Form the horn:
Take a tiny pea-sized ball of fresh clay and roll it into a tapered cone shape. -
Twist texture:
Using the edge of a credit card or a dull knife, gently press diagonal spiral lines around the cone to mimic a unicorn horn’s twist. -
Attach the horn:
Score the bottom of the horn and the top center of the clay circle. Dab a tiny bit of water on the scored areas and press the horn firmly into place. -
Create ears:
Roll two very small balls of clay and flatten them into triangles. Gently curve them slightly to give them a natural ear shape. -
Attach ears:
Attach the ears on either side of the horn using the same score-and-water method. Blend the base of the ears slightly into the back of the circle so they don’t pop off. -
Full dry:
Allow the entire piece to dry completely. This usually takes 24-48 hours depending on humidity. Flip it over halfway through the drying process to ensure the back dries evenly.
Step 3: Painting and Finishing
-
Sanding:
Once fully dry, gently sand any rough edges or fingerprints with fine-grit sandpaper for a professional, porcelain-like finish. -
Gilding:
Paint the horn carefully with metallic gold acrylic paint. You might need two coats for a solid, shiny coverage. -
Ear details:
Mix a tiny amount of pink paint with white (or use a light pastel pink) and paint small triangles inside the ears. -
Drawing the face:
Using a black fine-point marker or paint pen, draw two downward-curving arcs for the sleeping eyes. Make sure they are symmetrical. -
Lashes and smile:
Add three small lashes to each eye arc. Then, draw a tiny ‘u’ shape in the center for the smile. -
Rosy cheeks:
Dip a dotting tool or the glowing end of a paintbrush handle into pastel pink paint. Press gently onto the cheeks to create small flower-like splotches or simple dots. -
Sealing:
Protect your work with a coat of matte varnish, avoiding the gold horn if you want to keep its metallic sheen different from the face texture.
Magnet Magic
Glue a strong neodymium magnet to the back once dry to turn this into the cutest fridge magnet, or glue on a brooch pin to wear it on a jacket.
Now you have a serene little friend to keep you company and spark a bit of everyday magic
Unicorn Plant Pot Pick
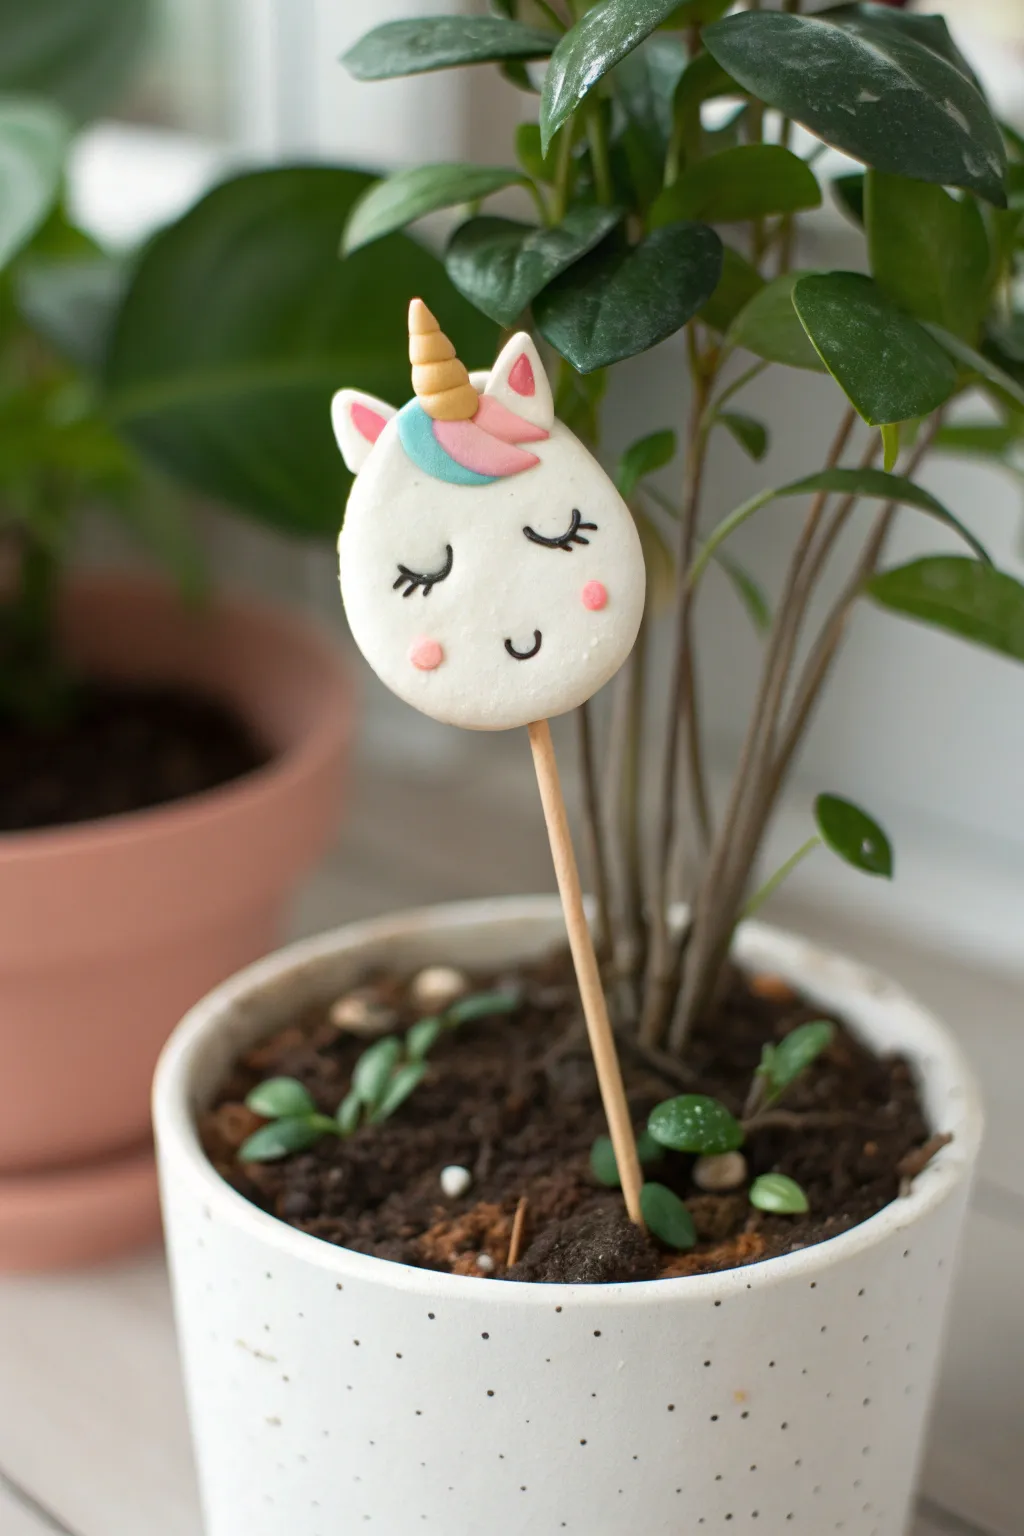
Add a sprinkle of magic to your indoor garden with this adorable unicorn plant pick. This simple air dry clay project features a sweet, sleeping unicorn face that perches perfectly amongst your potted greenery.
Step-by-Step Tutorial
Materials
- White air dry clay
- Pink air dry clay (or white clay + pink acrylic paint)
- Blue/teal air dry clay (or white clay + blue paint)
- Yellow/gold air dry clay (or gold paint)
- Black fine-line permanent marker or acrylic paint
- Wooden skewer or dowel
- Rolling pin
- Small round cutter (or a glass/jar)
- Ball tool or toothpick
- Craft glue or clear tacky glue
- Acrylic sealer (optional)
Step 1: Shaping the Base
-
Prepare the main clay:
Start by kneading a chunk of white air dry clay until it is smooth and pliable. If the clay feels too dry, add a tiny drop of water; if it’s too sticky, leave it exposed to air for a few minutes. -
Roll the slab:
Roll out the white clay to an even thickness of about 1/4 inch (6mm). You want it thick enough to hold the stick but not so heavy it droops. -
Cut the circle:
Use your round cutter or a small glass to cut out a perfect circle for the unicorn’s head. Smooth the edges gently with a wet finger to remove any rough cuts. -
Insert the stick:
Take your wooden skewer and carefully insert the pointed end into the bottom edge of the circle. Push it in about an inch, twisting gently so you don’t deform the circle shapes. Pinch the clay around the entry point to secure it.
Step 2: Adding Magical Details
-
Form the ears:
Pinch off two tiny pieces of white clay and roll them into small balls, then shape them into triangles. flatten them slightly. -
Add inner ear detail:
Take even tinier pieces of pink clay, create smaller triangles, and press them onto the white ear shapes. Glue these assembled ears to the top left and right of the head. -
Create the horn:
Roll a small piece of yellow or gold clay into a thin “snake” that is tapered at one end. Twist this tapered snake around itself to form a spiral horn shape. -
Attach the horn:
Apply a dab of glue to the bottom of the horn and place it centrally on the top of the head, right between the ears. I prefer to press down firmly to ensure a good bond as it dries. -
Design the mane:
Create the unicorn’s fringe by rolling a small teardrop of teal/blue clay and a slightly larger teardrop of pink clay. -
Attach the mane:
Swoop the pink teardrop across the forehead starting from the horn base, and layer the blue one slightly underneath or next to it for a colorful bangs effect. Glue them in place. -
Add rosy cheeks:
Roll two minuscule balls of pink clay and flatten them into discs. Press these onto the lower half of the face for cute blushing cheeks.
Loose Skewer?
If the stick wobbles inside the wet clay, remove it, dip the tip in craft glue, and reinsert it. Gently pinch the clay at the base again to tighten the seal.
Step 3: Finishing Touches
-
Let it dry completely:
Allow the project to dry flat for at least 24-48 hours. Turn it over halfway through if possible to ensure the back dries evenly. -
Draw the eyes:
Once hard and dry, use a fine black marker or a thin brush with black paint to draw two curved lines for sleeping eyes. Add three tiny lashes to the outer corner of each eye. -
Add the smile:
Draw a small, simple ‘u’ shape in the center lower face for a sweet little smile. -
Seal the piece:
To protect your unicorn from moisture in the plant pot, apply a coat of matte or satin acrylic sealer over the entire clay surface.
Make It Sparkle
Before the sealer dries, dust fine iridescent glitter over the white clay or the horn to give your unicorn an extra magical shimmer in the sunlight.
Now stick your new friend into a favorite houseplant and enjoy the cute company
Floral Crown Unicorn Cameo
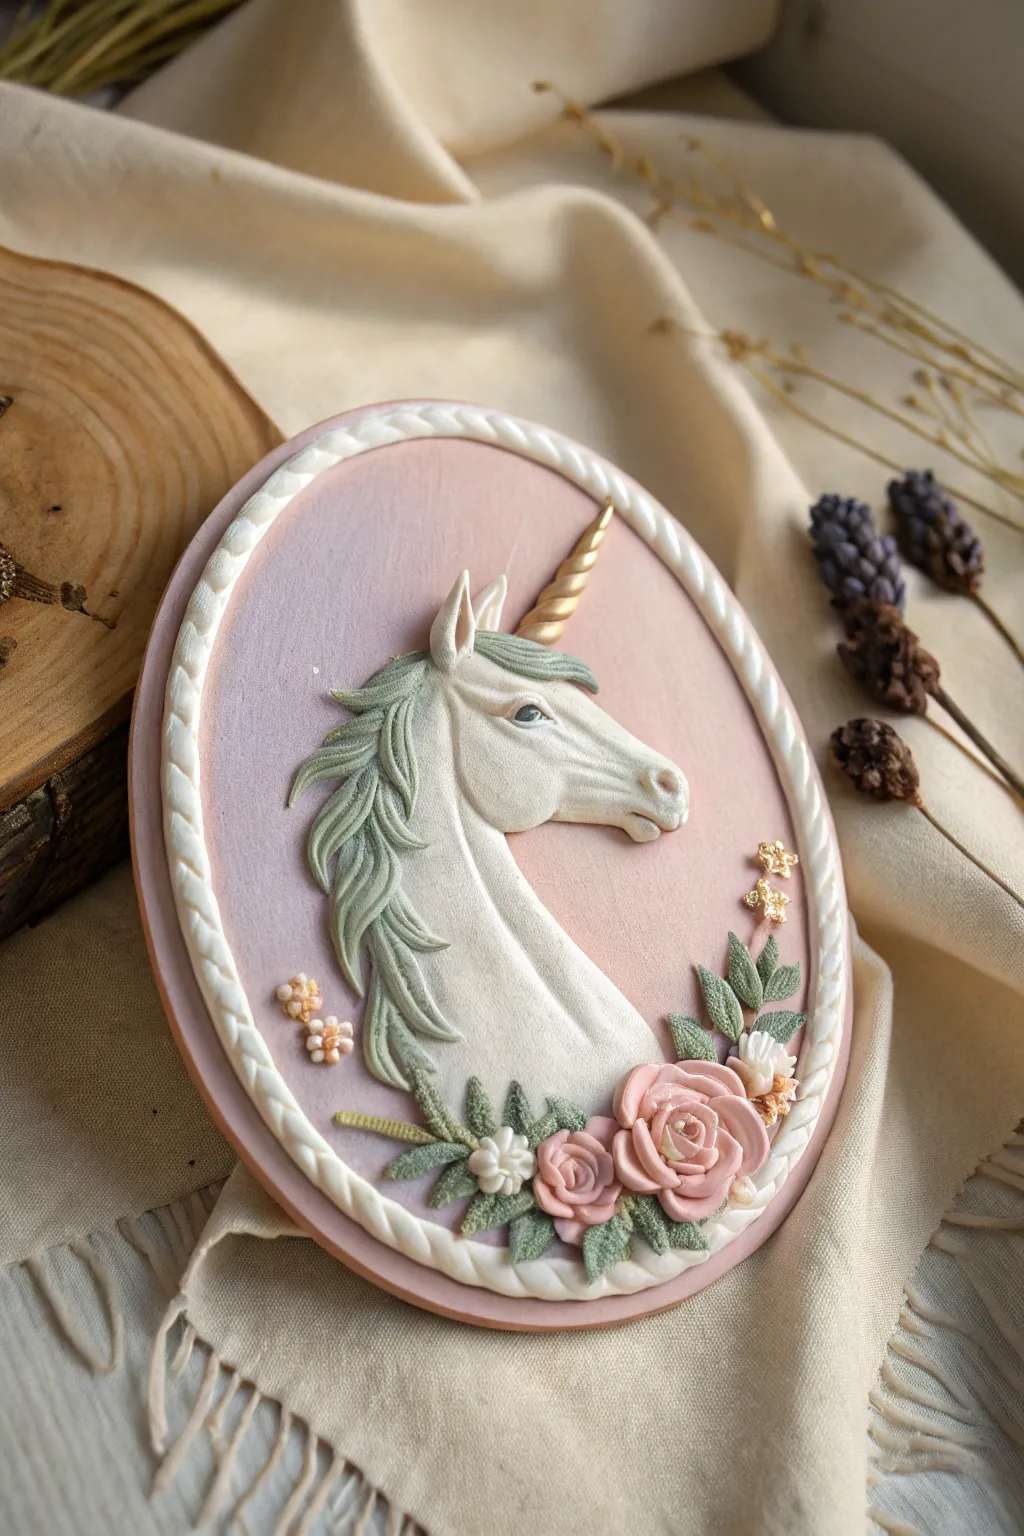
Capture the magic of a fairytale with this sophisticated unicorn cameo relief, featuring a sculpted profile set against a soft pink background. Framed by a twisted rope border and adorned with delicate roses, this piece looks like a vintage ceramic treasure but is crafted entirely from air dry clay.
Step-by-Step
Materials
- White air dry clay (preferably a smooth, fine-grain variety like cold porcelain or lightweight clay)
- Acrylic paints (pale pink, sage green, gold, white, darker pink)
- Sculpting tools (needle tool, ball tool, silicone shapers)
- Oval cutter or template (approx. 4-5 inches)
- Rolling pin
- PVA glue or clay slip
- Fine detail paintbrush
- Texture sponge or sandpaper (optional)
- Varnish (matte or satin)
Step 1: Base and Background
-
Prepare the Base:
Start by mixing a very small amount of pale pink acrylic paint into a ball of white clay until you have a uniform, blush-colored dough. Roll this out to about 1/4 inch thickness. -
Cut the Oval:
Use your oval cutter or a paper template with a craft knife to cut out the cameo shape. Smooth the edges with a little water on your finger to remove any jagged cuts. -
Create the Rope Border:
Roll two long, thin snakes of white clay. Twist them together gently to create a rope effect. Apply a thin line of PVA glue around the perimeter of your pink oval and press the twisted rope into place, trimming any excess.
Smooth Operator
Keep a small dish of water or baby oil nearby. Dip your sculpting tools or fingers in it lightly to smooth out fingerprints and join clay seams seamlessly.
Step 2: Sculpting the Unicorn
-
Shape the Head Profile:
Take a piece of white clay and shape it into a flattened teardrop. Place it centrally on the pink base. Press and mold it to form the unicorn’s neck and jawline, tapering towards where the nose will be. -
Refine Facial Features:
Use a silicone tool to define the cheekbone and eye socket. Add a small nostril indentation and a gentle line for the mouth. The sculpted relief should be elevated but smooth. -
Add the Eye:
Roll a tiny ball of clay for the eye, press it into the socket, and use a needle tool to add detail like eyelids. Adding a tiny spec of white highlight later helps it come alive. -
Create the Horn:
Roll a thin cone of white clay. Twist it gently to create the spiral texture characteristic of a unicorn horn. Attach it to the forehead with a dab of glue. -
Sculpt the Mane:
Mix a hint of sage green paint into white clay. Roll thin, tapered teardrops and layer them cascading down the neck. Use a needle tool to scratch fine hair lines into each lock for texture.
Step 3: Floral Details & Finishing
-
Make the Leaves:
Using a slightly darker green clay mix, form tiny diamond shapes. Press a needle tool into the center of each to create a vein and attach them at the base of the unicorn’s neck. -
Craft the Roses:
Mix varying shades of pink clay. Create the center by rolling a tiny flat strip into a spiral. Add tiny flattened petals around this center, curling the edges outward slightly for realism. -
Assemble the Bouquet:
Cluster three or four roses and a few smaller buds at the bottom of the cameo, nestled into the leaves. I find using a ball tool helps blend the flower bottoms onto the base. -
Add Small Blossoms:
Place tiny three-petaled flowers or small clay dots around the main bouquet and near the mane for extra whimsy. -
Painting Gold Accents:
Once the clay is dry creating a skin (or fully cured), use a fine brush to paint the horn with metallic gold paint. You can also touch the centers of the tiny filler flowers with gold. -
Dry and Varnish:
Allow the entire project to dry completely (24-48 hours depending on humidity). Finish with a coat of matte varnish to protect the clay while keeping a soft look.
Make it a Keepsake
Embed a small metal hook or a paperclip into the back of the wet clay oval base before starting. This transforms your cameo into a hangable wall ornament.
This charming relief sculpture brings a touch of mythical elegance to any room.
Unicorn Relief Tile Art
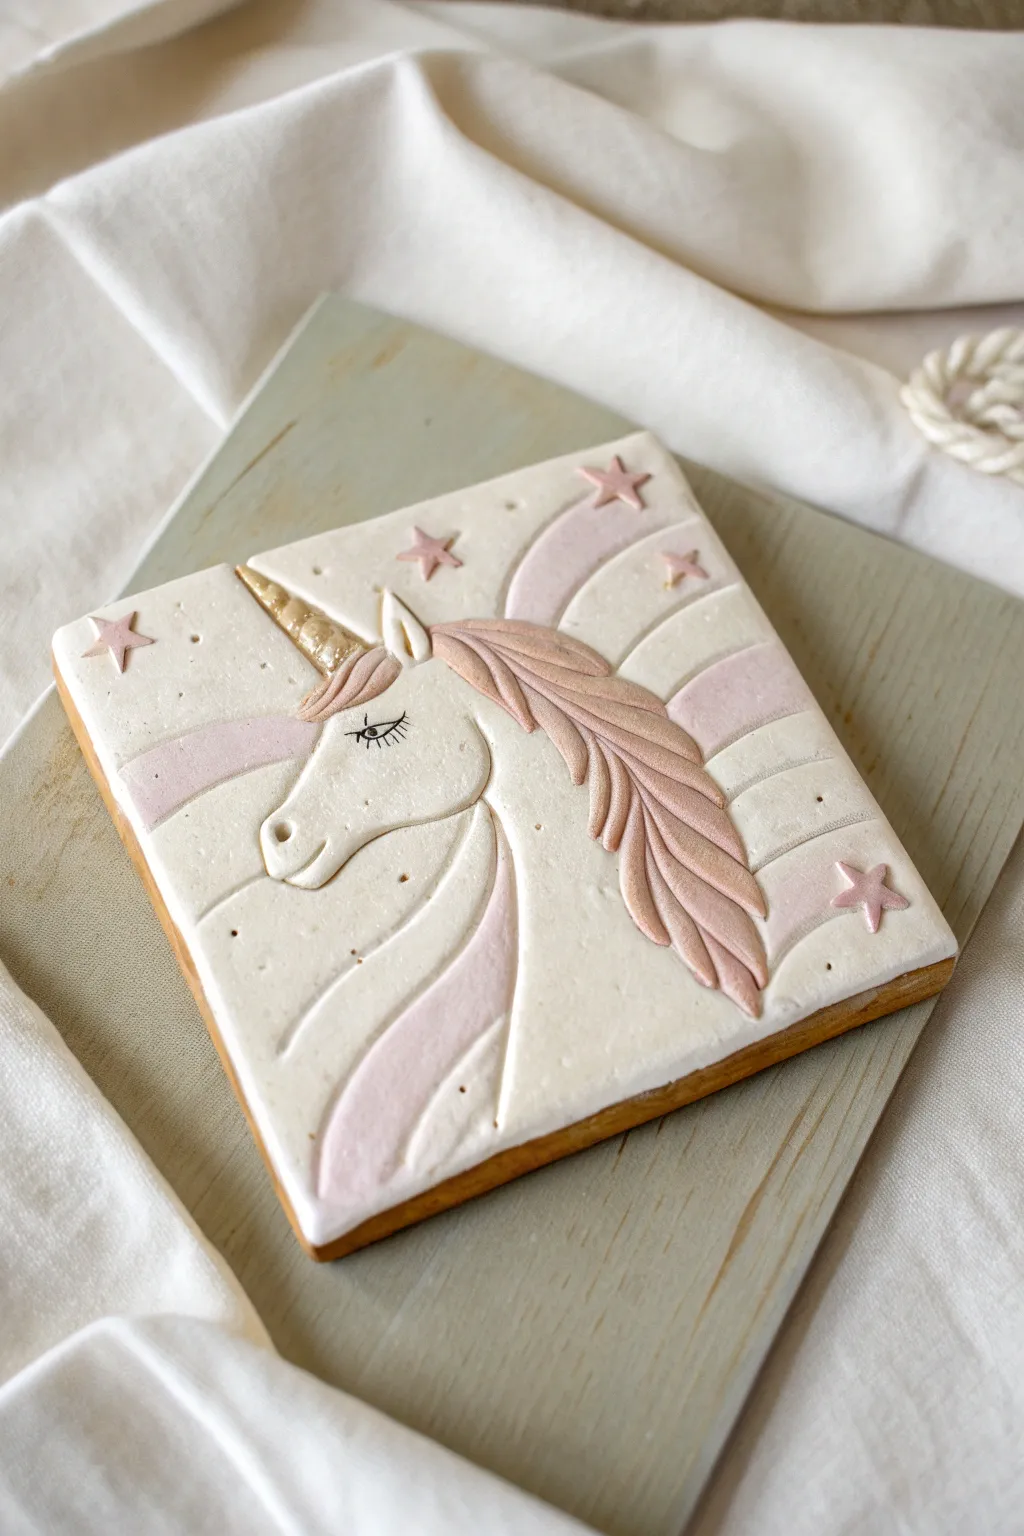
Capture the magic of a fairytale with this elegant unicorn relief tile, featuring soft pearlescent accents and a smooth, creamy finish. This project uses layering techniques to build a 3D effect that looks beautiful displayed on a shelf or wall.
Detailed Instructions
Materials
- White air dry clay (smooth, high quality)
- Square rolling pin guides or wooden slats (approx. 5-7mm thick)
- Acrylic rolling pin
- Square cookie cutter or craft knife
- Clay modeling tools (specifically a needle tool and a small spoon-shaped tool)
- Water in a small cup
- Soft paintbrush
- Acrylic paints (white, soft blush pink, metallic gold)
- Pearlescent medium or shimmer powder
- Fine-grit sandpaper
- Matte or satin varnish
Step 1: Creating the Base
-
Prepare the slab:
Condition your white air dry clay by kneading it until it is warm and pliable. Place it between your rolling pin guides or slats to ensure an even thickness. -
Roll and cut:
Roll the clay out into a smooth, flat slab. Using a large square cutter or a ruler and craft knife, cut out a perfect square base. Smooth the edges with a finger dipped in water. -
Sketch the outline:
Using a needle tool, very lightly lightly sketch the outline of the unicorn’s head, neck, and flowing mane directly onto the wet clay slab. This guide will be covered later, so don’t press too deep.
Smoother Surfaces
Keep a small dish of water nearby. Frequently dip your finger or a soft brush in it to smooth out fingerprints and join lines before the clay begins to set.
Step 2: Sculpting the Unicorn
-
Form the head shape:
Roll a flat piece of clay roughly the shape of the unicorn’s head and neck. Use a little water or slip (clay mixed with water) as glue, and press it onto your sketched outline. -
Smooth the seams:
Use a modeling tool to blend the edges of the added clay into the base tile so the transition looks seamless for the neck, but keep the jawline distinct and slightly raised. -
Add the muzzle details:
Gently indent the nostril area and use a tool to carve a soft mouth line. Add a small, flat tear-drop shape for the ear and blend the bottom edge onto the head. -
Create the horn:
Roll a thin tapered snake of clay for the horn. Twist it gently to create the spiral texture. Attach it to the forehead, ensuring it points diagonally upward. -
Sculpt the mane segments:
For the mane, roll several tapered teardrop shapes of varying sizes. Flatten them slightly and attach them one by one, overlapping them to create volume and flow. -
Texture the hair:
Using a needle tool or knife, carefully score long, flowing lines into the mane segments to simulate hair strands. Vary the depth of the lines for realism.
Make it an Ornament
Before the clay dries, use a straw to punch a clean hole in the top center of the square. Thread a silk ribbon through after painting for a beautiful hanging decoration.
Step 3: Background Details
-
Carve the rainbow:
Use a modeling tool to gently carve two wide, curving channels behind the unicorn’s head to represent rainbow stripes. I find smoothing these channels with a wet brush helps them look polished. -
Add celestial accents:
Cut or mold tiny five-pointed stars from spare clay. Attach two or three to the background using a dab of water. -
Punctuate the sky:
Use the tip of your needle tool to poke tiny, shallow dots sporadically across the background for a sparkling stardust effect. -
Dry thoroughly:
Place the tile on a wire rack or mesh screen to dry. This may take 24-48 hours depending on thickness. Flip it occasionally to prevent warping.
Step 4: Painting and Finishing
-
Sand imperfections:
Once fully dry, use fine-grit sandpaper to gently smooth any rough edges on the square border or the unicorn’s face. -
Base coat:
Paint the entire piece with a coat of creamy white acrylic if your clay isn’t naturally white enough, or just seal it with a clear matte sealer first. -
Apply blush tones:
Mix a soft blush pink acrylic paint. Carefully paint the mane segments, the carved rainbow stripes, and the tiny stars. A diluted wash works best for a soft look. -
Gild the horn:
Using a fine detail brush, paint the spiraled horn with metallic gold acrylic paint. -
Detail the eye:
With an ultra-fine black marker or liner brush, draw the closed eyelid with long, sweeping eyelashes. -
Add shimmer:
Brush a pearlescent medium or shimmer powder over the pink mane and rainbow sections to give it that magical glow seen in the photo. -
Final seal:
Protect your work with a coat of satin or matte varnish to preserve the delicate paint job.
Display your enchanting creation on a small easel or frame it in a shadow box to add a touch of whimsy to any room
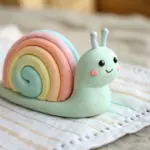
Unicorn “Cloud Bed” Figurine
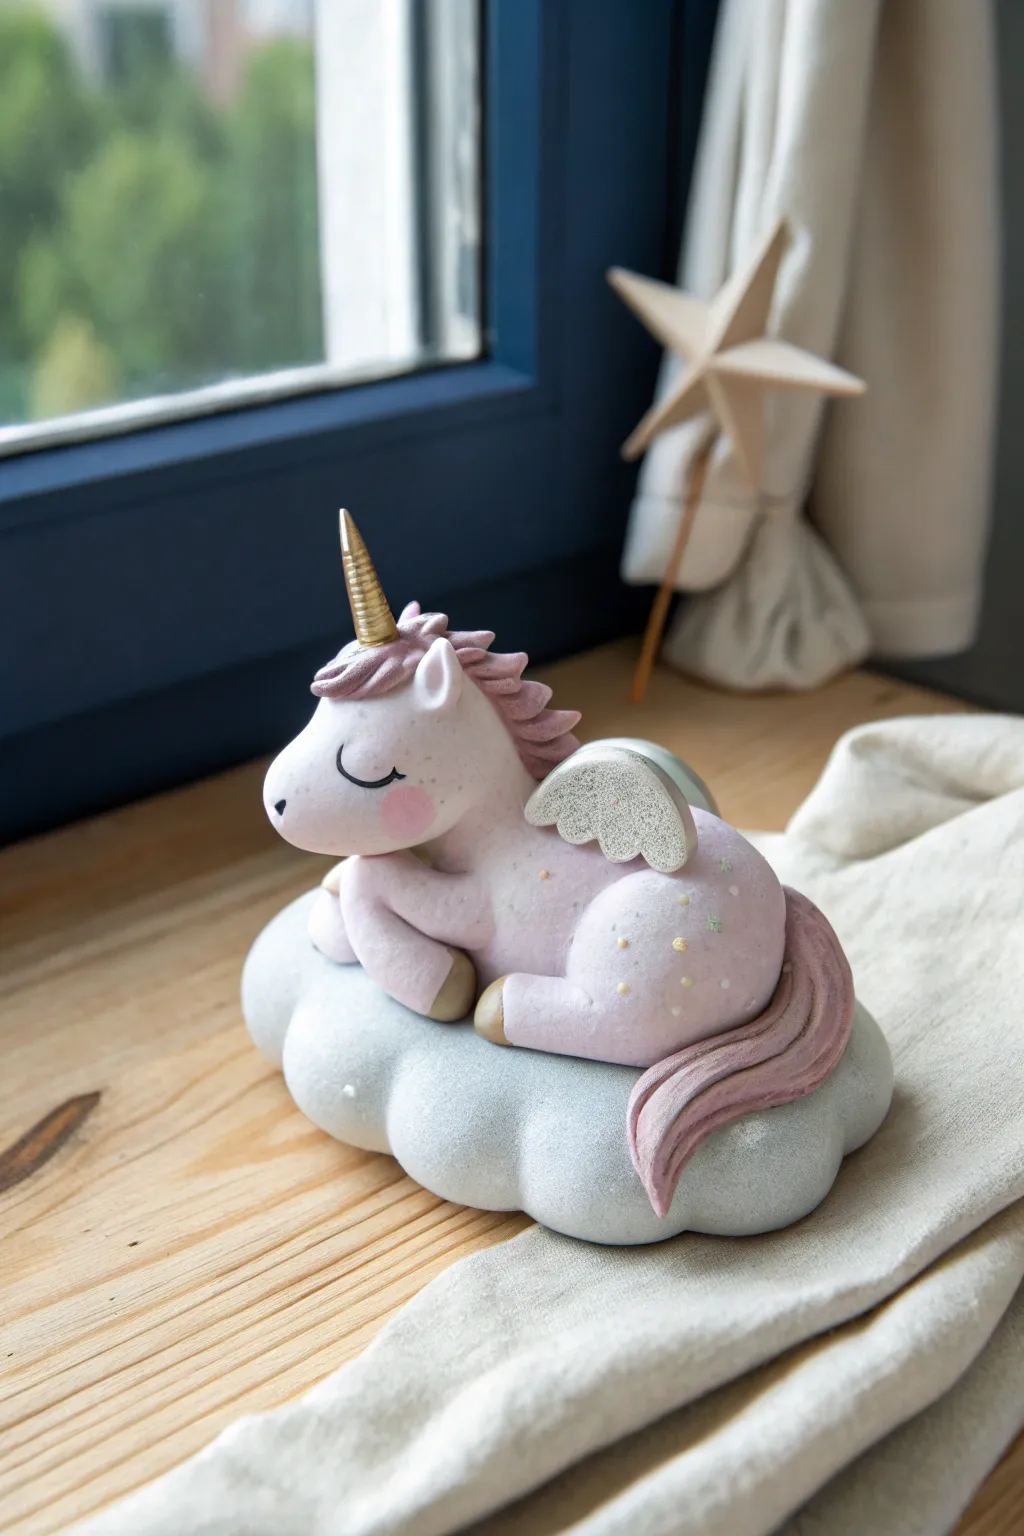
This whimsical figurine features a peaceful unicorn napping atop a fluffy grey cloud, complete with shimmering wings and a golden horn. It creates a serene piece of décor perfect for a bookshelf or nightstand.
Step-by-Step Tutorial
Materials
- White air dry clay
- Acrylic paints (pastel pink, soft grey, gold, black, pearl white)
- Clay sculpting tools (ball tool, needle tool, smoothing tool)
- Small rolling pin
- Water in a small cup
- Fine detail paintbrush
- Varnish or gloss glaze (optional)
- Glitter or iridescent powder
Step 1: Sculpting the Cloud Base
-
Mix the Cloud Color:
Start by mixing a very small amount of black or grey acrylic paint into a fist-sized ball of white clay. Knead it thoroughly until you achieve a consistent, soft grey marble tone. -
Shape the Base:
Flatten the ball slightly into an oblong, pillowing shape. This doesn’t need to be perfectly symmetrical, as organic shapes look fluffier. -
Create the Texture:
Use your thumbs or a large ball tool to press indentations around the edges of the shape to simulate puffy cumulus cloud formations. Smooth the transitions with a little water on your finger.
Smooth Operator
Keep a small dish of water and a designated ‘smoothing brush’ handy. Brushing water over seams creates an invisible join.
Step 2: Forming the Unicorn Body
-
Tint the Clay Pink:
Take a new portion of white clay and mix in a drop of pink paint to create a soft, pastel strawberry shade. -
Shape the Torso:
Roll a smooth, kidney-bean-shaped piece of pink clay. This will form the main body of the unicorn lying down. -
Attach to Cloud:
Score the bottom of the unicorn body and the top of the cloud base using a needle tool. Add a dab of water or clay slip, then press the body gently onto the center of the cloud. -
Mold the Head:
Roll a smaller ball of pink clay into a teardrop shape for the head. Flatten the wider end slightly for the snout. -
Connect the Head:
Attach the head to the higher end of the body bean shape, smoothing the neck seam carefully with a modeling tool so it looks like one continuous piece. -
Add Legs:
Roll four small sausages of clay. Bend them gently to look like tucked-in legs. Attach them to the sides of the body, blending the upper seams while leaving the ‘hoof’ ends distinct.
Step 3: Adding Magical Details
-
Sculpt the Mane and Tail:
Mix a slightly darker shade of mauve-pink clay. Roll tapered snakes of clay and layer them behind the ears for the mane and sweeping down the cloud for the tail. -
Detail the Hair:
Use a needle tool or knife tool to gently press lines into the mane and tail to mimic hair texture. -
Form the Wings:
Flatten two small pieces of white clay into teardrop shapes. Press a scalloped pattern into them to represent feathers. I usually let these stiffen for 10 minutes before attaching to the back. -
Make the Horn:
Roll a tiny snake of clay into a cone. Twist it gently to create a spiral texture, then attach it to the center of the forehead. -
Add Ears:
Pinch two tiny triangles of pink clay. Hollow out the centers slightly with a small ball tool and attach them on either side of the mane.
Texture Twist
For a fluffier cloud look, gently dab the wet grey clay with a crumpled ball of aluminum foil before it dries.
Step 4: Painting and Finishing
-
Paint the Hooves and Horn:
Once the clay is dry to the touch, paint the very tips of the hooves and the spiral horn with metallic gold paint. -
Draw the Face:
Use a very fine brush or a black fine-liner pen to draw two closed, curved eyelids with eyelashes for a sleeping expression. Use diluted pink paint to blush the cheeks. -
Add Sparkle:
Brush a light coat of pearl white paint or iridescent powder over the wings and the spots on the unicorn’s flank. -
Add Stars:
Using a toothpick, dot tiny gold or white stars onto the unicorn’s rear flank for a celestial touch.
Allow your magical friend to dry completely for 24-48 hours before displaying it in your favorite spot
Unicorn Geode Horn Decor
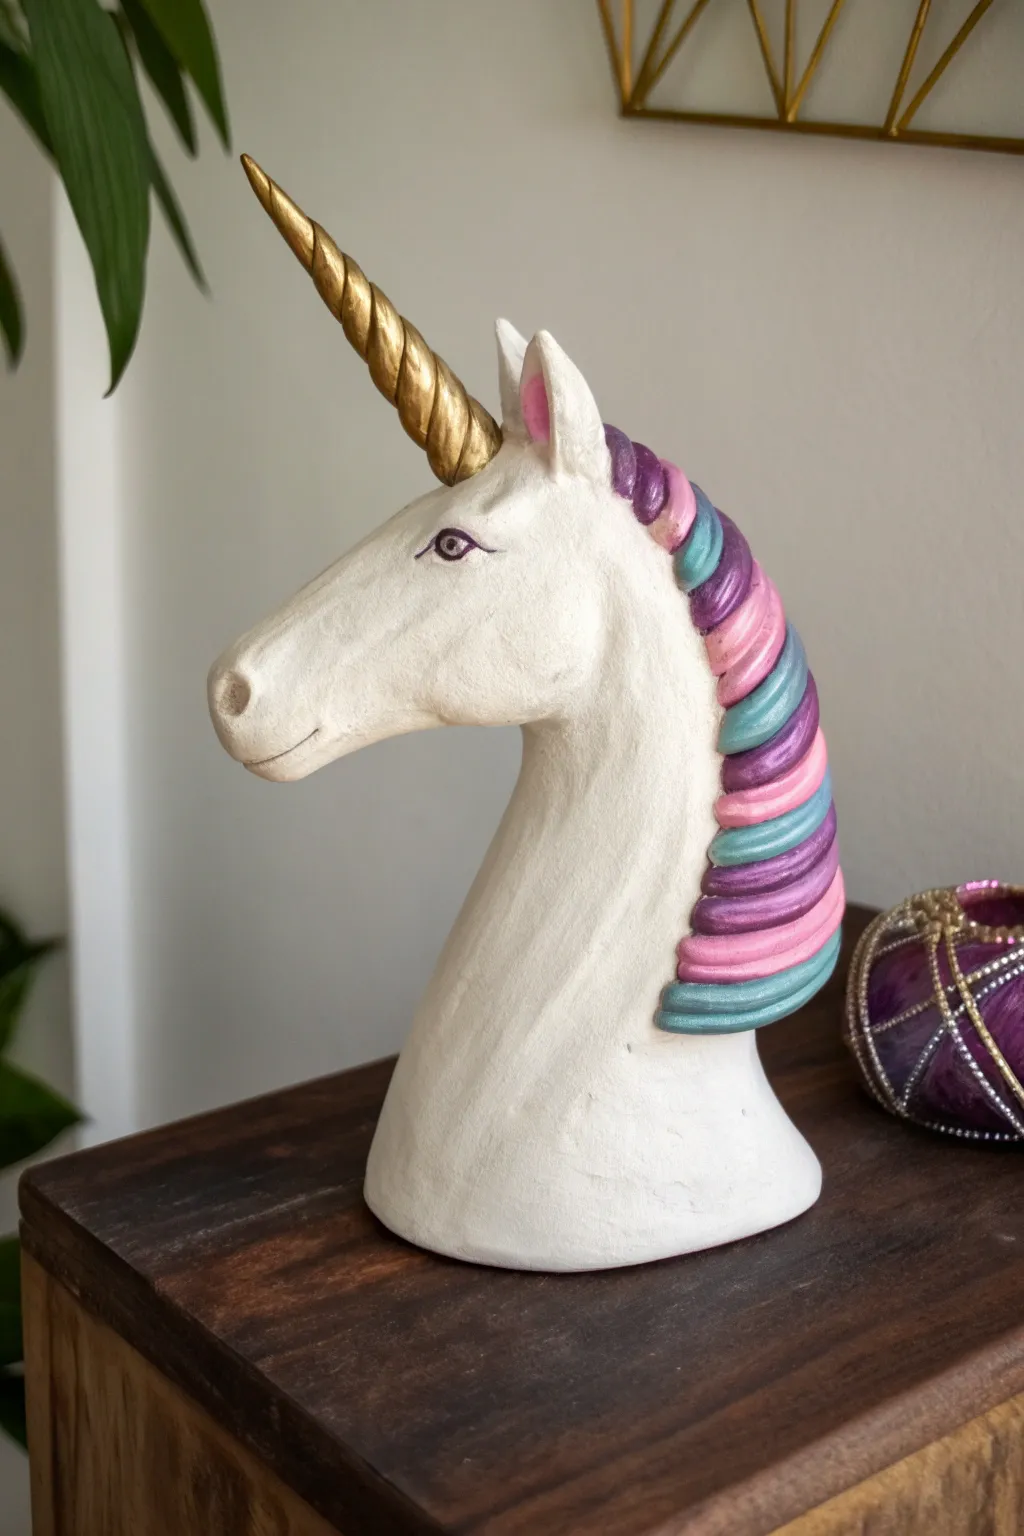
Transform simple air dry clay into a majestic unicorn bust that adds a touch of fantasy to any shelf. The combination of a stark white finish with metallic gold and soft candy-colored mane creates a modern yet magical aesthetic.
How-To Guide
Materials
- Air dry clay (white)
- Aluminum foil
- Masking tape
- Armature wire or a wooden dowel
- Sculpting tools (needle tool, smoother)
- Acrylic paints (White, Gold, Purple, Pink, Teal/Mint)
- Small and medium paintbrushes
- Fine-grit sandpaper
- Cup of water
Step 1: Building the Armature
-
Creating the core:
Crumple aluminum foil into the basic shape of a horse’s head and neck. The base should be wide enough to support the weight. Create a long cone shape for the horn using tightly packed foil. -
Secure the structure:
If you need extra stability for the neck, insert a wooden dowel or heavy gauge wire through the center of the foil neck and into the head. Wrap the entire foil form tightly with masking tape to create a smooth surface for the clay to grip. -
Attach the horn base:
Fix the foil horn to the forehead using masking tape, ensuring it’s centered and angled correctly. You can reinforce this joint with a bit of wire if it feels wobbly.
Cracking Clay?
If small cracks appear as the clay dries, don’t panic. Mix a small amount of fresh clay with water to make a paste (slip) and fill the cracks, then smooth over.
Step 2: Sculpting the Form
-
Apply base layer:
Roll out a sheet of air dry clay about 1/4 inch thick. Drape it over your foil armature, pressing firmly to adhere it to the tape. Smooth out any seams with a little water on your finger. -
Refine the face:
Add small amounts of clay to build up the cheeks, muzzle, and brow bone. Use your thumbs to define the eye sockets and shape the nostrils. I like to keep a reference photo of a horse nearby to check proportions. -
Detail the ears:
Form two small triangles of clay for the ears. Attach them to the top of the head using the score-and-slip method (scratching both surfaces and adding water). Smooth the connection points so they look seamless. -
Create the horn:
Cover the foil horn with a thin layer of clay. To create the spiral effect, roll a long, thin snake of clay and wrap it gently around the horn from base to tip, blending the edges slightly so it looks like a natural ridge. -
Sculpt the mane:
Roll several thick sausages of clay for the mane. Lay them down the back of the neck in a cascading pattern, curving the ends slightly. Use a sculpting tool to impress grooves into the clay to simulate hair texture. -
Refine and dry:
Do a final once-over with a slightly damp sponge to remove fingerprints. Let the sculpture dry completely in a safe place away from direct heat; this usually takes 24-48 hours depending to the thickness.
Add Sparkle
While the paint on the mane is still wet, sprinkle ultra-fine iridescent glitter on the ridges. It will catch the light and make the sculpture look enchanted.
Step 3: Painting and Finishing
-
Sand imperfections:
Once fully dry, use fine-grit sandpaper to gently smooth out any rough patches, especially around the jawline and neck base. Wipe away the dust with a dry cloth. -
Base coat:
Paint the entire sculpture with two coats of white acrylic paint to create a uniform, matte canvas. Let the first coat dry fully before applying the second. -
Gild the horn:
Using a small brush, carefully paint the spiral horn with metallic gold acrylic paint. Take your time to get into the grooves of the spiral without getting gold on the white forehead. -
Paint the mane:
Select your pastel colors (purple, pink, and teal). Paint distinct sections of the mane, alternating colors to create a striped candy effect. You may need two coats for vibrancy. -
Eye details:
With a very fine detail brush, paint the eye shape. Use black for outline and pupil, and add a tiny white dot as a highlight to bring the unicorn to life. Paint the inner ear a soft pink. -
Metallic accents:
For a magical finish, lightly dry-brush a tiny amount of metallic sheen over the colored mane sections to make them shimmer.
Place your finished masterpiece on a bookshelf or mantel where it can add a serene, magical presence to the room
Unicorn Wind Chime Charms
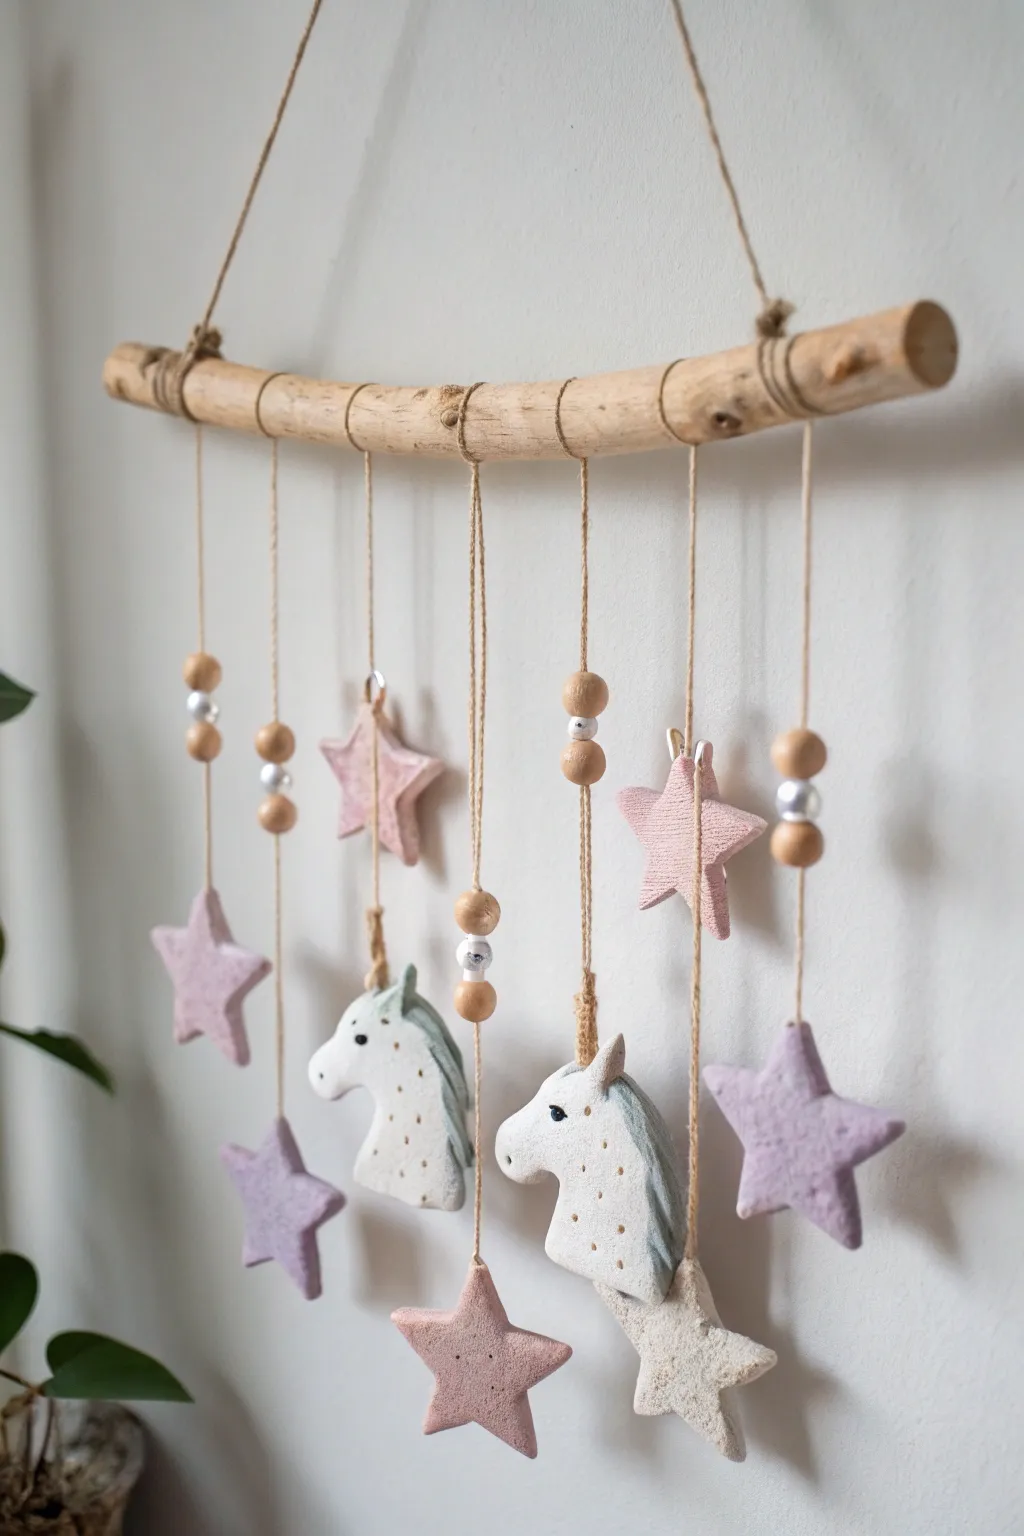
This enchanting wall mobile combines rustic charm with delicate clay artistry, featuring sweet unicorn profiles and pastel stars suspended from a natural branch. It makes for a perfect nursery decoration or a magical addition to any fantasy-lover’s corner.
Step-by-Step Guide
Materials
- White polymer clay or air dry clay (smooth, fine texture)
- Small branch or driftwood (approx. 12-15 inches)
- Natural jute twine
- Unfinished wooden beads (round)
- White or pearl craft beads
- Rolling pin
- Star-shaped cookie cutters (small and medium)
- Paring knife or clay carving tools
- Acrylic paints (pastel pink, lavender, pale blue/grey, black)
- Small detail paintbrushes
- Toothpick or needle tool
- Sandpaper (fine grit)
- Matte varnish (optional)
Step 1: Sculpting the Clay Elements
-
Prepare the dough:
Begin by conditioning your clay until it is soft and pliable. Roll it out on a smooth, non-stick surface to a consistent thickness of about 1/4 inch (6mm). Using guide sticks on either side of your roller can ensure an even surface. -
Cut the stars:
Use your cookie cutters to punch out several star shapes. You will need roughly 5-7 stars in varying sizes to match the fullness of the original design. Smooth the edges of each star with a damp finger to remove any ragged burrs. -
Shape the unicorns:
For the unicorn heads, you can either create a paper template first or freehand the shape. Cut out a simple horse profile with a distinct snout and neck. Gently press a small cone of clay onto the forehead to create the horn, blending the seams so it’s securely attached. -
Add mane details:
Roll a thin snake of clay and flatten it slightly. Attach this along the back of the neck to form the mane. Use your needle tool to etch deep, flowing lines into the mane to suggest hair texture. I find carving slightly deeper lines looks better once painted. -
Create hanging holes:
Before the clay begins to dry, use a toothpick or straw to poke a hole through the top of every star and unicorn piece. Make sure the hole is wide enough for your jute twine to pass through easily. -
Dry and refine:
Let all pieces dry completely according to your clay’s package instructions. This usually takes 24-48 hours for air dry clay. Once solid, lightly sand any rough edges with fine-grit sandpaper for a polished look.
Smoother Surfaces
Use a slightly damp finger or a wet paintbrush to smooth out fingerprints and cracks on raw clay before drying. This saves tons of sanding time later.
Step 2: Painting and Finishing
-
Base colors:
Paint the stars in soft pastel shades—alternate between pale pink and lavender. For the unicorns, keep the face white or a very pale cream, and paint the mane a soft grey-blue or mint green. Let the base coats dry fully. -
Add delicate details:
Use a fine liner brush to paint a small, curved eye with lashes on each unicorn. Add small dots or gold accents to the cheeks and neck area for a magical sparkle effect. Paint the horns in a contrasting pastel shade or metallic gold. -
Seal (optional):
To protect your work, apply a coat of matte varnish. This seals the paint and gives the clay a lovely, finished texture.
Step 3: Assembly
-
Prepare the branch:
Tie a long piece of jute twine to both ends of your wooden branch to create the main hanger. Secure the knots tightly, perhaps adding a dab of glue for extra security. -
Cut suspension strings:
Cut 5-7 lengths of jute twine, varying them slightly in length (between 10 to 18 inches) to create a tiered visual effect when hanging. -
String the beads:
On each string, thread a combination of wooden beads and pearl beads. I like to place a few beads about halfway down the string, securing them in place with a knot underneath so they float above the clay charm. -
Attach the charms:
Thread the bottom of each twine length through the hole in your clay stars and unicorns. Tie a secure double knot at the top of the charm to hold it suspended. -
Tie to the branch:
Tie each completed strand onto the branch, spacing them evenly. Arrange them so the central strands hang slightly lower or higher depending on your preference, creating a balanced silhouette. -
Trim excess:
Trim any excess twine from your knots for a clean finish. Adjust the spacing of the strings along the branch until the composition looks perfect.
Celestial Sparkle
Mix a tiny amount of glitter into your varnish or apply metallic gold leaf to the unicorn horns and star tips for an extra touch of magic.
Now hang your beautiful creation near a window or above a bed to enjoy the gentle movement of your handmade art