
When I’m craving a fresh studio session, I reach for ceramic clay and start with shapes that feel doable right away. These ceramic clay art ideas stick to simple handbuilding so you can make pieces that are both useful and a little magical.
Three Handbuilt Bowls
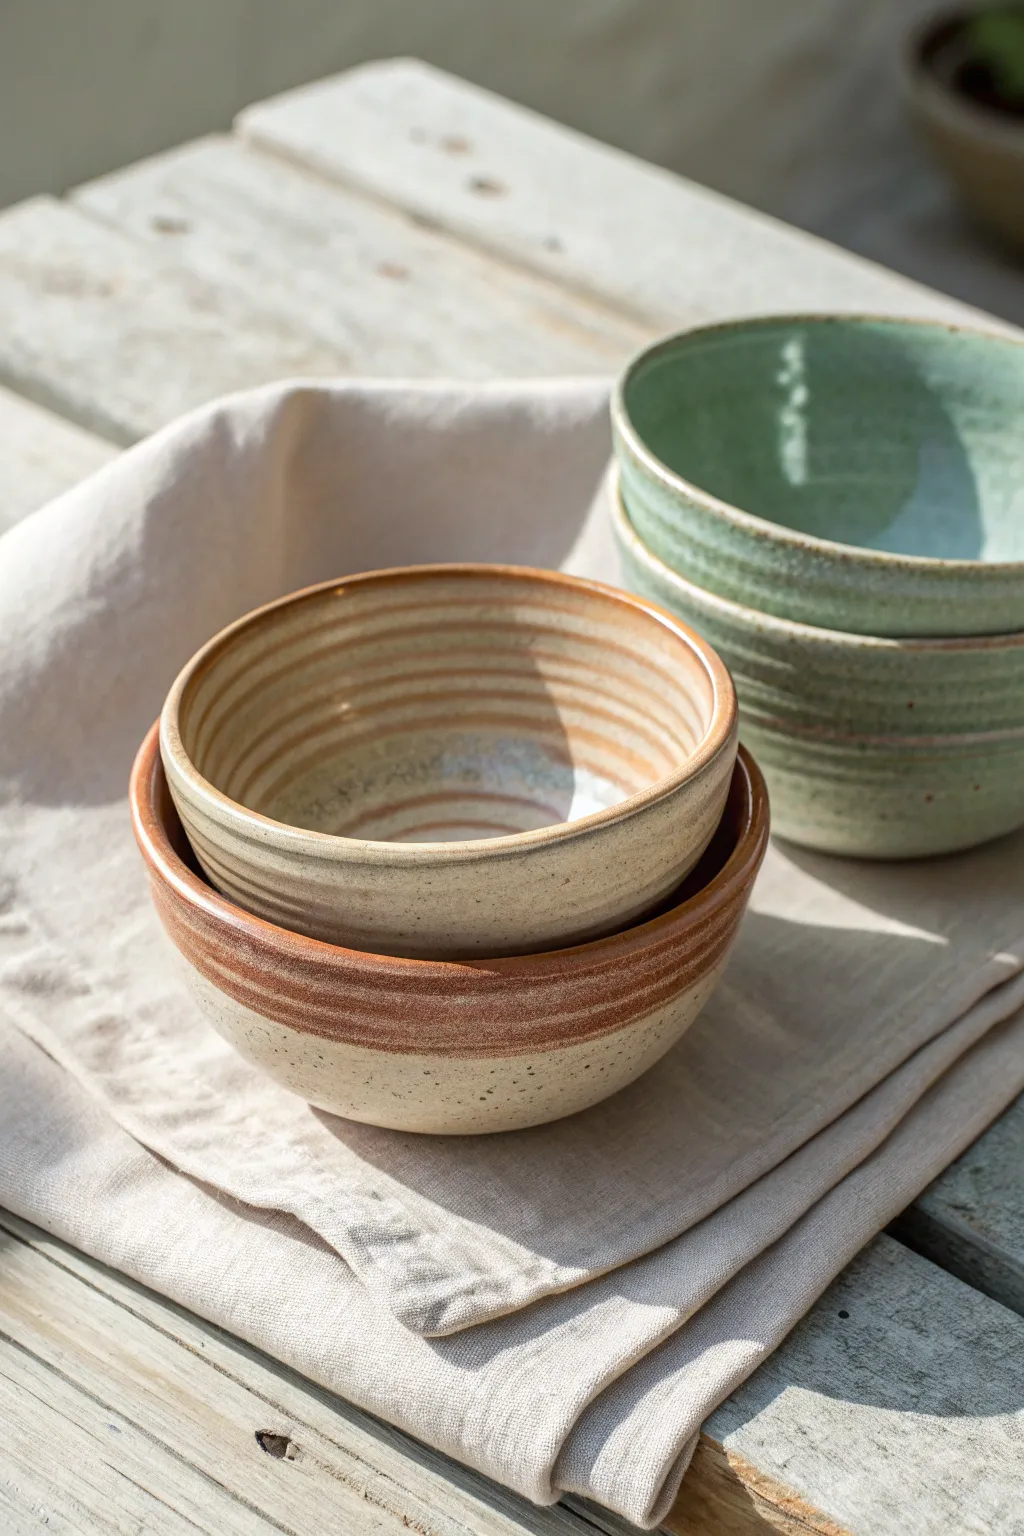
These charming, rustic bowls feature distinct ribbed textures and a warm, speckled finish that highlights the beauty of raw clay. Whether nested together or standing alone, their earthy tones and simple forms bring a touch of handcrafted serenity to any table.
Step-by-Step Guide
Materials
- Speckled stoneware clay (mid-fire)
- Pottery wheel (or banding wheel for hand-building)
- Rib tool (wooden or silicone)
- Wire cutter
- Sponge
- Loop tool for trimming
- Clear matte glaze
- Iron oxide wash or rust-colored glaze
- Seafoam green glaze
Step 1: Forming the Bowl Shape
-
Prepare the Clay:
Begin by wedging about 1.5 lbs of speckled stoneware clay to remove air bubbles. This ensures your bowls will be sturdy and crack-free during firing. -
Center and Open:
Center the clay on your wheel head. Open the mound to create the floor of the bowl, keeping it slightly curved rather than perfectly flat for a more organic feel. -
Pull the Walls:
Gently pull up the walls of the bowl. Aim for a distinct V-shape that flares outward, rather than a steep cylinder. Keep the rim slightly thicker than the walls for durability. -
Create the Ribbed Texture:
This is the signature look of these bowls. While spinning the wheel slowly, press distinct ridges into the exterior and interior walls using your fingers or the edge of a wooden rib tool. Don’t smooth them out; let the grooves remain visible. -
Refine the Rim:
Compress the rim using a chamois or a wet sponge. I like to leave it slightly rounded to echo the softness of the overall form. -
Wire Off:
Run a wire cutter underneath the bowl to separate it from the wheel head. Carefully slide it onto a ware board. -
Repeat for the Set:
Repeat this process two more times to create a trio. Try to make them similar in diameter if you want them to nest, or vary the heights slightly for visual interest.
Warped Rims?
If your rims warp during drying, ensure you compress the rim well after throwing. Wait until the clay is stiffer before trimming.
Step 2: Trimming and Drying
-
Wait for Leather Hard:
Allow the bowls to dry until they reach the leather-hard stage. They should be firm enough to hold their shape when handled but still cool to the touch. -
Center for Trimming:
Invert one bowl onto the wheel head and secure it with small coils of clay. -
Define the Foot:
Using a sharp loop tool, trim away excess clay from the bottom. Carve a distinct foot ring that elevates the bowl slightly, creating a shadow line at the base. -
Bisque Fire:
Once fully bone dry, load the bowls into the kiln for a bisque firing (typically Cone 04). This hardens the clay and prepares it for glazing.
Step 3: Glazing and Final Fire
-
Wax the Foot:
Apply wax resist to the bottom foot ring and the very bottom edge of the bowl to prevent glaze from sticking to the kiln shelf. -
Glaze the Interiors:
For the beige bowls, pour a clear matte glaze inside, swirl to coat, and pour out the excess. For the green bowl, use the seafoam glaze on the interior. -
Dip the Green Bowl:
Dip the exterior of the green bowl into the seafoam glaze. The glaze will break beautifully over the ribbed texture you created earlier. -
Glaze the Beige Bowls:
Dip the beige bowls into the clear matte glaze. The speckles in the clay body will show through, creating that lovely rustic effect. -
Apply the Oxide Rim:
For the specific look in the photo, brush a band of iron oxide wash or a rust-colored glaze along the upper exterior rim of the beige bowls. Let it drip slightly or vary the thickness for a natural look. -
Wipe Back:
If the glaze looks too thick in the ribbed grooves, gently wipe the raised areas with a damp sponge. This technique highlights the texture even more. -
Final Firing:
Fire the bowls to the maturity temperature of your clay and glaze combination (likely Cone 5 or 6). Let the kiln cool completely before unloading.
Make It Pop
Use a darker clay body or slip for one bowl to create high contrast. The lighter glaze will appear totally different on dark clay.
Now you have a stunning set of functional art ready for your next meal.


Slab-Built Leaf Dishes
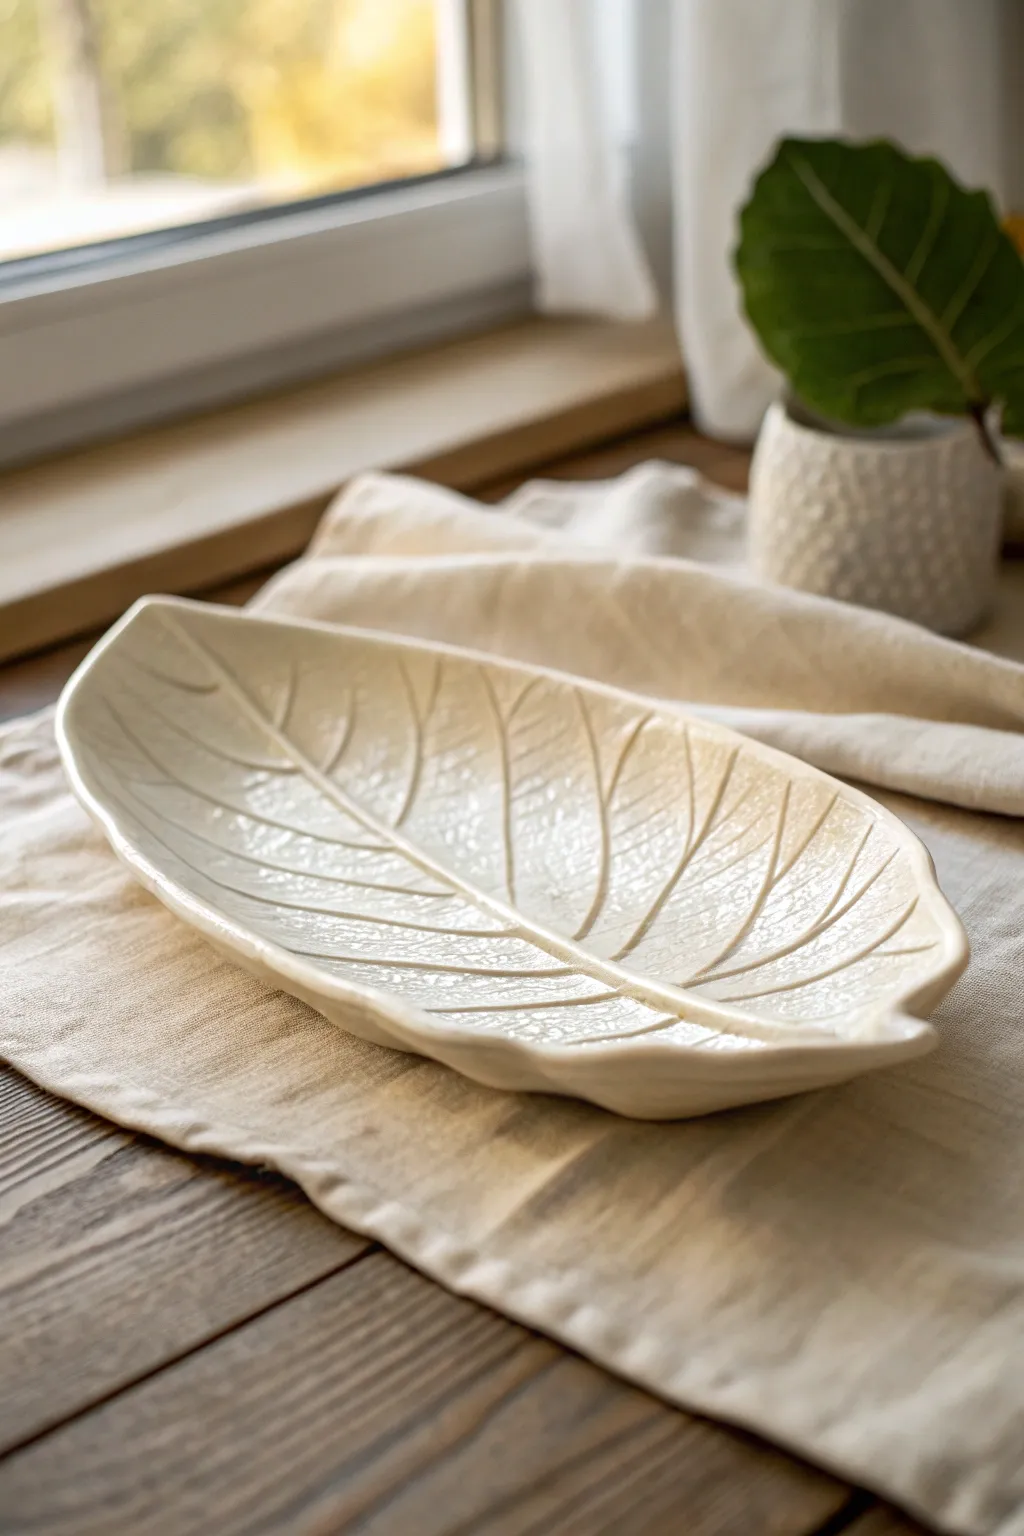
Capture the delicate beauty of nature with this refined leaf dish project, perfect for holding jewelry or serving treats. Using simple slab-building techniques, you will impress varying vein textures into smooth clay to create a functional piece of art with a glossy, creamy glaze finish.
How-To Guide
Materials
- White stoneware or porcelain clay body
- Rolling pin
- Two wooden guide slats (approx. 1/4 inch thick)
- Large, fresh leaf with prominent veins (e.g., Hosta, Hydrangea, or Fiddle Leaf Fig)
- Needle tool or fettling knife
- Pottery sponge
- Soft rib tool (rubber or silicone)
- Canvas or slab mat for rolling
- Shallow bowl or curved plaster mold for shaping
- Modelling tool with a rounded tip
- Creamy white or off-white glossy glaze
- Kiln access
Step 1: Preparing the Slab
-
Wedge the clay:
Begin by thoroughly wedging your white stoneware or porcelain clay to remove air bubbles and ensure a consistent texture. A smooth clay body is essential for capturing the fine details of the leaf veins later on. -
Set up your workspace:
Lay down your canvas or slab mat. Place your wooden guide slats on either side of the clay ball to ensure an even thickness when rolling. -
Roll the slab:
Using your rolling pin, roll the clay out into a smooth, even slab about 1/4 inch thick. Make sure the slab is wide enough to accommodate your chosen leaf with a bit of a border. -
Compress the surface:
Take your soft rubber rib and gently drag it across the surface of the clay in multiple directions. This compression aligns the clay particles, preventing warping during firing and creating a flawless canvas for your texture.
Natural Texture Hack
If you don’t have a fresh leaf, use a textured rolling pin or create veins manually by dragging a loop tool through the clay, then softening the harsh lines with a damp sponge.
Step 2: Creating the Texture & Shape
-
Position the leaf:
Place your fresh leaf vein-side down onto the clay slab. The underside of the leaf usually has the most prominent veins, which yields the best impression. -
Roll over the leaf:
Gently roll your rolling pin over the leaf once or twice to press it firmly into the clay. Be firm enough to catch the details, but careful not to thin the clay drastically. -
Cut the outline:
Using a needle tool or fettling knife, carefully trace around the edge of the leaf. Hold the tool vertically to ensure a clean, sharp edge relative to the table surface. -
Peel and reveal:
Start at the stem end and slowly peel the leaf away from the clay to reveal the beautiful network of veins impressed into the surface. -
Refine the edges:
Dip your finger or a small sponge in a little water and smooth the cut edges of the clay leaf. Softening these sharp angles now prevents chipping later and gives the piece a professional finish. -
Enhance the central vein:
If the central vein isn’t distinct enough, I sometimes use a rounded modelling tool to gently deepen that primary line, giving the piece more visual depth. -
Form the curve:
Carefully lift your clay leaf and drape it into a shallow bowl or over a curved mold. Press gently so the clay takes on a concave, dish-like shape. -
Add movement:
While the clay is in the mold, gently manipulate the edges to create slight waves or undulations, mimicking the organic flow of a natural leaf.
Warping Woes?
If your leaf curls up too much while drying, try placing a small, lightweight bag of sand or rice gently in the center to weigh it down until it reaches the leather-hard stage.
Step 3: Drying, Glazing & Firing
-
Slow drying:
Allow the dish to dry slowly to the leather-hard stage while still in the mold to maintain its shape. Once it can hold its own form, remove it from the mold and let it dry completely to the bone-dry stage. -
Bisque fire:
Load the bone-dry piece into your kiln for a bisque firing (typically cone 04 or 06). This initial firing hardens the clay and prepares it for glaze application. -
Clean the bisque:
Wipe the bisque-fired leaf with a damp sponge to remove any kiln dust. This ensures the glaze adheres properly without pinholing. -
Glaze application:
Apply your creamy white glossy glaze. You can dip the piece or brush it on. If brushing, apply 2-3 even coats, letting them dry in between. Ensure the glaze isn’t too thick in the deep vein crevices, or you might lose the detail. -
Clean the foot:
Wipe away any glaze from the bottom of the dish where it will touch the kiln shelf. This prevents the piece from fusing to the shelf during the glaze firing. -
Glaze fire:
Fire the piece again to the maturation temperature of your specific clay and glaze combination (e.g., cone 5/6 or cone 10).
Once cooled, your elegant ceramic leaf dish is ready to bring a touch of serene nature into your home decor


Stamped Ring Dishes
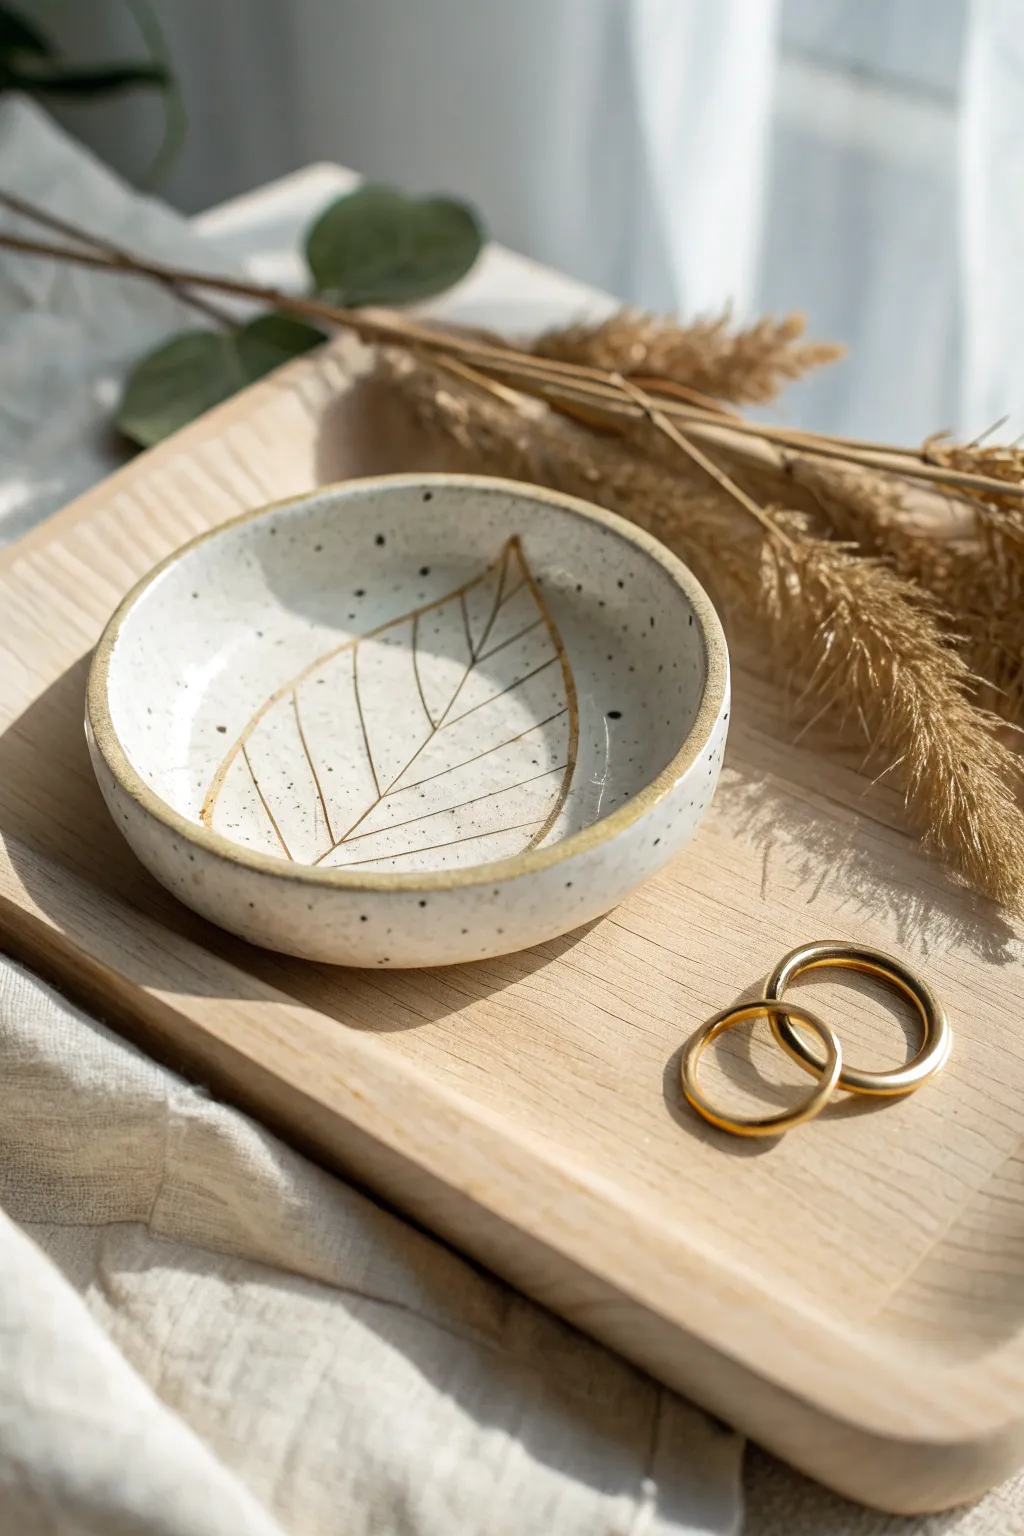
Capture the delicate beauty of nature in this minimalist ceramic ring dish, featuring an elegant leaf impression highlighted with gold. The creamy, speckled white glaze provides a rustic yet refined backdrop for the metallic accents, creating a perfect keepsake spot for your favorite jewelry.
Step-by-Step
Materials
- White stoneware clay with speckles (or plain white clay + speckled glaze)
- Small rolling pin
- Rolling guides or wooden slats (approx. 1/4 inch thick)
- Round cookie cutter or template (approx. 4-5 inches)
- Real or artificial leaf with prominent veins (e.g., beech or laurel)
- Small sponge
- Fettling knife or needle tool
- Shallow bowl or foam mold for shaping
- Clear or white speckled glaze (cone 06 or cone 6)
- Gold luster or gold overglaze
- Fine liner brush for luster application
- Kiln
Step 1: Shaping the Form
-
Prepare the clay:
Begin by wedging a baseball-sized amount of speckled stoneware clay to remove air bubbles. If you don’t have speckled clay, standard white clay works fine—you can add the ‘speckle’ later with a specialized glaze. -
Roll out the slab:
Set up your rolling guides on a canvas work surface. Roll the clay into a smooth, even slab about 1/4 inch thick. Make sure to roll in multiple directions to compress the clay platelets, which helps prevent warping. -
Impress the leaf:
Place your chosen leaf onto the center of the slab, vein-side down. Gently roll over the leaf with the rolling pin once or twice to press it firmly into the clay essentially creating a stamp. Don’t press too hard, or you’ll thin the slab too much. -
Remove the leaf:
Carefully lift the leaf edge with a needle tool and peel it away to reveal the impression. At this stage, smooth out any tiny imperfections in the clay texture around the leaf with a soft rib. -
Cut the circle:
Center your round cutter over the leaf design. Press straight down to cut out the dish shape. If using a paper template instead, trace around it with a needle tool. -
Smooth the edges:
Once cut, run a damp sponge or your finger along the rim to soften the sharp square edge created by the cutter. A rounded rim looks more finished and holds the glaze better later. -
Form the curve:
Gently lift the clay circle and place it into a shallow foam mold or a bisque bowl lined with newspaper. Press gently so the clay takes on a subtle concave curve. -
Dry slowly:
Allow the dish to dry slowly to the leather-hard stage, then refine the bottom if needed. Let it dry completely to bone dry before the bisque firing.
Stamp Definition
Leaf impression too faint? Ensure the clay is fresh and soft. If the leaf is thin, place a sheet of paper over it before rolling to press it deeper without tearing.
Step 2: Glazing & Gold Accents
-
Bisque fire:
Fire the bone-dry piece in the kiln to cone 04 (or your clay’s specific bisque temperature). -
Apply the glaze:
Wipe the bisqueware with a damp sponge to remove dust. Pour or brush a clear or white glaze over the entire piece. If you used plain white clay, use a ‘speckled white’ glaze here to achieve the look in the photo. -
Glaze fire:
Fire the piece again to the maturation temperature of your glaze (typically cone 6). Allow the kiln to cool completely before unloading. -
Paint the leaf detail:
Using a very fine liner brush and gold luster (overglaze), carefully trace the indented veins of the leaf impression. I find that bracing my pinky finger against the table helps keep my hand steady for these thin lines. -
Add the rim:
Load your brush with more gold luster and run it along the top rim of the dish. Apply enough pressure to create a slightly uneven, organic line that hugs the edge. -
Luster fire:
Place the dish back in the kiln for a third firing. Gold luster fires at a much lower temperature, usually cone 018 or 019. Follow the manufacturer’s specific instructions for ventilation, as lusters can be fumy. -
Final wash:
Once cool, wash the dish gently with soapy water to ensure it’s clean and ready for use.
Pro Tip: Luster Safety
Gold luster contains oils and solvents. Always apply it in a well-ventilated area and never use your good watercolor brushes—lusters are very hard to clean out.
Now you have a stunning, handcrafted dish that balances rustic texture with a touch of luxury


Easy Coil Vase
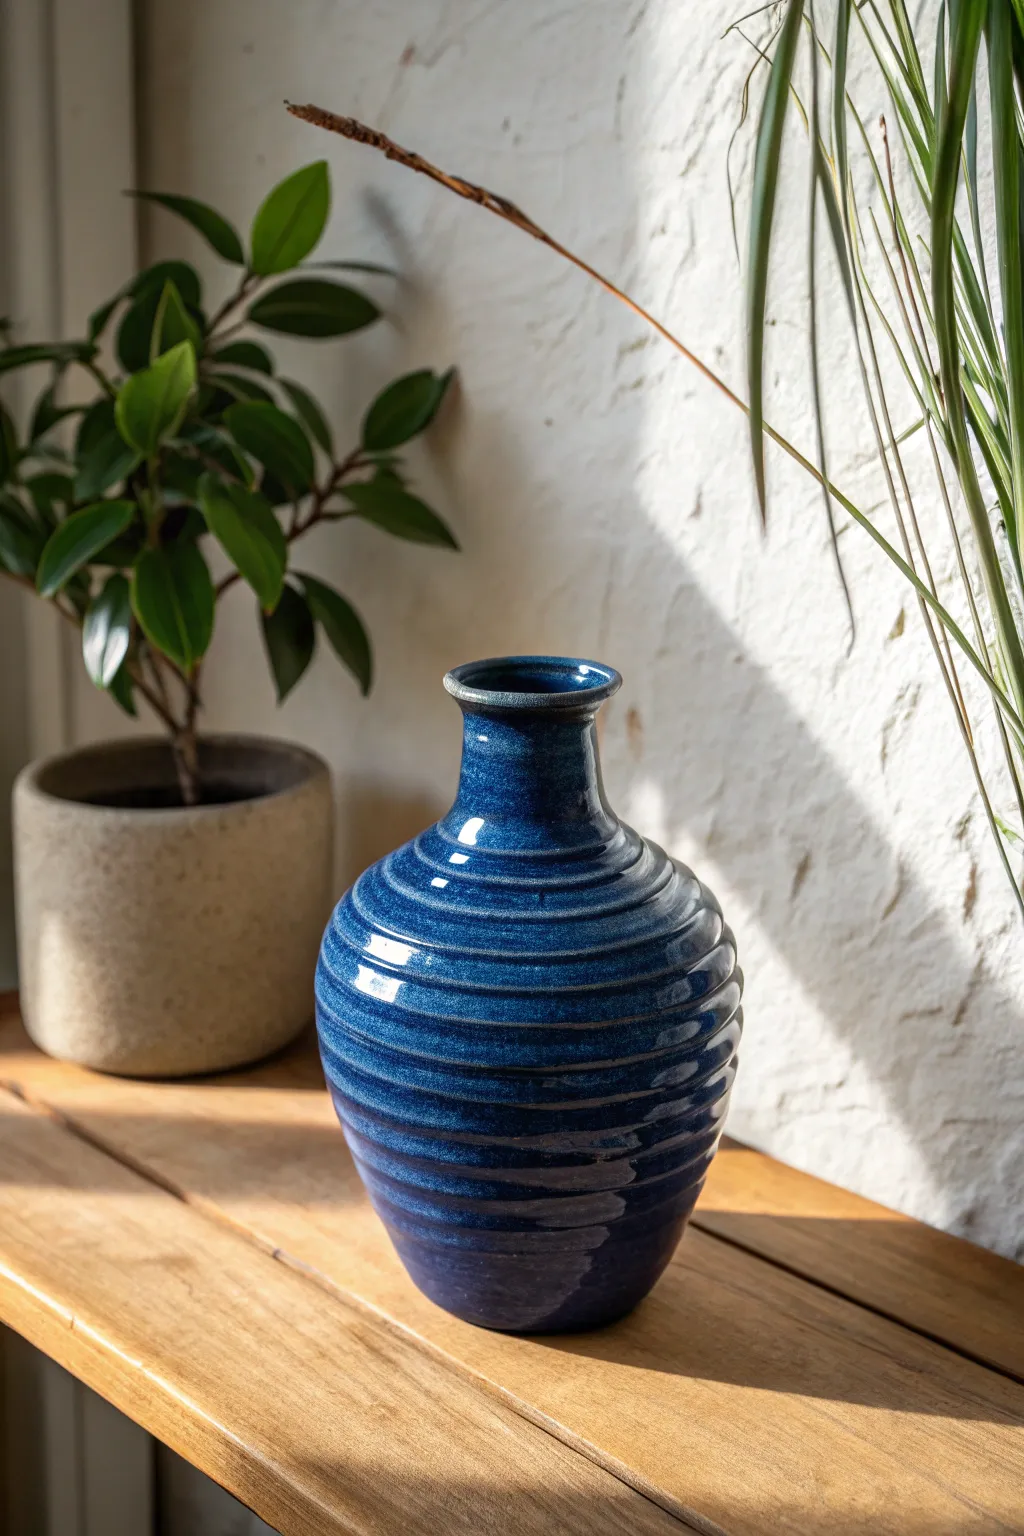
This elegant vase showcases the beauty of structured clay work, featuring rhythmic horizontal ridges that catch the light beautifully under a deep, speckled blue glaze. It’s a fantastic project for practicing consistent coil building or throwing tall, narrow-necked forms.
Detailed Instructions
Materials
- Stoneware clay (smooth body recommended)
- Pottery wheel (optional, can be hand-built)
- Clay coils (if hand-building)
- Serrated rib tool
- Flexible metal or rubber rib
- Sponge
- Needle tool
- Wire cutter
- Deep cobalt blue reactive glaze
- Soft fan brush for glazing
- Kiln
Step 1: Forming the Base
-
Prepare your clay:
Begin by thoroughly wedging about 3-4 pounds of stoneware clay to remove any air bubbles. If you are throwing on the wheel, center the clay firmly on the bat. -
Establish the floor:
Open the centered clay to create the floor of your vase. Aim for a base width of about 4-5 inches. Compress the floor well with a rib or sponge to prevent future cracking. -
Create the cylinder:
Pull up the walls to form a basic cylinder. If hand-building, roll out even coils and stack them on a circular slab base, blending the inside of the coils smooth while leaving the outside texture visible.
Glaze Trick
Choose a glaze with high ‘flux’ or movement. As it melts, it will run slightly into the grooves, creating darker pools in the recesses and lighter highlights on the ridges.
Step 2: Shaping the Belly
-
Volumize the form:
From the inside, gently push the clay wall outward to create a rounded belly shape. Support the outside with your other hand or a rib to maintain control. The widest part should sit below the halfway point of the vessel. -
Define the texture:
Whether throwing or coiling, accentuate horizontal ridges. On the wheel, I like to use the corner of a square wooden rib or my finger to press in distinct grooves as the wheel spins. If coiling, ensure the connection between coils forms a distinct indent. -
Add spiral details:
Working from bottom to top, refine the ridges to ensure they spiral continuously up the pot. This rhythmic texture is key to how the glaze will break and pool later. -
Smooth the interior:
Ensure the interior surface is completely smooth using a wet sponge on a stick or a long-handled rib. This contrast with the textured exterior adds professional quality.
Step 3: Refining the Neck
-
Collar the neck:
As you reach the upper third of the vase, gently collar the clay inward to narrow the opening. Do this gradually to avoid buckling the walls. -
Shape the rim:
Flare the very top edge slightly outward to create a defined lip. This small detail frames the opening nicely. -
Refine the surface:
Go over the exterior ridges one last time to ensure they are crisp. Remove any slurry or water that might be hiding the definition of your lines. -
Dry slowly:
Cover the rim loosely with plastic to let the bottom stiffen up, then dry the whole piece slowly to the leather-hard stage. -
Trim the foot:
Once leather hard, trim a distinct foot ring on the bottom. This lifts the form and gives it a visual lightness.
Level Up: Double Dip
Dip the rim in a second, lighter color glaze (like white or rutile). It will drip down over the blue texture, adding complex new layers.
Step 4: Glazing and Firing
-
Bisque fire:
Fire the bone-dry piece in a bisque kiln according to your clay body’s specifications (usually Cone 04 or 06). -
Wax the foot:
Apply wax resist to the bottom foot ring to keep it clean during glazing. -
Apply the glaze:
Select a reactive cobalt blue glaze that is known to ‘break’ over textures. Use a soft fan brush or dip the pot. Apply 2-3 coats depending on the glaze instructions. -
Highlight the ridges:
Be careful not to fill the ridge depressions too thickly, or you’ll lose the texture. If the glaze is very thick, you can gently wipe the highest points with a damp sponge to thin the glaze there, creating color variation. -
Final firing:
Glaze fire to the maturity temperature of your clay and glaze (typically Cone 5/6 or Cone 10 for stoneware).
Place your finished vase near a window where natural light can play across the beautiful ridges you created

The Complete Guide to Pottery Troubleshooting
Uncover the most common ceramic mistakes—from cracking clay to failed glazes—and learn how to fix them fast.
Textured Tile Coasters
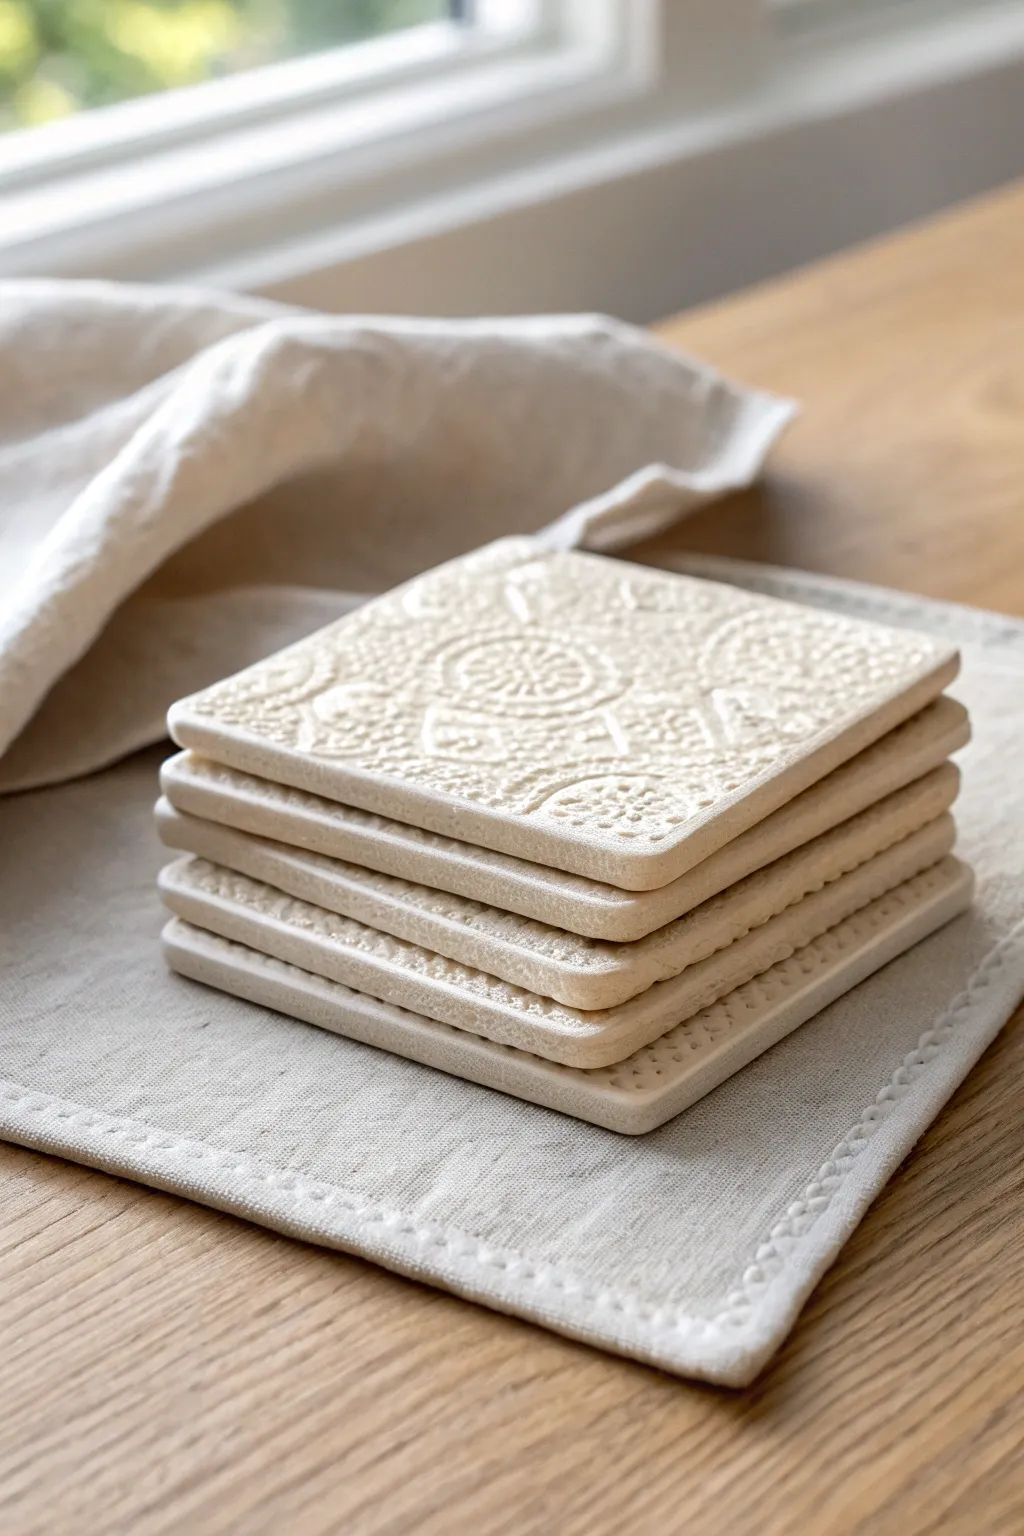
These elegant coasters feature delicate, raised textures reminiscent of vintage lace, finished in a creamy white glaze that highlights the relief pattern. They make a sophisticated addition to any coffee table and are surprisingly simple to create using basic slab-building techniques.
Step-by-Step
Materials
- White stoneware or porcelain clay body
- Rolling pin
- Two wooden guide strips (approx. 1/4 inch thick)
- Textured lace doilies or rubber texture mats
- Square cookie cutter (4×4 inch) or ruler and needle tool
- Clean canvas work surface
- Smoothing rib or damp sponge
- Cream or off-white breaking glaze
- Kiln
- Felt pads (for the bottom)
Step 1: Preparing the Slab
-
Wedge the clay:
Begin by thoroughly wedging your white stoneware clay to remove air bubbles and ensure a uniform consistency. -
Set up guides:
Place your canvas on a flat work surface. Position your two wooden guide strips parallel to each other, slightly wider than the width of your desired slab. -
Roll the slab:
Place a ball of clay between the guides. Using the rolling pin, roll the clay out until the pin rests on the wooden strips, creating a perfectly even thickness of about 1/4 inch. -
Smooth the surface:
Run a rubber rib or a slightly damp sponge over the surface of the clay slab to remove any canvas texture or imperfections. This creates a clean slate for your pattern.
Step 2: Adding Texture & Cutting
-
Position the texture:
Lay your chosen lace doily or rubber texture mat carefully onto the smoothed clay slab. Choose a section of the pattern that will look balanced when cut into squares. -
Roll in the pattern:
Using your rolling pin, firmly roll over the lace or mat once. Apply consistent heavy pressure to ensure a deep, crisp impression without thinning the clay too much. -
Reveal the design:
Gently peel back the lace or mat to reveal the embossed design. Be careful not to smudge the fresh texture with your fingers. -
Cut the shapes:
Use your 4×4 inch square cutter to punch out the coaster shapes. I find it helpful to hover the cutter over the pattern first to frame the design exactly how I want it before committing to the cut. -
Release the tiles:
Carefully remove the excess clay from around the cut squares, then gently lift the tiles.
Warping Woes?
If coasters curl while drying, flip them daily. Alternatively, dry them sandwiched between two pieces of drywall ware board to force them flat.
Step 3: Fining & Firing
-
Soften edges:
Once the tiles are leather-hard, gently run a damp finger or sponge along the sharp cut edges to round them slightly. This prevents chipping later and makes them pleasant to hold. -
Prevent warping:
Place the tiles between two sheets of drywall or weigh them down lightly with a board while they dry slowly. This ensures they stay perfectly flat. -
Bisque fire:
Once bone dry, load the coasters into the kiln for a bisque firing (usually around Cone 04). -
Glaze application:
Dip or brush a cream-colored breaking glaze onto the bisqueware. A breaking glaze is crucial here because it will pool in the recesses and thin out on the high points, accentuating the lace pattern. -
Wipe the feet:
Ensure the bottom of each coaster is completely free of glaze before firing. -
Glaze fire:
Fire the coasters to the maturation temperature of your specific clay and glaze combination (typically Cone 5 or 6 for stoneware). -
Final touches:
Once cooled and removed from the kiln, attach small adhesive felt pads or cork backing to the corners on the underside to protect your furniture.
Level Up: Oxide Wash
Before glazing, wipe on an iron oxide wash and sponge it off. The dark oxide stays in the texture, making the pattern pop under a translucent glaze.
Stack your finished set and admire how the light catches the intricate relief pattern you’ve created
Mini Bud Vases
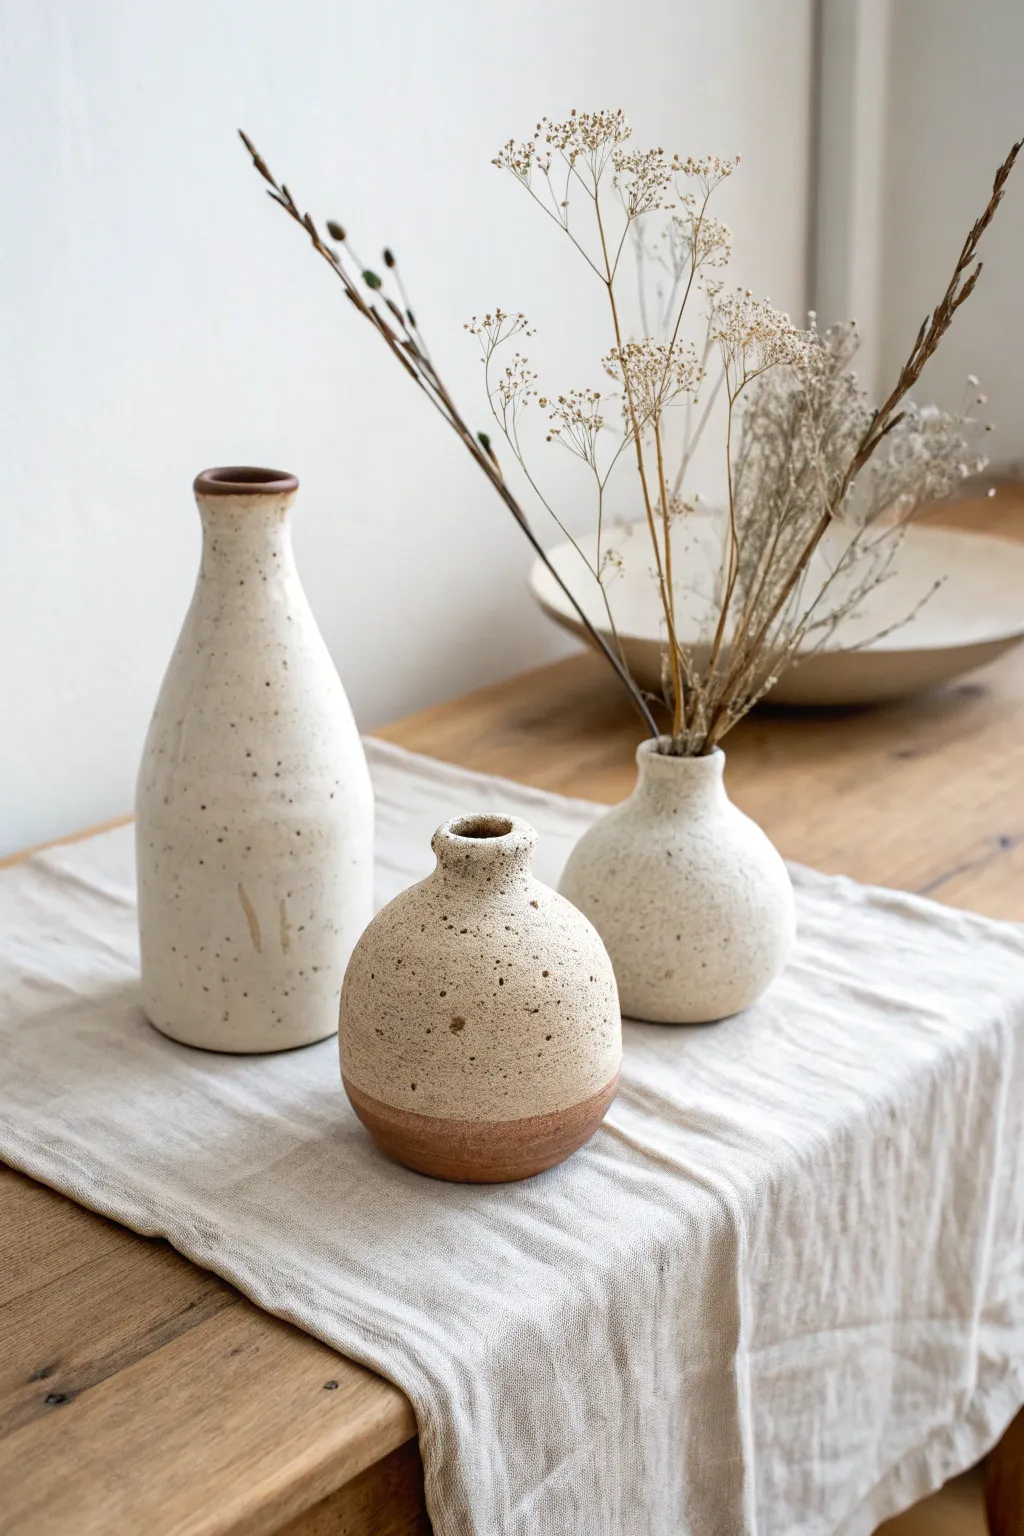
Embrace the beauty of simplicity with this set of three distinct bud vases, featuring a raw, speckled clay body and minimal glazing. The combination of a tall bottles shape and two rounded, organic orbs creates a perfectly balanced vignette for showing off dried botanicals.
Step-by-Step Guide
Materials
- Speckled stoneware clay (mid-fire)
- Pottery wheel
- Throwing tools (sponge, needle tool, rib, wooden knife)
- Wire cutter
- Trimming tools
- White or cream matte glaze
- Wax resist
- Kiln
- Dried flowers (for styling)
Step 1: Prepping and Throwing the Forms
-
Wedge the clay:
Begin by wedging your speckled clay thoroughly to remove air bubbles. Since you are making three pieces of varying sizes, portion out your clay balls: one large (approx. 1.5 lbs), one medium (1 lb), and one small (0.75 lb). -
Throw the tall bottle:
Center the largest ball of clay on the wheel. Open it up, keeping the floor relatively narrow to support a tall form. -
Pull the height:
Pull the walls up into a cylinder first, aiming for height rather than width. Keep the walls even. -
Shape the bottle neck:
Collar the top third of the cylinder inward gradually. Use your hands to gently choke the clay in, moving upward to create a tapered neck, ending with a small, rounded rim. -
Throw the medium round vase:
Center the medium clay ball. Open the form but keep it wider and lower than the bottle. Pull the walls up while pushing outward from the inside to create a bulbous, belly shape. -
Close the medium form:
Collar the neck in significantly to create a narrow opening, just wide enough for a few stems. Smooth the transition from the belly to the neck. -
Throw the small round vase:
Repeat the previous process with the smallest clay ball, creating a squat, rounded sphere with a very short, petite neck.
Clean Collaring
When narrowing a neck, keep the clay well-lubricated but not sopping wet. Too much water weakens the walls, causing the neck to twist or collapse.
Step 2: Trimming and Refining
-
Dry to leather hard:
Allow all three pieces to dry slowly to a leather-hard state. This usually takes a day or two depending on humidity. -
Trim the tall bottle:
Invert the tall bottle on the wheel (use a chuck if the neck is too narrow). Trim the bottom to clean up the weight and define the foot. -
Trim the round vases:
Trim the rounded vases to continue the curve of the belly all the way to the foot. A clean, distinct foot ring gives these round shapes a nice lift. -
Bisque fire:
Once fully bone dry, load the pieces into the kiln and bisque fire them according to your clay body’s specifications (usually Cone 04 or 06).
Uneven Glaze Lines?
If your dipped line on the small vase looks wavy, use a fettling knife or clean sponge to tidy up the edge while the glaze is still powdery and dry.
Step 3: Glazing and Finishing
-
Wax the bottoms:
Apply wax resist to the foot of each vase. For the smallest vase, apply wax slightly higher up the side—about a half-inch from the bottom—to leave that raw clay band exposed. -
Wipe down bisque:
Use a damp sponge to wipe any dust off the bisque ware to ensure the glaze adheres properly. -
Glaze the tall bottle:
Pour white matte glaze inside the bottle, swirl, and pour out. Then, dip the entire exterior into the glaze bucket. Shake gently to remove drips. -
Glaze the medium vase:
Glaze the interior and exterior of the medium vase fully, just like the tall bottle. -
Glaze the small vase:
Glaze the interior first. Then, hold the vase by the foot and dip it upside down into the glaze, stopping right where your wax line begins to create that distinct two-tone look. -
Clean the feet:
I always double-check the feet with a damp sponge to remove any stray glaze droplets on the waxed areas. -
Glaze fire:
Load the kiln again and fire to the maturity temperature of your clay and glaze (likely Cone 5 or 6). Allow to cool completely before unloading.
Fill your new vessels with dried grasses or wildflowers to complete the organic aesthetic.


What Really Happens Inside the Kiln
Learn how time and temperature work together inside the kiln to transform clay into durable ceramic.
Sweet Face Planters
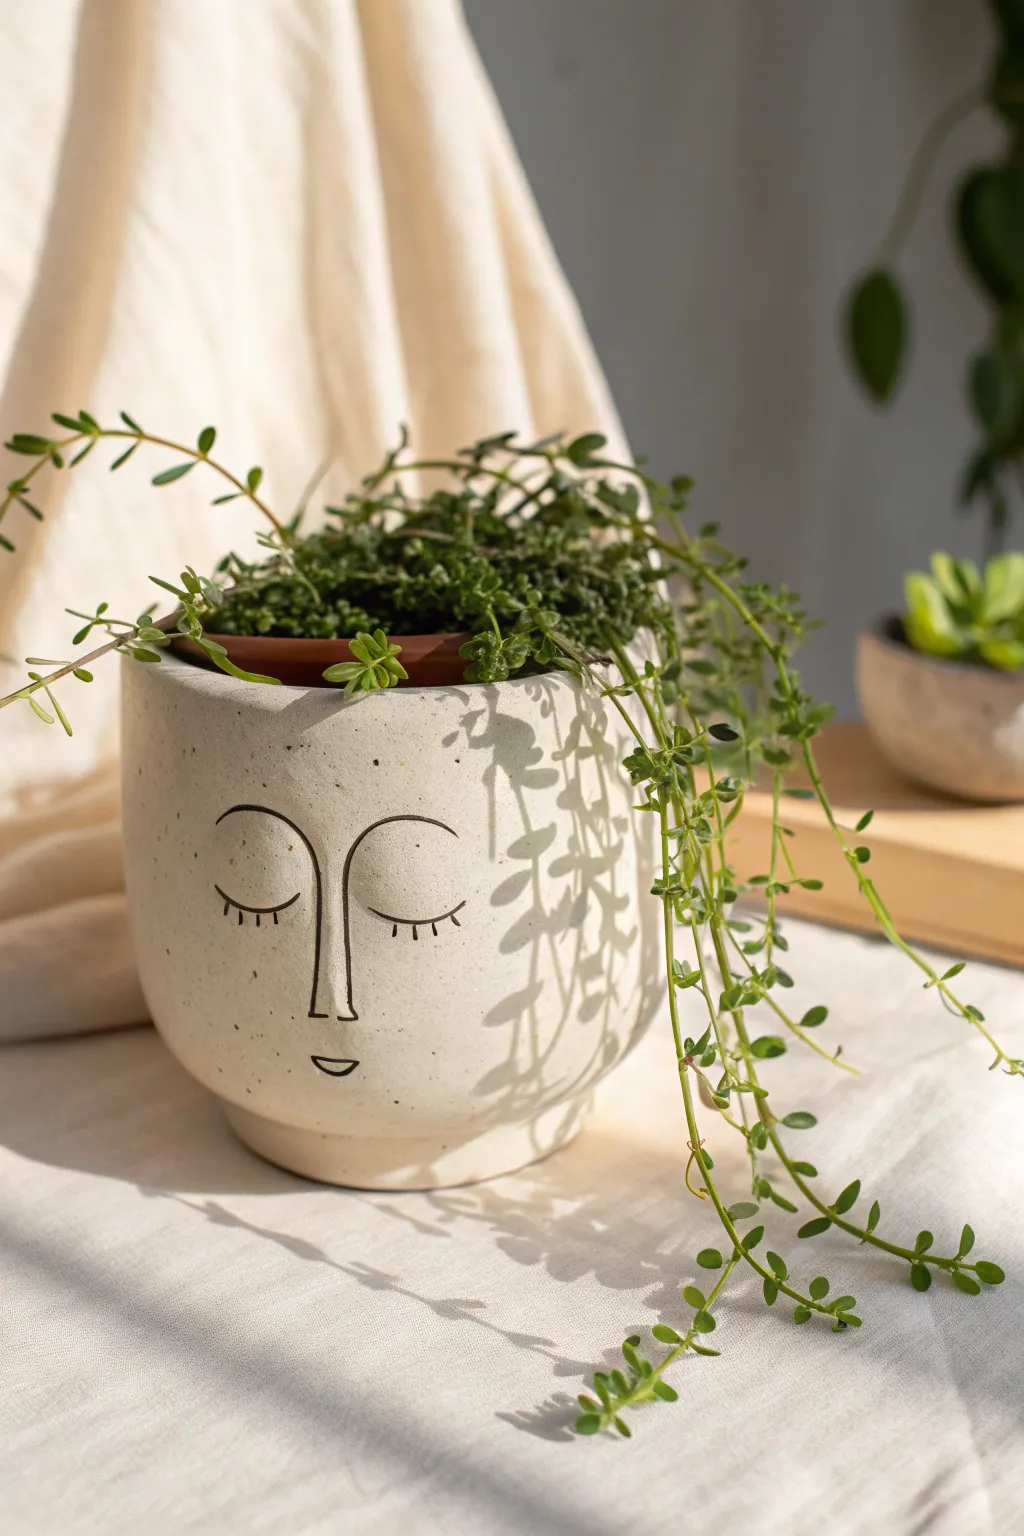
Bring a touch of calm serenity to your indoor garden with this hand-built ceramic face planter. The speckled clay body coupled with simple, line-drawn features creates a modern yet warm home for your trailing plants.
Detailed Instructions
Materials
- Speckled stoneware clay (mid-fire)
- Pottery wheel (optional, can be hand-built)
- Slab roller or rolling pin
- Rib tool (metal or rubber)
- Needle tool
- Sponge
- Black underglaze
- Fine-tip underglaze applicator bottle or liner brush
- Clear matte glaze
- Kiln
Step 1: Forming the Vessel
-
Prepare the Clay:
Begin by thoroughly wedging your speckled stoneware clay to remove air bubbles and ensure a uniform consistency. This clay type is essential for achieving that natural, spotted finish shown in the photo. -
Throwing the Cylinder:
Center a ball of clay on the wheel and open it up. Pull the walls up to create a simple, straight-sided cylinder with a flat bottom. Aim for a height of about 5-6 inches. -
Shaping the Belly:
Gently push the walls outward from the inside using a rib tool or your fingers to create a soft, rounded belly shape, slightly wider than the rim. -
Defining the Foot:
At the base, create a slight indentation or sharper angle where the pot meets the table to give it a floating appearance, similar to a pedestal foot. -
Refining the Rim:
Compress the rim with a sponge or chamois leather to ensure it is smooth and rounded, which prevents chipping later. -
Drying to Leather Hard:
Cut the pot from the bat using a wire tool and set it aside. Let it dry until it reaches a leather-hard state—firm enough to handle without deforming, but still cool to the touch. -
Trimming the Base:
Flip the pot over on the wheel (or a banding wheel) and trim away excess clay from the bottom to define the foot ring clearly.
Clean Lines
If your underglaze lines look shaky, use a SGRAFFITO tool to gently scrape the edges clean once the underglaze is dry but before firing.
Step 2: Adding the Face Details
-
Sketching the Design:
Before applying anything permanent, lightly sketch the face design onto the clay surface using a pencil. The graphite will burn off in the kiln, leaving no trace. -
Positioning the Eyes:
Draw two large, downward-curving semi-circles for the closed eyelids. Place them centrally on the ‘belly’ of the pot. -
Drawing the Nose:
Connect the inner corners of the eyes with two vertical lines that descend and narrow slightly, meeting at a small U-shape for the nose tip. -
Adding Lashes and Mouth:
Sketch short, vertical dashes along the bottom of the eyelids for lashes, and place a small, simple semi-circle below the nose for a serene mouth. -
Preparing Underglaze:
I usually give my black underglaze a good shake or stir to ensure the pigment is evenly suspended before loading it into a fine-tip applicator. -
Inlining the Features:
Using a trailing bottle with a fine metal tip or a liner brush, carefully trace over your pencil lines. Keep your hand steady and maintain even pressure for a consistent line width. -
Cleaning Up:
If you make a mistake or smudge a line, let it dry for a moment, then gently scratch it off with a needle tool or wipe carefully with a barely damp sponge.
Step 3: Glazing and Firing
-
Bisque Firing:
Once the pot is bone dry, load it into the kiln for a bisque fire (usually cone 04 or 06). This hardens the clay and prepares it for glazing. -
Wiping Down:
After the bisque firing, wipe the pot with a damp sponge to remove any kiln dust. This helps the clear glaze adhere properly and prevents pinholing. -
Applying Clear Glaze:
Dip the entire pot into a bucket of clear matte glaze. A matte finish is crucial here to achieve the soft, natural look in the image rather than a high gloss. -
Cleaning the Foot:
Wipe the glaze off the bottom foot ring completely so the pot doesn’t fuse to the kiln shelf during firing. -
Glaze Firing:
Fire the pot again to the maturation temperature of your specific clay body and glaze (likely cone 5 or 6 for stoneware). -
Final Styling:
Once cool, plant a trailing succulent or vine inside to mimic hair cascading down the sides of the face.
Speckle Hack
Using plain clay? Knead in granular manganese or ilmenite sand during wedging to create your own custom speckled effect.
Now you have a charming, sleepy-faced vessel ready to hold your favorite greenery
Minimal Incense Holders
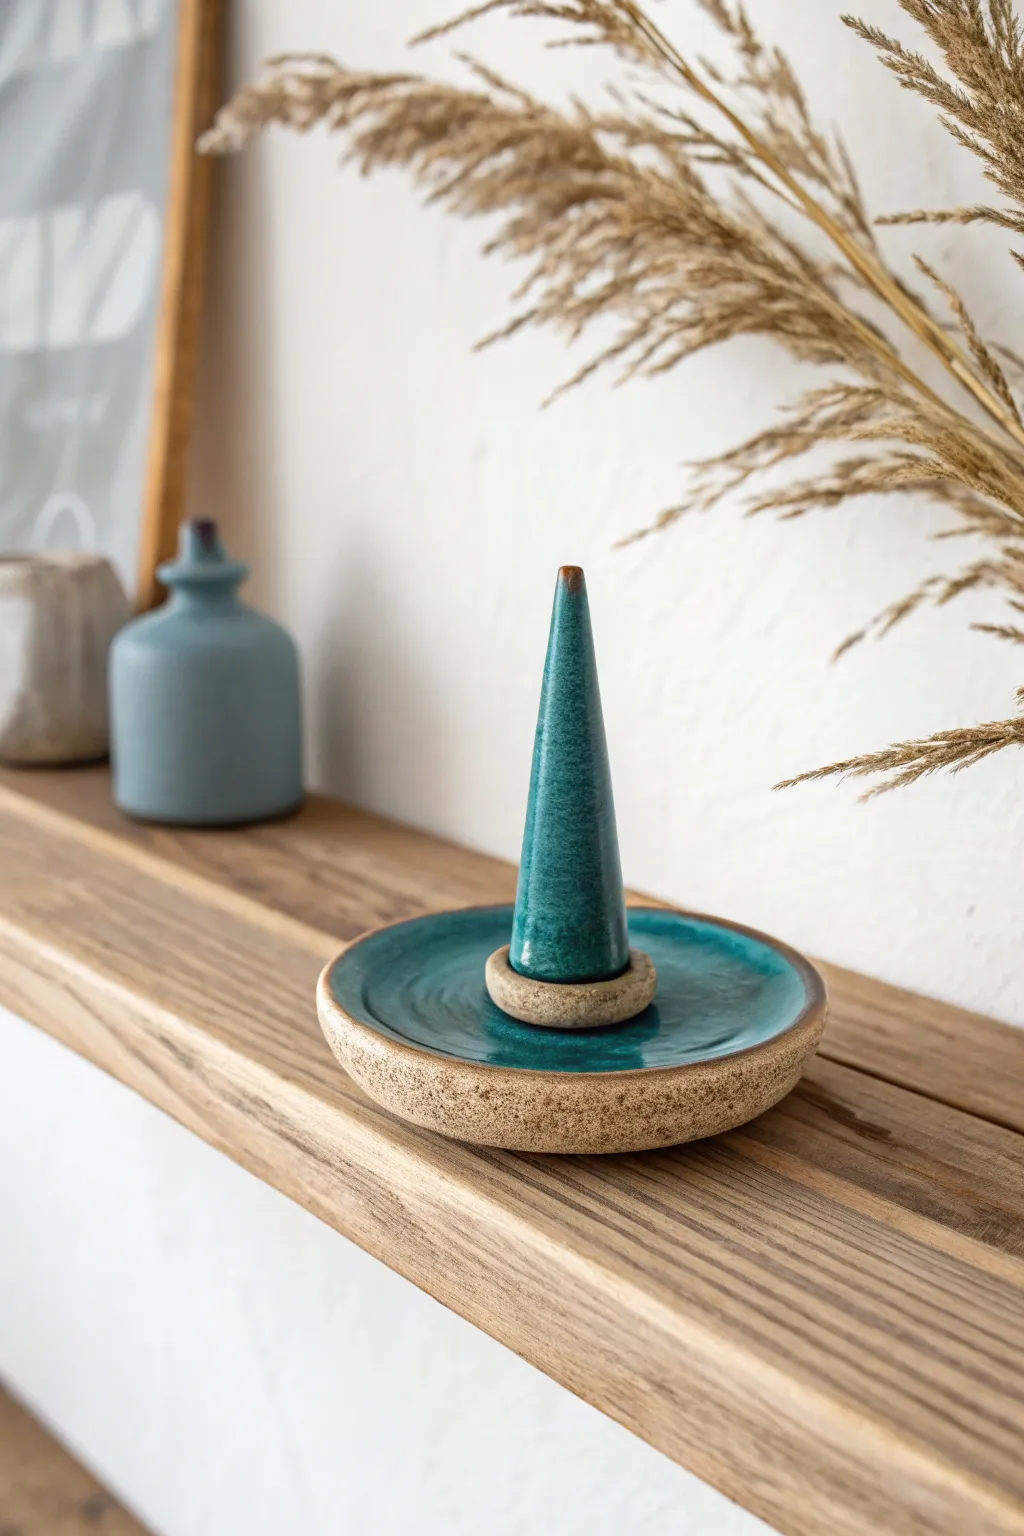
This elegant two-piece set combines the grounding texture of speckled stoneware with a vibrant splash of teal glaze. The sleek cone acts as the functional holder, resting perfectly in a matching shallow dish catch-all.
Step-by-Step
Materials
- Speckled buff stoneware clay
- Pottery wheel (or rolling pin for slab building)
- Needle tool
- Sponge
- Garrity rib or smooth metal rib
- Deep teal or turquoise reactive glaze
- Wax resist emulsion
- Small paintbrush
- Kiln
- Wire cutter
Step 1: Shaping the Base Dish
-
Prepare the Clay:
Start by wedging a small ball of speckled stoneware clay, about the size of a tennis ball. Ensure all air bubbles are removed to prevent cracking during firing. -
Throwing the Form:
Center the clay on the wheel and open it wide to create a flat, shallow base. You aren’t making a bowl; aim for a plate-like saucer with a very slight upward curve at the rim. -
Refining the Rim:
Use a sponge to gently round over the lip of the dish. Keep the walls somewhat thick and substantial to match the rustic aesthetic of the speckled clay. -
Creating the Interior Well:
Using a trimming tool or your thumb, create a very subtle depression or separate raised ring in the absolute center where the cone will eventually sit. This helps stability. -
Cutting Off:
Run a wire cutter underneath the dish to release it from the wheel head, then set it aside on a wooden board to dry to a leather-hard state.
Step 2: Sculpting the Central Cone
-
Wedge a Small Amount:
Take a much smaller amount of clay—roughly the size of a golf ball—for the central element. -
Forming the Cone:
You can throw this off the hump on the wheel for speed, or hand-build it by rolling a coil and smoothing it into a tapered cone shape. -
Refining the Shape:
Use a straight metal rib to smooth the sides of the cone as it spins, ensuring it is perfectly symmetrical and tall. It should resemble a miniature tree. -
Adding the Ring Detail:
I like to leave a small, distinct ring of clay at the very bottom of the cone. This unglazed ‘foot’ adds a textural contrast later. -
Hollowing (Optional):
If you are using this for stick incense, use a needle tool to poke a hole into the top or side of the cone while the clay is still workable. If it’s for cone incense, you can leave it solid.
Uneven Glaze?
If your glaze looks patchy, heating the bisque piece slightly with a hairdryer before dipping helps the glaze adhere more evenly and dry faster.
Step 3: Trimming and Bisque Firing
-
Trimming the Dish:
Once leather hard, flip the dish over and trim the bottom. Create a clean foot ring to give the piece a lifted, professional profile. -
smoothing Edges:
Go over both pieces with a slightly damp sponge to remove any sharp grog or rough tooling marks. -
Bisque Fire:
Load both components into the kiln and bisque fire to Cone 04 (or your clay body’s specifications) to prepare them for glazing.
Level Up: Texture
Before the first firing, gently press a real leaf or dried grass into the soft clay of the dish to leave a fossil-like impression under the glaze.
Step 4: Glazing and Finishing
-
Wax Resist Application:
Apply wax resist to the bottom of the dish, the outer rim of the dish, and the small ring at the base of the cone. This reveals the raw speckled clay. -
Glazing the Dish:
Pour a deep teal glaze into the center of the dish, swirl it to coat the interior floor, and pour out the excess. Leave the rim unglazed for that earthy contrast. -
Glazing the Cone:
Dip the cone upside down into the blue glaze, stopping right before you hit the wax-resisted ring at the bottom. -
Clean Up:
Use a sponge to wipe away any stray droplets of glaze on the waxed areas or the bottom foot. -
Final Firing:
Place the pieces in the kiln for the final glaze firing (usually Cone 5 or 6). Ensure the cone does not touch the dish during firing to prevent them fusing together.
Now you have a serene, functional sculpture ready to hold your favorite scents

TRACK YOUR CERAMIC JOURNEY
Capture glaze tests, firing details, and creative progress—all in one simple printable. Make your projects easier to repeat and improve.
Stacked Candle Holders
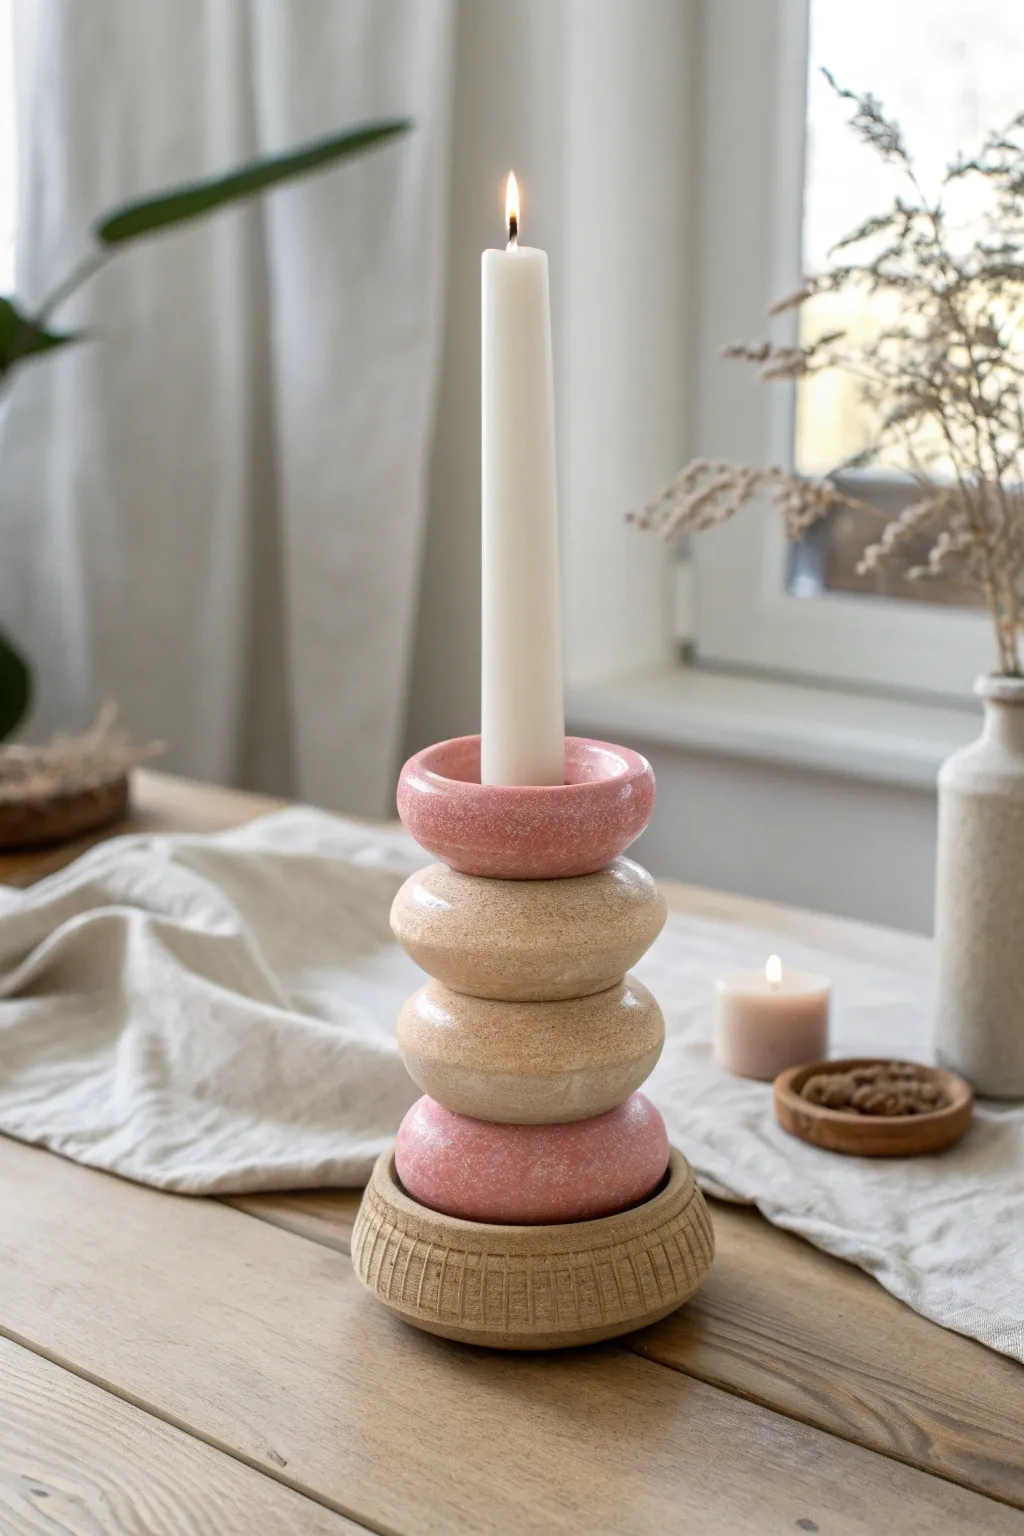
Bring a touch of playful, contemporary design to your table with this stacked ceramic candle holder. Featuring alternating glossy pink and beige donut rings atop a textured base, this project is a perfect introduction to slab and coil building techniques.
How-To Guide
Materials
- Stoneware or earthenware clay (white or light buff)
- Pottery wheel (optional, for base) or rolling pin
- Clay cutting needle tool
- Wooden sculpting tool
- Flexible metal kidney scraper
- Poring sponge
- Slip and score tool (or fork)
- Pink glossy glaze
- Beige/Sand glossy glaze
- Matte tan glaze (for base)
- Kiln
- Taper candle for sizing
Step 1: Creating the Base
-
Form the base slab:
Start by rolling out a thick slab of clay, approximately 3/4 inch thick. Cut out a circle roughly 4.5 inches in diameter to serve as the sturdy foundation. -
Build the rim:
Roll a thick coil of clay and attach it to the edge of your base circle using the score and slip method. Smooth the interior seam completely so it looks like one piece. -
Shape the taper:
Gently pinch and angle the coil wall inwards slightly so the top opening is smaller than the bottom. This creates a pedestal look. -
Add texture:
Using a wooden tool or a specialized texture rib, press vertical lines around the entire circumference of the base. I like to space them evenly to mimic a carved stone look. -
Refine the rim:
Smooth the top edge of the base flat. This needs to be level to support the stack of rings that will sit on top.
Step 2: Forming the Doughnut Rings
-
Roll your coils:
Roll out four substantial coils of clay. Try to keep them consistent in thickness, roughly 1.5 inches in diameter. -
Form the rings:
Curve each coil into a ring shape. Two should be slightly larger (for the middle sections) and two slightly smaller (for top and bottom of the stack), though the difference is subtle. -
Join the ends:
Cut the ends of your coils at a 45-degree angle to increase surface area. Score, slip, and join them firmly to close the loop. -
Smooth the shape:
Using a slightly damp sponge, round out the rings to remove any fingerprints and create that perfect ‘donut’ shape. Ensure the center hole is wide enough for your candle. -
Check the fit:
While the clay is leather hard, stack them temporarily to check the balance. The top ring’s center hole must be adjusted specifically to fit your taper candle snugly.
Clean Lines
Use wax resist between the rings before glazing. This keeps the glaze from pooling in the crevices and ensures distinct color separation.
Step 3: Assembly and Firing
-
Stack and join:
Score and slip the contact points between each ring and the base. You are building a permanent stack, so press them together firmly without deforming the rounded edges. -
Clean connections:
Use a small brush or tool to clean up any slip that oozes out between the rings. The definition between each ‘donut’ is key to the aesthetic. -
Dry slowly:
Cover the piece loosely with plastic to let it dry slowly. Because the rings vary in thickness compared to the joints, drying too fast can cause cracks. -
Bisque fire:
Once bone dry, fire the piece to the appropriate cone for your clay body (usually Cone 04 or 06). -
Glaze application:
Apply the matte tan glaze to the textured base to highlight the vertical lines. For the rings, alternate painting them with the pink and beige glossy glazes. -
Final firing:
Fire the piece a second time for the glaze setting. Ensure no glaze is on the very bottom of the base so it doesn’t stick to your kiln shelf.
Modular Options
Instead of scoring and slipping the rings together permanently, fire them as separate pieces. This lets you re-stack them in different color orders.
Place your favorite taper candle inside and enjoy the warm, artistic glow this centerpiece brings to your room
Wall Pocket Planters

Capture the essence of organic modern design with this simple yet striking wall pocket planter. With its gentle curve, speckled beige finish, and rustic twine suspension, it creates a perfect vertical home for trailing succulents or ivy.
Detailed Instructions
Materials
- Stoneware clay (buff or white)
- Rolling pin
- Guide sticks or slats (approx. 1/4 inch or 6mm)
- Speckled clay body OR speckled glaze/underglaze
- Paper template (half-circle shape)
- Needle tool
- Scoring tool (or serrated rib)
- Slip (clay mixed with water)
- Wooden modeling tool
- Sponge
- Drill bit or hole cutter (straw size)
- Matte white or beige glaze
- Jute or hemp twine
- Wooden dowel (optional, for shaping)
Step 1: Creating the Pocket Form
-
Prepare the slab:
Start by wedging a ball of stoneware clay to remove air bubbles. Place it on a canvas board between two guide sticks to ensure even thickness. -
Roll the clay:
Roll the clay out into a smooth, consistent slab. Aim for about 1/4 inch thickness; any thinner might warp, and thicker will be heavy for hanging. -
Cut the shapes:
Using a needle tool and your paper template, cut two pieces: a large semi-circle for the front and a slightly smaller, flatter rectangle/arch shape for the back plate. -
Refine the edges:
Smooth the cut edges with a damp finger or a soft sponge to remove any sharp burrs or crumbs of clay. -
Form the curve:
Gently bend the front semi-circle piece to create a bowed, cup-like shape. Be careful not to crack the clay; if it’s too dry, mist it lightly.
Uneven Drying?
If the front curve starts to slump or warp while drying, loosely stuff the pocket with crumpled newspaper to support the shape until it’s leather hard.
Step 2: Assembly and Detailing
-
Score the connection points:
Use a scoring tool to scratch up the curved edges of the front piece and the corresponding edges of the flat back plate where they will meet. -
Apply slip:
Dab a generous amount of slip onto the scored areas. This acts as the glue for your ceramic piece. -
Join the pieces:
Press the curved front piece firmly onto the flat backing. Wiggle it slightly to lock the clay particles together. -
Reinforce the seam:
Roll a very thin coil of clay and press it into the interior seam where the two pieces join. Smooth this out with a wooden tool for extra durability. -
Smooth the exterior:
On the outside, use a rib or your thumb to drag clay across the seam line, blending it until invisible. I prefer a slightly damp sponge here to really erase the join. -
Create hanging holes:
Using a hole cutter or a drill bit, punch a hole on the left and right sides of the rim. Ensure they are at least half an inch from the edge to prevent tearing. -
Add texture (optional):
If you aren’t using speckled clay, you can flick iron oxide or a darker slip onto the surface now using a toothbrush to mimic the speckled look. -
Drying:
Loosely cover the planter with plastic for a day to let the moisture equalize, then uncover and let dry completely to the bone-dry stage.
Drainage Matters
Add a hidden drainage hole at the very bottom, or plan to use this strictly as a cachepot (holding a plastic nursery pot inside) to protect roots from rot.
Step 3: Firing and Finishing
-
Bisque fire:
Fire the piece in a kiln to cone 04 (or your clay’s specific bisque temperature). -
Glazing:
Dip or brush, apply a matte white or beige glaze. If you used speckled clay, the specks will burn through the glaze. If not, use a speckled glaze formula now. -
Glaze firing:
Fire the piece again to the maturation temperature of your clay and glaze (typically cone 5 or 6 for stoneware). -
Adding suspension:
Cut a length of thick jute twine. Feed one end through the left hole from the outside in, and tie a chunky knot on the inside. Repeat on the right side. -
Final hang:
Bring the two loose ends of the twine together at the top and tie a secure loop for hanging on a wall hook.
Hang your new planter near a sunny window and enjoy the natural warmth it adds to your wall
Spoon Rests With Imprints
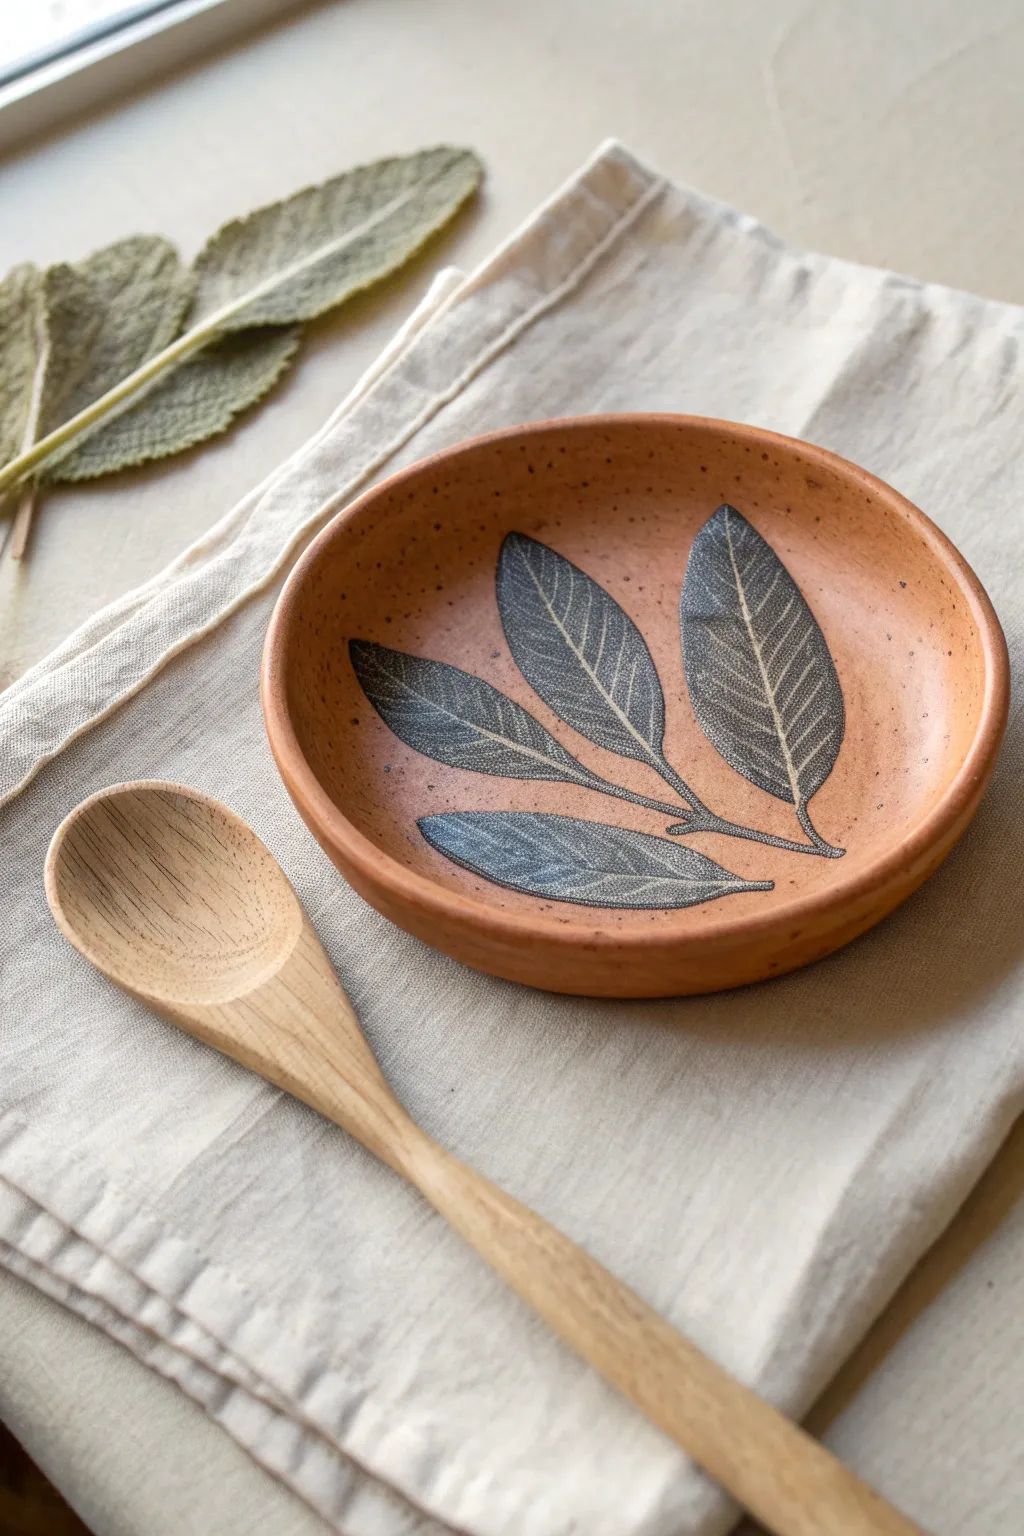
Capture the delicate veins of nature with this warm, earthenware spoon rest featuring a striking sage leaf imprint. The contrast between the rich terracotta clay and the dark underglaze creates a rustic yet modern kitchen accessory that is as functional as it is beautiful.
Step-by-Step
Materials
- Terracotta or red stoneware clay
- Rolling pin
- Canvas mat or cloth (to roll on)
- Fresh sage leaves (choose distinct, non-wilted ones)
- Black or metallic dark gray underglaze
- Small foam roller or soft brayer
- Sponge
- Needle tool
- Rib tool (metal or rubber)
- Small shallow bowl or plate (to use as a slump mold)
- Clear transparent glaze (cone 06 or suitable for your clay body)
- Kiln
Step 1: Preparation & Rolling
-
Wedge the clay:
Begin by thoroughly wedging a ball of terracotta clay slightly larger than a tennis ball to remove any air bubbles. -
Roll the slab:
On your canvas mat, roll the clay out into an even slab, approximately 1/4 inch thick. Aim for a thickness that feels sturdy but not chunky. -
Smooth the surface:
Using a rubber rib tool, gently compress and smooth the surface of the clay slab to remove any canvas texture or rolling pin marks. This ensures a clean background for your print.
Smudged Prints?
If leaves smear, the underglaze is likely too thick. Use a dryer roller and ensure leaves are fresh, not brittle or overly moist.
Step 2: Printing the Leaves
-
Prepare the leaves:
Select 3-4 fresh sage leaves. Lay them vein-side up on a piece of scrap paper. -
Apply underglaze:
Pour a small amount of black underglaze onto a palette. Load your foam roller or brayer with a thin, even layer of underglaze. -
Ink the botanical:
Gently roll the underglaze onto the vein side of the leaves. I like to do one test leaf on paper first to make sure I’m not over-applying ink, which blurs the details. -
Position the leaves:
Carefully pick up the inked leaves by the stem and place them ink-side down onto the smoothed clay slab. Arrange them in a fanned-out composition similar to the photo. -
Transfer the image:
Place a piece of clean newsprint or paper over the leaves. Gently rub over the paper with your hand or a clean brayer to transfer the underglaze and press the leaf texture into the clay. -
Reveal the design:
Carefully peel back the paper and lift the leaves off the clay by their stems. You should have a crisp black impression of the veins.
Add Subtle Dimension
Before inking, lightly press the un-inked leaf into the clay first to create a deeper relief, then ink and press again for color.
Step 3: Shaping & Finishing
-
Cut the circle:
Find a circular template (like a bowl rim) that frames your leaf design nicely. Place it over the design and trace around it with a needle tool to cut out your circle. -
Refine the rim:
Run a damp sponge or your finger along the cut edge to smooth away any sharp burrs or jagged bits specifically where you cut. -
Form the curve:
Gently lift your clay circle and place it into a shallow bowl or slump mold lined with plastic or newspaper. Press it lightly so it takes on a slight curve. -
Dry slowly:
Allow the piece to dry slowly to the leather-hard stage while inside the mold to maintain its shape. -
Bisque fire:
Once bone dry, fire the piece in the kiln to cone 04 (or your clay’s specific bisque temperature). -
Glaze application:
Wipe the bisqued piece with a damp sponge to remove dust. Apply 2-3 coats of clear transparent glaze over the entire top surface to seal the design and make it food safe. -
Final wipe:
Wipe the foot (bottom) of the dish completely clean of glaze to prevent it from sticking to the kiln shelf. -
Glaze fire:
Fire the piece a second time to the maturation temperature of your glaze and clay body.
Enjoy using your custom botanical rest next to your stovetop for a touch of handmade charm
Clay Bell Ornaments
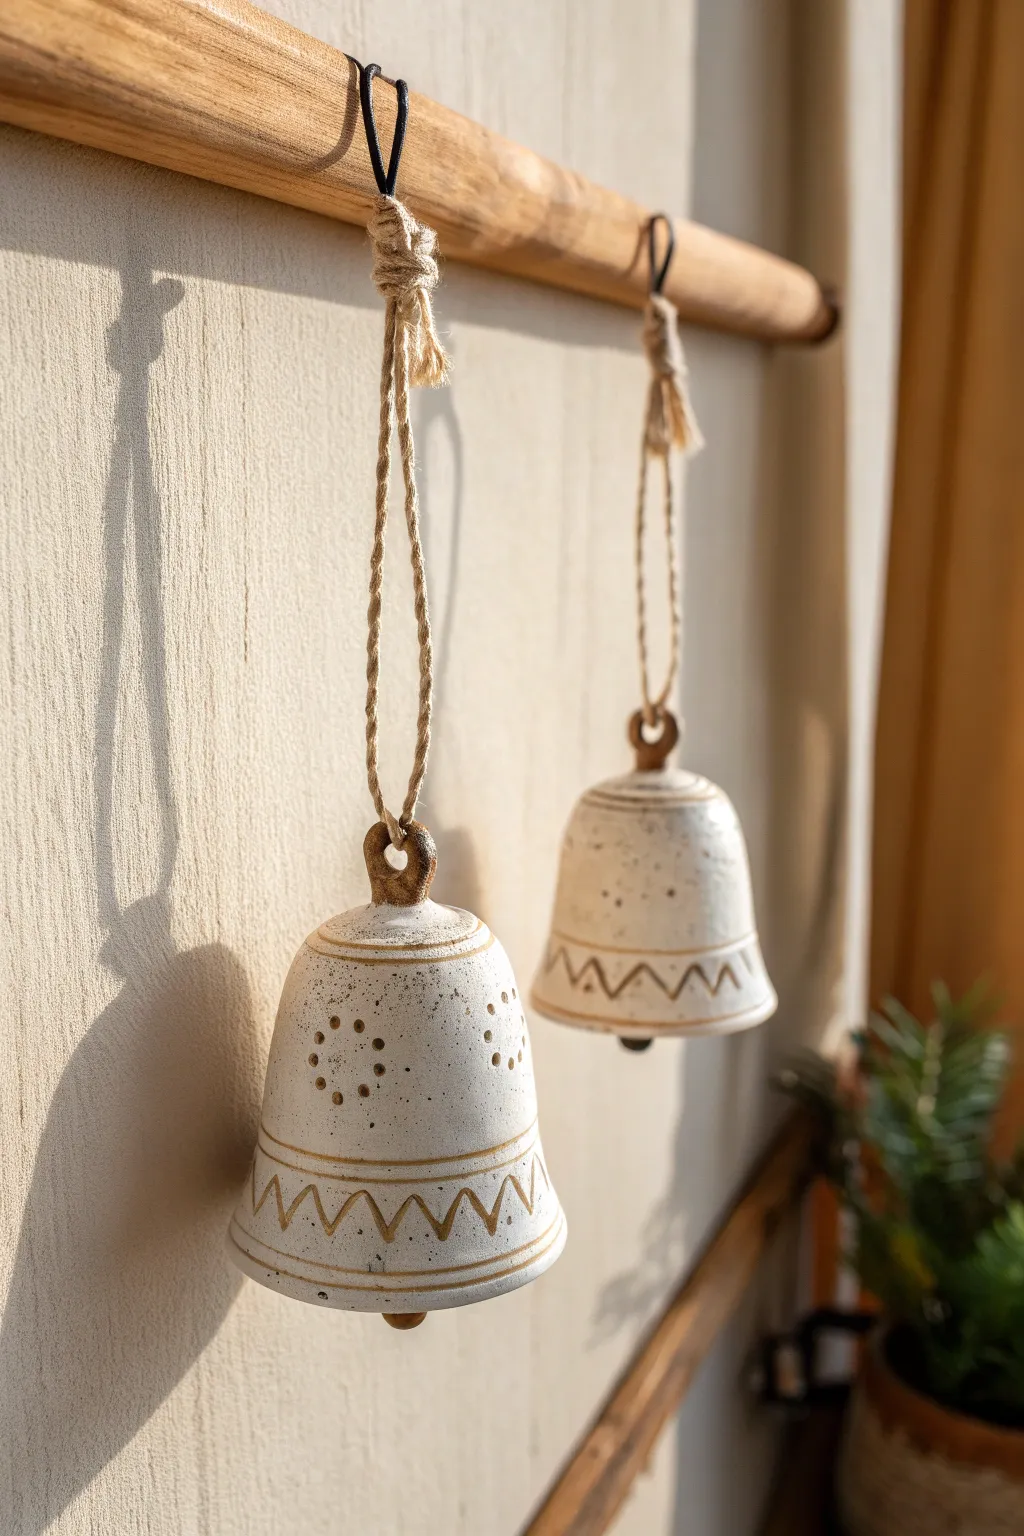
Create a charming set of handmade ceramic bells that bring an earthy, melodic touch to your space. These ornaments feature a lovely speckled clay body, simple geometric patterns, and a rustic twine finish perfect for holiday decor or year-round enjoyment.
Step-by-Step Guide
Materials
- Speckled Stoneware Clay (cone 5/6 recommended)
- Pottery Wheel (or slab roller/rolling pin for hand-building)
- Wooden Modeling Tool
- Pin Tool
- Small Loop Tool
- Sponge
- Underglaze (Ochre/Mustard Yellow)
- Clear or Satin Matte Glaze (transparent)
- Jute Twine or Hemp Cord
- Wooden Dowel or Driftwood
- Small Ceramic Beads (for clappers)
- Kiln
Step 1: Forming the Bells
-
Prepare the clay:
Begin by wedging about 1 pound of speckled stoneware clay to remove any air bubbles. Divide this into two equal balls, roughly the size of a tennis ball. -
Center on the wheel:
Throwing these on the wheel gives the best symmetry. Secure a ball of clay to the wheel head and center it carefully before opening. -
Open and pull walls:
Open the clay down to the bat, leaving just a thin floor. Pull the walls up into a cone or dome shape, keeping the top slightly narrower than the base to mimic a classic bell silhouette. -
Refine the shape:
Use a rib tool to smooth the outside and define the curve. Create a slightly flared lip at the bottom rim for visual interest. -
Create the hanging loop:
While the clay is still plastic, I shape a small coil into a loop and attach it securely to the very top of the bell using slip and scoring. This is essential for hanging later. -
Make the clapper:
Roll a small marble-sized ball of clay for the clapper. Pierce a hole through the center large enough for your twine. -
Dry to leather hard:
Cut the bell from the wheel and let it dry until it reaches the leather-hard stage, where it is firm but still cold to the touch.
Muted Ringing?
If the bell sound is dull, the wall thickness might be too uneven or the clay under-fired. Ideally, aim for thin, even walls and ensure the clay is fired to full maturity.
Step 2: Decorating and Firing
-
Carve the zigzag:
Using a small loop tool or a carving tool, gently carve a zigzag pattern around the bottom third of the bell. Remove just the surface layer to create texture. -
Add detail lines:
Carve two parallel horizontal lines framing the zigzag pattern—one above and one below—to give the design structure. -
Punch detail holes:
Use a small drill bit or hole punch tool to create a decorative circle of dots or small holes on the upper body of the bell. Don’t press too hard to avoid warping the shape. -
Apply underglaze insert:
Take your ochre or mustard yellow underglaze and paint it carefully into the carved zigzag lines and the horizontal bands. Wipe away any excess on the surface with a damp sponge so the color remains only in the recessed areas. -
Bisque fire:
Place your bells and clappers in the kiln for a bisque firing according to your clay body’s specifications (usually Cone 04). -
Glaze application:
Dip the entire bell into a clear or satin matte transparent glaze. This allows the natural speckles of the clay and the underglaze details to show through. -
Wipe the feet:
Ensure the bottom rim of the bell is wiped clean of glaze so it doesn’t fuse to the kiln shelf. -
Glaze fire:
Fire the pieces again to the maturity temperature of your clay and glaze (typically Cone 5 or 6).
Variation Idea
Instead of carving, try using wax resist. Paint the zigzag pattern with wax, then dip the bottom in a darker glaze for a bold, two-tone effect.
Step 3: Assembly
-
Prepare the cord:
Cut a length of jute twine or hemp cord, approximately 12-15 inches long depending on how low you want the bell to hang. -
Attach the clapper:
Thread the cord through the ceramic clapper bead. Tie a secure knot underneath the bead so it hangs freely. -
String the bell:
Pull the other end of the cord up through the inside of the bell and out through the top loop. Adjust the height so the clapper hits the rim of the bell when shaken. -
Create the hanging loop:
Determine the hanging length and tie a sturdy loop knot at the top of the twine. -
Hang and display:
Loop your finished bells onto a wooden dowel or rustic branch to complete the look shown in the image.
Now you have a set of handcrafted bells ready to add a cozy, artistic vibe to your home
Pinch Pot Whistle Creatures
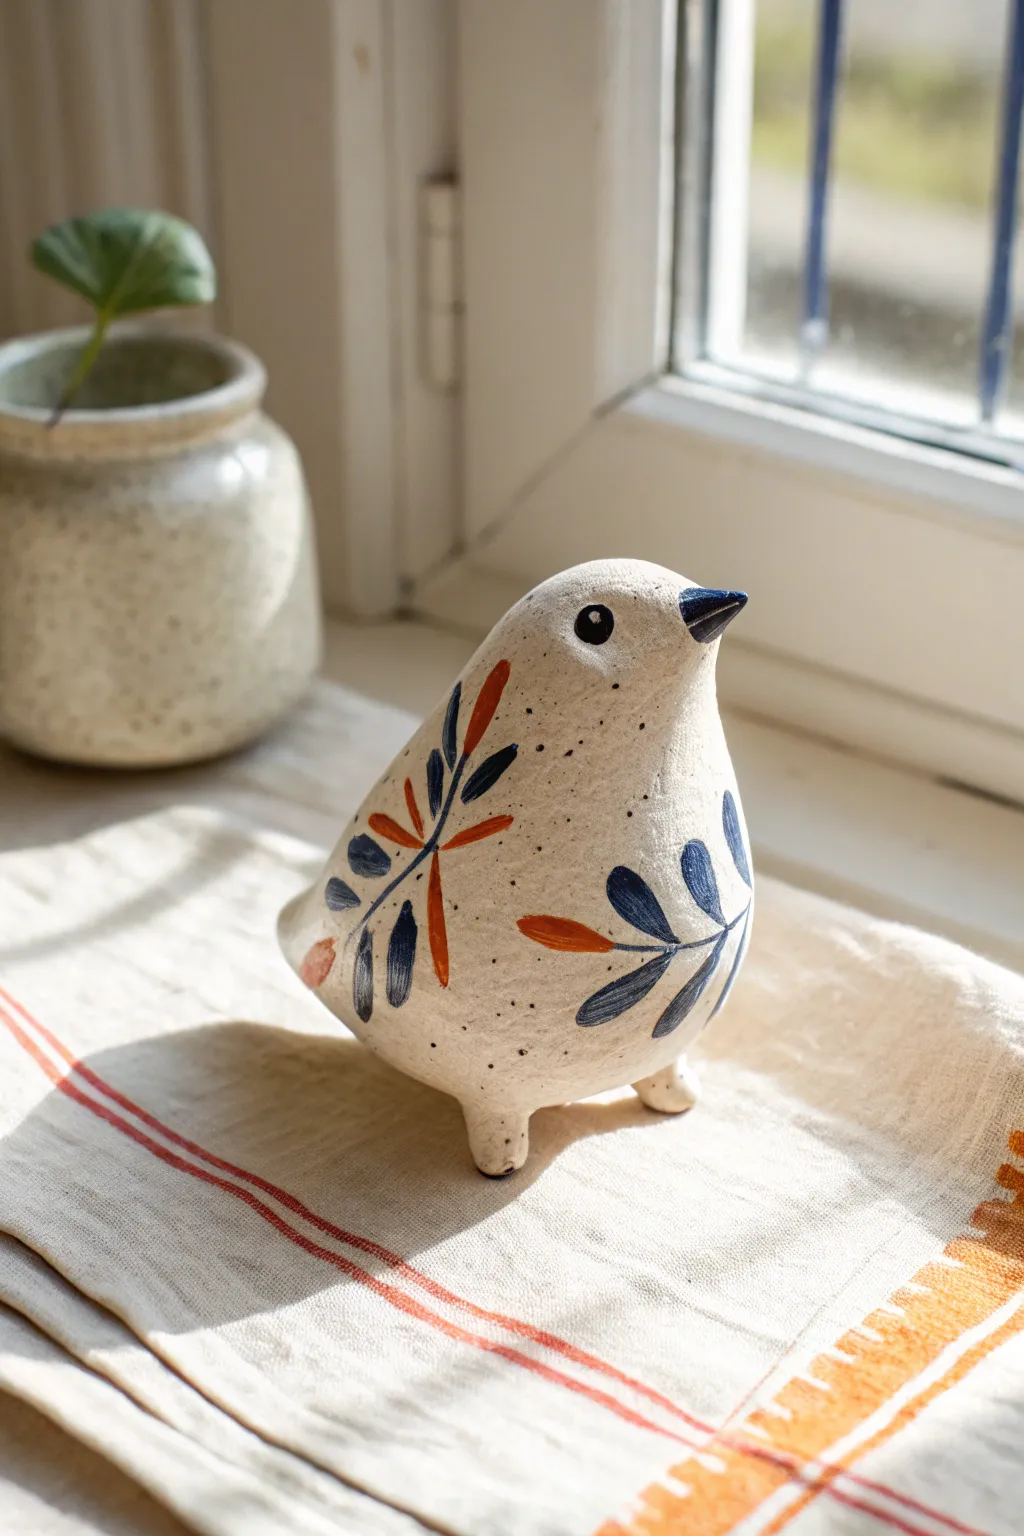
This charming little bird brings a touch of whimsy to any windowsill with its speckled cream finish and hand-painted folk art botanicals. Created from a simple pinch pot base, this project combines easy hand-building techniques with delicate underglaze decoration for a timeless, rustic look.
Step-by-Step
Materials
- White stoneware clay (preferably speckled)
- Small wooden paddle tool
- Pin tool or needle tool
- Rubber kidney rib
- Slip and score tool (or fork)
- Underglazes: Navy Blue, Terracotta/Burnt Orange, Black
- Fine detail paintbrush (size 0 or 00)
- Clear matte glaze
- Sponge
- Kiln access
Step 1: Forming the Body
-
Prepare the Clay:
Start with a ball of clay roughly the size of a tennis ball. Wedge it thoroughly to remove any air bubbles, ensuring the clay is smooth and uniform. -
Create the Pinch Pot:
Hold the ball in one hand and push your thumb into the center, stopping about a half-inch from the bottom. Gently pinch and turn the clay to open up the walls, aiming for an even thickness of about ¼ inch. -
Close the Form:
To turn this open cup into a hollow sphere (the bird’s body), gently collar the rim inwards. I like to fold the edges toward the center until they meet, trapping the air inside. -
Seal and Smooth:
Score the meeting edges, add a dab of slip, and seal the hole completely. Using a wooden paddle tool, gently tap the sphere to shape it into a slightly elongated egg shape, smoothing over the seam until it disappears. -
Pull the Tail:
Choose one end of the egg to be the back. Gently pinch and pull the clay outward to form a small, triangular tail nub that swoops slightly upward. -
Sculpt the Head:
On the opposite end, gently squeeze the form to define a neck area, then pull the clay up and forward to create the head. Use your thumb to smooth the transition so the neck isn’t too skinny. -
Define the Beak:
Pinch a tiny amount of clay at the very front of the face into a sharp, conical beak. Keep it small and integrated with the head rather than attaching a separate piece. -
Add Legs:
Roll two small, marble-sized balls of clay for the feet. Score and slip the bottom of the body and attach these near the front. Blend the seams thoroughly so the bird stands securely on its own.
Air Pocket Tip
Trapping air inside the hollow form actually gives the clay internal pressure, making it sturdier to handle while you sculpt the head and tail without collapsing the walls.
Step 2: Decoration & Glazing
-
Vent the Piece:
Once the clay is leather hard (stiff but cool to the touch), use your needle tool to poke a hidden hole in the bottom of the bird. This allows expanding air to escape during firing. -
Bisque Fire:
Allow the bird to dry slowly and completely (bone dry) before firing it in the kiln to bisque temperature (usually Cone 04). -
Prepare for Painting:
Wipe the bisque-fired bird with a damp sponge to remove any dust. This ensures the underglaze adheres properly to the surface. -
Paint the Foliage Stems:
Using your fine detail brush and Navy Blue underglaze, paint thin, curving lines on the wings and chest area to serve as the central stems for your leaves. -
Add the Leaves:
Paint almond-shaped leaves branching off the stems. Alternate between Navy Blue and Terracotta Orange for that classic folk art contrast visible in the photo. -
Detail the Face:
Carefully paint the beak fully black or dark navy. Add a small black circle for the eye, leaving a tiny pinprick of unpainted white space (or adding a white dot later) to create a ‘highlight’ or spark of life. -
Apply Speckles (Optional):
If your clay body isn’t naturally speckled, create a splatter effect. Load a toothbrush with watered-down black underglaze and flick the bristles to spray tiny dots across the bird’s back and chest. -
Clear Glaze Application:
Once the underglaze is completely dry, dip the bird into a clear matte glaze or brush on three even coats. Avoid gloss glazes if you want that natural, stony finish shown in the image. -
Final Firing:
Fire the piece again to the maturation temperature of your clay and glaze (typically Cone 5 or 6 for stoneware). Let the kiln cool completely before removing your new feathered friend.
Make It a Whistle
Turn this into a functional whistle by adding a fipple mechanism into the tail section before closing the form completely. Tune the sound by adjusting the hole size.
Place your finished bird near a sunny window where the natural light can highlight the delicate painting and earthy textures
Squiggle-Texture Vases

Embrace the beauty of free-flowing lines with this striking vase project that combines classic form with modern, graphic movement. The contrast between the creamy, textured stoneware and the bold black squiggles creates a playful yet sophisticated piece perfect for minimalist decor.
Step-by-Step Tutorial
Materials
- Stoneware clay (buff or speckled)
- Pottery wheel (or coil building supplies)
- Black underglaze
- Fine-point detail brush
- Wax resist (optional)
- Loop tool for trimming
- Sponge
- Matte clear glaze
- Rib tool
- Wire cutter
- Kiln
Step 1: Shaping the Vessel
-
Center and open:
Begin with about 3-4 pounds of wedged clay. Throw it onto the wheel head and center it firmly. Open the clay to create a floor that is roughly 4 inches wide, compressing the bottom well to prevent cracking. -
Pull the cylinder:
Pull the walls up into a tall, even cylinder. Aim for a height of at least 10-12 inches, keeping the walls relatively thick at the bottom to support the eventual curves. -
Belly out:
From the inside, gently push the clay outward around the mid-section to create a generous belly. Use a rib on the outside to refine this curve and smooth the surface. -
Collar the neck:
As you move upward, collar the clay in significantly to form a narrow neck. Do this gradually in multiple passes to avoid buckling the clay walls. -
Flare the rim:
At the very top, gently flare the clay outward to create a distinct, rolled lip. This gives the vase a classic silhouette and a sturdy visual finish. -
Refine the surface:
While the wheel is spinning slowly, use a metal rib to remove all throwing lines and slurry, leaving a smooth, clean canvas for your design. Let the piece dry to a leather-hard state.
Jittery Lines?
If your hand shakes while painting long lines, rest your pinky finger against the dry surface of the pot to stabilize your hand as you pull the brush downward.
Step 2: Trimming and Prep
-
Trim the foot:
Once leather hard, center the vase upside down on the wheel. Use a loop tool to trim away excess weight from the bottom and carve a clean foot ring. -
Smooth the texture:
If you want that slightly sandy, stone-like texture seen in the photo, wipe the surface with a slightly damp sponge to expose the grog in the clay body. -
Bisque fire:
Allow the vase to dry completely (bone dry) before loading it into the kiln for a bisque firing.
Step 3: Painting the Pattern
-
Plan your path:
Before painting, visualize the squiggles. They should flow vertically but meander left and right, interlocking without touching. You can lightly sketch the path with a pencil if you’re nervous; the graphite will burn off. -
Load the brush:
Use a high-quality black underglaze. I like to thin it just slightly with water so it flows like ink. Load a long-bristled liner brush or detail brush fully. -
Paint the first wave:
Start at the rim and paint a continuous, undulating line down to the base. Vary the width of your curves—some tight loops, some broad sweeps. -
Interlock the designs:
Paint the next vertical squiggle line next to the first. Let the curves of the new line nestle into the negative spaces of the previous one, creating a puzzle-piece effect. -
Maintain line weight:
Try to keep your brush pressure consistent to maintain an even line thickness. If the brush runs dry, stopping at a curve’s apex makes re-starting less noticeable. -
Clean up edges:
If you smudge a line, wait for it to dry and gently scrape the mistake away with an X-Acto knife or needle tool.
Texture Twist
Instead of painting, use a carving tool to incise the squiggles into the clay, then fill the grooves with black slip for an inlaid Mishima effect.
Step 4: Finishing
-
Apply clear glaze:
Once the underglaze is dry, dip the entire vase into a matte clear glaze. A matte finish is crucial here to recreate the organic, non-shiny look of the original artwork. -
Wipe the foot:
Thoroughly sponge off any glaze from the foot ring to prevent the pot from sticking to the kiln shelf. -
Final fire:
Fire the piece to the maturity temperature of your clay body (usually Cone 5, 6, or 10 depending on your stoneware).
Place your finished vase in a spot with good natural light to highlight the stunning contrast of the squiggles.
Sgraffito Story Plates
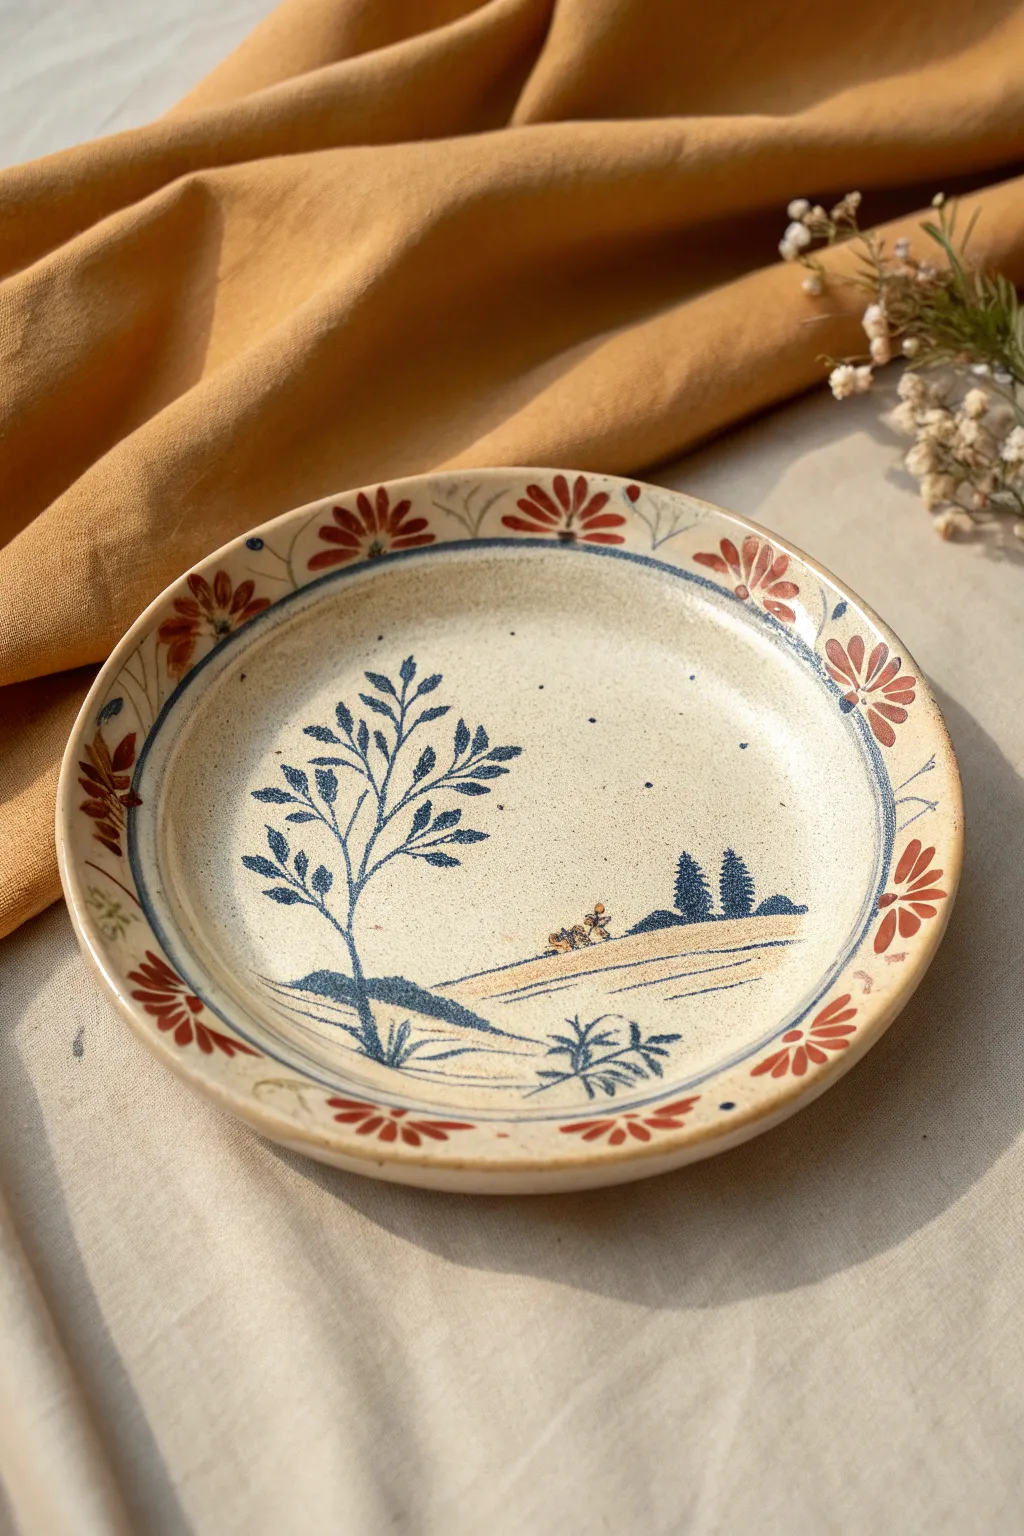
Capture the charm of a rustic countryside with this hand-painted ceramic plate featuring a serene blue landscape and warm floral border. The speckled creamy glaze and exposed clay rim give this piece a timeless, heirloom quality perfect for display or daily use.
Detailed Instructions
Materials
- Stoneware clay body (buff or speckled)
- Damp sponge
- Rolling pin and guide slats (optional)
- Plate mold or slump mold
- Potter’s wheel (optional, for trimming)
- Blue underglaze (cobalt or navy)
- Red-orange underglaze (terracotta or rust)
- Fine detail brush (liner brush)
- Small round brush
- Clear matte or satin glaze
- Needle tool
- Kiln
Step 1: Forming the Plate
-
Roll out the slab:
Start by rolling out a slab of stoneware clay to a uniform thickness, roughly 1/4 inch. Smooth the surface with a rib tool to compress the clay particles and remove any canvas textures. -
Cut the circle:
Place a circular template or plate mold over your slab and cut around it using a needle tool. Ensure the circle is slightly larger than your desired finished size to account for shrinkage. -
Shape the form:
Gently press your clay circle into a slump mold or over a hump mold to create the plate’s curvature. Smooth the rim with a damp sponge so the edge feels rounded and soft. -
Create the foot:
Once leather hard, attach a foot ring if desired, or simply trim the bottom flat. I like to sponge the rim again at this stage to expose some of the raw clay texture. -
Define the painting area:
Lightly incise or paint a thin blue guide circle about an inch inward from the rim to separate the central scene from the decorative border. Use a banding wheel to get a clean, continuous line.
Step 2: Painting the Scene
-
Establish the horizon:
Using diluted blue underglaze, paint gentle, sweeping lines across the bottom third of the plate to suggest rolling hills. Keep the wash light to create a sense of distance. -
Paint the hero tree:
With your fine liner brush and concentrated blue underglaze, stroke upward on the left side to create the main tree trunk. Branch out delicately, using quick, tapered strokes for the leaves to mimic a windblown look. -
Add distant pines:
On the right side of the horizon line, dab small triangular shapes using the tip of your round brush to form a cluster of distant pine trees. Ensure these are solid blue to contrast with the lighter ground. -
Detail the landscape:
Add tiny details near the center horizon, such as small figures or a cottage, using extremely light touches of brown or mixed underglaze. Keep these abstract and minimal. -
Ground the scene:
Add a few darker tufts of grass in the immediate foreground using the liner brush to give the landscape depth and perspective.
Smudged Lines?
If you make a mistake with the underglaze, let it dry completely, then gently scrape the error away with a sharp needle tool rather than wiping it while wet.
Step 3: The Floral Rim
-
Mark the spacing:
Lightly mark equidistant points around the rim of the plate where your flower motifs will go. This ensures your pattern remains even all the way around. -
Paint the petals:
Using the red-orange underglaze and a small round brush, press down and lift up to create teardrop-shaped petals radiating from the rim inward. aim for groups of three or four petals. -
Add connecting details:
Between the flower clusters, paint faint, thin stems or leaves using a diluted mix of the blue or green underglaze to connect the design visually. -
Bisque fire:
Allow the plate to dry completely, then load it into the kiln for a bisque firing (usually around Cone 04) to set the shape and underglaze design.
Watercolor Effect
Treat your underglazes like watercolors. Dilute them with water for the landscape background to get transparent washes, but keep the pigment thick for the dark tree lines.
Step 4: Glazing and Finishing
-
Wax resist (optional):
If you want the underglaze colors to remain very crisp, you can apply wax resist over the painted areas, though a good clear glaze usually works fine without it. -
Apply clear glaze:
Dip the plate into a clear matte or satin glaze. Shake off excess glaze gently and ensure the coating is even, as pooling can obscure your fine line work. -
Wipe the foot:
Use a damp sponge to meticulously wipe all glaze off the bottom foot ring to prevent the plate from sticking to the kiln shelf. -
Final firing:
Fire the plate to the maturation temperature of your clay body (typically Cone 5 or 6 for stoneware). Allow the kiln to cool naturally before unloading.
Once cooled, your plate is ready to bring a touch of pastoral beauty to your next meal
Hanging Ceramic Totems
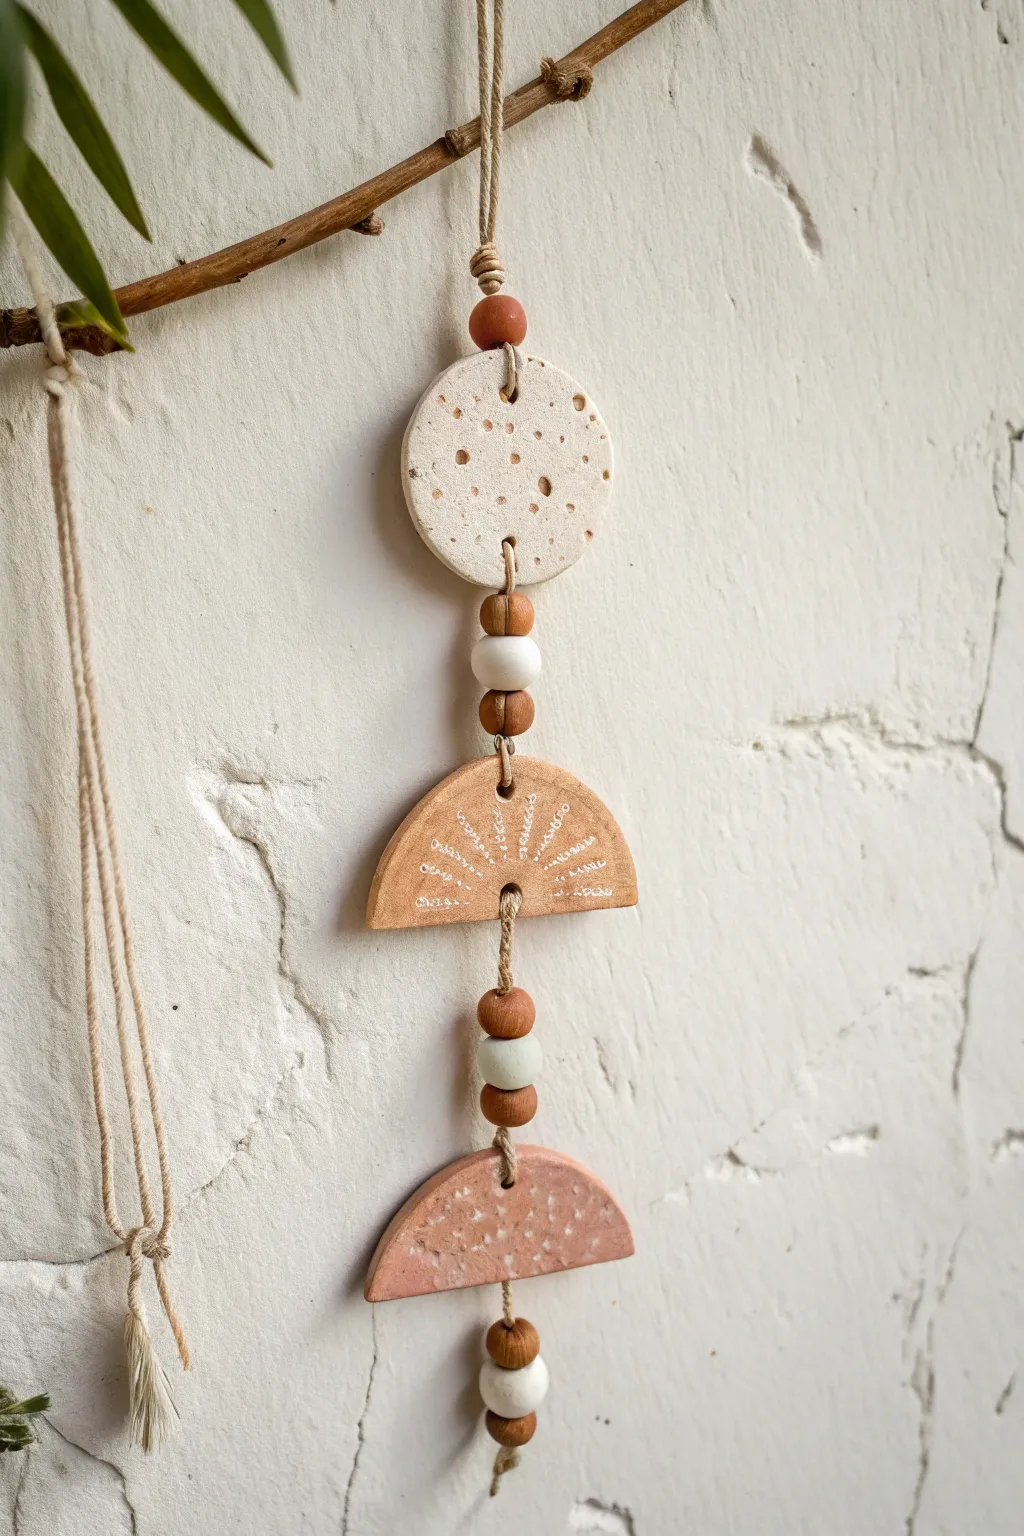
This charming ceramic wall hanging combines natural textures with warm, earthy tones to create a bohemian focal point. By layering simple geometric shapes with wooden beads, you’ll craft a delightfully tactile piece perfect for adding a sense of calm to any wall.
How-To Guide
Materials
- White or speckled polymer clay (or air-dry clay)
- Terracotta colored clay
- Pink or dusty rose colored clay
- Rolling pin
- Circle cookie cutters (approx. 2.5-3 inches)
- Knife or clay blade
- Needle tool or toothpick
- Coarse sand or salt (for texture)
- White acrylic paint (optional, for inlay)
- Jute twine or hemp cord
- Selection of wooden beads (natural and white painted, assorted sizes)
- Small drill bit or large needle (for holes)
- Oven (if using polymer clay)
Step 1: Creating the Clay Elements
-
Prepare the Speckled Circle:
Start by conditioning your white clay. To achieve the cratered texture shown in the top piece, knead in a small amount of coarse sand or even salt before rolling it out to about 1/4 inch thickness. -
Cut the Top Shape:
Press your round cutter into the textured white clay to create a perfect circle. Use your finger to gently soften the sharp edges left by the cutter. -
Create the Bead Holes:
Using a needle tool or a straw, punch two holes in the circle: one at the very top (for hanging) and one at the very bottom (to connect to the next piece). Ensure the holes are large enough for your twine to pass through twice. -
Form the Middle Arch:
Roll out your terracotta-colored clay. Cut a full circle, then slice it perfectly in half to create two semi-circles. You will use one for the middle section. -
Add Sun Ray Details:
On the terracotta semi-circle, use a needle tool to scratch radiating lines and tiny dots extending from the center of the straight edge outward, resembling a sunburst. Press firmly so the texture remains visible after baking. -
Prepare the Bottom Arch:
Repeat the rolling and cutting process with your pink clay to create another semi-circle. For the speckled look here, I like to mix in chopped bits of dried hard clay or coarse pepper before rolling. -
Finalize Holes:
Punch top and bottom holes in the middle terracotta arch. For the bottom pink arch, you only need one hole in the center of the straight edge and one at the bottom of the curve. -
Bake or Dry:
If using polymer clay, bake the pieces according to the package instructions (usually 275°F for 15-30 minutes). If using air-dry clay, let them cure flat for 24-48 hours.
Make It Look Stone
For a realistic stone texture on the white circle, gently press a piece of rough sandpaper or a crumpled ball of aluminum foil onto the raw clay surface before baking.
Step 2: Finishing and Assembly
-
Highlight the Etching:
Once cool, create a whitewash by watering down white acrylic paint. Brushing this over the terracotta sunburst and immediately wiping the surface with a cloth will leave white paint settled beautifully in the etched grooves. -
Start the Assembly:
Cut a long length of jute twine, doubling it over to create a loop at the top for hanging. Tie a knot about 3 inches down from the loop. -
Thread the Top Section:
Thread the two loose ends of the twine through a small wooden bead, then down through the top hole of your white circle, and out through the bottom hole. -
Add Spacer Beads:
Thread on a sequence of beads between the clay pieces: one small natural wood bead, one large white bead, and another small natural bead. This creates visual separation. -
Attach Middle Piece:
Pass the twine through the top hole of the terracotta arch. Tie a sturdy knot underneath the hole on the backside to keep the piece level, then thread the twine down through the bottom hole. -
Thread Lower Beads:
Add your second bead sequence: a small natural bead, a medium sage or white bead, and another small natural bead. -
Attach Bottom Piece:
Thread the twine through the top hole of the pink semi-circle. Again, secure with a hidden knot on the back to prevent it from sliding down. -
Final Tassel Detail:
Thread a final set of beads below the pink arch. Tie a large, secure knot at the very bottom. You can fray the remaining ends of the twine to create a small tassel effect.
Use Driftwood
Instead of a simple loop, tie the top of your totem to a small piece of driftwood or specific tree branch found on a walk to enhance the nature-inspired aesthetic.
Hang your totem near a window where the light can catch the textures and cast interesting shadows throughout the day