Whenever I’m craving a quick jewelry win, I reach for red clay beads because they look bold and instantly pulled-together on your wrist. Here are my favorite red clay bracelet ideas—from classic everyday combos to a few studio-style twists that still feel totally doable at home.
Classic Solid Red Heishi Bracelet
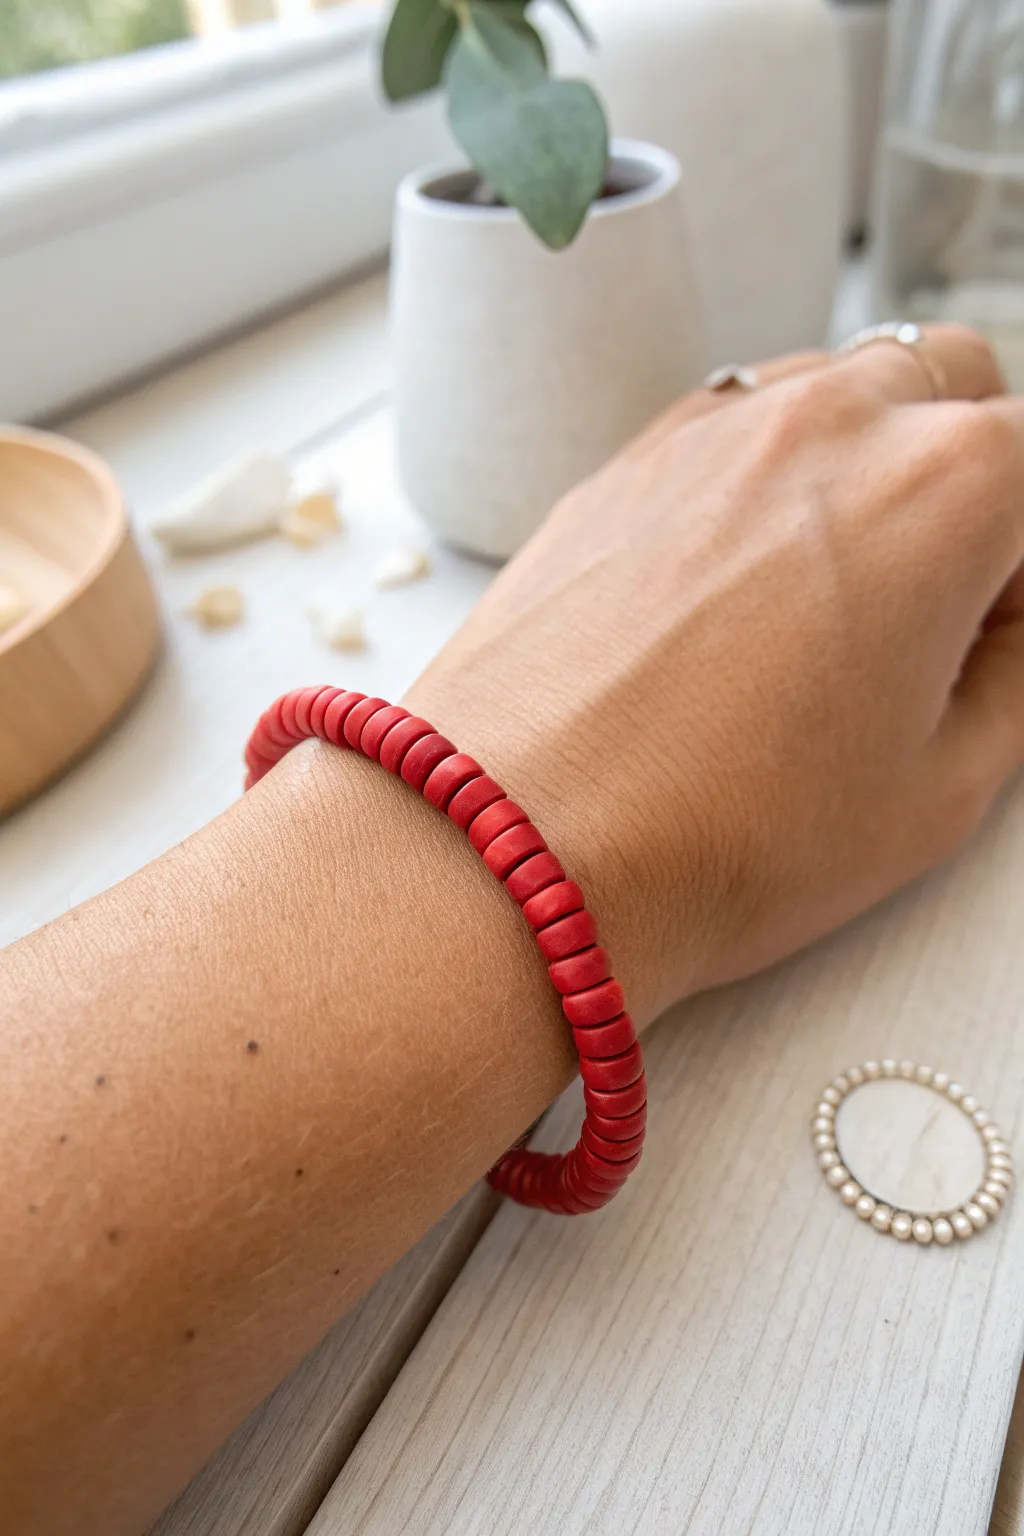
Embrace minimalist chic with a string of uniform, matte red clay discs that add a pop of color to any outfit. This project focuses on mastering the simple elegance of a single-color strand using polymery clay heishi beads.
Step-by-Step
Materials
- Red polymer clay (e.g., Fimo Soft, Sculpey Premo in ‘Cadmium Red’ or ‘Pomegranate’)
- Clay roller or pasta machine
- Small circle cutter (approx. 4mm – 6mm diameter) or a drinking straw
- Toothpick or bead piercing pin
- Baking sheet with parchment paper
- Elastic stretch cord (0.7mm or 0.8mm clear)
- Jewelry glue or super glue
- Scissors or wire cutters
Step 1: Prepping the Clay Discs
-
Condition the clay:
Start by warming the red polymer clay in your hands, kneading it until it is soft, pliable, and free of any air bubbles. -
Roll out a sheet:
Using your acrylic roller or a pasta machine on a medium setting, roll the clay out into an even sheet. Aim for a thickness of about 2mm to 3mm for nice chunky beads like the ones pictured. -
Cut the circles:
Press your small circle cutter or straw firmly into the clay sheet to punch out discs. You will need roughly 40-50 discs for an average wrist, but punch a few extras just in case. -
Release the shapes:
Gently poke the clay circles out of the cutter or straw using the blunt end of a skewer if they get stuck. -
Pierce the center:
Take a toothpick or piercing pin and carefully poke a hole directly in the center of each disc. Rotate the pin slightly as you push through to keep the hole round and clean. -
Refine the edges:
Inspect each bead. If the edges look a bit ragged from the cutting process, gently smooth them with your fingertip to get that polished, uniform look. -
Arrange for baking:
Place the beads flat on a baking sheet lined with parchment paper. Ensure they aren’t touching to prevent them from fusing together. -
Bake the beads:
Bake the clay according to the manufacturer’s package instructions (usually around 275°F/130°C for 15-30 minutes). Let them cool completely before handling.
Step 2: Assembling the Bracelet
-
Measure the cord:
Cut a piece of elastic cord about 10-12 inches long. This gives you plenty of slack for tying the knot later. -
Pre-stretch the elastic:
Firmly pull on the elastic cord a few times. This prevents the bracelet from loosening up after you wear it for the first time. -
Secure the end:
Place a piece of tape over one end of the cord or attach a binder clip to stop the beads from sliding off while you work. -
Begin stringing:
Thread the cooled red beads onto the elastic cord one by one. I find it therapeutic to establish a rhythm here. -
Check the fit:
Wrap the strand around your wrist occasionally to check the length. The beads should sit comfortably around your wrist without pinching or leaving large gaps where the elastic shows. -
Prepare the knot:
Once you are happy with the length, remove the tape or clip. Hold both ends of the elastic and bring the two end beads together. -
Tie it off:
Tie a surgeon’s knot (right over left, then left over right twice) and pull it tight. The elastic should stretch slightly as you secure the knot. -
Add security adhesive:
Dab a tiny drop of jewelry glue or super glue directly onto the knot. Wait a moment for it to tack up. -
Trim the excess:
Using sharp scissors, trim the tails of the elastic cord close to the knot, but leave about 1-2mm just to be safe. If possible, tuck the knot inside the hole of the nearest bead.
Smooth Operator
To get ultra-smooth bead edges, dust your clay lightly with cornstarch before cutting. It prevents sticking and reduces fingerprints.
Add a Focal Point
Break up the solid red pattern by adding a single gold spacer bead or a small cowrie shell charm to the center for a beachy vibe.
Enjoy wearing your vibrant new accessory stacked with others or shining on its own


Red and White Candy-Stripe Pattern
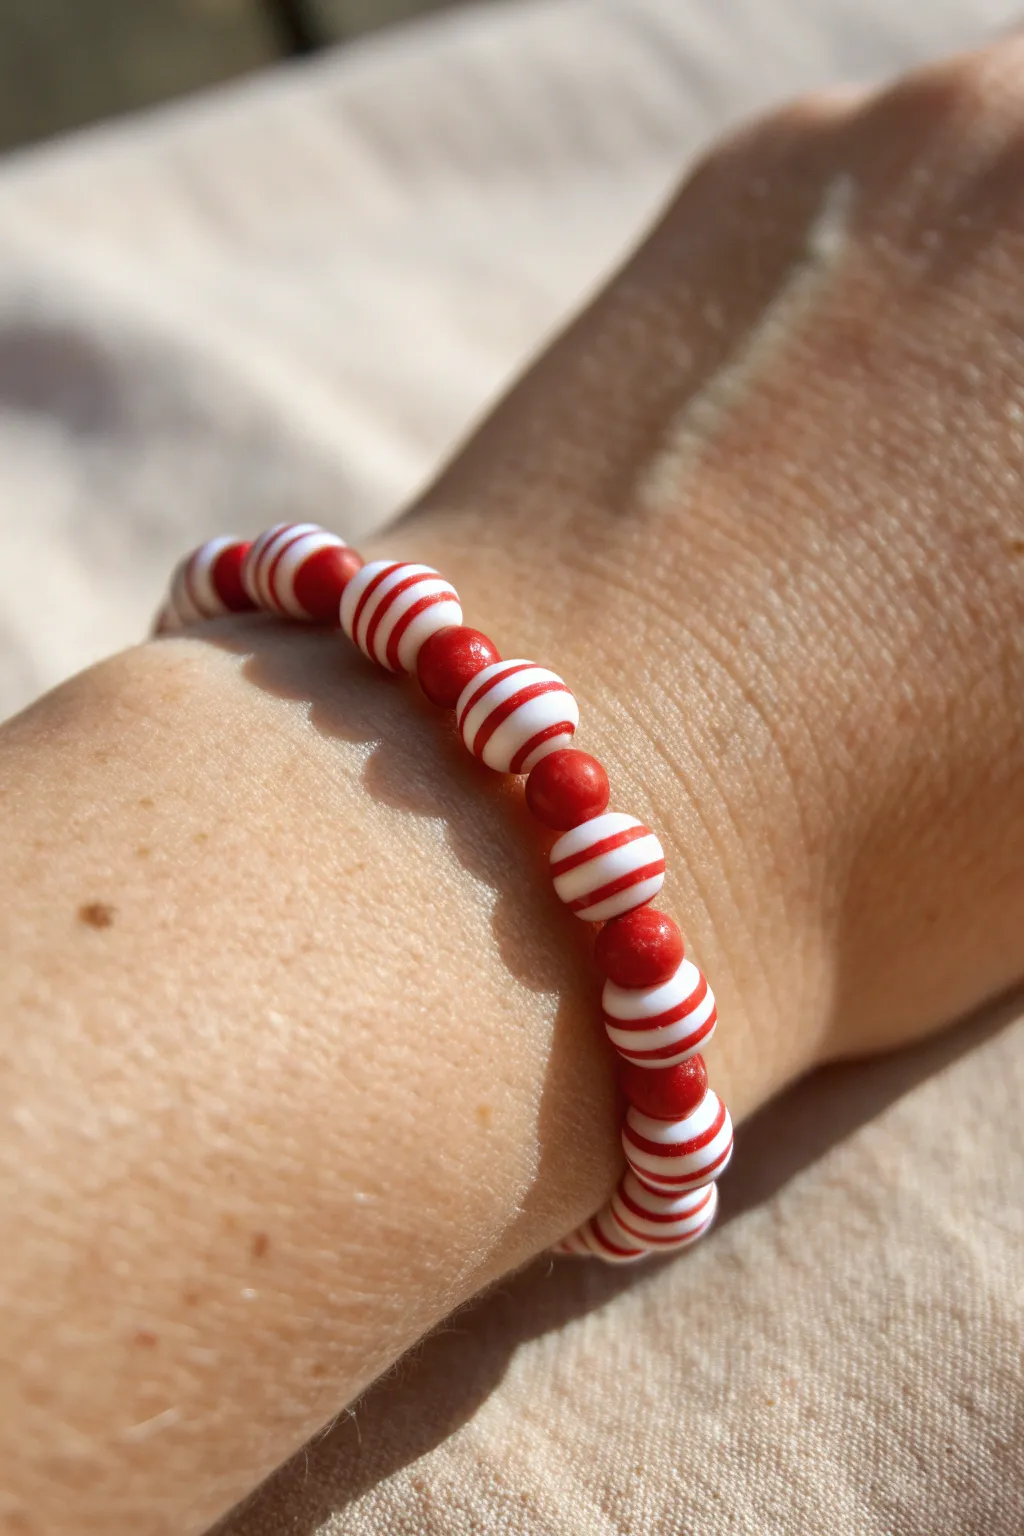
Capture the sweetness of classic peppermint candies with this fun and festive clay bracelet. The rhythmic pattern of solid red and swirled red-and-white beads creates a playful accessory perfect for adding a pop of color to any outfit.
Step-by-Step Tutorial
Materials
- Red polymer clay
- White polymer clay
- Elastic beading cord (0.8mm or 1mm)
- Clay roller or acrylic rolling pin
- Tissue blade or sharp craft knife
- Bead piercing pins or toothpicks
- Glossy polymer clay varnish (optional)
- Soft paintbrush
- Baking sheet
- Parchment paper
Step 1: Creating the Canes
-
Condition the Clay:
Begin by thoroughly kneading both your red and white polymer clay separately until they are soft, pliable, and free of cracks. This ensures the colors blend smoothly without crumbling. -
Form the Base Logs:
Roll a portion of the white clay into a thick log, about 1/2 inch in diameter. Clean your hands, then do the same with the red clay. -
Create Thin Stripes:
Flatten a piece of red clay into a thin sheet using your roller. Use your blade to cut thin, straight strips from this sheet. -
Assemble the Cane:
Place the thin red strips lengthwise along the white log, spacing them out evenly around the circumference. You can vary the thickness of the strips to mimic organic candy patterns. -
Reduce the Cane:
Gently squeeze and roll the log on your work surface to adhere the strips and lengthen the snake. Continue rolling until the log is roughly the thickness you want your final beads to be. -
Add the Twist:
Hold one end of the snake in each hand. Slowly twist your hands in opposite directions. The red stripes will begin to spiral around the white center, creating that classic peppermint look.
Dirty Clay Blues?
White clay picks up everything! Wipe your hands and work surface with a baby wipe or alcohol swab before switching from red to white clay to keep the white pristine.
Step 2: Forming the Beads
-
Cut Bead Segments:
Once your twisted cane is uniform, use your tissue blade to slice it into equal-sized segments. Aim for pieces that are roughly cubic or slightly cylindrical. -
Roll the Spheres:
Take each segment and gently roll it between your palms. Use a light, circular motion to smooth out the edges until you have a perfect sphere with swirled stripes. -
Make Solid Spacers:
Roll out a separate snake of just the solid red clay. Cut this into smaller segments—about half the volume of the swirled beads—and roll them into small, solid red spheres. -
Pierce the Holes:
Hold a bead gently between your thumb and forefinger. Using a bead pin, carefully drill a hole through the center. I find twisting the pin as I push helps prevent the bead from squishing out of shape. -
Check Hole Size:
Ensure the hole is wide enough to accommodate your elastic cord later. Repeat this for every bead.
Step 3: Baking and Assembly
-
Prepare for Baking:
Arrange all your pierced beads on a baking sheet lined with parchment paper. If you have a bead rack, you can suspend them on pins to keep them perfectly round. -
Bake:
Bake the beads according to the package directions of your specific brand of polymer clay. Let them cool completely before handling. -
Varnish (Optional):
For that shiny, hard-candy finish, brush a coat of glossy varnish onto each bead. Let them dry fully on a toothpick or wire rack. -
Measure the Cord:
Cut a length of elastic cord about 10 inches long. Pre-stretch the cord by pulling on it gently a few times to prevent the bracelet from sagging later. -
String the Beads:
Thread your beads onto the elastic, alternating between the large swirled beads and the smaller solid red spacers. -
Knot the Bracelet:
Once you’ve reached the desired length for your wrist, tie a strong surgeon’s knot (right over left, left over right). Pull it tight. -
Secure and Trim:
Add a tiny dab of super glue to the knot for extra security. Once dry, trim the excess cord ends close to the knot, and tuck the knot inside one of the larger beads.
Pro Tip: Refrigerate
If your cane becomes too soft or sticky while twisting, pop it in the fridge for 10 minutes. Chilled clay slices cleaner and deforms less.
Slip on your sweet new creation and enjoy the handcrafted charm on your wrist


Red and Gold Spacer Bracelet
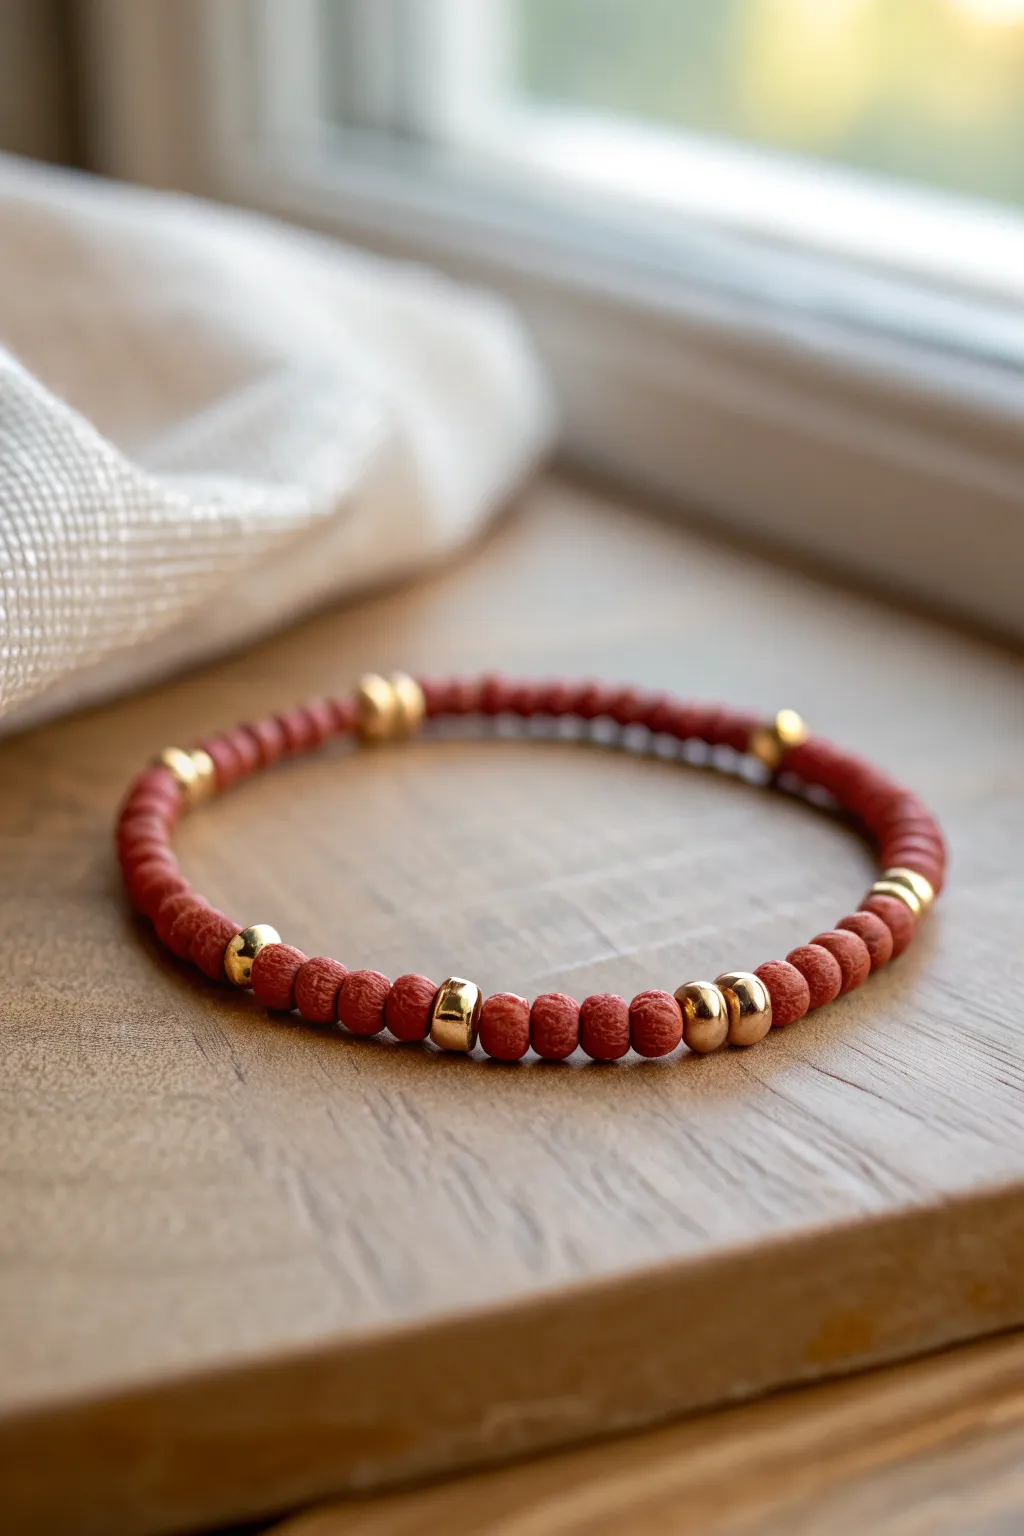
This rustic yet elegant bracelet pairs the earthy warmth of textured red clay beads with the sophistication of polished gold spacers. The natural variation in the clay offers a beautiful contrast against the smooth metallic shine, creating a versatile accessory for any occasion.
Step-by-Step
Materials
- Red polymer clay (terracotta color) or air-dry terracotta clay
- Gold tube spacer beads (approx. 4mm wide)
- Gold round spacer beads (approx. 4mm)
- Elastic beading cord (0.8mm clear)
- Beading needle (optional but helpful)
- Superglue or jewelry adhesive
- Small rolling pin or acrylic roller
- Toothpick or bead piercing tool
- Fine-grit sandpaper (optional)
- Scissors
Step 1: Preparing the Clay Beads
-
Condition the clay:
Begin by warming up your red polymer clay in your hands until it is soft and pliable. If you stick with real terracotta air-dry clay, knead it briefly to remove air bubbles. -
Roll a snake:
Roll the clay out into a long, even snake that is roughly 6mm in diameter. Keeping the thickness consistent here ensures your beads will all be the same size later. -
Cut equal sections:
Use a craft knife or blade to slice the snake into equal segments, each about 5-6mm wide. -
Form the spheres:
Roll each small segment between your palms or fingers to create a round bead shape. Don’t worry if they aren’t perfectly smooth; the slight texture adds to the rustic look shown in the photo. -
Create texture (optional):
To mimic the rough, stone-like surface in the image, you can gently roll the beads over a piece of coarse sandpaper or dab them lightly with a stiff toothbrush. -
Pierce the holes:
Carefully poke a hole through the center of each bead using a toothpick or piercing tool. I usually rotate the bead while piercing to keep the hole centered. -
Bake or dry:
If using polymer clay, bake according to the package instructions (usually 275°F/135°C for 15-30 minutes). If using air-dry clay, let them sit for 24-48 hours until hardened.
Pro Tip: Texture Trick
To get that distinct pitted ‘lava rock’ look on your clay, roll the unbaked beads lightly in a small amount of salt or sugar. After baking, wash the beads to dissolve the crystals.
Step 2: Assembling the Bracelet
-
Measure the cord:
Cut a piece of elastic cord about 10-12 inches long. This generous length makes tying the final knot much easier. -
Pre-stretch the elastic:
Give the cord a few firm tugs. This pre-stretching step is crucial to prevent the bracelet from sagging after you wear it a few times. -
Secure the end:
Place a piece of tape or a bead stopper on one end of the cord so your beads don’t slide off while you work. -
Begin the pattern:
Thread on a sequence of approximately 10 red clay beads to start the base of the design. -
Add first gold accent:
Slide on one gold tube spacer followed by a red clay bead, matching the pattern seen in the reference image. -
Create the focal section:
Add a few more red beads, then introduce a grouping of gold spacers. In the photo, there’s a nice variation of single gold beads and double gold beads separated by clay. -
Vary the spacers:
Continue beading, inserting gold spacers at irregular intervals. Try placing two gold spacers side-by-side for a bolder metallic flash in certain sections. -
Check the size:
Wrap the strand around your wrist to check the fit. It should sit comfortably without pinching skin or sliding off the hand too easily. -
Tie the knot:
Remove the tape and tie the ends together using a surgeon’s knot (right over left, left over right, and pull tight). Pull the elastic taut to secure the knot firmly. -
Apply adhesive:
Place a tiny drop of jewelry glue or superglue strictly on the knot itself. Be careful not to get glue on the beads, as it can spoil the matte finish. -
Hide the knot:
Before the glue fully sets, try to slide the knot inside the hole of the nearest gold spacer bead if the hole is large enough. This gives a professional finish. -
Trim excess cord:
Once the glue is completely dry, trim the excess cord ends close to the bead/knot with sharp scissors.
Level Up: Essential Oils
Use unglazed terracotta or porous lava stone clay to create a diffuser bracelet. Add a drop of essential oil to the red beads, and the porous surface will hold the scent all day.
Enjoy styling your new handcrafted accessory with other earth-toned pieces or wearing it solo for a pop of rustic color


Red and Black Minimal Contrast
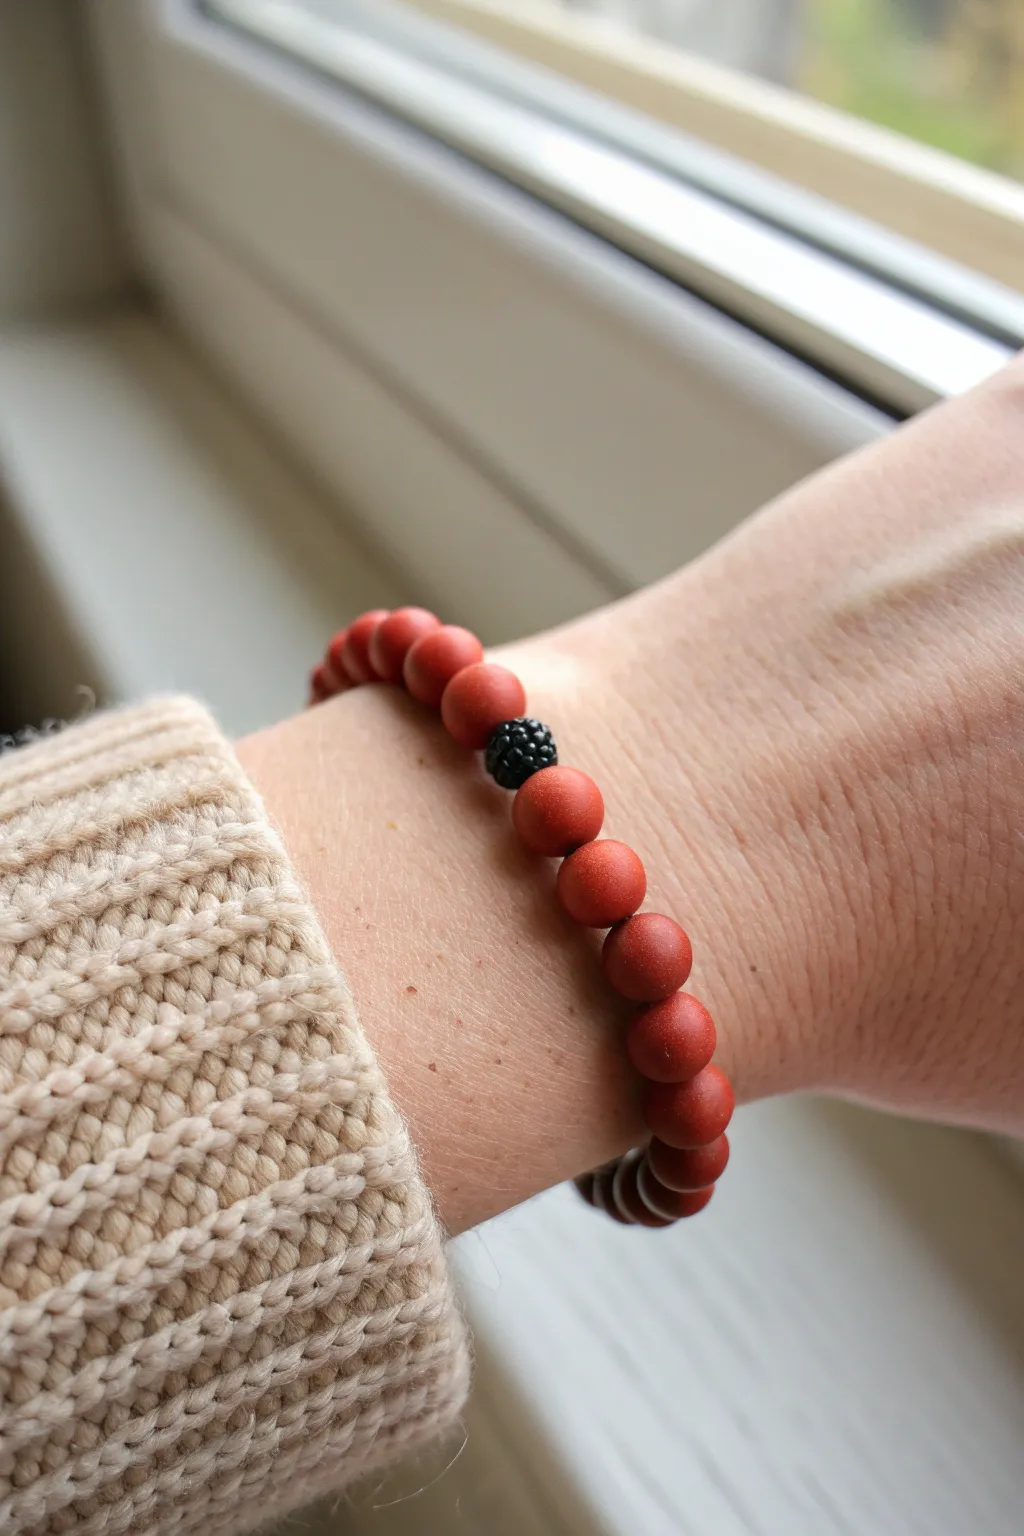
This understated accessory balances the earthy warmth of matte terracotta-colored clay beads with a striking, textured black focal point. Its simple design makes it an ideal beginner project that looks professionally crafted thanks to the high-quality finish of the clay.
Step-by-Step Tutorial
Materials
- Red polymer clay (terracotta or brick red)
- Black polymer clay
- Elastic stretch cord (0.8mm or 1mm)
- Bead rolling tool or acrylic block
- Needle tool or toothpick
- Medium grit sandpaper (optional)
- Super glue or jewelry cement
- Oven for baking
- Cornstarch or baby powder (for texture work)
Step 1: Creating the Clay Beads
-
Condition the Red Clay:
Begin by warming the red polymer clay in your hands, kneading it thoroughly until it is soft and pliable to prevent cracks during baking. -
Portion the Clay:
Roll the red clay into a long, even log or snake shape. Use a tissue blade or knife to slice the log into approximately 20-22 equal segments to ensure uniform bead size. -
Roll Spheres:
Take each red segment and roll it between your palms to form a rough ball. For a perfectly round shape, finish by rolling them in a circular motion on a flat work surface using an acrylic block. -
Create the Black Focal Bead:
Condition a small amount of black clay and roll it into a sphere slightly smaller than your red beads to account for the added texture layer. -
Texture the Black Bead:
To mimic the blackberry-like texture shown, gently poke the surface of the black bead repeatedly with a blunt tool or roll it lightly over coarse sandpaper. Alternatively, make many tiny black spheres and press them onto the core black bead. -
Pierce the Beads:
Using a needle tool, carefully pierce a hole through the center of each bead. I find twisting the needle while pushing helps maintain the round shape without squashing the clay. -
Refine the Shape:
After piercing, give each bead a quick, gentle roll between your fingers to smooth out any distortion caused by the needle.
Step 2: Baking and Finishing
-
Prepare for Baking:
Place your raw beads on a baking sheet lined with parchment paper. Ensure they aren’t touching each other to prevent sticking. -
Bake the Clay:
Bake the beads according to the specific temperature and time instructions on your brand of polymer clay packaging. Do not rush this step. -
Cool Down:
Allow the beads to cool completely in the oven with the door cracked open. This gradual cooling tempers the clay and makes it stronger. -
Matte Finish:
If your beads came out slightly shiny, you can gently buff them with a fine-grit sanding sponge to achieve that soft, matte terracotta look.
Hole Distortion?
If piercing squashes your beads, try letting the raw clay sit in the fridge for 10 minutes to firm up before making holes.
Step 3: Assembly
-
Measure the Cord:
Cut a piece of elastic cord about 10-12 inches long. This extra length makes tying the final knot much easier. -
Pre-stretch the Cord:
Give the elastic cord a few firm tugs. This pre-stretching prevents the bracelet from becoming loose and sagging after the first few wears. -
String the Beads:
Thread the red beads onto the elastic cord. Position the textured black bead in the center, or wherever you prefer the focal point to sit. -
Check the Fit:
Wrap the strung beads around your wrist to check the size. Add or remove red beads until it sits comfortably without digging into your skin. -
Tie the Knot:
Tie a surgeon’s knot (loop the cord through twice on the first pass) and pull it tight. Follow with a standard overhand knot to secure it. -
Secure the Knot:
Apply a tiny drop of super glue or jewelry cement directly onto the knot. Let it dry completely before trimming the excess cord close to the knot. -
Hide the Knot:
If the hole size allows, gently tug the bracelet so the knotted section slides inside one of the adjacent clay beads, hiding it from view.
Metallic Accent
Add small gold spacer beads on either side of the black focal bead to elevate the look from casual to chic.
Slip on your new custom-sized bracelet and enjoy the tactile feel of the handmade clay beads

The Complete Guide to Pottery Troubleshooting
Uncover the most common ceramic mistakes—from cracking clay to failed glazes—and learn how to fix them fast.
Red Ombre Fade Bracelet
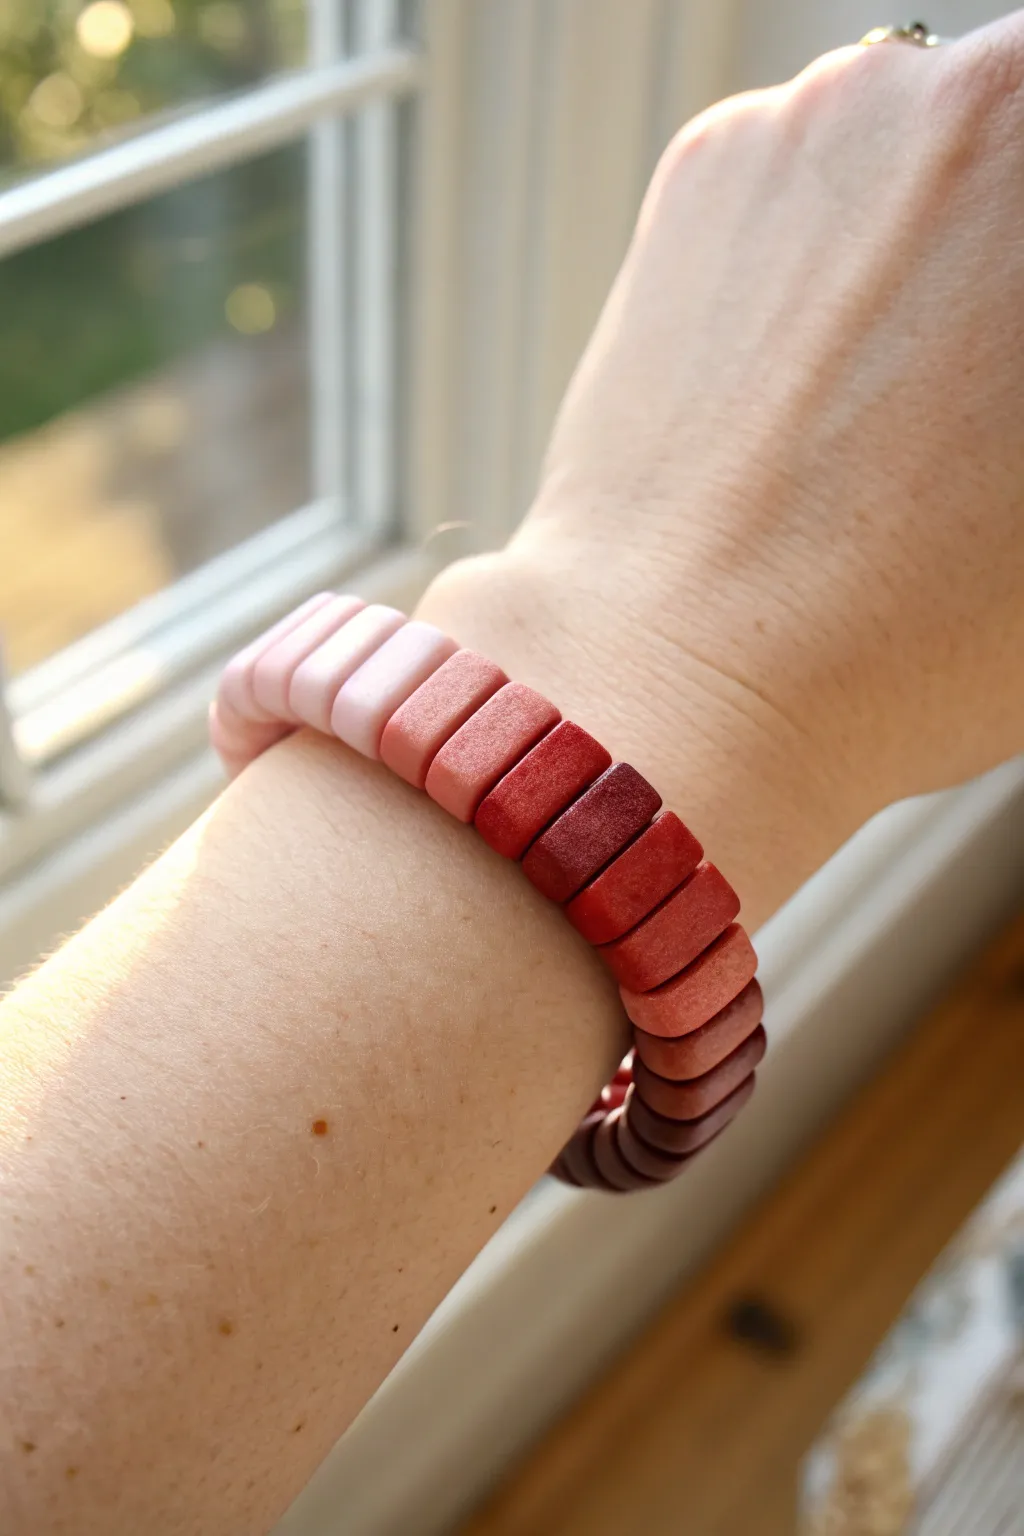
This elegant bracelet captures the warm hues of a sunset with its seamless transition from pale blush to deep maroon. The simple rectangular profile of the beads gives it a modern, architectural feel that balances perfectly with the soft ombre color palette.
Detailed Instructions
Materials
- Polymer clay in deep red/maroon
- Polymer clay in white or translucent mixing white
- Flexible clay slicing blade (tissue blade)
- Acrylic rolling pin or pasta machine
- Bead piercing pin or needle tool
- Elastic jewelry cord (0.8mm or 1mm)
- Super glue (cyanoacrylate)
- Ruler
- Oven (for baking)
- Wet/dry sandpaper (400-800 grit)
Step 1: Mixing the Ombre Palette
-
Prepare your base colors:
Start by conditioning your deep red clay and your white clay separately. You need them soft and pliable. Roll both out into equally thick slabs, roughly 1/8 inch thick. -
Create the blend gradient:
Cut a rectangle of the pure red clay and a rectangle of the pure white clay. Then, create 5-7 intermediate mini-batches by mixing different ratios of red and white. Aim for a smooth progression: mostly white with a speck of red, 75% white/25% red, 50/50, and so on until you reach the darkest shade. -
Check the transition:
Roll a small ball of each mixed shade and lay them in a line on your work surface. Adjust the colors if the jump between any two adjacent shades looks too abrupt add a pinch more white or red to smooth the transition.
Step 2: Shaping the Beads
-
Form logs:
Take each color batch and roll it into a smooth, even log or snake. Try to keep the thickness consistent across all colors, roughly the diameter of a pencil (about 1cm). -
Create the rectangular profile:
Instead of leaving them round, gently pinch and press the logs against your work surface to flatten the sides, creating a rectangular cross-section. I prefer using a scraping blade to press against the sides to get crisp, straight walls. -
Chill the clay:
Since cutting soft clay can distort the shape, place your rectangular logs in the refrigerator for about 15-20 minutes. This firms them up for sharper cuts. -
Slice the beads:
Using your flexible tissue blade, slice the logs into segments. Aim for a thickness of about 4-5mm per bead. Cut an equal number of beads for each shade to ensure the gradient stays balanced. -
Drill the holes:
While the clay is still cool, use a bead piercing pin to create a hole through the center of the flat side of each rectangle. gently twist the pin as you push through to avoid squishing the bead. -
Refine the shape:
After piercing, the exit hole might have a little raised lip. Gently pat this down or slice it off for a flush finish. Ensure the rectangular shape is still intact.
Distorted Rectangles?
If your beads squish perfectly flat while piercing, let the clay rest longer in the fridge or try piercing them while they are still in the “log” form before slicing them individualy.
Step 3: Baking and Assembly
-
Bake the beads:
Arrange the beads on a baking sheet or tile. Follow the temperature instructions on your specific brand of polymer clay (usually around 275°F/135°C). Bake for 30-45 minutes to ensure durability. -
Cool down:
Allow the beads to cool completely in the oven with the door cracked, or just let them sit on the counter. Do not handle them while hot as they are fragile until fully cured. -
Sand for smoothness:
Under running water, lightly sand the flat sides of the beads with wet/dry sandpaper if there are any fingerprints or rough edges. This gives them that professional matte finish seen in the photo. -
Arrange the gradient:
Lay your beads out on a bead board or towel in the correct color order: Darkest red, to medium, to light pink, to white, and then reverse the order (or cycle back to dark) depending on the pattern you want. -
String the bracelet:
Cut a piece of elastic cord about 10 inches long. Pre-stretch it by pulling firmly on the ends a few times to prevent it from stretching out later. -
Thread the beads:
Thread all your beads onto the elastic. Wrap it around your wrist to check the fit. It should sit comfortably without gaps between the rectangles. -
Tie the knot:
Tie a surgeon’s knot (right over left, left over right, and loop through twice). Pull the knot tight. -
Secure and hide:
Apply a tiny drop of super glue to the knot. Let it dry, then trim the excess cord. If your bead holes are large enough, gently tug the knot inside one of the beads to hide it.
Buff to Shine
For a satiny feel, buff the baked beads vigorously with a piece of denim or heavy canvas. The friction creates a subtle sheen without needing any varnish.
Enjoy wearing your new gradient creation as a daily pop of color
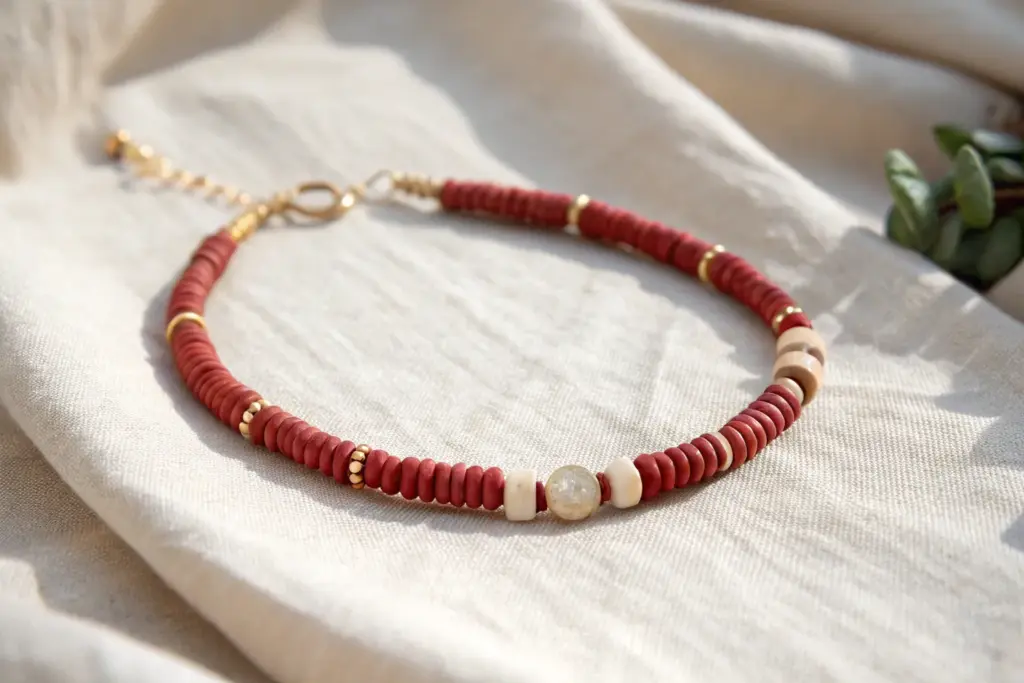
Red and Pearl Mixed-Media Stack
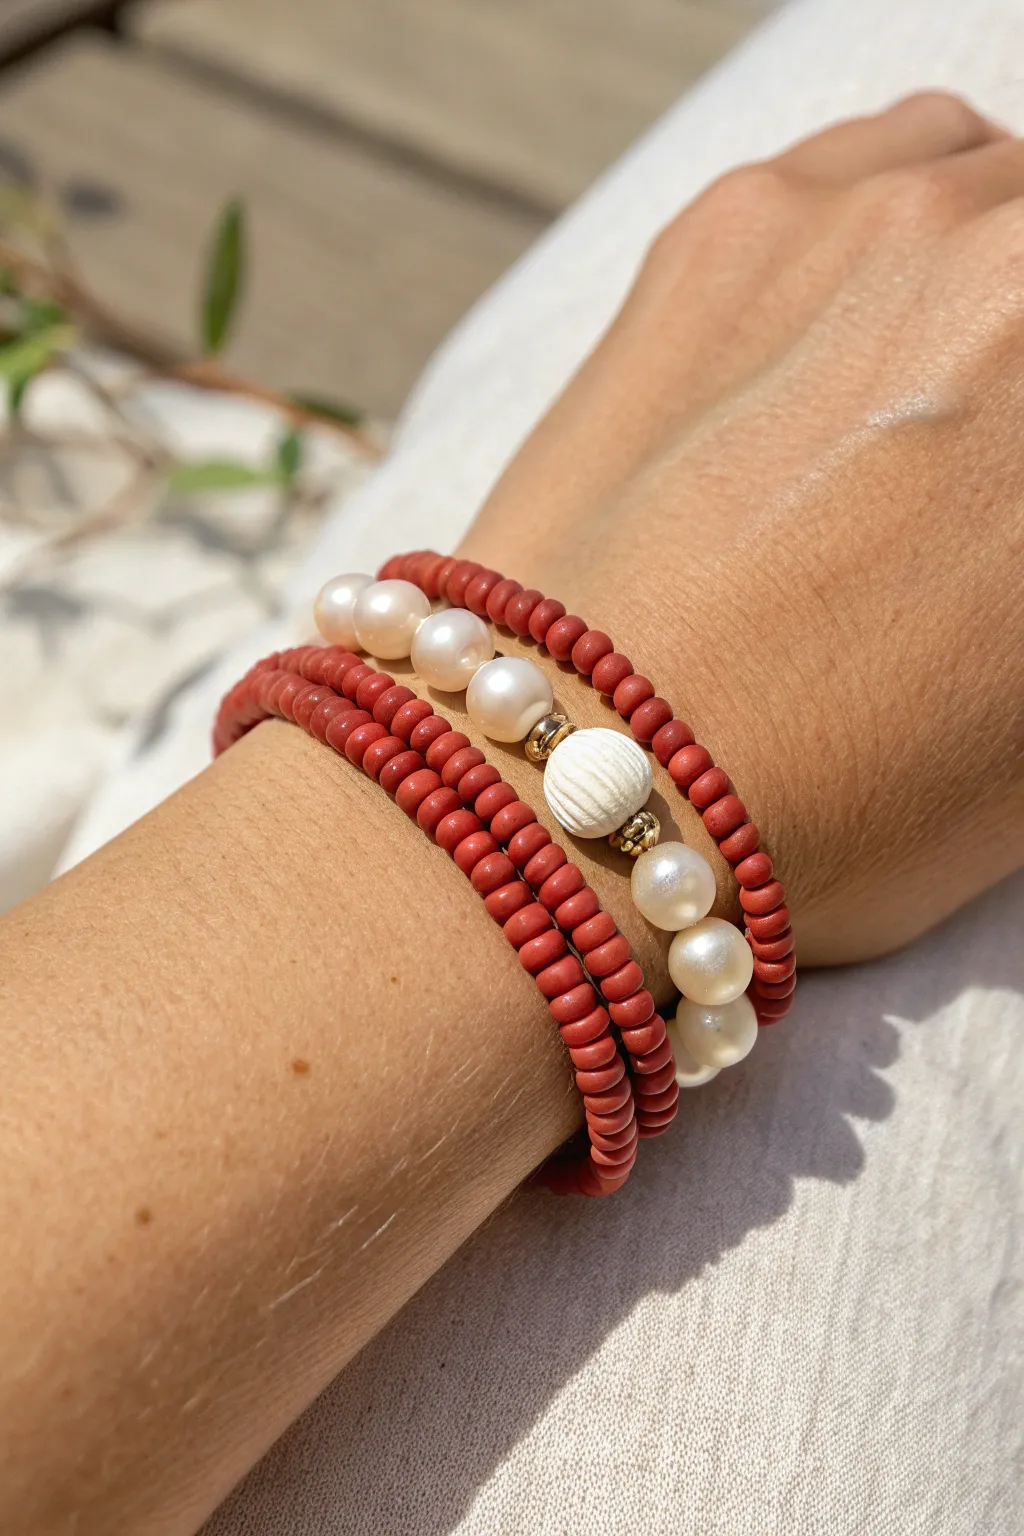
This elegant bracelet stack combines the earthy warmth of terracotta-colored clay heishi beads with the timeless luster of freshwater pearls. The multi-strand look offers a sophisticated boho vibe that transitions perfectly from beach days to evening dinners.
Step-by-Step Guide
Materials
- Terracotta or rust-colored polymer clay heishi beads (approx. 4-5mm)
- Freshwater pearls (potato or nugget shape, approx. 6-8mm)
- White carved bone or shell focal bead (round, ridged)
- Small gold spacer beads (round or faceted, 2-3mm)
- Strong elastic cord (0.8mm or 1mm)
- Jewelry adhesive (e.g., E6000 or GS Hypo Cement)
- Scissors
Step 1: Planning the Stack
-
Measure your wrist:
Before you begin stringing, measure your wrist with a flexible tape measure. Add about half an inch to this measurement to ensure the bracelets sit comfortably without pinching. -
Pre-stretch the cord:
Cut three lengths of elastic cord, each about 4 inches longer than your wrist measurement. Give each piece a firm tug to pre-stretch it; this prevents the bracelet from drooping later. -
Lay out the design:
Arrange your beads on a bead board or soft cloth. You’ll be making three coordinated strands: two solid clay strands and one focal pearl strand.
Step 2: Creating the Clay Strands
-
Start the first solid strand:
Clip a binder clip or piece of tape to one end of an elastic cord to stop beads from sliding off. Begin threading the terracotta clay heishi beads. -
Check consistency:
Occasionally check the beads as you string them to remove any that are misshapen or much thinner than the others, keeping a uniform look. -
Finish the length:
Continue adding clay beads until the strand reaches your target length. Double-check by wrapping it around your wrist. -
Tie the knot:
Tie a surgeon’s knot (right over left, left over right) to secure the strand. Pull it tight, but be careful not to snap the elastic. -
Repeat for strand two:
Repeat this exact process creates a second identical strand of solid clay beads. Having two solid bands frames the pearl strand beautifully.
Knot Security
If the knot won’t hide inside a bead, cover it with a crimp cover bead. It looks like a metal bead but clamps over the knot.
Step 3: Assembling the Pearl Focal Strand
-
Start the center mixed strand:
Take your third piece of elastic. Thread on about 1.5 to 2 inches of the red clay beads to serve as the back section of the bracelet. -
Add side pearls:
Thread on two or three freshwater pearls. Since natural pearls vary, try to pick ones with a similar size and luster for symmetry. -
Place the gold accents:
Add a small gold spacer bead, followed by your large white textured focal bead, and then another gold spacer bead. These gold accents add a necessary flash of light. -
Complete the pearl section:
Mirror the design by adding two or three more freshwater pearls on the other side of the focal bead. -
Finish with clay:
Fill the rest of the strand with red clay beads until it matches the length of your first two bracelets. -
Secure the final knot:
Tie off this mixed-media strand with a strong surgeon’s knot, ensuring the tension matches the other two bracelets.
Texture Twist
Swap the side pearls for jagged turquoise nuggets or faceted gemstones to change the color palette while keeping the earthy vibe.
Step 4: Finishing Touches
-
Apply adhesive:
Place a tiny dot of jewelry adhesive on each of the three knots. I like to let this dry for at least 15 minutes before trimming anything. -
Hide the knots:
Once the glue is tacky but not fully hard, try to slide the knot inside one of the larger beads adjacent to it if the hole size permits. -
Trim excess cord:
Use sharp scissors to trim the excess elastic tails close to the bead, ensuring no clear plastic is poking out. -
Final adjustment:
Roll all three bracelets onto your wrist and adjust them so the pearl strand sits snugly between the two clay strands.
Wear your new stack with a linen shirt or summer dress to let those textures really shine


What Really Happens Inside the Kiln
Learn how time and temperature work together inside the kiln to transform clay into durable ceramic.
Centered Heart Focal on Red Beads
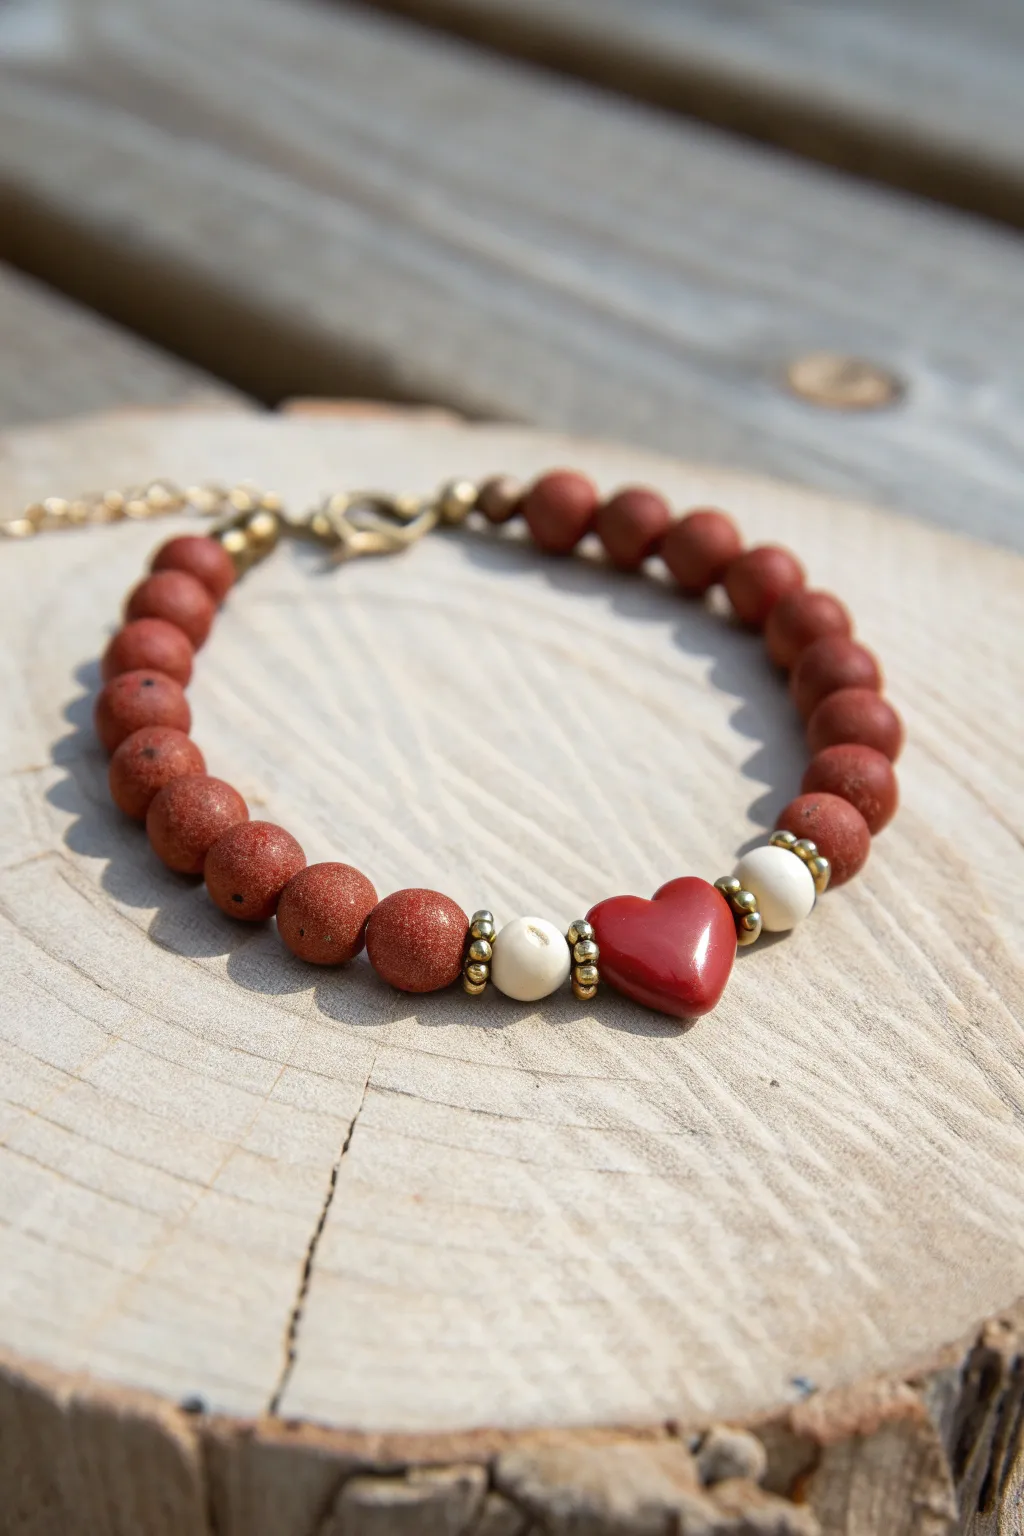
This rustic yet elegant bracelet centers a vibrant red heart bead between smooth, sparkling red goldstone and creamy white accents. It creates a warm, earthy accessory perfect for layering or wearing as a standalone statement piece.
How-To Guide
Materials
- Red Goldstone round beads (approx. 6mm or 8mm)
- Red ceramic or glass heart bead (approx. 10mm width)
- 2 White porcelain or stone round beads (approx. 6mm)
- 4 Antique gold spacer wheels/daisies
- 2 Antique gold crimp covers (optional)
- Gold-plated lobster clasp
- Gold-plated extension chain
- 2 Gold crimp beads (2mm)
- Beading wire (nylon coated, typically 0.015 or 0.018 in gold or clear)
- Wire cutters
- Crimping pliers or flat nose pliers
Step 1: Planning and Preparation
-
Measure your wrist:
Before cutting any wire, determine the length you need. A standard bracelet is about 7 inches, but measuring your own wrist and adding about half to one inch for ease is best. -
Cut the beading wire:
Cut a length of beading wire approximately 10-12 inches long to give yourself plenty of room to work with the ends without frustration. -
Lay out the design:
I always find it helpful to lay the beads out on a bead board or soft cloth first. Place the heart bead in the dead center, flanked by the gold spacers, then the white beads, and finally the red goldstone beads extending outwards.
Loose Spacer Wheels?
If spacers wobble too much next to the heart, add a tiny seed bead inside the spacer hole or use a slightly larger spacer to bridge the gap better.
Step 2: Creating the Focal Point
-
Start the center sequence:
Thread the red heart bead onto the middle of your cut wire. Ensure the heart is facing the ‘front’ if it has a specific orientation. -
Add gold spacers:
Slide one antique gold spacer wheel onto the wire on the left side of the heart, and another on the right side. They should hug the heart snugly. -
Add white accent beads:
Thread one white porcelain bead onto each side of the wire, followed immediately by another gold spacer wheel on each side. This creates a symmetrical frame for your centerpiece.
Step 3: Completing the Strand
-
String the goldstone:
Begin adding the red goldstone beads to both sides of the central arrangement. Count them as you go to ensure both sides remain equal in length. -
Check the fit:
Once you have added about 7-9 goldstone beads on each side (depending on wrist size), carefully wrap the strand around your wrist to check the length, keeping in mind the clasp will add about half an inch. -
Balance the sides:
Add or remove goldstone beads as necessary until the beaded portion is just slightly shorter than your desired total circumference.
Pro Tip: Stiffness Check
Before the final crimp, coil the bracelet into a circle. If beads buckle or pop out, it’s too tight. Loosen slightly before securing.
Step 4: Finishing the Ends
-
Prepare the first crimp:
On one end of the wire, slide on a crimp bead followed by the jump ring attached to your extension chain. -
Loop and secure:
Thread the wire tail back through the crimp bead and pull it tight, leaving a small loop of slack so the chain can move freely. -
Crimp the bead:
Establish the crimp by using your crimping pliers to flatten or fold the crimp bead securely onto the two wires. Give it a gentle tug to test the hold. -
Attach the clasp:
Repeat the process on the other end: slide on a crimp bead, then the lobster clasp. Thread the wire back through the crimp bead. -
Tighten the strand:
Pull the wire taut so there are no gaps between your beads, but leave just a tiny bit of wiggle room so the bracelet isn’t stiff. Crimp this second bead securely. -
Trim excess wire:
Use your wire cutters to trim the excess tail of the beading wire as close to the crimp bead as possible. -
Cover crimps (optional):
If you are using crimp covers, place the C-shaped cover over the flattened crimp bead and gently squeeze it closed with pliers to make it look like a seamless gold bead.
Your beautiful gemstone bracelet is now ready to wear, adding a touch of rustic warmth to your style
Name or Word Letter Beads With Red Base
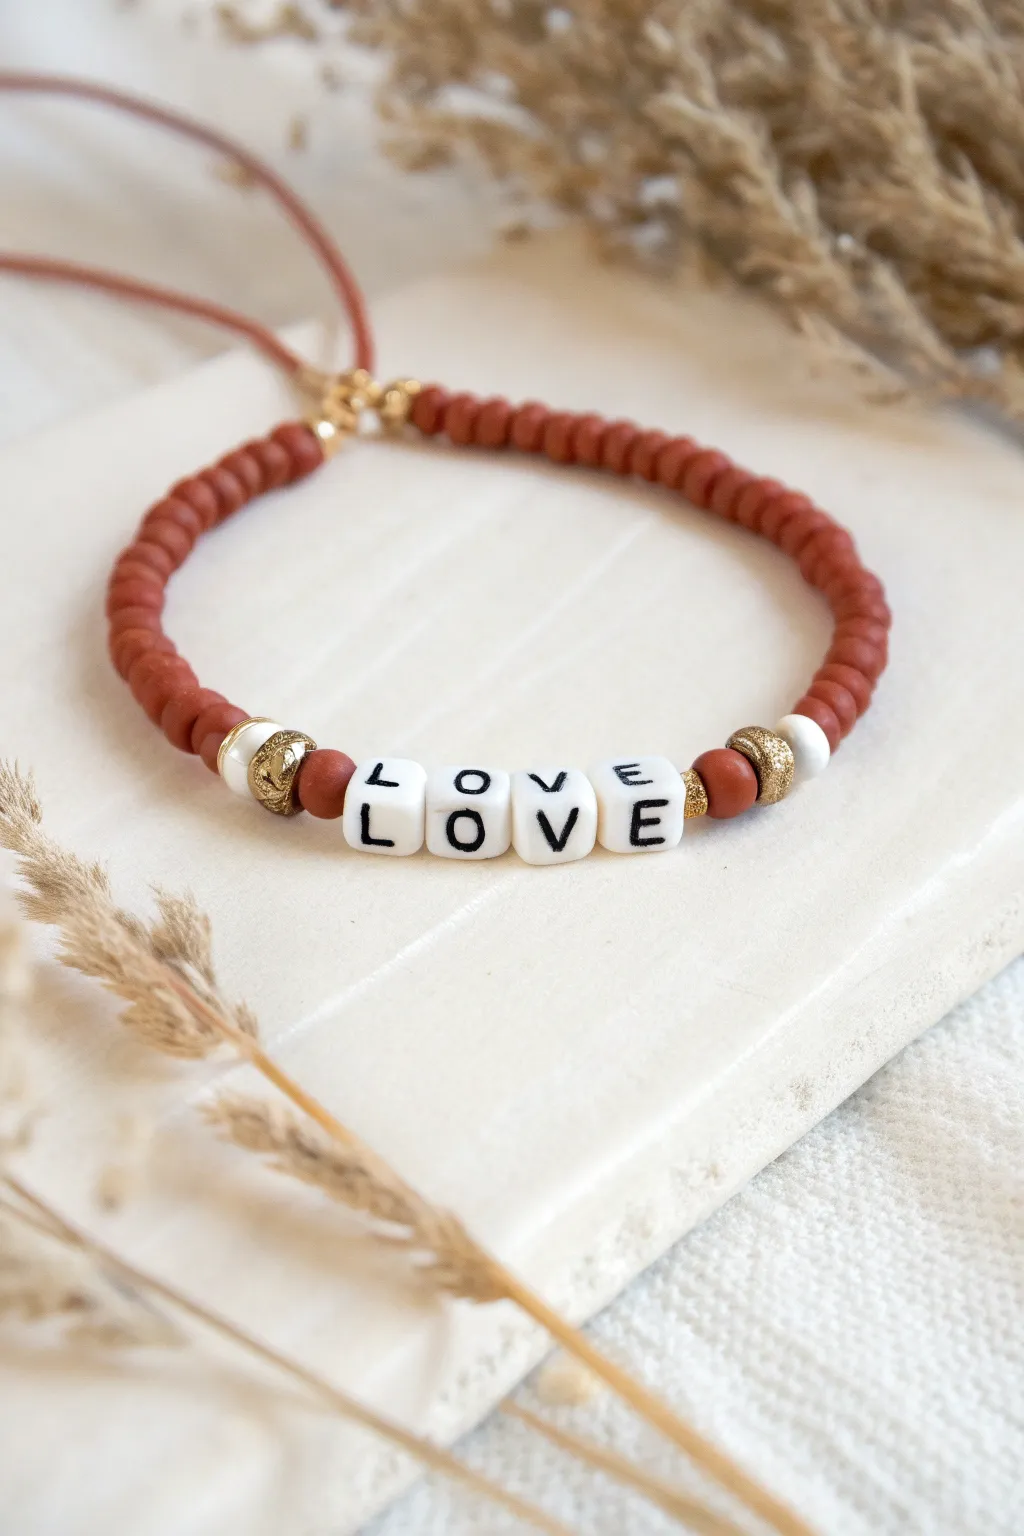
This warm, earthy bracelet combines the rustic texture of red clay heishi beads with crisp white letter beads for a personalized touch. The design features elegant gold accents and a sliding knot closure, making it an effortlessly stylish accessory for everyday wear.
Detailed Instructions
Materials
- Reddish-brown (terracotta) polymer clay heishi disc beads (approx. 4-6mm)
- White cube letter beads (L, O, V, E)
- Reddish-brown nylon or waxed cotton cord (0.8mm or 1mm)
- 2 Textured gold spacer beads (large hole)
- 2 Small gold crimp covers or round gold spacer beads
- 2 White polymer clay heishi disc beads
- Scissors
- Jewelry glue or clear nail polish
- Tape or a clipboard (optional, for holding the cord)
Step 1: Preparation and Base Design
-
Cut the cord:
Start by cutting a piece of your reddish-brown cord to about 12-14 inches in length. This gives you plenty of slack for knotting later on. -
Secure the end:
Tape one end of the cord to your workspace or clip it into a clipboard. This tension makes threading those tiny heishi beads much easier. -
Start the bead sequence:
Begin threading the terracotta clay heishi beads onto the cord. Continue this until you have roughly 2.5 to 3 inches of solid red beads.
Step 2: Creating the Focal Point
-
Add first transition beads:
Once your first red section is done, slide on one white heishi bead to start the color break. -
Insert the gold accents:
Next, thread on one of the textured gold spacer beads. This adds a beautiful metallic contrast next to the matte clay. -
Add a final red spacer:
Slide on just one single red clay heishi bead. This small detail separates the gold from the white letters. -
Spell the word:
Thread your letter beads in order: L, O, V, E. Make sure they are all facing the same direction so the word reads correctly when worn. -
Mirror the accent pattern:
Now reverse the previous pattern: add one single red clay bead, followed by the second textured gold spacer bead. -
Finish the transition:
Slide on the final white heishi bead to complete the focal section frame.
Thread Tip
If your cord frays while threading, briefly burn the tip with a lighter for 1 second and roll it (carefully!) between your fingers to harden it into a ‘needle’.
Step 3: Completing the Band
-
Finish the red section:
Resume threading the standard terracotta heishi beads. Match the length of this side to the first side (approx. 2.5 to 3 inches) so the word stays centered. -
Check the fit:
Wrap the strand around your wrist. The ends of the beaded section should almost meet, leaving a small gap for the closure mechanism. -
Secure the beads:
Once satisfied with the length, create a simple overhand knot with the cord snugly against the last bead on both ends to keep everything in place. -
Add elegant end caps:
Thread a small gold round bead or crimp cover onto each tail end, pushing it right up against the knot you just made. -
Knot the ends:
Tie another overhand knot immediately after the gold bead on each side to lock it in place.
Knot Slipping?
If the sliding macrame knot loosens over time, use waxed cotton cord instead of smooth nylon. The wax provides grip that holds square knots much tighter.
Step 4: The Sliding Closure
-
Position the tails:
Cross the two tail ends of the bracelet over each other so they overlap in a circle shape. -
Cut a slider cord:
Cut a fresh, shorter piece of cord, about 6 inches long. This will become your sliding knot. -
Start the square knots:
Place the short cord under the two overlapped tail cords. Begin tying a series of square knots (macrame flat knots) around the tails. -
Build the slider:
Continue tying square knots for about a half-inch. Ensure the knots are tight enough to hold, but loose enough to slide along the core cords. -
Trim and seal:
Trim the excess ends of the slider cord (not the bracelet tails!) very close to the knots. Carefully dab a tiny drop of jewelry glue on the cut ends to prevent fraying. -
Final adjustment:
Tie a small stopper knot at the very end of each bracelet tail cord so they can’t slip through the closure, and trim any final excess length.
Slip your new custom bracelet on and enjoy the warm, handmade vibes it brings to your outfit

TRACK YOUR CERAMIC JOURNEY
Capture glaze tests, firing details, and creative progress—all in one simple printable. Make your projects easier to repeat and improve.
Red Flower Bead Accent Bracelet
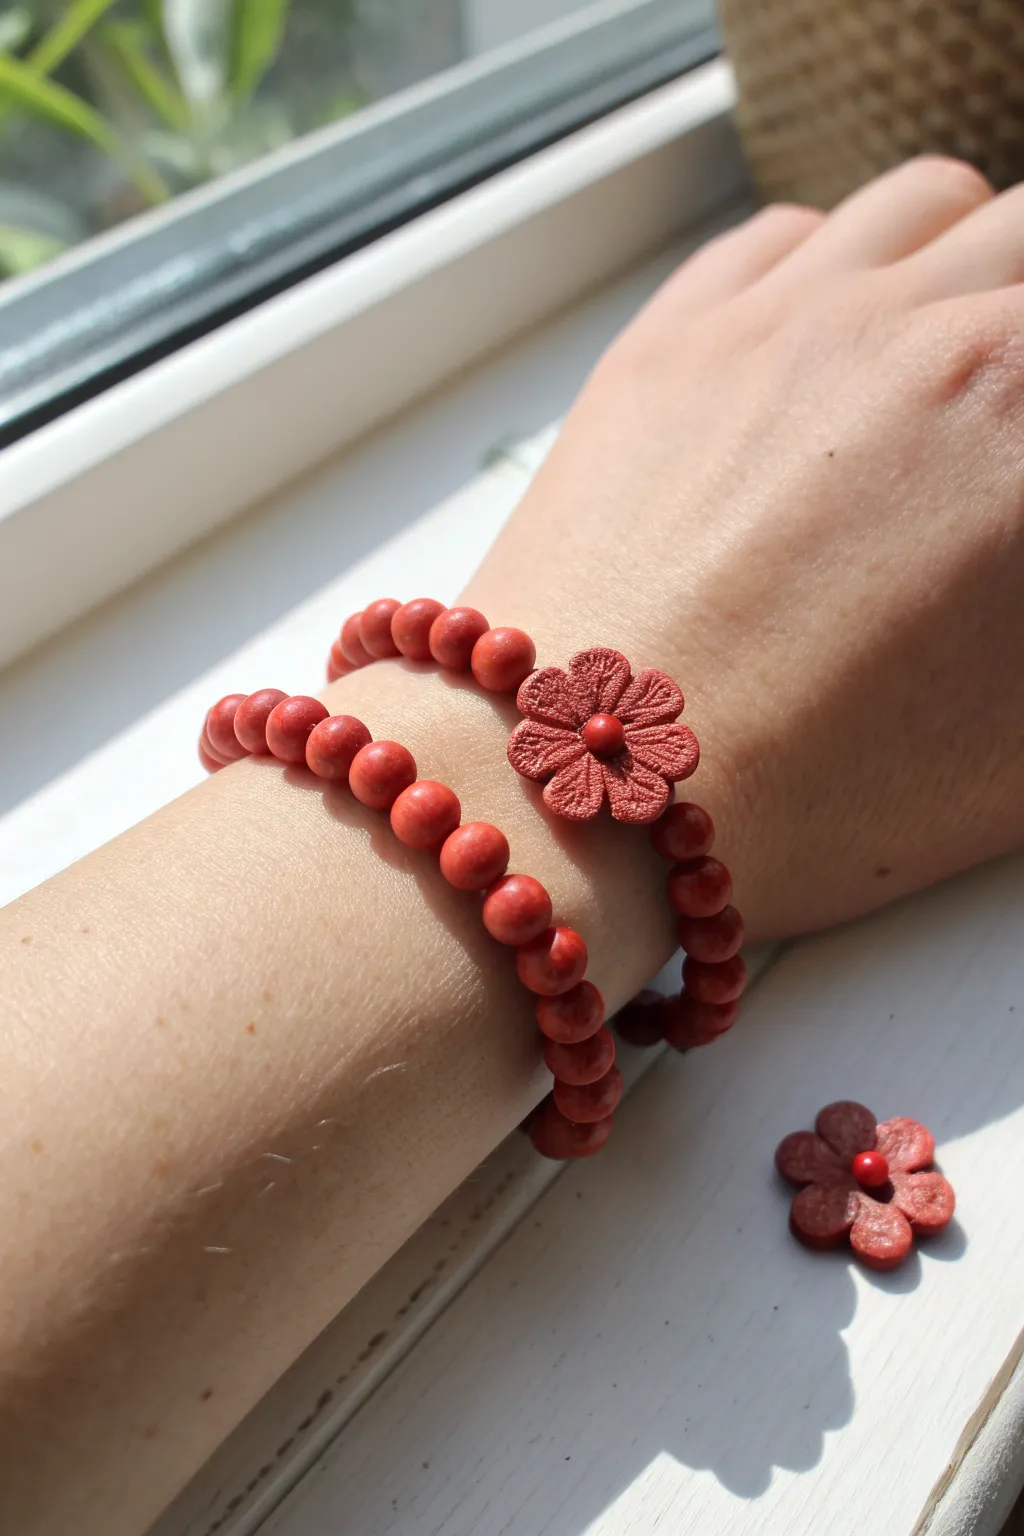
Embrace the warmth of handcrafted jewelry with this elegant double-sided bracelet featuring smooth red beads and a stunning, central floral accent. The textured, matte finish of the clay gives this piece an organic, artisan look that pairs beautifully with the rich terracotta hue.
Step-by-Step Guide
Materials
- Red polymer clay (terracotta or brick red color)
- Elastic jewelry cord (0.8mm clear)
- Bead rolling tool (optional, but helpful for uniformity)
- Needle tool or toothpick
- Small flower cookie cutter (approx. 1 inch)
- Texture sponge or sandpaper
- Baking tile or parchment paper
- Oven
- Super glue or jewelry adhesive
Step 1: Sculpting the Beads
-
Conditioning the Clay:
Begin by kneading your red polymer clay until it is soft, pliable, and free of air bubbles; warm clay is essential for preventing cracks during the piercing process. -
Portioning:
Roll the clay into a long, even snake about 1/2 inch in diameter, then use a blade to slice it into equal segments to ensure your beads end up the same size. -
Rolling Rounds:
Roll each segment between your palms or use a bead roller to create smooth, perfect spheres; you will need approximately 20-25 beads depending on your wrist size. -
Creating the Holes:
Gently twist a needle tool or toothpick through the center of each sphere. I find it helps to pierce halfway through, spin the bead, and pierce from the other side to keep the hole straight. -
Matte Finish:
Before baking, lightly roll the beads over a piece of fine-grit sandpaper or tap them with a texture sponge to remove shiny fingerprints and mimic natural stone.
Fingerprint Fix
If you notice fingerprints after baking, buff the beads lightly with pure acetone on a cotton swab. This removes oils and smooths the surface instantly.
Step 2: Crafting the Floral Accent
-
Flower Base:
Flatten a small amount of clay into a thick 1/4-inch disk and use your small flower cutter to punch out a six-petaled shape. -
Petal Definition:
Using a needle tool, gently press indentations onto each petal to simulate veins, radiating from the center outward. -
Center Detail:
Roll a tiny ball of clay and press it firmly into the center of the flower. -
Drilling the Channels:
Unlike the round beads, this flower acts as a connector. Carefully pierce a hole horizontally through the side of the flower, ensuring the channel goes all the way through without distorting the petals. -
Texture Match:
Give the flower the same textured treatment as the beads to ensure a cohesive look.
Perfect Sizing
Measure your wrist with a string, then add 0.5 inches for a snug fit or 1 inch for a loose fit. Lay your beads out against a ruler before stringing.
Step 3: Baking and Assembly
-
Baking:
Arrange all pieces on a baking tile or parchment-lined tray and bake according to the manufacturer’s instructions for your specific brand of clay (usually 275°F for 15-30 minutes). -
Cooling:
Allow the beads to cool completely inside the oven or on a wire rack; they are fragile while hot and need to harden fully. -
Stringing Part One:
Cut a length of elastic cord about 10 inches long and stretch it pre-stringing to prevent future sagging. -
Adding the Feature:
Thread the elastic through the side hole of the flower first, sliding it to the center of the cord. -
Adding Round Beads:
Thread the round beads onto both sides of the flower until the bracelet fits comfortably around your wrist. -
Tying the Knot:
Bring the ends together and tie a secure surgeon’s knot (right over left, left over right), pulling tight to close gaps between beads. -
Final Securing:
Place a tiny drop of super glue on the knot, let it dry, and snip the excess cord close to the knot before tucking it inside a bead hole.
Slip on your new handcrafted accessory and enjoy the earthy elegance it adds to your outfit
Red-Toned Evil Eye Accent Bracelet
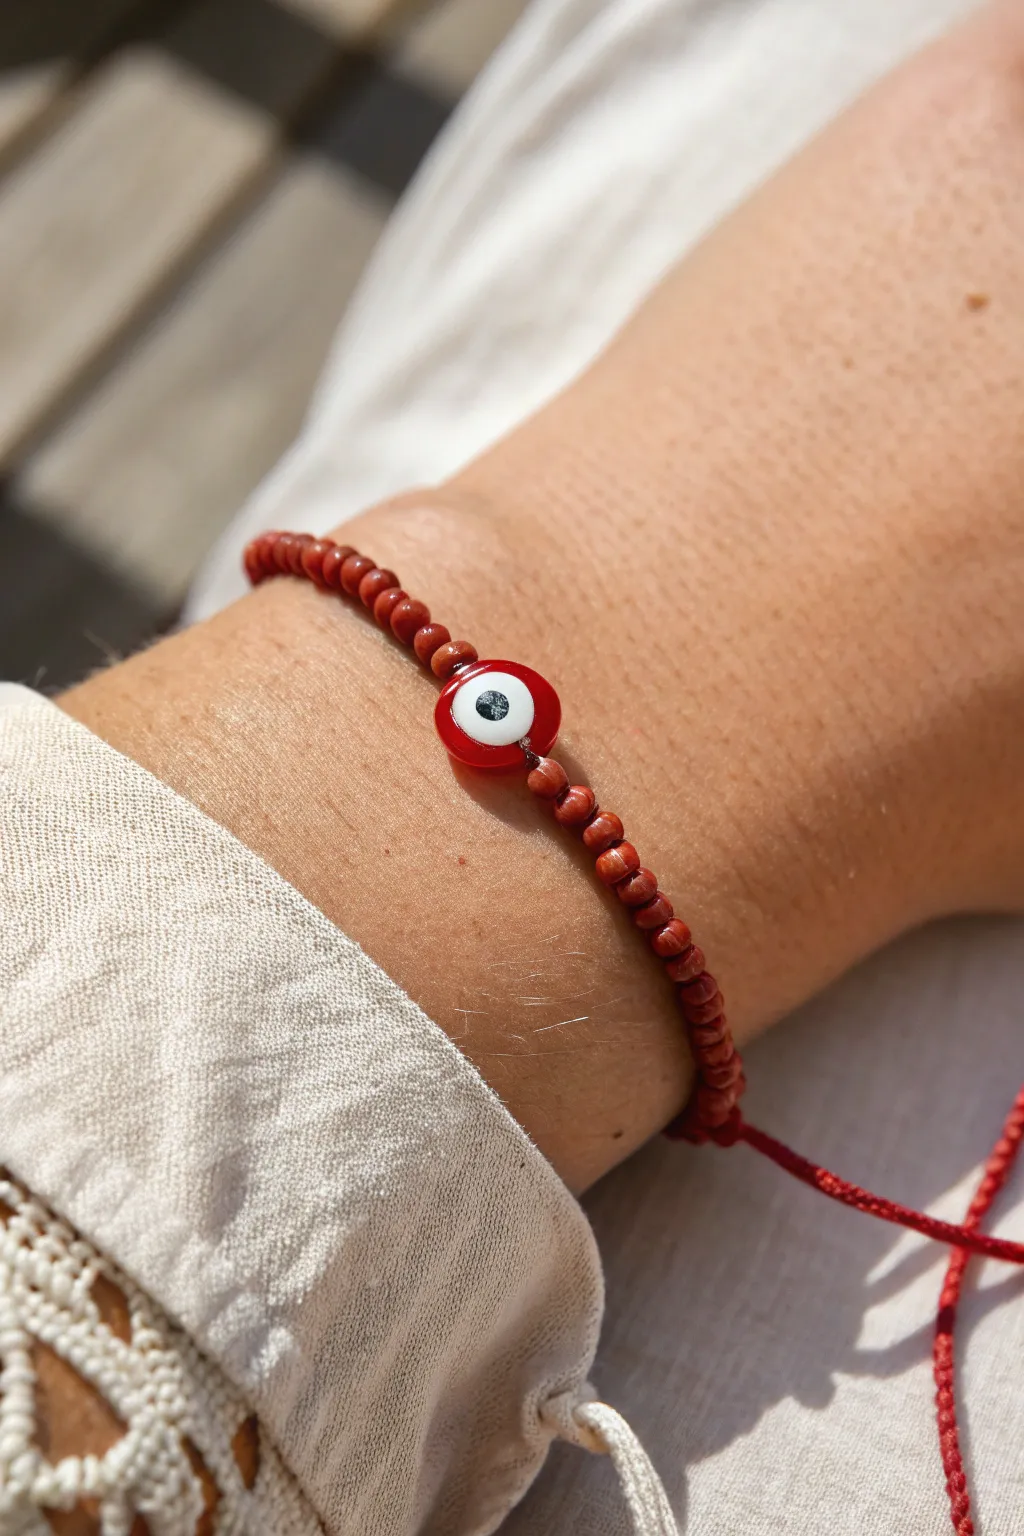
This simple yet striking bracelet combines earthy red tones with a vivid evil eye charm for a piece that feels both protective and grounded. The organic texture of small clay-colored beads pairs beautifully with the glossy focal point, making it perfect for everyday wear.
Step-by-Step
Materials
- Red nylon or waxed cotton cord (approx. 0.8mm to 1mm thick)
- Small reddish-brown wooden or clay beads (approx. 3-4mm)
- Flat round red glass evil eye bead (approx. 8-10mm)
- Scissors
- Lighter or clear craft glue (for sealing ends)
- Tape or clipboard (to hold work in place)
Step 1: Preparation
-
Measure the cord:
Cut a length of red cord approximately 12 to 14 inches long. This generous length ensures you have plenty of room for knotting and adjusting the fit later. -
Prepare the ends:
If your cord tends to fray, briefly singe the very tips with a lighter or dab on a tiny bit of glue and roll them between your fingers to create stiff, needle-like points. This makes threading the small beads much easier.
Stiffening the Cord
If you struggle to thread the tiny beads, dip the cord tip in clear nail polish or super glue. Let it dry hard, then cut it at a sharp angle to create a makeshift needle.
Step 2: Stringing the Beads
-
Start the center:
Take your prepared cord and slide the large red evil eye bead onto it. Position this bead directly in the middle of the cord length. -
Secure the focal point:
Tie a simple overhand knot on the cord right next to the left side of the eye bead. Repeat this on the right side. These knots keep the eye centered and prevent it from sliding around. -
Begin beading one side:
Choose one side of the cord and begin threading your small reddish-brown beads. For the look in the photo, you will need a strand length of about 2 to 2.5 inches. -
Check density:
As you string them, push the beads snugly against the central knot so there are no large gaps of string showing. -
Secure the first side:
Once you have reached your desired length of beads on the first side, tie a tight overhand knot flush against the last bead to lock them in place. -
Bead the second side:
Repeat the process on the other side of the eye bead. Count the beads to ensure you use the exact same number as the first side for perfect symmetry. -
Secure the second side:
Tie a matching overhand knot flush against the last bead on this second side.
Step 3: Finishing the Closure
-
Prepare for the closure:
Bring the two beaded ends together to form a circle. There are several ways to finish this, but a sliding knot is best for adjustable sizing. -
Cross the cords:
Overlap the remaining tails of the cord by about 2 inches. -
Create a slip knot or macramé closure:
If you are familiar with a square knot macramé closure, you can use a scrap piece of red cord here. Alternatively, tie a simple slip knot using one cord end around the other so the bracelet can expand and contract. -
Add stopper knots:
Decide how long you want your adjustment tails to be. At the very end of each cord tail, tie a small, tight overhand knot. -
Trim excess:
Cut off any cord extending beyond your final stopper knots. -
Seal the deal:
Carefully melt the cut tips with a lighter or use a drop of glue to prevent unraveling. Be careful not to fuse the sliding mechanism itself.
Uneven Bead Tension
If beads look loose or gapped, you didn’t push them tight enough before knotting. Use a pin inside the loop of your knot to slide it down snugly against the bead before tightening.
Now you have a beautifully handcrafted accessory that adds a pop of protective color to your wrist or ankle
Cherry Red With Tiny Green Pops
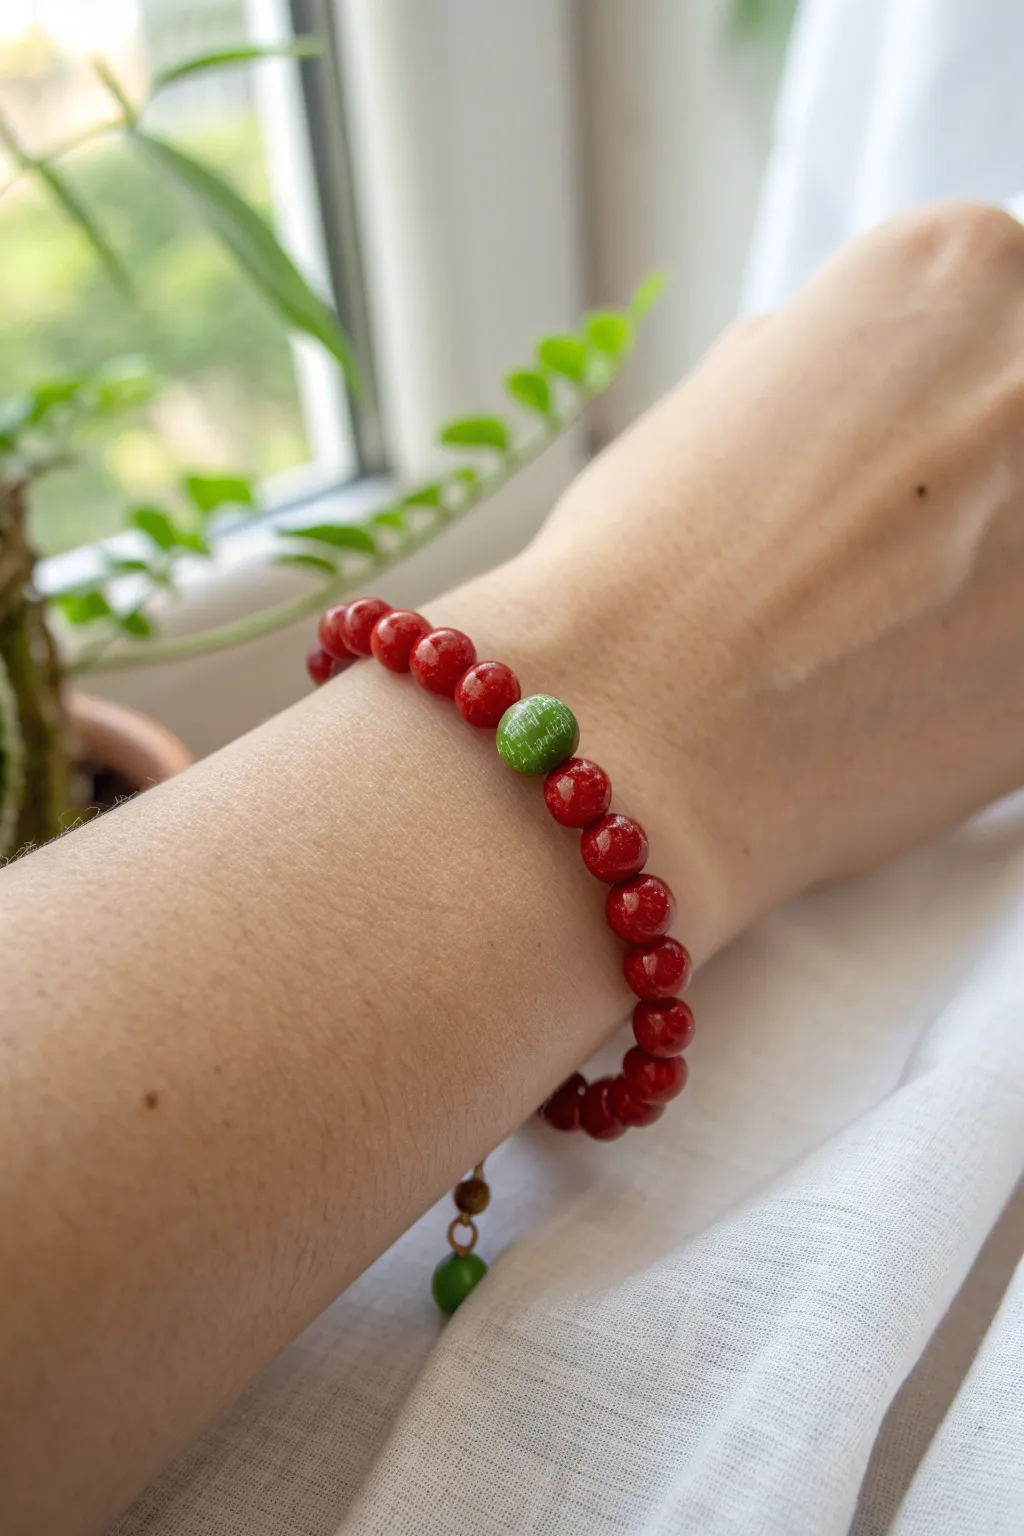
Capturing the vibrant contrast of summer fruit, this project combines rich cherry-red clay beads with a striking lime green focal point. The high-gloss finish gives the polymer clay a polished, professional look that rivals glass or stone.
Step-by-Step Tutorial
Materials
- Polymer clay (Bright Red/Cherry)
- Polymer clay (Lime Green)
- White acrylic paint
- Glossy polymer clay glaze or UV resin
- Bead rolling tool or acrylic block
- Pin tool or heavy gauge needle
- Beading elastic cord (0.8mm)
- Small paintbrush
- Paper towels
- Sandpaper (400-800 grit)
- Oven and baking tray
Step 1: Shaping the Beads
-
Condition the Clay:
Begin by thoroughly conditioning your cherry red polymer clay until it is soft and pliable. Warm clay prevents cracking and ensures a smoother finished surface. -
Portion the Red Clay:
Roll the red clay into a long, even snake about 1/2 inch thick. Slice the snake into equal segments to ensure your beads will be uniform in size. -
Roll Red Spheres:
Take each red segment and roll it between your palms to form a rough ball. Refine the shape by using a bead roller or gently rotating it under a clear acrylic block for a perfect sphere. -
Create the Green Focal Bead:
Condition a small amount of lime green clay. Roll it into a sphere slightly larger than your red beads to make it stand out as the centerpiece. -
Pierce the Holes:
Using a pin tool, carefully pierce a hole through the center of each bead. I find twisting the pin slowly while pushing helps prevent the bead from squishing out of shape. -
Texture the Green Bead:
Take your lime green bead and gently roll it over a piece of coarse sandpaper or use a stiff brush to create micro-texture on the surface. This will help hold the white paint later.
Step 2: Baking and Finishing
-
Bake the Components:
Arrange your beads on a baking tray or bead rack. Bake according to the manufacturer’s instructions for your specific brand of clay, usually around 275°F (135°C) for 30 minutes. -
Cool Down:
Allow the beads to cool completely before handling them. Polymer clay is slightly soft when hot and hardens as it returns to room temperature. -
Antiquing the Green Bead:
Dilute a drop of white acrylic paint with a tiny bit of water. Brush this wash over the textured green bead, getting into all the little crevices. -
Wipe Away Excess:
Immediately wipe the surface of the green bead with a damp paper towel. The white paint should remain only in the textured grooves, creating a crackled or frosted look. -
Apply Glaze:
Coat every bead—both red and green—with a high-gloss polymer clay glaze or UV resin. This step is crucial for achieving that juicy, cherry-like shine shown in the photo. -
Let Glaze Cure:
Allow the glaze to dry fully. If using UV resin, cure it under a UV lamp for the recommended time until hard and non-tacky.
Fingerprints everywhere?
If your raw clay beads have fingerprints, lightly brush them with a little baby oil or cornstarch before baking to smooth the surface perfectly.
Step 3: Assembly
-
Measure the Cord:
Cut a length of elastic cord about 10-12 inches long. Pre-stretch the cord by pulling it firmly a few times; this prevents the bracelet from loosening up later. -
String the Design:
Thread your beads onto the elastic. I suggest stringing half the red beads, then the green focal bead, followed by the remaining red beads to keep the design balanced. -
Tie the Knot:
Secure the bracelet with a surgeon’s knot (loop the thread twice on the first pass of the knot). Pull tightly to secure. -
Hide the Knot:
Add a tiny drop of super glue to the knot for security. Once dry, trim the excess cord and gently tug the knot inside the hole of the nearest red bead to hide it. -
Optional Dangle:
If you have leftover small beads, you can thread a single tiny green or metallic bead on a headpin and attach it near the knot for a playful dangle element.
Pro Tip: Consistent Sizes
Use a small circular cookie cutter or the cap of a marker to cut your clay sheet. This ensures every single bead starts with the exact same volume of clay.
Now you have a glossy, vibrant accessory ready to add a pop of color to any outfit
Red Color-Block With White End Caps
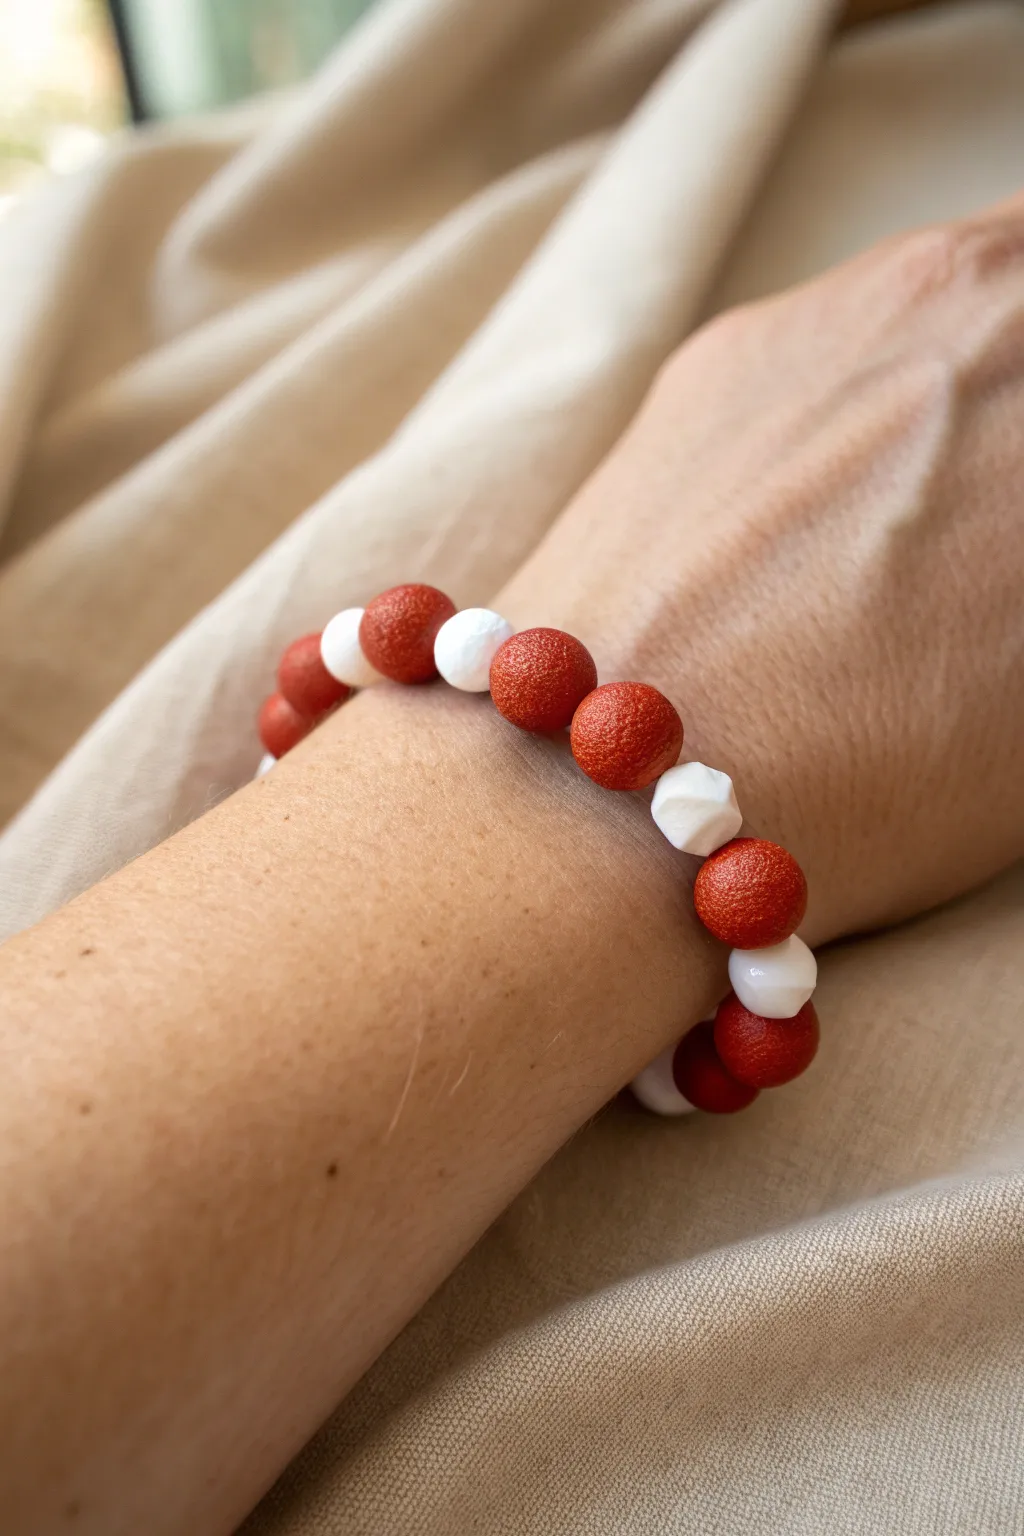
This rustic yet elegant bracelet contrasts warm, textured terracotta tones with crisp, faceted white accents. The distinct surface differences between the gritty red spheres and the smooth, geometric white beads create a satisfying tactile experience for everyday wear.
Step-by-Step Guide
Materials
- Red polymer clay (terracotta or granite effect)
- White polymer clay
- Coarse salt or sandpaper (for texturing)
- Blade or craft knife
- Pin drill or needle tool
- Elastic beading cord (0.8mm)
- Super glue or jewelry cement
- Baking sheet and parchment paper
- Oven
Step 1: Forming the Red Spheres
-
Condition the Clay:
Start by warming the red polymer clay in your hands until it becomes soft and pliable. If you are mixing colors to achieve a terracotta shade, do this now until no streaks remain. -
Portion the Clay:
Roll the clay into a long, even log snake about half an inch thick. Use your blade to slice equal segments to ensure your beads end up the same size. -
Roll Spheres:
Take each segment and roll it briskly between your palms to create smooth, round balls. -
Add Texture:
The key to this look is the sandy texture. Gently roll each red bead over a piece of coarse sandpaper or a small pile of coarse salt to imprint a pitted surface. I find tapping them lightly with a toothbrush also works wonders for this effect. -
Pierce the Beads:
While the beads are still soft, use a needle tool to poke a hole through the center. Twist the tool gently as you push through to avoid squishing the sphere shape.
Step 2: Creating the White Geometrics
-
Prep White Clay:
Clean your hands thoroughly before handling the white clay to keep it pristine. Condition it until soft. -
Create Small Balls:
Just like with the red clay, portion out smaller amounts and roll them into balls. These should be slightly smaller than your red beads. -
Facet the Edges:
Instead of keeping them round, use your blade to slice off small, random chips from the sides of the clay ball. This creates a faceted, geometric ‘gem’ look. -
Smooth Edges:
Tap the faceted beads gently on your work surface to soften the sharpest ridges slightly, making them comfortable against the skin. -
Drill Holes:
Carefully pierce the center of your faceted white beads with the needle tool.
Sticky Fingerprints?
If you leave prints on the white beads, lightly wipe them with a Q-tip dipped in rubbing alcohol or acetone before baking to smooth them out.
Step 3: Burbing and Assembly
-
Bake:
Arrange all beads on a parchment-lined baking sheet. Bake according to your clay manufacturer’s instructions (usually 275°F/135°C for 15-30 minutes). Let them cool completely. -
Measure Cord:
Cut a length of elastic cord about 10 inches long so you have plenty of room to tie knots. -
Patterning:
String the beads onto the elastic. Looking at the example, try a pattern of two red beads followed by one white bead to create that specific rhythm. -
Check Fit:
Wrap the strand around your wrist to check the size. Add or remove beads until it sits comfortably. -
Tie Off:
Tie a surgeon’s knot (looping through twice before pulling tight). Pull the elastic firmly to secure it. -
Secure the Knot:
Add a tiny drop of super glue or jewelry cement to the knot to prevent it from slipping. -
Hide the Knot:
Once the glue is dry, trim the excess cord and gently tug the cord to slide the knot inside the hole of the nearest red bead.
Natural Stone Look
Mix black pepper or dried tea leaves into the white clay before rolling for a speckled, granite-like finish that matches the organic vibe.
Enjoy the earthy warmth of your new handmade jewelry piece
Red Checkerboard Pattern Bracelet
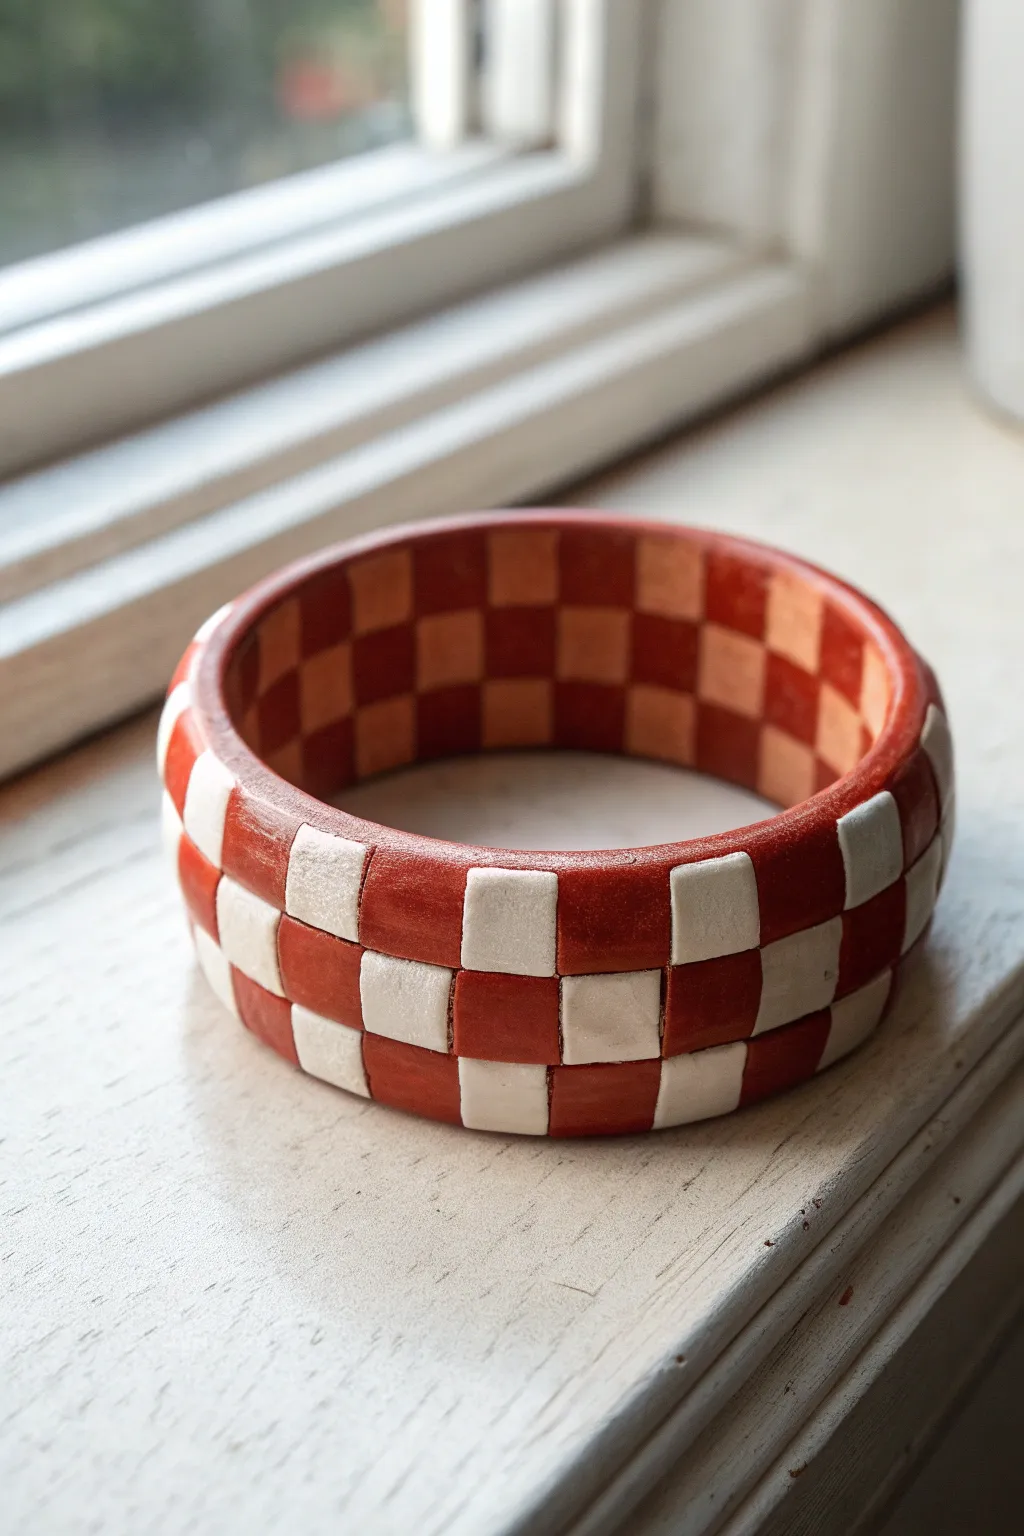
Embrace the bold simplicity of geometric patterns with this chunky checkerboard bangle featuring earthy red tones and contrasting creamy white squares. This project combines the tactile pleasure of shaping clay with the precision of pattern painting for a striking accessory.
Step-by-Step
Materials
- Red polymer clay or air-dry terracotta clay
- Rolling pin or pasta machine
- Round metal cookie cutter (bangle sized) or a straight-sided glass jar
- Flexible blade or craft knife
- Ruler
- White acrylic paint
- Small flat brush
- Fine grit sandpaper
- Matte or satin varnish/glaze
- Painters tape (optional)
Step 1: Creating the Base Bangle
-
Condition the Clay:
Start by thoroughly conditioning your red clay until it is warm, pliable, and free of cracks. If you are using polymer clay, spend extra time here to ensure strength. -
Roll Out a Sheet:
Roll your clay into a long, thick sheet. Aim for a thickness of about 1/4 inch (6mm) to achieve the chunky look shown in the photo. The strip needs to be long enough to wrap around your wrist comfortably with a little wiggle room. -
Cut the Strip:
Use your ruler and craft knife to cut a clean, straight strip of clay. The width should be roughly 1.5 inches (4cm) to accommodate the three rows of checks seen in the design. -
Form the Circle:
Carefully wrap the clay strip around your chosen cylindrical form (like a metal cutter or glass jar). I find it helps to lightly dust the form with cornstarch so the clay doesn’t stick. -
Seamless Join:
Where the two ends meet, slice them at a diagonal angle rather than straight down. Press the angled ends together and gently smooth the seam with your finger or a clay tool until it disappears completely. -
Bake or Dry:
Follow the manufacturer’s instructions for your specific clay. If baking polymer clay, support the bangle on the form to keep its shape perfectly round. Let it cool or dry completely before moving on.
Grid Master Tip
Cut a strip of paper the exact length of your bangle’s circumference. Fold it in half repeatedly to create even crease lines, then use this as a template to mark vertical lines.
Step 2: Painting the Pattern
-
Sand for Texture:
Once hardened, lightly sand the entire surface with fine-grit sandpaper. This smooths out any fingerprints and gives the surface a bit of ‘tooth’ for the paint to adhere to. -
Plan the Grid:
Using a pencil and ruler, lightly mark out your grid directly onto the bangle. You want three horizontal rows, and vertical lines spaced evenly to create squares. -
First Coat of White:
Using a small flat brush, begin painting the white squares in a checkerboard pattern. Skip every other square. Don’t worry about perfect opacity on the first pass; thin layers are better. -
Refine Edges:
Start the second coat. This is where you focus on crisp lines. Use the flat edge of your brush to push the paint exactly to your pencil marks. -
Inside Detail:
Don’t forget the inside! The photo shows the pattern continuing on the interior of the bracelet. Repeat the grid measuring and painting process on the inner curve. -
Clean Up:
If any white paint strayed onto the red sections, you can gently scrape it off with a craft knife once dry, or touch it up with a mix of paint that matches your raw clay color. -
Seal the Work:
Apply a coat of satin or matte varnish over the entire bangle. This protects the white paint from chipping and deepens the natural red color of the clay.
Make it Marble
Instead of painting, use white clay squares. Press them into the red base before baking for an inlaid effect. This takes longer but won’t chip over time.
Slip on your new statement piece and enjoy the modern, artisanal flair it adds to your outfit
Terrazzo-Style Red Speckle Beads
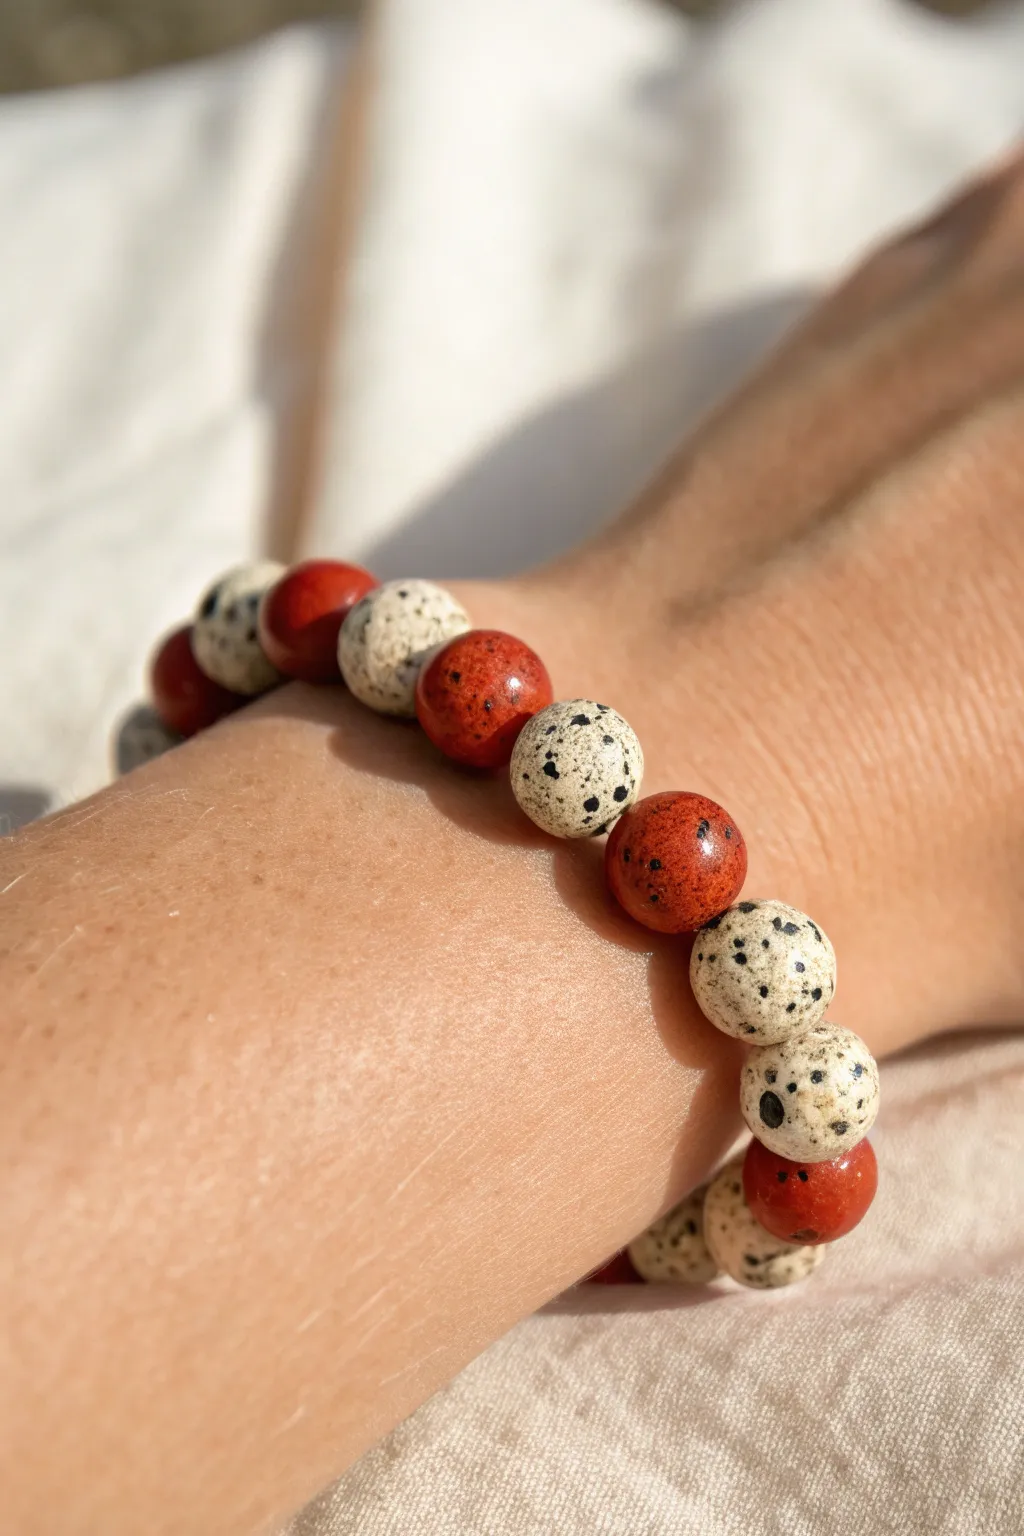
Create a stunning set of stone-effect beads using polymer clay to mimic the organic look of red jasper and Dalmatian stone. This simple stringing project combines earthy rust tones with playful black-dotted white beads for a sophisticated, natural aesthetic.
Step-by-Step Tutorial
Materials
- Polymer clay (rust red or terracotta)
- Polymer clay (white or cream)
- Polymer clay (black)
- Acrylic paint (black and brown)
- Old toothbrush or stiff bristle brush
- Bead piercing pin or needle tool
- Beading elastic cord (0.8mm)
- Super glue or heavy-duty jewelry glue
- Gloss or satin varnish (optional)
- Oven for baking
- Baking tray and paper
Step 1: Creating the Dalmatian Beads
-
Condition the base:
Begin by conditioning your cream or white polymer clay until it is soft and malleable. Roll it into a uniform log about 1cm thick. -
Prepare the speckles:
Condition a very small amount of black polymer clay. Roll it into an extremely thin snake, almost like a thread, or chop fine bits with a blade. -
Chop and mix:
Cut the black clay thread into tiny, irregular crumbs. Sprinkle these crumbs over your white log and gently roll the log to press them into the surface, or knead them in slightly for a deeper effect. -
Form the spheres:
Cut the speckled log into equal segments. Roll each segment between your palms to create smooth, round beads, ensuring the black spots are visible but flush with the surface.
Smooth Moves
To remove fingerprints before baking, gently brush the raw clay beads with a little cornstarch or baby oil. This leaves a professional, smooth finish.
Step 2: Crafting the Red Terrazzo Beads
-
Mix the red tone:
Condition your rust-red or terracotta clay. If the color is too flat, I sometimes mix in a tiny pinch of translucent clay to give it depth. -
Add subtle texture:
Instead of kneading in chunks like the Dalmatian beads, form your red beads into spheres first. -
Splatter technique:
Dilute a small amount of black and brown acrylic paint with water. Dip an old toothbrush into this mixture. -
Apply the speckle:
Hold the brush near the red beads and run your thumb across the bristles to flick tiny specks of paint onto the clay surface. Rotate the beads to get even coverage. -
Let dry:
Allow the paint speckles to dry completely before touching the beads to avoid smudging.
Step 3: Baking and Assembly
-
Pierce the holes:
Using a bead piercing pin, carefully drill a hole through the center of each bead. Twist the pin as you go to avoid distorting the round shape. -
Bake carefully:
Arrange the beads on a baking tray lined with paper. Bake according to your polymer clay manufacturer’s instructions, usually around 275°F (130°C) for 30 minutes. -
Cool and seal:
Let the beads cool completely. If desired, coat them with a thin layer of satin or gloss varnish to protect the paint and give them a stone-like sheen. -
Measure the elastic:
Wrap your elastic cord around your wrist to find the length, adding about 3 inches extra for tying the knot. -
String the pattern:
Thread your beads onto the elastic, alternating between the white Dalmatian beads and the red terrazzo beads to match the image. -
Check the fit:
Wrap the strung beads around your wrist one last time to ensure it fits comfortably without gaps. -
Tie the knot:
Tie a surgeon’s knot (right over left, left over right twice). Pull the elastic tight to secure the beads together. -
Secure and finish:
Place a tiny drop of super glue on the knot. Allow it to dry, then snip off the excess elastic tails, tucking the knot inside a bead hole if possible.
Stone Effect
For a grittier, more realistic texture, mix ground black pepper or dried used coffee grounds into the clay instead of paint for an organic speckled look.
Now you have a chic, nature-inspired accessory ready to wear or gift
Marbled Red Clay Disc Bead Bracelet

This earthy, bohemian bracelet showcases the beauty of hand-mixed polymer clay. By marbling striated red tones with white, these disc beads create a totally unique accessory that feels organic and artisanal.
Step-by-Step Guide
Materials
- Polymer clay (terracotta/brick red)
- Polymer clay (white)
- Polymer clay (translucent or cream – optional for depth)
- Acrylic rolling pin or pasta machine
- Small round circle cutter (approx. 8-10mm)
- Toothpick or bead piercing pin
- Baking sheet with parchment paper
- Elastic clear beading cord (0.7mm recommended)
- Super glue or jewelry cement
- Scissors
- Oven (for baking clay)
- Fine grit sandpaper (optional)
Step 1: Preparing the Clay Cane
-
Condition the Clay:
Begin by kneading your terracotta red and white polymer clay separately until they are soft and pliable. Warm clay is much easier to work with and cracks less. -
Create Sheets:
Roll the red clay into a thick sheet (about 3mm) and the white clay into a slightly thinner sheet. You can use an acrylic roller or a dedicated pasta machine for this. -
Stack for Striping:
Cut the sheets into rectangles of roughly the same size. Stack them in an alternating pattern—mostly red layers with occasional thin white layers to mimic the look in the photo. -
Consolidate the Block:
Press the stack effectively to remove air bubbles. Gently roll over the top with your rolling pin to fuse the layers together. -
Slice and Reassemble (Marbling):
Slice the stack vertically into thin strips. I like to twist a few of these strips gently or slightly offset them as I press them back together into a log to create that organic, striated marble effect rather than perfect stripes. -
Form the Log:
Roll this reassembled mass into a smooth cylinder (a ‘cane’) that is the diameter you want your final beads to be—roughly the thickness of a pencil or slight larger.
Chill Out
If your clay cane gets too soft and squishes while slicing, pop it in the fridge for 15 minutes. Cold clay slices much cleaner.
Step 2: Forming the Beads
-
Slicing Discs:
Using a very sharp tissue blade, slice thin discs off your clay cane. Aim for a consistent thickness of about 2-3mm for the heishi-style beads. -
Creating Accent Beads:
Take some of the white clay mixed with tiny scraps of the red. Roll these into small spheres to create the round accent beads seen in the design. -
Piercing the Holes:
Gently poke a hole through the center of each disc and sphere using a toothpick or piercing pin. Twisting the tool as you push helps prevent the clay from squishing out of shape. -
Refining Shapes:
Once pierced, lightly tap the edges of the discs with your finger to round them off slightly if they became distorted during piercing.
Step 3: Baking and Assembly
-
Baking:
Arrange your beads on a parchment-lined baking sheet. Bake according to your brand of clay’s instructions (usually 275°F/135°C for 15-30 minutes). -
Cooling:
Allow the beads to cool completely on the tray. Polymer clay hardens fully as it cools, so handle them carefully while hot. -
Smoothing (Optional):
If you have any rough fingerprints, briefly rub the beads with fine-grit sandpaper or buff them on a piece of denim. -
Stringing the Pattern:
Cut a length of elastic cord about 10 inches long. Thread your beads, grouping the red discs in long sections separated by the single white round accent beads. -
Checking Fit:
Wrap the strand around your wrist to check the size. Add or remove disc beads until it fits comfortably but isn’t too loose. -
Tying the Knot:
Tie a surgeon’s knot (right over left, loop twice; then left over right). Pull tight to secure the elastic. -
Clean Finish:
Place a tiny drop of super glue on the knot. Once dry, snip the excess elastic close to the knot and tuck the knot inside one of the larger bead holes.
Make it Shine
Coat the finished baked beads with a thin layer of water-based gloss varnish to make the marbled colors pop and simulate polished stone.
Now you have a gorgeous, custom-fitted bracelet ready to stack or wear solo
Red Bracelet With Rhinestone-Style Sparkle Spacers
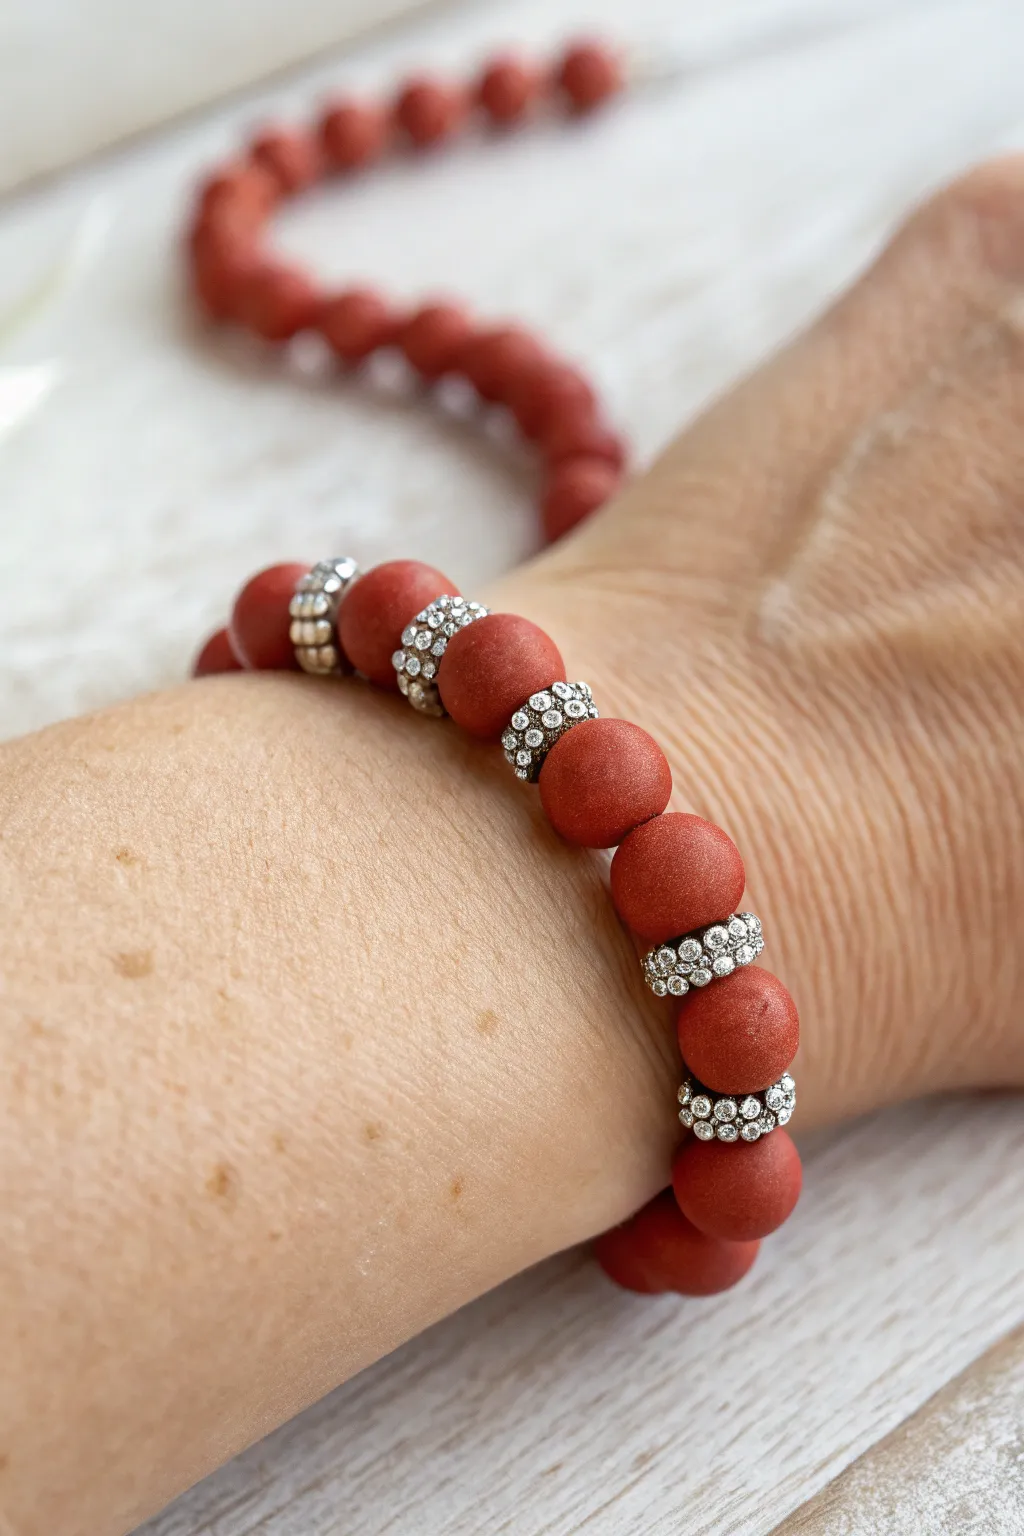
Combine the earthy warmth of handmade red clay beads with the glamorous sparkle of rhinestone spacers in this elegant bracelet project. The contrast between the matte finish of the clay and the glittering spacers creates a sophisticated piece perfect for stacking or wearing solo.
Step-by-Step Tutorial
Materials
- Red polymer clay (terracotta or brick red shade)
- Rhinestone rondelle spacer beads (silver tone, 6-8mm)
- Elastic beading cord (0.7mm or 0.8mm)
- Bead roller or acrylic block
- Toothpick or bead piercing pin
- Oven or toaster oven (for curing clay)
- Super glue or jewelry cement
- Scissors
Step 1: Crafting the Clay Beads
-
Condition the clay:
Start by taking a chunk of your red polymer clay and kneading it thoroughly in your hands until it becomes soft, pliable, and warm to the touch. -
Portion the clay:
Roll the conditioned clay into a long, even log or ‘snake’ shape on your work surface. Use a blade to slice the log into equal-sized segments to ensure your beads will be uniform. -
Roll spheres:
Take each small segment and roll it between your palms to form a rough ball. For a perfectly smooth finish, I like to use an acrylic block or a bead roller, moving in circular motions over the clay. -
Texture check:
Inspect each bead. The goal is a smooth, matte surface that mimics natural stone or terracotta. Gently pat down any fingerprints. -
Pierce the holes:
Using a toothpick or a dedicated bead piercing tool, carefully poke a hole through the center of each sphere. Twist the tool gently as you push through to avoid deforming the round shape. -
Refine the openings:
Once the tool is through, gently spin the bead on the pin to smooth the edges of the hole. This ensures the elastic won’t snag later. -
Bake the beads:
Arrange your raw clay beads on a baking sheet lined with parchment paper or a ceramic tile. Bake them according to the manufacturer’s instructions on your specific package of clay. -
Cool down:
Allow the beads to cool completely to room temperature before handling. They harden fully as they cool.
Pro Tip: Surface Texture
To get that extra-matte, stone-like texture, lightly roll your raw clay beads over a piece of coarse sandpaper or a textured sponge before baking.
Step 2: Assembling the Bracelet
-
Measure your cord:
Cut a piece of elastic beading cord about 10-12 inches long. This extra length makes tying the final knot much easier. -
Pre-stretch the elastic:
Give your cord a few firm tugs. Pre-stretching prevents the bracelet from sagging or loosening after you wear it a few times. -
Plan the pattern:
Lay out your beads on a design board or a towel. The pattern shown uses groups of red clay beads separated by single rhinestone spacers. Try two clay beads, then one spacer, repeating until the length is right for your wrist. -
Start stringing:
Thread the beads onto the elastic cord one by one, following your decided pattern. If the clay bead holes are tight, trimming the end of the elastic at a sharp angle can help guide it through. -
Check the fit:
Wrap the strung beads around your wrist to check the sizing. It should sit comfortably without pinching skin or drooping too much. -
Tie the knot:
Bring the two ends of the elastic together. Tie a surgeon’s knot (loop the right end over the left twice, then pull tight) to secure the bracelet. -
Secure the knot:
Apply a tiny drop of super glue or jewelry cement directly onto the knot. Let it dry for a few minutes to ensure it won’t slip. -
Hide the knot:
Once the glue is dry, trim the excess elastic tails close to the knot. If possible, gently pull the elastic so the knot slides inside the hole of a neighboring clay bead to hide it.
Level Up: Scent Diffuser
Leave the clay unsealed and slightly porous so you can add a drop of essential oil to the red beads, turning your jewelry into an aromatherapy diffuser.
Now you have a stunning, custom accessory that balances rugged texture with high-shine elegance
Double-Strand Red Clay Bracelet
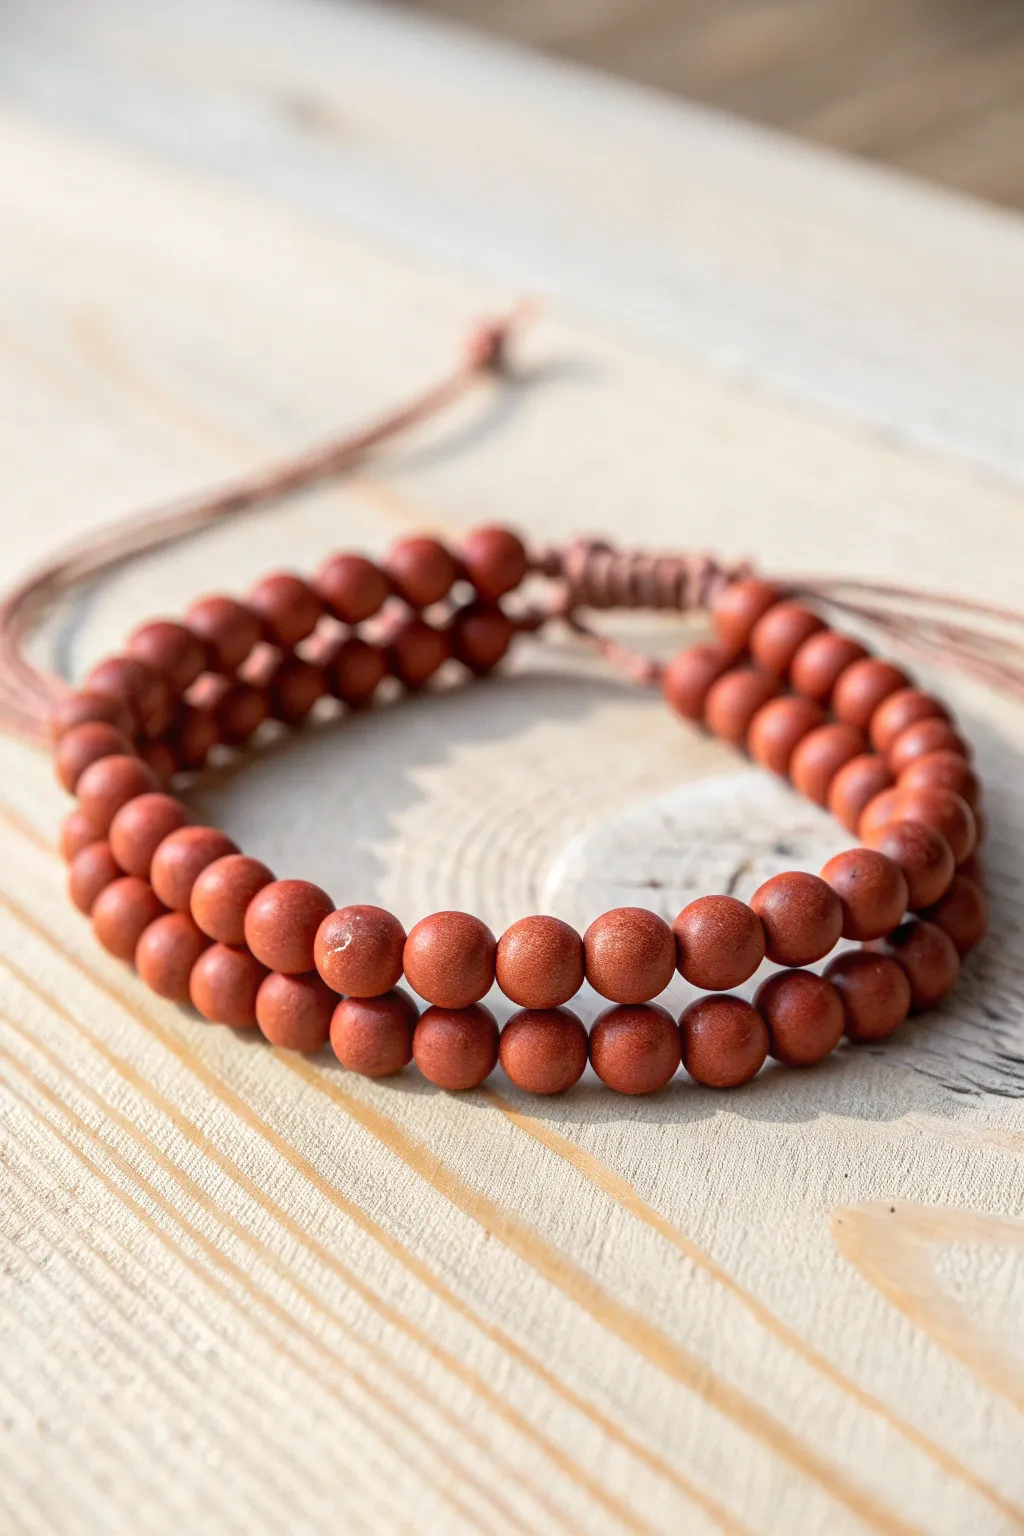
This rustic bracelet combines the warmth of terracotta-colored clay with the durability of traditional knotting techniques. The double-row design adds substance and visual interest, making it a perfect everyday accessory that feels grounded and natural.
Detailed Instructions
Materials
- Red clay beads (approx. 6mm or 8mm, roughly 50-60 count)
- Brown waxed cord (1mm thickness)
- Scissors
- Tape or a clipboard
- Ruler
- Lighter or clear craft glue (for sealing ends)
Step 1: Preparation & First Strand
-
Measure the cords:
Cut two lengths of brown waxed cord, each measuring about 30 inches (76 cm). This generous length allows plenty of room for knotting and the adjustable closure. -
Tie the starting knot:
Process the two cords together. Fold them in half to find the center, then shift slightly so you have about 10 inches on one side and 20 on the other. Tie a simple overhand knot with both cords together, leaving about 4-5 inches of tail on the shorter end. -
Secure the work:
Tape the knotted end securely to a table or clip it into a clipboard. This tension is crucial for keeping your beadwork straight. -
Begin threading beads:
You now have two long working strands extending from your knot. Take one strand and stiffen the end by rolling it between your fingers (waxed cord holds its shape well). -
String the first row:
Thread approximately 22-26 red clay beads onto the first cord. The exact number depends on your wrist size, but aim for a length that covers about 3/4 of your wrist circumference. -
Check for consistency:
Slide the beads up tight against the starting knot. Inspect them to ensure none are chipped or significantly misshapen compared to their neighbors.
Uneven Rows?
If one strand looks looser than the other, push all beads tight against the final knot before tightening. Tension is key for that parallel look.
Step 2: Second Strand & Joining
-
String the second row:
Repeat the threading process on the second cord. It is essential to use the exact same number and size of beads as the first strand so the rows sit perfectly parallel. -
Align the rows:
Push both sets of beads up toward the anchored knot. They should nestle against each other side-by-side without buckling. -
Tie the closing knot:
Once both strands are beaded and aligned, bring the two cords together immediately after the last beads. Tie a tight overhand knot using both cords to lock the beads in place. -
Check the fit:
Wrap the beaded section around your wrist. The two knots should sit near the edges of your wrist bone, with the open cord gap reserved for the underside of your wrist.
Step 3: The Sliding Macramé Closure
-
Form the loop shape:
Untape your project. Cross the tails from both ends of the bracelet so they overlap parallel to each other, forming a circle. -
Prepare the knotting cord:
Cut a fresh piece of cord, about 10 inches long. This will become the sliding adjustment mechanism. -
Start the square knots:
Place the 10-inch cord underneath the overlapped bracelet tails. Tie a standard square knot (Left over right, under and pull; Right over left, under and pull) to capture the bracelet tails. -
Build the slider:
Continue tying square knots for about half an inch. I find that 5-6 full square knots usually provide enough friction to hold tight but still slide smoothly. -
Finish the slider:
Trim the excess ends of the knotting cord (not the bracelet tails!) very close to the knots. creating the neat macramé bar shown in the image. -
Seal the knots:
Carefully burn the snipped ends with a lighter to melt the wax and seal the knot, or use a tiny dab of clear super glue if you prefer not to use fire.
Texture Twist
Use unpolished lava stones for one strand and smooth clay for the other. This adds a subtle, tactile contrast while keeping the color palette cohesive.
Step 4: Final Details
-
Add stopper beads:
Thread one small matching bead onto the very end of each bracelet tail cord. -
Knot the ends:
Tie a simple knot after each stopper bead to keep it on the cord. Adjust the placement so the tails don’t dangle too long when the bracelet is fully tightened. -
Determine final tail length:
Trim any excess cord past the stopper knots. Verify the sliding mechanism moves freely before wearing.
Slip your new double-strand bracelet on and enjoy the earthy feel of the clay against your skin
Wrap-Style Red Clay Bracelet
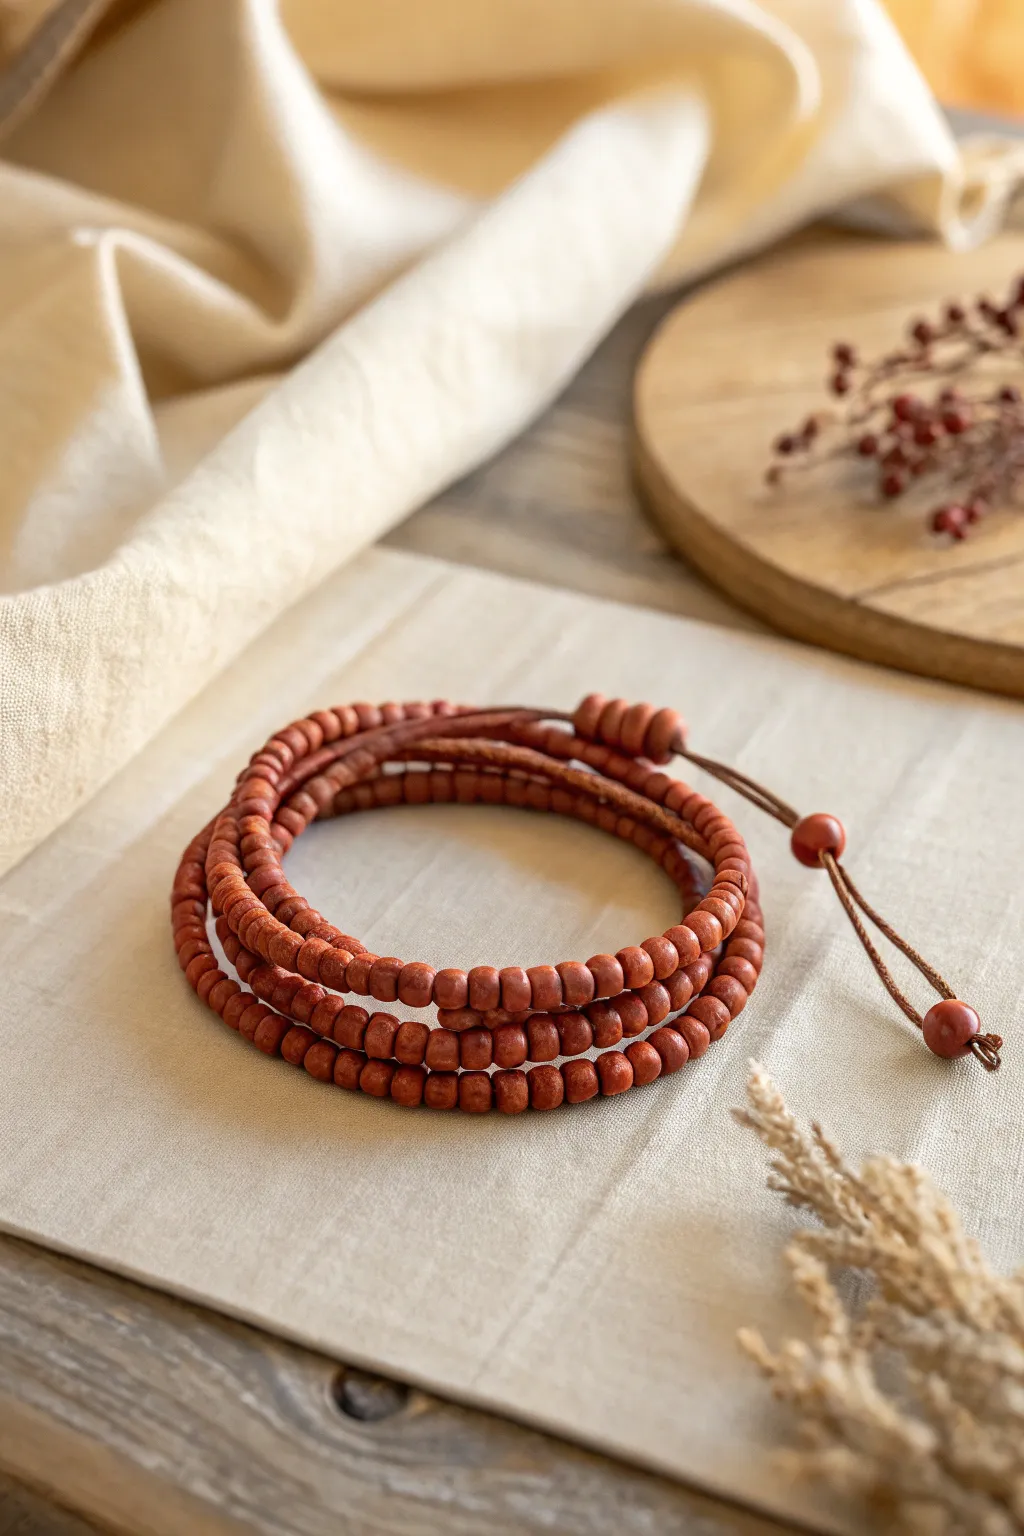
This earthy, wrap-style bracelet combines the warm, grounded tones of terracotta-colored clay with the rugged texture of leather cord. Its multi-strand look is achieved by simply coiling a single long strand, finishing with an adjustable closure for a relaxed, bohemian vibe.
Step-by-Step
Materials
- Red polymer clay (terracotta or brick red color)
- Leather cord or waxed cotton cord (1mm – 1.5mm thickness)
- Bead roller or acrylic block
- Needle tool, toothpick, or bead reamer
- Baking sheet and parchment paper
- Oven (for baking clay)
- Scissors
Step 1: Crafting the Clay Beads
-
Condition the Clay:
Start by taking a block of your red polymer clay and kneading it in your hands until it becomes soft, pliable, and warm. This conditioning step prevents cracking later on. -
Form Even Portions:
Roll the conditioned clay into a long, even snake or log shape, approximately 1/2 inch thick. Using a slicing blade, cut the log into small, equal-sized segments. Aim for pieces that are roughly pea-sized. -
Roll Individual Beads:
Take each segment and roll it between your palms to form a smooth sphere. For a more organic, handmade look like the photo, you don’t need them to be perfectly round—a slightly flattened or rondelle shape works beautifully here. -
Texturizing (Optional):
If you want that matte, stone-like texture seen in the image, lightly roll the beads over a piece of sandpaper or gently tap them with a toothbrush bristles before piercing. -
Piercing the Holes:
Using your needle tool or a toothpick, carefully pierce a hole through the center of each bead. Ensure the hole is wide enough to accommodate two passes of your cord if necessary, or at least a generous single pass. -
Refining the Shape:
Sometimes piercing deforms the bead creatively. Gently reshape the bead while it’s on the piercing tool to ensure it retains its general form. -
Baking:
Arrange your raw beads on a parchment-lined baking sheet. Bake them according to the manufacturer’s instructions on your clay package (usually around 275°F or 135°C for 15-30 minutes). Let them cool completely before handling.
Sticky Situation
If clay sticks to your needle tool, dust the tool lightly with cornstarch or baby powder before piercing each bead for a smooth release.
Step 2: Assembling the Wrap
-
Measure the Cord:
Cut a long length of leather cord. Since this is a wrap bracelet, measure your wrist, multiply that number by 3 or 4 (depending on how many wraps you want), and add an extra 10 inches for the knots and tails. -
Start Stringing:
Begin threading your cooled clay beads onto the leather cord. I find it helpful to cut the tip of the cord at a sharp angle to make threading easier without a needle. -
Filling the Strand:
Continue adding beads until you have covered almost the entire length required to wrap around your wrist the desired number of times. Leave about 4-5 inches of empty cord on each end. -
Check the Fit:
Wrap the beaded cord around your wrist to ensure the length is correct. The beads should sit comfortably without gaps, but not be so tight that the bracelet becomes stiff.
Step 3: Creating the Closure
-
Secure the Main Section:
Tie a simple overhand knot at both ends of the beaded section to keep the clay beads in place. Pull these knots tight against the first and last beads. -
Prepare for Sliding Knot:
Bring the two tail ends of the cord together so they overlap and run parallel to each other. -
Create the Bead Stopper:
Instead of a complex macrame knot, thread 2-3 extra clay beads onto *both* cord tails simultaneously. This acts as a sliding mechanism. -
Add End Details:
On each individual tail end, thread one final clay bead. Tie a sturdy overhand knot right after this bead to secure it at the very tip of the cord. -
Trim Excess:
Trim any excess leather cord extending past your final knots. If using specific types of synthetic cord, you might briefly singe the ends to prevent fraying, but for leather, a clean cut is sufficient.
Pro Tip: Rustic Finish
After baking, lightly buff the beads with a piece of denim or a soft cloth. This removes fingerprints without making them too shiny.
Now you have a versatile, earthy accessory that adds a natural touch to any outfit
Mixed Finish Red Clay Bracelet
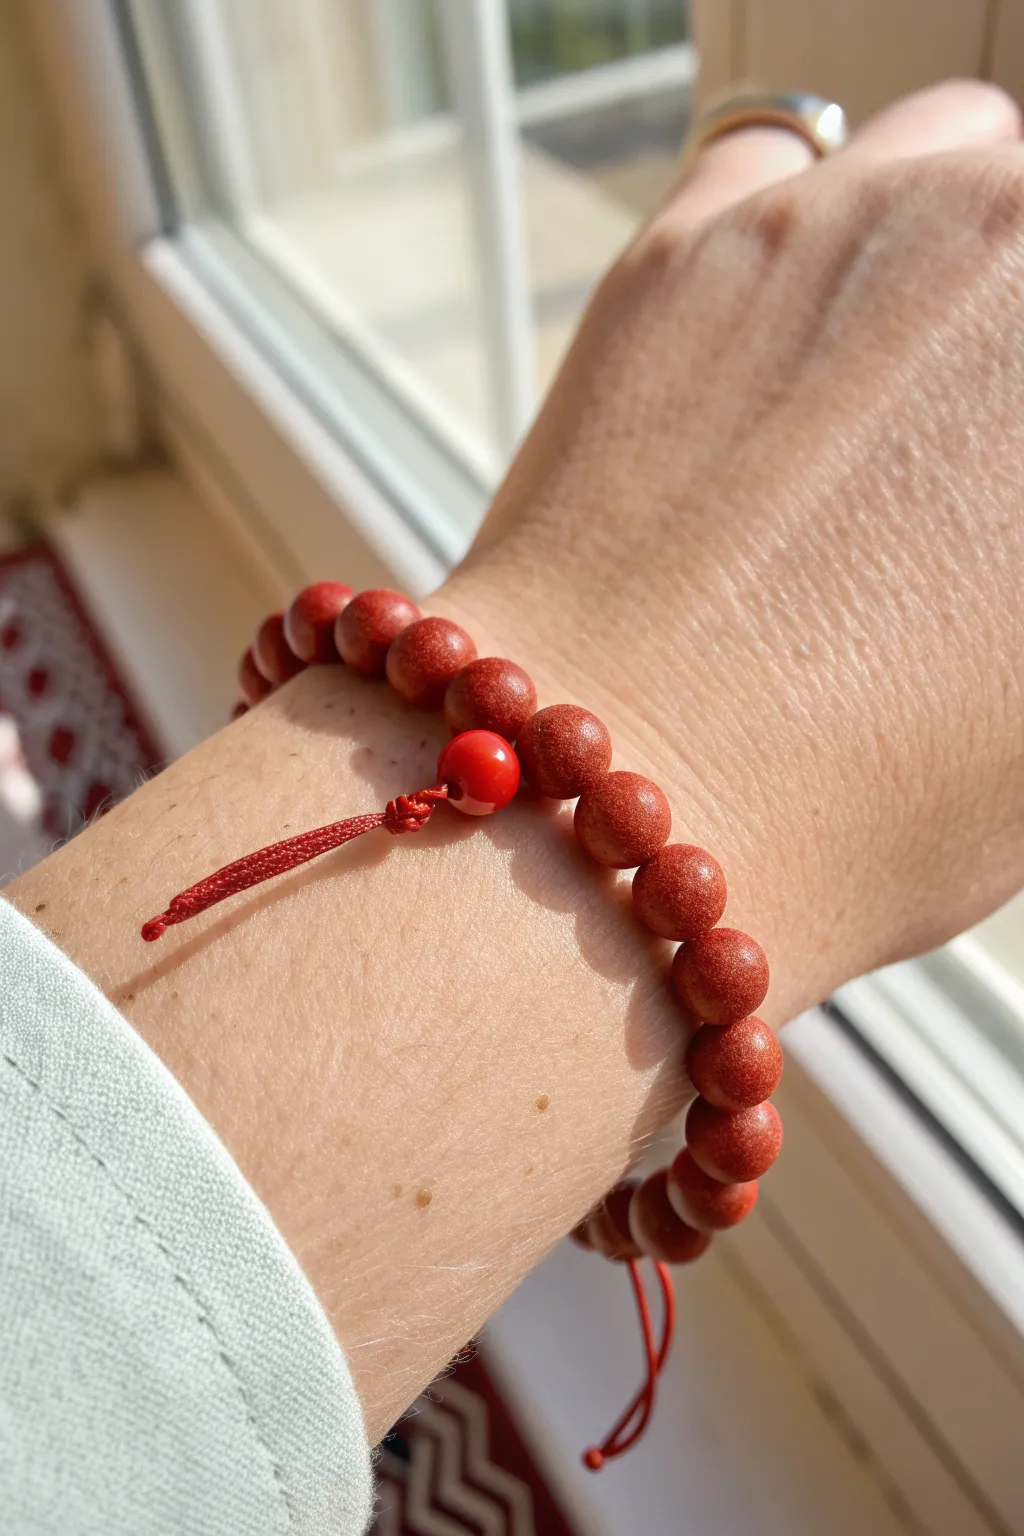
Capture the warmth of earthy tones with this stunning bracelet featuring textured red clay beads that sparkle like sunlit sandstone. A single glossy accent bead adds a modern pop of cherry red, creating a sophisticated mixed-finish accessory.
Step-by-Step Tutorial
Materials
- Red polymer clay (terra cotta or rust color)
- Translucent polymer clay
- Gold mica powder or fine gold glitter
- Glossy polyurethane varnish/glaze
- Red nylon cord (0.8mm or 1mm)
- Coarse grit sandpaper or sanding sponge
- Needle tool or toothpicks
- Small paintbrush
- Scissors and lighter
Step 1: Creating the Clay Blend
-
Condition the clay:
Start by thoroughly conditioning your red and translucent polymer clays separately until they are soft and pliable. -
Mix the base color:
Combine two parts red clay with one part translucent clay. This translucency adds depth and makes the sparkle effect we’ll add later really shine. -
Add the shimmer:
Flatten your mixed clay and sprinkle a generous amount of gold mica powder or very fine gold glitter onto the surface. -
Incorporate the sparkle:
Fold the clay over the powder and knead gently until the gold specks are evenly distributed throughout the entire batch.
Sticky Sandpaper?
If the raw clay sticks to your sandpaper while texturing, lightly dust the paper with cornstarch or water before rolling the beads.
Step 2: Forming Beads
-
Portion the clay:
Roll your clay into a snake about 1/2 inch thick and slice it into equal segments to ensure your beads are uniform in size. -
Roll the main beads:
Roll each segment between your palms to create smooth, round spheres. You’ll need about 18-22 beads depending on your wrist size. -
Texture the surface:
Gently roll the raw clay beads over a piece of coarse sandpaper. This creates that ‘sandstone’ pitted texture seen in the photo. -
Create the accent bead:
Set aside one bead to remain smooth. Do not texturize this one; simply roll it until it is perfectly spherical. -
Pierce the holes:
Using a needle tool, carefully pierce a hole through the center of each bead. I find twisting the needle while pushing helps prevent the bead from squashing. -
Bake carefully:
Arrange the beads on a baking sheet or skewer and bake according to your clay manufacturer’s instructions, typically around 275°F (130°C) for 30 minutes.
Step 3: Finishing and Assembly
-
Apply the gloss:
Once cooled, apply two coats of glossy varnish only to the single smooth accent bead, letting it dry completely between coats. -
Prepare the cord:
Cut a length of red nylon cord approximately 12 inches long. Burn the tip slightly with a lighter to make threading easier. -
String the beads:
Thread your beads onto the cord. Place the glossy accent bead first or last so it sit near the closure mechanism. -
Knot the accent:
Tie a simple overhand knot right next to the glossy bead to keep it distinct from the textured ones. -
Add spacing knots:
Push the textured beads tight against the knot you just made, and tie another knot at the other end of the bead line to secure them in place. -
Create sliding closure:
Cross the tail ends of the cord over each other. Using a separate short piece of cord, tie 3-4 square macrame knots around the crossed tails. -
Finish the ends:
Trim the excess cord from your sliding knot and carefully melt the ends with a lighter to seal them without catching the main cords. -
Final adjustments:
Tie small knots at the very tips of the pull cords so they don’t slip through the sliding closure mechanism.
Color Shift
Mix a tiny pinch of black clay into your red blend before adding glitter for a deeper, darker brick red tone.
Wear your new sandstone-inspired creation to add a warm, earthy touch to any outfit