Whenever I want a quick decor win without firing up a kiln, I reach for air dry clay and let it do its magic. These ideas are all about making easy, good-looking home decor pieces you’ll actually want to display.
Minimalist Hanging Ornaments
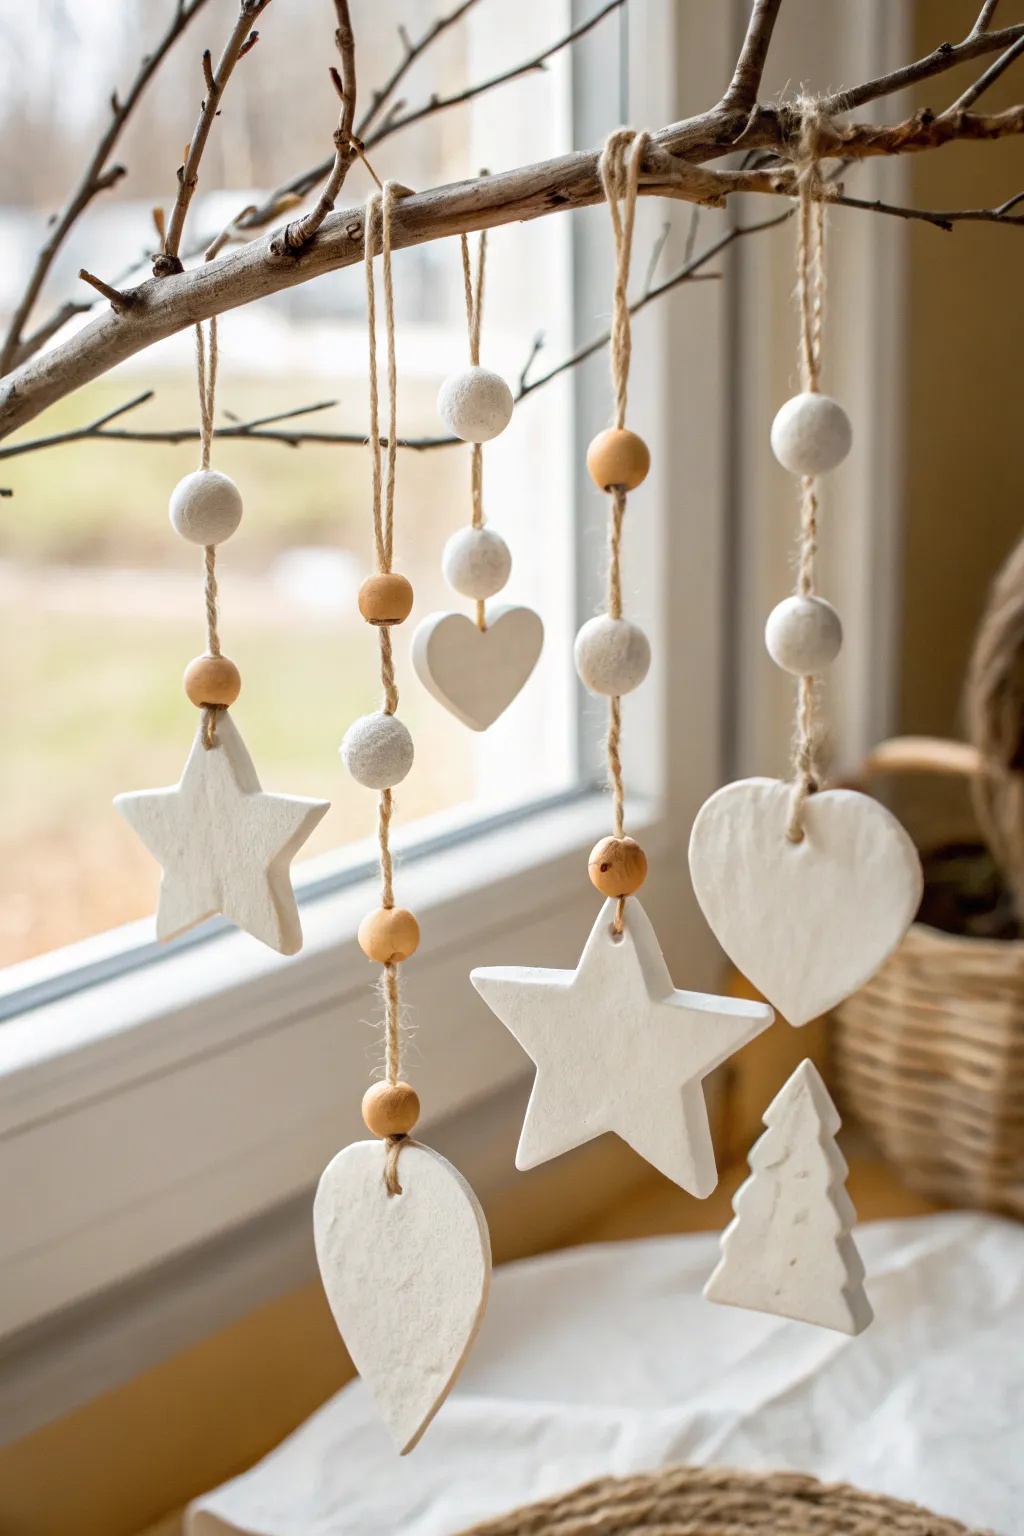
Bring the serene beauty of winter indoors with these minimalist air-dry clay ornaments suspended from a rustic branch. Combining clean white shapes with raw wood beads and jute creates a stunning contrast that fits perfectly into any modern or Scandinavian decor scheme.
Step-by-Step Guide
Materials
- White air-dry clay
- Rolling pin
- Jute twine or hemp cord
- Cookie cutters (star, heart, Christmas tree)
- Wooden beads (various sizes, unfinished)
- Drinking straw or skewer (for making holes)
- Fine-grit sandpaper
- Natural tree branch (approx. 1-2 feet long)
- Scissors
- Water in a small cup
- Parchment paper or craft mat
Step 1: Shaping the Clay Elements
-
Roll out the clay:
Begin by kneading a portion of air-dry clay until it’s pliable and smooth. Roll it out on parchment paper to an even thickness of about 1/4 inch (5-6mm). -
Cut the main shapes:
Using your cookie cutters, press firmly into the clay to create your main hanging pendants. You’ll need stars, hearts (both large and small), and perhaps a tree shape. -
Clean the edges:
Before the clay starts to dry, dip your finger in a little water and gently smooth any rough edges left by the cutters for a polished look. -
Create clay beads:
Roll small leftover pieces of clay into spheres to create your own handmade beads. Make them roughly the same size as your wooden beads or slightly larger for variety. -
Poke the holes:
Use a drinking straw to punch a clean hole near the top of each flat ornament. For your handmade clay spheres, carefully pierce through the center with a skewer, wiggling it slightly to ensure the hole is wide enough for the twine. -
Allow to dry:
Lay all your clay pieces flat on a drying rack or parchment paper. Let them dry completely according to the package instructions, usually 24-48 hours depending on humidity. I like to flip them halfway through to prevent warping. -
Sand for perfection:
Once fully cured, use fine-grit sandpaper to gently buff away any remaining imperfections or sharp edges, giving the surface a soft, matte finish.
Smooth Operator
To get purely white beads without fingerprints, wear latex gloves while rolling the clay spheres. A tiny drop of water smooths cracks instantly.
Step 2: Assembly and Hanging
-
Cut the twine:
Cut five lengths of jute twine. Vary the lengths slightly so the ornaments will hang at different heights, ranging from about 10 to 18 inches. -
Loop and knot:
Fold each piece of twine in half to create a loop at the top. Tie a simple overhand knot about 2 inches down from the fold to secure the loop. -
Start threading:
Begin threading your components onto the two loose ends of the twine. You can use a yarn needle if the twine is fraying. -
Create a pattern:
Alternate between your handmade clay beads and the natural wooden beads. Experiment with different sequences—try a wooden bead, then a clay sphere, then another wooden bead. -
Secure beads:
If beads are slipping down, you can tie a small knot underneath each one to keep it floating at a specific height, or let them rest in a stack. -
Attach the pendant:
Thread the ends of the twine through the hole of your main clay shape (the star, heart, or tree). Tie a secure double knot at the front or back, or tie a knot underneath the ornament to hold it in place. -
Trim the ends:
Snip off any excess twine below the final knot for a tidy finish, or leave a short tassel if you prefer a more rustic look. -
Prepare the branch:
Take your natural branch and ensure it is clean and dry. You can lightly sand any rough patches if needed. -
Mount the ornaments:
Slip the looped top of each ornament string over the branch. Arrange them so they are spaced evenly and the shapes don’t bump into each other. -
Final arrangement:
Adjust the positions until the visual balance feels right, mixing up the heights and shapes to create a pleasing cascade.
Cracked Clay?
If small cracks appear while drying, don’t panic. Mix a tiny bit of fresh clay with water to make a paste and fill the crack, then sand smooth once dry.
Now you have a serene, nature-inspired mobile that captures the quiet elegance of winter light


Stamped Texture Medallion Ornaments
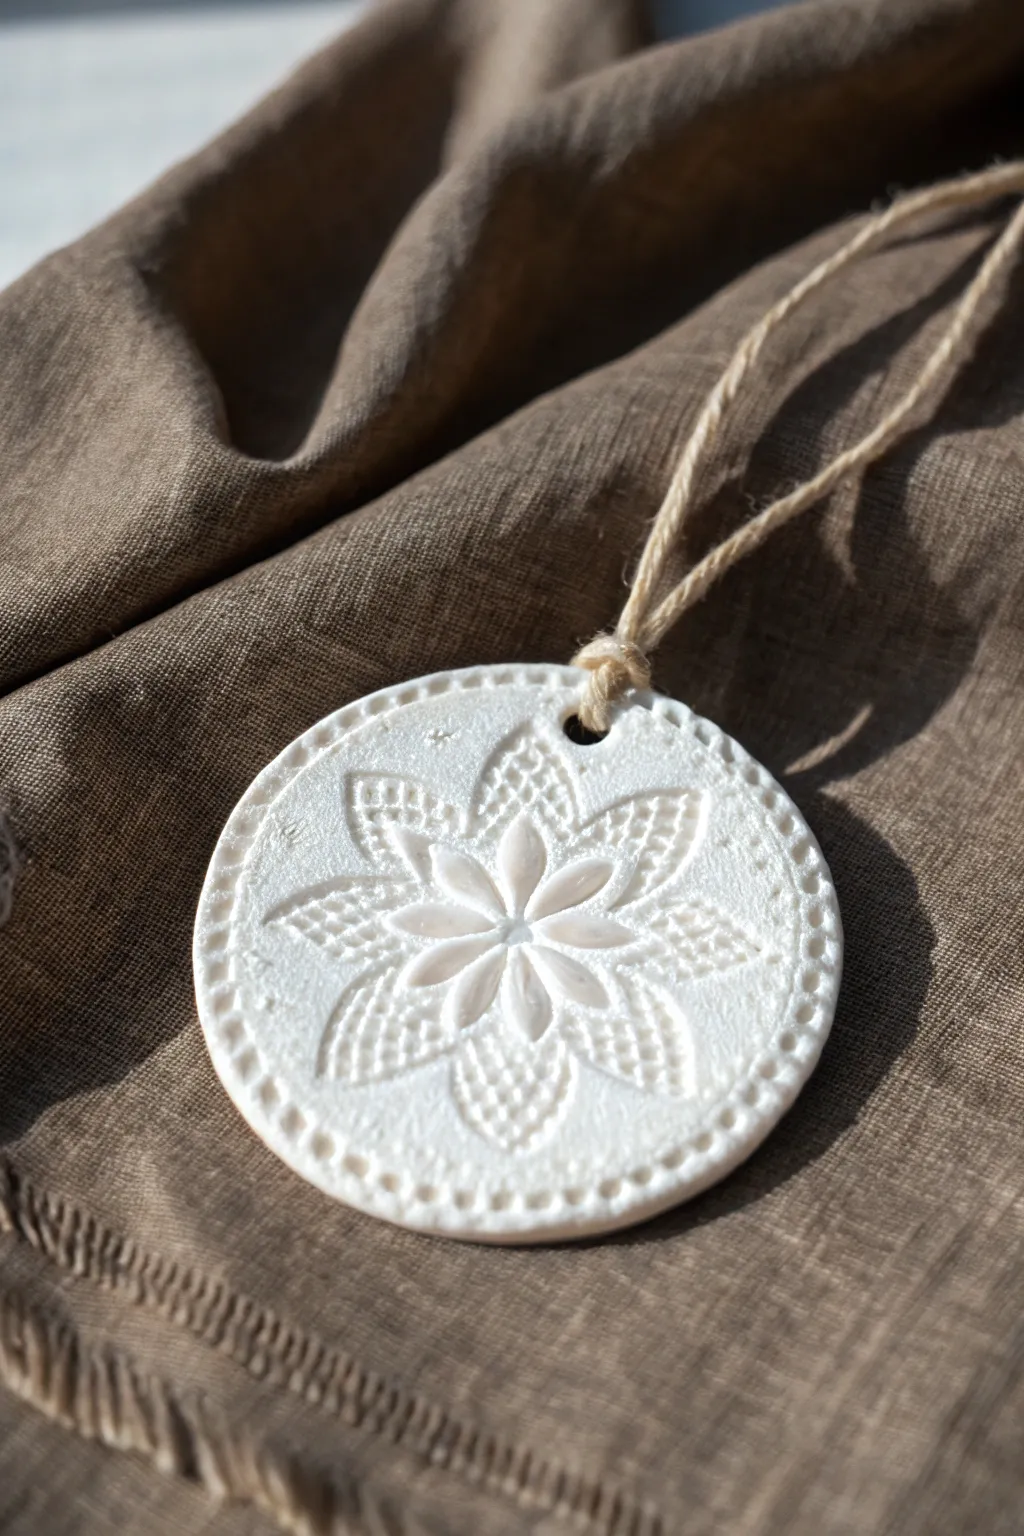
Capture the elegance of vintage lace with this deceptively simple air dry clay project. The result is a crisp, white ornament featuring a raised floral mandala design that looks stunning against rustic textures like linen or pine.
Detailed Instructions
Materials
- White air dry clay
- Rolling pin
- Circle cookie cutter (approx. 3 inches)
- Rubber stamp with mandala or floral pattern
- Drinking straw
- Fine grit sandpaper
- Jute twine or hemp cord
- Small bowl of water
- Wax paper or parchment paper
- Clear acrylic matte sealer (optional)
Step 1: Preparation and Rolling
-
Prepare your workspace:
Lay down a sheet of wax paper or parchment paper to prevent sticking. This makes it much easier to move your ornaments later without distorting their shape. -
Condition the clay:
Take a handful of white air dry clay and knead it in your hands for a minute until it feels warm and pliable. This removes air pockets and prevents cracking later. -
Roll out the clay:
Place the clay on your paper and use the rolling pin to flatten it. Aim for a consistent thickness of about 1/4 inch (6mm). If it’s too thin, the ornament will be fragile; too thick, and it will be heavy. -
Check surface smoothness:
Inspect the surface for any little creases or lint. I like to smooth over the clay gently with a slightly damp finger to ensure a flawless canvas before stamping.
Sticky Stamp Syndrome?
If the clay gets stuck in the intricate crevices of your stamp, lightly dust the stamp surface with cornstarch or baby powder before pressing it into the wet clay.
Step 2: Stamping and Cutting
-
Apply the texture:
Take your mandala or floral rubber stamp. Press it firmly and evenly into the center of the rolled clay. Don’t wiggle it, just press straight down and lift straight up to get a crisp impression. -
Center the cutter:
Position your circle cookie cutter over the stamped design. Look through the cutter to ensure the mandala is perfectly centered before you commit to the cut. -
Cut the shape:
Press the cutter down firmly through the clay. Twist it very slightly to ensure the edges separate cleanly from the excess clay. -
Remove excess clay:
Peel away the scrap clay from around the outside of the cutter first, then lift the cutter. If the clay sticks inside, gently push it out from the top. -
Add the dotted border:
To recreate the specific look in the photo, use a small, blunt tool (like the end of a paintbrush or a toothpick) to gently press a ring of small dots around the very edge of the circle. -
Create the hanging hole:
Use a drinking straw to punch a hole near the top edge of the ornament. Position it so it doesn’t interrupt the main floral design but isn’t so close to the edge that it might break.
Step 3: Finishing Touches
-
Smooth the edges:
Dip your finger in a tiny bit of water and run it around the cut edge of the circle. This softens the sharp cut lines for a more professional, ceramic-like finish. -
Let it dry:
Allow the ornament to dry on the parchment paper for 24-48 hours. Carefully flip it over halfway through the drying process to prevent curling and ensure even drying. -
Sand imperfections:
Once fully hard and white, use fine-grit sandpaper to gently buff away any rough spots on the edges. Be gentle to avoid scratching the stamped surface. -
Seal the piece (optional):
For longevity, spray or brush on a clear matte acrylic sealer. This protects the white clay from dust or yellowing over time. -
Prepare the hanger:
Cut a length of specific jute twine, about 8 inches long. Fold it in half to create a loop. -
Thread the loop:
Push the folded end of the twine through the hole in the ornament from front to back. -
Secure the knot:
Thread the loose ends of the twine through the loop you just pushed through the hole and pull tight (a lark’s head knot). Alternatively, just thread it through and tie a simple overhand knot near the clay as shown in the image.
Pro Tip: Prevent Curling
To keep your medallions perfectly flat, place a lightweight book on top of them once they are ‘leather hard’ (dry to the touch but still cool) to finish the drying process.
Now you have a timeless, textured ornament ready to hang or gift


Personalized Initial Gift Tags
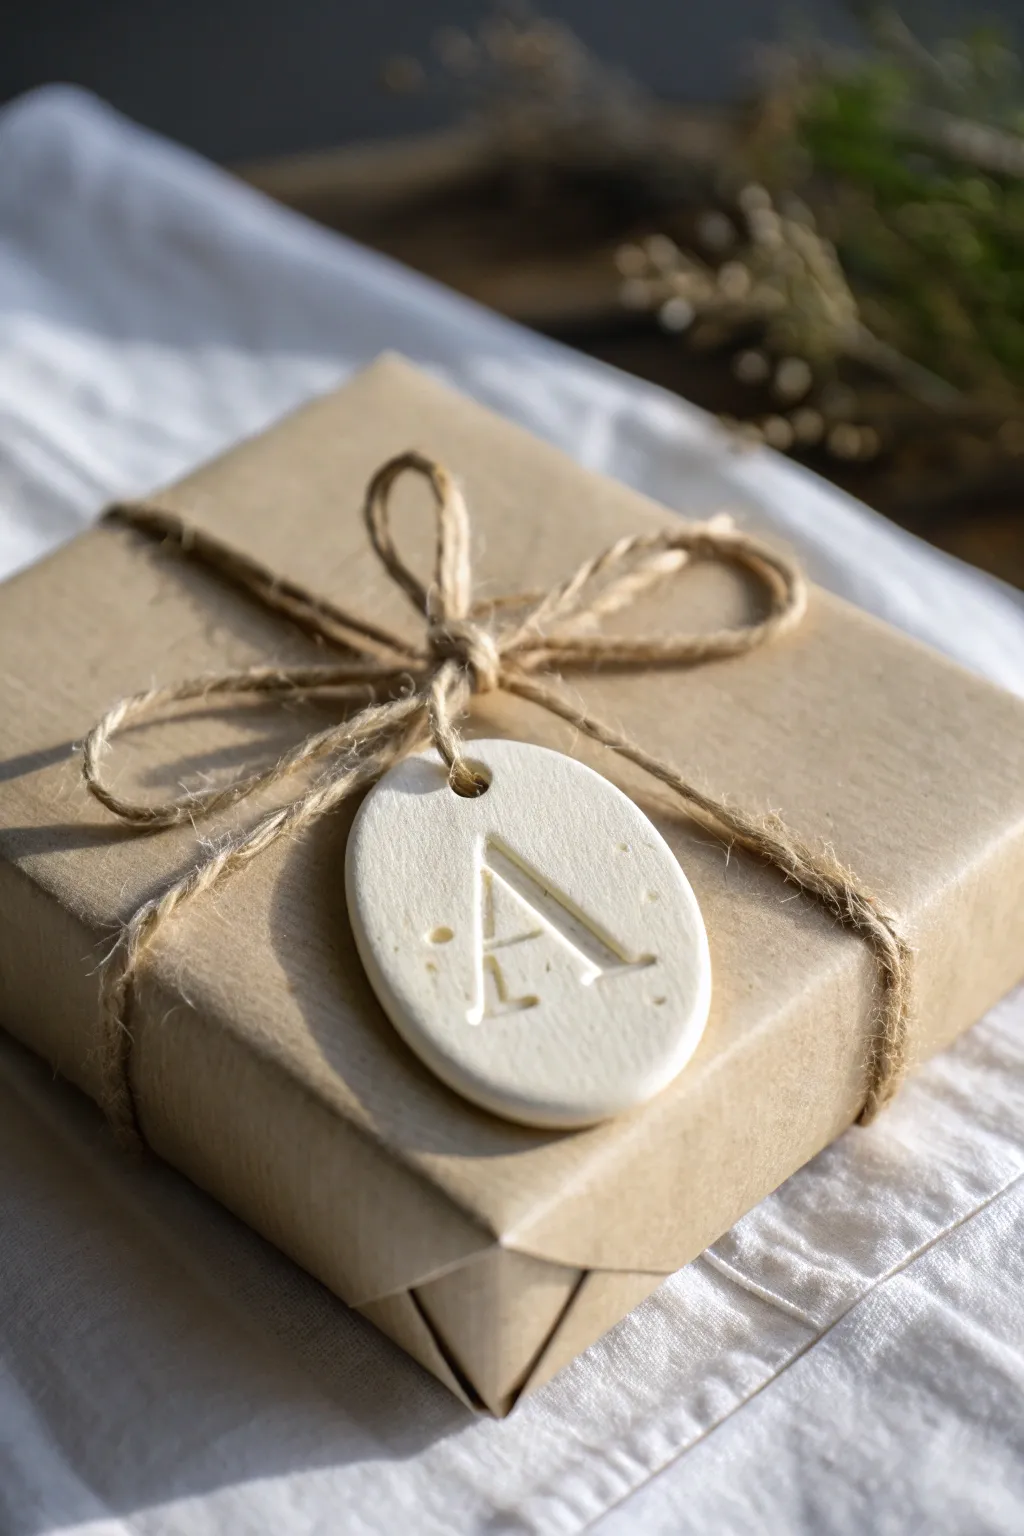
Add a bespoke touch to your gift wrapping with these elegant, minimalist monogram tags. This simple project combines the rustic charm of jute twine with the clean, modern look of white air-dry clay for a sophisticated finish.
Step-by-Step
Materials
- White extra-light air-dry clay
- Rolling pin (acrylic or wooden)
- Small oval cookie cutter (approx. 2 inches)
- Letter stamp set (serif font preferred)
- Drinking straw or small circular cutter
- Fine grit sandpaper (400-600 grit)
- Parchment paper or silicone mat
- Jute twine
- Brown kraft paper (for wrapping)
- Small bowl of water
Step 1: Preparation and Shaping
-
Prepare the workspace:
Lay down a sheet of parchment paper or a silicone mat on a flat surface. This prevents the clay from sticking and ensures a smooth back for your tags. -
Condition the clay:
Take a small handful of white air-dry clay. Knead it gently in your hands for about a minute until it feels pliable and warm, removing any air bubbles. -
Roll it out:
Place the clay ball in the center of your mat. Using your rolling pin, roll the clay out evenly until it is approximately 1/4 inch thick. Avoid going too thin, as the tag needs to be sturdy. -
Cut the shape:
Press your oval cookie cutter firmly into the rolled clay. Give it a tiny wiggle to ensure it cuts all the way through, then lift the cutter. Peel away the excess clay surrounding the shape. -
Smooth the edges:
Dip your finger into a small bowl of water just to dampen it. Gently run your finger around the perimeter of the oval to smooth out any rough edges left by the cutter.
Step 2: Detailing and Drying
-
Create the hole:
Take a drinking straw or a very small circular cutter. Press it into the top center of the oval, leaving enough margin (about 1/4 inch) from the edge so the clay won’t break later. -
Align the stamp:
Select the letter ‘A’ (or your desired initial) from your stamp set. Hover it over the center of the oval to visualize placement before committing. -
Make the impression:
Press the stamp straight down into the clay with firm, even pressure. Rock it very slightly to ensure the serif details catch, then lift straight up. -
Initial drying phase:
Let the tag sit undisturbed on the parchment paper. I like to let this dry briefly for about an hour so the surface isn’t tacky before moving it. -
Full cure:
Allow the clay to dry completely for 24-48 hours. Carefully flip the tag over halfway through the drying process to ensure the back dries evenly and prevents curling. -
Sand for perfection:
Once fully hard, inspect the edges. Use fine-grit sandpaper to buff away any burrs or uneven spots on the rim for a professional finish.
Cracking Up?
If you see tiny surface cracks appearing as it dries, mix a tiny bit of fresh clay with water to make a paste (slip) and smooth it into the cracks with your finger.
Step 3: Assembly
-
Wrap the gift:
Wrap your box neatly in brown kraft paper, ensuring the corners are crisp. -
Measure the twine:
Cut a generous length of jute twine—enough to wrap around your box twice plus extra for the bow. -
Secure the twine:
Wrap the twine around the box, crossing it at the back and bringing the ends to the front top center. Tie a simple overhand knot to secure it tight against the box. -
Thread the tag:
Take one end of the twine and thread it through the hole in your dried clay tag. Slide the tag down until it rests against the knot. -
Tie the bow:
Tie a standard bow on top of the tag. Fluff the loops of the jute so they look full and rustic, adjusting the tails to be roughly even length.
Gilded Edge
After the clay is fully dry and sanded, use a small paintbrush to apply liquid gold leaf or metallic paint just to the rim or inside the initial for a luxe pop.
Now you have a timeless, personalized element that elevates even the simplest wrapping paper


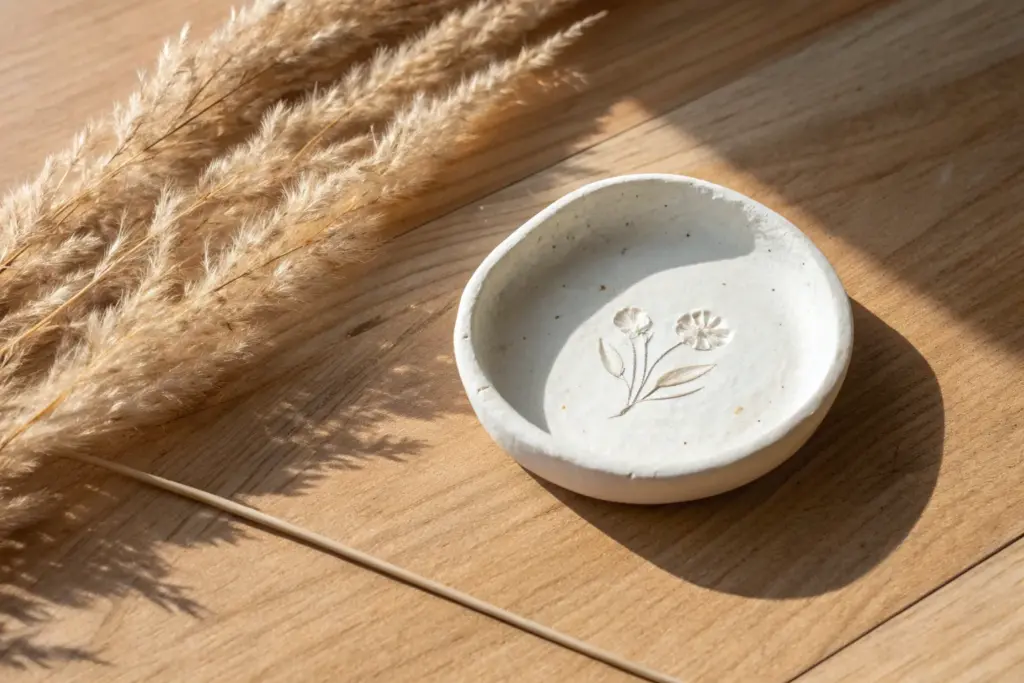
Simple Trinket Dishes
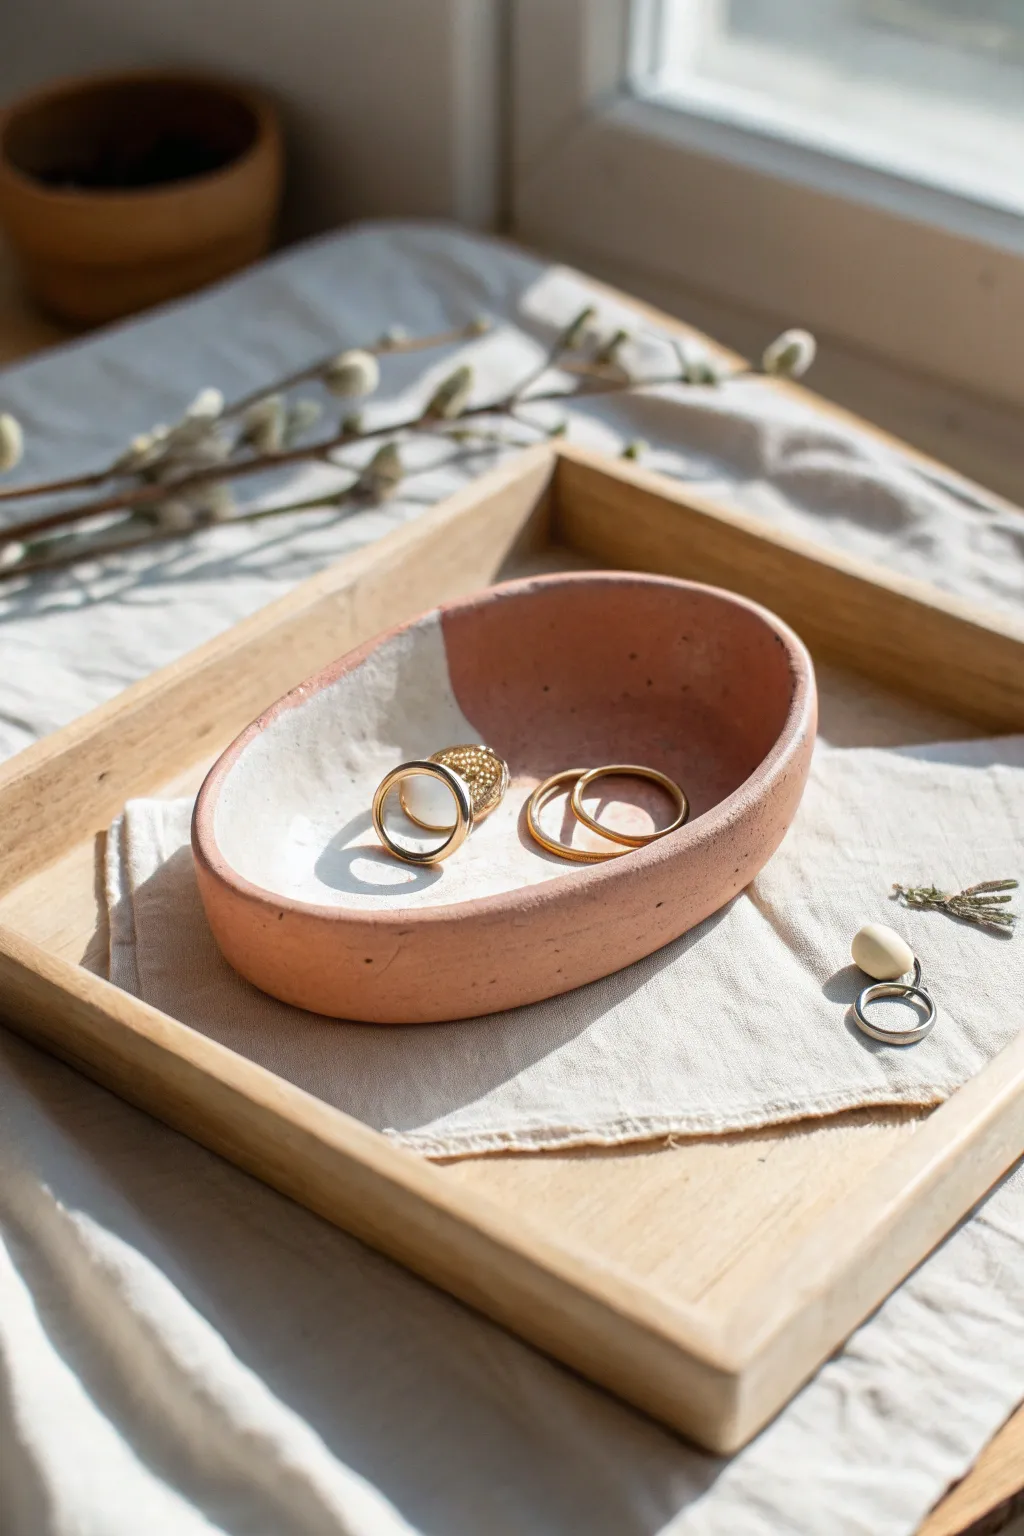
This rustic, minimalist trinket dish blends earthy terracotta tones with a crisp white accent for a modern dipping effect. Its shallow, oval shape makes it perfect for corralling everyday rings and small jewelry pieces while adding a soft, handmade touch to your dresser.
Step-by-Step Tutorial
Materials
- Terracotta colored air dry clay
- Rolling pin
- Oval cutter or paper template
- Craft knife
- Small bowl of water
- Sponge or finishing tool
- White acrylic paint
- Painter’s tape or masking tape
- Medium flat paintbrush
- Matte sealant or varnish
- Fine grit sandpaper (optional)
Step 1: Shaping the Clay Base
-
Condition the clay:
Start by taking a handful of terracotta air dry clay and kneading it in your hands. You want it to be warm and pliable, working out any trapped air bubbles that could cause cracks later. -
Roll out the slab:
Place the clay on a smooth surface or a silicone mat. Using a rolling pin, flatten the clay into an even slab that is roughly 1/4 inch thick everywhere. -
Cut the oval shape:
If you have a large oval cookie cutter, press it firmly into the center of your slab. Alternatively, sketch an oval onto a piece of paper, cut it out to use as a template, lay it on the clay, and trace around it carefully with a craft knife. -
Smooth the edges:
Dip your finger in a little bit of water and run it gently along the raw cut edge of the oval. This smooths out any harsh knife marks or jagged bits from cutting.
Step 2: Forming the Dish
-
Lift the edges:
Gently pinch and lift the outer rim of the oval upwards. You are essentially creating a small wall around the perimeter to keep things inside. -
Curve the transition:
Use your thumb to press the inner curve where the wall meets the base, smoothing it so there isn’t a sharp 90-degree angle but rather a gentle, bowl-like slope. -
Level the rim:
Look at the dish from the side to check that the rim height is relatively consistent. Gently tap down any high spots or pinch up any low spots. -
Refine the surface:
Take a slightly damp sponge and wipe it over the entire surface of the clay. This is the best time to remove fingerprints and ensure a professional, smooth finish before it starts to harden. -
Let it dry:
Place the formed dish on a clean, flat surface to dry. I like to flip it over halfway through the drying process—usually after about 24 hours—to ensure the bottom dries just as evenly as the top. Wait 48-72 hours total for full hardness.
Cracking Up?
If you see hairline cracks while drying, mix a tiny bit of fresh clay with water to make a paste (slip) and fill them in immediately.
Step 3: Decorating the Dish
-
Sand imperfections:
Once completely bone dry, inspect your edges. If there are any rough spots, use a fine-grit sandpaper to buff them away very lightly. -
Tape off the section:
Decide how much of the dish you want to be white. Apply a strip of painter’s tape across the dish at a slight diagonal or straight across, roughly covering two-thirds of the clay to protect it. -
Seal the tape edge:
Press the edge of the tape down firmly with your fingernail, especially over the rim and curves, to prevent paint from bleeding underneath. -
Apply base coat:
Paint the exposed section with white acrylic paint. Use smooth, even strokes moving away from the tape line. -
Add a second coat:
Let the first layer dry to the touch, then apply a second coat of white for a solid, opaque look that hides the terracotta color completely. -
Remove tape:
While the second coat is still slightly wet (but not runny), carefully peel back the tape at a 45-degree angle to reveal a crisp line. -
Seal the dish:
Once the paint is fully cured, apply a thin coat of matte varnish over the entire piece—both the painted and unpainted sections. This protects the clay from moisture and gives it a unified sheen.
Sharper Lines
For the crispest paint line possible, paint a clear layer of varnish over your tape edge first to seal it before adding the white color.
This simple technique results in a functional piece of art that looks much more expensive than the materials used to make it

What Really Happens Inside the Kiln
Learn how time and temperature work together inside the kiln to transform clay into durable ceramic.
Leaf-Imprint Catchall Bowls
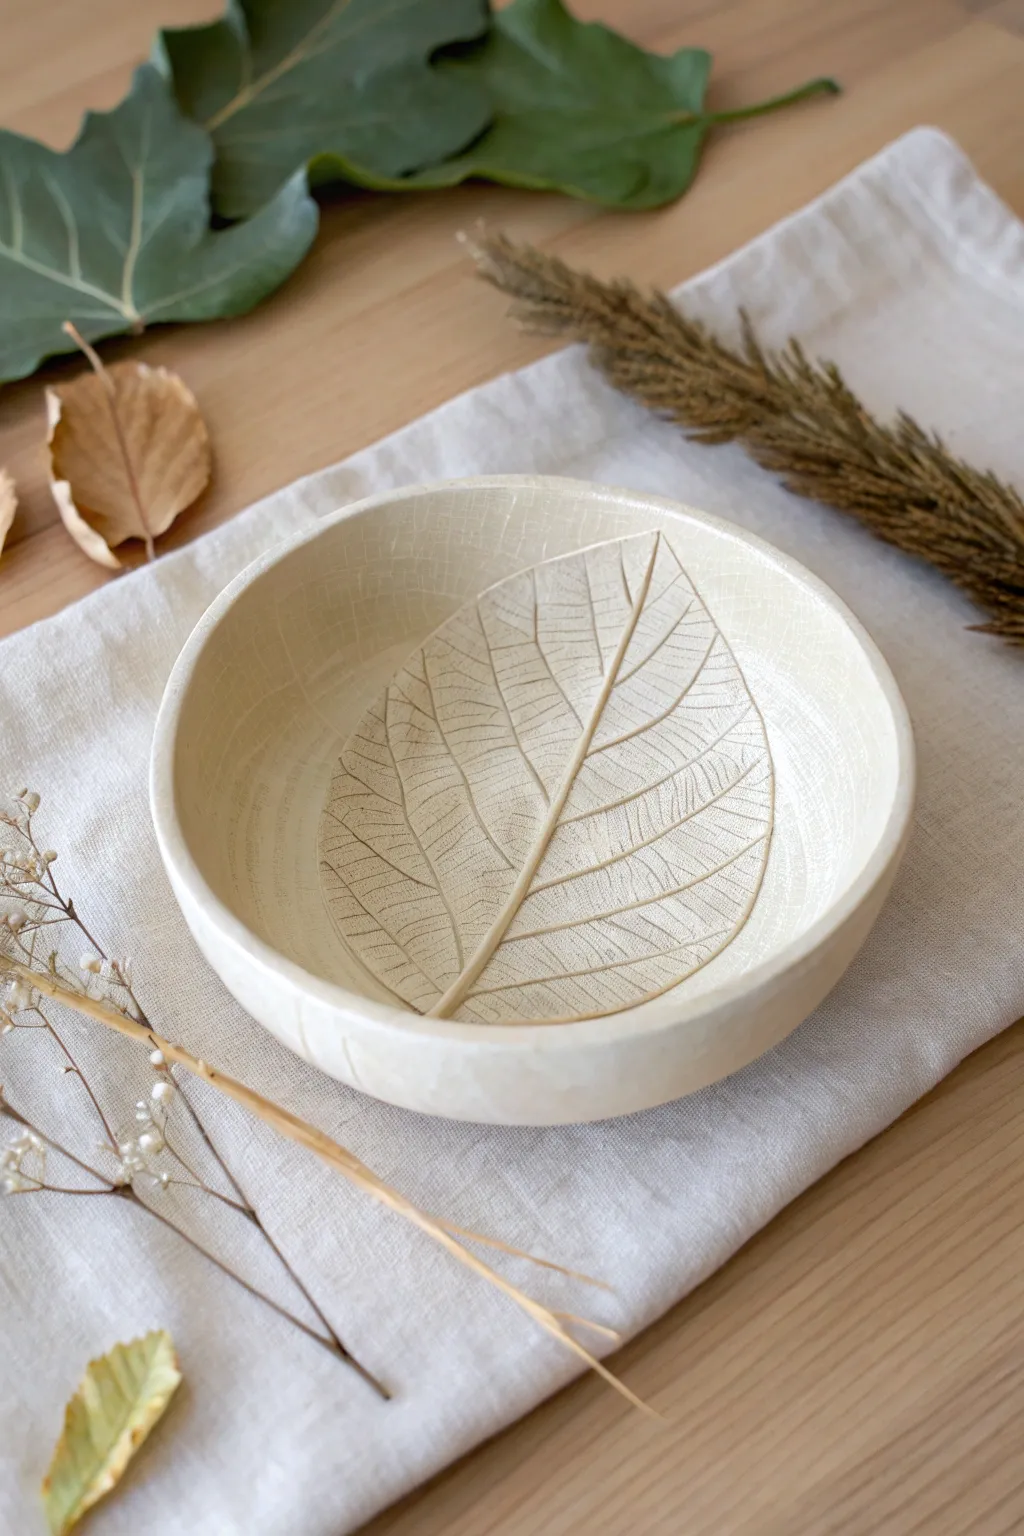
Capture the intricate beauty of nature by pressing a real leaf into soft air dry clay. This shallow catchall bowl features a striking, deeply textured botanical fossil effect that adds an organic touch to any tabletop.
Detailed Instructions
Materials
- White air dry clay
- Rolling pin
- Large, fresh leaf with prominent veins (like a hydrangea or walnut leaf)
- Small bowl (to use as a mold)
- Plastic wrap
- Sharp crafting knife or scalpel
- Sponge and water
- Fine-grit sandpaper
- Clear matte varnish or sealant
Step 1: Preparation & Impression
-
Condition the clay:
Begin by taking a handful of air dry clay and kneading it in your hands until it becomes warm, soft, and pliable. This helps prevent cracks later on. -
Roll out a slab:
Place the clay on a smooth surface or a mat. Use your rolling pin to flatten it into an even circle, aiming for a thickness of about a quarter-inch. -
Position the leaf:
Select your leaf simply based on its vein structure; deeply veined leaves work best. Place the leaf face-down (vein side down becomes the impression side) onto the center of your clay slab. -
Create the imprint:
Gently roll over the leaf with the rolling pin. Apply firm, even pressure to ensure the veins and stem are pushed deep into the clay surface, but be careful not to make the slab too thin. -
Remove the leaf:
Carefully locate the stem on the edge of the clay leaf. Slowly peel the leaf away to reveal the detailed impression left behind.
Fixing Cracks
If tiny cracks appear while drying, make a paste of clay and water (slip) and smooth it into the cracks, then let dry again.
Step 2: Shaping the Bowl
-
Select the cutting area:
Decide how large you want your bowl to be. Place a round bowl or a circular template over the leaf impression to visualize the final cut. -
Cut the circle:
Using a sharp crafting knife, cut straight down around your template to create a clean, perfect circle containing the leaf design. -
Smooth the edges:
Dip your finger in a little water and run it along the cut edge of the clay circle to smooth out any roughness or sharpness. -
Prepare the mold:
Line a small bowl—choose one that is slightly larger than your clay circle—with plastic wrap. This prevents sticking and makes removal easier. -
Form the curve:
Gently lift your clay circle and place it inside the lined bowl. Let gravity help it sink into the curve, or press very lightly around the edges to help it conform to the bowl’s shape.
Step 3: Finishing Touches
-
Initial drying:
Leave the clay inside the bowl to dry for at least 24 hours. Placing it in a cool, dry spot away from direct sunlight prevents warping. -
Remove from mold:
Once the clay feels firm to the touch and mostly dry, carefully lift it out of the bowl using the plastic wrap. I like to flip it over at this stage to let the bottom dry completely. -
Sand for smoothness:
When the bowl is bone dry and turns a chalky white, take fine-grit sandpaper and gently sand the rim and bottom to remove any imperfections. -
Clean surface:
Wipe away any sanding dust with a slightly damp sponge or a dry cloth so the surface is clean for sealing. -
Apply sealant:
Brush on a coat of clear matte varnish or acrylic sealant. This protects the clay from moisture and gives the piece a professional, finished look. -
Final cure:
Allow the sealant to cure fully according to the manufacturer’s instructions before using your new catchall.
Gilded Edge
Paint the rim with liquid gold leaf or metallic acrylic paint after sealing for a luxurious, high-end finish.
Enjoy styling your handmade bowl on a coffee table or gifting it to a nature lover
Flower-Shaped Coasters
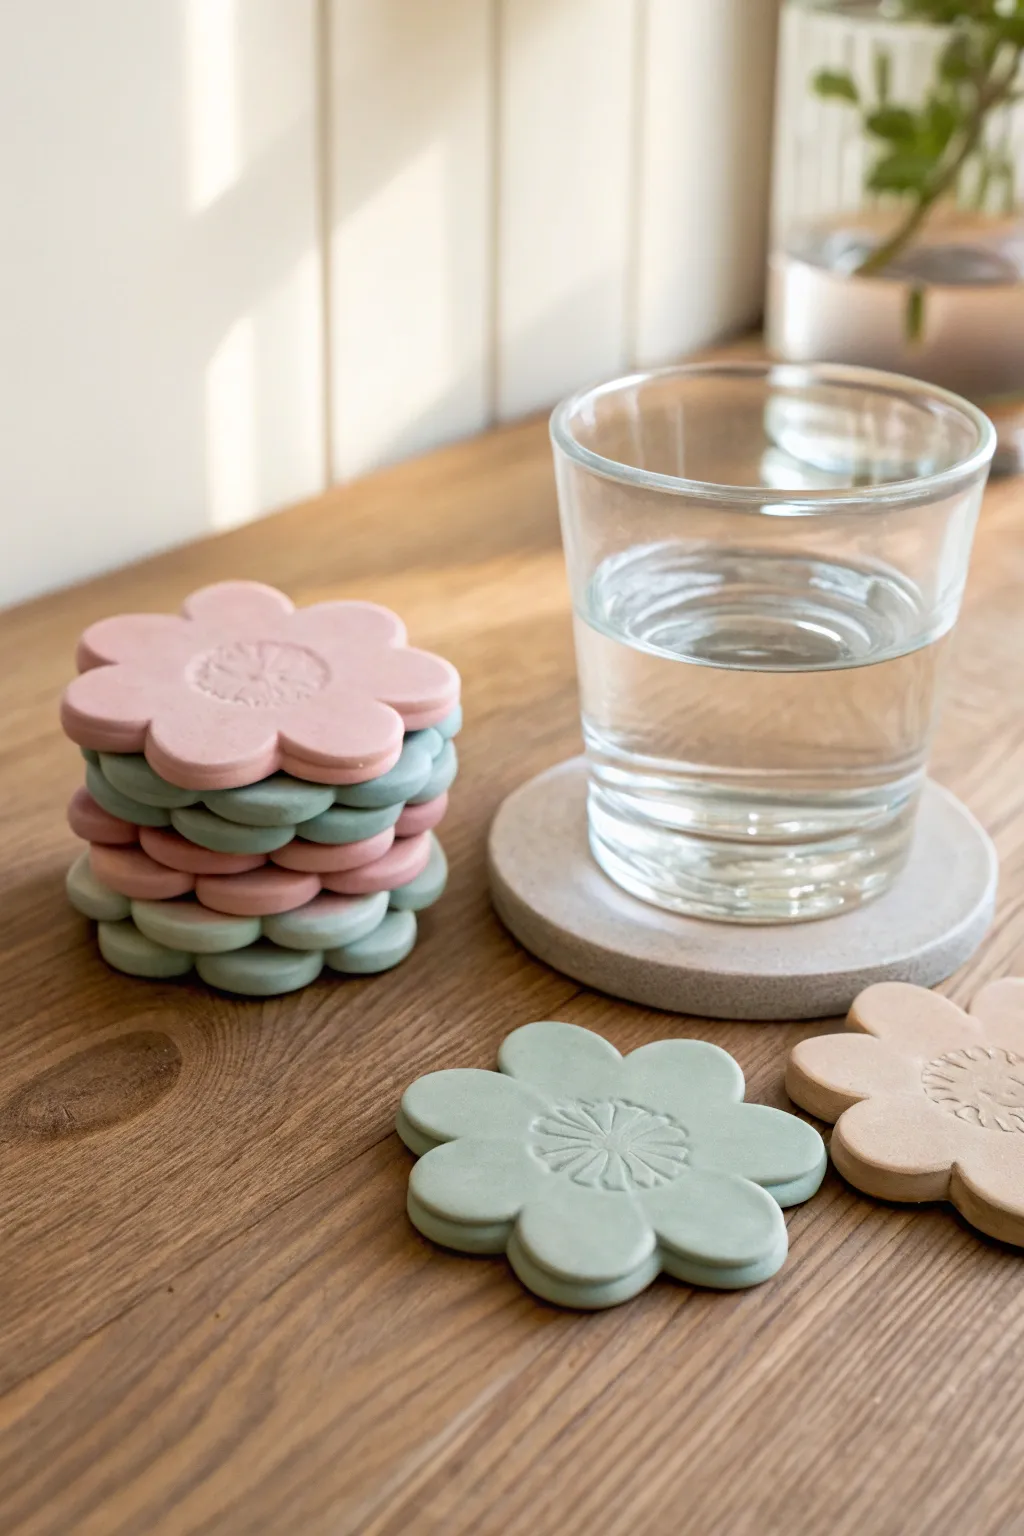
Bring a touch of springtime to your coffee table with these charming flower-shaped coasters. Their soft, matte finish and subtle central embossing make them as delightful to touch as they are to look at.
Step-by-Step
Materials
- Air dry clay (white or pre-colored)
- Acrylic paints (pastel pink, mint green, beige)
- Rolling pin
- Parchment paper or canvas mat
- Flower-shaped cookie cutter (approx. 3.5-4 inches)
- Small round stamp or textured button (for the center)
- Fine-grit sandpaper (220-400 grit)
- Matte spray varnish or acrylic sealer
- Sponge or craft knife (optional)
- Water in a small bowl
Step 1: Preparation & coloring
-
Condition the clay:
Start by taking a chunk of your air dry clay and kneading it thoroughly in your hands. You want it to be warm, pliable, and free of any air bubbles. -
Tint the clay:
If you are using white clay, flatten your ball slightly and add a small drop of pastel acrylic paint in the center. Fold the clay over the paint and knead until the color is uniform. Repeat for pink, mint green, and beige batches. -
Create a slab:
Place your colored clay onto a sheet of parchment paper. Roll it out evenly using your rolling pin until it is about 1/4 inch thick. Try to keep the thickness consistent so the coaster sits flat.
Fixing warped edges
If edges curl while drying, place a heavy book on top of them once they are about 75% dry. Put parchment paper between the clay and the book.
Step 2: Shaping & detailing
-
Cut the flower:
Press your flower-shaped cookie cutter firmly into the rolled slab. Give it a tiny wiggle to ensure it cuts all the way through, then lift the cutter straight up. -
Remove excess:
Peel away the excess clay from around your flower shape. Save these scraps in an airtight bag or container to prevent them from drying out while you work. -
Smooth the edges:
Dip your finger into a little water and gently run it along the cut edges of the flower to round them off slightly and remove any sharp ridges left by the cutter. -
Emboss the center:
Take your small round stamp or a textured button. Press it gently but firmly into the exact center of the flower to create the decorative pistil design. Don’t press so hard that you warp the coaster. -
Make the round base:
For the plain round coaster seen under the glass, simply cut a circle from a rolled slab (perhaps in a neutral grey or beige) using a large round cutter or a bowl as a guide.
Improvised stamps
No floral stamp? Use the cap of a marker for the circle and a toothpick to gently carve the radiating lines inside for the center design.
Step 3: Finishing touches
-
Initial drying phase:
Let the coasters sit on the parchment paper undisturbed for about 24 hours. Keep them away from direct heat sources to prevent cracking. -
Flip and continue drying:
Once the top feels dry to the touch, gently flip the coasters over. This helps the bottom dry evenly and prevents warping. Let them dry for another 24-48 hours until completely hard. -
Sand for smoothness:
Using fine-grit sandpaper, lightly buff the edges and surface of the dry coasters. I like to do this outside or over a trash can to minimize dust. -
Dust off residue:
Wipe the coasters down with a slightly damp cloth or a soft brush to remove any clay dust from the sanding process. -
Seal to protect:
Since air dry clay dissolves in water, sealing is crucial for coasters. Apply two to three thin coats of matte spray varnish or acrylic sealer, letting each coat dry completely in between.
Now you have a lovely set of custom coasters ready to protect your surfaces with style


The Complete Guide to Pottery Troubleshooting
Uncover the most common ceramic mistakes—from cracking clay to failed glazes—and learn how to fix them fast.
Speckled Faux-Ceramic Coaster Set
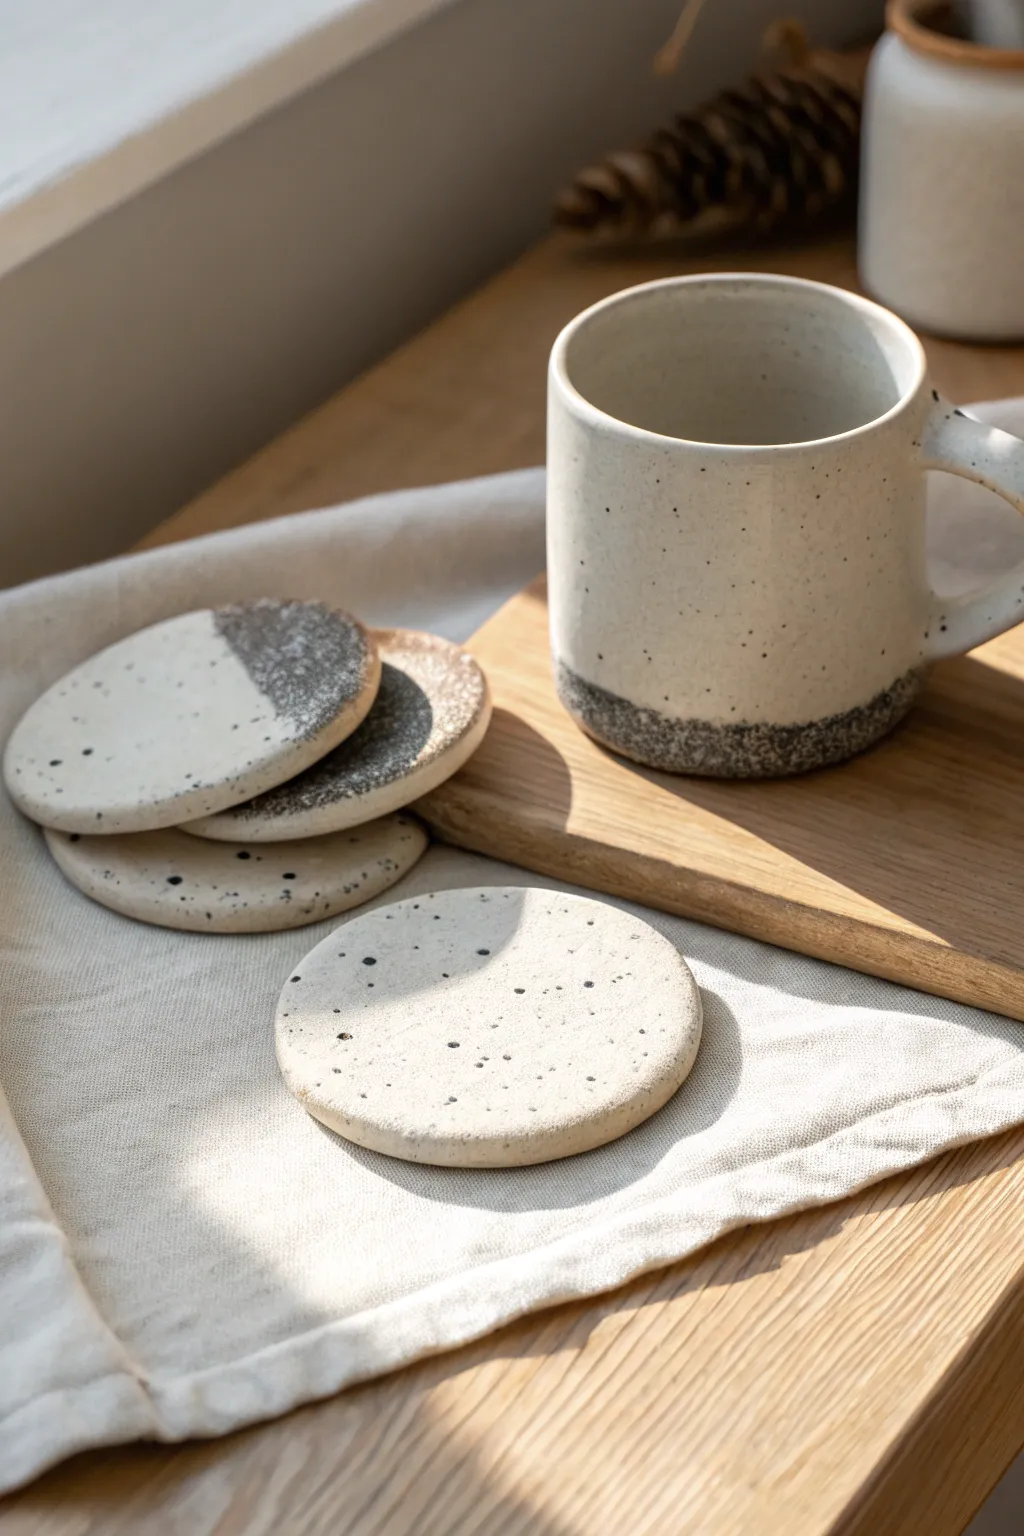
Achieve the high-end look of fired stoneware pottery without needing a kiln using this clever air-dry clay technique. These minimalist coasters feature authentic-looking black speckles and a smooth, matte finish that brings a modern, earthy touch to your coffee table.
How-To Guide
Materials
- White smooth air-dry clay
- Coarse black pepper or dried coffee grounds
- Rolling pin
- Round cookie cutter (approx. 3.5 – 4 inches)
- Sandpaper (fine grit)
- Acrylic rolling guides or two wooden rulers
- Water in a small cup
- Matte spray sealant or waterproof varnish
- Craft sponge
- Dark grey acrylic paint (optional for dip effect)
Step 1: Preparing the Clay Body
-
Condition the clay:
Begin by taking a large handful of white air-dry clay and kneading it thoroughly in your hands until it becomes warm, pliable, and free of stiff lumps. -
Create the heavy speckle:
Flatten the clay slightly and sprinkle a generous pinch of coarse black pepper or dried coffee grounds into the center. Fold the clay over to enclose the particles. -
Distribute the texture:
Knead the clay repeatedly to distribute the ‘speckles’ evenly throughout the mixture. If the effect is too subtle, add more pepper until you see a consistent, terrazzo-like distribution.
Fixing the Curl
If your coasters curl up at the edges while drying, dampen the concave side slightly with a sponge and weigh them down under a heavy book for a few hours to flatten them back out.
Step 2: Shaping and Drying
-
Set up your workspace:
Place your clay on a smooth, non-stick surface or a canvas cloth. Place your rolling guides or rulers on either side of the clay ball to ensure an even thickness. -
Roll out the slab:
Use the rolling pin to flatten the clay. Aim for a thickness of about 1/4 inch (6mm)—too thin and they may crack; too thick and they will take forever to dry. -
Check surface quality:
Inspect the surface for air bubbles. If you find any, poke them gently with a needle tool and smooth over the area with a damp finger. -
Cut the shapes:
Press your round cookie cutter firmly into the clay slab. Wiggle it very slightly to ensure a clean cut, then lift the cutter away. -
Remove excess clay:
Peel away the scrap clay from around your circles. You can re-knead these scraps to make more coasters. -
Smooth the edges:
Dip your finger in a little water and run it gently around the rim of each coaster to remove any sharp ridges left by the cutter. -
Initial drying:
Place the coasters on a wire rack or a clean sheet of paper to dry. Let them sit undisturbed for 24-48 hours. I find flipping them over halfway through helps prevent warping.
Level Up: Cork Bottoms
For a truly professional finish and to protect your furniture, cut circles of thin adhesive cork sheet slightly smaller than the clay and stick them to the bottom of each finished coaster.
Step 3: Finishing Touches
-
Sand for smoothness:
Once fully dry and hard, take your fine-grit sandpaper and gently buff the edges and surface. This exposes more of the black speckles and creates that soft, ceramic feel. -
Clean the dust:
Wipe the coasters down with a barely damp cloth or dry brush to remove all sanding dust before proceeding. -
Paint the accent (Optional):
To mimic the dipped look seen in the photo, sponge dark grey acrylic paint onto just one edge of the coaster, softly fading it toward the center for a textured gradient. -
Apply the sealant:
Since air-dry clay is not water-resistant, apply a coat of waterproof matte varnish or a spray sealant. Coat the top, wait for it to dry, and then coat the bottom. -
Second coat:
Apply a second layer of sealant to ensure durability against condensation from cold drinks.
Enjoy styling your new handcrafted faux-stone coasters with your favorite mugs and warm drinks
Modern Tea Light Candle Holders
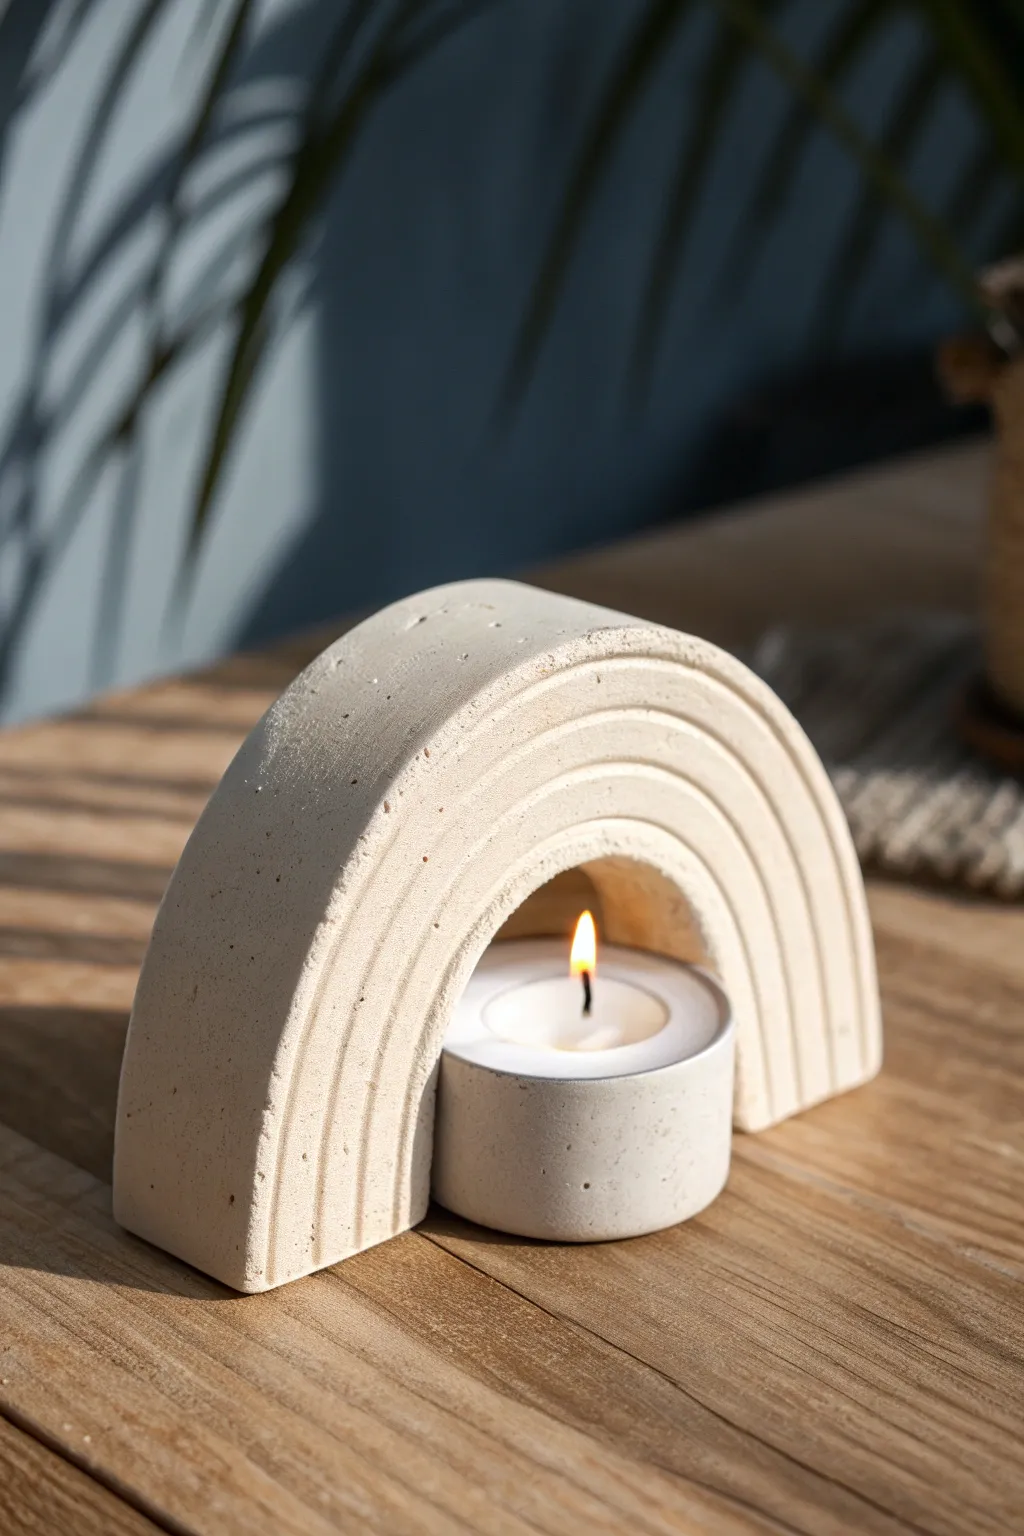
Bring a touch of modern serenity to your space with this architectural arch candle holder. The clean lines and raw, stone-like texture create a high-end look that belies how simple it is to craft from basic air-dry clay.
Detailed Instructions
Materials
- White or speckled air-dry clay
- Rolling pin
- Sharp craft knife or clay slicing blade
- Smooth work surface (glass or silicone mat)
- Small bowl of water
- 3-inch circular cookie cutter (or a glass)
- Small circular cutter (slightly larger than a tea light)
- Ruler
- Fine-grit sandpaper (220-400 grit)
- Modeling tool or dull butter knife
- Matte sealer (optional)
Step 1: Shaping the Base Components
-
Prepare the clay:
Begin by kneading a large ball of air-dry clay until it is warm and pliable. This conditioning step prevents internal air bubbles and cracks later on. -
Roll the slab:
Roll your clay out into an even slab that is approximately 3/4 inch thick. You want this quite chunky to match the solid, architectural look in the photo. -
Create the tea light cup:
Using a cutter or a template, cut a circle that is just slightly wider than a standard tea light candle. -
Form the cup walls:
Roll a separate strip of clay about 3/4 inch tall and wrap it around your circle base to create a small cup. Smooth the seams together with a bit of water so it looks like one solid piece. -
Verify the fit:
Gently place a real tea light inside your fresh clay cup to ensure it fits comfortably, but remove it immediately so it doesn’t get stuck while drying.
Step 2: Constructing the Arch
-
Cut the arch block:
From your thick slab, cut a large rectangle that is roughly 4 inches high and 6 inches wide. -
Use a round template:
Place a large circular object (like a bowl or large cutter) at the top of your rectangle and trace a curve to create the rounded top of the rainbow. -
Cut the outer shape:
Carefully slice along your traced line to create the smooth, domed top of the arch. -
Mark the inner arch:
Using a smaller circular object centered at the bottom of the shape, mark where the negative space will be. Ensure this opening is wide enough to straddle your tea light cup. -
Remove the center:
Cut out the inner semi-circle. I find it helpful to slice this out in sections rather than one go to keep the edges neat. -
Refine the edges:
Dip your finger in water and smooth all the cut edges of the arch, rounding them off slightly to remove any sharp angles from the knife.
Stone Texture Trick
Mix spent coffee grounds or black pepper into your white clay before rolling. This mimics the speckled ceramic look seen in the image perfectly.
Step 3: Adding Detail & Assembly
-
Carve the rainbow lines:
Using a modeling tool or the back of a butter knife, gently press three evenly spaced concentric arches into the front face of the clay. Don’t cut all the way through; just create deep grooves. -
Soften the grooves:
Run a damp finger or a wet paintbrush along these grooves to soften the clay crumbs and make the lines look intentional and molded. -
Dry the components:
Let both the arch and the tea light cup dry separately for 24-48 hours. Turn them over occasionally to ensure even airflow. -
Sand for perfection:
Once fully dry, use fine-grit sandpaper to buff away any fingerprints or uneven bumps. This creates that professional, stone-like finish. -
Assemble the piece:
The beauty of this design is modularity, but if you prefer a single unit, apply a strong craft glue to the back of the tea light cup and attach it flush against the back of the arch opening.
Color Wash Upgrade
Dilute acrylic paint with water (1:5 ratio) creating a ‘wash.’ Brush it over the dried piece and wipe off excess for a stained, antique effect.
Place a tea light in the holder and enjoy the warm glow as it highlights the textured arches of your new decor piece

TRACK YOUR CERAMIC JOURNEY
Capture glaze tests, firing details, and creative progress—all in one simple printable. Make your projects easier to repeat and improve.
Moon-and-Star Incense Holders

Bring the night sky indoors with this dreamy incense holder, featuring a standing crescent moon nestled on a starry cloud-like base. The simple white clay contrasted with sparkling gold inlays creates a serene, magical aesthetic perfect for any relaxation corner.
Step-by-Step Tutorial
Materials
- White air dry clay
- Rolling pin
- Circle cookie cutter (approx. 4 inches)
- Small crescent moon shape template or freehand sketch
- Clay knife or X-Acto knife
- Small star-shaped stamps or fondant cutters
- Incense stick (for sizing the hole)
- Sandpaper (fine grit)
- Gold acrylic paint
- Fine detail paintbrush
- Small bowl of water
- Clear matte varnish (optional)
Step 1: Shaping the Base and Moon
-
Prepare the clay:
Start by kneading a generous chunk of white air dry clay until it is soft, pliable, and free of cracks. If it feels too dry, dip your fingers in water and work it in. -
Roll the slab:
Roll the clay out onto a smooth work surface to a thickness of about 1/4 to 1/3 inch. Aim for a consistent thickness so the pieces dry evenly. -
Cut the base:
Use your circle cutter to punch out the round base. If the edges are rough, dip your finger in water and gently smooth them down. -
Cut the crescent moon:
From the remaining rolled clay, cut out a crescent moon shape. You can use a paper template to guide your knife for a perfect curve, or freehand it for a more organic look. -
Smooth the edges:
Take a moment to carefully smooth the cut edges of the moon with a damp fingertip, rounding them slightly so they aren’t sharp or jagged.
Moon won’t stand up?
Prop the crescent moon against a small object (like a spice jar) while the slip dries to keep it perfectly vertical during the bonding phase.
Step 2: Adding Details and Assembly
-
Create star impressions:
Using a small star stamp or cutter, gently press star shapes into the clay surface. Do this on both the round base and the face of the crescent moon. Don’t cut all the way through; just create a distinct indentation. -
Create tiny texture dots:
Use the tip of a needle tool or a small stylus to poke random tiny holes around the moon and base, adding a ‘stardust’ texture to the smooth clay. -
Make the incense hole:
While the clay is still wet, take an actual incense stick and poke a hole into the inner curve of the crescent moon. Angle it so the stick will stand diagonally over the base to catch ash. -
Check the fit:
Give the incense hole a gentle wiggle to make it slightly larger than the stick, as clay shrinks when it dries. -
Score and slip:
Score the bottom of the moon shape and the center of the round base with cross-hatch marks using your knife. Apply a dab of water or clay ‘slip’ (watery clay paste) to these scratched areas. -
Attach the moon:
Press the moon firmly onto the base. Use a small tool to blend the clay slightly at the seam where they meet to ensure a strong bond. -
Verify stability:
Stand the holder up and inspect it from all sides. Adjust the moon’s angle if needed so it stands perfectly upright without tipping.
Make it marble
Twist a small amount of grey or black clay into your white clay before rolling it out to create a sophisticated marble effect.
Step 3: Finishing
-
Let it dry:
Place your creation in a cool, dry spot away from direct sunlight. Allow it to air dry for at least 24-48 hours until it turns a unified chalky white. -
Sand imperfections:
Once fully dry, take a piece of find-grit sandpaper and lightly buff away any rough spots or fingerprints, paying attention to the rim of the base. -
Paint the stars:
Dip a fine detail brush into gold acrylic paint. Carefully fill in the indented star shapes. I prefer to dab the paint in thick enough to create a slightly raised, metallic texture. -
Seal the piece:
After the gold paint is dry, apply a coat of clear matte varnish or sealant to protect the clay from incense ash and moisture.
Light your favorite scent and watch the smoke drift past your handmade celestial sculpture
Tiny Bud Vase Magnets
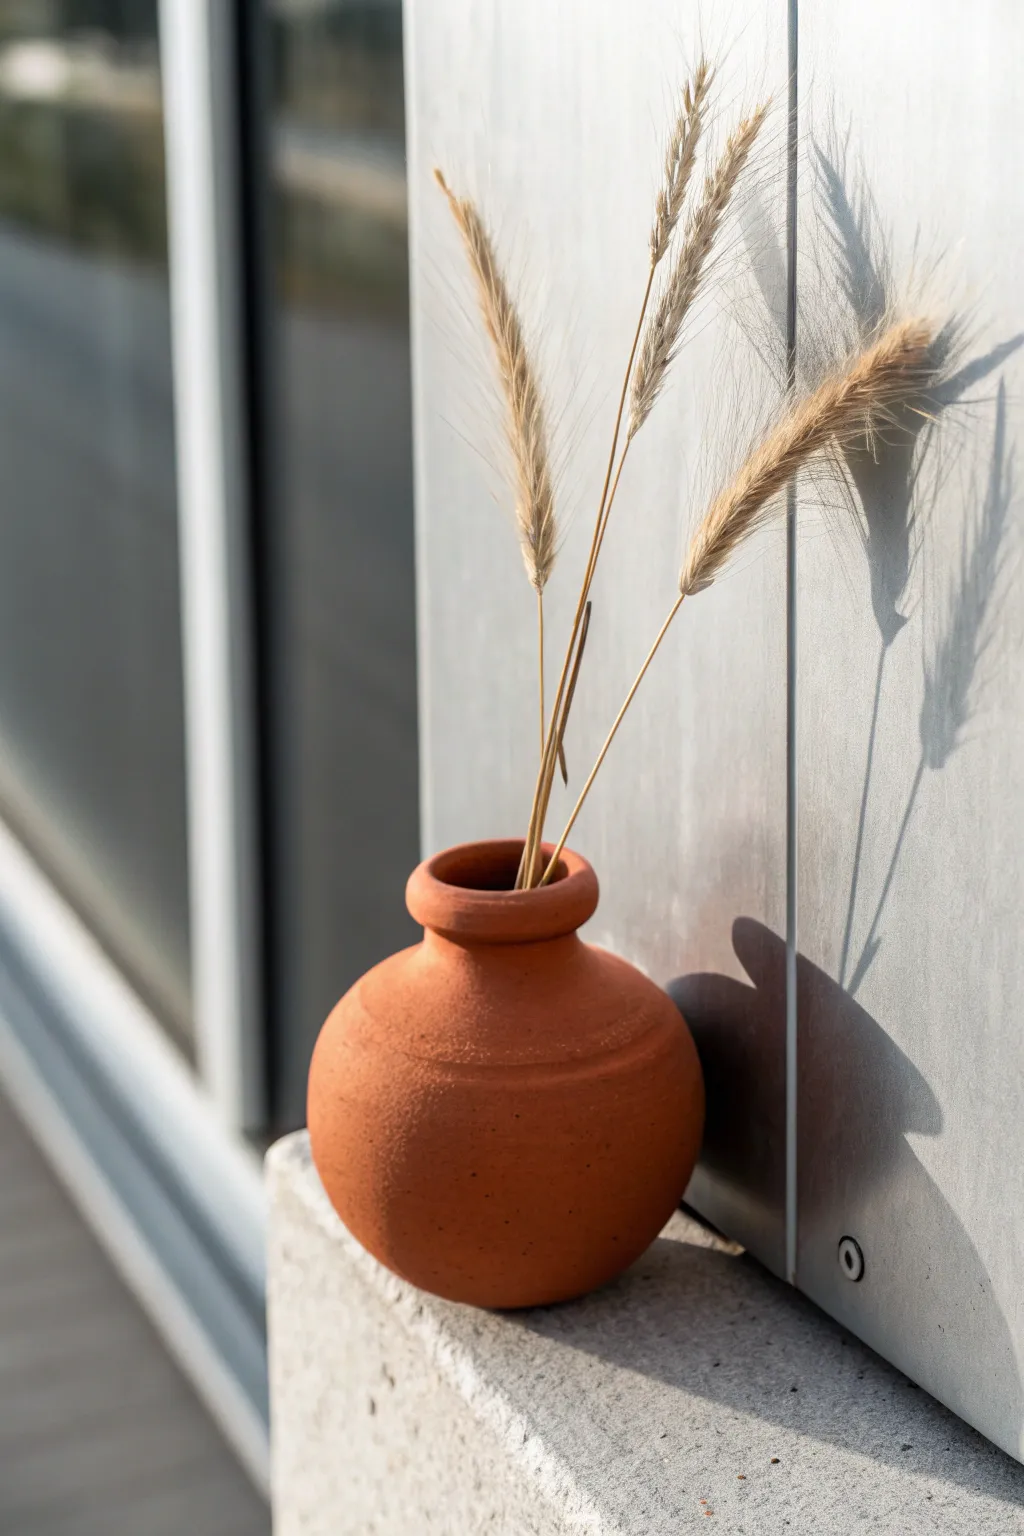
This charming miniature vase captures the earthy warmth of traditional pottery without needing a kiln. Its rounded, imperfect texture mimics real terracotta, making it a perfect little vessel for displaying dried grasses or wildflowers.
Step-by-Step
Materials
- Air dry clay (terracotta color preferred, or white)
- Acrylic paint (burnt sienna, orange oxide, and a touch of brown)
- Small magnets (neodymium recommended)
- Strong craft glue (E6000 or similar)
- Modeling tools or a toothpick
- Small cup of water
- Sponge or textured foam piece
- Fine grit sandpaper
- Matte varnish or sealant
Step 1: Shaping the Base
-
Prepare your clay:
Start with a ball of air dry clay roughly the size of a golf ball. Knead it thoroughly until it’s pliable and smooth, ensuring there are no air bubbles trapped inside. -
Form the sphere:
Roll the clay between your palms to create a smooth, round sphere. This will be the main body of your bud vase. -
Create the opening:
Gently press your thumb or a rounded modeling tool into the center of the sphere to create a hollow. Don’t go too deep; you just want a small well to hold the stems. -
Refine the shape:
While supporting the walls, gently pinch and smooth the clay to maintain a rounded, slightly bulbous shape. Ideally, the bottom should be flattened slightly so it can stand on its own if not used as a magnet. -
Flatten the back:
If you are making this specifically as a magnet, gently press one side of the sphere against your work surface to create a flat plane. This ensures a strong bond with the magnet later.
Step 2: Adding the Neck
-
Roll a coil:
create a small, thick snake of clay. Cut a segment that is just long enough to circle the opening of your vase base. -
Attach the neck:
Score the top rim of your base and the underside of your coil with a toothpick. Dab a little water on the scored areas and press the coil firmly onto the top rim. -
Blend the seam:
Using a modeling tool or your finger, blend the clay from the coil down onto the main body on the inside of the neck. On the outside, leave the distinction visible to mimic a thrown pot’s rim. -
Shape the rim:
Flair the top of the coil slightly outward using your fingers to create a classic vase lip. Smooth out any rough cracks with a tiny bit of water.
Seamless Blending
For a strong bond, always use the ‘score and slip’ method: scratch hatch marks on both surfaces and add water before joining clay pieces.
Step 3: Texturing and Finishing
-
Add texture:
Take a rough sponge or a piece of textured foam and gently pat it all over the surface of the wet clay. This gives it that sandy, authentic terracotta feel. -
Detailing line:
I like to use a needle tool or toothpick to lightly etch a shallow horizontal ring around the upper shoulder of the vase, adding a subtle decorative detail. -
Let it dry:
Set your vase aside in a dry, room-temperature spot. Allow it to dry completely for 24-48 hours. Turn it occasionally to ensure even drying. -
Painting the base coat:
If you didn’t use colored clay, mix burnt sienna with a little orange acrylic paint. Apply a solid base coat all over the vase and let it dry. -
Adding dimension:
Dry brush a lighter mix of paint (add a little white or tan) over the raised textured areas to highlight the ‘stone’ feel. -
Speckling for realism:
To mimic the imperfections of real clay, dip an old toothbrush in watered-down brown paint and lightly splatter tiny specks onto the surface. -
Attach the magnet:
Once the paint is fully dry, glue a strong magnet to the flattened back side using heavy-duty craft glue. -
Seal the work:
Apply a coat of matte varnish to protect the paint without making it look glossy or plastic.
Faux Glaze Dip
Paint the bottom half of the vase with a glossy white or pastel color to mimic the look of a dipped ceramic glaze.
Pop in a few dried wheat stalks or tiny wildflowers to complete your rustic display
Sculpted Ring Cones and Holders
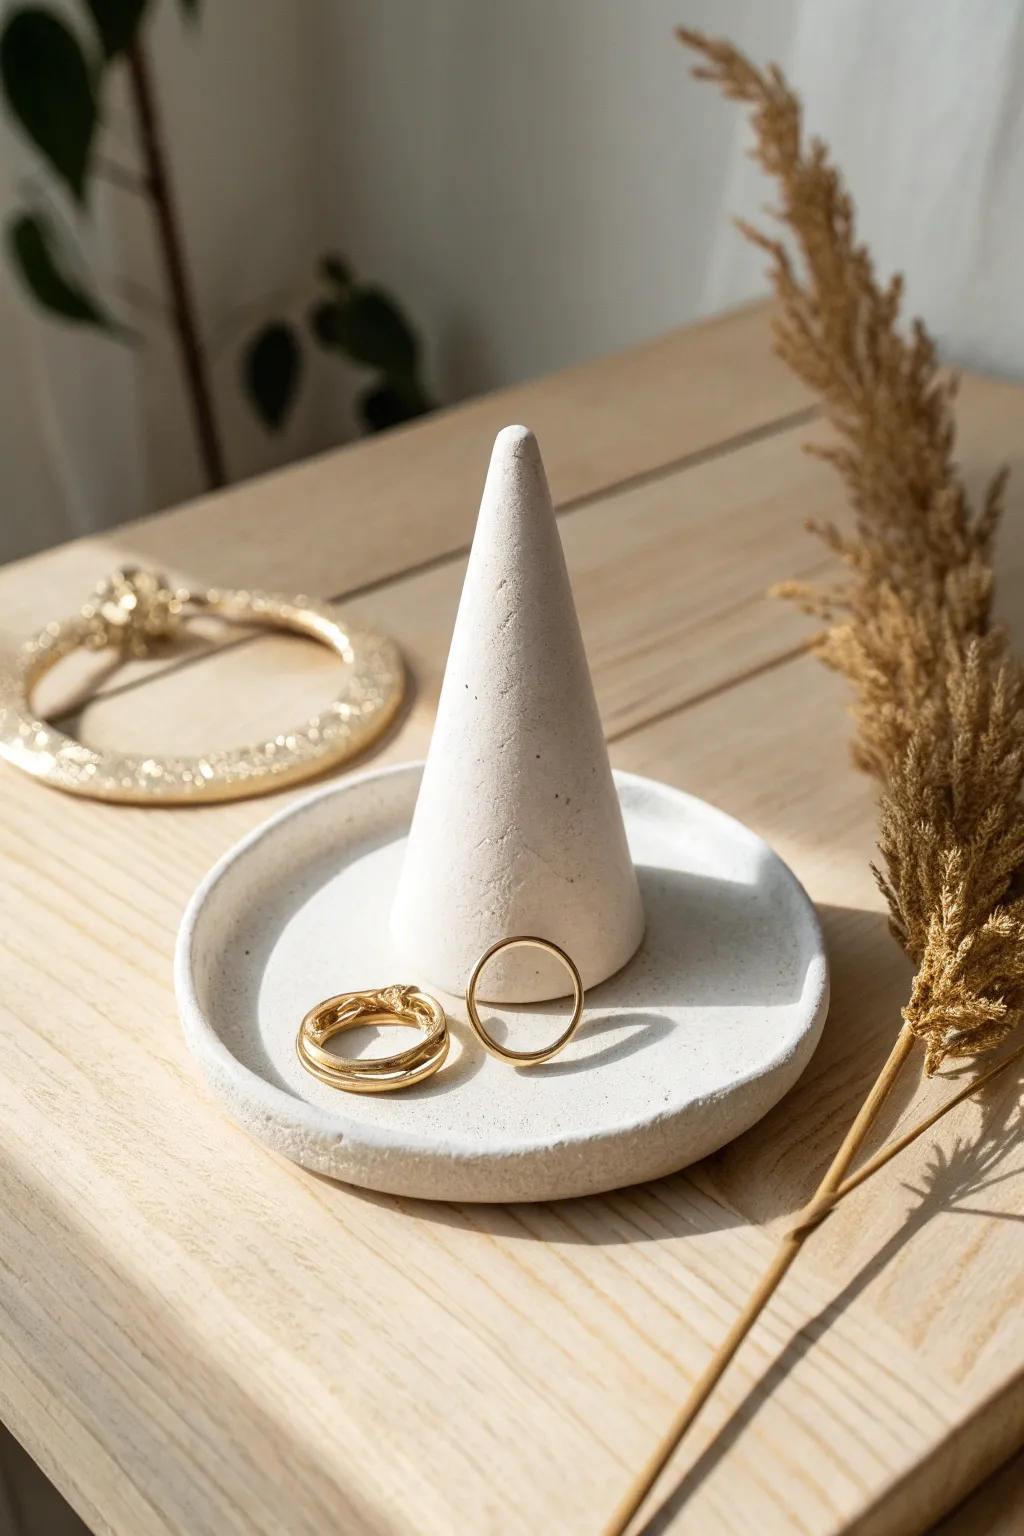
Embrace the beauty of simplicity with this stunningly understated ring holder. Featuring a stark white palette and subtle texture, this two-piece set combines a functional trinket dish with a sculptural cone, perfect for keeping your favorite bands secure.
Detailed Instructions
Materials
- White stone air dry clay
- Rolling pin
- Circle cutter or small bowl (approx. 4 inches)
- Craft knife or clay wire
- Small cup of water
- Sponge or fine-grit sandpaper
- Matte varnish or sealant
Step 1: Shaping the Base Dish
-
Prepare the clay:
Begin with a fist-sized ball of white air dry clay. Knead it in your hands for a few minutes to warm it up and ensure it’s pliable and free of air bubbles. -
Roll the slab:
Place the clay on a smooth surface or canvas mat. Use a rolling pin to flatten the clay into an even slab, aiming for a thickness of about 1/4 inch. -
Cut the circle:
Use a circle cutter or place a small bowl upside down on the slab as a template. Cut around it with a craft knife to create a perfect circle. -
Create the rim:
Gently lift the edges of the circle with your fingertips, pressing upwards to create a slight lip. Smooth the rim with water to erase any cracks that form during bending. -
Refine the surface:
Dip your finger or a small sponge in water and run it over the entire surface of the dish to ensure it is perfectly smooth.
Step 2: Creating the Cone
-
Form the basic shape:
Take a second piece of clay, slightly smaller than a golf ball. Roll it into a smooth ball first, then begin rolling just one side against the table to elongate it. -
Refine the cone:
Continue rolling back and forth while applying more pressure to the top end, gradually tapering it into a cone shape. Keep checking the height against your dish to ensure good proportions. -
Flatten the bottom:
Tap the wider base of the cone firmly on your work surface to create a completely flat bottom so it stands upright without wobbling. -
Sharp tip adjustment:
If the tip becomes too sharp or thin, gently tap it with your finger to round it off slightly. This prevents delicate breakage later. -
Optional texturing:
For the subtle, stone-like texture seen in the photo, you strictly avoid over-smoothing the cone. I like to leave tiny natural imperfections or even gently tap it with a dry sponge.
Seamless Seams
Use a tiny ‘snake’ or coil of wet clay wrapped around the base of the cone where it meets the dish. Blend this upwards and outwards to create an invisible, strong bond.
Step 3: Assembly and Finishing
-
Score the connection points:
Use a needle tool or knife to scratch cross-hatch marks into the center of the dish and the bottom of the cone. -
Apply slip:
Dab a small amount of water or liquid clay (slip) onto the scratched areas to act as glue. -
Join the pieces:
Press the cone firmly into the center of the dish. Use a sculpting tool or your finger to smooth the seam where the cone meets the dish so they look like one continuous piece. -
Adding speckles:
Review the surface for any unwanted fingerprint marks. To mimic the stone look, you can leave the natural clay grain visible rather than sanding it perfectly smooth. -
Dry thoroughly:
Let the piece dry completely for 24 to 48 hours. Turn it occasionally if possible to ensure the bottom of the dish dries evenly. -
Sand for finish:
Once fully dry, use fine-grit sandpaper to gently smooth the rim of the dish and the tip of the cone. -
Seal:
Apply a coat of matte varnish to protect the clay while maintaining that natural, unglazed stone appearance.
Make it Faux-Granite
Before rolling your clay, mix in some dried coffee grounds or black pepper. This adds permanent, natural speckling that mimics the look of real organic stone.
Place your new sculptural piece on your vanity and enjoy the organized elegance it brings to your space
Minimal Photo and Card Stands
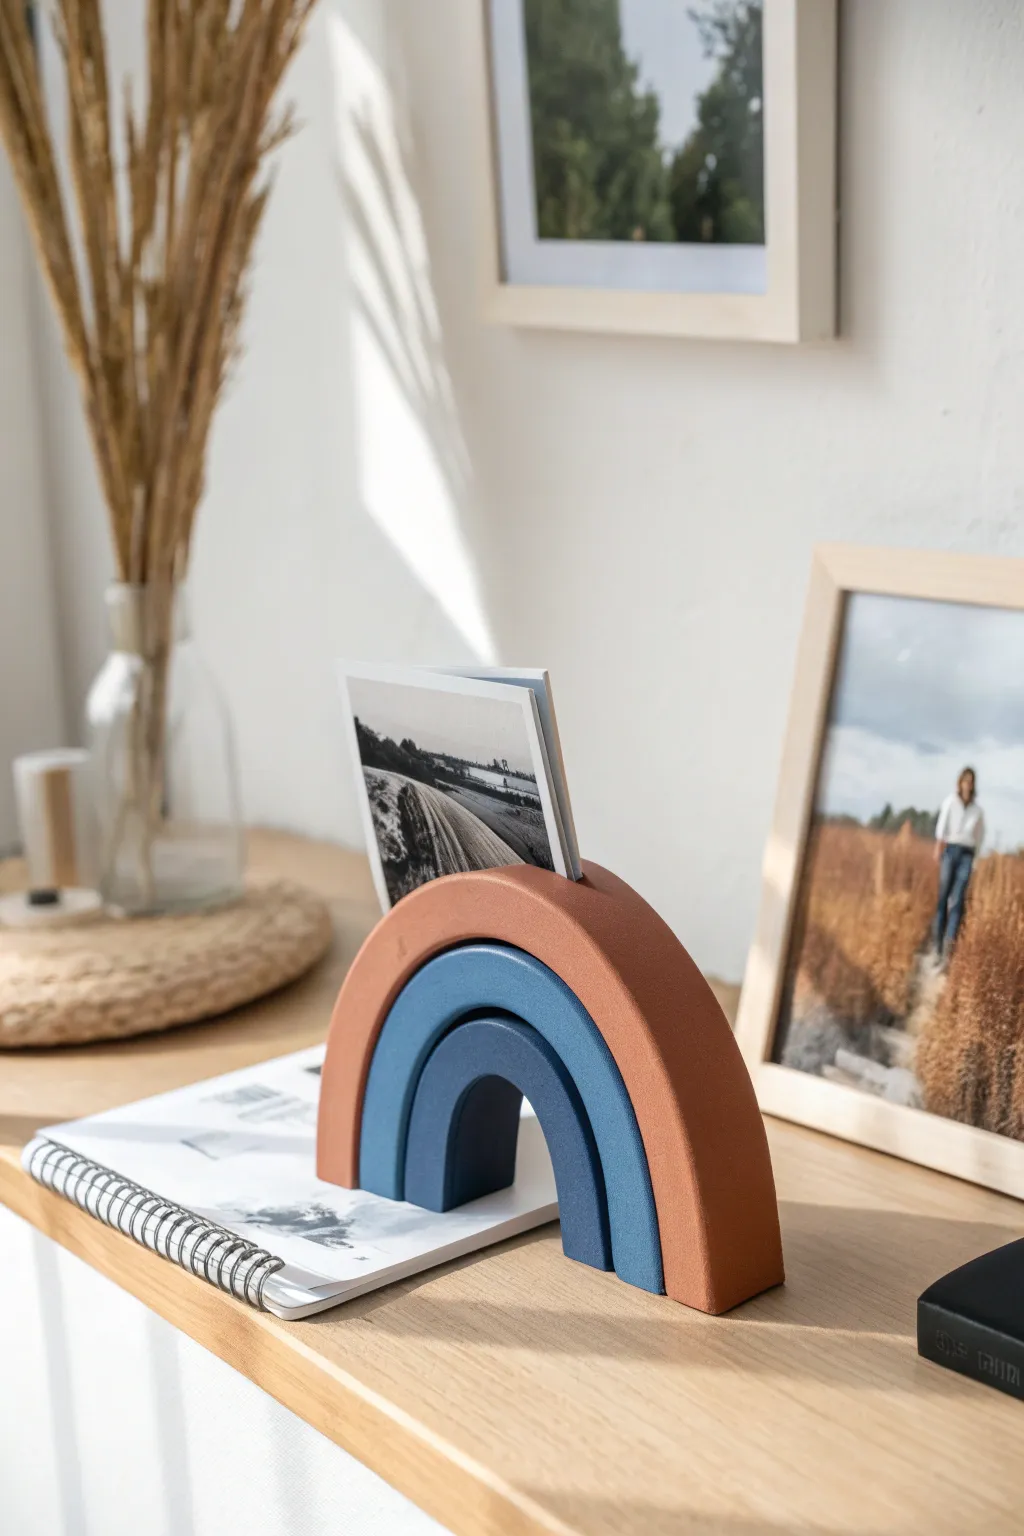
Bring a touch of modern bohemian style to your desk with this sculptural photo stand. Its earthy palette and clean concentric arches create a functional piece of art perfect for displaying postcards or cherished snapshots.
Step-by-Step
Materials
- Air dry clay (white or terracotta)
- Parchment paper or baking mat
- Rolling pin
- Sharp craft knife or scalpel
- Ruler
- Fine-grit sandpaper (220 grit)
- Acrylic paints (Terracotta/Burnt Sienna, Slate Blue, Navy Blue)
- Small flat paintbrush
- Water cup
- Matte varnish or sealant
Step 1: Shaping the Arches
-
Condition the Clay:
Begin by kneading a good-sized chunk of air dry clay in your hands until it becomes warm and pliable. This prevents cracking later on. -
Roll It Out:
Place the clay on parchment paper and use your rolling pin to create an even slab. Aim for a thickness of about 1.5 to 2 cm so the stand is sturdy enough to hold weight. -
Create the Strips:
Using a ruler and craft knife, cut three long, straight strips of clay. They should all be the same width (approximately 2.5 cm) but will need to be different lengths to form the rainbow layers. -
Form the Center Arch:
Take the shortest strip and gently curve it into a tight ‘U’ shape. Stand it up on its edge to ensure the bottom is flat. -
Add the Middle Arch:
Take the medium-length strip and drape it over the first arch. Press it gently to confirm the spacing, but don’t join them together just yet. We want them to dry as separate pieces or distinct layers depending on your preference. -
Create the Outer Arch:
Shape the longest strip over the previous two layers to complete the rainbow form. Trim the feet of the arches with your knife so they all sit perfectly flush on the table surface. -
The Crucial Split:
For this specific card-holder design, you need a gap. Carefully slice the top of the largest outer arch vertically down the center, stopping about halfway, or create a slit wide enough for a photo. Alternatively, separate the arches slightly during drying so a card can slide between the back of the blue arch and front of the terracotta one. -
Smooth the Edges:
Dip your finger in a little water and run it along any sharp cut edges or rough textures to smooth them out before the clay hardens.
Smooth Surface Secret
Use a damp sponge to smooth the clay *before* it dries. It saves loads of sanding time later!
Step 2: Refining and Painting
-
Drying Time:
Let the pieces air dry completely. This usually takes 24-48 hours depending on thickness. Flip them occasionally to ensure even drying on all sides. -
Sand for Perfection:
Once bone dry, use fine-grit sandpaper to gently buff away any imperfections, focusing on the flat front and back faces to get that crisp, minimalist look. -
Mix the Terracotta Tone:
Mix burnt sienna with a tiny dot of white (and maybe a touch of red) to achieve that warm, earthy terracotta hue seen on the largest arch. -
Paint the Outer Arch:
Apply the terracotta paint to the largest arch covering all sides. I find two thin coats work better than one thick gloom. -
Mix the Blues:
Prepare a slate blue for the middle arch (blue mixed with grey) and a deep navy for the smallest center arch. -
Complete the Painting:
Paint the remaining two arches in their respective cool tones. Use a small flat brush to keep your lines clean if you glued the pieces together, or simply paint them freely if they are still separate. -
Assembly (If Required):
If you dried them separate, glue the arches together now using a strong craft glue, ensuring the bottoms remain flat and aligned. -
Seal the Deal:
Finish with a coat of matte varnish. This protects the paint from chipping and gives the piece a professional, finished texture without being overly shiny.
Terrazzo Twist
Mix small chips of dried colored clay into your white wet clay before rolling for a cool terrazzo effect.
Now you have a stylish spot to showcase your favorite memories
Boho Clay Bead Garlands
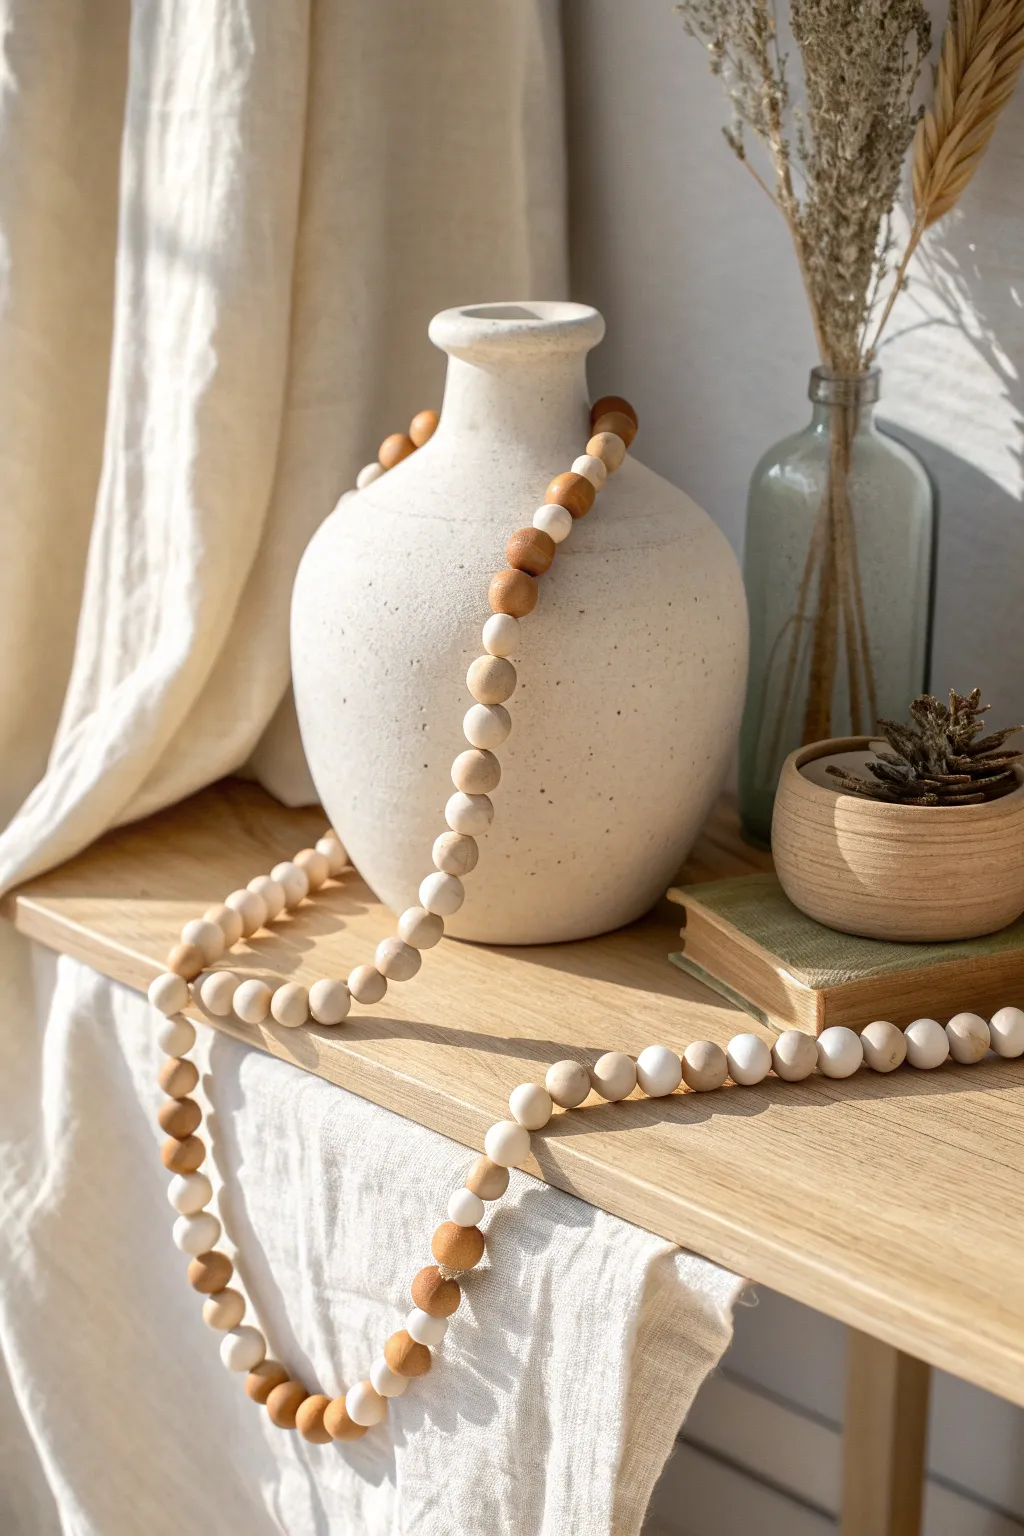
Bring earthy texture to your home decor with this wonderfully simple clay bead garland. By creating your own beads from air-dry clay, you can perfectly customize the size and color to achieve that relaxed, organic aesthetic seen in upscale boutiques.
Step-by-Step Tutorial
Materials
- White air-dry clay (approx. 500g)
- Wooden skewer or strong toothpick
- Jute twine or heavy waxed cotton cord
- Fine-grit sandpaper (220 grit)
- Small bowl of water
- Acrylic paint (warm caramel or chestnut brown)
- Matte acrylic sealer or varnish
- Paintbrush (small and medium)
- Parchment paper or non-stick mat
- Scissors
Step 1: Shaping the Beads
-
Condition the Clay:
Begin by taking portions of your air-dry clay and kneading them in your hands. The clay needs to be warm and pliable to prevent cracks from forming later. -
Portion Control:
Pinch off roughly equal amounts of clay to create about 50-60 beads. For this look, aim for marbles roughly 3/4 inch (2cm) in diameter. -
Roll Spheres:
Roll each piece of clay between your palms to form smooth spheres. I like to keep a small bowl of water nearby to slightly dampen my fingers, which helps smooth out any little creases. -
Create the Holes:
While the bead is still soft, gently push a wooden skewer through the center. Twist the skewer as you push to avoid deforming the round shape. -
Refine the Opening:
Ensure the hole is wide enough for your twine by wiggling the skewer slightly. The clay will shrink as it dries, so make the hole slightly larger than you think you need. -
Drying Phase:
Place all pierced beads on a sheet of parchment paper. Let them dry undisturbed for 24-48 hours, turning them over halfway through to ensure even drying.
Cracked Beads?
If cracks appear while drying, mix a tiny bit of fresh clay with water to make a paste (slip). Fill the crack, smooth it over with your finger, and let it dry again.
Step 2: Finishing and Assembly
-
Smooth imperfections:
Once fully dry and hard, lightly sand any rough spots or fingerprints with fine-grit sandpaper. Wipe away the dust with a dry cloth. -
Sort the Batch:
Divide your beads into two groups. Leave about two-thirds of them in their natural white clay state to match the dominant color in the photo. -
Mix Your Stain:
create a faux-wood stain by watering down your caramel or brown acrylic paint. You want a translucent wash, not an opaque coat, to mimic stained wood. -
Paint Accent Beads:
Paint the remaining one-third of the beads with your brown wash. If the color is too light, let it dry and add a second coat for that rich terracotta look. -
Seal the Beads:
Apply a coat of matte varnish to all beads—both white and brown. This protects the clay from humidity and gives them a finished, ceramic-like quality. -
Plan the Pattern:
Arrange your beads on a table before stringing. The image uses a random but balanced mix, clustering small groups of 2-3 brown beads separated by long stretches of 5-8 white beads. -
Stringing:
Cut a long length of jute twine. Tie a sturdy double knot at one end, large enough that the beads won’t slip off. -
Thread the Garland:
Feed the twine through your beads following your planned pattern. If the twine frays, wrap a tiny piece of tape around the tip to create a makeshift needle. -
Secure the End:
Once all beads are strung, push them snugly together but leave just a little slack so the garland drapes fluidly. Tie a secure knot at the end and trim the excess twine close to the knot.
Pro Tip: Texture
For a stone-like effect, tap the wet clay beads with an old toothbrush or a piece of crumpled foil before they dry to create subtle surface pitting.
Now drape your beautiful handmade garland over a vase or pile of books to instantly warm up your space
Pressed-Flower Vase Wraps
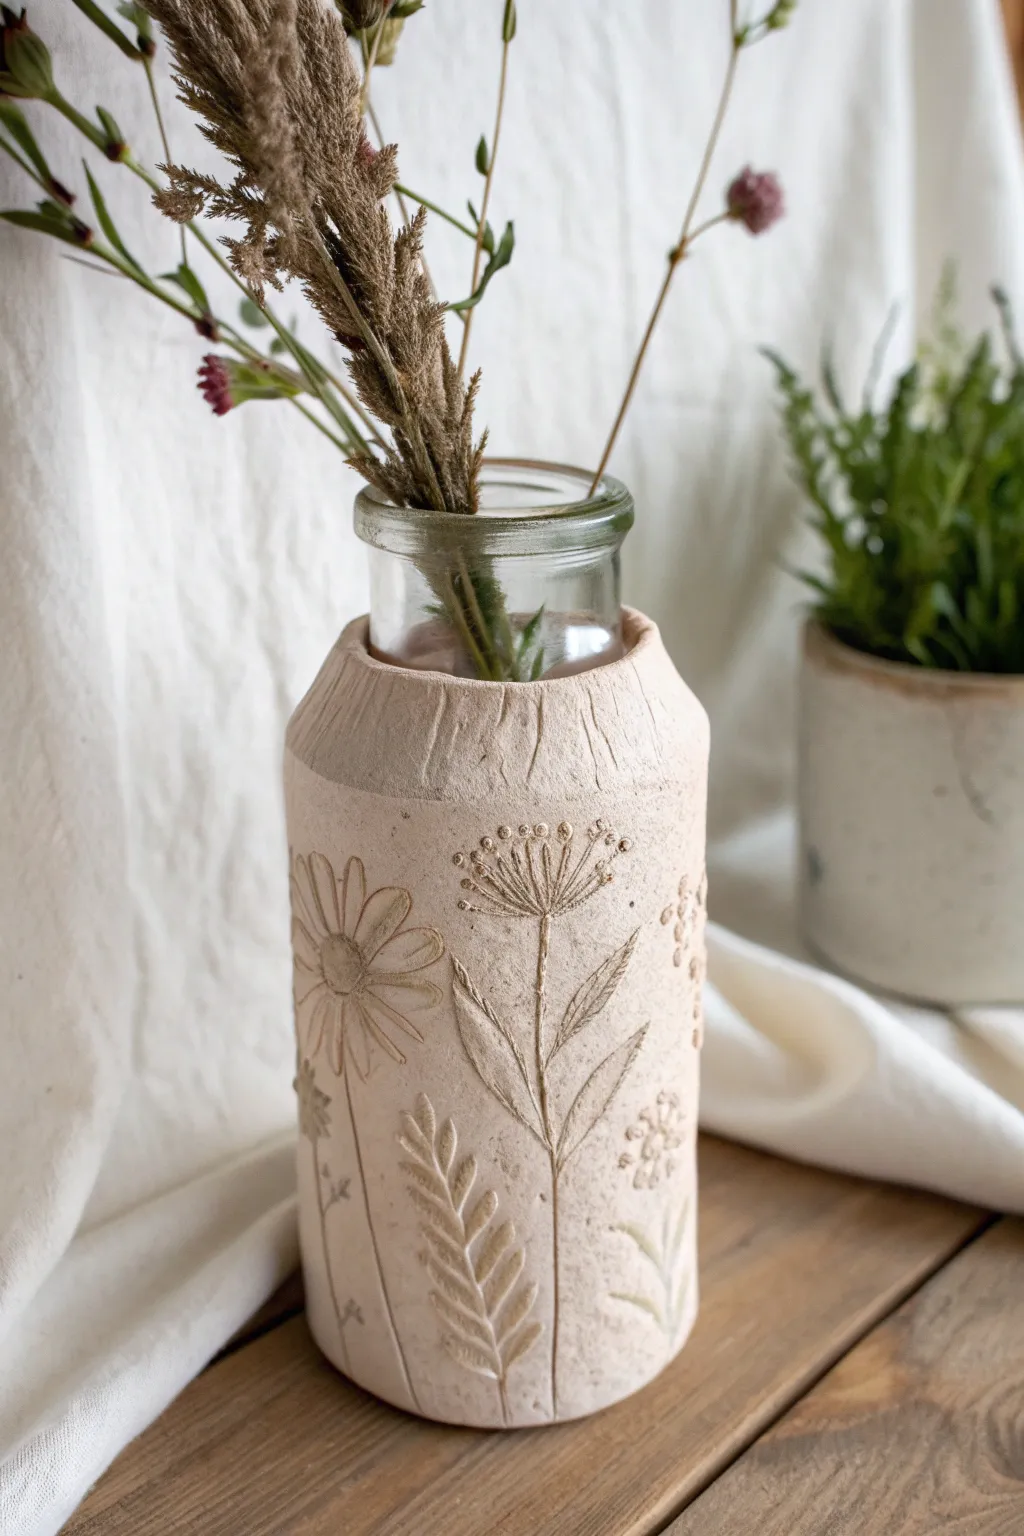
Transform a simple glass jar into an artisanal masterpiece by wrapping it in textured air dry clay. This project uses fresh or dried botanicals to stamp lasting impressions into the surface, creating a beautiful organic relief that mimics high-end ceramic studio pottery.
Step-by-Step
Materials
- White or terracotta air dry clay
- Glass milk bottle or cylinder vase
- Rolling pin
- Knife or craft blade
- Fresh or dried wildflowers (daisies, grasses, Queen Anne’s lace)
- Small bowl of water
- Sponge
- Sandpaper (fine grit)
- Matte spray varnish or Mod Podge (optional)
Step 1: Preparation & Rolling
-
Prepare the Clay:
Begin with a large handful of air dry clay. Knead it in your hands for a few minutes to warm it up and make it pliable, smoothing out any initial cracks. -
Roll the Slab:
On a clean, flat surface, roll the clay out into a long, rectangular slab. Aim for a consistent thickness of about 1/4 inch (4-6mm) throughout. -
Measure the Wrap:
Take your glass vessel and lay it on top of the clay slab to gauge the size. You need the clay to be tall enough to cover the bottle up to the neck and wide enough to wrap fully around with a slight overlap. -
Trim to Size:
Using a knife or craft blade, trim the clay into a clean rectangle based on your measurements. Save the excess clay scraps for future small projects.
Step 2: Stamping the Botanicals
-
Arrange the Flora:
While the clay slab is still flat on your work surface, lay out your selected flowers and grasses. Create a pleasing composition, mixing tall stems with broader blooms like daisies. -
Press the Stems:
Gently roll your rolling pin over the botanicals once or twice. Applying firm, even pressure embeds the plants into the clay without crushing them completely. -
Reveal the Texture:
Carefully peel the plant material away from the clay. Use a needle tool or tweezers to pick out any tiny bits of petals or seeds that get stuck in the impressions. -
Smooth Imperfections:
If the clay surface looks a bit ragged around the edges of the impressions, dip your finger in water and very lightly smooth it down, being careful not to erase the details.
Deep Impressions
For sharper details, use stiffer plants like dried stalks or hardy wildflowers. Soft petals can be too subtle and vanish as the clay shrinks during drying.
Step 3: Wrapping the Vase
-
Lift the Clay:
Carefully peel the textured clay slab off your work surface. If it sticks, slide a long blade or a piece of dental floss underneath to release it. -
Wrap the Vessel:
Stand your glass bottle up and wrap the clay around it. Ensure the bottom edge of the clay aligns perfectly with the bottom edge of the glass. -
Create the Seam:
Where the two ends of the clay meet, press them together. I usually wet my finger and smudge the clay across the seam line until it disappears, creating a continuous cylinder. -
Shape the Shoulder:
At the top of the bottle, where the glass narrows, gently press the clay inward to follow the curve. You can leave the very top edge slightly rough for a rustic look or trim it clean. -
Refine the Top Rim:
If the clay extends too high up the neck, trim it back now. Smooth the top rim with a wet sponge to prevent sharp edges once dried.
Cracks Happens
If hairline cracks appear while drying, mix a tiny bit of clay with water to make a paste (slip) and fill them in. Smooth with a damp finger and let dry again.
Step 4: Finishing Touches
-
Initial Drying:
Let the vase sit in a cool, dry place away from direct sunlight. Rotating it every few hours ensures even drying and prevents large cracks. -
Sand the Surface:
Once the clay is bone dry (usually 24-48 hours), take a piece of fine-grit sandpaper and lightly sand the un-textured areas to remove fingerprints or bumps. -
Highlight the Details:
This step makes the design pop. Use a dry brush to dust away the sanding powder, ensuring the deep floral impressions are clean and visible. -
Seal the Project:
To protect your vase from moisture and handling, apply a coat of matte spray varnish. This keeps the natural clay look while adding durability.
Now you have a stunning, nature-inspired vessel ready to hold your favorite dried boquets or fresh stems
Scented Diffuser Discs
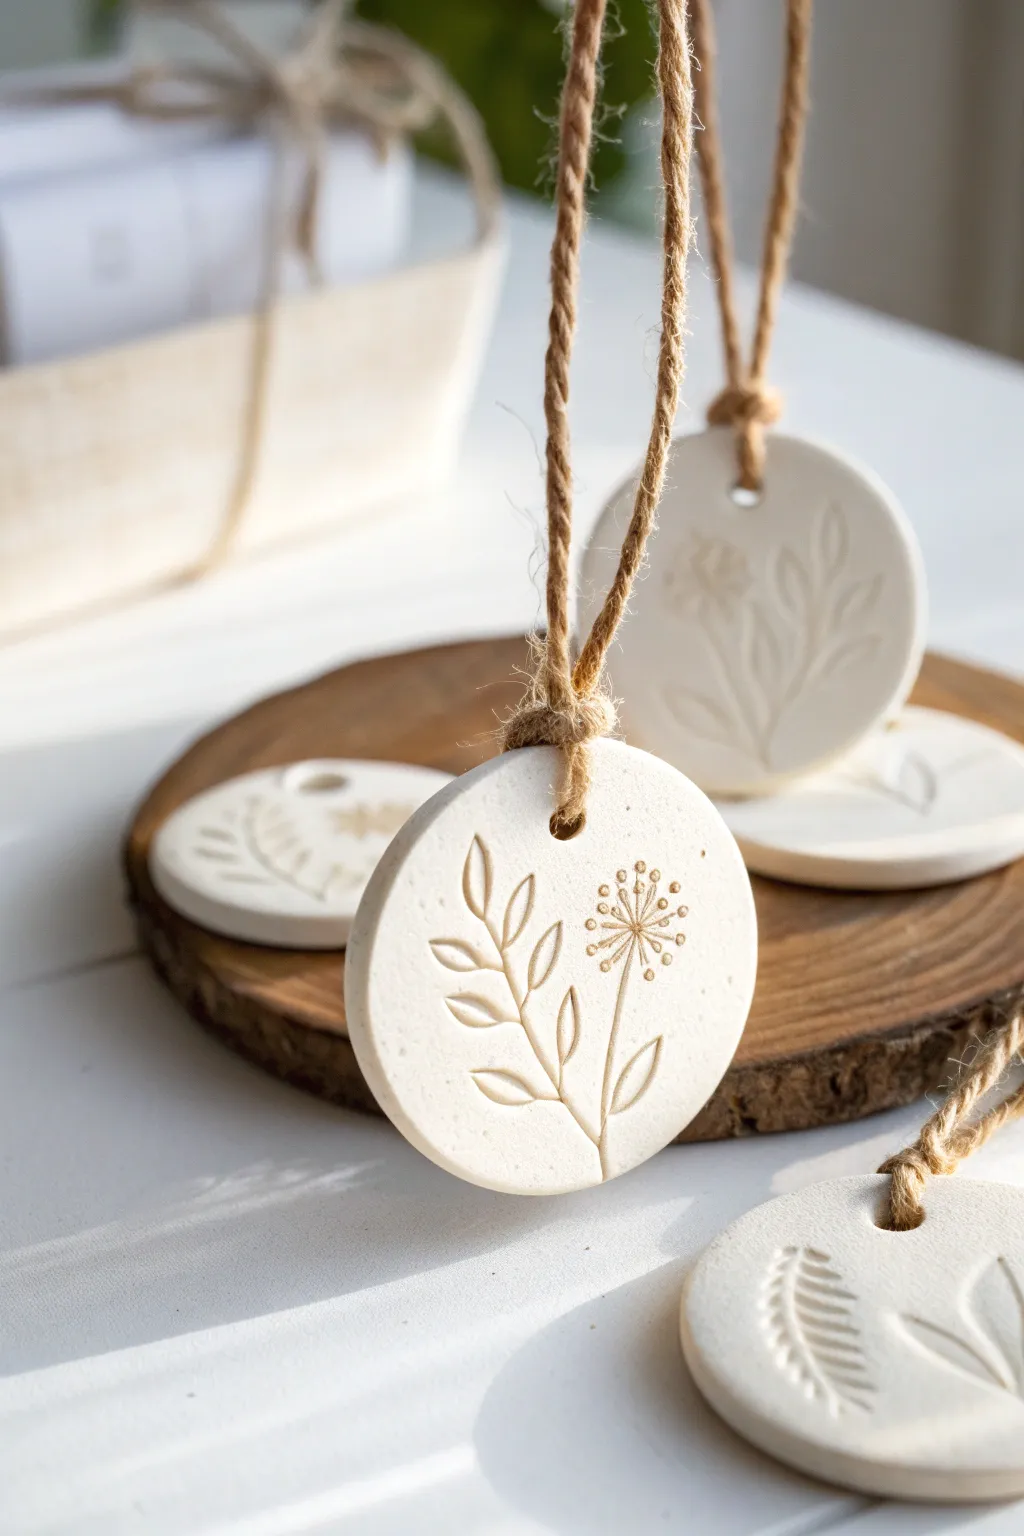
Create beautiful, minimalist scent diffusers using simple air-dry clay and natural botanicals. These white clay discs feature delicate floral impressions and serve as eco-friendly air fresheners when paired with your favorite essential oils.
Detailed Instructions
Materials
- White stone clay or air-dry clay
- Rolling pin (acrylic or wooden)
- Round cookie cutter (approx. 2-3 inches)
- Fresh or dried herbs/flowers (lavender, fern, or wildflowers)
- Rubber stamps with botanical motifs (alternative to fresh plants)
- Straw or small piping tip (for making the hole)
- Fine-grit sandpaper
- Jute twine or rustic string
- Wax paper or parchment paper
- Essential oils for scenting
Step 1: Preparing the Clay Base
-
Condition the Clay:
Begin by taking a handful of white air-dry clay and kneading it in your hands until it becomes warm, soft, and pliable. This prevents cracking later on. -
Roll it Out:
Place the clay on a sheet of parchment or wax paper to prevent sticking. Using your rolling pin, roll the clay out evenly. -
Check Thickness:
Aim for a uniform thickness of about 1/4 inch (6mm). Too thin and they might break; too thick and they will take too long to dry. -
Cut the Circles:
Press your round cookie cutter firmly into the rolled clay to create clean discs. Lift the excess clay away from around the circles. -
Smooth the Edges:
Dip your finger in a little water and gently run it along the cut edges of each disc to smooth down any roughness or sharp bits left by the cutter.
Prevent Cracking
Cracks happen if clay dries too fast. Keep them away from radiators or direct sun. If cracks appear, smooth a slurry of clay and water over them.
Step 2: Creating the Impressions
-
Position the Botanicals:
Select your botanical elements. You can use a rubber stamp like the dandelion shown in the example, or press fresh sprigs of herbs like rosemary or fern gently onto the clay surface. -
Impress the Design:
If using a stamp, press down firmly and evenly, then lift straight up. If using real plants, roll over them gently with the rolling pin to embed them into the surface. -
Remove Plant Matter:
If you used fresh plants, carefully peel the leaves or stems away from the clay. Use a needle tool or tweezers if a small piece gets stuck. -
Create the Hanging Hole:
Use a drinking straw or a small metal piping tip to punch a hole near the top of the disc. Make sure it isn’t too close to the edge to prevent tearing.
Step 3: Drying and Finishing
-
Initial Drying:
Leave the discs on the parchment paper in a cool, dry place away from direct sunlight. Let them sit undisturbed for 24 hours. -
Flip and Continue:
After the first day, carefully flip the discs over so the back side can dry evenly. I find this step crucial to prevent the clay from curling at the edges. -
Check for Dryness:
Allow them to dry for another 24-48 hours until the clay is completely white and hard to the touch. -
Sand the Edges:
Once fully cured, use a piece of fine-grit sandpaper to lightly buff the edges of the disc for a professional, smooth finish. -
Clean the Surface:
Wipe away any sanding dust with a dry, soft brush or cloth. -
Add the Hanger:
Cut a length of jute twine, thread it through the hole, and tie a secure knot to create a loop. -
Scent the Disc:
Apply 2-3 drops of essential oil onto the back (untextured side) of the disc rather than the front, to avoid staining the white clay design.
Use Baking Soda Clay
No air-dry clay? Cook 1 cup baking soda, 1/2 cup cornstarch, and 3/4 cup water over medium heat until it forms a mash potato texture.
Hang these charming discs in your closet or car to enjoy a gentle, personalized aroma
Textured Mini Tile Wall Art
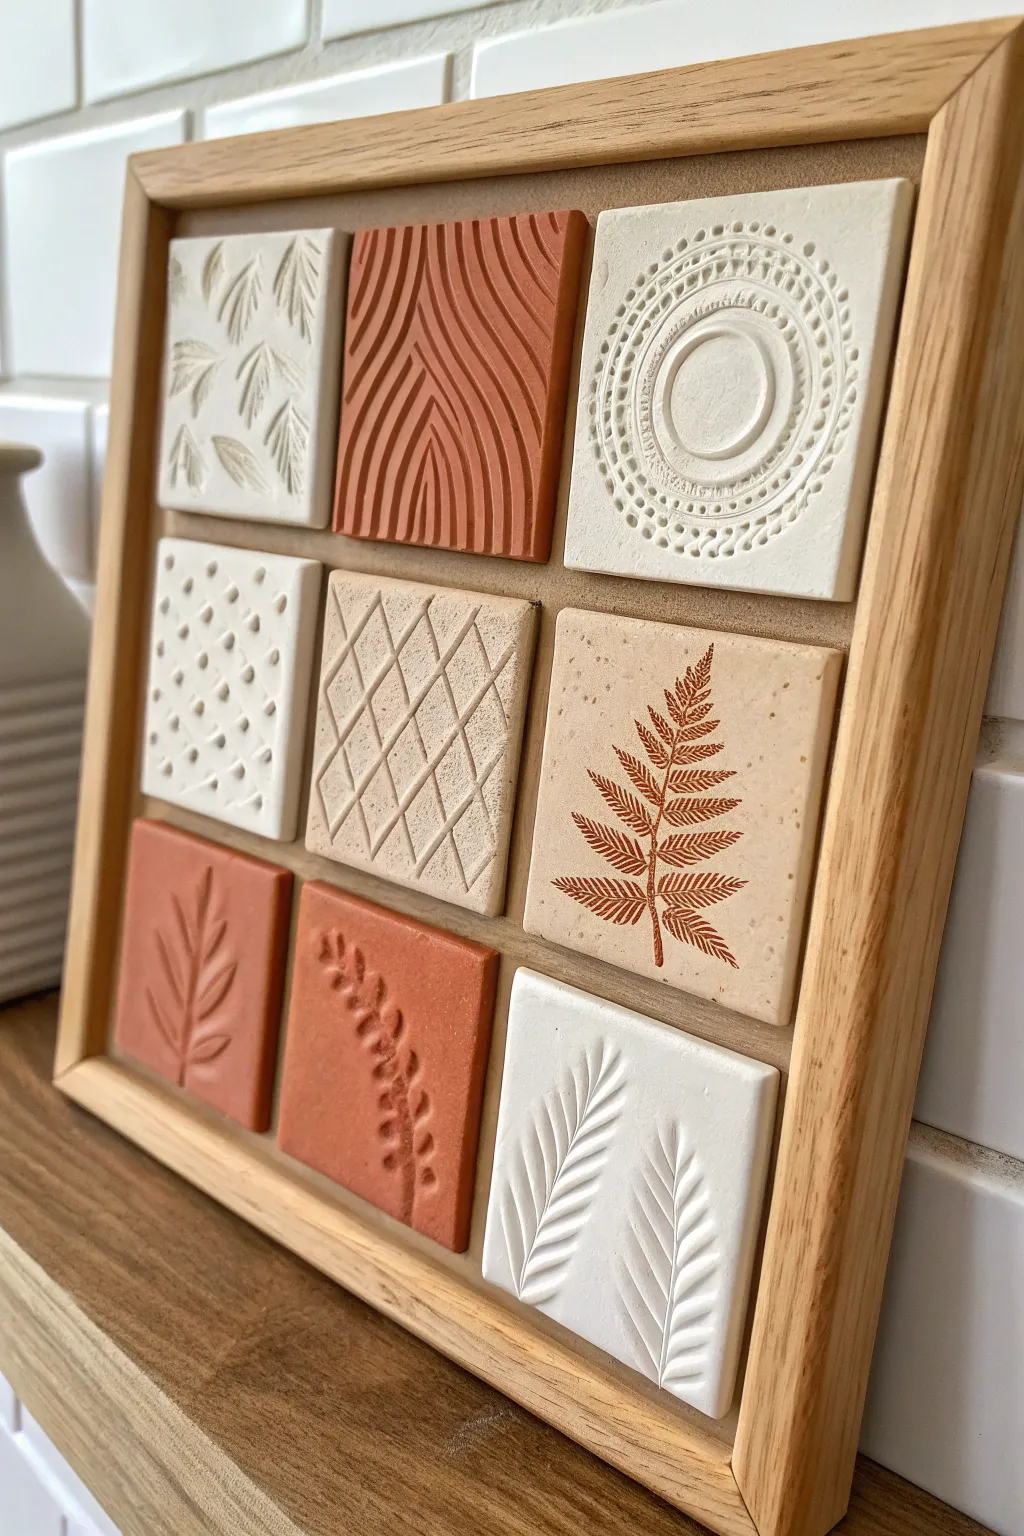
Transform simple air dry clay into a stunning gallery-worthy piece with this textured tile project. Combining earthy terracotta tones with creamy whites and varied relief patterns, this framed mosaic adds instant warmth and visual interest to any shelf or wall.
How-To Guide
Materials
- White or cream air dry clay
- Terracotta or rust-colored air dry clay
- Rolling pin with guide rings (0.5cm)
- Square cookie cutter (approx. 2-3 inches)
- Texture tools: doilies, stamps, clay carving tools, or found objects (shells, leaves)
- Craft knife
- Sandpaper (fine grit)
- Square wooden shadow box frame (without glass)
- Strong craft glue or heavy-duty construction adhesive
- Ruler
- Wax paper or parchment paper
Step 1: Creating the Clay Tiles
-
Prepare your workspace:
Lay down wax paper or parchment paper on a flat surface to prevent the clay from sticking. This also makes moving the wet tiles much easier later. -
Roll the white clay:
Start by kneading the white clay to warm it up, then roll it out to a consistent thickness of about 0.5cm (just under 1/4 inch). Using a rolling pin with guide rings helps keep everything perfectly even. -
Cut the base shapes:
Press your square cookie cutter firmly into the rolled clay to create your first set of tiles. For this design, you’ll need five white squares. If you don’t have a cutter, I suggest making a cardboard template and cutting around it with a craft knife for precision. -
Apply texture to white tiles:
While the clay is still wet, gently press your texture tools into the surface. For the top-right tile, press a circular doily or mandala stamp into the center. For the top-left, gently press real or artificial leaves into the clay to leave an impression. -
Carve details:
For the bottom-right and bottom-left tiles, use a carving tool or a toothpick to scratch freehand designs. Try simple repeating leaf patterns or geometric dots. -
Roll the terracotta clay:
Clean your rolling pin, then repeat the rolling process with the terracotta clay to the same thickness. -
Cut and texture terracotta tiles:
Cut out four terracotta squares. Create the striking ridged pattern (top-center) by dragging a loop tool through the clay in flowing, curved lines. For the others, impress a fern leaf or create a simple botanical relief. -
Create the center tile:
The center tile appears to be a mix or a painted effect. To replicate the grid texture, create a beige or light terracotta square and gently score diagonal lines in a diamond pattern using the back of a knife. -
Dry the tiles:
Place all nine tiles on a flat surface to dry for at least 24-48 hours. Carefully flip them over halfway through the drying process to prevent curling.
Curling Corners?
If tiles start curling while drying, place a sheet of wax paper over them and weigh them down with a heavy book. This forces them to dry flat.
Step 2: Refining and Assembly
-
Sand the edges:
Once fully dry, the tiles will be hard. Take your fine-grit sandpaper and gently smooth the edges and corners of each square to give them a polished, professional look. -
Dry fit the layout:
Place your wooden frame on the table. If it has glass, remove it—we want the texture exposed. Arrange your dry tiles inside the frame to finalize the spacing. Aim for an even gap between each tile. -
Prepare the backing grid:
If your frame backing is slippery, lightly sand it to help the glue adhere. Measure and lightly mark a 3×3 grid with a pencil to ensure your tiles will be perfectly centered. -
Glue the center row:
Start gluing from the center tile outwards. Apply a generous dab of strong craft glue to the back of the center tile and press it onto your pencil mark. Then add the left and right tiles of the middle row. -
Glue remaining tiles:
Work your way through the top and bottom rows, constantly checking your spacing. I like to use small spacers (like coin stacks or popsicle sticks) between the tiles while the glue sets to keep the gaps uniform. -
Clean up:
Check for any excess glue that might have squeezed out and wipe it away immediately with a damp cloth or cotton swab. -
Final drying:
Lay the frame flat and allow the adhesive to cure completely according to the manufacturer’s instructions before hanging the artwork vertically.
Stamp Secret
Don’t have fancy stamps? The bottom of cut-glass tumblers, ornate buttons, or even the tread of a shoe can make incredible abstract textures in clay.
Hang your textured masterpiece in a spot where natural light can rake across the surface to highlight all those beautiful details
Whimsical Mushroom Decor Pieces
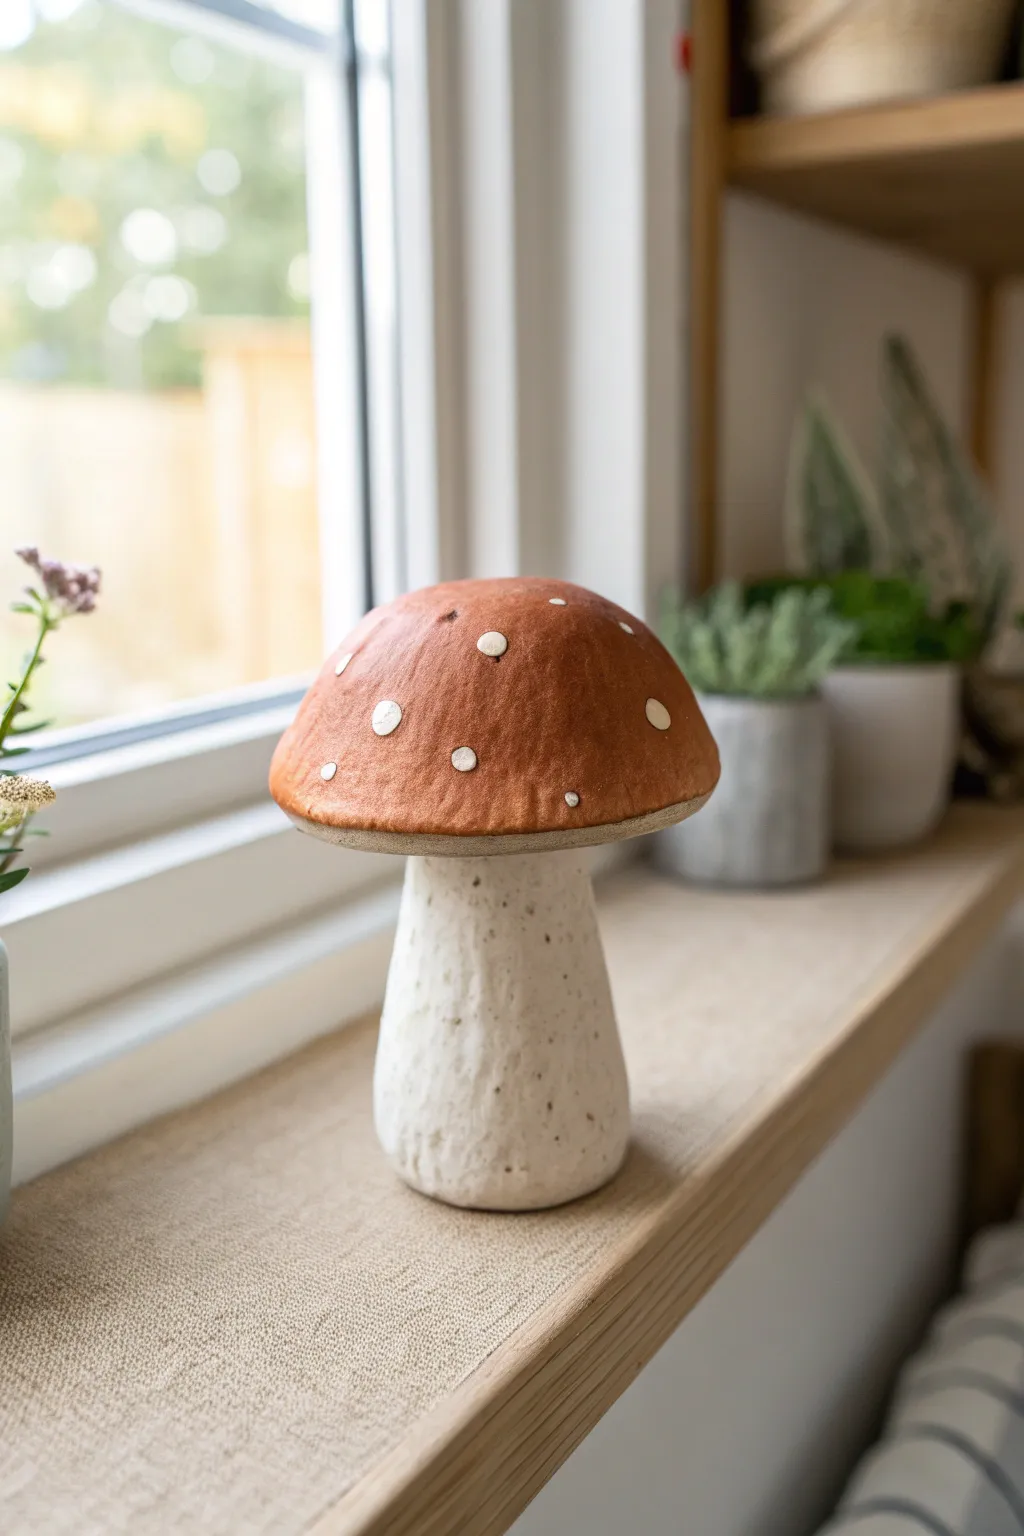
Bring a touch of woodland magic to your windowsill with this chunky, hand-sculpted mushroom. Its wide reddish-brown cap and textured white stem create an earthy, organic look that feels straight out of a fairy tale.
Step-by-Step Guide
Materials
- White air-dry clay (approx. 500g)
- Aluminum foil
- Acrylic paints (Burnt Sienna, Rust Red, Titanium White, Raw Umber)
- Matte sealant or varnish
- Basic sculpting tools
- Texture tool (toothbrush or stiff bristle brush)
- Bowl with water
- Paintbrushes (flat shader and fine detail)
Step 1: Armature & Base Structure
-
Form the cap core:
Creating a solid clay mushroom this size would be too heavy and slow to dry, so crumble a large sheet of aluminum foil into a tight ball. Press it against a flat surface to flatten the bottom into a dome shape roughly 3-4 inches wide. -
Shape the stem core:
Crumple a second piece of foil into a thick cylinder for the stem. It should be slightly wider at the base for stability. Make sure the top of the cylinder is flat enough to support the cap. -
Connect the parts:
Use a small amount of hot glue or masking tape to secure the foil cap to the foil stem. This armature doesn’t need to be perfect, just sturdy enough to hold the clay.
Step 2: Sculpting
-
Cover the stem:
Roll out a slab of white air-dry clay to about 1/4 inch thickness. Wrap this around your stem armature, pressing the seams together firmly. Use a little water on your fingers to smooth out the join lines so they disappear. -
Cover the cap:
Roll a larger circle of clay for the cap. Drape it over the foil dome, gently pressing it down to conform to the shape. Trim the excess around the rim, leaving just a slight overhang. -
Detail the underside:
For the underside of the cap where it meets the stem, add a small coil of clay to bridge the gap. Smooth the clay upwards into the cap and downwards into the stem so the transition looks seamless and sturdy. -
Refine the rim:
Use your fingers to round off the sharp edge of the cap’s rim. It shouldn’t be knife-edge sharp; a slightly rounded, organic lip looks more natural. -
Add stem texture:
This mushroom has a lovely rugged look. Take a stiff toothbrush or a texturing tool and firmly tap it all over the stem. Don’t be shy—you want visible pitting and roughness to mimic a real stalk. -
Smooth the cap:
Unlike the textured stem, the cap should be relatively smooth. Dip your finger in water and gently buff the top surface to remove any fingerprints or cracks. -
Let it dry:
Place your mushroom in a safe spot away from direct heat. Because of the foil core, it should dry faster than solid clay, but give it at least 24-48 hours until it is bone dry and chalky white.
Weighted Feel
For a heavier, high-quality feel, press a flat stone or a heavy washer into the bottom of the foil stem before wrapping it in clay. This lowers the center of gravity.
Step 3: Painting & Finishing
-
Base coat the cap:
Mix Burnt Sienna with a touch of Rust Red to get that warm, earthy colour. Paint the entire top of the cap. I like to apply this in thin layers to avoid brush strokes. -
Add depth:
While the red paint is still slightly tacky, mix a tiny bit of dark brown or black into your red. Dab this darker shade near the very top center of the cap and blend it outwards for a subtle gradient. -
Wash the stem:
To highlight that texture we made, water down some Raw Umber paint until it’s like ink. Brush it over the white stem and immediately wipe it off with a paper towel. The dark paint will stay in the textured pits while the raised areas remain pale. -
Paint the dots:
Using a small detail brush or the back end of a paintbrush, dip into thick Titanium White paint. Dot randomly across the red cap. Vary the pressure to create dots of slightly different sizes. -
Refine the dots:
If the white paint looks too stark, you can gently tap them with a clean finger once dry to smudge them slightly, making them look like natural scales rather than perfect polka dots. -
Clean up the rim:
Paint the thin rim edge and the underside (where it meets the stem) with a creamy off-white color to separate the red cap from the textured stem visually. -
Seal the piece:
Once all paint is completely dry, apply a coat of matte varnish. This protects the clay from humidity and unifies the sheen of the different paints.
Cracking Clay?
If hairline cracks appear while drying, don’t panic. Mix a tiny bit of fresh clay with water to make a paste (slip) and fill the cracks, then smooth over.
Place your finished mushroom near some potted plants to complete your little indoor garden scene