There’s something so satisfying about ringing in a fresh year with a bracelet stack you made yourself. These New Year’s clay bead bracelet ideas are festive, wearable, and totally doable at your kitchen table with a little color planning.
Classic Black and Gold Midnight Stack
Ring in the New Year with this sophisticated stack that combines matte black elegance with festive gold accents. This trio features contrasting textures and a striking central focal bead perfect for a midnight toast.
Step-by-Step
Materials
- Matte black onyx or agate beads (6mm or 8mm)
- White marble or howlite beads (6mm or 8mm)
- Large white focal bead (10mm or 12mm)
- Gold rhinestone spacer beads (barrel or rondelle style)
- Strong elastic stretch cord (0.8mm or 1mm)
- Jewelry glue or clear nail polish
- Scissors
Step 1: The All-Black Base
-
Measure your wrist:
Wrap a measuring tape loosely around your wrist to find your size, then add about half an inch for a comfortable fit. Cut a piece of elastic cord about 4 inches longer than this measurement to give yourself room to tie knots. -
Pre-stretch the cord:
Give your elastic cord a few firm tugs before you start stringing. This simple trick prevents the bracelet from drooping or stretching out permanently after you wear it a few times. -
String the matte beads:
Begin threading the matte black beads onto the cord. For a standard adult wrist, you will typically need about 22-26 beads, depending on their size. -
Check the fit:
Wrap the strand around your wrist to check the sizing. The ends should touch comfortably without pinching your skin or leaving large gaps. -
Tie the knot:
Tie a surgical knot (left over right, right over left) or a secure square knot. Pull the elastic tight so the knot becomes small and compact.
Knot Hiding Trick
Try to position your final knot next to a bead with a slightly larger hole. You can gently tug the knot inside that bead to make the finish completely invisible.
Step 2: The Marble Contrast
-
Prepare the second cord:
Cut a second length of elastic cord, pre-stretching it just like the first one to ensure durability. -
Create a pattern:
For this middle bracelet, you want high contrast. String approximately 10-12 matte black beads first to form the underside of the bracelet. -
Add the marble section:
Switch to your white marble or howlite beads. String enough of these to cover the top half of your wrist—usually about 10-12 beads. -
Finish the loop:
Complete the circle with any remaining black beads needed to reach your size, creating a split design where half is black and half is white. -
Secure the strand:
Tie off this second bracelet securely with a strong knot, ensuring the tension matches the first bracelet.
Add a Charm
For extra New Year flare, attach a small ‘2024’ or star charm to the gold spacer bead using a jump ring before stringing it onto the cord.
Step 3: The Golden Centerpiece
-
Start the final strand:
Cut your third piece of elastic. This bracelet will be the showstopper with the gold hardware. -
String the back section:
Thread on your matte black beads until you have filled about two-thirds of the bracelet’s length. -
Position the first gold accent:
Slide on one gold rhinestone spacer bead. These barrel-shaped spacers add a brilliant sparkle that catches the light beautifully. -
Add the focal point:
Place your large white feature bead next to the gold spacer. This larger bead anchors the entire stack visually. -
Complete the symmetry:
Follow the large white bead immediately with a second gold rhinestone spacer to frame the centerpiece perfectly. -
Close the loop:
Finish stringing any remaining black beads needed to complete the circle. -
Final assembly:
Tie your final knot securely. Apply a tiny dot of jewelry glue to all three knots and let them dry completely before trimming the excess cord close to the bead.
Enjoy wearing your sophisticated stack as you count down to midnight


White, Gold, and Pearl New Year Glow
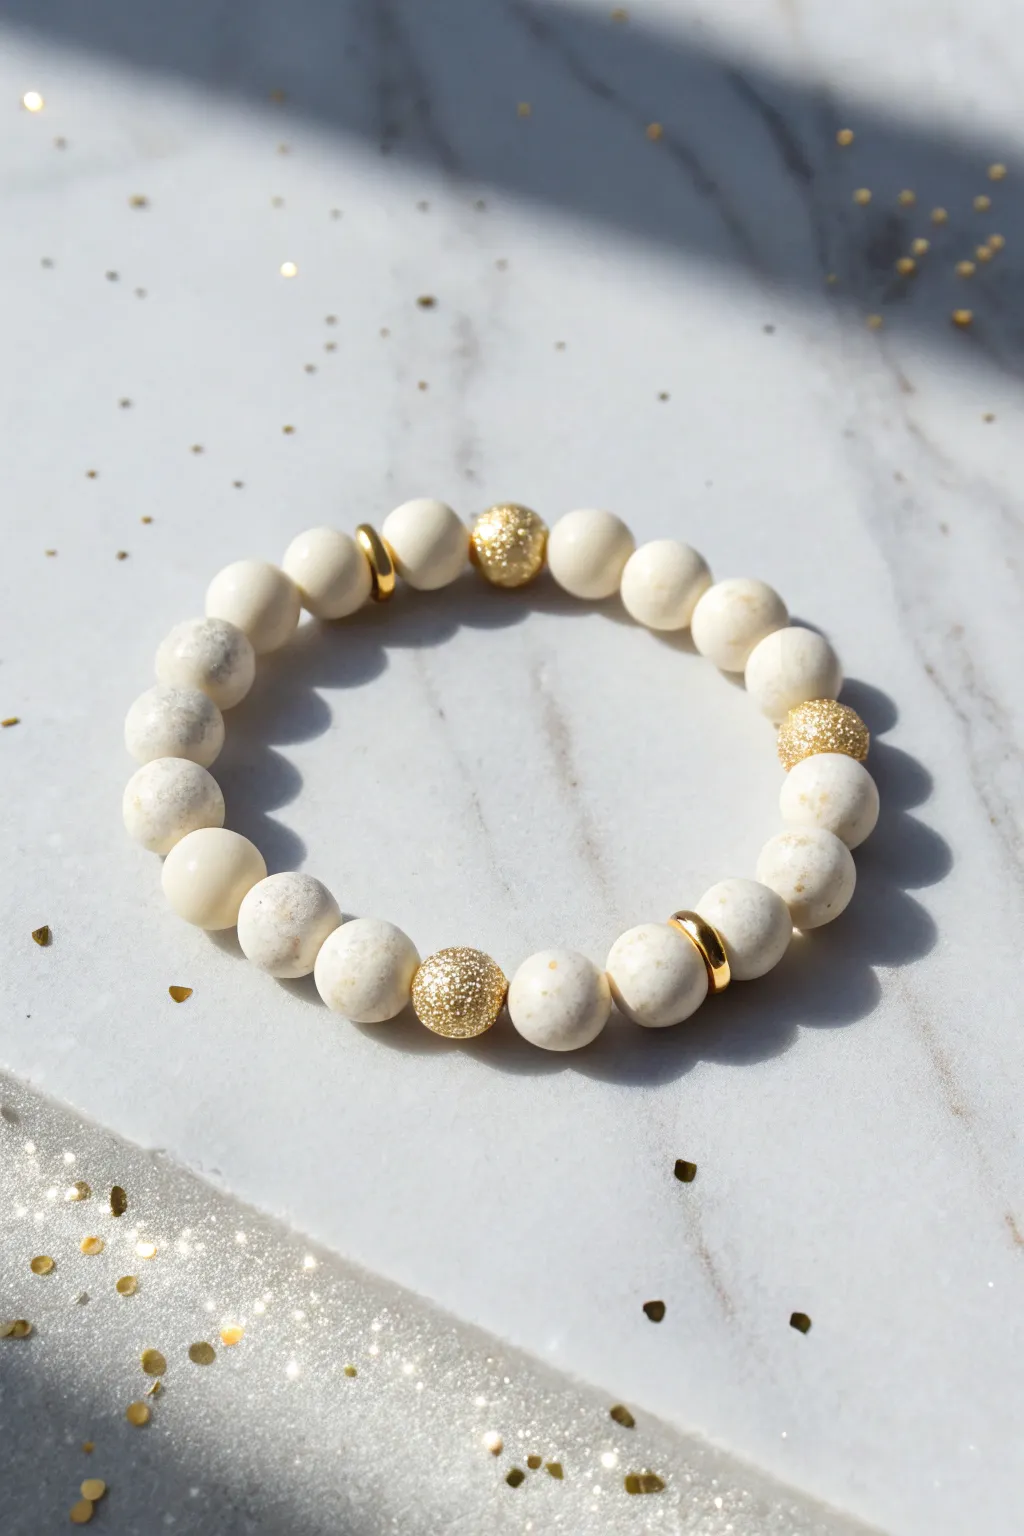
Capture the fresh promise of a clean slate with this sophisticated design featuring creamy matte beads and sparkling gold accents. It strikes the perfect balance between elegant simplicity and festive glimmer, making it an ideal accessory for ringing in the new year.
Detailed Instructions
Materials
- Matte cream/off-white round stone beads (8mm or 10mm, e.g., River Stone or White Jasper)
- Gold stardust round beads (same size as stone beads)
- Gold hematite or brass spacer discs/rondelles
- Strong elastic cord (0.8mm or 1.0mm recommended)
- Jewelry adhesive (e.g., G-S Hypo Cement)
- Scissors
Step 1: Planning the Pattern
-
Measure and Cut:
Begin by measuring your wrist and adding about 3-4 inches to determine your cord length. Cut a piece of elastic cord, ensuring you have plenty of slack for tying the final knot. -
Pre-stretch the Cord:
Firmly pull on the elastic cord several times to pre-stretch it. This crucial step prevents the bracelet from drooping or becoming loose immediately after you wear it. -
Layout the Design:
Before stringing, lay your beads out on a bead board or a soft towel to visualize the pattern shown in the image. -
Identify the Sequence:
Note the repeating pattern: a segment of about five or six white beads, followed by a gold accent section. The gold accents alternate between a simple gold spacer disc and a sparkly stardust bead.
Knot Slipping Out?
If the bead hole is too small to hide the knot, try ending your strand next to a bead with a larger hole, or simply dab clear nail polish on the knot to keep it discreet.
Step 2: Stringing the Beads
-
Start Stringing:
Secure one end of your elastic with a bead stopper or a piece of tape. Begin by threading on the first set of five matte white stone beads. -
Add First Gold Accent:
Slide on a single gold spacer disc. This slim metallic element adds a refined touch without overwhelming the white beads. -
Continue the Motif:
Thread on another group of five white stone beads. Adjust the number of white beads if you need to size the bracelet up or down for a specific fit. -
Insert Stardust Bead:
Now, add one textured gold stardust bead. This acts as the focal point of this section, contrasting beautifully with the smooth matte finish of the white stones. -
Repeat the Pattern:
Continue alternating your sections: five white beads, then a gold spacer disc; five white beads, then a gold stardust bead. -
Verify Length:
Keep stringing until you reach the desired length. Wrap the strand around your wrist to check the fit; it should be snug but comfortable. -
Final Bead Adjustment:
Ensure your pattern ends correctly so that when the two ends meet, the pattern remains continuous (e.g., finish with a white bead section if you started with a gold spacer).
Pro Tip: Bead Board
Use a flocked bead board or design tray. The grooves keep your round beads from rolling away while you plan your pattern, saving you frustration and lost supplies.
Step 3: Finishing Touches
-
Prepare to Tie:
Remove the tape or bead stopper. Bring the two ends of the elastic cord together, ensuring there are no gaps between the beads. -
Tie the Knot:
Tie a surgeon’s knot (right over left, left over right, looping the top strand through twice on the second pass). I usually pull this quite tight to secure it. -
Secure with Glue:
Apply a tiny dot of jewelry adhesive directly onto the knot. Be careful not to get glue on the surrounding beads. -
Hide the Knot:
Before the glue sets fully, gently pull the knot inside the hole of the nearest white bead. This hides the mechanics and gives a seamless finish. -
Dry and Trim:
Allow the adhesive to dry for at least 30 minutes. Finally, trim the excess elastic cord ends as close to the bead hole as possible.
Wear your shimmering creation with pride as you toast to new beginnings


Confetti Mix Party Bracelet
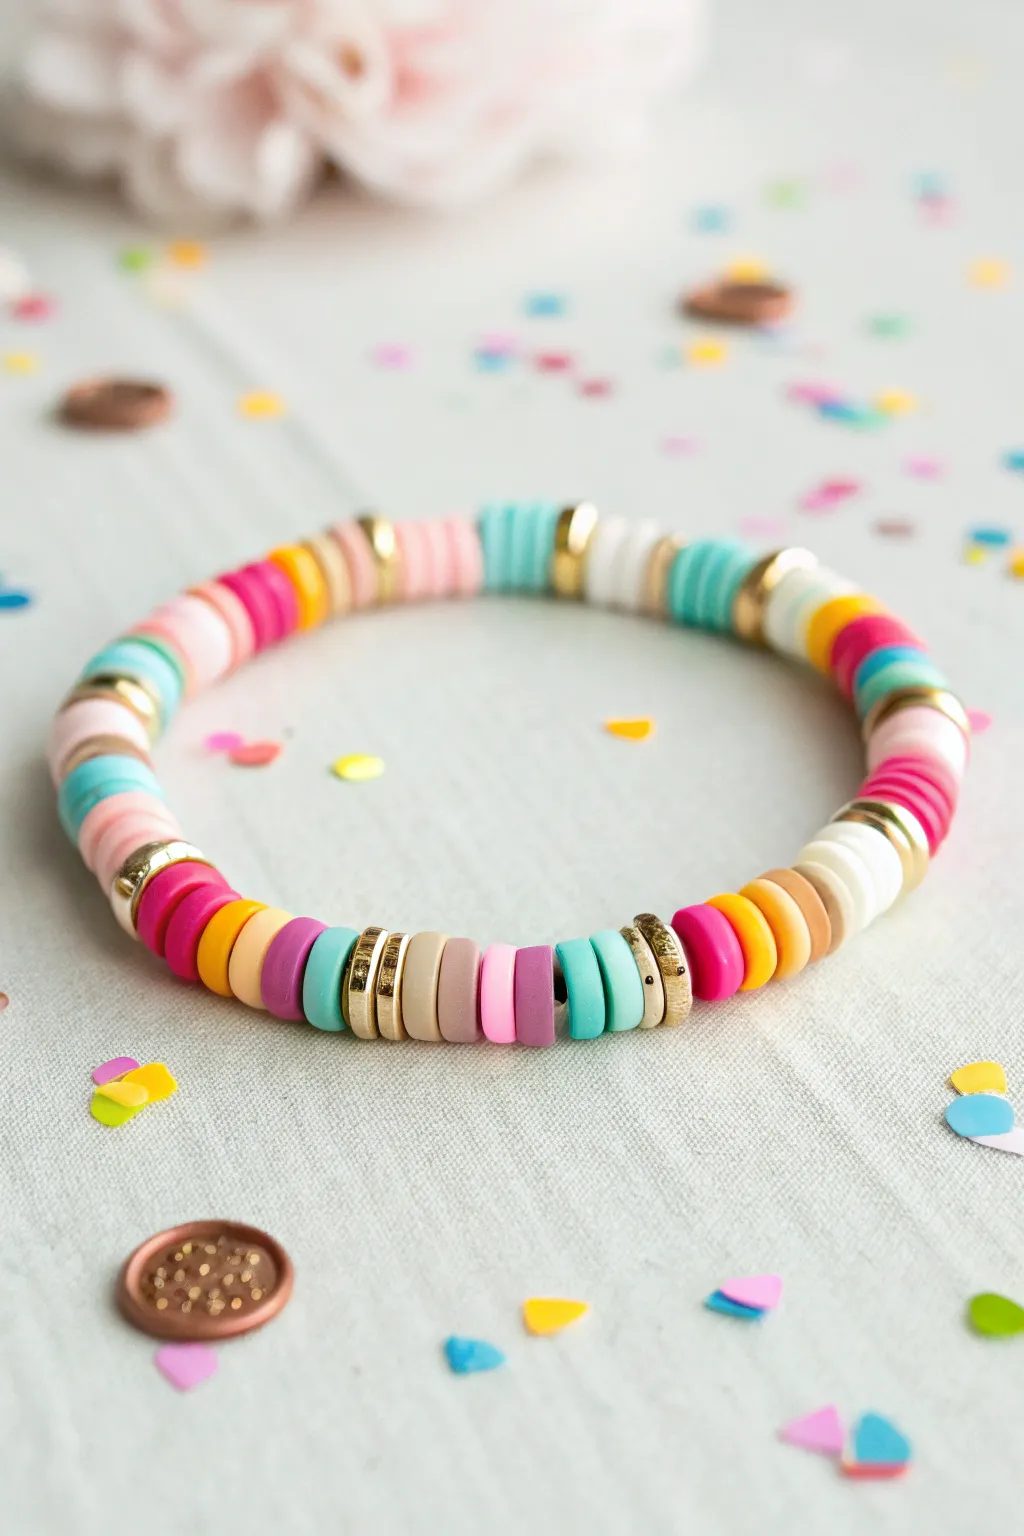
Celebrate with a wrist full of joy using this vibrant, multi-colored heishi bead design that mimics the scattered look of party confetti. The mix of solid colors, subtle stripes, and gleaming gold spacers creates a playful yet polished accessory perfect for ringing in a new year.
Step-by-Step Tutorial
Materials
- Polymer clay heishi beads (6mm or 4mm) in pink, hot pink, teal/turquoise, yellow, orange, white, tan, and purple
- Gold disc spacer beads (heishi style)
- Elastic stretch cord (0.8mm clear)
- Super glue or jewelry adhesive
- Scissors
- Bead stopper or tape
- Beading needle (optional)
Step 1: Preparation
-
Measure the Cord:
Cut a length of elastic stretch cord about 10-12 inches long. This gives you plenty of extra room for tying knots later without struggling with tight ends. -
Pre-stretch the Elastic:
Hold the cord firmly at both ends and give it a few gentle tugs. This pre-stretching helps prevent the bracelet from sagging or loosening immediately after you wear it. -
Secure the End:
Place a bead stopper or a piece of masking tape on one end of the cord to stop your beads from sliding right off as you work.
Step 2: Pattern Mixing
-
Understand the Aesthetic:
The key to this ‘confetti’ look is controlled chaos. You aren’t doing a strict repeating pattern like A-B-C. Instead, you are creating small color blocks separated by gold accents. -
Create Small Color Blocks:
Start by selecting 2 to 4 beads of the same color. For example, grab three hot pink beads. -
Add Contrast:
Immediately follow your first block with a contrasting color block. If you started with pink, add two or three teal beads next. -
Insert Gold Elements:
After every two or three small color blocks, slide on a gold spacer bead. This metallic flash breaks up the matte clay texture and adds that festive sparkle. -
Introduce Neutrals:
Don’t forget to mix in the white and tan beads. I find that placing a neutral block between two bright neons helps both colors pop without looking muddy. -
Cluster the Gold:
Occasionally, instead of a single gold spacer, string two or three gold discs in a row. This creates a more substantial focal point along the strand. -
Vary Block Sizes:
Keep the bracelet dynamic by changing the number of beads in your blocks. Do a stack of four yellow beads, then a gold spacer, then just two purple beads. -
Check the Length:
Continue stringing these random but balanced sections until the beaded portion measures about 6.5 to 7 inches, or fits comfortably around your wrist.
Randomizer Tray
Pour odd numbers of different colored beads into a shallow dish and pick blindly for a truly random confetti effect.
Step 3: Finishing
-
Test the Fit:
Wrap the unfinished strand around your wrist to check the size. Ideally, there should be no gaps between beads, but it shouldn’t be so tight it digs in. -
Remove the Stopper:
Carefully take off the bead stopper or tape while pinching the end of the cord securely. -
The Surgeon’s Knot:
Cross the two ends of the cord like you are tying a shoe. Loop one end under and over the other twice (instead of just once) before pulling tight. -
Tighten Securely:
Pull the cord ends firmly to cinch the knot. You want the beads to press together snugly so the elastic isn’t visible between them. -
Add A Second Knot:
Tie a standard overhand knot on top of your surgeon’s knot to lock it in place. -
Glue the Knot:
Apply a tiny dab of super glue or jewelry cement directly onto the knot. Let it dry completely before moving it. -
Hide the Evidence:
Once dry, trim the excess cord ends close to the knot. Gently tug the bracelet so the knot slides inside the hole of a neighboring bead, hiding it from view.
Charm Addition
Add a gold ‘2025’ or star charm on a jump ring next to one of the gold bead clusters for extra New Year branding.
Slip on your colorful new accessory and enjoy the fun confetti vibes it brings to your outfit


New Year’s Eve Silver and Black Sparkle
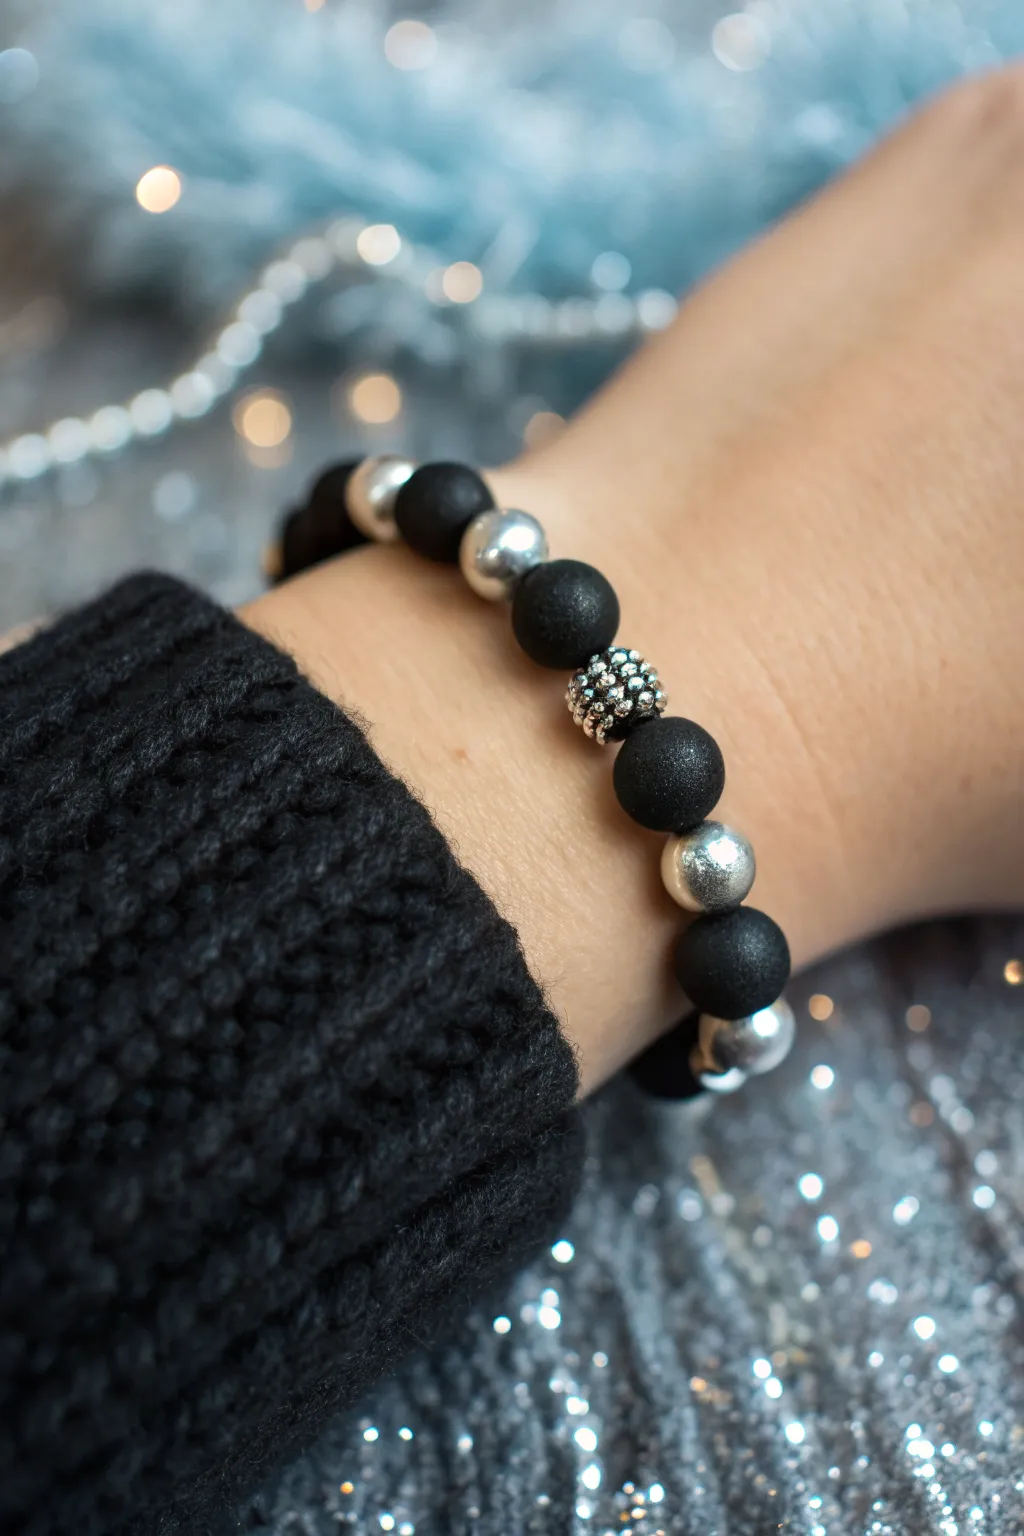
Embrace the elegance of New Year’s Eve with this sophisticated bracelet that pairs matte black textures with high-shine metallic accents. The contrast between the velvet-finish clay beads and the polished silver spacers creates a chic accessory perfect for ringing in the new year.
Step-by-Step
Materials
- Matte black polymer clay round beads (approx. 8mm-10mm)
- Shiny silver metallic round beads (same size as the black beads)
- Textured silver focal bead (stardust or clustered style)
- Durable elastic stretch cord (0.8mm or 1mm thickness)
- Bead stopper or a small piece of tape
- Jewelry adhesive or clear nail polish
- Scissors
Step 1: Preparation and Layout
-
Measure your wrist:
Wrap a flexible measuring tape comfortably around your wrist where you intend to wear the bracelet. Note the measurement and add about half an inch to ensure a comfortable fit that isn’t too tight. -
Cut the cord:
Cut a length of your elastic stretch cord about 10-12 inches long. Having this extra length makes tying the final knot much easier than fighting with short ends. -
Pre-stretch the elastic:
Hold the cord firmly at both ends and give it several gentle tugs. Pre-stretching helps prevent the bracelet from loosening up and sagging after the first few times you wear it. -
Secure the end:
Attach a bead stopper to one end of the cord, or simply fold a piece of tape over the end. This crucial step prevents your beads from sliding right off onto the floor while you work. -
Plan your pattern:
Lay your beads out on a mat or towel before stringing. The pattern shown here uses an alternating sequence: two matte black beads followed by one shiny silver bead. Place your textured focal bead in the center of the layout.
Knot Slipping?
If the elastic feels slippery, dust the ends with a tiny bit of cornstarch or baby powder before tying. This provides friction and helps the knot hold tight.
Step 2: Stringing the Beads
-
Start the sequence:
Begin stringing your beads onto the open end of the elastic. Start with the alternating pattern: thread two matte black beads, then slide on one silver bead. -
Check the fit:
Continue this 2-black, 1-silver pattern until you have completed about half of your desired length. At this point, I usually wrap it around my wrist to check if the bead size complements the arm correctly. -
Add the focal bead:
Slide on your special textured silver bead. This will act as the centerpiece. If the bead hole is larger than the others, ensure it sits securely against its neighbors. -
Mirror the pattern:
Continue the pattern on the other side of the focal bead. This creates a symmetrical look, so whatever bead sequence led into the focal bead should be reversed coming out of it. -
Finish the strand:
Keep stringing until you reach the total length you calculated earlier. Ensure the final bead pattern connects seamlessly with the first bead you strung (e.g., if you started with black, try to end with silver so the pattern continues across the knot). -
Verify length:
Bring the two ends together to form a circle. Test the fit on your wrist one last time. It should roll over your hand without extreme stretching but sit snugly on the wrist.
Step 3: Finishing Touches
-
Remove the stopper:
Carefully remove the tape or bead stopper while gripping the ends of the cord firmly so no beads escape. -
Tie the first knot:
Tie a simple overhand knot with the two ends. Pull it tight, bringing the beads together so there are no gaps of exposed elastic between them. -
Tie a surgeon’s knot:
For extra security, follow up with a surgeon’s knot. Loop the elastic twice before pulling the knot tight. This adds friction and prevents slipping. -
Secure with glue:
Place a tiny drop of jewelry adhesive or clear nail polish directly onto the knot. Allow this to dry for a few minutes to bond the elastic strands permanently. -
Hide the knot:
Once the glue is tacky but almost dry, gently pull the elastic so the knot slides inside the hole of the nearest bead. This hides the mechanics and gives a professional finish. -
Trim the excess:
Use your scissors to trim the remaining elastic tails close to the bead hole, being extremely careful not to cut the main bracelet cord.
Pro Tip: Bead Holes
Ensure the bead next to your knot has a slightly larger hole. This makes hiding the knot much easier and prevents the elastic from fraying against tight edges.
Slip on your shimmering new accessory and enjoy the countdown in style

The Complete Guide to Pottery Troubleshooting
Uncover the most common ceramic mistakes—from cracking clay to failed glazes—and learn how to fix them fast.
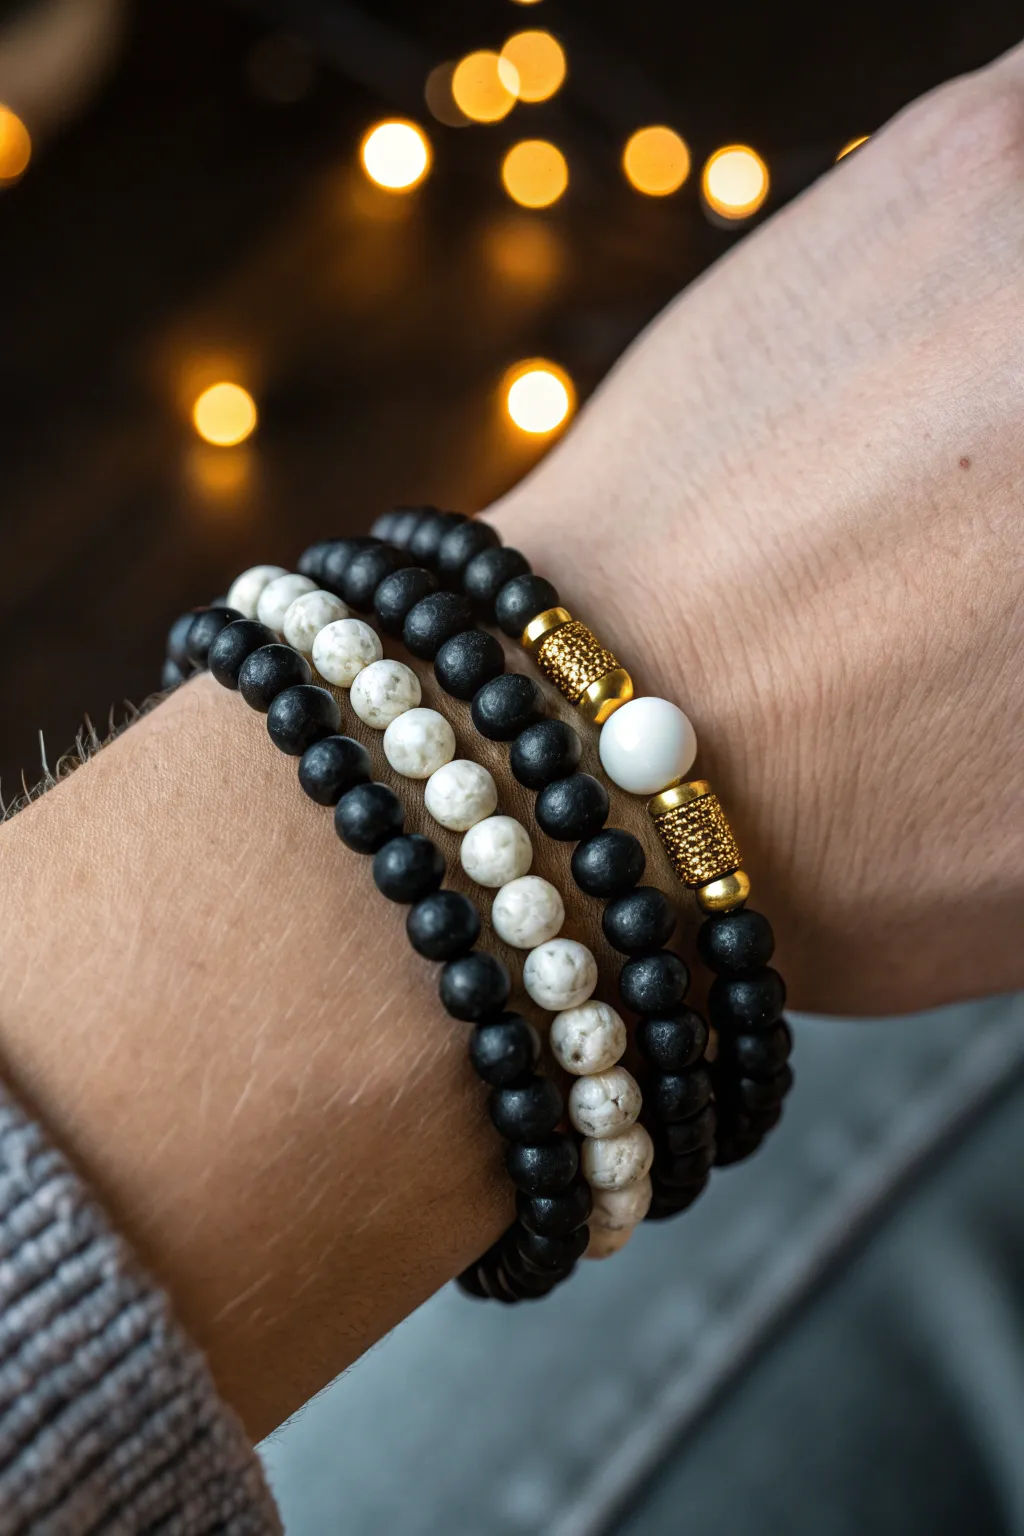
“Happy New Year” Letter Bead Centerpiece
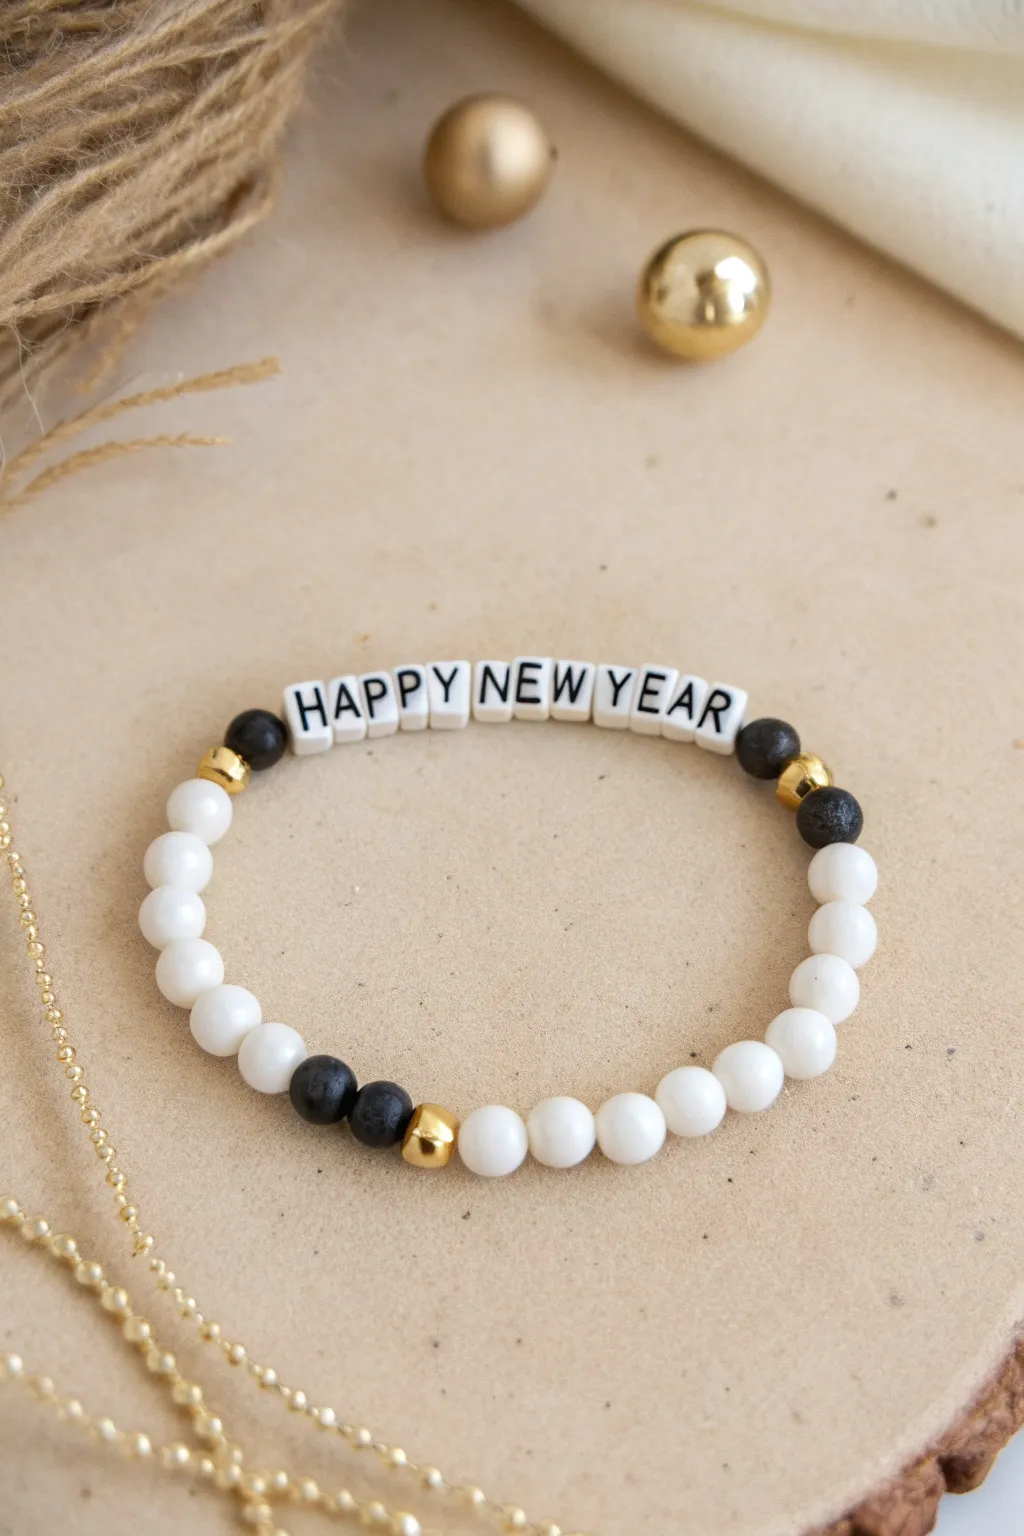
Ring in the new year with a sophisticated touch by crafting this monotone bracelet featuring striking gold accents. The combination of smooth white beads and textured black lava stones creates a beautiful tactile contrast that perfectly frames your celebratory message.
How-To Guide
Materials
- Elastic beading cord (0.8mm transparent)
- White square letter beads (H, A, P, P, Y, N, E, W, Y, E, A, R)
- 8mm smooth white jade or agate beads (approx. 14 beads)
- 8mm black lava stone beads (4 beads)
- Gold plated spacer beads (rondelle or irregular shape, approx. 4 beads)
- Beading needle (optional but helpful)
- Scissors
- Jewelry glue or clear nail polish
- Bead design board or tray
Step 1: Planning and Preparation
-
Organize Your Message:
Begin by sorting out your letter beads to spell ‘HAPPY NEW YEAR’. Lay them out on your bead board or a soft towel to double-check the spelling before you start stringing. -
Measure the Cord:
Cut a piece of elastic cord about 10-12 inches long. This might feel generous, but I always prefer having extra room to tie knots comfortably rather than struggling with short ends. -
Pre-stretch the Elastic:
Hold the ends of your cut cord and give it a few firm tugs. This crucial step prevents the bracelet from stretching out and becoming loose immediately after you finish making it.
Step 2: Stringing the Design
-
Start the Sequence:
Thread your beading needle if you are using one, or simply stiffen the end of the cord with a dab of glue. Begin stringing from the left side of the centerpiece. -
Add the First Accent:
Slide on one black lava bead first. This will sit right next to your letters. -
Insert Gold Spacer:
Follow the black bead immediately with a gold spacer bead. This adds a flash of metallic shine that separates the dark tone from the white letters. -
String the Message:
Carefully thread the letter beads onto the cord in order: ‘HAPPYNEWYEAR’. Ensure they are all facing the same direction so your message is legible. -
Mirror the Accents:
Once the ‘R’ is on, slide on another gold spacer bead, followed by a second black lava bead. Your centerpiece is now complete and symmetrical. -
Add White Beads:
Now, begin adding the smooth white beads to one side of the centerpiece. Thread approximately 7 round beads.
Knot Slipping?
If your elastic is slippery, dust the ends with a little cornstarch or baby powder before tying. This adds friction and helps the knot grip tighter.
Step 3: Creating the Back Detail
-
Create the Back Focal Point:
After your run of white beads, add a small visual break for the back of the wrist. Slide on one black lava bead. -
Add Central Gold Spacer:
Place a single gold spacer bead next to the lava bead. -
Finish the Back Pattern:
Add one final black lava bead to complete this three-bead detail group. -
Complete the Circle:
Fill in the remaining length of the bracelet with about 7 more smooth white beads until the strand fits comfortably around your wrist. -
Check the Fit:
Wrap the strand around your wrist to check the size. Ideally, the ends should touch without gaps, but not feel tight against your skin.
Scent Infusion
Since this design uses porous lava stone beads, add a drop of essential oil to the black beads. They act as a diffuser, carrying a calm scent all day.
Step 4: Finishing Touches
-
Tie the Knot:
Remove the needle. Bring both ends of the cord together and tie a surgeon’s knot (loop the cord through twice instead of once before pulling tight) to secure the bracelet. -
Secure with Glue:
Apply a tiny drop of jewelry glue or clear nail polish directly onto the knot. Let it dry for a few minutes to ensure it won’t slip. -
Hide the Evidence:
If one of your beads has a large enough hole (usually the lava beads are great for this), gently tug the elastic so the knot slides inside the bead, hiding it from view. -
Trim Excess Cord:
Use your scissors to trim the remaining tail ends of the elastic close to the bead, being careful not to nick the main cord.
Wear your new accessory with pride as you head into the upcoming year
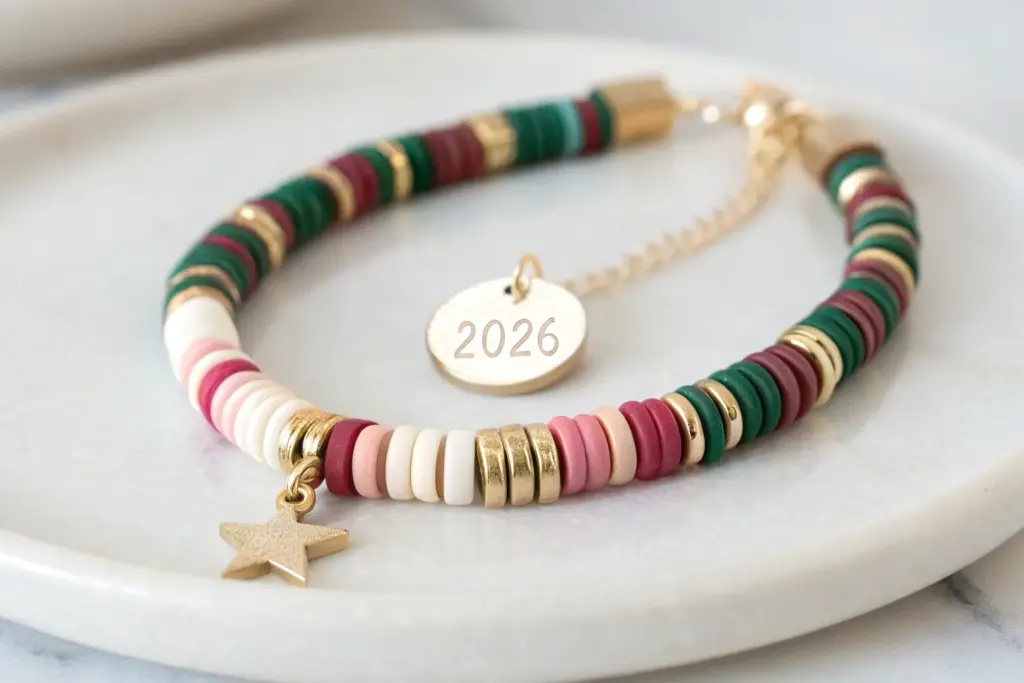
Wear-the-Year Number Bead Bracelet
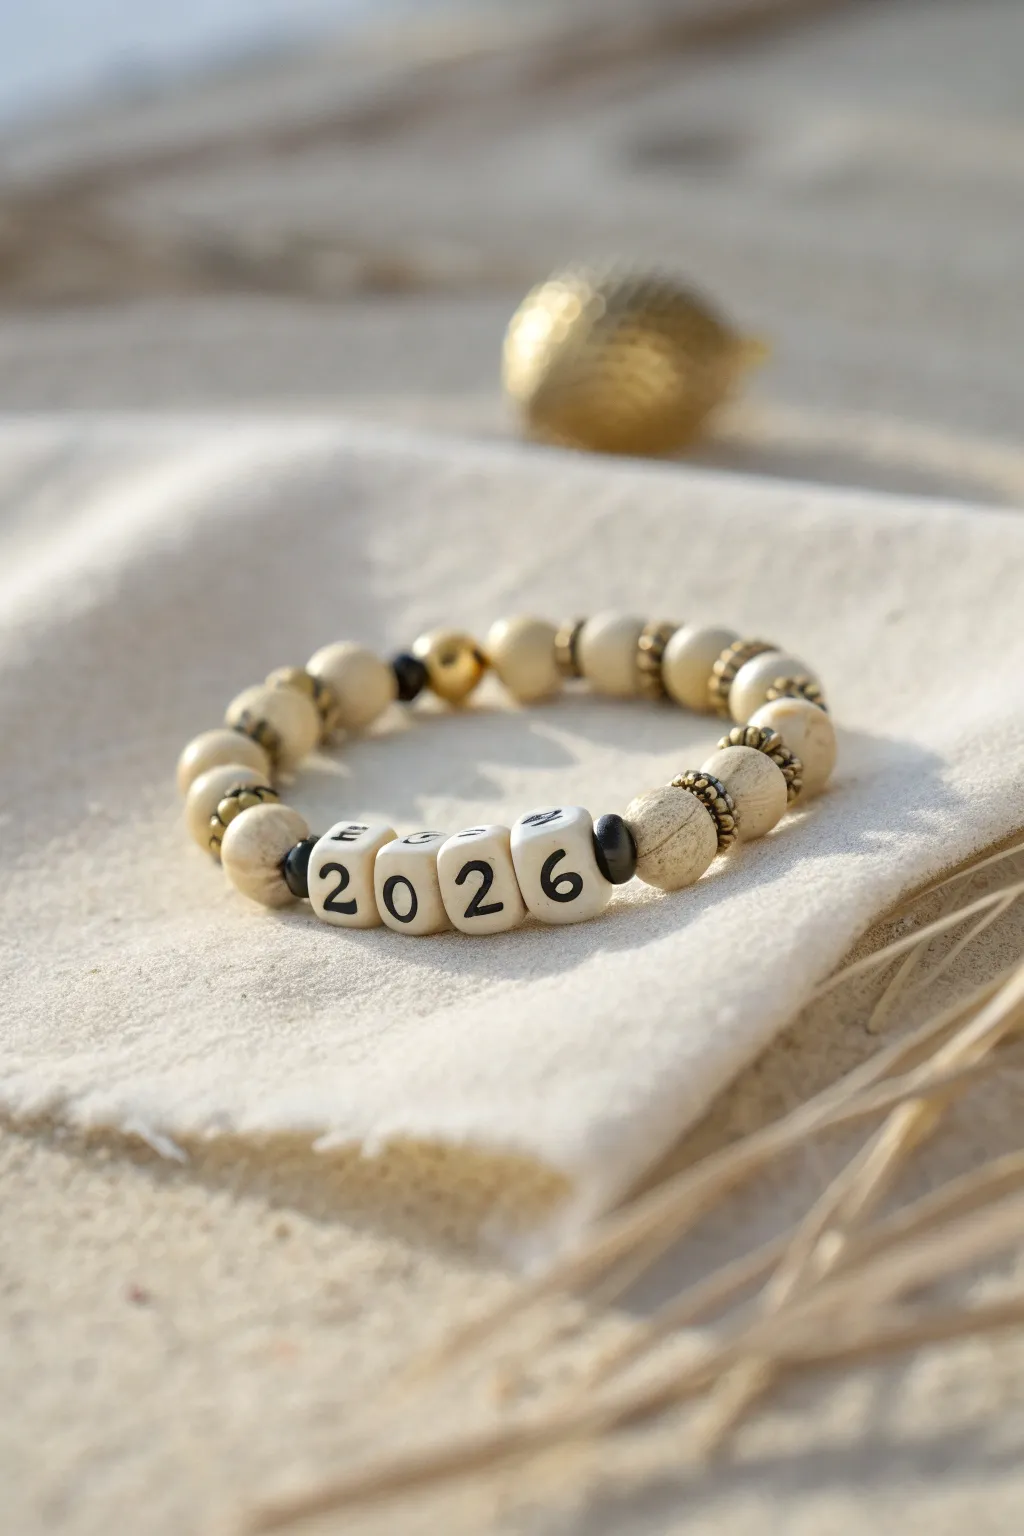
Celebrate the future with this earthy, minimalist bracelet featuring natural wood tones and a bold year display. Its neutral palette of cream, gold, and black makes it a versatile accessory that pairs perfectly with beachy vibes or casual everyday wear.
Detailed Instructions
Materials
- Elastic beading cord (0.8mm clear)
- 4 Square number beads (2, 0, 2, 6) – cream with black text
- Approx. 14-16 Round wood or bone beads (8mm or 10mm) – light beige/cream
- 2 Small black spacer beads (4mm round)
- 2 Gold bead caps or gold spacer beads
- 1 Gold accent bead (6mm or 8mm round)
- Approx. 12-14 Daisy spacer beads (antique gold or brass)
- Scissors
- Super glue or jewelry cement (optional)
- Beading needle (optional, for easier threading)
- Tape or bead stopper
Step 1: Preparation and Layout
-
Measure the cord:
Cut a piece of elastic cord about 10-12 inches long. This gives you plenty of extra room for tying knots later without struggling with short ends. -
Pre-stretch the elastic:
Holding both ends of the cord, give it a few gentle tugs. This is a crucial step I always do to prevent the bracelet from stretching out and becoming loose after the first time you wear it. -
Secure the end:
Place a piece of tape over one end of the cord or attach a bead stopper. This creates a safety net so your beads don’t slide off while you are working. -
Plan your design:
Lay out your beads on a bead board or a soft cloth. Start with the ‘2026’ focal point in the center, flanked by the black spacers, then arrange the wooden beads and daisy spacers in a pattern radiating outward.
Step 2: Beading the Focal Section
-
Start the sequence:
Thread on one small black round spacer bead first. This will act as a bookend for your numbers. -
Add the year:
Slide on the number beads in order: ‘2’, ‘0’, ‘2’, ‘6’. Double-check that they are all facing the correct direction and aren’t upside down. -
Finish the focal point:
Add the second small black round spacer bead immediately after the ‘6’. This frames your year distinctly from the rest of the bracelet.
Natural Texture
Use unfinished wood beads for an organic look. Over time, oils from your skin will naturally darken and polish the wood, giving each bracelet a unique patina.
Step 3: Building the Band
-
First wood bead set:
On the side extending from the ‘6’, thread on one large wooden bead. -
Add metallic texture:
Slide on an antique gold daisy spacer. These textured spacers add a lovely vintage feel and separate the wooden beads nicely. -
Create the repeating pattern:
Continue the pattern of alternating one wooden bead and one daisy spacer. Do this for about 5-6 sets on this side of the bracelet. -
Repeat on the other side:
Remove your tape or stopper from the starting end (carefully!) and repeat the wood-bead-daisy-spacer pattern on the side extending from the first ‘2’. Aim for symmetry, counting the same number of beads on each side. -
Check the fit:
Wrap the unfinished beaded strand around your wrist. The ends should just meet comfortably without pulling the elastic tight. Add or remove wood beads/spacers if needed to adjust the size.
Gold Rush
Swap the antique brass spacers for bright gold-plated heishi beads or tiny gold nuggets to instantly change the vibe from rustic bohemian to modern chic.
Step 4: Adding the Back Accent
-
Prepare the closure area:
To hide the knot area stylishly, we will add a special accent bead sequence at the back. Thread a gold bead cap (concave side facing outward) onto one end of the cord. -
Add the gold accent:
Thread on the single round gold accent bead. This adds a little flash of shine at the back of the wrist. -
Complete the grouping:
If you used a bead cap on the other side, add a matching one here, or simply add a small black spacer if your pattern needs balancing. -
Tie the knot:
Bring the two ends of the elastic together. Tie a surgeon’s knot (right over left twice, then left over right) and pull it tight. You want the elastic to be taut but not bunching the beads. -
Secure the knot:
Apply a tiny dot of super glue or jewelry cement directly onto the knot. Let it dry for a minute or two. -
Hide the knot:
Once the glue is tacky but not fully hard, try to gently pull the knot inside the hole of the adjacent gold accent bead or one of the wooden beads. Trim the excess cord tails close to the bead.
Now your wrist is ready to welcome the new year with natural style and charm


What Really Happens Inside the Kiln
Learn how time and temperature work together inside the kiln to transform clay into durable ceramic.
Champagne Bubbles Neutral Palette
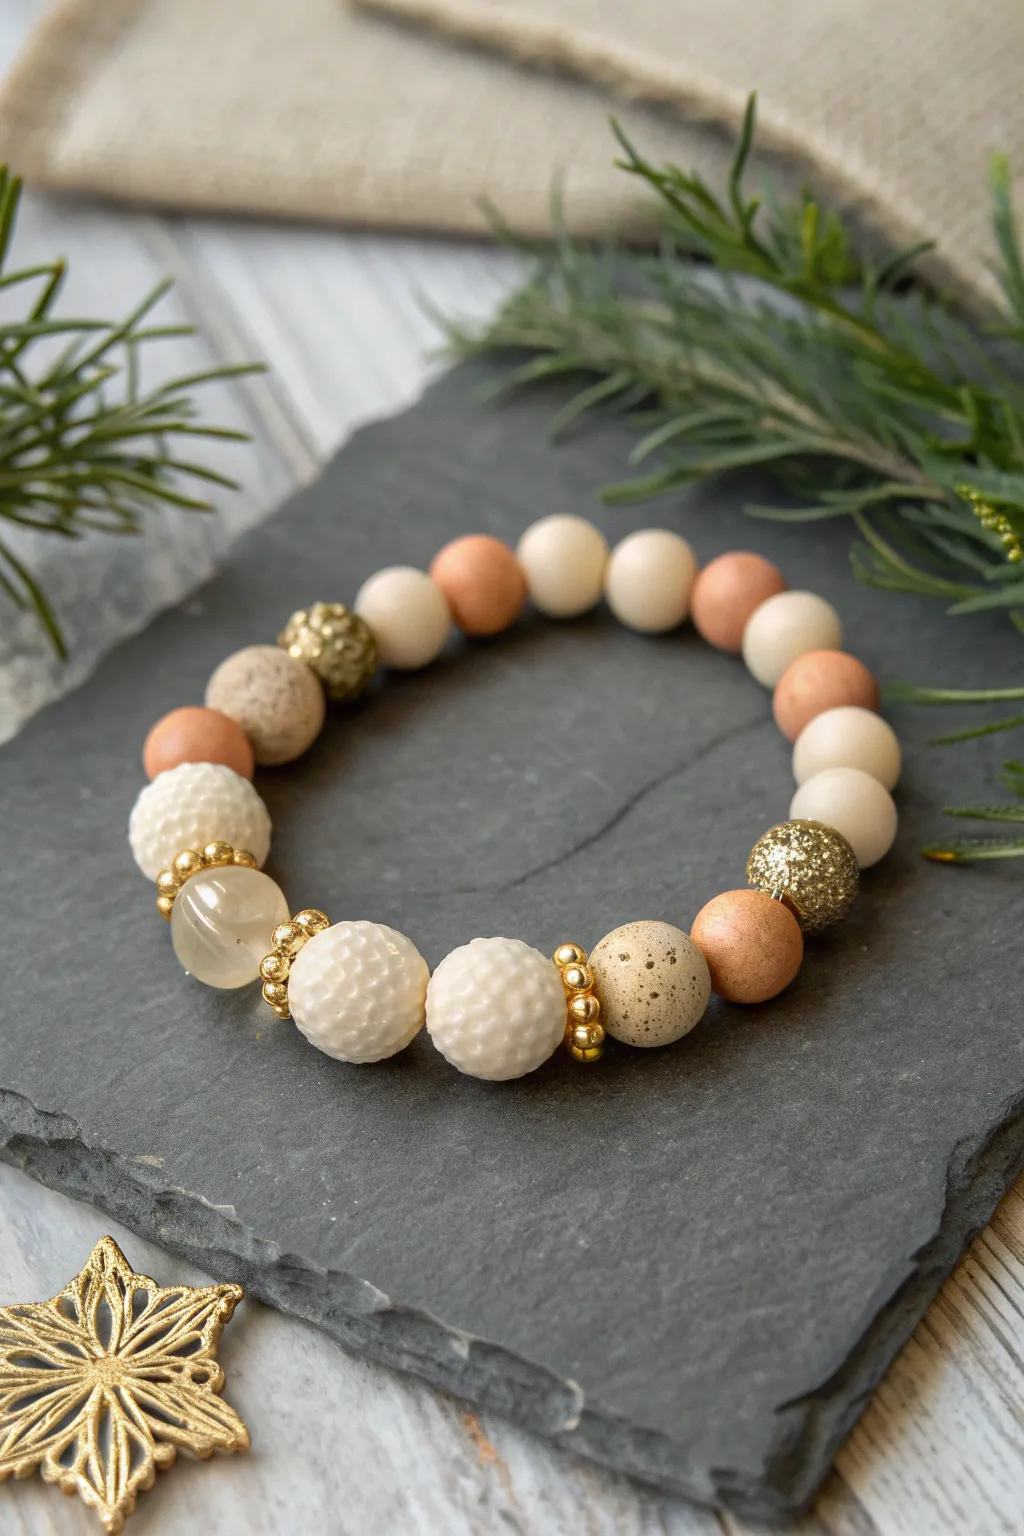
Ring in the New Year with this sophisticated neutral palette that mimics the effervescence of champagne bubbles. Combining matte textures, soft peach tones, and touches of gold sparkle, this bracelet adds a subtle festive flair to any wrist stack.
How-To Guide
Materials
- Polymer clay (white, peach/tan, translucent/beige)
- Gold acrylic paint or metallic gold powder
- Clear varnish or glaze (glossy)
- Gold glitter (fine)
- Small golf-ball texture tool or round-tipped dotting tool
- Toothbrush (for speckle texture)
- Brown acrylic paint (for speckles)
- Set of small gold spacer beads
- Large focal clear/translucent bead (simulated moonstone or glass)
- Gold sparkle bead (pre-made or handmade with glitter)
- Elastic beading cord (0.7mm or 0.8mm)
- Super glue or jewelry cement
- Bead reamer or toothpick
Step 1: Prepping the Clay Beads
-
Condition the clay:
Start by thoroughly conditioning your white, peach/tan, and translucent polymer clays until they are soft and pliable. -
Roll spheres:
Roll your clay into evenly sized balls, approximately 10-12mm in diameter. You will need about 6-8 white/cream beads, 4-5 peach beads, and 2-3 beige beads. -
Create the golf-ball texture:
Take two of larger white/cream beads. Using a small round-tipped tool, gently press indentations all over the surface to create a dimpled, golf-ball-like texture. -
Texture the accent beads:
For the additional white bead on the opposite side, apply the same dimpled texture. This repeats the motif without overcrowding the design. -
Make the glitter bead:
Take a ball of clay and roll it thoroughly in fine gold glitter until fully coated, or mix the glitter directly into the clay before rolling. Alternatively, paint a baked bead with glue and dip in glitter later. -
Pierce the beads:
Carefully pierce a hole through the center of each unbaked clay bead using a toothpick or piercing tool. Make sure the hole is large enough for your elastic cord.
Sticky Situation?
If the clay sticks to your texturing tool, dip the tip in a little cornstarch or water before pressing it into the clay. This creates a clean release.
Step 2: Baking and Finishes
-
Bake the clay:
Arrange your beads on a baking sheet or tile. Bake according to the manufacturer’s instructions for your specific brand of clay (usually around 275°F/135°C for 15-30 minutes). -
Cool down:
Allow the beads to cool completely before handling. This ensures they harden properly and won’t fingerprint. -
Apply speckling:
Dilute a small drop of brown acrylic paint with water. Dip a toothbrush into the mix and flick the bristles with your thumb to spray fine speckles onto the beige/tan beads for a stone-like effect. -
Let paint dry:
Allow the speckled paint to dry fully. I usually give this about 10 minutes to ensure no smudging occurs during assembly. -
Varnish optional beads:
If you want the peach or plain white beads to have a porcelain look, apply a thin coat of glossy varnish. Leave the textured ones matte for contrast.
Step 3: Assembly and Stringing
-
Cut the cord:
Cut a piece of elastic cord about 10-12 inches long. This gives you plenty of extra room for tying the knot comfortably. -
Pre-stretch the elastic:
Give your elastic cord a few firm tugs. This pre-stretching helps prevent the bracelet from sagging or loosening after you wear it a few times. -
Plan your pattern:
Lay out your beads on a bead board or towel. Start with the focal section: the large clear bead, flanked by gold spacers, then the textured white beads. -
Add the gold accents:
Place the gold spacer rings specifically between the large clear bead and the textured white beads to highlight the centerpiece. -
Complete the sequence:
String the rest of the beads, alternating the peach, smooth cream, speckled beige, and glitter beads to balance the colors around the loop. -
Check the size:
Wrap the strung beads around your wrist to check the fit. Add or remove a spacer bead if necessary to get the perfect snugness. -
Tie the knot:
Tie a secure surgeon’s knot (right over left, left over right). Pull the elastic tight to bring the beads together. -
Secure with glue:
Apply a tiny dot of super glue or jewelry cement to the knot. Let it dry for a minute before trimming the excess cord close to the knot. -
Hide the knot:
Gently pull the knot inside the hole of the nearest large bead (like the textured white one) to hide it from view.
Glitz & Glam
For extra New Year’s sparkle, brush a tiny amount of pearl mica powder onto the peach beads before baking. It gives a subtle shimmer without being full glitter.
Slip on your bubbly new accessory and celebrate the season with style
Firework Burst Star Spacer Pattern
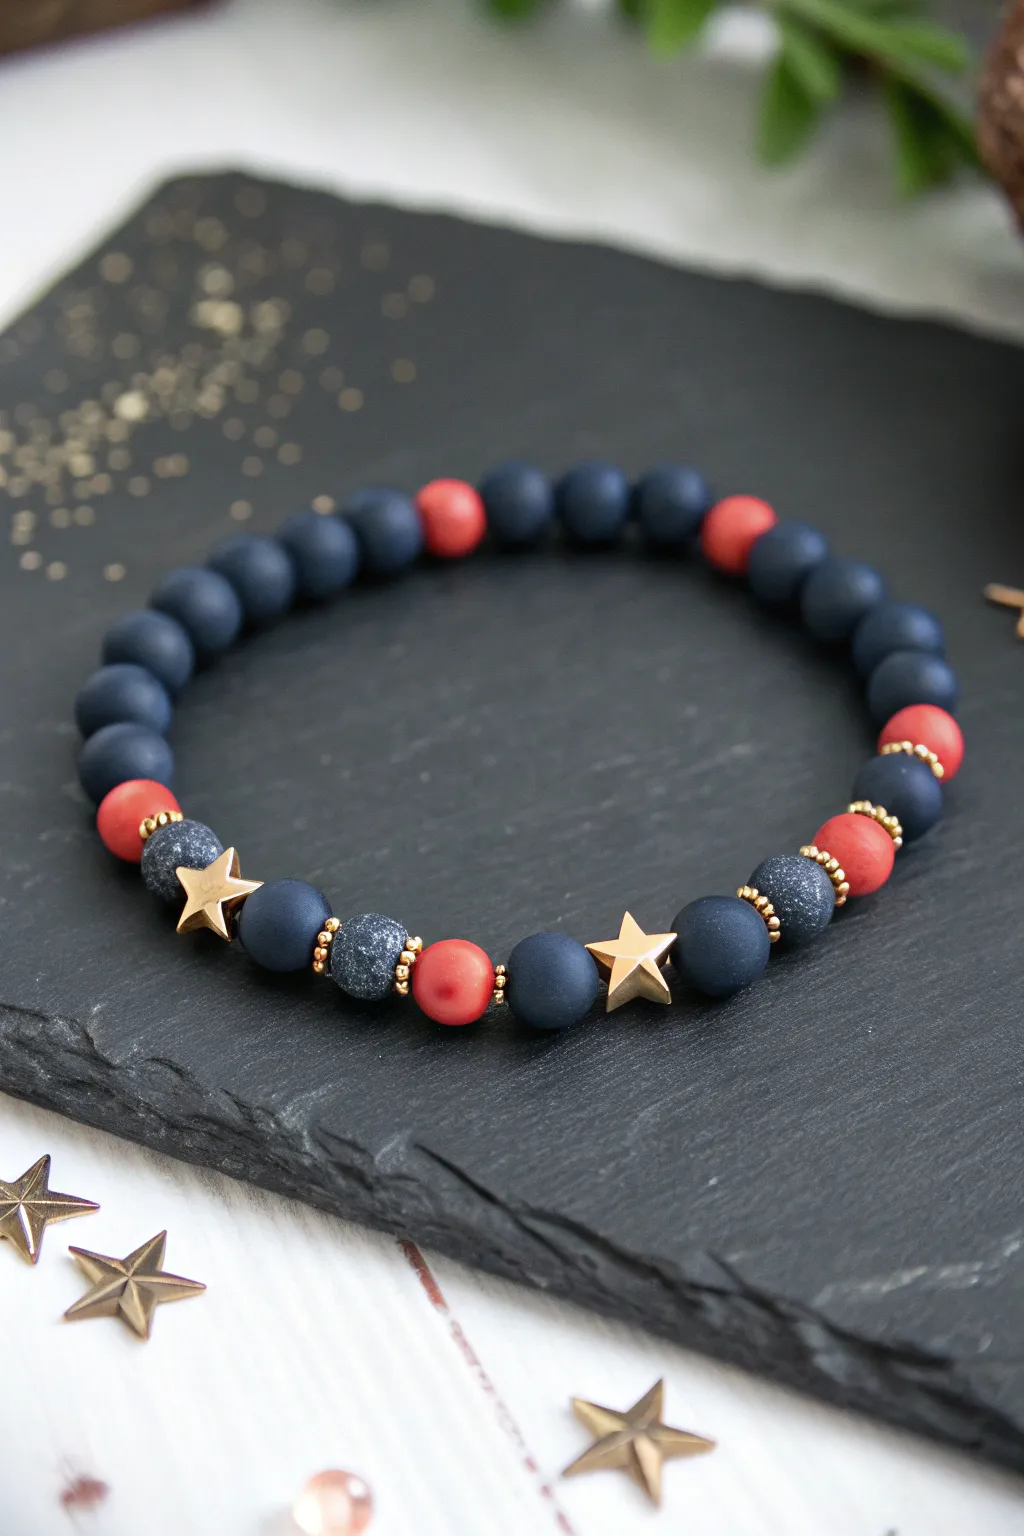
Capture the magic of a New Year’s Eve sky with this elegant beaded bracelet featuring matte navy and red tones. The gold stars and sparkling accents create a festive burst pattern that looks sophisticated enough for a party yet simple enough to make in minutes.
Detailed Instructions
Materials
- Matte navy blue round beads (approx. 8mm)
- Matte red round beads (approx. 8mm)
- Sparkling dark blue/black stardust beads (approx. 8mm)
- Gold star bead spacers (approx. 8-10mm)
- Tiny gold spherical spacer beads (2-3mm)
- Strong elastic beading cord (0.8mm or 1mm)
- Bead stopper or masking tape
- Scissors
- Jewelry glue or clear nail polish
Step 1: Setting the Pattern Core
-
Prepare your cord:
Cut a length of elastic cord about 10-12 inches long. This gives you plenty of extra room for tying knots later without struggling. -
Secure the end:
Attach a bead stopper to one end of the cord, or simply tape it down to your table so beads don’t slide off while you work. -
Start the center motif:
Begin threading your focal section by adding one matte navy blue bead followed by one gold star spacer. -
Add first spacers:
After the star, thread on a tiny gold spherical spacer. -
Introduce texture:
Slide on one sparkling dark blue stardust bead. These specialized beads add that ‘firework’ glitter effect against the matte stones. -
Mirrored spacing:
Add another tiny gold spherical spacer after the stardust bead. -
Add color pop:
Thread on a matte red bead. This vibrant red breaks up the dark tones beautifully. -
Complete the first segment:
Finish this specific segment pattern with a second tiny gold spacer, another sparkling stardust bead, and a third tiny gold spacer.
Wobbly Stars?
If your star beads spin too much or lay flat against the wrist rather than pointing out, try using slightly tighter tension on the cord or placing smaller spacer beads directly next to them for support.
Step 2: Building the Secondary Focal Point
-
Second star placement:
Slide on a matte navy bead, followed by your second gold star spacer. -
Mirror the sequence:
Just like before, add a tiny gold spacer, a sparkling stardust bead, another tiny gold spacer, and a matte red bead. -
Finish the focal area:
Add one last tiny gold spacer to bracket the red bead. This completes the complex ‘firework burst’ section of the bracelet shown in the front.
Extra Sparkle
Swap the matte red beads for faceted crystal red beads. This will catch more light and give the bracelet a dressier, more glamorous evening look suitable for New Year’s parties.
Step 3: Finishing the Strap
-
Transition to the back:
After your main pattern is set, you will fill the rest of the bracelet with a simpler sequence. Start with a matte navy bead. -
Simple pattern repeat:
Create the strap pattern: Thread three matte navy beads, then one matte red bead, and then three matte navy beads. Repeat this sequence until the bracelet reaches your desired wrist size. -
Check the fit:
Wrap the unfinished strand around your wrist to check the size. It should fit comfortably snug but not tight tailored to your wrist bone. -
Pre-stretch the cord:
Gently pull on both ends of the elastic cord to pre-stretch it. I find this helps prevent the bracelet from sagging later on. -
Tie the knot:
Remove the bead stopper and tie a surgeon’s knot (right over left, left over right, looping the second knot twice). -
Secure and trim:
Apply a tiny drop of jewelry glue or clear nail polish to the knot. Let it dry completely before trimming the excess cord close to the knot. -
Hide the knot:
If possible, gently tug the cord so the knot slides inside one of the larger matte beads to hide it from view.
Now you have a stunning, starry accessory perfect for ringing in the new year with style

TRACK YOUR CERAMIC JOURNEY
Capture glaze tests, firing details, and creative progress—all in one simple printable. Make your projects easier to repeat and improve.
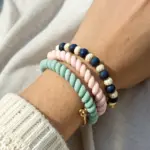
Fresh Start Pastel New Year Stack
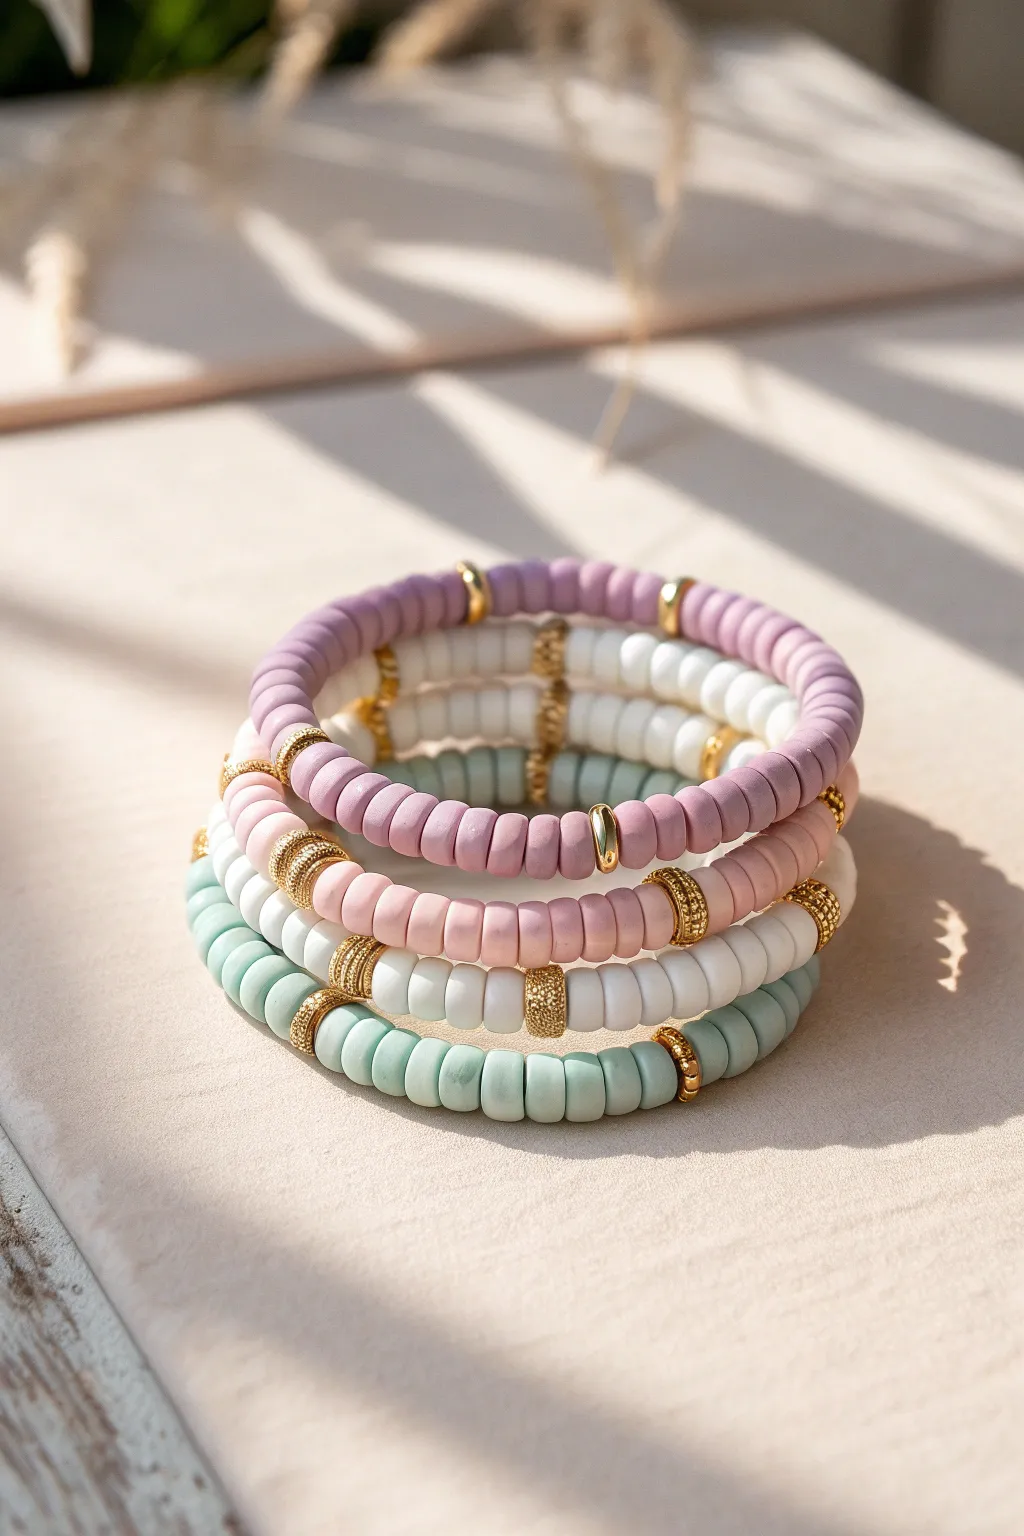
Ring in the new year with a soft, sophisticated palette that feels like a fresh start for your wrist. This tutorial guides you through creating a coordinated stack of five clay bead bracelets featuring soothing pastels interspersed with elegant gold accents.
Step-by-Step Guide
Materials
- 6mm polymer clay heishi beads (soft lilac, cream, dusty rose, mint green)
- 0.8mm clear elastic bead cord
- Gold spacer beads (assorted: smooth round 4mm, textured rondelle 5mm, small flat disk)
- Gold accent beads (tube or large ring style)
- Jewelry glue (GS Hypo Cement recommended)
- Scissors
Step 1: Planning & Preparation
-
Measure your wrist:
Before cutting any cord, wrap a measuring tape around your wrist. Add about half an inch to this measurement for a comfortable fit, or more if you prefer a looser bangle style. -
Cut the elastic:
Cut five strands of elastic cord, each about 10-12 inches long. Having extra length makes tying the final knots much easier than struggling with short ends. -
Pre-stretch the cord:
Gently pull on each strand of elastic a few times. This pre-stretching step is crucial because it prevents the bracelets from stretching out and becoming loose after the first few wears. -
Secure the ends:
Place a piece of tape or a bead stopper on one end of each cord to stop beads from sliding off while you work.
Knot Slipping?
If your elastic keeps slipping while tying, try dabbing a tiny bit of water on the knot area before pulling tight. The friction helps the specialized elastic grip itself better.
Step 2: Designing the Strands
-
Start the Lilac Strand:
Begin your first bracelet with the soft lilac heishi beads. Thread about 15-20 beads onto the cord. -
Add first gold accent:
Slide on a smooth, rounded gold spacer bead. This breaks up the color block without dominating the delicate purple. -
Create the pattern:
Continue adding sections of 15-20 lilac beads, separating each section with a gold spacer. Aim for 3-4 gold accents total for the entire bracelet circumference. -
Build the Cream Strand:
For the second bracelet, use cream or white heishi beads. Here, use textured gold spacers instead of smooth ones to add visual variety to the stack. -
Craft the Mixed Strand:
The middle bracelet in the stack combines colors. Thread a pattern alternating between cream and mint green sections, separated by flat gold disk spacers. -
Assemble the Rose Strand:
Using the dusty rose beads, create the fourth bracelet. Use a larger, bolder gold accent bead—like a thick gold ring or tube bead—as a focal point in the center. -
Finish with Mint:
For the final mint green bracelet, replicate the pattern from the lilac strand but use textured gold rondelles to frame the color.
Texture Tip
Don’t use identical gold spacers on every strand. Mix smooth, stardust/textured, and flat disk gold beads. This variety catches the light differently and makes the stack look high-end.
Step 3: Finishing Touches
-
Check the fit:
Wrap the first beaded strand around your wrist to verify the length. The ends should meet comfortably without gaps in the beads. -
Tie the surgeon’s knot:
Remove the tape/stopper. Cross the right end over the left, then loop it through twice. Pull tight. Repeat this process for a very secure hold. -
Hide the knot:
I like to thread one of the cord ends back through the nearest bead adjacent to the knot, then pull the elastic until the knot pops inside that bead creating a seamless look. -
Apply adhesive:
Dab a tiny drop of jewelry glue onto the knot (or inside the bead hole where the knot is hiding). Be careful not to get glue on the outside of the clay beads. -
Trim the excess:
Once the glue has set for a minute, use your sharp scissors to trim the remaining elastic tail as close to the bead as possible. -
Repeat for the stack:
Complete the tying and gluing process for the remaining four bracelets.
Now layer them up on your wrist for a refreshing pop of color that sets a peaceful tone for the year ahead
Resolution Word Bracelet You’ll Actually Wear
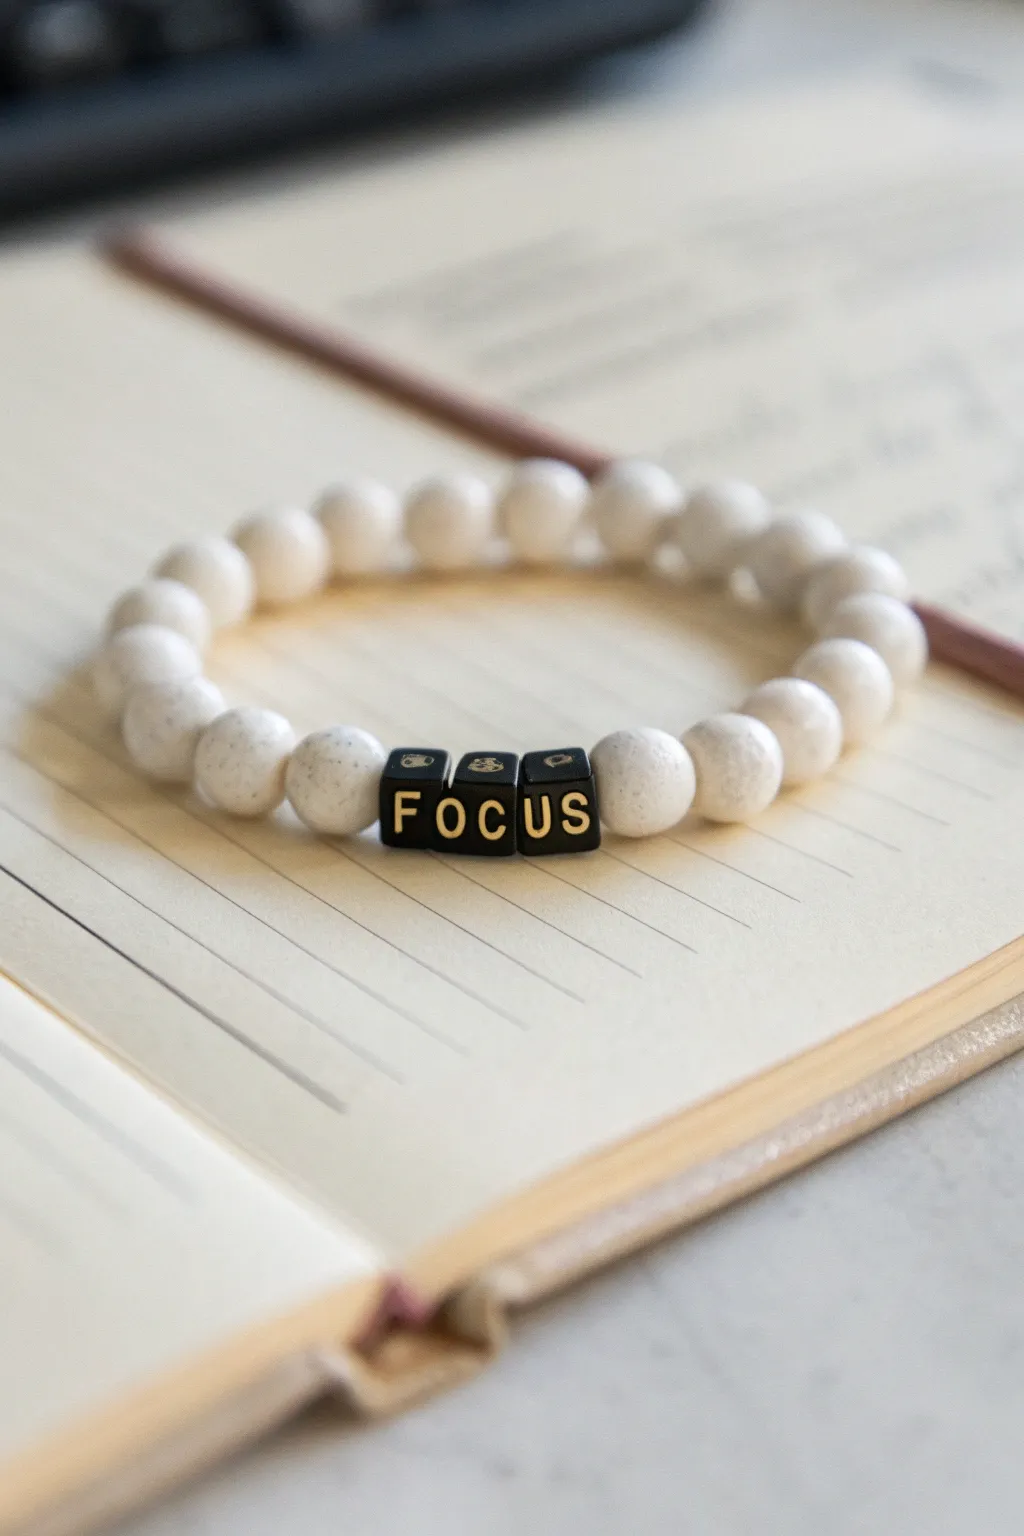
Keep your intentions clear and stylish with this clean, minimalist bracelet that serves as a gentle daily reminder. Featuring creamy white clay or stone beads and bold black letter cubes, this piece perfectly balances a modern aesthetic with personal meaning.
Step-by-Step Tutorial
Materials
- 8mm cream or off-white round beads (polymer clay heishi or natural porous stone like white lava stone)
- Black square alphabet beads with gold lettering
- 0.8mm clear elastic stretch cord
- Jewelry adhesive or clear nail polish
- Scissors
Step 1: Planning Your Resolution
-
Choose your word:
Select a single, powerful word that embodies your intention for the year, such as ‘FOCUS’, ‘CALM’, or ‘GROW’. -
Gather the letters:
Find the specific black cube beads corresponding to your chosen word and set them aside in order to ensure you have all the necessary characters. -
Measure your wrist:
Wrap a piece of string around your wrist to find your size, then add about half an inch for a comfortable fit. -
Calculate bead count:
Lay out your ruler. Place your letter beads in the center, then fill the remaining length on either side with your cream round beads until you reach your total desired length.
Knot Slipping Out?
If the knot keeps popping out of the bead hole, try using a slightly larger bore bead next to the knot, or widen a bead hole gently with a bead reamer tool.
Step 2: Stringing the Design
-
Prepare the cord:
Cut a piece of elastic cord about 10-12 inches long. Having extra length makes the final knotting process much easier. -
Pre-stretch the elastic:
Gently pull on the elastic cord a few times. This prevents the bracelet from stretching out and becoming loose immediately after you wear it. -
Secure one end:
Place a piece of tape on one end of the cord or attach a bead stopper to prevent beads from sliding off while you work. -
Start with the side beads:
Begin stringing the cream-colored round beads. You’ll want to thread roughly half of your total background beads first. -
Verify texture:
If you are using porous stone beads like the ones in the reference, check that the holes are smooth before stringing to avoid fraying the elastic. -
Add the word:
Thread your letter cubes onto the cord. Double-check that they are spelling the word correctly from left to right. -
Finish the background:
String the second half of your cream beads. The word should sit roughly in the middle of the strand. -
Check the fit:
Carefully bring the ends together and wrap the strand around your wrist to ensure the size is correct before tying.
Add a Scent Boost
Use unfinished white wood or lava stone for the round beads. Add a drop of essential oil to them for a diffuser bracelet that keeps you focused on the go.
Step 3: Securing the Bracelet
-
Remove the stopper:
Take off the tape or stopper, holding both ends of the elastic firmly. -
Tie the first knot:
Cross the ends and tie a simple overhand knot, pulling it tight to bring the beads together without bunching them. -
Tie a surgeon’s knot:
For extra security, tie a second knot, but this time loop the end through twice before pulling tight. This is a surgeon’s knot and holds very well. -
Secure with glue:
Apply a tiny dab of jewelry adhesive or clear nail polish directly onto the knot. I usually let this tack up for a minute to ensure the bond holds. -
Hide the knot:
While the glue is still slightly wet, gently pull the specific bead next to the knot so the knot slips inside the hole of the bead. -
Trim the excess:
Once the glue is fully dry, use sharp scissors to trim the remaining elastic tails as close to the bead hole as possible.
Wear your new bracelet as a daily anchor for your yearly goals
Clock Stripes for the Countdown Look
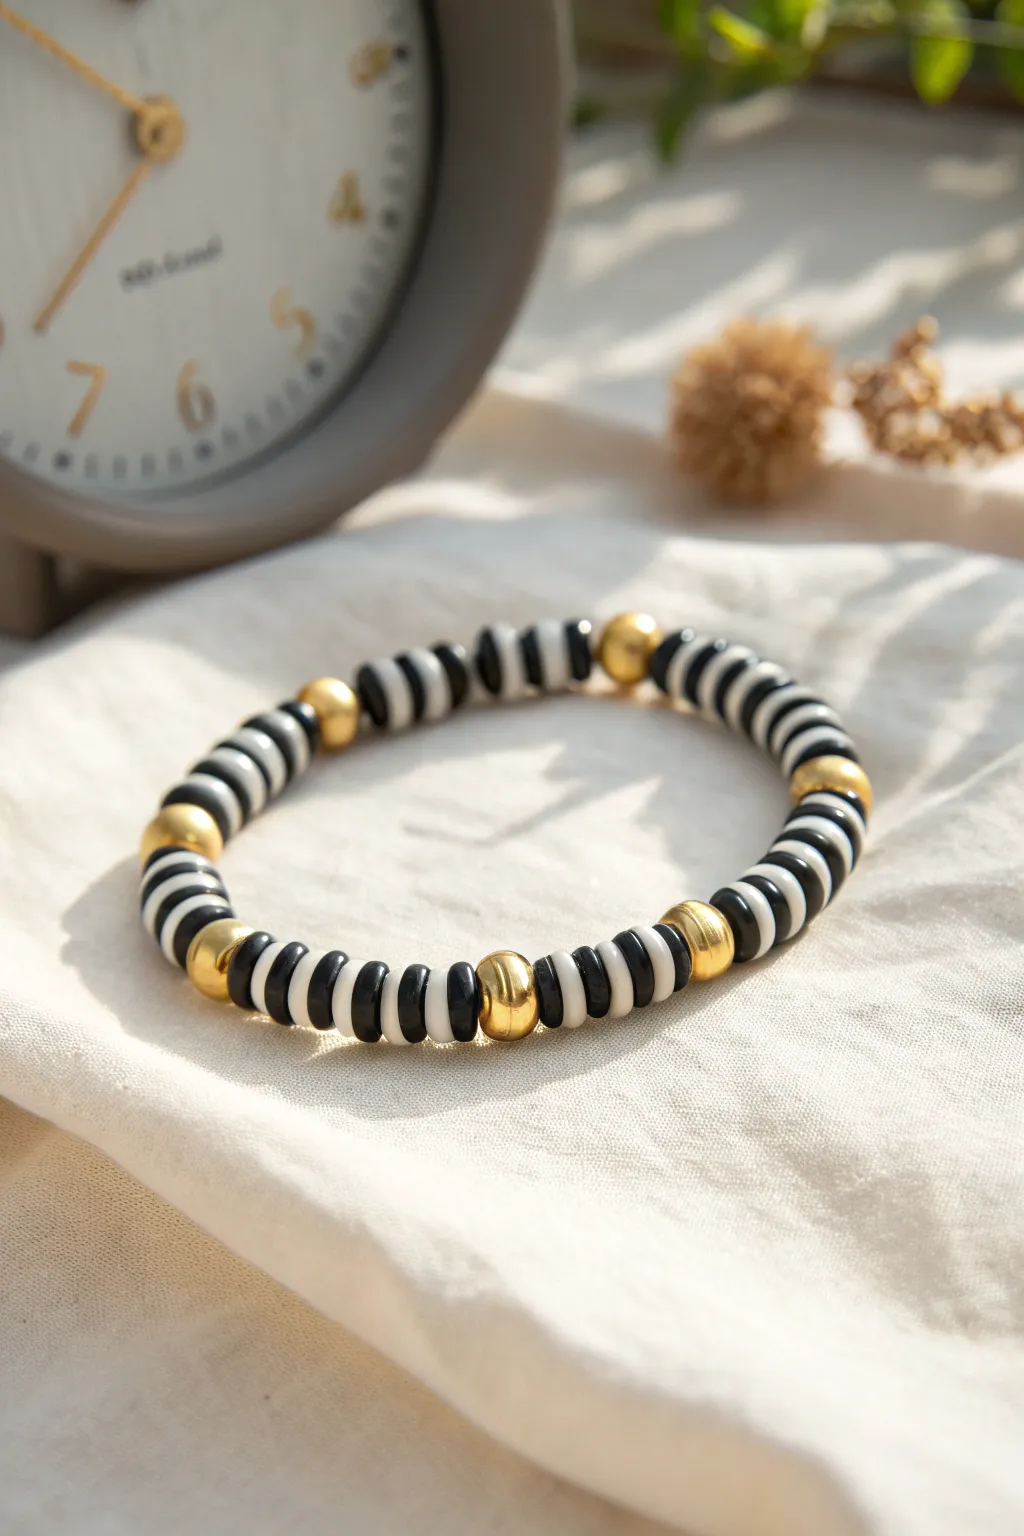
Ring in the New Year with a sophisticated black, white, and gold palette that echoes the classic face of a clock nearing midnight. This bracelet combines flat heishi beads with bold gold accents for a sleek, modern accessory perfect for your countdown celebration.
How-To Guide
Materials
- Black polymer clay heishi beads (6mm or similar)
- White polymer clay heishi beads (6mm or similar)
- Gold round spacer beads (approx. 6mm-8mm)
- Strong elastic bead cord (0.8mm crystal string recommend)
- Precision scissors
- Hypo-cement or clear nail polish (for knot security)
- Bead stopper or sturdy clip
- Measuring tape
Step 1: Planning and Prep
-
Measure your wrist:
Before cutting any cord, wrap a measuring tape around your wrist to find your size. Add about half an inch to this measurement for a comfortable fit. -
Cut the cord:
Cut a length of elastic cord about 10-12 inches long. Having this extra length makes tying the final knot significantly easier than struggling with short ends. -
Secure the end:
Attach a bead stopper or a simple binder clip to one end of your cut cord. This crucial step prevents your carefully threaded beads from sliding right off while you work. -
Establish the pattern rhythm:
Study the pattern shown: it consists of repeating segments of alternating black and white discs, separated by a distinct gold sphere. A typical segment has about 5-6 discs total.
Step 2: Stringing the Beads
-
Start the first segment:
Begin by threading one black heishi bead, followed by one white heishi bead. Repeat this alternating process until you have a stack of six discs. -
Check the contrast:
Ensure your discs are sitting flush against each other so the ‘striped’ effect is sharp and clear. -
Add a gold accent:
Slide on one gold round spacer bead. This breaks up the stripes and adds that essential festive sparkle. -
Reverse the stripe pattern:
For the next segment, I like to invert the order slightly or just maintain the alternations. Thread another set of 5-6 black and white discs. -
Maintain consistency:
Continue this pattern: 5-6 striped discs followed by 1 gold bead. Try to keep the number of discs between gold beads consistent for a symmetrical look. -
Test the fit:
Periodically wrap the strand around your wrist. Stop adding beads when the ends meet comfortably without stretching the elastic tight. -
Verify the pattern end:
Make sure your final bead completes the pattern logically so that when looped, it connects seamlessly to the starting bead (e.g., end with a strip section if you started with a gold bead).
Uneven Stripes?
If your stripes look messy, check bead thickness. Clay discs vary slightly. Sort your beads beforehand, discarding overly thin or thick ones to ensure uniform striping.
Step 3: Finishing Touches
-
Prepare to tie:
Remove the bead stopper carefully while tightly gripping the end of the cord. -
Pre-stretch the cord:
Give the entire bracelet a gentle pull. This ‘pre-stretching’ helps prevent the elastic from sagging later on after you’ve worn it a few times. -
Tie the surgeon’s knot:
Cross the ends, wrap one side around the other twice, and pull tight. Repeat this process one more time to create a very secure surgeon’s knot. -
Secure with adhesive:
Dab a tiny drop of hypo-cement or clear nail polish directly onto the knot. Let this dry for a few minutes to ensure it won’t slip. -
Hide the knot:
Trim the excess cord ends close to the knot, but not too close. Gently slide the knot inside the hole of the nearest gold bead to conceal it. -
Final adjustment:
Roll the bracelet gently between your palms to help the beads settle into a perfect circle.
Add Charm
Make it a true New Year’s piece by attaching a small ‘2024’ or clock charm to one of the gold spacer beads using a small jump ring.
Now your wrist is ready to sparkle when the clock strikes twelve
Gold-Dipped Edge Heishi Illusion
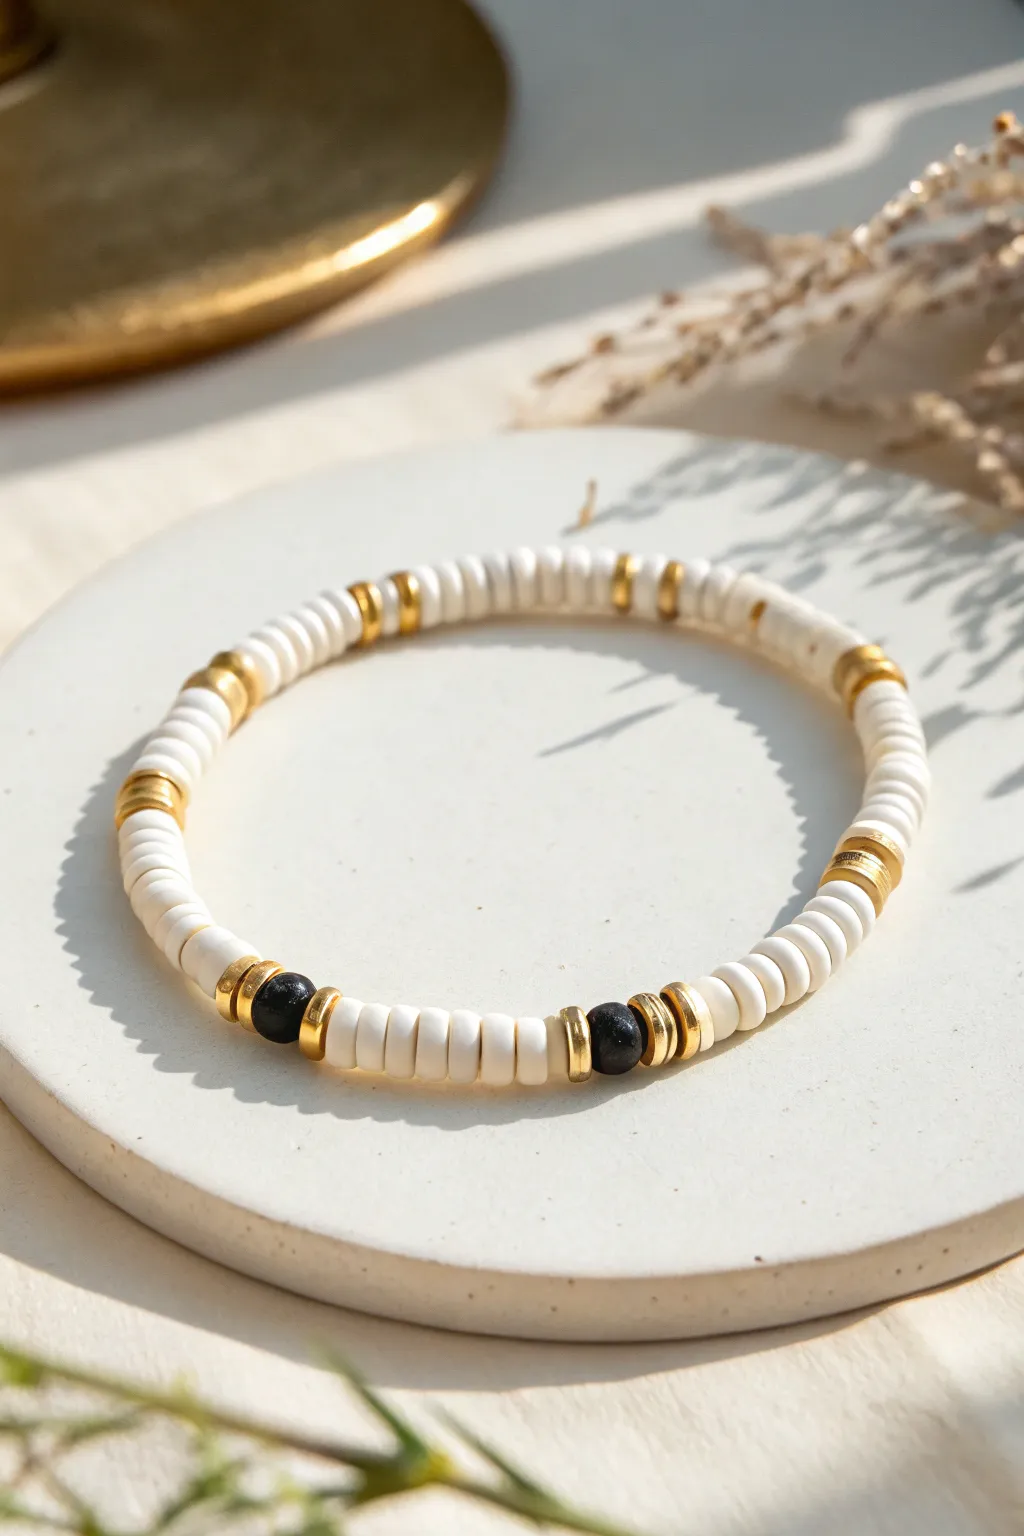
This elegant bracelet balances minimalism with a touch of luxury, featuring smooth white heishi beads interrupted by metallic gold spacers and stark black accents. The design creates a sophisticated rhythm perfect for stacking or wearing as a standalone statement piece.
Step-by-Step Guide
Materials
- 6mm white polymer clay heishi beads
- 6mm gold hematite or brass heishi spacer beads
- 8mm black lava stone or matte onyx beads (round)
- Stretch elastic cord (0.8mm recommended)
- Jewelry glue or clear nail polish
- Scissors
Step 1: Preparation
-
Measure the cord:
Cut a piece of elastic cord about 10-12 inches long. This generous length gives you plenty of room to tie knots without struggling against tension. -
Pre-stretch the elastic:
Give the cord a few firm tugs before you start beading; this simple trick prevents the bracelet from sagging or stretching out permanently after the first wear. -
Secure the end:
Place a piece of tape or a bead stopper clip on one end of the cord so your beads don’t slide off while you work.
Knot Slipping?
If your elastic knot feels insecure, try pre-coating the knot area with a tiny bit of clear nail polish before pulling it tight. Use a surgeon’s knot for max grip.
Step 2: The Pattern Sequence
-
Start the white base:
Thread on approximately 8 to 10 white heishi beads to begin the pattern segment. -
Add first gold accent:
Slide on a single gold spacer bead, followed by three white beads, and then another gold spacer. This creates a small metallic highlight section. -
Continue the white rhythm:
Add another long section of white heishi beads, aiming for about 15-20 beads depending on your desired circumference. -
Create the focal point:
Thread on one gold spacer bead. -
Add the contrast bead:
Slide on the round black accent bead (lava stone or onyx). -
Complete the focal grouping:
Finish this cluster with a second gold spacer bead immediately after the black bead to frame it. -
Build the separation:
Add a small spacer section of about 5-7 white heishi beads. -
Repeat the focal point:
Exactly like the previous cluster, add: one gold spacer, one round black bead, and one gold spacer. -
Resume main pattern:
Return to threading a significant length of white heishi beads (15-20 count) to mirror the other side. -
Final gold details:
Insert occasional single or double gold spacers within the remaining white sections to add random shimmer, keeping the spacing somewhat irregular for an organic look.
Golden Hour Glow
Swap standard brass spacers for 14k gold-filled beads. They resist tarnish much longer and match perfectly with high-end jewelry for a ‘fine jewelry’ stack look.
Step 3: Finishing Up
-
Check the fit:
Wrap the strand around your wrist to verify the size. If it’s too tight, add a few more white beads to either end; if too loose, remove a couple. -
Tie the knot:
Remove the tape or clip and bring the ends together. Tie a surgeon’s knot (right over left, left over right twice) and pull it very tight. -
Secure and hide:
Add a tiny drop of jewelry glue to the knot. Once dry, trim the excess cord and gently tuck the knot inside the hole of the nearest round black bead or large gold spacer if possible.
Slip on your new creation and enjoy the clean, modern vibe it brings to your wrist
Winter Holiday-to-New Year Transition Colors
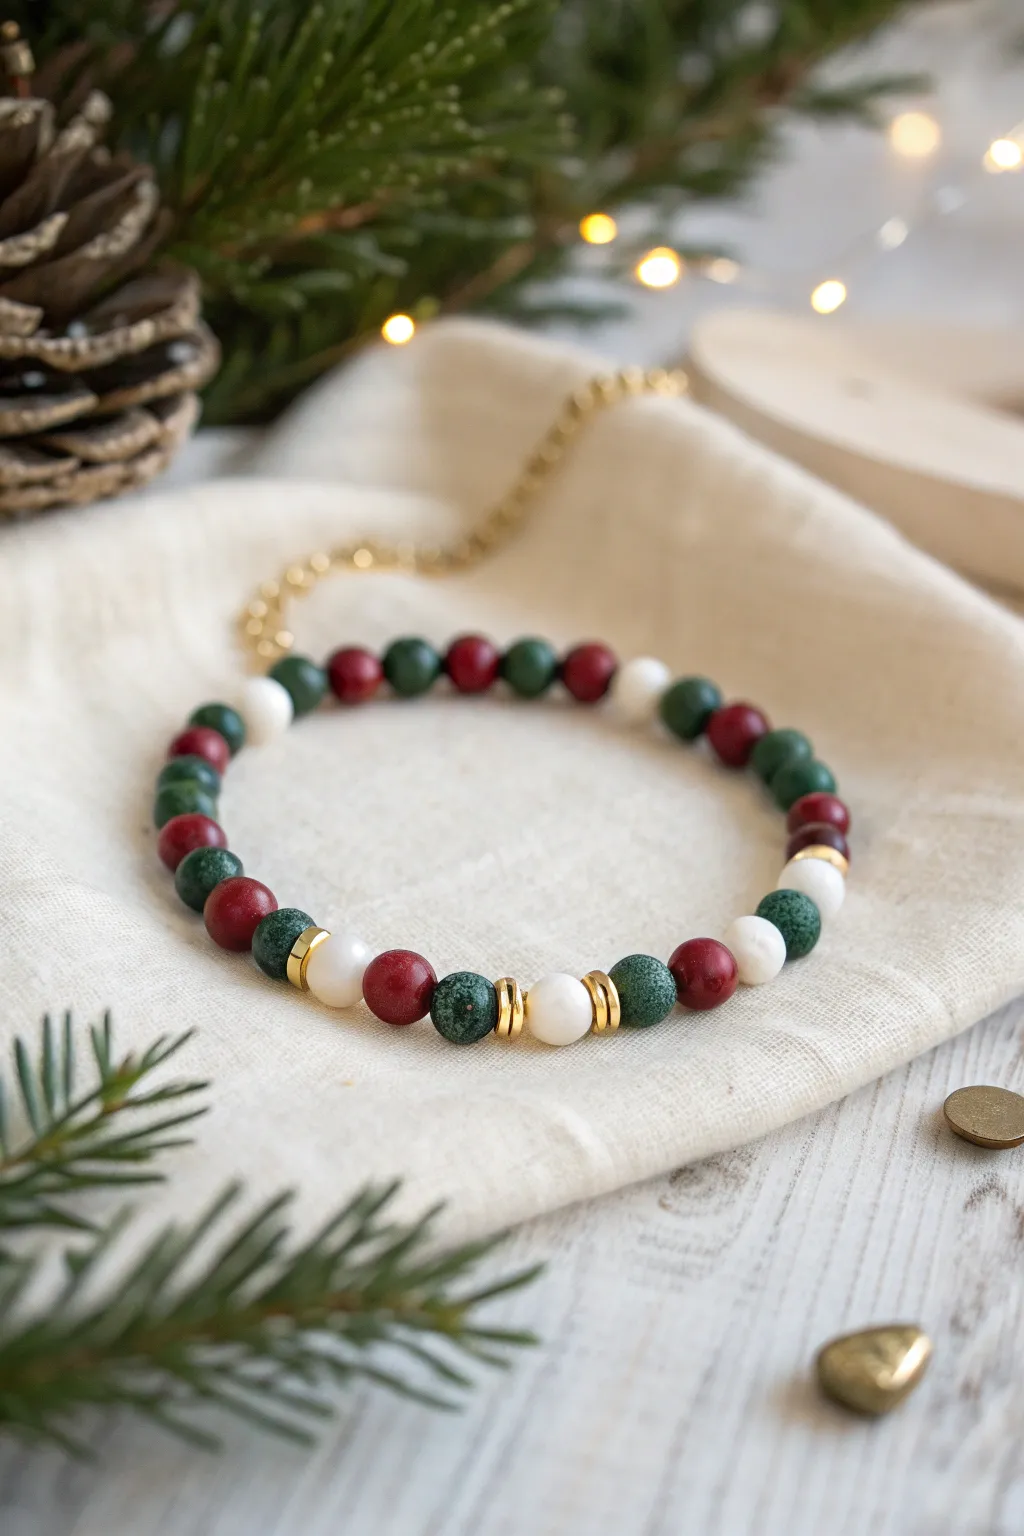
This elegant bracelet bridges the gap between festive holiday cheer and stylish New Year’s optimism with a classic palette of deep forest green, cranberry red, and creamy white stones. The addition of bright gold spacer discs adds a touch of sophistication, making it perfect for winter gatherings.
How-To Guide
Materials
- 6mm round gemstone or clay beads: Forest Green (Jasper or Malachite inspired)
- 6mm round gemstone or clay beads: Deep Red (Garnet or Red Jasper inspired)
- 6mm round gemstone or clay beads: Cream or White Jade
- Gold flat disc spacer beads (heishi style)
- Gold tone cable chain extender (approx. 2 inches)
- Gold tone lobster clasp
- 2 Gold crimp beads
- 2 Gold crimp covers
- 2 Gold wire guards (optional but recommended for durability)
- Beading wire (0.015 or 0.018 inch diameter, gold or clear)
- Crimping pliers
- Wire cutters
- Flat nose pliers
Step 1: Planning the Pattern
-
Measure your wrist:
Since this design uses a clasp and chain rather than elastic, you need an exact measurement. Wrap a measuring tape around your wrist and add about 1/2 to 3/4 inch for a comfortable fit. -
Layout the focal section:
This bracelet features a distinct focal pattern in the center. Select 3 cream beads, 2 green beads, 2 red beads, and 6 gold spacers. Arrange them on your bead board: Green, Gold Spacer, Cream, Gold Spacer, Red. Repeat this for the other side of the center cream bead to create symmetry. -
Design the main body:
For the rest of the bracelet, create a simpler repeating pattern. Looking at the design, I like to use an alternating sequence of Green, Red, Green, Red, usually separated by a single White bead every four or five colored beads to keep the rhythm interesting.
Double Spacer Technique
To make the gold accents pop like in the photo, use two thin heishi spacers side-by-side instead of just one. It adds visual weight and luxury.
Step 2: Stringing the Beads
-
Prepare the wire:
Cut a length of beading wire about 10-12 inches long. This gives you plenty of extra room to manipulate the ends without beads sliding off. -
Secure the first end:
String on a crimp bead, followed by a wire guard. Loop the wire through the last link of your extender chain, then back down through the wire guard and the crimp bead. -
Crimp the start:
Use your crimping pliers to flatten the crimp bead securely. I always give a gentle tug to ensure it holds. Cover the flattened crimp with a gold crimp cover for a polished look. -
Start with the side pattern:
Begin stringing your side pattern beads. Thread the loose tail of your wire through the first few beads to hide it. -
Build the focal point:
Once you reach the middle of your wire length, string your focal pattern: Green, Spacer, Cream, Spacer, Red, Spacer, Cream (center), Spacer, Green, Spacer, Cream. -
Finish the bead strand:
Continue with the alternating red and green pattern on the other side until you reach your desired total length.
Stiff Bracelet?
If the finished piece feels rigid, you pulled the wire too tight before crimping. Bend the bracelet into a circle shape *while* pulling the wire tight to ensure proper flexibility.
Step 3: Finishing Touches
-
Prepare the clasp end:
String on a crimp bead and a wire guard. Thread the wire through the loop of your lobster clasp. -
Thread back through:
Pass the wire back down through the wire guard, the crimp bead, and into the last 2-3 beads of your design. -
Removing slack:
Pull the wire tight so there are no gaps between beads, but leave enough flexibility so the bracelet can drape naturally around a wrist without being stiff. -
Final crimp:
Flatten the final crimp bead with your pliers. Trim the excess wire flush against the neighboring bead so no sharp end pokes out. -
Add the cover:
Place a gold crimp cover over the crimp bead and gently close it with flat nose pliers to make it look like a smooth gold bead.
Wear your beautiful new accessory solo or stack it with gold bangles for a sophisticated winter look
Disco Ball Glam Monochrome Mix
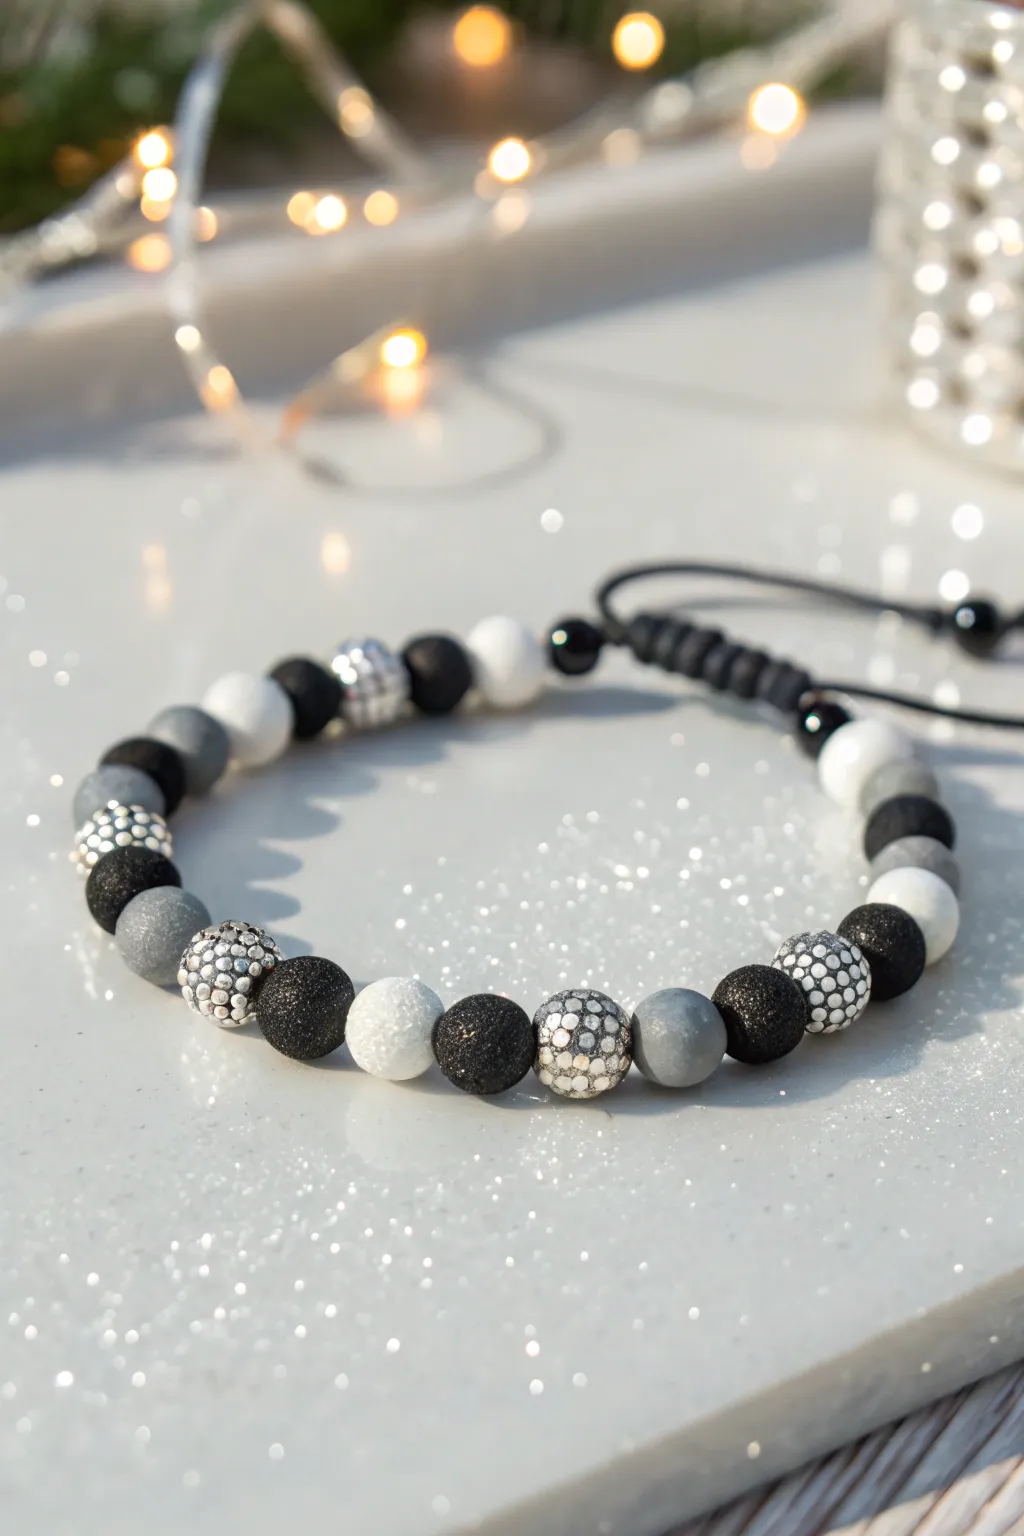
Ring in the New Year with this sophisticated monochromatic bracelet that balances matte elegance with festive sparkle. Featuring a mix of glittery stardust beads, classic matte spheres, and dazzling disco-ball accents, this adjustable piece captures the shimmering excitement of midnight celebrations.
Step-by-Step Tutorial
Materials
- Black nylon beading cord (approx. 0.8mm or 1mm thickness)
- 8mm black stardust/glitter beads
- 8mm white stardust/glitter beads
- 8mm matte grey agate or acrylic beads
- 8mm matte black beads
- 8mm matte white beads
- 8mm silver pave crystal disco ball beads
- 8mm white/silver polka dot beads (feature beads)
- Small smooth black accent beads (6mm or smaller) for strand ends
- Scissors
- Lighter or thread burner
- Tape or clipboard
- Ruler
Step 1: Preparing the Base
-
Cut the Cord:
Begin by measuring and cutting a piece of nylon cord approximately 12-14 inches long. This will be your main beading strand, giving you plenty of excess for the adjustable closure later. -
Sealing the Ends:
Lightly singe both ends of your cut cord with a lighter. I find that quickly rolling the warm end between my fingers creates a stiff, needle-like tip that makes threading beads much easier without a needle. -
The First Anchor Knot:
Tie a simple overhand knot about 3 to 4 inches from one end of the cord. This temporary stop-knot ensures your beads won’t slide off while you work on your pattern.
Step 2: Stringing the Pattern
-
Start with Symmetry:
This design relies on a mirrored pattern. Start threading beads from one side towards the center. Begin with a smaller black bead (optional) or start directly with your main pattern beads. -
The Outer Section:
Thread a matte black bead, followed by a silver pave disco ball bead. The contrast between the sparkly pave and the matte finish is key to this look. -
Adding Grey Tones:
Next, slide on a matte grey bead. This transition color softens the jump between black and white beads. -
Texture Variation:
Add a black stardust bead. These beads have a gritty, glittery texture that catches the light differently than the smooth beads. -
The Feature Bead:
Thread on a silver/white polka-dot bead or a pave bead with a distinct pattern. This adds a graphic element to the monochrome mix. -
Center Sequence:
Continue the pattern towards the center: a white stardust bead, followed by a black stardust bead, then a central silver pave disco ball bead. This sparkly bead will sit right at the top of your wrist. -
Mirror the Design:
Now, reverse the order you just created to finish the second half of the bracelet. Follow the sequence back: black stardust, white stardust, polka-dot bead, black stardust, matte grey, pave bead, final white or black matte bead. -
Check Length:
Wrap the beaded section around your wrist to check the fit. The beads should cover the top and sides of your wrist, leaving a gap of plain cord at the bottom for the adjustable knot. -
Secure the Beads:
Once satisfied with the sequence, tie another overhand knot on the other side, snug against the last bead, to lock the design in place.
Perfect Melt
To avoid black soot marks when sealing cord ends, use the blue part of the flame (the base) rather than the yellow tip.
Step 3: Creating the Closure
-
Prepare for Macrame:
Cross the two tail ends of your cord so they overlap parallel to each other. Temporarily tape these crossed cords down to a table or clipboard to keep them taunt while you knot. -
Cut the Knotting Cord:
Cut a separate piece of nylon cord, about 10 inches long. This will be used to create the sliding square knot closure. -
Starting the Square Knot:
Slide the new cord under the two overlapping tail cords. Tie a simple overhand knot to secure it, centering it over the overlap. -
Knotting Technique: Right Side:
Take the right end of the knotting cord, pass it over the central strands and under the left cord. Then take the left cord, pass it under the central strands and up through the loop formed by the right cord. -
Knotting Technique: Left Side:
Tighten securely, then repeat the process starting with the left cord to complete one full square knot cycle. -
Build the Closure:
Continue alternating sides to create a series of square knots. aim for about 0.5 to 1 inch of knotting, depending on your preference. -
Finish the Sliding Knot:
Once the closure is long enough, trim the excess knotting cord ends (not the main bracelet tails!) close to the knots. Carefully melt the trimmed ends with a lighter and press them flat against the knot with the side of the lighter to seal. -
Adding End Beads:
Slide a small smooth black accent bead onto each of the main tail cords. Tie a knot at the very end of each cord to secure the bead, then trim and melt the tips to prevent fraying.
Glam Upgrade
Swap the matte grey beads for metallic hematite beads to add a heavy, luxurious feel and extra shine to your stack.
Slip on your shimmering creation and enjoy the customized fit of your new favorite accessory
New Year’s Party Favor Matching Bracelets
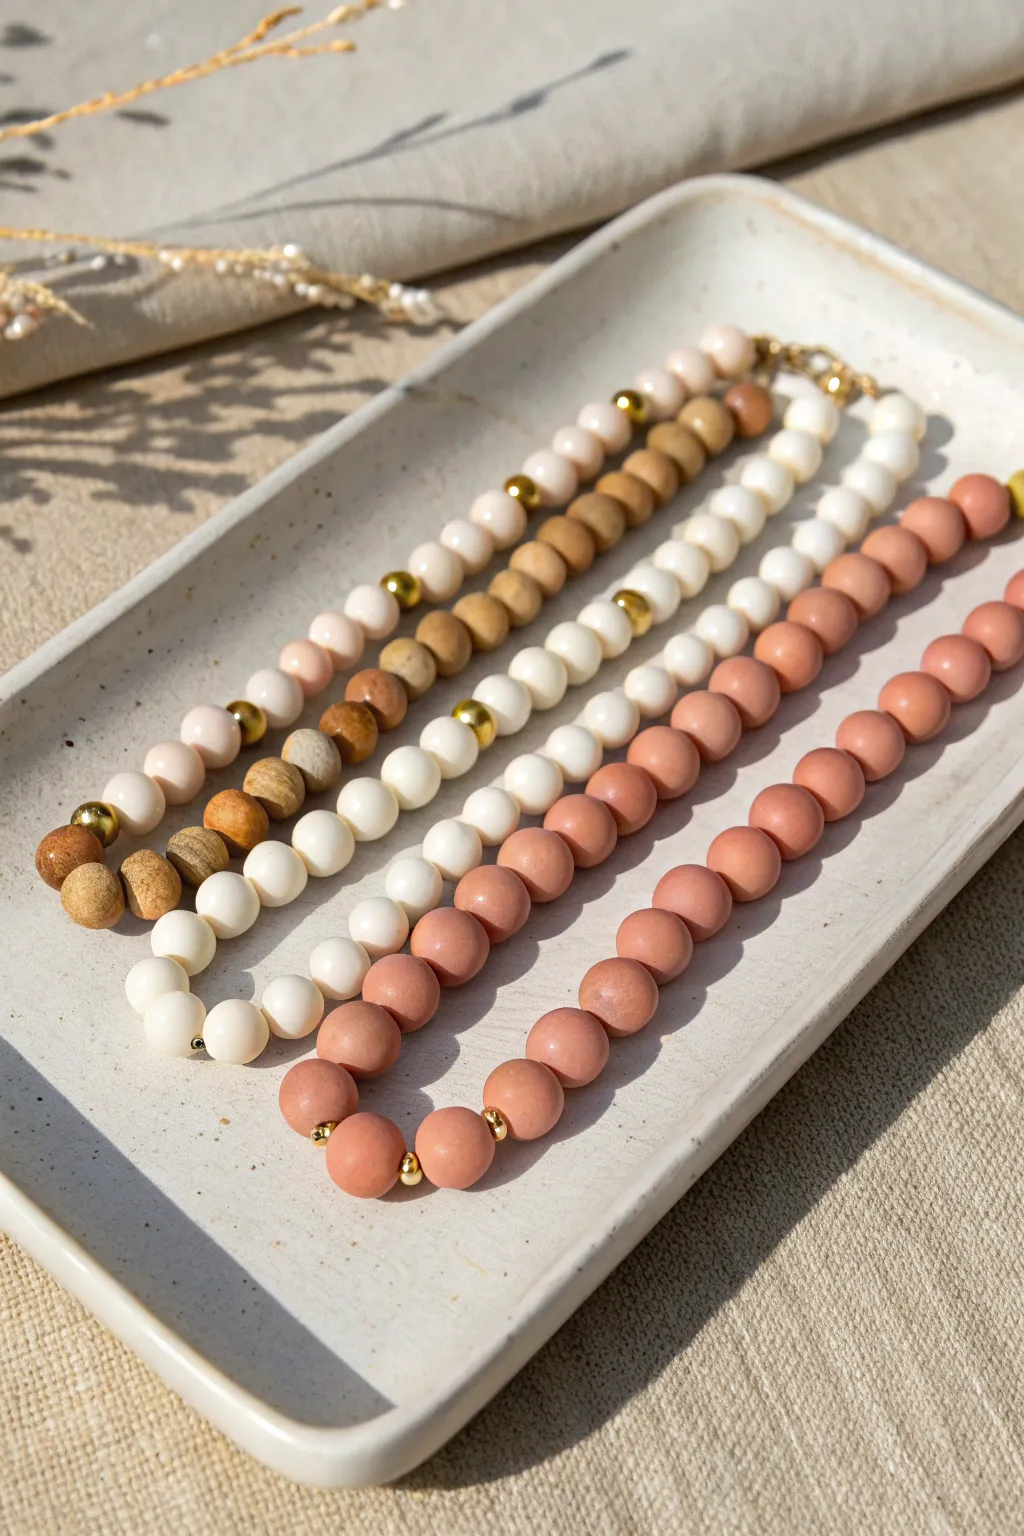
These sophisticated bracelets combine matte clay-toned beads with warm gold accents for a grounded yet festive look perfect for New Year’s party favors. Using a simple repeating pattern of varied earthy hues, they create a cohesive set that guests will love to mix and match.
Step-by-Step Guide
Materials
- 8mm round matte beads (cream/off-white)
- 8mm round matte beads (tan/wood-tone)
- 8mm round matte beads (terracotta/salmon)
- 3mm or 4mm gold spacer beads (round or saucer shape)
- Elastic beading cord (0.7mm or 0.8mm)
- Beading needle (optional, makes stringing easier)
- Jewelry glue (GS Hypo Cement or E6000)
- Scissors
- Measuring tape
Step 1: Planning and Preparation
-
Measure your wrist:
Before cutting any cord, measure your wrist or estimate an average size for party favors (usually about 7 inches). Add 3-4 inches of extra cord to this measurement to allow plenty of room for knotting later. -
Determine the pattern:
Observe the image to see the four distinct colorways. You’ll be making four separate bracelets: one primarily cream with tan accents, one primarily tan with cream accents, one ombre-style mixing cream and terracotta, and one solid terracotta with gold accents. -
Pre-stretch the cord:
Cut your lengths of elastic cord. Firmly pull on each end to pre-stretch the elastic; this crucial step prevents the bracelet from sagging or loosening shortly after you wear it.
Sticky Situation?
If the knot won’t fit inside your bead hole, don’t force it. Instead, put the knot next to a gold spacer, dab with clear glue, and let it dry visible but tidy.
Step 2: Stringing Texture & Tone
-
Start the Tan & Cream strand:
For the first design shown on the left, thread three 8mm tan beads followed by one small gold spacer. Repeat this small grouping once more. -
Transition to Cream:
After your tan section, switch to the 8mm cream beads. Thread about four cream beads, then add a gold spacer bead. Continue this pattern of four cream beads and one gold spacer for the majority of the bracelet length. -
Create the Cream & Tan strand:
For the second bracelet, reverse the first concept. String a long section of cream beads first, adding a gold spacer every 5-6 beads. Finish the strand with a distinct block of darker tan beads at the end to create an asymmetrical balance. -
Build the Ombre strand:
The third strand uses a subtle gradient. Start with your deepest terracotta beads at one end. After about ten beads, switch to a lighter salmon or tan shade for five beads, then finish the rest of the strand with the cream beads. Use gold spacers sparsely here, perhaps only at the color transitions. -
String the Solid Terracotta strand:
For the final warm-toned bracelet, use only the terracotta/salmon colored beads. To break up the solid color block, insert a gold spacer bead after every single clay bead for a ‘beaded chain’ look, or every 3-4 beads for a simpler aesthetic as shown in the photo. -
Check the length:
Wrap the strung beads around your wrist or sizing cone to ensure they meet perfectly without gaps. Usually, you want about 22-24 large beads total per bracelet depending on wrist size.
Add a Charm
Make these extra festive for New Year’s by adding a small ‘2024’ gold charm or a star charm next to one of the gold spacer beads on each bracelet.
Step 3: Finishing Touches
-
Prepare to knot:
Bring the two ends of your elastic cord together carefully so beads don’t slide off. Remove any slack so the beads sit touching each other but aren’t bunching up under tension. -
Tie the knot:
Tie a standard square knot (right over left, left over right). Pull the elastic tight—you should see the knot disappear slightly inside the hole of the nearest bead. -
Secure with glue:
Apply a tiny dot of jewelry glue directly onto the knot. This prevents the elastic from slipping over time, which is especially important for party favors that friends will keep. -
Hide the knot:
While the glue is still tacky, gently tug on the cord to pull the knot inside the hole of an adjacent bead. This hides the mechanics and gives a seamless professional finish. -
Trim the ends:
Once the glue is fully dry (I like to wait at least 15 minutes), use sharp scissors to trim the excess cord as close to the bead hole as possible without nicking the knot itself.
Your guests will now have a stylish, coordinated set of arm candy to ring in the new year together
Ombre Night Sky Into Sunrise Gradient
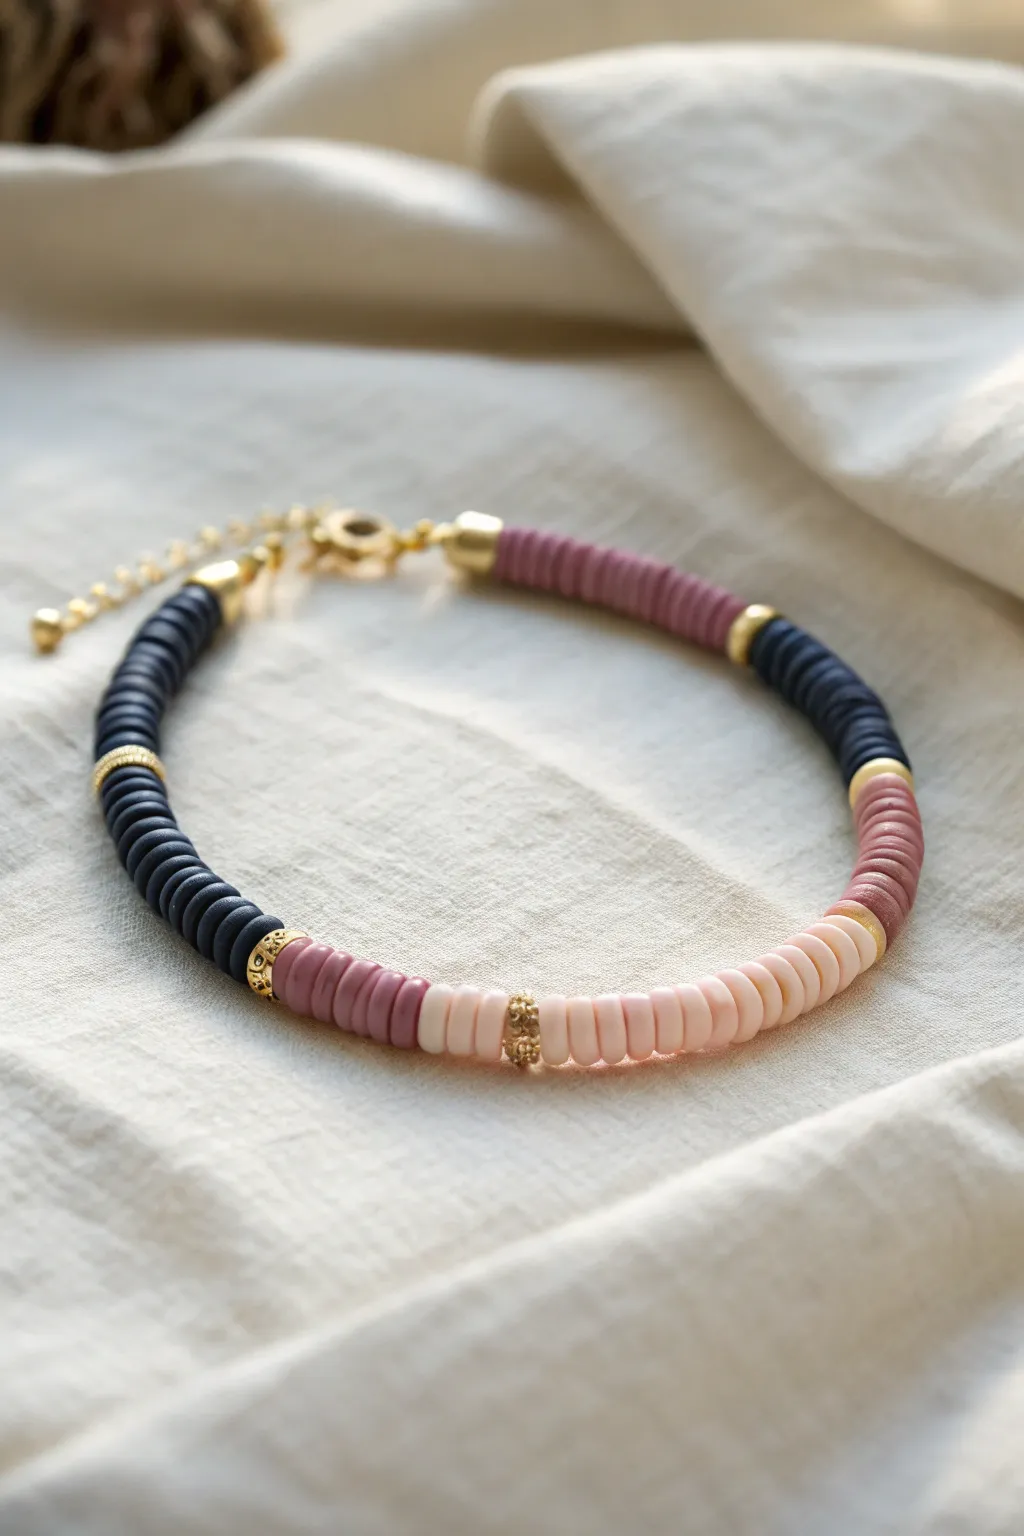
Capture the serene transition from a deep night sky to the soft hues of dawn with this elegant polymer clay bead bracelet. Gold accents punctuate the gentle gradient, creating a sophisticated accessory perfect for ringing in the new year.
Step-by-Step Tutorial
Materials
- Polymer clay heishi beads (Navy blue/Dark grey)
- Polymer clay heishi beads (Dusty rose/Mauve)
- Polymer clay heishi beads (Pale peachy-pink)
- Gold tone heishi spacer beads
- Gold tone textured/fancy spacer beads
- Gold crimp covers (approx. 3mm)
- Small gold crimp beads
- Elastic beading cord (approx 0.5-0.8mm)
- Gold jump rings
- Gold lobster clasp
- Gold extender chain with dangle
- Jewelry pliers (flat nose and chain nose)
- Scissors or bead snippers
- Bead stopper or masking tape
Step 1: Planning the Gradient
-
Lay out the palette:
Begin by sorting your three main clay bead colors: deep navy, dusty rose, and pale pink. Having them separated in piles makes the transition process much smoother. -
Visualize the segments:
This design features three distinct blocks of color separated by gold accents. Plan for the navy section to be slightly longer than the others to ground the design, just like the night sky.
Fixing Gaps
If you notice gaps between beads after tying off, don’t panic. Gently massage and roll the beads along the elastic to redistribute tension before glue sets completely.
Step 2: Stringing the Beads
-
Prepare the cord:
Cut a piece of elastic cord about 10-12 inches long. This gives you plenty of extra room to tie knots later without struggling. Secure one end with a bead stopper or a piece of tape. -
Start with the Night Sky:
Thread on approximately 25-30 navy blue heishi beads. Periodically check the length against your wrist; this first darker section should cover about one-third of the bracelet’s circumference. -
Add first gold accent:
Slide on a textured gold spacer bead followed by a plain gold heishi spacer. This adds a little touch of sparkle before the color transition. -
Transition to Dusty Rose:
String a smaller segment of the navy beads (about 10 beads) followed by a single plain gold spacer bead. Then, begin the dusty rose section. -
Complete the middle section:
Add approximately 20 dusty rose beads. This warm mauve tone acts as the bridge between the dark and light sections. -
Second gold accent:
Insert another textured gold spacer bead here. I find placing these textured beads between major color blocks makes the design look much more intentional and high-end. -
The Sunrise section:
Thread on your pale pink beads. You’ll want about 15-20 of these light beads to finish the gradient effect. -
Final color balance:
Finish the beading pattern by adding a gold heishi spacer, followed by a final short segment of dusty rose beads (about 10-12) to loop back into the darker colors smoothly.
Level Up: Starry Night
Swap the plain gold spacers within the navy section for tiny star-shaped charms or spacers to emphasize the ‘night sky’ theme.
Step 3: Finishing the Hardware
-
Add crimp beads:
Remove the bead stopper. Thread a crimp bead onto one end of the elastic, followed by a jump ring. -
Loop and secure:
Loop the elastic back through the crimp bead. Pull it taut so the jump ring sits close to the clay beads, but not so tight that the bracelet puckers. -
Flatten the crimp:
Use your flat nose pliers to squash the crimp bead flat, locking the cord in place. -
Cover the mechanics:
Place a gold crimp cover over the flattened crimp bead. Gently squeeze it shut with your pliers so it looks like a round gold bead. -
Repeat on the other side:
Repeat the crimping and covering process on the other end of the elastic cord, attaching a second jump ring. -
Attach the clasp:
Open one of the jump rings using two pairs of pliers (twist sideways, don’t pull apart) and slide on the lobster clasp. Close the ring securely. -
Attach the extender:
On the opposite jump ring, attach the gold extender chain. This allows the bracelet to fit various wrist sizes comfortably.
Now you have a stunning piece of jewelry that carries the promise of a new dawn wherever you go
Tinsel-Inspired Metallic Stripe Bracelet
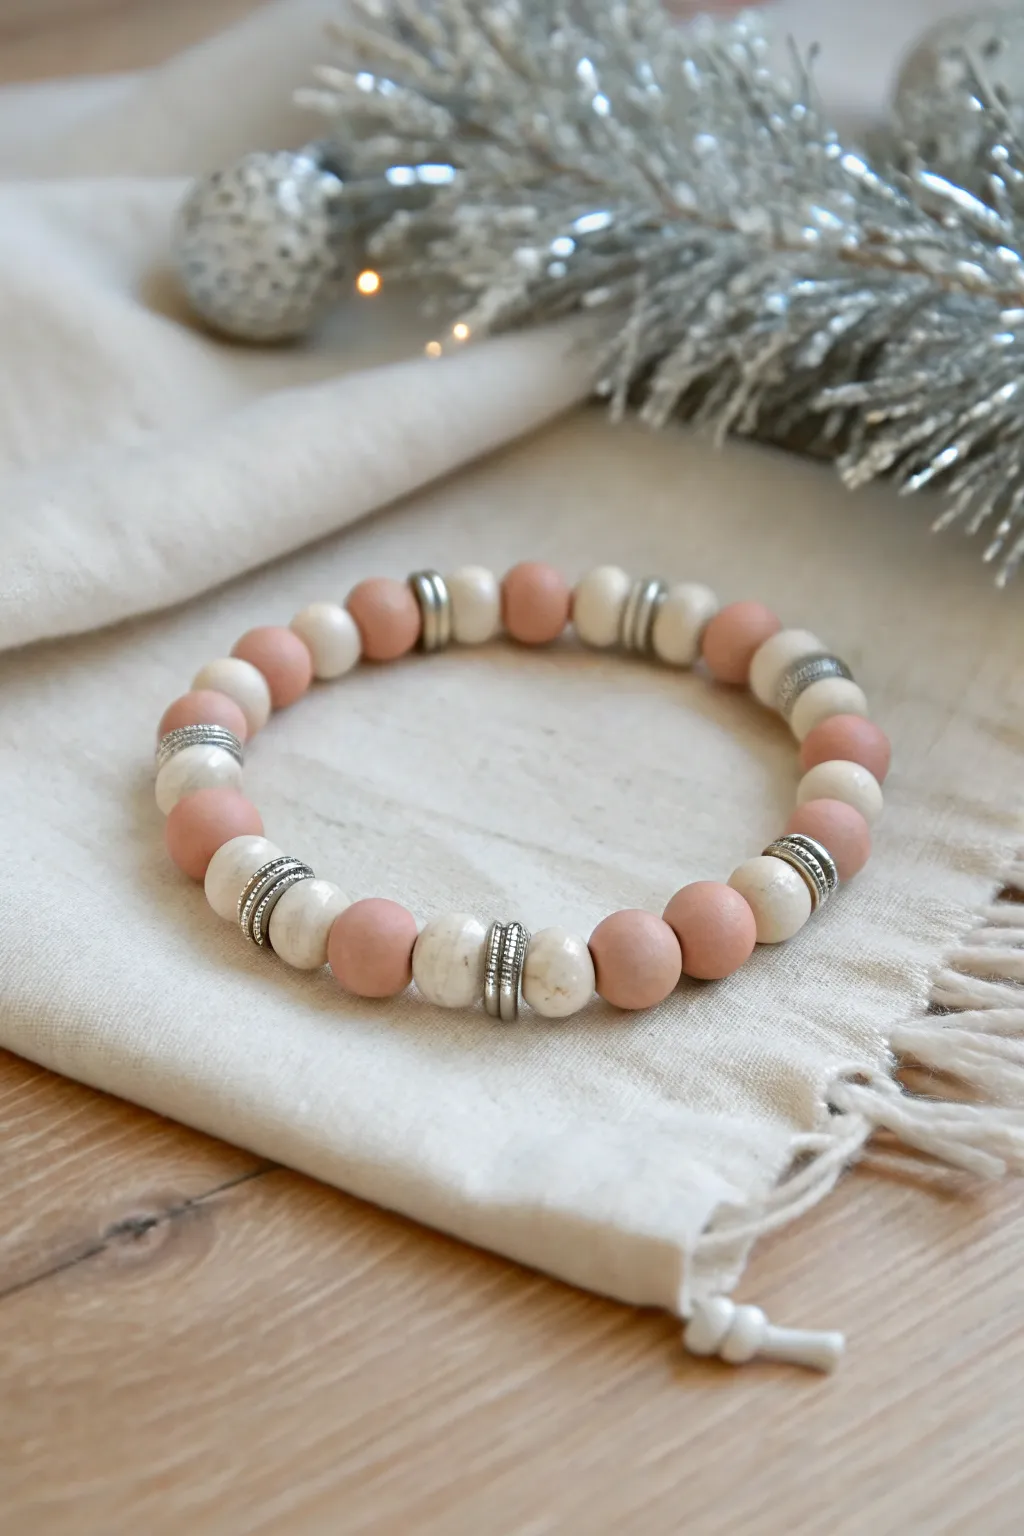
Ring in the New Year with a subtle festive shimmer that you can wear well past January. This sophisticated design combines soft clay textures with striking metallic accents, mimicking the elegant drape of silver tinsel.
Detailed Instructions
Materials
- Matte peach/clay pink round beads (approx. 8-10mm)
- White/cream round stone or clay beads (approx. 8-10mm) – look for subtle marbling
- Silver metallic disc spacer beads or textured ring spacers (approx. 4-6mm)
- Strong elastic jewelry cord (0.8mm or 1mm)
- Jewelry adhesive or clear super glue
- Scissors or wire cutters
- Bead stopper or binder clip
- Measuring tape
Step 1: Planning and Preparation
-
Measure Your Wrist:
Wrap a measuring tape loosely around your wrist to find your size. Add about half an inch to this measurement to ensure the chunkier beads don’t fit too tightly against your skin. -
Cut the Elastic:
Cut a length of elastic cord about 10-12 inches long. Having this extra length makes the final knot-tying process significantly less frustrating than working with short ends. -
Secure the End:
Attach a bead stopper or a simple binder clip to one end of your elastic. This small precaution saves you from the tragedy of beads slipping off while you work. -
Lay Out Your Design:
Before stringing, arrange your beads on a layout board or towel. The pattern shown here relies on a rhythm: pink bead, white bead, metallic spacer, white bead, pink bead.
Step 2: Stringing the Pattern
-
Start the Sequence:
Begin by threading one peach bead, followed by one white bead. This establishes the soft base color palette before introducing the metal. -
Add the Metallic Accent:
Slide on your silver spacer. For the look in the image, use a spacer that looks like a stack of rings or a thick textured disc; this mimics the look of gathered tinsel. -
Mirror the Pattern:
Immediately follow the silver spacer with another white bead. This creates a symmetrical frame around the metallic element. -
Check the Grouping:
Verify your first segment looks correct: Peach, White, Silver, White. This is your core repeating unit. -
Repeat the Pattern:
Continue adding the sequence (Peach, White, Silver, White) along the cord. Notice that the peach beads act as the connector between each metallic-framed section. -
Adjust for Length:
Keep stringing until you reach your desired length. Periodically wrap the strand around your wrist to check the fit, remembering that the knot will take up a tiny amount of space. -
Refine the Ends:
Ensure your pattern ends in a way that will look seamless when joined. Because our unit ends with a white bead and starts with a peach one, the connection should look continuous.
Spacer Selection Tip
If you can’t find thick textured spacers, stack 3-4 standard thin flat disc spacers together to achieve the same bold, striped metallic effect.
Step 3: Finishing Touches
-
Pre-stretch the Cord:
I always gently pull on both ends of the elastic cord a few times before tying. This ‘pre-stretching’ prevents the bracelet from loosening up the first time you wear it. -
Tie the Knot:
Remove the bead stopper and tie a surgeon’s knot. This is just a standard square knot with an extra loop through the first pass for added friction and security. -
Tighten Securely:
Pull the elastic ends firmly to tighten the knot. You want the beads to touch snugly but not bunch up or buckle. -
Apply Adhesive:
Place a tiny drop of jewelry glue or super glue directly onto the knot. Let this dry completely according to the glue manufacturer’s instructions. -
Hide the Knot:
Trim the excess elastic ends close to the knot (but not touching it). Gently pull the cord so the knot slides inside the hole of the nearest large bead to hide it.
Add Extra Sparkle
Replace one of the white beads with a pavé crystal ball bead in silver or champagne to create a glittering focal point for New Year’s Eve.
Enjoy styling your new bracelet stack with cozy winter whites or party metallics
Lucky Color Pop for New Year Intentions
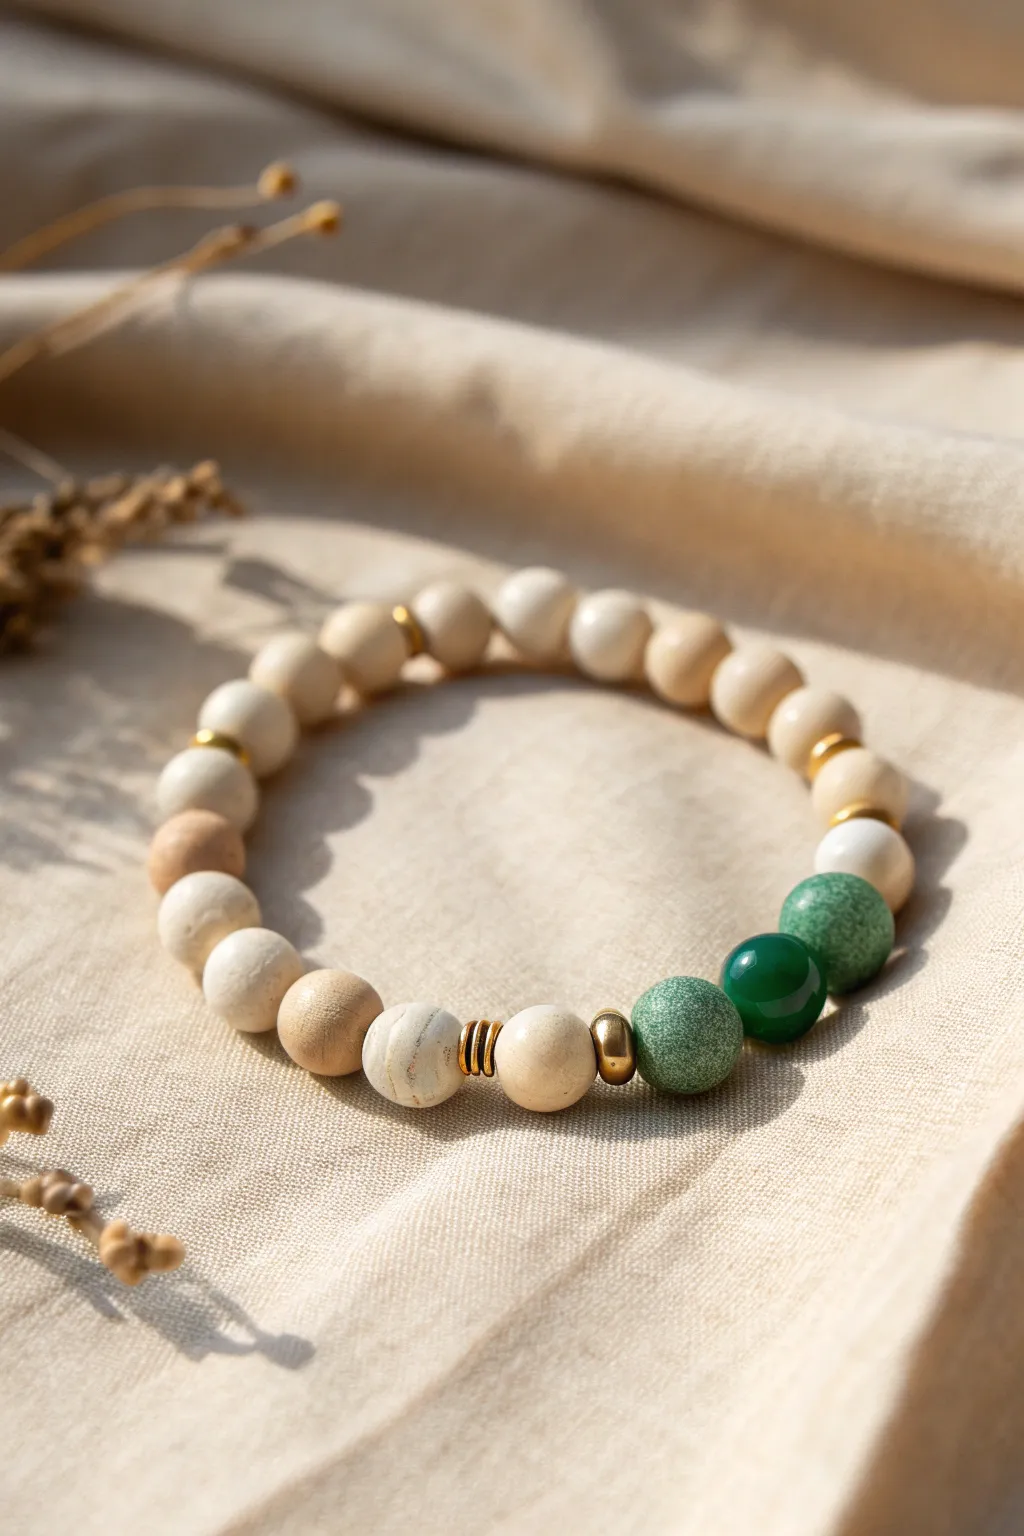
Embrace fresh beginnings with this tranquil combination of natural wood tones and vibrant green accents. The mix of textured stone, smooth wood, and hints of gold creates a grounded yet elegant accessory perfect for setting new intentions.
Step-by-Step Tutorial
Materials
- 8mm beige wood beads (round)
- 8mm white wood or river stone beads (round)
- 8mm green speckled stone beads (like aventurine or jade)
- 8mm dark green agate or glass bead (round, glossy)
- Gold spacer beads (small flat discs)
- Gold heishi spacer beads (wavy or textured discs)
- Gold accent bead (small rounded spacer)
- Elastic clear beading cord (0.7mm or 0.8mm)
- Scissors
- Hypo-cement or clear nail polish (optional)
- Bead stopper or tape
Step 1: Setting up the Design
-
Measure your wrist:
Wrap a piece of string around your wrist to find your measurement, then add about half an inch for a comfortable fit. -
Prepare your cord:
Cut a length of elastic cord about 10-12 inches long. This extra length makes tying the final knot much easier. -
Secure the end:
Place a bead stopper or a piece of masking tape on one end of the cord to prevent your beads from sliding off while you work.
Knot Security
When hiding the knot, pull gently! If you yank too hard, you risk fraying the elastic against the rough inside of a wood bead.
Step 2: Stringing the Lucky Colors
-
Start with the focal point:
Begin by threading the single dark green glossy bead. This will act as the bold center of your color pop section. -
Add texture:
On the left side of the dark green bead, add one textured green stone bead. On the right side, add another matching textured green bead. -
Insert gold accents:
Slide a gold spacer bead onto the cord next to the left green stone bead to create a metallic transition. -
Add a contrasting neutral:
Thread one cream-colored wood or stone bead next to that gold spacer. -
Create a gold stack:
Next to the cream bead, thread on three thin gold heishi spacers in a row. This creates a visually interesting ‘ribbed’ gold section.
Step 3: Completing the Circle
-
Begin the neutral pattern:
Now, start stringing the beige wood beads. I usually like to alternate slightly different tones if my strand has variety, mixing the lighter cream wood with the tan wood. -
Add intermittent shine:
After every 3 or 4 wood beads, slip on a single small gold disc spacer. This carries the metallic theme around the entire wrist without overwhelming the natural look. -
Continue patterning:
Keep adding wood beads and occasional spacers until the strand reaches your desired length. -
Check the symmetry:
Before tying off, hold the bracelet in a circle to ensure the green section sits nicely opposite the closure point or wherever you prefer. -
Test the fit:
Wrap the beaded strand around your wrist. It should sit comfortably without pinching or leaving large gaps between beads.
Texture Play
Swap the beige wood beads for matte river stone or frosted agate to give the bracelet a heavier, more luxurious weight and feel.
Step 4: Finishing Touches
-
Pre-stretch the cord:
Gently pull tightly on both ends of the elastic cord a few times. This pre-stretching prevents the bracelet from loosening up after you wear it. -
Tie the knot:
Remove the bead stopper and tie a strong surgeon’s knot (right over left, left over right, and loop through an extra time). -
Secure the knot:
Pull the knot tight. Apply a tiny dot of hypo-cement or clear nail polish to the knot and let it dry for a minute. -
Hide the knot:
Trim the excess cord ends to about 2mm. Gently tug the bracelet so the knot slides inside the hole of the nearest large bead to hide it.
Slip on your new bracelet and enjoy the calming energy of your handmade creation
“Midnight Kiss” Two-Tone Heart Center
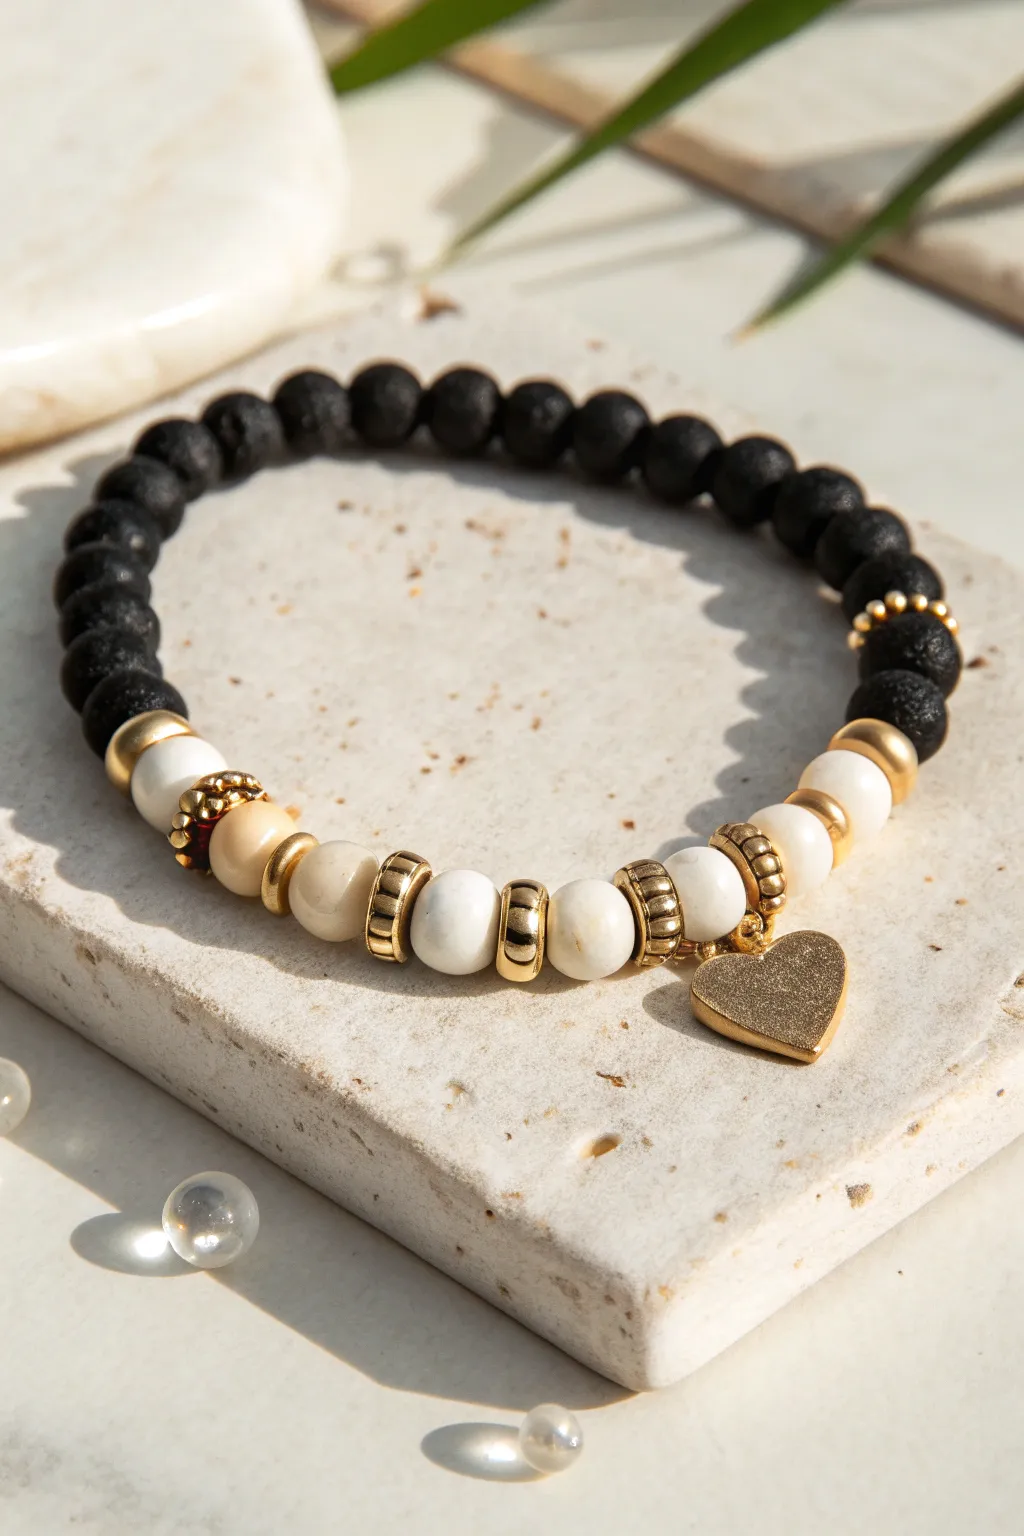
Capture the romantic contrast of midnight and moonlight with this elegant beaded bracelet. Featuring a split design of matte black lava stone and creamy white beads, it’s anchored by a charming gold heart charm that’s perfect for ringing in the New Year.
How-To Guide
Materials
- Black lava stone beads (8mm)
- White or cream round beads (8mm, polished stone or glass)
- Gold tone spacer beads (various: curved tubes, flat discs, textured rings)
- Gold tone heart charm with jump ring
- Elastic beading cord (0.8mm or 1mm)
- Jewelry glue or clear nail polish
- Scissors
Step 1: Planning and Preparation
-
Measure your wrist:
Before cutting anything, wrap a piece of string around your wrist to find the comfortable length. Add about an inch to this measurement to account for the bulk of the larger beads. -
Cut the cord:
Cut a length of elastic cord about 10-12 inches long. Having extra length makes tying the knot at the end much less frustrating than struggling with short ends. -
Pre-stretch the elastic:
Give your elastic cord a few firm tugs. This crucial step prevents the bracelet from stretching out and becoming loose after you wear it a few times. -
Secure the end:
Place a piece of tape or a bead stopper on one end of your cord to prevent your beads from sliding off while you design.
Aromatic Tip
Lava stones are porous! Add a drop of essential oil like lavender or peppermint to the black beads. They will act as a diffuser and carry the scent all day.
Step 2: Stringing the White Section
-
Start the center sequence:
Begin by threading on one white bead, followed by a gold spacer bead. This will start the lighter half of the bracelet. -
Add the charm holder:
Next, thread on the jump ring holding your gold heart charm. Ensure the jump ring sits securely between beads so it hangs properly. -
Continue the pattern:
Add a gold textured ring spacer, then another white bead. Follow this with a wider, curved gold tube spacer. -
Build the white side:
Add another white bead, then a narrow gold disc spacer. I find alternating spacer styles adds a nice rhythm to the design. -
Add a darker accent:
Thread on a slightly darker cream or beige bead to create a soft transition, followed by a decorative gold cap or textured spacer. -
Finish the light half:
Complete the ‘moonlight’ section with one final white bead and a plain gold round spacer to cap it off.
Go Glam
Swap the plain gold spacers for ones with tiny embedded crystals or rhinestones. This adds extra sparkle specifically for a New Year’s Eve party look.
Step 3: Stringing the Black Section
-
Transition to black:
Now, begin threading the black lava stone beads. These have a wonderful matte texture that contrasts beautifully with the smooth white beads. -
Fill the length:
String approximately 12 to 15 black lava beads, depending on your wrist size. Check fit periodically by wrapping it around your wrist. -
Add the final transition:
On the other end of the black section, add a small gold feature, like three tiny gold seed beads or a textured ring, to mirror the elegance of the front. -
Close the loop:
The final bead on this side should meet up with the first white bead you strung.
Step 4: Finishing Touches
-
Check the fit:
Bring the two ends together carefully to form a circle. Ensure the beads sit comfortably without gaps, but aren’t squeezed too tight. -
Tie the knot:
Tie a surgeon’s knot (loop the right end over the left twice, then pull tight). This knot holds much better on slippery elastic than a standard square knot. -
Secure with glue:
Apply a tiny dab of jewelry glue or clear nail polish to the knot. Let this dry briefly before handling to ensure it bonds fully. -
Hide the knot:
Once the glue is dry, trim the excess cord ends close to the knot. Gently pull the elastic to tuck the knot inside one of the adjacent lava beads.
Slip on your new two-tone bracelet and enjoy the stylish contrast of textures on your wrist