When kids make clay ornaments, the little wobbles and fingerprints are exactly what turns them into keepsakes you’ll want to hang up year after year. In my studio, I lean on air-dry clay and polymer clay ideas that feel fun, personal, and totally doable for small hands.
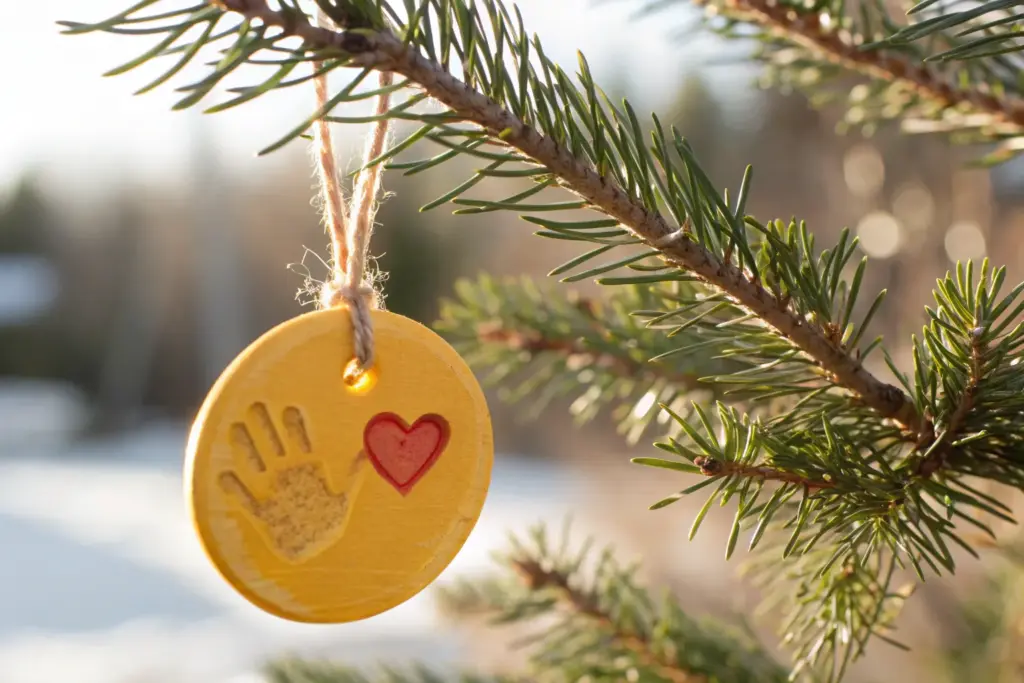
Handprint Keepsake Ornaments
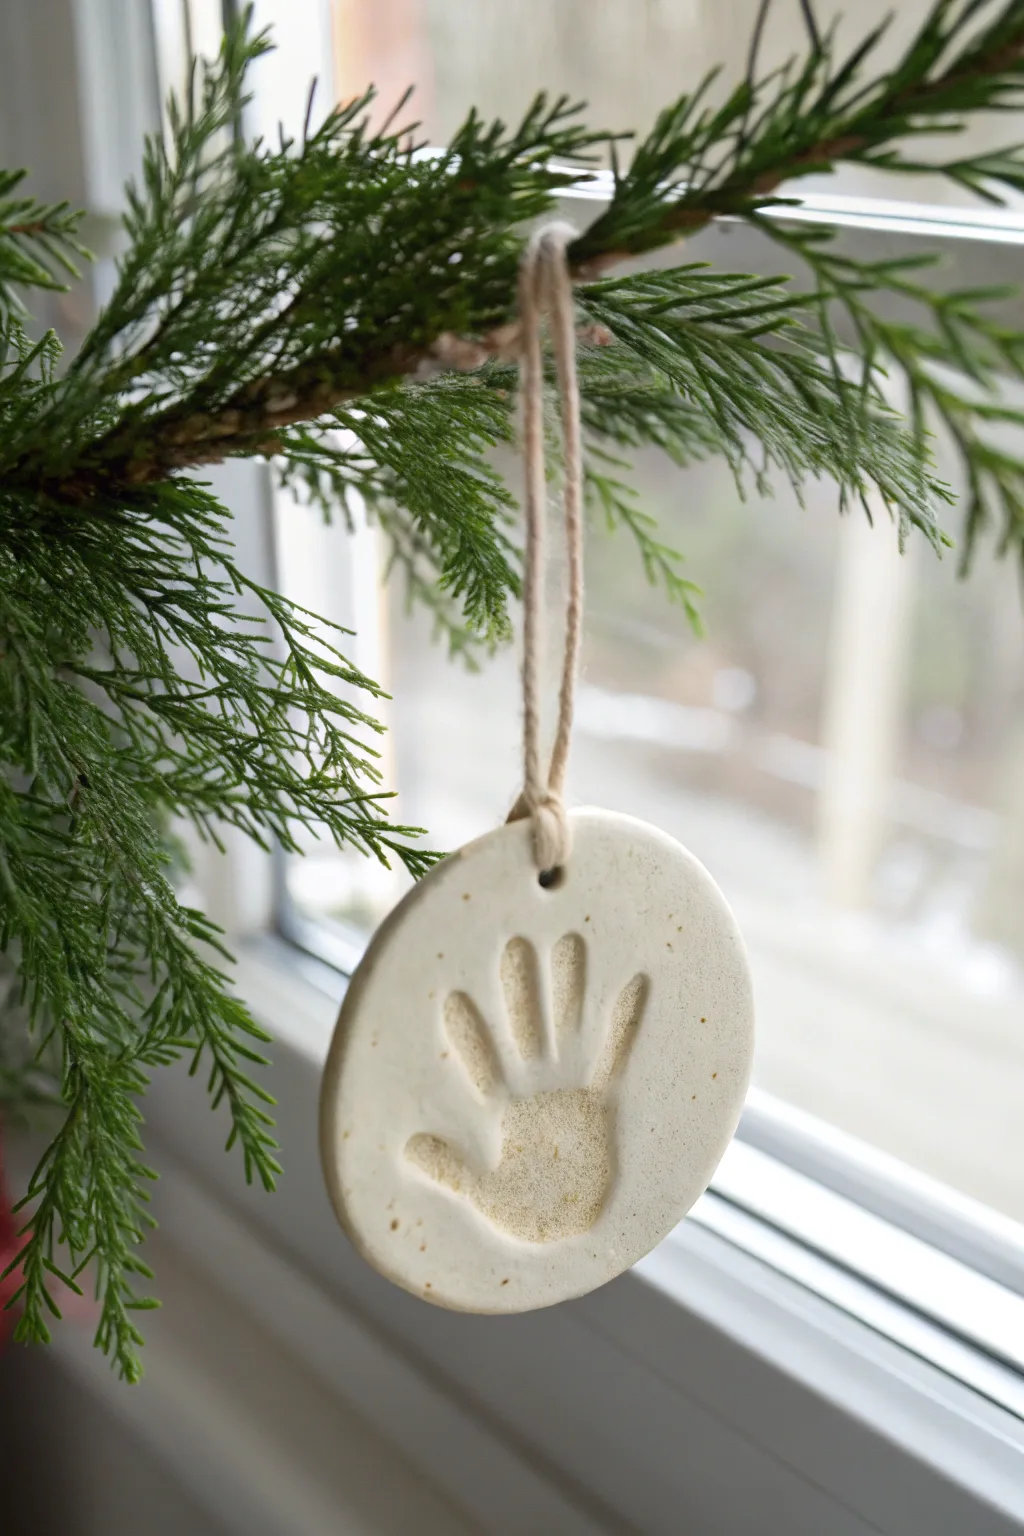
Capture a moment in time with this simple yet deeply sentimental clay keepsake that preserves a tiny handprint forever. With its rustic, natural finish and twine hanger, this ornament adds a touch of heartfelt nostalgia to any holiday display.
Detailed Instructions
Materials
- White air-dry clay or salt dough
- Rolling pin
- Parchment paper
- Circular cookie cutter (approx. 3-4 inches diameter)
- Straw or wooden skewer
- Jute twine or hemp cord
- Fine grit sandpaper
- Matte sealant spray (optional)
Step 1: Preparing the Base
-
Prepare your surface:
Lay out a sheet of parchment paper on a flat, stable table. This prevents the clay from sticking and makes transfer easier later. -
Knead the clay:
Take a handful of air-dry clay and knead it well in your hands until it becomes soft, pliable, and free of cracks. -
Roll it out:
Using a rolling pin, flatten the clay ball into an even slab. Aim for a thickness of about 1/4 to 1/2 inch—too thin and it cracks, too thick and it gets heavy. -
Check surface texture:
Inspect the surface for any lint or uneven bumps. Smooth them out gently with a damp fingertip if needed.
Step 2: Creating the Impression
-
Position the hand:
Have the child spread their fingers comfortably. Guide their hand gently over the center of the rolled-out clay. -
Press downfirmly:
Press the palm and each individual finger into the clay. Applying firm, even pressure is key to getting a deep, visible impression. -
Lift straight up:
Carefully lift the child’s hand straight up and off the clay to avoid smudging the print edges. -
Cut the shape:
Center your circular cookie cutter or a large jar mouth over the handprint. Press down to cut a clean circle, ensuring the print is nicely framed. -
Remove excess clay:
Peel away the scraps of clay from the outside of the circle. You can save these for another project. -
Add a hanging hole:
Use a straw or a skewer to punch a hole near the top edge of the circle. Make sure it’s not too close to the edge to prevent tearing.
Fixing Cracks
If small hairline cracks appear while drying, mix a tiny bit of fresh clay with water to make a paste. Fill the cracks, smooth with a finger, and let dry again.
Step 3: Finishing Touches
-
Smooth the edges:
Dip your finger in a tiny bit of water and run it along the cut edge of the circle to soften any sharp ridges left by the cutter. -
Let it dry completely:
Place the parchment paper with the ornament in a dry area. Let it air dry for 24-48 hours, flipping it over halfway through for even drying. -
Sand for perfection:
Once fully hard, inspect the edges. I find that lightly sanding the rim with fine-grit sandpaper gives it that professional, polished look shown in the photo. -
Seal the surface:
For longevity, mist the dry ornament with a matte clear coat. This protects the porous clay from humidity without making it look plastic. -
Attach the hanger:
Cut a length of natural jute twine. Fold it in half, feed the loop through the hole, and pull the tails through the loop to create a lark’s head knot. -
Tie it off:
Tie the ends of the twine together at your desired length, creating a loop ready for hanging on a tree branch.
Stamp the Date
Before the clay dries, use small letter stamps to press the year or the child’s name onto the back of the ornament for a hidden future reminder.
Hang this treasured piece on a sturdy branch where the light can catch the details of the impression


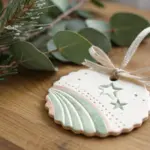
Cookie Cutter Holiday Shapes
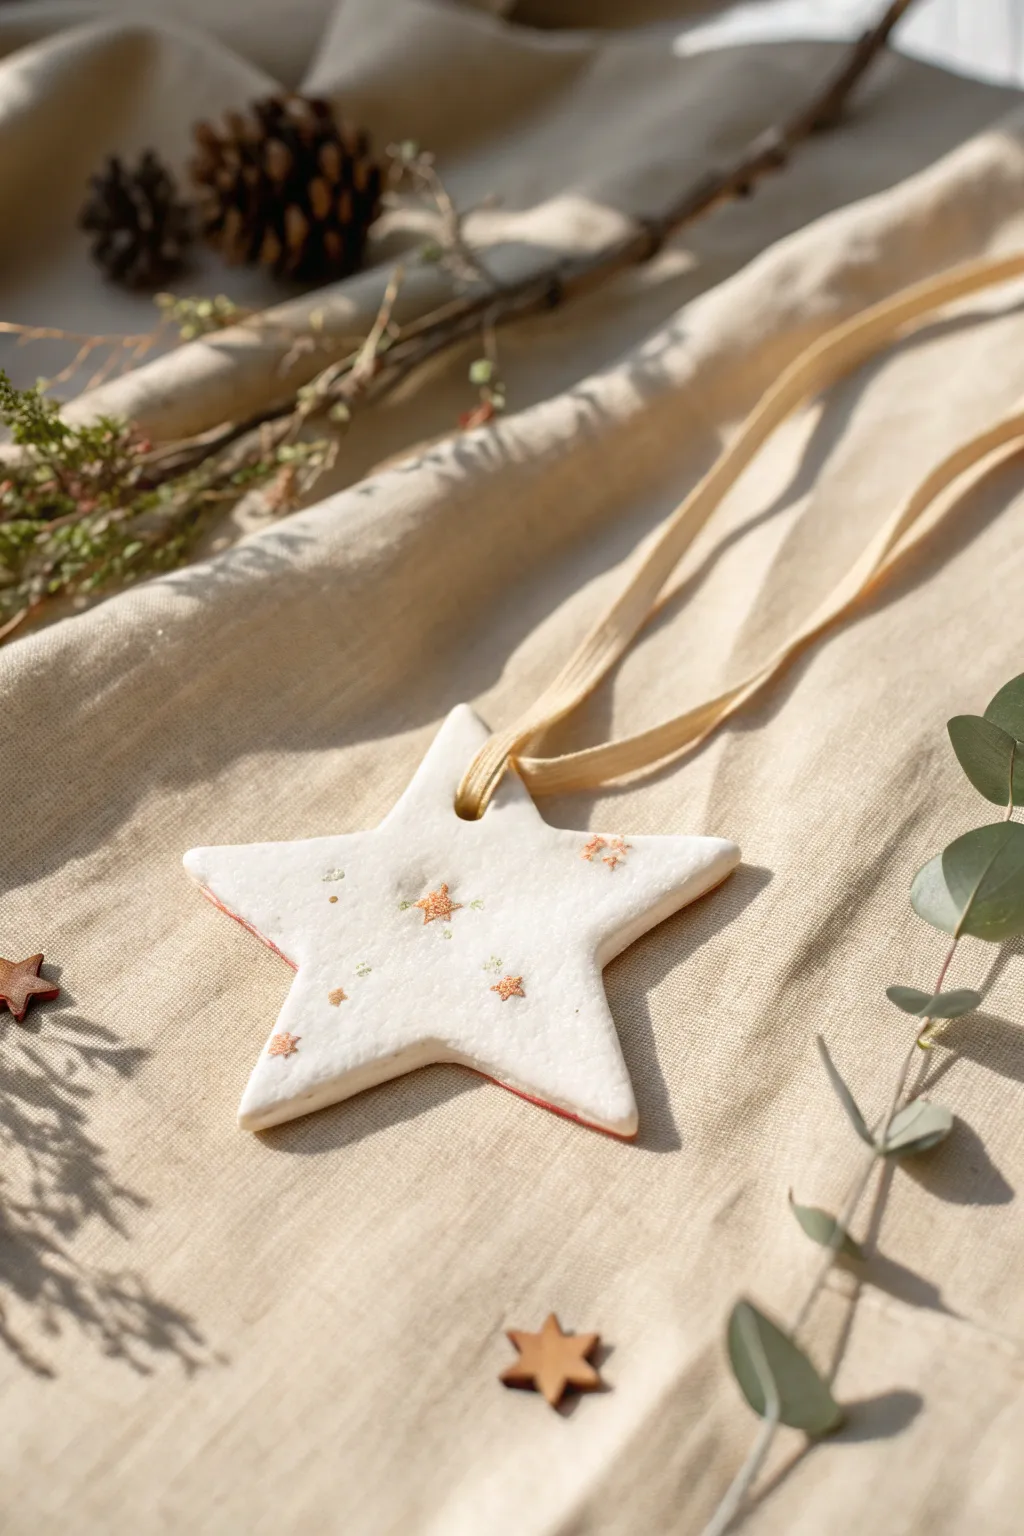
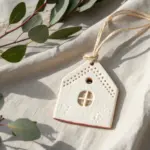
Embrace the magic of simplicity with these elegant white clay stars, dusted with tiny golden constellations. The organic, soft edges give them a lovely handmade feel that looks sophisticated yet is incredibly easy for little hands to master.
Step-by-Step Guide
Materials
- White air-dry clay (or polymer clay)
- Star-shaped cookie cutter
- Rolling pin
- Parchment paper or canvas mat
- Tiny star confetti or sprinkles (gold/copper)
- Straw or skewer (for hole punching)
- Beige ribbon or twine
- Fine-grit sandpaper (optional)
- Varnish or clear sealant (optional)
Step 1: Preparation and Shaping
-
Prepare your surface:
Lay down a piece of parchment paper or a canvas mat to prevent the clay from sticking to your table. -
Condition the clay:
Take a handful of white air-dry clay and knead it gently in your hands until it feels soft, warm, and pliable. -
Roll it out:
Use your rolling pin to flatten the clay. Aim for a thickness of about 1/4 inch; too thin and it might crack, too thick and it becomes heavy. -
Cut the shape:
Press the star-shaped cookie cutter firmly into the rolled clay. Wiggle it slightly to ensure a clean cut before lifting it away. -
Remove excess clay:
Peel away the scrap clay surrounding your star, leaving the clean shape on the parchment paper. -
Smooth the edges:
Dip your finger in a tiny bit of water and gently run it along the cut edges of the star to soften any harsh lines or jagged bits.
Keep it Clean
Work with clean hands and tools. White air-dry clay picks up dust and lint easily, so wipe your rolling pin and surface before starting.
Step 2: Decorating and Drying
-
Add the constellations:
Scatter a few tiny gold star confetti pieces or sprinkles randomly across the surface of the soft clay. -
Embed the sparkles:
Very gently press each tiny star into the clay with your fingertip or the back of a spoon so they sit flush with the surface but don’t distort the ornament’s shape. -
Add subtle texture:
For that organic look seen in the photo, you can lightly tap the surface with your finger to create a faintly uneven, natural texture. -
Create the hanging hole:
Use a drinking straw or a skewer to punch a hole near the tip of the top star point. Make sure it’s not too close to the edge, or it might break later. -
Initial drying:
Let the ornament sit undisturbed in a safe, dry place. I like to flip them over after about 12 hours so the bottom dries evenly. -
Check for dryness:
Allow at least 24-48 hours for the clay to fully harden. It should turn a solid chalky white and feel lightweight. -
Sand edges (optional):
If there are any rough spots remaining on the edges, lightly buff them away with fine-grit sandpaper. -
Seal the star:
Apply a thin coat of matte or satin varnish to protect the clay and hold the tiny stars in place.
Step 3: Finishing Touches
-
Cut the ribbon:
Snip a length of beige ribbon or natural cotton twill tape, about 10-12 inches long. -
Thread the ornament:
Feed one end of the ribbon through the hole you created earlier. -
Tie the knot:
Bring the two ends of the ribbon together and tie a simple knot at the top to create a hanging loop.
Curling Clay?
If the star edges curl up while drying, place a lightweight book or flat object gently on top of the ornament once it’s semi-dry to flatten it back out.
Now you have a charming, starry keepsake ready to hang on the tree or wrap as a gift


Stamped Snowflake Medallions
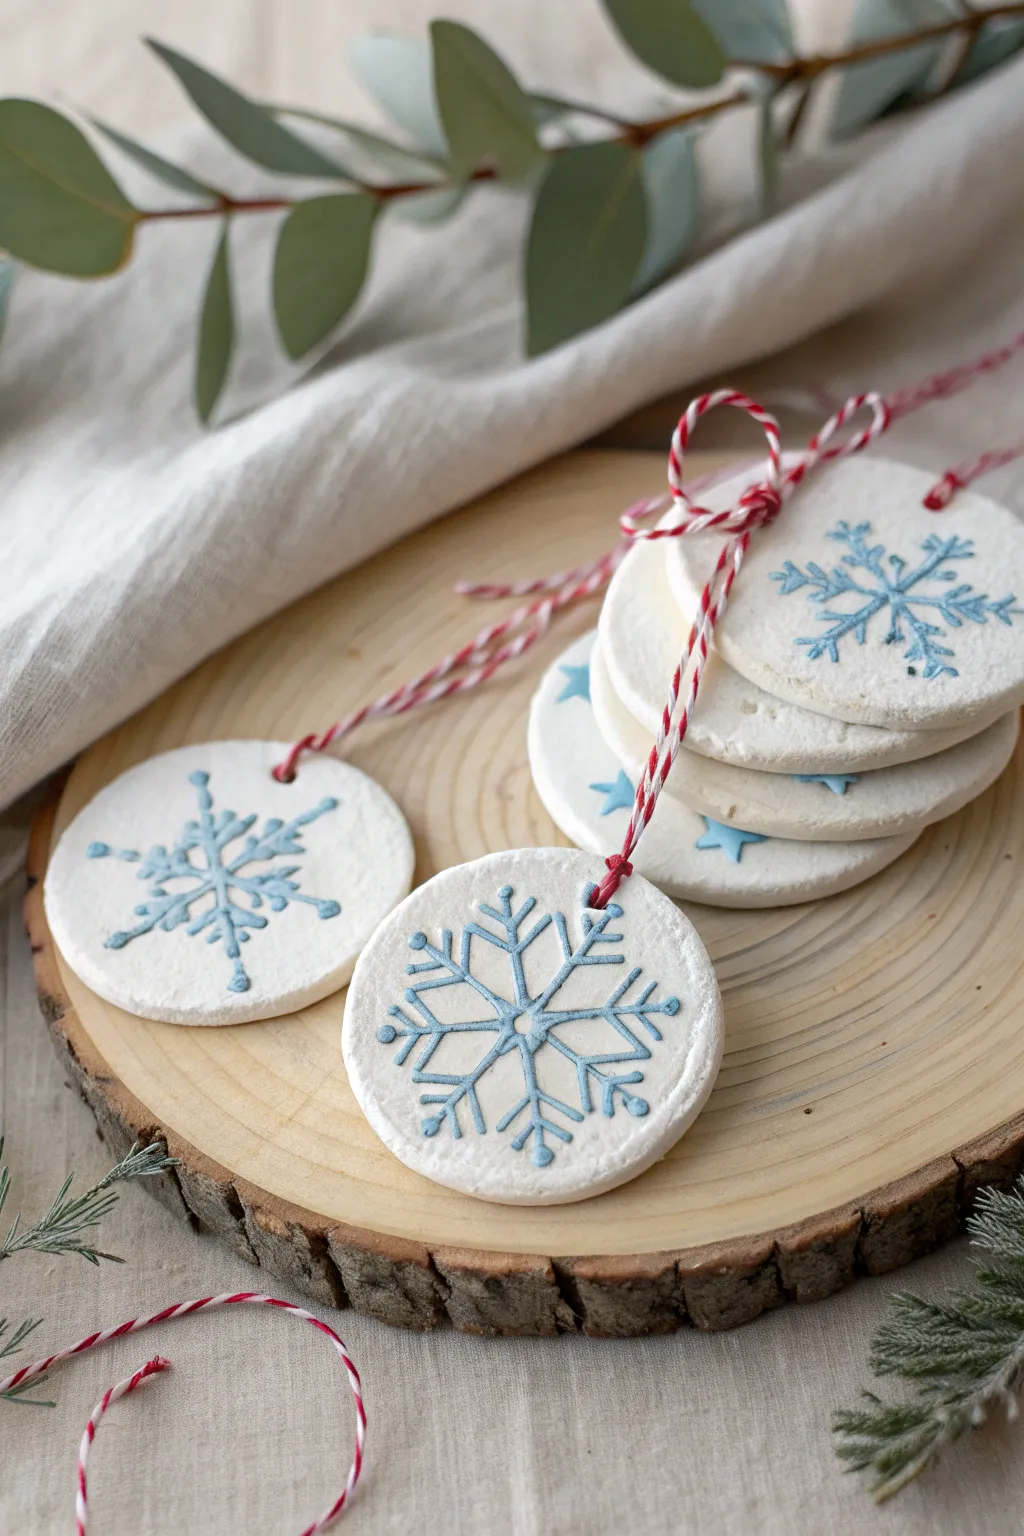
These elegant clay ornaments capture the frosty beauty of winter with deep blue snowflake imprints on a crisp white background. The classic red baker’s twine adds a cheerful pop of color, making them a timeless addition to any holiday tree.
How-To Guide
Materials
- White creative paper clay or air-dry clay
- Rolling pin
- Circle cookie cutter (approx. 2.5 – 3 inches)
- Snowflake rubber stamp (and a small star stamp)
- Light blue ink pad or blue acrylic paint with a sponge dabber
- Red and white baker’s twine
- Straw or skewer (for making hanging holes)
- Parchment paper
- Sandpaper style nail file or fine-grit sandpaper
Step 1: Preparing the Base
-
Prepare your workspace:
Lay down a sheet of parchment paper on a flat surface. This prevents the clay from sticking and makes cleanup much easier. -
Roll out the clay:
Take a handful of white air-dry clay and knead it briefly until it is pliable. Roll it out evenly to a thickness of about 1/4 inch. If the clay feels sticky, I sometimes dust the rolling pin with a tiny bit of cornstarch. -
Cut the shapes:
Press your circle cookie cutter firmly into the rolled clay to create your medallion shapes. Lift the excess clay away from the circles immediately so you can re-roll it for more ornaments. -
Smooth the edges:
Dip your finger in a little bit of water and gently run it along the cut edges of each circle to smooth out any roughness or jagged bits left by the cutter. -
Create the hanging hole:
Use a straw or a skewer to poke a hole near the top edge of each circle. Make sure the hole is big enough for your twine to pass through later, and not too close to the edge to prevent cracking.
Step 2: Stamping and Drying
-
Ink the stamp:
Take your snowflake rubber stamp and tap it evenly onto your light blue ink pad. If you don’t have ink, lightly dab blue acrylic paint onto the stamp surface with a sponge, but keep the layer thin to avoid globs. -
Stamp the clay:
Position the stamp over the center of a clay circle. Press down firmly and evenly, but not so hard that you deform the circle’s shape. Lift the stamp straight up to reveal the design. -
Stamp variations:
For variety, you can use a smaller star stamp on some ornaments, pressing them randomly around the surface to create a starry night pattern. -
Clean up smudges:
If you accidentally get a smudge of blue where you don’t want it, use a damp cotton swab to gently wipe it away before the ink sets into the porous clay. -
Dry partially:
Allow the ornaments to dry flat on the parchment paper for about 24 hours. Flip them over halfway through the drying process to ensure the bottom dries evenly and to prevent curling.
Stamp Stuck?
If the stamp sticks to the wet clay, lightly dust the stamp surface with cornstarch or baby powder before inking. This acts as a release agent and keeps the design crisp.
Step 3: Finishing Touches
-
Check for dryness:
The ornaments are fully ready when they feel hard, room temperature (not cool to the touch), and look chalky white. -
Sand the rim:
Take a fine-grit sandpaper piece or an emery board nail file and gently sand the outer rim of the circle to make it perfectly smooth and professional-looking. -
Dust off debris:
Wipe the ornament with a dry, soft cloth or paper towel to remove any clay dust from the sanding process. -
Cut the twine:
Cut a length of red and white baker’s twine, approximately 8 to 10 inches long, for each ornament. -
Thread the loop:
Pass one end of the twine through the hole you made earlier at the top of the medallion. -
Tie the knot:
Bring the ends of the twine together and tie a simple overhand knot or a bow, depending on how you want the finished hanging loop to look. -
Final inspection:
Give the knot a gentle tug to ensure it is secure. Your snowflake medallion is now ready to hang.
Add Some Sparkle
While the blue ink or paint is still wet inside the imprinted snowflake, sprinkle a tiny pinch of extra-fine iridescent glitter over it for a frozen, glimmering effect.
Now you have a set of crisp, wintery ornaments ready to gift or hang on your own tree

Name and Year Letter-Stamped Tags
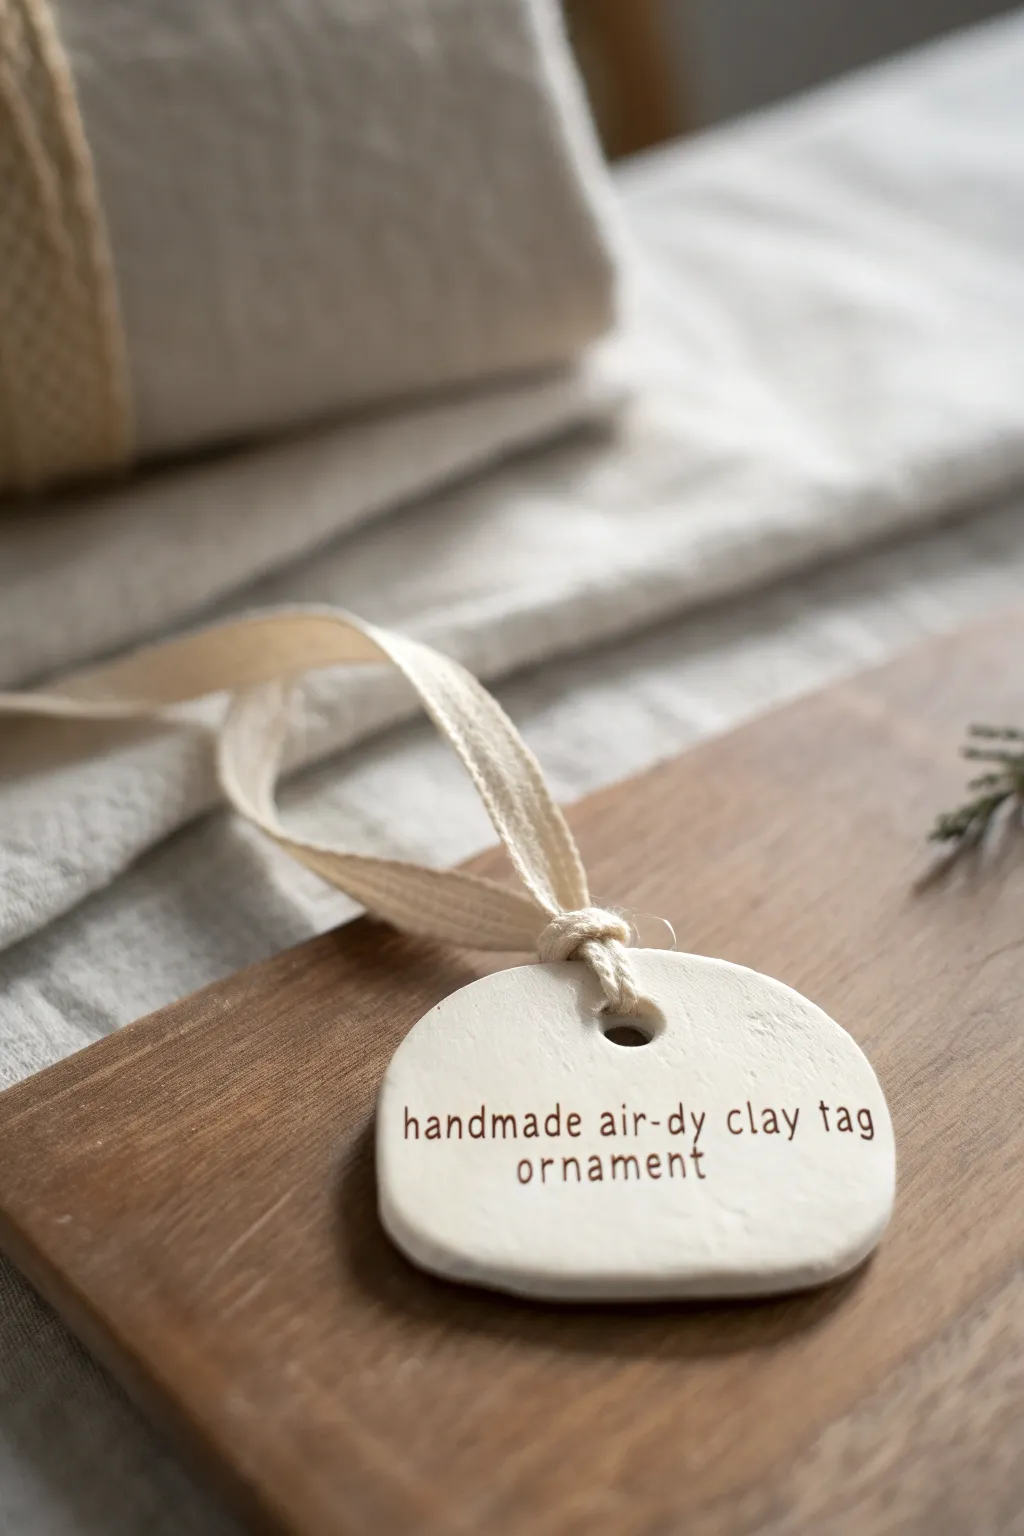
Create rustic, personalized charm with these simple air-dry clay tags that serve as perfect gift toppers or keepsake ornaments. Their soft, cream-colored finish and hand-stamped lettering offer a timeless, artisanal look that feels special without being fussy.
Step-by-Step Tutorial
Materials
- White air-dry clay
- Rolling pin
- Parchment paper or silicone mat
- Oval or rounded rectangle cookie cutter (approx. 2-3 inches)
- Small letter stamp set (lower case)
- Straw or cocktail stick
- Fine grit sandpaper
- Brown ink pad or acrylic paint
- Cotton or linen ribbon (cream color)
- Small bowl of water
- Clear matte sealant (optional)
Step 1: Shaping the Clay
-
Prepare your workspace:
Lay down parchment paper or a silicone mat to prevent the clay from sticking to your table. Take a handful of air-dry clay and knead it gently in your hands for a minute to warm it up and make it pliable. -
Roll it out:
Place the clay ball on your mat and use a rolling pin to flatten it. Aim for an even thickness of about 1/4 inch (5-6mm). If the clay is sticking to the roller, you can lightly mist it or place another sheet of parchment on top. -
Cut the shape:
Position your oval or rounded rectangle cutter over a smooth section of the clay. Press down firmly and wiggle slightly before lifting. -
Soften the edges:
Carefully remove the excess clay. Dip your finger in a little water and gently run it along the cut edges of your shape to smooth out any sharpness or roughness from the cutter. -
Create the hole:
Use a drinking straw or a cocktail stick to poke a hole near the top center of the tag. I prefer using a straw because it removes a clean plug of clay, making threading the ribbon much easier later.
Clean Edges Trick
If your clay edges look ragged after cutting, don’t worry. Wait until the clay is ‘leather hard’ (partially dry) before smoothing them with a damp sponge for a professional finish.
Step 2: Stamping and Drying
-
Plan your text:
Before stamping, lay your letter stamps out on the table to check the spelling and spacing. This little rehearsal saves you from accidentally running out of room on the actual tag. -
Stamp the message:
Gently press each letter stamp into the soft clay. In the reference image, the text ‘handmade air-dry clay tag’ is on top and ‘ornament’ is centered below. Apply even pressure but don’t push all the way through. -
Let it dry completely:
Leave the tag on a flat surface to dry. Air-dry clay typically takes 24 to 48 hours to cure fully. Turning it over halfway through the drying time helps prevent curling. -
Sand for smoothness:
Once the tag is bone dry and hard, use a piece of fine-grit sandpaper to buff the surface and edges lightly. This removes any fingerprints or lingering rough spots.
Step 3: Finishing Touches
-
Darken the letters:
To make the text pop like in the photo, dip a small brush into brown acrylic paint or lightly dab your stamps on a brown ink pad before stamping. If you stamped plain clay, carefully paint into the grooves now. -
Wipe away excess:
If you painted into the grooves, quickly wipe the surface with a barely damp cloth or paper towel. The paint will stay in the indented letters but wipe off the high points, creating a crisp look. -
Seal the surface:
For longevity, brush a thin coat of clear matte sealant over the entire tag. This protects the clay from moisture and gives it a finished sheen. -
Prepare the ribbon:
Cut a length of cream cotton or linen ribbon, approximately 8-10 inches long. -
Attach the ribbon:
Fold the ribbon in half to create a loop. Push the folded end through the hole in the tag from front to back. -
Secure the loop:
Thread the loose ends of the ribbon through the loop you just pushed through the hole. Pull tight gently to secure it with a lark’s head knot.
Add Texture
Before cutting your shape, press a piece of lace or a textured fabric into the wet clay surface. This creates a subtle, patterned background behind your stamped letters.
Now you have a charming custom tag ready to elevate any gift or hang simply on a branch

The Complete Guide to Pottery Troubleshooting
Uncover the most common ceramic mistakes—from cracking clay to failed glazes—and learn how to fix them fast.
Mini Photo Frame Clay Ornaments
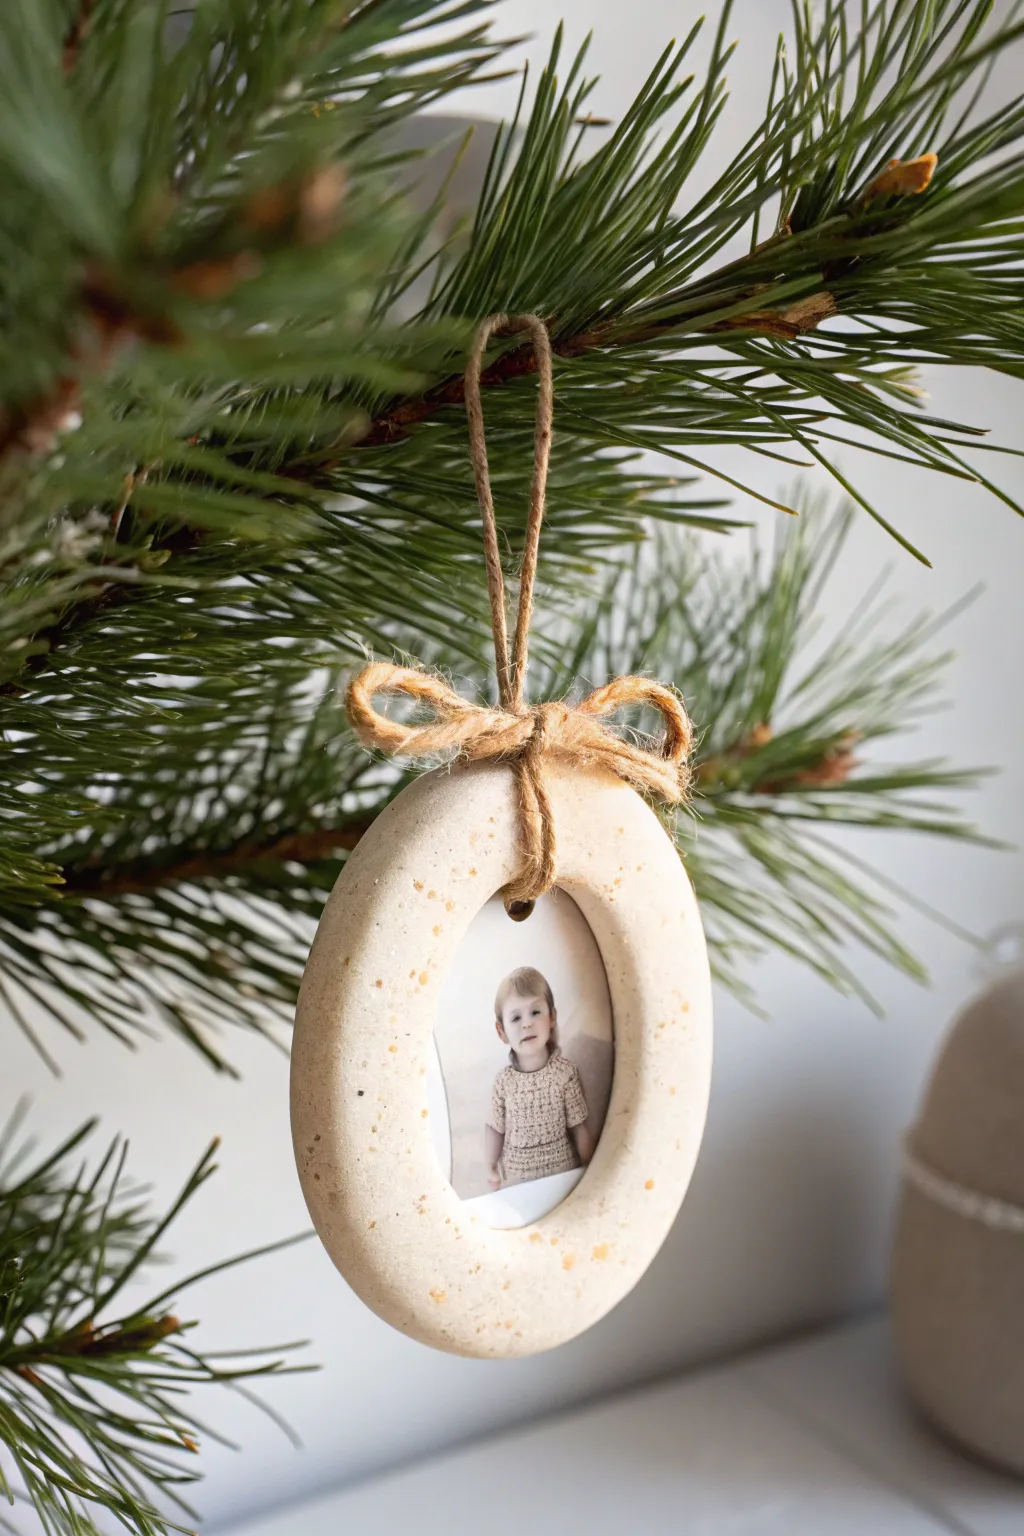
Create a timeless memory for your tree with these rustic, speckled clay photo frames. The thick, rounded doughnut shape holds a sweet picture inside, tied off with natural twine for a charmingly simple look.
Detailed Instructions
Materials
- Air-dry clay (white or off-white)
- Dried coffee grounds or cinnamon (for speckling)
- Rolling pin
- Oval cookie cutters (nested set) or a knife and template
- Small photo print
- Sandpaper (fine grit)
- Jute twine
- Glue stick or craft glue
- Straw or toothpick
- Clear matte sealant (optional)
Step 1: Preparing the Clay
-
Condition the clay:
Start by taking a handful of air-dry clay and kneading it in your hands until it becomes soft, pliable, and warm. -
Add texture:
To achieve the speckled look shown in the photo, sprinkle a very small pinch of dried coffee grounds or cinnamon onto the clay. -
Mix thoroughly:
Fold and knead the clay repeatedly to distribute the speckles evenly throughout the mesmerizing texture without making the clay too dark. -
Roll it out:
Roll the clay out on a smooth surface to a thickness of about 1/4 to 1/2 inch. You want these to be chunky and substantial.
Step 2: Shaping the Frame
-
Cut the outer shape:
Use a larger oval cookie cutter to stamp out the main shape of the ornament. If you don’t have a cutter, trace an oval onto paper, cut it out, lay it on the clay, and trace around it with a knife. -
Cut the inner window:
Use a smaller oval cutter to remove the center, creating a thick window for your photo. Aim to leave a border of clay that is at least 3/4 inch wide. -
Smooth the edges:
Dip your finger in a little water and gently run it along the cut edges to round them off. This gives the ornament that soft, stone-like appearance rather than a sharp, cookie-cutter look. -
Create the hanging hole:
Use a drinking straw to punch a hole at the very top of the frame, passing all the way through the clay. -
Dry completely:
Place the clay frame on a piece of parchment paper or a wire rack. Let it air dry for 24-48 hours until it is hard and turns a lighter white color.
Uneven Drying?
If edges curl while drying, flip the clay over every 6-8 hours. Weighing it down gently with a book (use parchment paper!) during the final stages helps keep it flat.
Step 3: Assembly
-
Sand for perfection:
Once fully dry, use fine-grit sandpaper to gently smooth away any uneven bumps on the surface or rough edges left from the cutting process. -
Size the photo:
Place your clay frame over your printed photo to find the perfect crop. Lightly trace the inner oval onto the photo. -
Cut the photo:
Cut the photo slightly larger than the line you traced (about 1/8 inch margin) so it can attach to the back of the frame without falling through. -
Attach the image:
Apply a ring of glue to the back of the clay frame, right around the opening. Press the photo face-down onto the back of the frame and let it dry. -
Seal (Optional):
If you want extra durability, brush a coat of matte clear sealant over the clay front. I prefer matte because it keeps the natural, unfinished look intact.
Backing Tip
For a cleaner finish, glue a piece of cardstock or felt onto the entire back of the ornament to hide the back of the photo and protect it from scratches.
Step 4: The Finishing Touch
-
Prepare the hanger:
Cut a length of jute twine, about 10 inches long. -
Thread the loop:
Fold the twine in half and push the looped end through the hole from front to back. Pull the tails through the loop to create a lark’s head knot, or simply tie it off at the top. -
Tie the bow:
Cut a separate, smaller piece of twine. Tie it into a small, neat bow right at the base of the hanging loop, resting against the top of the clay frame. -
Trim ends:
Trim the tails of the bow short for a tidy appearance and hang your new keepsake on a sturdy branch.
Now you have a charming, personalized ornament ready to hang or gift to a loved one
Simple Snowman Face Ornaments
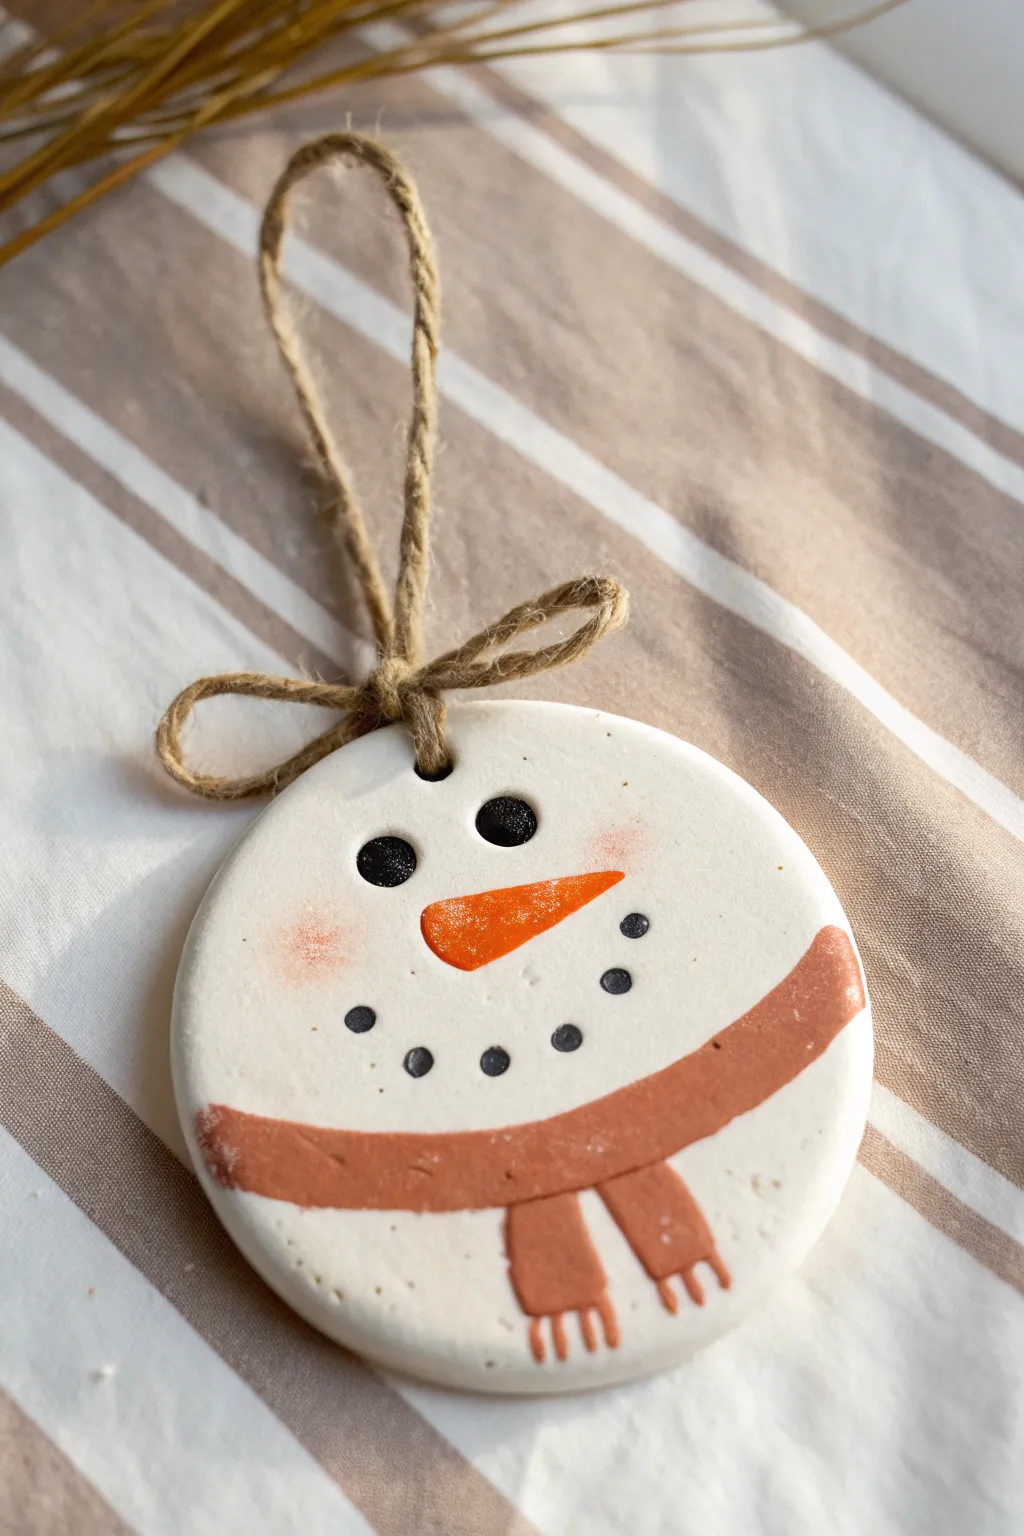
This adorable round ornament captures winter cheer with a simple, smiling snowman face on a clean white background. With its charming terracotta-colored scarf and rustic jute hanger, it adds a cozy, handmade touch to any tree.
How-To Guide
Materials
- White air-dry clay or polymer clay
- Rolling pin
- Circle cookie cutter (approx. 3 inches)
- Straw or skewer (for hole)
- Acrylic paints (black, orange, terracotta/red-brown, pink)
- Fine detail paint brushes
- Jute twine
- Sandpaper (fine grit)
- Matte sealant or varnish (optional)
Step 1: Shaping the Base
-
Prepare the Clay:
Begin by kneading a ball of white clay until it is smooth and pliable. You want to remove any air bubbles to prevent cracking later. -
Roll It Out:
Roll the clay out onto a non-stick surface or parchment paper to an even thickness of about 1/4 inch. If the clay is too thin, the ornament will be fragile. -
Cut the Circle:
Press your circle cookie cutter firmly into the clay to create a perfect round shape. Peel away the excess clay from the outside before lifting the cutter. -
Create the Hanging Hole:
Use a drinking straw or a skewer to punch a small hole near the top edge of the circle. Make sure it’s not too close to the edge, or the clay might break. -
Smooth the Edges:
Dip your finger in a little water and gently run it around the cut edge of the circle to smooth out any roughness from the cutter. -
Dry the Clay:
Let the ornament dry completely. If using air-dry clay, this can take 24-48 hours; flipping it halfway through helps it dry evenly. If using oven-bake clay, follow the package instructions.
Rosy Cheek Trick
Use actual powder blush or chalk pastel shavings! Apply with a dry Q-tip before sealing for the softest, most natural-looking rosy cheeks.
Step 2: Painting the Details
-
Sand Imperfections:
Once fully dry (and cool, if baked), lightly sand the edges or surface with fine-grit sandpaper if there are any rough spots. -
Paint the Snout:
Start with the carrot nose. Using orange paint and a small brush, paint a sideways teardrop shape in the center of the face. I like to make the rounded end point toward the left. -
Add the Eyes:
Load a detail brush or a dotting tool with black paint. Create two solid black circles just above the nose for the eyes. -
Create the Smile:
For the mouth, dip the end of a paintbrush handle or a dotting tool into black paint. Stamp five or six small dots in a curved smile shape below the nose. -
Blush the Cheeks:
Mix a tiny amount of pink paint with water to make a wash, or use a fairly dry brush. Gently dab a rosy spot on each cheek area for a soft, flushed look. -
Outline the Scarf:
Using a terracotta or reddish-brown paint, draw a thick curved line across the bottom third of the circle to represent the scarf wrapping around the neck. -
Add Scarf Tails:
Paint two rectangular shapes hanging down from the main scarf line. Angle them slightly to look natural. -
Detail the Fringe:
Use a very fine brush with the same terracotta paint to add three or four small lines at the bottom of each scarf tail to mimic fringe. -
Seal the Ornament:
Allows the paint to dry completely, then apply a coat of matte varnish or sealant to protect your work and give it a finished look.
Uneven Clay Surface?
If your clay dried with bumps, a fine-grit sanding sponge is gentler than paper and contours to the round shape without creating flat spots.
Step 3: Final Assembly
-
Cut the Twine:
Cut a piece of jute twine about 8-10 inches long. -
Thread the Loop:
Fold the twine in half and push the looped end through the hole in the ornament from back to front. -
Secure the Hanger:
Pass the loose ends of the twine through the loop and pull tight to secure it against the clay. -
Tie a Bow:
Instead of a simple knot, tie the loose ends into a small bow right at the base of the loop, close to the ornament hole, to match the rustic style shown.
Now your charming snowman is ready to be hung on the tree or gifted to a friend this holiday season


What Really Happens Inside the Kiln
Learn how time and temperature work together inside the kiln to transform clay into durable ceramic.
Gingerbread Person Ornaments

Achieve the warm, spiced look of freshly baked gingerbread without turning on the oven using this charming clay project. This durable ornament features realistic “icing” details and sweet red buttons, making it a perfect keepsake that lasts for years.
Detailed Instructions
Materials
- Brown air-dry clay (terracotta or gingerbread colored)
- White puff paint (3D fabric paint)
- Red puff paint or small red clay balls
- Yellow puff paint (or yellow acrylic paint)
- Black puff paint or fine-point marker
- Gingerbread man cookie cutter
- Rolling pin
- Parchment paper or non-stick mat
- Texture sponge or stiff bristle brush (optional)
- Straw or toothpick for the hole
- Jute twine or ribbon
Step 1: Shaping the Cookie Base
-
Prepare the Clay:
Start by kneading your brown air-dry clay until it is soft and pliable. If the color isn’t quite right, you can knead in a tiny drop of red and yellow acrylic paint to warm up a cool brown tone. -
Roll it Out:
Place your clay on a sheet of parchment paper. Roll it out evenly to a thickness of about 1/4 inch. You want it sturdy enough to hang but not too heavy. -
Texture Time:
For an ultra-realistic baked look, lightly dab the surface of the rolled clay with a texture sponge or an old toothbrush. This mimics the porous surface of a real cookie. -
Cut the Shape:
Press your gingerbread man cookie cutter firmly into the clay. Give it a little wiggle to ensure a clean cut, then gently lift the cutter away. -
Smooth the Edges:
Remove the excess clay from around the shape. Dip your finger in a little water and gently run it along the cut edges to smooth out any roughness or sharp corners. -
Create the Hanger Hole:
While the clay is still wet, use a drinking straw or a thick skewer to punch a hole at the very top of the head. Make sure the hole is big enough for your twine. -
Dry Completely:
Let the clay dry fully according to the package instructions. Flip it over halfway through the drying process to prevent curling.
Uneven Drying?
If your ornament curls while drying, place a heavy book on top of it once it’s mostly dry but still slightly flexible to flatten it back out.
Step 2: Decorating with Icing
-
Outline the Head:
Using white puff paint to simulate royal icing, carefully draw a thin line around the perimeter of the head. I find keeping steady pressure on the bottle helps prevent blobs. -
Add the Collar:
Switch to yellow puff paint. Draw a squiggly line at the base of the neck to create a ruffled collar or scarf. -
Detail the Face:
Use white paint to draw a simple, curved smile. Above the smile, add two small black dots for eyes using black puff paint or a marker. -
Arm Cuffs:
Draw straight white lines across the wrists. Inside the hand area, add a few small white dots or a zigzag pattern for extra detail. -
Leg Cuffs:
Move down to the ankles and pipe squiggly white lines across the legs to mirror the yellow collar’s texture, giving the impression of icing decorations. -
Side Accents:
Add straight white lines running down the sides of the torso, connecting the arm details to the leg details for a cohesive border. -
The Buttons:
Squeeze three distinct, round dots of red puff paint down the center of the chest. Ensure they are raised slightly to look like candy buttons. -
Let the Icing Set:
Allow the puff paint to dry completely. This usually takes at least 4-6 hours to become firm to the touch. -
String it Up:
Cut a length of jute twine or festive ribbon. Thread it through the hole in the head and tie a knot to create a hanging loop.
Scented Clay
Knead cinnamon, ginger, and clove spices directly into the clay before rolling. Your ornament will smell like real baking cookies for weeks.
Hang your new gingerbread friend on the tree and enjoy the handcrafted holiday charm
Candy Cane Twist Ornaments
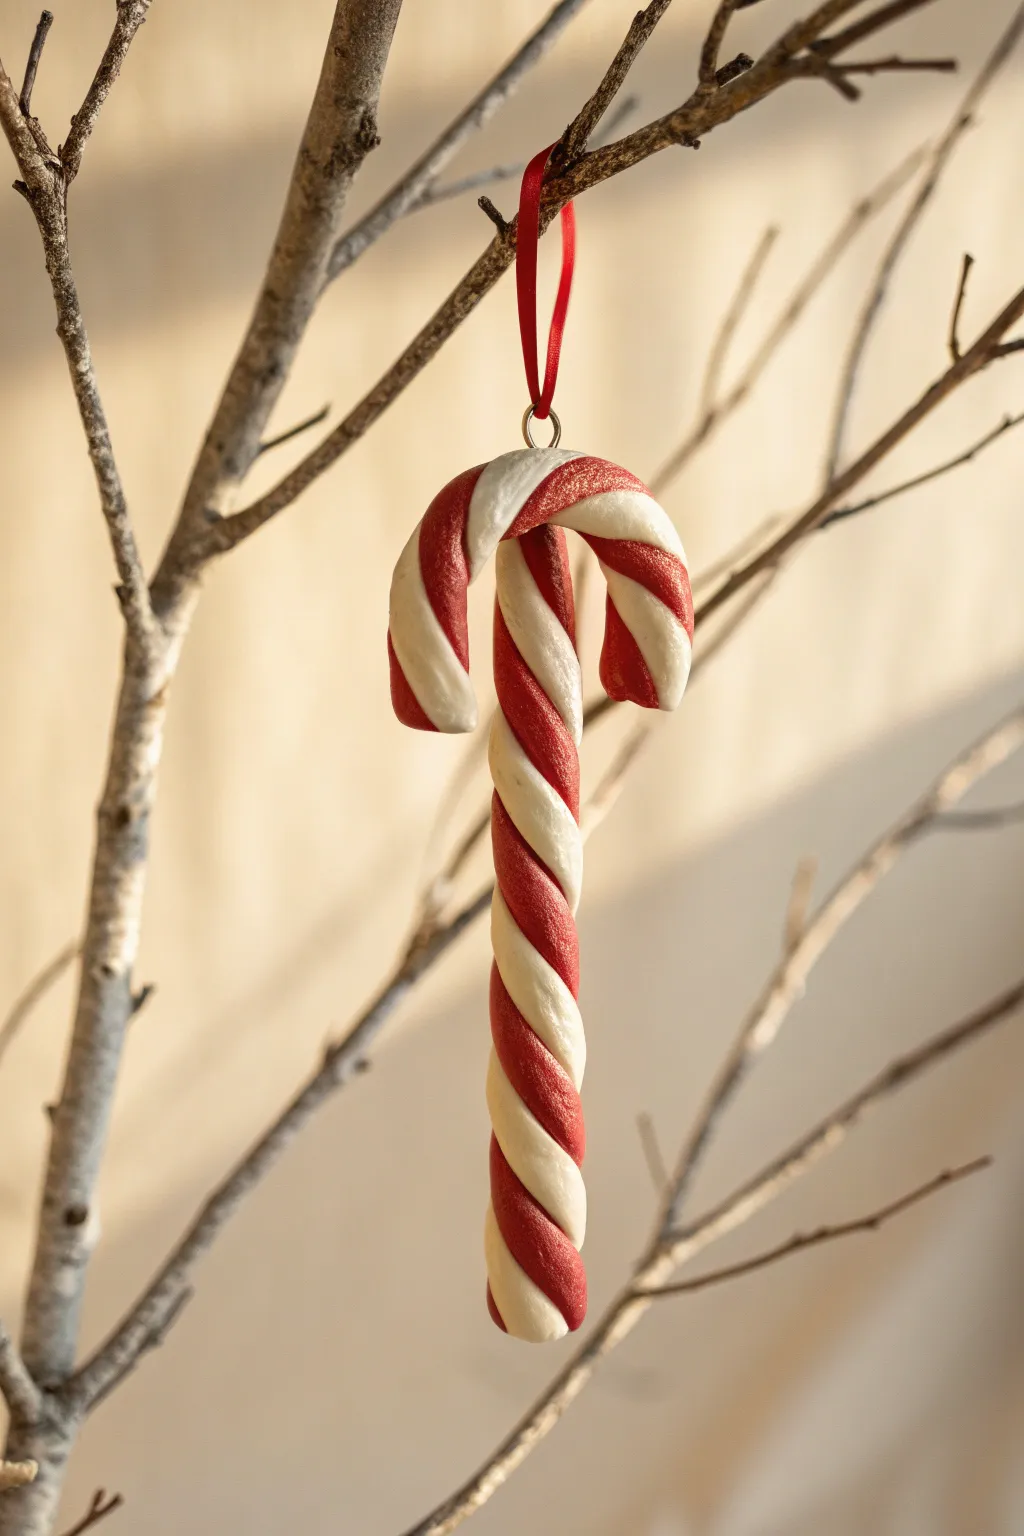
This classic holiday shape gets a sophisticated upgrade with a double-twisted design and a subtle sparkle finish. The interlocking red and white clay creates a delightful visual texture that looks good enough to eat, though it’s purely for decoration.
Step-by-Step Tutorial
Materials
- White polymer clay
- Red polymer clay (preferably with a slight shimmer or glitter effect)
- Small metal eye pin or screw eye hook
- Red satin ribbon (1/8 inch width)
- Clay roller or smooth rolling pin
- Clay slicer blade or craft knife
- Gloss glaze or sealant (optional)
- Baking sheet and parchment paper
- Oven
Step 1: Preparing the Clay
-
Condition the Clay:
Begin by working the white and red clay separately in your hands until they are soft, pliable, and free of cracks. This conditioning step is crucial to prevent the clay from breaking during the twisting process. -
Create Base Logs:
Roll each color into a long, even log. Aim for each log to be roughly 1/2 inch in diameter and about 6 inches long. -
Divide the Logs:
Using your clay blade, cut each log in half. You should now have two shorter red logs and two shorter white logs. -
Roll Thinner Strands:
Take these four pieces and roll them out further until they develop into long, thin snakes. Try to make them all equal in thickness, approximately 1/4 inch thick.
Step 2: Forming the Twist
-
Pair the Colors:
Lay one red strand next to one white strand. Gently press them together side-by-side without squishing them flat. -
Create the Primary Twist:
Holding one end stationary, twist the other end of the paired strands until you have a tight red-and-white rope. Repeat this process with the second pair of red and white strands. -
Combine the Ropes:
Now, place your two twisted ropes next to each other. This is the secret to the complex look: twist these two ropes together in the opposite direction of your original twists. -
Smooth the Rope:
Gently roll the final combined rope back and forth on your work surface. This helps the strands bond together and creates a smooth, uniform cylinder while keeping that intricate pattern intact. -
Trim the Ends:
Use your blade to cut off the messy ends of your rope. I usually trim just enough to reveal a clean cross-section where the pattern looks consistent.
Clean Hands Trick
Red pigment bleeds easily! Always handle and roll your white clay strands first, or wash your hands thoroughly between colors to keep the white pristine.
Step 3: Shaping and Finishing
-
Shape the Cane:
Bend the top third of your twisted rope into a classic shepherd’s hook shape. Be gentle to maintain the rounded profile of the rope. -
Flare the Curve:
Gently pinch the very ends of the cane to soften the cut edge, slightly rounding them off for a polished look. -
Insert the Hanging Hardware:
Take your small metal eye pin or screw hook. Carefully push it into the very top center of the candy cane arch. If the clay distorts, smooth it back into place around the metal base. -
Bake the Ornament:
Place the cane on a parchment-lined baking sheet. Bake according to your specific clay brand’s package instructions (usually around 275°F for 15-30 minutes). -
Cool Down:
Allow the ornament to cool completely on the baking sheet. Moving it while hot can cause warping or breakage. -
Apply Glaze (Optional):
For that wet, candy-like shine seen in the photo, brush on a coat of gloss glaze. Let it dry according to the bottle instructions. -
Add the Ribbon:
Cut a length of red satin ribbon. Thread it through the metal eye hook and tie a secure knot to create a hanging loop.
Cracking Clay?
If the clay cracks while bending the hook, it wasn’t conditioned enough. Warm it in your hands longer or mix in a drop of clay softener oil.
Hang this sweet creation on a sturdy branch to enjoy its festive charm all season long

TRACK YOUR CERAMIC JOURNEY
Capture glaze tests, firing details, and creative progress—all in one simple printable. Make your projects easier to repeat and improve.
Reindeer Face Ornaments
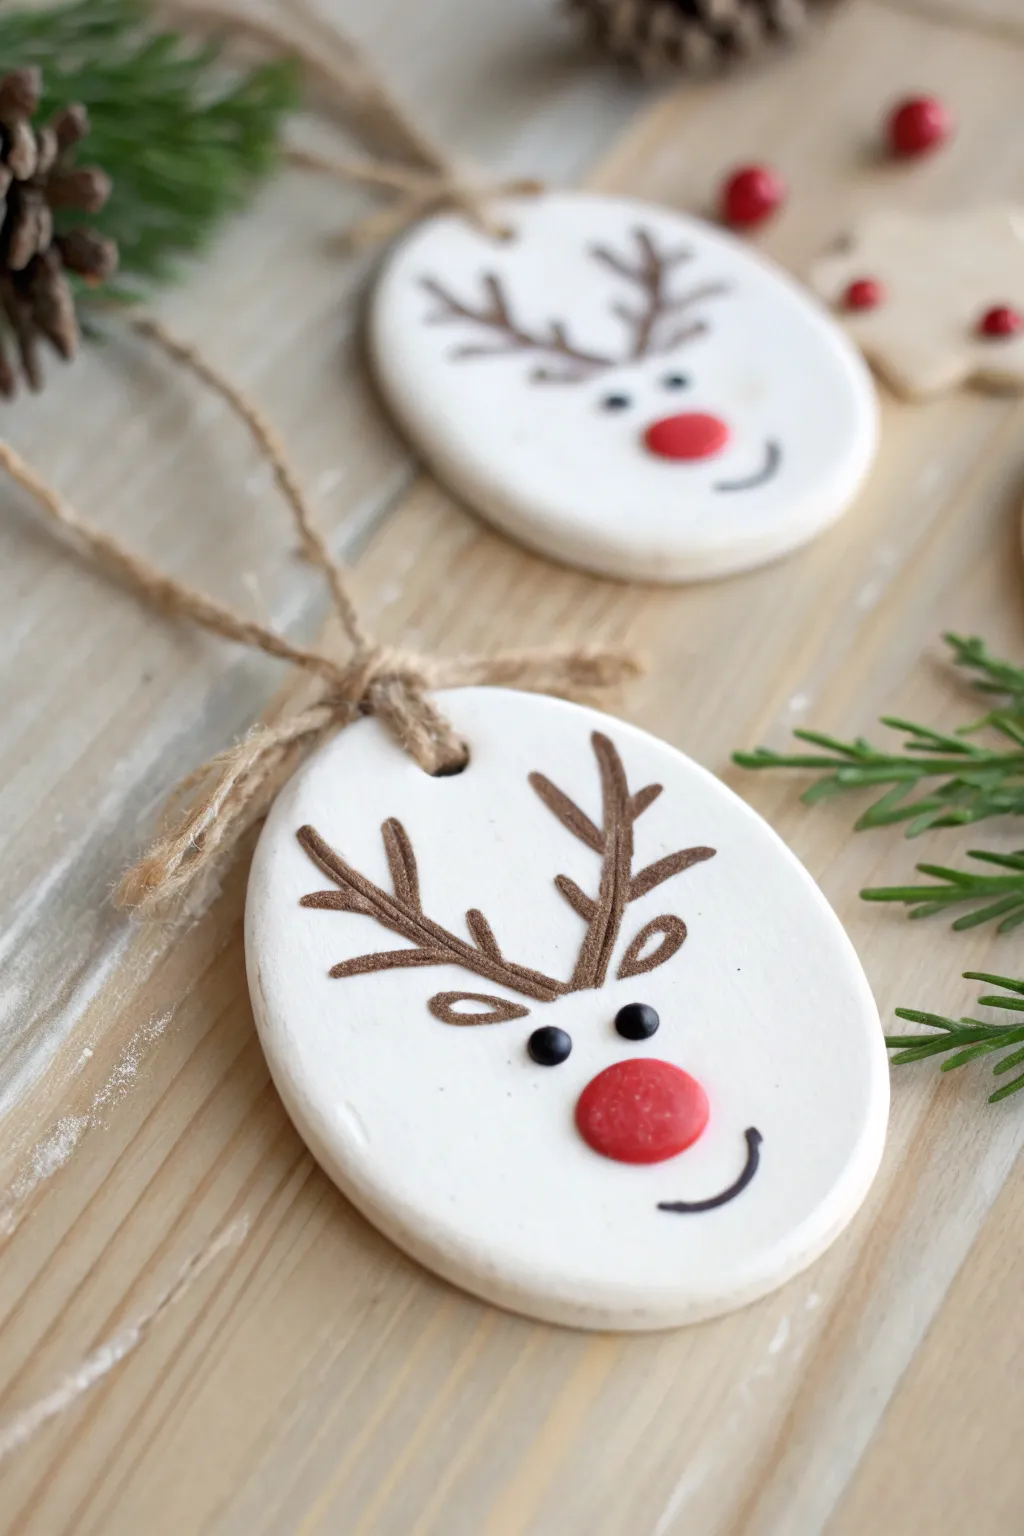
These charming oval ornaments capture the iconic look of a reindeer using simple shapes and a bright red nose. The smooth white clay provides the perfect canvas for painted antlers and a playful expression, making them a festive addition to any tree.
Step-by-Step
Materials
- White modeling clay (air-dry or polymer, white)
- Rolling pin
- Oval cookie cutter (or a knife and paper template)
- Straw or skewer (for the hole)
- Sandpaper (fine grit)
- Dark brown acrylic paint or permanent marker
- Black puff paint or small black beads (for eyes)
- Red polymer clay or red acrylic paint (for nose)
- Small detail paintbrush
- Jute twine or ribbon
- Clear matte varnish (optional)
Step 1: Shaping the Base
-
Roll the clay:
Begin by conditioning your white clay until it is soft and pliable. Roll it out on a smooth surface to an even thickness of about 1/4 inch so it’s sturdy enough for hanging. -
Cut the shape:
Using an oval cookie cutter, press firmly into the clay to create your face shape. If you don’t have a cutter, you can trace an oval template with a craft knife. -
Smooth the edges:
Before the clay hardens, dip your finger in a little water and gently run it along the cut edges to smooth out any roughness or stray crumbs. -
Add a hanging hole:
Use a drinking straw or a thick skewer to punch a clear hole near the top center of the oval. Make sure it’s not too close to the edge to prevent cracking. -
Dry the ornaments:
Allow the clay to dry completely according to the package instructions. Air-dry clay usually takes 24-48 hours, while polymer requires baking. -
Sand for perfection:
Once fully cured, use a piece of fine-grit sandpaper to buff the surface and edges. This creates a professional, smooth finish for your painting.
Clay Cracking?
If using air-dry clay, cracks can happen if it dries too fast. Try covering ornaments loosely with plastic wrap while they dry to slow the process down.
Step 2: Creating the Features
-
Add the nose:
If you are using polymer clay, adding a small flattened ball of red clay before baking is best. If painting, wait until the white base is dry, then paint a bold red circle in the lower center. -
Outline the antlers:
Using a very fine paintbrush dipped in dark brown paint, draw two main stems rising from the forehead area, curving slightly outward. -
Thicken the lines:
Go back over your initial antler lines to give them some weight. I find it helpful to make the base of the antlers slightly thicker than the tips. -
Add antler branches:
Paint smaller V-shaped branches coming off the main stems. Keep them simple and somewhat symmetrical for that classic cartoon look. -
Create the eyes:
For dimensional eyes like the photo, adhere two small black beads just above the nose using strong craft glue. Alternatively, use dots of black puff paint. -
Draw the smile:
With a fine-tip permanent marker or your detail brush and black paint, draw a simple, curved line off to one side below the nose for a quirky, cheerful grin. -
Seal the artwork:
Once all paint and glue is completely dry, brush on a thin layer of clear matte varnish to protect the design from scratches and dust. -
Attach the hanger:
Cut a length of jute twine, thread it through the hole at the top, and tie a secure knot to create a rustic loop. -
Tie the bow:
For a finishing touch, tie a second piece of twine into a small bow right at the base of the loop, trimming the ends short.
Make It Sparkle
Mix a tiny amount of red glitter into the paint for the nose or dust wet paint with superfine glitter to make Rudolph truly shine under the tree lights.
Hang your new reindeer friend on a sturdy branch where his red nose can be seen by everyone
Wreath Ornaments With Fingerprint Berries
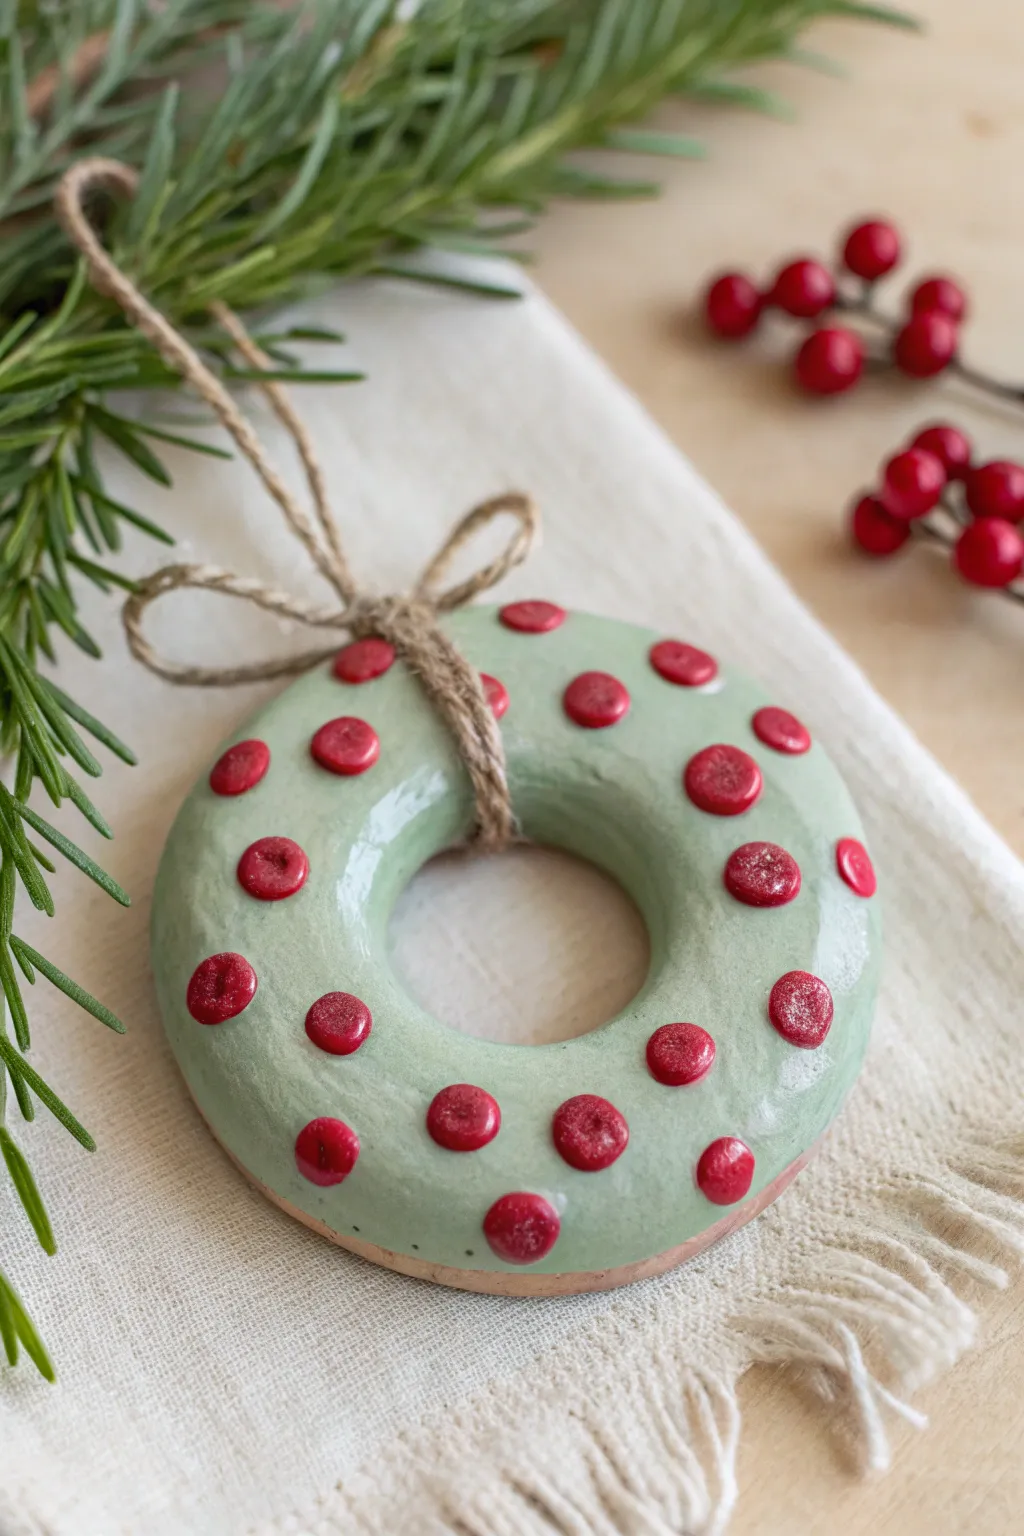
This charming wreath ornament combines the rustic texture of clay with a pop of glossy, festive red. Perfect for little hands, the ‘berries’ are made using simple fingerprint impressions or small applied clay balls for a personalized touch.
Detailed Instructions
Materials
- Air-dry clay or polymer clay (white)
- Circle cookie cutters (two sizes: one large for the wreath, one small for the center hole)
- Rolling pin
- Parchment paper or canvas mat
- Acrylic paints (sage green and bright red)
- Glossy varnish or clear sealant (Mod Podge Gloss is great)
- Jute twine
- Small paintbrush
- Fine-grit sandpaper (optional)
- Toothpick or straw
Step 1: Shaping the Base
-
Prepare the Clay surface:
Begin by rolling out a chunk of clay on a piece of parchment paper or a canvas mat. Aim for a thickness of about 1/4 inch to ensure the ornament is sturdy but not too heavy. -
Cut the outer circle:
Use your larger circle cookie cutter to stamp out the main shape of the wreath. If the edges are ragged, gently smooth them with a damp finger before moving on. -
Create the center hole:
Center the smaller circle cutter inside the large clay circle and press down firmly to remove the middle section, creating that classic donut shape. -
Smooth the edges:
Take a moment to dip your finger in a little bit of water and run it along the inner and outer freshly cut edges. This rounds them off slightly for a more polished professional ceramic look. -
Add the hanger hole:
Using a straw or a toothpick, punch a small hole near the top of the wreath shape. Make sure it goes all the way through so you can thread your twine later.
Cracked Clay Fix
If you see hairline cracks while drying, mix a tiny bit of fresh clay with water to make a paste. Fill the cracks, smooth it out, and let it dry again before painting.
Step 2: Adding the Berries
-
Form clay balls:
Pinch off very tiny amounts of leftover clay and roll them into small spheres between your fingers. You’ll need about 15-20 depending on the size of your wreath. -
Attach the berries:
Score the surface of the wreath lightly where you want a berry, dab a tiny bit of water or slip (liquid clay) on the spot, and press the clay ball down firmly so it flattens slightly into a button shape. -
Secure the bond:
I like to gently press the edges of each ‘berry’ just to make sure they are truly adhered to the base, so they don’t pop off during the drying phase. -
Let it dry:
Allow the clay to dry completely according to package instructions. For air-dry clay, this usually takes 24-48 hours. Flip it over halfway through to ensure the back dries evenly. -
Sand imperfections:
Once fully dry and hard, inspect the edges. If there are any sharp points or rough spots, gently buff them away with fine-grit sandpaper.
Step 3: Painting and Finishing
-
Apply the green base:
Paint the entire wreath shape in a soft sage green, carefully working around the raised berries. You might need two coats for opaque coverage. -
Paint the berries:
Using a smaller detail brush, paint the raised clay dots in a bright, festive crimson red. Keep a steady hand to avoid getting red on the green background. -
Seal for shine:
Once the paint is completely dry, apply a generous coat of glossy varnish or sealant over the entire front of the ornament. This gives it that glazed ceramic appearance. -
Prepare the hanger:
Cut a length of jute twine, about 8 inches long. Fold it in half to create a loop at the top. -
Tie the bow:
Thread the twine through the hole you made earlier. Secure it with a knot, then tie a small, rustic bow right at the base of the loop so it sits on top of the wreath.
Add Sparkle
While the red paint on the berries is still wet, sprinkle a tiny pinch of ultra-fine glitter on them. This creates a sugared berry effect that catches the lights.
Hang this lovely handmade keepsake on your tree to enjoy for years to come
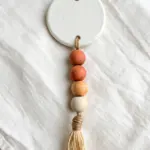
Angel Silhouette Ornaments
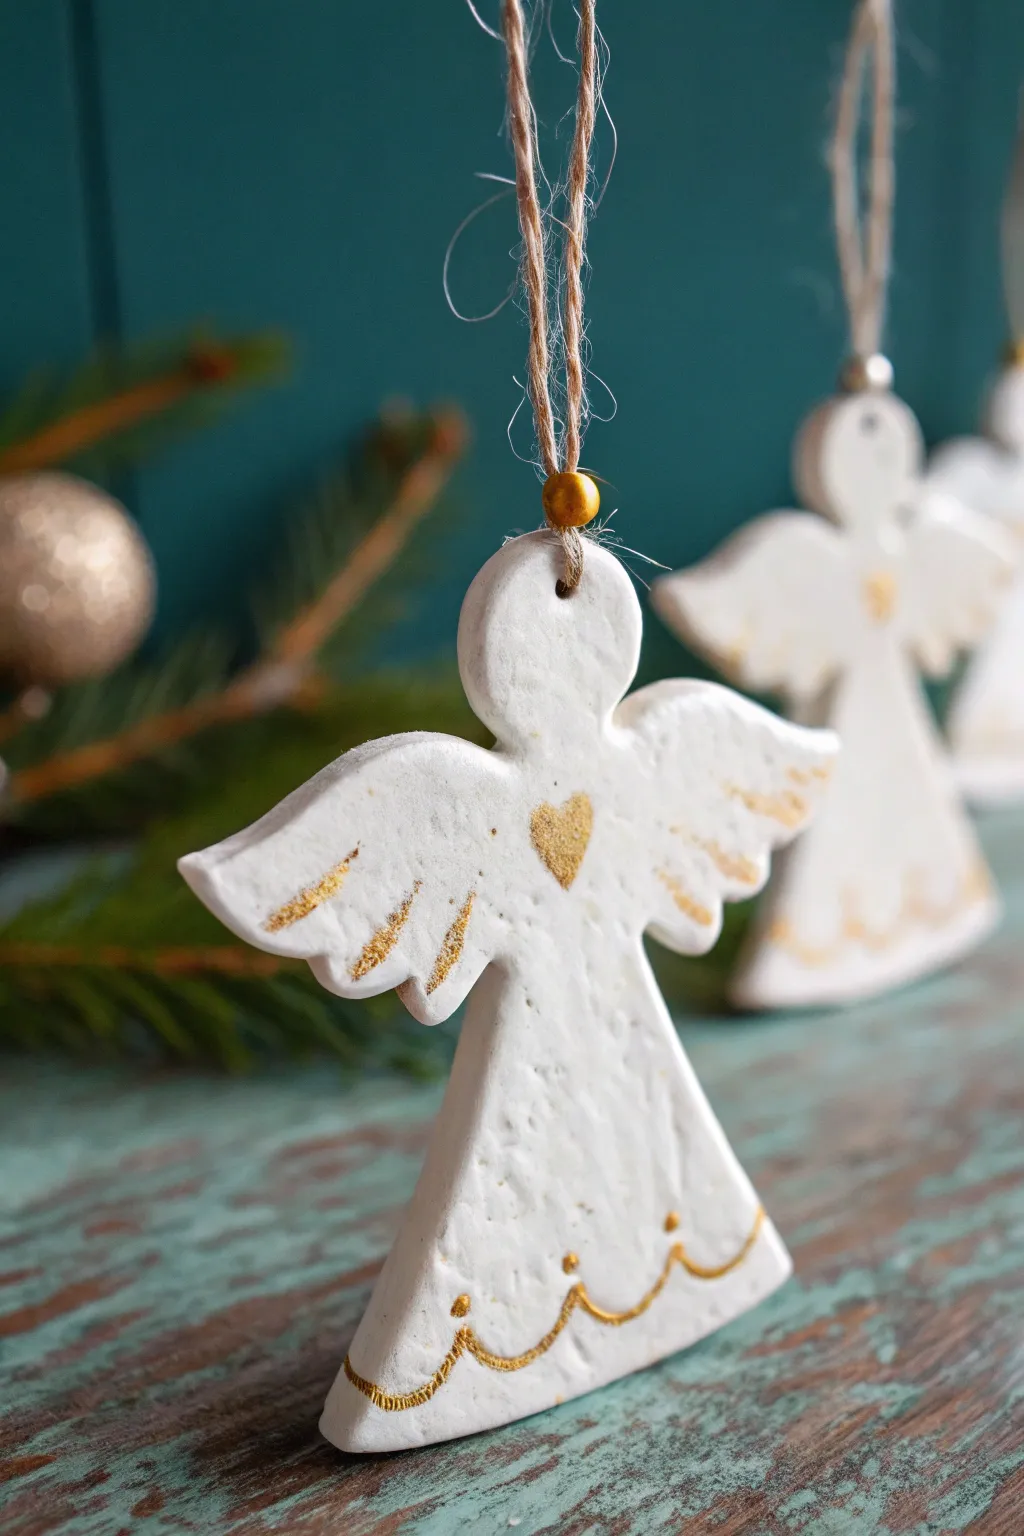
These charming clay ornaments feature a classic angel shape with a bright white finish and delicate hand-painted gold details. Their rustic jute hangers and wooden beads give them a timeless, handmade feel perfect for any holiday tree.
Step-by-Step Tutorial
Materials
- White or natural air-dry clay (or salt dough)
- Angel-shaped cookie cutter (approx. 3-4 inches tall)
- Rolling pin
- Parchment paper or non-stick craft mat
- Fine-grit sandpaper
- Metallic gold acrylic paint
- Fine detail paintbrush (size 0 or 00)
- Small wooden beads (gold or natural)
- Natural jute twine
- Straw or toothpick (for making the hole)
- Water and sponge (for smoothing)
Step 1: Shaping the Angels
-
Prepare the workspace:
Lay down a sheet of parchment paper or a non-stick craft mat on a flat surface to prevent the clay from sticking. -
Condition the clay:
Take a handful of air-dry clay and knead it in your hands for a minute until it feels soft, warm, and pliable. This helps prevent cracks later on. -
Roll out the slab:
Use a rolling pin to flatten the clay into an even slab. Aim for a thickness of about 1/4 inch—too thin and they might break; too thick and they’ll be heavy. -
Cut the shapes:
Press your angel cookie cutter firmly into the clay. Give it a gentle wiggle to ensure a clean cut before lifting it out. Remove the excess clay from around the shape. -
Smooth the edges:
Dip your finger in a little bit of water and gently run it along the cut edges of the angel to smooth down any roughness or stray bits of clay. -
Create the hanging hole:
Use a plastic straw or a toothpick to poke a neat hole near the top of the angel’s head. Make sure the hole is wide enough for your twine to pass through easily.
Step 2: Drying and Refining
-
Let them dry:
Place the cut-out angels on a flat drying surface. Let them air dry for 24-48 hours. I like to flip them over gently halfway through the drying process so both sides dry evenly and stay flat. -
Sand for perfection:
Once completely hard and dry, inspect your ornaments. Use a piece of fine-grit sandpaper to lightly buff away any remaining sharp edges or bumps on the surface. -
Wipe clean:
Use a dry cloth or a slightly damp paper towel to wipe off any clay dust created by sanding.
Fixing Cracks
If you notice tiny hairline cracks while drying, mix a small amount of fresh wet clay with water to make a paste and fill them in gently
Step 3: Adding the Gold Details
-
Load your brush:
Dip a fine detail brush into metallic gold acrylic paint. You don’t need much paint; a little goes a long way. -
Paint the heart:
Carefully paint a small heart right in the center of the angel’s chest. -
Highlight the wings:
Paint gentle, curved strokes along the edges and feathers of the wings to accentuate their shape. -
Detail the hem:
Paint a scalloped line along the bottom edge of the angel’s skirt. Add tiny gold dots at the peak of each scallop for extra sparkle. -
Dry the paint:
Allow the gold paint to dry completely, which should only take about 15–20 minutes.
Try Texture
Before cutting the angel shape, press a lace doily or a textured stamp into the wet clay slab to give the ornament a beautiful embossed pattern
Step 4: Final Assembly
-
Cut the twine:
Cut a piece of jute twine about 8 inches long. -
Thread the loop:
Fold the twine in half to create a loop. Thread the folded end through the hole at the top of the angel. -
Add the bead:
Before securing the loop, thread a small wooden bead onto the two loose ends of the twine and slide it down until it sits right on top of the angel’s head. -
Secure the hanger:
Tie a secure knot with the loose ends of twine to close the loop, creating your hanger.
Now your beautiful, gilded angels are ready to hang or be gifted to family and friends
Mitten and Stocking Ornaments
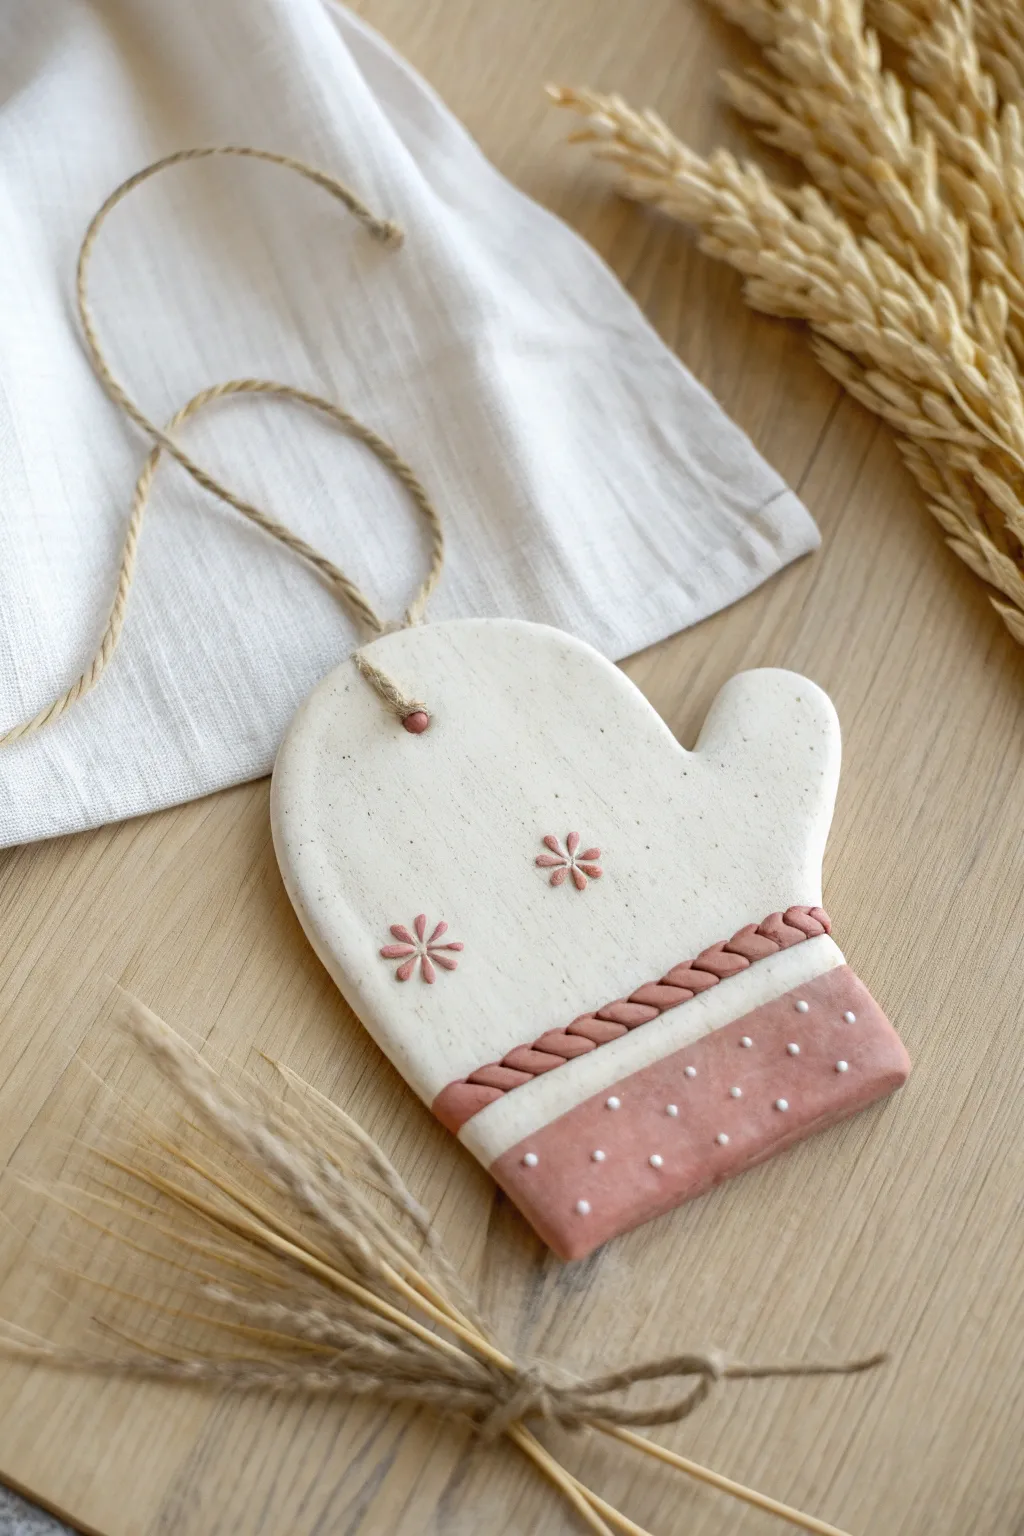
Create a warm and inviting winter keepsake with this adorable mitten-shaped clay ornament. Featuring sweet stamped flower details and a textured pink cuff, this project perfectly captures the charm of handmade holiday decor.
Step-by-Step
Materials
- White creative clay (polymer or air-dry)
- Pastel pink clay (or pink acrylic paint)
- Rolling pin
- Mitten cookie cutter (or craft knife and paper template)
- Small flower stamp or clay embossing tool
- Needle tool or toothpick
- Jute twine
- Small round piping tip or straw (for dots)
- Clear matte varnish (optional)
Step 1: Shaping the Base
-
Condition the Clay:
Begin by kneading a ball of white clay until it is soft, pliable, and free of any cracks. -
Roll It Out:
Roll the white clay out on a smooth surface to an even thickness of about 1/4 inch (6mm). -
Cut the Shape:
Press your mitten cookie cutter firmly into the clay. If you don’t have a cutter, I like to trace a paper mitten template lightly onto the clay and carefully cut around it with a craft knife. -
Smooth the Edges:
Dip your finger in a little bit of water (for air-dry clay) or baby oil (for polymer) and gently run it along the cut edges to smooth out any roughness. -
Make the Hanging Hole:
Use a straw or a tool to poke a clean hole near the top of the mitten cuff for the string later.
Clean Clay Tip
Keep baby wipes nearby! Pink clay can stain white clay easily. Clean your hands and tools thoroughly between handling the different colors to keep your white bright.
Step 2: Adding the Cuff Details
-
Prepare the Pink Clay:
Condition a smaller amount of pastel pink clay. Roll it out into a thin sheet. -
Cut the Cuff Strip:
Measure the width of your mitten’s bottom edge. Cut a rectangular strip of pink clay that perfectly matches this width and is about 1 inch tall. -
Attach the Cuff:
Gently press the pink rectangle onto the bottom of the white mitten. If using air-dry clay, score the back slightly and add a dab of water to help it stick. -
Create the Braid:
Roll two very thin snakes of pink clay. Twist them together tightly to form a mini rope or braid effect. -
Position the Trim:
Lay this twisted rope across the seam where the pink cuff meets the white mitten. press distinctly but gently so it adheres without flattening the texture. -
Trim Excess:
Use your craft knife to slice off any excess rope hanging over the sides, blending the ends into the ornament’s edge.
Cracking Up?
If you see tiny cracks forming while air-drying, smooth a tiny drop of water over them immediately. Drying away from direct heat sources helps prevent this too.
Step 3: Decorating and Finishing
-
Stamp the Flowers:
Using a small flower stamp, press two floral indentations into the center of the white section. If you don’t have a stamp, press a small ball of pink clay onto the surface and use a needle tool to drag lines outward from the center to form petals. -
Add Polka Dots:
Take tiny pinched bits of white clay and roll them into minuscule balls. Press these randomly onto the pink cuff section to create a polka dot pattern. -
Dry or Bake:
Follow the specific instructions for your clay type. Bake polymer clay in the oven as directed, or let air-dry clay sit in a safe spot for 24-48 hours. -
Thread the Twine:
Once fully cured and hard, cut a length of jute twine. -
Secure the Loop:
Thread the twine through the hole at the top and knot it securely to create a hanging loop. -
Optional Seal:
For extra durability, you can brush a coat of clear matte varnish over the entire piece.
Hang your new cozy mitten on a branch or gift it to a friend to spread some winter cheer
Jingle Bell Look-Alike Ornaments
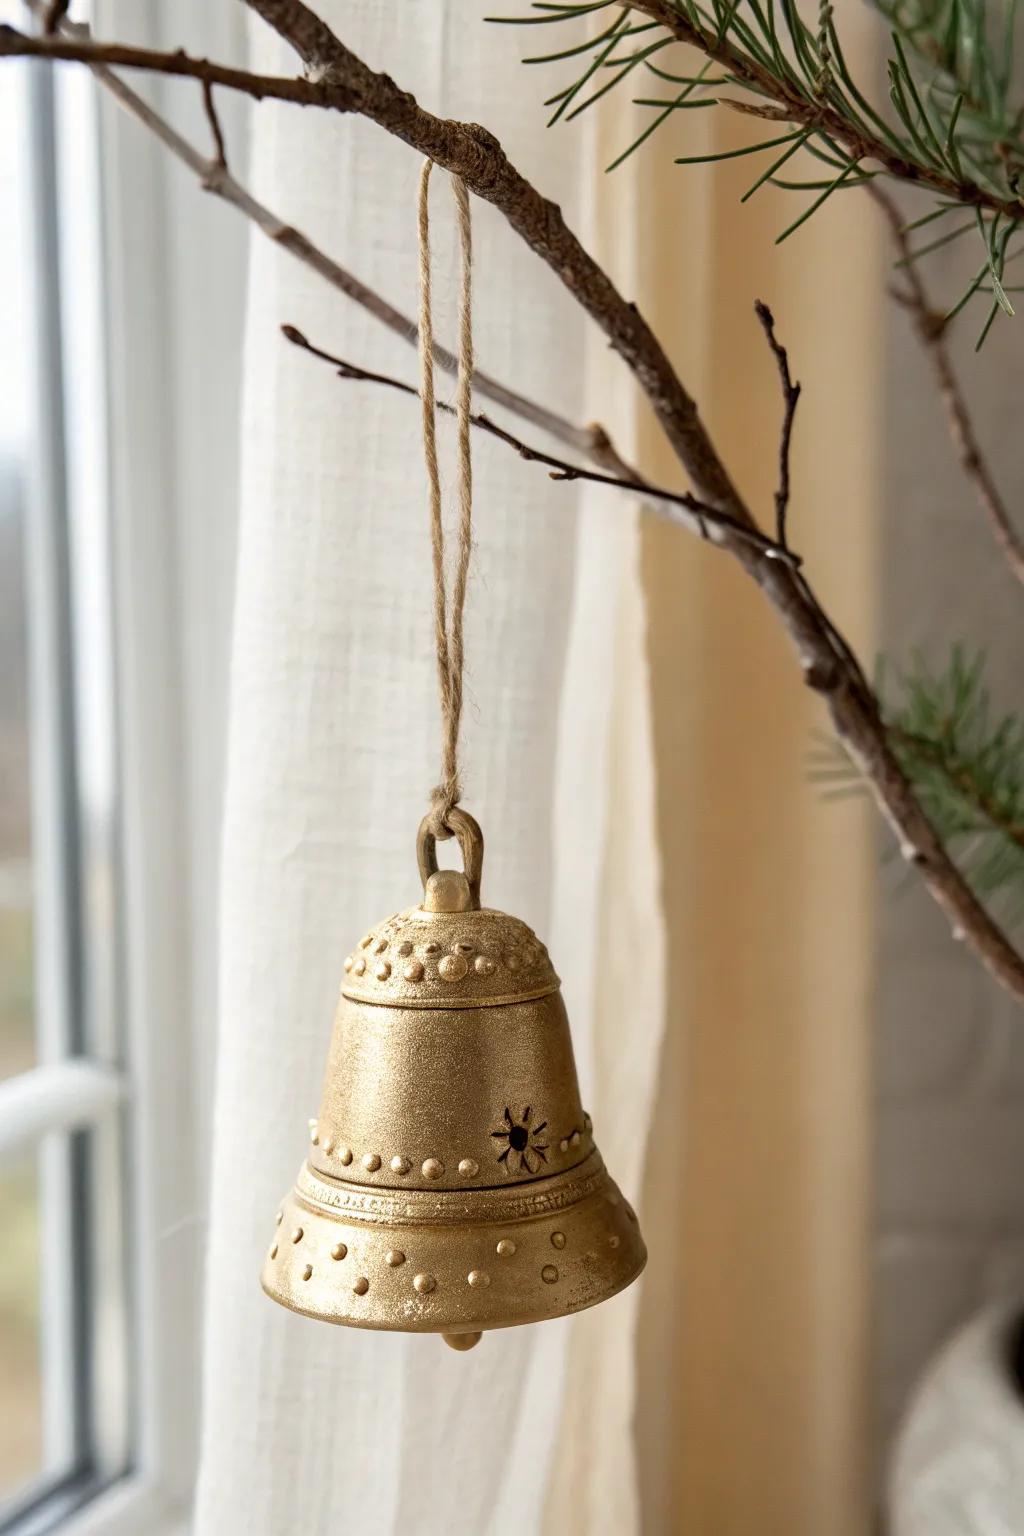
Transform simple air-dry clay into a stunning, rustic-style jingle bell that looks like heavy antique brass. This project uses basic coil and pinch techniques to create a beautiful, decorative bell perfect for hanging in a window or on a holiday tree.
Step-by-Step Guide
Materials
- Air-dry clay (white or terra cotta)
- Metallic gold acrylic paint
- Paintbrushes (flat shader and fine detail)
- Clay roller or rolling pin
- Clay knife or plastic crafting tool
- Small straw or toothpick (for star cutouts)
- Jute twine or hemp cord
- Water cup (for smoothing)
- Small spherical object (like a marble or bead) for the clapper
- Sandpaper (fine grit)
Step 1: Shaping the Bell Body
-
Form the base:
Start with a ball of clay roughly the size of a golf ball. Roll it smooth in your palms to remove any major cracks. -
Pinch the dome:
Gently press your thumb into the center of the ball to create a hollow opening, similar to starting a pinch pot. Rotate the ball as you pinch to keep the walls an even thickness. -
Elongate the shape:
Instead of making a wide bowl, gently squeeze and pull the clay upward to create a taller, bell-like dome shape. Work slowly to maintain symmetry. -
Create the flared rim:
At the open bottom edge, gently flare the clay outward with your fingers to give it that classic bell silhouette. -
Smooth the surface:
Dip your finger in a tiny bit of water and rub it over the exterior to smooth out fingerprints and join marks.
Crack Fixer
If cracks appear while drying, mix a tiny bit of fresh clay with water to make a paste (slip) and fill them in before painting.
Step 2: Adding Details and Hardware
-
create the top loop:
Roll a small snake of clay and form it into a U-shape. Attach this firmly to the very top of the bell dome. Use a little water to blend the clay seams so it doesn’t pop off later. -
Emboss the pattern:
Using the head of a small crafting tool or a dull pencil, gently press rows of small dots around the dome. I like to do a ring near the top and another near the bottom rim for visual interest. -
Add the star cutout:
Carefully use a knife tip or a star-shaped punch to carve a small starburst design into the center of the bell’s body. -
Create the decorative bands:
Roll two very thin coils or ‘snakes’ of clay. Wrap one around the bell just below the top dome, and another just above the bottom flare. Blend them slightly onto the body so they stick. -
Form the clapper (optional):
Roll a tiny clay ball for the clapper. Pierce a hole through it while wet so you can tie it inside later. -
Dry thoroughly:
Set your bell aside in a safe, dry place. Depending on humidity, this usually takes 24-48 hours. Turn it occasionally so the bottom dries evenly.
Step 3: Finishing Touches
-
Light sanding:
Once bone dry, take fine-grit sandpaper and gently buff away any sharp rough spots or uneven edges on the rim. -
Base painting:
Apply a first coat of metallic gold acrylic paint. Don’t worry if it looks streaky; the first coat acts as a primer. -
Second coat:
Apply a second, thicker coat of gold paint. Use a stippling motion (dabbing the brush) to get paint into the pressed dot details and corners of the bands. -
Antique effect:
If you want an aged look, you can mix a tiny drop of brown paint into your gold or water down some brown paint to create a wash, then wipe it off quickly, leaving darkness in the crevices. -
Attach the hanger:
Cut a length of jute twine. Fold it in half and thread the loop through the clay handle at the top. -
Secure the knot:
Pull the tails of the twine through the loop to create a lark’s head knot, tightening it securely against the clay handle. -
Hang and enjoy:
Tie off the ends of the twine to create a hanging loop at your desired length.
Texture Twist
Before painting, while the clay is wet, gently press a piece of lace or burlap onto the surface for a rich, vintage texture.
Now your lovely handmade bell is ready to bring a touch of golden warmth to your decor
Painted Polka Dot Baubles
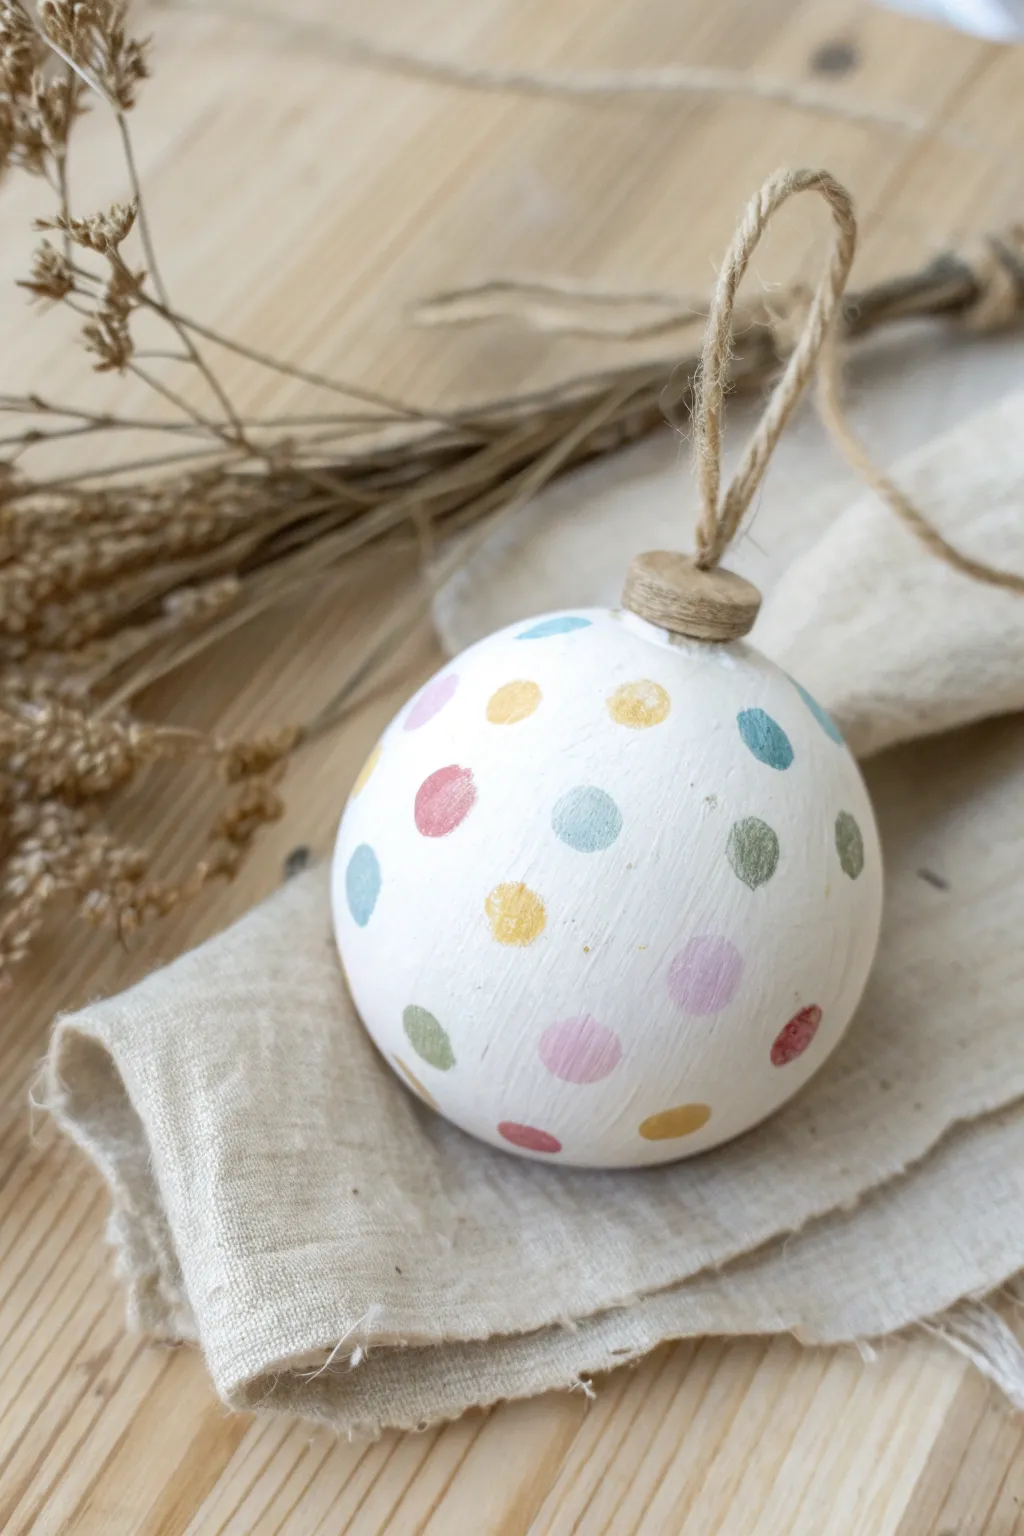
Using simple supplies, this charming ornament brings a soft, rustic touch to your holiday decor. The white clay base creates the perfect canvas for sweet, muted pastel dots that look almost like watercolor on paper.
How-To Guide
Materials
- Air-dry clay (white)
- Hollow plastic ball or styrofoam ball (as an anchor/armature)
- Acrylic paints (White, pastel pink, baby blue, muted yellow/gold, sage green)
- Small round paintbrush or foam pouncer
- Jute twine
- Small eye hook or wire loop
- Fine-grit sandpaper
- Wooden bead or small clay disk (for the cap)
- Matte sealant or varnish (optional)
Step 1: Creating the Base
-
Prepare the core:
Start with a lightweight core like a styrofoam ball or a plastic ornament form. This keeps the final piece from being too heavy for a tree branch. -
Condition the clay:
Take a handful of white air-dry clay and knead it until it is soft and pliable. If the clay feels dry, I like to dampen my fingers slightly to make it easier to work with. -
Cover the form:
Flatten the clay into a pancake shape and drape it over your core ball. Gently press and smooth the clay around the sphere until the core is completely covered. -
Smooth the surface:
Roll the clay-covered ball gently between your palms to smooth out any fingerprints or seams. A little water on your hands helps creating a seamless finish. -
Add the cap structure:
Create a small, flat disk of clay or use a small wooden bead/button. Press this onto the top of the sphere to mimic the metal cap of a traditional bauble. -
Insert the hanging mechanism:
While the clay is still wet, carefully push a small eye hook or a loop of wire into the center of the cap area. Ensure it goes deep enough to be secure once dry. -
Let it dry:
Place the ornament on a piece of parchment paper to dry. It needs to dry completely, which usually takes 24-48 hours depending on the thickness of the clay.
Step 2: Painting & Finishing
-
Sand for texture:
Once fully dry, lightly sand the surface with fine-grit sandpaper. You don’t need it perfectly smooth; keeping a bit of texture adds to the rustic handmade look. -
Apply the base coat:
Paint the entire sphere with white acrylic paint. This ensures a uniform background and helps the pastel colors pop. Let this coat dry completely. -
Mix your palette:
Prepare your pastel colors. You’ll need soft shades of pink, blue, yellow, and green. If your paints are too bright, mix in a tiny bit of white to mute them. -
Start the polka dots:
Dip a small round brush or a Q-tip into your first color (e.g., pastel yellow). Gently press it onto the surface to create a round dot. The dots don’t have to be perfect circles. -
Vary the spacing:
Move around the sphere, adding dots of the same color randomly. Leave generous space between them for the other colors. -
Add more colors:
Clean your brush and switch to the next color, like baby blue. FIll in some of the gaps, turning the ornament as you work to ensure even coverage. -
Complete the pattern:
Continue with the remaining colors (pink, sage green). Aim for an organic scatter rather than a rigid grid pattern. -
Paint the cap:
Paint the small cap at the top a natural beige or light brown to resemble wood or cork. -
Seal (optional):
Creates a protective layer by applying a coat of matte varnish. This will protect the paint and give the ornament a finished feel. -
Add the twine:
Thread a piece of rustic jute twine through the eye hook. Tie a simple knot at the ends to create a hanging loop.
Stamp don’t swirl
For cleaner circles, use the eraser end of a pencil as a stamp. Dip it in paint and press straight down, lifting straight up without twisting.
Add a little sparkle
Mix a tiny pinch of fine iridescent glitter into your white base coat paint for a subtle, snowy shimmer that catches the light.
Hang your speckled creation on the tree and enjoy the handcrafted warmth it brings to your holiday season
Nature-Imprint Leaf Ornaments
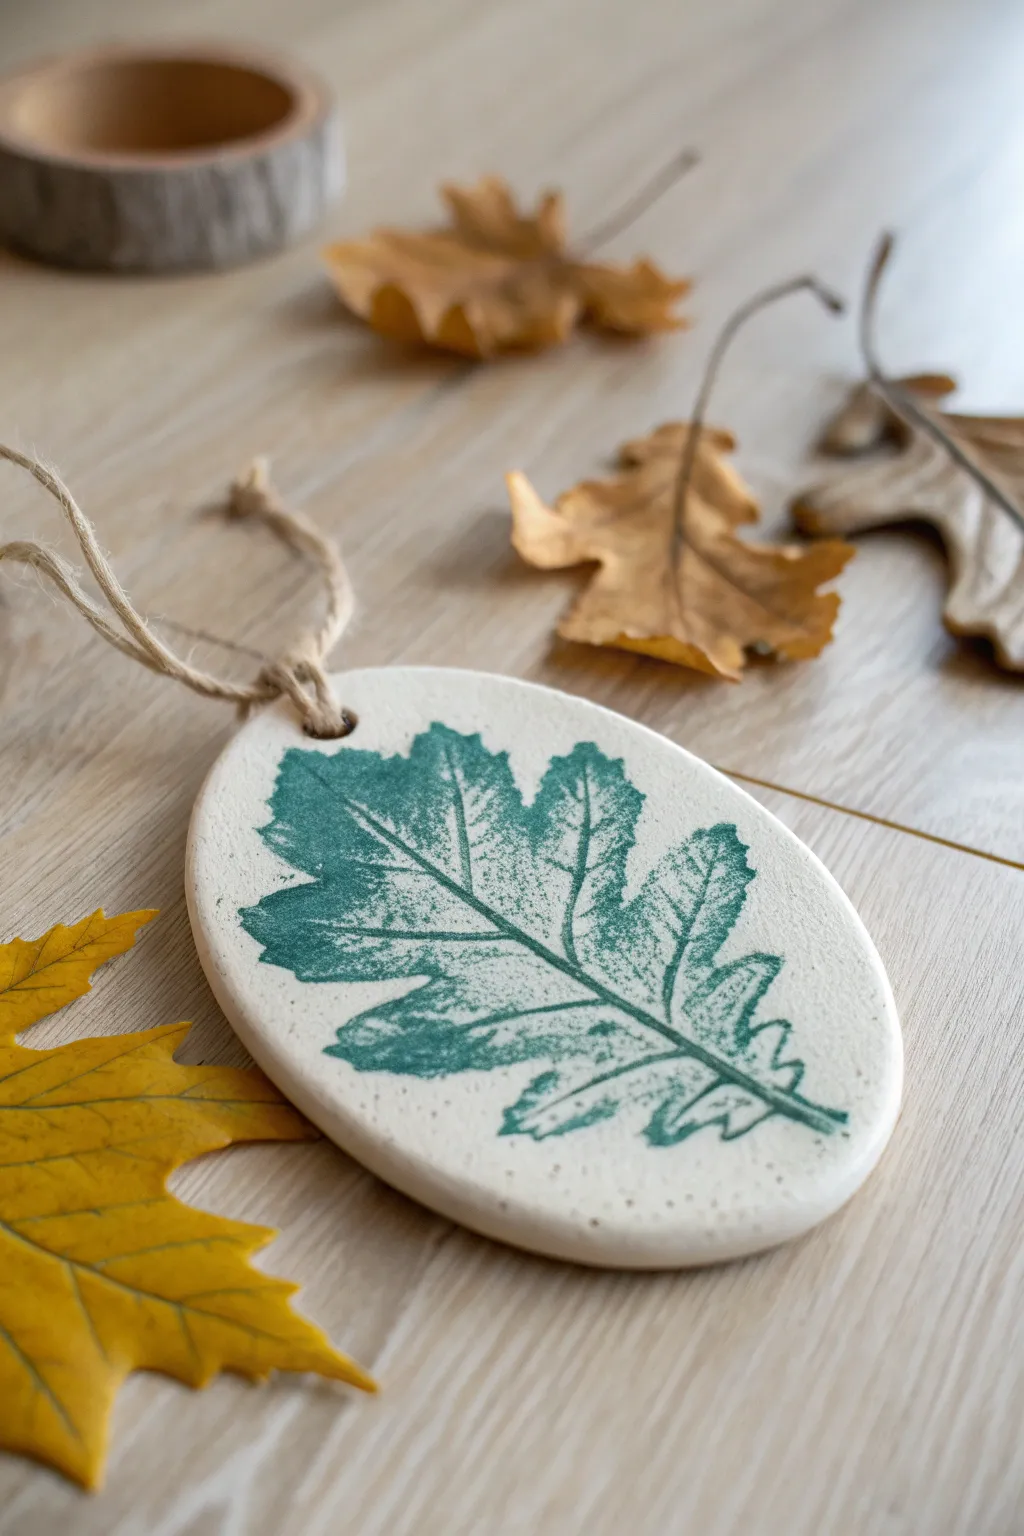
Capture the delicate veins of your favorite fall foliage with this elegant nature-inspired ornament. Using air-dry clay and a simple painting technique, you can preserve a crisp, green leaf impression that looks beautiful year-round.
Step-by-Step Guide
Materials
- White air-dry clay (or polymer clay)
- Fresh leaf with prominent veins (like an oak leaf)
- Rolling pin
- Oval cookie cutter (or a knife and paper template)
- Dark green acrylic paint
- Small foam brush or makeup sponge
- Jute twine or rustic string
- Straw or skewer (for the hole)
- Parchment paper or craft mat
- Fine-grit sandpaper (optional)
Step 1: Shaping the Clay
-
Prepare your workspace:
Lay down a sheet of parchment paper or a craft mat to prevent sticking. This makes it much easier to move the clay later without warping it. -
Rolll out the clay:
Take a handful of white air-dry clay and knead it until soft. Roll it out to an even thickness, roughly 1/4 inch thick. You want it sturdy but not too heavy. -
Select your leaf:
Inspect your leaf collection and choose one that fits nicely within your desired oval shape. A leaf with thick, raised veins on the back will give the crispest print. -
Press the leaf:
Place the leaf vein-side down onto the smooth clay surface. Gently roll over the leaf with your rolling pin once or twice to press it firmly into the clay. -
Cut the shape:
Position your oval cutter over the pressed leaf to frame it perfectly. Press down firmly to cut the shape, then peel away the excess clay from the outside. -
Remove the leaf:
Carefully lift the stem of the leaf and peel it off the clay. Do this slowly to reveal the intricate impression left behind. -
Create a hanging hole:
Use a straw or a wooden skewer to poke a hole near the top of the oval. Make sure it’s not too close to the edge to prevent cracking later. -
Smooth the edges:
Dip your finger in a tiny bit of water and run it along the cut edges of the oval to smooth out any roughness from the cookie cutter.
Step 2: Coloring and Finishing
-
Let it dry entirely:
Allow the ornament to dry completely according to your clay’s package instructions. This usually takes 24 to 48 hours for air-dry clay. Flip it halfway through for even drying. -
Sand imperfections:
Once fully hard, check the edges. If there are sharp spots, lightly sand them with fine-grit sandpaper for a professional finish. -
Apply the paint:
Squeeze a small amount of dark green acrylic paint onto a palette. Dab your foam sponge into the paint, then blot most of it off on a paper towel until the sponge is almost dry. -
Highlight the texture:
Key step: Gently dab the sponge over the leaf impression. Because you are using a ‘dry brush’ technique, the paint should catch on the surface texture but not flood the deep crevices, creating a stamped look. -
Refine the edges:
If the paint looks too heavy in one spot, quickly blot it with a clean paper towel. Aim for a textured, slightly rustic coverage rather than a solid block of color. -
Seal the surface (optional):
To protect the paint and clay, you can apply a thin layer of matte varnish or Mod Podge over the entire front surface once the green paint is dry. -
Add the hanger:
Cut a length of jute twine, about 6-8 inches long. Fold it in half and thread the loop through the hole you made earlier. -
Secure the twine:
Pass the loose ends of the twine through the loop and pull tight to create a lark’s head knot, then tie the ends together to finish the hanger.
Uneven Impressions?
If the leaf isn’t pressing evenly, place a piece of paper over the leaf before rolling. This distributes pressure without tearing the delicate foliage.
Level Up: Paint Wash
Instead of sponge painting, water down the acrylic paint heavily. Brush it over the whole imprint, then wipe the surface with a damp cloth.
Hang your finished masterpiece in a window or on a seasonal branch display to enjoy the natural texture
Marbled Swirl Clay Ornaments
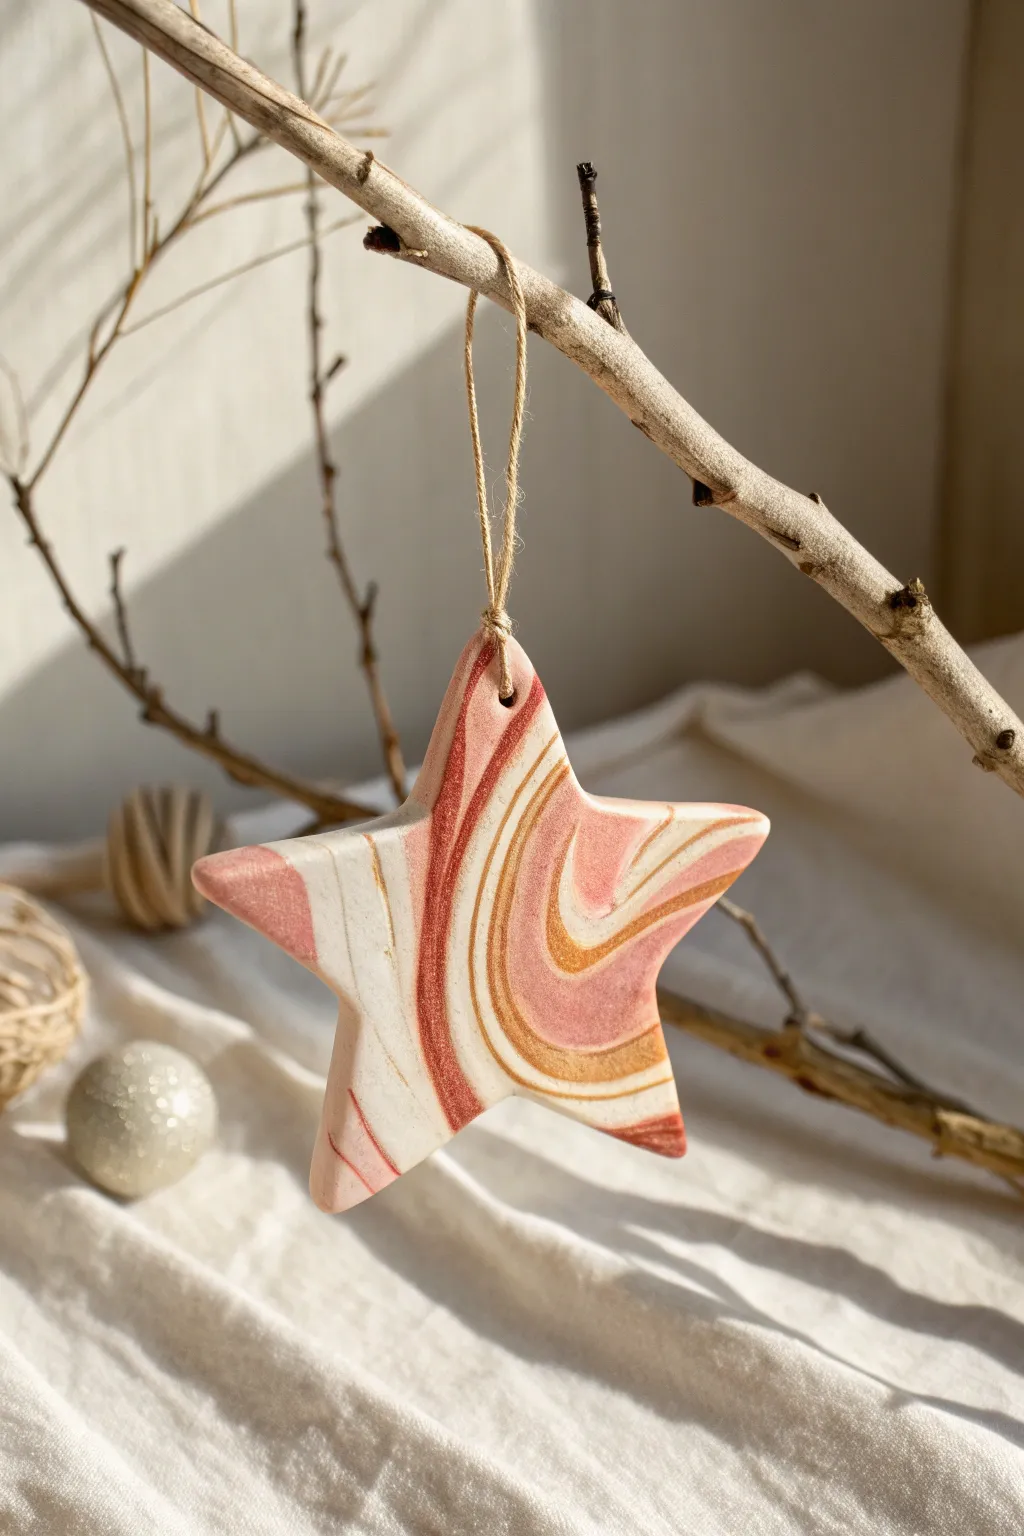
These elegant ornaments feature mesmerizing swirls of terra cotta, gold, and white that look far more complicated than they actually are. The soft, organic marbling technique ensures that no two stars are ever exactly alike, creating a unique constellation for your holiday décor.
How-To Guide
Materials
- Polymer clay (white, terra cotta/dusty pink, and gold/ochre)
- Star-shaped cookie cutter (medium size)
- Acrylic rolling pin or smooth glass jar
- Parchment paper or baking mat
- Straw or cocktail stick (for the hole)
- Baking sheet
- Oven
- Jute twine or clear fishing line for hanging
- Sandpaper (fine grit, optional)
- Gloss glaze (optional)
Step 1: Preparing the Clay
-
Condition the base colors:
Begin by taking small blocks of your three clay colors: white, terra cotta, and gold. Knead each color individually in your hands until they are soft, pliable, and warm to the touch. -
Create snakes:
Roll each color into a long, thin snake shape, roughly 5-6 inches long. You will want the white snake to be slightly thicker than the colored ones so the background remains bright. -
Twist them together:
Hold the three snakes together at one end and gently twist them around each other to form one large, multi-colored rope. Make sure the twist is tight, resembling a candy cane. -
Double the rope:
Fold this twisted rope in half, bringing the ends together. Twist the rope again. This step multiplies the layers of color. -
Repeat the fold:
Fold and twist the clay one or two more times. Be careful not to over-twist, as you want distinct ribbons of color rather than a muddy mixture. Stop when you see a pleasing density of lines.
Clean Cuts
To get super sharp edges on your star without distortion, place a piece of plastic wrap over the clay before pressing the cutter down. It rounds the edges slightly for a ‘puffy’ look.
Step 2: Marbling and Shaping
-
Form a ball:
Gently squash your twisted rope into a rough ball shape. Try to keep the swirling lines visible on the surface rather than burying them inside. -
Roll it out:
Place the clay ball on your parchment paper. Using the acrylic rolling pin, roll the clay out flat to about 1/4 inch thickness. I maintain even pressure here to ensure the ornament is uniform. -
Inspect the pattern:
Look at your flattened slab. You should see beautiful, organic swirls. If the marbling isn’t intricate enough, you can fold it once more and re-roll, but remember that less is often more with marbling. -
Cut the star:
Position your star-shaped cookie cutter over the section of the clay with the most pleasing pattern. Press down firmly and give it a tiny wiggle to ensure a clean cut. -
Remove excess clay:
Peel away the scrap clay from outside the cutter before lifting the cutter itself. Save these scraps! They can be re-rolled to make a ‘second generation’ marbled ornament that looks completely different. -
Lift and smooth:
Gently lift the star. Use your finger to softly smooth the edges where the cutter was, removing any tiny clay crumbs. -
Punch the hole:
Use a straw to punch a clean hole near the top point of the star. Make sure the hole isn’t too close to the edge to prevent the clay from cracking later.
Step 3: Baking and Finishing
-
Bake the clay:
Place the star on a parchment-lined baking sheet. Bake according to your specific brand of polymer clay instructions later—usually around 275°F (135°C) for 15-30 minutes per 1/4 inch thickness. -
Cool completely:
Once baked, remove the tray from the oven and let the star cool down completely on a flat surface. Don’t touch it while hot, as it can still be slightly soft. -
Sand rough edges:
If there are any sharp spots on the edges after baking, lightly sand them with fine-grit sandpaper for a professional finish. -
Add a glaze (optional):
If you prefer a shiny look, brush on a thin layer of polymer clay gloss glaze. Alternatively, leave it matte for a natural, stone-like appearance. -
String it up:
Cut a length of natural jute twine. Thread it through the hole and tie a knot at the end to create a rustic loop for hanging.
Metallic Magic
Mix a tiny amount of mica powder or gold leaf flakes into the translucent clay sections before twisting. This adds a subtle shimmer that catches the holiday lights beautifully.
Now you have a stunning, stone-like star ready to hang on a branch or give as a thoughtful handmade gift
Terrazzo Speckle Confetti Ornaments
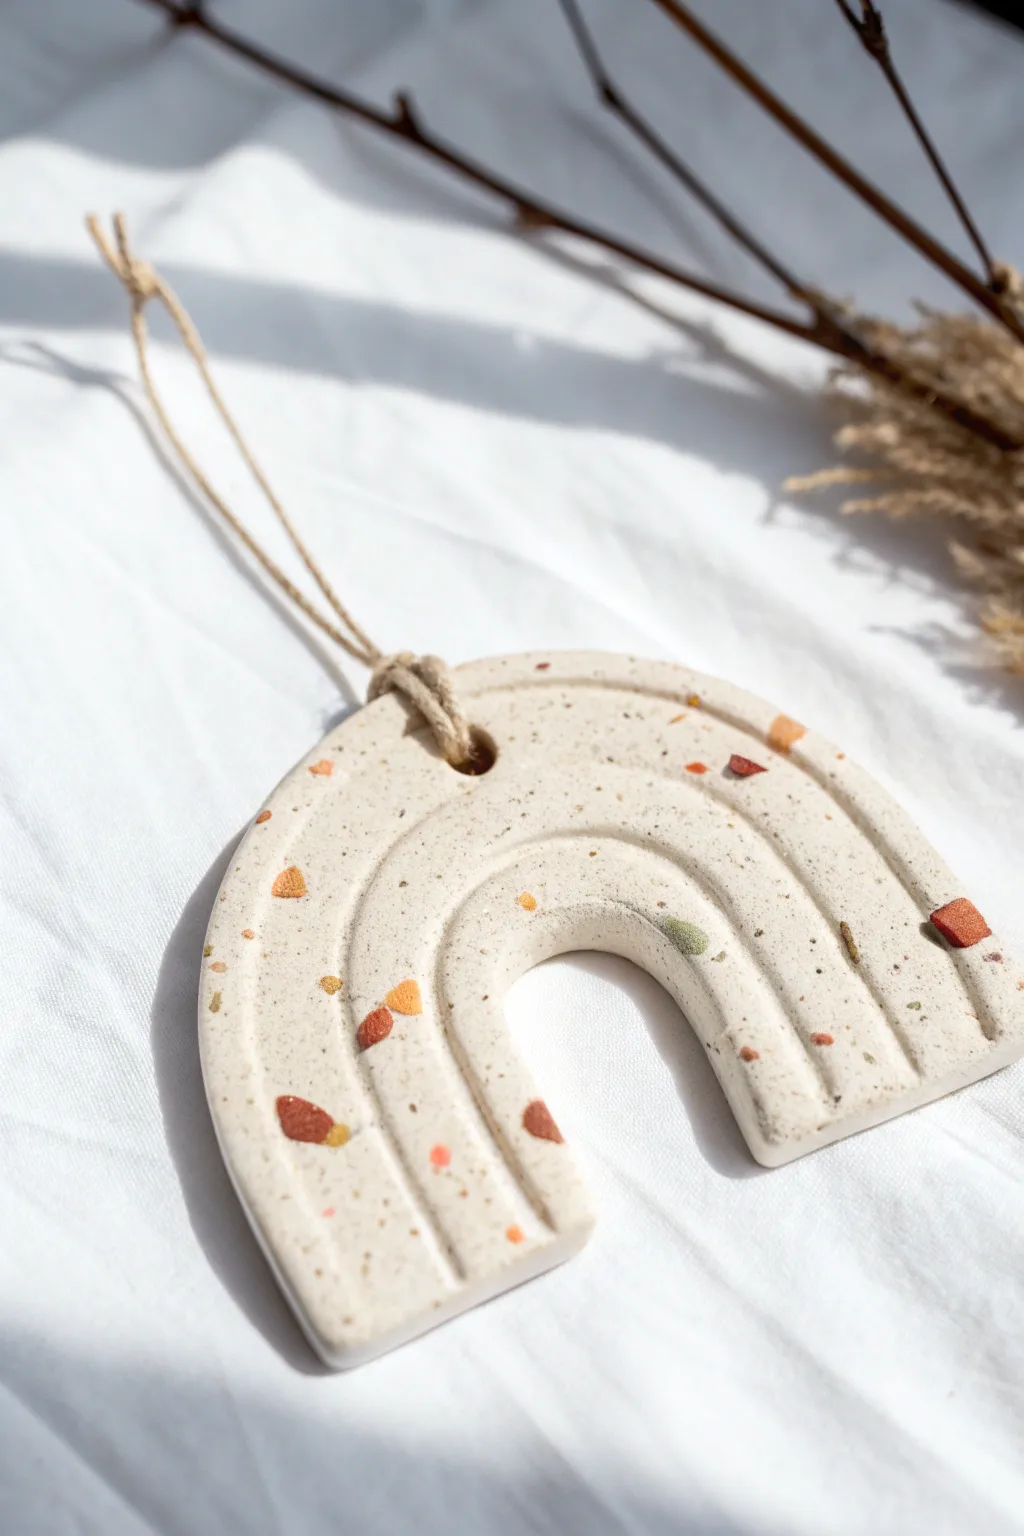
This trendy ornament achieves a high-end terrazzo look using nothing more than polymer clay. The speckled confetti effect creates a playful yet modern texture that looks beautiful hanging in a window or on a holiday tree.
Detailed Instructions
Materials
- White or cream polymer clay (main body)
- Small scraps of colored polymer clay (terrazzo chips – terracotta, mustard, olive green)
- Rolling pin or acrylic roller
- X-Acto knife or clay blade
- U-shaped rainbow clay cutter (or a printed template)
- Small circle cutter or straw (for the hanging hole)
- Parchment paper or baking mat
- Needle tool or toothpick
- Fine grit sandpaper (400-600 grit)
- Jute twine or hemp cord
- Oven
Step 1: Prepping the ‘Oatmeal’ Base
-
Condition the white clay:
Start by kneading your white or cream clay until it is soft and pliable. This prevents cracks later on. -
Add texture:
To get that speckled, stone-like appearance seen in the photo, add a tiny pinch of black pepper or very finely ground black clay into your white block and knead it until dispersed. This mimics a ceramic finish. -
Create the colored chips:
Take your colored clay scraps (terracotta orange, deep yellow, muted green) and chop them into tiny, irregular jagged pieces. Vary the sizes slightly, but keep them generally small like confetti.
Clean Rolling
Wipe your rolling pin with a baby wipe or alcohol between steps. This prevents stray colored clay from smearing onto your pristine white background.
Step 2: Forming the Terrazzo Pattern
-
Roll the base sheet:
Roll your conditioned white clay out to a thickness of about 1/4 inch (6mm). This sturdy thickness gives the ornament a quality feel. -
Apply the confetti:
Scatter your chopped colored clay chips randomly over the surface of the white slabs. Don’t overthink placement; random organic spacing looks best. -
Embed the chips:
Gently roll over the slab again with your rolling pin. You want to press the chips *into* the clay so the surface becomes smooth and flat, rather than having the chips sitting on top. -
Check the thickness:
Ensure the final slab is still an even thickness throughout. If the chips distorted the shape, trim the edges to square it up.
Glossy or Matte?
For a sealed finish, brush on a layer of water-based polyurethane varnish. Use matte for a natural stone look or gloss for a ceramic glaze effect.
Step 3: Cutting and Refining
-
Cut the rainbow shape:
Using a rainbow-shaped cookie cutter, press firmly into the terrazzo slab. If you don’t have a cutter, place a paper template on top and trace around it carefully with your blade. -
Add the arch grooves:
The ornament in the photo has distinct grooves separating the rainbow bands. Use a needle tool or a blunt styling tool to gently carve two curved lines following the arch shape. Keep the depth consistent but don’t cut all the way through. -
Create the hanging hole:
Use a straw or a small circular cutter to punch a hole at the very top center of the rainbow arch. Make sure it’s not too close to the edge. -
Smooth the edges:
Dip your finger in a little cornstarch or water and gently run it along the cut edges of the clay to soften them and remove any sharp angles.
Step 4: Finishing Up
-
Bake the clay:
Place the ornament on a parchment-lined baking sheet. Bake according to your polymer clay brand’s specific package instructions (usually 275°F/135°C for 15-30 minutes). -
Cool down:
Let the ornament cool completely on the baking sheet before handling. The clay hardens as it cools. -
Sand for exposure:
If the colored chips look a bit hazy, lightly wet-sand the surface with fine-grit sandpaper. This removes the thin layer of white clay over the chips and makes the colors pop. -
Add the hanger:
Cut a length of jute twine, thread it through the hole, and tie a secure knot at the base near the clay, then tie the ends together to form a loop.
Hang your new terrazzo masterpiece in a sunny spot and enjoy those beautiful speckles of color
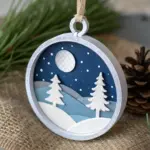
Glow-Accented Night Sky Ornaments
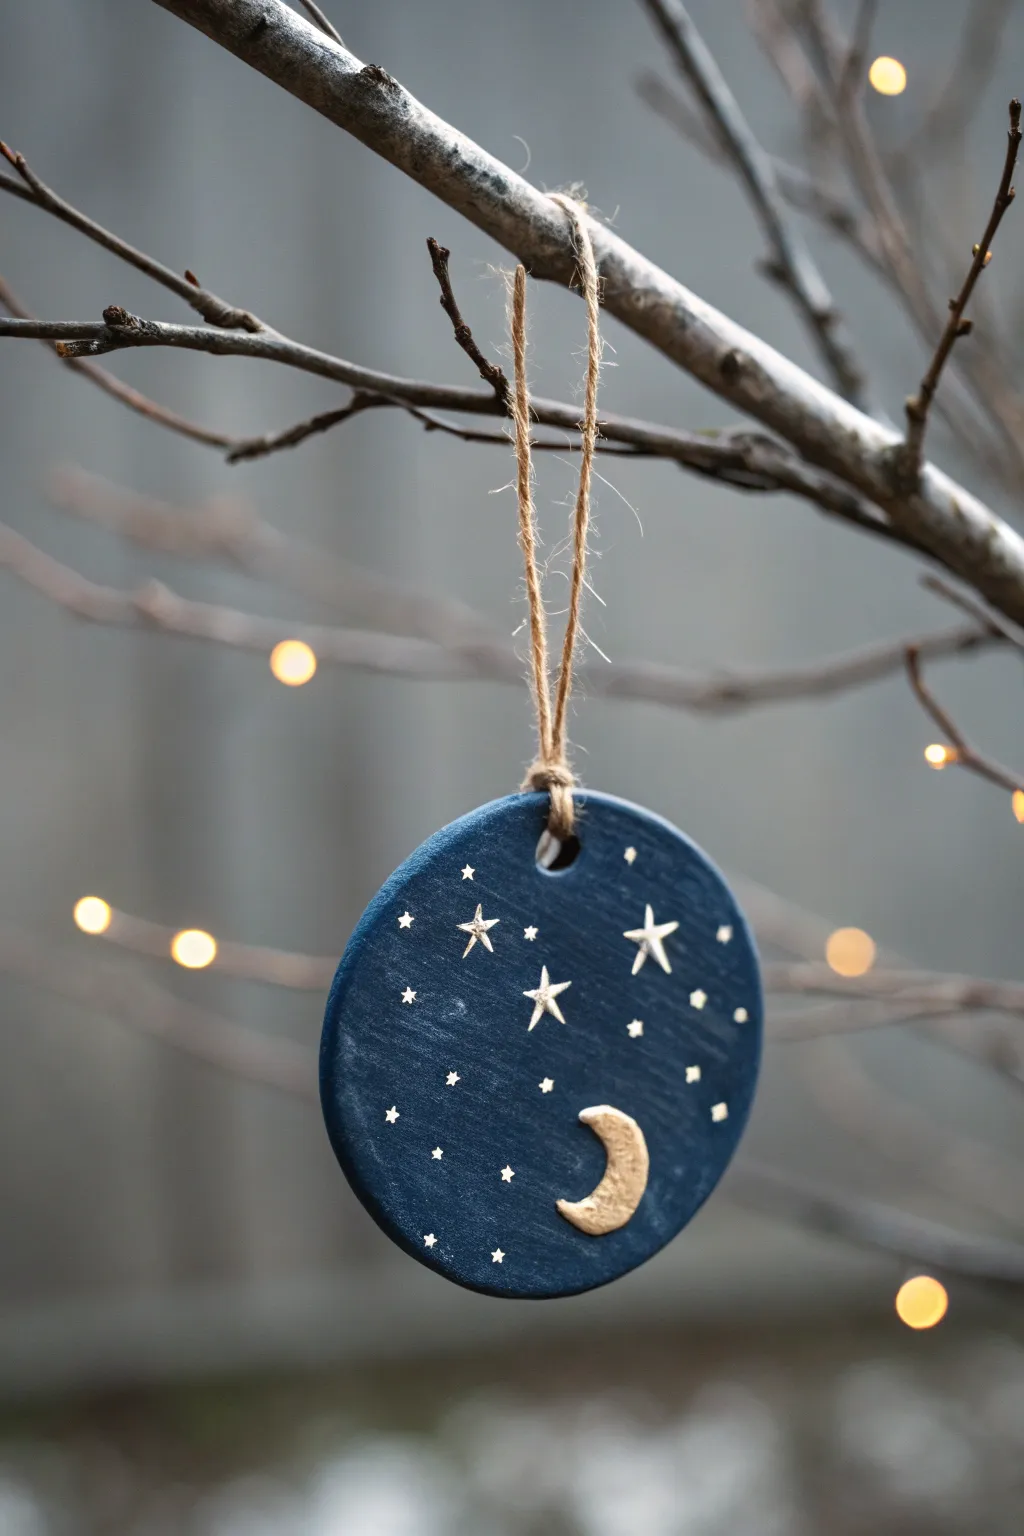
Bring the magic of a clear midnight sky indoors with these enchanting, deep blue ceramic-style ornaments. Featuring a textured golden moon and a scattering of celestial details, this project transforms simple clay into a dreamy piece of decor perfect for hanging on a winter branch.
Step-by-Step
Materials
- Air-dry clay or polymer clay (white)
- Circle cookie cutter (approx. 3 inches)
- Small rolling pin
- Drinking straw or skewer (for the hole)
- Acrylic paint: Midnight Blue or Navy
- Acrylic paint: Metallic Gold
- Fine-tipped paintbrush
- Small piece of parchment paper or craft mat
- Jute twine or ribbon
- Water cup and paper towels
- Toothpick or sculpting tool
- Fine-grit sandpaper (optional)
- Matte or satin sealant spray (optional)
Step 1: Shaping the Base
-
Roll the clay:
Start by taking a handful of clay and warming it in your hands until pliable. Place it on your craft mat or parchment paper and use the rolling pin to flatten it into an even sheet, aiming for about 1/4 inch thickness. Avoid going too thin, as the ornament needs to be sturdy. -
Cut the circle:
Press your circle cutter firmly into the clay to create the ornament base. Remove the excess clay from around the cutter before lifting the cutter itself to keep the edges clean. -
Smooth the edges:
Dip your finger in a tiny bit of water and gently run it around the circumference of your clay circle to smooth out any rough bits or stray crumbs left by the cutter. -
Create the hanging hole:
Using a drinking straw or a skewer, punch a hole near the top edge of the circle. Make sure not to place it too close to the very edge to prevent the clay from cracking later when hung.
Uneven Clay Surface?
If the clay dries slightly warped, place a heavy book on top of it while it’s in the ‘leather hard’ stage (semi-dry but not squishy) to flatten it out.
Step 2: Adding Celestial Details
-
Form the moon:
Take a tiny pinch of your leftover clay and roll it into a small ball, then flatten it slightly. Use your fingers to shape this into a crescent moon curve. -
Attach the moon:
Score the back of your moon and the spot on the circle where you want it to sit (near the bottom right looks nice) by scratching cross-hatches with a toothpick. Dab a tiny drop of water on the scratches and press the moon firmly onto the base to bond them. -
Texture the moon:
Gently tap the surface of the clay moon with the tip of a stiff paintbrush or a crumpled piece of foil to give it a cratered, rocky texture. -
Impress the stars:
Using a toothpick or a small star-shaped stamp if you have one, gently press a few star shapes into the clay background. Don’t press all the way through; you just want a slight indentation for the paint to catch later. -
Dry completely:
Set your ornament aside to dry. If using air-dry clay, this usually takes 24-48 hours. Flip it over halfway through the drying process to ensure it stays flat.
Step 3: Painting and Finishing
-
Sand edges:
Once fully cured and hard, check the edges. If there are any sharp spots, very lightly sand them down with fine-grit sandpaper. -
Base coat application:
Paint the entire surface (including the sides) of the round base with the midnight blue acrylic paint. You might need two coats to get that rich, opaque night-sky look. Be careful to paint carefully *around* the raised moon if you can, though painting over it is fixable later. -
Paint the moon:
After the blue is dry, carefully paint the raised moon shape with metallic gold paint. Use a small brush to get crisp edges where the gold meets the blue. -
Highlight the indented stars:
Take a very fine brush with a small amount of metallic gold or silver paint. Carefully fill in the larger star indentations you made earlier. -
Add tiny stars:
To create the distant stars, dip the very tip of a toothpick into white or pale gold paint. Gently dot the blue background in random clusters to create a galaxy effect. -
Adding the sparkle:
For the larger glimmering stars shown in the project, paint a small ‘x’ with a vertical line through it using white or silver paint. I find it helps to practice these on a scrap of paper first. -
Seal the work:
Once all paint works are totally dry, give the ornament a light coat of matte or satin sealant spray. This protects the finish and deepens the blue color. -
String it up:
Cut a length of jute twine roughly 8 inches long. Thread it through the hole at the top and tie a secure knot to create a rustic loop.
Glow Up Idea
Mix glow-in-the-dark powder into your white paint for the tiny star dots. During the day they look white, but at night your ornament will softly shine.
Hang your finished starry night ornament on a branch or in a window to catch the light