When I’m craving that soft, sweet air dry clay look, I always reach for projects that are small, functional, and totally aesthetic on a clean shelf or desk. Here are my go-to ideas for cute, pastel, display-worthy makes that feel doable even if you’re brand new to clay.
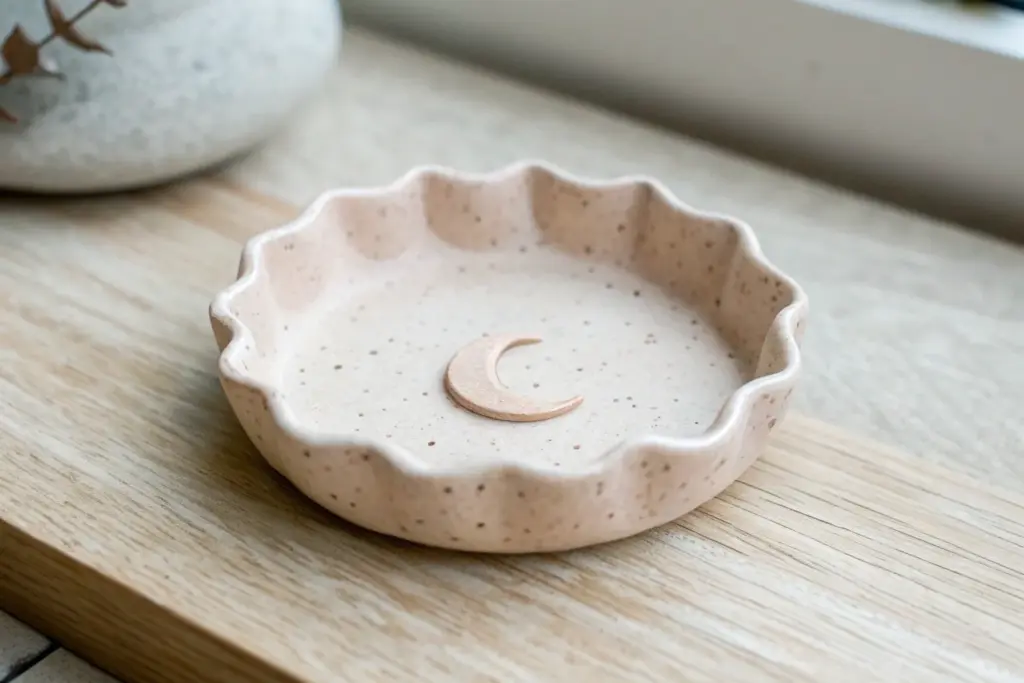
Pastel Flower Trinket Dish
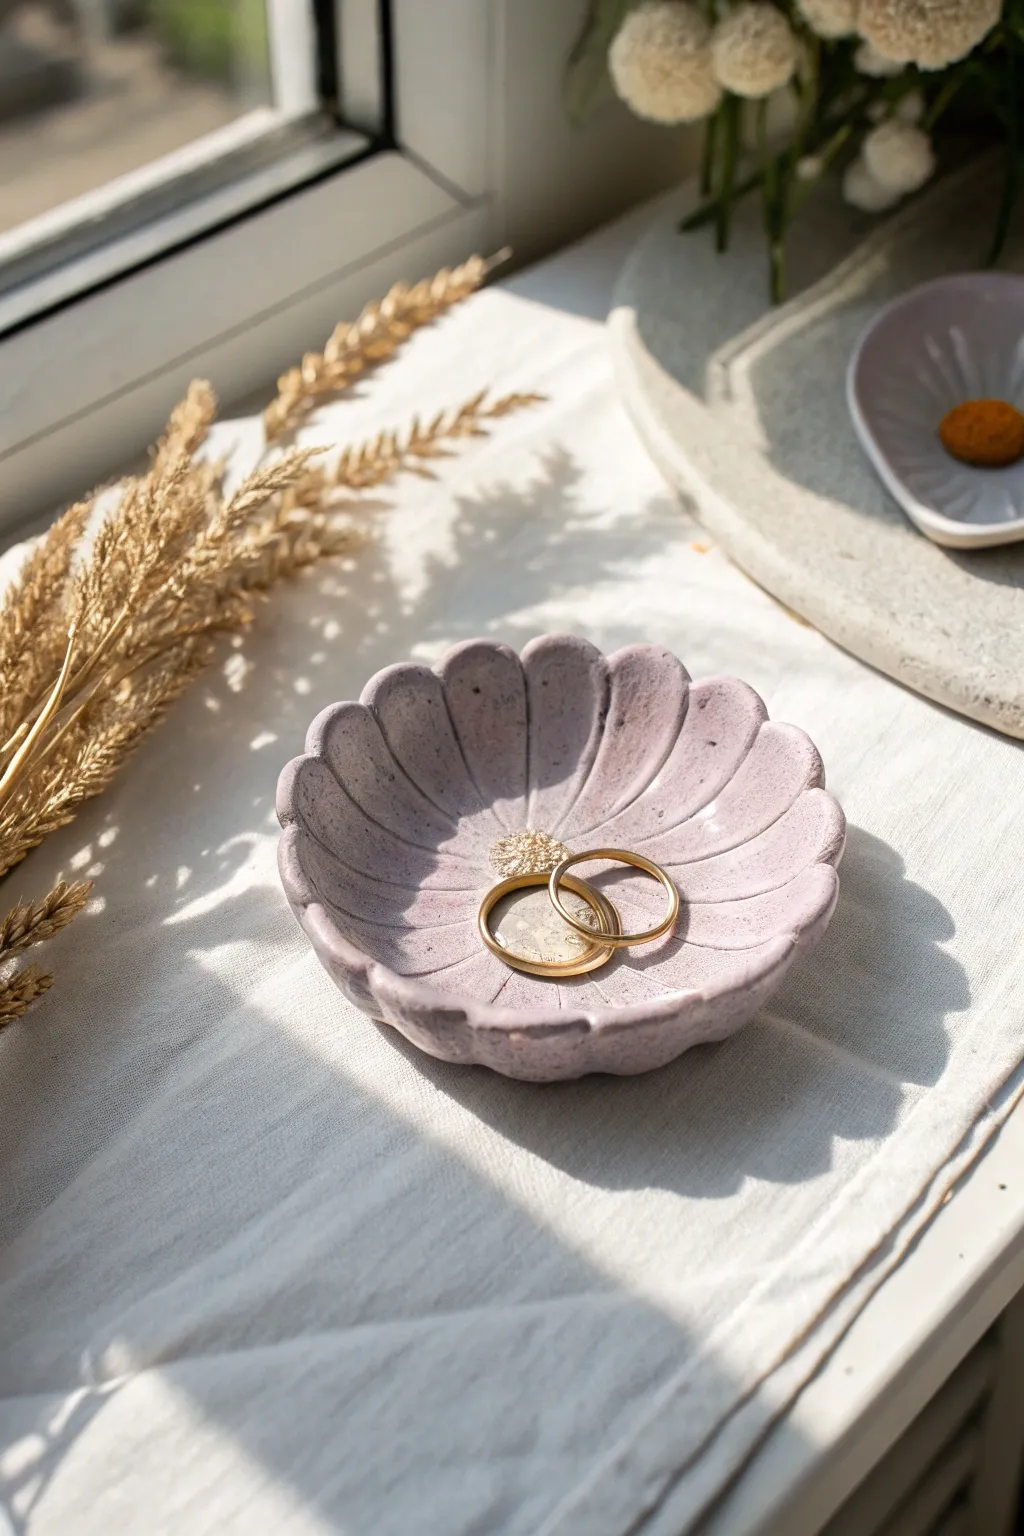
Capture the delicate beauty of a blooming flower or a sun-bleached seashell with this scalloped trinket dish. The soft, dusty lilac hue and subtle organic texture make it a dreamy spot to corral your favorite gold rings.
Step-by-Step Guide
Materials
- White air-dry clay (approx. 200g)
- Acrylic paint (pastel lilac or lavender)
- Acrylic rolling pin
- Small bowl or sphere (for shaping)
- Craft knife or clay needle tool
- Fine grit sandpaper (320 or 400 grit)
- Sealer (matte varnish)
- Small sponge for texturing
- Water in a small cup
- Parchment paper or silicone mat
Step 1: Coloring and Base Shaping
-
Pre-tint the clay:
Start by mixing a small pea-sized amount of lilac acrylic paint directly into your white air-dry clay. Knead it thoroughly until the color is completely uniform and streak-free; this gives a much smoother, stone-like finish than painting it later. -
Condition the clay:
Continue kneading until the clay feels warm and pliable. If it feels slightly dry or cracked during mixing, dip your finger in water and work it in to restore elasticity. -
Roll out the slab:
Place your clay on a piece of parchment paper. Use your acrylic roller to flatten the clay into an even slab, aiming for a thickness of about 1/4 inch (6mm). Don’t go too thin, or the edges will be fragile. -
Texture the surface:
To mimic the slightly gritty, stone-like look in the photo, gently dab a dry sponge or a crumpled piece of foil over the surface of your rolled slab. This breaks up the perfect smoothness.
Clean Cuts Hack
Before cutting into your clay, rub a tiny bit of lotion or oil onto your craft knife blade. It will glide through the clay without dragging or creating jagged edges.
Step 2: Cutting and Sculpting the Petals
-
Cut the circle:
Use a round cookie cutter or trace around a bowl (approx. 4-5 inches diameter) to cut a perfect circle from your slab. Lift away the excess clay. -
Mark the petals:
With a needle tool or the back of a knife, lightly score lines dividing the circle into equal segments—imagine a clock face. You’ll want about 12-14 segments for this daisy look. -
Scallop the edges:
Using your craft knife, carefully cut small ‘V’ notches or curves at the end of each marked line to create the separate petal tips. Smooth the fresh cuts immediately with a damp finger. -
Define the petals:
Take a modeling tool or a chopstick and press it radially from the center of the dish out to the notch between petals. This creates the deep groove that separates each petal segment. -
Curve the profile:
Using your thumb, gently press down in the center of each individual petal while pulling slightly upward on the edges. This gives the petals that cupped, concave shape seen in the reference. -
Refine the texture:
If you lost any texture while cutting, lightly re-dab the surface with your sponge, focusing on the center where jewelry will sit.
Step 3: Drying and Finishing
-
Form the bowl shape:
Lift your clay circle and gently place it inside a small cereal bowl or atop a sphere mold. I find that lining the drying bowl with plastic wrap first prevents sticking and helps the clay slide as it shrinks. -
Adjust the rim:
Once in the mold, double-check that your petal edges are even. If some look flat, gently curl the tips inward to enhance the blooming flower effect. -
Initial dry time:
Let the dish dry in a cool, dry place for 24 hours. Don’t rush this with heat, or the clay might crack. -
Flip to dry bottom:
After the top feels dry to the touch, carefully remove it from the mold and flip it over onto a wire rack. Let the bottom dry for another 12-24 hours. -
Sand for stone effect:
Once bone dry, take your fine-grit sandpaper and lightly buff the edges. You aren’t trying to make it perfectly smooth glass; just remove any sharp burs while keeping that matte, earthen texture. -
Seal the piece:
Apply a thin coat of matte varnish. This will protect the clay from moisture and deepen the lilac color slightly without adding an artificial shine.
Speckled Stone Look
To get the granite-like specks seen in the photo, mix tiny amounts of dried used coffee grounds or black pepper into the clay while kneading before you roll it out.
Place this lovely dish on your windowsill to catch the afternoon sun along with your treasures


Scalloped Edge Ring Dish
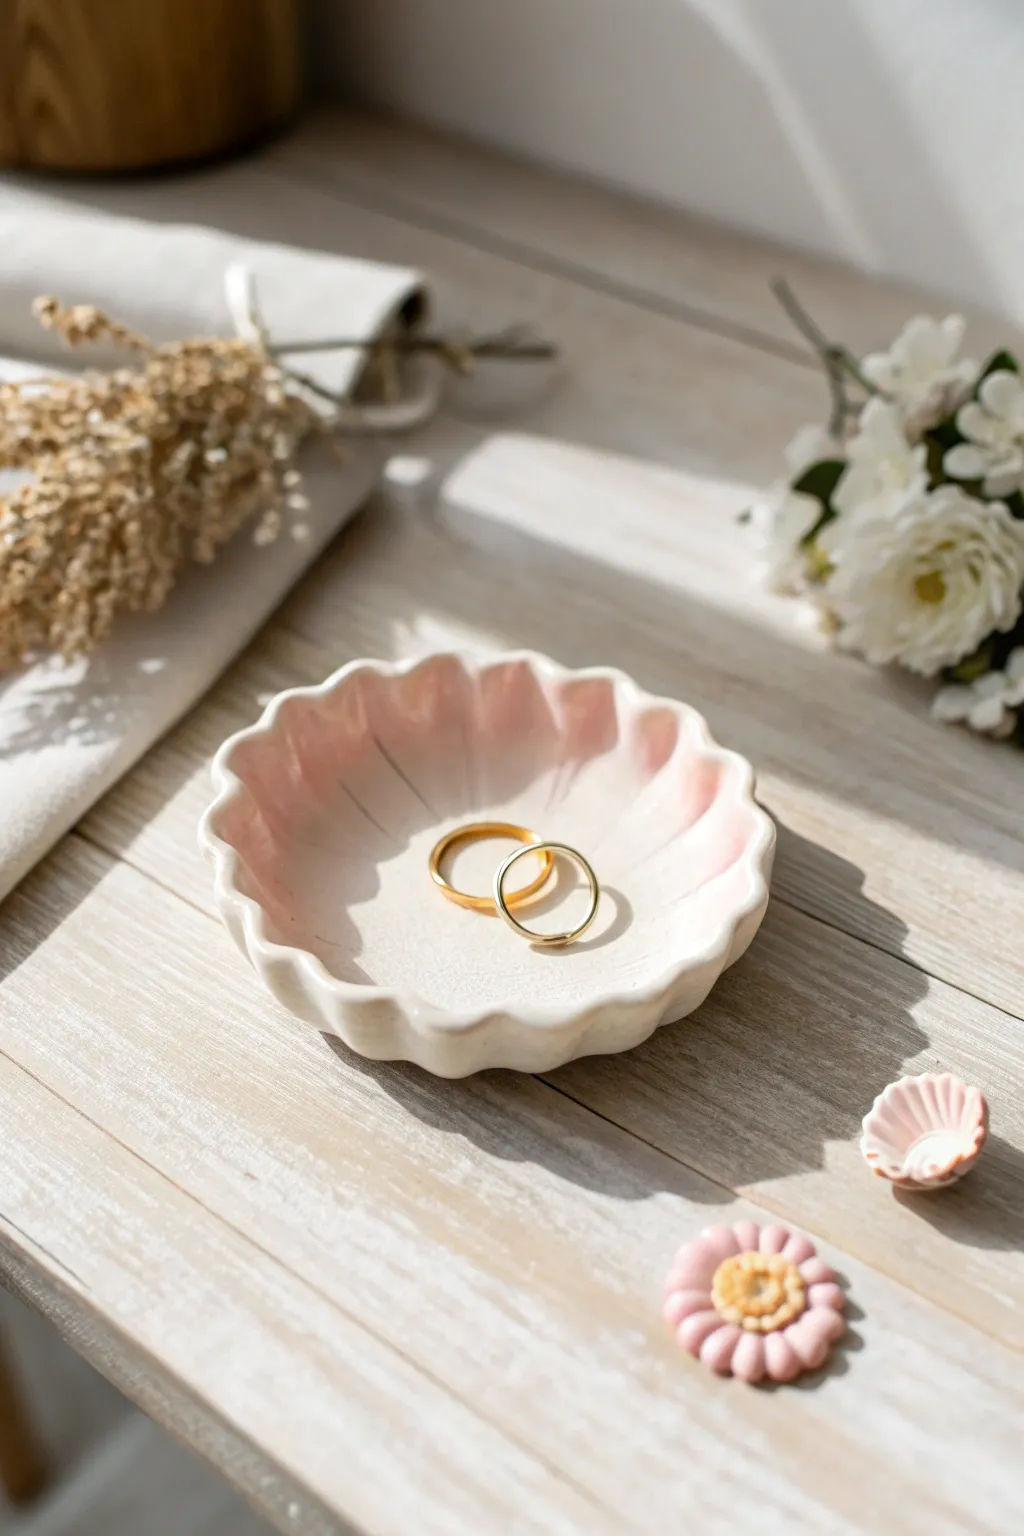
This delicate ring dish captures the romance of a blooming flower with its gentle scalloped edges and dual-tone pink and white finish. It’s the perfect beginner-friendly project to add a touch of soft, aesthetic elegance to your bedside table.
Detailed Instructions
Materials
- White air dry clay (Das or similar)
- Rolling pin
- Circle cookie cutter (approx. 4 inches) or a bowl to trace
- Craft knife or clay tool
- Small bowl for shaping (drying form)
- Sandpaper (fine grit)
- Acrylic paints: White, soft blush pink
- Small paintbrush
- Glossy varnish or sealant
- Water and a sponge for smoothing
Step 1: Shaping the Clay
-
Condition the clay:
Begin by taking a handful of white air dry clay and kneading it in your hands until it feels warm, pliable, and free of cracks. -
Roll it out:
Roll the clay onto a smooth surface to an even thickness of about 1/4 inch. If you want a textured bottom, you could roll it onto a piece of canvas, but for this smooth look, use a silicone mat or parchment paper. -
Cut the base circle:
Use a large circle cookie cutter or place a bowl upside down on the clay and trace around it with a craft knife to create a perfect circle. -
Create the scalloped edge:
To form the petals, gently press your thumb or the back of a spoon into the edge of the circle at regular intervals, pushing slightly outward to create indents. -
Refine the scallops:
Go back around the edge and pinch the clay between the indents to sharpen the ‘peaks’ of the scallops, mimicking the wavy edge of a flower or seashell. -
Add interior details:
Using a modeling tool or the back of a butter knife, gently score lines radiating from the center of the dish out toward the scallop dips. Don’t cut all the way through; just create light indentations for texture. -
Smooth the surface:
Dip your finger or a small sponge in a little water and run it over all the cut edges and the surface to remove any harsh lines or fingerprints. -
Form the curve:
Lift your clay circle carefully and place it inside a small bowl. Gently press the center down so the clay takes on the curved shape of the bowl. -
Dry the dish:
Let the clay dry completely in the bowl for at least 24-48 hours. Keep it away from direct heat to prevent cracking.
Cracks showing up?
If hairline cracks appear while drying, mix a tiny bit of fresh clay with water to make a paste (slip). Fill the cracks, smooth it over, and let it dry again.
Step 2: Painting and Finishing
-
Sand for smoothness:
Once fully dry and hard, remove the dish from the bowl. Use fine-grit sandpaper to gently buff away any rough edges or uneven spots on the rim. -
Paint the base coat:
Apply a coat of white acrylic paint to the entire dish to brighten the clay’s natural color and provide a uniform base. -
Mix the ombre pink:
Prepare a watery wash of soft blush pink paint. You want it slightly translucent to achieve that watercolor-like, aesthetic effect shown in the photo. -
Apply the pink gradient:
Starting from the outer rim, brush the pink wash inwards, stopping about halfway down the sides. I like to use a damp brush to blend the bottom edge of the pink so it fades seamlessly into the white center. -
Paint the exterior:
Repeat the pink gradient process on the outside of the bowl, focusing the color near the rim and fading it out towards the base. -
Dry the paint:
Allow the paint layers to dry completely before moving to the final step. -
Seal the piece:
Apply two thin coats of glossy varnish to the entire dish. This gives it that ceramic-like shine and protects your jewelry from scratching the paint.
Perfect Ombre
For the softest gradient, keep a second clean, wet brush handy. Apply the pink, then immediately use the wet brush to drag and fade the color edge downward.
Now you have a stunning, pearlescent catch-all that looks lovely holding your favorite gold rings


Arched Minimal Jewelry Tray
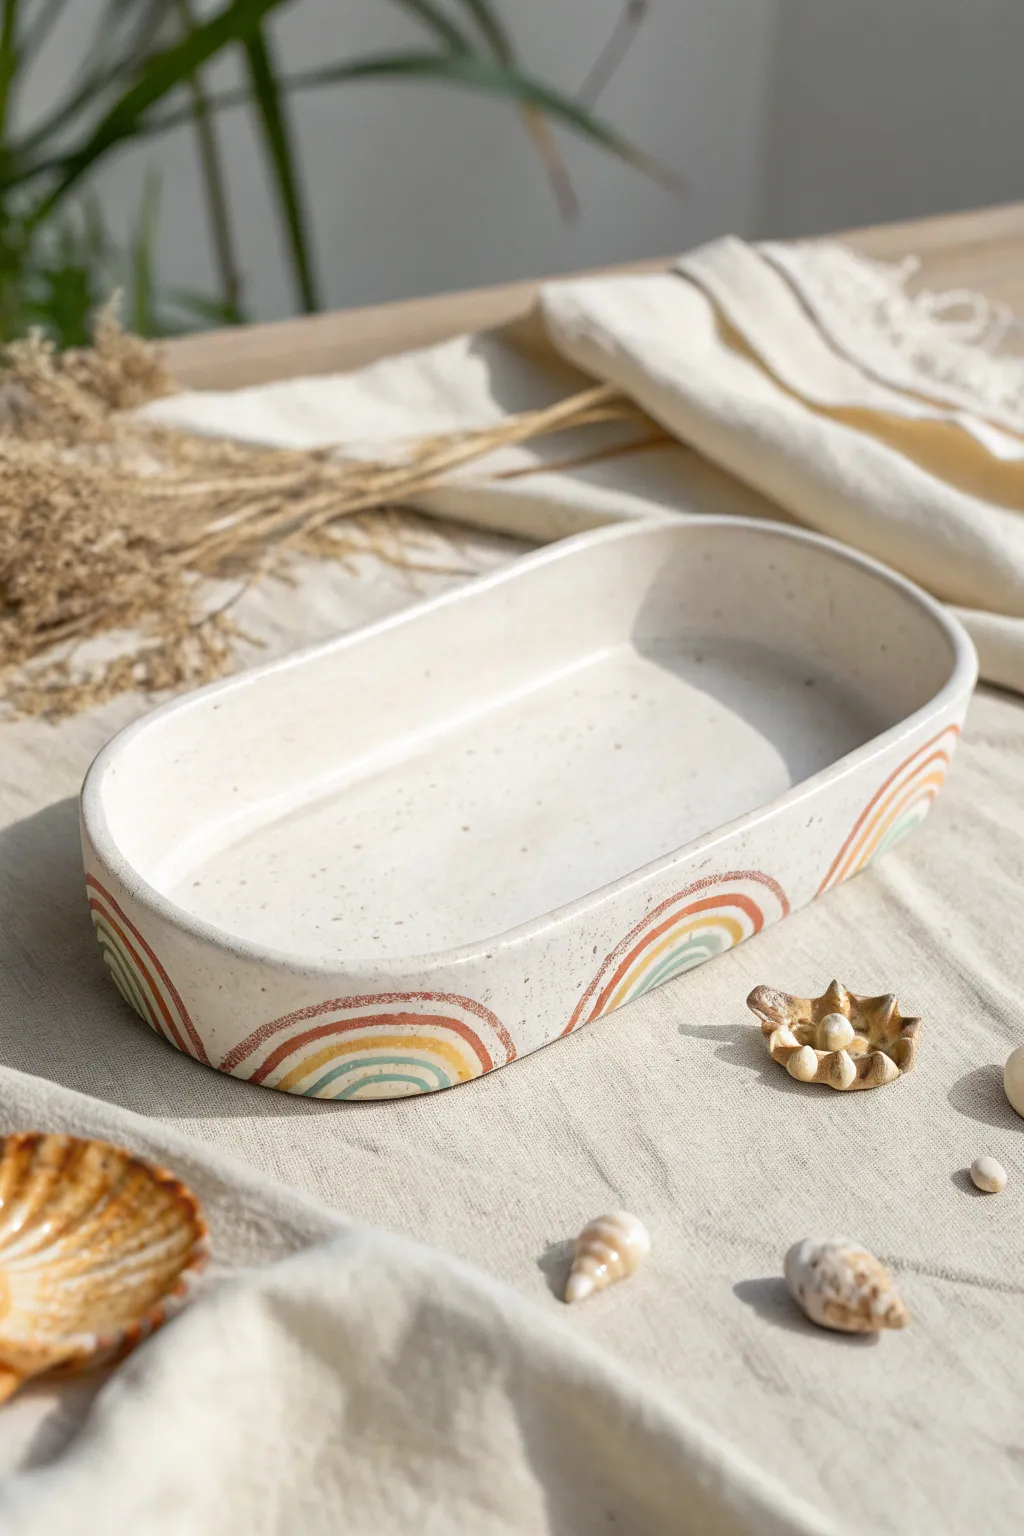
This elongated oval tray combines the charm of speckled stoneware with playful, earthy motifs. Perfect for holding jewelry or keys, its understated rainbow arches add a touch of warmth to any minimalist setting.
Step-by-Step Guide
Materials
- White air-dry clay (about 500g)
- Acrylic rolling pin
- Craft knife or clay cutter
- Oval paper template (approx. 8″ x 4″)
- Small bowl of water
- Sponge or fine-grit sandpaper
- Ground black pepper or dried coffee grounds (for speckling)
- Acrylic paints (terracotta, mustard yellow, sage green)
- Fine detail paintbrush
- Matte varnish or sealant
Step 1: Preparing the Base
-
Create the speckle effect:
Before rolling out your clay, knead a small pinch of ground black pepper or dried coffee grounds directly into the white clay. This faux-stoneware hack gives the finished piece that beautiful, organic texture without needing a kiln. -
Roll the slab:
Roll your clay out on a smooth surface to an even thickness of about 1/4 inch. If you want a super smooth finish, rolling onto parchment paper works wonders to prevent sticking. -
Cut the oval base:
Place your oval paper template onto the rolled clay. Using your craft knife, carefully trace around the template to cut out the base shape. -
Smooth the edges:
Dip your finger in a little water and run it along the cut edge of the oval base to remove any sharp angles or burrs left by the knife.
Step 2: Building the Walls
-
Prepare the wall strip:
Gently gather your remaining clay and roll it out again into a long, rectangular strip. Aim for the same 1/4 inch thickness as the base. You’ll need a strip long enough to wrap around the entire perimeter of your oval base. -
Trim the strip:
Use a ruler and your knife to cut a straight strip about 1 to 1.5 inches tall. Ensure the bottom edge is perfectly straight, as this will bond to the base. -
Score the connection points:
Using a needle tool or a fork, scratch up (score) the outer edge of the oval base and the bottom long edge of your clay strip. Add a dab of water to these rough areas to act as glue. -
Attach the wall:
Carefully drape the strip around the oval base. Instead of placing it *on top* of the base, I find it stronger to press it against the *side* edge, or rest it on the very lip. Press firmly to join them. -
Close the loop:
Where the two ends of the wall meet, slice through both overlapping layers at an angle with your knife. Remove the excess bits and press the two angled ends together for a seamless join. -
Blend the seams:
Use a modeling tool or your thumb to smear the clay downwards on the outside and inside seams until the line disappears. Smooth everything over with a damp sponge. -
Dry thoroughly:
Let the tray dry for 24-48 hours. Turn it over gently halfway through so the bottom gets air exposure too.
Cracks happen!
If hairline cracks appear while drying, don’t panic. Mix a tiny bit of fresh clay with water to make a paste (slip) and fill the crack, then sand smooth once dry.
Step 3: Finishing Touches
-
Sand for perfection:
Once fully bone dry, use fine-grit sandpaper to smooth out the rim and any bumps on the walls. Wipe away the dust with a barely damp cloth. -
Paint the outer arches:
Mix a rusty terracotta color. Using a fine brush, paint the largest arch first. Start at the bottom edge of the tray and paint a curved line up and back down. -
Add internal colors:
Inside the first arch, paint a smaller arch in mustard yellow, leaving a tiny gap of the ‘speckled’ clay showing between the colors. Repeat with a smaller sage green arch in the center. -
Repeat the pattern:
Continue painting these rainbow motifs around the exterior of the tray. Spacing them out irregularly adds to the organic, handmade aesthetic. -
Seal the piece:
Finish with two coats of matte varnish to protect the paint and detailed speckles from moisture and wear.
Pro Tip: Clean Lines
Rest your painting hand’s pinky finger on the table or the tray itself to steady your hand while painting the arches. This anchors your stroke for smoother curves.
Now you have a stylish, custom tray ready to organize your trinkets with a dash of boho flair


Cute Fruit Magnet Set
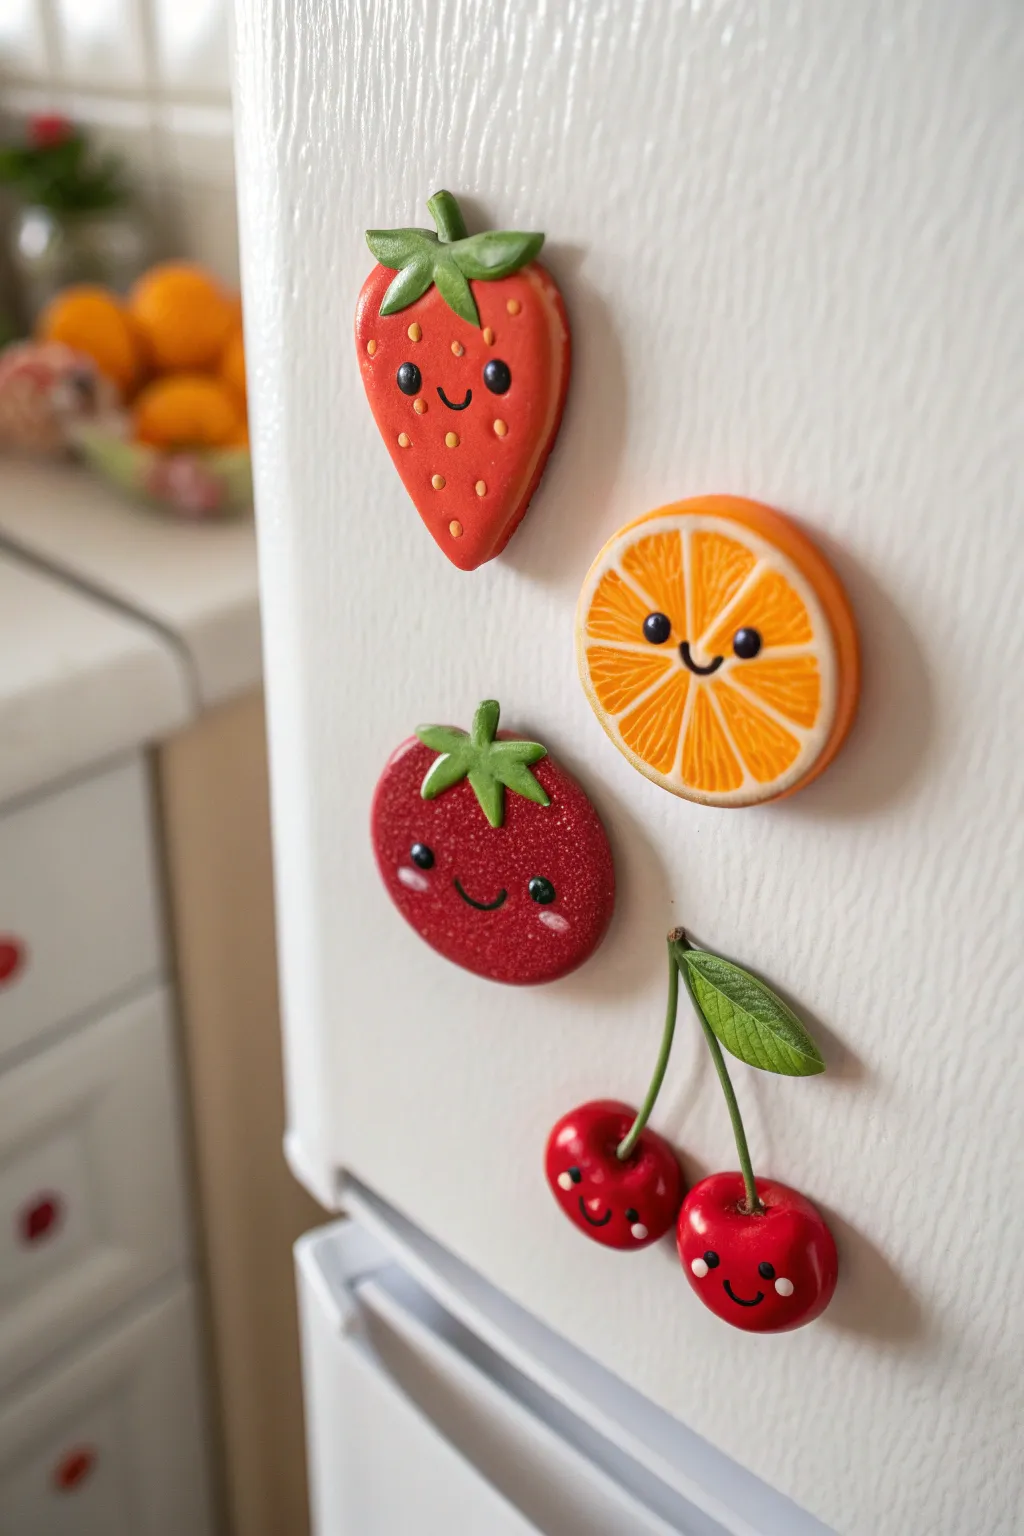
Brighten up your kitchen with this adorable set of smiling fruit magnets, featuring a strawberry, orange slice, tomato, and cherries. These chunky, glossy buddies are simple to sculpt from air dry clay and add a perfect touch of sweetness to any magnetic surface.
Detailed Instructions
Materials
- White smooth air dry clay
- Acrylic paints (Red, Orange, White, Green, Black)
- Glossy varnish or UV resin
- Rolling pin
- Clay sculpting tools (needle tool, ball tool)
- Small round magnets
- Strong craft glue (E6000 or similar)
- Fine detail paintbrushes
- Thin floral wire (for the cherries)
Step 1: Sculpting the Base Shapes
-
Prepare the clay:
Condition your air dry clay by kneading it until it’s smooth and pliable. If you want uniform thickness, roll a portion of it out to about 1/4 inch thick, or simply work with balls of clay for a chunkier look. -
Shape the strawberry:
Form a soft triangle shape with rounded corners. Gently flatten the back so it sits flush against the fridge, but keep the front domed and puffy. -
Shape the orange slice:
Roll a perfect circle and flatten it into a thick disc. Use a needle tool to lightly impress the rind border around the edge, but keep the surface relatively flat for painting later. -
Shape the tomato:
Create a round, slightly squat sphere shape. Press it gently to flatten the back. For the leafy top, fashion a small star shape out of a separate tiny piece of clay and press it onto the top center. -
Shape the cherries:
Roll two small, equal-sized spheres. Insert a small piece of floral wire into each cherry to act as stems. Join the wires at the top and add a small clay leaf to the junction. Make sure the cherries hang naturally.
Cracking Clay?
If small cracks appear as the clay dries, mix a tiny amount of fresh clay with water to make a paste and fill them in like spackle before painting.
Step 2: Adding Details & Drying
-
Texture the strawberry:
Using a small ball tool or the tip of a paintbrush handle, press tiny divots all over the strawberry’s surface for the seeds. Add a clay leaf cap to the top. -
Create the orange segments:
On your orange disc, use a needle tool to score the radiating lines of the fruit segments. This adds physical texture that will guide your painting later. -
Smooth everything out:
Dip your finger in a tiny bit of water and gently smooth away any fingerprints or rough edges on all the fruits. -
Let them dry:
Place your creations on a piece of parchment paper. Allow them to dry completely for at least 24-48 hours, flipping them occasionally so the backs dry evenly.
Step 3: Painting & Assembly
-
Base coats:
Once fully dry, paint the strawberry, tomato, and cherries a vibrant red. Paint the orange slice a bright orange, leaving the rim slightly lighter if desired. -
Paint the greenery:
Use a fresh leafy green for the strawberry leaves, tomato top, and the cherry leaf. I find a second coat often helps the green pop against the red. -
Detail the orange:
Mix a lighter orange or yellow-orange. Carefully paint the segment lines and the inner pith details to make the slices look juicy and distinct from the rind. -
Add the seeds:
For the strawberry, use a fine brush or a toothpick to dab yellow or light tan paint into the textured divots you made earlier. -
Paint the faces:
This is the most critical part! Use a dotting tool or the back of a brush to place two black eyes on each fruit. Paint a tiny ‘U’ shape for the mouth between them. -
Add the sparkle:
Once the black eyes are dry, add a tiny white dot to the upper corner of each eye. Add slight white highlight curves to the ‘cheeks’ of the tomato for extra shininess. -
Seal tightly:
Coat the front and sides of each fruit with a high-gloss varnish or UV resin. This gives them that ceramic-like, store-bought finish and protects the paint. -
Attach the magnets:
Flip the dried fruits over. Use a strong adhesive like E6000 to glue a round magnet securely to the center of the back of each piece. Let the glue cure completely.
Level Up: 3D Stem
For the orange slice, try sculpting the segments in slightly raised relief rather than just scoring them. It adds a wonderful tactile quality.
Now your fridge has a fresh new look with these cheerful fruity friends keeping your notes safe

What Really Happens Inside the Kiln
Learn how time and temperature work together inside the kiln to transform clay into durable ceramic.
Smiley Fried Egg Magnets
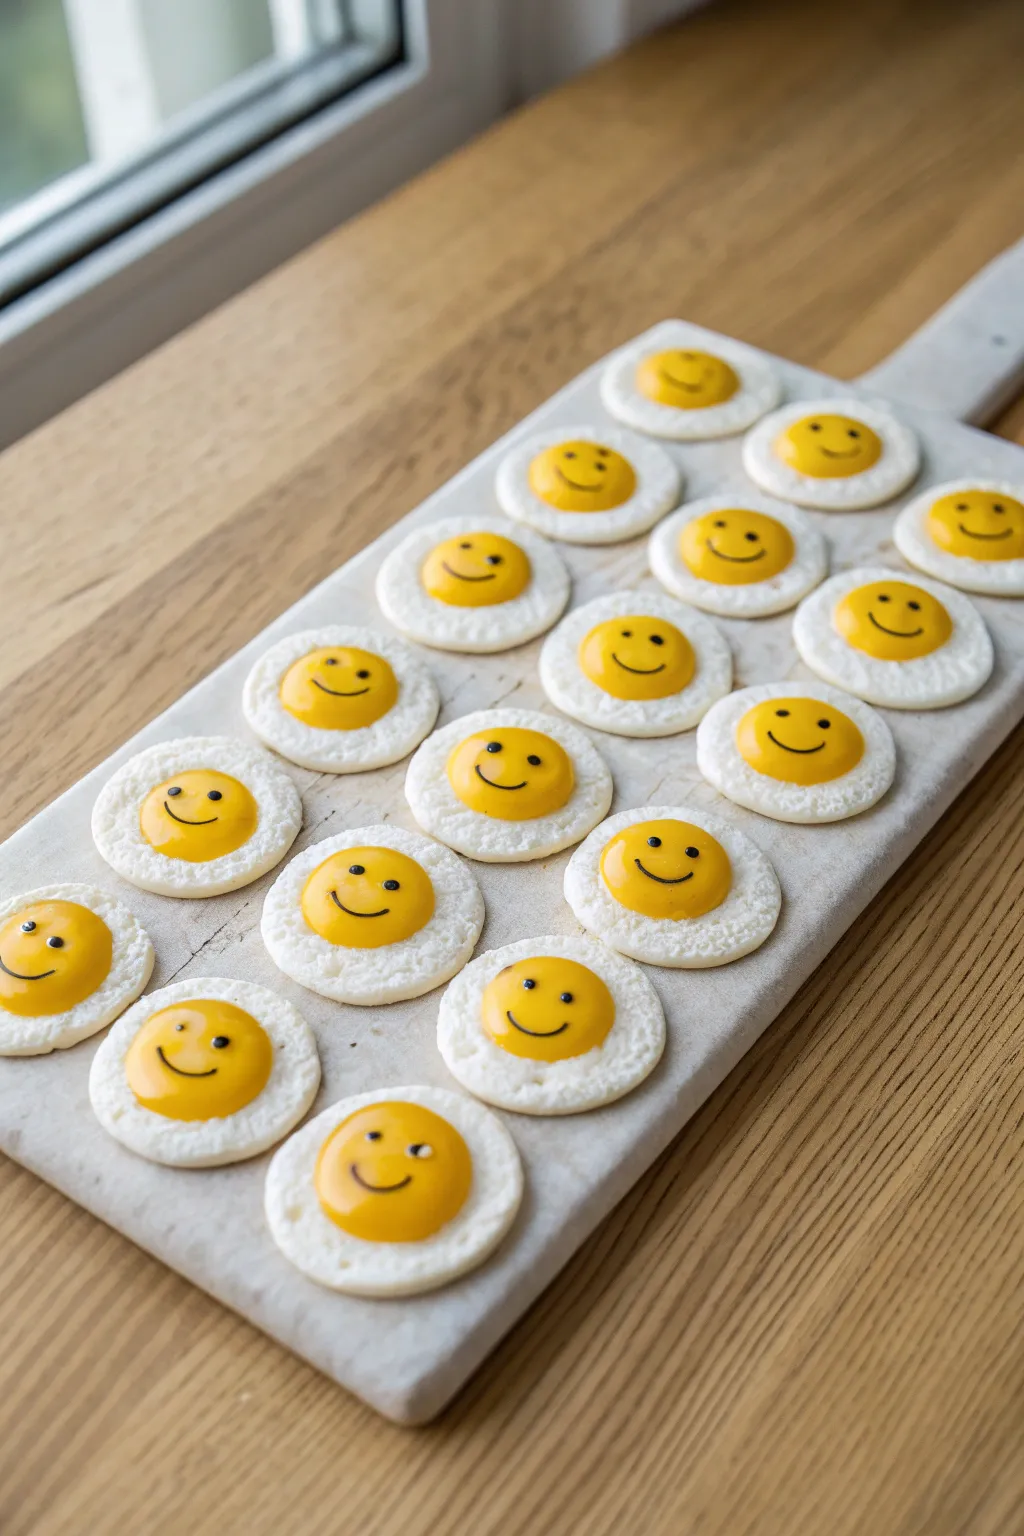
These cheerful little magnets bring a dose of dopamine to your fridge with their glossy, happy yolks and textured whites. They are incredibly easy to sculpt and make for perfect, bite-sized gifts for friends.
How-To Guide
Materials
- White smooth air dry clay
- Yellow air dry clay (or white clay mixed with yellow acrylic paint)
- Black acrylic paint or fine-tip permanent marker
- Gloss varnish or UV resin
- Strong craft glue (E6000 or similar)
- Small round neodymium magnets
- Toothbrush or crumpled foil (for texturing)
- Small paintbrush
- Rolling pin
- Circle cutter (optional)
Step 1: Sculpting the Egg White
-
Condition the white clay:
Start by taking a small amount of white air dry clay, roughly the size of a large grape. Knead it in your hands until it is soft, pliable, and free of cracks. -
Form the base:
Roll the clay into a smooth ball, then flatten it onto your work surface using your palm or a rolling pin. Aim for a thickness of about 4-5mm. -
Shape the organic edge:
Fried eggs aren’t perfect circles. Gently pull and press the edges of your flattened disc to create an uneven, wobbly outline that mimics a real egg white cooking in a pan. -
Add texture:
Take an old clean toothbrush or a ball of crumpled aluminum foil. Gently tap it all over the surface of the white clay to create that bubbly, fried texture. Leave the very center slightly smoother where the yolk will sit.
Cracked Clay?
If you see tiny cracks forming as the clay dries, mix a tiny bit of fresh clay with water to make a paste (slip) and smooth it over the cracks with your finger.
Step 2: Adding the Yolk
-
Prepare the yolk color:
If you don’t have pre-colored yellow clay, mix a dab of yellow acrylic paint into a small ball of white clay. Knead until the color is completely uniform and streak-free. -
Shape the yolk:
Roll a small piece of the yellow clay into a perfect sphere. It should be proportional to your white base—think marble-sized. -
Attach the yolk:
Place the yellow sphere onto the center of your textured white base. Press it down gently so it adheres and flattens slightly into a dome shape, but keep it nice and rounded. -
Smooth the seam:
I like to use a tiny bit of water on my finger to smooth the very bottom edge of the yolk where it meets the white, ensuring a seamless bond.
Step 3: Drying and Detailing
-
Let it dry:
Place your eggs on a sheet of parchment paper to dry. Depending on humidity and thickness, this will take 24-48 hours. Flip them halfway through to ensure the bottom dries evenly. -
Paint the face:
Once fully hard, it’s time for personality. Using a very fine paintbrush and black acrylic paint (or a fine-tip marker), carefully draw two small dots for eyes and a curved line for a smile on the yolk. -
Seal carefully:
The secret to the ‘wet’ egg look is the finish. Coat the entire yellow yolk with a thick layer of high-gloss varnish or UV resin. This makes it look uncooked and shiny. -
Seal the white:
For the white part, you can use a matte varnish to keep the contrast, or a satin varnish for a slightly fried-in-butter look. Avoid high gloss on the white to keep the yolk the focal point. -
Attach the magnet:
Flip the dried egg over. Apply a strong dab of E6000 or heavy-duty craft glue to the back. -
Secure the backing:
Press your magnet firmly into the glue. Let the glue cure completely according to the package instructions before sticking it to your fridge.
Make it a Brunch
Create a whole breakfast set by making companion magnets: try sculpting strips of wavy brown clay for bacon or a little brown triangle for toast.
Now your kitchen has a permanent sunny side up greeting waiting for you every morning
Tiny Bunny Buddy Figurine
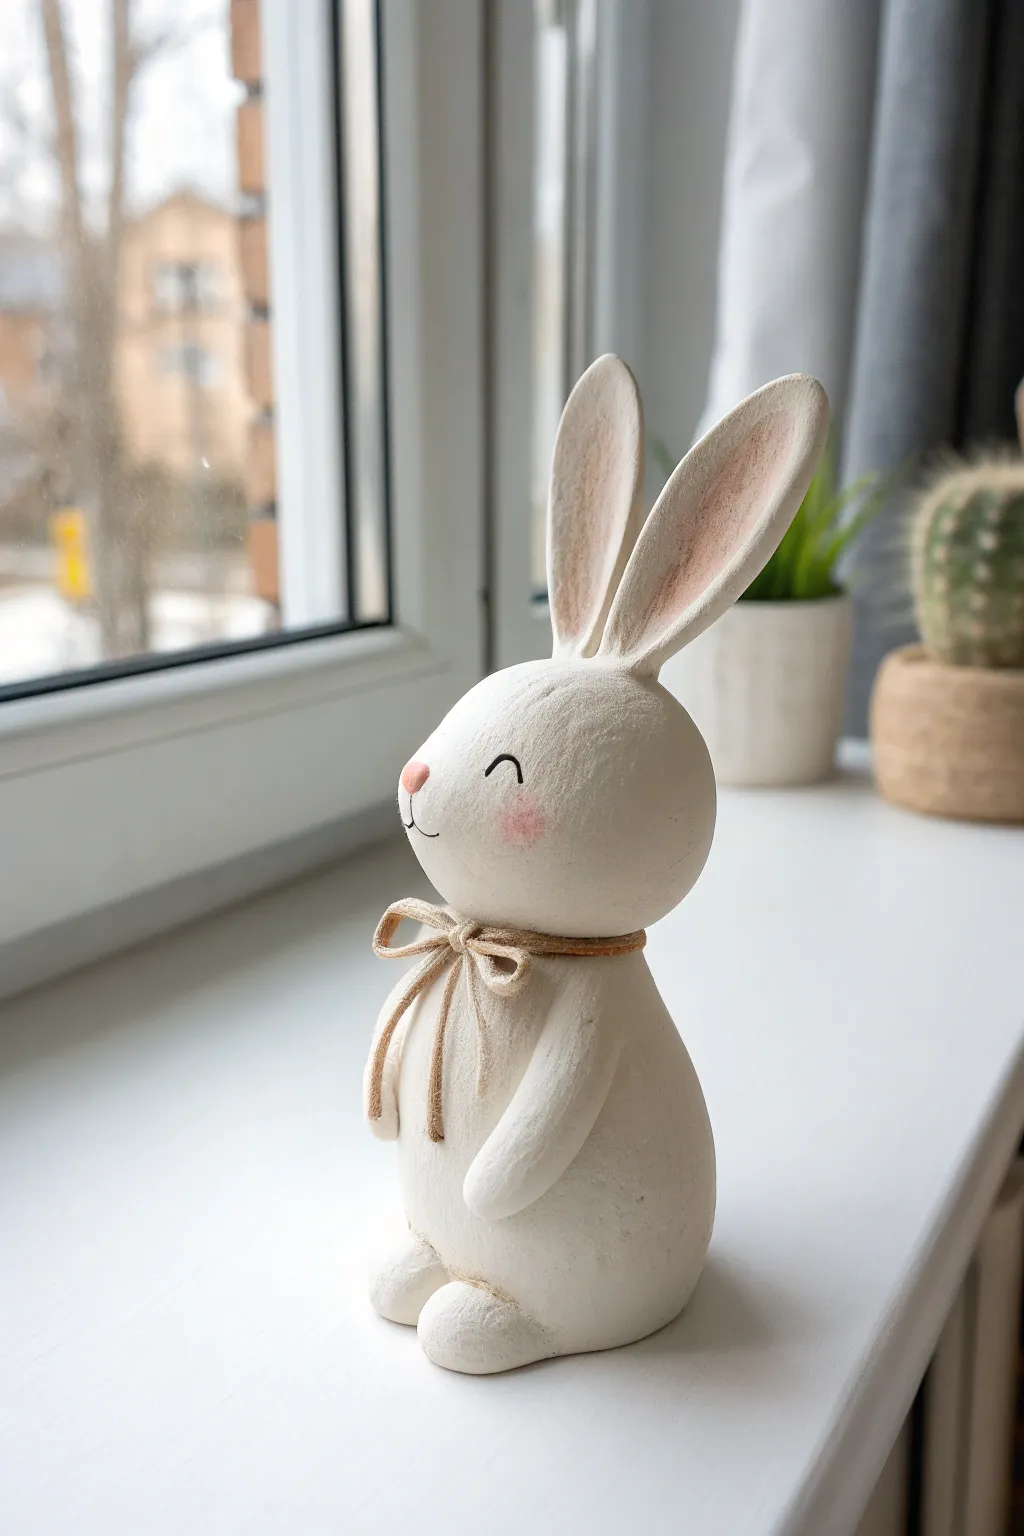
Bring a touch of minimalist charm to your shelf with this adorable sitting rabbit figurine. Its smooth, matte finish and simple twine bow create a cozy, rustic aesthetic perfect for spring decor.
Detailed Instructions
Materials
- White smooth air dry clay
- Water in a small cup
- Clay tools (needle tool, smoothing sponge)
- Fine grit sandpaper
- Acrylic paint (black, soft pink)
- Fine detail paintbrush
- Natural jute twine or thin rope
- All-purpose craft glue
- Toothpicks or armature wire (optional for support)
Step 1: Sculpting the Body
-
Form the base:
Start with a lime-sized ball of clay for the body. Roll it into a smooth sphere, then gently elongate the top slightly to create a pear shape, flattening the bottom so it sits securely. -
Create the head:
Roll a slightly smaller ball for the head. It should be a flattened sphere shape, wider than it is tall, to give the bunny a cute, chubby cheek look. -
Attach the head:
Score the top of the body and the bottom of the head with a needle tool. Apply a dab of water (or clay slip) to the scored areas and press them firmly together. I like to twist them slightly as I join to create a suction seal. -
Smooth the neck:
Using your finger or a clay tool, drag small amounts of clay across the seam between head and body to blend them seamlessly. Smooth out any tool marks with a damp sponge.
Ear Support Trick
If the long ears keep drooping while wet, insert a toothpick half into the head and half into the ear as an internal skeleton for support.
Step 2: Adding Features
-
Shape the ears:
Roll two equal logs of clay. Flatten them gently and taper one end of each into a point. These should be quite long and prominent. -
Refine the ears:
Use a modeling tool to create a shallow depression or groove running down the center of the inner ear. Pinch the base of the ears slightly so they will attach cleanly to the head. -
Attach the ears:
Score and slip the top of the head and the base of the ears. Press them on firmly. Blend the seams at the base carefully so the ears look like they are growing out of the head, not just stuck on. -
Add the arms:
Roll two small sausage shapes for the arms. Curved them slightly to hug the body. Attach them to the sides of the body, blending the shoulder area but leaving the paws distinct against the tummy. -
Create the feet:
Form two small oval shapes for the feet. Attach them to the bottom front of the body so they poke out slightly, grounding the figure. -
Final smoothing:
Look over the entire piece. Use a very slightly damp sponge or finger to buff away fingerprints and ensure the surface is silky smooth. Let the sculpture dry completely (24-48 hours depending on humidity).
Cracking Issues?
Cracks happen if clay dries too fast. Repair them by mixing a little clay with water into a paste (slip) and filling the crack, then sanding smooth.
Step 3: Finishing Touches
-
Sanding:
Once bone dry, use fine-grit sandpaper to gently remove any remaining bumps or imperfections. Wipe away the dust with a dry cloth. -
Paint the inner ears:
Mix a very watery wash of soft pink acrylic paint. Gently tint the inside groove of the ears, keeping the color subtle and natural. -
Paint the cheeks:
Using a dry brush technique with a tiny amount of pink paint, dab soft circles onto the cheeks for a rosy blush effect. -
Detail the face:
With your finest brush and black paint, carefully draw two small semicircles for closed, happy eyes. Add a tiny pink triangle for the nose and fine lines for the mouth. -
Add the accessory:
Cut a length of natural jute twine. Tie it carefully around the bunny’s neck into a small bow. Secure the knot with a tiny drop of glue at the back to prevent it from slipping. -
Trim the twine:
Trim the ends of the bow neatly so they drape down the front of the chest without dragging on the surface.
Place your finished bunny near a window or plant for a sweet companion that brightens the room


The Complete Guide to Pottery Troubleshooting
Uncover the most common ceramic mistakes—from cracking clay to failed glazes—and learn how to fix them fast.
Mini Bud Vase in Pastels
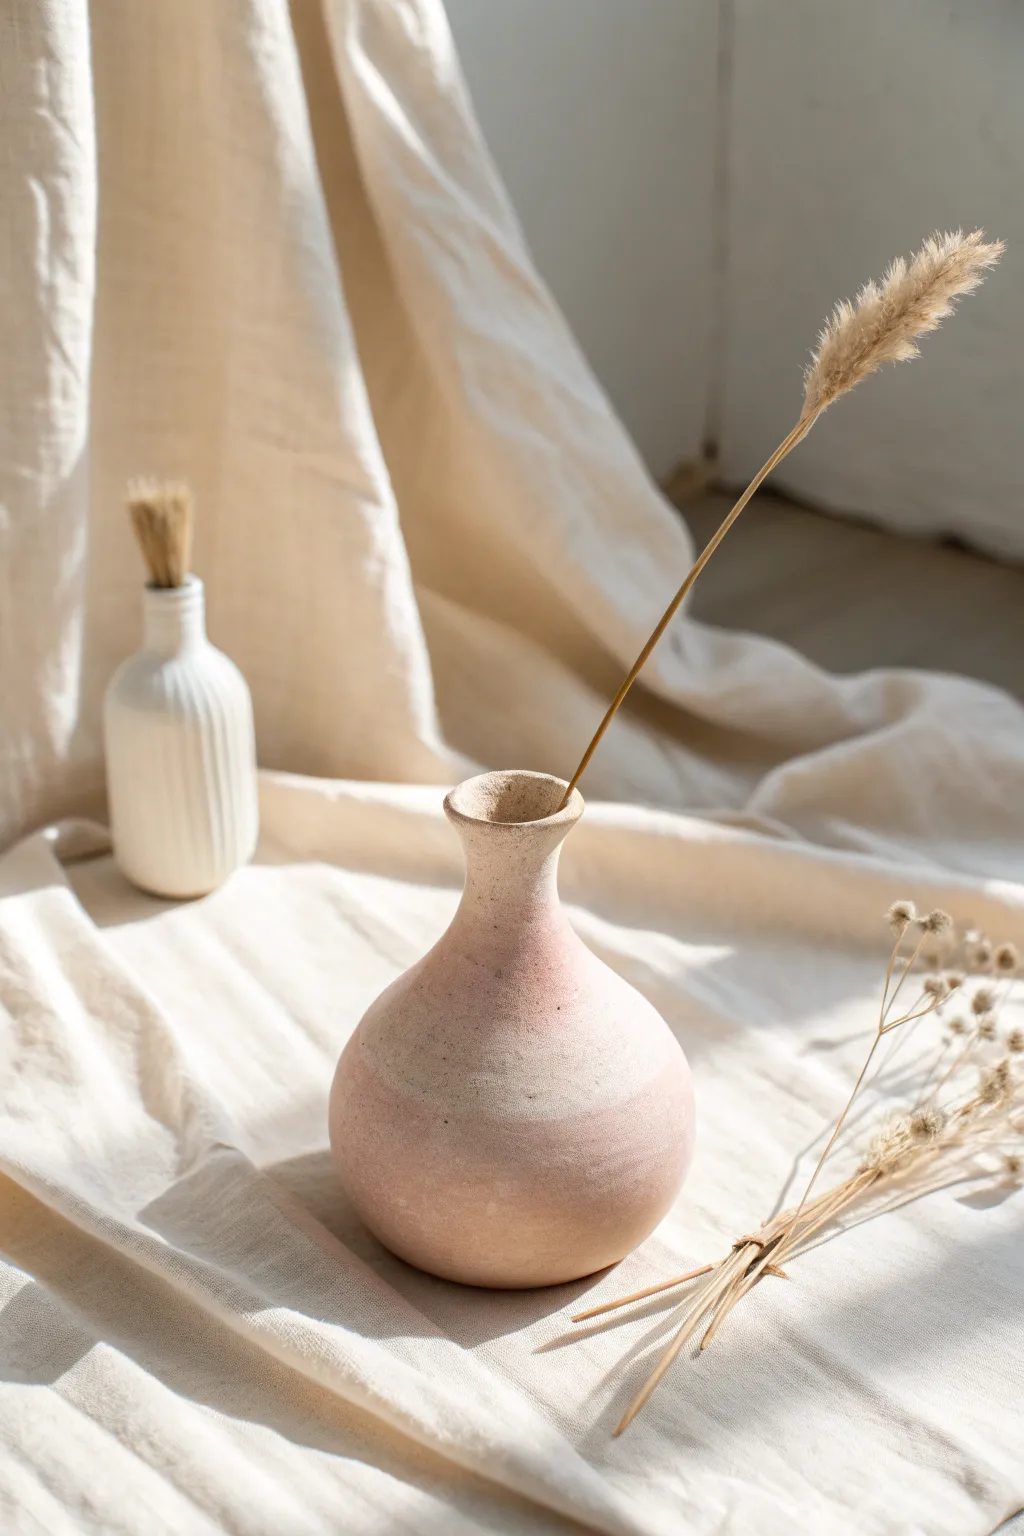
Capture the essence of soft, organic minimalism with this lovely ombre bud vase. Its gentle curves and dual-tone pastel blush finish make it the perfect vessel for a single dried stem or pampas grass.
How-To Guide
Materials
- Air dry clay (white)
- Acrylic paint (blush pink, white, warm beige)
- Rolling pin
- Small bowl of water
- Sponge or soft paintbrush
- Fine grit sandpaper (220 or higher)
- Clay sculpting tools (or a butter knife)
- Matte varnish or sealant
Step 1: Shaping the Base
-
Prepare the clay:
Cut off a generous chunk of air-dry clay, about the size of a large orange. Knead it in your hands for a minute or two to warm it up and make it pliable. -
Form a ball:
Roll the kneaded clay into a smooth, tight sphere between your palms to remove any major cracks. -
Create the pinch pot:
Push your thumb into the center of the sphere, stopping about a half-inch from the bottom. Gently pinch and rotate the clay to open up the center hollow. -
Build the body:
Continue pinching upwards, keeping the walls relatively thick—about a quarter inch—to support the neck later. Shape the body into a rounded, bulbous form. -
Smoothing the surface:
Dip your finger in a little water and run it over the exterior to smooth out fingerprints. I find it helpful to use a barely damp sponge here for an even finish.
Cracks Appearing?
If hairline cracks appear while drying, mix a small amount of fresh clay with water to make a paste and fill them in, then sand smooth once dry.
Step 2: Sculpting the Neck
-
Gather the top:
Begin gently squeezing the upper rim of your sphere inward to narrow the opening. -
Form a coil:
Roll a separate small snake of clay, about the thickness of your pinky finger. -
Attach the neck:
Score (scratch) the top rim of your base and the bottom of your coil. Add a dab of water (slip) and press the coil firmly onto the rim. -
Blend the seams:
Using your thumb or a sculpting tool, drag the clay from the coil down onto the body and the body up onto the coil until the seam disappears completely. -
Refine the shape:
Smooth the neck upwards, flaring the opening slightly at the very top for that organic, trumpet-like lip seen in the photo. -
Check symmetry:
Rotate the vase slowly at eye level to ensure the neck stands straight and the body is round.
Step 3: Finishing and Painting
-
Dry completely:
Let the vase sit in a cool, dry place for at least 24-48 hours. Turn it occasionally to ensure the bottom dries evenly. -
Sand for smoothness:
Once bone dry, use fine-grit sandpaper to buff away any remaining lumps or fingerprints, focusing on the curve where the neck meets the body. -
Mix your colors:
Create two shades: a very pale, warm beige-white and a soft, dusty blush pink. You want them to be close in tone for a subtle transition. -
Apply the top color:
Paint the neck and the upper shoulder of the vase with the beige-white shade. -
Apply the bottom color:
Paint the lower half of the bulbous body with the blush pink. -
Blend the gradient:
While both paint sections are still slightly wet where they meet, use a clean, slightly damp brush or sponge to gently dab the boundary line, creating a soft, blurred transition. -
Add texture (optional):
To mimic the stone-like look in the photo, dip a dry sponge into a tiny bit of darker beige paint and lightly dab it over the dry surface for a speckled effect. -
Seal the piece:
Finish with a coat of matte varnish to protect the paint without making it shiny.
Natural Stone Look
Mix baking soda into your acrylic paint before applying. It adds a gritty, ceramic-like texture that makes air-dry clay look like real fired pottery.
Place a dried botanical stem inside to complete your serene, minimalist decor piece
Hanging Pinch-Pot Planters
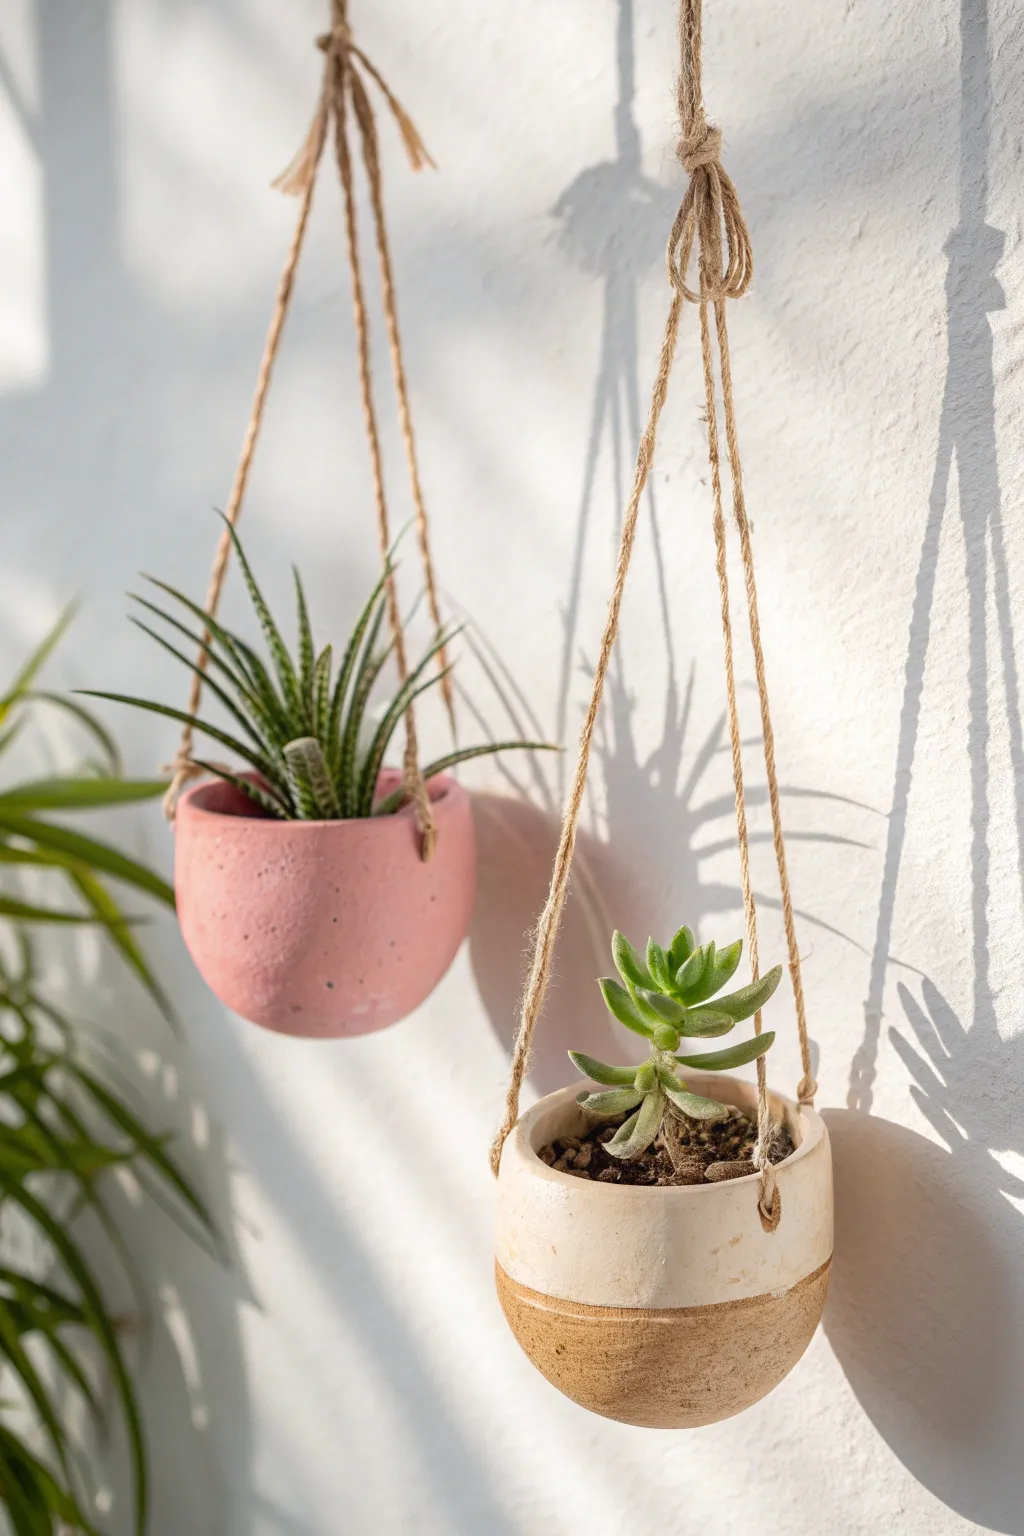
Bring a touch of organic warmth to your walls with these simple yet striking pinch pots suspended in jute. Their imperfect, handmade shape and soft matte finish make them the perfect cozy home for your favorite succulents.
Step-by-Step Tutorial
Materials
- Air dry clay (white or terracotta)
- Acrylic paints (Soft Pink, Cream, Burnt Sienna/Tan)
- Jute twine
- Small bowl of water
- Sponge or fine-grit sandpaper
- Clear sealant (matte or satin finish)
- Bamboo skewer or straw
- Succulents and potting soil
Step 1: Shaping the Clay Body
-
Create a sphere:
Start by taking a handful of air dry clay, roughly the size of a tennis ball. Roll it firmly between your palms until you have a smooth, solid sphere without major cracks. -
Start the pinch:
Hold the sphere in one hand and press your thumb into the center, stopping just before you push through the bottom. This central hole is the foundation of your pot. -
Widen the walls:
Using a gentle pinching motion with your thumb inside and fingers outside, slowly rotate the ball. Evenly thin out the walls as you rotate, working from the bottom up to the rim. -
Refine the shape:
Aim for a wall thickness of about 1/4 inch. For the pink planter style, keep the walls slightly curved inwards at the top. For the two-toned style, you can make the walls straighter. -
Smooth imperfections:
Dip your finger in a little water and run it over the clay surface to smooth out any fingerprints or small cracks. Don’t use too much water, or the clay will become mushy. -
Pierce the hanging holes:
Using a bamboo skewer or a straw, poke three holes evenly spaced around the rim of the pot, about half an inch down from the edge. Make sure these holes are large enough for your twine to thread through easily.
Cracks Appearing?
If small cracks appear while drying, mix a tiny bit of clay with water to make a paste (slip) and fill them in with a finger. Let dry again before sanding.
Step 2: Finishing and Decorating
-
Let it dry:
Place your pots on a clean surface to dry for 24-48 hours. I find that turning them upside down halfway through helps the bottom dry completely. -
Sand for smoothness:
Once fully dry and hard (the clay will turn white/light grey), use fine-grit sandpaper or a sanding sponge to gently buff away any rough edges, especially around the rim. -
Paint the pink pot:
For the pink planter, mix a soft pink acrylic paint. Apply two coats to the entire exterior and the inner rim, letting the first coat dry before applying the second. You can sponge it on for a textured, concrete-like look. -
Paint the two-toned pot:
For the beige planter, paint the top two-thirds with a cream color. Leave the bottom third raw if using terracotta clay, or paint it a tan/burnt sienna shade to mimic exposed earthenware. -
Seal the planters:
Apply a coat of clear matte sealant to the inside and outside. Since air dry clay isn’t waterproof, this step is crucial for longevity, though these pots are best used with potted succulents inside a plastic liner.
Step 3: Rigging the Suspension
-
Cut the twine:
Cut three equal lengths of jute twine, each about 24-30 inches long, depending on how low you want the planter to hang. -
Thread the holes:
Feed one end of a twine piece through one of the holes in the pot, working from the outside in. -
Secure the knots:
Tie a sturdy double knot on the inside of the pot. Pull the twine taut to ensure the knot is large enough not to slip through the hole. Repeat for the other two holes. -
Gather the top:
Hold all three strings up and assure the pot is hanging level. Gather the ends together at your desired height. -
Create the loop:
Tie all three strands together in a single overhand knot to create a top loop for hanging, trimming any excess frayed ends for a neat finish. -
Plant:
Place a small succulent (ideally still in a small nursery pot or plastic liner to protect the clay) into your new hanging planter.
Texture Play
While the clay is wet, press a piece of rough linen or canvas against the exterior to imprint a woven texture before drying.
Now you have a charming set of floating gardens ready to brighten up any corner of your room.

TRACK YOUR CERAMIC JOURNEY
Capture glaze tests, firing details, and creative progress—all in one simple printable. Make your projects easier to repeat and improve.
Cloud-Shaped Key Catchall
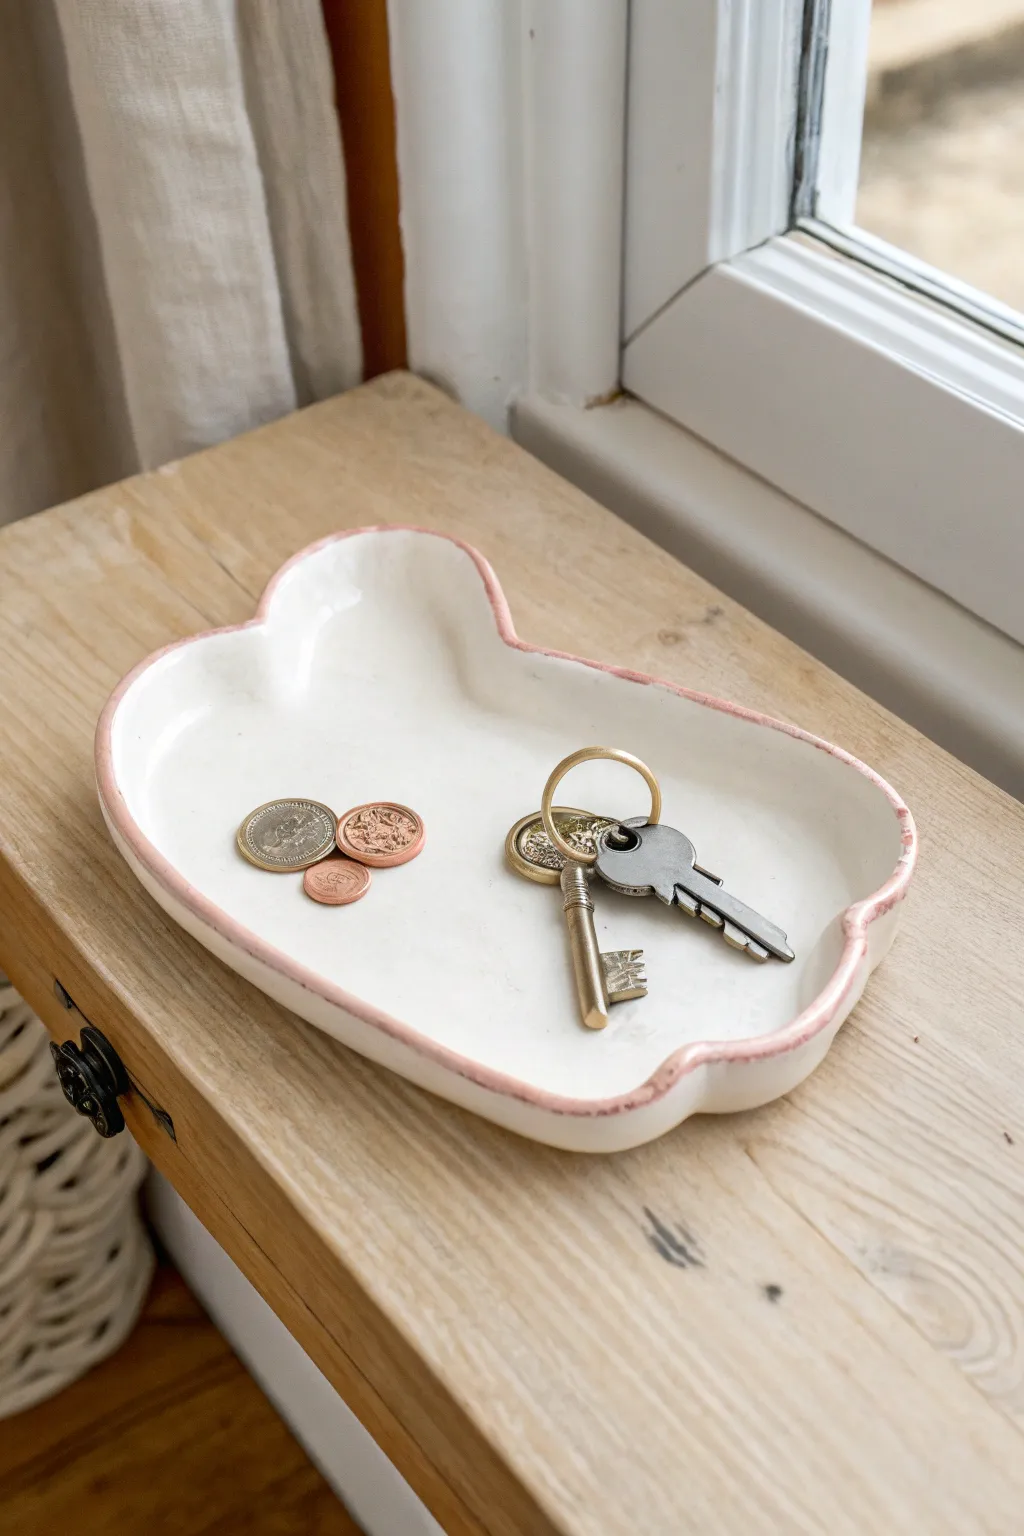
Keep your keys and loose change organized with this charming, minimalist tray. Its organic cloud shape and delicate pink rim offer a soft, handmade aesthetic that looks lovely on any entryway table.
Detailed Instructions
Materials
- White smooth air-dry clay (approx. 500g)
- Acrylic rolling pin
- Cloud template (printed paper or hand-drawn)
- Craft knife or clay cutter
- Small bowl of water
- Sponge or fine paintbrush for smoothing
- Fine-grit sandpaper (220-400 grit)
- White acrylic paint or glossy white spray paint
- Soft pink acrylic paint
- Fine detail paintbrush
- High-gloss varnish or sealant (polyurethane base recommended for durability)
Step 1: Shaping the Base
-
Condition the clay:
Begin by kneading your air-dry clay until it is warm, pliable, and free of air bubbles. If the clay feels too stiff, dip your fingers in water and work the moisture in. -
Roll out the slab:
Place the clay on a smooth work surface or silicone mat. Use your acrylic rolling pin to roll it out to an even thickness of about 1/4 inch (6mm). Rotate the clay occasionally to ensure it doesn’t stick. -
Cut the cloud shape:
Place your cloud template gently onto the clay slab. Using your craft knife, carefully trace around the template edge to cut out the main shape. Remove the excess clay and set it aside for future projects. -
Soften the edges:
Dip your finger into the water and run it along the cut edges to smooth out any sharp corners or drag marks from the knife. You want the perimeter to feel rounded and organic, not mechanical.
Fixing Cracks
If small hairline cracks appear during drying, create a ‘slip’ paste by mixing a tiny bit of dry clay dust with water. Fill the cracks, smooth over, and let dry again before sanding.
Step 2: Forming the Rim
-
Create a coil:
Take a portion of the leftover clay and roll it into a long, thin snake or coil. Aim for a thickness similar to a pencil. -
Score and slip:
To ensure a strong bond, lightly score (scratch cross-hatch marks) the top outer edge of your cloud base and the bottom of your clay coil. Dab a little water or slip onto the scored areas. -
Attach the rim:
Gently press the coil onto the perimeter of the base. If the coil breaks or isn’t long enough, just join a new piece by blending the seam together with your thumb. -
Blend the seams:
This is the most crucial step for a seamless look. Use a modeling tool or your thumb to drag the clay from the coil down into the base on the inside, and up from the base into the coil on the outside. -
Refine the shape:
Once blending is complete, use a damp sponge to smooth out all tool marks. Gently pinch the rim between your thumb and forefinger to create that slight, wavy lip seen in the photo. -
Let it dry:
Place the tray on a wire rack or a piece of parchment paper. Allow it to dry completely for 24-48 hours. I find flipping it over halfway through helps prevent warping.
Make it Luxe
Swap the pink rim for liquid gold leaf paint for a more sophisticated, jewelry-dish aesthetic. The metallic edge catches the light beautifully against the white clay.
Step 3: Finishing Touches
-
Sand for smoothness:
Once fully dry and bone-white, use fine-grit sandpaper to gently buff away any remaining imperfections or rough spots on the rim and surface. Wipe away dust with a slightly damp cloth. -
Apply base coat:
Paint the entire tray with white acrylic paint. You may need two to three thin coats to get an opaque, ceramic-like finish. Let each coat dry fully before adding the next. -
Paint the pink rim:
Load a fine detail brush with soft pink acrylic paint. Carefully paint just the very top edge of the rim. Don’t worry if the line isn’t perfectly straight; the shaky, organic line adds to the charm. -
Seal the piece:
Apply two coats of high-gloss varnish to seal the clay and protect it from scratches. This also gives it that shiny, glazed pottery look. -
Final cure:
Let the varnish cure according to the manufacturer’s instructions (usually 24 hours) before placing any keys or coins inside.
This sweet little tray is now ready to catch your daily essentials in style
Wavy Mirror Frame Charm
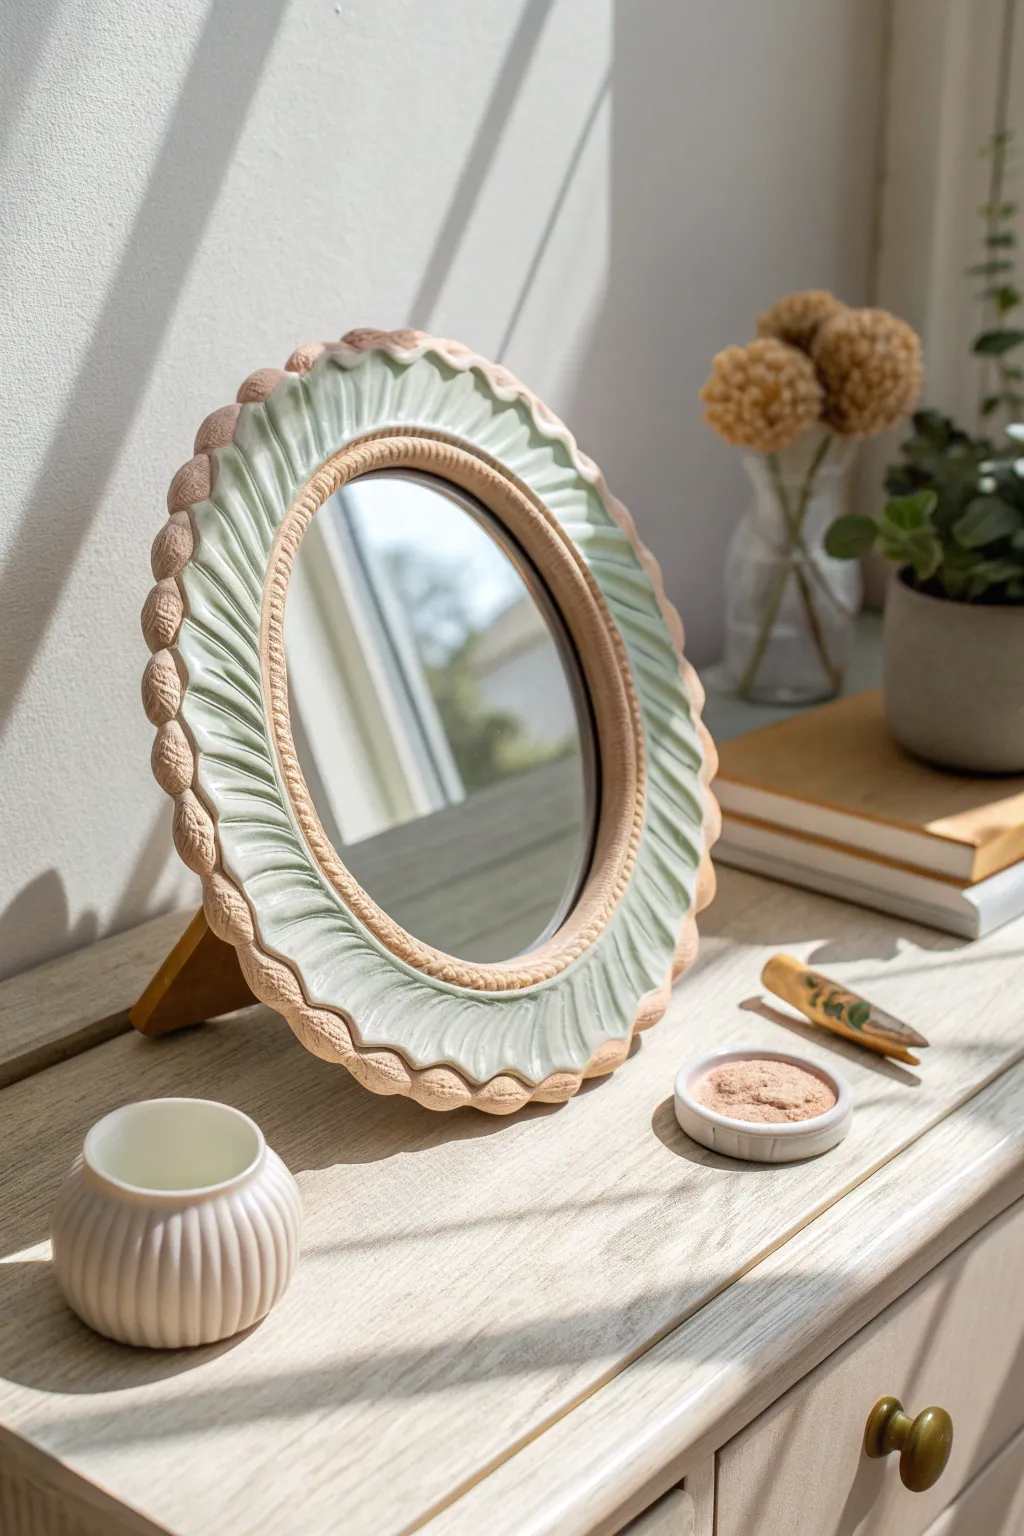
Transform a plain round mirror into a whimsical statement piece with this scalloped air-dry clay frame. The soft sage green pleating combined with a textured, raw clay edge creates a perfect balance of refined and rustic aesthetics.
Step-by-Step
Materials
- Round mirror (without frame or taken out of frame)
- White smooth air-dry clay (approx. 500g)
- Rolling pin
- Sculpting tools (needle tool and smooth modeling tool)
- Bowl of water
- Acrylic paints (sage green, white, cream/beige)
- Soft paintbrushes (flat and detail)
- Gloss or satin varnish/sealant
- Strong craft glue (E6000 or similar)
- Sandpaper (fine grit)
Step 1: Creating the Base & Pleats
-
Prepare the clay slab:
Begin by conditioning your air-dry clay until it is soft and pliable, then roll it out into a long, flat slab about 5mm thick. You want it long enough to wrap around your mirror’s circumference. -
Cut the clay strip:
Measure the circumference of your mirror and cut a strip of clay that is about two inches wide and slightly longer than the mirror’s edge to allow for overlap. -
Attach to the mirror:
Apply a thin layer of glue to the very edge of the mirror glass. Gently lay your clay strip on top, centering it so it covers the rim but leaves the reflection clear. -
Form the wavy texture:
Using a rounded modeling tool or the handle of a paintbrush, press into the clay at regular intervals to create valleys. Gently pinch the clay between the valleys to form raised ridges, creating a pleated, sunburst effect. -
Smooth the transitions:
Dip your finger in a little water and smooth out any harsh fingerprints on the ridges, ensuring the ‘waves’ flow naturally towards the center of the mirror.
Step 2: Adding the Scalloped Rim
-
Roll the outer coil:
Roll a long, thick snake of clay, roughly the thickness of your thumb. This will become the bumpy outer border. -
Join the borders:
Score the outer edge of your pleated section and the underside of your clay snake. Apply a little water or slip (clay and water mix) and press the snake firmly against the outer edge of the pleats. -
Sculpt the scallops:
Using your thumb or a large sculpting tool, press down on the clay snake at even intervals to flatten it into individual rounded ‘petals’ or beads that frame the wavy interior. -
Add inner details:
Roll a very thin, spaghetti-like coil of clay. Place this delicately over the seam where the mirror glass meets the pleated clay to create a neat, finished inner border. -
Texture the inner coil:
Use a needle tool or knife to make tiny, repetitive hatch marks all along this inner thin coil, giving it a rope-like or textured appearance. -
Dry thoroughly:
Let the entire piece dry flat in a cool, dry place. I recommend waiting at least 24-48 hours, flipping it carefully midway if possible to ensure the underside dries too.
Crack Prevention
To stop shrinkage cracks, dry the frame slowly away from direct heat or sunlight. If cracks appear, patch them with a mix of fresh clay and water.
Step 3: Painting and Finishing
-
Sand imperfections:
Once fully dry and hard, use fine-grit sandpaper to gently smooth any rough edges or sharp points on the scallops, wiping away the dust afterwards. -
Paint the pleats:
Mix a soft sage green acrylic paint. Carefully paint the wavy, pleated section, getting into the deep grooves but stopping cleanly before the outer scalloped rim. -
Paint the outer rim:
Use a beige or sandy cream color for the outer scallops and the inner rope detail. This mimics the look of raw terracotta or natural stone. -
Highlighting (Optional):
Dry brush a tiny amount of white paint over the very tops of the green ridges to accentuate the 3D wave effect. -
Seal the piece:
Apply a coat of gloss varnish to the green section to make it look like glazed ceramic, and a matte varnish to the beige rim to keep the earthy texture. -
Clean the glass:
Use a cotton swab dipped in glass cleaner to remove any paint smudges or varnish from the mirror surface.
Level Up: Speckled Finish
Flick slightly watered-down brown paint quickly over the beige rim with a toothbrush to create a trendy ceramic speckle effect.
Place your new mirror on your vanity or hang it up to bring a soft, artistic touch to your daily routine
Checkerboard Aesthetic Coasters
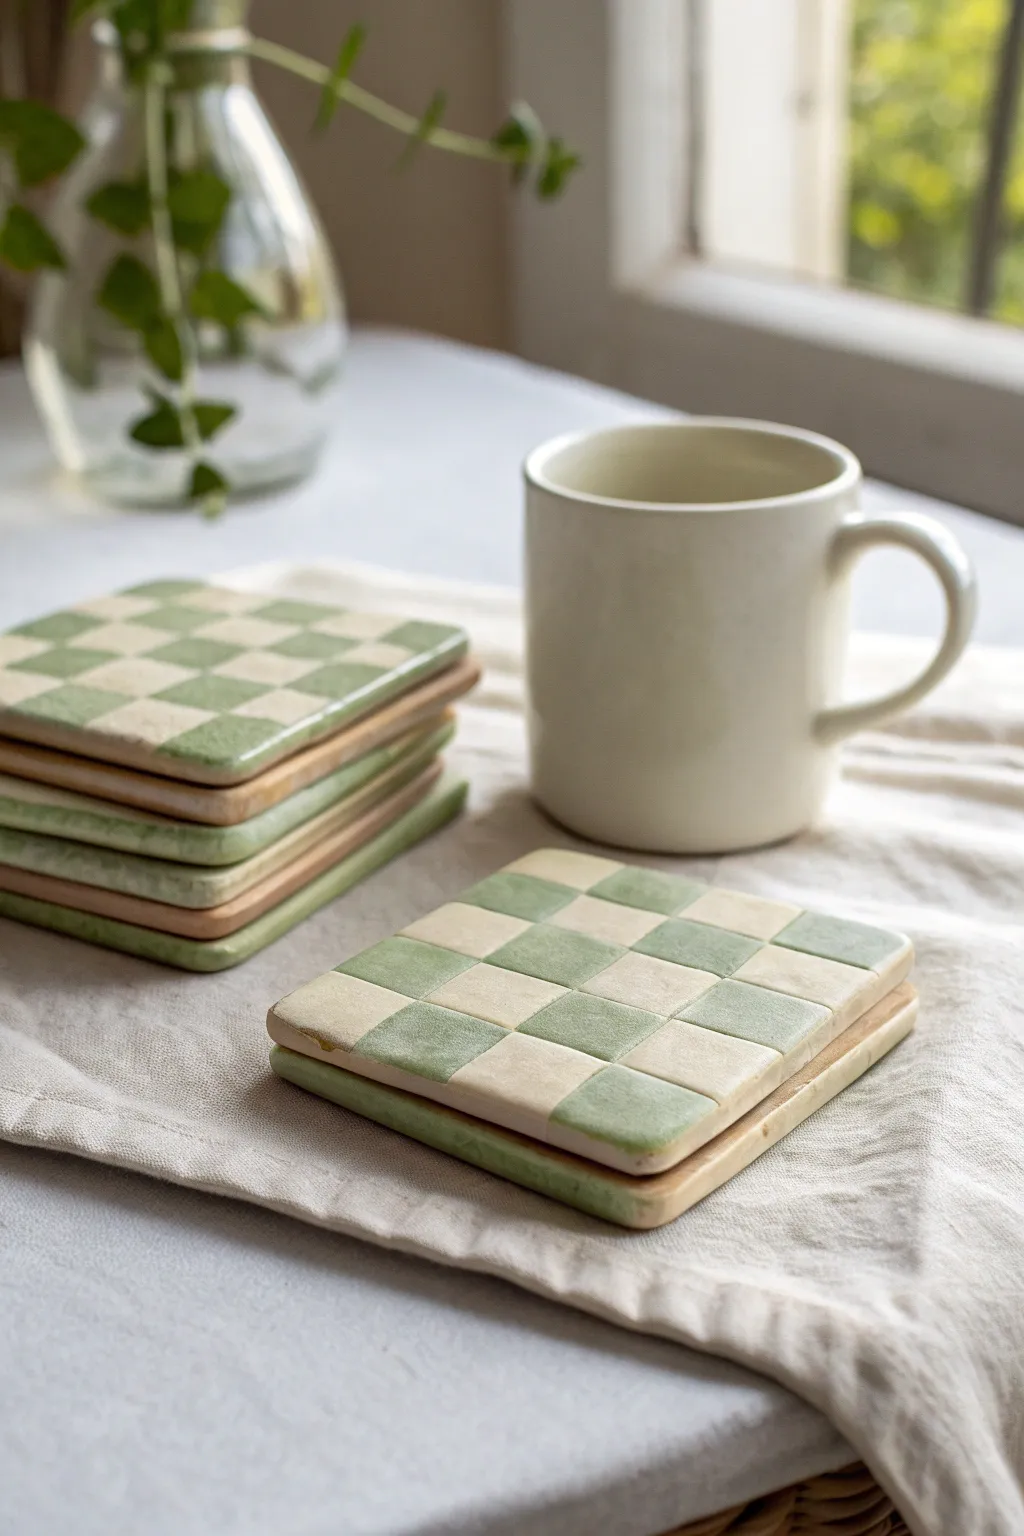
These trendy checkerboard coasters bring a soft, earthy charm to your coffee table with their muted sage green and cream palette. Made from air dry clay, they feature a satisfyingly tactile grid pattern that looks ceramic-like without needing a kiln.
Step-by-Step Tutorial
Materials
- White air dry clay
- Rolling pin
- Square cookie cutter (approx. 3.5 – 4 inches)
- Ruler
- Precision craft knife or clay blade
- Acrylic paints (Sage Green, Cream/Off-White)
- Fine grit sandpaper
- Flat shader paintbrush (small)
- Gloss or satin varnish/sealer
- Water cup
Step 1: Clay Preparation & Shaping
-
Condition the clay:
Start by grabbing a handful of air dry clay and kneading it in your hands until it feels soft, warm, and pliable. This prevents cracks later on. -
Roll it out:
Place the clay on a smooth surface or a silicone mat. Use your rolling pin to flatten it to an even thickness of about 1/4 inch. If you want perfectly even coasters, place two wooden rulers on either side of the clay as depth guides. -
Cut the base shape:
Press your square cookie cutter firmly into the rolled clay. If you don’t have a cutter, measure a 4×4 inch square with a ruler and carefully slice it out with your craft knife. -
Smooth the edges:
Dip your finger in a little water and run it along the cut edges of the square to smooth out any roughness or loose clay bits. -
Create the grid:
Using a ruler and the back of your knife (don’t cut all the way through!), gently score a grid pattern into the surface. Aim for a 5×5 or 6×6 grid depending on the size of your square.
Grid Master Tip
Instead of scoring lines freehand, gently press a wire cooling rack into the wet clay to create an instant, perfectly spaced grid pattern guide.
Step 2: Refining & Drying
-
Deepen the lines:
Go back over your scored lines with a slightly blunter tool or the edge of a ruler to make the grooves deeper and distinct, which helps with painting later. -
Check flatness:
Carefully lift the clay square to ensure it isn’t sticking, then place it on a wire rack or a piece of parchment paper to dry. -
Let it dry:
Allow the coasters to dry for 24-48 hours. I usually flip them over halfway through the drying process to ensure both sides dry evenly and to prevent curling. -
Sand for smoothness:
Once fully bone dry, take your fine grit sandpaper and gently buff the edges and the surface. Focus on smoothing out any sharp corners or uneven spots in your grid lines. -
Dust off:
Use a dry, soft brush or a cloth to wipe away all the sanding dust before you start painting.
Fixing Warps
If your coaster curls up while drying, slightly dampen the concave side and place a heavy book on top of it (with parchment paper in between) overnight.
Step 3: Painting & Sealing
-
Base coat:
Paint the entire coaster with your cream or off-white acrylic paint. This creates a uniform base and primes the clay. Let this layer dry completely. -
Paint the checkerboard:
Using your small flat brush, fill in alternating squares with the sage green paint. Use the indented grid lines as a guide to keep your edges neat. -
Refine lines:
If your green paint strayed outside the lines, wait for it to dry, then touch up the edges with the cream paint for a crisp look. -
Paint the sides:
Don’t forget the edges! Paint the sides of the coaster to match the adjacent squares, or keep them a solid cream color for a cleaner finish. -
Seal the deal:
Apply 2-3 coats of gloss or satin varnish to protect the coaster from moisture. Allow ample drying time between coats.
Enjoy your stylish new handmade coasters with a warm cup of coffee or tea
Terrazzo-Style Trinket Tray
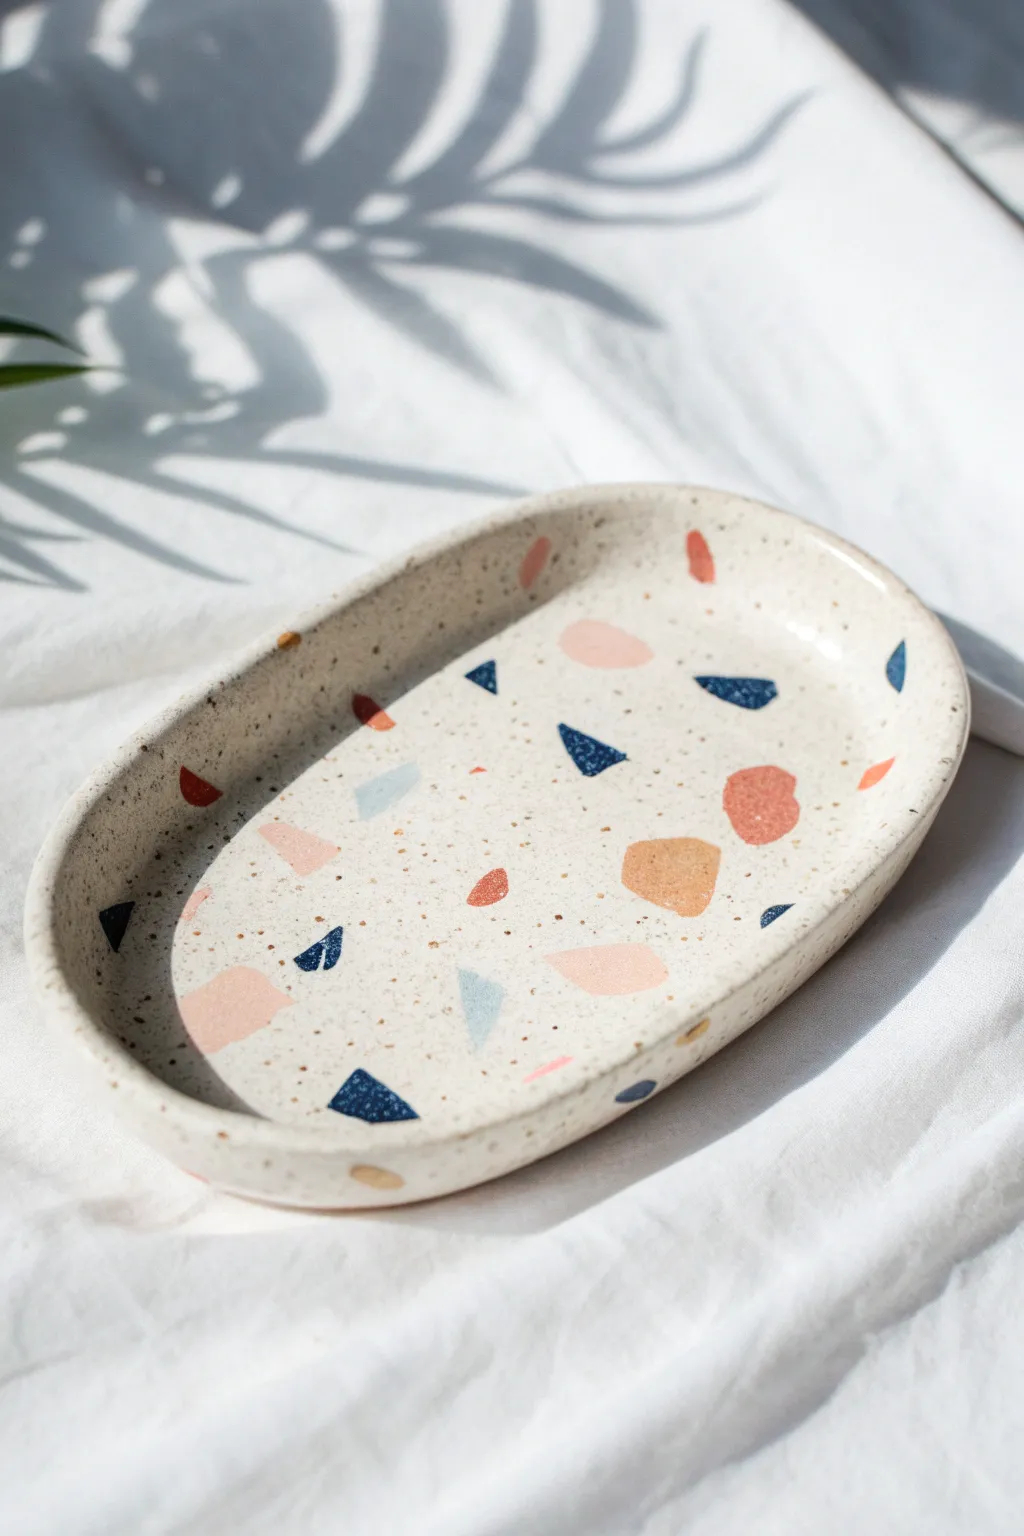
Channel the trendy look of Italian flooring with this chic terrazzo-style trinket tray. The speckled cream base and colorful geometric chips create a playful, modern home for your jewelry and keys.
Step-by-Step Guide
Materials
- White air-dry clay
- Acrylic paints (navy blue, coral, peach, light blue, cream, light brown)
- Rolling pin
- Craft knife or clay cutter
- Oval template (paper or cardboard)
- Small paintbrush
- Sandpaper (fine grit)
- Bowl of water
- Gloss varnish or sealant
- Old toothbrush (optional for speckling)
Step 1: Prepping the Clay ‘Chips’
-
Coloring small batches:
Pinch off four small, marble-sized pieces of white clay. Mix a different acrylic paint color into each one: navy blue, coral, peach, and light blue. Knead until the color is solid and uniform. -
Flattening the colored clay:
Roll each colored ball flat until they are quite thin, about 1-2mm thickness. These will become your terrazzo chips. -
Cutting the shapes:
Let these colored sheets dry for about 10-15 minutes so they aren’t too sticky. Then, use your craft knife to cut them into random, angular geometric shapes—triangles, trapezoids, and shards. -
Creating the stockpile:
Set these colorful chips aside on a piece of parchment paper to firm up slightly while you work on the main body of the tray.
Step 2: Forming the Base
-
Preparing the main clay:
Take a large handful of white clay. To get that natural stone look, I like to mix in a tiny drop of cream paint and a few flecks of dried brown clay or sand if you have it, though plain white works beautifully too. -
Rolling out the slab:
Roll out the large white piece on a flat surface until it is about 1/4 inch (5-6mm) thick. Ensure it’s large enough to fit your oval template. -
Embedding the chips:
Take your pre-cut colored chips and scatter them randomly over the rolled-out white slab. Press them gently into the surface. -
Securing the pattern:
Use your rolling pin to roll over the slab again gently. This presses the colored chips flush into the white clay, creating a smooth, unified surface. -
Cutting the oval:
Place your oval template on top of the patterned slab. Use your craft knife to trace around it, cutting out the clean oval shape.
Cracks happen!
If small cracks appear as the rim dries, mix a tiny bit of fresh clay with water to make a paste. Fill the cracks, smooth it out, and let it dry again.
Step 3: Shaping and Refining
-
Creating the rim:
Dip your finger in a little water and gently smooth the cut edges. Then, slowly curve the outer edges upward to create a shallow rim. -
Smoothing the imperfections:
Check for any cracks that formed while bending the rim. Smooth them over with a damp finger or a little clay slip (clay mixed with water). -
Initial drying:
Let the tray dry for 24-48 hours. Turn it over halfway through the drying process to ensure the bottom dries evenly and doesn’t warp.
Go metallic
Add gold leaf flakes during the rolling step alongside your colored chips for a luxurious, high-end finish that catches the light.
Step 4: Finishing Touches
-
Sanding for smoothness:
Once fully dry, use fine-grit sandpaper to gently sand the entire surface. This reveals the crisp edges of your terrazzo chips and makes the surface feel like real stone. -
Adding the speckles:
Dilute a small amount of light brown paint with water. Dip an old toothbrush into the mixture and run your thumb across the bristles to flick tiny speckles onto the tray. -
Sealing the deal:
Apply a coat of gloss varnish to the entire piece. This protects the clay from moisture and gives the ‘chips’ a polished, ceramic-like shine. -
Final cure:
Allow the varnish to dry completely according to the manufacturer’s instructions before placing any jewelry inside.
Now you have a stylish, faux-stone catchall ready to organize your treasures
Marbled Pastel Catchall Bowl
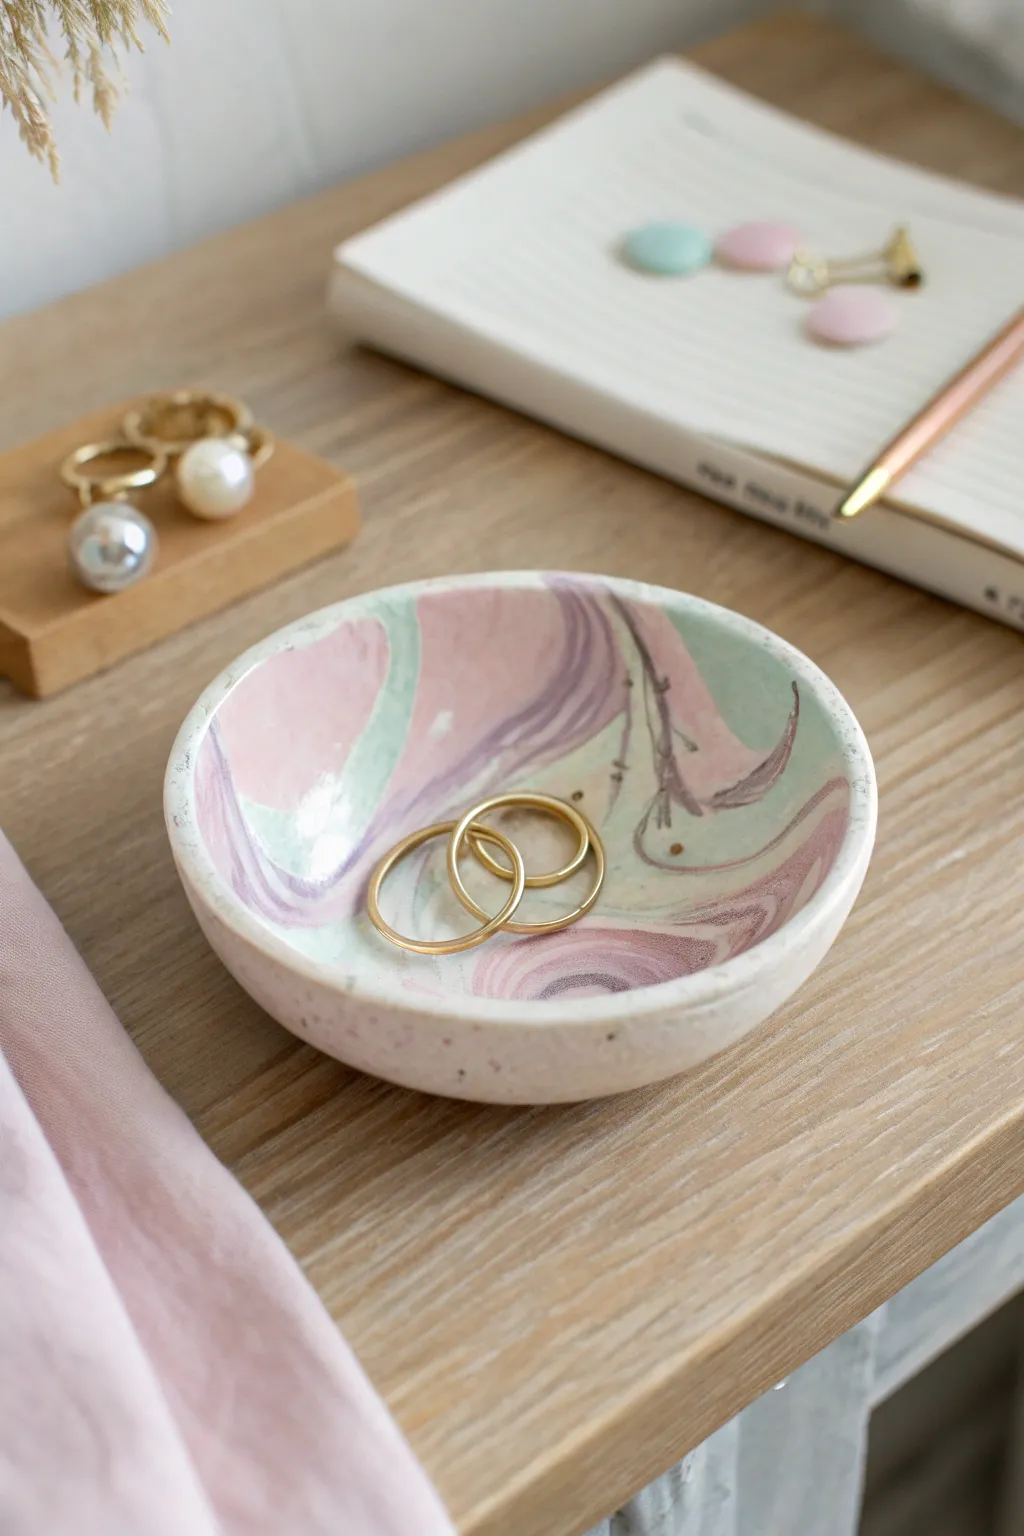
This delicate catchall bowl features swirls of soft pink, mint, and lilac against a creamy white base, creating a dreamy watercolor effect. It’s the perfect size for keeping your favorite rings safe while adding a touch of Pinterest-worthy aesthetic to your bedside table.
How-To Guide
Materials
- White pastel air dry clay (or white clay + acrylic paint)
- Pink air dry clay (or white clay + pink paint)
- Mint/Teal air dry clay (or white clay + teal paint)
- Lilac/Purple air dry clay (or white clay + purple paint)
- Rolling pin
- Small bowl (to use as a mold)
- Sharp knife or clay cutter
- Sandpaper (fine grit)
- Gloss varnish or sealant
- Paintbrush
- Optional: Speckled clay or black pepper for texture
Step 1: Preparing the Clay
-
Condition the white base:
Start by taking a generous amount of white air dry clay. Knead it in your hands until it is soft, pliable, and free of cracks. This will be the main body of your bowl. -
Create colored portions:
If you aren’t using pre-colored clay, separate three smaller balls of white clay. knead a tiny drop of acrylic paint (pink, mint, and lilac) into each respective ball until the color is uniform. -
Roll snakes:
Roll your white clay into a thick log. Then, roll your colored clays into thinner snakes. These will be used to create the marble veins.
Step 2: Marbling Technique
-
Combine the clays:
Twist the colored snakes around the thick white log. Fold the log in half, twist it again, and roll it back into a log shape. -
Repeat for detailed swirls:
Repeat the twist-fold-roll process about 3 or 4 times. Be careful not to over-mix, or the colors will blend into a muddy grey instead of distinct marble streaks. -
Form a ball:
Once you are happy with the color distribution in the twist, roll the entire mass into a smooth ball. -
Roll out the slab:
Take your rolling pin and flatten the ball into a slab about 1/4 inch thick. As you roll, you’ll see the beautiful marble pattern emerge. -
Select the best area:
Look at your rolled slab and identify the section with the most pleasing marbling pattern to be the center of your dish.
Clean Cuts Pro-Tip
When cutting your initial circle, place a piece of plastic wrap over the clay before pressing down your cutter or bowl. This creates a soft, rounded edge instantly.
Step 3: Shaping and Refining
-
Cut the circle:
Place a bowl or round cookie cutter over your chosen section and cut out a perfect circle using your knife or clay tool. -
Smooth the edges:
Dip your finger in a little water and gently run it along the cut edge of the circle to smooth out any roughness or sharp drag marks. -
Form the curve:
Place your clay circle inside a small bowl to give it a curved shape. Gently press it down so it takes the form of the bowl. -
Let it dry:
Allow the clay to dry inside the bowl for at least 24 hours. The bowl acts as a support mold while the clay hardens.
Level Up: Gold Rim
Once the varnish is dry, use a gold leaf pen or liquid gold gilding paint to carefully paint the rim of the bowl for an elegant, high-end finish.
Step 4: Finishing Touches
-
Remove and sand:
Once fully dry, pop the clay out of the mold. Use fine-grit sandpaper to gently smooth the rim and any bumps on the surface. -
Add speckles (optional):
To mimic the stone look in the photo, you can flick a tiny amount of watered-down grey paint onto the surface using an old toothbrush. -
Clean surface:
Wipe the bowl with a dry cloth to remove any sanding dust before sealing. -
Seal the piece:
Apply a coat of gloss varnish to the inside and outside of the bowl. This protects the clay from moisture and gives it a finished ceramic look. -
Final cure:
Let the varnish dry completely according to the bottle instructions before placing your jewelry inside.
Your jewelry now has a beautiful new home that looks like expensive stone
Pastel Desk Pen Cup With Face
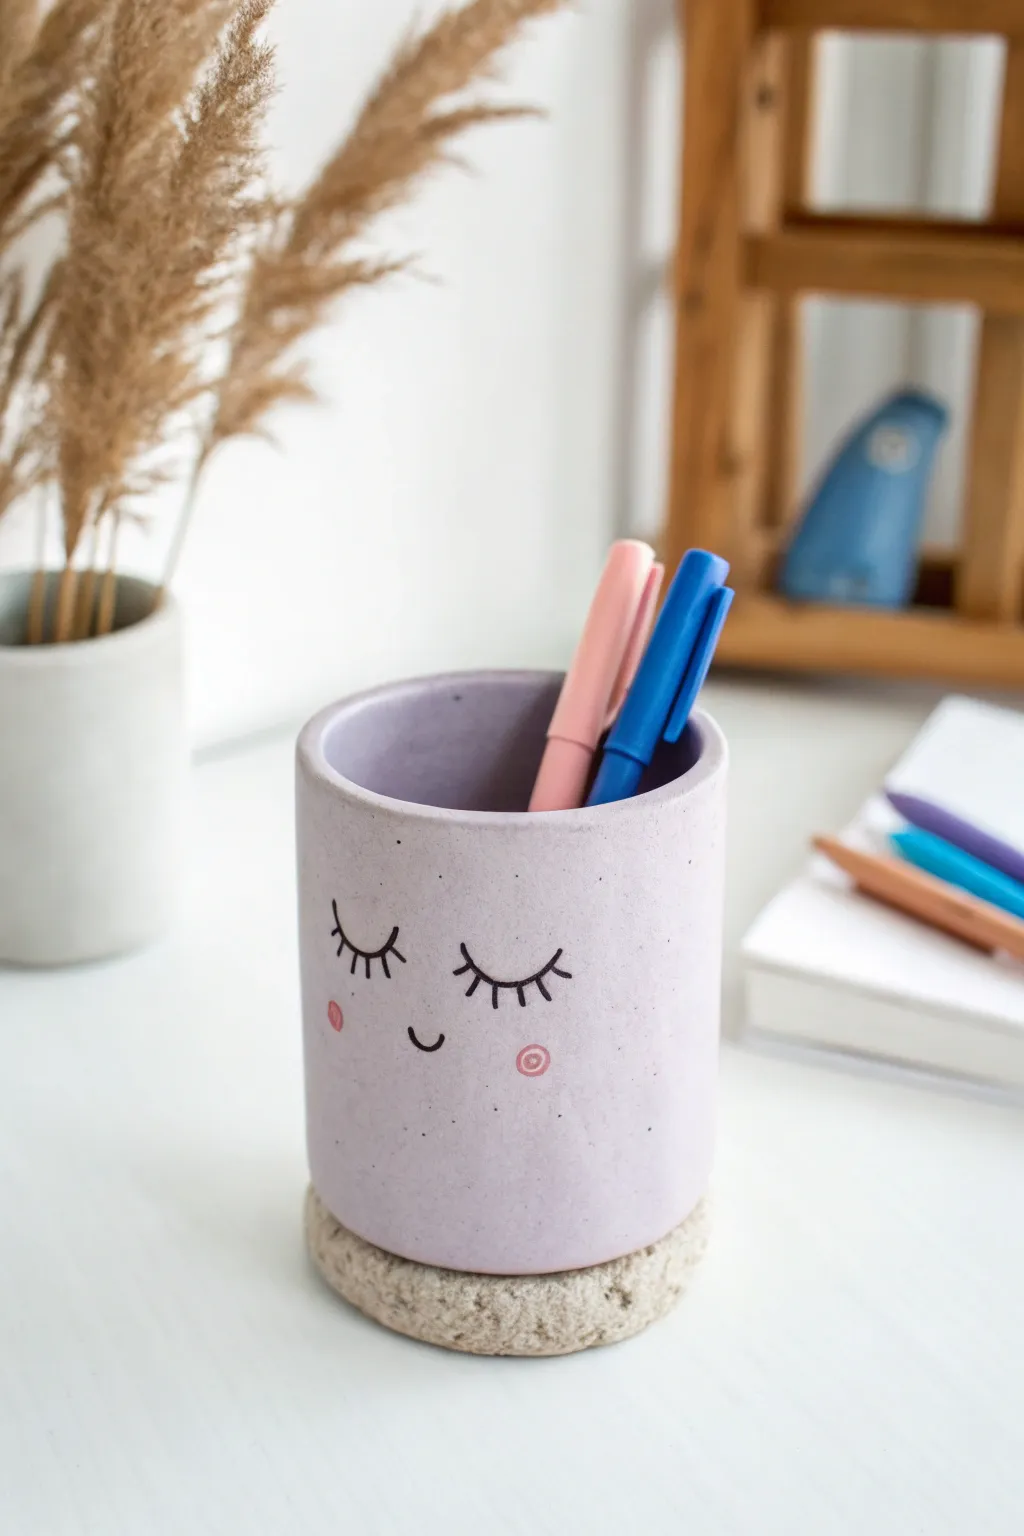
Brighten up your workspace with this adorable air-dry clay pen holder featuring a sleepy, smiling face. Its smooth lavender finish and textured base give it a modern, minimalist aesthetic that looks straight out of a boutique stationery shop.
Step-by-Step Tutorial
Materials
- White air-dry clay (approx. 500g)
- Acrylic rolling pin
- Craft knife or clay cutter
- Empty can or cylindrical glass (for use as a mold)
- Parchment paper
- Slip (clay mixed with water)
- Modeling tools (or a toothpick)
- Medium and fine grit sandpaper
- Lavender pastel acrylic paint
- Beige or stone-colored textured paint (for the base)
- Black fine-tip permanent marker or paint pen
- Pink paint marker or small brush
- Matte spray varnish
Step 1: Forming the Main Cup
-
Prepare your workspace:
Lay down a sheet of parchment paper to prevent sticking. Knead your air-dry clay until it is soft, pliable, and free of air bubbles. -
Roll the slab:
Roll out a large portion of clay into a long, even rectangular slab. Aim for a thickness of about 1/4 inch (6mm) to ensure the cup is sturdy but not too heavy. -
Cut to size:
Measure the height and circumference of your cylindrical mold (the can or glass). Cut the clay slab into a rectangle that matches these dimensions, adding a slight overlap for the seam. -
Create the base:
Roll out a second, smaller piece of clay. Place your mold on top and cut a circle around it to create the bottom of your pot. -
Wrap the mold:
Wrap your rectangular clay slab around the mold. I like to wrap the mold in parchment paper first to make removal easier later. -
Join the seam:
Score the overlapping edges with a needle tool and apply a little slip. Press the edges together firmly and smooth over the seam with your finger or a modeling tool until it disappears. -
Attach the bottom:
Score the bottom edge of the cylinder and the outer edge of the circular base. Apply slip and press the cylinder onto the base. Smooth the clay upwards to blend the two pieces seamlessly. -
Initial smoothing:
Dip your finger in a tiny bit of water and run it over the entire surface to remove fingerprints and minor imperfections.
Step 2: Creating the Textured Coaster
-
Form the coaster base:
Take a fresh ball of clay and flatten it into a thick disc, slightly wider than your pen cup. It should be about 1/2 inch thick. -
Add texture:
Use a crumpled ball of aluminum foil or a stiff-bristled brush to aggressively tap the surface and edges of this disc, creating a rough, stone-like texture. -
Drying time:
Allow both the cup and the textured coaster to dry completely. This usually takes 24-48 hours. Turn them occasionally to ensure even drying.
Cracking Clay?
Cracks often happen if clay dries too fast. Repair them by mixing a tiny bit of fresh clay with water to make a thick paste, filling the crack, and sanding it smooth once dry.
Step 3: Decoration and Assembly
-
Sanding:
Once fully dry, use medium grit sandpaper to level out any bumps on the main cup, followed by fine grit for a buttery smooth finish. Dust it off with a dry cloth. -
Painting the cup:
Paint the main cup with two to three coats of pastel lavender acrylic paint, letting each coat dry thoroughly in between. -
Painting the base:
Paint the textured coaster with a beige or stone-effect paint. If you don’t have textured paint, dab on a mix of beige and grey paint to highlight the foil texture you created earlier. -
Drawing the face:
Lightly sketch the sleepy eyes and smile with a pencil first. Then, trace over your lines with a black fine-tip paint pen or permanent marker. Add small eyelashes for extra cuteness. -
Adding cheeks:
Use a pink paint marker or a small brush dipped in pink paint to add small circles for cheeks. For the detail shown in the image, draw a small spiral or dot inside the pink circle. -
Sealing:
Spray the entire cup with a matte varnish to protect the paint and give it a professional, non-shiny finish. -
Final Assembly:
Using a strong craft glue or E6000, glue the finished purple cup to the center of the textured beige coaster.
Water Smoothing Trick
Keep a small bowl of water nearby while working. Just a drop on your finger can act like an eraser for smoothing out seams, but don’t use too much or the clay will get mushy.
Now fill your new pot with your favorite pens and enjoy the cozy vibe it adds to your desk
Kawaii Blob Animal Worry Stones
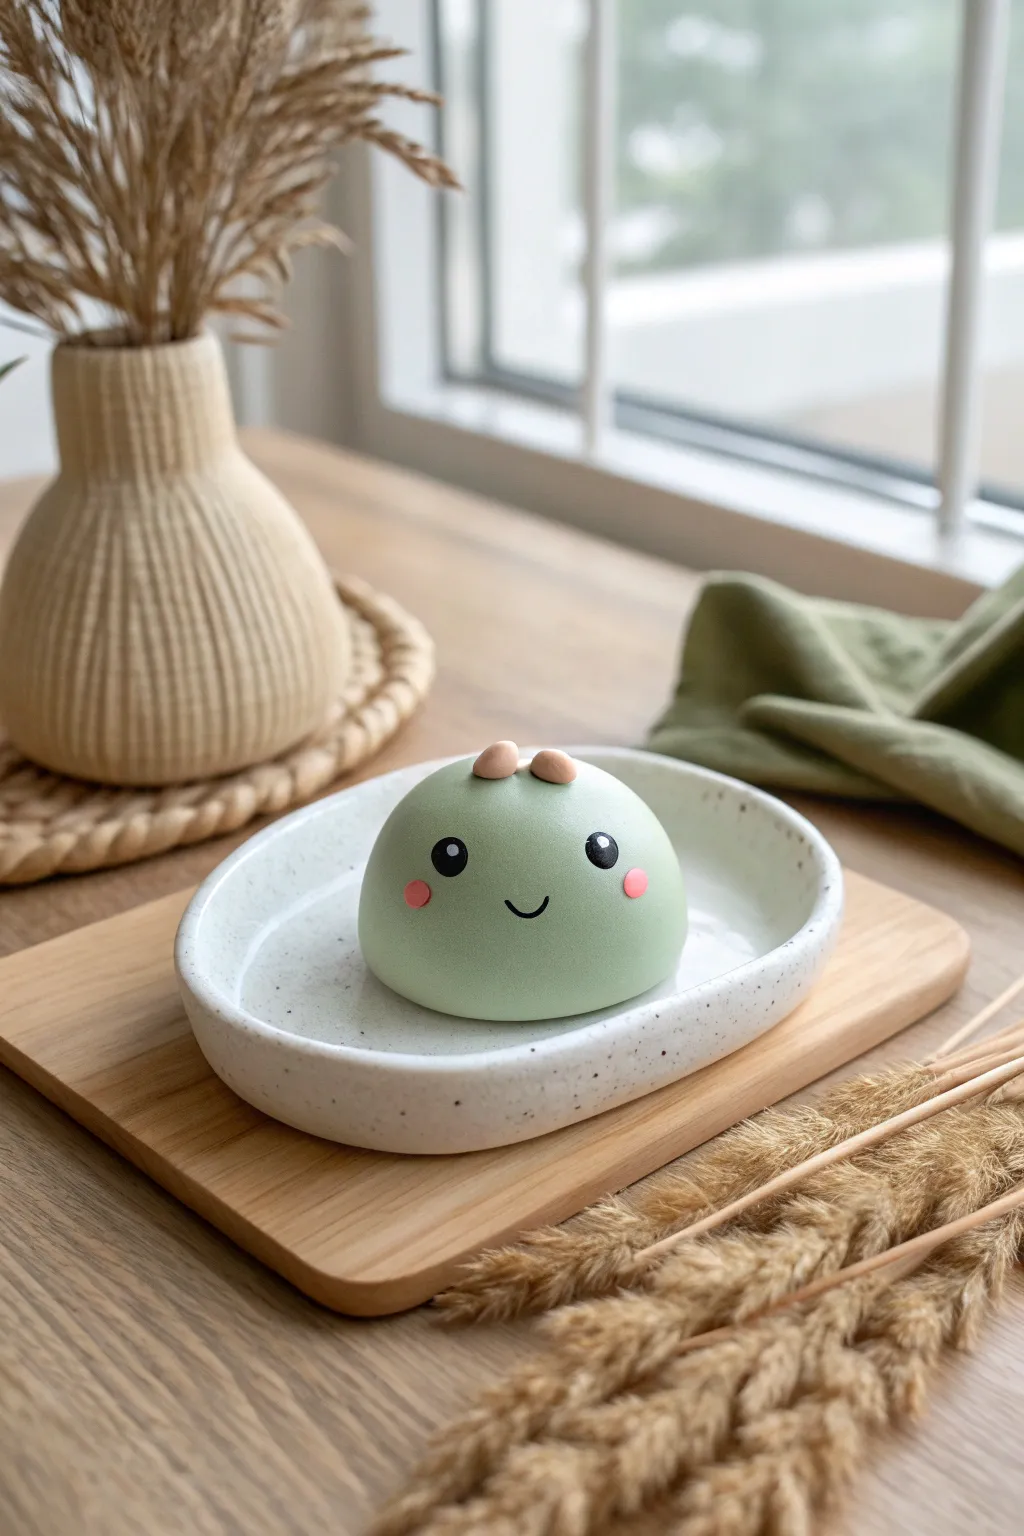
Create a soothing, palm-sized companion that mimics the soft matte look of a green tea mochi using air dry clay. This minimalist kawaii figure features a perfectly rounded dome shape and a sweet, simple face that is sure to bring a smile to your desk.
Step-by-Step Guide
Materials
- White smooth air dry clay
- Acrylic paints: sage green, pastel pink, warm brown, black, white
- Fine-grit sandpaper (400-600 grit)
- Small bowl of water
- Fine detail paintbrush (size 0 or 00)
- Matte spray varnish or Mod Podge Matte
- Rolling pin or smooth flat object
- Dotting tool or toothpick
Step 1: Shaping the Base
-
Condition the clay:
Start with a ball of clay roughly the size of a tangerine. Knead it thoroughly in your hands until it feels warm and pliable, removing any air bubbles to prevent cracks later. -
Form the dome:
Roll the clay into a seamless sphere between your palms. Place it onto your work surface and gently press down to flatten the bottom, creating a smooth, high-domed hemisphere. -
Refine the surface:
Dip your finger in a tiny bit of water and run it over the entire dome to smooth out any fingerprints or tiny bumps. I like to spend an extra minute here to ensure it’s perfectly glassy before drying. -
Create the ears:
Pinch off two very small, pea-sized amounts of fresh clay. Roll them into tiny oval nubs. -
Attach the ears:
Score the top of the dome slightly where you want the ears to sit. Use a dab of water or clay slip to attach the two nubs side-by-side on the very top center of the head. -
Blend the seams:
Use a modeling tool or your finger to gently blend the bottom of the ears into the main head shape so they look integrated, not just stuck on. -
Initial drying:
Let the piece dry completely for 24-48 hours. Turn it over occasionally so the bottom dries evenly.
Fixing Cracks
If tiny cracks appear while drying, don’t panic. Mix a small amount of fresh clay with water to make a paste (slip) and fill them in, then sand smooth once dry.
Step 2: Sanding and Painting
-
Sand for smoothness:
Once bone dry, take your fine-grit sandpaper and gently buff the entire surface in a circular motion. The goal is an ultra-smooth finish that feels like a stone. -
Dust off:
Wipe the figure down with a slightly damp cloth or dry brush to remove all sanding dust before painting. -
Mix the base color:
Mix sage green acrylic paint with a touch of white to get a soft, pastel matcha color. It should be opaque but light. -
Paint the body:
Apply 2-3 thin coats of the green paint to the entire body, letting each coat dry fully before adding the next. Leave the ears unpainted for now. -
Paint the ears:
Mix a soft, warm brown or beige color and carefully paint the two ear nubs. Use a steady hand to keep the edges crisp against the green. -
Draft the face:
Lightly mark the placement of the eyes and mouth with a pencil to ensure symmetry before committing to paint.
Step 3: Detailing the Face
-
Paint the eyes:
Using a dotting tool or the back of a paintbrush dipped in black paint, stamp two solid black circles for the eyes. They should be wide-set for maximum cuteness. -
Add eye highlights:
Once the black is dry, use a tiny toothpick tip dipped in white paint to add a small reflection dot near the top of each eye. -
Draw the mouth:
With your finest brush and slightly watered-down black paint, draw a tiny, shallow ‘U’ shape between the eyes for the smile. -
Add rosy cheeks:
Mix a soft pink. Use a dotting tool again to place two small pink circles right under the outer edge of the eyes. -
Seal the finish:
Finish with a spray of matte varnish. This removes the ‘plastic’ look of acrylics and gives it that soft, stone-like texture shown in the photo.
Make it a shaker
Hollow out the inside of the dome before attaching a flat slab bottom. Place a few dried beans or beads inside before sealing to make a gentle rattle.
Now you have a serene little friend to keep you company on your desk