When kids get their hands on clay, they don’t just make stuff—they make little worlds, characters, and treasures that feel totally real to them. Here are my favorite cool clay ideas for kids that stay simple, colorful, and genuinely fun (with plenty of room for their wild imaginations).
Pinch Pot Treasure Bowls
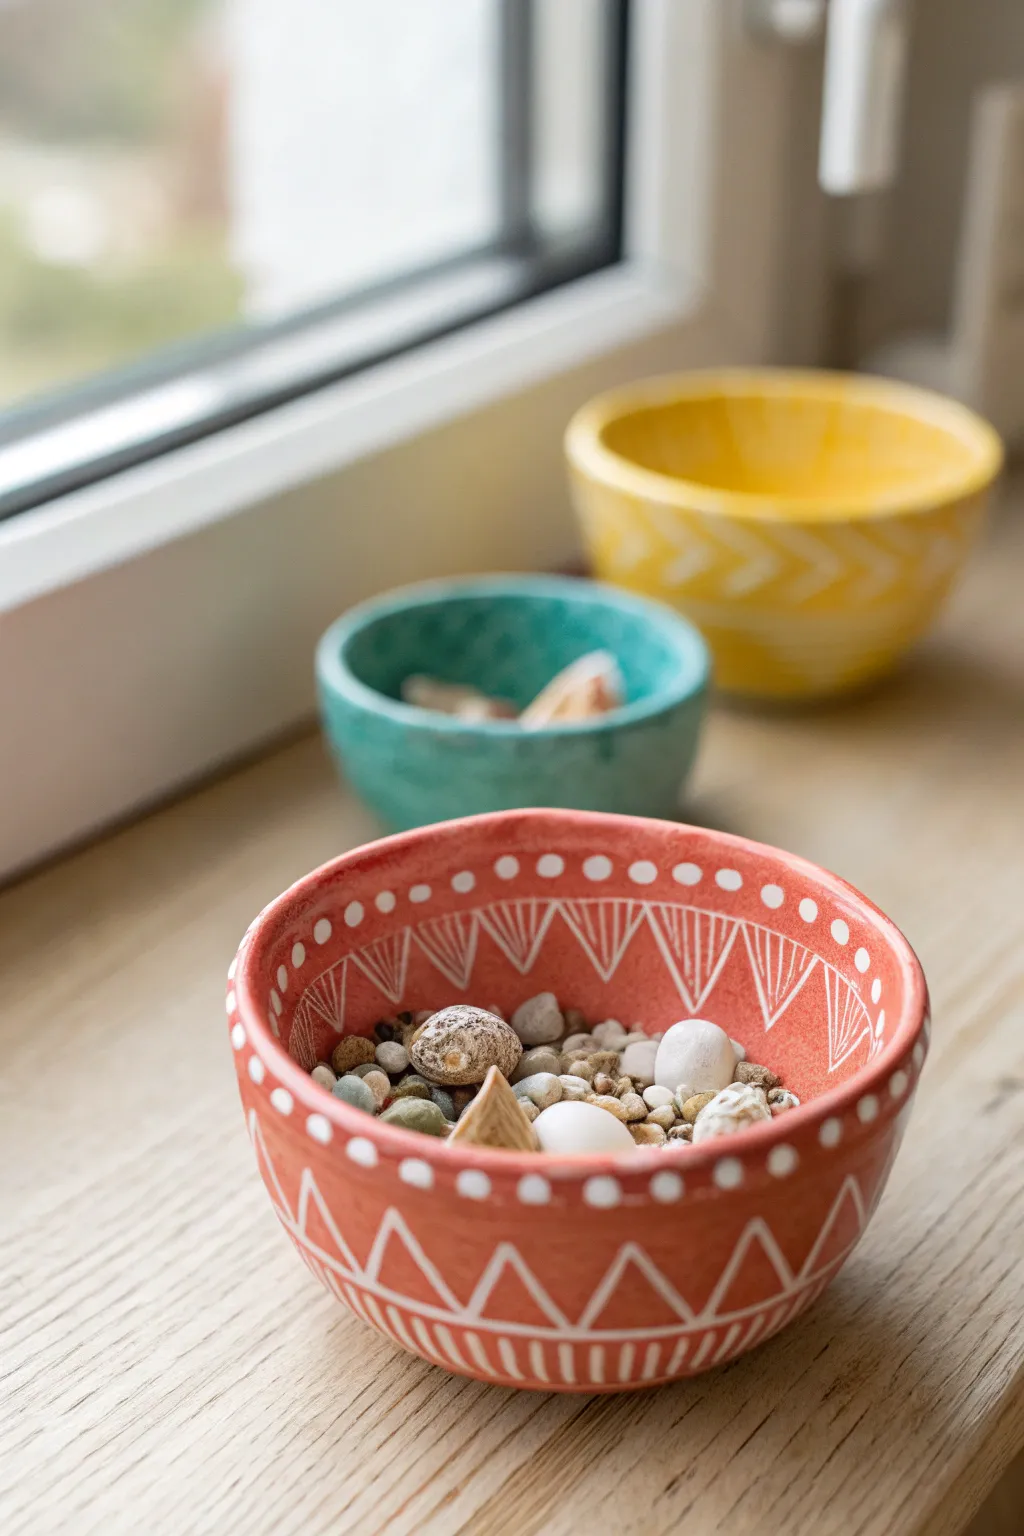
These charming, hand-formed bowls are the perfect size for storing tiny finds like sea glass or pebbles. With their vibrant colors and etched geometric details, they look like professionally glazed ceramics but are simple enough for kids to create.
Step-by-Step Tutorial
Materials
- Air-dry clay (white or terracotta)
- Acrylic paints (Coral/Red-Orange, Teal, Yellow)
- White acrylic paint or a white paint marker
- Fine-grit sandpaper
- Clay carving tools or a wooden skewer
- Small bowl of water
- Paintbrushes (flat shader and fine tip)
- Clear acrylic sealer or varnish (glossy)
Step 1: Forming the Bowl
-
Start with a sphere:
Begin by rolling a fist-sized chunk of clay into a smooth, even ball between your palms. Work out any cracks as you roll. -
Open the center:
Hold the ball in one hand and gently press your thumb into the center, stopping about a half-inch from the bottom to leave a sturdy base. -
Pinch the walls:
Using your thumb on the inside and fingers on the outside, gently pinch and turn the clay. Work your way up from the base to the rim in a spiral motion. -
Even it out:
Aim for a wall thickness of about a quarter-inch throughout. It doesn’t need to be perfectly machine-round; the slight unevenness adds handmade charm. -
Smooth the surfaces:
Dip your finger in a little water and run it over the clay to smooth out fingerprints and tiny cracks. Pay special attention to the rim. -
Flatten the bottom:
Gently tap the bowl on your table surface to create a flat spot on the bottom so it will stand upright without wobbling. -
Let it dry:
Set your bowl aside to dry completely. This usually takes 24-48 hours depending on humidity. Rotate it occasionally so the bottom dries evenly.
Smooth Operator
Use a damp sponge instead of sandpaper to smooth the dry clay if you want to avoid dust. It polishes the surface perfectly for painting.
Step 2: Finishing and Decorating
-
Sand for smoothness:
Once bone dry, use fine-grit sandpaper to gently buff away any rough patches or sharp edges on the rim. -
Apply the base coat:
Paint the entire bowl—inside and out—with your chosen base color (coral, teal, or yellow). I find two thin coats cover better than one thick, gloppy one. -
Plan the rim pattern:
Using white paint and a fine brush (or a paint marker), add a row of dots along the very top edge of the rim. -
Add the sawtooth design:
Paint a continuous zigzag line about a half-inch below the rim on the exterior. Fill the upper triangular spaces with vertical hatch lines. -
Decorate the interior:
Repeat the zigzag and hatch-line pattern on the inside wall of the bowl, mirroring the outside design for a cohesive look. -
Create the lower border:
Paint a second, larger zigzag pattern near the bottom of the bowl on the outside. -
Detail the base:
Finish the painting phase by adding a series of short vertical dashes around the very bottom edge. -
Seal the deal:
Once the paint is fully dry, apply a coat of glossy varnish. This mimics the look of fired ceramic glaze and protects your design.
Etched Effect
For actual texture, carve the zigzag lines into the wet clay with a toothpick before drying, then paint white into the grooves later.
Now your bowls are ready to hold colorful pebbles, shells, or small trinkets on a sunny windowsill


Animal Pinch Pot Critters
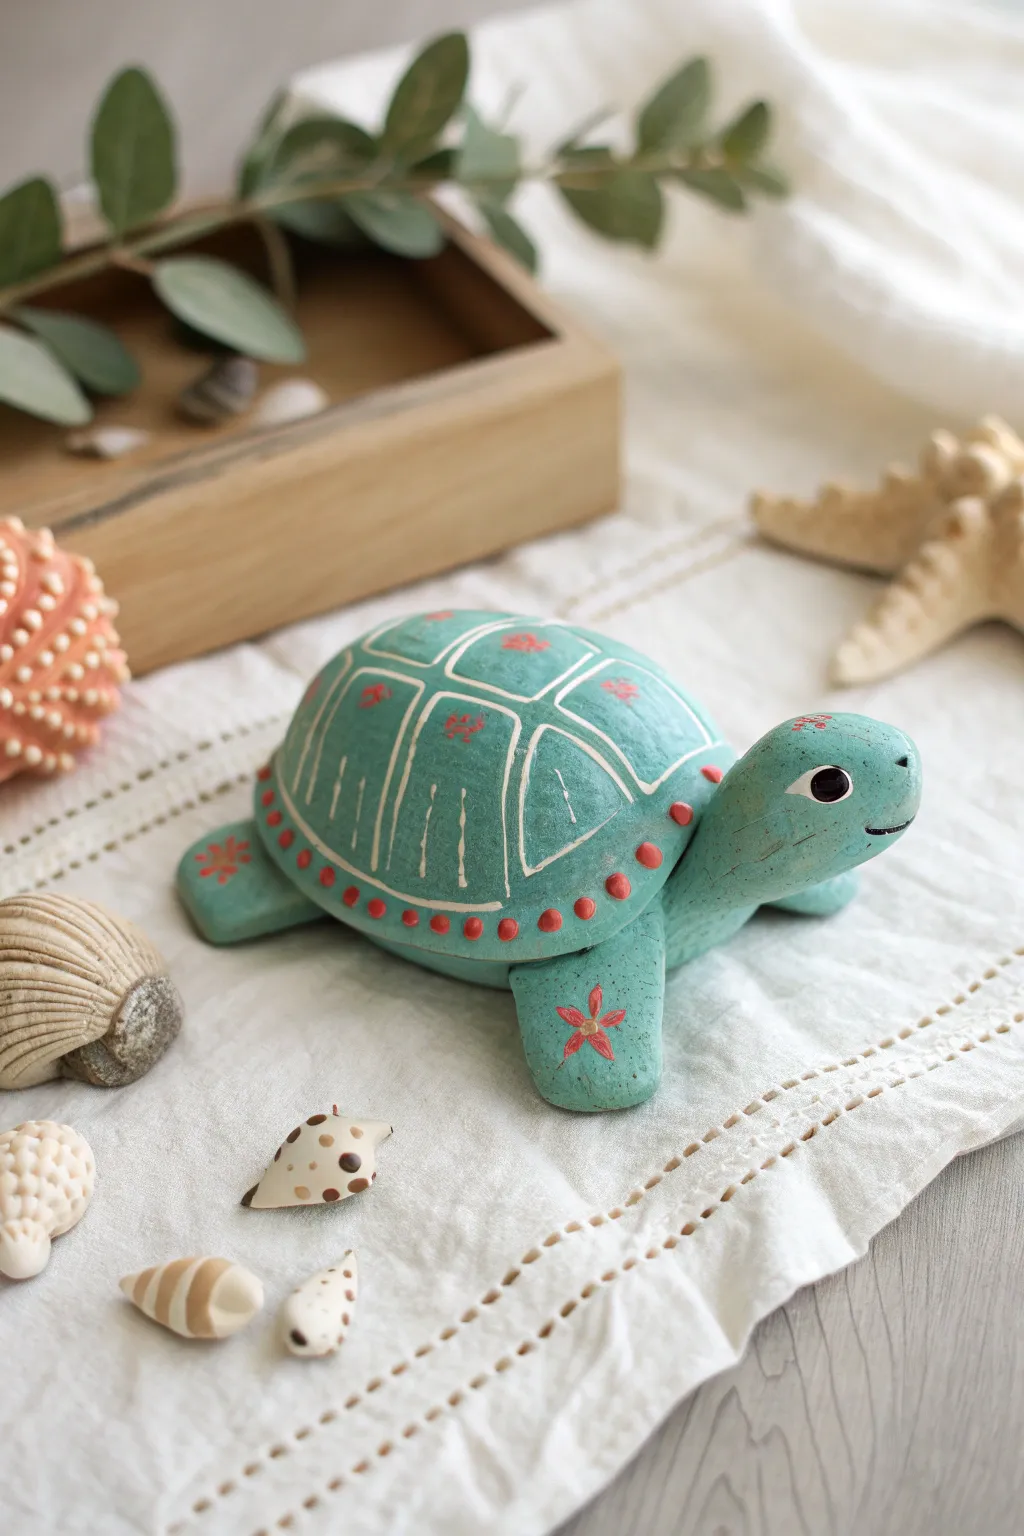
Transform two simple pinch pots into this adorable sea turtle sculpture, featuring charming hand-painted details. With a sturdy shell and sweet expression, this project is a wonderful way to practice smoothing and joining clay techniques.
How-To Guide
Materials
- Air-dry clay or polymer clay (white or light grey works best)
- Acrylic paints (teal/aqua, white, red, black)
- Small paintbrushes (fine tip and flat)
- Clay sculpting tool or wooden skewer
- Small bowl of water (for smoothing)
- Matte varnish or sealant spray (optional)
Step 1: Forming the Body
-
Create the shell base:
Start by rolling a ball of clay roughly the size of a tangerine. Press your thumb into the center and rotate the clay to form a uniform pinch pot. Turn it upside down on your work surface; this dome will be the turtle’s shell. -
Roll the plastron:
Take a slightly smaller piece of clay and flatten it into an oval disk roughly the same diameter as your shell opening. This will be the belly plate, or plastron. -
Join the main body:
Score (scratch) the rim of the pinch pot and the edge of the flat oval. Dab a little water or slip on the scored areas and press them firmly together to close the shell. -
Smooth the seams:
Using your thumb or a smoothing tool, gently drag clay across the seam where the two pieces meet until the join is invisible. I find using a tiny bit of water on my finger helps polish this area nicely. -
Shape the head:
Roll a smaller ball of clay into a smooth, slightly elongated egg shape for the head. Attach it firmly to the front of the body by scoring and wetting the clay, then blending the neck clay into the shell. -
Add flippers:
Create four flattened teardrop shapes for the legs. Attach two larger ones near the front and two slightly smaller ones near the back. Angle them slightly outward as though the turtle is swimming or walking. -
Refine the surface:
Before the clay dries, take a moment to smooth out any fingerprints with a damp sponge or finger. The smoother the surface now, the easier it will be to paint later. -
Let it dry:
Allow your clay turtle to dry completely according to the package instructions. This usually takes 24-48 hours for air-dry clay.
Cracks while drying?
If you see hairline cracks as the clay dries, mix a tiny bit of fresh clay with water to make a paste and fill them in immediately.
Step 2: Painting & Details
-
Base coat:
Paint the entire turtle with a solid coat of teal or aqua acrylic paint. You may need two thin layers to get full, opaque coverage. -
Sketch the shell segments:
Once the base is dry, use a very fine brush with white paint to draw the shell segments. Start with a central rounded rectangle on top, and draw lines radiating downward to create the side plates (scutes). -
Paint the border dots:
Using the handle end of a paintbrush dipped in red paint, stamp a row of small, uniform dots along the lower rim of the shell. -
Add floral motifs:
Paint small red flower designs inside the shell segments and one on the front flipper. Simple five-petal stars work perfectly for this folk-art look. -
Detail the face:
Paint a large black circle for the eye, adding a small white highlight dot near the top to give it life. Use a tiny brush or pen to draw a thin black line for the mouth. -
Highlight ridges:
For extra texture, gently dry-brush a tiny amount of white paint along the very top ridges of the shell to make them pop. -
Seal the work:
Protect your paint job with a coat of matte varnish or sealant if you want your turtle to last a long time.
Pro Tip: Hollow Out
Before attaching the head, poke a small hidden hole in the bottom of the belly. This allows air to escape and prevents trapped air from cracking the piece.
Place your finished turtle among some seashells for a lovely coastal display


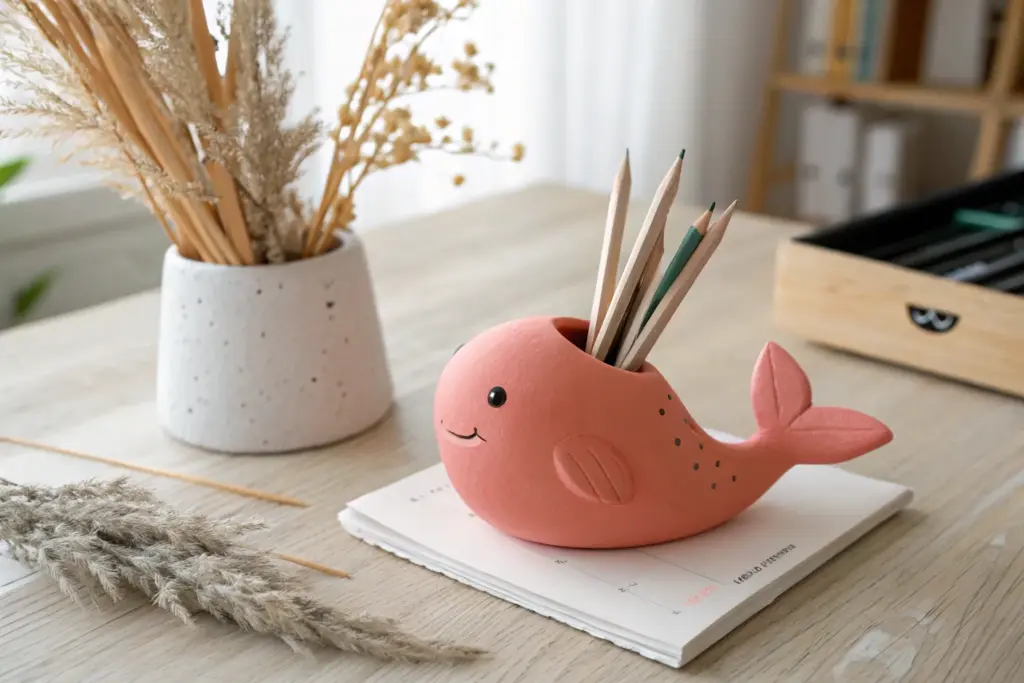
Silly Monster Pencil Holders

Keep your desk organized with this goofy, two-toned monster pencil holder. Featuring a zigzag belly, adorable horns, and a wide toothy grin, this ceramic-style creation is both functional and bursting with personality.
Detailed Instructions
Materials
- Air-dry clay or polymer clay (white or terracotta)
- Acrylic paints (terracotta orange, teal/mint green, white, black)
- Rolling pin
- Clay knife or plastic sculpting tool
- Empty toilet paper roll or cardboard tube (as a form)
- Small paintbrush
- Water cup (for smoothing)
- Clear matte varnish (optional)
Step 1: Forming the Base
-
Prepare the cylinder form:
Take your cardboard tube and wrap it in parchment paper or cling film. This prevents the clay from sticking to the cardboard so you can remove it later. -
Roll out the slab:
Roll out a slab of clay to about a 1/4 inch thickness. Use a knife to cut a rectangle that is tall enough to cover the tube and long enough to wrap all the way around it. -
Wrap the clay:
Carefully lift your clay rectangle and wrap it around the prepared tube. Join the two ends by blending the clay together with your fingers until the seam disappears completely. -
Create the bottom:
Roll a small ball of clay and flatten it into a disc slightly larger than the tube’s diameter. Place the tube on top of this disc and smooth the edges upward to seal the bottom to the cylinder walls. -
Smooth the surface:
Dip your finger in a little bit of water and run it over the entire surface to remove any fingerprints or cracks. I like to spend extra time here to get that smooth, ceramic finish.
Seam splitting?
If the seam where you joined the clay opens while drying, patch it with a tiny bit of fresh clay mixed with water (slip) and smooth over it immediately.
Step 2: Adding Monster Features
-
Make the horns:
Roll two small cones of clay. Attach them to the upper rim of the cylinder, blending the bottom of the cones into the main body so they stick securely. -
Create the eyes:
Form two flat circles of clay for the eyes. Stick them side-by-side in the center of the upper half of the holder. They should be relatively large and touching each other. -
Carve the mouth:
Using a clay tool or a dull pencil, gently carve a curved smile line below the eyes. Make small indentations at the corners of the mouth for extra character. -
Add the teeth:
Roll tiny balls of clay—about the size of a grain of rice—and press them flat onto the smile line to create the goofy teeth. -
Carve the belly texture:
On the bottom third of the holder, use your sculpting tool to carve a zigzag line all the way around. Add a second parallel zigzag line below it to create a patterned belly effect. -
Let it dry:
Allow the clay to dry completely according to the package instructions. If using air-dry clay, this usually takes 24-48 hours. Remove the cardboard tube once the clay is stiff enough to hold its shape.
Step 3: Painting and Finishing
-
Paint the top half:
Paint the upper section of the monster, including the face and horns, with a terracotta orange color. Be careful to paint around the white eyes and teeth. -
Paint the bottom half:
Switch to a teal or mint green paint for the bottom section. Paint right up to the line where the orange stops to create a color-blocked look. -
Detail the eyes:
Paint the eye discs white. Once dry, add a black dot in the center of each white circle for the pupils. Add a tiny white reflection dot inside the black pupil for life. -
Paint the teeth:
Carefully paint the tiny teeth white using your smallest brush. -
Highlight the belly:
If the paint filled in your carved zigzag lines too much, you can run a darker shade of teal into the grooves to make the pattern pop again. -
Seal the project:
Once all paint is fully dry, apply a coat of clear matte varnish to protect your monster and give it a finished, store-bought look.
Make it fuzzy
Instead of carving zigzags, execute the bottom half by pressing a rough textural sponge or stiff brush into the wet clay to give the monster a furry belly.
Now pop in your favorite colorful pencils and enjoy your new desk companion


Beaded Heart Ornaments

These sweet, durable heart charms are the perfect afternoon project for little hands, combining simple clay modeling with imaginative painting. With a charming rustic pink base and playful doodles, they make lovely gifts or Valentine’s Day decorations.
Step-by-Step
Materials
- Air-dry clay (white or terracotta)
- Heart-shaped cookie cutter (medium size)
- Rolling pin
- Parchment paper or canvas mat
- Straw or skewer (for poking holes)
- Fine-grit sandpaper (optional)
- Acrylic paints: Pink base color, red, white, purple, gold/metallic
- Fine-point black permanent marker or detail paint pen
- Fine detail paintbrush
- Mod Podge or gloss varnish
- Jute twine or rustic string
Step 1: Shaping the Base
-
Prepare your workspace:
Lay down a sheet of parchment paper or a canvas mat to prevent the clay from sticking to your table. If the clay feels too sticky, you can dust your hands lightly with cornstarch. -
Roll out the clay:
Take a handful of air-dry clay and knead it until it’s soft and pliable. Roll it out into an even slab, aiming for a thickness of about 1/4 inch so it’s sturdy but not too heavy. -
Cut the shapes:
Press your heart-shaped cookie cutter firmly into the clay slab. Wiggle it slightly before lifting to ensure a clean cut. -
Smooth the edges:
Dip your finger in a tiny bit of water and gently run it along the cut edges of the heart to smooth down any roughness or jagged bits left by the cutter. -
Create the hanging hole:
While the clay is still wet, use a straw or a thick skewer to punch a hole near the top center of the rounded lobes. Make sure the hole is big enough for your twine to pass through later. -
Let it dry completely:
Place the hearts on a flat surface to dry. This usually takes 24-48 hours depending on humidity. Flip them over halfway through to ensure the back dries evenly.
Clay cracked while drying?
Mix a tiny amount of fresh clay with water to make a paste (slip). Fill the crack with this paste, smooth it over with a wet finger, and let it dry again.
Step 2: Painting and Decorating
-
Sand imperfections:
Once bone dry, check for any rough spots. I like to give the edges a quick rub with fine-grit sandpaper for a professional finish. -
Apply the base coat:
Paint the entire front and sides of the heart with a dusty pink acrylic paint. You might need two coats for full coverage; let the first coat dry before adding the second. -
Outline the doodles:
Using a fine detail brush or a paint pen, sketch various heart shapes onto the pink base. Create a mix of sizes and styles—some tilted, some straight. -
Fill in the hearts:
Color in your sketched hearts. Use bright red for some, a smaller white heart inside a red outline for others, and purple for tiny accents. Laying down a white base first makes colors pop. -
Add striped details:
For the larger heart outlines, paint interior stripes. Use white stripes inside a small red heart, or try red stripes inside a larger outline for variety. -
Create dots and accents:
Dip the handle end of a paintbrush into red paint and dot it onto the clay to create perfect circular polka dots between your heart drawings. -
Apply gold outlines:
Once the colorful paint is dry, use a very fine brush with metallic gold paint or a gold marker to outline the hearts. This adds a subtle shimmer and defines the shapes cleanly. -
Seal the artwork:
Protect your design by brushing on a layer of Mod Podge or gloss varnish. This gives the ornament a nice sheen and prevents the paint from chipping. -
String it up:
Cut a length of jute twine. Fold it in half, push the loop through the hole from front to back, and pull the tails through the loop to secure it with a lark’s head knot.
Pro Tip: Cleaner Lines
If painting small details is tricky for little hands, use fine-tip acrylic paint markers instead of brushes. They offer way more control for drawing stripes.
Hang your charming new creation on a knob or hook to add a touch of love to any room

The Complete Guide to Pottery Troubleshooting
Uncover the most common ceramic mistakes—from cracking clay to failed glazes—and learn how to fix them fast.
Funny Face Mini Magnets
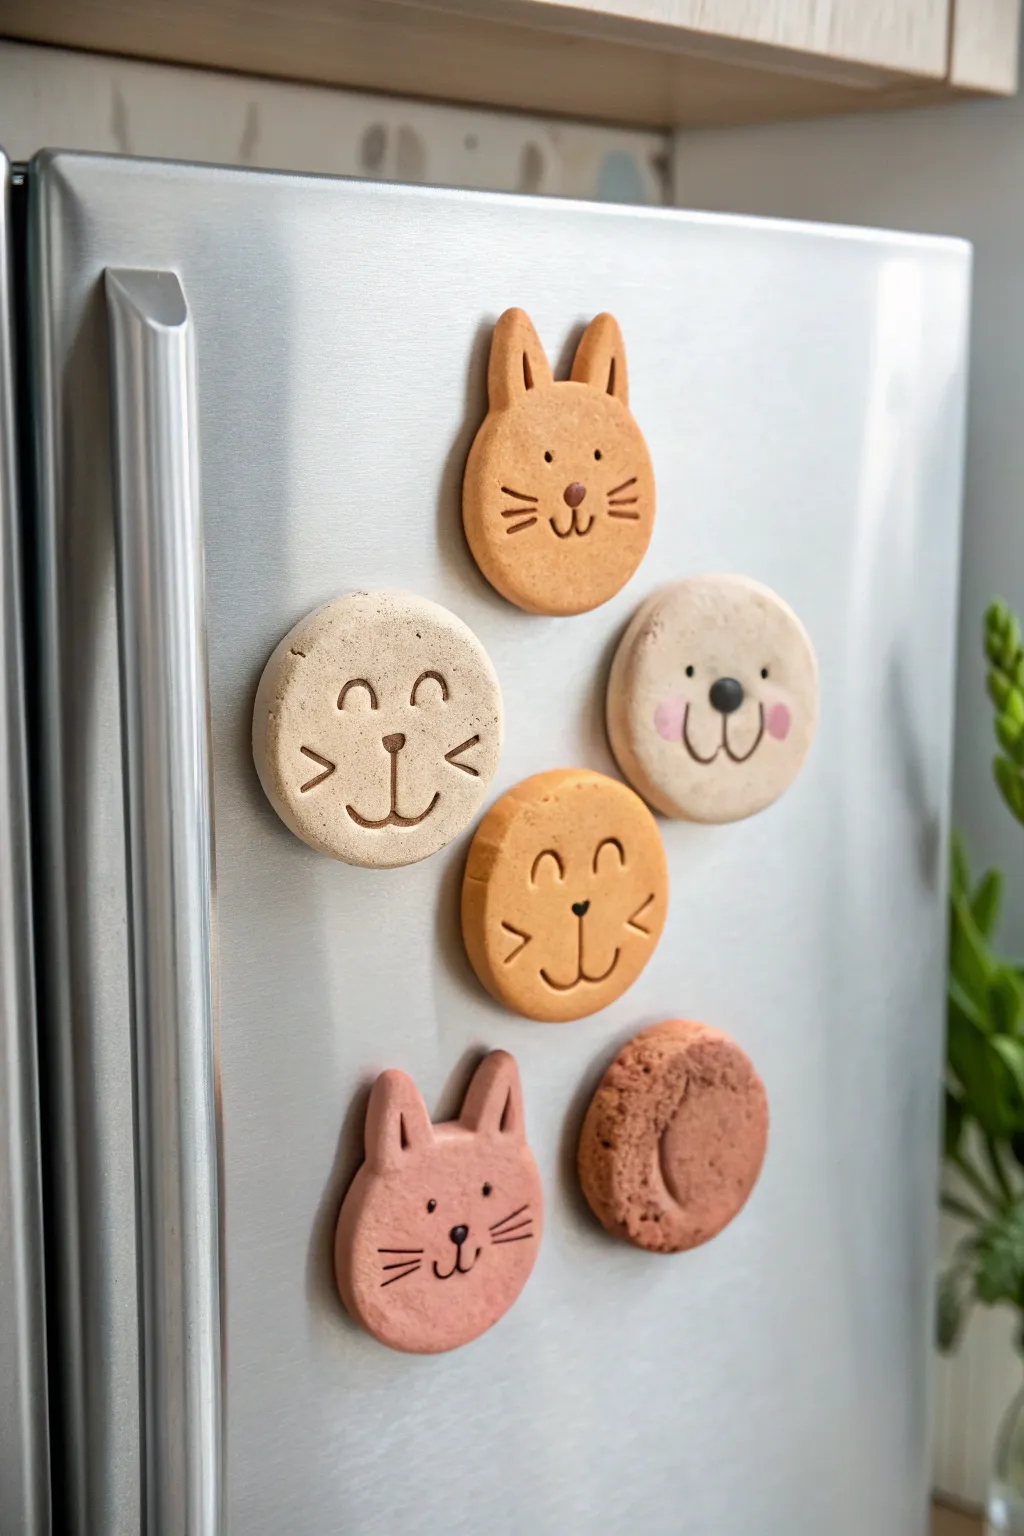
These adorable magnets look good enough to eat because they’re styled like classic sugar cookies with icing decorations. With their warm, toasted colors and simple etched faces, they add a sweet and playful touch to any metal surface.
Detailed Instructions
Materials
- Polymer clay (beige, tan, light pink, and terracotta colors)
- Round cookie cutter (approx. 2 inches)
- Small round cutter or straw (for ears)
- Acrylic paint (dark brown and black)
- Fine tip paintbrush or toothpick
- Modeling tools (or a butter knife and large needle)
- Strong craft magnets
- Super glue or E6000
- Rolling pin
- Parchment paper
Step 1: Shaping the Base
-
Prepare the dough:
Start by conditioning your polymer clay until it is soft and pliable. Use beige for the cat faces, a warmer tan for the bunny and bear, and a terracotta pink for the pink cat. -
Roll it out:
Roll the clay onto parchment paper to a thickness of about 1/4 inch. You want them thick enough to hold the magnets securely later. -
Cut the circles:
Use your round cookie cutter to punch out the main face shapes. For six magnets, you’ll need six circles, but feel free to mix and match colors. -
Form the ears:
For the bunny and cats, hand-shape small triangles of clay. Gently press them onto the top edge of the corresponding circles. I find blending the seam on the back with a smoothing tool ensures they don’t pop off later. -
Smooth the edges:
Use your finger to gently round off the sharp cut edges of the circles. This gives them that baked, puffy cookie look rather than a sharp, raw clay look.
Step 2: Adding Details
-
Sculpt the bear snout:
For the bear magnet, take a small ball of the beige clay, flatten it slightly, and press it onto the lower center of the tan circle to create a muzzle. -
Create indentations:
Use a needle tool or toothpick to gently etch out whisker lines on the cat and bunny faces. Press lightly; you don’t need to cut all the way through. -
Add dimensional noses:
Roll tiny spheres of dark brown or pink clay for the noses. Press them firmly into the center of the faces. For the bear, place a black clay nose deeply into the beige snout. -
Etch the eyes and mouths:
Using your needle tool, press curved lines for smiling eyes and mouths. For the blinking cat, create two upside-down ‘U’ shapes for eyes. Wiggle the tool slightly to widen the lines so they are visible after baking. -
Add rosy cheeks:
For the bear, take tiny bits of pink clay, flatten them paper-thin, and press them onto the cheeks. Blend the edges slightly so they look like soft blushing spots. -
Texture the cookie:
Use a toothbrush or a crumpled ball of aluminum foil to gently tap the surface of the plain round magnet (the reddish-brown one). This gives it a realistic, rough baked texture.
Loose Ears?
If ears fall off after baking, don’t panic. A tiny drop of super glue or liquid clay can reattach them seamlessly. For extra strength next time, use a bit of wire inside to connect pieces.
Step 3: Baking and Finishing
-
Bake the clay:
Bake your pieces according to the specific instructions on your polymer clay package. Usually, this is around 275°F (135°C) for 15-20 minutes. -
Cool down:
Let the clay pieces cool completely on the baking sheet to harden. Moving them while hot might warp the shapes. -
Paint the details:
Once cool, use a fine brush with dark brown acrylic paint to fill in the etched lines for whiskers, eyes, and mouths. This mimics the look of chocolate icing details. -
Wipe the surface:
Immediately after applying paint, wipe the surface gently with a damp paper towel. This leaves paint in the grooves but cleans the surface. -
Attach the magnets:
Flip the faces over. Apply a dab of strong glue to the center of the back and press a magnet firmly into place. Let the glue cure fully before sticking them to your fridge.
Scented Clay
Mix a tiny pinch of cinnamon or vanilla bean powder into the clay before sculpting. It won’t affect the bake, but your magnets will smell like real cookies for weeks.
Now your fridge is ready to host this sweet menagerie of characters.
Slab Fish Wall Plaques
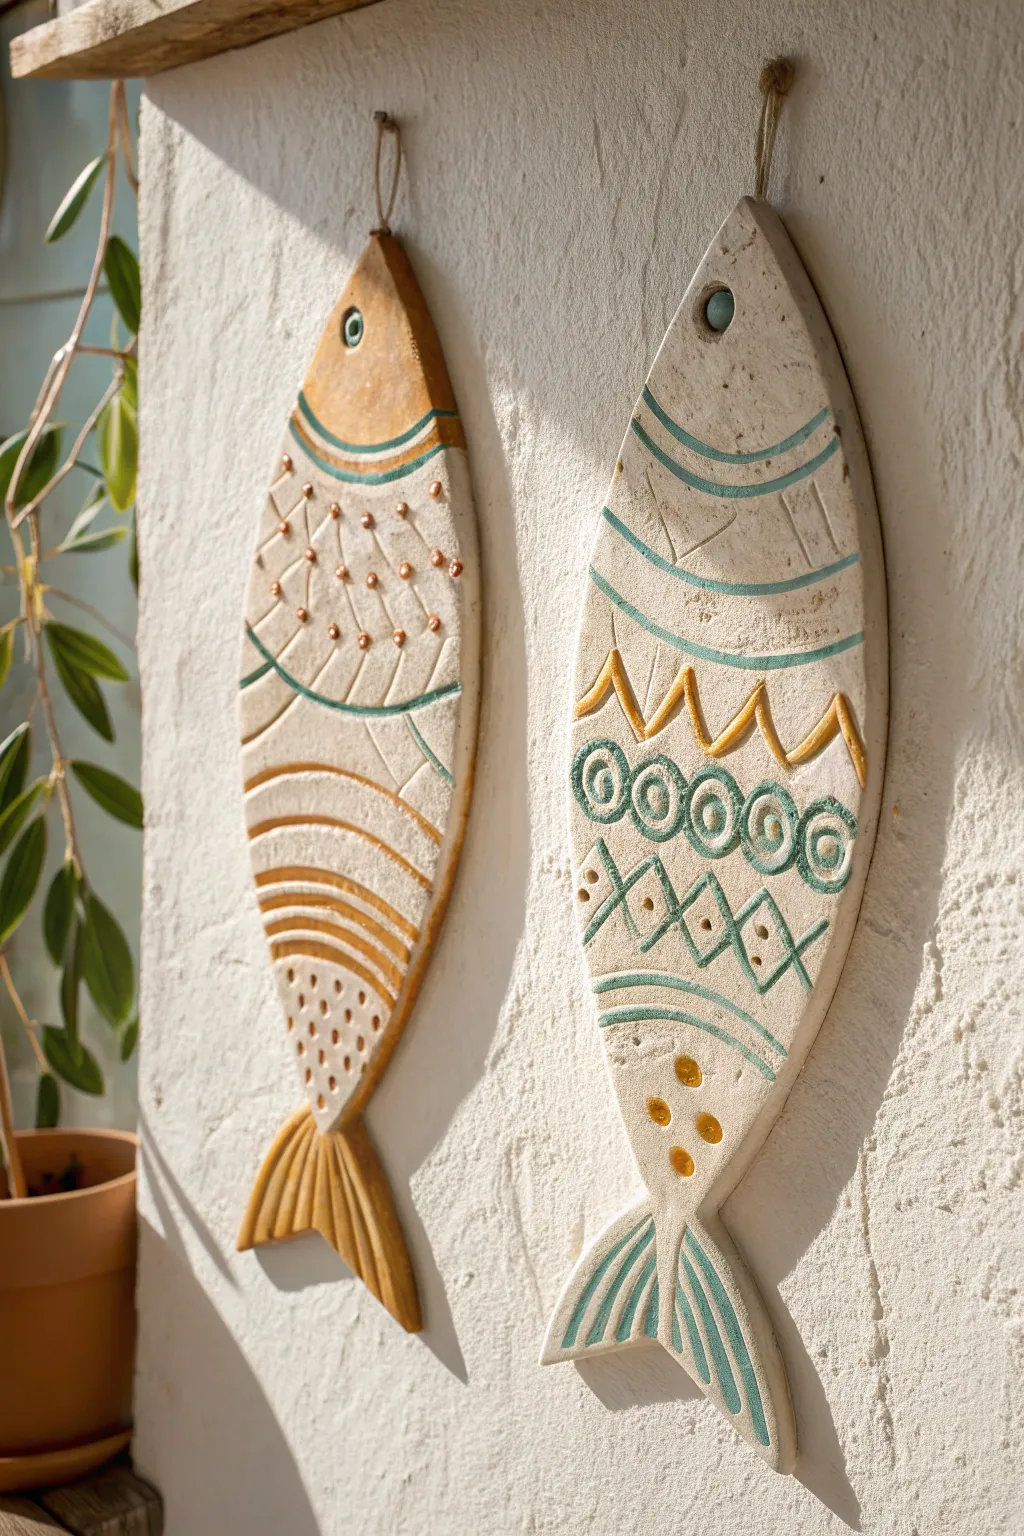
Bring a coastal breeze to your bedroom wall with these textured, earthy fish plaques. Made using a simple slab technique, these hanging decorations feature delightful carved patterns and touches of glaze for a rustic, handmade finish.
Step-by-Step Tutorial
Materials
- Air-dry clay or kiln-fire clay (white or light beige)
- Rolling pin
- Cardstock or paper (for template)
- Clay carving tools (needle tool, loop tool)
- Small round piping tip or straw (for circles)
- Small eyelet screw or wire loop (for hanging)
- Jute twine
- Acrylic paints or ceramic glazes (teal, mustard yellow, brown/gold)
- Fine detail paintbrush
- Sponge and water
- Satin varnish (optional, if using air-dry clay)
Step 1: Shaping the Foundation
-
Create a template:
Before touching the clay, sketch a simple fish shape—basically a long oval with a triangular tail—onto a piece of cardstock. Cut this out to use as your reusable guide. -
Roll out the slab:
Take a large chunk of clay and roll it out until it is an even thickness, roughly about a quarter of an inch thick. You don’t want it too thin, or it might crack when you carve into it later. -
Cut the shape:
Place your paper template onto the rolled clay. Using a needle tool or a plastic knife, trace around the edge of the template and remove the excess clay. Smooth the rough edges with a slightly damp finger or sponge. -
Install the hanger:
While the clay is still wet, insert a small metal eyelet or a loop of wire into the top center of the fish’s head. Make sure it goes deep enough to be secure but doesn’t poke out the front.
Uneven Drying?
If your fish tail starts curling up as it dries, gently place a light book on top of it (with parchment paper in between) to keep it flat.
Step 2: Adding Texture and Design
-
Divide the body:
Using a needle tool, lightly scratch curved lines across the width of the fish to separate its head, body, and tail sections. These don’t need to be perfect; a little wobble adds character. -
Define the head:
For the eye, press a small circle cutter or the non-writing end of a pen into the head area. You can add curving lines around the neck area using a carving tool to create ‘gills’ or collar patterns. -
Carve geometric patterns:
On one fish, use a carving tool to dig out zigzag lines or triangles in the middle section. On another, try carving a cross-hatch or diamond trellis pattern. -
Stamp details:
For raised bumps, roll tiny balls of extra clay and score-and-slip them onto the body, or press into the wet clay with the end of a paintbrush to make recessed dots depending on the look you want. -
Create the spirals:
For the spiral pattern seen in the image, press a small circular object (like a marker cap) into the clay to make rings, then carefully draw a small spiral inside each ring with a needle tool. -
Detail the tail:
Use a modeling tool to press long, deep grooves into the tail fin, fanning them out to look like fin rays. Deep grooves help catch the paint or glaze later. -
Dry thoroughly:
Let your fish dry completely. If using air-dry clay, this might take 24-48 hours. If using kiln clay, follow your specific firing schedule now.
Level Up: Texture
Before cutting your fish shape, press a piece of lace or burlap into the clay slab with a rolling pin to give the whole fish a subtle skin texture.
Step 3: Painting and Finishing
-
The wash technique:
To get that rustic, worn look, water down your teal or mustard paint slightly. Brush it into the carved grooves of the patterns you made. -
Wipe back excess:
Before the paint fully dries, take a slightly damp sponge and gently wipe the surface of the clay. This leaves the color deep inside the carvings but reveals the natural clay color on the high points. -
Highlighting details:
Use a small detail brush to paint specific elements solidly, like the yellow zigzags, the gold tail, or the teal spirals. I find that leaving some areas unpainted adds to the organic, beachy vibe. -
Seal the piece:
Once the paint is totally dry, apply a coat of satin varnish if you used air-dry clay to protect it from humidity. If you used ceramic glazes, this would have been your second firing. -
String it up:
Thread a piece of natural jute twine through the wire loop at the top. Tie a sturdy knot to create a hanging loop.
Hang your catch on a sunny wall and enjoy the instant beach vacation vibes


What Really Happens Inside the Kiln
Learn how time and temperature work together inside the kiln to transform clay into durable ceramic.
Fairy Houses With Nature Bits
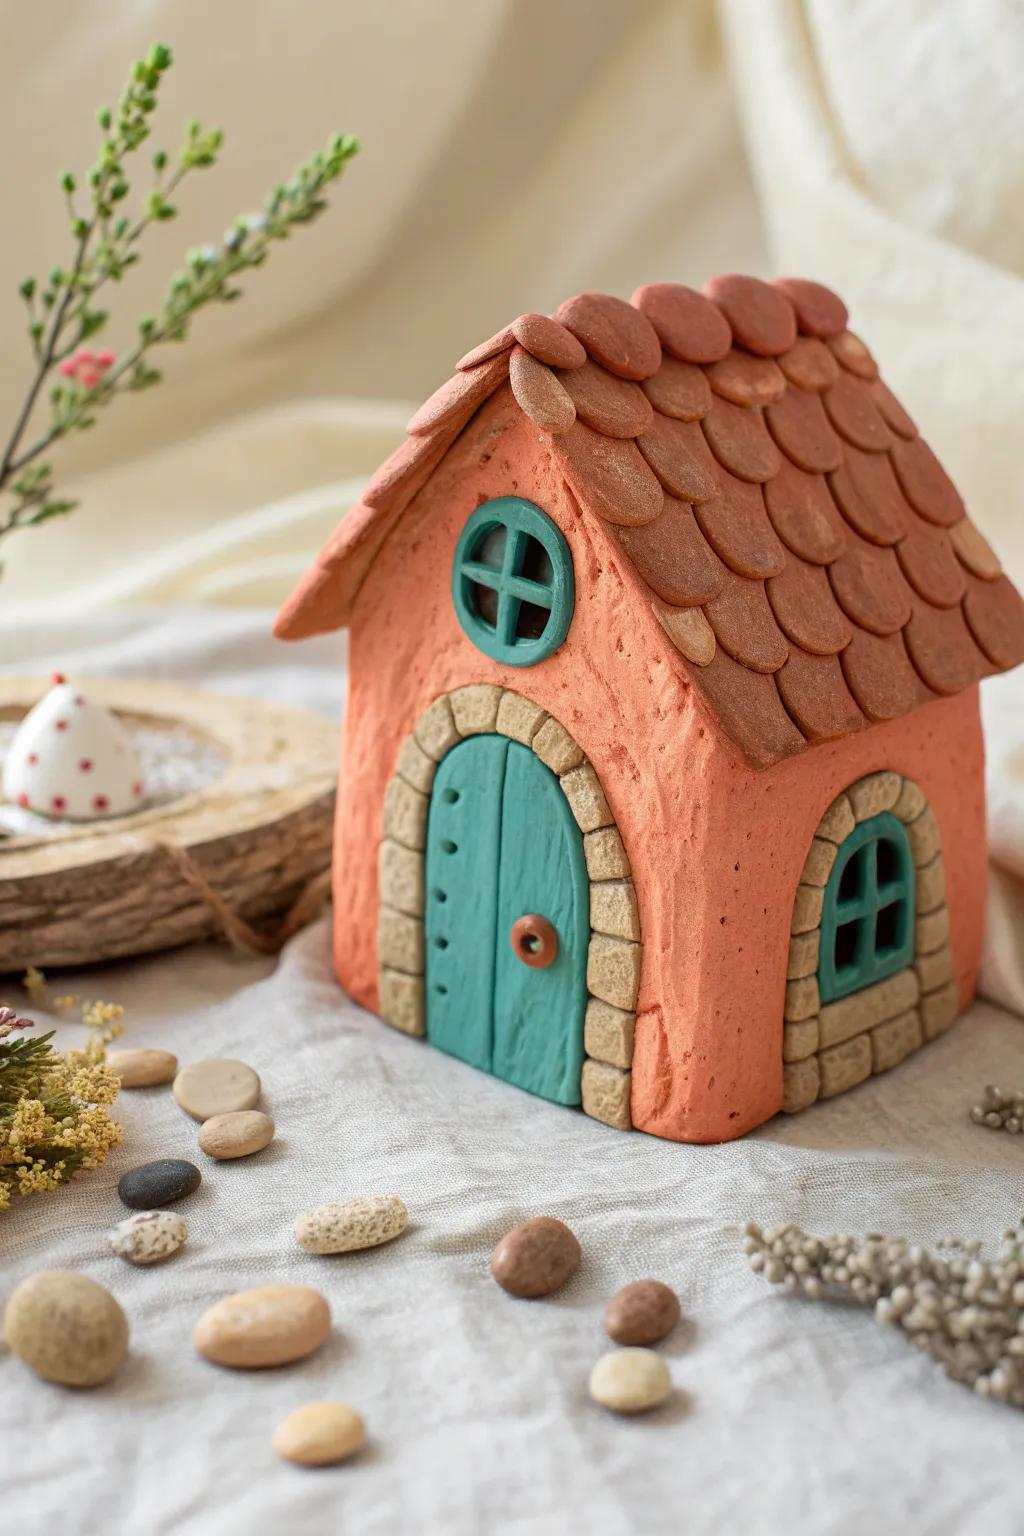
Bring a touch of whimsy to your garden or shelf with this delightful clay fairy house featuring a shingled roof and charming teal accents. Its rustic texture and warm colors give it a cozy, storybook feel that looks wonderful nestled among natural stones and pebbles.
How-To Guide
Materials
- Air-dry clay or polymer clay (terracotta, turquoise, stone grey, and brown)
- Clay rolling pin
- Clay knife or plastic sculpting tool
- Small circle cutter (or a bottle cap)
- Texture sponge or rough stone
- Cardboard or foil for internal support (optional)
- Acrylic paints (if using white clay)
- Gloss varnish (optional)
Step 1: Constructing the Base Structure
-
Prepare the walls:
Roll out a slab of terracotta-colored clay to about 1/4 inch thickness. Cut four rectangular pieces for the walls; two should have pointed peaks at the top to form the gables for the roof. -
Add texture:
Before assembling, gently press a rough sponge or a real stone against the clay surface to create a stucco-like texture. This gives the cottage that lovely rustic, aged appearance. -
Assemble the box:
Stand the walls up and join them at the seams. You can smooth the inside seams with your finger or a tool to ensure they hold tight. If the roof feels heavy later, you might want to place a crumpled ball of foil inside now for support. -
Cut the openings:
Use a knife to cut an arched doorway on the front wall and an arched window opening on the side wall. Save the cutout piece from the door to use as a template for the door itself.
Roof Sagging?
If the roof starts to bow inward while working, stuff the house interior securely with crumpled aluminum foil or dry paper towels to support the weight until the clay hardens.
Step 2: Creating the Roof
-
Form the roof base:
Roll out a flat slab of clay for the roof base. Cut two rectangular panels that are slightly wider than the house to allow for an overhang. -
Attach the roof panels:
Place the panels on the gable peaks, joining them at the top ridge. Smooth the seam where they meet to make it secure. -
Make the shingles:
Roll out brown or dark terracotta clay thinly. Use a small circle cutter or your fingers to flatten many small balls into discs. Gently pinch one side of each disc to make it slightly teardrop-shaped. -
Layer the shingles:
Starting at the bottom edge of the roof, press a row of shingles onto the roof panel so they slightly overhang the edge. Add the next row above it, overlapping the first row like fish scales. -
Finish the ridge:
Continue tiling until you reach the top. Create a final row of shingles that straddles the very top ridge to cover the seam neatly.
Mossy Magic
Dab a tiny bit of watered-down green acrylic paint into the crevices of the stone arch and roof shingles. It creates a realistic, mossy effect perfect for a forest floor.
Step 3: Door and Window Details
-
Craft the door:
Using turquoise clay, shape an arched door that fits inside your doorway. Use a needle tool or knife to score vertical wood grain lines into it. -
Add door features:
Roll tiny balls of turquoise clay and press them down the left side of the door to simulate hinges or rivets. Add a small brown ring for the doorknob. -
Frame the door:
Roll a snake of stone-grey clay and flatten it slightly. Press rectangle indentations into it to look like stone blocks, then wrap this arch around the outside of the doorframe. -
Create the side window:
Make a smaller arch of turquoise clay for the side window. Add a cross shape in the middle for the panes. Surround this with another stone-textured grey arch. -
Make the attic window:
Create a round turquoise window frame with a cross in the center. Place this high up in the front gable peak.
Step 4: Finishing Touches
-
Refine textures:
Check over your house. The stone frames might need a little extra stippling with a toothbrush to look like real rock. I prefer to re-texture any spots I accidentally smoothed while handling. -
Dry the project:
Let the house dry completely according to your clay’s instructions. Air-dry clay usually takes 24-48 hours depending on thickness. -
Painting (Optional):
If you used white air-dry clay, paint the walls terracotta, the roof tiles in shades of brown, and the trim in teal and grey after drying. A dark wash over the stones really makes the cracks pop.
Place your finished cottage in a sunny spot and wait for the fairies to move in.
Color-Pop Relief Rainbow Tiles
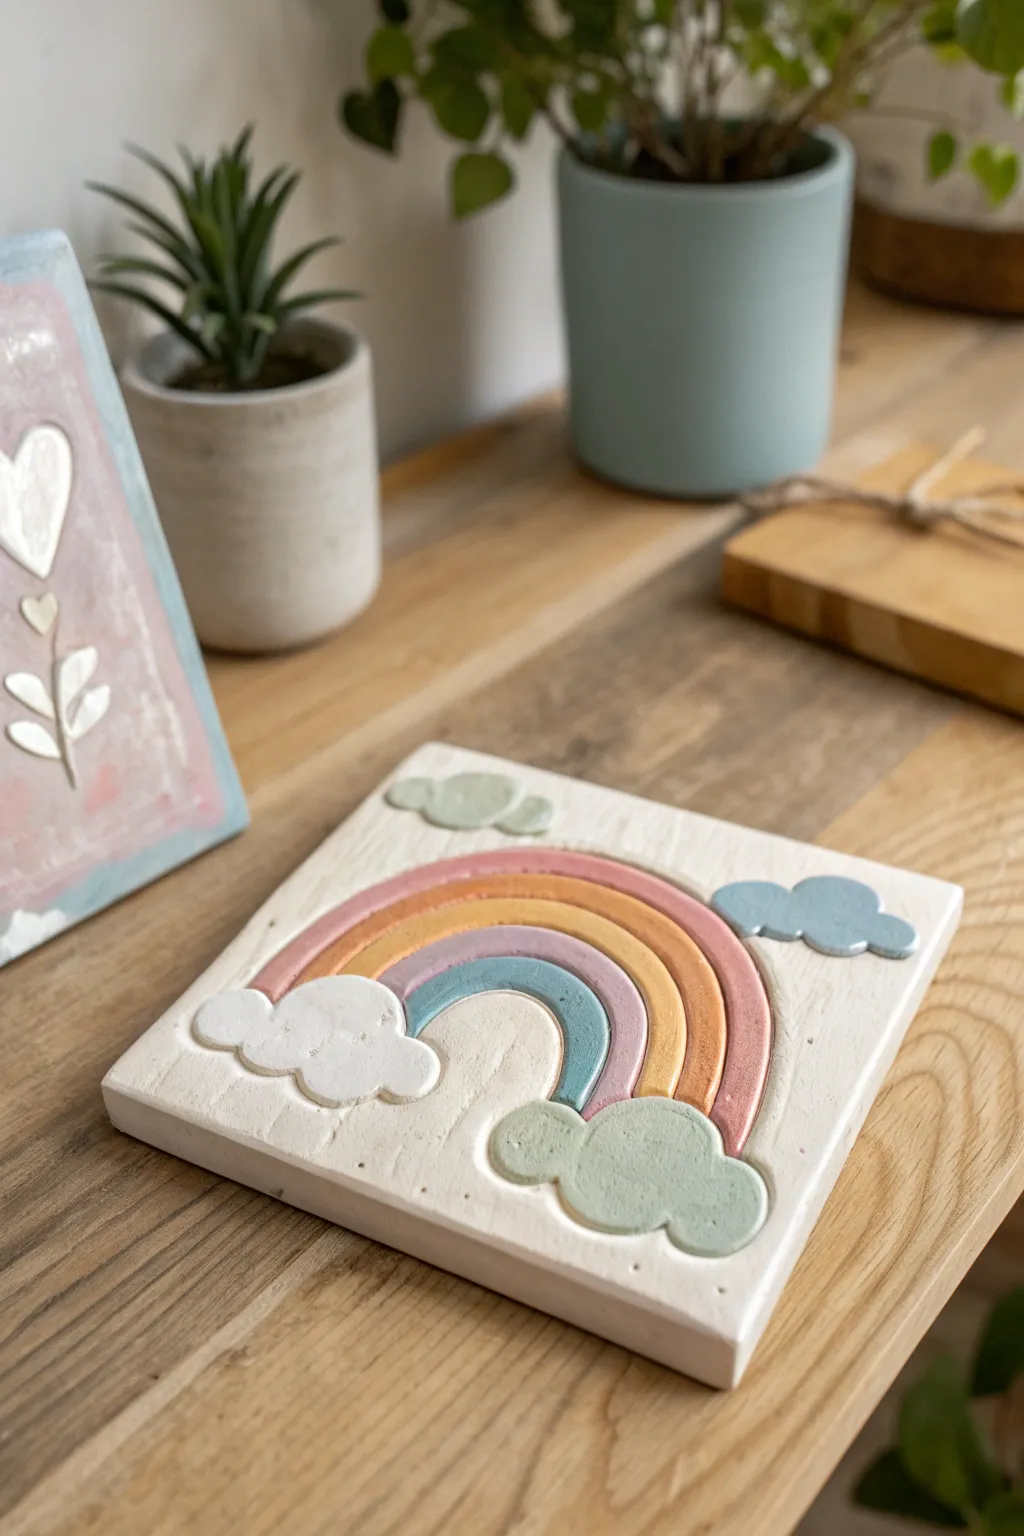
Create a charming piece of nursery decor or a sweet gift with this raised-relief clay tile project. The muted pastel tones and 3D rainbow design give it a sophisticated, modern look that’s surprisingly easy for kids to achieve with simple materials.
Step-by-Step Tutorial
Materials
- Air-dry clay (white)
- Square cookie cutter or knife and ruler
- Rolling pin
- Parchment paper or canvas mat
- Clay sculpting tools (or plastic knife)
- Acrylic paints (pastel pink, muted orange, teal, sage green, light blue, white)
- Small flat paintbrushes
- Fine-grit sandpaper (optional)
- Matte varnish or sealant
Step 1: Creating the Base
-
Roll the slab:
Begin by taking a large handful of air-dry clay and kneading it until soft. Roll it out on parchment paper to an even thickness of about 1/4 inch. -
Cut the square:
Use a large square cookie cutter or a ruler and craft knife to cut a perfect square shape for your tile base. Smooth the edges with a wet finger to remove any roughness. -
Prepare the surface:
Lightly score the surface of the square where you plan to place the rainbow arches. This scratching texture helps the added clay adhere better.
Step 2: Sculpting the Rainbow
-
Roll the coils:
Roll out four thin, even snakes or coils of clay. These will become the arches of your rainbow. Try to keep them consistent in thickness. -
Form the first arch:
Place the largest coil onto the tile to form the outermost arch. Gently press it down so it sticks, but don’t flatten it completely—you want that nice rounded relief. -
Add inner arches:
Repeat this process with the next three coils, nesting each one snugly inside the previous arch. Trim any excess clay from the bottom so they all end at the same line. -
Smooth the connections:
Use a small modeling tool or your finger to gently blend the very bottom edges of the rainbow into the tile, ensuring a strong bond without losing the arch shape. -
Shape the clouds:
Roll small balls of clay and flatten them slightly into organic cloud shapes. I like to press a few differently sized balls together to make them look fluffy. -
Attach the clouds:
Score the back of your clouds and press them onto the bottom ends of the rainbow. Add two smaller floating clouds near the top corners for extra detail. -
Dry completely:
Let the tile dry for at least 24-48 hours. Turn it over gently halfway through so the back dries evenly and prevents warping.
Slip & Score
Make ‘slip’ (a watery clay paste) and brush it onto scored areas before attaching the rainbow pieces. This acts like superglue for clay.
Step 3: Painting and Finishing
-
Sand imperfections:
Once fully dry, you can lightly sand any rough edges on the sides of the tile with fine-grit sandpaper for a professional finish. -
Base coat:
Paint the entire background white, carefully working around the raised rainbow shape. This makes the colors pop later. -
Paint the arches:
Using a small flat brush, paint each arch a different color. Start with the outer pink, then move to orange, followed by a muted purple-grey, and finally teal for the smallest arch. -
Detail the clouds:
Paint the bottom clouds a soft sage green and the floating sky clouds a gentle blue. Keep the paint application smooth to mimic a ceramic glaze. -
Clean up lines:
If any color smudged onto the white background, do a quick touch-up with white paint to crisp up the edges. -
Seal the piece:
Apply a coat of matte varnish over the entire tile to protect the paint and give it a finished, cohesive look.
Create Texture
Before the clay dries, gently press a piece of lace or textured fabric into the background area for a subtle, patterned effect.
Now you have a beautiful, handcrafted relief tile that looks wonderful displayed on a small easel or shelf