If you’re in the mood for a quick, satisfying clay project, clay food magnets are the sweetest little win. I love them because you get all the fun of mini food sculpting, plus something actually useful you’ll see every day.
Frosted Donut Ring Magnets
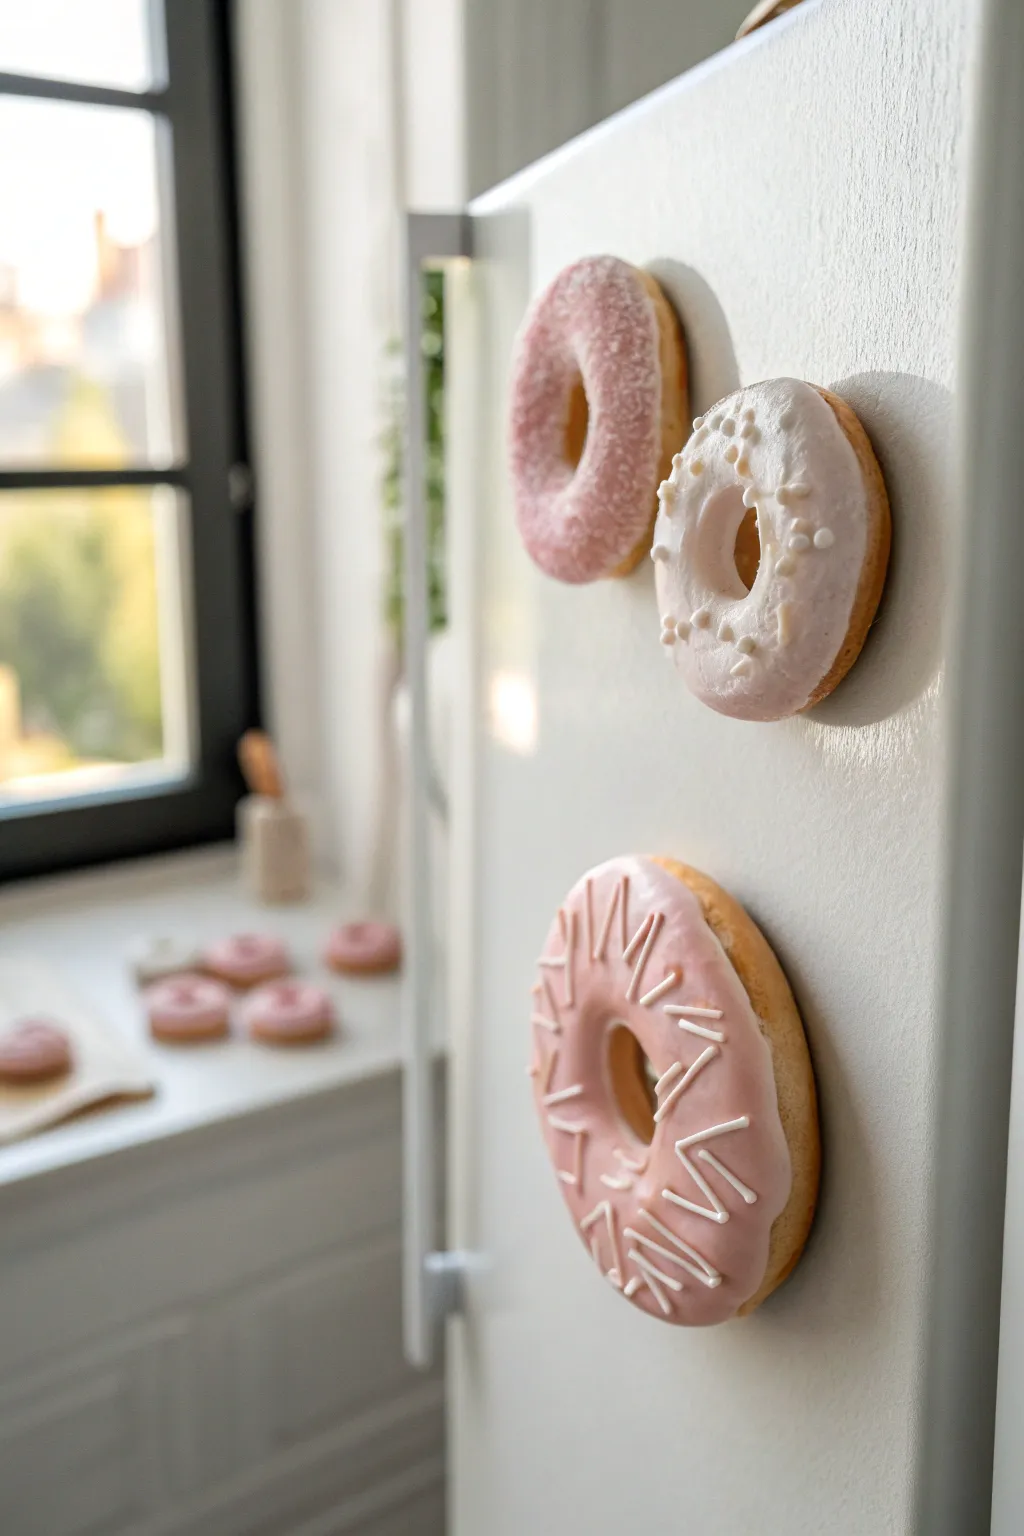
Transform ordinary polymer clay into a delightful set of realistic donut magnets that look good enough to eat. These oversized, playful rings feature distinct decoration styles—sugary dust, pearl drizzles, and geometric piping—that add a pop of bakery charm to your kitchen decor.
Detailed Instructions
Materials
- Light tan or beige polymer clay (dough color)
- White polymer clay
- Translucent liquid sculpey (TLS) or liquid polymer clay
- Soft pastel chalks (orange, yellow, brown) for shading
- Small round cutter (approx 1 inch)
- Larger round cutter (approx 3-4 inches)
- Texture tools (toothbrush or stiff bristle brush)
- Fine-grit sandpaper
- Acrylic paint (light pink, white)
- Small piping bag or tiny zip-lock bag
- White embossing powder or faux sugar dust
- Needle tool or toothpick
- Strong round craft magnets (ceramic or neodymium)
- Super glue or E6000 adhesive
- Small paintbrush for pastels
- Gloss varnish (optional)
Step 1: Baking the Dough Base
-
Condition the Clay:
Begin by conditioning the tan polymer clay until it is soft and pliable. Roll it into a thick sheet, approximately 1/2 inch to 3/4 inch thick, to give your donuts a substantial, realistic height. -
Cut the Shape:
Use your larger round cutter to stamp out the main donut circles. Then, use the smaller 1-inch cutter to remove the center hole. -
Soften the Edges:
Gently gently round over the sharp cut edges with your fingertips. Real fried dough doesn’t have 90-degree angles, so smooth the top and bottom rims until the shape looks puffy and risen. -
Add Texture:
Take a toothbrush or stiff bristle brush and tap it all over the surface of the clay. This stippling effect mimics the porous texture of fried cake dough. -
Shade the Dough:
Scrape some orange, yellow, and brown soft pastels into fine powder. With a soft brush, dust the powder lightly over the clay, concentrating the darker browns on the edges where a real donut would brown the most in the fryer. -
First Bake:
Place your naked donut bases on a tile or parchment-lined baking sheet. Bake according to your clay package instructions (usually 275°F/135°C for 15-30 minutes), then let them cool completely.
Step 2: Frosting & Decorating
-
Mix the Icing:
In a small cup, mix liquid polymer clay (TLS) with a small amount of solid white clay to thicken it. It should have the consistency of heavy cream or thick honey. -
Tint the Batches:
Divide your liquid clay mixture. Leave one batch white and tint the other with a tiny drop of pink acrylic paint or pink clay shavings to create a soft strawberry shade. -
Prepare the Dusty Donut:
For the top dusty pink donut, spread the pink liquid clay mixture over the top surface. Let it drip slightly down the sides naturally, but control the flow so it doesn’t run underneath. -
Add Sugary Texture:
While the pink layer is wet, sprinkle white embossing powder or very fine white glitter over the entire frosting surface to create that crystallized sugar look. -
Glaze the White Donut:
Take a second cooled base and spoon the white liquid clay mixture over it. Use a needle tool to drag the liquid downward in random spots to mimic gravity pulling the glaze. -
Add Pearl Accents:
Prepare tiny balls of white clay to act as sugar pearls. While the glaze is still wet, gently press these into the surface using tweezers, grouping them slightly for a natural look. -
Base the Geometric Donut:
Coat the final donut base with a smooth layer of the pink liquid clay mixture. Ensure this base coat is thinner and flatter than the others. -
Pipe the Lines:
Thicken your remaining white liquid clay with a bit more solid clay so it holds its shape. Put it in a tiny piping bag, snip the very tip, and pipe erratic, zig-zag lines across the wet pink base. -
Final Cure:
Place all decorated donuts back into the oven. Bake them again for about 15-20 minutes to set the liquid clay frosting. Watch closely to ensure the white frosting doesn’t scorch or yellow.
Bakery Fresh Tip
For the most realistic ‘fried’ look, run a barely-there strip of lighter clay around the equator of the donut before texturing. This mimics the pale ‘fry line’ actual donuts get when they float in oil.
Step 3: Assembly
-
Cool Down:
Allow the donuts to cool completely. The liquid clay frosting will be very hot and soft initially but hardens as it reaches room temperature. -
Prepare the Back:
Flip the donuts over. If the back surface isn’t perfectly flat, give it a quick scuff with fine-grit sandpaper to create a better bonding surface. -
Attach Magnets:
Apply a dab of E6000 or strong super glue to the back of the donut. Press your round magnet firmly into the glue. -
Dry Time:
I usually let these sit face-down (magnet up) overnight to ensure the glue cures fully before sticking them to a vertical surface.
Sticky Situation?
If your liquid clay is too runny and dripping off the donut too fast, let it sit on a piece of cardboard for 10 minutes before applying. The cardboard will leach out some plasticizer, thickening the mix.
Now your fridge can look like a donut shop display even when you’re out of groceries


Cute Taco Magnet Set
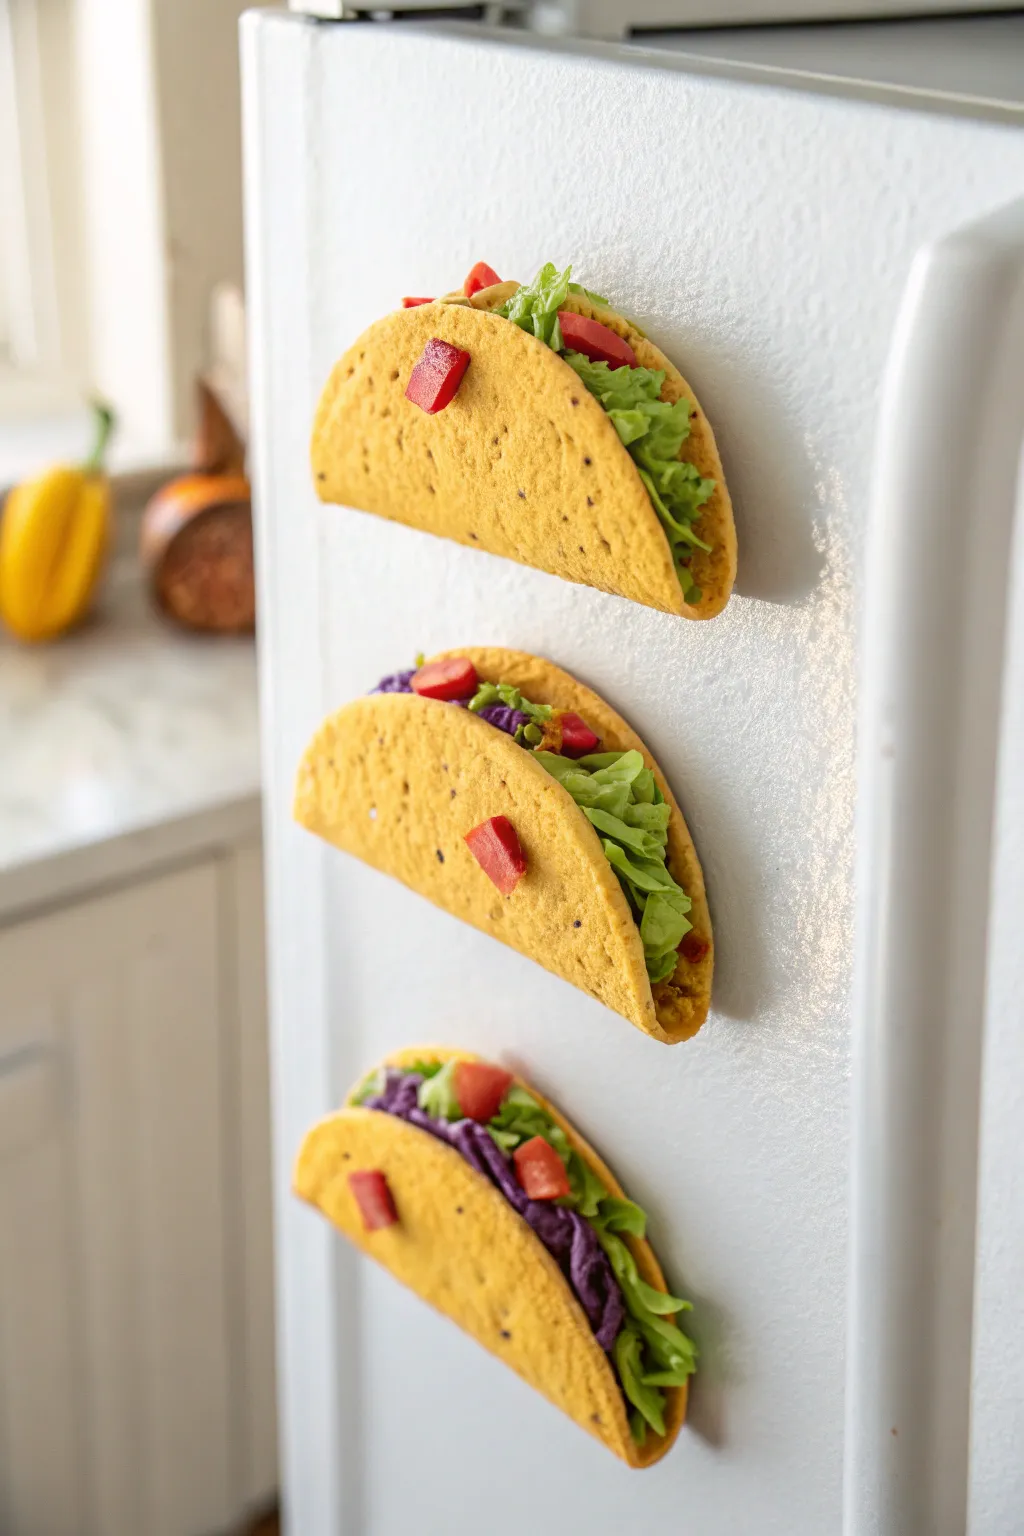
Transform your fridge into a mini fiesta with these unbelievably realistic taco magnets. Using polymer clay and a few simple texturing tricks, you’ll craft tiny folded tortillas bursting with colorful fillings that look good enough to eat.
How-To Guide
Materials
- Polymer clay (yellow ochre/corn color, translucent, green, red, brown, purple)
- Liquid polymer clay (optional)
- Pastel chalks (brown, orange, yellow) for shading
- Soft paintbrush
- Toothbrush or texturing sponge
- Needle tool or toothpick
- Rolling pin or pasta machine
- Circle cutter (approx. 2-3 inches diameter)
- Strong round magnets
- Superglue or heavy-duty craft adhesive
- Gloss glaze (optional, for ‘wet’ ingredients)
Step 1: Crafting the Tortillas
-
Mix the Perfect Corn Color:
Start by mixing yellow ochre clay with a small amount of translucent clay. This gives the taco shell a more realistic, slightly waxy corn tortilla look rather than a flat plastic yellow. -
Add Texture Speckles:
Grate a tiny amount of baked brown clay or dry brown pastel chalk into your yellow mixture. Knead it until evenly distributed to mimic the ground corn texture found in real hard shells. -
Roll and Cut:
Roll your clay out into a thin sheet, about 1/8th of an inch thick. Use your circle cutter to punch out three rounds. These will become your taco shells. -
Texture the Surface:
Take a clean toothbrush or a coarse texturing sponge and firmly tap it all over the surface of each clay circle. Don’t be shy here; deep texture holds the shading powder better later. -
The First Bake:
To make filling easier, draped the circles over a dowel or a rolled piece of foil to create the taco ‘U’ shape. Bake these partial shells for just 10 minutes to set their shape so they don’t collapse while filling.
Shell Shading Tip
Apply shading chalks heavier on the rims and the very bottom fold of the taco shell. This mimics where a real oven creates the darkest browning.
Step 2: Preparing the Fillings
-
Create the Ground Meat:
Crumble brown clay into tiny, irregular bits. I like to mix a little dark brown with reddish-brown clay here to give the ‘meat’ depth and a cooked appearance. -
Chop the Tomatoes:
Cut small cubes from a block of red clay. Keep them slightly irregular, just like diced tomatoes. For extra realism, mix a tiny bit of translucent clay into the red. -
Shred the Lettuce:
Roll a sheet of green clay very thinly until it’s almost translucent at the edges. Tear creates jagged edges, then ruffle and fold these strips like an accordion to mimic crisp lettuce leaves. -
Prep the Purple Cabbage:
Similar to the lettuce, use purple clay rolled thin. Cut it into very narrow strips rather than tearing, to look like shredded cabbage.
Level Up: Sour Cream
Mix white liquid clay with a tiny bit of white solid clay to make a thick paste. Drizzle it over the top using a toothpick for a sour cream dollop.
Step 3: Assembly and Finishing
-
Fill the Shells:
Take your semi-baked shells. Apply a thin layer of liquid clay or raw clay inside the bottom fold to act as glue. Press your brown ‘meat’ crumbles deep into the bottom of the shell. -
Layer the Greens:
Arrange the ruffled green lettuce strips on top of the meat layer. Ensure they spill over the top edge slightly so they are visible from the front. -
Add Colorful Toppings:
Nestle the red tomato cubes and purple cabbage strips into the lettuce. Press them gently so they adhere to the other raw clay components. -
Shading the Shell:
Before the final bake, use a soft brush to dust orange and brown pastel chalk powder along the edges and bottom curve of the shell. This creates a toasted, baked look. -
Final Bake:
Bake the assembled tacos according to your clay manufacturer’s instructions (usually 275°F for 15-30 minutes). Let them cool completely. -
Glazing:
Once cool, create a ‘fresh’ look by lightly dabbing gloss glaze only on the tomatoes and perhaps a few spots on the meat to make them look juicy. Keep the shell matte. -
Attach the Magnets:
Turn the taco over to the flat side (the back). Apply a drop of strong superglue and press your magnet firmly into the center. Let it cure fully before sticking it to your fridge.
Now you have a delicious-looking set of magnets that bring fun culinary flair to any magnetic surface.

Sushi Roll and Nigiri Magnets
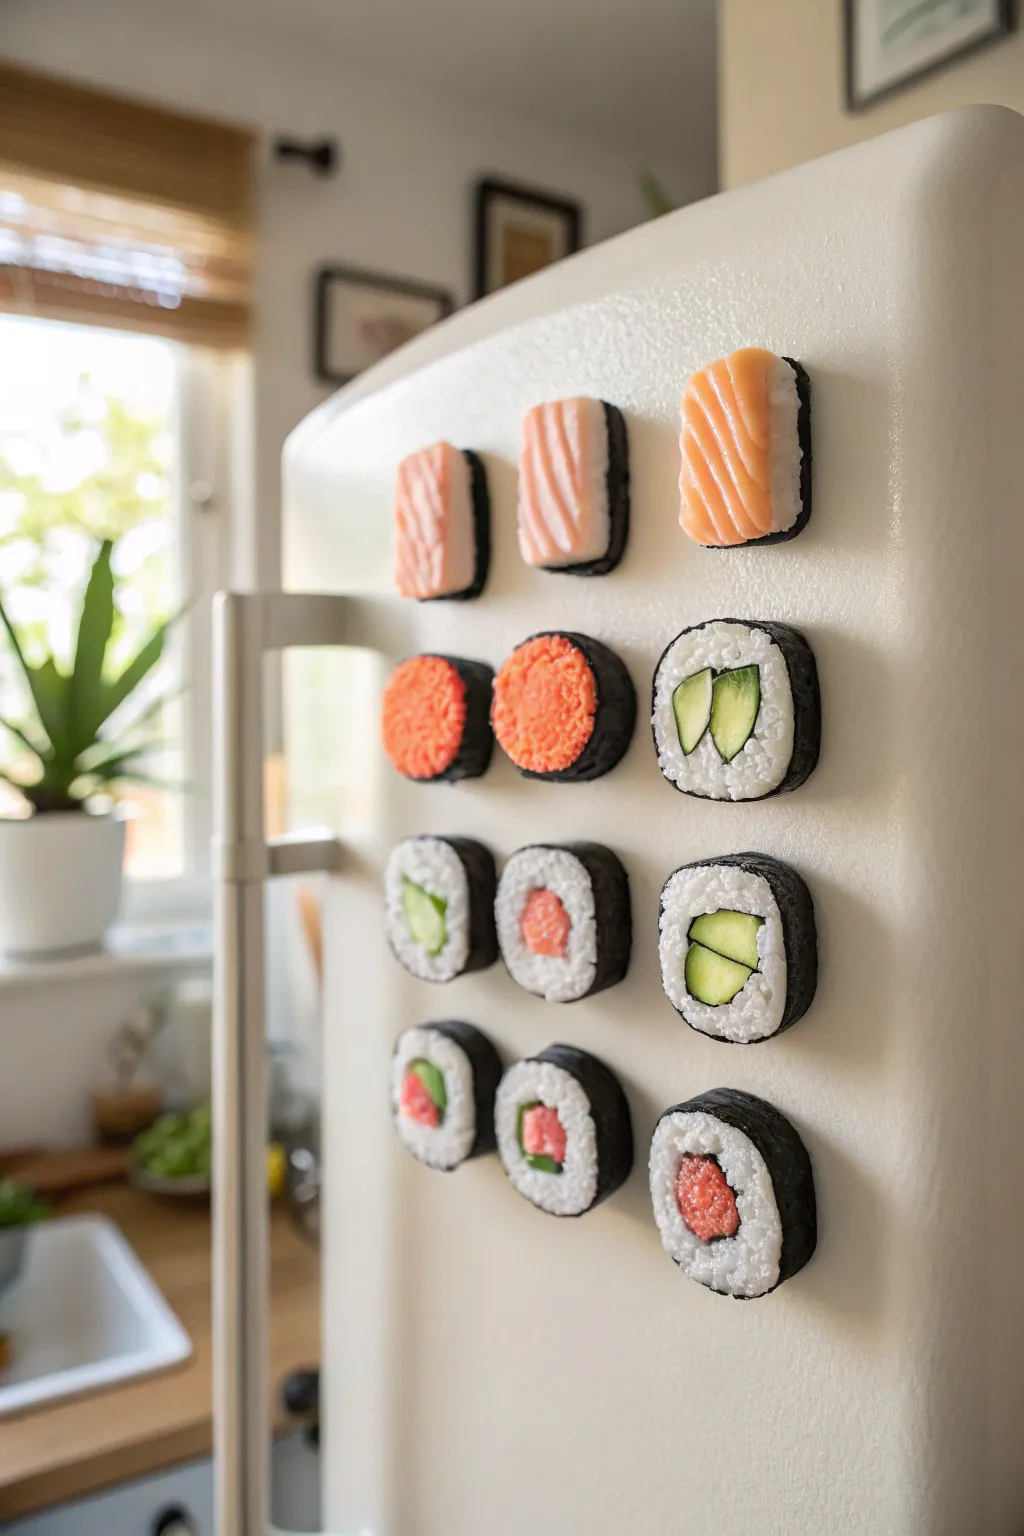
Transform your fridge into a delightful sushi bar with these incredibly realistic clay magnets. This project covers essential techniques for creating lifelike rice texture and convincing sashimi details that will make everyone crave a Japanese feast.
Detailed Instructions
Materials
- White polymer clay (for rice)
- Translucent polymer clay
- Pink, orange, and red polymer clay (for fish)
- Green polymer clay (for cucumber/avocado)
- Black polymer clay (for nori)
- Liquid polymer clay (fimo liquid or TLS)
- Needle tool or toothpick
- Sharp crafting blade or x-acto knife
- Old toothbrush or tinting brush
- Gloss glaze or UV resin
- Round neodymium magnets
- Super glue (E6000 or strong adhesive)
Step 1: Creating the Rice Base
-
Mix the rice color:
Combine a large block of white clay with a small amount of translucent clay. This mixture gives the ‘rice’ a realistic, slightly waxy look rather than a flat, opaque white. -
Texture the clay:
Before shaping, chopping the clay into tiny, jagged bits creates the best rice texture. Alternatively, roll the mixed clay into a sheet and gently poke it repeatedly with a stiff toothbrush to create a rough, grainy surface. -
Shape the nigiri bases:
Take a portion of your textured white clay and form it into small rectangular mounds with rounded corners, mimicking the hand-pressed shape of nigiri rice blocks.
Fixing Smudged Slices
If slicing the roll smears the colors, the clay is too warm. Pop the cane in the freezer for 10 minutes before cutting again with a clean blade.
Step 2: Crafting the Toppings & Fillings
-
Mix salmon and tuna colors:
For salmon, blend translucent clay with orange and a tiny touch of pink. For tuna, use translucent with red and a dot of purple. The translucency is key for that raw fish appearance. -
Create the fat lines:
Roll extremely thin snakes of straight white clay. Layer these between thick slabs of your salmon or tuna mixture, stack them, and compress. Slice through this stack to reveal the realistic striated muscle pattern. -
Form the toppings:
Cut rectangular slices from your layered fish stack. drape these gently over the pre-made nigiri rice bases, pressing down slightly so they hug the curves. -
Create roll fillings:
Roll small snakes of green for avocado or cucumber, and use leftovers from your fish mix for the protein. For spicy tuna (the bumpy orange filling), chop up orange clay scraps until they look minced.
Step 3: Assembling the Sushi Rolls
-
Make the core:
Cluster your filling snakes (such as two green wedges and a fish section) together into a tight cylinder. -
Wrap with rice:
Flatten a strip of your textured white rice clay. Wrap this carefully around your filling cylinder, trimming the excess where the ends meet for a seamless join. -
Add the Nori seaweed:
Roll black clay through a pasta machine or use a roller until it is paper-thin. Wrap this thin black sheet around the outside of your rice cylinder. I find tearing the edge slightly instead of cutting creates a more natural seaweed texture. -
Slice the rolls:
Allow the clay cane to rest or cool briefly in the fridge to firm up. Use your sharpest blade to slice the log into equal discs, revealing the classic maki design. -
Build the ‘Rice Outside’ rolls:
For the spicy tuna rolls (rice on the outside), wrap the black clay around the filling first, then press your textured rice clay onto the exterior of the black layer. -
Enhance texture:
After slicing, use a needle tool to gently fluff up individual ‘grains’ of rice on the cut surfaces so they don’t look smeared.
Level Up: Spicy Mayo
Mix liquid polymer clay with a dab of orange acrylic paint. Drizzle this ‘spicy mayo’ over your finished rolls before baking for extra flair.
Step 4: Finishing Touches
-
Bake the pieces:
Place all sushi pieces on a ceramic tile or baking sheet. Bake according to your polymer manufacturer’s instructions (usually 275°F/130°C for 15-30 minutes). -
Let cool:
Allow the pieces to cool completely before handling, as hot clay creates weak points that can crack. -
Apply the glaze:
Brush a thin layer of gloss glaze or UV resin specifically onto the ‘fish’ parts and the ‘cucumber’ centers. Leave the rice and nori matte for material contrast. -
Attach magnets:
Once the glaze is cured or dry, flip the sushi over. Use a strong super glue to attach a neodymium magnet to the back of each piece.
Enjoy arranging your delicious-looking miniature menu on the fridge door


Waffle Squares With Syrup Drip
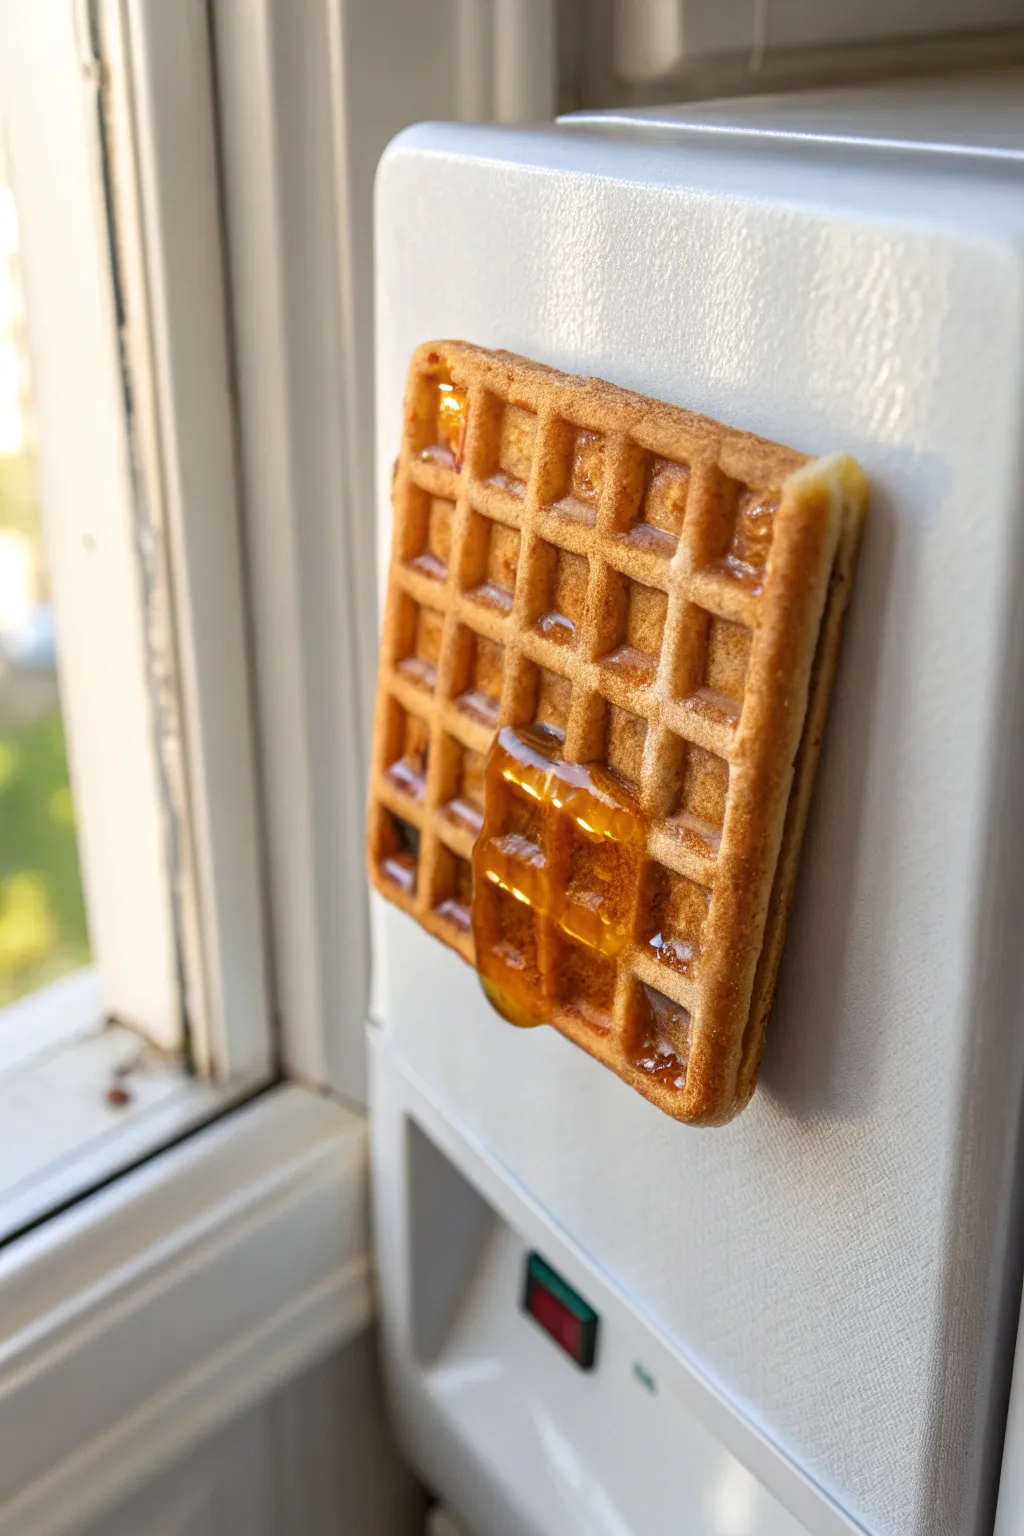
This hyper-realistic waffle magnet looks so good you’ll be tempted to take a bite every time you pass the fridge. With its golden-brown texture and translucent, glossy syrup drip, it’s a perfect trompe-l’œil piece for your kitchen decor.
Detailed Instructions
Materials
- Polymer clay (dough color, translucent, and white)
- Liquid polymer clay (translucent)
- Yellow and brown alcohol ink or chalk pastels
- Gloss glaze or UV resin
- Strong round craft magnets
- Superglue
- Needle tool or toothpick
- Waffle mold or clay texturing tool
- Old toothbrush (for texture)
- Soft paintbrush
- Baking tile or parchment paper
Step 1: Waffle Base
-
Mix the dough:
Start by conditioning a mixture of ‘dough’ colored polymer clay. If you don’t have a pre-mixed shade, combine equal parts white and translucent clay with a very small dot of yellow and a tiny speck of brown to achieve a raw batter color. -
Form the square:
Roll the clay into a sheet approximately 1/4 inch thick. Use a square clay cutter or a craft knife to cut out a perfect square, smoothing the edges slightly with your finger so they aren’t too sharp. -
Create the grid:
If you have a waffle texture mold, press the clay into it now. If working manually, use the back of a square paintbrush handle or a sculpting tool to press a regular grid of deep indentations into the surface. Leave a raised border around each square. -
Add texture:
Real waffles aren’t perfectly smooth. Gently tap the raised grid lines and the outer edges with an old toothbrush or a crumpled ball of aluminum foil to simulate a baked cake texture. -
Shade the waffle:
Using a soft brush, dust yellow and light brown chalk pastel powder over the raw clay. Focus the darker browns on the raised edges where a waffle iron would naturally toast the batter, keeping the indented squares slightly lighter.
Step 2: The Syrup & Baking
-
First bake:
Bake the waffle base according to your clay manufacturer’s instructions (usually 275°F/135°C for 15-20 minutes). Let it cool completely before adding the syrup. -
Mix the syrup:
Pour a small amount of translucent liquid polymer clay into a cup. Add a drop of yellow alcohol ink and a tiny touch of brown alcohol ink. Stir gently until you have a rich, amber honey color. -
The initial pour:
Carefully drip the liquid clay mixture into a few of the waffle indentations. Don’t overfill them yet; you want it to look like it’s soaking in slightly. -
Create the drip:
This is the crucial step. Place a larger dollop of the syrup mixture near the bottom edge. Use a needle tool to drag the liquid clay down over the side of the waffle, letting it pool naturally at the bottom curve. -
Thicken the drip:
If the liquid clay is too runny to hold its shape, let it sit for a few minutes or mix in a tiny scraping of solid translucent clay to thicken it. I find this helps the drip maintain that stunning 3D volume shown in the photo. -
Second bake:
Carefully place the waffle back in the oven. Bake for another 10-15 minutes to set the liquid clay. Ideally, prop the waffle up slightly so the drip doesn’t flatten against the baking tile.
Sticky Situation?
If your liquid clay drips too fast while baking, pre-bake the syrup for 2-3 minutes with a heat gun to set the outer shell before putting it in the oven for the full cure.
Step 3: Finishing Touches
-
Glaze the syrup:
Once cool, apply a high-gloss glaze or UV resin strictly over the syrup areas. This gives it that wet, sticky shine that contrasts beautifully with the matte waffle texture. -
Matte finish:
If the waffle part looks too shiny from handling, brush a very thin layer of matte varnish over the ‘biscuit’ areas to reinforce the dry texture. -
Attach the magnet:
Apply a drop of strong superglue or E6000 to the back of the waffle. -
Secure firmly:
Press a strong ceramic or rare-earth magnet into the glue. Let it cure fully (usually 24 hours for max strength) before sticking it to your fridge.
Make it a Sundae
Before the final bake, add a dollop of white clay textured as whipped cream, or shape tiny translucent red spheres to create strawberry syrup/jam pockets instead of maple.
Your waffle is now ready to confuse hungry house guests and hold up your grocery list

The Complete Guide to Pottery Troubleshooting
Uncover the most common ceramic mistakes—from cracking clay to failed glazes—and learn how to fix them fast.
Cupcake With Swirled Frosting Magnet
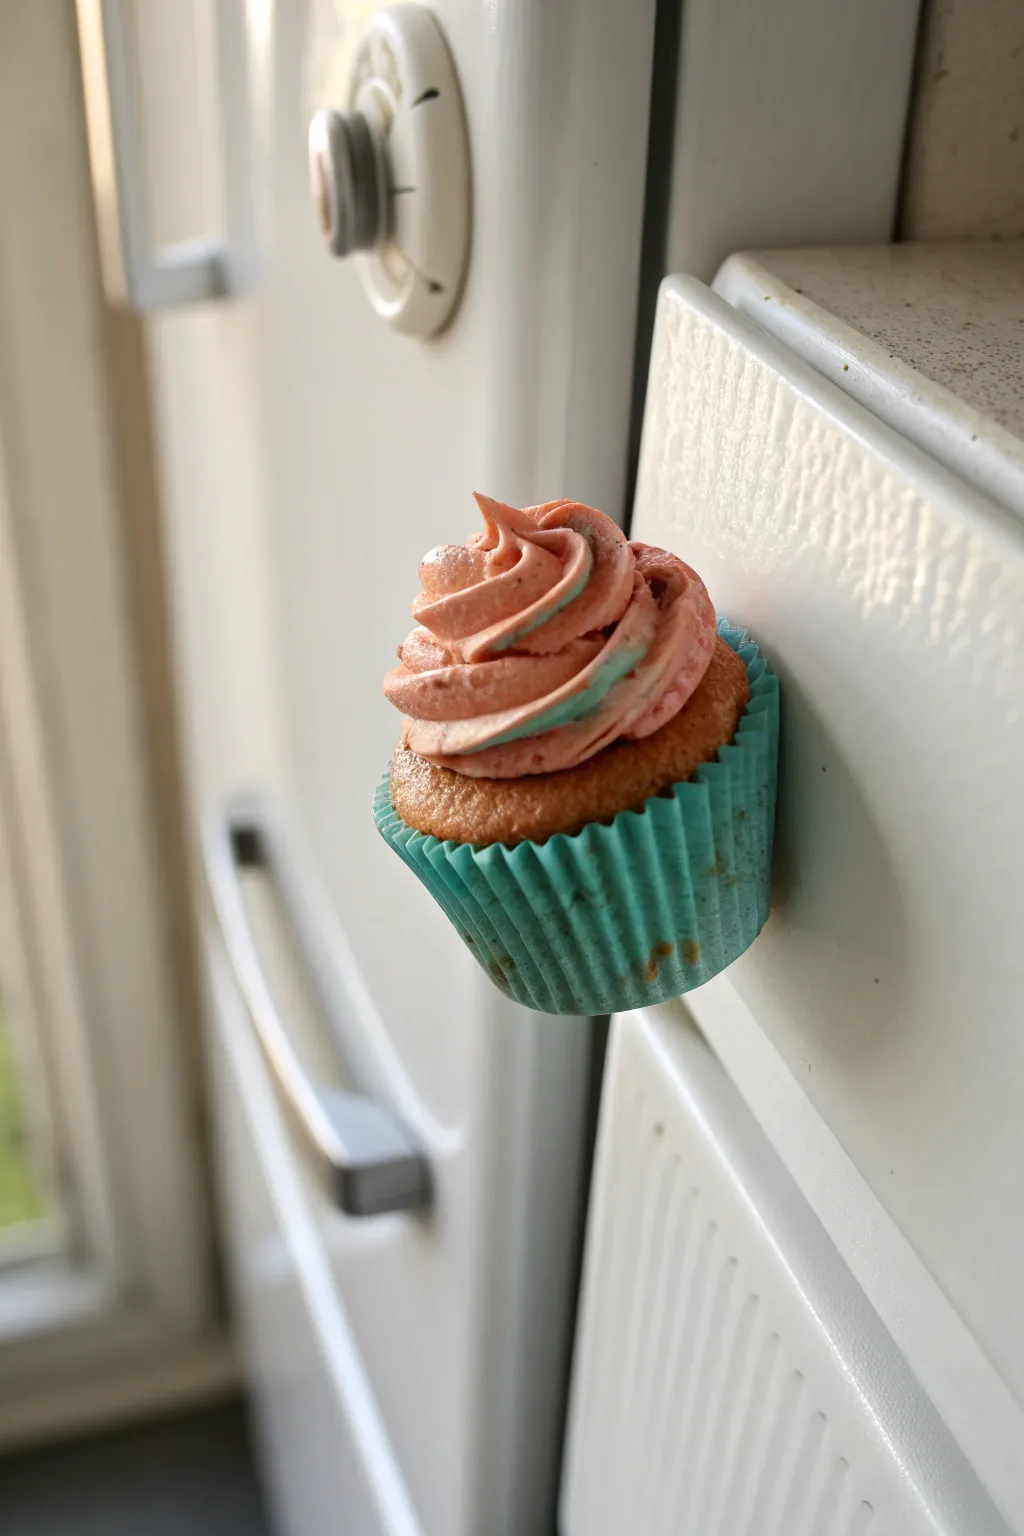
This delightful magnet looks good enough to eat, featuring a fluffy golden cake base and a generous swirl of two-tone frosting nestled in a teal liner. It is a charming way to add a pop of sweetness to your fridge or magnetic board.
Step-by-Step Guide
Materials
- Polymer clay (pale yellow, light brown, white, teal/light blue, rose pink)
- Strong neodymium magnet
- Liquid polymer clay (Translucent)
- Pastel chalks (shades of orange and brown)
- Soft paintbrush
- Old toothbrush or stiff bristle brush
- Serrated tool or ridged cutter (for liner texture)
- Star piping tip (small metal icing tip)
- Needle tool
- Clay roller or pasta machine
- Gloss varnish (optional)
Step 1: Creating the Cupcake Liner
-
Mix the color:
Start by conditioning your teal clay. If the color is too saturated, mix in a small amount of white clay until you achieve a soft, pastel blue-green shade similar to a standard baking cup. -
Roll the base:
Roll the clay into a thin sheet, approximately 1-2mm thick. You want it substantial enough to hold the shape but thin enough to look like paper. -
Create the texture:
To mimic the crimped paper look, use a serrated tool or press the edge of a ruler gently into the strip of clay at regular vertical intervals to create the iconic ridges. -
Shape the cup:
Cut a long strip from your textured clay and a small circle for the base. Wrap the strip around the circle, flaring it out slightly at the top, and blend the seams on the inside so they aren’t visible.
Clay Softener Tip
If your ‘frosting’ clay is too stif to pipe, add a drop of baby oil or clay softener. It should pass through the tip without breaking but hold its ridges.
Step 2: Baking the Cake Base
-
Mix the dough color:
Blend pale yellow clay with a tiny dot of light brown and translucent clay to get a realistic ‘baked clear’ dough color. Roll this into a smooth ball. -
Insert the cake:
Press the dough ball into your prepared clay liner. Fill it almost to the top, leaving it slightly domed in the center like a rising cake. -
Add cake texture:
Using an old toothbrush or a stiff brush, tap the surface of the domed clay vigorously. This creates the porous, crumbly texture of a baked sponge cake. -
Apply shading:
Scrape some orange and brown pastel chalk into fine dust. With a soft dry brush, gently dust the top of the textured dome to give it a golden-brown baked appearance. -
Place the magnet:
Press your magnet into the side of the cupcake liner now to create an indentation, then remove it. We will glue it in after baking to ensure the strongest hold.
Sprinkle Surprise
Before baking the final swirl, add sprinkles! Cut tiny bits of colored clay snakes or use real polymer clay sprinkles for extra detail.
Step 3: The Perfect Swirl
-
Prepare the frosting clay:
You will need a very soft clay mixture for piping. Mix white clay with liquid polymer clay until it reaches a consistency resembling thick chewing gum or cream cheese. -
Tint the frosting:
Divide your mixture: keep one part white (or very pale teal) and tint the larger portion with rose pink clay. You want the pink to be the dominant color. -
Load the piping bag:
Place the clay into a small piping bag fitted with a star tip. I like to smear the teal color on one side of the bag and fill the rest with pink to get that beautiful two-tone stripe effect. -
Pipe the swirl:
Starting from the outer edge of the cake dome, squeeze the clay out in a circular motion, spiraling upward and inward. Finish with a quick lift to create a peak at the center. -
Secure the frosting:
If the frosting feels heavy, you can insert a small piece of wire or a toothpick into the cake base before piping to help anchor the swirl, though usually the liquid clay bond is strong enough.
Step 4: Finishing Touches
-
Final bake:
Bake the entire piece according to your clay manufacturer’s instructions. Because the frosting is mixed with liquid clay, ensure your oven temperature is accurate to prevent scorching. -
Attach the magnet:
Once the cupcake has fully cooled, apply a drop of strong super glue (cyanoacrylate) into the indentation you made earlier and press the magnet firmly into place. -
Optional gloss:
For a ‘freshly iced’ look, verify the clay is cool, then brush a thin layer of gloss varnish designated for polymer clay over just the frosting swirl.
Now your fridge has a permanent sweet treat that looks just like the real thing
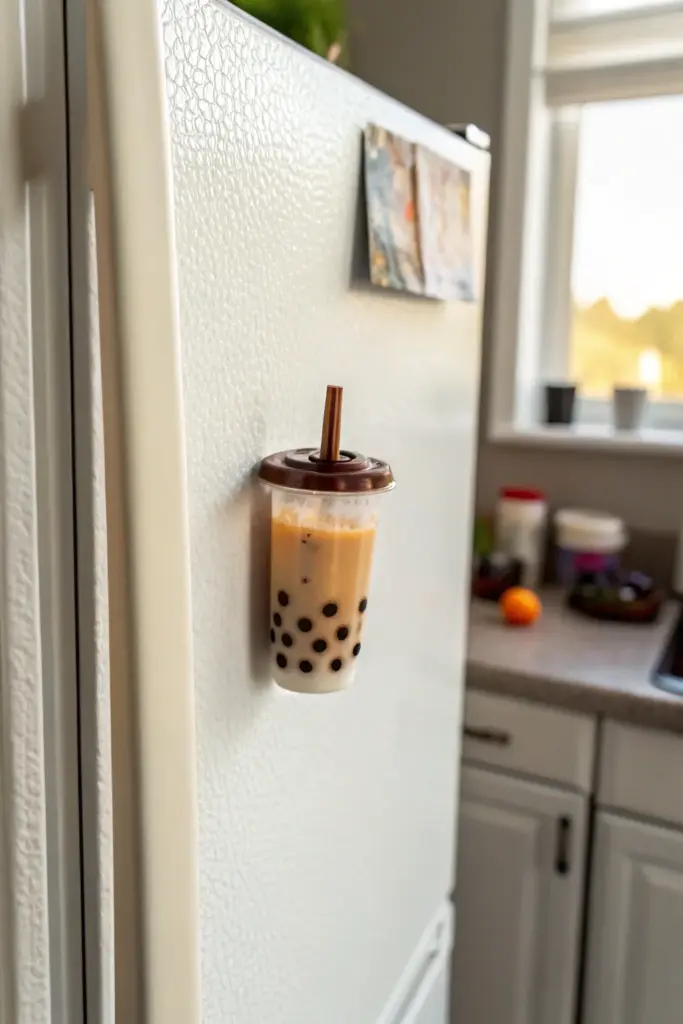
Boba Cup Drink Magnets
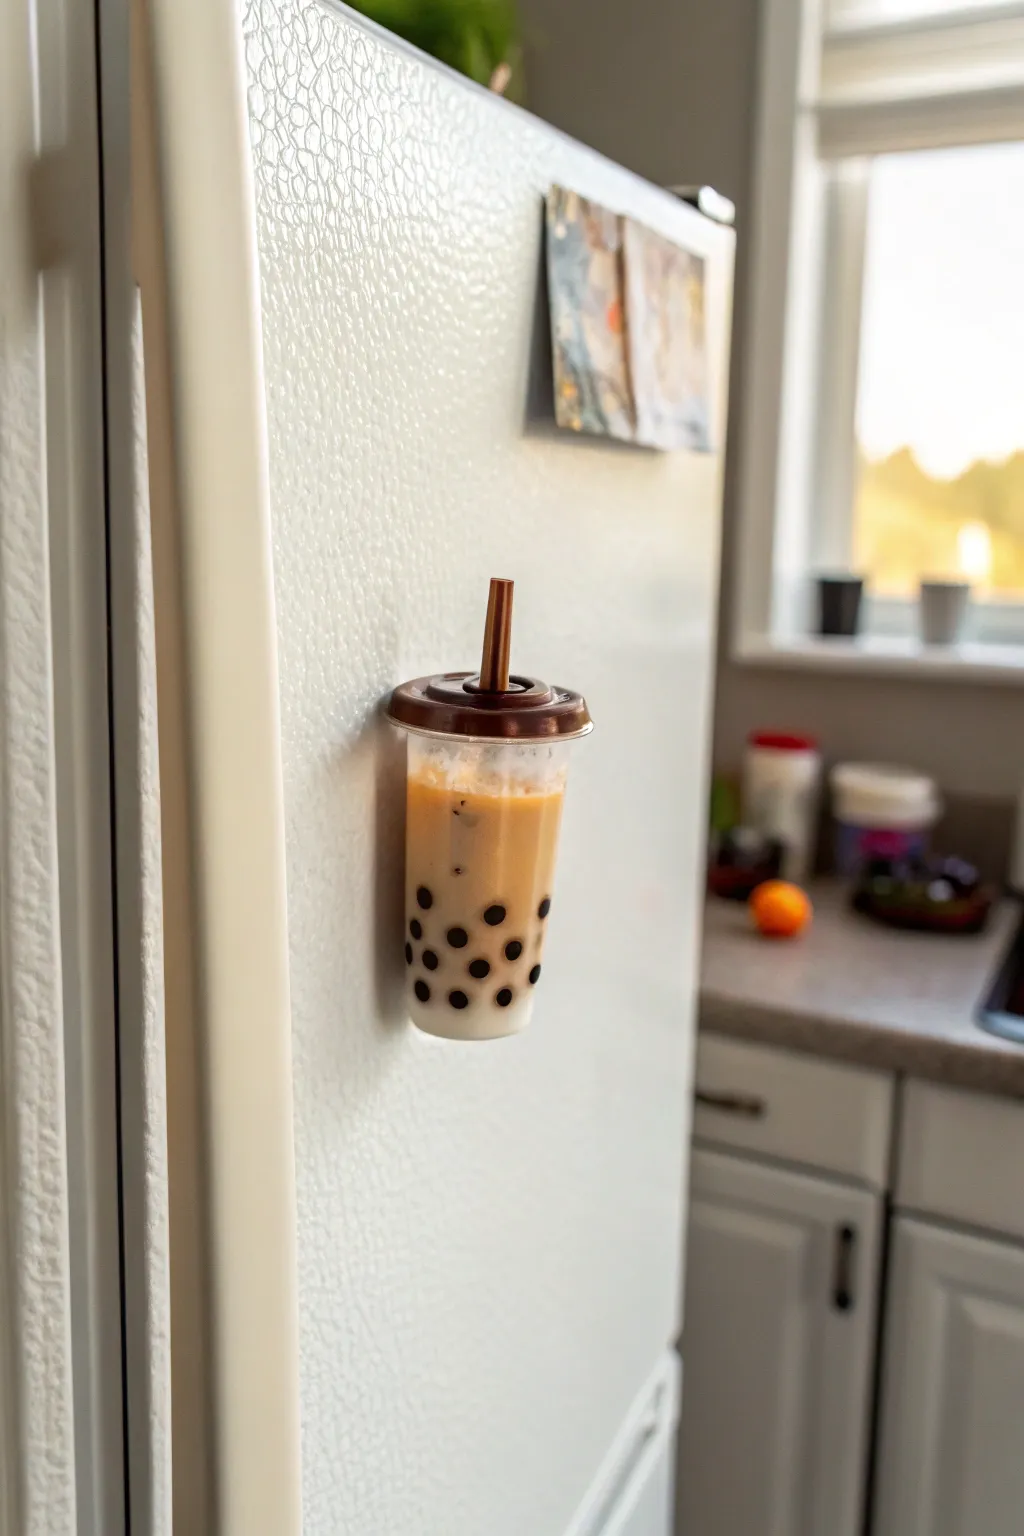
Capture the sweetness of your favorite bubble tea order with this hyper-realistic fridge magnet. Using clear resin and polymer clay, you can recreate the distinct layers of creamy milk tea and chewy tapioca pearls right on your refrigerator door.
Step-by-Step
Materials
- Miniature plastic frappuccino/slushy cup with dome lid (1:6 or 1:12 scale)
- UV Resin (clear)
- UV Lamp
- Polymer clay (black or dark brown)
- Acrylic paint (burnt sienna, ochre, white)
- Small mixing cup and toothpick
- White or translucent liquid polymer clay (optional for milk swirl)
- Strong neodymium magnet
- E6000 glue or superglue
- Miniature plastic straw (often comes with the mini cups)
- Sandpaper
Step 1: Prepping the Pearls
-
Form the tapioca:
Begin by rolling tiny amounts of black or dark brown polymer clay into small spheres. These should be small enough to sit comfortably at the bottom of your miniature cup without overcrowding it. -
Bake the pearls:
Place your clay pearls on a baking sheet or tile. Bake them according to your clay manufacturer’s instructions—usually around 275°F (135°C) for 10-15 minutes since they are so small. -
Prep the cup:
While the clay cools, take your miniature plastic cup and check the back. If it’s rounded, use a piece of sandpaper to flatten one side slightly; this creates a better surface for the magnet later.
Step 2: Mixing the Tea
-
Create the tea color:
In a small disposable mixing cup, pour a generous amount of clear UV resin. -
Tint the resin:
Add a tiny drop of burnt sienna and a touch of ochre acrylic paint. Mix thoroughly with a toothpick. You want a translucent, tea-like amber color. -
Add the milk factor:
To get that milky tea look, mix in a small amount of white acrylic paint or white liquid clay. Stir until opaque but still glossy. I prefer adding the white gradually to control the ‘creaminess’ level. -
Place the pearls:
Drop your cooled clay pearls into the bottom of the empty miniature cup. Shake it gently so they settle naturally.
Sticky Situation?
If your resin feels tacky after curing, wipe it with a cotton pad soaked in rubbing alcohol, or leave the cup in direct sunlight for 30 minutes to finish the hardening process.
Step 3: Pouring and Curing
-
First pour:
Carefully pour your resin tea mixture into the cup, filling it about half full. Make sure the resin coats the pearls thoroughly. -
Initial cure:
Place the cup under your UV lamp for 60-90 seconds to set the bottom layer and lock the pearls in place. -
Create the gradient (optional):
For a realistic look, add a bit more white to your remaining resin mix to make the top layer slightly lighter, mimicking milk settling. -
Final fill:
Pour the remaining resin into the cup, stopping just below the rim to leave room for the lid. -
Remove bubbles:
Use a lighter or a heat gun quickly over the surface to pop any air bubbles that have risen to the top.
Flavor Variations
Change up the ‘flavor’ by using berry pinks for strawberry milk tea, pale green for matcha, or purple for taro. You can even cut up bits of dark purple rubber bands to mimic jelly toppings.
Step 4: Assembly
-
Attach the lid:
Place the dome lid onto the cup. If it snaps on, great; if not, apply a tiny rim of clear resin around the edge and cure it to seal the cup permanently. -
Insert the straw:
Insert the miniature straw through the hole in the lid. If it feels loose, secure it with a tiny dot of glue or resin where it meets the lid. -
Final cure:
Place the entire assembled cup under the UV lamp for a full 2-3 minutes. Rotate it to ensure the UV light penetrates all sides of the resin. -
Attach the magnet:
Apply a dab of E6000 or strong superglue to the flat spot you sanded on the back of the cup. -
Hold steady:
Press the neodymium magnet firmly into the glue. Let the adhesive cure fully (overnight for E6000) before placing it on your fridge.
Now you have a refreshing little decoration that looks good enough to sip