
When I need a creative reset, I grab a lump of clay and start thinking in shapes instead of “perfect.” These clay sculpture ideas are all about making something tangible and expressive—whether you’re keeping it super simple or going for a little studio-style drama.
Simple Pinch-Pot Animal Figurines
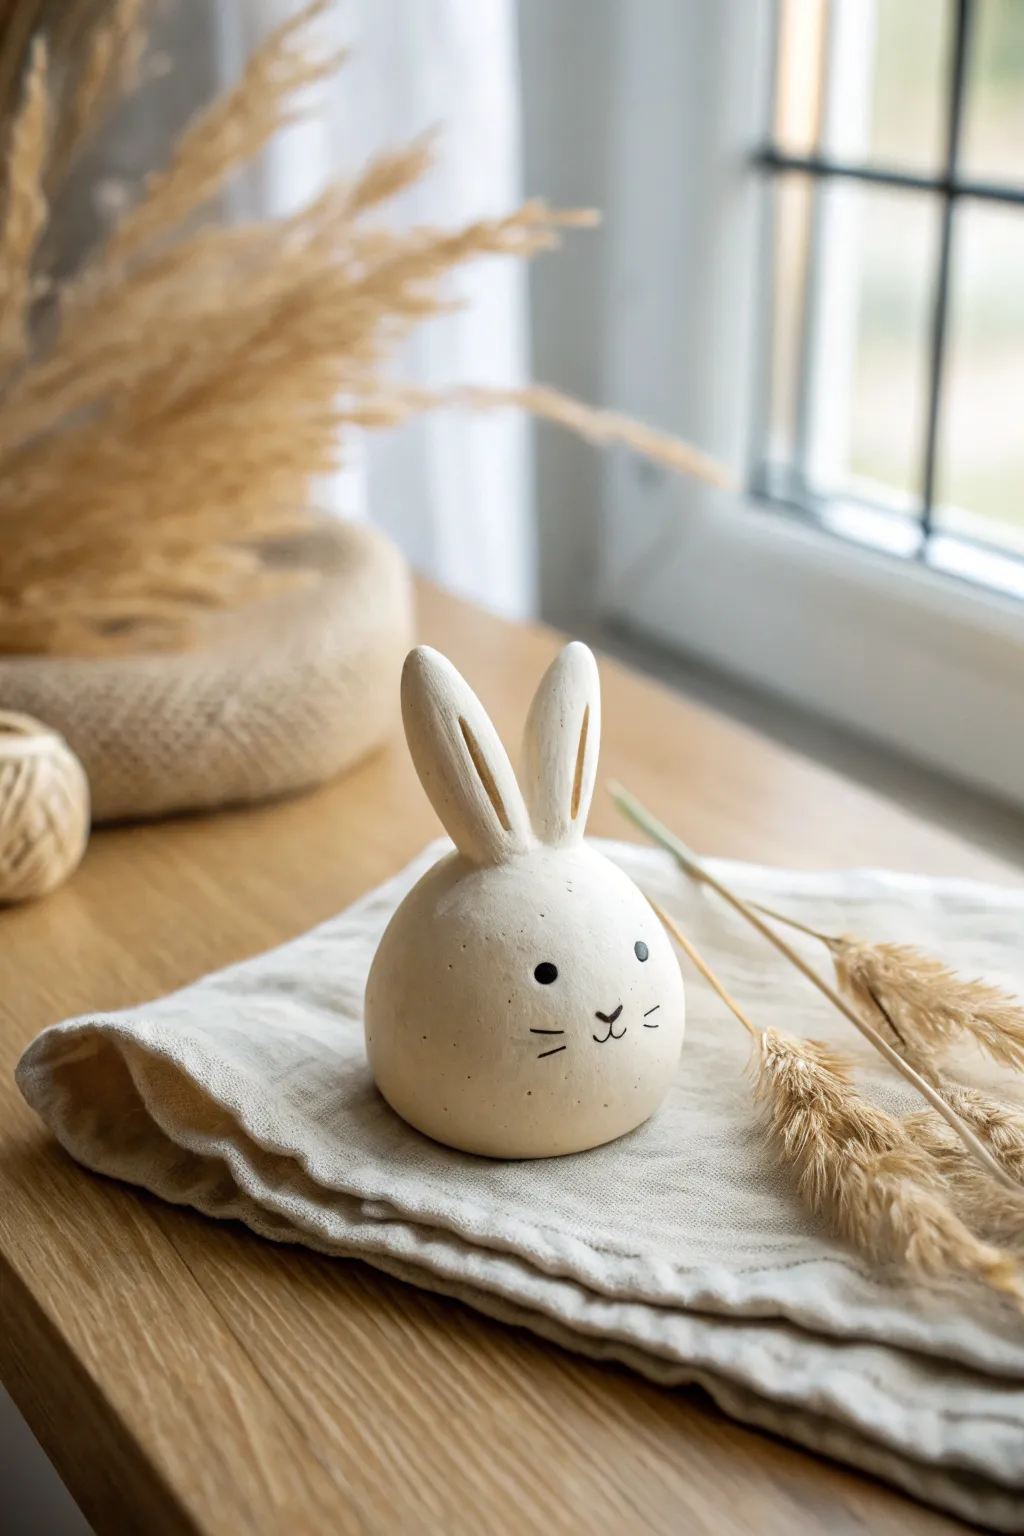
This adorable, minimalist bunny figurine starts as a simple sphere of clay and transforms into a charming piece of decor perfect for spring vignettes. Its smooth finish and graphic features give it a modern, clean look that belies its simple construction method.
Step-by-Step
Materials
- Air-dry clay (white or light cream)
- Small rolling pin or smooth jar
- Pin tool or toothpick
- Black acrylic paint or black fine-tip marker
- Small bowl of water
- Sponge
- Fine-grit sandpaper (optional)
- Clear matte varnish spray
Step 1: Forming the Body
-
Condition the clay:
Start by taking a handful of air-dry clay roughly the size of a tangerine. I always knead it in my hands for a minute or so to warm it up and remove any air pockets. -
Roll a sphere:
Roll the clay between your palms to create a smooth, solid ball. Aim for a perfect sphere without cracks. -
Create the pinch pot:
Gently press your thumb into the center of the sphere, stopping before you push through the bottom. Rotate the ball while pinching the walls to create an even, hollow shape. -
Close the form:
Unlike a traditional bowl, you want to gently coax the opening closed again to form a hollow sphere. Pinch the edges together at the top until sealed completely. -
Shape the egg:
Roll the hollow sphere gently on your work surface to smooth out the seam. Apply slight pressure to flatten the bottom just enough so the bunny sits stably without wobbling. -
Smooth the surface:
Dip your finger or a slightly damp sponge into water and run it over the entire surface to erase fingerprints and imperfections.
Keep it Hollow
Making the body hollow reduces drying time and prevents cracking. If the sphere feels too heavy, you haven’t thinned the walls enough.
Step 2: Sculpting the Ears
-
Form ear logs:
Take two smaller pieces of clay, roughly the size of large grapes. Roll them into tapered log shapes that are slightly pointed at the top. -
Indent the ears:
Using a modeling tool or the handle of a paintbrush, press a long, shallow indentation down the center of each ear to create depth. -
Score the attachment points:
Use your pin tool or a toothpick to scratch up the bottom of the ears and the spots on the head where they will attach. This rough texture helps them stick. -
Create slip:
Dab a tiny bit of water or liquid clay (slip) onto the scratched areas to act as glue. -
Attach the ears:
Press the ears firmly onto the head. Use your finger or a tool to blend the clay from the base of the ear downward into the head so the seam disappears. -
Final smoothing:
Check the connection points one last time. Smooth out any bumps with a wet finger, ensuring the ears stand upright and symmetrical.
Step 3: Finishing Touches
-
Let it dry completely:
Allow your bunny to dry for 24-48 hours. It should turn a lighter white color and feel room temperature (not cool) to the touch when ready. -
Sand imperfections:
If there are any rough spots, use fine-grit sandpaper to gently buff the surface. Wipe away the dust with a dry cloth. -
Paint the face:
Using a fine-tip paintbrush and black acrylic paint, add two small dots for eyes. Paint a small ‘Y’ shape for the nose and mouth, and add three horizontal whiskers on each cheek. -
Seal the piece:
Once the paint is dry, spray the entire sculpture with a clear matte varnish to protect the clay and give it a finished, professional look.
Cracks Appearing?
If small cracks appear while drying, mix a tiny bit of fresh clay with water to make a paste and fill them in before sanding smooth.
Place your finished bunny near a window or alongside dried grasses to complete the serene aesthetic


Mini Human Bust With Stylized Features
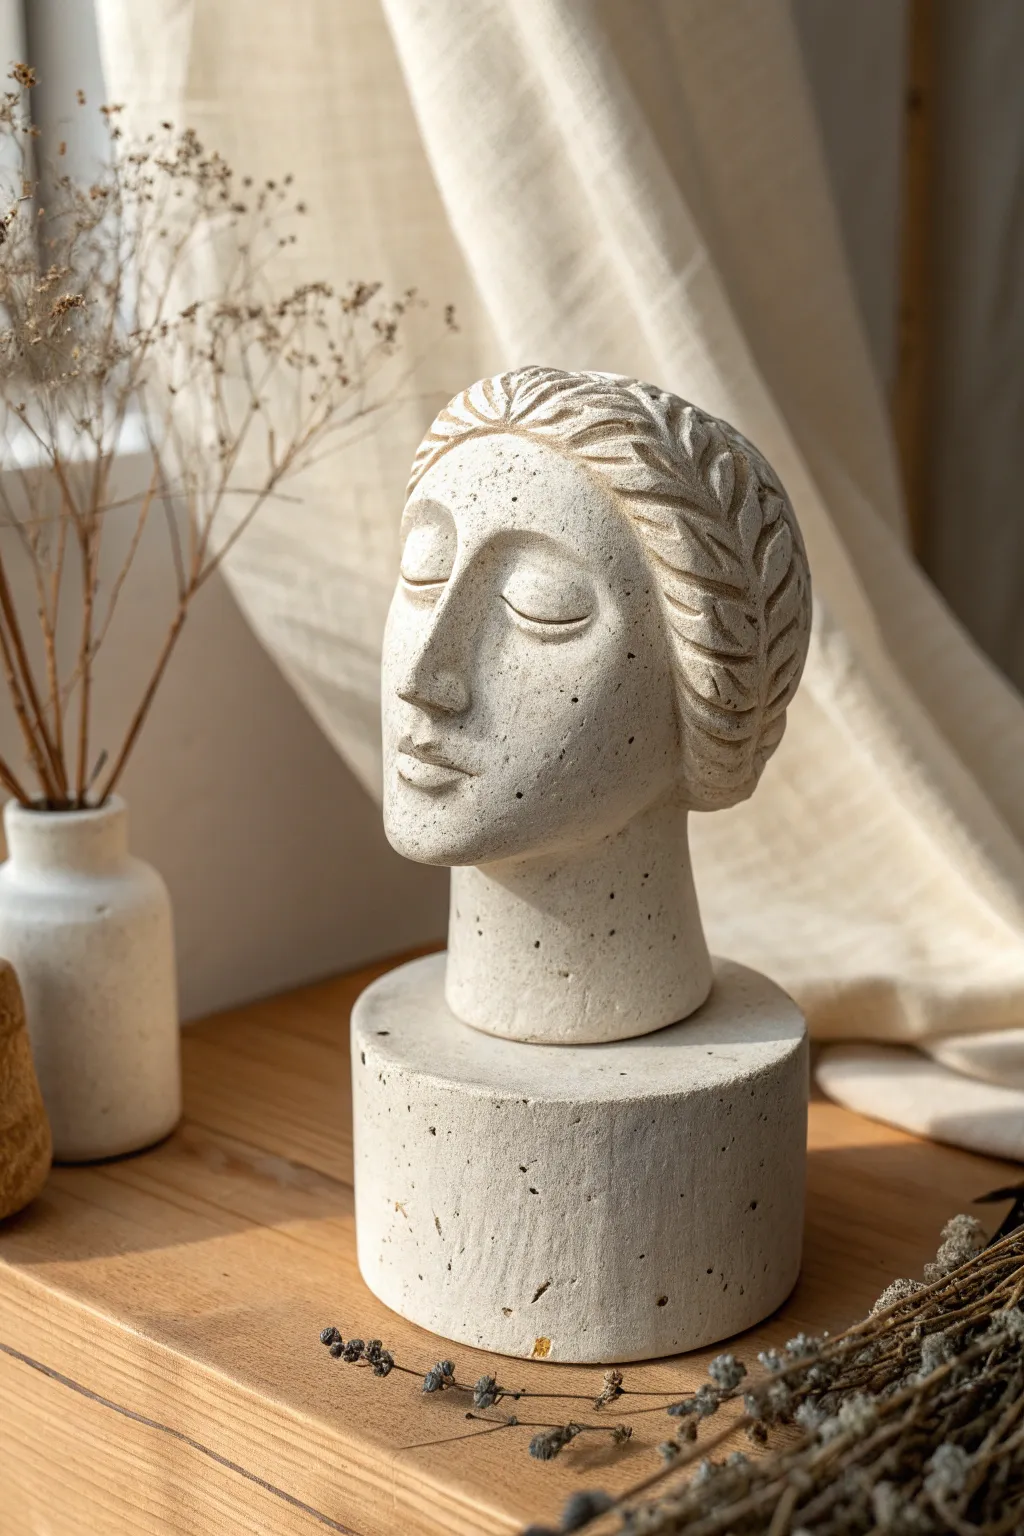
Capture a sense of timeless calm with this modern, stylized bust that mimics the texture of ancient carved stone. The elongated features, closed eyes, and leaf-patterned hair create a peaceful, meditative piece perfect for a minimalist shelf display.
Detailed Instructions
Materials
- Air-dry stone clay (white or light grey)
- Small wooden rolling impression tool or sculpting needle
- Wire armature or balled foil core
- Wooden dowel (for neck support)
- Round cookie cutter or jar lid (approx. 3-4 inches)
- Texture sponge or stiff bristle brush
- Sandpaper (fine grit)
- Acrylic paints (cream, beige, diluted black for speckling)
- Old toothbrush (for spattering)
Step 1: Forming the Base Structure
-
Prepare the plinth core:
Start by forming a solid cylinder for the base. You can tightly ball up aluminum foil into a cylinder shape about 3 inches high and wide to save on clay, or use a solid block of clay if you prefer a heavier piece. -
Cover the plinth:
Roll out a slab of clay about 1/4 inch thick. Wrap this around your foil cylinder, smoothing the seam perfectly so it disappears. Use a round cutter to create a neat top circle and attach it, ensuring sharp, clean edges. -
Insert neck support:
Push a wooden dowel down into the center of your wet clay plinth. Leave about 2-3 inches sticking out primarily to support the head. Add a thick coil of clay around the dowel to form the neck, blending it seamlessly into the plinth.
Step 2: Sculpting the Head
-
Shape the head armature:
Form a ball of foil slightly smaller than a tennis ball and press it onto the top of the dowel. Cover this entirely with a layer of clay, shaping it into an elongated oval that tapers slightly towards the chin. -
Refining the face shape:
Flatten the front of the oval slightly to create the facial plane. Gently pinch the clay at the chin to narrow it, and smooth the neck upward so it connects naturally to the jawline. -
Establish the nose:
Roll a small snake of clay and attach it vertically to the center of the face. Use your thumb to blend the sides onto the cheeks, keeping the bridge distinct and straight. Shape the tip so it turns slightly downward. -
Carve the eye sockets:
Using your thumbs, press gently on either side of the nose bridge to create shallow indentations for the eye area. This helps the brow bone and nose stand out. -
Sculpt closed eyes:
Roll two small, flat almond shapes of clay. distinctively curved like sleeping eyelids. Press these into the eye sockets. Use a needle tool to softly etch the curved line where the upper and lower lids meet. -
Define the mouth:
Add a very small bit of clay below the nose for the lips. Sculpt the upper lip with a slight bow and a fuller lower lip. Use a thin tool to press a horizontal line between them, keeping the expression neutral and relaxed.
Fixing Cracks
If hairline cracks appear while drying, don’t panic. Mix a small amount of fresh clay with water to make a paste (slip) and fill the crack. Smooth it over and re-texture with your brush.
Step 3: Adding the Stylized Hair
-
Create the hair volume:
Add a layer of clay over the top and back of the head, framing the face like a cap. Smooth it down so it hugs the skull shape closely. -
Mark the center part:
Draw a faint line down the center of the head from the forehead to the nape of the neck. This will be your guide for the leaf pattern. -
Carve the leaf pattern:
Using a needle tool or a small loop tool, carve angled, V-shaped grooves starting from the center part and flowing backward. Imagine a wheat braid or laurel wreath texture. Keep the cuts deep and repetitive for a graphic look. -
Refining hair texture:
Go back over your V-shapes and add tiny secondary lines inside each ‘leaf’ segment to mimic veins, enhancing the organic feel.
Ancient Patina
For an aged look, mix a watery brown wash paint. Brush it into the deep crevices of the hair and eyes, then immediately wipe the high points clean with a damp cloth.
Step 4: Surface Finish & Texture
-
Stone texturing:
Before the clay dries, take a stiff bristle brush or a rough sponge and dab it gently over the entire surface—face, neck, and plinth. This removes tool marks and mimics the porosity of sandstone. -
Drying:
Let the sculpture dry completely. For a solid piece this size, allow at least 48-72 hours away from direct heat to prevent cracking. -
Sanding:
Once bone dry, use fine-grit sandpaper to gently soften any sharp burrs on the nose or chin, but leave the hair texture crisp. -
Base painting:
Mix a warm cream or bone-colored acrylic paint. Apply an even coat over the entire sculpture. I find a second coat ensures that solid, stone-like opacity. -
Creating the speckle effect:
Mix a small amount of black paint with water until it’s very runny. Dip an old toothbrush into it, then run your thumb across the bristles to flick tiny speckles over the bust. This replicates the look of granite or sedimentary rock. -
Final matte seal:
To protect your work without making it shiny (which ruins the stone effect), apply a generous coat of ultra-matte varnish.
Place your finished bust near a window where the changing daylight can highlight the subtle textures of your faux stone masterpiece.


Coil-Built Snake or Dragon Sculpture
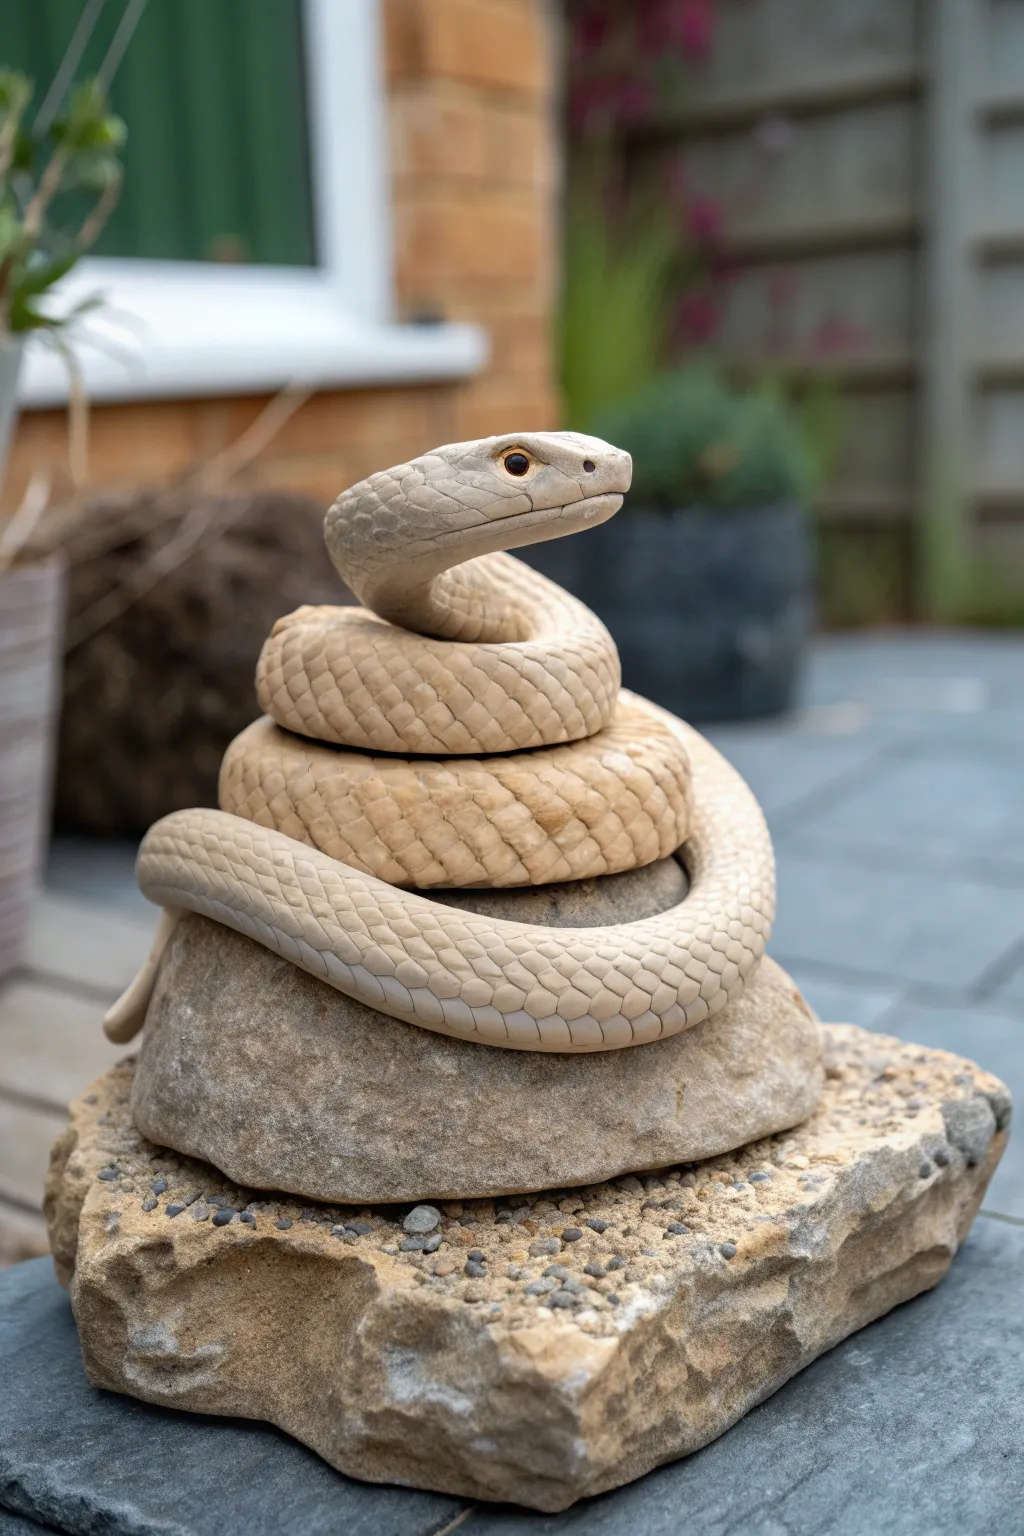
Create a striking garden or shelf guardian with this detailed coiled snake sculpture, featuring a natural stone-like finish and intricate scale work. This intermediate project teaches you how to balance form and texture to bring a cold-blooded creature to life on a pedestal of natural rock.
Step-by-Step Guide
Materials
- Light-colored stoneware clay or light grey polymer clay (approx. 2-3 lbs)
- Two flat, stackable natural rocks (for the base)
- Clay scoring tool or old toothbrush
- Slip (clay glue) – if using ceramic clay
- Loop tool for carving
- Small round sculpting tool or straw (for scales)
- Needle tool
- Sponge and water
- Black glass bead or small distinct clay ball (for eyes)
Step 1: Forming the Base Structure
-
Prepare the rock base:
Select two natural rocks that stack stably; place the larger one on the bottom and the smaller on top to serve as the sculpture’s permanent plinth. -
Roll the main coil:
Roll out a very long, thick tapered coil of clay. The head end should be roughly 1.5 inches thick, tapering gradually down to a thin tail point. -
Shape the initial coil:
Starting with the tail, carefully wind the clay onto the top rock, creating a flat spiral foundation that sits securely on the stone surface. -
Build the elevation:
Continue coiling the clay upwards, stacking each ring directly atop the previous one to create a tight, vertical stack rather than a loose spiral. -
Position the neck:
Once you have about three layers of coils, curve the remaining thick end (the neck) upwards and slightly backwards, leaving the head portion floating freely above the body. -
Refine the contact points:
I like to gently press the coils together where they touch to ensure structural integrity, but maintain the distinct roundness of each individual coil segment.
Step 2: Sculpting the Head and Details
-
Shape the head:
Flatten the thickest end of your coil slightly into a diamond shape to mimic a viper’s head, smoothing the transition from the neck. -
Define facial features:
Use a modeling tool to carve distinct brow ridges above the eye area and shape the snout to be slightly upturned and blunted. -
Add the eyes:
Press a small hole on each side of the head and insert a black glass bead or a tiny ball of black clay to create a piercing gaze. -
Carve the mouth line:
Slice a long, deep mouth line that extends far back on the jaw, curving slightly downward at the corner for a realistic expression. -
Create the nostrils:
Pierce two small holes at the very front of the snout with a needle tool.
Pro Tip: Seamless Start
Flatten the underside of the very first coil where it touches the rock. This increases surface area for better adhesion so your snake doesn’t slide off later.
Step 3: Texturing and Finishing
-
Map out scale flow:
Lightly trace guidelines along the length of the snake’s body to ensure your scale rows follow the curve of the spine. -
Impress the scales:
Using a small U-shaped loop tool or a modified straw, press scale textures into the clay, starting from the tail and working upward toward the head. -
Vary scale signs:
Keep the scales smaller near the tail and neck, and larger around the thickest part of the body coils. -
Detail the head scales:
On the top of the head, carve larger, plate-like scales rather than the small repeating pattern used on the body. -
Smooth and refine:
Gently wipe the surface with a barely damp sponge to soften any sharp clay burrs without erasing your texture work. -
Dry and fire (or bake):
Allow the clay to dry slowly under plastic to prevent cracking (if ceramic), then fire or bake according to your specific clay’s manufacturer instructions.
Level Up: Belly Scales
Before coiling, add horizontal ‘belly scute’ textures to the underside of your clay rope. These will peek out subtly on the upper curves for extra realism.
Place your finished serpent in a sunny spot where the light will catch the intricate texture of the scales


Cute Sea Creature Sculptures With Texture
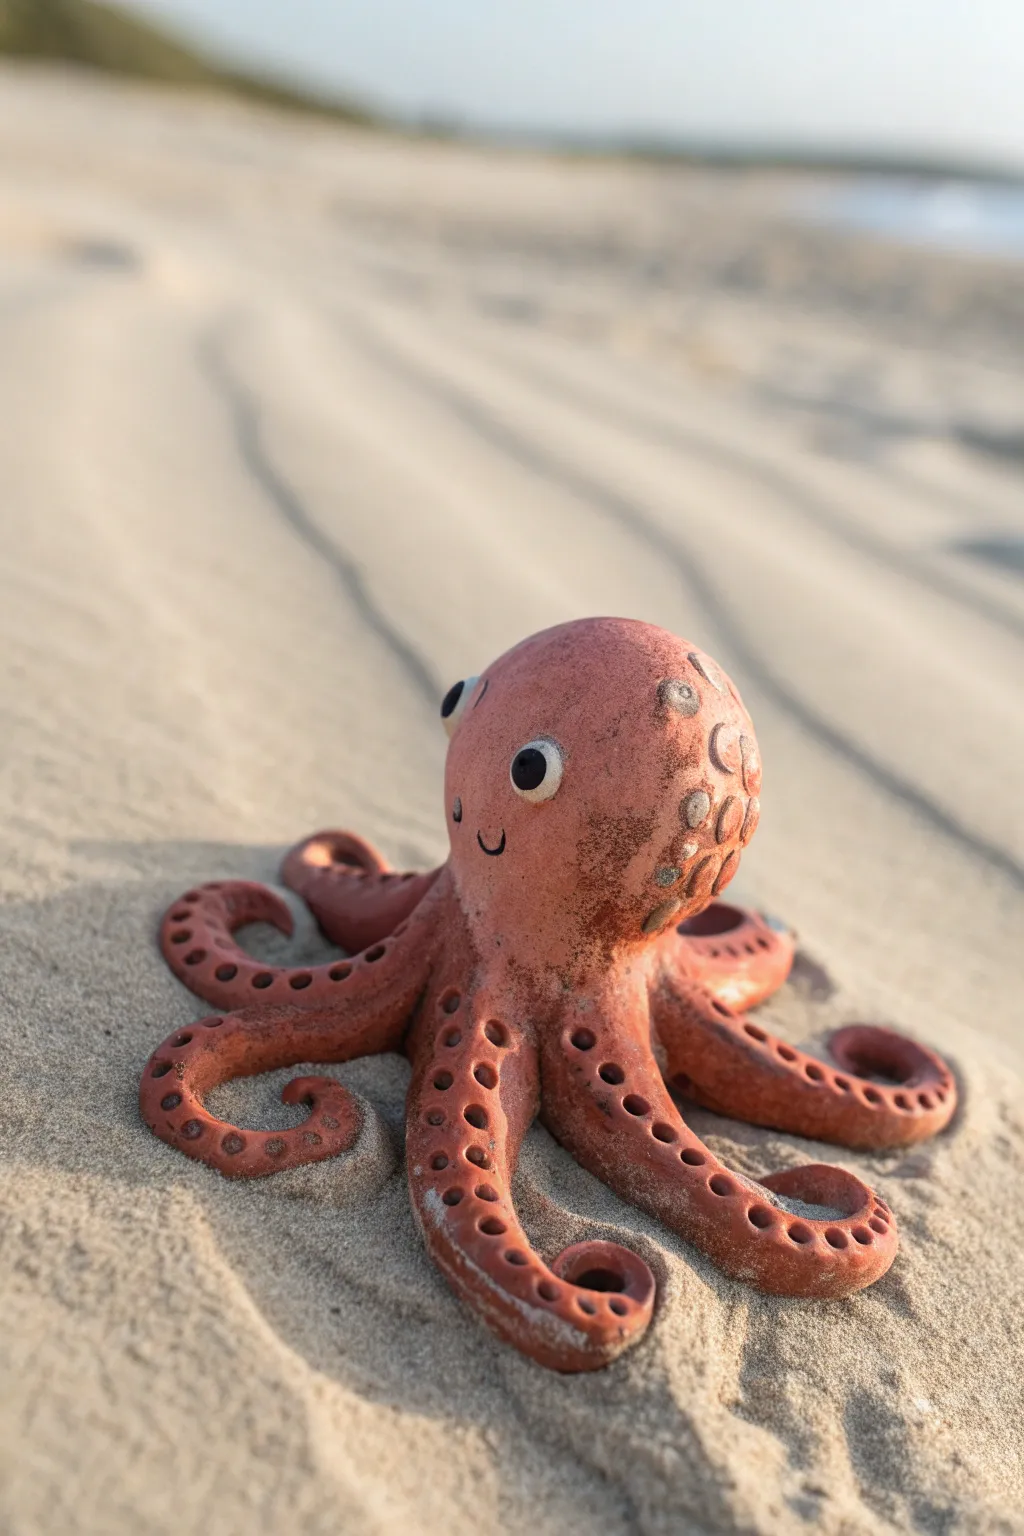
Sculpt a charming, cartoon-style octopus with distinctively textured details and expressive eyes. This reddish-brown clay creation creates a delightful seaside companion that looks perfect perched on a shelf or nestled in actual sand.
Detailed Instructions
Materials
- Terracotta-colored polymer clay or air-dry clay
- White polymer clay (small amount)
- Black polymer clay (small amount)
- Small ball stylus tool (or round chopstick end)
- Needle tool or toothpick
- Blending tool or smooth skewer
- Acrylic paint (optional, for weathering)
- Soft brush
- Varnish (satin finish)
Step 1: Forming the Base
-
Create the head:
Start with a generous ball of terracotta clay about the size of a golf ball or slightly larger to form the main head. Roll it until smooth, then shape it slightly into a rounded dome, keeping the bottom a bit wider than the top. -
Prepare the tentacles:
Roll out eight even snakes of clay, each tapering to a point at one end. These should be roughly 3-4 inches long, depending on how large you made the head. -
Attach the legs:
Attach the thicker ends of the tentacles to the underside of the head dome. Press them firmly together in a star pattern so they radiate outward. -
Blend the seams:
Using your thumb or a blending tool, smooth the clay where the tentacles meet the head/body so there are no visible lines. This ensures the structure is solid.
Curve Control
To keep tentacles curled while baking or drying, prop them up with small crumpled balls of foil or paper towel support.
Step 2: Shaping and Pose
-
Pose the tentacles:
Gently curve each tentacle into a unique wavy shape. I like to curl the very tips upward or inward to give the octopus a sense of movement, as if it’s crawling across the ocean floor. -
Refine the head shape:
Once the tentacles are posed, check the head shape again. If it got flattened during handling, gently re-round the top dome. -
Add surface texture:
Using a textured sponge or crumpled aluminum foil, lightly press against the head and top of the tentacles to create a pitted, organic skin texture rather than a perfectly smooth finish.
Cracking Seams?
If tentacle seams crack during drying, fill the gap with a ‘slip’ of water and clay (or liquid polymer) and smooth over.
Step 3: Detailing
-
Create suction cups:
Using the small ball stylus tool, press indentations along the underside or outward-facing curled edges of each tentacle. Make them deep enough to cast shadows but not so deep they pierce through. -
Add decorative spots:
Take tiny pinches of clay, flatten them, and press them onto the side of the head like barnacles or spots. Use the needle tool to gently texture these raised bumps. -
Make the eyes:
Roll two small balls of white clay and flatten them slightly onto the face. Follow this with two much smaller balls of black clay pressed into the center of the white circles for pupils. -
Add a smile:
Use the edge of your needle tool or a small curved tool to impress a simple, tiny ‘u’ shape mouth right between and slightly below the eyes.
Step 4: Finishing Touches
-
Bake or dry:
If using polymer clay, bake according to the package instructions (usually 275°F for 15-30 minutes). If using air-dry clay, allow it to dry completely for 24-48 hours. -
Weathering wash (optional):
To enhance the texture, mix a very watery dark brown acrylic paint. Brush it all over the sculpture and immediately wipe the surface with a paper towel, leaving pigment only in the deeper textures and suction cups. -
Seal the piece:
Apply a coat of satin varnish to protect the clay and give it a slight, wet-look sheen, mimicking a sea creature out of water.
Now you have an adorable ocean friend ready to bring a touch of the beach to your home decor

The Complete Guide to Pottery Troubleshooting
Uncover the most common ceramic mistakes—from cracking clay to failed glazes—and learn how to fix them fast.
Mushroom Cluster Sculpture

Bring a touch of the forest floor indoors with this charming clay sculpture featuring a family of four boletus-style mushrooms. The project combines realistic textures on the stems with smooth, spotted caps for a delightful centerpiece that looks almost real enough to pick.
Detailed Instructions
Materials
- Air-dry clay or polymer clay (white or beige)
- Aluminum foil
- Sculpting tools (needle tool, small loop tool)
- Old toothbrush or stiff bristle brush
- Acrylic paints (Burnt Sienna, Raw Umber, Titanium White, Cream/Off-White)
- Paintbrushes (flat shader, fine detail liner)
- Matte varnish or sealant
- Water and sponge (for smoothing)
Step 1: Forming the Base
-
Create the armature:
Ball up a significant amount of aluminum foil to create a dome shape. This acts as the core for your base, saving clay and reducing weight. Compressing it tightly ensures a solid foundation. -
Cover the base:
Roll out a slab of clay about 1/4 inch thick. Drape this over your foil dome, smoothing it down the sides and tucking any excess underneath. -
Refine the surface:
Dip your fingers or a sponge in a little water to smooth out any fingerprints or seams on the dome. It doesn’t need to be perfectly glass-smooth; a slight organic irregularity adds character. -
Add texture:
Gently tap the surface of the clay dome with an old toothbrush or a ball of crumpled foil to give it a subtle, earthy texture rather than a plastic-smooth finish.
Pro Tip: Seamless Blending
Use a damp paintbrush instead of your finger to smooth hard-to-reach joints, like where the mushroom cap meets the stem.
Step 2: Sculpting the Mushrooms
-
Shape the stems:
Roll four cylinders of clay in varying sizes—one large, one medium, and two smaller ones. Taper them slightly so they are thicker at the bottom and narrower at the top. -
Attach stems to base:
Score the bottom of each stem and the spot on the base where it will sit. Add a dab of water (or slip) and press them firmly onto the mound. Smoothe the clay from the bottom of the stem onto the base to create a seamless transition. -
Detail the stems:
Using a needle tool or a stiff brush, drag vertical lines up and down the stems. This mimics the fibrous texture found on real mushroom stalks. Keep these marks random and organic. -
Form the caps:
Create four balls of clay corresponding to your stem sizes. Flatten them slightly into dome shapes. Using your thumb, create a gentle indentation on the underside of each cap. -
Attach the caps:
Score the top of the stems and the underside of the caps. Press the caps onto the stems. You can tilt them at slightly different angles to give the cluster a dynamic, natural look. -
Refine the connection:
Use a small modeling tool to blend the clay where the stem meets the cap underneath, ensuring a strong bond so heads don’t pop off later. -
Dry the sculpture:
Allow the piece to dry completely. If using air-dry clay, this may take 24-48 hours. If using polymer, bake according to package directions.
Level Up: Mossy Details
Glue small bits of dried preserved moss or scatter green flocking powder around the base of the stems for a forestry finish.
Step 3: Painting and Finishing
-
Base coat:
Paint the entire sculpture with a mix of Cream and a tiny drop of Raw Umber to get a warm, neutral beige bone color. -
Paint the caps:
Mix Burnt Sienna with a touch of red or orange to get a rich rust color. Paint the tops of the mushroom caps. For a realistic look, I like to sponge the color on near the edges to soften the transition. -
Shade the stems:
Using a dry brush technique with a small amount of Raw Umber, lightly brush over the textured vertical lines on the stems. This catches the raised areas and darkens the recesses, emphasizing the texture. -
Detail the base:
Apply a very light wash of watered-down brown paint over the base dome, then quickly wipe it off with a paper towel. This leaves pigment in the tiny crinkles for depth. -
Add the spots:
Using a fine detail brush or the tip of a toothpick, apply tiny dots of Titanium White to the tops of the caps. Keep them irregular in size and placement for a natural appearance. -
Seal the work:
Once the paint is fully dry, coat the entire sculpture with a matte varnish. This protects the paint and unifies the sheen of the clay.
Place your finished mushroom cluster on a shelf or desk to enjoy a permanent piece of nature.
Balloon-Animal Style Dog Sculpture
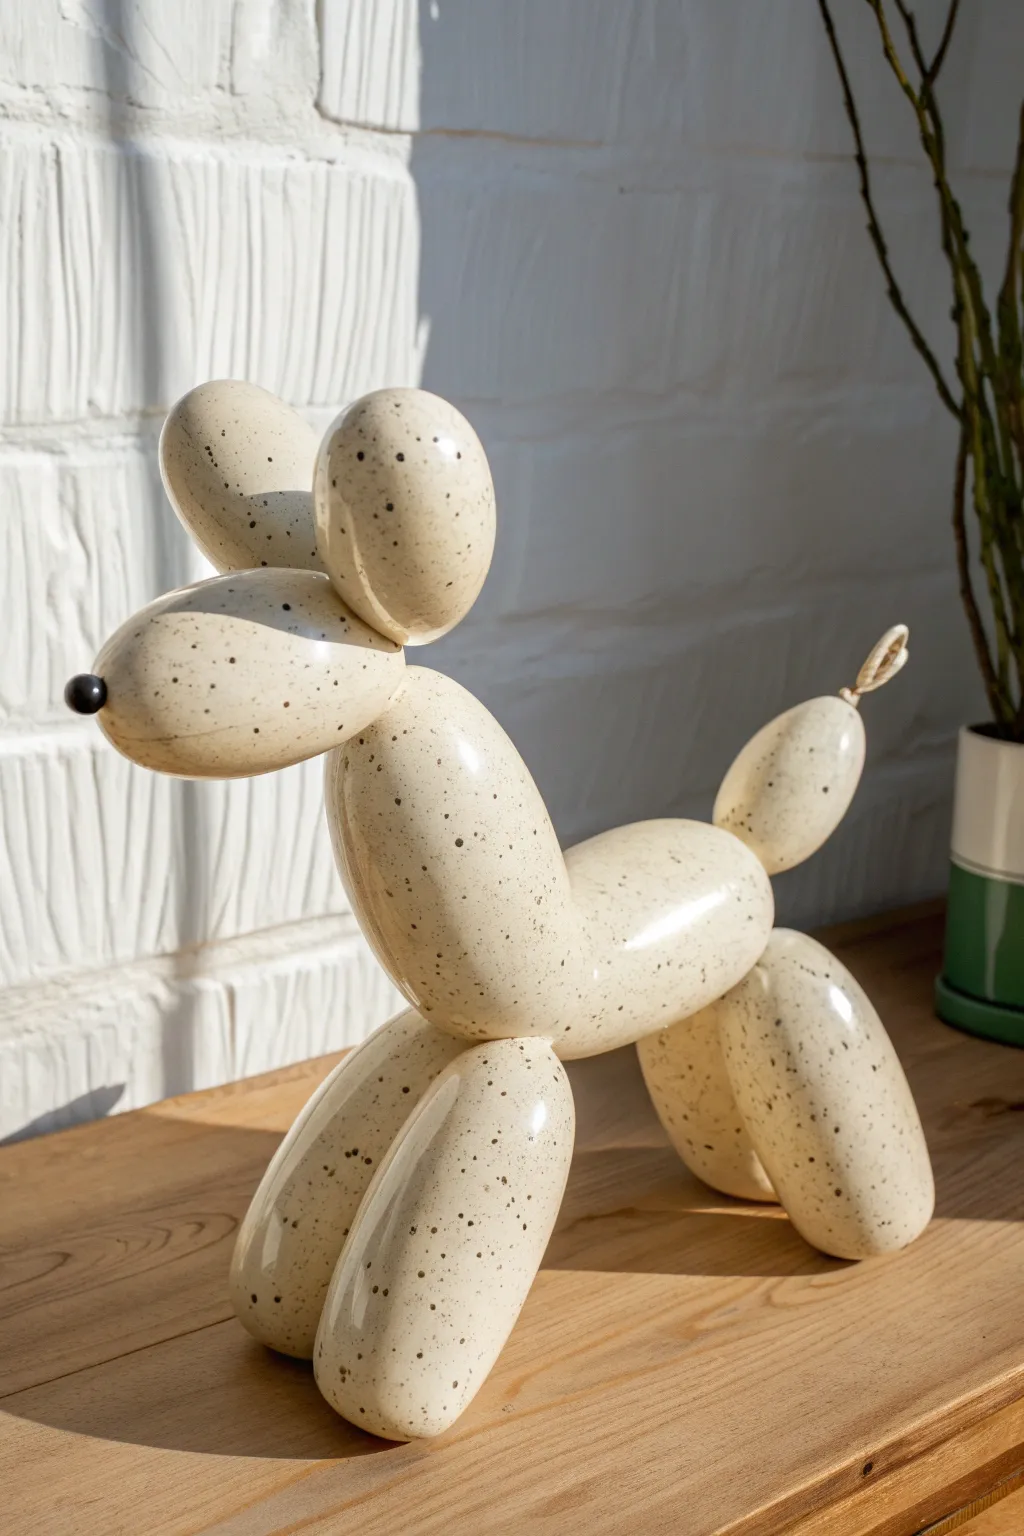
Whimsical and modern, this ceramic sculpture captures the nostalgic joy of a classic balloon animal with a sophisticated twist. The creamy, speckled glaze gives it an organic, stone-like appearance while maintaining that signature puffy silhouette.
Step-by-Step Tutorial
Materials
- White polymer clay or air-dry clay (smooth texture)
- Acrylic paints (cream/beige, black)
- High-gloss varnish or resin
- Small styrofoam ball (for the nose)
- Strong craft adhesive
- Sculpting tools (specifically a smoothing tool)
- Aluminum foil (for armatures)
- Stiff wire (for internal support)
- Old toothbrush (for splattering paint)
- Fine-grit sandpaper
Step 1: Sculpting the Base Forms
-
Prepare the foil armatures:
Crumple aluminum foil into tight oval shapes to create the core structure for each segment: four for the legs, one long sausage for the body, one shorter oval for the neck, two for the ears, and one for the snout. -
Insert connecting wires:
Cut short lengths of stiff wire. Insert them into the foil pieces where they will join together, leaving half the wire exposed to act as a connector for the adjoining piece. -
Condition the clay:
Knead your white stone or porcelain-style clay until it is warm and pliable to prevent cracking during the sculpting process. -
Cover the leg armatures:
Roll out sheets of clay and wrap them around the four leg armatures. Smooth the seams completely until you have four uniform, sausage-like shapes. -
Create the body:
Wrap the long body armature in clay. Gently taper the ends so they look like the twisted ends of a balloon segment. -
Form the head components:
Cover the snout, neck, and ear armatures with clay. Pay special attention to the ears, keeping them rounded and full.
Clean Splatters
Practice your toothbrush splattering technique on a scrap piece of paper first. Varying the distance changes the size of the dots.
Step 2: Assembly and Refining
-
Connect the legs to the body:
Push the wired legs into the underside of the body piece. Use a small clay tool to blend the clay at the join points so the transition looks pinched but seamless, just like a twisted balloon. -
Construct the neck and head:
Attach the neck piece to the front of the body, then secure the snout horizontal to the neck. Finally, attach the two ears to the top of the head/neck junction. -
Add the tail:
Roll a very small, thin piece of clay for the tail knot. Add a tiny looped teardrop shape to the end to mimic the tied-off balloon nipple. -
Refine the surface:
Dip your finger in a little water (or oil, if using polymer) and smooth out every fingerprint. The surface needs to be glass-smooth to sell the balloon effect. -
Add the nose:
Attach a small bead or ball of clay to the very tip of the snout for the nose. I find pressing it in slightly creates a better bond. -
Dry or bake:
Follow the specific instructions for your clay type. Bake vertically if polymer, or let air-dry completely on a soft surface to avoid flat spots.
Step 3: Finishing the Look
-
Sand imperfections:
Once fully cured, use fine-grit sandpaper to gently remove any remaining bumps or lint particles. -
Apply base color:
Paint the entire sculpture with two to three costs of a warm cream or beige acrylic paint, letting each coat dry fully. -
Paint the nose:
Carefully paint the small nose tip in matte black. -
Create the speckles:
Dilute a small amount of black acrylic paint with water. Dip an old toothbrush into the mix, and run your thumb across the bristles to flick tiny specks of paint over the entire sculpture. -
Seal with gloss:
This is the most crucial step for the ‘ceramic’ look. Apply two thick coats of high-gloss flow varnish or a layer of resin to create that wet, shiny finish.
Drooping Clay
If the clay is too heavy and the legs start to splay, prop the body up on a block or box while it dries/bakes to take the weight off.
Place your sculpture on a shelf where it can catch the light and show off that glossy finish


What Really Happens Inside the Kiln
Learn how time and temperature work together inside the kiln to transform clay into durable ceramic.
Tiny Monster Head With Big Expression
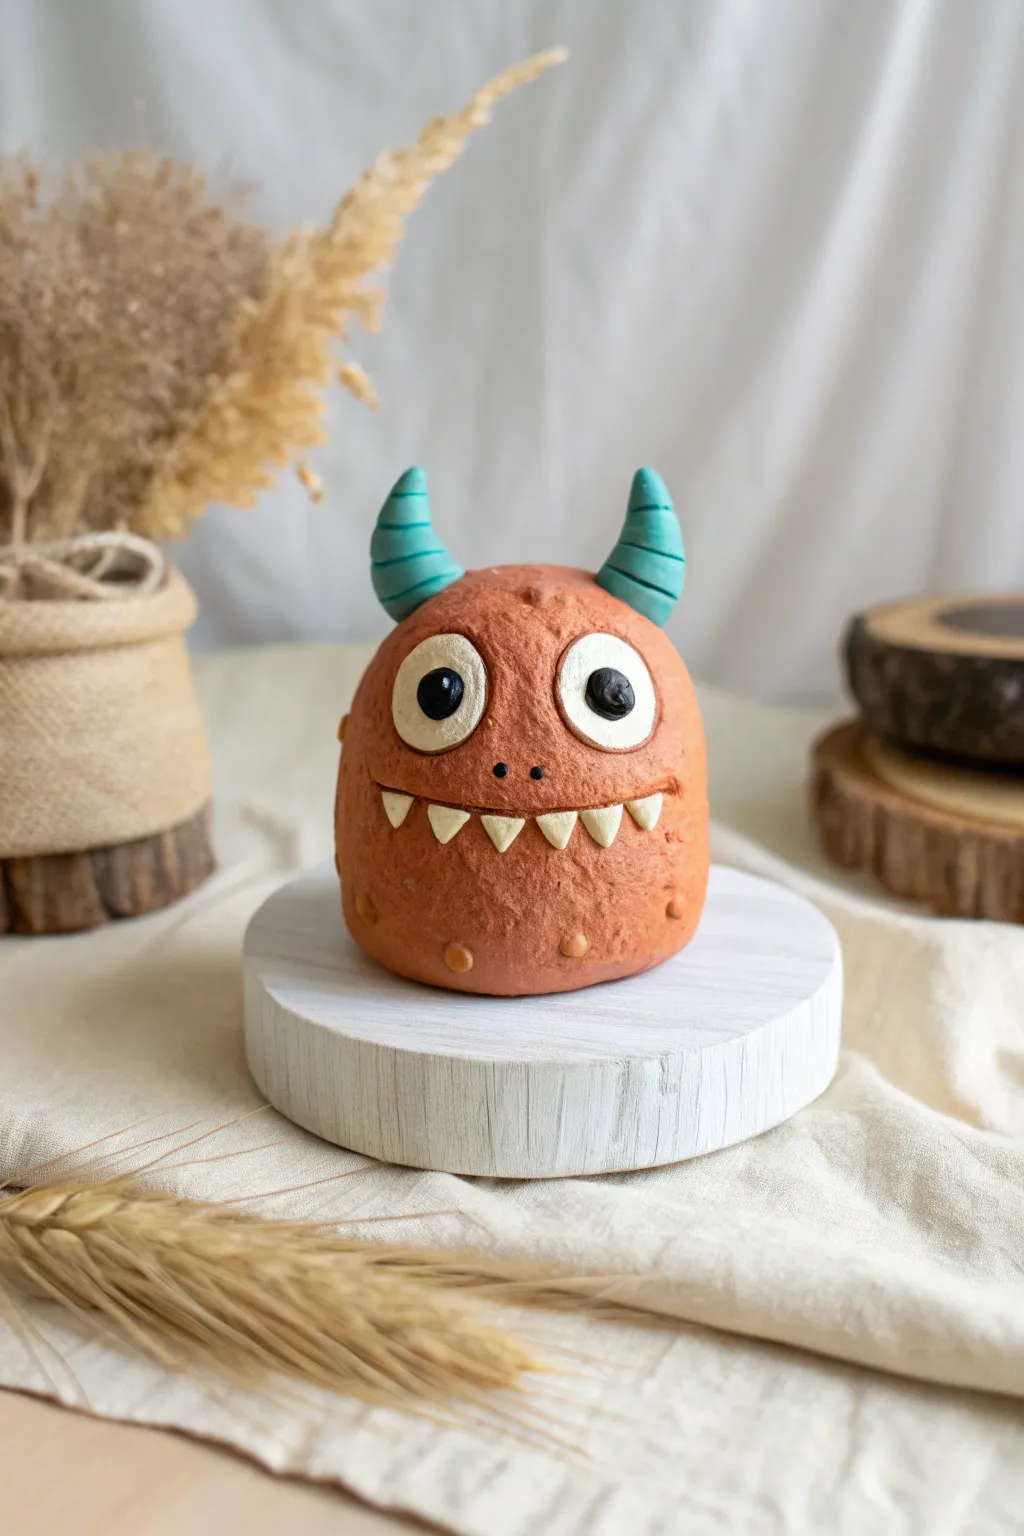
This delightful little desk companion features a textured orange body, comically oversized eyes, and a set of teal horns that give it plenty of personality. With its wide, toothy smile and simple shapes, this project is perfect for beginners looking to practice adding defined facial features to a basic form.
Step-by-Step Tutorial
Materials
- Polymer clay (Orange/Terracotta, Teal/Turquoise, White, Black)
- Aluminum foil (for the core)
- Needle tool or toothpick
- Ball stylus tool
- Clay roller or pasta machine
- Plastic modeling tool (knife shape)
- Soft toothbrush or stiff-bristled brush (for texturing)
- Oven (if using polymer clay) or air-dry sealant
Step 1: Base Form & Texture
-
Create the core:
Crumple a piece of aluminum foil into a tight ball, slightly elongated into an egg shape, roughly the size of a golf ball. This saves clay and keeps the sculpture lightweight. -
Cover with clay:
Condition your orange clay until it is soft and pliable, then roll it into a sheet about 1/4 inch thick. Wrap this sheet fully around your foil core, smoothing out any seams with your thumb until you have a seamless egg shape. -
Flatten the base:
Gently press the bottom of the egg onto your work surface to create a flat base so the monster stands upright without tipping. -
Add texture:
Using a soft toothbrush or a stiff brush, tap the entire surface of the orange clay. This stippled effect gives the monster a skin-like texture rather than being perfectly smooth.
Clean Clay Tip
Keep baby wipes handy! White clay picks up dust easily. Clean your hands and tools thoroughly before handling the white eye and teeth parts to keep them bright.
Step 2: Facial Features
-
Make eye sockets:
Use a large ball tool or your thumb to press two shallow indentations where the eyes will go, positioned slightly above the vertical center. -
Form the eyeballs:
Roll two balls of white clay. Flatten them slightly into discs and press them securely into the sockets you just made. They should be large and prominent. -
Add pupils:
Roll two much smaller balls of black clay. Press these onto the white eyeballs. I like to place them slightly off-center or cross-eyed to enhance the goofy expression. -
Carve the mouth:
Use a needle tool to lightly sketch a wide, curved smile line horizontally across the face. Once happy with the placement, use a knife tool to deepen the cut, slightly separating the lips. -
Insert teeth:
Roll tiny cones of white clay for the teeth. Carefully press them into the mouth slit, pointing downwards from the upper lip. Varying their angles slightly makes it look more organic. -
Create nostrils:
Use a small needle tool to poke two tiny holes right in the center of the face, between the eyes and the mouth line.
Step 3: Horns & Details
-
Shape the horns:
Take your teal or turquoise clay and roll two tapered cones approximately an inch long. Curve the tips slightly so they look like cow horns. -
Texture the horns:
Using a knife tool, gently press horizontal rings around the horns from base to tip to create a ridged texture. -
Attach the horns:
Press the horns onto the top of the head. You can blend the clay at the base slightly into the head or use a drop of liquid clay/sculpting gel for a stronger bond. -
Add warts:
Roll tiny balls of the orange clay (or a slightly lighter shade if you have it) and press them randomly around the bottom edge of the monster’s body to create little bumps or warts. -
Final check:
Look over your sculpture. If you accidentally smoothed out any texture while handling it, re-tap those areas with your brush now. -
Bake:
Bake the figure according to your specific brand of clay’s instructions (usually around 275°F for 15-30 minutes depending on thickness). Let it cool completely before handling.
Go Glossy
After baking and cooling, apply a coat of high-gloss water-based varnish just to the eyes. This makes them look wet and alive, contrasting nicely with the matte skin.
Now you have a charmingly quirky monster ready to guard your shelf
Geometric Faceted Animal Head
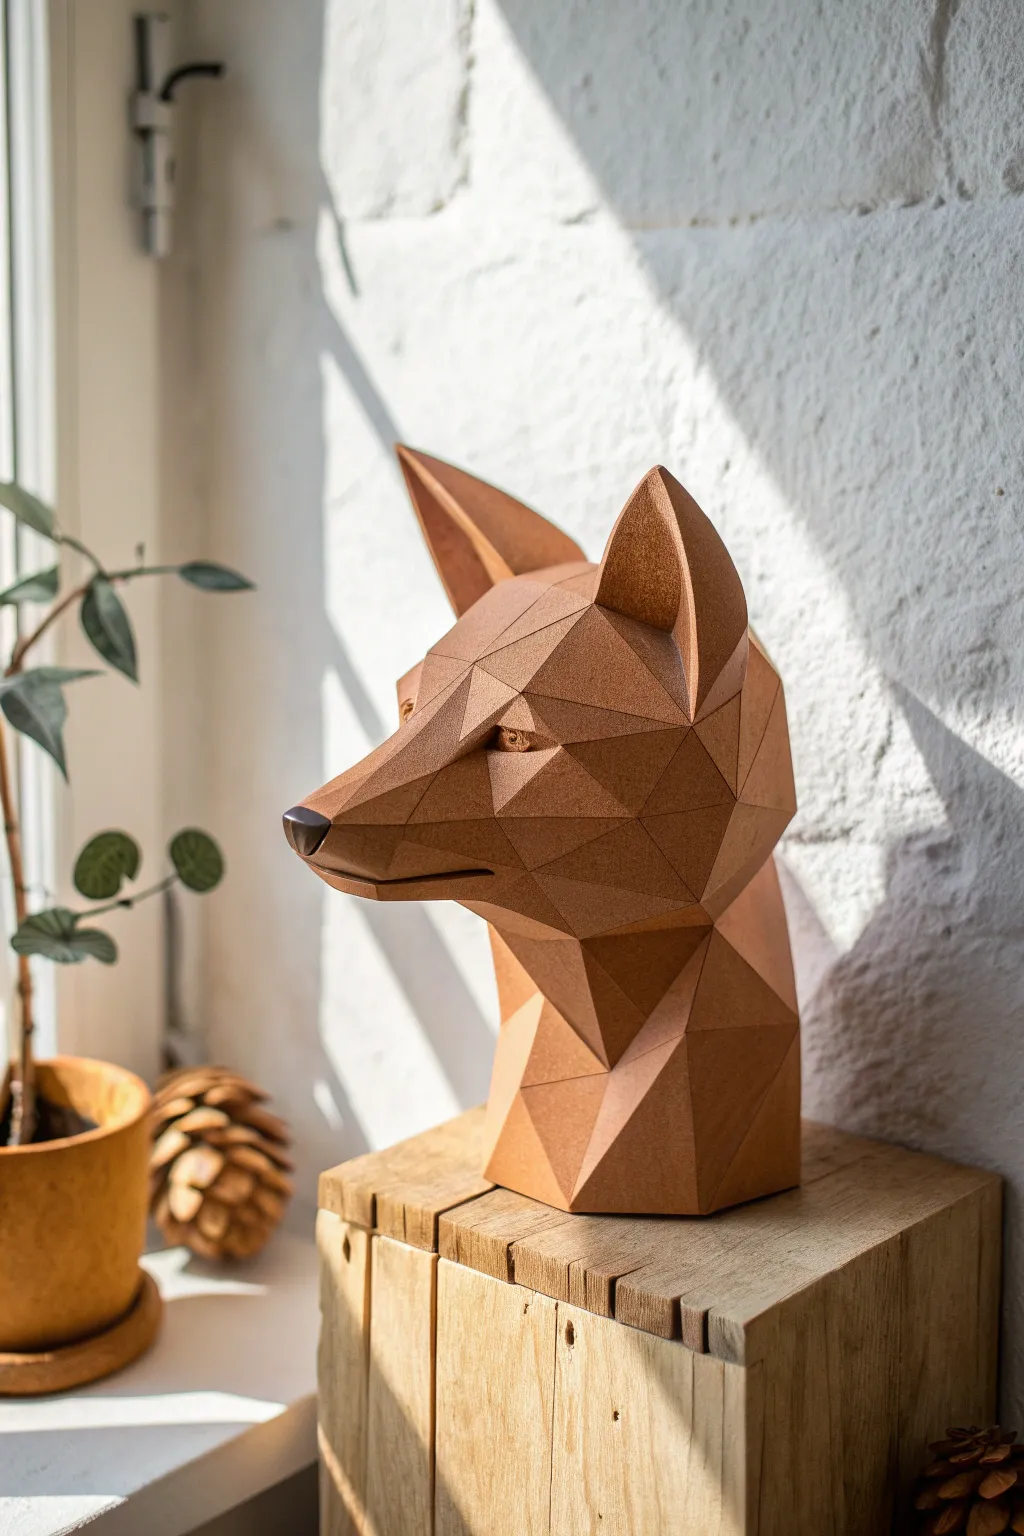
Capture the modern elegance of low-poly digital art in a tangible clay form with this stunning geometric fox head. Its sharp facets and warm terracotta finish create a sophisticated statement piece that plays beautifully with light and shadow.
Step-by-Step Tutorial
Materials
- Air-dry clay (terracotta color)
- Wire armature kit or thick aluminum wire
- Aluminum foil
- Cardboard or cardstock (for templates)
- Sharp crafting knife or scalpel
- Metal ruler
- Clay roller (acrylic or wooden)
- Slip (clay mixed with water)
- Measuring tape
- Fine-grit sandpaper
- Black acrylic paint (for nose/eyes)
- Matte sealant spray
Step 1: Preparation & Armature
-
Design and print templates:
Find a low-poly fox mask pattern online or draw your own faceted design. Print the shapes onto cardstock and cut them out to use as size guides for your clay slabs. -
Build the core structure:
Create a simple T-shaped armature using aluminum wire to support the neck and head. Anchor the bottom into a temporary wooden base or heavy clay block so it stands upright while you work. -
Bulk out the form:
Crumple aluminum foil tightly around the wire armature to create a rough skull and neck shape. This saves clay and reduces drying time. Keep the foil slightly smaller than your final desired dimensions.
Sagging Planes?
If a clay facet is sagging inward, poke a tiny pinhole (hidden in a seam) and inject a small amount of expanding foam or stuff more foil inside for support until it stiffens.
Step 2: Creating the Facets
-
Roll out clay slabs:
Roll your terracotta clay into even sheets, approximately 1/4 inch thick. Use guide sticks or a rolling frame to ensure a completely consistent thickness, which is crucial for sharp geometric edges. -
Cut the geometric shapes:
Using your cardstock templates and a sharp knife, cut out the individual triangles and polygons that will make up the fox’s face. Keep your cuts incredibly straight; a metal rule helps here. -
Begin with the snout:
Apply a thin layer of slip to the foil snout area. Place your first geometric clay pieces here, pressing them gently against the foil but ensuring the outer surface remains perfectly flat. -
Join the seams:
As you place adjacent clay tiles, score the edges and apply a tiny amount of slip. Press the edges together firmly. I like to reinforce the seams on the *inside* (where invisible) with a tiny coil of clay. -
Build the cheeks and forehead:
Work your way backward from the nose, attaching larger polygonal plates for the cheeks and forehead. Ensure the angles between plates are sharp and distinct, not rounded. -
Construct the ears:
The ears need to be self-supporting. Cut the triangular ear panels and let them stiffen slightly (leather-hard stage) before attaching them to the head so they don’t flop over. -
Form the neck:
Continue adjusting the foil bulk on the neck if needed, then clad it with larger, vertical geometric plates to create a solid base.
Metallic Finish
Instead of raw terracotta, paint the finished sculpture with metallic copper or bronze spray paint. The reflective surface will make the geometric facets pop even more.
Step 3: Refining & Finishing
-
Sharpen the edges:
Once the basic form is assembled, use a flat modeling tool or the side of a ruler to paddle the facets. This enhances the planar look and eliminates any finger impressions. -
Detail the eyes:
Carve out or assemble the recessed eye sockets. Add a small, simplified geometric shape for the eyeball itself, keeping the low-poly aesthetic intact. -
Let it dry slowly:
Cover the sculpture loosely with plastic to ensure slow, even drying. This prevents the seams from cracking as the clay shrinks. Check it daily for about a week. -
Sand for perfection:
Once fully dry, use fine-grit sandpaper wrapped around a small wooden block to sand each facet. The goal is to make every plane perfectly flat and every edge crisp. -
Paint the details:
Using a small brush and black acrylic paint, carefully color the tip of the nose and the eyes. Keep the paint lines extremely neat to match the precision of the sculpture. -
Seal the work:
Finish with a matte spray sealant. This protects the clay and deepens the terracotta color without adding an artificial gloss that might distract from the form.
Place your sculpture near a window to watch the shifting sun highlight the different planes throughout the day

TRACK YOUR CERAMIC JOURNEY
Capture glaze tests, firing details, and creative progress—all in one simple printable. Make your projects easier to repeat and improve.
Whimsical Tree Sculpture With Hidden Details
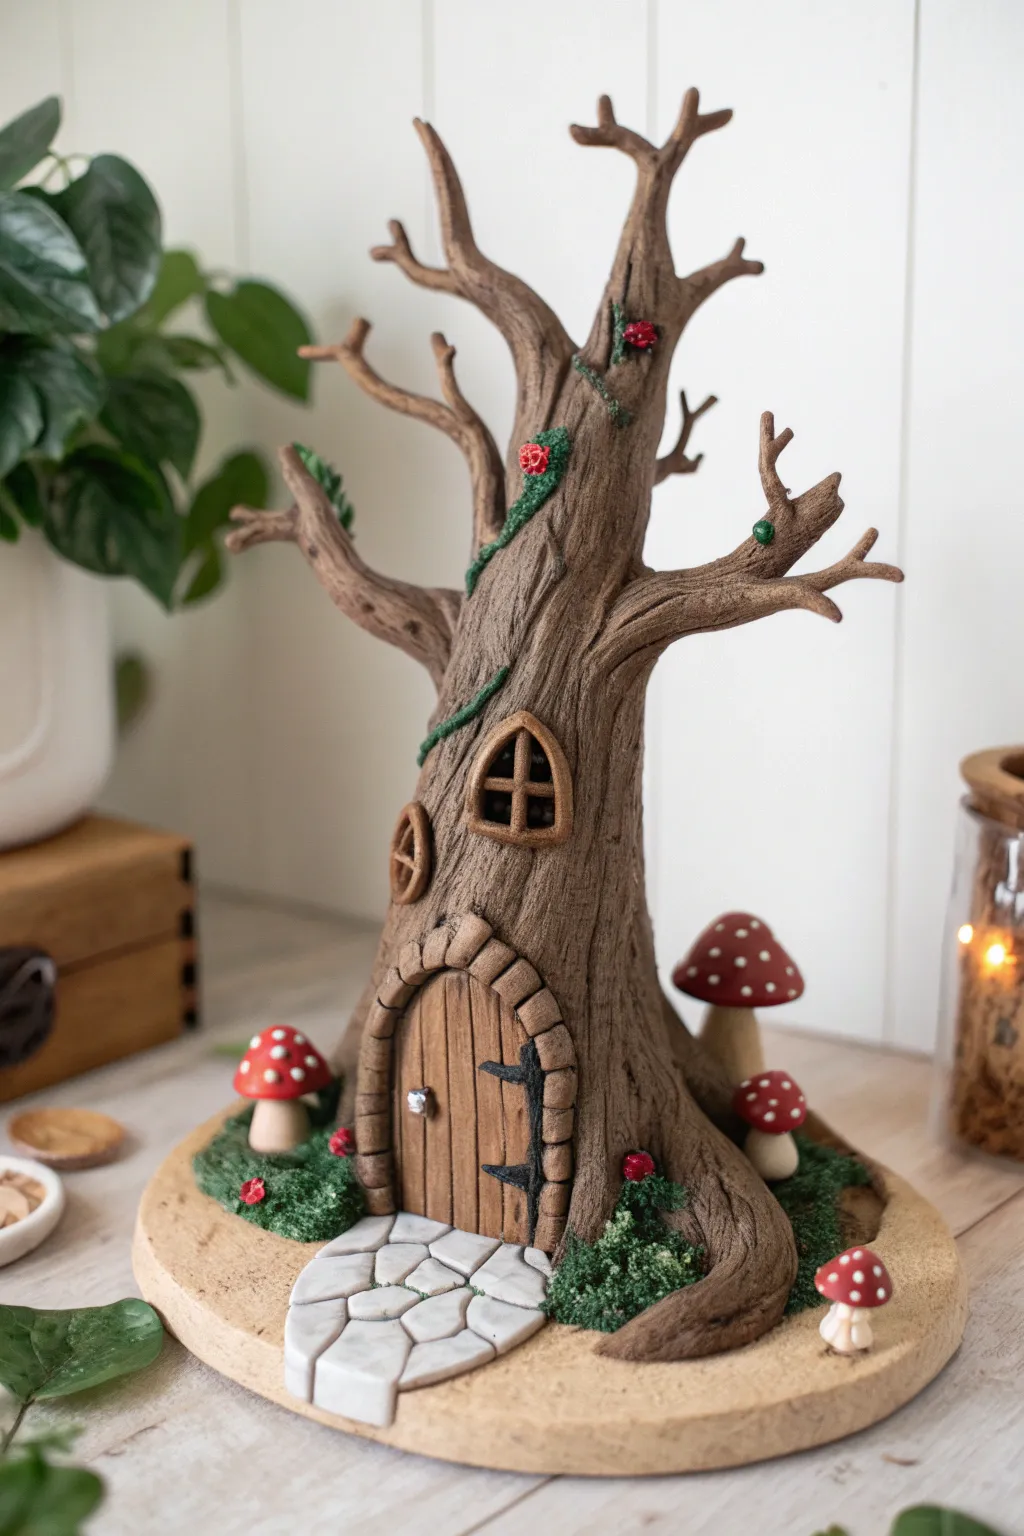
Bring a touch of magic to your shelf with this charming tree sculpture, featuring textured bark, tiny windows, and a fairytale door. This project transforms simple clay into an intricate woodland dwelling complete with spotted mushrooms and mossy accents.
Detailed Instructions
Materials
- Air-dry clay or brown polymer clay
- Wire armature (aluminum foil and thick wire relative to size)
- Wooden base or clay slab base
- Sculpting tools (needle tool, ball stylus, rubber shaper)
- Texture tool (stiff bristle brush or scrunched aluminum foil)
- Acrylic paints (browns, reds, white, green)
- PVA glue
- Faux moss or dried tea leaves/herbs
- Small craft knife
Step 1: Building the Skeleton
-
Prepare the base:
Start with a sturdy circular base. You can use a pre-cut wooden round or create a thick disc of clay about 6 inches in diameter. If using clay, texture the edges to look like earth. -
Construct the armature:
Twist three or four lengths of thick aluminum wire together to form the trunk. Fan them out at the bottom to secure to your base and spread them at the top to create the main branches. -
Bulk out the form:
Wrap the wire structure tightly with aluminum foil. This saves clay and keeps the sculpture lightweight. Shape the foil to be wider at the base for stability and taper it as you go up the trunk.
Step 2: Sculpting the Trunk
-
Apply the clay layer:
Roll out sheets of brown clay (about 1/4 inch thick) and wrap them around your foil armature. Smooth the seams where the clay sheets join using a little water or clay softener. -
Extend the branches:
Add smaller snakes of clay over the wire branches. Use your fingers to drag the clay from the branches down into the trunk so the transition looks seamless and organic. -
Create bark texture:
Using a needle tool or a sharp sculpting blade, drag long, deep vertical lines down the entire trunk. I like to vary the pressure to create different depths, mimicking the rugged look of old wood. -
Refine the surface:
Go back over your bark lines with a stiff bristle brush or a ball of crinkled foil to add a micro-texture. This removes the ‘plastic’ look of smooth clay.
Natural Texture
Use a real piece of rough bark or a rock to stamp texture onto the clay surface before carving the lines. This creates an authentically organic, non-uniform pattern.
Step 3: Adding Architectural Details
-
Form the main entrance:
Cut an arch shape from a darker brown clay slab for the door. Press vertical lines into it to resemble wood planks and attach a tiny ball of silver clay for the doorknob. -
Build the stone archway:
Roll small, flattened balls of light grey or beige clay. Press these around the door frame to look like a stone arch. Use a needle tool to add cracks or texture to each stone. -
Install the hinges:
For the rustic hinges, roll very thin snakes of black or dark brown clay. Press them horizontally across the door and flare the ends slightly to look like forged iron. -
Add upper windows:
Create small oval frames from the same ‘wood’ clay. Attach them higher up the trunk. Inside the frame, place a dark backing and add a cross of clay to represent the window panes. -
Embed the door:
Press your finished door assembly firmly onto the base of the trunk. Blend the edges of the surrounding bark clay over the sides of the stone arch so it looks built-in.
Glow Up
Before adding the window panes, paint the dark backing with glow-in-the-dark paint or insert a tiny LED wire behind the clay for a magical nighttime effect.
Step 4: Landscaping and Finishing
-
Lay the stone path:
Create irregular flat stones from grey or white clay. Press them into the base leading up to the door, leaving small gaps between them for a cobblestone effect. -
Sculpt the mushrooms:
Make several mushrooms by combining a thick white stalk with a red cap. Use a ball tool to indent the underside of the cap before attaching it to the stalk. -
Plant the garden:
Attach the mushrooms in clusters around the tree roots. Vary heights for visual interest. Add tiny white dots of clay or paint to the red caps for the classic toadstool look. -
Add climbing vines:
Roll very thin threads of green clay and twist them loosely around the trunk and branches. Add minuscule red dots to represent flower buds along the vine. -
Apply greenery:
Mix PVA glue with faux moss or dried herbs. Dab this mixture around the base of the tree, between the roots, and in the crevices of the cobblestone path to simulate grass.
Step back and admire your little world, ready to house an imaginary forest sprite
Cratered Moon and Planet Sculptures
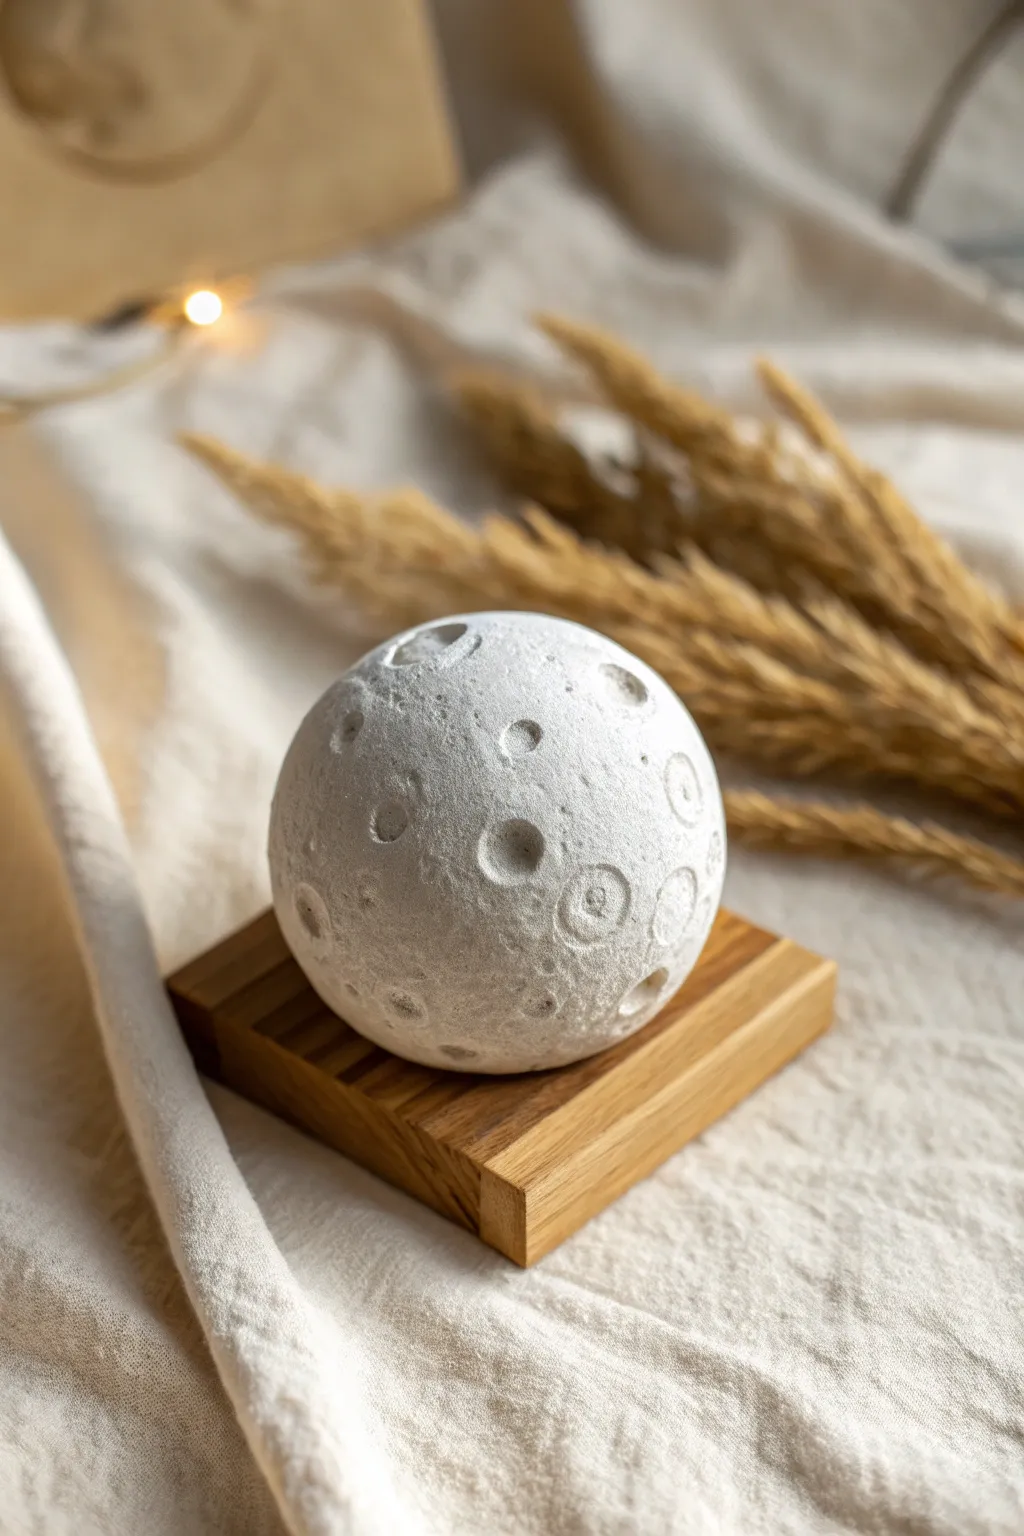
Bring a piece of the cosmos into your home with this minimalist white clay moon sculpture. Featuring realistic textured craters and a smooth spherical finish, it rests beautifully on a simple wooden stand as a calming decor piece.
Step-by-Step Guide
Materials
- White polymer clay or air-dry clay (smooth texture)
- Small wooden base or coaster (slatted or solid)
- Ball stylus tools (various sizes)
- Aluminum foil
- Sandpaper (fine grit)
- White acrylic paint (optional)
- Matte sealant spray
- Circular cookie cutter or small cap (optional for ring craters)
- Soft brush
Step 1: Foil Core and Base Layer
-
Form the core:
Start by crumpling a piece of aluminum foil into a tight ball. This saves clay and keeps the sculpture lightweight. Aim for a size slightly smaller than a tennis ball, compressing it firmly until it is roughly spherical. -
Condition the clay:
Take a generous amount of white clay and knead it thoroughly until it is soft and pliable. If you are using polymer clay, the warmth of your hands will make it easier to work with. -
Cover the core:
Flatten the clay into a pancake shape large enough to wrap around your foil ball. Carefully envelope the foil, pinching the seams closed and rolling it between your palms to smooth out any lines. -
Smooth the sphere:
Roll the ball gently on a clean, flat surface to perfect the spherical shape. Spend a few minutes here; the smoother the base canvas, the sharper your craters will look later.
Step 2: Cratering and Texturing
-
Plan your craters:
Look at the ball and verify the shape is still round after handling. Decide where your largest ‘impact’ sites will go. I like to keep the large craters somewhat spaced out so the surface doesn’t get too cluttered. -
Create large impacts:
Using your largest ball stylus or the rounded end of a paintbrush handle, press firmly into the clay to create deep depressions. Rock the tool slightly in a circular motion to widen the hole. -
Form ringed craters:
For the distinct ringed craters seen in the photo, take a small circular object like a pen cap or small tube. Gently press it into the surface creates a raised ring impression without removing clay. -
Add the central peaks:
Inside some of the larger ringed craters, use a very small stylus to poke a tiny dot in the direct center. This mimics the central peak formations found in real lunar geology. -
Layer medium craters:
Switch to a medium-sized stylus tool. Add random scattering of smaller dents across the surface, occasionally overlapping the edges of the larger craters for a realistic, time-worn effect. -
Micro-texturing:
To give the surface that stony, raw feel, take a stiff-bristled brush or a crumpled ball of aluminum foil and lightly tap the ‘flat’ areas between craters. This removes the artificial smoothness of the clay. -
Refine the edges:
If any crater edges became too sharp or messy during the texturing process, gently soften them with a fingertip to make the erosion look natural.
Cracks appeared?
If air-dry clay cracks while drying, mix a tiny bit of fresh clay with water to make a paste (slip) and fill the crack. Smooth it out and let it dry again.
Step 3: Finishing Touches
-
Check the stability:
Gently press the bottom of the sphere onto a flat surface to create a very subtle flat spot. This ensures it won’t roll away when placed on the wooden stand later. -
Dry or bake:
If using air-dry clay, set it aside in a cool, dry place for 24-48 hours. If using polymer clay, bake it according to the manufacturer’s temperature and time instructions. -
Sand for imperfections:
Once fully cured, inspect the surface. If there are unwanted fingerprints or sharp burrs, lightly buff them away with fine-grit sandpaper. -
Whitewash (optional):
If your clay dried with a grayish tint, or simply to unify the texture, apply a thin coat of white acrylic paint. Dab it into the craters and wipe the surface with a cloth for a weathered look. -
Seal the surface:
Spray the entire sphere with a matte sealant. This protects the porous clay from dust and moisture without adding an unnatural glossy shine. -
Prepare the stand:
Clean your small wooden coaster or slatted stand. You can use a bit of wood wax to deepen the grain color, providing a nice warm contrast to the stark white moon. -
Final assembly:
Simply place your finished moon sculpture onto the wooden stand.
Texture Pro Tip
For ultra-realistic tiny pores, gently press a clean piece of coarse sandpaper or a rough stone against the clay surface instead of using a brush.
Now you have a serene, celestial companion perfect for a desk or nightstand display
Mixed-Media Creature With Wire Legs
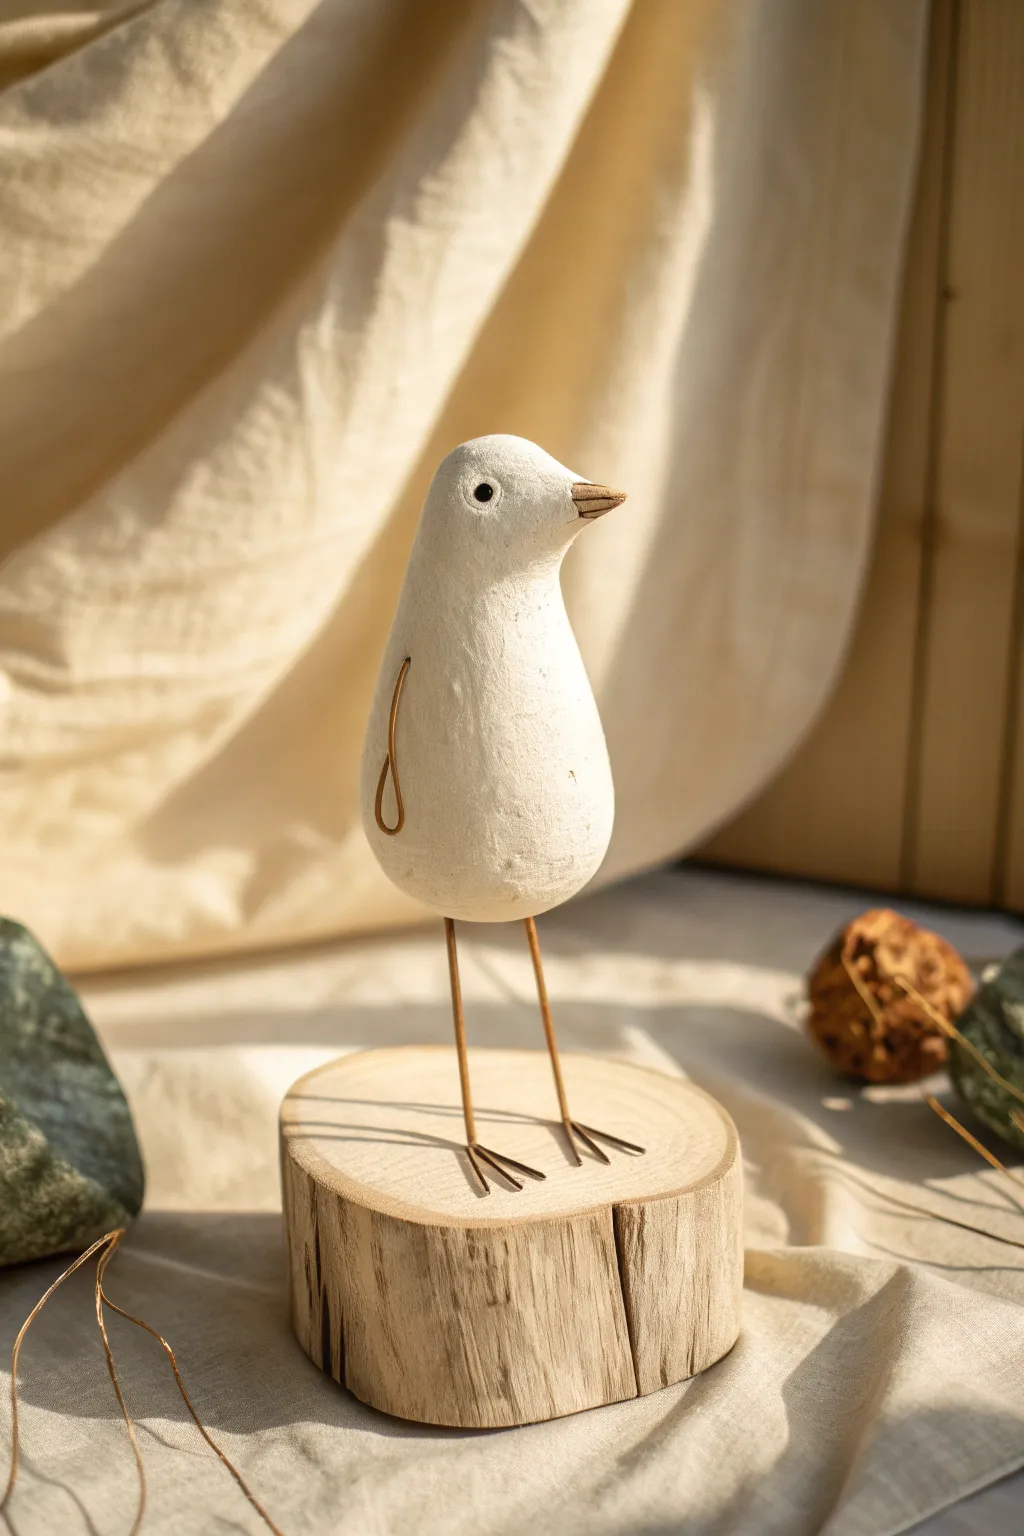
This charming, minimalist bird combines the smooth, organic feel of air-dry clay with delicate wire accents for a mixed-media piece full of personality. Standing atop a rustic wooden slice, its simple form and inquisitive posture make it a delightful addition to any shelf or mantelpiece.
Step-by-Step Tutorial
Materials
- White air-dry clay (smooth texture)
- Brass or copper wire (approx. 18-20 gauge for legs/feet)
- Thinner gold wire (approx. 22-24 gauge for wings)
- Wire cutters
- Needle-nose pliers
- Small wooden slice or round log segment
- Small black bead or black acrylic paint
- Clay sculpting tools (or a toothpick)
- Superglue or heavy-duty craft glue
- Sandpaper (fine grit)
- Drill with tiny bit (matching wire gauge)
Step 1: Shaping the Bird Body
-
Condition the Clay:
Start by taking a handful of white air-dry clay and kneading it thoroughly in your hands until it becomes warm, soft, and pliable, removing any air bubbles. -
Form the Base Shape:
Roll the clay into a smooth ball, then gently elongate it into a teardrop or pear shape. The wider bottom will be the belly, tapering up to form the head and neck. -
Refine the Head:
Pinch the narrower top section gently to define the bird’s head. Smooth the transition from the neck to the body with your thumb so it looks like one organic, flowing form. -
Create the Beak:
Pinch a very small amount of clay at the front of the face to pull out a beak shape. Flatten it slightly and use a sculpting tool or knife to make a horizontal indentation, separating the top and bottom beak. -
Detail the Tail:
At the back of the body, gently pinch and pull the clay to create a subtle tail point. It doesn’t need to be long; a small nub suggests the tail feathers perfectly. -
Insert Leg Holes:
Before the clay dries, use a piece of your wire to poke two vertical holes into the bottom of the belly where the legs will eventually go. Make sure they are deep enough to support the wire later. -
Add the Eye:
Press a small black bead into the side of the head for the eye. Alternatively, use a tool to make a small indentation now and paint it black after drying. -
Create Wing Attachment Points:
Using the thinner wire, poke a small angled hole on each side of the body where the delicate wire wings will be inserted. Let the clay body dry completely, usually 24-48 hours.
Stability Check
If the bird keeps tipping over, the clay body might be too heavy. Try bending the wire feet slightly wider or glue the toes directly to the wood surface for extra grip.
Step 2: Wire Work & Assembly
-
Cut Leg Wires:
Cut two equal lengths of the thicker brass wire, roughly 3-4 inches long depending on how tall you want your bird to stand. -
Form the Feet:
Cut two shorter pieces of wire (about 1.5 inches). Bend these into a ‘V’ shape. Adhere the ‘V’ shape to the bottom of your main leg wire using a tiny drop of superglue or by twisting them together if the wire is thin enough, creating a three-toed foot. -
Prepare the Base:
Take your wooden slice and drill two small holes into the top surface, spacing them to match the leg holes you made in the clay body. -
Shape the wire Wings:
Cut a small length of the thinner gold wire. Bend one end into a teardrop or loop shape to represent a minimalistic wing profile. Repeat for the other side. -
Sand the Body:
Once the clay is fully dry, gently sand the surface with fine-grit sandpaper to remove any fingerprints or rough textures, giving it that matte, stone-like finish. -
Attach Legs to Base:
Squeeze a drop of superglue into the holes on the wooden base and insert the wire legs. Hold them steady for a moment until the glue grabs so they stand upright. -
Mount the Body:
Apply glue to the top tips of the wire legs and carefully slide the clay body (using the pre-made holes) onto the wires. Balance is key here; adjust slightly before the glue sets. -
Install the Wings:
Dip the straight end of your wire wings into a bit of glue and insert them into the small holes on the bird’s sides. -
Final Touches:
If you didn’t use a bead, carefully paint the eye with a fine-point brush. You can also lightly stain the beak with a diluted brown wash to differentiate it from the white feathers.
Texture Trick
Before the clay dries, gently pat the surface with a coarse sponge or a crumpled ball of aluminum foil. This adds a subtle, realistic ‘feathery’ texture.
Place your little avian friend near a window where the natural light can highlight its simple form
Negative-Space Loop Sculpture
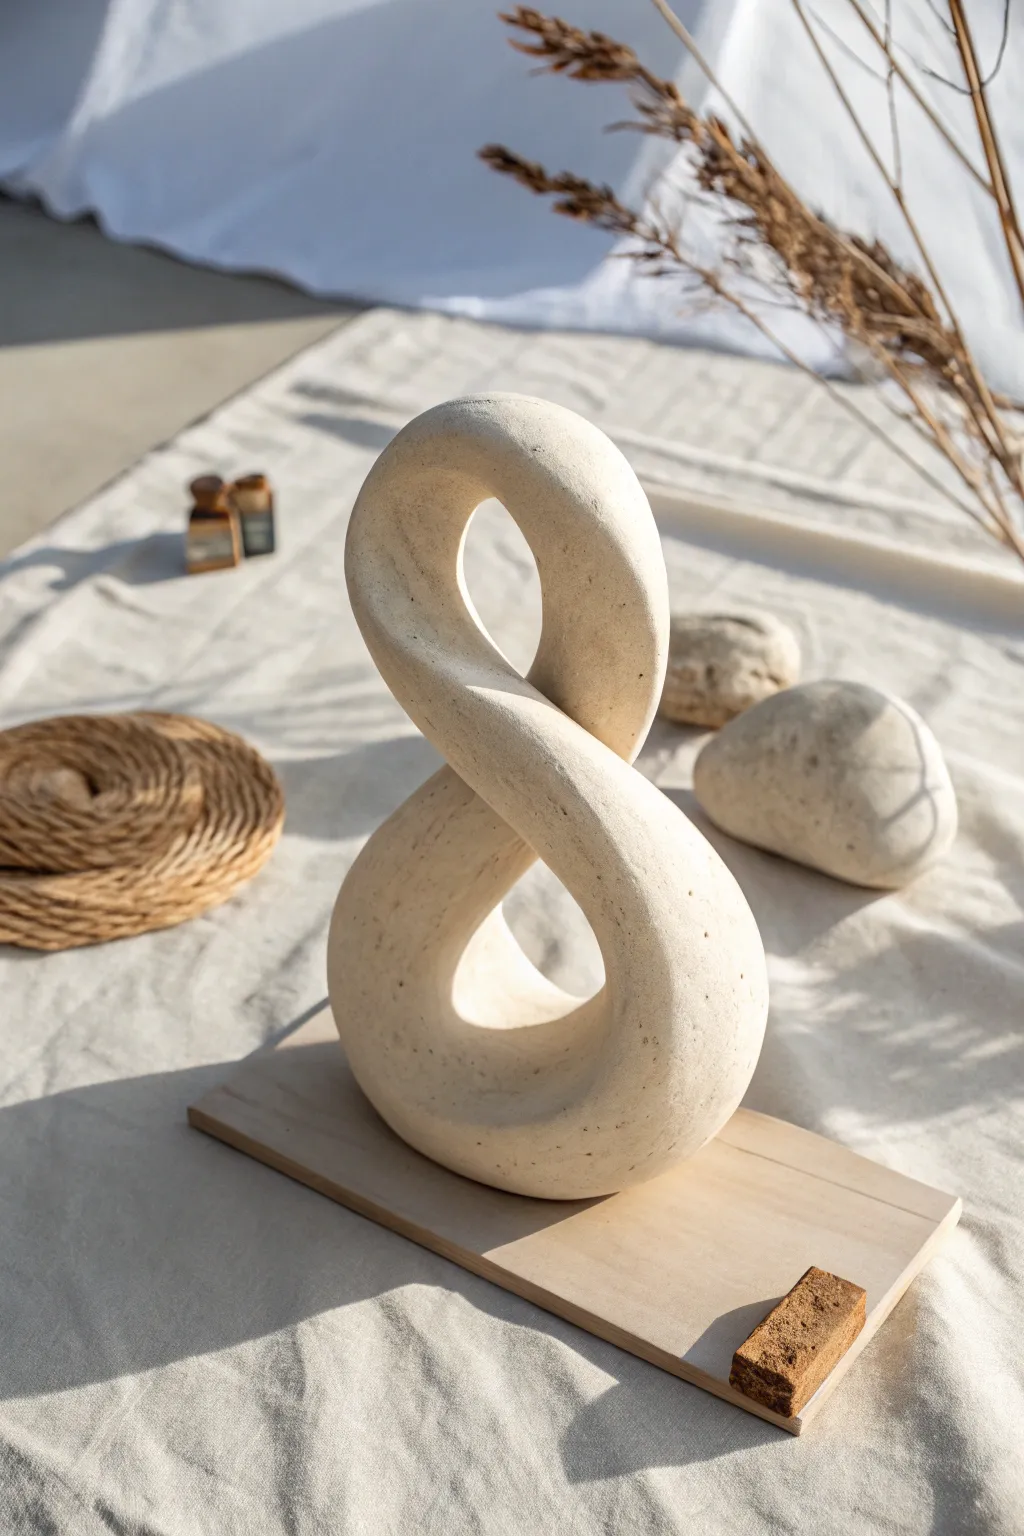
Embrace the elegance of negative space with this fluid, twisted loop sculpture that mimics the look of carved sandstone. This project transforms simple clay into a sophisticated, continuous infinity form that changes visually from every angle.
How-To Guide
Materials
- Air-dry clay (stone, white, or natural color)
- Aluminum wire (12-14 gauge for armature)
- Aluminum foil
- Masking tape
- Sculpting tools (loop tool, wood modeling tool)
- Sponge and water
- Fine and medium grit sandpaper
- Acrylic paint (cream, beige, white – optional for finish)
- Texturing brush (old toothbrush or stippling brush)
- Wooden base board
Step 1: Building the Armature
-
Form the wire core:
Cut a length of thick aluminum wire approximately 20 inches long. Bend it gently into a figure-eight shape, twisting the loop so the top and bottom circles face perpendicular directions to create that 3D twist. -
Secure the loop:
Twist the wire ends together firmly at the center point where the figure-eight crosses. Use pliers if necessary to ensure it won’t unravel during sculpting. -
Bulk up with foil:
Wrap the wire form tightly with strips of aluminum foil. You want to create a consistent snake-like thickness of about 1 inch all around the wire. -
Compress the foil:
Squeeze the foil firmly against the wire to remove air pockets and ensure the twisted shape is holding. Secure the foil wrap with masking tape to keep everything tight and smooth.
Keep it Light
Don’t skimp on the aluminum foil step. The more foil you use to build bulk, the lighter your sculpture will be and the faster it will dry without cracking.
Step 2: Applying the Clay
-
Prepare the clay slabs:
Roll out your air-dry clay into long, flat strips, roughly 1/4 inch thick. I find it easier to work with smaller strips than one giant sheet. -
Cover the armature:
Lay the clay strips over the foil form, pressing them down firmly to adhere. Ensure you wrap the clay all the way around the curve, overlapping the seams slightly. -
Blend the seams:
Use your thumb or a wooden modeling tool to aggressively smooth the seams where the clay strips meet. You want the form to look like one continuous piece of material. -
Refine the shape:
Once covered, check the silhouette from all angles. Add small bits of clay to low spots or trim away excess from bulky areas to maintain an even thickness throughout the loop.
Cracks Appearing?
If hairline cracks appear while drying, mix a small amount of fresh clay with water to make a paste (slip). Fill the cracks, smooth over, and let dry again.
Step 3: Smoothing and Texturing
-
Initial smoothing:
Dip a sponge lightly in water and run it over the entire surface to remove fingerprints and major bumps. Don’t use too much water, or the clay will become slimy. -
Create the stone texture:
Before the clay fully dries, take an old toothbrush or a stiff-bristle brush and gently stipple the surface. This creates small pits and pores that mimic natural limestone or sandstone. -
Sharpen the edges:
Use a damp finger to slightly soften the twist, but keep the transition lines distinct so the movement of the sculpture remains clear. -
Re-check balance:
Set the sculpture gently on your work surface to ensure it stands upright on its own. If it wobbles, gently flatten the bottom curve just enough to create a stable base. -
Slow drying:
Cover the piece loosely with a plastic bag and let it dry slowly over 24-48 hours. This prevents cracking, which is common with loop shapes.
Step 4: Finishing Touches
-
Sanding:
Once bone dry, use medium grit sandpaper to knock down any unwanted ridges. Switch to fine grit to smooth the surface, but be careful not to sand away all your stone texture. -
Dusting off:
Wipe the sculpture down with a dry cloth or a large soft brush to remove all sanding dust from the textured crevices. -
Painting (Optional):
If your clay isn’t the desired stone color, mix a wash of beige and cream acrylic paint. Apply it unevenly with a sponge to enhance the natural, organic look. -
Mounting:
Place your finished sculpture on a simple wooden board or plinth. You can use a dab of strong adhesive or epoxy putty on the flat spot at the base to secure it permanently if desired.
Place your finished sculpture in a spot where natural light can play across the curves