Whenever I need a quick creative win, I reach for oven-bake clay jewelry because you can go from raw color to wearable pieces in an afternoon. Here are my go-to polymer clay ideas—starting with the classics everyone loves, then drifting into the fun, unexpected designs that always get compliments.
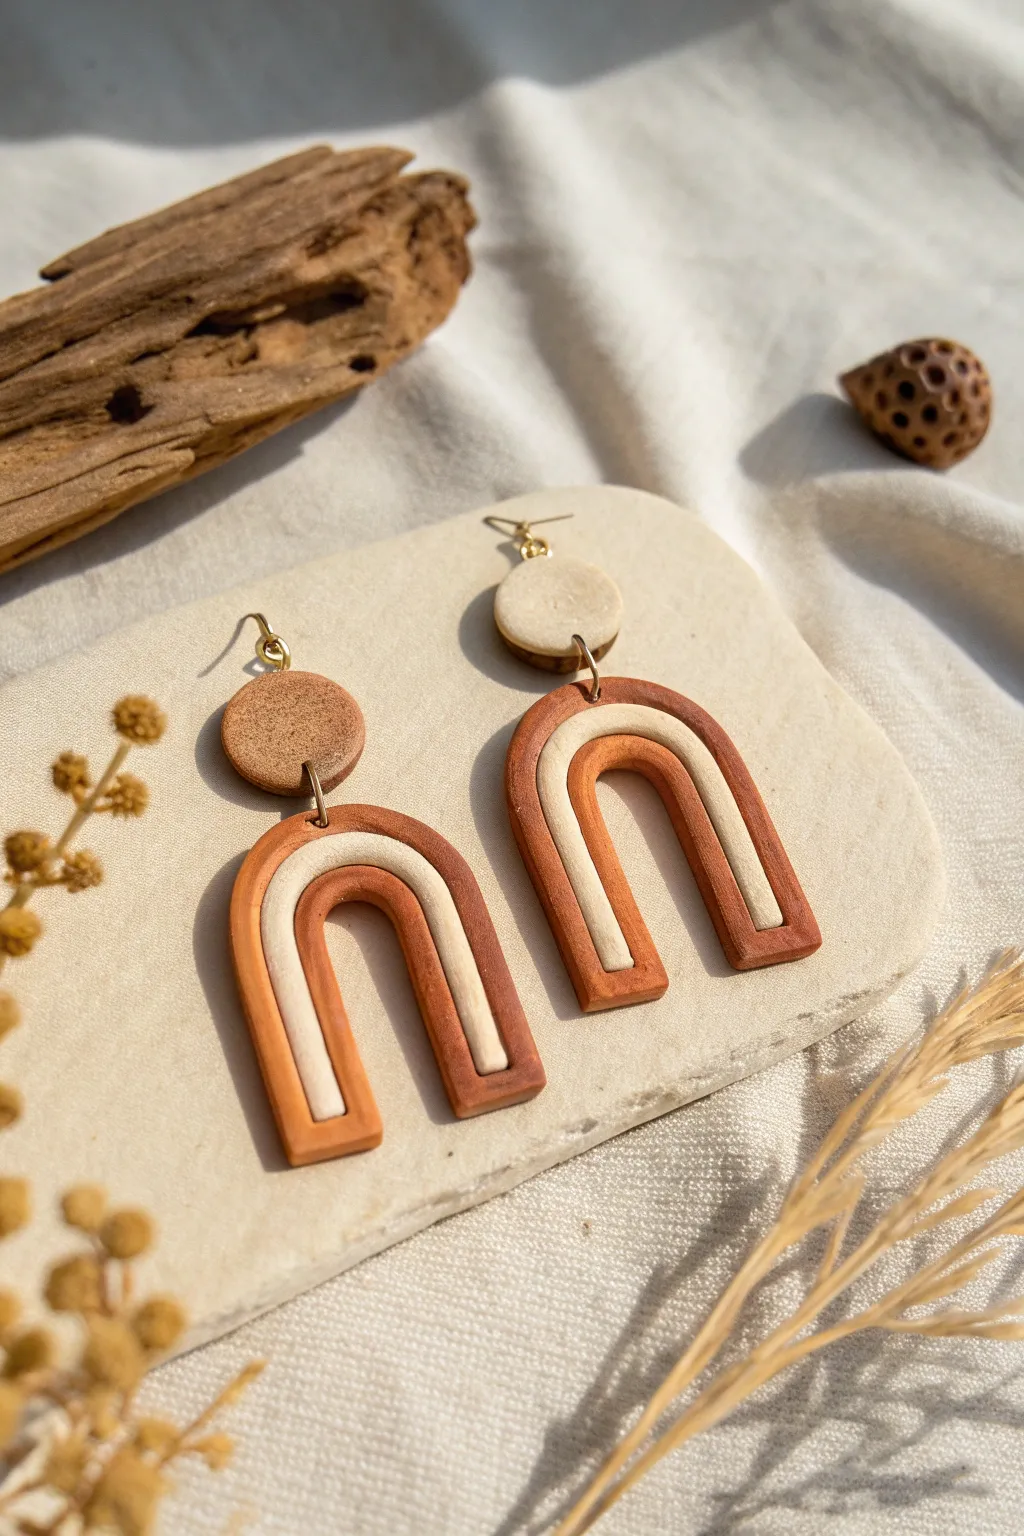
Classic Arch Dangle Earrings
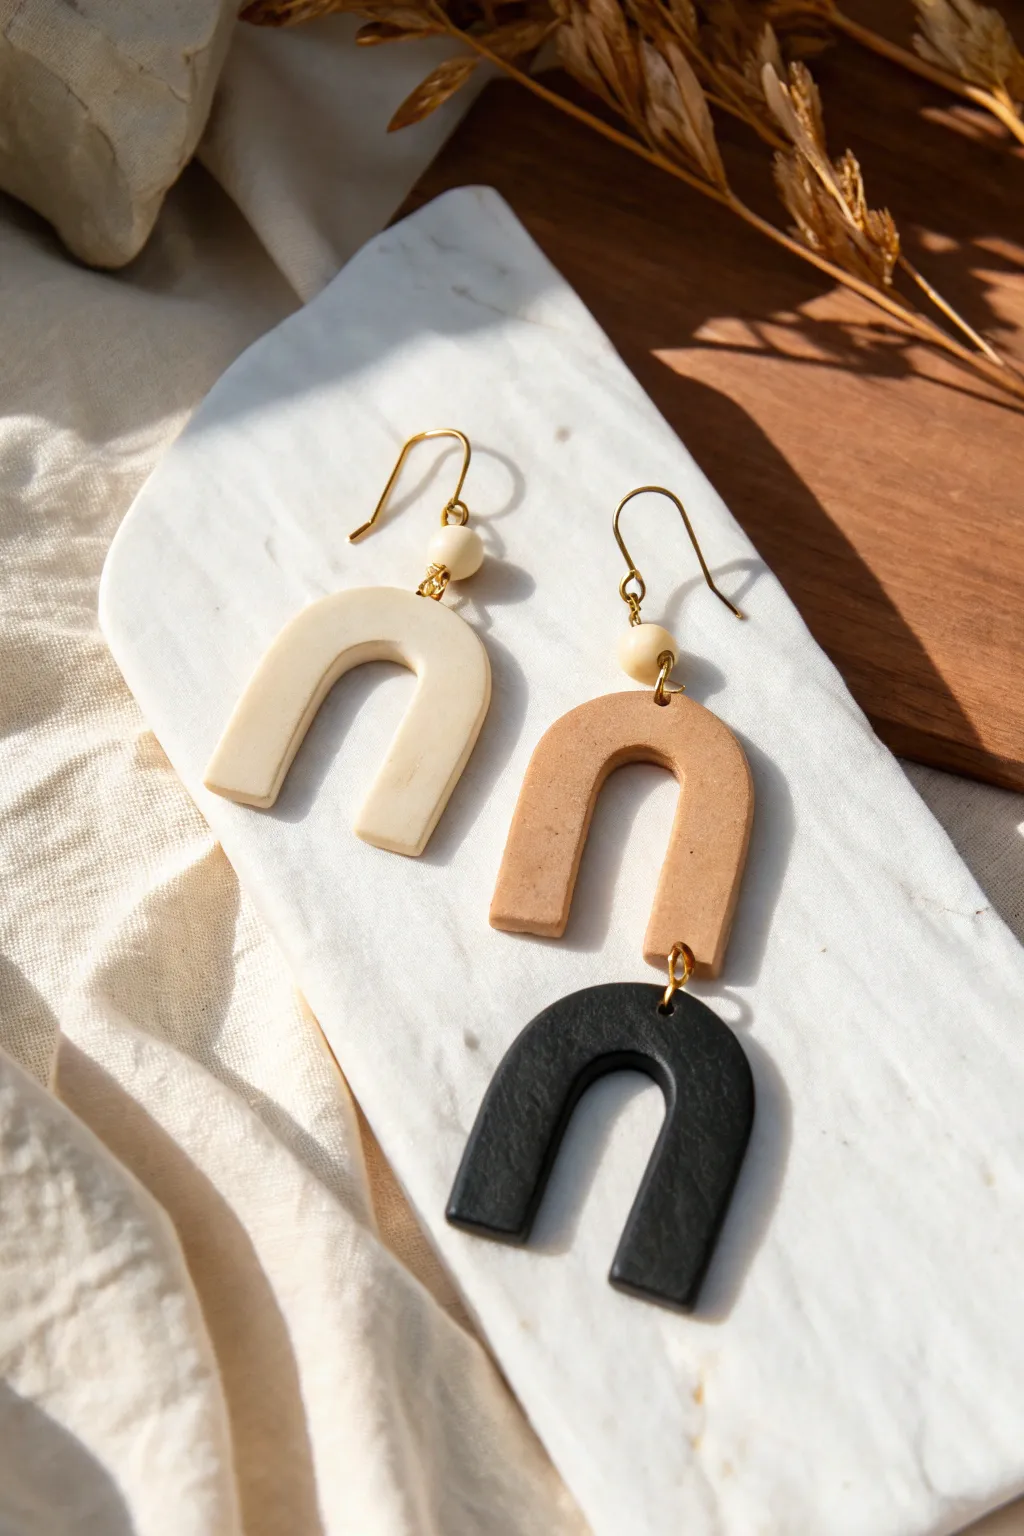
Embrace the sleek simplicity of modern design with these chic polymer clay arch earrings. Featuring a palette of cream, sandy beige, and matte black, you’ll learn to create both single-drop and double-tiered statement pieces that look effortlessly high-end.
Step-by-Step Guide
Materials
- Polymer clay (cream, beige/tan, black)
- Acrylic rolling pin or pasta machine
- U-shaped clay cutters (two sizes: small and medium)
- Small round cutter or piercing tool (for holes)
- Gold jump rings (approx. 6-8mm)
- Gold earring hooks (French hook style)
- Small round beads (cream or wood)
- Jewelry pliers (flat nose and round nose)
- Ceramic tile or baking sheet with parchment paper
- Fine grit sandpaper (optional)
- Oven
Step 1: Preparing the Clay
-
Condition the clay:
Start by warming the polymer clay in your hands, kneading it until it is soft and pliable. Do this separately for your cream, beige, and black colors to avoid color transfer. -
Roll out slabs:
Using your acrylic roller or pasta machine on a medium setting (approx. 3mm thick), roll out smooth, even sheets of each color. Ensure there are no air bubbles trapped underneath.
Uneven Edges?
If your U-shapes warped slightly while cutting, use a baby wipe to gently smooth the edges before baking. It acts like a mild solvent.
Step 2: Cutting and Shaping
-
Cut the single arch:
For the cream earrings, press your medium-sized U-shaped cutter firmly into the cream clay. Wiggle it slightly to ensure a clean cut before lifting. -
Cut the double arch top:
For the two-tone pair, cut a small U-shape from the beige clay. This will form the top tier of the dangle earring. -
Cut the double arch bottom:
Using the same medium cutter used for the cream pair, cut a larger U-shape from the black clay for the bottom tier. -
Pierce holes for hardware:
Using a needle tool or a very small round cutter, punch holes for assembly. For the cream arch, place one hole in the center top. For the beige piece, place a hole at the top center and *two* holes at the bottom of the legs. -
Pierce connecting holes:
On the black arch, pierce two corresponding holes at the top of the legs that will align with the bottom of the beige arch. -
Bake the pieces:
Arrange all your cut shapes on a ceramic tile or baking sheet. Bake according to your customized clay package instructions (usually 275°F/130°C for 15-30 minutes).
Step 3: Finishing and Assembly
-
Cool and sand:
Allow the clay to cool completely inside the oven to prevent cracking. Once cool, use fine-grit sandpaper to gently smooth any rough edges or fingerprints. -
Prep the top beads:
Grab your gold earring hooks. Thread a small cream or wooden bead onto the shaft of the hook if the design allows, or prepare to attach it via a headpin loop if preferred. -
Assemble the single drop:
For the cream earring, open a gold jump ring using two pairs of pliers (twist, don’t pull). Thread it through the top hole of the cream arch and attach it to your beaded earring hook component. -
Connect the double drop:
For the two-tone earrings, use two jump rings to connect the bottom of the beige arch to the top of the black arch. Make sure the arches hang freely and aren’t too tight. -
Add the final hook:
Attach the beaded ear wire to the top of the beige arch using a final jump ring, ensuring the front of the earring faces forward when worn. -
Final check:
Give all jump rings a final squeeze with your flat nose pliers to ensure they are fully closed and secure so your masterpiece stays intact.
Textured Twist
Before cutting your shapes, gently press a piece of coarse sandpaper or fabric onto the raw clay slab to add a subtle stone-like texture.
Now you have a stunning set of geometric earrings ready to wear or gift


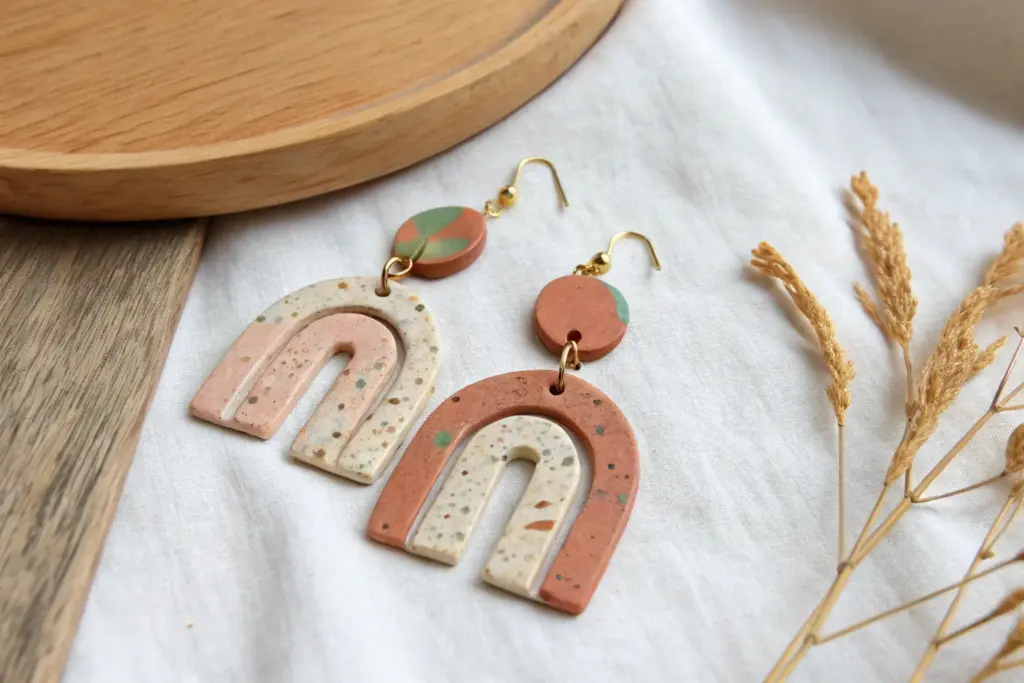
Terrazzo Speckled Statement Drops

These stunning statement earrings capture the warmth of a desert landscape with their creamy base and vibrant terrazzo inclusions. The bold arch shape combined with a classic stud top creates movement while the scattered chips of terracotta, mustard, Navy, and black add artistic flair.
Step-by-Step
Materials
- Polymer clay (beige/cream, terracotta, mustard yellow, navy blue, black)
- Black pepper or faux granite clay grit (optional)
- Acrylic rolling pin
- Tissue blade or X-Acto knife
- Clay texture sheet or sandpaper (optional)
- U-shaped arch cutter (approx. 1.5 – 2 inches)
- Small circle cutter (approx. 0.5 inch)
- Earring posts and backs
- Jump rings (gold)
- Jewelry pliers
- Hand drill or pin vibe
- Oven and baking sheet
- Parchment paper
Step 1: Prepping the Clay ‘Chips’
-
Isolate your colors:
Begin by conditioning small amounts of your accent colors: terracotta, mustard yellow, navy blue, and black. Roll each color into a thin sheet, about the thickness of cardstock. -
Bake the accent sheets:
Place these thin sheets on a tile or parchment-lined tray and bake them for only 10-15 minutes at the temperature recommended on your clay package. This partial bake makes them easier to chop without smearing. -
Chop into terrazzo:
Once cooled, take your tissue blade and chop the baked sheets into irregular fragments. Aim for a mix of sizes—some tiny specks and some larger, distinctive geometric chunks like triangles or trapezoids.
Clean Cut Pro-Tip
Use a piece of plastic wrap over the clay before pressing your cutters down. This creates a beautifully domed, rounded edge on your shapes and eliminates the need for sanding later.
Step 2: Creating the Base Slab
-
Condition the base:
Thoroughly condition your beige or cream clay until it is soft and pliable. If you want that extra organic speckled look seen in the photo, mix in a pinch of ground black pepper or specialty clay grit. -
Roll the slab:
Roll your conditioned base clay into a smooth slab, roughly 3mm to 4mm thick. Ensure it is level so your final earrings hang straight. -
Apply the terrazzo:
Scatter your pre-baked colored chips onto the raw beige slab. I like to place the larger, statement pieces intentionally first to ensure good spacing, then fill the gaps with the smaller crumbs. -
Embed the chips:
Cover the slab with a piece of parchment paper to prevent sticking. Use your acrylic roller to firmly press the chips down until they are flush with the surface of the beige clay. -
Smooth the surface:
Remove the parchment. If the surface is uneven, gently roll over it again. You want a unified, flat surface where the chips feel like part of the stone, not bumps on top.
Level Up: Matte Finish
For a true stone look, skip the glaze. After baking, buff the surface vigorously with a piece of denim or a dremel with a felt tip to create a natural, high-end matte sheen.
Step 3: Cutting and Baking
-
Cut the shapes:
Using your U-shaped cutter, press firmly into the slab to cut two arch shapes. Then, use the small circle cutter to create two matching studs. Try to capture an interesting distribution of colors in each cut. -
Refine the edges:
Before baking, gently smooth the cut edges with your fingertip to remove any stray clay bits or sharp ridges left by the cutter. -
Create connection holes:
Use a toothpick or a small detail tool to poke holes for your jump rings. You’ll need a hole at the top center of each arch and the bottom center of each circular stud. Ensure the holes are large enough for your jump rings to move freely. -
Make the final bake:
Arrange your pieces on a parchment-lined baking sheet. Bake for the full duration and temperature recommended by your clay manufacturer (usually 30-45 minutes at 275°F/130°C) to ensure durability.
Step 4: Assembly
-
Cool and inspect:
Allow the pieces to cool completely inside the oven or on the tray. Check the edges again; if there are rough spots, you can lightly sand them with fine-grit sandpaper. -
Attach the posts:
Use a strong jewelry glue or a dab of liquid polymer clay (requires rebaking) to attach the earring posts to the back of the circular studs. -
Connect the pieces:
Open a gold jump ring using two pairs of pliers (twist sideways, don’t pull apart). Thread it through the hole in the arch and the hole in the stud, then close it securely. -
Final check:
Ensure the jump ring is fully closed so the pieces don’t slip apart, and give the surface a quick buff with a soft cloth to shine up those terrazzo details.
Wear these artful arches with a simple linen top to let the colors really pop


Swirled Marble Slab Earrings
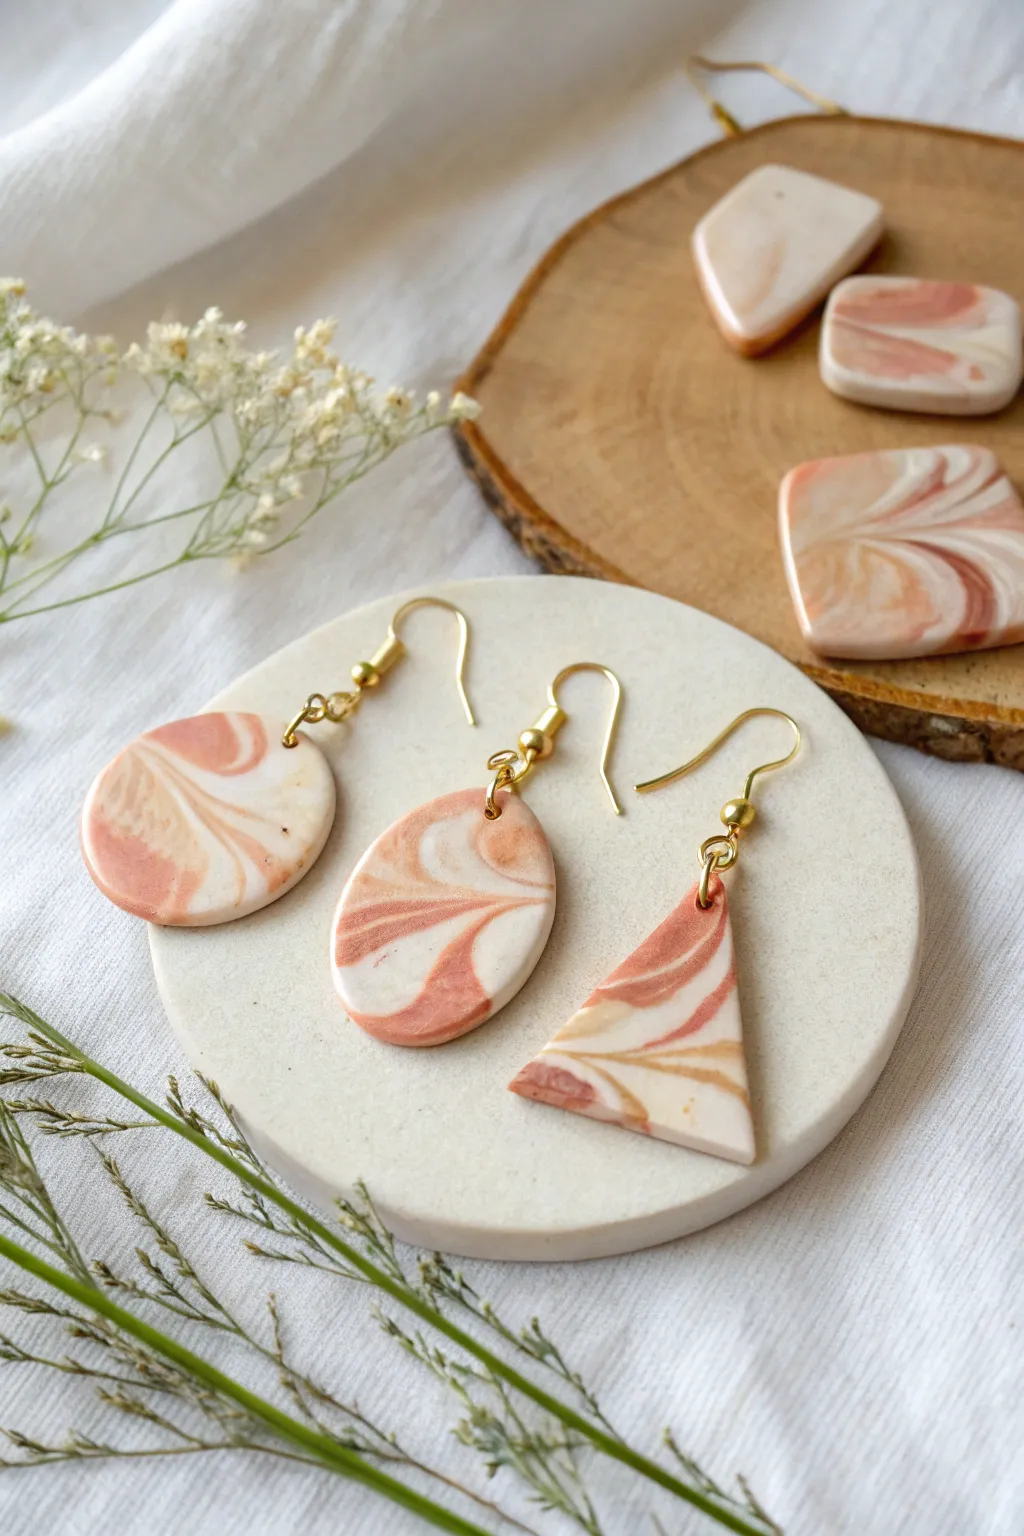
Capture the soft elegance of natural stone with these delicate, peach-swirled polymer clay earrings. This faux marble technique creates a unique, fluid pattern for every single piece, ensuring your accessories are truly one-of-a-kind.
Detailed Instructions
Materials
- Polymer clay (White)
- Polymer clay (Translucent)
- Polymer clay (Peach or soft terracotta)
- Jewelry pliers
- Gold earring hooks
- Jump rings (Gold, 6-8mm)
- Acrylic rolling pin
- Clay slicer blade
- Shape cutters (Circle, teardrop, triangle)
- Hand drill or pin tool
- Fine grit sandpaper (optional)
- Gloss glaze (optional)
Step 1: Preparing the Clay Slab
-
Condition the clay:
Start by thoroughly conditioning your white, translucent, and peach polymer clay separately. Knead each block until it is warm, soft, and pliable to prevent cracking later. -
Create base logs:
Roll each color into a long, thin snake or log shape. You’ll want roughly equal amounts of white and translucent, with slightly less of the peach color to keep the design light and airy. -
Combine the colors:
Twist the three logs of clay together into one large rope. Fold this rope in half and twist it again. Repeat this folding and twisting process 2-3 times to begin blending the colors. -
Marble the mixture:
Roll the twisted clay into a ball, then roll it back out into a snake. Be careful not to over-mix; you want distinct streaks of color rather than a solid new color. -
Flatten the slab:
Using your acrylic rolling pin, roll the marbled snake into a flat slab about 3mm thick. I like to roll in different directions to stretch the swirls into organic, cloud-like patterns.
Clean Cuts Secret
Before pressing your cutters into the clay, dip them into a small pile of cornstarch or soapy water. This prevents sticking and leaves cleaner edges.
Step 2: Cutting and Refining
-
Select your canvas:
Look closely at your flattened slab and identify the areas with the most interesting swirls and color transitions. -
Cut the shapes:
Press your cutters firmly into the chosen spots of the clay. For a geometric set like the photo, cut one circle, one teardrop, and one triangle. -
Smooth the edges:
Gently lift the cut shapes. Use your finger to softly smooth the cut edges, removing any stray bits of clay or sharp corners created by the cutter. -
Create holes:
Using a needle tool or a small toothpick, poke a hole near the top of each shape for the jump ring. Ensure the hole is large enough for your hardware but not so close to the edge that it will break. -
Bake the pieces:
Place your shapes on a ceramic tile or baking sheet lined with parchment paper. Bake according to your specific clay package instructions (usually around 275°F/135°C for 15-30 minutes). -
Cool down:
Allow the pieces to cool completely in the oven or on the counter before handling. Polymer clay is fragile while hot.
Step 3: Assembly and Finish
-
Sand for perfection:
Once cooled, inspect the edges. If there are any rough spots, gently wet-sand the edges with fine-grit sandpaper for a professional finish. -
Clean surface:
Wipe the earrings with a damp cloth or a baby wipe to remove any sanding dust or residue. -
Open jump rings:
Use two pairs of jewelery pliers to twist open your gold jump rings. Remember to twist the ends away from each other (front to back), rather than pulling them apart horizontally. -
Attach hardware:
Slide the open jump ring through the hole in the clay piece. Add the loop of the earring hook onto the jump ring as well. -
Secure the closures:
Use your pliers to twist the jump ring back into a closed position, ensuring the ends meet flush so the hook doesn’t slip out. -
Optional glaze:
If you prefer a shiny, polished stone look, apply a thin coat of gloss glaze or UV resin to the surface and let it cure.
Muddy Colors?
If your colors are blending into a single muddy shade, you are over-mixing. Stop twisting sooner next time; barely mixed logs create the best marble lines.
Enjoy wearing your sophisticated new marble accessories or gift them to a friend who loves handmade style

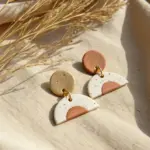
Minimal Circle Studs With Texture
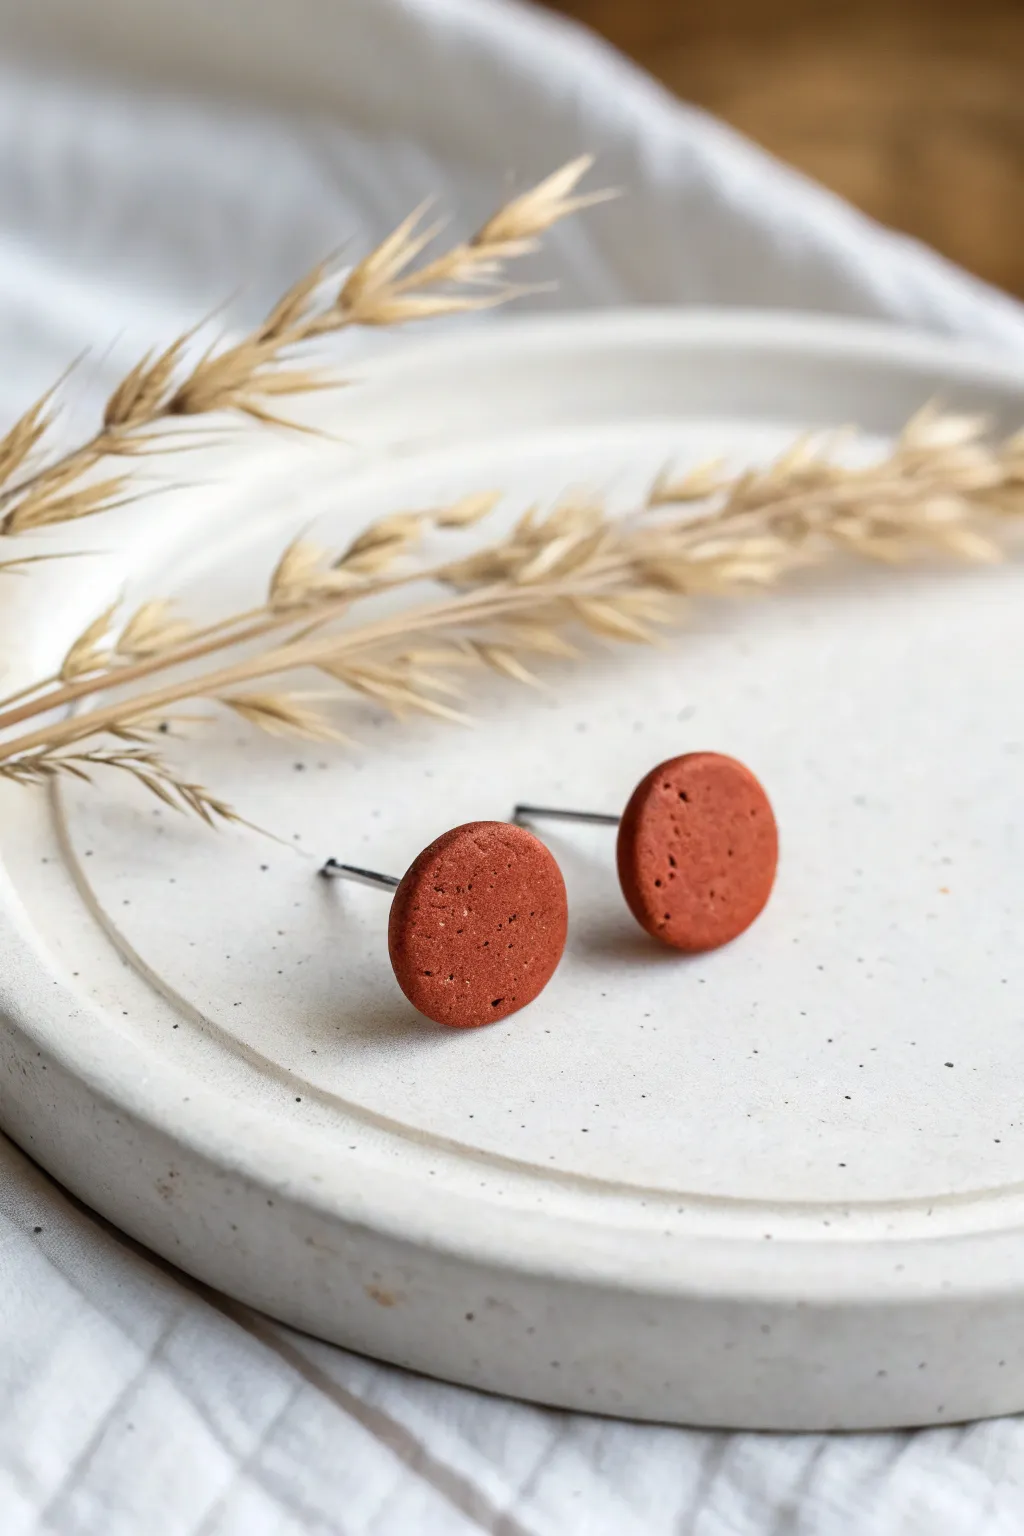
Embrace the beauty of raw earth tones with these understated circular studs. The rich terracotta color combined with a gritty, peppered texture creates a modern minimalist piece perfect for everyday wear.
Step-by-Step Guide
Materials
- Terracotta or rust-colored polymer clay
- Coarse black pepper or dried coffee grounds
- Small round clay cutter (approx. 10mm)
- Acrylic roller or pasta machine
- Flat baking tile or ceramic tile
- Surgical steel earring posts
- Super glue or strong gel adhesive
- Sandpaper (fine grit)
- Needle tool or toothpick (optional)
Step 1: Preparing the Textured Clay
-
Condition the base:
Begin by slicing off a portion of your terracotta polymer clay. Knead it thoroughly in your hands until it becomes soft, pliable, and warm to the touch. -
Flatten the clay:
Roll the clay into a ball and then slightly flatten it on your work surface using your palm. -
Add texture agents:
Sprinkle a pinch of coarse black pepper or dry, used coffee grounds onto the flattened clay. This is the secret to that organic, speckled look. -
Incorporate the texture:
Fold the clay over the inclusions and knead again. I like to repeat this process several times to ensure the speckles are evenly distributed throughout the batch rather than clustered in one spot. -
Roll out the slab:
Using your acrylic roller or pasta machine, roll the speckled clay out to a uniform thickness. About 2mm to 3mm is ideal—thick enough to be sturdy but thin enough to be lightweight.
Use Saran Wrap
Place a piece of plastic wrap over the clay before using your cutter. This creates a pillowy, domed edge rather than a sharp, flat edge.
Step 2: Cutting and Baking
-
Cut the shapes:
Press your small round cutter firmly into the clay slab. Give it a slight wiggle before lifting to ensure a clean cut. -
Smooth the edges:
Gently lift the circles. If there are any jagged edges or fingerprints, smooth them softly with your fingertip. You can also lightly tap the surface with a piece of sandpaper to enhance the matte texture. -
Prepare for baking:
Place your clay circles onto a ceramic baking tile. Using a tile helps maintain a consistent temperature and keeps the backs perfectly flat. -
Bake:
Bake the pieces according to the specific manufacturer’s instructions on your chosen brand of clay. Usually, this is around 275°F (130°C) for 15-30 minutes. -
Cool down:
Once the baking time is up, remove the tile from the oven but let the clay pieces cool completely on the tile before touching them. This prevents warping while they are still soft.
Add Gold Flecks
Mix in tiny bits of gold leaf along with the pepper during the conditioning phase for a subtle metallic shimmer inside the rustic texture.
Step 3: Assembly
-
Prepare the posts:
Check your earring posts to ensure the flat pad is clean and dry. A quick wipe with rubbing alcohol can help adhesion. -
Apply adhesive:
Place a small drop of strong gel adhesive or super glue onto the pad of the earring post. -
Attach the post:
Press the glued post firmly onto the center of the back of a clay circle. Hold it in place for a few seconds to let the bond initiate. -
Seal (optional):
For extra durability, you can secure the post further by adding a tiny drop of liquid clay over the post’s pad and baking it again briefly, though high-quality glue is usually sufficient. -
Final cure:
Allow the glue to cure fully (often 24 hours for maximum strength) before wearing your new studs.
Now you have a pair of chic, earthy studs that look like they were carved from stone

The Complete Guide to Pottery Troubleshooting
Uncover the most common ceramic mistakes—from cracking clay to failed glazes—and learn how to fix them fast.
Two-Tier Geometric Link Earrings
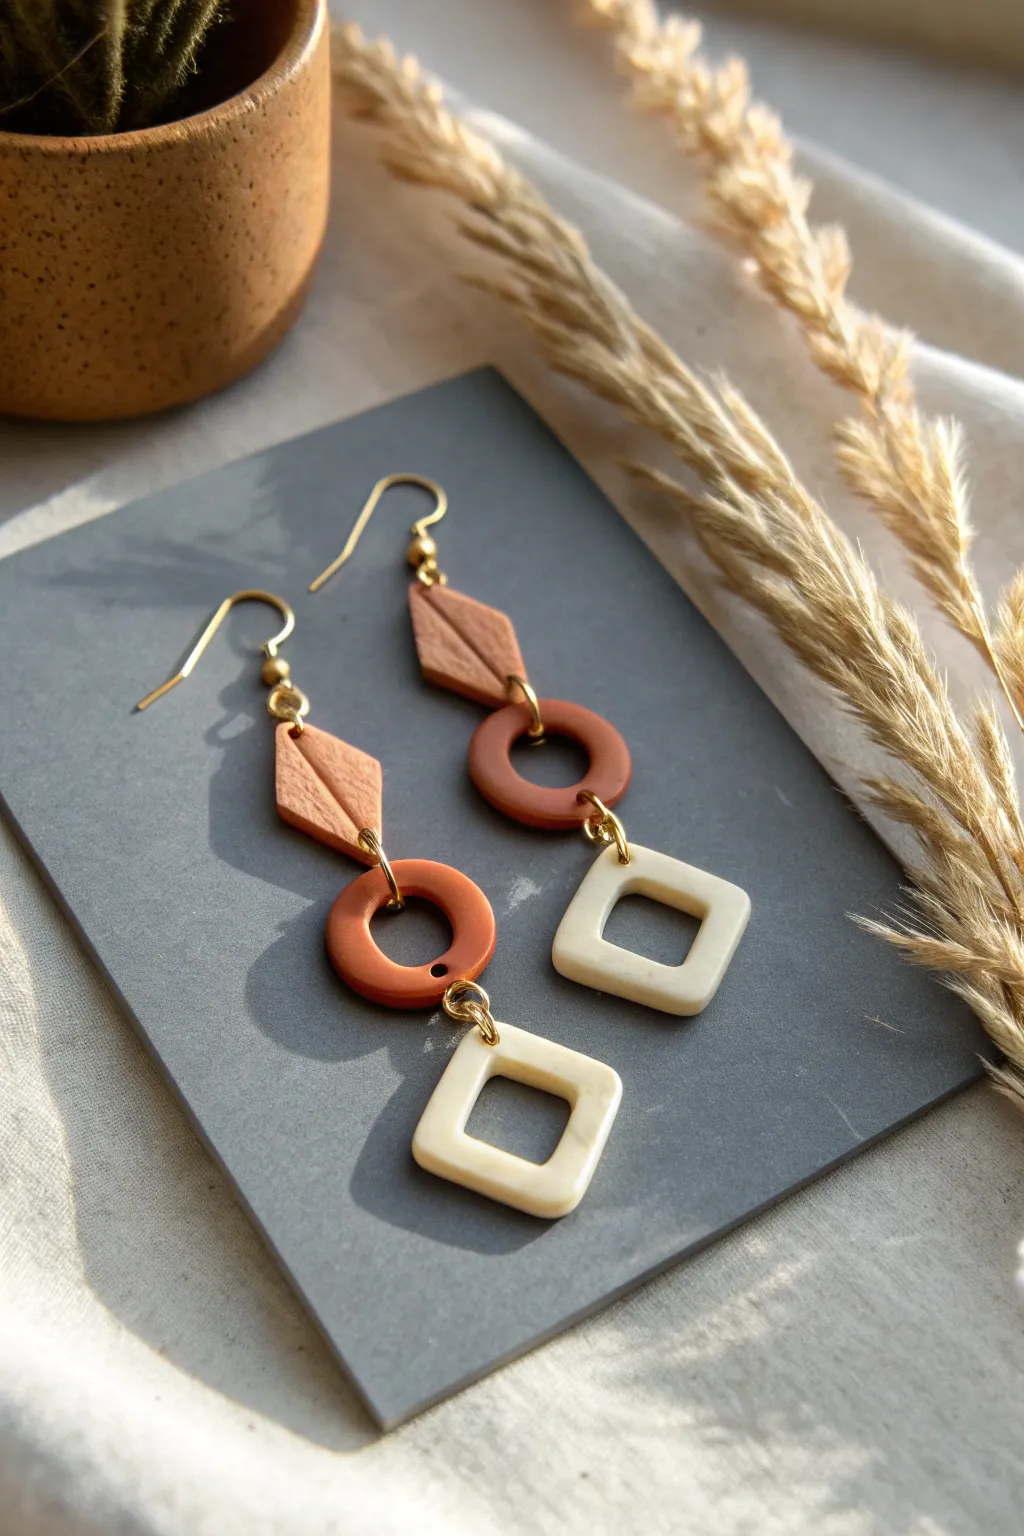
Embrace an earthy, bohemian vibe with these multi-tiered polymer clay earrings featuring a warm color palette and varied geometric shapes. This design combines textured leaf motifs with smooth rings and squares for a sophisticated yet playful accessory.
Step-by-Step Tutorial
Materials
- Polymer clay in light brown, terracotta/rust, and translucent white or pearl
- Rolling pin or pasta machine
- Clay cutters: small leaf/diamond shape, medium circle (with inner cutout), medium square (with inner cutout)
- Needle tool or toothpick
- Coarse sandpaper or texture sponge
- Parchment paper-lined baking sheet
- Gold tone jump rings (6mm or 7mm)
- Gold tone earring hooks
- Jewelry pliers (round nose and flat nose)
- Hand drill or pin vibe (if drilling holes post-bake)
Step 1: Prepping and Cutting
-
Condition the lighter brown clay:
Begin by thoroughly kneading the light brown clay until soft and pliable. Roll it out to an even thickness of about 3mm. -
Cut the top tier:
Use your diamond or leaf-shaped cutter to punch out two pieces. If you don’t have a specific cutter, you can freehand a diamond shape with a craft knife. -
Add texture:
Gently press a needle tool or toothpick into the center of the diamond shapes to create a vertical vein line. Add smaller diagonal lines branching out to mimic a leaf texture. -
Create the middle tier:
Condition and roll out the terracotta-colored clay. Use a medium circle cutter to create two discs, then use a much smaller circle cutter to remove the center, creating a donut or washer shape. -
Form the bottom tier:
Condition the white or pearl clay. I like to add a tiny speck of translucent clay here to give it a faux-stone look. Roll it out and cut two square shapes. -
Cut square centers:
Use a smaller square cutter to remove the centers of the white squares, creating a frame shape. Ensure the walls of the square are even on all sides.
Smooth Operator
Use a cotton swab dipped in rubbing alcohol or acetone to gently wipe unbaked clay. This removes dust, fingerprints, and minor lint before baking.
Step 2: Piercing and Baking
-
Pierce holes for assembly:
Before baking, use a needle tool to poke holes in your shapes. The leaf pieces need a hole at the very top and very bottom. The round donuts need holes at the top and bottom of the ring. The squares just need one hole at a top corner. -
Refine edges:
Gently smooth the cut edges of the clay with your fingertip to remove any stray bits or sharpness. A drop of baby oil on your finger helps glide over the clay without leaving prints. -
Bake the pieces:
Arranged all pieces on your parchment-lined metal baking sheet. Bake according to your specific brand of clay’s instructions—usually 275°F (130°C) for about 30 minutes. -
Cool down:
Let the pieces cool completely on the baking sheet before handling them, as warm clay is fragile.
Step 3: Assembly
-
Open the first jump rings:
Using two pairs of pliers, twist open two gold jump rings. Remember to twist sideways (like opening a door), not pull apart. -
Connect square to donut:
Feed an open jump ring through the hole in the white square and the bottom hole of the terracotta donut. Close the jump ring securely using the pliers. -
Connect donut to leaf:
Open two more jump rings. Connect the top hole of the terracotta donut to the bottom hole of the textured leaf piece for both earrings. -
Attach earring hooks:
Depending on the orientation of your ear wire loop, you may need one small jump ring or connect directly. Attach the ear wire to the top hole of the leaf piece. -
Final check:
Hold the earrings up to check that all tiers hang facing forward. If one twists, simply add an extra tiny jump ring at the connection point to rotate it 90 degrees.
Faux Stone Effect
Mix black pepper or dried tea leaves into the white clay before rolling. This creates a realistic speckled granite look for the bottom square tier.
Enjoy wearing your new statement earrings that perfectly balance structure and softness
Cutout Hoop Charms in Clay
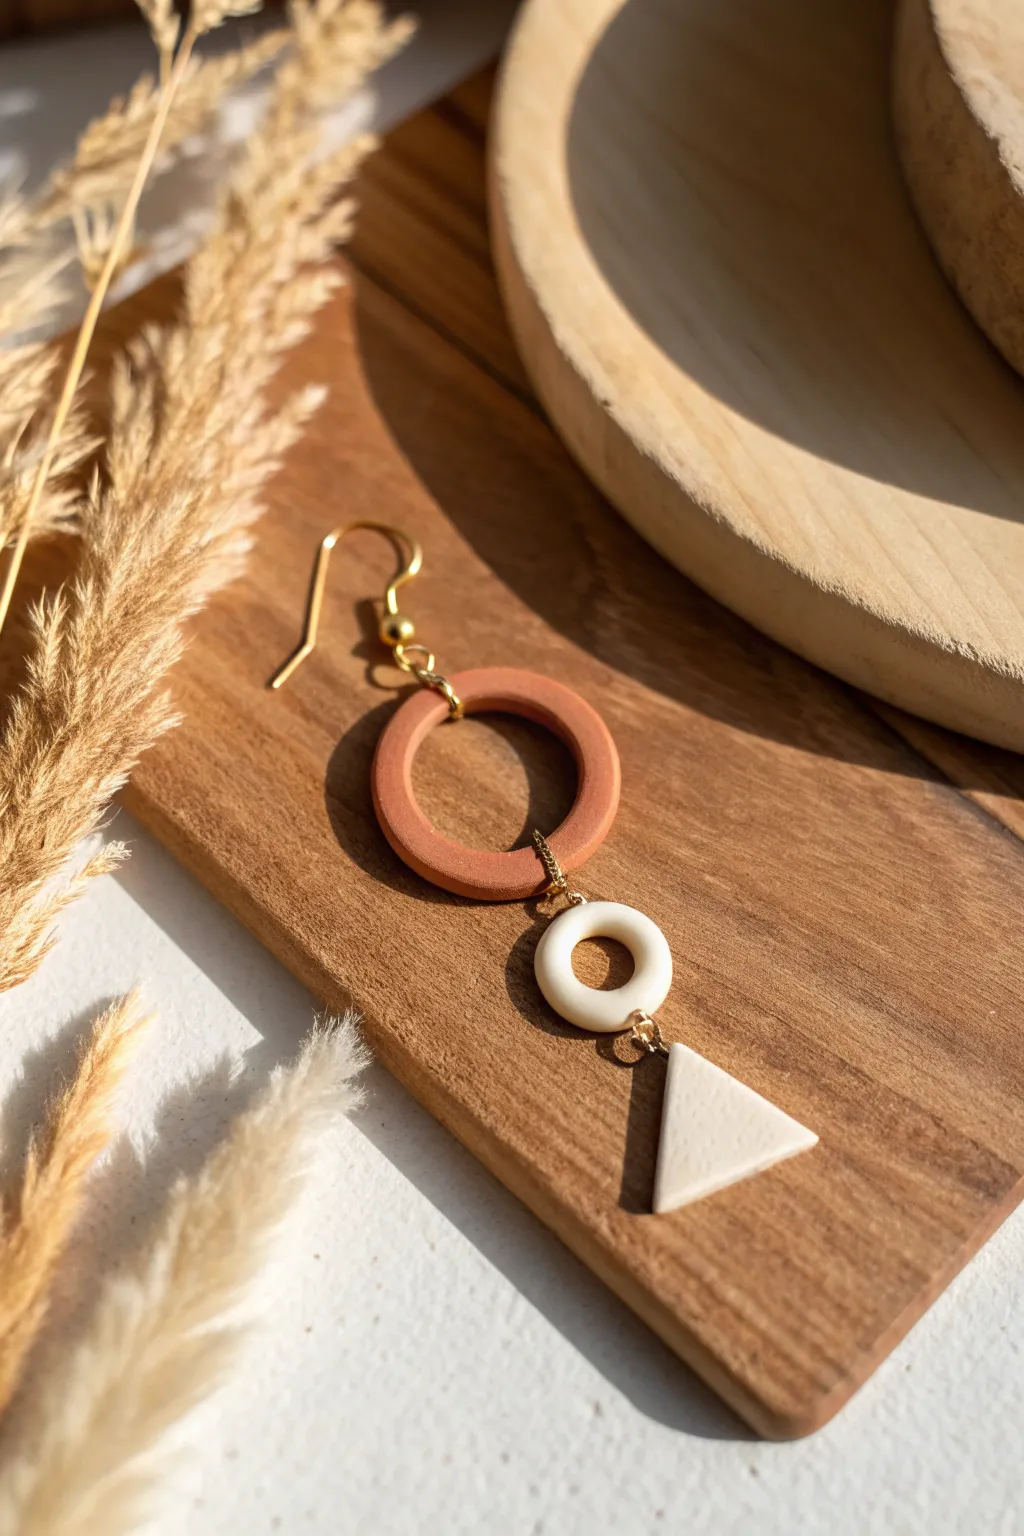
These elegant dangle earrings combine earthy terracotta tones with crisp white shapes for a sophisticated, modern look. The design relies on simple geometric forms—circles and triangles—linked together to create movement and balance.
How-To Guide
Materials
- Terracotta polymer clay
- White or cream polymer clay
- Acrylic rolling pin or pasta machine
- Circle cutters (approx. 1-inch and 0.5-inch)
- Small triangle cutter
- Smallest circle cutter or straw (for hole making)
- Gold tone jump rings (4mm and 6mm)
- Gold tone earring hooks
- Jewelry pliers (chain nose and flat nose)
- Craft knife or tissue blade
- Gloss glaze (optional)
- Small paintbrush (optional)
Step 1: Shaping the Terracotta Rings
-
Condition the Clay:
Begin by taking a small portion of the terracotta clay. Knead it in your hands until it is soft, pliable, and free of cracks. This conditioning step is crucial for strength later on. -
Roll Out the Clay:
Roll the terracotta clay into a sheet approximately 3mm thick. If you have a pasta machine, use a medium setting; otherwise, an acrylic roller works perfectly. -
Cut the Outer Circle:
Using your larger circle cutter (around 1 inch), press down firmly to cut the outer shape of the ring. Make two of these circles for a pair of earrings. -
Create the Inner Cutout:
Center a slightly smaller circle cutter inside the shape you just made. Press down to remove the center, leaving a perfect terracotta ring. Alternatively, use a medium plastic straw if you don’t have nested cutters. -
Pierce the Holes:
Depending on how you want the ring to hang, use a needle tool or toothpick to make a small hole at the top and the bottom of the terracotta ring. Ensure the holes are large enough for your jump rings.
Fingerprint Fix
Use a q-tip dipped in a tiny bit of acetone or rubbing alcohol to gently smooth away fingerprints on raw clay before baking.
Step 2: Creating the White Components
-
Prepare White Clay:
Clean your hands or wear gloves to avoid transferring terracotta pigment, then condition and roll out the white clay to the same thickness as the terracotta. -
Cut Small Rings:
Use a small circle cutter (approx. 0.5 inch) to cut two white circles. Then, use a very small cutter or large straw to punch out the centers, creating the smaller, thick white rings. -
Pierce the White Rings:
Carefully poke a hole at the top and bottom of these small white rings. Be gentle so you don’t distort their circular shape. -
Cut the Triangles:
Using your triangle cutter or a sharp craft knife, cut two small triangles from the remaining white clay sheet. These will form the bottom weight of the earring. -
Add Triangle Holes:
Pierce a single hole at the center of the top edge of each triangle.
Step 3: Baking and Assembly
-
Bake the Pieces:
Place all your clay components on a parchment-lined baking sheet or a ceramic tile. Bake according to the manufacturer’s instructions on your clay package (usually around 275°F/130°C for 15-30 minutes). -
Cool Down:
Allow the pieces to cool completely before handling. I like to let them sit inside the oven with the door open to cool gradually, which can prevent brittleness. -
Sand the Edges (Optional):
If there are any rough spots, gently sand the edges with fine-grit sandpaper or buff with a denim cloth for a smooth finish. -
Attach the Triangle:
Open a small jump ring using two pairs of pliers. Thread it through the top hole of the white triangle and the bottom hole of the small white ring. Close the jump ring securely. -
Connect the Rings:
Open another jump ring. Connect the top of the small white ring to the bottom of the larger terracotta ring. -
Add the Earring Hook:
Finally, attach the gold earring hook to the top of the terracotta ring using a jump ring. Ensure all rings are closed tightly so the pieces don’t slip off.
Clean Cuts
Dip your cutters into cornstarch or water before pressing into the clay. This acts as a release agent and prevents sticking.
Wear your geometric creations enthusiastically or gift them to a friend who loves modern style


What Really Happens Inside the Kiln
Learn how time and temperature work together inside the kiln to transform clay into durable ceramic.
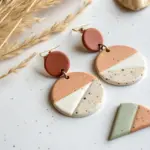
Skinny Bar Earrings With Color Blocking
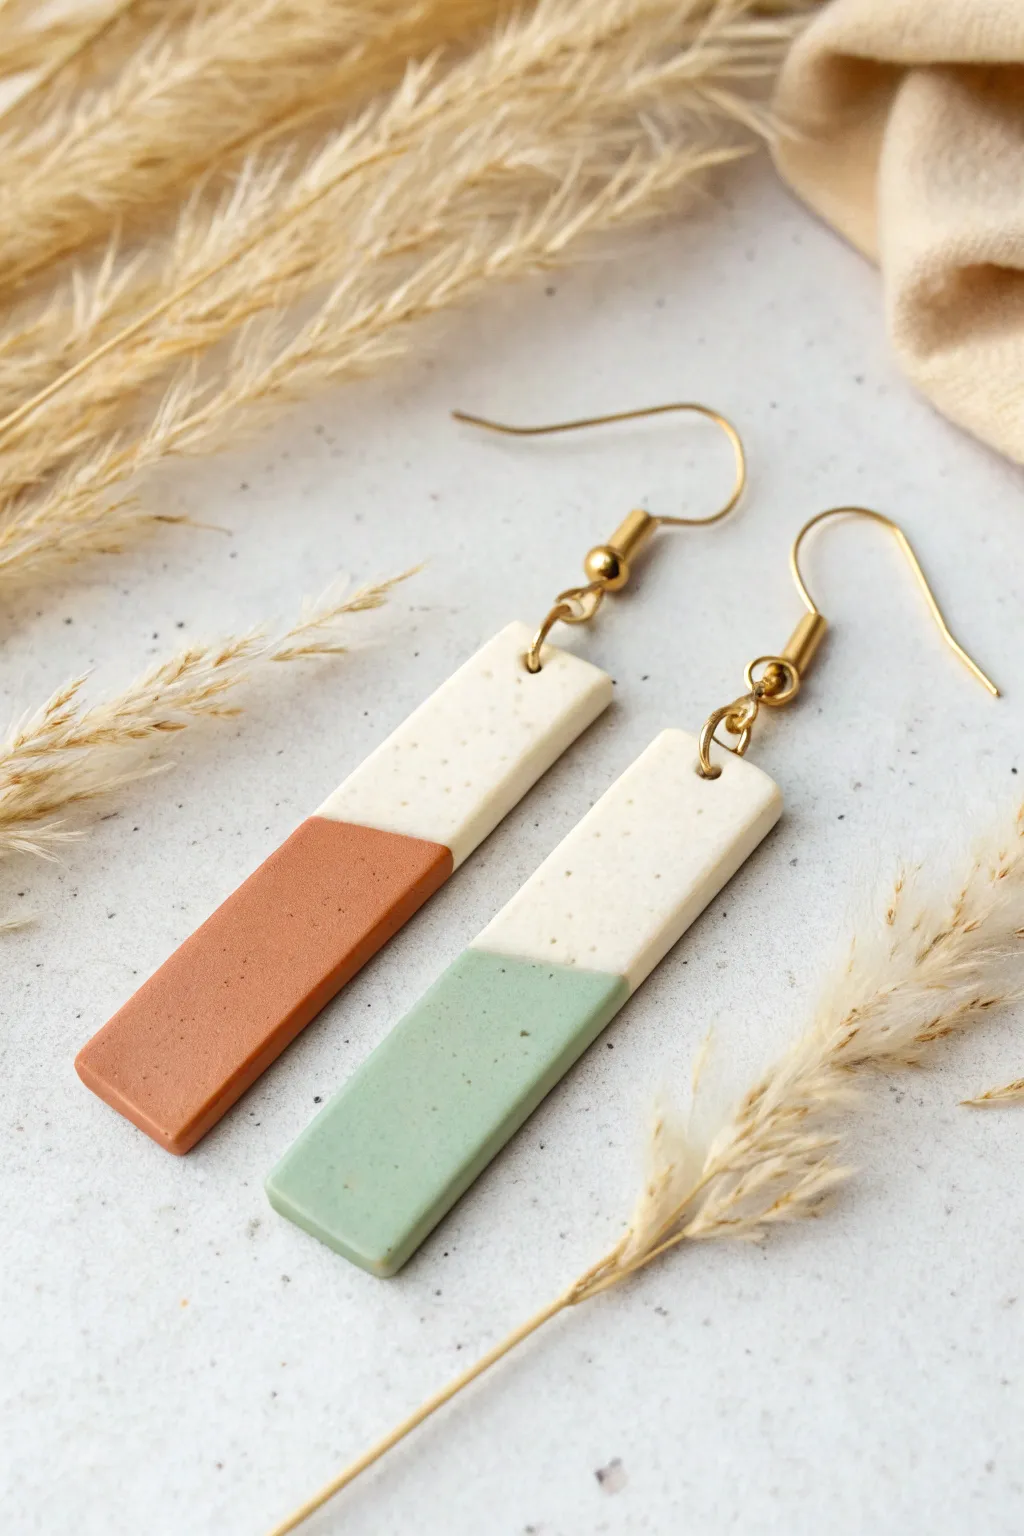
These sleek, modern earrings combine minimal design with an earthy color palette for a sophisticated everyday accessory. The color-blocking technique creates a clean, graphic look using speckled white clay paired with warm terracotta and soft sage green.
Step-by-Step Guide
Materials
- Polymer clay (Speckled White, Terracotta, Sage Green)
- Clay roller or pasta machine
- Tissue blade or very sharp craft knife
- Ruler
- Needle tool or small drill bit
- Fine-grit sandpaper (400 to 1000 grit)
- Gold earring hooks (fishhook style)
- Gold jump rings (6mm)
- Jewelry pliers (round nose and flat nose)
- Parchment paper or ceramic tile
Step 1: Prepping and Cutting the Clay
-
Condition the clay:
Start by conditioning each color of clay separately. Knead the speckled white, terracotta, and sage green until they are soft, pliable, and warm to the touch. -
Roll out sheets:
Roll each color into a slab of even thickness, ideally about 3mm thick. If you have a pasta machine, use a medium setting; otherwise, use a roller with depth guides to ensure consistency. -
Cut the base strips:
Using your tissue blade and ruler, cut straight, clean strips from each color. You want the strips to be the exact same width, approximately 1 cm (0.4 inches) wide. -
Create the diagonal cuts:
Decide on the angle for your color block. Lay your white strip over your colored strip to visualize the join, then use your tissue blade to make a sharp diagonal cut through both pieces of clay simultaneously. This ensures the angles match perfectly. -
Join the seams:
Gently press the cut edge of the white clay against the corresponding cut edge of the colored clay (one terracotta, one sage). Push them together firmly enough to adhere but gently enough not to distort the shape.
Clean Cuts Pro Tip
Chill your clay sheet in the fridge for 10 minutes before cutting. Cooler clay is firmer and drags less against the blade, giving you crisper, sharper corners.
Step 2: Shaping and Refining
-
Smooth the back:
Flip the joined strip over. Gently smooth the seam on the back with your finger or a clay tool to reinforce the bond. -
Trim the bars:
Using your ruler and blade, trim the glued strips into clean, rectangular bars. The final dimensions should be long and slender—aim for about 5 cm (2 inches) in length. -
Smooth the edges:
I like to run a finger lightly dipped in baby oil or cornstarch along the sharp edges to soften them slightly before baking, which saves sanding time later. -
Pierce the holes:
Use a needle tool to poke a hole at the very top center of the white section. Make sure the hole is large enough for your jump rings.
Step 3: Baking and Assembly
-
Bake the pieces:
Place your clay bars on a ceramic tile or parchment paper. Bake according to the manufacturer’s instructions for your specific brand of clay (usually around 275°F/135°C for 30 minutes). -
Cool down:
Allow the pieces to cool completely inside the oven or on a cooling rack before handling them, as warm clay is fragile. -
Sand for finish:
Once cool, use fine-grit sandpaper to smooth any rough edges or unevenness on the sides. You can do this wet to avoid clay dust. -
Open the jump rings:
Using two pairs of pliers, twist your jump rings open sideways (never pull them apart outward). -
Attach the hardware:
Slide the open jump ring through the hole in the clay bar, then add the earring hook onto the ring. -
Close the rings:
Twist the jump ring closed securely with your pliers, ensuring the gap is completely sealed.
Level Up: Texture
Before cutting your strips, roll a piece of sandpaper or a linen fabric over the clay surface to press in a subtle, organic texture.
Wear your new geometric creations with a simple outfit to let their clean lines really shine
Botanical Imprint Pendant Necklace
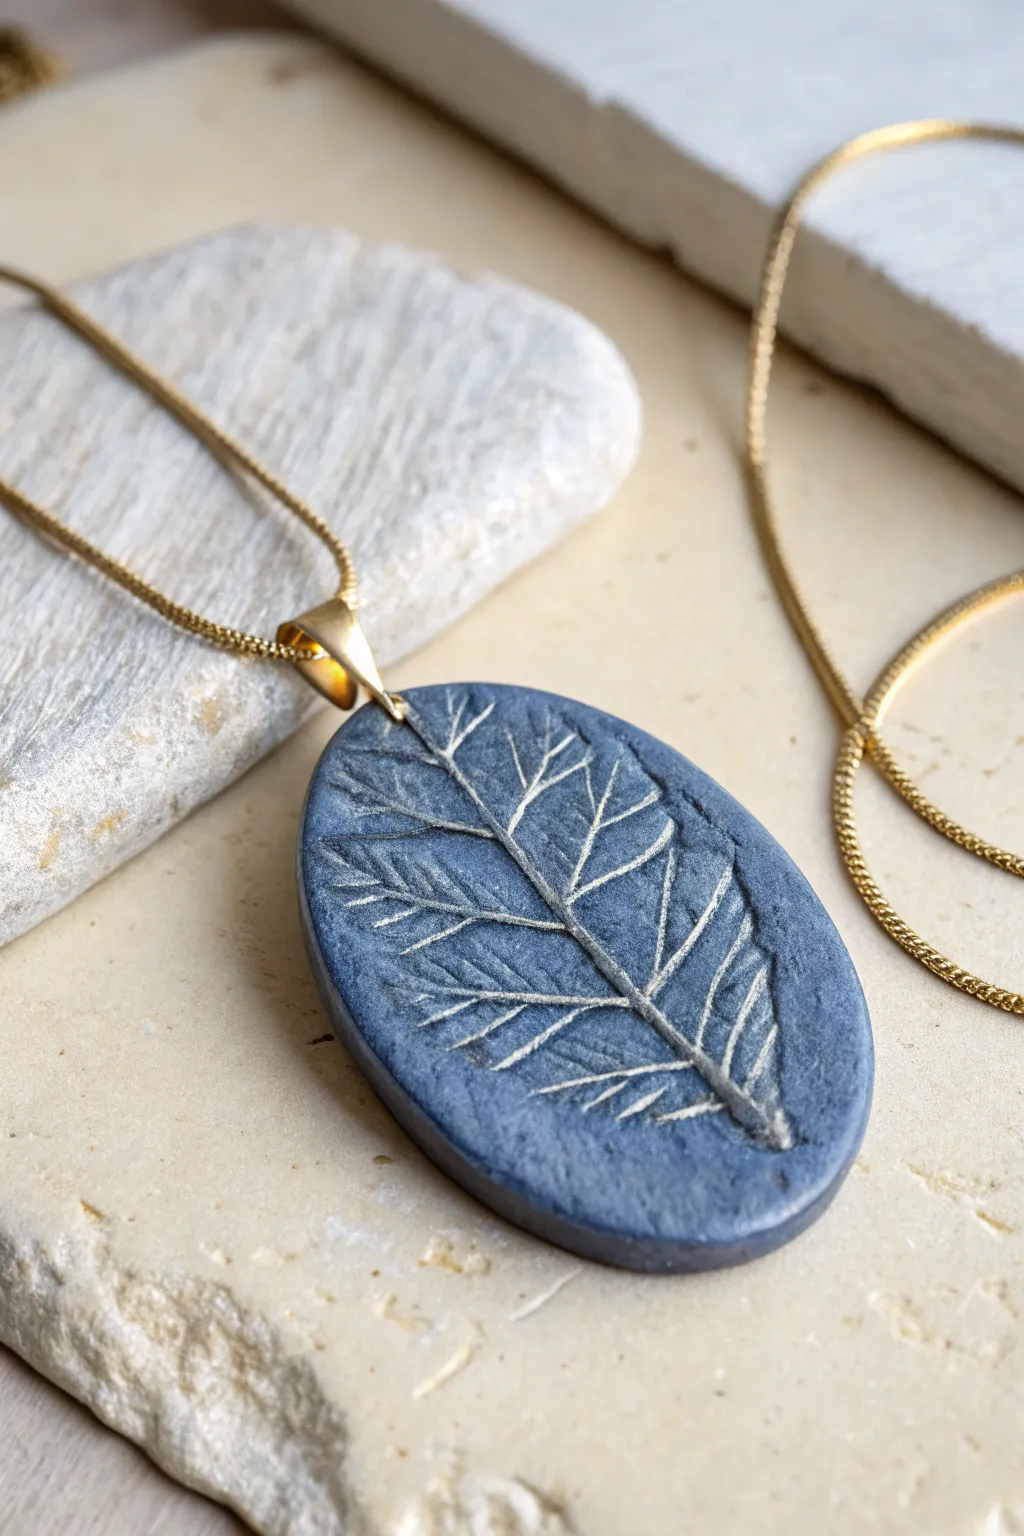
Capture the delicate details of nature in a modern, slate-like pendant that feels as timeless as a fossil. This project uses a simple botanical impression technique on dark polymer clay to create sophisticated, wearable art.
How-To Guide
Materials
- Dark grey or charcoal polymer clay (e.g., Fimo or Sculpey)
- Fresh leaf with prominent veins (fern, sage, or similar)
- Acrylic rolling pin or pasta machine
- Oval clay cutter
- Cornstarch or baby powder (release agent)
- White or silver acrylic paint
- Paper towel or soft cloth
- Gold pinch bail
- Gold jewelry chain
- Hand drill or pin vice
- Fine-grit sandpaper (optional)
- Gloss or matte varnish (optional)
Step 1: Preparing the Clay Canvas
-
Condition the clay:
Begin by kneading your dark grey polymer clay in your hands until it becomes warm, soft, and pliable. This conditioning step is crucial to prevent cracks later on. -
Roll the slab:
Using an acrylic roller, flatten the clay into a smooth sheet. Aim for a thickness of about 4mm to 5mm so the pendant has a nice weight and durability. -
Check for smoothness:
Inspect the surface for any air bubbles or fingerprints. If you see any, gently smooth them out with your finger or roll over them lightly one more time.
Clean Edges Pro-Tip
Place a piece of plastic wrap over the clay before cutting with your oval shape. This creates a soft, domed pillow effect on the edges rather than a sharp, straight cut.
Step 2: Creating the Botanical Impression
-
Select your leaf:
Choose a fresh leaf that is slightly smaller than your intended pendant size. Look for one with thick, raised veins on the back, as this will give the crispest impression. -
Dust the surface:
Lightly dust your clay slab with a tiny bit of cornstarch. This acts as a release agent so the leaf doesn’t stick to the clay. -
Position the leaf:
Place the leaf vein-side down onto the clay. I usually like to position it slightly off-center or diagonally for a more organic, artistic look. -
Imprint the design:
Use your roller to firmly press the leaf into the clay. Roll over it once with steady pressure; rolling back and forth can cause a double image. -
Reveal the pattern:
Carefully grab the stem of the leaf and peel it away to reveal the detailed imprint left behind in the clay.
Level Up: Stone Texture
Before stamping the leaf, gently press a piece of coarse sandpaper or a stiff toothbrush onto the clay surface to give it a realistic, gritty stone texture around the print.
Step 3: Cutting and Baking
-
Cut the shape:
Center your oval cutter over the leaf impression. Press down firmly to cut through the clay, then wiggle slightly to separate the shape. -
Smooth the edges:
Lift the oval away from the excess clay. Gently rub the cut edges with your finger to soften any sharp corners left by the cutter. -
Initial hole placement:
Before baking, use a needle tool or toothpick to mark a small pilot dimple at the top center where the drill hole will go later. This helps guide your drill bit. -
Bake the piece:
Place the pendant on a ceramic tile or baking sheet. Bake according to your clay package instructions (usually 275°F/135°C for 15-30 minutes). -
Cool down:
Allow the clay to cool completely in the oven or on the tray. It hardens fully only after it has returned to room temperature.
Step 4: Finishing Touches
-
Highlight the veins:
Apply a small amount of white or silver acrylic paint directly over the imprinted area, ensuring it gets into the deep crevices. -
Wipe away excess:
Immediately wipe the surface with a damp paper towel. The paint will stay trapped in the depressed veins while the top surface returns to the dark slate color. -
Drill the hole:
Using a hand drill or pin vice, carefully drill a hole through the top of the pendant at your pilot mark. -
Attach hardware:
Open the prongs of your gold pinch bail and insert them into the drilled hole. Squeeze the bail tightly shut with pliers to secure it. -
String the necklace:
Thread your gold chain through the bail loop to complete the necklace.
Wear your new botanical necklace with pride, knowing you’ve preserved a tiny piece of nature forever

TRACK YOUR CERAMIC JOURNEY
Capture glaze tests, firing details, and creative progress—all in one simple printable. Make your projects easier to repeat and improve.
Tiny Bead Bracelets With Mixed Shapes
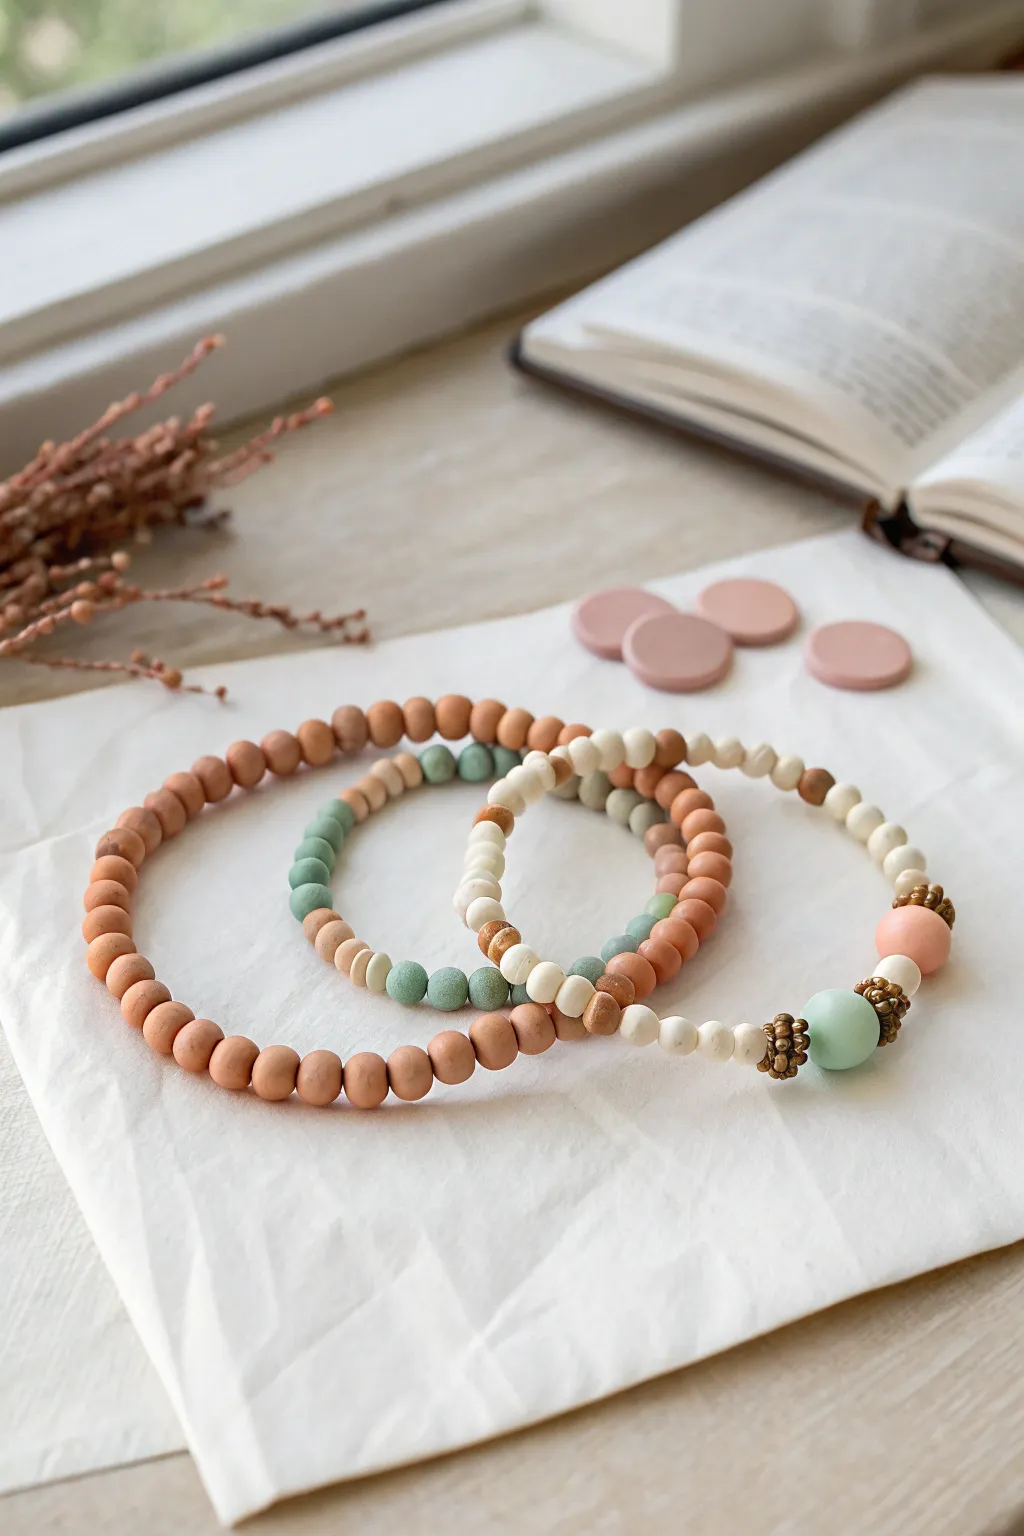
These simple stretch bracelets feature handmade polymer clay beads in warm terracotta, sage green, and creamy white tones. The combination of handcrafted round beads and flatter disc shapes creates an organic, earthy texture that looks perfect when stacked together.
Step-by-Step
Materials
- Polymer clay in terracotta, sage green, and white
- Rolling pin or acrylic clay roller
- Small round clay cutters
- Toothpick or bead piercing tool
- Baking sheet with parchment paper
- Oven
- Elastic jewelry cord (0.7mm or 0.8mm)
- Gold tone spacer beads (daisy spacers and small smooth rounds)
- Small bead stopper or tape
- Jewelry glue (GS Hypo Cement recommended)
- Scissors
Step 1: Making the Beads
-
Condition the Clay:
Start by warming the terracotta clay in your hands, kneading it until it is soft and pliable. Repeat this process separately for the sage green and white clay to ensure they are ready for shaping. -
Roll Uniform Snakes:
Roll the conditioned clay into long, even snakes about the thickness of a pencil. This helps ensure your finished beads will be roughly the same size. -
Cut Equal Segments:
Use a clay blade to slice the snakes into equal-sized small chunks. For the simple round beads seen in the outer bracelets, keep the chunks cube-like. -
Shape the Rounds:
Roll each small chunk of terracotta and sage clay between your palms to create smooth spheres. They don’t need to be machine-perfect; a little irregularity adds to the organic charm. -
Create Disc Beads:
For the cream-colored beads, roll them into balls first, then gently flatten them between your thumb and forefinger to create a rondelle or disc shape. -
Make Statement Beads:
Take a larger amount of sage clay and terracotta clay to create two slightly larger focal beads for the main bracelet, rolling them into perfect spheres about 10-12mm in diameter. -
Pierce the Holes:
Support a bead gently with your fingers to avoid squashing it. Carefully twist a toothpick or piercing pin through the center. I find twisting while pushing prevents the bead from deforming. -
Bake the Beads:
Arrange all your pierced beads on a parchment-lined baking sheet. Bake according to your brand of clay’s instructions (usually around 275°F/135°C for 15-30 minutes). -
Cool Down:
Once baked, turn off the oven and let the beads cool completely before handling them to ensure they harden fully.
Uneven Holes?
If beads deform while piercing, try refrigerating the raw clay balls for 10 minutes first. This firms them up enough to resist squishing while the tool passes through.
Step 2: Assembly
-
Prepare the Cord:
Cut a piece of elastic cord about 10-12 inches long. This gives you plenty of extra room for tying knots easily. Secure one end with a bead stopper or a piece of tape. -
String the Solid Bracelet:
For the first bracelet, thread your terracotta round beads onto the cord until the strand measures about 6.5 to 7 inches (or your wrist size). -
Design the Mixed Bracelet:
For the second bracelet, alternate sections of terracotta beads with sage green beads to create a color-blocked pattern. -
Create the Focal Bracelet:
For the third strand, thread white disc beads for the majority of the length. When you reach the center point, add a gold daisy spacer, the large sage bead, another daisy spacer, a gold round bead, and the large terracotta bead. -
Finish the Pattern:
Complete the focal section with another gold daisy spacer before continuing with the rest of the white disc beads. -
Tie the Knot:
Remove the tape or stopper. Bring the two ends of the elastic together and tie a surgeon’s knot (loop the cord through twice before pulling tight). -
Secure and Trim:
Apply a tiny dab of jewelry glue to the knot. Pull the knot tight and let the glue dry for a few minutes. Carefully trim the excess cord ends close to the knot. -
Hide the Knot:
If possible, gently tug the bracelet to slide the knot inside the hole of the nearest bead for a seamless finish.
Add Texture
Before baking, gently roll your raw clay beads over a piece of sandpaper or a textured fabric. This gives them a stone-like matte finish rather than a shiny plastic look.
Now you have a gorgeous set of custom-sized bracelets ready to wear or gift
Chunky Hollow Bead Necklace
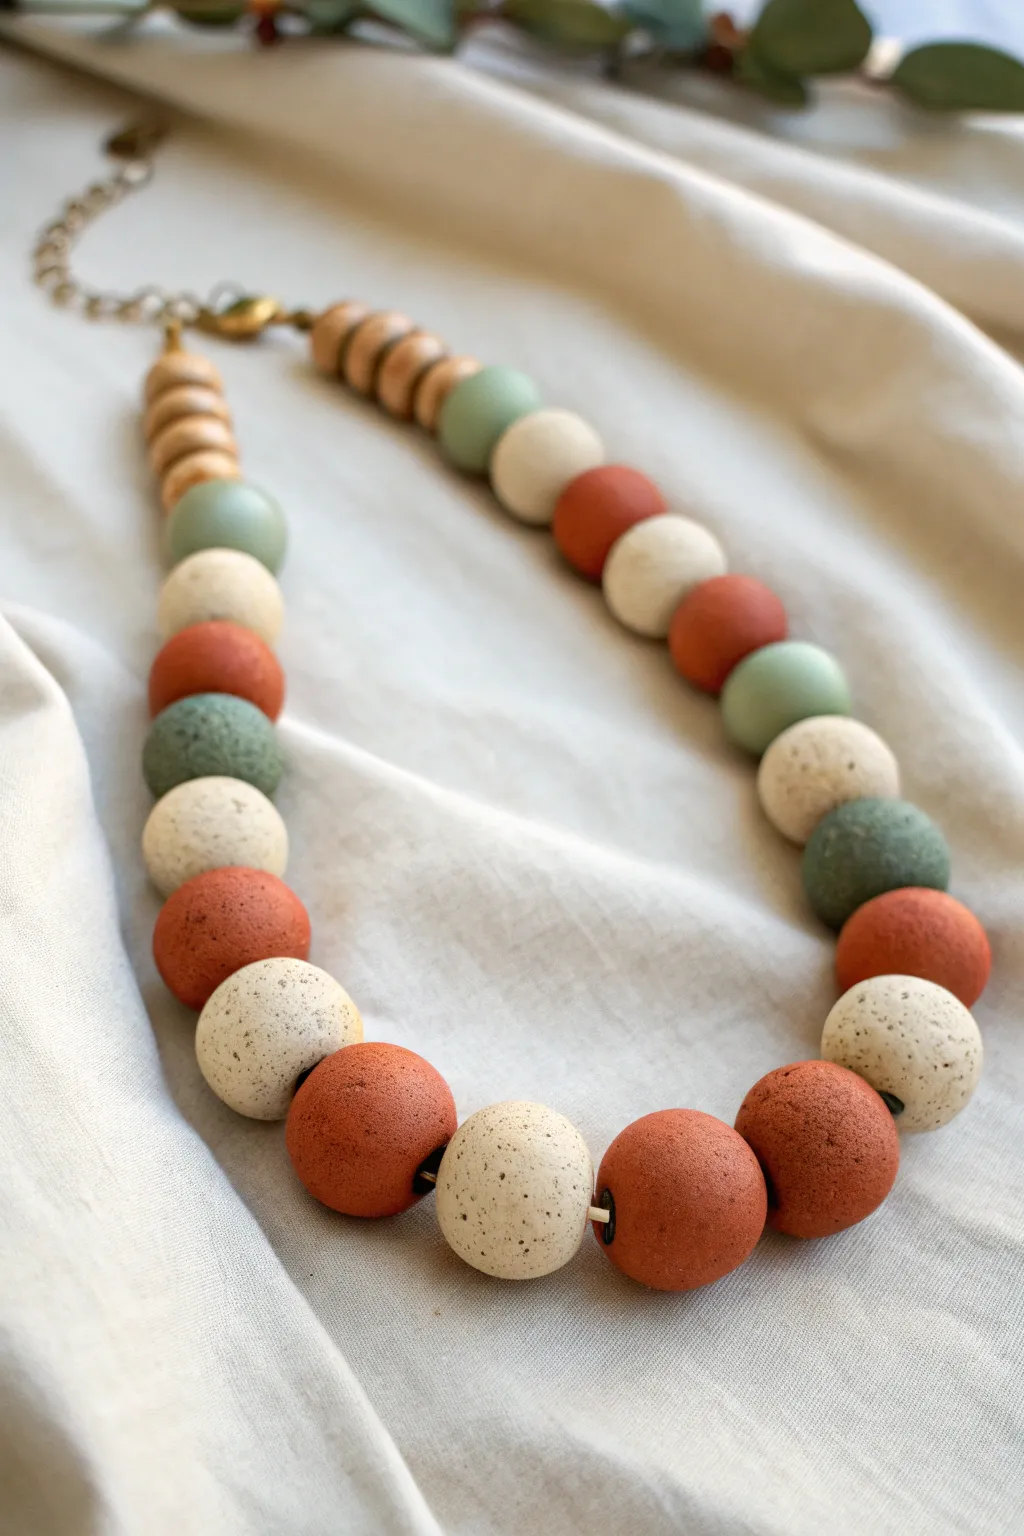
Embrace the natural beauty of stone and clay with this bold, chunky necklace. Featuring hollow polymer clay beads in rust, sage, and granite textures, this statement piece adds an organic yet polished touch to any outfit.
Step-by-Step Guide
Materials
- Polymer clay (terracotta, sage green, and granite/speckled cream)
- Small wooden beads or spacer beads (natural finish)
- Hollow bead maker tool (or two matching measuring spoons)
- Needle tool or toothpick
- Sandpaper (varying grits from 400 to 1200)
- Acrylic roller or pasta machine
- Flexible tissue blade
- Jewelry cord or beading wire
- Crimp beads and crimping pliers
- Clasps and jump rings
- Oven and baking sheet
- Cornstarch or baby powder (as release agent)
Step 1: Creating the Hollow Beads
-
Condition the clay:
Start by thoroughly conditioning your three main colors of polymer clay—terracotta, sage, and speckled cream—until they are soft and pliable. -
Sheet the clay:
Roll each color into a consistent sheet, approximately 2-3mm thick. If you have a pasta machine, use a medium setting to ensure uniform thickness. -
Cut the circles:
Use a round cutter that is slightly larger than the diameter of your hollow bead mold to punch out circles from your clay sheets. You will need two circles for each finished bead. -
Form the domes:
Dust your hollow bead mold or measuring spoons lightly with cornstarch to prevent sticking. Press a clay circle gently into the mold, ensuring it fits flush against the curve without trapping air. -
Trim excess clay:
Using your flexible tissue blade, carefully slice across the top of the mold to remove any excess clay, creating a perfectly flat rim for your half-sphere. Repeat this for all your circles. -
Join the halves:
Take two matching half-spheres (still in the molds if possible, or carefully removed) and apply a tiny dab of liquid clay or Sculpey Bake & Bond to the rims. Press them together firmly but gently to create a full sphere. -
Smooth the seam:
Gently roll the bead between your palms to round it out and blur the seam where the two halves meet. You can use a silicone tool to smooth the joint further if needed. -
Create the bead holes:
While the clay is raw, use a needle tool to pierce a hole directly through the center of the bead. Wiggle it slightly to ensure the hole is wide enough for your cord. I find piercing from both sides helps keep the shape. -
Texturize (Optional):
Looking at the reference, the terracotta beads have a lovely pitted texture. You can achieve this by gently rolling the raw bead over a piece of rough sandpaper or tapping it lightly with a toothbrush.
Seam Stress?
If the seam where you joined the halves cracks during baking, fill it with a mix of liquid clay and shavings of the raw clay color, then re-bake briefly.
Step 2: Baking and Assembly
-
Bake the beads:
Arranged your beads on a baking sheet, ideally resting in a bed of cornstarch or on a bead rack to prevent flat spots. Bake according to your brand’s specific temperature and time instructions. -
Cool and sand:
Allow the beads to cool completely. Once hard, wet-sand them, starting with 400 grit and working up to 1200 grit, focusing especially on the seams to make them invisible. -
Buff the finish:
For that matte, stone-like look seen in the photo, buff the beads briskly with a piece of denim or a soft cotton cloth rather than applying a glossy varnish. -
Prepare the spacers:
Sort out your small wooden disc beads. These will act as the transition element near the clasp, sitting cleanly against the neck. -
Layout the design:
Lay your beads out on a bead board or towel. Start large in the center with alternating terracotta and speckled beads, transitioning to the smaller sage beads, and finishing with the wooden discs at the ends. -
String the beads:
Cut a length of jewelry wire or strong cord. Thread your beads, following your layout pattern carefully. -
Secure the ends:
Thread a crimp bead onto the wire end, followed by a jump ring or clasp loop. Thread the wire back through the crimp bead and pull tight. -
Crimp and finish:
Use your crimping pliers to flatten the crimp bead securely. Trim the excess wire and tuck the tail into the adjacent wooden beads for a clean finish.
Level It Up
Mix dried tea leaves or black pepper into the cream clay before rolling while conditioning to create your own custom organic granite effect.
Now you have a stunning, lightweight statement piece that brings an earthy elegance to your wardrobe
Ombre Teardrop Dangles
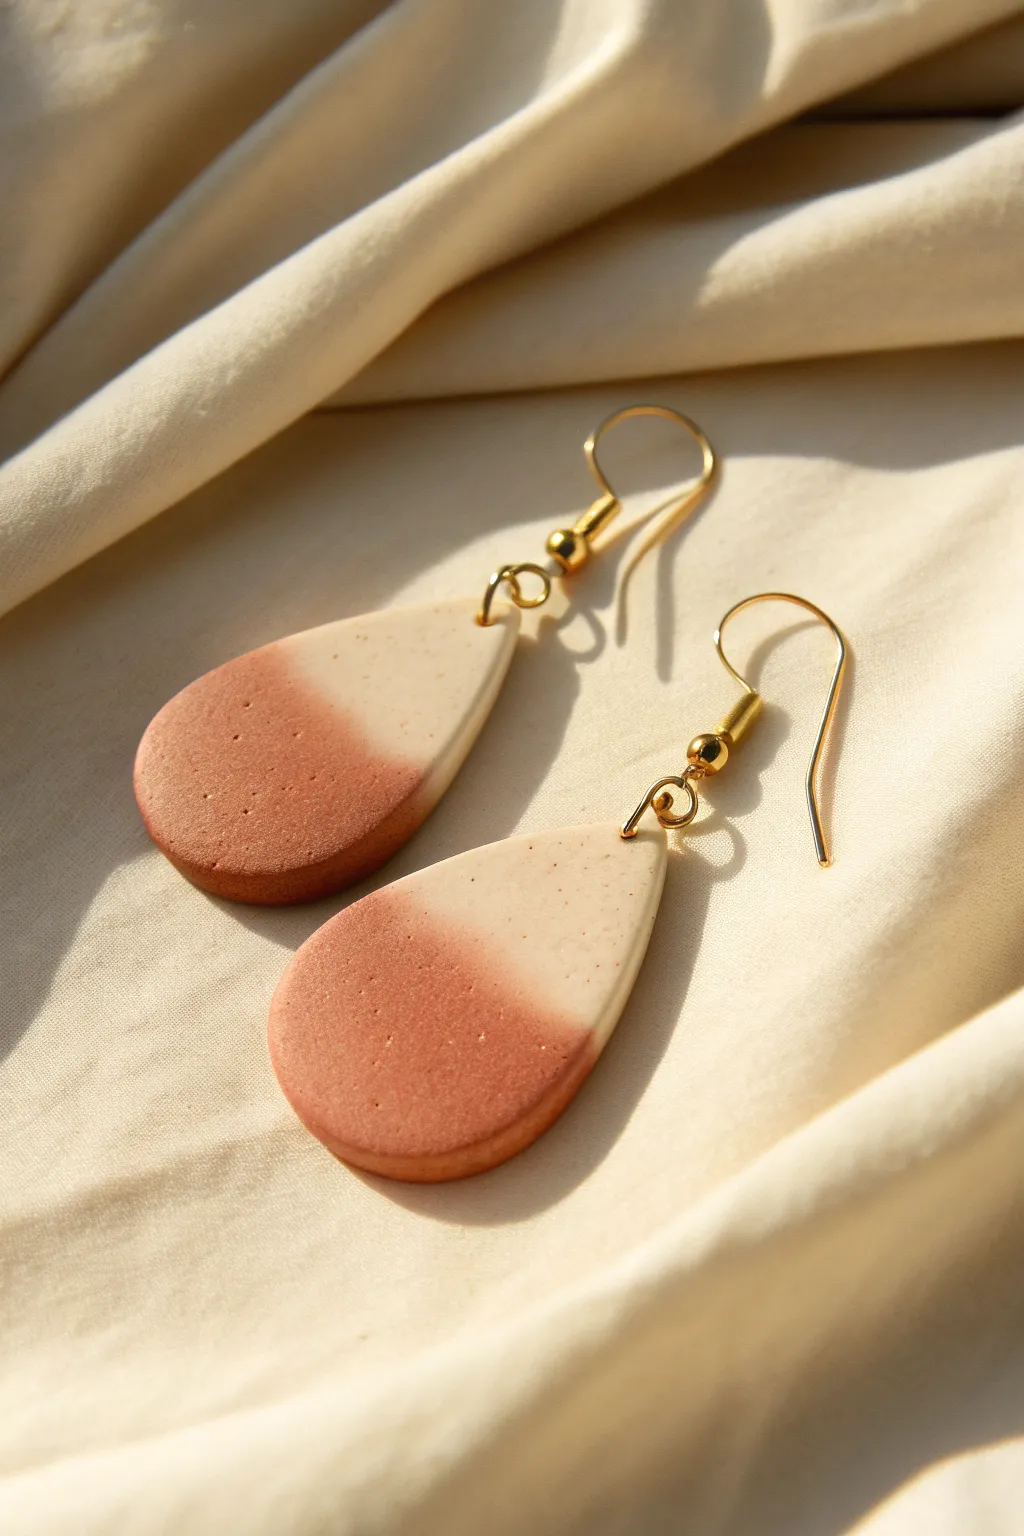
Capture the warm glow of dusk with these elegant ombre dangle earrings. The seamless blend of terracotta and cream clay creates a sophisticated gradient that looks stunning paired with gold hardware.
Detailed Instructions
Materials
- Polymer clay (Terracotta or Rust color)
- Polymer clay (Cream or Beige color)
- Small clay rolling pin
- Teardrop clay cutter (approx. 1.5 inches)
- Small blending tool or your fingertip
- Parchment paper or ceramic tile
- Hand drill or needle tool
- 2 Gold fishhook ear wires
- 4 Gold jump rings (small)
- Jewelry pliers (needle nose and flat nose)
- Oven
Step 1: Creating the Clay Gradient
-
Condition the clay:
Begin by warming up both the terracotta and cream clays in your hands separately. Knead them until they are soft, pliable, and free of any cracks. -
Form teardrop shapes:
Create two small teardrop shapes of roughly equal size from each color. You should have two rust teardrops and two cream teardrops. -
Join the colors:
Take one rust teardrop and one cream teardrop. Place them on your work surface so the pointed tip of the rust meets the rounded bottom of the cream. -
Flatten delicately:
Gently press the two pieces together at the seam so they stick, then flatten the combined piece slightly with your palm. -
Roll the slab:
Using your rolling pin, roll the combined clay into a slab about 3mm thick. Roll in the direction of the colors (top to bottom) to encourage them to meet, rather than widening the slab too much. -
Blend the seam:
To create the ombre effect, create a ‘Skinner blend’ modification by folding the clay sheet in half (bottom to top), then rolling it out again. Repeat this folding and rolling process 10-15 times. -
Alternative smear technique:
If the fold method is intimidating, I sometimes just use my thumb to gently smear the lighter clay down over the darker clay and vice versa at the seam line until the transition looks soft.
Fixing Muddy Colors
If your gradient looks muddy or gray in the middle, you over-blended. Stop mixing sooner next time, or wipe your hands between touching the different colors.
Step 2: Cutting and Baking
-
Position the cutter:
Once you have a smooth gradient sheet, inspect it to find the prettiest section where the two colors merge. Place your teardrop cutter over this area. -
Cut the shapes:
Press the cutter firmly down into the clay. Give it a tiny wiggle to ensure it cuts all the way through, then lift straight up. -
Smooth the edges:
Lift the cut shapes carefully. Gently run your finger along the cut edges to smooth out any sharpness or stray bits of clay. -
Pierce holes:
Using a needle tool, poke a hole near the very top point of the teardrop. Ensure the hole is large enough for your jump rings but not too close to the edge. -
Bake:
Place the pieces on a parchment-lined baking sheet or ceramic tile. Bake according to your specific clay brand’s package instructions (usually around 275°F for 15-30 minutes). -
Cool down:
Allow the pieces to cool completely in the oven with the door slightly ajar. This helps prevent thermal shock and brittleness.
Add Some Sparkle
Before baking, press gold leaf flakes into the transition line between the two colors. The metallic flecks will highlight the ombre effect beautifully.
Step 3: Assembly
-
Open jump rings:
Using two pairs of pliers, twist your jump rings open. Remember to twist the ends away from each other (side-to-side) rather than pulling them apart. -
Attach hardware:
Thread an open jump ring through the hole you created in the clay. Add the loop of the fishhook ear wire onto the jump ring as well. -
Close the rings:
Twist the jump ring back into a closed position, ensuring the ends meet continuously so the hook doesn’t slip out. -
Final adjustment:
Check that the earring faces forward when worn. If not, add a second small jump ring between the clay and the ear wire to correct the orientation.
Enjoy wearing these warm, earthy tones with your favorite neutral outfit
Faux Stone Cabochon Rings

Capture the timeless elegance of jade without the price tag by crafting this realistic faux stone ring. Using translucent polymer clay and simple marbling techniques, you’ll create a stunning, swirling green cabochon set in a classic gold-toned bezel.
Step-by-Step
Materials
- Translucent polymer clay
- Green alcohol ink (medium or emerald green)
- White alcohol ink
- Gold polymer clay or metallic gold powder
- Liquid polymer clay (clear)
- Ring blank (with pad)
- Oval clay cutter (small)
- Wet/dry sandpaper (400 to 1000 grit)
- UV resin or polyurethane gloss varnish
- UV lamp (if using resin)
- Sculpting tools
- Rolling pin or pasta machine
Step 1: Mixing the Faux Stone
-
Prepare the base:
Start by conditioning a block of translucent polymer clay until it is soft and pliable. Divide it into three unequal portions. -
Add color:
To the largest portion, add 2-3 drops of green alcohol ink. Knead thoroughly until the color is evenly distributed and translucent. -
Create variation:
To the second portion, add just 1 drop of green ink for a lighter shade. Leave the smallest third portion uncolored or add a tiny drop of white ink for milky veins. -
Chopping techniques:
Roll each color into thin snakes. Use a blade to chop these snakes into tiny, irregular confetti-sized bits. I find chopping them quite small yields better marbling. -
Recombine the clay:
Gather all the chopped bits into a pile and squeeze them together into a rough block. Do not knead! You want the separation of colors to remain distinct.
Quench for Clarity
Drop your hot, baked stone immediately into a bowl of ice water straight from the oven (called quenching). This increases the transparency of translucent clay significantly.
Step 2: Shaping the Cabochon
-
Shape the stone:
Roll the rough block into a ball, then flatten it slightly with an acrylic roller to a thickness of about 5-6mm. Look for the most interesting swirl pattern. -
Cut the oval:
Use your small oval cutter to punch out your cabochon shape. Smooth the sharp bottom edges with your fingertip. -
Dome the top:
Gently press and smooth the top edges of the cut oval to create a domed, cabochon effect. Try to keep the surface smooth to minimize sanding later. -
Bake the stone:
Place the faux stone on a tile and bake according to your clay manufacturer’s instructions (usually 275°F/135°C for 30 minutes). Let it cool completely.
Step 3: Creating the Setting
-
Prepare the bezel clay:
Condition a small amount of gold polymer clay. Roll it out into a long, thin strip, roughly 2mm wide and 1mm thick. -
Wrap the stone:
Apply a tiny amount of liquid clay to the side edge of your baked stone. Wrap the gold strip around the perimeter of the stone to create the bezel, trimming the excess where the ends meet. -
Smooth the seam:
Use a rubber sculpting tool to gently blend the seam of the gold strip so it looks continuous. Ensure the gold hugs the stone tightly. -
Backing the stone:
Roll a thin sheet of gold clay and place your wrapped stone on top. Cut around the base with a craft knife to create a backing plate. -
Attach ring blank:
Embed the flat pad of your ring blank into the back of the gold clay. Use a dab of liquid clay between the metal and the raw clay for a strong bond. -
Second bake:
Bake the entire assembly again for the full duration recommended by the clay package to cure the setting.
Metallic Magic
Don’t have gold clay? Mix gold mica powder into translucent clay, or paint the cured bezel with gold leaf paint for an even brighter metallic shine.
Step 4: Finishing Touches
-
Wet sanding:
Once cool, wet sand the green stone surface gently with 400 grit, moving up to 1000 grit sandpaper to remove fingerprints and reveal the translucency. -
Polishing:
Buff the stone briskly with a denim cloth or a polishing wheel on a rotary tool to bring out a natural sheen. -
Glazing:
For a high-gloss, glass-like finish like the photo, apply a layer of UV resin to the stone (avoiding the gold bezel) and cure under a UV lamp for 2-3 minutes.
Your sophisticated faux jade ring is now ready to add a touch of vintage class to any outfit you wear
Mini Mosaic Tile Stud Sets
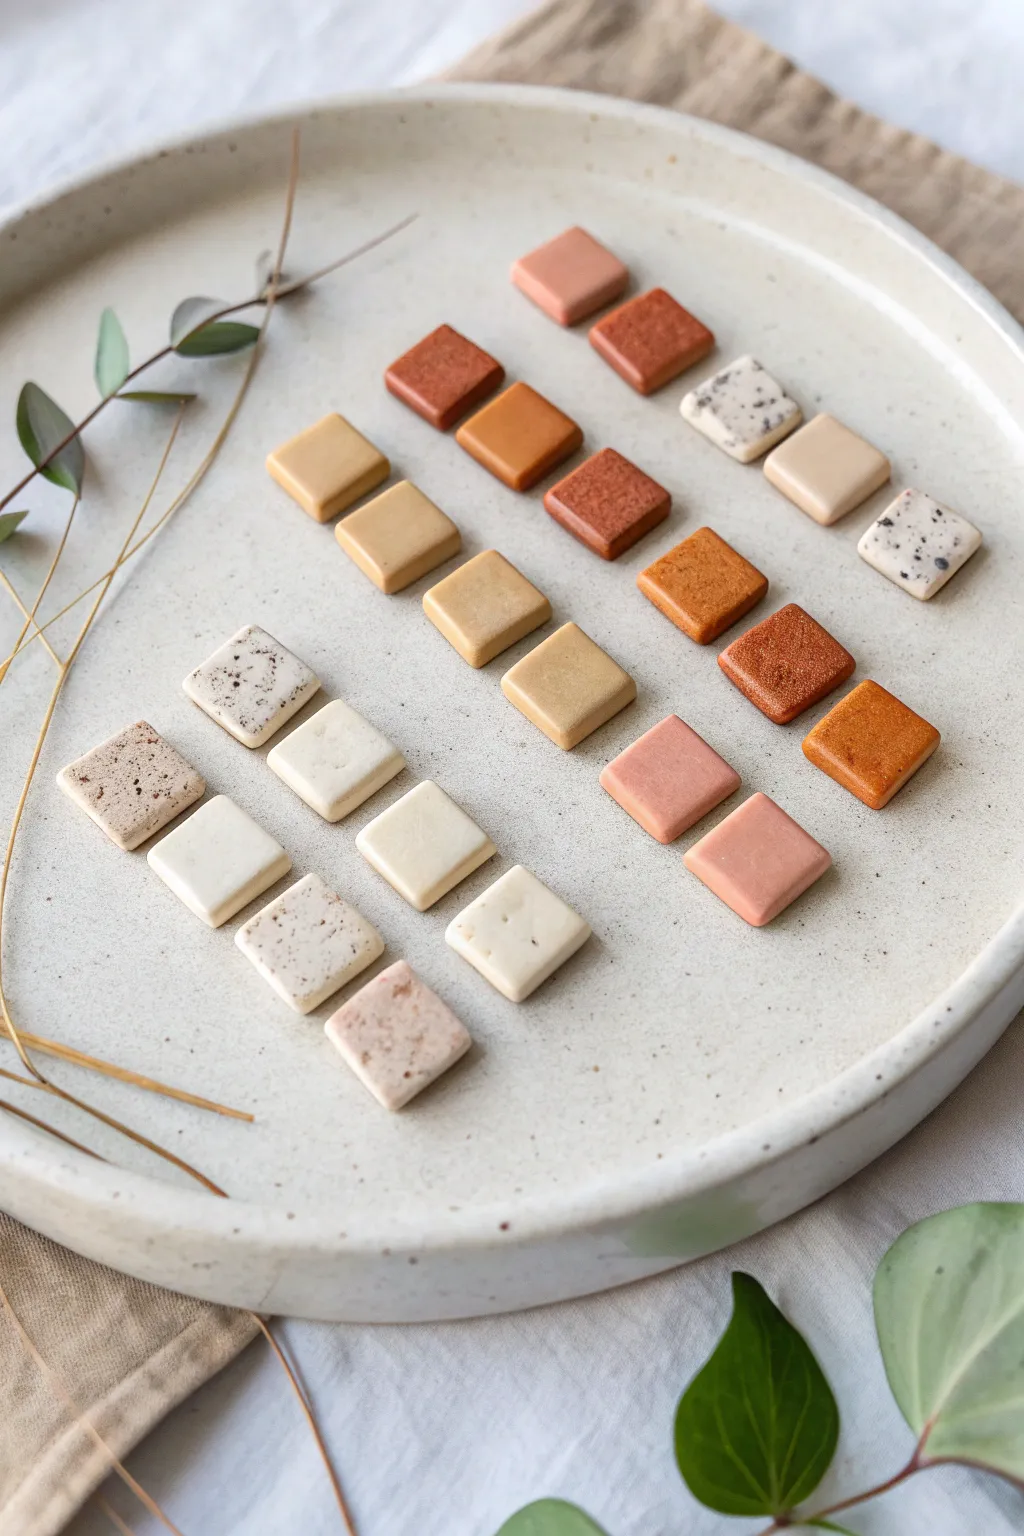
Embrace the beauty of minimalism with these tiny, perfectly square clay tiles that mimic the look of high-end ceramic mosaics. This project explores subtle color mixing and textural inclusions to create a sophisticated palette of earth tones ranging from speckled cream to deep rust.
How-To Guide
Materials
- Polymer clay (white, translucent, beige, terracotta, brown)
- Ground black pepper or dried coffee grounds (for speckling)
- Acrylic rolling pin or pasta machine
- Tissue blade or very sharp craft knife
- Small square cutter (approx. 1cm) or a grid ruler
- Ceramic tile or smooth glass work surface
- Sandpaper (400-800 grit)
- Earring posts and backs (stainless steel or tidal)
- Strong jewelry glue (e.g., E6000 or Loctite Gel)
- Gloss or matte varnish (optional)
Step 1: Color Mixing & Prep
-
Prepare the base:
Start by conditioning your white polymer clay until it is soft and pliable. This will serve as the base for your lighter shades and the mixing agent for your pastels. -
Create the speckled cream:
To achieve the look of speckled stoneware, take a portion of white clay and mix in a tiny pinch of ground black pepper or dried coffee grounds. Knead thoroughly until the specks are evenly distributed. -
Mix earth tones:
Create a gradient of warm neutrals. Mix white with small amounts of beige or translucent clay for the lightest tans. For the warmer squares, blend terracotta with varying amounts of white. -
Deepen the palette:
For the darker rust and sienna tiles, use pure terracotta or mix it with a tiny dot of brown to deepen the hue. I like to keep a few pieces pure and vibrant to anchor the collection. -
Sheet the clay:
Roll each mixed color out into a sheet. Aim for a thickness of about 3mm to 4mm—you want them substantial enough to hold an earring post but light enough to wear comfortably.
Step 2: Cutting & Shaping
-
Cut squares:
Using a small square cutter is the easiest method for uniformity. If you don’t have one, use a grid ruler and a sharp tissue blade to cut precise 1x1cm squares. -
Soften the edges:
Once cut, gently tap the edges of each square with your finger to round them slightly. This removes the harsh ‘cut’ look and makes them resemble fired ceramic tiles. -
Texture variation:
Leave some tiles smooth, but for others, lightly press a piece of sandpaper or a textured sponge onto the surface before baking to add a subtle matte finish. -
Arrange for baking:
Place your cut tiles on a ceramic tile or baking sheet lined with parchment paper. Ensure they aren’t touching each other.
Fixing Warp
If your squares curled slightly during baking, reheat them briefly and press them under a heavy book while they cool down to flatten them back out.
Step 3: Baking & Assembly
-
Bake:
Bake the clay according to the manufacturer’s instructions (usually 275°F/130°C) for about 30 minutes. Tent with foil to prevent whites from yellowing. -
Cool down:
Allow the tiles to cool completely in the oven before removing them. This helps prevent thermal shock cracking. -
Sand the edges:
Inspect your cooled tiles. If there are any sharp burrs on the sides or back, gently sand them away with 400-grit sandpaper for a professional finish. -
Clean surface:
Wipe the back of each tile with a little rubbing alcohol to remove any oils or dust, ensuring a strong bond for the glue. -
Attach posts:
Apply a small dot of strong jewelry glue to the flat pad of an earring post. Press it firmly onto the center of the back of a clay tile. -
Let cure:
Allow the glue to cure fully (usually 24 hours) before testing the bond or wearing the earrings.
Faux Glaze
Make them look like high-gloss ceramic tiles by adding a thick layer of UV resin or glossy polyurethane varnish to the top surface only.
Arranging your finished studs on a dish makes for a beautiful display before you gift or wear them
Cane-Slice Pattern Dangle Earrings
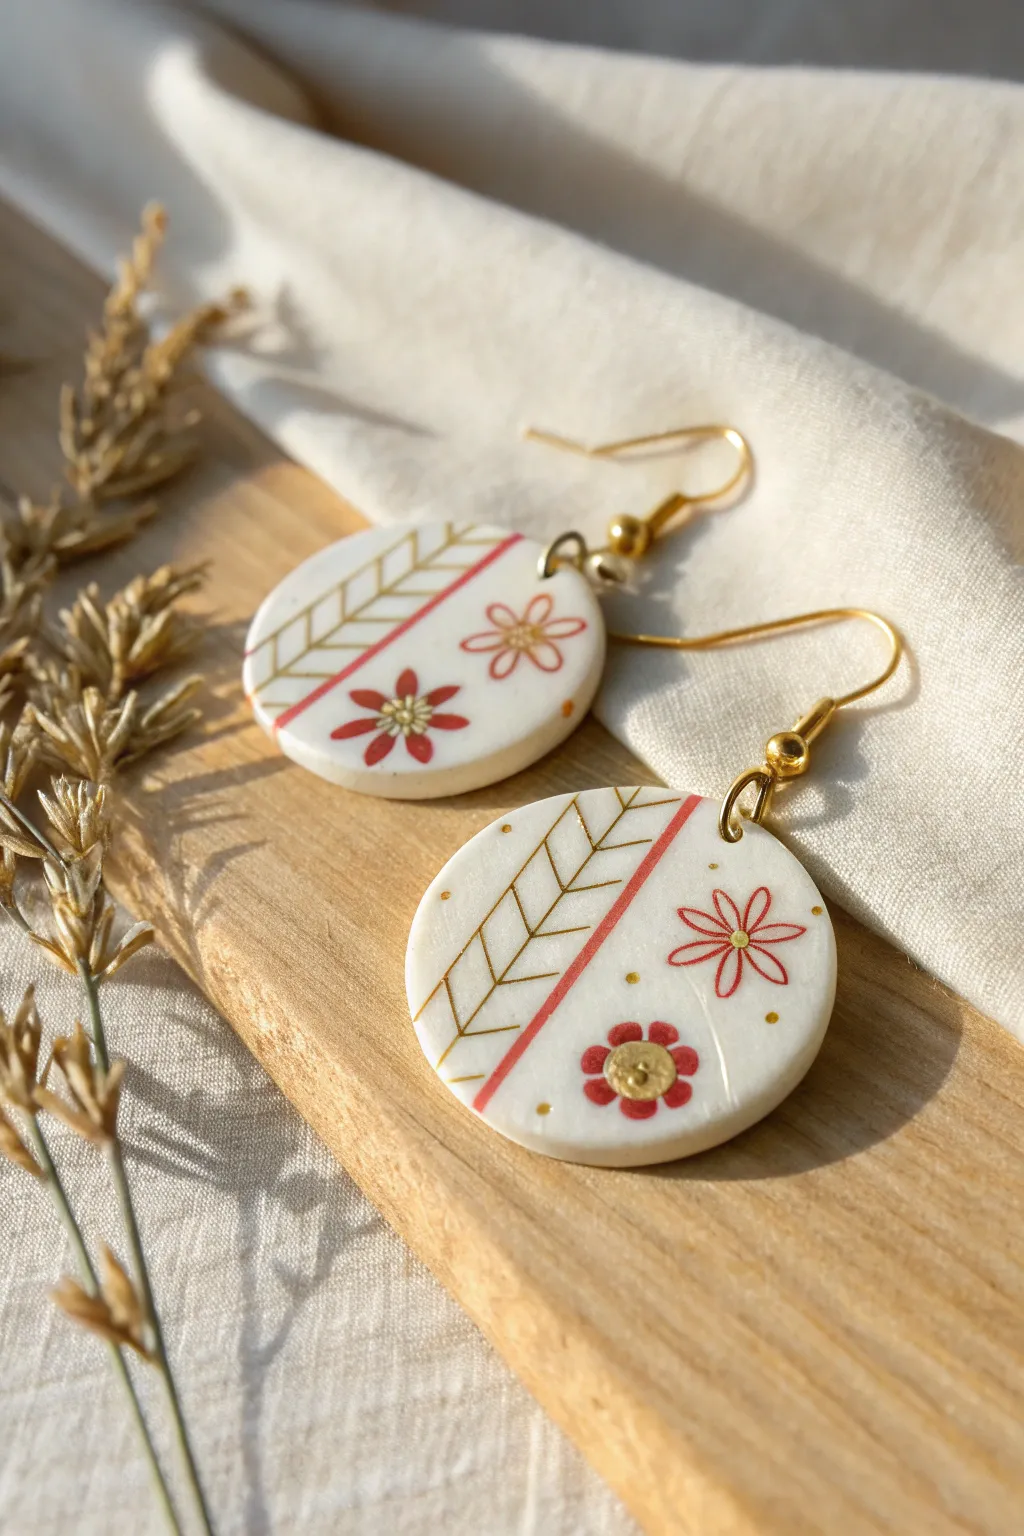
These elegant earrings combine classic white clay with delicate floral motifs and geometric gold accents for a timeless botanical look. The design features a lovely balance of solid and outlined petals, accented by a crisp dividing line that brings structure to the organic shapes.
Detailed Instructions
Materials
- White oven-bake polymer clay
- Rolling pin or pasta machine
- Circle clay cutter (approx. 1.5 inch diameter)
- Fine detail paintbrush (size 00 or 000)
- Acrylic paints: Coral pink, deep red, and metallic gold
- Small dotting tool or toothpick
- Gold jewelry jump rings (6-8mm)
- Gold fish-hook ear wires
- Hand drill or pin vibe with small bit
- Gloss or matte varnish (optional)
- Parchment paper and baking sheet
Step 1: Base Preparation
-
Condition the Clay:
Begin by kneading your white polymer clay until it is soft and pliable. This conditioning stage mimics the process of warming up dough and prevents cracking later. -
Roll the Slab:
Roll out the clay to a uniform thickness, roughly 3mm to 4mm thick. Using a pasta machine on a medium setting ensures a perfect, even surface, but a rolling pin with guide rings works well too. -
Cut the Shapes:
Use your circle cutter to punch out two identical discs. Press straight down and lift up to avoid distorting the circular shape. -
Smooth the Edges:
Gently rub the edges of the circles with your fingertip to remove any harsh cut lines or burrs, ensuring a professional, rounded finish. -
Initial Bake (Optional):
Some crafters prefer to bake the blank discs first to create a hard canvas for painting. If you choose this method, bake according to the package instructions (usually 275°F/130°C for 15-30 minutes) and let cool completely.
Clean Lines
To get a perfectly straight divider line, gently press a piece of masking tape onto the baked clay as a guide, paint against the edge, and peel it away quickly while wet.
Step 2: Designing the Motifs
-
Draw the Divider:
Mix your coral pink acrylic paint. Using your fine detail brush, paint a straight diagonal line across each circle, slightly off-center. This line anchors your composition. -
Paint the Gold Fern:
On the smaller side of the divided circle, use metallic gold paint to create a fern or wheat pattern. Paint a central stem parallel to your pink line, then add V-shaped chevrons branching off it. -
Create the Solid Flower:
On the larger side of the circle, dip your brush into the deep red paint. Paint a simple five-petal flower shape near the bottom edge. Don’t worry about perfection; organic shapes look best. -
Outline the Second Flower:
Using the coral pink paint again, carefully paint the outline of a second flower higher up in the open space. This creates a visually interesting contrast with the solid red flower. -
Add Centers and Details:
Once the base petals are dry, use gold paint to fill the center of the red flower. Use a dotting tool with gold paint to add a tiny center to the outlined flower. -
Golden Accents:
To finish the design, add tiny gold dots sporadically around the flowers to fill negative space and add a bit of sparkle.
Texture Twist
Before baking the raw clay, gently press a piece of canvas or coarse fabric onto the surface to give the white background a subtle woven texture.
Step 3: Assembly & Finishing
-
Final Bake or Seal:
If you painted on raw clay, bake the pieces now. If you painted on baked clay, let the paint cure fully. I like to add a thin layer of matte varnish at this stage to protect the detailed paintwork from scratches. -
Drill Holes:
Using a hand drill or pin vise, carefull drill a small hole at the very top of each circle. Ensure the hole is centered relative to your hanging orientation. -
Open Jump Rings:
Use two pairs of jewelry pliers to twist open your gold jump rings. Twist the ends away from each other (front to back) rather than pulling them apart, which weakens the metal. -
Attach Hardware:
Slide the jump ring through the clay hole, then slide on the loop of the fish-hook ear wire. Ensure the earring faces forward before closing the ring. -
Close and Secure:
Twist the jump ring closed tightly so there is no gap for the clay to slip through. Repeat for the second earring.
Wear your new botanical dangles with pride or gift them to a friend who loves handcrafted style
Layered Inlay Window Earrings
Capture the warmth of earthy tones with these stunning layered arch earrings. The design features a clever inlay technique that creates a clean, graphic window effect while keeping the structure lightweight and durable.
Step-by-Step
Materials
- Polymer clay in three colors: deep terracotta, burnt orange, and cream/beige
- Acrylic rolling pin
- Clay machine (pasta roller) – optional but helpful
- Large U-shaped arch cutter
- Small circular cutter (approx. 10mm)
- X-Acto knife or sharp flexible blade
- Sandpaper (400 to 1000 grit) or a Dremel tool
- Hand drill or pin vibe
- Jump rings (gold finish)
- Earring posts or hooks (gold finish)
- Jewelry pliers
- Superglue or liquid clay
- Ceramic tile or baking sheet with parchment paper
- Texture sponge or coarse sandpaper (for the top stud)
Step 1: Creating the Color Palette
-
Condition the Clay:
Begin by conditioning each of your three colors separately. Knead them until they are soft, pliable, and free of air bubbles. This is crucial for preventing cracks during baking. -
Create Sheets:
Roll out your clay into sheets of even thickness. Aim for about 3mm thick for the main structural pieces. A pasta machine set to a medium setting works perfectly, but rolling guides and an acrylic roller work just as well.
Step 2: Cutting the Arches
-
Cut the Base Arch:
Use your large U-shaped cutter to punch out two arch shapes from the burnt orange (middle tone) clay. These will serve as the outer frame of your design. -
Cut the Inner Rainbow:
From the same burnt orange cutouts, use a smaller U-cutter or carefully freehand with a craft knife to remove the center, leaving just a U-shaped frame. -
Create the Cream Insert:
Repeat the cutting process with the cream clay, but this time cut a U-shape that is slightly smaller than the negative space of your orange frame. Alternatively, cut a thick strip of cream clay and gently curve it to fit inside. -
Prepare the Center Arch:
Finally, cut a smaller, solid U-shape from the deep terracotta clay. This piece needs to fit snugly inside the cream curve.
Gaps in your seams?
If your inlay pieces aren’t sticking, apply a tiny amount of liquid polymer clay between the seams before baking. It acts like a grout and bonder.
Step 3: Assembling the Inlay
-
Fit the Pieces Together:
On your working tile, assemble the pieces like a puzzle. Place the orange frame first, nest the cream strip inside it, and finally place the terracotta arch in the center. Ensure they are touching. -
Bond the Seams:
Gently press the seams together with your fingers. I like to lay a piece of parchment paper over the top and lightly roll over it with the acrylic roller to fuse the clay into one cohesive flat surface without distorting the shape. -
Smooth the Edges:
Use your finger or a silicone tool to gently smooth any gaps between the colors. The goal is for the surface to feel like one solid piece. -
Add Texture (Optional):
For an organic look, you can lightly tap the surface with a piece of coarse sandpaper or a toothbrush to remove fingerprints and add a stone-like finish.
Clean Cuts Every Time
Dip your cutters into a small pile of cornstarch or water before pressing into the clay. This prevents sticking and ensures your arches have crisp edges.
Step 4: Making the Studs
-
Cut the Circles:
Using your small circular cutter, punch out two circles from the remaining clay. You can duplicate the colors (one cream, one terracotta) or mix them for a marbled look. -
Texturizing:
Press a texture sponge or sandpaper firmly into the raw clay circles to give them that rough, earthy appearance visible in the reference photo. -
Create Holes:
Use a needle tool or toothpick to poke a hole near the bottom edge of each circle and the top center of each arch. Ensure the holes are large enough for your jump rings.
Step 5: Baking and Assembly
-
Bake:
Place your tile in the oven. Bake according to your clay manufacturer’s instructions (usually 275°F/130°C for at least 30 minutes). Tent with foil to prevent scorching lighter colors. -
Cool and Sand:
Let the pieces cool completely. If there are rough edges, wet sand them with high-grit sandpaper or buff them with a Dremel tool for a professional finish. -
Attach Earring Posts:
Use superglue to attach the earring posts to the back of the circular studs. Let them dry fully before handling. -
Connect the Components:
Open a jump ring with your pliers (twist sideways, don’t pull apart). Thread it through the hole in the arch and the hole in the stud, then close it securely.
Now you have a sophisticated pair of statement earrings ready to wear or gift
Quilted Texture Charm Necklace
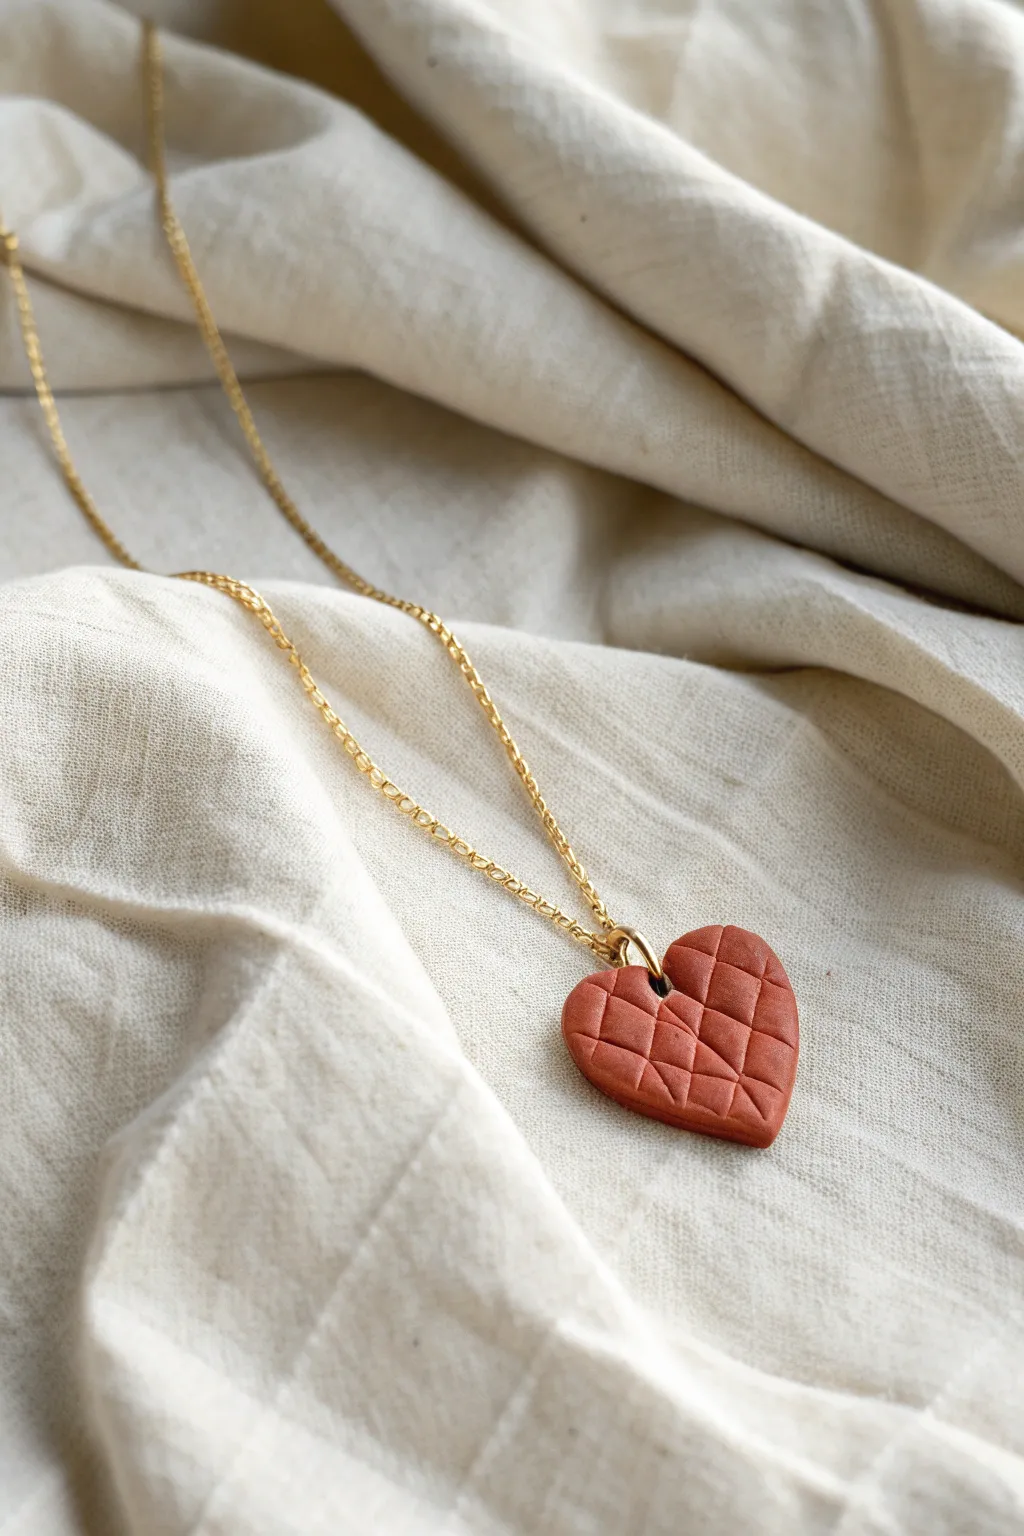
Embrace the cozy charm of textiles with this clay pendant that mimics the look of quilted fabric. This project uses a simple carving technique on terracotta-colored clay to create a warm, textured heart that pairs perfectly with a delicate gold chain.
Detailed Instructions
Materials
- Terracotta or brick red polymer clay
- Heart-shaped clay cutter (approx. 1 inch)
- Clay roller or pasta machine
- Craft knife or scalpel
- Pin drill or large needle tool
- Small gold jump ring (6-8mm)
- Gold necklace chain
- Pliers (chain nose and flat nose)
- Medium grit sandpaper (optional)
- Ceramic tile or baking sheet
- Piece of parchment paper
Step 1: Preparing the Base
-
Condition the Clay:
Begin by taking a chunk of your terracotta polymer clay. Knead it thoroughly in your hands until it becomes soft, pliable, and warm to the touch. -
Roll the Sheet:
Using your acrylic roller or pasta machine, roll the clay out into an even sheet. Aim for a thickness of about 4mm to 5mm; you want the pendant to feel substantial, not flimsy. -
Cut the Shape:
Place your heart-shaped cutter onto the clay sheet. Press down firmly and evenly to cut out your shape. If the clay sticks to the surface, gently slide a blade underneath to release it. -
Smooth the Edges:
Before texturing, gently run your finger around the cut edge of the heart to smooth out any harsh lines or jagged bits left by the cutter.
Lines not deep enough?
If your grid lines are disappearing during baking, press deeper initially. I like to re-trace the lines very lightly just before baking to ensure they stay crisp.
Step 2: Adding the Quilted Texture
-
Create Diagonal Lines:
Take your craft knife or a dedicated detail tool. Starting from one side, gently press lines into the clay surface diagonally across the heart. Don’t cut all the way through; just make a clear indentation. -
Finish the Grid:
Now, create lines going in the opposite diagonal direction to form a diamond grid pattern. Try to keep the spacing relatively consistent, but slight irregularities add to the handmade charm. -
Add Stitch Detail:
To enhance the ‘puffy’ look, use a dull tool or the back of your knife to press lightly into the intersections of the grid lines, deepening them slightly. -
Make the Hole:
Use a needle tool or small drinking straw to create a hole at the top center of the heart, right in the cleavage of the shape. Ensure the hole is large enough for your jump ring.
Add a matte finish
To get that earthy, unglazed ceramic look shown in the photo, lightly buff the cured surface with a piece of denim or coarse fabric after baking.
Step 3: Baking and Assembly
-
Bake the Pendant:
Transfer your clay heart to a ceramic tile or baking sheet lined with parchment paper. Bake according to the manufacturer’s instructions for your specific brand of clay (usually 275°F/130°C for 15-30 minutes). -
Cool Down:
Once baked, turn off the oven and let the piece cool down completely before handling. It will harden fully as it cools. -
Sand (Optional):
If there are any rough fingerprints on the back or edges, lightly sand them away with medium-grit sandpaper under running water. -
Open Jump Ring:
Using your two pairs of pliers, grip the jump ring on either side of the opening. Twist one hand forward and the other back to open the ring sideways—never pull it apart. -
Attach to Pendant:
Slide the open jump ring through the hole you created in the top of the clay heart. -
Add the Chain:
Before closing the ring, loop your gold necklace chain onto the jump ring as well. -
Close the Ring:
Use your pliers to twist the jump ring back into a closed position, ensuring the two ends meet perfectly flush so the chain doesn’t slip out.
Wear your new quilted heart necklace over a simple tee or sweater to add a touch of handcrafted warmth to your outfit
Translucent Sea-Glass Pendants
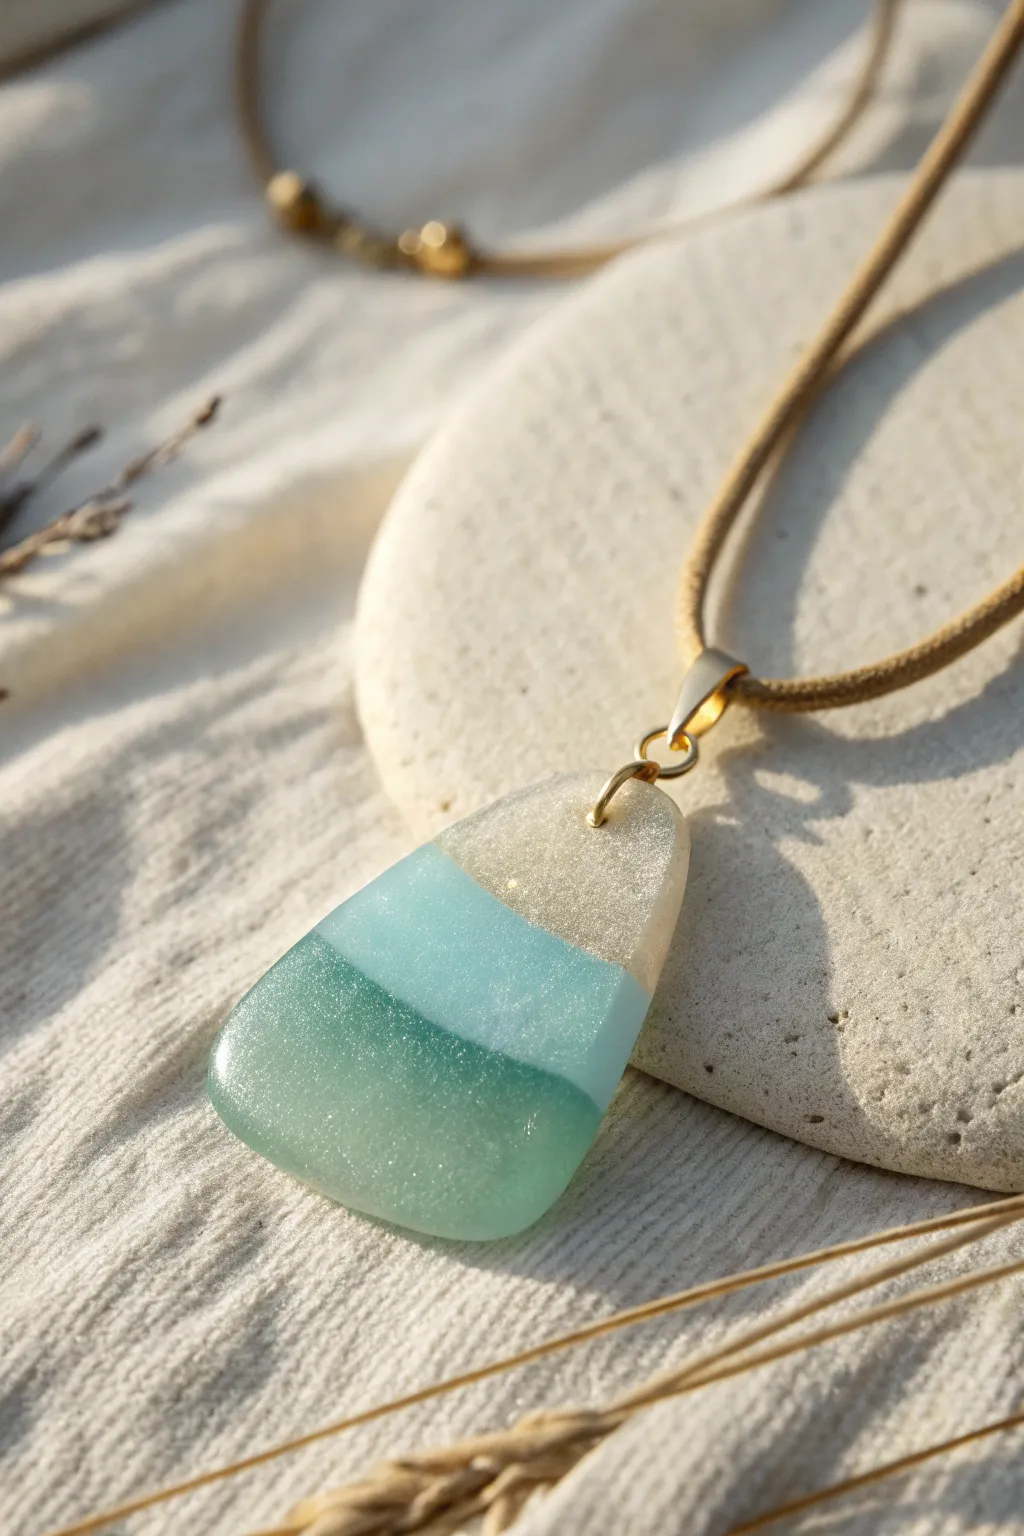
Capture the serene beauty of the shore with this stunning faux sea glass pendant. Featuring graduated layers of translucent clay in sand, aqua, and teal, this piece mimics the frosted, time-worn texture found on beach treasures.
How-To Guide
Materials
- Translucent polymer clay (white or uncolored)
- Alcohol inks (blue, teal/green, yellow/gold)
- White or pearl metallic alcohol ink (optional for shimmer)
- Coarse salt (sea salt or kosher salt)
- Acrylic rolling pin or clay machine
- Tissue blade or craft knife
- Teardrop or pear-shaped clay cutter
- Baking tile or parchment paper
- Hand drill or pin vibe
- Jump ring and pendant bail (gold tone)
- Suede or leather cord
- Fine grit sandpaper (800-1000 grit)
- Water bowl (for sanding)
- Gloss glaze or UV resin (optional for extra shine)
Step 1: Preparing the Faux Sea Glass Colors
-
Condition the base:
Start by thoroughly conditioning your translucent polymer clay until it is soft and pliable. Divide the clay into three equal portions. -
Create the sand shade:
Take the first portion and add a tiny drop of yellow or gold alcohol ink. You want a very subtle tint, barely off-white, to represent the sandy top. Mix until fully incorporated. -
Mix the aqua middle:
For the second portion, add a drop of blue alcohol ink and a tiny speck of green. We are aiming for a soft, airy aqua color. -
Mix the teal base:
For the third portion, use teal or a mix of blue and green alcohol inks to create a deeper, richer sea-green shade. This will be the darkest section at the bottom. -
Sheet the clay:
Roll each colored ball into a thick sheet, roughly 3mm to 4mm thick. Try to keep the thickness consistent across all three colors.
Icy Effect Pro-Tip
Before baking, quickly dip the clay in ice water for a moment immediately after rolling. This ‘shocks’ the translucent clay and can increase clarity significantly after baking.
Step 2: Assembling and Shaping
-
Cut the strips:
Using your tissue blade, cut a clean straight edge on the strips of clay so they can join flawlessly. You don’t need to cut the final shape yet, just prepare the blocks to touch. -
Join the layers:
Place the sand color at the top, the aqua in the middle, and the teal at the bottom. Press the cut edges gently together on your work surface. -
Smooth the seams:
Gently roll over the joined clay with your acrylic roller to bond the seams. Be careful not to thin it out too much; sea glass looks best when it has some chunky weight to it. -
Cut the teardrop:
Position your teardrop cutter over the joined clay so that the top third captures the sand color, the middle holds the aqua, and the wide bottom features the teal. Press down firmly to cut the shape. -
Soften the edges:
Remove the excess clay and gently tap the edges of your pendant with your finger to round them off slightly, removing the harsh ‘cookie cutter’ look.
Uneven Seams?
If your color transitions aren’t sticking, verify your clay isn’t too dry. Apply a tiny amount of liquid polymer clay or bake-and-bond to the edges before pressing them together.
Step 3: Texturing and Baking
-
Apply the salt texture:
Generously sprinkle coarse salt over the entire front surface of the pendant. Press the salt granules firmly into the clay using your roller or finger. This creates the pitted sea glass texture. -
Bake the piece:
Place the pendant on your baking tile and bake according to the manufacturer’s instructions for translucent clay (usually 275°F/130°C for 15-30 minutes). -
Remove the salt:
Once the pendant has baked and cooled completely, submerge it in a bowl of warm water. Let the salt dissolve, then scrub any remaining granules away with a soft brush. -
Frost thoroughly:
While the piece is still wet, sand the surface with fine-grit sandpaper. This enhances the frosted, opaque look typical of tumbled glass. -
Buff for translucency:
Buff the piece vigorously with a piece of denim or a soft cloth. This brings back the transparency of the clay without making it perfectly shiny. -
Drill the hole:
Mark a center point near the top of the ‘sand’ section. Carefully drill a hole using a hand drill or pin vise suitable for your jump ring size. -
Final assembly:
Open a gold jump ring and thread it through the hole. Attached the pendant bail to the jump ring, close it securely, and string it onto your suede cord.
Enjoy wearing your slice of the ocean, a perfect accessory for any beach lover.
Foil-Fleck Confetti Earrings
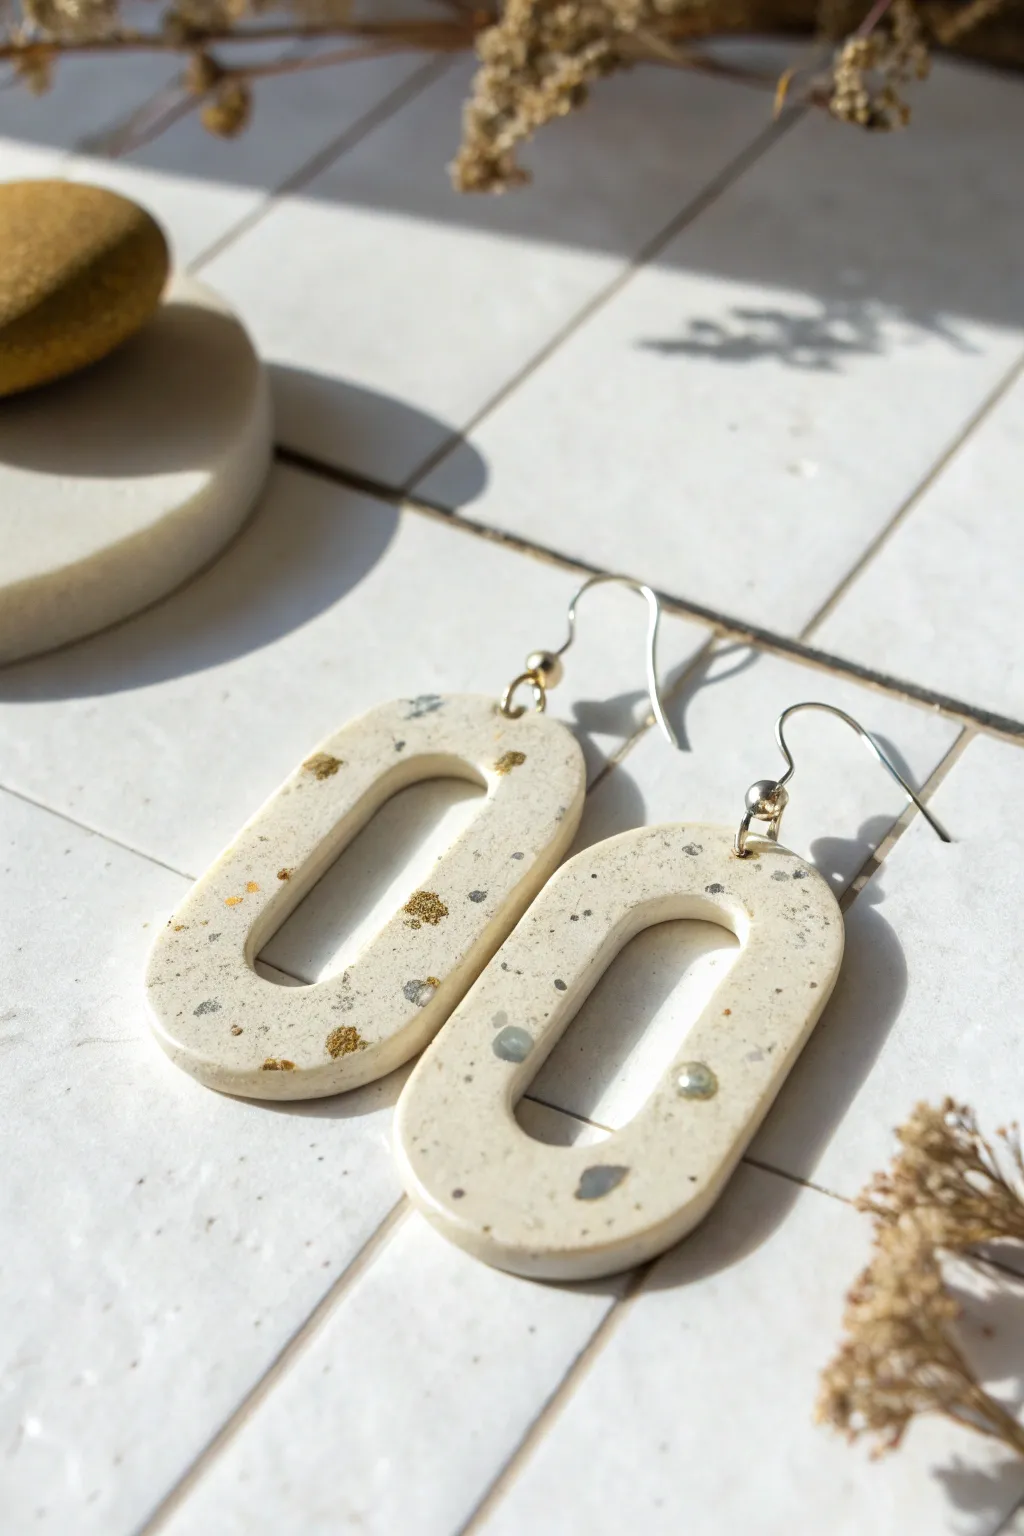
These sophisticated earrings mimic the look of natural terrazzo stone with a touch of elegance. By mixing translucent flakes and gold leaf into a neutral base, you create a faux-stone finish that looks incredibly high-end but is surprisingly simple to achieve.
Detailed Instructions
Materials
- Polymer clay (white or ecru)
- Small amount of grey or granite polymer clay (for speckles)
- Gold leaf foil sheets
- Rolling pin or pasta machine
- Oval shaped clay cutter (approx. 1.5 – 2 inches)
- Smaller oval cutter (for the center cutout)
- Clay knife or blade
- Parchment paper
- Oven
- Hand drill or pin vibe
- Jump rings and earring hooks
- Jewelry pliers
- Sanding paper (high grit) or buffing tool
- Gloss glaze (optional)
Step 1: Preparing the Clay
-
Condition the base:
Start by thoroughly conditioning your white or ecru clay until it is soft and pliable. This prevents cracking later on. -
Create the speckles:
Take a tiny pinch of the grey or granite clay and chop it into extremely fine, sand-like crumbs using your clay blade. You want these to be irregular and small. -
Add the gold:
Tear off small bits of gold leaf foil. Don’t worry about neatness; ragged edges look more organic and natural. -
Mix the inclusions:
Press the clay crumbs and gold foil bits into your conditioned white clay. Fold the clay over and roll it a few times to distribute the flecks, but don’t over-mix or the colors will muddy.
Step 2: Shaping and cutting
-
Roll the slab:
Roll your speckled clay out to a uniform thickness, roughly 3mm or 1/8th of an inch. A pasta machine is great for this, but a roller with depth guides works too. -
Check the pattern:
Inspect your slab. If you don’t see enough gold or grey on the surface, you can press a few more tiny pieces directly onto the top and roll gently once more to seal them in. -
Cut the outer shape:
Place your slab on a piece of parchment paper to prevent sticking. Use your larger oval cutter to punch out two shapes. -
Cut the center:
Center the smaller oval cutter inside the shapes you just made. Press down firmly to remove the middle section, creating the open loop design shown in the photo. -
Smooth the edges:
Before baking, gently run your finger along the cut edges to soften any sharp ridges left by the cutters.
Sticky Cutters?
If the clay sticks inside your cutter, dip the cutter into a bit of cornstarch or water before pressing down. This acts as a release agent for a clean cut.
Step 3: Baking and Assembly
-
Bake:
Place the clay pieces on a baking sheet lined with parchment paper. Bake according to your specific clay brand’s instructions (usually 275°F/135°C for 15-30 minutes). -
Cool down:
Allow the pieces to cool completely in the oven or on a wire rack before handling, as warm clay is fragile. -
Sand and buff:
For a professional finish, wet-sand the edges and surface lightly with fine-grit sandpaper. This reveals more of the granite specs and gold foil. -
Drill holes:
Mark a spot at the very top center of each oval. Use a hand drill or pin vise to carefully bore a hole for the hardware. -
Attach hardware:
Twist open a jump ring using your pliers. Thread it through the hole in the clay and attach your earring hook loop. -
Close the ring:
Gently twist the jump ring closed, ensuring the ends meet perfectly flush so the hook doesn’t slip out. -
Final polish:
Wipe the earrings with a soft cloth to remove any sanding dust. If you prefer a glossy look like polished stone, you can apply a thin coat of glaze now.
Foil Flaking Off
If gold leaf flakes off after baking, seal the surface with a very thin layer of liquid polymer clay or resin to lock the metallic bits in place.
Enjoy wearing your chic, faux-stone creations knowing no two pairs are ever exactly alike
Sculpted Bow Stud Earrings
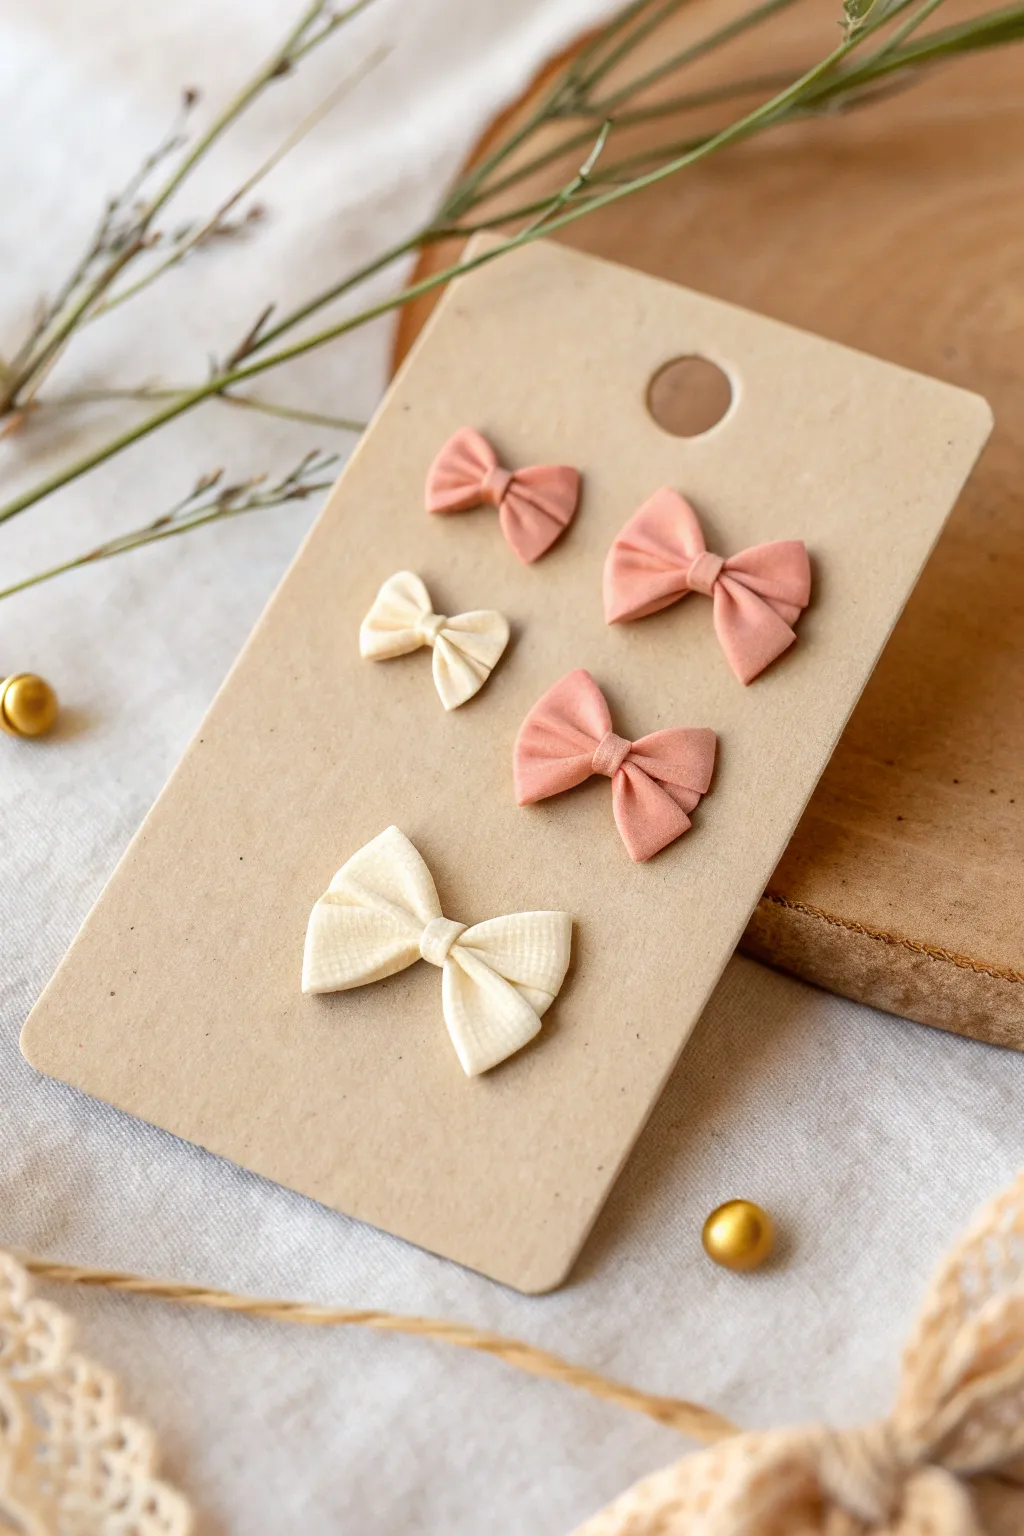
These dainty sculpted bow earrings bring a touch of feminine charm to any outfit with their soft matte finish and delicate fabric-like texture. Created from polymer clay in gentle shades of blush pink and cream, each tiny bow is a wearable piece of art that looks deceptively intricate but is wonderfully simple to assemble.
How-To Guide
Materials
- Polymer clay (blush pink and cream/white)
- Clay rolling pin or pasta machine
- Flexible tissue blade or craft knife
- Small piece of textured fabric (like linen or muslin) or a clay texture sheet
- Needle tool or toothpick
- Earring posts and backs (stainless steel or gold-plated)
- Strong jewelry glue (like E6000)
- Ceramic tile or glass baking sheet
- Oven
Step 1: Conditioning & Texturing
-
Prepare the Clay:
Begin by conditioning your blush pink and cream clay separately. Knead the clay until it is soft, pliable, and free of any air bubbles. -
Roll to Thickness:
Roll each color out into a flat sheet. You want the sheet to be relatively thin, approximately 1mm to 1.5mm thick, to keep the earrings lightweight and delicate. -
Add Texture:
Place your piece of textured fabric (linen works beautifully for this) over the clay sheet. Roll over it firmly once with your roller to imprint the fabric weave onto the clay surface. -
Cut Strips:
Using your flexible blade, cut the textured clay into narrow strips. For the larger bows, cut strips about 6-8mm wide; for the tiny bows, aim for 4-5mm wide.
Uneven Loops?
If your bow loops look lopsided, insert the handle of a small paintbrush into the loop to reshape it from the inside out before pressing the center knot piece on.
Step 2: Sculpting the Bows
-
Create the Loops:
Take a single strip and fold the two ends inward to meet in the center, overlapping slightly. This forms the two main loops of the bow. -
Pinch the Center:
Use your fingers to gently pinch the overlapped center section. This creates the gathered look of a real fabric bow. -
Make the Tails:
Cut a separate, shorter, V-shaped piece from the remaining strip to serve as the tails. Press this piece gently onto the back of the pinched center section. -
Add the Center Knot:
Cut a very thin, small rectangle of clay. Wrap this piece vertically around the pinched center, covering the join where the loops and tails meet. Smooth it down at the back. -
Refine the Shape:
Use a needle tool to gently fluff the loops, ensuring they aren’t flattened. I like to use the tool to press small indentation lines near the knot to mimic fabric creases. -
Create Variations:
Repeat the process to create pairs. Make some in pink and some in cream, varying the sizes as shown in the photo for a versatile set.
Step 3: Baking & Assembly
-
Prepare for Baking:
Place your finished bows on a ceramic tile or glass baking sheet. Double-check that no lint or dust has settled on the light-colored clay. -
Bake:
Bake the clay according to the manufacturer’s instructions for your specific brand (usually around 275°F or 130°C for 15-30 minutes). Do not overbake. -
Cool Down:
Allow the bows to cool completely in the oven or on the counter before handling them, as the clay is fragile while hot. -
Attach Posts:
Flip the cooled bows over. Apply a small dab of strong jewelry glue to the flat pad of an earring post. -
Secure:
Press the glued post firmly onto the center back of the bow. Let the glue cure fully (usually 24 hours) for a secure bond.
Add a Pearl Detail
For a vintage look, skip the clay center knot and instead press a tiny seed bead or micro-pearl into the center of the bow before baking.
Once the glue is fully set, your charming handmade bow collection is ready to be worn or gifted on a cute display card
Mismatched Abstract Earring Pairs
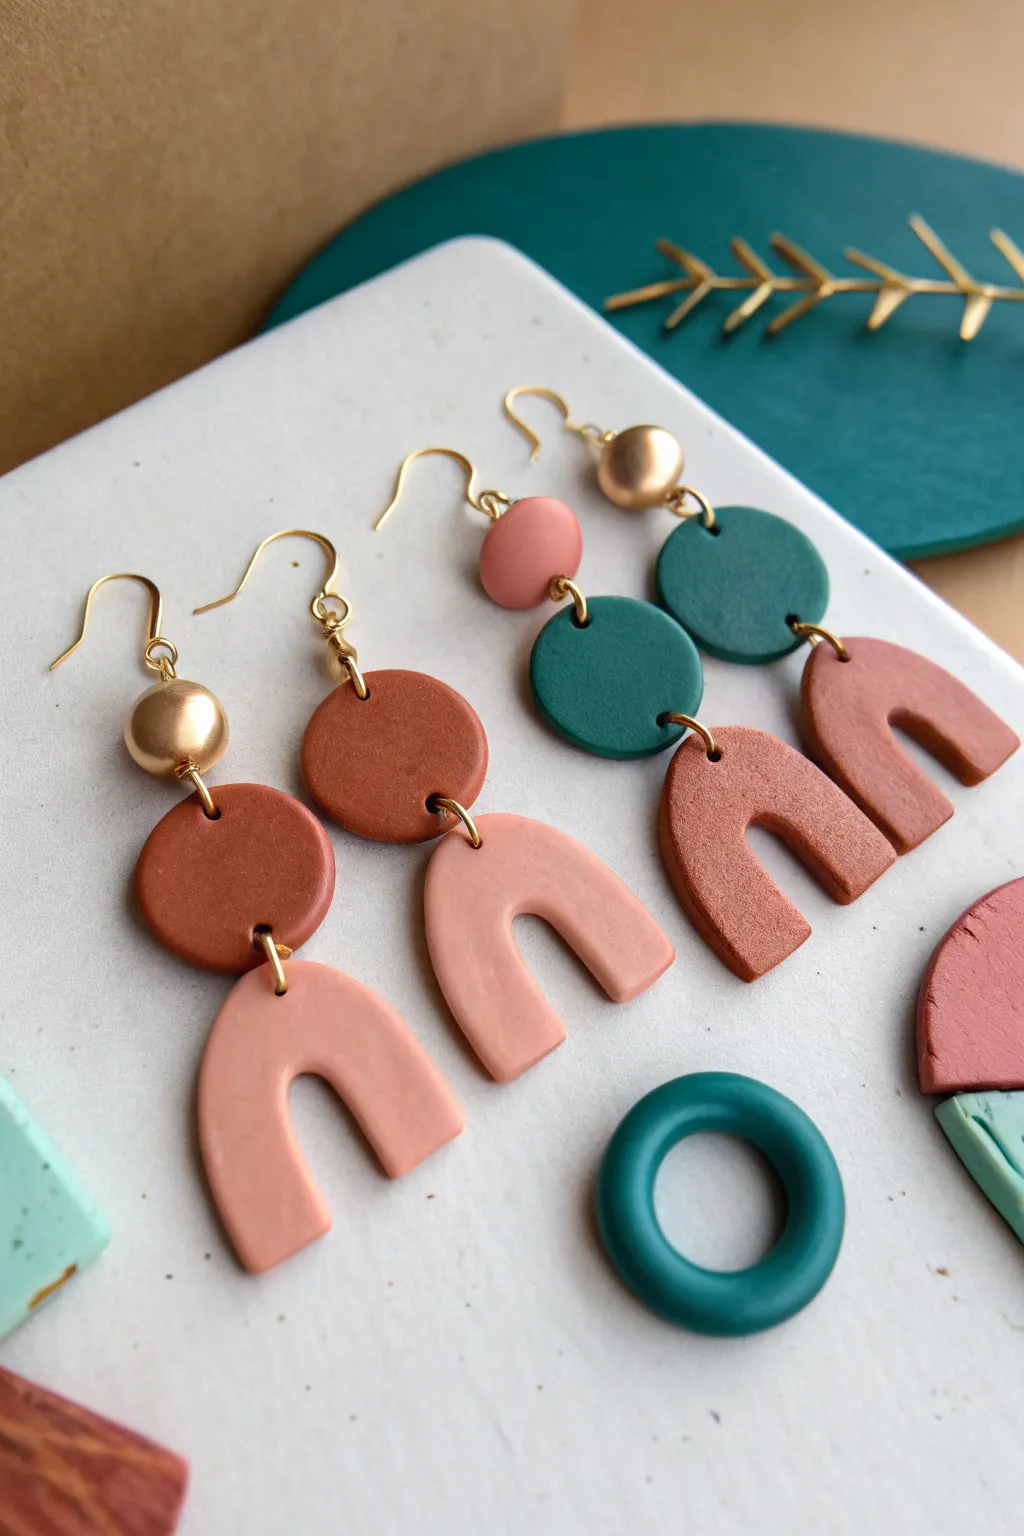
These stylish, earthy-toned earrings combine simple geometric shapes into eye-catching accessories perfect for everyday wear. The project explores harmonious color palettes like terracotta, soft pink, and deep emerald green to create professional-looking dangles.
Step-by-Step Guide
Materials
- Polymer clay (terracotta, soft pink/peach, deep emerald green)
- Acrylic rolling pin or pasta machine
- Circle cutters (various sizes: approx. 15mm, 20mm)
- Arch cutter (or blade/craft knife)
- Hand drill or needle tool
- Jewelry pliers (round nose and flat nose)
- Gold tone jump rings (6mm)
- Gold tone earring hooks
- Gold tone beads (optional, approx. 6-8mm)
- High-grit sandpaper (400 to 1000 grit)
- Ceramic tile or baking sheet
- Oven
Step 1: Preparing the Clay Shapes
-
Conditioning:
Start by conditioning each color of polymer clay separately. Knead the clay in your hands until it is soft, pliable, and warm to the touch. This prevents cracking later. -
Rolling out:
Roll out your clay sheets on a clean, flat surface to a uniform thickness, ideally around 3mm. A pasta machine set to a medium setting works best, but an acrylic roller with depth guides creates great results too. -
Cutting the arches:
Press your arch cutter firmly into the soft pink and terracotta clay sheets. If you don’t have a specific cutter, use a circle cutter to make a round, then use a smaller circle cutter entirely inside it to make a ring, cut that ring in half, and gently flatten the bottom edges. -
Cutting the circles:
Using your medium circle cutters, punch out shapes in the terracotta and emerald green clay. For the top studs or connector pieces, cut smaller circles from the soft pink clay. -
Adding texture (optional):
For the organic, matte look seen in the photo, gently sponge the surface with a piece of sandpaper or a toothbrush before baking to remove fingerprints and add a stone-like texture. -
Effective piercing:
Before baking, use a needle tool to create holes where the jump rings will go. Place holes at the very top of arches and at both the top and bottom of the connector circles. Ensure the hole is roughly 2mm from the edge to prevent breakage.
Smooth, Fingerprint-Free Clay
Before cutting shapes, gently wipe the raw clay surface with a baby wipe or a tiny bit of cornstarch. This helps smooth imperfections.
Step 2: Baking and Assembly
-
Baking:
Arrange your clay pieces on a ceramic tile or baking sheet lined with parchment paper. Bake according to your specific clay brand’s instructions (usually 275°F/130°C for 15-30 minutes). -
Cooling down:
Allow the pieces to cool completely inside the oven or on the counter. Clay is fragile when hot and achieves its full strength only after cooling. -
Sanding edges:
Once cool, inspect the edges. If there are any rough spots, wet-sand them gently with high-grit sandpaper under running water or in a bowl of water for a polished finish. -
Drilling adjustments:
If any holes closed up during baking or need to be slightly larger, use a small hand drill to carefully widen them now. -
Attaching the bead connector:
For the style with the gold bead, thread a gold headpin through the bead, create a loop at the bottom to attach to the terracotta circle, and a loop at the top to attach to the earring hook. -
Linking the shapes:
Open a jump ring by twisting it sideways with two pairs of pliers. Thread it through the hole in the top of the pink arch and the bottom of the corresponding circle or bead component. -
Closing the rings:
Twist the jump ring back into place until the ends meet perfectly flush. A secure closure ensures your earring pieces won’t fall apart while wearing them. -
Final hook assembly:
Open the loop at the base of your earring hook. Slide on the top circle component (or the top loop of your gold bead element) and close the hook loop securely.
Why Did My Clay Burn?
Use an oven thermometer! Built-in oven dials are often inaccurate. If your pieces are darkening, tent a piece of foil over them while baking.
Now you have a stunning set of geometric earrings ready to gift or wear.