Whenever I need a quick handmade gift (or a super fun party craft), I reach for clay bead bracelets because they feel instantly festive. Here are my favorite birthday-ready bracelet ideas you can mix, match, and personalize for any age.
Name And Age Centerpiece Bracelet
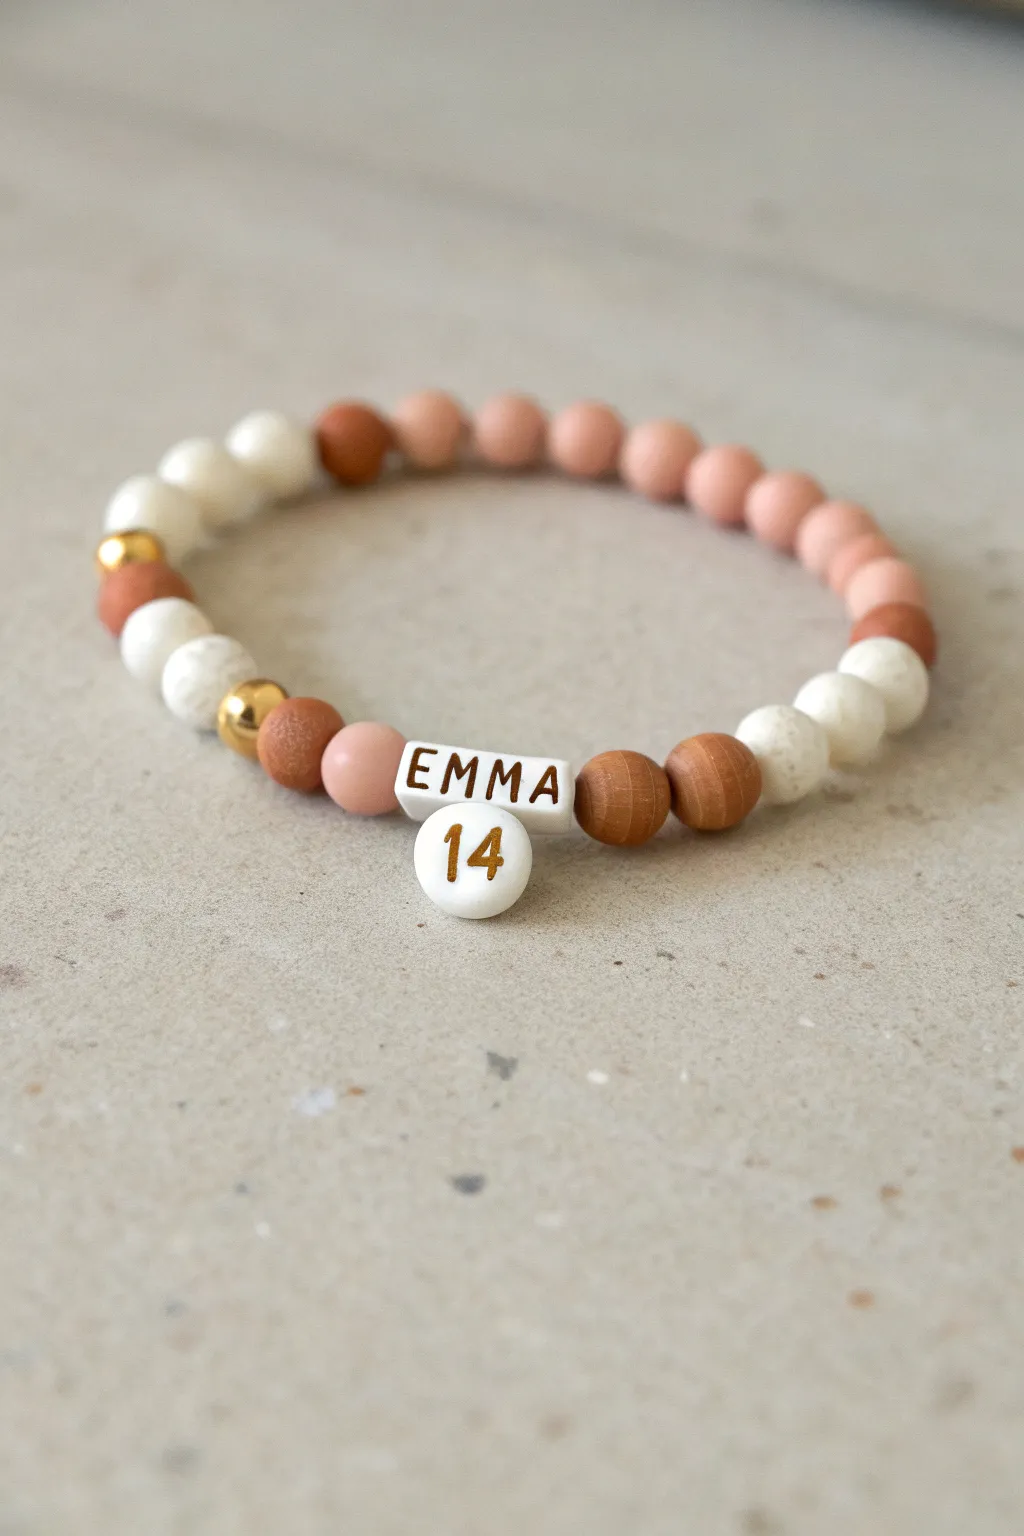
This charming design combines the earthy warmth of wood and clay with a personalized milestone touch. Featuring a balanced pattern of terra cotta, blush pink, and creamy white beads, it places a custom name and age charm front and center for a truly special birthday gift.
Step-by-Step
Materials
- Stretch cord (0.7mm or 0.8mm)
- Round wood beads (approx. 8mm, medium warm brown/terra cotta)
- Matte polymer clay beads (8mm, blush pink)
- White lava stone beads (8mm) or textured white clay beads
- Gold-plated or brass spacer beads (6mm, round)
- White square alphabet beads with gold lettering
- White round number bead with gold numerals (flat disc style)
- Jewelry glue (GS Hypo Cement recommended)
- Scissors
Step 1: Planning the Layout
-
Measure the wrist:
Before cutting any cord, measure the recipient’s wrist to determine the total length needed. For a 14-year-old, a standard size is often around 6 to 6.5 inches. -
Cut the cord:
Cut a piece of stretch cord about 10-12 inches long. I always cut extra length to make the final knotting process much less fumbly. -
Pre-stretch the elastic:
Give the cord a few gentle tugs. This pre-stretching helps prevent the bracelet from loosening up immediately after wearing it. -
Secure one end:
Place a piece of tape or a bead stopper clamp on one end of the cord so your beads don’t slide off while you work.
Hiding the Number Charm
If the age bead keeps flipping backward, add small 3mm spacer beads immediately next to it. This tightens the spacing and prevents the charm from rotating on the cord.
Step 2: Creating the Centerpiece
-
Select the name beads:
Gather the square gold-lettered beads to spell out the name (e.g., ‘EMMA’). -
Thread the name:
Thread the letters onto the cord. Double-check that they are facing the correct direction to be read easily. -
Add the age charm:
This design uniquely hangs the age below the name. If your number bead has a hole running top-to-bottom, you use a headpin to attach it, but for a simpler strung style like this, slide the cord through the horizontal hole of a flat round bead. -
Position the age:
Thread the round ’14’ bead so it sits directly in the middle of the name beads. For ‘EMMA’, place it between the two ‘M’s. -
Frame the centerpiece:
On either side of the full name block, add one wood bead to act as a bookend. In the photo, a warm brown wood bead brackets the white letters.
Uneven Taping
Does the bracelet look lumpy? Ensure all beads are 8mm size. Mixing 6mm and 10mm beads randomly can disrupt the smooth circle shape. Keep sizes consistent for a clean finish.
Step 3: Beading the Pattern
-
Start the left side:
Working outward from the left wood bead, string a matte blush pink clay bead. -
Add texture:
Next, add a brown wood bead, followed by a gold spacer bead for a touch of shine. -
Transition to white:
Add a white lava stone (or textured clay) bead, then another white bead. Follow this with a brown wood bead. -
Create the white block:
String two more white beads, then a gold spacer bead. -
Mirror the right side:
Repeat a similar pattern on the other side of the name: blush pink clay, wood bead, gold spacer. -
Continue the pattern:
Add a white bead, another white bead, then a wood bead. This creates that lovely asymmetrical but balanced look shown in the image. -
Fill the back:
Continue stringing the remaining back section with alternating blush pink beads and wood beads until you reach the desired length. The back of the bracelet in the image uses a sequence of pink-pink-pink-wood-wood to close the loop.
Step 4: Finishing Up
-
Check the fit:
Wrap the unfinished strand around your wrist (or a sizing cone) to ensure it fits comfortably without large gaps between beads. -
Tie the first knot:
Remove the tape/clip. Bring the two ends together and tie a simple overhand knot, pulling it tight to bring the beads together. -
Tie the secure knot:
Tie a surgeon’s knot (loop the cord twice instead of once) for extra security. Pull tight. -
Apply adhesive:
Dab a tiny drop of jewelry glue onto the knot. Be careful not to get glue on the beads themselves. -
Hide the knot:
Ideally, slide the knot inside the hole of one of the adjacent wood or lava beads to conceal it. Let the glue dry completely before trimming excess cord.
Now you have a thoughtful, customized keepsake ready for a sweet 14th birthday celebration


Rainbow Confetti Heishi Mix
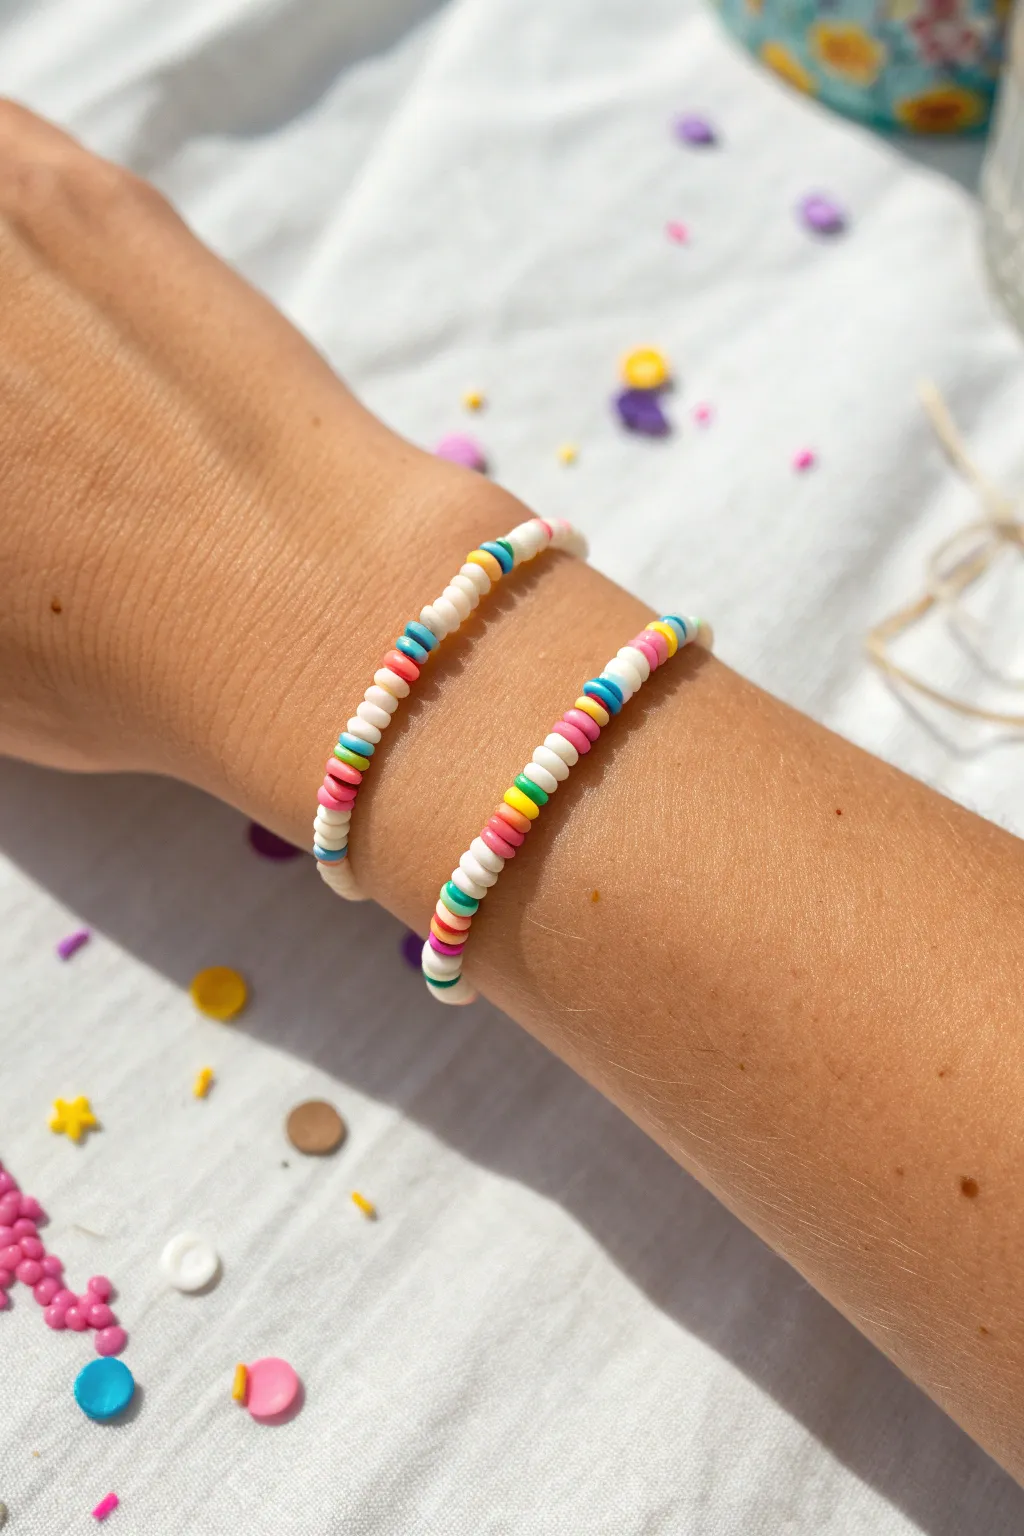
These cheerful bracelets mimic the joy of birthday sprinkles with their bright pops of color against a clean white background. The stacked look combines classic clay heishi discs with random bursts of rainbow hues for a playful yet wearable accessory.
How-To Guide
Materials
- White 6mm polymer clay heishi beads
- Assorted rainbow colored 6mm polymer clay heishi beads (pink, yellow, orange, turquoise, blue, purple)
- 0.8mm clear elastic stretch cord
- Super glue or jewelry cement
- Scissors
- Bead stopper or masking tape
- Ruler or measuring tape
Step 1: Preparation & Planning
-
Measure your wrist:
Wrap a measuring tape loosely around your wrist to find your size. Add about 0.5 inches to this measurement to ensure a comfortable fit that isn’t too tight. -
Cut the cord:
Cut a piece of elastic cord roughly 10-12 inches long. Having this extra length makes tying the finishing knot significantly easier than working with a short tail. -
Pre-stretch the elastic:
Gently tug on the elastic cord several times before you start beading. This crucial step prevents the bracelet from stretching out and becoming loose after you wear it a few times. -
Secure the end:
Attach a bead stopper to one end of your cord, or simply fold a piece of masking tape over the end, so your beads don’t slide right off while you work.
Knot Slipping?
If your elastic feels too slippery to hold a knot, try sanding the very ends of the cord lightly with a nail file before tying. The rougher texture helps the knot grip better.
Step 2: Creating the Pattern
-
Start with the base:
This design relies on white as the primary canvas. Begin by threading on 4 to 6 white heishi beads to start your first section. -
Add a color pop:
String on a single colorful bead. You can follow a specific rainbow order (ROYGBIV) or keep it random for a true confetti look. -
Build a color block:
For the second style visible in the photo, instead of a single bead, add a small grouping of 2 or 3 distinct colors together before returning to white. -
Return to neutral:
Thread on another segment of white beads. Vary the length of these white sections—sometimes use 3 beads, sometimes use 7—to create an organic, scattered rhythm. -
Continue the sequence:
Repeat the process of alternating white sections with colorful confetti bursts until the beaded length matches your wrist measurement. -
Check the fit:
Wrap the beaded strand around your wrist to check the size. I usually like it just loose enough to roll over my hand but not dangle too much.
Step 3: Finishing the Bracelet
-
Prepare the knot:
Remove the bead stopper or tape carefully, holding both open ends of the elastic firmly. -
The surgeon’s knot:
Cross the ends like you are tying a shoe. Loop one end through the circle a second time before pulling tight. This extra loop creates a surgeon’s knot, which is much more secure for elastic. -
Tighten evenly:
Pull the knot tight by tugging on all four strands (the two tail ends and the two bracelet loops) to ensure it seats deeply between the beads. -
Secure with glue:
Apply a tiny dot of super glue or jewelry cement directly onto the knot. Let it dry completely before touching it to avoid clouding the beads. -
Hide the knot:
Once the glue is dry, trim the excess elastic tails close to the knot. Gently slide the beads so the knot tucks invisibly inside the hole of a neighboring bead.
Gold Glam Up
Elevate the birthday look by swapping every third colorful bead for a gold spacer disc or a tiny gold ball bead. It adds a sophisticated sparkle to the confetti theme.
Stack several of these together to create a festive arm party perfect for celebrating any special day


Soft Pastel Party Palette
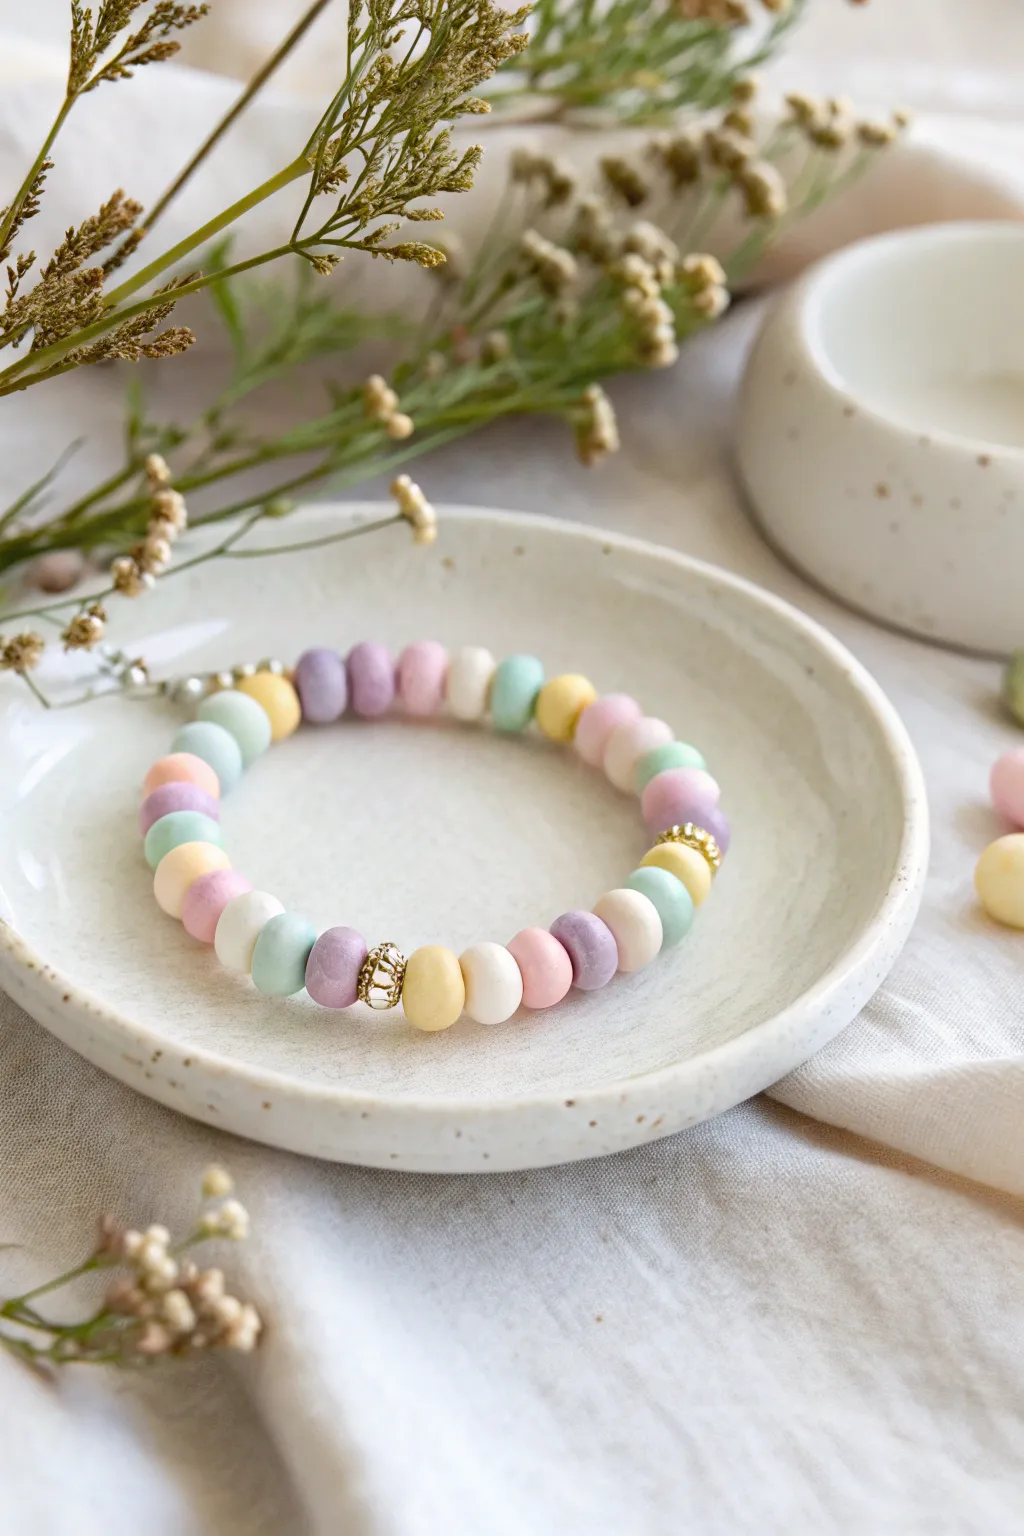
Capture the soft hues of a spring morning with this delicate clay bead bracelet. The matte finish of the pastel beads combined with subtle gold accents creates a sophisticated yet playful accessory perfect for any birthday celebration.
Step-by-Step Tutorial
Materials
- Polymer clay in pastel colors (baby pink, lavender, mint green, pale yellow, baby blue, white)
- Small gold rhinestone spacer beads (rondelle shape)
- Stretch cord (0.8mm or 1mm thickness)
- Ruler or bead design board
- Clay roller or pasta machine
- Small round clay cutter (approx. 8-10mm)
- Toothpick or clay needle tool
- Baking sheet and parchment paper
- Super glue or jewelry cement
- Scissors
Step 1: Crafting the Beads
-
Condition the clay:
Start by taking small amounts of each pastel polymer clay color. Knead them individually in your hands until they are soft, pliable, and free of any air bubbles. -
Roll out sheets:
Using a clay roller or a pasta machine, roll each color out into a thick slab. Aim for a thickness of about 4-5mm to match the chunky look of the beads in the image. -
Cut the shapes:
Use your small round cutter to punch out circles from each color sheet. You will need roughly 4-5 beads of each color for a standard adult wrist. -
Smooth the edges:
Gently pick up each clay circle and use your finger to smooth the sharp edges created by the cutter. You want them to look like soft, rounded discs rather than sharp cylinders. -
Pierce the holes:
Take a toothpick or needle tool and carefully pierce the center of each bead. Twist the tool gently as you push through to avoid deforming the round shape. -
Refine the hole:
Flip the bead over and insert the tool from the other side to ensure the hole is clean and even all the way through. -
Bake the beads:
Arrange your raw beads on a parchment-lined baking sheet. Bake them according to the specific temperature and time instructions on your package of polymer clay. -
Cool completely:
Once baked, turn off the oven and let the beads cool down fully before handling them. They harden as they cool.
Step 2: Assembly & Finishing
-
Measure the cord:
Cut a piece of stretch cord about 10-12 inches long. This extra length makes tying the final knot much easier. -
Pre-stretch the elastic:
Give the cord a few gentle tugs. I find this simple step prevents the bracelet from stretching out and becoming loose shortly after you start wearing it. -
Plan your pattern:
Lay out your beads on a design board or a flat surface. Arrange them in a repeating pastel sequence—for example: pink, white, mint, lavender, yellow, blue. -
Incorporate gold accents:
Insert a gold rhinestone spacer bead periodically within your pattern. In this design, place one gold spacer after every 8-10 pastel clay beads. -
String the beads:
Thread the beads onto the elastic cord one by one, following your established pattern. Double-check the length around your wrist as you go. -
Tie the knot:
Once you have reached your desired length, tie the ends together using a surgeon’s knot (loop the cord through twice on the first pass) for extra security. -
Secure with glue:
Place a tiny drop of super glue or jewelry cement directly onto the knot. Let it dry for a minute or two. -
Hide the knot:
Trim the excess cord ends close to the knot, then gently pull the cord so the knot slides inside the hole of one of the adjacent clay beads to hide it.
Keep it Clean
Pastel clay picks up dust easily. Keep baby wipes nearby to clean your hands between colors, or roll a scrap piece of white clay in your hands first to pick up lint.
Make it Shine
For a different look, coat the baked beads with a satin or gloss glaze before stringing. This makes the pastel colors pop and gives the jewelry a professional ceramic feel.
Enjoy wearing your custom handmade accessory or wrapping it up as a thoughtful gift


Gold Spacer “Birthday Glam” Bracelet
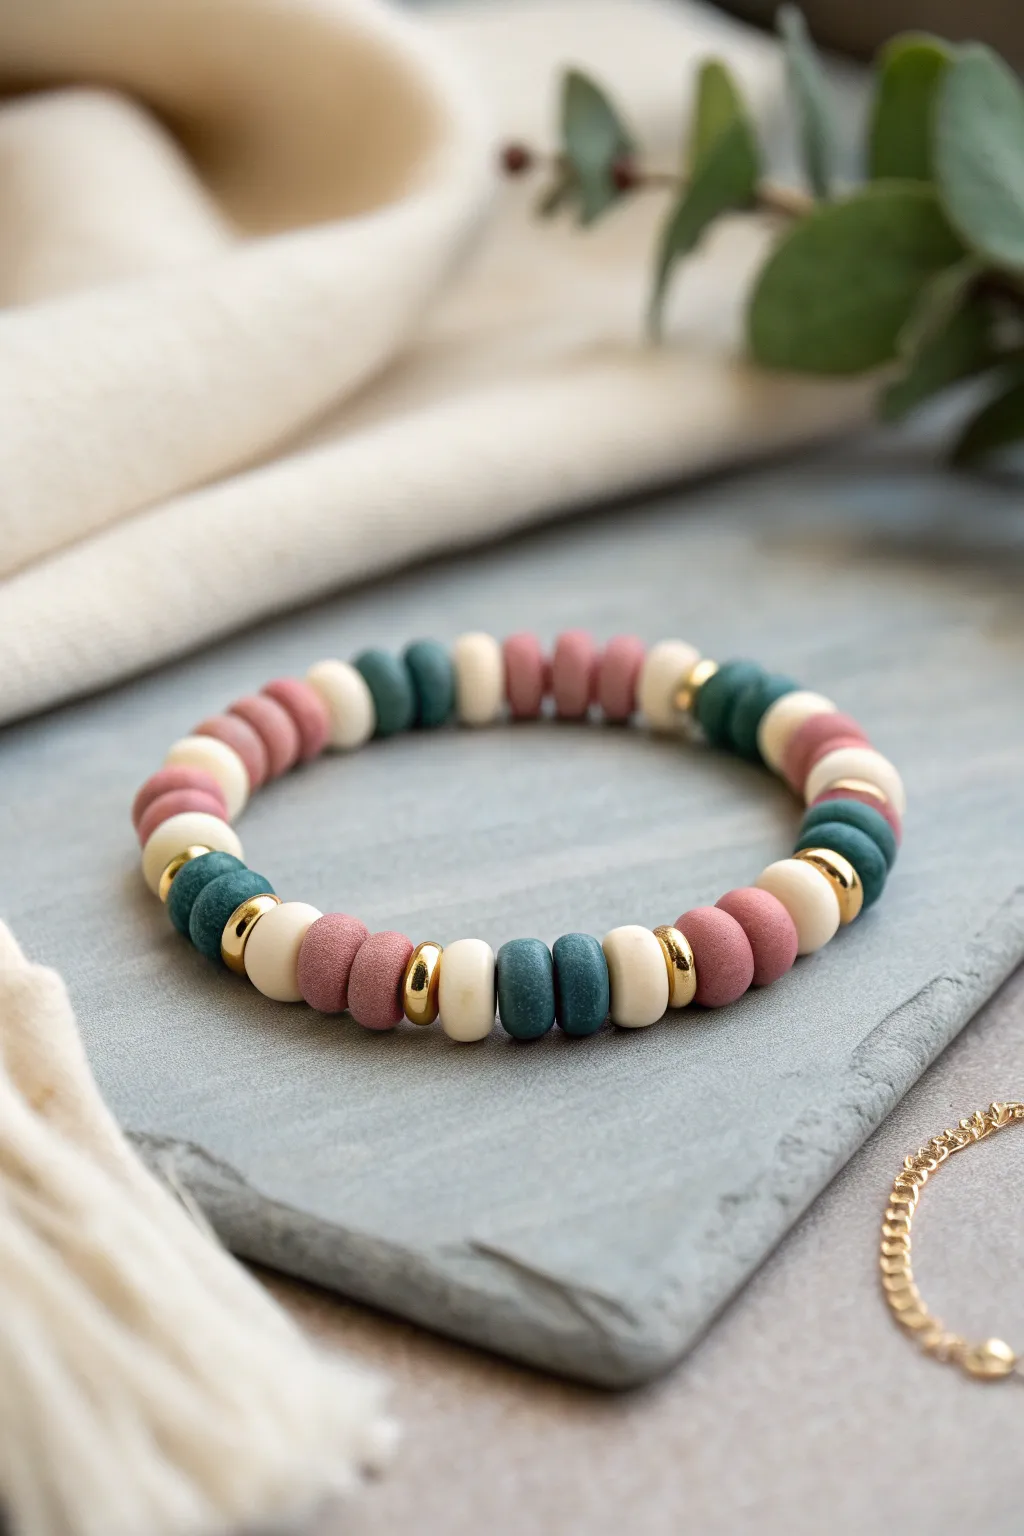
Elevate a simple clay bead design into a sophisticated birthday gift with the addition of gleaming gold accents. This bracelet balances earthy teal and rose tones with cream neutrals, creating a piece that feels both festive and timelessly chic.
How-To Guide
Materials
- Polymer clay heishi beads (teal/deep green)
- Polymer clay heishi beads (dusty rose/mauve)
- Polymer clay heishi beads (cream/off-white)
- Gold tone metallic spacer beads (rounded/donut shape, roughly 4-5mm)
- 0.8mm clear elastic stretch cord
- Jewelry glue or clear nail polish
- Scissors
Step 1: Preparation
-
Measure your cord:
Cut a piece of elastic cord about 10-12 inches long. This generous length gives you plenty of room to tie knots without struggling against tension. -
Pre-stretch the elastic:
Hold both ends of the cord and give it a few firm tugs. This pre-stretching step is crucial to prevent the bracelet from loosening up immediately after you wear it. -
Secure the end:
Place a piece of tape over one end of the cord, or attach a bead stopper, so your beads don’t slide off while you are working.
Step 2: Beading the Pattern
-
Start the sequence:
Begin by threading on two teal heishi beads. I like to start with a darker color to anchor the pattern visually. -
Add a creamy contrast:
Slide on one cream heishi bead next to the two teal ones. -
Insert the gold accent:
Place one gold metallic spacer bead onto the cord so it sits snugly against the cream bead. -
Mirror the cream:
Add another single cream heishi bead immediately after the gold spacer. -
Introduce the rose tone:
Thread on two dusty rose clay beads to complete the first main color block. -
Add a solo cream bead:
Place one cream bead after the rose section. -
Second gold accent:
Slide on another gold spacer bead.
Knot Slipping?
If the elastic feels too slick to hold a knot, dust the ends lightly with cornstarch or baby powder before tying to add extra grip.
Step 3: Repeating the Design
-
Check the pattern logic:
Observe the rhythm: The pattern generally alternates between pairs of colored beads (teal or rose) separated by cream/gold/cream segments, though sometimes the gold separates sections directly. Let’s build the next segment. -
Continue with cream:
Add one cream bead after your second gold spacer. -
Return to teal:
Thread on two teal heishi beads. -
Create a variation:
For a slightly organic look like the photo, occasionally place a simple cream bead between color groups without a gold spacer, or group three colored beads instead of two. However, sticking to the [2 Color – 1 Cream – 1 Gold – 1 Cream] repetition is the safest bet for symmetry. -
Check length:
Wrap the strand around your wrist. You want it to sit comfortably without digging in or drooping too low.
Add a Charm
Attach a small gold initial charm or a tiny birthday cake charm to one of the gold spacer beads using a jump ring for personalization.
Step 4: Finishing Touches
-
Prepare to knot:
Once you have reached your desired length, ensure your pattern ends in a way that will look seamless when joined to the start. -
Tie the first knot:
Remove the tape or bead stopper and bring the two ends together. Tie a simple overhand knot and pull it gently. -
Tie a surgeon’s knot:
Cross the ends again, but loop one end through twice before pulling tight. This creates a much stronger hold than a standard knot. -
Secure with glue:
Dab a tiny drop of jewelry glue or clear nail polish onto the knot. I prefer to let this dry for about a minute before trimming distinct ends. -
Hide the knot:
Pull the cord so the knot slides inside one of the larger gold spacer beads or a clay bead if the hole is wide enough. -
Trim excess:
Use your scissors to snip off the remaining tail ends of the elastic as close to the bead as possible.
Slip this elegant bracelet on your wrist and enjoy the birthday sparkle

The Complete Guide to Pottery Troubleshooting
Uncover the most common ceramic mistakes—from cracking clay to failed glazes—and learn how to fix them fast.
Birthday Cake Sprinkle Pattern
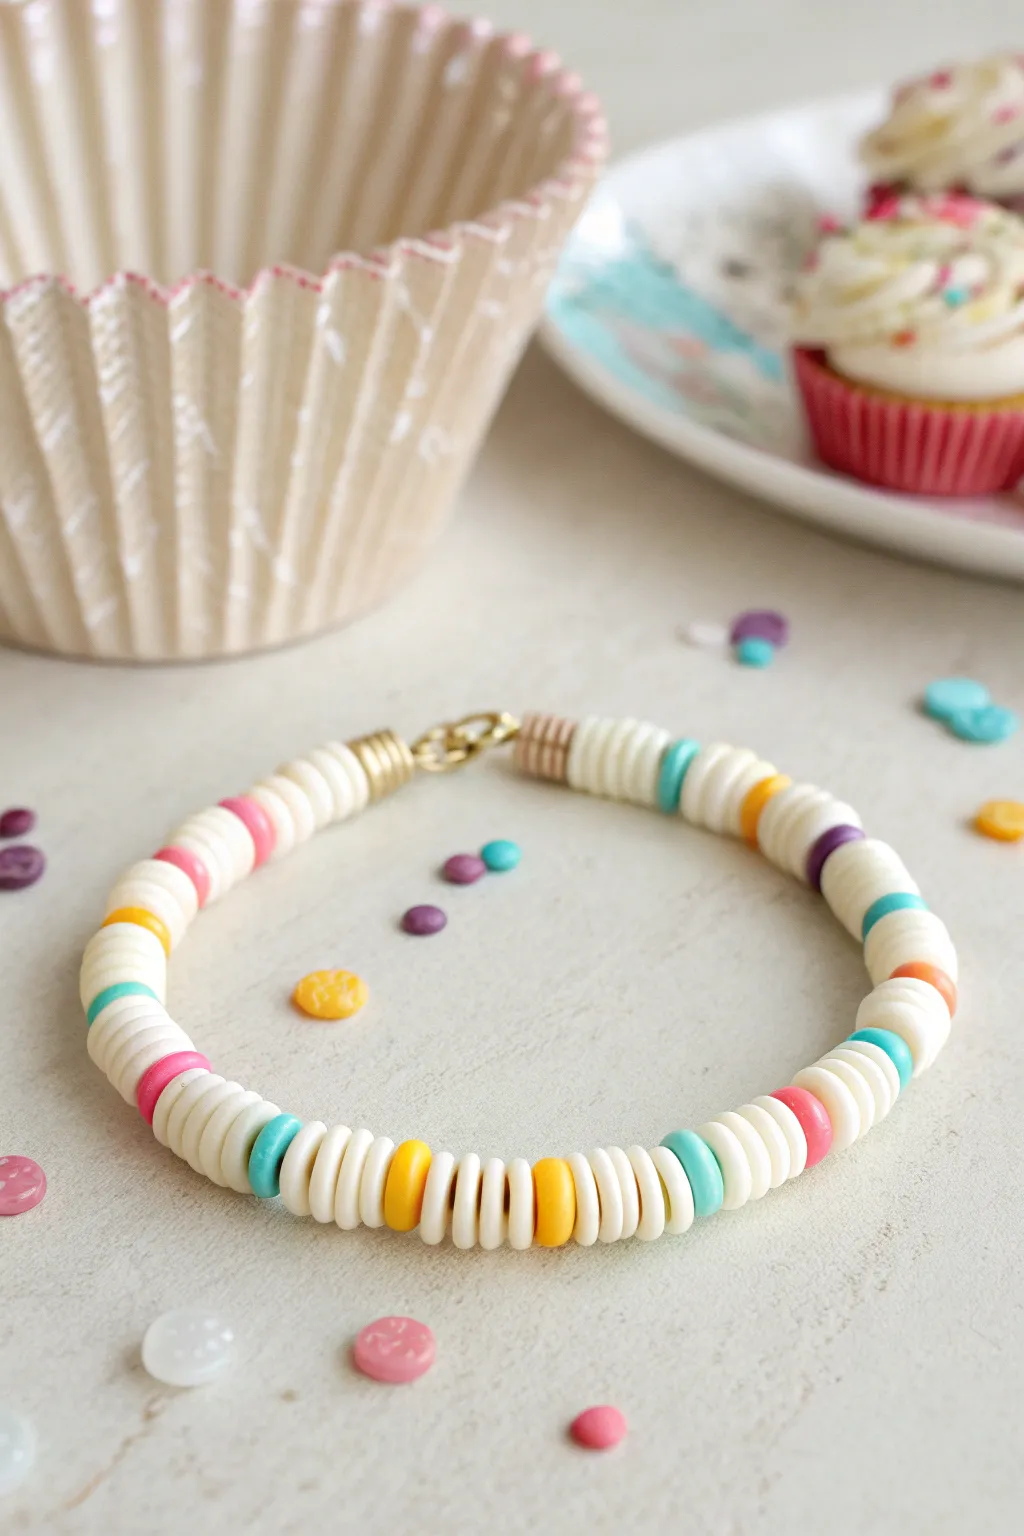
Capture the joy of birthday cake with this delightful clay bead bracelet that mimics the look of vanilla frosting and scattered rainbow sprinkles. The pattern uses creamy white spacer beads interrupted by vibrant pops of color for a sweet accessory perfect for celebrating another trip around the sun.
Step-by-Step Tutorial
Materials
- 6mm flat clay heishi beads (Cream/Off-White)
- 6mm flat clay heishi beads (Hot Pink, Teal, Yellow, Orange, Purple)
- Elastic cord (0.8mm clear stretch)
- Gold finish crimp covers or wire guards
- Gold tone lobster clasp and jump ring
- Jewelry glue or clear nail polish
- Beading needle (optional but helpful)
- Scissors
Step 1: Planning and Preparation
-
Measure the wrist:
Begin by wrapping a piece of string or a soft measuring tape around the wrist where the bracelet will sit. Note the measurement and add about half an inch to ensure a comfortable fit that isn’t too tight. -
Cut the cord:
Snip a length of your elastic cord about 10 inches long. I always like to have extra room on the ends for tying knots; it makes the finishing process much less frustrating than working with short tails. -
Secure one end:
Place a piece of tape over one end of the cord or attach a binder clip. This acts as a stopper so your beads don’t slide off while you are working on your pattern. -
Sort your sprinkles:
Pour out a small amount of your colorful beads (pink, teal, yellow, orange, purple) and a larger pile of the cream beads onto your workspace. Having them accessible makes the random selection process easier.
Step 2: Creating the Pattern
-
Start with the frosting:
Thread approximately 4 to 6 cream-colored beads onto the cord. This creates the first section of neutral ‘frosting’ base. -
Add a sprinkle:
Slide on one colorful bead. You can follow a specific rainbow order (like pink, orange, yellow, teal, purple) or keep it completely random for a fun confetti look. -
Build the second section:
Add another stack of cream beads. Vary the number slightly if you want an organic look, but aiming for 3 to 5 spacers usually creates a nice balance between the white space and the colors. -
Continue the sequence:
Repeat the process: add a colorful ‘sprinkle’ bead, followed by a small stack of cream ‘frosting’ beads. Keep checking your colors to ensure you aren’t bunching too many of the same shade together. -
Check the length:
Periodically wrap the strand around your wrist to check the sizing. Continue beading until the design reaches your desired length.
Randomness Rule
To get that authentic ‘scattered sprinkles’ vibe, roll a dice to decide how many white spacer beads go between each color (roll a 3, use 3 beads).
Step 3: Finishing the Bracelet
-
Prepare the ends:
Once you have reached the correct length, ensure you end with a cream section to balance the start of the bracelet. -
Tie the knot:
Remove the tape or clip. Bring both ends together and tie a strong surgeon’s knot (looping the cord through twice before pulling tight). Pull the cords firmly to secure. -
Secure with glue:
Dab a tiny drop of jewelry glue or clear nail polish directly onto the knot. Let it dry for a few minutes to ensure it won’t slip undone. -
Add gold hardware (optional):
If you want the professional finish shown in the photo, slide a gold crimp cover over the knot area and gently squeeze it shut with pliers to hide the join. -
Attach the clasp:
Using a jump ring, attach the lobster clasp to one side of your finishing hardware. On the other side, attach a closed jump ring for the clasp to hook into. -
Trim excess:
Carefully snip away the excess elastic cord close to the knot or crimp cover, being careful not to cut the main bracelet line.
Wonky Beads?
Clay beads can vary in thickness. If your bracelet looks uneven, gently roll the finished strand between your palms to help the discs settle flat against each other.
Slip on your new creation and enjoy the festive pop of color on your wrist
Balloon Color-Block Bracelet
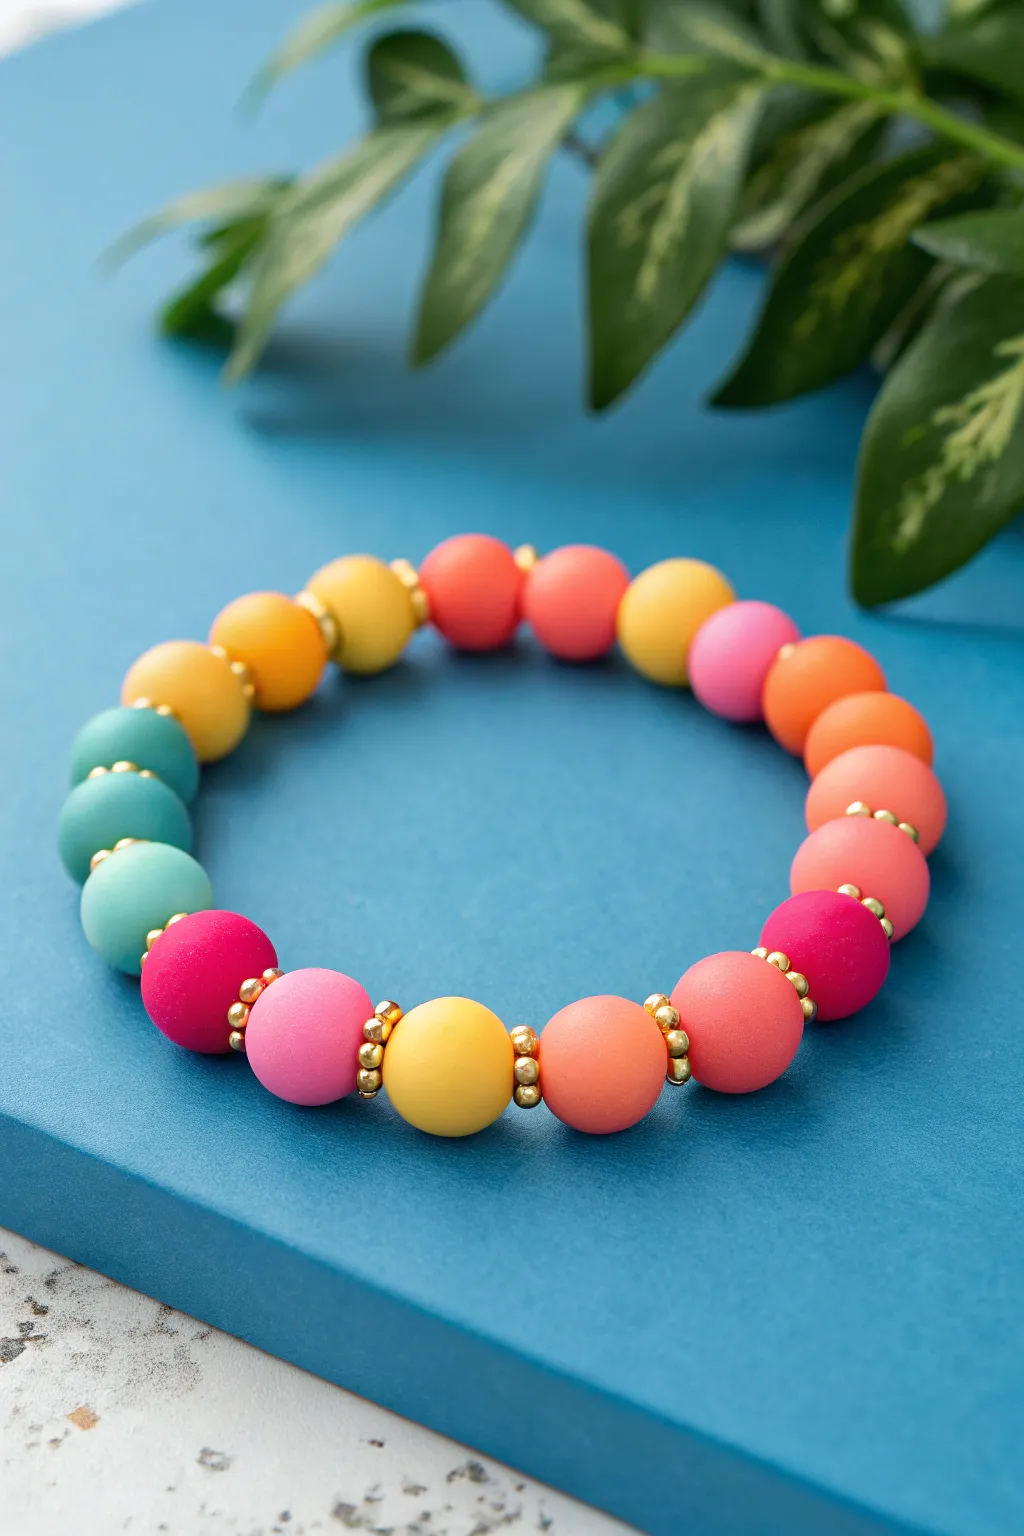
Celebrate with a burst of color on your wrist using this playful design that mimics a vibrant balloon arch. With its matte, oversized beads and elegant gold accents, this bracelet creates a sophisticated yet festive party-ready accessory.
Step-by-Step
Materials
- 10mm or 12mm round matte acrylic or polymer clay beads (hot pink, light pink, yellow, peach, orange, coral, teal)
- Small gold spacer beads (approx. 3mm round or seed beads)
- Strong elastic cord (0.8mm or 1mm thickness)
- Jewelry glue or clear nail polish
- Scissors
Step 1: Planning the Color Blocks
-
Sort your beads:
Begin by separating your large matte beads by color. You will need pairs or trios of similar shades to create the ‘color block’ effect seen in the photo. -
Determine the sequence:
Lay out your beads on a bead board or a soft towel to prevent rolling. Arrange them in a specific gradient pattern: start with teal/blue-green, move to yellow, then orange, then pinks, and cycle back. -
Create distinct blocks:
Instead of a totally random mix, group 2-3 beads of the same color family together before transitioning to the next shade. For instance, place two light teals, then a transition to yellow.
Step 2: Stringing the Design
-
Cut the elastic:
Cut a piece of elastic cord about 10-12 inches long. This gives you plenty of extra room for tying the knot later without struggling. -
Pre-stretch the cord:
Give the elastic piece a few firm tugs. Pre-stretching is a crucial step that prevents the bracelet from sagging or loosening after you wear it a few times. -
Start with a teal block:
Thread on your first large teal bead. Follow it immediately with a small gold spacer bead. -
Continue the pattern:
Add the next teal bead, followed by another gold spacer. The pattern throughout the entire bracelet is: 1 Large Bead + 1 Gold Spacer. -
Transition to yellow:
After your teal section, switch to your yellow beads. Thread a yellow bead, then a gold spacer. Repeat this for the second yellow bead if your design calls for two. -
Add warmth with orange:
Next, move to the peach and orange tones. Thread a peach bead, a spacer, then a deeper orange bead, followed by a spacer. The gold beads act as little separators that make the colors pop. -
Finish with pinks:
Thread your coral, hot pink, and light pink beads, ensuring you place a gold spacer between every single large bead. Check your length by wrapping it around your wrist. -
Verify the loop:
Ensure the very last item on your string is a gold spacer bead so that when you tie it, the pattern (Bead-Spacer-Bead) remains unbroken.
Hiding the Knot
Choose a bead with a slightly larger hole (often the acrylic ones) to be positioned next to your knot, making it much easier to pull the knot inside to hide it.
Step 3: Finishing Touches
-
Prepare the knot:
Bring the two ends of the elastic together, removing any slack so the beads sit snugly against one another without bunching. -
Tie a surgeon’s knot:
Fold the left end over the right, then wrap it through the loop twice before pulling tight. This extra wrap adds significant security compared to a standard overhand knot. -
Perform a pull test:
Gently pull the beads away from the knot to ensure it holds firm. If it slips, tighten it further. -
Secure with glue:
Dab a tiny drop of jewelry glue or clear nail polish directly onto the knot. I find it helpful to let this dry for at least 15 minutes before trimming. -
Hide the knot:
Once dry, trim the excess elastic tails close to the knot. Gently tug the cord so the knot slides inside the hole of one of the large matte beads, hiding it from view.
Add a Charm
Make it a true birthday piece by attaching a small gold initial charm or a tiny cupcake charm to one of the jump rings between the beads.
Slip on your vibrant new accessory and let the colors brighten your day


What Really Happens Inside the Kiln
Learn how time and temperature work together inside the kiln to transform clay into durable ceramic.
“Two Sweet” Fruit Slice Bracelet
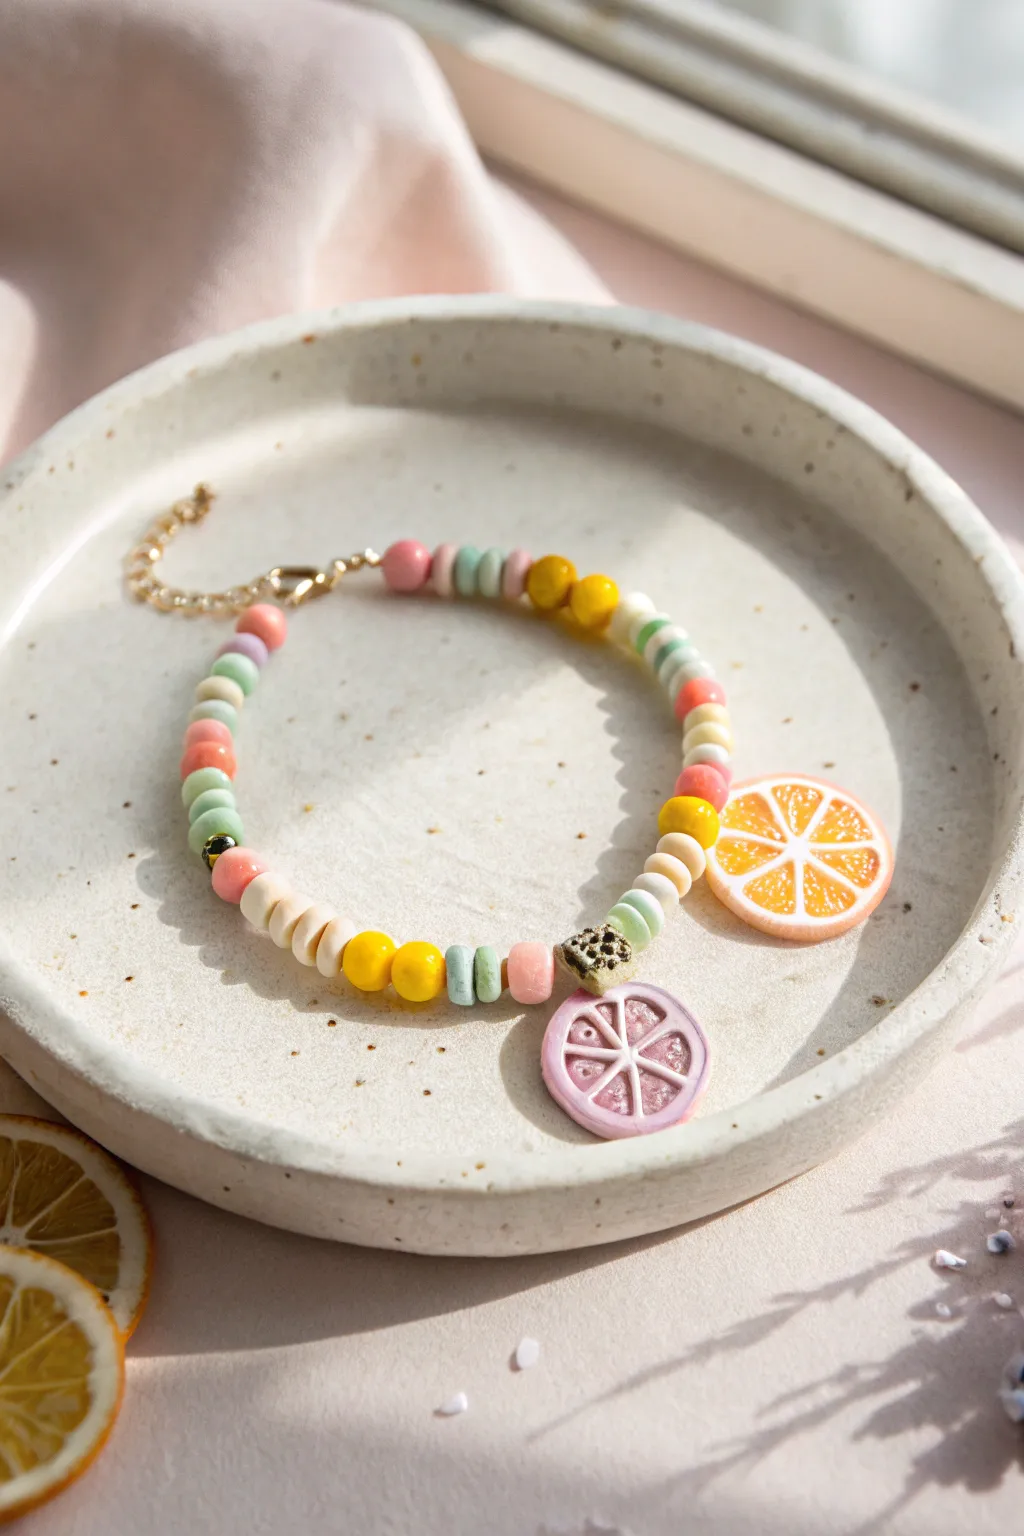
Brighten up your accessory game with this playful bracelet featuring vibrant fruit slice charms and a mix of pastel clay beads. This ‘Two Sweet’ inspired design perfectly balances soft mint and pink hues with sunny pops of yellow and orange.
Step-by-Step Guide
Materials
- Polymer clay heishi beads (pastel pink, mint green, off-white)
- Round polymer clay beads (yellow)
- Small gold spacer beads or crimp covers (optional)
- Polymer clay fruit slice charms (orange and pink grapefruit)
- Gold tone jump rings (4mm or 6mm)
- Elastic beading cord (0.8mm recommended)
- Gold tone crimp ends or knot covers
- Gold tone lobster clasp and extension chain
- Jewelry pliers (chain nose and flat nose)
- Scissors
- Super glue or jewelry adhesive
Step 1: Planning and Prep
-
Measure your wrist:
Wrap a piece of string around your wrist to find your comfortable length, then add about an inch for ease. Cut a length of elastic cord roughly 4 inches longer than your measurement to give yourself plenty of room for tying knots. -
Lay out the pattern:
Before sliding anything onto the cord, arrange your beads on a bead board or a soft towel. Create a repeating pattern that alternates between the flat heishi discs and the round yellow beads to establish a playful rhythm. -
Prepare the charms:
Using your chain nose pliers, carefully open two jump rings. Slide the opening through the loop or hole of your fruit slice charms. -
Attach the charms:
Ideally, these charms should hang from a carrier bead or a larger jump ring that slides onto the main cord. If your charms have a top loop, attach the jump ring securely and close it tight so there are no gaps.
Stay Symmetrical
Use a bead design board to layout your pattern first. This helps ensure your fruit charms end up exactly where you want them relative to the clasp.
Step 2: Stringing the Beads
-
Start the strand:
Begin threading your beads onto the elastic cord. Start with a sequence of the pastel heishi beads—try alternating mint, pink, and white for a candy-like effect. -
Add texture:
After about an inch of heishi beads, slide on one of the round yellow beads. This change in shape adds great visual interest and breaks up the stack. -
Creating the fruit section:
Once you have strung about one-third of the bracelet length, it’s time to add the first fruit charm. Slide the charm onto the cord, ensuring it faces outward. -
Spacing the fruits:
Add a small section of beads between the two fruit slices. I usually do about three to four heishi beads and maybe a gold spacer bead here to separate the charms slightly without putting them on opposite sides. -
Add the second charm:
Slide on your second fruit charm—the pink grapefruit slice looks great next to the orange one. This asymmetry gives the bracelet a fun, organic feel. -
Finish the pattern:
Continue your beading pattern for the rest of the strand. Mirror the first side or continue the alternating sequence until you reach your desired length.
Step 3: Finishing Touches
-
Check the fit:
Carefully bring the ends of the cord together around your wrist to check the sizing. Add or remove a few heishi beads if it feels too tight or too loose. -
Secure the ends:
Instead of a simple knot, use crimp ends for a professional finish. Thread one end of the elastic into a crimp end, loop it back if necessary, and use flat nose pliers to squash the metal tab down firmly over the cord. -
Glue for security:
Before closing the final crimp completely, place a tiny drop of super glue inside the metal casing to bond the elastic to the finding. -
Attach the hardware:
Open a jump ring and attach the lobster clasp to one end of the bracelet. Close the jump ring securely using your pliers. -
Add the extension chain:
On the opposite end, attach the extension chain using another jump ring. This allows the bracelet to be adjustable, which is perfect for gifting. -
Final inspection:
Give the bracelet a gentle tug to ensure all connections are secure and the knots or crimps are holding firm. Trim any tiny excess bits of elastic cord carefully.
Add Some Sparkle
Mix in small gold-filled spacer beads between every third heishi bead to elevate the look and catch the light as you move.
Now you have a refreshing handmade accessory perfect for sunny days and sweet celebrations
Smiley And Flower Birthday Stack
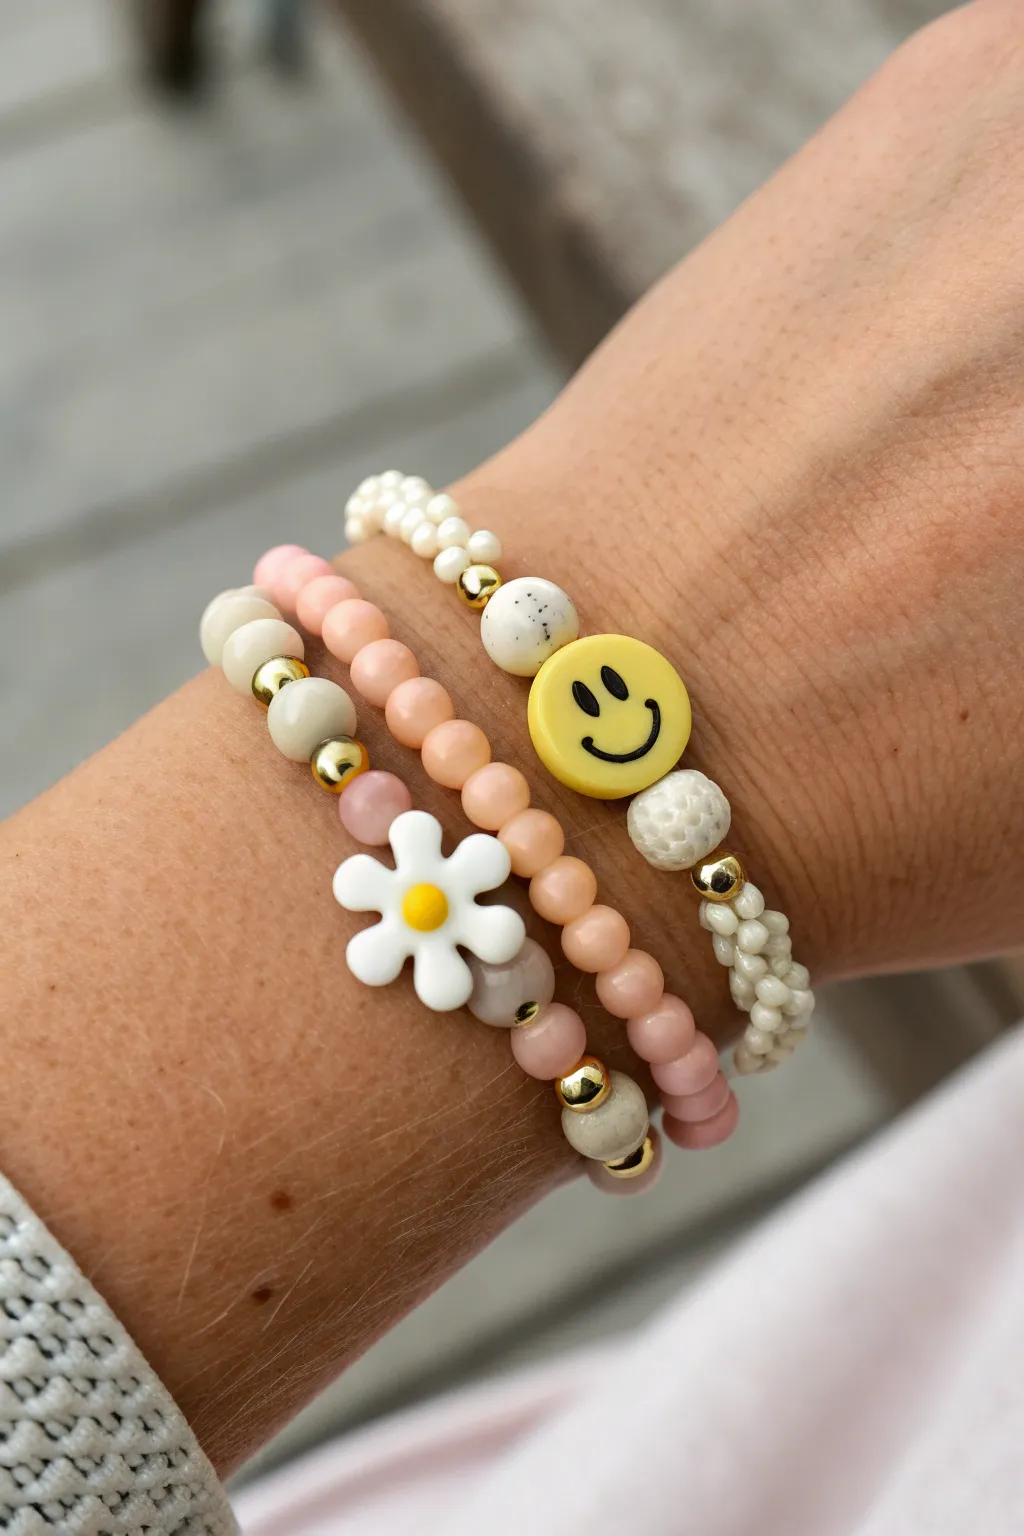
Brighten up any birthday with this cheerful trio of stretch bracelets featuring a nostalgic smiley face and a sweet daisy charm. The combination of soft peach tones, creamy whites, and pops of gold creates a trendy, sophisticated stack that is perfect for gifting.
Detailed Instructions
Materials
- 0.8mm clear elastic cord
- Cream/off-white seed beads (size 6/0)
- Peachy-pink round beads (6mm or 8mm)
- Warm beige round beads (6mm or 8mm)
- Gold tone metal spacer beads (round)
- Yellow smiley face flat round bead
- White and yellow daisy charm bead
- Large speckled white accent beads (polymer clay or ceramic)
- Two speckled grey/beige round accent beads
- Jewelry glue or clear nail polish
- Scissors
Step 1: Golden Smiley Bracelet
-
Prepare the cord:
Cut a piece of elastic cord about 10-12 inches long. Is better to have too much cord than too little, so you have plenty of room for tying the knots later. -
Pre-stretch:
Give the elastic a firm tug a few times. This pre-stretching prevents the finished bracelet from sagging after you wear it for the first time. -
Start the pattern:
String on about 10-12 cream seed beads to start the base of the bracelet. -
Add first accents:
Slide on a small gold spacer bead, followed by a large speckled white accent bead. -
Centerpiece placement:
Thread on the yellow smiley face bead. Make sure the face is oriented correctly relative to how you want it to sit on your wrist. -
Complete the grouping:
Add another speckled white bead (I prefer a slightly textured one here for contrast) followed by another gold spacer bead. -
Finish the strand:
Continue stringing the cream seed beads until the bracelet reaches your desired wrist size, usually about 6.5 to 7 inches for an average adult. -
Secure the knot:
Tie a secure surgeon’s knot (right over left, left over right). Add a tiny dot of jewelry glue to the knot before trimming the excess cord.
Knot Hiding Trick
Try to position your knot next to a bead with a larger hole (like the smiley face or the speckled beads). Use tweezers to gently pull the knot inside the bead to hide it.
Step 2: Peach Perfection Bracelet
-
String the beads:
Cut and pre-stretch a new piece of cord. This layer is the simplest; string your peachy-pink round beads continuously. -
Check the sizing:
Wrap it around your wrist to check the fit against the first bracelet. They should sit comfortably together without pinching. -
Tie it off:
Knot the elastic securely, glue the knot, and trim the ends close.
Step 3: Daisy Chain Bracelet
-
Begin the beadwork:
Prepare your third cord. String on several warm beige round beads to begin one side. -
Add gold details:
Add a gold spacer bead, one beige bead, and another gold spacer to create a nice defined section leading up to the charm. -
Insert the flower:
Slide on a translucent pinkish bead, followed immediately by the white daisy charm. -
Mirror the design:
Place a translucent grey bead on the other side of the flower, followed by a gold spacer. -
Add texture:
Thread on a speckled grey/beige bead, another gold spacer, and then continue with your main warm beige round beads to finish the loop. -
Final assembly:
Tie your final surgeon’s knot, apply a dab of adhesive, and let it dry before snipping the ends. Your floral birthday stack is complete.
Personal Touch
Swap the generic smiley face for letter beads to spell out the birthday girl’s name or initials, keeping the same color palette for a custom look.
Enjoy wearing this sunny stack that brings a pop of joy to any outfit

TRACK YOUR CERAMIC JOURNEY
Capture glaze tests, firing details, and creative progress—all in one simple printable. Make your projects easier to repeat and improve.
Party Hat Triangle Color Pattern
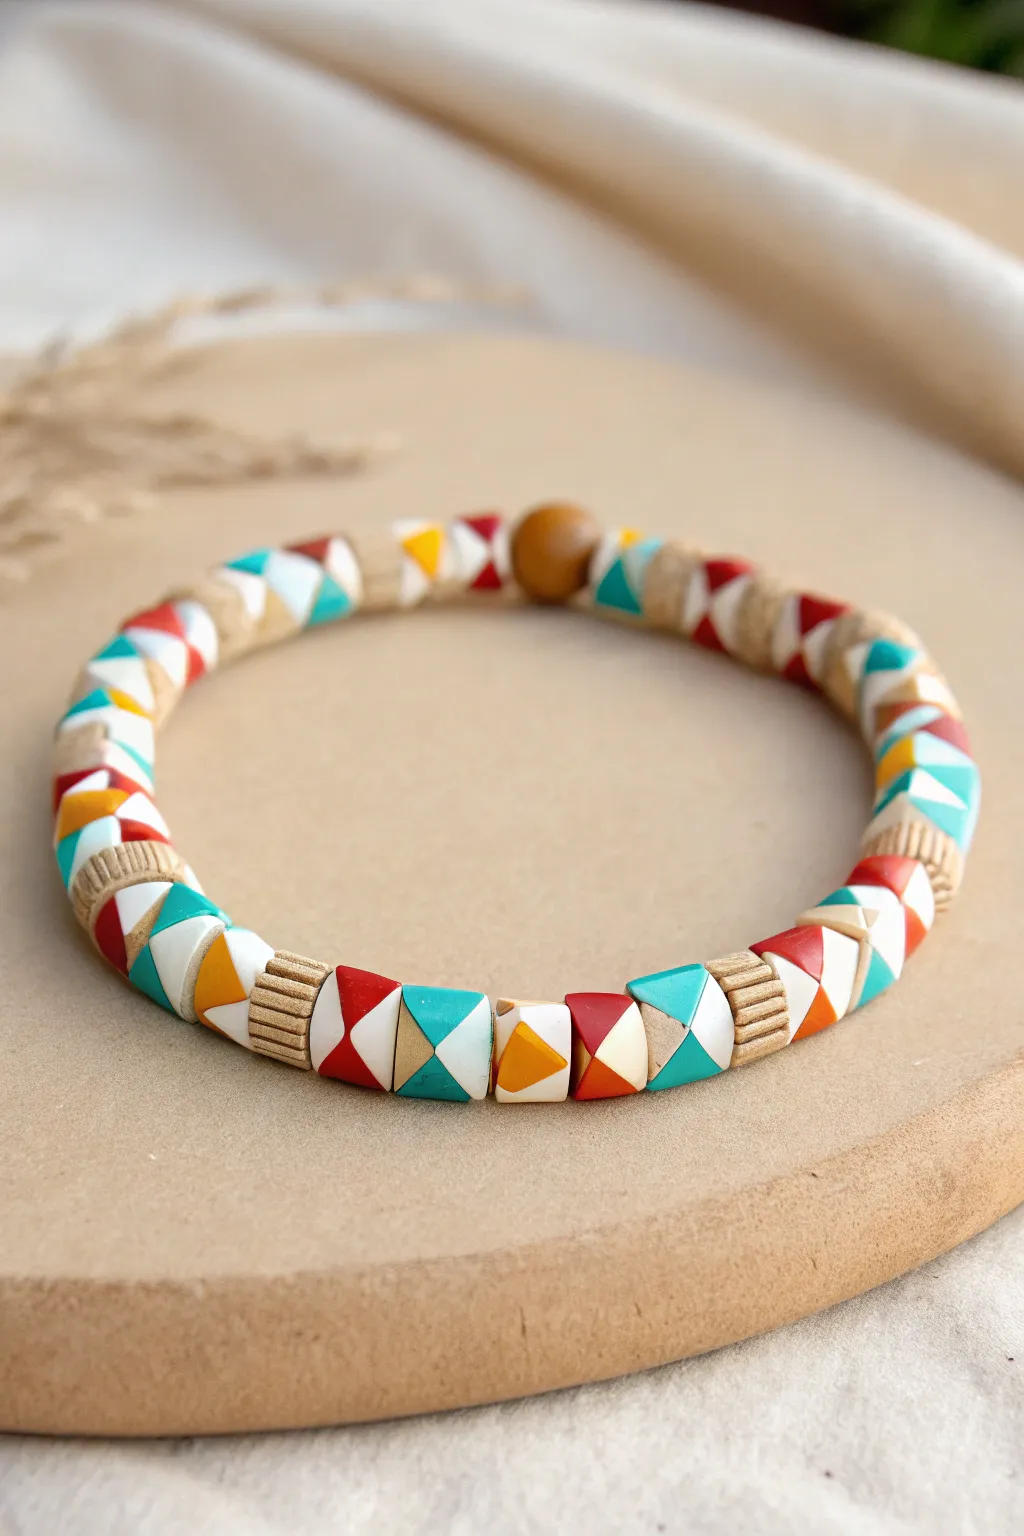
This vibrant bracelet captures the fun of a birthday celebration with its geometric ‘party hat’ pattern. Using square beads strung on the diagonal, you create a playful, zigzagging effect that mimics colorful bunting or confetti.
How-To Guide
Materials
- Square polymer clay beads (white base)
- Acrylic paints (bright red, teal, mustard yellow, orange)
- Fine detail paintbrush
- Painter’s tape (washi tape works great)
- Clear matte varnish or sealant
- Ribbed wooden spacer beads (cylindrical)
- One round wooden accent bead
- Elastic clear beading cord (0.8mm)
- Super glue or jewelry glue
- Scissors
Step 1: Prepping the Beads
-
Clean and sort:
Begin by wiping down your square polymer clay beads with a damp cloth to remove any dust or oils. Let them dry completely. -
Tape diagonals:
To get perfectly crisp triangles, place a strip of painter’s tape diagonally across the face of a square bead, covering exactly half of it. -
Press edges:
Using a fingernail or a tool, press the tape edges down firmly. This prevents paint from bleeding underneath and ensures clean lines. -
Repeat taping:
Prepare a batch of about 20-25 beads this way. Vary the diagonal direction on different beads to create a randomized look later.
Paint Hack
Stick beads onto toothpicks or a skewer with a bit of blu-tack before painting. This lets you paint all sides without getting fingers messy.
Step 2: Painting the Pattern
-
First color application:
Choose your first color palette, maybe starting with teal. Paint the exposed triangle half of several beads. Apply thin, even coats. -
Rotate colors:
Switch to your red, yellow, and orange paints, coloring the exposed halves of the remaining taped beads. I like to keep the white base color for the covered half to make the colors pop. -
Dry and peel:
Allow the paint to set until tacky but not fully hard, then carefully peel off the tape at a sharp angle. -
Touch-ups:
If any lines are jagged, use a very fine brush with white paint (or your base bead color) to clean up the edges. -
Seal the beads:
Once fully dry, coat each painted bead with a clear matte varnish. This protects the geometric design from scratching during wear.
Bead Rotation Fix
If beads flip too much while wearing, string them tighter. A slightly tighter elastic pulls the diagonal holes together, interlocking the beads.
Step 3: Assembly
-
Cut the cord:
Cut a piece of elastic cord about 10-12 inches long. This gives you plenty of room to tie knots without struggling. -
Pre-stretch:
Gently stretch the elastic cord a few times. This simple step prevents the bracelet from drooping or loosening immediately after you make it. -
Design the layout:
Lay your beads out on a mat. Create a pattern of 3-4 painted triangle beads followed by one ribbed wooden spacer. -
Mix diagonals:
When arranging the painted beads, intentionally flip their orientations. Having some triangles point up and others down creates that dynamic party-hat confetti look. -
Stringing:
Thread the beads onto the elastic. Remember that the square beads are hole-drilled diagonally (corner to corner), which is key to their diamond shape when strung. -
Add the focal bead:
Somewhere in the loop, place the single round wooden bead. This acts as a subtle focal point or a ‘clasp’ cover. -
Check sizing:
Wrap the strand around your wrist to check the fit. It should sit comfortably without pinching.
Step 4: Finishing
-
Tying the knot:
Tie a surgeon’s knot (right over left twice, then left over right) to secure the bracelet. Pull the elastic tight. -
Secure with glue:
Place a tiny drop of jewelry glue directly onto the knot. Let it dry for a minute. -
Hide the knot:
If possible, gently tug the elastic so the knot slides inside the large hole of the round wooden bead or one of the spacer beads. -
Trim excess:
Trim the extra elastic cord close to the bead, being careful not to cut the knot itself.
Enjoy wearing your festive, geometric creation that brings a little party to every outfit
Zodiac-Inspired Birthday Bracelet
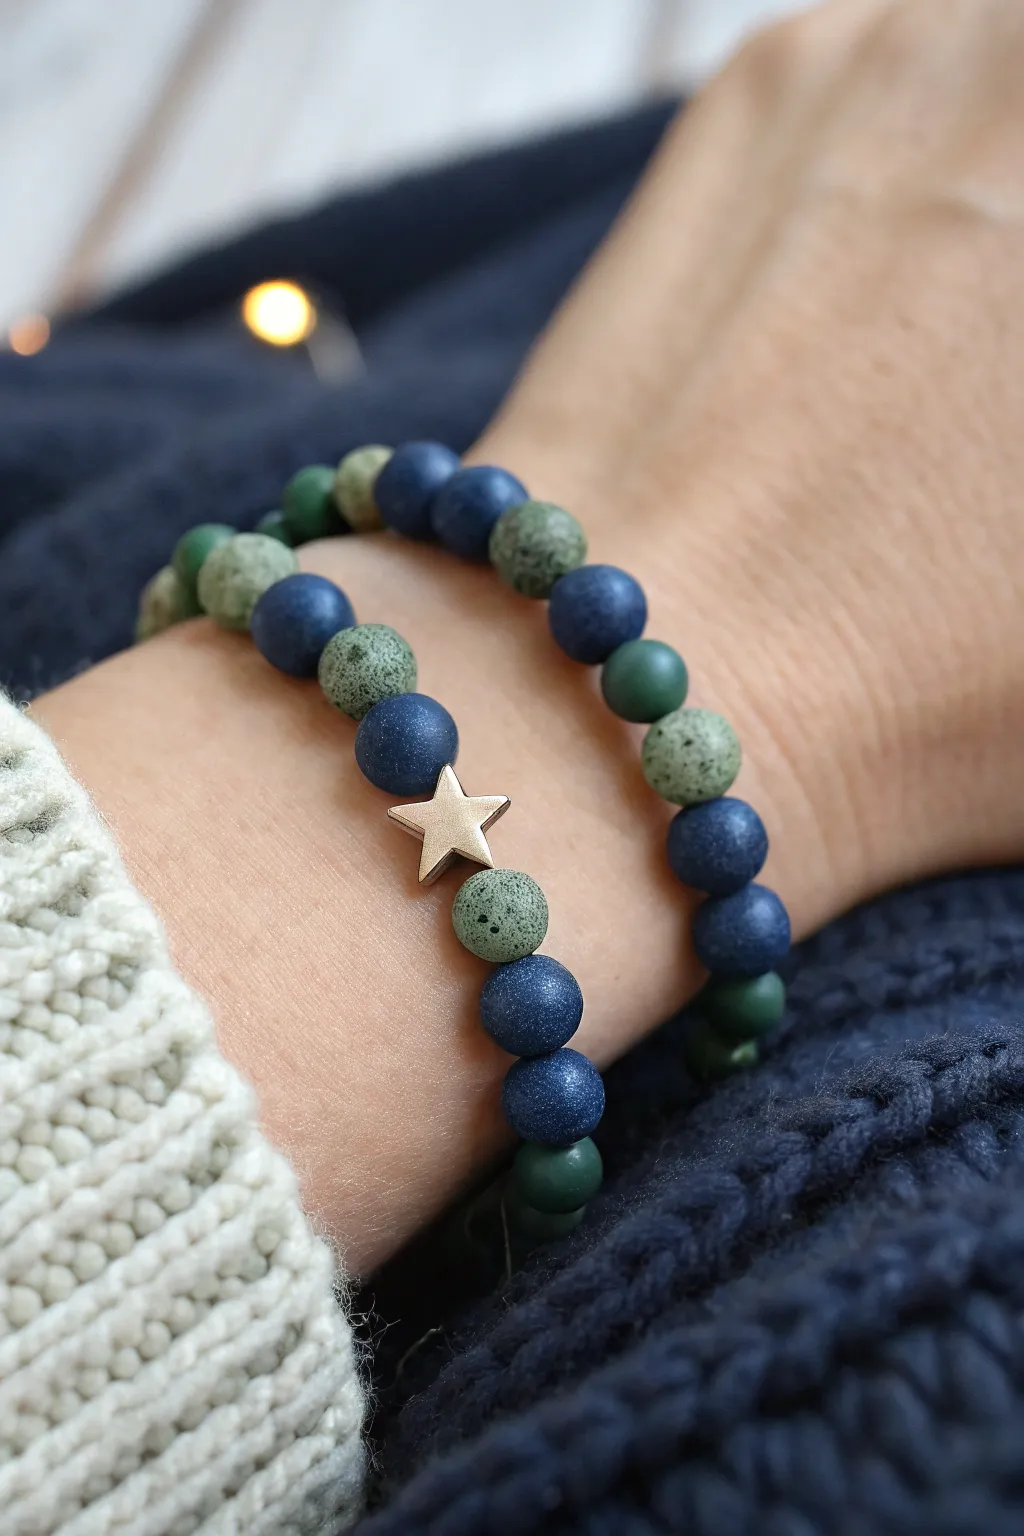
Celebrate celestial energy with this dreamy, two-strand bracelet stack. Featuring deep blues, earthy greens, and a standout gold star charm, this design perfectly captures the mood of a clear night sky.
Detailed Instructions
Materials
- Matte navy blue round beads (6mm or 8mm)
- Speckled moss green round beads (6mm or 8mm)
- Dark forest green round beads (6mm or 8mm)
- Gold finish star slider bead or flat charm
- Strong elastic beading cord (0.7mm recommended)
- Beading glue or clear nail polish
- Scissors
- Bead stopper or tape
- Ruler
Step 1: Planning the Design
-
Measure your wrist:
Wrap a flexible tape measure around your wrist to find your size, then add about half an inch for a comfortable fit. -
Cut the elastic:
Cut two lengths of elastic cord, making them about 10-12 inches long each. This extra length makes tying the final knots much easier. -
Secure the ends:
Place a bead stopper or a piece of tape on one end of each cord so your beads don’t slide off while you work. -
Lay out the pattern:
On a bead board or soft cloth, arrange your beads loosely to visualize the spacing. Notice that the image uses an alternating rhythm rather than a strict ABC pattern.
Star alignment tip
If your star charm keeps flipping over, string it tightly between two slightly larger beads to hold it flat against the wrist.
Step 2: Creating the Star Strand
-
Start the center sequence:
Thread a speckled green bead, followed by the gold star charm, and then another speckled green bead onto the first cord. -
Build the sides:
Add a navy blue bead to each side of your center trio. Working symmetrically outwards helps keep the star perfectly centered. -
Continue the pattern:
Continue stringing beads, alternating between the matte navy blue and the speckled green beads. I like to check the length against my wrist periodically to ensure the fit is right. -
Check the symmetry:
Ensure you end with beads that will look continuous when the circle is closed, avoiding two identical beads touching at the knot if possible.
Knot slipping out?
If the knot won’t stay hidden inside a bead, simply widen the hole of one bead carefully using a bead reamer tool before restringing.
Step 3: Creating the Second Strand
-
Begin the second cord:
Pick up your second piece of prepared elastic. This strand will be a simpler complement to the star strand. -
Mix your greens:
For this strand, incorporate the dark forest green beads along with the navy and speckled beads to add depth. -
Create a random flow:
Thread the beads in a more organic, distinct pattern: try a sequence like navy, speckled green, dark green, navy. This irregularity mimics natural stone formations. -
Match the lengths:
Hold this strand up against the first one to ensure they are the exact same size before finalizing.
Step 4: Finishing Touches
-
Pre-stretch the cord:
Before tying, gently pull on the ends of the elastic. This pre-stretching prevents the bracelet from sagging later on. -
Tie the first knot:
Remove the bead stopper and tie a simple overhand knot, pulling it tight against the beads. -
Secure with a surgeon’s knot:
Follow up with a surgeon’s knot—loop the elastic through twice before pulling tight—for extra security. -
Glue the knot:
Apply a tiny drop of beading glue or clear nail polish directly onto the knot. Let it dry completely before moving on. -
Hide the knot:
If one of your beads has a large enough hole, gently tug the elastic so the knot slides inside the bead, disappearing from view. -
Trim the excess:
Use sharp scissors to trim the remaining tail ends of the elastic, being careful not to cut the main knot.
Now you have a personalized celestial stack perfect for gifting or keeping for yourself
Party Favor “One-Size” Bracelet Set
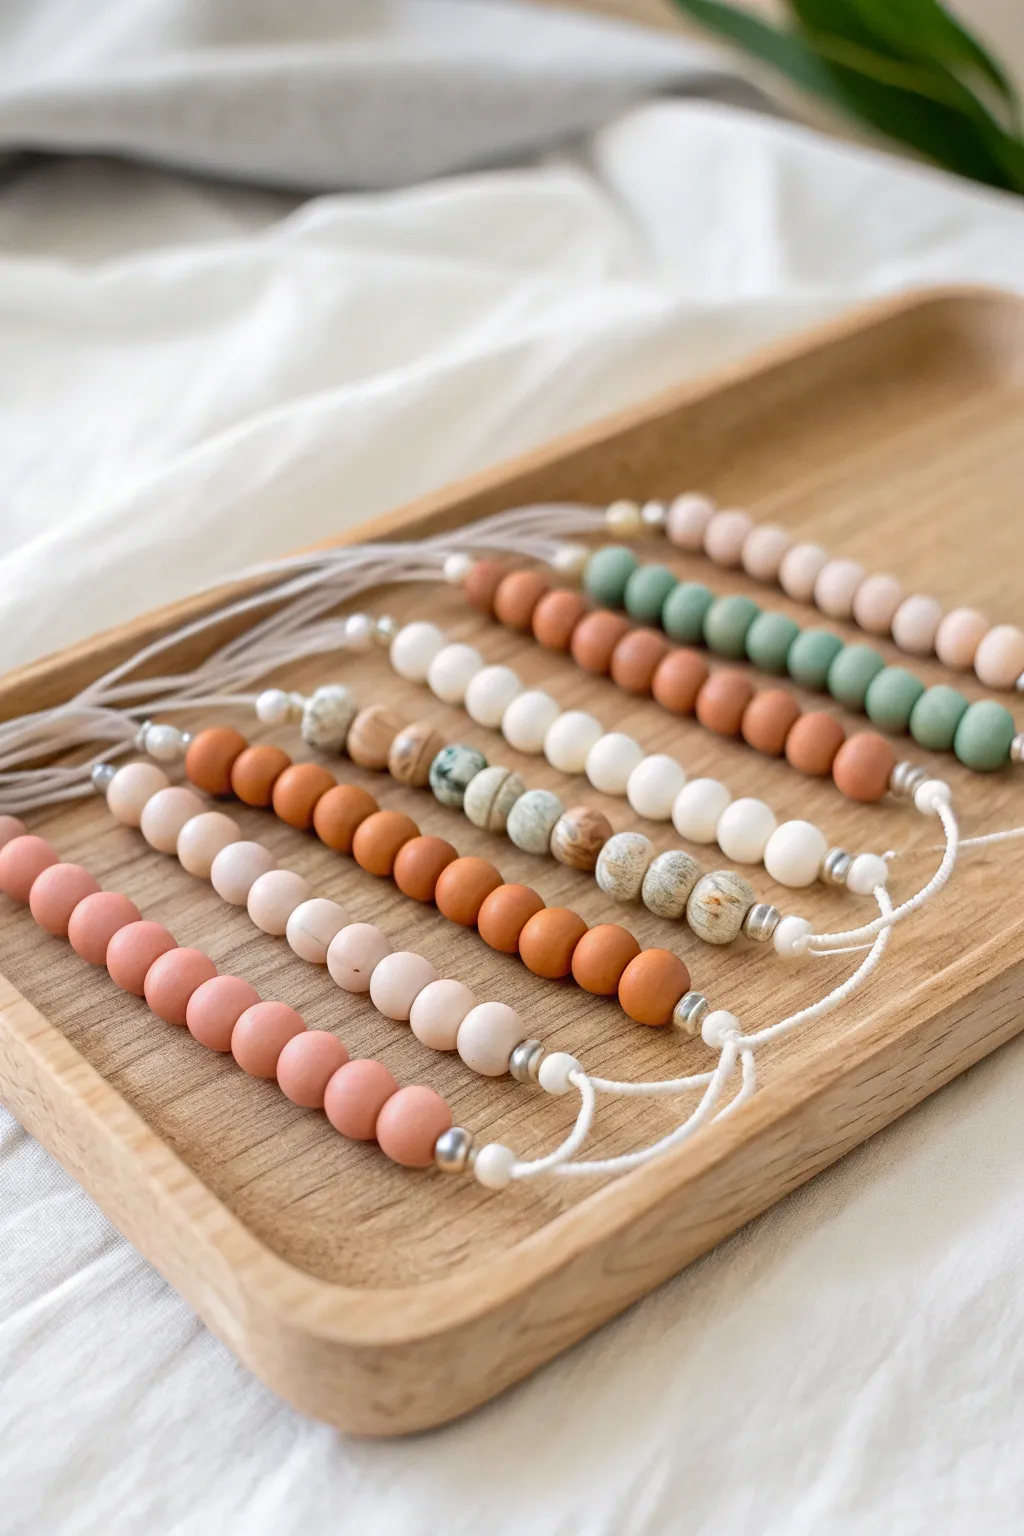
These minimal, earthy bracelets feature a curated palette of matte beads in sage, terra cotta, blush, and speckled stone. Their simple adjustable cord design makes them the perfect one-size-fits-all party favor for guests of any age.
Step-by-Step Guide
Materials
- 12mm or 10mm round silicone or polymer clay beads (matte finish)
- Round speckled jasper or terrazzo-style stone beads
- 1mm to 1.5mm waxed cotton or nylon cord (white or cream)
- Small silver spacer beads (approx. 4mm)
- Scissors
- Lighter or clear craft glue (for sealing knot ends)
- Tape or a clipboard (optional, for holding cord steady)
Step 1: Planning the Palettes
-
Sort your colors:
Begin by separating your matte beads into color groups. You’ll need distinct piles of blush pink, deep terra cotta, sage green, cream, and the speckled stone beads. -
Visualize the strands:
Lay out the beads in rows on your work surface before stringing. The design relies on solid blocks of color. For instance, one strand might be all blush, another all terra cotta, and a third alternating cream with speckled stone. -
Determine length:
Aim for about 6 to 7 inches of beaded length for an average adult wrist. This usually equates to approximately 14-16 beads of the 10mm size.
Loose Knots?
If your square knots unravel, the cord might be too silky. Switch to a waxed cotton cord; the wax provides necessary friction to grip tight.
Step 2: Stringing the Beads
-
Cut the cord:
Cut a piece of white waxed cord to about 18 inches in length. This generous length makes the final knotting much easier. -
Seal the tip:
Briefly run a lighter flame over one end of the cord to harden it into a needle-like point, or dip it in a tiny bit of glue and roll it between your fingers. This helps it pass through the beads smoothly. -
Start with a knot:
Tie a simple overhand knot about 5 inches from the unsealed end of the cord to stop your beads from sliding off while you work. -
Add a spacer:
Thread on one small silver spacer bead first. This adds a polished, professional finish to the start of the bead row. -
Thread the main beads:
Strung your chosen pattern of matte beads onto the cord. Keep the tension relaxed; you don’t want the beads bunching up tight against each other. -
Finish the row:
Once you have reached your desired beaded length, thread on a second silver spacer bead to bookend the design. -
Secure the beads:
Tie another overhand knot flush against that final silver spacer. Ensure it’s tight so the beads stay in a neat row but still have enough wiggle room to curve around a wrist.
Step 3: Creating the Adjustable Closure
-
Overlap the ends:
Bring the two loose ends of the cord together so they overlap parallel to each other, forming a circle with the bracelet. -
Start the sliding knot:
Cut a separate small piece of cord, about 6 inches long. Place this piece under the two overlapped bracelet, creating a perpendicular cross. -
Tie the square knots:
Using the shorter piece, tie 3 to 4 macramé square knots over the overlapped bracelet cords. This creates a sliding casing. -
Tighten and trim:
Pull the square knots tight and trim the excess tails of the *knotting* cord (not the bracelet cord) very close to the knot. -
Seal the closure:
Carefully melt the trimmed ends with a lighter or dab with superglue to fuse the knot without gluing it to the sliding cords underneath. -
Add stopper beads:
On the very ends of the original bracelet cords, tie a heavy knot or add a tiny bead and a knot to prevent the cords from pulling completely through the slider. -
Trim final length:
Make sure the pull-cords are even in length, trim any excess, and give the sliding mechanism a test pull to ensure it moves smoothly.
Scented Beads
Use unfinished wood beads for the ‘speckled’ accents and add a drop of essential oil to turn these favors into personal aromatherapy diffusers.
Now you have a set of harmonious, stackable bracelets ready to gift or wear
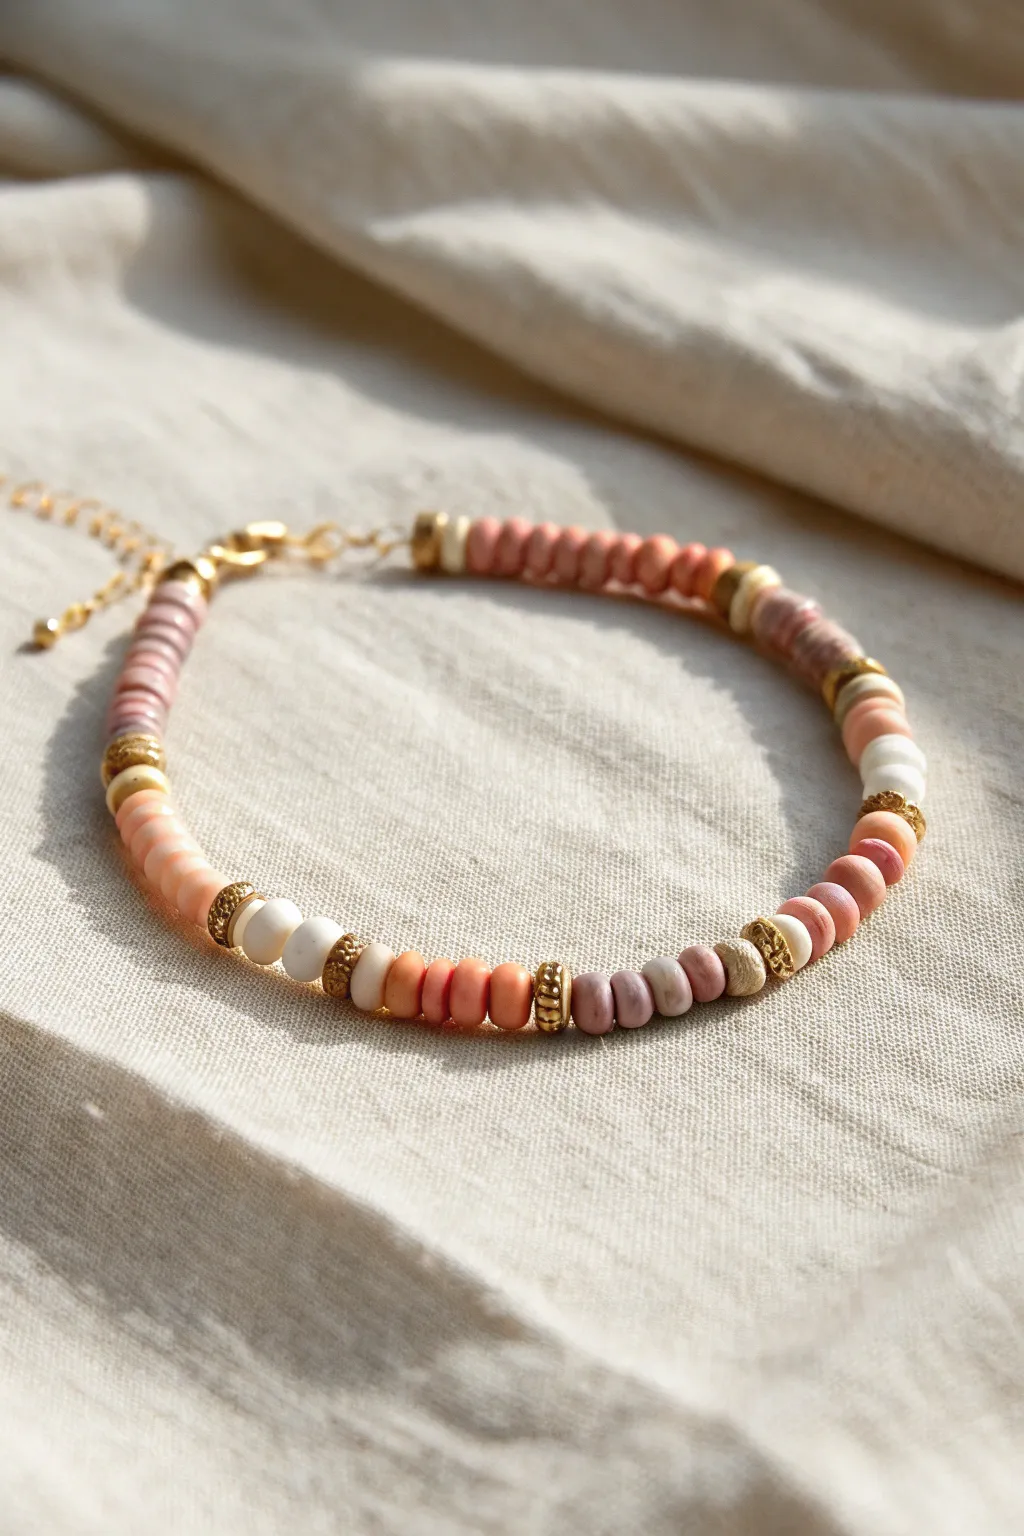
Initial And Tiny Heart Center Bracelet
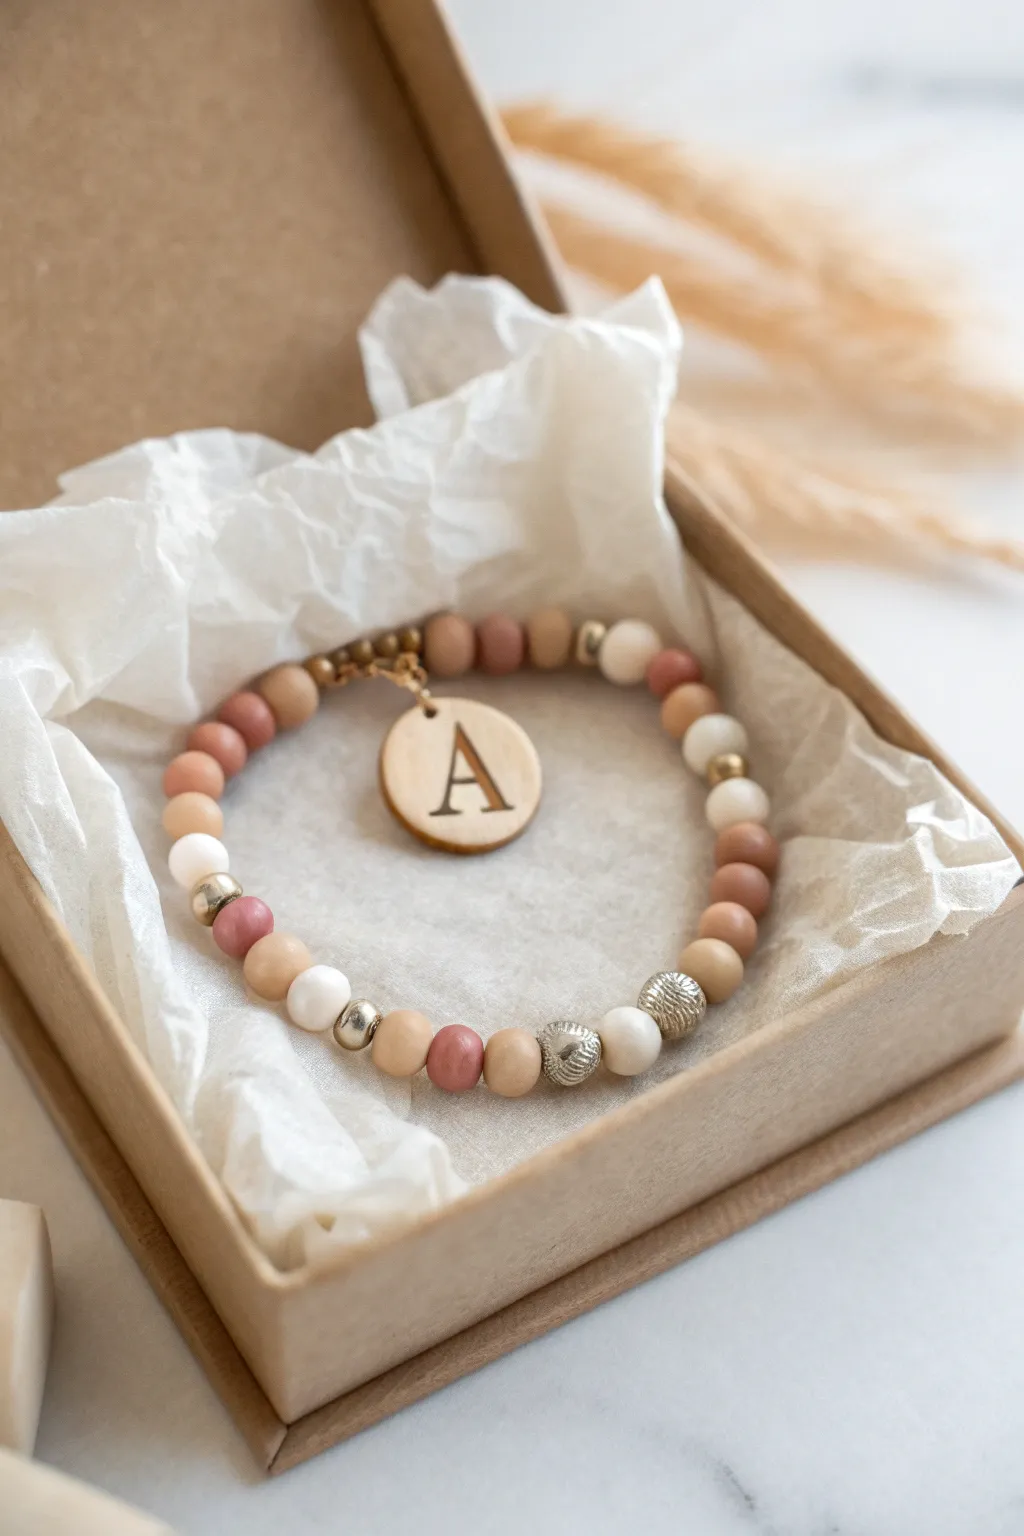
This elegant bracelet combines the warmth of natural wood tones with the subtle shine of textured silver spacers. The gradient of rose, tan, and cream creates a sophisticated palette, perfectly anchored by a personalized wooden charm that adds a bespoke touch.
Detailed Instructions
Materials
- Elastic beading cord (0.7mm or 0.8mm clear)
- 6mm-8mm round wooden beads (rose pink, light tan, cream/off-white, medium brown)
- 6mm textured silver metal spacer beads
- Small gold or silver jump ring
- Flat round wooden charm disc (approx. 15mm)
- Small metal letter sticker or wood burning tool (for the initial)
- Jewelry adhesive (e.g., G-S Hypo Cement)
- Scissors
Step 1: Preparing the Charm
-
Select your centerpiece:
Begin by choosing a flat, round wooden charm. If it doesn’t already have a hole at the top, carefully drill a small hole near the edge. -
Add the initial:
Apply a black serif letter sticker (like the ‘A’ shown) to the center of the wooden disc. Alternatively, if you have steady hands, you can use a fine-tip wood burning tool or a permanent marker to draw the letter. -
Seal the design:
If using a sticker or marker, brush a very thin layer of clear matte varnish over the charm face to protect the letter from wear. -
Attach hardware:
Open a jump ring using two pliers (twist, don’t pull apart) and thread it through the hole in your wooden charm. Close the ring securely.
Loose Knot?
If the elastic feels slippery and the knot won’t hold, try rubbing the knot area of the cord with a little beeswax before tying for extra grip.
Step 2: Stranding the Beads
-
Measure and cut:
Cut a piece of elastic cord about 10-12 inches long. Is usually like to pre-stretch the cord firmly a few times to prevent the bracelet from sagging later. -
Secure the end:
Place a piece of tape or a bead stopper on one end of the cord to stop beads from sliding off while you work. -
Start the pattern:
Begin threading beads near the clasp area. Start with two small distinct beads, like a medium brown wood bead followed by a tiny gold spacer if desired, to hide the knot later. -
Create the ombre sections:
Thread a section of rose pink wooden beads. Aim for about 5-6 beads in this color block. -
Transition colors:
Switch to a lighter shade, threading on a tan or beige wooden bead, followed by a cream bead to start breaking up the color blocks. -
Incorporate accents:
Slide on a textured silver bead, followed by a rose bead, and then another tan bead. This randomizes the pattern slightly for an organic look. -
Add the charm:
Slide your prepared wooden charm onto the cord. This will act as the focal point of the bracelet. -
Mirror the pattern:
Continue adding beads to the other side of the charm, trying to balance the colors. Use a mix of cream, tan, and rose beads. -
Insert texture breaks:
Place two large textured silver beads separated by a single cream bead on the side opposite the charm to add visual interest. -
Check the fit:
Wrap the strand around your wrist to check the size. Add or remove beads until it sits comfortably without digging in.
Step 3: Finishing Touches
-
Tie the knot:
Remove the tape/stopper and bring the two ends together. Tie a surgeon’s knot (loop the cord through twice before pulling tight). -
Secure with glue:
Apply a tiny dab of jewelry adhesive specifically to the knot. Let this dry for a few minutes before trimming. -
Hide the mechanics:
If the hole of the adjacent bead is large enough, gently tug the elastic so the knot slides inside the bead to hide it. -
Trim excess:
Use sharp scissors to trim the excess cord tails close to the knot (or the bead hiding the knot).
Natural Stain
Make white wooden beads look aged or tan by briefly soaking them in strong black tea or wiping them with a walnut stain cloth.
Place your finished piece into a tissue-lined box for a beautiful, handmade gift presentation
Glow-Style Neon Birthday Bracelet
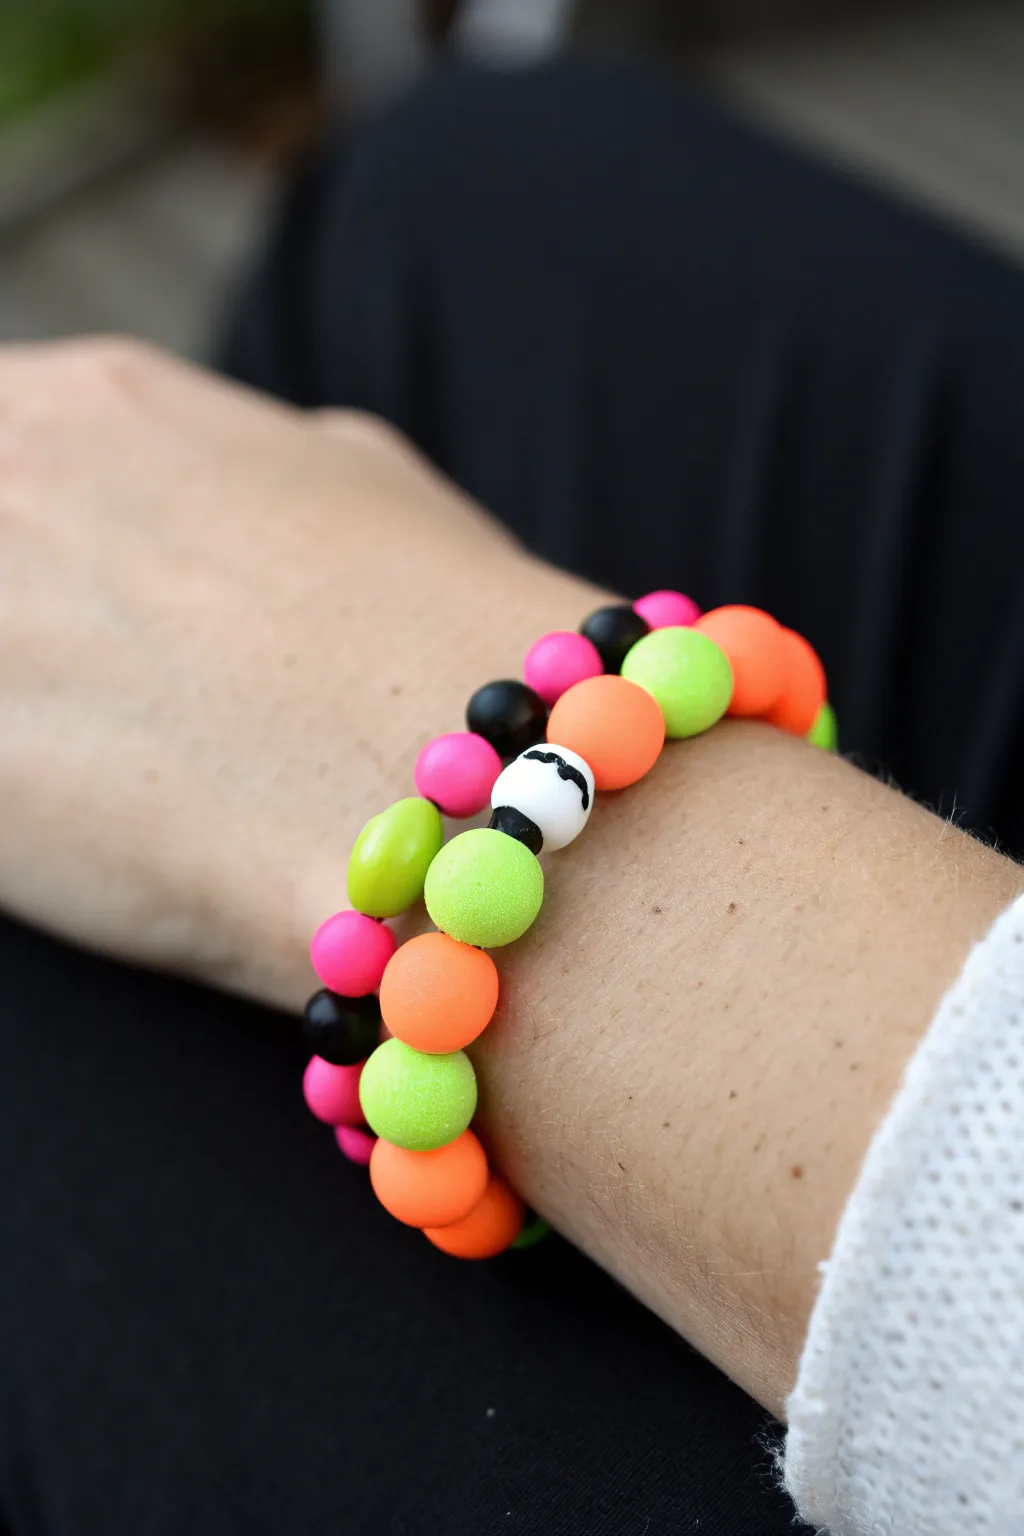
Brighten up any birthday outfit with these vibrant neon clay bead bracelets. Featuring a fun matte texture and striking black accents, this stacked look is perfect for a lively party atmosphere.
Step-by-Step
Materials
- Polymer clay in neon pink, neon orange, and neon green
- Polymer clay in black and white
- Elastic stretch cord (0.8mm or 1mm)
- Clay roller or pasta machine
- Small round bead roller tool (optional but helpful)
- Needle tool or toothpick
- Baking sheet with parchment paper
- Super glue or jewelry cement
- Ruler
- Scissors
Step 1: Preparing the Clay
-
Condition the Clay:
Start by taking small portions of your neon pink, orange, and green polymer clay. Knead each color separately in your hands until they are soft, pliable, and warm to the touch. -
Create Uniform Portions:
Roll each color into a long, even snake shape on your work surface. Use a ruler to help guide you, keeping the thickness consistent. -
Cut the Segments:
Use a blade to cut the clay snakes into equal-sized segments. Aim for pieces that are roughly 1cm wide to ensure all your finished beads are the same size. -
Condition Black and White:
Repeat the conditioning and cutting process for the black clay and a small amount of white clay.
Hole Sizing
Twist your needle tool as you push it through the clay to create a cleaner hole without distorting the sphere’s round shape.
Step 2: Shaping the Beads
-
Roll Spheres:
Take each cut segment and roll it between your palms to form a smooth sphere. I find using a light circular motion prevents flat spots. -
Create the Focal Bead:
Take a white sphere and a tiny pinch of black clay. Roll the black clay into a microscopic snake. -
Apply the Smiley Detail:
Gently press the tiny black snake onto the white bead in a curved shape to create a mustache or smile design. Roll the bead gently again to embed the design flush with the surface. -
Pierce the Holes:
Hold a bead gently between your thumb and forefinger. Use a needle tool to pierce a hole straight through the center. -
Widen the Channel:
Give the tool a little wiggle so the hole is large enough for your elastic cord. Repeat this for every bead.
Glow Up
Swap the standard white clay for glow-in-the-dark polymer clay for the focal bead so the design really shines when the lights go down.
Step 3: Baking and Assembly
-
Arrangement for Baking:
Place all pierced beads onto a baking sheet lined with parchment paper. To keep them perfectly round, you can rest them on a bed of cornstarch or folded paper accordion-style. -
Bake the Clay:
Bake according to your polymer clay package instructions (typically 275°F/135°C for 15-30 minutes). Let them cool completely before handling. -
Measure the Cord:
Cut two lengths of elastic cord, measuring about 10-12 inches each to give yourself plenty of room for tying knots. -
String the First Bracelet:
String the beads in a random pattern, mixing the neon pink, green, orange, and occasional black beads. Check the length against your wrist as you go. -
String the Second Bracelet:
For the second strand, include your special white focal bead in the center, flanked by black beads to make it pop, and fill the rest with the neon mix. -
Secure the Ends:
Tie a strong surgeon’s knot (right over left, left over right) to close the loop. Pull tight to secure. -
Glue the Knot:
Apply a tiny drop of super glue specifically to the knot. Let it dry for a few seconds. -
Trim Excess:
Snip off the excess cord close to the knot using scissors. If possible, tuck the knot inside one of the adjacent beads to hide it.
Enjoy wearing your vibrant new stack of neon bracelets
Stamped Birthday Date Clay Tag Bracelet
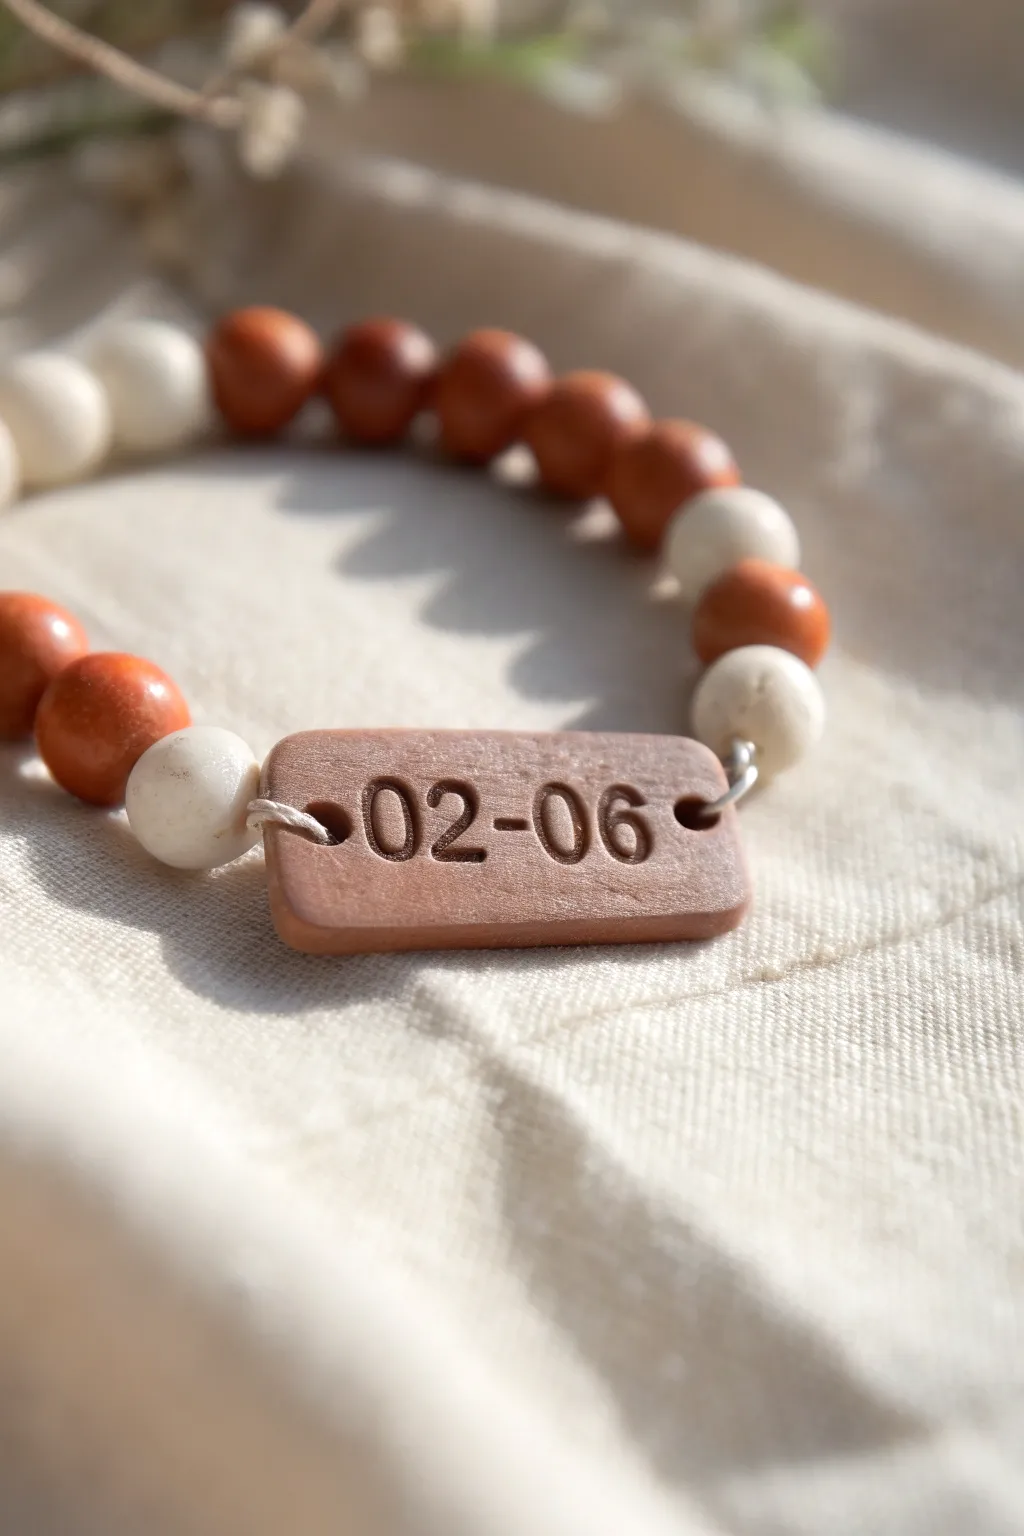
Capture a special moment in time with this rustic, personalized bracelet featuring a hand-stamped clay tag as its centerpiece. The warm terracotta and cream tones create a natural, effortless look that pairs beautifully with the meaningful date you choose to commemorate.
Detailed Instructions
Materials
- Polymer clay in terracotta/burnt sienna
- Small round wooden beads (approx 8-10mm) in dark stain
- Small round wooden or stone beads (approx 8-10mm) in cream/off-white
- Elastic beading cord (0.7-1mm)
- Small letter/number stamp set
- Rectangular clay cutter (approx 1 inch)
- Clay roller or pasta machine
- Needle tool or toothpick
- Parchment paper
- Dark brown acrylic paint
- Paper towel or wet wipe
- Baking sheet
- Oven
- Super glue or jewelry cement
Step 1: Crafting the Clay Tag
-
Condition the clay:
Begin by warming the terracotta polymer clay in your hands, kneading it until it is soft, pliable, and free of any air bubbles. -
Roll out the slab:
Roll the clay out onto a smooth surface or parchment paper to an even thickness of about 3-4mm. You want it sturdy enough to hold its shape but not too bulky. -
Cut the shape:
Using your rectangular clay cutter, punch out a clean rectangle shape. If the edges are sharp, gently tap them with your finger to soften the look. -
Add holes:
Use a needle tool or toothpick to carefully pierce holes on the far left and right sides of the rectangle. Wiggle the tool slightly to ensure the hole is large enough for your elastic cord to pass through later. -
Stamp the date:
Arrange your number stamps to form the desired date (MM-DD). I find it helpful to test the spacing on a scrap piece of clay first. -
Impress the clay:
Press the stamps firmly and evenly into the center of the rectangle. Ensure you don’t push so hard that the clay distorts, but deep enough to catch paint later. -
Bake the tag:
Place your stamped tag on a parchment-lined baking sheet and bake according to the manufacturer’s instructions for your specific brand of clay. -
Cool down:
Once baked, remove the tray from the oven and allow the clay piece to cool completely before handling it further.
Stamp Alignment Fix
If your numbers look crooked before baking, don’t panic! Just roll the clay into a ball and re-flatten it to try again. Clay is forgiving until it hits the oven.
Step 2: Antiquing and Assembly
-
Apply the wash:
Squeeze a tiny dot of dark brown acrylic paint onto the stamped date. Work the paint into the deep grooves of the numbers. -
Wipe away excess:
Immediately wipe across the surface with a damp paper towel or wet wipe. This leaves paint inside the numbers for contrast while revealing the terracotta color on top. -
Measure the cord:
Cut a length of elastic cord about 10-12 inches long. This gives you plenty of slack for tying the final knot comfortably. -
Start the pattern:
Thread one cream bead onto the cord, followed by the clay tag. Thread the cord through the left hole, across the back (or front, depending on preference, though side-holes usually mean threading separately), and out the right side. -
Attach the tag:
Actually, for this specific style, thread the cord through one hole of the tag, then string your beads, and finally thread through the other hole of the tag to complete the circle. -
String the beads:
Create an alternating pattern to match the photo: string groups of the burnt orange/brown beads separated by single cream beads. In the photo, it looks like a pattern of approximately 5 brown beads, 1 white, 1 brown, 1 white. -
The pattern logic:
Use the cream beads as accents near the tag itself to frame the focal point. Add two cream beads directly next to the tag on the right side. -
Check the fit:
Wrap the unfinished strand around your wrist to check the size. Add or remove brown filler beads until it fits comfortably without stretching the elastic. -
Tie the knot:
Bring the two ends of the elastic together. Tie a standard square knot (right over left, left over right) and pull tight. -
Secure and finish:
Apply a tiny drop of super glue or jewelry cement to the knot for security. Let it dry for a moment, then trim the excess cord ends close to the knot. Hide the knot inside a bead hole if possible.
Pro Tip: Rustic Texture
Before baking, gently press a piece of sandpaper or a rough stone onto the clay tag’s surface. This adds a subtle, grainy stone texture that looks very high-end.
Now you have a charming, customized accessory that keeps your favorite date close to hand
Marbled “Birthday Party Swirl” Beads
Celebrate a special day with this elegant yet playful bracelet featuring a sophisticated palette of polymer clay heishi beads. The mix of soft peaches, dusty roses, and creamy whites creates a ‘birthday cake’ vibe that feels grown-up and chic.
How-To Guide
Materials
- Polymer clay heishi disc beads (6mm or 4mm) in: peach, coral, dusty rose, light pink, white, cream, and marbled tan/beige
- Gold spacer beads (heishi style or small rondelles)
- Gold textured/dimpled accent beads (slightly larger than the clay beads)
- Beading wire (e.g., Beadalon 7-strand or 19-strand)
- 2 small gold crimp beads
- 2 gold wire guardians (optional but recommended)
- 2 gold crimp covers (optional)
- Gold lobster clasp
- Gold extension chain (optional)
- Crimping pliers
- Wire cutters
- Bead design board or masking tape
Step 1: Planning the Pattern
-
Lay out your design:
Before stringing, place your beads on a bead design board or a piece of felt. This allows you to visualize the color transitions shown in the image—notice how the colors are grouped in small blocks rather than a strict ABC pattern. -
Analyze the color blocks:
Observe the image carefully: you’ll see sections like ‘two dusty rose, one gold spacer, three peach.’ The pattern feels organic. I like to group 3–5 beads of similar tones together before breaking them up with a contrasting color or gold accent. -
Cut the wire:
Cut a piece of beading wire about 10-12 inches long. This gives you plenty of room to work comfortably without beads sliding off the ends.
Pro Tip: Texture Talk
Mix matte finish clay beads with glossy gold spacers. The contrast makes the colors look richer and less like plastic toy jewelry.
Step 2: Starting the Strand
-
Secure the first end:
Thread a crimp bead onto one end of the wire, followed by a wire guardian. Loop the wire through the guardian and back down through the crimp bead. -
Attach the clasp:
Hook the loop (protected by the wire guardian) onto the ring of your lobster clasp before pulling the wire tight. Use crimping pliers to flatten the crimp bead securely. -
Add a crimp cover:
If you want a polished finish, place a gold crimp cover over the flattened crimp bead and gently close it with pliers so it looks like a round gold bead.
Step 3: Stringing the Beads
-
Begin with a gold accent:
Start your strand with a small gold spacer or a few smaller beads to taper the design near the clasp. -
Create the first color block:
Thread on about 6-8 beads of a darker dusty rose tone to mimic the section on the right side of the bracelet in the specific photo reference. -
Insert a gold highlight:
Slide on one of the textured gold spacer beads. These act as little dividers that make the clay colors pop. -
Transition to lighter tones:
After the gold spacer, switch to a lighter sequence. Try adding a mixed block of 2 white beads sandwiched between 2 peach beads. -
Build the ‘swirl’ effect:
Continue stringing, alternating between solid blocks of color (like the 5 bright coral beads) and mixed sections (alternating white and tan). This irregularity creates the ‘marbled’ aesthetic. -
Check the length:
Periodically wrap the strand around your wrist. For an average fit, you’ll want roughly 6 to 6.5 inches of beaded length, excluding the clasp. -
Finish the pattern:
End the beading sequence symmetrically if possible, or finish with a small gold spacer just like you started, ensuring the design feels balanced.
Level Up: Lettering
Swap the central block of peach beads for gold-lettered white beads to spell ‘BDAY’ or a name for a personalized gift.
Step 4: Finishing Touches
-
Prepare the final crimp:
Thread a crimp bead onto the wire, followed by the second wire guardian. -
Attach the extension chain:
Loop the wire guardian through the final link of your extension chain (or a simple jump ring). -
Secure the wire:
Pass the wire back down through the crimp bead and through the first couple of clay beads on the strand. Pull tight to remove slack, but leave a tiny bit of wiggle room so the bracelet stays flexible. -
Crimp and trim:
Flatten the final crimp bead with your pliers. Trim the excess wire tail closest to the beads using flush cutters. -
Cover the crimp:
Add the second crimp cover over the flattened crimp bead for that professional jewelry-store look.
Now you have a beautifully handcrafted piece ready to gift or wear to the party
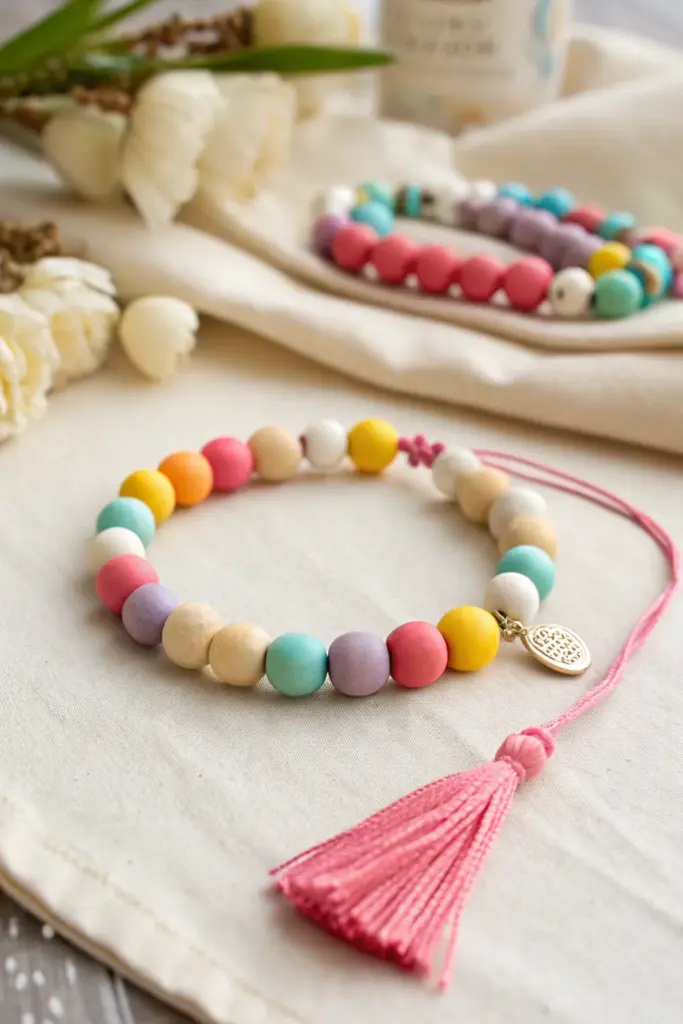
Piñata Tassel Surprise Bracelet

Capture the festive joy of a birthday party on your wrist with this vibrant, tassel-adorned accessory. Featuring matte beads in playful candy colors and a swinging golden charm, it is as fun to make as it is to wear.
Step-by-Step Tutorial
Materials
- Polymer clay beads (10mm round matte finish): pastel pink, hot pink, yellow, lilac, turquoise, white, cream, tan
- Pink cotton embroidery floss or thin tassel cord
- Elastic beading cord (0.8mm clear stretchy string)
- Small gold coin charm or branded tag
- Gold jump ring (6mm)
- Beading needle (optional but helpful)
- Scissors
- Jewelry pliers
- Tape or bead stopper
- Super glue or jewelry adhesive
Step 1: Planning and Stringing
-
Measure and cut:
Begin by measuring your wrist to determine the correct size. Cut a piece of elastic cord about 12 inches long, giving yourself plenty of slack for knotting later. -
Secure the end:
Attach a piece of tape or a bead stopper to one end of the elastic cord to prevent your colorful beads from sliding off while you work. -
Select your palette:
Pour out your matte clay beads. You are aiming for a ‘piñata’ mix—bright, happy colors interspersed with neutrals like cream and tan to balance the look. -
Start the pattern:
Begin stringing the beads. Start with a neutral color like white or cream to anchor the brighter hues coming next. -
Create color blocks:
Add a sequence of brights: yellow, then orange, then pink. Try not to repeat the exact same color twice in a row for a more scattered, confetti-like effect. -
Intersperse neutrals:
Every three or four bright beads, add a tan, cream, or white bead. This mimics the paper layers often seen on party decorations. -
Check the length:
Continue stringing until the bracelet wraps comfortably around your wrist without stretching the elastic. Usually, this is about 6.5 to 7 inches for an adult. -
Add the charm loop:
Before you tie off the elastic, slide a gold jump ring (with the charm already attached) onto the cord so it sits between two beads.
Step 2: Creating the Tassel
-
Wind the floss:
Take your pink embroidery floss. Wrap it around three fingers (or a piece of stiff cardboard about 2 inches wide) approximately 20 times. -
Tie the top:
Cut a separate 6-inch piece of floss. Thread it underneath the top loop of your wrapped bundle and tie it tightly with a double knot. Leave these ends long; they will attach to the bracelet. -
Create the neck:
Cut another piece of floss. Wrap it specifically around the ‘neck’ of the tassel, about a quarter-inch down from the top knot. Wrap 3-4 times tightly, knot it, and trim the excess. -
Trim the fringe:
Use sharp scissors to cut the bottom loops of the bundle. Trim the ends straight across so the tassel looks neat and uniform.
Tassel trouble?
If the tassel fringe looks crinkled or messy after cutting, dampen it slightly with water and comb through with a clean toothbrush, then let it dry flat.
Step 3: Assembly and Finishing
-
Attach the tassel:
Thread one of the long top strings from the tassel through the bracelet elastic, right next to where you plan to knot it. I like to tie the tassel onto the elastic itself separately first to keep it secure. -
Knot the bracelet:
Remove the tape from your elastic. Bring the two ends together and tie a surgeon’s knot (loop the thread through twice before pulling tight). -
Add security:
Place a tiny drop of super glue or jewelry adhesive directly onto the knot. Let it dry for a few minutes before trimming the tails. -
Hide the knot:
Ideally, pull the knot gently so it slides inside the hole of the nearest bead, hiding the mechanics of the bracelet entirely. -
Final adjustment:
Give the bracelet a gentle tug to ensure everything is secure and the tassel hangs freely alongside the gold charm.
Level Up
Add alphabet beads to spell out a birthday message or a name, replacing the neutral sections of the pattern for a personalized touch.
Wear your colorful creation to bring a little bit of party spirit to every day of the week