When you’re itching to sculpt a clay head, it helps to have a menu of ideas that covers everything from super simple faces to story-filled characters. I pulled together my favorite head concepts I teach (and make) when you want something fun, doable, and full of personality.
Classic Mini Portrait Bust
Capture a moment of peaceful repose with this elegant mini portrait bust. This project focuses on subtle facial planes and a smooth, stone-like finish to create a timeless piece that evokes the calm of classical sculpture.
Step-by-Step Guide
Materials
- White sculpting clay (stoneware or air-dry)
- Armature wire and wooden base
- Aluminum foil for bulking
- Sculpting tools (loop tools, wooden modeling tools)
- Needle tool
- Sponge and water
- Cylindrical plaster or wood pedestal (for display)
- Fine grit sandpaper
Step 1: Building the Foundation
-
Prepare the armature:
Begin by securing a sturdy loop of armature wire onto a temporary wooden working base. The wire should reach roughly the height of the neck and the center of the head. -
Bulk with foil:
Crumple aluminum foil tightly around the wire to form the core shape of the skull and neck. This saves clay and reduces drying time. -
Apply the base clay:
Roll out slabs of clay approximately 1/4 inch thick. Cover the foil armature completely, pressing the clay firmly to ensure no air pockets remain between the foil and the clay. -
Establish the basic form:
Using your hands, smooth the clay into an egg-like shape for the cranium and a cylinder for the neck. Ensure the neck is thick enough to support the head, tapering slightly as it meets the jawline.
Step 2: Detailed Facial Modeling
-
Map out proportions:
Use a needle tool or wooden skewer to lightly sketch a horizontal line for the eyes (halfway down the face) and a vertical line for the nose center. Mark the bottom of the nose and the mouth line. -
Build the nose:
Add a small wedge of clay for the nose. Blend the edges seamlessly into the face, focusing on the bridge and the brow ridge connection. -
Sculpt the eye sockets:
Press your thumbs gently into the eye area to create orbital hollows. Since the eyes will be closed, you don’t need deep recesses, just defined concave areas beneath the brow. -
Form the eyelids:
Roll small coils or flattened ovals of clay and place them in the eye sockets. Smooth them to create the convex shape of closed eyelids, refining the crease where the lid meets the brow bone. -
Shape the lips:
Add two small coils for the lips. Blend them onto the face, then use a modeling tool to carve the separation line. Focus on the ‘M’ shape of the upper lip and the fuller curve of the bottom lip. -
Define the cheeks and jaw:
Add clay to the cheekbones to give the face structure. Smooth the jawline so it flows elegantly into the neck, keeping the chin soft but defined.
Keep it Cool
To keep the clay workable for longer, spritz it occasionally with a fine mist of water. If you need to take a break, wrap the piece tightly in plastic.
Step 3: Refining and Finishing
-
Add the ears:
Shape two C-shaped pieces of clay and attach them to the sides of the head, aligning the top with the eyes and the bottom with the nose. Use a small loop tool to carve out the inner ear details. -
Indicate the hairline:
Instead of sculpting individual strands, use a modeling tool to lightly etch a hairline or shallow grooves that suggest the direction of pulled-back hair, maintaining the smooth, bald aesthetic of the bust. -
Smoothing the surface:
Once the primary forms are set, use a damp sponge to wipe down the entire surface. This removes fingerprints and unifies the texture. -
Final detailing:
Go back in with a fine tool to sharpen the eyelids and nostrils. I find distinct, sharp lines around the eyes dramatically improve the ‘sleeping’ effect. -
Drying:
Allow the sculpture to dry slowly under a loose plastic bag for several days to prevent cracking. -
Sanding:
Once bone dry (or after firing if using kiln clay), use fine-grit sandpaper to gently buff the surface, achieving that soft, stone-like matte finish seen in the photo. -
Mounting:
Place your finished head atop a simple white cylindrical pedestal to complete the gallery-ready look.
Antique Wash
After drying, apply a diluted wash of raw umber acrylic paint, then wipe it away immediately with a rag. The pigment will stay in the crevices, highlighting details.
Enjoy the quiet presence this sculpture brings to your space.


Pinch-Pot Head With Simple Features
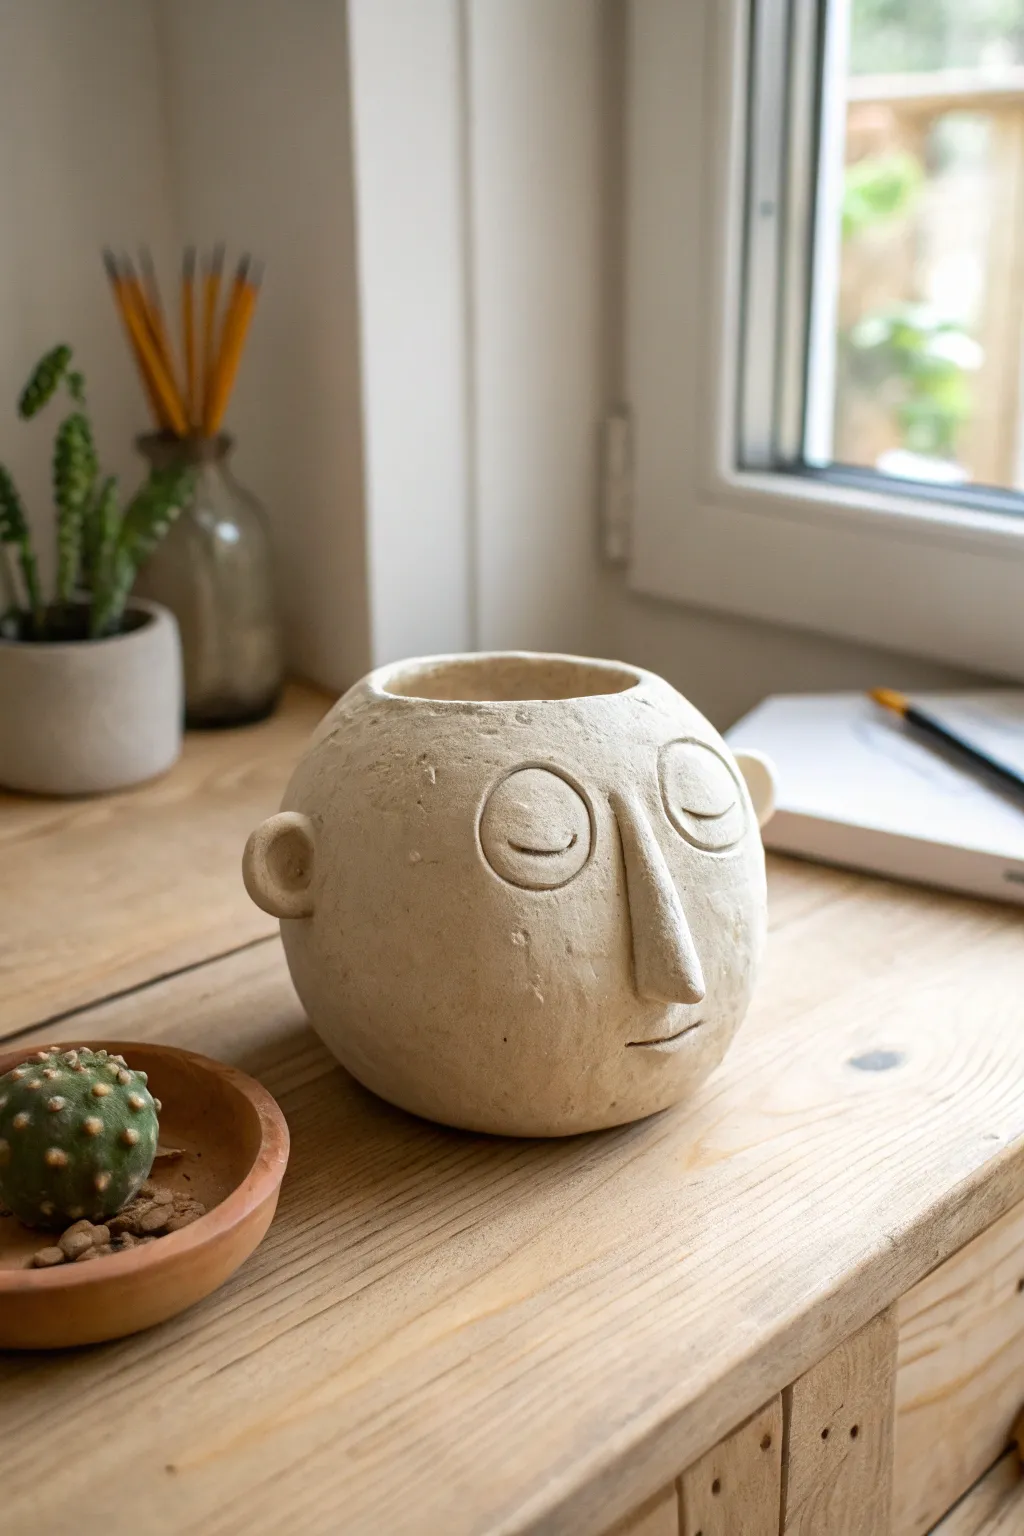
This calming, sphere-shaped vessel captures a peaceful expression with minimalist features, perfect for holding small trinkets or acting as a decorative object. Using basic pinch-pot techniques, you’ll sculpt a rounded form with an organic, stone-like texture that feels ancient yet modern.
Detailed Instructions
Materials
- White or beige air-dry clay (or kiln-fire stoneware)
- Small bowl or cup (for water)
- Basic clay tool set (needle tool, loop tool)
- Small sponge
- Rolling pin (optional)
- Wooden modeling tool or popsicle stick
- Fine-grit sandpaper (optional)
- Clear matte sealer (for air-dry clay)
Step 1: Forming the Base
-
Prepare the Clay:
Start with a ball of clay roughly the size of a large grapefruit. Wedge it well to remove air bubbles, ensuring the consistency is smooth and pliable. -
Create the Pinch Pot:
Push your thumb deep into the center of the ball, stopping about half an inch from the bottom. Begin pinching the clay walls between your thumb and fingers, rotating the ball as you go to create an even opening. -
Shape the Sphere:
Continue pinching and pulling the walls upwards. Unlike a bowl, you want the walls to curve slightly inward at the top to maintain that round, spherical head shape. -
Flatten the Base:
Gently tap the bottom of your sphere against your work surface. This creates a small flat spot so your head will stand stable and upright without rolling. -
Refine the Rim:
Smooth the top rim with your fingers or a damp sponge. It doesn’t need to be perfectly symmetrical; a slight organic wobble adds character.
Seamless Blending
When attaching the nose, drag clay from the nose onto the face, not the other way around. This keeps the nose volume intact while securing the bond.
Step 2: Adding Facial Features
-
Position the Nose:
Roll a small, elongated cone of clay for the nose. Score (scratch) the back of the nose and the center of the face where it will attach. -
Attach the Nose:
Apply a dab of water or slip to the scored areas and press the nose firmly onto the face. Use a modeling tool to blend the edges of the clay seamlessly into the main pot so it looks like one continuous piece. -
Form the Ears:
Roll two small balls of clay and flatten them slightly into thick discs. These will become the prominent, rounded ears. -
Attach the Ears:
Score the sides of the head and the back of your ear discs. Attach them aligned roughly with the nose area. I prefer to blend the back seam fully while leaving the front join distinct to define the ear shape. -
Detail the Ears:
Use your thumb or a rounded tool to press a small indentation into the center of each ear, giving them a stylized, cup-like appearance.
Step 3: Incising and Finishing
-
Draft the Eyes:
Using a needle tool, very lightly sketch two large circles for the eyes. Place them fairly wide apart on either side of the nose bridge. -
Carve the Eye Outline:
Once you are happy with the placement, go over your lines with a loop tool or the needle tool, pressing deeper to create a distinct groove. -
Add the Eyelids:
Carve a gentle, downward-curving line horizontally across the center of each eye circle to represent the closed eyelids. -
Carve the Mouth:
Below the nose, carve a small, simple horizontal mouth. Add a tiny upward tick at one corner to suggest a faint, peaceful smile. -
Texture the Surface:
Take a slightly damp sponge and dab it all over the surface. This softens any sharp tool marks and gives the piece a natural, slightly weathered stone texture. -
Final Smoothing:
Check the interior rim and smooth away any rough burrs. Let the piece dry slowly away from direct heat to prevent cracking.
Make it a Planter
Before drying, use a straw to poke a drainage hole in the bottom. Once fired or sealed, add a succulent for a fun ‘hair’ effect.
This serene little sculpture brings a sense of calm to any shelf it rests upon

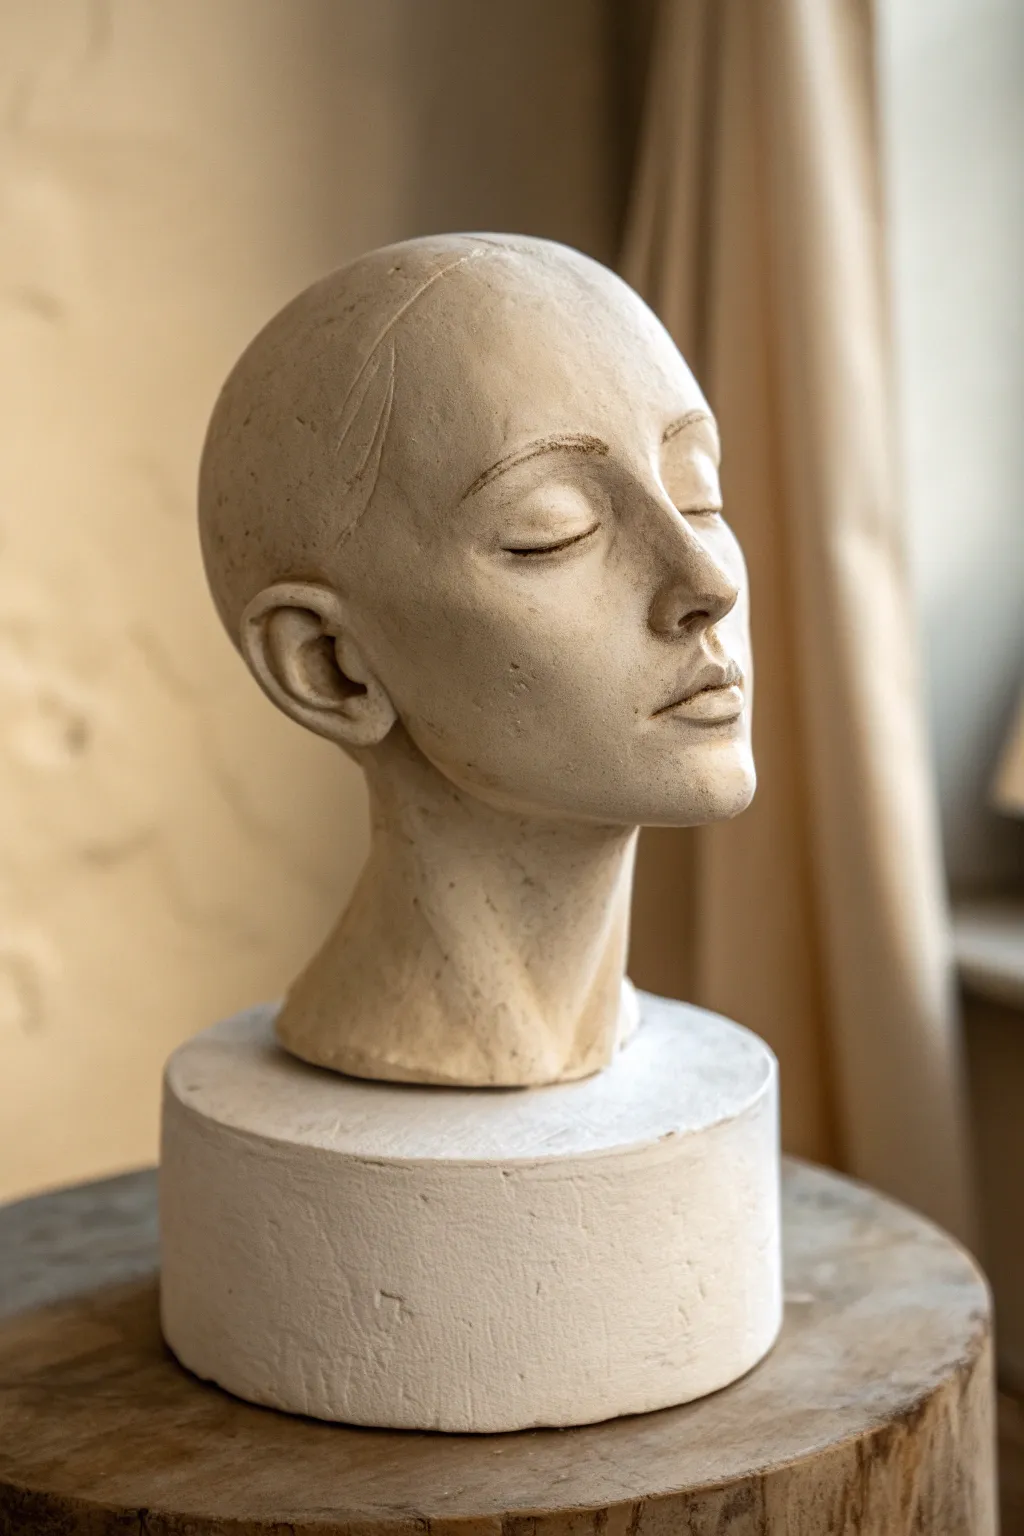
Basic Face Planes Study Head
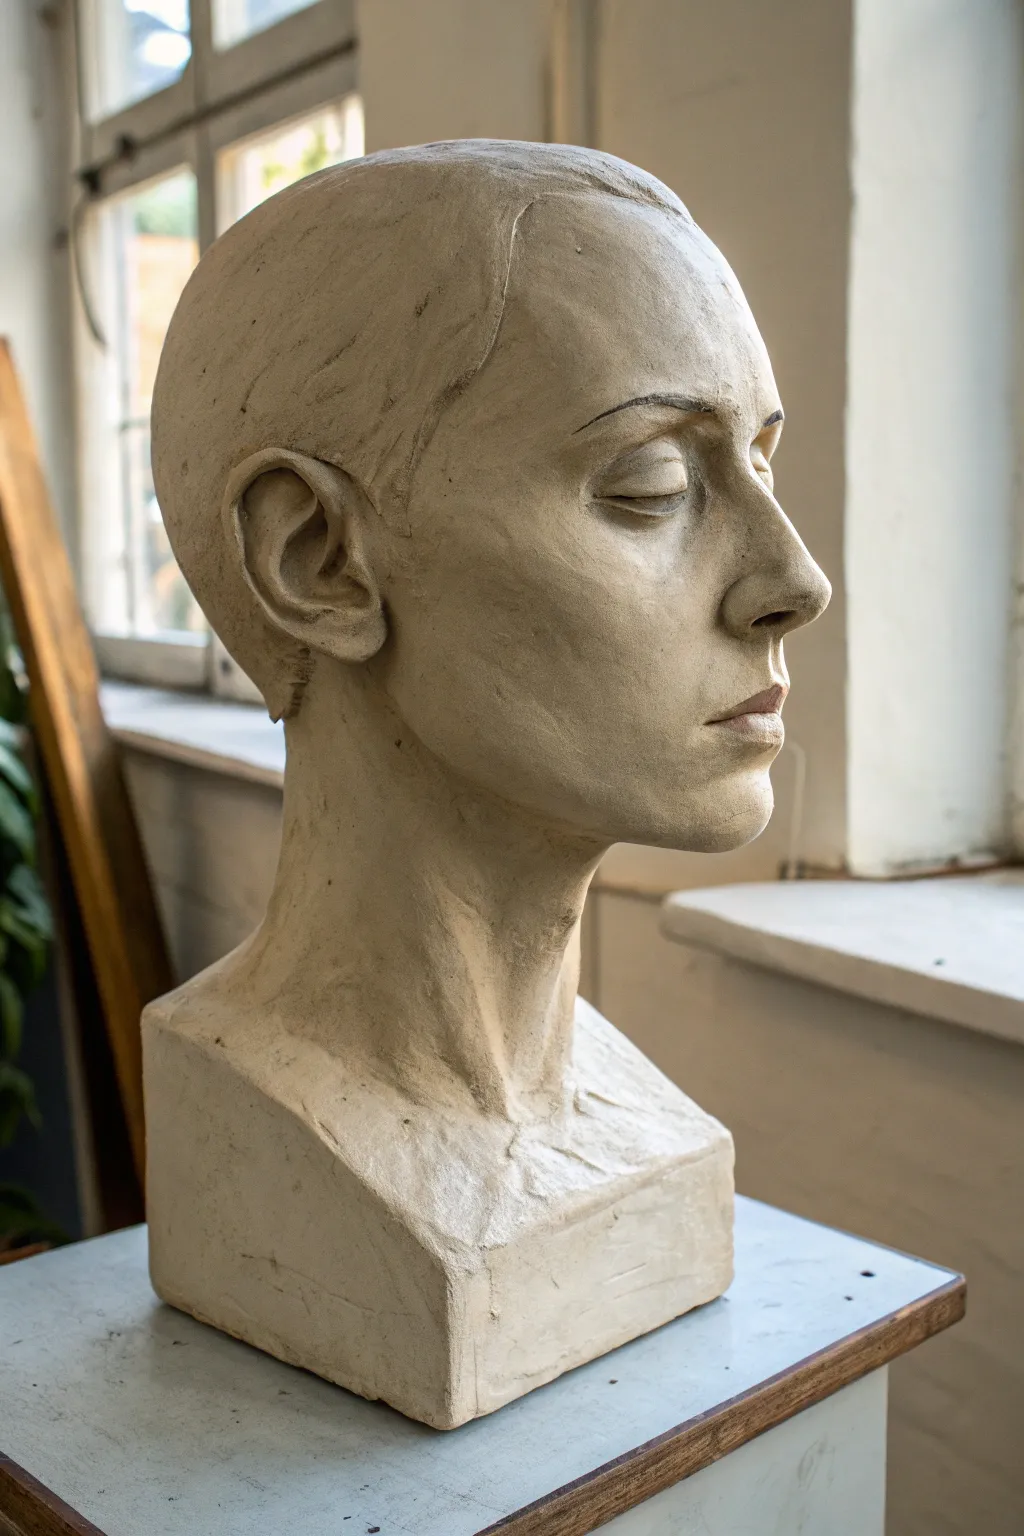
This project focuses on capturing the quiet dignity of a human face in repose, emphasizing the structural planes and anatomy over high-detail skin texture. The result is a classic bust with closed eyes and a smooth, unrefined finish that highlights form and light.
Step-by-Step
Materials
- Water-based sculpting clay (earthenware or stoneware)
- Armature stand with a vertical post
- Wooden modeling tools
- Loop tools (large and medium)
- Needle tool
- Kidney tool (metal or rubber)
- Spray bottle with water
- Calipers (optional for measurements)
- Sponge
Step 1: Building the Foundation
-
Prepare the armature:
Secure your armature to a heavy base. Tightly wrap newspaper or aluminum foil around the central post to form a rough egg shape for the skull core, securing it with tape. This saves clay and reduces weight. -
Rough out the mass:
Pack handfuls of clay firmly onto the armature core. Build up a substantial neck column first, then form the main cranium shape and the jawline. You want a rough silhouette that resembles a lightbulb. -
Establish the centerline:
Use a needle tool or the edge of a wooden tool to lightly mark a vertical centerline down the face. Mark horizontal lines for the eyes (halfway down the head), the bottom of the nose, and the mouth slit. -
Define the primary planes:
Using a block of wood or the flat side of a paddle, flatten the sides of the head (the temporal area) and the front plane of the face. This creates the ‘box’ like structure of the skull before adding features.
Step 2: Adding Features and Anatomy
-
Build the nose structure:
Add a wedge of clay for the nose. Don’t worry about nostrils yet; focus on the bridge, the tip’s protrusion, and the side planes connecting to the cheeks. Keep the bridge straight and strong. -
Form the eye sockets:
Press your thumbs deep into the eye line area to create the orbital cavities. The brow ridge should overhang slightly. This shadow is crucial for the realistic look shown in the reference. -
Add the mouth barrel:
Layer a rounded mound of clay where the mouth will go. This ‘muzzle’ shape sits on top of the skull structure. Use a tool to cut the separation line for the lips, curving it around the cylinder of the teeth beneath. -
Shape the chin and jaw:
Refine the jawline. It should angle sharply from the ear downwards before turning towards the chin. Add a small pad of clay for the chin prominence to give the profile strength. -
Sculpt the closed eyes:
Instead of carving eyes out, add small spheres into the sockets, then layer thin sheets of clay over them for eyelids. Smooth the lids into the surrounding skin, ensuring the lower lid tucks slightly under the upper lid at the outer corners. -
Construct the ears:
Make two ‘C’ shaped slabs of clay. Attach them roughly between the eye line and the nose base level. I find it easiest to focus on the outer rim (helix) and the tragus (the nub near the cheek) first, keeping the details simplified.
Drooping Features?
If the nose or chin starts sagging, your clay is likely too wet or the armature hasn’t grabbed the clay. Let the piece sit uncovered for an hour to firm up before adding more weight.
Step 3: Refining and Surfacing
-
Define the neck muscles:
Add two long, diagonally running coils of clay from behind the ears down to the center of the collarbone area. These represent the sternocleidomastoid muscles. Blend them so they aren’t too stark. -
Block in the hair:
The hair in this piece is very sleek. Add thin slabs of clay over the skull, smoothing them down completely. Use a tool to create a visible hairline ridge that separates the forehead from the hair mass. -
Refine the hairline:
Carve a subtle, curving line around the ear to show where the hair is tucked back. Keep the hair texture minimal; the interest comes from the shape, not individual strands. -
Smooth the skin planes:
Use a rubber kidney or a slightly damp sponge to unify the surface. You want to remove small thumbprints but leave the larger structural planes visible, like the cheekbones and the side of the forehead. -
Sharpen the details:
Go back with a small wooden tool. Sharpen the edges of the eyelids, the nostrils, and the philtrum (the groove above the lip). Ensure the transition where the neck meets the square base is blocky and deliberate. -
Final texture check:
The reference has a matte, slightly dusty look. If your clay is too shiny from water, let it stiffen, then gently brush it with a dry sculpting tool or stiff brush to knock back the sheen. -
Create the base block:
Ensure the bottom of the neck flares out into a solid, rectangular prism shape. Use a wire cutter or knife to slice the sides straight down for that clean, architectural base shown in the photo.
See the Light
Keep a single strong light source on your sculpture while working. This creates distinct shadows that help you see if your facial planes are symmetrical and anatomically correct.
Allow your clay sculpture to dry slowly under a loose bag to prevent cracking before firing or sealing


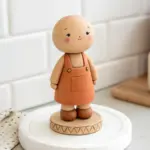
Bobblehead-Style Clay Head
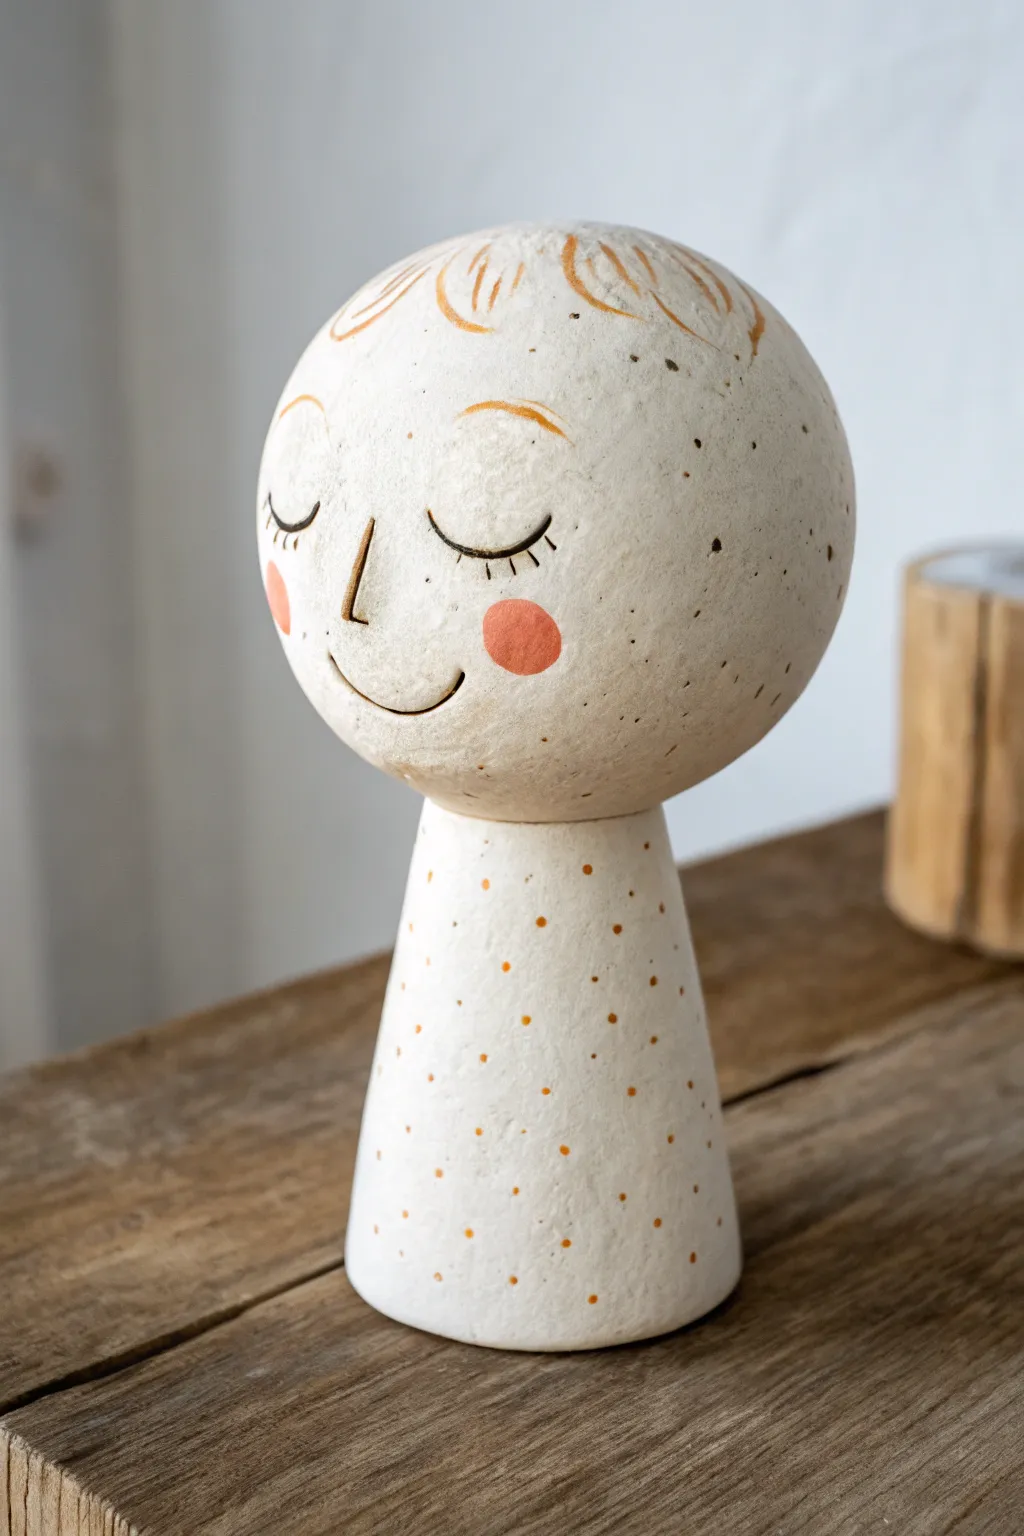
Create a charming, minimalist character with a sweet, serene expression using simple geometric forms. This bobblehead-style figure combines a perfectly round head with a sturdy conical base, finished with delicate painted details for a modern folk-art look.
Detailed Instructions
Materials
- White polymer clay or air-dry clay
- Speckled clay option (or black pepper for faux speckles)
- Acrylic paints (black, terracotta/peach, orange-brown)
- Fine detail paintbrush
- Sculpting tool or toothpick
- Ball of foil (optional, specifically for air-dry clay armature)
- Strong craft glue or liquid clay
- Matte varnish or sealant
Step 1: Forming the Base Structure
-
Prepare the clay:
Begin by conditioning your clay until it is soft and pliable. If you are using plain white clay and want the speckled look shown in the photo, knead in a tiny pinch of cracked black pepper or dried coffee grounds. -
Shape the body cone:
Take a portion of clay roughly the size of a golf ball. Roll it into a smooth cylinder first, then gently roll one end more than the other to create a tapered cone shape. -
Refine the base:
Tap the wider bottom of the cone firmly against your work surface to create a flat, stable base. The figure needs to stand independently without wobbling. -
Flatten the neck:
Gently flatten the very top point of the cone slightly. This creates a small platform where the head will eventually sit, ensuring a stronger bond than a sharp point would offer.
Step 2: Sculpting the Head
-
Create the sphere:
Roll a second, slightly larger portion of clay into a perfect sphere. For air-dry clay, creating a foil core first can reduce drying time and weight. -
Smooth the surface:
Roll the sphere gently between your palms for several minutes. The goal is to remove any fingerprints or lumps, achieving a smooth, moon-like surface. -
Test the fit:
Place the sphere onto the cone body to check proportions. The head should look slightly oversized compared to the body for that cute ‘bobblehead’ aesthetic. -
Join the pieces:
If using air-dry clay, score (scratch) the connecting surfaces and add a dab of water or slip before pressing them together. For polymer clay, use a drop of liquid clay or Simply press firmly to blend the seam slightly underneath.
Faux Ceramic Look
To mimic stoneware, mix translucent polymer clay with white clay (1:1 ratio) and add the cracked pepper. The translucency adds depth that looks just like fired pottery.
Step 3: Refining and Curing
-
Final smoothing:
Use a damp finger or a soft silicone tool to smooth out the neck join if you want it seamless, or leave it defined as two separate shapes as seen in the inspiration image. -
Dry or Bake:
Follow the manufacturer instructions for your specific clay. If baking polymer clay, consider propping the figure against a ceramic mug to prevent it from tipping over in the oven. -
Cool and Sand:
Once fully cured or dried, use very fine-grit sandpaper to buff away any remaining fingerprints or imperfections on the face area.
Interactive Wobble
Instead of gluing the head, embed a small spring or a heavy-duty wire coil into the neck before baking. This turns the sculpture into a functional bobblehead toy.
Step 4: Painting the Details
-
Sketch the face:
Lightly sketch the facial features with a pencil. Place the nose right in the center, with the curved eyes spaced widely apart for a peaceful expression. -
Paint the cheeks:
Mix a soft terracotta or coral paint color. Dip a round brush or a sponge tool into the paint and dab two perfect circles for the rosy cheeks. -
Add fine lines:
Using your finest liner brush and black paint, carefully trace the closed eyelids, adding tiny vertical lashes. Paint a simple ‘L’ shape for the nose and a gentle upward curve for the smile. -
Detail the hair:
With an orange-brown or ochre paint, add sweeping, curved strokes at the very top of the sphere to suggest bangs or hair texture. Keep the strokes loose and sketchy. -
Decorate the body:
Using the blunt end of a small paintbrush or a toothpick, dip into the orange-brown paint and dot the conical body. Vary the spacing slightly for a natural, organic pattern. -
Seal:
Finish the piece with a coat of matte varnish to protect the paint and give the clay a professional, unglazed ceramic feel.
Place your finished figure on a shelf or desk where its serene expression can bring a moment of calm to your day

The Complete Guide to Pottery Troubleshooting
Uncover the most common ceramic mistakes—from cracking clay to failed glazes—and learn how to fix them fast.
Set of Emotion Practice Heads
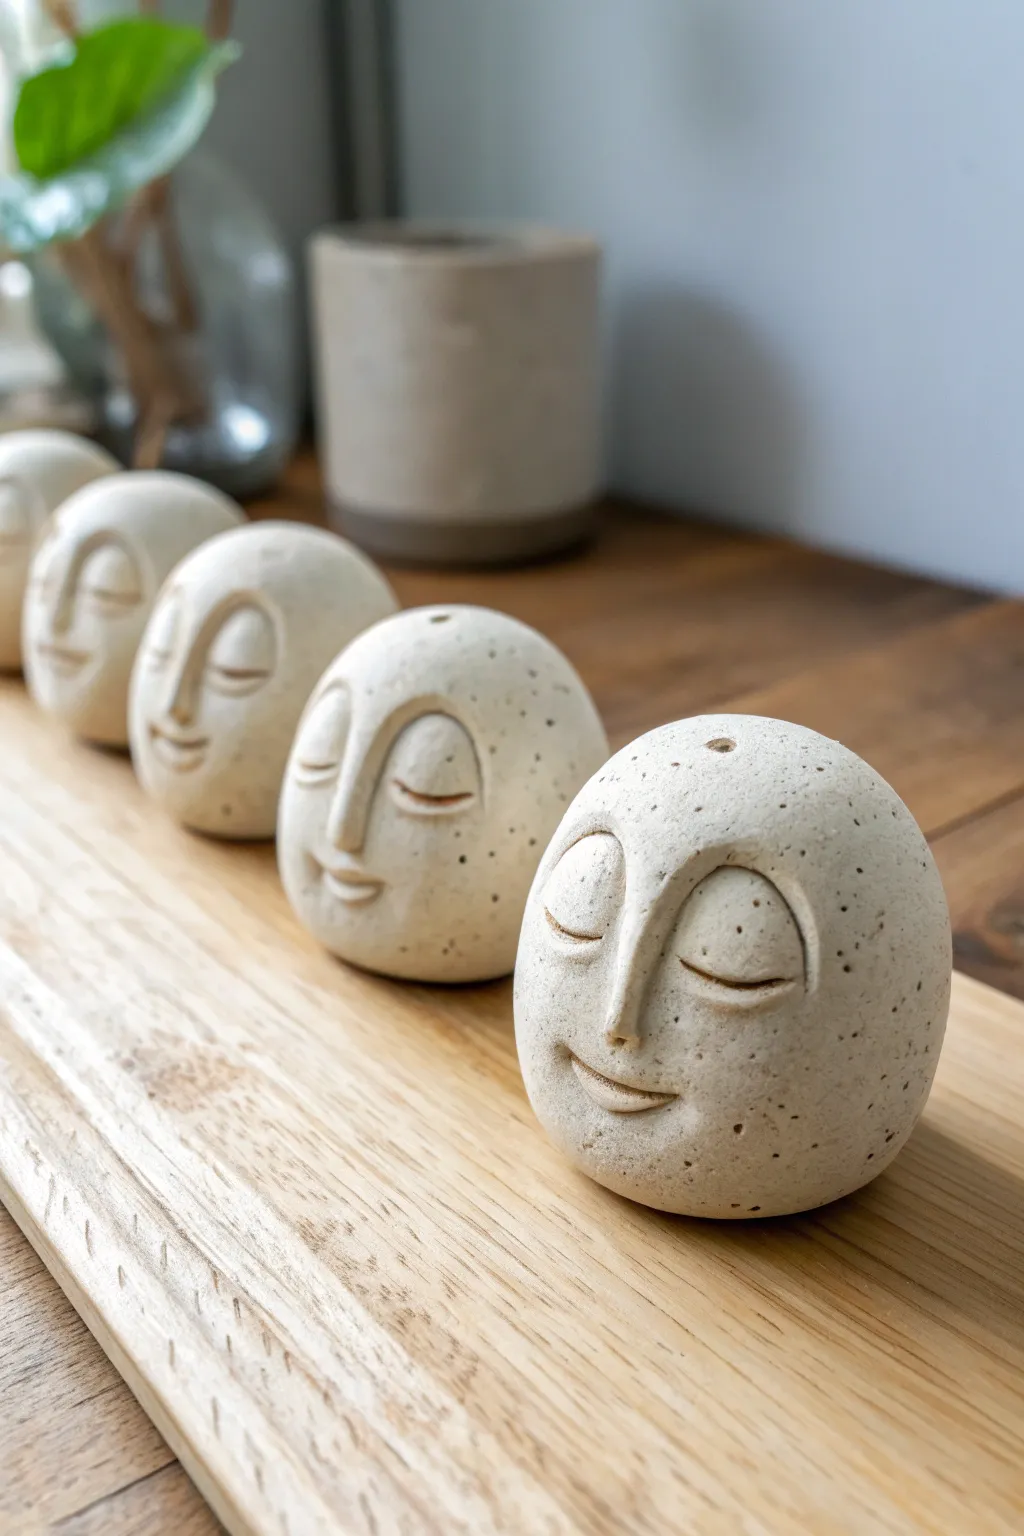
Create a soothing set of meditating faces using speckled stoneware clay. These small, palm-sized sculptures feature simplified features and gentle arcs, perfect for practicing expressive minimalism in your ceramic work.
Step-by-Step Tutorial
Materials
- Speckled stoneware clay (white or buff)
- Wooden modeling tool (rounded tip)
- Small sponge
- Pin tool or needle tool
- Ribbon tool (small loop)
- Smooth wooden board or bat
- Water slip
- Clear matte glaze (cone 5/6 depending on clay)
Step 1: Shaping the Base
-
Prepare the Clay:
Begin by wedging your speckled stoneware clay thoroughly to remove any air bubbles. You will need roughly a tennis-ball-sized amount of clay for each head you plan to make. -
Form Individual Spheres:
Divide your clay into equal portions. Roll each piece between your palms to create a smooth, tight sphere. They don’t need to be mathematically perfect, but aim for a consistent round shape. -
Create a Flat Base:
Gently tap the bottom of each sphere against your work surface. This creates a small flat spot so the head will sit upright without rolling away. -
Refine the Egg Shape:
Instead of leaving them perfectly round, gently elongate the form slightly into a subtle egg shape. The wider part should be at the bottom where the chin will be, tapering slightly toward the forehead.
Cracking Features?
If the nose or lips crack away during drying, the clay was too dry when you attached them. Always score (scratch) and slip (wet) both surfaces thoroughly before joining.
Step 2: Sculpting the Features
-
Mark the Center Line:
Using your pin tool very lightly, draw a fainter-than-faint vertical line down the center of the face. This guide helps keep the nose and mouth symmetrical. -
Establishing the Brow:
Press your thumbs gently into the clay about halfway down the face to create the indentation for the eye sockets. This pressure naturally pushes clay forward to form the bridge of the nose. -
Define the Nose Bridge:
Use a small wooden modeling tool to refine the nose. Smooth the clay from the forehead down into the nose bridge, creating a continuous, elegant line rather than a sharp break. -
Carve the Eye Arches:
Use a small loop tool or the edge of your wooden tool to carve out two clean, semi-circular arches for the eyebrows. These should flow directly into the line of the nose bridge. -
Shape the Eyelids:
Roll two very small, flattened almond shapes of clay. Score and slip these into the eye sockets you created earlier so they look like closed, resting eyelids. -
Smooth the Seams:
Blend the edges of the added eyelids into the main clay body carefully. I like to use a barely-damp brush here to ensure the transition is seamless. -
Incise the Lash Line:
With your needle tool or a sharp knife, draw a gentle, downward-curving line across the bottom of the eyelid to indicate the closed eye slit. Keep the curve soft to maintain the sleepy expression. -
Form the Mouth:
Below the nose, make a small horizontal cut for the mouth. Use your wooden tool to press the corners upward slightly into a subtle, mysterious smile. -
Add the Lip Definition:
Gently press a small coil of clay underneath the mouth cut to form the lower lip. Blend it downwards into the chin so it doesn’t look stuck on. -
Vent the Piece:
If your sphere is solid and thicker than an inch, use a pin tool to poke a discrete hole in the very top or bottom to allow steam to escape during firing.
Pro Tip: The Speckle Pop
After the final sponge-down, gently wipe the surface with a rib one last time. This compresses the clay particles and makes the speckles stand out more after firing.
Step 3: Finishing Touches
-
Texture Check:
Look over the surface. The beauty of this project is the speckle, so the clay needs to be smooth. Use a rib tool to compress the surface and remove any fingerprints. -
Sponge Smoothing:
Wipe the entire piece down with a slightly damp sponge. This brings the grog (the speckled bits) slightly to the surface and creates that nice stone-like texture. -
Dry Slowly:
Cover the heads loosely with plastic and let them dry slowly over several days to the bone-dry stage. Rapid drying can cause cracks around the added features. -
Bisque Fire:
Fire the pieces to the appropriate bisque temperature for your specific clay body (usually Cone 04 or 06). -
Glaze Application:
Apply a clear matte glaze. A glossy glaze might obscure the subtle carving, while a matte finish enhances the natural, stone-like aesthetic shown in the photo. -
Final Fire:
Fire to the final temperature (likely Cone 5 or 6). Once cool, sand the bottoms if they feel rough.
Arranged in a row, these calm little faces bring a wonderful sense of peace to any shelf or windowsill
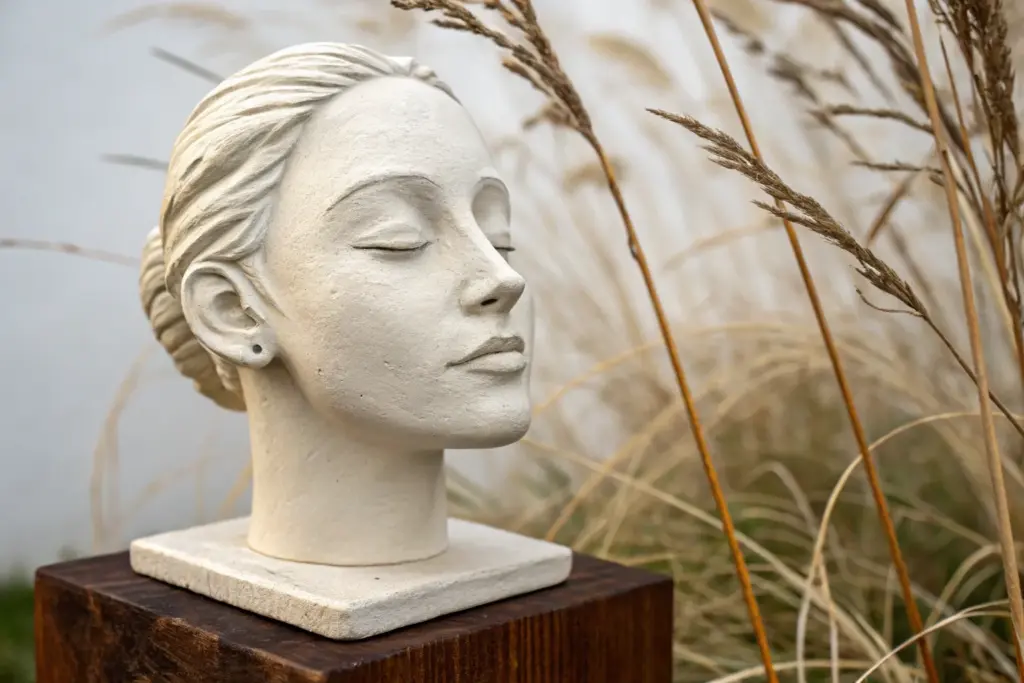
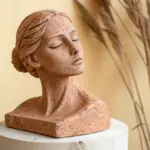
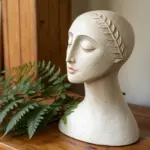
Self-Portrait Clay Head

Embrace the serene beauty of classical sculpture with this stylized clay bust, featuring elegant leaf-like hair textures and a peaceful expression. The warm terracotta finish gives the piece an ancient, earthy feel perfect for sophisticated home decor.
Detailed Instructions
Materials
- Terracotta-colored air-dry clay or earthenware clay
- Wire armature kit (base, rod, wire loops) or DIY aluminum foil core
- Wooden sculpting tools (spatula, needle tool, loop tool)
- Sponge and water bowl
- Slip (clay mixed with water to form a paste)
- Fine-grit sandpaper (220-400 grit)
- Acrylic paint (Black, Burnt Sienna)
- Fine detail paintbrush
- Matte spray varnish
- Round wooden base block for mounting
Step 1: Building the Foundation
-
Prepare the Armature:
Begin by securing a sturdy wire armature to a temporary working base. If you don’t have a professional armature, crumple aluminum foil into an egg shape for the head and a cylinder for the neck, sliding them onto a dowel or wire rod for support. -
Bulk Out the Neck:
Take handfuls of terracotta clay and press them firmly around the neck area of your armature. Build a solid, cylindrical column that flares out slightly at the bottom to form the pedestal base that will eventually sit on the wood. -
Form the Head Shape:
Add slabs of clay over the head armature. Aim for an elongated oval shape, keeping the chin slightly pointed and the forehead rounded. Smooth the clay downwards to seamlessly connect the head to the neck, ensuring there are no air pockets.
Smoother Skin Texture
Brush a tiny amount of baby oil or water onto the face with a soft paintbrush before drying. It eliminates tool marks without flattening the forms.
Step 2: Sculpting the Features
-
Map the Facial Features:
Use a needle tool or the tip of a wooden spatula to lightly sketch a centerline down the face and a horizontal line for the eyes. Position the nose line about halfway between the eyebrows and chin. -
Build the Nose:
Roll a small wedge of clay and score the back. Apply some slip to the center of the face and press the wedge on. Smooth the clay into the forehead and cheeks, sculpting a long, straight bridge and a refined, slightly downturned tip. -
Carve the Eye Sockets:
Press your thumbs gently where the eyes will go to create slight depressions. This creates the brow ridge and cheekbone structure naturally without adding extra clay yet. -
Sculpt Closed Eyelids:
Form two almond-shaped flattened pieces of clay. Score and slip them into the eye sockets. Smooth the edges into the surrounding skin so they look like resting eyelids rather than floating shapes. I like to use a damp sponge here to soften the transition. -
Refine the Lips:
Add a small mound of clay below the nose. Use a small wooden tool to carve the separation line for the mouth, pressing gently to create a subtle smile. Shape the upper lip with a defined cupid’s bow and keep the lower lip fuller.
Step 3: Creating the Foliage Hair
-
Establish the Hair Volume:
Add thick layers of clay over the top and back of the head to create a rounded helmet shape. This base layer doesn’t need detail, just volume. -
Lay the Laurel Leaves:
Roll out several flat, leaf-shaped pieces of clay about 2 inches long. Starting from the forehead hairline, layer these pieces backwards over the head, overlapping them slightly like shingles or feathers. -
Detail the Hair Texture:
Using a sharp needle tool or knife, carve a central vein down each ‘leaf’ of hair. Then, etch diagonal lines branching from the center vein to create a stylized, leafy texture. vary the pressure to make the hair look organic. -
Define the Hairline:
Ensure the front row of leaves frames the face nicely. You can curve the tips slightly upward or downward to soften the forehead line.
Cracking Issues?
If cracks appear while drying, mix a small amount of dry clay powder with white glue and water to make a paste. Fill the cracks, let dry, and sand smooth.
Step 4: Finishing Touches
-
Initial Smoothing:
Once the main sculpting is done, take a slightly damp sponge and wipe down the face and neck. This removes fingerprints and unifies the skin texture, giving it a stone-like appearance. -
Drying:
Allow the piece to dry completely. For air-dry clay, this may take 48-72 hours. Turn the piece occasionally if possible to ensure even drying. -
Sanding:
Once bone dry, use fine-grit sandpaper to polish the cheeks, nose, and neck. Leave the hair texture rough for contrast. -
Painting Details:
Using a very fine brush and black acrylic paint, paint a thin, arching line for the eyelashes and eyebrows. Outline the intricate veins in the hair if you want extra definition. -
Tinting the Lips:
Mix a small amount of Burnt Sienna with a drop of water to make a glaze. Paint the lips carefully to give them a slightly darker, natural terracotta tint compared to the skin. -
Mounting:
Glue the finished clay base onto your round wooden block for stability and elevation. Seal the entire piece with a matte spray varnish to protect the surface.
Place your sculpture near a window to let the natural light highlight the peaceful contours of your work.


What Really Happens Inside the Kiln
Learn how time and temperature work together inside the kiln to transform clay into durable ceramic.
Friend or Family Portrait Head
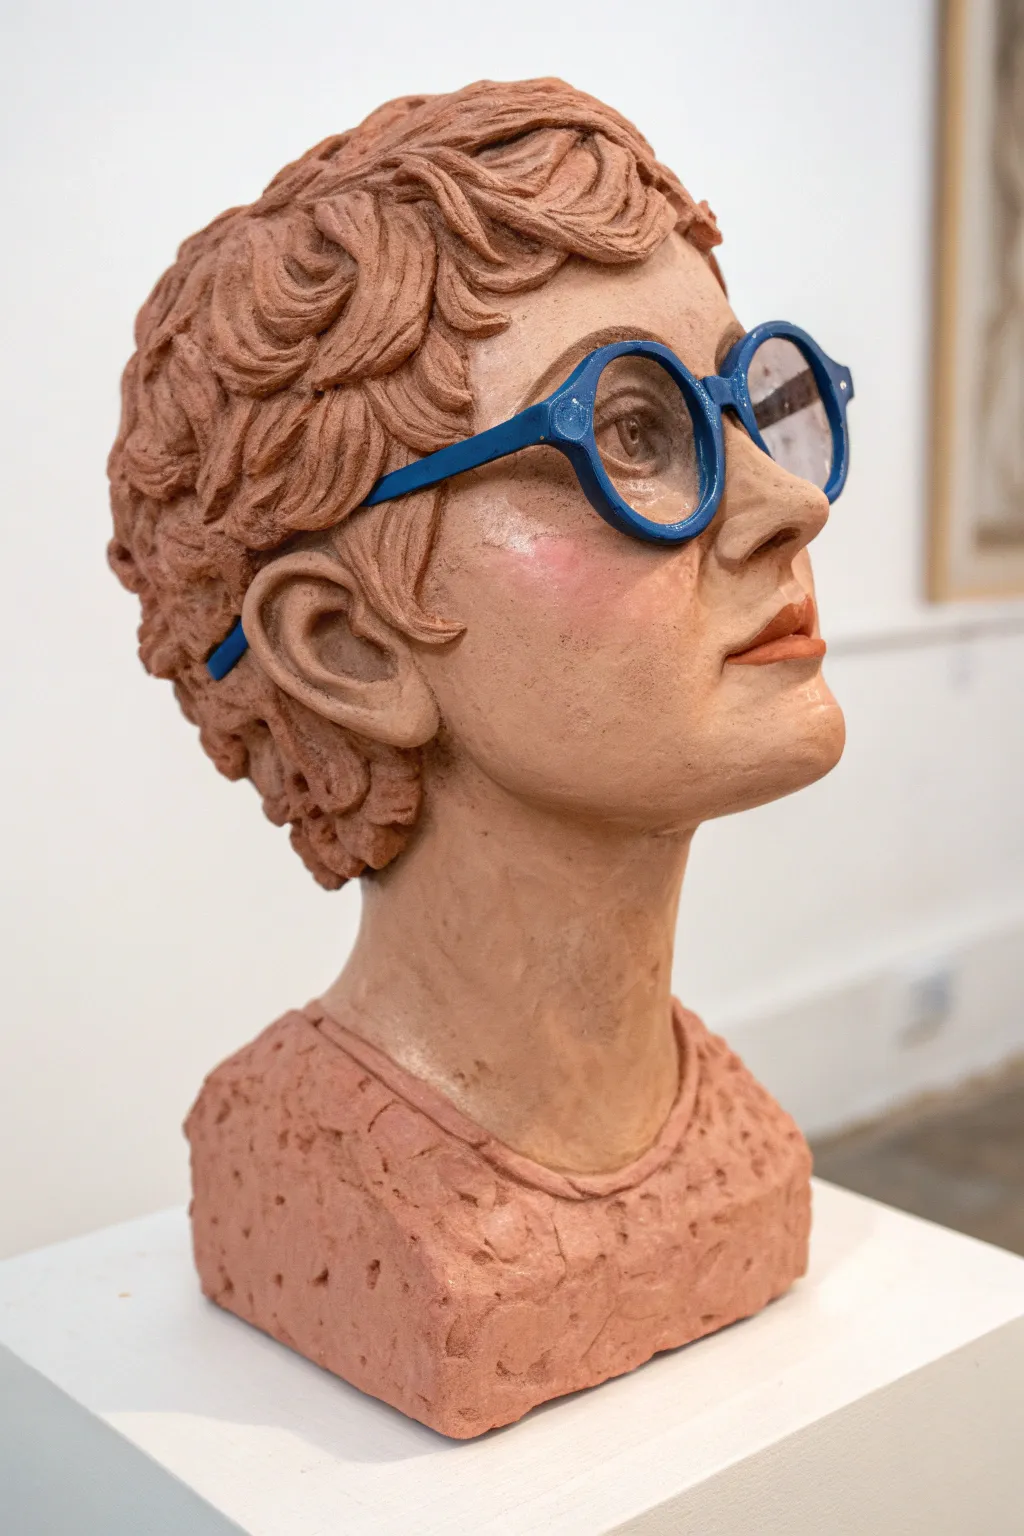
Immortalize a loved one with this charmingly stylized clay bust, featuring intricate hair texture and striking accessory details. This project captures personality through careful sculpting and a soft, realistic paint application that brings the character to life.
How-To Guide
Materials
- Air-dry clay or polymer clay (terracotta or skin tone base)
- Armature wire and aluminum foil
- Wooden sculpting tools
- Loop tools for texture
- Needle tool
- Acrylic paints (skin tones, blue, white, black, brown)
- Fine detail paintbrushes
- Matte varnish or sealant
- Reference photos of your subject (front and profile)
Step 1: Building the Foundation
-
Create the armature:
Begin by crumpling aluminum foil into a tight ball for the head and a rough block for the shoulders. Insert a sturdy wire or dowel to connect them, simulating the neck. -
Apply base clay:
Cover your foil armature with a consistent layer of clay, about 1/4 inch thick. Ensure the clay is smoothed together where the neck meets the shoulders to create a strong bond. -
Shape the rough forms:
Using your hands, shape the basic mass of the head. Establish the jawline, the curve of the cranium, and the slope of the shoulders. -
Mark feature placement:
Use a needle tool to lightly sketch a centerline down the face and a horizontal line for the eyes. This grid helps ensure symmetry before you commit to adding volume.
Step 2: Sculpting the Features
-
Add facial volume:
Add small balls of clay to build up the nose, cheeks, and chin. Smooth the edges of these additions down into the base clay so they look seamless. -
Carve the eyes:
Press shallow sockets for the eyes, then insert small spheres of clay. Delicate eyelids can be added by rolling tiny coils and placing them over the spheres, blending the outer edges. -
Refine the nose and mouth:
Use a small wooden tool to define the nostrils and the philtrum. For the mouth, shape the lips carefully, ensuring the corners are tucked in slightly for realism. -
Sculpt the ears:
Attach C-shaped pieces of clay to the sides of the head. Use a loop tool to hollow out the intricate curves of the inner ear, positioning them between the eye and nose line. -
Texture the hair:
Apply chunks of clay for the hair mass. Instead of carving individual strands, use a loop tool or modeling tool to carve deep, swirling grooves that mimic clumps of curly hair. -
Detail the clothing:
For the shirt, keep the form simple but add surface interest. Use a rough tool or a textured stamp to create the pitted, fabric-like pattern seen on the bust’s chest.
Uneven Skin Tone?
If the face paint looks flat, mix a tiny bit of green or blue into your shadow color. Apply this very faintly under the chin and jawline to create realistic depth.
Step 3: The Glasses & Finishing
-
Fabricate the glasses:
Roll out two thin snakes of clay for the frames. Shape them into circles (or your subject’s frame shape) and connect them with a bridge. Let these dry or cure separately to avoid fragility. -
Dry and sand:
Allow the entire sculpture to dry completely (if using air-dry clay). Once hard, lightly sand the skin areas for a smooth finish, but leave the hair and shirt textured. -
Base coat the skin:
Mix a skin tone using white, ochre, and a touch of red. Apply this evenly over the face and neck. I like to use thin layers here to keep the clay texture visible. -
Add complexion details:
Gently dry-brush a rosy pink onto the cheeks, nose tip, and ears to give the subject a flushed, living look. Darken the lips slightly with a terracotta hue. -
Paint the hair and shirt:
Paint the hair a solid color, then use a darker wash to settle into the grooves, emphasizing the curls. Paint the shirt a complementary soft tone, like the dusty rose shown here. -
Install the glasses:
Paint the glasses a bold, contrasting color like bright blue. Once dry, carefully glue them onto the bridge of the nose and tuck the arms behind the ears. -
Seal the work:
Finish with a matte varnish to protect the paint and give the skin a natural, non-glossy sheen.
Wire Confidence
For the glasses, encase a thin piece of floral wire inside the clay coils. This prevents the delicate frames from snapping during painting or assembly.
Place your finished portrait on a shelf where the light can catch those thoughtful details you sculpted
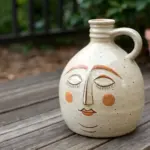
Caricature Head With Exaggerated Nose
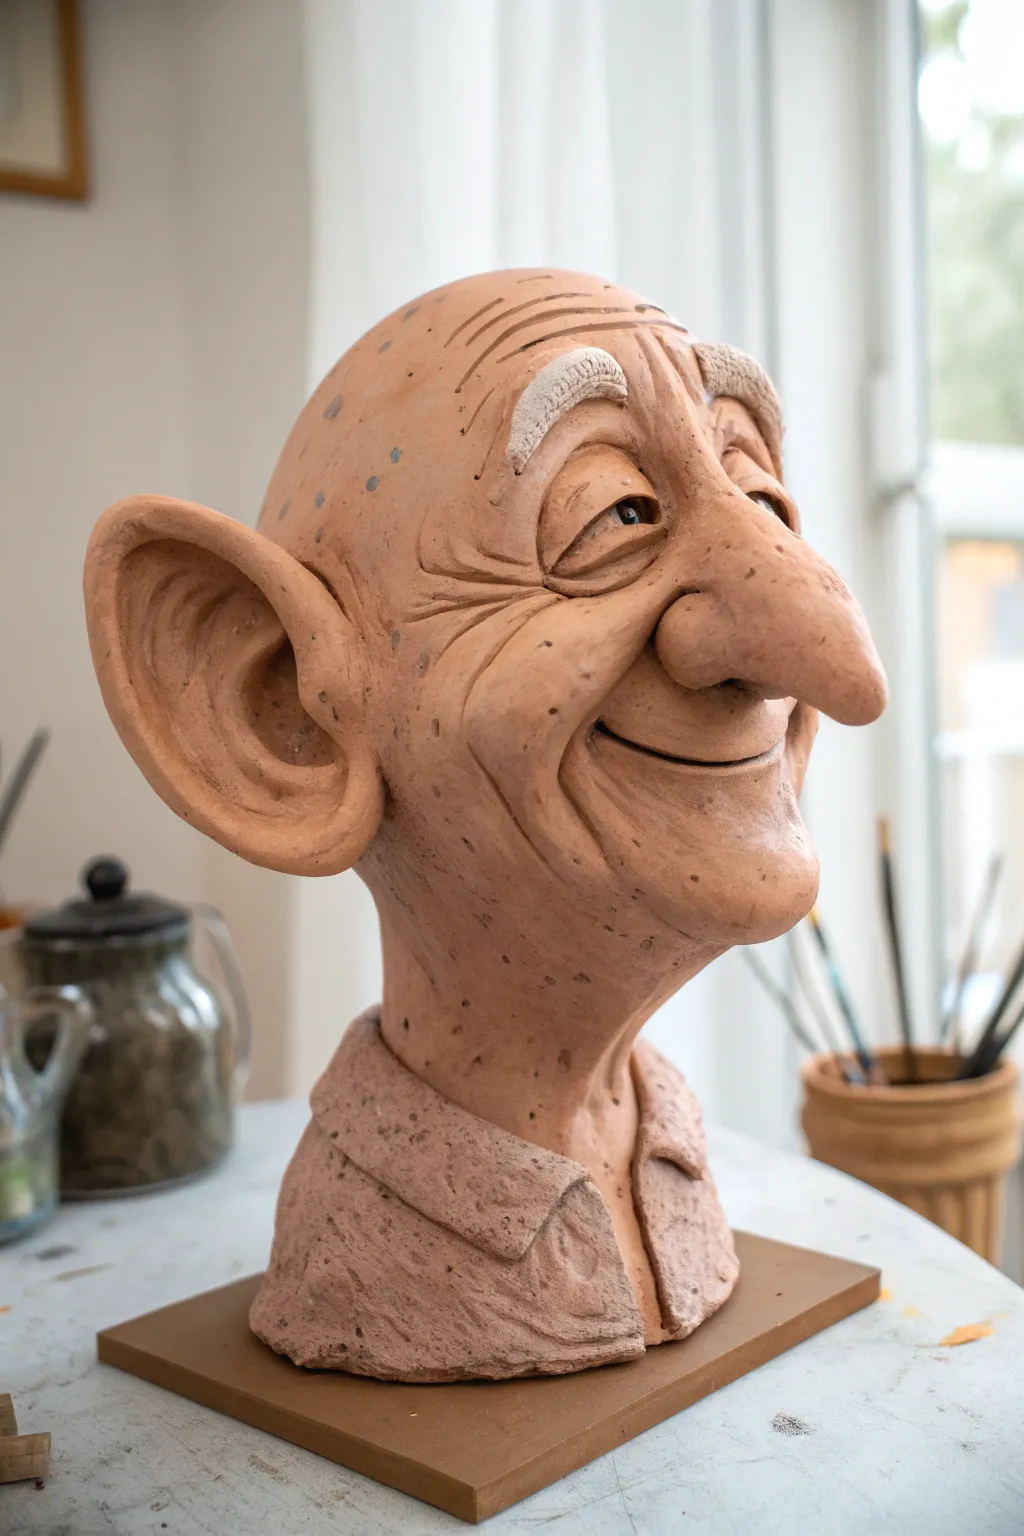
Capture humor and personality with this sculpted bust of a cheerful, elderly character defined by amplified features. The piece highlights the charm of imperfection through exaggerated ears, a prominent nose, and deeply etched laugh lines.
Step-by-Step
Materials
- Earthenware or stoneware clay (terracotta color)
- Wooden sculpting base or armature stand
- Pointed sculpting tool (wooden or metal)
- Loop tool for carving
- Needle tool
- Sponge and water cup
- Scoring tool or old fork
- Slip (clay and water mixture)
- Small wooden base for final mounting
Step 1: Forming the Base Structure
-
Build the armature foundation:
Begin by securing a sturdy mound of clay onto your sculpting stand or armature wire. Create a cylindrical neck that flares slightly at the bottom where it will become the shirt collar, ensuring it’s thick enough to support the head. -
Shape the initial cranial mass:
Add a large, egg-shaped ball of clay on top of the neck. Smooth the connection point thoroughly by dragging clay downward from the head to the neck so they become one solid unit. -
Define the face plane:
Flatten the front of the egg shape slightly to create a dedicated surface for the facial features. The head should tilt slightly backward to give the character a confident, upward gaze.
Keep it Light
When creating the large nose, hollow it out slightly from the back during the construction phase. This reduces weight on the face and prevents the nose from drooping before the clay hardens.
Step 2: Modeling the Exaggerated Features
-
Construct the prominent nose:
Roll a large, carrot-shaped coil of clay. Score and slip the center of the face, then attach the nose. Blend the edges seamlessly into the face, but leave the bulbous tip protruding significantly. -
Carve the mouth and cheeks:
Use a loop tool to carve away clay underneath the nose to form the upper lip area. Add two mounds of clay on either side of the nose for cheeks, blending them outward to create a smiling foundation. -
Sculpt the oversized ears:
Create two large, flat kidney-bean shapes. Attach these to the sides of the head using the score and slip method. Position them lower than realistic ears would be to enhance the caricature effect. -
Detail the inner ear:
Use your thumb to press deep indentations into the center of the ears. Roll a thin worm of clay to create the helix (the outer rim) and blend it onto the ear edge for definition.
Cracks Appearing?
If hairline cracks appear at joints (like ears or nose) while drying, fill them immediately with soft clay slip. Cover tightly with plastic for 24 hours to rehydrate the area and equalize moisture.
Step 3: Adding Personality and Details
-
Create the eyes:
Press two small sockets above the cheekbones. Roll small balls of clay for the eyeballs and insert them. Add thin strips of clay over the top for eyelids, drooping them slightly at the corners for an aged look. -
Sculpt the eyebrows:
Form two thick, arched eyebrows and attach them high on the forehead. Use a needle tool to scratch vertical texture lines into them to mimic coarse hair. -
Etch wrinkles and skin texture:
Using a pointed tool, carve deep forehead lines and crows’ feet around the eyes. I find that deepening these lines more than you think necessary helps them show up clearly after firing. -
Define the smile lines:
Carve strong nasolabial folds running from the sides of the nose down to the corners of the mouth. Curve the mouth line upward deeply at the ends to lock in that friendly expression. -
Add freckles and spots:
Gently poke the surface of the skin (scalp and cheeks) with a dull needle tool or a stiff brush to create varied texture spots and ‘age spots’ without piercing through the clay.
Step 4: Clothing and Finishing
-
Shape the collar:
Roll a flat slab of clay and cut a rectangular strip. Wrap this around the base of the neck to form a shirt collar. Fold the corners down to look like casual fabric. -
Texture the shirt:
Rough up the surface of the shirt area with a wire brush or sponge to differentiate the textile texture from the smooth skin of the face. -
Hollow out the sculpture:
Once the clay is leather-hard, carefully slice off the top of the head (or access from the bottom) to hollow out the inside to an even wall thickness. Reattach securely using slip. -
Final smoothing:
Use a damp sponge to wipe down high points on the nose and head, erasing any unwanted tool marks while preserving the intentional textures. -
Drying and mounting:
Allow the piece to dry slowly under plastic to prevent cracking. Once fired to a bisque state, mount the finished head onto a simple square wooden base for display.
This charming fellow is ready to bring a touch of humor to your shelf once he’s fired and mounted

TRACK YOUR CERAMIC JOURNEY
Capture glaze tests, firing details, and creative progress—all in one simple printable. Make your projects easier to repeat and improve.
Textured Hair and Beard Head
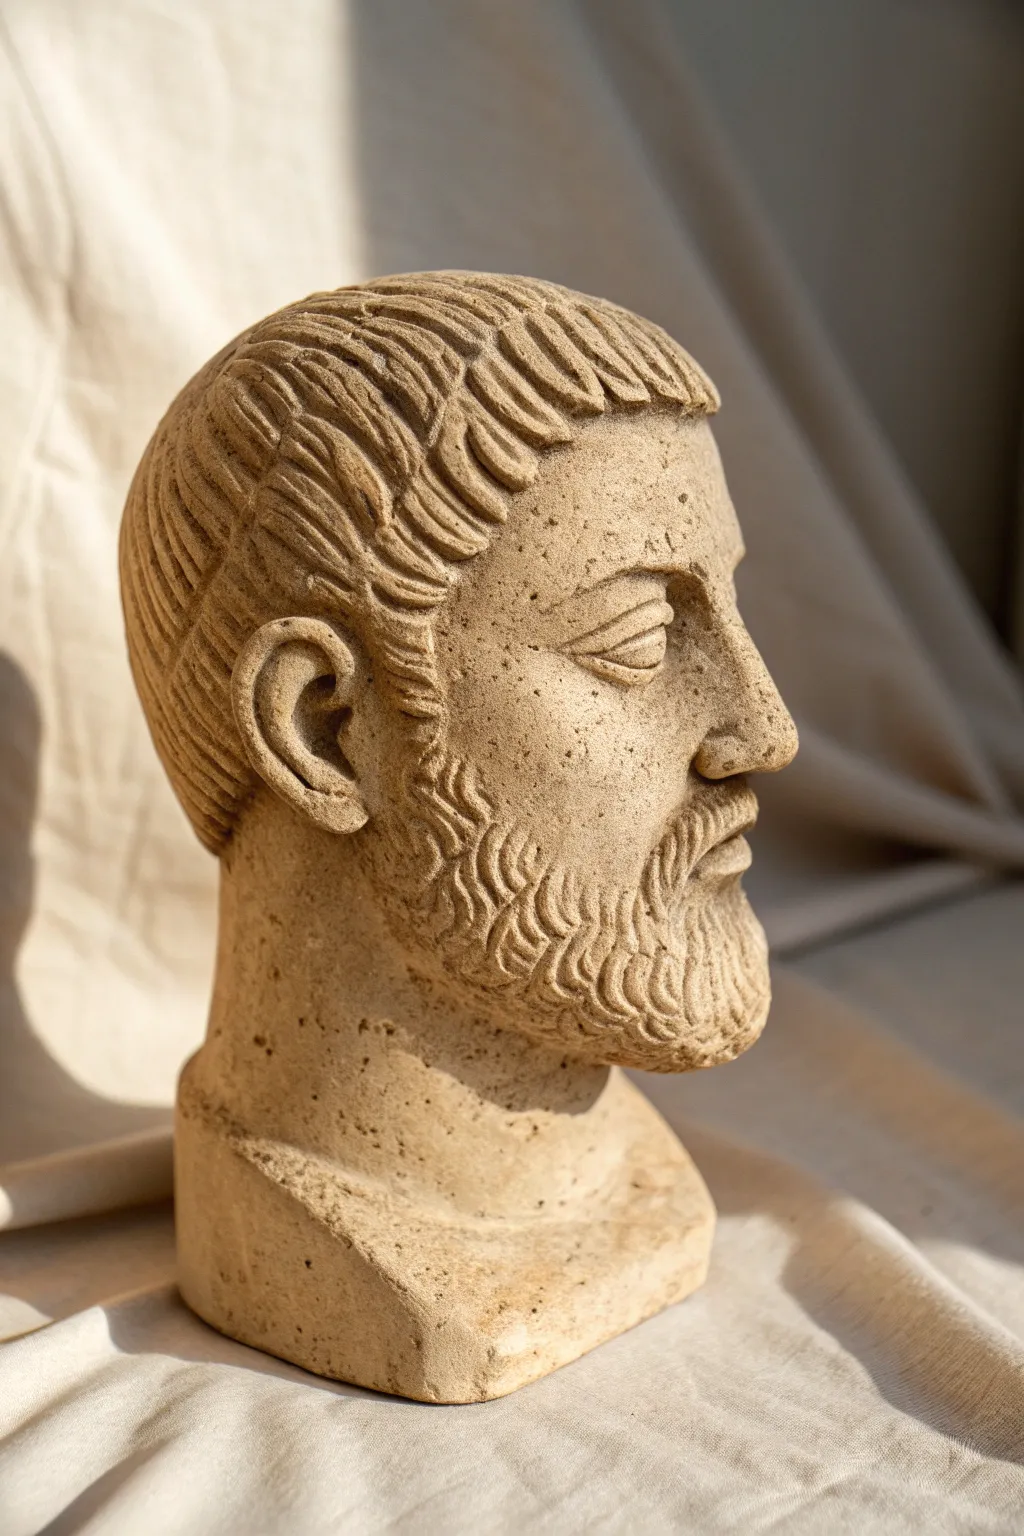
Channel the ancient world with this Greco-Roman inspired bust, featuring stylized, rhythmic hair and a weathered, sandy finish. This project focuses on capturing the bold textures of classical sculpture using carving tools rather than additive modeling.
How-To Guide
Materials
- Coarse stoneware clay or sculpture clay (groggy)
- Small loop tools (wire end)
- Needle tool
- Wooden modeling tools
- Fettling knife
- Sponge
- Water spray bottle
- Lazy Susan or banding wheel
Step 1: Forming the Core
-
Build the armature base:
Start by creating a sturdy, rectangular base using a solid block of clay about 2 inches high. This will support the weight of the head. -
Join the neck:
Score and slip the center of your base. Attach a thick cylinder of clay for the neck, ensuring it isn’t too thin to support the head, and blend the seams downwards seamlessly. -
Shape the cranial mass:
Form a large egg shape for the head. It’s easier if you hollow this out now or build it with thick coils if the sculpture is large; for a smaller bust, a solid form is manageable but will need hollowing later. Attach this firmly to the neck. -
Establish facial planes:
Using a wooden paddle or flat tool, flatten the front of the egg to create the face plane and define the sides for the ears. Don’t worry about features yet; just get the primary geometry right.
Step 2: Sculpting the Features
-
Map the features:
Use a needle tool to lightly sketch a horizontal line for the eyes (halfway down the head) and the nose line. Mark the position of the hairline and the beard line. -
Build the nose profile:
Add a wedge of clay for the nose. Since this is classical style, aim for a straight, strong bridge that merges smoothly into the forehead, distinct from the brow bone. -
Carve the eyes:
Instead of adding eyeballs, carve sockets using a small loop tool. Add almond-shaped distinct lids inside the sockets. Keep the eyes blank (pupil-less) to mimic classical stone statues. -
Form the ears:
Attach C-shaped lumps of clay on the sides of the head, aligned between the eye line and the nose base. Use a small wooden tool to press in the inner spiral of the ear. -
Refine the mouth:
Form the lips. The upper lip should slightly overhang the lower lip. Keep the expression neutral and stoic.
Cracks while drying?
If hairline cracks appear, score the area, add a tiny bit of vinegar to your slip, and patch it. Cover tightly to re-homogenize moisture.
Step 3: Texturing Hair and Beard
-
Define hair volume:
Add slabs of clay to the skull and jawline to build up the volume where the hair and beard will sit. It should look like a thick helmet before texturing. -
Sketch the flow:
With your needle tool, lightly draw the direction of the hair strands. Notice how classical hair often flows forward from the crown towards the forehead. -
Carve the hair channels:
I prefer using a U-shaped wire loop tool here. Carve deep, parallel channels following your sketch lines. Create groupings of strands that wave together. -
Detail the beard:
For the beard, carve shorter, curved strokes that overlap. Create a rhythm of ‘S’ curves or C-shapes that mimic tightly curled facial hair common in Roman portraiture. -
Separate the locks:
Go back with a finer tool to deepen the shadows between the major clumps of hair. This high contrast is essential for the stone-carved look.
Faux Stone Finish
After firing, apply a wash of diluted iron oxide or a tan acrylic wash, then wipe it back. This leaves dark color in the crevices and highlights the carved texture.
Step 4: Finishing Touches
-
Texture the skin:
Gently stipple the skin areas with a coarse sponge or a stiff bristle brush. This removes smooth fingerprints and gives the surface a porous, stone-like quality. -
Hollow out:
If your piece is solid and thick, slice off the top of the head (carefully!) or go in from the bottom to hollow it out to an even 1-inch thickness to prevent explosions in the kiln. Reattach and smooth seams thoroughly. -
Final survey:
Check your profile view. Ensure the nose and beard project correctly and the back of the head is fully rounded, not flat. -
Dry slowly:
Cover the work loosely with plastic. Because of the varying thicknesses in the textured beard versus the ears, slow drying over several days prevents cracking.
Once fired, this stoic bust will add a touch of timeless history to your shelf
Coil-Built Braided Hair Head
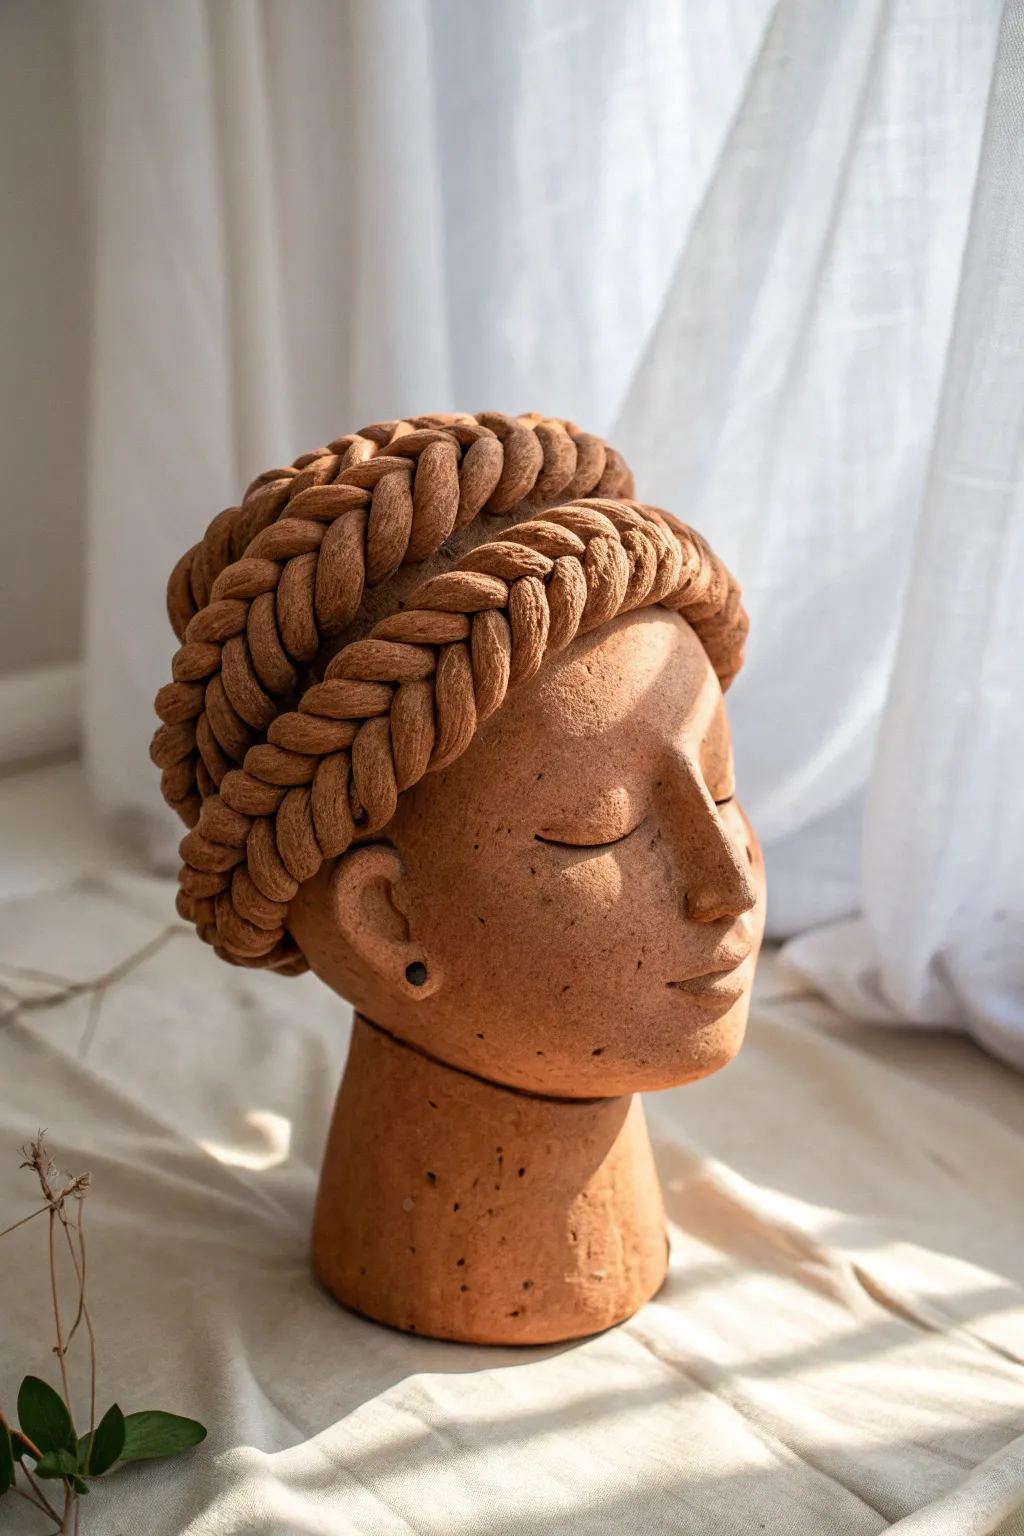
This serene clay sculpture features a peaceful face crowned with elaborate, chunky braids built from thick coils. The warm, unglazed finish highlights the texture of the hair and the gentle contours of the facial features.
Detailed Instructions
Materials
- Terracotta stoneware clay (medium grog for stability)
- Clay carving tools (needle tool, loop tool)
- Wooden modeling tools
- Serrated rib or scoring tool
- Slip (clay mixed with water)
- Spray bottle with water
- Sponge
- Paddling tool
- Lazy susan or banding wheel
Step 1: Forming the Base Structure
-
Build the neck cylinder:
Start by forming a solid cylinder for the neck and base. It needs to be sturdy enough to support the head, so ensure the walls are at least half an inch thick if building hollow, or create a solid mass that you will hollow out later. -
Shape the head mass:
Add a large oval mass of clay on top of the neck to form the cranium. Blend the clay downwards onto the neck thoroughly so there are no seams. -
Define the facial plane:
Flatten the front of the oval slightly to create the plane for the face. Use a wooden paddle to gently tap the shape into symmetry. -
Hollow out the form:
If you built the head solid, slice off the top of the head (the skull cap) and use a loop tool to hollow out the inside until the walls are an even thickness. Reattach the top securely with scoring and slip.
Braid Construction
Instead of braiding 3 damp coils which can break, twist 2 coils together. It mimics a braid visually but is structurally stronger and easier to wrap.
Step 2: Sculpting the Features
-
Map out the features:
Lightly sketch the position of the eyes, nose, and mouth using a needle tool. The eyes should be roughly in the middle of the head vertically. -
Build the nose bridge:
Add a wedge of clay for the nose. Blend it smoothly into the forehead and cheeks, keeping the bridge straight and strong. -
Sculpt the closed eyes:
Form two small, almond-shaped mounds for the eyelids. Smooth them onto the face, creating a gentle curve that implies resting eyes. Carefully carve a thin, curved line for the lashes/lid separation. -
Shape the mouth and chin:
Add a small coil for the lips and refine the shape with a wooden tool. Ensure the chin has a soft, rounded prominence below the mouth. -
Add the ears:
Attach C-shaped pieces of clay to the sides of the head. I find it helpful to look at the work from the top down to ensure they are level with the eyes. Pierce a small hole for the earring detail.
Step 3: Creating the Braided Crown
-
Roll consistent coils:
Roll out several long, thick coils of clay. They should be roughly the thickness of your thumb to replicate the chunky look of the braid. -
Construct the first braid:
Take three coils and gently braid them together on your table. Keep the braiding somewhat loose so the texture reads clearly from a distance. -
Attach the lower coronet:
Score the head heavily where the hair will sit. Apply slip, then wrap the first large braid around the head, just above the ears and across the forehead. Press firmly to adhere without squashing the braid details. -
Build the upper coronet:
Create a second, slightly shorter braid. Attach this one directly above the first braid, stacking them to create height and volume. -
Fill the crown:
If the top of the head is still visible in the center, add a flattened coil or a smaller braid to fill the gap, creating a complete dome of woven texture. -
Refine the hair texture:
Go over the braids with a damp sponge or brush to soften any sharp edges or cracks that formed during bending. Use a modeling tool to deepen the crevices between the strands for better shadow definition.
Surface Depth
After bisque firing, apply a diluted black iron oxide wash and wipe it back with a sponge. This leaves darkness in the braid crevices.
Step 4: Finishing Touches
-
Texture the skin:
For that natural, slightly speckled look shown in the image, you can lightly stipple the skin areas with a stiff brush or coarse sponge. Smooth out the nose and eyelids to keep those areas soft. -
Pierce the ears:
Ensure the earring hole is clean and open. If you want to add a permanently attached clay ‘stud’ earring like in the photo, insert a tiny ball of black clay or glaze it dark later. -
Dry slowly:
Cover the sculpture loosely with plastic. Because the solid braids are thick and the head is hollow, drying must be very slow to prevent cracking. -
Fire:
Bisque fire the piece. For the finish shown, leave the clay unglazed to show off the raw terracotta color, or apply a very matte, transparent wash.
Place your finished sculpture near a window where natural light can play across the texture of the braids
Elder Character Head With Wrinkles
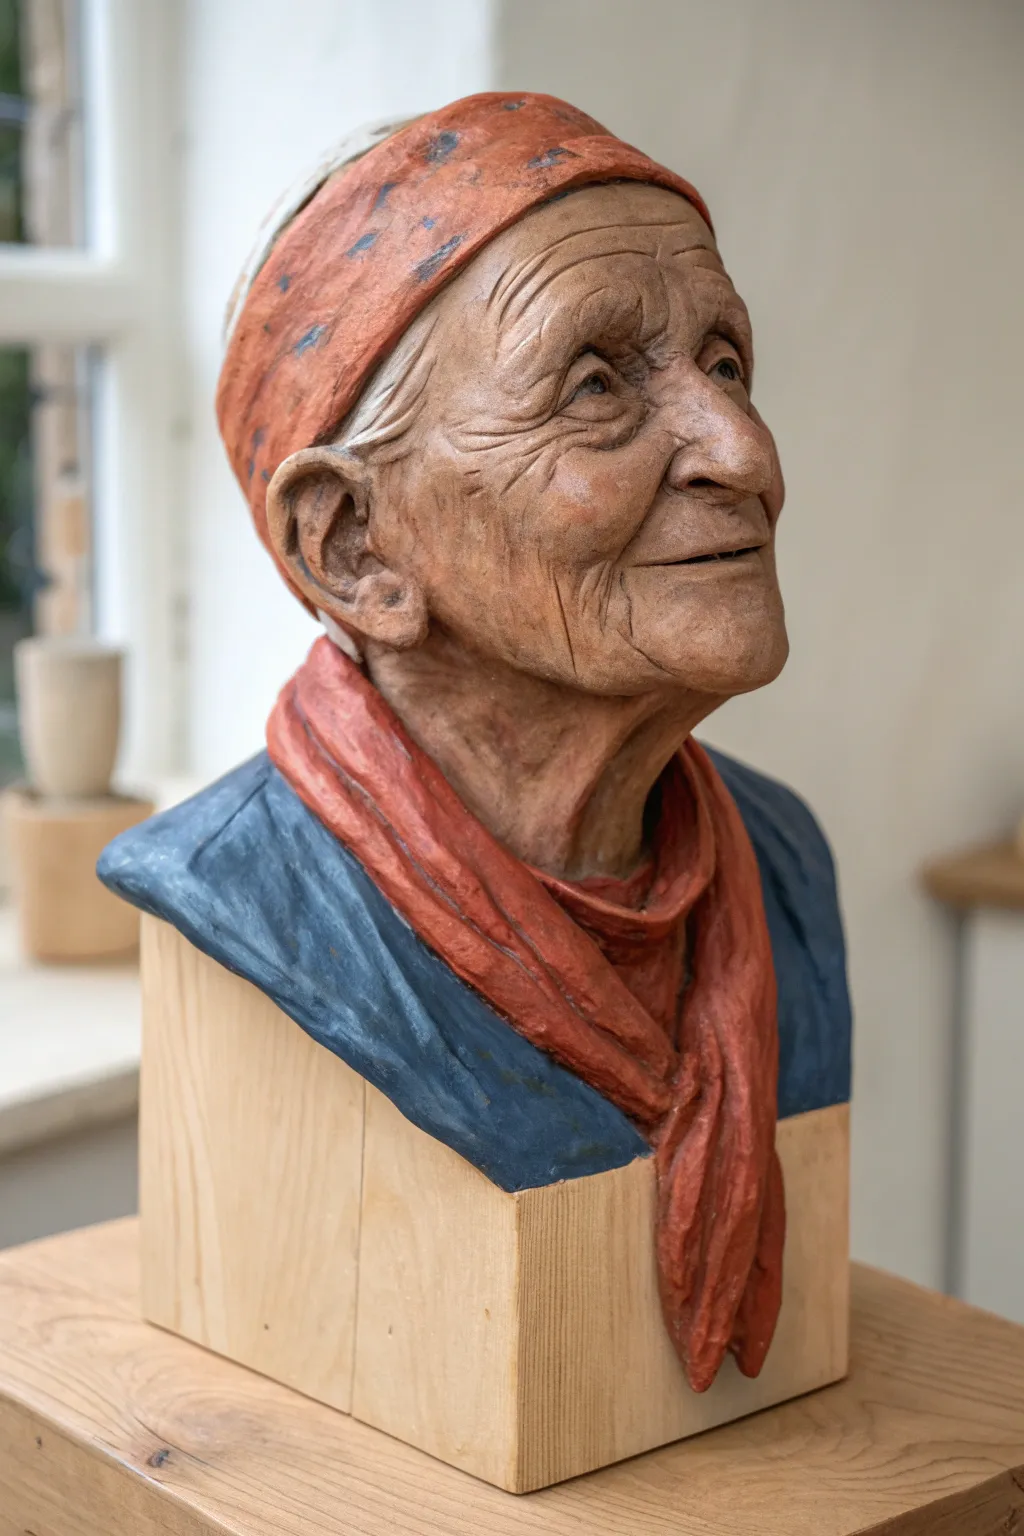
This project captures the quiet dignity of age through a detailed bust of an elderly woman wrapped in a warm scarf. You will learn to sculpt convincing wrinkles and paint your clay to achieve a textured, rustic finish that resembles carved wood or aged ceramic.
Step-by-Step Tutorial
Materials
- Polymer clay (flesh tone or neutral beige)
- Aluminum foil (for armature)
- Masking tape
- Wooden block base (approx. 4×4 inches)
- Needle tools and ball stylus tools
- Rubber shaping tools (clay shapers)
- Texture sponge or stiff brush
- Acrylic paints (burnt sienna, raw umber, navy blue, terra cotta, flesh tones)
- Finishing varnish (matte)
Step 1: Armature & Basic Forms
-
Prepare the core:
Crumple aluminum foil into a tight egg shape for the head and a wider, flatter shape for the shoulders. Secure these together using strong wire or masking tape. -
Mount to base:
Attach your foil bust structure to the top of your wooden block. If you want the final look to be integrated like the photo, you can sculpt directly onto the wood, or sculpt separately and glue it later. I prefer adhering the foil directly to the wood for stability. -
Bulking out:
Sheet your polymer clay and cover the entire foil armature. Aim for an even layer about 1/4 inch thick. Smooth the clay down so no foil is visible and the surface is ready for detailing.
Wrinkle Woes?
If wrinkles look like cuts, soften edges with a brush dipped in baby oil (for polymer clay) or water (for air-dry clay) to blend them naturally.
Step 2: Sculpting the Face
-
Establish landmarks:
Mark the eye line halfway down the face. Add small snakes of clay for the brow ridge, the nose, and the chin. Blend these onto the base form to create the primary structures. -
Shape the nose:
Refine the nose shape. For an elder character, a slightly larger, slightly drooping nose adds character. Use a loop tool to carve out the nostrils. -
Deep set eyes:
Press thumbs into the eye sockets to deepen them. Insert small balls of clay for eyeballs, then add upper and lower lids. Create “bags” under the eyes to emphasize age. -
The mouth area:
Cut a horizontal line for the mouth. Roll very thin snakes of clay for the lips—keep them thin, as lips tend to lose volume with age. Smooth them onto the face.
Level Up: Wood Effect
To mimic the image precisely, skip realistic skin tones. Instead, paint the skin with streaks of dark and light brown to look like carved wood grain.
Step 3: Wrinkles & Texture
-
Deep wrinkles:
Use a needle tool or small rubber shaper to carve the deep nasolabial folds running from nose to chin. Add deep horizontal lines across the forehead. -
Fine lines (Crow’s feet):
Delicately etch radiating lines at the outer corners of the eyes. Add small vertical lines above the upper lip. -
Skin texture:
Gently stipple the skin surface with a texture sponge or a toothbrush. This removes the artificial smoothness of the clay and mimics skin pores. -
Adding hair:
Add a thin sheet of clay over the forehead for hair. Use a needle tool to drag lines through it, sweeping it back away from the face to look like pulled-back gray hair. -
Sculpting the ears:
Attach two flat teardrop shapes to the side of the head. Shape the helix and earlobe. Remember that ears on older subjects often appear larger and longer.
Step 4: Clothing & Accessories
-
The headscarf:
Roll a flat sheet of clay. Drape it over the top of the head, covering the hairline. Press it gently to conform to the skull shape. -
The neck scarf:
Create long, thick coils of clay. Flatten them slightly and wrap them around the neck area. Use a tool to carve deep valleys to simulate fabric folds and drapery. -
Shoulders/Jacket:
Layer a sheet of clay over the shoulder armature to create a jacket or shirt. Smooth the transition where the clay meets the wooden block for a seamless, bust-like appearance.
Step 5: Painting & Finishing
-
Base coat:
Bake the clay according to package instructions and let cool. Apply a diluted wash of raw umber acrylic over the entire piece, wiping most of it off. This stays in the crevices (wrinkles) to accentuate depth. -
Skin tones:
Dry brush a mix of burnt sienna, flesh tone, and a touch of yellow ochre over the face. Keep the paint thin to let the darker undercoat show through the texture. -
Painting the fabric:
Paint the headscarf and neck scarf with terra cotta or rusted orange. Paint the jacket area a deep, muted navy blue. -
Highlighting:
Mix a very light beige color. Lightly dry brush the high points—the nose tip, cheekbones, chin, and the ridges of the scarf folds. This makes the details pop. -
Final touches:
Add tiny white dots to the eyes for a “spark of life.” Once dry, seal the painted areas with a matte varnish to protect the finish.
Place your finished bust on a shelf where the light can catch those carefully sculpted textures
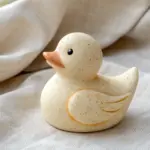
Childlike Round-Cheek Clay Head
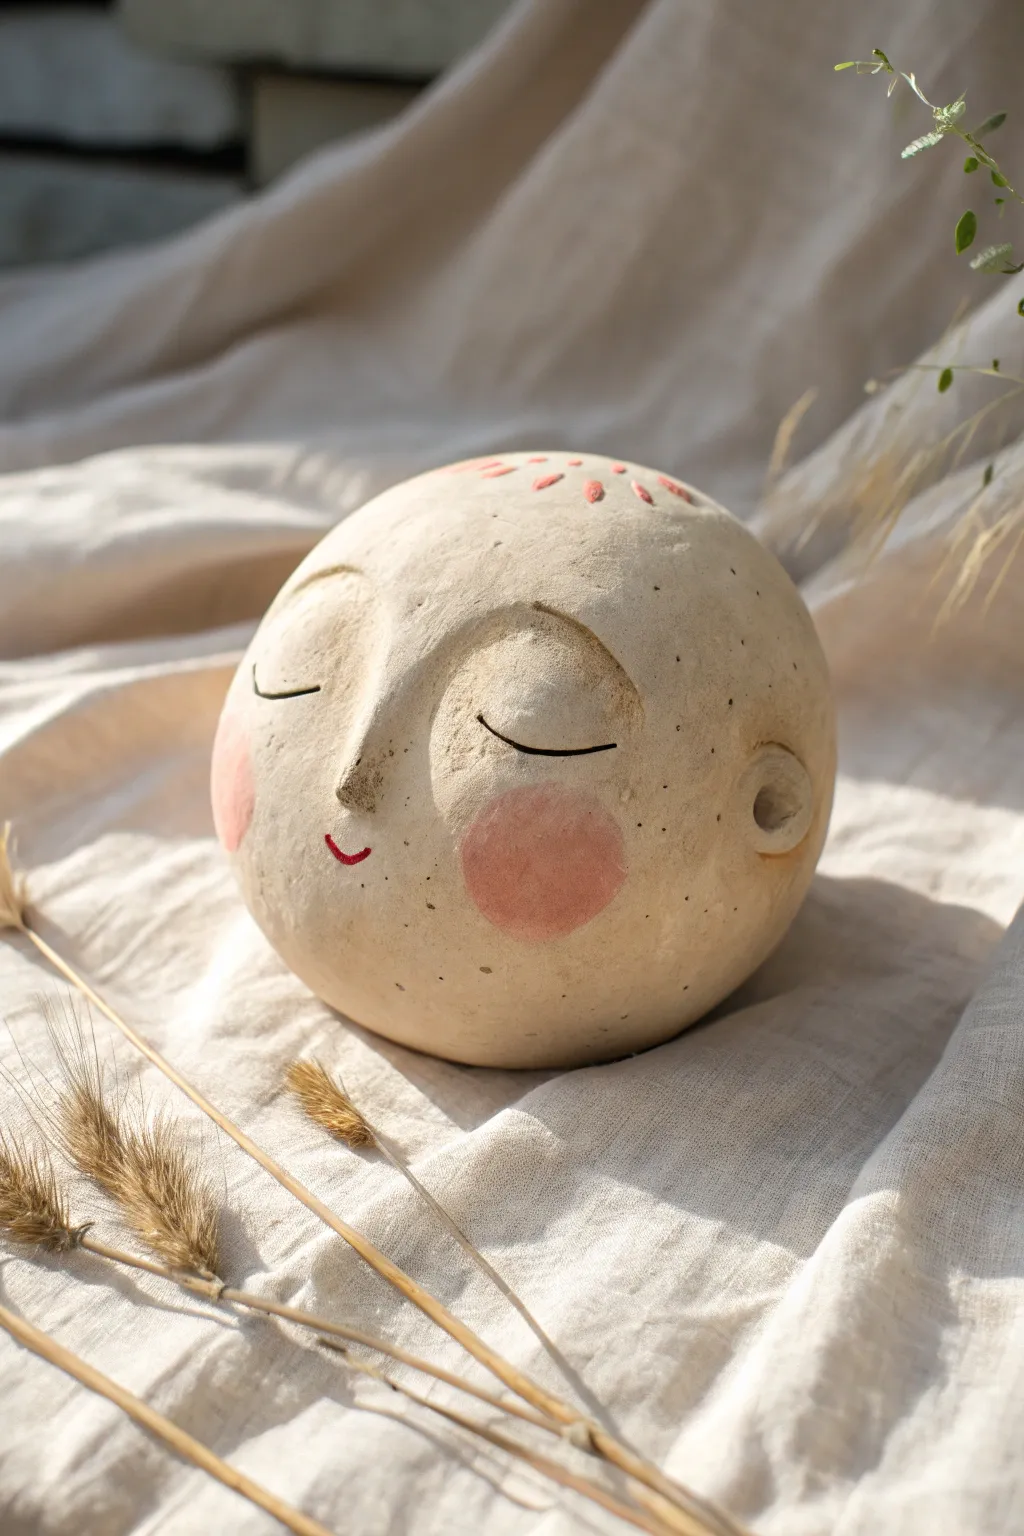
This charming, spherical clay sculpture captures a moment of serene stillness with its soft curves and rosy cheeks. The design relies on simple, organic shapes and a matte finish to create a dreamy, childlike character that feels both ancient and modern.
How-To Guide
Materials
- Air-dry clay or polymer clay (white or light beige)
- Small rolling pin
- Sculpting tools (needle tool, blending tool)
- Small bowl or sphere (as a mold/form)
- Sandpaper (fine grit)
- Acrylic paints (pink, red, black, light peach)
- Small detail brushes
- Matte sealant or varnish
- Water and sponge (for smoothing)
Step 1: Forming the Base
-
Prepare the Clay:
Begin by kneading a large handful of clay until it is warm and pliable. This conditioning step is crucial to prevent cracks later on. -
Create a Sphere:
Roll the clay into a smooth, tight ball. You can use your palms or roll it gently on a work surface to ensure it is perfectly round. -
Hollow the Form (Optional):
To speed up drying and save weight, I like to gently press my thumbs into the bottom to create a hollow cavity, pinching the walls to keep an even thickness while maintaining the spherical exterior. -
Smooth the Surface:
Dip a sponge or your finger in a little water and run it over the entire surface of the sphere to remove any fingerprints or creases.
Step 2: Sculpting the Features
-
Build the Nose Bridge:
Take a small snake of clay and attach it vertically to the center of the face. Blend the edges outward seamlessly so it rises gently from the forehead and tapers down to the nose tip. -
Define the Eye Sockets:
Using your thumbs, press gently on either side of the nose bridge to create subtle, shallow depressions where the eyes will sit. -
Add the Ears:
Roll two small balls of clay and attach them to the sides of the head. Press the center of each indentation with a rounded tool to create a simple, stylized ear shape. -
Refine the Cheeks:
Ensure the cheek area below the eye sockets remains full and round, adding a tiny bit more clay if necessary to exaggerate the youthful chubbiness. -
Create Texture:
Before the clay hardens completely, you can gently tap the surface with a stiff brush or a crumpled subtle foil ball to give it that stone-like, slightly pitted texture. -
Allow to Dry:
Set your sculpture in a safe, dry place away from direct heat. Let it dry completely for 24-48 hours until it is hard and lighter in color.
Keep it Seamless
When attaching the nose or ears, score (cross-hatch) both surfaces and use a dab of water or slip. This acts as glue and prevents pieces popping off as they dry.
Step 3: Painting and Finishing
-
Sand Imperfections:
Once fully dry, use fine-grit sandpaper to gently smooth out any rough spot or sharp edges, particularly around the ears or nose connection points. -
Paint the Cheeks:
Mix a soft, rosy pink acrylic paint. Using a dry-brush technique (remove most paint onto a paper towel first), stipple two large, soft circles onto the cheeks for a blushed look. -
Draw the Eyes:
Using a very fine liner brush and black paint, carefully paint two downward-curving crescents for the closed winking eyes. Keep the lines thin and delicate. -
Add the Mouth:
Paint a tiny, curved red smile just below the nose. Keep it minimal and understated to maintain the peaceful expression. -
Top Decoration:
Paint small red dashes or petal shapes radiating from the top center of the head, adding small black dots for texture if desired. -
Seal:
Finish the piece with a coat of matte spray varnish or sealant to protect the paint and give the clay a unified, finished sheen without being glossy.
Make it a Vase
Before drying, use a large dowel or tool to push a deep hole into the top center of the head. Once fired or sealed, you can use it to hold dried flowers or grasses.
Display your peaceful little sculpture on a sunny shelf or bedside table for a daily dose of calm
Mask-Inspired Wall Head Plaque

Capture a sense of tranquility with this mask-inspired wall relief that features stylized features and a smooth, stone-like finish. Its calming expression and natural texture make it a beautiful addition to any bohemian or minimalist space.
Step-by-Step
Materials
- White sculpture clay (air-dry or kiln-fire)
- Rolling pin
- Canvas mat or heavy cloth (for rolling)
- Cardboard (for templates)
- Fettling knife or clay cutter
- Loop tool (small size)
- Needle tool
- Rubber kidney rib
- Sponge
- Slip (clay and water mixture)
- Hole punch or straw
- Jute twine for hanging
Step 1: Shaping the Base
-
Prepare the slab:
Start by wedging your clay to remove air bubbles, then roll it out on your canvas mat to a thickness of about 3/4 inch. You want a substantial slab that won’t warp easily. -
Cut the oval:
Sketch a large, elongated oval shape on a piece of cardboard to use as a template. Place this over your clay slab and use the fettling knife to cut out the main face shape. -
Smooth the edges:
Using a slightly damp sponge, soften the cut edges of the oval to remove any sharp angles, giving the perimeter a rounded, organic feel. -
Form the contour:
Gently press the slab over a curved mold (like an overturned bowl or a mound of newspaper) if you want a convex shape, or keep it flat for a simpler relief.
Cracking Up?
If small cracks appear while drying, fill them immediately with a mixture of vinegar and clay slip (for air-dry clay) or standard slip (for ceramics) and smooth over.
Step 2: Sculpting the Features
-
Map out the face:
Lightly trace a central vertical line and a horizontal eye line with your needle tool to ensure symmetry for the nose and eyes. -
Build the nose bridge:
Roll a coil of clay that tapers at the top. Score and slip the center of the face, then attach the coil, blending the clay outward onto the cheeks to create a seamless nose bridge. -
Shape the eyebrow ridge:
Add curved coils above the eye line to create the prominent brow ridges shown in the image. I find it helpful to blend the bottom edge thoroughly while leaving the top edge slightly more defined. -
Add the eyelids:
Form two half-moon shapes from small slabs of clay. Attach them below the brow ridge. Use your rubber kidney to smooth them until they look like closed, heavy eyelids. -
Define the lips:
Roll a small oval for the mouth. Attach it below the nose, then use a needle tool to press distinct indentation across the center to separate the upper and lower lips. Press the corners inward slightly to create a peaceful expression.
Symmetry Hack
Use a flexible ruler or a piece of paper folded in half to measure the distance from the nose to the outer eye corners, ensuring both eyes are identical widths.
Step 3: Detailing and Refining
-
Carve the brow details:
Using a loop tool or a wooden styling tool, carve vertical, striated lines into the eyebrow ridges to mimic the texture seen in the reference. -
Refine the eyelids:
Use the needle tool to gently etch a sharp, clean line separating the upper eyelid from the lower lid area, ensuring the curve is smooth and continuous. -
Add the forehead symbol:
Carve or etch a small teardrop or diamond shape in the center of the forehead, just above the brow junction. -
General smoothing:
Go over the entire face with a tightly wrung-out sponge to remove any fingerprints or rough tool marks, aiming for a matte, stone-like surface. -
Create the hanging hole:
Use a straw or a hole punch tool to create a clean hole at the very top center of the mask for the twine. -
Dry slowly:
Place plastic loosely over the finished piece to let it dry slowly over several days. This prevents the edges from curling or cracking. -
Final finish:
Once fully dry (and fired, if using ceramic clay), you can lightly sand any rough spots. Thread a piece of rustic natural jute through the top hole and tie a secure knot.
Hang your serene creation in a spot that catches the afternoon light to highlight the beautiful relief shadows
Half-Real, Half-Stylized Split Head
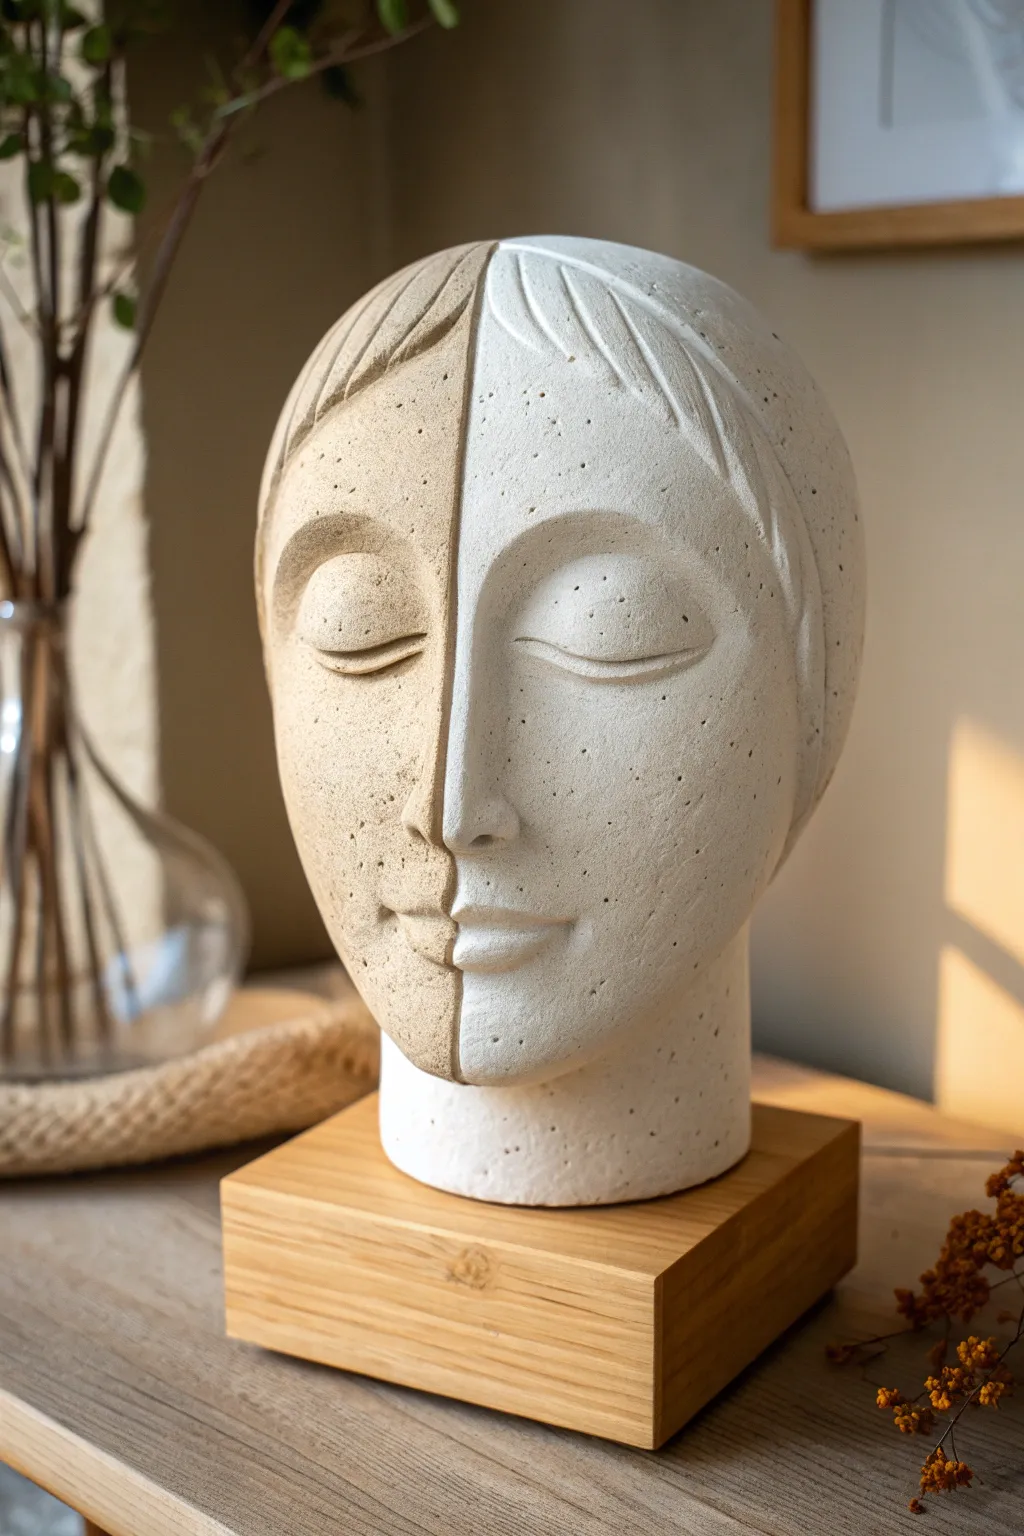
This elegant sculpture explores duality by combining two contrasting clay bodies into a single, serene visage. The finished piece features a striking vertical split between a textured, sandy-beige side and a smooth, cool-white side, all resting on a minimalist wooden base.
How-To Guide
Materials
- Air-dry clay (white)
- Air-dry clay (terracotta or sandstone color)
- Sculpting armature wire
- Aluminum foil
- Wooden block base (approx. 5×5 inches)
- Sculpting tools (loop tool, needle tool, smoothing rib)
- Slip (clay and water mixture)
- Sandpaper (various grits)
- Texturing sponge or heavy-grit sandpaper
- Clear matte sealant spray
- Strong adhesive (E6000 or wood glue)
Step 1: Building the Core
-
Prepare the armature:
Begin by twisting thick armature wire onto your wooden base to create a central support. Form a loop at the top roughly the size of the head to support the clay weight. -
Bulk out the form:
Crumple aluminum foil tightly around the wire loop to create the basic skull shape. This reduces the amount of clay needed and ensures the sculpture isn’t too heavy. -
Divide the zones:
Draw a vertical line down the center of your foil face with a marker. This guide will help you keep the two different clay types separated.
Seam Separation
If the clay separates at the center line while drying, fill the crack with a mixture of slip and paper pulp (toilet paper works well) to create a strong patch.
Step 2: Sculpting the Features
-
Apply the white clay:
Roll out a sheet of white air-dry clay and press it firmly onto the right side of the foil skull. Smooth the edges down the center line but leave them rough enough to join later. -
Apply the colored clay:
Repeat the process on the left side using the terracotta or sandstone-colored clay. Press the two clay bodies together firmly along the center seam. -
Secure the join:
Score the meeting point of both clays with a needle tool and apply a little slip to ensure a strong bond. Smooth the seam so it is tight, even if the colors remain distinct. -
Block in facial planes:
Add small clay lumps to build up the nose, brow ridge, cheeks, and chin. Focus on symmetry despite the color difference. -
Refine the eyes:
Carve out the eye sockets and add almond-shaped lids for the closed eyes. I find using a small loop tool helps keep the curve of the eyelid gentle and peaceful. -
Sculpt the nose and mouth:
Shape the nose bridge straight down the center seam. Add the lips, keeping them soft and slightly smiling, ensuring the split runs perfectly through the cupid’s bow. -
Carve the hair:
Add a layer of clay for hair, sweeping it back from the forehead. Use a carving tool to create stylized, rhythmic grooves resembling strands.
Step 3: Finishing Touches
-
Drying phase:
Let the sculpture dry slowly under a loose plastic bag for 24-48 hours. This prevents cracking at the seam where the two clay bodies meet. -
Sand the white side:
Once fully dry, use fine-grit sandpaper on the white side to achieve a porcelain-smooth finish. Wipe away dust with a damp cloth. -
Texture the beige side:
For the sandy side, dab it with a coarse sponge or gently press coarse sandpaper into the surface to enhance the granular, stone-like texture. -
Add speckling (optional):
If your white clay is too plain, flick a toothbrush loaded with watered-down brown paint to add subtle speckles that mimic natural stone. -
Seal the work:
Spray the entire head with a clear matte sealant to protect the surface and unify the sheen. -
Mount the head:
If the head wasn’t sculpted directly onto the final base, use strong adhesive to glue the neck securely to your clean, sanded wooden block.
Pro Tip: Faux Stone
Mix dried tea leaves or used coffee grounds into the beige clay before sculpting. This creates an authentic organic texture without needing to paint effect later.
Place your sculpture near natural light to highlight the differing textures of the dual visage
Animal-Human Hybrid Clay Head
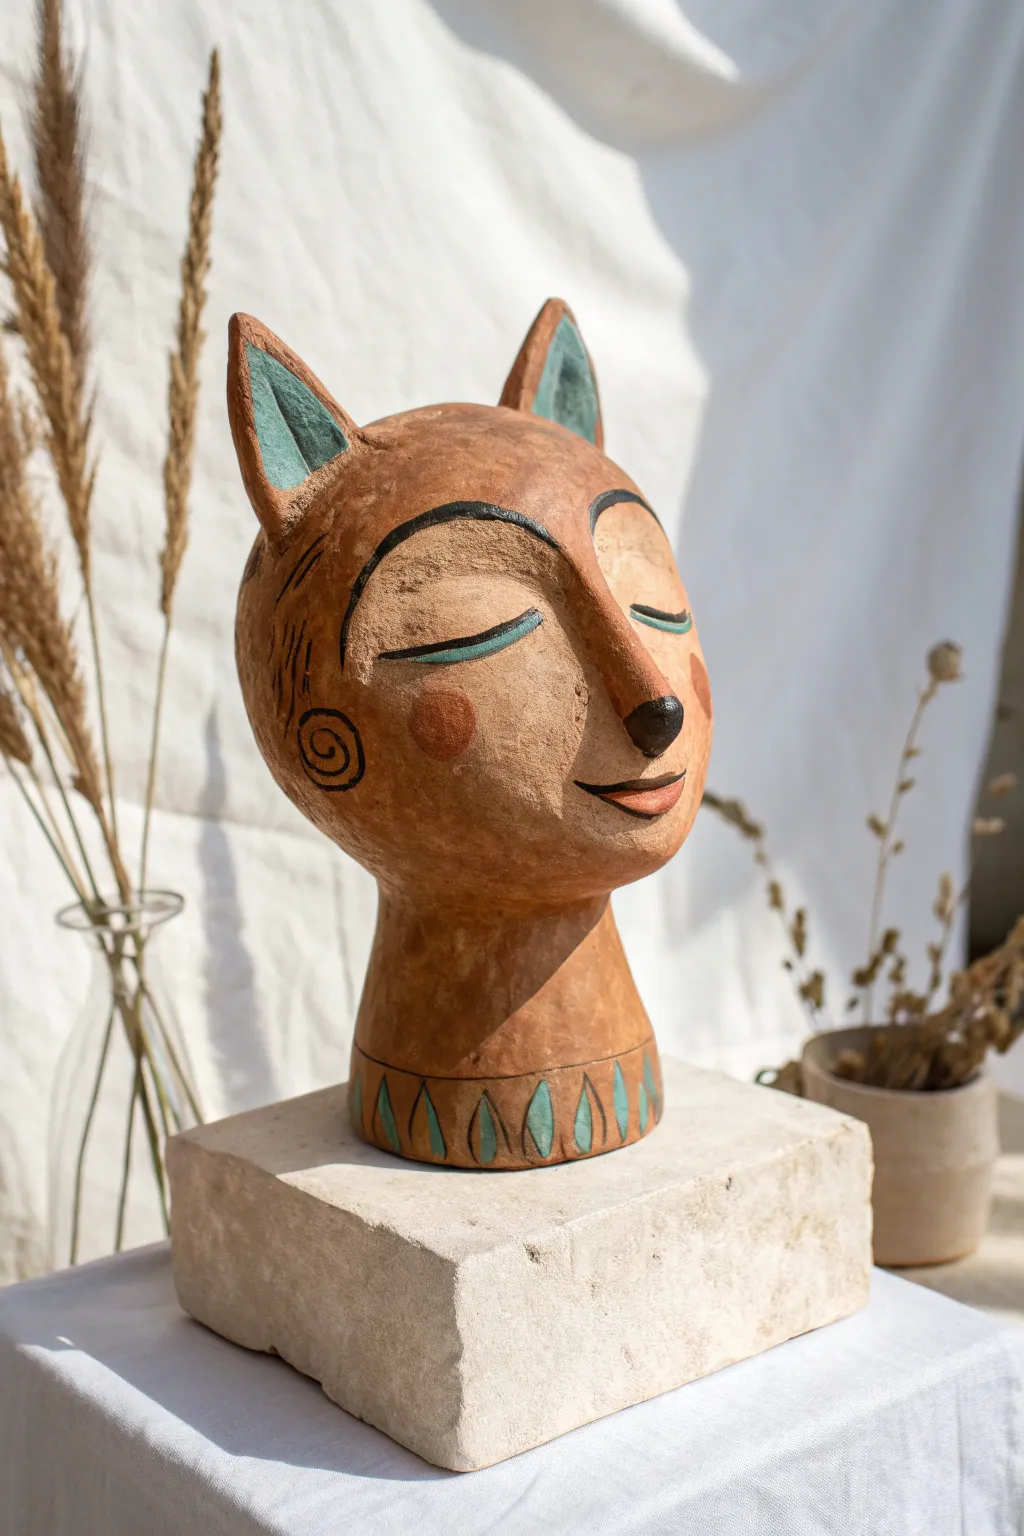
This meditative sculpture blends human facial features with the warmth and charm of a fox. With its prominent ears, closed eyes, and earthy terracotta finish accented by teal and black, it creates a peaceful, whimsical presence perfect for any mantle.
Step-by-Step
Materials
- Air-dry clay (terracotta color) or firing clay
- Sculpting tools (wire loop, needle tool, sponge)
- Aluminum foil for armature
- Masking tape
- Acrylic paints (black, teal, burnt orange/terracotta)
- Fine detail paintbrush
- Cup of water
- Matte varnish or sealant
Step 1: Forming the Base Structure
-
Create the Armature:
Begin by crumpling aluminum foil into a large egg shape for the head and a sturdy cylinder for the neck. Tape these separate pieces together firmly with masking tape to create the core structure. -
Base Layer of Clay:
Roll out a slab of clay to about 1/4 inch thickness. Wrap this slab entirely around your foil armature, smoothing the seams together with a bit of water so the foil is completely hidden. -
Extend the Neck Base:
Add extra bulk to the base of the neck, flaring it out slightly at the bottom to ensure the head stands stable and won’t tip over. -
Initial Smoothing:
Use a damp sponge to wipe down the entire form, removing fingerprints and ensuring a cohesive surface before starting the facial features.
Step 2: Sculpting the Hybrid Features
-
Shape the Fox Ears:
Create two large triangles from thick slabs of clay. Bevel the edges and score the attachment points on top of the head. Press them firmly into place, blending the clay downwards so they look seamless. -
Define the Nose Bridge:
Add an elongated strip of clay running from the forehead down to where the nose tip will be. Unlike a human nose, this should be wider and flatter at the top, tapering into a distinct animal muzzle. -
Add the Muzzle and Tip:
Build up the snout area slightly so it protrudes past the cheeks. Attach a small, rounded ball of clay at the very tip for the nose. -
Refine the Cheeks:
Smooth the transition from the muzzle to the cheeks. The face should remain relatively flat and mask-like, rather than anatomically deep.
Smooth Operator
Keep a small bowl of water and a cosmetic sponge handy. Wiping the clay periodically as you work eliminates tool marks and gives that professional, sleek finish.
Step 3: Carving and Painting Details
-
Incise Facial Lines:
Using a needle tool, lightly sketch the placement of the eyes, eyebrows, and mouth. The eyes should be large, slanted almonds, drawn closed. -
Carve the Eyes:
Deepen the lines for the closed eyelids and the arched eyebrows. Carve a spiral detail on the cheek for a whimsical touch. -
Texturize the Base:
Use a U-shaped loop tool or a knife to carve a repeating pattern of leaves or teardrops around the flared base of the neck. -
Drying Time:
Allow the sculpture to dry completely. If using air-dry clay, this may take 24-48 hours. If creating a ceramic piece, fire it in the kiln now. -
Mixing the Base Tone:
If your clay dried too pale, mix a wash of burnt orange and brown paint and sponge it over the surface to achieve that warm, terracotta glow. I like to wipe some away to let the texture show. -
Painting the Design:
Use black acrylic paint to carefully outline the eyes, eyebrows, spiral cheek detail, and the tip of the nose. -
Adding Teal Accents:
Fill in the inner triangles of the ears and the carved leaf shapes on the base with a muted teal or turquoise paint. -
Completing the Face:
Paint the lips with a reddish-brown tone and add circular rosy cheeks using a diluted terracotta paint. -
Final Seal:
Once the paint is fully dry, apply a coat of matte varnish to protect the surface and unify the finish.
Gold Leaf Glamour
For a more mystical look, swap the teal paint on the neck pattern for gold leaf application. It adds an unexpected shimmer against the matte earth tones.
Place your finished hybrid sculpture near a plant to echo its natural, earthy vibes
Horned Fantasy Character Head
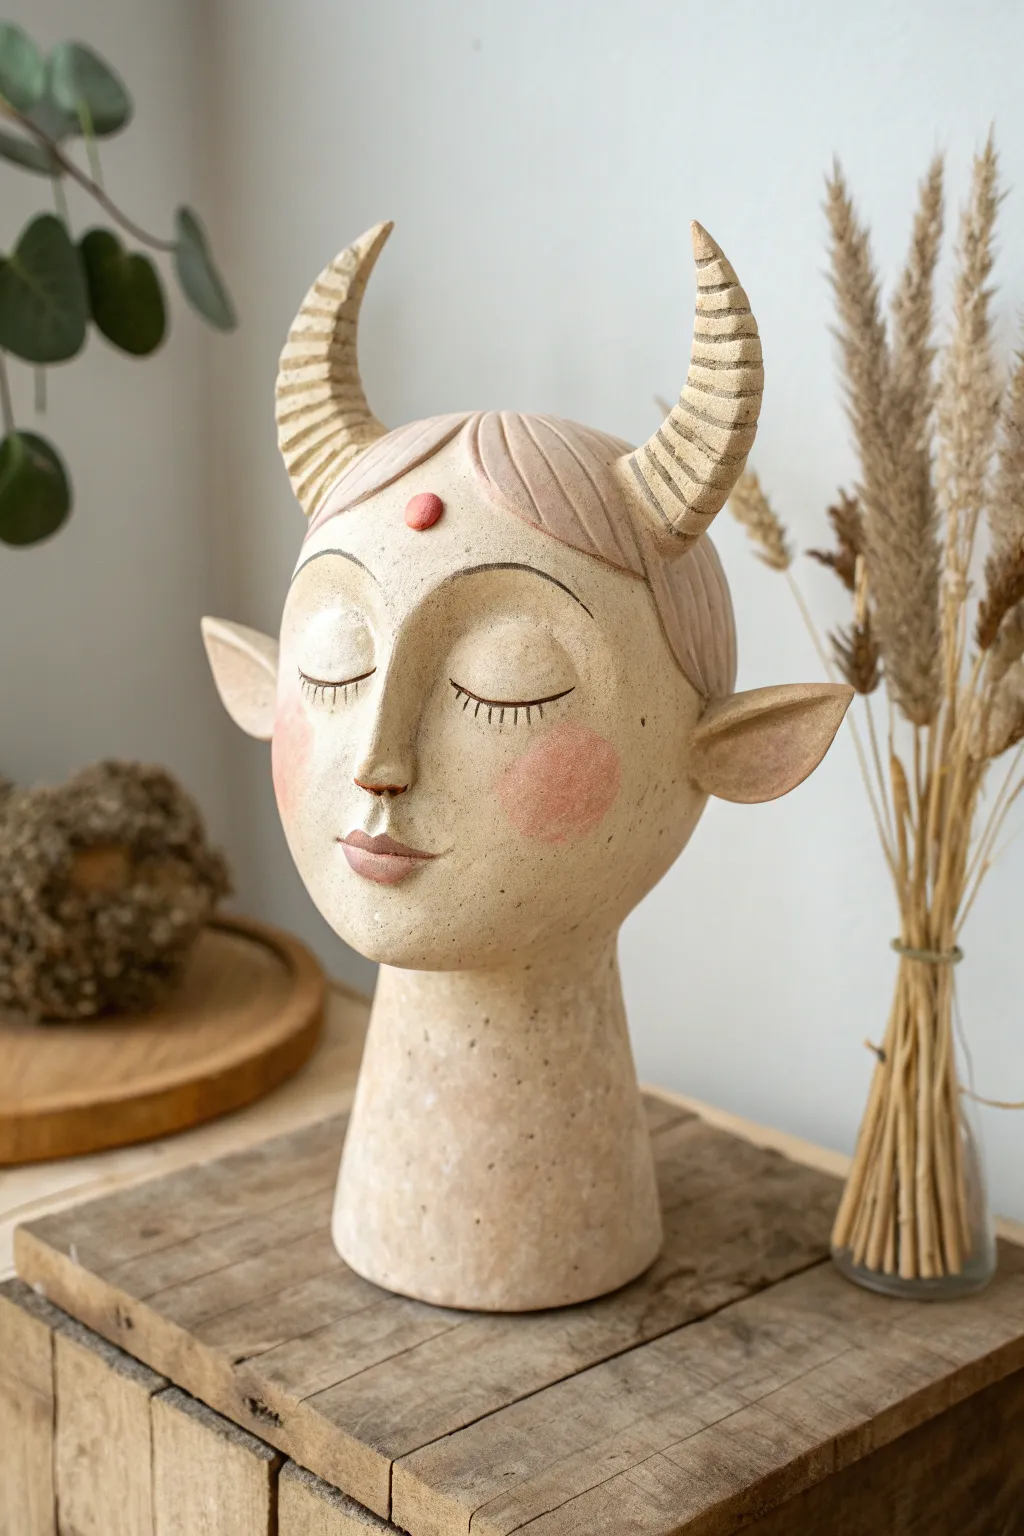
This project captures a moment of tranquil magic with a stylized fantasy character bust featuring elegant horns and peaceful, closed eyes. The aesthetic relies on natural clay textures and subtle, dry-brushed coloring to create an earthy, mythical feel.
Step-by-Step Tutorial
Materials
- Light-colored stoneware clay (smooth or fine grog)
- Wooden sculpting tools (modeling tool, needle tool)
- Serrated metal kidney or rib
- Slip (clay mixed with water)
- Scoring tool or old fork
- Sponge
- Underglazes (Soft Pink, Terracotta/Red, Black)
- Small paintbrush
- Clear matte glaze (optional, for finish)
- Wooden base or armature for support during building
Step 1: Forming the Base Structure
-
Build the neck pillar:
Start by rolling a sturdy cylinder of clay for the neck. It needs to be thick enough to support the head, roughly 3-4 inches in diameter. Flare the base slightly for stability. -
Shape the head armature:
Create an egg shape from newspaper or aluminum foil to act as the core for the head, which saves clay weight. Wrap this core tightly with a slab of clay about 1/2 inch thick. -
Attach head to neck:
Score and slip the top of the neck cylinder and the bottom of the head shape. Press them firmly together, blending the clay across the seam with your thumb until the join is seamless. -
Refine the overall shape:
Use a wooden paddle or flat tool to tap the clay into a pleasing oval shape. Smooth out any major lumps, ensuring the jawline tapers gently toward a chin.
Drooping Horns?
If your horns slump while wet, insert a piece of firm wire or a toothpick inside the clay coil to act as an internal skeleton until the clay stiffens.
Step 2: Sculpting Facial Features
-
Map out proportions:
Lightly trace a vertical line down the center of the face and a horizontal line where the eyes will sit. This T-guide is crucial for symmetry. -
Build the nose bridge:
Add a long, triangular wedge of clay for the nose. Unlike realistic noses, this one connects seamlessly into the brow line in a stylized ‘Greek profile’ manner. Blend the edges smooth. -
Establish the brow ridge:
Press your thumbs into the clay just below the brow line to create shallow sockets for the eyes, simultaneously pushing clay up to emphasize the forehead. -
Sculpt the closed eyelids:
Roll two small half-spheres and flatten them. Place them in the eye sockets. Smooth them onto the face so they look like gently closed lids rather than protruding bugs. -
add the mouth:
Add a very small coil for the mouth area. Use a needle tool to slice a horizontal line, then gently use a modeling tool to shape a fuller bottom lip and a defined cupid’s bow on top. -
Create the ears:
Shape two triangular, leaf-like slabs for the ears. Pinch the tips so they are pointy. Attach them to the sides of the head at eye level, blending the clay behind the ear for a strong bond.
Make it Mystical
Pierce holes in the top of the head behind the horns before firing. This turns the sculpture into a dried flower vase for pampas grass or wheat stalks.
Step 3: Adding Fantasy Elements
-
Form the hair:
Roll a thin sheet of clay and drape it over the top of the head like a cap. Cut bangs in the front. Use a needle tool to draw deep, flowing lines to simulate hair strands. -
Construct the horns:
Roll two tapered coils of clay. Bend them into slight ‘C’ curves. Place them on top of the head, piercing through the hair layer to join them to the skull underneath. -
Texturize the horns:
Using a fettling knife or wire tool, carve distinct horizontal rings up the length of each horn. These ridges give them an organic, goat-like texture. -
Add the bindi:
Roll a tiny ball of clay, flattened slightly, and slip-score it to the center of the forehead/hairline area.
Step 4: Color and Finish
-
Bisque fire:
Allow the piece to dry slowly for several days before the first kiln firing (bisque fire). -
Apply blushing details:
Once fired, use a dry brush technique to dab watered-down soft pink underglaze onto the cheeks and lips. You want a stained look, not a solid coat of paint. -
Paint the details:
Carefully paint the bindi red. Use a very fine liner brush and black underglaze to paint delicate, down-swept eyelashes on the closed lids. -
Final texture wash:
To age the piece, I like to apply a very watered-down brown or grey wash over the whole sculpture and immediately wipe it back with a sponge, leaving darkness only in the crevices of the horns/hair.
Place your finished sculpture near a window where natural light can highlight the textures of the clay
Surreal Head With Flowers as Hair

Merging the permanence of sculpture with the fleeting beauty of nature, this project creates a serene, plaster-like bust adorned with a crown of dried botanicals. The result is a piece of contemplative art that feels both ancient and freshly gathered from a meadow.
Detailed Instructions
Materials
- Air-dry clay (white or light grey)
- Head armature stand or improvised support (dowel on a base)
- Sculpting tools (loop tool, wooden modeling tools, needle tool)
- Water spray bottle
- Sponge
- Dried botanicals (orange berries, wheat stalks, dried leaves, hydrangeas)
- Floral wire and tape
- White gesso or acrylic primer
- Fine-grit sandpaper (220 grit)
- Matte sealant spray
Step 1: Building the Form
-
Establish the armature:
Begin by securing your armature to a stable base. If you don’t have a professional head stand, a sturdy wooden dowel drilled into a wood block works perfectly. Wrap the core with aluminum foil to bulk out the basic egg shape of a head, pressing it firmly to minimize air pockets. -
Apply the base clay layer:
Roll out thick slabs of your air-dry clay and drape them over the foil armature. Use your thumbs to mesh the clay seams together aggressively; you want a solid, unified surface before you start adding details. -
Block in facial features:
Add extra clay to establish the nose, brow ridge, and chin. Don’t worry about refinement yet—just get the geometric masses in the right places by using the ‘rule of thirds’ for facial proportions. -
Refine the eyes and nose:
Use a wooden modeling tool to carve distinct eyelids, keeping the eyes closed for a serene look. Smooth the bridge of the nose and define the nostrils using a small loop tool, ensuring the transition into the cheeks is subtle.
Cracks happen!
If cracks appear while drying, mix a ‘slip’ of clay and water into a paste. Fill cracks, smooth over, and let dry again.
Step 2: Sculpting Details & Texture
-
Define the mouth and chin:
Roll small coils for the lips and blend them onto the face. Use a needle tool to gently separate the slightly parted lips, then smooth exactly where the chin meets the jawline for a soft, feminine contour. -
Create the ears:
Shape two flat ovals of clay and attach them to the sides of the head, level with the eyes and nose. Carve basic helix and lobe details; they don’t need to be hyper-realistic, just suggestive of form. -
Texturize the surface:
Instead of smoothing the skin to perfection, dab a damp sponge lightly over the cheeks and forehead. I like to leave slight tool marks or scratches visible to give it that weathered, stone-carved aesthetic seen in the photo. -
Prepare the floral anchor points:
Since this head serves as a vase of sorts, use a large tool handle to depress a deep channel or hole into the top of the head while the clay is still wet. This hidden reservoir will hold the flower stems later. -
Dry the sculpture:
Allow the piece to dry slowly over 2-4 days away from direct sunlight. Cover it loosely with a plastic bag for the first 24 hours to prevent cracking.
Step 3: Finishing and Adorning
-
Sand and prime:
Once fully dry, lightly sand any sharp burrs with fine-grit sandpaper. Apply a coat of white gesso or primer to unify the color and give it a chalky, plaster effect. -
Create clay leave accents:
While the head dries, sculpt small, individual leaves or petals from leftover clay. Let these dry separately; creating them apart from the head allows for cleaner painting and easier arrangement. -
Seal the surface:
Spray the entire head with a matte sealant. This protects the clay from humidity and prevents the dried flower debris from staining the white surface. -
Arrange the floral crown:
Insert your tallest dried grasses and twigs into the top recess first to establish height. Follow with clusters of orange berries and textural grains to fill out the volume. -
Attach the clay petals:
Using a strong craft glue, adhere your pre-made clay leaves along the hairline, tucking them amongst the real dried flowers. This blends the transition between the sculpture and the botanical elements flawlessly.
Seasonal Shift
Don’t glue the flowers permanently. Swap botanicals seasonally—pine in winter, fresh violets in spring—for evolving art.
Place your sculpture near a window where the natural light can highlight the textures of both the clay and the delicate petals.