
If you’re craving something sweet and handmade, cute Valentine’s clay projects are basically instant joy. I love how a tiny heart, a soft pastel palette, and a few stamped words can turn into gifts you’ll actually want to keep, too.
Classic Conversation Hearts With Stamped Phrases
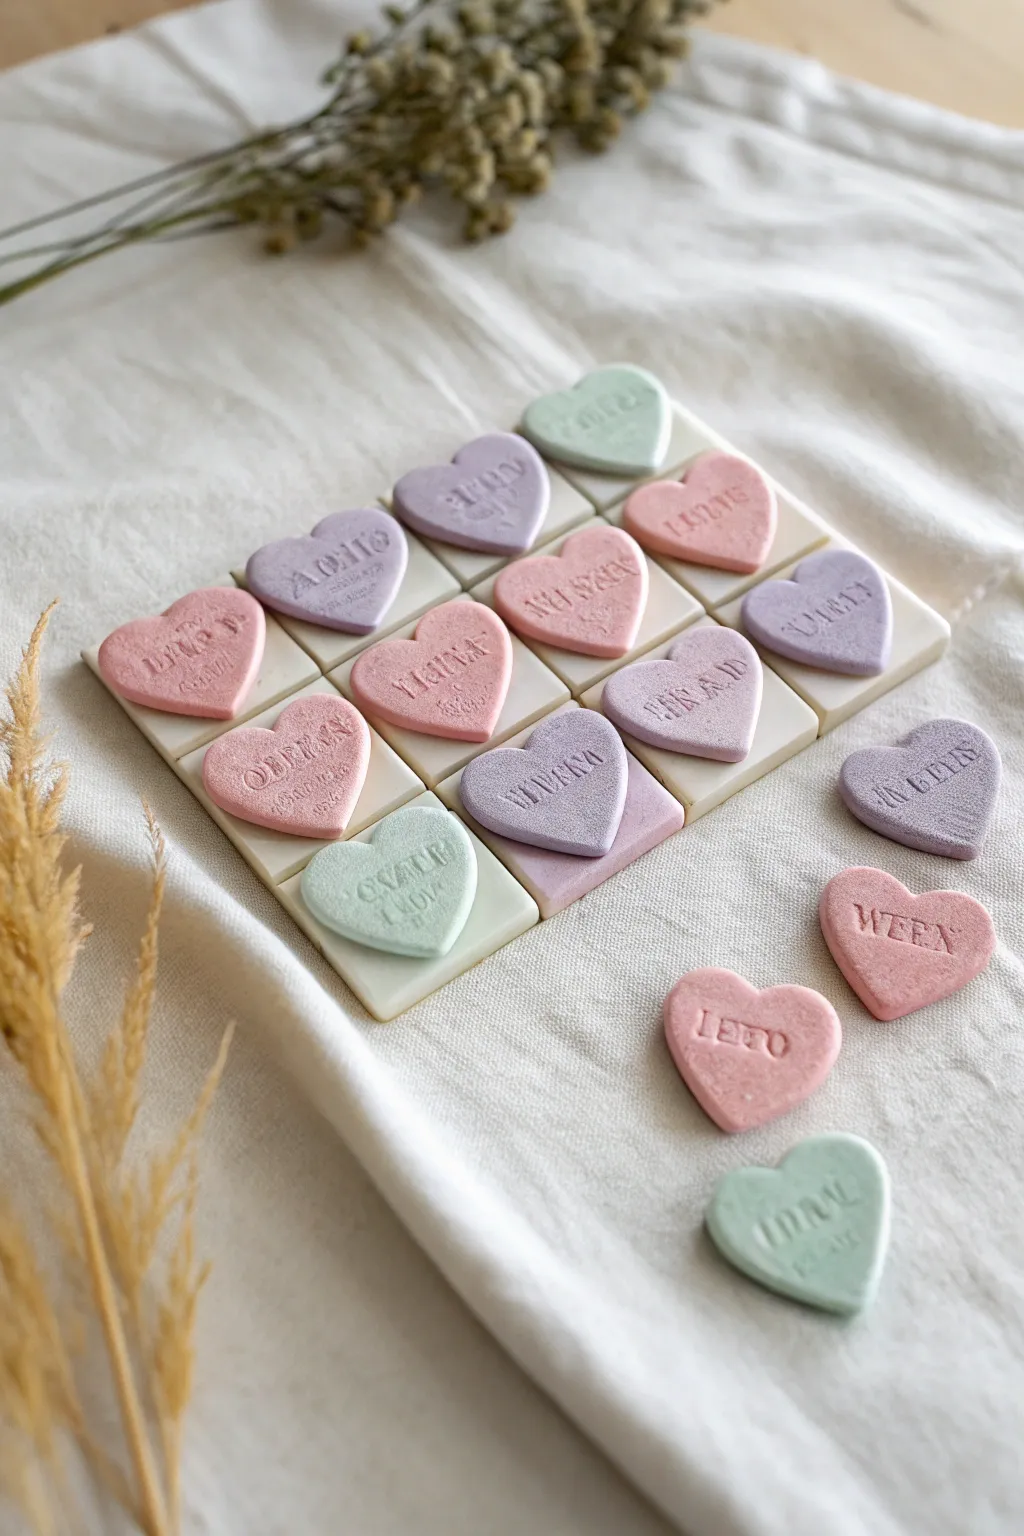
Recreate the nostalgia of favorite Valentine’s Day candies with these charming clay replicas. Featuring soft pastel hues and stamped typographic messages, they make perfect pendants, magnets, or simply sweet table decorations.
Detailed Instructions
Materials
- Polymer clay (white, pink, purple, mint green)
- Acrylic rolling pin
- Small heart-shaped cutter (approx. 1-1.5 inches)
- Alphabet letter stamp set (small sans-serif font)
- Parchment paper or ceramic tile worksurface
- Cornstarch or baby powder (for release)
- Baking sheet
- Oven (for curing)
- Square tile or clay slab (optional, for mounting)
- Sandpaper (fine grit)
Step 1: Prepping the Clay
-
Condition the clay:
Start by warming the polymer clay in your hands. Knead the white clay until it is soft and pliable. Do the same for your colored clays. -
Mix pastel shades:
To achieve the soft candy look, mix a very large amount of white clay with tiny amounts of your pigmented colors. You want barely-there pinks, lavenders, and mint greens. -
Roll out the slab:
Place your conditioned clay on a piece of parchment paper or a smooth tile. Use your acrylic roller to flatten the clay to an even thickness, aiming for about 1/4 inch so the hearts have some substance.
Sticky Stamps?
If your letter stamps are pulling clay up when you lift them, dip the stamp face lightly into cornstarch or water before pressing it into the heart.
Step 2: Cutting and Stamping
-
Dust the surface:
Lightly brush the surface of your rolled clay with a tiny bit of cornstarch. This prevents the cutter from sticking and distorting the shape. -
Cut the hearts:
Press your heart-shaped cutter firmly into the clay. Give it a tiny wiggle to ensure a clean cut, then lift. Repeat this for as many hearts as you need. -
Smooth the edges:
Once you remove the excess clay, gently tap the edges of each heart with your fingertip to soften any sharp ridges left by the cutter. -
Prepare your stamps:
Select the letters for your phrases (like ‘LOVE’, ‘HUG ME’, or ‘YOU’). I find it helpful to line them up in reverse order on the table first to visualize the spacing. -
Stamp the text:
Press the stamps gently into the center of the soft clay hearts. Don’t press too deep, or you might distort the heart shape; you just want a clear impression. -
Add texture (optional):
If you want the slightly grainy look of real sugar candy, you can gently tap the surface with a piece of sandpaper or a stiff brush before baking.
Make Them Wearable
Before baking, insert a small metal eye pin into the top of the heart. Once baked, you can easily attach them to a chain for a sweet necklace or charm bracelet.
Step 3: Baking and Finishing
-
Arrange for baking:
Transfer your stamped hearts onto a baking sheet lined with parchment paper or cardstock. Ensure they aren’t touching each other. -
Bake the clay:
Bake in a preheated oven according to the manufacturer’s instructions on your specific package of clay. Typically, this is around 275°F (130°C) for 15-30 minutes. -
Cool down:
Allow the hearts to cool completely on the baking sheet. Touching them while warm can leave fingerprints as the clay is still slightly soft until fully cool. -
Enhance the text:
To make the letters pop, you can brush a tiny amount of darker pastel mica powder or acrylic paint into the grooves, then wipe the surface clean. -
Create a display grid (optional):
For the grid look shown in the photo, roll out a square of white clay, score grid lines with a ruler, and mount the baked hearts onto the squares using a dab of liquid clay or strong glue.
Gather your finished hearts in a bowl or arrange them on a tray for a delightful pop of color on your table


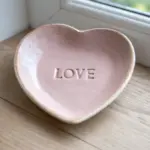
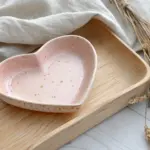
Heart-Shaped Trinket Dish
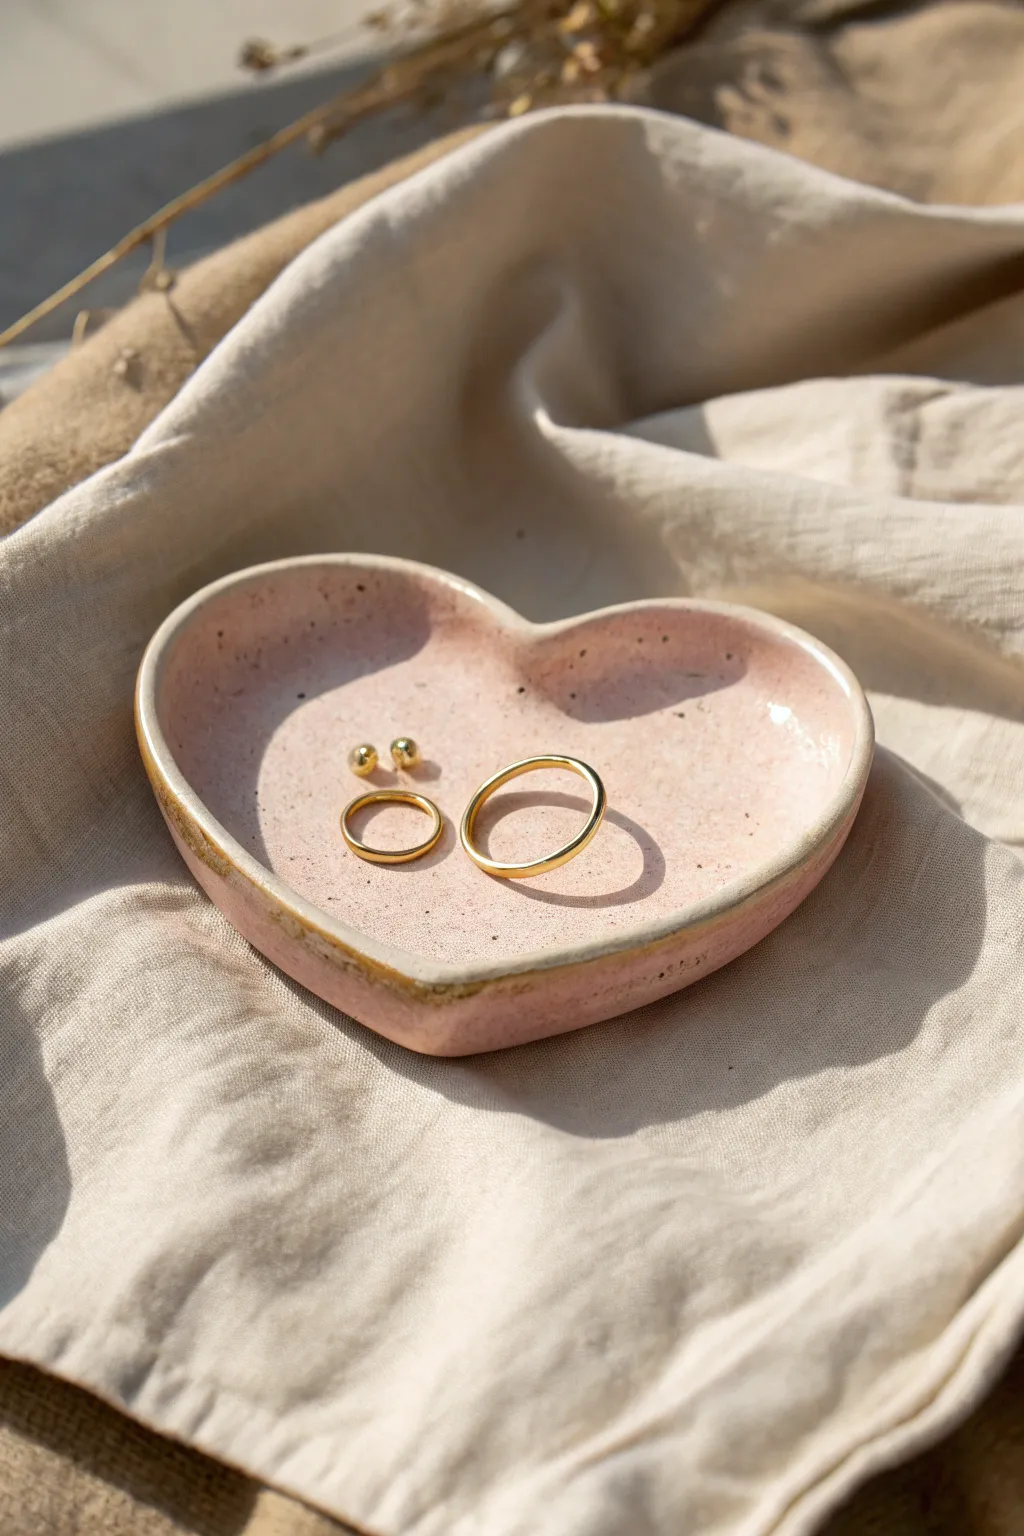
This charming little tray combines a soft blush pink glaze with an elegant gold rim for a sophisticated handmade look. Its organic, hand-formed shape is perfect for keeping your favorite rings and studs safe on a nightstand.
Step-by-Step
Materials
- Air-dry clay (white) or polymer clay
- Rolling pin
- Heart-shaped cookie cutter (medium size)
- Small sponge
- Acrylic paints: Blush pink, White, Black (or dark brown)
- Gold leaf paint or metallic gold acrylic
- Glossy varnish or sealant (Mod Podge or glaze)
- Fine detail paintbrush
- Old toothbrush
- Small bowl of water
- Sandpaper (fine grit)
Step 1: Shaping the Clay
-
Condition the clay:
Start by taking a ball of clay roughly the size of a golf ball. Knead it in your hands until it becomes soft, pliable, and free of cracks. -
Roll it out:
Place the clay on a smooth surface or parchment paper. Use your rolling pin to flatten it to an even thickness of about 1/4 inch. -
Cut the shape:
Press your heart-shaped cookie cutter firmly into the rolled clay. Remove the excess clay from around the outside before lifting the cutter away. -
Soften the edges:
Dip your finger in a little water and gently run it along the cut edges of the heart to smooth out any sharpness or roughness left by the cutter. -
Create the curvature:
Gently lift the clay heart and pinch the edges slightly upward with your fingers to create a shallow rim. You want a slight bowl shape, just deep enough to hold jewelry. -
Refine the form:
Use your dampened sponge to smooth the interior of the dish, ensuring there are no fingerprints left behind. I find this step crucial for that professional ceramic look. -
Let it dry:
Set the dish aside in a safe, dry place. Depending on your clay type and humidity, this could take 24 to 48 hours. Turn it over halfway through to ensure the bottom dries evenly.
Smooth Moves
To prevent the bottom from flattening while drying, rest the curved heart inside a real spoon or small bowl lined with plastic wrap.
Step 2: Sanding and Painting
-
Sand for smoothness:
Once fully dry and hard, take fine-grit sandpaper and lightly buff the edges and surface. Wipe away all dust with a slightly damp cloth. -
Apply base color:
Mix a small amount of blush pink acrylic paint. Apply two thin coats to the entire dish, letting the first coat dry completely before adding the second. -
Create the speckles:
Dilute a tiny drop of black or dark brown paint with water so it is runny. Dip an old toothbrush into this mixture. -
Splatter technique:
Hold the toothbrush over the dish and run your thumb across the bristles to flick tiny specks of paint onto the pink surface. Practice on paper first to control the spray. -
Dry the details:
Allow the speckled paint to dry completely. This usually only takes about 10-15 minutes since the dots are so small.
Step 3: Finishing touches
-
Seal to protect:
Apply a coat of glossy varnish over the entire painted surface. This mimics the look of fired ceramic glaze and protects the paint from scratching. -
Wait for curing:
Let the varnish cure according to the bottle instructions. It should be non-tacky to the touch before proceeding. -
Paint the rim:
Using a fine detail brush and your metallic gold paint, carefully paint the very top edge of the rim. A steady hand is key here. -
Final dry:
Let the gold rim dry undisturbed. If the gold looks translucent, add a second coat for a richer, more solid metallic finish.
Glazed Effect
For a super high-gloss finish that really looks like ceramic, use a dimensional glaze or UV resin as your final topcoat instead of regular varnish.
Now you have a delicate, custom dish ready to hold your most precious little treasures


Sweet Heart Earrings
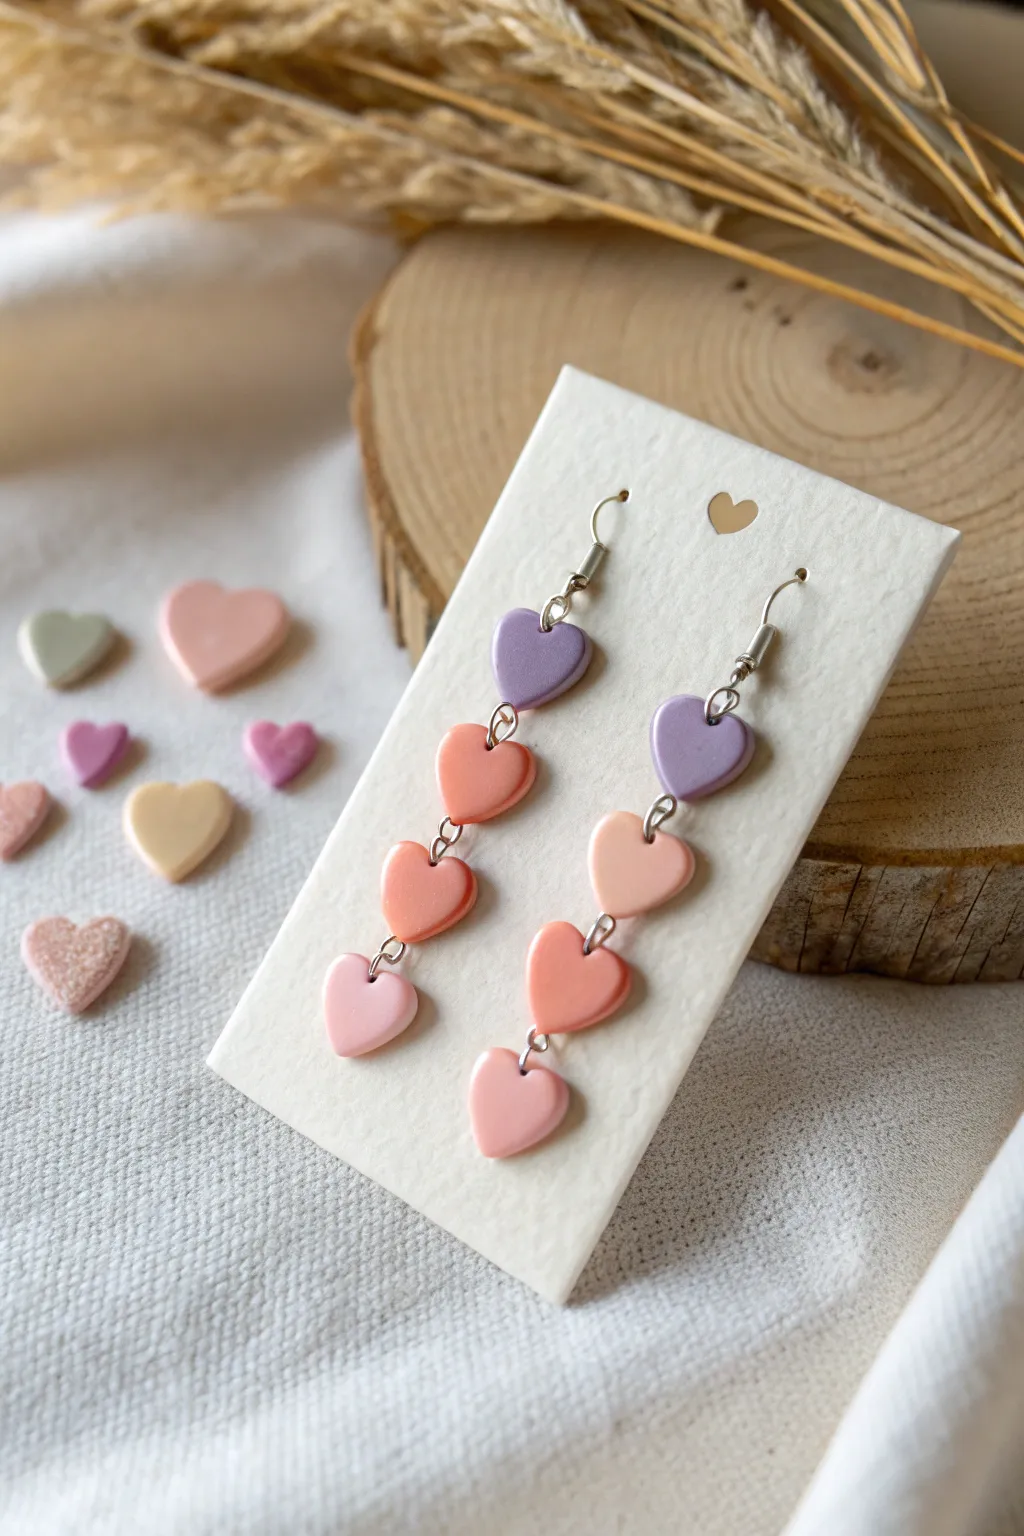
Create a romantic cascade of color with these polymer clay heart earrings, featuring a soft gradient from lavender to baby pink. These lightweight dangles are perfect for Valentine’s Day or adding a touch of sweetness to any everyday look.
Detailed Instructions
Materials
- Polymer clay (lavender, coral/peach, light pink, baby pink)
- Small heart-shaped cutter (approx. 1 cm)
- Clay roller or pasta machine
- Ceramic tile or baking sheet
- Parchment paper
- Needle tool or toothpick
- Silver jump rings (5mm or 6mm)
- Silver earring hooks (fishhook style)
- Jewelry pliers (flat nose and round nose)
- Oven for baking
- Sandpaper (optional, fine grit)
- Gloss glaze (optional)
Step 1: Shaping the Hearts
-
Condition the Clay:
Begin by thoroughly conditioning your four colors of polymer clay—lavender, coral, light pink, and baby pink—until they are soft and pliable. -
Roll Out Slabs:
Roll each color out onto a flat surface or ceramic tile to a uniform thickness, aiming for about 2-3mm. Using a pasta machine on a medium setting ensures they are perfectly even. -
Cut the Shapes:
Use your small heart cutter to punch out two hearts of each color. You will need a total of eight hearts for one pair of earrings (four per side). -
Smooth the Edges:
Gently pick up each heart and use your fingertip to lightly smooth the raw edges left by the cutter, giving them a polished, rounded look. -
Create Connection Holes:
Using a needle tool, pierce a small hole at the very top center (in the dip of the heart) and the very bottom center (at the point) of each heart. Important: The bottom-most hearts (the lightest pink ones) only need a hole at the top. -
Refine the Holes:
To ensure the holes stay open during baking, wiggle the needle tool slightly. I like to flip the heart over and poke through the back as well to keep the opening clean.
Hole Distortion?
If your heart shapes distort when piercing the holes, let the clay ‘rest’ and cool on the tile for 10 minutes after cutting but before piercing to firm it up slightly.
Step 2: Baking and Assembly
-
Bake the Pieces:
Arrange your hearts on a parchment-lined baking sheet or ceramic tile. Bake according to your specific brand of clay’s instructions (usually around 275°F/130°C for 15-30 minutes). -
Cool Down:
Allow the clay pieces to cool completely inside the oven or on a wire rack before handling, as they are fragile when hot. -
Sand Imperfections:
Once cool, check for any rough spots or fingerprints. If needed, gently sand the edges with fine-grit sandpaper for a professional finish. -
Prepare Jump Rings:
Using your flat nose pliers and round nose pliers, twist open your silver jump rings laterally (side-to-side, not pulling apart). -
Chain the Hearts:
Start assembly by connecting the bottom-most pink heart to the heart above it using a jump ring. Close the ring securely. -
Continue the Gradient:
Working your way up, connect the remaining hearts in order: baby pink at the bottom, then light pink, then coral, and finally lavender at the top. -
Attach Earring Hooks:
Open the small loop on your earring hook (or use a final jump ring if preferred) and attach it to the top hole of the lavender heart. -
Repeat for Second Earring:
Follow the same assembly steps for the second earring, ensuring the color order matches perfectly. -
Final Check:
Hold the earrings up to ensure all jump rings are fully closed and the hearts hang straight without twisting.
Mix It Up
Add texture to one or two hearts per earring using a clean toothbrush or sandpaper before baking to create a ‘sugar cookie’ effect similar to the loose hearts in the photo.
Now you have a charming pair of handmade earrings ready to wear or gift to someone special

Heart Keychains With Puffy Charm Shapes
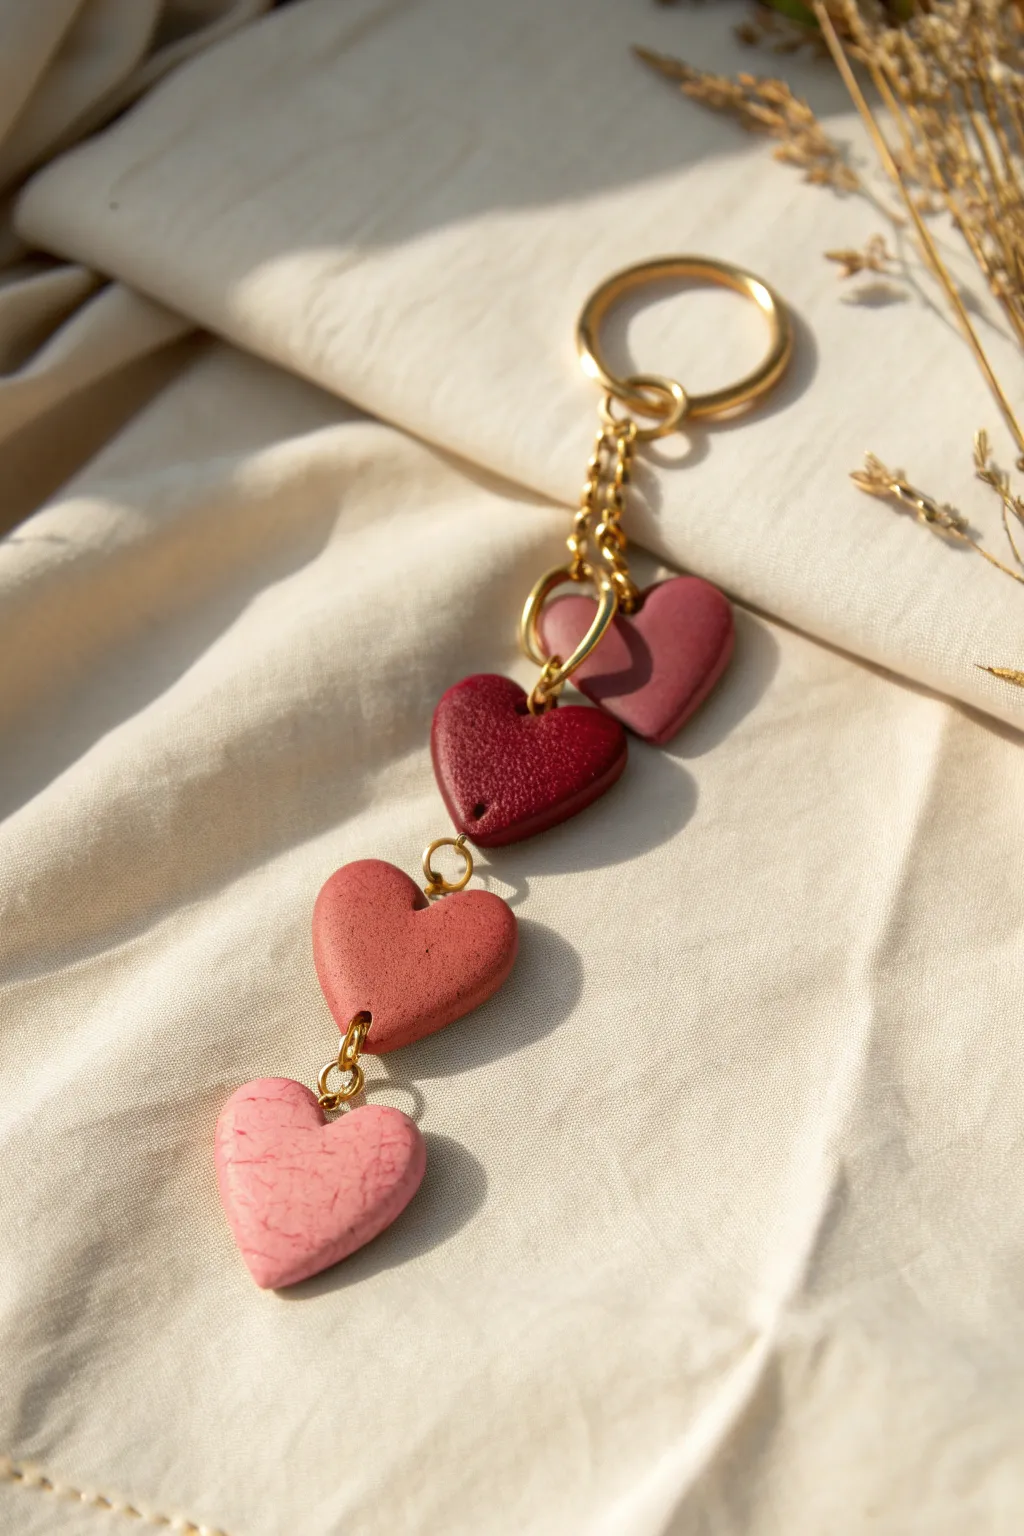
This charming keychain is a sweet way to carry a little love with you everywhere, featuring four puffy polymer clay hearts cascading in a gradient of romantic hues. From speckled pale pink to deep wine red, the soft, rounded shapes and golden hardware create a sophisticated yet playful accessory.
Step-by-Step
Materials
- Polymer clay in four shades: pale pink, medium rose, deep red/maroon, and dark plum
- Granite/speckle effect polymer clay (optional mixed into the pale pink)
- Heart-shaped clay cutter (approx. 1 inch)
- Acrylic rolling pin
- Gold tone keychain ring with existing chain links
- Gold tone jump rings (6mm-8mm)
- Plastic wrap (cling film)
- Jewelry pliers (needle nose and flat nose)
- Small hand drill or piercing tool
- Baking sheet and parchment paper
- Oven
Step 1: Creating the Hearts
-
Condition the clay:
Begin by conditioning each color of polymer clay separately in your hands until it becomes soft and pliable. If you want the bottom heart to have that subtle texture shown in the image, mix a tiny pinch of granite-effect clay into your palest pink. -
Roll out the slab:
Roll your lightest pink clay into a thick slab, aiming for about 4mm to 5mm thick. You want these hearts to feel substantial and chunky, not flat. -
Applying the puffy technique:
Lay a piece of plastic wrap (cling film) gently over the top of your rolled clay. Smooth out any major air bubbles. -
Cutting the shape:
Press your heart cutter firmly down through the plastic wrap and into the clay. The plastic softens the cutting edge, creating that beautiful pillow-like curve on the edges of the heart. -
Release the shape:
Remove the cutter and gently peel back the plastic wrap to reveal your first puffy heart. -
Repeat for all colors:
Repeat this process for the medium rose, deep red, and dark plum clays, ensuring each heart is roughly the same thickness for a uniform look. -
Smooth imperfections:
Inspect the edges of your hearts. If there are any fingerprints, gently buff them away with your fingertip or a tiny bit of cornstarch.
Sticky Situation?
If the plastic wrap sticks to your clay too much, lightly dust the clay surface with cornstarch or baby powder before laying down the film. This helps it release cleanly after cutting.
Step 2: Piercing and Baking
-
Adding holes (Option A):
If you are using a piercing tool, carefully poke a hole through the top lobe of each heart now, while the clay is raw. Make sure the hole is wide enough for your jump rings. -
Baking setup:
Place your four hearts on a baking sheet lined with parchment paper or a ceramic tile. -
Bake the clay:
Bake the pieces according to your specific brand of polymer clay’s package instructions. Usually, this is around 275°F (135°C) for 15-30 minutes. -
Cool down:
Allow the hearts to cool completely before handling. They are fragile when warm but harden as they cool. -
Adding holes (Option B):
I personally prefer drilling after baking for cleaner lines. If you didn’t pierce them earlier, use a small hand drill to carefully make a hole in the upper corner of each heart now.
Step 3: Assembly
-
Open jump rings:
Using two pairs of pliers, twist your gold jump rings open. Remember to twist the ends away from each other (front to back) rather than pulling them apart sideways, which weakens the metal. -
Connect the bottom heart:
Slide an open jump ring through the hole of the palest pink (bottom) heart and close it securely. -
Link the chain:
For the cascading style, we aren’t just hanging them on one chain. Attach a second jump ring to the one you just closed on the pale heart. -
Attach the second heart:
Thread the medium rose heart onto this new jump ring before closing it. Now the two bottom hearts are linked. -
Continue the chain:
Repeat the linking process, moving up to the deep red and finally the dark plum heart, creating a vertical chain of hearts. -
Final attachment:
Attach the top-most jump ring (holding the dark plum heart) to the chain or ring of your main keychain hardware. -
Check security:
Give the keychain a gentle shake to ensure all jump rings are fully closed and the hearts hang freely without catching.
Glazing Up
For extra shine and durability, coat your baked hearts with UV resin or a gloss polyurethane varnish. This makes the rounded edges look even more like candy.
Now you have a stunning handmade accessory ready to gift to a valentine or keep for yourself

The Complete Guide to Pottery Troubleshooting
Uncover the most common ceramic mistakes—from cracking clay to failed glazes—and learn how to fix them fast.
Mini Heart Gift Tags With Names

Elevate your gift wrapping this Valentine’s Day with these charming, rustic clay heart tags. With a soft, stoneware-like finish and personalized stamped lettering, they add a heartfelt touch that makes the packaging just as special as the present inside.
Detailed Instructions
Materials
- Air-dry clay (white or stone color)
- Small heart-shaped cookie cutter (approx. 2-3 inches)
- Mini alphabet stamp set
- Rolling pin
- Parchment paper or silicone craft mat
- Drinking straw or skewer
- Fine-grit sandpaper (optional)
- Jute twine
- Brown kraft paper
- Scissors
Step 1: Shaping the Clay Hearts
-
Prepare your workspace:
Lay down a sheet of parchment paper or a silicone mat to prevent sticking. Take a handful of air-dry clay and knead it briefly in your hands to warm it up and make it pliable. -
Roll out the slab:
Using your rolling pin, flatten the clay to a uniform thickness of about 1/4 inch. If you want a perfectly even surface, you can place two wooden rulers on either side of the clay as guide rails for your rolling pin. -
Cut the shapes:
Press your heart-shaped cookie cutter firmly into the clay. Give it a tiny wiggle to ensure it cuts all the way through, then lift it straight up. -
Smooth the edges:
Gently pop the heart out of the cutter. Dip your finger in a little water and run it along the raw edges of the heart to smooth down any roughness or loose bits of clay. -
Create the hanging hole:
Using a drinking straw or a skewer, punch a hole near the top center of the heart (between the two arches). Make sure the hole is large enough for your jute twine to pass through easily later.
Step 2: Personalizing and Drying
-
Plan your text:
Before stamping, lay out your alphabet stamps on your work surface to check the spelling and ensure you have the right letters handy. -
Position the stamps:
Gently press the letters into the center of the damp clay heart. Aim for a slightly imperfect, handmade alignment. I usually start with the middle letter of the name to ensure it is centered, then work my way outwards. -
Check the depth:
Press down firmly enough to leave a clear impression, but not so hard that you distort the shape of the heart or crack the clay. -
Let it dry:
Place your finished hearts on a clean sheet of parchment paper in a safe spot. Allow them to dry for at least 24-48 hours. Flipping them over halfway through the drying process helps keep them flat. -
Sand for finish:
Once fully dry and hard, inspect the edges. If there are any sharp points or rough spots, gently buff them away with fine-grit sandpaper for a professional look.
Cracked Clay?
If tiny cracks appear while drying, mix a small amount of clay dust (from sanding) with white glue to create a paste. Fill the cracks, let dry, and sand smooth.
Step 3: wrapping and Assembly
-
Wrap the gift:
Wrap your box neatly in plain brown kraft paper. Create crisp creases at the edges for a tidy appearance. -
Cut the twine:
Cut a generous length of jute twine. You’ll need enough to wrap around the box multiple times and tie a bow. -
Wrap the twine:
Place the center of the twine on the bottom of the box. Bring the ends up the sides and cross them over the top center. Flip the box over, cross the twine again essentially creating a four-way wrap. -
Thread the tag:
Bring the twine ends back to the top of the box. Take one end of the twine and thread it through the hole in your dried clay heart. -
Secure the tag:
Slide the heart down so it rests against the intersection of the twine on top of the package. -
Tie the bow:
Tie a simple shoelace bow directly over the heart tag to secure it in place. Adjust the loops so they look balanced. -
Adjust placement:
Nudge the heart tag so it lays flat and the text is upright and readable.
Clean Lettering Tip
If the clay is sticky, lightly dust your alphabet stamps with cornstarch or baby powder before pressing them in. This prevents the clay from pulling up with the stamp.
Now your gifts are ready to be given with a personalized charm that can double as a keepsake ornament later
Stenciled Pattern Hearts for Hanging Decor
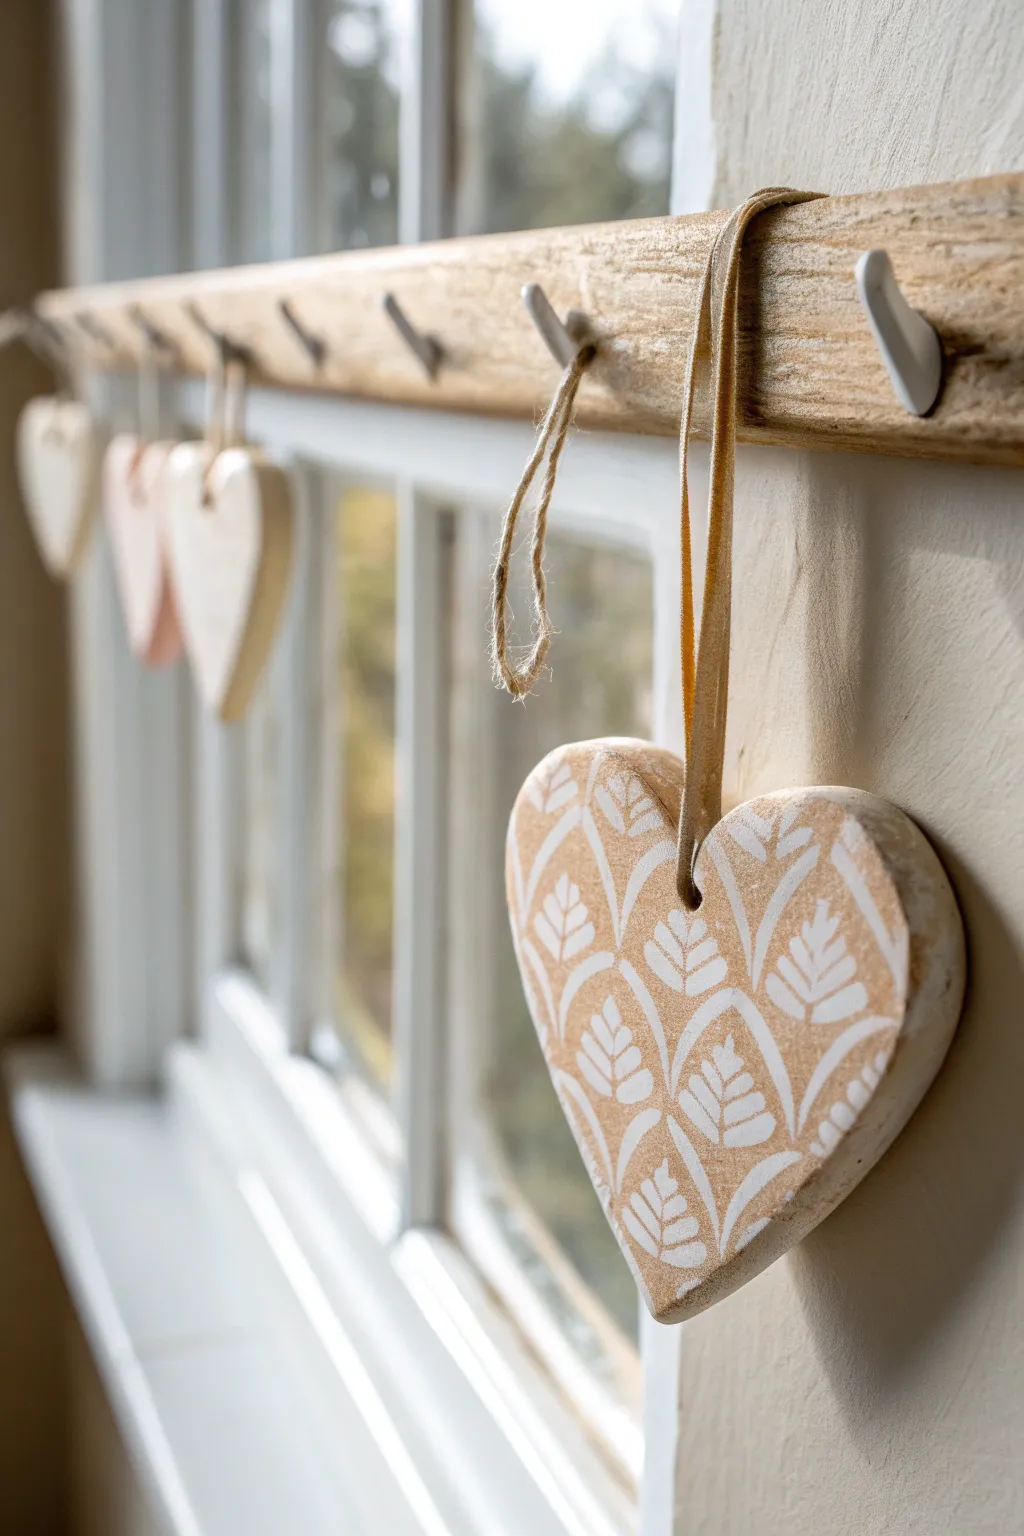
These simple yet striking ornaments bring a rustic elegance to your Valentine’s decor, featuring a crisp white botanical pattern on natural-toned clay. Hung in a row by a window, they catch the light beautifully and add a touch of handmade warmth to any room.
How-To Guide
Materials
- Air-dry clay (terra cotta or kraft color)
- Heart-shaped cookie cutter (medium size)
- Rolling pin
- Parchment paper or canvas mat
- Botanical stencil (flourish or leaf pattern)
- White acrylic paint
- Stencil brush or cosmetic sponge
- Fine-grit sandpaper (optional)
- Drinking straw or skewer
- Suede lace or jute twine
- Clear matte sealer (optional)
Step 1: Shaping the Base
-
Prepare your workspace:
Lay down a sheet of parchment paper or a canvas mat to prevent sticking. This makes it much easier to move your clay later without warping the shape. -
Condition the clay:
Take a handful of your natural-colored air-dry clay and knead it until it’s pliable and smooth. This warms up the material and removes air bubbles. -
Roll it out:
Use your rolling pin to flatten the clay to an even thickness of about 1/4 inch. I find that using rolling guides or two stacked popsicle sticks on either side helps keep the slab perfectly level. -
Cut the shapes:
Press your heart-shaped cookie cutter firmly into the clay. Give it a tiny wiggle before lifting to ensure a clean cut. -
Clean the edges:
Dip your finger in a little water and gently run it along the cut edges of the heart to smooth out any roughness or loose crumbs of clay. -
Create the hanging hole:
Use a drinking straw or a skewer to punch a hole at the top centered part of the heart. Make sure it goes all the way through and is large enough for your cord.
Clean Stencil Lines
Work with a ‘dry brush’ technique. Offloading paint onto a paper towel before hitting the clay is crucial to stop paint from bleeding underneath the stencil.
Step 2: Adding the Pattern
-
Dry partially (optional):
Let the clay sit for about 30 minutes. It shouldn’t be fully dry, but firmly leather-hard makes stenciling cleaner than working on wet, squishy clay. -
Position the stencil:
Lay your botanical stencil over the heart. Press it down very gently so it makes good contact with the surface but doesn’t dent the clay. -
Load the paint:
Dip your stencil brush or sponge into the white acrylic paint, then dab most of it off onto a paper towel. You want a very ‘dry’ brush to prevent paint from bleeding under the stencil. -
Apply the pattern:
Using a straight up-and-down dabbing motion, apply the white paint over the stencil openings. Build up the color gradually rather than glopping it on all at once. -
Reveal the design:
Carefully lift the stencil straight up to avoid smudging the crisp white lines. -
Full drying time:
Place the hearts on a wire cooling rack to let air circulate underneath. Allow them to dry completely for 24-48 hours, flipping them occasionally to prevent curling.
Step 3: Assembly & Finishing
-
Sand the edges:
Once bone dry, use fine-grit sandpaper to lightly buff the edges of the heart if there are any lingering sharp spots. -
Seal the surface:
For longevity, brush a thin coat of clear matte sealer over the front and back. This protects the chalky paint finish from scratches. -
Cut the cord:
Snip a length of suede lace or twine, approximately 8-10 inches long depending on how low you want the ornament to hang. -
Attach the hanger:
Thread the cord through the hole. You can either knot the ends together to form a loop, or use a lark’s head knot directly on the heart itself. -
Hang and display:
Arrange your finished hearts on a window rail, peg rack, or branches to showcase your new rustic decor.
Textured Variation
Before the clay dries, gently press a piece of lace or the stencil itself into the surface for a debossed texture, then dry-brush white paint over the raised areas.
Now you have a charming set of rustic hearts ready to bring a subtle seasonal touch to your home.


What Really Happens Inside the Kiln
Learn how time and temperature work together inside the kiln to transform clay into durable ceramic.
Heart Garland in Mixed Pastels
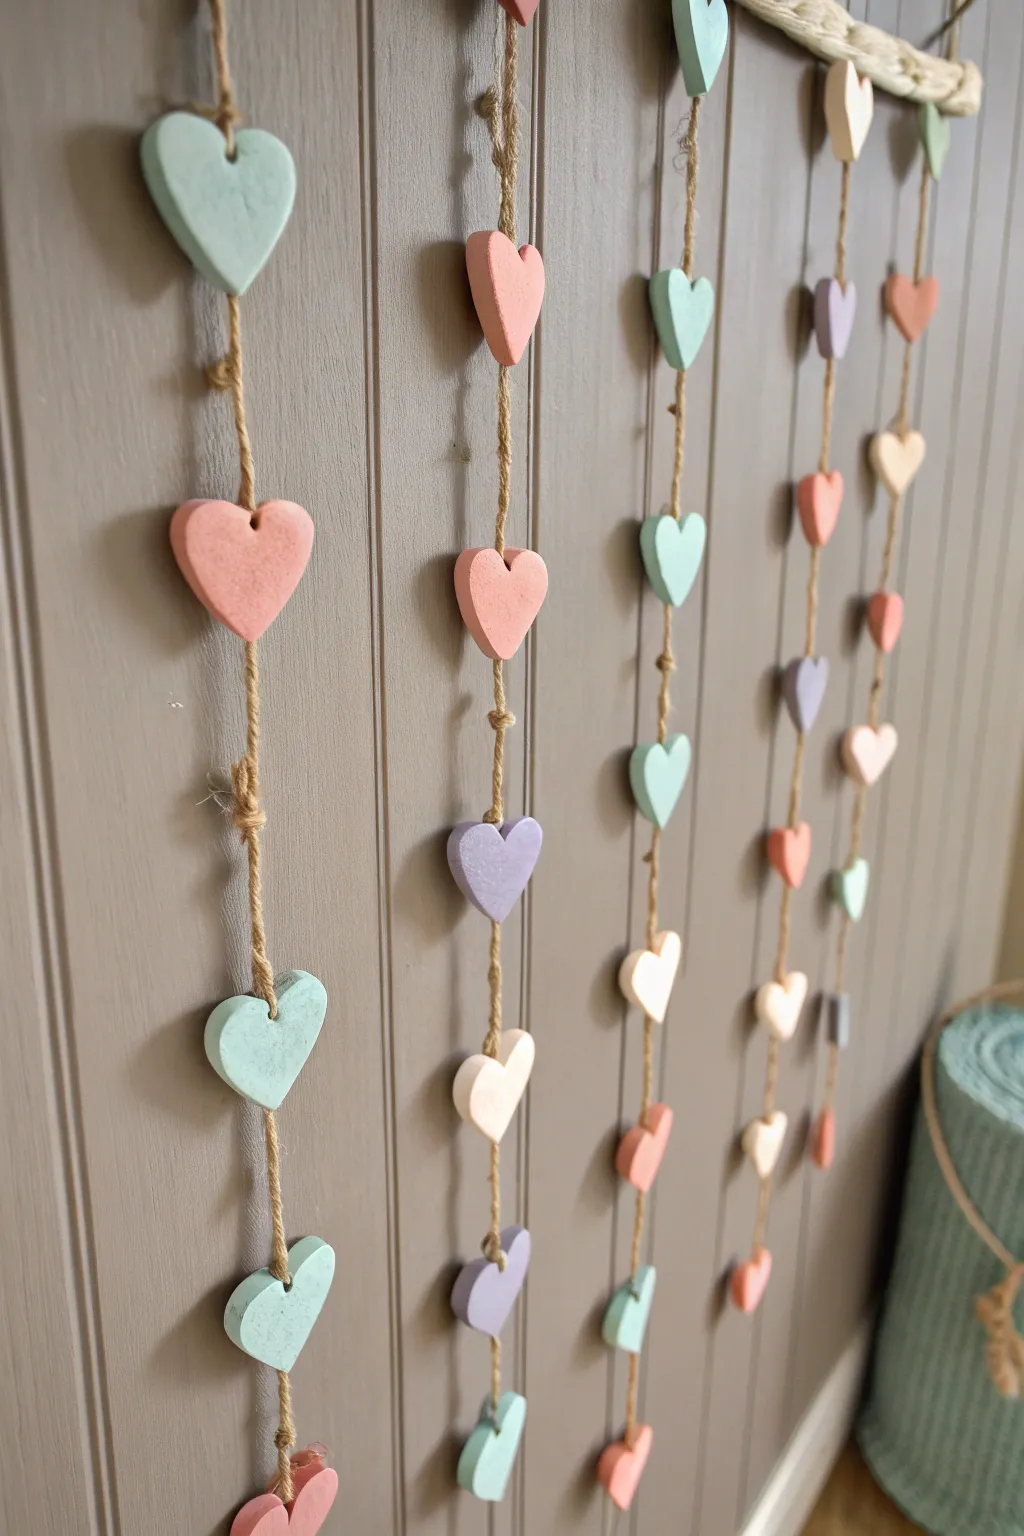
Create a charming vertical display with this multi-strand heart garland. Featuring soft pastel shades of mint, peach, lavender, and cream, these textured clay hearts bring a gentle, romantic touch to any wall.
Step-by-Step
Materials
- Air-dry clay (white)
- Small heart-shaped cookie cutter (approx. 1.5 – 2 inches)
- Acrylic paints (mint green, peach/coral, lavender, cream)
- Jute twine or rustic hemp cord
- Rolling pin
- Parchment paper or non-stick craft mat
- Straw, toothpick, or skewer (for making holes)
- Medium-grit sandpaper
- Paintbrushes (flat shader and detail brush)
- Matte spray varnish (optional)
- Driftwood branch or wooden dowel (for hanging)
Step 1: Preparing the Clay Hearts
-
Condition the Clay:
Begin by taking a chunk of air-dry clay and kneading it in your hands until it becomes soft, pliable, and free of cracks. If the clay feels too dry, add a tiny drop of water. -
Roll It Out:
Place the clay on parchment paper or a non-stick mat. Use your rolling pin to create a smooth slab that is roughly 1/4 inch thick. Aim for an even thickness so all hearts dry at the same rate. -
Cut the Shapes:
Press your heart-shaped cookie cutter firmly into the clay. Lift the cutter and wiggle slightly to release the shape. Repeat this process until you have about 25-30 hearts for a full garland. -
Smooth the Edges:
Dip your finger in a little bit of water and gently run it along the cut edges of each heart to smooth out any roughness left by the cutter. -
Create Hanging Holes:
Before the clay dries, use a straw or a skewer to poke a hole horizontally through the top lobes of the heart, from side to side. Alternatively, simply poke a hole through the center top if you plan to knot them differently, but the side-to-side channel allows them to hang flat like the photo. -
Dry Completely:
Lay the hearts flat on a drying rack or parchment paper. Let them air dry for 24-48 hours, flipping them over halfway through to prevent curling.
Fixing Curled Clay
If your hearts curl while drying, slightly dampen the concave side and weigh them down under a heavy book (with parchment paper in between) for a few hours.
Step 2: Painting and Finishing
-
Sand Imperfections:
Once the hearts are bone dry, check for any rough spots. I like to quickly run a piece of medium-grit sandpaper over the edges for a professional, polished look. -
Mix Custom Pastels:
Prepare your palette by mixing white acrylic paint with small amounts of green, orange/red, and purple to create soft pastel mint, peach, and lavender shades. Keep one set of hearts plain cream or white. -
Apply Base Coat:
Paint the front and sides of each heart. You will need roughly 5-7 hearts of each color. Let the first coat dry. -
Second Coat and Backs:
Apply a second coat for opaque coverage. Don’t forget to flip them over and paint the backs so the garland looks good from all angles if it spins. -
Seal the Clay:
For durability, take them outside and give them a light misting of matte spray varnish. This protects the finish without making them too shiny.
Step 3: Assembly
-
Cut the Twine:
Cut five lengths of jute twine, each measuring about 3 to 4 feet long. Leave extra length at the top for tying onto your main branch. -
String the First Heart:
Start at the bottom of a twine strand. Thread the twine through your first heart and tie a sturdy double knot underneath it to hold it in place. -
Spacing the Hearts:
Measure about 4-5 inches up the twine from your first heart. Tie a simple overhand knot at this mark. -
Adding More Layers:
Thread the next heart down to that knot. If the hole is horizontal, the knot might hide inside; if vertical, tie the knot below the heart. Continue adding hearts, alternating colors (e.g., mint, peach, lavender, cream) until the strand is full. -
Repeat for All Strands:
Repeat the stringing process for all five lengths of twine, trying to vary the color order slightly for a natural, organic look. -
Attach to Support:
Tie the top of each finished strand onto a piece of driftwood or a wooden dowel. Space the strands evenly, about 3-4 inches apart. -
Final Adjustments:
Hang the branch on the wall and gently adjust the rotation of the hearts so most are facing forward.
Add Subtle Texture
Before cutting the shapes, press a piece of lace or linen fabric into the wet clay slab. This transfers a beautiful, subtle texture that painting will highlight.
Hang your lovely handmade garland where it can catch the light and add a soft pop of color to your room
Pocket-Sized Heart Worry Stone
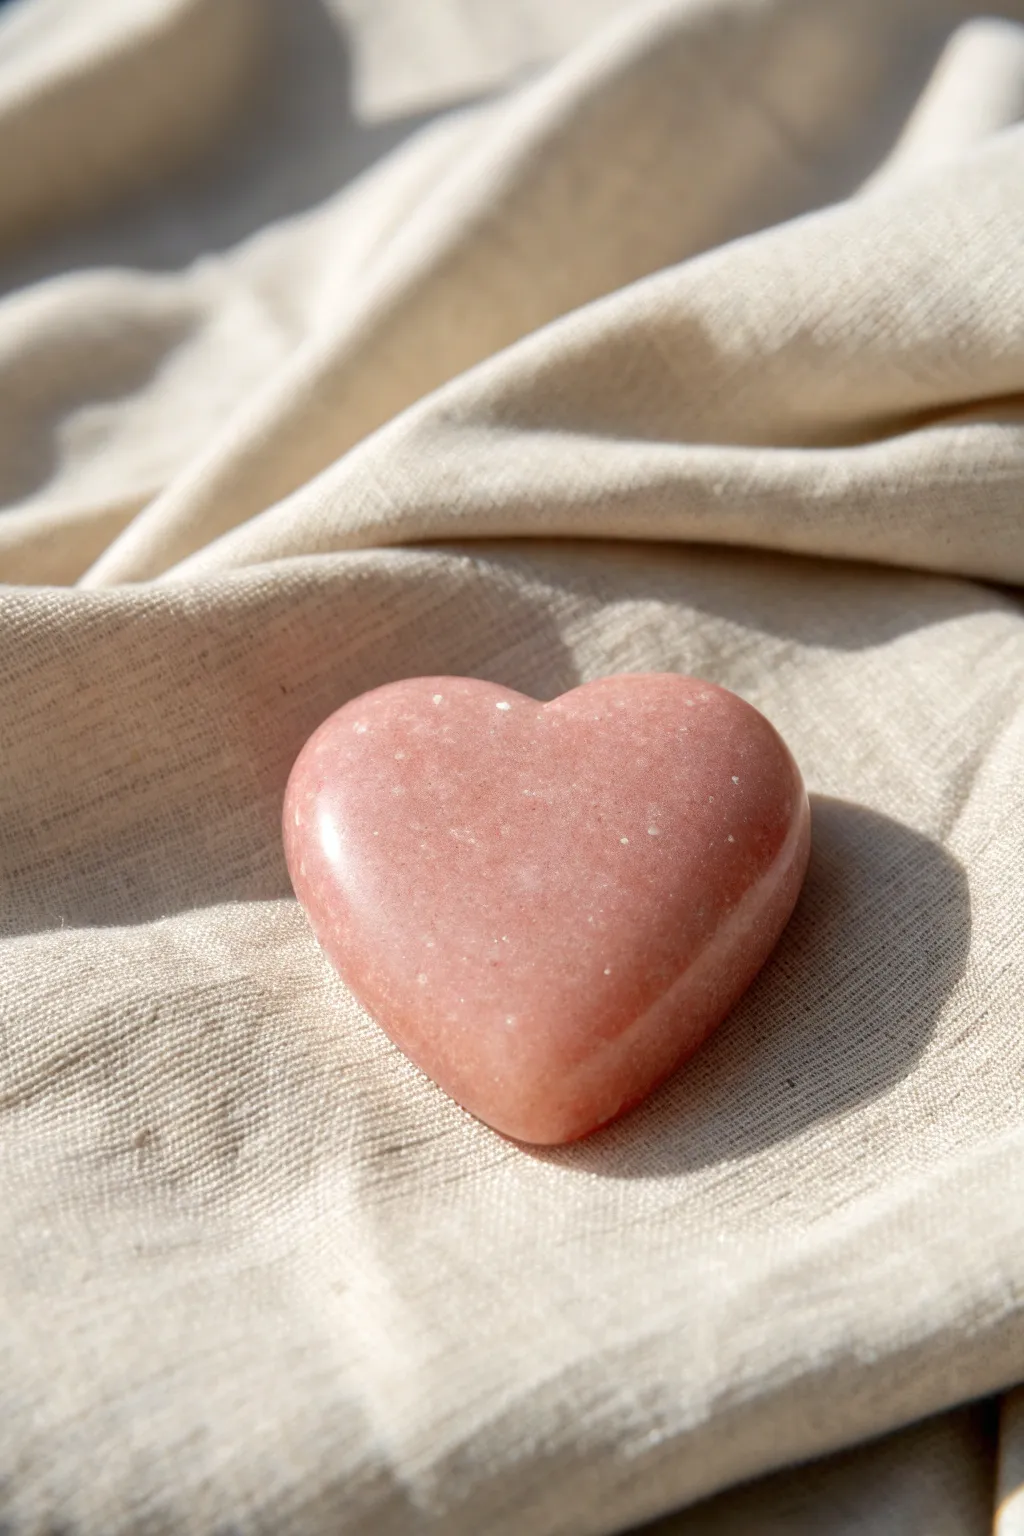
Looking for the perfect little token of affection that feels as smooth as a real gemstone? This tutorial guides you through crafting a pocket-sized worry stone that mimics the translucent beauty of rose quartz, complete with subtle, suspended sparkles. It fits perfectly in the palm of your hand for a soothing touch whenever you need it.
Step-by-Step Guide
Materials
- Translucent Polymer Clay (e.g., Cernit Translucent or Sculpey Premo Translucent)
- Small amount of Red or Pink Polymer Clay (for tinting)
- Fine glitter (iridescent or silver)
- Stone grit sandpaper (assorted grits from 400 to 2000)
- Buffing wheel or denim scrap
- UV Resin or Gloss Glaze (optional, for extra shine)
- Clay roller or pasta machine
- Heart-shaped clay cutter (approx. 2 inches wide)
- Ceramic tile or glass work surface
- Oven
Step 1: Mixing the Faux Stone
-
Condition the base:
Begin by thoroughly conditioning a block of translucent polymer clay. Knead it in your hands until it is warm, soft, and pliable. The more you condition translucent clay, the clearer it becomes after baking. -
Create the tint:
Take a very tiny amount of red or pink clay—about the size of a peppercorn for every 2 ounces of translucent clay. You want a barely-there tint, not an opaque color. -
Blend the colors:
Mix the colored speck into the translucent clay. Keep folding and rolling until the color is completely uniform. It should look like a pale, milky pink at this stage. -
Add the inclusions:
Flatten your clay into a pancake and sprinkle a pinch of fine iridescent glitter over the top. You want subtle sparkles that look like mineral inclusions, so don’t overdo it. Roughly 1/8th of a teaspoon is plenty. -
Distribute the glitter:
Fold the clay over the glitter and knead it again. Ensure the sparkles are distributed evenly throughout the entire lump of clay so they show up from every angle.
Ice Water trick
Immediately plunging hot, baked translucent clay into a bowl of ice water stops the baking process instantly and significantly increases the clay’s transparency.
Step 2: Shaping the Stone
-
Form the slab:
Roll your mixed clay into a thick slab, approximately 1/4 inch to 1/2 inch thick. I sometimes leave it slightly thicker in the center to give it a nice domed weight. -
Cut the shape:
Place your heart cutter onto the slab. Press down firmly and evenly to cut out your heart shape. Remove the excess clay from around the cutter before lifting it. -
Smooth the edges:
Gently pop the heart out of the cutter. Use your fingertips to gently smooth down the sharp edges created by the cut. You want a rounded, pebble-like profile, not sharp corners. -
Create the dome:
Cup the heart in your palm and gently rub the surface with your thumb in a circular motion. This helps erase fingerprints and enhances the rounded, organic stone shape. -
Bake carefully:
Place your heart on a ceramic tile. Bake according to your clay manufacturer’s instructions (usually 275°F/130°C). To prevent browning on translucent clay, tent a piece of aluminum foil over the top or plunge it into an ice water bath immediately after baking to shock it into clarity.
Step 3: Polishing to Perfection
-
Start wet sanding:
Once the heart is completely cool, begin wet sanding with 400 grit sandpaper. Dip the paper in water and sand the entire surface to remove any major bumps or unevenness. -
Move through the grits:
Progressively move to finer sandpapers: 600, 800, 1000, and finally 2000 grit. Rinse the heart between each grit level. By the end, the clay should feel incredibly smooth to the touch. -
Buff for shine:
If you have a rotary tool with a buffing wheel, use it now on a low speed to bring out a glass-like shine. Alternatively, rub the heart vigorously with a piece of heavy denim or jeans fabric. -
Optional glazing:
If you prefer a wet-look finish rather than a natural stone polish, you can apply a thin coat of UV resin or polymer clay gloss glaze instead of buffing. -
Final inspection:
Hold your stone up to the light to admire the depth and sparkle. This is the moment where the ‘stone’ really comes to life.
Preventing Plaquing
Tiny white moon shapes (plaques) sometimes appear in translucent clay. To minimize this, avoid trapping air while kneading and wash your hands to remove oils before shaping.
Slip this little gem into your pocket or gift it to a friend as a reminder of your enduring affection.

TRACK YOUR CERAMIC JOURNEY
Capture glaze tests, firing details, and creative progress—all in one simple printable. Make your projects easier to repeat and improve.
Cute Heart Magnets for the Fridge
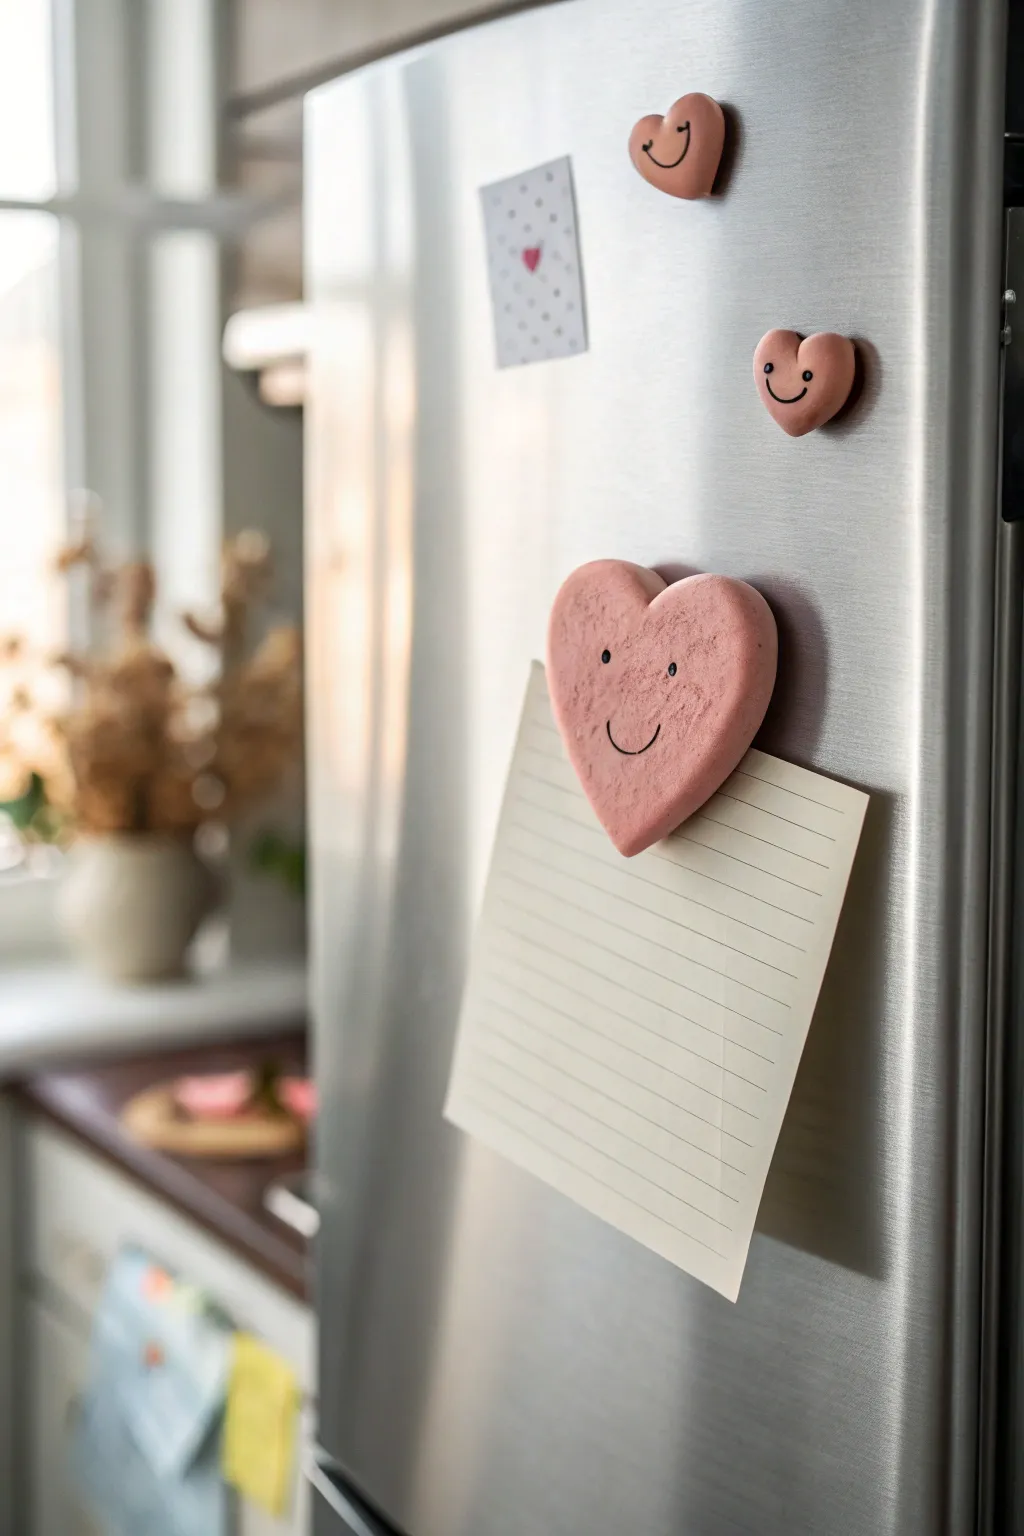
Brighten up your kitchen with these charmingly simple clay heart magnets. Their soft pink finish and minimalist smiley faces add a sweet, handmade touch that’s perfect for holding up grocery lists or love notes.
Step-by-Step
Materials
- Polymer clay (in soft pink or white mixed with acrylic paint)
- Small heart-shaped cookie cutter (approx. 2 inches)
- Rolling pin or smooth glass jar
- Parchment paper or baking mat
- Fine-grit sandpaper (optional, for texture)
- Black fine-point permanent marker or acrylic paint pen
- Strong round craft magnets (neodymium recommended)
- Strong craft glue (E6000 or super glue)
- Baking sheet
- Oven
Step 1: Shaping the Hearts
-
Prepare your clay:
Begin by conditioning your polymer clay in your hands. Knead it thoroughly until it becomes soft, pliable, and warm to the touch. This prevents cracking later. -
Roll it out:
Place the clay on your parchment paper or baking mat. Roll it out evenly to a thickness of about 1/4 inch (6mm). You want them thick enough to hold a magnet but not too heavy. -
Cut the shapes:
Press your heart-shaped cookie cutter firmly into the rolled clay. Wiggle it slightly to ensure a clean cut, then lift the cutter. -
Soften the edges:
Use your fingertip to gently tap and smooth down the sharp edges left by the cutter. This gives the heart a softer, puffy, pillow-like appearance similar to the photo. -
Add subtle texture:
If you want that slightly organic, stone-like texture seen in the reference, gently press a piece of fine-grit sandpaper onto the surface of the raw clay, then peel it back.
Keep it Clean
Polymer clay picks up dust easily. Wipe your hands and work surface with a baby wipe before rolling the clay to ensure your pink color stays pristine.
Step 2: Baking and Decorating
-
Bake carefully:
Transfer the parchment paper with your hearts onto a baking sheet. Follow the specific temperature and time instructions on your package of clay. I usually tent a piece of foil over them to prevent browning. -
Cool down fully:
Once baked, remove the tray from the oven and let the hearts cool completely. Do not attempt to draw on them while they are warm. -
Draft the face:
Practice the smiley face expression on a scrap piece of paper first. The key is small, wide-set eyes and a simple U-shaped smile placed low on the heart. -
Draw the expression:
Using a fine-point black permanent marker or paint pen, carefully dot two eyes onto the hardened clay. -
Add the smile:
Draw the simple curve for the smile just below the eyes. Use a confident, light stroke to keep the line clean. -
Seal the face (optional):
If using marker, let it set for a few minutes. You can apply a thin layer of matte varnish over the face area to prevent smudging over time.
Step 3: Final Assembly
-
Prepare the back:
Flip the heart over. Check that the back is relatively flat; if it warped slightly during baking, you can lightly sand it down. -
Apply adhesive:
Place a small dollop of strong craft glue (like E6000) onto the center of the back of the heart. -
Attach the magnet:
Press your round magnet firmly into the glue. Ensure the magnet is strong enough to hold through thick glimmer paper or cardstock. -
Let it cure:
Leave the magnets face down to dry completely. Although super glue dries fast, heavier craft glues often need 24 hours for a full cure to support heavy papers.
Make Them 3D
Before baking, adhere tiny clay balls for cheeks or use a tool to indent the smile line physically into the clay for a tactile, engraved look.
Once dry, stick your cheerful new creations on the fridge to hold your most important reminders
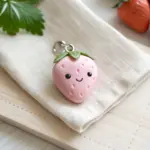
Kawaii Hearts With Blushing Faces
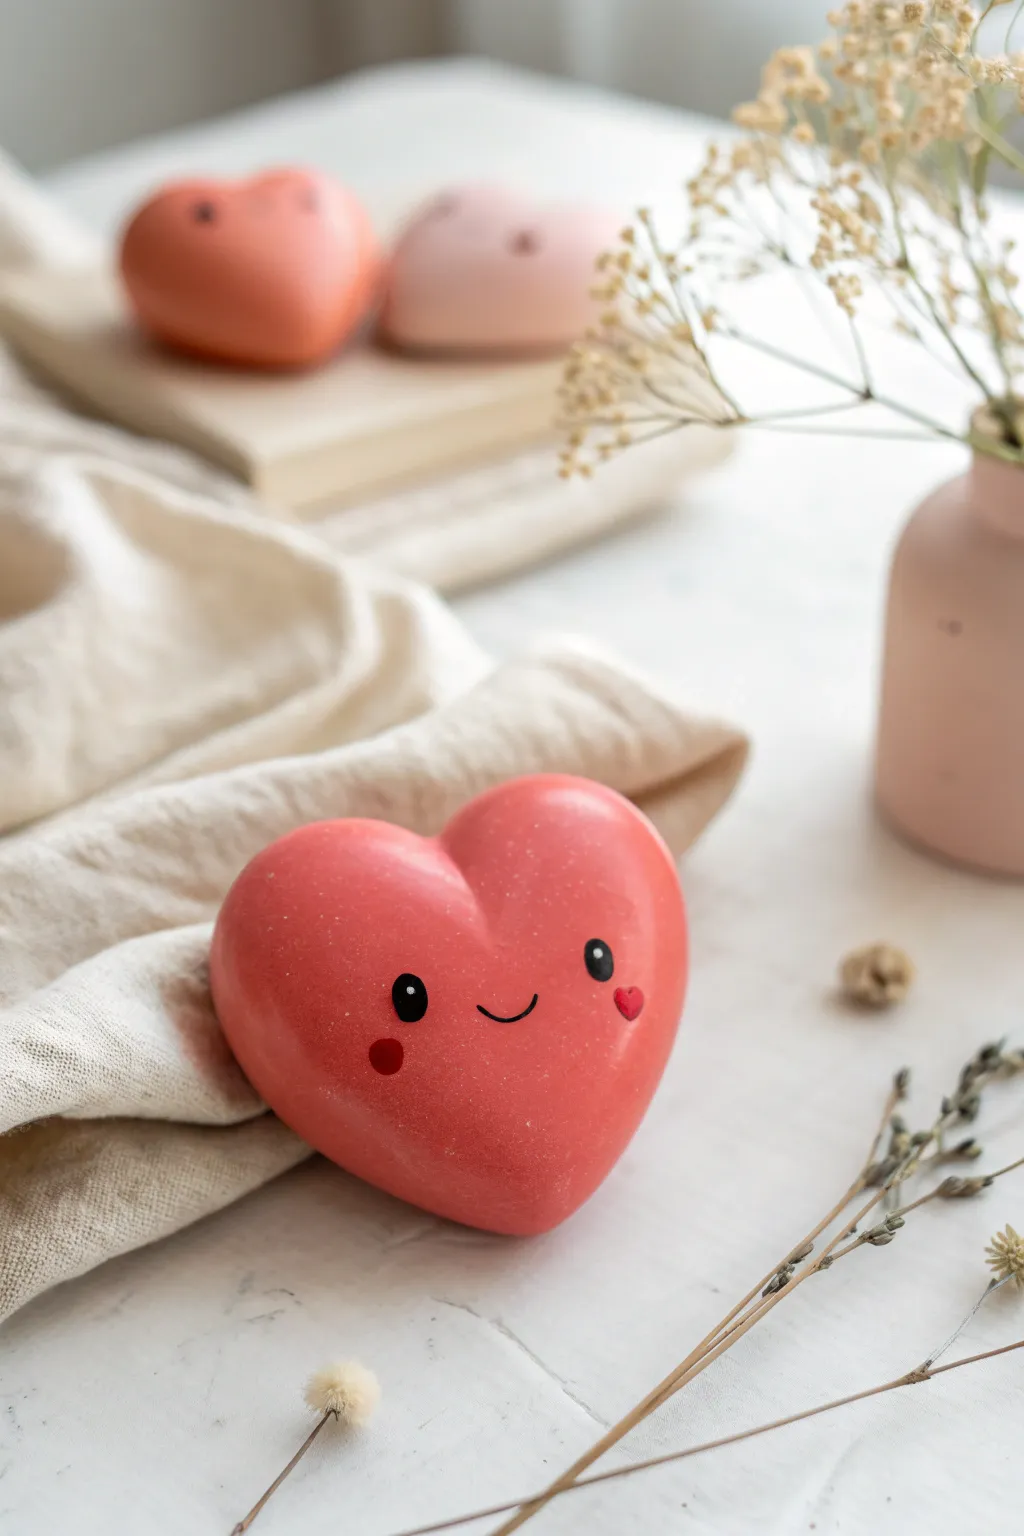
These adorable heart-shaped figurines radiate pure sweetness with their gentle curves and shy, blushing faces. Perfect for gifting or decorating, this project uses smooth polymer clay and simple painting techniques to bring a little personality to your Valentine’s Day decor.
How-To Guide
Materials
- Pink polymer clay (or white clay mixed with a touch of red)
- Acrylic rolling pin
- Heart-shaped cookie cutter (optional, for uniform sizing)
- Clay modeling tools (smoother/shaper)
- Black acrylic paint
- Red acrylic paint
- Fine detail paintbrush (size 0 or 00)
- Dotting tool or toothpick
- Matte or satin varnish (optional, for sealing)
- Baking sheet and parchment paper
- Oven
Step 1: Shaping the Base
-
Condition the clay:
Start by warming the pink polymer clay in your hands. Knead and roll it until it’s soft, pliable, and free of any cracks or air bubbles. -
Form a smooth ball:
Roll the clay into a perfect sphere. Ensuring the ball is smooth now will save you time smoothing later. -
Create the basic heart shape:
Gently pinch the bottom of the sphere to create a tapered point. Then, press down on the top center of the sphere with your thumb or a modeling tool to create the initial dip of the heart. -
Refine the curves:
Using your fingers, round out the two top lobes of the heart. You want them to be plump and dimensional, not flat like a cookie. -
Smooth the surface:
Inspect the clay for fingerprints. Use a light touch to buff them away, or roll the surface very gently against your work mat to keep the finish seamless.
Sticky dust everywhere?
Polymer clay loves dust. Keep baby wipes nearby to clean your hands and tools often. If you spot lint before baking, remove it gently with a piece of clear scotch tape.
Step 2: Baking and Cooling
-
Preheat the oven:
Set your oven to the temperature recommended on your specific brand of polymer clay packaging (usually around 275°F or 130°C). -
Prepare for baking:
Place your heart on a baking sheet lined with parchment paper. To prevent a flat spot on the back, you can nestle the heart gently into a bed of cornstarch or baking soda. -
Bake the clay:
Bake according to package directions, typically 15-30 minutes depending on the thickness of your heart. -
Cool completely:
Once baked, turn off the oven and let the heart cool down completely before handling. Painting on warm clay can ruin the acrylic finish.
Step 3: Painting the Kawaii Face
-
Plan the placement:
Visualize where the face will sit. I find placing the eyes slightly lower on the heart makes it look simpler and cuter. -
Paint the eyes:
Dip your smallest dotting tool or the back of a paintbrush into black acrylic paint. Press two confident dots onto the clay for the eyes, spacing them wide apart. -
Add eye highlights:
Wait for the black paint to dry almost completely. Then, using a tiny needle or the very tip of a clean toothpick, add a microscopic dot of white paint to the top corner of each black eye for sparkle. -
Paint the smile:
Using your finest detail brush (00 size is best here) and black paint, draw a tiny, shallow ‘U’ shape right between the eyes. Keep the line thin and delicate. -
Create the blushing cheeks:
Mix a tiny bit of red paint to get a deep rose color. Using a dotting tool, place a small circle under one eye. -
Add the heart cheek:
For the other cheek, use the tip of your brush to paint a tiny red heart instead of a circle, adding that extra touch of love seen in the example.
Pro Tip: Cornstarch magic
To remove stubborn fingerprints without squishing your shape, lightly brush the raw clay with a little cornstarch and rub gently. It buffs the surface perfectly smooth.
Step 4: Finishing Touches
-
Let the paint set:
Allow the acrylic paint to dry thoroughly for at least 30 minutes so it doesn’t smear during the final step. -
Seal the artwork:
Apply a thin coat of matte or satin varnish over the entire heart. This protects the face paint and gives the clay a professional, unified sheen.
Place your finished heart on a desk or shelf to spread a little joy every time you see it
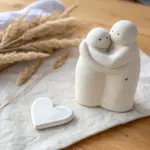
Tiny Animals Holding Hearts
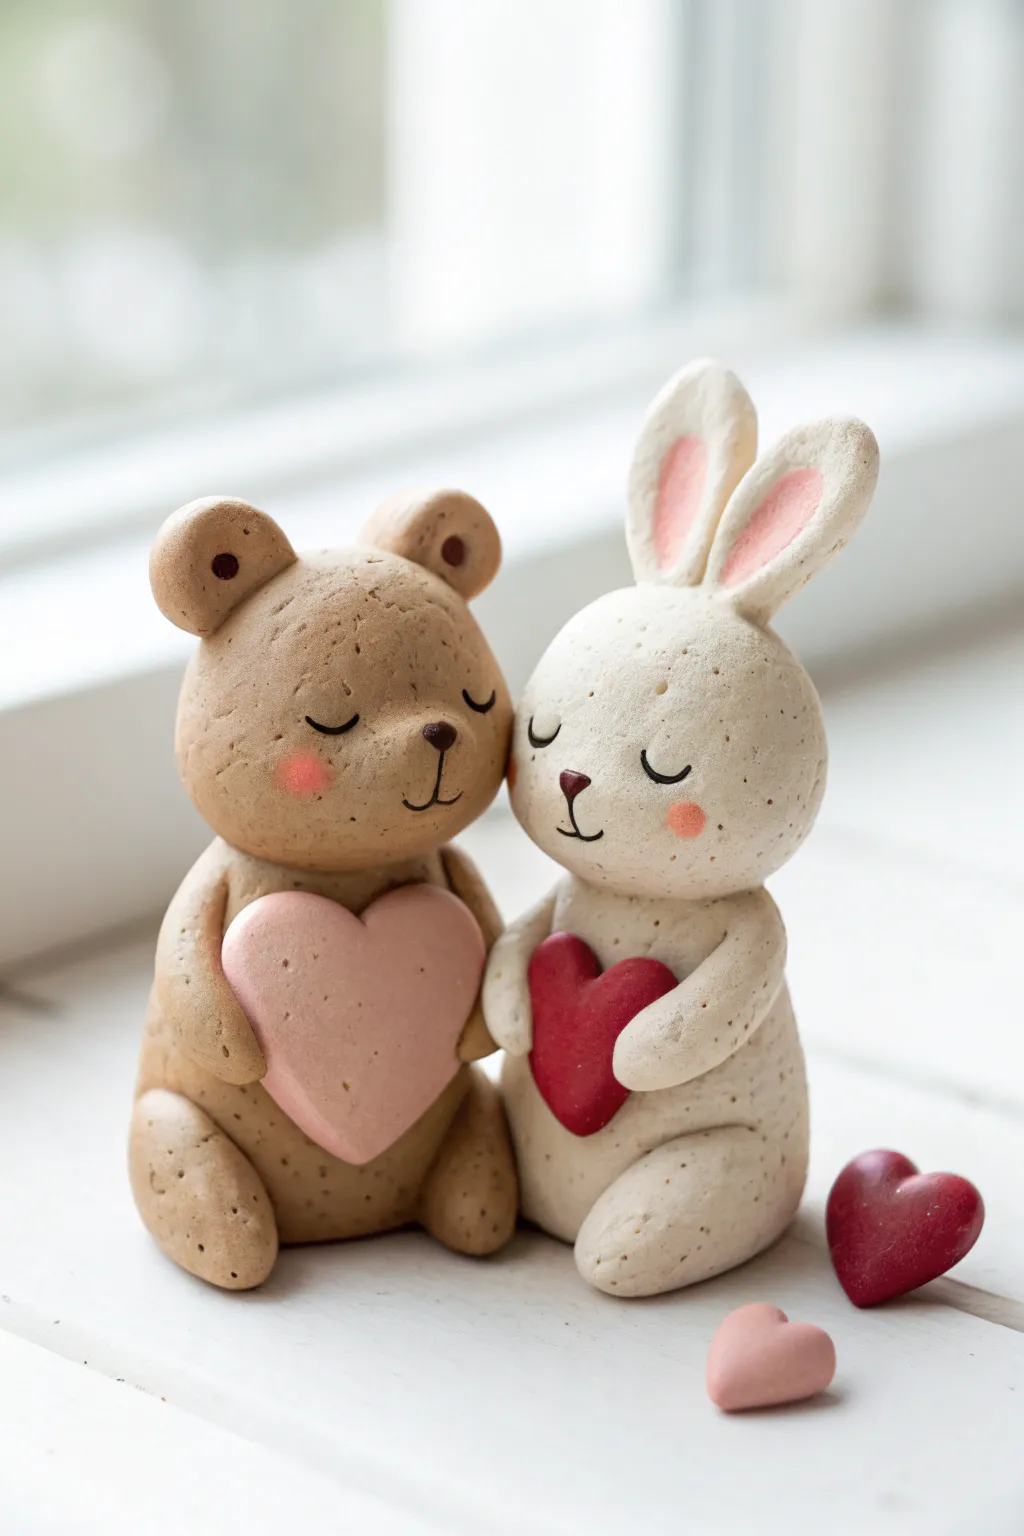
These adorable polymer clay companions sit side-by-side clutching sweet hearts, making them the perfect symbol of friendship or love. Their speckled stone-like finish and soft pastel blushes give them a gentle, handmade charm that is wonderful for gifting.
How-To Guide
Materials
- Polymer clay (light warm brown, cream/white, pink, red)
- Black acrylic paint or fine-tip permanent marker
- Rolling pin or acrylic roller
- Needle tool or toothpick
- Ball tool (styling tool)
- Old toothbrush or stiff bristle brush
- Soft pink pastel chalk (for blushing)
- Soft small paintbrush
- Oven for baking
- Craft knife
- Glaze or varnish (optional)
Step 1: Shaping the Bodies
-
Mix the colors:
Begin by conditioning your light brown clay for the bear and cream clay for the bunny. If you want that speckled look shown in the photo, mix in a tiny pinch of black pepper or black sand into the clay bodies, or use ‘granite’ effect clay mixed with your base colors. -
Form the torsos:
Roll two equal-sized balls of clay—one brown, one cream. Shape them into pear-like drops with a wide, rounded bottom for them to sit comfortably. -
Shape the heads:
Roll two slightly smaller balls for the heads. Gently press them onto the top of the tapered body shapes. You can insert a small piece of toothpick or wire between the head and body for extra stability. -
Add texture:
Before adding limbs, gently tap the entire surface of both figures with an old toothbrush. This stippling creates the soft, matte texture rather than a shiny plastic look.
Clean Clay Tip
Keep baby wipes nearby! When switching from red clay to white rabbit clay, clean your hands thoroughly. Red pigment transfers easily and can stain your cream bunny pink.
Step 2: Adding Faces & Limbs
-
Create the bear’s ears:
Roll two tiny balls of brown clay. Press clear indentations into the centers with a ball tool to make the inner ear, then attach them to the top of the bear’s head. -
Form the bunny’s long ears:
Roll two small logs of cream clay, tapering the ends. Flatten them slightly. Add a smaller, flattened strip of pink clay inside each ear. Attach these securely to the top of the bunny’s head. -
Make the muzzles:
Roll extremely small flattened ovals of clay (matching the skin tone) and place them centrally on the faces to create a slight snout area. -
Attach the legs:
Roll four sausage shapes (two brown, two cream) for the legs. Attach them at the bottom sides of the bodies, pointing forward so the figures are in a seated position.
Magnet Magic
Before baking, press strong neodymium magnets into the backs or bottoms. Now these cute valentine critters can hug comfortably on your refrigerator door.
Step 3: The Hearts & Arms
-
Form the hearts:
Take a piece of pink clay and a smaller piece of red clay. Flatten them slightly and use a mini heart cutter or cut the shapes freehand with a craft knife. The pink heart should be larger for the bear. -
Position the hearts:
Press the pink heart against the bear’s chest and the red heart against the bunny’s chest. Use a tiny dot of liquid clay or Sculpey Bake & Bond if they don’t stick easily. -
Add the arms:
Roll two small logs for each animal’s arms. Attach them at the shoulders and curb them around so the ‘hands’ (ends of the logs) are holding the sides of the hearts. -
Optional texture:
Re-texture any areas you’ve smoothed out while attaching limbs, ensuring the toothbrush stipple effect is consistent.
Step 4: Finishing Details
-
Paint the faces:
Using a needle tool, lightly etch the curved lines for the closed eyes. Once baked and cooled, you can fill these lines with black paint, or paint them carefully now if you have a steady hand. -
Add noses and mouths:
Add a tiny triangle of dark brown or black clay for the noses. Etch a small vertical line and smile beneath the nose. -
Apply blush:
Scrape a little powder from a pink pastel chalk. Using a soft dry brush, gently dust rosy circles onto the cheeks of both animals. -
Bake the figures:
Place your duo on a baking sheet lined with parchment paper. Bake according to your brand of clay’s instructions (usually around 275°F/130°C for 15-30 minutes). -
Sculpt extra hearts:
While baking, you can form a few extra loose hearts to scatter around the finished display as shown in the photo. -
Cooling and finishing:
Let the figures cool completely. I find this patience crucial to prevent cracking. Once cool, they are ready to display.
Place these two sweet friends on a shelf or gift them to someone special to brighten their day
Message-in-a-Heart Locket Pendant
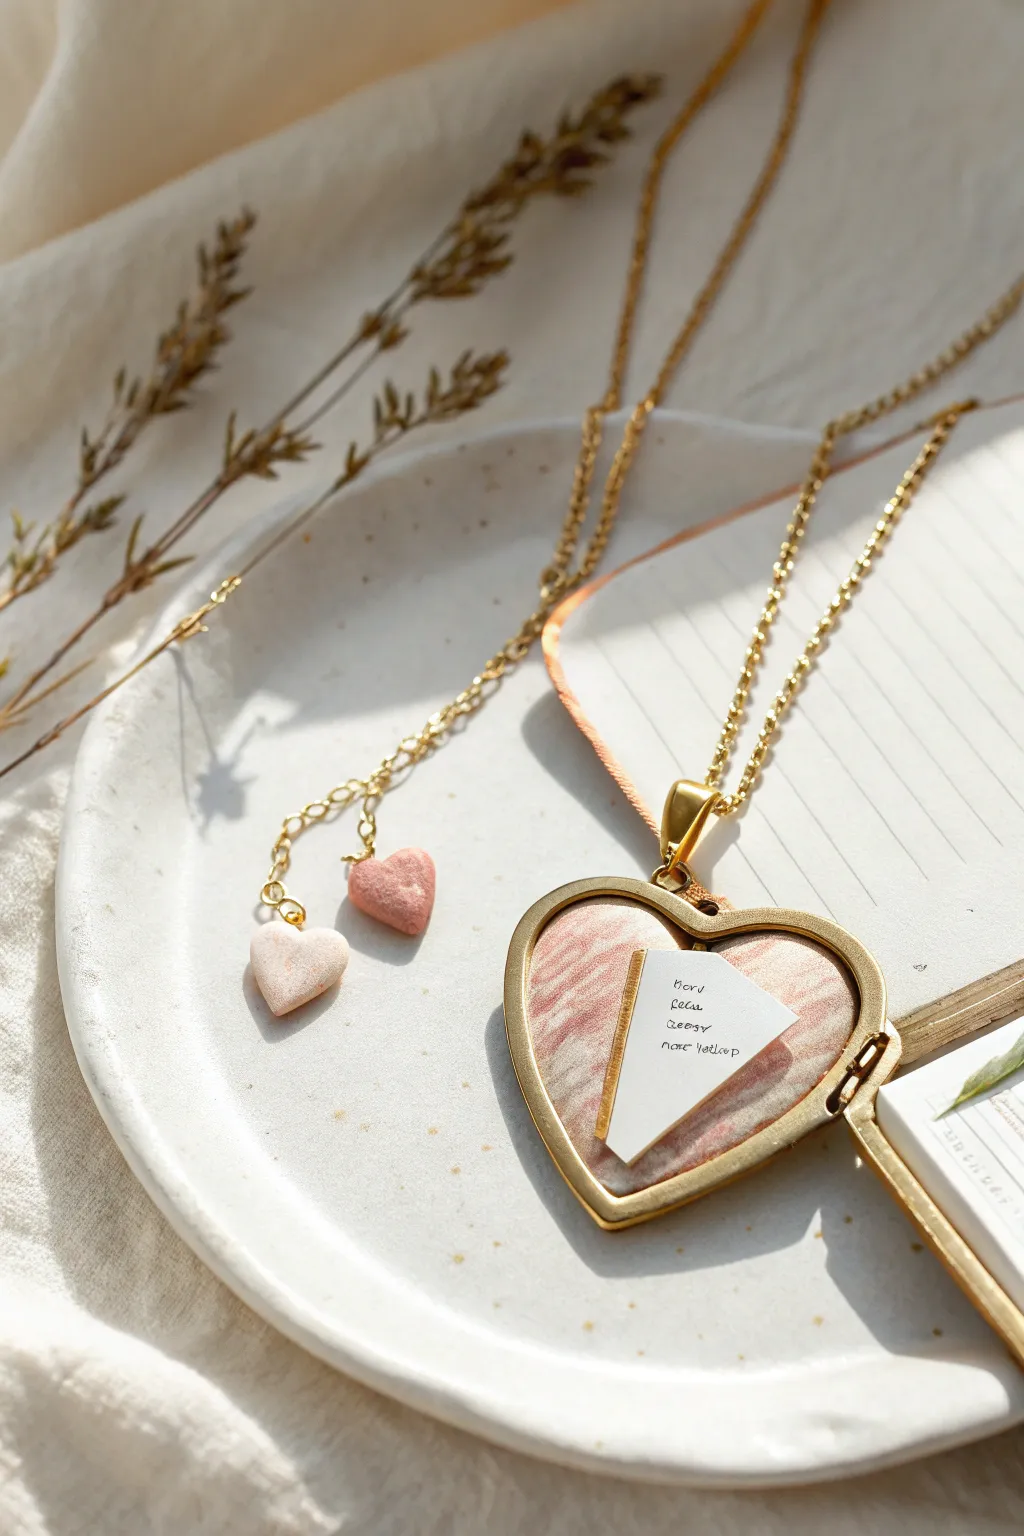
Transform a classic thrifted or craft store locket into a personalized treasure using a touch of pink polymer clay. This project features a lovely marbled clay insert that holds a tiny, folded secret note.
Detailed Instructions
Materials
- Heart-shaped metal locket (gold or brass tone)
- White polymer clay
- Pink or dusty rose polymer clay
- Rolling pin or pasta machine
- Craft knife or X-Acto blade
- Small piece of paper (high quality stationery preferred)
- Fine-point black pen
- Super glue or E6000
- Gold chain and jump rings
- Cardstock (for template)
- Sculpting tool or toothpick
Step 1: Creating the Swirled Clay Base
-
Prepare the Clay:
Begin by conditioning small amounts of white and pink polymer clay. Knead them separately until they are soft and pliable in your hands. -
Mix the Colors:
Roll each color into a thin snake. Twist the two snakes together, fold the twist in half, and twist again. Repeat this simple motion just enough to create a marble effect without blending the colors fully into a solid shade. -
Flatten the Slab:
Using a rolling pin or a pasta machine on a thick setting, flatten your marbled clay. Aim for a thickness of about 2-3mm, ensuring it’s thin enough to fit inside the locket but sturdy enough to handle. -
Make a Template:
Place your open locket face down on a piece of cardstock and trace the heart shape. Cut this out slightly inside the lines to account for the metal rim’s thickness. -
Cut the Heart:
Lay your cardstock template onto the swirled clay slab. Use your craft knife to carefully cut around the template, creating a perfect clay heart. -
Test the Fit:
Before baking, gently place the clay heart into the locket bezel. If it’s too tight, trim the edges slightly with your blade. It should sit flush against the back. -
Create Texture:
To mimic the stone-like texture seen in the photo, lightly press a piece of coarse sandpaper or a toothbrush bristles onto the surface of the unbaked clay.
Clean Edges Trick
After cutting your clay heart, dip your finger in a little baby oil and smooth the raw edges. This removes rough cuts and fingerprints before baking.
Step 2: Baking and Assembly
-
Bake the Clay:
Remove the clay from the locket and place it on a baking tile. Bake according to the manufacturer’s instructions (usually 275°F for 15-30 minutes). Let it cool completely. -
Secure the Insert:
Apply a small dot of strong adhesive, like E6000, to the inside back of the locket. Press your cooled clay heart firmly into place. -
Write the Message:
Cut a small, triangular or rectangular strip of high-quality paper. Using your finest pen, write a tiny, meaningful message like ‘love you’ or a special date. -
Fold the Note:
Fold the paper carefully so it fits neatly inside the heart shape without obscuring the beautiful marble texture too much. -
Attach the Note:
You can leave the note loose for the recipient to discover, or use a tiny dab of glue to secure one corner of the paper to the clay surface so it stays displayed when opened. -
Pendant Assembly:
Attach a gold jump ring to the top loop of the locket. Thread your chain through the jump ring. -
Bonus: Mini Charms:
If you have leftover swirled clay, form two tiny hearts. Pierce them with a needle before baking to create matching charm accents for the clasp or chain end.
Vintage Patina
Rub a tiny bit of white or gold acrylic paint into the textured surface of the baked clay, then wipe off the excess for an aged, stone-like look.
Now you have a sentimental keepsake ready to gift to someone special
Tiny Valentine “Box of Hearts” Trinket Box
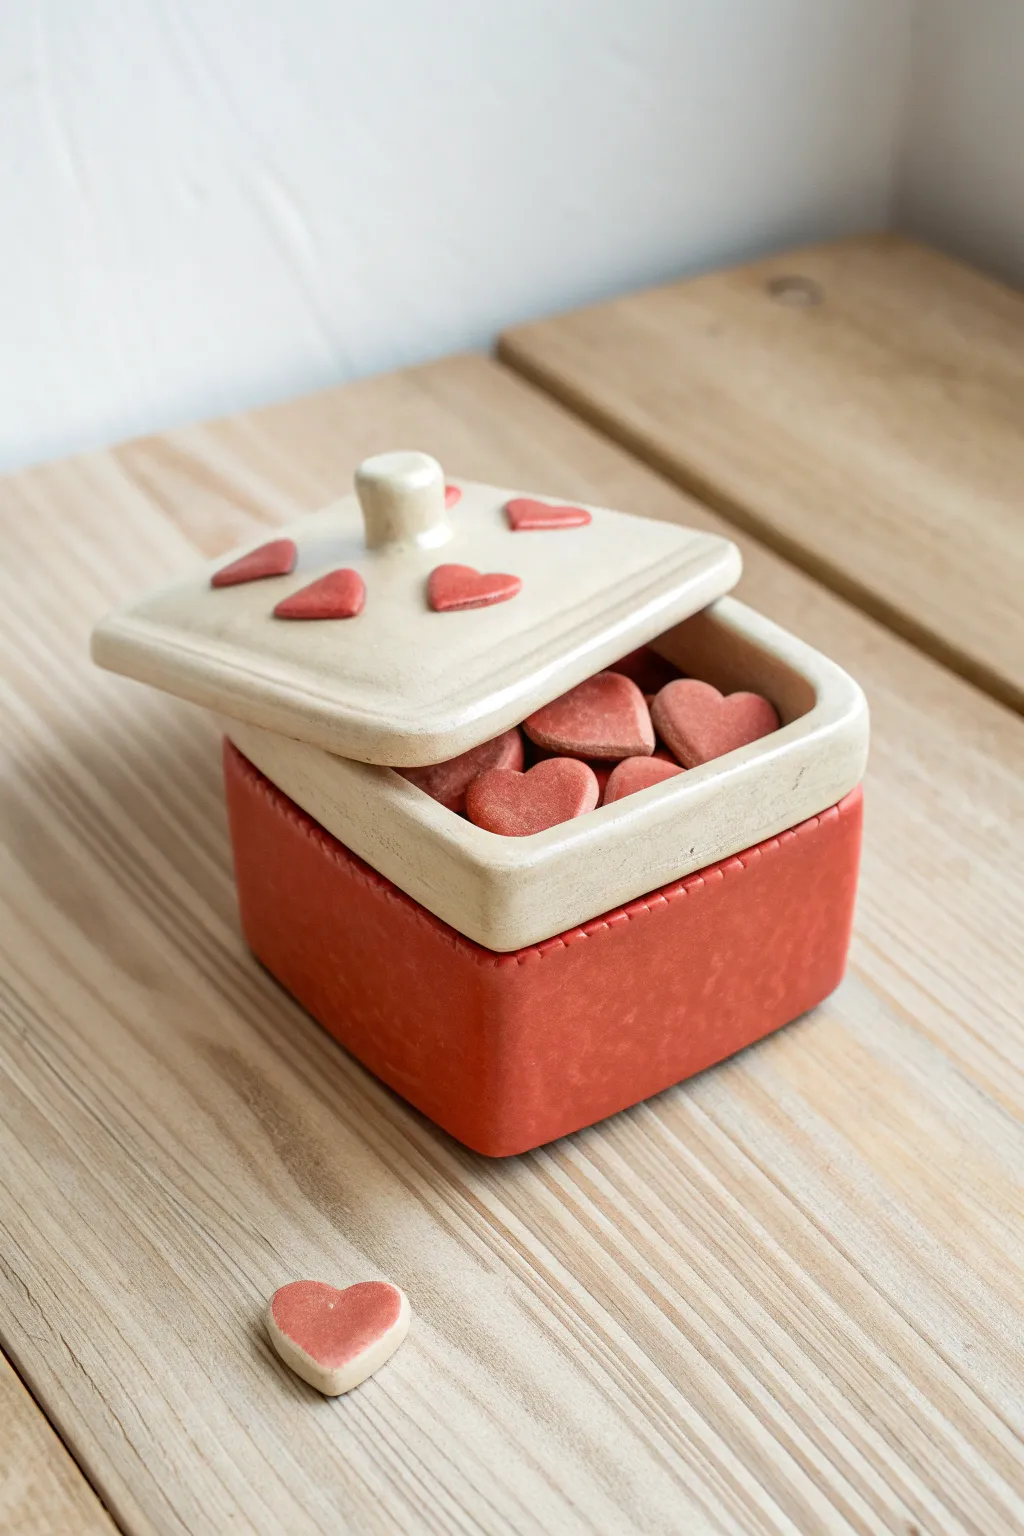
This adorable square trinket box features a textured red base and a creamy beige lid adorned with tiny hearts, perfect for holding small treasures or sweet notes. It creates a charming “box of chocolates” aesthetic that makes for a thoughtful handmade Valentine’s gift.
Step-by-Step
Materials
- Polymer clay (terracotta red and cream/beige)
- Square clay cutter (approx. 3 inches)
- Rolling pin or pasta machine
- Texture sponge or coarse sandpaper
- Small heart-shaped cutter
- Smoothing tool or finger
- Liquid polymer clay (bake and bond)
- Craft knife
- Ruler
- Gloss glaze (optional)
Step 1: Forming the Base
-
Prepare the red clay:
Condition your terracotta red polymer clay until it is soft and pliable, then roll it out into a thick, even slab about 1/4 inch thick. -
Cut the base square:
Using your square cutter or a ruler and craft knife, cut out a perfect square for the bottom of the box. -
Create the walls:
Roll out a long strip of the same red clay, ensuring it is the same thickness as your base. Measure the perimeter of your square and cut the strip to length, plus a tiny bit of overlap. -
Texture the clay:
Before assembling, gently press a texture sponge or coarse sandpaper against the exterior side of your wall strip and the edges of the base to create that pitted, stone-like texture shown in the image. -
Assemble the walls:
Wrap the wall strip around the square base. Use a small clay tool to blend the seams on the inside and outside corners so they disappear. Press the walls firmly onto the base to seal. -
Add the rim detail:
Using a needle tool or small blunt point, press vertical indentations all along the very top rim of the red box walls to create the stitched-look border.
Sagging Lid?
If the domed lid sags while baking, support it underneath with a mound of polyester batting or cornstarch. This keeps the curve shape intact in the oven.
Step 2: Creating the Lid
-
Roll the lid clay:
Condition the cream-colored clay and roll it into a slab that is slightly thicker than the base walls. -
Cut and shape the lid:
Cut a square that is slightly larger than your box base. Gently curve the edges downward with your fingers to create a soft, pillow-like dome shape rather than a flat tile. -
Make the inner lip:
Roll a small snake of cream clay and attach it to the underside of the lid in a square shape. This square needs to fit *inside* the red box walls to keep the lid from sliding off. -
Form the knob:
Roll a small cylinder of cream clay for the handle. Attach it securely to the very center of the lid using a dab of liquid clay. -
Decorate with hearts:
Roll out a very thin sheet of the red clay. Use your tiny heart cutter to make five small hearts. -
Apply the hearts:
Place four hearts in the corners of the lid and one heart on the center front edge. Press them down gently so they adhere without losing their shape.
Step 3: Finishing Touches
-
Create the filler hearts:
With the remaining red clay, roll a medium-thickness slab and punch out numerous heart shapes to fill the box later. I find it helpful to vary the thickness slightly for a natural look. -
Baking prep:
Place the lid (right side up) and the base separately on a baking sheet lined with parchment paper. Scatter the loose hearts around them. -
Bake the project:
Bake according to your clay manufacturer’s instructions (usually 275°F/130°C for 15-30 minutes). Let everything cool completely. -
Optional glazing:
If you want the ceramic look shown in the box knob, apply a very light coat of satin or gloss glaze only to the cream sections, leaving the red textured parts matte.
Seamless Corners
When blending the wall seams, use a drop of baby oil or clay softener on your tool. It melts the clay slightly, making the join invisible and smooth.
Once filled with the loose clay hearts, your keepsake box is ready to be gifted or displayed