If you’re obsessed with clay bead bracelets and you’ve got softball on the brain, you’re in the right creative lane. I love how a few polymer clay disc beads in that classic softball yellow and red can instantly turn a simple stack into game-day jewelry.
Classic Softball Yellow With Red Stitch Accents
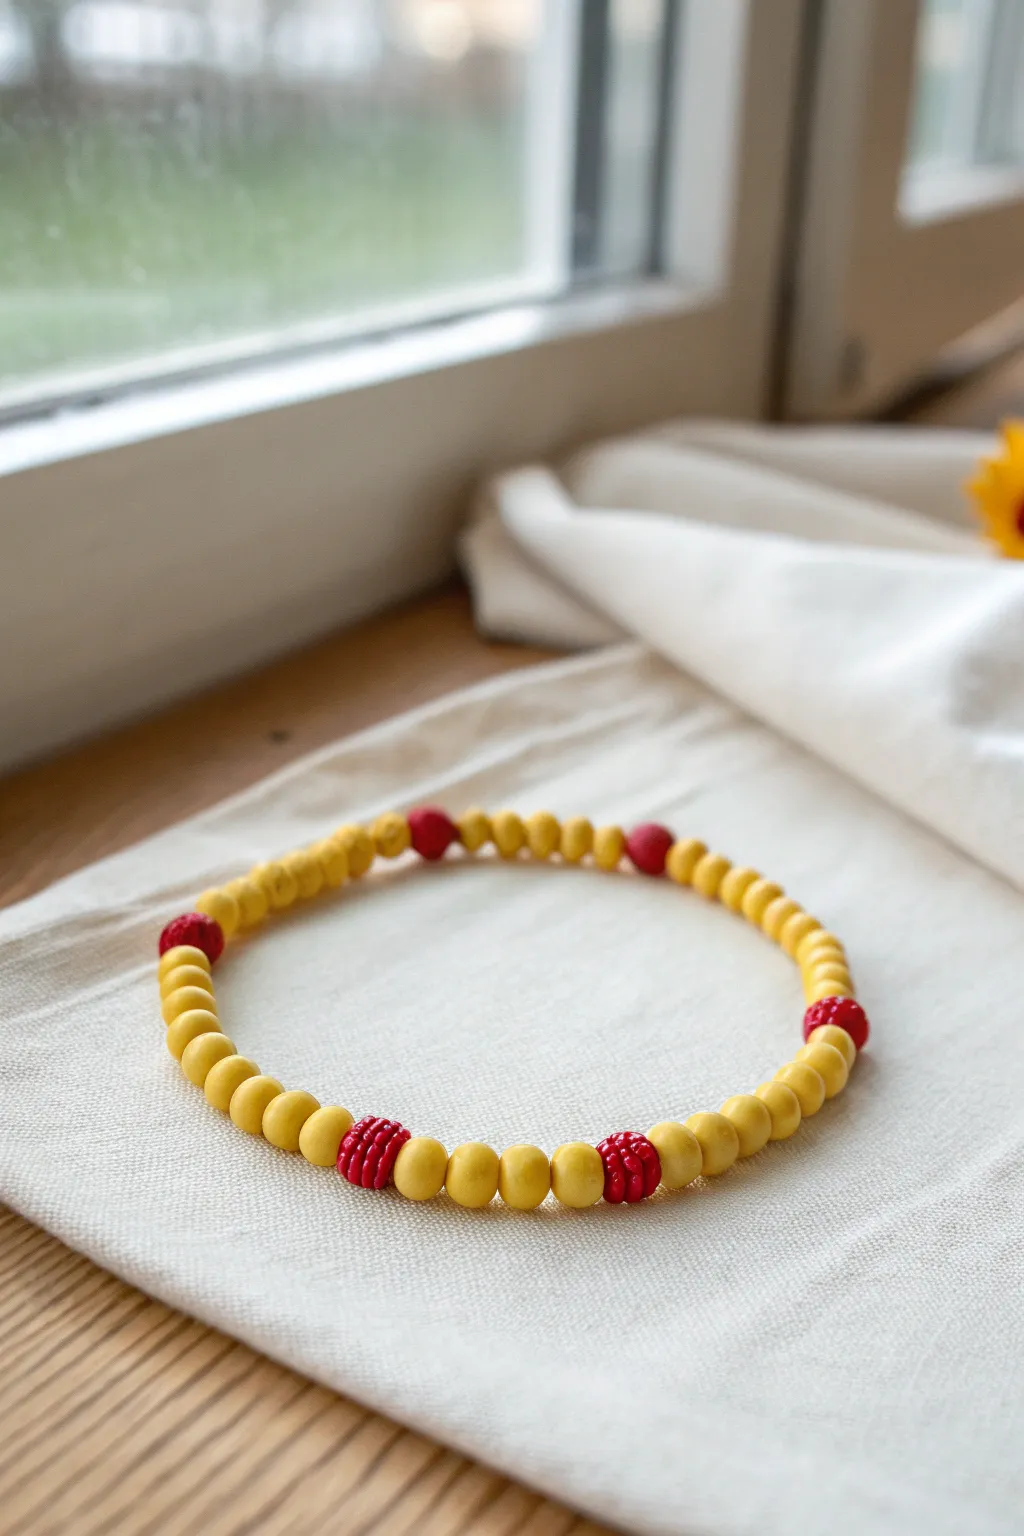
Capture the spirit of the game with this simple yet iconic bracelet design. Using matte yellow clay beads paired with textured red accents, this accessory perfectly mimics the look of a real softball’s stitching.
Step-by-Step Guide
Materials
- Matte yellow polymer clay round beads (6mm or 8mm)
- Textured red polymer clay beads (same size as yellow)
- Elastic stretch cord (0.7mm or 0.8mm)
- Super glue or jewelry adhesive
- Scissors
- Beading needle (optional but helpful)
- Bead stopper or tape
Step 1: Planning Your Pattern
-
Measure your wrist:
Wrap a piece of string around your wrist to find the desired length, then add about 2-3 inches to that measurement for knotting room later. -
Cut the cord:
Cut your elastic cord to the measured length. It is always better to have a little too much string than not enough when you reach the end. -
Secure the end:
Attach a bead stopper or simply place a piece of tape on one end of the cord to prevent your beads from sliding right off as you work. -
Plan the intervals:
Look at the project image; notice the pattern is segments of yellow interrupted by bold red accents. A good rule of thumb is 5-7 yellow beads between each red ‘stitch’ bead.
Knot Slipping?
If your elastic knot keeps slipping undone before you can glue it, try rubbing the elastic ends with a bit of beeswax or even a rough emery board to give them grip.
Step 2: Stringing the Beads
-
Start with yellow:
Thread your first set of matte yellow beads onto the cord. I usually start with about 6 yellow beads to establish the base color. -
Add the first stitch:
Slide on one textured red bead. These beads represent the raised stitching of the softball, so their texture is key to the look. -
Continue the pattern:
Add another set of 6 yellow beads following the red one. Keep the count consistent for a symmetrical look. -
Repeat until full:
Continue this alternating pattern—6 yellow, 1 red—until the beaded section reaches your desired wrist length. Test the fit by wrapping it around your wrist gently. -
Check the symmetry:
Ensure your pattern ends with a set of yellow beads so that when you tie it, the red beads are evenly spaced out.
Add a Jersey Number
Personalize the design by replacing one of the yellow segments with white number beads representing your favorite player’s jersey number.
Step 3: Finishing the Bracelet
-
Pre-stretch the cord:
Before tying, give the ends of the elastic a gentle tug. This pre-stretching helps prevent the bracelet from sagging or loosening up immediately after you wear it. -
Tie the first knot:
Remove the bead stopper and cross the two ends. Tie a simple overhand knot and pull it tight against the beads. -
Secure with a surgeon’s knot:
For the second knot, make a loop just like the first one, but pass the tail end through the loop twice instead of once. This creates a secure surgeon’s knot. -
Pull tight:
Pull all four strands (the two tails and the two loop sides) firmly to lock the knot in place. -
Apply adhesive:
Dab a tiny drop of super glue or jewelry adhesive directly onto the knot. Be careful not to get glue on the neighboring beads. -
Hide the knot:
While the glue is still slightly tacky, slide one of the yellow beads over the knot to hide it inside the bead hole. -
Trim excess:
Once the glue is fully dry, use your scissors to trim the excess cord ends as close to the bead as possible without cutting the knot itself.
Now you have a sporty accessory ready for game day or everyday wear


Name Bracelet for Your Favorite Player

Show off your team spirit with this personalized name bracelet featuring vivid yellow beads and clever softball-themed accents. It’s the perfect gift for players, moms, or fans who want to wear their support right on their wrist.
Step-by-Step Tutorial
Materials
- Matte yellow round beads (8mm or 10mm, wooden or acrylic)
- White cube letter beads with red text
- Two softball-themed focal beads (textured or paved style)
- Red or pink nylon braiding cord (0.8mm or 1mm)
- Small gold crimp beads or spacer beads (optional)
- Scissors
- Lighter (for sealing cord ends)
- Clipboard or tape (to hold work in place)
Step 1: Setting the Base
-
Measure the cord:
Cut a length of nylon cord approximately 12-14 inches long. This generous length gives you plenty of room for knotting later. -
Prepare the end:
Tie a simple overhand knot about 3 inches from one end. This acts as a temporary stopper so your beads don’t slide off while you work.
Step 2: Designing the Centerpiece
-
Start the name:
Select the letter beads needed for your player’s name. In our example, we are spelling ‘AMY’ with white cubes featuring red lettering. -
Add focal beads:
Locate your two softball-themed beads. These textured beads mimic the red stitching of a real ball. -
String the center sequence:
Thread one softball bead, followed by the specific letters for the name, and finish with the second softball bead. Center this grouping on your cord. -
Check spacing:
If the name is short, like ‘AMY’, this simple arrangement works perfectly. For longer names, you might need smaller focal beads so the design doesn’t wrap too far around the wrist.
Knot Slipping?
If your square knots unravel, make sure you are alternating sides (left over right, then right over left). Unwaxed cord can be slippery; pull each knot very tight.
Step 3: Adding the Band
-
String the left side:
On the left side of your focal arrangement, begin threading the yellow round beads. -
Count your beads:
Add about 8 to 10 yellow beads depending on the desired wrist size. I find it helpful to measure against a ruler to ensure symmetry. -
String the right side:
Repeat the process on the right side of the necklace, adding the exact same number of yellow beads to keep the name perfectly centered. -
Add optional accents:
If you have small gold spacer beads, you can place one at the very end of the yellow bead strand on both sides for a polished metallic touch.
Team Spirit Upgrade
Swap the standard yellow beads for your specific team colors, or add a small metal charm with the player’s jersey number next to the sliding clasp.
Step 4: Creating the Adjustable Closure
-
Form a circle:
Bring the two cord ends together to form a circle, crossing them over each other so the tails point in opposite directions. -
Cut a knotting cord:
Cut a separate piece of the same nylon cord, about 8 inches long. -
Start the square knot:
Place the new short cord under the two crossed main cords. Tie a basic square knot (macramé style) around the main cords. -
Continue knotting:
Continue tying square knots for about half an inch. This creates the sliding mechanism. -
Finish the slider:
Trim the excess tails of the knotting cord (not the main bracelet cords!) very close to the knots. -
Seal the deal:
Carefully use a lighter to melt the trimmed ends of the knotting cord, pressing them flat against the knot with the side of the lighter to secure them. -
Add stopper beads:
Thread a small bead onto the very end of each main bracelet tail cord. -
Final knots:
Tie a secure overhand knot after each stopper bead and trim any excess cord, lightly singeing the tips to prevent fraying.
Now you have a custom piece of fan gear ready for the next big game


Jersey Number Bead Bracelet
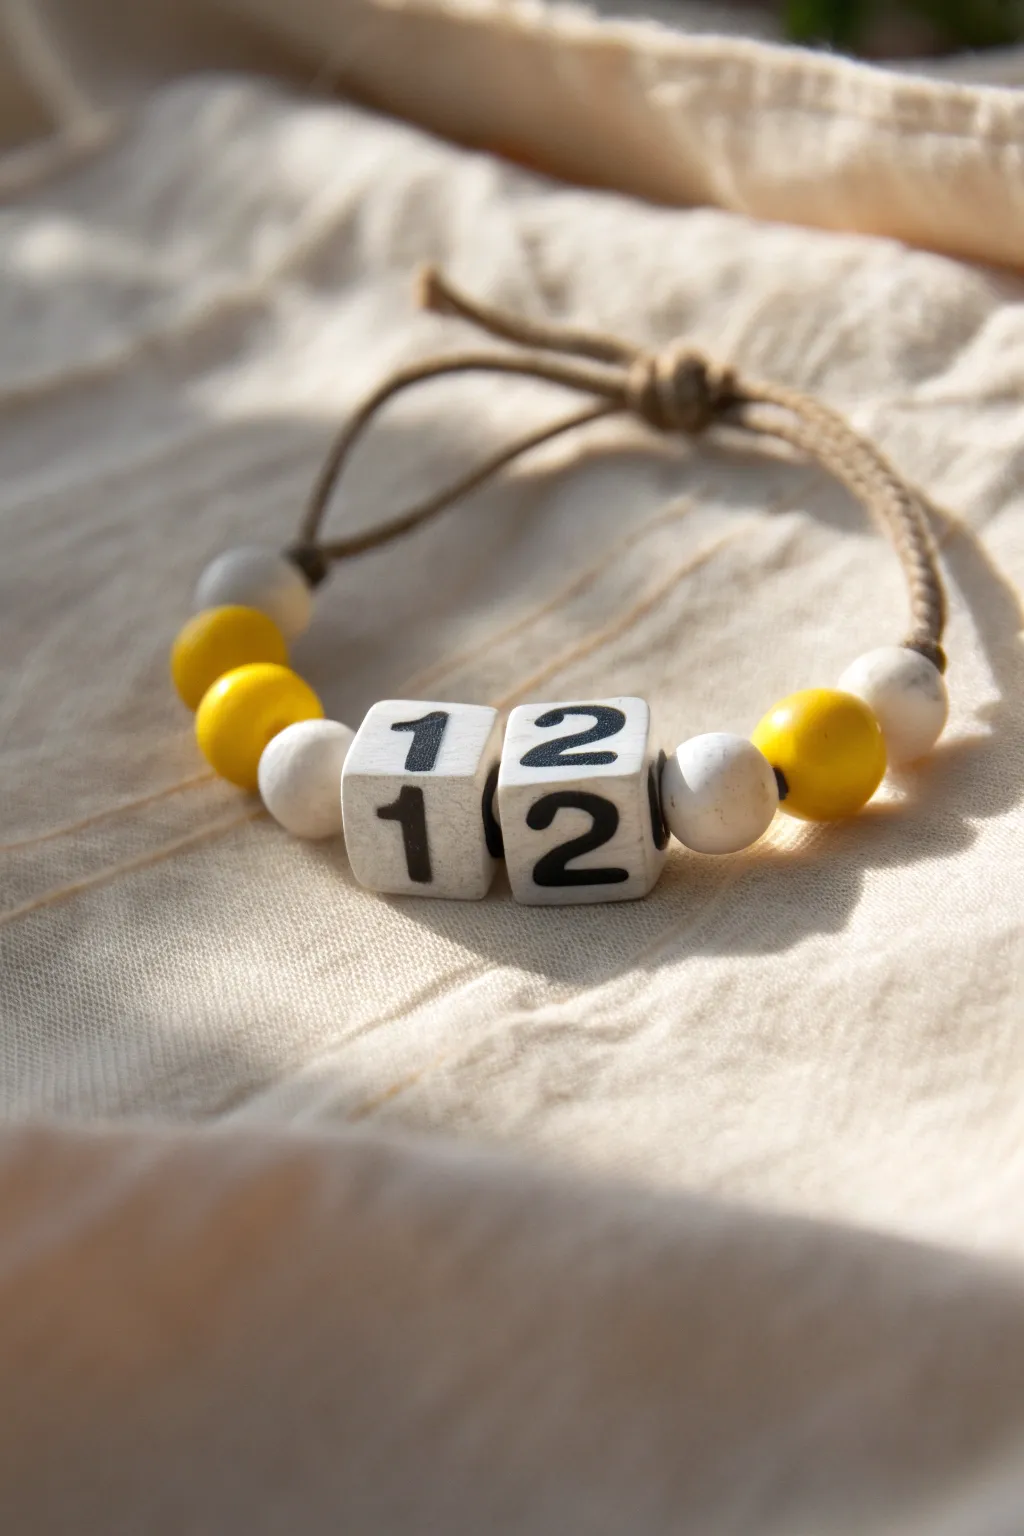
Celebrate your favorite player or commemorate your own spot on the team with this bold jersey number bracelet. Featuring chunky number blocks flanked by vibrant team colors, this adjustable cord bracelet is sporty yet stylish enough for everyday wear.
Step-by-Step
Materials
- 1.5mm waxed cotton or hemp cord (light brown/tan)
- Two large white square number beads (digits ‘1’ and ‘2’)
- Four 8mm yellow wood or acrylic round beads
- Four 8mm white stone or acrylic round beads (marble effect works well)
- Scissors
- Bead reamer or large needle (optional)
- Tape or clipboard
Step 1: Setting the Foundation
-
Measure and Cut:
Begin by cutting a length of your waxed cord to approximately 18 inches. This generous length ensures you have plenty of room for knotting and adjusting the final size. -
Prepare the Cord:
Stiffen one end of the cord to make stringing easier. I usually dip the tip in a tiny bit of glue or clear nail polish and roll it between my fingers to create a needle-like point. -
Secure the Start:
Tie a simple overhand knot about 5 inches from one end of the cord. This will act as a stopper for your beads while you work.
Knot Security
If your square knots feel loose, dab clear nail polish on the cut ends. It seals the fiber without the harsh white residue that super glue sometimes leaves.
Step 2: Stringing the Pattern
-
First Team Beads:
Start sliding your beads on from the un-knotted end. Begin with one white round bead. -
Add Color:
Follow the white bead with two sunny yellow round beads. -
Inner White Accent:
Thread on a second white round bead. This completes the left decorative side of the bracelet. -
The Jersey Number:
Now for the centerpiece. Slide on the square number block ‘1’, ensuring the number is facing the correct way up relative to how you want to read it. -
Second Digit:
Immediately follow with the square number block ‘2’. Push them snugly against the previous round bead. -
Mirror the Pattern:
Now reverse the order for the right side. Slide on a white round bead first, placing it directly against the number block. -
Yellow Accents:
Add your two yellow round beads next. -
Final Bead:
Finish the stringing sequence with the last white round bead.
Team Spirit Upgrade
Swap the plain white round beads for ‘cracked glass’ or ‘soccer ball’ textured beads to match the sport theme even more closely.
Step 3: Finishing the Closure
-
Secure the Beads:
Push all the beads to the center of the cord so they sit tightly together. Tie an overhand knot on the open side, mirroring the starting knot, snug against the last white bead to lock everything in place. -
Position for Closure:
Bring the two cord tails together, overlapping them so they run parallel to each other in opposite directions. -
Form the Sliding Knot:
Cut a separate scrap piece of cord, about 6 inches long. Place this underneath the two parallel main cords. -
Tie the Macramé Square Knot:
Take the right end of the scrap cord, pass it over the main cords but under the left scrap end. Take the left scrap end, go under the main cords and up through the loop on the right. Pull tight. -
Finish the Square Knot:
Repeat the process starting from the left side this time to complete one full square knot. Continue making 2-3 full square knots until the closure feels secure but still tough enough to slide. -
Trim Closure Ends:
Trim the excess tails of the scrap cord (the knotting cord) very close to the knot. You can add a dab of superglue to the cut ends to prevent fraying, being careful not to glue the knot to the main cords. -
Final Knots:
Tie a small knot at the very end of each main cord tail to prevent them from slipping through the sliding closure. Trim any excess beyond these end knots.
Slip on your customized jersey number bracelet and head to the game in style


Coach Bracelet With Clean Neutrals
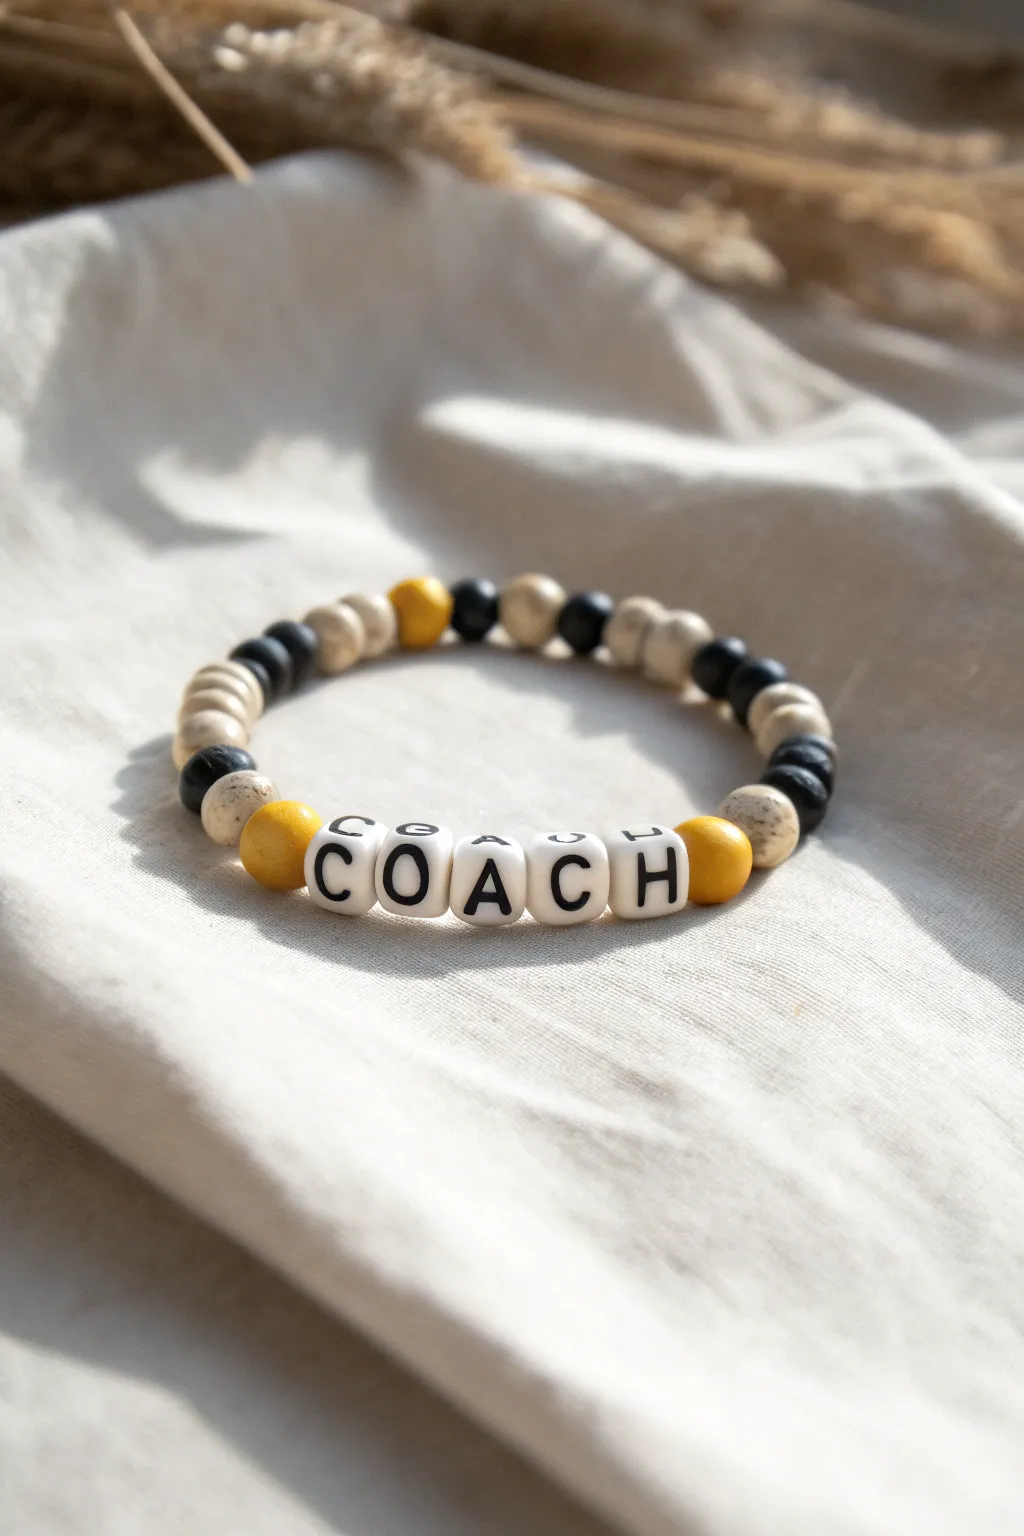
Show your appreciation with this sophisticated beaded bracelet that steps away from bright team colors in favor of cleaner, modern neutrals. The mix of matte black, natural wood tones, and pops of mustard yellow creates a stylish accessory any coach would be proud to wear on or off the field.
How-To Guide
Materials
- White cube letter beads (spelling COACH)
- 6mm round wooden beads (natural/beige)
- 6mm round wooden beads (black)
- 8mm round wooden beads (mustard yellow/gold)
- Stretch cord (0.8mm or 1mm strongly recommended)
- Scissors
- Super glue or jewelry cement
- Bead stopper or binder clip
- Measuring tape
Step 1: Planning and Prep
-
Measure the wrist size:
Since this is likely a gift, start by estimating the size. A standard men’s wrist is about 7.5 to 8 inches, while a standard women’s size is roughly 6.5 to 7 inches. Cut a piece of stretch cord about 12 inches long to give yourself plenty of room to tie knots later. -
Pre-stretch the cord:
Hold the ends of your cut cord and give it a few firm (but not breaking-strength) tugs. This is a crucial step that prevents the bracelet from sagging immediately after you finish it. -
Secure the end:
Attach a bead stopper or a simple binder clip to one end of the cord so your beads don’t slide right off while you work. -
Layout the focal point:
Lay out your letter beads on a bead board or towel to spell ‘COACH’. Identify the center of your design.
Step 2: Beading the Pattern
-
Add first accent bead:
Thread a mustard yellow bead onto the cord first. This will sit to the right of the word ‘COACH’. -
String the letters:
Thread the letter beads in order: H, C, A, O, C. We are threading backward from the end so that when you flip it to tie, the word reads correctly, but double-check your orientation as you go. -
Add second accent bead:
Add the second mustard yellow bead immediately after the last C. Now your focal section is framed by the yellow pop of color. -
Begin the monochrome pattern:
On the side with the ‘H’, create a small section of black and beige. Thread one black bead, followed by one beige bead with faint speckles. -
Alternate the darker section:
Continue this alternating pattern—one black, one beige—for about four or five beads. In the photo, we see a grouping of darker tones here before transitioning to lighter ones. -
Transition to lighter beads:
Switch to using primarily the natural beige wooden beads. String 3-4 of these in a row to lighten up the design. -
Create the back pattern:
For the back of the bracelet (opposite the word COACH), create an alternating pattern. String one black bead, then two beige beads, then one black bead. I like repeating this 2-1-2 rhythm to keep it visually interesting. -
Mirror the design:
Now work on the other side of the cord (closest to the ‘C’). Mimic the pattern you created on the first side so the bracelet looks balanced. Start with the black/beige alternating section, then move to the solid beige section. -
Add the final accent:
Towards the back, add one single mustard yellow bead to break up the neutrals. This ties the back design to the front focal point. -
Check the fit:
Wrap the unfinished strand around a wrist or a sizing cone. You want the beads to touch end-to-end comfortably without gaps showing the cord, but not so tight that the elastic is stretched out.
Knot Slipping?
If your elastic knot feels loose, try tying it while the cord is under tension. Pull the ends away from each other firmly while tightening down the knot to lock it into place properly.
Step 3: Finishing Touches
-
Tie the first knot:
Remove the bead stopper carefully. Bring the two ends of the cord together and tie a simple overhand knot, pulling it snug against the beads. -
Secure with a surgeon’s knot:
For the main securing knot, create a surgeon’s knot. Loop the cord twice through the loop instead of just once before pulling tight. This extra friction holds the elastic much better. -
Apply adhesive:
Dab a tiny drop of super glue or jewelry cement directly onto the knot. You only need a small amount; too much can make the cord brittle. -
Hide the knot:
While the glue is still slightly tacky but not wet, gently pull tight on the cord to slide the knot inside the hole of the nearest large bead (the mustard yellow one works great for this). -
Trim the excess:
Once the glue is fully dry, use sharp scissors to trim the tails of the cord as close to the bead hole as possible without nicking the main knot.
Add Texture
Swap the smooth black round beads for glossy lava stone beads. The porous texture of lava stone adds grit and allows the bracelet to double as an essential oil diffuser.
This refined accessory is ready to be gifted to your favorite team leader for the upcoming season

The Complete Guide to Pottery Troubleshooting
Uncover the most common ceramic mistakes—from cracking clay to failed glazes—and learn how to fix them fast.
Gold or Silver Spacer “Uniform Jewelry” Look
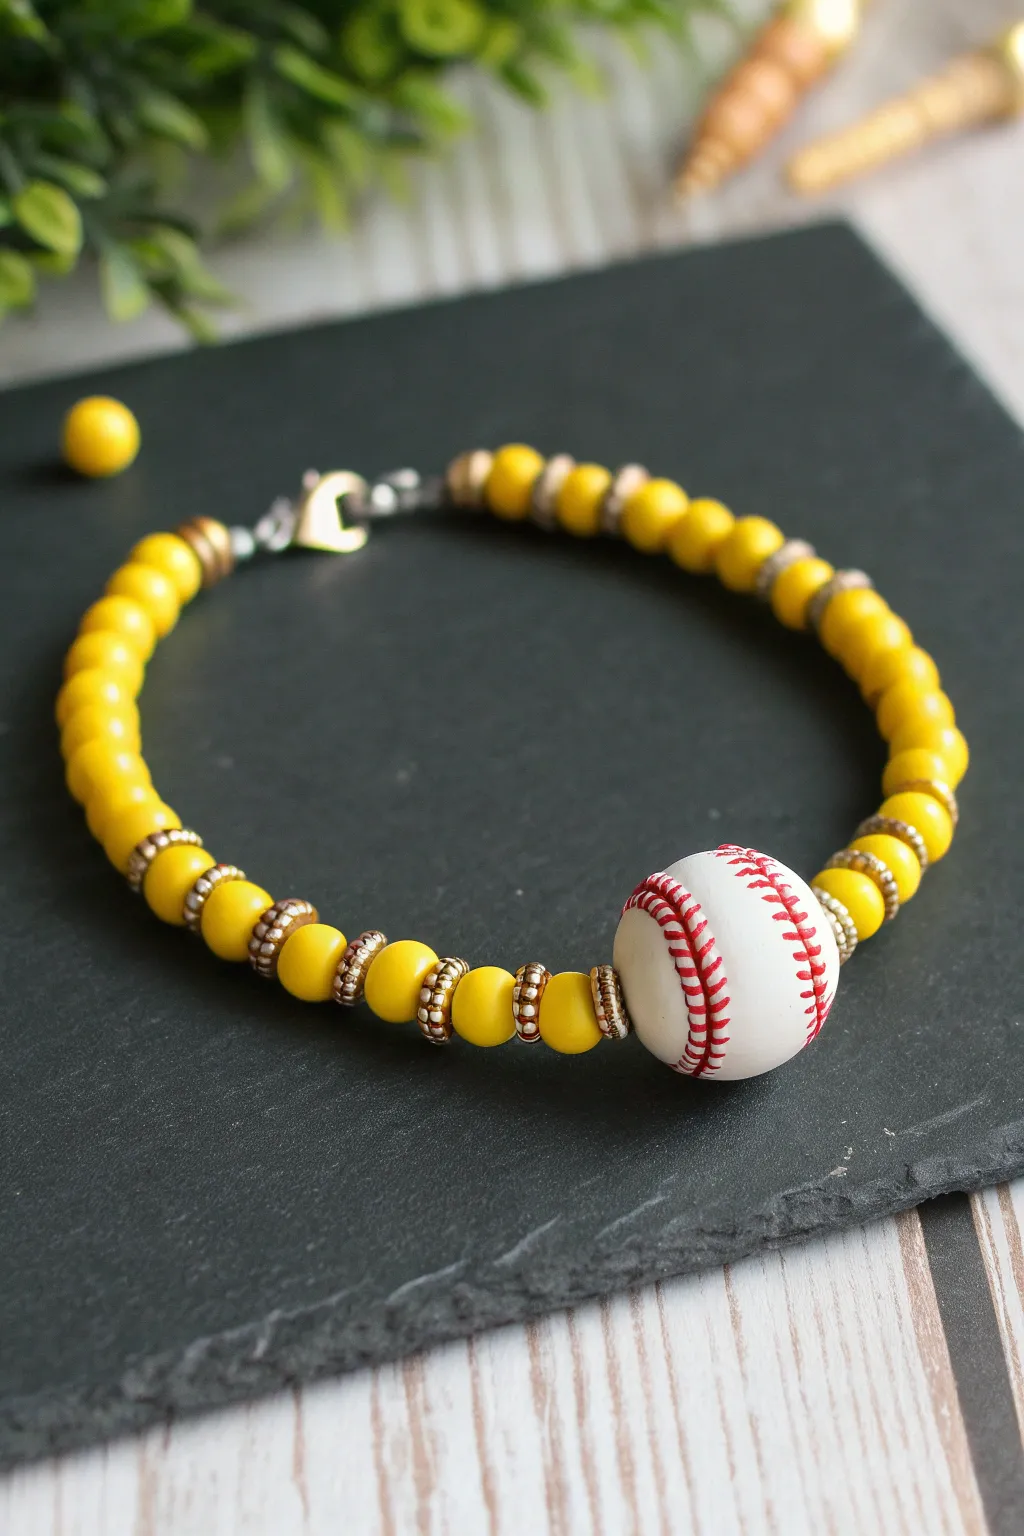
Show off your love for the game with this vibrant, custom jewelry piece that combines the classic bright yellow of a softball with elegant metallic accents. The realistic softball focal bead serves as the perfect centerpiece for a bracelet that looks great both on and off the field.
Detailed Instructions
Materials
- 10mm polymer clay or acrylic softball focal bead
- 6mm or 8mm opaque yellow round glass or acrylic beads
- Antique gold or brass rondelle spacer beads (approx. 4mm x 2mm)
- Beading wire (such as flexible 7-strand or 19-strand, .018 inch diameter)
- 2 crimp beads (gold tone)
- 2 crimp covers (gold tone, optional)
- Gold tone lobster clasp
- Gold tone jumping ring (closed or open)
- Wire cutters
- Crimping pliers
Step 1: Preparation and Centerpiece
-
Measure your wrist:
Before cutting any wire, wrap a flexible measuring tape around your wrist to find your size. Add about 1/2 to 3/4 inch to this measurement to account for the bulk of the beads and the clasp. -
Cut the wire:
Cut a length of beading wire that is at least 4 inches longer than your final bracelet size. This extra length gives you plenty of room to work with the crimps and tools without frustration. -
Thread the focal bead:
Slide your large softball focal bead onto the center of the wire. This will be the anchor for your pattern, so keep it roughly in the middle as you work outwards. -
Add immediate spacers:
On both the left and right sides of the softball bead, thread on one gold rondelle spacer bead. These metallic accents frame the white bead beautifully and transition into the yellow.
Stiff Bracelet Syndrome?
If your bracelet stands up in a perfect circle and doesn’t flop, you strung it too tightly. Always leave a tiny hair’s breadth of space on the wire before the final crimp.
Step 2: Creating the Beading Pattern
-
Start the yellow pattern:
On the right side of the focal bead, string on one yellow round bead. -
Add a spacer:
Follow the yellow bead with another gold rondelle spacer. I find that placing spacers between every bead creates a high-end, ‘uniform’ look rather than just a simple string of plastic. -
Repeat on the left:
To ensure your focal bead stays perfectly centered, switch to the left side and repeat: add one yellow bead followed by one gold spacer. -
Build the pattern outwards:
Continue adding beads in this ‘bead-spacer-bead’ sequence, alternating between working on the left and right sides of the wire. -
Check the symmetry:
Pause occasionally to hold the ends of the wire together and let the beads drop down. Ensure the pattern matches identically on both sides of the softball. -
Transition the pattern:
As you get about halfway down the sides of the bracelet, you can choose to stop adding spacers between every single bead if you prefer a simpler look near the clasp, or continue the full pattern. The example shows spacers continuing for several inches. -
Simplify the ends:
For the last inch or so near the clasp, switch to just stringing solid yellow beads without spacers. This reduces bulk on the underside of your wrist for a more comfortable fit. -
Test the fit:
Wrap the unfinished strand around your wrist. The ends should almost touch, leaving just a small gap (about 1/2 inch) for the clasp hardware.
Pro Tip: Spacer Orientation
Rondelle spacers often have a concave side. Ensure they ‘cup’ the round beads consistently. Put them on facing the same direction or mirrored for symmetry.
Step 3: Finishing the Clasp
-
Thread the first crimp:
On one end of the wire, slide on a tiny crimp bead, followed by the jump ring. -
Create the loop:
Thread the tail end of the wire back through the crimp bead to create a loop that holds the jump ring. Pull it snug, but leave a tiny bit of wiggle room so the ring can move. -
Secure the wire:
Use your crimping pliers to flatten or fold the crimp bead securely. Give it a gentle tug to ensure it won’t slip. -
Hide the tail:
Thread the excess tail wire back through the first few yellow beads on the strand, then trim the excess wire flush with your cutters. -
Attach the lobster clasp:
Repeat the crimping process on the other end of the bracelet, but this time, loop the wire through the hoop of the lobster clasp instead of a jump ring. -
Tighten the slack:
Before crimping this second side, pull the wire tight enough to remove gaps between beads, but not so tight that the bracelet becomes stiff and rigid. It needs to drape naturally. -
Final trim:
Crimp the bead, thread the final tail through the adjacent beads, and trim the wire closely for a professional finish.
Slide your new bracelet on and enjoy the sparkle of the gold spacers against those energetic yellow beads
Softball Stitch Pattern in Bead Blocks
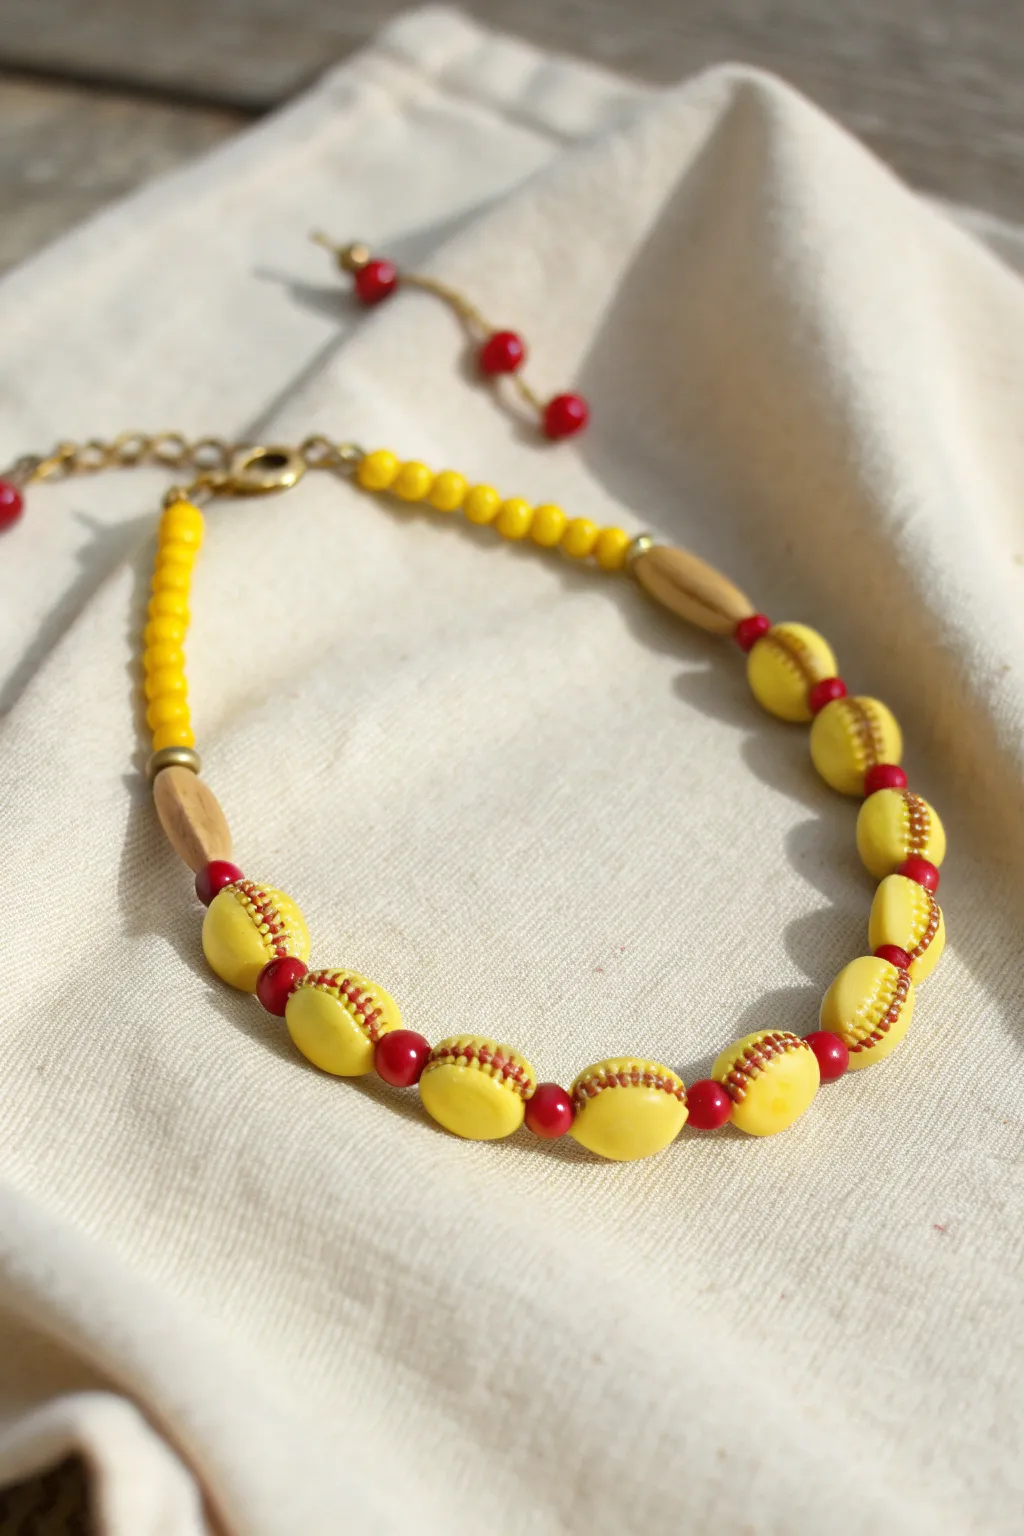
Show off your love for the game with this unique beaded piece that mimics the classic yellow leather and red stitching of a regulation softball. The design alternates handcrafted clay beads with spacer accents for a lightweight, sporty accessory perfect for game day.
How-To Guide
Materials
- Polymer clay (bright yellow)
- Acrylic paint context (deep red/crimson)
- Fine-point paintbrush or toothpick
- Sculpting tools or dotting tool
- Small round wooden beads (approx. 4mm)
- Elongated wooden or bamboo beads
- Bright red seed beads or small round beads
- Yellow seed beads (opaque)
- Beading wire
- Crimp beads
- Lobster clasp and extension chain
- Jewelry pliers and wire cutters
- Oven for baking clay
Step 1: Crafting the Softball Beads
-
Mix and condition:
Begin by conditioning your bright yellow polymer clay until it is soft and pliable, ensuring there are no air bubbles. -
Form the base shapes:
Roll small portions of clay into even spheres, roughly 8-10mm in diameter. Slightly flatten them into oval or ‘lentil’ shapes rather than perfect spheres, as this sits better against the skin. -
Add the stitch texture:
Using a sculpting tool or a dull knife, gently impress two curved lines onto opposite sides of each yellow bead to mimic the seams of a softball. -
Create stitch marks:
Take a needle tool or toothpick and make tiny, evenly spaced indentations perpendicular to your seam lines to represent the stitch holes. -
Pierce the beads:
Carefully insert a bead pin or toothpick through the center of each oval lengthwise to create the stringing hole, checking that the shape doesn’t distort. -
Bake the clay:
Follow the manufacturer’s instructions to bake your clay beads. Allow them to cool completely before moving to the painting stage. -
Paint the stitching:
Dip a very fine brush into deep red acrylic paint. Carefully fill in the indented seam lines, using a steady hand to dab the ‘stitches’ across the texture you created. -
Seal (optional):
Once the paint is dry, I like to brush a thin layer of matte glaze over the beads to protect the paint from chipping during wear.
Stitch Precision
If painting tiny stitches is too hard, use a red ultra-fine tip permanent marker instead of paint for easier control.
Step 2: Assembling the Strand
-
Prepare the wire:
Cut a length of beading wire generally 2-3 inches longer than your desired finished length. -
Start the crimp:
Thread a crimp bead and your lobster clasp onto one end of the wire. Loop the wire back through the crimp bead and secure it tightly with pliers. -
Begin with the patterned section:
String a sequence of small yellow seed beads (about 1.5 inches worth) to create the back portion of the bracelet or choker. -
Add transition beads:
Add a small metal spacer or wooden bead, followed by one elongated bamboo bead, then a single red seed bead. -
Start the main sequence:
Thread your first handmade softball bead. Follow it immediately with a red seed bead. -
Continue the pattern:
Repeat the pattern: Softball Bead, Red Seed Bead, Softball Bead, Red Seed Bead. Continue this until you have used approximately 7-9 softball beads, depending on the size. -
End the main sequence:
After your final softball bead, add one last red seed bead. -
Mirror the transition:
Add your second elongated bamboo bead, followed by a small spacer bead to mirror the beginning of the design. -
Finish the strand:
Fill the remaining length of wire with the same amount of yellow seed beads used at the start. -
Secure the end:
Add a crimp bead and an extension chain or jump ring. Loop the wire back through the crimp bead, pull taut, and crush the crimp flat.
Team Spirit Twist
Swap the red spacer beads for beads in your specific team’s colors (like blue or green) to customize the spirit wear.
Enjoy wearing your sporty, handmade creation to the next big game


What Really Happens Inside the Kiln
Learn how time and temperature work together inside the kiln to transform clay into durable ceramic.
Minimalist Softball Bracelet With One Stitch Stripe
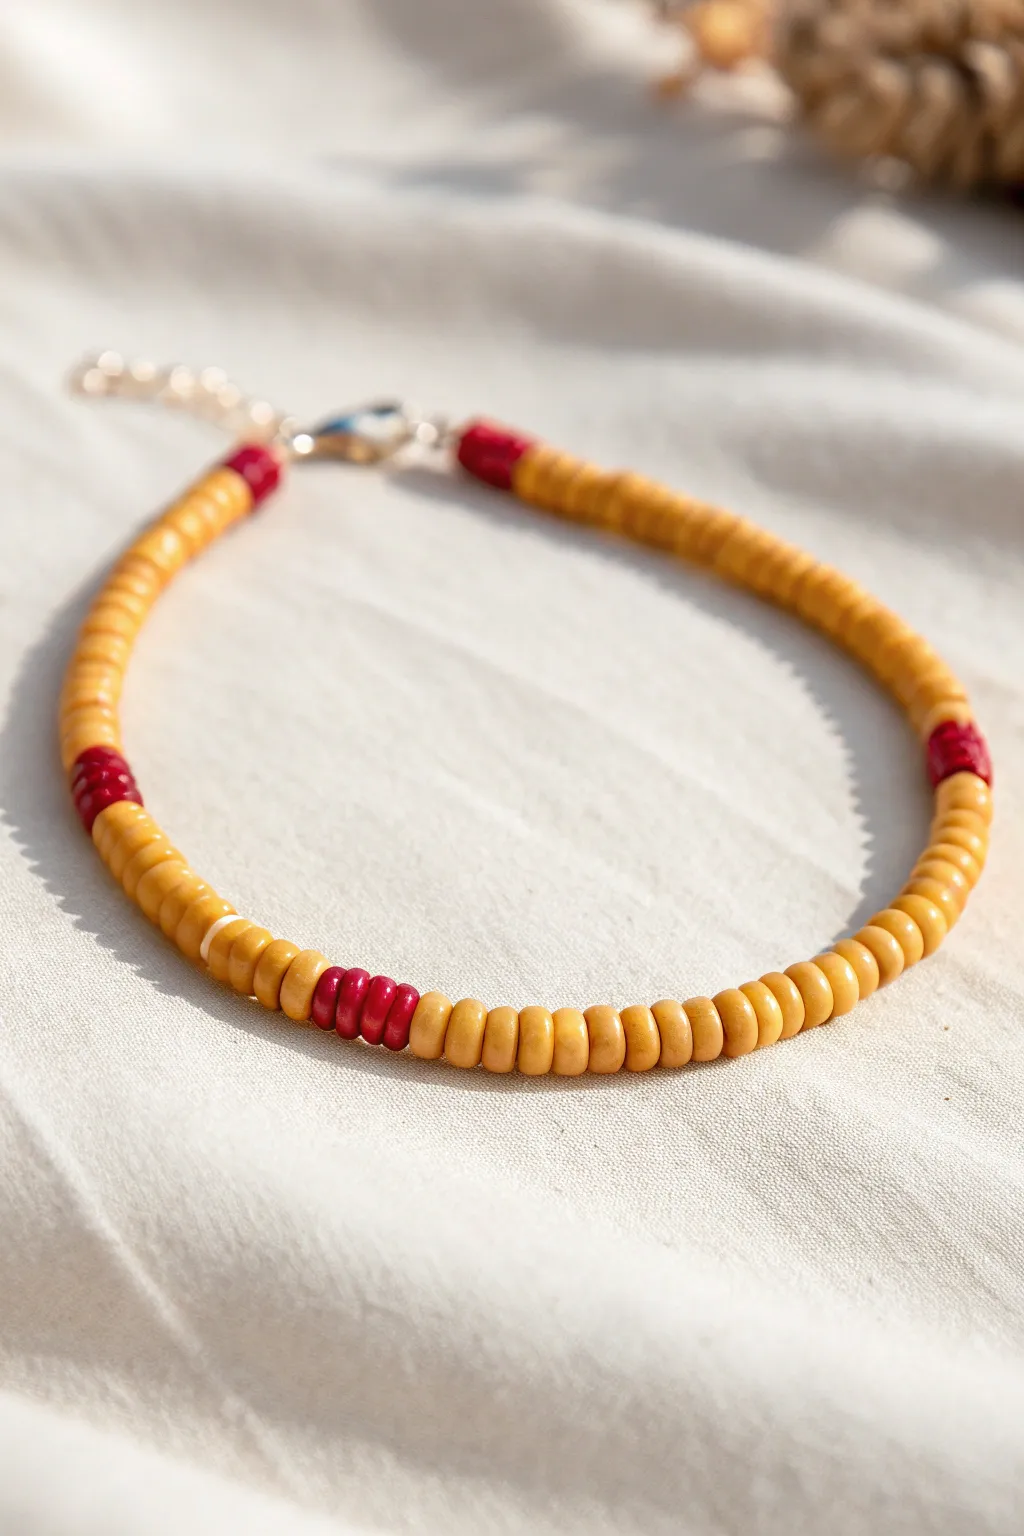
Capture the spirit of the game with this sleek, understated design that mimics the classic look of a softball. Using matte yellow clay beads and strategic red accents, you’ll create a subtle nod to the sport that’s perfect for stacking or wearing solo.
How-To Guide
Materials
- Heishi clay beads (mustard yellow or softball yellow)
- Heishi clay beads (dark red)
- Beading wire (flexible, 0.38mm or similar)
- Lobster claw clasp (gold or silver)
- Jump rings
- Crimp beads
- Crimp covers (optional but recommended)
- Chain nose pliers
- Wire cutters
- Tape or bead stopper
Step 1: Preparation and First Clasp
-
Measure your wrist:
Before cutting any wire, wrap a piece of string or measuring tape around your wrist to find your size. Add about 1-2 inches to this measurement to give yourself plenty of room for tying off the ends. -
Cut the wire:
Cut your beading wire to the calculated length using your wire cutters. It is always better to have a little too much wire than not enough. -
Secure the first end:
Thread a crimp bead onto one end of the wire, followed by a jump ring. Loop the wire back through the crimp bead to create a secure loop holding the ring. -
Crimp the bead:
Use your chain nose pliers to flatten the crimp bead firmly. Make sure the wires are not crossed inside the crimp for maximum security. Give it a gentle tug to ensure it holds.
Uneven Tension?
If the bracelet feels stiff or kinks, you pulled the wire too tight before crimping. Leave a tiny 1-2mm gap of slack near the clasp to allow the beads to roll freely.
Step 2: Creating the Pattern
-
Establish the yellow base:
Begin threading your yellow coin beads onto the wire. You will want a solid section of yellow to start, roughly 1.5 to 2 inches long, depending on where you want the first ‘stitch’ to sit. -
Add the first stitch:
To simulate the softball texture, thread on three or four red heishi beads. This small pop of color represents the stitching on the ball. -
Continue the pattern:
Resume threading yellow beads for another long section. I find that spacing the red sections about 2 inches apart creates a balanced look that isn’t too busy. -
Repeat until full loop:
Repeat the pattern—long yellow section, short red stitch—until the beaded portion equals your wrist measurement. Usually, this means you will have 3 or 4 red ‘stitches’ in total around the bracelet. -
Check for symmetry:
Before finishing, hold string up to see if the red stitches are spaced relatively evenly. It doesn’t have to be mathematically perfect, but visual balance helps.
Team Spirit Upgrade
Personalize it by using polymer clay letter beads to spell out a player’s name or jersey number in the center of one of the long yellow sections.
Step 3: Finishing Touches
-
Prepare the final closure:
Thread a crimp bead onto the open end of the wire, followed by the lobster claw clasp. -
Loop and secure:
Feed the tail of the wire back through the crimp bead and through the last few yellow beads on the strand. Pull the wire tight so there are no gaps between beads, but leave just enough slack so the bracelet stays flexible. -
Final crimp:
Flatten this final crimp bead securely with your pliers. Ensure the loop attached to the clasp is small and neat. -
Trim excess wire:
Using your flush cutters, snip off the remaining tail of wire as close to the beads as possible so it doesn’t poke your skin. -
Optional crimp covers:
If you want a polished, professional finish, carefully close a crimp cover over each flattened crimp bead. This makes them look like smooth metal spacer beads. -
Add an extender chain:
If adjustable sizing is desired, attach a small chain extender to the initial jump ring using your pliers to open and close the link securely.
Slide on your new bracelet and enjoy carrying a piece of the game with you everywhere you go
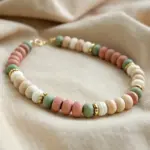
Half Yellow, Half White “Two-Tone Softball”
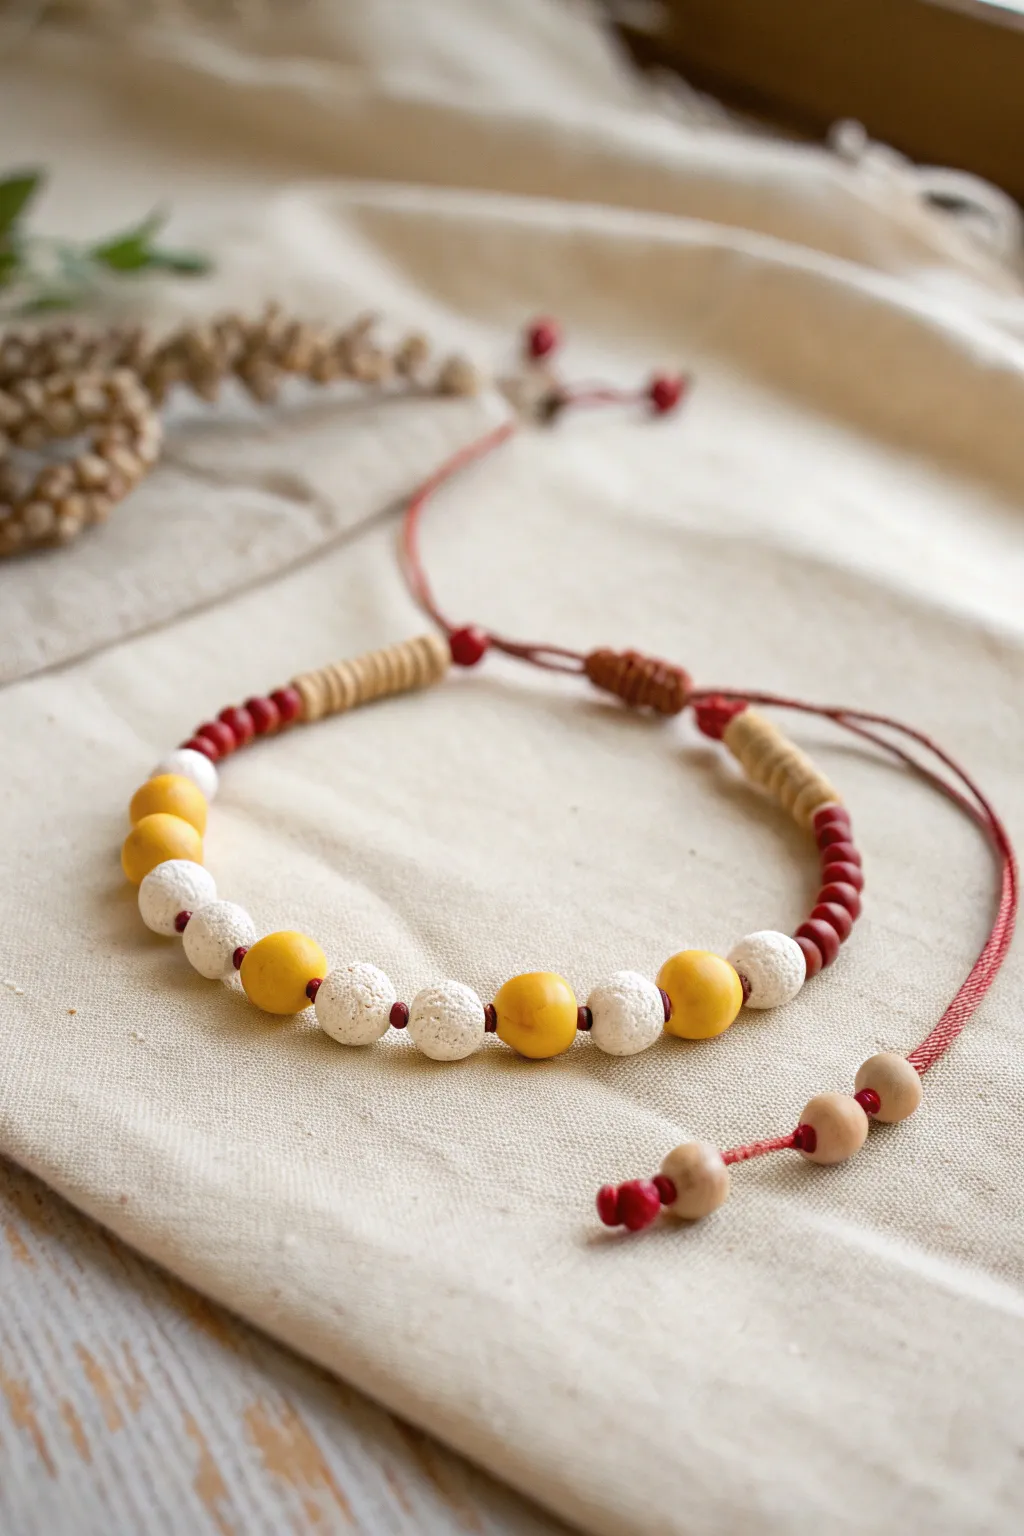
Celebrate team spirit or just the joy of sunny days with this beautifully textured adjustable bracelet. Featuring a playful rhythm of yellow and white lava-style beads accented with earthy wood and red spacers, this accessory captures the classic softball aesthetic in a chic, wearable design.
Step-by-Step Guide
Materials
- Red nylon or cotton cord (approx. 0.8mm – 1mm thickness)
- 8mm – 10mm yellow lava stone or clay beads
- 8mm – 10mm white lava stone or clay beads
- Small red seed beads or spacer beads (approx. 2-3mm)
- Flat disc wood beads or heishi beads (natural/beige)
- 3 large round natural wood beads (approx. 8mm) for the closure ends
- Scissors
Step 1: Preparing the Cord
-
Measure and Cut:
Begin by cutting a length of red cord approximately 18-20 inches long. This generous length ensures you have plenty of room for knotting and creating the adjustable sliding mechanism later. -
Seal the End:
If you are using a synthetic nylon cord, quickly singe one end with a lighter to prevent fraying. For cotton cord, you can dip the tip in a tiny bit of glue or clear nail polish to make threading beads easier.
Knot Security
Apply a tiny dab of clear jewelry glue or clear nail polish to your final knots on the sliding closure. This prevents them from unraveling over time without bulking up the cord.
Step 2: Creating the Bead Pattern
-
Start the Sequence:
Thread on a section of the flat beige disc beads first. Use about 8-10 of these to create a textured wooden block that frames the main colored section. -
First Accent Beads:
Slide on about five small red spacer beads. These act as a visual transition between the wood texture and the main ‘softball’ pattern. -
Begin the Main Pattern:
Thread your first large bead. Start with a white lava bead, followed by a yellow one. Between each large bead, I like to place a single small red spacer bead to keep the colors distinct. -
Repeat the Rhythm:
Continue the pattern: White bead, red spacer, yellow bead, red spacer. Repeat this until you have a central section of about 7-9 large beads, alternating colors. -
Mirror the Ends:
Once your central beaded section covers the top of your wrist, mirror the start of the bracelet. Thread on five more red spacer beads. -
Finish the Main Strand:
Conclude the beading by adding another set of 8-10 flat beige disc beads, matching the first wooden section exactly. -
Secure the Beads:
Tie a simple overhand knot immediately after the last wood bead on both ends of the beaded section. Push the knot close to the beads so they don’t slide around too freely on the cord.
Step 3: The Sliding Knot Closure
-
Form the Circle:
Bring the two loose ends of the cord together, overlapping them so they run parallel to each other in opposite directions. -
Prepare the Slide:
Cut a separate, smaller piece of red cord, about 6-8 inches long. This will be used to tie the macramé square knots for the sliding closure. -
Tie Square Knots:
Using the new short cord, tie a series of square knots (macramé style) over the two overlapped main cords. Create a knotted section about half an inch long. -
Trim and Secure Closure:
Trim the excess tails of the knotting cord (not the main bracelet cords!) very close to the knots. Carefully singe or glue these ends so the sliding mechanism stays intact.
Texture Twist
Swap the plain red spacers for tiny metallic gold or silver beads. The subtle flash of metal elevates the sporty look into something you can wear with dressier stack.
Step 4: Finishing Touches
-
Add Dangling Beads:
On each of the two main cord tails hanging from the closure, thread one or two natural round wood beads. -
Knot the Tips:
Tie a firm overhand knot at the very end of each cord tail to keep the wood beads from falling off. Trim any excess cord beyond this final knot. -
Final Test:
Gently pull the tails to tighten the bracelet and pull the bracelet sides to loosen it. Ensure the sliding knot moves smoothly but offers enough resistance to hold its size.
Slip on your new custom bracelet and enjoy the comfortable, earthy feel of wood and stone on your wrist

TRACK YOUR CERAMIC JOURNEY
Capture glaze tests, firing details, and creative progress—all in one simple printable. Make your projects easier to repeat and improve.
Softball Bracelet Set With Matching Anklet
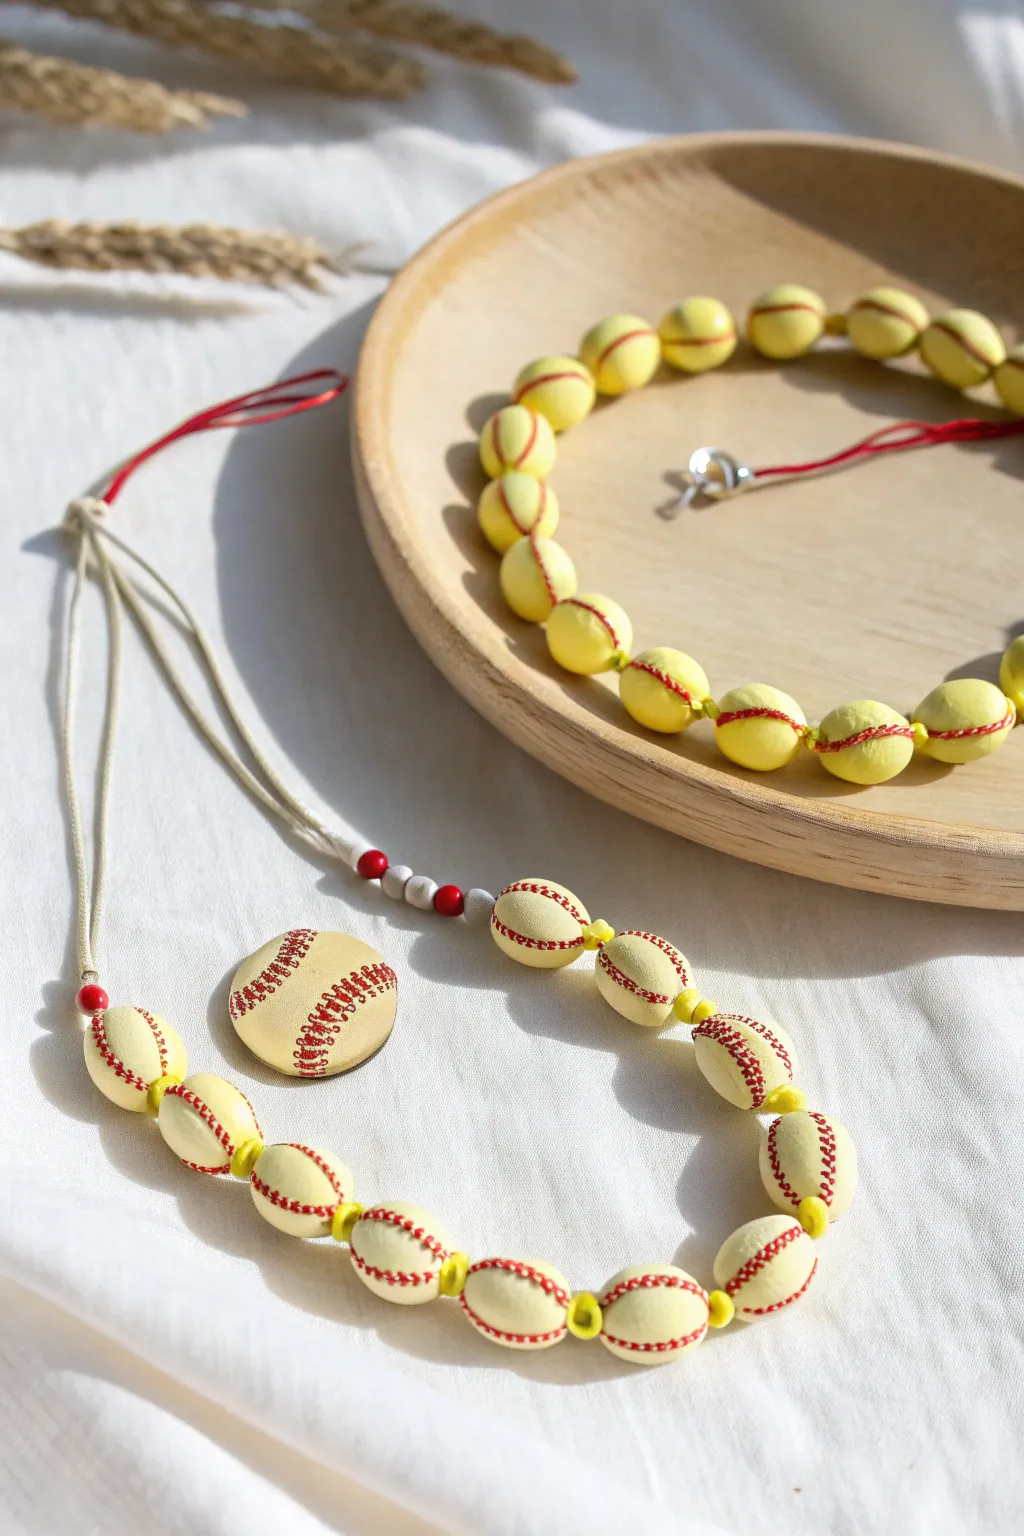
This charming matching set features handmade polymer clay beads shaped like miniature softballs, complete with red stitching details. The combination of a simple beaded choker or bracelet and a coordinating pendant piece makes for a playful accessory perfect for game day.
Step-by-Step Tutorial
Materials
- Yellow polymer clay (softball yellow)
- Red acrylic paint
- Fine detail paintbrush (size 00 or smaller)
- Small yellow spacer beads (seed beads or tube beads)
- Red and white spacer beads (pony or wooden beads)
- Waxed cotton cord (beige or white)
- Red nylon cord
- Jewelry clasp (lobster claw) and jump rings
- Rolling pin or pasta machine for clay
- Small circular clay cutter or circle template
- Toothpick or needle tool
- Gloss glaze (optional)
Step 1: Crafting the Softball Beads
-
Condition the Clay:
Begin by kneading your yellow polymer clay until it is soft and pliable. This prevents cracking later on. -
Form the Base Shape:
Roll the clay into a long log or ‘snake’ of even thickness, then cut it into equal segments to ensure your beads are the same size. -
Shape the Spheres:
Roll each segment between your palms to create smooth, round spheres. For the slightly flattened look seen in the photo, gently press them between your thumb and forefinger. -
Pierce the Beads:
Using a toothpick or needle tool, carefully poke a hole through the center of each bead. Rotate the tool as you push through to avoid distorting the sphere. -
Make the Pendant (Optional):
If you want to recreate the larger pendant piece, roll a larger ball of clay and flatten it into a disc about 1 inch wide. -
Detail the Pendant:
Create the stitching texture on the pendant by gently pressing the needle tool into the surface in two curved lines. -
Bake:
Place all your beads and the pendant on a baking sheet lined with parchment paper. Bake according to your brand of polymer clay’s instructions (usually around 275°F/135°C for 15-30 minutes).
Smudged Paint?
If you make a mistake painting the thin red lines, gently scrape the wet paint off with a damp toothpick or wait for it to dry and scratch it off with a fingernail before resealing.
Step 2: Adding the Details
-
Cool Down:
Allow the beads to cool completely before determining which side is the front for painting. -
Paint the Stitching:
Using your finest brush and red acrylic paint, carefully paint two curved red lines on each bead to mimic softball seams. Steadiness is key here. -
Add Stitch Marks:
On the pendant piece or larger beads, paint small perpendicular dashes across the red lines to represent the actual stitches. -
Let Dry:
Set them aside to dry fully. I prefer to string them loosely on a toothpick stuck in foam so the paint doesn’t smudge. -
Seal (Optional):
For durability, coat the beads with a thin layer of gloss glaze, giving them a slight shine.
Level Up: Texture
Before baking, roll your unbaked yellow clay balls over a piece of sandpaper or a clean toothbrush to give them a realistic leathery texture like a real softball.
Step 3: Assembly
-
Cut the Cord:
Cut your beige cotton cord to the desired length for the necklace, leaving extra room for knots. -
String the Accent Beads:
Start by threading a few red and white spacer beads onto the cord to act as a transition from the cord to the clay beads. -
Add the Clay Beads:
Thread your handmade yellow softball beads onto the cord. Place a small yellow spacer bead or seed bead between each clay bead to separate them and add flexibility. -
Create the Second Strand:
For the bracelet or anklet shown on the wooden plate, repeat the process using the same alternating pattern but potentially on the red nylon cord for contrast. -
Finish the Ends:
tie secure knots at the ends of your beaded sections. Attach jump rings and your lobster clasp to the ends of the cord to complete the closure.
Now you have a unique set of custom jewelry ready to show off your team spirit at the next game
Softball-Inspired Color Fade (Yellow to Red)
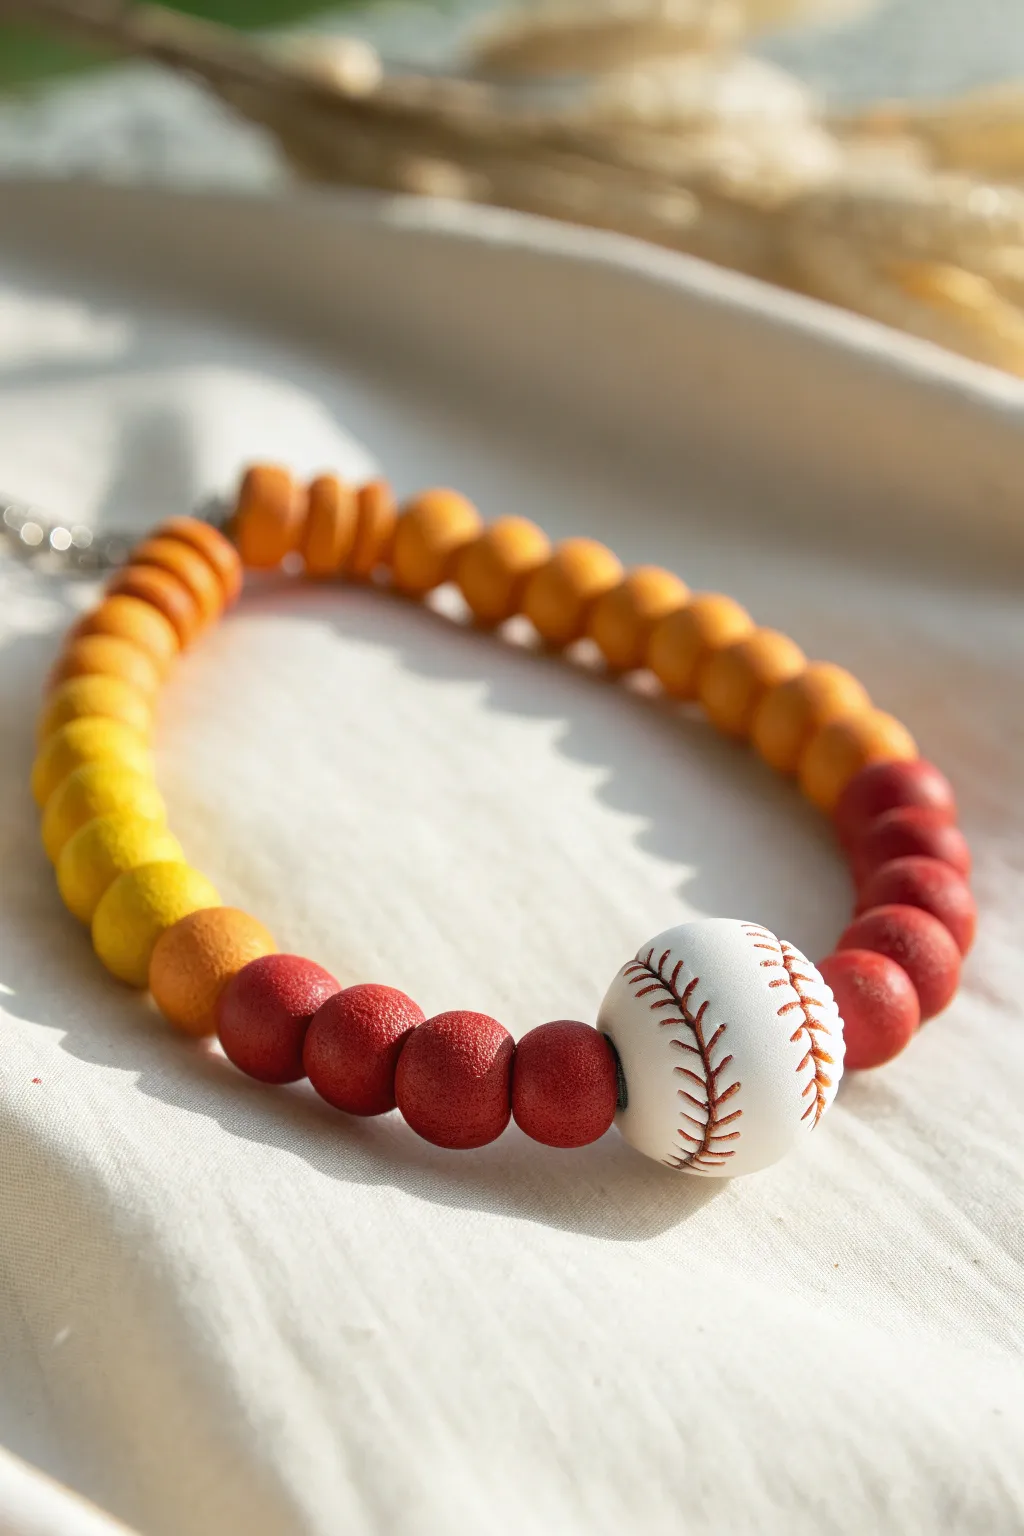
This striking bracelet captures the heat of the game with a vibrant ombre fade from sunny yellow to deep team red, anchored by a detailed clay softball bead. The textured finish of the beads adds a tactile, sporty feel that makes this accessory stand out from typical smooth polymer clay jewelry.
How-To Guide
Materials
- Polymer clay (Yellow, Orange, Red, White)
- Brown acrylic paint
- Bead roller (round) or hand-rolling surface
- Toothbrush or crumpled aluminum foil (for texturing)
- Needle tool or toothpick
- Thin paintbrush (liner brush)
- Beading elastic cord (0.8mm)
- Super glue or jewelry glue
- Gloss glaze (optional for the softball)
- Baking sheet and parchment paper
- Oven
Step 1: Prepping The Clay Colors
-
Condition the clay:
Begin by thoroughly kneading your white, yellow, orange, and red polymer clays separately until they are soft and pliable. This prevents cracking later. -
Mix transition shades:
To get that smooth gradient seen in the photo, you’ll need intermediate colors. Mix equal parts yellow and orange to create a yellow-orange, and equal parts orange and red for a red-orange. -
Portion the beads:
Pinch off small, equal-sized pieces of clay for each color. You will need roughly 4-6 beads of each shade: yellow, yellow-orange, orange, red-orange, and red. keep them organized in a line to visualize the fade. -
Portion the softball:
Take a larger portion of white clay—about double the size of the colored beads—to serve as your focal softball bead.
Step 2: Forming and Texturing
-
Roll the colored beads:
Roll each small colored portion into a smooth sphere between your palms. They don’t need to be perfect yet, as texturing will shape them further. -
Apply texture:
To mimic the suede-like texture visible in the photo, gently tap the surface of each bead with a clean toothbrush or roll them lightly over a ball of crumpled aluminum foil. This removes shine and adds that matte, sporty grip look. -
Shape the softball:
Roll your white clay into a perfect sphere. For this one, you want a smoother finish than the colored beads, so smooth out any fingerprints carefully. -
Create stitch indentations:
Using a needle tool, gently impress two curved lines onto the white bead to represent the seams of the softball. Don’t dig too deep; just a guide for painting later. -
Add stitch details:
Along those curved lines, make tiny diagonal hash marks with your needle tool to simulate the actual stitching threads. -
Pierce the beads:
Use your needle tool to poke a hole through the center of every bead. For the softball, ensure the hole runs perpendicular to the visible stitching so the design faces outward when worn.
Texturing Tip
Work lightly when texturing the colored beads. If you press too hard, you’ll distort the spherical shape. Aim for a surface that looks like fine sandpaper or moss.
Step 3: Baking and Painting
-
Bake the clay:
Arrange your beads on a parchment-lined baking sheet. Bake according to your clay package instructions (usually 275°F/135°C for 15-30 minutes). -
Cool down:
Allow the beads to cool completely before handling. I like to let them sit for at least an hour to ensure they reach their full hardness. -
Paint the stitches:
Dip a very fine liner brush into brown acrylic paint. Carefully trace the indented stitch lines on your white softball bead. If you get paint outside the lines, quickly wipe it away with a damp Q-tip.
Level Up: Glossy Stitches
For extra realism, apply a very thin layer of gloss glaze ONLY over the painted brown stitches on the softball. This makes the ‘threads’ catch the light.
Step 4: Assembly
-
Cut the cord:
Cut a piece of elastic cord about 10 inches long. This gives you plenty of room to tie the knot without struggling. -
String the softball:
Thread the white softball bead onto the cord first. This will act as your center point. -
String the gradient:
Add your red beads on one side of the softball, and the darker orange on the other. Continue adding beads in color order (Red -> Red-Orange -> Orange -> Yellow-Orange -> Yellow) working outwards from the center to maintain the ombre effect. -
Check the fit:
Wrap the strand around your wrist to check the size. Add or remove yellow beads at the back (opposite the softball) to adjust the fit. -
Tie the knot:
Tie a strong surgeon’s knot (right over left, left over right). Pull the elastic tight to secure it. -
Secure and hide:
Add a tiny drop of super glue to the knot. Once dry, trim the excess string and gently tug the knot inside one of the adjacent beads to hide it.
Now you have a durable, custom bracelet perfect for wearing to the next big game
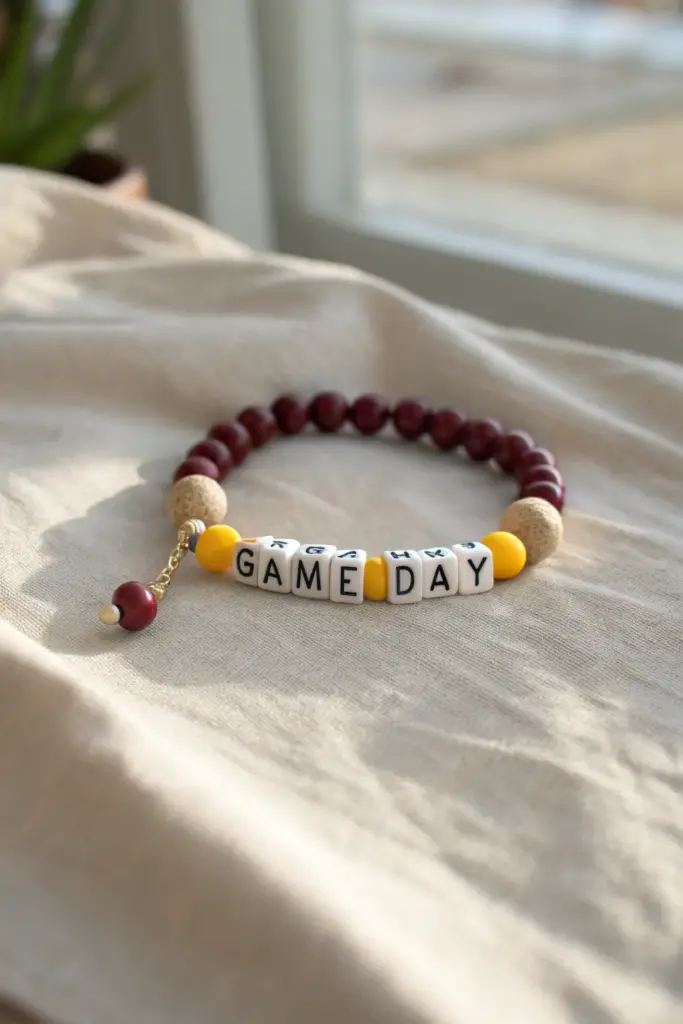
Softball Quote Bracelet (Short and Punchy)
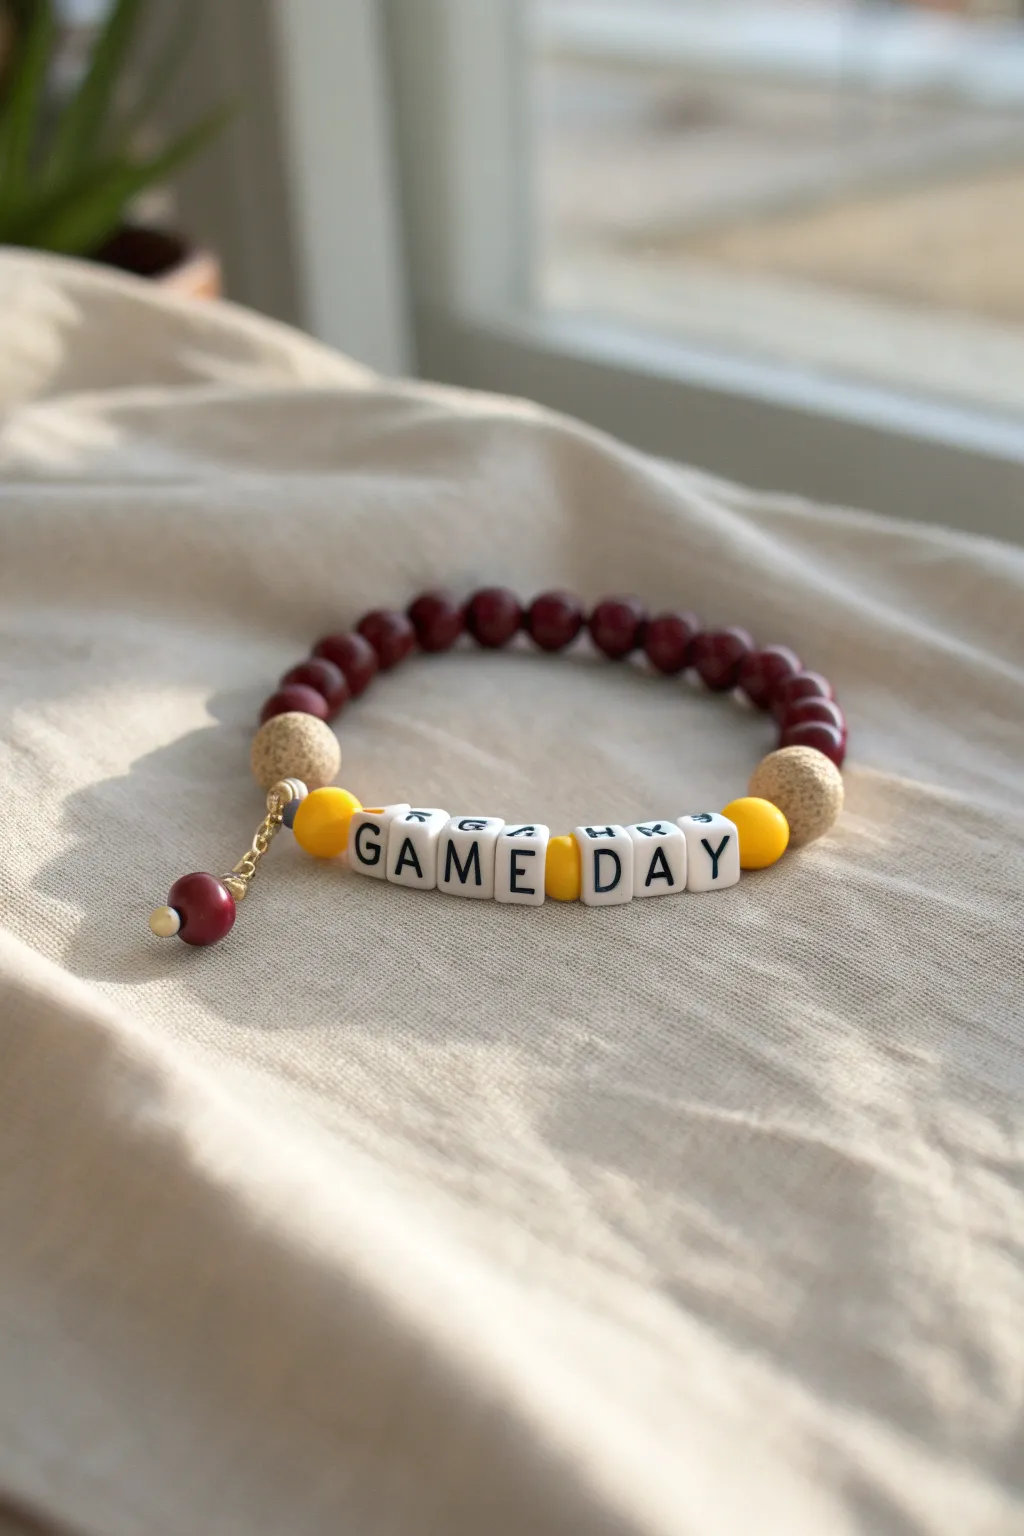
Show off your team pride with this bold beaded bracelet featuring a punchy “GAME DAY” message. Combining deep maroon tones with bright yellow accents and textured elements, this accessory is the perfect way to support your favorite players from the stands.
Detailed Instructions
Materials
- Stretch cord (0.8mm or 1mm thickness)
- White alphabet cube beads (letters G, A, M, E, D, A, Y)
- 8mm round wooden or acrylic beads in matte maroon
- 10mm textured round spacer beads (cork or stone style) in beige/tan
- 6mm round spacer beads in yellow/gold
- Small gold jump rings (4mm or 5mm)
- Gold chain extender or short chain segment
- Gold crimp bead cover (optional)
- Jewelry pliers (flat nose)
- Scissors
- Jewelry glue or clear nail polish
Step 1: Planning the Layout
-
Measure your wrist:
Before cutting anything, wrap a piece of string around your wrist to determine the desired length. Add about an inch to this measurement to account for the bulk of the beads. -
Prepare the cord:
Cut a length of stretch cord about 10-12 inches long. Having extra length makes tying the final knot much easier without fumbling. -
Pre-stretch the cord:
Give your elastic cord a few firm tugs. This is a crucial step I always do because it prevents the bracelet from sagging or stretching out permanently after the first wear. -
Sort your letters:
Locate all your alphabet cube beads to spell out “GAME DAY”. Arrange them on a bead board or flat surface to ensure you have all the necessary letters ready to go.
Knot Slipping?
If your stretch cord is slick, use a surgeon’s knot instead of a square knot. Simply loop the cord through twice on the first pass before pulling tight for extra grip.
Step 2: Creating the Focal Point
-
String the central message:
Thread the alphabet beads onto the center of the cord in the correct order: G-A-M-E-D-A-Y. -
Add separation:
Place one 6mm yellow round bead between the word “GAME” and the word “DAY” to act as a space bar and add a pop of team color. -
Frame the quote:
Slide one 6mm yellow round bead onto the cord at the beginning of the word and one at the end of the phrase to encase the text. -
Add texture:
Thread one large 10mm textured tan bead on either side of the yellow framing beads. These larger beads add visual weight and break up the design nicely.
Custom Charm Tip
Add a tiny softball charm to the chain dangle instead of just a bead. It instantly clarifies the theme and adds a professional, store-bought finish to the piece.
Step 3: Completing the Band
-
Fill the remaining space:
Continue stringing the 8mm maroon round beads onto both ends of the cord until you reach your desired total length. -
Create the dangle charm:
While the main bracelet is set aside, take a small headpin or a piece of wire and loop it through a single maroon bead. Attach this to a short segment of gold chain using a jump ring. -
Attach the charm holder:
Slide a gold jump ring or a bead with a loop onto the string right next to one of the large text beads. This is where your decorative dangle chain will hang. -
Check the fit:
Wrap the unfinished strand around your wrist to verify the size. Add or remove maroon beads as needed for a comfortable fit.
Step 4: Securing the Project
-
Tie the primary knot:
Bring the two ends of the stretch cord together and tie a standard square knot (right over left, left over right). -
Tighten securely:
Pull all four strands (the two tails and the bracelet loop sides) firmly to tighten the knot. You want the beads to touch snugly but not bunch up. -
Glue the knot:
Apply a tiny dot of jewelry glue or clear nail polish directly onto the knot. This prevents it from slipping over time. -
Hide the mechanics:
If the hole of the adjacent maroon bead is large enough, gently tug the cord so the knot slides inside the bead, hiding it from view. -
Attach the dangle:
Use your pliers to open the jump ring on your pre-made charm chain and hook it onto the designated spot you created earlier on the band. -
Trim excess cord:
Wait for the glue to dry completely, then use sharp scissors to trim the excess cord tails as close to the knot (or bead hole) as possible.
Slide on your new bracelet and head to the field with style