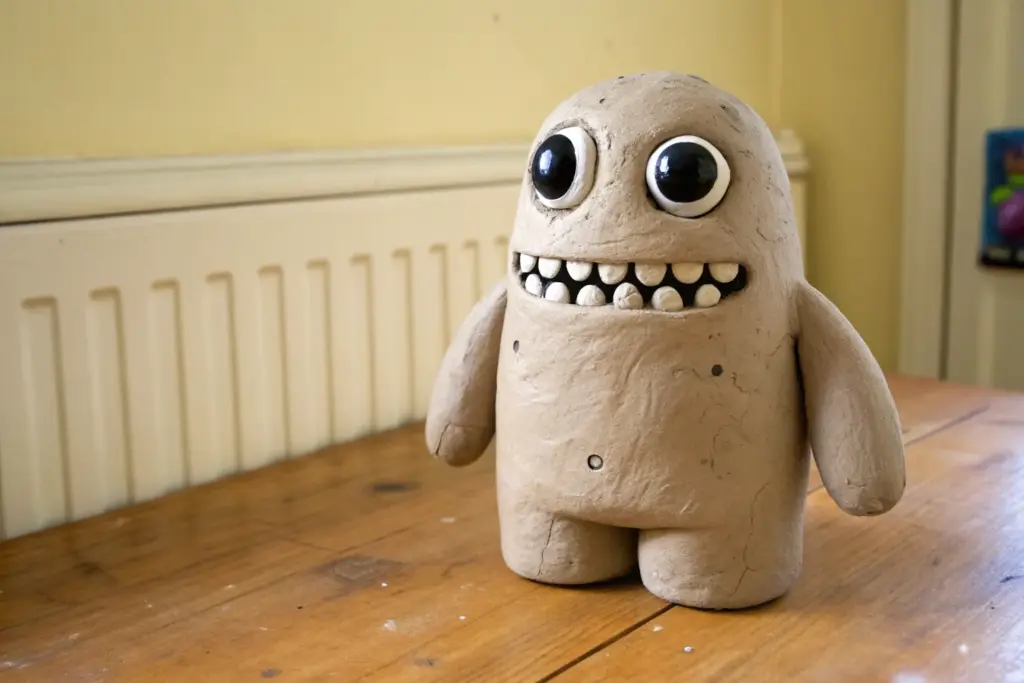
If you’re craving a project that’s equal parts fun and unsettling, scary clay monsters are the perfect excuse to go wild with eyes, teeth, and weird textures. I’m sharing my favorite monster concepts you can totally pull off with air-dry clay or polymer clay, even if you’re still building your sculpting confidence.
Classic Cyclops Brute
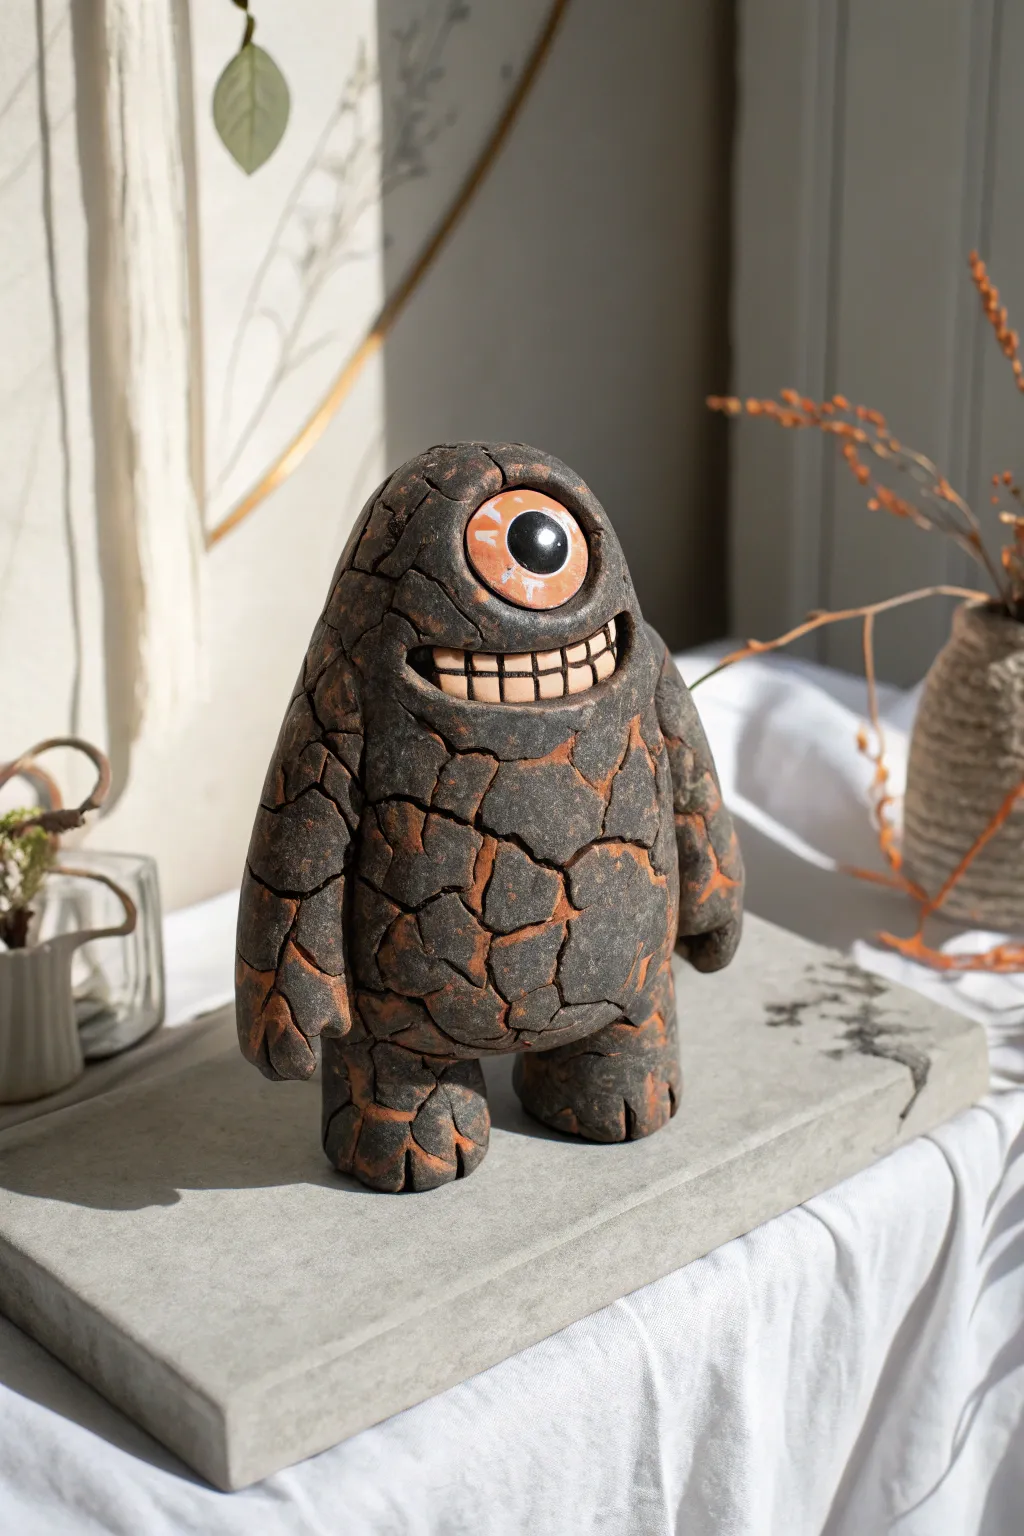
Embrace the rugged charm of this cyclopean golem, featuring a signature cracked-earth texture that reveals hints of fiery orange beneath. This sculpture balances a menacing rocky exterior with a goofy, toothy grin that makes it perfect for shelves or spooky displays.
Step-by-Step
Materials
- Polymer clay (black or dark grey)
- Polymer clay (white and terracotta/orange)
- Aluminum foil
- Sculpting tools (needle tool, ball stylus)
- Toothbrush or sanding sponge (for texture)
- Acrylic paints (black, burnt orange, white, cream)
- Paintbrushes (fine detail and dry brush)
- Matte varnish or sealant
- Gloss varnish (for the eye)
Step 1: Armature and Base Form
-
Build the Foil Core:
Crumple aluminum foil into a tight egg shape that is slightly flattened at the bottom. This will be the main body, ensuring the sculpture isn’t too heavy and bakes evenly. -
Wrap the Body:
Roll out a sheet of dark grey or black polymer clay about 1/4 inch thick. Completely cover the foil armature, smoothing the seams with your thumb until you have a seamless, potato-shaped mound. -
Add Legs and Balance:
Form two short, thick cylinders of clay for the legs. Attach them firmly to the bottom of the body. Press the structure down gently onto your work surface to flatten the feet soles and ensure the monster stands upright without tipping.
Crack Control
If your carving tool drags or creates burrs instead of clean cracks, chill your sculpture in the fridge for 15 minutes to firm up the clay before texturing.
Step 2: Sculpting the Features
-
Carve the Mouth:
Using a knife tool, cut a horizontal slit for the mouth about halfway down the face. Gently press the clay in and upward to create a slight overhanging upper lip, creating a cavity for the teeth. -
Insert the Teeth:
Roll a small snake of cream-colored clay. Press it into the mouth cavity. Use a needle tool or knife to score vertical lines along this strip to define individual, blocky teeth. -
Create the Eye Socket:
Thumb a circular depression into the upper center of the face. This indentation needs to be deep enough to hold the eyeball securely. -
Form the Eyeball:
Roll a ball of white clay and press it into the socket. Flatten a smaller disc of terracotta orange clay for the iris and a tiny black dot for the pupil, placing them in the center of the white ball. Add a minuscule white highlight dot for life. -
Sculpt the Eyelids:
Roll slim coils of your dark body clay to frame the eye. Blend these coils outward into the forehead and cheek area so they look like organic skin folds rather than stuck-on worms. -
Add the Arms:
Roll two tapered logs of clay for arms. Attach them to the sides of the body, blending the shoulders smoothly. Press the ends to flatten them slightly and use a knife to cut simple grooves indicating fingers.
Step 3: Texturing and Firing
-
Create the Cracked Earth Look:
This is the crucial step. Use a needle tool or a sharp sculpting blade to carve erratic, jagged channels all over the monster’s skin. Connect the lines to create irregular polygons, mimicking dry, cracked mud. -
Deepen the Cracks:
Go back over your main cracks and widen them slightly at the intersections. I like to press a rough stone or sandpaper lightly against the raised ‘plates’ to give the skin a stony, non-smooth finish. -
Refine the Feet:
Make sure to carry the crack texture down the legs. Use a ball tool to indent distinct toe separations on the feet blocks. -
Bake the Clay:
Bake the figure according to your clay manufacturer’s instructions (usually 275°F for 15-30 minutes depending on thickness). Let it cool completely before painting.
Magma Glow Effect
For a hotter look, paint the deepest parts of the cracks with bright yellow *before* doing the orange wash. It creates a glowing core effect.
Step 4: Painting and Finishing
-
The Magma Wash:
Dilute burnt orange acrylic paint with water until it’s very runny. Brush this liberally over the entire figure, ensuring it flows deep into all the cracks you carved. -
Wipe Away Excess:
Before the wash dries, gently wipe the surface with a paper towel or damp sponge. The orange should remain in the deep cracks, but the raised surfaces should be mostly clean. -
Dry Brushing the Surface:
Load a flat brush with black or dark grey paint, then wipe almost all of it off on a paper towel. Lightly dust the brush over the raised ‘plates’ of skin to reinforce the dark rocky look and clean up any stray orange. -
Varnishing:
Apply a matte sealant to the body to protect the paint. Finally, carefully apply a coat of gloss varnish only to the eyeball to give it a wet, lifelike shine.
Now your little magma monster is ready to stand guard on your desk or blend perfectly into a potted plant display


Many-Eyed Cave Crawler
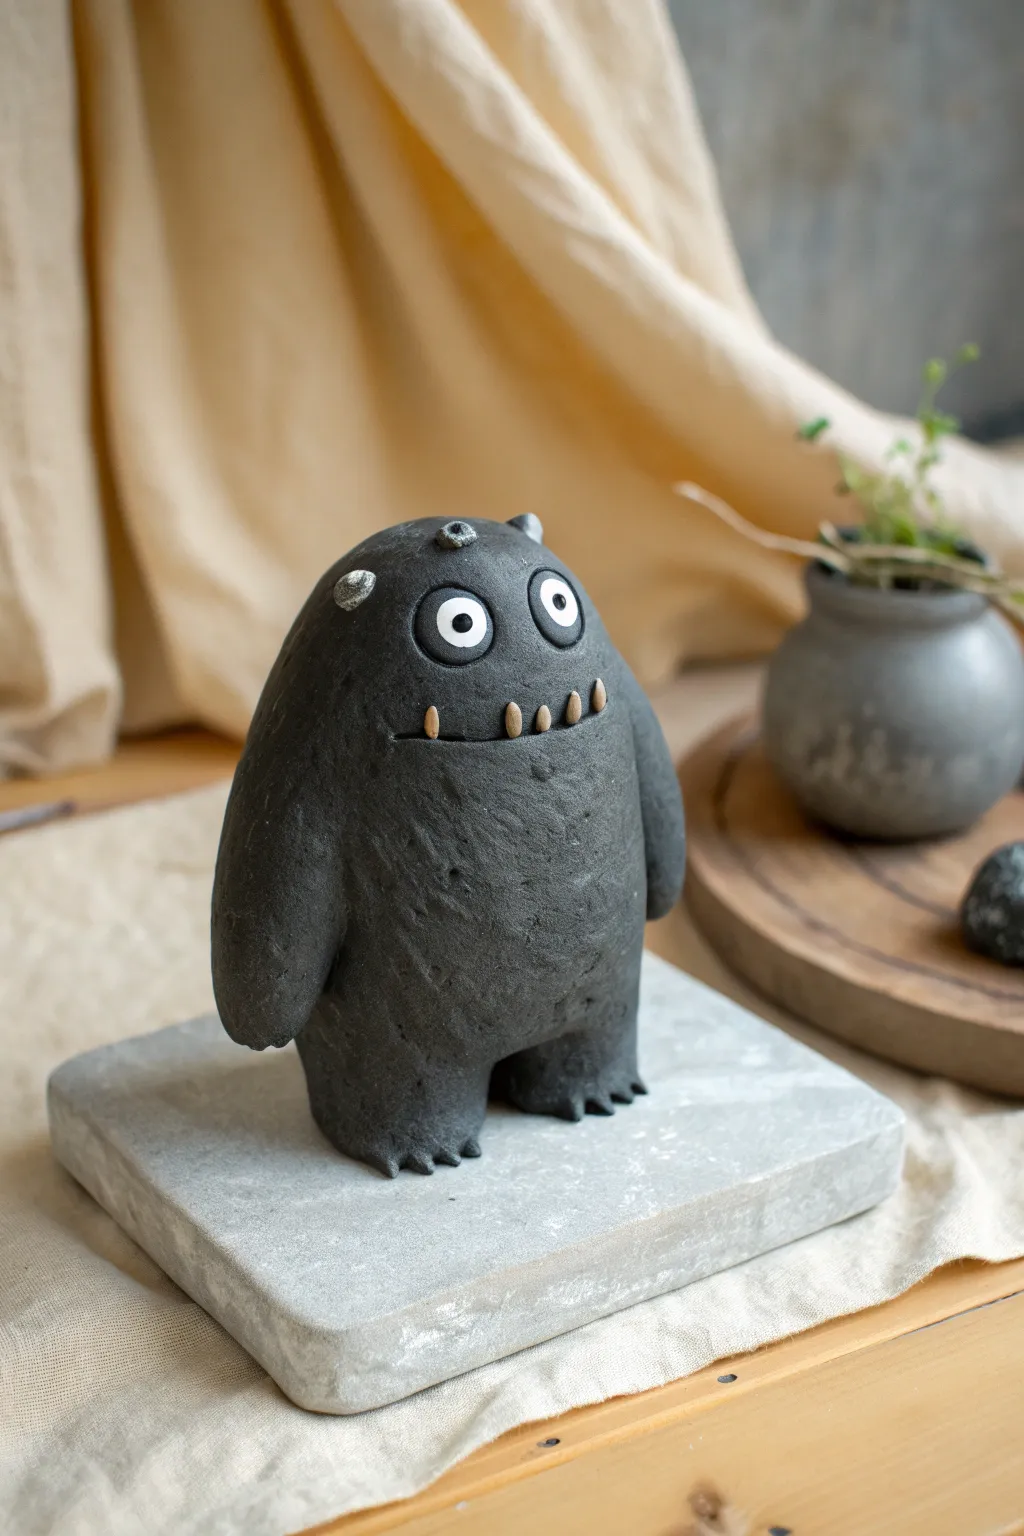
This charmingly spooky cave dweller features a textured charcoal body, a wide toothy grin, and prominent eyes that seem to watch your every move. It’s a solid, freestanding sculpture perfect for guarding a desk or shelf.
Step-by-Step Tutorial
Materials
- Black polymer clay (or air-dry clay painted black)
- White polymer clay
- Translucent or beige polymer clay (for teeth)
- Black acrylic paint (if detailing eyes)
- Small ball stylus tool
- Texture sponge or stiff bristle brush
- Needle tool
- Sculpting wire or foil (optional armature)
- Oven (if using polymer clay)
Step 1: Forming the Body
-
Create the core:
Start with a large ball of black clay. If you want to save material or reduce weight, you can crumble a core of aluminum foil into a tight egg shape and cover it with a smooth sheet of black clay. -
Shape the torso:
Roll the clay into a tall, rounded dome shape. The bottom should be slightly wider than the top, similar to an upright potato or an oversized gumdrop. -
Pull the legs:
Instead of attaching separate legs, pinch the bottom corners of your dome to extend two short, stout legs. Flatten the bottoms so the figure stands stable on a flat surface. -
Add the toes:
Use a needle tool or small knife to press three small indentations into the front of each foot, creating little claw-like toes. -
Attach the arms:
Roll two thick sausage shapes of black clay for arms. Blend them seamlessly onto the sides of the body, letting them hang down casually. I like to keep the hands simple, just rounded stumps without detailed fingers.
Step 2: Texturing and Details
-
Add skin texture:
Gently press a coarse sponge or a stiff bristle brush all over the black clay surface. This removes fingerprints and gives the monster a rough, rocky ‘cave dweller’ skin texture. -
Carve the mouth:
Use a needle tool to slice a long, horizontal line across the middle of the face. Gently curve the ends upward for a subtle, mischievous smile. -
Prepare the teeth:
Roll tiny, rice-sized grains of beige or translucent clay. Taper one end slightly to make them look like jagged little teeth. -
Insert teeth:
Press the tiny teeth into the mouth line you carved. Arrange them irregularly—some pointing up, some down—to give the character a jagged, goofy grin.
StayDust-Free
Black clay shows every speck of dust! Keep a piece of scotch tape nearby to dab away lint from the clay before baking.
Step 3: Eyes and Finishing Touches
-
Make the eye sockets:
Using your thumb or a large ball tool, press two shallow divots into the upper face where the eyes will sit. Make one slightly higher than the other for a quirky look. -
Add the whites:
Roll two balls of white clay and press them firmly into the sockets. Flatten them slightly so they look embedded rather than just stuck on top. -
Create pupils:
Add tiny flattened disks of black clay to the center of the white eyes. Alternatively, you can paint these on after baking for more precision. -
Sculpt extra details:
Add small warts or bumps using leftover black clay on the top of the head. You can also add a tiny ‘third eye’ bump or small horns if you’re feeling adventurous. -
Final inspection:
Check the balance to ensure the monster stands upright without tipping. Smooth out any rough seams where the arms attach. -
Bake or dry:
Follow the manufacturer’s instructions for your specific clay type to bake or air-dry the finished piece. -
Highlight (Optional):
Once hardened, you can dry-brush a very light layer of grey paint over the textured body to make the rocky details pop.
Glow Up
Swap the white clay for glow-in-the-dark polymer clay for the eyes and teeth. Your monster will look extra spooky at night
Place your little void monster on a shelf where it can keep a watchful eye on the room


Crooked Fanged Grinner
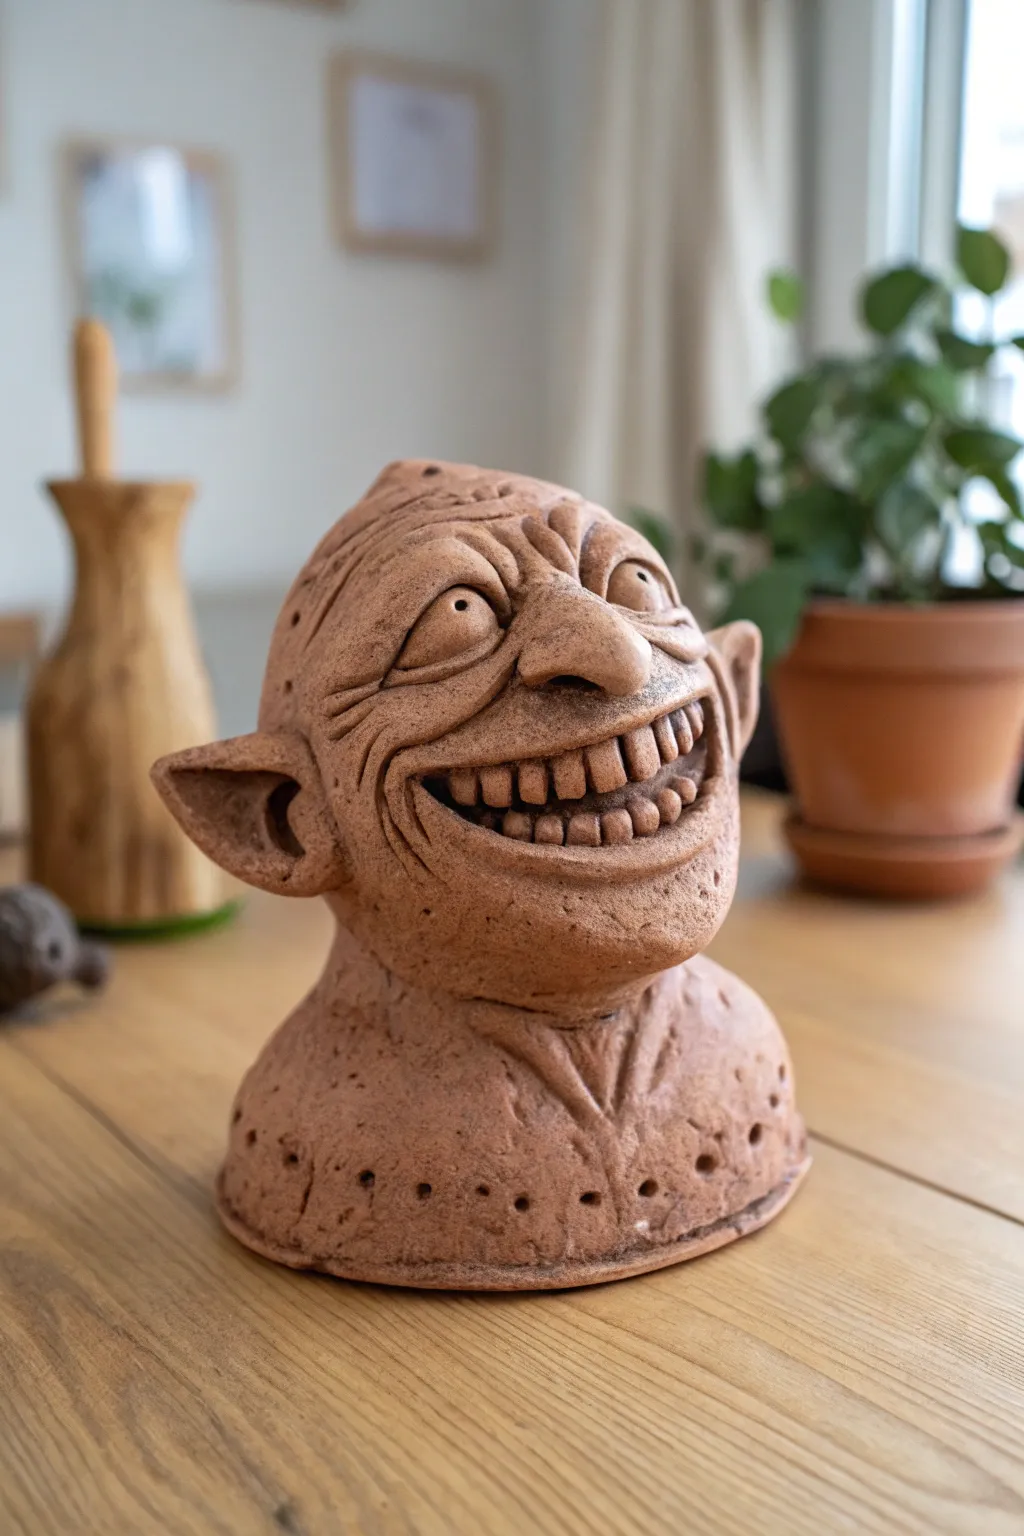
This mischievous clay bust features a delightfully oversized grin and craggy skin textures that give it instant personality. With its pointed elven ears and manic expression, this project is perfect for practicing exaggerated facial anatomy on a small scale.
Step-by-Step
Materials
- Red earthenware or terracotta air-dry clay
- Aluminum foil (for armature core)
- Wooden modeling tools (flat spatula and needle tool)
- Loop tool (for carving)
- Small sponge
- Water in a spray bottle
- Wooden base or lazy susan (optional)
Step 1: Armature and Base Structure
-
Form the foil core:
Crumple aluminum foil into a tight ball slightly smaller than your desired head size. Shape a second, flatter piece of foil into a wide oval for the shoulder and chest base. -
Join the sections:
Connect the head ball to the chest base using a short, thick cylinder of foil to act as the neck. Make sure the structure feels stable before adding clay. -
Apply the clay skin:
Roll out a slab of red clay about 1/4 inch thick. Cover the entire foil armature, pressing firmly to ensure the clay adheres to the foil and to itself. -
Define the chest:
Smooth the clay down over the shoulder area. Use your thumbs to press small indentations along the bottom edge, resembling a ragged shirt collar or skin folds.
Cracks Appearing?
If you spot hairline cracks while it dries, mix a small amount of clay with water to make a paste (slip). Paint this into the cracks and smooth it over immediately.
Step 2: Sculpting the Face
-
Build the jaw:
Add extra bulk to the lower face to create a prominent, jutting jaw. This monster is all about the smile, so create a wide, deep channel where the mouth will go. -
Add the nose:
Roll a teardrop shape of clay and score slightly before attaching it to the center of the face. Blend the edges seamlessly, pushing the tip downwards for a droopy, bulbous look. -
Carve the eyes:
Press two deep hollows above the nose. Roll two small spheres for eyeballs and place them inside. Add thin coils of clay above and below for eyelids, blending them outwards. -
Sculpt the grin:
Refine the mouth channel you made earlier. Roll tiny, chickpea-sized balls of clay for the teeth. Press them into the upper and lower gums in a crooked, slightly uneven row. -
Shape the gums:
Use a thin snake of clay to outline the teeth, creating a gum line. Use a needle tool to push clay slightly between the teeth gaps for realism.
Step 3: Details and Texture
-
Create the ears:
Form two triangular wedges of clay. Attach them to the sides of the head at eye level. Use your thumb to create the inner conch and pull the tips outward into sharp points. -
Wrinkle the skin:
Using a needle tool or a small wooden spatula, draw deep crease lines radiating from the corners of the eyes and around the mouth. This aging effect gives him character. -
Add forehead texture:
Carve horizontal furrows across the forehead. I find that deepening these lines slightly more than looks necessary helps them show up after drying. -
Texture the shirt:
Take a needle tool and poke random holes across the chest and shoulder area. This creates a rough, fabric-like texture that contrasts with the smoother face skin. -
Refine the surface:
Wipe the highest points of the cheeks, nose, and chin with a barely damp sponge. This smooths the clay slightly, mimicking stretched skin. -
Final eye details:
Use a needle tool to poke a pupil into the center of each eye. Ensure they are looking in slightly different directions to enhance the ‘crazy’ expression. -
Drying:
Let the sculpture dry slowly away from direct heat or sunlight to prevent cracks. Wait until it is fully light in color and hard to the touch.
Level Up: Antique Look
Once dry, apply a dark brown acrylic wash (paint diluted with lots of water). Wipe it off the raised areas quickly, leaving the dark color in the wrinkles and teeth gaps.
Place your grinning goblin on a shelf near a potted plant where he can peek out mischievously


Long Tongue Lurker
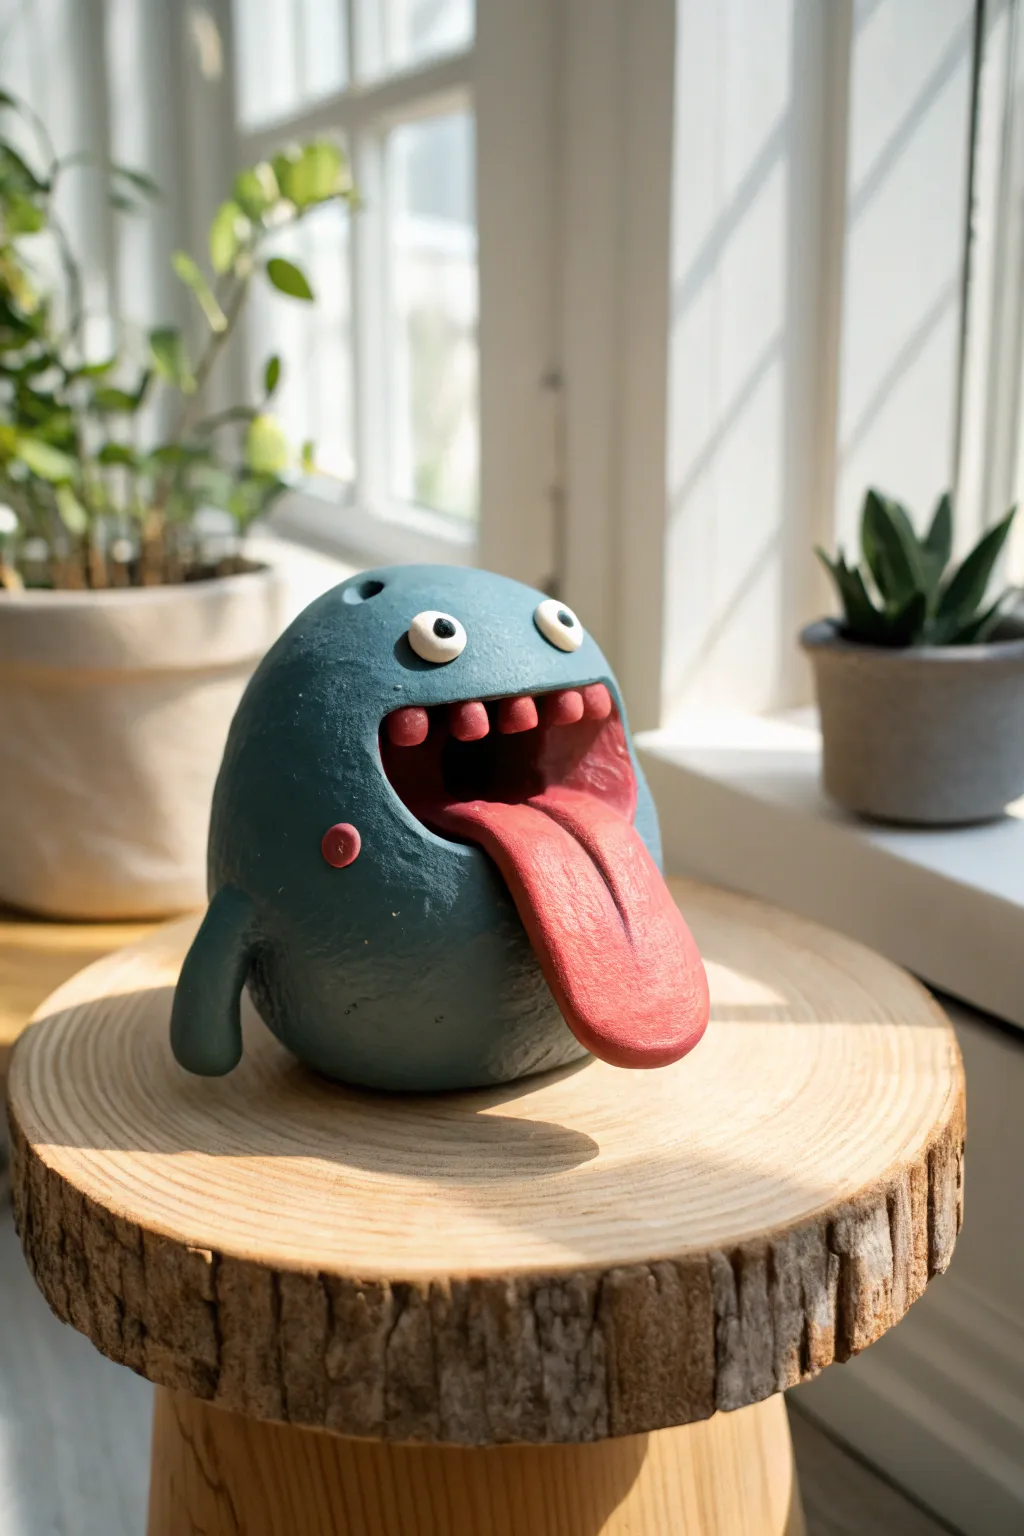
This quirky little beast features a comically oversize mouth and a tongue that just won’t quit. With its textured blue skin and goofy eyes, it strikes the perfect balance between spooky and silly for your creepy cute collection.
Detailed Instructions
Materials
- Blue polymer clay (or air-dry clay)
- Red polymer clay
- Pink polymer clay
- White polymer clay
- Black polymer clay
- Aluminum foil
- Sculpting tools (needle tool, ball stylus)
- Texturing tool (toothbrush or stiff bristle brush)
- Acrylic paints (if using neutral clay)
- Matte varnish
Step 1: Forming the Body
-
Create the core:
Start by crumpling a small ball of aluminum foil into a rough egg shape. This saves clay and keeps the figure lightweight. -
Cover with clay:
Condition your blue day until it’s soft, then flatten a large sheet. Wrap this entirely around your foil core, smoothing out any seams with your thumb until you have a seamless, roundish blob shape. -
Shape the base:
Gently press the bottom of the shape onto your work surface to create a flat base so the monster sits upright without wobbling. -
Add texture:
Before adding details, take an old toothbrush or a stiff bristle brush and stipple the entire surface of the blue clay. This gives it a stony, organic monster skin texture rather than a smooth plastic look. -
Carve the mouth:
Identify where you want the face. Use a large ball tool or your thumbs to press a deep, wide cavern into the front for the mouth. It should take up about half the height of the body.
Step 2: The Mouth and Tongue
-
Line the mouth:
Take a piece of dark red or reddish-brown clay and flatten it into a thin strip. Press this into the back of the mouth cavity to create depth and shadow. -
Form the tongue:
Roll a snake of standard red clay and flatten it into a long, wide tongue shape. It needs to be long enough to drape out of the mouth and hang down to the ‘floor’. -
Detail the tongue:
Use a needle tool or knife to score a long line down the center of the tongue. Gently curl the end so it looks like it’s resting on the ground. -
Attach the tongue:
Press the back of the tongue firmly into the bottom of the mouth cavity. Blend the clay at the connection point so it doesn’t fall out later. -
Add the teeth:
Roll small balls of dull pink or off-white clay into little tic-tac shapes. Press 4-5 of them into the upper lip area, spacing them out slightly for a goofy look.
Gravity Defying Tongue
If the tongue is very long and heavy, prop it up with a piece of crumpled foil or a folded piece of cardstock while baking. This supports the shape until the clay hardens in the oven.
Step 3: Eyes and Arms
-
Make eye sockets:
Use a small ball tool to make two shallow indentations above the mouth where the eyes will sit. -
Position the eyeballs:
Roll two white balls of clay and press them into the sockets. Keep them slightly bulging out. -
Add pupils:
Take tiny specs of black clay and press them into the center of the white eyes. I like to make one pupil slightly smaller than the other to give him a confused expression. -
Sculpt the arms:
Roll two short sausages of blue clay. Attached them to the lower sides of the body. -
Blend the limbs:
Smooth the shoulder seams into the body using a modeling tool so the arms look like part of the torso, not just stuck on. Re-texture these areas with your brush. -
Cheek detail:
Add a small, flat circle of pink clay to one cheek for a cute blush spot.
Dirty Clay Fix
Light clay colors like white and pink pick up dust easily. Keep a pack of baby wipes nearby/clean your hands thoroughly between colors, or use a cotton swab with rubbing alcohol to clean the raw clay.
Step 4: Finishing Up
-
Bake:
Bake the figure according to your polymer clay package instructions (usually 275°F/130°C for 15-30 mins per 1/4 inch thickness). -
Cool down:
Let the monster cool completely in the oven to prevent cracking from thermal shock. -
Varnish:
Apply a coat of matte varnish to the skin to protect it, and consider a gloss varnish just on the tongue and eyes to make them look wet.
Set your new little friend on a windowsill to greet visitors with his goofy grin

The Complete Guide to Pottery Troubleshooting
Uncover the most common ceramic mistakes—from cracking clay to failed glazes—and learn how to fix them fast.
Tentacled Slime Blob
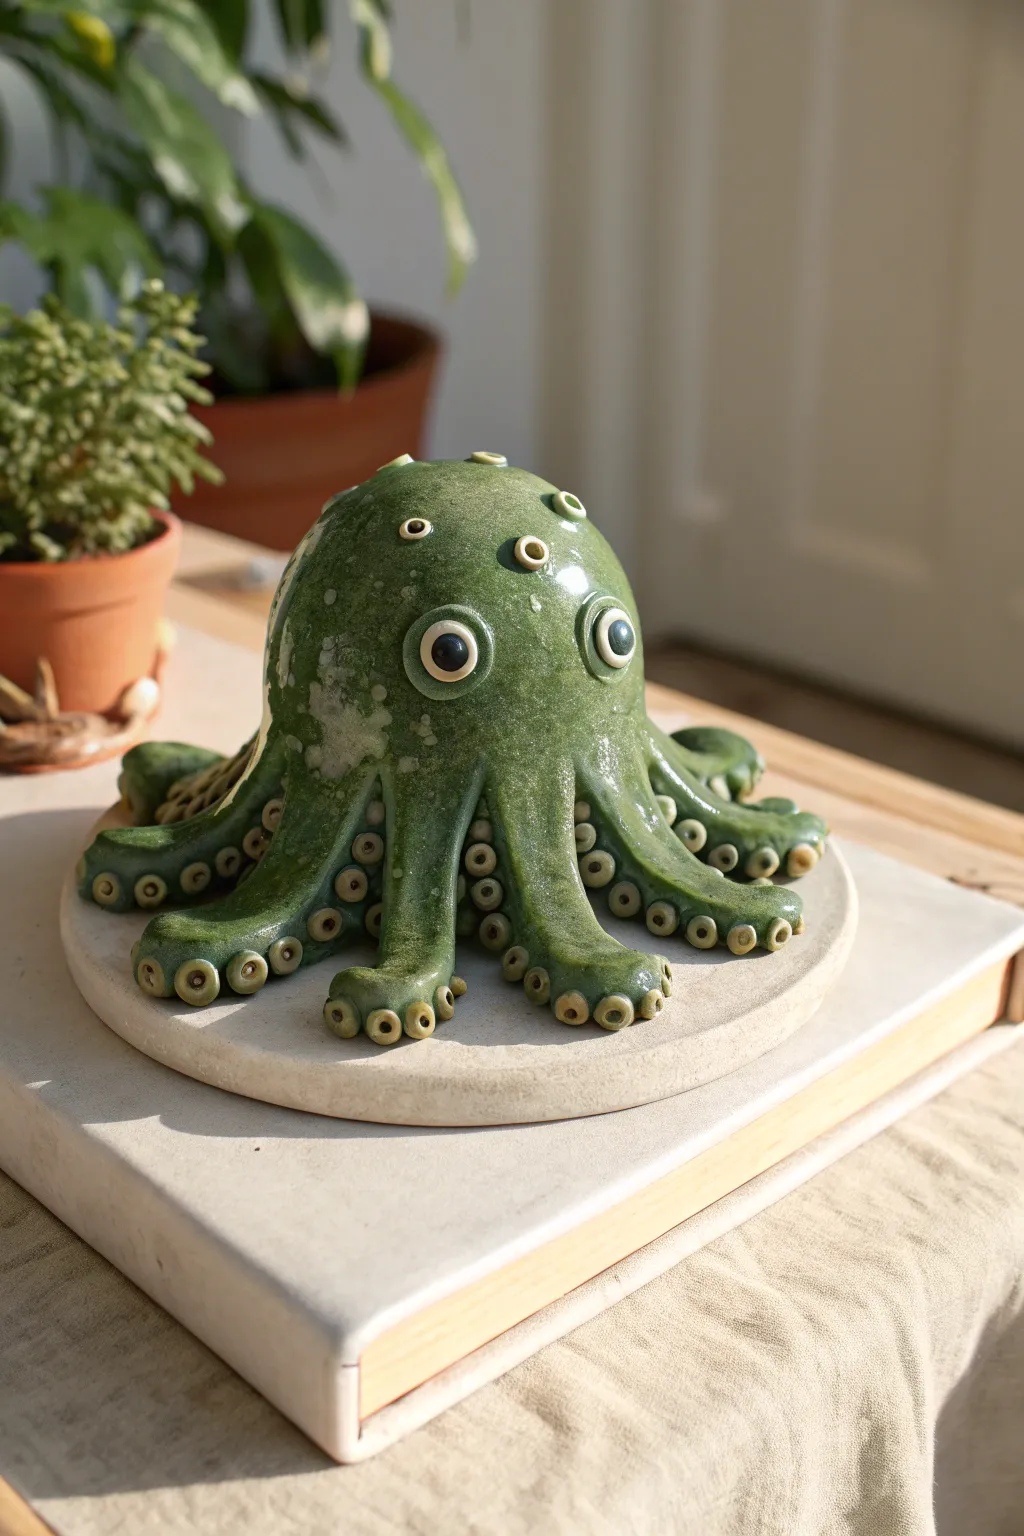
This quirky creature combines the charm of a friendly octopus with the glistening sheen of a swamp monster. Using basic hand-building techniques, you’ll sculpt a bulbous head with sprouting tentacles and finish it with a distinctive specked glaze.
Step-by-Step Guide
Materials
- White stoneware clay
- Pottery wheel (optional, for the basic dome shape)
- Fettling knife
- Needle tool
- Loop tool
- Small circle cutter or straw
- Scoring tool or serrated rib
- Slip (clay slurry)
- Underglaze (Black and White)
- Green crystalline or speckled glaze (semi-translucent)
- Clear gloss glaze
- Sponge
- Kiln
Step 1: Sculpting the Base Form
-
Form the main dome:
Start with a softball-sized lump of wedged clay. You can either throw a closed dome on the wheel or form a large pinch pot by hand. Aim for a smooth, rounded shape that is slightly taller than it is wide. -
Create the tentacle ring:
Roll out a thick coil of clay, roughly an inch in diameter. Attach this coil securely to the bottom rim of your dome using the score and slip method. -
Pull down the tentacles:
Using your thumb and forefinger, gently pull sections of the attached coil downward and outward to create the tentacle shapes. They should flare out slightly onto your work surface. -
Refine the tentacle tips:
Smooth each tentacle so it tapers gently but remains rounded at the end. Use a modeling tool to define the separations between each limb, pushing the clay up towards the main body.
Sticky Situation?
If clay sticks to your fingers while smoothing tiny suction cups, dust your fingertips lightly with cornstarch. It acts as a release agent and burns off in the kiln.
Step 2: Adding Details and Texture
-
Create the sucker pads:
Roll tiny balls of clay, about the size of peas. Press them flat onto the underside and sides of each tentacle. -
Hollow the suckers:
Take a small loop tool or the back of a paintbrush and press an indentation into the center of each flattened ball to create the classic suction cup look. -
Add the main eyes:
Form two larger balls of clay for the eyes. Score and slip the area on the ‘face’ of the dome, then press the eyes on securely. Use a needle tool to gently blend the back edges of the eyeballs into the head so they don’t pop off. -
Sculpt the pupils:
Press a small, circular indentation into the center of each eye. You can add a tiny coil ring around the pupil for extra definition if you like. -
Create scattered warts:
To give it that ‘slime blob’ texture, add random smaller circles/warts on the top of the head using the same technique as the suckers—flatten a small ball and indent the center. -
Vent holes:
Since this is a hollow form, ensure air can escape during firing. I recommend piercing a discreet hole in the bottom of the base or hiding one inside a suction cup.
Pro Tip: Eye Shine
Add a tiny dot of clear gloss glaze over the black pupil after the wax step. It gives the creature a distinctive ‘wet’ and lively look after the final firing.
Step 3: Glazing and Finishing
-
Bisque firing:
Let the piece dry slowly and completely (bone dry) before firing it to a bisque temperature (usually cone 04) to prepare it for glazing. -
Detail the eyes:
Paint the pupils with black underglaze and the surrounding whites of the eyes with white underglaze. Let this dry completely. -
Wax resist application:
Carefully paint wax resist over the painted eyes. This prevents the green glaze from adhering to them, keeping them crisp and bright. -
Apply the green glaze:
Dip or brush your main green glaze over the entire body. A glaze that breaks over texture (showing lighter edges) works best here to highlight the suction cups. -
Clean the bottom:
Wipe the glaze off the very bottom of the tentacles where they will touch the kiln shelf to prevent sticking. -
Final smooth:
Check for any drips or overly thick spots of glaze, especially between the tentacles, and smooth them with a finger. -
Glaze firing:
Fire the piece again to the maturation temperature of your specific clay and glaze (typically cone 5 or 6 for stoneware).
Now you have a charmingly slimy desktop companion ready to guard your pencils
Horned Woodland Demon
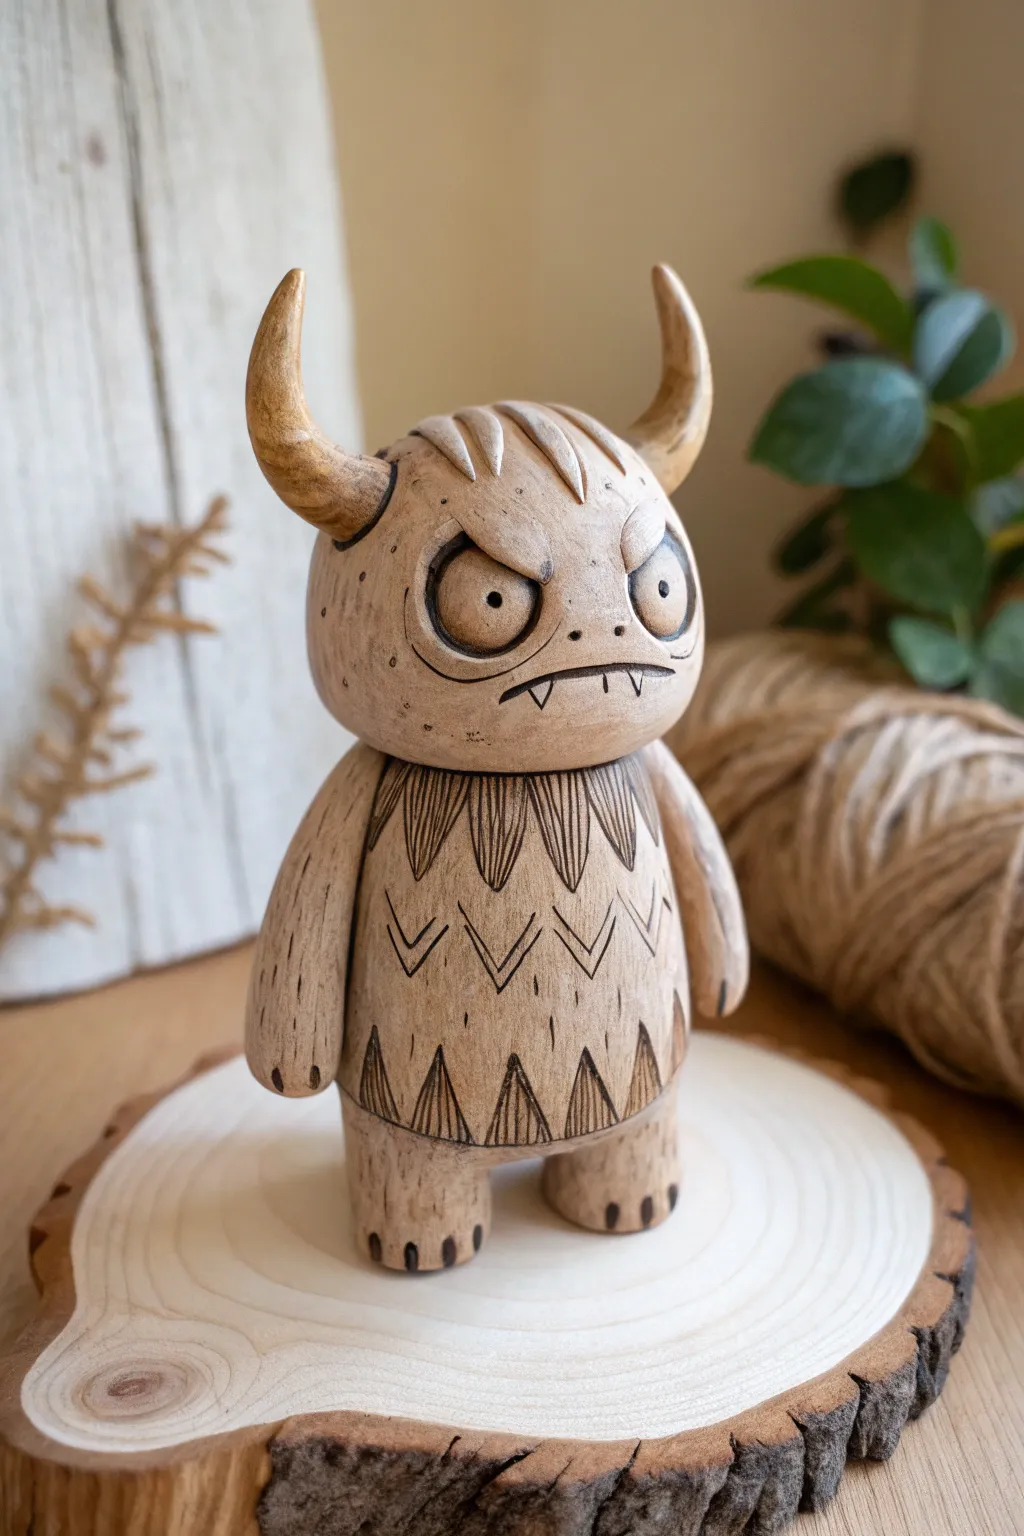
Capture the charm of hand-carved wood without picking up a whittling knife by sculpting this expressive little beastie. With its textured finish, earthy wash, and engraved details, this clay project mimics the rustic appeal of traditional woodland folk art perfectly.
Step-by-Step Tutorial
Materials
- Polymer clay (beige or light tan)
- Aluminum foil
- Sculpting tools (needle tool, ball stylus, rubber shaper)
- X-Acto knife or craft blade
- Acrylic paints (dark brown, black, cream)
- Water
- Paintbrushes (small detail brush, soft flat brush)
- Paper towels or rag
- Matte varnish
Step 1: Sculpting the Base Structure
-
Armature preparation:
Begin by crumpling a tight ball of aluminum foil about the size of a golf ball for the head, and a slightly larger, elongated oval for the body. This saves clay and ensures the figure isn’t too heavy. -
Covering the core:
Roll out a sheet of beige polymer clay to about 1/4 inch thickness. Wrap the head and body foil pieces completely, smoothing the seams until you have two clean, solid shapes. -
Joining the sections:
Press the head firmly onto the body. To strengthen the bond, you can insert a small piece of toothpick or wire between the two before pressing them together. Blend the clay at the neck seam slightly if you want a continuous look, or leave a subtle groove for a separate-piece aesthetic. -
Adding legs:
Roll two short, thick cylinders of clay for the legs. Attach them to the bottom of the body, blending the clay upwards so they are securely fused. Flatten the bottoms so the figure stands stable on its own.
Step 2: Refining the Form & Face
-
Shaping the arms:
Create two elongated teardrop shapes for the arms. Press them against the sides of the body, blending the shoulder area seamlessly while leaving the hands slightly detached from the torso. -
Adding the horns:
Roll two tapered cones for the horns. Curve them gently to curve inward and upward. Attach them to the top of the head, blending the base of the horns into the skull so they look like organic outgrowths. -
Creating the eye sockets:
Use a large ball tool or your thumb to press two deep indentations into the face area. This establishes the brow ridge which gives the monster its grumpy expression. -
Eyeballs and lids:
Place small balls of clay into the sockets and flatten them slightly. Roll tiny snakes of clay to create the upper and lower eyelids, pressing them over the eyes to define a glaring stare. -
Mouth and nose:
Use a needle tool or knife to slice a horizontal frown line. Poke two small holes for nostrils. Add two tiny triangles of clay pointing down from the upper lip to serve as fangs.
Wood Grain Pro Tip
When adding the scratchy wood texture, always pull your tool in one general vertical direction (or following the curve of the horns). Cross-hatching ruins the illusion of wood grain.
Step 3: Texturing and Details
-
Adding hair definition:
Roll very thin, small tapered sausages of clay and press them onto the top of the head between the horns to create the segmented hair tuft look seen in the reference. -
Carving the body patterns:
Here is where you fake the carving look. Use a sharp needle tool to etch the geometric designs onto the belly. Create the collar of triangles around the neck, the zigzag lines in the middle, and the triangular trim at the hemline. -
Simulating wood grain:
I find that adding vertical texture lines is crucial here. Use a stiff brush or a needle tool to gently scratch vertical striations all over the body, arms, and horns. Don’t be too uniform; real wood grain is organic. -
Deepening accents:
Go back over your etched patterns—the triangles and zigzags—and make the lines deeper and wider so they will hold paint later. -
Baking:
Bake the figure according to your polymer clay package instructions. Let the piece cool completely before starting the paint job.
Level Up: Mossy Touch
To make him look like an ancient forest guardian, dab tiny spots of green flocking powder or textured craft paint in the deepest crevices after sealing to mimic varying moss growth.
Step 4: The Antique Finish
-
The dark wash:
Mix a small amount of dark brown and black acrylic paint with water until it’s quite runny. Brush this liberally over the entire sculpture, making sure it gets into every crack, crevice, and etched line. -
Wiping back:
Before the paint dries, use a damp paper towel or rag to wipe the paint off the raised surfaces. The dark paint will remain in the textures and carved lines, instantly highlighting your “wood” details. -
Highlighting eyes:
Use a detail brush to paint the pupils black. If the wipe-away method made the eyeballs too dark, dry-brush a little cream paint onto the center of the eyes to make them pop. -
Refining the pattern:
If your body patterns (the zigzags and triangles) faded too much during wiping, use a fine liner brush with slightly watered-down brown paint to re-trace those specific design elements. -
Sealing:
Finish with a coat of matte varnish to protect the paint and eliminate any glossy shine, keeping the dry wood aesthetic intact.
Now you have a delightfully grumpy forest spirit ready to guard your bookshelf


What Really Happens Inside the Kiln
Learn how time and temperature work together inside the kiln to transform clay into durable ceramic.
Stitched-Up Patchwork Ghoul
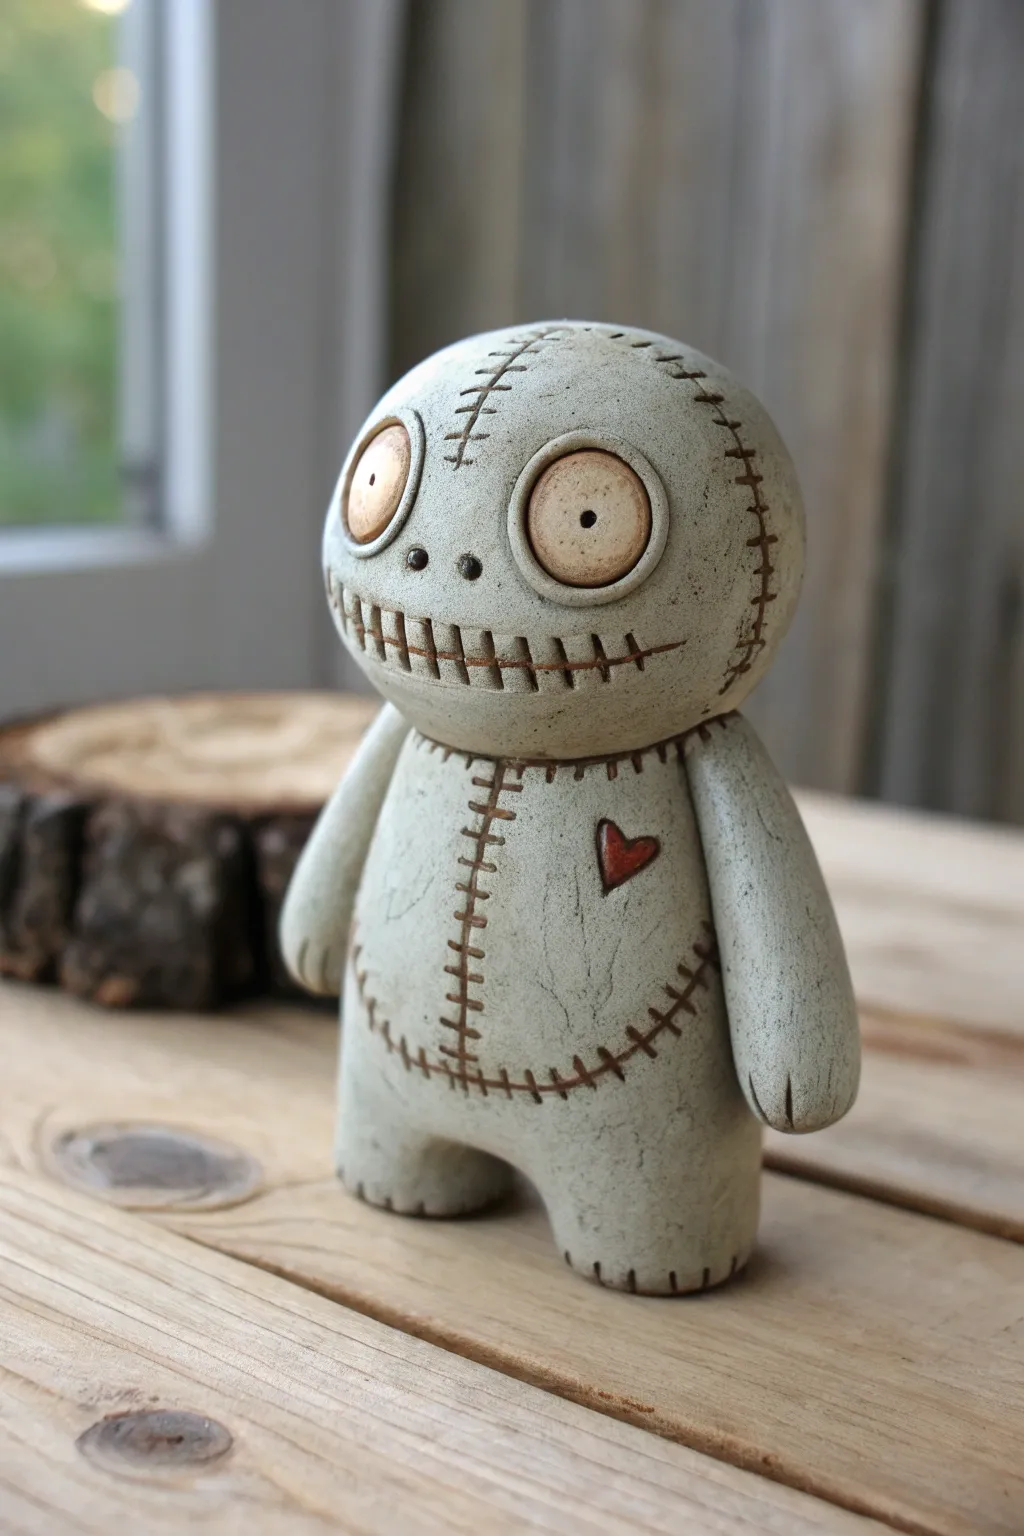
This charmingly spooky figurine combines the whimsy of a ragdoll with the permanence of pottery. With its oversized button eyes and faux-stitched details, this project captures a perfect balance of creepy and cute for your Halloween decor.
How-To Guide
Materials
- Light gray polymer clay or air-dry clay (approx. 1lb)
- Acrylic paints (black, brown, burnt sienna, cream/off-white)
- Sculpting tools (needle tool, small ball stylus, clay knife)
- Texture sponge or stiff bristle brush
- Water and small container
- Matte spray varnish or sealant
- Fine grit sandpaper
- Paper towels or soft rag
Step 1: Forming the Base Structure
-
Shape the body:
Begin by conditioning a large ball of clay until it is soft and pliable. Roll it into a smooth, thick cylinder that is slightly wider at the bottom to form the creature’s torso. -
Create the legs:
At the base of your cylinder, use your thumb or a modeling tool to press an indentation into the center, creating a split. Gently pull and shape two short, stout legs from this mass, tapping them on your work surface to make them flat so the figure stands stably. -
Form the head:
Roll a separate geometric sphere for the head, making it proportionally large compared to the body—almost the same width as the torso. Press it gently onto the neck area of the body; you may need to score (scratch) both connecting surfaces and add a dab of water or slip to ensure a strong bond. -
Attach the arms:
Roll two thick sausage shapes for the arms. Press them firmly against the sides of the body, blending the clay at the shoulder joint so they look seamless. Keep the arms hanging straight down for that stiff, doll-like posture.
Stitch Perfect
For deeper, more realistic stitches, press a piece of actual coarse thread into the soft clay and peel it away. This leaves a genuine fabric impression.
Step 2: Sculpting the Features
-
Add texture:
Before adding details, gently pat the entire surface with a texture sponge or a stiff brush. This removes fingerprints and gives the clay a stonelike, slightly rough appearance. -
Create the eye sockets:
Roll two medium-sized balls of clay and flatten them into thick discs. Press these firmly onto the face to create the large, bug-eyed look. -
Detail the eyes:
Using a small tool, press a tiny indentation into the center of each eye for the pupil. If you want them to look like buttons, you can poke two small holes instead, but a single pupil creates a more intense stare. -
Carve the mouth:
Take a clay knife or needle tool and carve a long, horizontal line across the lower face for the mouth. Add short vertical hash marks along the entire length to simulate teeth or heavy stitching. -
Add stitched seams:
Using a needle tool, draw indented lines where ‘seams’ would naturally be—down the center of the chest, around the belly, and circling the top of the head like a skull cap. Add small perpendicular hatch marks across these lines to look like thread stitches. -
The finishing heart:
Carve a small, shallow heart shape into the upper left chest area. You don’t need to add extra clay; negative space works beautifully here to look like an embroidered patch.
Head Heavy?
If the head keeps slumping during sculpting, insert a toothpick or crumpled aluminum foil core into the neck and body for internal support.
Step 3: Painting and Antiquing
-
Drying or baking:
Allow your sculpture to fully cure according to your specific clay’s instructions. If using air-dry clay, wait at least 24-48 hours; if using polymer, bake at the recommended temperature. -
Base wash:
Mix a very watery wash of brown and black acrylic paint. Brushing this over the entire figure ensures the dark pigment settles deep into the stitches, mouth, and texture marks. -
Wipe back technique:
Immediately after applying the dark wash, take a damp paper towel and wipe away the surface paint. The high points should go back to the clay color, while the crevices remain dark, instantly revealing the stitched details. -
Dry brushing:
Dip a dry brush into cream or off-white paint and wipe most of it off on a towel. Lightly dust the surface of the sculpture to highlight the texture and give it a dusty, bone-like finish. -
Detail painting:
Use a small brush to paint the eyes a warm cream color, and fill the tiny heart with a muted burnt sienna or rust red. Avoid bright primary colors to keep the antique vibe. -
Sealing:
Finish by spraying the entire piece with a matte varnish. This protects the paint and unifies the sheen, making it look like glazed ceramic.
Place your little patchwork ghoul on a shelf where he can keep a watchful eye on your room
Undead Hand-Snatcher Monster
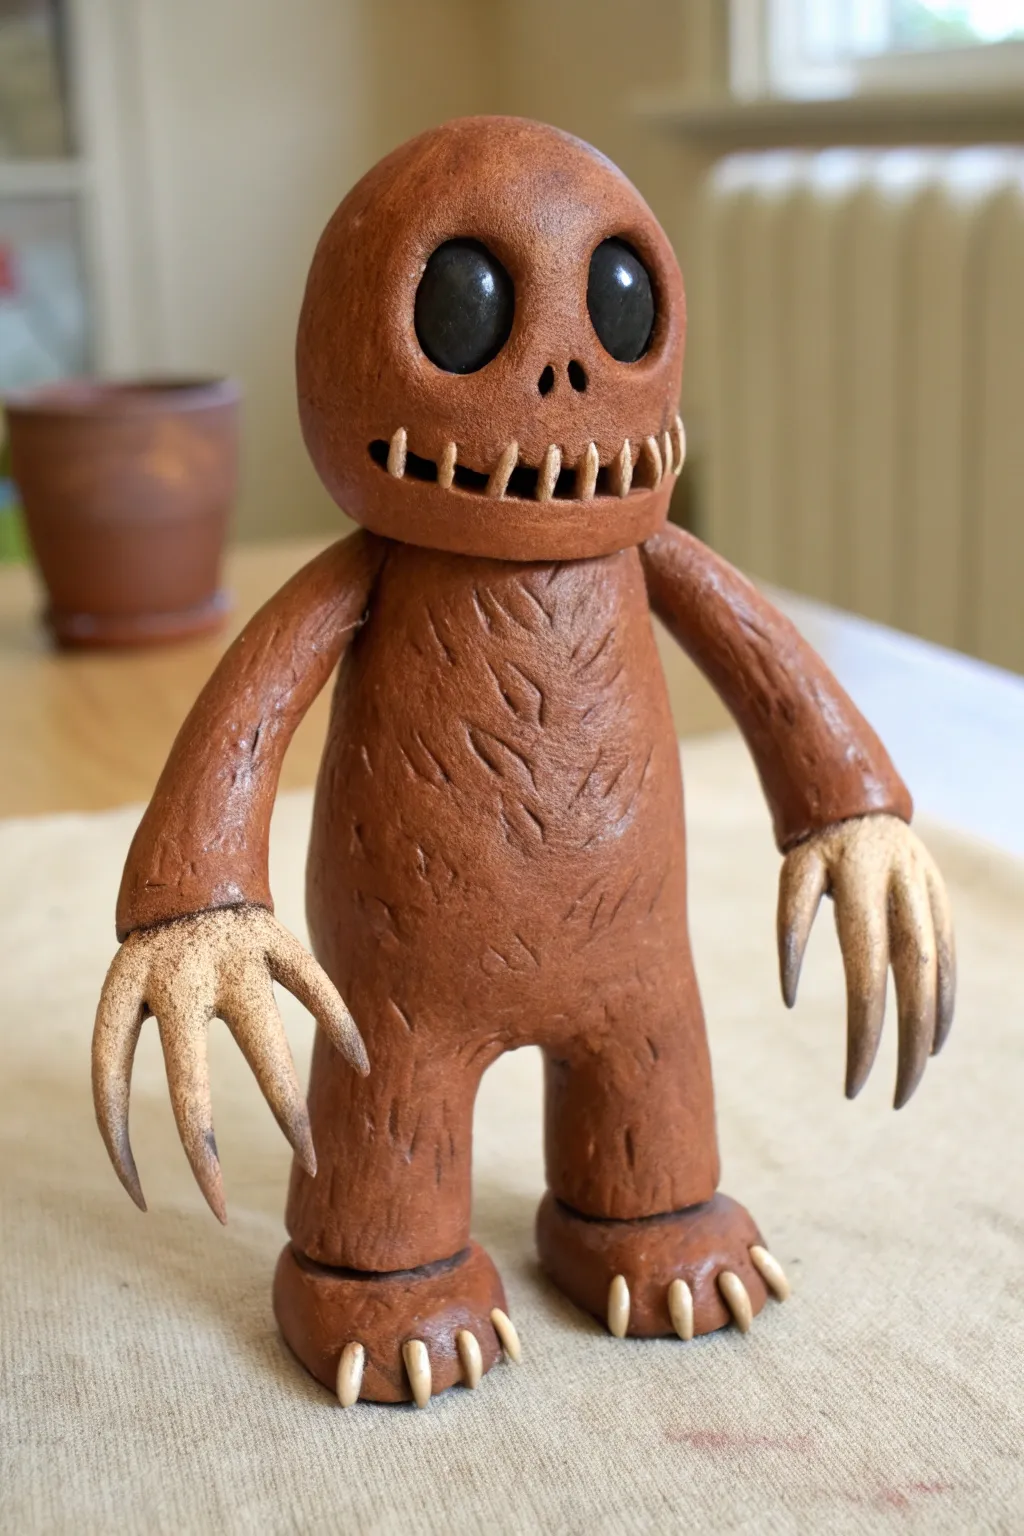
This eerie yet oddly charming figurine combines a smooth, skeletal finish with rough, fur-like textures. With its oversized claws and prominent stitched grin, it looks like a creature that wandered straight out of a dark fairytale forest.
Detailed Instructions
Materials
- Polymer clay (terracotta or reddish-brown)
- Polymer clay (pale bone or beige)
- Black glass beads or black clay (for eyes)
- Sculpting tools (needle tool, ball stylus, clay knife)
- Texture tool or stiff bristle brush
- Wire armature wire (aluminum, approx 16-18 gauge)
- Wire cutters
- Aluminum foil
- Acrylic paints (black, dark brown wash)
- Matte varnish or sealant
Step 1: Building the Armature & Body
-
Create the skeleton:
Start by twisting sturdy armature wire to form a basic stick-figure shape. You’ll need loops for the feet, a central spine, arms, and a loop for the large head. -
Bulk it up:
Crumple aluminum foil tightly around the wire frame. Build a large oval for the head and a cylindrical torso, keeping the limbs slightly thinner to allow for clay coverage. -
Apply the base layer:
Condition your terracotta-colored polymer clay until pliable, then roll it into sheets. Cover the entire foil armature, smoothing out the seams as you go until you have a solid, smooth brown figure. -
Refine the shape:
Ensure the legs are thick and sturdy enough to support the weight. The feet should be flat-bottomed ovals to keep the monster standing upright.
Step 2: Sculpting the Head & Face
-
Define the head shape:
Smooth the head into a large, egg-like dome. It should join directly to the body with little to no neck definition, creating a hunched look. -
Set the eyes:
Press two large hollows into the face for the eyes. Insert black glass beads or roll two balls of black clay, pressing them deep into the sockets so they look sunken. -
Carve the nose:
Using a small ball stylus, create two vertical teardrop shapes in the center of the face for nasal cavities. -
Create the mouth channel:
Use a clay knife to cut a wide, horizontal slit across the lower face for the mouth. Gently widen it to create a dark recess. -
Add the teeth:
Roll tiny, thin snakes of bone-colored clay. Press these vertically across the mouth opening to look like stitched teeth, spacing them evenly but imperfectly.
Sticky Situation
Use a drop of liquid polymer clay (or ‘Bake & Bond’) on the wire ends before adding the claws to ensure they don’t fall off after baking.
Step 3: Texturing the Body
-
Fur texture base:
For the torso and upper legs, use a needle tool to scratch in short, directional lines. This creates the illusion of coarse fur or matted hair. -
Deepen the details:
Go back over the fur texture with a slightly blunter tool, pressing deeper in some areas to create a ‘tufted’ pattern, especially on the chest and back. -
Keep the head smooth:
Be careful to keep the head relatively smooth and leather-like, contrasting with the rougher body texture.
Eye Glow
Instead of black beads, use glow-in-the-dark clay for the eyes. Add a tiny dot of UV resin after baking for a wet, shiny look.
Step 4: Claws & Finishing Touches
-
Form the claw base:
At the end of the brown arms, attach rounded stumps of the bone-colored clay. Blend the seam where the brown and bone clays meet. -
Sculpt the fingers:
Extrude three long, tapered cones of bone clay for each hand. Attach them to the stump, curling them slightly downward for a menacing grasp. -
Add toenails:
Create smaller, triangular spikes of bone clay. Press three or four onto the front of each brown foot section. -
Texture the bone:
Use a toothbrush or stiff brush to lightly stipple the bone-colored claws and toes, giving them a calcified, organic look rather than smooth plastic. -
Bake the figure:
Bake the sculpture according to your clay manufacturer’s specific temperature instructions—usually around 275°F (135°C) for 15-30 minutes per 1/4 inch of thickness.
Step 5: Painting & Aging
-
Apply a dark wash:
Once cool, mix black and dark brown acrylic paint with water to create a thin wash. Brush this over the entire figure, letting it settle into the fur grooves and around the teeth. -
Wipe back:
Immediately wipe the high points with a damp cloth or sponge. The dark paint will remain in the crevices, making the texture pop. -
Stain the claws:
I like to dab extra brown wash on the tips of the claws and toes to make them look dirty and used.
Place your menacing little monster on a shelf where he can keep watch over your other creations

TRACK YOUR CERAMIC JOURNEY
Capture glaze tests, firing details, and creative progress—all in one simple printable. Make your projects easier to repeat and improve.
Brain-Top Nightmare Head
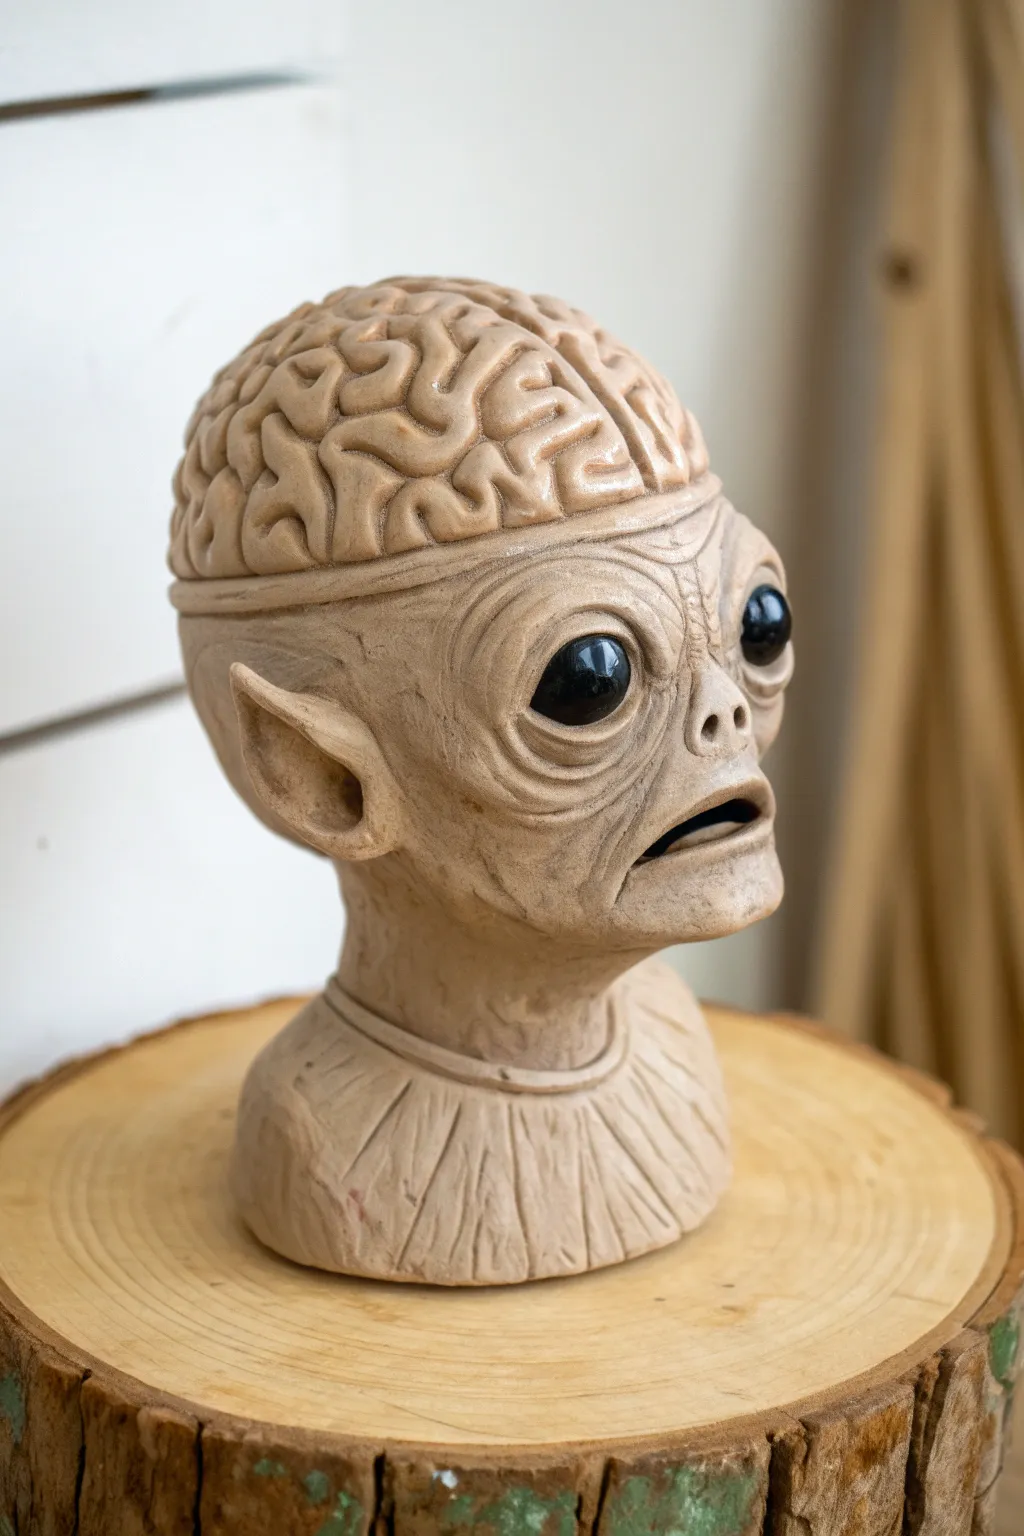
This unsettling bust combines classic sci-fi tropes with visceral textures, featuring an exposed brain atop a wrinkled, wide-eyed alien visage. The monochromatic, earthy finish gives it the look of a specimen found in an archeological dig or a dusty laboratory.
Step-by-Step Guide
Materials
- Polymer clay or air-dry clay (flesh or beige tone)
- Aluminum foil (for armature)
- Wire armature or wooden dowel
- Sculpting tools (loop tool, needle tool, silicone shapers)
- Two large black glass cabochons or beads (approx. 18-20mm)
- Texture sponge or stiff bristle brush
- Brown acrylic paint (burnt umber)
- Water and paper towels
- Matte varnish (optional)
- Gloss varnish (for the eyes)
Step 1: Building the Core
-
Prepare the Armature:
Since the head is bulbous, you need a strong core to save clay and reduce weight. Crumple aluminum foil into a tight ball for the cranial area and a slightly elongated shape for the neck and chin. Connect them securely. -
Establish the Base:
Insert a wire or wooden dowel into the foil neck to serve as a handle while you work. If you are using a base like the wood slice shown, you can mount the armature directly to it now, or wait until the end. -
Bulk Out the Form:
Cover the entire foil core with an even layer of clay, about 1/4 inch thick. Smooth the seams together so you have a seamless, blank head shape. Flatten the top of the skull slightly where the brain will eventually sit.
Step 2: Sculpting the Face
-
Insert the Eyes:
Press your large black glass cabochons firmly into the clay where the eyes should reside. Place them wide apart and slightly angled inward to create that classic alien look. -
Build the Eye Ridgelines:
Roll thin snakes of clay and place them around the glass eyes to form eyelids. Blend the outer edges into the face, but keep the inner edge against the glass crisp. I find using a small silicone tool helps keep the glass clean here. -
Shape the Nose and Mouth:
Add a small lump of clay for the nose area and use a small ball tool to indent two nostrils. Beneath that, cut a horizontal slit for the mouth. Push the lower lip slightly back to give the creature an agape, surprised expression. -
Define the Jaw and Cheeks:
Add volume to the cheekbones and define a weak, receding chin. The goal is a skeletal, gaunt appearance, so keep hollows under the cheekbones distinct. -
Add the Ears:
Shape two triangular wedges of clay for the pointed ears. Attach them to the sides of the head, blending the seams thoroughly. Use a sculpting tool to hollow out the inner ear canal.
Eyes Falling Out?
If the glass eyes won’t stay put, add a tiny drop of liquid clay adhesive (like Bake & Bond) or PVA glue into the socket before pressing the cabochon back in.
Step 3: Creating the Brain and Details
-
Mark the Cranial Cut:
Use a needle tool or knife to carve a distinct line around the forehead, separating the face from the exposed brain area. You want this to look like a surgical separation or a biological ridge. -
Form the Brain Texture:
Roll many small, uneven snakes of clay. Begin placing them onto the top of the head in a winding, maze-like pattern. Ensure they act like gyri and sulci of a brain—tightly packed and squiggling against each other without blending them flat. -
Texture the Skin:
Using a needle tool, draw deep wrinkles around the eyes, forehead, and mouth. Radiate lines out from the corners of the eyes. Use a texture sponge to lightly stipple the skin on the cheeks and neck to mimic pores. -
detail the Neck and Collar:
Add a ring of clay at the base of the neck to form a simple collar. Use a tool to carve vertical striations or ribs into the sculpted fabric or skin of the bust’s base for visual interest.
Pro Tip: Brain Variation
Make the brain snakes slightly different thicknesses. A uniform noodle size looks artificial; varying them creates a more organic, biological appearance.
Step 4: Finishing Touches
-
Bake or Dry:
Follow the manufacturer’s instructions for your specific clay. If using polymer, bake at the recommended temperature. If using air-dry, let it sit for at least 24-48 hours until fully hardened. -
Apply an Antiquing Wash:
Dilute burnt umber acrylic paint with water until it is very thin. Brush this wash over the entire sculpture, making sure it gets into every brain crevice and wrinkle. -
Wipe Away Excess:
Before the paint dries, gently wipe the surface with a damp paper towel or sponge. The dark paint will remain in the deep textures, highlighting the sculpture’s details, while the raised areas will return to the clay color. -
Clean and Seal:
Ensure the glass eyes are wiped clean of any paint. Once the paint is dry, apply a gloss varnish to just the black eyes to make them look wet and alive.
Place your finished specimen on a shelf where its dark stare can unnerve any unexpected visitors
Warty Bog Ogre
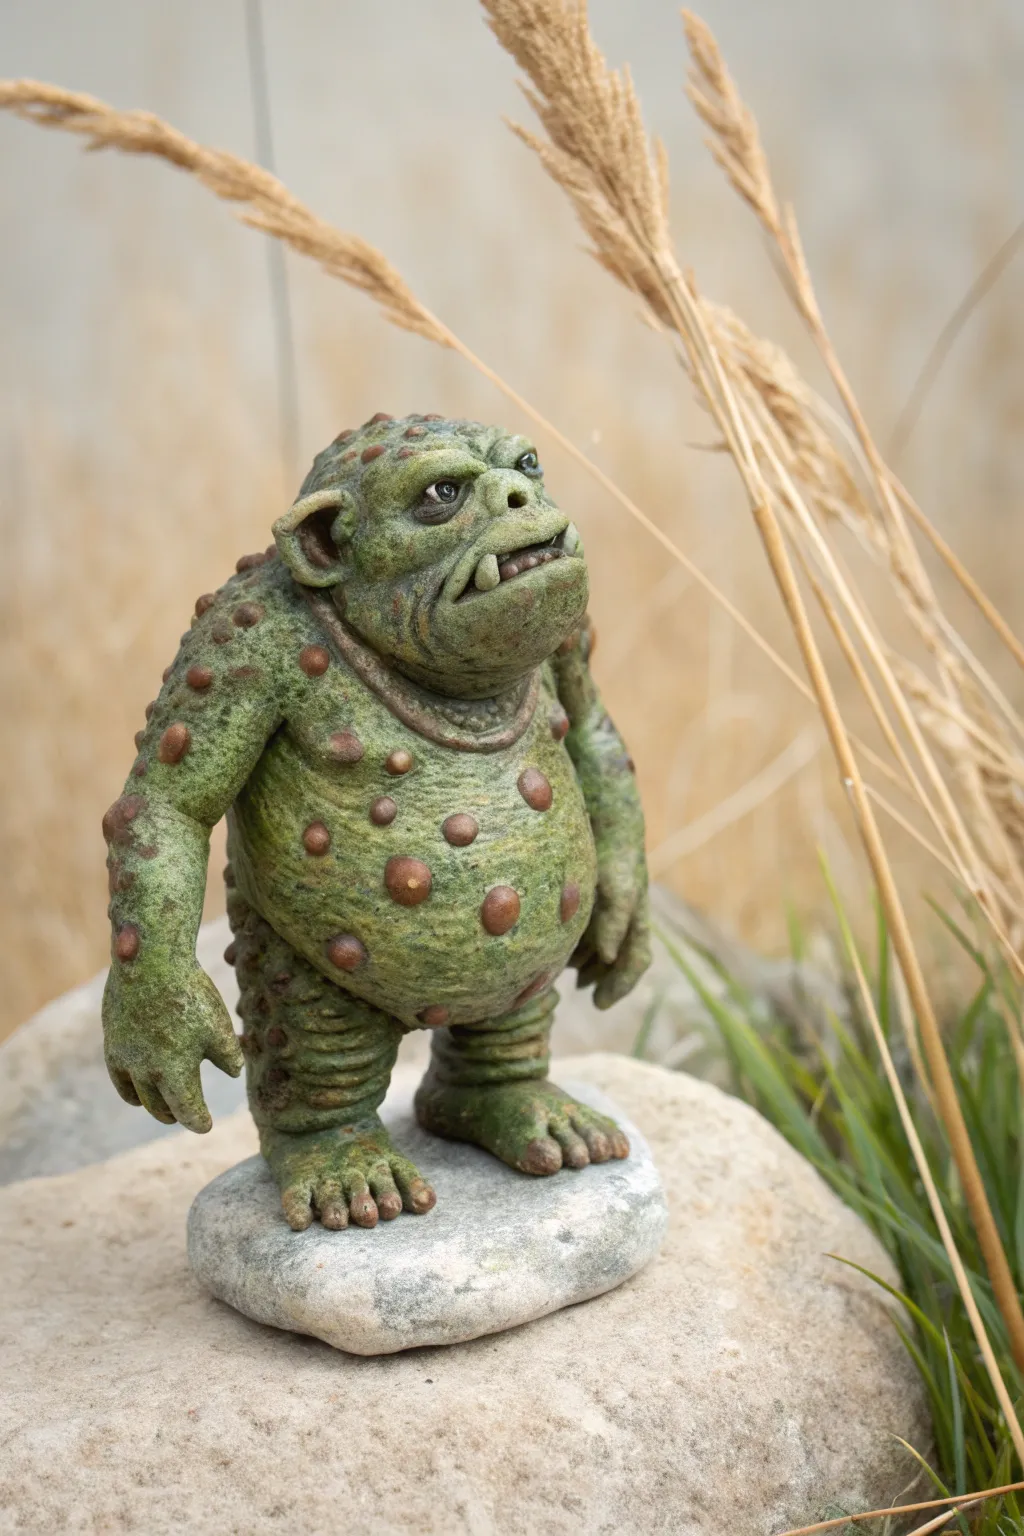
This grumpy green swamp dweller features textured, mossy skin covered in distinctive brown warts and deep wrinkles. You’ll layer various shades of green and brown to create a realistic, aged biological look that brings this fantastical creature to life.
Step-by-Step
Materials
- Polymer clay (green or grey base)
- Aluminum foil (for armature)
- Thin floral wire
- Sculpting tools (ball styluses, needle tool, rubber shapers)
- Acrylic paints (moss green, olive, dark brown, tan, black, white)
- Matte varnish or sealant
- Gloss varnish (for eyes and mouth)
- Small flat river stone (for the base)
- Super glue or strong epoxy
- Texturing tools (sponge, stiff brush, or sandpaper)
Step 1: Armature & Basic Form
-
Build the core:
Crumple aluminum foil into a tight egg shape for the body and a smaller sphere for the head. Insert a piece of floral wire connecting the two to create a neck. -
Wire limbs:
Twist four lengths of wire for the arms and legs, embedding them firmly into the foil body. Bend the leg wires at the knees and ankles to create a slight squatting stance. -
Cover with clay:
Condition your polymer clay until soft, then flatten sheets of it to cover the entire foil armature. Smooth the seams with your fingers or a rubber tool so the foil is completely hidden.
Step 2: Sculpting the Features
-
Define the limbs:
Add extra snakes of clay to bulk up the arms and thighs. The forearms should be thick and heavy. Carve deep horizontal lines around the ankles and wrists to simulate sagging, wrinkled skin. -
Shape the face:
Add a small ball of clay for the nose and two spheres for eyes. Blend a heavy brow ridge over the eyes to give him a permanent scowl. -
Create the mouth:
Cut a horizontal slit for the mouth, pulling the lower lip down slightly. Insert two tiny cones of white clay pointing upward for teeth. -
Add the ears:
Attach small, flat discs to the sides of the head. Use a ball stylus to press the centers in, forming cup-shaped ears. -
Refine the belly:
Add a large, flat pancake of clay to the stomach area to give him a rotund, pot-bellied appearance. Blend the edges seamlessly into the torso.
Slumping Ogre?
If the clay gets too soft and the limbs sag while sculpting, put the figure in the fridge for 10 minutes to firm up the clay before continuing.
Step 3: Texture & Detailing
-
Create the skin texture:
Gently press a piece of coarse sandpaper or a stiff stipple sponge all over the clay surface. This removes fingerprints and creates a pores-like texture essential for a realistic creature. -
Apply the warts:
Roll strictly varying sizes of tiny clay balls. Press them randomly onto the shoulders, belly, and head. Flatten them slightly so they look like organic bumps, not just stuck-on beads. -
Detail the hands and feet:
Sculpt four thick toes on each foot and fingers on the hands. Use a needle tool to indent toenails and fingernails. -
Bake the sculpture:
Place your ogre on a baking sheet. Bake according to your specific clay’s package instructions (usually 275°F/135°C for 15-30 minutes). Let it cool completely.
Pro Tip: Wart Realism
For extra gross realism, mix a little translucent liquid clay with your brown paint for the warts to give them a slightly semi-transparent, fluid look.
Step 4: Painting & Finishing
-
Base coat:
Paint the entire figure with a dark olive green acrylic paint. Ensure you get paint into every deep crevice and wrinkle. -
Dry brush the skin:
Mix a lighter moss green. Dip a dry brush into the paint, wipe most of it off on a paper towel, and lightly dust the raised surfaces of the skin to highlight the texture. -
Color the warts:
Carefully paint each raised wart with a reddish-brown or dark tan color. I find using a fine-point brush helps keep the edges clean. -
Detail the face:
Paint the teeth an off-white or yellowish bone color. Add tiny black pupils to the eyes and a small white catching light dot to make them look alive. -
Mount and seal:
Glue the finished ogre’s feet to your river stone. Apply a matte varnish to the skin to protect the paint, and a touch of gloss varnish to the eyes, mouth, and open warts for a wet look.
Now you have a marvellously grotesque guardian for your desk or garden shelf
Spider-Leg Head Creeper
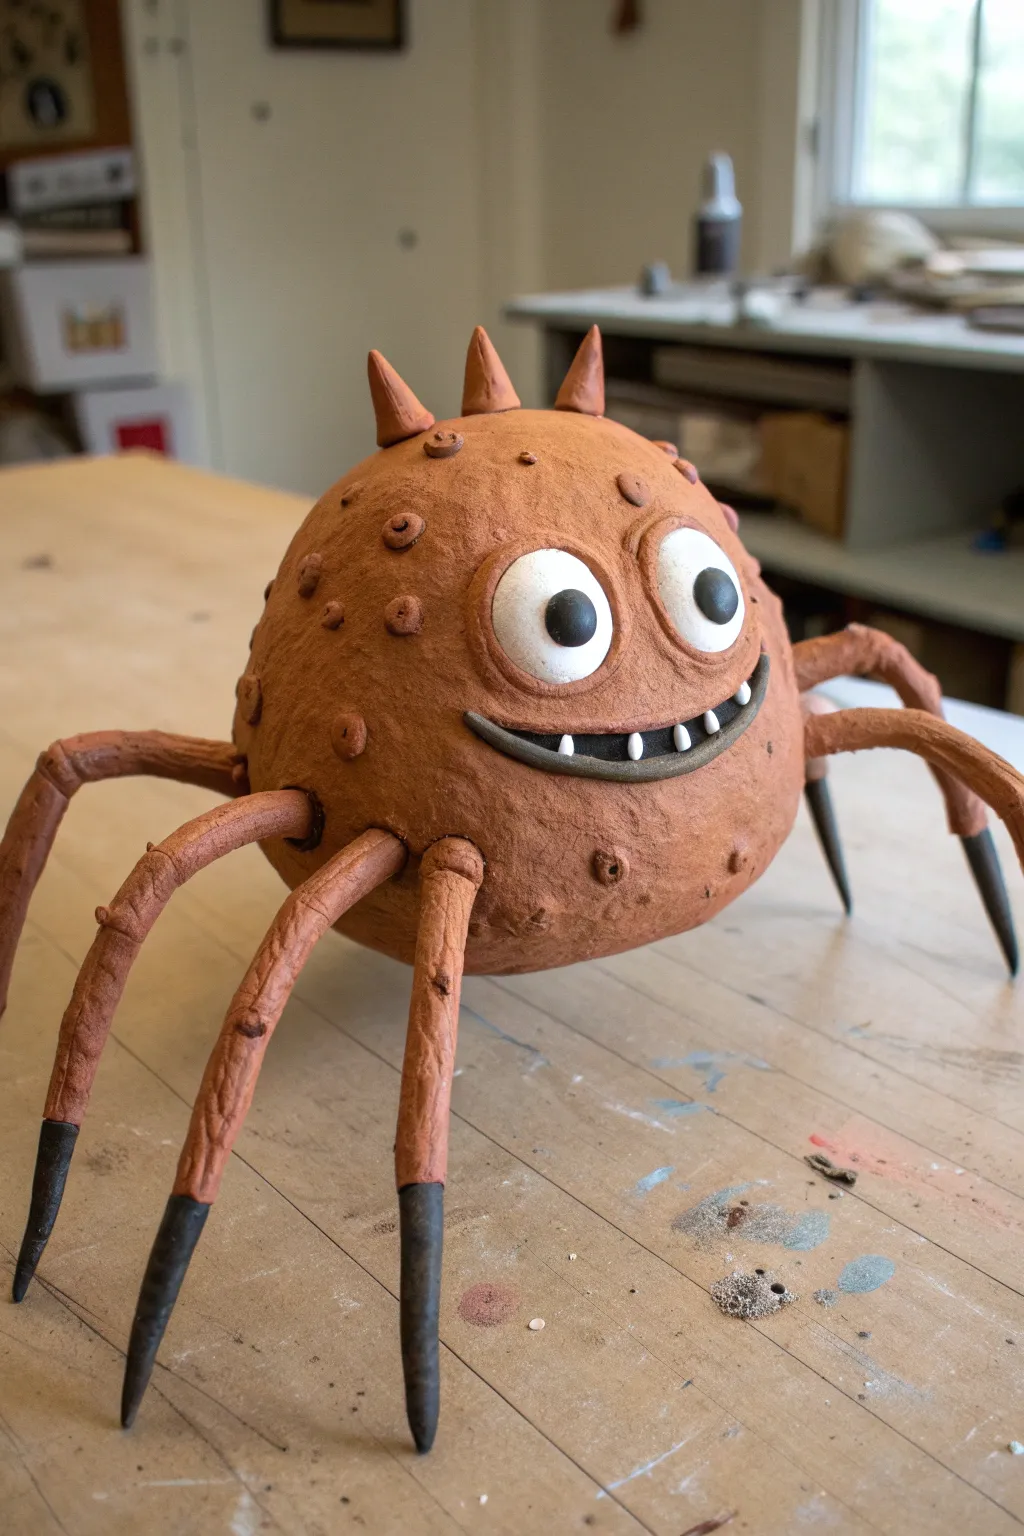
This whimsical yet spooky sculpture features a textured, spherical body perched on spindly spider legs. With its cartoonishly large eyes and toothy grin, it balances the line between scary and silly perfectly.
Step-by-Step Guide
Materials
- Red earthenware or terracotta polymer clay
- Aluminum foil
- Thick gauge floral wire or armature wire
- White polymer clay (for eyes/teeth)
- Black polymer clay (for pupils/leg tips)
- Black acrylic paint
- Sculpting tools (needle tool, ball stylus)
- Texture sponge or stiff bristle brush
- Wire cutters
- Clay adhesive or liquid clay (optional)
Step 1: Forming the Body Core
-
Create the armature:
Crumple a large amount of aluminum foil into a tight ball, roughly the size of a grapefruit. This saves clay and reduces baking weight. -
Cover with clay:
Roll out a sheet of your red clay (about 1/4 inch thick) and wrap it completely around the foil ball. Smooth the seams until the sphere is seamless. -
Texture the surface:
Using a stiff bristle brush or a texture sponge, tap the entire surface of the clay ball to create a rough, pitted skin texture. -
Add warts and bumps:
Roll tiny balls of red clay, flatten them slightly, and press them randomly all over the body. Use a small ball stylus to press into the center of some bumps for a crater look.
Supporting the Weight
Before baking, place a block of scrap wood or a ball of foil under the creature’s belly. This takes the strain off the wire legs while the clay is soft and hot.
Step 2: Constructing the Legs
-
Cut the leg wires:
Cut eight equal lengths of thick armature wire. They should be long enough to go deep into the body and extend out for the main leg length. -
Insert the wires:
Poke the wires into the sides of the clay body—four on each side. Bend them downwards at a sharp angle to create the ‘knee’ joint. -
Wrap the legs:
Take long snakes of red clay and wrap them around the wires. Smooth the clay down the length of the wire, tapering it slightly as you get closer to the foot. -
Texture the legs:
Lightly scratch longitudinal lines along the legs using a needle tool to mimic a segmented or wrinkled insect texture. -
Add the spike tips:
Switch to black clay. Form cone shapes and attach them to the ends of the red clay legs to act as the sharp, creepy feet. Blend the seam between the red and black clay well.
Legs Keep Cracking?
If the clay cracks around the wire legs when bending, your clay is too dry. Mix in a drop of clay softener or baby oil to improve flexibility before wrapping the wire.
Step 3: Face and Details
-
Add head spikes:
Form three small cones of red clay. Attach these to the very top of the head in a mohawk or crown formation. Blend the bases into the head. -
Create the eye sockets:
Press two large shallow indentations into the front of the face where the eyes will go using your thumbs. -
Form the whites:
Roll two generous balls of white clay and press them into the sockets. Flatten them slightly but keep them bulging. -
Add pupils:
Place small discs of black clay onto the white eyes. I find putting them slightly off-center makes the expression wackier. -
Sculpt the mouth:
Roll a thin snake of black clay for the mouth shape and press it onto the face in a wide U-shape. Press small white triangles or tic-tacs of clay onto this black line for the teeth. -
Final touches:
Use a thin snake of red clay to outline the mouth and eyes slightly, creating eyelids and lips that integrate the features into the skin. -
Bake carefully:
If using polymer clay, bake according to the package instructions. Support the belly with a bit of foil so the legs don’t sag under the weight while hot.
Once cooled, your creepy crawler is ready to guard your desk or spook your guests
Snail-Backed Night Beast
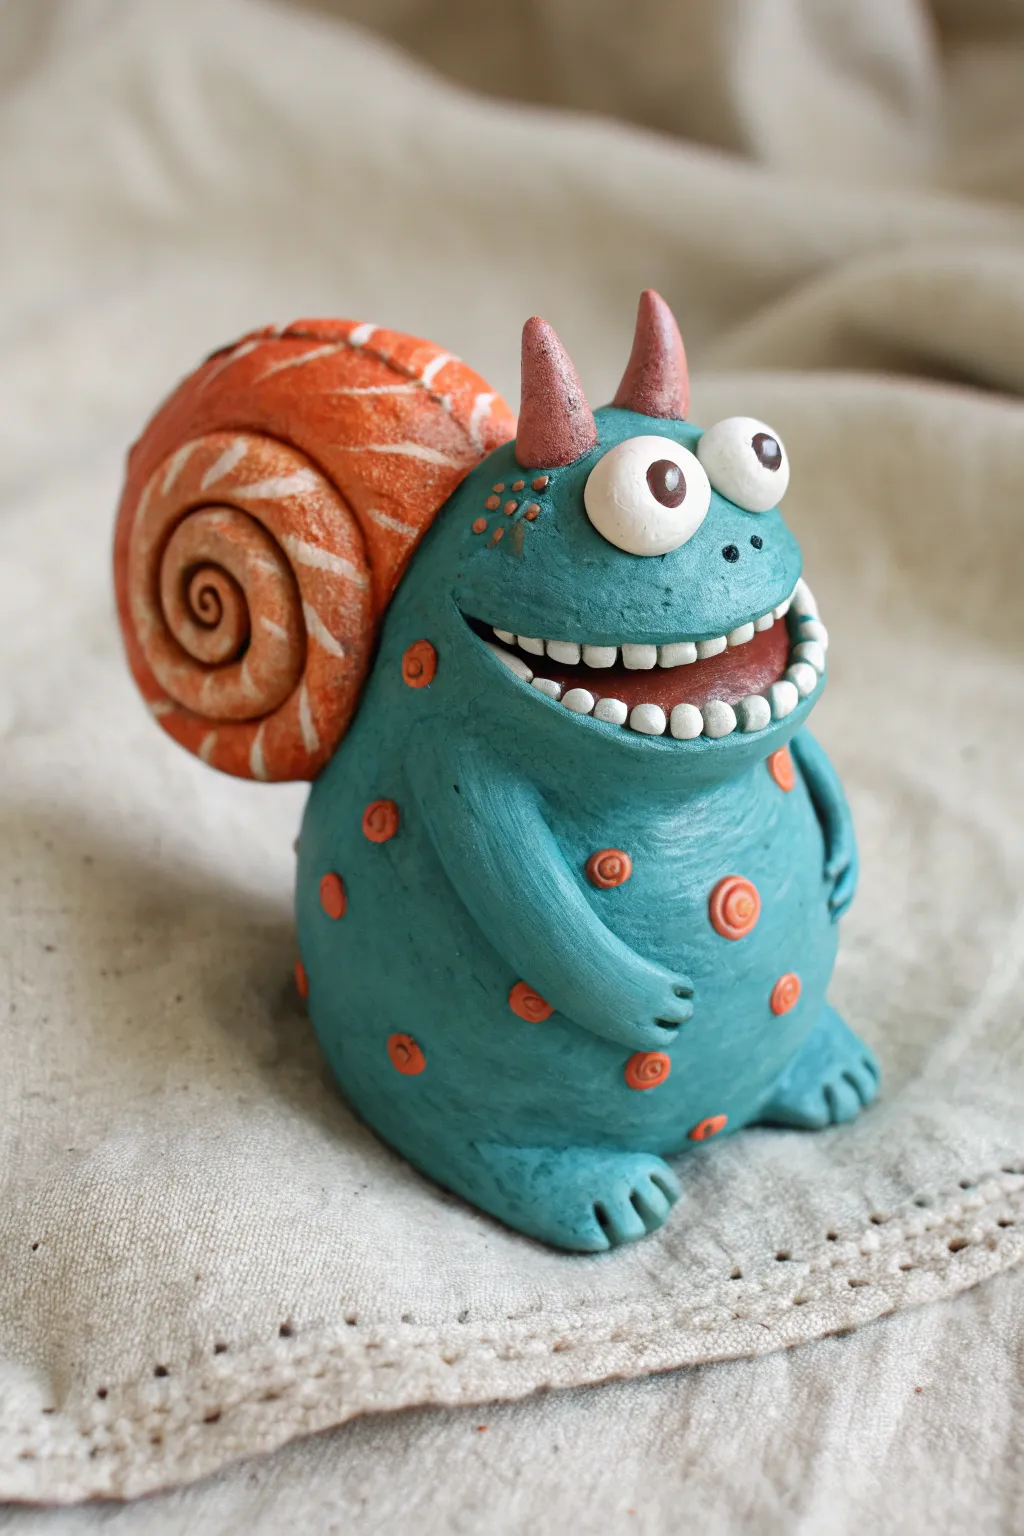
Embrace the goofy side of spooky with this charming monster figurine. Featuring a vibrant teal body, a detailed orange shell, and a delightfully toothy grin, this clay creation makes for a perfect desk companion or Halloween decoration.
Step-by-Step
Materials
- Polymer clay (Teal, Orange, White, Black, Red/Brown)
- Sculpting tools (ball styluses, needle tool, sculpting knife)
- Aluminum foil (for armature)
- Acrylic rolling pin
- Baking sheet and parchment paper
- Liquid polymer clay or ‘Bake & Bond’
- Texture sponge or coarse sandpaper
- Clear matte varnish (optional)
Step 1: Forming the Core Body
-
Create the armature:
Begin by crumpling aluminum foil into a pear shape. This will be the monster’s belly and head. Compress it tightly so it’s a solid base that saves you clay later. -
Cover with teal clay:
Condition your teal polymer clay until soft. flatten a large sheet and wrap it entirely around the foil armature. Smooth out any seams with your thumbs so you have a seamless pear-shaped blob. -
Add texture:
Gently press a texture sponge or a piece of coarse sandpaper against the teal surface. Do this all over to give the skin a leathery, monster-like appearance rather than leaving it perfectly smooth. -
Sculpt the feet:
Roll two small balls of teal clay. Flatten them slightly and attach them to the bottom front of the body for feet. Use a sculpting tool to press in three indentations on each to create simple toes. -
Shape the arms:
Roll two sausage shapes of teal clay. Attach them to the sides of the body, curving them forward so they rest on the belly. Use your needle tool to faint fingers into the ends.
Baking Pro Tip
Prop the shell up with some extra crumpled foil or polyester batting during baking. This prevents the heavy shell from sagging or pulling the monster backwards in the oven.
Step 2: Building the Shell & Horns
-
Form the shell base:
Roll a long, tapered snake of orange clay. Coil it up like a cinnamon roll to create a classic snail shell shape. The center should be the thickest part. -
Add shell patterns:
Take very thin strands of white clay and lay them across the orange coil to create stripes. Roll the shell gently on your work surface to embed the white strips flat into the orange clay. -
Texture the shell:
Use a needle tool or small brush to stipple the surface of the shell, giving it a pitted, organic texture similar to the body but slightly rougher. -
Attach the shell:
Apply a drop of liquid clay or bond to the back of your monster figure. Press the shell firmly onto the back, blending the clay edges underneath where they meet the body so it sticks securely. -
Add the horns:
Shape two small cones from brownish-orange clay. Attach them to the top of the head area. I find smooth blending at the base helps them look like they are growing out of the skin.
Level Up: Slime Trail
After baking, use UV resin or clear glossy varnish mixed with a tiny drop of green ink to paint a shiny ‘slime’ trail behind your monster or dripping from its mouth.
Step 3: The Face & Details
-
Carve the mouth:
Use a knife tool to cut a wide, crescent-shaped slit into the face for the mouth. Gently pry it open and smooth the inside edges. -
Fill the mouth:
Press a thin layer of dark reddish-brown clay into the back of the mouth cavity to create depth and a tongue area. -
Add teeth:
Roll many tiny balls of white clay. Press them into a row along the top and bottom lips. Flatten them slightly into rectangles to create that goofy, toothy grin. -
Make the eyes:
Roll two large balls of white clay and place them on top of the head, just in front of the horns. Add medium dots of brown clay for irises and tiny white specs for highlights. -
Create body spots:
Roll tiny balls of orange clay. Press them flat onto the body in random spots. Use a small ball stylus to poke a dimple in the center of each spot. -
Final bake:
Double-check your monster for fingerprints. Bake according to your clay manufacturer’s instructions (usually 275°F/135°C for 15-30 minutes per 1/4 inch thickness).
Let your monster cool completely before displaying it on your shelf to guard your books
Two-Faced Split Monster
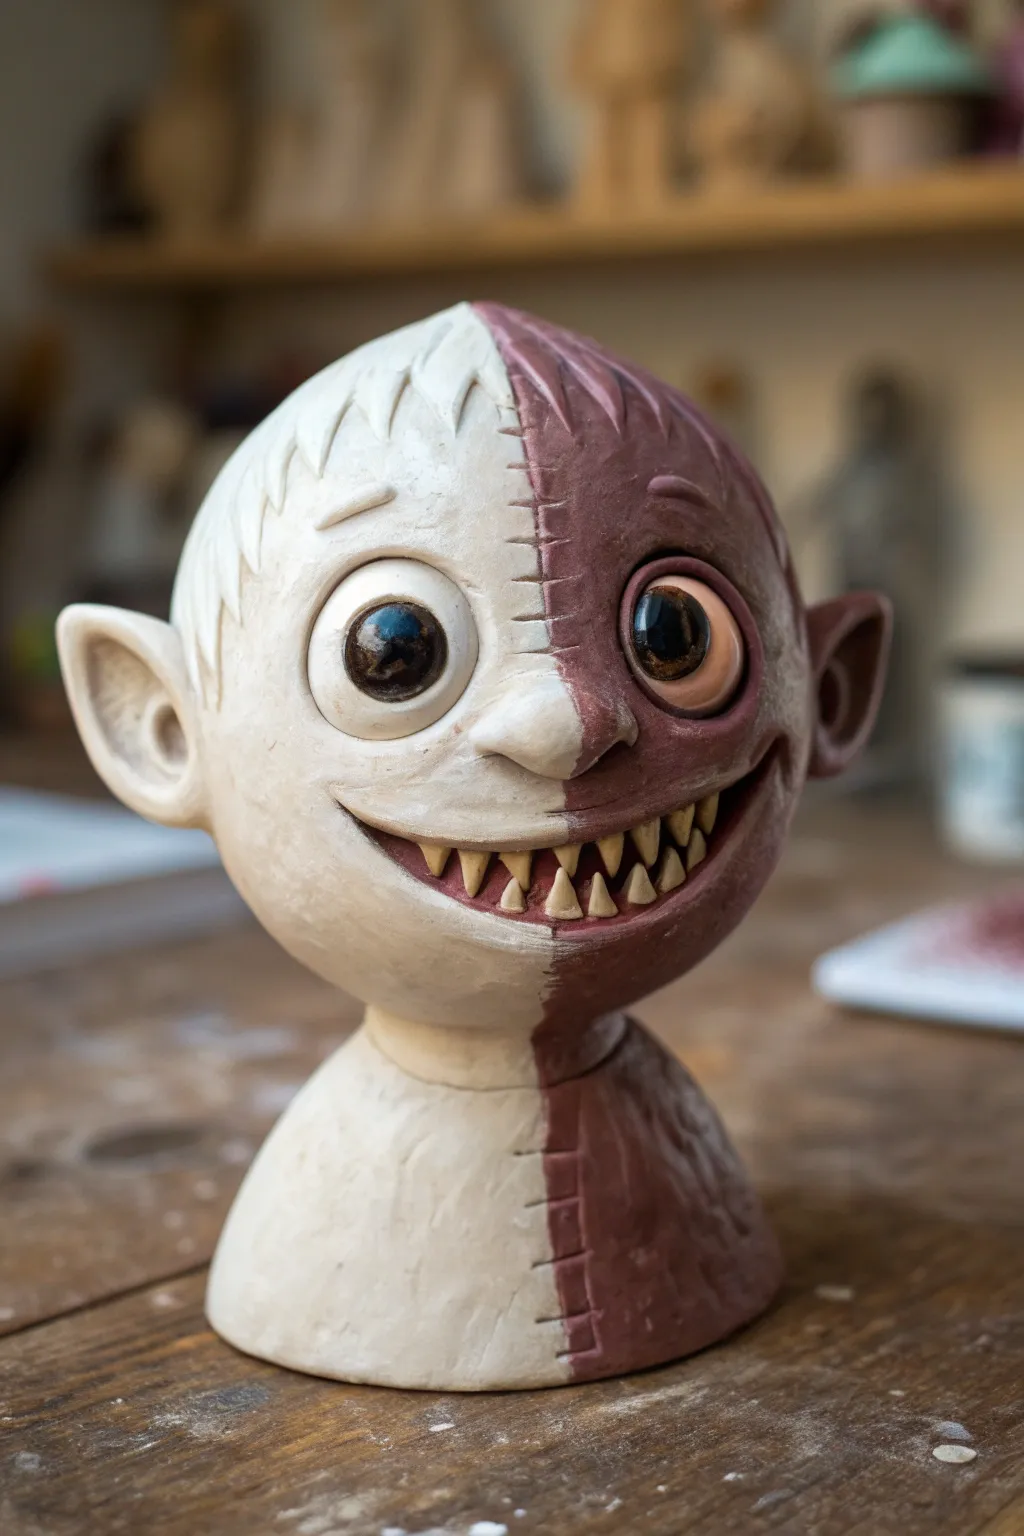
This striking two-toned monster project explores the concept of duality with a distinct centerline visually stitching two personalities together. With its oversized eyes, shark-like grin, and textured surface, this sculpture offers a fantastic opportunity to practice precision joining and contrasting finishes.
How-To Guide
Materials
- Polymer clay (white and terracotta/reddish-brown)
- Aluminum foil
- Armature wire (heavy gauge)
- Clay sculpting tools (needle tool, ball stylus, loop tool)
- Acrylic paints (black, white, brown, yellow)
- Gloss varnish or UV resin
- Isopropyl alcohol and soft brush
- Wooden base (optional)
- Rolling pin or pasta machine
Step 1: Armature and Base Structure
-
Create the core:
Crumple aluminum foil into a tight ball for the head, slightly larger than a tennis ball, and a smaller, tapered cone shape for the neck and upper shoulders. Pierce them with a heavy gauge wire for stability. -
Prepare the clay:
Condition both your white and terracotta-colored clays separately until they are soft and pliable. Use a rolling pin to create even sheets of both colors, aiming for about 1/4 inch thickness. -
Cover the form:
Cover the left side of your foil armature with the white clay and the right side with the terracotta clay so they meet directly in the center. Smooth the clay down, ensuring there are no air bubbles trapped between the foil and the clay.
Step 2: Sculpting the Features
-
Define the seam:
Using a needle tool, gently score a line right down the center where the two colors meet. Press small indentations perpendicular to this line to create the ‘stitch’ marks, making the skin look pulled tight. -
Socket preparation:
Use a large ball tool or your thumbs to press deep indentations where the eyes will go. These monster eyes are oversized, so make the sockets quite dominant on the face. -
Insert the eyes:
Roll two balls of white clay for the eyeballs. Insert them into the sockets. For the pupil and iris, you can either sculpt them flat now or insert glass cabochons if you prefer a realistic shine immediately. -
Refine the eyelids:
Roll thin coils of the respective skin colors (white for left, red-brown for right) and place them over and under the eyeballs to form eyelids. I find using a silicone tool helps blend these seamlessly into the face without leaving fingerprints. -
Build the nose:
Add a small lump of clay for the nose, split perfectly down the middle with the two colors. Shape it into a snub, characterful nose and blend the edges into the cheeks. -
Carve the mouth:
Cut a wide, curved slit for the mouth using a craft knife. Press the clay inwards to create depth for the gums and teeth. Ensure the smile reaches far back towards the ears.
Keep it Clean
Use baby wipes or hand sanitizer to clean your hands and tools when switching from the dark clay to the white clay to avoid muddying the pristine white side.
Step 3: Ears, Hair, and Details
-
Form the ears:
Shape two large, pointed ears. Attach the white ear to the left side and the brown ear to the right. Blend the seams thoroughly behind the jawline so they look organic. -
Create the teeth:
Roll a very thin snake of off-white or yellowish clay. Cut it into tiny, sharp triangles. Carefully place these individually into the mouth, creating a jagged, threatening row of teeth on the bottom jaw. -
Add hair texture:
Apply flattened patches of clay to the top of the head for hair. Use a sculpting tool to carve deep grooves and spikes, maintaining the split color scheme—white hair on the left, brown hair on the right. -
Texturize the skin:
Before baking, use a stiff brush or a crumpled ball of foil to gently tap texture onto the skin surface. This makes the clay look less like plastic and more like organic hide. -
Stitch detailing:
Go back over your center seam. Add tiny, thin rolls of clay across the gap to look like physical threads holding the two halves together.
Glow Up
For a spooky night-light effect, use glow-in-the-dark polymer clay for the white half of the face and the teeth.
Step 4: Finishing Touches
-
Bake the sculpture:
Bake your piece according to the polymer clay package instructions. Let it cool completely inside the oven to prevent cracking. -
Apply a wash:
Dilute brown and black acrylic paint with water. Brush this wash over the entire sculpture, getting it into the cracks, hair grooves, and teeth gaps, then quickly wipe away the excess with a paper towel to enhance the shadows. -
Paint the eyes:
Paint the irises a deep glossy brown and add a stark black pupil. Add a tiny white reflection dot to bring life to the character. -
Gloss the wet areas:
Apply a high-gloss varnish or UV resin specifically to the eyes, the teeth, and the inside of the gums. This moisture contrast is what makes the monster truly pop.
Once the gloss is dry, display your divided creature where the light can catch those shiny, mischievous eyes
Melting Wax Wraith Monster
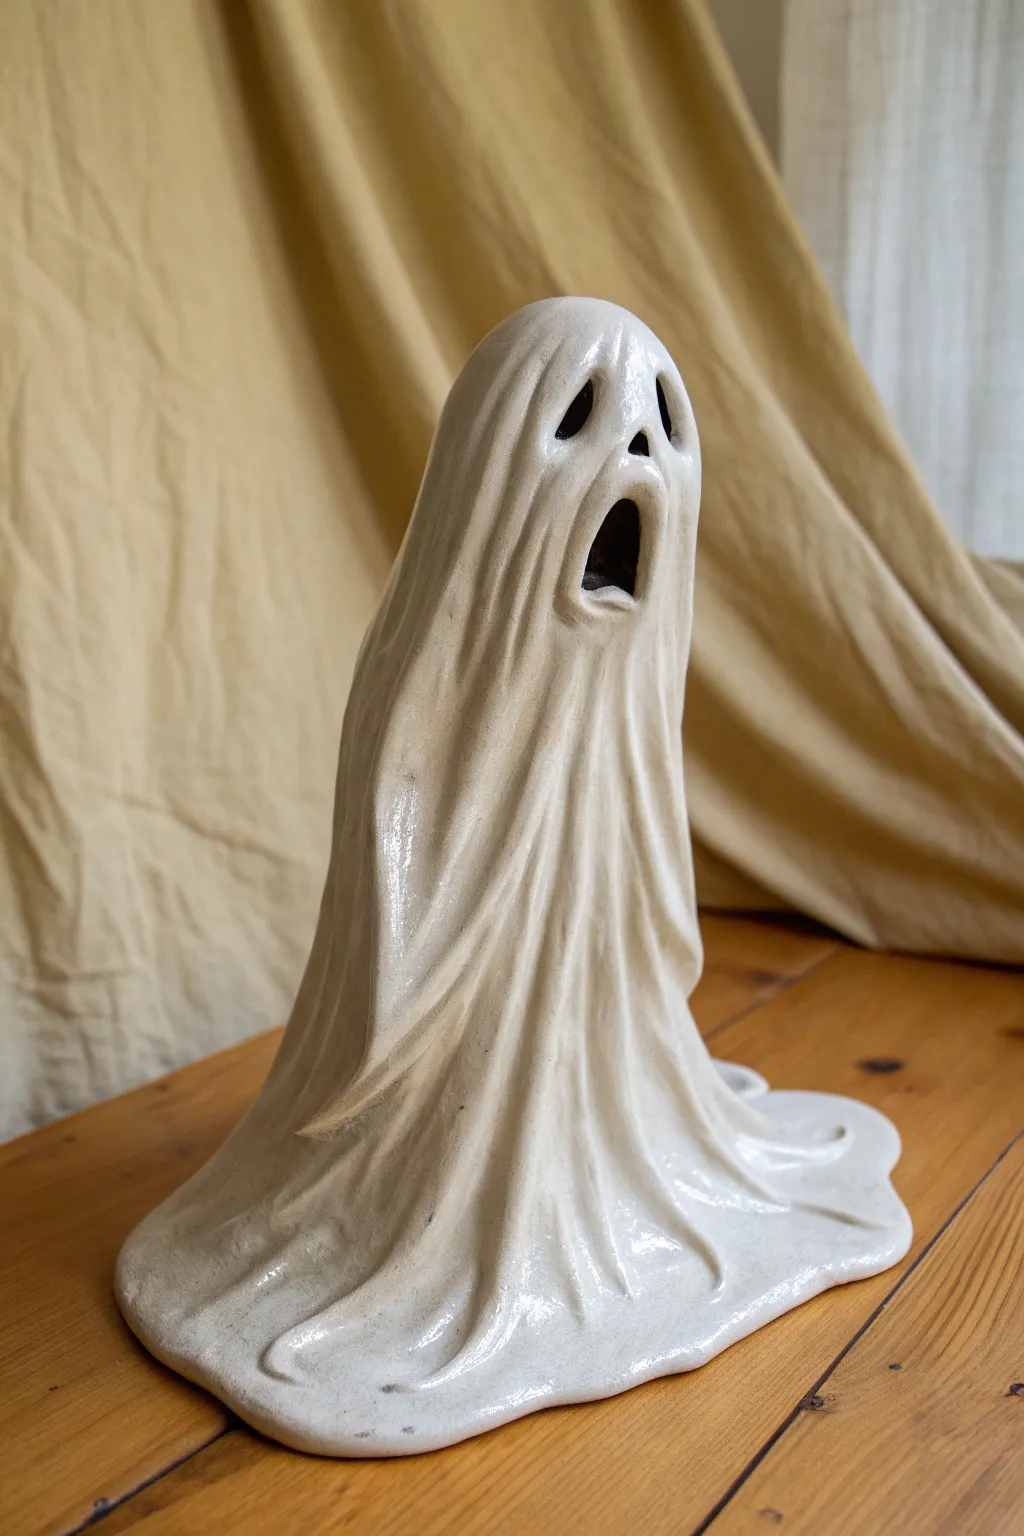
This spooky ceramic sculpture captures the eerie essence of a spirit dissolving into a puddle of wax. The glossy, cream-colored glaze mimics the texture of both old bone and melting candles, creating a haunting tabletop piece perfect for Halloween decor.
Step-by-Step Guide
Materials
- White earthenware or sculptural clay body
- Basic clay tools (needle tool, modeling tool, sponge)
- Wooden dowel or rolling pin
- Newspaper or aluminum foil (for armature)
- Piece a wooden board or bat
- Fettling knife
- Loop tool for carving
- Slip and scoring tool
- Clear or antique white glossy glaze
- Brown iron oxide wash or thinned acrylic paint (for finishing)
Step 1: Building the Form
-
Prepare the Armature:
Begin by crumpling a tight ball of newspaper or foil to act as the head, and create a taller, conical support underneath it (either more paper or a cardboard cone). This will support the clay ‘sheet’ while it dries. -
Roll the Slab:
Roll out a slab of white clay to roughly 1/4 inch thickness. Use a large enough piece to drape completely over your armature with plenty of excess at the bottom. -
Drape the Ghost:
Carefully lift your clay slab and drape it over the armature. Allow the clay to fall naturally, but guide the folds with your fingers to create deep, dramatic vertical pleats that mimic fabric. -
Form the Puddle:
At the base, let the excess clay pool outward onto your work surface. Flatten these edges irregularly to look like melting wax or slime spreading across the floor. -
Refine the Drapes:
Strengthen the illusion of gravity by using a modeling tool to deepen the recesses between the folds. The fabric should look heaviest at the bottom where it merges into the puddle base.
Gravity Assistance
When draping the initial slab, let the clay sit for 10 minutes first. Slightly stiffer clay holds the ‘fabric’ folds better without collapsing.
Step 2: Sculpting the Features
-
Position the Face:
Locate where the head is under the clay sheet. Gently press inward with your thumbs to create shallow indentations for the eye sockets and an elongated area for the mouth. -
Cut the Openings:
Use a fettling knife or needle tool to carefully cut out two tear-drop shaped eyes and a long, wailing mouth. Keep the edges smooth and rounded. -
Hollow and Clean:
Once the clay is leather-hard (firm but still cool), carefully remove the paper or foil armature from underneath. Use a loop tool to clean up the inside walls if they are too ragged. -
Refine the Expression:
Use a damp sponge or your finger to smooth the cut edges of the face. You want the holes to look like voids in a smooth sheet, not sharp cuts. -
Detail the Folds:
Go back over the vertical folds with a damp sponge. Soften any sharp ridges so the ‘fabric’ looks worn and soft rather than angular. -
Check Stability:
Ensure the base is wide enough to support the height. If the ‘puddle’ edges are too thin, reinforce them underneath with a small coil of clay and smooth it in.
Internal Illumination
Cut a large hole in the bottom of the base before firing. This lets you insert an LED tea light, making the eyes and mouth glow eerily in the dark.
Step 3: Firing and Glazing
-
Bisque Fire:
Allow the piece to dry completely slowly (this may take a week or more for thick sections) before bisque firing it in the kiln according to your clay body’s specifications. -
Apply Oxide Wash:
To get the aged look seen in the photo, apply a watered-down iron oxide wash or a dark underglaze into the deep folds and eye sockets. Then, wipe away the excess on the high points with a sponge. -
Glaze Application:
Dip or brush a glossy white or clear glaze over the entire piece. The gloss is crucial for achieving that wet, melting wax appearance. -
Glaze Firing:
Fire the piece a second time to the temperature required by your glaze. Make sure the bottom is wiped clean of glaze so it doesn’t stick to the kiln shelf. -
Alternative: Acrylic Finish:
If you are using air-dry clay instead of ceramic, paint the dried piece with a creamy off-white acrylic. Then, use a diluted brown paint wash to darken the crevices, wiping it back before sealing with a high-gloss varnish.
Now you have a hauntingly beautiful wraith that looks frozen in time
Creepy-Cute Chibi Monster
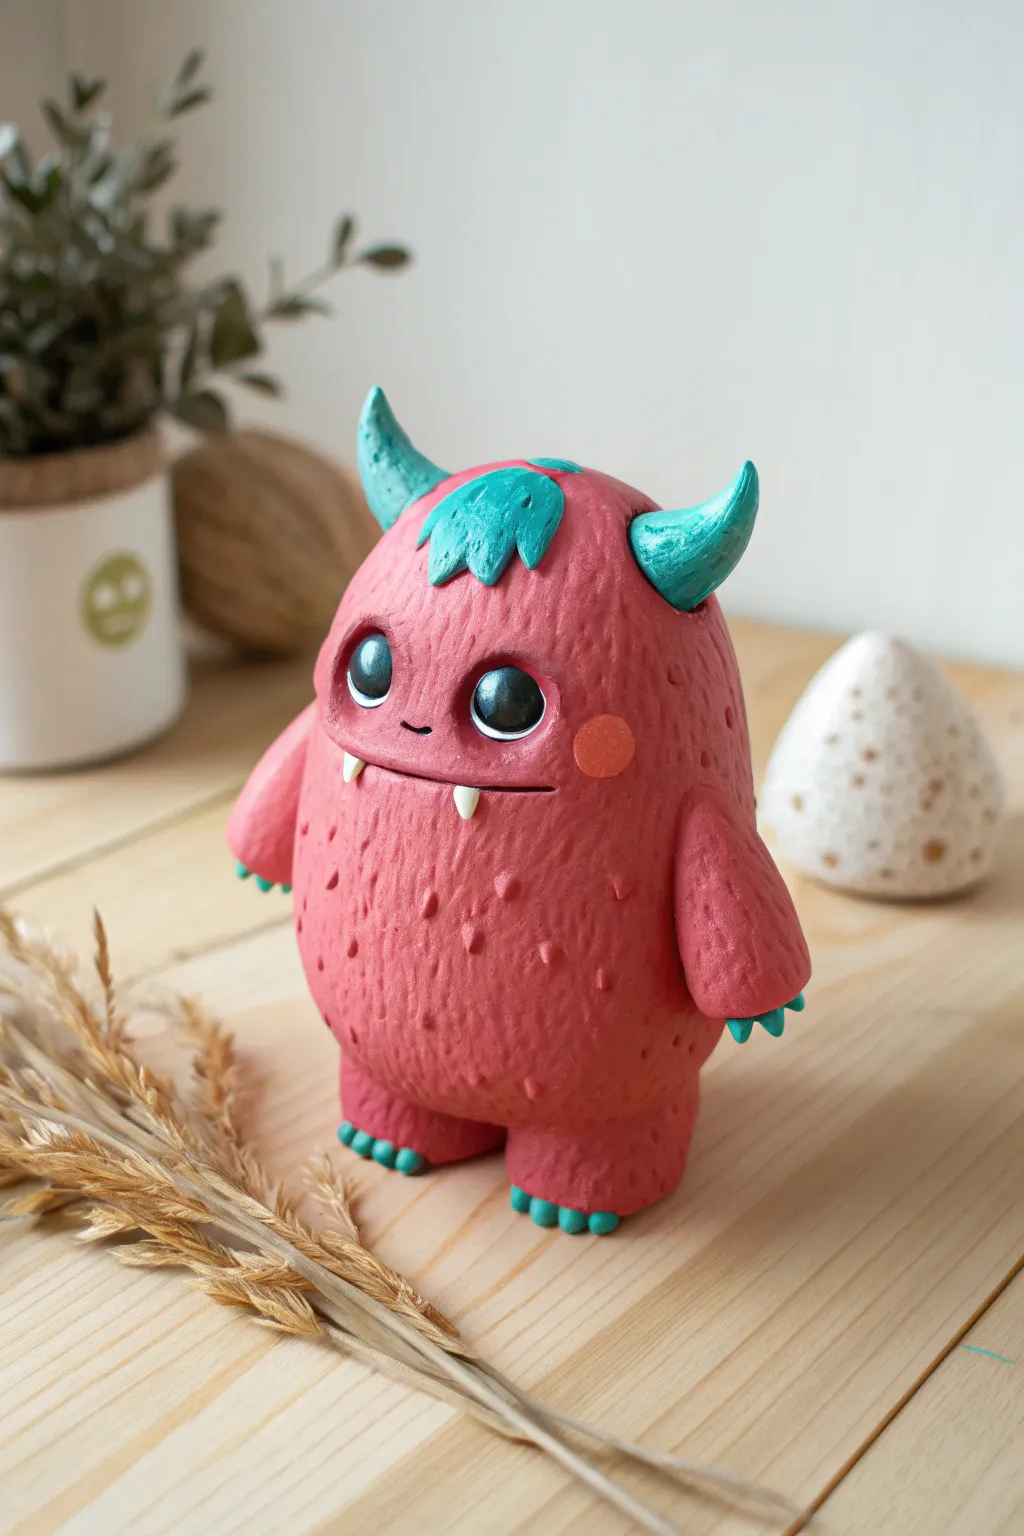
This adorable little beast strikes the perfect balance between spooky and sweet with its round, textured body and oversized glossy eyes. Despite the sharp little horns and claws, this polymer clay creation looks more ready for a hug than a scare.
Step-by-Step
Materials
- Polymer clay (Berry Pink or muted Red)
- Polymer clay (Teal or Aqua Blue)
- Polymer clay (White)
- Polymer clay (Black)
- Two black glass cabochons or beads (approx 10mm)
- Needle tool or toothpick
- Ball stylus tools
- Aluminum foil
- Gloss varnish or UV resin
- Blade or craft knife
- Soft pastel chalk (pink/orange for blush)
Step 1: Shaping the Core Body
-
Create the armature:
Start by scrunching a piece of aluminum foil into a tight egg shape roughly the size of a kiwi from. This saves clay and keeps the figure lightweight. -
Condition the main color:
Take a large block of your berry pink clay and kneed it until it is soft and pliable. Roll it into a smooth sheet about 1/4 inch thick. -
Cover the foil:
Wrap the pink sheet around your foil egg, smoothing out seams with your thumb. Roll the shape gently on your work surface to ensure it is perfectly round and seamless. -
Form the legs:
Roll two thick, short logs of the same pink clay. Attach these to the bottom of the body, blending the clay upwards so the legs look like natural extensions of the torso rather than stuck-on pieces. -
Add the feet textured details:
Use a needle tool or a stiff toothbrush to texturize the bottom of the feet slightly for grip, though the visible parts will get the fur texture later. -
Attach the arms:
Create two teardrop shapes for arms. Press them onto the sides of the body, creating a slight bend at the ‘elbow’ area so they look relaxed.
Step 2: Adding Features & Texture
-
Position the eye sockets:
Use a large ball tool or your thumb to press two deep indentations into the upper half of the face where the eyes will go. -
Insert the eyes:
Press your black glass cabochons into the sockets. If you don’t have glass, you can bake balls of black clay and varnish them later, but glass gives that instant depth. -
Sculpt the eyelids:
Roll thin snakes of pink clay and place them over the top and bottom of the eyes. Blend the outer edges into the head to create hooded, expressive eyelids. -
Create the mouth:
Use a blade or needle tool to slice a horizontal line for the mouth. Gently curve the ends upward for a subtle smile. -
Add the fangs:
Roll two extremely tiny cones of white clay. Carefully place them pointing downward from the upper lip, spacing them slightly apart. -
Apply the fur texture:
This is the meditative part. Using a needle tool, make hundreds of small, shallow dashes or pockmarks all over the pink skin. Vary the direction slightly to make it look organic.
Texturing Tip
Work in sections when texturing! Holding onto a smooth area while you texture the back keeps you from squishing your previous work.
Step 3: Horns, Hair, and Claws
-
Make the horns:
Roll two cones of teal clay. Curve them slightly and attach them to the sides of the head using a drop of liquid clay or Sculpey Bake & Bond for security. -
Add the hair tuft:
Flatten a small piece of teal clay into a messy leaf shape. Press this onto the center of the forehead, blending the edges so it looks like it’s growing from the scalp. -
Attach toes and fingers:
Roll tiny balls of teal clay—three for each foot and three for each hand. Shape them into small triangles and press them onto the ends of the limbs. -
Make the blush:
Shave a little pink or orange pastel chalk into a powder. Use a soft brush to apply a circle of ‘blush’ on the cheek area for extra cuteness. -
Bake the figure:
Bake according to your clay manufacturer’s instructions (usually 275°F/135°C for 15-30 minutes per 1/4 inch thickness). -
Final varnish:
Once cool, apply a high-gloss varnish or UV resin specifically to the horns, claws, and eyes (if you didn’t use glass) to make them look wet and shiny contrast to the matte body.
Fingerprint Fix
If you smudge a smooth area like the horns, lightly brush it with a little baby oil or clay softener before baking to melt the print away.
Now you have a charming little desk buddy ready to guard your workspace