I love how black air dry clay gives you that moody, matte finish straight from the package—no messy paint session required. Here are my favorite black air dry clay ideas that look polished, high-contrast, and totally doable on a lazy afternoon in the studio.
Matte Black Trinket Dishes
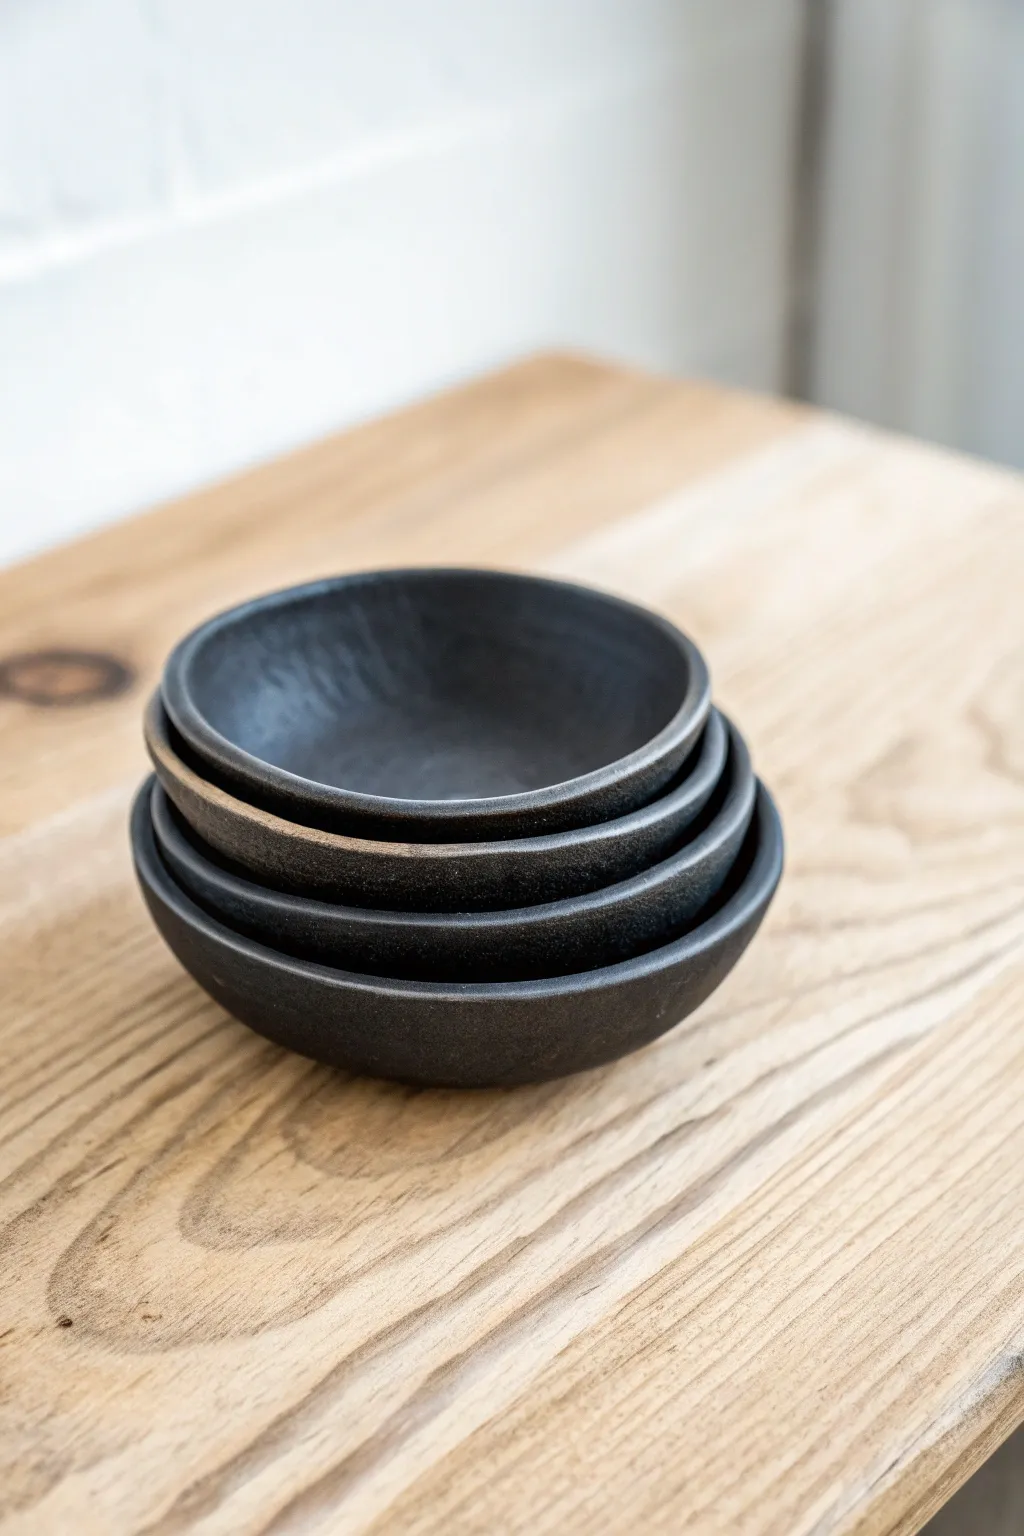
Embrace the beauty of imperfection with these moody, organic trinket dishes. Their soft-focus matte finish and subtle textural variances give them a sophisticated, pottery-wheel aesthetic without needing a kiln.
Step-by-Step Tutorial
Materials
- Black air dry clay (or white clay painted black)
- Small bowl for a mold (approx. 4-5 inches wide)
- Rolling pin
- Parchment paper or canvas mat
- Craft knife or needle tool
- Small bowl of water
- Sponge or soft paintbrush
- Fine-grit sandpaper (220-400 grit)
- Matte acrylic varnish or sealant
- Cling film (plastic wrap)
Step 1: Shaping the Clay
-
Condition the clay:
Begin by taking a handful of black air dry clay and kneading it in your hands. You want it warm and pliable to prevent cracks later on. -
Roll it out:
Place the clay on parchment paper or a canvas mat. Use your rolling pin to flatten it to a uniform thickness of about 1/4 inch. Avoid going too thin, as these dishes need a bit of visual weight. -
Prepare the mold:
Take a small kitchen bowl (something with a gentle curve works best). Wrap the outside of the bowl tightly with cling film to ensure the clay doesn’t stick. -
Cut the circle:
Place your bowl upside down on the rolled clay to use as a template. Use a craft knife to cut a circle slightly larger than the bowl’s rim, or just cut closely around it for a precise fit. -
Position on the mold:
Lift the clay circle carefully and drape it over the cling-film-covered bottom of your bowl. Let gravity help it settle initially. -
Form the curve:
Gently press the clay against the bowl with your palms. Don’t press too hard, or you’ll leave fingerprints; use sweeping motions to smooth it down the sides. -
Refine the rim:
The rim in the photo is slightly thicker and rounded. Using your finger dipped in a little water, run it along the cut edge to soften the sharpness and round it off.
Cracks Appearing?
Mix a tiny bit of fresh clay with water to create a ‘slip’ paste. Fill the cracks with this paste, smooth it over with a sponge, and let it dry again
Step 2: Refining and Texture
-
Add subtle texture:
To mimic the organic look in the photo, you don’t want it perfectly smooth. I sometimes lightly dab the surface with a damp sponge to create faint, irregular dimples. -
Initial drying phase:
Let the clay sit on the mold for about 2-3 hours until it holds its shape on its own but isn’t fully dry. -
Remove from mold:
Carefully lift the clay dish off the bowl and peel away the cling film. Place the dish right-side up on a flat surface to finish drying. -
Check for warping:
As it dries, the bottom might puff up slightly. If this happens, place a small, light weight (like a spice jar) in the center to keep the bottom flat. -
Full cure:
Allow the dishes to dry completely for 24-48 hours. They will turn a lighter shade of grey as the moisture leaves.
Step 3: Finishing Touches
-
Sand the surfaces:
Once bone dry, use fine-grit sandpaper to smooth out any sharp edges on the rim or rough patches on the bottom. Wipe away the dust with a barely damp cloth. -
Deepen the color:
To get that deep, charcoal black seen in the image, apply a wash of black acrylic paint if your clay dried too grey. Dilute the paint slightly so it sinks into the texture rather than sitting on top. -
Seal the deal:
The finish in the photo is distinctly matte. Apply two thin coats of a high-quality matte varnish. Avoid glossy sealers, as they will ruin the stone-like effect. -
The final buff:
If the varnish feels slightly rough after drying, give it one last very gentle pass with a piece of brown paper bag to buff it to a soft sheen.
Gilded Edge
For a luxe contrast, paint just the very top rim with a thin line of liquid gold leaf or metallic copper paint after the black sealant has fully dried
Stack your finished set on a shelf or bedside table for an instant touch of modern elegance


Sleek Black Cat Figurines
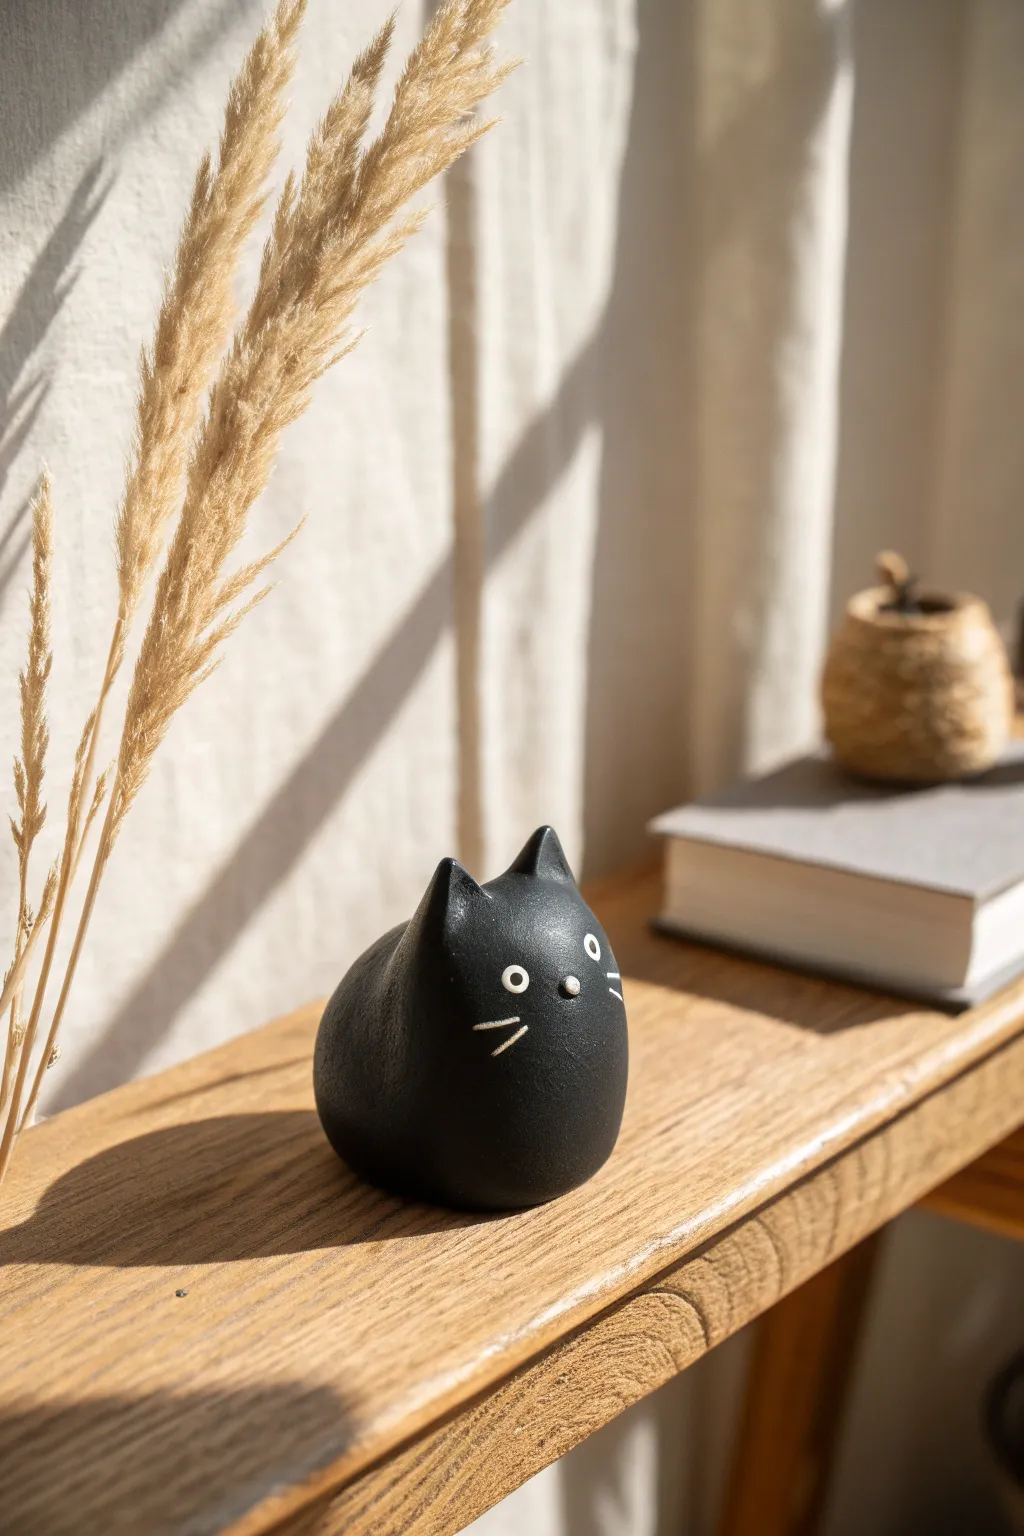
Capture the essence of feline grace with this sleek, ultra-minimalist black cat figurine. Its smooth, rounded form and simple white details create a modern decor piece that feels both playful and sophisticated.
How-To Guide
Materials
- Black air dry clay (or white clay + black acrylic paint)
- Small cup of water
- Aluminum foil
- Fine-grit sandpaper (optional)
- White acrylic paint or a white Posca paint pen
- Fine detail paintbrush (if not using a pen)
- Matte or satin varnish (optional)
Step 1: Sculpting the Base Form
-
Create the core:
Start by crumpling a small piece of aluminum foil into a tight ball, slightly smaller than you want your finished cat to be. This saves clay and helps the figure dry evenly. -
Coat the core:
Take a generous amount of black air dry clay and flatten it into a pancake. Wrap this completely around your foil ball, ensuring no foil is showing. -
Shape the body:
Roll the clay between your palms to smooth out the seams. Gently tap the bottom against your work surface to create a flat base so the cat sits stability. -
Refine the silhouette:
Mold the ball into a tall, rounded gumdrop shape. The body should be smooth and continuous, without a separate neck or head definition—think of it like a Russian nesting doll shape. -
Smooth the surface:
Dip your finger in a tiny bit of water and rub it over the entire surface to eliminate fingerprints or cracks. Getting this surface perfectly smooth now saves sanding time later.
Fixing Cracks
If small cracks appear while drying, mix a tiny bit of fresh clay with water to make a paste (slip). Fill the cracks with this paste and smooth it over.
Step 2: Adding Ears and Details
-
Shape the ears:
Pinch off two very small, pea-sized balls of clay. Roll them into tiny cones or triangles. -
Attach the ears:
Place the ears on top of the rounded head, spacing them moderately apart. Score the contact points (scratch them up a bit) with a toothpick to help them stick better. -
Blend the seams:
Using a sculpting tool or your fingertip with water, smooth the clay from the base of the ears down into the head. The transition should be seamless, making the ears look like they grew out of the body. -
Sharpen the tips:
Gently pinch the tips of the ears to make them pointy and alert. I find that slightly exaggerating the points looks better once the clay shrinks during drying. -
Final smooth check:
Do one last pass with a wet finger over the entire piece to ensure the ear joints are invisible and the body is perfectly round.
Metallic Twist
Instead of white paint for the face, try gold or silver metallic paint pens. The metallic shine against the matte black clay looks incredibly chic.
Step 3: Finishing Touches
-
Let it dry:
Allow the figurine to dry completely. This usually takes 24-48 hours depending on thickness. Flip it occasionally so the bottom dries too. -
Sand imperfections:
Once bone dry, use fine-grit sandpaper to gently buff away any remaining bumps or rough textures. Wipe away dust with a slightly damp cloth. -
Paint the base (optional):
If your black clay dried slightly grey or chalky, give the entire piece a coat of black acrylic paint for a deep, rich void-like color. -
Paint the eyes:
Using a white paint pen or a fine brush, dot two small circles for eyes. Keep them relatively wide-set for that cute, derpy look shown in the photo. -
Add pupils:
Once the white is dry, add extremely tiny black dots in the center of the white circles for pupils. -
Draw the nose:
Place a single tiny white dot centered below the eyes for the nose. -
Add whiskers:
Draw three simple straight lines on each cheek area using your paint pen. Keep the strokes confident and quick to avoid shaky lines. -
Seal the piece:
Finish with a coat of matte or satin varnish to protect the paint and give the clay a finished, professional sheen.
Place your little guardian on a bookshelf or desk and enjoy its quiet company


Moon Phase Wall Hangings
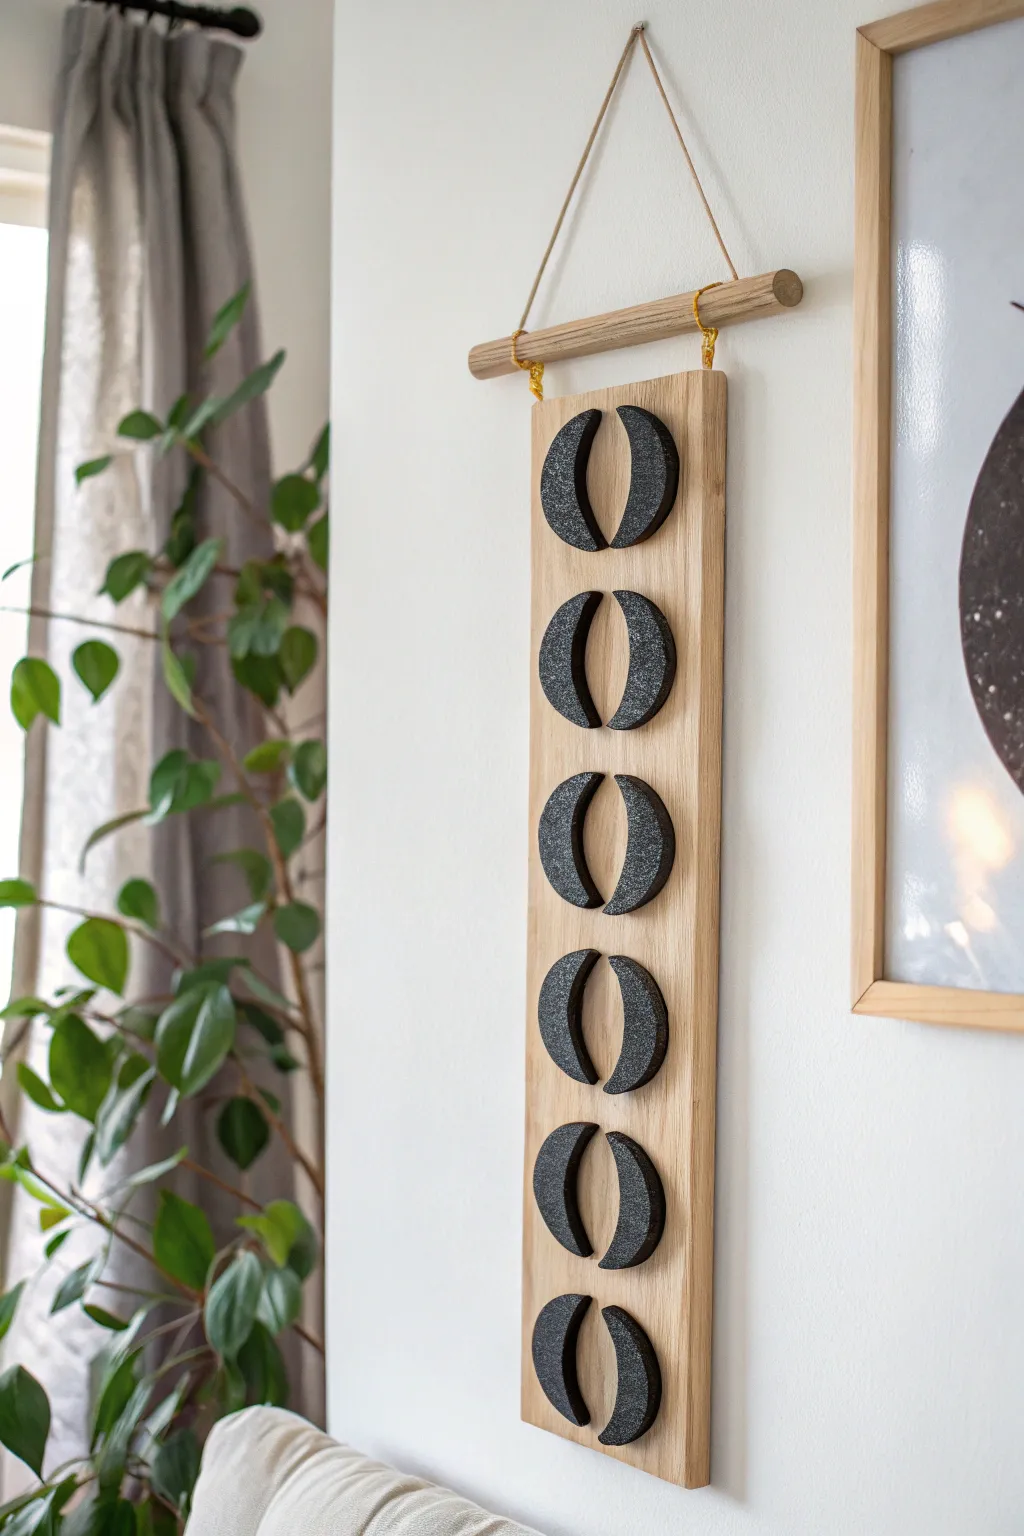
Bring a touch of modern mysticism to your wall with this vertical moon phase display. By combining the raw texture of sanded black clay with the warmth of natural wood, you’ll create a piece that feels both grounded and ethereal.
Step-by-Step Guide
Materials
- Black air dry clay
- Rolling pin
- Circle cookie cutters (approx. 2-inch diameter)
- Sharp craft knife or clay slicing blade
- Sandpaper (medium and fine grit)
- Wooden board or slat (approx. 5 x 24 inches)
- Wooden dowel (1/2 inch diameter)
- Jute twine or leather cord
- Strong craft glue (e.g., E6000) or wood glue
- Yellow embroidery floss or yarn (for accents)
- Drill with small bit
- Ruler and pencil
- Matte sealant spray (optional)
Step 1: Shaping the Moons
-
Prepare the clay:
Begin by kneading your black air dry clay until it becomes soft, pliable, and free of cracks. If it feels too dry, dip your fingers in a tiny bit of water. -
Roll it out:
Roll the clay out onto a smooth surface to an even thickness of about 1/4 inch. Using guide sticks on either side can help ensure the slab is perfectly level. -
Cut the circles:
Use your circle cookie cutter to punch out six identical black circles. Re-roll the scraps if necessary to get all your shapes. -
Create the crescents:
Take the same circle cutter and overlap it slightly over one of your clay circles to cut out a crescent shape. You are aiming to create two opposing crescents from one circle, but for this specific design, we are cutting separate crescent shapes. -
Refine the shapes:
For this project, you need 12 individual crescent shapes total (two for each of the six ‘moon’ levels). Cut them carefully so they are uniform. Smooth the cut edges gently with a wet finger. -
Let them dry:
Place all clay pieces on a wire rack or parchment paper. Allow them to dry fully for 24-48 hours, flipping them occasionally to prevent curling.
Stone Effect Secret
Don’t wipe away all the sanding dust! Leaving a tiny bit of that gray powder in the crevices before sealing highlights the texture and mimics granite.
Step 2: Adding Texture
-
Initial specific sanding:
Once fully cured, take a piece of medium-grit sandpaper and sand the surface of the clay vigorously. This specific look relies on the speckled, stone-like texture that appears when sanding black clay. -
Refine the edges:
Switch to a finer grit sandpaper to smooth out any sharp ridges on the sides of the crescents, but keep the top face textured and slightly rough for visual interest. -
Dust off debris:
Wipe each piece down with a slightly damp cloth to remove the gray dust. You’ll see the black color deepen instantly. I like to let this dry briefly before proceeding. -
Optional sealing:
If you want to protect the finish, apply a very light coat of matte sealant spray now, though leaving it raw preserves the stone-like look best.
Step 3: Structure & Assembly
-
Prepare the board:
If your wooden board isn’t pre-cut, saw it to your desired length. Sand the edges of the wood so it feels effortless and clean. -
Drill hanging holes:
Mark two points at the very top edge of your wooden board, about an inch in from each side. Drill small holes just large enough for your yellow accent thread or wire to pass through. -
Arrange the phases:
Lay the board flat and arrange your crescent pairs. Start with the top pair curving inward, and alternate or repeat the orientation down the line to mimic the moon cycle. Use a ruler to ensure equal spacing between each set. -
Glue the clay:
Apply a strong adhesive to the back of each clay piece. Press them firmly onto the wood and hold for a few seconds. Let the glue cure completely according to the package instructions. -
Attach the dowel:
Cut your wooden dowel slightly wider than the main board. Using the yellow embroidery floss, loop through the drilled holes in the board and tie it securely around the dowel above it. -
Create the hanger:
Cut a length of jute twine or leather cord. Tie each end to the outer edges of the wooden dowel to create a triangle shape for hanging. -
Final check:
Double-check that all knots are tight and the clay is secure before hanging your piece on the wall.
Fixing Curled Clay
If your crescent shapes curled up while drying, gently sand the back side flat against a coarse sanding block until they sit flush against the wood.
Hang your new moon phase art in a sunny spot and enjoy the natural textures


Geometric Black-and-White Coasters
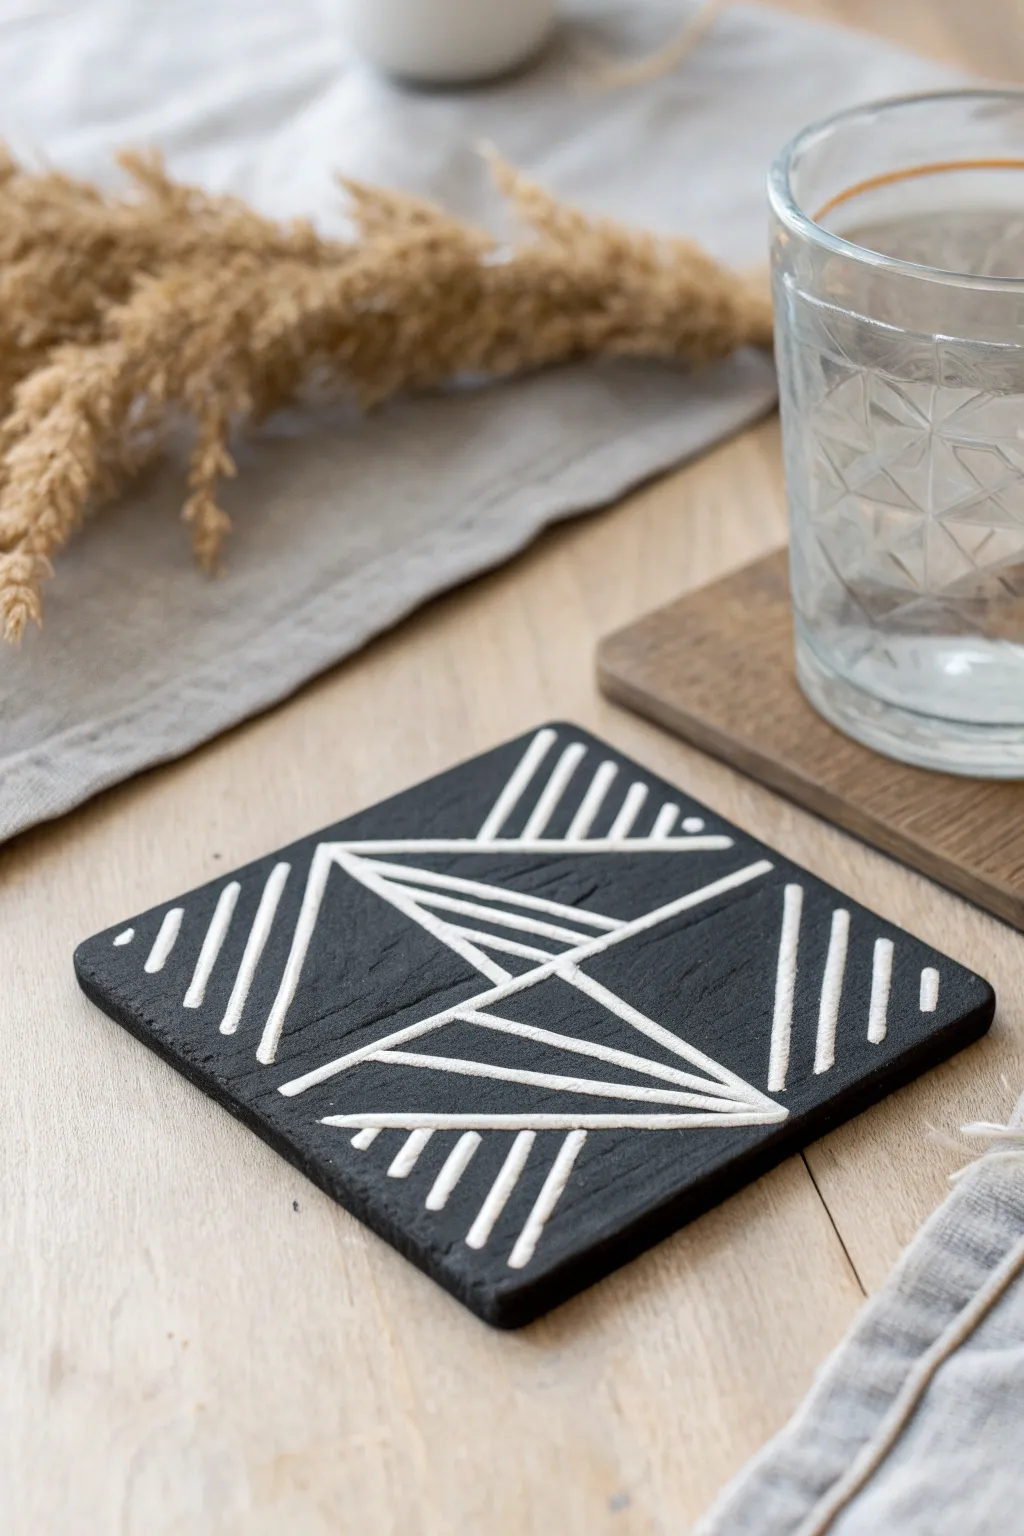
Achieve a high-end designer look with these sleek black coasters featuring striking white geometric patterns. By painting the clay first and carving later, you create crisp, high-contrast lines that make a sophisticated addition to any coffee table.
Step-by-Step Tutorial
Materials
- Air dry clay (white or grey)
- Black acrylic paint (matte finish)
- White acrylic paint
- Rolling pin
- Square cookie cutter or knife and ruler
- Sandpaper (fine grit)
- Carving tool (e.g., linoleum cutter or sharp awl)
- Small detail brush
- Clear sealant (matte or satin)
- Parchment paper
Step 1: Shaping the Base
-
Prepare the workspace:
Lay down a sheet of parchment paper on a flat surface to prevent sticking. Take a handful of air dry clay and knead it until it is soft and pliable. -
Roll the slab:
Use a rolling pin to flatten the clay. Aim for an even thickness of about 1/4 inch (6mm) to ensure the coaster is durable but not clunky. -
Cut the square:
Using a square cookie cutter or a ruler and craft knife, cut out a perfect square shape. A 4×4 inch size works best for most glasses. -
Smooth the edges:
Dip your finger in a little water and run it along the cut edges to smooth out any roughness or sharpness. -
Initial drying:
Let the clay dry completely for 24-48 hours. Carefully flip it over halfway through the drying process to prevent curling. -
Sand for perfection:
Once fully dry and hard, use fine-grit sandpaper to gently smooth the surface and edges, creating a professional flat finish.
Step 2: Painting and Etching
-
Apply the base coat:
Cover the entire top and sides of the coaster with matte black acrylic paint. You may need two coats for full opacity; let the paint dry fully. -
Plan the design:
Lightly sketch your geometric pattern onto the black surface using a pencil. The graphite will shine slightly against the matte black, making it visible. -
Carve the main lines:
Using a carving tool or a sharp awl, firmly scratch into the black paint along your pencil lines. You want to reveal the white clay beneath. -
Deepen the groove:
Go over your lines a second time to make the grooves slightly deeper and wider, which adds nice texture. -
Enhance the white:
If the clay underneath isn’t white enough (or if you used grey clay), take a very fine detail brush and carefully paint white acrylic into the carved grooves. -
Clean up edges:
If any white paint spills onto the black surface, wait for it to dry and then touch it up with a tiny dab of black paint.
Keep it Straight
Use a ruler as a guide when carving your lines. Run your carving tool directly against the metal edge to ensure your geometric patterns stay crisp and perfectly straight.
Step 3: Finishing Touches
-
Seal the surface:
Apply a coat of clear matte or satin sealant over the top and sides. This is crucial to protect the clay from moisture when used as a coaster. -
Add protection:
Cut a piece of felt or cork slightly smaller than your coaster and glue it to the bottom to protect your furniture.
Make it a Set
Create a set of four coasters where each one features a different segment of a larger geometric pattern. When placed together in a square, the lines connect to form one big design.
Now your coffee table is protected with a piece of modern art you made yourself

What Really Happens Inside the Kiln
Learn how time and temperature work together inside the kiln to transform clay into durable ceramic.
Minimal Arch Bookends

These striking, sculptural bookends bring a high-end architectural feel to your shelf with their textured, matte black finish. Though they look like heavy iron or carved stone, they are surprisingly simple to craft using humble air dry clay.
Step-by-Step
Materials
- Black air dry clay (or white clay and black acrylic paint)
- Aluminum foil
- Rolling pin
- Wooden skewer or toothpick
- Sandpaper (medium and fine grit)
- Small bowl of water
- Sponge or textured cloth
- Matte black acrylic paint (optional, for deeper color)
- Matte sealant or varnish
- Non-slip pads or felt (for the base)
Step 1: Forming the Armature
-
Create the core:
Since solid clay takes forever to dry and can crack, start by creating a core shape using aluminum foil. Crumple foil into a long snake, roughly 1 inch thick. -
Shape the arch:
Bend your foil snake into a ‘U’ shape. Adjust the height and width to match the scale of the books you intend to support—about 5-6 inches tall is usually a good standard size. -
Flatten the ends:
Press the bottom ends of the foil ‘U’ firmly against your table to ensure they are flat and level. The armature needs to stand upright on its own without wobbling too much.
Step 2: Sculpting the Clay
-
Condition the clay:
Take a large chunk of your black air dry clay and knead it in your hands until it becomes warm and pliable. This prevents cracks later on. -
Roll out a slab:
Using a rolling pin, roll the clay out into a long, flat slab about 1/4 inch thick. Make sure it’s long enough to cover your entire foil arch. -
Wrap the armature:
Drape the clay slab over your foil arch. Gently press the clay onto the foil, wrapping it around the sides and underneath the feet so the foil is completely encased. -
Trim excess:
Use a knife or clay tool to trim away any bulky excess clay, especially around the base, but ensure you leave enough material to create a solid, stable foundation. -
Smooth the seams:
Dip your finger in a little water and rub it over any joins or seams where the clay edges meet. Blend the clay until the seams disappear entirely.
Fixing Cracks
Using a core often causes minor cracking as clay shrinks. Make a slip (clay + water paste) to fill cracks, then smooth over.
Step 3: Refining and Texturing
-
Shape the uniform curve:
Now, focus on the silhouette. Use your palms to gently roll and shape the legs of the arch so they are uniform in thickness from top to bottom. -
Define the base:
Stand the arch up on your work surface. Press down firmly to create a perfectly flat bottom. Check that it doesn’t lean forwards or backwards. -
Add surface texture:
To mimic the stone-like look in the photo, take a damp sponge or a crumpled textured cloth and dab it all over the surface of the clay. We don’t want it perfectly smooth. -
Insert weights (optional):
If your bookends feel too light to hold heavy books, you can carefully push a few heavy washers or fishing weights into the underside of the clay feet before they dry, then smooth clay over them. -
Create the second arch:
Repeat the entire process to create the matching bookend. Place them side-by-side to ensure they are roughly the same height and thickness.
Stone Effect
Mix baking soda into your black paint before applying. This creates a gritty, realistic stone texture instantly.
Step 4: Finishing Touches
-
Let it dry completely:
Place the arches in a cool, dry spot away from direct sunlight. Let them dry for at least 24-48 hours. I usually flip them over halfway through so the bottoms dry evenly. -
Sand imperfections:
Once fully dry and hard, use sandpaper to smooth out any sharp edges or unwanted bumps, but keep the overall textured finish intact. -
Enhance the color:
Even black clay can dry slightly grey. To get that deep, rich charcoal look, paint the entire piece with a coat of matte black acrylic paint. -
Apply sealant:
Protect your work with a matte varnish or sealant spray. This prevents the paint from transferring onto your books. -
Add grip:
Finally, stick felt pads or small rubber feet to the bottom of each arch. This protects your shelf and gives the bookends the grip they need to function.
Style these on a light wood shelf to let the bold shape and dark texture truly pop
Modern Photo and Card Stands
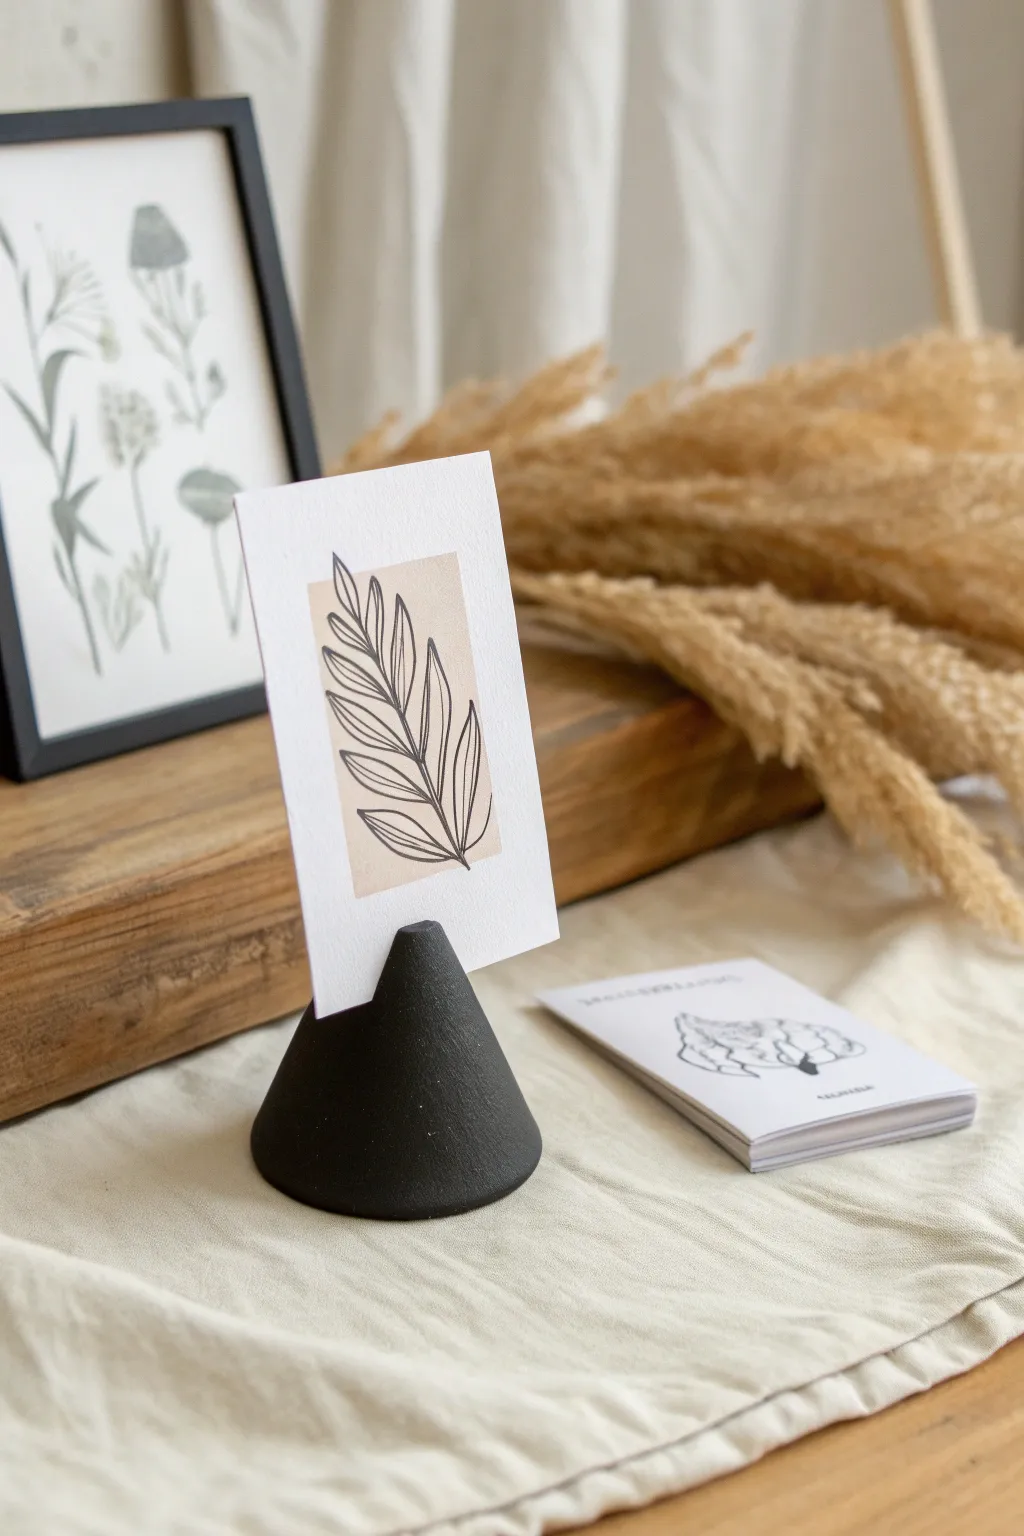
Embrace the beauty of geometric simplicity with this ultra-modern photo and card holder. Using black clay creates a striking, matte finish that lets your featured artwork or photos take center stage without distraction.
Detailed Instructions
Materials
- Black air dry clay
- Cutting wire or dental floss
- Rolling pin
- Craft knife or scalpel
- Sandpaper (fine grit)
- Small bowl of water
- Sponge
- Ruler
- Thin plastic card or palette knife (to create the slot)
Step 1: Shaping the Cone
-
Condition the clay:
Begin by taking a chunk of black air dry clay roughly the size of a golf ball. Knead it thoroughly in your hands to warm it up and ensure it is pliable and free of air bubbles. -
Form a ball:
Roll the clay between your palms until you have a smooth, perfect sphere. Check for any cracks and smooth them out with a dab of water on your finger if necessary. -
Start the cone shape:
Place the ball on your work surface. Place your flat palm on top and begin rolling it back and forth, applying slightly more pressure on one side of your hand to start elongating one end into a point. -
Refine the taper:
Stand the clay up on its wider end. Use your fingers to gently smooth and pull the clay upward towards the tip, rotating the piece constantly to keep it symmetrical. -
Flatten the base:
Pick up the cone and tap the bottom firmly against your table to create a perfectly flat base. This ensures your stand won’t wobble once it’s holding a card. -
Check proportions:
Look at the cone from eye level. It should have a sturdy, wide base that tapers smoothly to a soft point, resembling the photo. Adjust the height by gently pressing down if it feels too tall.
Deep Black Trick
If sanding turns your black clay gray, rub a tiny drop of baby oil or olive oil into the finished piece to restore the deep, rich black color instantly.
Step 2: Details & Drying
-
Create the slot:
While the clay is still soft, take a thin plastic card or a palette knife. Position it directly over the center of the cone’s tip. -
Press down:
Gently press the tool straight down into the tip of the cone, going about a half-inch deep. Be careful not to wiggle the tool too much, as you want a tight fit for the paper. -
Smoothing:
Widen the opening just a hair by extremely gently rocking the tool side-to-side, then remove it. Use a slightly damp finger to smooth the very edges of the cut so the clay doesn’t look ragged. -
Texture check:
Inspect the surface. If you see fingerprints, dip a sponge in water, ring it out almost completely, and lightly swipe it over the surface of the cone to erase the marks. -
Initial drying:
Set the cone aside in a cool, dry place away from direct sunlight. I usually rotate the piece every few hours during the first day to ensure even drying. -
Full cure:
Allow the piece to dry for 24-48 hours. The black clay will lighten slightly as the moisture evaporates.
Make it a Set
Create a trio of stands in varying heights (small, medium, tall) for a dynamic display. Group them together on a mantelpiece for an architectural look.
Step 3: Finishing Touches
-
Sanding:
Once fully dry, take a fine-grit sandpaper (300 grit or higher) and gently buff the surface. This removes any tiny bumps and enhances the matte stone-like texture. -
Dusting:
Wipe away the sanding dust with a slightly damp cloth or a soft brush. At this stage, the deep black color will return. -
Sealing (Optional):
If you want to protect the finish, apply a very thin layer of matte varnish. However, leaving it raw maintains the beautiful, earthy texture seen in the reference image.
Now you have a chic, modern vessel ready to display your favorite memories or mini-prints


The Complete Guide to Pottery Troubleshooting
Uncover the most common ceramic mistakes—from cracking clay to failed glazes—and learn how to fix them fast.
No-Paint Statement Jewelry Charms

Achieve a stunningly modern, minimalist look with this multi-tier pendant that skips the painting phase entirely. By using black air-dry clay, you create a deep, matte finish that feels sophisticated and organic against the gleam of gold hardware.
Step-by-Step Guide
Materials
- Black air-dry clay (or polymer clay)
- Acrylic rolling pin or glass jar
- Small circle cutter (approx. 15mm)
- Tiny circle cutter (approx. 8-10mm)
- Craft knife or scalpel blade
- Plastic straw or coffee stirrer (for hole punching)
- Fine-grit sandpaper (400 and 800 grit)
- Gold tone jump rings (3 large, 3 small)
- Gold tone pendant bail
- Gold tone necklace chain
- Jewelry pliers (flat nose and round nose)
- Parchment paper or silicone mat
Step 1: Shaping the Components
-
Condition the Clay:
Take a small portion of black air-dry clay and knead it until it’s warm and pliable. This prevents cracks later on. -
Roll the Slab:
Place the clay on parchment paper or a silicone mat. Roll it out evenly to a thickness of about 3-4mm. Make sure the surface is smooth and free of fingerprints. -
Cut the Top Circle:
Using your medium circle cutter, punch out a perfect circle. This will be the top component of the pendant. -
Create the Lower Ring:
Use the same cutter to punch another circle. Then, take the tiny cutter and punch a hole directly in the center of this circle to create the bottom ‘donut’ shape. -
Cut the Base for Half-Moons:
Cut out two more circles, slightly larger than your top circle if you have a larger cutter, or roll the clay slightly thinner to stretch the diameter. These will become the middle tiers. -
Form the Arches:
Using your craft knife, cut a straight line across the top third of these circles to create a flat edge, turning them into ‘D’ shapes or arches. -
Refine the Arches:
If you want a deeper crescent look like the image, use a circle cutter to bite a small curve out of the flat edge you just cut.
Fixing Cracks
If you see tiny hairline cracks as it dries, mix a tiny bit of fresh clay with water to make a paste and fill them in.
Step 2: Refining and Assembly preparation
-
Plan the Holes:
Lay your pieces out in order: solid circle on top, two arches in the middle facing down, and the donut ring at the bottom. -
Punch Top Holes:
Using the straw or a small tool, punch a hole at the very top and very bottom of the solid circle. -
Punch Arch Holes:
For the two arches, punch a hole in the center of the curved side (bottom) and one in the center of the flat side (top). Ensure they align vertically. -
Punch Bottom Ring Hole:
Punch a single hole at the top of the donut ring component. -
Smooth Edges:
Dip your finger in a little water and gently run it along the cut edges of each piece to smooth away any roughness before drying. -
Let Dry:
Allow the pieces to dry completely on a flat surface for 24-48 hours. I usually flip them over halfway through so the back dries evenly.
Level Up: Texture
Before cutting shapes, gently press a piece of linen or coarse fabric onto the clay slab to imprint a subtle, woven texture.
Step 3: Finishing and Assembly
-
Sand for Perfection:
Once bone dry, lightly sand the edges and flat surfaces with fine-grit sandpaper to remove any lint or uneven textures. -
Open Jump Rings:
Using two pairs of pliers, twist your gold jump rings open sideways (never pull them apart outward). -
Connect the Tier:
Thread a jump ring through the bottom hole of the top circle and the top hole of the first arch. Close the ring securely. -
Continue the Chain:
Repeat the process, connecting the first arch to the second arch, and the second arch to the bottom ring using jump rings. -
Attach the Bail:
Attach the pendant bail to the very top hole of the solid circle using a jump ring. -
String It Up:
Slide your finished geometric clay pendant onto the gold chain.
Now you have a bold, handcrafted accessory that brings an artistic touch to any outfit
Yin-Yang Pet Charm Keychains
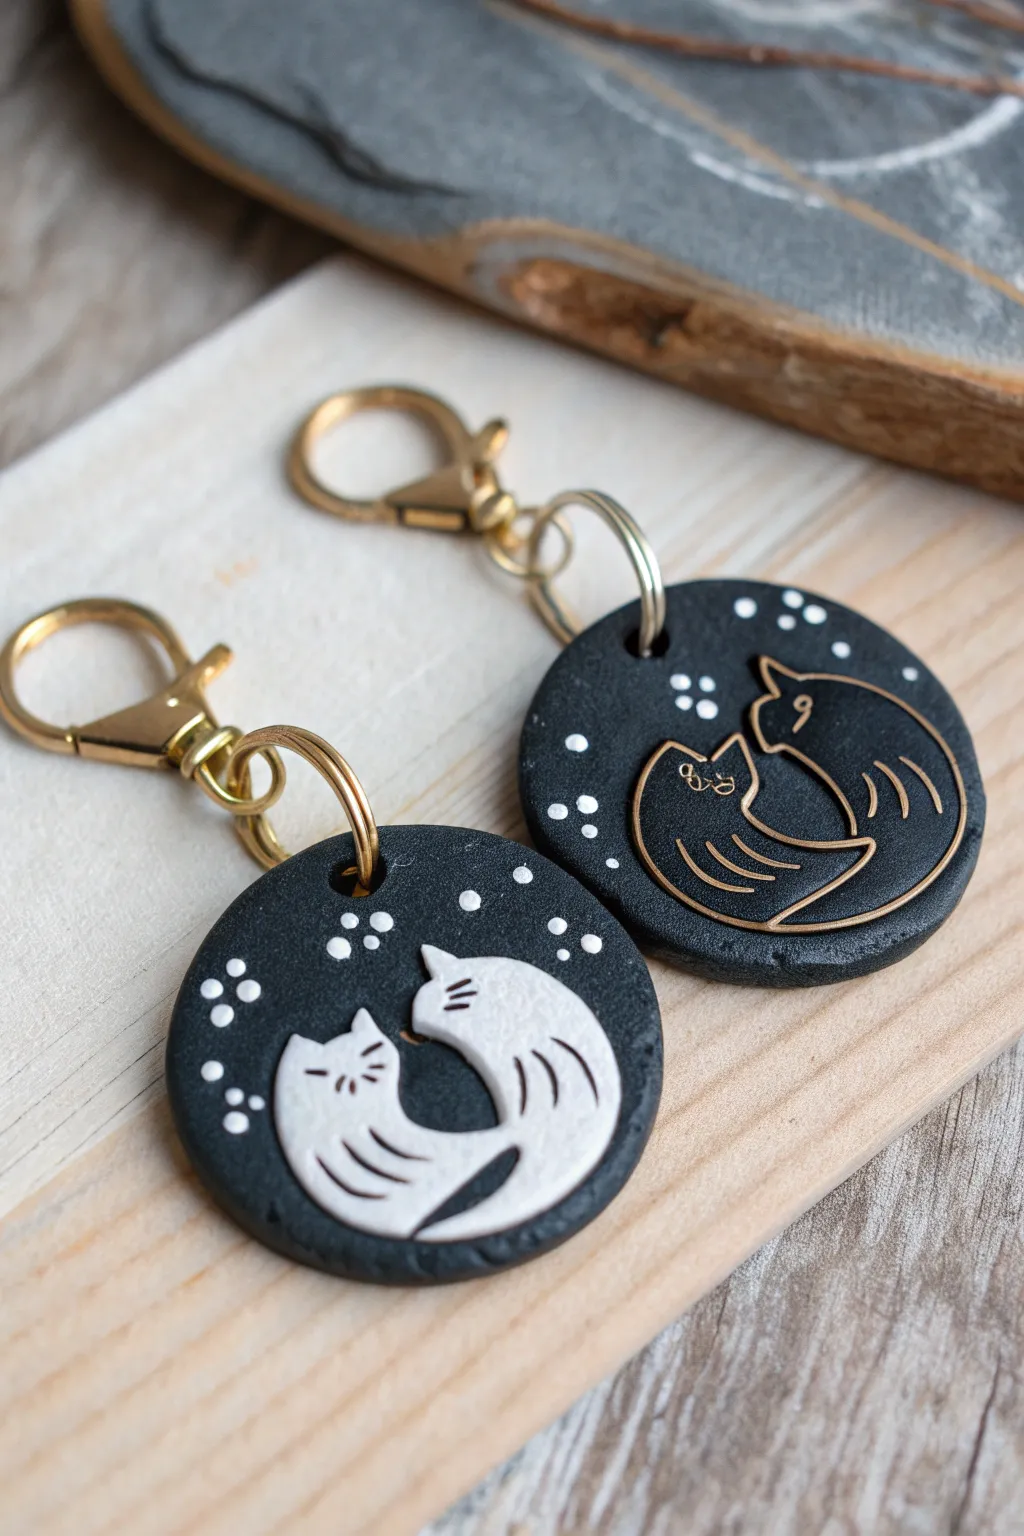
These charming black clay keychains celebrate balance with a sweet yin-yang cat motif. Whether you choose the raised relief style or the elegant gold-inlaid version, they make perfect matching gifts for a best friend or partner.
Step-by-Step Tutorial
Materials
- Black air dry clay (smooth, fine texture)
- White air dry clay (if making the raised version)
- Acrylic rolling pin
- Round cookie cutter (approx. 1.5 – 2 inches)
- Needle tool or clay detailing tool
- White acrylic paint
- Gold acrylic paint or gold gilding wax
- Fine detail paintbrush (size 0 or 00)
- Fine-grit sandpaper (optional)
- Gloss or matte varnish/sealant
- Gold tone lobster clasp keychains with jump rings
- Small drill bit or straw (for hole making)
- Baking paper or non-stick mat
Step 1: Base Preparation
-
Condition the Clay:
Start by kneading your black air dry clay until it is soft, pliable, and free of cracks. If it feels dry, incorporate a tiny drop of water. -
Roll to Thickness:
Roll out the black clay into a sheet approximately 1/4 inch thick. You want it substantial enough to be durable as a keychain. -
Cut the Circles:
Use your round cutter to punch out two clean circles. Smooth the outer edges with a damp finger to remove any jagged bits from the cutting process. -
Add Hardware Holes:
While the clay is still wet, use a straw or a tool to poke a hole near the top edge of each circle for the jump ring. Ensure the hole is not too close to the edge to prevent tearing.
Cracking Up?
If small surface cracks appear while drying, mix a tiny bit of fresh clay with water to make a paste and fill them in before painting.
Step 2: Design Option A: The White Relief Cats
-
Shape the White Clay:
Roll a small amount of white air dry clay into a thin sheet. Using a needle tool, carefully cut out two comma-like shapes that curve around each other. -
Attach the Shapes:
Score the back of the white shapes and the surface of the black circle slightly. Add a tiny dab of water or slip, then press the white shapes onto the black base to form the yin-yang cat bodies. -
Add Ears and Tails:
Mold tiny triangles for ears and very thin snakes for tails, attaching them to the white bodies so they look like two curling cats. -
Detail the Face:
Use a needle tool to gently impress lines for the fur texture, whiskers, and sleepy eyes into the wet white clay.
Step 3: Design Option B: The Gold Inlaid Cats
-
Sketch the Outline:
On the second black circle, lightly sketch the same two curved cat shapes using the tip of your needle tool. -
Carve the Grooves:
Go back over your sketch lines with deeper pressure. You want create clean, deep grooves for the outline, the eyes, and whiskers. I find a steady hand and a slow pace works best here. -
Clean the Edges:
If carving pushed up small ridges of clay (burrs), smooth them down gently with a damp fingertip or soft brush.
Make it Resin-y
For a super durable, glass-like finish, coat the dry pieces in UV resin instead of varnish and cure under a UV lamp.
Step 4: Finishing Touches
-
Allow to Dry:
Let both keychains dry completely for 24-48 hours. Turn them over halfway through so the backs dry evenly. -
Paint the Stars:
Dip the non-brush end of a paintbrush into white acrylic paint. Dot small stars around the cats on the black background of both keychains. -
Fill the Gold Lines:
For the incised keychain (Option B), carefully paint gold paint into the carved grooves. If you get paint on the surface, wipe it away quickly with a damp cloth. -
Paint the Raised Details:
If needed, touch up the raised white cats (Option A) with black paint for the eyes and whiskers. -
Seal the Work:
Apply a coat of varnish to seal the clay and protect the paint from chipping. -
Assemble:
Once the varnish is dry, open a gold jump ring using pliers, thread it through the hole, attach the lobster clasp, and close the ring securely.
Hook these onto your keys or backpack and enjoy your handcrafted feline art

TRACK YOUR CERAMIC JOURNEY
Capture glaze tests, firing details, and creative progress—all in one simple printable. Make your projects easier to repeat and improve.
Botanical Imprint Ornaments
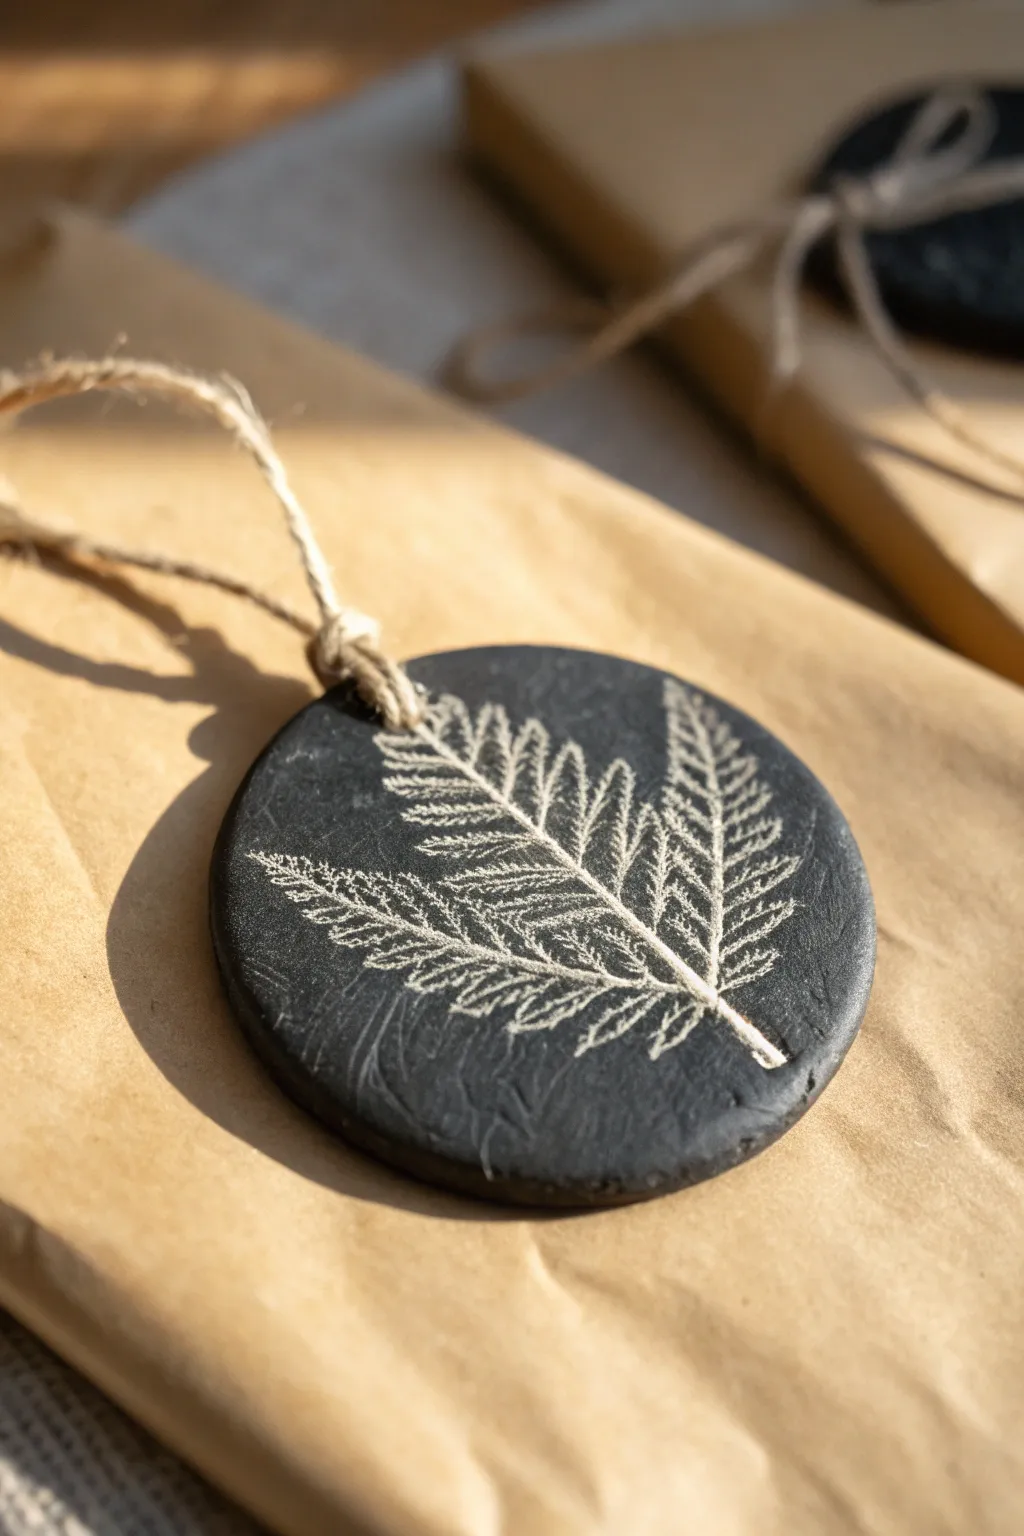
Contrast is the name of the game with these striking botanical ornaments, where moody black clay meets delicate, light imprints. The result is a sophisticated decoration that feels both earthy and modern, perfect for gifting or adorning your own home.
How-To Guide
Materials
- Black air-dry clay
- Fresh fern leaves (or similar flat botanicals with vein detail)
- Acrylic rolling pin
- Round cookie cutter (approx. 3 inches)
- White or light grey acrylic paint
- Small foam pouncer or makeup sponge
- Natural jute twine
- Straw or cocktail stick
- Wax paper or parchment paper
- Fine grit sandpaper (optional)
- Matte varnish spray (optional)
Step 1: Preparing the Base
-
Condition the clay:
Start by taking a handful of black air-dry clay and kneading it in your hands. You want it warm and pliable to minimize edge cracking. -
Roll it out:
Place the clay on a sheet of wax paper to prevent sticking. Use your acrylic rolling pin to roll it into an even slab, aiming for a thickness of about 1/4 inch (6mm) for durability. -
Position the botanical:
Select a fresh fern leaf that is slightly smaller than your intended cutter size. Lay it vein-side down onto the black clay slab. The vein side usually has more texture, which is crucial for a crisp impression. -
Make the impression:
Gently roll over the leaf with your rolling pin once or twice. Applying firm, even pressure embeds the plant into the clay without distorting the shape too much. -
Reveal the texture:
Carefully find the stem of the fern and slowly peel the leaf away from the clay. Do this vertically to avoid smudging the delicate lines you just created.
Step 2: Cutting and Drying
-
Cut the shape:
Center your round cookie cutter over the imprint. Press down firmly to cut out your ornament disc, then lift the cutter away. -
Smooth the edges:
Dip your finger in a tiny bit of water and run it lightly around the rim of the circle to smooth down any rough clay burrs left by the cutter. -
Add a hanging hole:
Use a straw or cocktail stick to punch a hole near the top edge of the ornament. Make sure it’s not too close to the rim to prevent tearing later. -
Let it dry:
Transfer the ornament to a drying rack. Allow it to air dry for 24 to 48 hours, flipping it occasionally to ensure both sides dry evenly and to prevent warping. -
Sand imperfections:
Once fully cured and hard, you can light sand the edges with fine-grit sandpaper if you want a cleaner look, though keeping it rustic is part of the charm.
Freshness Matters
Use fresh, stiff leaves rather than dried ones. Dried leaves tend to crumble into the clay, leaving debris that is difficult to remove cleanly.
Step 3: Highlighting and Finishing
-
Prepare the highlight:
Squeeze a very small amount of white or light grey acrylic paint onto a palette or scrap paper. You want a ‘dry brush’ consistency, so minimal paint is key. -
Apply the effect:
Dab your foam pouncer or sponge into the paint, then dab most of it off onto a paper towel until almost no paint remains. Gently tap the sponge over the indented fern design. -
Refine the contrast:
The paint should catch only on the textured ridges and inside the veins, leaving the smooth surface black. If you get paint where you don’t want it, quickly wipe it with a damp cloth. -
Seal the surface:
I usually prefer a matte spray varnish here to protect the clay without making it glossy, which keeps that natural stone look intact. -
Attach the twine:
Cut a length of natural jute twine, loop it through the hole at the top, and tie a secure knot to create the hanger. -
Final touches:
Trim any excess twine ends for a neat finish, and your monochromatic masterpiece is ready to hang.
Gold Gilding
Swap the white paint for metallic gold wax or acrylic paint. The gold against the matte black clay creates an incredibly luxurious, high-end look.
Hang these on kraft paper packages for a beautifully organic presentation
Bat-Shaped Tea Light Holders
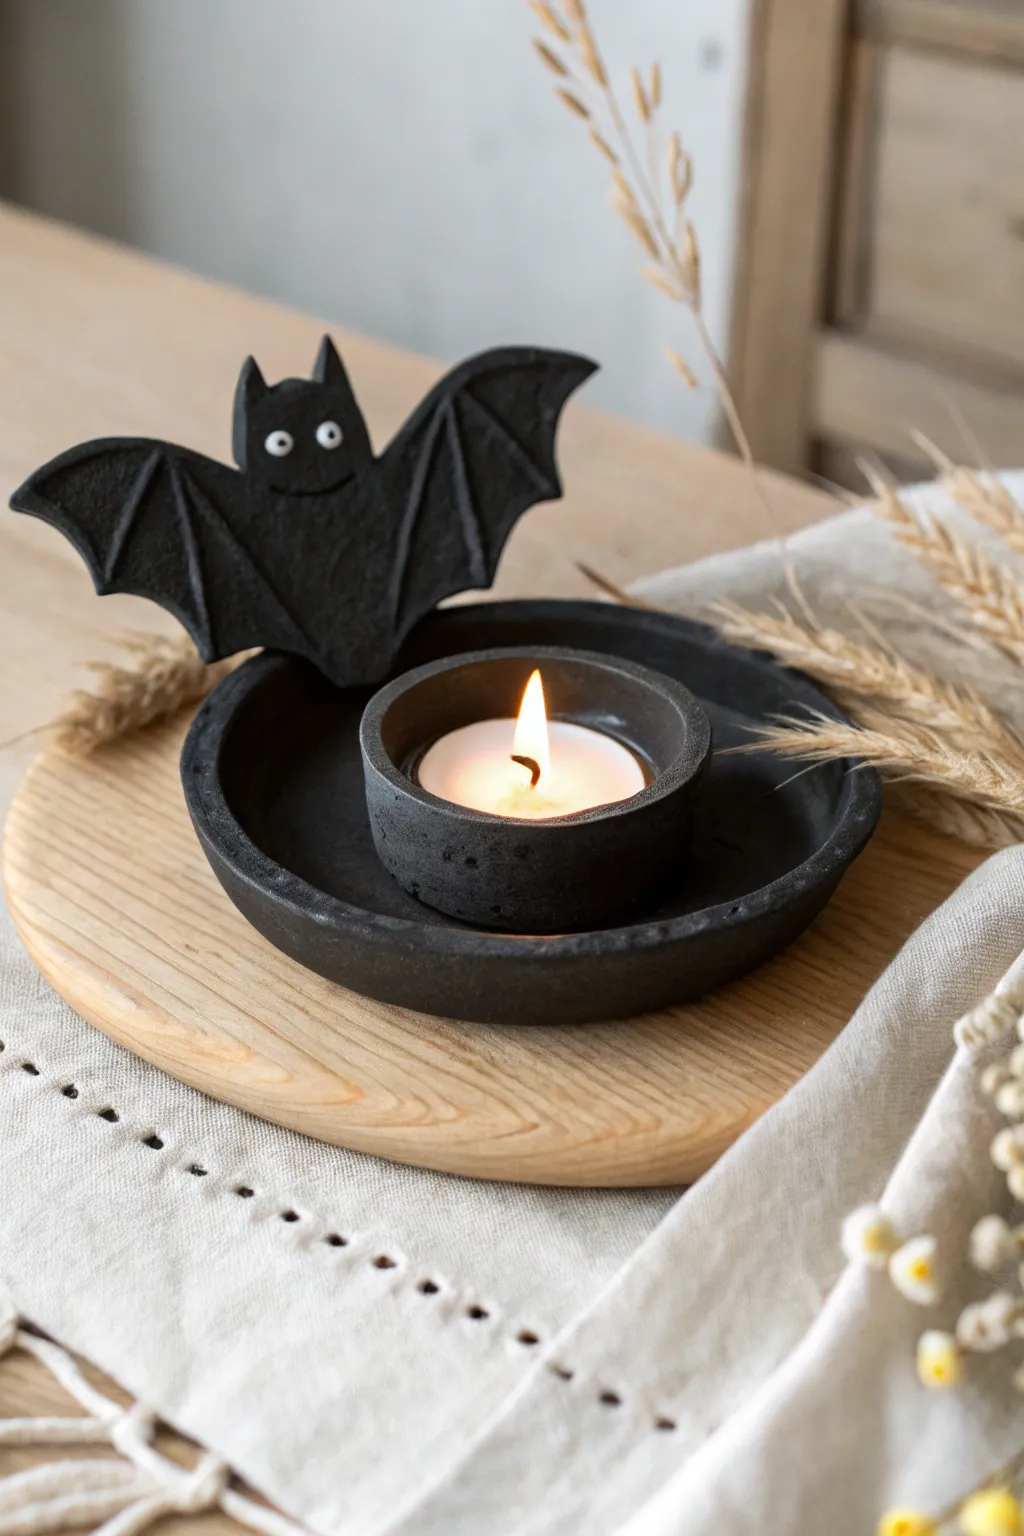
Bring a touch of playful darkness to your decor with this charming bat-themed candle holder. Crafted from clay and featuring a matte black finish, this project combines a functional tea light tray with a cute silhouette that’s perfect for Halloween or year-round gothic style.
Step-by-Step
Materials
- Black air-dry clay (or white clay + black acrylic paint)
- Rolling pin
- Circle cutters (large and small)
- Craft knife
- Water and sponge
- Sandpaper (fine grit)
- White paint (for eyes)
- Small detail brush
- Tea light candle (for sizing)
- Mod Podge or matte sealant
Step 1: Base Construction
-
Roll the base:
Begin by taking a substantial chunk of your air-dry clay and kneading it until soft. Roll it out to a thickness of about 1/4 inch on a smooth surface. -
Cut the tray:
Use your larger circle cutter (or trace a bowl) to cut out the main base of the holder. This should be wide enough to hold a tea light comfortably with plenty of room around the edges. -
Create the rim:
Roll a long, thin snake of clay. Score the outer edge of your circular base and moisten it with a little water. -
Attach the rim:
Press the clay snake onto the scored edge to create a raised rim. Blend the clay downwards onto the base on both the inside and outside using your thumb or a modeling tool so it looks like one seamless piece. -
Form the candle cup:
Roll a smaller ball of clay and flatten it slightly. Use a tea light candle to press an indentation into the center, or create a ring of clay just slightly larger than the candle to hold it snugly in the middle of the tray. -
Smooth the surfaces:
Dip a sponge in water and gently wipe over the entire base structure to remove fingerprints and smooth out any rough blending lines.
Wing Support Hack
If the bat wings are drooping while wet, support them with crumpled aluminum foil. It holds the shape perfectly without sticking to the drying clay.
Step 2: Sculpting the Bat
-
Cut the silhouette:
Roll out another slab of clay, slightly thinner than the base. Use a craft knife to freehand cut a bat shape. You want a central body with triangular ears and two wide, scalloped wings. -
Add detail:
I like to use a modeling tool or the back of my knife to gently press lines into the wings, mimicking the skeletal structure of bat wings. Add a small smile indentation near the top of the body. -
Attach the bat:
Score the bottom edge of the bat and the back rim of your tray base. Apply a bit of water or slip to both surfaces. -
Secure the joint:
Press the bat firmly onto the back rim. Use a small tool to blend the clay at the back of the join so it’s sturdy enough to stand upright. -
Prop while drying:
Place a small object, like a spice jar or a block of wood, behind the bat to keep it upright while the clay is wet. Let the entire piece dry completely for 24-48 hours.
Step 3: Finishing Touches
-
Sand imperfections:
Once fully dry, take your fine-grit sandpaper and gently buff away any sharp edges or rough patches on the rim and wings. -
Paint it black:
If you didn’t use pre-colored black clay, apply two coats of matte black acrylic paint, ensuring you get into all the crevices of the bat wings. -
Add the eyes:
Using a tiny detail brush or the end of a toothpick, dot two small circles of white paint onto the bat’s face for eyes. -
Pupil details:
Once the white dots are dry, add tiny black dots in the center to give the bat a focused, slightly silly expression. -
Seal the piece:
Finish by applying a coat of matte sealant or Mod Podge. This protects the clay from heat and soot, though you should always be careful with open flames.
Cracks appeared?
Minor cracking during drying is normal. Mix a tiny bit of fresh clay with water to make a paste and fill in the cracks, then smooth it over with a damp finger.
Light a candle in your new creation and enjoy the cozy shadows it casts on your table
Creepy-Cute Spider Sculptures
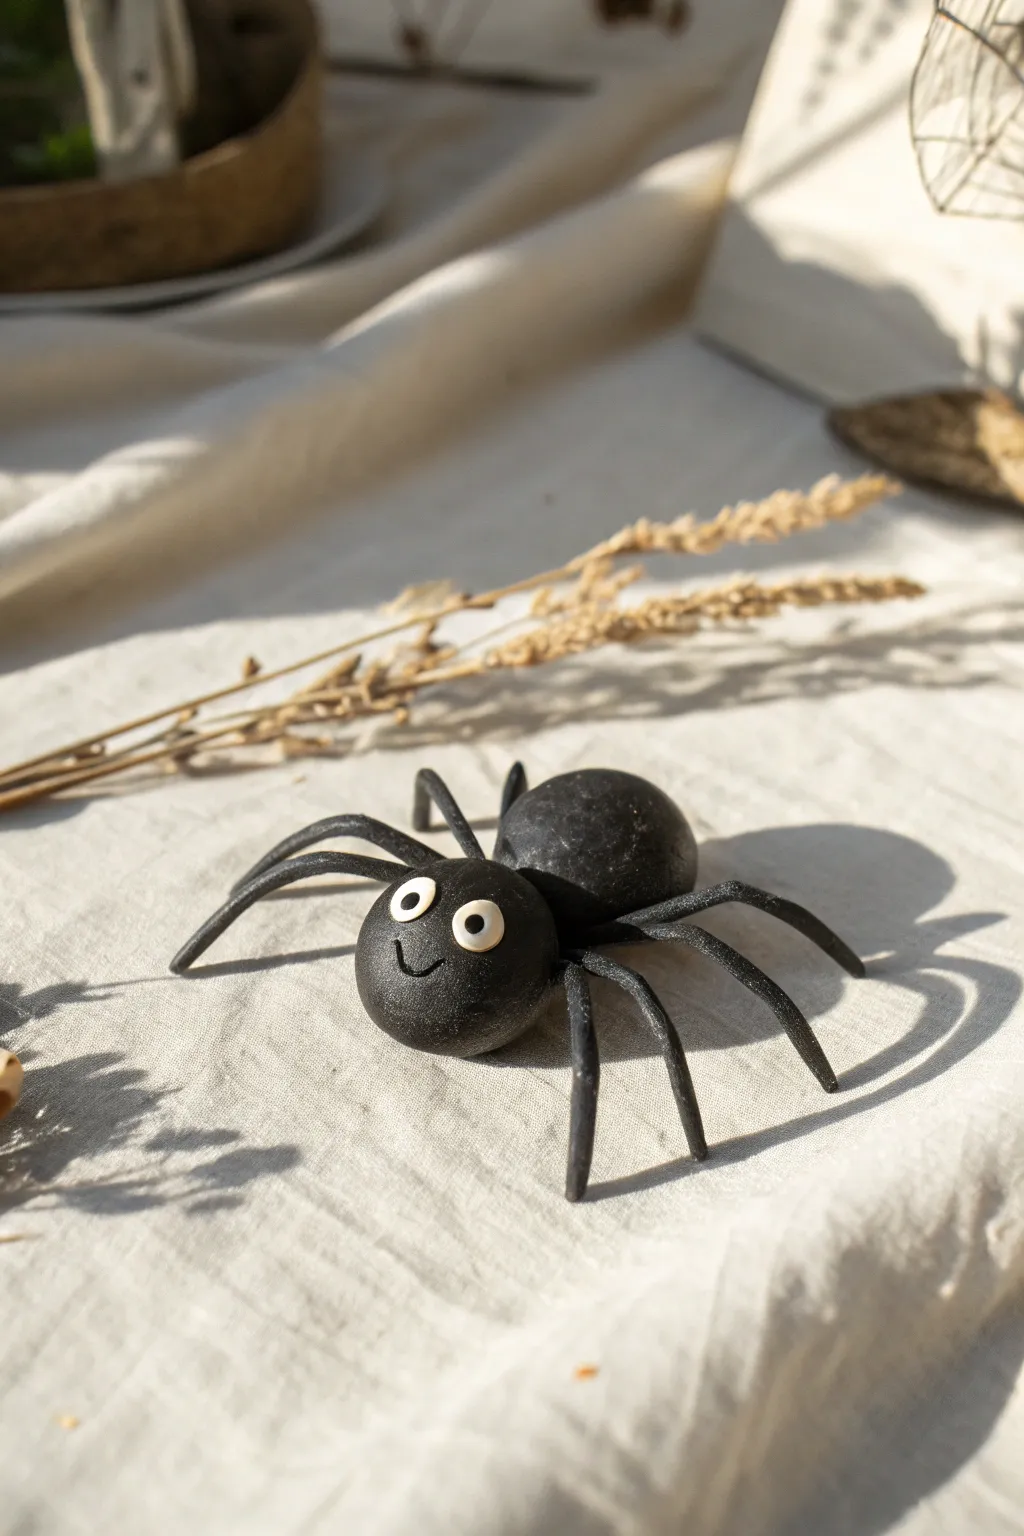
This adorable little arachnid balances spooky and sweet with its round, friendly features and oversized eyes. Perfect for Halloween decor or just charming desk company, this black air-dry clay project comes together quickly with simple shapes.
Detailed Instructions
Materials
- Black air-dry clay
- White air-dry clay (small amount)
- Black acrylic paint (optional, for touch-ups)
- Clay sculpting tool or toothpick
- Water in a small cup
- PVA glue or clay slip
- Sandpaper (fine grit, optional)
Step 1: Shaping the Body
-
Prepare the main body:
Start by taking a chunk of black air-dry clay about the size of a walnut. Roll it between your palms until it forms a smooth, crack-free sphere. This will be the abdomen (the back part) of the spider. If cracks appear, dip your finger in water and smooth them over. -
Form the head:
Take a slightly smaller piece of black clay, roughly half the volume of the first piece. Roll this into a second, smaller sphere to serve as the spider’s head. -
Connect the segments:
Slightly flatten one side of each sphere where they will join. Score these flat spots with a sculpting tool or toothpick to create a rough texture, then apply a tiny dab of water or clay slip. -
Secure the bond:
Press the head firmly against the body. Wiggle them slightly to lock the clay fibers together, then smooth the seam underneath if needed for extra stability.
Wire Reinforcement
For sturdier legs, insert small pieces of floral wire inside the clay coils. This prevents snapping and lets you repose legs later.
Step 2: Creating the Legs
-
Roll a long coil:
Roll out a long, thin snake of black clay on your work surface. Aim for a consistent thickness, roughly 3-4mm wide. -
Cut leg segments:
Cut the coil into eight equal segments. For this size spider, each leg should be about 1.5 to 2 inches long. -
Taper the ends:
Gently roll one end of each segment between your fingertips to create a slightly tapered point. Leave the other end blunt for attaching to the body. -
Shape the arch:
Take each leg segment and gently bend it in the middle to create an arch or ‘knee’ joint. This gives the spider its classic crawling posture. -
Attach the legs:
One by one, press the blunt end of each leg into the side of the body piece (the larger sphere). I find it easiest to attach four on the left and four on the right, spacing them evenly. -
Blend the seams:
Use a small modeling tool to smooth the clay from the leg onto the body so they are securely attached. This prevents legs from falling off as they dry. -
Pose the spider:
Adjust the stance of the spider while the clay is still soft. Ensure all eight feet touch the surface so it stands balanced.
Spooky Variations
Make a whole family! Try adding extra eyes for realism, tiny clay fangs, or paint the back with a red hourglass for a widow spider look.
Step 3: Adding the Face
-
Make the eyes:
Pinch off two very tiny balls of white air-dry clay. Flatten them slightly into discs and press them onto the upper front of the head. -
Add pupils:
Ideally, use two microscopic specks of black clay and press them into the center of the white discs. Alternatively, you can paint these on after the clay dries. -
Carve the smile:
Using a needle tool, toothpick, or the edge of a small spoon, gently press a curved line into the clay below the eyes to create a simple, happy smile. -
Smoothen imperfections:
Give the entire sculpture a once-over. Smooth out any fingerprints or rough spots with a barely damp finger. -
Drying:
Place the spider on a piece of parchment paper to dry. Let it sit undisturbed for at least 24-48 hours. -
Final touches:
Once fully dry, if the black clay looks a bit dusty or gray, you can brush on a thin coat of matte varnish or black acrylic wash to restore the deep color.
Enjoy finding the perfect spot for your friendly new crawling companion
Tiny Witch Hat Ring Cones
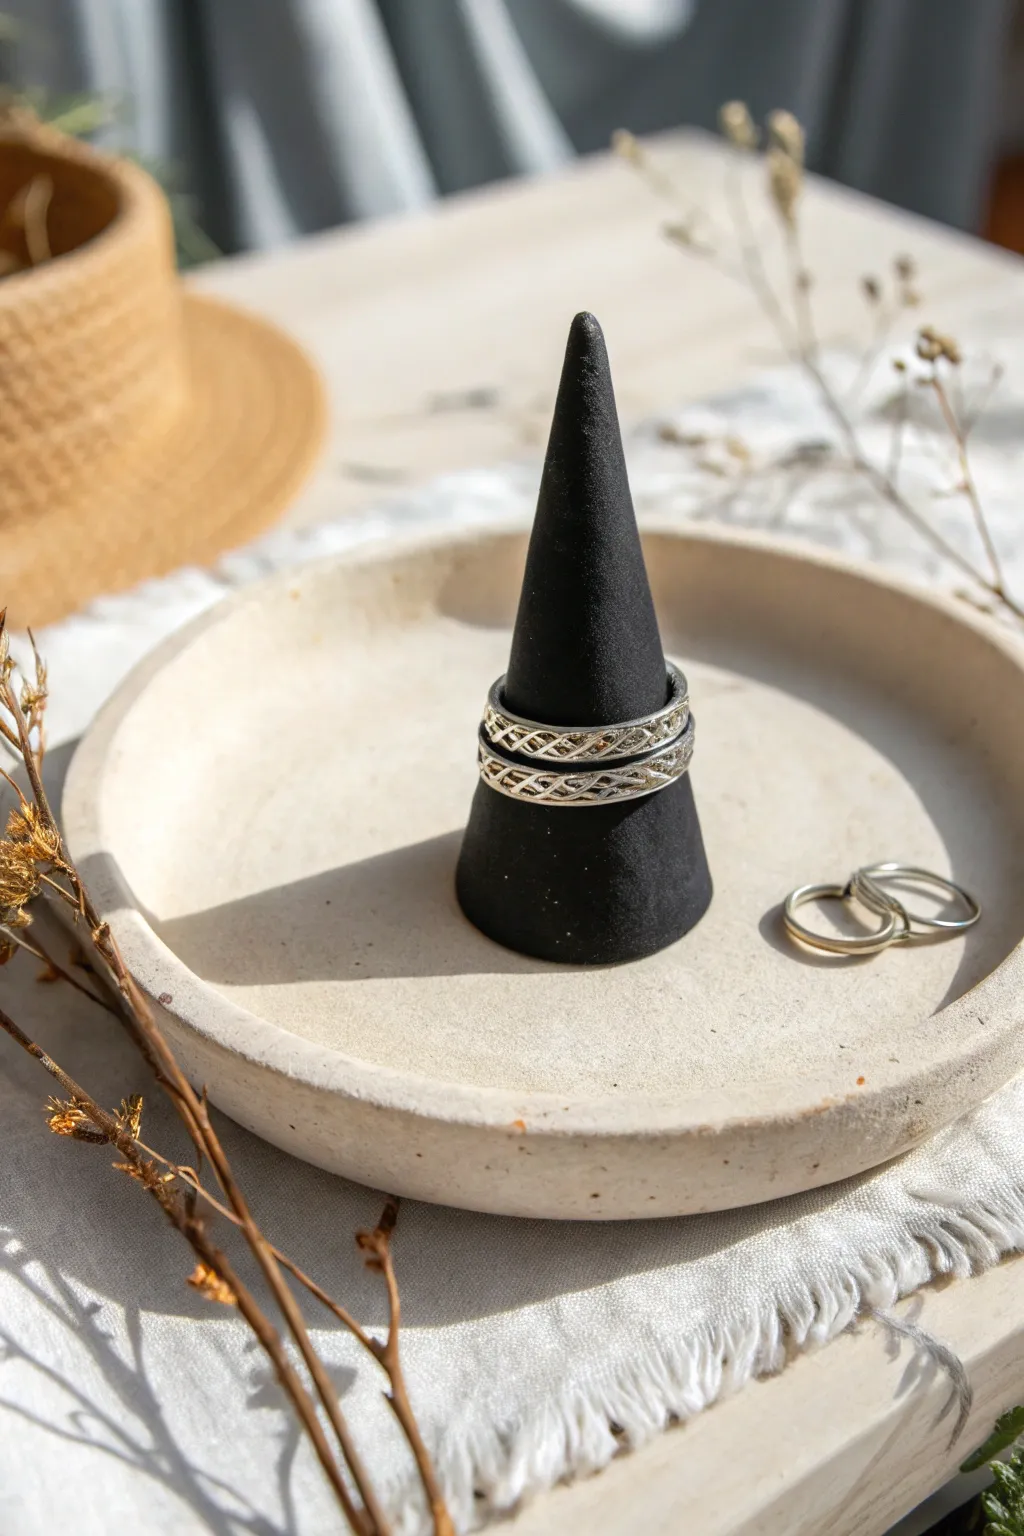
This chic and functional jewelry holder captures the silhouette of a witch’s hat with a modern, minimalist twist. Made from rich black clay, it serves as a subtle nod to the mystical while keeping your favorite rings organized and displayed beautifully.
How-To Guide
Materials
- Black air dry clay (or white clay painted black)
- Small rolling pin
- Clay knife or craft blade
- Sandpaper (fine grit, 320-400)
- Water and a small sponge
- Cardstock or thick paper (for the template)
- Compass or circular object (approx. 2-inch diameter)
- Matte varnish or sealant
- Soft paintbrush
Step 1: Shaping the Cone
-
Prepare the clay:
Start with a golf ball-sized amount of black air dry clay. Knead it in your hands for a minute until it feels warm, pliable, and free of any cracks. -
Roll a basic cylinder:
Roll the ball into a thick cylinder or log shape on your work surface to begin forming the height of the cone. -
Form the cone shape:
Place the cylinder upright. Using your palms, gently roll the top portion back and forth while applying downward pressure to taper it into a point. -
Refine the base:
Keep the base flat against the table. If it becomes rounded, press the cone firmly down onto the surface to flatten the bottom again. -
Adjust proportionality:
Check the width against your rings. The cone needs to be slender enough at the top for rings to slide down, but wide enough at the bottom to stop them before they hit the table. -
Smooth the surface:
Dip your finger or a small sponge into a little water. Run it over the clay to smooth out any fingerprints or uneven bumps.
Step 2: Refining and Drying
-
Slice the bottom:
For a perfectly flat stance, use your craft blade to slice a thin layer off the very bottom of the cone. This ensures it won’t wobble. -
Initial drying phase:
Set the cone aside in a cool, dry place. Let it dry for about 24 to 48 hours. I like to rotate it every few hours so the air circulates evenly. -
Sanding for smoothness:
Once fully cured and hard, use fine-grit sandpaper to buff the surface. Focus on removing any tiny ridges or imperfections. -
Clean off dust:
Wipe the cone down with a slightly damp cloth to remove all the clay dust from sanding. This is crucial for a clean finish.
Cracking Up?
If you see tiny cracks forming as it dries, mix a small amount of fresh clay with water to create a ‘slip’ paste. Fill the cracks, smooth over, and let dry again.
Step 3: Finishing Touches
-
Painting (Optional):
If you didn’t use pre-colored black clay, apply two coats of matte black acrylic paint now, letting it dry completely between layers. -
Apply sealant:
Brush on a thin layer of matte varnish. This protects the clay from moisture and oils from your hands or jewelry. -
Final cure:
Allow the varnish to cure fully according to the bottle instructions before placing any jewelry on the cone to prevent sticking.
Speckled Stone Effect
Before the final seal, flick a toothbrush loaded with diluted white or gold paint over the black cone to create a magical, starry night or galaxy texture.
Now you have a sleek, handmade sculpture ready to hold your treasured rings
Faux Obsidian Crystal Clusters
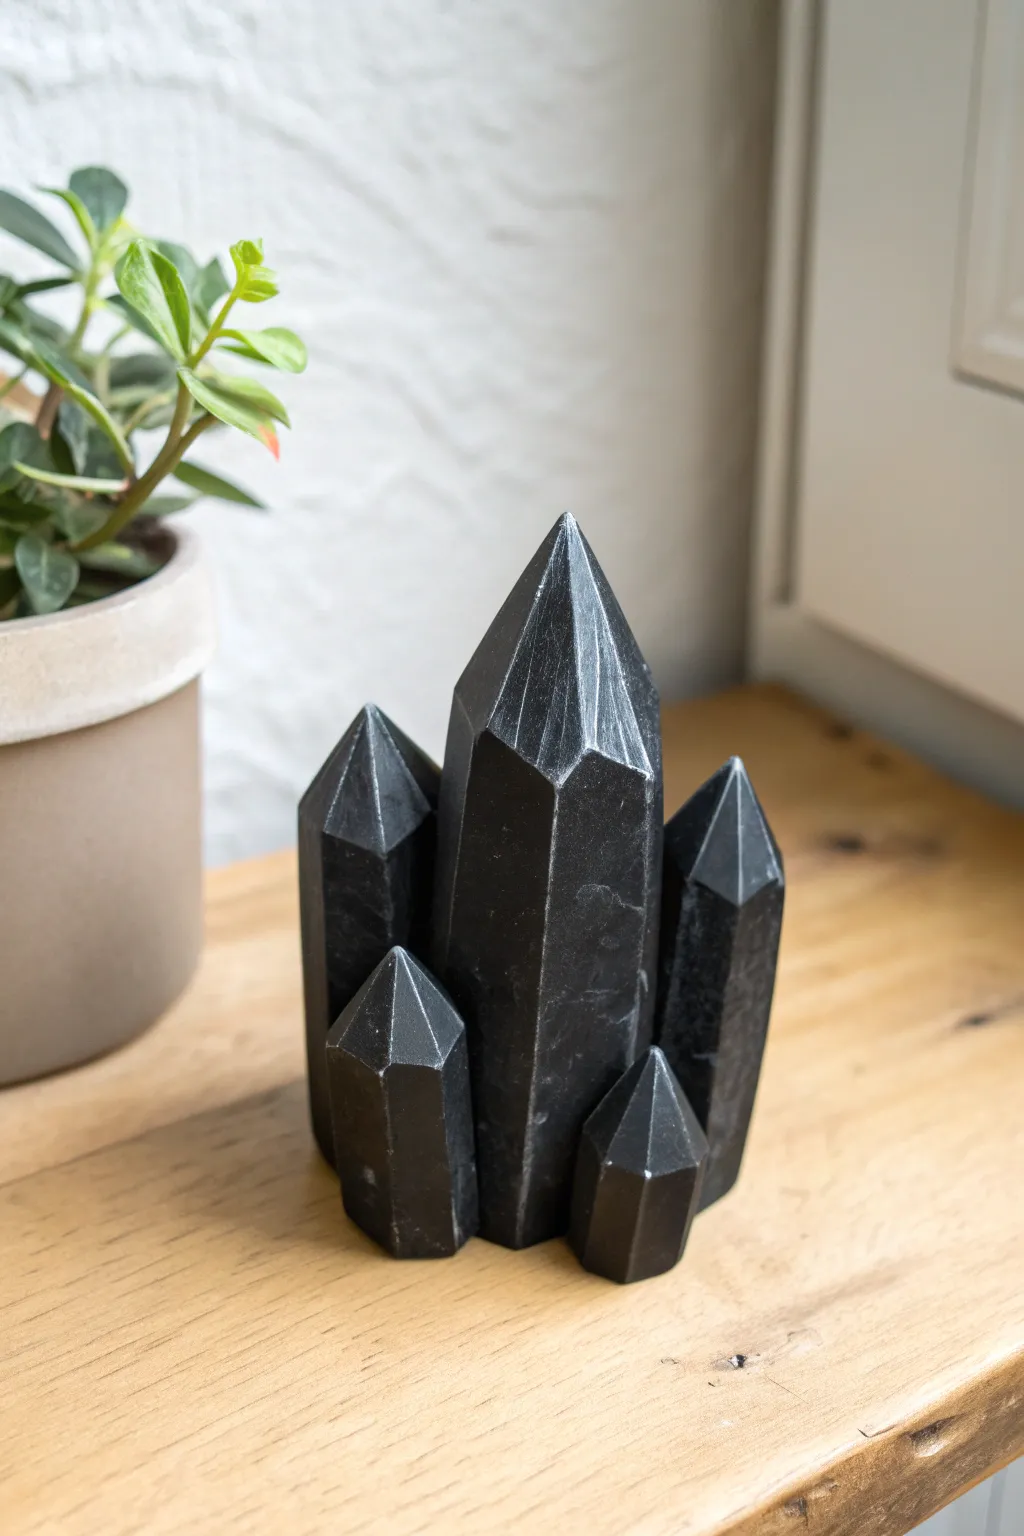
Transform simple black air dry clay into a striking, mysterious crystal cluster that looks surprisingly like real obsidian. This architectural piece captures the geometric beauty of natural stone with sharp facets and a subtle, matte finish.
How-To Guide
Materials
- Black air dry clay
- Rolling pin (acrylic preferred)
- Craft knife or X-Acto blade
- Cutting mat
- Ruler
- Water in a small cup
- Sandpaper (fine grit)
- Gloss or satin varnish (optional for extra shine)
- Soft brush
Step 1: Shaping the Base Structures
-
Prepare the clay:
Start by conditioning a large chunk of black air dry clay. Knead it thoroughly in your hands until it is pliable and smooth, ensuring there are no hidden air pockets. -
Roll the logs:
Divide your clay into five uneven portions to create variety in your cluster. Roll each portion on your work surface to form thick cylinder or hexagonal logs of varying heights and thicknesses. -
Flatten the bases:
Tap the bottom of each log firmly against your table to create a flat, stable base so the crystals will stand upright without wobbling. -
Initial shaping:
Using your fingers or a flat tool, gently press the sides of the logs to begin suggesting a hexagonal or octagonal column shape rather than a perfect cylinder.
Cracks Appearing?
If small cracks form while drying, mix a tiny bit of fresh clay with water to make a paste. Fill the cracks, smooth it over, and let it dry again.
Step 2: Carving the Facets
-
Cutting the primary angle:
Take your tallest crystal log. Using your craft knife, make a steep, diagonal cut starting about an inch from the top, angling toward the center tip. This establishes the main point. -
Creating the termination point:
Rotate the clay and make similar diagonal cuts around the top. Aim for 5 to 7 facets that meet at a sharp point, mimicking the natural termination of quartz or obsidian crystals. -
Refining the sides:
Slice thin strips vertically down the sides of the column to sharpen the edges. Obsidian breaks with sharp, clean lines, so avoid rounding these corners. -
Repeat for all crystals:
Continue this carving process for the remaining four logs. Make sure to vary the angles and the number of facets on the tips so they don’t look identical. -
Smoothing:
Dip your finger in a tiny bit of water and very gently smooth out any rough fingerprints on the flat planes, but be careful not to dull the sharp edges you just carved.
Add Realism
Before the clay dries, gently press coarse sandpaper or a real rock against the very bottom of the cluster to give the ‘ground’ area a rough, raw texture.
Step 3: Assembly and Finishing
-
Scoring the contact points:
Arrangement is key here. Decide how you want the cluster to sit, with the tallest crystal in the center or back. Mark where the crystals will touch each other. -
Joining the cluster:
Score the clay (make scratch marks) at the contact points and add a dab of water or clay slip. Press the crystals firmly together, starting with the central tower and adding the smaller ones around the base. -
Blending seams:
Where the bases of the crystals meet, use a sculpting tool or the back of your knife to blend the clay slightly so they look like they grew out of the same rock mass. -
Drying phase:
Let the sculpture dry completely. Because these are thick pieces, I usually leave them for at least 48 to 72 hours in a cool, dry place. Flip the cluster occasionally if the bottom stays damp. -
Sanding:
Once fully cured, use fine-grit sandpaper to lightly buff the flat planes. This enhances the geometric look and removes any lingering texture. -
Cleaning up:
Wipe away all the sanding dust with a slightly damp cloth or a soft brush to restore the deep black color. -
Final touch:
The clay will dry to a matte dark grey/black. If real obsidian shine is your goal, apply a coat of gloss varnish; otherwise, keep it matte for a modern, industrial stone look.
Place your completed crystal cluster on a shelf or desk to bring a touch of grounded energy to your space
Scratch-Reveal Sgraffito Tiles
These striking coasters combine the sleek, modern look of black surface design with organic textures. By using a simple scratch-reveal technique known as sgraffito, you’ll uncover the warm, natural clay color beneath a dark surface coating.
Detailed Instructions
Materials
- Light-colored air dry clay (white or natural/bisque)
- Black acrylic paint or black underglaze
- Square cookie cutter (approx. 3.5 inches)
- Rolling pin
- Carving tools (needle tool, small loop tool, or a toothpick)
- Two wooden guide rulers (1/4 inch thick)
- Fine grit sandpaper
- Clear matte acrylic sealer or varnish
- Paintbrush
Step 1: Shaping the Base
-
Prepare the Clay:
Begin with a ball of light-colored air dry clay. I prefer using a natural or bisque shade as it provides excellent contrast against the black paint later. -
Roll the Slab:
Place your clay between two wooden guide rulers on a smooth surface. Roll the clay out until the rolling pin rests on the guides, ensuring a perfectly even thickness of about 1/4 inch. -
Cut the Shape:
Press a square cookie cutter firmly into the clay slab. If you don’t have a cutter, measure a square with a ruler and carefully cut it out with a craft knife. -
Smooth the Edges:
Dip your finger in a little bit of water and run it gently along the edges of the square to soften any sharpness or irregularities. -
Initial Drying:
Allow the clay square to dry until it is leather-hard. It shouldn’t be squishy, but it needs to be slightly cool to the touch and firm.
Step 2: Applying the Dark Layer
-
Apply the Base Coat:
Paint the top surface of the leather-hard clay with black acrylic paint or underglaze. Use smooth, even strokes to avoid heavy brush marks. -
Check Coverage:
Wait for the first coat to dry slightly. If the clay color shows through, apply a second thin coat for solid opacity. -
Dry to Touch:
Let the black layer dry until it is no longer wet to the touch, but do not let the clay fully cure yet. The moisture in the clay makes carving much easier.
Paint Flaking Off?
If paint chips off in chunks while carving, the paint layer is likely too thick or too dry. Try carving while the paint is slightly tacky, or use thinner coats.
Step 3: Carving the Design
-
Plan the Composition:
Visualize your layout. The example uses a horizon-like style with wavy lines in the middle, stars at the top, and patterned arches at the bottom. -
Carve the Waves:
Using a needle tool or sharp carving implement, scratch two or three parallel wavy lines horizontally across the center of the tile. Apply enough pressure to remove the black paint and reveal the light clay. -
Add the Stars:
In the upper section, carve small outline stars. I like to scatter small dots around them to create a distant galaxy effect. -
Create the Arches:
In the bottom section, carve simple arched lines suggesting hills or dunes. -
Add Dotted Details:
Enhance the bottom arches by poking rows of dots that follow the curve of the lines. Varying the spacing makes the design feel more dynamic. -
Clean Up Crumbs:
Gently blow away any paint or clay crumbs that accumulate as you carve so they don’t get mashed back into the black surface.
Switch It Up
Try reverse coloring! Use black clay (or dye your clay black) and paint a layer of white or gold on top. When you scratch, you’ll reveal a bold dark line.
Step 4: Finishing Touches
-
Full Dry:
Set the coaster aside in a dry area. Let it dry completely for 24-48 hours until the clay turns a lighter color and feels room temperature. -
Sand the Sides:
Once fully dry, take fine-grit sandpaper and lightly sand the edges of the coaster to expose the natural clay color, creating a nice frame effect. -
Seal the Surface:
Apply a coat of clear matte acrylic sealer. This protects the carving and prevents the black paint from smudging if the coaster gets wet. -
Add Cork (Optional):
For extra protection on your table, glue a thin sheet of cork to the bottom of the coaster, or attach small felt pads to the corners.
Place your favorite mug on your new cosmic coaster and enjoy the functional art you created
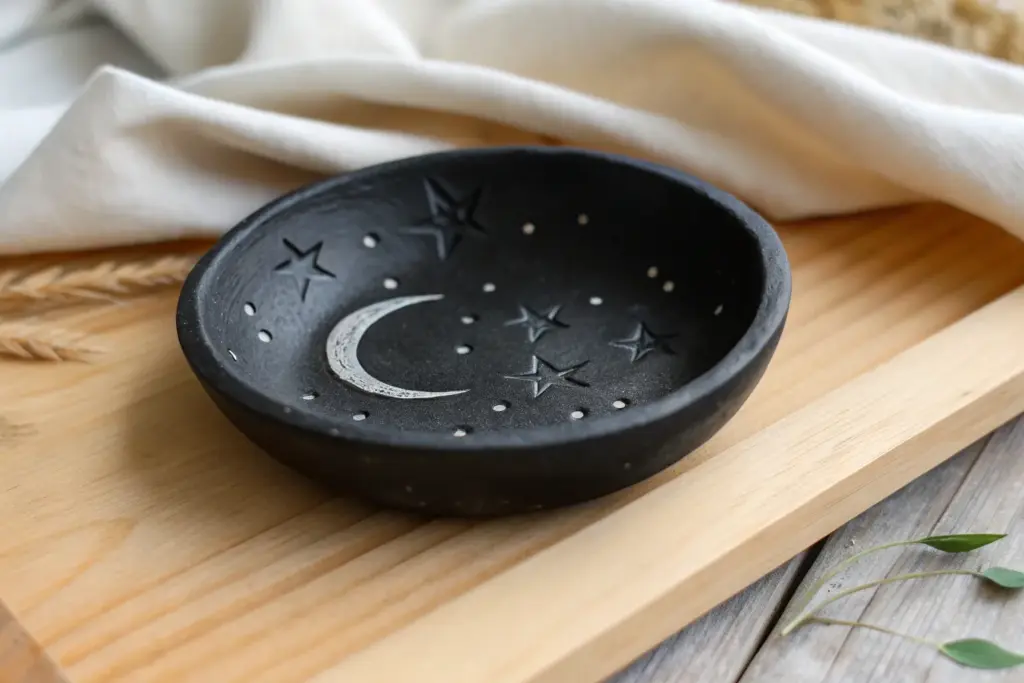
Constellation Night-Sky Wall Plaques
Bring the night sky indoors with this sleek, minimalist wall plaque featuring your favorite zodiac constellation. The matte black finish and organic shape create a modern bohemian vibe perfect for personalizing any corner of your home.
Step-by-Step
Materials
- Black air dry clay (or white clay + black acrylic paint)
- Rolling pin
- Circle cutter or a round bowl to trace
- Parchment paper or craft mat
- Needle tool or toothpick
- Small star-shaped clay cutter (optional)
- Jute twine or leather cord
- Sandpaper (fine grit)
- Water bowl and sponge
- Constellation reference image
Step 1: Shaping the Canvas
-
Prep the clay:
Begin by kneading a fist-sized ball of black air dry clay until it is warm and pliable. This conditioning step is crucial to prevent internal air bubbles and cracks later on. -
Roll it out:
Place the clay on a sheet of parchment paper. Roll it out evenly to a thickness of about 1/4 inch (6mm). If you want a perfectly uniform thickness, you can use guide slats on either side of your roller. -
Cut the circle:
Use a large round cookie cutter or place a bowl upside down on the clay and trace around it with a needle tool. Peel away the excess clay, leaving your perfect circle behind. -
Smooth the edges:
Dip your finger or a small sponge in water and gently run it along the cut edge of the circle to round it off and remove any sharp angles or drag marks from the knife. -
Add suspension holes:
Using a straw or a tool with a similar diameter, punch two holes near the top edge of the circle, roughly 2-3 inches apart. Ensure they are evenly spaced from the center so the plaque hangs straight.
Clean Edges Trick
Dip your clay cutters in cornstarch before pressing them into the black clay. This prevents sticking and ensures your stars and circles come out with crisp edges.
Step 2: Creating the Constellation
-
Mark the stars:
Referencing your chosen constellation diagram, lightly poke small guide dots onto the wet clay surface with a needle tool to map out where your stars belong. -
Punch the stars:
For the main stars of the constellation, press your tool all the way through the clay to create clean holes. Varying the size of your tool can represent different star magnitudes. -
Add detail stars:
If you have a tiny star-shaped cutter, press it gently into the surface at key points or cut all the way through for larger celestial bodies. Alternatively, use a knife to carve small four-point stars. -
Clean up the burrs:
Pushing tools through the clay often leaves messy ‘burrs’ on the back side. Flip the circle over carefully and smooth these rough bits down with a damp finger. -
Let it dry:
Lay the piece flat on a drying rack or a fresh sheet of parchment. Allow it to air dry for 24-48 hours, flipping it occasionally to ensure even drying and prevent warping.
Step 3: Finishing Touches
-
Sand imperfections:
Once fully cured and hard, check the edges. If there are any sharp spots, lightly sand them with fine-grit sandpaper for a professional finish. -
Seal (Optional):
I usually prefer the raw matte look of black clay, but if you want extra durability, apply a coat of matte spray varnish now. Avoid glossy finishes to maintain the stone-like appearance. -
Measure the cord:
Cut a length of jute twine roughly 12-15 inches long. The length will determine how low the plaque hangs, so test it against your wall space first. -
Insert the twine:
Feed one end of the twine through the front of the left hole and tie a secure knot on the front side. The knot becomes a decorative element. -
Secure the hanger:
Repeat on the right side, entering from the back to the front and knotting on the front face, ensuring the loop is even. -
Hang and enjoy:
Find a hook or a wooden bar as seen in the photo, and display your celestial artwork proudly.
Make It Sparkle
For a magical touch, back the star holes with pieces of gold leaf or metallic gold paper before hanging, so a subtle glimmer shines through the darkness.
This simple yet striking project captures the mystery of the cosmos in a piece you can keep forever