
When I want a relaxing win in the studio, I reach for air-dry clay because it’s quick, forgiving, and honestly kind of magical. Here are my favorite simple air clay ideas that look adorable (or super useful) without needing fancy tools or advanced sculpting skills.
Classic Pinch Pot Planter
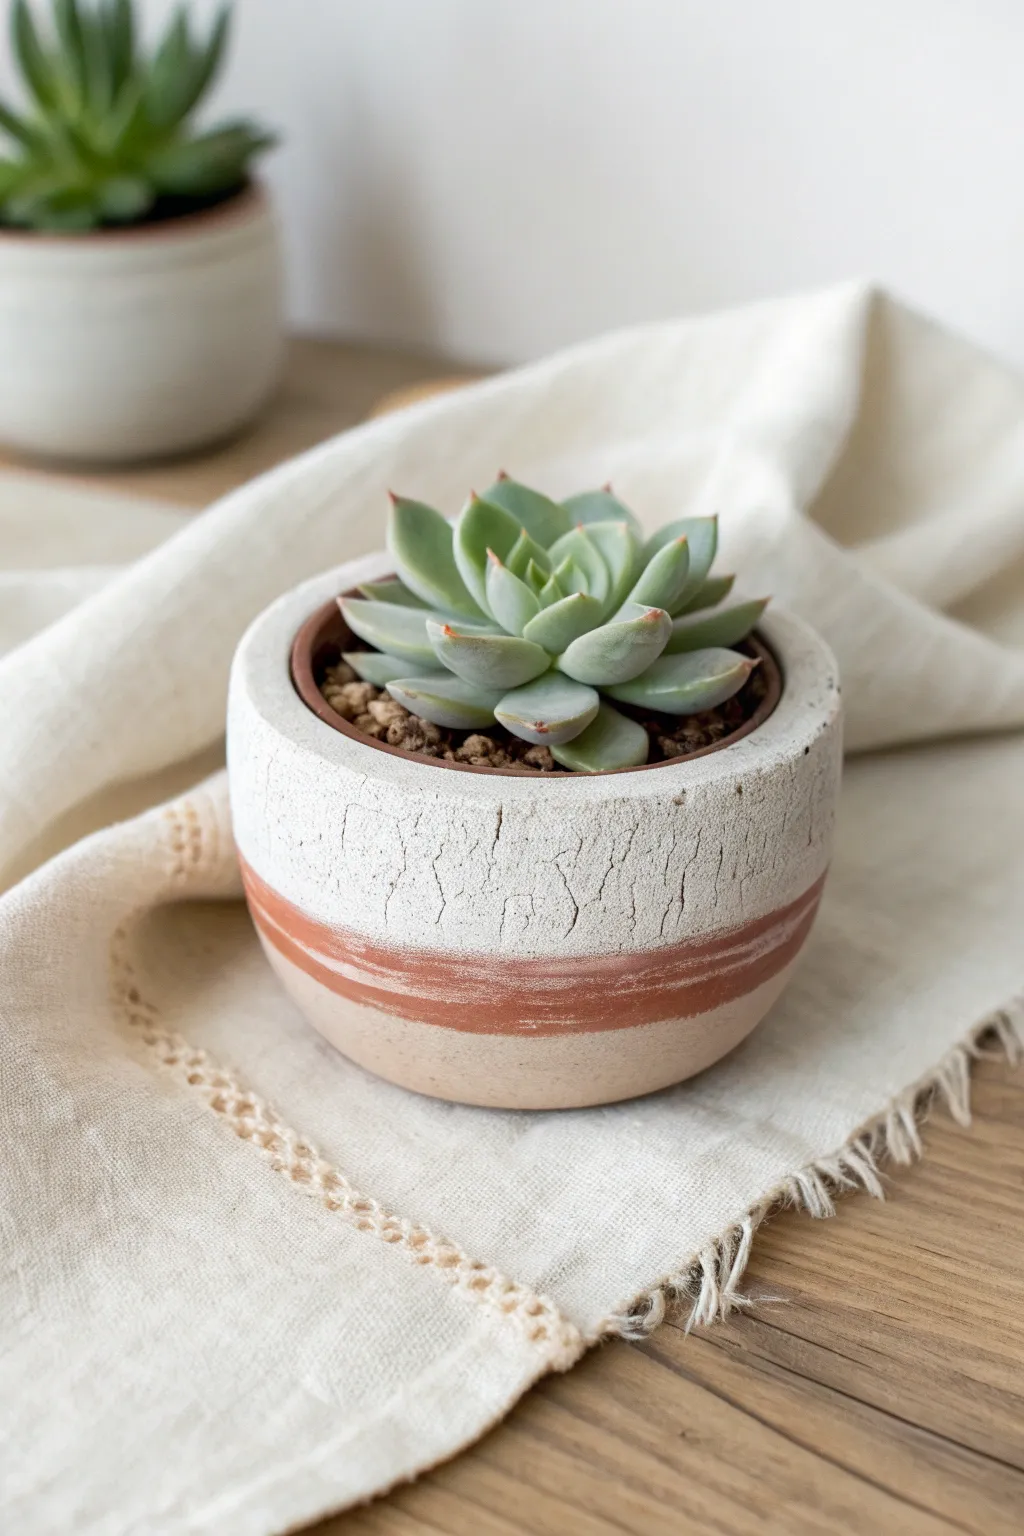
This charming little planter combines the rustic warmth of exposed terracotta with a sophisticated, aged crackle finish. The contrast between the sleek, crackled white top and the raw, earthy stripes creates a timeless look perfect for housing your favorite small succulent.
Step-by-Step Tutorial
Materials
- Terracotta-colored air dry clay
- White acrylic paint
- Crackle medium (or PVA glue for a DIY version)
- Clear matte varnish or sealant
- Rolling pin
- Small sponge or foam brush
- Fine grit sandpaper
- Water and a small bowl
- Modeling tool or butter knife
Step 1: Shaping the Base
-
Prepare the clay ball:
Start by taking a chunk of terracotta-colored air dry clay about the size of a tennis ball. Knead it in your hands until it’s warm and pliable. -
Form the pinch pot:
Press your thumb into the center of the ball, leaving about half an inch of clay at the bottom. Start pinching the clay walls between your thumb and fingers, rotating as you go to thin them out evenly. -
Refine the cylinder shape:
Instead of flaring the walls out like a bowl, try to keep them relatively straight and vertical to mimic the cylindrical shape in the photo. Gently tap the base on your table to flatten the bottom. -
Smooth the rim:
Moisten your finger with a little water and run it along the top rim to smooth out any cracks or unevenness. The rim should be fairly thick and rounded. -
Dry partially:
Set the pot aside to dry for about 24 hours. You want it to be ‘leather hard’—able to hold its shape perfectly but not bone dry yet.
Crackle Master Tip
For deeper, wider cracks in your finish, apply a thicker layer of crackle medium. For fine, hairline cracks, use a very thin layer.
Step 2: Creating the Texture
-
Sand for smoothness:
Once the exterior feels firm (but not totally dry), gently sand the outside wall to create a smooth canvas for your paint effects. Wipe away the dust with a damp cloth. -
Define the raw stripes:
Using masking tape or simply a steady hand, mark off the bottom third of the pot. This area will remain largely unpainted or lightly washed to show the clay color. -
Apply the base coat:
Paint the top two-thirds of the pot with a solid coat of white acrylic paint if you want a very bright base, or leave it bare if you want the crackles to reveal the terracotta underneath directly. Let this dry completely. -
Add crackle medium:
Apply a generous layer of crackle medium over the top section of the pot. Brush it on in one direction only. Let it dry until it’s tacky but not wet. -
Apply the top coat:
Quickly brush a layer of heavy body white acrylic paint over the tacky medium. Brush in the opposite direction of the medium application. Do not overwork it; one pass is enough. -
Watch the magic:
As the top coat dries, you will see the white paint separate to create that lovely aged, crackled texture revealing the clay underneath.
Step 3: Adding the Earthy Stripes
-
Mix a wash:
To create the banded look near the bottom, mix a tiny drop of brown or terracotta paint with water to create a translucent wash. -
Paint the first stripe:
Using a small brush, paint a horizontal band just below where the white crackle section ends. Keep the edges organic and soft rather than perfectly sharp. -
Add the second stripe:
Leave a small gap of exposed raw clay, then paint a second, thinner band near the very bottom. I find rotating the pot on a lazy susan helps get a continuous line. -
Distress the paint:
Once the stripes are dry, take fine sandpaper and very lightly scuff the painted bands and the white section to blend them together and enhance the weathered aesthetic.
Level Up: Faux Texture
Before painting, gently roll a textured fabric or a piece of crumpled foil over the clay surface to add physical indentations that catch the paint.
Step 4: Sealing and Finishing
-
Seal the interior:
Air dry clay is not waterproof. Apply 2-3 coats of a waterproof varnish or sealant to the inside of the pot to protect it from moisture. -
Seal the exterior:
Apply a matte sealant to the outside. A glossy finish would ruin the rustic, earthy vibe, so stick to matte. -
Plant or insert pot:
Ideally, place a small plastic nursery pot inside your clay creation rather than planting directly, to ensure the clay stays dry.
Now you have a beautifully weathered pot that looks like a vintage find from the garden.


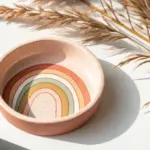
Easy Flower Coasters
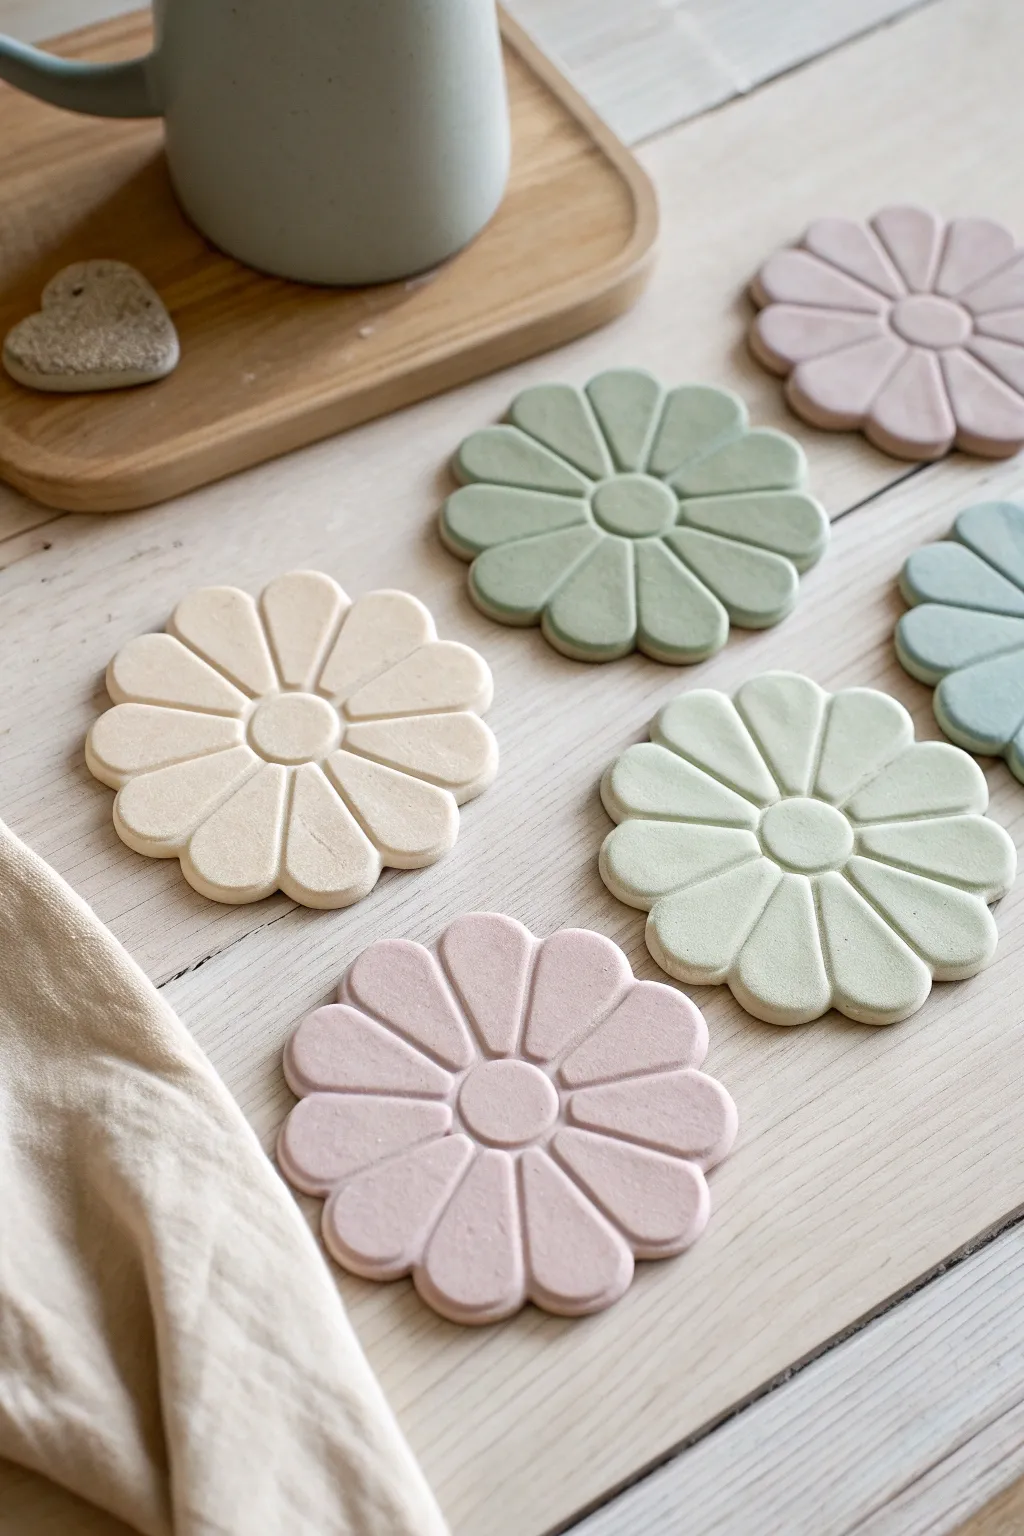
Bring the softness of spring to your coffee table with these charming daisy-inspired coasters. Made from simple air-dry clay, they feature a chunky, minimalist floral design in soothing matte pastel tones.
How-To Guide
Materials
- Air-dry clay (white)
- Acrylic paints (pastel pink, sage green, cream, light blue)
- Rolling pin
- Parchment paper or a silicone mat
- Round cookie cutter (approx. 3.5 – 4 inches diameter)
- Small round cutter or bottle cap (approx. 1 inch diameter)
- Modeling tool or dull knife
- Fine-grit sandpaper (400 grit)
- Matte spray varnish or sealant
- Cup of water
- Small sponges or bristle brushes
Step 1: Shaping the Base
-
Prepare the Clay:
Begin by taking a handful of white air-dry clay and kneading it in your hands until it becomes warm, soft, and pliable. This conditioning step prevents cracks later on. -
Roll it Out:
Place the clay between two sheets of parchment paper to keep your rolling pin clean. Roll the clay out into an even slab that is about 1/4 inch thick. You want them thick enough to be durable coasters. -
Cut the Circle:
Using your large round cookie cutter, punch out a circle from the rolled clay. If you don’t have a cutter, trace a wide mug and cut carefully with a craft knife. -
Smooth the Edges:
Dip your finger in a little water and gently run it around the circumference of the clay circle to smooth out any rough bits left by the cutter.
Clean Cuts Pro Tip
Before cutting your initial circle, dust your cutter with a tiny bit of cornstarch. This acts as a release agent and prevents the clay from sticking to the mold.
Step 2: Sculpting the Flower
-
Mark the Center:
Take your smaller round object (like a bottle cap) and gently press it into the absolute center of the clay circle. Don’t cut all the way through; just make a clear indentation. -
Draft the Petals:
Using a dull knife or a sculpting tool, lightly score lines radiating from the center circle to the outer edge, dividing the coaster into even sections. Aim for about 10-12 petals. -
Define the Separation:
Once you are happy with the spacing, press your tool firmly into those lines to create deep grooves. I find it helpful to slightly wiggle the tool to widen the gap between petals. -
Round the Petal Tips:
Using your fingers or a smoothing tool, gently press the outer edge of each ‘slice’ inward to round off the corners, giving each section a distinct petal shape rather than a hard wedge. -
Refine the Center:
If the center circle got distorted during the petal sculpting, gently repress your bottle cap or small cutter into the middle to sharpen the outline again. -
Final Smoothing:
Do a final pass with a damp finger or a slightly wet sponge to smooth out any tool marks or jagged clay bits. The smoother it is now, the less sanding you’ll need later.
Level Up: Texture
Before drying, press a piece of rough linen fabric or a stamp gently onto the specific petals (but not the center) to add a subtle tactile texture to the design.
Step 3: Drying and Finishing
-
Wait for the Clay to Dry:
Place your coasters on a clean wire rack or parchment paper to dry. This typically takes 24-48 hours. Flip them over halfway through the drying process to ensure the bottom dries evenly and stays flat. -
Sand for Perfection:
Once the clay is bone dry and hard, use fine-grit sandpaper to buff away any remaining roughness on the edges or surface. Wipe away the dust with a dry cloth. -
Mix Your Palette:
Prepare your acrylic paints. The look works best with muted pastels, so mix your colors with plenty of white if they are too vibrant straight out of the tube. -
Apply the Color:
Paint the entire coaster in one solid color. You may need two coats for opaque coverage, letting the first coat dry completely before adding the second. -
Seal the Deal:
Since these are coasters, protection is key. In a well-ventilated area, spray the coasters with a clear matte varnish. This will protect the clay from moisture rings without making them shiny. -
Add Bottom Protection:
Optionally, glue a circle of felt or cork to the underside of the refined coaster to prevent it from scratching delicate table surfaces.
Enjoy styling your table with these soft, blossoming accents that are practical and pretty


Tiny Animal Minis
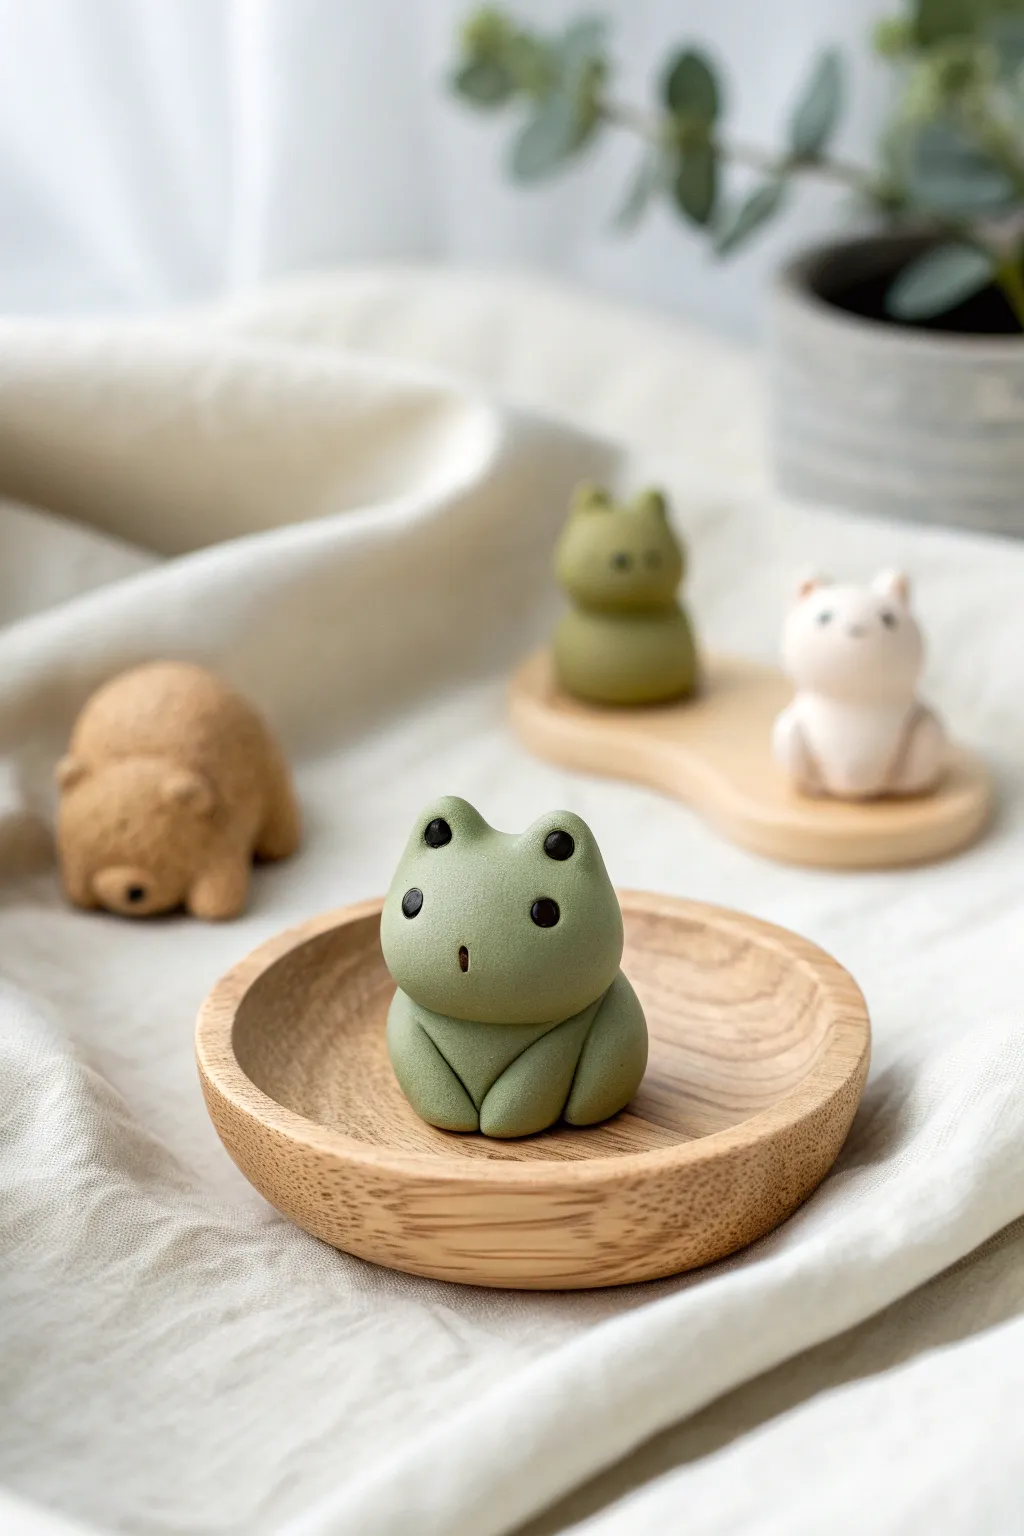
Create this adorably serene frog figurine that fits perfectly in the palm of your hand. Its smooth matte finish and minimalist features make it a charming desk companion or a sweet handmade gift.
Step-by-Step Guide
Materials
- Sage green air-dry clay (or white clay + acrylic paint)
- Black air-dry clay (tiny amount)
- Small ball tool or dotting tool
- Pointed sculpting tool or toothpick
- Smooth work surface (silicone mat recommended)
- Water for smoothing
- Matte varnish (optional)
Step 1: Shaping the Body Base
-
Prepare the clay:
Start by conditioning a walnut-sized amount of sage green clay until it is pliable and free of cracks. If you are mixing white clay with paint, ensure the color is evenly distributed. -
Roll the main form:
Roll the clay into a smooth ball between your palms. -
Create the pear shape:
Gently taper the top third of the ball slightly to create a subtle pear shape. This wider bottom will form the frog’s seated posture. -
Flatten the base:
To ensure your frog sits stable on the tray, tap the bottom of your shape firmly against your work surface to flatten it.
Cracks while rolling?
If your clay cracks as you shape the initial ball, it’s too dry. Knead in a drop or two of water until the dough is silky and elastic again before restarting.
Step 2: Sculpting the Head & Face
-
Define the eye mounds:
Using your thumb and forefinger, gently pinch the top of the head on the left and right sides to raise two distinct mounds for the eyes. -
Smooth the transition:
Dip your finger in a tiny bit of water and smooth the area between the eye mounds so there is a soft valley, not a sharp crease. -
Indent the eye sockets:
Take your ball tool and press gently into the front center of each eye mound to create shallow sockets for the pupils. -
Create the mouth:
Using a very small dotting tool or the tip of a toothpick, press a tiny, vertical oval hole in the center of the face for a surprised, open mouth. -
Insert the pupils:
Roll two minuscule spheres of black clay. Place them into the eye sockets and press gently to flatten them flush with the green clay.
Step 3: Adding Limbs & Details
-
Form the legs:
Roll two small, bean-sized logs of sage green clay for the legs. -
Attach the legs:
Press these logs vertically against the bottom sides of the body, curving them slightly around the front belly. -
Blend the seams:
I like to use a silicone tool or a damp finger to smooth just the back edge of the legs into the body, leaving the front defined. -
Create the paws:
At the bottom front of each leg, where they meet in the middle, gently press to signify feet. -
Add separation:
Use a sculpting tool or knife to score a distinct line between the two front feet so they don’t look like a single blob. -
Final smoothing check:
Inspect the figurine for any fingerprints. Gently buff them away with a drop of water. -
Drying:
Allow the frog to dry completely for 24-48 hours in a cool, dry place away from direct sunlight to prevent cracking.
Make it a set
Create different animals using this same base shape! Try rounded ears for a bear or pointed ones for a cat, swapping the sage green for brown or white clay.
Place your finished frog on a small wooden coaster for a peaceful display


Smiley Face Magnets
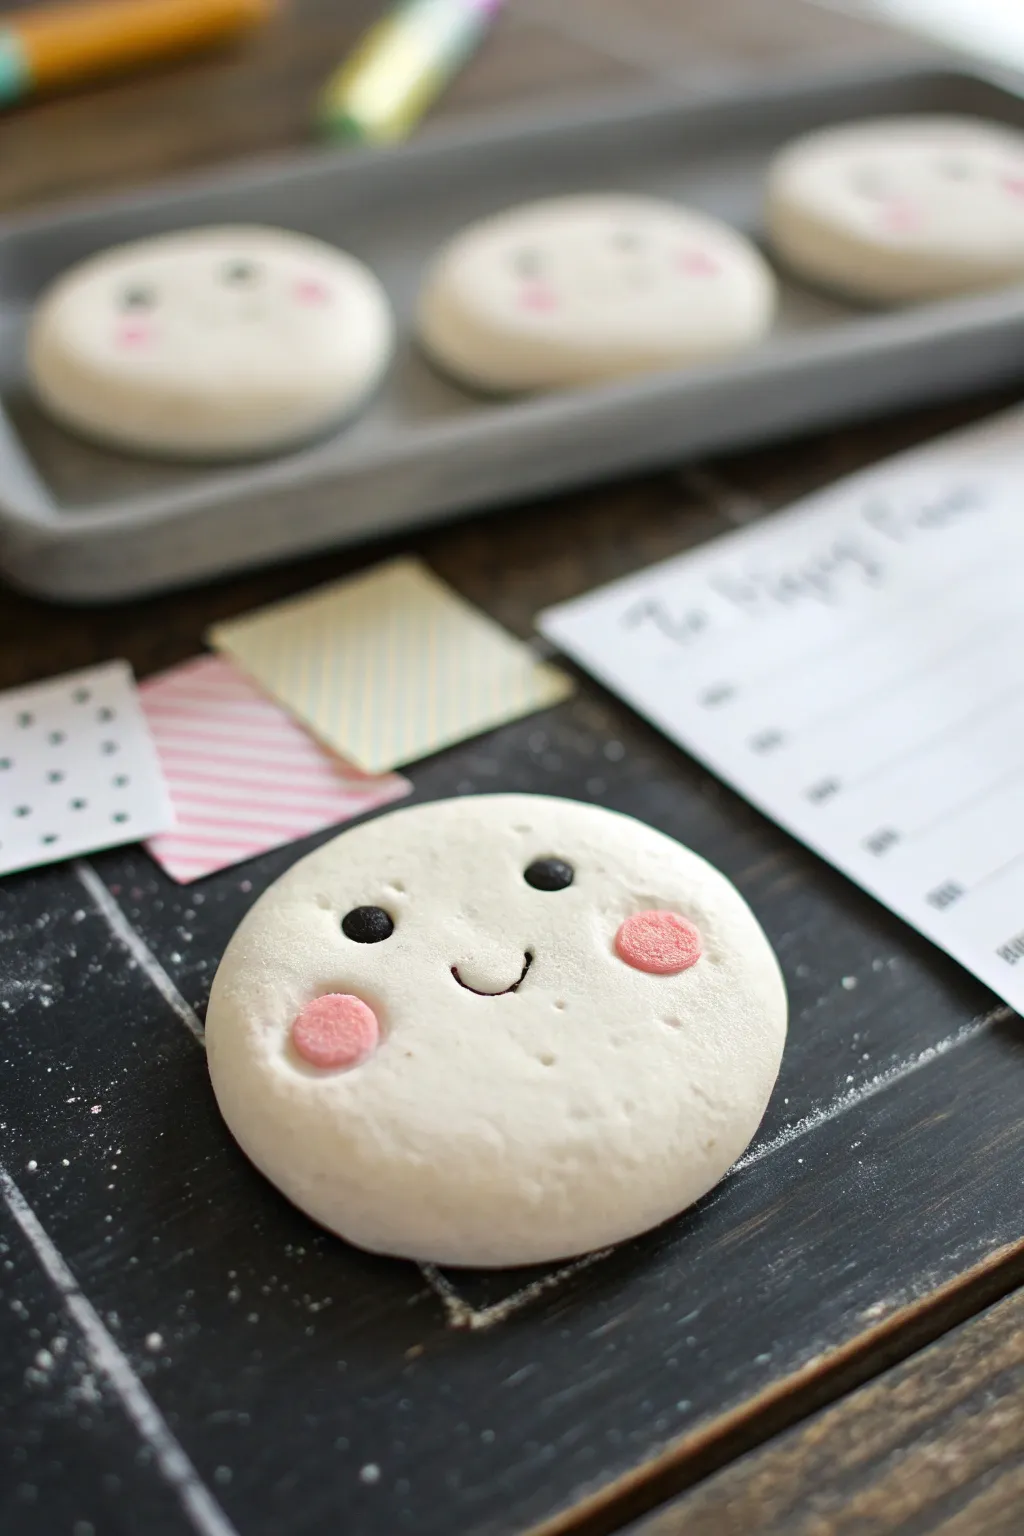
These adorable, puffy magnets bring a touch of whimsy to any fridge or magnetic board with their marshmallow-like texture and sweet expressions. Made from lightweight air-dry clay, they are a simple yet satisfying project perfect for beginners.
Step-by-Step Tutorial
Materials
- White lightweight air-dry clay (e.g., Model Magic or hearty clay)
- Small disk magnets (ceramic or neodymium)
- Black acrylic paint or black fine-tip marker
- Pink acrylic paint or pink clay
- Small round cutter or a drinking glass
- Rolling pin
- Parchment paper or non-stick mat
- Toothpick or sculpting tool
- Strong craft glue (like E6000)
- Matte sealant (optional)
Step 1: Shaping the Base
-
Condition the Clay:
Begin by taking a handful of white air-dry clay. Knead it thoroughly in your hands to warm it up and ensure it’s smooth and pliable. -
Roll Out the Slab:
Place the clay on your parchment paper. Using a rolling pin, roll the clay out until it is an even slab, approximately 1/4 to 1/3 inch thick. You want them to look a bit chubby and soft. -
Cut the Circles:
Use your round cutter or the rim of a small glass to punch out circles from the clay slab. Press straight down and lift cleanly to avoid distorting the shape. -
Soften the Edges:
I like to gently tap the edges of the cut circle with my finger to round them off slightly, removing the sharp cut line so it looks more organic and pillow-like. -
Make the Cheeks (Clay Method):
If you are using pink clay for the cheeks, pinch off two tiny balls of pink clay. Flatten them slightly and press them onto the white face while the clay is still damp so they adhere naturally. -
Embed the Magnet (Optional):
If you want the magnet flush with the back, flip the circle over and gently press your magnet into the back to create an indentation, then remove it. This helps later with gluing.
Step 2: Adding the Face
-
Create Eye Indentations:
Before painting, use the rounded end of a paintbrush handle or a ball tool to gently press two small divots where the eyes will go. This adds dimension. -
Dry the Clay:
Allow your clay circles to dry completely according to the package instructions. This usually takes 24-48 hours. Flip them halfway through to ensure the bottom dries evenly. -
Paint the Cheeks (Paint Method):
If you didn’t use pink clay earlier, mix a soft pink acrylic paint. Using a small round brush or the end of a chopstick, dab two perfect pink circles onto the dried face. -
Add the Eyes:
Dip a toothpick or a very fine detail brush into black acrylic paint. Carefully fill in the small indentations you made earlier, or simply dot two eyes onto the surface. -
Draw the Smile:
Using a fine-tip black marker or a very thin brush with black paint, draw a small, U-shaped smile between the cheeks. -
Add the ‘Tail’ to the Smile:
To match the reference image style, give the smile a tiny little upward stroke or tick at one end for a quirky, hand-drawn look.
Cracking Clay?
If you see hairline cracks as it dries, smooth a tiny bit of water or a slurry of clay and water over the crack with your finger to patch it immediately.
Step 3: Finishing Up
-
Attach the Magnet:
Once all paint is fully dry, flip the face over. Apply a dab of strong craft glue to the back (or into the optional indentation) and press the magnet firmly in place. -
Let the Glue Set:
Leave the magnets face down while the glue cures completely to prevent sliding. -
Seal the Surface:
For longevity, lightly brush a coat of matte sealant over the front of the magnet. This protects the painted details and keeps the white clay looking clean.
Add a Glow
Mix a tiny amount of glitter into the white clay before rolling it out, or dust the wet cheeks with pearlescent powder for a magical, shimmering finish.
Now you have a set of cheerful faces ready to hold up your most important notes and photos

The Complete Guide to Pottery Troubleshooting
Uncover the most common ceramic mistakes—from cracking clay to failed glazes—and learn how to fix them fast.
Boho Arch Wall Hanging
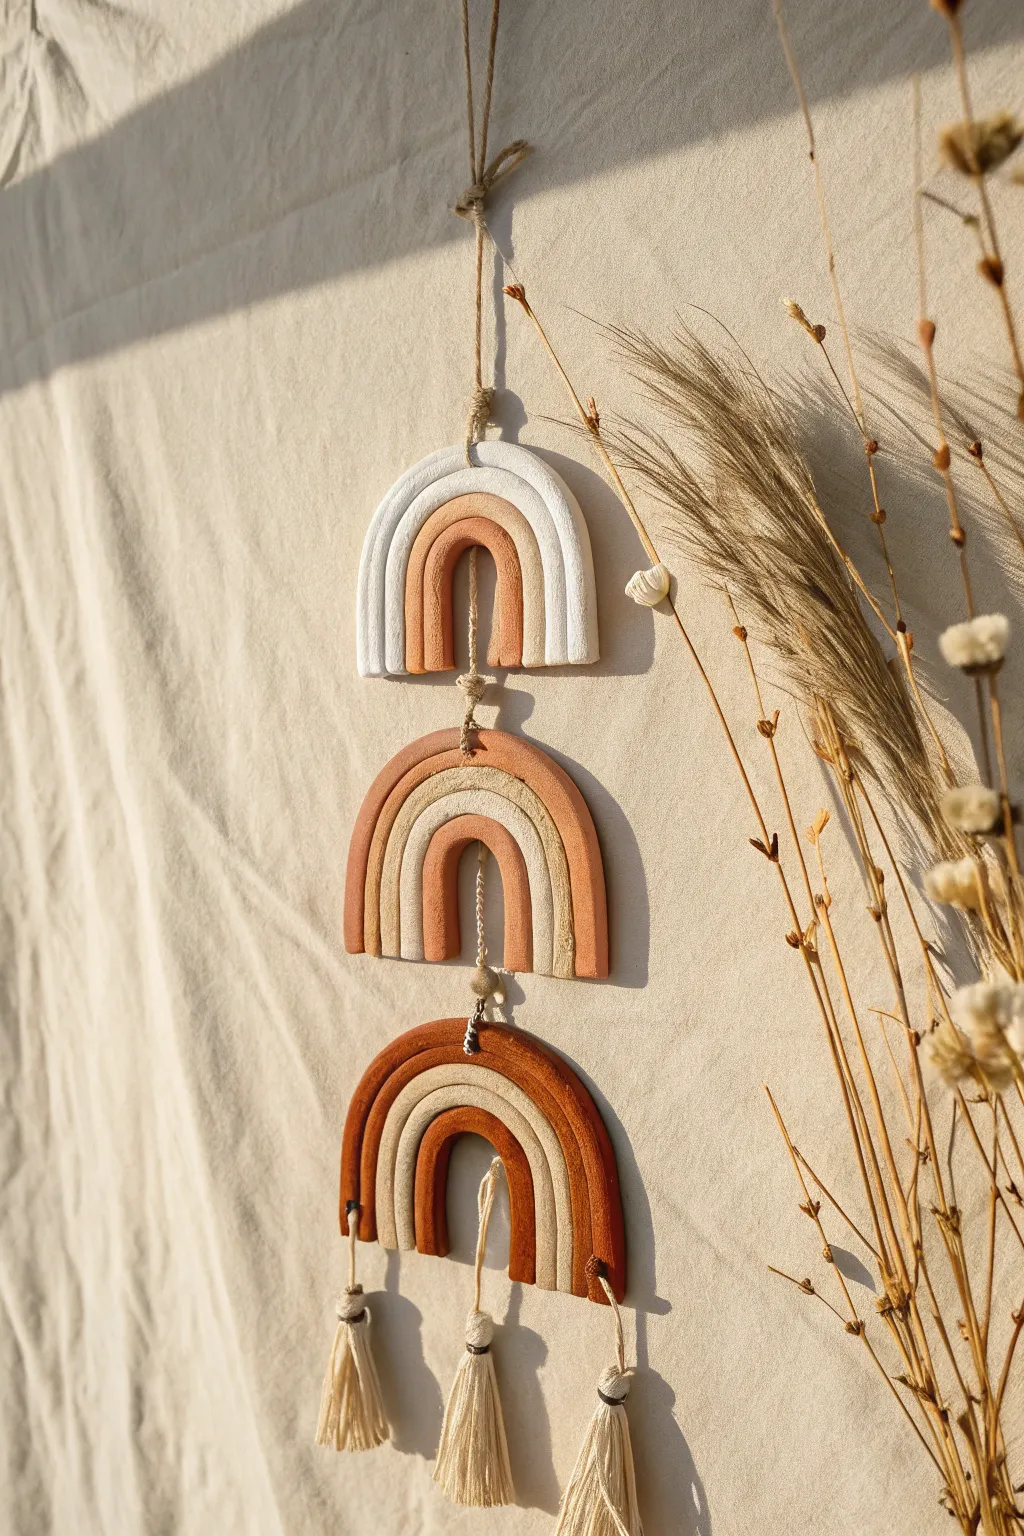
This earthy, minimalist wall hanging combines the malleability of air-dry clay with the warmth of natural textures. Featuring a tiered design of three graduated arches in varying terracotta and cream tones, it brings a calming, artisanal touch to any vertical space.
How-To Guide
Materials
- White air-dry clay (approx. 500g)
- Acrylic paints (burnt sienna, raw umber, cream/off-white)
- Rolling pin
- Jute twine or macramé cord
- Craft knife or clay cutter
- Small paintbrush
- Water cup (for smoothing)
- Straw or toothpick (for poking holes)
- Sandpaper (fine grit)
- Clear matte varnish (optional)
Step 1: Shaping the Arches
-
Roll the clay coils:
Begin by pinching off substantial chunks of smooth, white air-dry clay. Roll them on a flat surface into long, even snakes about 0.5 inches thick. You will need roughly nine coils total for the complete design. -
Form the first arch:
Take your first coil and curve it into a tight ‘U’ shape. Take a second coil and wrap it snugly around the first one. Add a third coil around that to complete the first rainbow. This will be your measurement guide. -
Trim the edges:
Use a sharp craft knife or dedicated clay cutter to slice straight across the bottom of the arch legs, creating a clean, flat base for the rainbow. -
Create the trio:
Repeat this process two more times to create three distinct rainbow arches. Make sure the coils are pressed gently against each other so they bond, but keep each rainbow as a separate unit. -
Add connection points:
While the clay is still wet, you need to create holes for the twine. For the top and middle arches, poke a hole vertically through the center of the top arc and another hole through the center of the bottom arc’s leg base. For the bottom arch, you only need holes along the bottom edge for tassels. -
Smooth imperfections:
Dip your finger in a little water and gently rub away any cracks or uneven textures on the surface. Smooth the joined areas between the coils to ensure they don’t separate while drying. -
Dry properly:
Lay the arches on a flat surface lined with parchment paper. Let them dry completely for 24-48 hours, flipping them occasionally to prevent warping.
Cracking Clay?
If you see cracks forming as it dries, mix a tiny bit of fresh clay with water to make a paste (slip) and fill in the cracks. Smooth it over with a finger.
Step 2: Painting and Assembly
-
Sand for finish:
Once fully cured and hard, check for rough spots. Use fine-grit sandpaper to gently buff the edges and surface until smooth to the touch. -
Mix your palette:
Prepare your acrylics. You want a gradient effect. For the top arch, I like to keep the outer ring white/cream and paint the inner ring a light terracotta. For the middle arch, paint the outer ring terracotta and the inner ring cream. -
Paint the bottom arch:
For the lowest rainbow, mix a darker burnt sienna or rust color. Apply this to the outer ring for visual weight, keeping the inner rings lighter. -
Apply the paint:
Paint the arches carefully, using a small brush to get crisp lines between the colors. You might need two coats for opaque coverage. Let the paint dry completely. -
Prepare the tassels:
Cut three lengths of jute twine or cord, each about 6 inches long. Fold them in half to create tassels, wrapping a smaller piece of string around the top to secure the loop. -
Connect the tiers:
Thread a long piece of twine through the top hole of the top arch to create a hanging loop. Knot it securely underneath. -
Link them together:
Thread twine from the bottom center of the top arch to the top center of the middle arch. Tie knots to secure the spacing (leave about an inch of rope visible). Repeat to connect the middle arch to the bottom arch. -
Attach tassels:
Finally, thread your prepared tassels through the holes at the bottom of the lowest arch. Secure them with knots so they dangle freely.
Add Texture
Before the clay dries, gently press a piece of lace or burlap into one of the rings to imprint a subtle, fabric-like texture before painting.
Hang your new art piece near a window to let the natural light highlight those earthy tones
Moon Phase Mobile
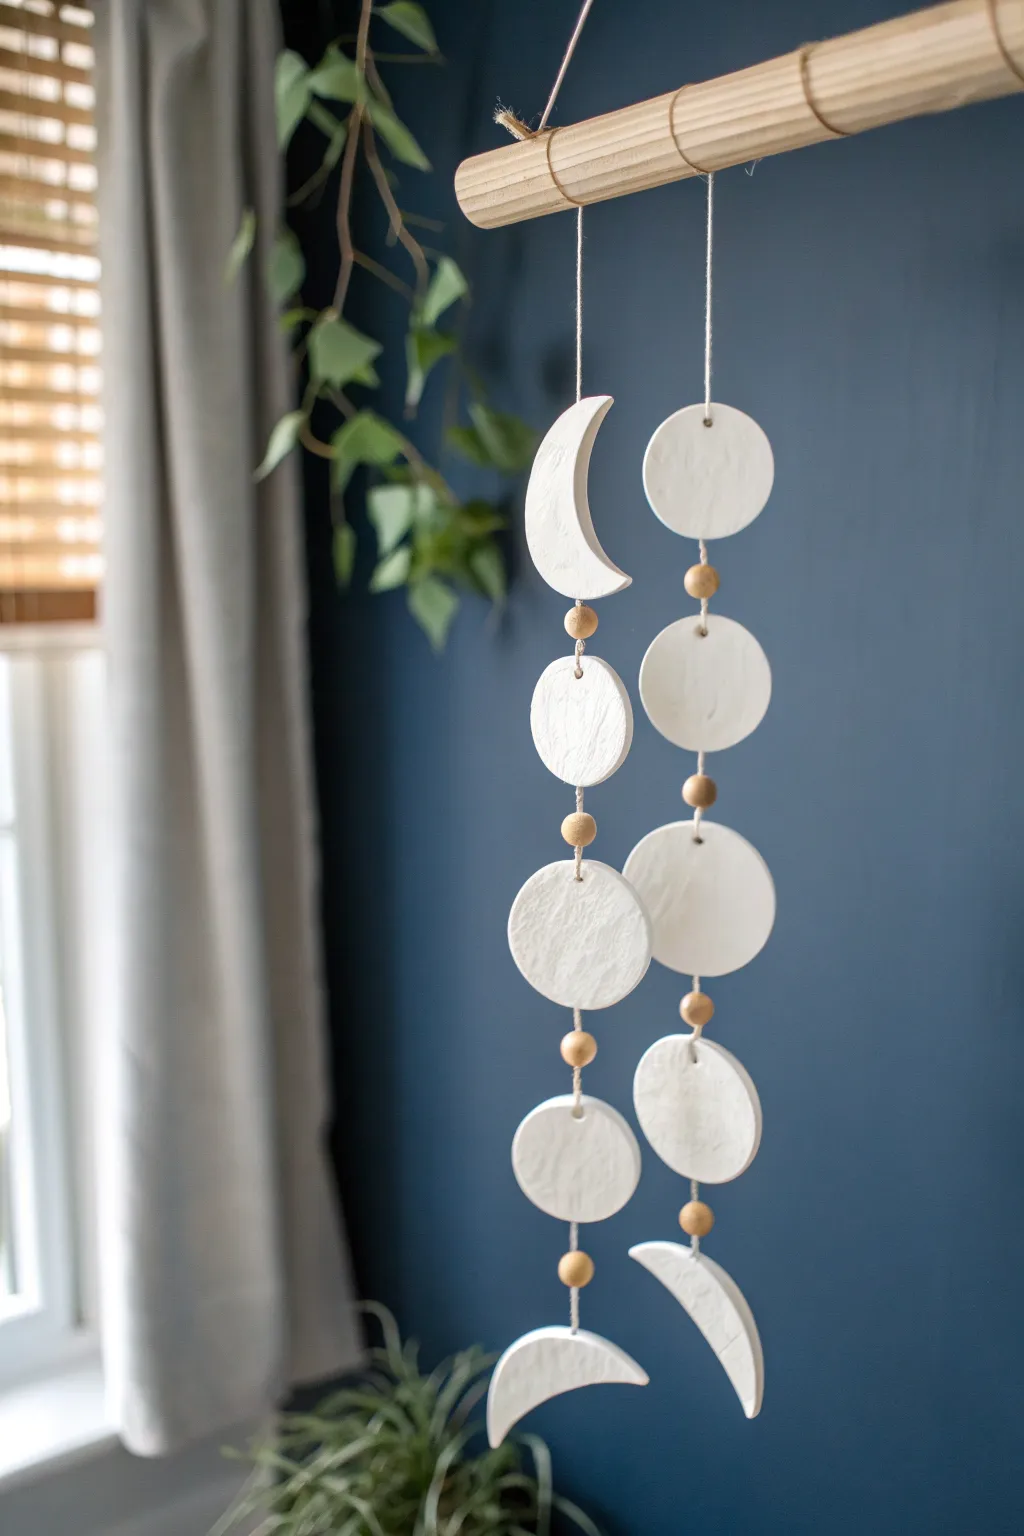
Bring the calming influence of the night sky into your home with this minimalist moon phase mobile. Using simple air-dry clay and natural wood elements, you’ll create a textured, bohemian wall hanging that captures the waxing and waning cycles of the moon.
Step-by-Step Tutorial
Materials
- White organic air-dry clay
- Rolling pin
- Circle cookie cutter (approx. 2.5 – 3 inches)
- Small wooden beads (approx. 8-10mm)
- Wooden dowel (1/2 inch thick, 12 inches long)
- White twine or strong cotton string
- Drinking straw or skewer
- Fine-grit sandpaper
- Non-stick mat or parchment paper
- Clean sponge and water
Step 1: Shaping the Moon Phases
-
Condition the Clay:
Begin by taking a chunk of air-dry clay and kneading it in your hands until it becomes soft, warm, and pliable. This prevents cracks later on. -
Roll It Out:
Place the clay on a non-stick surface or parchment paper. Use your rolling pin to flatten the clay to an even thickness of about 1/4 inch. -
Cut the Circles:
Press your circle cookie cutter firmly into the clay to create seven distinct circles. Remove the excess clay from around the shapes. -
Create Crescent Shapes:
For the crescent moons, take three of your cut circles. Re-position the circle cutter slightly off-center over each one and cut again to slice away a crescent shape. You’ll need two crescents facing opposite directions (waxing and waning). -
Add Texture:
The charm of this mobile is its rustic look. Lightly press a crumpled piece of plastic wrap or a rough sponge onto the surface of the wet clay to give it a subtle, craters-and-rock texture. -
Pierce Hanging Holes:
Use a straw or skewer to poke a hole at the top and bottom of every piece, *except* for the bottom-most crescent, which only needs a hole at the top. Ensure the holes are large enough for your twine to pass through easily. -
Smooth the Edges:
Dip your finger in a little water and gently run it along the cut edges of each shape to soften any sharp ridges or rough spots. -
Let Them Dry:
Lay all pieces flat on a piece of parchment paper away from direct heat. Let them dry for 24-48 hours, flipping them over halfway through so they dry evenly without warping.
Step 2: Assembly and Hanging
-
Sand Imperfections:
Once fully dry, lightly sand the edges with fine-grit sandpaper if you find any rough burs remaining. -
Cut Your Twine:
Cut two long lengths of twine, each about 3 feet long. You’ll be creating two vertical strands of moons. -
Tie the Bottom Pieces:
Start with the bottom-most crescent of one strand. Thread the twine through its single top hole and tie a knot secure enough to hold it. -
Add a Spacer Bead:
Thread a small wooden bead onto the string and slide it down until it rests on top of the crescent knot. -
Knot for Separation:
Decide how much space you want between pieces (about 1-2 inches looks balanced). Tie a simple overhand knot in the twine at that height. -
Attach the Next Moon:
Thread the next clay circle onto the string. The knot you just made will sit inside the bottom hole of this piece, hidden, supporting its weight. -
Secure the Top:
Tie a knot immediately as the string exits the top hole of the circle to keep it stable, then add another wooden bead. -
Repeat the Pattern:
Continue this pattern—bead, space, knot, clay piece, knot—until you have completed both vertical strands. One strand typically has four pieces, the other three. -
Attach to Dowel:
Tie the top of each finished strand securely onto your wooden dowel. I like to wrap the twine around the wood three or four times for a decorative finish before knotting it. -
Create the Hanger:
Cut a final piece of twine and tie it to both ends of the dowel to create a triangle hanger for the wall.
Fixing Cracks
If hairline cracks appear while drying, mix a tiny bit of fresh clay with water to make a paste (slip). Fill the crack, smooth it over, and let it dry again.
Make it Shine
Add a touch of magic by painting just the edges or the craters with metallic gold acrylic paint for a shimmering, sophisticated look.
Hang your mobile near a wind source to watch the moon phases gently dance and turn


What Really Happens Inside the Kiln
Learn how time and temperature work together inside the kiln to transform clay into durable ceramic.
Coil Rainbow Ornament
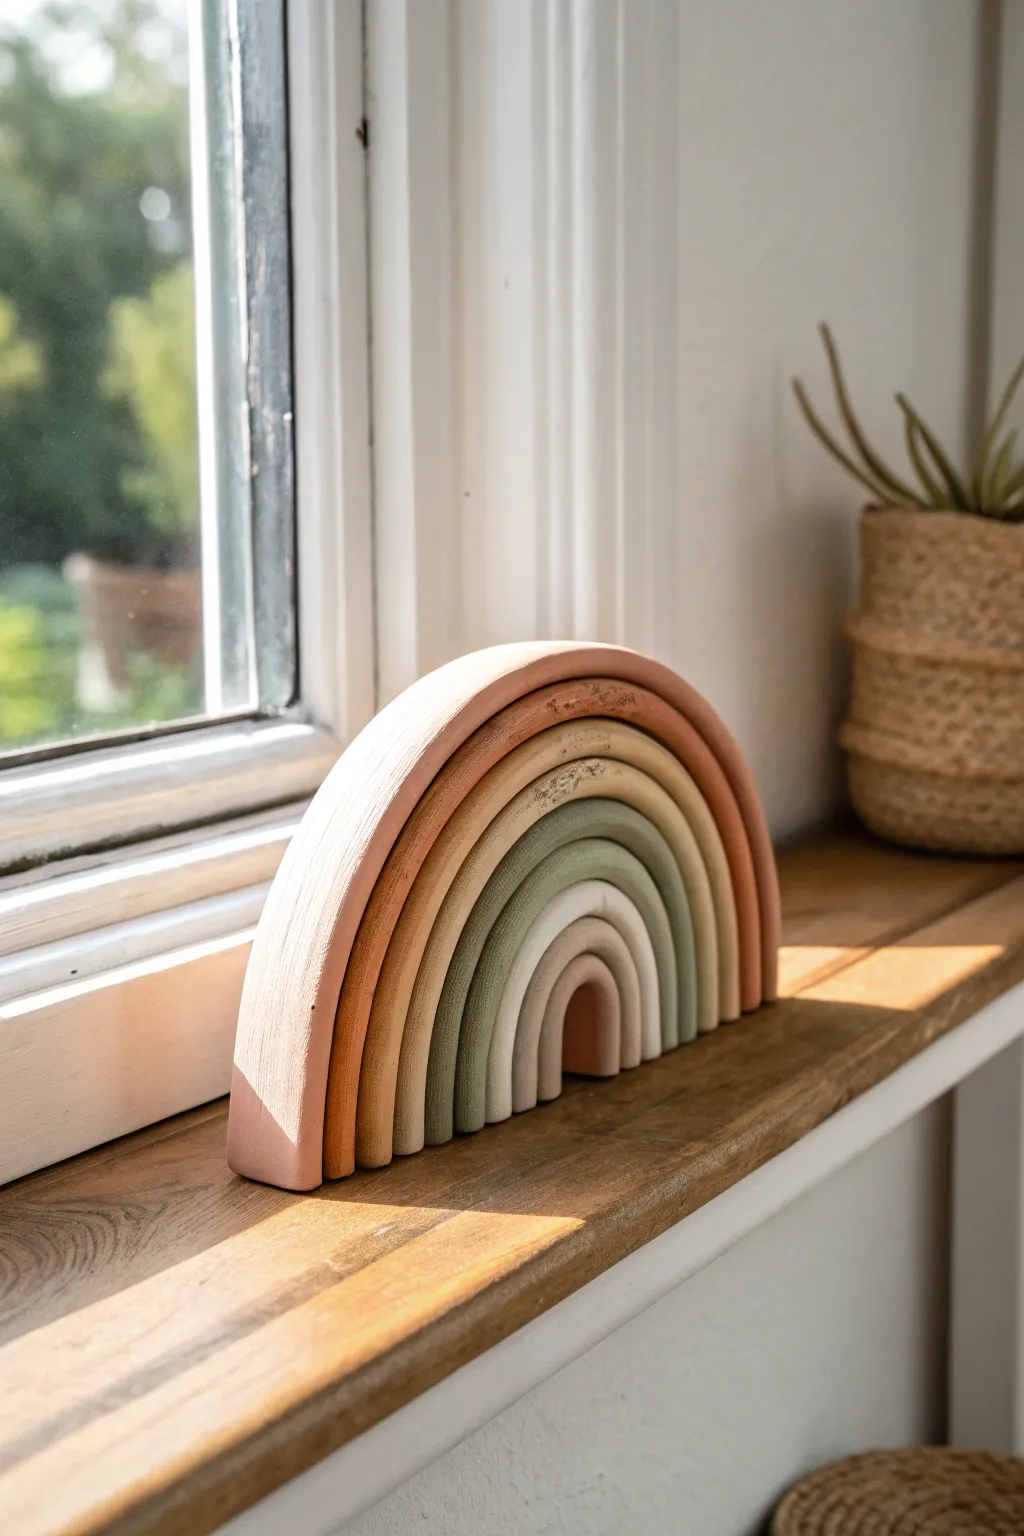
Capture the beauty of soft, muted tones with this minimalist rainbow sculpture. Perfect for a nursery shelf or a sunny windowsill, this project uses simple rolling techniques to create a sophisticated, modern décor piece.
How-To Guide
Materials
- Air dry clay (white or terra cotta)
- Acrylic paints (muted pink, sage green, cream, terracotta, beige)
- Rolling pin or smooth glass jar
- Knife or clay cutting tool
- Sandpaper (fine grit)
- Clean work surface or silicone mat
- Small cup of water
- Paintbrushes (flat and detail)
Step 1: Shaping the Arches
-
Prepare your clay:
Start by grabbing a large chunk of air dry clay and kneading it in your hands to warm it up. This conditioning makes the clay pliable and less likely to crack as you roll it. -
Initial rolling:
Roll the clay into a long, uniform snake or coil. You want it to be fairly thick, perhaps half an inch to an inch in diameter, depending on how chunky you want your final rainbow to look. -
Flatten the coil:
Instead of leaving it round, gently flatten the coil with a rolling pin or the palm of your hand to create a rectangular cross-section. This helps the arches stack neatly without rolling away. -
Form the smallest arch:
Cut a section of the flattened coil and bend it into a tight ‘U’ shape. This will be the center of your rainbow. Stand it up on your work surface to ensure the bottom sits flat. -
Build outward:
Roll out more coils, flatten them, and drape them over the first arch to measure the length needed. I find it easiest to work directly over the previous arch to get the sizing perfect. -
Trim the excess:
Once an arch is draped and shaped, use your knife to trim the ends flush with the bottom of the inner arches. All the feet of the rainbow should sit on the same level line. -
Create all layers:
Continue this process, creating larger and larger arches until you have about 6 or 7 layers. Ensure they fit snugly against one another but aren’t permanently stuck together yet. -
Smooth the edges:
Dip your finger in a little water and run it along any rough edges or cracks. Smooth the flat faces of the arches now while the clay is still workable.
Step 2: Drying and Refining
-
Separate for drying:
Carefully separate the arches and lay them flat on their sides to dry. Drying them while stacked can cause them to stick together or dry unevenly. -
Flip occasionally:
Let the clay dry for at least 24-48 hours. Flip the pieces over halfway through the process so both sides are exposed to air, preventing warping. -
Sanding:
Once fully dry and hard, use fine-grit sandpaper to smooth out any bumps, fingerprints, or sharp edges on the sides and tops of each arch. -
Clean up dust:
Wipe each piece down with a slightly damp cloth or a dry brush to remove the fine clay dust before painting.
Cracks Appearing?
If you see cracks forming while drying, make a ‘slurry’ paste of clay and water. Fill the cracks, smooth it over, and let it dry again.
Step 3: Painting and Assembly
-
Plan your palette:
Mix your acrylic paints to create a cohesive earth-tone palette. You’ll need a gradient ranging from deep terracotta/brown on the outside to lighter creams and sage greens on the inside. -
Paint the outer arch:
Start painting the largest arch with your darkest or most dominant color (like the dusty pink or terra cotta shown). Apply thin, even coats. -
Paint the middle layers:
Paint the subsequent arches in your chosen gradient—sage green, muted mustard, deep beige. Allow them to dry completely between coats if you need better coverage. -
Paint the center:
Finish with the smallest central arch, perhaps in a light cream or soft taupe color to brighten the middle. -
Distress (optional):
For that rustic, stone-like look in the photo, you can lightly sand areas of the paint once dry to reveal a bit of the clay texture underneath. -
Final assembly:
Stack the arches back together. You can leave them loose as an interactive puzzle, or use a tiny dab of superglue between the layers if you want a permanent sculpture.
Texture Twist
Before drying, press a piece of lace or linen into the wet clay surface. This leaves a beautiful, subtle imprint that catches paint washes perfectly.
Set your finished rainbow on a sunny ledge and enjoy the calm, natural vibe it brings to your space
Cute Charm Keychain Tags
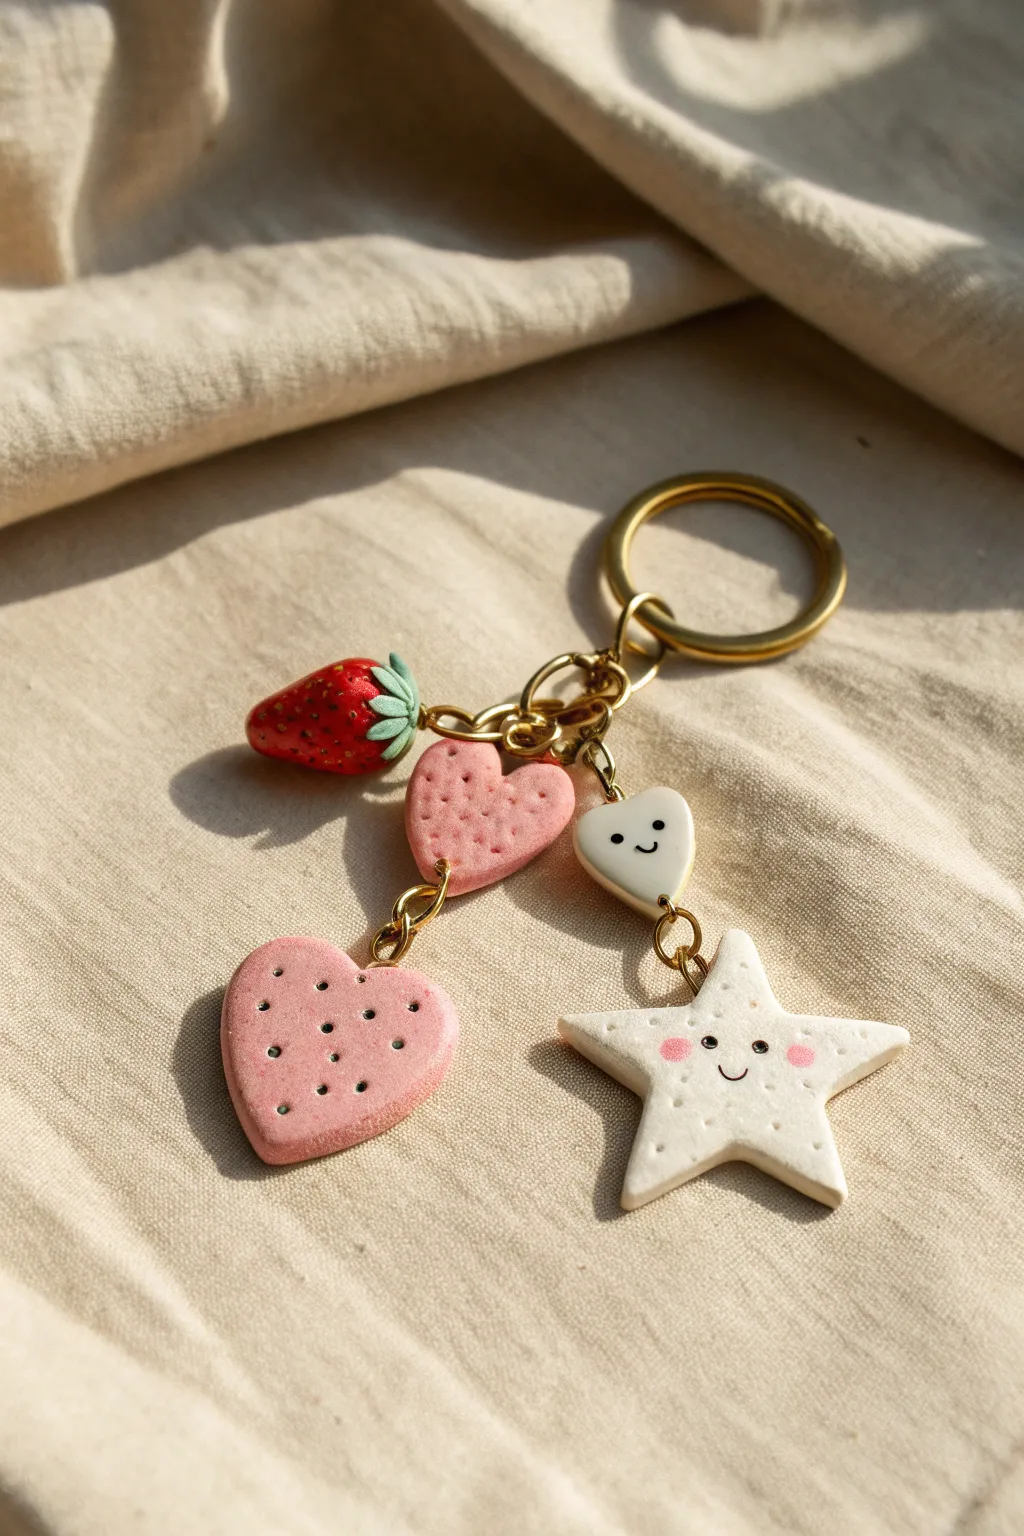
Create an adorable clustered keychain featuring a mix of textures and characters, from sugary sweet cookies to a realistic little strawberry. This project combines simple modeling techniques with basic jewelry assembly for a functional piece of art.
Step-by-Step Guide
Materials
- Air dry clay (white and pink)
- Acrylic paints (red, green, black, white)
- Glossy varnish or UV resin
- Gold keychain ring and chain
- Gold jump rings (various sizes)
- Eye pins (gold)
- Needle tool or toothpick
- Small round piping tip or straw (for texture)
- Fine detail paintbrush
- Old toothbrush (for texturing)
- Pliers (flat nose and round nose)
- Super glue (optional)
Step 1: Sculpting the Strawberry
-
Shape the base:
Start with a small ball of white clay and gently roll it into a teardrop shape that is rounded at the top and pointed at the bottom. -
Add texture:
Using a needle tool, poke shallow holes all over the surface of the teardrop to mimic seeds, leaving the very top smooth for the leaves. -
Create the leaves:
Flatten a tiny piece of clay and cut out a small star or flower shape. Press this onto the top of the strawberry. -
Insert hardware:
Cut an eye pin to size so it doesn’t poke through the bottom. Dip the end in a tiny bit of white glue and insert it through the center of the leaves into the berry.
Step 2: Making the Cookies
-
Form the hearts:
Roll out pink clay to about 1/4 inch thickness. Use a small heart cutter or shape two hearts by hand—one slightly larger than the other. -
Texture the pink hearts:
Gently press an old toothbrush onto the surface to create a ‘baked’ texture. Then, use a needle tool to add six decorative dots in the center of the larger heart. -
Shape the star cookie:
Roll out white clay and cut or form a five-pointed star. Ideally, make the points slightly rounded for a soft, chubby look. -
Texture the star:
Texture the star with the toothbrush method. Use a needle tool to poke scatter small holes around the edges to mimic cracker perforations. -
Make the mini heart:
Form a tiny, smooth white heart. Keep this one untextured as it acts as a smooth charm connector. -
Add eye pins:
Carefully insert eye pins into the top center of all four cookie shapes (two pink hearts, one white star, one mini white heart).
Loose Eye Pins?
If an eye pin feels loose after the clay dries, pull it out gently, add a drop of super glue to the metal stem, and slide it back into the existing hole.
Step 3: Painting & Finishing
-
Dry completely:
Allow all clay pieces to dry for 24-48 hours until they are hard and lightweight. -
Paint the strawberry:
Paint the body of the strawberry a vibrant red. Once dry, paint the leaves a muted green. You can add tiny yellow dots inside the seed holes for extra realism. -
Detail the faces:
On the white star and the mini white heart, use a very fine brush or a black paint pen to draw simple smiling faces with wide-set eyes. -
Add blush:
Using a dry brush technique with pink paint, gently dab rosy cheeks onto the star cookie. -
Seal the pieces:
Coat the strawberry with a high-gloss varnish to make it look juicy. Use a matte or satin varnish for the cookies to keep their baked appearance.
Add Sparkle
Before the varnish dries on the strawberry, sprinkle a tiny pinch of super-fine clear glitter over it to mimic the look of sugar crystals.
Step 4: Assembly
-
Connect the hearts:
Using pliers, open a jump ring and connect the eye pin of the large pink heart to the bottom loop of the small pink heart’s eye pin. -
Connect the star combo:
Similarly, use a jump ring to attach the large white star to the mini white heart charm. -
Attach to chain:
Attach the strawberry, the top of the pink heart chain, and the top of the white heart/star chain to the main keychain ring using larger jump rings. -
Final check:
Ensure all jump rings are closed tightly so your charms stay secure.
Clip your new handmade accessory onto your bag or keys and enjoy the sweet aesthetic

TRACK YOUR CERAMIC JOURNEY
Capture glaze tests, firing details, and creative progress—all in one simple printable. Make your projects easier to repeat and improve.
Easy Statement Earrings
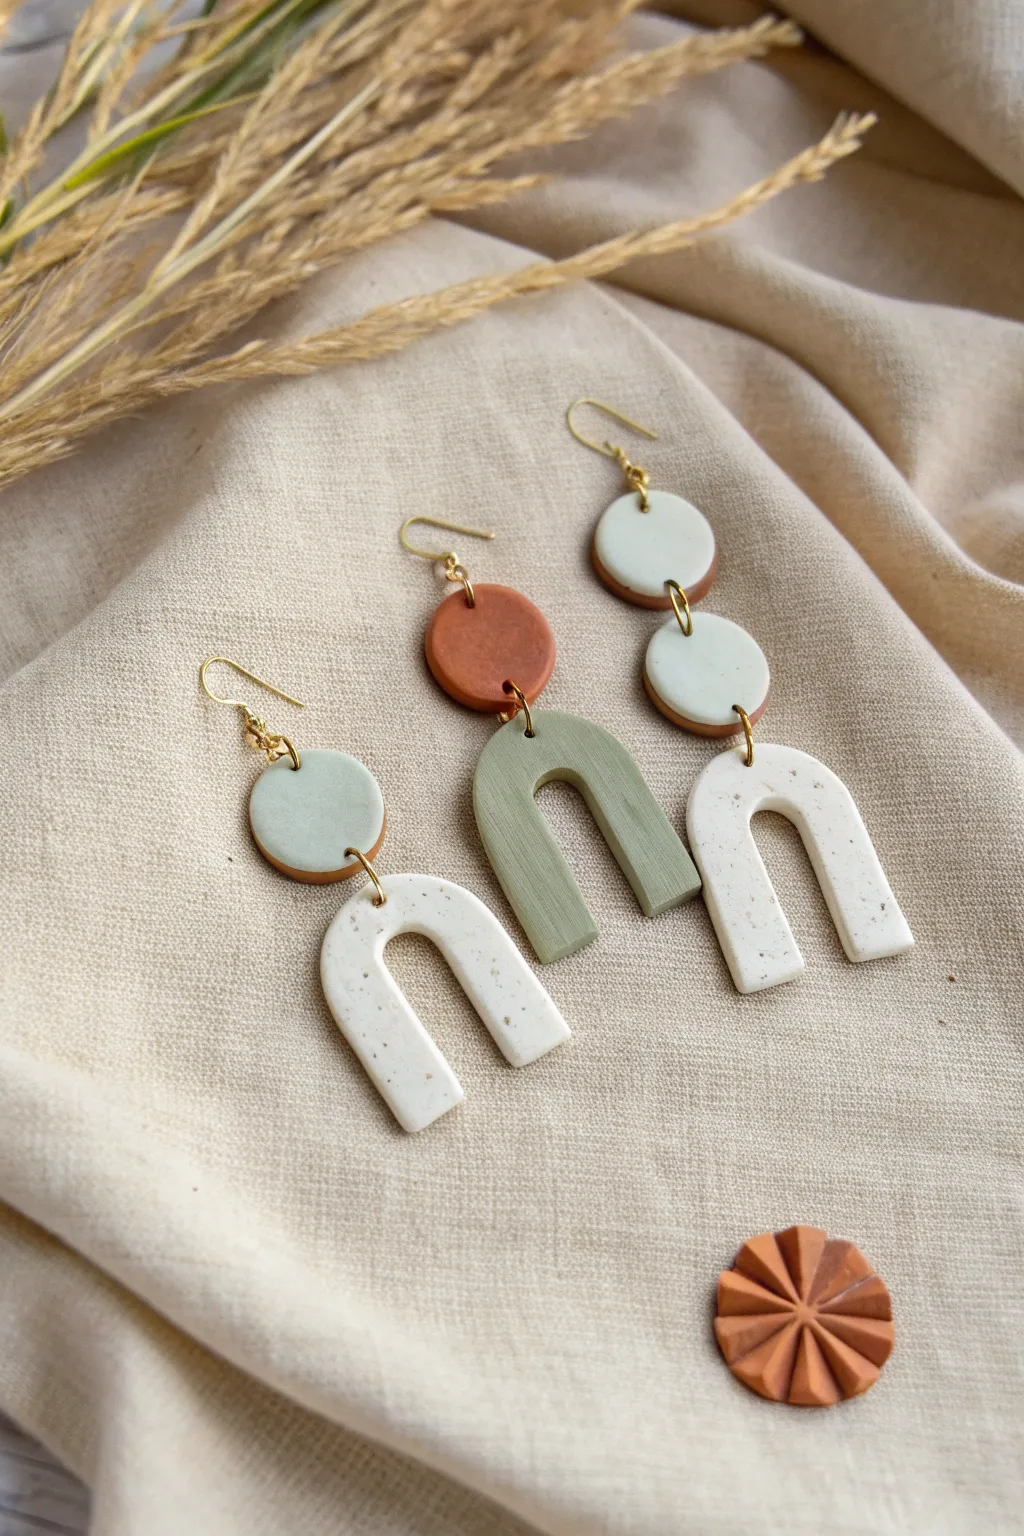
These trendy, minimalist earrings combine soft earth tones with a striking speckled finish, creating a high-end boutique look you can make at home. The design features geometric circles and U-shaped arches in calming shades of sage, rust, and granite-speckled cream.
How-To Guide
Materials
- Air dry clay (white)
- Acrylic paints (burnt sienna, sage green, light mint, black)
- Rolling pin
- Parchment paper or silicone mat
- Small circle cutters (approx. 1cm and 1.5cm)
- U-shape clay cutter (or a craft knife and paper template)
- Sandpaper (fine grit)
- Hand drill or sewing needle
- Jump rings (gold finish)
- Earring hooks (gold finish)
- Jewelry pliers
- Gloss or matte varnish (optional)
Step 1: Color Mixing & Conditioning
-
Condition the clay:
Start by taking a chunk of your white air dry clay and kneading it in your hands until it is smooth, pliable, and free of cracks. If it feels too dry, add a tiny drop of water. -
Create the base colors:
Divide your clay into three equal sections. Leave one section plain white for now. To the second, knead in a small amount of sage green paint until fully incorporated. To the third, mix in burnt sienna to create a rust tone. -
Make the speckled effect:
Take your reserved white clay section. To achieve that granite-like speckled look, grate a tiny amount of dry black pastel or add speckles of black paint, then knead gently. Stop before it turns fully grey; you want visible streaks or dots.
Step 2: Shaping the Components
-
Roll out the slabs:
Place your clay on parchment paper. Using a rolling pin, roll each color out into a slab. Aim for a consistent thickness of about 3mm to 4mm—too thin and they become fragile, too thick and they get heavy. -
Cut the circles:
Using your small circle cutters, cut out your top connector pieces. You’ll need two rust circles, two sage green circles, and two light mint circles (you can mix white into your sage clay for this shade). -
Cut the arches:
Use your U-shape cutter to press firmly into the clay slabs. Cut two arches from the speckled white clay and one from the sage green clay to match the photo’s set. -
Smooth the edges:
Dip your finger in a little water and very gently run it along the cut edges of your clay shapes to smooth out any rough bits or drag marks from the cutters. -
Pierce the holes:
Before the clay dries, use a needle to carefully poke holes for your jump rings. Place holes at the top and bottom of the connector circles, and at the centers of the arch tops. Make the holes slightly larger than your jump rings to account for shrinkage.
Cracked Clay Fix
If you notice small cracks as the clay dries, mix a tiny bit of fresh clay with water to make a paste (slip). Fill the cracks, smooth it out, and let it dry again.
Step 3: Finishing & Assembly
-
Dry thoroughly:
Lay all pieces flat on parchment paper and let them dry completely. This usually takes 24-48 hours depending on humidity. Flip them over halfway through to ensure even drying. -
Sand for perfection:
Once bone dry, take your fine-grit sandpaper and gently sand the edges and surfaces to remove any remaining imperfections or fingerprints. Wipe away the dust with a dry cloth. -
Seal (Optional):
For durability, you can brush on a thin layer of matte varnish. I like to do this to protect the paint color, but the raw clay texture looks beautiful too. -
Open the jump rings:
Use your jewelry pliers to twist your jump rings open laterally (side-to-side), rather than pulling them apart, to maintain their circle shape. -
Connect the shapes:
Thread a jump ring through the hole of an arch and connect it to its corresponding circle piece. Close the jump ring securely using the pliers. -
Attach the hooks:
Attach a second jump ring or hook directly to the top hole of the circle component. Ensure the earring faces forward when hung.
Make it Textured
Before cutting your shapes, gently press a piece of coarse linen, lace, or sandpaper onto the wet clay slab to create an interesting surface texture.
Now you have a stunning set of artisan-style earrings ready to wear or gift