Some of my favorite projects are the ones that make you smile and actually earn their spot on your shelf. Here are a bunch of cute functional clay ideas I’d totally make with you at the studio—simple, useful, and full of personality.
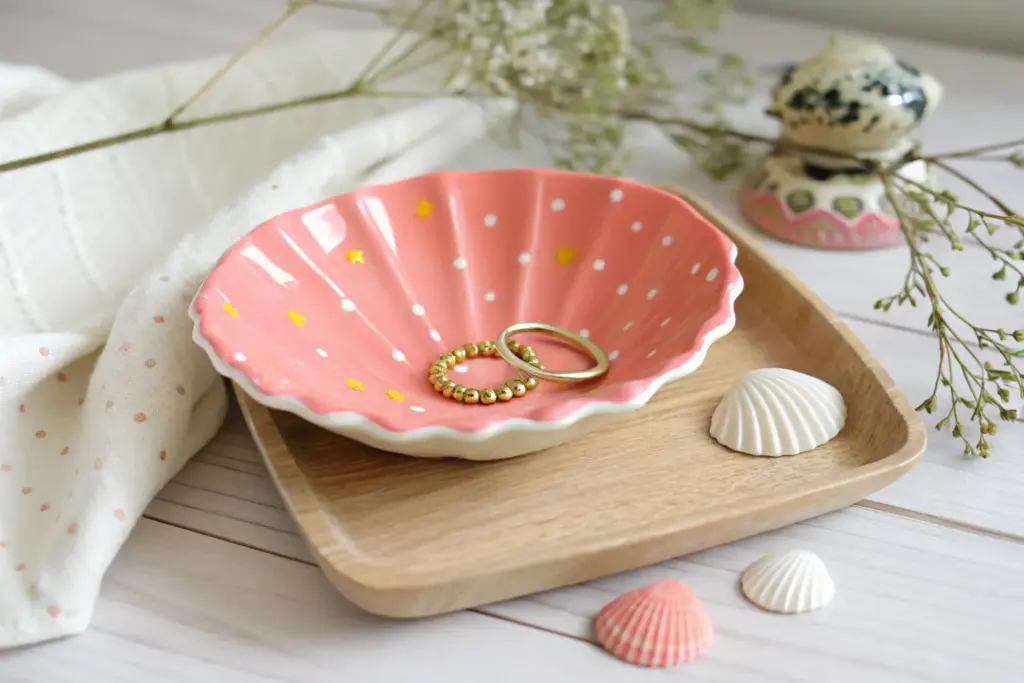
Sweet Little Ring Dishes

This darling little ring dish combines a soft blush pink glaze with delicate speckles and a festive gold rim. Its organic, hand-molded heart shape makes it the perfect bedside keeper for your most precious jewelry.
How-To Guide
Materials
- Air-dry clay or polymer clay (white)
- Acrylic rolling pin
- Heart-shaped cookie cutter (approx. 3-4 inches)
- Small bowl of water
- Sponge or smoothing tool
- Fine-grit sandpaper (400 grit)
- Pink acrylic paint (blush shade)
- Black acrylic paint
- Gold leaf paint or metallic liquid gilding
- Old toothbrush
- High-gloss varnish or glaze
- Small detail brush
Step 1: Shaping the Clay
-
Condition the Clay:
Start by taking a handful of white clay and kneading it in your hands until it becomes soft, pliable, and warm. This prevents cracks later on. -
Roll it Out:
Place the clay on a smooth surface or silicone mat. Use your acrylic rolling pin to roll it into a slab about 1/4 inch thick. Try to keep the thickness consistent. -
Cut the Shape:
Press your heart-shaped cookie cutter firmly into the clay slab. Wiggle it slightly to ensure a clean cut, then remove the excess clay from around the heart. -
Soften the Edges:
Dip your finger or a small sponge into water. Gently run it along the cut edges of the heart to round them off and remove any sharp angles from the cutter. -
Create the Curve:
To turn the flat heart into a dish, gently pinch and lift the edges upwards with your thumb and forefinger. You want to create a shallow bowl shape. -
Smooth the Form:
Once the edges are lifted, use a damp sponge to smooth out any fingerprints or uneven spots on the interior and exterior. I like to spend extra time here to get that porcelain-like finish. -
Dry Completely:
Set your dish aside in a safe, dry place. Let it cure according to your package instructions—usually 24 to 48 hours for air-dry clay. Flip it halfway through for even drying.
Cracked Clay?
If small cracks appear during drying, mix a tiny bit of fresh clay with water to make a paste. Fill the cracks, smooth over, and let dry again.
Step 2: Painting and Glazing
-
Sand Imperfections:
Once fully dry and hard, inspect your dish. Use fine-grit sandpaper to buff away any remaining rough spots or jagged edges until the surface is silky smooth. -
Base Coat:
Apply an even coat of blush pink acrylic paint to the entire dish including the bottom. Let it dry, then add a second coat for full opacity. -
Prepare the Speckles:
Dilute a small amount of black acrylic paint with water until it has an inky consistency. Dip an old toothbrush into this mixture. -
Splatter the Dish:
Hold the toothbrush over the dish and run your thumb across the bristles to flick tiny specks of paint onto the pink surface. Practice on paper first to control the spray. -
Seal the Design:
After the paint is completely dry, apply a coat of high-gloss varnish. This gives the dish that shiny, ceramic-glaze look and protects the paint. -
Add the Gold Rim:
Using a small detail brush, carefully paint the very top edge of the rim with gold leaf paint or liquid gilding. Make the line slightly irregular for an organic feel. -
Final Cure:
Allow the varnish and gold accent to dry fully in a dust-free area for at least 24 hours before placing any jewelry inside.
Glaze Hack
For an ultra-glassy finish without a kiln, use UV resin instead of varnish. Cure it under a UV lamp for 2 minutes for a rock-hard, crystal-clear coating.
Enjoy displaying your rings in this lovely handmade keepsake


Smiley Trinket Catch-All Trays
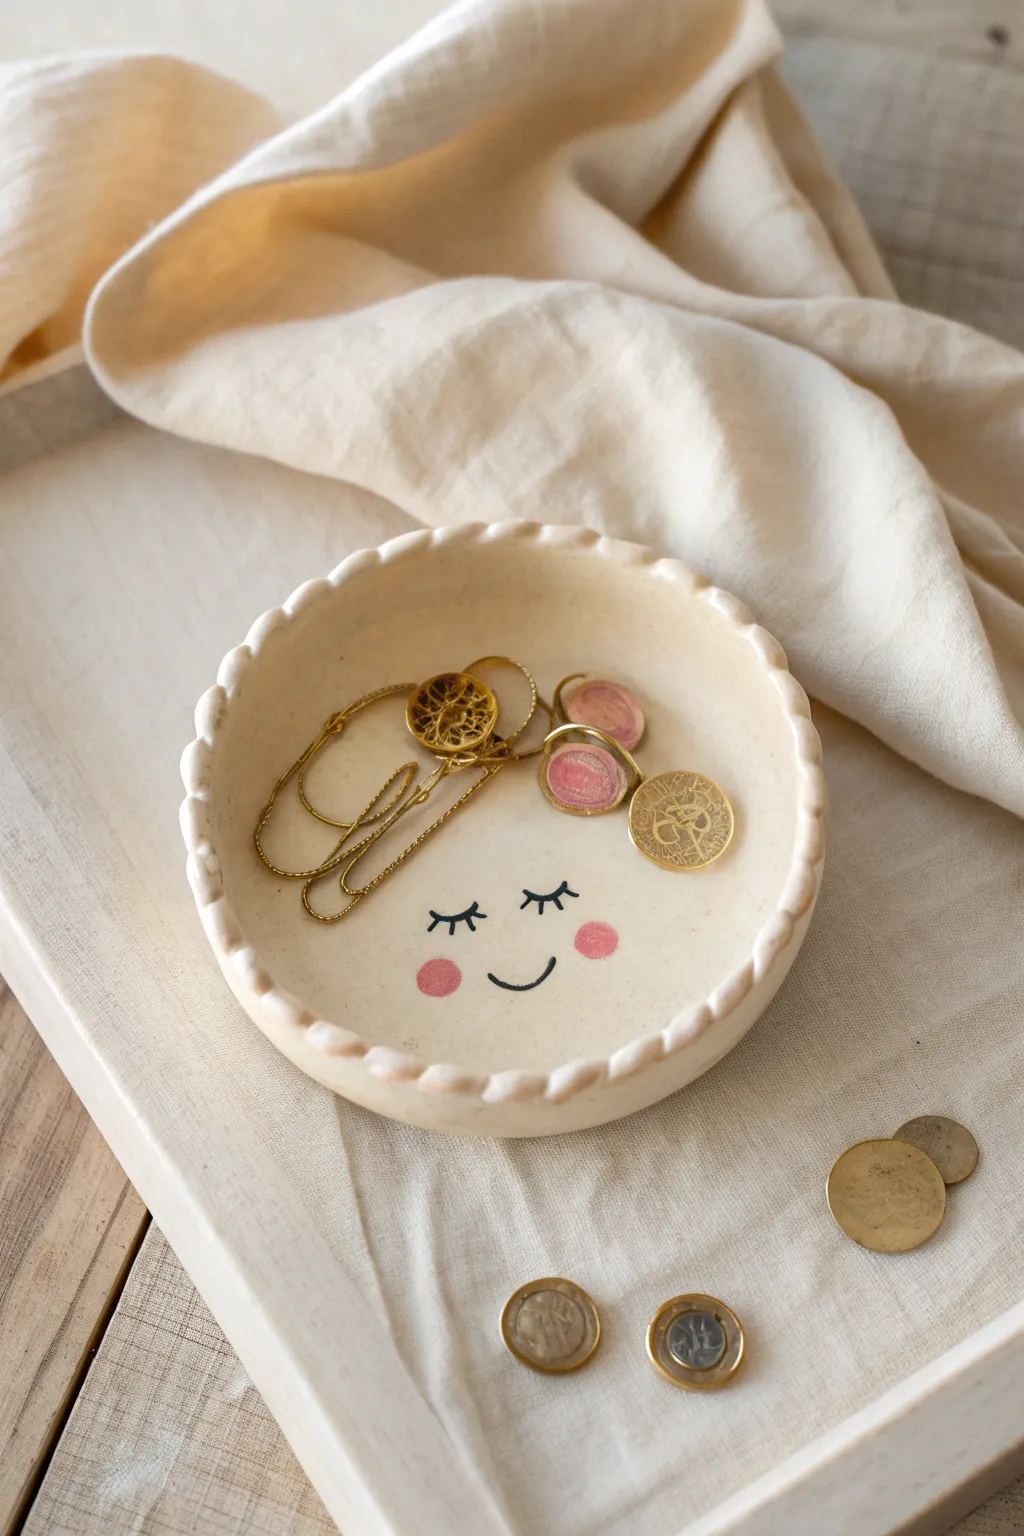
Bring a little joy to your bedside table with this adorable ceramic catch-all, perfect for keeping rings and coins safe. Its gentle scalloped edge and sweet sleeping face make it as charming as it is useful.
Step-by-Step Tutorial
Materials
- Air-dry clay (white or cream)
- Acrylic rolling pin
- Circle template or small bowl (approx. 4-5 inches diameter)
- Craft knife or needle tool
- Water in a small cup
- Modeling tool (rounded end) or pinky finger
- Fine grit sandpaper
- Acrylic paints: Black and Pink
- Fine detail paintbrush (size 0 or 00)
- Round paintbrush (size 2-4)
- Gloss varnish or clear sealant (spray or brush-on)
- Canvas mat or parchment paper
Step 1: Shaping the Dish
-
Prepare the clay:
Start by taking a handful of air-dry clay and kneading it until it is soft, warm, and pliable. If it feels too dry or cracks easily, work just a drop of water into the mass. -
Roll out the slab:
Place the clay on your canvas mat or parchment paper. roll it out evenly until it is about 1/4 inch thick. Try to keep the thickness consistent across the entire slab to prevent uneven drying. -
Cut the circle:
Place your bowl or circle template gently on top of the clay slab. Use your needle tool or craft knife to trace around the edge, cutting out a perfect clay disc. -
Smooth the edges:
Dip your finger in a little water and run it along the cut edge of the circle. This removes any sharp burrs or clay crumbs left behind by the knife. -
Create the walls:
Gently lift the edges of the circle upwards to create a shallow bowl shape. You can cup the clay in your palm, pressing the center down slightly while encouraging the rim to stand up. -
Form the scalloped rim:
To create the signature scalloped effect, use your thumb and forefinger to pinch the rim gently. Place your thumb on the inside and index finger on the outside, pinching at regular intervals all the way around. -
Refine the scallops:
Go back around the rim and smooth out your pinch marks with a damp finger or a rounded modeling tool. The goal is a soft, wavy edge rather than sharp pinches. -
Dry the piece:
Place your finished dish in a safe, dry spot away from direct sunlight. Let it air dry completely for 24-48 hours. I like to flip it over gently halfway through so the bottom dries evenly too.
Cracks while drying?
Make a ‘slip’ paste by mixing clay scraps with water. Fill the cracks with this paste, smooth it over with a finger, let it dry again, then sand it flush.
Step 2: Decorating and Finishing
-
Sand for smoothness:
Once the clay is bone dry and hard, use fine-grit sandpaper to buff away any rough spots, especially along the rim and the bottom. Wipe away the dust with a barely damp cloth. -
Base coat (optional):
If you want a specific off-white tone like the reference image, paint the entire dish with a creamy acrylic paint. If your clay is already the perfect color, you can skip this step. -
Paint the cheeks:
Mix a soft rose-pink color. Using the round paintbrush, dab two small, solid circles onto the lower half of the dish to create the cheeks. -
Paint the sleeping eyes:
Switch to your finest detail brush and black paint. Carefully paint two small downward curves (U-shapes) above and between the cheeks to represent closed eyelids. -
Add the lashes:
With the very tip of your detail brush, add three tiny, flicked lines extending from the top of each eyelid curve for the eyelashes. -
Paint the smile:
Painting a simple, small upward curve right between the pink cheeks completes the happy expression. -
Seal the deal:
Once the paint is totally dry, apply a coat of gloss varnish over the entire dish. This gives it that ceramic-like shine and protects the paint from chipping. -
Double protection:
Apply a second coat of varnish if you plan to use this for jewelry that might scratch the surface. Let it cure fully according to the bottle instructions before use.
Make it luxe
Paint the scalloped rim with liquid gold leaf or metallic gold acrylic paint before sealing for a high-end, boutique jewelry store look.
Now you have a sweet little spot to drop your earrings at the end of the day


Animal Phone Stands
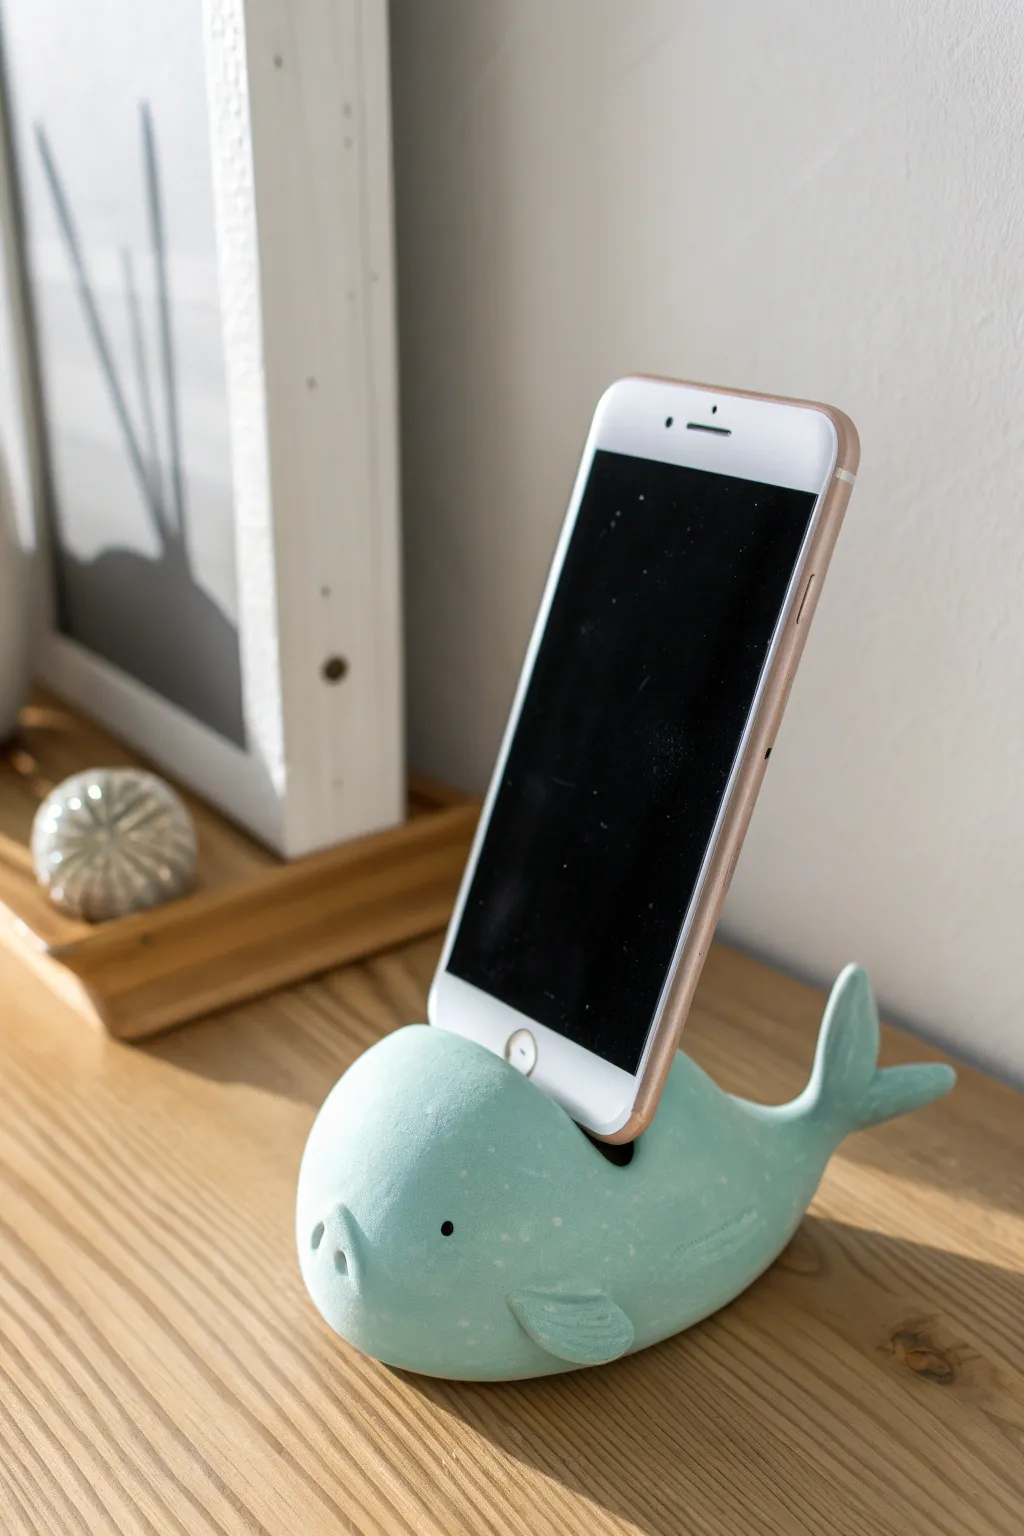
This adorable pastel blue whale isn’t just a friendly desk companion; he’s a sturdy assistant ready to hold your phone upright at the perfect angle. With his chubby design and speckled finish, this clay project strikes the perfect balance between whimsy and practical utility.
How-To Guide
Materials
- Air-dry clay (or polymer clay)
- Acrylic paints (pastel turquoise, white, black)
- Clay sculpting tools (or a butter knife and toothpick)
- A small bowl of water (for smoothing)
- Fine-grit sandpaper
- Matte varnish or sealant
- Paintbrush (flat and fine tip)
- Your phone (for sizing measurement)
Step 1: Sculpting the Base Shape
-
Form the Body:
Start with a large ball of clay about the size of a grapefruit. Roll it between your palms until it’s smooth, then gently elongate it into a teardrop shape that is thicker at the front (the head) and tapers slightly towards the back. -
Flatten the Base:
Press the teardrop shape firmly onto your work surface to create a flat, stable bottom. The whale needs to sit securely without rocking, so check stability often. -
Create the Phone Slot:
Take your phone (or a piece of cardboard of similar thickness) and gently press it into the back of the whale’s ‘head’ area to mark the width. Use a clay tool to carve out a deep, rectangular groove. Make it slightly wider than your phone to account for shrinkage. -
Refine the Groove Angle:
Test the angle by inserting your phone. You want it to lean back slightly for stability. Carve the slot deep enough so at least an inch of the phone is supported.
Fixing Cracks
If small cracks appear while drying, mix a tiny bit of fresh clay with water to make a paste (slip) and fill them in before painting.
Step 2: Adding Details
-
Shape the Tail:
Take a separate piece of clay and shape it into a wide ‘Y’ or crescent shape for the flukes. Attach this to the tapered end of the body. -
Blend the Seams:
Use a little water on your finger to smooth the clay where the tail meets the body until the seam disappears completely. I find this strengthens the bond significantly. -
Add Side Fins:
Form two small, flat oval shapes. Attach one to each side of the whale’s body near the bottom. Orient them slightly backwards as if the whale is swimming. -
Detail the Fins:
Use a needle tool or toothpick to gently press horizontal lines onto the fins for texture, mimicking the ridges shown in the photo. -
Sculpt the Face:
For the snout, add a very small, flattened circle of clay to the lower front center. Use a rounded tool to press two nostril indentations into it. -
Smooth Everything:
Dip your finger in water and run it over the entire sculpture to remove fingerprints or cracks. Let the piece dry completely (24-48 hours for air-dry clay).
Step 3: Painting and Finishing
-
Sand Imperfections:
Once fully dry, lightly sand any rough patches, especially around the phone slot and the tail connection. -
Base Coat:
Paint the entire whale with a pastel turquoise or seafoam green acrylic paint. You may need two coats for full opacity. -
Add the Eyes:
Using a fine-tip brush or the handle end of a paintbrush, dot two small black circles on either side of the head for the eyes. -
Create the Speckles:
Mix a little water into white acrylic paint. Dip an old toothbrush or stiff brush into it, and flick the bristles with your thumb to spray tiny white specks across the whale’s back. -
Seal the Piece:
Finish with a coat of matte varnish to protect the paint and give it a professional, finished look.
Go Geometric
Instead of a smooth finish, use a knife to shave the clay into facets before it dries for a trendy, low-poly geometric whale look.
Now your desk has a charming aquatic friend ready to help you multitask


Open-Mouth Toothbrush Holders
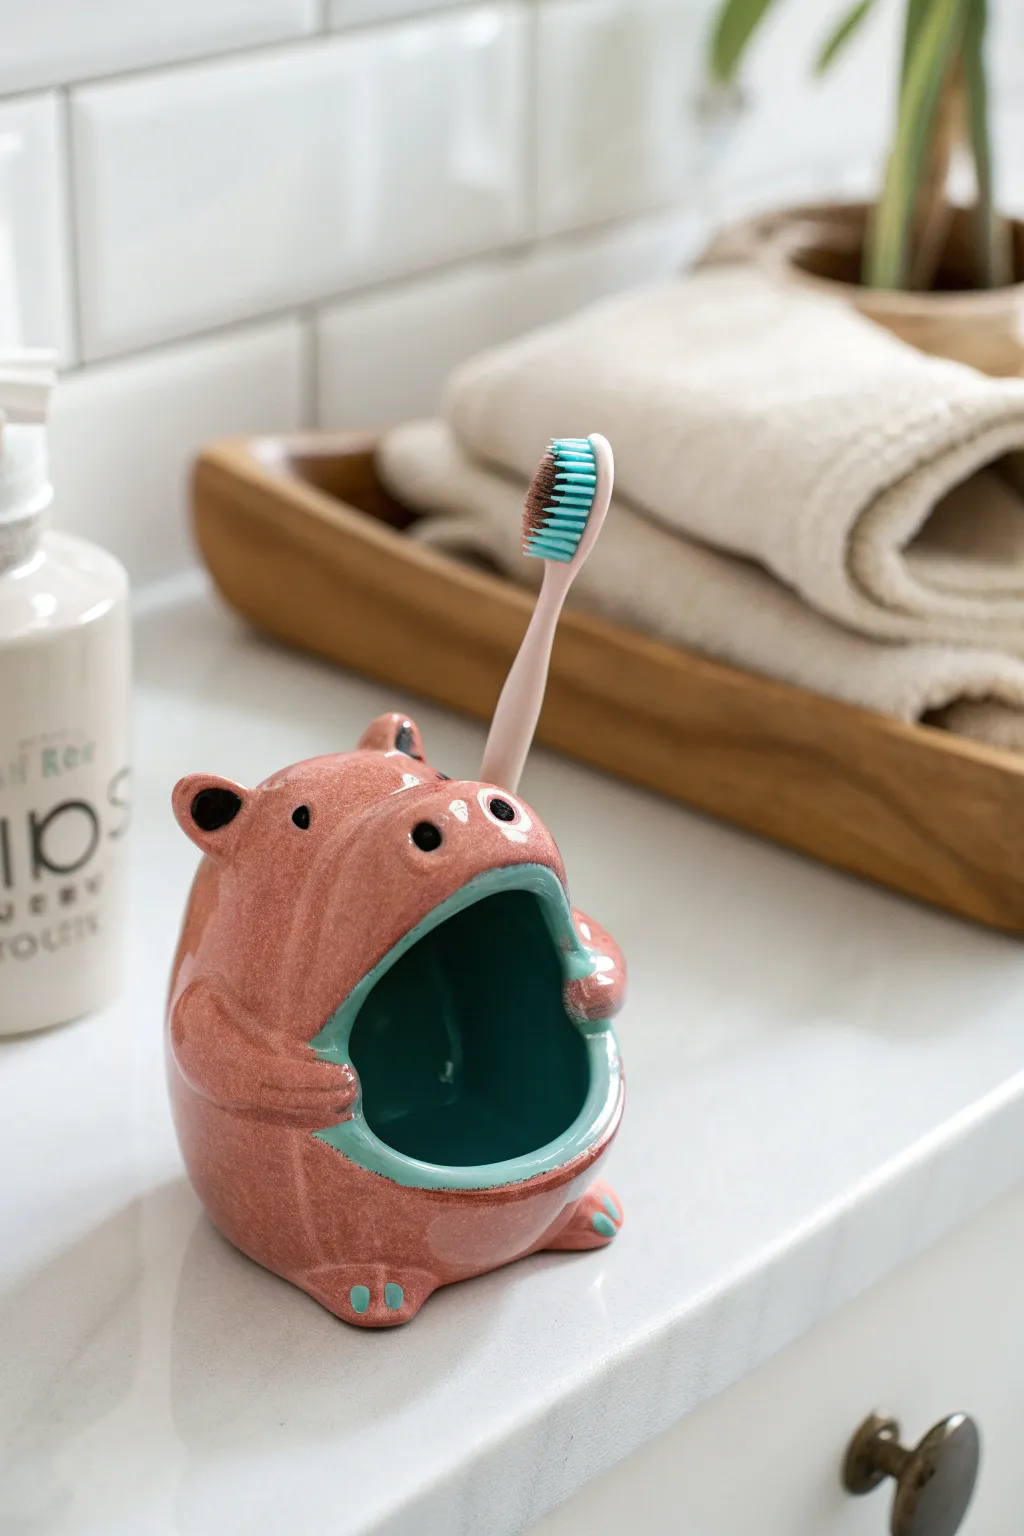
This adorable open-mouthed hippo serves a double purpose: adding whimsical charm to your bathroom counter and keeping your toothbrush upright and clean. With its glossy pink glaze and contrasting teal interior, this functional sculpture is as fun to make as it is to use.
Detailed Instructions
Materials
- Earthenware or stoneware clay (white firing)
- Pottery wheel (optional) or rolling pin
- Basic clay sculpting tools (needle tool, rib, sponge)
- Scoring tool or serrated kidney
- Slip (liquid clay)
- Underglazes: Dusty rose pink, bright teal/turquoise, black, white
- Clear transparent glaze
- Kiln
- Small hole punch or straw (for nostrils)
Step 1: Forming the Body
-
Prepare the base:
Start with a ball of clay about the size of a grapefruit. If you are throwing on the wheel, throw a closed form resembling a rounded egg shape. If hand-building, create two pinch pots and join them securely to form a hollow sphere. -
Shape the torso:
Gently paddle the sphere to flatten the bottom so it sits stable on the table. Elongate the top slightly to suggest the hippo’s head rising from the body. -
Cut the mouth:
Wait until the clay is leather hard. Using a needle tool, cut a large, wide ‘U’ shape into the front upper section where the mouth will be. Save the cutout piece. -
Refine the opening:
Smooth the cut edges with a damp sponge. Gently push the clay around the opening outward to create a slight lip, mimicking the hippo’s jawline. -
Create the interior pocket:
Take a slab of clay or the cutout piece from earlier and fashion a curved wall inside the mouth. This inner wall prevents the toothbrush from falling into the hollow body cavity and makes the interior easier to glaze. -
Check fit:
Test the opening with an actual toothbrush to ensure the angle is correct and the handle rests comfortably against the back of the throat before the clay hardens.
Step 2: Sculpting Details
-
Add the ears:
Roll two small balls of clay and shape them into rounded triangles. Attach them to the top of the head using the score-and-slip method, pressing a thumb into the center of each to hollow them out. -
Form the snout:
Add a small mound of clay just above the mouth opening to build up the nose bridge. Use your rib tool to blend this seamlessly into the face. -
Make the nostrils:
Use a small dowel or the end of a paintbrush handle to press two distinct nostril indentations into the front of the snout. I like to flare them slightly for extra character. -
Attach the arms:
Roll two thick coils of clay. Attach them to the sides of the body, curving them around the front as if the hippo is holding its belly. Blend the seams thoroughly so they don’t crack during firing. -
Add feet:
Create flattened tabs at the bottom front of the sculpture to suggest feet peeking out. Score and adhere them firmly. -
Create the toothbrush hole:
Using a hole punch tool or a specialized clay drill, create a hole near the back of the head or top of the neck. This provides a secondary spot to slot a toothbrush handle if you prefer it standing straight up rather than resting in the mouth.
Slumping Mouth?
If the mouth opening sags while working, prop it open with a small ball of crumpled newspaper or paper towel. This supports the clay structure as it dries to the leather-hard stage.
Step 3: Glazing and Finishing
-
Bisque fire:
Allow the piece to dry slowly and completely before loading it into the kiln for a bisque fire (usually cone 04). -
Apply base color:
Once fired, wipe the piece with a damp sponge to remove dust. Apply three coats of the dusty rose pink underglaze to the entire exterior surface. -
Paint the interior:
Carefully paint the inside of the mouth and the internal pocket with the bright teal underglaze. Use a smaller brush to get a crisp line where the pink meets the teal on the lips. -
Add accents:
Use the teal color to paint three small oval toenails on each foot. Paint the inside of the ears black. -
Detail the eyes:
Using a fine-tip brush, paint small black dots for the eyes on either side of the nose bridge. Add a tiny speck of white to each eye for a reflective highlight. -
Clear glaze and final fire:
Dip the entire piece in a clear transparent glaze or brush it on carefully. Wipe the bottom clean and fire to the maturity temperature of your clay (cones 5/6 for stoneware).
Texture Time
Before the clay dries, gently press a piece of coarse linen or canvas against the ‘skin’ of the hippo. This subtle texture breaks up the glaze and makes the animal look more realistic.
Place this cheerful critter by your sink and enjoy a smile every time you brush your teeth

The Complete Guide to Pottery Troubleshooting
Uncover the most common ceramic mistakes—from cracking clay to failed glazes—and learn how to fix them fast.
Mini Desk Pen Pals
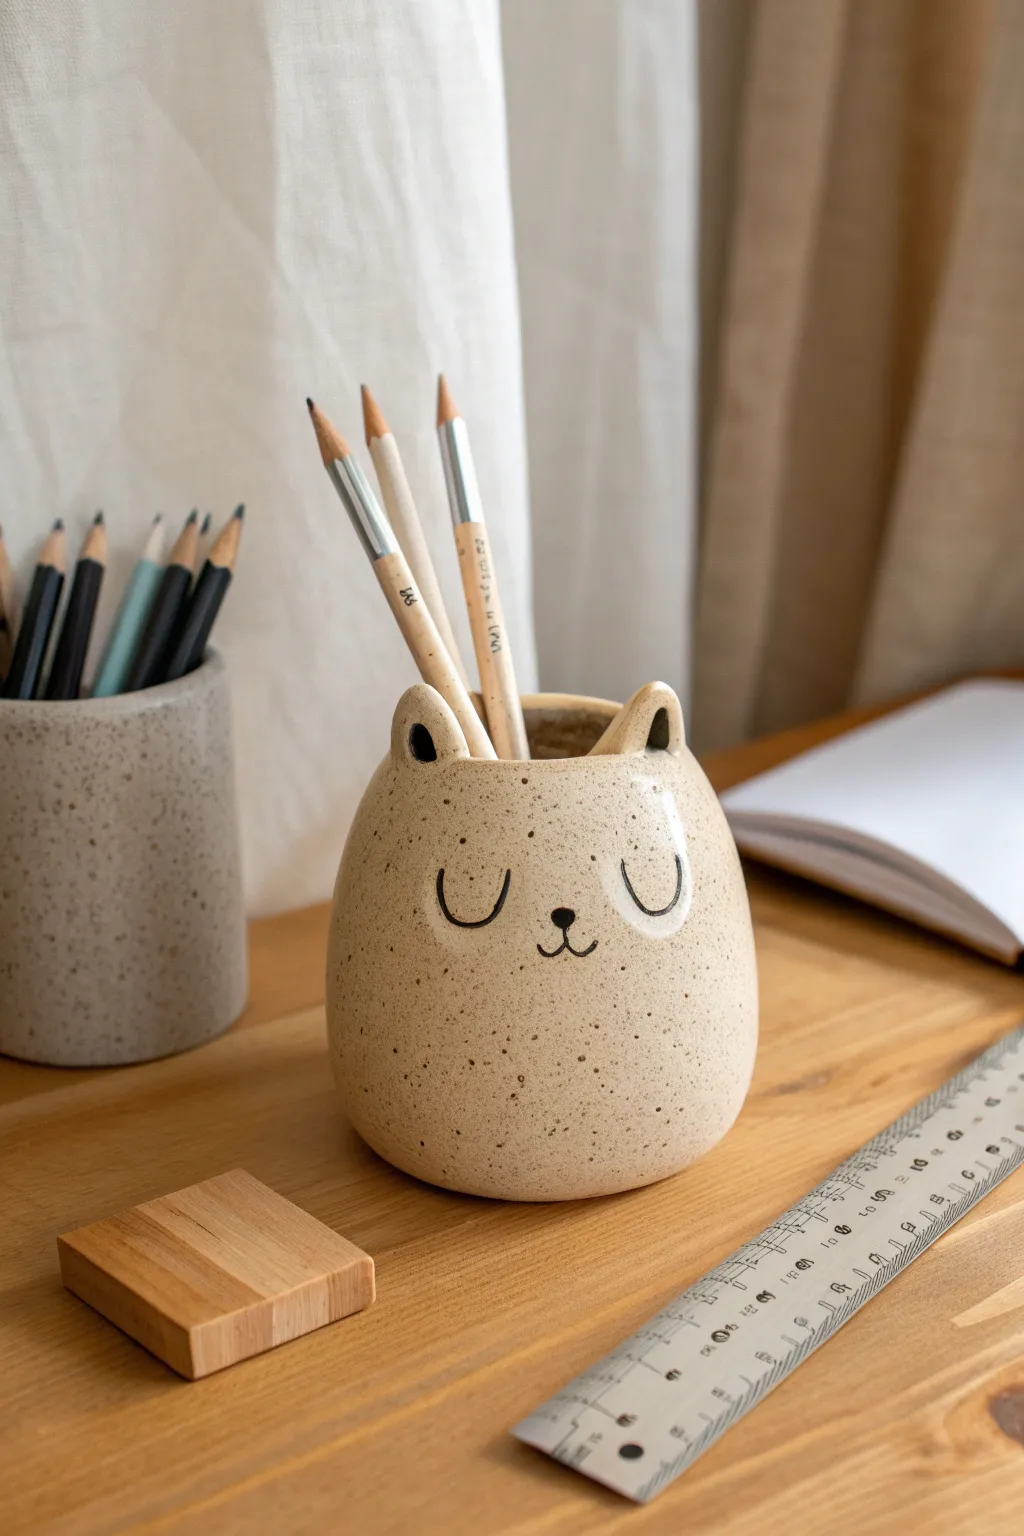
Bring a touch of whimsy to your workspace with this adorable ceramic-style pen holder. Featuring a sweet sleeping face and a natural speckled finish, this project transforms basic clay into a functional and charming desk companion.
Step-by-Step Guide
Materials
- Air-dry clay (stone or granite effect preferred) or polymer clay
- Rolling pin
- Clay knife or craft blade
- Small bowl or cylinder (for molding)
- Small cup of water
- Sponge or smoothing tool
- Black acrylic paint
- White acrylic paint
- Fine detail paintbrush (size 0 or 00)
- Gloss or matte varnish (optional)
Step 1: Shaping the Body
-
Condition the clay:
Begin by taking a large handful of clay and kneading it thoroughly until it is soft, pliable, and free of any air bubbles. -
Roll the base:
Pinch off a portion of clay and roll it into a ball, then flatten it into a circle about 3 inches in diameter to serve as the sturdy bottom of your cup. -
Create the walls:
Take the remaining clay and roll out a long, rectangular slab approximately 1/4 inch thick. Ensuring an even thickness is key for structural integrity. -
Form the cylinder:
Wrap the rectangular slab around the circular base or your cylindrical mold form. Trim any excess clay where the edges meet. -
Seal the seams:
Gently score (scratch) the connecting edges, dab with a little water, and press them together firmly. I like to use a wooden tool to drag clay across the seam to really lock it in. -
Round the shape:
Working from the inside out, gently push the walls slightly outward to create a rounded, bulbous belly shape rather than a straight cylinder. -
Smooth the surface:
Dip a sponge or your finger in water and run it over the entire surface to erase fingerprints and create a seamless finish resembling wheel-thrown pottery.
Cracks Appearing?
If you see hairline cracks while drying, mix a small amount of fresh clay with water to make a paste (slip) and fill the cracks immediately, then smooth over.
Step 2: Sculpting Details
-
Pinch the ears:
At the top rim of the cup, gently pinch two sections of clay upwards to form small, triangular ears on opposite sides. -
Shape the ears:
Refine the triangles by smoothing the edges, making them rounded and soft rather than sharp points so they integrate naturally with the body. -
Dry the clay:
Allow your piece to dry completely according to the package instructions. This usually takes 24-48 hours for air-dry clay. -
Sand imperfections:
Once fully dry, use fine-grit sandpaper to gently buff away any rough spots, paying special attention to the rim and ear tips.
Make it a Set
Create a matching smaller version without ears to hold paperclips or erasers, creating a cohesive family of desk organizers.
Step 3: Painting the Face
-
Draft the face:
Using a pencil, very lightly sketch where you want the sleepy eyes, nose, and mouth to sit. Place them in the upper third of the “belly” area. -
Paint the eye patch:
Mix a semi-transparent white wash or use solid white paint to create a soft, circular patch around the right eye area. -
Paint the features:
Using your finest brush and black paint, carefully trace the ‘U’ shapes for the closed eyes, the small nose, and the curved mouth. -
Add ear details:
Fill the inner triangle of the ears with black paint to give them depth and definition. -
Create speckles:
If you didn’t use speckled clay, load a toothbrush with watered-down brown or grey paint and flick the bristles to spray fine speckles across the surface. -
Seal the piece:
Protect your paint job with a coat of varnish. A matte finish looks most natural, but gloss adds a nice ceramic shine.
Pop in your favorite pencils and enjoy your charming new desk buddy
Flower-Shaped Coasters
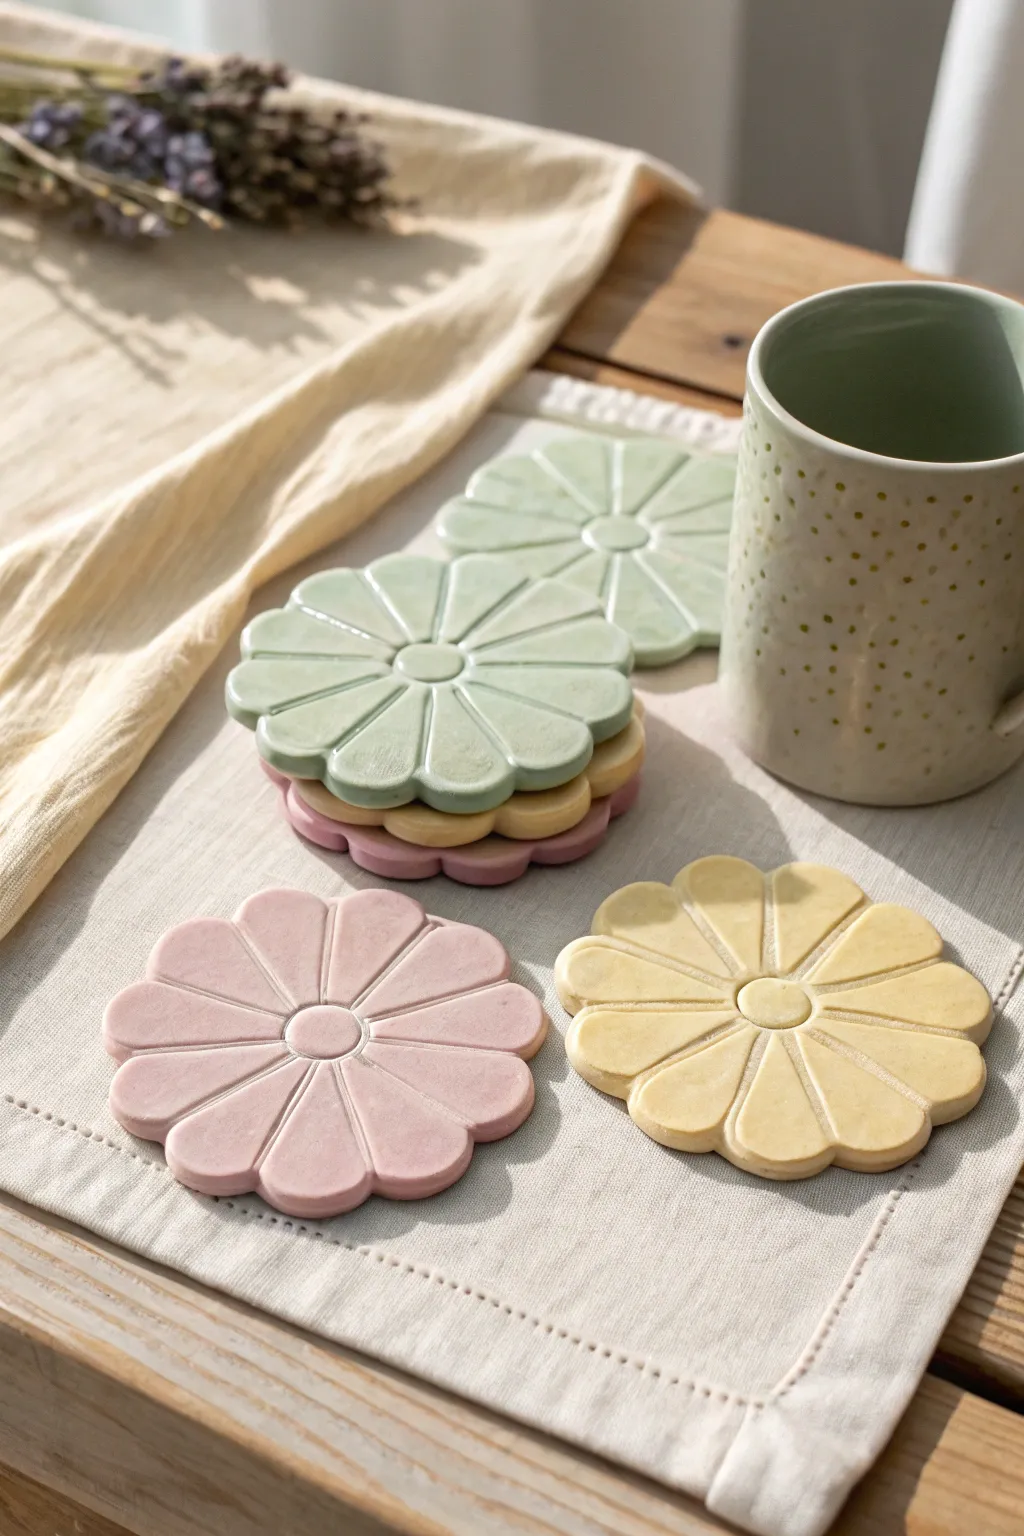
These charming flower-shaped coasters add a soft, spring-like touch to any coffee table with their muted pastel palette and gentle grooves. Made from air-dry or polymer clay, they are surprisingly simple to sculpt and perfect for protecting surfaces in style.
Detailed Instructions
Materials
- White air-dry clay or polymer clay
- Rolling pin
- Circle cookie cutter (approx. 4 inches)
- Small circle cutter (approx. 1 inch)
- Modeling tool or dull butter knife
- Sanding sponge (fine grit)
- Acrylic paints (sage green, dusty pink, buttercream yellow)
- Matte sealant or varnish
- Wax paper or craft mat
- Small paintbrush
- Water
Step 1: Shaping the Clay Base
-
Condition the Clay:
Begin by taking a handful of your clay and kneading it thoroughly in your hands until it becomes warm, pliable, and free of cracks. -
Roll the Slab:
Place the clay on your wax paper or craft mat. Use the rolling pin to flatten it into an even slab, aiming for a consistent thickness of about 1/4 inch to ensure durability. -
Cut the Main Circle:
Press your large 4-inch circle cutter firmly into the clay slab to create the main coaster shape. Peel away the excess clay from the edges. -
Smooth the Edges:
Dip your finger in a little water and run it gently along the cut edge of the circle to smooth out any sharpness or roughness left by the cutter.
Fixing Cracks
If tiny cracks appear while drying, don’t panic. Mix a small amount of fresh clay with water to make a paste (slip) and fill the cracks, then sand smooth once dry.
Step 2: Sculpting the Flower Design
-
Mark the Center:
Take the small 1-inch circle cutter and press it gently into the exact center of your clay slab. Do not cut all the way through; just make a clear indentation. -
Create the Petal Lines:
Using your modeling tool or the back of a dull knife, press straight lines radiating from the center circle out to the edge. Imagine a clock face and mark 12, 3, 6, and 9 first to keep things symmetrical. -
Fill in the Petals:
Add two evenly spaced lines between each of your ‘clock’ marks. You should end up with roughly 12 petals total. -
Deepen the Grooves:
Go back over your lines, pressing slightly deeper this time. Widen the grooves slightly at the outer edge to help define the separation between petals. -
Shape the Petal Tips:
Use your finger or a sculpting tool to gently press in the outer rim of the coaster at the end of each groove line. This creates the scalloped, flowery silhouette rather than a perfect circle. -
Refine the Center:
If your center circle mark got distorted, lightly press the small cutter back into the center to redefine it. -
Smooth Imperfections:
Do a final pass with a damp finger or soft damp brush to smooth out any clay burrs created by the carving tools.
Step 3: Finishing and Coloring
-
Dry the Clay:
Allow the clay to dry completely according to the package instructions. For air-dry clay, this usually takes 24-48 hours. Flip them halfway through to prevent curling. -
Sand the Surface:
Once fully cured, use a fine-grit sanding sponge to gently buff the surface and edges. This is crucial for that professional, silky-smooth look shown in the photo. -
Mix Custom Colors:
Mix your acrylics with a tiny bit of white to achieve those soft, milky pastel tones—think sage, blush, and cream. -
Apply Base Coat:
Paint the entire coaster in your chosen pastel shade. I like to use a flat, soft brush to avoid leaving visible brushstrokes. -
Paint the Grooves:
Make sure you get paint into the carved grooves and the center indentation so the color is uniform. -
Seal the Coaster:
After the paint is fully dry, apply 1-2 thin coats of matte varnish. This protects the coaster from moisture and stains from your cups.
Make it a Set
Make a matching large trivet for a teapot by using a cake pan or bowl as your cutting template, scaling up the petal design to match the larger size.
Now you have a lovely set of botanical coasters ready for your next tea time


What Really Happens Inside the Kiln
Learn how time and temperature work together inside the kiln to transform clay into durable ceramic.
Berry Cute Spoon Rests
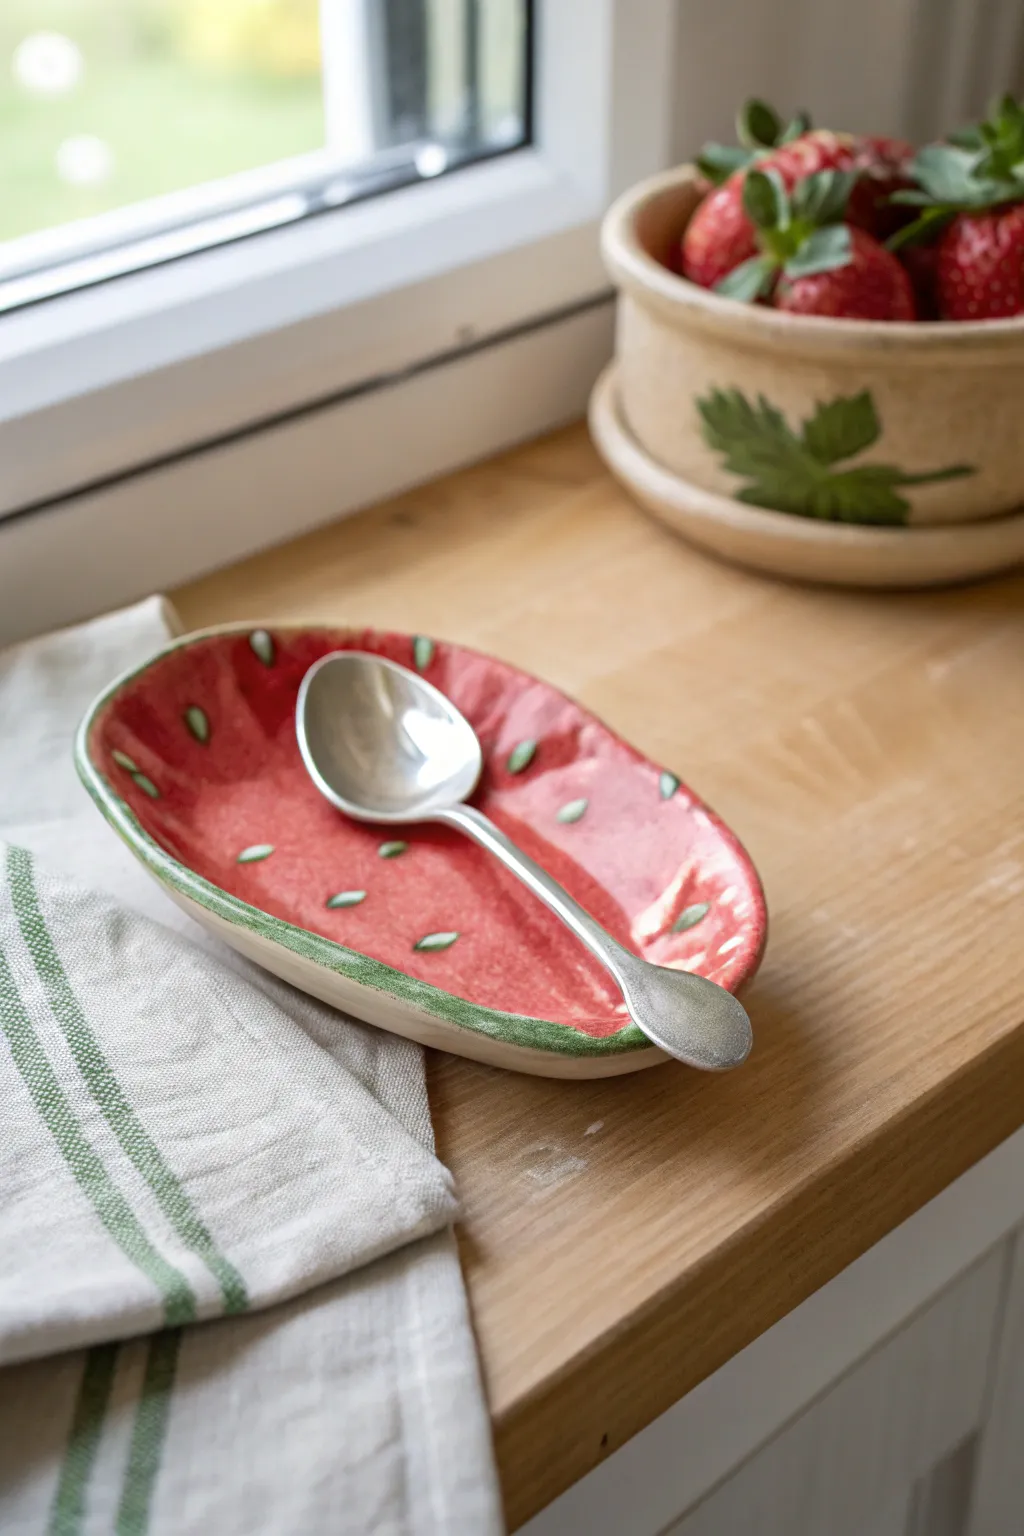
Bring the freshness of a summer picnic to your kitchen counter with this charming watermelon-inspired spoon rest. Hand-built from simple clay, its glossy red glaze and playful seeds make it a delightful spot to park your messy utensils.
Step-by-Step
Materials
- Earthenware or stoneware clay (white firing)
- Rolling pin
- Canvas mat or wooden board
- Fettling knife or needle tool
- Rib tool (smooth wood or rubber)
- Small sponge
- Underglazes: Bright Red, Leaf Green, White
- Clear glossy glaze
- Small detail paintbrush
- Medium wash brush
- Kiln (or access to a firing service)
Step 1: Shaping the Clay
-
Prepare the slab:
Begin by wedging a baseball-sized amount of clay to remove air bubbles. Roll it out on your canvas mat to an even thickness of about 1/4 inch. -
Cut the oval:
Sketch a freehand oval shape lightly onto the slab with a needle tool—aim for something organic, not perfectly geometric. Once satisfied, cut through the clay cleanly with your fettling knife. -
Smooth the edges:
Dip your finger or a small sponge in a tiny bit of water and run it along the cut rim to compress and round off the sharp edges. This prevents chipping later. -
Form the curve:
Gently lift the clay oval and place it onto a piece of soft foam or simply cup it in your hand. Press lightly into the center with your thumb to create a shallow depression while urging the rim upwards. -
Refine the shape:
Ensure the bottom remains slightly flattened so it won’t rock on the counter. You want a gentle bowl shape that can cradle a spoon without tipping. -
Dry partially:
Let the piece dry to a ‘leather hard’ state. This is when the clay is stiff enough to hold its shape perfectly but still cool to the touch and able to accept underglaze.
Warping Woes?
If your spoon rest dries unevenly, it might curl. Dry it slowly under a loose sheet of plastic for the first 24 hours to keep the drying rate consistent.
Step 2: Painting the Design
-
Apply the red base:
Using a medium wash brush, apply two to three even coats of bright red underglaze to the interior of the bowl, stopping about 1/8th of an inch from the very edge. Let each coat dry slightly before adding the next. -
Create the rind:
Mix a vibrant leaf green underglaze. With a steady hand, paint the very rim of the dish, allowing the green to overlap slightly onto the unpainted white border to create a natural rind look. -
Add texture to the rind:
While the green is still damp, I allow myself a little artistic license here by gently wiping back irregular spots with a clean, damp brush to give the rind a textured, organic appearance. -
Outline the seeds:
Using your smallest detail brush and white underglaze, paint small teardrop shapes scattered randomly across the red flesh. These are the casings for the seeds. -
Fill the seeds:
Once the white teardrops are dry, paint a smaller green or dark grey teardrop inside each white shape, leaving a thin white outline visible. -
Bisque fire:
Allow the spoon rest to dry completely (bone dry) before loading it into the kiln for a bisque firing.
Step 3: Glazing and Finishing
-
Clean the bisque:
Wipe the fired piece with a damp sponge to remove any kiln dust. This ensures the clear glaze will adhere properly without crawling. -
Apply clear glaze:
Dip the entire piece into a bucket of clear glossy glaze, or brush on three coats using a wide fan brush. Ensure the application is even to avoid milkiness. -
Wipe the foot:
Flip the piece over and meticulously wipe all glaze off the bottom surface that will touch the kiln shelf. Any leftover glaze here will fuse your art to the shelf. -
Final fire:
Fire the piece again to the temperature required by your specific clay and glaze body (typically Cone 04 or Cone 6). -
Review results:
Once the kiln cools, unload your spoon rest. Check for any sharp spots on the glaze (you can sand these down with wet-dry sandpaper) and get ready to use it.
Go Bigger
Scale this technique up to create a matching serving platter for summer fruits. Just ensure the wall is thicker (about 1/2 inch) to support the larger size.
Your kitchen now has a splash of color ready to keep countertops clean
Tiny Lidded Jewelry Pots
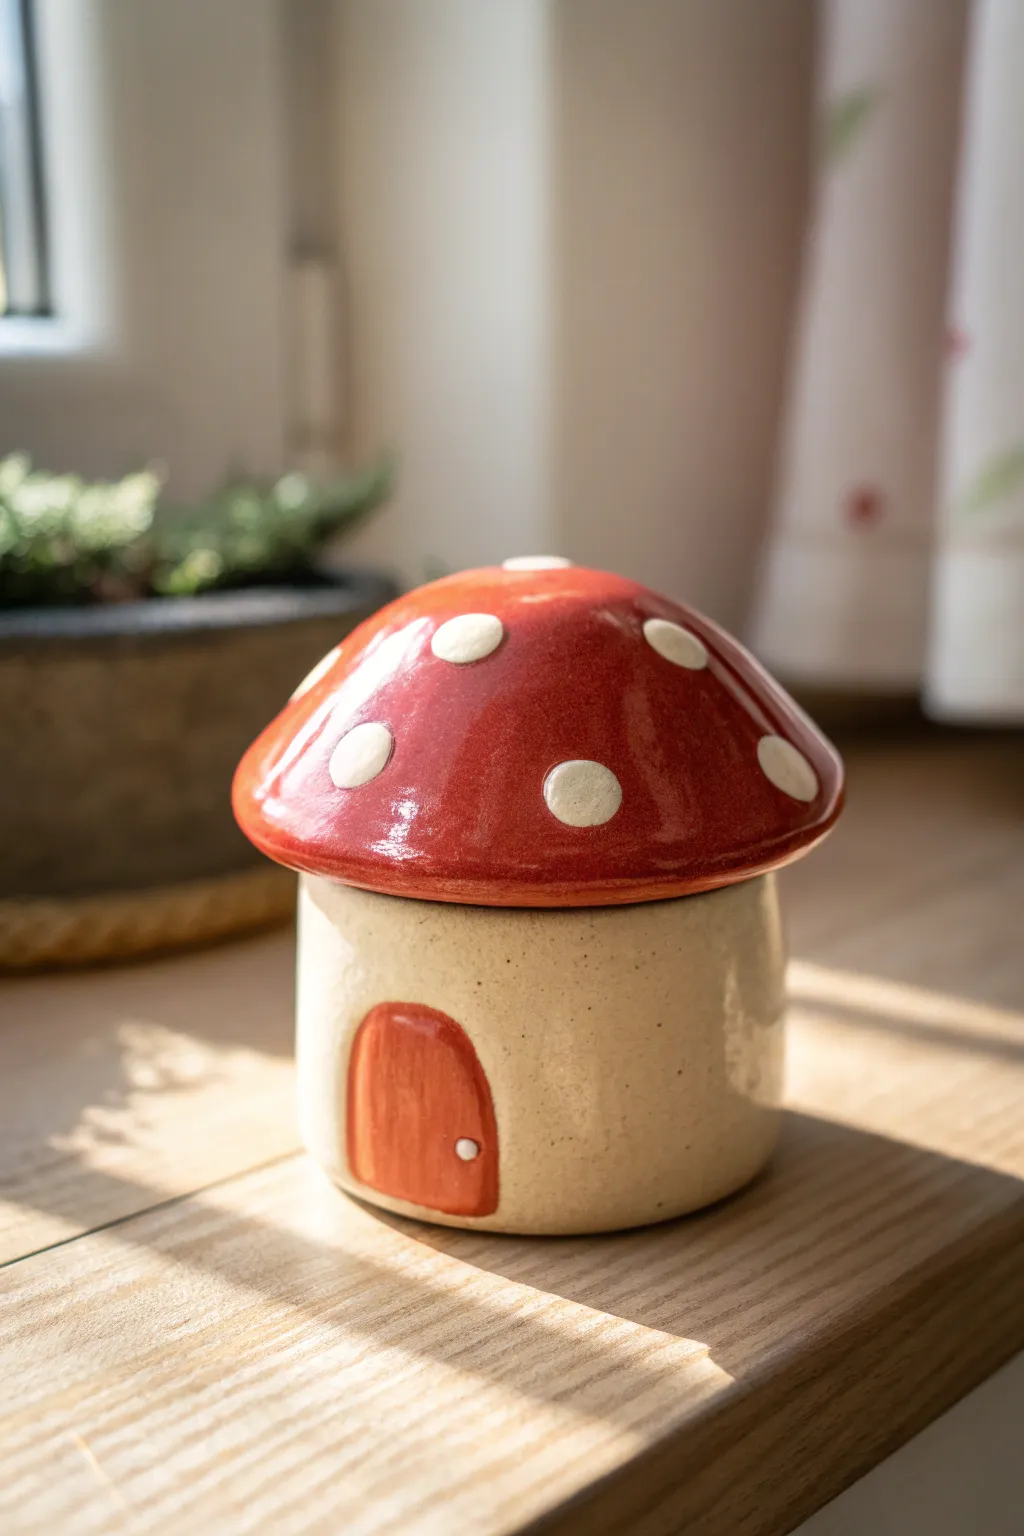
This adorable storage pot disguises itself as a tiny fairytale home, perfect for keeping rings or small treasures safe. With a glossy red cap lid and a cozy little door, this ceramic piece brings a touch of woodland magic to any windowsill.
Detailed Instructions
Materials
- Earthenware or stoneware clay (white or light buff)
- Pottery wheel (or rolling pin for hand-building)
- Clay carving tools (needle tool, loop tool)
- Sponge
- Underglaze (bright red, orange/terracotta, white)
- Clear glossy glaze
- Paintbrushes (small detail brush, medium glazing brush)
- Kiln
Step 1: Forming the Base
-
Center and open:
Begin with a small ball of clay, centering it on your wheel. Open it up gently to create a cylindrical shape, keeping the floor flat and stable. -
Pull the walls:
Pull the walls up to create a short, stout cylinder about 2-3 inches high. Keep the form relatively straight but allow a slight curve for an organic, mushroom-stem feel. -
Refine the rim:
Compress the rim well with a shammy or sponge. This area needs to be smooth and flat to support the lid later. -
Trim the foot:
Cut the pot from the bat using a wire tool. Once it’s leather hard, trim a clean foot ring on the bottom for stability.
Sticky Lids?
Apply wax resist to the rim of the jar and the underside of the lid where they touch. This prevents glaze fusion during the final firing.
Step 2: Creating the Mushroom Cap Lid
-
Throw the lid:
Using a slightly larger amount of clay, throw a bowl shape upside down (or right-side up depending on your preference), aiming for a wide, domed profile like a mushroom cap. -
Measure the gallery:
Using calipers, measure the rim of your base pot. Ensure the interior of your lid (or a flange you create) matches this measurement so it sits securely without sliding off. -
Shape the eaves:
Flare the edges of the lid outwards slightly. This overhang mimics a real mushroom cap and gives you a nice surface for the polka dots later. -
Dry fit:
Once both pieces are leather hard, test the fit gently. Don’t force them, but ensure the lid rests comfortably on the base.
Step 3: Decorating and Glazing
-
Carve the door:
On the leather-hard base, use a needle tool to lightly outline a small arched door shape. You can subtly press this area in to give it dimension. -
Bisque fire:
Let both pieces dry completely (bone dry) before loading them into the kiln for the bisque firing to Cone 04 (or your clay’s specification). -
Paint the cap:
Apply 2-3 coats of bright red underglaze to the top of the lid. Ensure each layer is dry before adding the next for solid, opaque coverage. -
Add the dots:
Using a round brush or a sponge dabber, apply clean white circles over the dried red underglaze. I find rotating the lid helps space them evenly. -
Paint the door:
Fill in the arched door area on the base with an orange or terracotta underglaze. Use a tiny detail brush to add a white dot for the doorknob. -
Clear glaze application:
Once the underglaze is fully dry, dip or brush the entire piece (except the foot ring and the contact points of the lid) in a clear glossy glaze. -
Wipe the feet:
Carefully sponge off any glaze from the bottom of the base so it doesn’t fuse to the kiln shelf. -
Final firing:
Fire the project a final time to the temperature required by your glaze and clay body (typically Cone 5 or 6 for stoneware).
Natural Texture
For the base, leave the clay bare (unglazed) on the outside but glazed inside. This speckled clay body looks great raw against the shiny red cap.
Now you have a charming little hiding spot for your favorite jewelry that looks sweet enough to belong in a fairy garden

TRACK YOUR CERAMIC JOURNEY
Capture glaze tests, firing details, and creative progress—all in one simple printable. Make your projects easier to repeat and improve.
Earring Display Tiles With Pegs
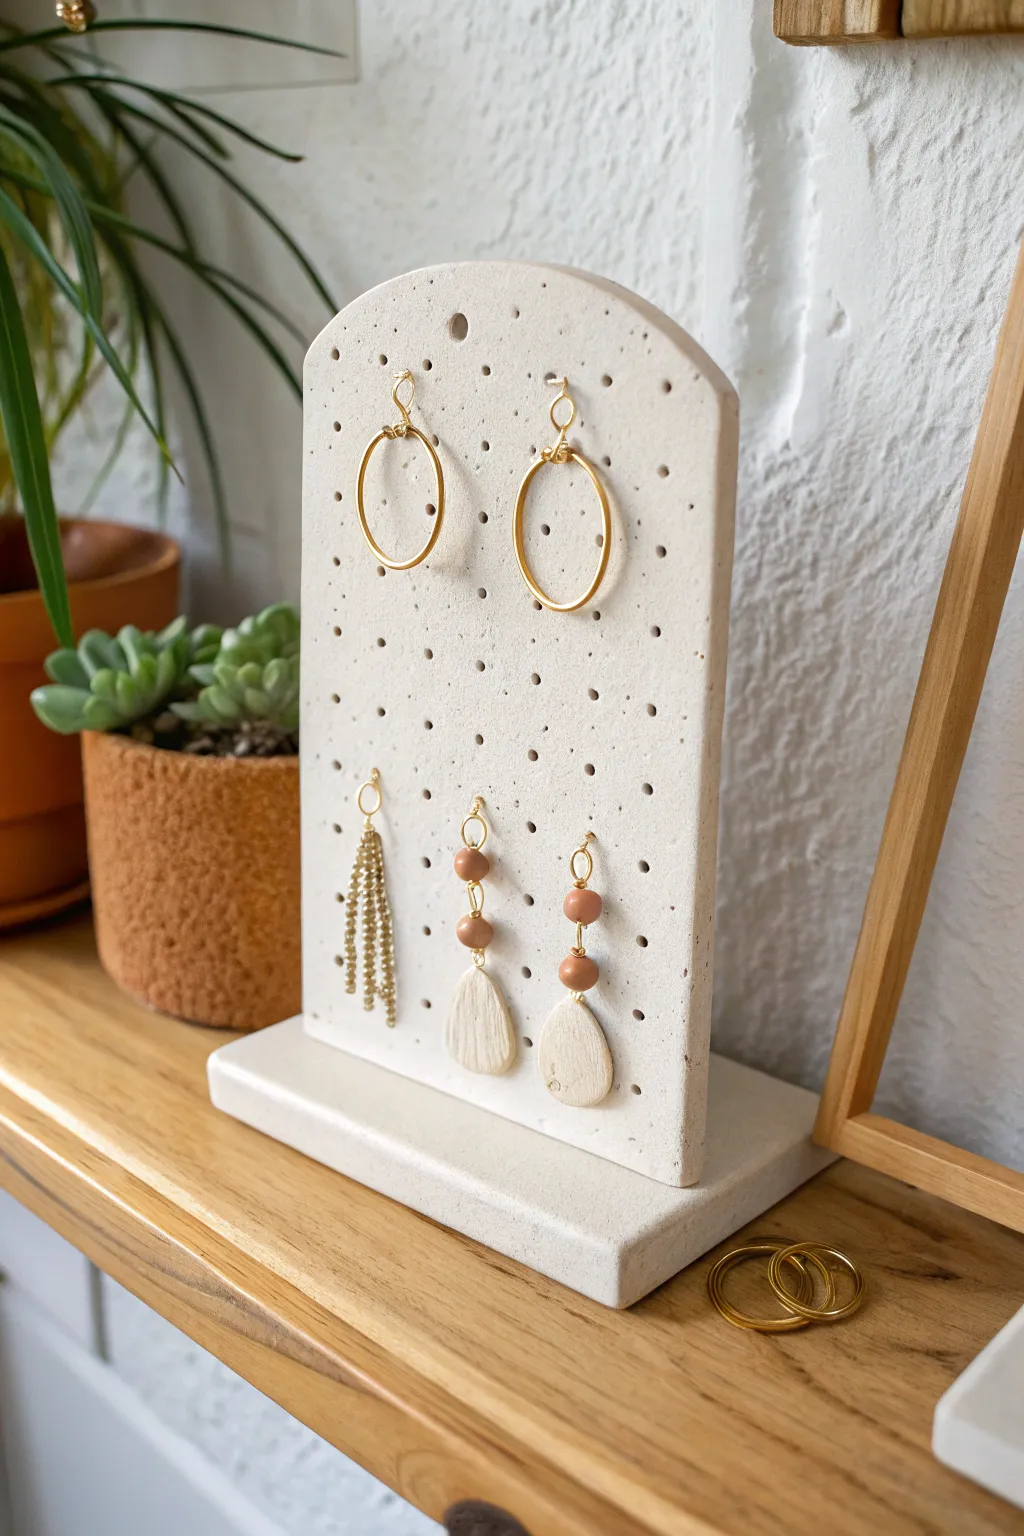
Show off your favorite hoops and dangles with this modern, minimalist display stand. The speckled clay finish gives it a high-end ceramic look while the arch shape provides plenty of vertical space for longer pieces.
Step-by-Step Tutorial
Materials
- Oven-bake polymer clay (granite or speckled white effect)
- Clay rolling pin or acrylic roller
- Sharp clay blade or X-Acto knife
- Paper template (arch shape)
- Small round cutter or a thick skewer/toothpick
- Baking sheet
- Parchment paper
- Fine-grit sandpaper (optional)
- Strong super glue or gel adhesive
- Ruler
Step 1: Shaping the Clay
-
Condition the Clay:
Begin by warming the polymer clay in your hands. Knead it thoroughly until it is soft, pliable, and free of any cracks or crumbly bits. -
Roll the Slab:
Place the clay on a clean, flat surface. Roll it out into an even slab that is roughly 1/4 inch (6mm) thick. You want it substantial enough to stand upright without bending. -
Prepare the Base:
Cut a rectangular strip from your slab for the bottom base. A good size is about 5 inches long by 2 inches deep. Set this aside on your parchment-lined baking sheet. -
Draft the Arch Template:
Sketch an arch shape on a piece of paper that is slightly narrower than your base length. Cut out this paper template to use as your guide. -
Cut the Arch:
Lay the paper template onto the remaining rolled clay. Using your sharp blade, carefully trace around the template to cut out the main display piece. -
Smooth the Edges:
Dip your finger in a tiny bit of water or baby oil and gently run it along the cut edges of both the base and the arch to smooth out any sharpness or drag marks.
Baking Safety
To prevent the clay from having shiny spots or burning, tent a piece of foil over the baking sheet. This protects white or light-colored clay from discoloration.
Step 2: Adding Details
-
Mark the Grid:
Lightly press a ruler against the clay arch to create faint guide marks for your holes. Spacing them about 1/2 inch apart ensures your earrings won’t overlap. -
Create Perforations:
Using a small round cutter or a thick skewer, punch clean holes through the clay at your marked points. I find twisting the tool slightly as you pull it out keeps the hole neat. -
Clean Up Holes:
Inspect the back of the arch. If the punching tool pushed clay out the back, gently slice off visible bumps with your blade to keep the back flat. -
Final Surface Check:
Wipe the surface with a little rubbing alcohol on a lint-free cloth or your finger to remove any dust or fingerprints before baking.
Step 3: Baking and Assembly
-
Bake the Pieces:
Place the arch flat on the baking sheet alongside the base. Bake according to your specific clay package instructions, usually around 275°F (130°C) for 30 minutes depending on thickness. -
Cool Down:
Allow the pieces to cool completely on the baking sheet. Moving them while warm can cause warping, so patience is key here. -
Sand Edges (Optional):
If there are any rough spots after baking, lightly sand the edges with fine-grit sandpaper under running water for a polished finish. -
Align the Assembly:
Stand the arch upright on the center of the rectangular base to check the fit. Ensure the contact points are clean. -
Glue Together:
Apply a strong line of super glue or gel adhesive along the bottom edge of the arch. Press it firmly onto the center of the base. -
Secure While Drying:
Prop the arch up with small objects (like spice jars or books) on either side to keep it perfectly vertical while the glue cures fully.
Perfectly Round Holes
Use a small drinking straw to punch the holes instead of a skewer. It removes the core of the clay cleanly rather than just pushing it aside.
Now you have a chic, custom organizer ready to hold your jewelry collection
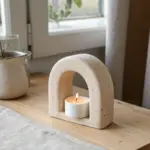
Cloudy Incense Holders
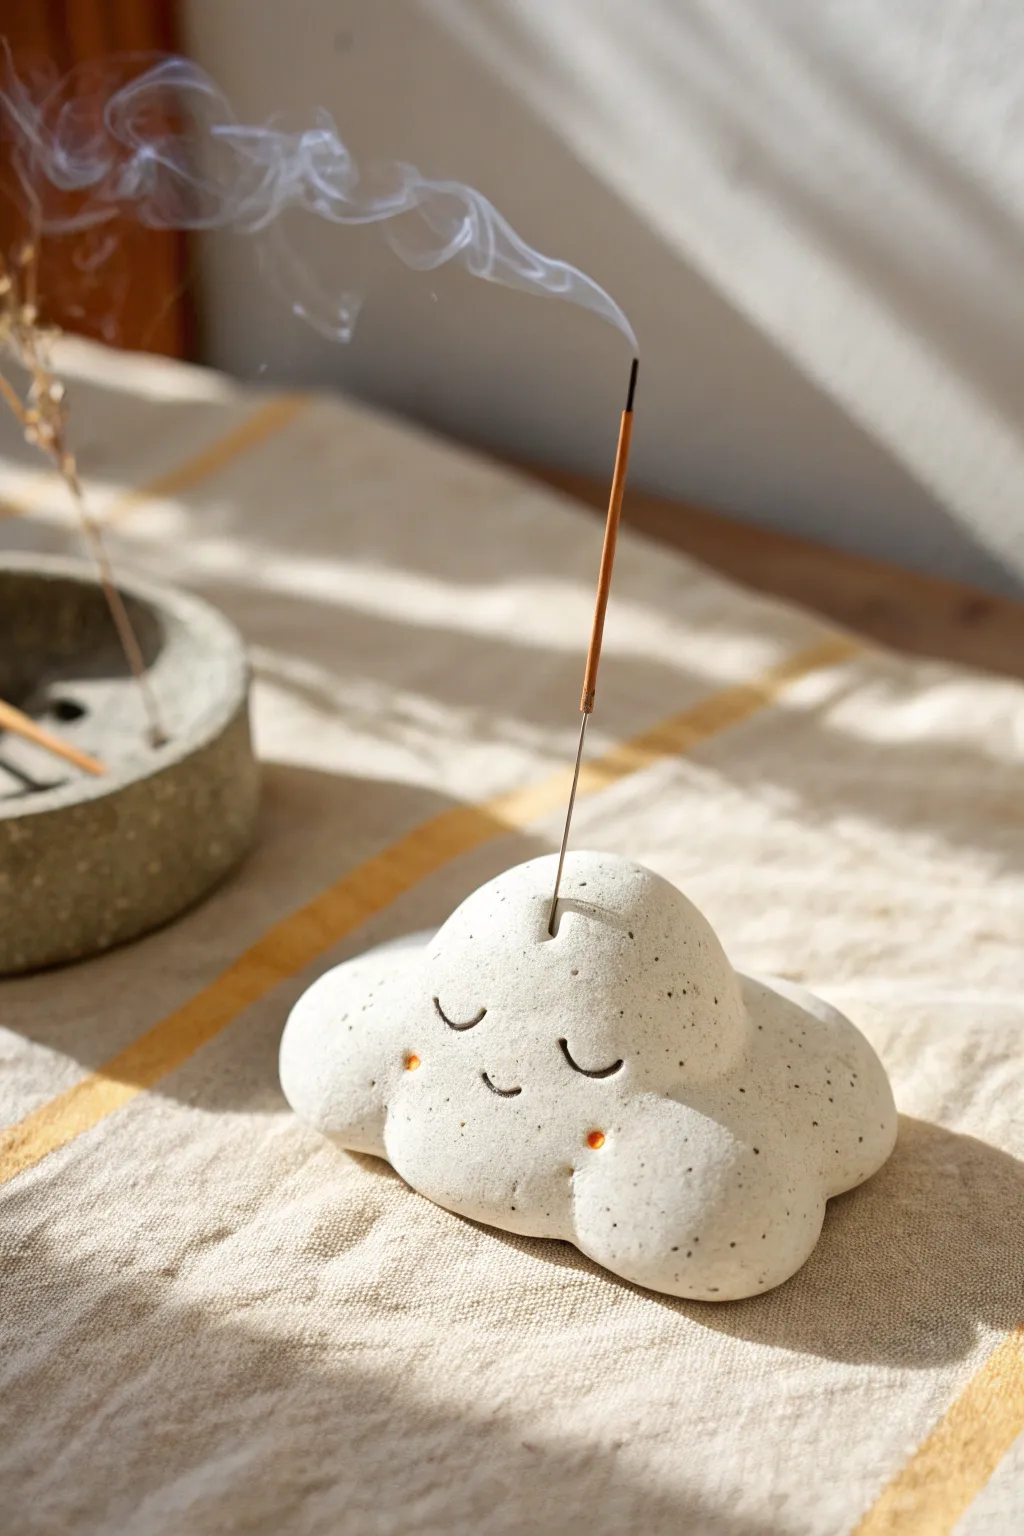
Bring a little sky-high serenity to your space with this adorable cloud-shaped incense holder. Crafted from speckled clay for a natural textured look, its sweet sleepy face adds a touch of whimsy while collecting ash in the clean curves of its form.
Step-by-Step Guide
Materials
- White stoneware clay (preferably speckled, or add grog/speckles)
- Small rolling pin
- Needle tool
- Modeling tool or small spoon
- Water and slip
- Incense stick (for sizing)
- Sponge
- Black underglaze or acrylic paint
- Orange underglaze or acrylic paint
- Small detail brush
- Clear matte or satin glaze (if firing)
Step 1: Shaping the Cloud
-
Prep the clay:
Begin with a ball of clay roughly the size of a large tangerine. If you aren’t using pre-speckled clay, knead in some cosmetic sand or dried clay grounds to achieve that texture. -
Flatten the base:
Gently press the ball onto your work surface to create a flat bottom so the cloud sits stable and won’t wobble. -
Create the lumps:
Using your fingers, start pinching and pushing the clay outwards to form the distinct ‘lumps’ of a cloud. Aim for a larger, higher center mass with two or three smaller puffs extending out to the sides. -
Refine the form:
Smooth out the transitions between the rounded humps. You want soft, organic curves rather than sharp indentations. -
Smooth the surface:
Take a slightly damp sponge and wipe over the entire piece to remove fingerprints and refine the roundness of the cloud puffs.
Cracking at the hole?
If the clay creates tiny stress cracks around the incense hole as it dries, smooth them immediately with a damp brush. A tiny drop of vinegar helps bond the crack back together.
Step 2: Adding Details
-
Create the incense hole:
While the clay is still plastic, take an actual incense stick (or a tool of slightly larger diameter to account for shrinkage) and press it into the highest point of the center hump. -
Check the angle:
Angle the hole slightly backward so the ash will fall onto the cloud itself or the surface behind it, rather than just straight down. -
Carve the expression:
Using a needle tool, very gently sketch the placement of the face. You want two ‘U’ shapes for sleeping eyes and a small curve for the smile. -
Deepen the lines:
Once happy with the placement, go back over the lines with a slightly thicker tool or the needle tool to deepen the varying width of the eyes and mouth. -
Add rosy cheeks:
Using a small rounded tool or the back of a paintbrush, make two small, shallow indentations on either side of the smile for the cheeks.
Step 3: Finishing and Coloring
-
Drying:
Allow the piece to dry slowly to the leather-hard stage. I usually cover it loosely with plastic for the first few hours. -
Paint the features:
Using a fine detail brush, carefully fill the carved eye and mouth lines with black underglaze. Wipe away any excess that spills onto the surface with a damp sponge for crisp lines. -
Paint the cheeks:
Fill the small cheek indentations with a bright orange or coral underglaze. -
Bisque fire:
Fire the piece to cone 04 (or according to your clay’s instructions). -
Glazing:
Dip or brush on a clear matte glaze to seal the piece while letting the natural speckles of the clay shine through. -
Final fire:
Perform the glaze firing to finish the piece. If using air-dry clay instead, simply seal with a varnish after painting.
Raincloud Variation
Before drying, punch three small holes in the bottom edge and attach small clay ‘raindrops’ on wire or string after the piece is fired for a mobile effect.
Light your favorite scent and watch the smoke drift from your new little cloud friend
Cute Key Dish by the Door
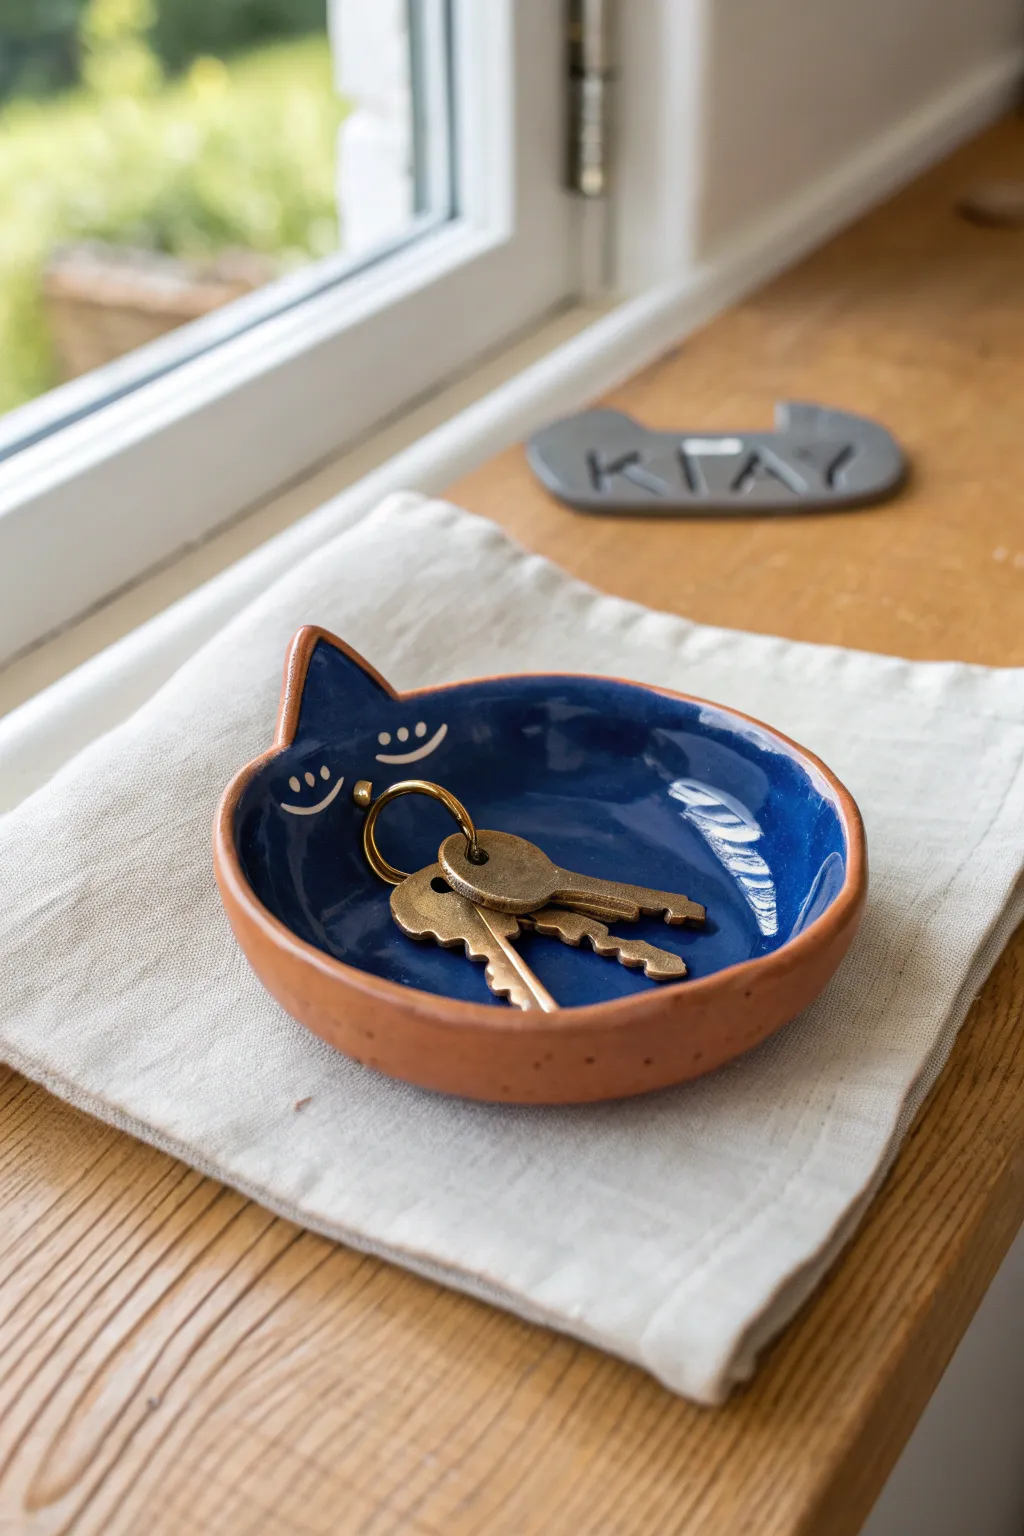
Keep your keys safe and add a touch of whimsy to your entryway with this charming cat-shaped catchall. This project combines the earthy warmth of red clay with a stunning, high-gloss indigo interior for contrast.
Detailed Instructions
Materials
- Red earthenware or terra cotta clay
- Rolling pin
- Canvas mat or cloth (to prevent sticking)
- Needle tool
- Small sponge
- Bowl or circular object (approx. 5-6 inches diameter)
- Blue low-fire gloss glaze
- White underglaze (for the face details)
- Fine detail paintbrush
- Medium glaze brush
- Clear transparent glaze (optional, if your blue glaze isn’t food safe or glossy enough)
Step 1: Forming the Body
-
Prepare the slab:
Start by wedging a ball of red clay to remove air bubbles, then roll it out into a smooth slab about 1/4 inch thick. I find rolling on canvas prevents the clay from sticking to the table. -
Cut the basic circle:
Place your bowl or circular template onto the clay slab. Using your needle tool, trace and cut out a perfect circle. -
Shape the rim:
Gently lift the edges of the circle to create a shallow bowl shape. You can do this by pinching up the sides while supporting the bottom, or by slumping the clay into a shallow bowl mold. -
Form the ears:
For the ears, pinch and pull two small triangle shapes from the rim at the ‘top’ of your circle. Alternately, you can cut small triangles from extra clay, score and slip them attached to the rim, and smooth the seams completely. -
Smooth the edges:
Dip your finger or a small piece of sponge in water and run it along the rim. Smooth out any sharp edges or cracks, ensuring the transition from the bowl to the ears is seamless. -
Dry to leather hard:
Let the dish sit until it reaches a leather-hard state. It should be firm enough to handle without warping but still cool to the touch.
Step 2: Decorating & Glazing
-
Bisque fire:
Once the piece is bone dry, fire it in the kiln to bisque temperature (usually cone 04) to prepare it for glazing. -
Apply the blue glaze:
Using a medium glaze brush, apply 2-3 coats of deep blue gloss glaze to the interior of the dish only. Leave the exterior raw to show off the beautiful red clay. -
Clean the rim:
If any blue glaze dripped onto the rim or outer edge, wipe it away carefully with a damp sponge. The blue should stop neatly at the interior edge. -
Paint the face details:
With a fine detail brush and white underglaze, paint the simple face features directly on top of the dried blue glaze. Two small curved lines for closed eyes and a tiny mouth will do the trick. -
Add abstract fur details:
On the right side of the inner bowl, paint a few loose, white brushstrokes to suggest light reflection or abstract fur texture. -
Final wipe down:
Check the underside of the dish to ensure no glaze is on the bottom, which would stick to the kiln shelf. -
Glaze fire:
Fire the piece again to the temperature recommended for your specific glaze (typically cone 05 or 06 for low fire). -
Cool down:
Allow the kiln to cool completely before removing your finished dish. The blue should now be glassy and vibrant against the matte terracotta exterior.
Smooth Operator
Use a damp chamois strip to compress the rim while spinning the dish on a banding wheel. This creates a professional, rounded edge that resists chipping.
Warped Edges?
If your dish isn’t sitting flat, it may have dried unevenly. Dry slowly under plastic next time, or gently sand the bottom flat after the bisque firing.
Place it by your entryway and enjoy being greeted by this friendly face every time you come home
Face Planters With Hair Plants
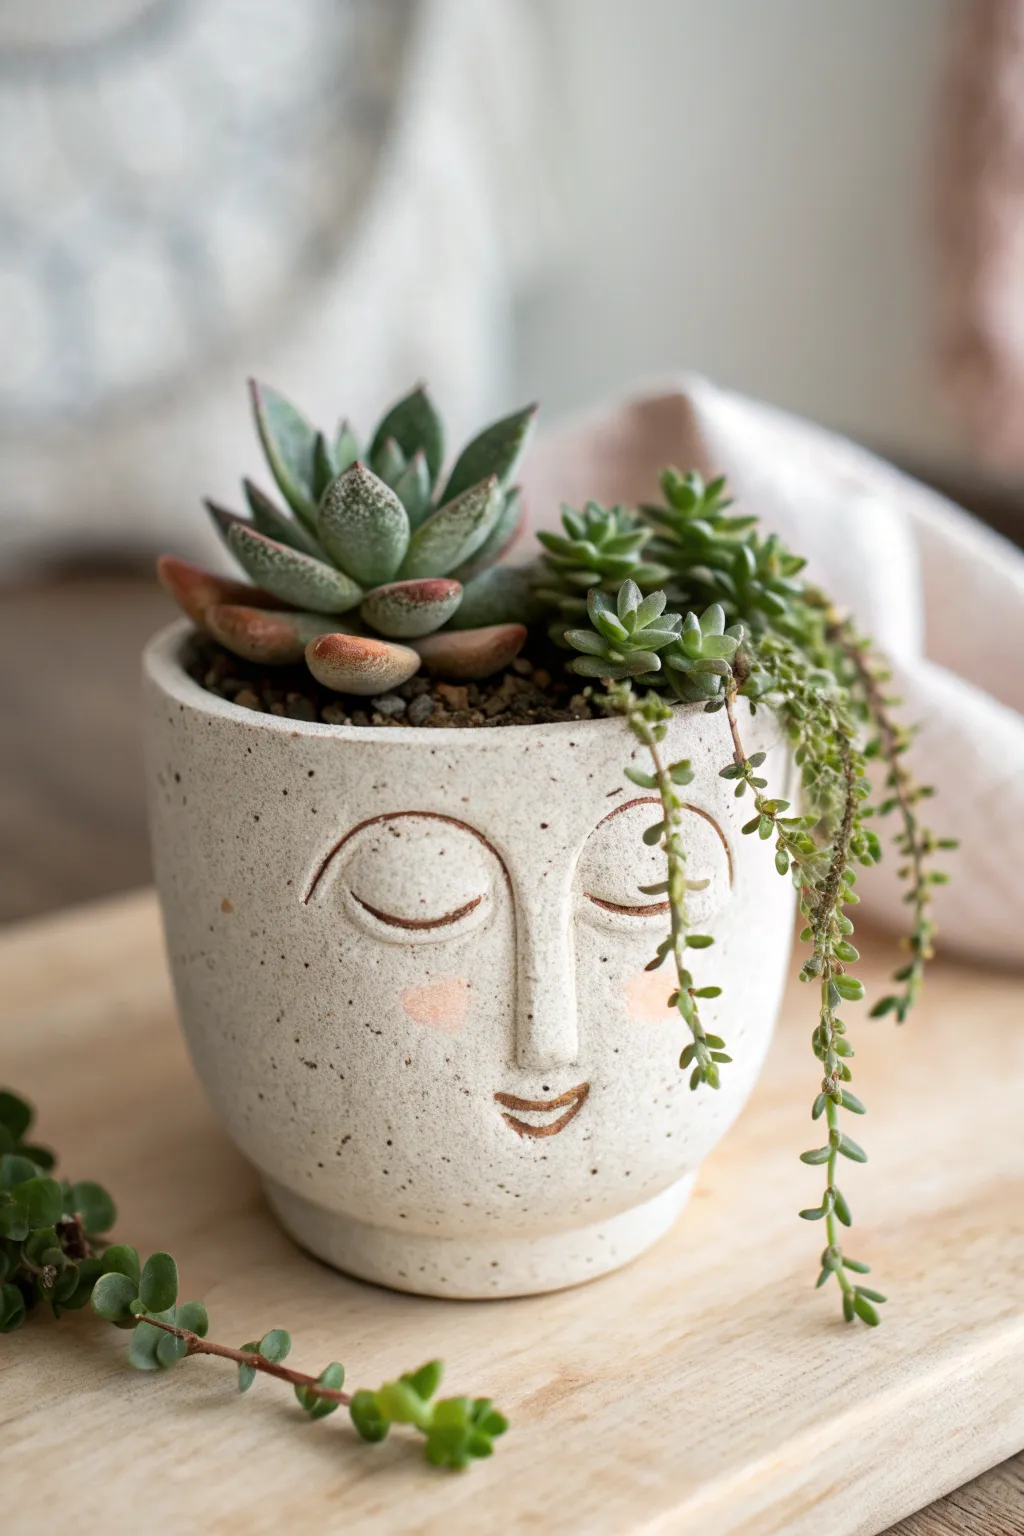
This charming ceramic project transforms a simple vessel into a peaceful character, featuring gently closed eyes and rosy cheeks. The speckled cream finish gives it an organic, handmade feel perfect for holding trailing succulents that mimic flowing hair.
How-To Guide
Materials
- Light-colored stoneware or polymer clay (oven-bake)
- Speckled clay additive (if using plain clay) or pre-speckled clay
- Pottery wheel or rolling pin and slab templates (for hand-building)
- Needle sculpting tool
- Loop tool for carving
- Small sponge
- Water or slip (for joining)
- Pink chalk pastel or underglaze (for cheeks)
- Brown underglaze or acrylic paint (for details)
- Clear matte glaze or sealant
Step 1: Forming the Vessel
-
Prepare the clay body:
Begin by wedging your clay thoroughly to remove air bubbles. If you want that lovely speckled look shown in the photo but only have plain clay, knead in some speckled clay additive or ground dried clay bits now. -
Shape the base cylinder:
If using a wheel, throw a simple cylinder with a slightly narrowed base for elegance. For hand-builders, roll out a slab about 1/4 inch thick, cut a rectangle and a circle for the base, and join them to form a cup shape. -
Smooth the surface:
Use a rib tool or a damp sponge to smooth out the exterior walls. The surface needs to be relatively even so the facial features stand out clearly later. -
Create the foot:
Trim or sculpt a slight inward curve at the very bottom of the pot. This little ‘foot’ creates a nice shadow line and makes the face shape feel more distinct from the table surface.
Fixing Wobbly Lines
If your carved lines are jittery, let the clay firm up to ‘leather hard’ status. Smooth over the bad line with a sponge and re-carve; damp clay drags too much.
Step 2: Sculpting the Features
-
Map out the face:
Lightly trace the position of the nose, eyes, and mouth with a needle tool. I like to place the features slightly lower on the pot to leave plenty of ‘forehead’ room for the plant ‘hair’. -
Build the nose bridge:
Roll a small, thin coil of clay. Attach it vertically where the nose intersects the forehead, blending the clay outward onto the pot surface so it looks seamless and raised. -
Carve the eyebrows:
Using a needle tool, incise two grand, arching lines that start from the top of the nose bridge and sweep outward. These define the closed eye shape. -
Define the eyelids:
Carve a second, smaller arch underneath the eyebrow lines to represent the closed eyelids. The spacing here is crucial for that peaceful expression. -
Shape the nose tip:
Add a tiny bit more clay to the tip of the nose if needed, smoothing it into a soft triangular mound that protrudes slightly from the surface. -
Carve the smile:
Incise a small, gentle ‘U’ shape for the mouth. Keep the line thin and delicate. -
Refine the lines:
Go back over your carved lines with a slightly damp brush or tool to clean up any rough clay crumbs and soften the edges.
Step 3: Color & Finishing
-
Apply the blush:
Before firing (or baking), rub a little pink pastel or apply a wash of pink underglaze to the cheek area. Use your finger to smudge it into a soft, circular gradient. -
Highlight the lines:
Paint a thin line of brown underglaze or diluted acrylic inside the carved lines of the eyebrows, eyelids, and mouth to make the expression pop. -
The first fire:
Fire the piece in a kiln according to your clay’s instructions (bisque fire). If using polymer clay, bake it in your home oven at the manufacturer’s specified temperature. -
Glazing:
Apply a clear matte or satin glaze over the entire exterior. Avoid glossy glaze, as the high shine can obscure the subtle facial sculpting. -
Final firing:
Fire the piece a second time to set the glaze. Once cool, plant your succulents, letting the trailing strings cascade over the side like bangs.
Add Texture
Before the clay dries, use an old toothbrush to gently flick a mixture of water and brown paint/oxide onto the surface for added speckles.
Enjoy the calm presence your new planter brings to your space
Air Plant Slings and Hangers
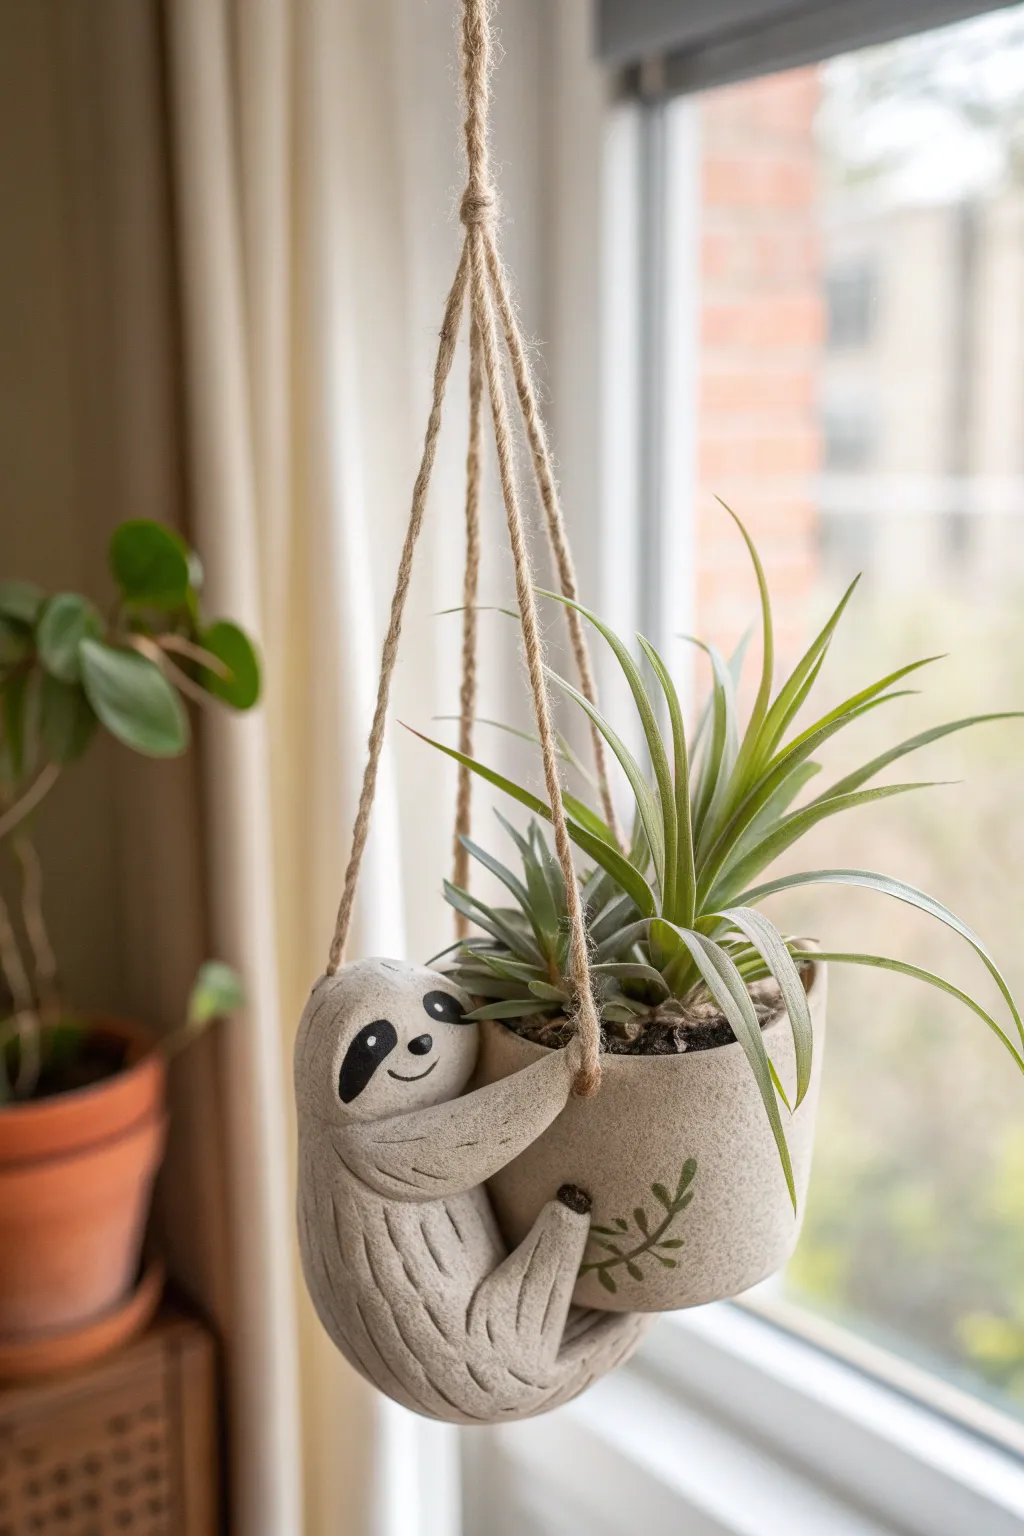
Bring a slow-paced, whimsical vibe to your window with this adorable sloth air plant hanger. Sculpted from polymer or air-dry clay, this charming creature cradles a small pot while seeming to lazily climb its own suspension ropes.
Step-by-Step
Materials
- White air-dry clay or polymer clay (approx. 500g)
- Small plastic condiment cup or mini terracotta pot (to use as a mold)
- Jute twine or hemp cord
- Acrylic paints (black, olive green)
- Fine-grit sandpaper
- Clay sculpting tools (needle tool, modeling tool)
- Rolling pin
- Water and sponge (for smoothing)
- Matte spray varnish or sealant
- Fine detail paintbrush
Step 1: Shaping the Pot Body
-
Prepare the clay:
Begin by conditioning your clay. If using air-dry clay, knead it briefly with slightly damp hands to ensure it is pliable and crack-free. -
Roll the base slab:
Roll out a portion of clay to about 1/4 inch thickness. Use your condiment cup or mini pot as a template to cut a circle for the base and a long rectangular strip for the walls. -
Form the vessel:
Wrap the rectangular strip around your mold (which should be wrapped in plastic wrap for easy removal) and join the seam by scoring and adding slip or blending the clay. Attach the base circle in the same manner. -
Smooth the exterior:
With the mold still inside for support, use a wet finger or a damp sponge to completely smooth the seams until the vessel looks like a solid, continuous piece. Carefully remove the mold.
Sloth Slipping?
If the heavy clay limbs slide down while wet, prop them up with crumpled aluminum foil or small cardboard wedges until the clay stiffens enough to hold its shape.
Step 2: Sculpting the Sloth
-
Form the sloth’s head and body:
Roll a teardrop shape for the sloth’s body and a separate, slightly flattened oval for the head. Flatten the back of the body slightly so it sits flush against the curved pot. -
Attach the main body:
Score and slip the back of the sloth body and the side of the pot. Press the sloth firmly onto the pot, blending the clay edges so they merge seamlessly. -
Add the limbs:
Roll four snake-like coils for the arms and legs. Attach the arms so they reach up towards the rim of the pot, bending slightly at the ‘elbow’ as if gripping. -
Secure the grip:
Curl the ends of the arms over the rim of the pot or fuse them directly to the side near the top. Position the legs so they hook underneath the pot, creating the illusion that he is hanging on. -
Create hands and feet notches:
Using a needle tool, gently press indentations into the paws to mimic claws or fingers gripping the surface. -
Add texture:
Take a needle tool or a stiff bristled brush and gently scratch short, directional lines all over the sloth’s body to simulate fur texture. Leave the face smooth. -
Drill suspension holes:
Before the clay dries, use a straw or large sculpting tool to poke three evenly spaced holes around the rim of the pot. Ensure one hole is positioned centrally between the sloth’s arms for balance.
Step 3: Finishing Touches
-
Dry completely:
Let the piece dry according to your clay’s instructions. Air-dry clay usually takes 24-48 hours. I like to rotate it occasionally so the bottom dries evenly. -
Sand imperfections:
Once fully cured, use fine-grit sandpaper to smooth out any rough edges on the rim or the sloth’s face. -
Paint the face:
Using a fine detail brush and black acrylic paint, carefully paint two curved patches for the eye mask, a small nose, and a simple smile. Once the black dries, add tiny white dots for eye highlights. -
Decorate the pot:
Paint a small olive green leafy branch on the side of the pot opposite the sloth to add a bit of botanical flair. -
Seal the piece:
Spray the entire planter with a matte varnish to protect the paint and seal the clay against moisture. -
String it up:
Cut three equal lengths of jute twine. Thread one end through each hole and tie a sturdy double knot on the inside. -
Final assembly:
Gather the three strings at the top, ensuring the pot hangs level, and knot them together in a loop for hanging.
Texture Pro-Tip
For realistic fur, drag your needle tool in different directions rather than uniform rows. It creates a more organic, ‘bed-head’ look typical of sloths.
Pop in your favorite air plant or succulent and enjoy your new climbing companion
Wavy Desk Divider Trays
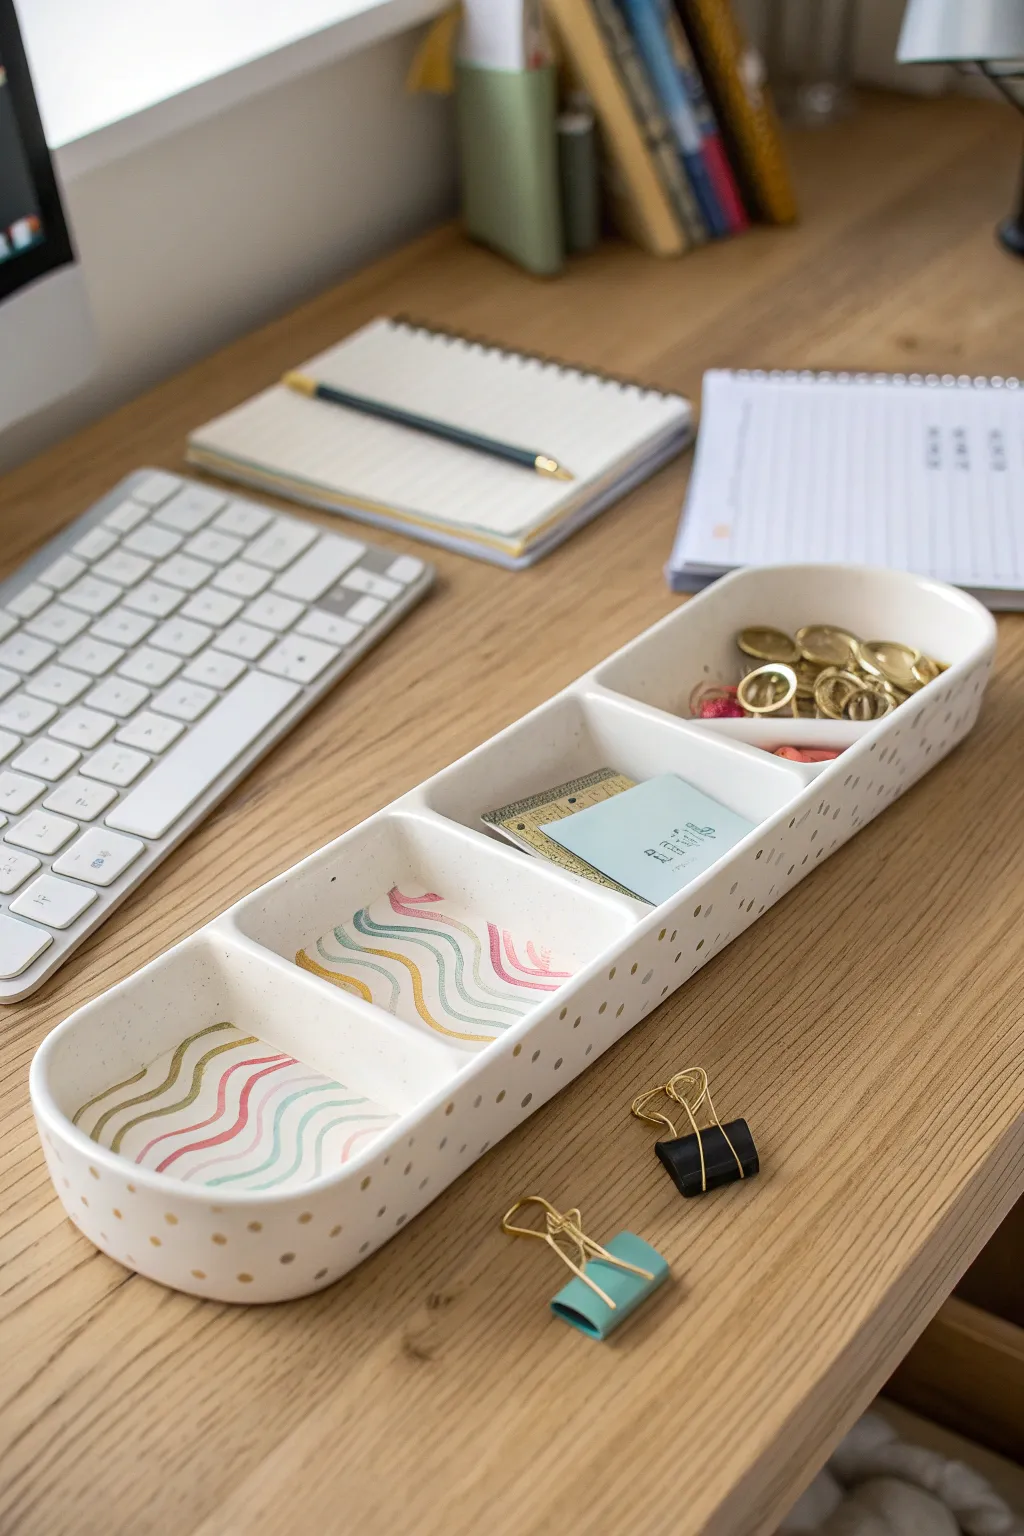
Bring a touch of whimsical organization to your workspace with this long, segmented tray featuring delicate gold polka dots and a wavy interior accent. Its four compartments are perfect for sorting clips, coins, and sticky notes, while the handmade clay finish adds warmth to any desk.
Step-by-Step Guide
Materials
- White polymer clay or air-dry clay (approx. 500g)
- Rolling pin or clay machine
- sharp clay blade or craft knife
- Ruler
- Acrylic paints (pastel pink, teal, yellow, gold)
- Fine detail paintbrush
- Small dotting tool or toothpick
- Gloss or matte varnish (optional)
- Sandpaper (fine grit)
- Oven (if using polymer clay)
Step 1: Shaping the Base and Walls
-
Condition the Clay:
Begin by kneading your white clay until it is soft, pliable, and free of cracks. If using polymer clay, spend extra time ensuring it’s fully conditioned to prevent brittleness later. -
Roll the Slab:
Roll out a large slab of clay to an even thickness of about 1/4 inch (6mm). This sturdy thickness will serve as the base and walls of your tray. -
Cut the Base:
Using your ruler and blade, cut a long rectangle for the base. A good size is approximately 10-12 inches long by 3 inches wide. Round off the four corners gently with your craft knife. -
Create the Wall Strip:
Cut a long strip of clay from your remaining slab, about 1.5 inches tall. The length needs to be slightly longer than the perimeter of your base rectangle. -
Attach the Walls:
Wrap the long strip around the edge of the base. Score the contact points (creating texture) and add a little liquid clay or water (for air-dry) to bond them. Smooth the seam where the strip ends meet, blending it invisibly. -
Blend the Seams:
Use a modeling tool or your finger to smooth the clay where the wall meets the base, both inside and outside. This ensures the tray is watertight and structurally sound. -
Create Dividers:
Cut three rectangular pieces to fit the width inside the tray. These will create the four compartments. Space them evenly inside the tray. -
Secure the Dividers:
Score the edges of the dividers and the corresponding spots on the interior walls. Press them into place and blend the clay seams completely so they look integral to the piece. -
Smooth the Edges:
Run your finger along the top rim of the tray and dividers to round them off gently. Look for any fingerprints and smooth them away with a tiny bit of baby oil or water.
Use a Template
Cut a paper template for the base rectangle first. Use this same template to measure the exact length of clay strip needed for the walls.
Step 2: Design & Finishing
-
Bake or Dry:
If using polymer clay, bake according to package instructions (usually 275°F/135°C for 15-30 mins). For air-dry clay, let it dry completely for 24-48 hours until hard. -
Sand for Perfection:
Once fully cured or dry, use fine-grit sandpaper to buff away any rough spots on the rim or outside surface. Wipe away dust with a damp cloth. -
Paint the Waves:
Inside the first two compartments, paint delicate wavy lines using your fine brush. Use pastel pink, teal, and yellow, alternating the colors to create a playful rhythm. Leave the other compartments plain white for contrast. -
Add Polka Dots:
Using a dotting tool or the dull end of a toothpick, dip into metallic gold paint. Apply small, random dots all over the exterior walls of the tray for a chic finish. -
Dry the Patterns:
Allow the paint to dry completely. Acrylics dry fast, but give it an hour to be safe so you don’t smudge your work. -
Seal the Tray:
Apply a coat of varnish over the entire piece to protect the paint and give the clay a finished ceramic look. Matte varnish looks very modern, while gloss adds a porcelain shine.
Sagging Walls?
If the long walls bow inward before baking, place balls of crumpled foil or parchment paper inside the compartments to support the shape while it cures.
Place your new organizer on your desk and enjoy the satisfaction of a tidy, handmade workspace
Character Calendar Block Buddy
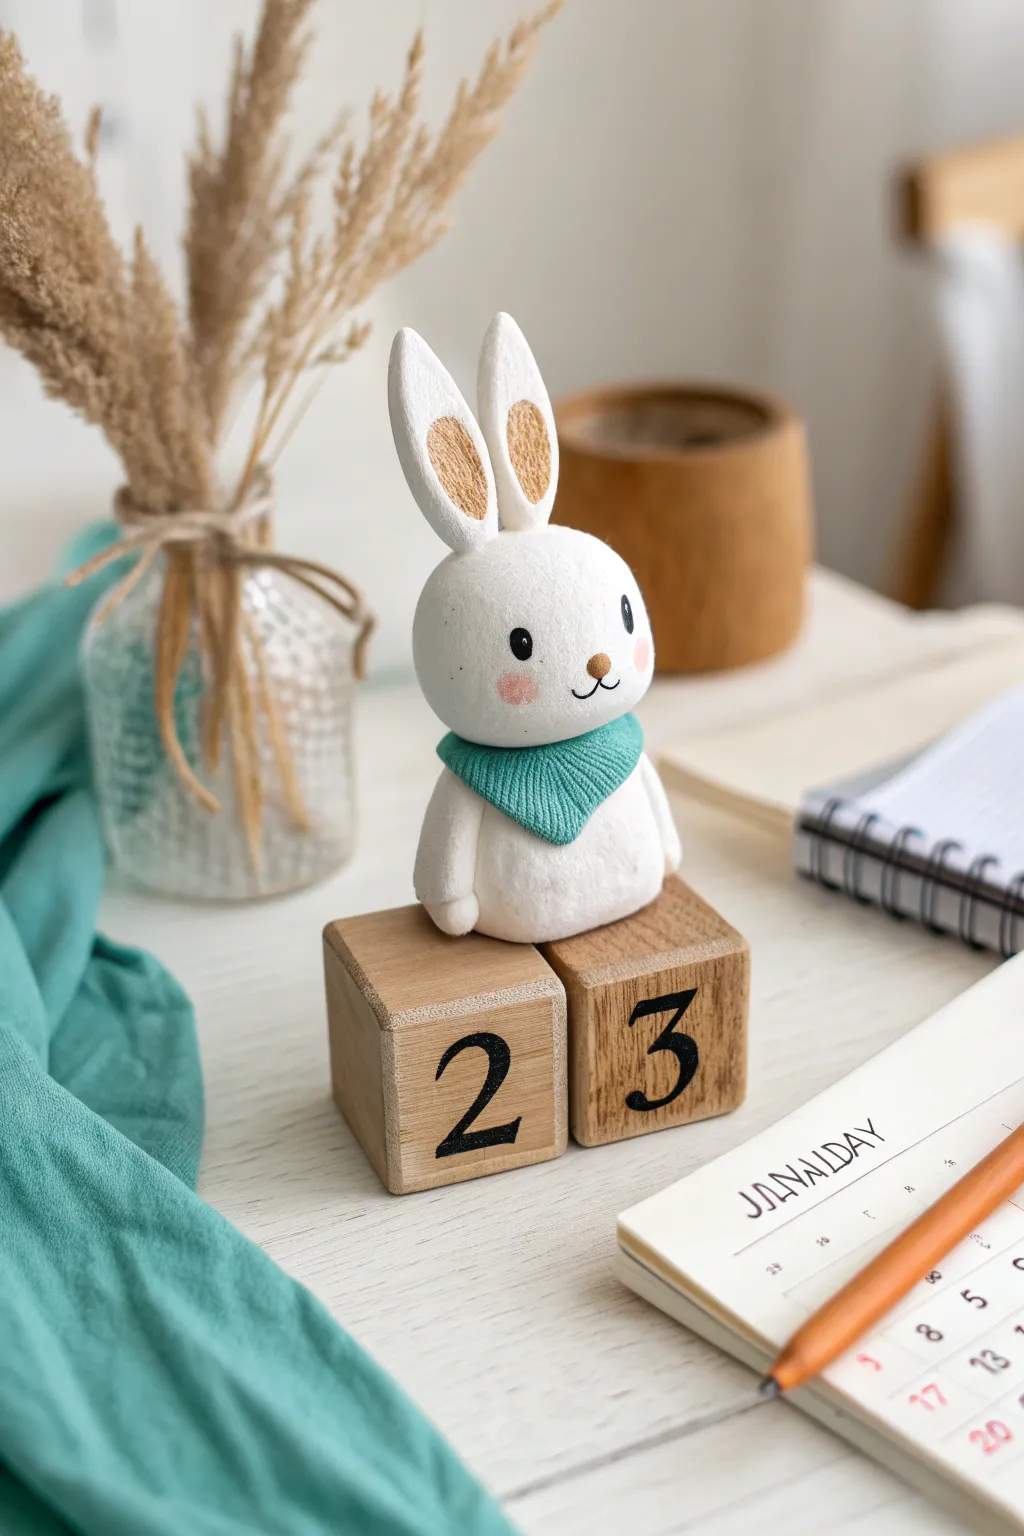
Transform simple wooden blocks into a charming desk companion with this adorable clay bunny tutorial. This functional figurine serves as both decor and a date keeper, featuring a textured teal scarf and a sweet, minimalist expression.
Step-by-Step
Materials
- White polymer clay (approx. 2oz)
- Teal or aqua polymer clay (small amount)
- Set of two blank wooden cubes (approx. 1.5 inches)
- Black acrylic paint
- Pink chalk pastel or blush
- Needle tool or toothpick
- Small ball tool
- Rolling pin
- Fine-grit sandpaper
- Super glue or strong craft adhesive
- Matte varnish (optional)
- Small paintbrush
Step 1: Sculpting the Bunny Body
-
Form the base:
Start by conditioning your white polymer clay until it is soft and pliable. Roll a large ball for the head and a slightly smaller, more oval-shaped portion for the body. Gently flatten the bottom of the body piece so it will sit flush on the wooden blocks later. -
Connect head and body:
Press the head firmly onto the body. To ensure a strong bond, you can insert a small piece of toothpick or wire between the two parts as an internal armature. -
Shape the ears:
Roll two medium-sized teardrop shapes from white clay. Flatten them slightly with your thumb to create the ear shape. Use a small ball tool to create an indentation in the center of each ear for the inner ear detail. -
Add texture to ears:
Take a very small amount of beige or light brown clay (or mix white with a speck of brown). Press this thin layer into the indentations you made in the ears. Use a needle tool to stipple this inner area, creating a fuzzy, fur-like texture. -
Attach the ears:
Position the ears on top of the head, blending the clay at the base slightly with a sculpting tool so they look seamless. I like to tilt them slightly for a more curious expression. -
Add arms:
Roll two small snakes of white clay for the arms. Attach them vertically along the sides of the body, curving them slightly forward so they rest naturally.
Date Logic Tip
To display every date (01-31), paint block one with: 0, 1, 2, 3, 4, 5. Paint block two with: 0, 1, 2, 6, 7, 8. The 6 doubles as a 9 when flipped
Step 2: Accessories and Details
-
Create the scarf:
Roll out a thin sheet of teal or aqua clay. Cut a triangular shape large enough to wrap around the bunny’s neck. -
Texture the fabric:
Before attaching, gently press a piece of fabric, mesh, or a needle tool repeatedly onto the clay triangle to mimic a knitted rib texture. The more detail here, the cozier it looks. -
Dress the bunny:
Wrap the textured triangle around the neck, positioning the point of the triangle at the front like a bandana. Smooth the seams at the back of the neck. -
Sculpt the face:
For the nose, roll a tiny ball of brown clay and press it into the center of the face. Use a needle tool to gently impress a small ‘Y’ shape beneath it for the mouth. -
Rosy cheeks:
Before baking, use a soft brush to apply a tiny amount of shaved pink chalk pastel or cosmetic blush to the cheek area. This bonds with the raw clay for a soft, airbrushed look. -
Bake the figurine:
Bake the bunny according to your clay manufacturer’s instructions (usually 275°F for 15-30 minutes). Let it cool completely.
Fixing Clay Smudges
If you get lint or fingerprints on your raw white clay, dip a Q-tip in a tiny bit of rubbing alcohol or acetone and gently wipe the surface smooth before baking.
Step 3: Finishing the Calendar
-
Prep the blocks:
While the clay cools, sand your wooden cubes lightly to ensure they are smooth. Wipe away any dust with a damp cloth. -
Paint the numbers:
Using black acrylic paint and a fine brush, carefully paint the numbers on the faces of the blocks. A stencil can help if you want perfectly uniform digits. -
Paint the eyes:
Once the bunny is cool, use the handle end of a paintbrush dipped in black paint to dot on the eyes widely apart. Add tiny white reflection dots once the black is dry. -
Assembly:
Arrange the blocks side-by-side. Apply a strong adhesive to the bottom of the bunny and press it firmly onto the center seam where the two blocks meet so it sits securely on top. -
Seal (Optional):
For longevity, brush a coat of matte varnish over the clay parts to protect the surface from dust and scratches.
Enjoy changing the date each morning with your new little desk friend
Cute Page Holder Thumb Rest
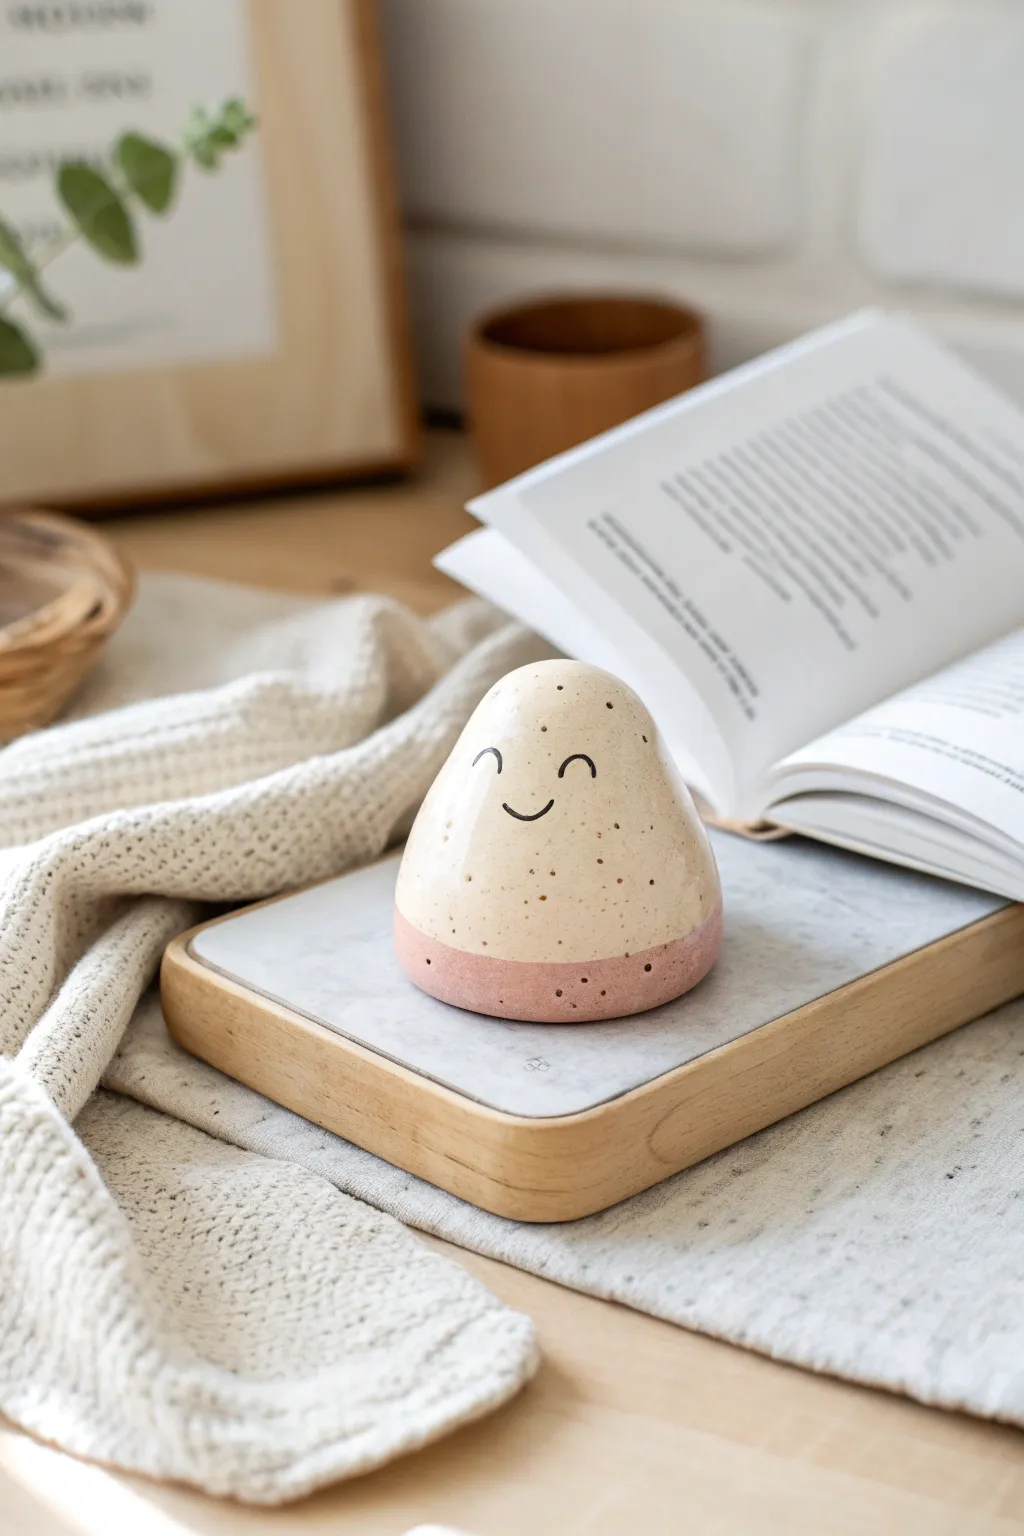
Keep your favorite novels sitting open with this adorable, egg-shaped ceramic friend. Featuring a gentle speckled cream finish atop a textured dusty pink base, this cheerful minimalist weight adds joy to any reading nook.
How-To Guide
Materials
- Polymer clay (white/cream and terracotta/dusty pink)
- Black acrylic paint
- Fine-point paintbrush or toothpick
- Old toothbrush (for speckling)
- Brown acrylic paint (watered down)
- Gloss or matte varnish (optional)
- Sandpaper (fine grit)
- Oven for baking
Step 1: Shaping the Base Form
-
Condition the clay:
Start by warming up your cream-colored polymer clay in your hands. Knead it thoroughly until it is soft, pliable, and free of any air bubbles. -
Form the main shape:
Roll the clay into a smooth ball about the size of a tangerine. Then, gently taper the top half to create a rounded cone or egg-like shape with a slightly flattened bottom. -
Check stability:
Press the bottom of your shape firmly onto your work surface. Give it a gentle nudge to ensure it is heavy enough and stable enough to sit flat without wobbling. -
Prepare the colored base:
Condition a smaller amount of the terracotta or dusty pink clay. Roll this into a flat, even sheet, roughly 3-4mm thick. -
Cut the base circle:
Use a round cutter or shape the pink clay by hand into a disc that matches the diameter of your cream cone’s bottom.
Weight It Down
For a truly functional page holder, ball up some aluminum foil around a heavy metal washer or stone, then wrap your clay around that core to add significant weight.
Step 2: Assembly and Texture
-
Attach the two parts:
Place the cream cone onto the pink clay disc. Use your thumb to gently smooth the seam where the two colors meet, blending them slightly or keeping a distinct line depending on your preference. -
Shape the transition:
I like to gently press the pink clay up the sides of the white clay just a little, creating a dipped look about a quarter of the way up the form. -
Add surface texture:
Take a stiff-bristled brush or a balled-up piece of foil and gently tap it all over the surface of the clay. This removes fingerprints and gives it a stone-like, organic texture. -
Smooth the shape:
Give the entire piece a final check. If the tapping distorted the happy little cone shape, gently reshape it with your palms. -
Bake the clay:
Follow the manufacturer’s instructions for your specific brand of polymer clay. Bake the piece in the oven and let it cool completely before moving to the painting stage.
Uh Oh, Fingerprints!
If you notice fingerprints before baking, lightly brush the clay with a little baby oil or cornstarch to smooth them out without ruining the shape.
Step 3: Painting the Details
-
Prepare the speckle mix:
Mix a small amount of brown acrylic paint with water until it has an inky consistency. You want it wet enough to flick easily. -
Apply the speckles:
Dip an old toothbrush into the brown paint wash. Run your thumb over the bristles to flick tiny droplets of paint onto the cured clay, mimicking a ceramic glaze effect. -
Let the speckles dry:
Wait for the paint splatters to dry completely. This usually takes about 10–15 minutes. -
Paint the face:
Using a very fine detail brush or a toothpick dipped in black acrylic paint, carefully draw two small, curved semicircles for eyes and a wider U-shape for the smile. -
Add dimples:
For extra cuteness, place a tiny dot at each end of the smile line. -
Seal the project:
Once all paint is perfectly dry, brush on a coat of matte or satin varnish to protect the surface and seal the paint.
Now you have a charming little desk buddy ready to assist with your next reading session