When you want something calming and creative, simple clay projects are honestly the best kind of studio therapy. These ideas are made for adults who want chic, useful pieces using air dry clay or polymer clay—no fancy sculpting skills required.
Minimal Trinket Dish

This minimal trinket dish embraces the beauty of imperfection with its organic edges and charming speckled glaze effect. It is the perfect size for keeping your favorite everyday rings safe and looks beautiful on any bedside table.
Step-by-Step Tutorial
Materials
- Air-dry clay (white or cream)
- Small rolling pin
- Small bowl (for use as a mold)
- Plastic wrap
- Sponge
- Water cups
- Sandpaper (fine grit)
- Acrylic paint (creamy white/beige)
- Acrylic paint (brown/burnt umber)
- Old toothbrush
- Glossy varnish or sealant
- Paintbrushes
- Craft knife
Step 1: Shaping the Clay
-
Prepare the clay:
Start by taking a handful of air-dry clay and kneading it in your hands until it becomes soft, pliable, and free of cracks. -
Roll it out:
On a clean, flat surface, roll the clay out into an even slab. Aim for a thickness of about 1/4 inch—too thin and it might crack, too thick and it will look chunky. -
Cut the circle:
Place a bowl or large mug upside down on your clay as a guide. Use your craft knife to trace around it, cutting out a perfect circle. -
Prepare the mold:
Take a small bowl that has a gentle curve (like a cereal or soup bowl) and line the inside with plastic wrap. This prevents the clay from sticking as it dries. -
Form the dish:
Gently lift your clay circle and place it inside the lined bowl. Press it down softly so it takes on the curved shape of the bowl bottom. -
Refine the rim:
Use a damp sponge or your wet fingertip to smooth out the cut edge of the clay. I find this step crucial for getting that professional finish. -
Dry partially:
Let the clay sit in the mold for about 24 hours until it holds its shape but isn’t bone dry. -
Finish drying:
Remove the dish from the bowl and plastic wrap. Place it upside down on a drying rack to let the bottom dry completely, usually another 24-48 hours.
Step 2: Finishing and Painting
-
Sand until smooth:
Once fully cured, use fine-grit sandpaper to smooth any bumps on the surface or rough spots on the rim. Wipe away the dust with a slightly damp cloth. -
Base coat:
Paint the entire dish—top and bottom—with your creamy white or beige acrylic paint. You may need two coats to get solid, opaque coverage. -
Create the rim detail:
Mix a small amount of water into your brown paint to create a wash. Use a fine brush to unevenly dab this diluted brown along the very edge of the rim, mimicking exposed stoneware. -
Prepare the splatter:
Dilute a bit more brown paint with water until it is engagingly runny, like ink. -
Add speckles:
Dip an old toothbrush into the brown wash. Hold it over the dish and run your thumb across the bristles to flick tiny specks onto the surface. Practice on paper first to control the spray. -
Let paint dry:
Allow the paint to dry completely. The splatter dries quickly, but the thick base coat might take an hour or so. -
Seal the piece:
Apply a generous coat of glossy varnish. This gives the piece a ceramic-like sheen and protects the paint from scratching. -
Final cure:
Let the varnish cure according to the bottle’s instructions before placing any jewelry inside.
Clean Edges Only
When sanding the rim, use a circular motion rather than back-and-forth. This prevents creating flat spots and keeps the edge looking organic and rounded.
Gold Rim Upgrade
Instead of the brown wash on the rim, use liquid gold leaf paint or a gold leaf pen. Painting just the very edge adds a touch of modern luxury to the rustic look.
Enjoy styling your new handmade dish with your favorite gold accessories or give it as a thoughtful gift


Simple Ring Cone Holder
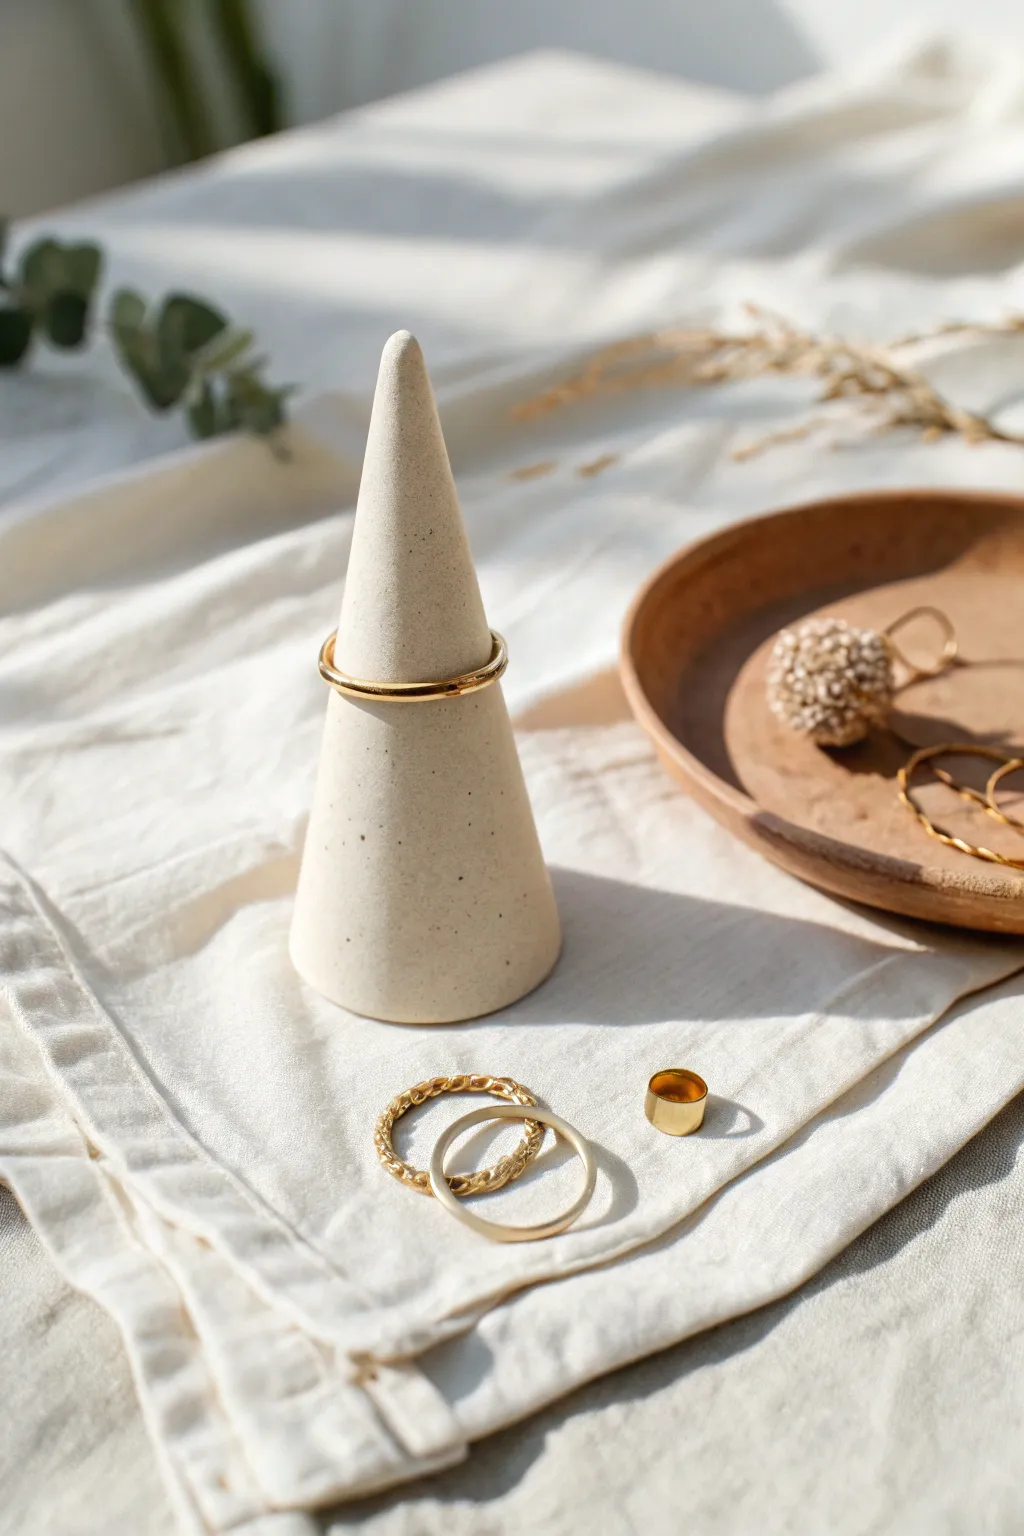
These elegant conical ring holders are the perfect blend of modern minimalism and functional decor. With a subtle speckled finish that mimics high-end ceramic, this project is surprisingly simple to create at home.
How-To Guide
Materials
- White polymer clay (approx. 2oz per cone)
- Black pepper or dried coffee grounds (for speckles)
- Roller or acrylic brayer
- Flexible cutting blade or craft knife
- Smooth work surface (ceramic tile or glass)
- Sandpaper (fine grit, e.g., 400 and 800)
- Oven (for baking polymer clay)
Step 1: Preparation & Mixing
-
Condition the Clay:
Start by warming up your white polymer clay in your hands. Knead it thoroughly until it is soft, pliable, and free of any cracks. -
Create the Speckled Effect:
Flatten the clay slightly and sprinkle a very small pinch of ground black pepper or dried coffee grounds onto the surface. Fold the clay over to trap the particles inside. -
Mix Uniformly:
Continue kneading and folding the clay to distribute the ‘speckles’ evenly throughout the white base. I prefer to stop when the distribution looks random but balanced. -
Form a Smooth Ball:
Roll the mixed clay between your palms to create a smooth, tight sphere with no visible seams.
Uneven Base?
If your cone wobbles after baking, rub the bottom firmly against a sheet of coarse sandpaper on a flat table until it sits flush.
Step 2: Shaping the Cone
-
Initial Cone Shape:
Place the ball on your work surface. Using the flat of your palm, begin rolling the clay back and forth, applying slightly more pressure on one side to start forming a tapered shape. -
Refine the Point:
Continue rolling, focusing pressure on the top end to create a sharper point while leaving the base wide and sturdy. -
Flatten the Base:
Once you have a cone shape, pick it up and gently tap the wide bottom against your work surface to create a flat, stable base. Ensure it stands perfectly straight without wobbling. -
Smoothing the Sides:
Inspect the sides for fingerprints. Gently roll the cone on the sleek surface or lightly stroke it with your finger to smooth out any imperfections. -
Check Dimensions:
Test the height and width. Aim for a cone about 3-4 inches tall with a base width of about 1.5 inches for stability.
Step 3: Baking & Finishing
-
Prepare for Baking:
Double-check that the base is flat one last time. Place the cone upright on a baking sheet lined with parchment paper. -
Bake the Clay:
Bake the customized cones according to your clay package instructions (usually 275°F or 135°C for 15-30 minutes per 1/4 inch of thickness). -
Cool Completely:
Remove from the oven and let the cone cool down entirely before handling. Polymer clay is fragile when hot. -
Initial Sanding:
Once cool, take your coarser grit sandpaper (around 400 grit) to smooth out any tiny bumps or fingerprints. Sanding under a trickle of water helps keep dust down. -
Final Polish:
Switch to a finer grit sandpaper (800 grit or higher) to buff the surface to a velvety matte finish. -
Clean Up:
Wipe the finished cone with a damp cloth to remove any sanding residue and reveal the speckled pattern clearly.
Gold Accents
For a luxe touch, dip the very tip of the cone into liquid gold leaf or paint a thin gold rim around the bottom edge.
Place your favorite rings on your new modern display for a stylish bedside accessory


Easy Coaster Set With Texture

These nature-inspired coasters bring an organic warmth to your table with their raised botanical patterns and earthy tones. It’s a surprisingly simple project that relies on basic incising techniques to create sophisticated, functional art pieces.
Step-by-Step Tutorial
Materials
- Air-dry clay (terracotta or reddish-brown tone)
- Circle cutter or a round bowl/jar to trace
- Rolling pin
- Two wooden slats or rulers (approx. 1/4 inch thick)
- Small carving tools or a loop tool
- Pointed detailing tool or needle tool
- Sponge and water
- Fine-grit sandpaper
- Clear matte acrylic sealer or varnish
- Parchment paper or canvas mat
Step 1: Preparation & Shaping
-
Prepare the workspace:
Lay down your canvas mat or parchment paper to prevent sticking. Place your two wooden slats or rulers parallel to each other, slightly wider apart than your intended coaster size; these will act as depth guides. -
Roll the slab:
Take a generous ball of clay and place it between the guides. Using your rolling pin, roll the clay out until the pin rests evenly on both slats, ensuring a perfectly uniform 1/4 inch thickness across the slab. -
Smooth the surface:
Before cutting, gently wipe the surface of the clay with a damp sponge. This removes any canvas textures or fingerprints and gives you a pristine canvas for carving later. -
Cut the circles:
Using a circle cutter or by tracing around a bowl with a needle tool, cut out four to six circles. Remove the excess clay and set it aside for future use. -
Refine the edges:
Dip your finger in a little water and run it smoothly around the cut edge of each circle to round off the sharpness. Compressing these edges now helps prevent cracking later.
Warped Coasters?
If your coasters curl while drying, slightly dampen the concave side with a sponge, wrap them in plastic, and place them under a heavy stack of books for 24 hours to flatten.
Step 2: Carving the Design
-
Mark the stem:
Lightly drag your needle tool across the circle to create a central curved line. This will be the main vein of your leaf design. Keep it graceful and not too perfectly straight. -
Outline the leaves:
Sketch the outline of the leaf shapes extending from the central stem. I like to keep these initial lines very faint so I can correct them if the spacing looks off. -
Carve the negative space:
Using a small loop tool, begin carving away the clay *outside* of your leaf shapes. You want to lower the background level so the leaves appear raised in relief. -
add vein details:
Take your pointed detailing tool and gently incise deeper lines down the center of each individual leaf segment to represent the veins. -
Texture the leaves:
For added visual interest, use the needle tool to scratch tiny, angled lines radiating from the veins of the leaves. This cross-hatching adds that lovely textured look seen in the reference. -
Clean up crumbs:
Use a soft, dry paintbrush to sweep away the little clay crumbs created by the carving process. Avoid using water here, as it might soften your crisp carving lines.
Step 3: Finishing Touches
-
Initial drying:
Place the coasters on a wire rack or a clean sheet of parchment paper. To keep them perfectly flat, I recommend flipping them over every few hours during the first day of drying. -
Weighted drying:
Once the clay is leather-hard (firm but still cool to the touch), place a lightweight board and a book on top of them. This creates pressure that prevents the edges from curling up as the moisture evaporates. -
Sand the imperfections:
When completely bone dry, use fine-grit sandpaper to smooth any rough spots on the rim or the back. Be gentle around your carved details to preserve the texture. -
Wipe down:
Use a slightly damp cloth to remove all sanding dust. The surface must be totally clean before sealing. -
Apply sealer:
Brush on a thin coat of clear matte acrylic sealer. This protects the clay from moisture, which is essential for coasters. -
Final coat:
Allow the first coat to dry completely, then apply a second coat to ensure durability against hot mugs and condensation.
Color Wash
Mix a tiny bit of dark brown acrylic paint with water. Brush it over the dry texture and wipe it back immediately with a cloth to highlight the carved grooves.
Stack your new set on the coffee table and enjoy the handcrafted charm they add to your daily tea ritual


Modern Incense Holder Arch
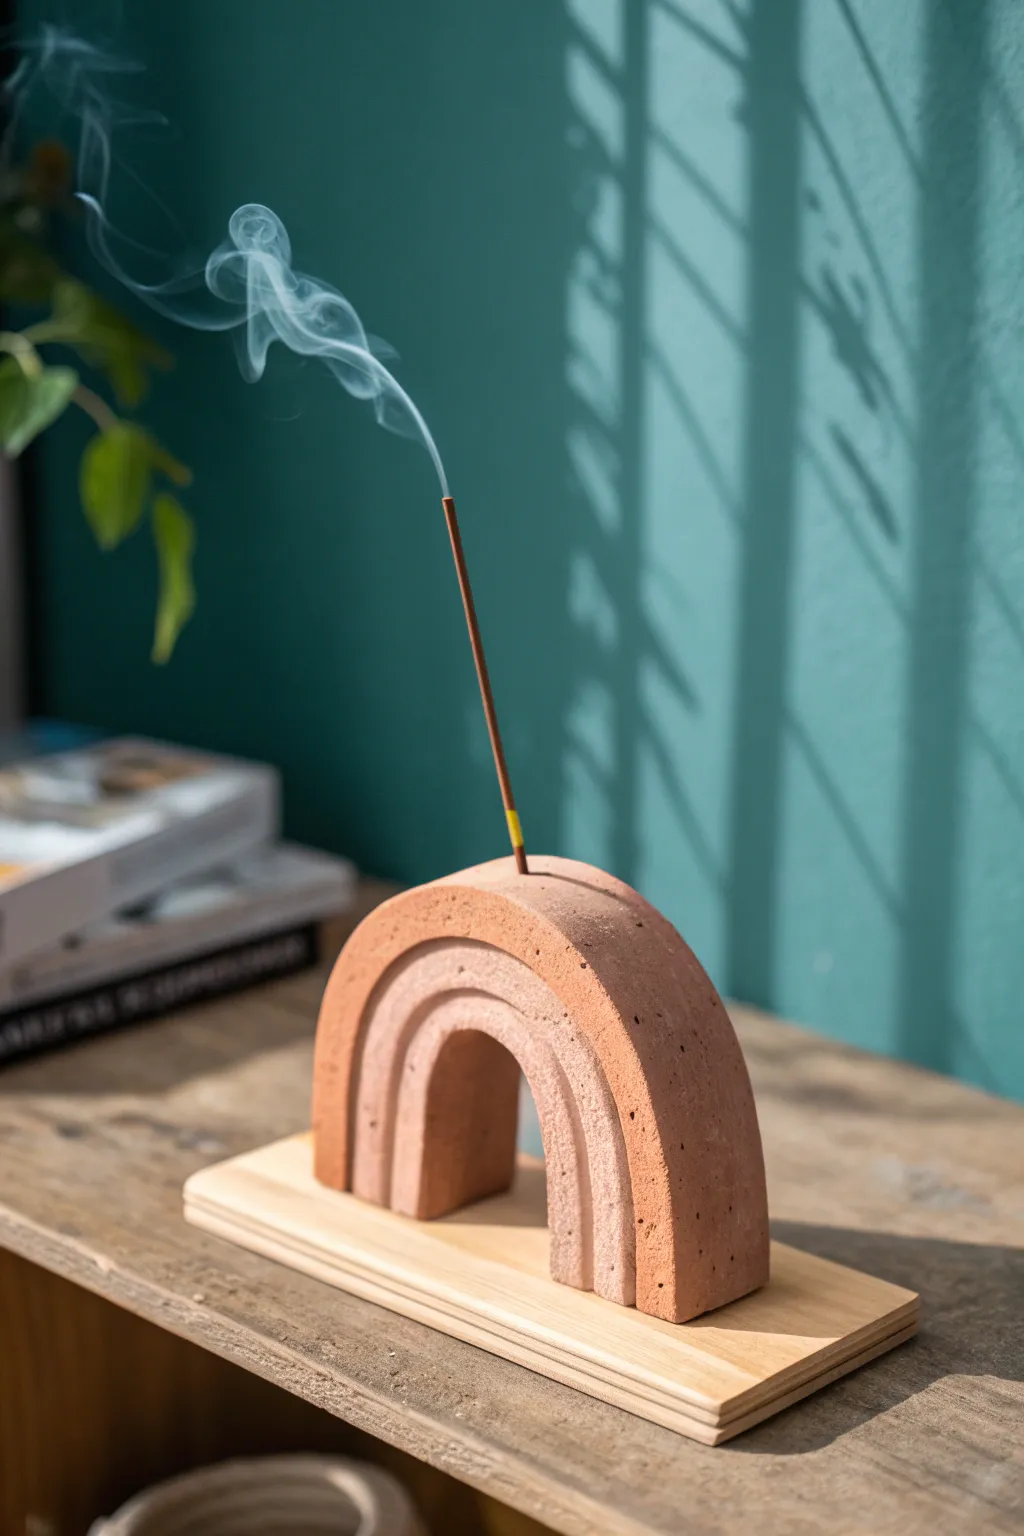
Capture the warmth of desert hues with this modern incense holder that doubles as sculptural decor. The minimalist arch design features three distinct layers of terracotta tones, creating a calming focal point perfect for your daily mindfulness rituals.
Detailed Instructions
Materials
- Air-dry clay (white or terracotta)
- Acrylic paints (burnt sienna, white, beige)
- Rectangle wooden base (approx. 4″ x 8″)
- Rolling pin
- Sharp craft knife
- Sandpaper (fine grit)
- Strong craft glue (E6000 or similar)
- Small drill bit or needle tool
- Ruler
- Cardstock or paper for templates
Step 1: Shaping the Arches
-
Create templates:
Begin by drawing three arches on cardstock. Each arch should be the same depth (about 1 inch) but decrease in overall size so they can nest inside each other. The largest arch will form the outer shell, and the smallest will be the center. -
Color the clay:
If using white clay, separate it into three distinct balls. Knead acrylic paint directly into each ball to create three gradient shades: a deep terracotta, a medium peach, and a light beige. -
Roll the first slab:
For the largest outer arch, I like to roll the darkest clay into a slab that is roughly 3/4 inch thick. Thickness is key here for stability. -
Cut the outer shape:
Place your largest template on the clay slab and cut around it cleanly with a sharp craft knife. Smooth the cut edges immediately with a little water on your finger. -
Form the middle arch:
Repeat the rolling process with the medium-shade clay. Cut using the middle-sized template, ensuring the thickness matches the first piece perfectly. -
Create the center piece:
Roll out the lightest shade of clay and cut the smallest arch. This central piece needs to be solid enough to support the incense stick. -
Create the incense hole:
While the clay is still wet, take the largest outer arch. Locate the exact center of the top curve. -
Pierce the clay:
Use an incense stick or a tool of similar diameter to press a hole straight down into the top center of the outer arch. Ensure it is deep enough to hold the stick securely but doesn’t go all the way through. -
Test the fit:
Gently arrange the three arches standing up to ensure they nest together well. Do not glue them yet; just check the sizing. -
Dry completely:
Lay the pieces flat to dry on a wire rack or parchment paper. This usually takes 24-48 hours depending on humidity; flip them occasionally to prevent warping.
Clean Cuts Only
If your clay drags while cutting the arches, let the slab sit for 15 minutes to firm up slightly, or wipe your blade with a tiny bit of oil.
Step 2: Assembly and Finishing
-
Sand for smoothness:
Once fully dry, lightly sand any rough edges or uneven surfaces. Pay special attention to the flat bottoms where they will sit on the wood. -
Add texture (optional):
If you prefer the speckled look shown in the image, dismantle the stack and use an old toothbrush to flick diluted dark brown paint lightly over the rounded surfaces. -
Prepare the base:
Sand your wooden rectangle base until smooth. You can leave it raw for a Scandi look or seal it with a clear matte varnish. -
Glue the center:
Apply strong craft glue to the bottom of the smallest (lightest) arch. Position it purely in the center of your wooden board and press down firmly. -
Attach the remaining layers:
Apply glue to the bottom of the middle arch and place it over the center one. Repeat with the largest outer arch. You can add a tiny dab of glue between the arches where they touch for extra stability. -
Clean up:
Wipe away any excess glue immediately throughout the assembly process before it hardens. -
Final cure:
Allow the adhesive to cure fully according to the manufacturer’s instructions before inserting your first incense stick.
Terrazzo Twist
Mix tiny chunks of dried, colored clay into your wet clay before rolling. Once sanded, these chips will reveal a beautiful flush terrazzo pattern.
Light your favorite scent and watch the smoke drift beautifully from your handmade sculpture

The Complete Guide to Pottery Troubleshooting
Uncover the most common ceramic mistakes—from cracking clay to failed glazes—and learn how to fix them fast.
Minimal Taper Candle Holders
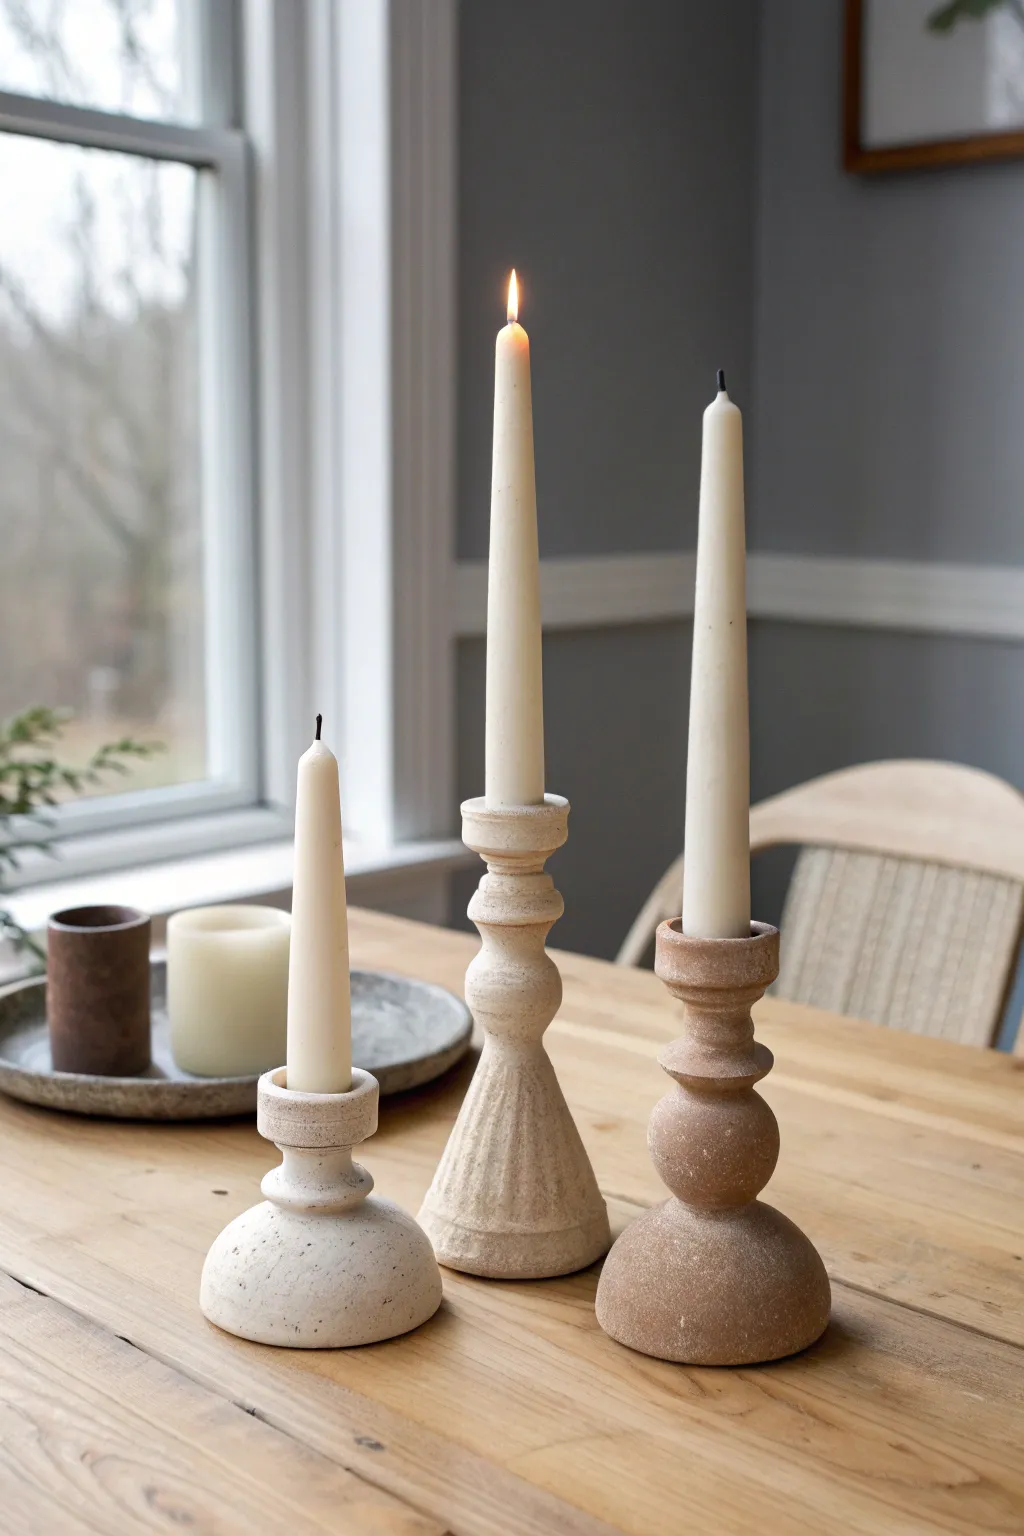
Create a cozy, sculptural centerpiece with these textured ceramic-style candle holders featuring varied heights and organic silhouettes. This project focuses on building distinct geometric shapes—cones, spheres, and cylinders—that act as classic bases for elegant taper candles.
How-To Guide
Materials
- Air-dry clay or polymer clay (white or terracota)
- Rolling pin
- Clay cutting tool or wire cutter
- Slip (clay and water mixture) or liquid clay adhesive
- Standard taper candle (for sizing)
- Sponge and bowl of water
- Pottery carving tools or a knitting needle
- Acrylic paints (stone gray, beige, antique white)
- Baking soda (optional for texture)
- Fine grit sandpaper
- Matte sealant
Step 1: Shaping the Bases
-
Prepare the Clay:
Begin by conditioning your clay thoroughly until it is pliable and warm. Separate the clay into three unequal portions to create a small, medium, and large holder. -
Form the Short Base:
For the shortest holder (on the left), roll a ball of clay approx 3 inches wide. Gently flatten the bottom so it sits stable, then press down on the top to create a softly rounded, dome-like mound. -
Create the Tall Conical Base:
For the tallest holder (center), take your largest chunk of clay and roll it into a thick cone shape. Tap the base repeatedly on your work surface to flatten it completely, ensuring it stands upright without wobbling. -
Sculpt the Bulbous Base:
For the medium holder (right), form two spheres of clay—one larger for the bottom and a slightly smaller one to stack on top. Flatten the contact points slightly to prepare them for joining later. -
Add Texture to the Tall Base:
Using a carving tool or the side of a knitting needle, press vertical grooves into the conical base. Start from the bottom and drag upward, fading out the lines as you reach the narrow top.
Stay Stable
To prevent tipping, embed a heavy metal washer into the bottom of the base while the clay is still wet. This lowers the center of gravity significantly.
Step 2: Building the Necks
-
Roll the Necks:
Create the decorative neck pieces by rolling out thick coils or cylinders of clay. You will need different shapes: a simple cylinder for the short holder, and bulbous, bead-like shapes for the taller ones. -
Assemble the Short Holder:
Score (scratch) and slip the top of your dome base and the bottom of a short cylinder. Press them together firmly. Smooth the seam with your finger or a tool until the join is invisible. -
Stack the Medium Holder:
Stack your two prepared spheres, using slip between the layers. Add a small clay ring or ‘donut’ shape at the very top to act as the candle cup. -
Construct the Tall Holder:
On top of your textured cone, add a rounded bead shape, then a flattened disc, and finally the candle cup. Check the vertical alignment frequently to ensure the stack doesn’t lean. -
Size the Candle Fit:
Before the clay hardens, gently press the base of a real taper candle into the top of each holder to create the perfectly sized socket. Wiggle it slightly to ensure the hole is just a fraction wider than the candle to account for shrinkage.
Faux Terracotta
Mix burnt orange paint with a tiny drop of brown and baking soda. Sponge it on for an aged terracotta look that mimics high-end pottery studio finds.
Step 3: Finishing and Painting
-
Smooth and Refine:
Dip a sponge in water and gently wipe down all surfaces. This smooths out fingerprints and softens any harsh tool marks on the tall holder’s fluting. -
Dry Completely:
Allow your pieces to dry according to package instructions. Air dry clay may take 24-48 hours; baking clay will need oven time. Rotate them occasionally for even drying. -
Initial Sanding:
Once fully cured, use fine-grit sandpaper to buff away any remaining rough patches, paying attention to the rims of the candle cups. -
Mix Textured Paint:
To achieve the stone-like look in the photo, mix a teaspoon of baking soda into your beige or antique white acrylic paint. This creates a gritty, faux-ceramic finish. -
Apply Base Coat:
Paint the tall and medium holders with a warm beige tone. Use a dabbing motion rather than sweeping strokes to enhance the stone texture. -
Speckle the Short Holder:
Paint the shortest holder a clean, creamy white. Once dry, load a stiff brush with diluted brown paint and flick the bristles to create tiny speckles. -
Weathering Effects:
Dry brush a lighter shade of cream over the raised ridges of the tall fluted holder to make the texture pop. Add subtle darker washes in the crevices. -
Seal:
Protect your work with a coat of matte spray sealant to preserve the chalky, matte aesthetic.
Arrange your new candle trio on a dining table or mantle for an instant touch of artisanal warmth
Tiny Bud Vase
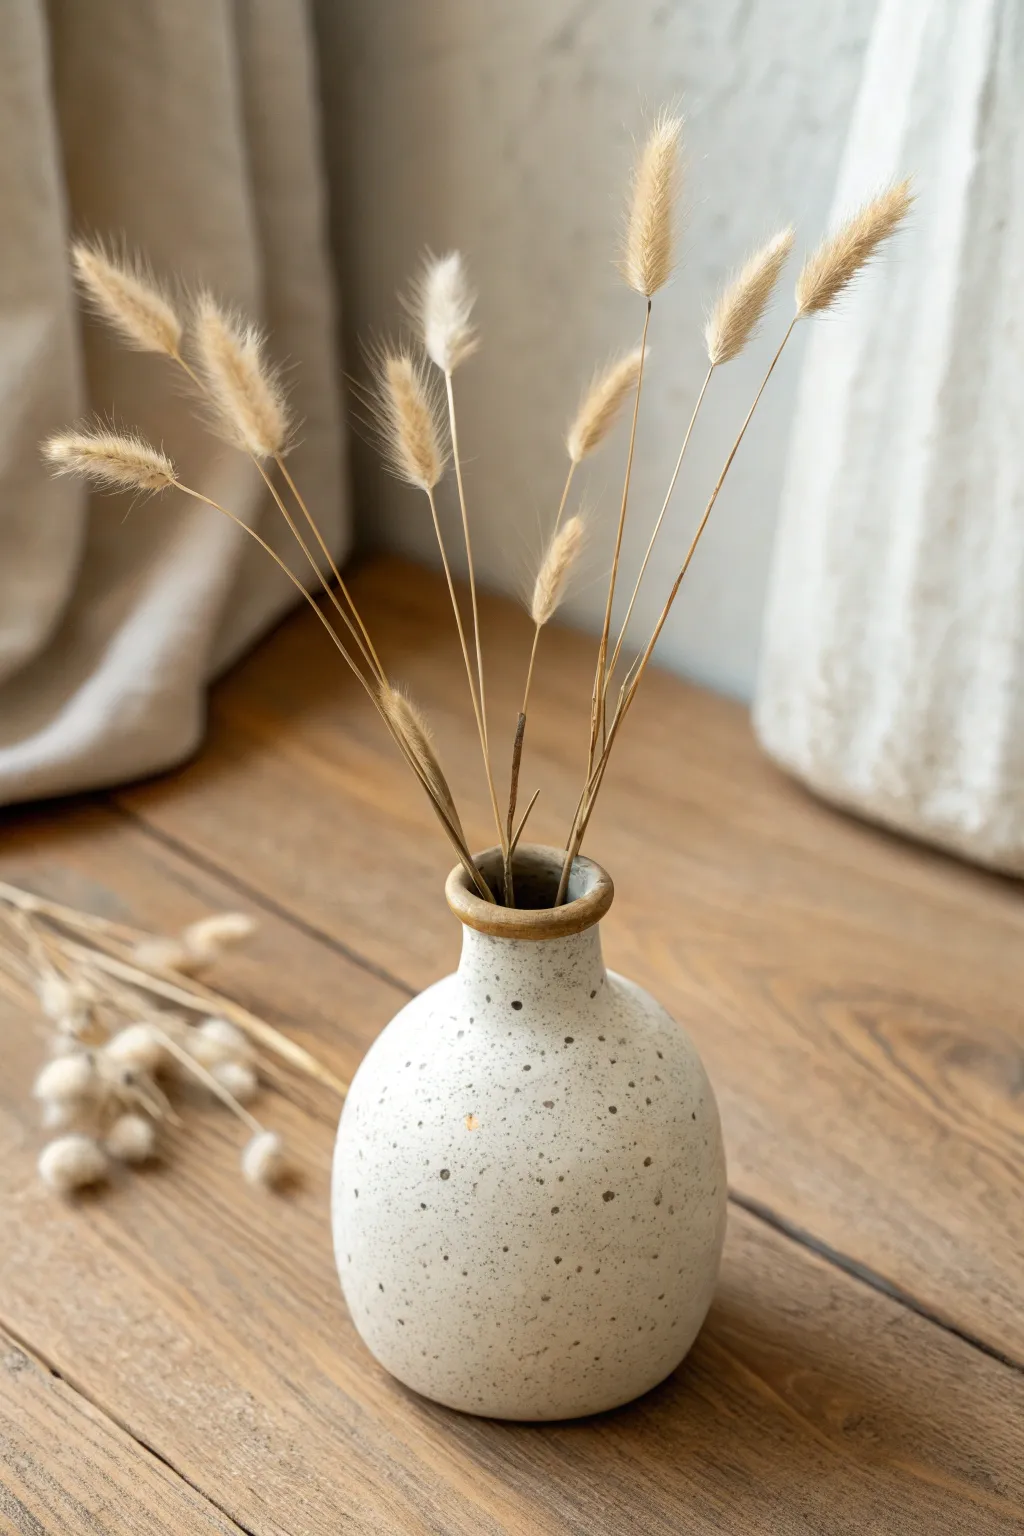
This charming, rustic bud vase features a creamy, speckled finish and a warm, unglazed rim that adds a touch of earthiness. Its bulbous base and narrow neck make it the perfect vessel for displaying a few stems of dried bunny tails or wildflowers.
Step-by-Step Tutorial
Materials
- White stoneware clay or air-dry clay
- Speckled pottery glaze (creamy white with brown flecks)
- Small sponge
- Pottery wheel (optional) or rolling pin
- Wooden modeling tool
- Needle tool
- Cutting wire
- Small paintbrush
- Warm brown underglaze or oxide wash (for the rim)
Step 1: Forming the Base
-
Prepare the Clay:
Start with a ball of clay roughly the size of a tennis ball. Whether wedging for the wheel or preparing for hand-building, ensure the clay is free of air bubbles to prevent cracking later. -
Pinch Pot Method (Option A):
If hand-building, press your thumb into the center of the clay ball, stopping about a half-inch from the bottom. Gently pinch and rotate the clay to open up a bowl shape. -
Shape the Bulb:
Continue pinching the walls, encouraging the belly of the pot to round outwards. Keep the walls even, aiming for about a quarter-inch thickness throughout the body. -
Wheel Throwing (Option B):
If using a wheel, center your clay and open it up. Collar the clay inwards as you pull up to create that distinguishable bulbous bottom shape.
Rim Perfection
When wiping glaze off the rim, rotate the vase on a banding wheel (or lazy susan) while holding a steady sponge against it for a perfectly crisp line.
Step 2: Refining the Neck
-
Collar the Neck:
Gently squeeze the top third of your form inwards to create a narrow neck. If hand-building, you may need to smooth out any small creases that form as you compress the clay. -
Elongate the Spout:
Pull the clay at the very top slightly upward to create a defined vertical neck, roughly one inch high. This provides structural support for tall dried stems. -
Define the Rim:
Using a slightly damp sponge or chamois, round over the lip of the vase. You want a distinct, slightly thickened ring at the top, just like the inspiration image. -
Smooth the Surface:
Run a flexible rib or a smooth stone over the exterior to remove fingerprints. I find this step crucial for getting that professional, sleek finish before firing. -
Dry and Bisque Fire:
Allow the piece to dry slowly to bone dry. If using kiln-fire clay, fire it to bisque temperature (usually cone 04) before proceeding to glazing.
Faux Speckles
Using air-dry clay? Mimic the ceramic look by flicking watered-down brown acrylic paint onto the white base with an old toothbrush.
Step 3: Glazing and Finishing
-
Clean the Bisqueware:
Wipe the fired vase with a damp sponge to remove any kiln dust, which helps the glaze adhere properly. -
Apply the Speckled Glaze:
Dip the vase or brush on a creamy white glaze that contains iron or manganese speckles. Coat the entire exterior and the inside of the neck. -
Wipe the Rim:
Immediately use a damp sponge to carefully wipe the glaze off the very top ring of the rim. You want to expose the raw clay or prepare it for a contrasting color. -
Accent the Rim:
Paint a thin layer of warm brown oxide wash or underglaze onto the exposed rim. This recreates that beautiful toasted caramel ring seen in the photo. -
Final Fire:
Fire the piece again to the glaze’s maturity temperature (often cone 5 or 6 for stoneware). Let it cool completely before arranging your dried florals.
Place your finished vase on a wooden side table and fill it with soft, dried grasses for an instant cozy update


What Really Happens Inside the Kiln
Learn how time and temperature work together inside the kiln to transform clay into durable ceramic.
Simple Succulent Planter
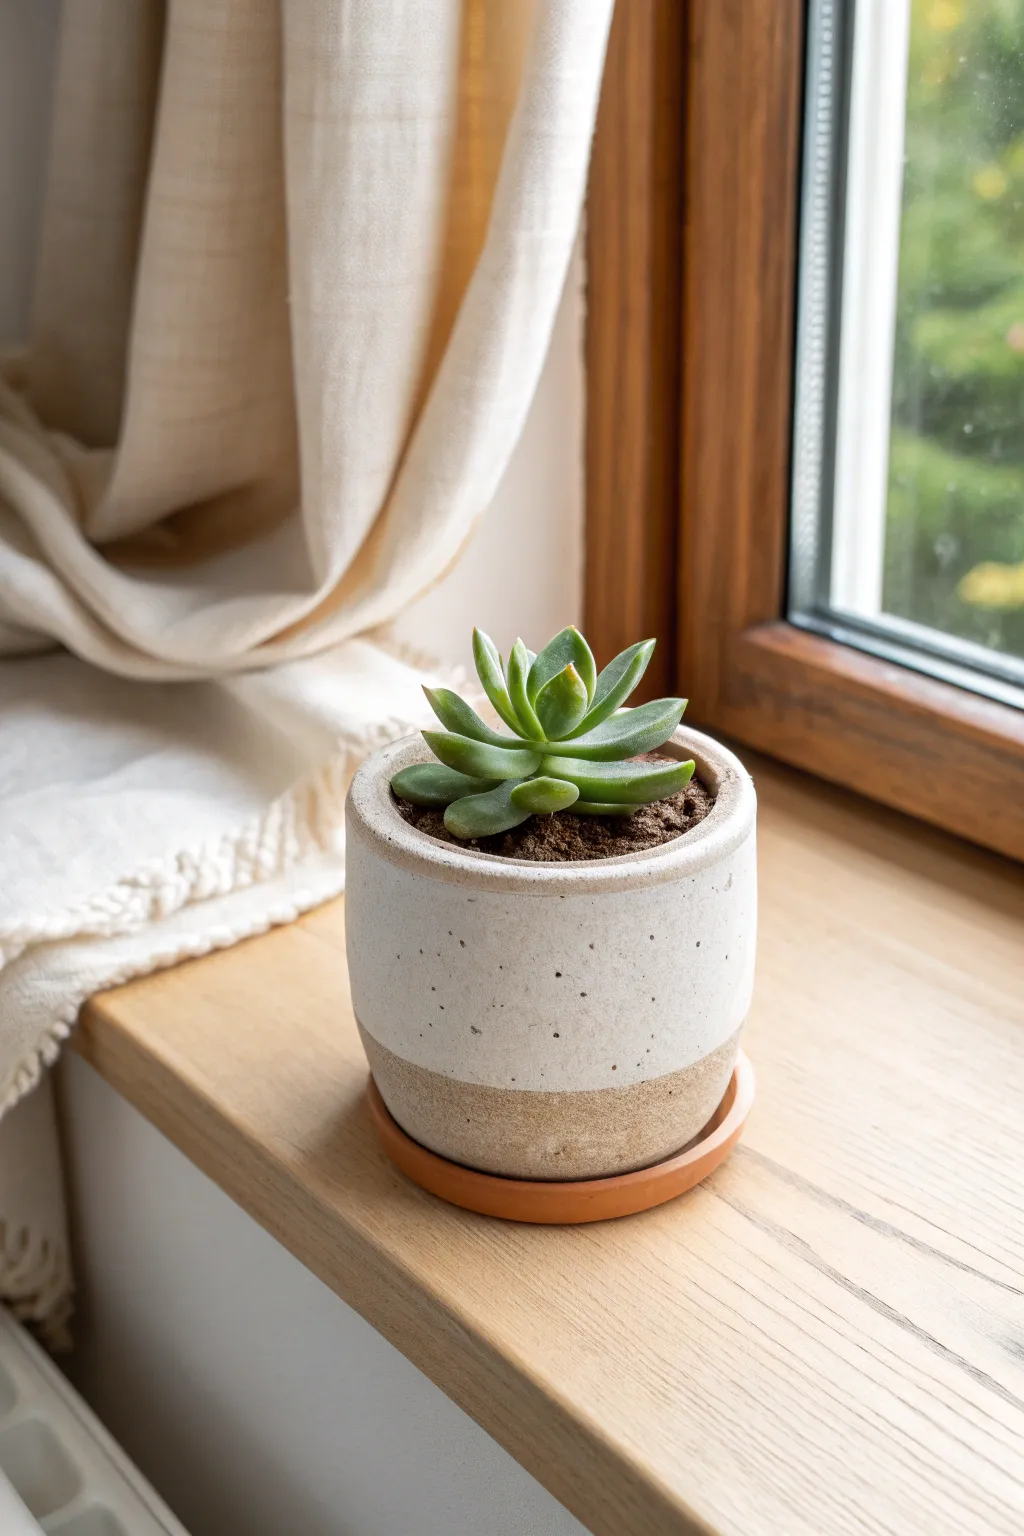
Bring a touch of minimalist charm to your windowsill with this sleek two-tone succulent planter. The design features a raw, sandy-textured base contrasted with a smooth, speckled white glaze that mimics high-end ceramic studio pottery.
Step-by-Step
Materials
- White air-dry clay or polymer clay (oven-bake)
- Small cylindrical mold (like a sturdy glass or metal can)
- Rolling pin
- Potter’s needle tool or craft knife
- Water and a small sponge (for smoothing)
- Sandpaper (fine grit)
- White acrylic paint (matte or satin finish)
- Black acrylic paint (for speckling)
- Stiff bristle brush or old toothbrush
- Soft synthetic paintbrush
- Matte spray sealant or air-dry gloss varnish
- Terracotta colored polymer clay (for the saucer)
- Small circle cutter or jar lid (for the saucer)
Step 1: Shaping the Planter Body
-
Prepare the clay:
Begin by conditioning a large ball of white clay until it is pliable and smooth. If you are using air-dry clay, keep your hands slightly damp to prevent cracking. -
Roll the slab:
Roll out the clay into a long, rectangular slab about 1/4 inch thick. Aim for an even thickness throughout so your pot walls stand straight. -
Cut the rectangle:
Measure the circumference and height of your chosen cylindrical mold. Using a ruler and your knife tool, cut a clean rectangle from the clay slab that matches these dimensions, adding a tiny bit of overlap length for the seam. -
Cut the base:
Cut a separate circle from the remaining clay slab that matches the diameter of your mold for the bottom of the pot. -
Form the cylinder:
Wrap the rectangular clay slab around your mold. Sometimes I like to wrap a piece of parchment paper around the mold first to make removal easier later. -
Join the seam:
Where the two ends of the rectangle meet, score the edges with your needle tool and add a drop of water (or liquid clay texturer). Press them firmly together and smooth the seam with your finger or a tool until it is invisible. -
Attach the base:
Place the cylinder on top of the circular base piece. Blend the clay from the outside of the base up into the walls of the cylinder using a smoothing tool or your thumb to create a watertight seal. -
Refine the shape:
Gently roll the mold on the table to ensure the pot is perfectly round. Remove the mold carefully and smooth the top rim with a wet sponge to soften any sharp edges. -
Dry or Bake:
If using air-dry clay, let the pot dry completely for 24-48 hours. If using polymer clay, bake according to the package instructions.
Step 2: Creating the Saucer
-
Roll out saucer clay:
Take a small amount of terracotta-colored clay and roll it into a flat slab, slightly thinner than the pot walls. -
Cut the circle:
Use a circle cutter or jar lid that is slightly larger than the diameter of your finished pot to cut out the base. -
Create a lip:
Roll a very thin snake of terracotta clay. Place this snake around the perimeter of the circle base. -
Blend the lip:
Blend the snake down into the base on the inside to create a seamless, slightly raised edge that will catch water. Bake or dry this piece alongside your main pot.
Achieving Texture
To mimic the sandy bottom texture, mix baking soda into your clay before rolling, or press fine sand into the bottom third of the damp clay surface.
Step 3: Painting and Finishing
-
Sand the surface:
Once the main pot is fully cured and dry, gently sand the exterior and rim to remove any fingerprints or uneven texture. -
Tape off the base:
Use masking tape or painter’s tape to cover the bottom third of the pot. We want to keep this area raw (or unpainted) to achieve that sandy, dipped look shown in the photo. -
Paint the top section:
Apply 2-3 coats of white acrylic paint to the upper two-thirds of the pot. Let each coat dry fully before adding the next for opaque coverage. -
Prepare the speckles:
Mix a tiny drop of water into a small amount of black acrylic paint to make it fluid, like ink. -
Apply the speckle effect:
Dip a stiff brush or old toothbrush into the watered-down black paint. Run your thumb over the bristles to flick tiny splatters of paint onto the white section of the pot. -
Seal the pot:
After the paint is completely dry, remove the tape. I prefer to spray the entire pot (including the unpainted section) with a matte sealant to protect the clay from moisture. -
Final assembly:
Place your finished pot onto the terracotta saucer, fill with soil, and plant your succulent.
Uneven Paint Line?
If paint bleeds under your tape, don’t panic. Wait for it to dry, then gently scrape the excess paint off the raw clay section with an X-Acto knife.
Enjoy the quiet beauty of your new handmade planter sitting in the sunlight
Terrazzo-Style Catch-All Tray

This elegant tray combines the rustic warmth of terracotta with a modern terrazzo twist, creating the perfect spot for your daily essentials. Using air-dry clay and a simple chip technique, you can craft a sophisticated organizer that looks professionally made but is surprisingly easy to construct.
Detailed Instructions
Materials
- Terracotta-colored air-dry clay (approx. 500g)
- Black, white, and grey air-dry clay (small amounts)
- Rolling pin
- Two 1/4 inch wooden guide slats (optional)
- Craft knife or clay cutter
- Rectangular template (cardboard or paper)
- Small bowl of water
- Sandpaper (fine grit)
- Matte spray varnish
Step 1: Preparing the Terrazzo Chips
-
Roll chip colors:
Begin by taking small pinches of your black, white, and grey clay. Roll them out into very thin, flat sheets, much thinner than you’d want your final tray to be. -
create fragments:
Once these thin sheets are relatively dry but still flexible, tear or cut them into tiny, irregular fragments. Aim for a variety of sizes, from specks to small chunks, to mimic authentic stone chips. -
Mix chips in:
Take your main block of terracotta clay. Gently press a handful of your colored chips into the surface, fold the clay over, and knead it briefly. Don’t over-knead, or the colors will streak instead of staying as distinct chunks.
Clean Cuts Pro-Tip
Apply a tiny bit of oil or lotion to your craft knife blade before cutting. This prevents the sticky clay from dragging and ruining your crisp, straight lines.
Step 2: Shaping the Base
-
Roll the slab:
Place your prepared terracotta clay on a clean work surface. Using rolling pin guides or slats can help ensure an even thickness of about 1/4 inch across the entire slab. -
Add surface chips:
Scatter more of your prepared colored chips on top of the rolled slab. Use the rolling pin to firmly press them into the surface until they are flush with the terracotta clay. -
Cut the rectangle:
Place your rectangular template onto the clay slab. Use a sharp craft knife to cut cleanly around the edges, removing the excess clay. -
Score the edges:
Measure about 3/4 of an inch in from each edge of your rectangle. Lightly score a line along these measurements—this will act as a guide for folding up the sides.
Troubleshooting Cracks
If small cracks appear while drying, mix a tiny amount of fresh clay with water to make a paste (slip). Fill the cracks, let dry, and sand smooth.
Step 3: Forming the Tray
-
Cut corner notches:
To make folding easier, cut a small square notch out of each of the four corners where your scored lines intersect. This removes bulk so the corners meet neatly. -
Fold the sides:
Gently lift and fold the sides up along your scored lines to create the tray walls. Support the walls with your fingers so they stand vertical. -
Seal the corners:
Where the corner edges meet, use a dab of water on your finger to smooth the seam. Press the clay together firmly to bond it, blending the clay until the join is invisible. -
Smooth the rim:
Run a wet finger along the top rim of the tray to soften any sharp edges left by the cutting process. I find this gives the piece a much more finished, ceramic look. -
Refine the shape:
Check that your side walls are straight and corners are crisp. If the walls are sagging, you can prop them up with small items like matchboxes while they firm up.
Step 4: Finishing Touches
-
Slow drying:
Allow the tray to dry slowly in a cool place away from direct sunlight. This usually takes 24-48 hours. Rotate it occasionally to ensure even airflow. -
Sanding phase:
Once completely dry and hard, use fine-grit sandpaper to sand the entire surface. This is critical—sanding reveals the colored chips clearly and removes any cloudy film of terracotta clay covering them. -
Wipe clean:
Use a slightly damp cloth or sponge to wipe away all the sanding dust. You should see the terrazzo pattern pop brightly now. -
Seal:
Finish by applying a coat of matte spray varnish. This protects the clay from moisture and gives it a durable finish without making it look plasticky.
Now you have a chic, custom organizer ready to hold your jewelry and trinkets in style

TRACK YOUR CERAMIC JOURNEY
Capture glaze tests, firing details, and creative progress—all in one simple printable. Make your projects easier to repeat and improve.
Simple Earring Organizer Stand
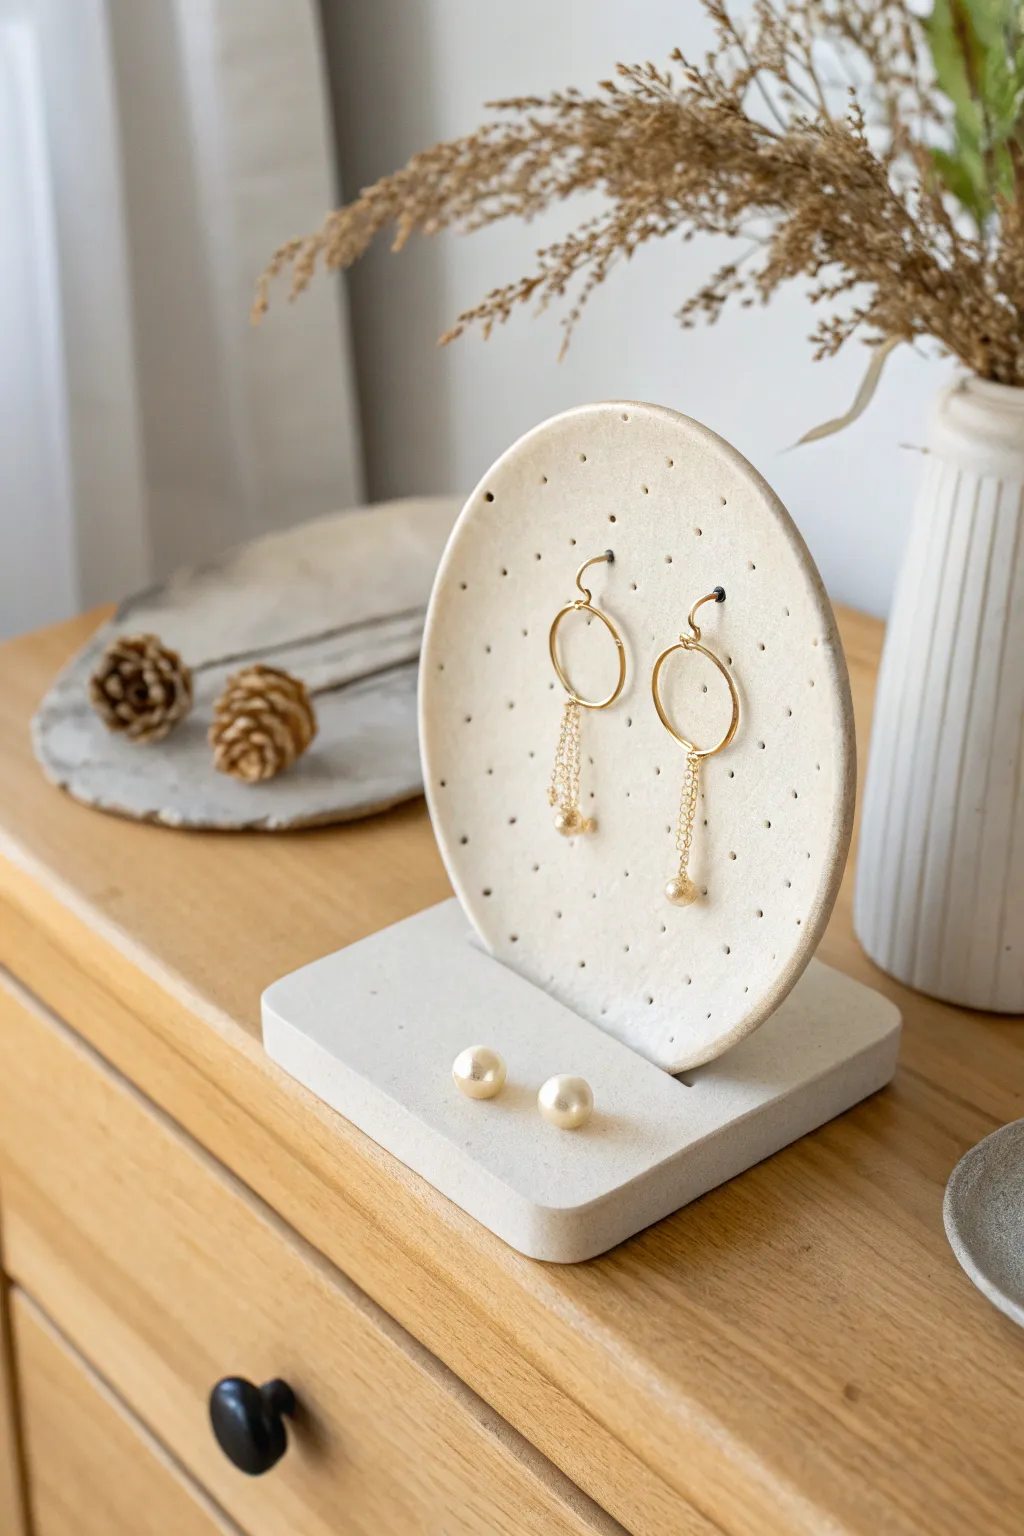
Keep your favorite dangles and studs within reach with this chic, minimalist organizer. Combining a speckled clay finish with a sleek geometric design, this stand serves as both practical storage and a beautiful piece of decor for your dresser.
Step-by-Step Tutorial
Materials
- Air-dry clay or polymer clay (white or light beige)
- Non-stick rolling pin
- Circle cutter (approx. 4-5 inches diameter)
- Small square or rectangle cutter (for the base)
- Needle tool or tapestry needle
- Sandpaper (fine grit)
- Acrylic sealant (matte finish)
- Craft knife
- Bowl with water (for smoothing)
- Parchment paper
Step 1: Shaping the Components
-
Condition the clay:
Begin by taking a generous amount of clay and kneading it in your hands until it becomes soft, pliable, and free of cracks. -
Roll the slab:
Place the clay on parchment paper and roll it out to an even thickness of about 1/4 inch. It needs to be sturdy enough to stand upright. -
Cut the display circle:
Use your large circle cutter or trace around a bowl to cut out the main display disc. Remove the excess clay and set it aside. -
Create the base:
Roll out a second piece of clay, slightly thicker than the circle (about 1/3 inch). Cut a rectangular slab that is wider than your circle to ensure stability. -
Smooth the edges:
Dip your finger in a little water and gently run it along the cut edges of both pieces to smooth out any sharpness or roughness. -
Cut the slot:
I prefer to do this step while the clay is wet: carefully cut a groove into the center of the rectangular base. It should be just wide enough to snugly fit the circle piece later. -
Add texture (optional):
If you want that speckled stone look shown in the photo, gently press coarse sand or cracked pepper into the surface, or splatter tiny dots of paint after drying.
Smooth Seams
To fix small cracks during drying, make a ‘slip’ paste by mixing a tiny bit of raw clay with water. Smear this into cracks and sand smooth once dry.
Step 2: Punching and Drying
-
Mark the grid:
Lightly mark a grid pattern on the circle piece using a ruler to ensure your earring holes will be evenly spaced. -
Pierce the holes:
Using a needle tool, poke holes through the clay at your marked points. Wiggle the tool slightly to ensure the holes are large enough for earring hooks. -
Initial drying:
Let the pieces dry separately on a flat surface. Turn them over periodically to ensure they dry evenly and don’t curl, usually for 24-48 hours. -
Dry fitting:
Once the pieces are semi-dry but still slightly workable, gently test the fit of the circle into the base slot. Adjust the slot width with a craft knife if needed.
Terrazzo Effect
Mix tiny chopped bits of colored clay into your main white block before rolling. It creates a trendy terrazzo pattern when sanded down.
Step 3: Assembly and Finish
-
Sand until smooth:
Once completely dry, use fine-grit sandpaper to refine the edges and surface. Pay special attention to the slot in the base. -
Secure the pieces:
Apply a strong super glu or heavy-duty craft glue into the slot of the base. Insert the circle piece firmly. -
Support while setting:
Prop the circle up with books or cups to keep it perfectly vertical while the glue cures completely. -
Seal the surface:
Apply two thin coats of matte acrylic sealant to protect the clay from moisture and oils, letting each coat dry fully in between.
Now you have a stylish home for your jewelry collection that looks like high-end decor
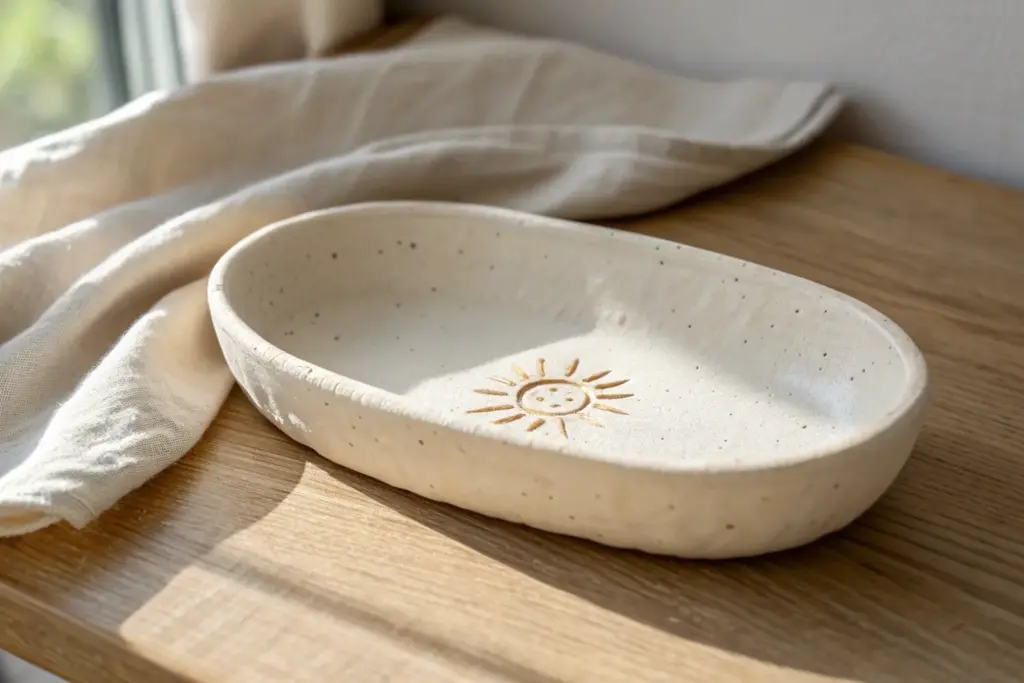
Easy Soap Dish With Ridges
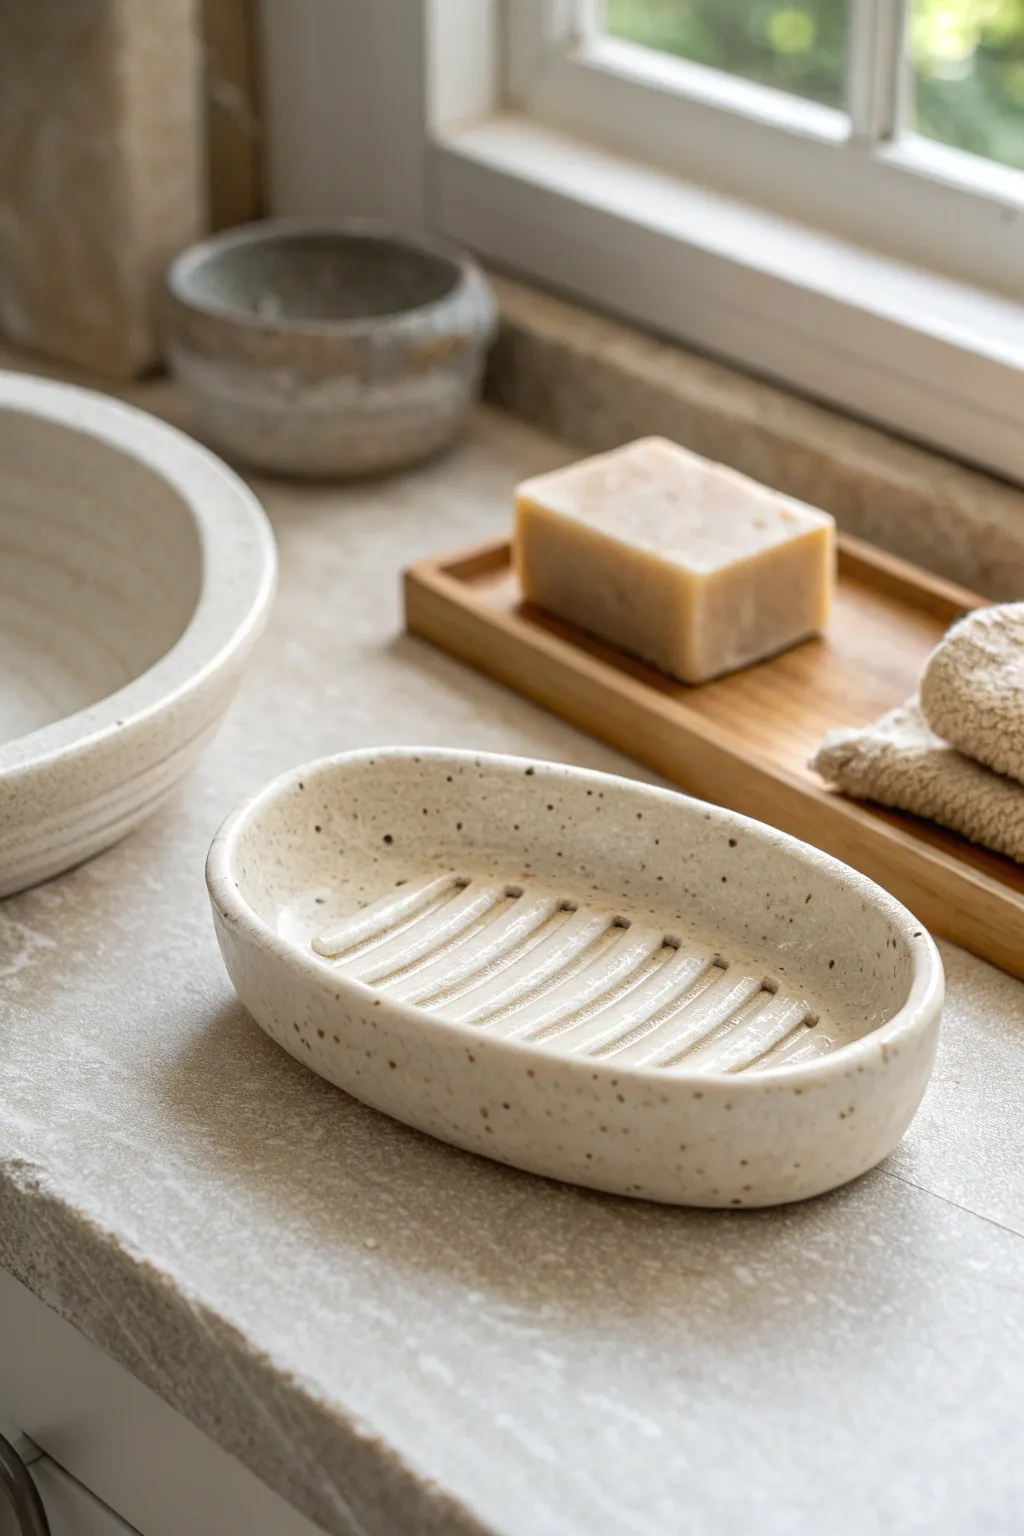
Embrace rustic charm with this beautiful oval soap dish, featuring practical ridges to keep your soap dry. The natural speckled finish gives it an organic, pottery-studio feel that looks at home in any bathroom.
How-To Guide
Materials
- Speckled stoneware clay (or white clay with speckles)
- Small rolling pin
- Oval template (paper or flexible plastic)
- Fettling knife or clay needle tool
- Slab strips or thick wooden rulers (about 1/4 inch thick)
- Loop tool or carving tool (for ridges)
- Small sponge
- Bowl of water
- Smoothing rib (rubber or wood)
- Clear or matte glaze (food safe if desired)
- Kiln (or access to firing services)
Step 1: Preparing the Slab
-
Wedge the clay:
Start by wedging a softball-sized amount of speckled stoneware clay to remove air bubbles and ensure a consistent texture. -
Set up guides:
Place your slab strips or wooden rulers on either side of your work surface to ensure an even thickness. -
Roll the slab:
Roll the clay out between the guides until it is completely flat and smooth, approximately 1/4 inch thick. -
Compress the surface:
Use a damp sponge or a rubber rib to compress the clay surface, smoothing out the canvas texture and aligning the clay particles.
Drainage Tip
Make sure your ridges are slightly taller than any standing water might be. This keeps your soap high and dry, extending its lifespan significantly.
Step 2: Shaping the Form
-
Cut the oval:
Lay your oval template onto the slab and carefully cut around it using a fettling knife or needle tool. -
Soften the edges:
Run a damp finger along the sharp cut edge to round it off slightly, removing any loose bits of clay. -
Lift the walls:
Gently pinch up the outer edge of the oval to create a vertical wall. I usually aim for a wall height of about 3/4 of an inch. -
Refine the curve:
Use your thumb on the inside and fingers on the outside to smooth the transition where the floor meets the wall, creating a seamless curve. -
Level the rim:
Check that the top rim is level. If it’s wavy, gently paddle it down with a wooden spatula or trim it carefully.
Creative Twist
Instead of coils, try carving negative space out of the slab floor with a loop tool to create drainage channels rather than raised bars.
Step 3: Adding the Ridges
-
Mark the spacing:
Using a needle tool, lightly sketch parallel lines across the bottom interior of the dish where you want the ridges to be. -
Create coils:
Roll out several thin, even coils of clay about the thickness of a pencil. -
Score and slip:
Score (scratch) the lines you marked on the bottom and apply a small amount of water or slip. -
Attach the coils:
Lay the coils onto the scored lines, pressing them firmly into place. -
Shape into ridges:
Using a modeling tool or your finger, press the sides of the coils down to blend them into the floor, creating raised, rounded bars. -
Clean the channels:
Use a small loop tool to clean up the spaces between the ridges, ensuring they are deep enough to let water drain away from the soap.
Step 4: Finishing Touches
-
Smooth everything:
Wipe the entire piece with a damp sponge to remove any tool marks and expose the beautiful speckles in the clay. -
Dry slowly:
Cover the dish loosely with plastic and let it dry slowly to the bone-dry stage to prevent warping. -
Bisque fire:
Fire the piece in a kiln to cone 04 (or your clay’s specific bisque temperature). -
Glaze application:
Dip or brush a clear or semi-matte white glaze over the piece. The glaze should be thin enough to let the clay’s natural speckles show through. -
Final wipe:
Check the bottom of the dish to ensure no glaze is on the foot, then fire it again to the final glaze temperature.
Place your new dish by the sink and enjoy the clean, handmade touch it adds to your space
Simple Toothbrush Holder Cup
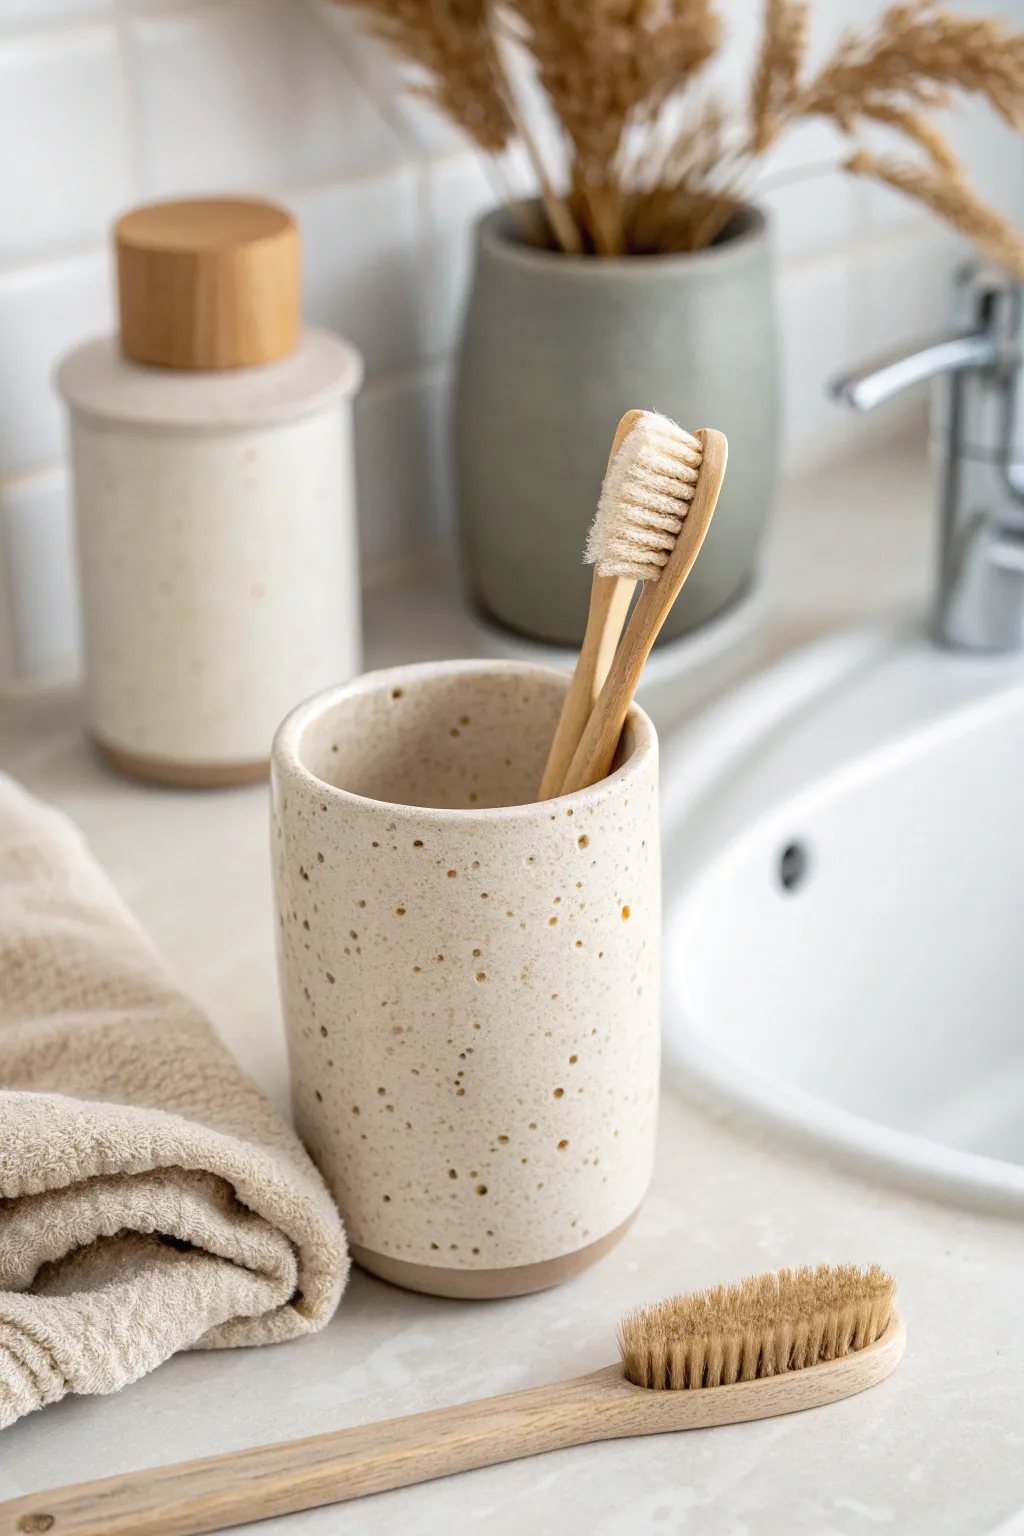
This rustic, minimalist toothbrush holder brings a touch of spa-like serenity to your bathroom counter. The natural speckled texture looks sophisticated but is surprisingly simple to achieve using basic pottery techniques.
Step-by-Step Tutorial
Materials
- White or cream-colored stoneware clay
- Rolling pin
- Canvas mat or cloth (to prevent sticking)
- Ruler
- Fettling knife or clay cutting tool
- Coarse sand or grog (dark color for contrast)
- Slip (liquid clay)
- Scoring tool or fork
- Small sponge
- Cylindrical form (like a PVC pipe or rolling pin) for shaping
- Clear matte glaze
Step 1: Preparation and Texture
-
Prepare the Clay:
Start with a ball of white stoneware clay roughly the size of a large orange. Wedge it thoroughly to remove any air bubbles. -
Add Texture:
Sprinkle a generous amount of coarse, dark sand or grog onto your work surface. Roll your clay ball over this texture, pressing firmly so the particles embed into the surface. -
Knead in the Speckles:
Continue wedging the clay to distribute the sand or grog evenly throughout the entire lump. This ensures the speckled look appears inside and out. -
Roll the Slab:
Place the clay on your canvas mat. Using a rolling pin, roll out a slab to an even thickness of about 1/4 inch. -
Additional Surface Texture:
For that extra cratered look seen in the photo, lightly press coarse salt or more sand into just the surface of the slab, then roll over it once more gently.
Seam Splitting?
If the vertical seam cracks during drying, score it deeper, add vinegar to your slip mixture, and patch it with fresh soft clay immediately.
Step 2: Cutting and Forming
-
Measure the Rectangle:
Using a ruler, measure a rectangle roughly 4 inches high and 9-10 inches wide (circumference depends on your desired cup width). -
Cut the Shape:
Use your fettling knife to cut out the rectangle cleanly. Save the excess clay for the base. -
Bevel the Edges:
On the two shorter sides of the rectangle, slice the edges at a 45-degree angle. Bevel them in opposite directions so they will overlap flush when curled. -
Score the Seam:
Rough up the beveled edges using a scoring tool or fork. Apply a generous amount of slip to the scored areas. -
Form the Cylinder:
Carefully lift the slab and curl it into a cylinder, bringing the scored edges together. Press the seam firmly to bond it. -
Smooth the Join:
Support the inside of the wall with one hand while smoothing the outside seam with your finger or a rib tool. I like to blend it until the join is invisible.
Coil Detail
Add a thin coil of clay to the interior bottom seam and smooth it out. This reinforces the join and makes the cup easier to clean later.
Step 3: Base and Finishing
-
Cut the Base:
Roll out a small piece of remaining clay. Place your cylinder on top of it and trace a circle slightly larger than the cylinder’s diameter. -
Attach the Base:
Score and slip the bottom edge of the cylinder and the outer edge of the circular base. Press them together firmly. -
Trim Excess:
Trim away any excess clay from the base so it is flush with the walls of the cup. -
Create the Shadow Line:
To mimic the image, leave a tiny, slight indentation or unglazed line at the very bottom where the wall meets the base. -
Refine the Rim:
Use a damp sponge to round off the top rim. It should be smooth to the touch. -
Surface Finishing:
Gently tap the exterior with a wooden spoon or paddle to ensure it isn’t perfectly round, giving it that organic, handmade feel. -
Drying:
Let the piece dry slowly under loose plastic for a day, then uncover until bone dry. -
Firing and Glazing:
Bisque fire the piece. Apply a clear matte glaze to the interior and exterior to seal it while keeping the raw clay look, then glaze fire.
Now you have a calm, earthen vessel ready to organize your morning routine
Easy Pen Cup Desk Set

Bring minimalist elegance to your workspace with this hand-built ceramic cup, featuring a raw, textured base and a smooth, speckled white glaze. The distinctive two-tone look is achieved by leaving the lower third unglazed, allowing the clay’s natural warmth to shine through.
Step-by-Step Guide
Materials
- Stoneware clay (preferably with speckles or heavy grog)
- Rolling pin
- Guide sticks or slats (approx. 1/4 inch thick)
- Circle template or cutter (approx. 3.5 inches)
- Rectangular template (approx. 11 inches x 4.5 inches)
- Fettling knife or needle tool
- Scoring tool (or serrated rib)
- Slip (clay and water mixture)
- Wooden sculpting tool
- Sponge
- Matte white glaze (speckled variety recommended)
- Masking tape or wax resist
- Kiln access (or suitable oven if using polymer/air-dry clay alternatives)
Step 1: Preparing the Slab
-
Wedge the clay:
Begin by wedging your stoneware clay thoroughly on a canvas board to remove any air bubbles, which helps ensure a sturdy final structure. -
Set up guides:
Place your wooden guide sticks on either side of the wedged clay ball to ensure an even thickness when rolling. -
Roll the slab:
Using the rolling pin, flatten the clay until the pin rests on the guide sticks, creating a perfectly uniform slab about 1/4 inch thick. -
Smooth the surface:
Take a rubber kidney or a slightly damp sponge and run it gently over the clay slab to compress the particles and remove any canvas texture.
Wobbly Walls?
If your cylinder collapses or warps, let the slab stiffen to ‘leather hard’ before assembling. It should be flexible but firm enough to hold its own weight.
Step 2: Cutting and Forming
-
Cut the walls:
Lay your rectangular template onto the slab and carefully cut around it using your fettling knife or needle tool to create the body of the cup. -
Cut the base:
Use your circle template or cutter to create the base piece from the remaining slab. -
Score the edges:
Score the short ends of the rectangular slab and the outer edge of the circular base using your scoring tool to roughen the surface. -
Apply slip:
Generously dab slip onto all the scored areas; this acts as the glue that will bond your pieces together. -
Form the cylinder:
Curve the rectangular slab into a cylinder, bringing the slipped ends together. -
Join the seam:
Press the seam firmly but gently. I typically reach inside to support the wall while using a wooden tool to smudge the clay across the join line on the exterior, then repeat on the interior. -
Attach the base:
Place the cylinder on top of the scored circular base. -
Seal the bottom:
Use the wooden tool to drag clay from the base up onto the wall to create a seamless bond, reinforcing the container’s bottom.
Step 3: Finishing and Glazing
-
Refine the rim:
Use a damp sponge or a chamois cloth to smooth the top rim of the cup so it feels soft to the touch. -
Clean and dry:
Smooth out any fingerprints or rough spots on the body, then let the piece dry slowly under plastic before bisque firing it in the kiln. -
Bisque fire:
Fire the cup according to your clay body’s instructions (usually Cone 04 or 06) to harden it for glazing. -
Apply resistance:
Once the bisque piece is cool, carefully brush wax resist or execute a straight line of masking tape around the lower third of the cup to protect the raw clay area. -
Glaze dip:
Holding the cup by the base, dip it strictly up to the wax line into your matte white speckled glaze. -
Clean the resist:
If any glaze dripped onto the waxed bottom section, wipe it away cleanly with a damp sponge. -
Final Fire:
Place the cup in the kiln for the final glaze firing (typically Cone 5 or 6), ensuring the unglazed bottom doesn’t touch other glazed wares.
Add a Texture Tip
Before rolling your slab, sprinkle coarse sand or grog onto your canvas. This embeds into the clay surface, enhancing the earthy texture of the unglazed bottom section.
Once fired and cooled, slide this stylish cup onto your desk to keep your favorite pens organized and ready for inspiration
Minimal Photo Holder Block

This minimal photo holder brings a trendy, organic aesthetic to your desk or mantelpiece with its gentle curves and stone-like texture. It acts as both a functional display for your favorite memories and a standalone piece of modern sculptural decor.
Step-by-Step Tutorial
Materials
- Air-dry clay (white or cream)
- Rolling pin
- Clay knife or craft knife
- Template (paper or cardboard)
- Ruler or straight edge
- Small bowl or cup (for water)
- Sandpaper (fine grit)
- Acrylic paint (beige/cream) – optional
- Baking soda (optional for texture)
Step 1: Shaping the Base
-
Prepare your clay:
Start with a generous block of air-dry clay. Knead it thoroughly in your hands to warm it up and remove any potential air bubbles, which helps prevent cracking later. -
Roll out a slab:
Using your rolling pin, flatten the clay into a thick slab. You want this to be quite substantial to stand upright, so aim for a thickness of about 1 to 1.5 inches. -
Create the arch shape:
You can freehand this, but for symmetry, I recommend cutting a paper template of a semicircle first. Lay the template on your clay slab and use your knife to cut around the curved edge. -
Cut the straight edge:
Use your ruler to slice the bottom straight edge cleanly. This surface needs to be completely flat so the holder doesn’t wobble.
Clean Lines Hack
Use a damp paintbrush to smooth inside the carved rainbow grooves. It reaches the tight corners your fingers can’t fit into.
Step 2: Carving the Details
-
Mark the ridges:
Using a blunt tool or the back of your knife, lightly score three concentric arches onto the face of the clay. These will be your guides for carving the rainbow effect. -
Carve the relief:
Carefully carve out V-shaped grooves along your scored lines. You aren’t cutting all the way through; you are just creating deep channels to separate the ‘rainbow’ bands. -
Smooth the channels:
Dip your finger in a little water and run it through the carved grooves to smooth out any rough crumbs of clay and soften the harsh angles of the cut. -
Refine the edges:
Check the outer perimeter of your arch. If the cutting process left drag marks, smooth them down now with a damp sponge or fingertip.
Step 3: Adding Functionality
-
Create the heavy slot:
Using your knife or a thick piece of card stock, press a slot into the very top center of the arch. Press down about half an inch deep. -
Widen gently:
Wiggle the tool slightly to ensure the opening is wide enough to hold a photo or postcard without tearing it, but tight enough to keep it upright. -
Final smoothing:
Do one last pass over the entire piece with a barely damp sponge to promote a unified surface texture before leaving it to dry.
Alternative Finish
Skip the paint and leave the raw clay! Seal it with a matte varnish to protect it while keeping the natural color intact.
Step 4: Finishing and Texturing
-
Allow to dry:
Let the piece dry completely. Because this project is thick, I suggest letting it sit for 48-72 hours, flipping it occasionally so the bottom dries evenly. -
Sand imperfections:
Once fully cured, use fine-grit sandpaper to buff away any sharp ridges or bumps on the surface. -
Mix textured paint:
To achieve that stony, matte look seen in the photo, mix a teaspoon of baking soda into your cream acrylic paint. It creates a lovely faux-ceramic finish. -
Apply the finish:
Paint the entire holder with your textured mixture. Use a dabbing motion rather than long strokes to enhance the gritty, natural effect. -
Let paint cure:
Allow the paint to dry completely before inserting your favorite photo or note.
Now you have a serene, custom-made display piece ready to showcase your favorite moments.
Boho Wall Hanging Shapes
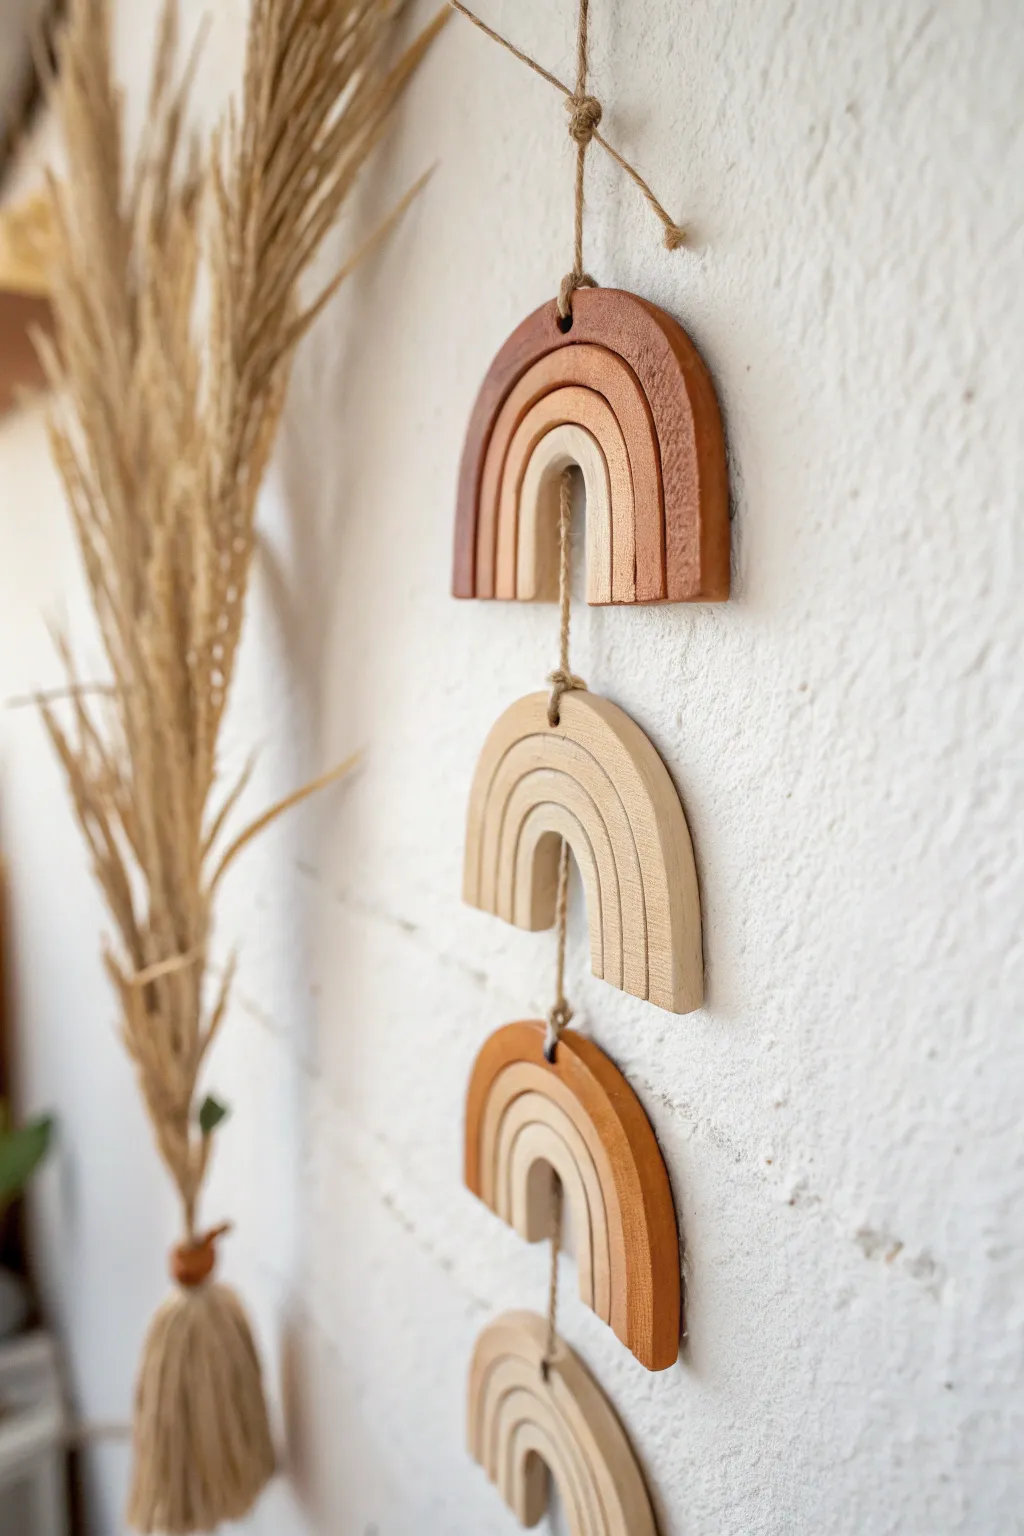
Bring warmth to any corner of your home with this earthy, bohemian wall hanging featuring cascading rainbow arches. Using air-dry clay and a simple palette of terracotta and cream, this mobile adds modern texture and a handcrafted touch to your vertical space.
Step-by-Step Guide
Materials
- Air-dry clay (white or light grey)
- Acrylic paints (terracotta, burnt sienna, warm white, beige)
- Rolling pin
- Parchment paper or craft mat
- Sharp knife or clay cutting tool
- Round cookie cutters (various sizes) or a compass
- Tool for poking holes (skewer or straw)
- Jute twine or hemp cord
- Fine-grit sandpaper
- Small paintbrush
- Matte finish sealant (optional)
Step 1: Shaping the Arches
-
Condition the Clay:
Begin by taking a large chunk of air-dry clay and kneading it in your hands until it becomes soft, pliable, and free of cracks. -
Roll it Out:
Place the clay on parchment paper and roll it out until you have an even slab that is roughly 1/4 inch thick. Try to keep the thickness consistent for all pieces. -
Cut the Circles:
Using circle cutters or bowls as templates, cut out four identical circles. These will become the base for your rainbow shapes. -
Form the Arches:
Slice each circle in half to create semicircles; set the other halves aside for future projects. Then, use a smaller cutter or freehand a smaller semicircle cut-out at the bottom center of each piece to create the arch shape. -
Add Decorative Grooves:
Use a needle tool or the back of a knife to gently score two curved lines following the rainbow shape. I find dragging the tool slowly creates a cleaner line than quick strokes. These grooves simulate individual rainbow bands. -
Create Hanging Holes:
Carefully poke a hole through the very top center of each arch using a skewer. Ensure the hole goes all the way through and is wide enough for your twine. -
Smooth the Edges:
Dip your finger in a little water and run it along the cut edges of the clay to smooth out any roughness or sharp burrs.
Smooth Operator
To get super clean lines on your “rainbow bands,” use a sculpting loop tool instead of a knife. It carves out a tiny strip of clay rather than just pushing it aside.
Step 2: Drying and Painting
-
Let it Dry:
Lay your clay pieces flat on a clean surface to dry for at least 24-48 hours. Flip them halfway through to ensure even drying and prevent warping. -
Refine the Surface:
Once fully cured, gently sand the edges and faces with fine-grit sandpaper to remove any imperfections or fingerprints. -
Mix Your Palette:
Prepare your paint colors. You’ll need two main shades: a deep terracotta/rust color and a soft, natural wood or cream tone. -
Paint the Top Arch:
Paint the first arch completely in your terracotta shade. Use a small brush to get inside the grooves if you want a solid look, or keep the brush dry to let the texture show. -
Paint the Second Arch:
For the second arch, paint it a solid light beige or raw wood color to provide contrast. -
Paint the Third Arch:
Paint the third arch in the terracotta shade again to continue the alternating pattern. -
Paint the Bottom Arch:
Finish by painting the final, bottom arch in the light beige tone.
Add Bead Accents
Thread a raw wooden bead onto the twine in the spaces between the clay arches. This adds extra texture and reinforces the natural boho aesthetic.
Step 3: Assembly
-
Prepare the Twine:
Cut a long piece of jute twine, roughly 30 inches long. You can always trim it later, so give yourself plenty of slack. -
Tie the Top Loop:
Fold the twine in half and tie a knot near the top to create a loop for hanging the mobile. -
Attach the First Piece:
Thread the two loose ends of the twine through the hole in the top terracotta arch. Tie a sturdy knot underneath the arch to hold it in place. -
Connect the Rest:
Move down the twine about 1-2 inches, tie a knot, thread the beige arch, and tie another knot beneath it to secure. Repeat this spacing for the remaining two arches. -
Finishing Touches:
Trim any excess twine below the bottom knot and make sure all your knots are tight and secure before hanging.
Hang your new creation near a window where shadows can play off the textured grooves throughout the day
Simple Napkin Rings Set
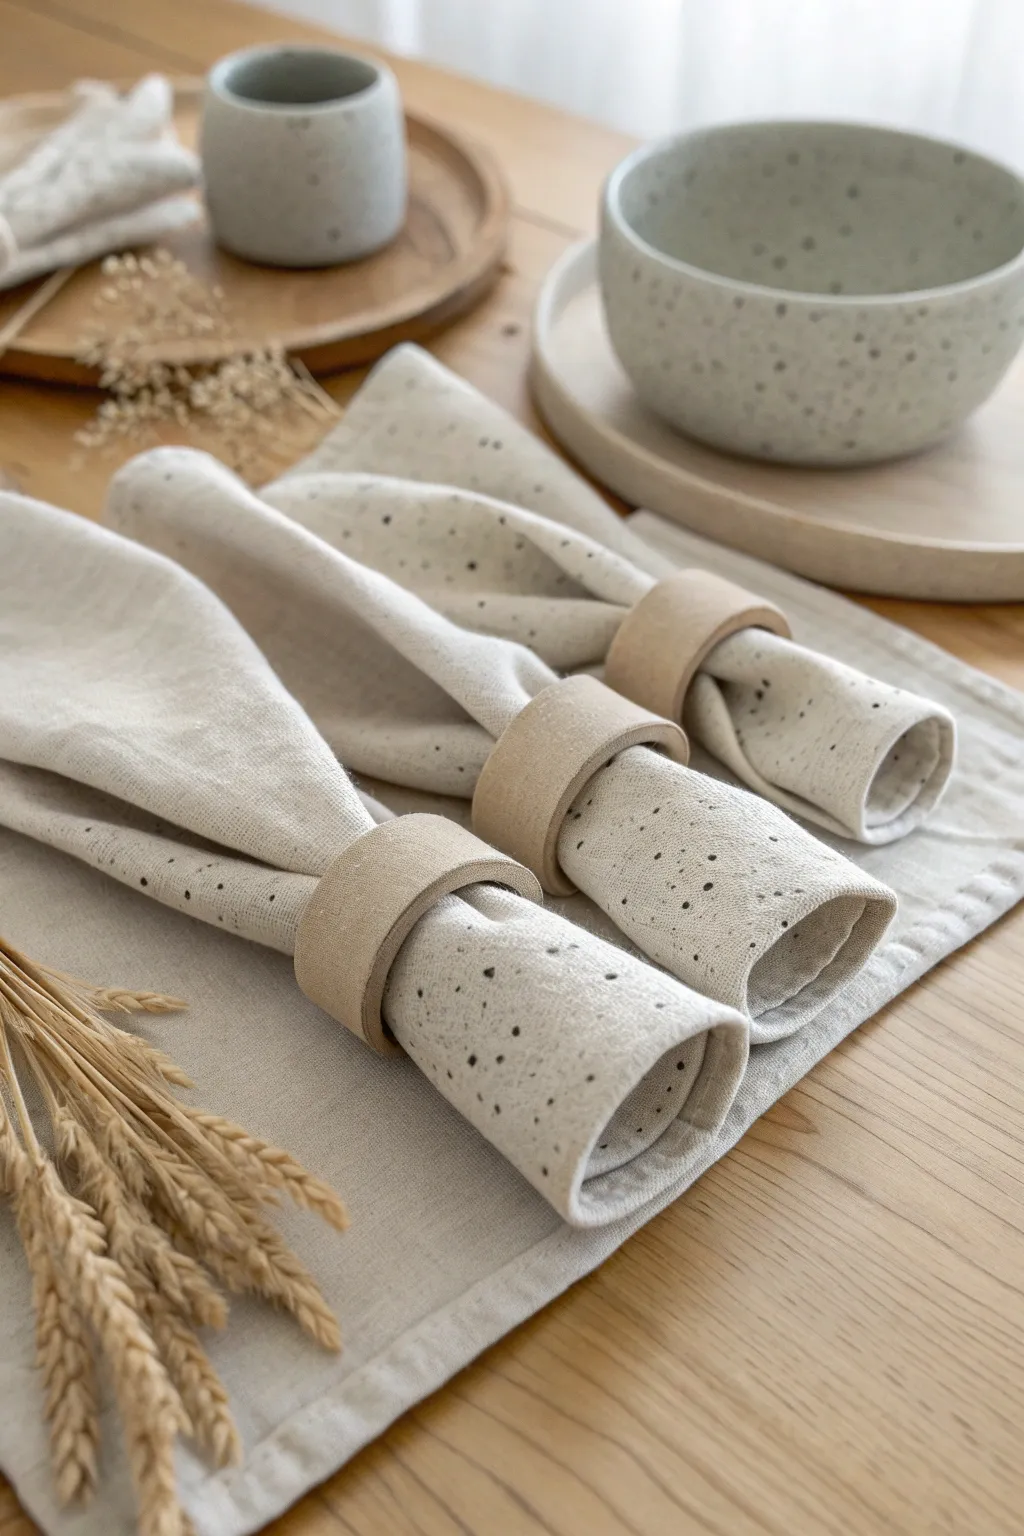
These understated napkin rings add a touch of modern rustic charm to any table setting. Their clean, flat-band design mimics the look of raw sandstone or leather, perfectly complementing textured linen napkins.
Step-by-Step Tutorial
Materials
- Polymer clay (beige, sand, or granite effect)
- Acrylic rolling pin
- Sharp craft knife or clay blade
- Ruler
- Cardboard tube (paper towel or toilet paper roll)
- Parchment paper
- Fine-grit sandpaper (400-600 grit)
- Matte clear varnish (optional)
- Oven (for baking)
Step 1: Preparation & Rolling
-
Condition the Clay:
Begin by kneading your chosen polymer clay until it is soft and pliable. If the clay feels too stiff, warm it in your hands for a few minutes to improve workability. -
Roll Out the Slab:
Place the conditioned clay on a clean, flat surface or a silicone mat. Using your acrylic rolling pin, roll the clay out into a long, even slab. -
Achieve Uniform Thickness:
Aim for a thickness of about 1/8 inch (3-4mm). Consistent thickness is key for durability, so take your time to ensure the slab is level across the entire surface.
Cracking Clay?
If the clay cracks when wrapping it around the tube, it wasn’t conditioned enough. Warm it up more or add a drop of clay oil to restore flexibility.
Step 2: Cutting & Shaping
-
Measure Strips:
Use a ruler to lightly mark the width of your rings on the clay slab. For the classic look shown, a width of roughly 1 to 1.25 inches works perfectly. -
Slice the Clay:
Hold the ruler firmly against the clay to use as a straight edge. Take your sharp craft knife or blade and slice clean, straight strips along your markings. -
Determine Length:
Trim the length of each strip to approximately 5 to 6 inches. You can test fit one around your cardboard tube to see if the circumference feels right for your napkins. -
Prepare the Form:
Wrap your cardboard tube in a layer of parchment paper. This prevents the clay from sticking to the cardboard and ensures easy removal later. -
Form the Rings:
Carefully lift a clay strip and wrap it around the parchment-covered tube. Bring the two ends together so they meet flush. -
The Overlap Variation:
Alternatively, you can overlap the ends slightly and press them together firmly if you prefer a joined seam look, but the flush join creates a cleaner, seamless circle. -
Blend the Seam:
If doing a flush join, gently smooth the clay where the ends meet using your finger or a smoothing tool so the seam disappears. I find a tiny drop of clay softener helps blend stubborn seams.
Make it Granite
Mix black pepper or dried tea leaves into plain beige clay before rolling. This creates a stunning faux-stone speckled effect instantly.
Step 3: Refining & Baking
-
Smooth Edges:
While the clay is still on the tube, run your finger dipped in a little water (or baby oil) along the sharp cut edges of the band to soften them slightly. -
Check for Fingerprints:
Inspect the surface for any accidental fingerprints. Lightly buff them out with a soft brush or your finger before baking. -
Bake the batch:
Place the cardboard tube, with the clay rings still formed around it, directly onto a baking sheet. This keeps the perfect circle shape during the curing process. -
Oven Curing:
Bake according to the manufacturer’s instructions for your specific brand of clay. Usually, this is around 275°F (135°C) for 15-30 minutes. -
Cool Down:
Once baked, remove from the oven and let the rings cool completely on the tube. Do not try to remove them while hot, as the clay is still slightly soft.
Step 4: Finishing Touches
-
Remove from Tube:
Once fully cool, slide the rings off the cardboard tube and peel away the parchment paper liner. -
Sand for Perfection:
Use fine-grit sandpaper to gently smooth over any rough spots on the edges or the inner seam. A quick sanding gives them that professional, stone-like feel. -
Optional Sealing:
If you want extra protection against stains, apply a thin coat of matte varnish. However, leaving them raw maintains that lovely organic, matte aesthetic seen in the photo.
Now you have a timeless set of handmade rings ready to elevate your next dinner party
Easy Face Vase
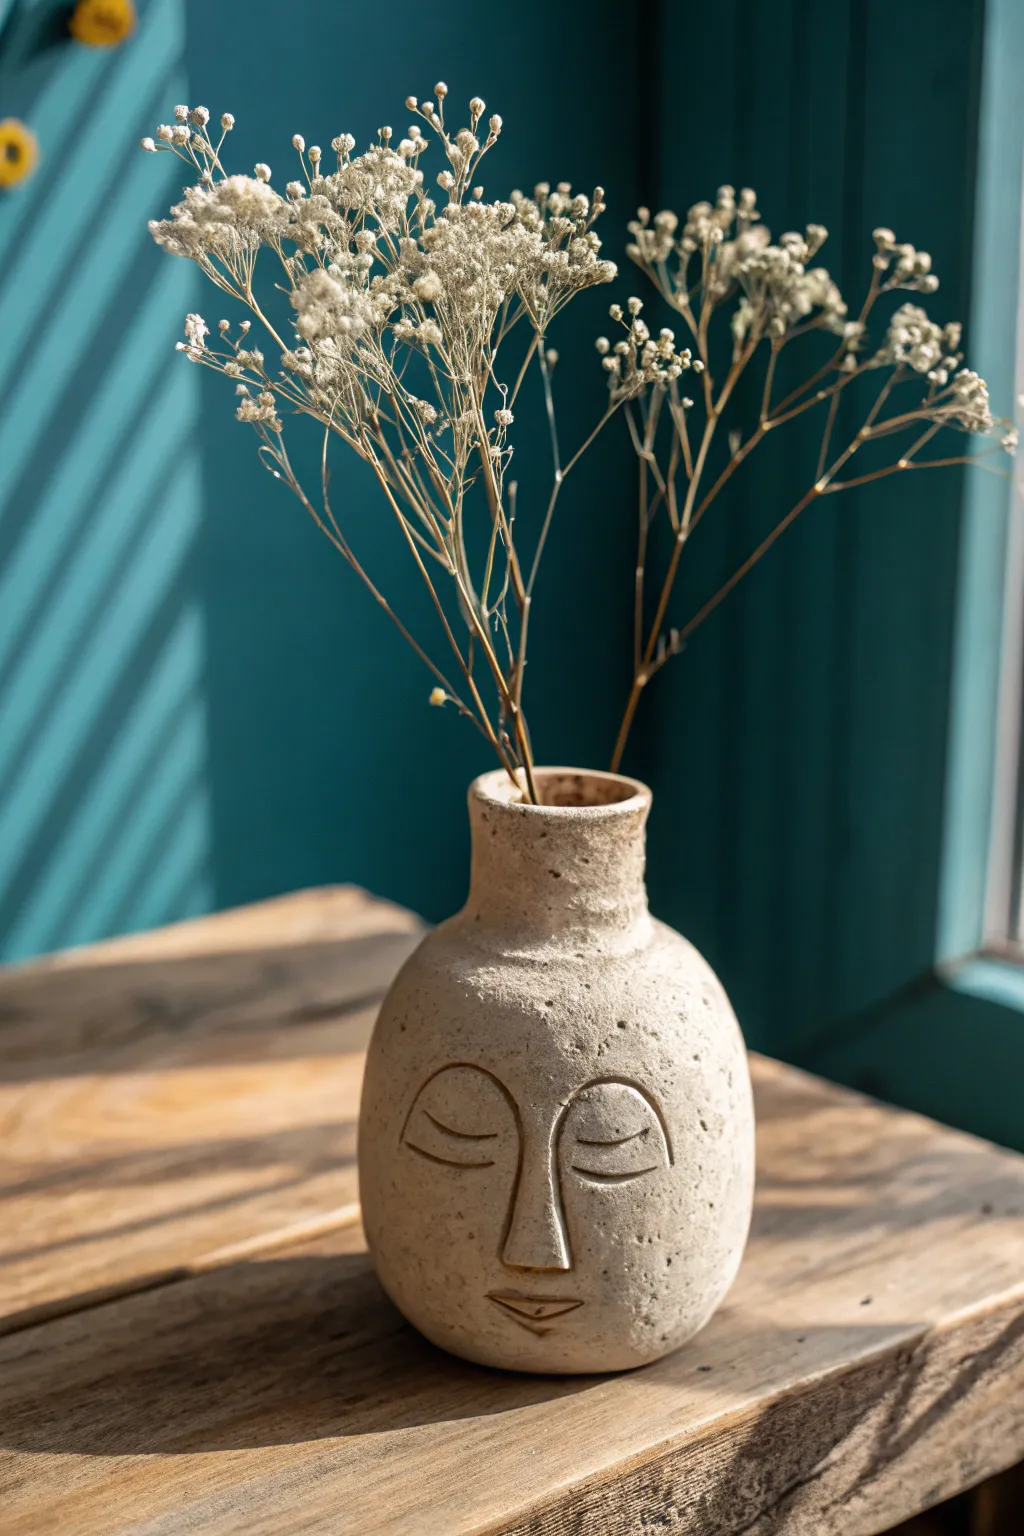
Bring a calm, artistic presence to your shelf with this textured clay project. The design mimics the look of carved sandstone, featuring gentle curves and a meditative expression that looks beautiful with dried florals.
How-To Guide
Materials
- Air-dry clay (stone or white color)
- Small glass bottle or jar (for the armature)
- Rolling pin
- Clay knife or fettling tool
- Sponge
- Small bowl of water
- Needle tool or toothpick
- Soft bristle brush
- Optional: Speckled clay paint or acrylic wash
Step 1: Building the Form
-
Prepare the Armature:
Select a small glass bottle to serve as the internal structure, which ensures your vase is water-tight and sturdy. Clean and dry the exterior thoroughly so the clay adheres well. -
Roll the Slab:
Roll out a slab of clay to about 1/4 inch thickness. You need enough length to wrap entirely around the circumference of your bottle with a little overlap. -
Wrap the Base:
Gently lift the clay slab and wrap it around the glass bottle. Cut away the excess clay where the ends meet, creating a straight seam. -
Seal the Seam:
Score (scratch) both cut edges of the clay, add a tiny bit of water or slip, and press them firmly together. Use your thumb to smooth the clay over the line until the join is invisible. -
Create the Neck:
Mold the clay upwards over the neck of the bottle. If your bottle narrows significantly, you may need to trim small triangles out of the clay at the top so it folds inward without bulking. Smooth everything down to create a continuous curve. -
Add the Lip:
Roll a small coil of clay and attach it to the very rim of the bottle opening. Pinch and smooth it to create a finished, slightly flared lip for the vase.
Stone Texture Trick
Mix a small amount of used coffee grounds or sand into your clay before rolling it out. This creates an authentic gritty texture and visual speckling instantly.
Step 2: Sculpting the Features
-
Map the Face:
Lightly trace the outline of the face with a needle tool. Position the nose bridge centrally and mark two large semi-circles for the eyes on either side. -
Form the Nose:
Roll a small, elongated triangle of clay. Score the back of it and the center of the vase face. Press the nose firmly onto the surface. -
Blend the Nose:
Use a modeling tool or your finger to blend the edges of the nose into the vase, particularly at the top near the brow line, leaving the bottom nostril area distinct. -
Define the Eyebrows:
I find it helpful to roll two thin worms of clay for the brows. Curve them naturally over the eye tracings and blend the top edges into the forehead so they look raised but integrated. -
Carve the Eyes:
Using a U-shaped loop tool or the rounded end of a paintbrush handle, gently press into the clay to create the closed eyelid shape. You want a deep, clean indentation. -
Detail the Eyelids:
Use a needle tool or knife to verify the horizontal slit of the closed eye is defined within the indentation you just made. -
Shape the Mouth:
Carve a small, simple mouth below the nose. Keep it minimal—a simple curved line for a smile or a small indentation for lips works best for this stylized look.
Abstract Variations
Try experimenting with asymmetry for a modernist look. Place one eye slightly higher than the other or elongate the nose past the brow line for a Picasso-inspired vibe.
Step 3: Texturing and Finishing
-
Create Texture:
To mimic the stone look in the photo, take a coarse sponge or a crumpled ball of aluminum foil and dab it all over the surface of the clay. Press gently to create pits and speckles without deforming the features. -
Refine Edges:
Check the rim and the base for any sharp burrs of clay. Smooth them slightly with a damp finger, but keep the overall rough texture intact. -
Drying Process:
Allow the vase to dry slowly away from direct heat or drafts to prevent cracking. This usually takes 24 to 48 hours for air-dry clay. -
Stone Painting Effect:
Once fully dry, you can enhance the look. If you didn’t use speckled clay, flick a toothbrush loaded with diluted brown or black paint over the vase to create a natural, stony speckle pattern. -
Sealing:
Apply a matte varnish specifically for clay to protect the surface and seal in the texture. This gives it a professional, finished appearance.
Now pop in some dried baby’s breath and enjoy the peaceful vibe of your new creation
Abstract Body-Form Planter
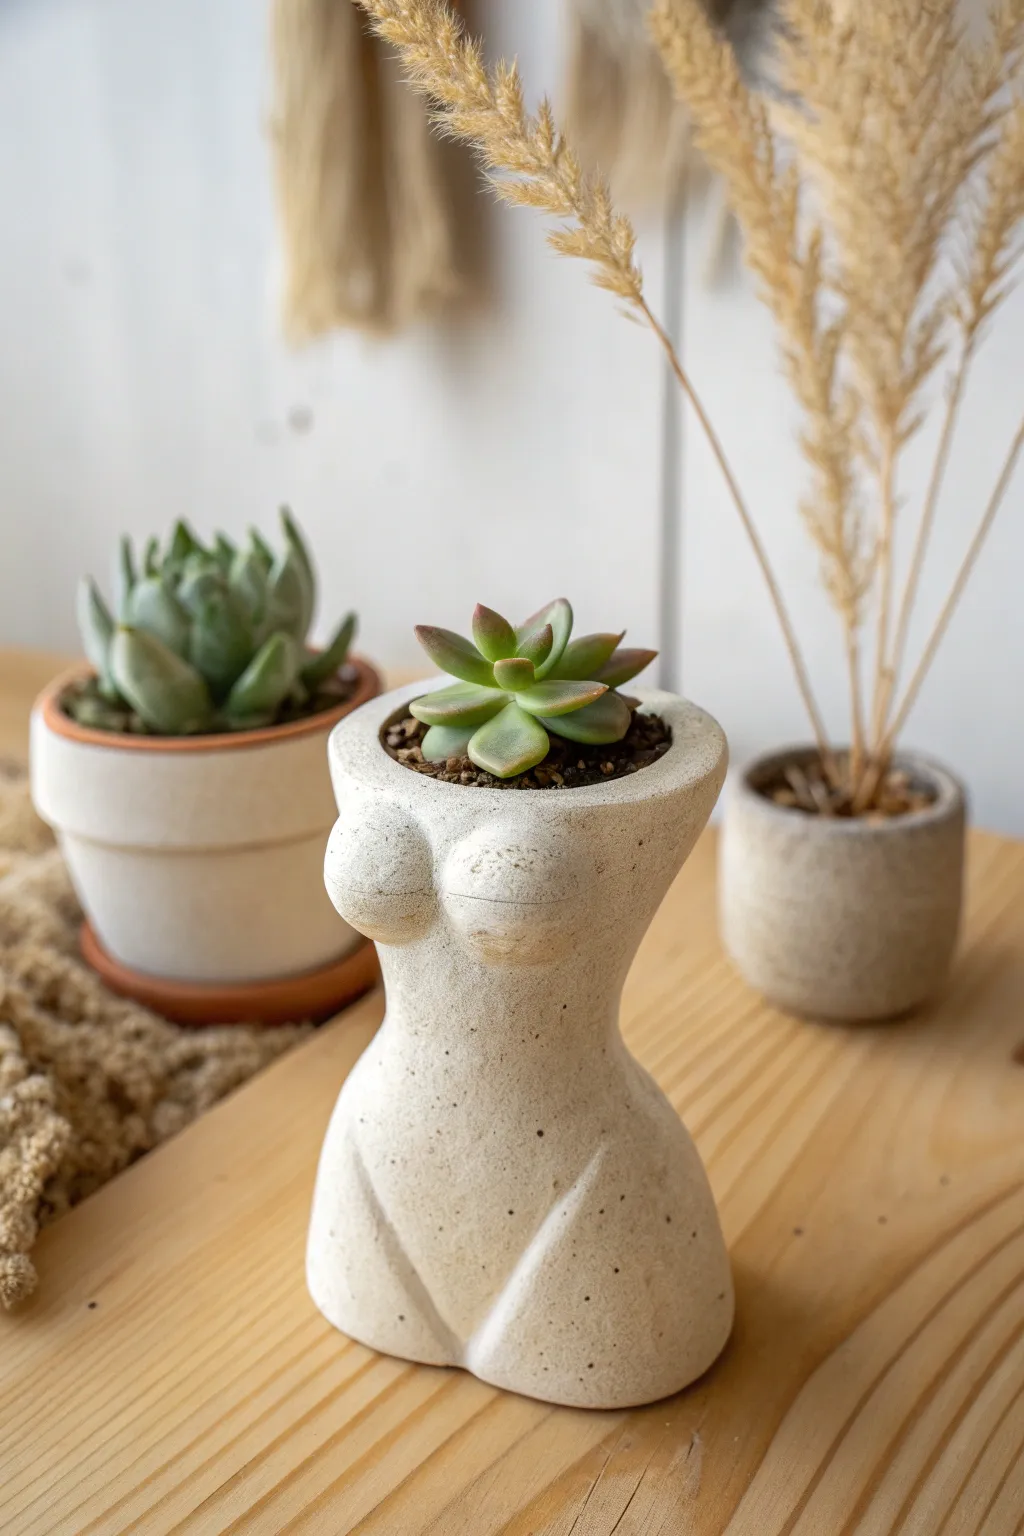
Sculpt functional art with this minimalist female form planter that celebrates the beauty of the body. The finished piece features a speckled, stone-like texture that pairs perfectly with small succulents for a modern, earthy aesthetic.
Detailed Instructions
Materials
- Air-dry clay (white or beige stone effect)
- Clay sculpting tools (needle tool, loop tool)
- Small cup of water
- Rolling pin
- Sponge
- Sandpaper (fine grit)
- Acrylic paint (beige/cream and dark brown/black)
- Old toothbrush
- Matte sealant or varnish
Step 1: Forming the Base Structure
-
Condition the Clay:
Start by kneading a generous amount of air-dry clay until it is soft, warm, and pliable. This prevents cracks later on. -
Create the Core Cylinder:
Roll a thick slab of clay about 1/4 inch thick. Cut a rectangle and form it into a cylinder around a temporary form (like a cardboard tube) or freehand it to create the main torso shape. -
Seal the Seam:
Join the edges of your cylinder by scoring (scratching) both sides, adding a dab of water, and pressing them together firmly. Smooth the seam with your thumb until it disappears. -
Add the Bottom:
Cut a circle of clay slightly larger than your cylinder’s opening. Score and slip the bottom edge of the cylinder and attach the circle. Trim any excess clay and smooth the join.
Step 2: Sculpting the Body
-
Shape the Waist:
With wet fingers, gently squeeze the cylinder slightly below the halfway point to create an indentation, forming the waistline. -
Form the Chest:
Roll two equal-sized balls of clay. Score the chest area of your cylinder and the back of each ball. Press them firmly onto the upper torso to create the breasts, blending the edges into the main body for a seamless look. -
Add the Hips:
Add extra clay to the lower section to flare it out slightly, mimicking the curve of hips. Smooth this additional clay downward so it integrates fully with the base structure. -
Carve the Legs:
Using a loop tool or modeling tool, gently carve two angled lines starting from the lower hips meeting at the bottom center. This suggests the groin area and separates the thighs abstractly. -
Refine the Silhouette:
Look at the sculpture from all angles. Smooth out any bumps with a damp sponge and ensure the curves flow naturally from the waist to the hips. -
Create Drainage (Optional):
If you plan to plant directly into the pot, use a straw or needle tool to poke a small hole in the very bottom for water drainage.
Cracks Appearing?
If small cracks appear while drying, mix a tiny bit of fresh clay with water to make a paste (slip) and fill them in. Let dry again and sand smooth.
Step 3: Finishing and Texturing
-
Dry the Piece:
Let the planter dry completely for 24-48 hours. I usually rotate it occasionally so air reaches all sides evenly. -
Sanding:
Once bone dry, use fine-grit sandpaper to remove any rough fingerprints or sharp edges, particularly around the rim and the sculpted curves. -
Base Coat:
Paint the entire planter with a matte beige or cream acrylic paint. Apply two coats for solid coverage. -
Create the Speckle Effect:
Dilute a small amount of dark brown or black paint with water. Dip an old toothbrush into this mixture. -
Splatter Technique:
Hold the toothbrush near the planter and run your thumb across the bristles to flick tiny specks of paint onto the surface. This mimics a natural ceramic or stone finish. -
Seal the Project:
Apply a waterproof matte varnish or sealant inside and out to protect the clay from moisture, especially if you plan to use live plants.
Faux Stone Texture
Mix baking soda into your beige acrylic paint before applying. It adds a gritty, realistic stone texture that catches the light beautifully.
Pop in your favorite succulent and enjoy this chic piece of decor.
Handmade Dominoes or Tile Set
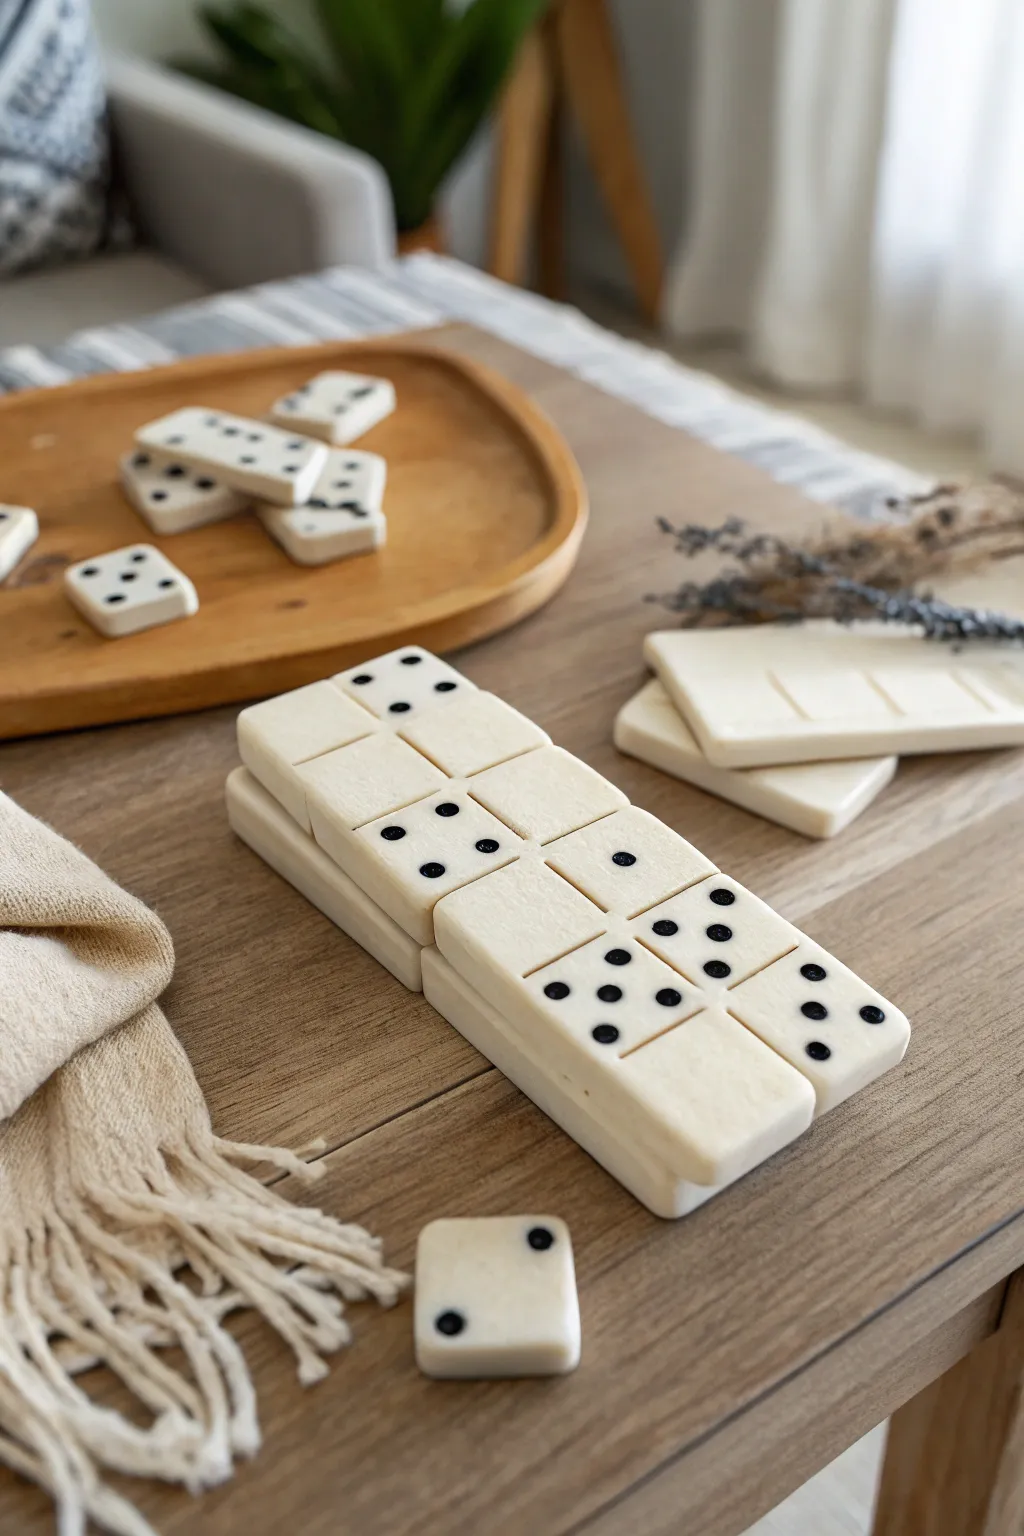
Elevate your game night with this sophisticated, handcrafted set of dominoes made from simple white clay. The finished pieces feature a soft, organic texture and a clean, minimalist aesthetic that looks just as good displayed on a coffee table as it does in play.
Step-by-Step
Materials
- White polymer clay or high-quality air-dry clay (e.g., DAS)
- Acrylic rolling pin
- Parchment paper or silicone work mat
- Ruler
- Sharp craft knife or rigid clay blade
- Medium and fine grit sandpaper (around 220 and 400 grit)
- Black acrylic paint
- Fine-point paintbrush or dotting tool
- Gloss or matte varnish (optional for sealing)
- A small bowl of water (for smoothing)
Step 1: Prepping and Cutting
-
Condition the clay:
Begin by kneading your white clay thoroughly until it is soft, pliable, and free of any air pocket bubbles. This ensures a crack-free finish later. -
Set up your surface:
Tape down a sheet of parchment paper to your work surface to prevent sticking in the next steps. -
Roll out the slab:
Roll the clay out into a large, even slab. Aim for a thickness of about 1/4 inch (6mm) to give the dominoes a substantial, quality feel. -
Use thickness guides:
If you struggle with even rolling, place two magazines or wooden slats of equal height on either side of the clay to guide your rolling pin. -
Measure the tiles:
Using a ruler, lightly mark out a grid on the clay surface. A standard domino size is roughly 1 inch by 2 inches, which fits perfectly in the hand. -
Slice the rectangles:
With a sharp craft knife or rigid clay blade, press straight down to cut along your grid lines. Avoid dragging the knife, as this can distort the rectangular shape. -
Create the dividing line:
Use the back of your knife blade or a modeling tool to gently impress a shallow line across the center of each tile, dividing it into two square halves. -
Smooth the edges:
Dip your finger in a little water and gently run it along the cut edges of each tile to soften the sharp corners just slightly.
Clean Cuts Pro Tip
For the crispest edges, chill your rolled clay slab in the fridge for 15 minutes before cutting. Use a long blade to chop straight down rather than dragging it through.
Step 2: Adding Details and Finishing
-
Plan the pips:
Before marking the clay, it helps to look up a standard double-six domino chart so you don’t miss any number combinations. -
Indent the dots:
Using a rounded dotting tool or the non-brush end of a small paintbrush, press gently into the soft clay to create the indentations for the ‘pips’ (dots). -
Refine the indentations:
Make sure each indentation is deep enough to hold paint later, but not so deep that it warps the back of the tile. -
Dry the tiles:
Allow the clay to dry completely according to package instructions. I prefer to flip them over halfway through the drying process to ensure both sides dry evenly. -
Sand for perfection:
Once fully cured, use medium-grit sandpaper to smooth out any rough edges or uneven surfaces on the sides of the tiles. -
Final polish:
Switch to fine-grit sandpaper for a smoother finish that feels pleasant to hold. -
Paint the pips:
Dip a fine-point brush into black acrylic paint and carefully fill in the indented dots. Don’t worry if you get a little paint outside the hole; we can fix that. -
Clean up overflow:
If paint spills over, wait for it to dry slightly and then scrape the excess away gently with your craft knife or a quick swipe of sandpaper. -
Seal the set:
To protect your handiwork from oils and dirt during play, apply a thin coat of matte or gloss varnish over each tile.
Level Up: Gold Leaf
Swap the black paint for liquid gold leaf or metallic copper paint to fill the pips. This adds a stunning, luxurious touch that contrasts beautifully with the matte white clay.
Now you have a timeless, custom gaming set ready for your next cozy gathering