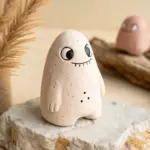
I love how simple clay figures can start as nothing more than a few basic shapes and still come out with big personality. Grab whatever clay you like—air-dry clay or polymer clay—and let’s make a little crew of cute, no-stress characters.
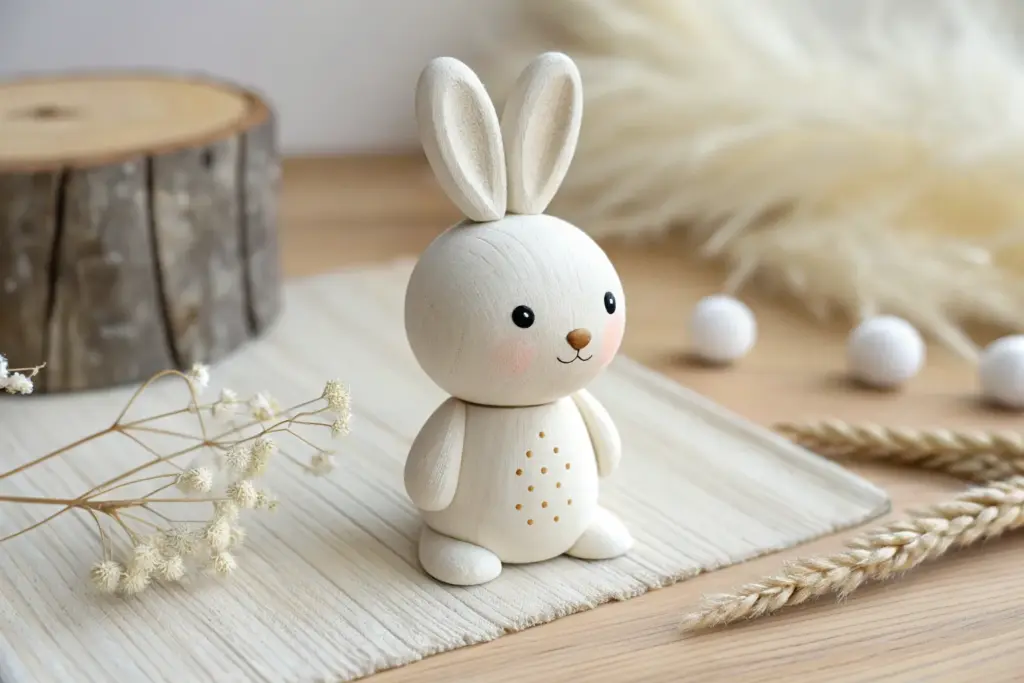
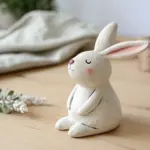
One-Ball Bunny
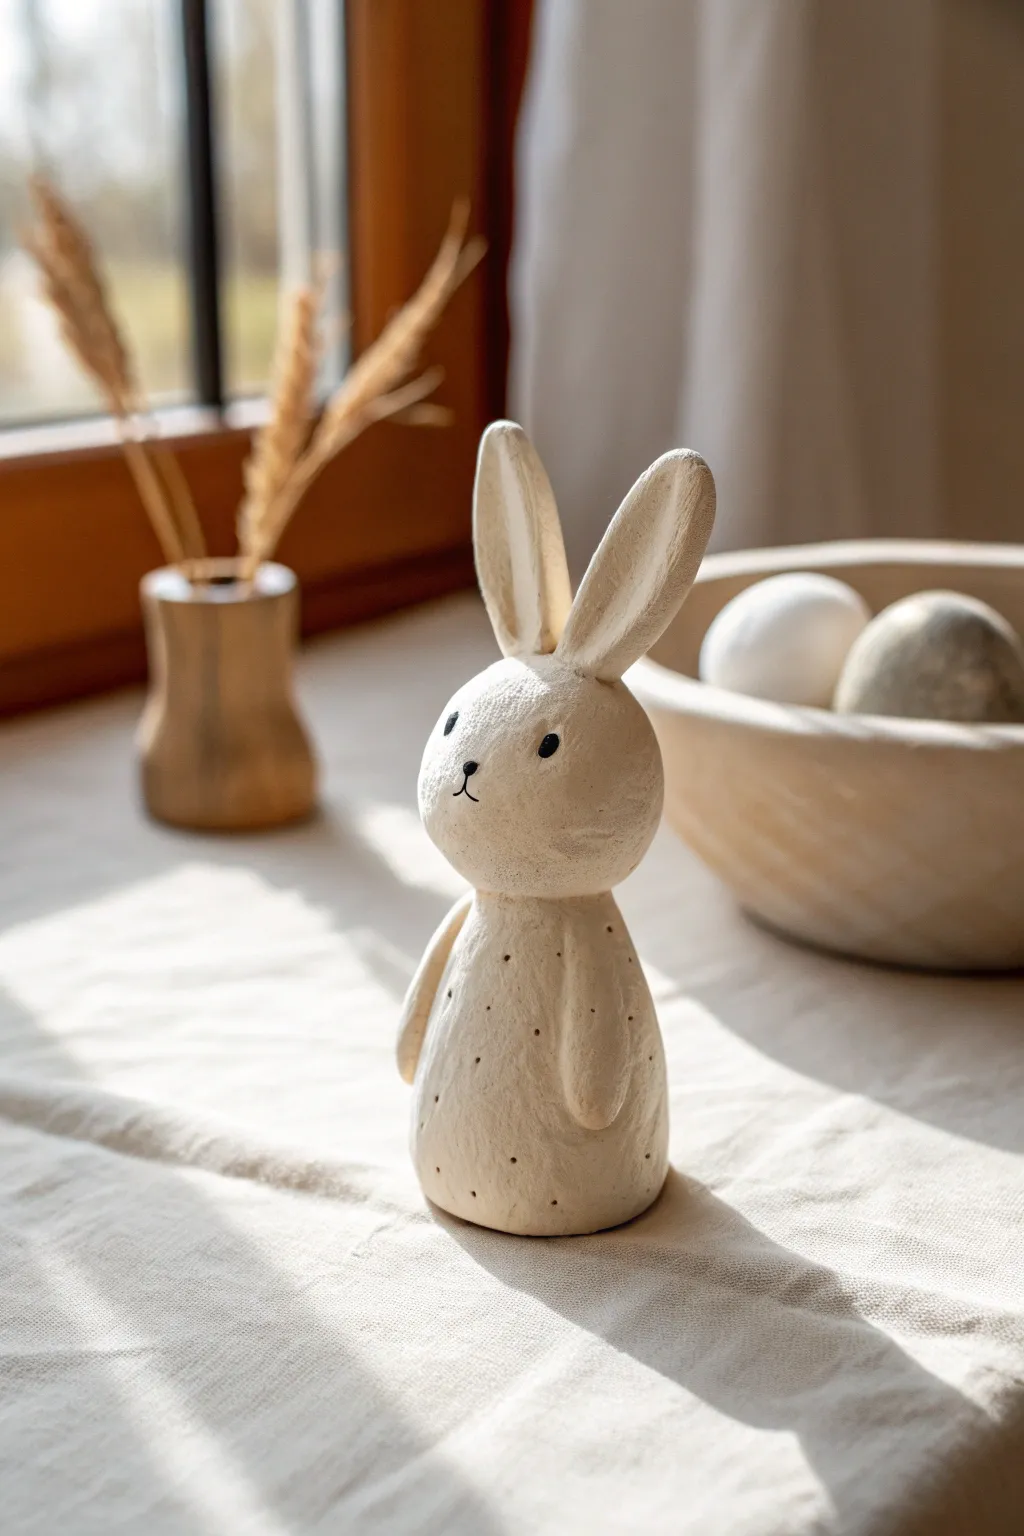
This charming, primitive-style bunny brings a touch of rustic elegance to your decor with its matte finish and gentle textures. The simple two-part construction creates a timeless silhouette that looks wonderful on a windowsill or holiday table.
Step-by-Step Tutorial
Materials
- White air-dry clay or polymer clay
- Aluminum foil (for armature core)
- Small rolling pin
- Sculpting tools (needle tool, smoothing tool)
- Black acrylic paint
- Very fine detail paintbrush
- Needle or toothpick
- Water bonding slip (for air-dry clay) or liquid clay (for polymer)
- Matte varnish (optional)
Step 1: Forming the Body and Head
-
Create the core:
Begin by crumpling a small piece of aluminum foil into a tight ball for the head and a slightly larger pear shape for the body. This saves clay and reduces weight. -
Cover the body:
Roll out a sheet of clay to about 1/4 inch thickness. Wrap it entirely around the pear-shaped foil core, smoothing the seams together until invisible. -
Shape the torso:
Roll the clay-covered body on your work surface to create a smooth, tapered cylinder that is wider at the bottom and slightly narrower at the neck. -
Form the head:
Cover the head foil core with a layer of clay in the same manner. Roll it between your palms to achieve a clean, spherical shape. -
Attach the pieces:
Score the top of the body and the bottom of the head with a needle tool to create a rough texture. Apply a dab of water or slip (or liquid clay) to the scored areas. -
Secure the join:
Press the head firmly onto the body. Use a sculpting tool or your thumb to drag a small amount of clay from the neck area up onto the head to lock them together, then smooth this seam entirely.
Ears Drooping?
If the ears won’t stay upright while drying, insert a short piece of toothpick or wire into the head as a support post, sliding the ear over it.
Step 2: Adding Features and Details
-
Shape the ears:
Roll two equal logs of clay. Flatten them gently and taper one end of each into a point. -
Refine ear shape:
Use your thumb to create a shallow, concave indentation running down the inner length of each ear to give them depth. -
Attach the ears:
Score the attachment points on the top of the head and the base of the ears. Press them firmly into place, blending the clay at the base smoothly into the skull. -
Create arms:
Roll two small, thin logs for the arms. They should be simple and unstructured, just suggesting the shape of limbs. -
Attach arms:
Press the arms onto the sides of the body, blending the shoulder area seamlessly into the torso while leaving the ‘hand’ end slightly raised for dimension. -
Texture the surface:
I like to take a slightly damp sponge or a stiff brush and gently tap the entire surface of the bunny to remove fingerprints and give it a subtle, stone-like texture. -
Add dotted details:
Using a needle tool or toothpick, gently poke small, random holes around the lower half of the bunny’s belly to mimic the texture seen in the reference.
Natural Stone Look
Mix tiny specks of dried herbs (like crushed tea leaves) or black sand into your white clay before sculpting to create a faux granite effect naturally.
Step 3: Finishing Touches
-
Dry or bake:
If using air-dry clay, let the figure sit for 24-48 hours until fully hard. If using polymer, bake according to package instructions. -
Paint facial features:
Dip a fine detail brush into black acrylic paint. Paint two small oval eyes wide apart on the face. -
Add nose and mouth:
Paint a tiny ‘Y’ shape purely in black to represent the nose and mouth cleft. Keep the lines extremely thin for a minimal look. -
Optional sealing:
Once the paint is dry, apply a coat of matte varnish to protect the surface without adding unwanted shine.
Place your finished bunny near a window where natural light can highlight its gentle curves and texture


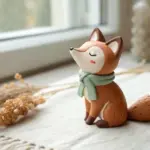
Chubby Sitting Cat
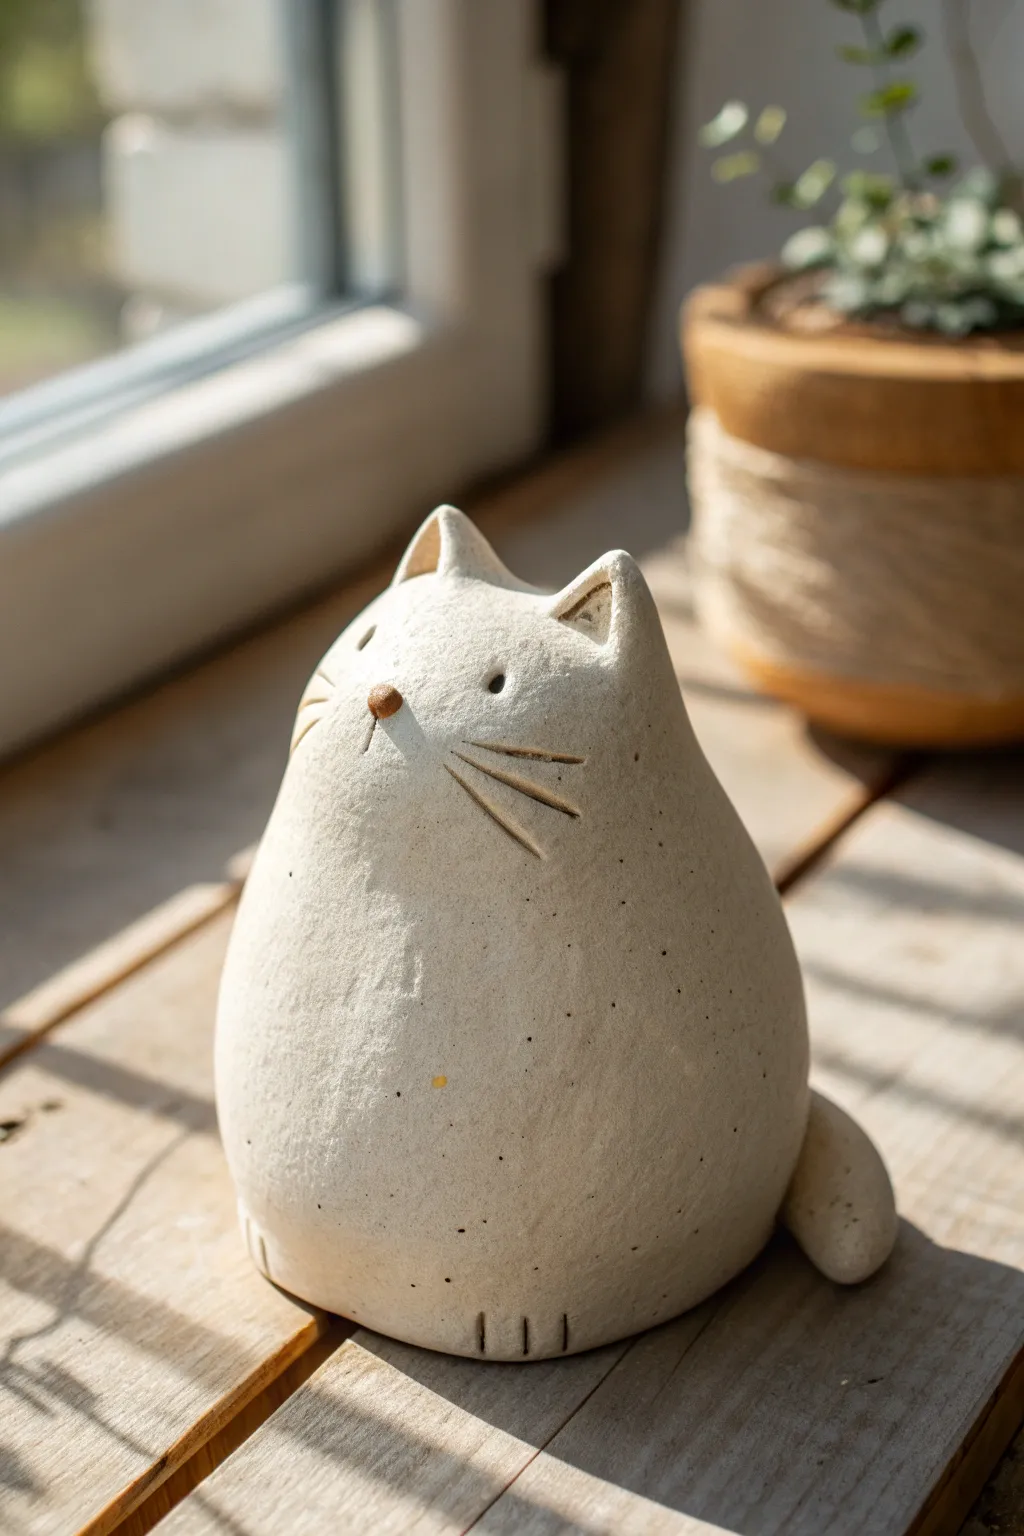
This adorable, rotund feline captures the essence of a relaxed cat with minimal lines and maximum charm. Using speckled clay adds a lovely texture that gives the piece an organic, handcrafted feel perfect for a windowsill companion.
Step-by-Step Guide
Materials
- Speckled air-dry clay or stoneware clay (white or light beige)
- Small amount of brown clay (for the nose)
- Needle tool or toothpick
- Small sponge
- Water slip (if using firing clay) or water (for air-dry)
- Clean work surface (canvas or wooden board)
- Matte spray varnish (optional)
Step 1: Shaping the Base Body
-
Establish the volume:
Begin with a ball of speckled clay roughly the size of a large orange. Roll it firmly between your palms to compress the clay and remove any trapped air bubbles. -
Create the taper:
Place the ball on your work surface. Gently roll the top third of the ball between your hands to narrow it slightly, creating a pear shape. The bottom needs to remain wide and heavy to anchor the figure. -
Flatten the base:
Pick up the pear shape and tap the bottom firmly against the table. You want a flat, stable surface so your cat sits securely without rocking. -
Smooth the spine:
Use your dampened thumb to gently smooth the transition from the back to the head. It shouldn’t have a distinct neck; the goal is one continuous, fluid curve from ears to tail.
Step 2: Sculpting the Head and Ears
-
Pinch the ears:
At the very top of the tapered end, use your thumb and forefinger to pinch up two small triangles of clay. Keep them fairly close together. -
Refine ear shape:
Use a modeling tool or your fingertip to press a small indentation into the front of each ear triangle, giving them depth and a distinct inner ear structure. -
Define the brow:
Just below the ears, gently press your thumb horizontally across the face area. This subtle depression helps separate the forehead from the muzzle. -
Round the muzzle:
With the brow defined, gently push the clay below it outwards slightly to emphasize a round, protruding muzzle area where the whiskers will go.
Pro Tip: Texture Trick
If you don’t have speckled clay, mix used dry coffee grounds or black pepper into plain white air-dry clay. It mimics the ceramic stoneware look perfectly.
Step 3: Adding Details and Tail
-
Create the eyes:
Take your needle tool or a small dowel and press two small holes for the eyes. Don’t go too deep; just enough to create a shadow. -
Add the nose:
Roll a tiny, lentil-sized ball of contrasting brown clay. Score the center of the muzzle slightly, add a dab of water or slip, and press the nose firmly into place. -
Carve the whiskers:
Using the needle tool, carefully carve three lines on each cheek. Start near the nose and sweep outward. I find that deepening the start of the line makes it look more expressive. -
Indicate the mouth:
Make a tiny vertical mark directly under the nose to suggest the split in the upper lip. -
Form the tail:
Roll a short, thick sausage of clay for the tail. It should be chubby and rounded at the end, matching the cat’s overall aesthetic. -
Attach the tail:
Score the side of the cat’s hip and the flat side of the tail. Apply water or slip, and press the tail so it curves affectionately around the body’s side. -
Mark the paws:
At the very bottom front of the figurine, use your needle tool to make three or four vertical indentations to represent toe divisions.
Troubleshooting: Cracks
If hairline cracks appear while drying, mix a tiny bit of fresh clay with water to make a paste and fill the crack immediately, then smooth it over with a damp finger.
Step 4: Finishing Touches
-
Sponge smooth:
Dampen a small sponge and lightly wipe over the entire surface. This removes fingerprints and softens any harsh tool marks. -
Final check:
Rotate the figure to ensure it looks symmetrical and the ‘spine’ curve is pleasingly round. Adjust the ears if they got bumped during handling. -
Dry slowly:
Let the piece dry slowly away from direct heat to prevent cracking. This usually takes 24-48 hours depending to the clay type.
Place your finished chubby friend on a sunny sill and enjoy its calming presence


Little Puppy With Floppy Ears
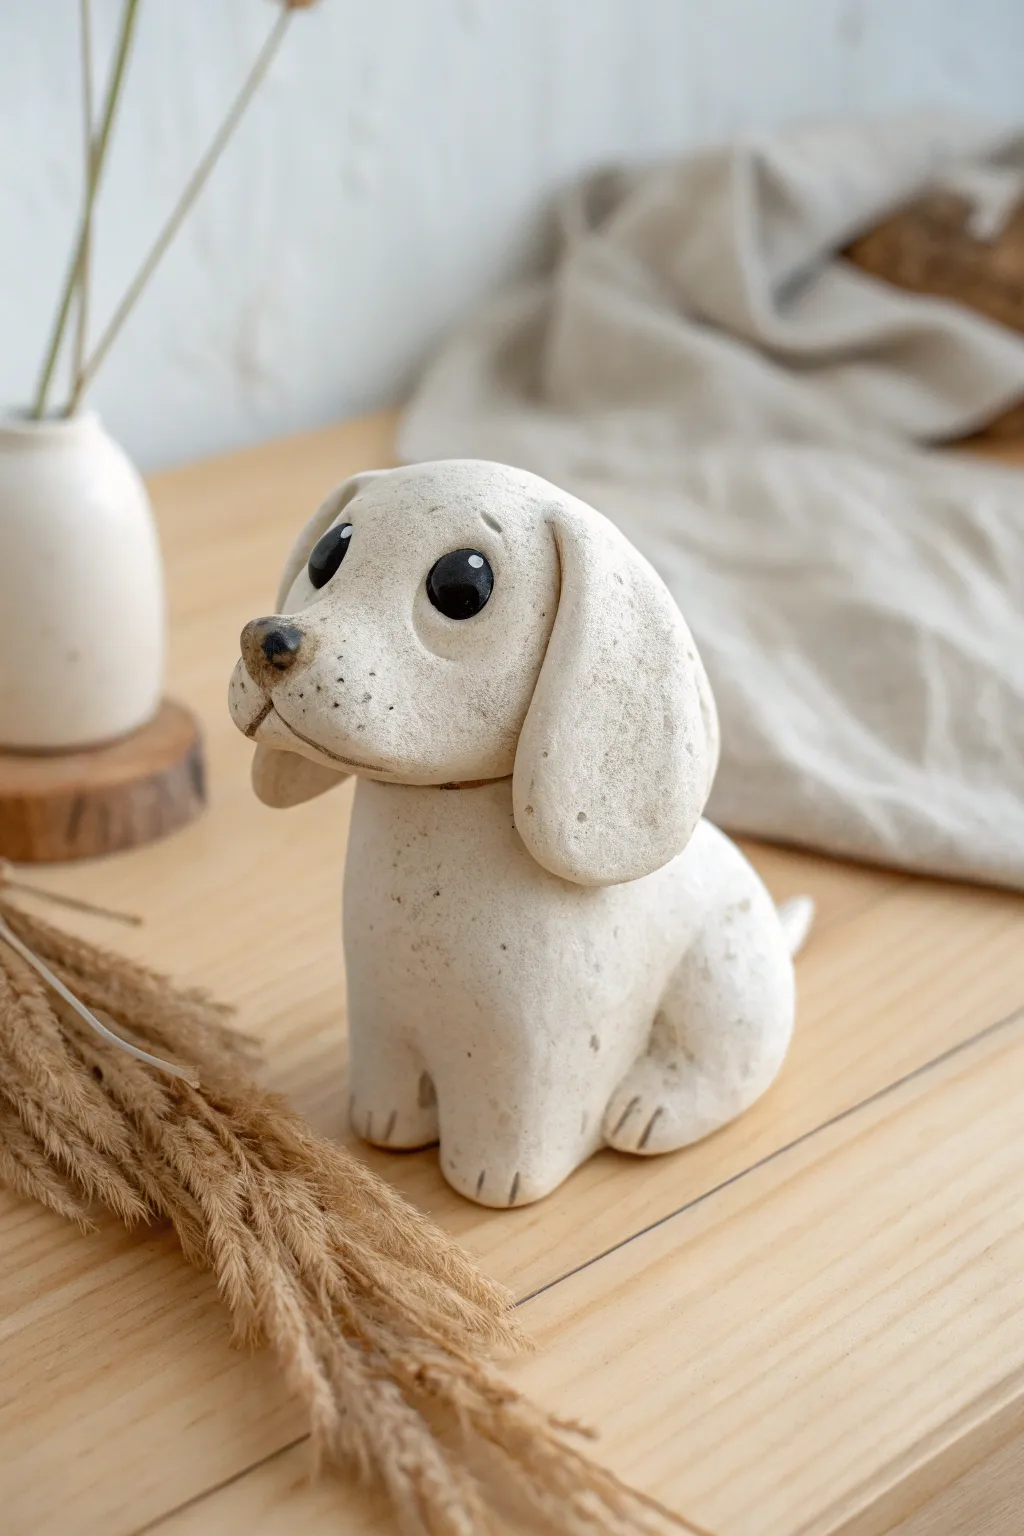
Capture the charm of man’s best friend with this adorable, minimalist puppy figurine. Featuring oversized floppy ears and soulful eyes, its speckled cream finish gives it a lovely, organic ceramic look without needing a kiln.
Detailed Instructions
Materials
- White air-dry clay or polymer clay (approx. 200g)
- Black acrylic paint
- Gloss varnish or clear nail polish
- Sculpting tools (needle tool, smoothing sponge)
- Water cup (for smoothing)
- Old toothbrush (for speckling)
- Diluted brown/grey acrylic paint (for speckles)
Step 1: Forming the Body
-
Shape the torso:
Begin with a large ball of clay slightly smaller than a tennis ball. Roll it into a smooth pear shape, flattening the wider bottom so it sits stable and upright on your work surface. -
Define the chest:
Gently press the upper portion of the pear shape to create a distinct chest area, ensuring the transition to the neck is smooth but visible. -
Add the back legs:
Roll two small balls of clay and flatten them slightly into ovals. Attach these to the lower sides of the body to form the haunches of the sitting puppy. -
Create paw details:
Use a needle tool or a dull knife to press three small vertical lines into the front of the base and the attached haunches to simulate toes. -
Attach the tail:
Roll a small cone of clay for the tail. Attach it to the lower back, curving it slightly upward or to the side for a playful look, blending the seams thoroughly.
Pro Tip: Eye Placement
Place the eyes lower on the head, aligned with the top of the muzzle. This creates a ‘puppy’ proportion that instantly makes the figure look cuter and younger.
Step 2: Sculpting the Head
-
Form the head shape:
Roll a second ball of clay, slightly smaller than the body. Press it gently to flatten the bottom where it will attach to the neck. -
Create the muzzle:
Pinch the front of the face sphere gently to pull out a rounded muzzle shape. It shouldn’t be too long; keep it blunt and cute. -
Attach head to body:
Score (scratch) the top of the neck and bottom of the head, add a touch of water or slip, and press them firmly together. Smooth the clay over the seam to make it invisible. -
Make the ears:
Create two thick oval slabs of clay. Smooth the edges so they are rounded and organic, resembling large teardrops. -
Attach the ears:
Press the narrower end of the ears onto the sides of the head near the top. Let them drape naturally down the sides of the face, curving slightly forward.
Level Up: Collar Detail
Before drying, roll a very thin snake of colored clay or paint a stripe around the neck to create a collar. You can even add a tiny clay tag with a name initial.
Step 3: Details and Finishing
-
Sculpt the nose:
Add a tiny triangular button of clay to the tip of the muzzle. Use your tool to create a small vertical line underneath it for the mouth cleft. -
Indent eye sockets:
Determine where the eyes will go and use a rounded tool or your thumb to make gentle indents. This helps the eyes sit naturally rather than bulging out. -
Create the eyes:
Roll two small balls of clay and press them into the sockets. Alternatively, you can leave these smooth and paint them later, but sculpted eyes add dimension. -
Add texture:
Before the clay dries, gently tap the surface with a stiff brush or texture sponge if you want a rougher stone look, or smooth it perfectly with water for a porcelain finish. -
Dry completely:
Let the figure dry for 24-48 hours. I find that turning the figure upside down halfway through helps the base dry evenly.
Step 4: Painting the Rustic Look
-
Paint the eyes and nose:
Use opaque black acrylic paint to color the eyes and the nose tip. Add a tiny white dot to each eye for a reflection. -
Speckle the surface:
Dilute a small amount of brown or grey paint with water. Load an old toothbrush, wipe off the excess, and flick the bristles to spray fine speckles across the puppy’s body. -
Seal the piece:
Once the paint is dry, apply a matte varnish over the body. Use a high-gloss varnish just on the eyes and nose to make them look wet and alive.
Place your new ceramic-style friend on a shelf or desk where it can bring a smile to your face every day


Tiny Teddy Bear Cub
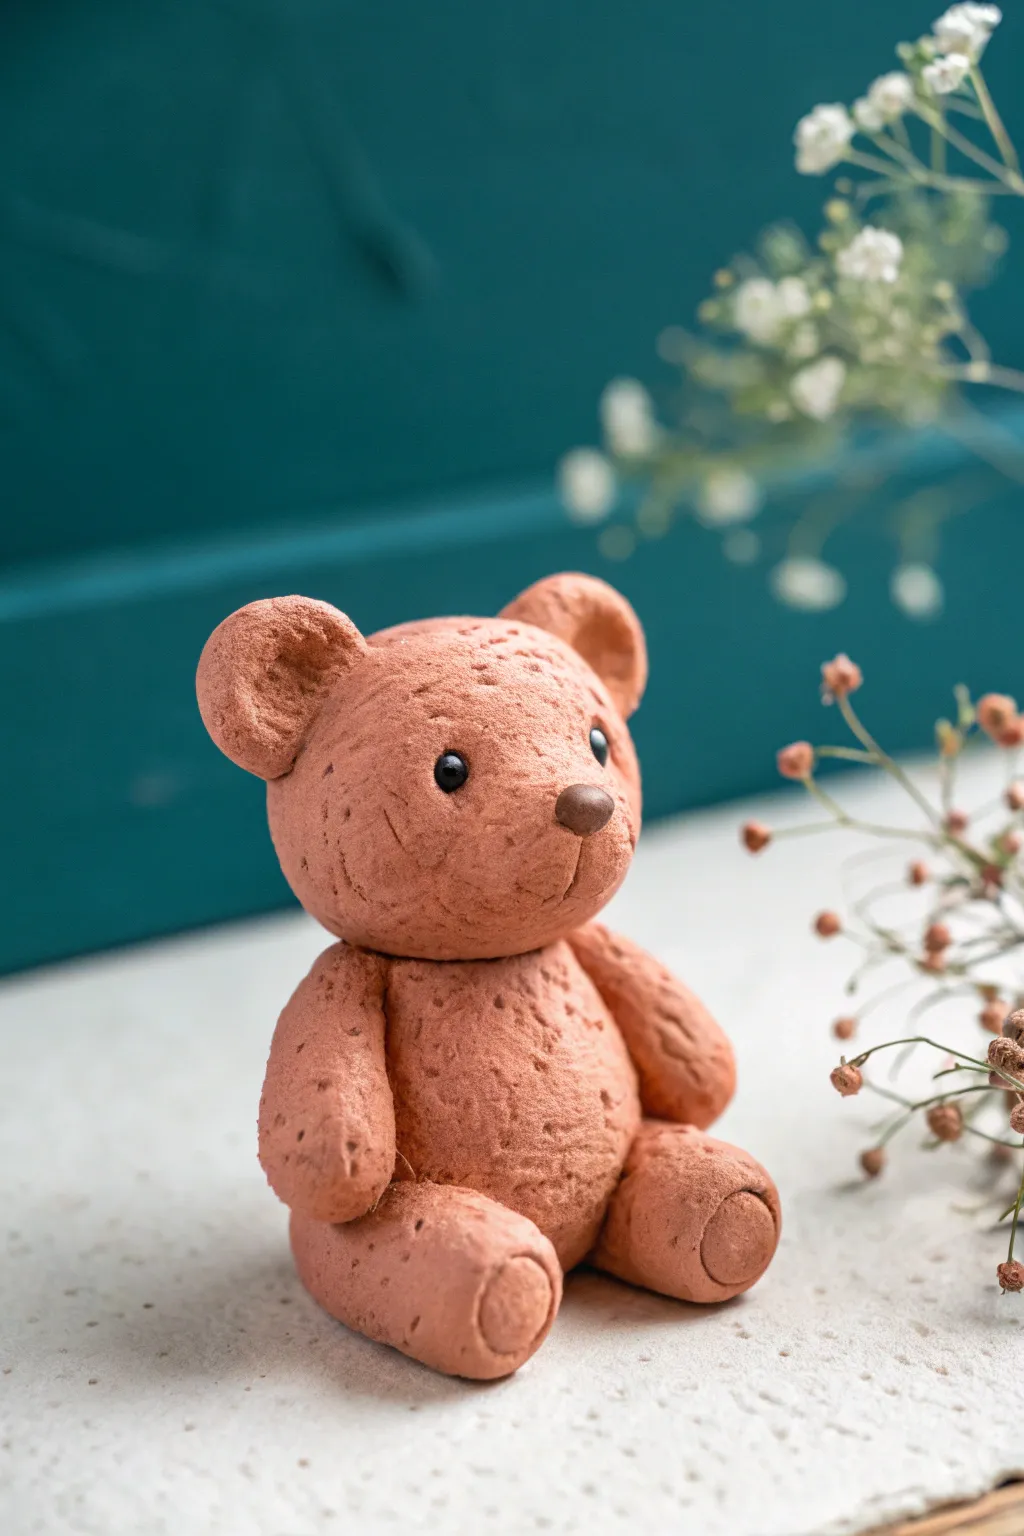
This charming little bear cub captures the warmth of terracotta with a delightful surface texture that begs to be touched. Its simple shapes make it an approachable project for beginners, while the detailed finish gives it a professional, artisanal look.
Step-by-Step Guide
Materials
- Polymer clay (terracotta or reddish-brown color)
- Small amount of dark brown or black clay (for eyes/nose)
- Toothbrush or stiff stippling brush
- Needle tool or toothpick
- Ball stylus tool (small)
- Baking sheet and parchment paper
- Oven (for baking polymer clay)
Step 1: Shaping the Head
-
Form the base:
Start with a ball of terracotta clay roughly the size of a walnut. Roll it between your palms until it is perfectly smooth and free of major cracks. -
Refine the shape:
Gently press the ball into a slightly oval shape to create the bear’s head. It shouldn’t be perfectly round; a slight wideness at the cheeks adds character. -
Add the muzzle:
Create a smaller, flattened oval of the same clay color. Press this onto the lower center of the face to form the muzzle area, blending the back edges slightly into the head so it doesn’t look stuck on. -
Create the ears:
Roll two small pea-sized balls of clay. Flatten them slightly and use your thumb or a ball tool to create a small indentation in the center of each. -
Attach the ears:
Place the ears on the top corners of the head. I like to blend the clay slightly at the connection point using a sculpting tool to ensure they are secure.
Stubble Technique
If you don’t have a stiff brush, wad up a ball of aluminum foil and roll it roughly over the clay surface. This creates a fantastic, craggy rock-like texture instantly.
Step 2: Building the Body
-
Form the torso:
Roll a second ball of terracotta clay, slightly larger than the head. Shape this into a pear shape, flattening the bottom so the bear can sit upright. -
Connect head and body:
Gently press the head onto the top of the pear-shaped body. You can insert a short piece of toothpick or wire between them for internal support if desired. -
Shape the legs:
Roll two generous sausage shapes for the legs. Gently flatten the ends to suggest paws. Attach these to the bottom sides of the body, facing forward. -
Shape the arms:
Create two slightly smaller sausage shapes for the arms. Attach these to the upper sides of the body, letting them rest naturally against the tummy or legs. -
Define the paws:
Use a ball tool to press circular indentations into the bottom of the foot pads, giving distinct definition to the soles of the feet.
Rustic Wash
After baking, dilute brown acrylic paint with water. Brush it over the bear and wipe off the excess. The paint will settle into the texture pits, highlighting the roughness.
Step 3: Texturing and Details
-
Create the texture:
This is the most crucial step for the ‘stone’ look. Take an old toothbrush or a stiff stippling brush and firmly tap it all over the surface of the bear. Don’t drag it; just tap repeatedly to create a pitted, rough surface. -
Refine the texture:
Pay special attention to the seams where limbs attach; texturing over these joins helps hide the connection lines and unifies the sculpture. -
Add scratches:
For extra realism, use a needle tool to add a few very light, random scratches or deeper pores here and there, breaking up the uniformity. -
Prepare eye sockets:
Use a small ball tool to press two indentations into the face where the eyes will go. This ‘sets’ the eyes into the head rather than having them bulge out. -
Insert eyes:
Roll two tiny specks of black clay into balls. Press them firmly into the eye sockets you just created. -
Add the nose:
Roll a small, soft triangular shape from dark brown clay. Press this onto the top center of the muzzle area. -
Detail the mouth:
Use a needle tool or knife to verify the slight vertical line beneath the nose, creating the classic teddy bear mouth split. -
Bake:
Follow the baking instructions on your specific package of polymer clay (usually 275°F/135°C for 15-30 minutes). Let the bear cool completely before handling.
Now you have a timeless little companion ready to sit on your shelf or desk

The Complete Guide to Pottery Troubleshooting
Uncover the most common ceramic mistakes—from cracking clay to failed glazes—and learn how to fix them fast.
Simple Penguin With Belly Patch
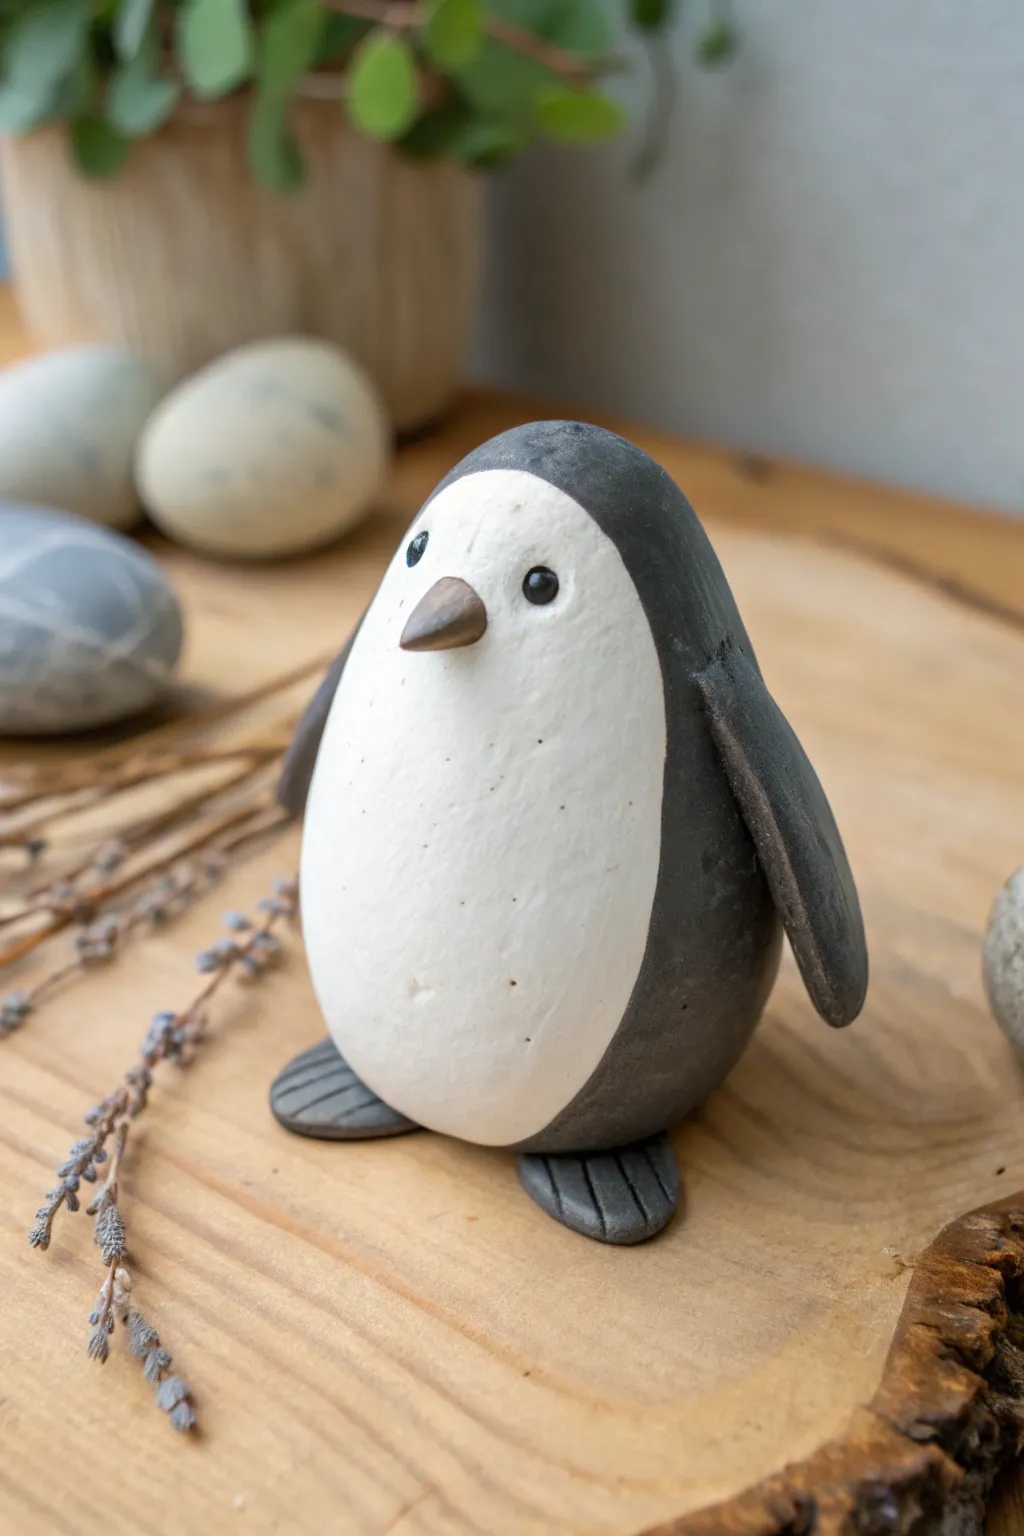
This adorable penguin figurine features a charmingly simple teardrop shape with a distinct belly patch and matte finish. Its minimalist style makes it a perfect beginner sculpting project that adds a touch of whimsy to any shelf.
How-To Guide
Materials
- White air-dry clay or polymer clay
- Acrylic paints (Black, White, Brown/Golden-brown)
- Small fine-point paintbrush
- Rolling pin
- Modeling tools or a toothpick
- Water (for smoothing)
- Matte varnish (optional)
Step 1: Shaping the Core
-
Roll the main body:
Start with a palm-sized ball of clay. Roll it between your hands until it is smooth and free of cracks. -
Form the teardrop:
Gently taper the top of the ball to create a rounded cone or teardrop shape. This will be the penguin’s head and body combined. -
Flatten the base:
Tap the bottom of the teardrop figure onto your work surface firmly so the penguin stands upright without wobbling. -
Outline the belly:
Using a needle tool or toothpick, lightly etch a large oval shape on the front of the belly area. This marks where the white patch will go later.
Cracks Appearing?
If you see hairline cracks while air-drying, mix a tiny bit of fresh clay with water to make a ‘slip’ paste and fill the gaps, then smooth it over.
Step 2: Adding Features
-
Create the wings:
Roll two small, equal-sized logs of clay. Flatten them into elongated teardrop shapes to form the flippers. -
Attach the wings:
Score the clay on the sides of the body where the wings will attach. Press the wider end of the wings onto the shoulders, smoothing the seam downward. -
Shape the beak:
Take a tiny pinch of clay and roll it into a small cone. Gently press this onto the center of the face area, pointing slightly downward. -
Make the feet:
Form two small, flat semicircles for the feet. Use a knife tool or toothpick to press three lines into each foot to create toes. -
Attach the feet:
Place the body on top of the feet so they stick out slightly from the front. Blend the clay at the connection point underneath to secure them. -
Smooth the surface:
Dip your finger in a little water and gently run it over the entire figure to remove fingerprints and bumps. I find this step crucial for that professional, smooth look. -
Dry completely:
Create some space for the figure to dry. If using air-dry clay, wait 24-48 hours; if using polymer, bake according to package instructions.
Step 3: Painting and Finishing
-
Paint the belly:
Using white acrylic paint, fill in the oval area you marked on the stomach. You may need two thin coats for opaque coverage. -
Paint the body:
Carefully paint the rest of the body (back, head, wings, and feet) with a matte black or dark charcoal grey paint. Use a steady hand near the white belly line. -
Color the beak:
Paint the small beak cone with a golden-brown or copper shade to give it a natural look. -
Add the eyes:
Dip the non-brush end of your paintbrush into black paint and dot two small eyes onto the white face area above the beak. -
Highlight the eyes:
Once the black dots are dry, add a microscopic dot of white inside them to bring the character to life. -
Seal the piece:
If desired, apply a matte varnish over the entire penguin to protect the paint and give it a unified finish.
Make It Winter Ready
Before the clay dries, sculpt a tiny scarf or a woolly hat to add on top. Knit textures can be imprinted using a piece of fabric or mesh.
Now you have a charming little arctic friend to keep you company on your desk.
Round Frog With Big Eyes
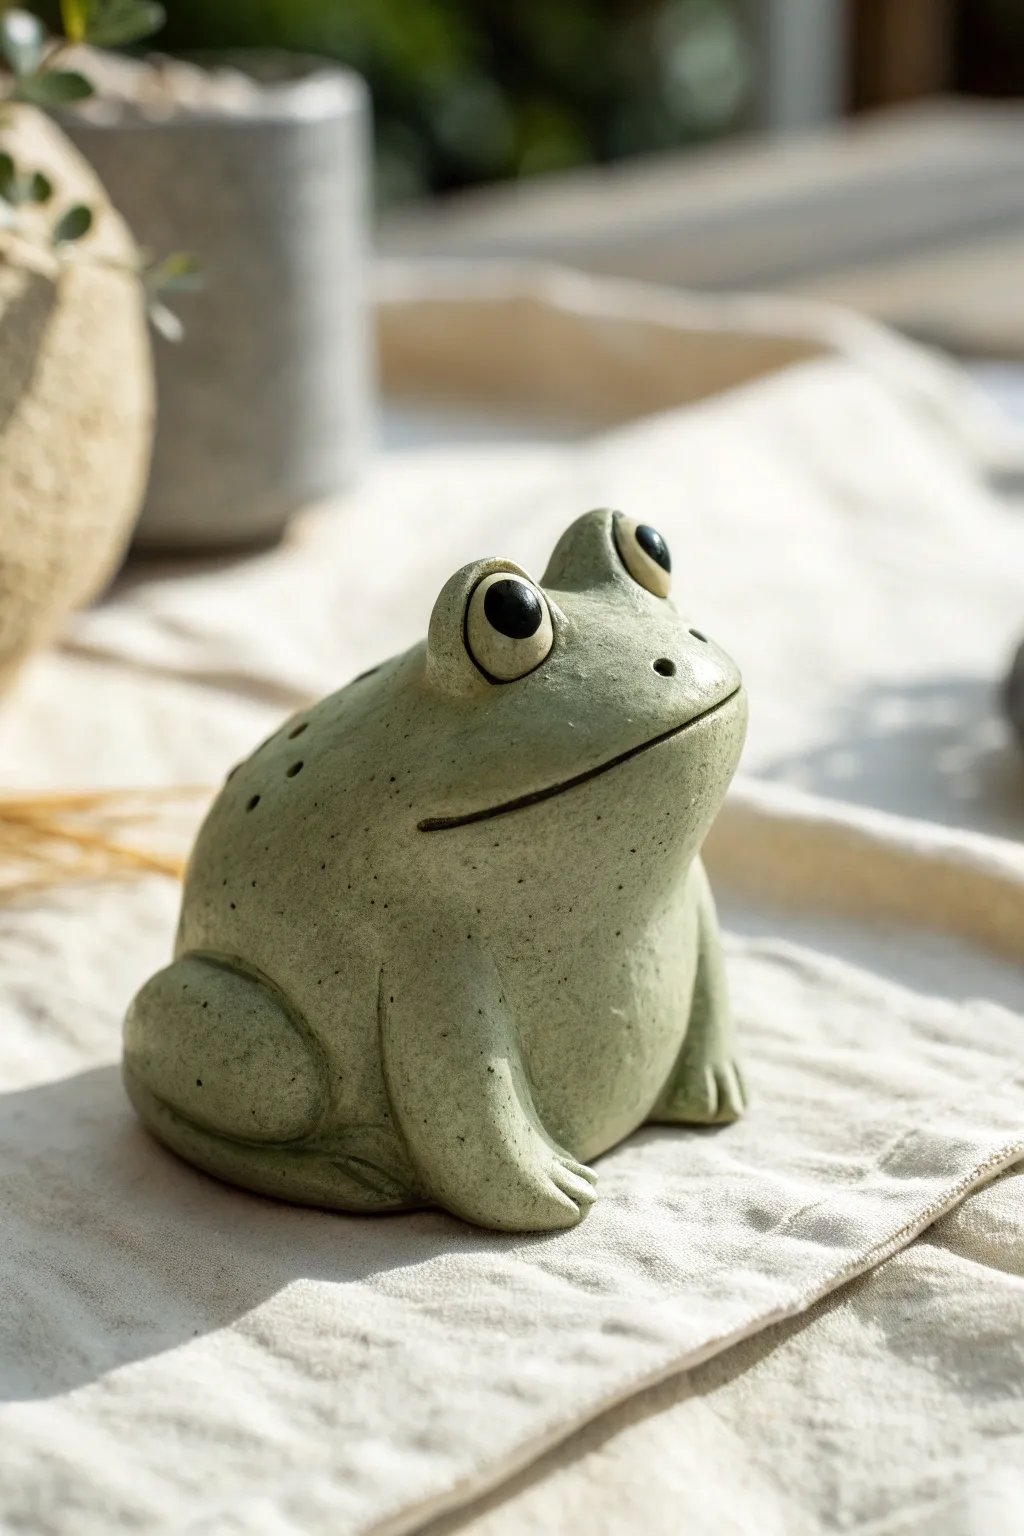
This charming little amphibian brings a touch of whimsy to any desk or shelf with its smooth, speckled green finish and endearing upward gaze. The project focuses on round, organic shapes and a stylized, minimalist face that is surprisingly expressive.
Step-by-Step Guide
Materials
- Polymer clay or air-dry clay (sage green)
- Small amount of white clay
- Small amount of black clay
- Clay blending tool or silicone smoother
- Needle tool or toothpick
- Acrylic paint (dark green or brown) for speckling
- Old toothbrush
- Gloss varnish (optional)
Step 1: Shaping the Body
-
Create the base:
Start with a large ball of sage green clay roughly the size of a tangerine. Roll it until it is perfectly smooth and free of cracks. -
Form the torso:
Gently press the ball onto your work surface to flatten the bottom. Using your palms, slightly taper the top half to create a rounded, gumdrop-like shape, keeping the bulk of the weight at the bottom. -
Define the head:
Instead of adding a separate head, sculpt it from the main mass. Use your thumbs to gently push in at the sides, delineating where the neck would subtly be, keeping the transition very smooth and organic.
Cracks while rolling?
If your clay sphere gets surface cracks, your clay is too dry. Add a drop of clay softener (for polymer) or water (for air-dry) and knead thoroughly before rolling again.
Step 2: Constructing the Legs
-
Make the thigh shapes:
Roll two medium-sized balls of green clay for the rear legs. Flatten them into thick discs and press them firmly against the lower back sides of the body. -
Blend the thighs:
Use a silicone tool or your finger to smooth the seams where the thighs meet the body. I like to leave the outer curve distinct to suggest the folded leg muscle. -
Form the front legs:
Roll two thick logs of green clay. Attach these vertically to the front of the body, creating a slight inward curve so they look like they are supporting the frog’s weight. -
Create the feet:
At the bottom of the front legs, press the clay flat against the table. Use a needle tool to score two lines into each flattened area, creating three simple, rounded toes. -
Add the rear feet:
Roll two small pieces of clay into flattened tear-drop shapes. Tuck these under the rear thighs, extending slightly forward, and mark the toes just like you did for the front feet.
Make it a planter
Before the clay hardens, hollow out the back with a large loop tool. After curing, you can insert a tiny air plant or succulent into the frog’s back.
Step 3: Sculpting the Face
-
Position the eye sockets:
On the top of the head, use a ball tool or your thumb to make two shallow, upward-facing indentations where the large eyes will sit. -
Sculpt eye mounds:
Roll two balls of green clay and place them into the indentations. Smooth the bottom edges downward into the head so the eyes look like they are protruding naturally from the skull, not just stuck on top. -
Insert the whites:
Press a depression into the front of each green eye mound. Fill this space with a flattened disc of white clay. -
Add the pupils:
Take two small balls of black clay and press them onto the white discs. Position them slightly high and centered to give the frog that optimistic, upward gaze. -
Carve the mouth:
Using a needle tool or the edge of a clay knife, carve a long, wide smile that stretches almost from one side of the head to the other. Curve the ends upward slightly. -
Refine the mouth:
Use a smooth tool to soften the sharp edges of the cut you just made, ensuring the smile looks soft and friendly. -
Add nostrils:
Poke two tiny holes with a needle tool just above the mouth line, centered between the eyes.
Step 4: Finishing Details
-
Texture the skin:
This frog has a speckled, stone-like texture. Dilute a small amount of dark green or brown acrylic paint with water. -
Apply speckles:
Dip an old toothbrush into the paint mixture. Run your thumb across the bristles to flick tiny splatters of paint onto the frog’s back and sides. -
Add larger spots:
Use a toothpick to add a few deliberate, larger dots of the dark paint near the back, mimicking the warts or spots of a real toad. -
Final smooth:
Check the entire piece for fingerprints. If using polymer clay, lightly brush with baby oil to smooth; if using air-dry, use a tiny bit of water. -
Bake or dry:
Follow the drying or baking instructions specific to your clay type. Once fully hardened, you can add a touch of gloss varnish to the eyes to make them look wet and alive.
Enjoy your new garden companion as it sits patiently waiting for a fly


What Really Happens Inside the Kiln
Learn how time and temperature work together inside the kiln to transform clay into durable ceramic.
Easy Octopus With Coil Tentacles
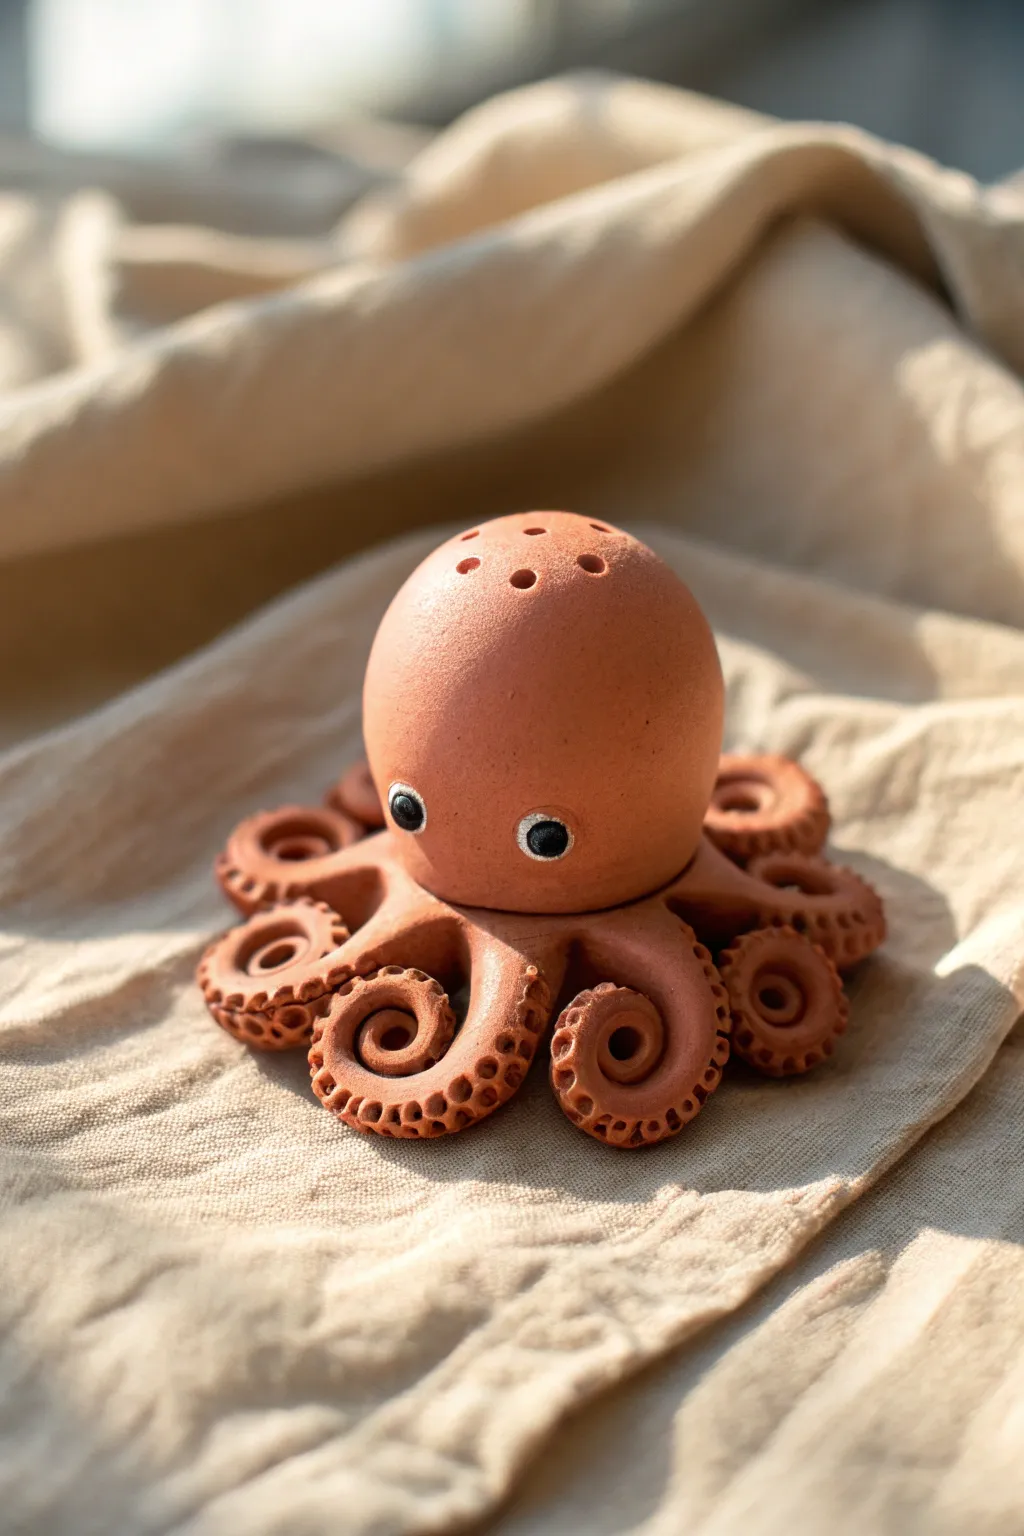
This charming little sea creature combines a smooth, rounded pinch-pot head with wonderfully spiraled tentacles. The reddish-brown clay gives it a natural, earthy look that highlights the delicate sucker textures perfectly.
Step-by-Step Tutorial
Materials
- Terracotta colored air-dry clay or polymer clay
- Small rolling pin
- Needle tool or toothpick
- Small drinking straw or hollow tube tool
- Black and white acrylic paint
- Fine detail paintbrush or dotting tool
- Water mirror (for smoothing)
Step 1: Sculpting the Head
-
Roll the main form:
Start with a ball of terracotta clay roughly the size of a golf ball or slightly larger, ensuring it is smooth and free of major cracks. -
Shape the dome:
Gently press the ball onto your work surface to flatten the bottom. Use your palms to cup and shape the top into a tall, smooth egg-like dome. -
Add texture holes:
Using a needle tool or the tip of a toothpick, carefully poke a grouping of 5-6 small holes on the very top of the head. This adds a decorative, shaker-like quality.
Cracks while rolling?
If your clay coils are cracking while spiral rolling, the clay is too dry. Dip your fingers in water and knead it back into the clay before re-rolling the sausage shapes.
Step 2: Creating the Tentacles
-
Prepare clay coils:
Roll out eight even sausages of clay. They should be about the thickness of a pencil and slightly tapered at one end. -
Create the spirals:
Take one clay sausage and tightly curl the tapered end inward to create a snail-shell spiral shape. Leave the thicker end straight. -
Add suckers:
I like to use a small hollow straw for this part. Gently press the end of the straw into the side of the coiled tentacle repeatedly to create rows of little ring-shaped sucker marks. -
Repeat the process:
Create all eight spiraled and textured tentacles before attaching them, trying to keep them relatively consistent in size.
Turn it into a planter
Instead of a solid dome head, create a pinch pot for the head and leave the top open. It makes an adorable home for a tiny air plant or succulent.
Step 3: Assembly and Details
-
Attach the legs:
Arrange the eight tentacles in a circle. Score and slip the straight ends (if using water-based clay) or blend them together at the center point where the head will sit. -
Mount the head:
Place the dome head onto the center of the ring of tentacles. Use a sculpting tool to smooth the clay from the bottom of the head down onto the tops of the tentacles. -
Refine the join:
Run a wet finger or smoothing tool around the ‘neck’ area to ensure a seamless transition between the head and the legs. -
Create eye sockets:
Use the back of a paintbrush or a ball tool to make two shallow indentations where the eyes will go. -
Add the eyes:
Roll two tiny balls of white clay (or paint them later) and press them into the sockets. Add tinier black clay pupils, or wait to paint these details after drying. -
Let it dry or bake:
Follow the specific instructions for your clay type to harden the sculpture. If using air-dry clay, allow at least 24 hours.
Step 4: Finishing Touches
-
Paint the eyes:
If you didn’t use colored clay, paint the whites of the eyes first. Let them dry completely. -
Add pupils:
Using a dotting tool or the very tip of a brush, place a black dot in the center of the white eye. -
Highlighting:
Add a microscopic white dot on the black pupil to act as a ‘catchlight’, bringing the character to life. -
Seal (Optional):
For a finished look, apply a matte varnish over the body and a gloss varnish over the eyes to make them look wet.
Place your finished octopus on a shelf where its cheerful eyes can greet you every day
Mini Turtle With Dome Shell
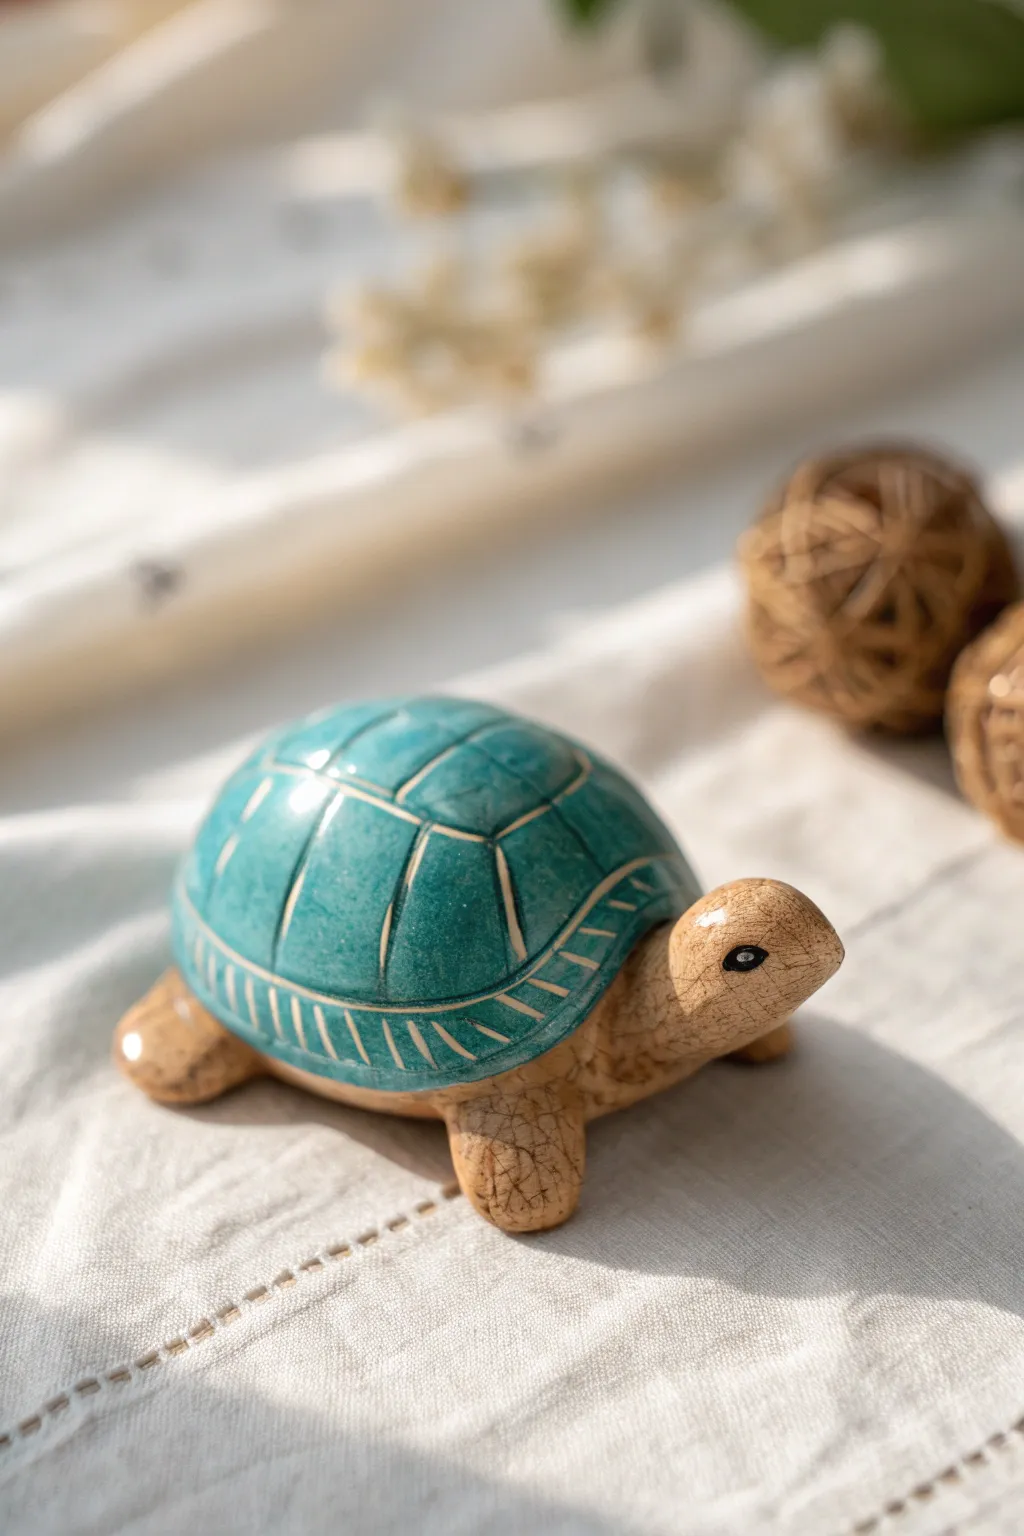
Create a calming, minimal piece of decor with this charming ceramic-style turtle. Featuring a smooth, teal domed shell etched with clean lines and a textured, crackle-finish body, this project perfectly mimics the look of high-end glazed pottery.
Step-by-Step Guide
Materials
- Air-dry clay or polymer clay (white or beige)
- Acrylic paints (Teal/Turquoise, Beige/Tan, Dark Brown/Black)
- Sculpting tools (needle tool, small ball stylus, smoothing tool)
- Antiquing medium or dark brown wash
- High-gloss varnish
- Matte varnish
- Fine grit sandpaper
- Aluminum foil (optional, for armature)
- Soft paintbrushes
Step 1: Sculpting the Base Form
-
Prepare the core:
Start by balling up a small piece of aluminum foil to act as the core for the shell. This saves clay and keeps the figurine lightweight. -
Create the shell dome:
Roll a smooth ball of clay and flatten it into a thick pancake. Drape this over your foil core, shaping it into a perfect, smooth semi-circle dome. Smooth out any fingerprints with a bit of water. -
Form the body base:
Flatten a separate piece of clay into an oval shape slightly larger than the base of your shell. This will be the turtle’s underside. -
Attach the head:
Shape a cylinder of clay, rounding one end for the nose. Attach this to the front of the body oval, blending the clay seams seamlessly so it looks like one solid piece. -
Add the legs:
Roll four small, equal-sized tear-drop shapes. Flatten slightly and attach them to the underside of the body oval—two near the front, two near the back—blending the seams well. -
Connect shell to body:
Place your dome shell onto the body assembly. Use a blending tool to seal the edges where the shell meets the underbelly, ensuring no gaps remain.
Clean Carving Lines
Wait until the clay has stiffened slightly (leather hard) before carving the shell lines. Soft clay tends to drag and create messy, jagged edges.
Step 2: Adding Details & Texture
-
Mapping the shell pattern:
Using a needle tool, lightly sketch the geometric pattern onto the shell. Draw a central oval at the top, surrounded by trapezoids connecting to the outer rim. -
Carving the lines:
Once you are happy with the spacing, carve these lines deeper. The grooves need to be distinct enough to hold paint later. -
Rim detailing:
Carve a double line around the very bottom edge of the shell to create a rim. Inside this rim, make small vertical tick marks all the way around for extra texture. -
Texturing the skin:
To mimic the crackled ceramic look on the head and legs, gently press a crumpled ball of aluminum foil or a stiff-bristled brush against the clay surface. Don’t texture the shell; keep that smooth. -
Add the eyes:
Use a small ball stylus to press indented sockets on either side of the head, then place a tiny seed of clay inside for the eyeball. -
Dry and sand:
Allow the piece to dry completely (24-48 hours for air-dry clay). Once hard, likely sand the shell lightly to ensure it is perfectly smooth.
Step 3: Painting & Glazing
-
Base coat the shell:
Paint the entire shell with a rich teal or turquoise acrylic paint. You may need two coats for opaque coverage. Avoid filling the carved grooves too much. -
Base coat the body:
Paint the head, legs, and underside with a warm beige or tan color. -
Highlighting the carving:
Once the teal is dry, use a fine brush to carefully paint cream or light beige inside the carved lines of the shell. This makes the geometric pattern pop. -
Antiquing the body:
Create a wash with water and dark brown paint. Brush it over the beige body parts and immediately wipe it back with a cloth. The dark paint will stay in the texture crevices, creating that aged ‘crackle’ effect. -
Detailing the eyes:
Paint the tiny eyeballs black. Add a micro-dot of white for a reflection if desired. -
Final varnish:
Apply a high-gloss varnish to the teal shell to mimic glazed ceramic. Use a matte varnish for the body to provide contrast between the two textures.
Gold Leaf Accents
For a luxury upgrade, paint the carved grooves in the shell with metallic gold liquid leaf instead of beige. It adds a beautiful, expensive-looking shimmer.
Place your finished turtle on a sunny shelf or window sill to let that glossy shell catch the light.

TRACK YOUR CERAMIC JOURNEY
Capture glaze tests, firing details, and creative progress—all in one simple printable. Make your projects easier to repeat and improve.
Goldfish Blob With Pinch Fins
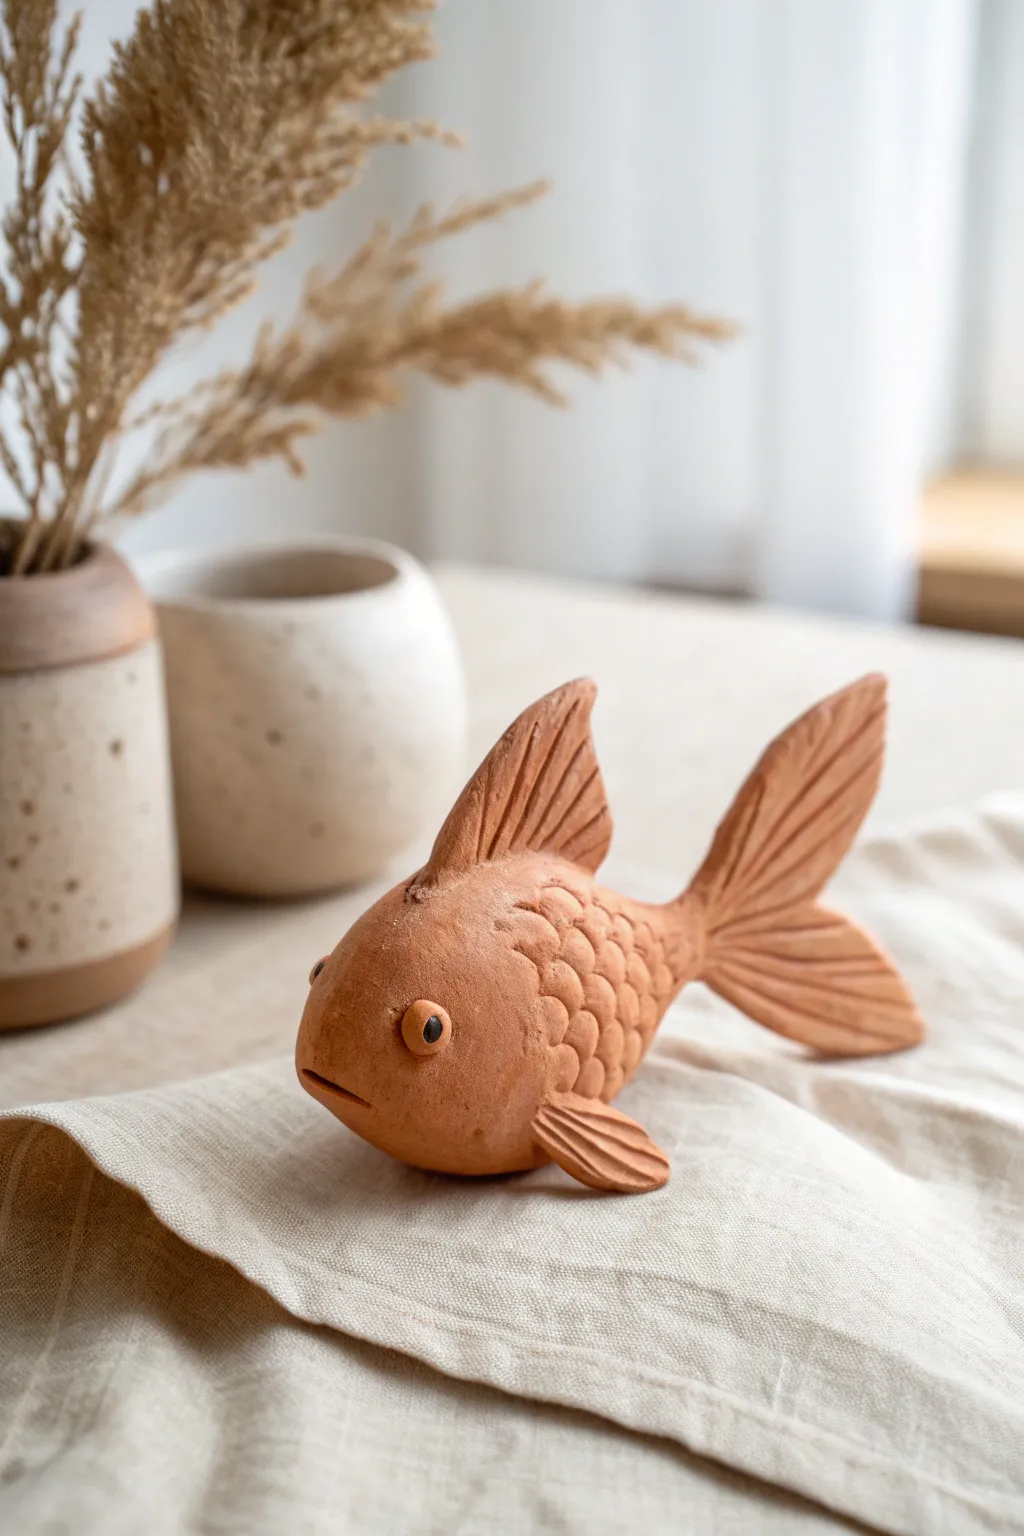
This charming, rustic goldfish is sculpted from warm terracotta clay, featuring textured scales and sweeping fins that give it a sense of movement. The unglazed finish highlights the natural beauty of the earth, making it a perfect organic accent for any table or shelf.
How-To Guide
Materials
- Terracotta air-dry clay or kiln-fire clay
- Small bowl of water
- Pointed sculpting tool or toothpick
- Modeling tool with a curved edge (or a spoon)
- Small round bead or ball tool for eyes
- Sponge
Step 1: Forming the Body
-
Create the base:
Start by taking a fist-sized ball of terracotta clay and rolling it vigorously between your palms to warm it up and remove air bubbles. -
Shape the teardrop:
Gently gently roll the ball into a thick teardrop or egg shape. One end should be slightly blunter for the face, while the other tapers slightly toward where the tail will attach. -
Flatten the base:
Tap the bottom of your fish gently against your work surface so it sits flat and stable without rolling over. -
Refine the surface:
Dip your finger in a little water and smooth out any cracks on the body. I like to take a moment here to ensure the surface is pristine before adding details.
Cracked Fins?
If thin fins start cracking while you work, your clay is getting too dry. Mist it lightly with water or wrap the fins in damp paper towels while you work on the scale texture.
Step 2: Adding Fins and Tail
-
Make the dorsal fin:
Flatten a small piece of clay into a triangle shape. Score the top of the fish’s back and the bottom of the triangle, apply a dab of water or slip, and press the fin firmly onto the back. -
Shape the tail:
Create a larger, flattened V-shape from clay. Pinch the center point to create an attachment site, then attach it to the tapered end of the body using the score-and-slip method. -
Add pectoral fins:
Form two small, leaf-shaped pieces of clay. Attach one to each side of the lower body, angling them slightly backward for an aerodynamic look. -
Blend the seams:
Use your modeling tool or finger to smudge the clay at the join points of all fins, ensuring they are seamlessly integrated into the body and won’t pop off later. -
Sculpt fin texture:
Using your pointed tool or toothpick, draw deep, sweeping lines radiating from the body outward to the edges of the fins to mimic spines.
Burnished Glow
Before the clay fully dries, rub the scale-free areas (like the face and fins) with the back of a metal spoon. This burnishing technique creates a soft, satin sheen without glaze.
Step 3: Detailing and Finishing
-
Create the mouth:
Use a modeling tool or a thin blade to cut a horizontal slit at the front of the face. Gently press the lower lip down slightly to give the fish a subtle expression. -
Position the eyes:
Roll two tiny balls of clay for the eyes. Attach them to the sides of the head, slightly higher than the mouth line. -
Define the pupils:
Using a small tool or the back of a paintbrush, press a deep indentation into the center of each eye ball to create the pupil. -
Map out the scales:
Starting just behind the head, use a semi-circular tool (like the end of a straw or a curved sculpting tool) to impress a row of ‘U’ shapes. -
Texture the body:
Continue pressing these ‘U’ shapes in staggered rows down the length of the body, stopping just before you reach the tail fin. -
Smooth the edges:
Check the edges of your fins. If the clay has roughened while working, lightly sponge them smooth with a damp sponge. -
Final drying:
Set your fish in a safe place to dry slowly away from direct heat to prevent cracking. If using air-dry clay, wait 24-48 hours; if kiln clay, fire according to instructions.
Once fully dry, your terracotta fish brings a lovely touch of aquatic serenity to your home decor
Sweet Snail With Spiral Shell
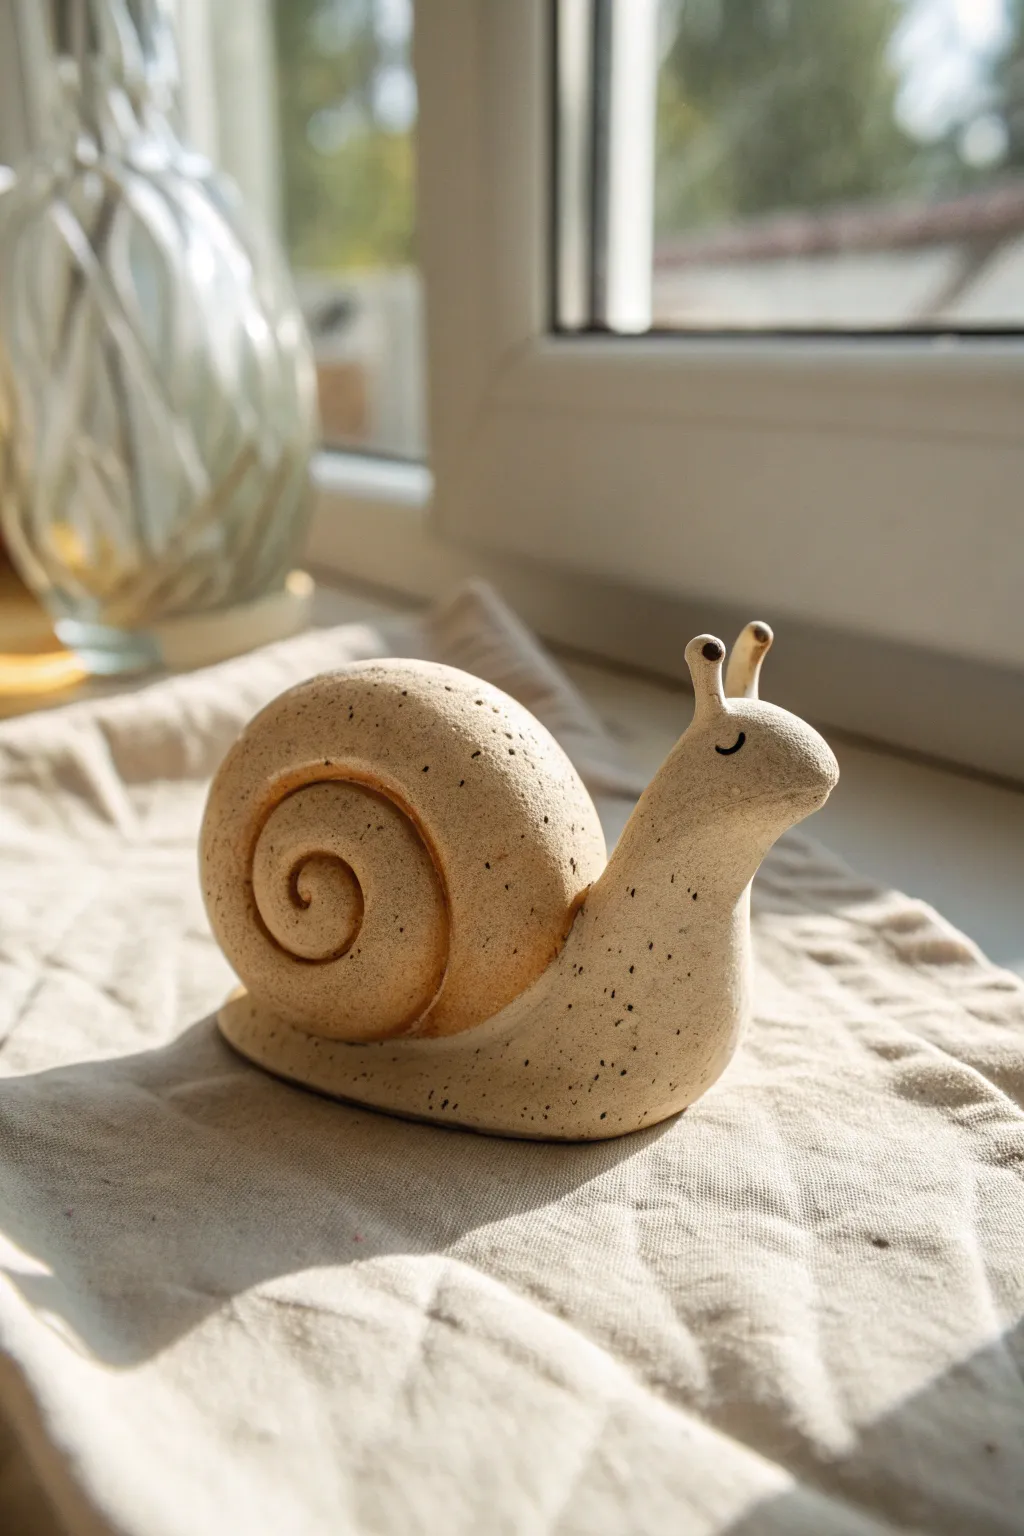
This charming little ceramic snail brings a gentle, slow-living vibe to any windowsill with its warm, speckled clay body. The simple spiral shell and contented expression make it a perfect beginner project that celebrates organic shapes and natural textures.
Detailed Instructions
Materials
- Speckled stoneware clay (or polymer clay with granite effect)
- Modeling tool with a small rounded tip
- Needle tool or toothpick
- Small rolling pin
- Slip and scoring tool (if using ceramic clay)
- Black underglaze or acrylic paint (for the eyes)
- Clear matte glaze or varnish
- Small fine-point brush
- Sponge and water bowl
Step 1: Forming the Body
-
Prepare the base:
Start by conditioning a medium-sized ball of speckled clay until it is smooth and pliable. Roll this into a thick, tapered log shape about 4-5 inches long, which will become the snail’s main body. -
Shape the head and tail:
Gently pinch and lift the thicker end of the log upwards to form the snail’s neck and head. Smooth the tapering tail end so it lies flat against your work surface, creating a stable base. -
Refine the curve:
Using your thumb and forefinger, gently smooth the transition where the neck rises from the body, ensuring a natural, sloping curve rather than a sharp angle. -
Create the eye stalks:
Roll two very small, thin coils of clay for the antennas. Attach them securely to the top of the head. If using ceramic clay, remember to score and slip these tiny joins. -
Add the eyes:
Roll two tiny spheres of clay and gently press them onto the tips of your eye stalks. Flatten the tops slightly so they aren’t perfectly round.
Keep it Clean
Use a barely-damp sponge to constantly smooth out fingerprints as you work. The charm of this snail relies on smooth, uninterrupted surfaces.
Step 2: Creating the Shell
-
Roll the coil:
Take a separate lump of clay, slightly larger than what you used for the body. Roll this into a long, even snake about 1/2 inch thick. -
Taper the end:
Gradually taper one end of the snake so it becomes thinner; this will be the center of your spiral. -
Wind the spiral:
Starting with the thin tapered end, tightly coil the clay snake upon itself to create a flat disc shape. Keep winding until the shell looks proportional to the body you made earlier. -
Domed shape:
Instead of keeping the spiral perfectly flat like a lollipop, gently press the center outward slightly while winding to give the shell a convex, domed appearance on both sides. -
Join the seams:
Use a modeling tool to gently blend the coils together on the *inside* or bottom of the shell where it will attach to the body, ensuring structural integrity without ruining the spiral look on the outside.
Step 3: Assembly and Details
-
Attach shell to body:
Score the back of the snail body and the bottom of the shell. Apply slip (or liquid clay) and press the shell firmly onto the back. It should sit comfortably just behind the neck. -
Reinforce the connection:
Underneath the shell edges, use your modeling tool to drag a little clay from the body up into the shell to lock it in place. Then smooth this area over with a damp sponge. -
Detail the spiral:
Recarve the spiral lines with a needle tool if they got smudged during handling. I find deep, clean lines really help the glaze break nicely later on. -
Add the smile:
Use a needle tool or small blade to impress a tiny, curved smile on the side of the head. Keep it simple and subtle. -
Paint the eyes:
Once the clay is dry (or cured, if using polymer), use a fine-point brush to paint simple black curved lines for closed, sleepy eyes near the antennas. -
Final finish:
After firing or baking according to your clay type, apply a clear matte varnish or glaze to seal the piece while preserving the natural, stony texture of the speckled clay.
Garden Variant
Before baking, press real leaf textures into the side of the shell or attach tiny clay flowers near the base for a ‘spring garden’ theme.
Now you have a quiet little companion ready to bask in the sunlight on your shelf
Ball-Chain Caterpillar
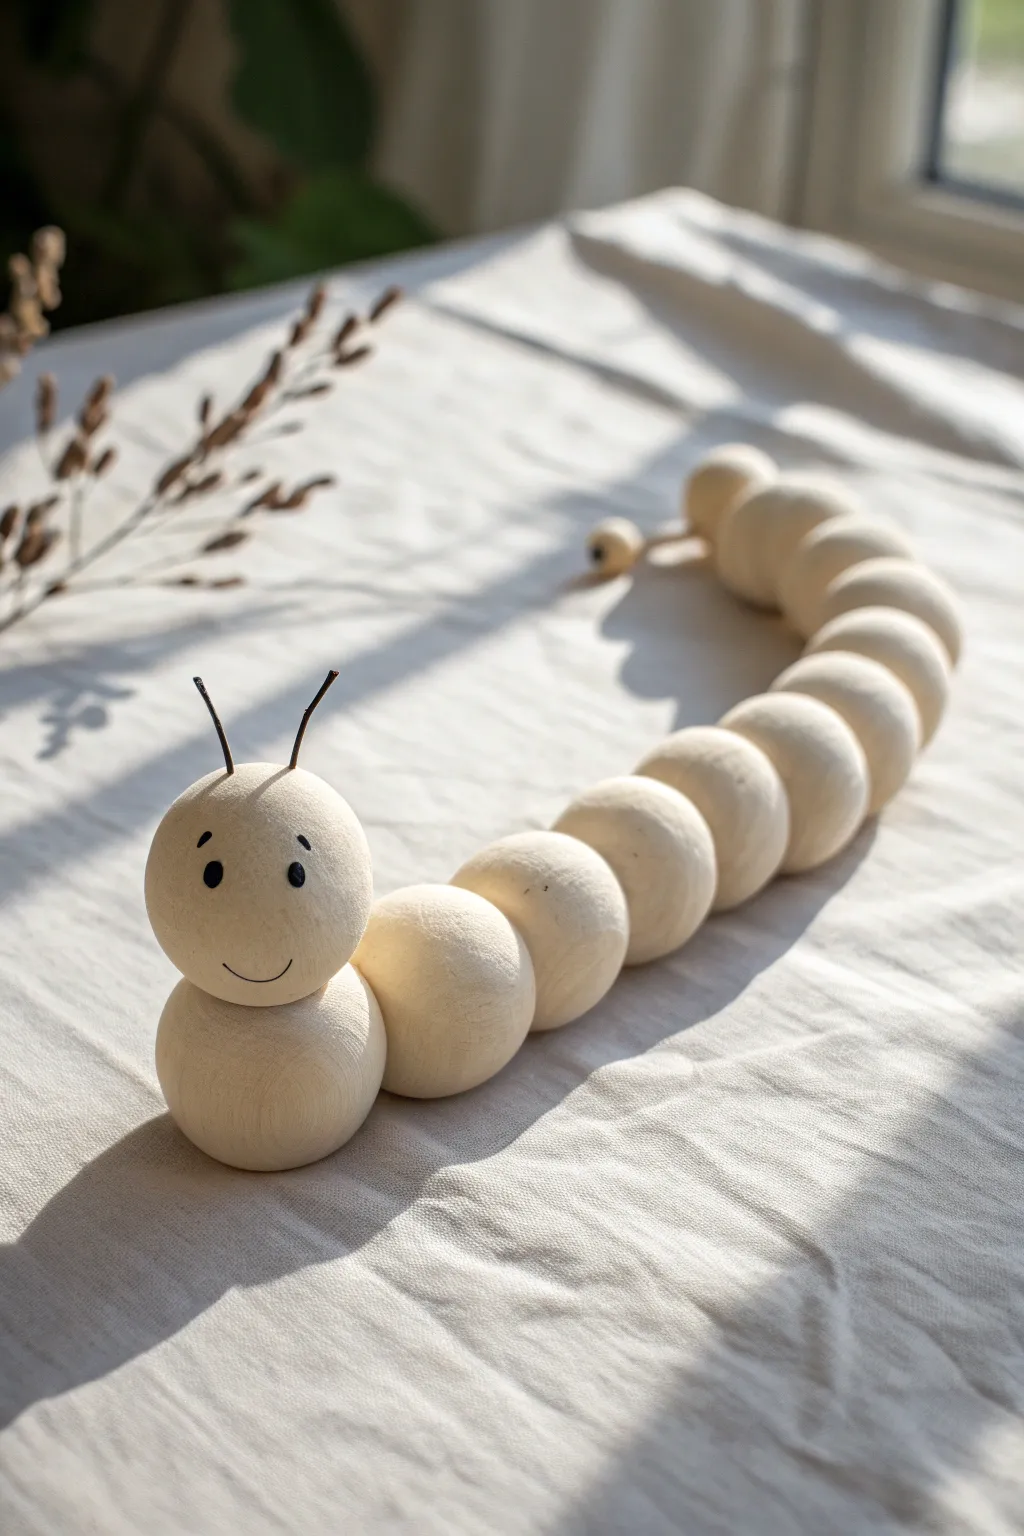
This charming decorative caterpillar brings a touch of nature indoors with its smooth, segmented body and sweet, simple expression. Crafted from natural wooden beads and strung together for flexibility, it makes for a delightful minimalist toy or shelf accent.
Step-by-Step Guide
Materials
- 12-14 large unvarnished wooden beads (approximately 1.5 – 2 inches diameter)
- Strong elastic cord or thin cotton rope
- Fine-grit sandpaper (400 grit or higher)
- Black fine-point permanent marker or acrylic paint pen
- Two small darkened twig pieces or stiff brown crafting wire (approx. 1 inch long)
- Wood glue or strong craft glue
- Scissors
Step 1: Preparation & Selection
-
Select your beads:
Lay out all your wooden beads on a flat surface. Pick the smoothest, roundest bead to serve as the head. -
Order the body:
Arrange the remaining beads in a line behind the head. If your beads vary slightly in size, I like to place the largest ones near the front and taper down to smaller ones at the tail for a natural look, or keep them uniform for the style shown. -
Smoothing the surface:
Lightly sand any rough spots around the bead holes with fine-grit sandpaper. This prevents the cord from snagging later and ensures a clean finish.
Step 2: Creating the Face
-
Orient the head:
Hold your chosen head bead so that the holes are facing up and down (vertically). This hides the connection points once assembled. -
Marking the features:
Using a pencil very lightly, mark two dots for eyes and a gentle curve for the smile. Keep the features centered on the front face of the bead. -
Drawing the eyes:
With your black marker or paint pen, fill in the eye dots. Make them slightly oval-shaped for a friendly expression, adding tiny eyebrows just above them. -
Drawing the smile:
Carefully trace over your pencil smile line with a steady hand. A simple, thin curve works best to match the minimalist aesthetic. -
Antennae holes:
If your bead doesn’t have extra holes, you can simply glue the antennae to the surface. However, for a sturdy finish, ask an adult to drill two tiny pilot holes at the top of the head. -
Attaching antennae:
Dip the ends of your small twigs or wire into wood glue. Press them firmly into the pilot holes or hold them against the top of the head until the glue tacks up. Let this dry completely before moving on.
Use Beeswax
For a warm glow without altering the color, rub a little natural beeswax onto the wood and buff with a soft cloth. It seals the wood beautifully.
Step 3: Assembly
-
Measure the cord:
Cut a length of elastic cord or rope that is about 6 inches longer than your line of beads. -
Tie the stopper:
Tie a large, sturdy knot at one end of the cord. If the bead hole is very large, you may need to tie the cord around a small button or bead to prevent it from slipping through. -
String the tail:
Thread the cord through your last bead first (the tail end). Pull it tight against the knot. -
String the body:
Continue threading the remaining body beads onto the cord one by one. -
Add the neck bead:
Thread the bead that sits just below the head. This bead connects the horizontal body to the vertical head. -
Attach the head:
Thread the cord up through the bottom hole of the head bead. The cord should come out at the top, between the antennae. -
Secure the top:
Pull the cord taut so the beads sit snugly together but can still wiggle slightly. Tie a secure double knot at the very top of the head bead, trimming any excess cord close to the knot. -
Hide the knot:
If possible, tuck the top knot back down into the hole of the head bead using the tip of a pencil or a skewer to conceal it. -
Pose your creation:
Gently bend the line of beads into an ‘S’ curve shape to give your caterpillar the appearance of crawling.
Loose Segments?
If the caterpillar feels too floppy, re-tie your knot tighter. The tension needs to be firm enough to hold a curve but loose enough to bend.
Place your finished wooden friend on a sunny windowsill where the light can highlight the natural grain of the wood
Egg-Shaped Chick
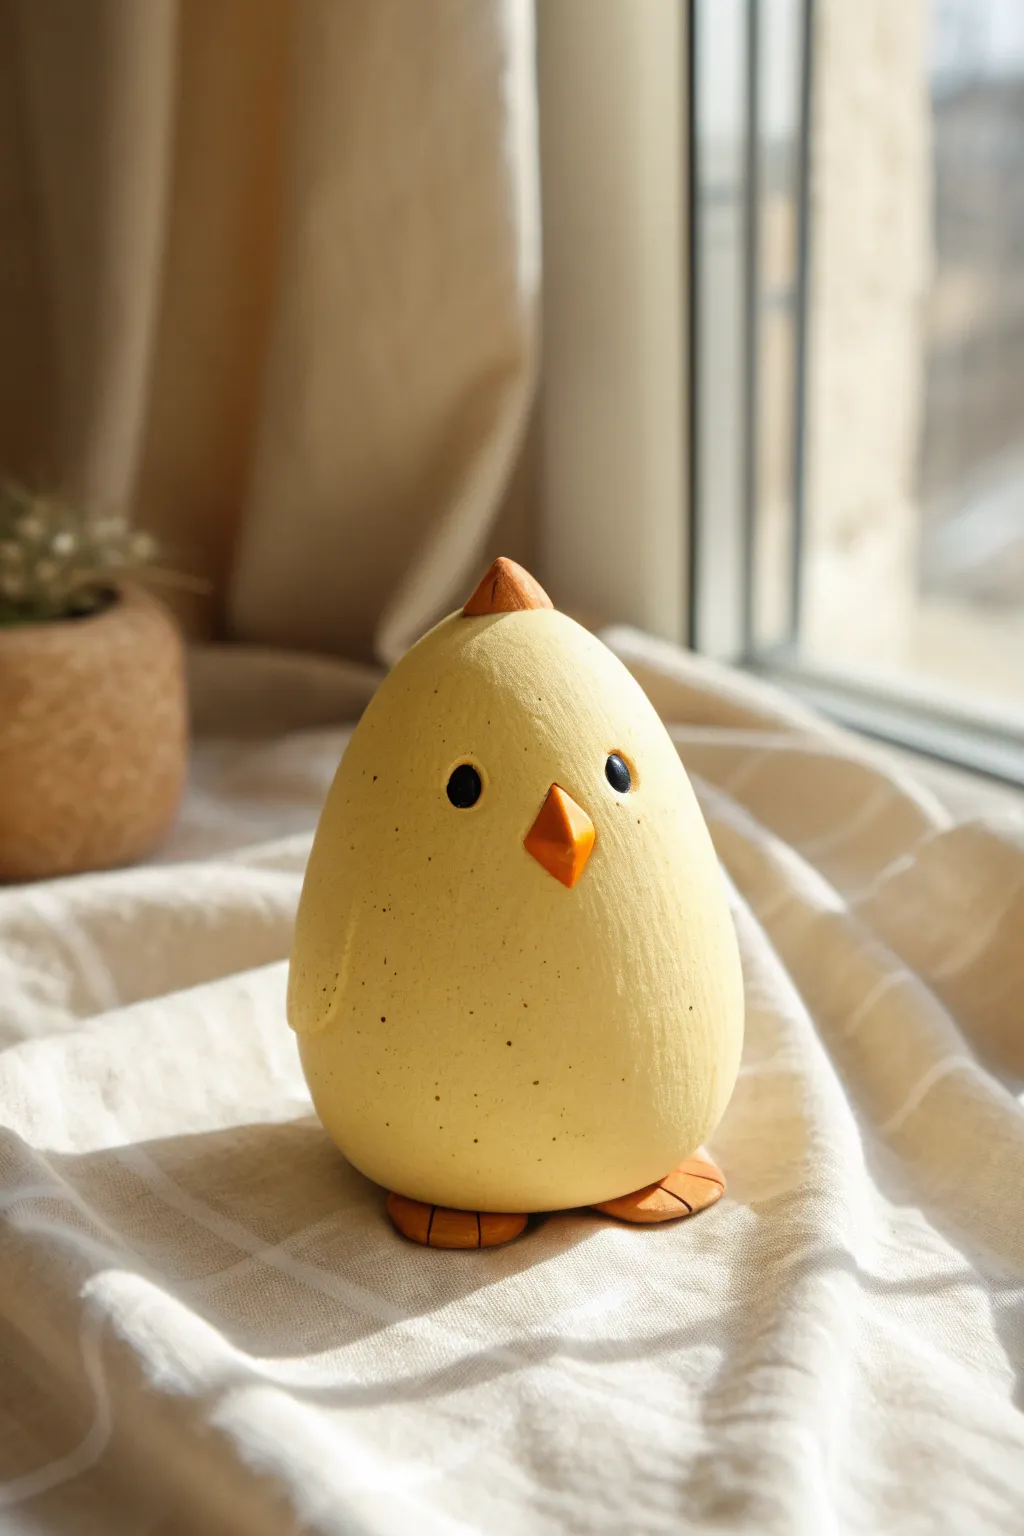
Embrace the charm of simplicity with this adorable egg-shaped chick, perfect for spring decor or a sweet handcrafted gift. Its textured yellow surface and tiny details give it a wonderful, folk-art feel that looks lovely on a windowsill.
Step-by-Step Tutorial
Materials
- Air-dry clay (white or light grey)
- Acrylic paints (pale yellow, light orange, black, brownish-grey)
- Fine-grit sandpaper
- Small flat paintbrush
- Fine-point detail brush
- Old toothbrush
- Sculpting tools (or a butter knife)
- Cup of water and foil (for shaping)
Step 1: Sculpting the Base
-
Prepare the core:
Start by grabbing a handful of air-dry clay, roughly the size of a large orange. Condition it by kneading it in your hands until it’s soft, pliable, and free of cracks. -
Shape the egg:
Roll the clay into a smooth ball first, then gently narrow the top half to create a classic egg shape. The bottom should be wide and flat enough for the figure to stand securely on its own. -
Smooth the surface:
Dip your finger in a little water and run it over the clay to smooth out any major bumps or fingerprints. Don’t worry about making it glass-smooth; a little texture adds character to this rustic style. -
Form the wings:
Take two small pieces of clay, about the size of lima beans. Flatten them into elongated teardrop shapes to form the wings. -
Attach the wings:
Score the sides of the egg body slightly with a tool, dab a bit of water (slip) on the back of the wings, and press them flush against the sides near the bottom third of the body. Blend the edges just a little so they look integrated.
Texturizing Tip
Before the clay dries, gently pat the surface with a piece of crumpled aluminum foil or a stiff sponge. This creates an organic, eggshell-like texture that catches the paint beautifully.
Step 2: Adding Details
-
Create the crest:
Roll a very tiny cone of clay for the head feathers. Flatten the bottom and attach it to the very peak of the egg head, smoothing the seam so it looks like it grew there. -
Make the beak:
Form a small diamond or pyramid shape from clay. Press this firmly into the center of the face area, ensuring it protrudes enough to cast a tiny shadow. -
Sculpt the feet:
Create two small, flat semi-circles for feet. Use a knife tool to indent two lines into each, creating three ‘toes’. Place the chick body onto these feet, pressing down gently so they bond. -
Initial drying:
Let the sculpture dry completely. Depending on the thickness and your climate, this usually takes 24-48 hours. I stick mine on a wire rack to let air circulate underneath.
Make a Trio
Make two more chicks in varying sizes—one taller and slimmer, one shorter and rounder. Paint them in slightly different shades of pastel yellow and cream for a charming family set.
Step 3: Painting and Finishing
-
Apply the base coat:
Once dry, paint the entire body (excluding beak, crest, and feet if possible) with a creamy, pale yellow acrylic paint. You may need two coats for opaque coverage. -
Paint the accents:
Use a light orange paint for the beak, the crest on top, and the feet. A small flat brush works best to keep these edges clean. -
Add the eyes:
Using the handle end of a paintbrush or a dotting tool, dip into black paint and stamp two round, solid black eyes just above the beak line. -
Create texture with speckles:
Dilute a small amount of brownish-grey paint with water. Dip an old toothbrush into this mixture, aim it at the chick, and flick the bristles with your thumb to spray fine speckles over the yellow body. -
Add white highlights:
For a bit of life, add a tiny white dot to the black eyes once they are dry, though the rustic look works well without this too. -
Dry brush texture (optional):
If the finish looks too flat, take a dry brush with a tiny amount of lighter yellow or white and gently whisk it vertically over the body to simulate feather texture. -
Final drying:
Allow all paint to set fully before handling or displaying your new friend.
Place your little chick near a window to catch the sunlight and brighten up your room
Sleepy Koala Hugging a Leaf
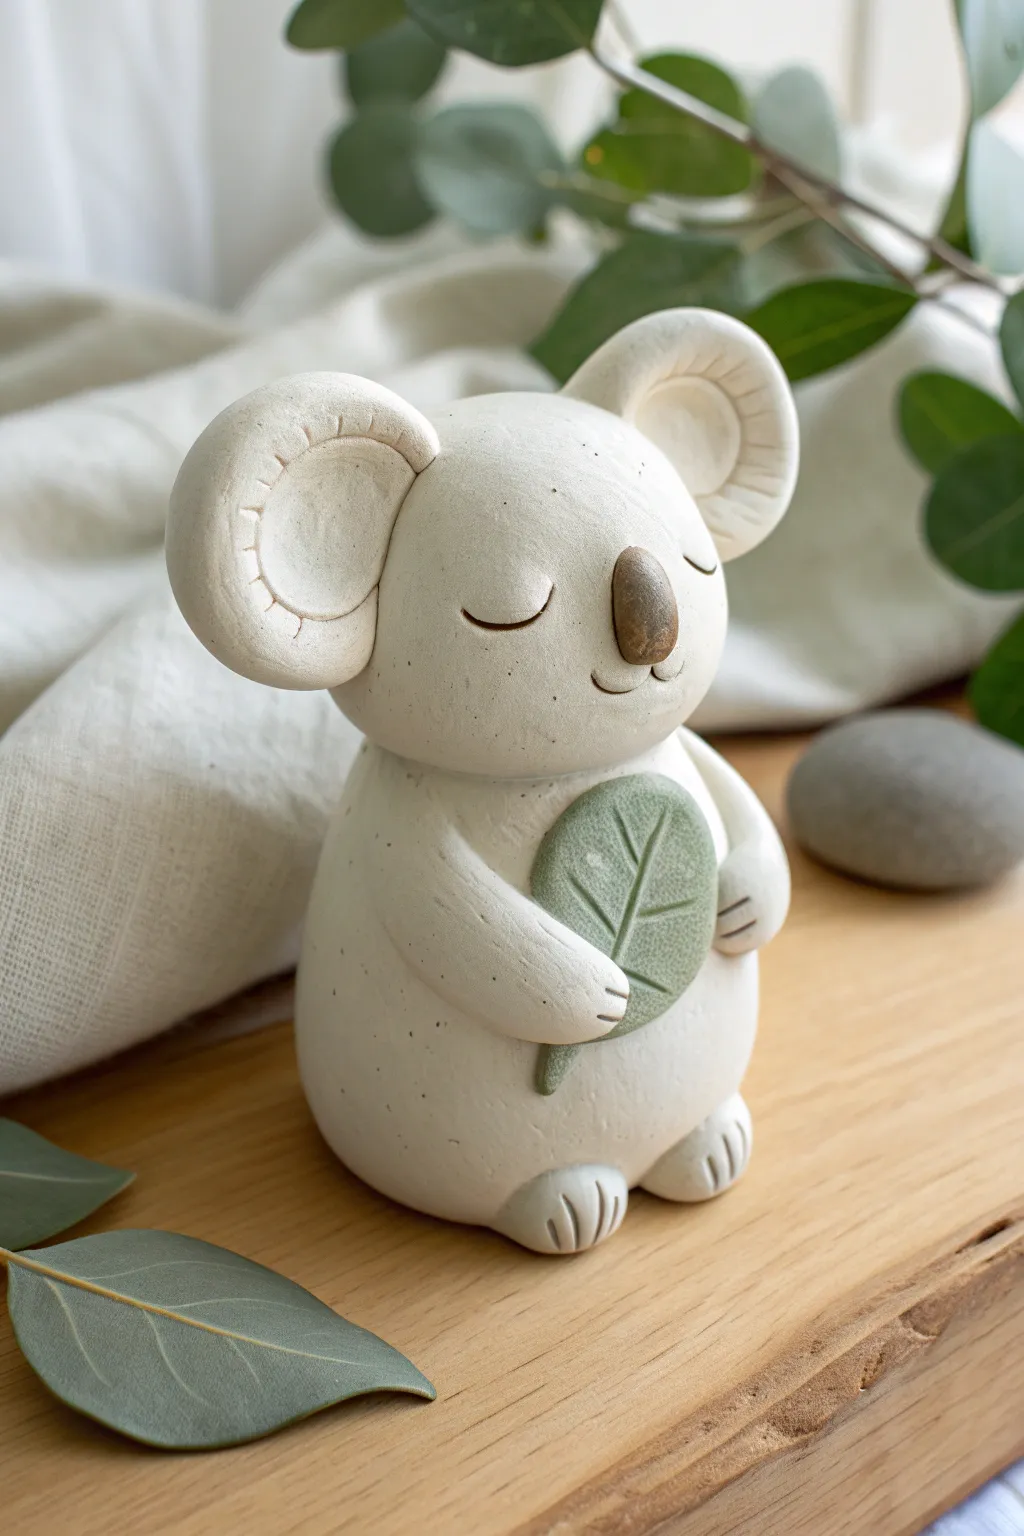
Capture the essence of calm with this adorable clay koala, pleasantly dozing while clutching a eucalyptus leaf. The smooth, speckled finish gives it a professional ceramic look, perfect for a nursery shelf or a desk companion.
How-To Guide
Materials
- White air-dry clay or polymer clay (white or beige)
- Small amount of green clay (or acrylic paint)
- Brown clay (or acrylic paint)
- Clay sculpting tools (needle tool, ball stylus)
- Rolling pin
- Water (for smoothing)
- Speckle paint or watered-down black/brown acrylics
- Old toothbrush (for speckling)
- Matte varnish
Step 1: Shaping the Base
-
Form the body:
Start with a large ball of white clay about the size of a tangerine. Roll it until it is smooth, then gently flatten the bottom onto your work surface so it sits stably. Taper the top slightly to create a pear shape. -
Create the head:
Roll a second ball of clay, slightly smaller than the body. Flatten it just a bit into a rounded bun shape rather than a perfect sphere. -
Attach head to body:
If using air-dry clay, score (scratch) the top of the body and the bottom of the head. Dab a little water or slip on the rough areas and press them firmly together. Blend the seam gently at the neck with a smoothing tool or your finger.
Seamless Merging
When attaching heavy parts like the head, insert a short piece of toothpick or clipped wire into the neck to act as an internal armature for extra strength.
Step 2: Facial Features
-
Make the ears:
Roll two equal-sized balls of clay. Flatten them into thick discs. Use your thumb or a large ball tool to press an indentation into the center of each disc, leaving a thick rim around the edge. -
Add ear texture:
Using a knife tool or needle, gently press small, curved notches along the inner rim of the ears to simulate fur or folded skin texture. -
Attach the ears:
Score and slip the sides of the head where the ears will go. Press the ears on firmly. I like to support them with a small wedge of scrap clay underneath for a few minutes while the bond strengthens. -
Add the nose:
Take a small piece of brown clay (or white clay you plan to paint later) and shape it into a smooth, oval teardrop. Attach this to the center of the face, slightly lower than the midline. -
Carve the expression:
With a needle tool, carefully carve two U-shaped curves for the sleeping eyes. Add a tiny vertical line just below the nose for the mouth.
Avoiding Cracks
Air-dry clay can crack if it dries too fast. Drape a slightly damp paper towel loosely over your koala while it dries to slow down the process.
Step 3: Limbs and Leaf
-
Sculpt the feet:
Roll two small balls of white clay. Flatten them into ovals and attach them to the bottom front of the body. Use a knife tool to press three vertical lines into each foot for toes. -
Create the leaf:
Roll out a small slab of green clay (or white clay to be painted later). Cut out a teardrop or oval leaf shape. Use a needle tool to etch a central vein and branching veins. -
Position the leaf:
Place the leaf on the center of the koala’s belly. You don’t need to glue it down fully yet, just position it to see where the arms need to go. -
Add the arms:
Roll two sausage shapes for arms, slightly tapered at one end. Attach them to the shoulders, curving them downward and inward so they overlap the edges of the leaf. -
Detail the paws:
Press small lines into the ends of the arms to create fingers, making it look like the koala is tightly gripping its treasure.
Step 4: Finishing Touches
-
Smooth the surface:
Dip your finger in a little water and gently rub away any fingerprints or harsh tool marks. The goal is a matte, smooth, stone-like finish. -
Speckling effect:
To mimic the ceramic look in the photo, dilute a tiny drop of brown or black paint with water. Dip an old toothbrush in it and flick the bristles with your thumb to mist tiny speckles over the clay. -
Painting (if needed):
If you used all white clay, wait until fully dry to paint the nose brown and the leaf a muted sage green. -
Seal the piece:
Once fully dry (and painted), apply a coat of matte varnish to protect your new friend without making it look glossy or plastic.
Place your sleepy koala near a plant or window for a peaceful vibe
Mushroom Buddy Figure
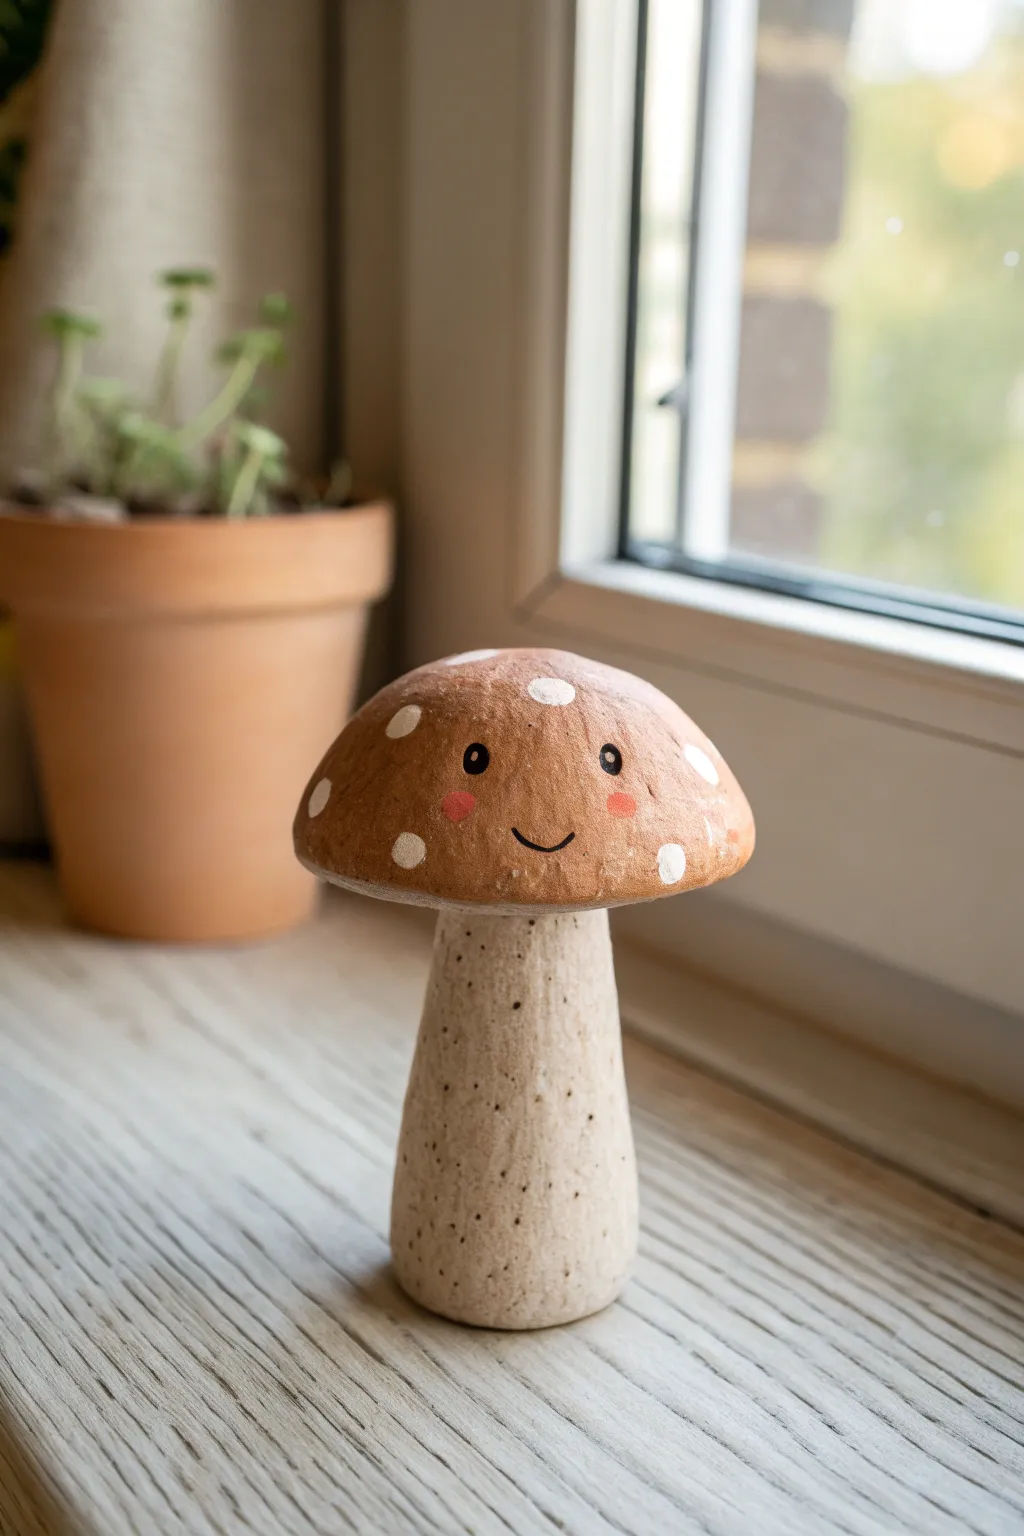
Bring a touch of woodland whimsy to your windowsill with this adorable clay mushroom figure. Its charming, speckled cap and sweet, painted face make it the perfect beginner-friendly sculpting project.
Step-by-Step Tutorial
Materials
- Air-dry clay (white or terracotta)
- Acrylic paints (burnt sienna, cream/light beige, white, black, pink)
- Small paintbrush (detail round)
- Medium paintbrush (flat)
- Old toothbrush (optional for speckling)
- Water cup
- Paper towels
- Matte varnish or sealant
Step 1: Sculpting the Form
-
Form the stem base:
Start with a ball of clay roughly the size of a golf ball. Roll it back and forth on your work surface to create a thick cylinder. Gently taper the top slightly so it’s narrower than the base, resembling a classic mushroom stalk shape. -
Flatten the bottom:
Tap the wider end of your cylinder firmly against the table to create a completely flat surface. This ensures your mushroom buddy will stand upright without wobbling. -
Create the cap:
Take a second, slightly larger ball of clay. Press it between your palms to flatten it into a thick disc, then gently curve the edges downward to form a dome shape. -
Attach the pieces:
Score the top of the stem and the underside of the cap with a toothpick or sculpting tool to create rough textures. Apply a tiny amount of water (or slip) to these roughened areas. -
Secure the join:
Press the cap firmly onto the stem. Use your fingers or a smoothing tool to blend the clay slightly at the connection point underneath the cap to ensure it doesn’t pop off later. -
Smooth and dry:
Dip your finger in a little water to smooth out any fingerprints or cracks on the surface. Set your figure aside in a safe, dry place for at least 24 hours, or until the clay is fully hardened and turns white.
Step 2: Painting the Texture
-
Base coat the stem:
Mix a cream or light beige color. Paint the entire stem, ensuring you get right up under the cap. You might need two thin coats for opaque coverage. -
Paint the cap:
Apply a coat of burnt sienna or warm brown acrylic paint to the top dome. Let this dry completely before moving on. -
Apply stem texture:
Dilute a tiny bit of dark brown paint with water. Dip an old toothbrush into this mixture and flick the bristles with your thumb to create a fine, speckled spray across the beige stem. This mimics natural mushroom textures. -
Add cap details:
Using your small round brush and white paint, carefully dab uneven circles onto the brown cap. Vary the sizes slightly and place them randomly for a natural, organic look. -
Refine the spots:
I find that if the white paint looks too transparent, going back over the spots with a second layer really makes them pop against the brown background.
Smooth Surface Secret
Before painting, lightly sand your dried clay with fine-grit sandpaper (like 400 grit) to remove bumps or fingerprints for a porcelain-like finish.
Step 3: Bringing It to Life
-
Paint the eyes:
Using the smallest tip of your detail brush or a toothpick, dip into black paint. Place two small ovals near the center of the cap’s front face. Leave enough space between them for a smile. -
Add eye highlights:
Once the black is dry, add a tiny white dot in the upper right corner of each eye. This ‘catchlight’ is crucial for giving your buddy a lively expression. -
Create the smile:
Paint a very thin, small ‘U’ shape between and slightly below the eyes using black paint. Keep the line delicate. -
Blush the cheeks:
Dip a dry brush into a tiny amount of pink paint and wipe most of it off on a paper towel. Gently circular motions, buff two rosy cheeks onto the brown cap, right next to the eyes. -
Seal the project:
Once all paint is completely dry, apply a coat of matte varnish. This will protect the paint from chipping and give the figure a finished, professional look.
Make a Colony
Vary the heights and cap shapes to create a whole family. Try tall, skinny stems with tiny caps or squat, wide stems with massive flat caps.
Place your new smiling friend near a plant or on a shelf to brighten up your room
Food-Pun Hot Dog Pup
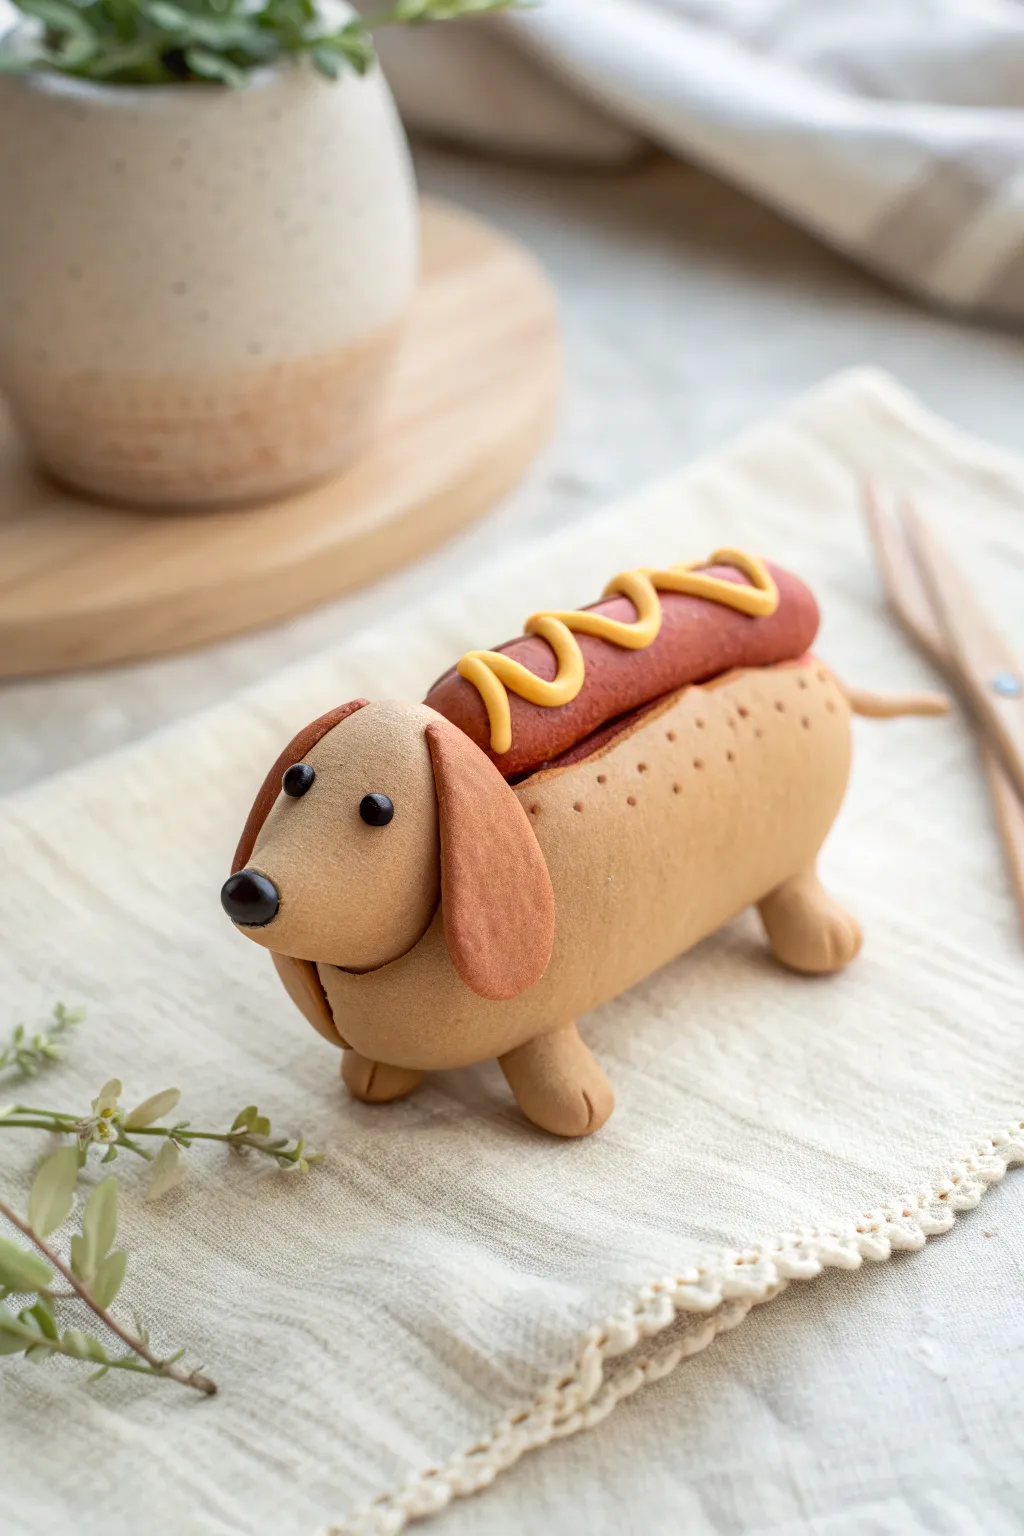
This adorable polymer clay project brings the classic ‘wiener dog’ pun to life with a literal sausage dog. Featuring a perfectly toasted bun body and a squiggle of mustard, it’s a playful accent for your desk or a cute gift for dog lovers.
Step-by-Step
Materials
- Polymer clay (colors: tan/beige, reddish-brown, yellow, dark brown/black)
- Clay modeling tools or a toothpick
- Rolling pin or smooth round object
- Needle tool
- Soft pastel chalk (burnt sienna/orange) and a soft brush for shading
- Baking sheet and parchment paper
- Oven (per clay manufacturer instructions)
Step 1: Shaping the Bun Body
-
Create the base:
Start by taking a generous amount of tan or beige clay and conditioning it in your hands until it is soft and pliable. -
Form the log:
Roll the tan clay into a thick log shape, rounding off both ends to mimic the appearance of a hot dog bun. -
Create the cavity:
Using your thumb or a rounded modeling tool, gently press a long indentation down the center top of the log. This is where the ‘sausage’ will sit, so make sure the sides puff up slightly around it. -
Texture the bun:
For a realistic baked look, lightly texture the surface of the bun using a toothbrush or stiff brush, but keep it subtle.
Mustard Keeping Breaking?
If your yellow clay snake keeps snapping while rolling, your clay is likely too dry. Mix in a drop of clay softener or baby oil and knead well before trying again.
Step 2: Adding the Sausage and Mustard
-
Roll the sausage:
Take the reddish-brown clay and roll a cylinder that is slightly shorter than your bun. -
Insert the meat:
Place the reddish-brown cylinder into the indentation you made in the bun. Press it down gently so it nestles securely without losing its round shape. -
Make the mustard:
Roll a very thin snake of yellow clay. I find it helps to do this on a glass surface for consistent thickness. -
Apply the topping:
Drape the yellow snake in a classic zigzag pattern across the top of the sausage. Press the ends down lightly so they adhere.
Level Up: Relish & Sesame
Add tiny green clay chunks for relish alongside the mustard. You can also form microscopic white teardrops to stick onto the bun for sesame seeds.
Step 3: Sculpting the Dog Features
-
Head shape:
Roll a spherical ball of tan clay for the head. Shape one side slightly narrower to form a snout. -
Attach the head:
Press the back of the head firmly against the front of the bun body. You can blend the clay slightly at the connection point underneath for extra stability. -
Create ears:
Flatten two small ovals of slightly darker tan or reddish-brown clay (or shade your tan clay). Attach these to the sides of the head so they flop downwards. -
Add paws:
Create four small, flattened balls of tan clay. Attach two to the front bottom and two to the back bottom of the bun for feet. -
Detail the paws:
Use a knife tool or toothpick to press two small lines into each paw to create toes. -
Add the tail:
Roll a tiny, tapered snake of tan clay and attach it to the rear center of the bun, giving it a little upward curve.
Step 4: Finishing Touches
-
Wait, the face!:
Roll a tiny black ball for the nose and place it on the tip of the snout. Push two small indentations for eyes above the snout, then insert tiny black clay balls into them. -
Shade the bun:
Before baking, use a soft brush to dust burnt sienna pastel chalk gently over the top curves of the bun and the ears to give it a ‘toasted’ effect. -
Final texture:
Using a needle tool, poke very tiny holes randomly along the sides of the bun to mimic air pockets in bread. -
Bake:
Place your figure on parchment paper and bake according to the specific temperature and time directions on your package of clay.
Once cooled, your little hot dog pup is ready to sit faithfully on your shelf
Marshmallow-Style Blob Characters
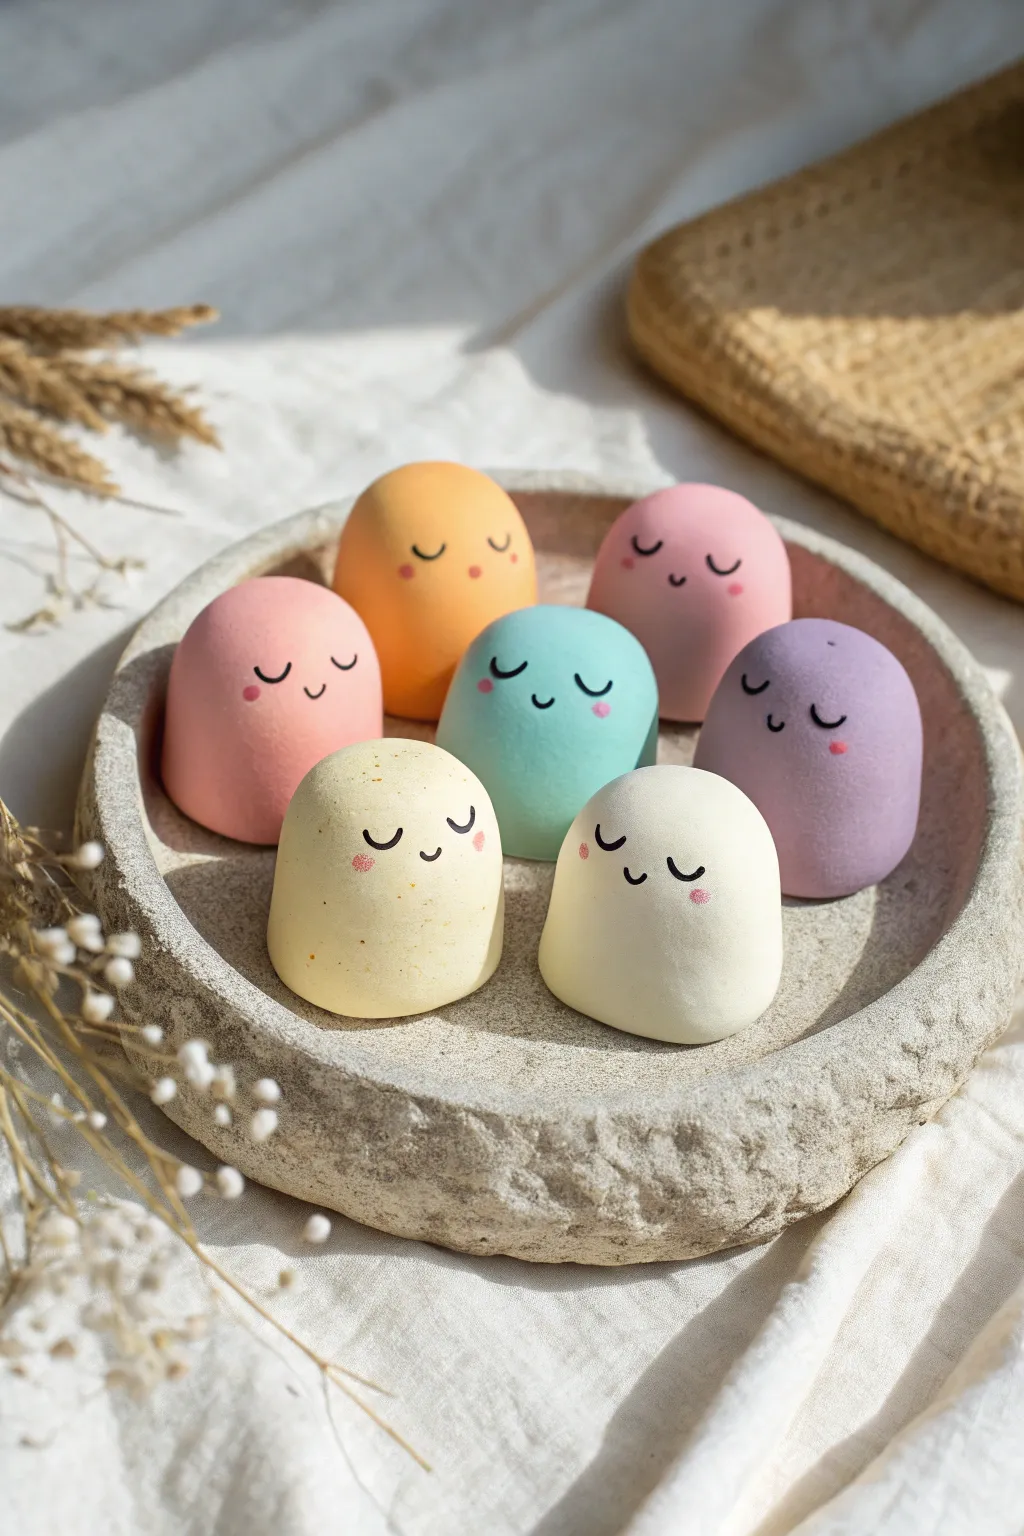
These adorable, bell-shaped friends are the epitome of simple sweetness, featuring soft pastel colors and matching sleepy expressions. Their smooth, matte finish makes them look like gentle marshmallow candies resting in a cozy dish.
Step-by-Step Guide
Materials
- Polymer clay (white, pastel pink, pastel purple, pastel yellow, peach, teal)
- Acrylic rolling pin
- Small ball tool or dotting tool
- Fine-point black paint pen or liner brush with black acrylic paint
- Pink soft pastel chalk (for cheeks)
- Small fluffy paintbrush
- Gloss glaze (optional, only if you want a shiny finish)
- Baking sheet and parchment paper
- Clean work surface (ceramic tile or glass mat)
Step 1: Shaping the Bodies
-
Prepare your clay:
Begin by conditioning your polymer clay. Take a small amount of each pastel color and knead it until it’s soft and pliable. If the clay feels too stiff, rolling it between your warm palms for a few minutes will help soften it up. -
Form the base balls:
Roll each color into a smooth, seamless sphere about the size of a ping-pong ball. Ensure there are no cracks or air bubbles trapped inside. -
Create the bell shape:
Place a clay sphere on your work surface. Gently cup your hand over it and lightly press down while rolling slightly to flatten the bottom. You want a shape that looks like a gumdrop or a sitting marshmallow—rounded on top and flat on the bottom. -
Refine the silhouette:
Look at the shape from the side. Soften any sharp edges created by the bottom flattening. The transition from the sides to the base should be a gentle curve, not a hard angle. -
Smooth the surface:
Use your fingertip to lightly buff away any fingerprints. I find that a tiny drop of baby oil on my finger helps glide over the clay and create a flawless, matte texture before baking. -
Repeat for all colors:
Repeat this shaping process for all your different colored clays. Aim to keep them roughly the same height and width so they look like a cohesive set.
Clean Clay Tip
Keep baby wipes handy! Clean your hands thoroughly between switching colors. Pastels show dust easily, so wipe your hands and tools often to keep the colors pure.
Step 2: Baking and Cooling
-
Set up for baking:
Preheat your oven according to the manufacturer’s instructions on your specific brand of clay (usually around 230°F to 275°F or 110°C to 135°C). -
Bake the figures:
Place your marshmallow shapes on a baking sheet lined with parchment paper. Bake them for the recommended time, which is typically 15-30 minutes depending on thickness. -
Cool down completely:
Once baked, turn off the oven and let the figures cool down completely before handling them. They harden fully as they cool, so don’t worry if they feel slightly soft right out of the oven.
Make Them Useful
Before baking, use a craft knife to cut a slit in the top of the shape. Now your cute marshmallow blob doubles as a minimal photo holder or place card stand
Step 3: Adding the Sweet Faces
-
Plan the face placement:
Visualize where the face should go. Placing the features slightly lower on the shape, rather than dead center, creates a cuter, ‘chibi’ aesthetic. -
Draw the eyes:
Using a fine-point black paint pen, draw two small ‘U’ shapes for closed, sleepy eyes. Keep them spaced widely apart for that sweet, relaxed look shown in the photo. -
Add a tiny smile:
Draw a tiny, shallow ‘u’ shape right between the eyes, just slightly lower. This simple line creates the content little smile. -
Prepare the blush:
Scrape a small amount of pink soft pastel chalk onto a piece of scrap paper to create a fine powder. -
Apply rosy cheeks:
Dip a small, dry fluffy brush into the chalk powder. Tap off the excess, then gently dab a rosy circle onto the clay character’s cheeks, right next to the outer corners of the eyes. -
Add freckles (optional):
For added texture like the yellow figure in the image, you can gently speckle a bit of contrasting paint or chalk dust onto the surface before sealing. -
Seal the deal:
Since we used surface powders and paint, it’s smart to seal your work. Apply a thin layer of matte varnish to protect the face without making the clay look like plastic.
Now you have a whole family of sleepy marshmallow friends to brighten up your desk or shelf
Balloon-Animal Dog in Clay
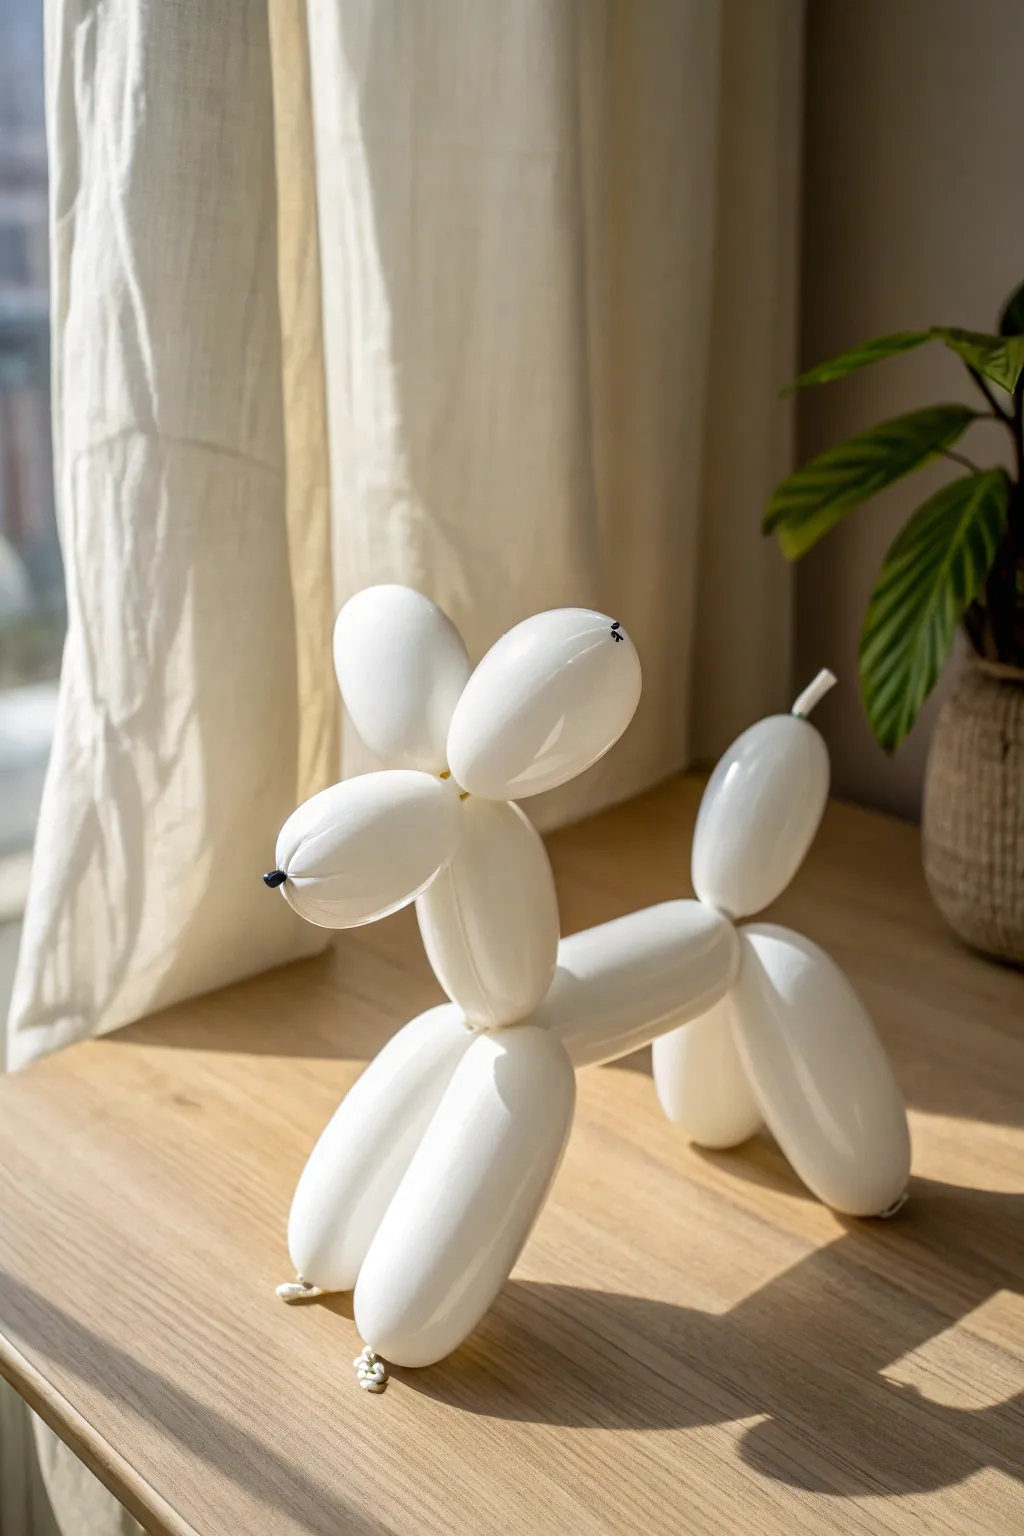
This whimsical sculpture captures the nostalgic charm of a classic balloon animal but freezes it in time using bright white clay. With its glossy finish and segmented shapes, it creates a playful trompe l’oeil effect that looks deceptively light and airy.
Step-by-Step
Materials
- White air-dry clay or polymer clay
- Rolling tool or smooth surface
- Cutting tool or knife
- Strong craft glue or liquid clay (if using polymer)
- Black acrylic paint
- Fine detail paintbrush
- High-gloss varnish or resin
- Soft paintbrush for varnishing
- Fine-grit sandpaper (optional)
- Water (for smoothing)
Step 1: Creating the Segments
-
Prepare the clay:
Begin by conditioning your white clay until it is soft and pliable. If using air-dry clay, keep a small bowl of water nearby to keep your fingers damp and prevent cracking. -
Form the main log:
Roll a substantial portion of clay into a long, smooth cylinder or ‘snake’. I find it helpful to aim for a thickness of about 1 inch to mimic a standard twisting balloon. -
Cut the segments:
Instead of twisting the clay like a real balloon, which can distort the shape, cut the cylinder into individual sections. You will need: four equal lengths for legs, one slightly longer piece for the body, one for the neck, two shorter ovals for the ears, one oval for the snout, and a tiny piece for the tail. -
Round the ends:
Take each cut segment and gently round off the cut ends. Roll the ends between your fingers to create that characteristic sausage-link shape indicative of an inflated balloon. -
Refine the shapes:
Check your pieces against each other. The legs should be uniform, while the ears and snout should be slightly tapered ovals. Smooth out any fingerprints with a drop of water.
Step 2: Assembly
-
Connect the legs:
Take two leg segments and join them at the top to form an upside-down ‘V’. Repeat with the other pair of legs. Use a dab of glue or liquid clay at the junction points for a secure bond. -
Attach the body:
Place the main body segment horizontally between the two leg pairs. Press it firmly onto the leg junctions. Ensure the sculpture stands stable on a flat surface. -
Build the neck:
Attach the neck segment vertically to the front leg junction. It should angle slightly forward for a perky look. -
Form the head base:
Creating the head requires joining three pieces: the two ears and the snout. Connect the two ear ovals at their base, then attach the snout segment pointing forward from the center of the ears. -
Mount the head:
Place the assembled head unit onto the top of the neck segment. Rotate it slightly to give your dog a bit of personality and movement. -
Add the tail:
Attach the small tail segment to the rear of the body piece, angling it upward. Pinch the very tip of the tail to look like the uninflated nozzle of a balloon. -
Create the nose knot:
Roll a tiny, flat circle of clay and attach it to the very tip of the snout. This mimics the knotted end of the balloon.
Smooth Surface Secret
Before varnishing, wipe the cured clay with a baby wipe or a tiny bit of rubbing alcohol. This removes dust and oils, ensuring the gloss coat goes on perfectly glass-like.
Step 3: Finishing Touches
-
Smooth the joints:
Go over every connection point. While real balloon animals have distinct crevices, you want to ensure the clay is bonded. Use a tool to deepen the creases between segments if they got smushed during assembly. -
Dry or bake:
Allow the sculpture to dry thoroughly according to your clay’s instructions. If using polymer clay, bake it now. If using air-dry clay, wait 24-48 hours until fully hard. -
Sand imperfections:
Once hardened, gently sand any rough spots or fingerprints with fine-grit sandpaper to achieve a surface as smooth as stretched rubber. -
Paint the details:
Using the fine detail brush and black acrylic paint, add a tiny dot on the nose knot. You can also add a minuscule text detail on an ear to mimic print found on balloons. -
Apply the gloss:
This is the most crucial step for realism. Apply two to three coats of high-gloss varnish or resin. This shine mimics the tension and reflective quality of an inflated balloon.
Metallic Makeover
Instead of white, paint the finished piece with metallic gold, silver, or chrome mirror paint. It will instantly transform into a high-end looking modern art statue.
Place your shiny new sculpture on a shelf where it can catch the light and fool your guests
Stacked Mini Creature Totem
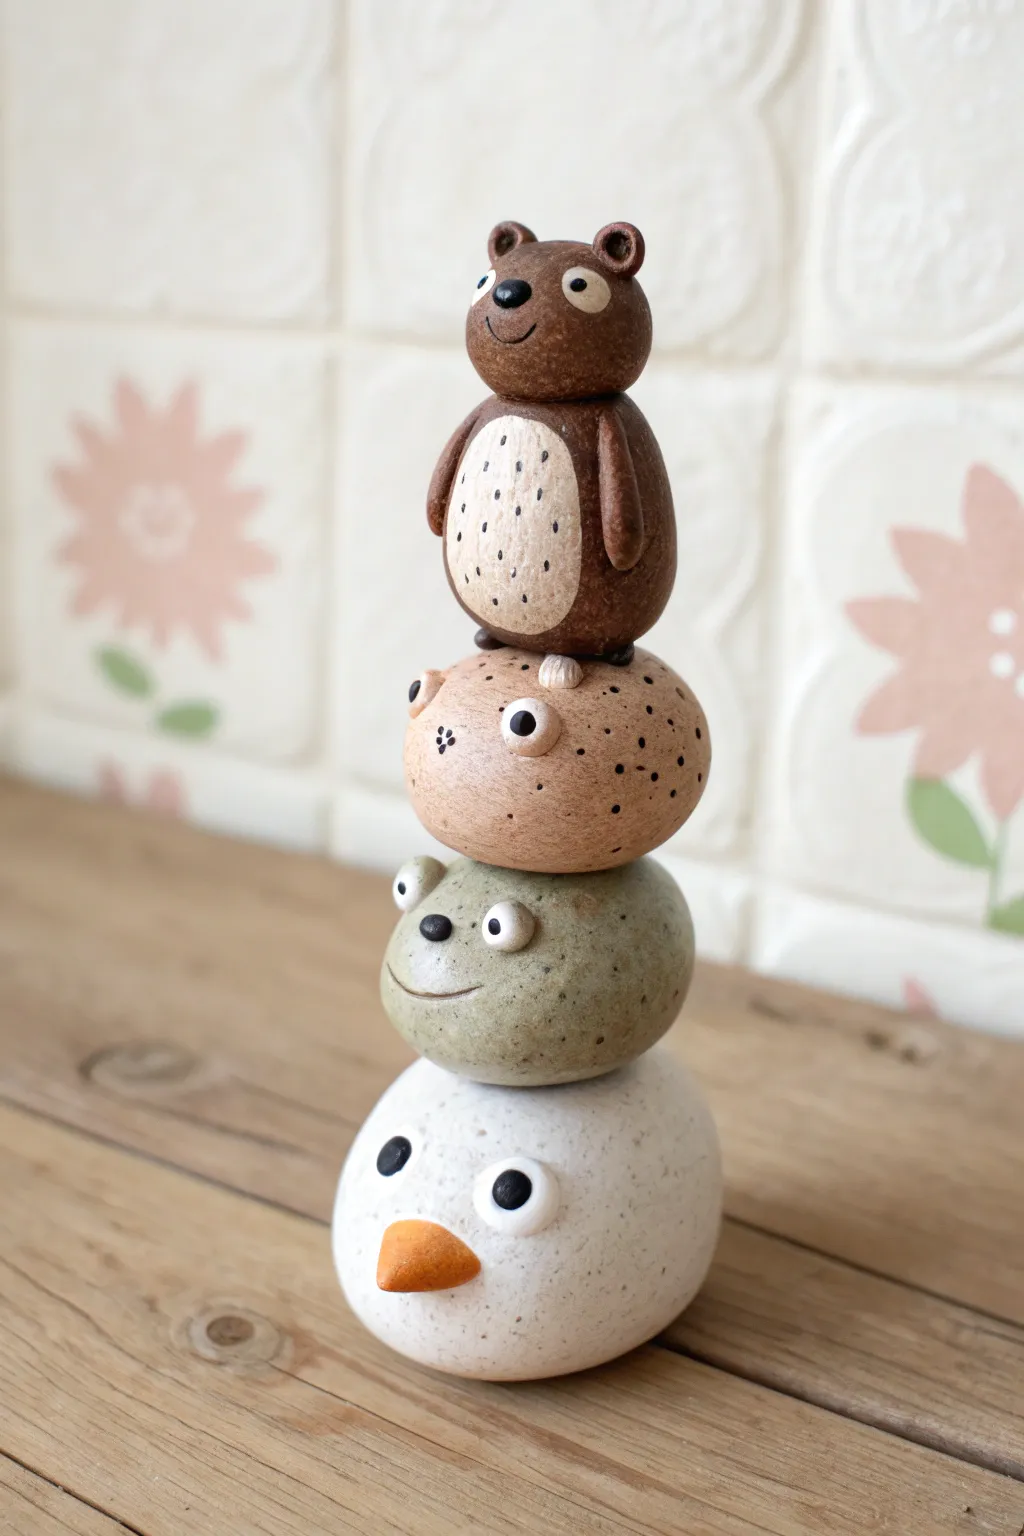
Create a charming vertical display with this totem of four adorable, rounded animal friends stacked precariously atop one another. The textured, speckled finish gives these simple clay shapes a natural, stone-like appearance perfect for shelf decor.
Step-by-Step Guide
Materials
- Polymer clay (brown, tan, sage green, white, black, orange)
- Flecked/granite effect polymer clay (optional, for finding texture)
- Acrylic paints (black, white)
- Small dotting tool or toothpick
- Basic sculpting tools
- Soft bristled brush
- Old toothbrush (for texturing)
- Matte varnish
- Strong craft glue or liquid clay
Step 1: The Base: The White Bird
-
Form the base:
Start with a generous ball of white clay, kneading it until soft. Roll it into a smooth, slightly flattened oval shape to serve as the sturdy foundation for your totem. -
Add texture:
Gently tap the surface of the clay with an old toothbrush to create a subtle, speckled stone texture rather than leaving it perfectly smooth. -
Create the beak:
Take a small pinch of orange clay and roll it into a cone. Press this firmly into the lower center of the face. -
Add eyes:
For the eyes, press two small flattened discs of white clay above the beak, then add smaller black pupils on top. I find placing them slightly wide apart adds a goofy charm.
Granite Hack
Mix a tiny pinch of black pepper or used dried coffee grounds into your clay before rolling. This creates instant, realistic faux-stone speckles without painting.
Step 2: The Middle: Frog and Hedgehog
-
Shape the frog:
Roll a ball of sage green clay slightly smaller than your white base. Flatten it slightly into a disc shape. -
Sculpt frog features:
Add two tiny white balls with black pupils for eyes near the top edge. Use a needle tool or toothpick to carve a wide, simple smile. -
Stack and secure:
Place the frog carefully on top of the bird. If using polymer clay, adding a drop of liquid clay between layers ensures a permanent bond after baking. -
Form the tan creature:
Create a similar flattened oval using tan or light brown clay. This layer should be roughly the same size as the frog. -
Add tiny ears:
Pinch two very small triangles of matching tan clay and attach them to the top curvature for ears. -
Creates eyes and freckles:
Use your dotting tool to add eyes; you can use clay or paint them later. Prick small holes or use black paint to add freckle details on the cheeks later.
Level Up: Magnet Maker
Instead of a 3D stack, slice the backs of the figures flat before baking. Glue strong neodymium magnets to each one for a set of mix-and-match stacking fridge magnets.
Step 3: The Top: The Brown Bear
-
Body mechanics:
For the bear, you need a different shape. Roll a smooth egg shape from dark brown clay for the torso. -
Add the belly:
Flatten a small oval of lighter tan clay and press it onto the bear’s tummy area. Texture this gently with your toothbrush. -
Arms and head:
Attach two sausage-shaped logs of brown clay to the sides for arms. Roll a separate sphere for the head and attach it to the body. -
Bear face details:
Add a tiny muzzle with a black nose, small round ears, and two eyes. Secure the finished bear to the top of the tan creature. -
Checking balance:
Before curing, ensure the stack stands straight. Adjust shapes slightly to center the gravity.
Step 4: Finishing Touches
-
Bake the totem:
Bake your stacked creation according to your clay package instructions. Using an oven thermometer is crucial to prevent scorching the lighter colors. -
Paint details:
Once cool, use a fine brush and acrylic paint to add the tiny speckled dots on the tan creature and the bear’s belly. -
Seal it:
Apply a coat of matte varnish to protect the paint and give the piece a unified, ceramic-like finish.
Enjoy your whimsical totem sitting faithfully on your desk or shelf