Whenever I need a relaxing project, I make a little clay pond—it’s basically a tiny world you can hold in your hand. These ideas are all about easy shapes, cozy details, and fun ways to fake that glossy water effect.
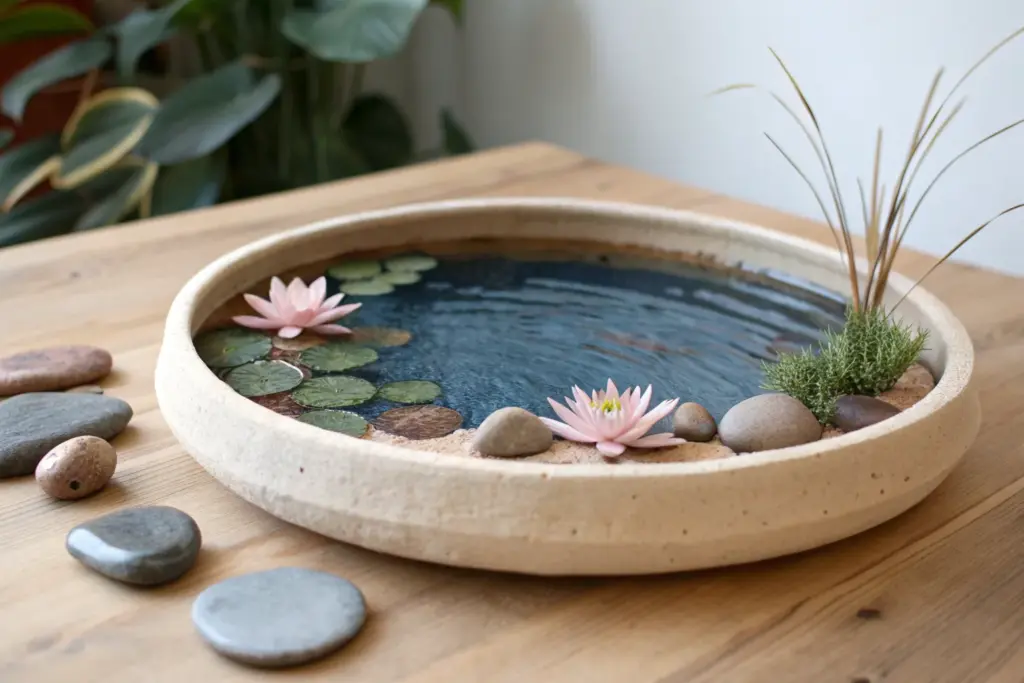
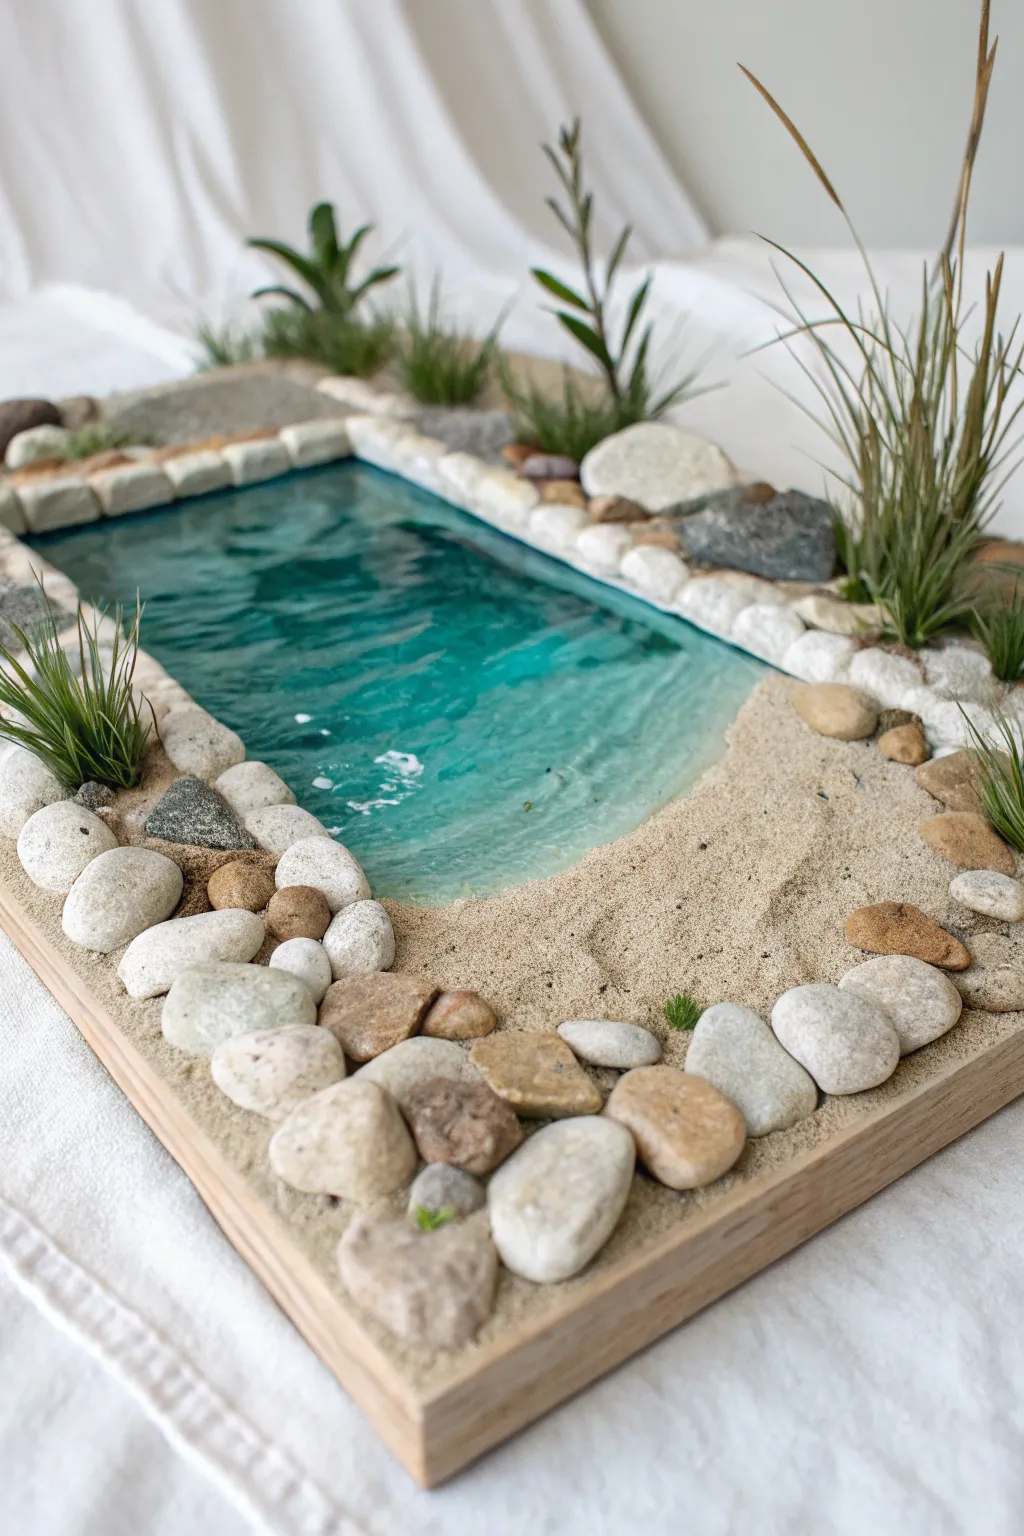
Classic Stone Ring Mini Pond
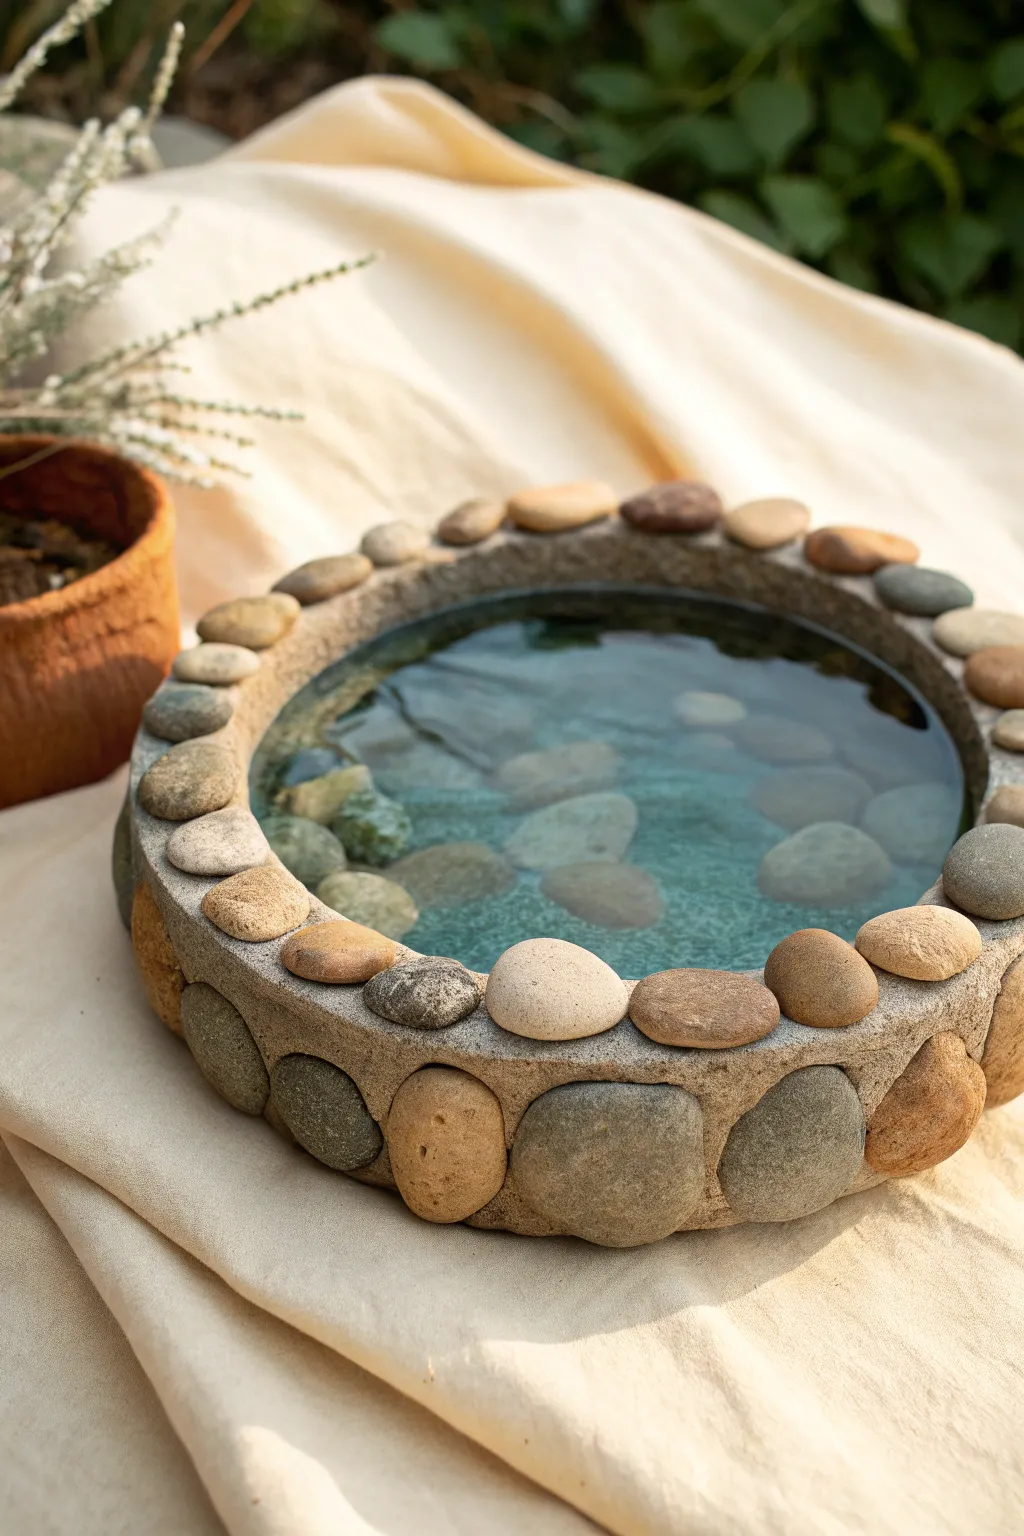
This serene mini pond brings the calming influence of a riverbed right to your patio or tabletop. By embedding smooth river rocks into a sturdy concrete or clay base, you create a timeless, natural vessel perfect for a small water feature.
Detailed Instructions
Materials
- Quick-setting concrete mix or hydraulic cement
- Two nesting plastic bowls (one large, one slightly smaller for the mold)
- Cooking spray or petroleum jelly (release agent)
- Smooth river stones (various sizes: small for rim, medium for sides)
- Bucket for mixing concrete
- Trowel or mixing stick
- Sandpaper or sanding block (medium git)
- Water sealant (concrete sealer)
- Clean water
Step 1: Preparing the Mold
-
Select your forms:
Choose two plastic bowls. The larger one determines the outer diameter of your pond, and the smaller one creates the inner water basin. Ensure there is at least a 1.5-inch gap between them for the walls. -
Lubricate the molds:
Generously coat the inside of the larger bowl and the outside of the smaller bowl with cooking spray or petroleum jelly. This release agent is crucial for removing the concrete later. -
Sort your stones:
Before mixing anything, sort your river stones. You’ll need decorative, flat-ish stones for the top rim and larger, oval stones for the exterior walls. Having them organized by size speeds up the embedding process.
Pro Tip: Smoother Walls
Vibrate the mold vigorously after pouring the concrete walls. Use a rubber mallet to tap the outside of the mold or shake the table to bring air bubbles to the surface for a smoother finish.
Step 2: Casting the Base
-
Mix the concrete:
In your bucket, mix the concrete according to the package instructions. You want a consistency similar to peanut butter or thick oatmeal—stiff enough to hold stones but wet enough to pour. -
Pour the bottom layer:
Pour about 1.5 to 2 inches of concrete into the bottom of the large bowl. Tap the bowl firmly on your work surface to release trapped air bubbles and level the mix. -
Insert the inner mold:
Center the smaller bowl inside the larger one, pressing it down into the wet concrete until the base thickness feels right. Don’t push it all the way to the bottom. -
Weight it down:
Place heavy rocks or weights inside the smaller bowl to keep it from floating up as you work. I usually use a bag of sand for even weight distribution. -
Fill the walls:
Carefully scoop the remaining concrete into the gap between the two bowls to form the walls. Stop when you are about 1/2 inch from the top edge of the inner bowl if you want a recessed look, or fill to the top.
Step 3: Embedding the Stones
-
Wait for initial set:
Let the concrete sit for 15-30 minutes until it firms up slightly but is still workable. It needs to support the weight of the stones without them sliding down. -
Set the rim stones:
Starting at the top edge usually works best. Press your small, flat stones gently into the damp concrete rim, creating a continuous ring. Ensure they adhere well but remain visible. -
Remove the outer mold early (optional):
This is the tricky part. To place stones on the *outside* walls like the photo, you need to carefully remove the outer plastic bowl while the concrete is firm but still ‘green’ (uncured). If it slumps, put the bowl back and wait longer. -
Embed side stones:
Once the outer mold is off and the shape holds, press the larger river stones into the exterior walls. You may need to add a dab of fresh wet concrete to the back of each stone to act as ‘glue’ if the wall has dried too much. -
Clean the stones:
Use a damp sponge to gently wipe away any concrete smear from the face of the rocks before it hardens completely.
Troubleshooting: Sliding Rocks
If side stones keep sliding off the vertical walls, wrap masking tape or large rubber bands around the circumference of the basin to hold the rocks in place while the mortar sets completely.
Step 4: Finishing Touches
-
Full cure:
Cover the project with plastic wrap to retain moisture and let it cure for at least 24-48 hours in a shaded spot. -
Remove inner mold:
Twist and pull the inner bowl to remove it. If it’s stubborn, pour a little hot water inside the plastic bowl to loosen the release agent. -
Clean and sand:
Rinse the basin thoroughly. Use sandpaper to smooth any rough concrete edges on the rim or interior. -
Seal the basin:
Apply a concrete water sealant to the interior of the basin. This prevents the concrete from absorbing water and protects the pond’s integrity. -
Fill and enjoy:
Once the sealer is dry, fill your new basin with water. Add a layer of loose stones to the bottom for aesthetics.
Now you have a tranquil water feature ready to reflect the sky


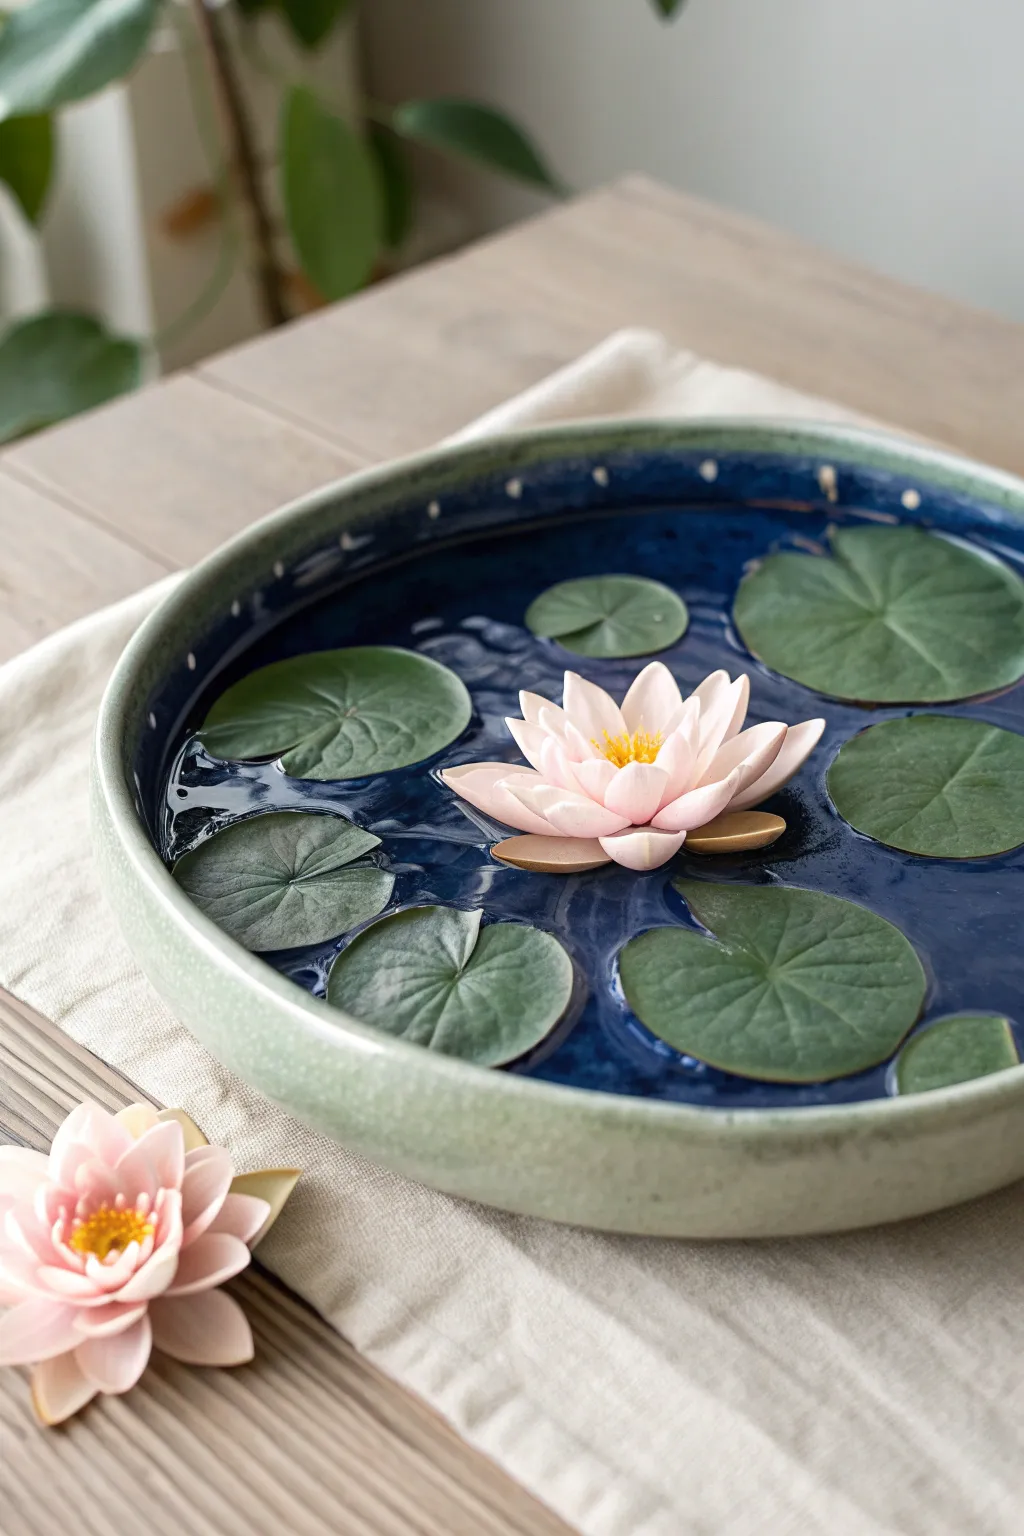
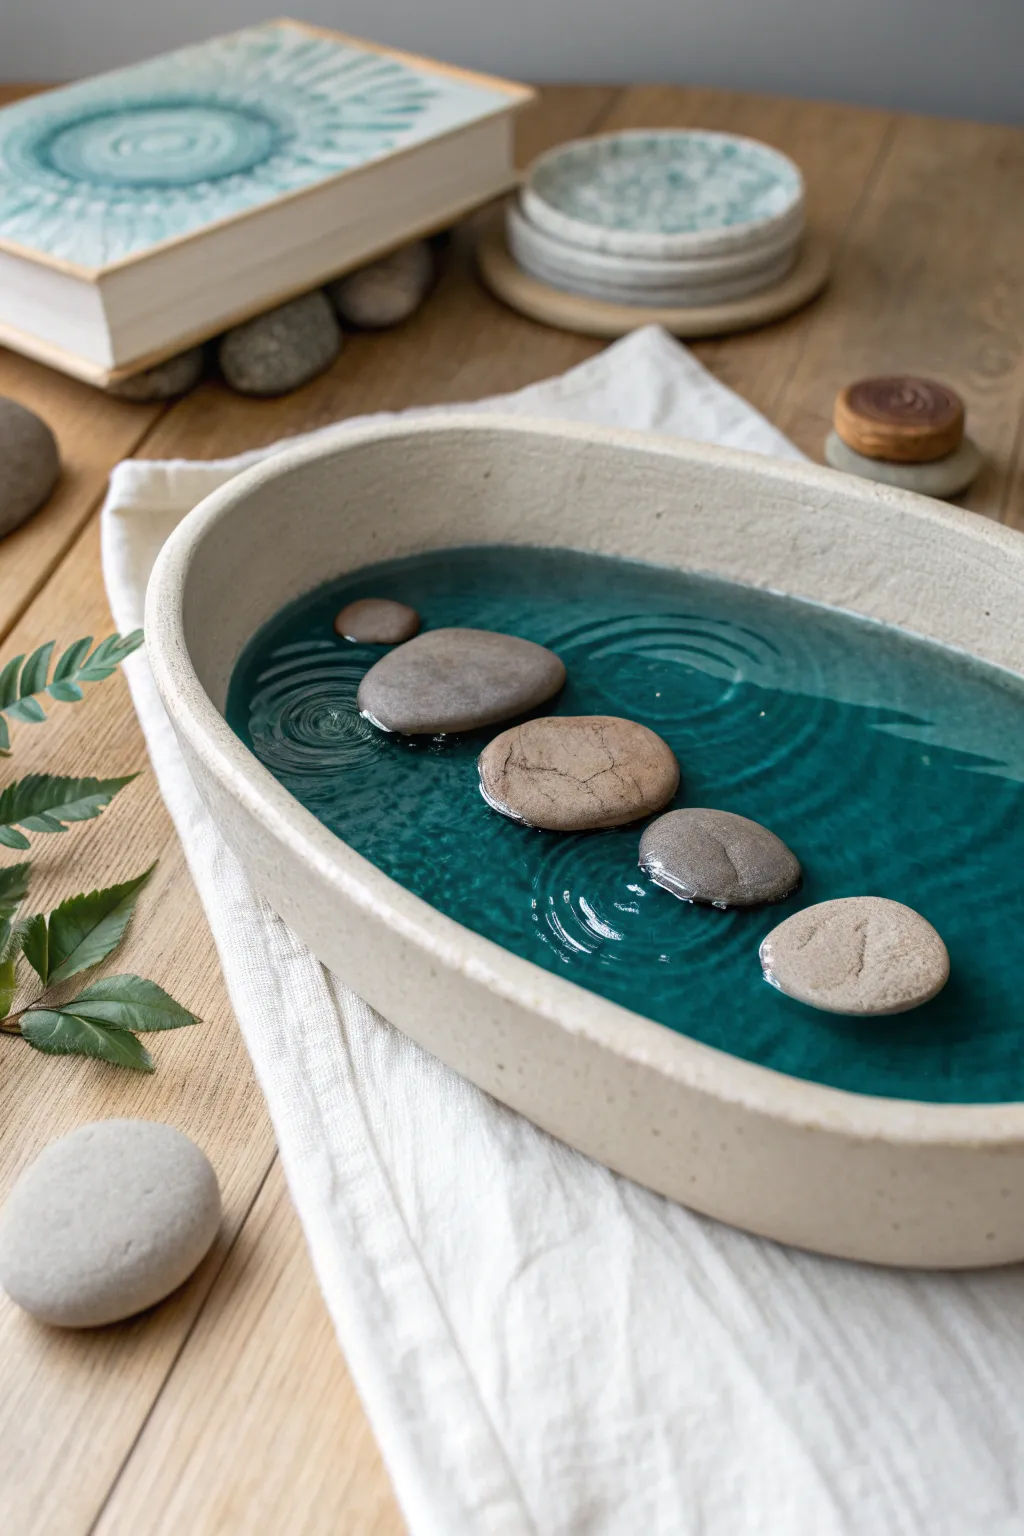
Glossy Water Surface Finish
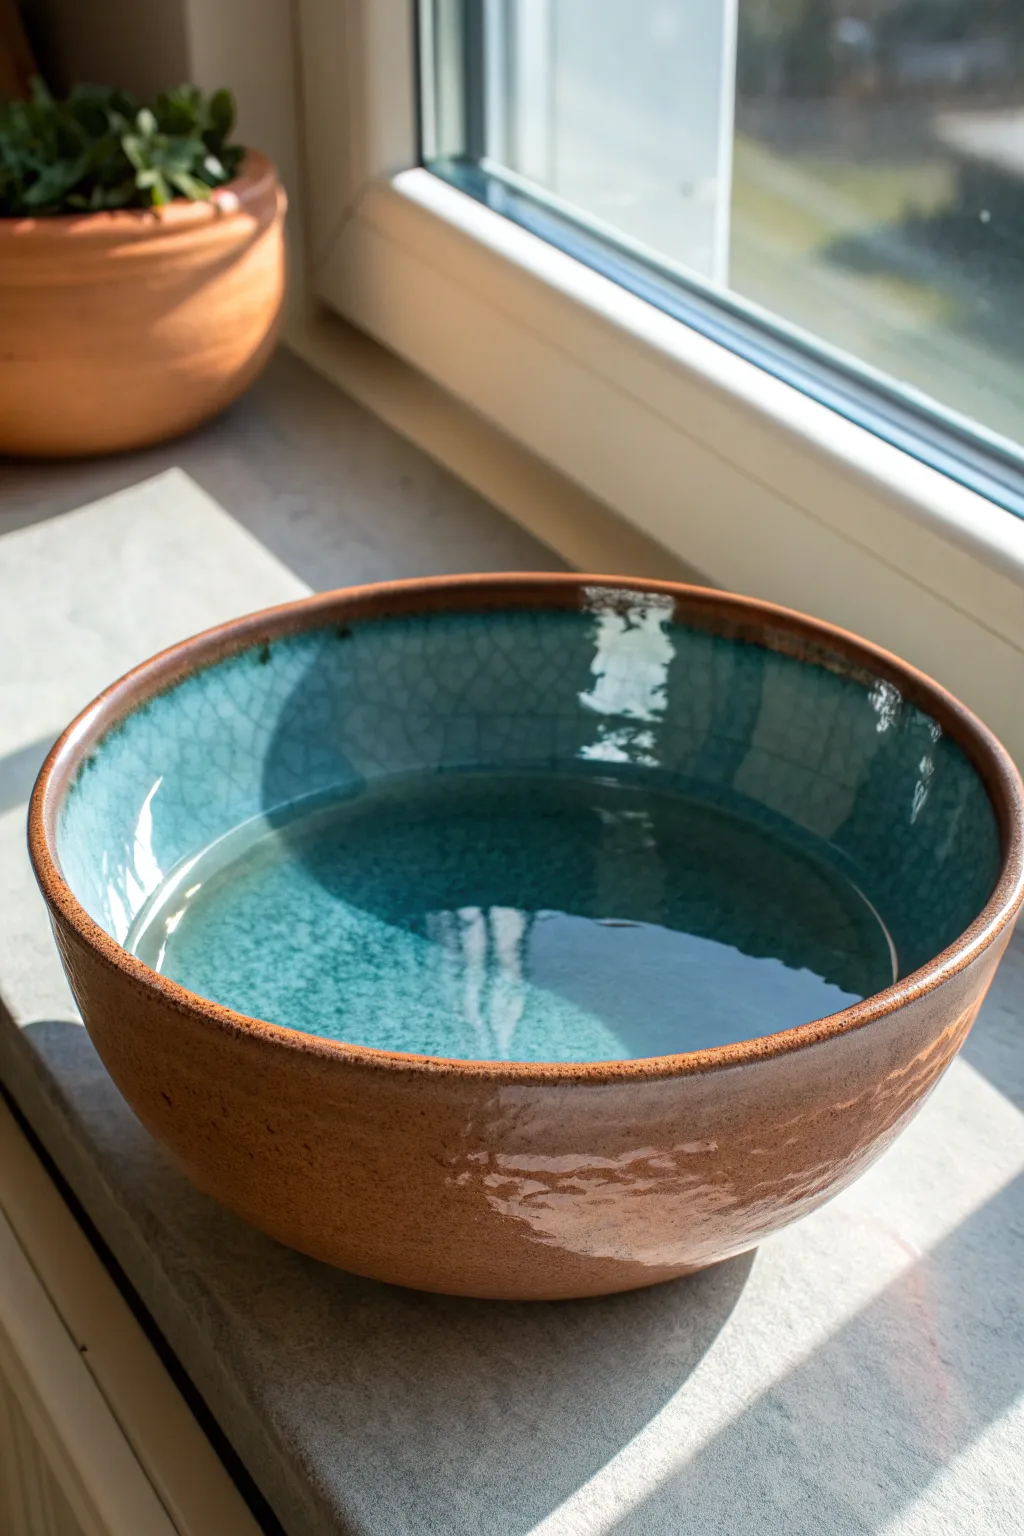
Bring the tranquility of a garden pond indoors with this hand-thrown ceramic bowl featuring a stunning contrast between raw clay and a glassy, turquoise interior. This project focuses on achieving a water-like glaze effect that mimics the shimmering surface of a deep pool.
Step-by-Step Tutorial
Materials
- Stoneware clay body (speckled or terracotta color)
- Pottery wheel
- Throwing tools (sponge, rib, wire cutter)
- Trimming tools
- High-fire turquoise crackle glaze (cone 6 or 10)
- Wax resist (liquid)
- Sponge for wiping
- Clean water
- Kiln
Step 1: Throwing and Shaping
-
Center the clay:
Start by wedging your clay thoroughly to remove air bubbles, then slam it onto the center of your wheel head. Using coning up and down motions, center the clay until it spins smoothly without wobbling. -
Open the form:
Press your thumbs into the center to create the initial opening, leaving about half an inch of clay at the bottom for the foot. Pull the floor out wide to establish the base of your bowl. -
Pull the walls:
Using steady pressure from both inside and outside hands, pull the clay upward to create the walls. Aim for a gentle, rounded curve rather than straight vertical sides to better mimic a natural basin. -
Refine the rim:
Compress the rim with a piece of chamois or your sponge to ensure it is smooth and durable. A slightly thickened rim adds visual weight and sturdiness to the piece. -
Smooth the interior:
Run a flexible metal or rubber rib along the interior curve to remove throwing lines. A perfectly smooth inside surface is crucial for the watery glaze effect later. -
Cut and dry:
Wire the bowl off the wheel head and set it aside to dry until it reaches a leather-hard state.
Uneven Glaze Coat?
If the glaze pools too thickly at the bottom, try pouring the excess out faster next time. You can also brush the interior glaze rather than pouring for more control.
Step 2: Trimming and Bisque
-
Center for trimming:
Place your leather-hard bowl upside down on the wheel. Secure it with lug clay or tap it on center if using a Giffin Grip. -
Trim the exterior:
Use a trimming tool to remove excess weight from the bottom and refine the exterior curve. I like to leave a bit of texture on the outside to contrast with the smooth interior. -
Define the foot ring:
Carve out a distinct foot ring so the bowl sits slightly elevated, giving it a lighter appearance on a table surface. -
Bisque fire:
Once bone dry, load the bowl into the kiln for the bisque firing (usually Cone 04 or 06) to prepare it for glazing.
Step 3: Glazing the ‘Water’
-
Clean the bisque:
Wipe the entire bisque-fired bowl with a damp sponge to remove any dust, which can cause pinholes in your glaze. -
Apply wax resist:
Carefully paint liquid wax resist on the exterior of the bowl and the very top edge of the rim. This ensures the outside remains raw clay. -
Mix the glaze:
Stir your turquoise crackle glaze thoroughly. If it seems too thick, add a tiny amount of water; a slightly thinner application often enhances the pooling effect. -
Pour the interior:
Pour a generous amount of glaze into the bowl. Roll it around to coat the entire interior surface evenly, then pour the excess back into your bucket. -
Clean the exterior:
Even with wax resist, some glaze might drip. Use a damp sponge to meticulously wipe any stray glaze droplets off the raw exterior clay. -
Glaze fire:
Fire the bowl to the maturation temperature of your specific glaze and clay body (typically Cone 6 or Cone 10).
Floating Flora
Enhance the pond effect by floating a single small blossom or a few duckweed leaves on the water surface for a touch of living greenery.
Step 4: Finishing Touches
-
Sand the foot:
After the kiln cools, check the bottom of the foot. If it feels rough, sand it lightly with wet sandpaper to prevent it from scratching furniture. -
Add water:
Once fully finished, fill the bowl with clean water and place it near a light source to enjoy the full depth of your ceramic pond.
Now you have a serene water feature that catches the light beautifully on any windowsill


Ripple Water Texture Pond

This stunning ceramic basin mimics the serene ripples of a pond with its grooved, teal-glazed interior set against a rustic, unglazed exterior. The contrast between the smooth, watery inside and the textured, earthy outside creates a captivating centerpiece.
Step-by-Step
Materials
- Stoneware clay (smooth or slightly grooved body)
- Pottery wheel
- Throwing tools (sponge, needle tool, wire cutter)
- Rib tools (wooden and metal)
- Trimming tools
- Underglaze (Teal or Turquoise)
- Clear glossy glaze
- Medium soft fan brush
- Sponge for wiping
- Kiln
Step 1: Throwing and Shaping
-
Center the clay:
Start with a substantial ball of stoneware clay (approx. 3-4 lbs) on your wheel head. Center it firmly, ensuring a wide, stable base, as this will become a wide, shallow bowl. -
Open the form:
Opening the clay wide and relatively flat at the bottom, curving gently upward. Aim for a generous curve rather than straight vertical walls. -
Pull the walls:
Pull the walls up, keeping them thick enough to support the width. Focus on creating a consistent curve that resembles a half-sphere or a deep basin. -
refine the rim:
Use a chamois or a wet sponge to compress and smooth the rim. A slightly rounded rim looks best for this organic style. -
Create the interior ripples:
While the wheel is spinning slowly, use the rounded end of a wooden tool or your finger to gently press a spiral groove starting from the center and moving outward. Vary the pressure slightly to create organic ‘ripples’ rather than perfect machine lines.
Uneven Glaze Check
If the clear glaze pools too thickly in the center, it may cloud the teal color. Pour out excess glaze quickly and keep the bowl inverted for a few seconds to let it drain.
Step 2: Trimming and Texturing
-
Dry to leather hard:
Allow the bowl to dry slowly until it reaches a leather-hard state. It should be firm enough to handle without deforming but soft enough to carve. -
Trim the foot:
Flip the bowl onto a chuck or foam bat and center it. Trim away excess weight from the bottom, creating a clean, defined foot ring that lifts the bowl slightly. -
Create exterior texture:
Using a trimming tool with a chattering motion or a serrated rib, scrape the exterior walls while the wheel spins. I like to let the tool bounce slightly to create that rough, earthy texture shown in the photo. -
Bisque fire:
Once fully bone dry, load the bowl into the kiln and bisque fire it according to your clay body’s specifications (usually Cone 04 or 06).
Step 3: Glazing the ‘Water’
-
Clean the bisque:
Wipe the entire bisqueware with a damp sponge to remove dust and ensure the glaze adheres properly. -
Prepare the resist:
Apply wax resist to the rim and the entire exterior of the bowl. This ensures the raw clay texture remains visible and unglazed. -
Apply teal underglaze:
Paint 2-3 coats of teal underglaze into the interior grooves. Let each coat dry. The grooves will naturally hold more pigment, enhancing the depth. -
Optional wipe-back:
For more contrast, gently wipe the interior with a damp sponge. This removes some underglaze from the high points of the ripples while leaving it dark in the recesses. -
Apply clear glaze:
Pour a clear, high-gloss glaze into the interior, swilling it around to coat entirely, then pour out the excess. This creates the ‘wet water’ look. -
Clean up:
Double-check the exterior and rim. Use a sponge to wipe away any stray droplets of glaze that got on the waxed areas. -
Glaze fire:
Fire the piece again to the maturity temperature of your clay and glaze (often Cone 5/6 or Cone 10).
Adding Pond Life
Before the clear glaze, paint tiny koi fish or lily pads using contrasting underglazes at the bottom of the ‘pond’ for a hidden surprise.
Place your finished basin in a sunlit spot where the glossy interior can catch the light like real water


Lily Pad and Lotus Pond
Capture the serenity of a garden water feature in miniature form with this elegant clay project. Using polymer or air-dry clay and resin, you will create a permanent, tranquil pond complete with delicate floating flora.
Step-by-Step Guide
Materials
- Wide, shallow ceramic bowl (pre-made or handmade with clay)
- Epoxy resin (2-part crystal clear)
- Deep blue alcohol ink or resin pigment
- Polymer clay (translucent white, soft pink, deep green, yellow)
- Clay tools: ball stylus, needle tool, rolling pin
- Chalk pastels (dark pink or red) for shading
- Soft paintbrush
- UV resin (optional, for quick adhering)
- Gloss varnish or glaze
Step 1: Sculpting the Lotus
-
Prepare the petals:
Mix translucent white clay with a tiny amount of pink to get a soft, pale blush color. Roll the clay out thinly and cut approximately 12-15 teardrop shapes in varying sizes. -
Shape the petals:
Place a teardrop shape in your palm. Using a large ball stylus, gently press and roll the center to cup the petal. Pinch the pointed end slightly to give it definition. -
Shade for realism:
Before assembly, I like to use a soft brush to dust the tips of the petals with scraped pink chalk pastel dust. This gradient makes the flower look alive. -
Create the center:
Roll a small ball of yellow clay and flatten it slightly. Texture the surface with a needle tool to mimic the carpels and stamens of a real lotus. -
Assemble the bloom:
Attach the smallest petals around the yellow center first, curving them inward. Layer larger petals behind them, opening them outward as you go. Bake according to package instructions.
Step 2: Crafting the Lily Pads
-
Color mixing:
Take your green clay and mix in a speck of brown or black to desaturate it; lily pads are rarely neon green. -
Form the leaves:
Roll small balls of green clay and flatten them into thin circles. Use your finger to press a slight indentation in the center of each disc. -
Cut the notch:
Using a craft knife or a small triangle cutter, remove a small pie-slice wedge from each circle to create the classic pac-man shape of a lily pad. -
Add veining:
With a needle tool, gently score lines radiating from the center indentation out to the edges. Keep the touch light so you don’t cut through the clay. -
Bake the greenery:
Arrange the pads on a baking sheet. To give them a floating look later, slightly curl one or two edges upward before baking.
Sunken Pads?
If your lily pads are sinking, the resin is too fluid. Wait another 30-45 minutes. If it’s too late, use UV resin to quickly tack them to the surface.
Step 3: Creating the Pond Water
-
prepare the vessel:
Ensure your ceramic bowl is clean, dry, and free of dust. Place it on a leveled surface to ensure the water cures flat. -
Mix the resin:
Combine your 2-part epoxy resin according to the manufacturer’s ratio. Stir slowly for several minutes to minimize bubbles. -
Tint the water:
Add drops of deep blue alcohol ink. Start with just one drop and stir; you want a semi-transparent deep blue that looks like deep water, not opaque paint. -
The first pour:
Pour the blue resin into the bowl until it is about halfway filled. Let this layer cure until it is tacky but thick enough to support weight (usually 4-6 hours).
Bloom Variations
Make a few clay buds (tightly closed petals) and glue them peeking out between the leaves for a variety of growth stages in your pond.
Step 4: Final Assembly
-
Placement:
Once the base resin is tacky (gel stage), gently place your baked lily pads onto the surface. The tackiness will hold them in place without them sinking. -
Securing the flower:
Place the lotus flower in the center or slightly off-center for a natural composition. Press it gently to ensure contact with the resin. -
Create ripples:
For a dynamic water effect, use a toothpick to drag small circles in the tacky resin around the flower and pads, simulating gentle movement. -
Final cure:
Cover the project with a box to prevent dust from settling on the sticky surface and allow it to fully cure for 24-48 hours.
Now you have a permanent moment of zen that brings calmness to any desk or shelf

The Complete Guide to Pottery Troubleshooting
Uncover the most common ceramic mistakes—from cracking clay to failed glazes—and learn how to fix them fast.
Cute Duck Pond Family Scene
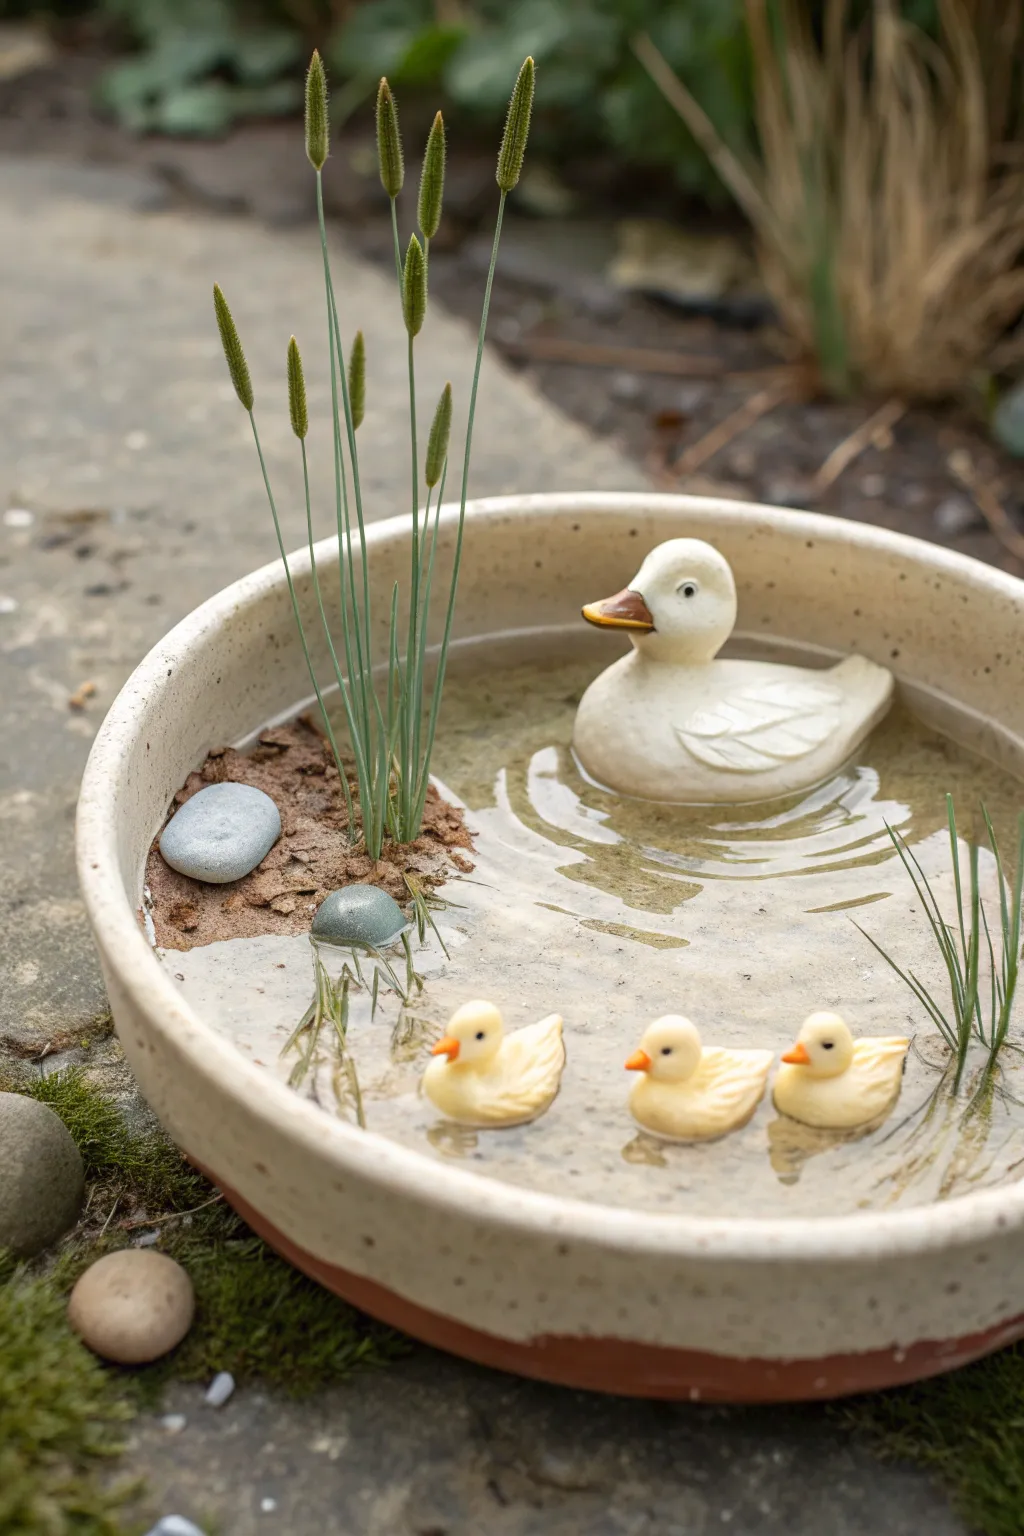
Transform a simple terracotta saucer into a delightful miniature water scene featuring a serene mother duck and her trail of ducklings. This project combines clay sculpting with resin pouring to create a permanent, tranquil moment perfect for garden nooks or indoor shelves.
How-To Guide
Materials
- Shallow terracotta plant saucer (approx. 8-10 inches)
- Cream or off-white acrylic paint
- Polymer clay (white, yellow, orange)
- Two-part clear epoxy resin
- Small pebbles or smooth river stones (grey/tan)
- Fine sand and potting soil mix
- Artificial tall grass or preserved reeds
- Strong craft glue or E6000
- Matte spray sealant
- Small sculpting tools (ball stylus, needle tool)
- Disposable mixing cup and stir stick
Step 1: Preparing the Basin
-
Source the base:
Begin with a clean, low-profile terracotta saucer. If it has a drainage hole, use waterproof epoxy putty or strong tape on the underside to seal it completely tight. -
Paint the ceramic:
Give the entire inner and outer surface two coats of cream or oatmeal-colored acrylic paint. Since the original terracotta adds warmth, I like to sponge the paint on lightly near the bottom rim to let some of that earthy red peek through. -
Create the shoreline:
Mix a small amount of fine sand with a pinch of potting soil and craft glue to make a thick paste. Spackle this mixture onto one side of the dish interior to form a textured, earthy bank. -
Add nature elements:
Press a smooth gray stone into your sand mixture while it’s still wet. At the same time, insert the stems of your faux reeds or grass into the ‘mud’ so they stand upright.
Step 2: Sculpting the Ducks
-
Form the mother duck:
Shape a golf-ball-sized piece of white polymer clay into a rounded teardrop for the body. Roll a smaller ball for the head and blend it seamlessly onto the narrow end of the body. -
Detail the feathers:
Using a knife tool, gently carve wing outlines on the sides of the mother duck. Press small, C-shaped indentations into the clay to suggest layers of feathers. -
Add facial features:
Attach a small orange triangle for the beak. Use a dotting tool to indent eye sockets and insert tiny black beads or balls of black clay for the eyes. -
Sculpt the ducklings:
Form three very small yellow ovals for the ducklings. Add tiny orange beaks and ensure their bodies are slightly flattened on the bottom so they will float upright in the resin. -
Bake the clay:
Read your polymer clay package instructions carefully for temperature settings. Place all four ducks on a baking sheet and bake them until hardened, then let them cool completely.
Ripple Effect Trick
If you miss the gel window for ripples, you can add them later using clear gloss heavy gel medium on top of the cured resin.
Step 3: Pouring the Water
-
Secure the inhabitants:
Once the shoreline is dry and the ducks are cool, glue the mother duck and her babies onto the painted basin floor. Arranging them in a line creates a sweet narrative. -
Add underwater details:
Sprinkle a very fine dusting of sand across the rest of the basin floor if you want a textured bottom, or leave it smooth white for a cleaner look. -
Mix the resin:
In a disposable cup, mix your two-part epoxy resin according to the manufacturer’s ratios. Stir slowly to avoid creating too many air bubbles. -
The first pour:
Pour the resin carefully around the ducks and up to the edge of your sandy bank. Don’t submerge the ducks entirely; you want the resin to reach slightly up their sides to mimic displacement. -
Creating ripples:
Wait until the resin reaches a thick, gel-like consistency (usually 30-45 minutes). Use a toothpick to gently drag concentric circles outward from the mother duck’s chest to simulate ripples. -
Final curing:
Cover the project with a box to prevent dust from landing on the sticky surface and let it cure undisturbed for a full 24 hours.
Cloudy Resin?
This usually happens due to humidity or improper mixing ratios. Ensure your room is dry and you scrape the cup sides while mixing.
Place your finished pond among real garden plants to let nature embrace your miniature creation
Wide-Eyed Frog Pond Perch
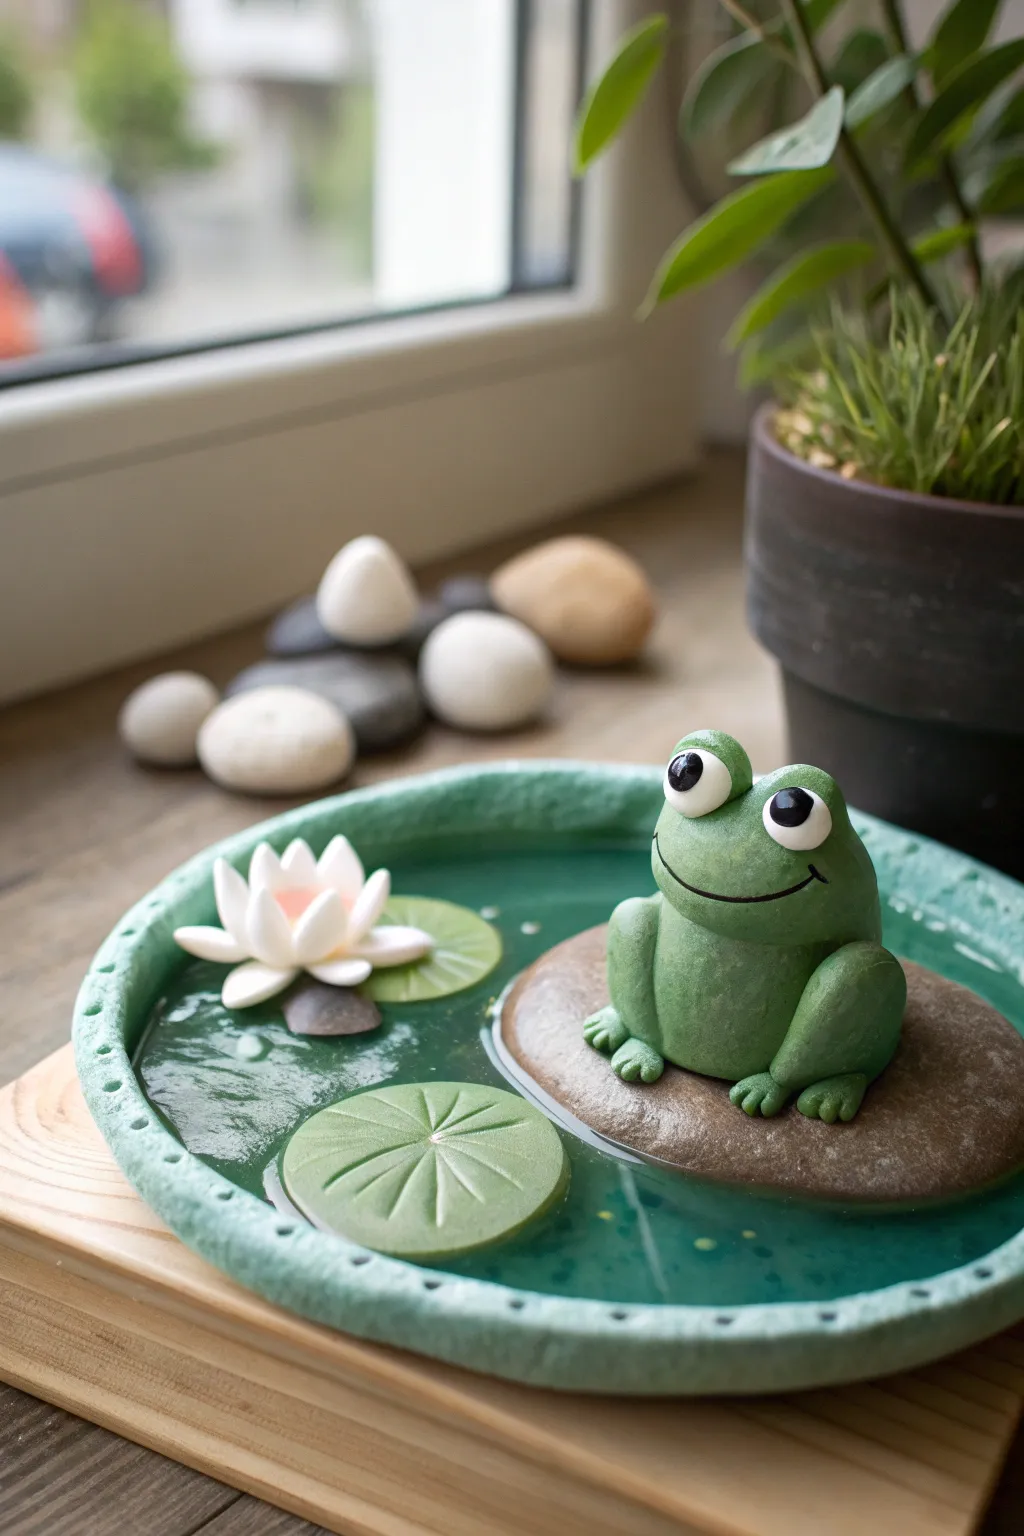
Create a whimsical miniature desktop oasis featuring a cheerful green frog basking on a faux rock. This delightful project combines polymer clay sculpting with resin pouring techniques to capture a serene, watery moment frozen in time.
Step-by-Step Guide
Materials
- Polymer clay (shades of green, white, pale pink, brown/grey)
- Shallow ceramic dish or clay saucer (approx. 4-5 inches diameter)
- Two-part clear epoxy resin
- UV resin (optional, for quick spot-fixing)
- Acrylic paints (green teal, dark green, black)
- Sculpting tools (ball styluses, needle tool, rubber shapers)
- Aluminum foil
- Gloss glaze or varnish
- Heat gun or lighter (for resin bubbles)
- Oven for baking polymer clay
Step 1: Sculpting the Happy Frog
-
Form the body:
Start with a medium green polymer clay. Roll a smooth ball about the size of a walnut for the body, flattening the bottom slightly so it sits securely. -
Add the hind legs:
Roll two teardrop shapes from the same green clay. Press them onto the sides of the body, wrapping the thinner end towards the front to create the haunches. -
Attach the feet:
Create flattened ovals for the feet. Using a needle tool or small knife, indent the toes to give them definition, then attach these to the ends of the leg teardrops. -
Create the front legs:
Roll two shorter logs of green clay. Attach these vertically under the ‘chin’ area of the frog, blending the seams into the main body so the frog looks like it’s propping itself up. -
Make the eyes:
Roll two balls of white clay. Press these gently onto the top of the head. Add tiny black clay pupils centered on the white balls to create that wide-eyed look. I like to add a tiny dot of white paint to the pupil later for extra life. -
Carve the smile:
Use a needle tool or a flexible clay blade to gently impress a wide, curved smile across the face. Backfill this thin line with a tiny snake of black clay or paint it after baking.
Depth Perception
Paint the bottom of your dish darker in the center and lighter at the edges before pouring resin. This creates a realistic illusion of deep water.
Step 2: Creating the Pond Elements
-
Sculpt the rock perch:
Using brown or grey clay (or a scrap clay core covered in brown), form a large, flat oval stone shape larger than your frog. Texture the surface by pressing a crumpled ball of aluminum foil against it. -
Form the lily pad:
Flatten a disk of light green clay. Use a needle tool to cut a small ‘V’ pie slice out of one side and etch vein lines radiating from the center. -
Build the lotus flower:
Create a base with teardrop-shaped green leaves. Layer white teardrop petals on top, curving them upward. Add a tiny pink center using a small ball of pale pink clay textured with a needle tool. -
Bake the components:
Place the frog, rock, lily pad, and lotus on a tile or baking sheet. Bake according to your clay manufacturer’s instructions, usually at 275°F (130°C) for 15-30 minutes. Let them cool completely.
Step 3: Assembling the Water Scene
-
Prepare the basin:
Take your shallow ceramic dish. If it isn’t already green, paint the interior with teal and dark green acrylics to simulate depth. Let the paint dry fully. -
Secure the rock:
Glue the baked clay rock into position on one side of the dish using a strong adhesive like E6000 or a hidden dab of super glue. -
Mix the resin:
Mix a small batch of two-part epoxy resin, ensuring equal parts are stirred slowly to minimize bubbles. You want enough to fill the dish about halfway up the rock. -
Pour the water:
Slowly pour the clear resin into the dish. If bubbles appear, wave a heat gun or ligther quickly over the surface to pop them. -
Place floating elements:
Gently place the lily pad and lotus flower onto the surface of the wet resin. Instead of sinking, surface tension should help them float, but you can let the resin thicken slightly for 20 minutes first if they seem heavy. -
Mount the frog:
Place the frog onto the dry top of the rock perch. You don’t need to submerge him; just ensure his feet are settled comfortably on the stone. -
Final cure:
Cover the project with a box to prevent dust from settling on the sticky resin and let it cure undisturbed for 24 hours.
Sticky Situation?
If your resin isn’t curing hard after 24 hours, the mixing ratio was likely off or the room is too cold. Move to a warmer spot or add a thin top coat.
Enjoy the peaceful vibe your little amphibian friend brings to your desk or shelf


What Really Happens Inside the Kiln
Learn how time and temperature work together inside the kiln to transform clay into durable ceramic.
Koi Fish Under Clear Water Pond
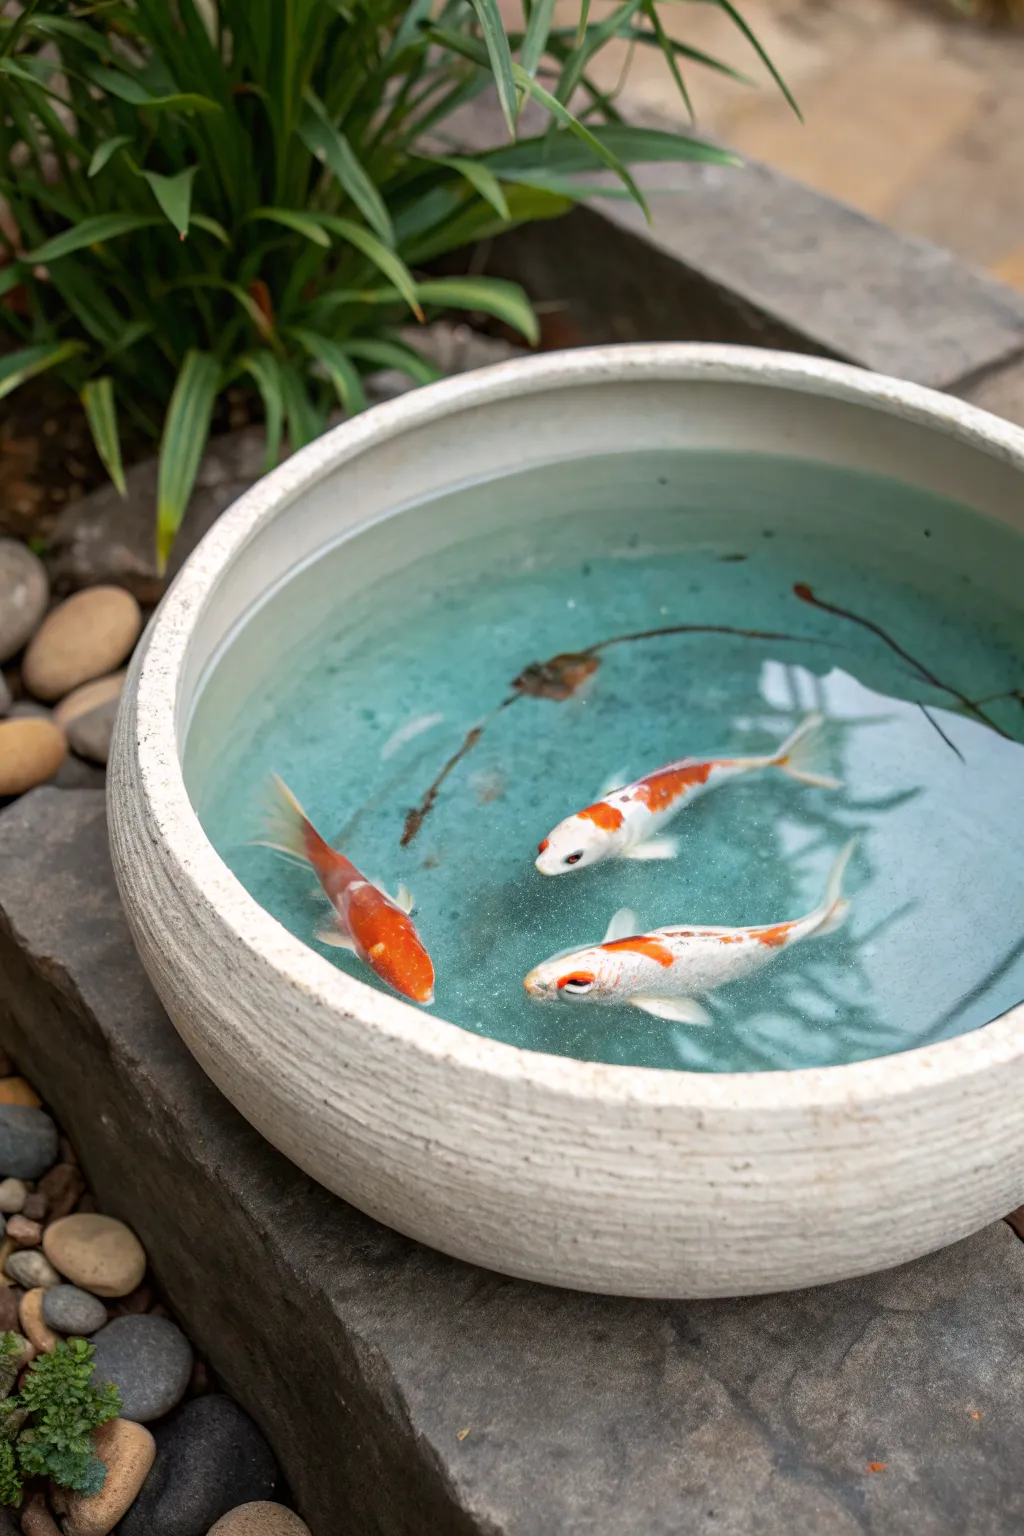
Create a breathtaking miniature pond that captures the serene beauty of koi swimming in crystal-clear water. By layering resin and paint, you will build a 3D illusion in a simple ceramic bowl that looks indistinguishable from real life.
How-To Guide
Materials
- Shallow, white ceramic bowl or planter (approx. 10-12 inches diameter)
- Epoxy resin (clear, casting type)
- Acrylic paints (Titanium White, Vermillion/Orange, Black, Yellow Ochre)
- Fine detail paintbrushes (sizes 000, 00, and 0)
- Dried twigs or small dried leaves (for debris)
- Tweezers
- Mixing cups and stir sticks
- Heat gun or torch (for bubbles)
- Blue or turquoise alcohol ink (optional)
Step 1: Base Preparation
-
Clean the Vessel:
Begin by thoroughly cleaning and drying your ceramic bowl. Any dust or oils inside will be permanently trapped, so wipe it out with a lint-free cloth or a little isopropyl alcohol. -
Arrange Natural Elements:
Select a few small, dried twigs or a singular dried leaf. Arrange them naturally at the bottom of the bowl to mimic pond debris. Use a tiny dab of superglue to secure them so they don’t float during the first pour. -
First Resin Pour:
Mix a small batch of epoxy resin according to the manufacturer’s instructions. Slowly pour a thin layer (about 1/4 inch) into the bottom of the bowl, just enough to cover the twigs. -
Remove Bubbles:
Pass a heat gun or torch quickly over the surface to pop any air bubbles. Let this layer cure completely, which usually takes 24 hours depending on your resin brand.
Step 2: Painting the Fish – Layer 1
-
Outline the Shapes:
Once the base layer is hard, mix a small amount of white acrylic paint. Using your finest brush, paint the basic elongated oval shapes of the three koi fish bodies directly onto the cured resin. -
Add Dimension:
Paint the fins and tails extending from your white ovals. Keep the paint thin and somewhat translucent at the edges of the fins to create a ghostly, 3D effect. -
Second Resin Pour:
After the paint is fully dry, mix another batch of resin. If you want a slight water tint, add a microscopic drop of blue alcohol ink. I prefer to keep this layer clear to maintain visibility. Pour a thin layer over your painted shapes.
Depth Perception
Paint the bottom-most fins slightly smaller and hazier than the top details. This forced perspective makes the fish look like they are descending deeper.
Step 3: Painting the Fish – Layer 2
-
Building Opacity:
Once the second layer is cured, paint over your white koi shapes again. This time, focus on the center of the bodies to make them more opaque. -
Adding Color:
Start introducing the orange or vermillion spots. Dab the color onto the head and back of the fish, blending slightly with the wet white paint for a natural transition. -
Detailing Fins:
Use a mix of white and a tiny bit of grey or yellow ochre to add faint striations or lines to the fins and tails, giving them texture. -
Third Resin Pour:
Verify the paint is dry, then pour your third thin layer of clear resin. Remove bubbles and let it cure fully.
Surface Tension
For a ‘breaking the surface’ look, add tiny ripples of clear gel medium on top of the final cured resin layer right above the fish mouths.
Step 4: Final Details and Finish
-
Painting the Spines:
On this cured layer, paint the final details. Use a steady hand to add the dorsal fin spine along the back and very small black dots for the eyes. -
Refining Color:
Intensify the orange patches if they look too washed out. The color should look vibrant against the white body. -
Shadows (Optional):
If you want extreme realism, you can paint a very faint, diluted grey shadow on the resin surface slightly offset from the body, though the layers naturally create good depth. -
Final Pour:
Mix a final, larger batch of resin. This layer should be the thickest, filling the bowl to your desired ‘water level’. A tiny drop of blue-green ink here works well to unify the scene. -
Cover and Cure:
Place a clean box over the entire bowl while it cures to prevent dust from settling on your pristine water surface.
Place your finished resin pond on a low table where guests can gaze down into the depths of your artwork
Muddy Bottom Nature Pond Look
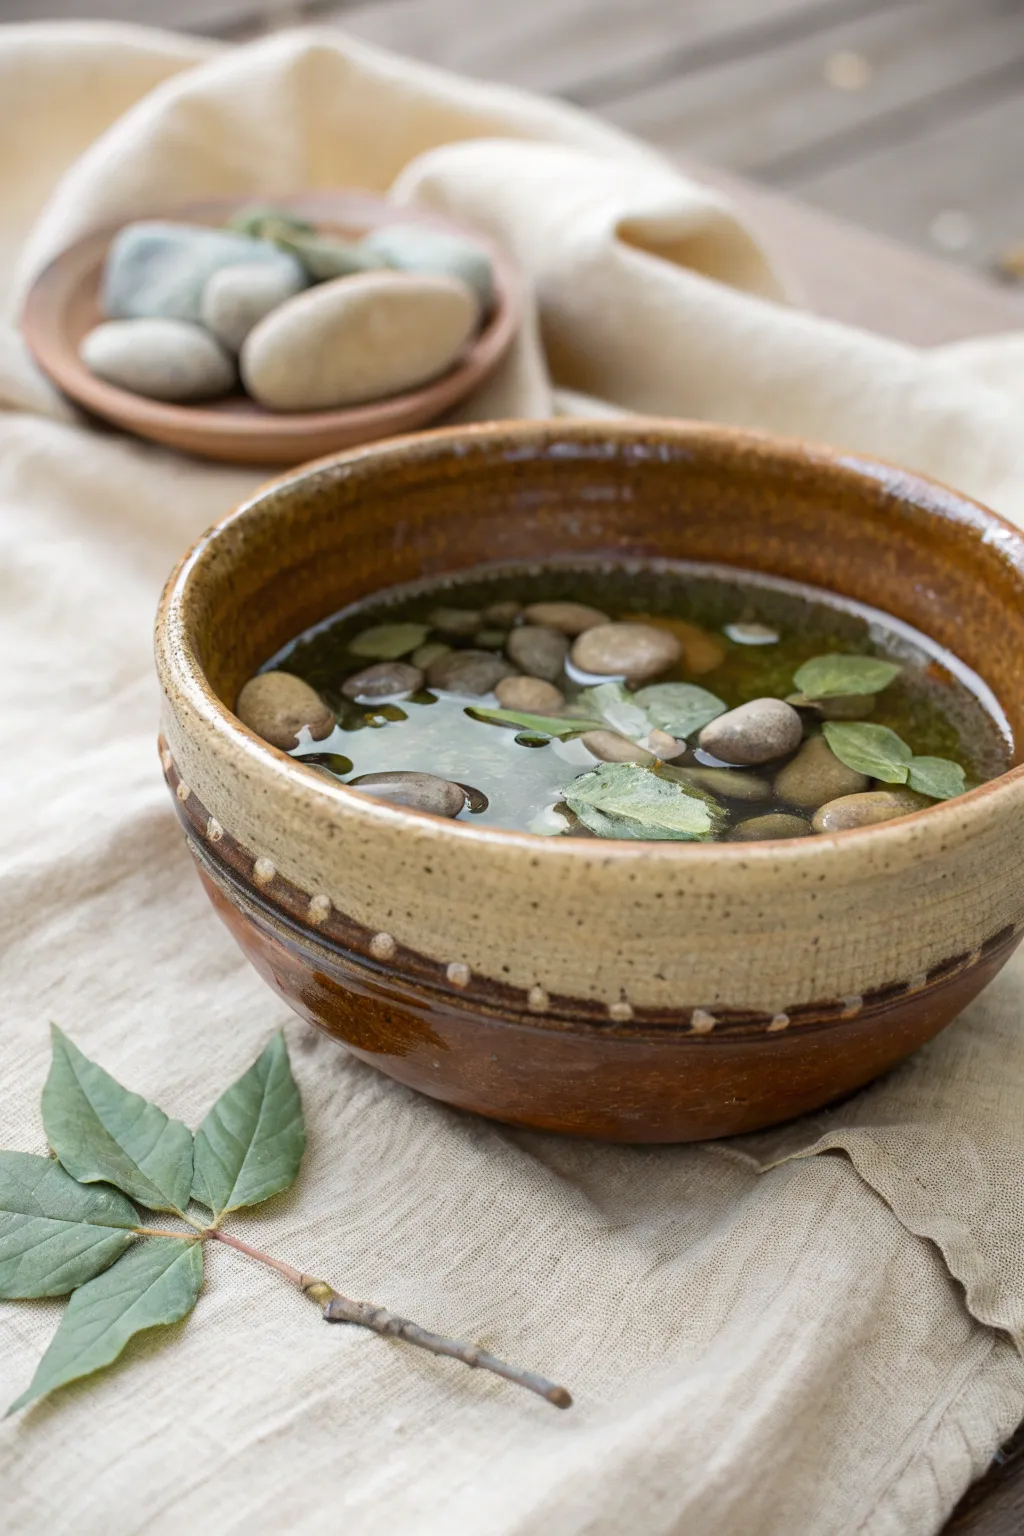
Bring the calming essence of a woodland stream indoors with this simple yet evocative arrangement. By combining earthy ceramics with water, river stones, and fresh greenery, you can create a meditative focal point that mimics a muddy-bottomed nature pond in miniature form.
Step-by-Step Guide
Materials
- Large, wide-mouthed ceramic bowl (earth tones/glazed interior)
- Small companion ceramic saucer or dish
- River stones (assorted sizes, smooth textures)
- Fresh water
- Green foliage (small leaves, aquatic plants, or durable clippings)
- Small branch or twig with leaves attached
- Natural linen or textured cloth for display
Step 1: Setting the Scene
-
Prepare the base:
Select a location for your arrangement where it won’t be easily bumped. Lay down your natural linen cloth, creating gentle folds and ripples in the fabric to suggest a soft, organic landscape rather than a stiff tablecloth. -
Position the vessels:
Place your main vessel—the large ceramic bowl—in the foreground. Position the smaller companion dish slightly behind it and to the left, creating depth in your composition. -
Clean the stones:
Rinse your river stones thoroughly under tap water to remove any dust or real dirt. Even though we are going for a ‘muddy bottom’ look, we want the water to remain clear enough to see the details.
Cloudy Water?
If the water turns milky immediately, wash your stones again. Sediments on natural rocks can cloud the water quickly. A drop of vinegar can also help clear it.
Step 2: Creating the Pond
-
Arrange the main bowl stones:
Gently place a layer of river stones at the bottom of the large bowl. I like to start with the larger stones to create a foundation. -
Add detail stones:
Fill the gaps with smaller pebbles. Don’t overfill; leave enough vertical space for the water line to sit comfortably below the rim. -
Fill with water:
Slowly pour fresh, room-temperature water into the bowl. Pour directly onto a stone to prevent splashing and to keep the substrate from shifting too much. -
Adjust the water level:
Fill the bowl until the water is quite high, just below the decorative rim. This high water line helps capture reflections and makes the stones appear clearer. -
Submerge the greenery:
Take several individual green leaves. Push some completely under the water’s surface so they rest on the stones, mimicking sunken foliage. -
Float surface leaves:
Place a few lighter leaves gently on top of the water so they float. This creates a multi-layered effect typical of natural ponds.
Step 3: Styling the Surroundings
-
Style the background dish:
Fill the small background saucer with dry river stones. Pile them slightly higher than the rim to create a textured, dry contrast to the wet pond bowl. -
Balance the colors:
Ensure the stones in the background dish carry similar grey and beige tones to those underwater to maintain visual continuity. -
Prepare the foreground branch:
Select a small twig or branch that still has healthy green leaves attached. A clean break or cut on the stem looks best. -
Place the accent branch:
Lay the branch on the linen cloth in the foreground, angling it toward the main bowl. This leads the viewer’s eye into the center of the arrangement. -
Final adjustment:
Check the light reflection on the water. If possible, position the arrangement near natural window light to enhance the glistening effect on the submerged stones.
Floating Trick
To make leaves float longer without sinking, coat the underside with a tiny, invisible smear of petroleum jelly. This repels water and keeps them buoyant.
Now you have a peaceful, reflective water feature to enjoy on your table

TRACK YOUR CERAMIC JOURNEY
Capture glaze tests, firing details, and creative progress—all in one simple printable. Make your projects easier to repeat and improve.
Rocky Shore Pond Diorama Base
This stunning diorama captures the serene beauty of a coastal rock pool with hyper-realistic resin water and a naturally textured shoreline. It’s a perfect meditative piece for a desk or shelf, combining natural elements with artistic craftsmanship.
Step-by-Step
Materials
- Shallow wooden tray or shadow box frame (unfinished)
- Two-part epoxy resin (clear)
- Alcohol inks or resin pigments (teal, blue, white)
- Fine sand (natural beige)
- Assorted river rocks and small pebbles (white, grey, tan)
- Faux air plants or plastic aquarium grass tufts
- White craft glue or Mod Podge
- Heat gun or lighter
- Disposable mixing cups and stir sticks
- Gloves and protective sheet
- Hot glue gun and glue sticks
Step 1: Preparing the Landscape
-
Base Construction:
Begin with a sturdy wooden tray. If your tray has gaps in the corners, seal them thoroughly with wood glue or clear tape to prevent resin leaks later. -
Drafting the Layout:
Arrange your larger rocks loosely to define where the water will be versus the sandy shore. Create a natural ‘cove’ shape, leaving one side open for a sandy beach. -
Securing the Border:
Using a hot glue gun, affix the larger border rocks around the perimeter of your designated water area. Build them up slightly to act as a dam for the resin. -
Creating the Beach:
Brush a layer of white craft glue over the wooden base where you want the land to be. Sprinkle fine sand generously over the wet glue until the wood is completely hidden. -
Shoreline Transition:
Add a second dab of glue right at the water’s edge and sprinkle a bit more sand there, allowing it to slope gently into the ‘water’ area to simulate a shallow entry. -
Locking the Sand:
Once the initial sand layer is dry, mix a small amount of water with white glue (50/50 mix) and drip it over the sand to seal it completely so loose grains don’t float into your resin later.
Sticky Situation?
If your resin remains sticky after 48 hours, the ratio was likely off or it wasn’t mixed enough. Unfortunately, you can’t dry it, but you can carefully pour a fresh, correctly mixed thin coat on top.
Step 2: Adding Vegetation
-
Planting the Grass:
While the terrain is dry but before pouring resin, glue small clusters of faux grass or air plants into the rocky crevices and the back corners of the sand area. -
Detailing Rocks:
Glue smaller pebbles around the base of the plants to hide any plastic roots or glue spots, integrating them naturally into the landscape.
Glow Up
Mix a small amount of phosphorescent (glow-in-the-dark) powder into your sand or under the water layer. The pond will look normal by day but emit a magical bioluminescent glow at night.
Step 3: Pouring the Water
-
Mixing Resin:
Put on your gloves and mix the two-part epoxy resin according to the manufacturer’s ratio. Stir slowly for several minutes to minimize bubbles. -
Tinting:
Separate a small amount of resin into a second cup. Dye the main batch a transparent teal/blue. Keep the smaller batch clear or very faintly blue. -
First Pour:
Pour the teal resin into the rock-bordered basin. Fill it about halfway to the desired depth. Tilt the tray slightly if needed to ensure it reaches all corners of the rock dam. -
Adding Depth:
Drop tiny amounts of darker blue ink into the deepest part of the pool and swirl gently with a toothpick to create shadows and depth illusions. -
Bubble Removal:
Pass a heat gun or lighter quickly over the surface of the wet resin to pop any rising air bubbles. Be careful not to scorch the faux plants.
Step 4: Creating Waves
-
The White Water Effect:
Wait until the resin has thickened to a honey-like consistency (usually 30-45 minutes). Mix a tiny drop of white pigment into a small reserve of resin. -
Applying Ripples:
Drizzle thin lines of white resin near the shoreline and around the rocks. Use a toothpick or a straw to blow these lines into wispy foam patterns. -
Final Cure:
Cover the project with a clean box to prevent dust from settling on the sticky surface and let it cure fully for 24-48 hours in a level area. -
Surface Polish:
I like to wipe the wooden frame edges with a clean cloth once everything is dry to remove any accidental sand grit or fingerprints.
Enjoy the calming view of your handmade miniature oasis every time you look at your desk
Stepping Stones Across the Pond
Bring the calming stillness of a zen garden indoors with this beautiful miniature pond project. By combining a hand-formed clay vessel with tinted resin and natural river rocks, you’ll capture the peaceful illusion of water rippling around gentle stepping stones.
Step-by-Step
Materials
- Air-dry clay (stone or white color)
- Oval template (cardboard or paper)
- Rolling pin
- Clay sculpting tools (sponge, loop tool)
- Fine-grit sandpaper
- Acrylic paint (cream/beige for the vessel)
- Epoxy resin kit (clear)
- Resin tint (teal blue and green)
- 5 flat, smooth river stones of graduating sizes
- Heat gun or torch
- Clear varnish or sealant (waterproof)
- Disposable mixing cups and stir sticks
- Modeling paste or heavy gel medium (optional for ripples)
Step 1: Sculpting the Vessel
-
Prepare the Clay Base:
Begin by conditioning your air-dry clay until it is pliable and smooth. Roll out a large slab, approximately 1/4 inch thick. Use your oval cardboard template to cut out the base shape of your pond. -
Form the Walls:
Roll out long coils of clay to build the walls. Score and slip the edges of the base, then attach the first coil. Use your fingers or a modeling tool to blend the clay seamlessly on both the inside and outside. -
Refine the Shape:
Build up the walls to a height of about 2-3 inches, keeping them slightly angled outward or straight up depending on your preference. Smooth the rim with a damp sponge to create a soft, rounded edge. -
Create Texture:
Before the clay dries, gently sponge the exterior to give it a natural, stone-like texture. Let the vessel dry completely, which usually takes 24-48 hours depending on humidity.
Cloudy Water Fix
If your resin looks cloudy, it might be due to humidity or mixing too fast. Always mix slowly and work in a room with low humidity to ensure crystal clear water.
Step 2: Finishing the Container
-
Sand and Smooth:
Once fully dry, use fine-grit sandpaper to remove any sharp ridges or uneven spots on the rim and interior. Wipe away all dust with a tack cloth. -
Paint the Basin:
Paint the entire vessel with a cream or beige acrylic paint to mimic light sandstone. I prefer applying two thin coats rather than one thick one for better coverage. -
Seal the Clay:
This step is crucial: Apply a waterproof sealant or varnish to the entire interior of the dish. This prevents the resin from soaking into the porous clay and discoloring it. Allow this to cure fully.
Add Life Underneath
Before pouring the teal resin, paint tiny koi fish or place small pebbles at the bottom of the basin. The tinted resin will create depth over them.
Step 3: Pouring the Pond
-
Arrange the Stones:
Place your five river stones into the dry basin to test their positioning. Arrange them in a gentle curve or straight line across the center. Once happy, you can secure them lightly with a dab of superglue so they don’t drift during the pour. -
Mix the Resin:
Mix your epoxy resin according to the manufacturer’s ratio. Stir slowly for several minutes to minimize bubbles. -
Tint the Water:
Add a drop of teal blue and a tiny touch of green tint to the resin. You want a translucent, deep water look, so add color very sparingly—it’s easier to add more than to take it away. -
First Pour:
Pour the tinted resin carefully into the basin, surrounding the stones but not submerging them completely. The tops of the stones should remain dry. -
Pop Bubbles:
Wait about ten minutes for air to rise, then quickly pass a heat gun or torch over the surface to pop any bubbles.
Step 4: Creating Movement
-
Wait for Gel Stage:
Monitor the resin closely. When it reaches a thick, gel-like consistency (usually after several hours), use a toothpick or small tool to swirl the resin gently around the base of each rock. -
Enhance Ripples:
For more pronounced ripples like in the photo, wait until the resin is hard. Apply clear heavy gel medium or clear modeling paste in concentric circles around the stones. -
Final Cure:
Let the entire piece cure in a dust-free area for at least 24 hours until the resin is rock hard and the ripple medium (if used) is completely transparent.
Place your finished stone pond on a bright surface to let the light play through the teal water
Mini Bridge Over the Pond
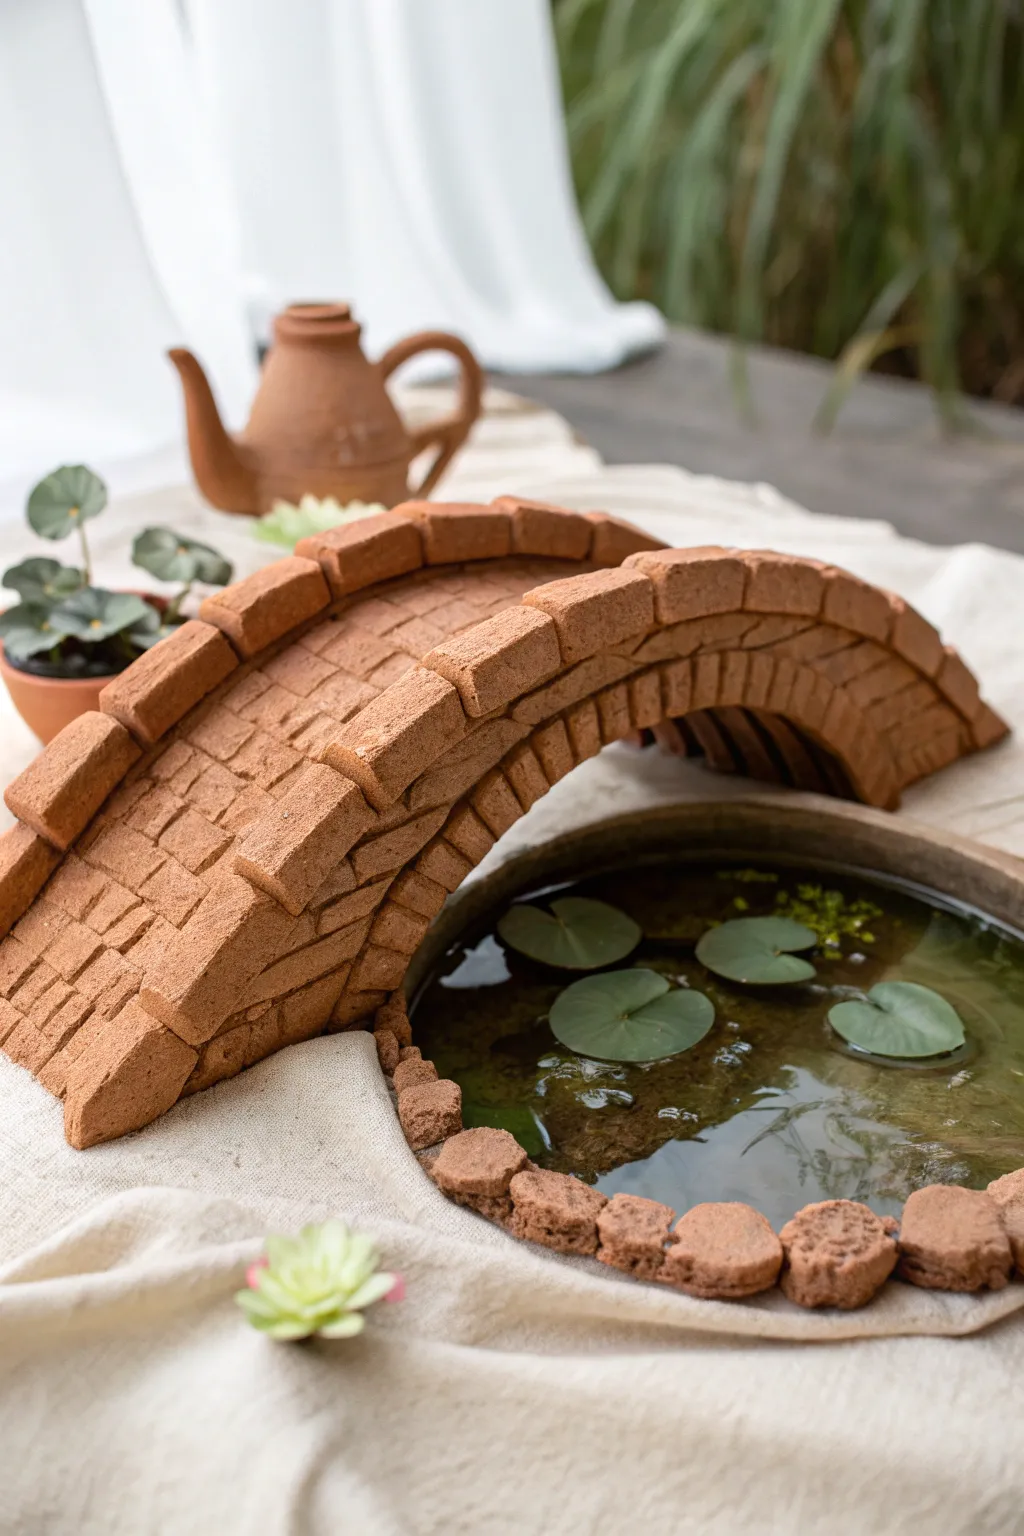
Bring old-world charm to your miniature garden with this handcrafted clay bridge, featuring a rustic brick texture and a graceful arch. This project pairs beautifully with a shallow water feature to create a serene, Zen-like atmosphere.
Step-by-Step Guide
Materials
- Terracotta-colored air-dry clay (or polymer clay)
- Rolling pin
- Clay knife or craft blade
- Chopstick or stiff bristle brush (for texturing)
- Cardboard or plastic bottle (for the arch form)
- Parchment paper
- Shallow round dish or plant saucer
- Water-safe sealant (if using with real water)
- Acrylic water medium or resin (optional)
Step 1: Forming the Base Structure
-
Create the support form:
Cut a piece of cardboard into a curved arch shape or use the side of a large plastic bottle to act as a mold. This will hold the bridge’s shape while the clay dries. -
Cover the form:
Drape a piece of parchment paper over your mold so the clay won’t stick during the drying process. -
Roll out the base:
Roll a smooth slab of terracotta clay, roughly 1/4 inch thick. Cut a long rectangle that is wide enough for your pathway and long enough to span your intended pond. -
Shape the arch:
Lay this clay rectangle gently over your parchment-covered mold, allowing it to curve naturally. Trim the ends so they sit flush with the ground.
Sagging Bridge?
If the clay sags while drying, your clay might be too wet. Let the rolled slab sit for 15 minutes to firm up before placing it on the mold.
Step 2: Brickwork Construction
-
Prepare the bricks:
Roll out another slab of clay, slightly thicker than the base. Use your knife to cut uniform rectangular strips, then cross-cut them into small individual ‘bricks’. -
Texture the bricks:
I prefer to tap the surface of each brick lightly with a stiff bristle brush or a piece of sandstone to give them a weathered, realistic stone look before attaching. -
Lay the center path:
Start placing bricks in the center of the arch, working your way out toward the edges. Leave tiny gaps between them to resemble mortar lines. -
Create the side rails:
For the raised sides of the bridge, cut larger, thicker rectangular blocks. These should be slightly taller than the walking bricks. -
Attach the rails:
Score the edges of your bridge base and apply a little water or slip. Press the larger rim blocks along both sides of the bridge, following the curve. -
Refine the edges:
Ensure the side blocks follow the staggered brick pattern shown in the image, slightly overlapping the gaps of the bricks below.
Step 3: The Pond Setting
-
Prepare the basin:
Select a shallow round dish. If desired, cover the rim with small, rough lumps of clay to create a rocky shoreline effect similar to the bridge material. -
Texture the stones:
Press a real rock or crumpled foil into the wet rim clay to deepen the texture, making it look like natural earth. -
Dry completely:
Allow both the bridge (still on its mold) and the pond rim to air dry for 24-48 hours. Turn the bridge over halfway through to let the underside dry. -
Apply sealant:
Once bone dry, coat the entire bridge and pond rim with a waterproof matte varnish. This is crucial if you plan to use real water. -
Fill the pond:
Place the saucer in position, fill with water (or resin for a permanent look), and add floating lily pads. -
Final assembly:
Carefully place the bridge over the pond, ensuring the feet rest securely on the table surface outside the water basin.
Realistic Moss
Mix green acrylic paint with a tiny bit of baking soda and dab it into the brick crevices for a fuzzy, mossy texture.
Enjoy the peaceful view of your handmade miniature landscape
Tiered Waterfall Pond Rocks
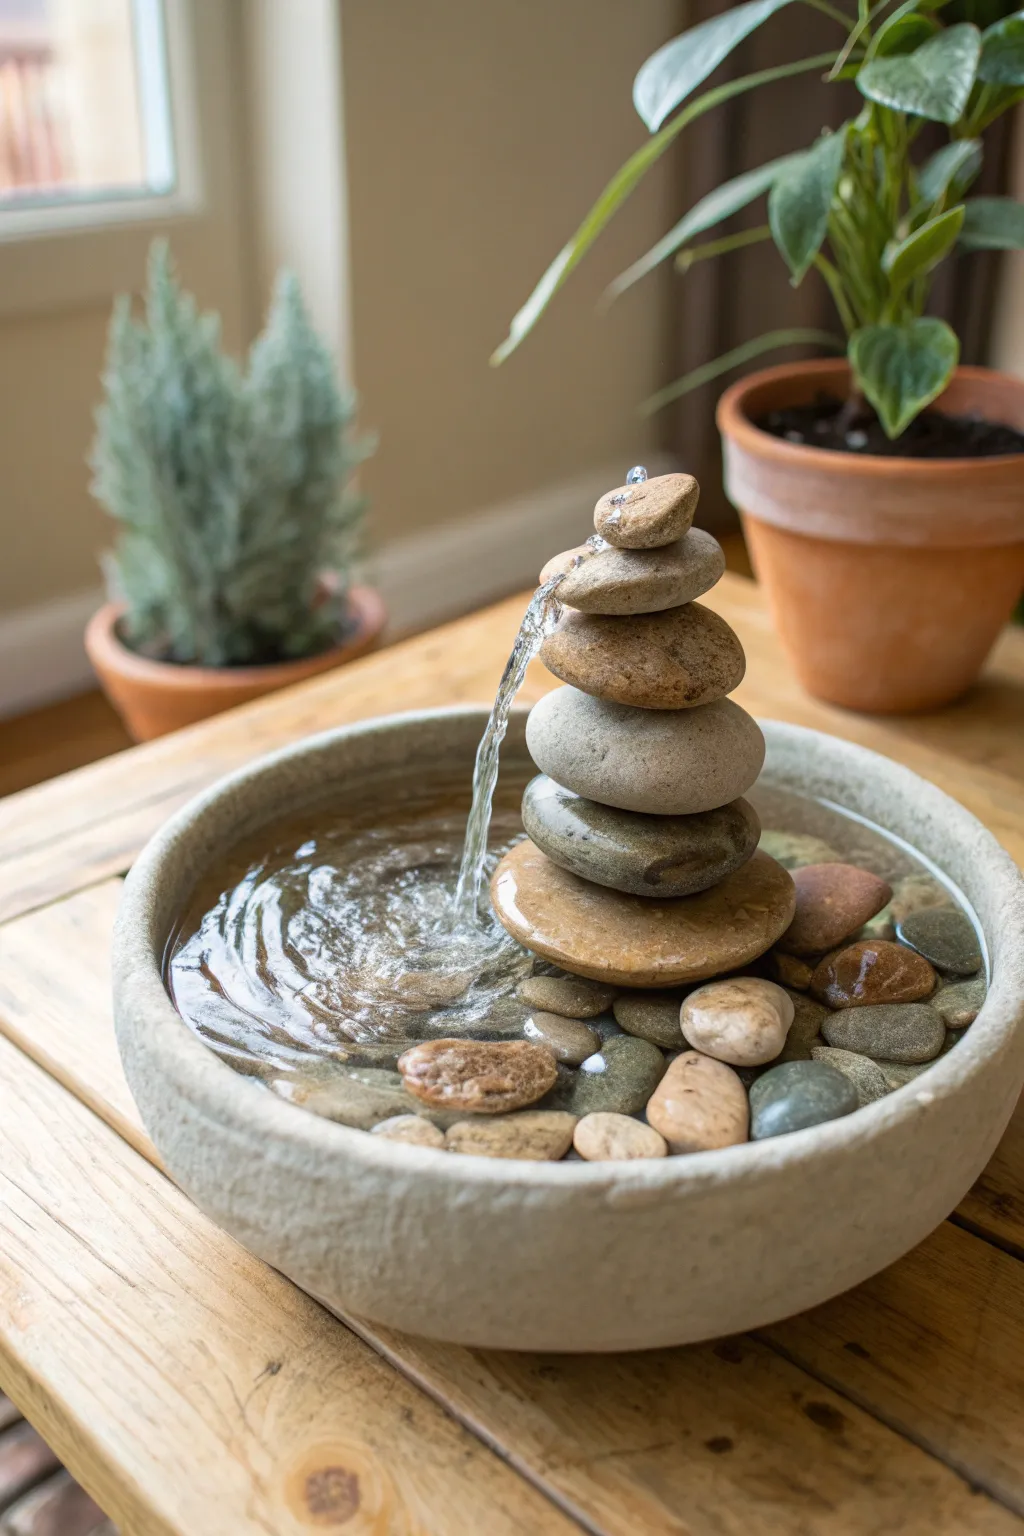
Bring the soothing sounds of a babbling brook indoors with this elegant tiered rock fountain. Using simple natural stones and a hidden pump mechanism, you can create a serene water feature that fits perfectly on a side table or desk.
How-To Guide
Materials
- Shallow round bowl (ceramic, stone, or concrete)
- Small submersible water pump (adjustable flow)
- Clear vinyl tubing (fitting the pump outlet)
- Silicone sealant (waterproof)
- Flat river stones (assorted sizes for stacking)
- Small pebbles or gravel (for the base)
- Drill with diamond-tipped masonry bits
- Water
- Basin or bucket for drilling
- Clamp or vice grip (optional but recommended)
Step 1: Preparing the Stones
-
Select your stack:
Choose 5-7 flat river stones that stack securely on top of each other. Arrange them from largest at the bottom to smallest at the top, testing their stability dry before doing anything else. -
Mark drilling spots:
Using a pencil or chalk, mark the exact center of each stone where the water tube will pass through. Accuracy here is key to a straight stack. -
Set up a water bath:
Place a scrap piece of wood in a shallow plastic tub and add enough water to just cover the wood. This will be your drilling station to keep the stone and drill bit cool. -
Drill the stones:
Place your first stone on the wood block under water. Using a diamond-tipped masonry bit slightly larger than your tubing diameter, drill slowly through the center mark. Let the drill do the work; don’t press too hard. -
Repeat the process:
Continue drilling through all the stones in your stack except the very top one if you want the water to bubble over, or drill halfway through the top stone if you want to embed the tube end.
Drilling Safety
Always wear safety glasses. Drilling creates stone dust and debris. Keep the stone submerged in water to cool the bit and suppress dust.
Step 2: Assembling the Fountain
-
Prepare the pump:
Attach a length of clear vinyl tubing to your submersible pump’s outlet. The tube should be long enough to reach from the bottom of the bowl through the top of your stone stack. -
Position the pump:
Place the pump in the center of your shallow bowl. Ensure the cord runs towards the back, and use the suction cups to secure it if available. -
Thread the stones:
One by one, thread the drilled stones onto the vinyl tubing, starting with the largest base stone. Slide them down until the base stone rests securely over the pump. -
Adjust the stability:
If the base stone wobbles on the pump, use smaller pebbles underneath it to create a level, stable foundation. The stack must stand upright without support. -
Trim the tubing:
Once all stones are stacked, mark the tubing where it exits the top stone. Remove the top stone briefly, trim the excess tubing so it sits flush or slightly recessed, and replace the stone.
Step 3: Final Touches
-
Fill the basin:
Surround the base of your stone stack with the smaller decorative pebbles. Fill the bowl until the pump is completely hidden and the river rocks create a natural riverbed look. -
Add water:
Pour clean water into the bowl until the water level is just below the rim. I like to use distilled water here to prevent mineral buildup on the stones over time. -
Test the flow:
Plug in the pump. If the water shoots too high or splashes, adjust the flow dial on the pump (you may need to lift the stack slightly to access it). -
Secure loose stones:
If the water pressure causes the top stones to vibrate or shift, apply a tiny dab of clear silicone sealant between the stones to lock them in place while keeping the look natural. -
Arrange decorative elements:
Add a few larger, non-drilled stones around the base of the stack to break up the surface and create interesting ripples in the water.
LED Glow
Use a pump with a built-in LED ring light at the tube outlet. As water bubbles up, the top of the fountain will glow warmly.
Enjoy the peaceful ambiance your new stone water feature adds to your space
Pouring Pot Water Feature Pond
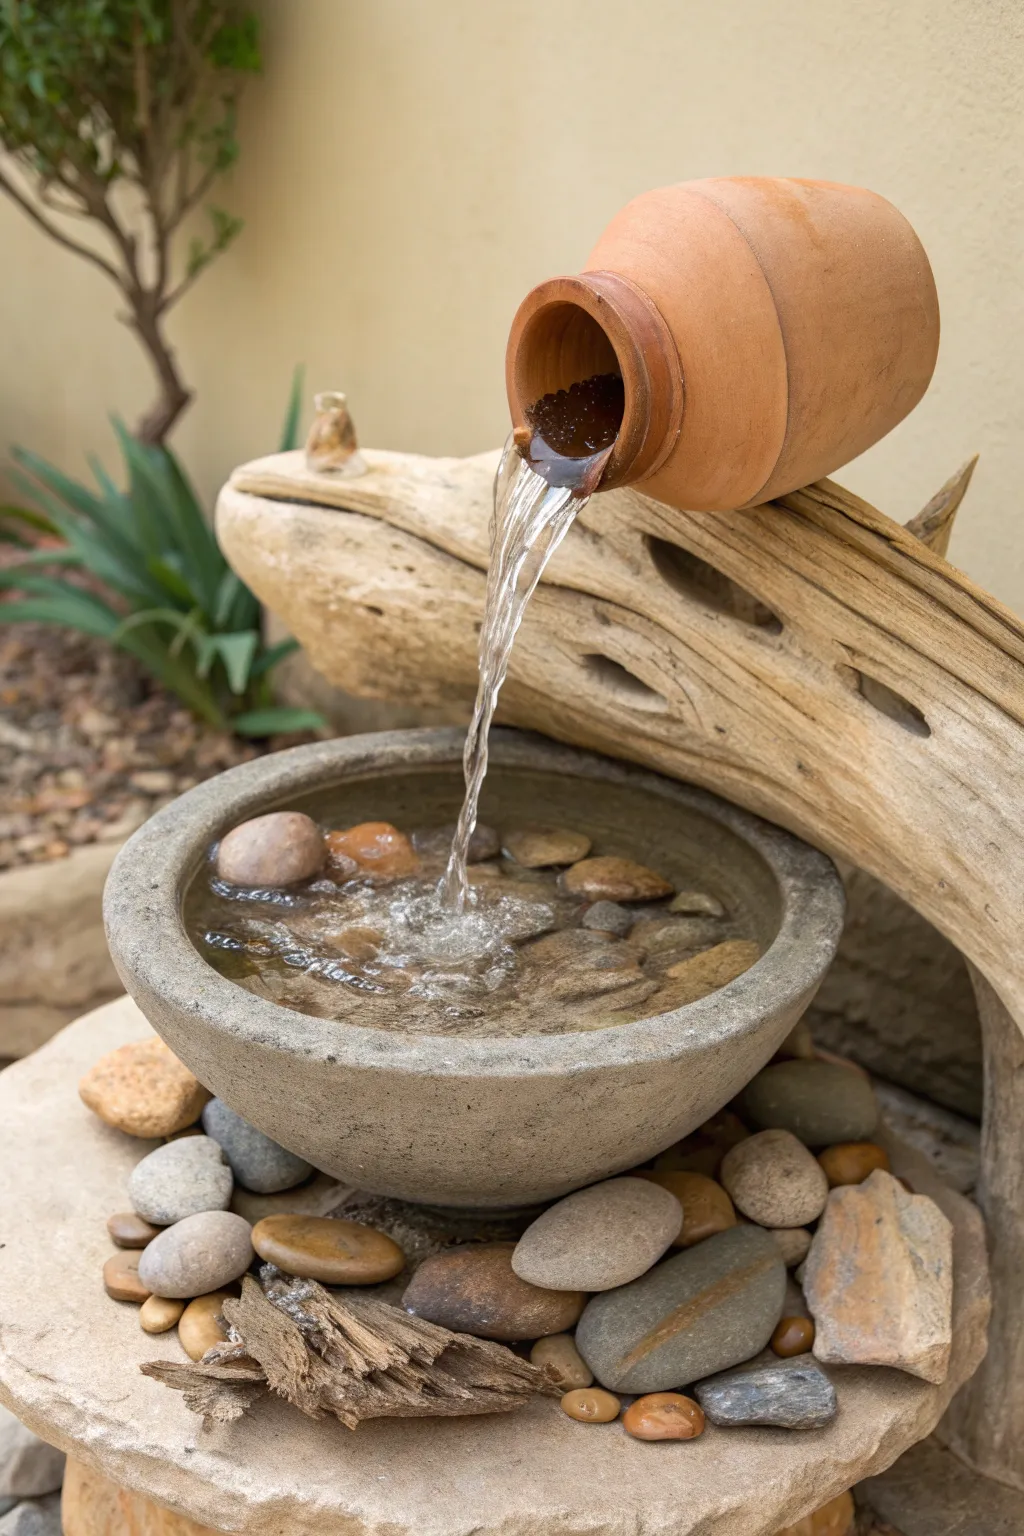
This rustic water feature combines the warmth of terracotta with the organic texture of weathered driftwood and natural stone. The gentle sound of water trickling from the suspended pot into the rock-filled basin creates an instantly serene atmosphere for any garden corner.
Step-by-Step
Materials
- Stone or concrete bowl (approx. 12-16 inch diameter)
- Small submersible water pump (low flow)
- Clear vinyl tubing (to fit pump outlet, approx. 3 feet)
- Terracotta pot (urn or olive jar shape)
- Large piece of hollow driftwood or cholla wood skeleton
- Large flat stepping stone or flagstone slab (base)
- Silicone sealant (clear, waterproof)
- Assorted river rocks and pebbles
- Drill with masonry and wood bits
- Decorative driftwood shards (optional)
Step 1: Preparing the Components
-
Select the base:
Begin by finding a sturdy, level location for your fountain. Place your large flagstone or stepping stone slab down, ensuring it creates a stable foundation that won’t wobble. -
Drill the driftwood:
Examine your large piece of driftwood or cholla wood. Identify a path for the tubing to travel from the bottom (where it will sit in the bowl) up to where the pot will rest. Can drill a discreet hole through the wood structure if a natural hollow doesn’t exist. -
Prepare the pot:
If your terracotta pot doesn’t have a drainage hole, you’ll need to drill one in the bottom using a masonry bit. If it already has one, ensure it is large enough for your vinyl tubing to pass through snugly. -
Attach tubing to pot:
Thread the vinyl tubing into the bottom of the pot. Pull it through until it reaches near the rim. Use a bead of silicone sealant around the tube on the *inside* bottom of the pot to make it watertight, preventing water from leaking back down the outside of the tube.
Uneven Flow?
If water trickles down the pot’s side instead of pouring clean, apply a thin line of hot glue or silicone under the rim where you want the water to exit. This creates a ‘drip edge’.
Step 2: Assembly and Plumbing
-
Position the pump:
Place the stone bowl on your base slab. Set the submersible pump in the center of the bowl. Attach the other end of your vinyl tubing to the pump’s outlet. -
Thread the wood:
Carefully feed the tubing (which is now connected to the pump) through your driftwood or cholla wood piece. I find it helpful to use a stiff wire as a guide if the wood’s interior is rough or curvy. -
Secure the wood:
Position the driftwood so it arches over the bowl securely. The bottom end should rest stably within or on the rim of the bowl, hiding the tubing as it rises. -
Mount the pot:
Nestle the terracotta pot onto the upper end of the driftwood. The tubing should now be connecting the submerged pump directly to the interior of the pot. Adjust the pot’s angle so it tips slightly downward toward the bowl. -
secure the tubing inside:
Inside the terracotta pot, trim the tubing so it rests near the lip but remains invisible from the outside. You can use a dab of silicone or a small weight to keep the tube tip pointing exactly where you want the water to pour.
Step 3: Finishing Touches
-
Fill the basin:
Fill the stone bowl with water to test the connections. Ensure the pump is fully submerged before turning it on. -
Initial flow test:
Switch on the pump. Watch the water flow from the pot. Adjust the pump’s flow rate dial (usually located on the front of the pump) to get a gentle, steady stream rather than a splashing geyser. -
Conceal the mechanics:
Once the flow is perfect, begin placing medium-sized river rocks into the bowl. Arrange them to completely hide the pump and the tubing entering the driftwood. -
Add splash stones:
In the spot where the water hits the surface, place a larger, flatter stone slightly above the water line or just below it. This creates a pleasing sound and minimizes splashing. -
Decorate the base:
Scatter smaller pebbles, smooth stones, and perhaps a few shards of small driftwood around the base of the stone bowl on the flagstone slab to create a cohesive, finished look. -
Final adjustment:
Step back and check the angle of the pour one last time. If water is dripping down the underside of the pot, use a tiny dab of clear silicone on the pot’s rim to break the surface tension and force a clean drop.
Stabilize the Pot
Don’t rely just on gravity. Use a generous amount of underwater-safe epoxy putty to adhere the terracotta pot to the driftwood. It stays hidden but ensures the pot won’t slip.
Enjoy the soothing sights and sounds of your new handcrafted garden oasis
Fairy Garden Pond With Tiny Details
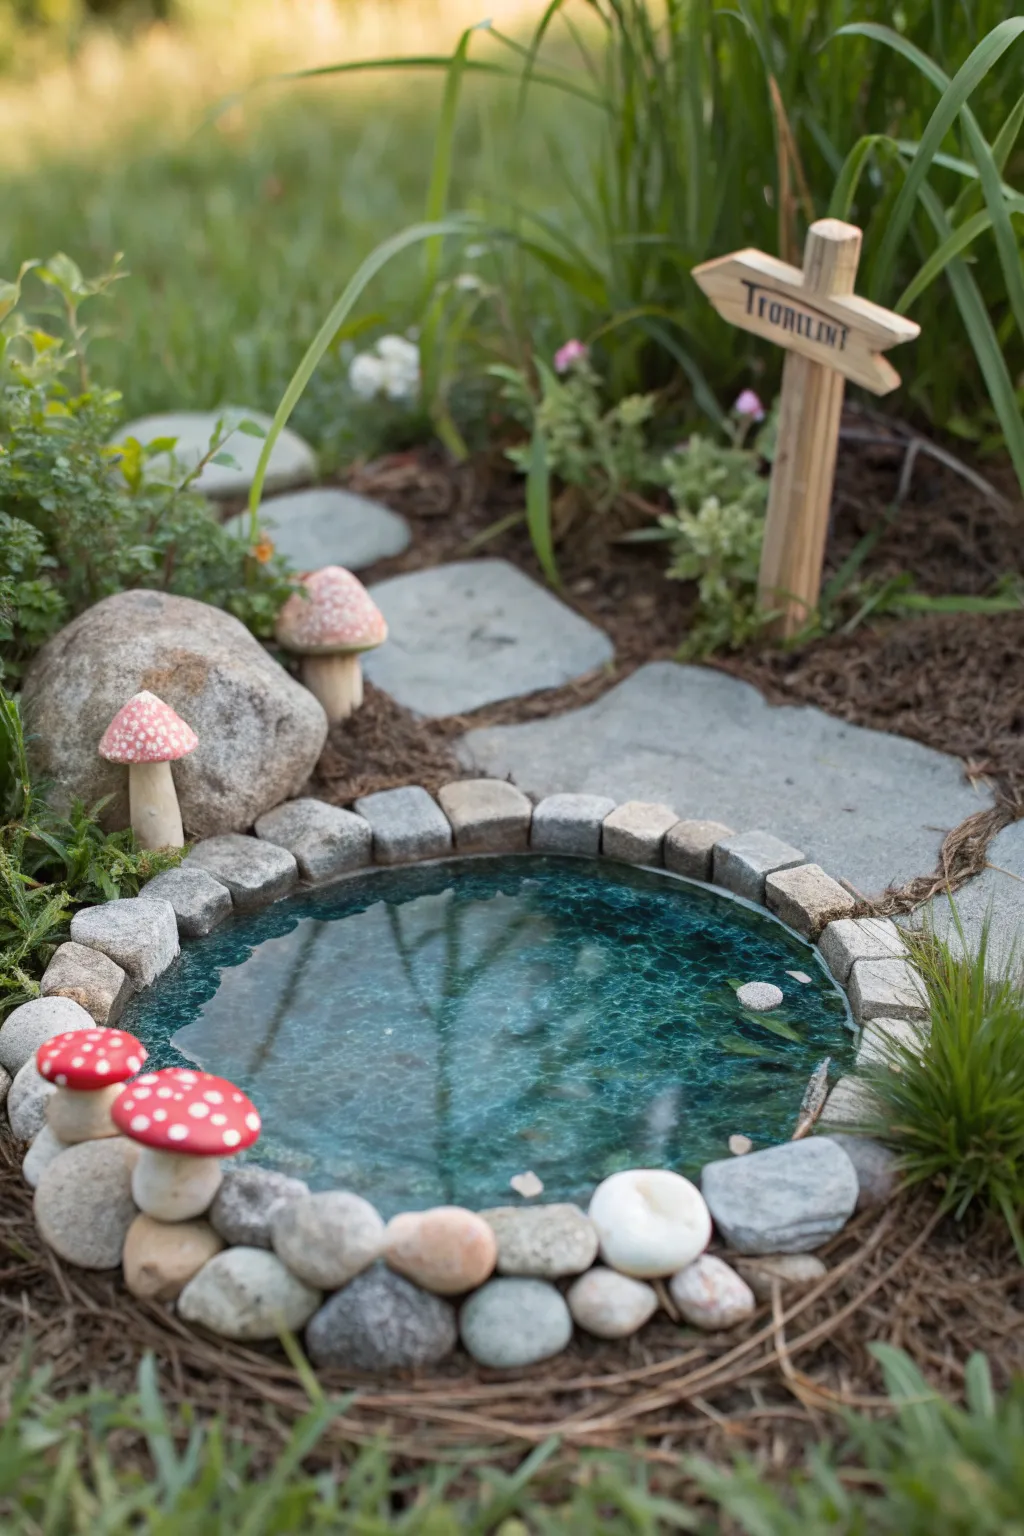
This enchanting fairy garden feature centers around a sparkling, deep blue miniature pond encircled by natural stones and tiny clay mushrooms. The glassy water effect and realistic hardscaping create an inviting, magical oasis perfect for tucking into a planter or garden bed.
Step-by-Step Tutorial
Materials
- Polymer clay (white, red, tan)
- Epoxy resin (2-part clear casting resin)
- Blue alcohol ink or resin dye (transparent)
- Shallow ceramic or clay saucer (approx. 4-6 inches wide)
- Small natural river stones (assorted sizes)
- Flat slate pieces or stone-look clay for path
- Dried moss and potting soil
- Small twig for signpost
- Waterproof craft glue or E6000
- Acrylic paints (brown, dark green)
- Paintbrushes
- Toothpick or sculpting tool
Step 1: Creating the Pond Base
-
Prepare the saucer:
Clean and dry your shallow saucer thoroughly. This dish will act as the waterproof basin for your resin, so ensure there are no cracks. -
Paint the basin depth:
Paint the inside bottom of the saucer with varied shades of blue and deep green acrylic paint. Darker colors in the center create an illusion of depth, while lighter teals near the edges suggest shallows. -
Let it dry completely:
Allow the paint to dry fully before moving on to the resin step to prevent cloudiness. -
Mix the resin:
Combine your two-part epoxy resin according to the package instructions, stirring slowly to minimize air bubbles. -
Add tint and pour:
Add a single drop of blue alcohol ink to the resin for a transparent, watery tint. Pour the mixture into your painted saucer until it’s about half full. -
Texture the water:
Wait until the resin is slightly tacky (usually 30-45 minutes), then gently disturb the surface with a toothpick to create ripples that catch the light.
Bubble buster
After pouring resin, use a long-neck lighter or heat gun to quickly pass over the surface. This pops surface bubbles instantly for a glass-like finish.
Step 2: Sculpting the Accessories
-
Form mushroom stems:
Roll thick snakes of tan polymer clay to create sturdy mushroom stems. Flare the bottoms slightly so they stand upright easily. -
Shape the caps:
Roll balls of red polymer clay and press them into dome shapes. Texture the underside of the caps with a needle tool to mimic gills if you like extra detail. -
Add spots and bake:
Press tiny flattened bits of white clay onto the red caps for the classic toadstool look. Assemble caps onto stems and bake according to your clay’s specific instructions. -
Create the signpost:
Cut a small wooden craft stick into an arrow shape and glue it to a sturdy twig. Use a fine-tip marker or paint to write a tiny destination name like “Trollunt” or similar.
Step 3: Assembling the Scene
-
Prepare the site:
Clear a small, flat area in your garden or planter box. Dig a shallow depression just deep enough to nestle your pond saucer so the rim is level with the ground. -
Place the coping stones:
Arrange small, flat rectangular stones around the rim of the saucer to hide the edge. I prefer to glue these directly to the saucer rim first for stability before placing it in the dirt. -
Lay the stone path:
Place flat slate pieces leading up to the pond edge. Nestle them into the soil so they look like stepping stones that have been there for years. -
Position the mushrooms:
Tuck your baked clay mushrooms near the pond edge and beside larger rocks. Glue them to a small buried stone if they need help standing up in loose soil. -
Install the signpost:
Push the twig signpost into the soil near the path entrance, angling it slightly for a whimsical feel. -
Add finishing details:
Fill gaps between the path stones and pond edge with potting soil. Sprinkle loose pine needles or dried mulch around the perimeter to blend everything naturally. -
Plant greenery:
Insert small tufts of moss or creeping plants like baby’s tears around the pond border to soften the rock edges and complete the scene.
Glow-up opportunity
Mix glow-in-the-dark powder into the white clay for the mushroom spots. Your fairy garden will come alive with a magical luminescence at night.
Enjoy watching your new miniature ecosystem settle into its garden home
Moonlit Pond With Soft Glow Accents
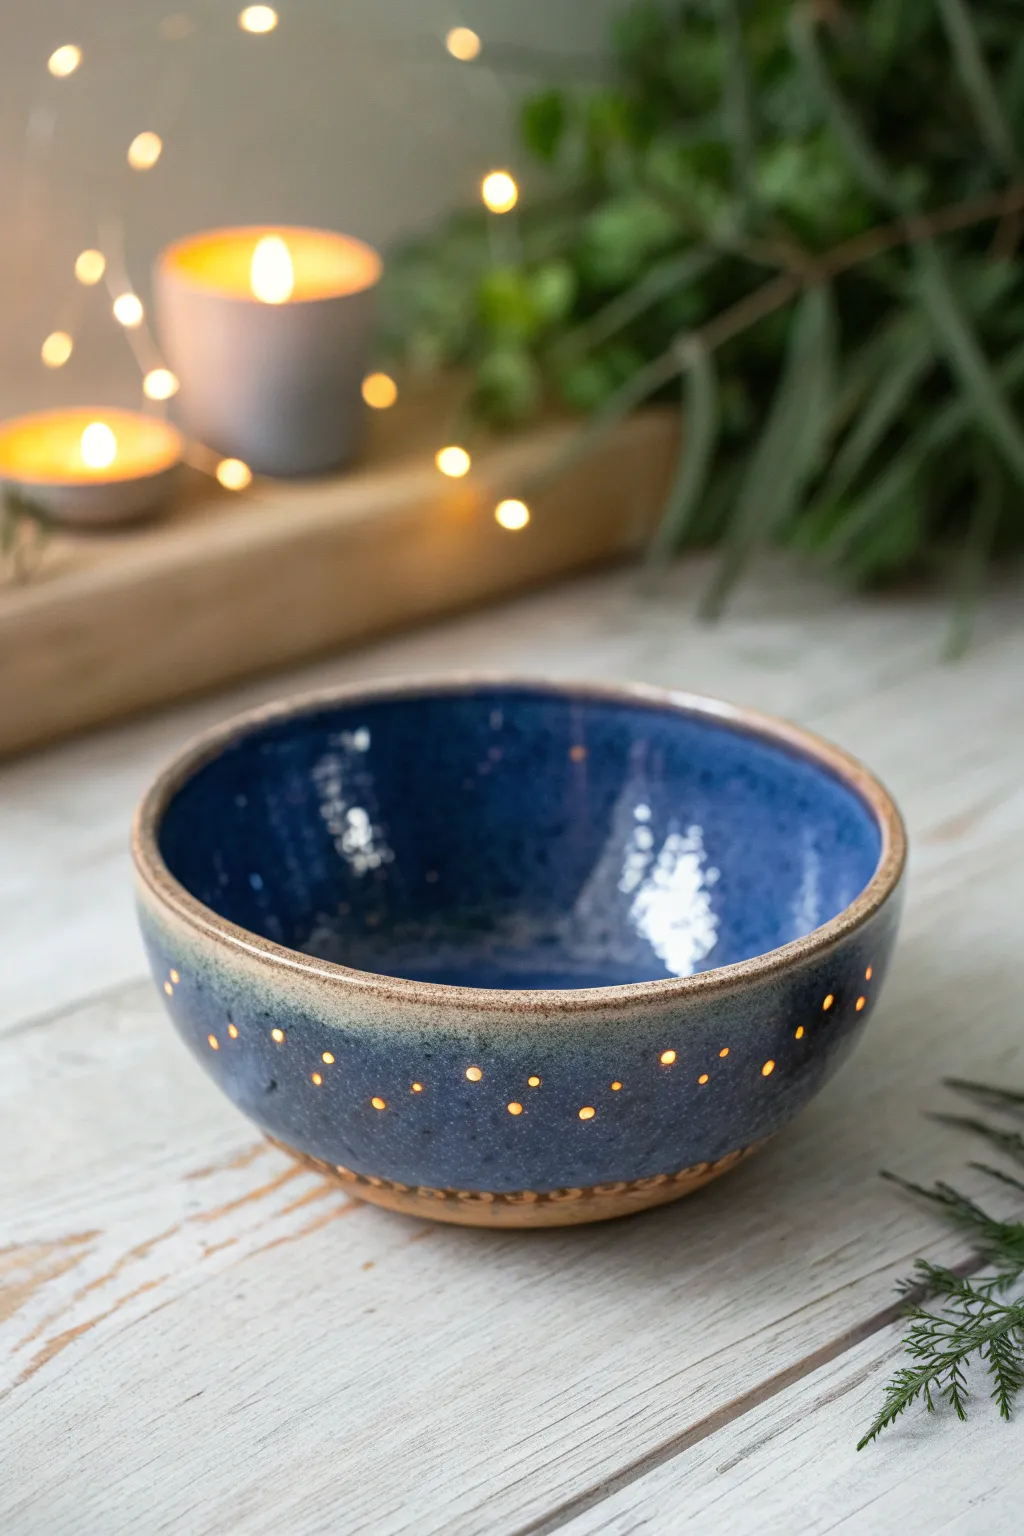
Capture the serene magic of moonlight reflecting on still water with this pierced ceramic bowl. The deep indigo glaze mimics midnight depths, while tiny, strategically placed holes allow candlelight or LEDs to shine through like distant stars or fireflies.
How-To Guide
Materials
- Stoneware clay body (speckled or buff works well)
- Pottery wheel or slab roller/rolling pin
- Pottery trimming tools
- Pin tool or small drill bit for clay
- Sponge
- Kiln
- Deep indigo blue glaze (high gloss)
- Lighter blue or rutile reaction glaze (for the rim)
- Wax resist
- Small paintbrush
Step 1: Forming the Bowl
-
Prepare the Clay:
Begin by wedging about 1.5 to 2 pounds of stoneware clay to remove any air bubbles, ensuring a smooth, workable consistency. -
Throw or Build the Form:
Throw a simple, open bowl shape on the wheel. If you are hand-building, roll out a slab and slump it into a round mold, smoothing the interior perfectly. -
Refine the Rim:
Use a chamois or a damp sponge to round off the rim. A slightly thickened rim adds visual weight and durability to the piece. -
Dry to Leather Hard:
Allow the bowl to dry slowly until it reaches a leather-hard state. It should be firm enough to handle without warping but still cool to the touch. -
Trim the Foot:
If wheel-thrown, flip the bowl and trim a neat foot ring. I like to add a small textured band just above the foot using a chatter tool or a carved repeating pattern for extra earthly detail.
Clogged Holes?
If glaze fills a hole and dries, use a small drill bit twisted by hand to gently re-open it before firing. Avoid pushing hard or the dry glaze might chip off the surrounding area.
Step 2: Piercing and Decoration
-
Plan the Constellation:
Lightly sketch a waving line or scattered pattern around the lower third of the bowl using a needle tool, just scratching the surface. -
Pierce the Clay:
Using a sharp pin tool or a small drill bit, carefully punch holes through the clay wall along your sketched path. Vary the spacing to create a natural, organic look. -
Clean the Holes:
Once the clay dries a bit more, go back and gently smooth the edges of each hole with a barely damp sponge or brush to remove sharp burrs. -
Bisque Fire:
Let the bowl dry completely (bone dry) before loading it into the kiln for a bisque firing to roughly cone 04, preparing it for glazing.
Starry Night Effect
Make the holes different sizes using different tools. A mix of tiny pin pricks and slightly larger drill holes creates a more realistic, twinkling depth when lit from within.
Step 3: Glazing the Night Sky
-
Wax the Foot:
Apply wax resist to the bottom foot ring and the textured band just above it. This keeps the beautiful raw clay visible, grounding the piece. -
Clear blocked holes:
Check your pierced holes one last time. If glaze fills them later, the light won’t shine through, so ensure they are clear. -
Pour the Interior:
Pour a glossy, deep indigo glaze inside the bowl. Swirl it to coat the entire interior evenly and pour out the excess promptly. -
Dip the Exterior:
Holding the foot, dip the exterior into the same dark blue glaze. Only dip down to the wax line. -
Clean the Holes Again:
This is crucial: immediately after dipping, use a toothpick or a burst of air to clear any glaze that has filled the tiny holes. -
Rim Accent:
Dip just the top inch of the rim into a lighter blue or a running glaze that reacts well. This creates that ‘moonlight hitting the water’s edge’ transition. -
Final Cleanup:
Wipe any stray glaze droplets off the waxed foot area using a damp sponge. -
Glaze Fire:
Fire the piece to the maturation temperature of your clay and glaze (typically cone 5 or 6 for stoneware). The high heat will melt the glazes into a glassy pool.
Place a tea light inside and watch your dark water bowl transform into a softly glowing lantern
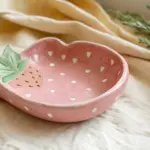
Functional Trinket Dish Pond Illusion
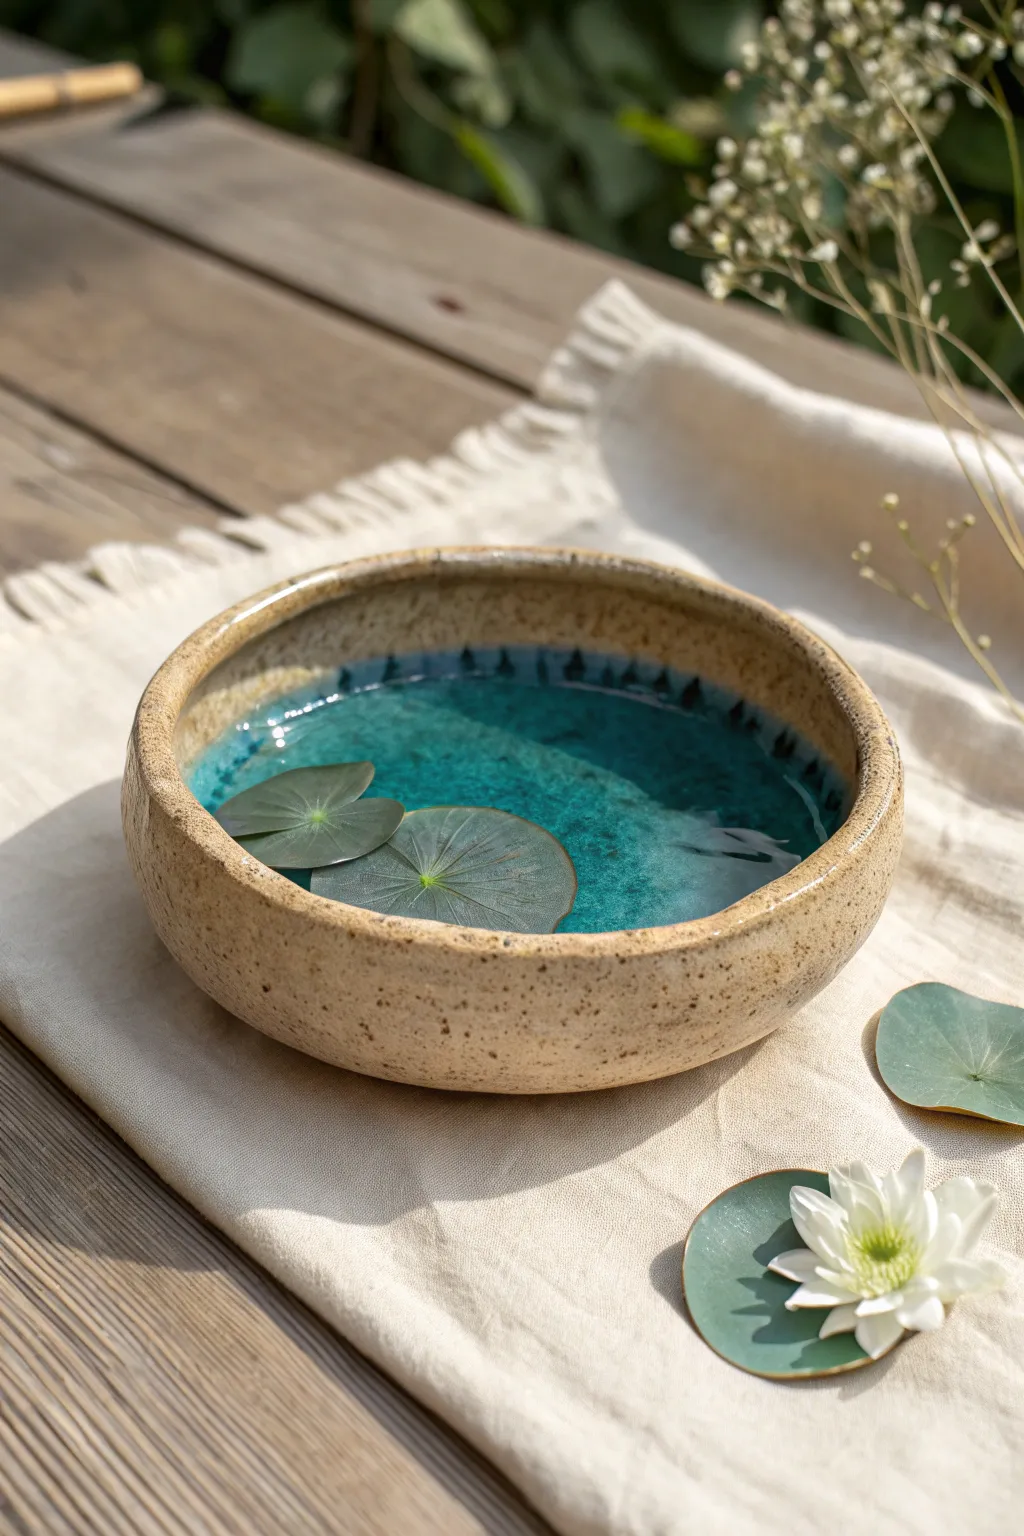
Capture the serenity of a garden pond in a functional piece of art with this handmade ceramic trinket dish. The contrast between the raw, speckled stoneware exterior and the deep, glossy turquoise interior creates a stunning illusion of water depth perfect for holding your favorite rings.
Step-by-Step Tutorial
Materials
- Speckled stoneware clay (approx. 1-2 lbs)
- Pottery wheel (or rolling pin for hand-building)
- Rib tool
- Sponge
- Wire cutter
- Trimming tools
- Turquoise or lagoon blue glaze (translucent/shiny)
- Wax resist
- Paintbrush (fan or hake)
- Kiln access
Step 1: Shaping the Vessel
-
Prepare the Clay:
Begin by thoroughly wedging your speckled stoneware clay. This removes air pockets and aligns the clay particles, which is critical for preventing cracks during firing. Aim for a smooth, homogenous ball. -
Center on the Wheel:
Secure the clay ball to the wheel head. Using wet hands and steady pressure, center the clay until it spins true without wobbling. -
Open the Form:
Gently press your thumbs into the center to open the clay, leaving about a half-inch thick floor. This thickness adds visual weight and mimics the bed of a pond. -
Pull the Walls:
Pull the clay outward and upward to create low, wide walls. You want a shallow bowl shape, rather than a tall cylinder, to maximize the visible surface area for your ‘water’ glaze. -
Refine the Rim:
Use a rib tool or a piece of chamois leather to compress and smooth the rim. I prefer to leave the rim slightly rounded and thick to enhance the earthy, rustic feel of the finished piece. -
Smoothing the Interior:
Take a soft rib and run it specifically along the interior curve. A perfectly smooth inside surface is vital because the glaze will pool here; any unwanted finger ridges will distort the water illusion. -
Wire Off:
Run a wire cutter underneath the base to separate the bowl from the wheel head while it spins slowly. Carefully lift it off and set it aside to dry to a leather-hard state.
Uneven Glaze?
If the glaze looks patchy inside, ensure you pour enough volume to coat it quickly. Don’t brush the interior; pouring creates a smoother, glassier water surface.
Step 2: Trimming and Bisque
-
Center for Trimming:
Once leather-hard, place the bowl upside down on the wheel. Use lugs of clay to secure it in place. -
Define the Foot:
Use loop tools to trim away excess weight from the bottom and sides. Carve a distinct foot ring so the bowl sits slightly elevated, giving it a lighter appearance. -
Clean Up:
Smooth out any rough trimming marks with a damp sponge. The exterior texture should be uniform to show off the clay’s natural speckles later. -
Bisque Firing:
Allow the clay to dry completely to the bone-dry stage. Load it into the kiln for a bisque fire (typically Cone 04 or 06, depending on your clay body).
Step 3: Glazing the Pond
-
Clean Bisque Ware:
Wipe the fired bowl with a damp sponge to remove any kiln dust. This ensures the glaze adheres properly without crawling. -
Apply Wax Resist:
Using a brush you don’t care about, apply wax resist carefully to the entire exterior of the bowl AND the top rim. You want the raw, speckled clay to remain completely unglazed to contrast with the interior. -
Select the Water Glaze:
Choose a high-gloss, translucent turquoise or sea-green glaze. A glaze that breaks over texture or pools darker in the center works best for the water effect. -
Pour and Swirl:
Pour a generous amount of glaze into the bowl. Rotate the bowl in your hands to coat the entire interior surface evenly, right up to the wax line on the rim. -
Create Depth:
Pour out the excess glaze. If your glaze is thin, you might consider a second pour or brushing an extra layer at the very bottom center to create a ‘deep water’ darkening effect. -
Clean the Foot:
Even though you used wax, double-check the foot ring and exterior walls. Wipe away any stray droplets of glaze with a sponge to save your kiln shelves. -
Glaze Firing:
Fire the piece again to the maturation temperature of your clay and glaze (often Cone 5 or 6 for stoneware). The heat will melt the glaze into a glass-like pool. -
Styling the Dish:
Once cool, fill with water and add small floating leaves (like Pilea peperomioides or nasturtium) for the photo finish, or simply use it dry as a jewelry catch-all.
Level Up: Fish Decals
Apply tiny ceramic overglaze decals of koi fish to the bottom of the fired glaze, then fire a third time at a low temperature to permanently ‘submerge’ fish in your pond.
Enjoy the calming presence of this little water feature sitting right on your desk or vanity