When I’m craving that satisfying “what even is this?” kind of creativity, I reach for abstract clay ideas—the kind that lean on organic curves, bold silhouettes, and a little bit of mystery. Here are my favorite approachable directions to play with negative space, movement, and simplified forms without getting stuck in realism.
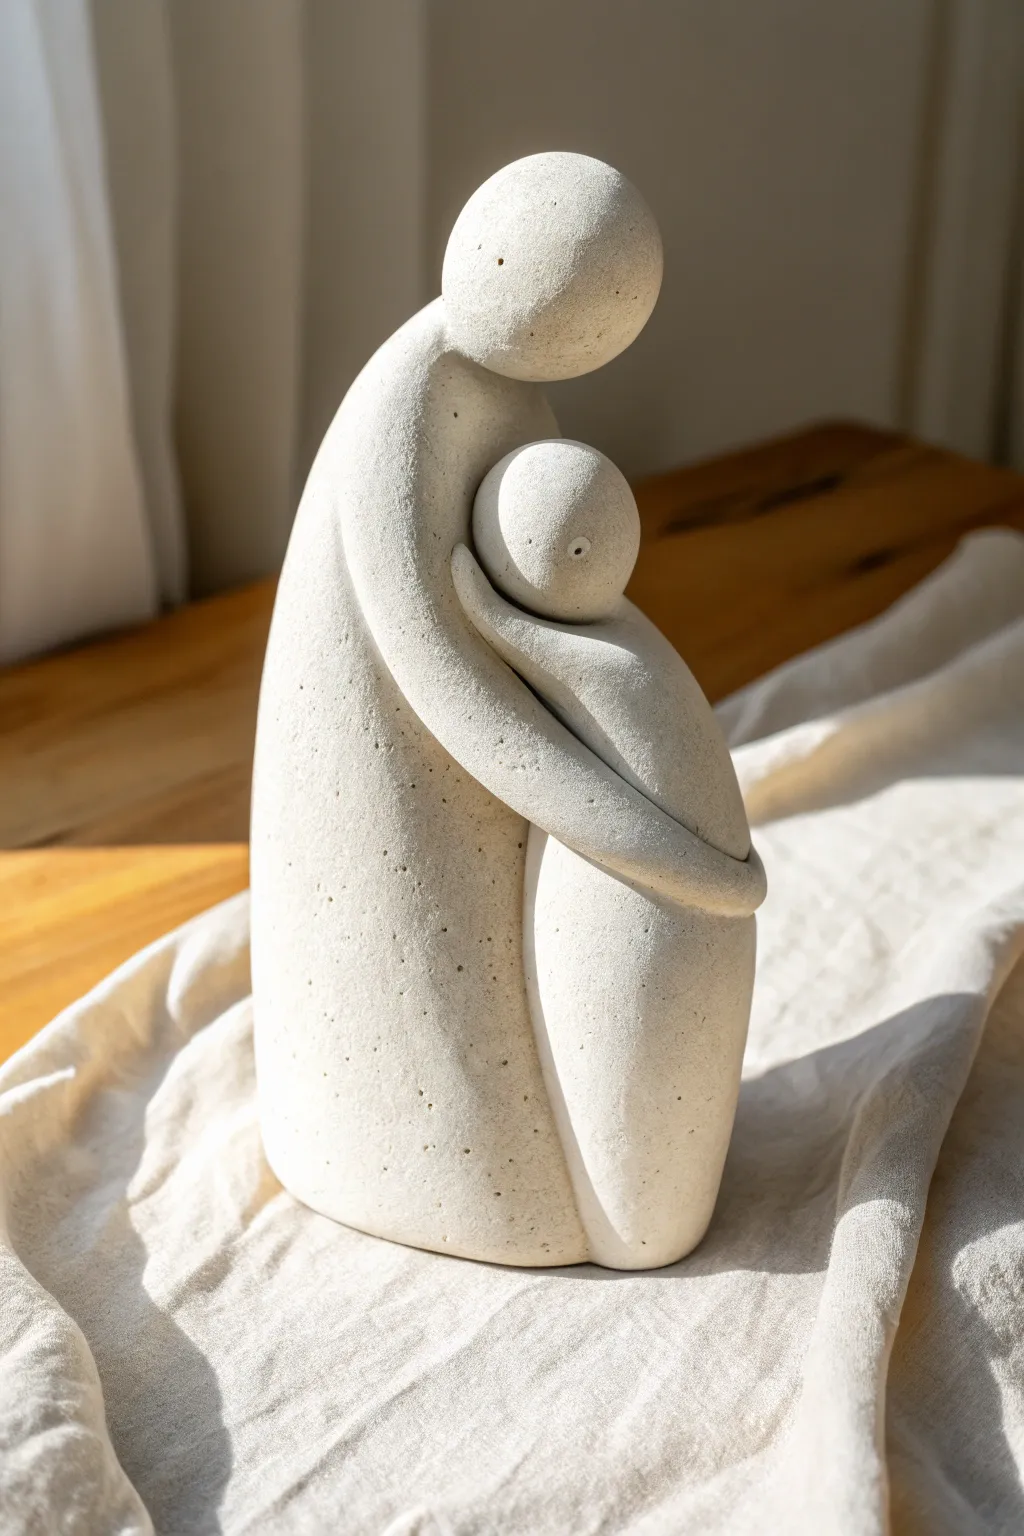
Merged Couple Sculpture

This elegant sculpture captures an intimate moment of connection purely through form and posture, eliminating facial features to focus on the universal emotion of an embrace. The smooth, flowing lines and soft, stone-like texture create a calming focal point perfect for a windowsill or shelf display.
Step-by-Step Guide
Materials
- Light-colored stoneware clay (with grog) or air-dry clay (stone finish)
- Thick gauge armature wire
- Wooden sculpting tools (various shapes)
- Potter’s needle tool
- Slip (clay slurry) and scoring tool
- Sponge
- Sandpaper (fine grit)
- Clear matte sealant (optional)
Step 1: Building the Core Structure
-
Prepare the Armature:
Cut a piece of thick armature wire approximately 12 inches long. Bend it into an inverted ‘U’ shape to serve as the structural spine for both figures. -
Establish the Base:
Flatten a substantial ball of clay into an oval slab about 1 inch thick. Insert the ends of your wire armature into this base, ensuring it stands firmly upright. -
Rough Out the Forms:
Pack clay around both sides of the wire loop to create two tall, pillar-like forms. Keep the clay thicker at the bottom and slightly tapered near the top.
Cracks at the Junction?
If cracks appear where the figures merge during drying, dampen the crack with a wet brush and fill it with a mixture of clay slip and paper fibers (or vinegar for stoneware) to bond it back together.
Step 2: Shaping the Figures
-
Define the Heads:
Add extra clay to the very top of each pillar to form the heads. Shape them into smooth ovals, keeping them featureless and abstract. -
Pose the Figures:
Gently curve the taller figure so its ‘chest’ leans slightly forward. Tilt the shorter figure’s head inward so it rests against the taller figure’s chest or shoulder area. -
Create the Embrace:
Roll a thick coil of clay to represent the taller figure’s arms. Wrap this coil entirely around the shorter figure’s upper back, blending the clay smoothly where the arms meet the torso. -
Merge the Lower Bodies:
Using your thumbs, blend the clay between the two figures at the hip and leg level. The goal is to make them look like they are growing from a single root. -
Smooth the Transitions:
Use a wooden modeling tool to remove any harsh seams where you attached the arms. The arm should flow seamlessly from the shoulder of the taller figure.
Faux-Stone Finish
If using plain air-dry clay, mix fine sand or used coffee grounds into the clay body before sculpting. This adds speckles and grit that perfectly mimics the limestone look seen in the photo.
Step 3: Refining and Texturing
-
Refine the Silhouettes:
Step back and look at the negative space. Use a carving tool to shave away excess bulk, ensuring the curves of the backs and the space between their necks look natural. -
Soften the Heads:
Wet your fingers slightly and rub the head shapes to ensure they are perfectly rounded ovals with no sharp angles. -
Create the Stone Texture:
I like to use a slightly rough sponge or a stiff brush to gently stipple the surface of the clay. This prevents it from looking plastic and gives it that natural, carved stone appearance. -
Check Stability:
Ensure the base is perfectly flat so the sculpture doesn’t rock. If needed, tap the sculpture gently on the table to level the bottom.
Step 4: Finishing Touches
-
Slow Drying:
Cover the piece loosely with plastic to let it dry very slowly over several days. This is crucial to prevent cracking where the two figures join. -
Sanding:
Once bone dry (or fully cured if using air-dry clay), use fine-grit sandpaper to smooth out any unintentional bumps while keeping the overall stone texture. -
Add Pitting Details:
Take a needle tool and press tiny, random pinholes into the surface, concentrating them near the base and back. This mimics the natural porosity of sandstone. -
Seal:
If you used air-dry clay, apply a clear matte sealant to protect the finish. If firing in a kiln, fire to the appropriate cone for a matte, unglazed finish.
Place your finished piece near a window where the shifting daylight will highlight the gentle curves and emotional connection.
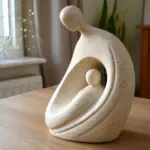

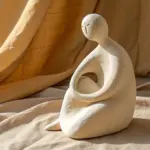

Parent-and-Child Embrace Form
This minimalist sculpture captures the pure, unconditional bond between parent and child through simple, flowing curves. The speckled, stone-like texture adds an organic warmth to the abstract forms, creating a timeless piece perfect for a nursery or mantle.
How-To Guide
Materials
- White stoneware clay with grog (or polymer clay with speckled granite effect)
- Small cup of water
- Wire clay cutter
- Wooden modeling tools
- Rubber kidney tool or soft sponge
- Needle tool
- Rolling pin
- Score and slip tool (or old toothbrush)
- Smooth work surface (canvas or ceramic tile)
Step 1: Forming the Base Figures
-
Prepare the parent body:
Start with a large fist-sized ball of clay. Roll it into a thick cylinder, slightly tapering one end to form a elongated teardrop shape. This will be the parent’s torso. -
Flatten the base:
Gently tap the wider end of the teardrop onto your work surface to create a flat, stable bottom. Ensure the sculpture stands straight without wobbling. -
Curve the torso:
Gently bend the top third of the tapered cone forward. This creates the protective, leaning posture of the parent figure. -
Create the child’s body:
Take a smaller piece of clay, about one-third the size of the parent piece. Roll a similar but smaller teardrop shape for the child’s torso. -
Attach the torsos:
Score the front of the parent figure and the back of the child figure. Applying a little slip, press the child’s body firmly against the parent’s torso so they merge seamlessly at the bottom.
Seamless Blending
When attaching heads, roll a tiny ‘snake’ of clay and wrap it around the neck seam. Smear this coil up and down to create a reinforced invisible joint.
Step 2: Adding Heads and Arms
-
Form the heads:
Roll two smooth spheres of clay—one larger for the parent and a smaller one for the child. Keep them perfectly round to maintain the abstract style. -
Attach the parent head:
Score the top of the parent’s curved neck and the bottom of the larger sphere. Attach firmly using slip, blending the clay downward just slightly at the back of the neck for strength. -
Position the child’s head:
Attach the smaller sphere to the top of the child’s body. Position it so it tucks right under the chin of the parent figure, conveying intimacy. -
Create the embracing arms:
Roll a long, thin coil of clay and flatten it slightly to create a ribbon-like shape. Cut it to a length that wraps from the parent’s side around the child’s back. -
Attach the arms:
Score and slip the ribbon of clay onto the figures. It should start from the parent’s shoulder area, wrap diagonally down across the child’s body, and blend into the child’s far side. -
Blend the seams:
Use a wooden modeling tool to smooth the edges of the arm where it meets the body, making it look like it grows naturally out of the main form rather than just sitting on top.
Step 3: Refining and Finishing
-
Smooth the surface:
Take a slightly damp sponge or a rubber kidney tool and go over the entire sculpture. You want to remove all fingerprints and harsh tool marks. -
Enhance the curves:
Check the silhouette from all angles. I find that gently rubbing the clay with a circular motion helps round out any accidental flat spots on the heads. -
Define the separation:
Use a needle tool or a thin wooden tool to gently deepen the groove between the parent and child bodies slightly, ensuring they look like distinct individuals in an embrace. -
Add texture (optional):
If your clay isn’t naturally speckled, you can lightly flick a stiff toothbrush with diluted dark brown underglaze over the surface to create that stone-like effect. -
Final drying check:
Poke a hidden air release hole in the bottom if your figures are solid and thick, or hollow them out from the bottom if they exceed an inch in thickness to prevent cracking. -
Drying:
Let the piece dry slowly under loose plastic for a few days before firing to prevent warping.
Minimalist Feature
Skip the speckling and instead glaze the finished piece in a glossy white or a metallic bronze for a more modern, gallery-style aesthetic.
Once fired, this touching sculpture serves as a beautiful reminder of family bonds


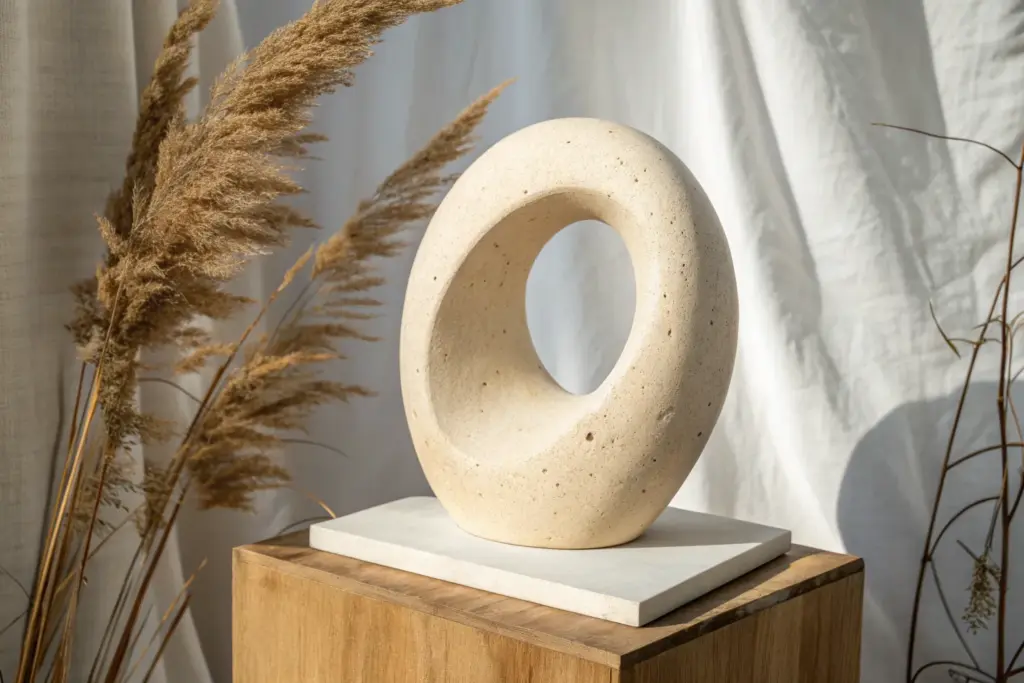
Abstract Torso With a Void
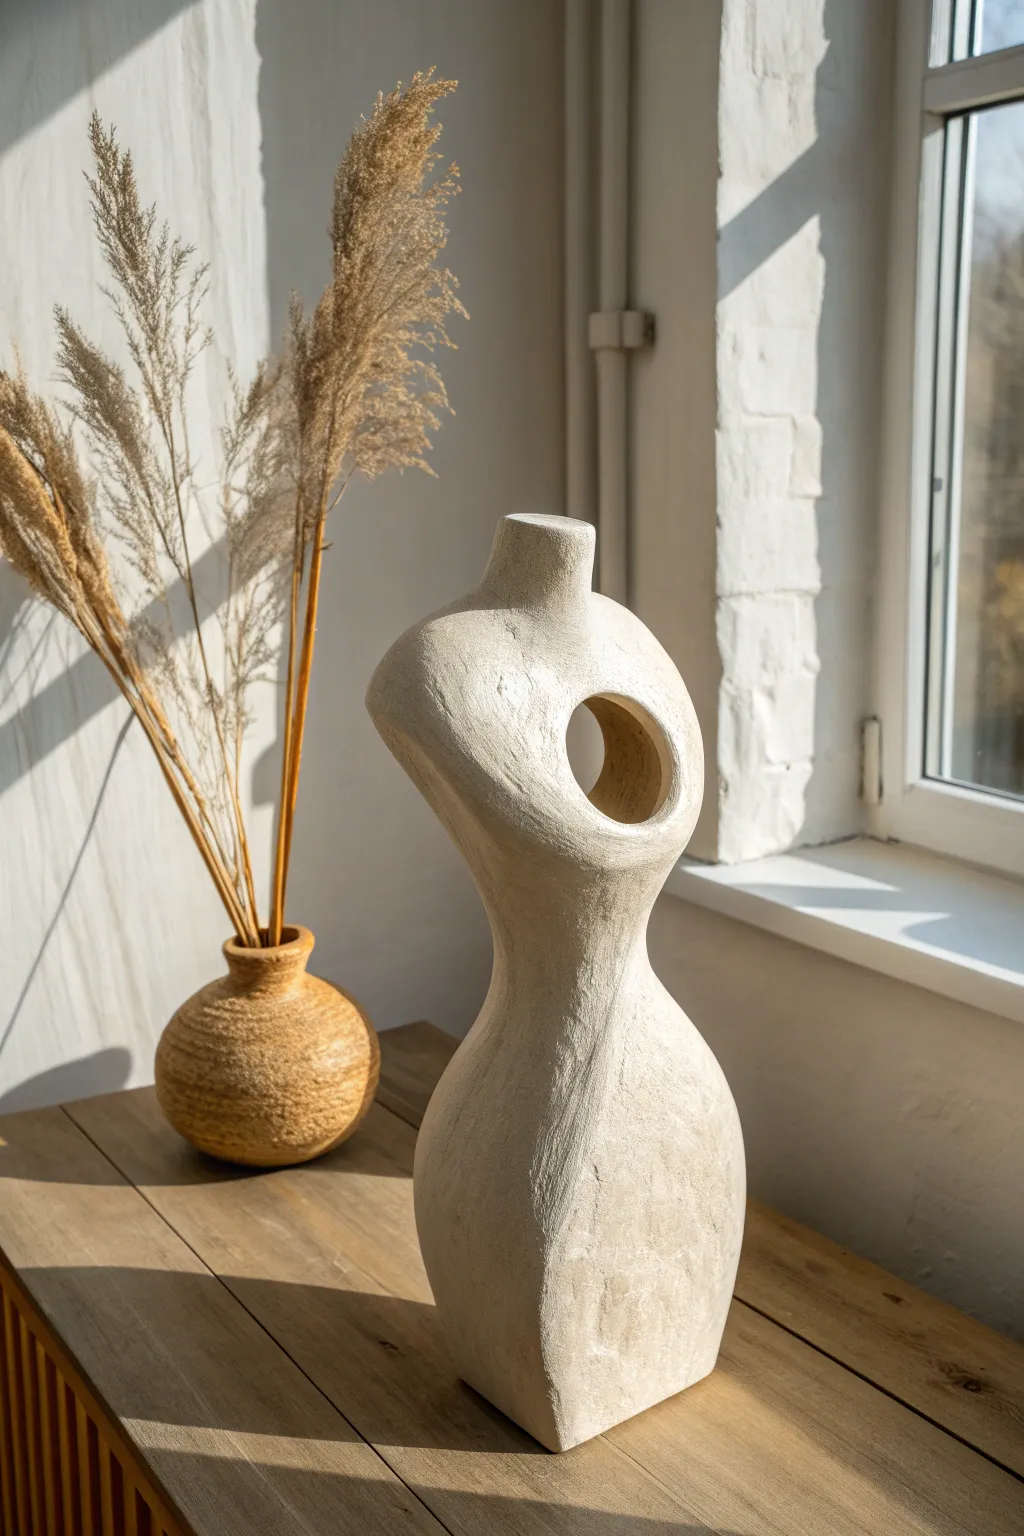
This striking project combines the classic beauty of the human form with modern abstraction, featuring a distinct circular negative space through the chest. Using air-dry clay and specialized texturing techniques, you can achieve a look that mimics carved limestone or sandstone without needing a kiln.
Step-by-Step Tutorial
Materials
- High-quality air-dry clay (white or stone color)
- Strong wire armature wire (aluminum is best)
- Wooden base or armature stand
- Aluminum foil
- Masking tape
- Sculpting tools (loop tool, needle tool, wooden rib)
- Circular cutter or a small round object (like a pill bottle cap)
- Coarse sandpaper (80 grit)
- Rough texture sponge or old toothbrush
- Acrylic paints (cream, beige, white)
Step 1: Building the Skeleton
-
Form the armature:
Begin by twisting your heavy-gauge wire into a basic T-shape to represent the spine and shoulders. Secure this firmly into your wooden base so it doesn’t wobble while you work. -
Establish the volume:
Crumple aluminum foil tightly around the wire to build up the core shape of the torso. Focus on the waist curve and the flare of the hips, but keep the overall form slightly thinner than your final desired size. -
Plan the void:
This is crucial: Shape the foil to specifically leave a gap or a thinner area where the hole in the chest will be. Don’t bulk up the foil right where you plan to punch the hole through later. -
Secure the base structure:
Wrap the entire foil form in masking tape. This smooths out sharp foil edges and gives the clay a much better surface to adhere to than slick metal.
Stone Effect Tip
Mix a small amount of fine sand or dried coffee grounds directly into your acrylic paint. This adds gritty, realistic texture that mimics limestone perfectly.
Step 2: Applying the Clay
-
Bulk application:
Roll out slabs of clay about 1/4 inch thick. Begin wrapping these around your armature, pressing them firmly against the taped foil to remove air pockets. -
Merge the seams:
Use your thumbs or a wooden rib tool to blend the seams where the clay slabs meet. The surface doesn’t need to be perfect yet, but the structure must be solid. -
Refine the silhouette:
Add extra clay to accentuate the hips and the shoulder line. Step back frequently to look at the profile; you want a graceful S-curve from the neck down to the base. -
Create the defining hole:
Once the torso shape is solid but the clay is still workable, determine the placement of the void on the upper chest. Use a small circular cutter or carefully carve out a circle, pushing all the way through to the other side. -
Smooth the interior:
Use a little water on your finger to smooth the inside walls of the hole you just created. The transition from the chest into the void should be rounded and soft, not sharp.
Step 3: Texturing and Finishing
-
Distress the surface:
To mimic the stone look in the photo, stop smoothing. Take a rough texture sponge or a crumpled ball of foil and press it repeatedly all over the surface to create organic pitting. -
Directional scratching:
Take a needle tool or stiff brush and drag it gently upwards along the torso’s curves. I find this subtle vertical grain really helps distinctuate the form and simulates carved stone. -
Let it dry completely:
Allow the sculpture to dry for at least 24-48 hours. Turn it occasionally if possible to ensure even drying. -
Sanding for contrast:
Once bone dry, take your coarse sandpaper to specific high points—like the shoulder and hip bone areas. This knocks back the texture slightly, creating a nice contrast between rough and smooth areas. -
Base coat painting:
Mix a warm beige or cream acrylic paint. Apply this all over the sculpture, getting into all the textured crevices. -
Dry brushing highlights:
Dip a dry brush into pure white paint and wipe most of it off on a paper towel. Lightly dust the surface of the sculpture to catch the raised texture, making it look like sun-bleached stone.
Mix It Up
Instead of a circle, try an oval or amorphous shape for the void. You can also paint the inside of the hole a darker shade to create more dramatic depth.
Place your sculpture near a window where shadows can play through the void, highlighting your beautiful work


Minimal Loop Ring Sculpture
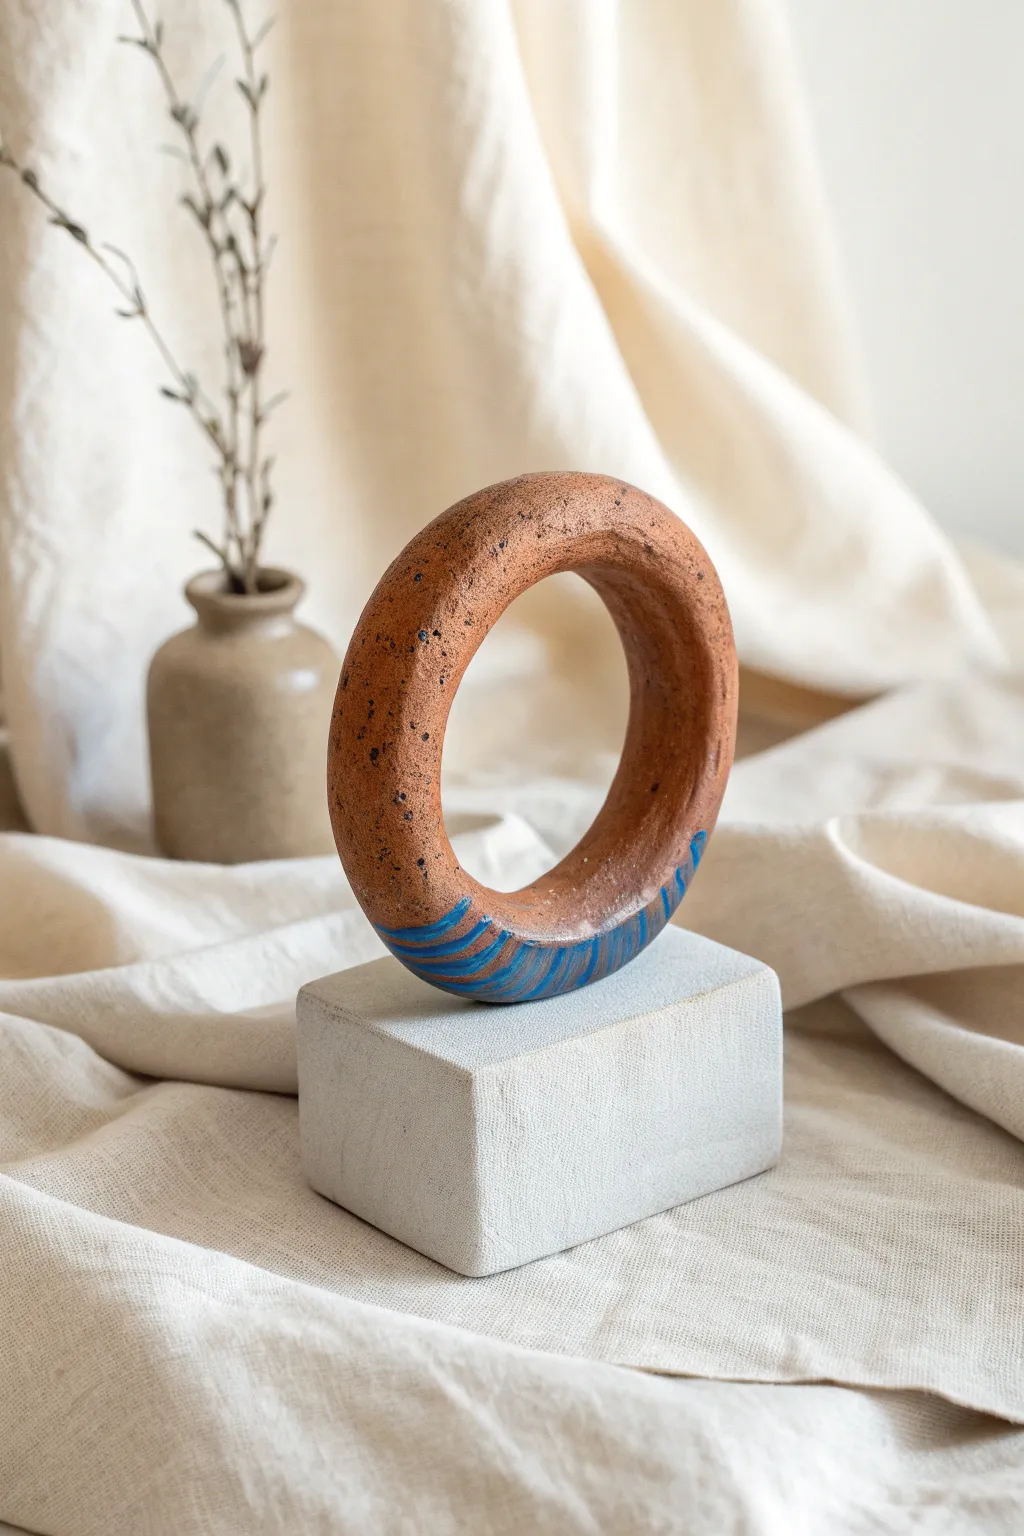
This striking minimalist sculpture balances a warm terracotta ring atop a crisp white geometric base. The piece features a textured, speckled finish and a subtle accent of blue stripes, creating a beautiful contrast between organic warmth and modern structure.
How-To Guide
Materials
- Speckled brown stoneware or terracotta clay
- Rolling pin
- Canvas or cloth work surface
- Slip and scoring tool (or a fork)
- Clean sponge
- Rubber kidney rib
- Ceramic underglaze (cobalt blue)
- Small liner brush
- Rectangular plaster mold or wooden form (for the base)
- White matte glaze (for the base)
- Clear matte glaze (optional for the ring)
- Epoxy glue (for assembly)
Step 1: Forming the Loop
-
Prepare the Clay:
Begin by wedging a pound of speckled brown clay to remove air bubbles. Roll it into a thick, even coil about 1 inch in diameter. -
Shape the Ring:
Curve the coil into a circle, aiming for an inner diameter of about 3-4 inches. I find it helpful to wrap the clay around a cylindrical object like a large jar to get a perfect curve. -
Join the Ends:
Cut the ends of the coil at a 45-degree angle to increase surface area. Score both cut surfaces thoroughly and apply slip before pressing them firmly together. -
Smooth the Seam:
Use your thumb to drag clay across the seam line in both directions. Follow up with a damp sponge to smooth the join until it is invisible and the ring is uniform. -
Refine the Surface:
Allow the ring to stiffen to a leather-hard state. Once firm, use a rubber kidney rib to smooth out finger marks and refine the rounded profile.
Step 2: Creating the Base
-
Prepare the Block:
You can hand-build a hollow box using slab construction, but casting solid in a mold adds nice weight. If hand-building, roll slabs to 1/4 inch thickness. -
Cut Slabs:
Cut six rectangles to create a block approximately 4 inches wide, 3 inches deep, and 2 inches tall. Be sure to miter the edges for cleaner corners. -
Assemble the Box:
Score and slip all edges, then assemble the rectangular prism. Gently paddle the outside with a flat wooden tool to sharpen the corners and ensure tight seams. -
Create a Resting Notch:
Make a very shallow, curved indentation in the top center of the block where the ring will eventually sit. This increases the contact area for gluing later. -
Bisque Fire:
Let both the ring and the base dry slowly under plastic to prevent warping. Once bone dry, bisque fire them according to your clay body’s temperature.
Cracking at the seam?
If the ring join cracks during drying, wrap the seam area in a damp paper towel and plastic wrap to rehydrate it slightly, then score and fill with fresh soft clay.
Step 3: Decoration and Assembly
-
Paint the Accent:
On the bisque-fired ring, locate the area that will sit near the base. Using the small liner brush and blue underglaze, paint irregular, wavy stripes that curve with the form. -
Apply Glaze:
Dip or brush the rectangular base with a matte white glaze. Leave the terracotta ring unglazed to show off the clay texture, or apply a very thin clear matte coat. -
Final Firing:
Fire both pieces separately to maturity. Ensure the ring is supported well in the kiln so it doesn’t warp out of round. -
Prepare for Assembly:
Once cool, check the fit of the ring on the base. If the glaze on the base is too thick in the notch, sand it down slightly for a better bond. -
Final Bonding:
Mix a small amount of strong two-part epoxy. Apply it to the notch on the base and set the ring in place, ensuring the blue stripes are positioned at the bottom near the connection point. -
Curing:
Prop the ring up with small supports (like books or boxes) so it stays perfectly upright while the glue cures completely.
Try textural contrast
Add texture to the white base before firing by pressing a canvas cloth or linen fabric into the wet slabs for a woven surface effect.
Place your sculpture near a window where shadows can play through the open center loop

The Complete Guide to Pottery Troubleshooting
Uncover the most common ceramic mistakes—from cracking clay to failed glazes—and learn how to fix them fast.
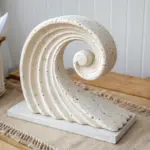
Wave-Form Sculptural Vessel
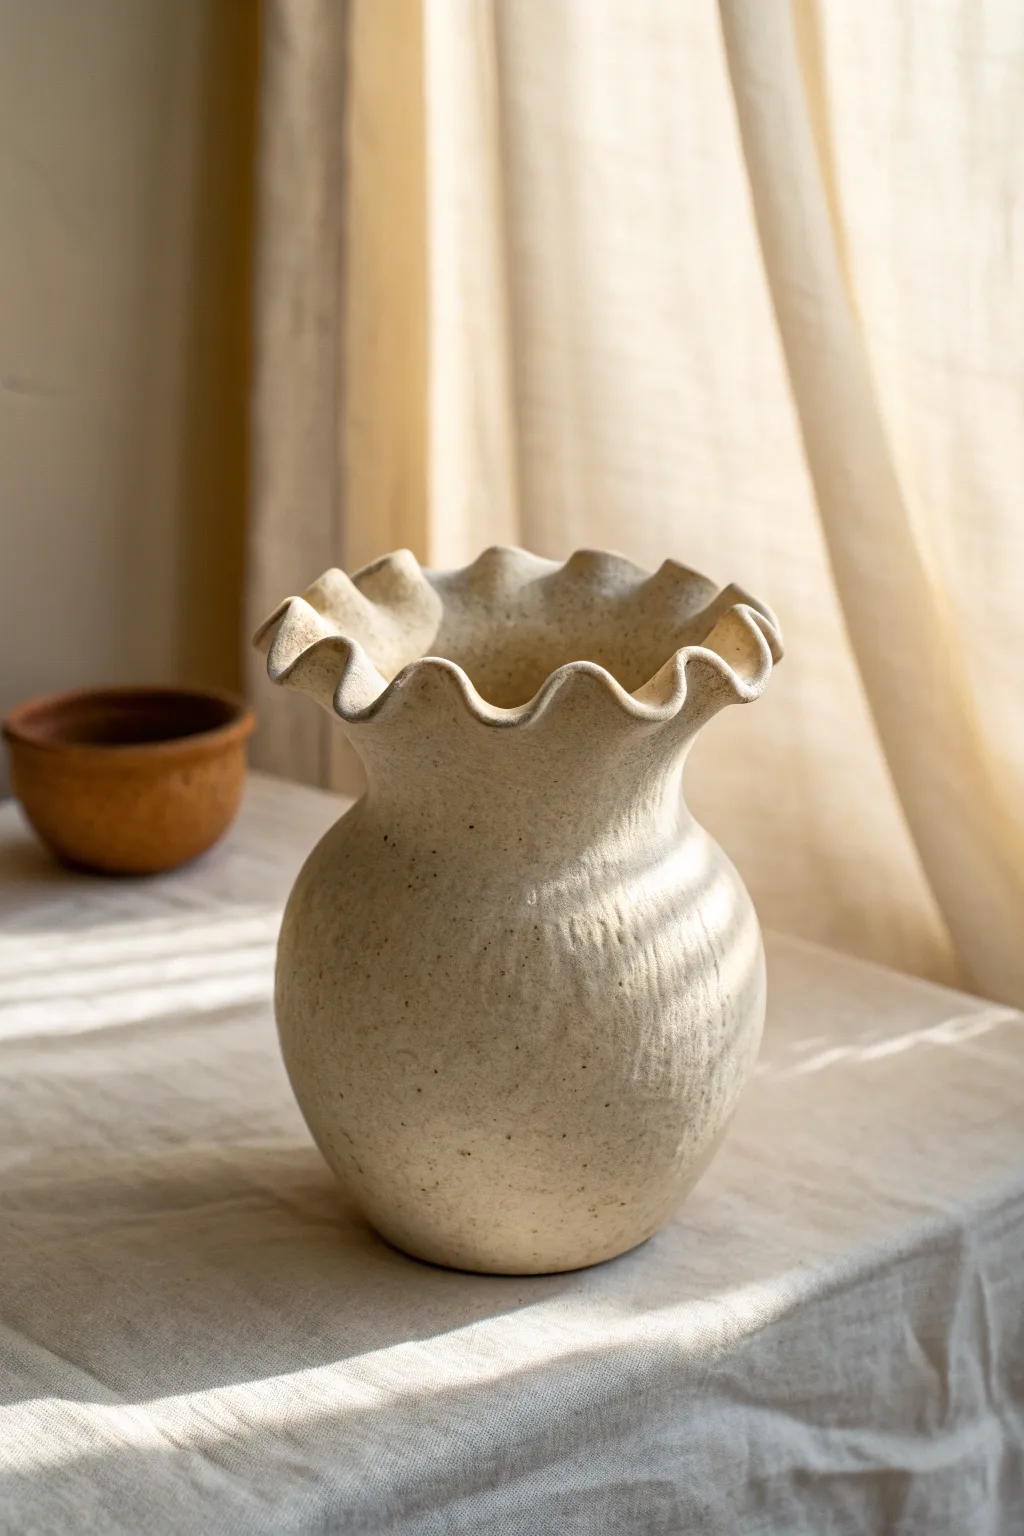
This vase captures the organic movement of water with its striking ruffled rim, contrasting beautifully with the solid, grounded feel of the round body. The speckled, sandy glaze adds a natural warmth that makes this piece perfect for holding dried flowers or standing proudly on its own.
Detailed Instructions
Materials
- Speckled buff stoneware clay (or polymer clay with faux speckles)
- Pottery wheel (or materials for coil building)
- Wooden modeling tools
- Metal kidney rib
- Sponge
- Needle tool
- Wire cutter
- Matte cream or clear glaze (if using ceramic clay)
- Rolling pin (if hand-building)
Step 1: Building the Form
-
Prepare your clay:
Start by wedging your clay thoroughly to remove air bubbles. For a vase of this size, you will need a ball of clay roughly the size of a grapefruit. -
Center and open:
If throwing on a wheel, center the clay firmly. Open up the vessel, leaving the base about a half-inch thick to support the weight of the walls. -
Pull the walls:
Pull the clay upward into a basic cylinder first. Aim for even wall thickness from bottom to top to ensure the vessel fires evenly later. -
Shape the belly:
Using a metal kidney rib on the inside and your fingers on the outside, gently push the belly of the vase outward. Create a rounded, bulbous shape that sits low and heavy. -
Narrow the neck:
Collar the clay in at the top to create a definitive neck. This narrowing is crucial as it provides the structural transition needed before flaring out the rim. -
Flare the rim:
Once the neck is established, pull the remaining clay at the very top outward into a wide, dramatic flare. It should look like a flat plate resting on the neck. -
Refine the surface:
Use a damp sponge or a soft rib to smooth the exterior walls. I find that leaving a tiny bit of surface texture here adds to the organic, handmade feel.
Master the Wave
Work systematically (like a clock face) when creating ruffles—push down at 12, up at 1, down at 2—to ensure your waves are evenly spaced around the circumference.
Step 2: Sculpting the Wave
-
Support the flare:
If the clay is too soft, let it sit for 15-20 minutes to firm up slightly. The rim needs to be pliable but strong enough to hold its shape. -
Create the heavy ruffles:
Using your thumb and forefinger, gently push the rim up and down at regular intervals. Support the clay from underneath as you push down, and from above as you push up. -
Deepen the curves:
Go around the rim a second time to exaggerate the waves. The high points should be crisp and the low points deep, creating a rhythmic, undulating pattern. -
Smooth the edge:
Take a small piece of chamois or a very smooth, damp sponge and run it along the very edge of the ruffle to soften any sharp angles created during sculpting. -
Dry slowly:
Cover the rim loosely with plastic while leaving the bottom exposed. This allows the thicker base to dry at the same rate as the delicate rim, preventing cracks.
Floppy Rim Fix
If your rim keeps collapsing, the clay is too wet. Use a heat gun carefully or wait 30 minutes. You can also prop up the “up” waves with foam bits while they dry.
Step 3: Finishing and Glazing
-
Bisque fire:
Once bone dry, fire the piece to the appropriate cone for your specific clay body (usually bisque is cone 04 or 06). -
Clean the bisque:
Wipe the fired piece down with a damp sponge to remove any kiln dust, which can prevent the glaze from adhering properly. -
Apply glaze:
Dip or brush on a matte cream glaze. If you used a speckled clay body, choose a semi-translucent glaze so those beautiful iron spots show through. -
Wipe the foot:
Carefully wipe the glaze off the bottom of the foot ring to ensure the pot doesn’t fuse to the kiln shelf during the final firing. -
Final fire:
Load the kiln for the final glaze firing. Ensure the ruffled rim isn’t touching any other pots, as it may warp slightly as it vitrifies.
Now you have a stunning, sculptural vessel that brings a sense of fluidity to any room
S-Curve Bird Abstraction
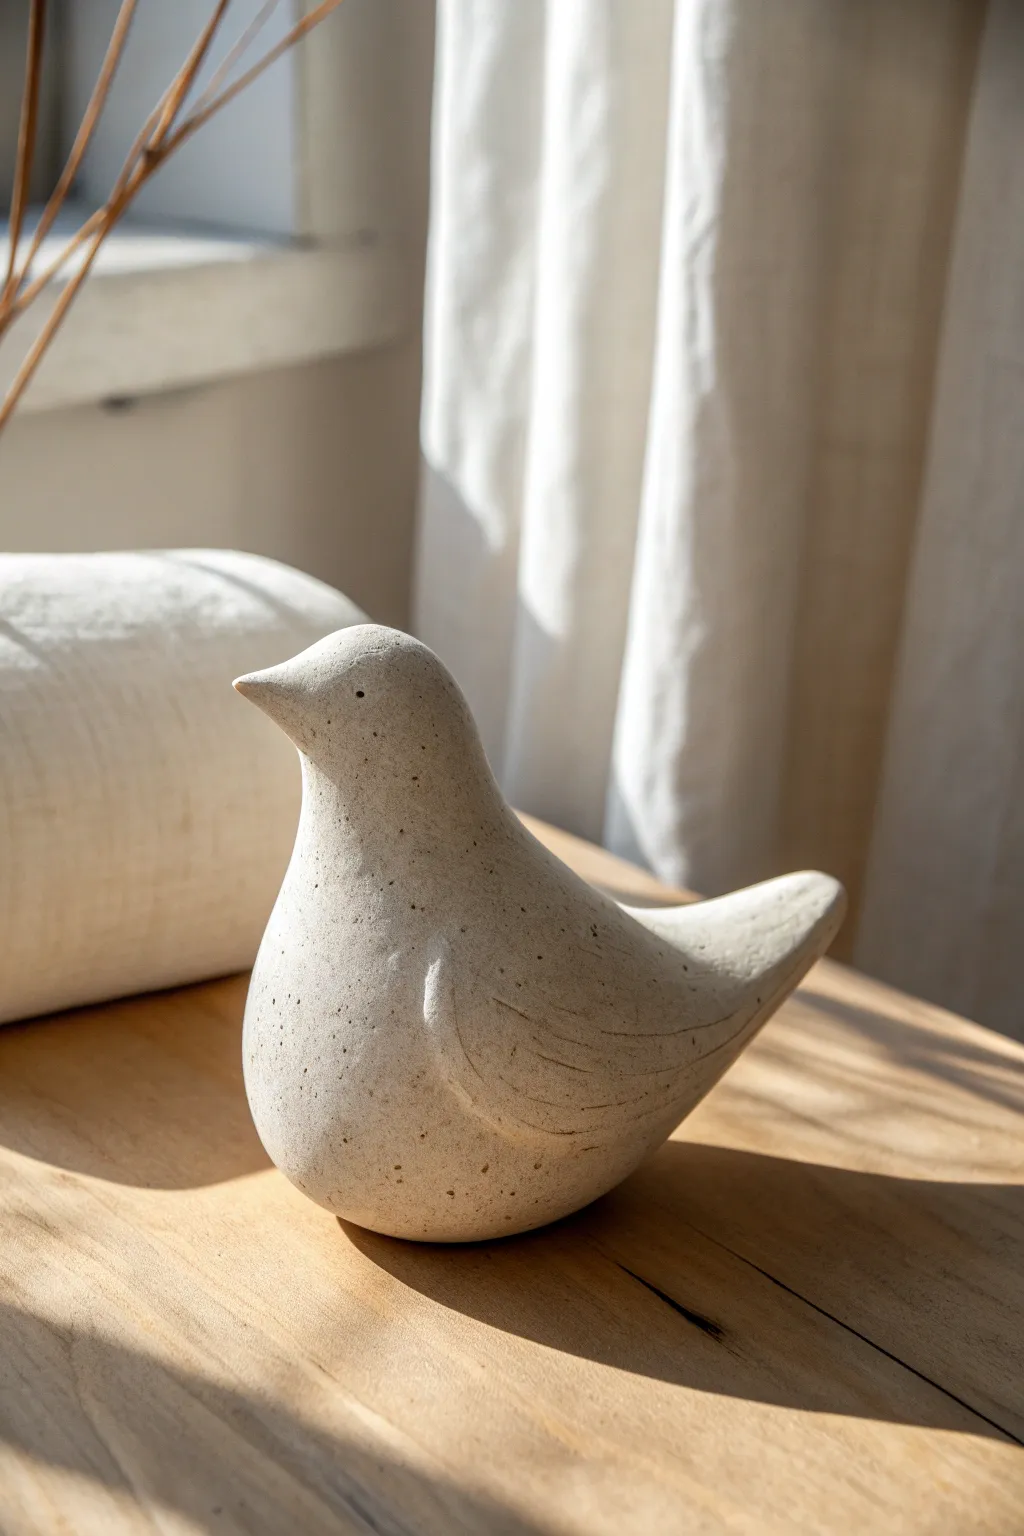
Embrace organic simplicity with this gentle S-curve bird sculpture, perfect for minimalist decor. The smooth, flowing lines combined with a naturally speckled clay body create a peaceful, grounded aesthetic.
How-To Guide
Materials
- Speckled stoneware clay (white or light beige)
- Wooden modeling tool
- Pointed sculpting tool or needle tool
- Rib tool (flexible metal or rubber)
- Sponge
- Canvas work surface
- Small container of water
- Clear matte glaze (optional)
Step 1: Forming the Body
-
Prepare the Clay:
Begin with a ball of speckled stoneware clay roughly the size of a large orange. Wedge it thoroughly to remove air bubbles and ensure an even consistency. -
Shape the Base Cone:
Roll the ball between your palms to smooth it, then gently elongate one side to create a fat teardrop or cone shape. This wider end will be the body, and the tapered end will become the tail. -
Establish the S-Curve:
Place the teardrop on your work surface. Gently press down on the wider, upper portion and pull it slightly upward and backward to define the chest and neck area, initiating that crucial S-shaped silhouette. -
Pinch the Head:
At the very top of the neck, pinch the clay gently to form a small, rounded head. Don’t overwork it; keep the transition from the neck seamless. -
Pull the Beak:
Using your thumb and forefinger, gently pull a tiny amount of clay forward from the face to create a subtle, pointed beak. I like to keep this quite minimal to match the abstract style. -
Define the Tail:
Smooth the back of the bird down towards the tail. Flatten the tail slightly and curve the tip upward just a fraction to give the bird a perky, alert posture.
Step 2: Refining and detailing
-
Smooth the Surface:
Using a slightly damp sponge, wipe over the entire form to remove fingerprints. Follow this with a flexible rib tool to compress the clay and achieve that ultra-smooth, matte finish. -
Check the Balance:
Tap the base of the bird firmly on the table once or twice to create a flat bottom. Ensure the sculpture stands stable without tipping forward or backward. -
Carve the Wing Outline:
Take your pointed sculpting tool or needle tool. On one side of the body, lightly sketch a sweeping, curved line that mimics the shape of a folded wing. It should start low on the body and sweep up towards the tail. -
Deepen the Wing Lines:
Once satisfied with the placement, retrace the line with slightly more pressure to create a distinct groove. -
Add Wing Feathers:
Inside the main wing outline, carve two or three gentle, horizontal curved lines to suggest flight feathers. Keep these lines fluid and parallel to the bottom curve of the wing. -
Repeat on Opposite Side:
Turn the bird around and repeat the wing carving process on the other side, trying to keep them symmetrical in placement. -
Create the Eyes:
Use the tip of your needle tool to poke a single, small hole on either side of the head for the eyes. Position them slightly back from the beak. -
Final Smoothing:
Run a damp finger over the carved lines to soften any sharp ridges or clay burrs created during carving. The goal is a soft, weathered look, not sharp cuts.
Cracking at the Neck?
If the neck starts to crack while bending the S-curve, your clay is too dry. Sprritz it with water, wrap it in plastic for 20 minutes to rehydrate, and try bending again.
Step 3: Finishing
-
Drying:
Loosely cover the bird with plastic for the first day to let humidity maximize evenly, then uncover and let it dry completely to the bone-dry stage. -
Bisque Fire:
Fire the piece in a kiln to cone 04 (or according to your clay’s instructions). -
Glazing Decision:
To maintain the raw texture shown in the image, you can leave the outside unglazed or apply a clear matte glaze. If unglazed, the natural speckles will be more prominent. -
Final Firing:
Fire the piece a final time to the maturity temperature of your specific stonewear clay.
Make it a Set
Make a trio of birds in graduating sizes (Mama, Papa, and Baby) to display together. Vary the beak angles slightly so they appear to be interacting with each other.
Place your finished sculpture near a window where the light can trace the gentle curves of the form


What Really Happens Inside the Kiln
Learn how time and temperature work together inside the kiln to transform clay into durable ceramic.
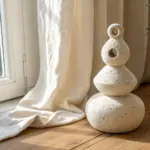
Featureless Head Totem
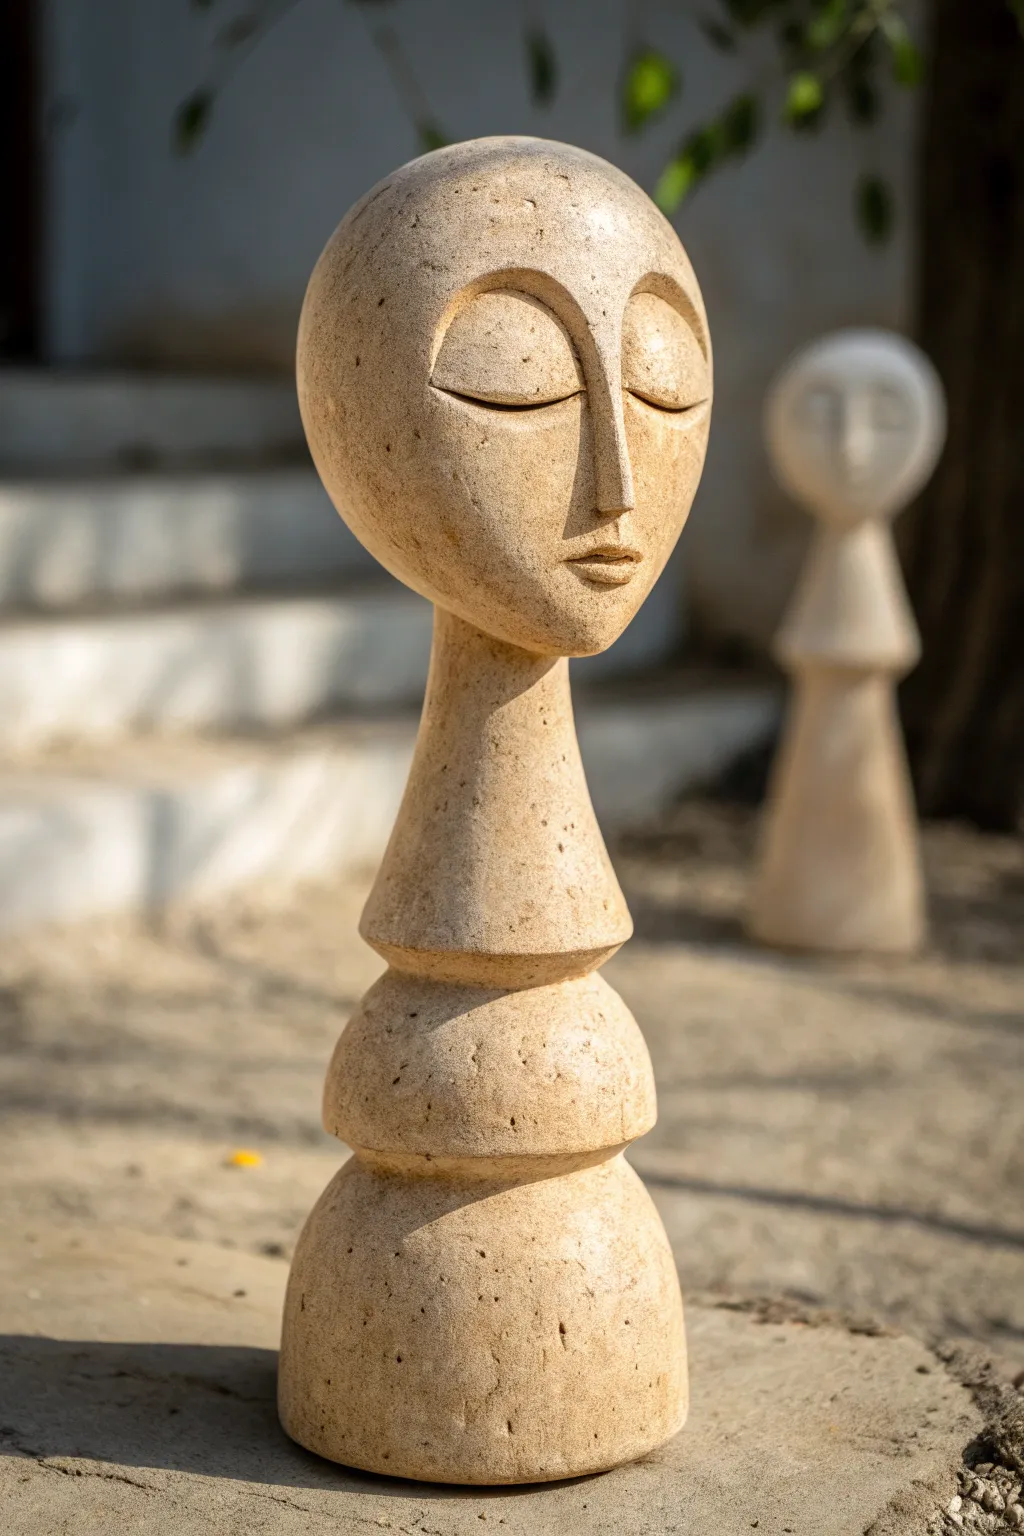
This elegant, segmented sculpture captures a sense of peaceful meditation with its softly stylized features and stacked geometric forms. By combining earthy clay with a textured faux-stone finish, you will create a timeless piece that feels like an artifact recovered from an ancient temple.
Step-by-Step Guide
Materials
- Stone-colored polymer clay or air-dry clay (approx. 2-3 lbs)
- Aluminum foil (for armature)
- Strong armature wire (12-14 gauge)
- Wooden base or scrap wood block
- Sculpting tools (needle tool, loop tool, silicone shapers)
- Balling tool (large)
- Texture sponge or stiff bristle brush
- Coarse sandpaper
- Acrylic paints (sand, beige, raw umber)
- Matte spray varnish
Step 1: Building the Armature
-
Secure the wire:
Begin by drilling a hole into your wooden base or scrap block and gluing your heavy-gauge wire vertically into it. This wire spine needs to be tall enough to support the entire stack, roughly 10-12 inches. -
Form the core shapes:
Crumple aluminum foil firmly around the wire to create the internal bulk. You need three distinct sections: a rounded base ‘boulder’, a slightly smaller middle ‘boulder’, a cone-like neck section, and finally, a large egg shape for the head. Keep the foil tightly packed. -
Check proportions:
Step back and look at your foil skeleton. The head should be significantly larger than the body segments to achieve that stylized, illustrative look. Adjust by adding more foil where needed.
Step 2: Sculpting the Body
-
Base layer application:
Condition your clay and roll it into sheets about 1/4 inch thick. Wrap these sheets around the bottom two foil ‘boulders’, smoothing the seams together thoroughly so no lines remain. -
Define the segments:
Use a modeling tool to press in the groove between the bottom and middle shapes. You want distinct separation, but they should look like they are resting heavily on one another. -
Create the neck pedestal:
Apply clay to the cone-shaped neck section. This part should flare out at the bottom to meet the middle stone and taper gently upward into the chin area. Keep the surface relatively smooth but not perfectly polished. -
Texturizing the body:
Before the clay hardens, tap a coarse sponge or a crumpled ball of aluminum foil over the entire surface of the body segments to create a pitted, stone-like texture.
Cracking Issues?
If air-dry clay cracks while drying, mix a ‘slip’ of fresh clay and water to fill the gaps. Apply it like spackle into the cracks and smooth over.
Step 3: Sculpting the Head & Face
-
Cover the head:
Wrap the large foil egg in a seamless layer of clay. Ensure the connection between the neck and the jawline is sturdy; I usually add a small snake of clay here and blend it upwards for extra support. -
Map the features:
Lightly sketch a vertical centerline and a horizontal line for the eyes. The face is stylized, so the nose will be long and elegant, starting from high up on the forehead. -
Build the nose:
Add a long, triangular wedge of clay for the nose bridge. Blend the edges seamlessly into the forehead and cheeks, keeping the ridge straight and defined. -
Carve the eye sockets:
Using a loop tool or your thumbs, press deep, cavernous depressions on either side of the nose bridge. These sockets should be large and semi-circular. -
Form the eyelids:
Roll two smooth balls of clay, flatten them slightly, and place them into the sockets to form the closed eyelids. Smooth the edges so they look like part of the stone, not stuck-on additions. -
Refine the eyes:
Use a fine needle tool to etch the curved slit of the closed eye. This line should curve downward gently, creating a sleeping or meditating expression. -
Shape the mouth:
Add a very small mount of clay for the lips. Sculpt them to be small and pursed. Use a sharp tool to define the separation between the lips and slightly indent the corners. -
Final shaping:
Go over the silhouette of the head. It should be perfectly round at the top, tapering to a soft point at the chin. Smooth out any fingerprints.
Ancient Moss
Dab tiny spots of diluted green paint into the deepest crevices or on the ‘shoulders’ of the segments to mimic moss growing on aged stone.
Step 4: Finishing Effects
-
Surface distressing:
Take a stiff bristle brush and stipple the face and head. You want distinct pitting, simulating sandstone or travertine. Add a few deeper, random pockmarks with a needle tool. -
Dry or Bake:
Follow the specific instructions for your clay type. If using air-dry clay, allow at least 24-48 hours for complete drying; for polymer, bake according to package directions. -
Sanding:
Once fully cured, use coarse sandpaper to knock back any sharp ridges. This contributes significantly to the weathered, eroded aesthetic. -
Painting the base:
Paint the entire sculpture with a sand or beige acrylic color. Let this base coat dry completely. -
The antique wash:
Mix a small amount of raw umber paint with water to create a thin wash. Brush this over the sculpture, letting it flow into the textures and eye crevices. -
Wipe back:
Immediately use a rag to wipe away the surface paint, leaving the dark color only in the pits, textures, and deep facial grooves to emphasize the shadows. -
Seal:
Finish with a coat of matte spray varnish to protect the finish without making it look plasticky or shiny.
Place your finished totem in a spot with natural light to highlight the serene shadows of the face
Geometric Relief Texture Tiles
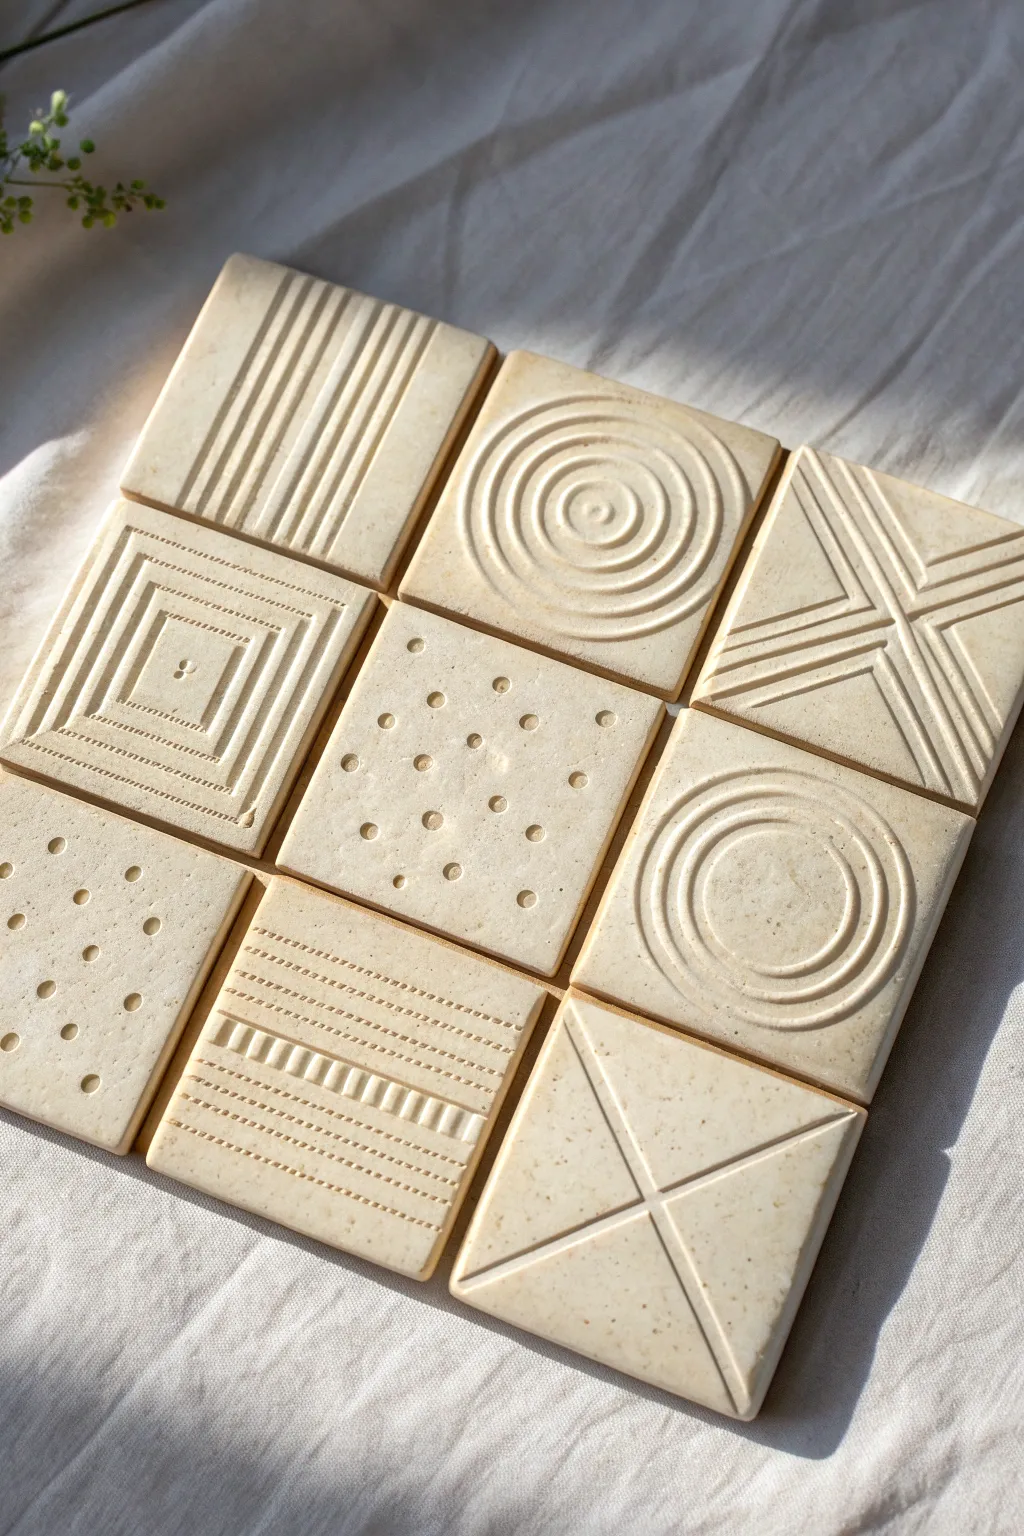
These sleek, monochromatic tiles explore the interplay of light and shadow through simple geometric relief patterns. Their soothing, neutral palette and varied textures make them a perfect modern accent for any creative space or a unique coaster set.
Step-by-Step Tutorial
Materials
- White or cream-colored polymer clay (approx. 1lb)
- Square cookie cutter (approx. 3-4 inches)
- Acrylic rolling pin
- Clay thickness guides or playing cards
- Parchment paper or ceramic tile work surface
- Pottery needle tool or awl
- Small circle cutters (various sizes)
- Ribbon loop tools (small)
- Ruler or straight edge
- Sandpaper (fine grit)
- Oven (for baking) or sealant (if using air-dry clay)
- Matte spray varnish (optional)
Step 1: Preparation & Base Creation
-
Condition the clay:
Begin by thoroughly conditioning your polymer clay until it is soft and pliable. Warm clay prevents cracking and ensures your impressions will be crisp. -
Roll out the slab:
Set up your thickness guides (about 1/4 inch thick) on a piece of parchment paper. Roll the clay out into a large, even slab. Uniform thickness is crucial for the final grid to look cohesive. -
Cut the squares:
Using your square cookie cutter, firmly press down to cut out nine identical squares. If the clay sticks to the cutter, I find a light dusting of cornstarch helps release it cleanly. -
Smooth the edges:
Gently refine the edges of each square with your finger or a smoothing tool to remove any burrs or drag marks from the cutting process.
Uneven Impressions?
If your lines aren’t straight or depth varies, try laying a piece of plastic wrap over the clay before pressing your tools down. This softens edges and prevents dragging.
Step 2: Creating the Textures
-
Design 1: Linear Grooves:
For the first tile, use the edge of a ruler or a dull knife. Press parallel vertical lines into the clay, spacing them evenly. Do not cut all the way through; just create deep impressions. -
Design 2: Concentric Circles:
Select 3-4 circle cutters of graduating sizes. Press them gently into the center of a tile to create rings, starting from the smallest in the middle and working outward. -
Design 3: The ‘X’ Pattern:
Use a straight edge to impress a large ‘X’ connecting the corners. Then, create smaller V-shapes nested inside the arms of the X to build up the geometric density. -
Design 4: Framed Square:
Press a slightly smaller square cutter lightly inside the tile perimeter. Use a needle tool to add texture inside this frame, perhaps adding a tiny hole or dot in the very center. -
Design 5: Polka Dots:
Take a small ball stylus or the end of a paintbrush. Press rows of dots into the clay surface. You can arrange them in a grid or a slightly offset diamond pattern. -
Design 6: Negative Space Rings:
Similar to the concentric circles, but instead of thin lines, use a loop tool to gently carve out wider, shallow channels, leaving raised rings of clay in between. -
Design 7: Stippled Stripes:
Combine techniques by pressing horizontal lines with your ruler, and then using a needle tool to add tiny dashes or dots between every other line for a ‘stitched’ look. -
Design 8: Minimalist Cross:
Create a very simple tile with just two deep diagonal lines crossing in the center. Keep the surface otherwise smooth to provide visual rest against the busier textures. -
Design 9: Mixed Dot Grid:
Create a grid of dots, but vary the size of the tool used, alternating between small pinpricks and larger circular indentations.
Make It a Mosaic
Glue strong magnets to the backs to create an interactive fridge art piece, or frame them in a shadow box with spacers for a high-end gallery look.
Step 3: Finishing Touches
-
Clean up details:
Inspect all nine tiles. Use a rubber shapers or your fingertip to smooth out any tiny crumbs of clay that formed while texturing. -
Bake or Dry:
If using polymer clay, bake according to the manufacturer’s instructions (usually 275°F for 15-30 minutes). If using air-dry clay, allow them to dry flat for 24-48 hours away from direct heat. -
Sand and Refine:
Once fully cured and cooled, lightly sand the edges and surface with fine-grit sandpaper to achieve a stone-like finish. -
Seal (Optional):
Apply a light coat of matte varnish spray to protect the surface from dust and fingerprints without adding unwanted shine.
Arrange your finished tiles in a grid to enjoy the satisfying rhythm of your handmade textures

TRACK YOUR CERAMIC JOURNEY
Capture glaze tests, firing details, and creative progress—all in one simple printable. Make your projects easier to repeat and improve.
Layered Cutout Wall Sculpture
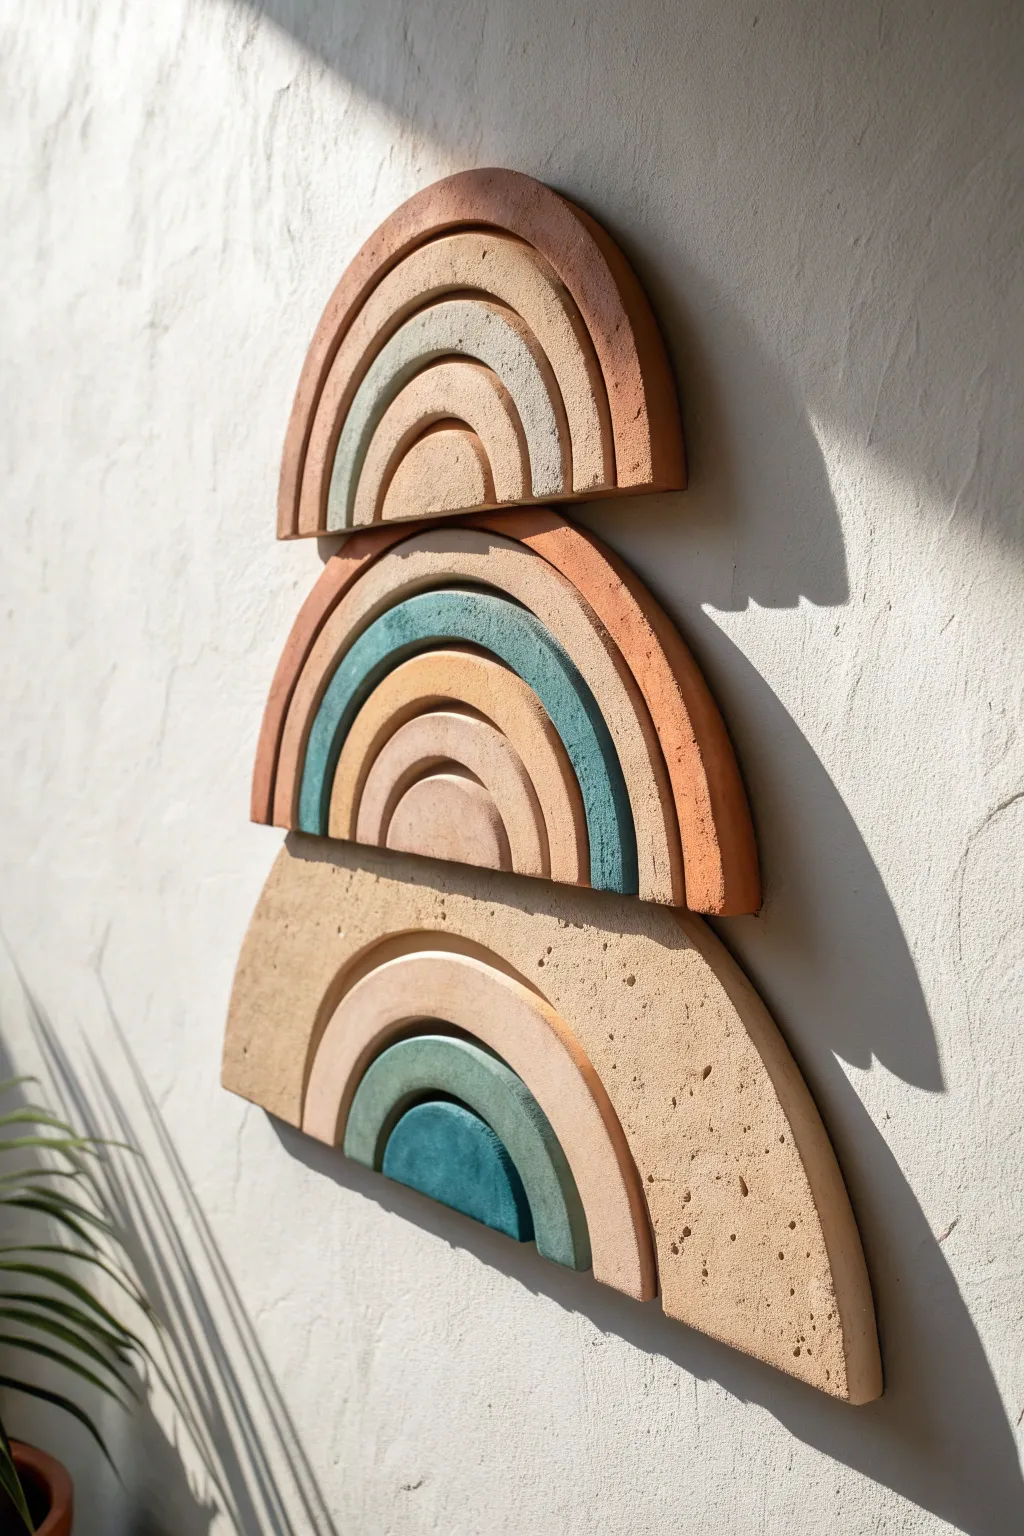
This striking wall sculpture stacks three distinct rainbow forms to create a modern, earthy focal point. The raw, textured finish of the clay combined with muted teal and sandstone glazing gives it a sophisticated desert-modern aesthetic.
Step-by-Step Guide
Materials
- Stoneware clay with grog (for texture and strength)
- Rolling pin and guide sticks (approx. 1/2 inch thick)
- Compass or circle templates
- Fettling knife or needle tool
- Cardboard or poster board (for templates)
- Slip and score tool (serrated rib)
- Underglazes (terracotta, sandstone beige, teal, sage green)
- Matte clear glaze (optional)
- Heavy-duty mounting adhesive or epoxy
- Wooden backing strip or French cleat system
Step 1: Drafting and Cutting Shapes
-
Create templates:
Begin by sketching your three tiers on cardboard to visualize the scale. The bottom tier shapes a wide semi-circle, while the middle and top tiers are classic rainbow arches. Cut these templates out to use as cutting guides. -
Roll the clay slabs:
Working on a canvas surface, roll out your stoneware clay to a uniform thickness of about 1/2 inch. Depending on the size of your sculpture, you may need to attach multiple slabs together or work in sections. -
Cut the primary forms:
Place your cardboard templates onto the clay. Using a needle tool held perpendicular to the surface, trace and cut out the outer silhouette of each of the three tiers. -
Define the inner arches:
For the layered look, you won’t just incise lines; you need to cut separate concentric arches. Use your compass or smaller templates to cut the distinct bands that make up each rainbow. Keep the pieces arranged in order so they fit back together later.
Fixing Warped Arches
If an arch warps during drying, try misting it slightly and placing a wooden board with a light weight on top while it dries further to gently flatten it back out.
Step 2: Refining and Adding Texture
-
Smooth the edges:
Once the clay has stiffened slightly to a ‘leather hard’ state, take a damp sponge and gently soften the sharp 90-degree edges of every cut piece to prevent chipping. -
Enhance surface texture:
The charm of this piece is its gritty feel. If your clay is too smooth, press a coarse sanding sponge or a rough stone gently into the surface to create organic pitting and texture. -
Dry fit alignment:
Arrange the pieces back into their three tiered groups to ensure the gaps between arches are consistent. I find it helpful to let them dry in this formation to minimize warping issues.
Step 3: Color Application and Firing
-
Bisque firing:
Allow the greenware to dry completely slowly (this usually takes a week). Fire the pieces to bisque temperature (usually cone 04) to prepare them for glazing. -
Apply base colors:
Using underglazes, paint the specific arches. Use a deep terracotta for the outer rings of the top two tiers. Apply a sandstone beige to the largest bottom tier and inner arches. -
add accent colors:
Paint the accent arches with muted teal and sage green. Apply 2-3 coats for opaque coverage, allowing each coat to dry before the next. -
Wax resist edges (optional):
If you want the raw clay body to show on the sides for contrast, carefully wipe away any glaze drips with a sponge or apply wax resist before painting. -
Final firing:
Fire the pieces again to the temperature required by your clay and glaze (likely cone 5 or 6 for stoneware). We are skipping a glossy clear coat to maintain that dry, matte stone look.
Make It Modular
Instead of gluing the pieces to a board, attach a high-strength magnet to the back of each individual ceramic arc. Arrange them freely on a magnetic metal wall strip.
Step 4: Assembly and Mounting
-
Prepare the backing structure:
Cut a wooden spine or three separate backing plates from plywood that are slightly smaller than your ceramic shapes so they remain hidden when hanging. -
Adhere the ceramics:
Using a strong two-part epoxy or heavy-duty construction adhesive, glue the fired ceramic arches onto your wooden backing. Ensure you maintain the spacing between the concentric rings. -
Stack the tiers:
Glue the tiers to each other if using a single spine, or mount them individually on the wall. If gluing together, ensure the top rainbow allows the one below to tuck visibly underneath or rest flush against it. -
Install hanging hardware:
Attach sturdy D-rings or a French cleat to the back of the wooden structure. Ensure the hardware is rated for the weight of the ceramic.
Enjoy the warmth this handcrafted texture brings to your living space
Spiral Coil Abstract Platter
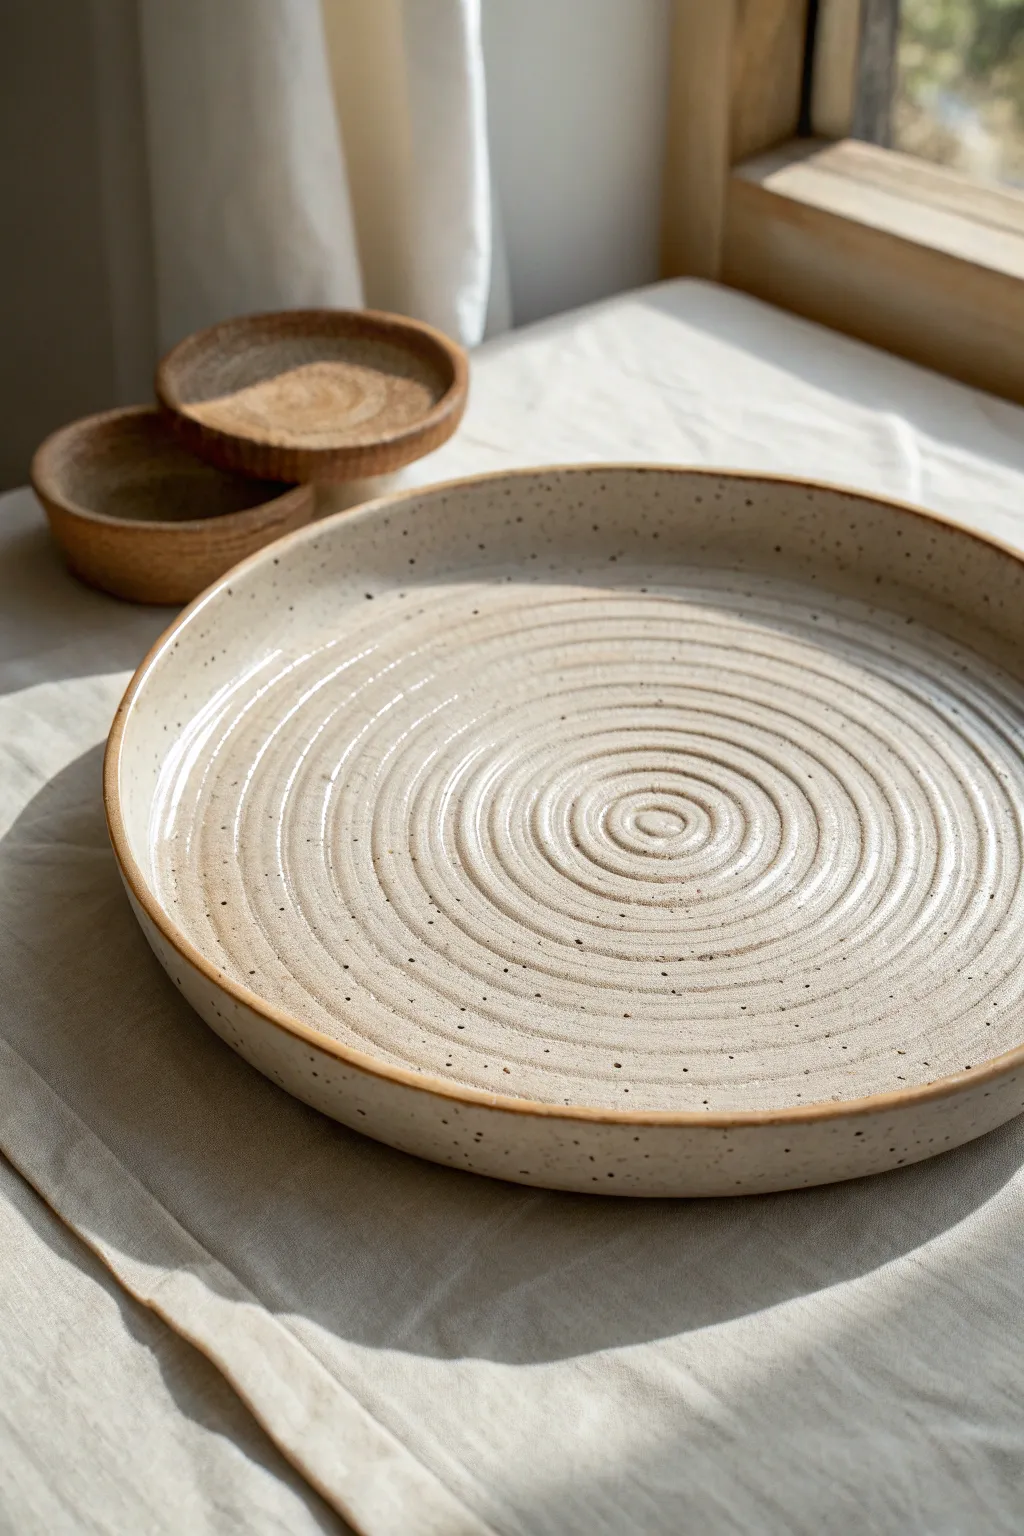
This project transforms a simple slab of clay into a meditative statement piece featuring a hypnotic spiral texture. The result is a creamy, speckled platter that feels both earthy and modern, perfect for a coffee table centerpiece or serving tray.
Detailed Instructions
Materials
- Speckled stoneware clay (mid-fire)
- Rolling pin and guide strips (approx. 1/4 inch)
- Circular bat or plaster mold (flat surface)
- Sponge
- Water bowl
- Pottery rib (smooth, soft rubber)
- Needle tool
- Clay knife or fettling knife
- Clean banding wheel (optional but helpful)
- Transparent or semi-opaque creamy white glaze
- Kiln
Step 1: Preparing the Slab
-
Wedge the Clay:
Begin by thoroughly wedging your speckled stoneware clay to remove air bubbles and ensure particle alignment, which helps prevent warping later. -
Roll the Base:
Using your rolling pin and guide strips, roll the clay out into a large, even slab about 1/4 inch thick. Make sure it is wide enough to cut a generous circle from. -
Compress the Slab:
Take your smooth rubber rib and compress the clay surface in all directions. This is a crucial step to align the clay platelets and prevent cracks during drying. -
Cut the Circle:
Place your circular bat or a large plate template onto the slab and trace around it with a needle tool to cut a perfect circle.
Step 2: Creating the Spiral Texture
-
Find Center:
Lightly mark the exact center of your clay circle. If using a banding wheel, center the slab on the wheel now. -
Start the Coil:
You have a choice here: you can either impress a thick rope into the clay or carve the texture. For the look in the photo, take a loop tool with a rounded edge. -
Carve the Grooves:
Starting from the absolute center, press your tool gently into the clay while slowly spinning the banding wheel. Keep the pressure consistent. -
Expand the Spiral:
Slowly move your hand outward as the wheel spins, creating a continuous, tight spiral groove that radiates toward the edge. I find that holding my breath slightly helps keep my hand steady here. -
Refine the Rim:
Stop the spiral about an inch or so from the very edge of the slab. This leaves a smooth border that will become the vertical wall of the platter. -
Smooth the Roughly Carved Edges:
Use a damp sponge or a soft brush to gently go over the carved grooves. You want to soften any sharp burrs of clay without washing away the definition.
Preventing Cracks
Platters love to create ‘S’ cracks in the center. To fix this, compress the center of your slab aggressively on both sides before cutting your circle shape.
Step 3: Forming and Finishing
-
Lift the Rim:
Gently lift the outer edge of the slab upward to create a shallow vertical wall. You can support the outside with a coil or let it rest in a shallow curved bowl mold to hold its shape. -
Refine the Wall:
Smooth the transition between the flat base and the vertical wall using your thumb or a soft rib, ensuring a gentle curve rather than a sharp angle. -
Dry Slowly:
Cover the piece loosely with plastic. Because platters are prone to warping, let this dry very slowly over several days, keeping drafts away. -
Bisque Fire:
Once bone dry, fire the piece to bisque temperature (usually cone 04 or 06, depending on your clay body). -
Glaze Application:
Brush or pour a cream-colored, semi-opaque glaze over the interior. The glaze should pool slightly in the spiral grooves, accentuating the texture. -
Leave the Rim Raw:
Wipe back or avoid glazing the very top rim and the exterior walls. This ‘exposed clay’ look highlights the speckled stoneware body. -
Final Firing:
Fire the platter to the maturity temperature of your clay and glaze (typically cone 5 or 6). Allow the kiln to cool completely before opening.
Level Up: Oxide Wash
Before glazing, wipe a diluted iron oxide wash into the spiral grooves, then sponge the surface clean. This makes the rings pop with dark contrast.
Once cooler, you can enjoy the tactile satisfaction of running your fingers over those endless ceramic ripples
Marbled Abstract Tray Form
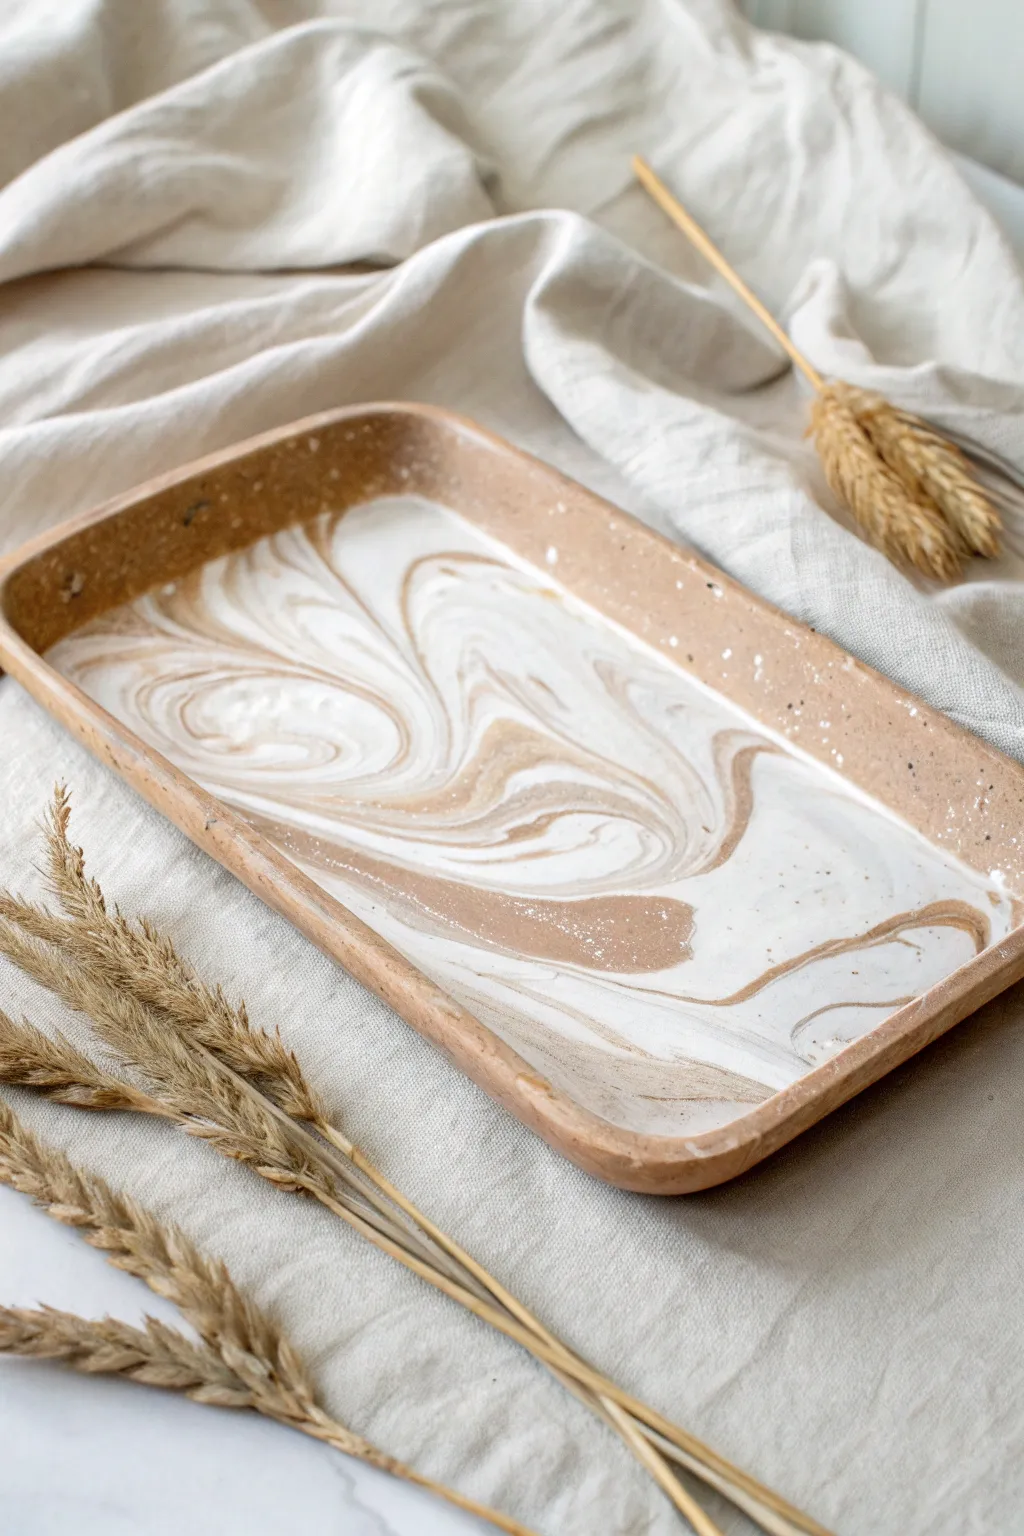
This elegant rectangular tray combines the warmth of toasted sand tones with the crisp purity of white clay in a mesmerizing marble pattern. Perfect for holding jewelry or keys, its organic swirls and speckled texture create a sophisticated, modern piece that looks far more expensive than it is.
Step-by-Step Guide
Materials
- Polymer clay (white)
- Polymer clay (translucent or beige)
- Acrylic paint (burnt umber or deep tan)
- Coarse black pepper or dried coffee grounds (for speckling)
- Clay roller or pasta machine
- sharp craft knife or tissue blade
- Rectangular baking dish or metal tray (for use as a mold)
- Fine-grit sandpaper (400 to 1000 grit)
- Matte polyurethane varnish or glaze
- Clean work surface (ceramic tile or glass)
Step 1: Preparing the Clay Colors
-
Condition the white clay:
Begin by taking a large block of white polymer clay. Knead it in your hands until it is soft, pliable, and warm. This conditioning step is crucial to prevent cracks later on. -
Create the custom sand tone:
Take a portion of white clay and mix it with a small amount of beige clay. To get that deep, toasted color, add a tiny dot of burnt umber acrylic paint directly into the clay and knead until the color is uniform. -
Add texture speckles:
Flatten your sand-colored clay slightly and sprinkle a tiny pinch of coarse black pepper or dried coffee grounds onto it. Fold the clay over and knead it to distribute the specks evenly, mimicking a natural stone look. -
Form logs:
Roll the pristine white clay into a thick log, about 1 inch in diameter. Do the same for your speckled sand-colored clay. The logs should be roughly equal in length.
Air pockets?
If you see a bubble while rolling, pierce it gently with a needle tool and smooth the air out with your finger immediately to avoid bumps after baking.
Step 2: Creating the Marble Pattern
-
Twist the colors:
Place the two logs side by side and twist them together like a candy cane. Keep twisting until tight ridges form. -
Fold and roll:
Fold the twisted log in half and roll it smooth again on your work surface. Repeat this twisting and folding process 2-3 times. Be careful not to over-mix, or the distinct colors will turn into a single muddy beige. -
Form a ball:
Once you see nice striations, roll the entire mass into a smooth ball. Check the surface to identify where the most interesting swirls are located. -
Roll out the slab:
Using your acrylic roller or pasta machine, flatten the ball into a uniform sheet about 1/4 inch thick. Roll in different directions to stretch the swirls into wider, more organic shapes.
Step 3: Shaping and Baking
-
Cut the rectangle:
Lay your clay slab on a flat surface. Place your intended mold (the baking dish) gently on top to gauge size, then use a sharp craft knife to cut a clean rectangle about 1 inch larger than the base of your mold on all sides. -
Smooth the edges:
Pick up the clay rectangle and gently run your finger along the cut edges to soften them, removing any sharp corners or dragging marks from the knife. -
Form the tray:
Place the clay slab inside your rectangular baking dish. Gently press the center down and ease the clay up the sides of the dish to create the tray walls. I like to use a soft makeup sponge to press the clay into the corners without leaving fingerprints. -
Refine the rim:
Use your knife to trim any excess clay that rises too high above the rim. Aim for a consistent lip height all around the tray. -
Bake the project:
Preheat your oven according to the clay manufacturer’s instructions (usually around 275°F/130°C). Bake the tray while it is still inside the mold for 30-45 minutes to ensure it fully cures.
Pro Tip: Smoother Finish
Wipe the raw clay with a little baby oil or clay softener on your finger before baking to remove fingerprints without needing heavy sanding later.
Step 4: Finishing and Polishing
-
Cool down:
Remove the tray from the oven and let it cool completely inside the mold. Removing it while hot can cause the clay to warp or sag. -
Initial sanding:
Pop the clay tray out of the mold. Dip a piece of 400-grit sandpaper in water and sand the edges and rim to make them perfectly smooth. The water keeps dust down and prevents scratching. -
Fine sanding:
Switch to 800 or 1000-grit wet sandpaper. Buff the entire surface of the tray, including the bottom, until it feels satiny and smooth to the touch. -
Seal the piece:
Apply a thin layer of matte polyurethane varnish or clay glaze with a soft brush. This protects the faux stone finish and makes the tray easier to wipe clean.
Place your finished tray on a console table or dresser to bring a touch of earthy calm to your space
Surreal Hand-and-Face Fusion
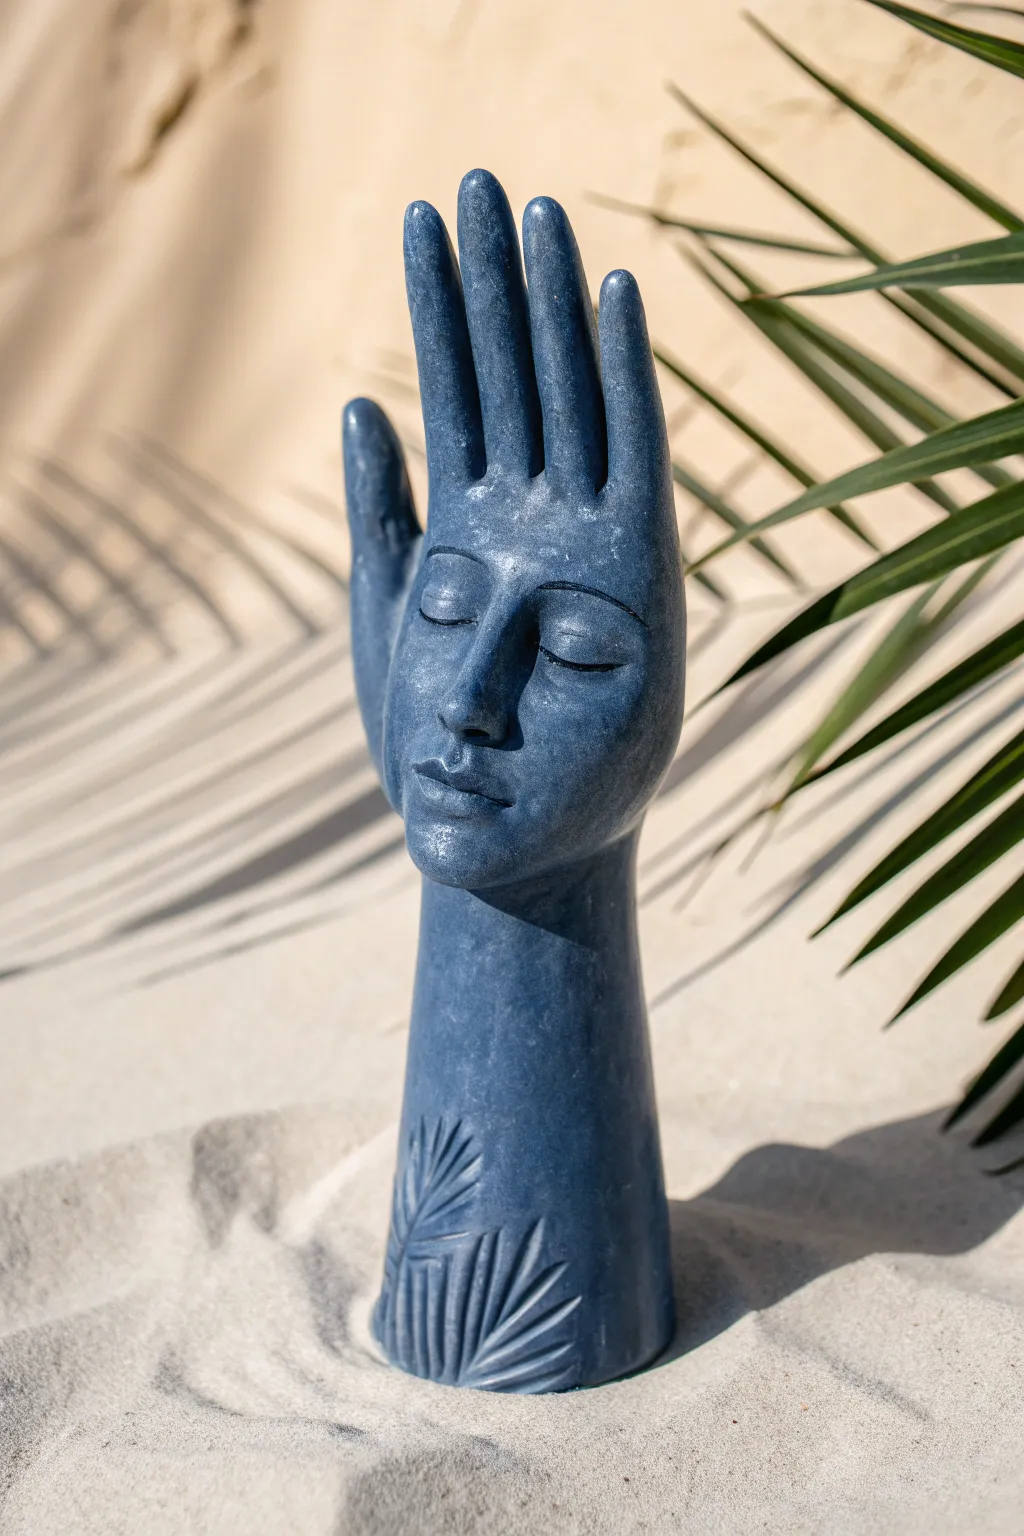
Merge portraiture and anatomy in this striking surrealist sculpture where a serene face emerges from the palm of an upright hand. Finished with a stone-like blue texture and tropical carvings, this piece makes a mystical statement for any shelf or garden.
Detailed Instructions
Materials
- Air-dry clay or polymer clay (approx. 2-3 lbs)
- Armature wire (12-gauge or similar strong wire)
- Aluminum foil
- Masking tape
- Sculpting tool set (needle tool, loop tool, smoothing tools)
- Rolling pin
- Sponge and water
- Deep indigo or denim blue acrylic paint
- White acrylic paint (for dry brushing)
- Matte spray varnish
- Fine-grit sandpaper
Step 1: Armature Construction
-
Form the core wire:
Cut five lengths of heavy wire for the fingers and one thicker bundle for the wrist and arm. Twist the bottom of the finger wires together with the arm wires to create a solid skeletal structure. -
Bulk up with foil:
Crumple aluminum foil tightly around the wire structure to build out the volume of the forearm, palm, and individual fingers. Aim for a slightly flattened, wide shape in the palm area to accommodate the face later. -
Secure the form:
Wrap masking tape completely around the foil. This prevents the clay from sliding off and smooths out sharp foil edges before you begin sculpting.
Step 2: Clay Application & Hand Sculpting
-
Base layer:
Roll out sheets of clay about 1/4 inch thick. Wrap them around the foil armature, pressing firmly to adhere them to the tape underneath. -
Define the fingers:
Smooth the clay up each finger, ensuring they are slender and elongated. Don’t worry about knuckles or fingernails; this style relies on smooth, stylized forms. -
Shape the palm:
Add extra clay to the palm area, building it up into a convex, rounded surface. Merge the thumb seamlessly into the side of the hand. -
Create the wrist base:
Flare the bottom of the forearm slightly to create a stable base so the sculpture can stand on its own. Check the balance frequently.
Smooth Operator
Keep a small bowl of water nearby to constantly wet your fingers. This helps blend the clay seams perfectly, essential for that ‘merged’ surreal look.
Step 3: Facial Fusion
-
Position the features:
Using a needle tool, lightly sketch a centerline down the palm and mark where the eyes, nose, and mouth will sit. The nose should align roughly with the center of the palm. -
Build the nose:
Add a small wedge of clay for the nose. Blend the edges smoothly into the ‘cheeks’ (the sides of the palm), keeping the bridge straight and narrow. -
Sculpt the eyes:
Form two small almond shapes from clay and press them into the eye sockets. Use a small smoothing tool to carve the eyelids, creating a closed, sleeping expression. -
Form the mouth:
Roll a tiny coil for the lips. Attach it below the nose and sculpt a gentle, neutral expression, blending the outer corners into the surrounding clay. -
Smooth the transitions:
Use a damp sponge to meticulously smooth the area where the face meets the hand. The transition should be invisible, as if the face is pushing through the skin.
Cracking Up?
If small cracks appear while drying, mix a small amount of clay with water to make a paste (slip) and fill them in before painting.
Step 4: Texture & Details
-
Carve the base:
Once the main form is firm but not fully dry, use a needle tool or small loop tool to carve stylized palm leaf patterns into the base of the wrist. -
Refine the surface:
Go over the entire piece with a barely damp sponge to remove fingerprints. Let the sculpture dry completely according to your clay’s instructions (usually 24-48 hours). -
Sand imperfections:
Once bone dry, use fine-grit sandpaper to gently buff away any rough patches, paying special attention to the fingertips and the curve of the chin.
Step 5: Faux Stone Finish
-
Base coat:
Paint the entire sculpture with a deep indigo or denim blue acrylic paint. I find distinct dark coverage is crucial here, so apply two coats if necessary. -
Dry brushing:
Mix a tiny amount of white paint into your blue to create a lighter shade. Wipe most of the paint off your brush, then lightly sweep it over the raised areas—the nose bridge, eyebrows, and fingertips—to highlight the texture. -
Seal the work:
Finish with a coat of matte spray varnish to protect the paint and give the piece a unified, stone-like sheen.
Place your mystical sculpture on a shelf or amidst some sand for a truly dreamlike display.
Pierced Shadow-Play Sculpture
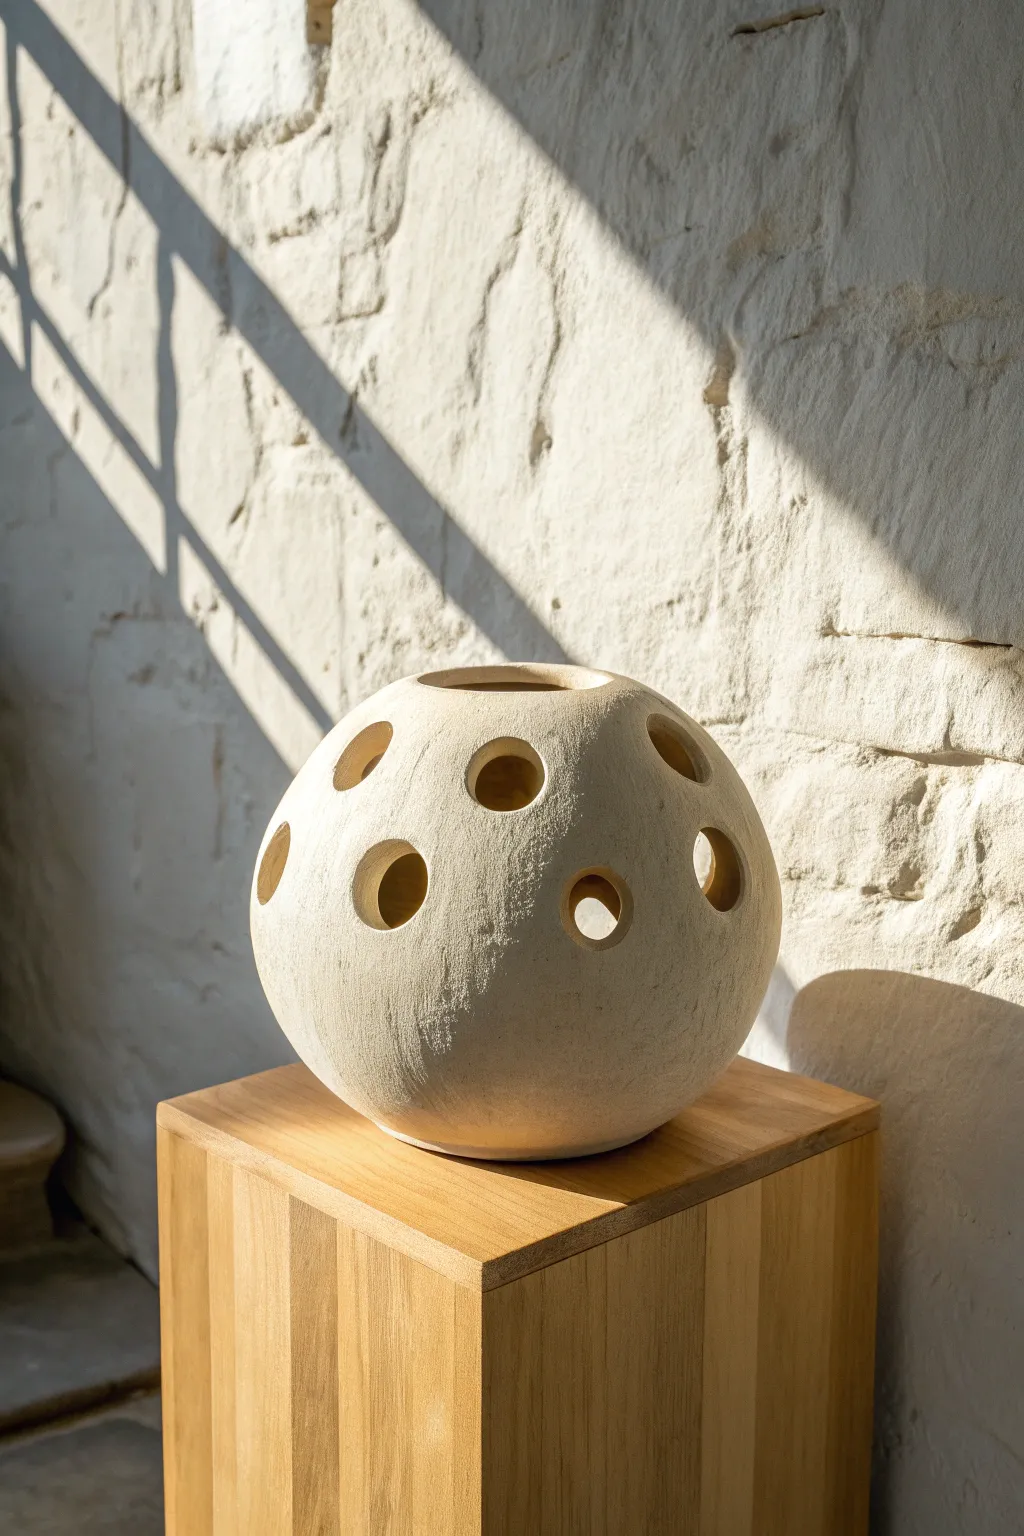
Embrace the interplay of solid form and negative space with this striking spherical sculpture. The matte, textured surface and precise circular cutouts create mesmerizing patterns of light and shadow, turning simple clay into a modern architectural statement.
Step-by-Step
Materials
- Stoneware clay body (buff or white)
- Pottery wheel (or materials for hand-building)
- Rib tools (metal and rubber)
- Needle tool
- Circular hole cutters (various sizes)
- Sponge
- Wire clay cutter
- Paddle tool
- Sanding sponge or fine steel wool
- Matte white or transparent glaze (optional)
Step 1: Throwing the Form
-
Prepare the Clay:
Begin by thoroughly wedging about 3-4 pounds of stoneware clay to remove air bubbles and ensure consistency, forming it into a tight ball. -
Center on the Wheel:
Secure the clay to your wheel head and center it using steady pressure and moisture, compressing the base well. -
Open the Sphere:
Open the form, keeping the floor relatively narrow to encourage the round shape, rather than a flat bowl bottom. -
Pull the Walls:
Pull the walls upward, curving them outwards initially to create the belly of the sphere. Keep the walls even, perhaps slightly thicker than a standard mug to support the structure during cutting. -
Collar In:
As you reach the upper third, begin collaring the clay inward aggressively to close the sphere, leaving a small, clean opening at the top about 3 inches wide. I find slowing the wheel speed helps maintain control here. -
Final Shaping:
Use a flexible metal rib on the outside to refine the curve into a perfect globe, removing throwing lines if a smoother look is desired, though a slight texture adds character.
Clean Cuts
Twist the hole cutter as you push it through the clay wall rather than pushing straight in. This twisting motion slices cleanly and prevents the surrounding wall from warping.
Step 2: Sculpting the Negative Space
-
Leather Hard Stage:
Allow the piece to dry slowly to a leather-hard state. It must be firm enough to be handled without deforming but soft enough to cut cleanly. -
Trim the Foot:
Place the sphere back on the wheel (or a chuck) upside down and trim a neat, defined foot ring to elevate the curve off the table surface. -
Map the Holes:
Lightly mark the placement of your holes using a needle tool. Aim for a randomized yet balanced distribution, avoiding too many holes in one cluster which could weaken the wall. -
Cut the Circles:
Using circular hole cutters, punch through the clay walls at your marked spots. Support the inside of the wall gently with your fingers if possible to prevent caving. -
Clean the Edges:
Once the holes are cut, wait for the clay to stiffen slightly more, then use a damp sponge or a soft finishing tool to smooth the sharp edges of each cutout.
Illuminate It
Turn this sculpture into a functional lamp by leaving the bottom open (no floor) during throwing. Place it over an LED puck light or candle to cast incredible circular shadows.
Step 3: Finishing and Firing
-
Surface Texture:
To achieve the stone-like finish seen in the photo, gently dab the exterior with a rough sponge or a stiff brush while the clay is still slightly damp. -
Bisque Fire:
Allow the piece to dry completely—this may take several days for a closed form—before loading it into the kiln for a bisque firing. -
Glazing Decision:
For the raw look in the example, leave the outside unglazed or apply a very thin wash of white matte glaze. If functional, glaze the interior. -
Final Firing:
Fire the piece to the appropriate temperature for your specific clay body (likely Cone 6 or 10). -
Post-Fire Sanding:
Once cool, use a diamond sanding pad or wet/dry sandpaper to smooth the bottom of the foot so it won’t scratch your furniture.
Now step back and admire how the light plays through your modern ceramic creation