When you’re brand-new to clay, the sweetest wins are the tiny projects that actually turn out cute on the first try. These beginner-friendly air dry clay ideas are all about simple shapes, soft details, and that instant “I made this!” feeling.
Blob-Style Mini Cat Figurines
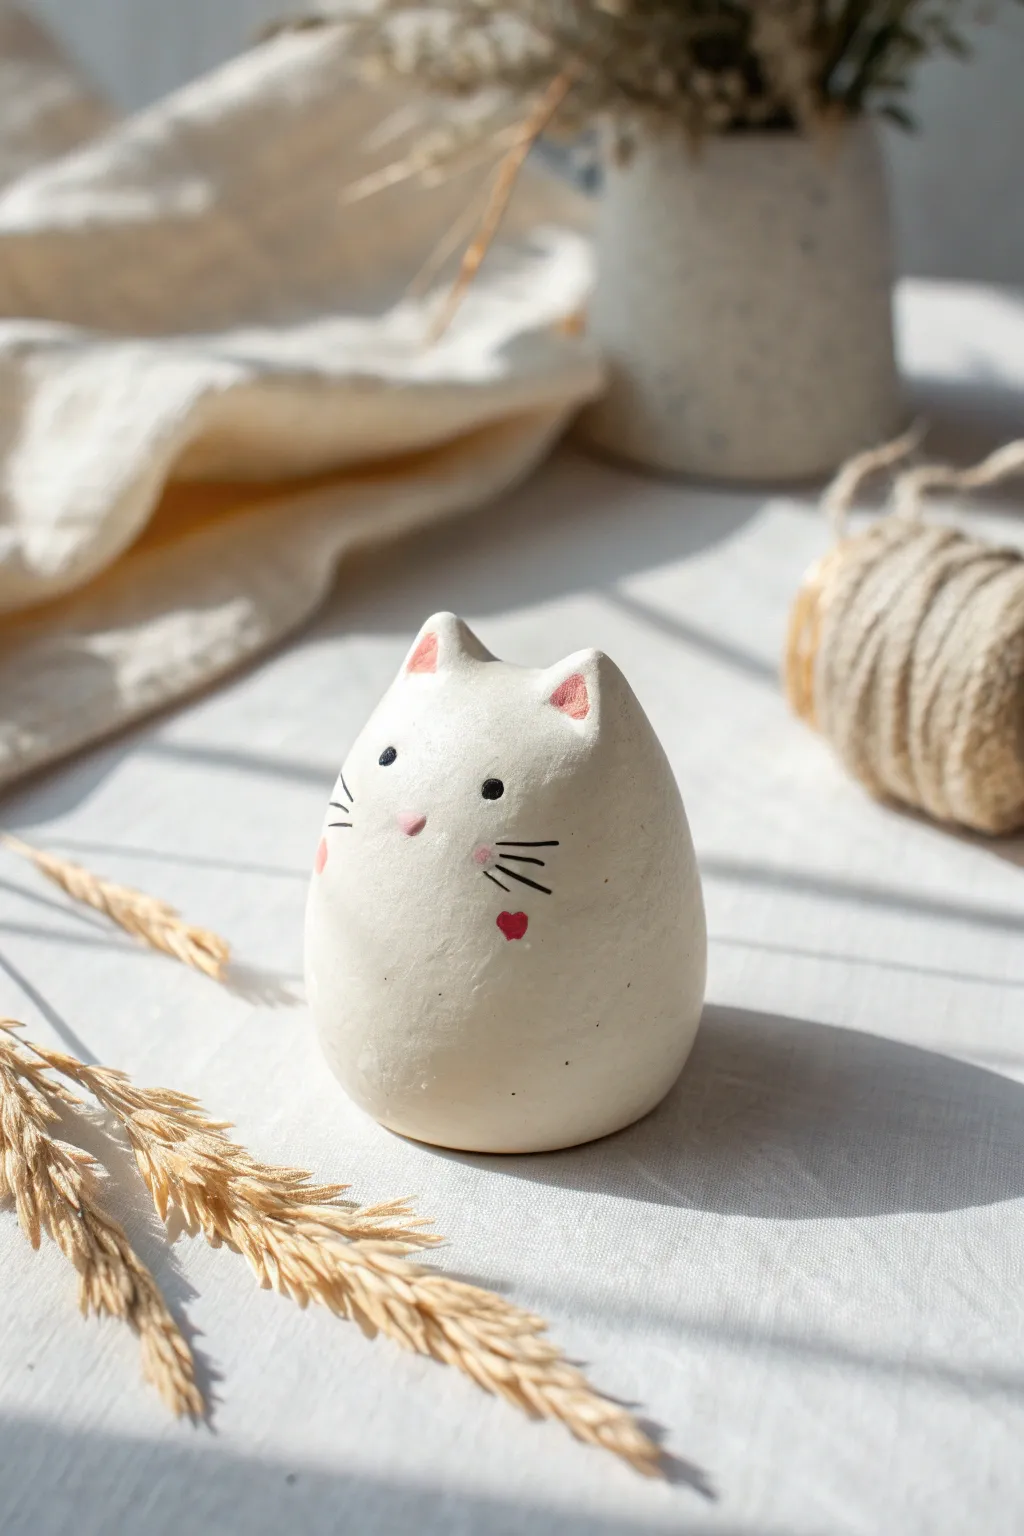
This adorable blob-style cat is the perfect introduction to sculpting because it relies on a single, uncomplicated shape. The finished figurine has a smooth, matte finish with charmingly simple facial features that give it a gentle personality.
Step-by-Step Tutorial
Materials
- White air-dry clay
- Small rolling pin
- Cup of water
- Modeling tools (or a toothpick)
- Fine-grit sandpaper
- Black acrylic paint or fine-point marker
- Pink acrylic paint
- Red acrylic paint
- Small fine-tipped paintbrush
- Matte varnish (optional)
Step 1: Sculpting the Form
-
Condition the Clay:
Start by taking a lump of air-dry clay about the size of a golf ball or chicken egg. Knead it thoroughly in your hands to warm it up and remove any air bubbles. -
Roll a Sphere:
Roll the clay between your palms until you have a perfectly smooth ball. If you see cracks, dip your finger in water and smooth them out now. -
Shape the Egg:
Gently gently roll the ball on your work surface using just one side of your hand to taper the top slightly. You want a fat, heavy bottom and a slightly narrower top, resembling a squat egg. -
Flatten the Base:
Tap the bottom of your egg shape firmly against the table. This creates a flat base so your cat stands up straight without wobbling. -
Refine the Surface:
Dip your finger in a tiny bit of water and rub it over the entire surface to erase fingerprints and ensure a porcelain-like finish.
Step 2: Ears and Drying
-
Pinch the Ears:
At the top of the head, gently pinch up two small triangles of clay to form the ears. I like to use my thumb and forefinger to pull the clay upwards rather than adding separate pieces. -
Shape the Ear Hollows:
Use the rounded end of a paintbrush handle or a modeling tool to verify the front of the ears, creating a small indentation. -
Smooth the Transitions:
Ensure the base of the ears blends seamlessly back into the head curve. Use a wet finger or tool to smooth out any harsh lines. -
Final Smoothing:
Give the entire piece one last check for symmetry. Make sure the ears are even and the body is nicely rounded. -
Let it Dry:
Set the cat in a safe, dry place for at least 24-48 hours. Turn it occasionally so the bottom dries evenly.
Cracks Appearing?
If small cracks appear while drying, mix a tiny bit of fresh clay with water to make a paste (slip) and fill them in, then smooth over.
Step 3: Painting the Details
-
Sand Imperfections:
Once fully dry and hard, use fine-grit sandpaper to gently buff away any remaining rough spots or fingerprints. -
Paint the Inner Ears:
Using a very small brush and light pink paint, fill in the triangular indentations of the ears. -
Add the Nose:
Paint a tiny, inverted triangle in pink in the center of the face for the nose. -
Create the Eyes:
Dip the handle end of a paintbrush into black paint and dot two eyes widely spaced apart on either side of the nose. -
Draw Whiskers:
Using a fine-point black marker or a very thin liner brush, draw three short, straight whiskers on each cheek. -
Paint the Cheeks:
Add small, soft pink circles or ovals behind the whiskers for a blushing effect. -
The Heart Detail:
Paint a tiny red heart on the chest, slightly off-center to the right, just below the whiskers. -
Seal (Optional):
Once the paint is completely dry, apply a coat of matte varnish to protect your work and give it a finished look.
Customize Your Kitty
Try painting calico spots, tabby stripes, or a tuxedo pattern instead of plain white for a totally different personality.
Now you have a charming little desk companion to keep you company while you work


Tiny Teddy Bears With Round Ears
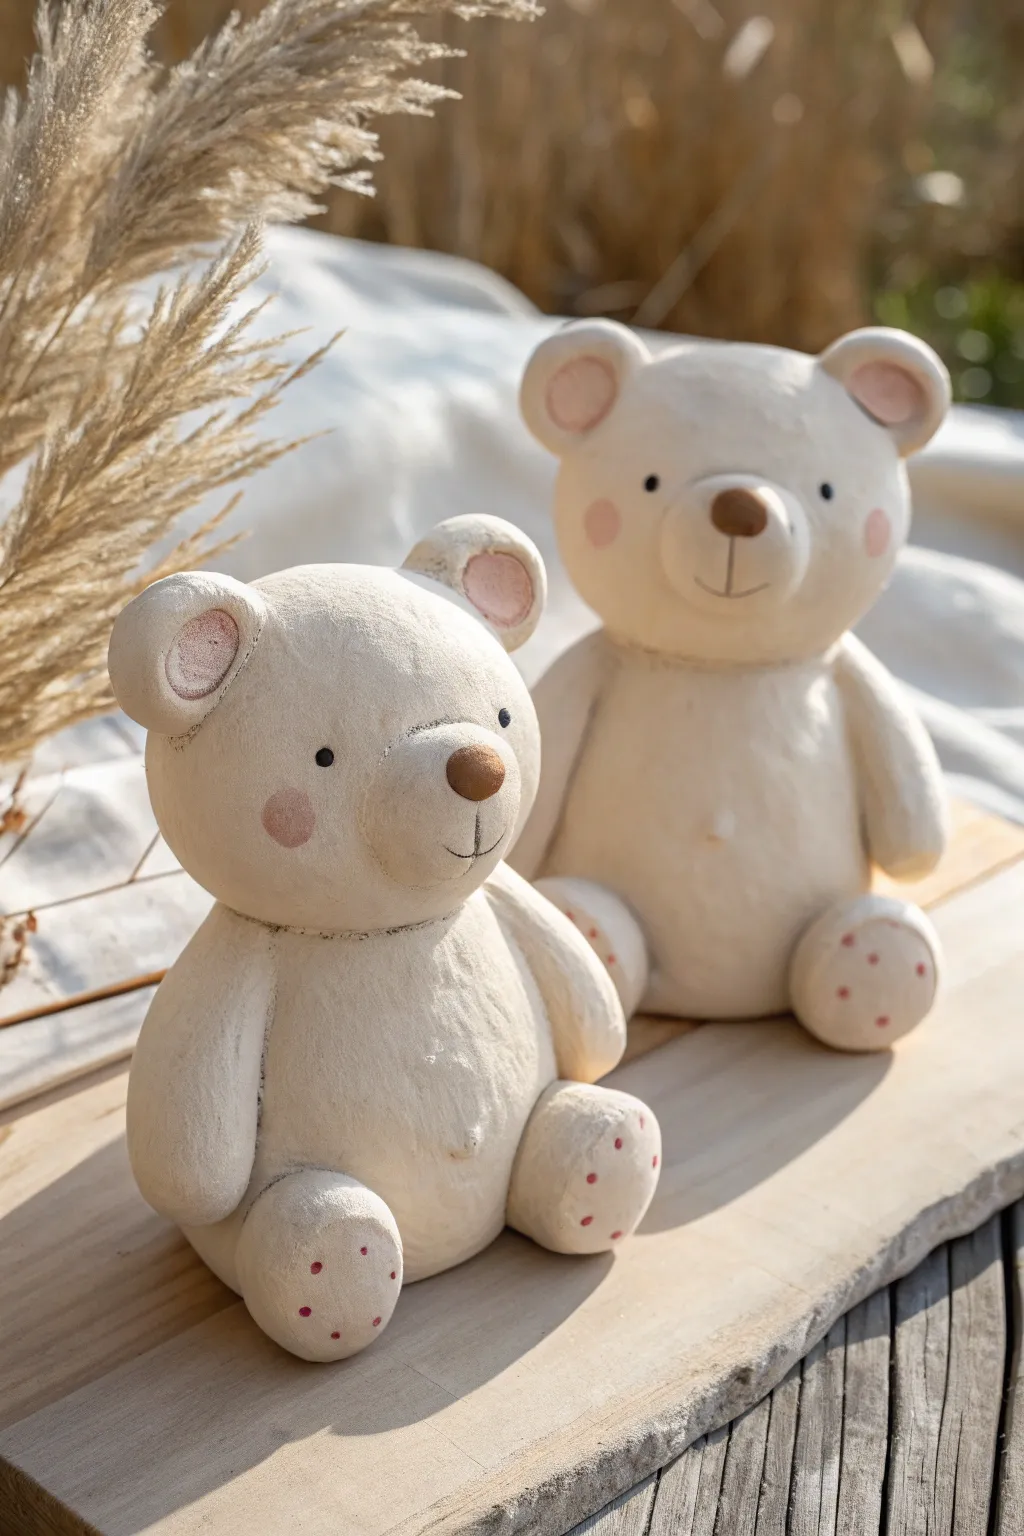
These charming, rounded teddy bears feature a soft cream finish with rustic pink and brown accents that give them a vintage storybook feel. Perfect for a nursery shelf or as a sweet handmade gift, their simple shapes make them approachable for beginners while achieving a professional ceramic look.
Detailed Instructions
Materials
- White or cream-colored air dry clay (approx. 200g per bear)
- Acrylic paints: warm white/cream, soft dusty pink, warm brown, black
- Rolling pin
- Aluminum foil (for armature)
- Needle tool or toothpick
- Ball tool (medium and large)
- Small paintbrush
- Fine grit sandpaper
- Water in a small cup
- Matte varnish (optional)
Step 1: Forming the Core Structure
-
Create the Body Core:
Crumple a piece of aluminum foil into a tight, slightly flattened pear shape. This will serve as the inner core for the bear’s body, saving clay and reducing drying time. -
Create the Head Core:
Ball up a second, slightly smaller piece of foil into a sphere for the head. Ensure it’s tightly packed so the final bear feels solid. -
Cover the Body:
Roll out a slab of your cream clay to about 1/4 inch thickness. Wrap it completely around the foil body core, smoothing the seams with a little water until the surface is uniform. -
Cover the Head:
Repeat the process for the head, wrapping the foil sphere in clay. Roll it gently between your palms to ensure it is perfectly round and smooth. -
Join Head and Body:
Insert a toothpick halfway into the top of the body. Dab a little water or slip (clay mixed with water) around the base of the toothpick, then press the head firmly onto it. -
Smooth the Neck:
Use a modeling tool or your finger to blend the clay slightly at the neck seam to secure the bond. While I usually blend it fully, for this style, leaving a slight demarcation line adds to the toy-like aesthetic.
Pro Tip: Seamless Joins
Score (scratch) both surfaces before adding water when joining the ears or limbs. This ‘score and slip’ method acts like velcro, ensuring pieces won’t pop off as the clay shrinks during drying.
Step 2: Adding Limbs and Features
-
Form the Legs:
Roll two equal-sized logs of clay for the legs. Round off one end of each log to create the paw/foot area. Attach these to the bottom front of the body, bending them slightly so the bear sits securely. -
Sculpt the Arms:
Create two smaller sausage shapes for the arms. Attach them to the sides of the body just below the neck, pressing them gently so they rest naturally against the tummy or alongside the legs. -
Make the Ears:
Roll two small balls of clay and flatten them slightly. Press your thumb or a large ball tool into the center of each to create a cup shape. Attach these to the top of the head. -
Add the Muzzle:
Form a small oval of clay and flatten it against the lower center of the face. Smooth the edges down so it transitions gently into the curve of the head. -
Insert the Nose:
Roll a tiny, triangular piece of clay. Press it onto the top center of the muzzle you just created.
Level Up: Tie a Bow
While the clay is wet, use a needle tool to poke a hole through the bear’s paw. Once dry, thread a piece of twine or a tiny dried flower stems through it so the bear appears to be holding a gift.
Step 3: Refining and Painting
-
Texture the Surface:
Before the clay dries, take a stiff bristle brush or a crumpled ball of foil and gently tap it all over the bear’s surface. This creates a subtle ‘fur’ texture that mimics the matte finish in the photo. -
Allow to Dry:
Let your bear dry completely. This usually takes 24-48 hours depending on humidity. Rotate it occasionally so the bottom dries evenly. -
Sand Imperfections:
Once bone dry, use fine-grit sandpaper to gently smooth out any fingerprints or harsh bumps, being careful not to remove your texture. -
Base Coat:
Given that air dry clay often dries greyish or stark white, paint the entire bear with a coat of warm cream acrylic paint to get that even, milky tone. -
Paint Details:
Paint the nose a warm medium brown. Use a very fine brush or a black fine-liner pen to draw the eyes and the vertical line of the mouth. -
Add Cheeks and Paws:
Dilute a bit of dusty pink paint with water to make a wash. Gently dab this onto the inner ears and cheeks. For the feet, use the end of a paintbrush handle to stamp tiny pink dots. -
Seal (Optional):
Finish with a spray of matte varnish if you want to protect your work from dust.
Now you have an adorable keepsake that captures the timeless comfort of a classic teddy bear


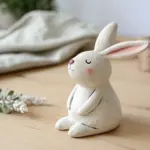
Kawaii Bunny Head Charms
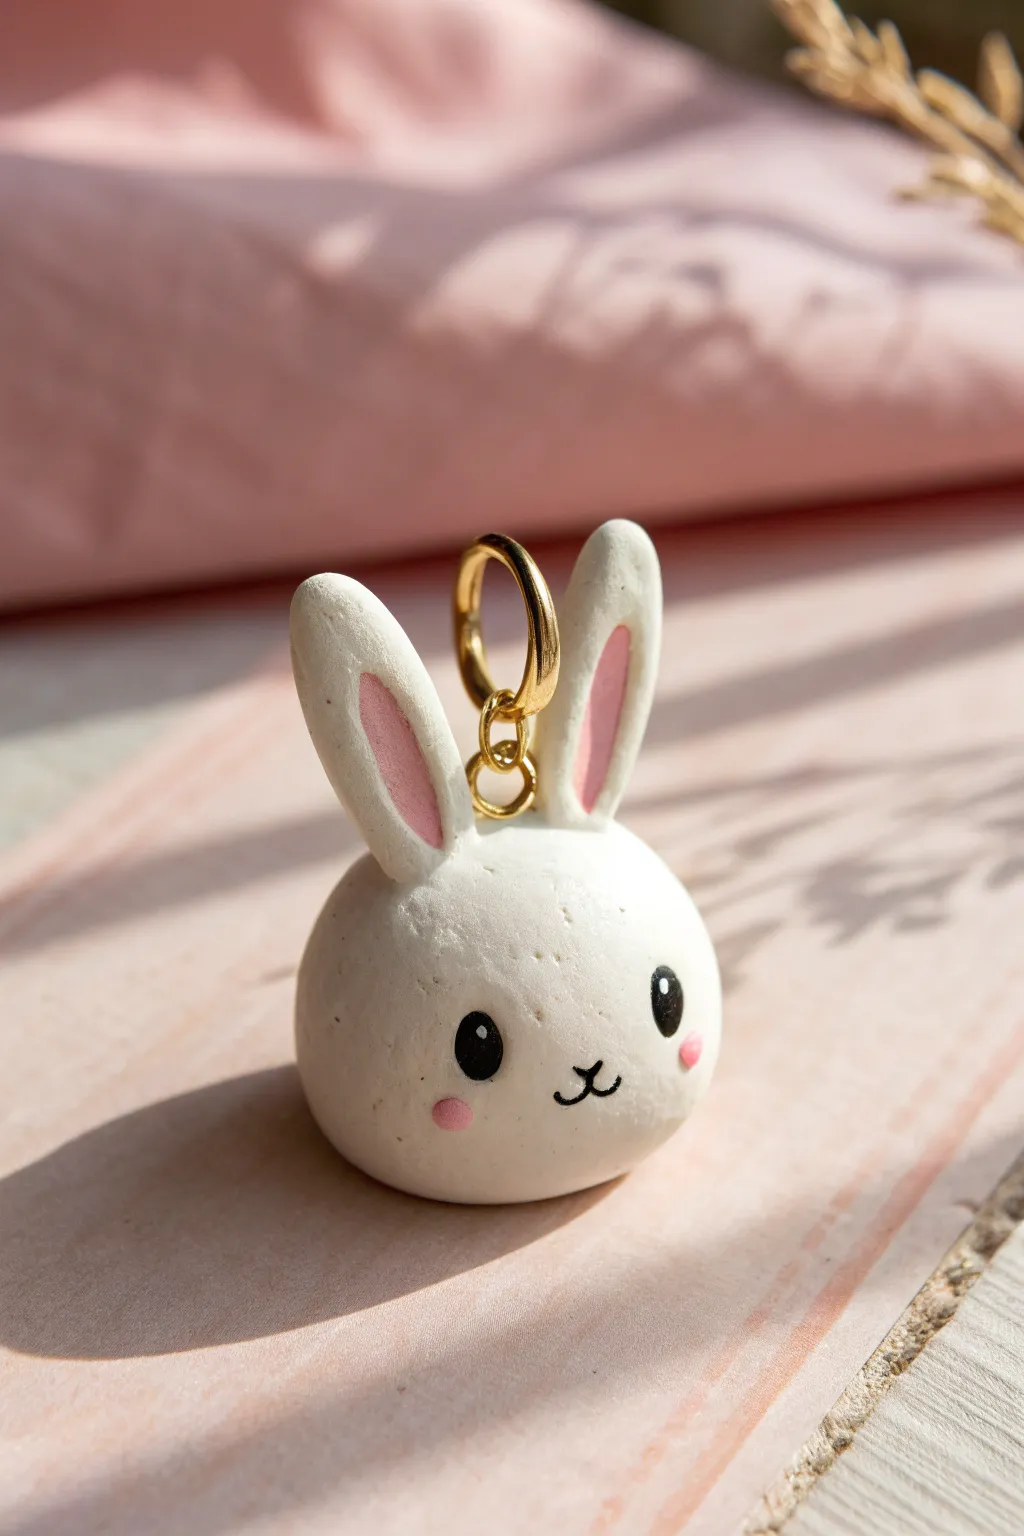
Sculpt this adorable minimalistic bunny head charm using simple white air-dry clay and a touch of paint. With its sweet expression and tiny gold loop, it makes for a perfect keychain or jewelry component.
Step-by-Step Tutorial
Materials
- White air-dry clay (or polymer clay)
- Black acrylic paint
- Pink acrylic paint
- Fine detail paintbrush (size 0 or 00)
- Dotting tool or toothpick
- Gold screw eye pin
- Gold jump ring
- Sandpaper (fine grit)
- Gloss varnish or sealant (optional)
- Water
Step 1: Shaping the Base
-
Prepare the clay:
Start by conditioning your clay. Knead a small amount of white air-dry clay in your hands until it becomes soft, pliable, and free of any cracks. -
Roll the head:
Take a portion of clay roughly the size of a large grape or small walnut. Roll it between your palms to form a smooth, perfect sphere. Gently tap the bottom on your work surface to create a flat base so the head stands upright. -
Form the ears:
Pinch off two smaller, equal-sized pieces of clay for the ears. Roll each into a small ball first, then elongate them into teardrop or tic-tac shapes. -
Flatten the ears:
Gently press each teardrop slightly flat. You want them to be thick enough to stand up but thin enough to look like bunny ears. Keep the tips rounded. -
Attach the ears:
Score the bottom of the ears and the top of the head slightly with a toothpick to roughen the surface. Add a tiny dab of water (or slip) to the connection points. Press the ears firmly onto the top of the head, ensuring they stand upright and parallel. -
Smooth the seams:
Using a sculpting tool or your finger dipped in a little water, gently blend the clay at the base of the ears into the head so there is no visible seam. This strengthens the attachment. -
Insert hardware:
While the clay is still wet, carefully screw the gold eye pin into the center top of the head, right between the ears. Screw it down until the loop sits flush against the clay.
Step 2: Painting & Finishing
-
Dry completely:
Let your clay bunny dry thoroughly. Depending on your brand of clay and humidity, this usually takes 24-48 hours. The clay should feel hard and chalky to the touch. -
Sand imperfections:
If you notice any fingerprints or rough spots, gently buff them away with fine-grit sandpaper until the surface is ultra-smooth. -
Paint ear details:
Mix a soft, pastel pink acrylic paint. Using a fine brush, carefully paint the inner oval of each ear, leaving a consistent white border around the pink. -
Paint the eyes:
Using black acrylic paint and a dotting tool (or the back of a paintbrush handle), stamp two small ovals for the eyes. Place them relatively wide apart for maximum cuteness. -
Add highlights:
Once the black paint is dry, dip a toothpick into white paint and add a tiny dot to the upper right corner of each eye. This ‘catchlight’ brings the character to life. -
Draw the mouth:
With your finest detail brush and black paint, draw a small, anchor-shaped mouth (like a rounded ‘w’) centered between and slightly below the eyes. -
Add rosy cheeks:
Dip a small dotting tool into the pastel pink paint again. Place a small dot directly under the outer corner of each eye to create blushing cheeks. -
Seal the charm:
Once all paint is completely dry, apply a coat of gloss varnish or sealant to protect your work and give it a polished, ceramic-like finish. -
Attach jump ring:
Using jewelry pliers, open your gold jump ring and loop it through the eye pin on top of the bunny’s head. Close the ring securely.
Smooth Operator
Use a wet finger to smooth the clay surface constantly while working. Water acts like an eraser for fingerprints before the clay dries.
Glaze It Up
For a glassy, professional look, use UV resin instead of varnish. Cure it under a UV lamp for a durable, high-shine finish.
Now you have a charming little companion ready to hang on your bag or keys


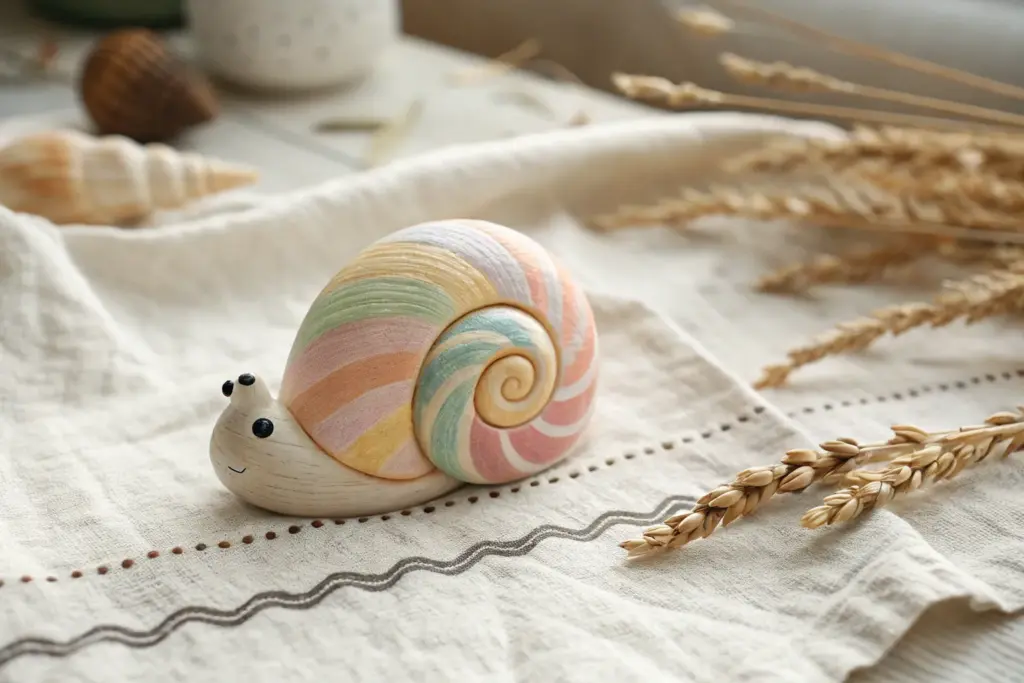
Mini Rainbow Arch Decor Pieces
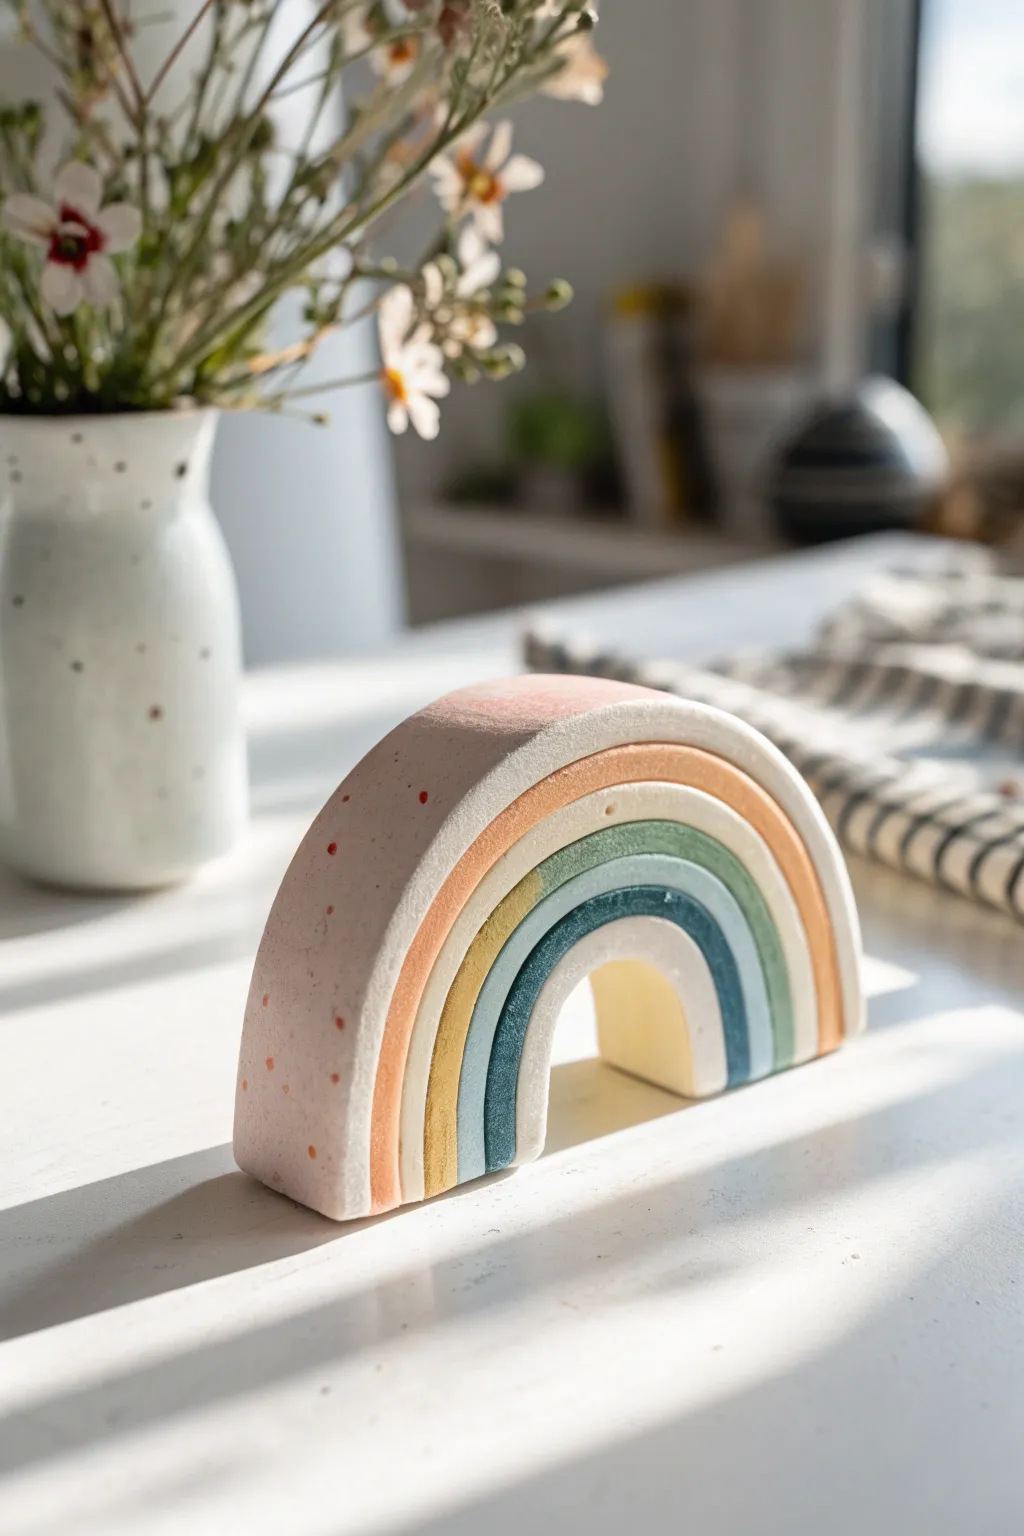
This charming, earthy rainbow arch serves as a beautiful piece of minimal decor for a nursery or desk. With its soft, muted colors and subtle speckling, it captures a modern bohemian aesthetic that is surprisingly simple to achieve with air dry clay.
How-To Guide
Materials
- White air dry clay
- Rolling pin
- Sharp crafting knife or clay cutter
- Acrylic paints (terracotta, cream, sage green, dusty blue, mustard yellow)
- Small paintbrush
- Old toothbrush (for speckling)
- Cardstock or paper (for templates)
- Sandpaper (fine grit)
- Cup of water
- Clear matte varnish (optional)
Step 1: Planning and Cutting
-
Create templates:
Before touching the clay, draw a series of concentric arches on cardstock to determine the size of your rainbow. Each arch needs to be the same width (about 1/2 inch) so they nest perfectly together. -
Condition the clay:
Taking a large chunk of air dry clay, knead it warm in your hands until it becomes pliable and smooth, removing any air bubbles that might cause cracks later. -
Roll it out:
Roll the clay onto a flat surface to an even thickness of approximately 3/4 inch. You want the rainbow to be thick enough to stand freely on its own. -
Trace and cut:
Place your largest paper template on the slab and carefully cut around it using your sharp crafting knife. Repeat this process for each smaller arch piece. -
Check the fit:
While the clay is still wet, gently nest the arches inside one another to ensure they fit. If one is too snug, trim the edges slightly with your knife.
Use Parchment Paper
Work on a sheet of parchment or wax paper. It prevents the thick clay slab from sticking to your table and makes flipping the pieces while drying much easier.
Step 2: Refining and Drying
-
Smooth the edges:
Dip your finger in a little water and run it along the cut edges of each arch to smooth out any roughness or sharp corners. -
Separate for drying:
Though they will eventually sit together, separate the arches slightly for drying so they don’t stick together. Lay them flat on a clean surface. -
Rotate frequently:
Air dry clay can warp as moisture evaporates. Flip your pieces every few hours during the first day to ensure they dry flat and evenly. -
Let it cure:
Allow the pieces to dry completely for at least 24-48 hours. The clay should turn chalky white and feel hard to the touch. -
Sand for perfection:
Once fully dry, take a piece of fine-grit sandpaper and gently buff the sides and faces of the arches to create a silky smooth finish ready for paint.
Step 3: Painting and Finishing
-
Mix your palette:
Prepare your acrylic paints on a palette. Aim for earthy tones: mix orange with a touch of brown and white for the outer arch, and use muted sages and dirty blues for the inner rings. -
Paint the arches:
Paint each arch individually. I find it easiest to paint the front face first, let it dry, and then do the sides and back to avoid messy fingerprints. -
Add texture:
For one or two of the arches (like the outer pinkish one), you can add a speckled effect. Dilute a darker contrasting paint (like a rust red) slightly with water. -
Flick the specks:
Dip an old toothbrush into this diluted paint, then run your thumb across the bristles to flick tiny splatters of paint onto the specific arch for a ceramic-like texture. -
Assemble:
Once all paint is dry, nest the arches back together. You can glue them for a solid piece or leave them loose as an interactive styling object.
Fixing Cracks
If small cracks appear as the clay dries, don’t panic. Mix a tiny bit of fresh clay with water to make a paste (slip) and fill in the cracks, then sand smooth once dry.
Now you have a stunning, handcrafted rainbow ready to brighten up your favorite shelf

The Complete Guide to Pottery Troubleshooting
Uncover the most common ceramic mistakes—from cracking clay to failed glazes—and learn how to fix them fast.
Heart Trinket Dishes With Sweet Faces
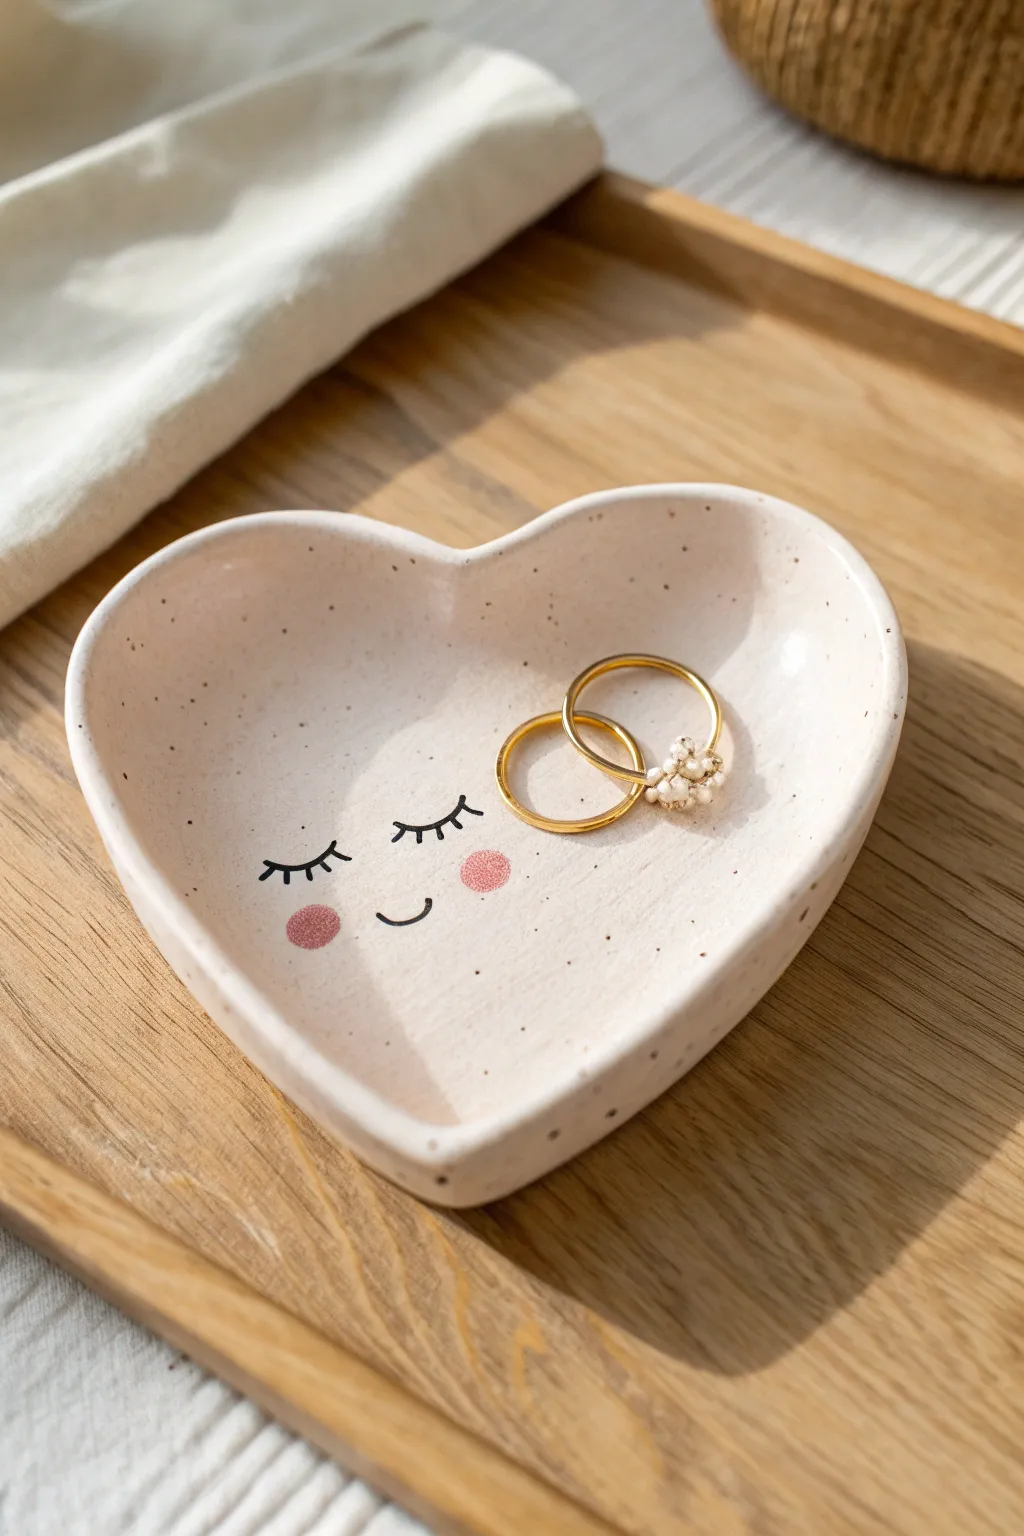
This adorable trinket dish adds a touch of whimsy to your bedside table with its gentle heart shape and delicate sleeping face. The speckled clay finish gives it a charming, pottery-like feel without needing a kiln, making it a perfect spot to rest your favorite rings.
Step-by-Step
Materials
- White air-dry clay
- Rolling pin
- Heart-shaped cookie cutter (large) or paper template
- Small bowl of water
- Clay sponge or smooth cloth
- Fine-grit sandpaper
- Acrylic paint (black and pink)
- Fine detail paintbrush or fine-tip black marker
- Small paint dabber or rounded brush
- Toothbrush or stiff bristle brush
- Brown watercolor or diluted acrylic paint (for speckles)
- Gloss varnish or sealant
Step 1: Shaping the Clay
-
Condition the clay:
Begin by taking a handful of air-dry clay and kneading it in your hands until it becomes soft, pliable, and free of any air bubbles. -
Roll it out:
On a clean, flat surface, roll the clay out to a consistent thickness of about 1/4 inch. If you notice the clay sticking, you can lightly dust your surface with cornstarch. -
Cut the heart shape:
Press a large heart-shaped cookie cutter firmly into the clay. If you don’t have a cutter, place a paper template on top and carefully trace around it with a knife. -
Soften the edges:
Dip your finger in a little water and run it gently along the cut edges to smooth out any sharpness or roughness left by the cutter. -
Create the curve:
Pick up the clay heart and gently curve the edges upward to create a shallow bowl shape. I like to pinch and smooth the rim slightly to give it an organic, handmade feel. -
Refine the shape:
Use a damp sponge to smooth out the interior of the dish, ensuring there are no fingerprints or dents. -
Allow to dry:
Place the dish on a wire rack or piece of parchment paper to dry. This usually takes 24-48 hours depending on humidity; flip it over halfway through so the bottom dries evenly.
Smooth Moves
To get perfectly curved edges without pinch marks, let the clay dry inside a larger curved bowl lined with plastic wrap to hold the shape.
Step 2: Filing and Refining
-
Sand the surface:
Once the dish is bone dry and completely hard, take fine-grit sandpaper and gently buff the edges and surface until they are silky smooth. -
Wipe away dust:
Use a slightly damp cloth or a dry soft brush to remove all the sanding dust before you start decorating.
Step 3: Decorating the Face
-
Add the speckles:
Dip an old toothbrush into diluted brown acrylic paint or watercolor. Hold it over the dish and flick the bristles with your thumb to create a fine, random spray of speckles across the surface. -
Let the speckles dry:
Wait a few minutes for the splattered paint to dry completely so face details don’t smudge. -
Paint the cheeks:
Using a small round brush or a specialized foam dabber, gently stamp two soft pink circles onto the lower half of the heart for the rosy cheeks. -
Draw the lashes:
With a very fine detail brush and black acrylic paint (or a black permanent marker), carefully draw two curved lines for closed eyes just above the cheeks, adding three small lashes to each. -
Add the smile:
Paint a tiny, simple ‘U’ shape between the cheeks to give your dish a sweet, contented smile. -
Seal the piece:
Finish by applying a coat of gloss varnish over the entire dish. This protects the clay from moisture and gives it a professional, ceramic-like shine.
Golden Touch
Paint the very rim of the heart with metallic gold leaf paint before sealing to make the dish look like high-end porcelain.
Once the varnish cures, your sweet heart dish is ready to hold your treasures and brighten your morning
Flower-Shaped Coasters in Soft Pastels
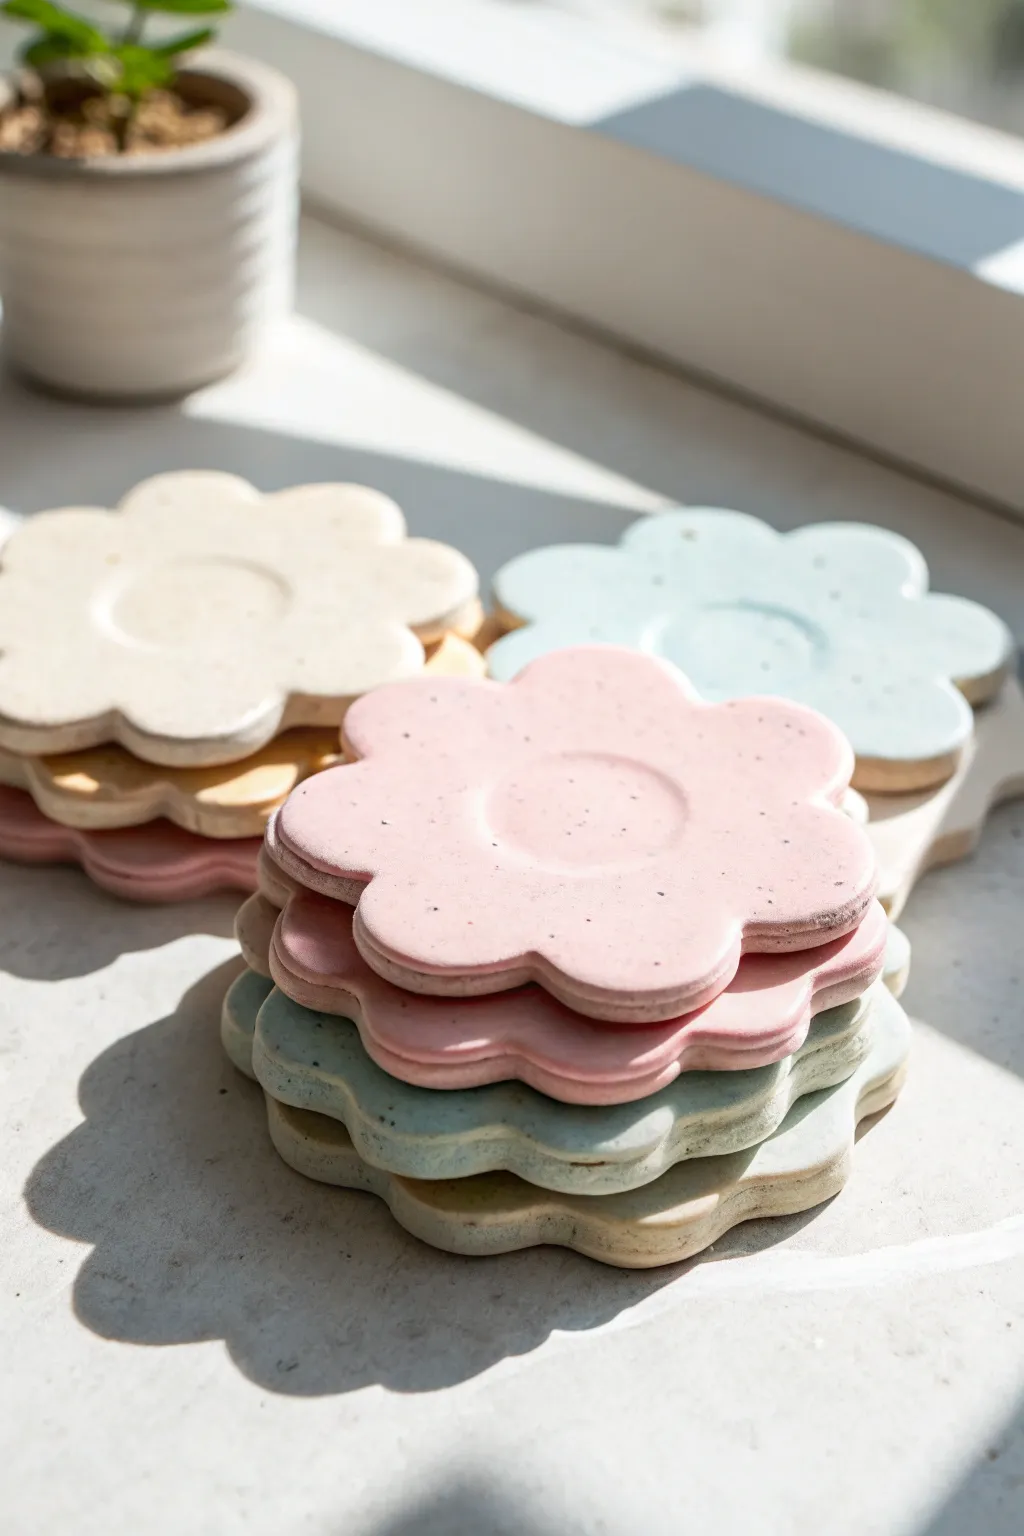
These charming flower-shaped coasters bring a soft, whimsical touch to any coffee table with their gentle pastel tones and speckled finish. The subtle indented center perfectly cradles your favorite mug, while the speckled clay adds a lovely, stone-like texture.
Step-by-Step Guide
Materials
- Air dry clay (white or pre-colored pastels)
- Acrylic paints (pastel pink, light blue, cream, mint green)
- Speckled clay additive (optional but recommended for texture)
- Rolling pin
- Two wooden guide strips (approx. 5-7mm thick)
- Flower-shaped cookie cutter (large enough for a mug base)
- Small circular object or smaller cookie cutter (for the center indentation)
- Sponge or fine-grit sandpaper
- Matte sealant or varnish
- Paintbrush (soft bristle)
- Old toothbrush (for splatter effect if needed)
Step 1: Preparing the Clay
-
Knead and condition:
Begin by taking a handful of air dry clay. Knead it thoroughly in your hands to warm it up and remove any potential air bubbles, which helps prevent cracks later. -
Add color or texture:
If you are starting with plain white clay, mix in a tiny drop of acrylic paint now to tint the clay itself for a solid color base. If you want that stone-like look directly in the clay, you can knead in some dried tea leaves or pepper for speckles. -
Set up guides:
Place your clay on a flat, non-stick surface. Lay your two wooden guide strips on either side of the clay ball. These will ensure your coaster is perfectly even in thickness. -
Roll it out:
Using your rolling pin, roll the clay out until the pin rests on the guide strips. Aim for a thickness of about 5-7mm so the coaster feels substantial.
Fixing Curled Edges
If your coaster starts curling upward while drying, check it often. Gently press it flat under a heavy book (with parchment paper in between) for a few hours.
Step 2: Shaping the Flowers
-
Cut the shape:
Press your large flower-shaped cutter firmly into the rolled slab. Give it a gentle wiggle before pulling it up to ensure a clean cut. -
Smooth the edges:
Release the clay flower from the cutter. Dip your finger in a little bit of water and run it along the raw petal edges to smooth out any sharpness or drag marks. -
Create the center well:
Take your smaller circular object or a small round cutter. Position it perfectly in the center of the flower. -
Press gently:
Press down lightly—do not cut all the way through! You only want to create a subtle depression or ‘well’ to hold a cup securely. I find twisting slightly as you lift helps release the tool without sticking. -
Check shape integrity:
If pressing the center distorted the petals, quickly reshape them with your fingers while the clay is still pliable.
Step 3: Drying and Refining
-
Begin drying:
Place your coasters on a wire rack or a piece of parchment paper. Let them dry away from direct sunlight to prevent warping. -
Flip occasionally:
Every few hours, flip the coasters over. This ensures airflow reaches both sides evenly, which is crucial for flat results. -
Wait for full cure:
Allow the clay to dry completely, which usually takes 24 to 48 hours depending on humidity. The clay will feel lighter and look chalky when dry. -
Sand the surface:
Once fully dry, use fine-grit sandpaper to gently buff the surface and edges. Focus on smoothing the rim of the center circle. -
Dust off:
Wipe away all sanding dust with a slightly damp sponge or cloth.
Level Up: Cork Backing
Make them super professional by cutting a flower shape out of thin adhesive cork sheet. Stick it to the bottom to prevent slipping and protect table surfaces.
Step 4: Painting and Sealing
-
Apply base color:
If you didn’t tint the clay earlier, paint your coasters now with soft matte acrylics in pink, blue, cream, and mint. -
Add speckles:
To recreate the stone effect shown in the photo, dilute a tiny bit of black or dark brown paint with water. Dip an old toothbrush in it and flick the bristles with your thumb to spray tiny speckles over the surface. -
Protect the piece:
Once the paint is bone dry, apply a coat of matte varnish or sealant. This protects the clay from moisture condensation from cold drinks. -
Final cure:
Let the sealant cure fully before testing it out with your favorite mug.
Stack your lovely new set of coasters on the table and enjoy their soft, blooming presence


What Really Happens Inside the Kiln
Learn how time and temperature work together inside the kiln to transform clay into durable ceramic.
Cute Mushroom Miniatures

Create a charming little forest scene right on your windowsill with this adorable family of four clay mushrooms. Their soft, matte textures and organic shapes make them a perfect beginner project that adds a touch of cottagecore magic to any room.
Detailed Instructions
Materials
- White air dry clay
- Rolling pin
- Small bowl of water
- Craft knife or clay wire cutter
- Acrylic paints (Cream/Off-White, Burnt Orange, Red, Brown)
- Fine grit sandpaper
- Paintbrushes (soft bristle)
- Small sponges for texture
- Matte sealant or varnish
- Round clay coaster or base (optional)
Step 1: Shaping the Stems
-
Condition the clay:
Start by kneading a chunk of your air dry clay until it is warm, pliable, and free of cracks. This conditioning step is crucial for preventing fissures later on. -
Divide portions:
Separate the clay into four uneven pieces for the stems. You want variety in height and thickness, so make one large, one medium, and two smaller ones. -
Roll the cylinders:
Roll each piece into a cylinder shape. Gently tap the bottom on your work surface to create a flat base so they stand upright on their own. -
Taper the tops:
Using your fingers, gently pinch and smooth the top of each cylinder so it tapers slightly inward. This neck will hold the mushroom cap. -
Smooth the surface:
Dip your finger in a tiny bit of water and rub it over the surface of the stems to erase any fingerprints or cracks.
Step 2: Creating the Caps
-
Form the spheres:
Roll four balls of clay corresponding to the sizes of your stems. The caps should be slightly wider than the stems. -
Flatten the bottoms:
Press the bottom of each sphere against your work surface to flatten it significantly leaving a nice dome shape on top. -
Hollow the underside:
For a better fit, use your thumb to gently indent the flat side of the cap, creating a small hollow where the stem will connect. -
Attach cap to stem:
Score the top of the stem and the underside of the cap with a craft knife (making hashtag patterns). Apply a dab of water or slip, then press the parts together firmly. -
Refine the shape:
Once assembled, check the proportions. You can gently press the cap down to make it look ‘heavy’ or widen the edges for a more toadstool look.
Seamless Joins
If your caps feel wobbly, insert a short piece of toothpick or wire into the stem before attaching the cap for invisible internal support.
Step 3: Adding Texture & Drying
-
Add surface interest:
Before the clay dries, take a crumpled piece of aluminum foil or a stiff brush and tap it gently over the caps to create a porous, organic texture. -
Let it cure:
Place your mushrooms in a safe, dry spot away from direct sunlight. Allow them to dry completely for at least 24-48 hours. -
Sand imperfections:
Once fully hard, use fine-grit sandpaper to smooth out any rough patches on the stems, but try to leave the texture on the caps intact.
Display Base
Create the round base shown in the photo by rolling a large slab of clay and texturing it with a stone. Glue your mushrooms down once everything is dry.
Step 4: Painting & Finishing
-
Paint the stems:
Mix a creamy off-white color and paint the stems. Apply two thin coats for opaque coverage. -
Base coat the caps:
Paint the caps with a solid coat of orange or red. It doesn’t need to be perfect yet, just get that base color down. -
Add depth:
I like to sponge on a darker shade of red or burnt orange gently over the caps. This highlights the texture you created earlier and gives a natural look. -
Paint speckles (optional):
If you want a detailed look, use the very tip of a brush or a toothpick to add tiny brown speckles or imperfections to the caps. -
Seal the work:
Finish by applying a matte sealant. Avoid glossy varnish if you want to maintain that soft, earthy aesthetic shown in the photo.
Now you have a timeless little nature scene that looks lovely on a mantle or desk
Strawberry Charms With Dotted Seeds
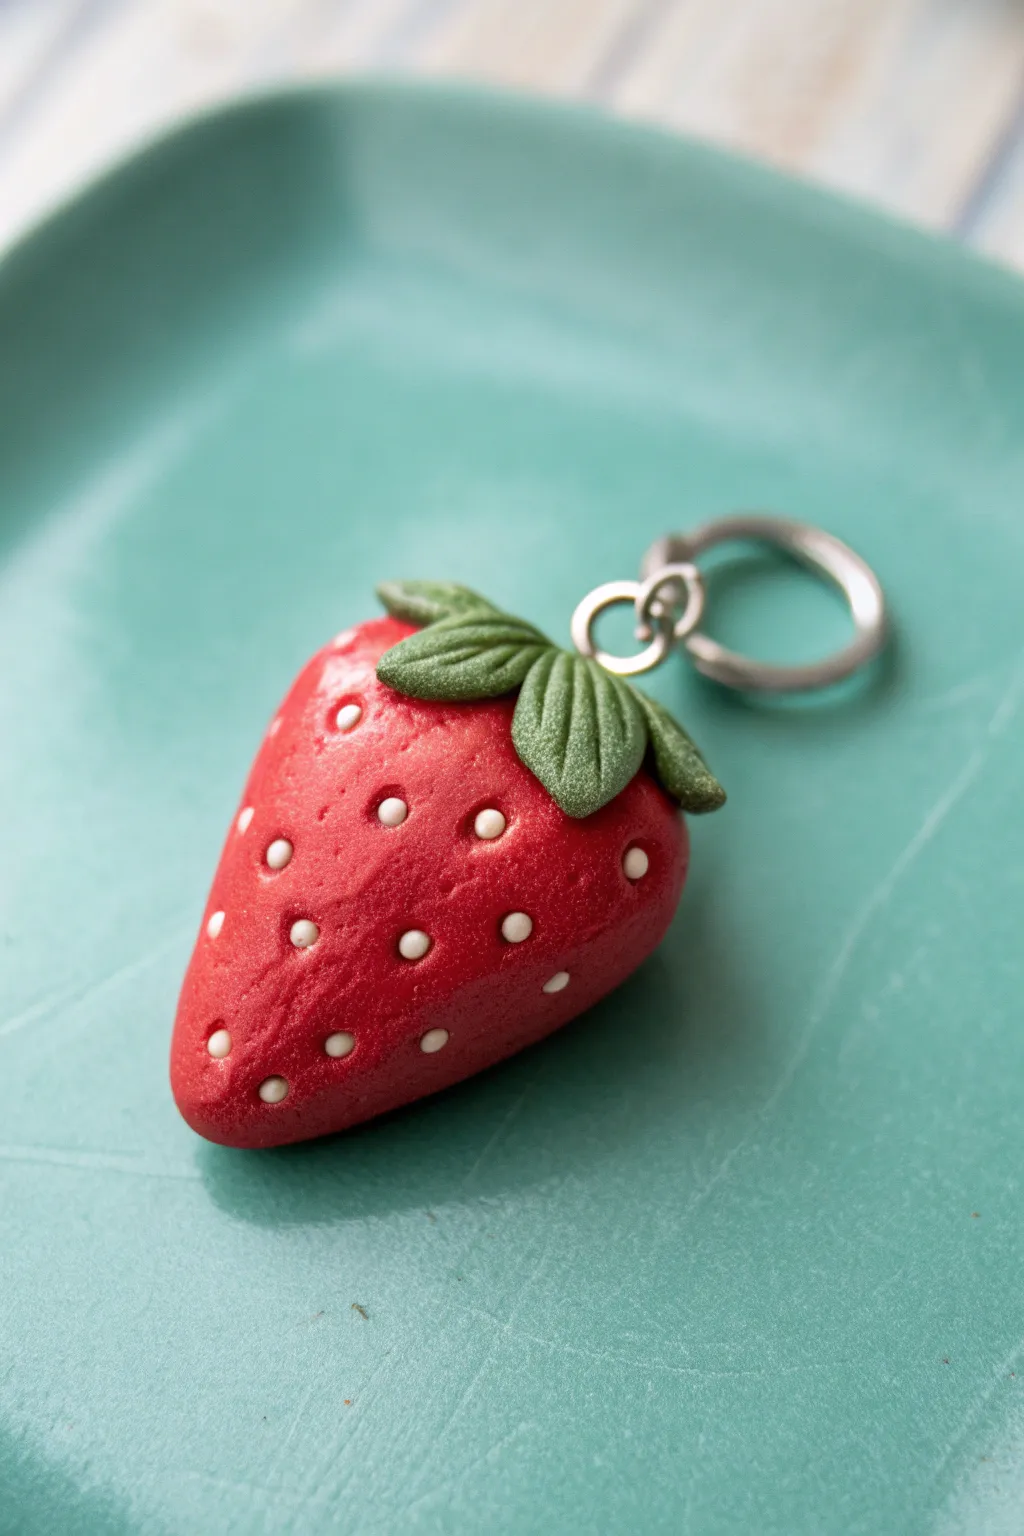
This delightful little strawberry charm adds a pop of summer sweetness to any backpack or set of keys. With its vibrant red body, delicate white seeds, and textured green leaves, it looks almost good enough to eat.
Step-by-Step Guide
Materials
- Red air dry clay
- Green air dry clay
- White liquid clay or white air dry clay
- Small dotting tool or toothpick
- Needle tool or craft knife
- Eye pin or screw eye pin
- Jump ring and keyring
- Gloss varnish or glaze
- Rolling pin
- Soft paintbrush
Step 1: Shaping the Berry
-
Condition the clay:
Start by taking a chunk of red air dry clay roughly the size of a walnut and knead it well with your hands until it becomes soft, pliable, and free of cracks. -
Form the base shape:
Roll the red clay into a smooth ball between your palms to remove any seams or lines. -
Taper the strawberry:
Gently roll one side of the ball against your palm or work surface to create a tapered point, forming a classic teardrop or strawberry shape. Keep the top relatively flat and wide. -
Insert the hardware:
Ideally, while the clay is still wet, carefully push your screw eye pin or eye pin into the center of the flat top part of the strawberry. If needed, add a tiny dab of glue to the pin for extra security.
Loose Eye Pin?
If the eye pin wiggles after the clay dries, unscrew it gently, add a drop of superglue to the threads or stem, and screw it back into the existing hole for a permanent bond.
Step 2: Adding Texture and Seeds
-
Create seed indentations:
Using a small ball tool or a rounded toothpick, gently press tiny indentations all over the surface of the red berry. Space them somewhat evenly, as these divots will hold your white seeds later. -
Prepare the seeds:
Take a tiny amount of white clay and roll it into an extremely thin snake, or simply pinch off microscopic bits. -
Place the seeds:
Roll tiny spheres of white clay between your fingers—smaller than a grain of rice—and gently press one into each indentation you made on the red body. You want them slightly embedded but still visible. -
Smooth the seeds:
Lightly tap each white seed with your finger to ensure it adheres to the red clay without flattening the strawberry’s shape.
Step 3: Crafting the Foliage
-
Roll the green clay:
Condition a small piece of green clay and flatten it on your work surface using a rolling pin until it is about 2mm thick. -
Cut the leaf shape:
Using a needle tool or craft knife, cut out a small star-shaped calyx or several individual teardrop-shaped leaves. You will need about five to six points for the top. -
Add leaf texture:
Using your needle tool, gently score details onto the leaves. Draw a central vein down the middle of each leaf and tiny diagonal veins branching off for a realistic look. -
Attach the leaves:
Place the green leaves on top of the strawberry, arranging them around the eye pin. Gently press them down so they curve naturally over the rounded shoulders of the fruit. -
Secure the edges:
Use a tool to lightly lift the very tips of the leaves upward just a fraction, giving the foliage a bit of life and movement rather than having it plastered perfectly flat.
Add a Blossom
Make a tiny white flower with a yellow center using leftover clay and attach it near the leaves for an extra cute, botanical detail before the main piece dries.
Step 4: Finishing Touches
-
Let it dry completely:
Set the strawberry aside in a safe, dry place. Depending on your humidity and brand of clay, this usually takes 24 to 48 hours. Turn it occasionally so the bottom dries evenly. -
Apply varnish:
Once fully cured, apply a coat of gloss varnish or glaze over the entire strawberry to protect it from moisture and give it a juicy, fresh-picked shine. -
Attach the keyring:
After the varnish is dry to the touch, use pliers to open your jump ring, loop it through the eye pin on the strawberry, and attach your keyring hardware. -
Final check:
Close the jump ring securely with pliers to ensure your new charm stays put.
Now you have a charming accessory to keep summer vibes with you all year round

TRACK YOUR CERAMIC JOURNEY
Capture glaze tests, firing details, and creative progress—all in one simple printable. Make your projects easier to repeat and improve.
Cloud and Raindrop Wall Dangles
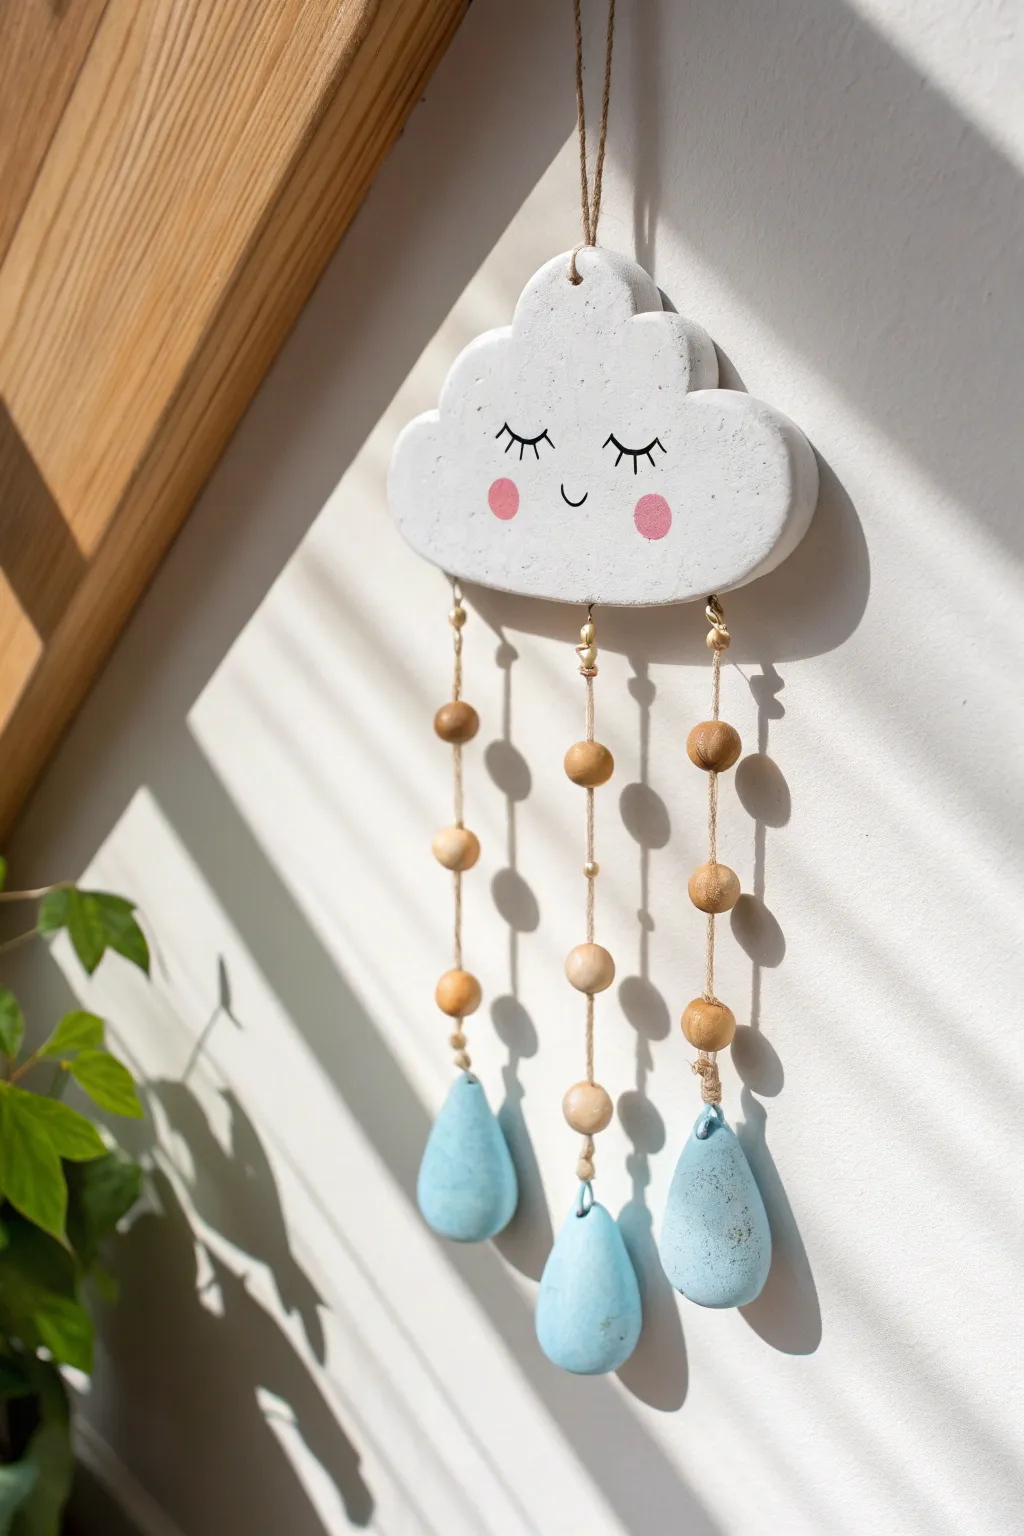
Bring a little sky-high cheer into your home with this adorable cloud mobile, featuring rustic wooden beads and soft blue raindrops. The gentle curves of the cloud and the natural textures make it a perfect beginner project with a high-end, boutique look.
Step-by-Step Tutorial
Materials
- White air dry clay
- Rolling pin
- Clay knife or craft knife
- Water and sponge for smoothing
- Sandpaper (fine grit)
- Blue acrylic paint (soft sky blue)
- Black fine-tip marker or acrylic paint pen
- Pink acrylic paint and small sponge dauber
- Jute twine
- Wooden beads (natural finish, approx 10mm-12mm)
- Small gold screw eyes (optional) or poking tool
- Clear matte sealant (optional)
Step 1: Sculpting the Components
-
Roll out the slab:
Begin by conditioning your clay and rolling it out on a smooth surface to a uniform thickness of about 1/4 inch. If you want a perfectly flat surface, rolling guides on either side work wonders. -
Cut the cloud shape:
Sketch a fluffy cloud shape lightly onto the clay with a toothpick or use a printed template. Carefully cut around the outline using your craft knife. -
Soften the edges:
Dip your finger in a little water and gently run it along the cut edges of the cloud to round them off. This removes that ‘cookie-cutter’ sharpness and gives it a softer, pillowy look. -
Form the raindrops:
Roll three balls of clay slightly larger than a marble. Pinch the top of each ball while gently flattening the bottom to create a classic teardrop shape. -
Pierce the holes:
While the clay is still wet, use a toothpick or skewer to poke a hole vertically through the top of the cloud for the hanging loop. Poke three evenly spaced holes along the bottom edge for the rain strands. -
Pierce the drops:
Poke a vertical hole through the narrow top of each raindrop. Ensure the hole is wide enough for your jute twine to pass through easily. -
Dry completely:
Lay all your clay pieces on a wire rack or a sheet of parchment paper. Let them air dry for 24-48 hours, flipping them occasionally to ensure even drying and prevent warping.
Cracking Up?
If you notice small surface cracks appearing as your clay dries, don’t panic. Mix a tiny bit of fresh clay with water to make a ‘slip’ paste and fill the cracks, then sand smooth once dry.
Step 2: Decorating & Painting
-
Sand for smoothness:
Once fully dry and hard, take a piece of fine-grit sandpaper and lightly buff the surface of the cloud and the raindrops to remove any minor bumps or fingerprints. -
Paint the raindrops:
Using a soft brush, paint the three raindrops with your sky blue acrylic paint. I find that two thin coats usually look better than one thick one. -
Draw the face:
With a fine-tip black paint pen or a very thin brush, draw two sleepy curved eyes with eyelashes in the center of the cloud. Add a tiny ‘u’ shape for a smiling mouth. -
Add rosy cheeks:
Dip a small round sponge dauber or the wrong end of a paintbrush into pink paint. Dab off the excess, then stamp two rosy circles onto the cloud’s cheeks. -
Seal the pieces:
Apply a coat of clear matte sealant to all clay parts if you want to protect the paint and give the finish a professional durability.
Level Up: Texture
Before the cloud dries, press a piece of lace or a textured rolling pin gently into the surface to give it a patterned, embossed effect before painting.
Step 3: Assembly
-
Prepare the rain strings:
Cut three lengths of jute twine, each about 10 inches long. Tie a sturdy knot at one end of each string. -
Thread the drops:
Thread the un-knotted end of the twine up through the bottom of a blue raindrop until the knot catches inside the hole. -
Add the bead details:
Slide three or four wooden beads onto each string, allowing about an inch of space between the raindrop and the first bead. -
Secure the beads:
To keep the beads from sliding down to the raindrop, tie a simple overhand knot in the twine right below where you want the bottom bead to sit. -
Attach to cloud:
Thread the top of each rain string through the corresponding hole at the bottom of the cloud. Tie a knot on the back side of the cloud to secure it, trimming any excess twine. -
Create the hanger:
Cut a final piece of twine for the top loop. Thread it through the top hole of the cloud, knot it securely, and your mobile is ready to hang.
Hang your charming new creation near a window to catch the light and enjoy the peaceful vibes it brings to your space
Smiley Face Fridge Magnets
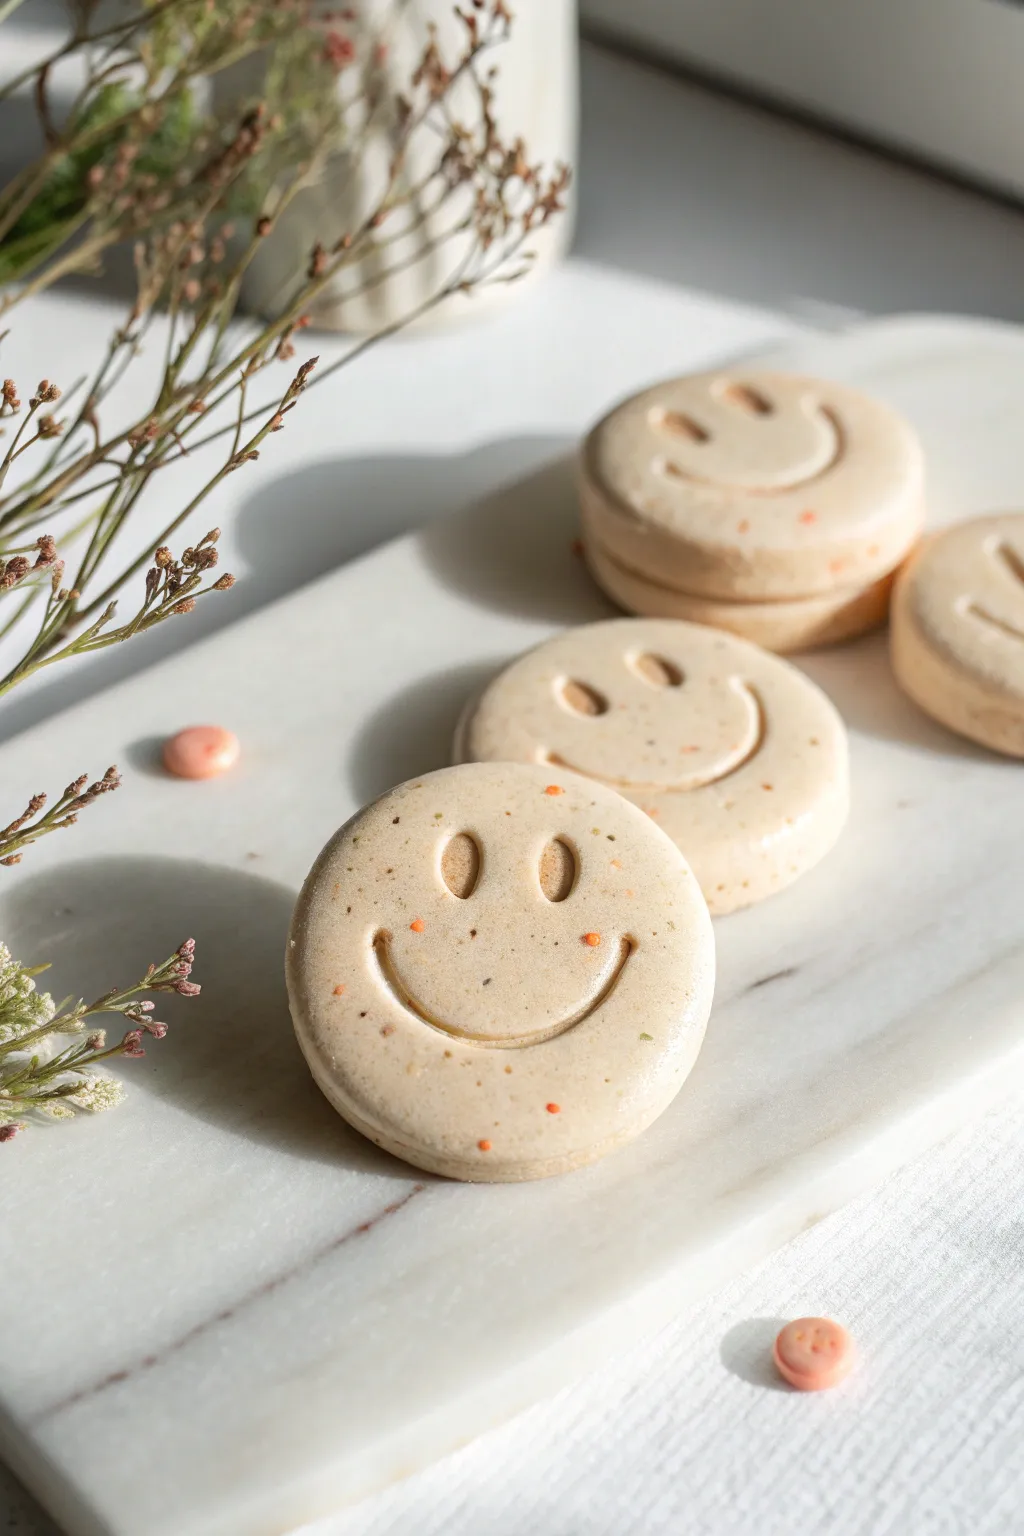
These cheerful little magnets look just like adorable sugar cookies, bringing a touch of whimsy to your fridge or magnetic board. With their natural speckled finish and deeply stamped smiles, they are a simple yet satisfying project perfect for clay beginners.
Step-by-Step
Materials
- White air dry clay
- Rolling pin
- Round cookie cutter (approx. 2 inches)
- Black pepper or dried tea leaves (for speckles)
- Orange acrylic paint or pastel shavings
- Small circle cutter or straw (for eyes)
- Spoon or clay tool (for smile)
- Strong craft magnets
- Superglue or E6000
- Wax paper or craft mat
Step 1: Preparing the Clay
-
Condition the clay:
Start with a ball of white air dry clay about the size of a tennis ball. Knead it in your hands until it feels soft, warm, and pliable to prevent cracking later. -
Add texture:
To get that cookie-dough look, sprinkle in a pinch of ground black pepper or dried loose-leaf tea. Knead the clay thoroughly to distribute the specs evenly throughout the ball. -
Tint the clay:
Mix in a very tiny drop of orange or tan acrylic paint to warm up the white color. Alternatively, I like to use shaved chalk pastel dust for a softer, more matte color integration. Knead until the color is uniform. -
Create confetti spots:
For the larger orange speckles seen in the photo, take a tiny pea-sized bit of clay, color it bright orange, and tear it into minuscule crumbs. Gently press these crumbs into your main clay ball without over-mixing them.
Keep it Clean
Work with clean hands and tools. Dust and lint love sticking to white clay. Keep a pack of baby wipes nearby to frequently clean your fingers and work surface.
Step 2: Shaping the Faces
-
Roll it out:
Place your clay on wax paper or a craft mat. Use a rolling pin to flatten the clay to an even thickness of about 1/4 inch (6mm). Using guide rings on your rolling pin can help keep it perfectly level. -
Cut the circles:
Press your round cookie cutter firmly into the clay to create clean discs. Lift the excess clay away from the cutout shapes rather than trying to move the circles themselves, which might warp them. -
Smooth the edges:
Dip your finger in a little bit of water and run it gently around the circumference of each circle to soften any sharp ridges left by the cutter. -
Stamp the eyes:
Use a small circle cutter, a straw, or the back end of a paintbrush to impress two oval or circular eyes. Press deep enough to make a shadow, but don’t punch all the way through. -
Create the smile:
Use the edge of a spoon, a curved clay tool, or a large circle cutter held at an angle to press a wide, U-shaped smile below the eyes. Rock the tool slightly to widen the impression. -
Refine the expression:
Check the smile’s edges. You want soft, rounded indentations that look pillowy, so gently tap any jagged bits down with a fingertip.
Step 3: Finishing Up
-
Initial drying:
Place the clay faces on a clean, flat surface to dry. A wire cooling rack is ideal as it allows air to circulate underneath. -
Flip them over:
After about 12 hours, turn the discs over. This ensures the bottom dries at the same rate as the top, preventing the magnet headers from curling up like potato chips. -
Full cure:
Allow them to dry completely for another 24 to 48 hours. The clay should feel room temperature and hard, not cool to the touch. -
Attach the magnet:
Apply a dab of strong adhesive like E6000 or superglue to the center of the back of each smiley face. -
Secure firmly:
Press a strong craft magnet into the glue. Hold it there for 20-30 seconds to ensure a good initial bond, then let the glue cure according to the package instructions.
Fixing Cracks
If you see hairline cracks while drying, make a thick paste with a scrap of clay and water (slip). Smear it into the crack with a finger and smooth it out.
Now your fridge has a friendly and organic vibe that will make everyone smile
Paw Print Mini Dishes
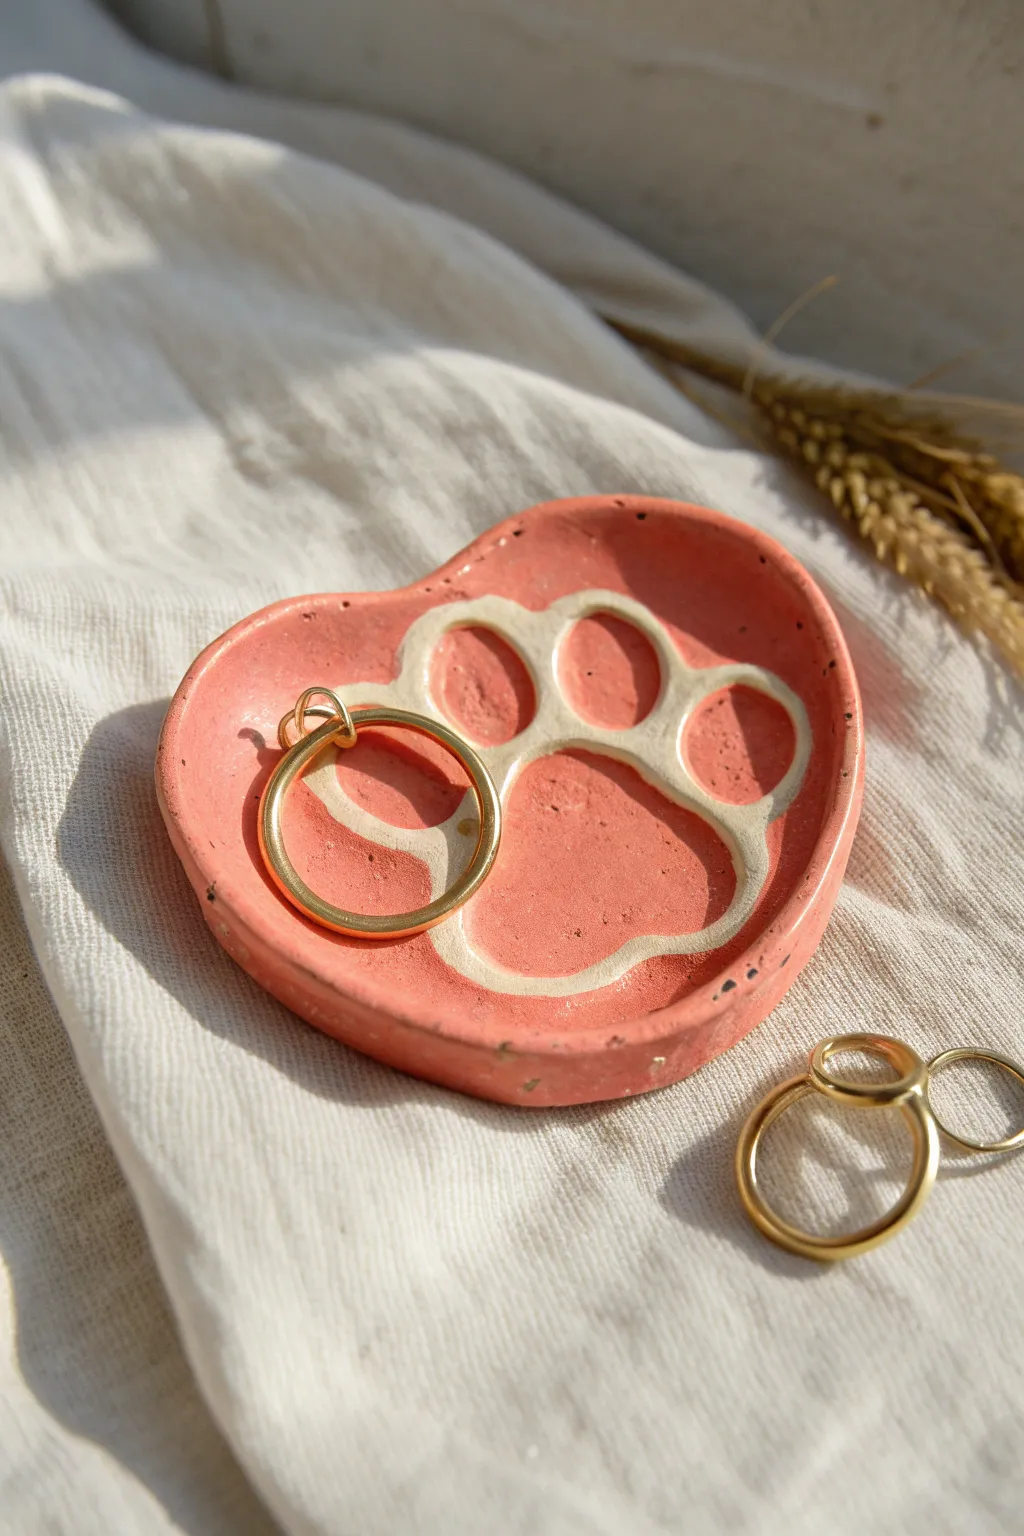
Capture your love for furry friends with this adorable heart-shaped trinket dish featuring a stylized paw print. The soft coral-pink finish contrasts beautifully with the recessed raw white clay, creating a modern, textured piece for holding your favorite rings.
Detailed Instructions
Materials
- White polymer clay or air-dry clay
- Rolling pin
- Heart-shaped cookie cutter (medium size)
- Paw print stamp or carving tools
- Coral pink acrylic paint
- Fine detail paintbrush
- Small sponge (optional)
- Fine grit sandpaper
- Gloss varnish or sealant
Step 1: Shaping the Base
-
Condition the clay:
Start by taking a ball of white clay and kneading it in your hands until it becomes soft, pliable, and free of cracks. -
Roll it out:
Using your rolling pin, flatten the clay to an even thickness of about 1/4 inch. If you want a uniform look, use depth guides on either side. -
Cut the shape:
Press your heart-shaped cookie cutter firmly into the clay to create the main form. Remove the excess clay from around the edges. -
Smooth the edges:
Dip your finger in a little bit of water and run it gently along the cut edge of the heart to soften any sharp corners left by the cutter.
Step 2: Creating the Design
-
Form the rim:
Gently lift the edges of the heart with your thumbs and forefingers to create a slight curve, forming a shallow bowl shape. -
Draft the paw print:
Use a pencil or a needle tool to faintly sketch the outline of a large paw pad and four smaller toe pads in the center of the heart. -
Carve the relief:
Using a small loop tool or carving tool, carefully scoop out a thin channel around each pad of the paw print. You want deep grooves that separate the ‘pads’ from the rest of the dish. -
Smooth the grooves:
Go back in with a rubber-tipped clay tool or a damp cotton swab to smooth the inside of the carved lines so they aren’t jagged. -
Let it dry:
Allow the clay to dry completely according to the package instructions. I usually let air-dry clay sit for at least 24-48 hours to ensure it’s rock hard.
Cracks while drying?
If small cracks appear as the clay shrinks, mix a tiny bit of fresh clay with water to make a paste and fill them in before painting.
Step 3: Finishing Touches
-
Sand imperfections:
Once fully dry, use fine-grit sandpaper to gently buff the edges and surface, removing any fingerprints or rough texture. -
Dust off:
Wipe the dish down with a dry cloth or brush to remove all sanding dust before painting. -
Paint the surface:
Load a brush with coral pink acrylic paint. Carefully paint the raised surface of the dish, including the top ‘pads’ of the paw and the outer rim area. -
Avoid the grooves:
Take your time to paint around the carved channels. You want to leave those deep grooves unpainted (white) to create that crisp, graphic outline. -
Paint the underside:
Flip the dish over and paint the bottom and sides a solid pink to match the top. -
Add speckles (optional):
To mimic the stone-like texture in the image, dip a toothbrush in slightly darker paint and flick tiny specks onto the surface. -
Seal the piece:
Applying a coat of varnish will protect the paint and give it a finished look. Matte varnish looks natural, while gloss adds a ceramic feel.
Sharper Lines
If your painting hand is shaky, paint the whole thing pink first, then use a white paint pen to draw the lines inside the grooves.
Place your finished dish on your nightstand for a sweet spot to keep your treasures safe
Simple Bow Ring Holders
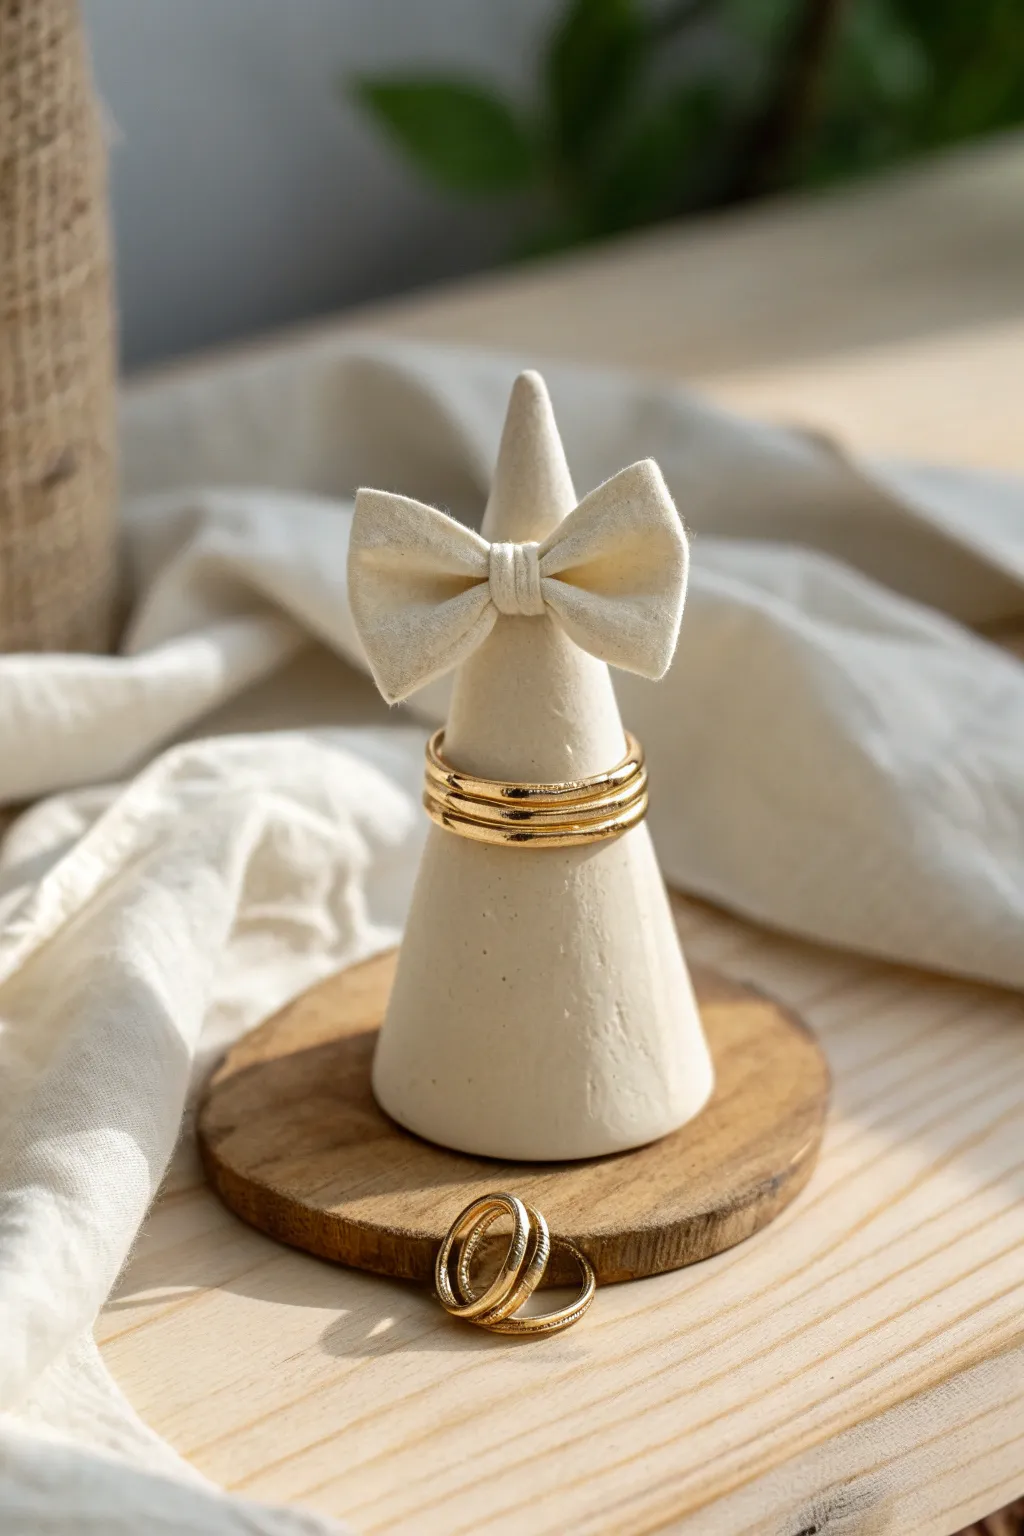
This charming ring holder combines the minimalist elegance of a traditional cone stand with a soft, whimsical touch. The faux-fabric bow adds a sweet texture contrast that makes your favorite rings look like tiny gifts waiting to be opened.
Step-by-Step Guide
Materials
- Air dry clay (white or beige)
- Rolling pin
- Craft knife or scalpel
- Small cup of water
- Fine grit sandpaper
- Acrylic rolling tool or smooth acrylic block
- A small wooden coaster (optional base)
- Strong craft glue (E6000 or similar)
Step 1: Forming the Base Cone
-
Condition the clay:
Start by taking a handful of clay and kneading it thoroughly in your hands until it feels warm and pliable, eliminating any dry pockets. -
Roll a simple ball:
Roll the clay between your palms to form a smooth, crack-free sphere roughly the size of a golf ball or slightly larger. -
Shape into a cone:
Create a cone shape by applying pressure to just one side of the ball while rolling it back and forth on your work surface. -
Refine the height:
Continue rolling until you have a tapered cone that is approximately 3 to 4 inches tall with a pointed tip. -
Flatten the bottom:
To ensure stability, gently press the wide base of the cone onto a flat surface. Pick it up and tap it down a few times until it stands perfectly upright without wobbling. -
Smooth the surface:
Dip your finger in a tiny bit of water and run it over the cone to smooth out any fingerprints or minor bumps.
Keeping the Shape
To prevent the bow loops from drooping while drying, tuck small pieces of rolled-up plastic wrap or foam inside the loops for support.
Step 2: Sculpting the Bow
-
Roll a thin slab:
Roll out a small piece of fresh clay until it is quite thin, about 1/8th of an inch thick. -
Cut the strips:
Using your craft knife, cut a rectangle for the main bow (about 2 inches long by 0.5 inches wide) and a tiny strip for the center knot. -
Form the loops:
Fold the two ends of the long rectangle toward the center so they meet in the middle. Do not flatten the loops; keep them puffy. -
Pinch the center:
Gently pinch the middle section where the ends meet to create that classic cinched bow shape. -
Add the center knot:
Wrap the tiny strip of clay around the pinched center to hide the seam. I find using a dab of water helps this strip adhere securely. -
Attach to the cone:
Score the back of the bow and the spot on the cone where you want it to sit (about an inch from the top). Add a drop of water or liquid clay slip and press the bow firmly in place. -
Secure the edges:
Use a modeling tool or the tip of your knife to gently blend the back of the bow into the cone just enough so it doesn’t fall off, but keep the front defined.
Step 3: Finishing Touches
-
Let it dry completely:
Place the cone in a safe, dry spot away from direct sunlight for at least 24 to 48 hours until it is hard and opaque. -
Check for cracks:
Once dry, inspect the join where the bow meets the cone. If any tiny separation occurred, fill it with a little fresh clay and smooth it out. -
Sand for perfection:
Use fine grit sandpaper to gently buff out any remaining fingerprints or rough texture on the cone’s surface, being careful around the delicate bow. -
Optional base mounting:
If you want the exact look from the photo, apply strong craft glue to the bottom of your clay cone and center it on a small, rustic wooden coaster.
Cracked Clay Fix
If hairline cracks appear as it dries, make a ‘slurry’ by mixing a scrap of clay with water until it’s a paste, and use it to fill the gap.
Now you have a functional piece of art ready to display your favorite jewelry collection
Tiny Whale Figurines With Blush Cheeks
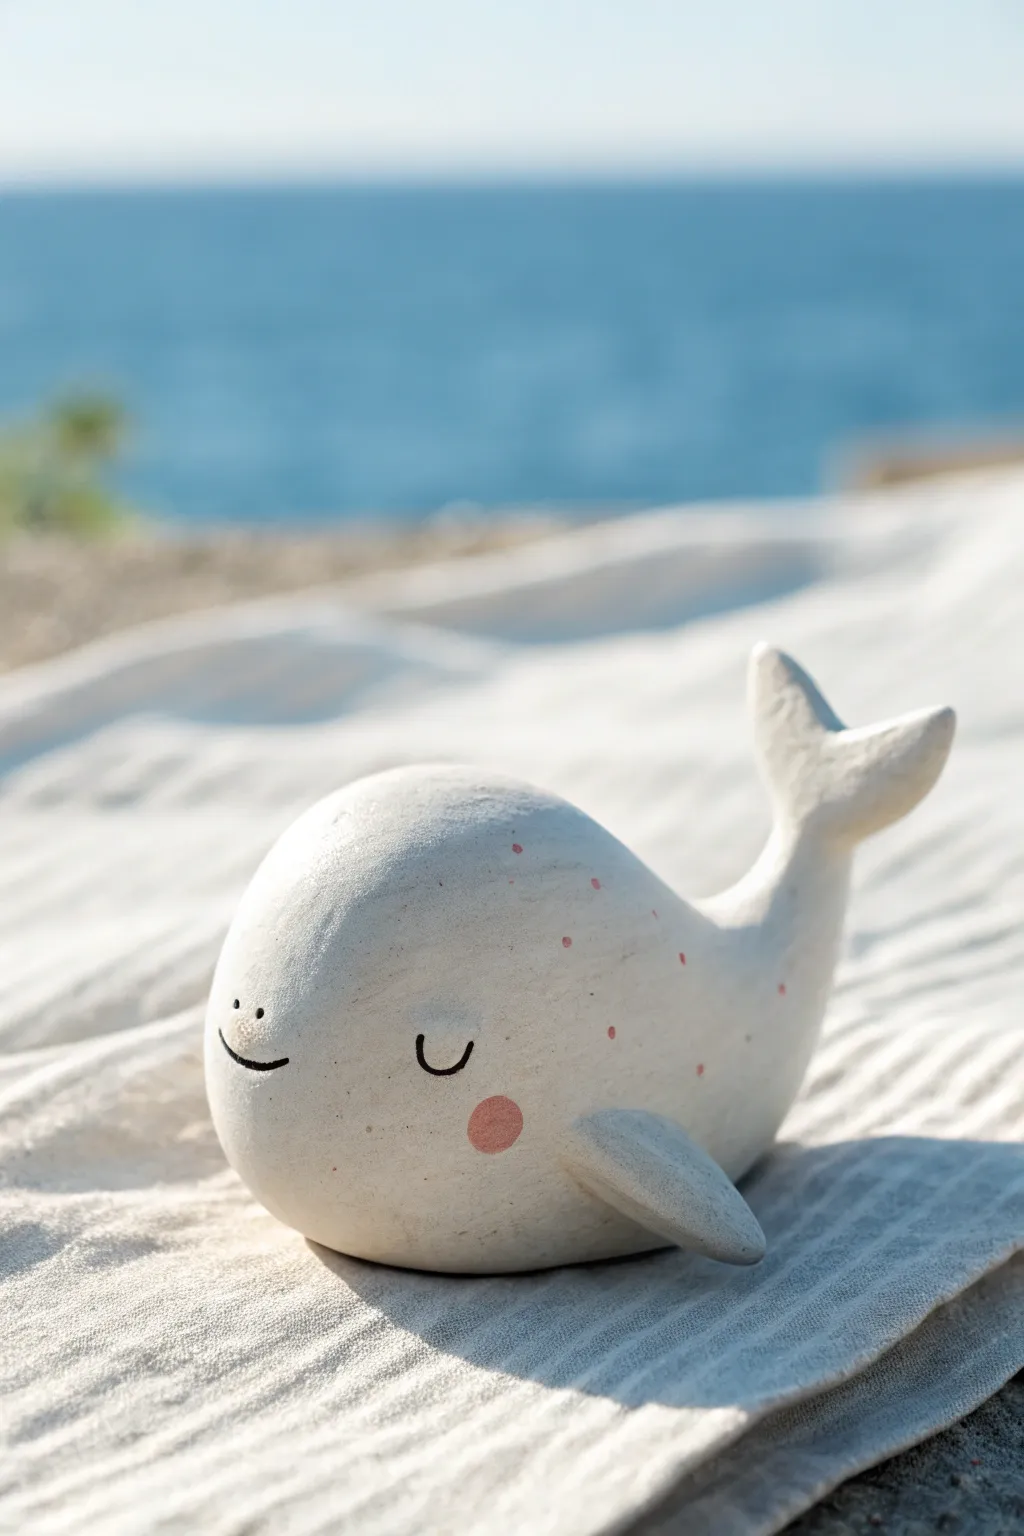
This charming little whale figurine captures the essence of seaside serenity with its smooth white finish and sweet, sleepy expression. Perfect for beginners, its rounded form and minimalist details make it an approachable yet delightful project to sculpt.
Step-by-Step
Materials
- White smooth air dry clay
- Small bowl of water
- Fine grit sandpaper
- Black fine-tip acrylic marker or detail brush with black paint
- Pink acrylic paint
- Small round paintbrush or cotton swab
- Mod Podge or matte varnish (optional)
- Sculpting tool or toothpick
Step 1: Shaping the Body
-
Prepare the Clay:
Start with a ball of clay about the size of a tangerine. Knead it thoroughly until it’s warm and pliable to prevent cracks later on. -
Create the Teardrop:
Roll the ball on your work surface, applying slightly more pressure on one side to taper it into a large, smooth teardrop shape. This will be the whale’s body and tail area. -
Curve the Tail:
Gently lift the tapered end of the teardrop and curve it upwards. You want a distinct upward swoop that looks like the whale is happily swimming. -
Flatten the Base:
Tap the bottom of the main body section gently against your table. This creates a small flat surface so your figurine sits straight without rolling over.
Step 2: Adding Fins and Flukes
-
Form the Tail Flukes:
Pinch the very tip of the raised tail to flatten it horizontally. Then, use a sculpting tool or your finger to make a small indentation in the center, splitting the flattened area into two distinct flukes. -
Refine the Tail:
Smooth out the connection point between the flukes and the tail stem using a little water on your finger, ensuring the transition is seamless. -
Make the Side Fins:
Roll two small pea-sized balls of clay. Flatten each into a rounded triangle or petal shape to create the pectoral fins. -
Attach the Fins:
Score the clay slightly on the sides of the body where the fins will go, and score the back of the fins. Add a dab of water (slip) and press the fins firmly onto the lower sides of the whale. -
Blend the Seams:
Use a sculpting tool or your finger to smooth the clay from the fin onto the body so they look like one solid piece rather than glued-on parts.
Smooth Operator
Keep a small bowl of water nearby while sculpting. Dipping your finger and rubbing the clay smooths out fingerprints instantly before drying.
Step 3: Finishing Touches
-
Let it Dry:
Set your whale in a safe, dry spot away from direct sunlight. Depending on humidity and brand, this can take 24 to 48 hours to dry completely. -
Smooth the Surface:
Once fully hard, inspect your whale. If there are any rough bumps or fingerprints, gently buff them away with fine-grit sandpaper for a porcelain-like finish. -
Draw the Face:
Using a fine-tip black marker or a very thin brush, draw two wide-set ‘U’ shapes for sleepy eyes. Add a tiny curved smile slightly to the left, and two small dots for a nose. -
Add the Blush:
Mix a diluted wash of pink acrylic paint. Using a brush or a cotton swab, dab a perfectly round circle on the cheek area to give it that rosy glow. -
Adding Freckles:
Using the tip of a toothpick or a very fine brush, dot tiny specks of the same pink paint across the back and top of the head for texture. -
Seal (Optional):
To protect your paint work, apply a thin coat of matte varnish or Mod Podge over the entire piece.
Spouting Off
Before drying, use a toothpick to poke a small hole in the top of the head. After painting, insert a tiny dried flower or wire to mimic a water spout.
Set your new little friend on a desk or shelf to bring a calm ocean vibe to your space
Mini Berry Bowls With Scalloped Rims
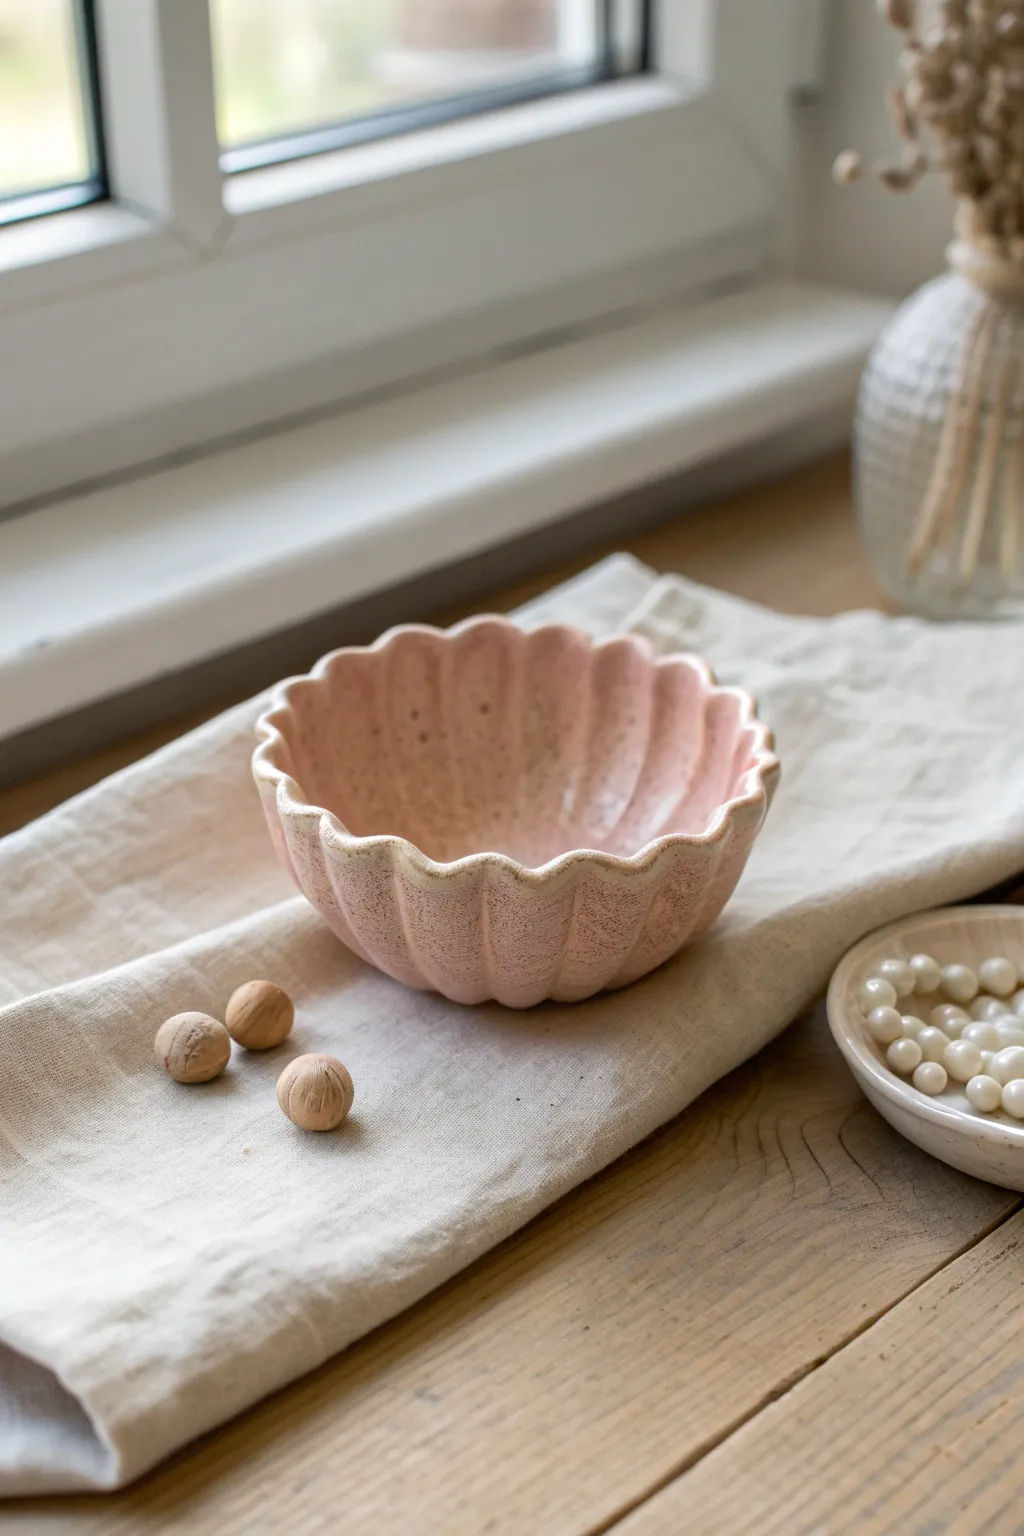
This delicate little bowl features a charming petal-like rim and a soft, speckled pink finish that mimics high-end ceramic glazes. It’s perfectly sized for holding jewelry, small trinkets, or even serving as a decorative pinch pot on your desk.
Detailed Instructions
Materials
- Air dry clay (white or terracotta)
- Acrylic paint (soft pink, white, brown)
- Glossy varnish or sealant
- Rolling pin
- Small bowl or cup (as a mold)
- Clay knife or plastic sculpting tool
- Sponge or sandpaper
- Old toothbrush
- Fine grit sandpaper
Step 1: Shaping the Bowl
-
Prepare the Clay:
Start with a ball of air dry clay roughly the size of a tangerine. Knead it well in your hands to warm it up and remove any air bubbles, ensuring the consistency is smooth and pliable. -
Roll it Out:
On a clean, flat surface, roll the clay out into an even circle. Aim for a thickness of about 1/4 inch (6mm). If the clay sticks, you can lay down a sheet of parchment paper first. -
Form the Base Shape:
Drape your clay circle over the bottom of a small upside-down bowl or cup to help it hold a curved shape. Gently press it down so it takes the form of the mold without getting too thin in spots. -
Create the Scallops:
While the clay is still on the mold, use your thumb and forefinger to gently pinch the rim at regular intervals. Push the clay outward slightly between your fingers to create the fluted, flower-petal effect shown in the photo. -
Refine the Ridges:
Use a modeling tool or the handle of a paintbrush to deepen the grooves on the inside of the bowl, extending the indentation from the scalloped rim down toward the center base. -
Smooth the Edges:
Dip your finger in a tiny bit of water and run it along the rim. This softens any sharp angles and gives that pottery-wheel look. Be careful not to make the clay too wet, or it may sag. -
Drying Time:
Let the bowl sit on the mold for about an hour so it holds its shape, then carefully remove it. Place it rim-side up to dry completely for 24-48 hours until it turns a chalky white and feels hard.
Step 2: Finishing Touches
-
Sand for Smoothness:
Once fully dry, use fine-grit sandpaper to gently buff the surface. Focus on the rim and the outside texture. Wipe away the dust with a barely damp cloth. -
Paint the Base Color:
Mix a soft, dusty pink acrylic paint. Apply two coats to the entire bowl, allowing the first coat to dry before adding the second. This creates a solid, opaque background. -
Add the Speckled Effect:
Dilute a small amount of brown paint with water. Dip an old toothbrush into the mixture, then run your thumb across the bristles to flick tiny specks onto the bowl. Use a light hand here; less is more. -
Highlight the Rim:
To mimic the look of unglazed ceramic edges often seen in stoneware, carefully paint the very top edge of the scalloped rim with a thin line of beige or off-white paint. -
Seal the piece:
Finish by applying a glossy varnish over the entire piece. This not only protects the paint but gives it that fired ceramic shine that makes the pink color pop.
Keep it Even
To get perfectly even spacing on your scallops, lightly mark the rim with a toothpick at 12, 3, 6, and 9 o’clock before you start pinching.
Cracks happen
If small cracks appear while drying, don’t panic. Mix a tiny bit of fresh clay with water to make a paste (slip) and fill the crack, then sand smooth once dry.
Now you have a sweet, custom-made trinket dish ready to display your favorite treasures
Cute Star and Moon Charms
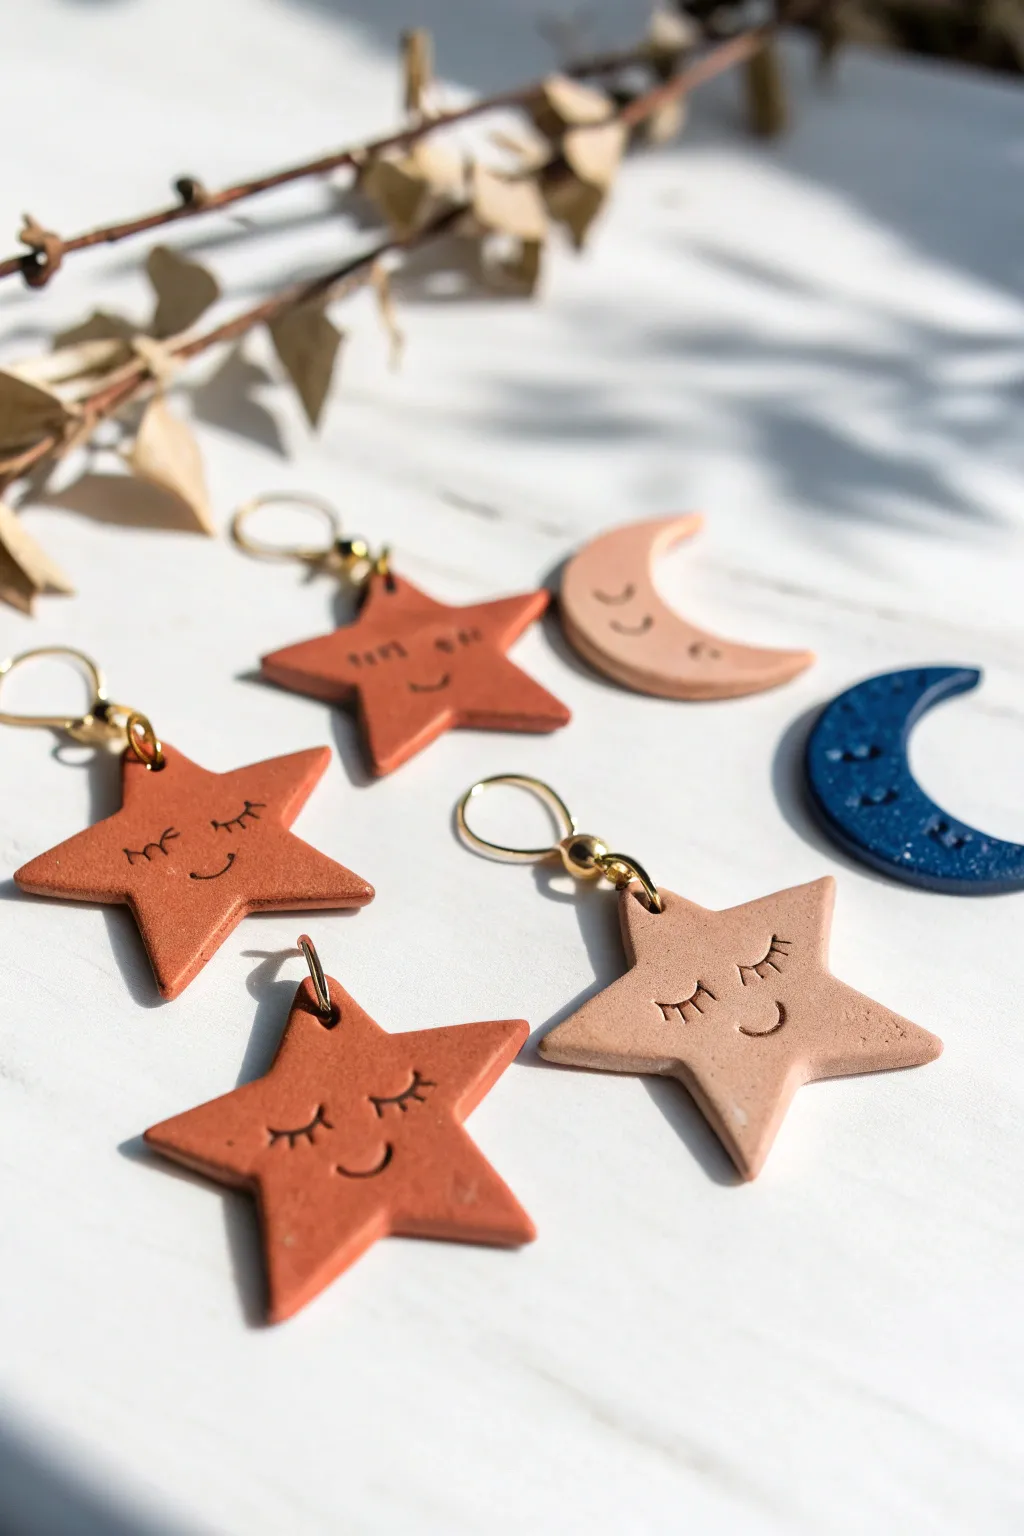
These adorable celestial charms feature sweet, sleeping faces and warm, earthy tones that feel cozy and magical. Perfect for earrings, keychains, or zipper pulls, they bring a touch of whimsy to your everyday accessories.
Step-by-Step Guide
Materials
- Air dry clay (terracotta, beige, and dark blue colors)
- Star and crescent moon cookie cutters (small size)
- Acrylic rolling pin
- Parchment paper or silicone mat
- Needle tool or toothpick
- Small black permanent marker or fine tip paint pen
- Gold jump rings (6mm or 8mm)
- Jewelry pliers
- Fine grit sandpaper (optional)
- Glossy varnish (optional for the blue moon)
- Face stamp set (optional, or use needle tool)
Step 1: Shaping the Clay
-
Condition the Clay:
Start by kneading your clay until it is soft, pliable, and free of any cracks. If you are mixing colors to get that perfect terracotta shade, now is the time to blend them thoroughly. -
Roll it Out:
Place the clay on your parchment paper or silicone mat. Use the acrylic rolling pin to roll the clay into an even slab, aiming for a thickness of about 3mm to 4mm—thick enough to be sturdy but light enough for jewelry. -
Cut the Shapes:
Press your star and crescent moon cutters firmly into the clay. Give them a gentle wiggle before pulling up to ensure a clean cut. -
Smooth the Edges:
After removing the excess clay, dip your finger in a tiny bit of water and gently run it along the edges of your cutouts to smooth away any roughness or burrs left by the cutter. -
Create the Hanging Hole:
While the clay is still wet, use a needle tool or a straw to punch a hole near the top point of your star or the top curve of your moon. Make sure the hole isn’t too close to the edge to prevent breakage later.
Clean Cuts Every Time
If your clay is sticking to the cutter, dip the cutter into a little bit of cornstarch or baby powder before pressing it into the clay slab. This acts as a release agent.
Step 2: Adding Details & Drying
-
Impress the Features:
If you are using a stamp tool for the eyes and mouth, press it gently into the wet clay now to create an impression. If you plan to draw the faces on later with ink, you can skip this step. -
Texture the Blue Moon:
For the dark blue moon variation, take your needle tool and gently poke random, shallow dots across the surface to mimic craters or stardust texture before the clay dries. -
Begin Drying Process:
Lay your shapes flat on a piece of parchment paper to dry. I find that flipping them over carefully after the first few hours helps them dry evenly and prevents curling. -
Wait for Full Cure:
Allow the pieces to dry completely for 24 to 48 hours. They should feel hard and room temperature to the touch, not cool or damp. -
Sand Imperfections:
Once fully dry, check the edges again. If there are any sharp spots, very gently buff them away with fine-grit sandpaper until smooth.
Fixing Cracks
If small cracks appear as the clay dries, make a ‘slurry’ by mixing a tiny bit of fresh clay with water. Paint this paste into the crack and smooth it out with your finger.
Step 3: Finishing Touches
-
Draw the Faces:
Using a fine-tip permanent marker or paint pen, carefully draw the sleepy eyes and smiling mouth. If you stamped the impression earlier, simply trace inside the grooves for a clean look. -
Detail the Lashes:
Add tiny, delicate strokes branching off the closed eyelids to create the sweet eyelashes characteristic of this design. -
Seal the Blue Moon:
To make the texturing on the dark blue moon pop, apply a thin layer of glossy varnish. This gives it a celestial shine compared to the matte finish of the clay stars. -
Prepare the Hardware:
Use two pairs of jewelry pliers to twist a gold jump ring open. Always twist side-to-side rather than pulling the ends apart to maintain the circle’s strength. -
Attach the Ring:
Slide the open jump ring through the hole you created in the clay shape. -
Close the Loop:
Use your pliers to twist the jump ring back into a closed position, ensuring the ends are flush so the charm doesn’t slip off.
Now you have a handful of dreamy charms ready to be turned into gifts or worn as your new favorite accessory
Tiny Tooth Fairy Boxes
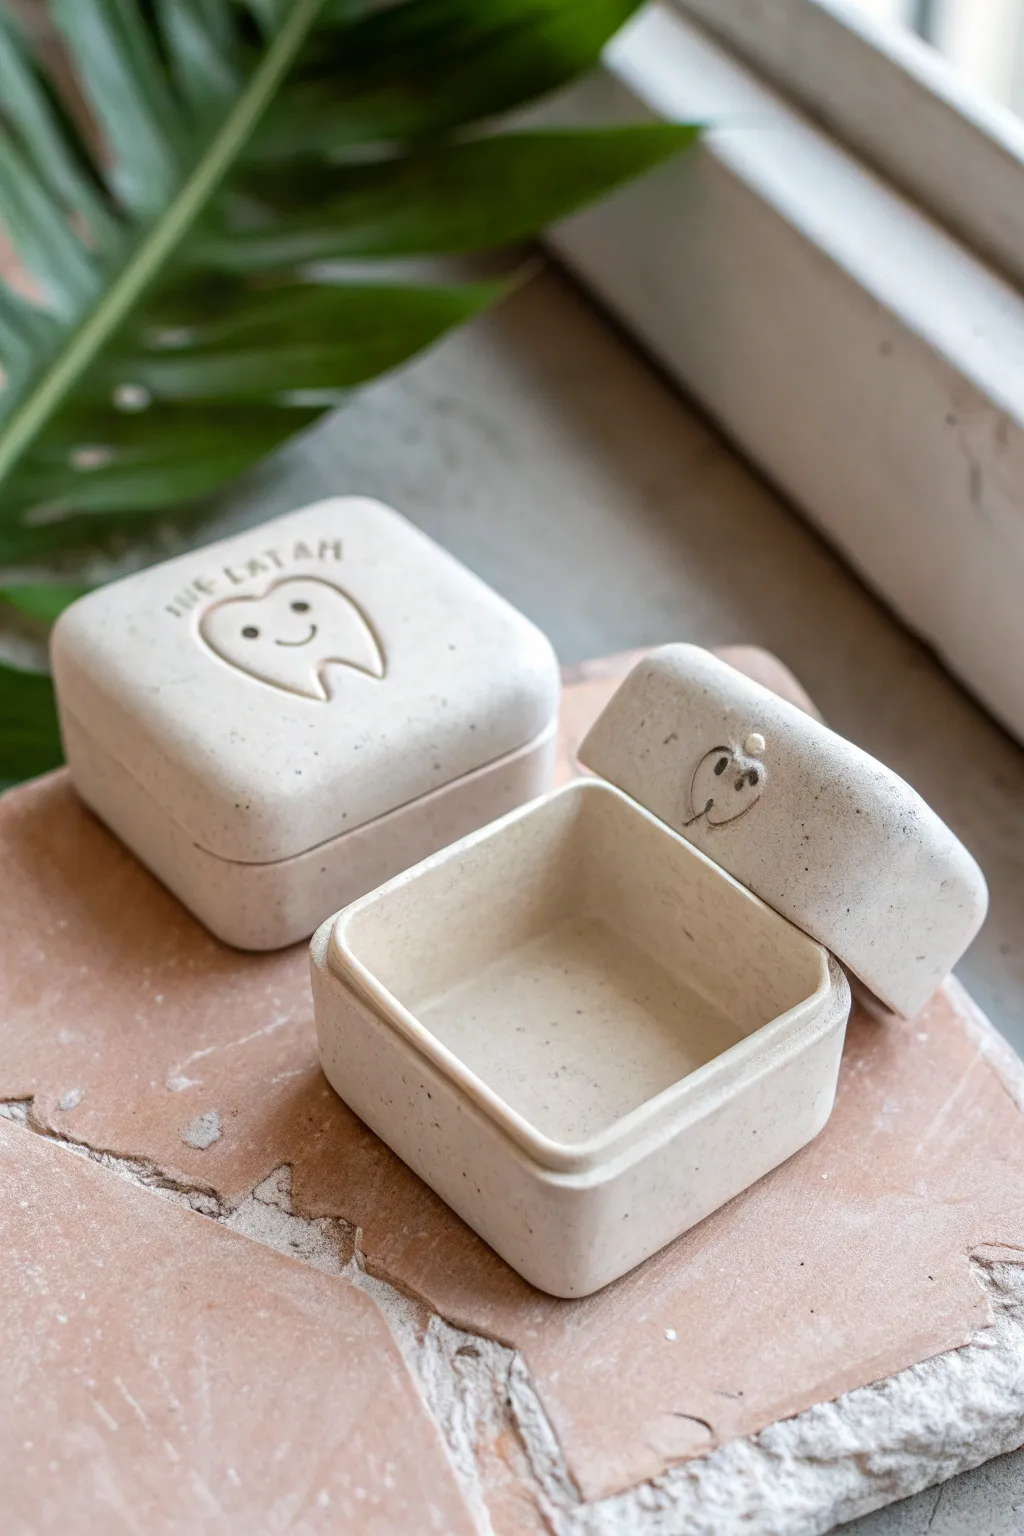
These adorable speckled trinket boxes are the perfect size for safeguarding a lost tooth until the Tooth Fairy arrives. They feature a clean, minimal design with a charming indented tooth motif on the lid for a playful touch.
Step-by-Step
Materials
- Stone-effect or speckled air dry clay
- Rolling pin
- Square cookie cutter (approx. 2 inches)
- Small craft knife or clay blade
- Small bowl of water
- Fine grit sandpaper
- Toothpick or needle tool
- Black acrylic paint
- Small detail paintbrush
- Matte varnish or sealant
Step 1: Shaping the Box Base
-
Roll and cut the slab:
Begin by rolling out your speckled clay to an even thickness of about 1/4 inch. Using your square cookie cutter, punch out a square for the base of the box. -
Create the walls:
Roll out a long strip of clay, maintaining the same 1/4 inch thickness. Cut this strip so its width matches the desired height of your box (around 1 to 1.5 inches). -
Measure the perimeter:
Measure the length of the strip against the perimeter of your square base. Cut the strip to the exact length needed to wrap all the way around the square. -
Score and slip:
Using a needle tool or toothpick, scratch up (score) the edges of the base and the bottom edge of the wall strip. Dab a little water heavily onto the scored areas to create a slip. -
Attach the walls:
Place the wall strip onto the base, wrapping it around the square shape. Press firmly where the ends of the strip meet and smooth the seam together with your finger or a tool so it disappears. -
Smooth the interior:
Use a little water on your finger to smooth the inside seam where the wall meets the floor of the box. This ensures a watertight seal and a professional finish. -
Create the inner lip (optional):
To make the lid sit securely, roll a very thin snake of clay and attach it to the inside rim of the box, extending slightly above the wall line. Smooth it down so the lid has something to grip onto.
Step 2: Crafting the Lid
-
Cut the lid shape:
Roll out more clay, slightly thicker this time. Use the same square cookie cutter to cut the lid piece. Gently stretch it just a tiny bit so it’s slightly larger than the base for an overhang, or keep it flush for a modern look. -
Round the corners:
Gently tap the corners of both the box and the lid against your work surface to soften the harsh points, giving it that smooth, stone-like appearance seen in the photo. -
Impress the design:
While the clay is still soft, use a toothpick or a small sculpting tool to gently press a cartoon tooth outline into the center of the lid. Don’t drag the tool; press and lift to create a clean indentation. -
Add the smile:
Press two tiny dots for eyes and a small curve for a smile inside the tooth outline. I like to use the back end of a paintbrush for the eyes to get perfect circles. -
Stamp text (optional):
If you have tiny letter stamps, press ‘TOOTH’ or a name lightly above the design.
Uneven Walls?
If your box walls are warping, wrap the clay around a small square block or object covered in parchment paper to help it hold its shape while drying.
Step 3: Finishing Touches
-
Dry thoroughly:
Let both pieces dry completely for at least 24-48 hours. Keep the lid off the box so air can circulate everywhere. -
Sand for smoothness:
Once bone dry, take fine-grit sandpaper and gently buff away any fingerprints or rough edges, especially around the rim and corners. -
Paint the details:
Using a very fine brush and black acrylic paint, carefully fill in the indented lines of the tooth, eyes, and mouth. Wipe away any excess immediately with a damp paper towel if you go outside the lines. -
Seal the piece:
Finish by applying a coat of matte varnish to protect the clay and give it a finished feel.
Pro Tip
Dip your finger in water and smooth all edges before drying. This reduces sanding time later and gives the clay that polished, manufactured look.
Set this little box on a nightstand and wait for the magic to happen
Mini Animal Planter Pots With Faces
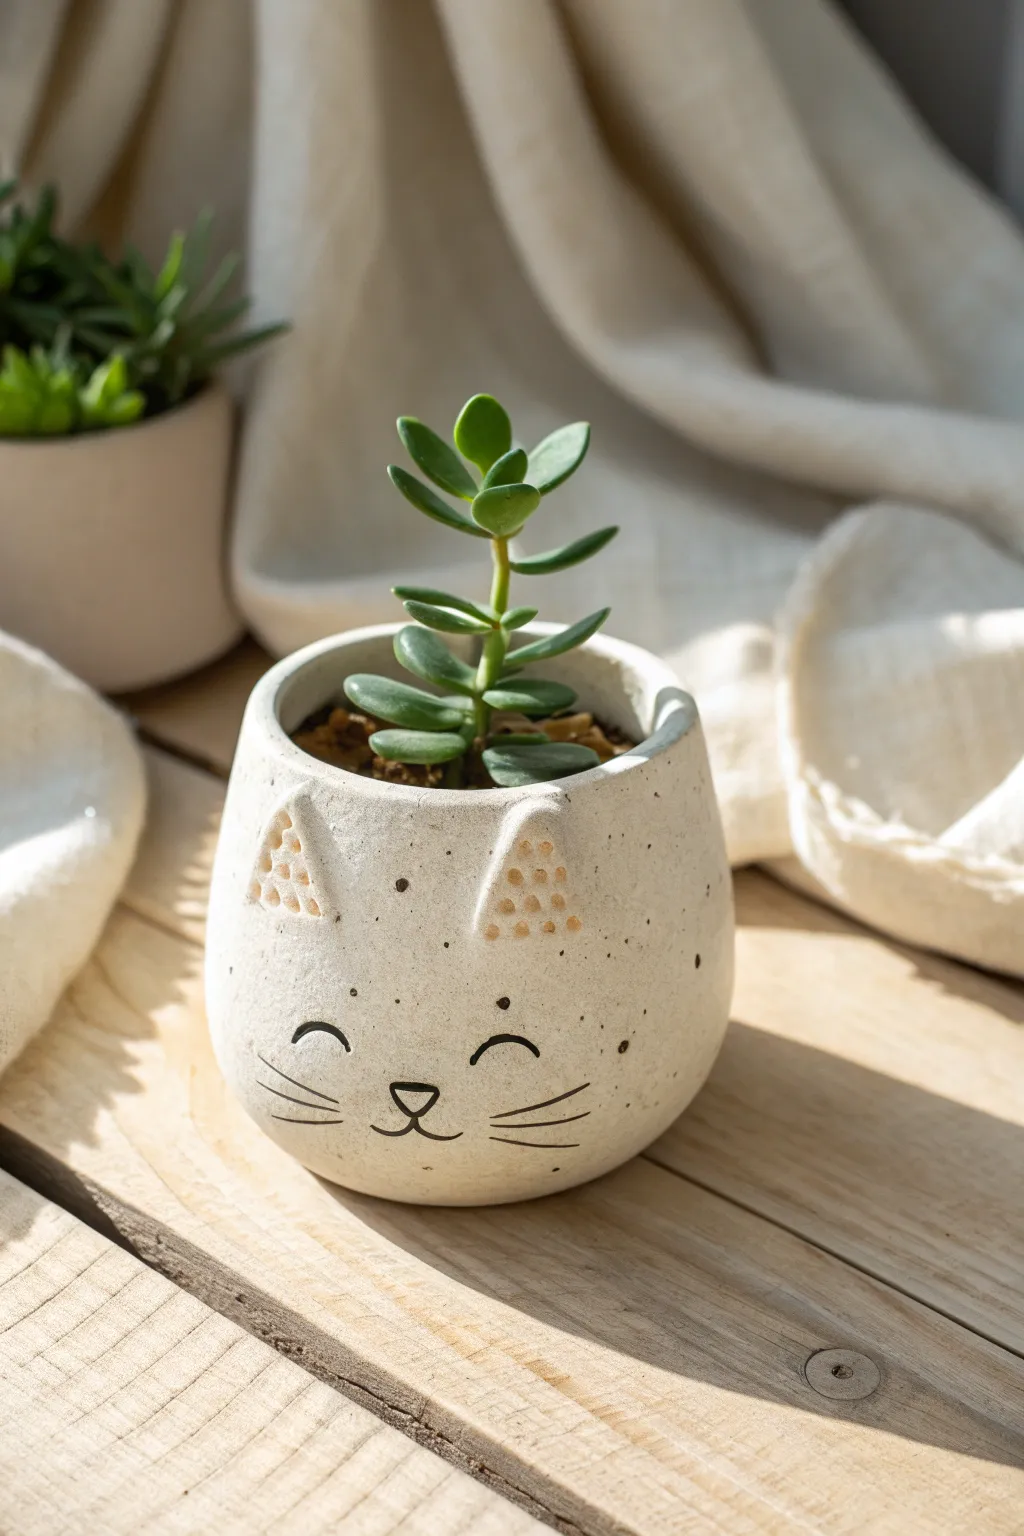
Brighten up your windowsill with this adorable cat-shaped planter, perfect for housing tiny succulents. Its minimal face design and speckled texture give it a charming, modern ceramic look without needing a kiln.
Step-by-Step Guide
Materials
- White extra-light air dry clay
- Rolling pin
- Small bowl or cup (about 3-4 inches diameter) to use as a mold
- Plastic wrap
- Clay knife or craft knife
- Needle tool or toothpick
- Small sponge
- Water in a small dish
- Fine-grit sandpaper
- Black acrylic paint or black permanent marker
- Small paintbrush (if using paint)
- Acrylic sealer or varnish (matte or satin finish)
- Tan or beige acrylic paint (optional for speckles)
Step 1: Shaping the Base
-
Preparation:
Begin by covering your small bowl or cup with plastic wrap. This will act as the internal mold and ensure the clay doesn’t stick to the surface. -
Roll the Clay:
Take a generous handful of white air dry clay and knead it briefly until pliable. Roll it out on a flat surface to an even thickness of about 1/4 inch. -
Cut the Base:
Place your wrapped bowl upside down on the rolled clay and cut a circle around the rim using your craft knife. This circle will be the bottom of your pot. -
Construct the Walls:
Roll out a long rectangular strip of clay, wide enough to match the height of your bowl (about 2.5 to 3 inches) and long enough to wrap all the way around it. -
Attach the Walls:
Wrap the strip around the plastic-covered bowl. Score (scratch) the edges where the clay meets, apply a little water, and press the seam together firmly to join the ends. -
Join Bottom and Sides:
Place the clay cylinder onto the circular base. Score and slip the contact points, then smooth the clay from the walls down onto the base to create a seamless connection. -
Smoothing:
Use a damp sponge or your finger dipped in water to smooth out all seams, fingerprints, and cracks. I find it helpful to rotate the pot slowly to ensure an even curve.
Smooth Seams Secret
Running a wet finger over joined seams is good, but rolling a round paintbrush handle over the seam helps compress the clay for a truly invisible bond.
Step 2: Adding Features
-
Form the Ears:
Roll two small triangles of clay for the ears. They should be roughly equitable in size, slightly thick at the base and tapering to a rounded point. -
Attach the Ears:
Score the top rim of the pot where the ears will sit. Add a dab of water and press the ears firmly onto the rim. Smooth the clay downwards into the pot body so they are securely attached. -
Texturing the Ears:
Using a needle tool, gently press a triangular grid of small dots into the front face of each ear to create a decorative inner-ear texture. -
Drying:
Let the pot sit on the mold for a few hours until it feels stiff enough to hold its shape. Then, carefully remove the mold and plastic wrap. Allow the pot to dry completely for 24-48 hours until hard and white.
Step 3: Finishing Touches
-
Sanding:
Once fully dry, lightly sand any rough edges or uneven spots with fine-grit sandpaper to achieve a smooth, professional finish. -
Speckling:
To mimic the stone look in the photo, dilute a tiny drop of tan or black paint with water. Load an old toothbrush or stiff brush and flick tiny speckles onto the pot. Keep this very subtle. -
Painting the Face:
Using a fine paintbrush and black acrylic paint (or a permanent marker for easier control), draw two curved lines for smiling eyes. -
Nose and Whiskers:
Paint a small, upside-down triangle for the nose directly between the eyes. Add three thin whisker lines on each cheek and a small ‘w’ shape for the mouth connected to the nose. -
Sealing:
Protect your work by applying a coat of matte or satin acrylic sealer. This is crucial for planters to prevent moisture from degrading the clay.
Prevent Cracking
If the clay cracks while drying, fill the crack with a ‘slurry’ (a paste made of clay scraps and water), let it dry again, and sand it smooth.
Pop in a small succulent and enjoy your charming handmade creation
Cute Bubble-Edge Trinket Trays
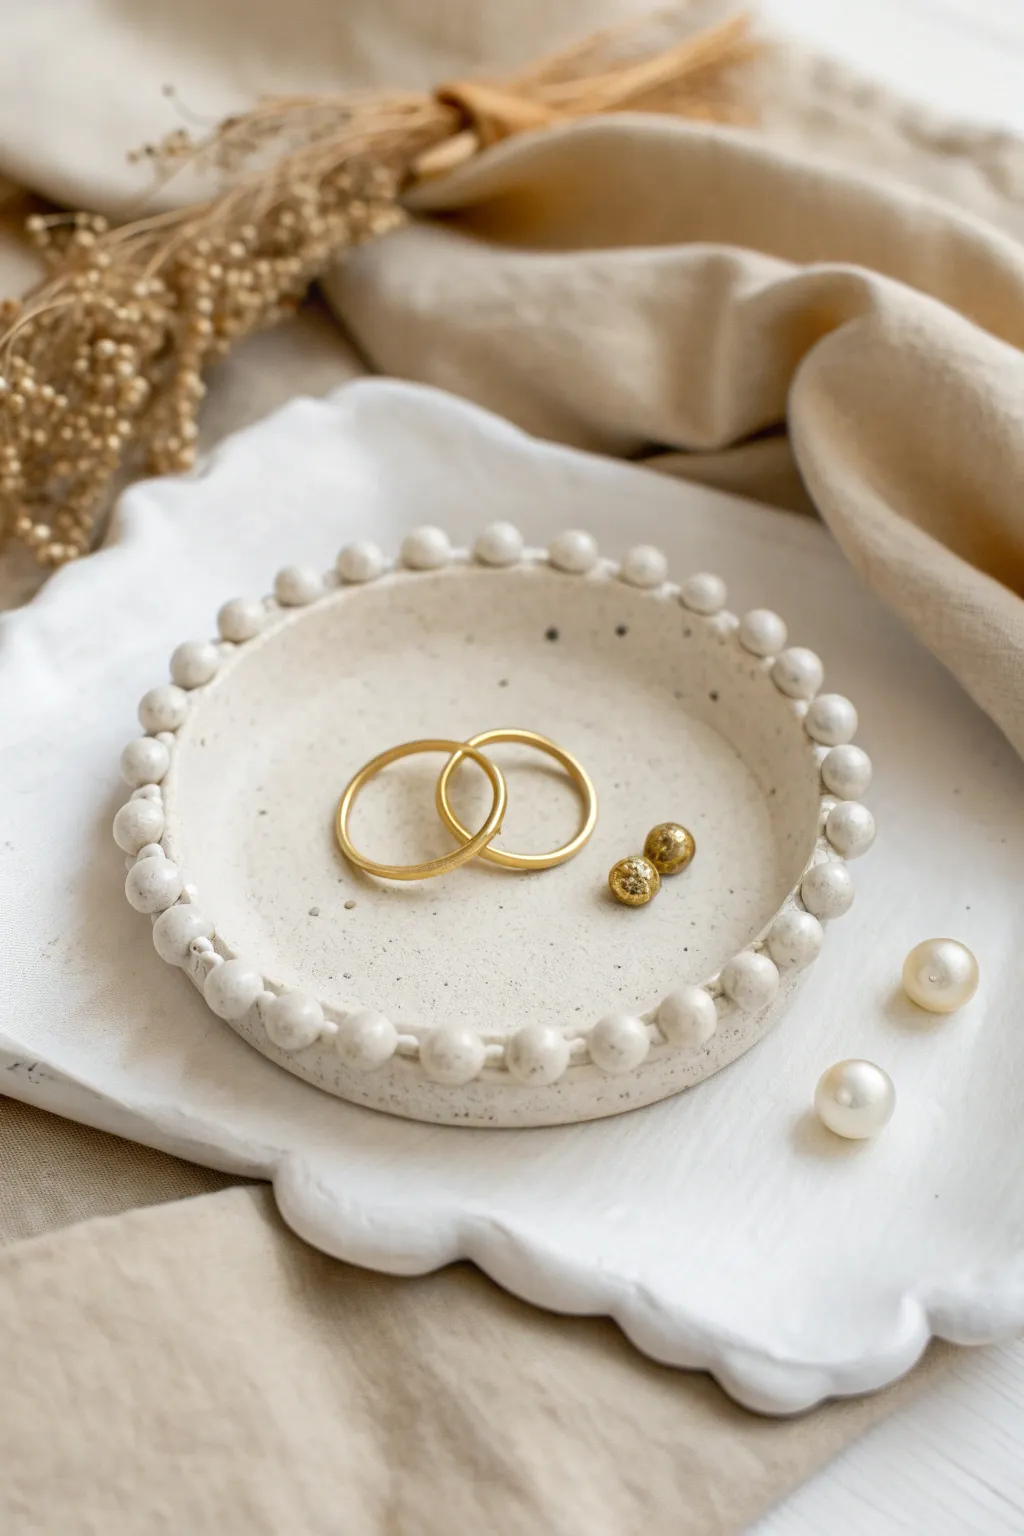
This elegant little tray features a charming beaded rim that looks like a string of pearls wrapped around your jewelry. The subtle speckled finish gives it a high-end ceramic look without needing a kiln, making it the perfect home for your favorite rings.
How-To Guide
Materials
- White air-dry clay (smooth texture)
- Acrylic rolling pin
- Circle cutter (approx. 4 inches) or a bowl to trace
- Craft knife
- Small bowl relative to your circle size (optional, for drying shape)
- Sponge
- Fine grit sandpaper
- Dark brown or black acrylic paint
- Old toothbrush
- Gloss or matte varnish
- Bowl of water
- Needle tool or toothpick
Step 1: Creating the Base
-
Prep the clay:
Start by kneading a handful of white air-dry clay until it is warm, pliable, and free of air bubbles. -
Roll it out:
Roll the clay onto a smooth surface or canvas cloth to a thickness of about 1/4 inch (6mm). Try to keep the thickness consistent across the slab. -
Cut the circle:
Use a large circle cutter or the rim of a bowl to cut out your base shape. Remove the excess clay and set it aside for the bead rim. -
Smooth the edges:
Dip your finger in a little water and gently run it along the cut edge of the circle. This softens the sharp angle left by the cutter. -
Add a slight curve:
Gently lift the edges of the circle with your fingers to create a shallow dish shape. Alternatively, you can place the clay circle inside a slightly larger shallow bowl to help it hold a curved form while you work.
Seamless Size Trick
Make a “snake” of clay first and cut it into equal segments before rolling your balls. This ensures every single bead on the rim is exactly the same size.
Step 2: Beading the Rim
-
Create uniform balls:
Take the excess clay and roll small, individual spheres between your palms. Aim for pea-sized balls, about 1cm in diameter. You will need roughly 25-30 depending on your dish size. -
Score the surface:
Taking your needle tool, gently scratch (score) the very top edge of your clay dish base where the beads will sit. -
Attach the first bead:
Dab a tiny amount of water or liquid clay slip onto the scored area. Press the first clay ball gently onto the rim so it adheres, but don’t smash it flat. -
Complete the circle:
Continue attaching balls side-by-side all the way around the rim. Press them slightly into each other as well as the base to ensure a strong bond. -
Blend the underside:
This is a crucial step for durability: flip the dish over carefully (or hold it up) and use a tool to gently smudge the bottom of each bead into the rim of the plate underneath, so they don’t pop off later. -
Refine the shape:
Once all beads are attached and blended from below, use a damp sponge to smooth out any fingerprints or tool marks on the balls.
Metallic Magic
After the sealant dries, paint just the beaded rim with gold leaf or liquid gilding. The contrast between raw speckled clay and gold looks incredibly luxurious.
Step 3: Finishing Touches
-
Dry thoroughly:
Let the dish dry completely for 24-48 hours. I find flipping it over halfway through the drying process helps the bottom dry evenly. -
Sand for perfection:
Once bone dry, use fine-grit sandpaper to gently smooth the rim and the surface. Be very gentle with the beaded area. -
Create the speckled mix:
Dilute a very small amount of dark brown or black acrylic paint with water until it is quite runny/inky. -
Apply the speckles:
Dip an old toothbrush into the paint mixture. Hold it over the dish and run your thumb across the bristles to flick tiny splatters of paint onto the clay for a faux-stone effect. -
Seal the piece:
Allow the paint speckles to dry completely, then coat the entire dish with a matte or gloss varnish to protect it from moisture.
Place this lovely detailed dish on your nightstand and enjoy having a stylish spot for your daily jewelry
Mix-and-Match Mini “Blob” Monsters
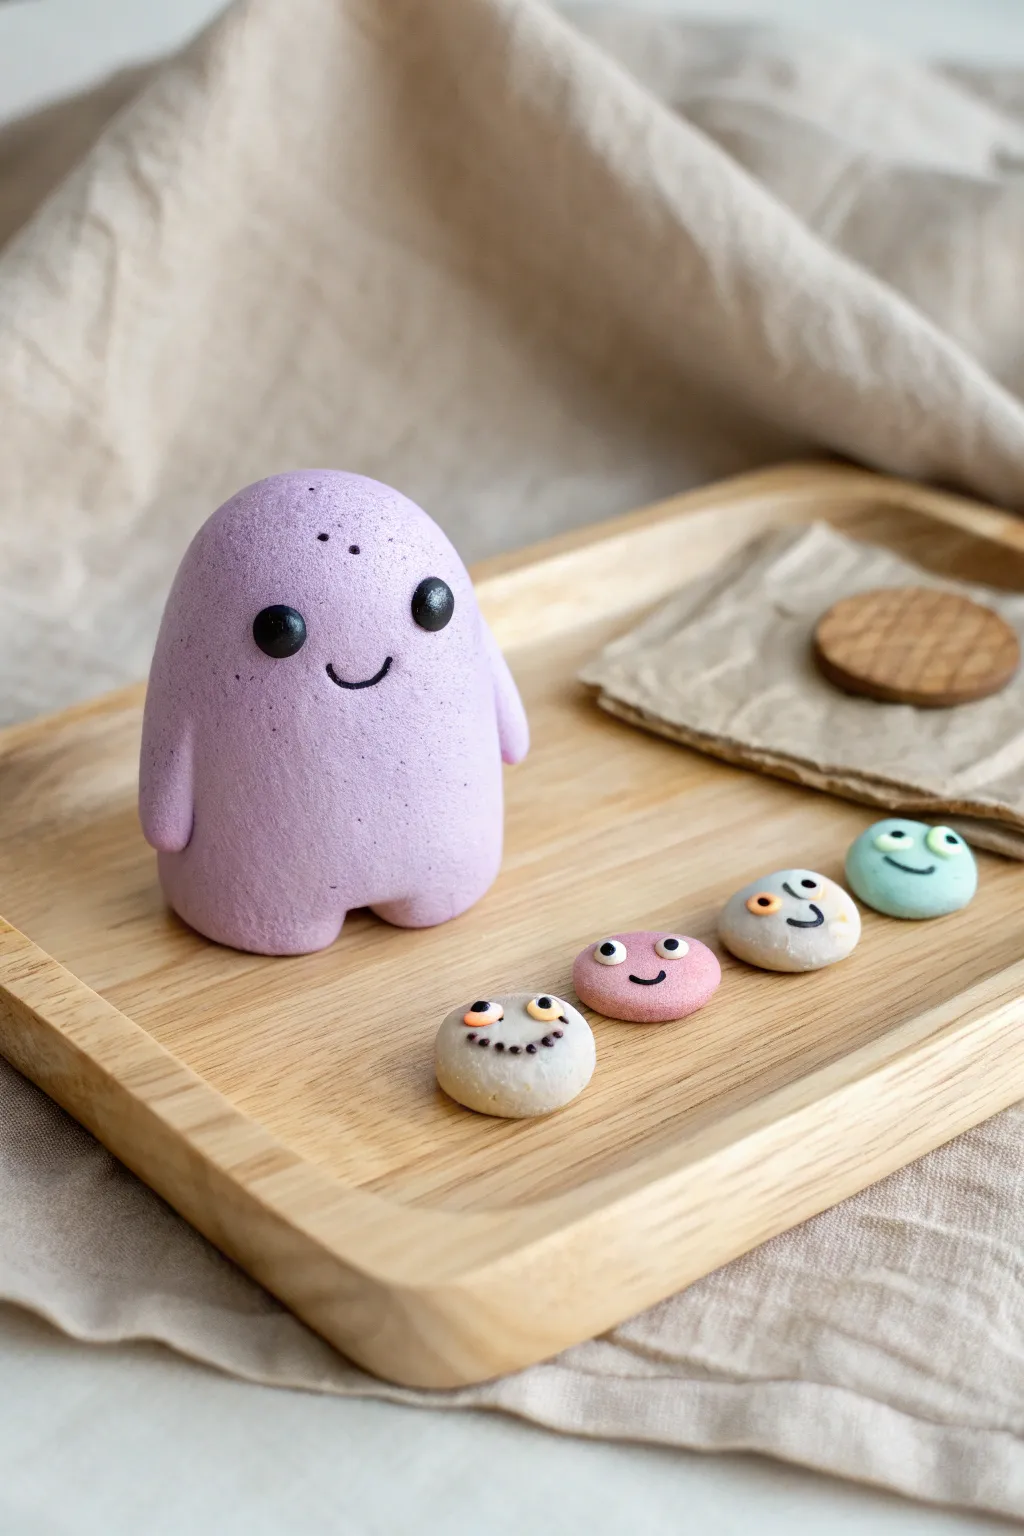
Create this adorable, minimalist purple monster and its tiny colorful companions to brighten up any desk or shelf. The soft matte finish and simple geometric shapes make this a perfect, low-pressure project for air-dry clay beginners.
Step-by-Step Tutorial
Materials
- Air-dry clay (white)
- Acrylic paints (purple, black, beige, pink, teal, white, orange)
- Rolling pin
- Small ball tool or dotting tool
- Fine-grit sandpaper
- Paintbrushes (small detail brush and medium shader)
- Water cup
Step 1: Sculpting the Main Monster
-
Form the base body:
Take a large handful of white air-dry clay and roll it into a smooth ball. Slowly elongate it into a tall gumdrop or egg shape, pressing the bottom gently onto a flat surface to make it stand. -
Refine the shape:
Smooth out any fingerprints with a little water on your finger. The goal is a seamless, rounded dome top with slightly straighter sides. -
Create the legs:
At the bottom center of the creature, use a modeling tool or your finger to push up an indentation, creating an arch that separates two sturdy little legs. -
Add the arms:
Roll two small, thin logs of clay. Attach them vertically to the sides of the body, blending the top seam so they look like they are hanging naturally. -
Smooth everything out:
Do a final pass with a damp finger to ensure all seams are invisible and the surface is texture-free. I prefer to let this dry for at least 24 hours before painting.
Cracks happen!
If small cracks appear while drying, mix a tiny bit of fresh clay with water to make a paste (slip) and fill the cracks, then smooth over.
Step 2: Creating the Mini Companions
-
Roll the small rounds:
Pinch off four small pieces of clay, roughly coin-sized. Roll each into a ball and then flatter them gently into thick discs. -
Shape the varied eyes:
For the companions, you can either sculpt the eyes now or paint them later. For the sculpted look shown, add tiny balls of clay to the surface for 3D eyes. -
Indenting details:
If you want indented mouths, use a small tool to press gentle smiles into the wet clay discs.
Step 3: Bringing Them to Life with Color
-
Sand for perfection:
Once fully dry, lightly sand the main purple figure to remove any bumps, creating that flawed, stone-like texture. -
Mix the purple base:
Mix purple acrylic paint with a generous amount of white to achieve a soft, pastel lavender. Paint the entire large figure, applying two coats if necessary for opacity. -
Stipple technique:
To get the speckled texture seen in the photo, dip an old toothbrush or stiff brush in darker purple paint and lightly flick or stipple it onto the dry lavender base. -
Paint the companions:
Paint the small discs in your chosen colors: beige, soft pink, grey, and teal. Let them dry completely. -
Adding the faces:
Using a fine detail brush and black paint, draw the simple smiles. For the eyes, you can paint solid black circles or defined outlines depending on the character. -
The big eyes:
For the main monster, paint two large, glossy black circles wide apart. Add tiny white reflection dots if you want extra cuteness. -
Little quirky details:
Don’t forget the tiny details on the minis, like orange eyelids or little freckles, using the very tip of your smallest brush.
Make them functional
Before drying, insert a heavy rare-earth magnet into the back of the small discs to turn these cute monster faces into custom fridge magnets.
Now you have a charming little clay family ready to keep you company