Whenever I’m craving a quick sculpting win, I reach for air dry clay and start building a little character from simple shapes. Here are my favorite air dry clay figure ideas, starting with the classics and ending with a few studio-style surprises.
Tiny Sitting Cat Figurine
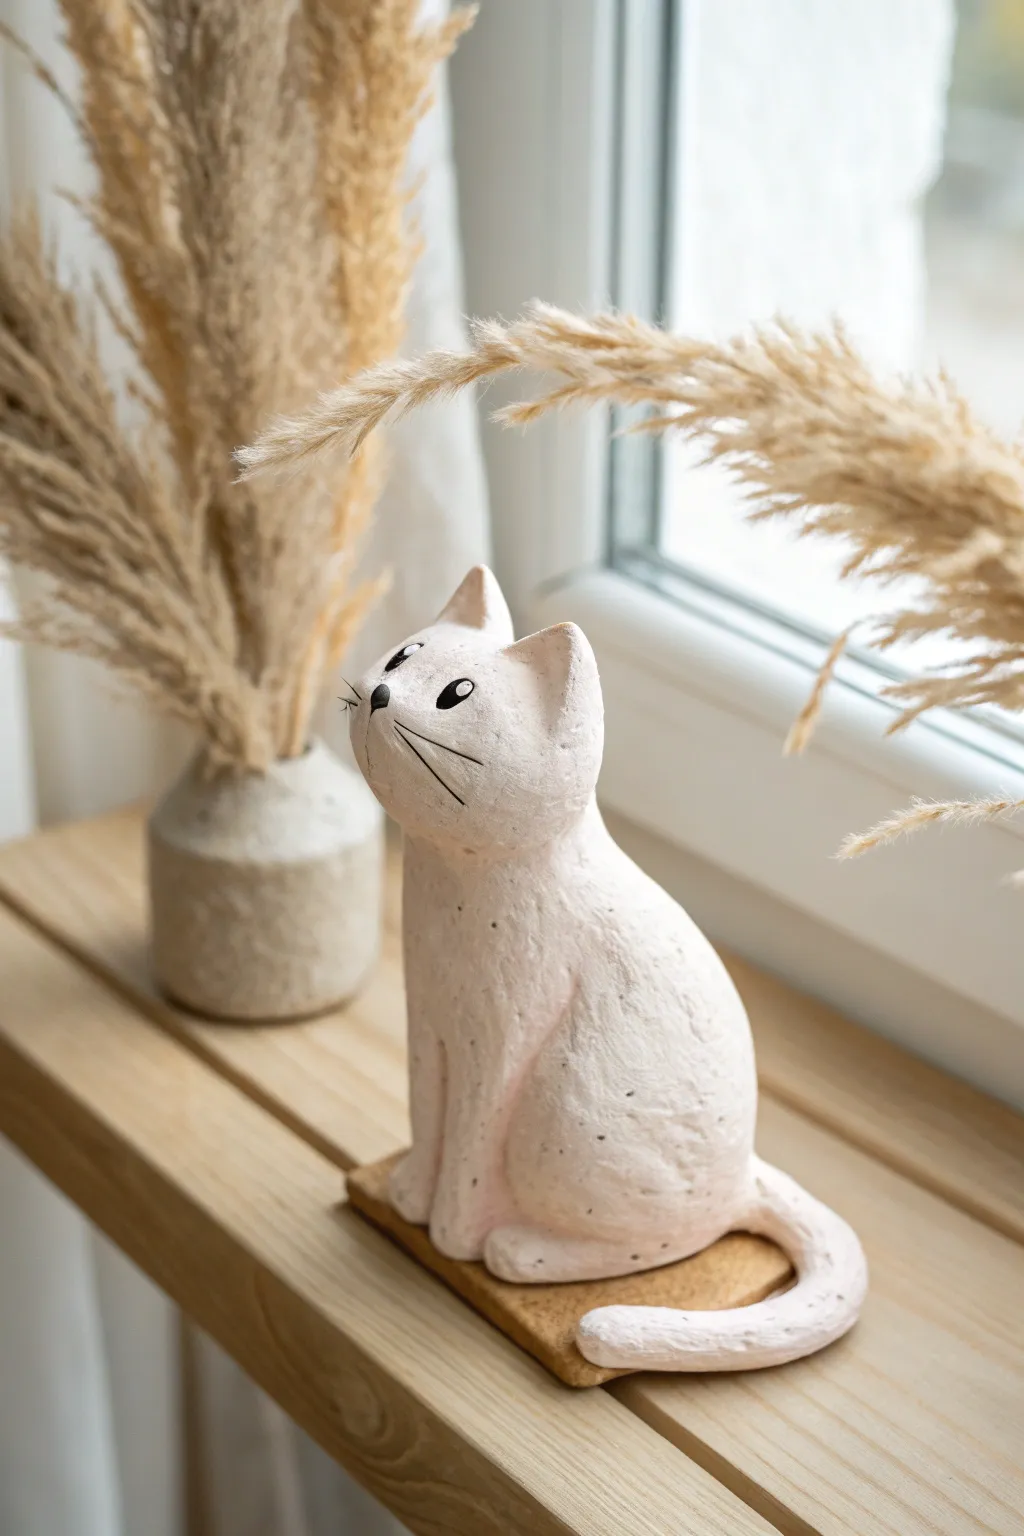
Create this charming, minimalist cat figure that gazes sweetly upward, perfect for a windowsill perch. The textured, slightly speckled finish gives it a lovely, rustic stone-like appearance while remaining lightweight.
Step-by-Step Tutorial
Materials
- Air-dry clay (white or natural)
- Small wooden base (rectangular)
- Black acrylic paint
- Fine liner brush or black permanent marker
- Sculpting tools (or a toothpick and butter knife)
- Water
- Sandpaper (fine grit)
- Sponge or textured cloth
- Speckled stone spray paint or diluted paint for speckling
Step 1: Forming the Body
-
Shape the torso:
Begin with a fist-sized ball of clay. Roll it into a smooth pear shape, making the bottom wider and heavier for stability while slightly tapering the top where the neck will be. -
Enhance the posture:
Gently press the pear shape onto your work surface to flatten the base. Push the ‘chest’ area forward slightly to give the cat an alert, sitting posture. -
Define the legs:
Using a modeling tool or knife, carve a vertical line down the front center of the chest to separate the two front legs. Smooth the edges so they look like rounded limbs rather than sharp cuts. -
Create the haunches:
Roll two smaller flattened ovals of clay. Press these onto the sides of the lower body to form the rear haunches, blending the clay seamlessly into the main body with a little water.
Use wire armature
For added strength, especially in the neck, insert a crumpled ball of foil or a wire core into the body before adding the outer layer of clay.
Step 2: Sculpting the Head & Tail
-
Form the head:
Roll a smaller sphere for the head. Slightly flatten the front to create a face plane, and pinch the top corners gently to pull out two triangular ear shapes. -
Attach the head:
Score the top of the neck and the bottom of the head with a cross-hatch pattern. Add a drop of water or slip, then press the head firmly onto the body. Tilt it upward so the cat looks like it’s gazing at the sky. -
Refine the neck:
Add a small coil of clay around the seam where the head meets the body. Smooth this coil out completely to create a strong, seamless neck transition. -
Add the tail:
Roll a long snake of clay for the tail. Attach one end to the lower back of the figure, wrapping it around the side and curling it neatly onto the base area near the front paws. -
Texturize the surface:
To mimic the rustic look in the photo, dab the entire surface of the wet clay with a sponge or a crumpled ball of foil. This removes fingerprints and adds a stone-like texture.
Metallic accent
Make it chic by painting just the tip of the tail and the ears with liquid gold leaf for a modern, elegant twist.
Step 3: Finishing Touches
-
Dry thoroughly:
Allow your cat to dry completely. Depending on the thickness, this may take 24-48 hours. Turn it occasionally to ensure airflow to the bottom. -
Sand and prep:
Once dry, lightly sand any sharp ridges or bumps, but leave the overall sponged texture intact. -
Initial painting:
Paint the entire figure with a coat of creamy white or pale pink acrylic paint. I find a matte finish looks best for this style. -
Create the speckled effect:
Mix a tiny amount of grey or brown paint with water. Load a stiff brush and flick the bristles to splatter tiny specks across the cat for a faux-stone finish. Alternatively, use a specialty stone-effect spray. -
Paint the face:
Using a fine liner brush or marker, draw two solid black ovals for eyes with small white reflection dots. Add a small triangular nose and three whiskers on each cheek. -
Mount to base:
Glue the finished cat onto a small wooden rectangle. This acts as a sturdy plinth and completes the sculptural look.
Now you have a serene little feline friend ready to keep you company on your desk or shelf


Chubby Penguin Buddy
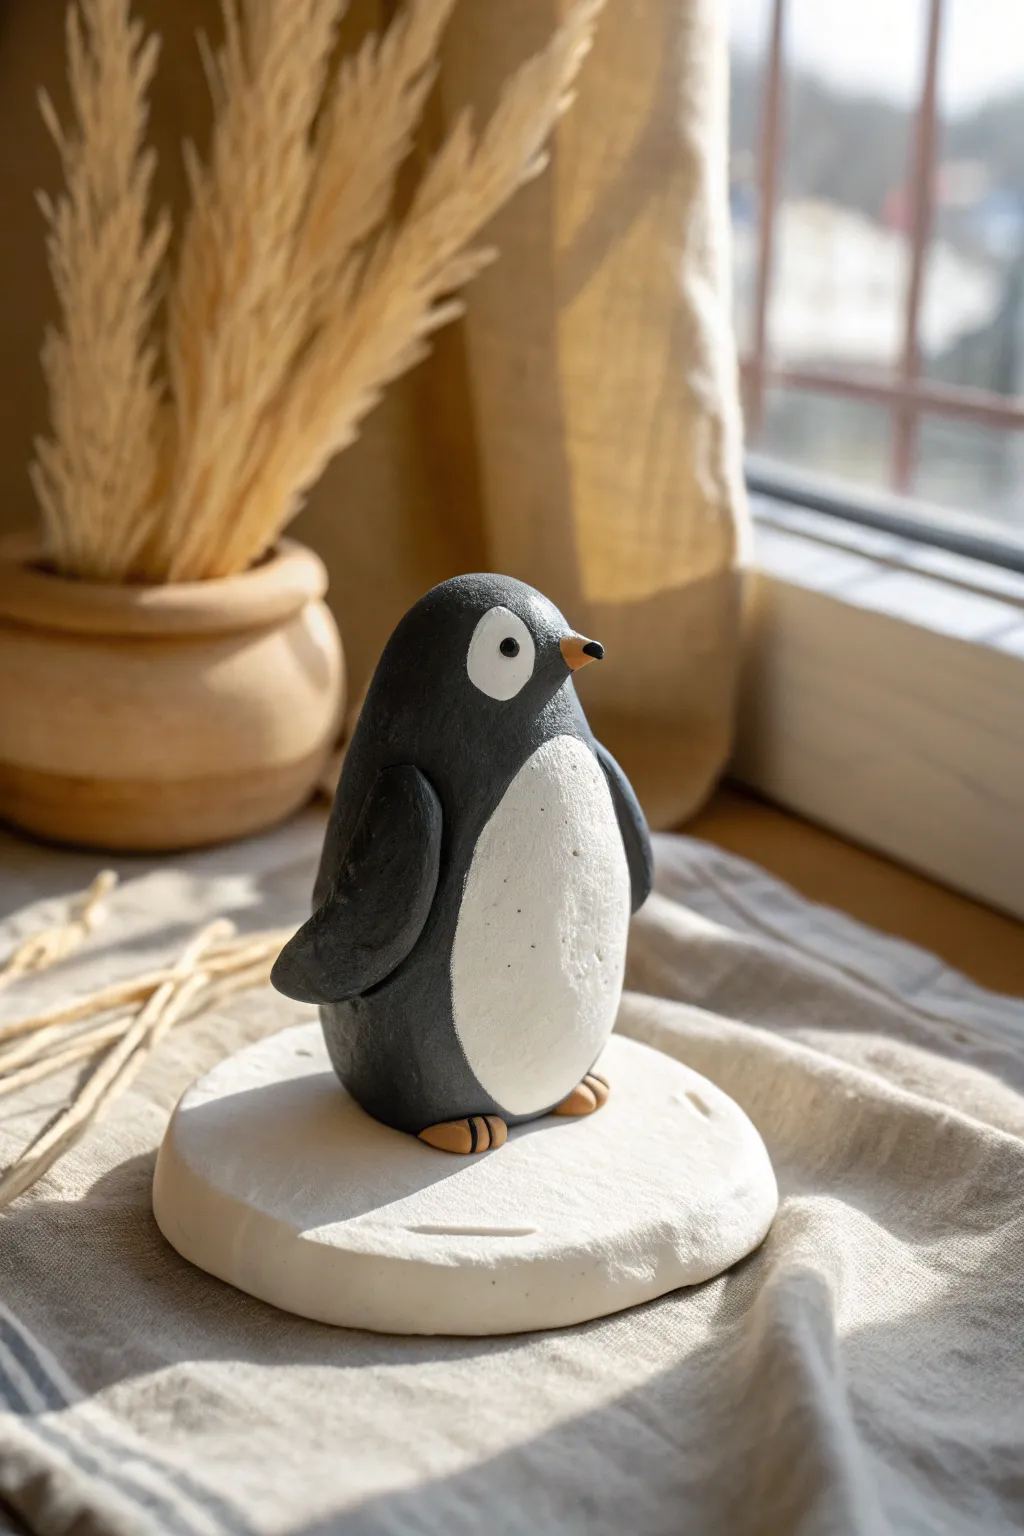
Create your own frosty friend with this adorable air-dry clay penguin project. Featuring a charmingly round body and standing proudly on its own little ice floe, this figurine brings a touch of winter whimsy to any desk or shelf.
Step-by-Step Guide
Materials
- Air-dry clay (white)
- Acrylic paints (black, white, orange/yellow ochre)
- Fine grit sandpaper
- Small rolling pin
- Clay carving tools or a toothpick
- Small paintbrush
- Water cup (for smoothing)
- Varnish (optional, matte or satin)
Step 1: Sculpting the Body
-
Form the core:
Start with a generous handful of clay and knead it until soft and pliable. Roll it into a smooth ball, then gently elongate it into a teardrop or egg shape. This will be your penguin’s main body. -
Flatten the base:
Tap the wider bottom end of your egg shape onto your work surface to create a flat stable base so the penguin can stand upright on its own. -
Shape the head:
Subtly mold the narrower top part to define the head area. You want a smooth transition rather than a distinct neck, keeping that cute, chubby silhouette. -
Create the wings:
Take two smaller balls of clay and flatten them into teardrop shapes. Attach these to the sides of the body, blending the top edge into the shoulder area with a little water so they look seamless. -
Add the feet:
Roll two tiny balls of clay for the feet. Flatten them slightly and use a knife tool to press two indentations into each for toes. Attach these under the front edge of the belly. -
Attach the beak:
Form a very small cone of clay for the beak. Using a dab of water, attach it to the center of the face area, slightly pointing downwards. -
Smooth the surface:
Dip your finger in water and gently run it over the entire sculpture to erase fingerprints and smooth out any bumps. I find this step crucial for getting that professional finish.
Seamless Blending
Use a sculpting tool to drag clay across the seam where wings attach to the body, then smooth it with water. This prevents cracks from forming as it dries.
Step 2: Creating the Ice Floe
-
Roll the base:
Take a separate chunk of clay and roll it out until it’s about a quarter-inch thick. You want a nice, heavy base to support the figure. -
Cut the shape:
Use a round cutter or freehand a rough circle to create the ice floe. Smooth the edges with a wet finger to rounded them off so it looks like a melting ice chunk. -
Check the fit:
Before the clay dries, place your penguin on the base to ensure it fits well. You won’t glue it yet, just check the proportions. Then, set both pieces aside to dry completely for 24-48 hours.
Scarf it Up
Before drying, sculpt a tiny scarf from a flat strip of clay and wrap it around the penguin’s neck. Paint it red or green later for a festive holiday vibe.
Step 3: Painting and Assembly
-
Sand imperfections:
Once fully dry, lightly sand any rough spots on the penguin and the base with fine-grit sandpaper. Wipe away the dust with a barely damp cloth. -
Paint the belly:
Start painting by outlining a large oval on the penguin’s front for its white belly. Fill this area in with white acrylic paint. You may need two coats for opaque coverage. -
Paint the face details:
Paint a white circle around where the eye will go on each side of the head. Let this white layer dry completely. -
Apply the dark coat:
Carefully paint the rest of the body—back, head, and wings—with black or dark charcoal grey paint. Use a steady hand to create a clean line where the dark feathers meet the white belly. -
Detail the beak and feet:
Paint the beak and feet with an orange or yellow ochre color. Adding a tiny touch of brown can give the feet a more realistic, earthy tone. -
Add the eyes:
Using the handle end of a paintbrush or a dotting tool, place a black dot inside the white face circles for the eyes. Add a tiny white speck inside the black dot for a lively glint. -
Paint the base:
Paint the round base entirely white. For texture, you can dab the paint on thickly to mimic snow or ice. -
Final assembly:
Once all paint is dry, use a strong craft glue or epoxy to permanently attach the penguin to the center of the ice floe base.
Give your cold-weather buddy a prime spot near a window or plant to show off their cool new look


Sleepy Dog on a Little Pillow
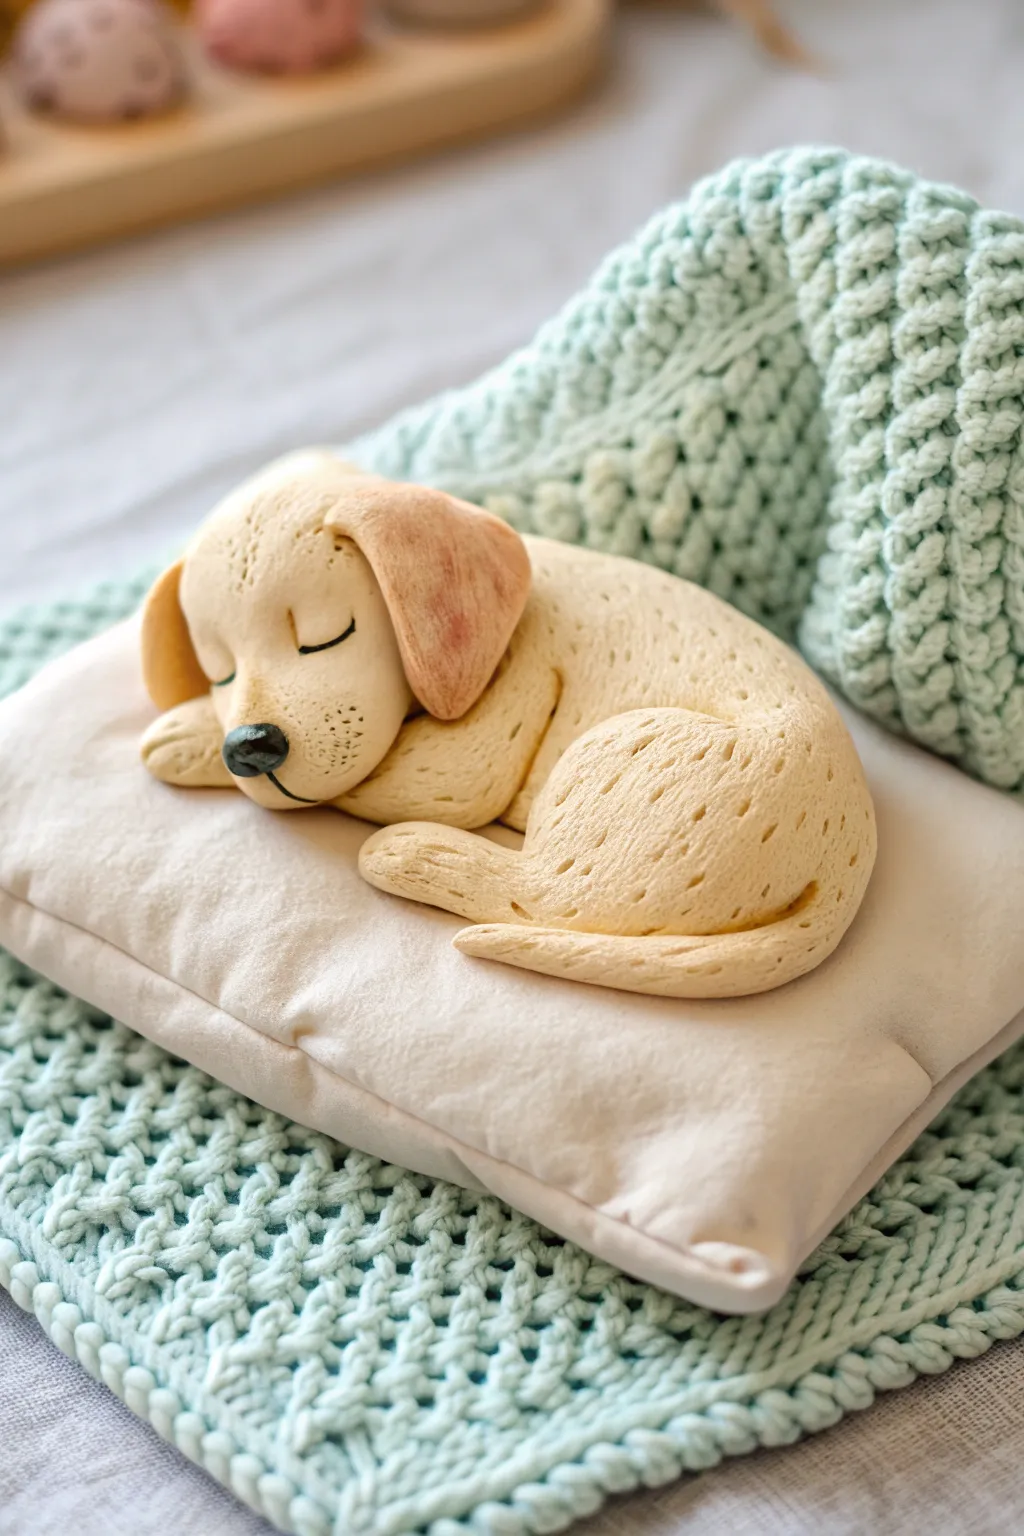
Capture the peaceful sweetness of a sleeping puppy with this charming air dry clay project. You’ll sculpt a textured golden retriever-style dog resting comfortably on its own little fabric cushion, creating a cozy display piece.
Step-by-Step Tutorial
Materials
- Beige or cream air dry clay
- Small piece of cream fabric (cotton or velvet)
- Fiberfill stuffing or cotton balls
- Clay sculpting tools (needle tool, ball tool)
- Black acrylic paint
- Soft pastels (brown and pink)
- Small paintbrush
- Needle and ivory thread
- Toothbrush or texture sponge (for fur effect)
- Matte sealant (optional)
Step 1: Sewing the Pillow Base
-
Cut the fabric:
Begin by cutting two identical rectangles from your cream fabric, roughly 4 inches by 3 inches in size. This will form the bed for your little clay friend. -
Stitch the perimeter:
Place the fabric pieces right-sides together and sew around the edges, leaving a small 1-inch gap open on one side for turning. -
Stuff and close:
Turn the fabric right-side out and gently pack it with fiberfill. You want it somewhat flat but puffy enough to look cozy. Hand-stitch the opening closed with a hidden ladder stitch.
Step 2: Sculpting the Head and Body
-
Form the main shape:
Take a large ball of beige clay and roll it into a smooth, thick oval. Gently curve it into a kidney bean shape to emulate a curled-up sleeping posture. -
Shape the head:
Roll a slightly smaller ball for the head. Press it gently onto the ‘neck’ area of the body, smoothing the seam with a little water or slip so the connection is invisible. -
Define the snout:
Pinch the front of the head slightly to pull out a muzzle shape. It shouldn’t be too pointy; keep it rounded and soft for a puppy look. -
Add the back leg:
Create a teardrop shape from clay and flatten it slightly. Press this onto the rear of the body to form the large thigh muscle of the haunch. -
Add the paws:
Roll two small sausage shapes for the front paws. Tuck one under the chin and the other slightly in front of the muzzle. Add a small flattened piece near the back leg for the rear foot. -
Attach the tail:
Roll a tapered snake of clay. Wrap it gently around the front of the paws, curling it near the nose to complete the circle of the sleeping pose.
Cracks appearing?
If you see hairline cracks while drying, mix a tiny bit of fresh clay with water to make a paste. Fill the cracks, smooth it out, and re-texture with your toothbrush.
Step 3: Adding Details and Texture
-
Attach the ears:
Form two flat, triangular teardrops. Press them onto the sides of the head, letting them flop downwards. I like to curve the tips slightly outward so they look relaxed. -
Sculpt the nose:
Take a tiny fleck of black clay (or paint the beige clay black later) and press it onto the tip of the muzzle. Indent two tiny nostrils with a needle tool. -
Mark the eyes:
Using a needle tool or a clay shaper, press two gentle crescent curves into the face to represent closed, sleeping eyelids. -
Texture the fur:
This is the most crucial step for realism. Use a stiff toothbrush or a texturing tool to gently stipple the entire surface of the dog. Press specifically in directional rows to mimic fur growth. -
Define the paws:
Use a knife tool to press small indentations into the paws to separate the individual toes. -
Create pore details:
For the snout area, use a needle tool to poke tiny, random holes where the whiskers would be. This adds a nice contrast to the fuzzy texture elsewhere.
Make it sweeter
Before baking or drying, flatten a tiny ball of pink clay into a tongue shape and position it just peeking out of the mouth for a ‘blep’ effect.
Step 4: Shading and Finishing
-
Pre-dry shading:
While the clay is still slightly damp (or dry, depending on preference), use a dry brush to dust shaved brown pastel chalk onto the ears and the creases of the legs for depth. -
Add warmth:
Dust a tiny bit of pink pastel on the inside of the ear flaps and very lightly on the cheeks to make the puppy look warm and alive. -
Paint the nose and eyes:
Use a fine liner brush and black acrylic paint to darken the nose and carefully trace the sleeping eyelid slits. -
Mounting:
Once the clay is fully hardened (usually 24-48 hours), use a dab of strong glue to secure the puppy permanently onto the fabric pillow you made in step one.
Now you have a serene little companion to keep you company on your desk


Simple Bunny With Long Ears
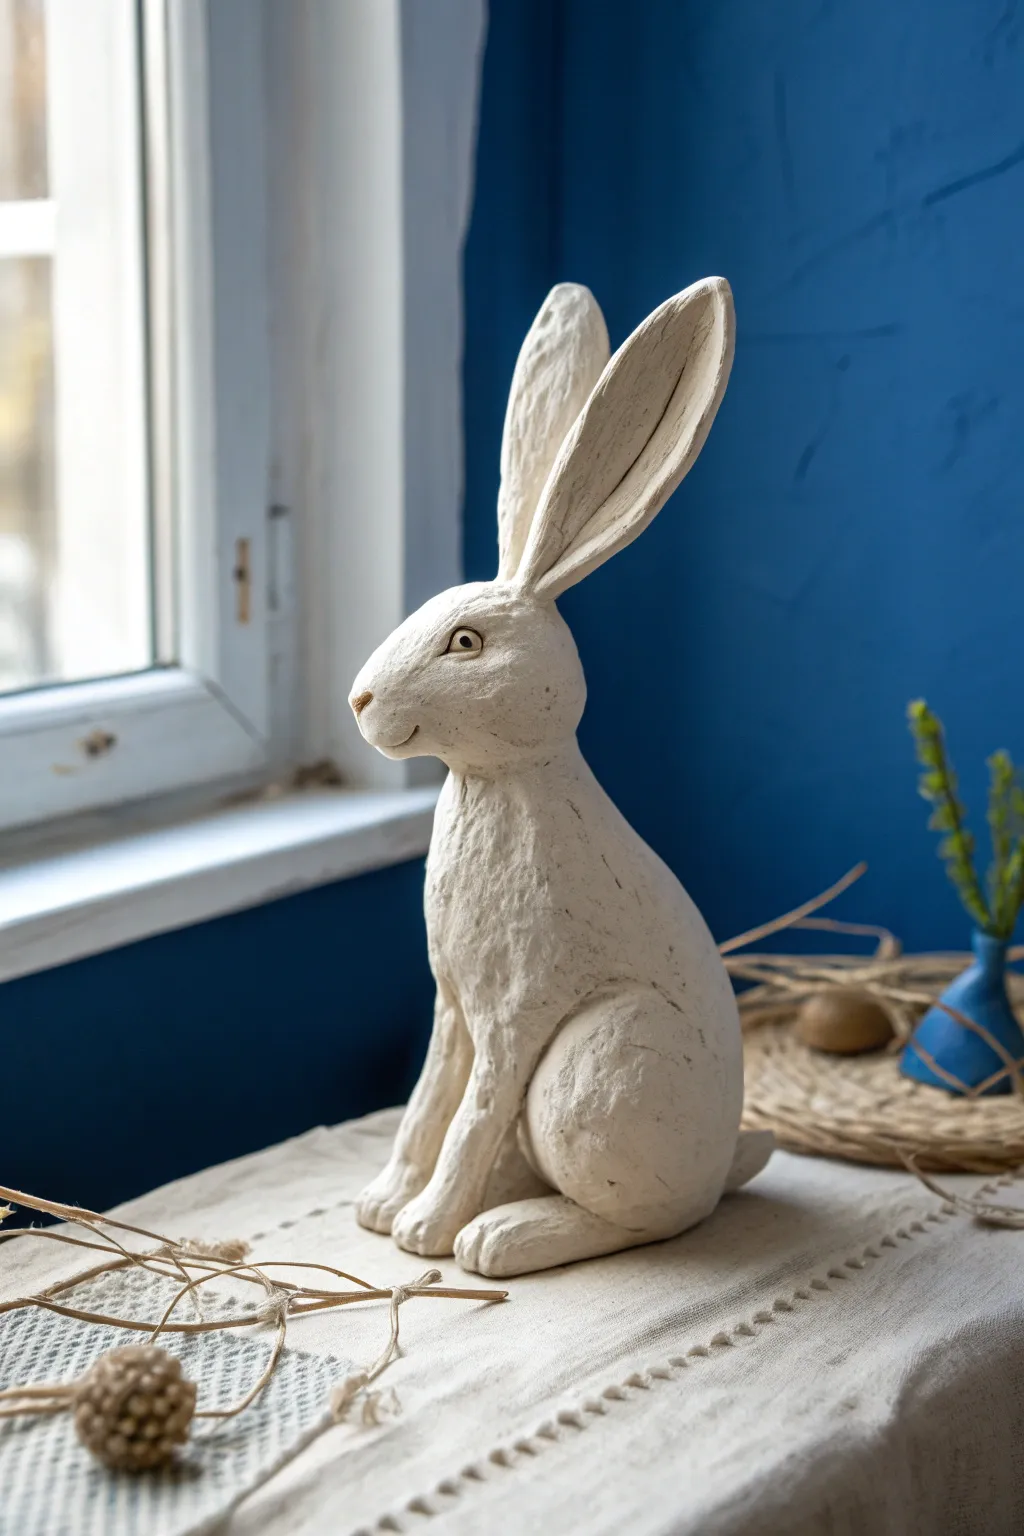
Capture the charm of springtime with this primitive-style hare sculpture, captivating with its impressively tall ears and textured finish. Its unpolished, slightly rough surface gives it an authentic, hand-carved stone appearance perfect for rustic decor.
Step-by-Step Guide
Materials
- White or stone-colored air dry clay (approx. 500g-1kg)
- Aluminum foil (for armature)
- Masking tape
- Thick floral wire (for ear support)
- Small basin of water
- Clay carving tools (needle tool, loop tool)
- Sponge
- Fine grit sandpaper
- Acrylic paint (cream, antique white, light grey)
- Matte varnish
Step 1: Building the Core
-
Form the body armature:
Crumple aluminum foil into a large, elongated teardrop shape to form the main body of the rabbit. It should be wider at the bottom (the haunches) and taper slightly toward the neck. -
Create the head armature:
Make a smaller, slightly flattened oval from foil for the head. It should be roughly one-third the size of the body. Don’t worry about facial details yet; just focus on the general mass. -
Connect the pieces:
Use masking tape to secure the head to the neck area of the body armature. Wrap the tape tightly to ensure the structure is solid and won’t wiggle while you sculpt. -
Support the ears:
Cut two lengths of floral wire, each about 6-8 inches long. Poke them into the top of the foil head where the ears will go, securing them with a bit more foil and tape so they stand upright but curve slightly backward.
Pro Tip: Score & Slip
Always scratch (score) the surface and add water or liquid clay (slip) before attaching new clay pieces like legs or ears. This acts as glue and prevents parts from falling off as they dry.
Step 2: Adding the Clay
-
Cover the body:
Roll out a sheet of clay roughly 1/4 inch thick. Wrap it around the body armature, pressing firmly to remove air pockets between the foil and clay. Smooth the seams with a little water on your finger. -
Cover the head:
Apply clay over the head armature, blending it seamlessly into the neck and body. I like to add a little extra bulk to the cheeks at this stage to give the face structure. -
Sculpt the ears:
Take two elongated pieces of clay and press them around the wire supports for the ears. Flatten them out so they are wide and leaf-shaped, tapering at the tips. -
Refine the ear shape:
Use your thumb to create a deep, smooth indentation running down the center of each ear’s inner face, mimicking the natural fold of a rabbit’s ear.
Level Up: Stone Effect
For a true faux-stone look, mix a pinch of real sand or dried coffee grounds into your white paint. This adds grit and realistic speckling that mimics limestone or granite.
Step 3: Sculpting the Anatomy
-
Build the haunches:
Add two large, rounded oval lumps of clay to the lower sides of the body to create the powerful rear legs. Blend the edges into the main body so they look muscular but integrated. -
Form the front legs:
Roll two cylinders of clay for the front legs. Attach them vertically to the front of the chest, extending down to the surface. Note how the bunny in the photo sits tall, with straight front posture. -
Shape the paws:
At the base of the legs, slightly flatten the clay and use a knife or needle tool to score simple lines for the toes. -
Detail the face:
Add a small triangle of clay for the nose and blend it. With a sculpting tool, carve the mouth line—a simple ‘Y’ shape is effective. Use a loop tool to hollow out small sockets for eyes, then insert small balls of clay for the eyeballs. -
Create the texture:
Instead of smoothing the clay perfectly, dab the surface lightly with a stiff bristle brush or a rough sponge. This creates the primitive, stone-like texture evident in the photo.
Step 4: Finishing Touches
-
Dry thoroughly:
Let the sculpture dry for at least 24-48 hours. Turn it occasionally if possible to ensure the bottom dries evenly. -
Sand gently:
Once bone dry, use fine-grit sandpaper to knock off any sharp burrs or unintentional bumps, but keep the overall surface rustic. -
Base coat:
Paint the entire figure with an antique white or cream acrylic paint. Let this layer dry completely. -
Antique wash:
Mix a very watery light grey or light brown paint. Brush it over the textured surface and immediately wipe most of it off with a rag. This leaves darker pigment in the crevices, highlighting the fur texture. -
Seal:
Apply a coat of clear matte varnish to protect your work without making it look glossy or plastic.
Place your finished hare on a sunny shelf or by a window to let the light catch all those beautiful textures you created

The Complete Guide to Pottery Troubleshooting
Uncover the most common ceramic mistakes—from cracking clay to failed glazes—and learn how to fix them fast.
Mini Fox With Wrapped Tail
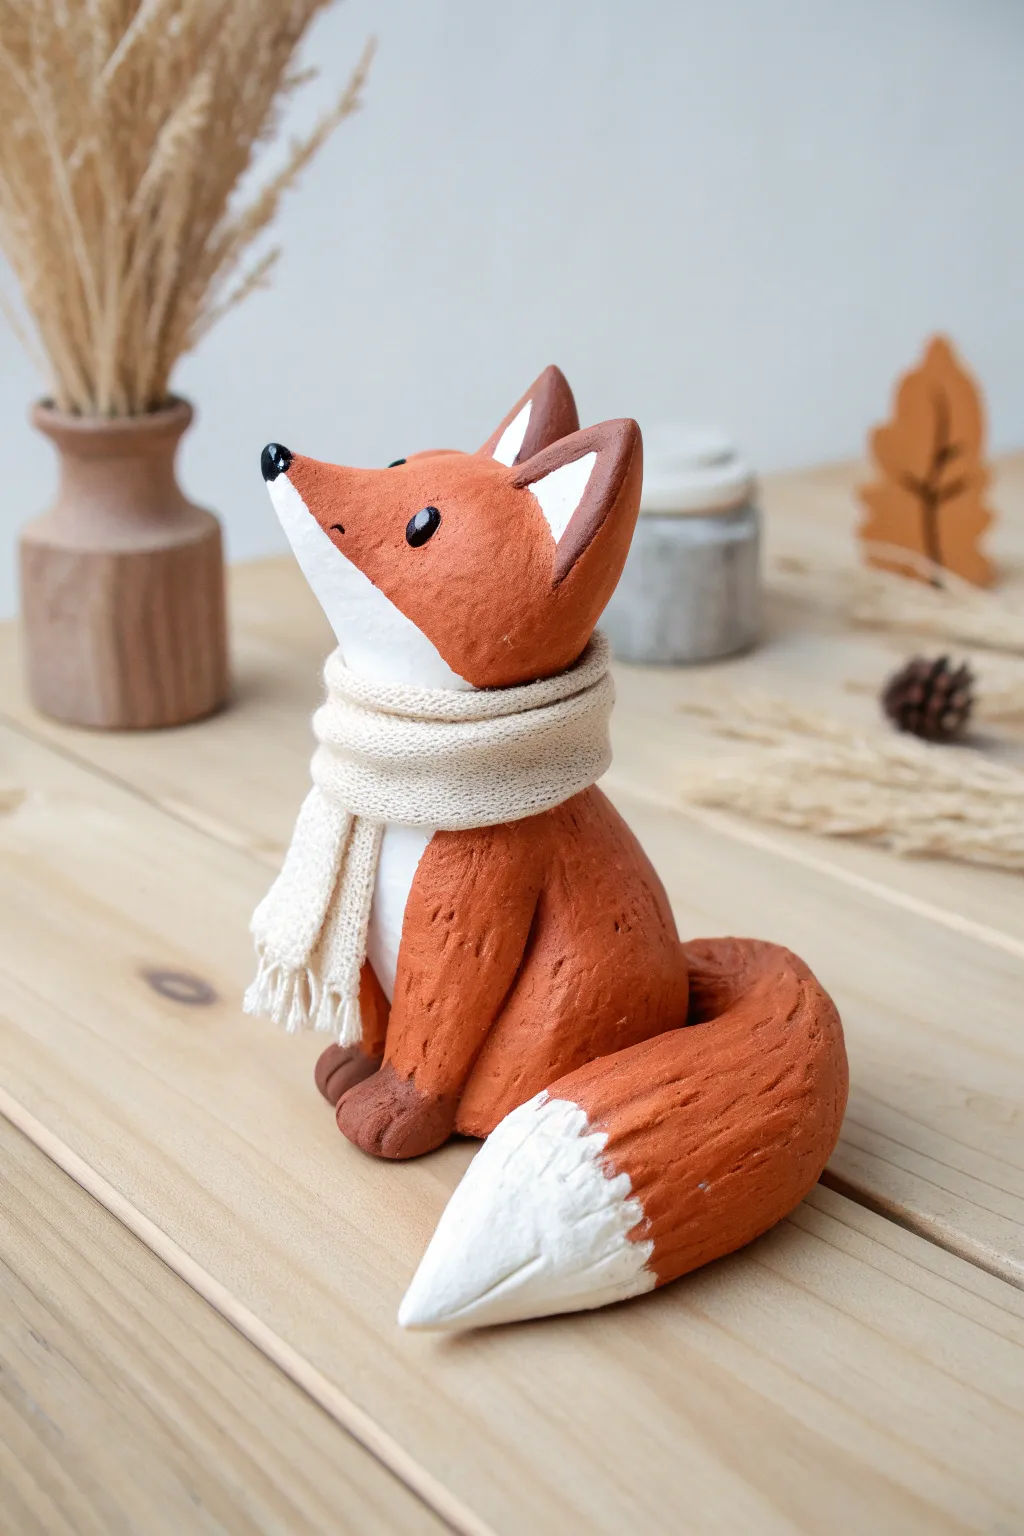
This adorable woodland creature features a textured orange coat and a snuggly, real fabric scarf. Its upturned nose and wrapping tail make it a heartwarming addition to any autumn or winter decor display.
Step-by-Step
Materials
- Air dry clay (white or terracotta)
- Acrylic paints (burnt orange, white, black, brown)
- Small piece of knit fabric or thick yarn
- Clay sculpting tools (needle tool, modeling tool)
- Aluminum foil (for armature)
- Water and paintbrush
- Fine grit sandpaper
- Matte varnish (optional)
Step 1: Shaping the Base
-
Create a foil core:
Start by scrunching a small amount of aluminum foil into a teardrop shape for the body and a slightly smaller, flattened sphere for the head. This keeps the figure lightweight and saves clay. -
Cover with clay:
Roll out a sheet of air dry clay about 1/4 inch thick. Wrap the foil shapes completely, smoothing the seams with a little water on your finger until the surface is uniform. -
Form the body:
Shape the body piece so it sits flat on your work surface. Gently pinch the top to create a slight neck area where the head will attach. -
Sculpt the head:
Mold the head piece into a rounded triangle shape. Pull one side gently to form a pointy snout that tilts slightly upwards. -
Attach head to body:
Score the neck area and the bottom of the head with a needle tool. Apply a dab of water or slip (watery clay) and press the pieces together, smoothing the clay across the join to secure it.
Needle Tool Trick
When texturing the fur, vary the pressure of your strokes. Deep strokes create shadow, while light scratches add softness.
Step 2: Adding Details
-
Add the ears:
Form two small triangles of clay. Attach them to the top of the head using the slip and score method. Press a small indentation into the center of each ear. -
Shape the tail:
Roll a thick sausage of clay that tapers at one end. Curve it around the side of the body so the tip points forward. This heavy tail helps counterbalance the figure. -
Attach the legs:
Create two small oval shapes for the front paws and press them against the chest area. They should look tucked in, as the fox is sitting. -
Refine the snout:
Use your fingers to smooth the transition from the forehead to the nose. Add a tiny ball of clay to the very tip for the nose. -
Texture the fur:
Once the basic shape is solid but still damp, use a needle tool or stiff brush to create short, directional strokes across the orange parts of the body. This mimics the look of fur. -
Dry thoroughly:
Let your fox dry completely. Depending on the brand of clay and humidity, this can take 24-48 hours. Turn it occasionally so the bottom dries too.
Step 3: Painting and Finishing
-
Base coat:
Paint the entire body, head, and tail (except the tip) with a burnt orange acrylic paint. You may need two coats for opaque coverage. -
Paint the details:
Using white paint, carefully fill in the chest area, the lower half of the snout, the inner ears, and the very tip of the tail. I find a flat brush works best for these distinct edges. -
Facial features:
With a fine detail brush or a dotting tool, paint the nose black. Add two small, solid black ovals for the eyes. -
Add paw details:
Paint the very tips of the paws dark brown to differentiate them from the rest of the leg. -
Protect the piece:
Once the paint is fully dry, apply a coat of matte varnish. This seals the clay and protects the paint from chipping. -
The scarf accessory:
Cut a strip of knit fabric or use a piece of thick, textured yarn. Wrap it snugly around the fox’s neck, tying a simple knot and letting the ends drape down the chest.
Seasonal Switch
Make multiple scarves in different colors (green for winter, yellow for spring) to change your fox’s look throughout the year.
Place your finished fox on a shelf or desk for a charming handmade companion
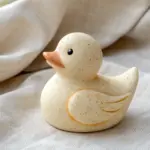
Kawaii-Style Duckling Figure
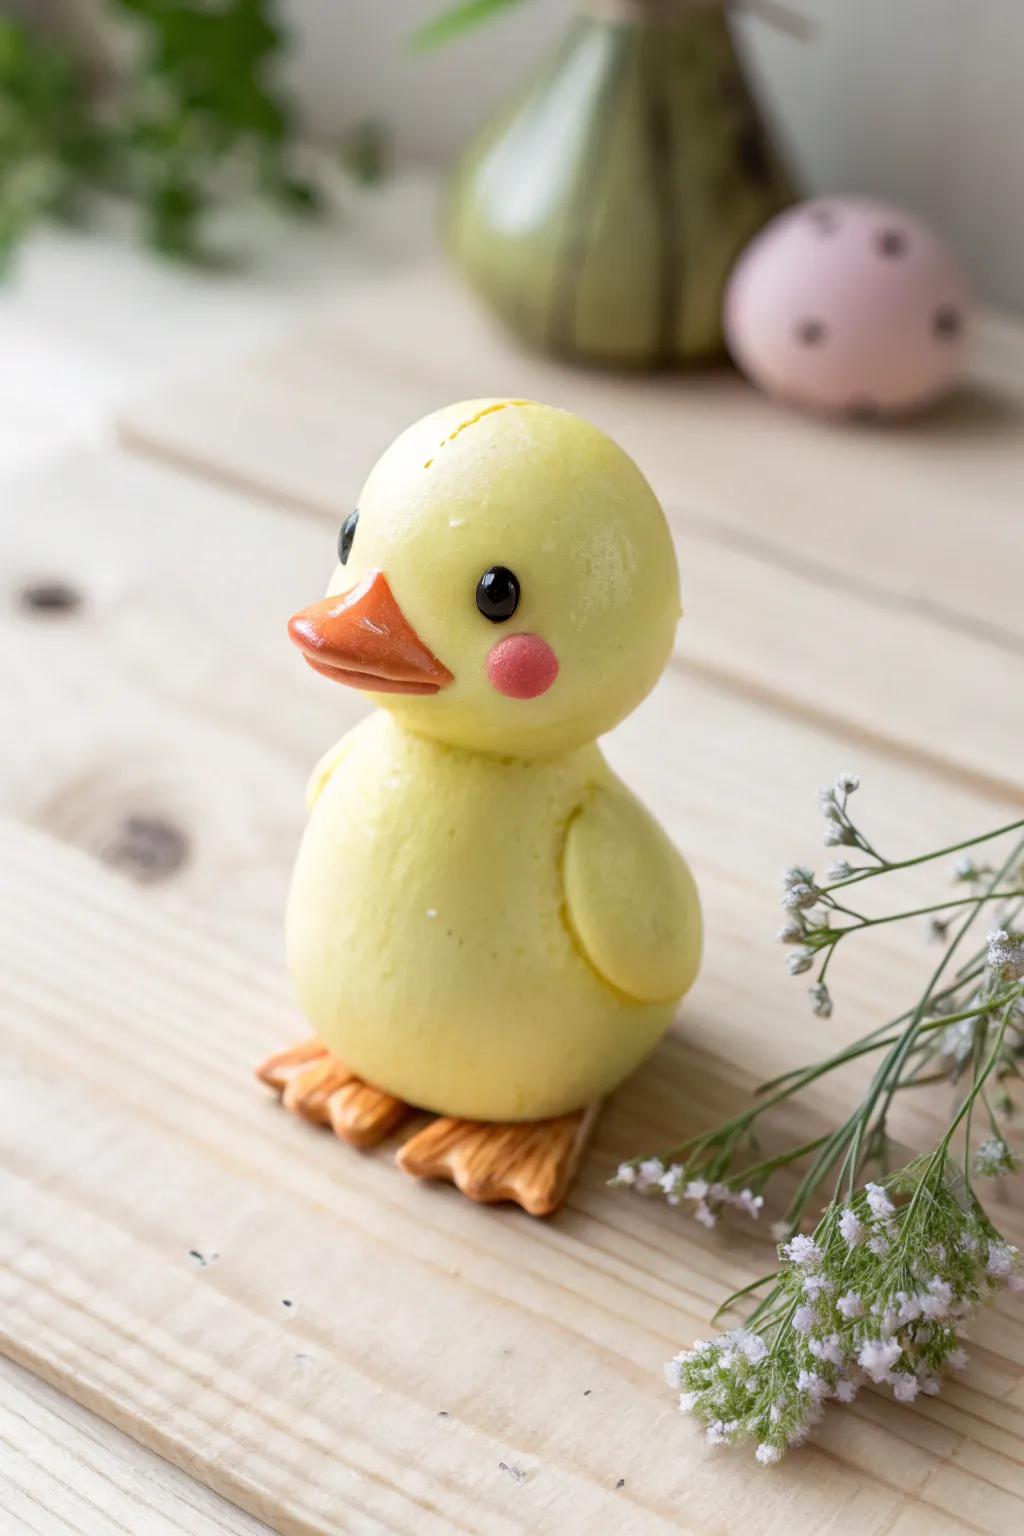
Capture the essence of spring with this impossibly cute kawaii duckling, perfectly poised on tiny webbed feet. With its smooth, round body and cheerful rosy cheeks, this air dry clay figure makes an adorable desk companion or Easter decoration.
Step-by-Step Tutorial
Materials
- Lightweight air dry clay (white)
- Acrylic paints (pastel yellow, bright orange, black, pink)
- Clay sculpting tools (ball tool, needle tool)
- Water in a small cup
- Aluminum foil (optional core)
- Clear varnish (matte or satin)
- Paintbrushes (fine detail and medium flat)
Step 1: Basic Forms
-
Prepare the clay:
Before sculpting, mix your white clay with a generous amount of pastel yellow paint until the color is uniform. Knead it thoroughly to ensure there are no streaks. -
Roll the body:
Take a larger portion of the yellow clay and roll it into a smooth, slightly teardrop-shaped ball. This will be the main body; flatten the bottom gently by tapping it on your work surface so it stands upright. -
Form the head:
Roll a second ball of yellow clay, slightly smaller than the body. It should be perfectly spherical. -
Attach the head:
Score the top of the body and the bottom of the head with a needle tool. Dab a tiny bit of water on the scored areas and press the head firmly onto the body. Gently smooth the seam with your finger or a clay tool if you want a seamless look, though a defined neck is also cute.
Cracking Up?
If you see tiny hairline cracks forming as the head dries, simply mix a tiny bit of fresh clay with water to make a paste and smooth it over the crack with your finger.
Step 2: Detailed Features
-
Shape the wings:
Create two small, flattened teardrop shapes from the yellow clay. These will be the wings. -
Attach the wings:
Press one wing onto each side of the body, positioning them slightly lower than the neck. Blend the top edge of the wing into the body for a natural look, leaving the bottom edge free to protrude slightly. -
Sculpt the beak:
Mix a small amount of clay with orange paint. Shape a tiny, wide triangle. Using a needle tool, gently press a horizontal line across the front to create the mouth opening, and gently curve the top surface. -
Place the beak:
Attach the beak to the center of the face, slightly lower than the middle line. Press it on gently so it adheres well without losing its shape. -
Create the feet:
Using the remaining orange clay, form two flat, fan-shaped triangles. Use a tool to press two indentations into the wide edge of each triangle to simulate webbed toes. -
Attach the feet:
Place the feet under the flattened bottom of the body. Angle them slightly outward for a charming stance. Press the body down gently to secure the bond.
Step 3: Finishing Touches
-
Add the eyes:
You can either use small black beads pressed into the wet clay or wait for the clay to dry and paint them. For this look, paint two small, solid black ovals wide apart on the face. -
Paint reflections:
Once the black eye paint is dry, use a very fine tool or toothpick to add a tiny white dot to the upper corner of each eye. This ‘catchlight’ brings the figure to life. -
Apply rosy cheeks:
Mix a soft pink paint. Using a dry brush technique or a Q-tip, gently dab round circles just below and to the side of the eyes to create a blushing effect. -
Let it cure:
Allow the figure to dry completely. This usually takes 24-48 hours depending on the brand of clay and the thickness of the figure. -
Seal the work:
Apply a coat of satin or matte varnish to protect your duckling. I find that a satin finish gives the beak a nice, slight sheen that looks realistic.
Make it a Scene
Create a tiny pond base using blue-tinted resin or blue painted clay, and add a miniature lily pad for your duckling to sit on.
Now you have a cheerful little friend to brighten up your shelf or gift to someone special


What Really Happens Inside the Kiln
Learn how time and temperature work together inside the kiln to transform clay into durable ceramic.
Little Mushroom Person Character
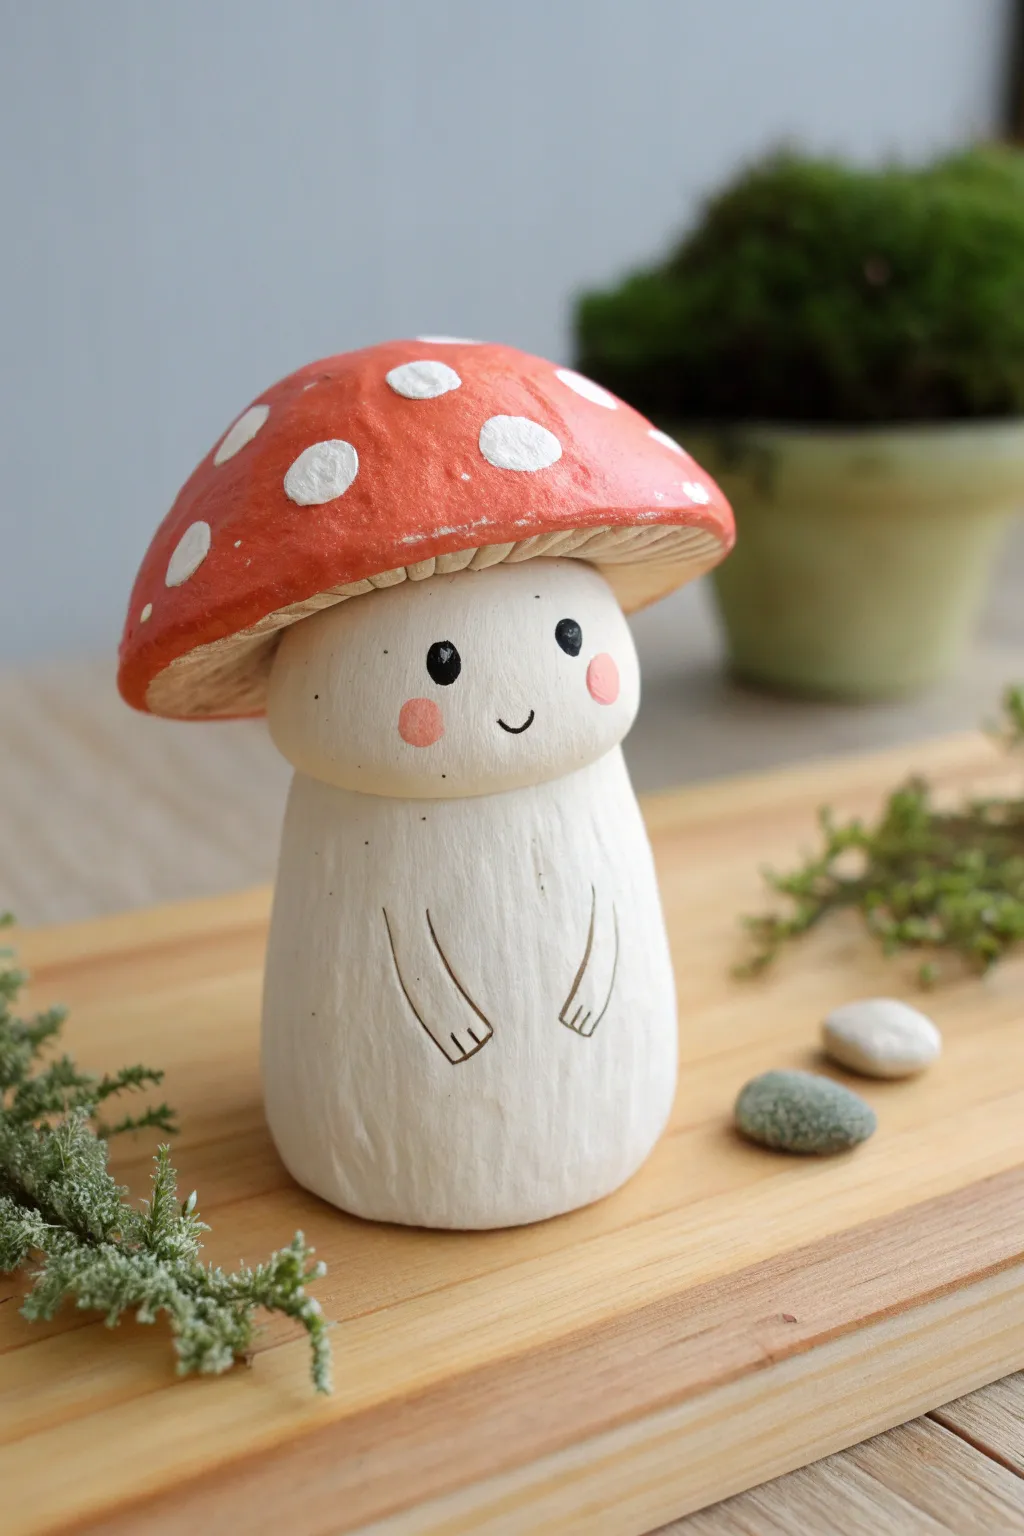
Bring a touch of forest magic to your desk with this adorable mushroom character. Featuring a classic red-capped design and a sweet, simple face, this project creates a charming figure with a rustic, carved texture.
Detailed Instructions
Materials
- Air dry clay (white)
- Aluminum foil
- Sculpting tools (needle tool, knife tool)
- Acrylic paints (red, white, black, rosy pink, beige)
- Paintbrushes (small detail brush, medium flat brush)
- Water and sponge
- Fine grit sandpaper
- Matte sealant or varnish
Step 1: Sculpting the Base
-
Create the armature:
Ball up a piece of aluminum foil into a slightly elongated cylinder shape about 2 inches tall. This will form the core of the mushroom’s body and save you some clay. -
Wrap the body:
Roll out a slab of air dry clay about 1/4 inch thick. Wrap it completely around your foil cylinder, smoothing the seams together with a bit of water until invisible. -
Shape the stalk:
Gently roll the clay cylinder on your work surface to make it smooth. Establish a slightly wider base for stability, tapering slightly as you go up, but keep the top flat so the head can sit securely. -
Form the head:
Roll a solid ball of clay (slightly smaller than a golf ball) for the head. Press it gently onto the top of the body stalk. Use a sculpting tool to drag clay from the head down to the body to fuse them, then smooth the connection area perfectly.
Step 2: Adding Details & Texture
-
Sculpt the cap:
Create a separate, larger ball of clay and flatten it into a dome shape. Hollow out the underside slightly so it will cup over the head. You want the rim to overhang quite a bit. -
Detail the gills:
Before attaching the cap, flip it upside down. Use a knife tool to score fine lines radiating from the center to the edge to mimic mushroom gills. -
Attach the cap:
Score the top of the head and the inside center of the cap. Apply a little water or slip (wet clay paste) and press the cap firmly onto the head. Adjust the angle so it looks cute. -
Texturing the body:
This figure has a lovely wood-carved look. Use a sculpting tool to carve shallow vertical grooves down the length of the white stalk body to simulate bark or organic growth. -
Carve the arms:
Instead of adding separate clay for arms, carve them directly into the body. Use a sharp tool to incise two U-shaped outlines on the front belly. Add three tiny lines at the bottom of each for fingers.
Smooth Seams Secret
If you struggle to smooth out seam lines where you attached clay parts, try using a tiny bit of vinegar on your finger instead of water. It breaks down the clay surface slightly for a seamless bond.
Step 3: Refining and Drying
-
Smoothing touch:
Dip your finger in water and gently rub over any harsh ridges on the cap to make it smooth for painting later. Avoid smoothing out your intentional body texture too much. -
Adding texture spots:
While most spots will be painted, you can gently press small, flat circles of clay onto the cap now for a slight relief effect if desired, or keep the cap smooth for painting only. -
Drying time:
Let your mushroom friend dry completely. Depending on the thickness and your climate, this usually takes 24 to 48 hours. I like to rotate it occasionally so the bottom dries evenly. -
Sanding:
Once bone dry, use fine grit sandpaper to gently buff the red cap area until it feels like porcelain. Wipe away the dust with a damp cloth.
Forest Floor Base
Glue your finished dried mushroom onto a small wood slice coaster. Add preserved moss and tiny pebbles around the base to create a permanent mini diorama display.
Step 4: Painting the Character
-
Base coat:
Paint the entire body and the underside of the cap (gills) with an off-white or cream color. Painting the gills a slightly darker beige adds nice depth. -
Painting the cap:
Apply a coat of bright red acrylic paint to the top of the mushroom cap. Let it dry and add a second coat for full opacity. -
Adding spots:
Using a medium round brush, dab clean white circles onto the red cap. Vary the sizes—some large, some small—for a natural look. -
Drawing the face:
Use a very fine detail brush or a black paint pen. Paint two small black circles for eyes and a tiny ‘u’ shape for a smile right in the center of the face area. -
Blushing cheeks:
Mix a soft rosy pink. Dab two small circles just below and to the outside of the eyes to give him a bashful expression. -
Highlighting eyes:
Dip the back of a paintbrush or a toothpick into white paint and place a tiny dot near the top of each black eye to bring the character to life. -
Darkening the grooves:
To make the carved arms stand out, create a very watery wash of brown paint. Brush it into the carved arm lines, then immediately wipe the surface with a paper towel, leaving the dark paint only in the recesses. -
Final seal:
Protect your hard work with a coat of matte varnish. This keeps the rustic feel while ensuring the paint doesn’t chip.
Now you have a charming little guardian for your plants or bookshelf who will never fail to make you smile
Classic Gnome With Pointy Hat
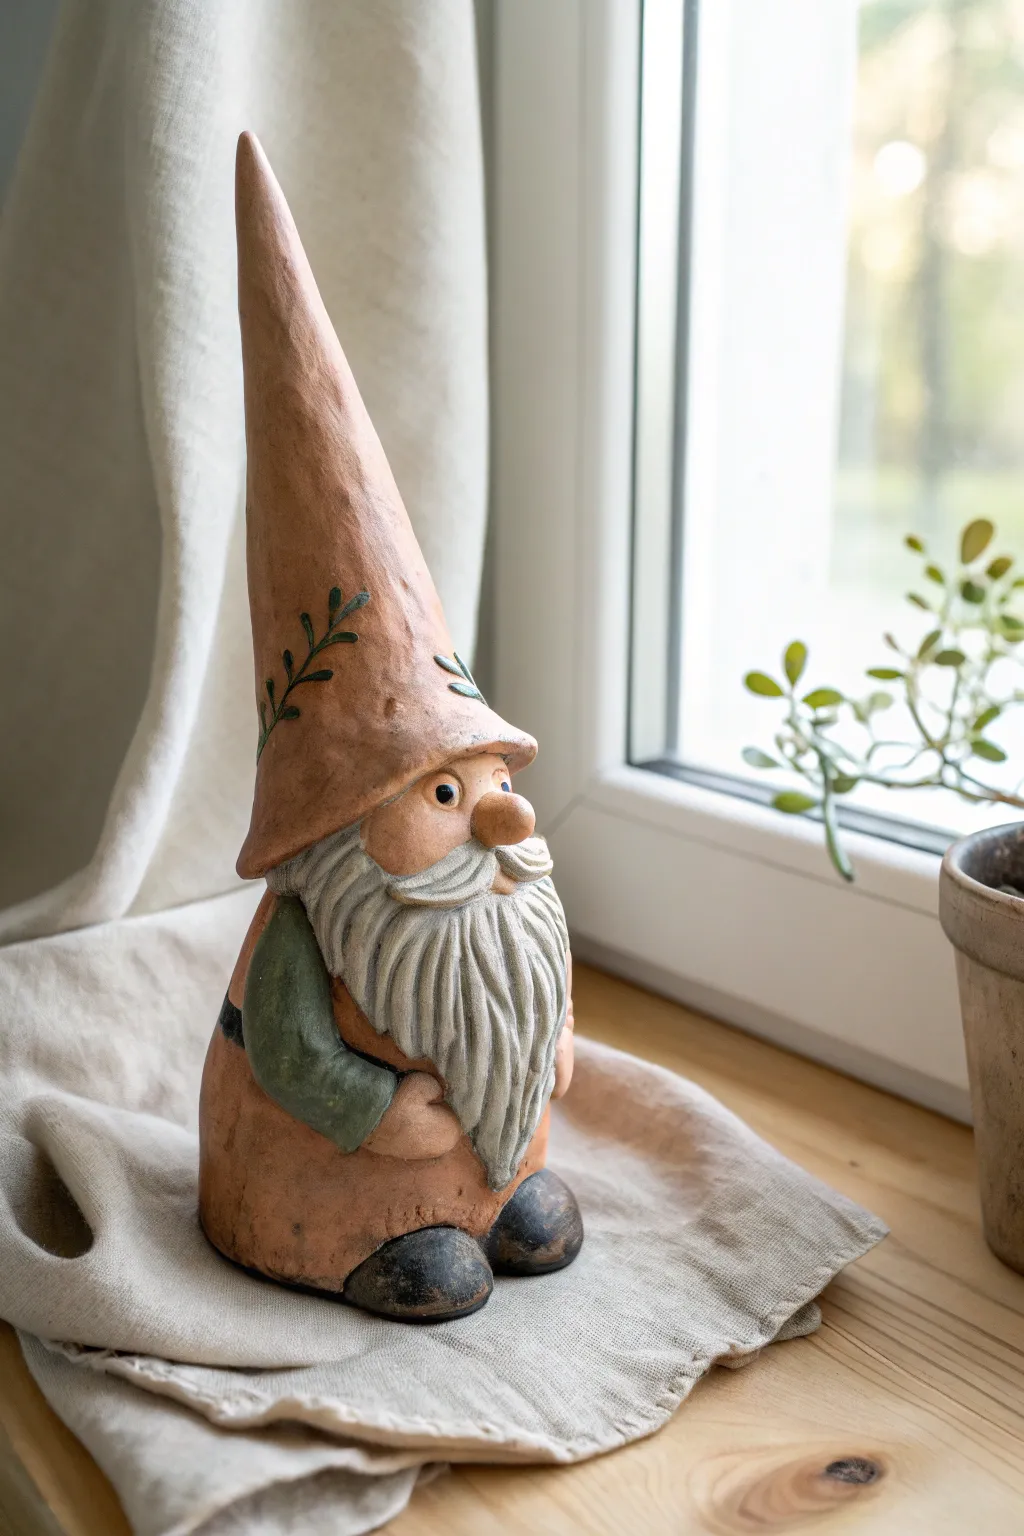
Bring a touch of woodland whimsy to your windowsill with this delightful classic gnome figure. Featuring a textured tall hat, rustic terracotta tones, and a charmingly grumpy beard, this sturdy little friend is the perfect afternoon sculpting project.
Step-by-Step Tutorial
Materials
- Air-dry clay (terra cotta color or white)
- Acrylic paints (terracotta orange, sage green, cream/off-white, black, dark brown)
- Matte varnish or sealant
- Sculpting tools (needle tool, small loop tool)
- Water cup and sponge
- Aluminum foil (for armature)
- Small paintbrushes (flat and fine detail)
- Texturing tool or old toothbrush
Step 1: Building the Base Structure
-
Form the foil core:
Start by crumpling aluminum foil into a cone shape. Make the base wide and stout for the body, tapering up into a long, thin point for the hat. This saves clay and keeps the figure lightweight. -
Cover the body:
Roll out a slab of clay about 1/4 inch thick. Wrap it around the bottom half of your foil cone to create the gnome’s body, smoothing the seam at the back with a little water. -
Create the hat shape:
Add clay to the top section of the foil cone. Pinch and pull the clay upwards to elongate the point, giving it a slight, whimsical curve if you like. -
Refine the brim:
Where the hat meets the head area, pinch the clay outwards to form a rim. This overhang should be prominent enough to cast a shadow over where the face will be.
Step 2: Sculpting Details
-
Shape the nose:
Roll a small ball of clay and attach it firmly right under the hat brim. Use a sculpting tool to blend the back edges of the nose into the face area so it doesn’t fall off. -
Add the beard base:
Flatten a teardrop shape of clay and attach it below the nose. It should cover the chest area and curve slightly outward at the bottom. -
Texture the beard:
Using a needle tool or a knife, carve deep, flowing grooves into the beard clay. Start from under the nose and sweep downward to mimic hair strands. -
Add the mustache:
Roll two small, tapered sausages of clay. Attach them directly under the nose, curving outwards like a handlebar mustache, and texture them to match the beard. -
Sculpt the arms:
Create two thick logs of clay for arms. Attach them to the sides of the body, bending them at the elbows so the hands (two small balls of clay) rest on the stomach. -
Form the feet:
Shape two flattened oval blobs for shoes. Attach these to the very bottom front of the body, ensuring the figure still stands flat and stable. -
Incise the hat details:
While the clay is still wet, use a needle tool to gently scratch a leaf or vine pattern into the side of the hat for extra character. -
Dry thoroughly:
Let the gnome dry completely for at least 24-48 hours. I always check the bottom center—if it feels cold to the touch, it needs more time.
Cracks happen
If small cracks appear as the clay dries, don’t panic. Mix a tiny bit of fresh clay with water to make a paste (slip) and fill in the cracks, then smooth over with a finger.
Step 3: Painting and Finishing
-
Base coat the clothes:
Paint the hat and main body with a warm terracotta or burnt orange acrylic. It’s okay if it looks a bit streaky; that adds to the rustic pottery look. -
Paint the sleeves:
Carefully paint the arm sections with a muted sage green, keeping the hands the same color as the nose (a light skin tone or unpainted terracotta). -
Detail the beard:
Paint the beard and mustache with a solid coat of cream or off-white. Avoid pure white, which can look too harsh against the earth tones. -
Adding depth (Wash):
Mix a very watery black or dark brown paint. Brush this over the textured beard and the hat incisions, then immediately wipe the surface with a paper towel. The dark paint stays in the cracks, highlighting the texture. -
Paint the face:
Paint the nose a soft peach or terracotta. Use a fine brush to add two small black dots for eyes peeking out from under the hat brim, adding a tiny white highlight speck to each. -
Paint the boots:
Color the shoes a dark charcoal or black. You can scuff them slightly with a dry brush of brown to make them look worn. -
Highlight the vines:
Trace the incised vine pattern on the hat with a thin brush and green paint to make the design pop. -
Seal the piece:
Finish with a coat of matte varnish to protect the paint and give the gnome a unified, professional finish.
Seasonal Switch
Customize your gnome for the holidays by painting the hat red and the tunic green, or add a tiny clay pumpkin or wrapped gift into his hands before baking.
Place your finished gnome among your house plants or on a shelf where he can keep a watchful eye on your home

TRACK YOUR CERAMIC JOURNEY
Capture glaze tests, firing details, and creative progress—all in one simple printable. Make your projects easier to repeat and improve.
Tiny People in Cozy Sweaters

Capture the quiet warmth of winter with these charming, minimalist figures bundled up in textured sweaters and caps. This project focuses on clean lines, subtle textures, and a muted, earthy color palette perfect for a windowsill display.
Step-by-Step Guide
Materials
- High-quality air dry clay (white)
- Small rolling pin
- Sculpting tools (needle tool, small ball stylus, rubber shaper)
- Acrylic paints (antique white, terracotta, burnt sienna, deep brown)
- Fine grit sandpaper (320-400 grit)
- Matte varnish or sealant
- Small detail paintbrushes
- Clay adhesive or slip
- Water cup
Step 1: Shaping the Bodies
-
Form the core:
Begin by conditioning two balls of clay. Roll them into thick, elongated oval shapes to form the main bodies. Flatten the bottoms firmly against your work surface so they stand independently. -
Define the legs:
Using a knife tool or wire cutter, gently mark a vertical line at the bottom third of each figure to suggest legs. Do not cut all the way through; just define the separation between the trousers. -
Add the heads:
Roll two smaller spheres for the heads ensuring they are proportional to the bodies. Score the top of the body and the bottom of the head, apply a dab of water or slip, and press them firmly together. Smooth the seam at the neck completely so it looks like one solid piece. -
Attach the base:
Roll out a thick slab of clay into an oval shape to serve as the shared base. Score the bottom of the figures’ feet and the top of the base, then press the figures onto the slab so they stand side-by-side.
Step 2: Sculpting the Clothing
-
Create the sweater hem:
Roll a very thin snake of clay. Wrap it around the body just above where the legs begin. Use a sculpting tool to impress tiny vertical lines all around this strip to mimic a ribbed sweater hem. -
Add the collars:
Repeat the process for the neck. Roll a small snake of clay, wrap it around the neck seam, and use your tool to create the same ribbed knit texture for a high-neck collar effect. -
Sculpt the caps:
Flatten a small disk of clay and mold it over the top of the head to create a tight-fitting cap. Smooth the edges down so the cap blends seamlessly into the forehead and sides of the face, leaving a round opening for the facial features. -
Attach arms:
Roll two small sausage shapes for arms for each figure. Press them against the sides of the body. Blend the clay at the shoulders so the arms look like part of the sweater, allowing the hands to peek out slightly at the bottom. -
Texture the sweaters:
This is the signature detail. For the left figure, use a small ball stylus to press indented dots in a random polka-dot pattern all over the sweater involved. For the right figure, you can leave the texture smooth or add very subtle dimples. -
Refine the faces:
Keep the faces minimal. Use your thumb to gently press a slight indentation for the eye area, creating a subtle brow ridge. Pinch a tiny bit of clay for a nose and attach it, blending the edges till smooth.
Smooth Operator
Dip your finger in water and smooth the clay frequently while sculpting. A smooth surface before drying saves you hours of sanding later.
Step 3: Finishing Touches
-
Drying time:
Allow the sculpture to dry completely. Because these are solid forms, I recommend letting them sit for at least 48-72 hours away from direct heat to prevent cracking. -
Sanding:
Once bone dry, take your fine-grit sandpaper and gently buff the surfaces. Focus on the faces and the base to remove any fingerprints, but be gentle over the textured sweater areas. -
Base coat:
Paint the entire sculpture with a wash of antique white or cream acrylic paint. This unifies the surface and prepares it for the specific colors. -
Painting the warmth:
Paint the legs and cap of the right figure in a soft terracotta. For the left figure, paint the legs a darker burnt sienna. Use a fine brush to paint the tiny polka dots on the sweaters using contrasting earth tones. -
Face details:
Mix a very watery pinkish-tan wash for the cheeks. Using the finest brush point or a toothpick, add two tiny black dots for eyes. -
Seal the work:
Finish with a coat of matte varnish. A glossy finish would look too plastic for this cozy aesthetic, so matte is best to preserve the ceramic feel.
Knit-Wits
Press a piece of actual coarse fabric or burlap against the wet clay of the sweater area to create a realistic woven wool texture in seconds.
Place your finished duo near a window or on a shelf to add a touch of handcrafted serenity to your room
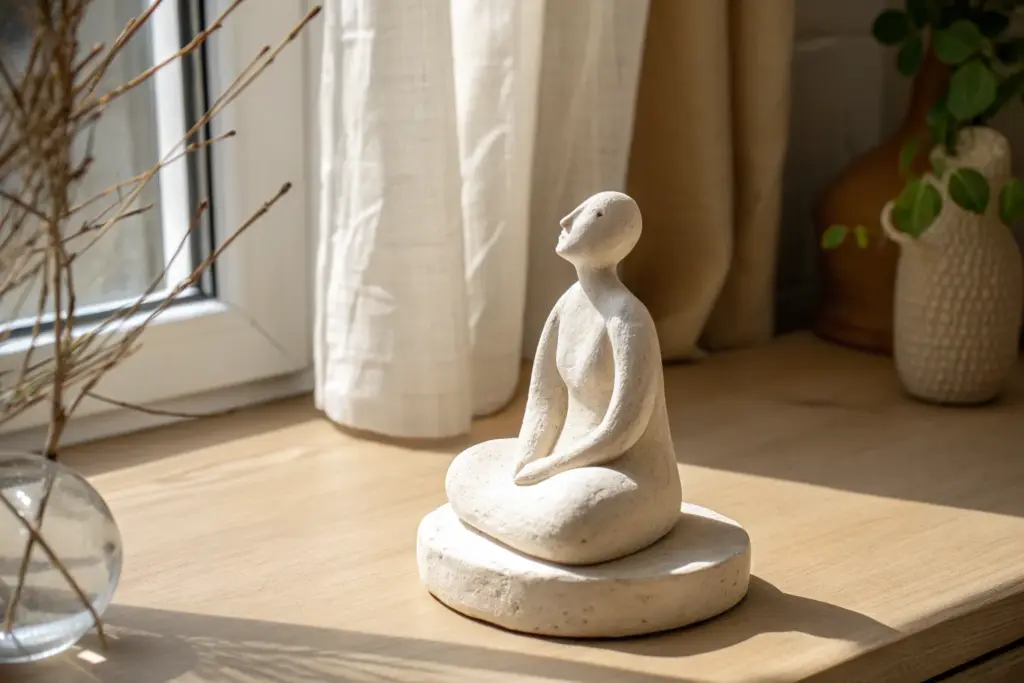
Easy Face Bust for Beginners
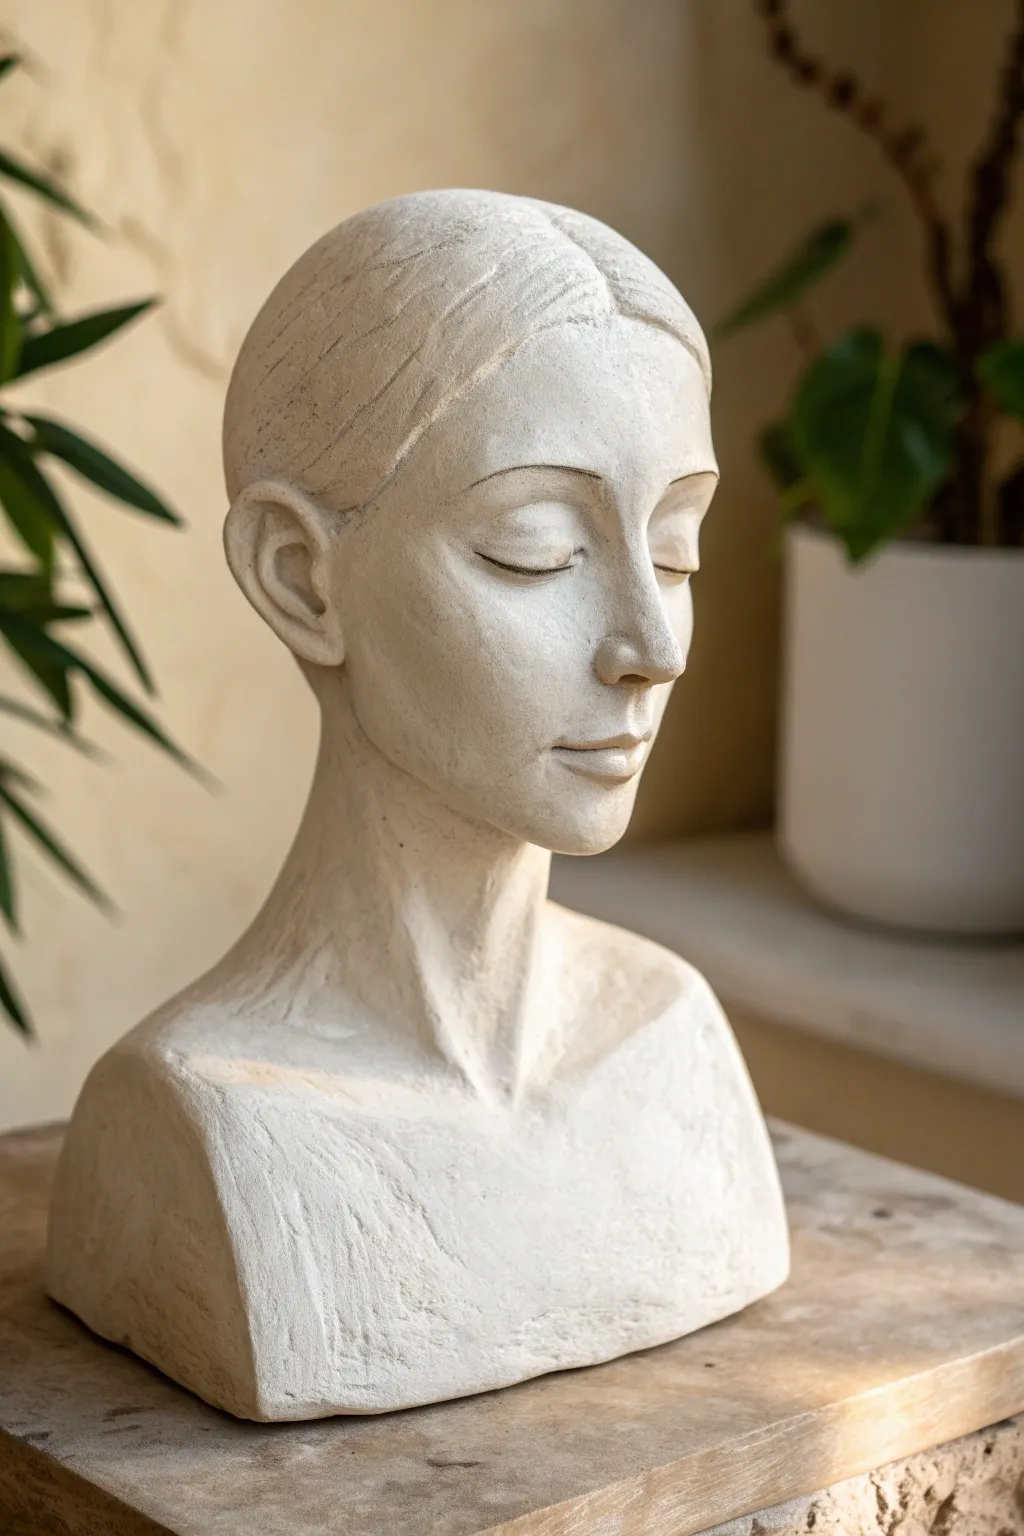
This elegant bust captures a mood of peaceful contemplation with its smooth planes, elongated neck, and gently closed eyes. Using simple shaping techniques and attention to proportion, you’ll create a sophisticated sculpture that looks far more advanced than it actually is.
How-To Guide
Materials
- High-quality white air dry clay (approx. 2-3 lbs)
- Armature wire (thick gauge for support)
- Aluminum foil
- Wooden base or heavy cardboard square
- Masking tape
- Bowl of water
- Modeling tools (loop tool, needle tool, wooden rib)
- Sponge
- Fine-grit sandpaper
Step 1: Building the Core Structure
-
Prepare the armature:
Begin by twisting your thick wire into a loop that mimics the shape of a head and neck. Secure the bottom ends of the wire firmly into your wooden base or tape them heavily to a cardboard square to ensure the sculpture doesn’t tip over. -
Bulking out the form:
Crumple aluminum foil into a dense ball for the skull and a cylinder for the neck. Press these firmly onto your wire frame and secure them with masking tape. This saves clay and reduces drying time significantly. -
Initial clay application:
Roll out thick slabs of air dry clay and drape them over the foil armature. Use your thumbs to press the clay firmly against the foil, eliminating air pockets. Aim for an even layer about half an inch thick all around.
Keep it Moist
Keep a spray bottle handy while working. If the clay starts to crack or feel leathery, a light misting will make it pliable again and help smoother blending without adding too much water.
Step 2: Shaping the Head and Neck
-
Refining the silhouette:
Smooth the clay upwards from the base to form the chest and shoulders. The shoulders in this piece are cut off cleanly, so shape the base into a rectangular block that gently slopes up into the neck. -
Elongating the neck:
Add extra clay to the neck area to create that graceful, elongated look. Smooth the transition where the neck meets the jawline and the collarbones. -
Defining the face shape:
Identify where the hairline will start and smooth the forehead. Keep the overall face shape oval and symmetrical. Use a wooden rib tool to scrape away excess clay and ensure the surface is planar and clean.
Step 3: Modeling Facial Features
-
Mapping the features:
Lightly draw a vertical center line and a horizontal eye line with a needle tool. The eyes should fall roughly halfway down the head. -
Building the nose:
Roll a small wedge of clay and score the surface where the nose will go. Apply a bit of water (slip) and press the wedge onto the face. Blend the edges seamlessly into the cheeks and forehead, keeping the bridge straight and elegant. -
Forming the eye sockets:
Use your thumbs to gently press into the clay on either side of the nose bridge to create the natural depression of the eye sockets. This sets the stage for the eyelids. -
Creating the eyelids:
Roll two small spheres of clay, flatten them slightly, and place them in the sockets. Smooth them down to create the rounded shape of the eyeball. Then, add thin crescents of clay over them to represent the closed upper eyelids. -
Adding the mouth:
Place a small coil of clay below the nose. Use a modeling tool to carefully carve the line of the mouth, giving it a very subtle upward curve at the corners for a peaceful expression. Smooth the lips so they are soft, avoiding sharp edges. -
Sculpting the ears:
Create two C-shaped pieces of clay and attach them to the sides of the head. Position the top of the ear in line with the eyes and the bottom with the nose tip. Hollow out the center slightly for realism.
Fixing Cracks
Cracks happen! If hairline fractures appear during drying, mix a small amount of fresh clay with water to make a paste (slip) and fill the crack. Let it dry again, then sand smooth.
Step 4: Hair and Final Texturing
-
Blocking in the hair:
Add a thin layer of clay over the skull to form the hair mass. This particular style is pulled back tightly, so smooth the clay backward away from the face. -
Suggesting strands:
Use a needle tool or a fine-point modeling tool to lightly etch lines running from the hairline toward the back of the head. Don’t overdo it; subtle texture implies hair without needing individual strands. -
Refining the surface:
Take a damp sponge and gently wipe the entire sculpture. This smooths out fingerprints and tool marks. For the base area, you can leave slight texture tool marks visible to give it a hand-hewn, artistic feel. -
Drying and sanding:
Let the sculpture dry slowly for 2-3 days away from direct heat to prevent cracking. Once fully white and hard, use fine-grit sandpaper to polish the face cheeks and forehead for a porcelain-like finish.
Place your finished bust near a window where natural light can highlight the gentle contours of the face
Boho Female Torso Bud Vase
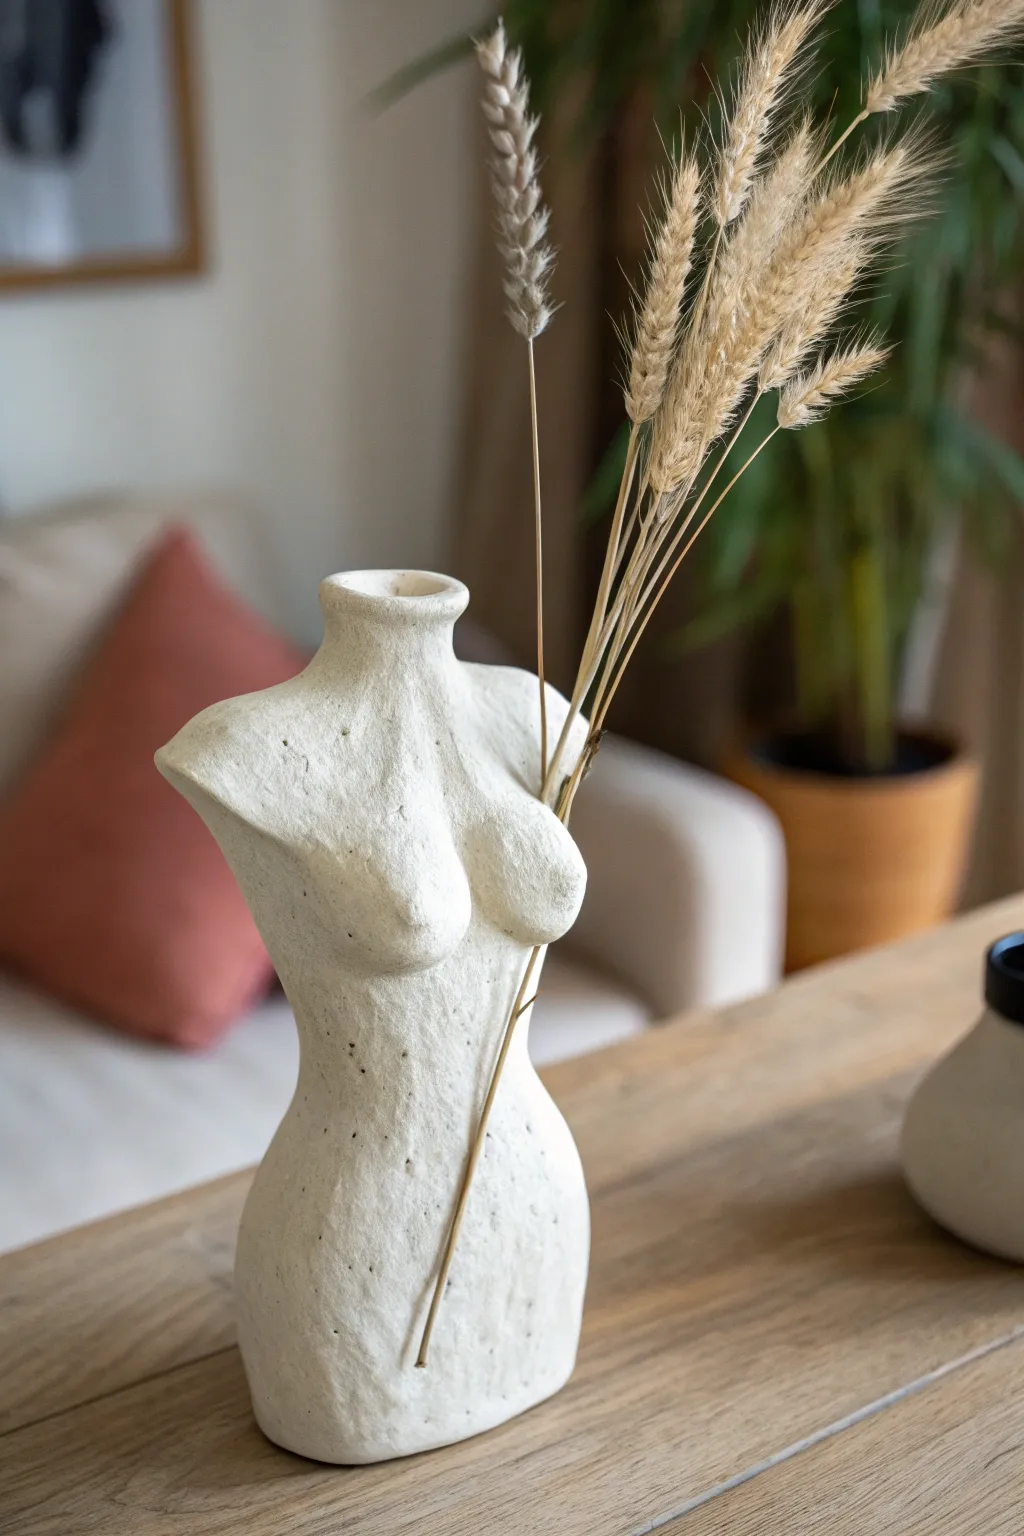
Capture the beauty of the feminine form with this trendy, minimalist female torso bud vase. Its raw, textured finish and elegant curves make it the perfect vessel for displaying dried grasses or a single stem.
Step-by-Step Guide
Materials
- White air dry clay (approx. 1-1.5 lbs)
- Small rolling pin
- Aluminum foil (for armature)
- Cardboard toilet paper roll or PVC pipe scrap (for internal support)
- Clay tools (needle tool, loop tool, sponge)
- Small bowl of water
- Sandpaper (medium and fine grit)
- White acrylic paint (optional, for touch-ups)
- Matte sealant/varnish
Step 1: Building the Armature
-
Prepare the core:
Start with a sturdy core to keep the vase hollow. Take your cardboard tube or PVC pipe and wrap it loosely in a single layer of paper towel; this prevents the clay from sticking permanently if you want to remove it later, though leaving a cardboard tube inside is fine for dry stems. -
Shape the foil armature:
Crumple aluminum foil around the lower half of your tube to bulk up the hip area. Add two balls of foil to the upper section to form the base shape for the chest. This saves clay and keeps the sculpture lighter.
Crack Control
If small cracks appear while drying, mix a tiny bit of fresh clay with water to make a paste (slip). Fill the cracks with this paste and smooth over.
Step 2: Sculpting the Form
-
Roll out the slab:
Roll your air dry clay into a large, even slab about 1/4 inch thick. Make sure it’s wide enough to wrap entirely around your foil armature with some overlap. -
Wrap the armature:
Gently drape the clay slab around your foil structure. Join the seam at the back by scoring both edges (scratching them up), adding a dab of water, and pressing them firmly together. Smooth the seam until it disappears. -
Define the waist:
Using wet hands, gently squeeze the clay inward at the center to define the waistline. The foil underneath will provide resistance, so push just enough to create an hourglass silhouette. -
Build the chest:
Add extra clay over the foil balls you placed earlier to define the bust. Smooth the fresh clay into the main body so there are no visible lines of attachment. -
Refine the neck opening:
At the top of the tube, trim excess clay to create a clean, circular rim. Use your wet finger to smooth the rim edges so they are rounded and soft, rather than sharp. -
Sculpt the collarbones:
For a realistic touch, use a modeling tool or your thumb to create shallow indentations just below the neck rim, suggesting the clavicles. This subtle detail elevates the piece. -
Shape the hips:
Add clay to the hip area if needed to create a fuller curve. Smooth the bottom edge so the vase sits perfectly flat on your table. I find picking it up and tapping it gently on the work surface helps level the base.
Step 3: Texturing and Refining
-
Initial smoothing:
Go over the entire sculpture with a slightly damp sponge. This merges all your added pieces and removes deeper fingerprints. -
Adding texture:
To achieve the stone-like look in the photo, take an old toothbrush or a stiff bristle brush and gently tap it all over the surface. This creates a porous, organic texture. -
Pinpoint detailing:
Use a needle tool to poke random, slightly deeper holes scattered across the torso. These emulate natural stone imperfections. -
Slow drying:
Let the sculpture dry for at least 24-48 hours. Keep it away from direct heat to prevent cracking. Turn it occasionally so all sides dry evenly.
Waterproofing Trick
To hold fresh flowers, slide a small glass test tube or spice jar inside the clay neck instead of putting water directly into the sculpture.
Step 4: Finishing Touches
-
Light sanding:
Once bone dry, use fine-grit sandpaper to gently knock down any sharp burrs or unwanted lumps, but be careful not to sand away your intentional texture. -
Color correction (Optional):
If you want a brighter white than your dried clay provides, dry brush a very light coat of white matte acrylic paint over the surface. -
Seal the piece:
Apply a coat of matte spray varnish or sealant. This protects the clay from humidity and dust while maintaining that natural, unglazed look. -
Styling:
Insert your dried wheat or bunny tails. Since air dry clay isn’t waterproof, only use this for dry botanicals.
Place your sculptural vase on a stack of books or a wooden console table to instantly add an artistic vibe to your room
Quirky Face Planter Head
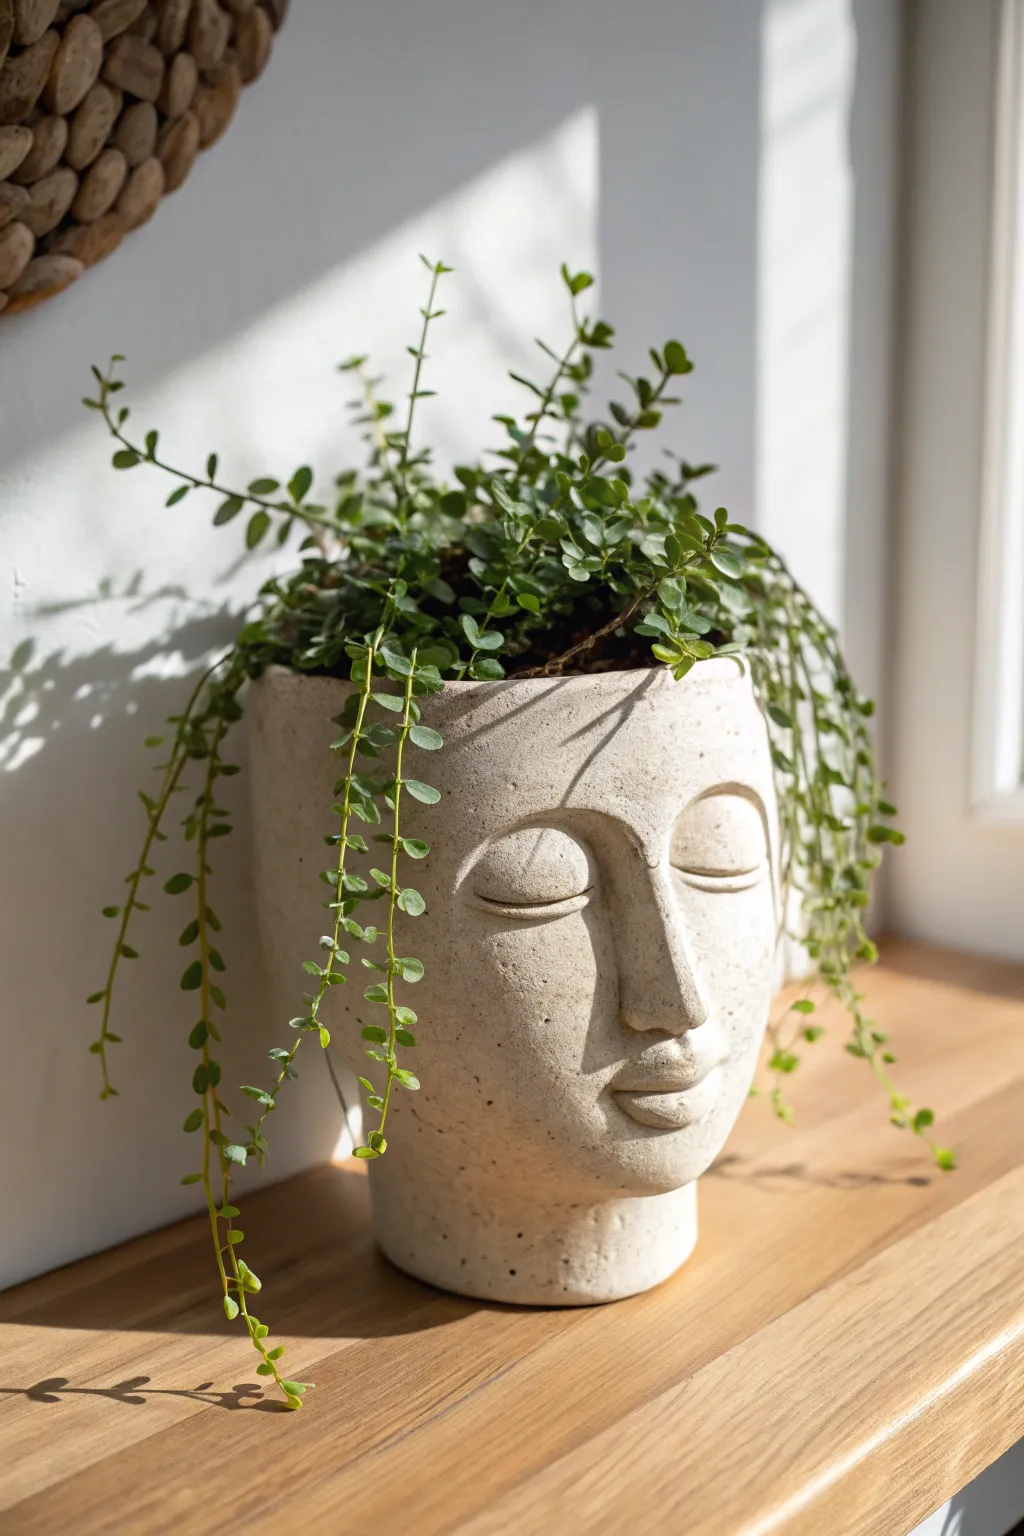
Bring a sense of calm to your windowsill with this sculptural face planter, featuring closed eyes and soft, meditative features. The smooth, stone-like texture pairs perfectly with trailing plants that create the illusion of wild, green hair.
How-To Guide
Materials
- High-quality white air dry clay (approx. 1-1.5kg)
- Small plastic plant pot or cylindrical container (to use as an internal mold)
- Plastic wrap/Cling film
- Clay sculpting tools (loop tool, needle tool, smoothing sponge)
- Rolling pin
- Water in a small bowl
- Fine-grit sandpaper
- Stone-textured spray paint or acrylic paint (cream/beige)
- Matte sealant spray
Step 1: Forming the Base Structure
-
Prepare the internal mold:
Take your plastic plant pot or cylindrical container and wrap it thoroughly in plastic wrap. This prevents the clay from sticking and makes removing the mold later much easier. Ensure the plastic wrap is relatively smooth to avoid deep creases. -
Roll out the slab:
Roll out a large portion of your air dry clay into a slab about 1cm thick. You want it thick enough to support the weight of the features you’ll be adding later, but not so heavy that it slumps. -
Wrap the cylinder:
Cut a rectangular strip from your slab that is tall enough to cover the height of your container mold. Wrap this strip around the container, joining the ends together. Score the edges (make scratches) and add a little water (slip) to create a strong seam, then smooth it over with your fingers or a flat tool. -
Create the rounded base:
While the cylinder is on the mold, shape the bottom edge inward slightly to mimic the curve of a chin and neck. If you want a pedestal look like the image, add a smaller, thick coil at the very bottom to serve as a neck stand.
Pro Tip: Eye Depth
Make the eye sockets deeper than you think is necessary before adding the lids. The heavy shadow cast by the brow bone is the secret to that peaceful ‘sleeping’ look.
Step 2: Sculpting the Features
-
Establish the nose:
Roll a wedge-shaped piece of clay for the nose. Score and slip the area in the center of the face where the nose will sit. Press the wedge onto the cylinder and smooth the edges down onto the face, blending the clay seamlessly so it looks like it emerges from the surface. -
Refine the brow ridge:
Add small strips of clay horizontally above the nose area to build up the forehead and brow bone. This structural step is crucial because it creates the deep eye sockets that give the face its serene expression. Blend these upwards into the forehead. -
Form the closed eyelids:
Roll two semi-circles or flattened ovals of clay. Place them into the eye sockets you created under the brow ridge. They should bulge slightly outward. Take your modeling tool and carve a gentle arch line across the bottom of each shape to define the closed eyelid. -
Sculpt the lips:
Create a small, flattened oval for the mouth area. Attach it below the nose. Use a needle tool to press a horizontal line across the center, dipping slightly in the middle. Carefully shape the upper lip into a subtle ‘M’ shape and round out the bottom lip for fullness. -
Add the cheeks:
To soften the cylindrical shape, add thin pads of clay to the cheek areas and smooth them outwards. This gives the face a more natural, organic contour rather than a perfect geometric cylinder. -
Initial smoothing:
Dip a sponge lightly in water and run it over the entire face. This will remove fingerprints and unify the added features with the base. Don’t use too much water, or the clay might weaken.
Level Up: Aged Texture
Before the paint dries, gently dab the surface with a crumpled ball of aluminum foil. This presses tiny divots into the finish, mimicking weathered ancient stone.
Step 3: Finishing and Texturing
-
Dry and demold:
Let the clay dry until it is leather hard—firm to the touch but still holds a fingernail imprint. Carefully slide the internal plastic mold out. If you wait until it’s fully bone dry, the clay shrinks and might crack against the mold. -
Complete drying:
Allow the sculpture to dry completely. This usually takes 24-48 hours depending on humidity. Turn it occasionally so air reaches all sides. -
Sanding:
Once bone dry, use fine-grit sandpaper to smooth out any rough bumps, particularly around the seam at the back and the jawline. Wipe away the dust with a barely damp cloth. -
Painting for stone effect:
To achieve the look in the photo, apply a stone-textured spray paint in a light beige or cream color. Alternatively, dab acrylic paint on with a sponge to create a speckled, porous texture. -
Sealing:
I always recommend finishing with a matte waterproof sealant, especially for planters. Coat the inside thoroughly to protect the clay from moisture, and give the outside a light coat to preserve the finish.
Pop in a trailing plant like a string of pearls or ivy to give your new sculpture a magnificent head of overflowing green hair.
Hand-and-Arm Ring Holder Figure
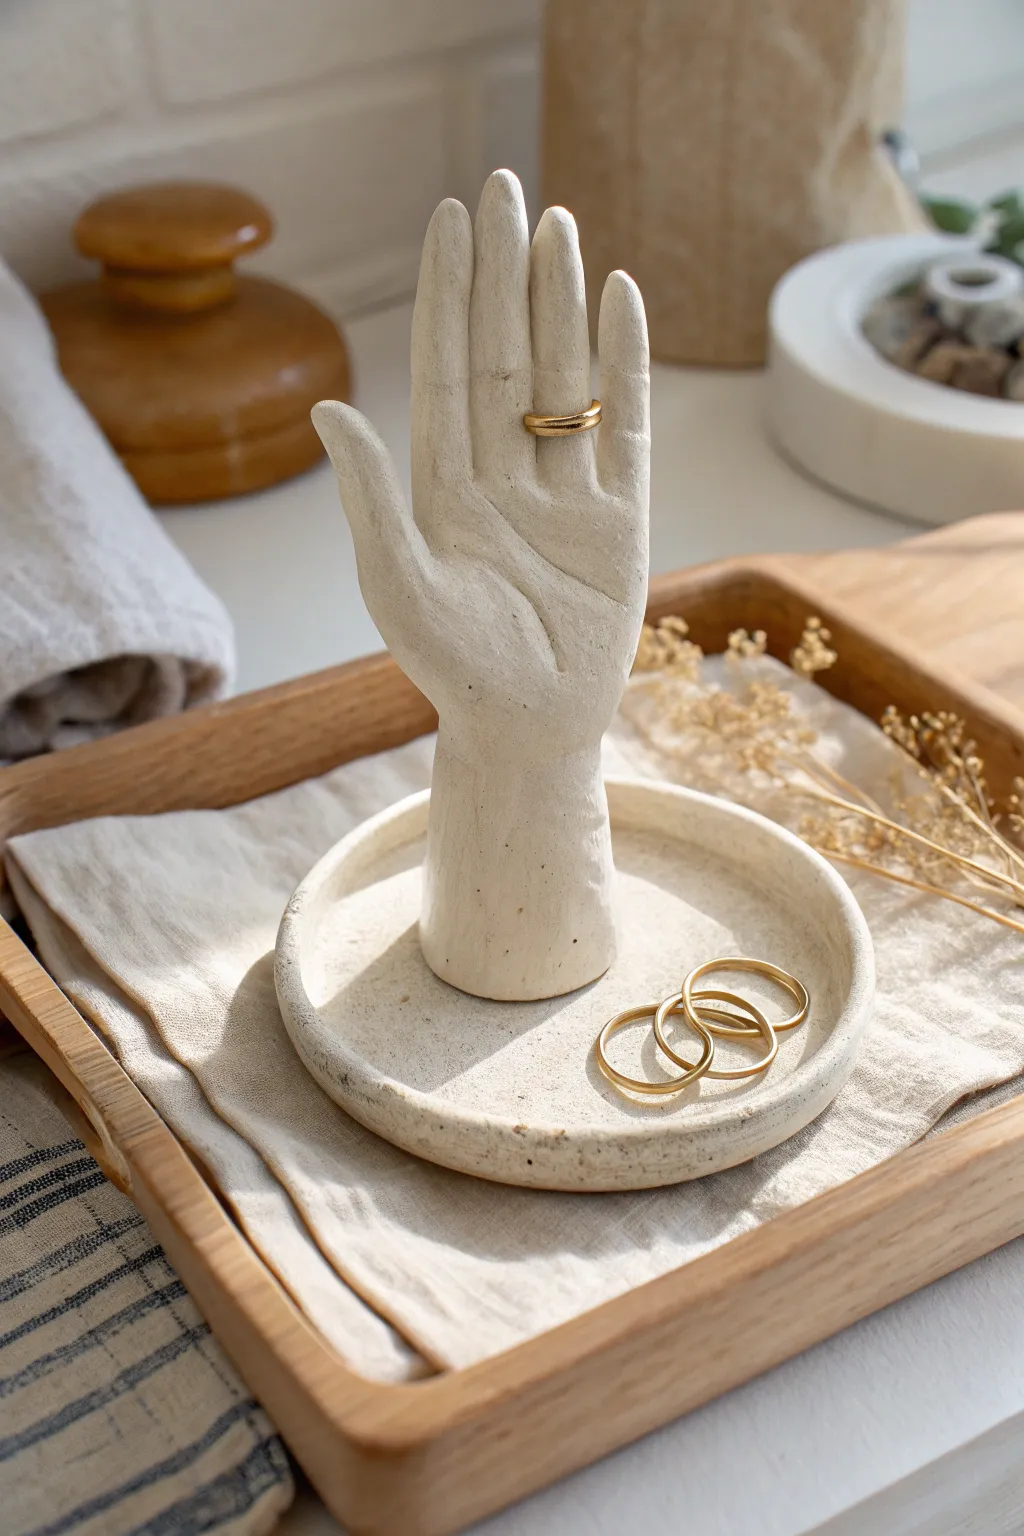
Create a minimal and chic jewelry display that doubles as a piece of sculpture. This air-dry clay project features an elegant hand rising from a shallow catch-all dish, perfect for keeping your favorite rings organized and accessible.
Detailed Instructions
Materials
- White air-dry clay
- Rolling pin
- Craft knife or scalpel
- Clay sculpting tools (specifically a needle tool and a smoothing tool)
- Small bowl of water
- Sponge
- Fine-grit sandpaper (220-400 grit)
- Acrylic sealer (matte finish)
- Circle cutter or small bowl (appx. 4-5 inches diameter)
- Slip (clay mixed with water into a paste)
Step 1: Forming the Base Dish
-
Roll the slab:
Begin by wedging your clay to remove air bubbles, then roll it out into a flat slab that is roughly 1/4 inch thick. Aim for an even thickness to prevent cracking during the drying process. -
Cut the circle:
Use a circle cutter or place a small bowl upside down on the clay as a guide. Trace around it with your craft knife to cut out a perfect circle, which will serve as the tray base. -
Create the rim:
Roll a thin coil of clay, about the thickness of a pencil. Score the outer edge of your circular base and brush on a little water or slip. -
Attach and smooth:
Lay the coil onto the scored edge to form a raised rim. Use your thumb or a modeling tool to blend the clay downwards onto the base, ensuring a seamless transition so it looks like one solid piece.
Structural Pro Tip
Insert a piece of sturdy floral wire or a toothpick down through the middle finger and into the wrist while sculpting to keep the fingers from drooping.
Step 2: Sculpting the Hand
-
Make the arm base:
Form a solid cylinder of clay roughly the width of your own wrist but scaled down slightly. This will be the vertical stand part. Flatten the bottom so it stands upright on its own. -
Shape the palm:
flattening the top portion of your cylinder into a paddle shape. It should look somewhat like a mitten at this stage. -
Cut the fingers:
Using your craft knife, carefully slice usually four cuts into the paddle shape to create the five fingers. Remember that the thumb should be distinct and set lower on the side. -
Refine the digits:
Gently roll each cut strip of clay between your fingers to round them out. You aren’t looking for hyper-realism here, but rather a stylized, smooth shape. -
Pose the hand:
Arrange the fingers in an upright, slightly open position. I find it helpful to look at my own hand for reference on how the thumb naturally angles away from the palm. -
Detailing:
Use a needle tool to softly impress lines for the palm longevity lines and the knuckles. Keep these subtle; the goal is a minimal, stone-like aesthetic.
Step 3: Assembly and Finishing
-
Prepare the connection:
Score the bottom of the wrist and the center of your dish thoroughly. Apply a generous amount of slip to both scored areas. -
Join the pieces:
Press the hand firmly onto the center of the dish. Use a small coil of clay around the base of the wrist to reinforce the joint, blending it smoothly upwards into the arm and downwards into the dish. -
Smooth the surface:
Dip a sponge in water and wring it out almost completely. Gently wipe down the entire sculpture to remove fingerprints and harsh tool marks. -
Slow drying:
Place a plastic bag loosely over the sculpture to let it dry slowly over 24-48 hours. Fast drying can cause the fingers to crack. -
Sanding:
Once bone dry, use fine-grit sandpaper to smooth out any remaining bumps or rough edges, paying special attention to the rim of the dish and the fingertips. -
Sealing:
Apply a coat of matte acrylic sealer to protect the clay from moisture and oils, which will help keep the white finish pristine over time.
Stone Effect
For a gritty, faux-stone texture like the image, mix a teaspoon of used coffee grounds or cracked black pepper into the clay before you start sculpting.
Now you have a stunning, handmade sculpture ready to showcase your favorite rings
Poseable Animal on a Wire Armature
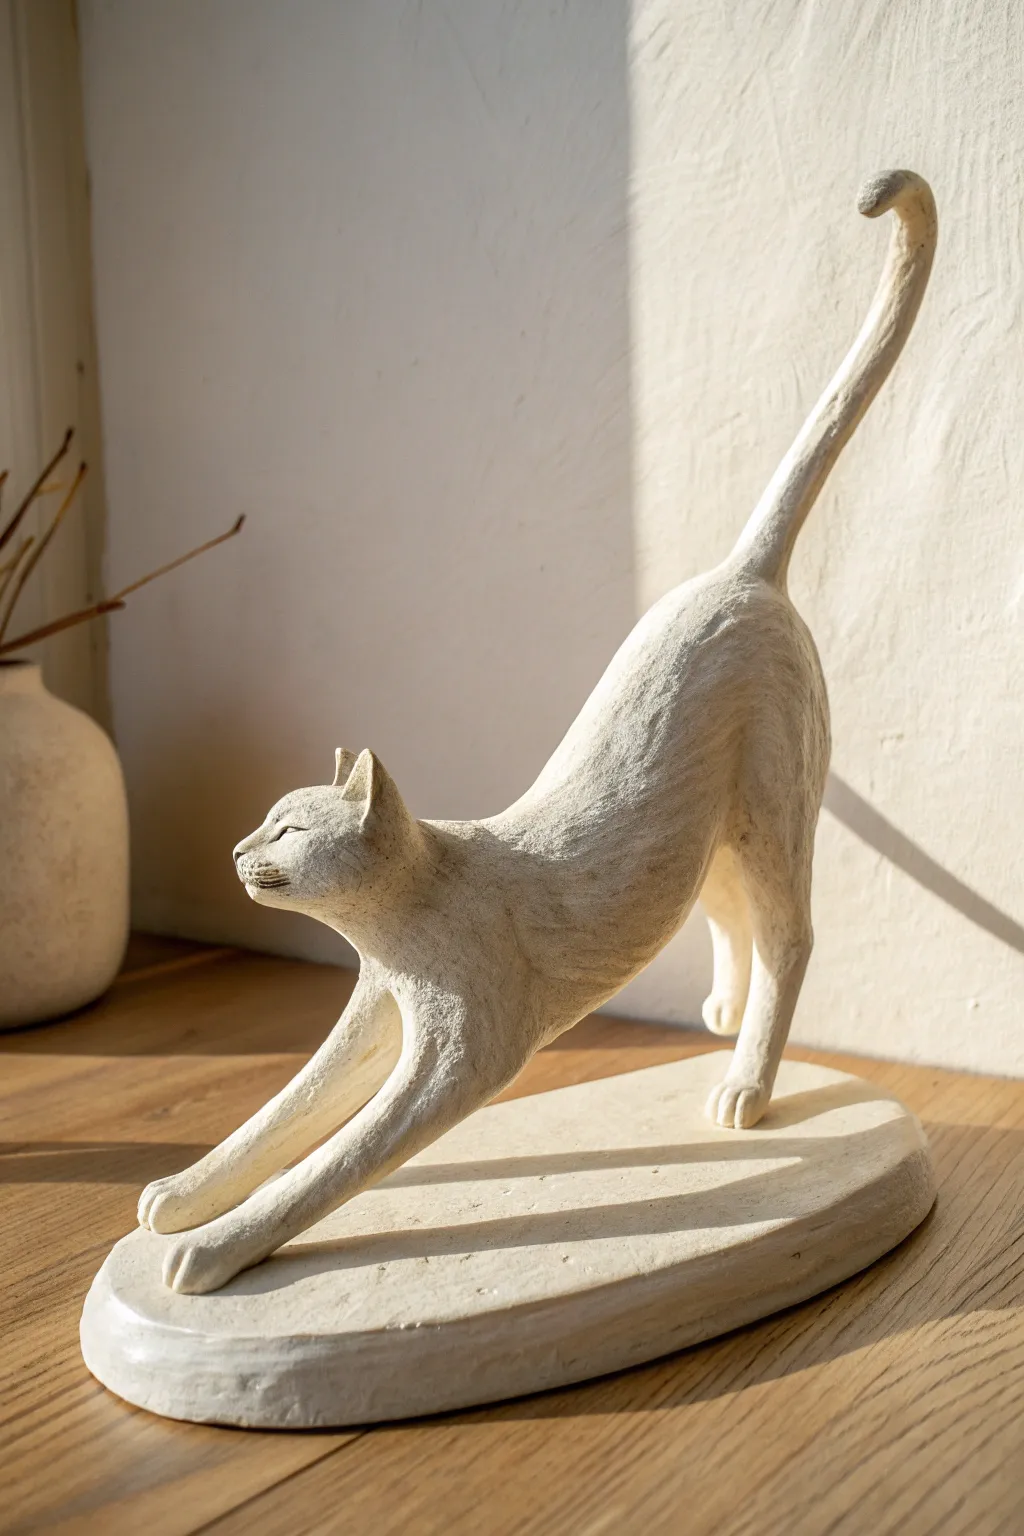
Capture the fluid elegance of a waking feline with this textured air dry clay sculpture. The elongated pose relies on a sturdy armature to support that satisfying, spine-arching stretch.
Step-by-Step Tutorial
Materials
- Air dry clay (white or light stone)
- Aluminum crafting wire (2mm or thicker)
- Thinner binding wire
- Aluminum foil
- Masking tape
- Wooden base or oval plaque (optional)
- Sculpting tools (needle tool, loop tool, rubber shaper)
- Wire cutters
- Pliers
- Acrylic paint (cream, white, pale beige)
- Matte varnish
Step 1: Building the Skeleton
-
Form the spine and tail:
Cut a long length of thick aluminum wire to act as the spine. Bend one end upwards in a gentle curve to create the upright tail, and arch the middle section downwards to mimic the cat’s stretching back. -
Create the limbs:
Cut two U-shaped pieces of wire for the legs. Twist the ‘front legs’ piece around the front of your spine wire, angling them forward. Twist the ‘back legs’ piece near the base of the tail, angling them slightly back to support the weight. -
Construct the head loop:
At the front end of the spine wire, twist a smal foil ball or wire loop to represent the skull. Position it slightly lifted, looking forward. -
Bulk up with foil:
Wrap crumpled aluminum foil tightly around the wire armature to create muscle mass. Focus on bulking up the hips and shoulders, keeping the legs and tail relatively slender. Compression is key here so the clay doesn’t slide. -
Secure the form:
Wrap the entire foil structure with masking tape. This smooths out sharp foil edges and provides a much better surface for the clay to adhere to.
Cracks Appearing?
If hairline cracks form while drying, mix a small paste of clay and water (slip). Rub this into the cracks with your finger and let it dry again.
Step 2: Sculpting the Figure
-
Apply the base layer:
Roll out sheets of air dry clay about 1/4 inch thick. Wrap these sheets around the taped armature, using a little water to smooth the seams where clay meets clay. -
Refine the stretch:
Add extra clay to the shoulder blades and hip bones to emphasize the tension of the stretch. The back should look concave, dipping low between the shoulders and hips. -
Shape the legs and paws:
Taper the clay down the legs. For the front paws, flatten them slightly against the surface and use a knife tool to mark the toes, showing how they spread during a stretch. -
Detail the head:
Add two small triangles for ears. Smooth small balls of clay onto the face for cheeks, blending them seamlessly. Use a needle tool to imply closed, squinting eyes and a small nose. -
Create the texture:
Before the clay dries, take a stiff bristle brush or a multi-needle tool and gently scratch the surface in the direction of fur growth. This gives it that carved, organic look seen in the photo. -
Add the base:
Flatten a large oval of clay to serve as the platform. Firmly press the cat’s paws onto this base. I find using a bit of slip (watery clay) acts like glue here to ensure a permanent bond.
Step 3: Finishing Touches
-
Dry thoroughly:
Let the sculpture sit for at least 24-48 hours. Turn it occasionally if possible to let air reach the bottom of the base. -
Sand imperfections:
Once bone dry, use fine-grit sandpaper to knock down any unintentionally sharp ridges or rough fingerprints, but be careful not to smooth away your fur texture. -
Painting the base coat:
Mix a warm white or cream acrylic paint. Apply a solid coat over the entire figure and the base. -
Dry brushing:
Dip a dry brush into a slightly lighter shade of white. Wipe most of the paint off on a rag, then lightly brush over the textured fur. This highlights the ridges and mimics a carved stone effect. -
Seal the work:
Apply a coat of matte varnish to protect the clay from humidity and dust without adding an unnatural shine.
Customize the Pose
Before adding clay, tweak the wire to change the stretch. Try arching the back up (Halloween style) or curling the tail around the paws.
Place your elegant feline on a sunny shelf where the light can catch the texture of its coat
Story Scene Figure With a Tiny Prop
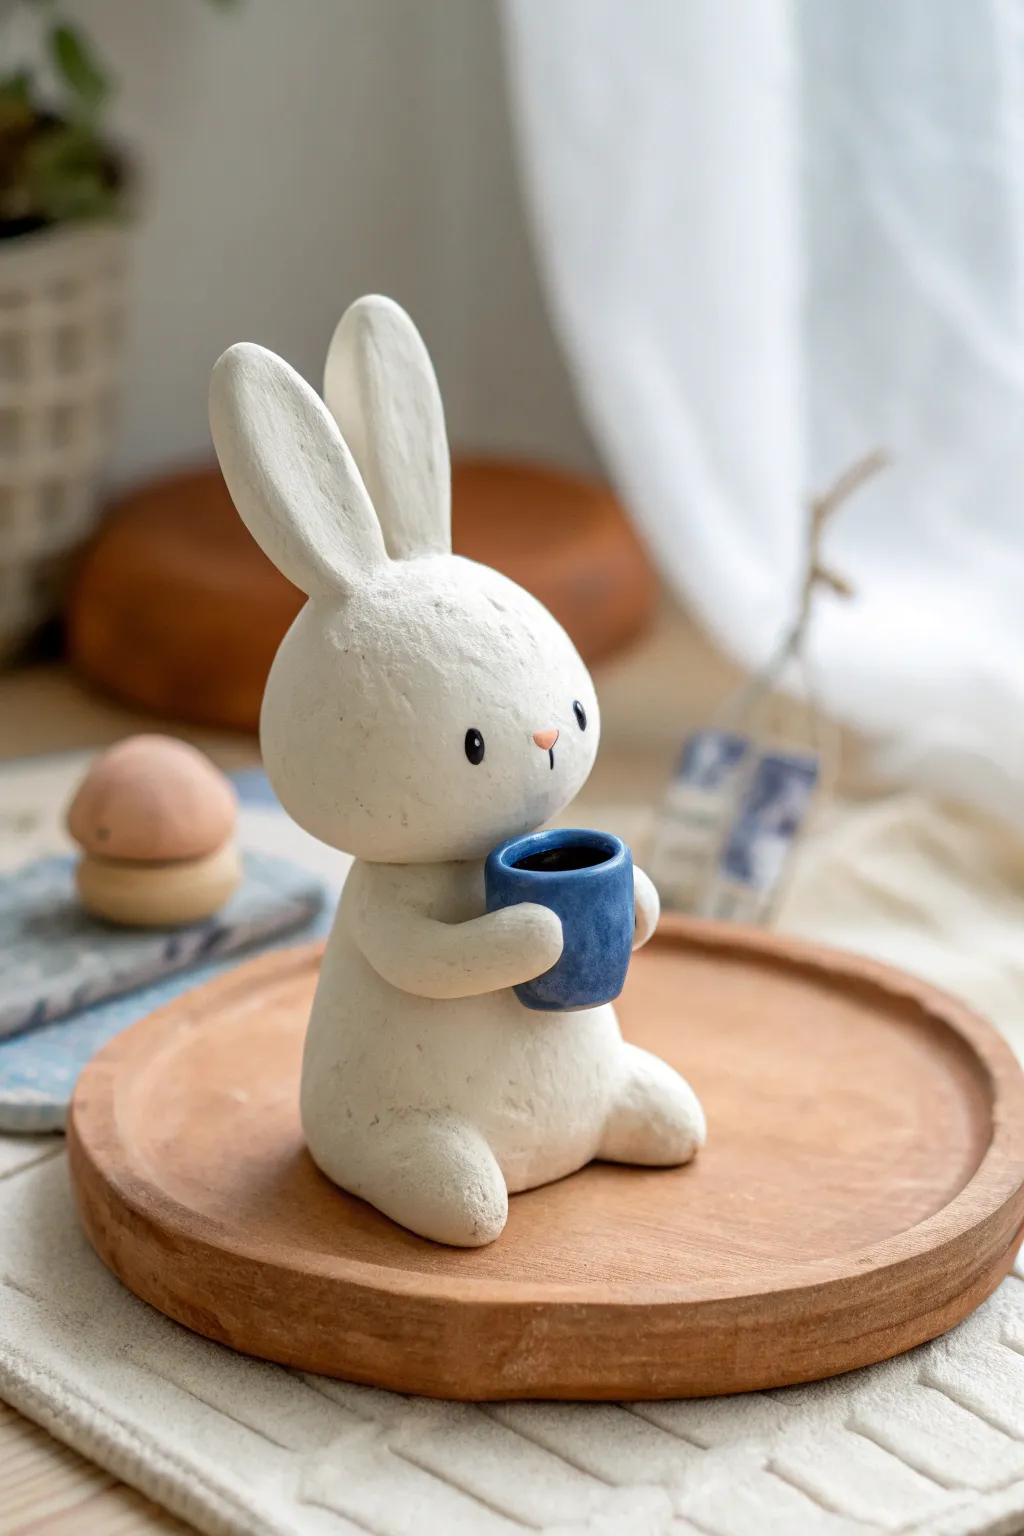
Capture the warmth of a peaceful morning with this adorable, minimalist bunny figure. With its gentle expression and tiny blue mug, this air dry clay project brings a touch of calm whimsy to any desk or shelf.
Step-by-Step
Materials
- White polymer or fine air dry clay
- Aluminum foil (for armature core)
- Small rolling pin
- Sculpting tools (needle tool, smoothing tool)
- Acrylic paints (navy blue, black, soft pink)
- Fine detail paintbrush
- Matte varnish or sealant
- Water and small sponge (for smoothing)
- Sandpaper (fine grit)
Step 1: Sculpting the Base
-
Build the core:
Begin by scrunching a piece of aluminum foil into a small egg shape. This will act as the core for the body, saving clay and reducing drying time. -
Form the body:
Roll out a thick sheet of white clay and wrap it completely around your foil egg. Smooth all seams with your thumb and a little water until you have a seamless, slightly pear-shaped body. -
Add the feet:
Roll two small, equal-sized balls of clay. Flatten them slightly into ovals and attach them to the bottom front of the body to create the sitting legs. Blend the clay at the connection points so they look integral to the body. -
Create the head:
Roll a larger sphere of white clay for the head. It should be slightly wider than the top of the body for that cute, chibi proportion. Attach it firmly to the body, perhaps using a small piece of toothpick or wire as internal support.
Smooth Seams
Keep a small dish of water nearby. Dip your finger and rub circular motions over joints to make clay connections vanish completely.
Step 2: Adding Details
-
Shape the ears:
Roll two medium-sized logs of clay, tapering them at the ends. Flatten them gently to form the iconic rabbit ear shape. I find it helpful to curve them slightly for a more natural look. -
Attach the ears:
Score the top of the head and the base of the ears to create a rough texture. Apply a dab of water or clay slip, then press the ears into place. Smooth the clay downward to blend the seam. -
Make the mug:
For the tiny prop, roll a small cylinder of clay. Indent the top with the back of a paintbrush to hollow it out, then add a miniscule snake of clay for the handle. -
Position the arms:
Roll two small sausage shapes for the arms. Press the mug against the bunny’s chest, then wrap the arms around it so the bunny appears to be holding it securely. Blend the shoulders into the main body.
Step 3: Finishing Touches
-
Smooth the surface:
Dip your finger or a sponge in water and gently run it over the entire figure to remove fingerprints. Let the figure dry completely—this usually takes 24-48 hours depending on humidity. -
Sand imperfections:
Once fully dry, inspect your bunny. Use fine-grit sandpaper to buffer away any remaining bumps or rough patches for a professional, matte finish. -
Paint the mug:
Using a small brush, carefully paint the mug a deep denim blue. Be steady around the bunny’s white paws. Paint the inside of the mug black to simulate coffee or tea. -
Add facial features:
This is the moment the personality arrives. Use your finest brush or a dotting tool to add two small black ovals for eyes and a tiny, soft pink triangle for the nose. Keep the features centered and low on the face for maximum cuteness. -
Seal the work:
Protect your creation with a coat of matte varnish. This preserves the texture and prevents the paint from chipping over time.
Texture Twist
Before the clay dries, gently tap the surface with a stiff toothbrush to give the bunny a subtle ‘furry’ texture instead of a smooth finish.
Now you have a serene little companion to keep you company during your own coffee breaks
Draped Cloth Spirit Figure
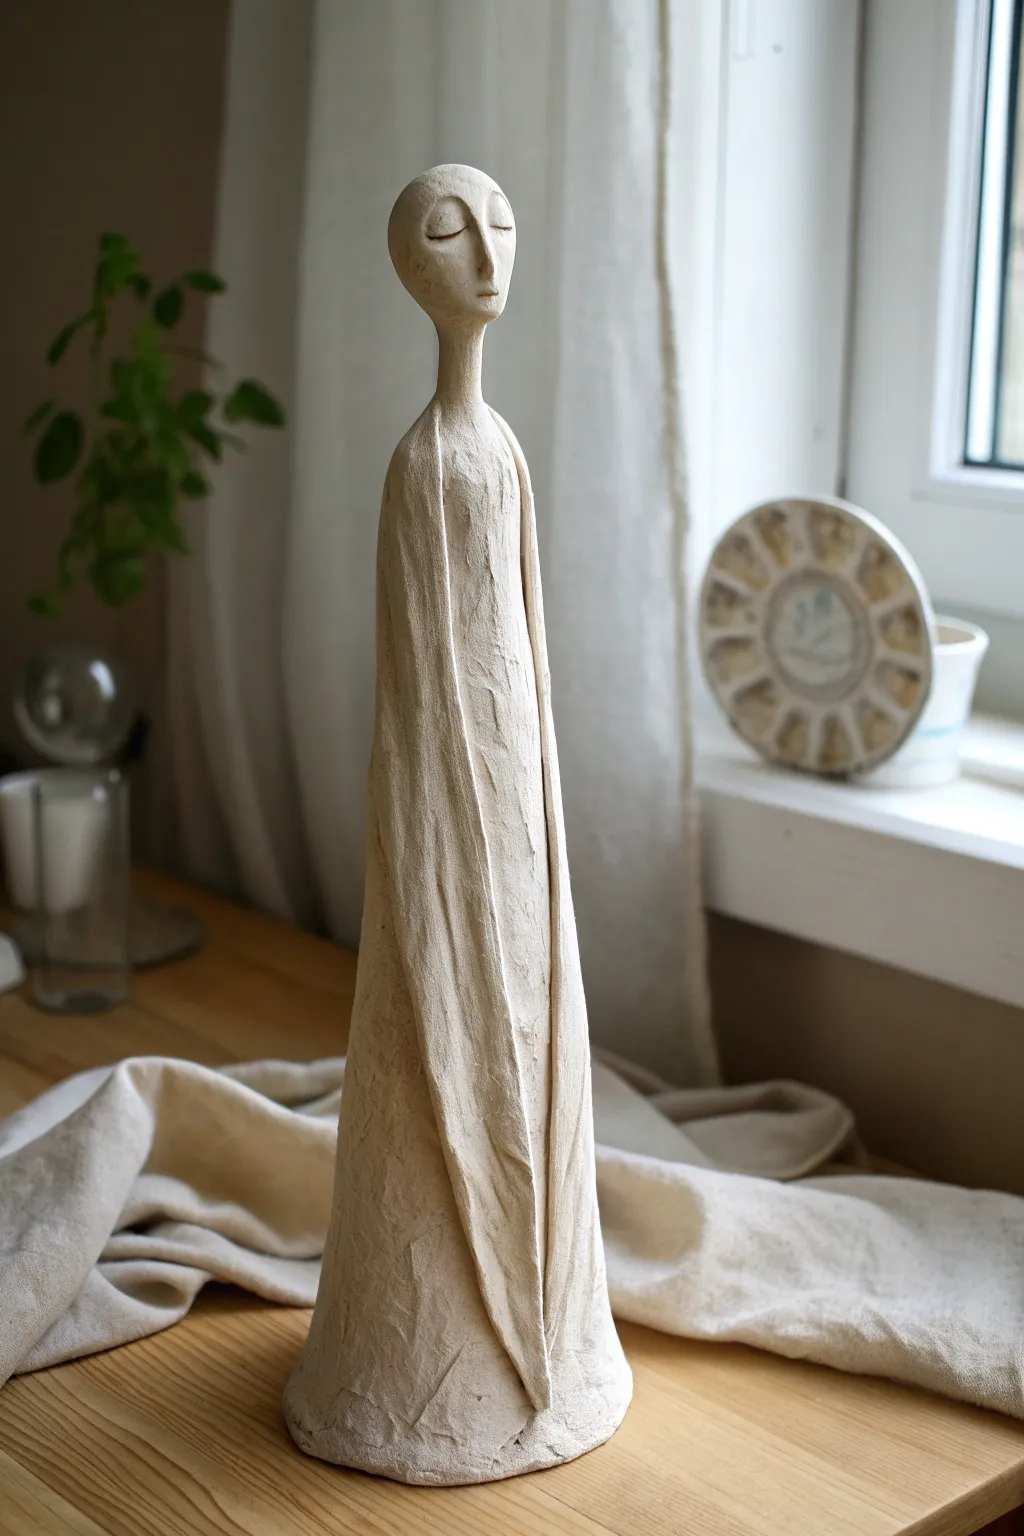
Capture quiet contemplation with this elegant, minimalist sculpture that focuses on long, graceful lines and subtle textures. The figure features a serene, stylized face and a flowing, draped aesthetic that gives the impression of ancient stone.
How-To Guide
Materials
- High-quality white air dry clay (e.g., DAS or stone clay)
- Aluminum foil
- Strong craft wire or metal armature wire
- Wooden base or scrap wood for support while working
- Masking tape
- Small cup of water
- Clay tools (needle tool, smooth modeling tool)
- Fine grit sandpaper
- Acrylic matte varnish (optional)
Step 1: Building the Armature
-
Form the core wire:
Cut a length of strong armature wire approximately 12-14 inches long. Fold it in half and twist the loop at the top to form a small head shape, leaving the two legs straight down. -
Bulking out the body:
Crumple aluminum foil tightly around the wire structure to create a elongated cone shape. The base should be wider for stability, tapering gently up to a very thin neck. Keep the foil layer thinner than your final sculpture size. -
Establishing the head:
Add a small, tightly compressed ball of foil for the head. It should be slightly oval-shaped and proportionate to the very tall, slender body. Secure all foil parts firmly with masking tape so the clay has a surface to grip.
Fixing Cracks
If cracks appear while drying, mix a small amount of clay with water to make a paste (slip). Fill the cracks with this paste and smooth it over with a damp finger.
Step 2: Applying the Base Clay
-
Covering the form:
Roll your air dry clay into thin sheets or flatten chunks with your palms. Begin covering the foil armature completely, starting from the bottom base and working upwards. -
Smoothing the column:
Once covered, use wet fingers to smooth the seams. Roll the sculpture gently on your work surface to ensure the main body is a perfect, smooth cone shape. -
Defining the neck:
Add extra clay to the neck area, blending it seamlessly into the shoulders and head. The neck should be long and elegant, a signature trait of this style. -
Refining the head shape:
Add a smooth layer of clay over the head foil. Shape it into a smooth, slightly flattened oval. Keep the chin area tapered and delicate.
Step 3: Sculpting Details and Drapery
-
Creating the sleeves:
Roll out two long, thin coils of clay and flatten them into ribbons. Attached these vertically starting from the shoulders down to the base to mimic long, hanging sleeves or folded cloth. -
Blending the drapery:
Use a modeling tool to blend the inner edges of these ‘sleeves’ into the main body, leaving the outer edges slightly raised to create depth and shadow. -
Sculpting the nose:
Roll a tiny tear-drop of clay. Attach it to the center of the face. Use a small tool to blend the sides into the cheeks, creating a long, straight nose bridge. -
Forming the eyes:
Instead of sculpting open eyes, create the impression of closed eyelids. Use a needle tool to gently impress two crescent shapes on either side of the nose bridge. -
Adding the mouth:
Make a very subtle horizontal indentation for the mouth. Keep it small and neutral to maintain the peaceful expression. -
Texturing the surface:
I like to take a slightly damp sponge or a rough piece of fabric and pat the entire surface gently. This removes fingerprints and gives the piece a stone-like, organic texture.
Stone Effect
For an ancient look, lightly dab diluted grey or beige watercolor paint into the crevices of the drapery and wipe away the excess with a cloth.
Step 4: Finishing Touches
-
Checking stability:
Ensure the base is perfectly flat so the figure stands on its own. If it wobbles, gently tap the base against the table while the clay is still damp. -
Slow drying:
Let the figure dry vertically in a draft-free area. Because of the foil core, this may take 24-48 hours. Turn it occasionally if possible for even drying. -
Sanding:
Once fully cured and hard, use fine-grit sandpaper to smooth out any rough patches, particularly around the neck and facial features. -
Final look:
Leave the clay raw for a matte, natural finish as seen in the photo, or apply a very thin coat of matte varnish to protect it without adding shine.
Place your finished figure near a window where natural light can highlight the subtle shadows of the drapery
Stacked-Shape Character Totem
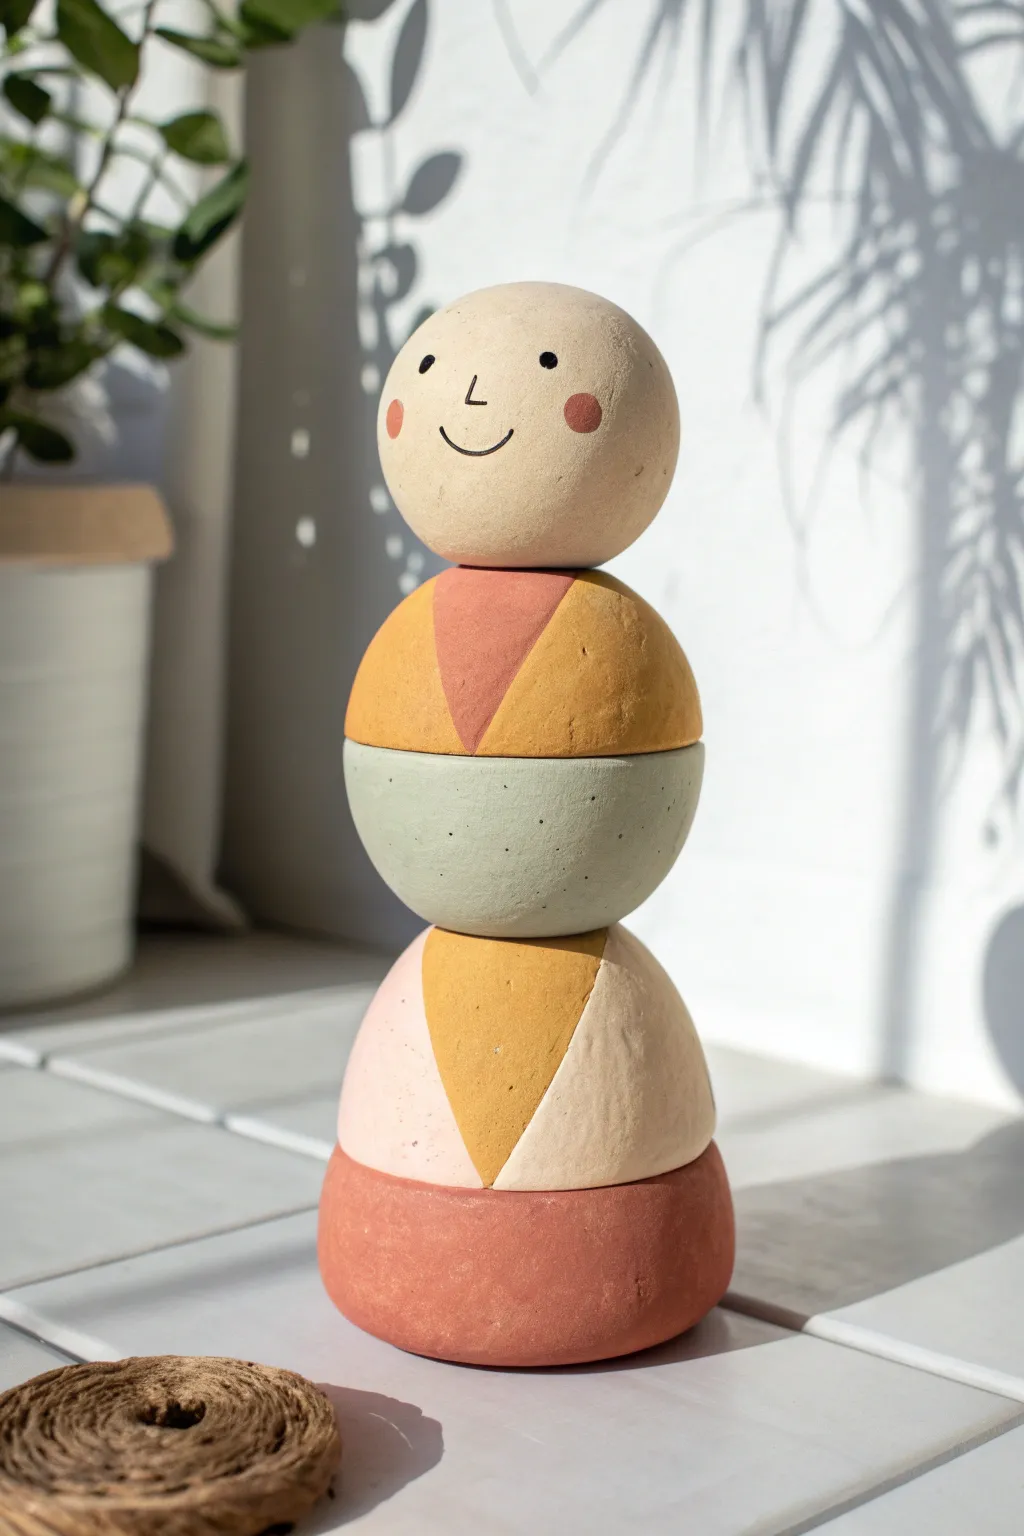
This charming, smiling sculpture combines simple geometric shapes into a delightful character that adds a touch of modern folk art to any shelf. The muted, earthy color palette and stacked design give it a playful yet sophisticated look perfect for a sunny windowsill.
Step-by-Step
Materials
- White air-dry clay (approx. 500g)
- Acrylic paints (terracotta/rust red, mustard yellow, sage green, blush pink, black)
- Small rolling pin
- Modeling tools or a butter knife
- Sandpaper (fine grit)
- Water and a small sponge
- Paintbrushes (flat shader and detailed liner)
- Clear matte varnish (optional)
Step 1: Shaping the Segments
-
Form the Base:
Start by taking a handful of clay and rolling it into a smooth ball. Gently press it onto a flat surface to flatten the bottom, then flatten the top slightly to create a thick, rounded disc shape about 3 inches wide. -
Create the Lower Body:
Roll a slightly smaller ball of clay and shape creates a tapered cone with a rounded bottom. This section should be roughly pyramid-shaped but with soft, rounded edges to sit atop the base. -
Mold the Middle Bowl:
Form a third ball, slightly smaller than the base. Press your thumb into the center to create a shallow bowl shape, keeping the walls thick and the bottom rounded. This piece will act as the torso. -
Shape the Shoulders:
Create another tapered cone shape, similar to the lower body but inverted so the wider part faces upwards. This will be the shoulder section that supports the head. -
Roll the Head:
Roll a perfect sphere for the head. It should be proportional to the rest of the stack—large enough to look cute but not so heavy it topples the structure. -
Test the Stack:
While the clay is still damp, carefully stack all pieces to check the balance and fit. I like to gently press them together just enough to ensure they sit flush, but don’t stick them together permanently yet.
Wobbly Stack?
If pieces won’t sit flat, tape sandpaper to a table and rub the bottom of the wobbly piece against it in a circular motion until perfectly level.
Step 2: Refining and Drying
-
Smooth the Surfaces:
Unstack the pieces. Dip your finger or a small sponge in water and smooth out any cracks, fingerprints, or uneven textures on each individual piece. -
The Drying Phase:
Place all five pieces on a wire rack or a piece of parchment paper. Let them dry completely typically for 24-48 hours. Turn them occasionally to ensure even drying. -
Sand for Perfection:
Once fully dry and hard, use fine-grit sandpaper to gently buff away any remaining bumps. Pay special attention to the areas where the pieces stack to ensure they are flat and stable.
Step 3: Painting and Assembly
-
Paint the Base:
Paint the bottom disc entirely in a deep terracotta or rust red color. Apply two coats for solid coverage. -
Design the Lower Body:
For the first cone shape, paint a pale blush pink base. Once dry, paint a contrasting inverted triangle of mustard yellow on the front face. -
Paint the Middle Section:
Paint the bowl-shaped middle section entirely in a soft sage green. You can add tiny speckles of dark grey with a toothbrush for a stone-like texture if desired. -
Detail the Shoulders:
Paint the upper cone section mustard yellow. Once that layer dries, add a smaller, inverted terracotta triangle on the front, mirroring the pattern on the lower body. -
Create the Face:
Leave the head primarily the natural clay color or paint it a creamy off-white. Using a fine liner brush and black paint, add two small eyes, a tiny nose, and a simple curved smile. -
Add Cheeks:
Dip the end of a paintbrush or a cotton swab into the terracotta paint and gently stamp two rosy cheeks on either side of the smile. -
Final Assembly:
You can leave the pieces loose as a stacking toy, or glue them permanently with a strong craft glue or epoxy. I prefer gluing them for stability if it’s purely decorative. -
Seal:
Finish with a coat of clear matte varnish to protect the paint and give the sculpture a unified finish.
Paint Pro Tip
Mix a tiny amount of baking soda into your acrylic paint. This gives the totem a matte, ceramic-like texture that hides brush strokes perfectly.
Now you have a friendly little sculpture ready to brighten up your desk or shelf with its cheerful expression