
When I’m teaching beginners, easy cute clay food is my go-to because you can nail the shapes fast and still get that “aww” factor. These ideas are all about simple miniature food you can make with beginner-friendly clay and bold color choices.
Mini Pizza Slice Charms
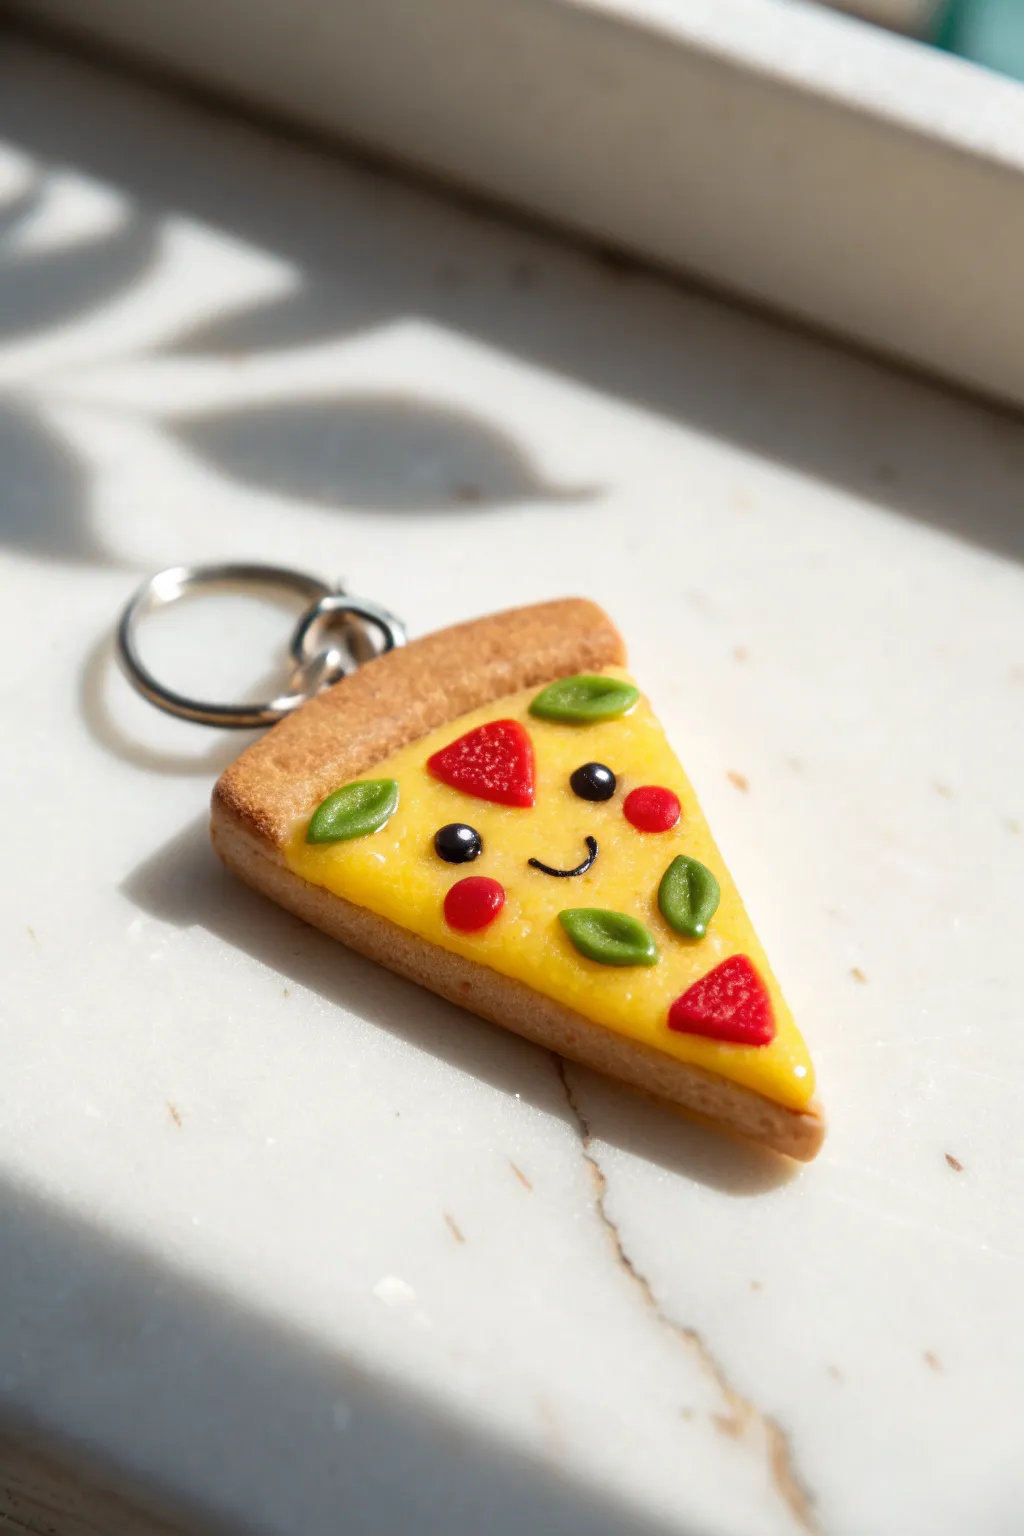
Carry a slice of happiness with you everywhere with this adorable mini pizza charm. Made from polymer clay, it features realistic crust textures, classic toppings, and a tiny smiling face that adds a touch of kawaii sweetness.
Step-by-Step Tutorial
Materials
- Polymer clay (beige/tan, yellow, red, green, black)
- Translucent liquid polymer clay (optional)
- Cutting blade or X-Acto knife
- Needle tool or toothpick
- Ball tool (small)
- Rolling pin
- Soft pastel chalks (orange, brown)
- Paintbrush (soft)
- Eye pin or screw eye
- Gloss glaze or varnish
- Jump ring and keychain attachment
Step 1: Creating the Base
-
Color mixing:
Start by conditioning your beige or tan clay until it’s soft. If the color looks too plain, mix in a tiny speck of white or translucent clay to give it a more realistic dough appearance. -
Rolling the dough:
Roll the tan clay into a ball about the size of a marble, then flatten it slightly with your palm or a rolling pin until it’s about 1/4 inch thick. -
Shaping the slice:
Using your cutting blade, trim the flattened circle into a classic triangle shape. Don’t discard the excess just yet; you can use it for practice textures. -
Creating the crust:
Roll a small snake of the same tan clay. Attach it along the top, wide edge of the triangle to form the puffy crust. Blend the seam on the back so it won’t fall off. -
Texturing the dough:
Take a toothbrush or a ball of crinkled aluminum foil and gently tap it all over the tan areas (crust, sides, and bottom). This mimics the porous texture of baked bread. -
Adding the bake effect:
Shave a little orange and brown soft pastel chalk into a powder. Using a dry, soft brush, dust the edges of the crust and the bottom of the slice to make it look perfectly golden-baked.
Step 2: Sauce and Toppings
-
Adding the cheese:
Flatten a thin piece of yellow clay. Cut it into a slightly smaller triangle than your base and press it onto the slice. Alternatively, mix yellow clay with liquid polymer clay to create a ‘melted’ sauce you can spread on. -
Making pepperoni:
Roll out a tiny amount of red clay very thinly. Use the smallest circle cutter you have, or a straw, to punch out mini circles. Pinch one side of some circles into triangle shapes for variety. -
Placing the meats:
Press the red pieces gently into the yellow cheese layer. I like to submerge them just slightly so they look like they are baked into the cheese. -
Creating the basil:
Roll teeny-tiny teardrop shapes from green clay. Flatten them slightly and use a needle tool to press an indentation down the center of each leaf for a vein detail. -
Adding the greens:
Arrange the basil leaves on the pizza, placing them near the pepperoni or in empty cheese spots for a balanced look.
Make it Melt
Mix your yellow clay with translucent liquid sculpey until it’s a frosting consistency. Spread this ‘sauce’ on instead of solid clay for an ultra-realistic melted cheese effect.
Step 3: Putting on a Happy Face
-
Setting the eyes:
Roll two impossibly small balls of black clay. Position them in the center of the slice, spaced slightly apart, and press them flat gently to secure them. -
Adding the blush:
Create two small circles of red clay (slightly larger than the eyes) and place them below and to the outside of the eyes to create rosy cheeks. -
Drawing the smile:
Roll an extremely thin thread of black clay. Cut a tiny u-shaped segment and carefully place it between the cheeks using a needle tool to form the smile.
Best Friends Charm
Make a full circular pizza with 6-8 slices first. Texture and decorate the whole circle, then slice it BEFORE baking. Give the matching slices to your whole friend group.
Step 4: Finishing Up
-
Inserting hardware:
Before baking, insert an eye pin into the center of the crust at the top. Use a little liquid clay on the pin’s shaft to act as glue. -
Baking:
Bake the charm according to your specific brand of polymer clay’s instructions (usually around 275°F/135°C for 15-20 minutes). Let it cool completely. -
Glazing:
Apply a coat of gloss glaze over the cheese and toppings to make them look greasy and delicious. Leave the crust matte for a realistic contrast. -
Assembly:
Once dry, use pliers to open a jump ring, slide it through the eye pin, and attach your keychain hardware.
Now you have a savory little slice of art to keep your keys company


Stacked Burger Bites
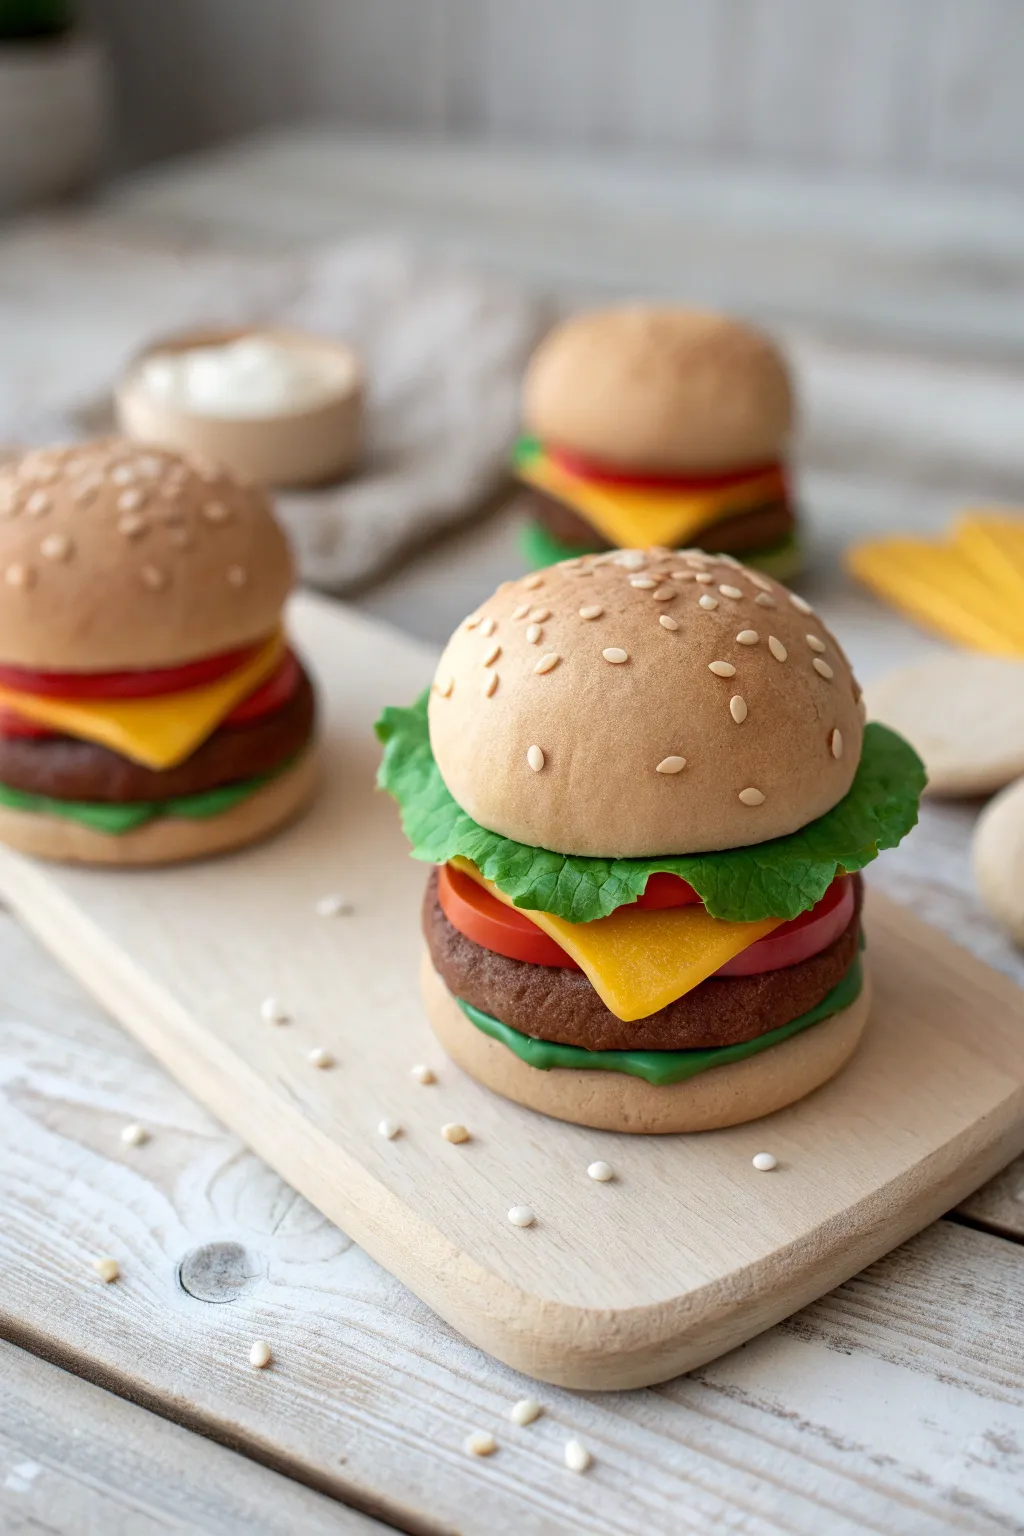
These delightfully realistic miniature hamburgers are perfect for dollhouse displays or just as charming desk mascots. With their textured buns, distinct layers of cheese and lettuce, and tiny sesame seeds, they look good enough to eat but are crafted entirely from clay.
Step-by-Step
Materials
- Polymer clay (colors: tan/beige, dark brown, red, yellow, green, white)
- Texturing tool (old toothbrush or stiff bristle brush)
- Dotting tool or toothpick
- Rolling pin or pasta machine
- Circle cutters (small)
- Translucent liquid clay (optional for sauce looks)
- Chalk pastels (orange/brown for shading)
- Soft paintbrush
- Craft knife
Step 1: Shaping the Buns
-
Mix the Dough Color:
Start by conditioning your tan or beige clay until it’s soft and pliable. If the color is too pale, mix in a tiny pinhead-sized amount of orange or yellow to get that warm, baked bread tone. -
Form the Base:
Create the bottom bun by rolling a medium-sized ball of clay. Flatten it gently with your palm until it becomes a thick disc, keeping the edges slightly rounded rather than sharp. -
Form the Dome:
Roll a slightly larger ball for the top bun. Press it down more gently so it retains a nice, high dome shape, just like a real burger bun. -
Texture the Bread:
Take your old toothbrush or a stiff bristle brush and tap it all over the surface of both bun pieces. I like to focus on the curved edges to mimic the natural airy texture of bread. -
Shade for Realism:
Scrape some orange and brown chalk pastel into a fine dust. Using a soft paintbrush, gently dust the top of the dome bun to give it a ‘baked’ golden-brown appearance.
Natural Gloss Effect
Mix a tiny drop of translucent liquid clay with red or yellow clay to create ‘ketchup’ or ‘mustard’ that oozes realistically out the sides.
Step 2: Creating the Meat Patty
-
Mix the Meat Color:
Combine dark brown clay with a tiny bit of red and black to create a rich, cooked beef color. Ensure the color is uniform throughout. -
Shape the Patty:
Roll a ball similar in size to your bottom bun and flatten it into a thick disc. The edges should be rough and uneven, not perfectly smooth. -
Add Meat Texture:
Use a toothpick or a needle tool to aggressively poke and drag across the sides and top edge of the patty. You want a rough, minced texture that looks ground.
Step 3: Preparing the Toppings
-
Slice the Tomato:
Roll out red clay into a flattened sheet. Use a small circle cutter to punch out a disc. Smooth the edges with your finger so they aren’t too sharp. -
Craft the Cheese:
Roll out yellow clay thinly. Cut a square shape that is slightly larger than your burger patty so the corners will drape over the sides naturally. -
Prepare the Lettuce:
Flatten a piece of green clay very thinly until the edges are almost translucent. Tear the edges irregularly with your fingers. -
Ruffle the Greens:
Using a dotting tool or toothpick, gently press and curl the torn edges of the green clay to create a wavy, ruffly lettuce effect.
Make it a Necklace
Insert a metal eye pin into the center of the top bun before baking. Once baked and cooled, add a jump ring and chain for quirky jewelry.
Step 4: Assembly and Finish
-
Stack the Fillings:
Place your bottom bun on your work surface. Add a layer of green clay (perhaps a second flatter piece for a bottom garnish if desired) and then place the textured meat patty on top. -
Add Cheese and Tomato:
Lay the tomato slice on the patty, followed by the square of cheese. Gently press the corners of the cheese down so they look like they are melting over the patty. -
Top with Lettuce:
Place your ruffled lettuce layer on top of the cheese. Ensure the wavy edges poke out visibly past the bun’s circumference. -
Crown the Burger:
Place the top bun dome onto the stack. Press down gently but firmly to adhere all the layers without squashing the textured details. -
Seed the Bun:
Roll incredibly tiny teardrop shapes from white or very light tan clay. Carefully press these onto the top bun to act as sesame seeds. -
Baking:
Bake the clay according to the manufacturer’s instructions for the specific brand you used. Let it cool completely before handling.
Now you have a delicious-looking miniature burger that will last forever without spoiling


French Fries in a Little Box
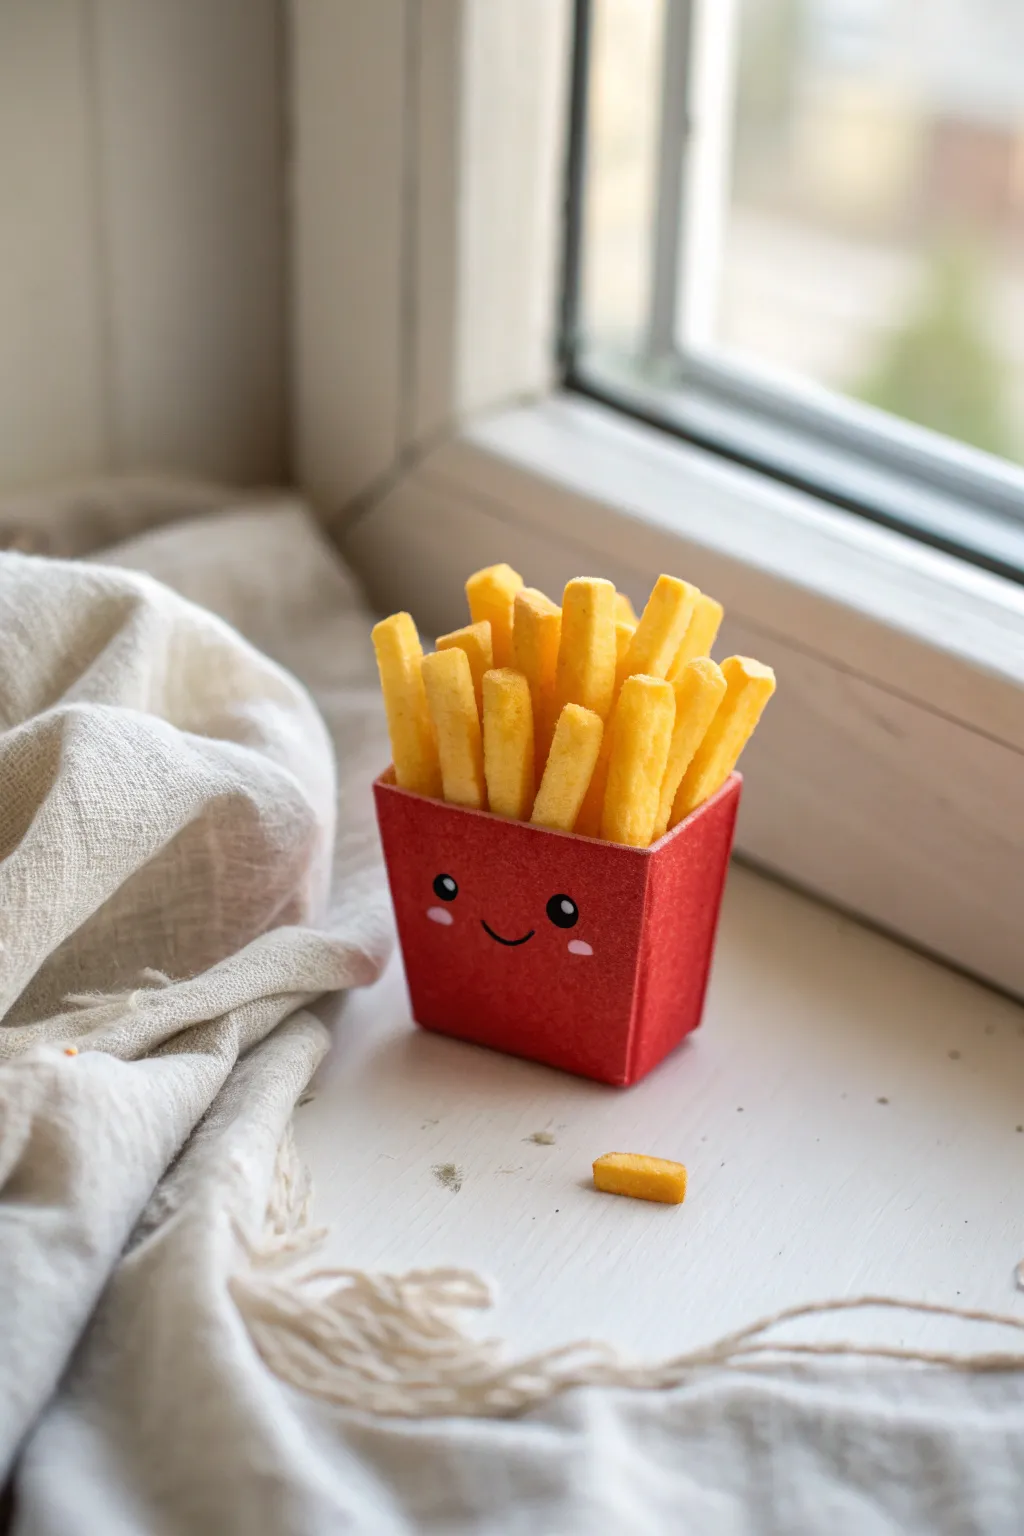
Create an adorable miniature serving of French fries that will never go stale. This project features a cheerful red container holding a generous portion of textured, golden-yellow clay fries.
Step-by-Step Guide
Materials
- Lightweight air-dry clay (white)
- Acrylic paints (bright red, golden yellow, ochre, black, pink)
- Thin cardboard or heavy cardstock
- Craft knife or scalpel
- Ruler
- Fine sandpaper
- Tacky glue or strong craft glue
- Old toothbrush or stiff bristle brush
- Soft pastel chalks (orange/brown) – optional
- Fine detail paintbrush
- Matte varnish
Step 1: Making the Fry Box
-
Designing the template:
Cut a strip of cardboard approximately 1 inch tall and 3 inches long. Score it into four sections to create a rectangular tube shape, leaving a small tab at the end for gluing. -
Assembling the base:
Fold the cardboard into a rectangular box shape and glue the tab to secure it. Cut a separate small rectangle for the bottom and glue it in place. -
Painting the base coat:
Paint the entire outside of the box with a bright red acrylic paint. You will likely need two coats for a solid, opaque look. -
Adding the face:
Using a very fine detail brush or a paint pen, draw two small black circles for eyes on the front of the box. Add a small ‘u’ shape between them for a smile. -
Highlights and cheeks:
Dip the end of a toothpick in white paint to add tiny glint dots to the eyes. Then, paint small pink ovals under the eyes for rosy cheeks.
Step 2: Creating the Fries
-
Coloring the clay:
Mix a small amount of golden yellow acrylic paint into your white air-dry clay. Knead it thoroughly until the color is uniform and resembles raw potato dough. -
Rolling it out:
Roll or press the yellow clay into a flat slab, about 1/4 inch thick. Try to keep the thickness consistent for uniform fries. -
Texturing part one:
Before cutting, lightly tap the surface of the clay slab with an old toothbrush. This adds a subtle, fried texture rather than leaving the clay perfectly smooth. -
Cutting the strips:
Use your craft knife to slice the slab into long, rectangular strips. Just like real fries, they don’t have to be perfectly straight; a little waviness adds realism. -
Texturing part two:
After cutting, gently tap the cut sides of each strip with the toothbrush again to ensure texture on all viewing angles. -
Trimming to size:
Trim the strips into various lengths. You want some to stick out tall from the box and others to fill the gaps lower down.
Sticky Situation?
If your knife drags through the clay while cutting strips, let the slab sit for 10-15 minutes to firm up slightly before slicing again.
Step 3: Assembly and Shading
-
Adding baked color:
Shave a little orange or brown soft pastel into a powder. Dust this powder lightly onto the edges and tips of the damp clay fries to mimic crispy, golden-brown spots. -
Initial filling:
I prefer to wad up a small ball of scrap clay or paper and place it inside the bottom of the box. This acts as a riser so you don’t have to fill the entire deep box with perfect fries. -
Arranging the fries:
Apply a small dab of glue to the bottom of your clay fries and start arranging them in the box. Place taller ones in the back and shorter ones in the front. -
Creating volume:
Pack them in relatively tightly, angling them slightly outward to create that overflowing, generous look. -
The stray fry:
Don’t forget to save one small, perfect fry to place next to the box for the final display setup. -
Final sealing:
Once the clay is completely dry (usually 24 hours), give the fries a coat of matte varnish to protect the pastel shading and paint.
Go Deluxe
Mix gloss varnish with red paint and drip it over the finished fries for a realistic ketchup topping, or add tiny clay ‘salt’ grains.
Now you have a charming little snack pal to brighten up your desk or shelf


Simple Taco Cuties
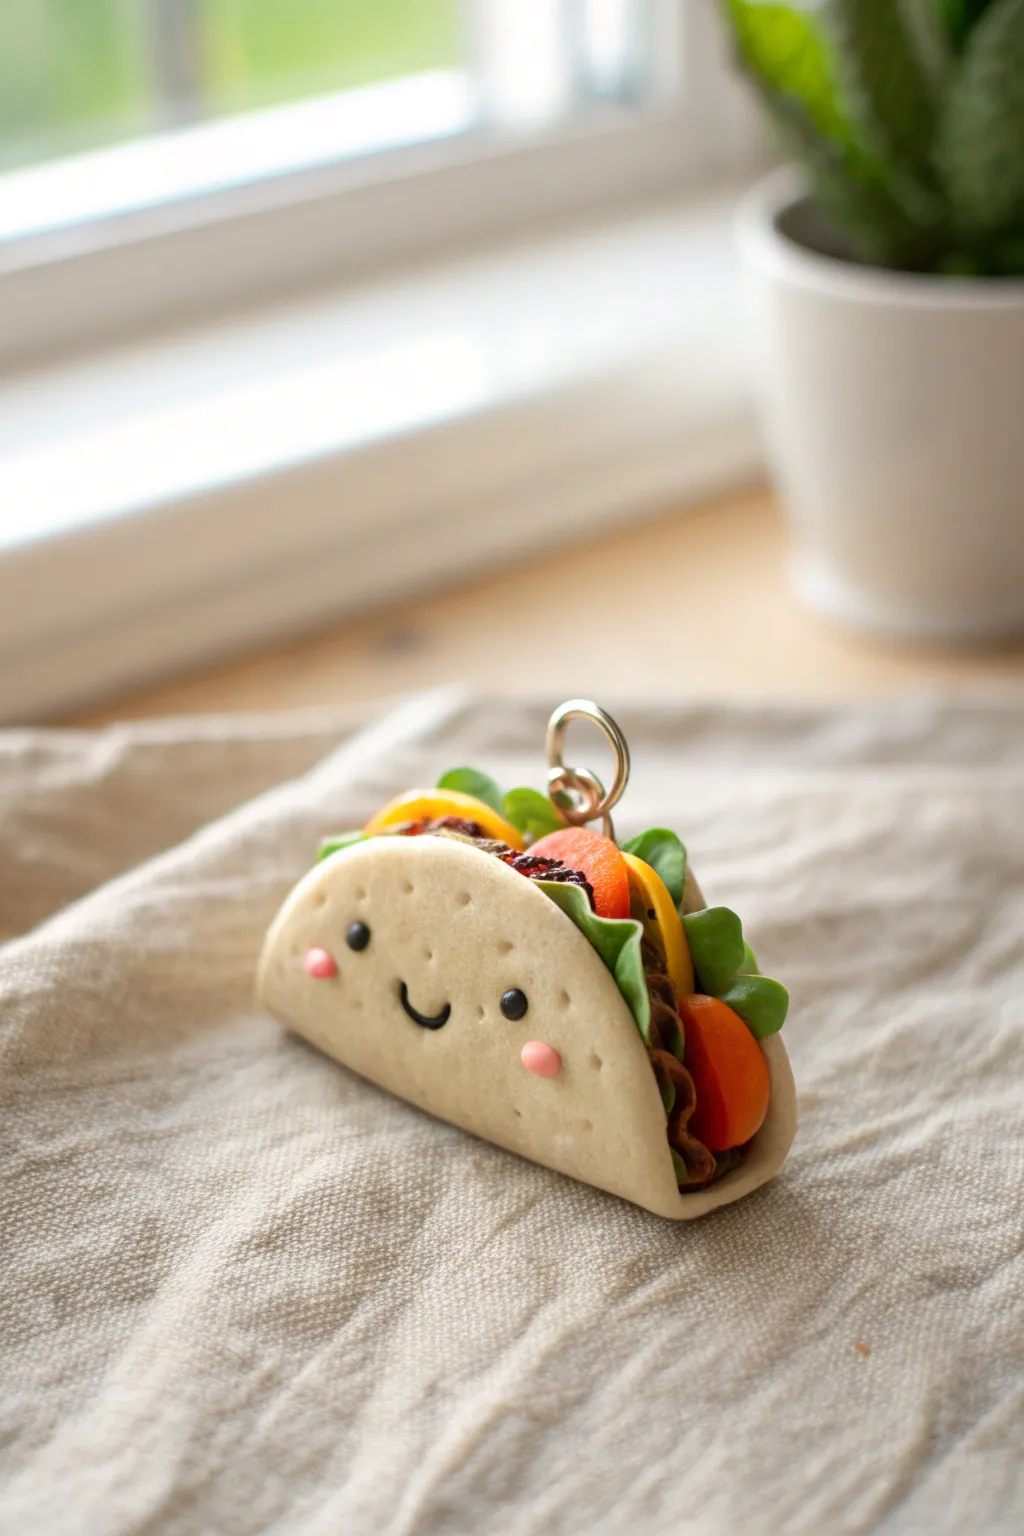
This adorable anthropomorphic taco charm is a perfect beginner project that combines simple shapes with cute details. With its tiny smile and colorful fillings, this miniature food friend makes for a delightful keychain or piece of jewelry.
Detailed Instructions
Materials
- Polymer clay (tan/beige, dark brown, bright green, red, yellow, black, pink)
- Clay roller or pasta machine
- Circle cutter (approx. 2 inches diameter)
- Needle tool or toothpick
- Ball stylus tool
- Small metal eye pin
- Liquid clay or Bake & Bond (optional)
- Gloss glaze (optional)
Step 1: Prepping the Tortilla
-
Mix the perfect tortilla color:
Start by mixing simple beige clay with a tiny speck of white and yellow to get a warm, baked-dough color. Condition the clay by kneading it until it’s soft and pliable. -
Roll it out:
Roll the tan clay into a flat sheet, about 2-3mm thick. You want it sturdy enough to hold its shape but thin enough to look like a tortilla. -
Cut the circle:
Use your circle cutter to punch out a clean round shape. If the edges are sharp, gently tap them with your finger to soften the look. -
Add texture:
Using a clean toothbrush or a ball of aluminum foil, lightly tap the surface of the circle to give it a realistic, bready texture. Be gentle; you don’t want deep craters.
Uneven face?
Use a needle tool to gently nudge the eyes or mouth into place before pressing them down firmly. Symmetry is key.
Step 2: Creating the Fillings
-
Make the meat filling:
Take the dark brown clay and crumble it into tiny, irregular bits. Mash them together slightly to form a rough log shape that will fit inside the taco fold. -
Shape the lettuce:
Roll out thin strips of bright green clay. Use your needle tool to ruffle the edges, creating a wavy, leafy effect. Tear these into smaller pieces. -
Dicing tomatoes:
Roll small balls of red clay in varying sizes. Flatten them slightly so they aren’t perfect spheres, mimicking chopped tomato chunks. -
Shredding cheese:
Roll a very thin snake of yellow clay and cut it into tiny, short segments to resemble shredded cheddar cheese.
Dust issues?
Keep baby wipes handy to clean your hands between colors, especially before handling the light tan tortilla clay.
Step 3: Assembly & Face
-
Start the fold:
Gently curve your tortilla circle in half, but don’t press it flat yet. You need room to insert the fillings. -
Insert the base filling:
Place the crumbled brown ‘meat’ log into the center of the fold. Apply a tiny dab of liquid clay if you’re worried about adhesion. -
Layer the toppings:
Tuck the ruffled green lettuce pieces around the meat so they poke out the top. Add the red tomato chunks and yellow cheese shreds, arranging them artfully so the colors are visible. -
Insert the eye pin:
If making a charm, trim a metal eye pin to the right length and insert it vertically into the center of the filling before closing the taco securely around it. -
Close the taco:
Gently press the tortilla sides against the fillings to secure everything in place, ensuring the taco keeps its curved ‘U’ shape. -
Mark the eye sockets:
On the front of the taco shell, use a small ball tool to make two small indentations for the eyes. -
Add the eyes:
Roll two tiny balls of black clay and press them into the indentations. This embeds them securely so they won’t pop off later. -
Create the mouth:
Roll a microscopic snake of black clay. Curve it into a ‘U’ shape using a needle tool and press it gently between the eyes. -
Apply blush:
Roll two tiny, flat ovals of pink clay and press them onto the cheeks, just below the eyes. -
Bake carefully:
Bake according to your clay manufacturer’s instructions, usually around 275°F (135°C) for 15-20 minutes. I like to prop the taco up with some tissue paper during baking to keep it from falling over.
Once cooled, your little taco friend is ready to hang on a bag or necklace

The Complete Guide to Pottery Troubleshooting
Uncover the most common ceramic mistakes—from cracking clay to failed glazes—and learn how to fix them fast.
Smiley Avocado Halves
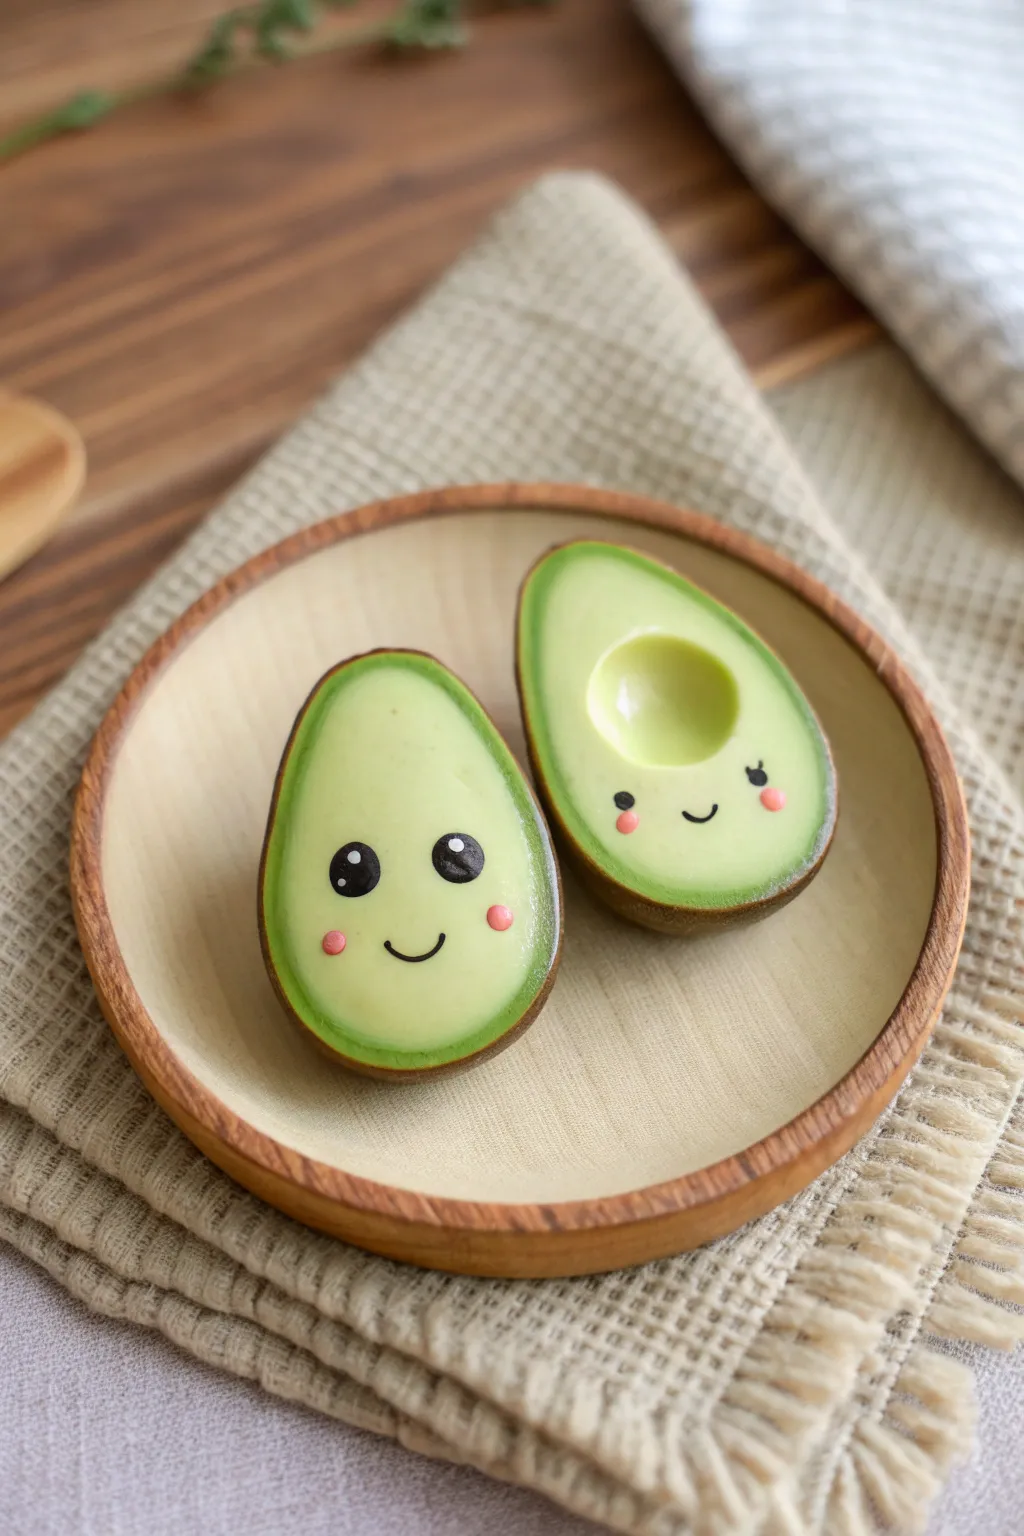
Create a pair of adorable avocado halves that will smile right back at you. This simple polymer clay project produces two distinctive pieces—one smooth and filled out, and the other featuring the classic concave pit space, both with charming Kawaii-style expressions.
How-To Guide
Materials
- Polymer clay (dark brown, light green, yellow, black, pink)
- Clay roller or pasta machine
- Circle cutter or small round mold (optional)
- Ball stylus tools (large and small)
- Blade or craft knife
- Soft pastel chalks/powder (dark green and brown) for shading
- Small soft brush
- Liquid clay or Bake & Bond
- Clear matte or satin varnish
Step 1: Shaping the Avocado Body
-
Mix the Flesh Tone:
Begin by conditioning your clay. Mix a large portion of light green with a small amount of yellow to create that creamy, fresh avocado interior color. Blend until completely streak-free. -
Condition the Skin:
Condition a piece of dark brown clay for the outer skin. Roll this out into a thin, even sheet, roughly 2-3mm thick. -
Form the Base Shape:
Take your light green mixture and divide it into two equal lumps. Roll each into a smooth ball, then gently taper the top half to form a pear or teardrop shape. -
Flatten Slightly:
Gently press the teardrop shapes onto your work surface to flatten the back, then smooth the front so it is slightly doomed but relatively flat on the face. -
Create the Concave Half:
Choose one of your green shapes to be the ’empty’ half. Using a large ball stylus or your thumb, gently press a circular indentation into the lower, wider part of the pear shape to mimic where the pit was. -
Wrap the Skin:
Place your green avocado shapes onto the thin sheet of dark brown clay. Using your blade, carefully cut the brown clay around the green shape, leaving just enough to pull up slightly around the edges. -
Smooth the Edges:
Gently smooth the seam where the brown skin meets the green flesh. You want a distinct line, but the two clays should be firmly bonded. -
Texture the Skin:
Since real avocados have bumpy skin, use an old toothbrush or a stiff brush to gently stipple the dark brown outer layer, being careful not to touch the smooth green face.
Fixing Smudges
If black clay from the eyes smudges onto the light green face, dip a cotton swab in rubbing alcohol or acetone and gently wipe the stain away before baking.
Step 2: Defining Features
-
Add Depth:
Shave a tiny bit of dark green and brown soft pastel into a powder. Using a dry, soft brush, gently dust the outer edges of the light green clay to create a ripe gradient. -
Shade the Pit Area:
For the concave avocado half, brush a little extra yellow pastel inside the indentation to make it look creamy and realistic. -
Make the Eyes:
Roll tiny spheres of black clay for the eyes. For the flat avocado, make them slightly larger and position them lower down. For the concave one, place them wider apart on either side of the pit hole. -
Add Eye Shine:
Roll extremely tiny specks of white clay. Place two specks on the larger eyes (one large, one small) for a reflection, and add tiny eyelashes to the concave avocado using minuscule snakes of black clay. -
The Smile:
Roll a very thin snake of black clay. Cut small U-shaped segments and gently press them into the clay between the eyes to create the mouths. -
Pink Cheeks:
Roll small circles of pink clay and flatten them. Place them just under the eyes on both avocados for that classic blushing look.
Step 3: Finishing Touches
-
Bake:
Place your avocados on a tile or parchment-lined baking sheet. Bake according to your brand of clay’s instructions (usually around 230°F/110°C for 30 minutes). -
Cool Down:
Let the pieces cool completely before handling them, as warm clay is fragile. -
Varnish:
Apply a coat of satin or matte varnish to seal the pastel shading and protect the faces. I like to add a tiny dot of gloss varnish just on the eyes to make them sparkle.
Make it a Keychain
Before baking, insert a screw eye pin into the top of each avocado. Once baked and cooled, secure it with superglue to turn your charms into a BFF keychain set.
Enjoy your new adorable avocado duo, perfect for display or gifting to a friend
Watermelon Slice Wedges

Capture the essence of summer with these remarkably realistic watermelon wedges made from polymer clay. Their textured ruby-red centers and crisp rinds make them perfect for miniatures, magnets, or playful desk decor.
How-To Guide
Materials
- Polymer clay (translucent red, opaque red, white, dark green, black)
- Liquid polymer clay (optional)
- Toothbrush or texturing tool
- Sharp craft blade or tissue blade
- Rolling pin or pasta machine
- Needle tool
- Sandpaper (fine grit)
- Gloss glaze or varnish
Step 1: Creating the Melon Flesh
-
Mix the perfect red:
Start by mixing translucent red clay with a small amount of opaque red. This combination gives the melon flesh that realistic, slightly juicy depth rather than a flat, plastic look. -
Form the base log:
Roll your mixed red clay into a thick, smooth cylinder. The thickness of this log will determine the final size of your watermelon slices, so aim for a diameter of about 1.5 to 2 inches. -
Add the rind layer:
Roll out a sheet of white polymer clay to a medium thickness, roughly 1/8th of an inch. Ensure it is wide enough to wrap completely around your red log. -
Wrap the cylinder:
Carefully wrap the white sheet around the red cylinder. Trim the excess neatly with your blade so the edges butt up against each other without overlapping, then smooth the seam with your finger. -
Prepare the skin:
Roll out a sheet of dark green clay. This should be slightly thinner than the white layer to mimic the tough outer skin of a watermelon. -
Wrap the skin:
Wrap this green sheet around the white-covered cylinder. Again, trim the excess carefully and smooth the seam so it blends invisibly.
Smudged Rind?
If the red clay smears onto the white rind during texturing, use a piece of tape to lift the red dust off, or carefully scrape the white section clean with a craft knife before baking.
Step 2: Adding Texture and Detail
-
Add stripes (optional):
If you want a striped melon, roll very thin snakes of a lighter green clay and press them vertically along the dark green cylinder, flattening them slightly with your roller. -
Chill the cane:
Place your completed cylinder in the refrigerator for about 15-20 minutes. Firming up the clay makes it much easier to slice without distorting the round shape. -
Slice into rounds:
Using a very sharp tissue blade, slice the cold log into distinct rounds. Aim for slices that are about 1/4 inch thick for stability. -
Cut into wedges:
Take each round slice and cut it into halves, thirds, or quarters depending on the wedge shape you prefer. The example image uses rustic, thick triangular wedges. -
Create the texture:
I like to use a clean, stiff toothbrush for this part. Gently tap the bristles over the red creating a porous surface texture. avoid hitting the white rind to keep it crisp.
Bite Marks
Make a wedge look eaten! Use a small scalloped cookie cutter or a straw to remove a ‘bite’ from the top tip of the wedge before you add the texture.
Step 3: Seeding and Finishing
-
Make the seeds:
Roll tiny teardrop shapes out of black clay. You will need roughly 6-10 seeds per wedge. -
Embed the seeds:
Using a needle tool, press the seeds gently into the textured red flesh. Push them in slightly so they look embedded rather than just sitting on top. -
Re-texture if needed:
Lightly dab the area around the seeds with your toothbrush again to disturb any smooth marks left by your tools. -
Bake the pieces:
Arrange your wedges on a baking sheet lined with parchment paper. Bake according to your customized clay brand’s temperature and time instructions. -
Glaze for juice:
Once cool, apply a coat of gloss varnish just to the red flesh and the seeds. Leave the rind and skin matte for a realistic contrast.
Display these vibrant slices in a miniature bowl or turn them into the cutest fridge magnets you own