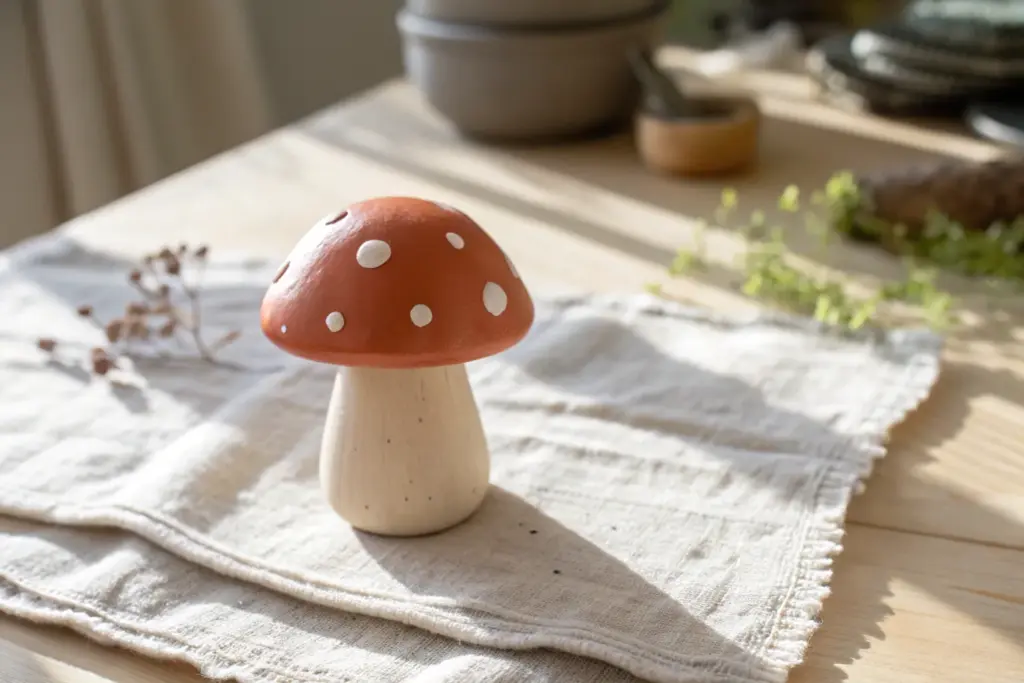
Whenever I’m craving a quick creative win, I reach for modeling clay because you can go from a simple shape to something truly giftable in one cozy session. Here are my go-to modeling clay craft ideas—starting with the classics everyone loves and ending with a few playful curveballs.
Easy Polymer Clay Stud Earrings
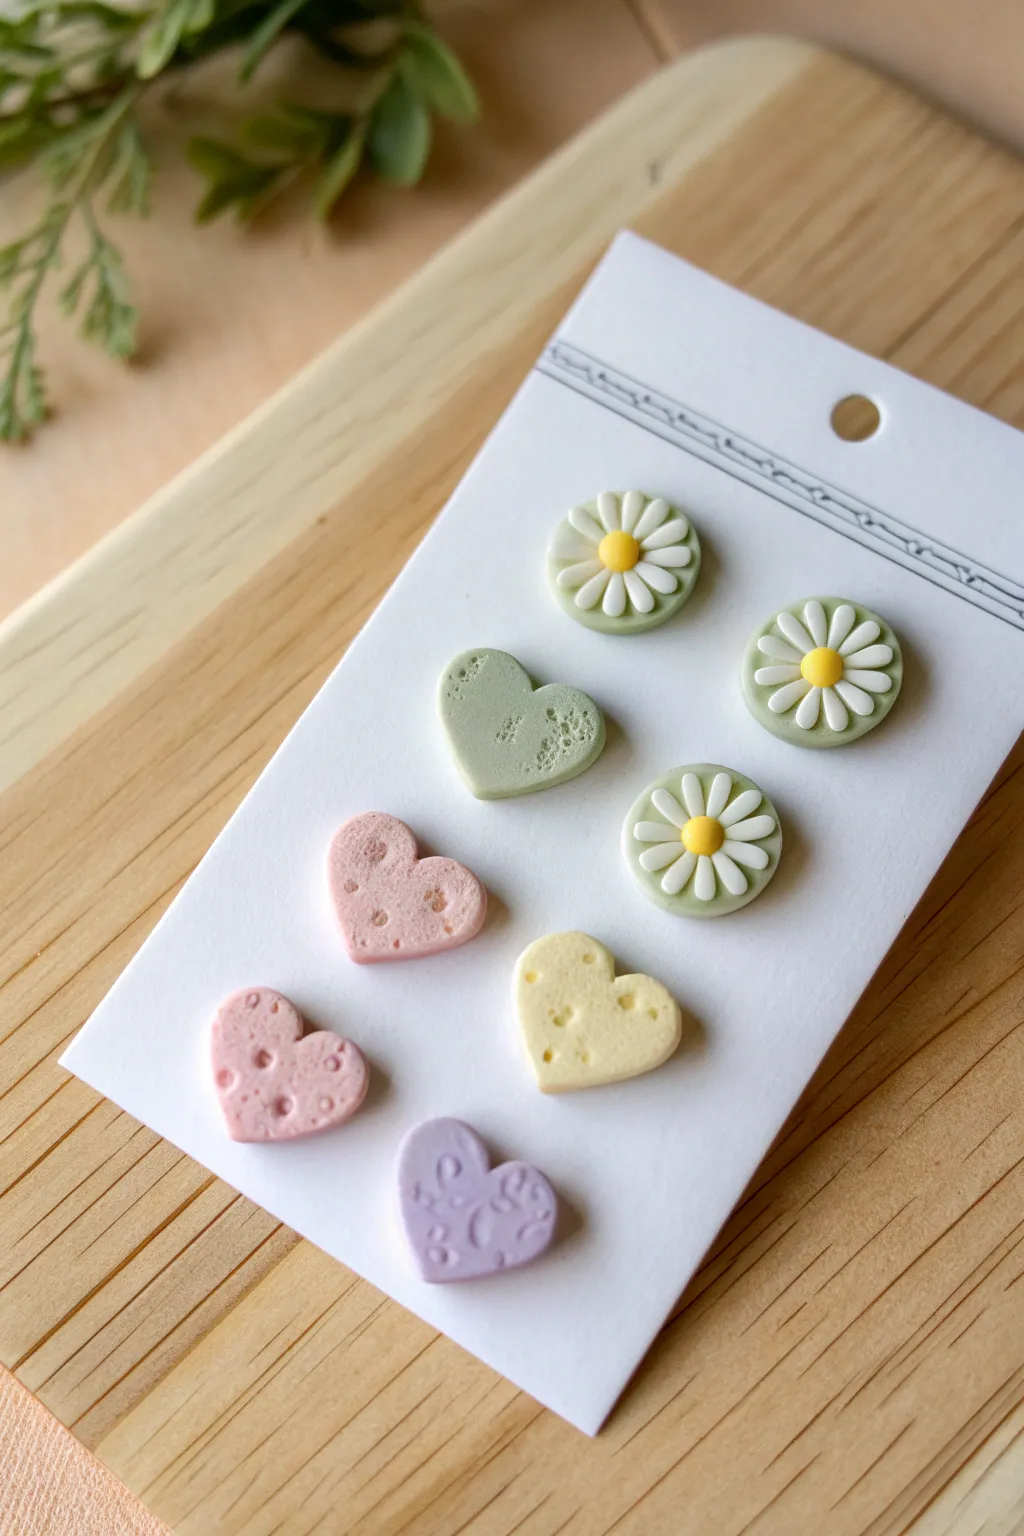
Create a charming collection of spring-inspired jewelry with these delightful polymer clay stud earrings. This set combines sweet, simple daisies on calming green backgrounds with a variety of pastel hearts featuring unique, bubbly textures for a soft, tactile finish.
Detailed Instructions
Materials
- Polymer clay in pastel colors: sage green, soft pink, pale yellow, lavender, and white
- Small circular clay cutter (approx. 1cm diameter)
- Small heart-shaped clay cutter (approx. 1cm width)
- Detailing tool or needle tool
- Ball stylus tool (small)
- Toothbrush or texturing sponge
- Clear liquid polymer clay (optional but recommended)
- Super glue or E6000 jewelry glue
- Stud earring posts and backings
- Clay roller or pasta machine
- Parchment paper or baking tile
- Oven
Step 1: Creating the Daisy Studs
-
Prepare the base:
Condition the sage green clay until soft and roll it out to a thickness of about 3mm. Use your circular cutter to punch out three small discs (two for the finished pair, one for practice). -
Make the petals:
Take a very small amount of white clay and roll it into a thin log or snake. Cut tiny, equal segments from this log—you will need about 9-12 segments per flower. -
Shape the petals:
Roll each tiny white segment into a teardrop shape between your fingers. Flatten them slightly to create the petal form. -
Assemble the flower:
Carefully arrange the petals in a circle on top of a sage green disc, pointing the tapered ends inward toward the center. Gently press them down so they adhere to the green base. -
Add the center:
Roll a tiny ball of yellow clay. Place it directly in the center of the petals, covering the points where they meet. -
Detail the center:
Use a small ball stylus to gently press into the yellow center to secure it, or give it a light texture with a needle tool for a pollen effect.
Needle Tool Trick
Use a needle tool to gently impress a line down the center of each white daisy petal. This simple detail adds instant realism and dimension to the flower.
Step 2: Crafting the Textured Hearts
-
Roll pastel colors:
Condition your remaining pastel colors (pink, yellow, green, lavender) and roll them out to the same 3mm thickness as the daisy bases. -
Cut the shapes:
Use your heart-shaped cutter to punch out hearts from each color. Aim for at least two hearts per color so you have matching pairs. -
Create the texture:
This is the fun part where I like to experiment. Take a clean toothbrush, sandpaper, or an uneven texturing sponge and firmly press it into the surface of the raw clay hearts. This creates that organic, ‘bubbly’ look seen in the photo. -
Add accent dimples:
For deeper texture variance, use a mid-sized ball tool to press random, deeper indentations into the hearts. Don’t overthink placement; random looks best. -
Smooth the edges:
Gently tap the edges of the hearts with your finger to remove any sharp ridges created by the texturing process, ensuring a soft, finished look.
Glossy or Matte?
Keep the hearts matte for a soft, stone-like feel, but apply a thin layer of UV resin or gloss varnish to just the white petals and yellow centers to make the daisies pop.
Step 3: Baking and Assembly
-
Bake the batch:
Arrange all your clay pieces on a ceramic tile or parchment-lined baking sheet. Bake according to your brand of clay’s specific temperature instructions, usually for about 15-20 minutes for small items. -
Cool down:
Allow the clay pieces to cool completely before moving them. They will harden fully as they cool. -
Prepare the backs:
Flip the clay pieces over. Apply a very small dab of strong jewelry glue to the flat pad of an earring post. -
Attach posts:
Press the glued post onto the center of the back of each clay piece. Let the glue cure fully according to the package directions. -
Secure with resin or clay (Optional):
For extra durability, you can cover the earring post pad with a drop of UV resin or a thin layer of liquid polymer clay and cure it again. This traps the metal post so it can’t snap off.
Enjoy wearing your new handmade collection or gift them on a cute card to a friend


Bold Dangle Earrings With Cutout Shapes
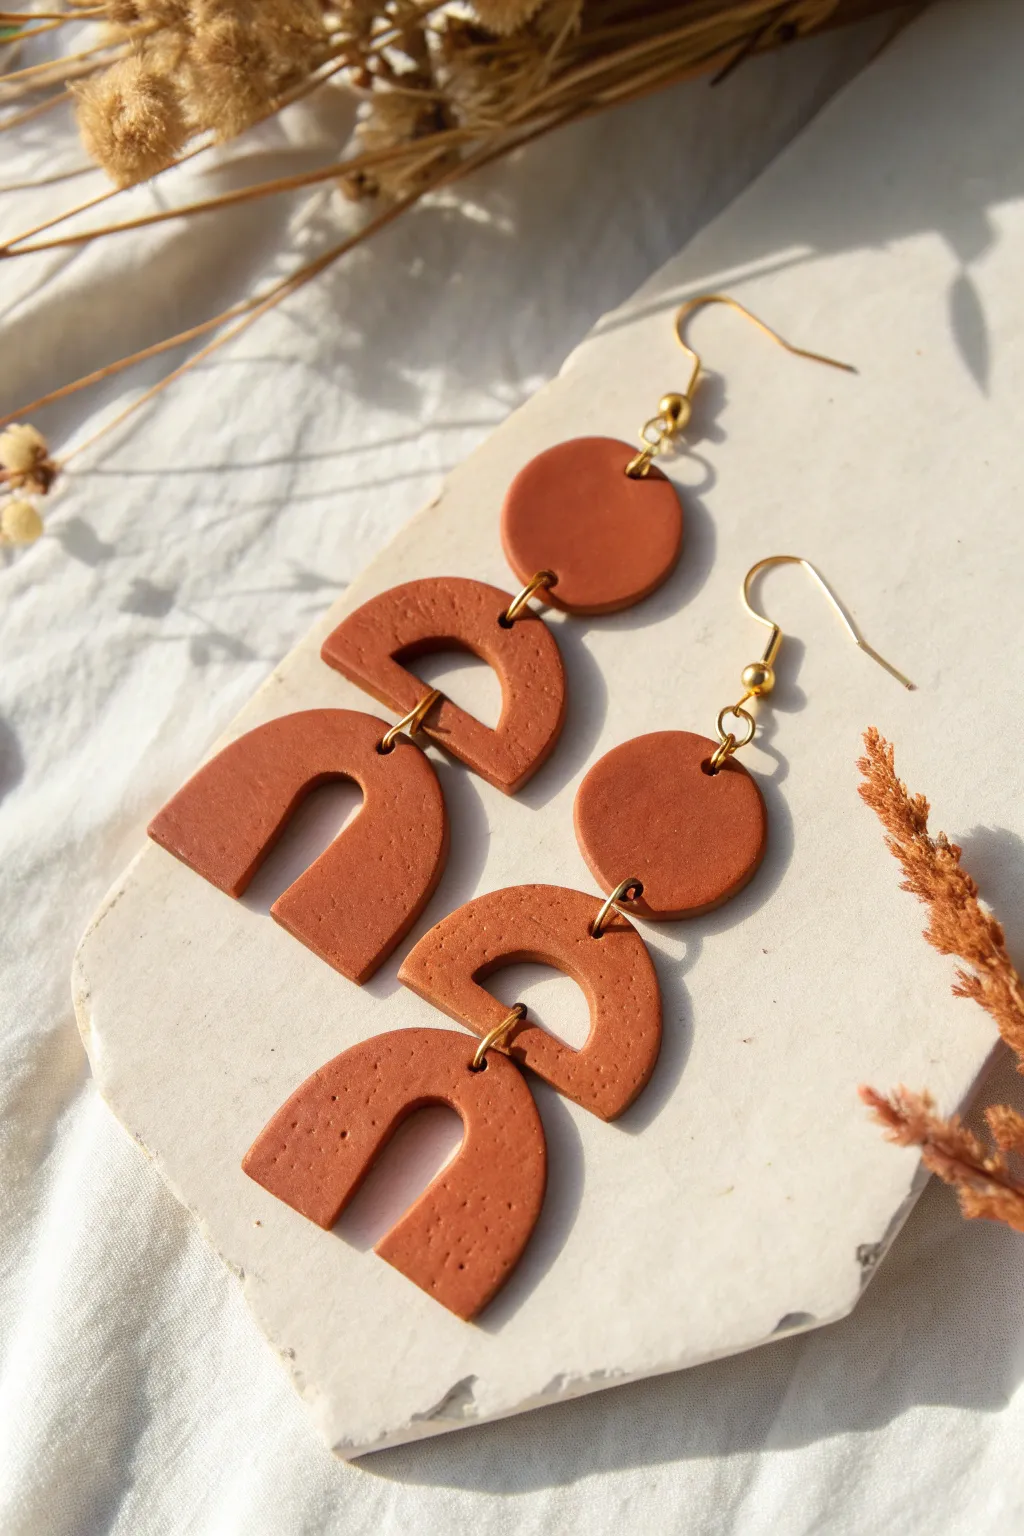
These warm, terracotta-colored dangle earrings make a sophisticated statement with their modern geometric shapes and subtle textured finish. Perfect for everyday wear or special occasions, this three-tiered design balances bold structure with an organic, earthy feel.
Step-by-Step Guide
Materials
- Polymer clay (terracotta or reddish-brown color)
- Acrylic rolling pin or clay machine
- Clay cutters: small circle (approx 0.5 inch), small arch cutter, large U-arch cutter
- Sandpaper or texture sponge (optional)
- Needle tool or toothpick
- Jump rings (gold finish, approx 6-8mm)
- Earring hooks (gold finish)
- Jewelry pliers (flat nose and round nose)
- Ceramic tile or baking sheet with parchment paper
- Oven
Step 1: Preparation & Cutting
-
Condition the Clay:
Begin by warming the polymer clay in your hands. Knead it thoroughly until it is soft, pliable, and free of cracks. This ensures the clay won’t be brittle after baking. -
Roll Out a Sheet:
Using an acrylic rolling pin or a pasta machine dedicated to clay, roll out a sheet of clay. Aim for a uniform thickness of about 3mm (1/8 inch). If you want the pieces strictly uniform, place chopsticks or playing cards on either side of the clay as depth guides for your rolling pin. -
Add Texture (Optional):
Looking at the reference, the clay has a lovely, subtle sandy texture. You can achieve this by gently pressing a piece of sandpaper or a coarse sponge against the clay sheet before cutting. Alternatively, lightly speckle it with a toothbrush for a stone effect. -
Cut the Circles:
Use your small circle cutter to punch out two identical circles. These will be the top tier that connects to the ear hook. -
Cut the Middle Arches:
Use a small semi-circle or arch cutter to create two identical shapes. Orient them horizontally so the curved side faces upward, creating a bridge shape. -
Cut the Bottom U-Shapes:
Use your large U-shaped arch cutter to punch out the bottom tier. These are the focal point, so ensure your cutter is clean for sharp edges. You should now have six pieces total: two circles, two middle arches, and two large U-shapes. -
Smooth the Edges:
Before baking, gently run your finger along the cut edges of each piece to soften any sharp ridges or loose bits of clay.
Step 2: Assembly & Finishing
-
Pierce the Holes:
Using a needle tool, poke holes for the jump rings. For the top circle: one hole at the very top (for the hook) and one at the bottom. For the middle arch: one hole at the top center and one at the bottom center. For the bottom U-shape: one hole at the top center. -
Check Hole Alignment:
Ensure your holes are centered and not too close to the edge (leave about 2mm from the edge to prevent tearing). Wiggle the needle slightly to make the hole large enough for your jump rings. -
Bake the Pieces:
Arrange the pieces on a ceramic tile or baking sheet lined with parchment paper. Bake according to your brand of clay’s instructions—usually around 275°F (135°C) for 15-30 minutes. -
Cool Down:
Let the pieces cool completely inside the oven or on a cooling rack. Do not attempt to assemble them while warm, as the clay is still slightly soft. -
Connect Middle to Bottom:
Using two pliers, twist open a jump ring (don’t pull it apart). Thread it through the top hole of the large U-shape and the bottom hole of the middle arch. Close the ring securely. -
Connect Middle to Top:
Open another jump ring and connect the top hole of the middle arch to the bottom hole of the circle stud piece. -
Attach the Ear Hooks:
Open the small loop at the base of your earring hook (or use a small jump ring if needed). Attach it to the very top hole of the clay circle. -
Repeat for Second Earring:
Repeat the assembly process for the second earring, ensuring the pieces face the correct way so any texture you added is visible on the front.
Clean Cuts Only
Before cutting your shapes, dip your cutters into cornstarch or water. This acts as a release agent and prevents the clay from sticking inside the cutter or dragging at the edges.
Add Gold Accents
For a luxe touch, apply a small amount of gold leaf to the clay slab before rolling it out. The gold will crackle and embed into the surface, creating stunning metallic veins.
Wear your new terracotta earrings with pride or wrap them up as a beautifully handcrafted gift


Simple Clay Beads for Bracelets
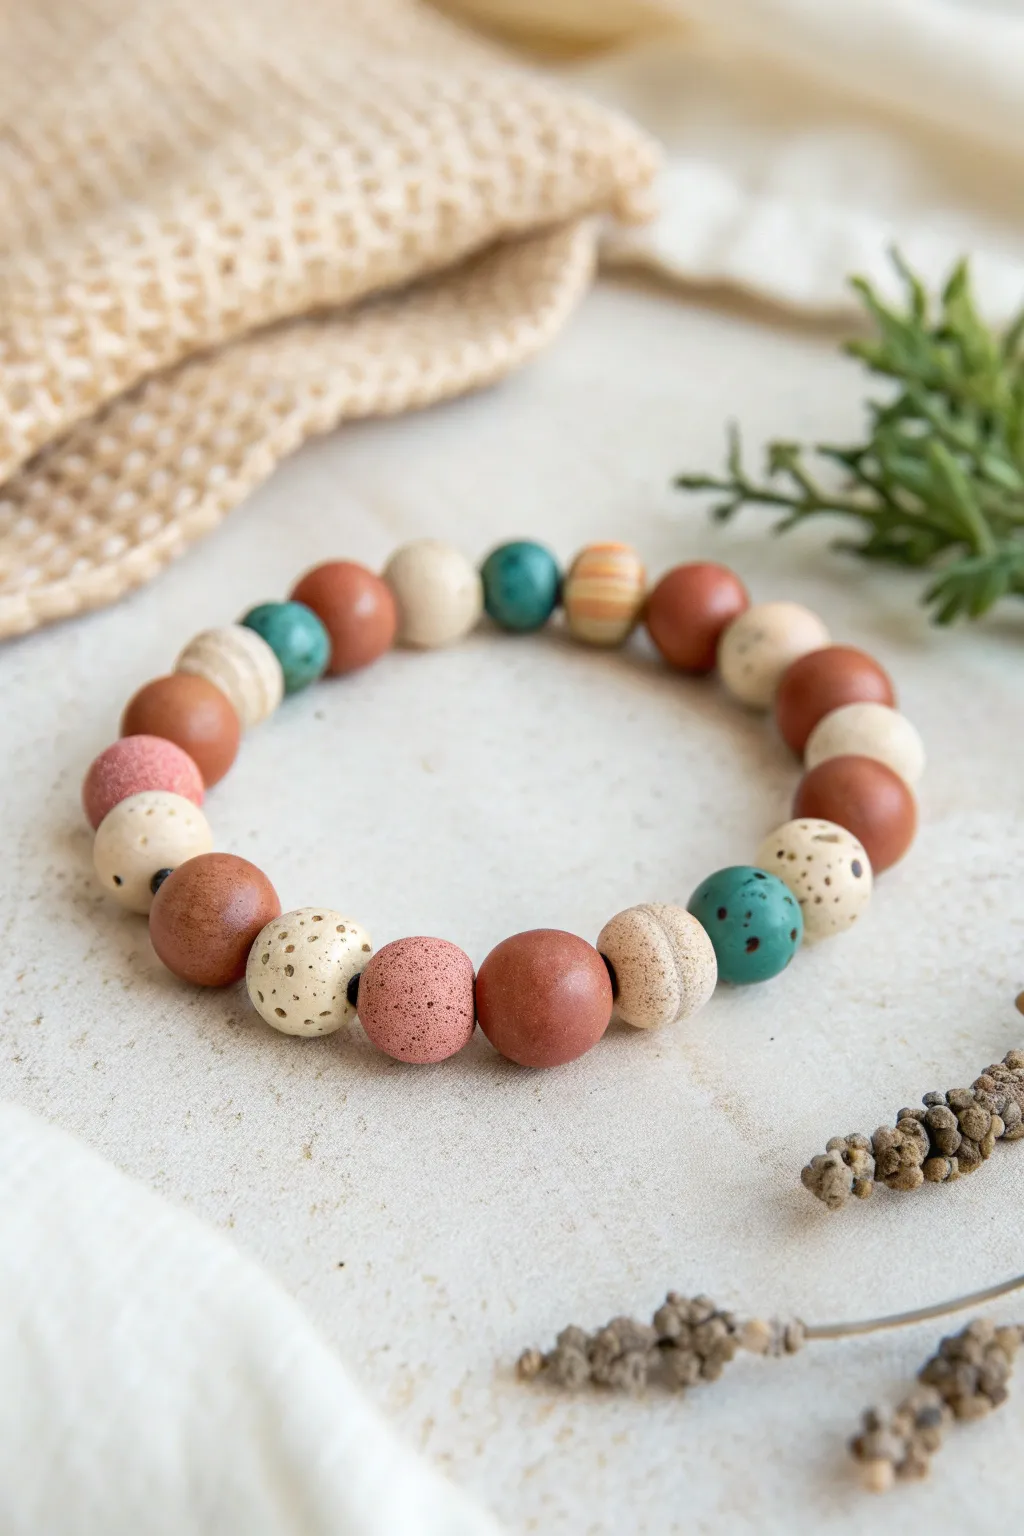
Create a rustic, boho-inspired bracelet using simple modeling clay techniques to mimic the look of natural stone and ceramic. This project features a warm palette of terracotta, cream, sage, and teal, with charming speckled details that give each bead a unique, handcrafted character.
Step-by-Step Tutorial
Materials
- Polymer clay or air-dry clay (terracotta/rust, cream/white, peach/coral, teal/sage green)
- Black acrylic paint or black clay (for speckling)
- Old toothbrush (for spattering paint) OR black pepper/sand (for mixing into clay)
- Bead piercing pin or toothpick
- Elastic cord or strong beading thread
- Baking sheet and parchment paper (if using polymer clay)
- Clay roller or consistent flat surface
- Small round cutter (optional, for uniform size)
- Fine-grit sandpaper
- Matte varnish or sealant
Step 1: Prepping and Mixing Clay
-
Condition the clay:
Start by warming up your clay blocks in your hands. Knead the terracotta, cream, peach, and teal colors separately until they are soft and pliable. -
Create custom shades:
To achieve the muted, earthy tones seen in the photo, you might need to mix colors. Add a tiny pinch of brown to the teal to dull it down, or mix white with terracotta to get that soft peach hue. -
Add texture naturally:
For the cream-colored speckled beads, I like to knead in a pinch of coarse black pepper or dried coffee grounds directly into the white clay. This mimics the look of stoneware pottery.
Step 2: Forming the Beads
-
Portion the clay:
Roll each color into a consistent ‘snake’ or log shape. Slice off equal-sized segments to ensure your beads are relatively uniform in size. -
Roll spheres:
Take each segment and roll it between your palms to create a smooth ball. Vary the sizes slightly if you want a more organic look, aiming for about 10-12mm diameter. -
Create the textured beads:
For the grooved beige beads shown in the bracelet, roll a cream ball and then gently press the side of a toothpick into the surface to create horizontal indentations or stripes. -
Pierce the holes:
While the clay is still soft, gently push your piercing tool or toothpick through the center of each bead. Twist as you push to avoid squishing the spherical shape. -
Check the exit hole:
Once the pin pokes through the other side, remove it and re-insert it from the exit side to ensure the hole is clean and open on both ends.
Fixing Squished Beads
If piercing the hole deforms your perfect sphere, let the clay sit for 15-20 minutes to firm up slightly (leeching) before piercing, or re-roll gently while on the pin.
Step 3: Finishing the Surface
-
Paint speckling technique:
If you didn’t mix flecks into the clay earlier, place your unbaked beads on a piece of paper. Dip an old toothbrush into watered-down black acrylic paint. -
Apply the splatter:
Run your thumb across the bristles to flick tiny droplets of paint onto the beads. Focus on the lighter cream and teal beads for contrast. -
Hand-painting large spots:
For the larger spots seen on some cream beads, use the very tip of a toothpick dipped in black paint to carefully dot the surface. -
Final smoothing:
Check all your beads for fingerprints. If you find any, gently buff them out with your finger or a baby wipe before the next step.
Essential Oil Diffuser
Use unsealed terracotta or specialized porous clay for a few beads. You can add a drop of essential oil to these specific beads, creating a wearable aromatherapy diffuser.
Step 4: Baking and Assembly
-
Bake or dry:
Follow the manufacturer’s instructions for your specific clay. If using polymer, bake on parchment paper at the recommended temperature. If using air-dry, let them sit for 24-48 hours. -
Cool and inspect:
Allow the beads to cool completely. If the holes shrunk during baking, use a small drill bit or reamer to widen them slightly. -
Seal the beads:
Apply a coat of matte varnish to protect the paint and clay. A matte finish is key here to maintain the natural, stone-like appearance. -
Arrange the pattern:
Lay out your beads in a circle to plan the design. Alternate colors randomly—place a teal next to a wood-tone, then a speckled cream, avoiding large clumps of the same color. -
String the beads:
Cut a length of elastic cord about 10 inches long. Thread the beads onto the cord, checking the fit around your wrist as you go. -
Tie the knot:
Tie a secure surgeon’s knot (right over left, left over right) and pull tight. Add a dab of super glue to the knot for extra security. -
Hide the knot:
Trim the excess cord and gently tug the knot inside the hole of the nearest bead to hide it from view.
Enjoy wearing your custom, nature-inspired accessory that looks just like expensive ceramic jewelry


Personalized Clay Keychains With Initials
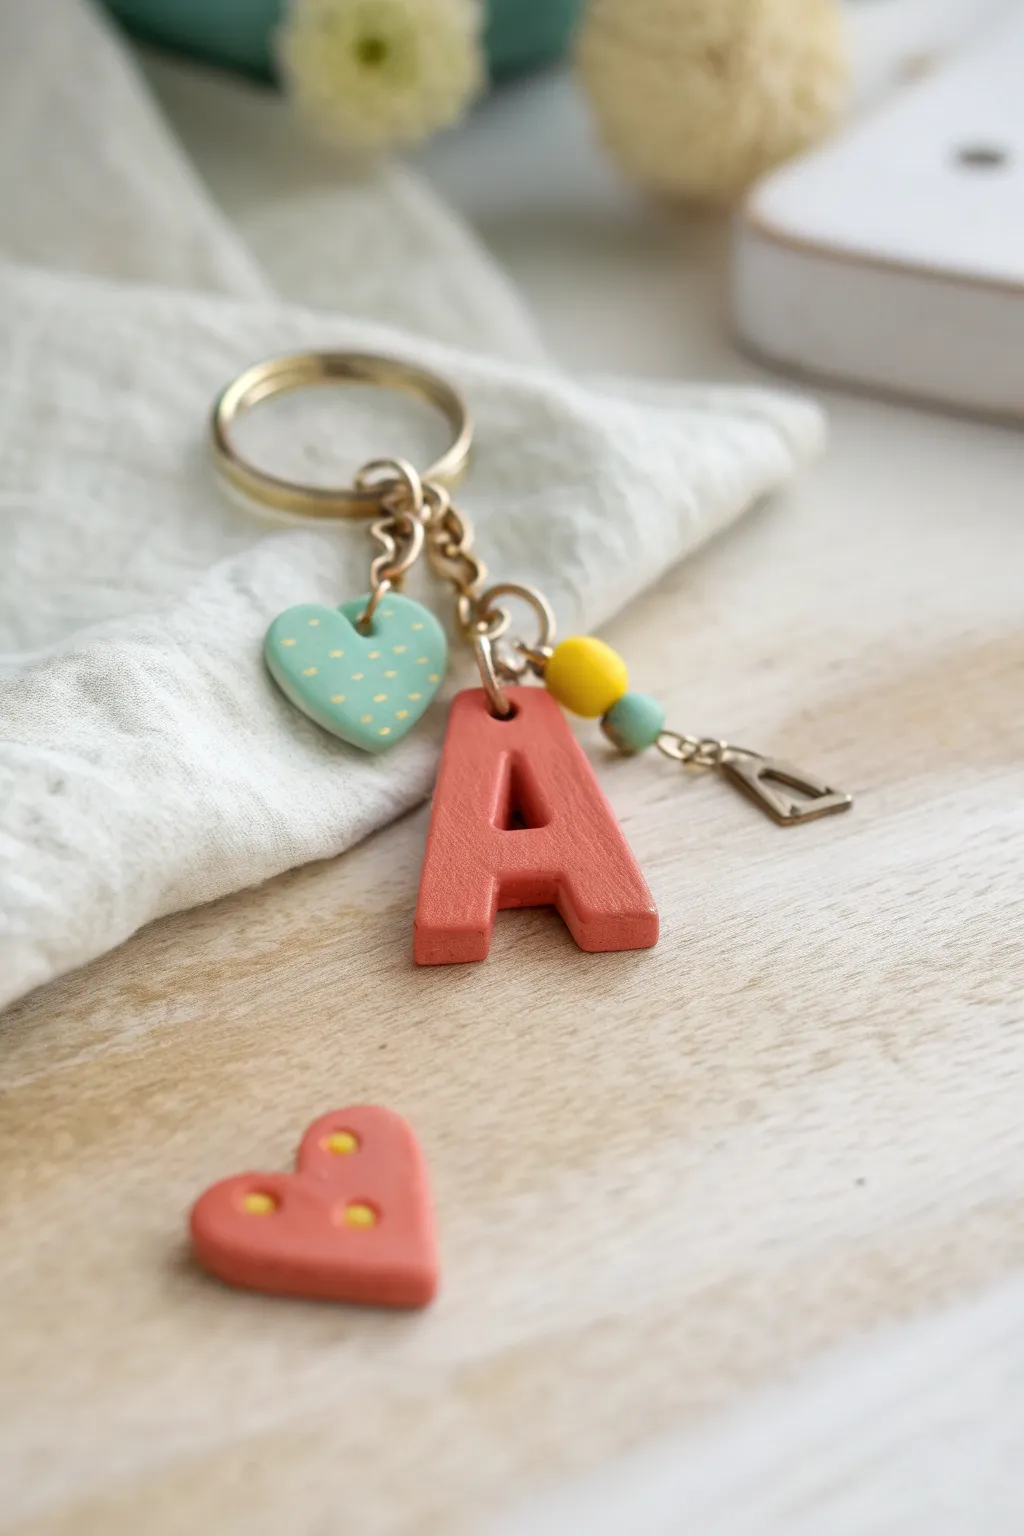
Create a personalized accessory with this delightful initial keychain featuring a chunky letter charm and a sweet dotted heart. The matte finish and soft pastel colors give it a modern, playful look that’s perfect for gifting or keeping for yourself.
How-To Guide
Materials
- Polymer clay (coral pink, teal/mint, yellow)
- Clay rolling pin or acrylic roller
- Letter cookie cutter (block font)
- Small heart cookie cutter
- Needle tool or toothpick
- Jump rings (gold finish)
- Keychain ring with chain extender
- Jewelry pliers
- Baking sheet and parchment paper
- Sandpaper (fine grit)
- Matte spray varnish (optional)
Step 1: Shaping the Charms
-
Condition the coral clay:
Begin by warming the coral pink clay in your hands, kneading it until it is soft and pliable. This prevents cracks later on. -
Roll the main slab:
Roll out the coral clay on a clean surface to a thickness of about 1/4 inch (6mm). You want the letter to be chunky and durable. -
Cut the initial:
Press your letter cutter firmly into the coral slab. Wiggle it slightly to ensure a clean cut, then gently push the clay letter out. -
Smooth the edges:
Use your finger or a smoothing tool to gently round off the sharp edges left by the cutter for a softer, more finished look. -
Make the heart charm:
Roll out a piece of teal or mint green clay to the same thickness. Use the small heart cutter to create the secondary charm. -
Add the hole:
Using a needle tool or toothpick, pierce a hole at the top of the letter ‘A’ and the top of the heart. Make the hole wide enough to fit your jump rings comfortably.
Step 2: Adding Details
-
Prepare the dots:
Take a tiny amount of yellow clay and roll it into a very thin snake. pinch off minuscule pieces and roll them into tiny balls. -
Apply the pattern:
Gently press the yellow balls onto the surface of the teal heart in a polka-dot pattern. Lightly roll over the heart once to flatten the dots into the surface so they are flush. -
Create beads:
Roll two small spheres of clay—one yellow and one teal—to use as accent beads. I like to make these about dime-sized. -
Pierce the beads:
Carefully poke a hole all the way through the center of both beads using your needle tool. -
Create the extra heart:
If you want the matching loose heart shown in the photo, cut a small heart from the coral clay and press three yellow dots into it for detail.
Clean Cuts Only
Before cutting your shapes, place a sheet of plastic wrap over the clay. Press the cutter down over the plastic for incredibly smooth, rounded edges that require almost no sanding.
Step 3: Baking and Assembly
-
Bake the pieces:
Arrangement your clay pieces on a parchment-lined baking sheet. Bake according to the manufacturer’s instructions for your specific brand of clay. -
Cool down:
Let the pieces cool completely before handling. They are fragile when warm. -
Sand for perfection:
gently sand any rough edges or fingerprints with fine-grit sandpaper to achieve that smooth, professional matte finish. -
Attach the letter:
Open a large jump ring with your pliers. Thread it through the hole in the letter ‘A’ and attach it to the main chain of the keyring. -
Attach the heart:
Use a smaller jump ring or a small chain extension to attach the teal heart charm next to the letter. -
Add the beads:
Thread headpins through your clay beads, create a loop at the top with pliers, and attach them to the end of the chain or alongside the charms. -
Final seal:
If desired, give the finished keychain a light coat of matte spray varnish to protect it from dirt and wear.
Fixing Fingerprints
If you notice fingerprints on your raw clay before baking, lightly brush the surface with a little baby oil or cornstarch to smooth them away without altering the shape.
Now you have a charming, personalized accessory ready to brighten up your keys or bag

The Complete Guide to Pottery Troubleshooting
Uncover the most common ceramic mistakes—from cracking clay to failed glazes—and learn how to fix them fast.
Cute Refrigerator Magnets in Mini Sets
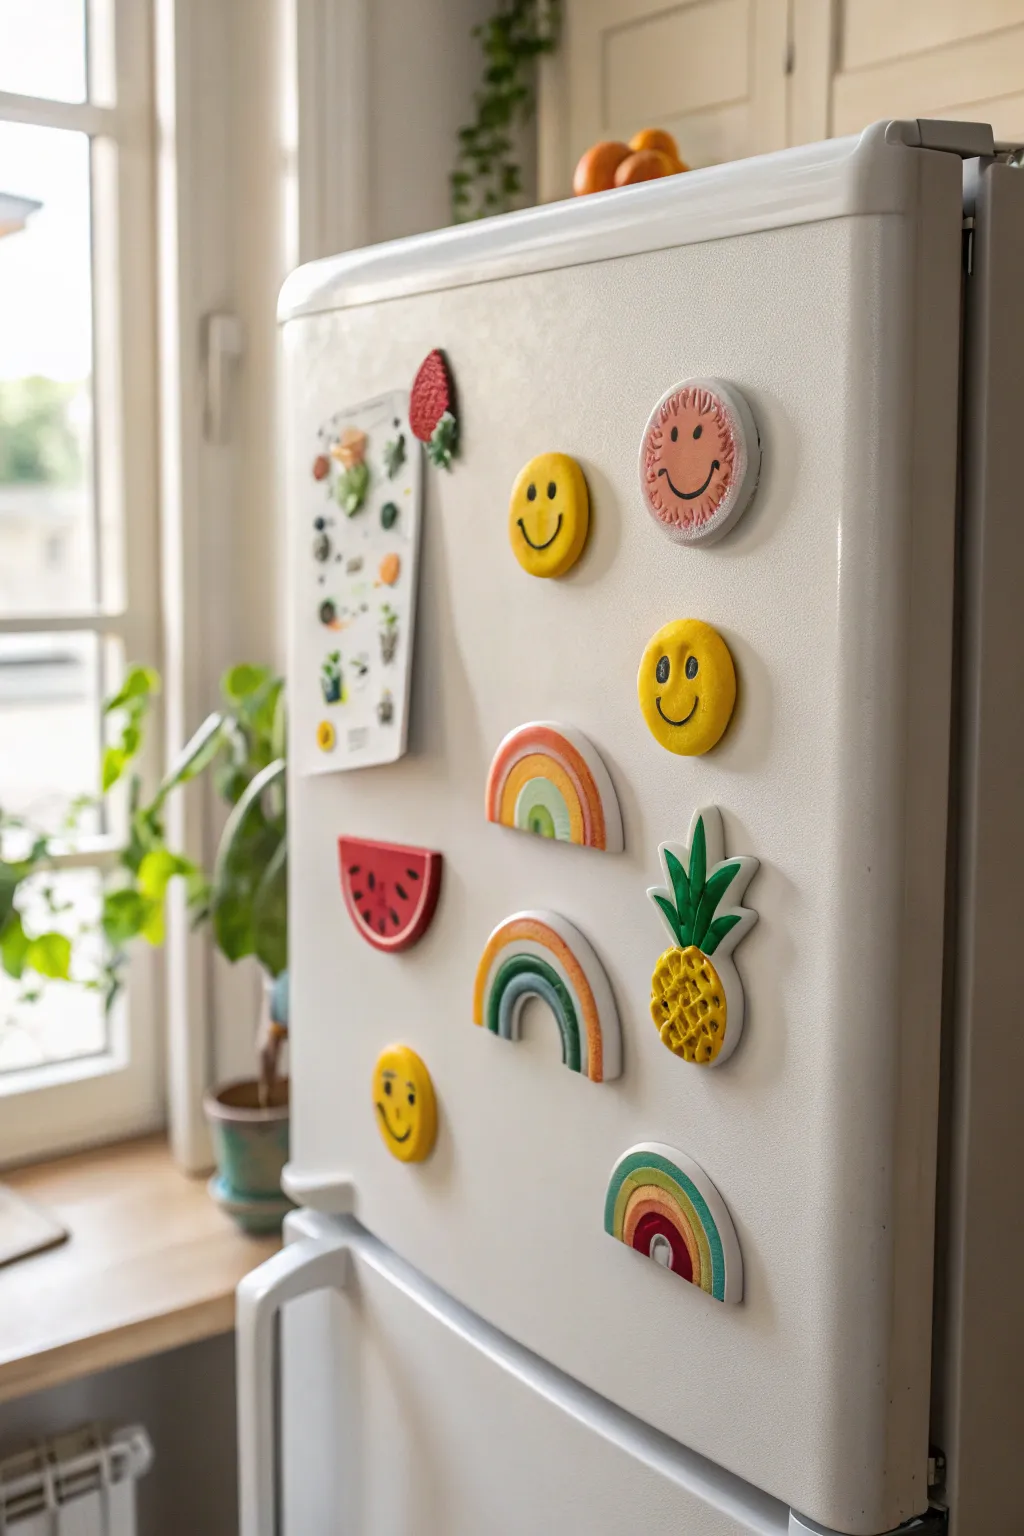
Brighten up your kitchen with this cheerful collection of handmade clay magnets featuring sunny smiles, juicy fruits, and pastel rainbows. The slightly textured, matte finish gives them a lovely, stone-like quality that looks sophisticated yet playful.
Detailed Instructions
Materials
- White air-dry clay or polymer clay (white base allows for easier painting)
- Acrylic paints (yellow, orange, green, red, pink, black, blue, white)
- Fine-grit sandpaper or a stiff bristle brush (for texture)
- Small round magnets (strong neodymium ones work best)
- Super glue or strong craft adhesive
- Rolling pin or smooth glass jar
- Clay sculpting tools or a toothpick
- Small detail paintbrushes
- Cookie cutters (circle) or a bottle cap
- Gloss varnish (optional, for fruit accents)
Step 1: Golden Smileys
-
Form the base:
Roll out a portion of your clay to about 1/4 inch thickness. Use a small circular cookie cutter or bottle cap to punch out three clean circles. -
Add texture:
Before the clay hardens, gently tap the surface with a stiff bristle brush or a ball of crumpled foil to create that subtle, stone-like pitting seen in the photo. -
Paint the yellow:
Once dry (or baked, if using polymer), paint the circles with a bright, sunny yellow acrylic paint. You may need two coats for full opacity. -
Create the faces:
Using a very fine detail brush and black paint, add the features. For the classic smiley, paint oval eyes and a wide U-shape mouth. For the ‘winking’ one, paint one open eye and one curved line. For the textured pink one, paint a light pink base first, then add the smiling features in black.
Clay Cracking?
If air-dry clay cracks while drying, mix a tiny bit of fresh clay with water to make a paste (slip) and fill in the cracks. Smooth it over with a wet finger.
Step 2: Tropical Fruits
-
Shape the pineapple:
Mold an oval shape for the pineapple body and flatten the back. Hand-sculpt three or four pointed leaves and attach them to the top. -
Texture the pineapple:
Use a toothpick to press crisscross diagonal lines into the pineapple body to mimic the skin’s texture. I find pressing firmly creates deeper grooves that catch the paint beautifully later. -
Sculpt the watermelon:
Cut a circle of clay in half to create a semi-circle. Smooth the edges so it looks like a clean slice. -
Paint the pineapple:
Paint the body a deep yellow. Once dry, add a yellow-orange wash into the grooves for depth. Paint the leaves a deep emerald green. -
Paint the watermelon:
Paint the main area red. Carefully paint the curved bottom edge white, then add a thin green stripe on the very bottom rim for the rind. Dot small black seeds on the red flesh.
Pro Tip: Clean Lines
For the rainbow arches, use the edge of a credit card or stiff cardstock to stamp the dividing lines into the wet clay instead of dragging a tool. It makes cleaner grooves.
Step 3: Boho Rainbows
-
Cut the arches:
Roll out a flat slab of clay. Use nesting circle cutters or freehand cut semi-circle arches. You want a solid semi-circle shape, not individual ropes of clay. -
Carve the bands:
Use a sculpting tool to carve deep grooves separating the bands of the rainbow. This mimics the look of separate clay coils but keeps the magnet sturdy. -
Apply base colors:
Paint each band a different color. For the top rainbow, use muted orange, soft yellow, and sage green. For the others, experiment with blues and earthy reds. -
Add white details:
If you want the defined look shown in the blue rainbow, paint a very thin line of white between the colored arches to separate them cleanly.
Step 4: Final Assembly
-
Seal the work:
Apply a matte varnish over all pieces to protect the paint. This helps maintain that stone-clay aesthetic. -
Attach magnets:
Flip all the dry pieces over. Apply a drop of strong super glue to the center of the back and press a magnet firmly into place. Let them cure completely before sticking them to your fridge.
Arrange your mini gallery on the fridge door to greet you every time you reach for a snack
Tiny Miniature Food Charm Collection
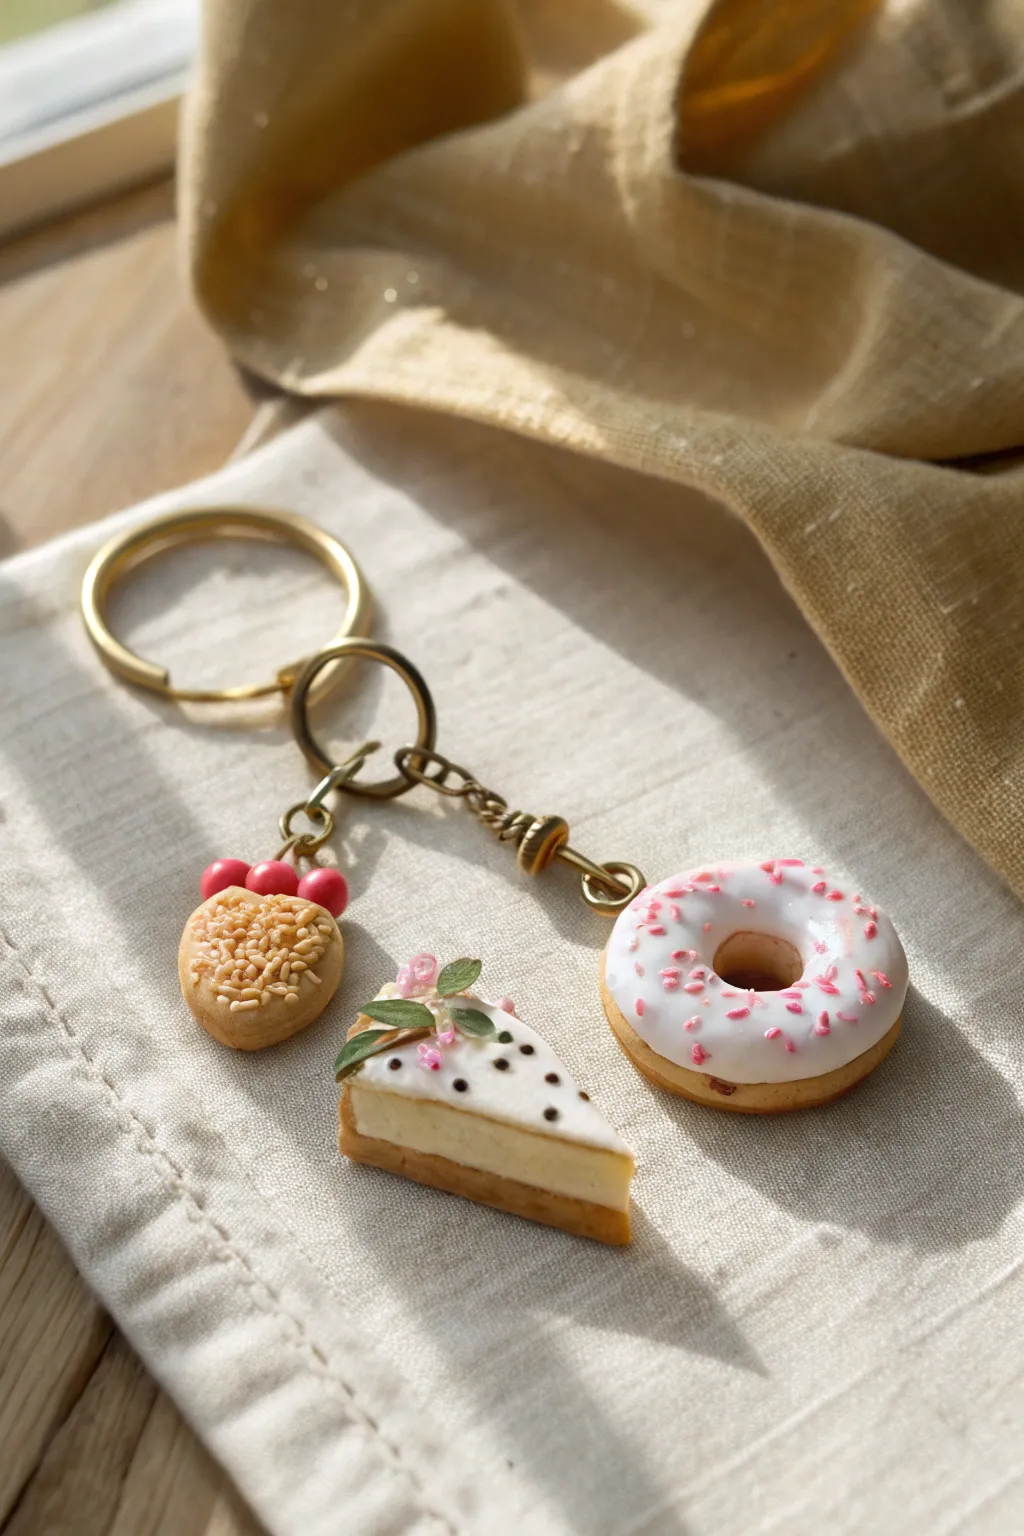
Carry a little sweetness wherever you go with this adorable miniature food keychain featuring a glazed donut, a berry-topped cheesecake slice, and a rustic heart cookie. These tiny treats are sculpted from polymer clay with incredible detail, making for a charming accessory that looks good enough to eat.
How-To Guide
Materials
- Polymer clay (beige/tan, white, pink, red, translucent)
- Liquid polymer clay (white and translucent)
- Soft pastel chalks (yellow ochre, brown) for shading
- High-gloss glaze or UV resin
- Satin varnish
- Needle tool and dotting tool
- Exacto knife or flexible cutting blade
- Small paintbrush
- Keychain hardware (gold ring and chain)
- Screw eye pins (gold)
- Pliers
- Superglue
- Toothbrush (for texture)
Step 1: Sculpting the Base Shapes
-
Mix the dough color:
Start by conditioning your beige polymer clay. To get a realistic baked good color, I like to mix a tiny bit of white and translucent into the tan clay to give it depth. -
Form the donut:
Roll a marble-sized ball of the dough color and flatten it slightly into a thick disk. Use a dotting tool or the back of a paintbrush to press a hole through the center. -
Texturize the donut:
Gently gently use the center line of the donut as a guide and texture only the top and bottom edges with a toothbrush, leaving a smooth ‘fried line’ around the middle equator. -
Create the cheesecake slice:
Shape a wedge of beige clay for the crust and a slightly smaller wedge of cream-colored clay (white mixed with a dot of yellow) for the filling. Stack them, ensuring the crust comes up the back edge slightly. -
Make the heart cookie:
Flatten a small piece of dough colored clay and use a tiny heart cutter or your knife to shape a heart. Texture the entire surface with your toothbrush to mimic a shortbread consistency.
Fixing Sticky Clay
If your clay gets too soft and sticky while shaping tiny details, pop it in the fridge for 10 minutes. This firms it up, making it much easier to cut clean slices without squishing the form.
Step 2: Adding Delicious Details
-
Shade the baked goods:
Scrape some yellow ochre and brown soft pastels into dust. Use a dry brush to gently dust the edges of the donut, the back of the cheesecake crust, and the edges of the heart cookie to create a toasted effect. -
Frost the donut:
Mix white liquid clay with a drop of white solid clay to make a thick icing. Spread this over the top of the donut, letting it drip naturally down the sides but stopping before the fried line. -
Decorate the donut:
While the icing is wet, sprinkle real polymer clay ‘sprinkles’ on top. You can make these by baking a thin snake of pink clay ahead of time and chopping it into tiny bits. -
Top the cheesecake:
Spread a thin layer of white liquid clay over the top of the cheesecake slice. Use a needle tool to add tiny brown dots of liquid clay for decoration. -
Add cheesecake garnish:
Create microscopic green leaves and pink flower buds from clay. Carefully place them on the back corner of the slice using tweezers. -
Finish the heart cookie:
Apply a patch of liquid clay to the center of the heart. Cover it with tiny beige clay crumbles (finely chopped raw clay) to mimic a crumb topping.
Step 3: Assembly and Finishing
-
Insert eye pins:
Trim your gold screw eye pins to a short length. Dip the ends in a tiny bit of liquid clay or superglue gel and screw them securely into the top of each charm. -
Create the red berries:
For the additional charm near the heart, roll three tiny balls of red clay. Press them together in a cluster and insert an eye pin into the center junction. -
Bake the charms:
Bake all pieces according to your clay manufacturer’s instructions, usually at 275°F (130°C) for about 15-20 minutes. Suggested baking on a tile or cardstock to prevent shiny spots. -
Apply varnish:
Once cool, glaze the donut icing and the berries with high-gloss varnish or UV resin for a wet look. Use a satin or matte varnish on the cookie and cheesecake crust to keep them looking realistic. -
Attach to keychain:
Using pliers, open the jump rings on your keychain assembly. Attach the donut to the end of the chain, and group the heart, berries, and cheesecake further up near the main ring.
Realistic Texture Tip
For the most realistic looking cake or biscuit texture, tear a piece of cleaning sponge and dab it onto the clay surface gently. This creates a random, airy pore structure better than a tool.
Clip your new miniature bakery onto your keys or bag and enjoy the sweet compliments coming your way


What Really Happens Inside the Kiln
Learn how time and temperature work together inside the kiln to transform clay into durable ceramic.
Kawaii Animals You Can Sculpt in Minutes
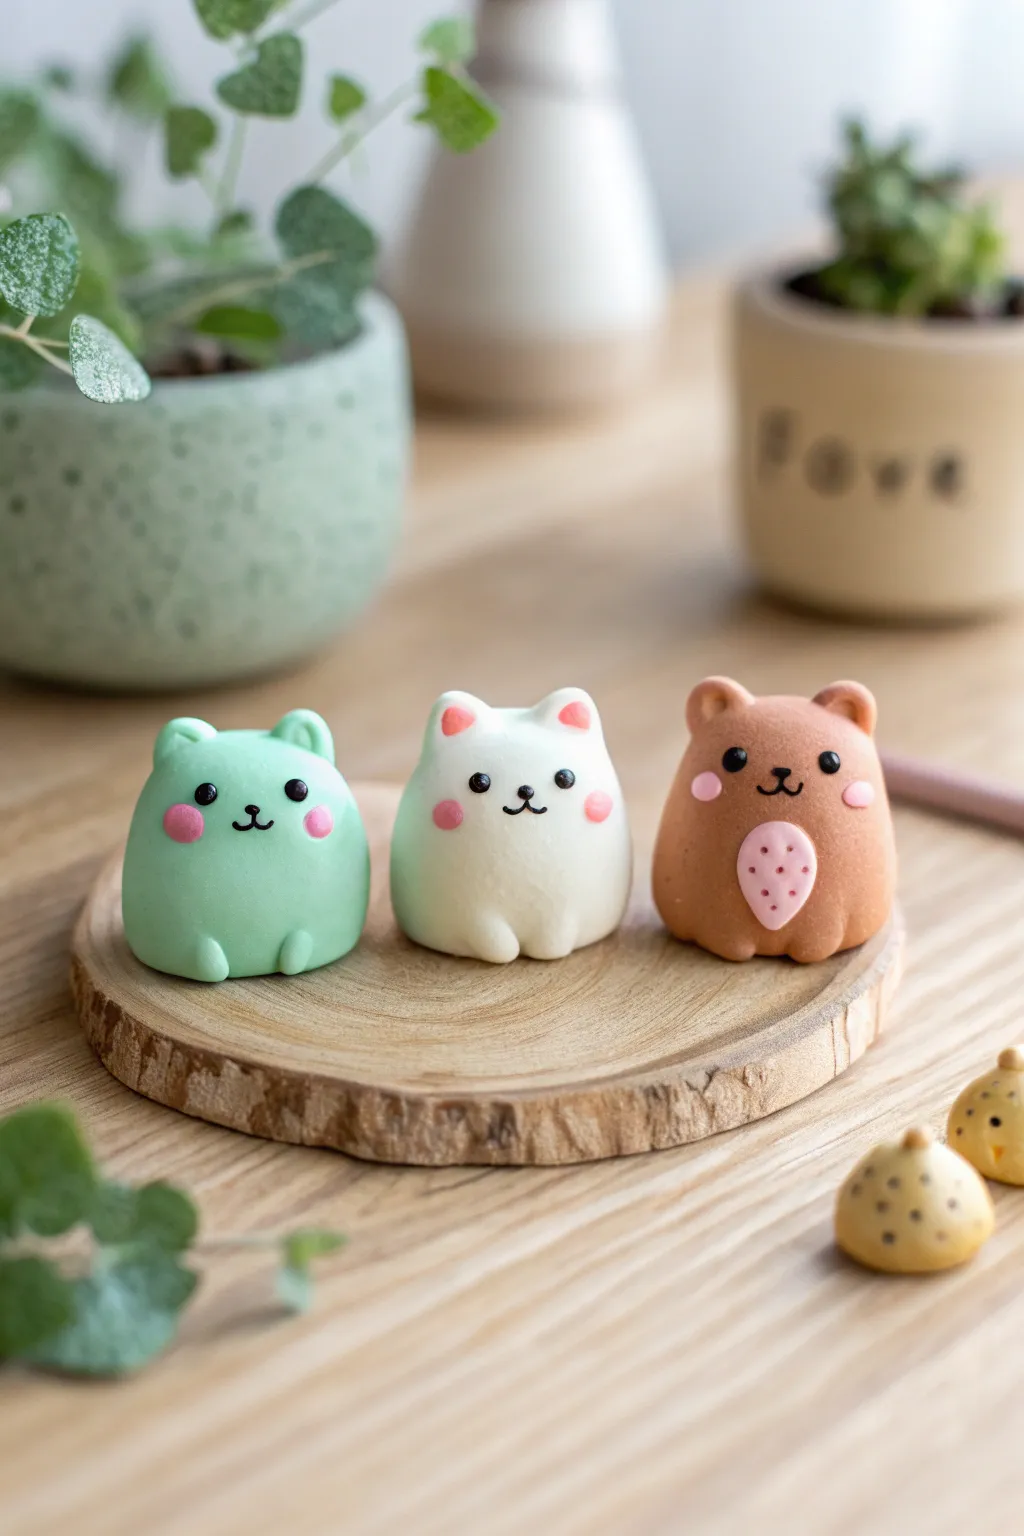
These delightfully chubby kawaii animals—a sleepy mint bear, a snowy cat, and a cocoa teddy—are the perfect introduction to miniature sculpting. Their smooth, matte finish and simple geometric shapes make them incredibly satisfying to create and display on a desk or shelf.
Step-by-Step Tutorial
Materials
- Polymer clay (Mint Green, White, Light Brown, Pink, Black, Yellow)
- Small dotting tool or toothpick
- Rolling pin or acrylic roller
- Clean working surface (ceramic tile or glass)
- Wet wipes (for cleaning hands between colors)
- Baking sheet and parchment paper
- Oven (for curing)
- Needle tool
Step 1: Shaping the Mint Bear
-
Base Body:
Condition a piece of mint green clay until soft and roll it into a smooth ball about the size of a large grape. Gently flatten the bottom so it sits securely without rolling away, then slightly taper the top to create a soft, rounded dome shape. -
Tiny Ears:
Pinch off two very small, equal-sized pieces of mint clay. Roll them into balls and press them onto the top sides of the head. Use your dotting tool to gently indent the front of each ear to create a cup shape. -
Adding Paws:
Create two tiny teardrop shapes from mint clay for the feet. Press them against the bottom front of the body, rounded side facing out, so it looks like the bear is sitting politely. -
Blushing Cheeks:
Take two minuscule specks of pink clay. Roll them into flat discs and press them onto the cheeks, placing them wide apart to enhance the kawaii look.
Clean Hands Trick
White clay attracts dust like a magnet. Keep a piece of scrap white clay nearby and roll it in your hands to pick up lint before starting the real project.
Step 2: Crafting the White Cat
-
White Body Form:
Clean your hands thoroughly to avoid transferring color to the white clay. Roll a white ball similar in size to the mint one, creating that same stable, dome-like seated posture. -
Pointed Ears:
Form two small triangles from white clay. Attach these to the top of the head. Instead of indenting them, flatten a tiny triangle of pink clay inside each ear for detail. -
Simple Paws:
Like the bear, roll two small white balls or teardrops and attach them at the base of the figure to form the front paws. -
Rosy Cheeks:
Apply two small pink circles for cheeks, just below where the eyes will eventually go.
Make Them Shine
After baking and cooling, apply a coat of UV resin or glossy water-based varnish to just the eyes and noses. It makes the characters look bright and alive.
Step 3: Sculpting the Brown Bear
-
Cocoa Base:
Condition the light brown clay and roll your third body shape. I like to make the brown bear slightly rounder at the bottom for an extra chubby appearance. -
Round Ears:
Create rounded ears similar to the mint figure, attaching them high on the head. Indent the centers slightly with your tool. -
Strawberry Belly:
Flatten a small teardrop of pink clay and press it onto the center of the bear’s tummy. Use a needle tool to poke tiny ‘seed’ indentations into the pink patch for a strawberry texture. -
Paws and Cheeks:
Add the two brown feet at the base and place the pink cheek dots on the face.
Step 4: Bringing Faces to Life
-
Embedding Eyes:
Roll six tiny, equal-sized balls of black clay. Press two onto each animal’s face, spacing them somewhat wide apart. Press them in gently so they fuse with the base clay. -
Tiny Noses:
Roll incredibly small, thin snakes of black clay. For the nose and mouth, you can shape a tiny ‘Y’ or a simple curved ‘w’ shape depending on the expression you want. Use a needle tool to help position these microscopic pieces between the eyes. -
Yellow Mini-Chicks:
Use leftover yellow clay to make two gumdrop-sized shapes. Add tiny black specks for eyes and a microscopic orange or brown beak to create the little chick companions. -
Baking:
Place all figures on parchment paper. Bake according to your clay manufacturer’s instructions (usually 275°F/135°C for 15-30 minutes). Let them cool completely before handling.
Now you have a trio of adorable desk buddies ready to brighten your workspace
Leaf-Imprint Trinket Dish
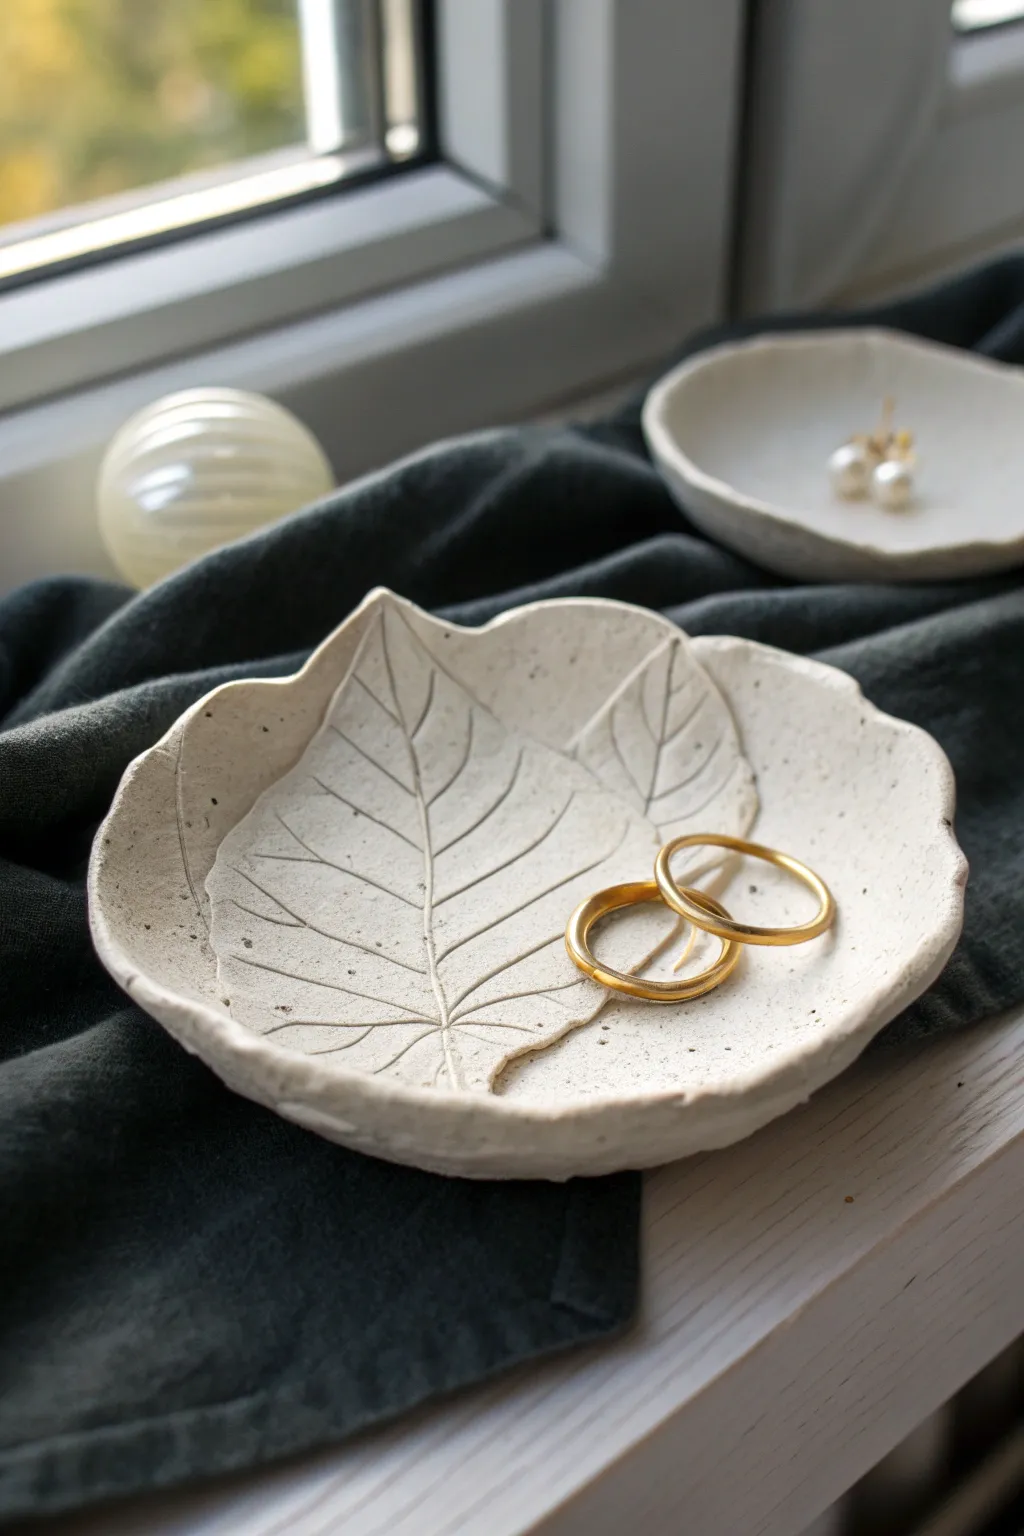
Bring the elegance of nature indoors with this beautifully textured trinket dish featuring delicate leaf imprints. The speckled clay finish gives it a sophisticated, stoneware-like appearance perfect for holding your favorite rings or earrings.
Step-by-Step
Materials
- White or cream air-dry clay (or polymer clay)
- Real leaves with prominent veins (like Hydrangea or Birch)
- Rolling pin
- Small pairing knife or clay cutting tool
- Small bowl or saucer (for forming the curve)
- Sandpaper (fine grit)
- Black acrylic paint (optional, for speckling)
- Old toothbrush (optional)
- Matte varnish or sealant
Step 1: Preparing the Clay Slab
-
Condition the Clay:
Start by kneading a ball of clay roughly the size of a tennis ball until it is soft, pliable, and free of cracks. -
Add Texture (Optional):
To achieve the speckled stoneware look from the photo, you can knead in some dried coffee grounds or black pepper before rolling, or save the speckling for the painting phase. -
Roll it Out:
On a smooth surface or parchment paper, flatten the clay ball by hand. Then, use your rolling pin to create an even slab about 1/4 inch thick. -
Check Consistency:
Ensure the thickness is uniform throughout; too thin and it will crack, too thick and it will look clunky.
Step 2: Creating the Leaf Impression
-
Position the Leaves:
Place your chosen leaves on top of the clay slab. Position them vein-side down, as the veins create the strongest impression. -
Arrange the Composition:
Overlap two leaves slightly to create the layered look seen in the example, ensuring the stems point toward what will be the center-bottom of the dish. -
Roll the Impression:
Gently but firmly roll over the leaves with your rolling pin. Do this once or twice to embed the veins deeply without making the clay too thin. -
Remove the Leaves:
Carefully lift the leaves away by the stem to reveal the detailed impression underneath.
Cracking Up?
If small cracks appear while drying, mix a tiny bit of fresh clay with water to make a paste (slip) and fill the cracks, then sand smooth once dry.
Step 3: Shaping and Refining
-
Cut the Shape:
Using a knife or needle tool, cut around the outline of your leaf impressions. You can leave a small border of clay around the leaf edge for a more rustic, organic rim. -
Smooth the Edges:
Dip your finger in a little water and gently run it along the cut edges to soften any sharp angles or rough clay crumbs. -
Form the Curve:
Carefully lift the clay slab and drape it inside a small bowel or saucer. The drying clay will take on this cupped shape. -
Dry the Piece:
Place the bowl in a cool, dry place. Let it dry completely for 24-48 hours. I find flipping it halfway through helps the bottom dry evenly.
Make it Luxe
Paint the rim of the bowl with gold leaf paint or a metallic gold marker to add a touch of glamour that contrasts beautifully with the raw clay texture.
Step 4: Finishing Touches
-
Sand Imperfections:
Once fully dry and hard, use fine-grit sandpaper to gently smooth the rim and any rough patches on the underside. -
Create the Speckles:
Mix a tiny amount of black acrylic paint with water. Dip an old toothbrush into the mixture and run your thumb across the bristles to flick tiny specks onto the dish for that faux-stone effect. -
Enhance the Veins (Optional):
If washed out, you can lightly rub a diluted brown or grey paint into the veins and wipe away the excess to highlight the texture. -
Seal the Dish:
Apply a coat of matte varnish or clay sealant to protect your work and give it a finished, durable surface.
Now you have a stunning, nature-inspired vessel ready to cradle your most precious little treasures

TRACK YOUR CERAMIC JOURNEY
Capture glaze tests, firing details, and creative progress—all in one simple printable. Make your projects easier to repeat and improve.
Cute Cone Ring Holder
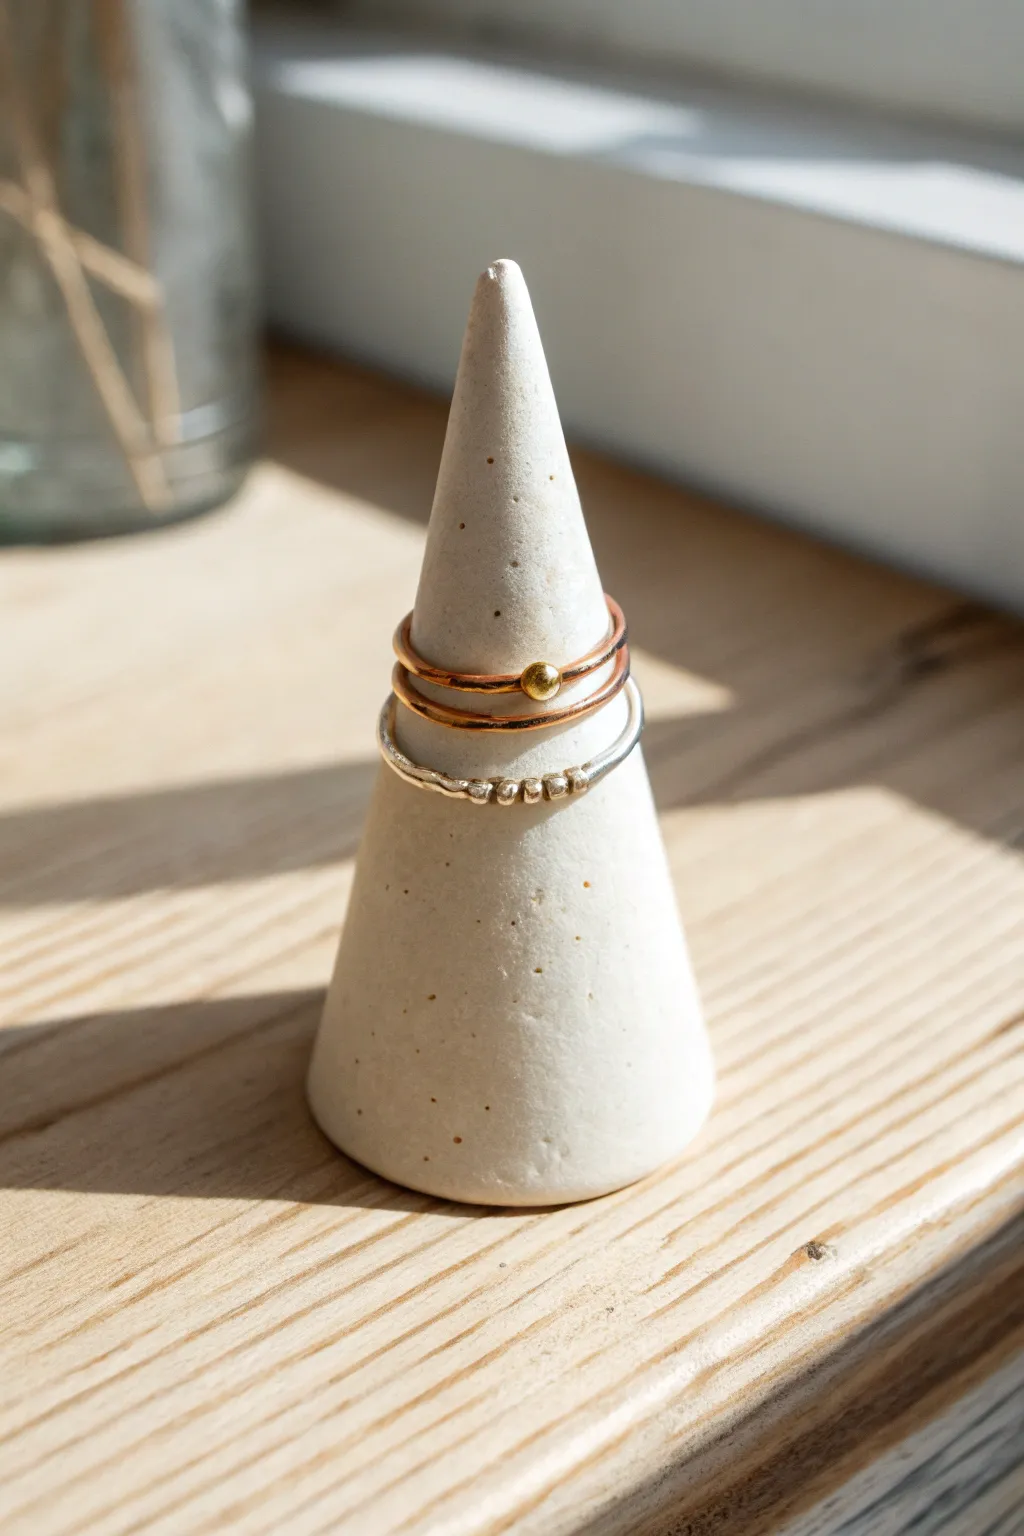
Embrace the beauty of simplicity with this elegant, minimalist concrete-style ring holder. Its clean conical shape and speckled finish create a modern display for your delicate jewelry while taking only moments to shape.
Step-by-Step Tutorial
Materials
- White polymer clay or air-dry clay (approx. 50g)
- Fine grit sandpaper (400-600 grit)
- Black pepper or dried tea leaves (for speckled effect)
- Rolling pin or smooth glass jar
- Cutting blade or craft knife
- Clean work surface (ceramic tile or glass works best)
- Optional: matte varnish
Step 1: Preparing the Clay
-
Measure the clay:
Cut off a block of white clay roughly the size of a golf ball. You want enough to create a cone about 3-4 inches tall. -
Condition thoroughly:
Knead the clay in your hands for several minutes until it becomes warm, soft, and pliable. This prevents cracking later. -
Add texture:
To achieve that natural, stone-like look, sprinkle a very small pinch of ground black pepper or dried tea leaves onto the clay. I like to fold the clay over and knead it again to distribute the specks evenly throughout the ball. -
Form a ball:
Roll the clay between your palms in a circular motion until you have a completely smooth sphere with no visible seams.
Wobbly Cone?
If the cone leans, your rolling pressure was uneven. Fix it by gently tapping the base on a table to flatten it, then use a ruler held vertically next to the cone to check alignment.
Step 2: Shaping the Cone
-
Initiate the shape:
Place the ball on your work surface. Using the flat part of your palm, begin rolling the ball back and forth, but apply more pressure to one side than the other. -
Elongate the point:
As you continue rolling, the side with more pressure will start to point, creating a teardrop shape. Focus your rolling energy towards that tip. -
Stand it up:
Once you have a rough cone shape, stand it upright on its flat base. Press down gently to ensure it stands stable and straight. -
Refine the surface:
Use your fingers to gently smooth the sides, stroking upward from the base to the tip. Rotate the cone frequently to ensure it remains symmetrical. -
Check the tip:
Gently pinch and smooth the very top of the cone so it isn’t too sharp; a slightly rounded tip holds rings better and is less fragile. -
Flatten the base:
Pick up the cone and tap the base firmly against your work surface a few times to make it perfectly flat and steady. -
Final smoothing:
Give the entire surface one last check for fingerprints. You can dip your finger in a tiny bit of water (for air-dry clay) or baby oil (for polymer clay) to create a glass-smooth finish.
Make it Marbled
Twist a small snake of grey or beige clay into your white clay before rolling. Stop kneading before fully blended to create beautiful, realistic marble veins.
Step 3: Finishing Touches
-
Cure or dry:
If using polymer clay, bake according to the package instructions (usually 275°F/135°C for 15-30 minutes). If using air-dry clay, leave it in a dry spot for 24-48 hours. -
Cool down:
Allow the cone to cool completely before handling it further. The clay is still somewhat soft when hot. -
Sanding base:
Once fully hard, take your fine-grit sandpaper and place it flat on the table. Rub the base of the cone against the paper in a circular motion to ensure it sits perfectly flat. -
Sanding imperfections:
Lightly sand any bumps or fingerprints on the sides of the cone if needed, wiping away the dust with a damp cloth. -
Optional sealing:
Apply a thin coat of matte varnish if you want to protect the surface from oils and dirt while keeping that natural stone look.
Place your favorite rings on your new creation and admire how organized your jewelry collection looks
Modern Photo Holder With a Clay Base
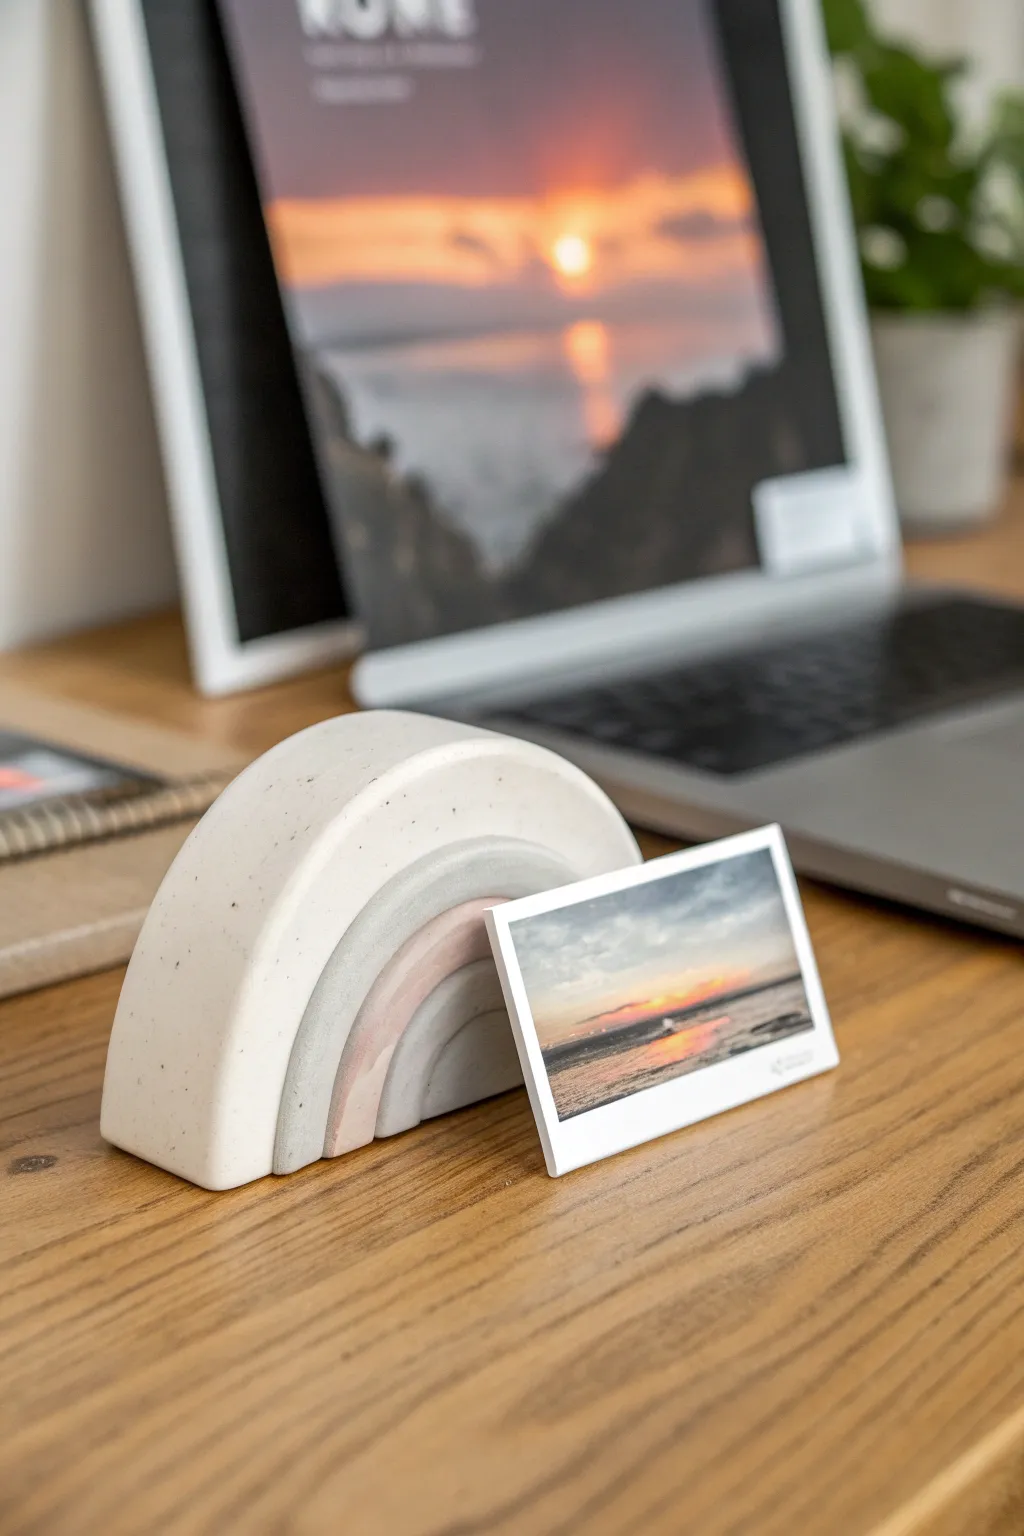
Add a touch of modern minimalism to your desk with this speckled clay photo holder. Its soft, muted color palette and clean, arched lines create the perfect sculptural display for your favorite mini prints or notes.
How-To Guide
Materials
- Polymer clay (white, black, beige/sand, and muted pink)
- Black pepper or black embossing powder (for speckles)
- Clay roller or acrylic rolling pin
- Sharp craft knife or clay blade
- Circle cutters in graduating sizes (or round household objects)
- Sandpaper (fine grit)
- Oven (for baking)
- Parchment paper
Step 1: Prepping the Clay
-
Conditioning:
Start by kneading your white clay until it is soft and pliable. This step is crucial to prevent cracks later on. -
Mixing the Speckled Base:
To achieve the stone-like look of the largest outer arch, mix a large chunk of white clay with a tiny pinch of black clay. Knead until fully incorporated for a grey tint, or stop early for a marbled look. -
Adding Texture:
For the speckles, I like to knead in a pinch of ground black pepper or black embossing powder into your white/grey mixture. Fold the clay over itself repeatedly until the specks are evenly distributed. -
Creating the Colors:
Mix a soft grey tone using white and a touch of black. Then, create a muted blush shade by mixing white with a small amount of beige and pink. You aim for earthy, Scandinavian tones rather than bright primaries.
Step 2: Forming the Arches
-
Rolling Out:
Roll your speckled white clay into a thick snake, approximately 3/4 inch in diameter. Roll the grey and pink clays into slightly thinner snakes, around 1/2 inch thick. -
Shaping the Center:
Take a small segment of the grey clay snake and curve it into a tight U-shape to form the smallest, innermost arch. -
Layering the Blush:
Take your pink clay snake and wrap it snugly over the top of the small grey arch. Trim the bottom ends so they sit flush with the first arch. -
Adding the Grey:
Wrap a layer of the grey clay snake over the pink arch. Gently press the layers together as you go to ensure they adhere, but be careful not to flatten the rounded profile of the coils. -
The Outer Shell:
Finally, wrap your thick, speckled white snake over the entire stack. This outer layer should be substantial enough to support the weight of the piece. -
Creating the Base:
Stand the rainbow up on a flat surface covered with parchment paper. Use your long clay blade to slice straight down through all four layers at the bottom, creating a perfectly flat base so it stands upright without wobbling.
Arch Separation?
If layers separate after baking, apply a tiny drop of super glue or strong jewelry adhesive between the arches. Press firmly for 30 seconds to bond them invisibly.
Step 3: Finishing Touches
-
Smooth the Seams:
Turn the rainbow onto its back side. While the front shows defined arches, use a modeling tool or your thumb to gently smudge the clay layers together on the back only. This structural reinforcement prevents the arches from separating later. -
Creating the Slot:
To make this a photo holder, identify a natural gap between two of the arches—usually between the outer speckled layer and the grey one. Use a thin card or a blade to gentle widen this gap slightly so a photo can slip in after baking. -
Final Check:
Do a final check for fingerprints. You can lightly brush the surface with a tiny bit of cornstarch or baby oil if needed to smooth them away. -
Baking:
Bake the piece according to the manufacturer’s instructions on your clay package. Use an oven thermometer to ensure the temperature is accurate to prevent scorching. -
Cooling:
Let the clay cool completely inside the oven with the door cracked open. Sudden temperature changes can cause cracking. -
Sanding:
Once cool, use fine-grit sandpaper under running water to smooth out any rough edges on the bottom or surface imperfections.
Uniform Thickness
Use an acrylic rolling guide or stacks of playing cards on either side of your roller. This acts as a bridge, ensuring your clay snakes are rolled to the exact same height.
Place it on your desk and slide in a cherished memory to enjoy every day
Mini Bud Vases for Single Stems
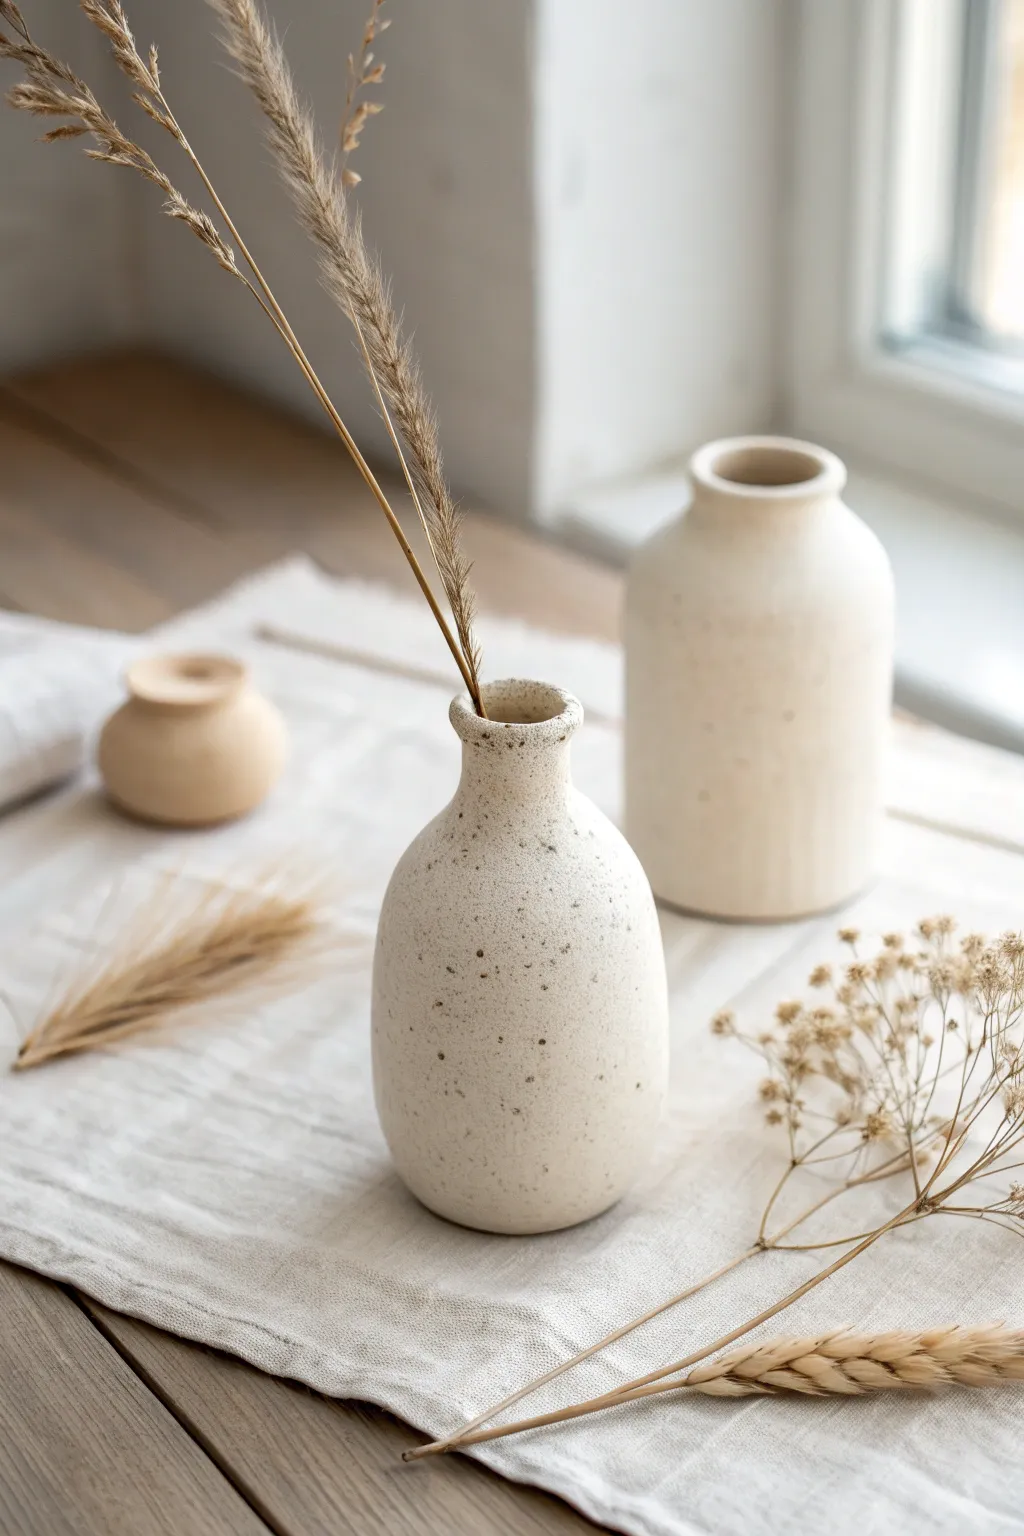
Create the rustic charm of stoneware pottery without needing a kiln using simple air-dry clay. These minimalist bud vases feature a beautiful speckled finish and organic shapes that perfectly showcase single stems or dried grasses.
Detailed Instructions
Materials
- Air-dry clay (white or cream)
- Acrylic paint (cream/off-white, brown, black)
- Matte varnish or sealant
- Rolling pin
- Clay sculpting tools (or a butter knife)
- Sponge or sandpaper
- Small paintbrush
- Old toothbrush (for speckling)
- Water in a small bowl
Step 1: Shaping the Clay Forms
-
Condition the Clay:
Begin by taking a handful of air-dry clay and kneading it in your hands until it becomes warm, soft, and pliable. This prevents cracks later on. -
Form the Base:
Roll the clay into a smooth ball about the size of a tennis ball for the central vase. Gently flatten the bottom against your work surface so it stands upright securely. -
Create the Body:
Using your palms, gently roll and press the sides of the clay ball to separate it into a bulbous bottom section and a slightly narrower upper section, starting to define the bottle shape. -
Pull the Neck:
Pinch and pull the clay upward from the center top to elongate the neck. I like to keep the transition from the body to the neck smooth and gradual rather than sharp. -
Hollow the Vase:
Use a modeling tool or the handle of a wooden spoon to press a hole vertically down through the neck. Don’t go all the way through; stop about half an inch from the bottom. -
Refine the Rim:
Widen the opening slightly at the top to create a flared rim. Smooth the edges with a wet finger to ensure there are no sharp cracks. -
Shape Variation: The Stout Pot:
For the smaller background vase, start with less clay. Form a wider, shorter base and pinch the neck in sharply, creating a squat, round shape reminiscent of an inkwell. -
Shape Variation: The Cylinder:
For the tall vase shown in the back, roll a cylinder of clay. Flatten the top and bottom, then press your finger in to create the opening, keeping the walls thick and straight. -
Smoothing:
Dip your finger in a little water and run it over the entire surface of each vase to erase fingerprints and join marks. The goal is a smooth, matte texture.
Waterproof Hack
To hold fresh flowers with water, hide a small glass vial or test tube inside the clay form while you are shaping it. Build the clay directly around the glass insert.
Step 2: Drying and Finishing
-
Initial Drying:
Place your vases on a clean board or wire rack. Let them dry for 24-48 hours. Keep them away from direct heat sources to prevent uneven drying and cracking. -
Sanding:
Once fully dry and hard, use fine-grit sandpaper or a sanding sponge to buff away any remaining lumps or bumps. Wipe away the dust with a slightly damp cloth. -
Base Coat:
Mix a cream or off-white acrylic paint. Apply two even coats to the entire vase, allowing the first coat to dry completely before applying the second. -
Creating the Speckles:
Mix a small amount of dark brown or black paint with a few drops of water to make it runny. Dip an old toothbrush into this mixture. -
Splattering:
Hold the toothbrush about 6 inches from the vase and run your thumb across the bristles to flick tiny droplets of paint onto the surface. Rotate the vase to cover all sides evenly but sparsely. -
Protecting the Finish:
Allow the paint to cure fully. Apply a coat of matte varnish or sealant over the entire piece to protect the paint and give it that sealed ceramic look. Avoid glossy finishes to maintain the natural aesthetic. -
Styling:
Since air-dry clay isn’t waterproof, these are best for dried botanicals. Insert a single stem of dried grass or a wheat stalk to complete the minimalist look.
Two-Tone Texture
For a dipped look, paint the bottom third of the vase a darker beige or taupe before doing the speckle step. This mimics stoneware dipped in glaze.
Now you have a set of modern faux-ceramics perfect for adding a touch of nature to your desk or windowsill
Simple Patterned Candle Holders
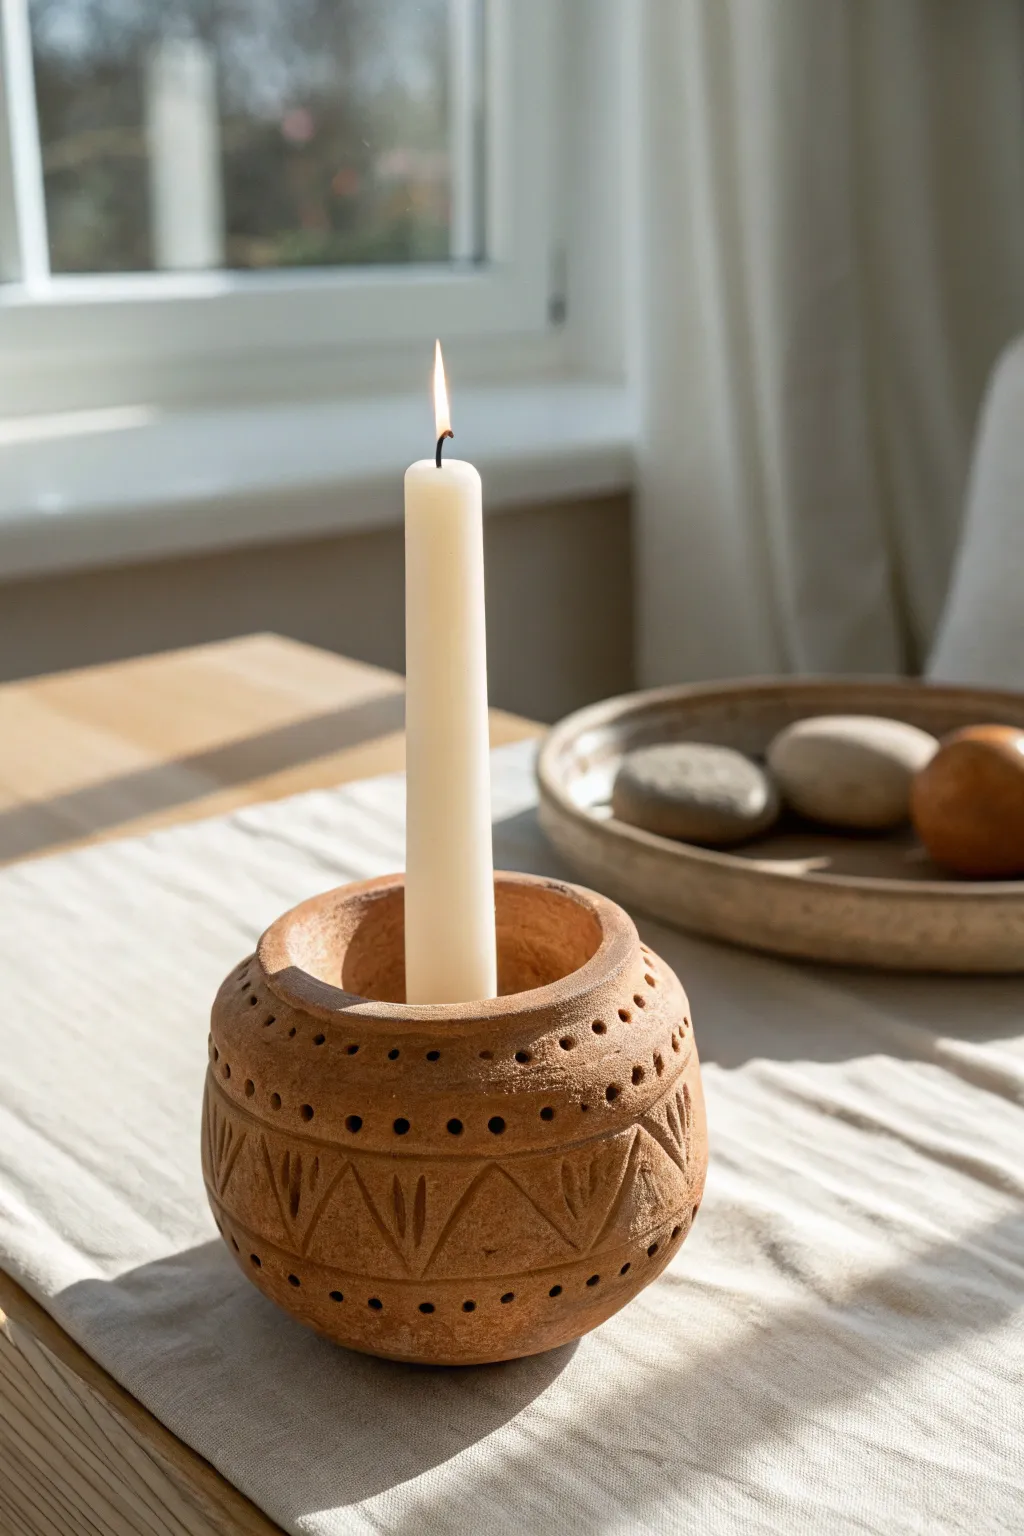
Bring warmth to your table setting with this rustic, hand-carved candle holder made from terracotta-colored modeling clay. Its earthy tones and geometric patterns create a cozy, artisanal vibe perfect for illuminating quiet evenings.
Detailed Instructions
Materials
- Terracotta air-dry clay or polymer clay
- Rolling pin
- Small knife or clay carving tool
- Wooden skewer or toothpick
- Circle cutter or a small glass (approx. 3-4 inches diameter)
- Small bowl (for shaping support)
- Water (for smoothing)
- Sponge
- Sandpaper (fine grit)
- Taper candle (to size the hole)
Step 1: Forming the Base
-
Prepare the Clay:
Start with a generous handful of terracotta clay. Knead it thoroughly until it is warm, pliable, and free of any air bubbles. -
Roll a Sphere:
Roll the clay into a smooth, even ball about the size of a large orange. Ensure the surface is free of cracks. -
Create the Opening:
Using your thumb, press gently into the center of the ball to begin opening it up. I like to rotate the ball in my palm while pressing to keep the walls even, forming a classic pinch pot shape. -
Shape the Walls:
Continue pinching and rotating until you have a hollow, rounded vessel with walls about 1/4 inch thick. Curve the upper edges inward slightly to create that bulbous, enclosed silhouette rather than an open bowl. -
Flatten the Bottom:
Gently tap the base of your pot on your work surface to create a flat, stable bottom so the candle holder won’t wobble.
Step 2: Creating the Candle Support
-
Form the Central Insert:
Take a separate piece of clay and roll it into a thick cylinder. This needs to be wide enough to hold a taper candle stably. -
Size the Hole:
Press the bottom of your actual taper candle into this cylinder to create the perfect socket size. Wiggle it slightly so the fit isn’t too tight, as clay shrinks when drying. -
Attach the Insert:
Score the bottom inside of your main pot and the base of your cylinder. Add a dab of water or slip, then press the cylinder firmly into the center of the pot’s interior. -
Secure the Rim:
Unlike a simple pot, this design has a thick, flat top rim. Roll a coil of clay and attach it to the top opening, smoothing it downwards to blend with the exterior walls and inwards towards the candle socket. -
Smooth the Surfaces:
Dip a sponge in a little water and wipe down the exterior to remove fingerprints and create a uniform, matte surface ready for carving.
Cracks Appearing?
If you see hairline cracks while drying, mix a tiny bit of fresh clay with water to make a paste and fill them in immediately. Smooth with a damp finger.
Step 3: Carving the Details
-
Mark Guide Lines:
Using a toothpick, very lightly sketch two horizontal rings around the circumference of the pot—one near the top shoulder and one near the bottom. These define your central carving band. -
Carve the Triangles:
Between your guide lines, use a carving tool to scratch in a zigzag line that creates a row of connecting triangles all around the pot. -
Add Texture Inside Triangles:
Inside each triangle pointing upwards, carve two or three small vertical dashes or leaf-like strokes for added texture. -
Punch the Dot Pattern:
Use the blunt end of a skewer or a small round tool to press rows of dots into the clay. Place a row above the top guide line and a row below the bottom guide line. -
Detail the Rim:
Add a final ring of small dots around the flat top rim for a cohesive look.
Natural Texture
Before carving, gently press a piece of coarse linen fabric onto the damp clay surface. This leaves a subtle woven texture that enhances the rustic look.
Step 4: Finishing Touches
-
Clean Up Burrs:
Let the clay dry until it’s leather-hard. Then, gently brush away any little crumbs of clay produced during the carving process. -
Final Dry:
Allow the piece to dry completely according to your clay package instructions (usually 24-48 hours for air-dry clay). Turn it occasionally for even drying. -
Sand and Refine:
Once fully dry, lightly sand any rough edges, especially around the rim, for a professional finish. You can leave it raw for that matte terracotta look or seal it with a matte varnish.
Place your favorite taper candle inside and enjoy the warm, handmade charm this piece adds to your home
Alphabet Ornaments and Gift Tags
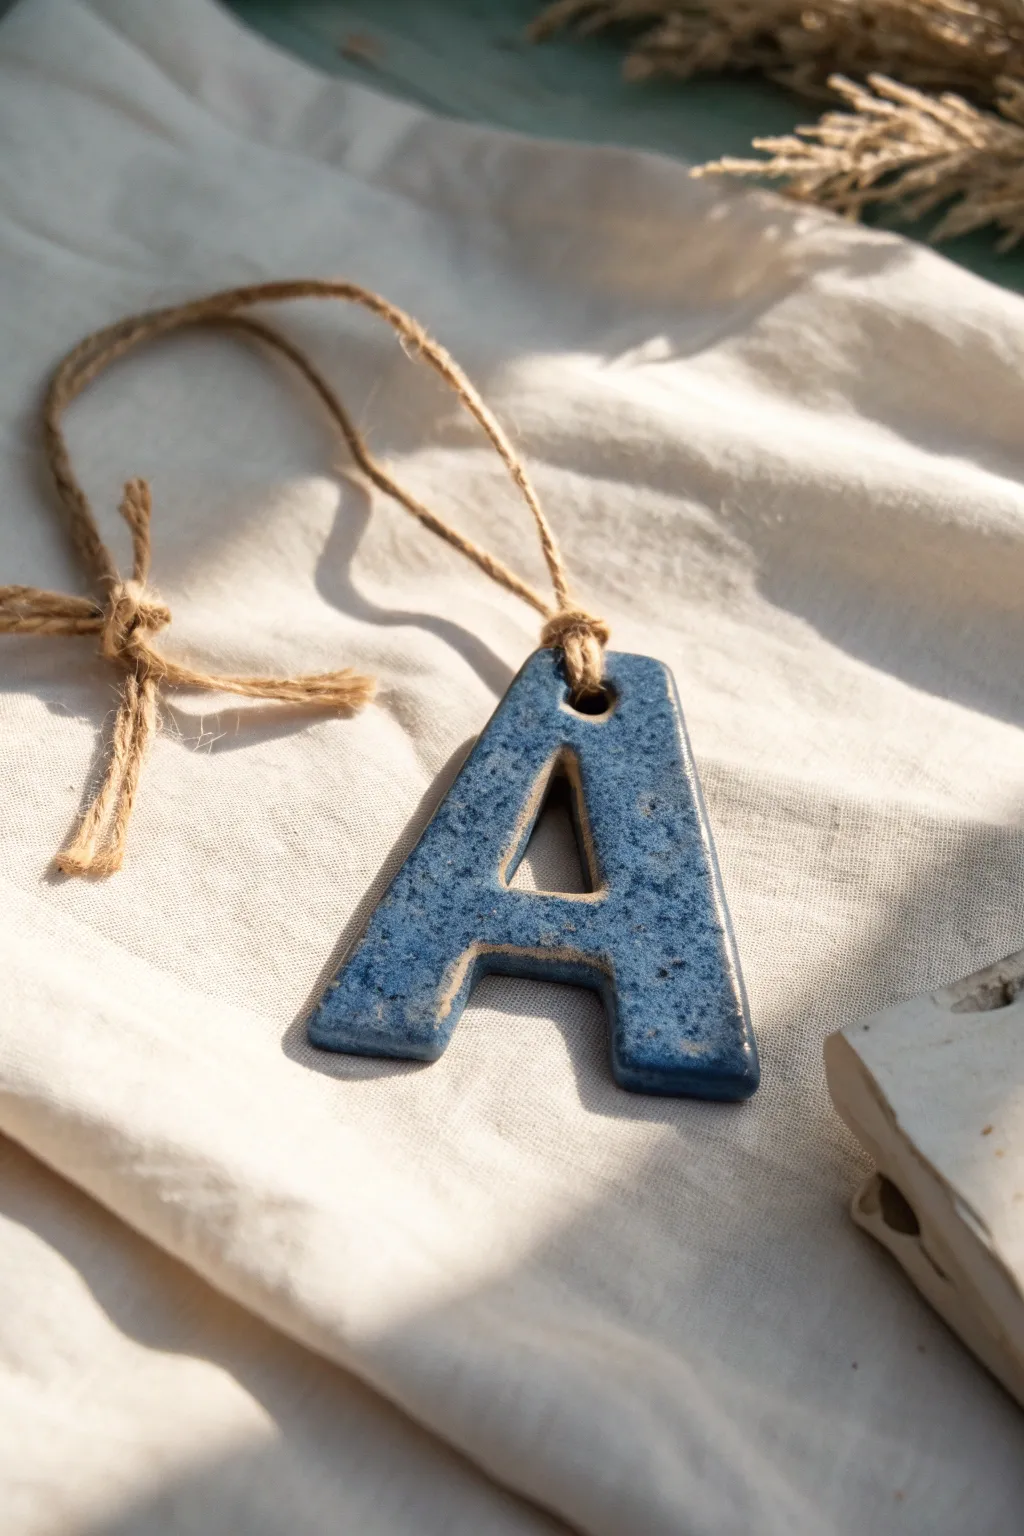
Create the illusion of high-end stoneware pottery using air-dry modeling clay and a clever painting technique. This chunky letter ‘A’ features a stunning speckled blue finish and a rustic jute hanger, making it a perfect personalized gift tag or holiday ornament.
Step-by-Step Tutorial
Materials
- White air-dry modeling clay
- Rolling pin
- Alphabet cookie cutter (approx. 2-3 inches)
- Parchment paper
- Straw or cocktail stick
- Fine-grit sandpaper (optional)
- Acrylic paint: Navy or denim blue
- Acrylic paint: Black or dark grey
- Acrylic paint: Cream or beige (optional for edges)
- High-gloss varnish or Mod Podge
- Old toothbrush
- Soft paintbrush
- Jute twine
Step 1: Shaping the Clay
-
Prep your surface:
Lay down a sheet of parchment paper to protect your table and prevent the clay from sticking. Tape the corners down if it tends to curl up. -
Part the clay:
Grab a chunk of air-dry clay roughly the size of a golf ball. Knead it in your warm hands for a minute until it feels pliable and smooth. -
Roll it out:
Use your rolling pin to flatten the clay. Aim for a thickness of about 1/4 inch (6mm) to give the ornament a substantial, ceramic feel. -
Cut the letter:
Press your alphabet cookie cutter firmly into the clay. Wiggle it slightly to ensure a clean cut all the way through, then lift the cutter. -
Remove excess:
Peel away the scrap clay from around the letter first, then gently push the letter out of the cutter if it’s stuck inside. -
Smooth the edges:
Dip your finger in a little water and run it along the cut edges of the letter. This softens the sharp angles and makes it look more like fired pottery. -
Create the hole:
Use a straw (for a larger hole) or a cocktail stick to punch a hole at the top of the letter. Twist the tool as you pull it out to keep the hole neat. -
Drying time:
Let the letter dry completely on a flat surface. This usually takes 24-48 hours. I find flipping it over halfway through helps it dry evenly without warping. -
Sanding:
Once bone dry, lightly check for rough spots. A quick pass with fine-grit sandpaper will perfect the shape.
Glaze Illusion
For an even more convincing ‘fired glaze’ effect, mix a tiny drop of your blue paint into the gloss varnish before applying. It adds depth!
Step 2: Painting and Finishing
-
Base coat:
Paint the entire front and sides of the letter with your denim blue acrylic paint. You might need two coats for opaque coverage. -
Distress the edges:
For that worn ceramic look, you can either leave the very edges unpainted (showing the white clay) or lightly dab a cream color along the rims. -
Prepare the speckle:
Dilute a small drop of black paint with water until it’s the consistency of ink. Dip the bristles of an old toothbrush into this mixture. -
Apply the speckles:
Hold the toothbrush over the letter and run your thumb across the bristles to flick tiny droplets of paint onto the surface. Practice on paper first to control the spray. -
Seal it:
Once the paint is totally dry, apply a thick coat of high-gloss varnish. This is the secret step that makes the clay look like glazed ceramic. -
Cut the twine:
Cut a length of jute twine, approximately 10 inches long. -
Thread the hanger:
Fold the twine in half and push the loop end through the hole from front to back. -
Secure the loop:
Feed the loose ends of the twine through the loop you just pushed through (a lark’s head knot) and pull tight. -
Tie it off:
Tie the two loose ends of the twine together in a simple overhand knot to close the loop ready for hanging.
Warped Letter?
If your clay curls up while drying, place a heavy book on top of it once it’s semi-dry (leather hard) to force it flat again.
Hang your personalized faux-ceramic letter on a gift bag or use it to add a sophisticated touch to your holiday decor
Tiny Mini Room Diorama in Clay
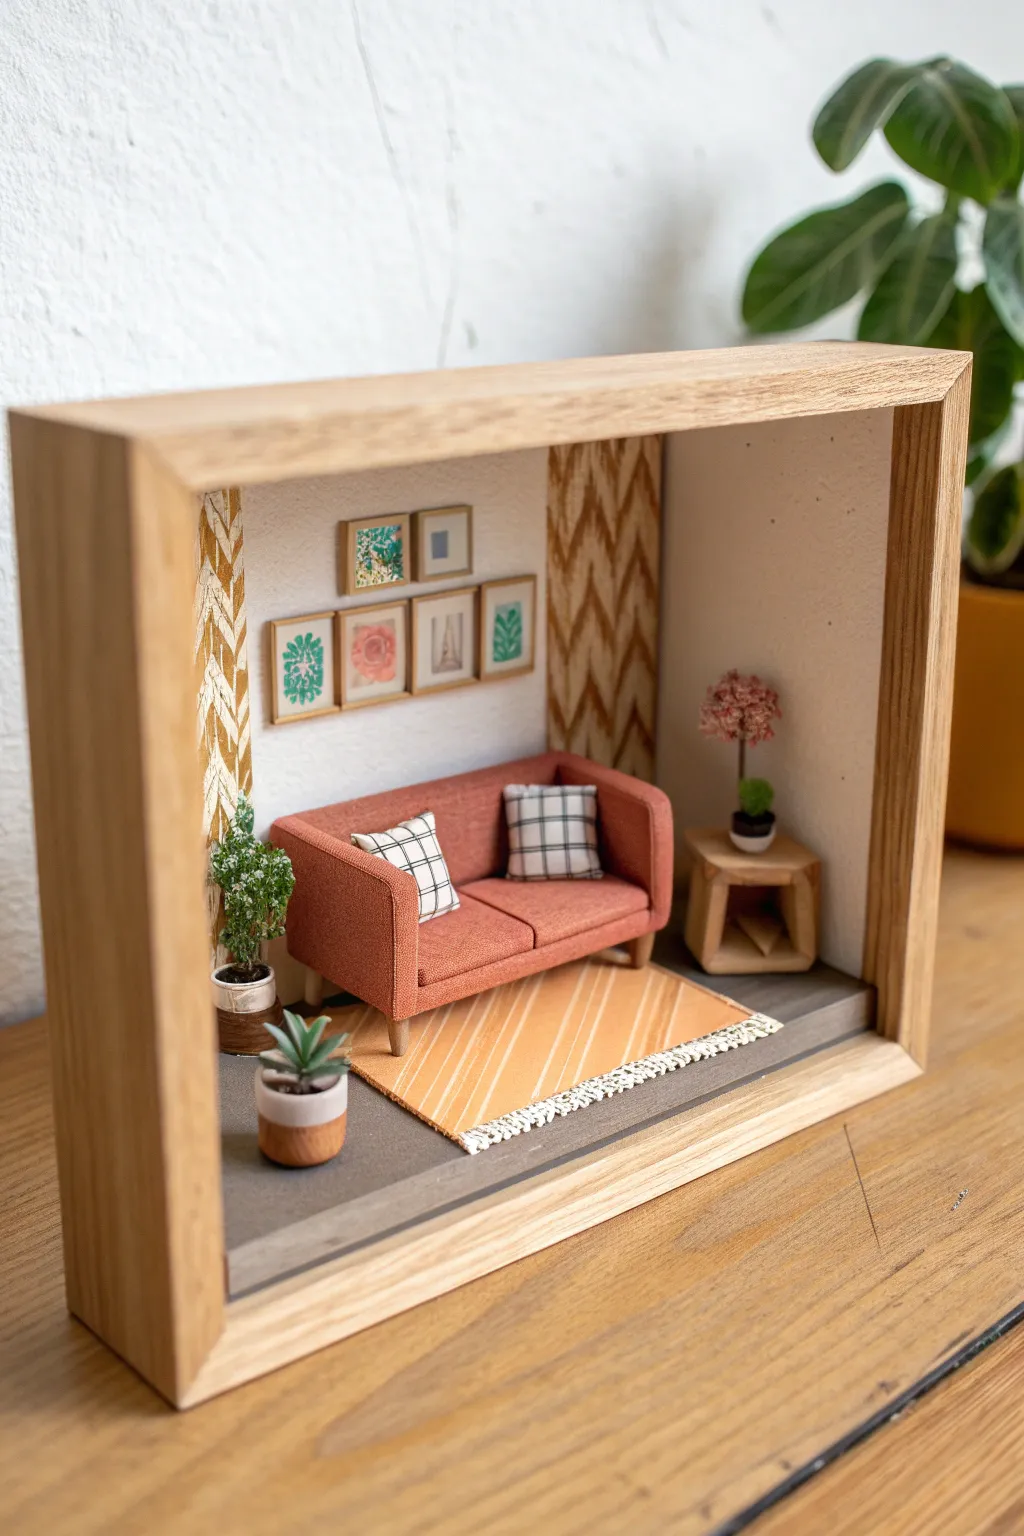
Capture the cozy essence of home decor in miniature form with this delightful shadow box diorama. Using polymer clay and a simple wooden frame, you will build a tiny, stylish living room complete with a textured sofa and potted plants.
Step-by-Step
Materials
- Polymer clay (terracotta, white, black, green, brown)
- Deep shadow box frame (wooden)
- White acrylic paint
- Cardstock or thin cardboard
- Patterned scrapbook paper or fabric scraps
- Balsa wood scraps or popsicle sticks
- Wood glue and strong craft glue
- Texture tools (toothbrush, needle tool, fabric scrap)
- Small paintbrushes
- Mod Podge or varnish
Step 1: Setting the Scene
-
Prepare the frame:
Remove the glass from your shadow box frame. If the back panel is dark, paint the interior back wall with white acrylic paint to simulate a clean drywall finish. Let it dry completely. -
Create the flooring:
Cut a piece of dark grey or brown cardstock to fit the ‘floor’ area of the frame. Glue this securely to the bottom ledge of the shadow box interior. -
Add wallpaper accents:
Cut two narrow vertical strips of patterned paper or fabric. Glue these to the back wall’s left and right corners to mimic stylish wallpaper panels or curtains.
Step 2: Modeling the Furniture
-
Form the sofa base:
Using terracotta-colored clay, shape a long rectangular block for the seat and a taller, thinner rectangle for the backrest. Round the edges slightly for a soft look. -
Add sofa arms:
Create two smaller rectangular blocks for the armrests. Attach them to the sides of the seat base, blending the clay seams carefully with a smoothing tool. -
Texture the fabric:
Before baking, gently press a piece of scrap denim or coarse fabric relative to the clay surface to imprint a realistic upholstery texture onto the sofa. -
Make the legs:
Roll four tiny tapered logs of light brown clay (or use tiny dowel pieces). Attach these to the bottom of the sofa. I prefer baking the sofa upside down so the legs don’t warp under the weight. -
Craft the side table:
Cut small pieces of balsa wood into a geometric shape—two hexagons or squares connected by angled legs works well. Glue them together with wood glue.
Uneven Furniture?
If your clay sofa wobbles after baking, use a nail file or coarse sandpaper to gently sand down the bottom of the legs until it sits perfectly flat on the floor.
Step 3: Tiny Decor Details
-
Sculpt the pillows:
Form two small squares of white clay. Press them gently to look indented and fluffy. Bake them separately or place them on the sofa if you want them permanently attached. -
Paint the pillows:
Once baked and cooled, use a fine-tip brush or black pen to draw grid lines on the pillows for a modern plaid pattern. -
Create the rug:
Cut a rectangle of orange paper or fabric. Paint thin white diagonal stripes across it. For fringe, glue a tiny strip of white lace or frayed fabric to the short ends. -
Make the gallery wall:
Cut tiny rectangles of balsa wood or thick cardstock for frames. Print or hand-paint tiny abstract art or botanical images and glue them inside the frames.
Lighting Upgrade
Drill a tiny hole in the top corner of the frame and thread a single LED fairy light through to create a working ‘ceiling lamp’ for your miniature room.
Step 4: Plant Life & Assembly
-
Pot the big plant:
Roll a cylinder of brown clay and wrap a white band around the bottom for a two-tone pot. Insert a toothpick or wire into the center for stability. -
Add foliage:
For the tall plant, glue small clumps of green railing foam or preserved moss onto the wire stem. For the succulent, shape tiny teardrops of green clay and arrange them in a rosette. -
Assemble the room:
Glue the rug down first. Position the sofa on top, then place the side table. Use strong craft glue to attach the gallery frames to the back wall at varying heights. -
Final touches:
Place the potted plants—one on the floor near the sofa and a smaller one on the side table. Ensure everything is glued down securely if you plan to hang the frame.
Now you have a charming snapshot of a dream living room that fits right on your shelf