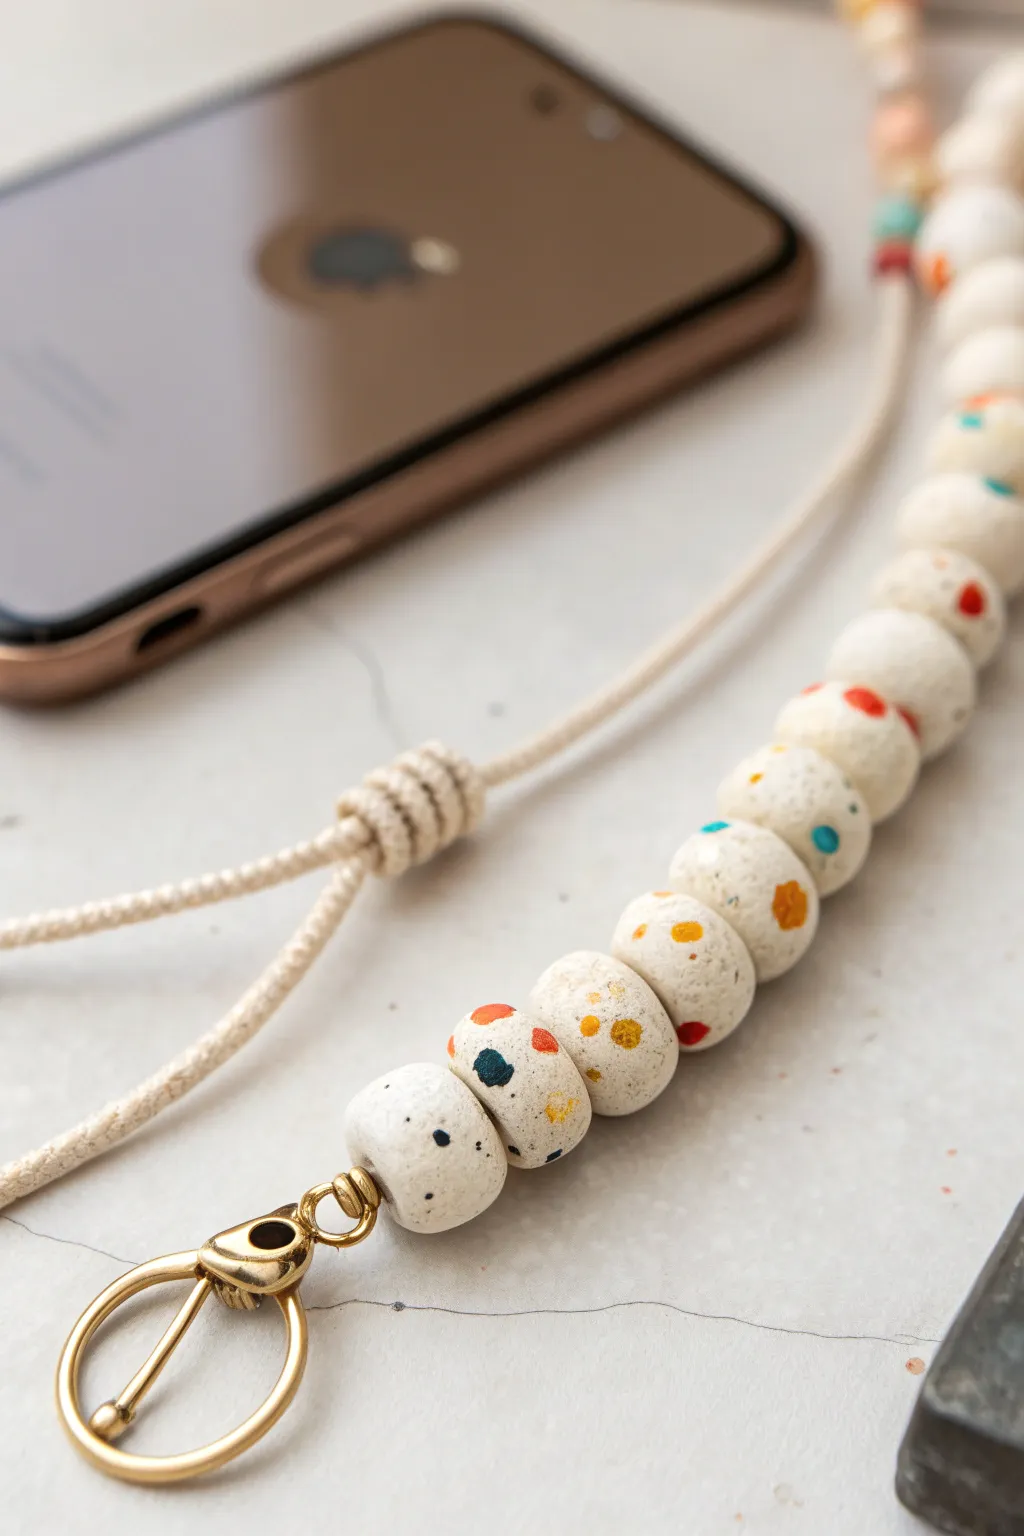
If you’ve been craving a cute, customizable accessory for your phone, clay bead phone charms are the sweetest little project to play with. I love how polymer clay heishi beads let you build endless color stories, from simple neutrals to full-on nostalgic fun.
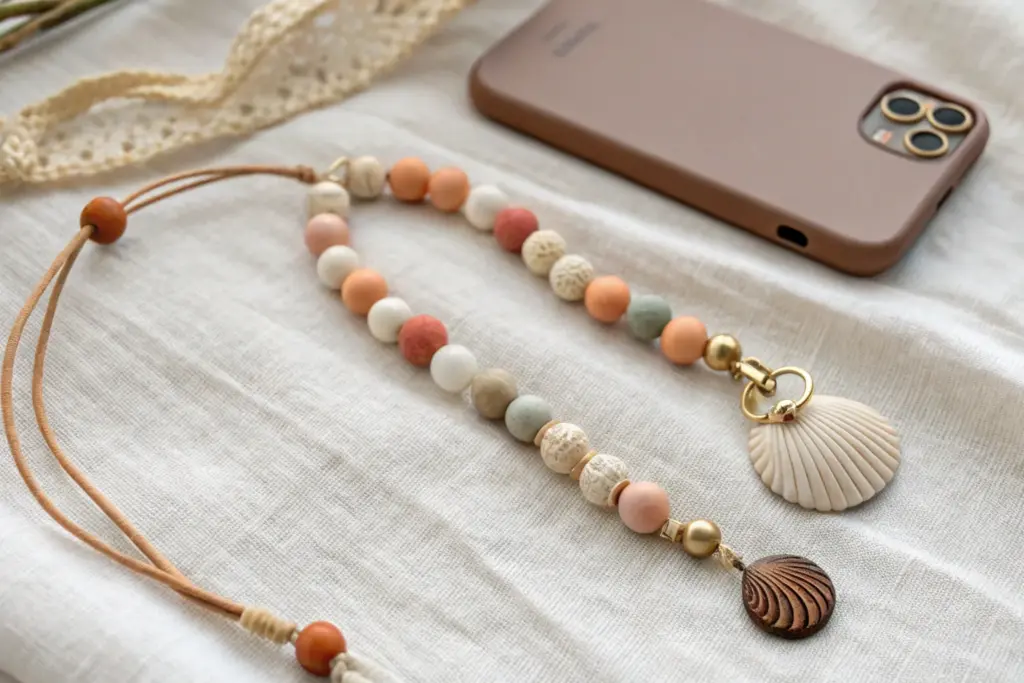
Beachy Shell and Pearl Mix
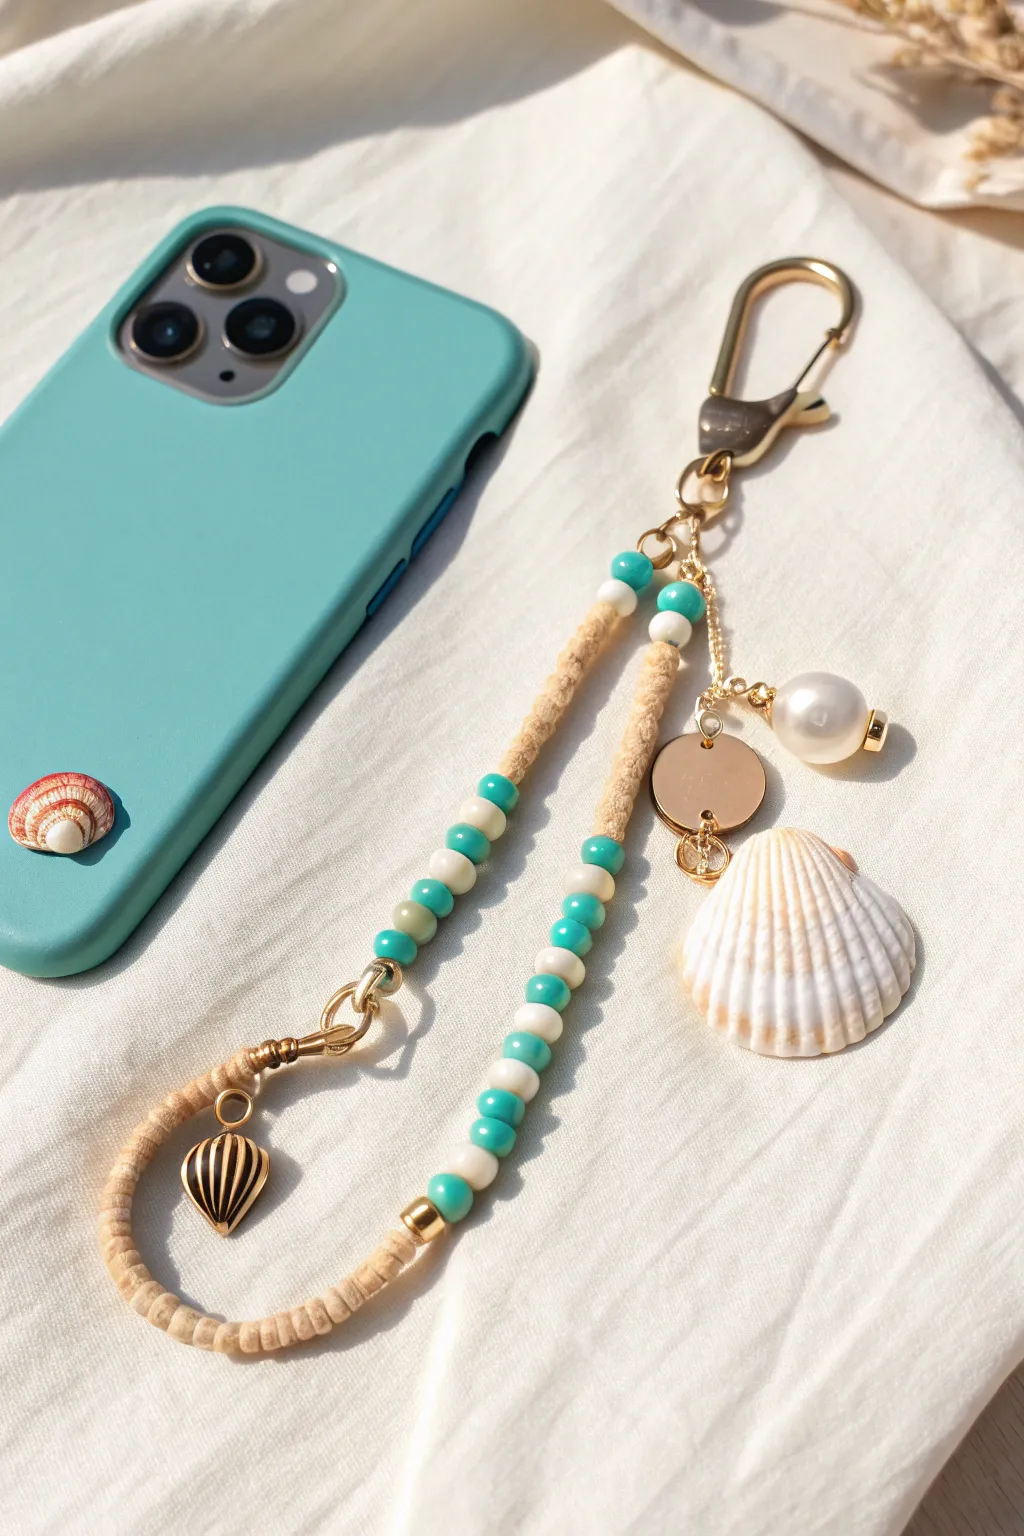
Capture the essence of a beach vacation with this elegant phone strap featuring beige clay discs, turquoise accents, and genuine shell charms. This mix of natural textures and gold hardware creates a sophisticated accessory that pairs perfectly with a teal phone case.
Step-by-Step Guide
Materials
- Beige polymer clay heishi beads (approx. 4mm)
- Turquoise glass seed beads or mini spacers
- White or cream seed beads/spacers
- Large scallop shell charm (natural or resin)
- Gold heart charm with shell details (or similar nautical charm)
- Faux pearl bead (large, approx. 10mm)
- Gold coin charm or blank tag
- Gold lobster clasp (swivel style preferred)
- Gold jump rings (various sizes, 4mm-6mm)
- Durable beading cord (nylon or jewelry wire)
- Crimp beads and covers (gold)
- Jewelry pliers (round nose and flat nose)
- Scissors
Step 1: Golden Charm Cluster
-
Prepare the scallop shell:
If your large scallop shell doesn’t have a hole, carefully drill one at the top hinge. Attach a medium-sized gold jump ring through this hole. -
Create the pearl dangle:
Thread a headpin through the large pearl bead. Use your round nose pliers to create a neat whimsical loop at the top, securing the bead. -
Assemble the cluster chain:
Cut a short length of gold chain (about 1.5 inches). Attach this chain directly to the base of your lobster clasp using a small jump ring. -
Attach the charms:
Using jump rings, attach the large scallop shell, the pearl dangle, and the gold coin tag to the bottom link of your short chain. Varying the jump ring sizes slightly can help them hang nicely.
Loose loops?
If the beaded loop feels floppy, use a thicker gauge beading wire or double up your nylon cord. The stiffness helps the charm hold its pleasing U-shape.
Step 2: Beading the Strap
-
Cut the cord:
Cut a piece of beading cord approximately 12-14 inches long. This will be folded over, so it provides plenty of working room. -
Start the loop:
String a crimp bead onto the cord, loop it through the connection point on your lobster clasp (where the chain is also attached), and thread the cord back through the crimp bead. Flatten the crimp bead securely. -
Cover the crimp:
Place a gold crimp cover over the flattened crimp bead and gently close it with pliers to make it look like a smooth gold bead. -
Begin the beige section:
String both tail ends of the cord through your first few beads to hide the shorter tail. Begin with a long section of beige clay heishi beads—about 1.5 inches in length. -
Add the first accent:
Transition to the accent pattern: add one turquoise bead, one white spacer, one turquoise bead, and one white spacer. -
Create the patterned section:
Follow this pattern for the middle section: five beige clay beads, followed by a turquoise/white/turquoise sequence. Repeat this sequence until the strap is your desired length, ending with beads rather than spacers. -
Finish the bead strand:
End the strand with another solid section of beige clay beads to mirror the beginning, but leave it slightly shorter to accommodate the bottom loop.
Pro Tip: Shell Prep
Coat natural shells with a thin layer of clear nail polish or resin. This strengthens them against cracks and gives a permanent ‘wet look’ shine.
Step 3: Final Assembly
-
Create the bottom loop:
Thread a crimp bead, then a wire guardian (optional but recommended for durability), and loop the wire back through the crimp bead. -
Attach the bottom charm:
Before tightening the wire, hook a jump ring containing your gold heart shell charm onto the loop you just created. -
Secure the end:
Pull the wire taut so there are no gaps between beads, flatten the crimp bead, and trim the excess wire. Add a crimp cover for a polished finish. -
Double check connections:
I always give every jump ring a gentle tug to ensure they are fully closed so you don’t lose any precious charms.
Clip this beauty onto your phone case and enjoy carrying a little piece of the ocean with you everywhere


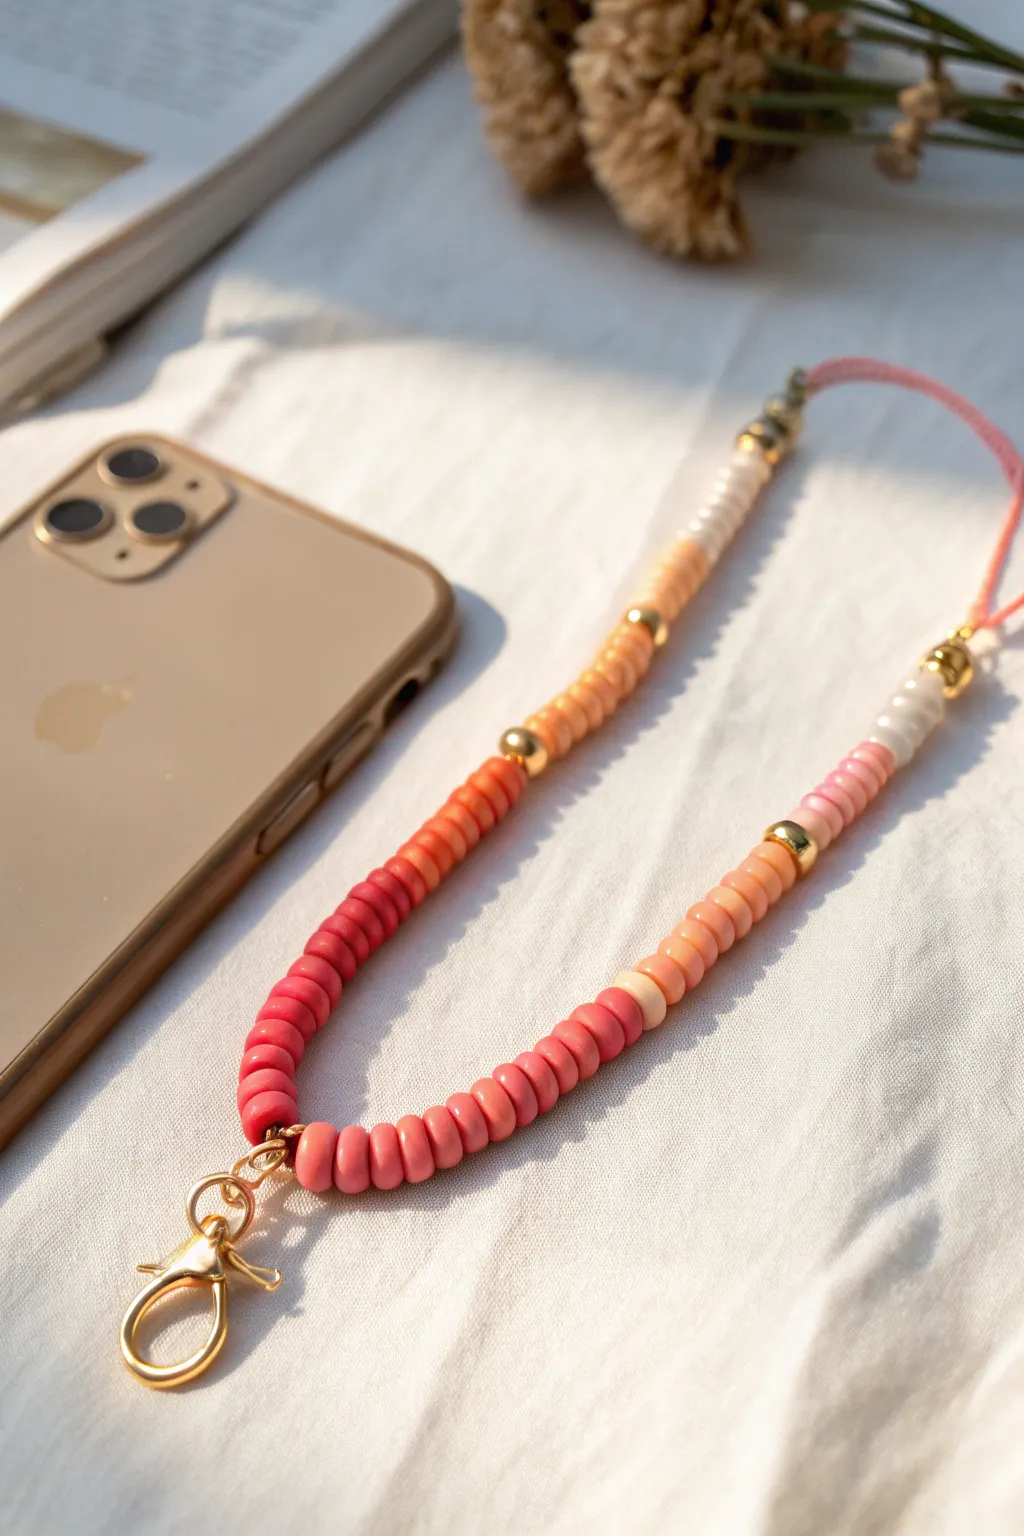
Color-Blocked Stack Sections
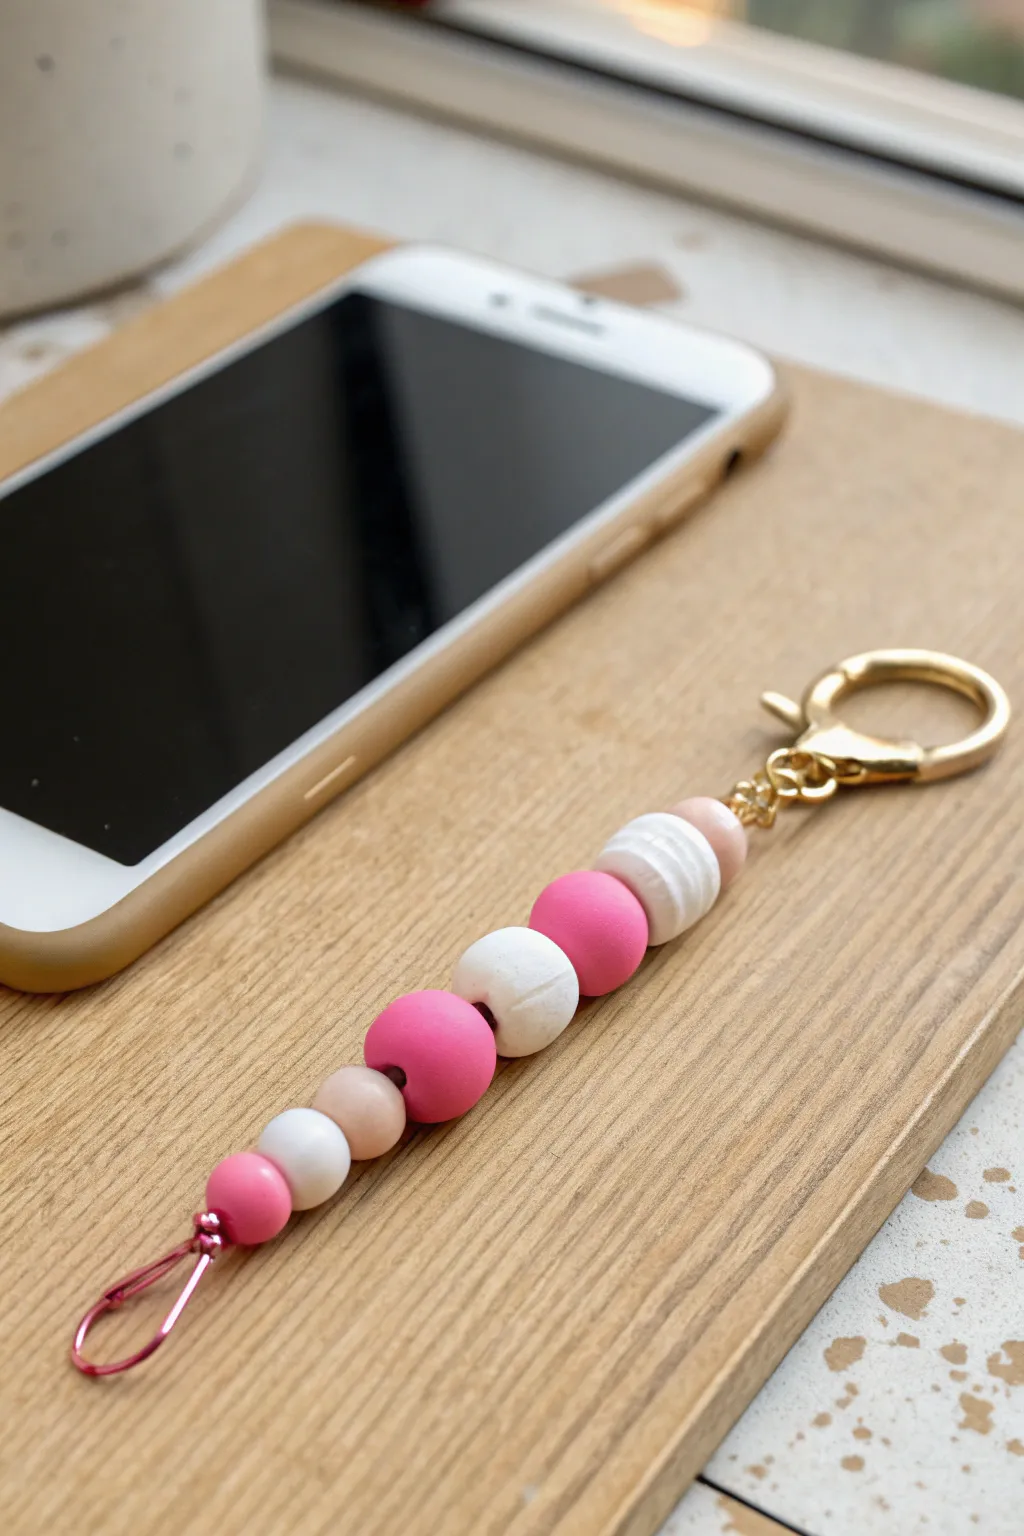
Create a sleek and minimalist phone charm that uses simple color blocking to make a big impact. This design alternates between crisp whites, soft pearls, and varying shades of pink clay beads for a cheerful, polished look.
Step-by-Step
Materials
- Polymer clay in white, pearl/beige, bright pink, and light pink
- Gold lobster clasp keychain hardware
- Pink nylon cord or beading thread (approx 1mm)
- Small jump ring (gold)
- Beading needle (optional but helpful)
- Cutting tool or craft knife
- Bead rolling tool or clear acrylic block
- Toothpick or bead piercing pin
- Oven for baking
Step 1: Creating the Clay Beads
-
Condition the Clay:
Begin by kneading each color of polymer clay separately until it is soft and pliable. This warmth helps prevent cracks during the rolling process. -
Portion the Clay:
Pinch off small pieces of clay for your beads. Aim for slightly different sizes to mimic the organic feel of the original: larger chunks for the main colored beads and smaller bits for the accent spacers. -
Roll the Spheres:
Roll each piece of clay between your palms or using an acrylic block on a flat surface to create perfect spheres. You will need roughly 3 large beads (white, bright pink, light pink) and 4-5 medium-to-small beads. -
Create the Texture (Optional):
Notice the white bead near the top has a slight ribbed texture. You can achieve this by gently rolling the sphere over a textured surface or lightly pressing lines into it with a needle tool. -
Pierce the Holes:
Using a toothpick or a dedicated bead piercing pin, carefully poke a hole through the center of each sphere. I find gently rotating the bead while pushing the tool through keeps the shape round. -
Bake the Beads:
Arranged your beads on a baking sheet lined with parchment paper. Bake according to your specific clay brand’s package instructions (usually around 275°F or 135°C for 15-30 minutes). -
Cool Down:
Let the beads cool completely before handling them. They harden fully as they return to room temperature.
Smooth Operator
To remove fingerprints from raw clay beads before baking, lightly brush them with a drop of baby oil or cornstarch.
Step 2: Assembly
-
Prepare the Cord:
Cut a length of pink nylon cord, approximately 8-10 inches long. Fold it in half to create a loop at one end. -
Attach the Lanyard Loop:
Tie a simple overhand knot about 1.5 inches down from the fold. This loop is what will attach to your phone case. -
Start Threading:
Thread the loose ends of the cord through your beads. Follow the pattern shown: Small pink, White, Nude/Pearl, Large Pink, White, Large Pink, Textured White, Nude/Pearl. -
Secure the Top:
Once all beads are threaded, tie a secure double knot tightly against the top bead (the Nude/Pearl one) to hold everything in place. -
Add Hardware:
Thread a gold jump ring through the knot you just created at the top of the bead stack. Connect this jump ring to the gold lobster clasp. -
Final Trim:
Make sure your knots are tight. Trim any excess cord sticking out from the top knot. You can carefully melt the tips with a lighter if using nylon cord to prevent fraying. -
Attaching to Phone:
To use, push the bottom pink loop through the hole in your phone case, then pass the beaded charm through the loop and pull tight.
Level Up: Metallic Touch
Add gold spacer beads between the clay spheres to match the gold hardware and add a touch of luxury to the stack.
Clip this onto your phone case or keys for an instant pop of handmade charm


Daisy Focal Bead Pop
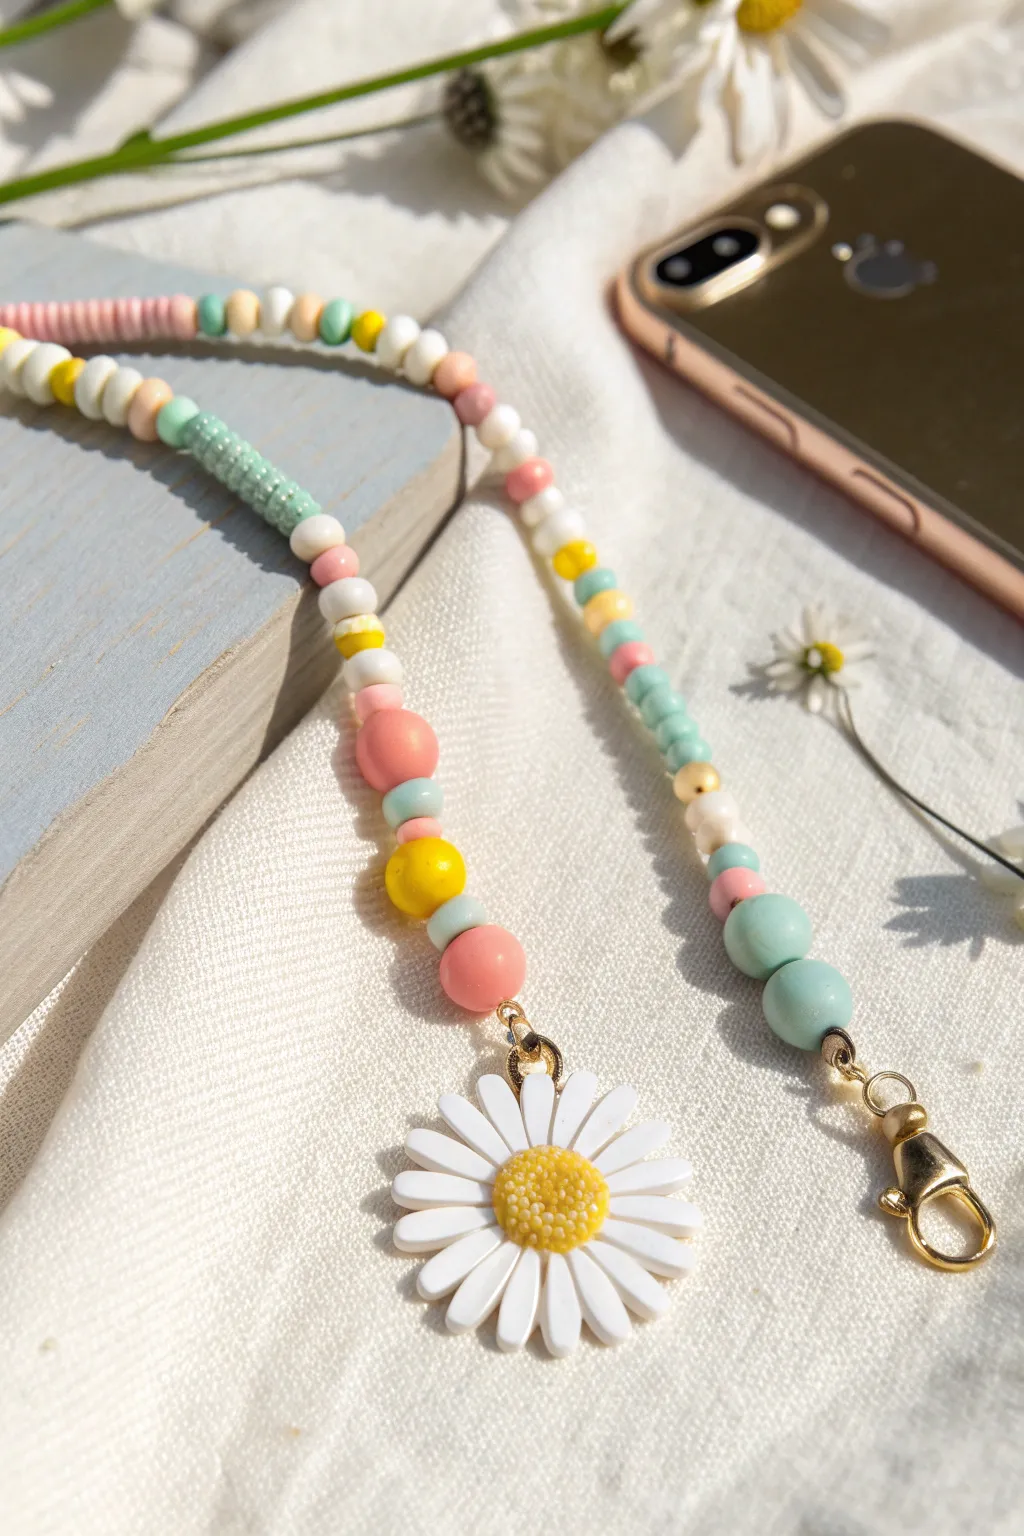
Capture the essence of a sunny afternoon with this charming phone strap featuring a large daisy pendant and a soothing palette of pastel beads. It combines larger round beads with delicate seed beads for a textured, playful look.
Detailed Instructions
Materials
- White polymer clay daisy pendant with gold jump ring
- Nylon beading cord or sturdy polyester string (approx. 12 inches)
- Pastel round clay/acrylic beads (10mm): Pink, Yellow, Mint, White
- Pastel seed beads (size 6/0 or 8/0): Mint green, White, Yellow, Coral
- Heishi polymer clay disc beads: Pink, Mint, Yellow
- Small gold spacer beads (2mm-3mm)
- Gold lobster clasp
- Scissors
- Jewelry pliers (chain nose)
- Lighter (optional, for sealing cord ends)
- Beading needle (optional)
Step 1: Preparing the Base
-
Cut the Cord:
Begin by cutting a length of your nylon cord, approximately 12 to 14 inches long. This gives you plenty of room to work with for knotting later. -
Attach the Lobster Clasp:
Thread one end of the cord through the loop on the bottom of the gold lobster clasp. -
Center and Secure:
Pull the cord through until the clasp is sitting exactly in the middle of the string, then tie a simple overhand knot right below the clasp to secure it in place so you have two equal strands hanging down.
Sticky Situation
If the knot won’t disappear inside a bead, use a ‘crimp cover’ bead. Close it over the knot with pliers for a professional gold finish.
Step 2: Beading the Pattern
-
Start with Symmetry:
Treat the two hanging strands as a single thick unit for the first few inches if you want a chunky look, or split them to bead separately. For this design, hold both strings together and thread on a large mint green round bead. -
Add Variation:
Follow the mint bead with a smaller pink round bead to begin tapering the size. -
Create Texture:
Thread on a section of mint green seed beads next; aim for about a half-inch of these to create a distinct textural break from the smooth round beads. -
The Heishi Section:
Introduce the flat disc beads now. Add a pattern like white, yellow, then pink heishi beads. -
Gold Accents:
Slide on a small gold spacer bead to add a touch of shine before moving to the next color block. -
Repeating Blocks:
Continue the pattern by adding a white round bead, followed by a yellow round bead. I like to visually check the length against my phone case here to ensure the drape will be correct. -
Midpoint Detail:
Add a slightly longer section of alternating pink and mint seed beads. This creates a visually lighter section in the middle of the strap. -
Final Bead Run:
Finish the main length of the strap with a sequence of large round beads: pink, yellow, mint, and finally a large white one to frame the pendant.
Step 3: Adding the Focal Piece
-
Prepare the Jump Ring:
Using your pliers, gently twist open the gold jump ring attached to your daisy pendant. Ensure the opening is wide enough to accommodate your cord. -
Attach the Daisy:
Since the cord ends form the ‘bottom’ loop of this style of charm, thread the daisy’s jump ring onto the very end of your beaded section. -
Secure the Loop:
Instead of knotting the cord directly onto the daisy, form a loop with the remaining cord ends. This loop is what you will use to attach the charm to your phone case. -
Knotting:
Tie a very tight double or surgeon’s knot with the two cord ends, ensuring the beads are snug but the strap remains flexible. -
Sealing the Deal:
Trim the excess cord tails close to the knot. If using nylon cord, carefully use a lighter to melt the very tips of the knot to prevent it from slipping. -
Hide the Knot:
If possible, slide the final large bead down over the knot to conceal it, leaving just the loop exposed for attachment.
Garden Variety
Swap the single large daisy for three smaller flower beads spaced out along the chain for a ‘scattered petals’ effect across the strap.
Now your phone has a cheerful floral companion ready for sunny days.


Fruit Slice Summer Charm
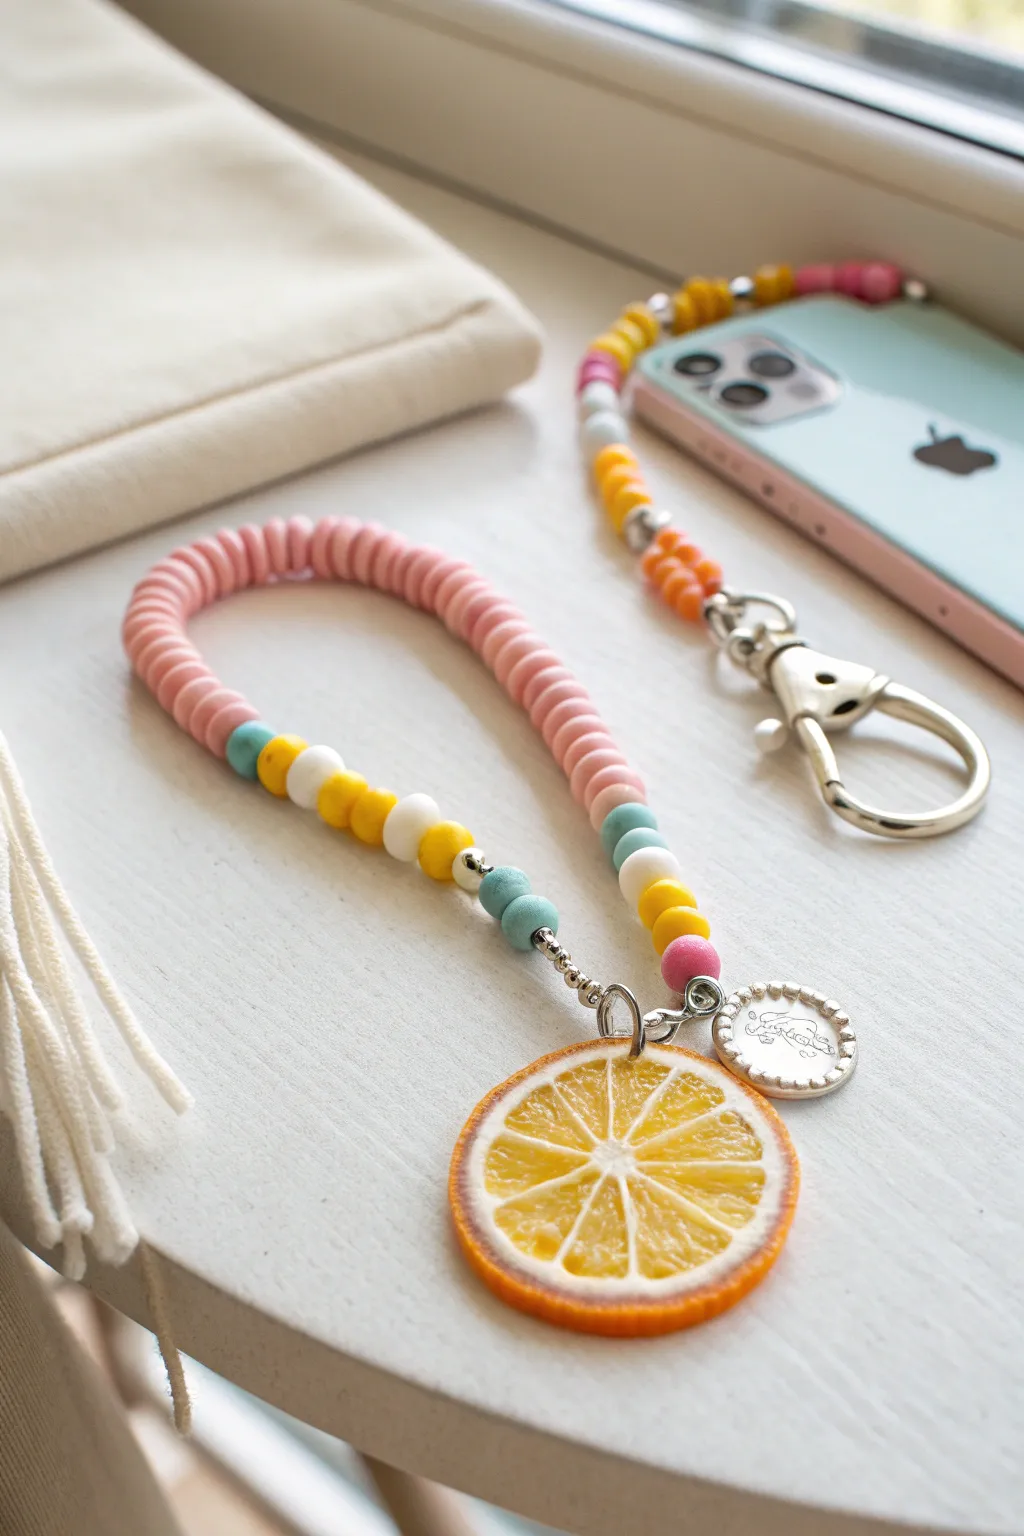
Capture the essence of summer with this vibrant phone charm featuring a realistic orange slice pendant. The mix of cheerful pink heishi beads and sunny yellow accents makes this accessory a fresh, juicy addition to any device.
Step-by-Step
Materials
- Pink polymer clay heishi beads (approx. 6mm)
- Round wooden or acrylic beads in yellow, white, and teal (approx. 8mm)
- Small faux orange slice pendant (resin or plastic)
- Small round silver logo tag or charm
- Silver crimp beads
- Silver jump rings (6mm or 8mm)
- Strong nylon beading cord or jewelry wire
- Jewelry pliers (flat nose and round nose)
- Scissors
Step 1: Planning and Preparation
-
Measure the cord:
Cut a length of nylon beading cord or jewelry wire approximately 12 inches long. This gives you plenty of slack for knotting and crimping later. -
Layout the design:
Before stringing, lay out your beads on a flat surface to visualize the pattern. For this look, plan a long section of pink heishi beads for the loop, flanked by a pattern of teal, yellow, and white round beads near the bottom connector.
Loose Ends?
If your knot feels slippery or the crimp bead doesn’t feel secure enough, add a tiny drop of super glue or clear nail polish to the knot/crimp before trimming the excess cord.
Step 2: Stringing the Loop
-
Start the pattern:
Begin by threading one teal round bead, followed by one white round bead, and then two yellow round beads onto the center of your cord. -
Add the heishi section:
Thread approximately 40-50 pink heishi beads onto the cord. This section will form the main loop that goes around your wrist or hangs from the phone case. -
Mirror the pattern:
Finish the bead stringing by mirroring the start: add two yellow round beads, one white round bead, and finally one teal round bead. -
Check the length:
Hold the two ends of the cord together to form a loop. Ensure the pink section is long enough for your preference and that the colored round beads sit evenly at the base.
Make It Sparkle
Swap the plain silver spacer beads for rhinestone rondelle spacers between the colored round beads to add a touch of glamour and catch the light.
Step 3: Securing the Ends
-
Prepare for closure:
Thread both ends of the cord through a small silver spacer bead or a crimp bead. This brings the two sides of the loop together into a single strand. -
Add the attachment ring:
Thread both cord ends through a sturdy silver jump ring. This ring will hold your charms. -
Loop back and crimp:
Take the cord ends and thread them back down through the crimp bead or spacer you added two steps ago. Pull tight so the jump ring is secure but has a tiny bit of movement. -
Secure the crimp:
Using your flat nose pliers, firmly squash the crimp bead to lock the cords in place. Provide a firm squeeze to ensure it won’t slip. -
Trim excess cord:
Snip off the excess tail of the cord as close to the crimp bead as possible for a neat finish.
Step 4: Attaching the Charms
-
Prepare the orange slice:
Locate the small hole at the top of your faux orange slice. Open a jump ring sideways using your pliers, slide it through the fruit slice hole, and close it securely. -
Attach to the main ring:
Open the main jump ring that is attached to your beaded loop. Slide on the orange slice pendant. -
Add the silver tag:
While the main jump ring is still open, slide on your small silver logo tag or extra charm next to the orange slice. I generally like placing the smaller charm in front so it sits nicely against the fruit. -
Final closure:
Use your pliers to close the main jump ring tightly. Ensure the gap is completely flush so the thin cord or charm loops cannot slip out. -
Attach to phone:
Use a lark’s head knot to attach the pink loop end to your phone case, or simply clip the jump ring onto an existing phone hardware loop.
Now your phone has a refreshing new look that feels like a sunny day

The Complete Guide to Pottery Troubleshooting
Uncover the most common ceramic mistakes—from cracking clay to failed glazes—and learn how to fix them fast.
Yin-Yang Contrast Strand

Achieve perfect balance with this striking black and white phone charm featuring a handcrafted clay yin-yang pendant. The design plays with alternating glossy solids and patterned accents for a timeless, monochromatic look.
Detailed Instructions
Materials
- White polymer clay
- Black polymer clay
- Liquid clay or bake and bond (optional)
- Glossy polyurethane varnish or UV resin
- Black nylon phone strap cord with jump ring connector
- Beading wire (tiger tail) or strong nylon thread
- Crimp beads (silver)
- Small white pearl seed beads (approx. 2-3mm)
- Black round beads (approx. 6mm)
- White round beads with black patterns (approx. 6mm)
- Silver jump rings (approx. 5mm and 7mm)
- Jewelry pliers (round nose, flat nose)
- Clay carving tools or needle tool
- Small circle cutter (approx. 2cm)
- Very small circle cutter or straw (for the dots)
Step 1: Sculpting the Pendant
-
Base shape:
Roll out a slab of white polymer clay to about 3-4mm thickness. Use your 2cm circle cutter to punch out a perfect round disc to serve as the base of your yin-yang pendant. -
Creating the divide:
Take a separate piece of black clay and roll it to the same thickness. Cut out another circle of the same size. Using a flexible blade or a needle tool, carefully cut a curved ‘S’ line through both circles to create the two interlocking teardrop shapes of the yin-yang symbol. -
Assembly:
Remove one half of the white circle and replace it with the corresponding black half. Press the seam gently together. I like to smooth the connection on the back with a little pressure to ensure they bond well. -
Adding the dots:
Use a tiny cutter or the tip of a straw to remove a small circle from the center of the bulbous part of each swirl. Swap the colors—place a tiny dot of white clay into the black side’s hole, and a black dot into the white side. -
Piercing:
Insert an eye screw into the top center of the charm, or carefuly pierce a hole through the top edge using a needle tool so you can attach a jump ring later. -
Baking:
Bake the clay piece according to your specific brand’s package instructions (usually around 275°F/130°C for 15-30 minutes). Let it cool completely. -
Glazing:
Apply a coat of glossy varnish or UV resin to the cooled pendant to give it that shiny, finished ceramic look shown in the photo. Cure or dry fully.
Fix Sticky Clay
If your white clay picks up dust or lint during sculpting, wipe it gently with a q-tip dipped in rubbing alcohol or acetone before baking to clean it up.
Step 2: Creating the Bead Strand
-
Prepare the wire:
Cut a length of beading wire approximately 6 inches long. This gives you plenty of room to work with for a short charm. -
Start crimping:
Thread a crimp bead onto one end of the wire, loop the wire through the connector of your black phone strap, and thread it back through the crimp bead. Flatten the crimp bead with pliers to secure it. -
Top details:
String on three small white pearl seed beads. These act as a delicate transition from the strap to the main beads. -
Main sequence part 1:
Add one solid black round bead followed by a white bead with a black pattern. The pattern in the image looks like a stylized flower or grid. -
Main sequence part 2:
Next, thread on two solid black round beads for some visual weight in the center of the charm. -
Main sequence part 3:
Add another white patterned bead, matching the first one you used. -
Main sequence part 4:
Follow this with one solid black round bead. -
Bottom transition:
Finish the bead sequence with one small white pearl bead. This mirrors the top section, though it is singular here.
Step 3: Final Assembly
-
Closing the strand:
Thread a crimp bead onto the wire tail. Follow it with a closed jump ring (approx. 5mm). -
Secure the loop:
Pass the wire back through the crimp bead and pull tight so there is no slack in the bead strand, but keep it flexible. Mash the crimp bead flat with pliers and trim excess wire. -
Connecting the pendant:
Open a larger jump ring (approx 7mm) using two pairs of pliers (twist sideways, don’t pull apart). Slide on your finished clay yin-yang pendant. -
Attaching together:
Hook this large jump ring onto the smaller closed jump ring at the bottom of your bead strand. Close the large jump ring securely.
Pro Tip: Perfect Seams
To merge the black and white clay halves seamlessly without distortion, place a piece of parchment paper over them and gently rub with your finger in circular motions.
Now you have a stylish, customized accessory ready to attach to your phone case
Sweet Heart Charm Drop
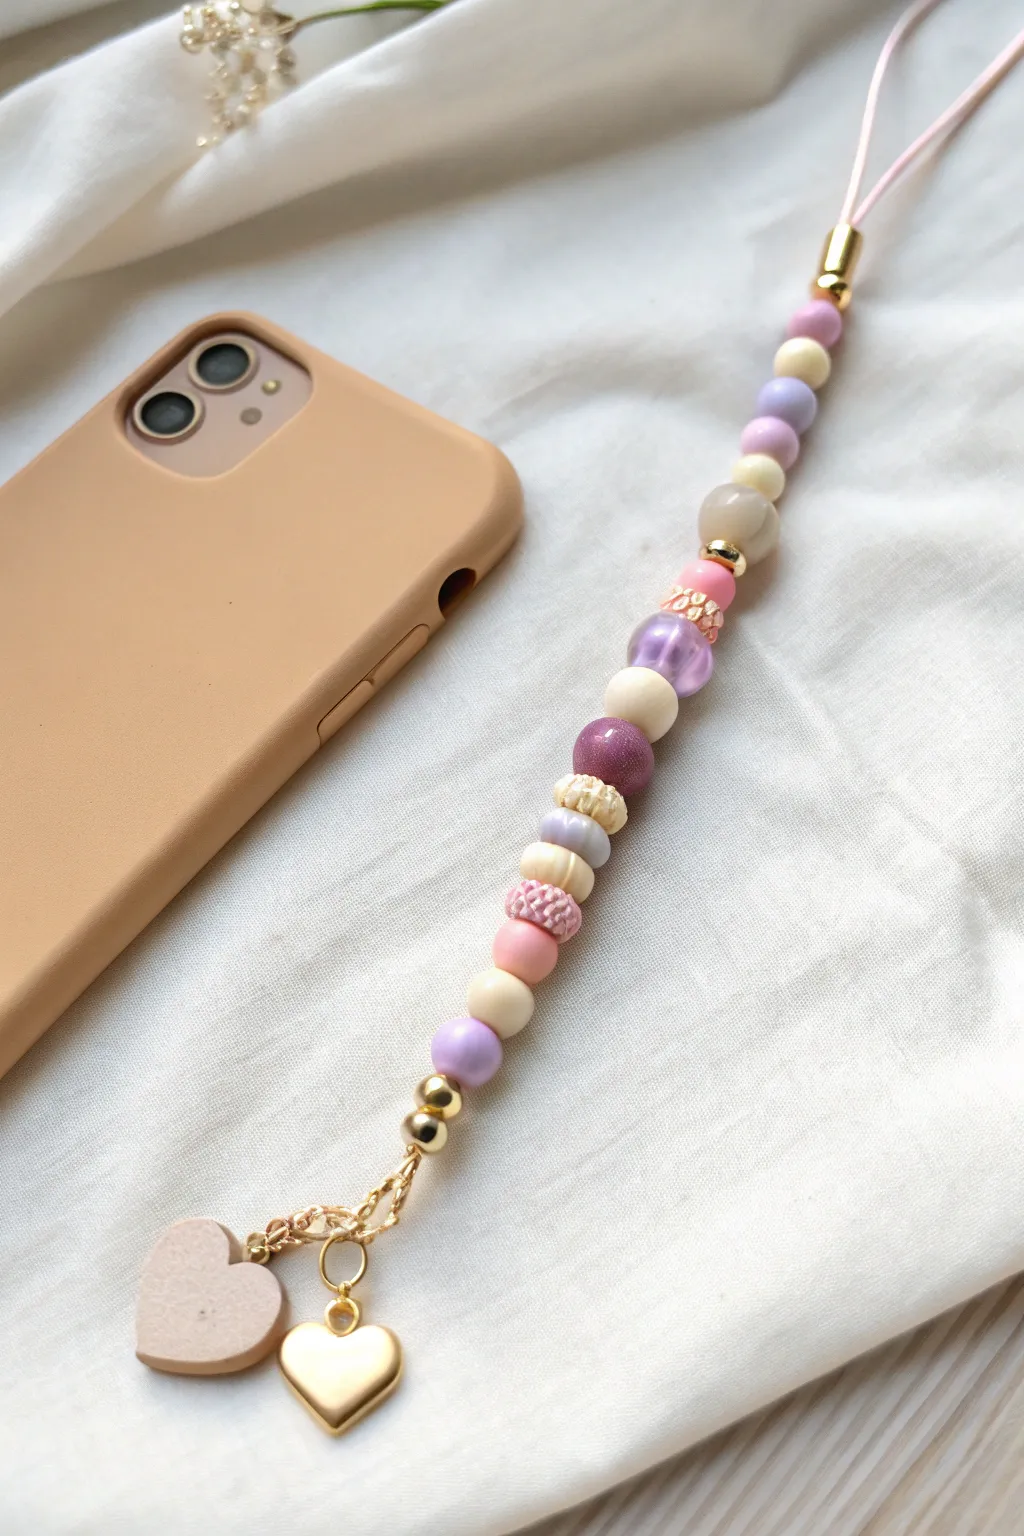
This elegant phone charm combines soft pastel hues with varied textures for a sophisticated, tactile accessory. Featuring a mix of smooth matte beads, shimmery rounds, and unique textured accents, it finishes with a dual-heart drop that adds a romantic touch.
How-To Guide
Materials
- 1mm or 0.8mm light pink nylon cord (approx. 12-14 inches)
- Gold-plated crimp end caps with loop
- Gold jump rings (4mm and 6mm)
- Gold chain extender (about 1 inch)
- Cream wooden heart charm
- Gold metal heart charm
- Assorted 8mm-10mm acrylic beads (matte cream, matte lavender, pearlized purple)
- Textured specialty beads (crochet-style or carved look in pink and cream)
- Small gold spacer beads (3mm-4mm)
- Jewelry pliers (chain nose and round nose)
- Scissors
- Jewelry glue (optional)
Step 1: Stringing the Design
-
Prepare the Cord:
Cut a length of pink nylon cord to your desired length. For a wristlet style like this, 12 to 14 inches is usually sufficient. Fold the cord in half to create a doubled strand. -
Secure the Top Loop:
At the folded end, slide on a gold crimp end cap. Position it so a small loop of the pink cord extends out the top (this loop will attach to your phone case later). Flatten the crimp firmly with pliers to secure the cord ends inside. -
Start the Gradient:
Begin threading beads onto the double cord from the bottom end. Start with a small 6mm matte pink bead, followed by a matte cream bead to establish the soft color palette. -
Add Texture:
Design your pattern by alternating textures. Slide on a lavender bead, then introduce a larger beige bead. I like to add a small gold spacer bead here to separate the sections. -
Feature Bead Placement:
Thread on a specialty textured bead—the pink one that looks like a knitted knot or carved berry. This adds a lovely tactile element to the center of the charm. -
Create the Bead Sequence:
Continue the pattern: add a pearlized purple bead for shine, then a matte cream bead. Follow this with a textured cream ring bead or carved bead. -
Deepen the Color:
Add a darker, glittery purple bead to anchor the color scheme. Follow with a standard matte cream bead to keep things light. -
Mirror the Texture:
Slide on another textured pink ‘knitted’ style bead, creating balance with the one placed earlier in the strand. -
Finish the Bead Strand:
Complete the beading sequence with a smooth matte pink bead, a pearlized lavender bead, and finally two small gold spacer balls at the very end to taper the design.
Use Tape for Threading
If the nylon cord ends fray while threading, wrap a tiny piece of scotch tape tightly around the tips to create a stiff ‘needle’ that slides easily through beads.
Step 2: Attaching the Charms
-
Secure the Bottom:
Tie a secure overhand knot right up against the last gold spacer beads. Tighten it well. For extra security, add a tiny drop of jewelry glue to the knot. -
Attach the Chain:
Using a jump ring, attach a short 1-inch piece of gold chain to the knot or loop at the bottom of your bead strand. Alternatively, crimp the cord end into a gold cord end finding if you prefer a cleaner metal finish. -
Prep the Wooden Heart:
Take your cream wooden heart charm. If it has a top hole, attach a 6mm gold jump ring through it. Ensure the ring is closed tightly. -
Prep the Gold Heart:
Similarly, attach a small jump ring to the gold metal heart charm. -
Assemble the Drop:
Attach the wooden heart to the very end of your short gold chain. Then, attach the gold heart about two links up from the wooden heart so they stagger slightly when hanging. -
Final Adjustments:
Check all jump rings to ensure they are fully closed. Trim any excess cord tail below your bottom knot carefully with sharp scissors.
Scent Your Wood
Add a drop of essential oil to the wooden heart charm. The unfinished wood acts as a natural diffuser, carrying a subtle scent with you throughout the day.
Attach the loop to your phone case and enjoy the gentle jingle of your new accessory


What Really Happens Inside the Kiln
Learn how time and temperature work together inside the kiln to transform clay into durable ceramic.
Gold Spacer Elevated Style
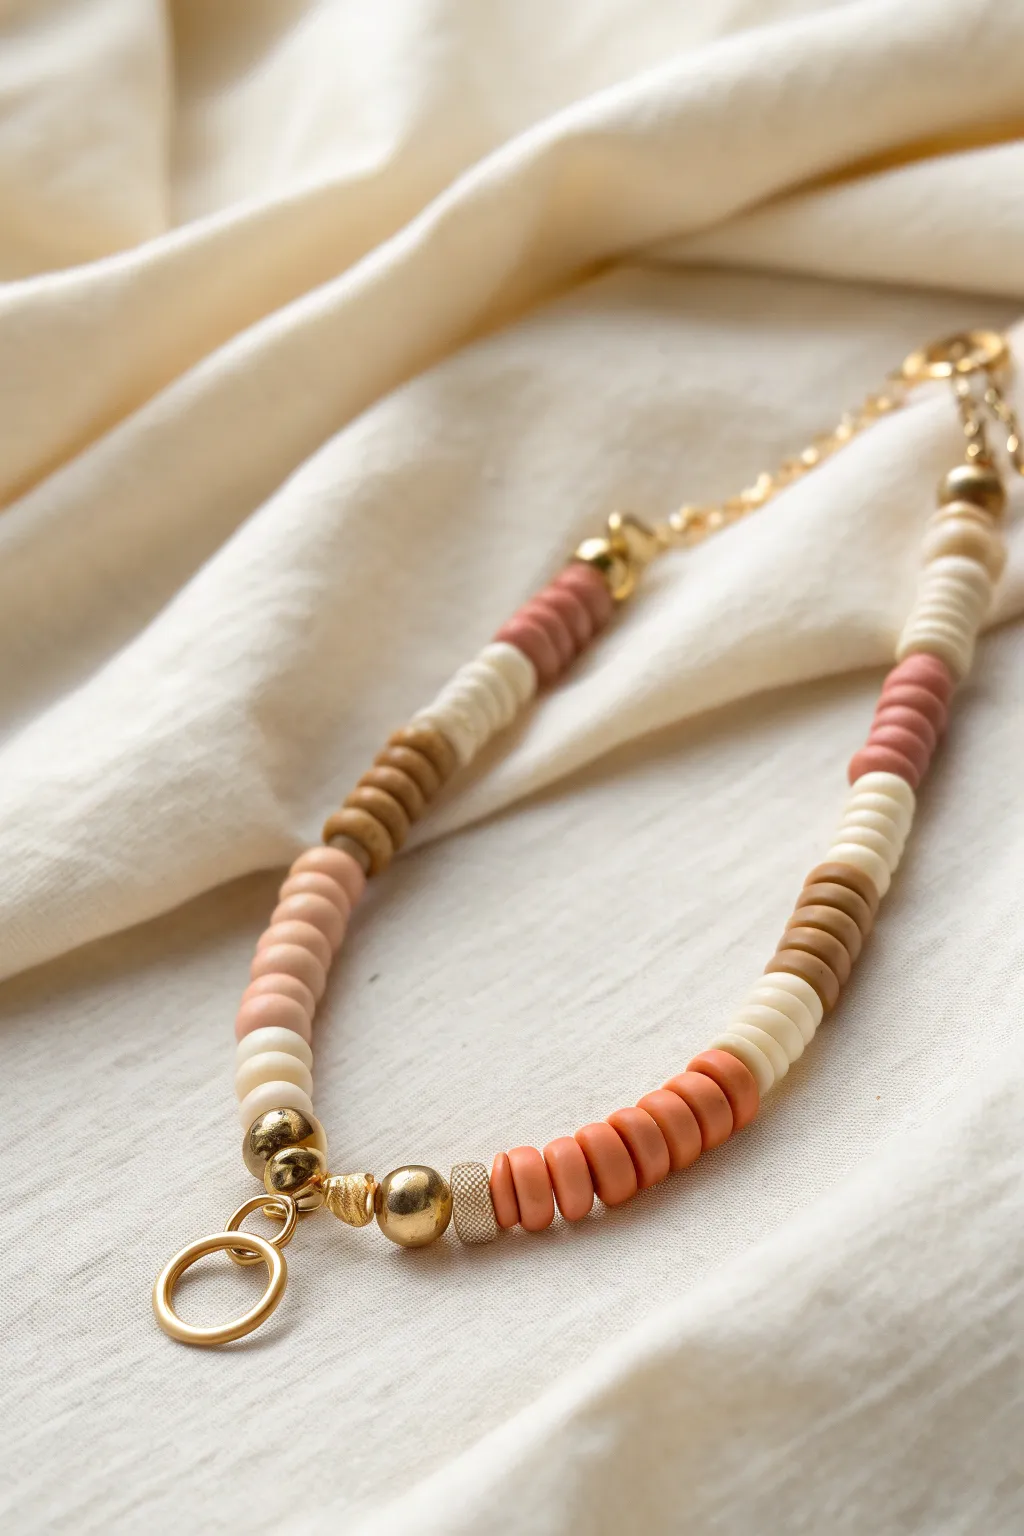
Eschewing bright primary colors for a sophisticated palette, this phone charm combines matte clay discs with varied gold spacers for a truly upscale look. The mix of terracotta, cream, and mocha tones creates a warm, neutral accessory that feels more like jewelry than a simple gadget strap.
Detailed Instructions
Materials
- Polymer clay Heishi beads (terracotta/salmon, cream/off-white, mocha brown/tan)
- Small gold bead spacers (round)
- Gold textured/patterned drum beads (approx 4-6mm)
- Gold focal beads (large smooth round, approx 8mm)
- Gold jump ring (large, approx 12-14mm)
- Gold crimp beads and bead covers
- Nylon beading cord or strong beading wire
- Gold lobster clasp and extension chain (optional for versatile attachment)
- Jewelry pliers (chain nose and flat nose)
- Scissors or wire cutters
Step 1: Preparation and Anchor Point
-
Cut the Cord:
Begin by cutting a length of your beading cord. Aim for about 12-14 inches to give yourself plenty of slack for knotting and finishing, even though the final charm will be shorter. -
Secure the End:
Thread one end of your cord through a crimp bead, loop it through the small attachment ring of your clasp or a starter jump ring, and pass back through the crimp bead. -
Clamp and Cover:
Use your flat nose pliers to flatten the crimp bead securely. I like to place a gold crimp cover over this utilitarian bead to maintain the high-end jewelry aesthetic.
Gold Preservation
Coat your metal beads with a thin layer of clear nail polish or jewelry shield before stringing. This prevents the gold finish from tarnishing due to oils on your hands or phone case.
Step 2: Beading the Pattern
-
Start with Gold:
Thread on a small gold spacer bead followed by a larger, smooth gold round bead to hide your crimp work and start the strand boldly. -
Terracotta Section:
Add approximately 8-10 clay heishi beads in the terracotta/salmon color. These disc beads stack firmly, creating a solid block of color. -
Cream Transition:
Switch to the cream or off-white clay beads. Add a slightly shorter section here, using about 6-8 beads to create a subtle contrast. -
Mocha Segment:
Introduce the mocha brown beads next. Thread on about 8 beads to balance the visual weight of the darker tone. -
Repeat Cream:
Place another small section of cream beads (6-8 beads) to act as a buffer before the next color change. -
Salmon Return:
Add another block of the terracotta/salmon beads, matching the length of your very first clay section. -
Gold Interruption:
Slide on a decorative gold spacer bead. This breaks up the matte texture of the clay with a flash of metallic shine. -
Pattern Continuation:
Continue this alternating pattern blocks of color separated by occasional gold accents until you reach your desired length. The charm in the image is asymmetrical, so fel free to vary the block sizes slightly.
Make it Functional
Instead of just an aesthetic charm, turn that large gold ring at the bottom into a functional holder by attaching loops for airpods, keys, or a mini hand-sanitizer bottle.
Step 3: The Focal Finish
-
The Final Transition:
As you near the bottom loop where the main charm ring will sit, end your clay pattern with a section of the terracotta beads. -
Textured Gold Accent:
Thread on a textured gold drum bead. The knurled or cross-hatched surface adds a lovely industrial-chic detail. -
Smooth Gold Feature:
Follow the drum bead with a large, smooth gold round bead. This mirrors the start of the necklace and provides visual weight. -
Focal Connection:
Add a small gold spacer, then thread the cord through a crimp bead, through the large gold jump ring (the main focal point), and back up through the crimp and the last few beads. -
Secure the Loop:
Pull the cord taut so the beads sit snugly against the large ring, but not so tight that the charm becomes stiff. Flatten the crimp bead firmly. -
Finishing Touches:
Trim the excess wire flush against the beads. If you are using nylon cord, you can add a tiny drop of superglue to the final knot for extra security before trimming.
Now you have a chic, neutral-toned phone accessory that brings a touch of elegance to your daily tech
Soft Checkerboard Color Rhythm
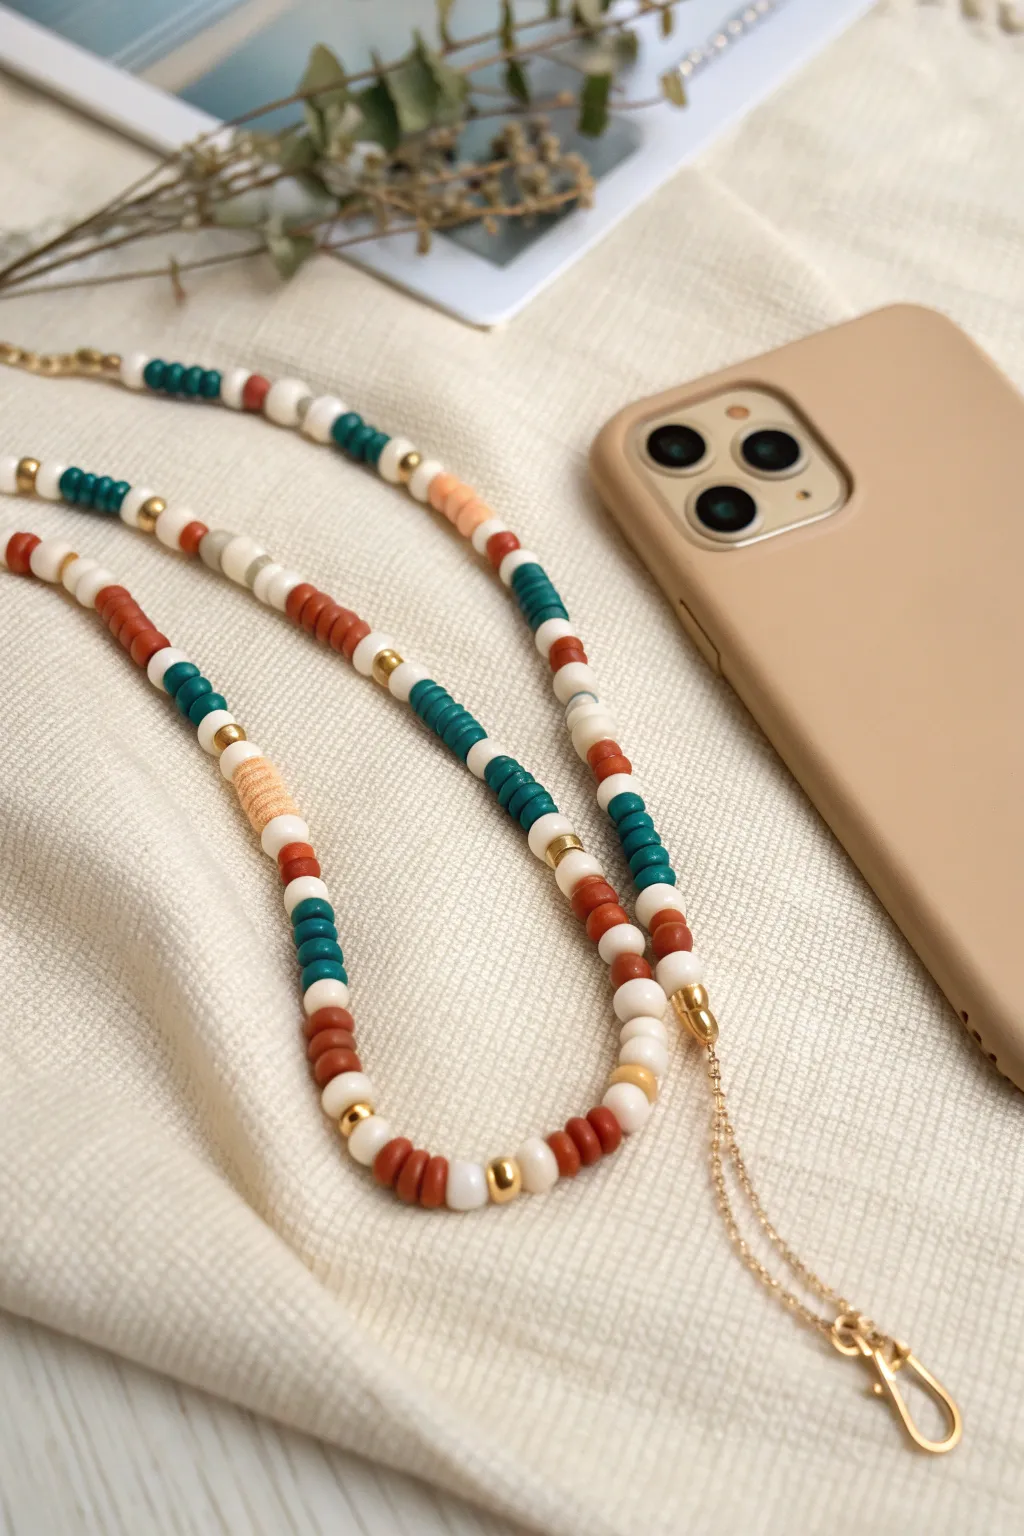
Embrace earthy elegance with this phone strap that combines terracotta, teal, and cream tones in a soft, rhythmic pattern. The mix of flat Heishi beads and metallic accents creates a sophisticated accessory that pairs perfectly with neutral phone cases.
How-To Guide
Materials
- 6mm polymer clay Heishi beads (terracotta/rust)
- 6mm polymer clay Heishi beads (dark teal/turquoise)
- 6mm polymer clay Heishi beads (cream or off-white)
- 6mm polymer clay Heishi beads (peach/soft coral)
- 4mm gold metal spacer beads (round)
- Nylon beading cord or strong beading wire (0.5mm – 0.8mm)
- Gold finish crimp beads (2mm)
- Gold tone cable chain (very fine)
- Gold tone lobster clasp
- Gold tone jump rings (4mm)
- Jewelry pliers (flat nose and cutting pliers)
- Scissors
Step 1: Planning and Prep
-
Measure your cord:
Cut a piece of nylon beading cord approximately 25 inches long. This gives you plenty of extra length for knotting and finishing, even though the final charm will be shorter. -
Secure the start:
Attach a small piece of tape to one end of the cord to act as a stopper, preventing beads from sliding off while you work. -
Understand the pattern:
Study the image carefully. The design relies on blocks of color separated by single contrasting beads or gold spacers rather than a strict ABC pattern.
Keep it fluid
Don’t count beads precisely! The charm looks more organic if color blocks vary slightly in size (e.g., 4 teal beads vs 5 rust beads).
Step 2: Stringing the Beads
-
Start the sequence:
Begin by threading a section of 3-4 cream beads, followed by a gold spacer bead to establish a metallic anchor point. -
Create a teal block:
Add about 4-5 teal beads. Follow this block immediately with a single cream bead to break up the color. -
Add the warmth:
Thread on a section of terracotta beads. Aim for a slightly longer section here, perhaps 5-6 beads, to create that rich, earthy emphasis. -
Insert gold accents:
After the terracotta section, slide on a gold spacer bead. These gold accents elevate the look from playful to chic. -
Vary the rhythm:
Create a visual ‘pause’ by adding a longer stretch of cream beads (about 8-10). In the middle of this cream section, you can sneak in a single peach or light orange bead for a subtle pop. -
Repeat loosely:
Continue adding blocks of teal and terracotta. Don’t worry about making every color block exactly the same length; slight irregularity adds to the organic, handmade feel. -
Add the peach section:
About halfway through your strand, introduce a distinct block of 4-5 peach beads to soften the palette. -
Check the length:
Wrap the strand around your wrist to check the size. For a phone charm, you typically want about 10-12 inches of beaded length before looping. -
Finish the beadwork:
End your pattern with a few cream beads and a final gold spacer to mirror the beginning.
Make it sparkle
Swap the plain gold spacers for gold crystal rondelle beads to add a hint of glitter that catches the light whenever you text.
Step 3: Finishing the Hardware
-
Looping the chain:
Cut a 2-inch piece of fine gold chain. This will serve as the attachment point for your phone case. -
Thread the crimp bead:
Thread both ends of your beading cord through a single crimp bead. Don’t crush it yet. -
Attach the chain:
Pass the cord ends through the last link of your gold chain piece, then loop them back down through the crimp bead. -
Tighten the loop:
Pull the cords so the crimp bead sits snug against the last beads you strung, leaving a small loop of cord holding the chain. -
Secure the crimp:
Use your flat nose pliers to firmly flatten the crimp bead. This locks the entire strand in place. -
Attach the clasp:
Open a jump ring with your pliers. Attach the lobster clasp to the other end of the gold chain, then close the jump ring securely. -
Hide the tails:
Thread the loose cord tails back down through the first few beads of your design to hide them, then trim any excess wire close to the beads.
Now your phone has a personalized accessory that brings a touch of warmth to your everyday tech

TRACK YOUR CERAMIC JOURNEY
Capture glaze tests, firing details, and creative progress—all in one simple printable. Make your projects easier to repeat and improve.
Sunset Ombre Gradient
Capture the warmth of a setting sun with this stunning ombre phone charm that transitions from deep terracotta to soft creamy white. The subtle gold accents add a touch of luxury, making this functional accessory feel like a piece of jewelry for your tech.
Step-by-Step
Materials
- Polymer clay Heishi beads (deep terracotta/dark coral)
- Polymer clay Heishi beads (salmon pink)
- Polymer clay Heishi beads (peach)
- Polymer clay Heishi beads (pale blush/light pink)
- Polymer clay Heishi beads (cream/off-white)
- Strong nylon beading cord (pink or neutral)
- 4 large gold round spacer beads (approx. 4-6mm)
- Gold-tone lobster clasp
- Gold jump ring
- Scissors
- Super glue or jewelry glue
- Masking tape (optional)
Step 1: Preparation & First Section
-
Measure and Cut:
Cut a piece of nylon cord approximately 12-14 inches long. This gives you plenty of slack for knotting later. Tape one end to your table to stop beads from sliding off. -
Start with the Darkest Shade:
Begin threading your darkest terracotta or deep coral beads. You will need about 20-22 beads for this first block of color alongside the clasp. -
Add the Clasp:
Slide a gold jump ring onto the cord, followed by your gold lobster clasp. Loop the cord back through the jump ring and tie a secure double knot against the first bead creates a loop for the clasp to hang from. I like to add a tiny dab of glue here for security. -
Hide the Knot:
Gently pull the first few terracotta beads over the knot tail to hide it inside the bead holes, trimming any excess cord carefully.
Step 2: Creating the Ombre Pattern
-
Transition to Salmon:
After your block of terracotta beads, thread on roughly 15 salmon pink beads. The goal is to make the color transition look seamless. -
First Gold Accent:
String one large gold spacer bead. This breaks up the color blocks and adds that metallic shine characteristic of the sunset theme. -
Peach Section:
Add about 10-12 peach-colored clay beads. Notice how the sections are getting slightly shorter as we move up the charm to create an asymmetrical look. -
Second Gold Accent:
Slide on your second gold spacer bead. -
Pale Blush Section:
Thread on roughly 8-10 pale blush or light pink beads. We are lightening the gradient significantly now. -
Cream Finale:
Add about 6-8 cream or off-white beads to finish this side of the loop. Cap this section with a third gold spacer bead.
Knot Slipping?
If your nylon cord is too silky and knots won’t hold, briefly singe the tip with a lighter to create a small melted ball, ensuring it can’t slip back through.
Step 3: The Attachment Loop
-
Create the Phone Loop:
Leave a gap of bare cord about 2 inches long. This open section is what will eventually loop through your phone case.
Make it Personal
Swap out the middle gold spacer bead for a letter bead with your initial, or add a small gold star charm to the jump ring for extra sparkle.
Step 4: Mirroring the Gradient
-
Start the Return Side:
On the other side of the bare loop, mirror your pattern in reverse order, though not necessarily exact bead counts. Start with a gold spacer bead, followed by the cream beads. -
Reverse Ombre:
String your pale blush beads, followed by a gold spacer bead. -
Darkening Down:
Add your peach beads, then the salmon pink beads. You want the colors to align roughly with the first side when the charm is held together. -
Final Terracotta Block:
Finish with the deep terracotta beads. Stop when this strand meets the jump ring/clasp area of the first strand. -
Secure the Ends:
Tie the loose end of the cord securely to the jump ring or main structural knot you made at the beginning. Use a surgeon’s knot for extra hold. -
Final Touches:
Apply a drop of super glue to the final knot. Once dry, trim the excess string closely and tuck any sharp ends inside the adjacent bead holes.
Now you have a warm, stylish accessory ready to brighten up your phone case every day
Ocean Blues With Turtle Accent
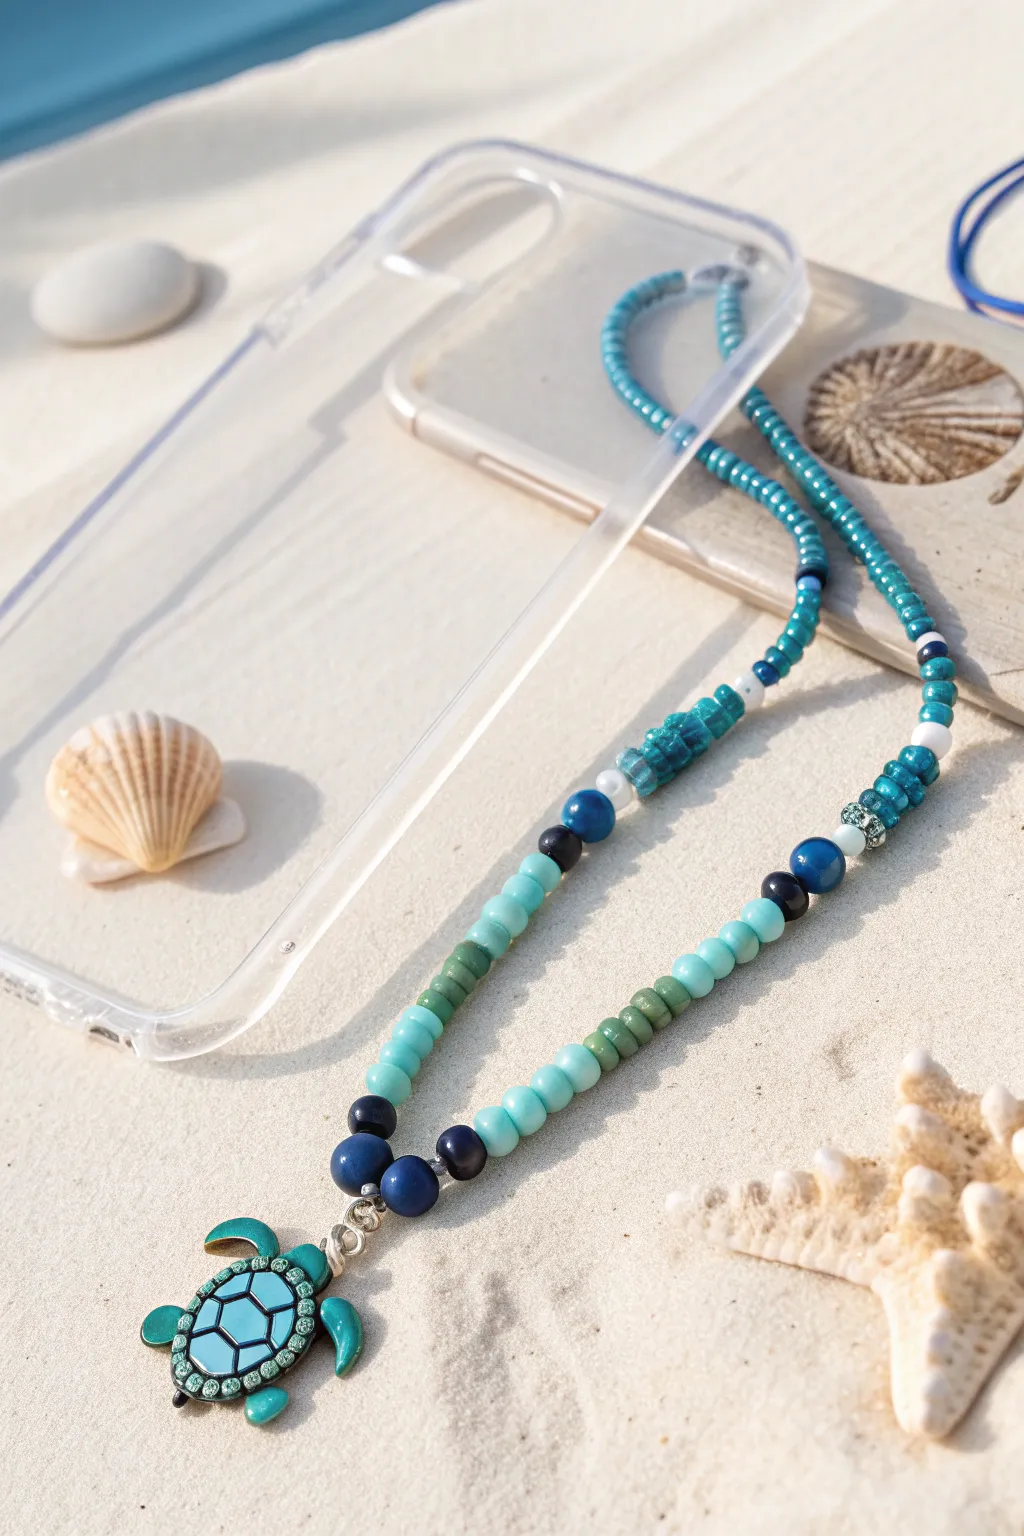
Dive into relaxation with this ocean-inspired phone charm featuring soothing waves of teal, navy, and turquoise beads. The centerpiece is an adorable sea turtle pendant that adds a playful coastal touch to your everyday tech.
Step-by-Step Tutorial
Materials
- Nylon jewelry cord (white or clear)
- Clear phone case with lanyard attachment point
- Large teal turtle charm (enamel or alloy)
- 6mm Heishi clay beads (varying shades of blue, teal, green, and navy)
- Round acrylic beads (blue, white, and faceted teal)
- Small silver spacer beads
- Dark blue wooden or resin beads
- Jump ring
- Scissors
- Jewelry pliers
- Super glue or clear nail polish
Step 1: Preparing the Base
-
Measure and Cut:
Cut a piece of nylon cord approximately 24-28 inches long. This length includes extra room for tying knots and looping through your phone case. -
Create the Lanyard Loop:
Fold the cord exactly in half to find the center point. Tie a secure overhand knot about 2 inches down from the fold. This loop is what will eventually attach the charm to your phone case.
Knot Slipping?
If nylon cord feels too slippery to hold a knot, briefly singe the very tips with a lighter (carefully!) or use a dab of clear jeweler’s glue inside the knot before pulling it tight for a permanent bond.
Step 2: The Top Bead Section
-
Begin Beading:
Separate your two cord tails. You will be threading beads onto both cords simultaneously for the upper section to keep it sturdy. -
Start with Teal:
Thread a long sequence of small teal seed beads or very thin Heishi spacers onto both strands together. Aim for about 2-3 inches of solid teal color. -
Add Contrast:
Slide on a white spacer bead, followed by a dark navy bead, and another white spacer to break up the color block. -
Transition Colors:
Add a few larger, faceted translucent teal beads. These catch the light beautifully, mimicking sea glass.
Designing Pro-Tip
Lay out your bead pattern on a towel or bead board before threading. This stops round beads from rolling away and lets you visualize the color gradient from light teal to deep navy perfectly.
Step 3: Creating the Pattern
-
Split the Strands:
At this point, you can continue stringing both strands together for a thicker look, or separate them momentarily if your beads have smaller holes, then rejoin. For this specific look, keep treating the two cords as one single thick strand. -
Form the Middle Section:
Create a pattern using a mix of round blue beads and silver spacers. Try a sequence like: three blue beads, one metal spacer, three teal beads. -
Add Texture with Clay Beads:
Thread a section of green and teal Heishi clay beads. I find that stacking about 10-15 of these flat discs creates a nice, flexible texture compared to round beads. -
Introduce Darker Tones:
Slide on larger, dark navy or black round beads. Place a silver spacer or a rhinestone rondelle bead in between them for a bit of sparkle. -
Lower Gradient:
As you move toward the bottom, arrange your beads in a gradient, moving from lighter turquoise round beads to darker navy ones near the charm.
Step 4: Attaching the Turtle
-
Secure the Bottom:
Once you are happy with the length (usually 6-8 inches of beads total), tie a tight double knot right against the last bead to hold everything in place. -
Prepare the Charm:
Using your jewelry pliers, open a jump ring slightly. Loop it through the top loop of your turtle pendant. -
Attach to Cord:
Thread one of your cord tails through the jump ring, then bring it back up to meet the other tail. -
Final Knotting:
Tie several very tight surgeon’s knots with the cord tails, securing the jump ring firmly at the bottom of your bead strand. -
Trim and Seal:
Trim the excess cord close to the knot. Apply a tiny dot of super glue or clear nail polish to the knot to prevent it from slipping over time.
Now loop your new ocean-themed accessory through your phone case and enjoy the beach vibes wherever you go
Boho Earth Tones With Pendant Charm
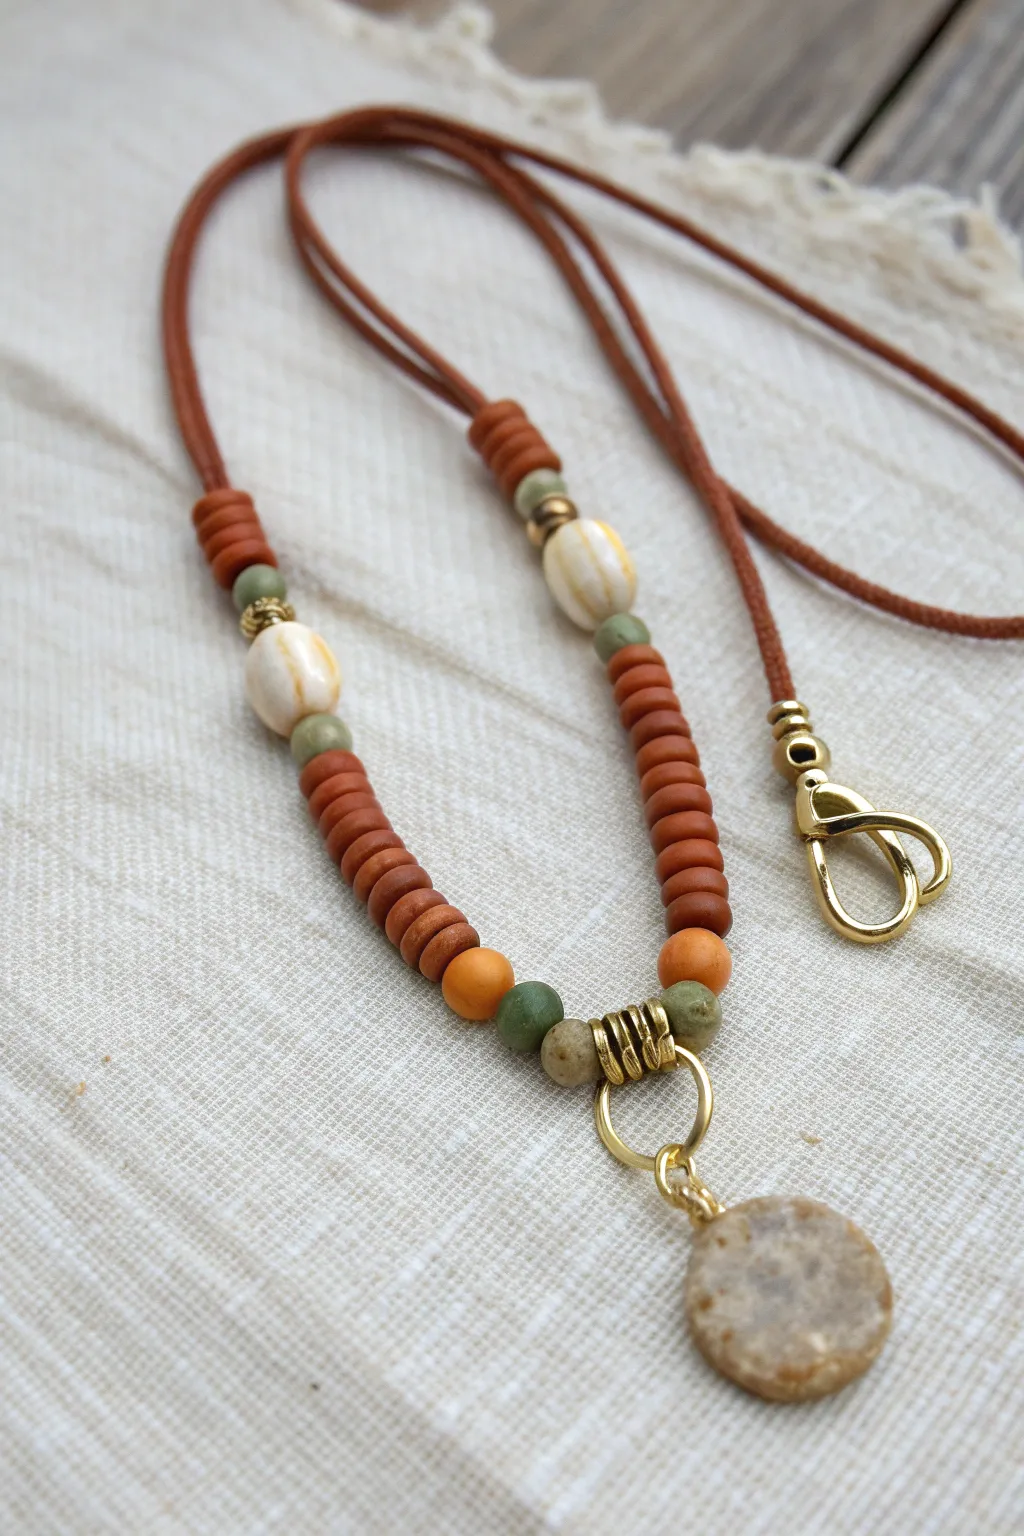
Embrace natural textures and warm hues with this earthy, bohemian-style phone lanyard. Featuring a mix of terracotta clay beads, speckled stone accents, and a raw stone pendant, this accessory adds a grounding touch to your daily tech.
Step-by-Step Guide
Materials
- Rust/Terracotta Heishi Polymer Clay Beads (6mm)
- Speckled Olive Green Stone Beads (6mm)
- Beige/White Striped Oval Beads (approx. 10mm)
- Matte Mustard Yellow Round Beads (8mm)
- Raw Beige Stone Disc Pendant with Gold Bail
- Gold Spacer Discs or Rings (5-6 pieces)
- Medium Gold Jump Ring (approx. 10mm)
- Gold Lobster Clasp (Large swivel style)
- Brown Faux Suede or Leather Cord (1.5mm – 2mm thick)
- Gold Cord Ends (coil or crimp style)
- Jewelry Pliers (chain nose and flat nose)
- Scissors or Flush Cutters
- Jewelry Glue (e.g., E6000)
Step 1: Preparation and Centerpiece
-
Measure the cord:
Cut a length of brown suede cord approximately 32-36 inches long. Fold it perfectly in half to find the center point, creating a loop at the bottom. -
Attach the jump ring:
Slide your large 10mm gold jump ring onto the cord so it rests at the halfway fold. This ring will hold your main pendant later. -
Secure the center loop:
Thread three gold spacer discs (or wide jump rings acting as spacers) onto both ends of the cord simultaneously. Push them down until they sit snugly on top of the large jump ring, locking the loop in place. -
Start the symmetry:
Now, working on both sides of the cord symmetrically, thread one speckled green stone bead onto the left cord and one onto the right cord. -
Add first color blocks:
Next, add one matte mustard yellow bead to each side. These larger beads provide a nice visual transition from the center cluster.
Tight Fit Tip
When threading suede, cut the cord tips at a sharp diagonal angle. This creates a makeshift ‘needle’ point that helps slide beads on much easier.
Step 2: Beading the Pattern
-
Build the terracotta sections:
Thread approximately 12 to 15 rust-colored heishi clay beads onto the left cord. -
Match the right side:
Repeat on the right cord, ensuring you use the exact same number of heishi beads to keep the necklace balanced. -
Add spacing accents:
After the clay section, slide one speckled green stone bead onto each side. -
Insert the statement beads:
Thread a large beige/white striped oval bead onto the left cord, followed by a small decorative gold spacer bead. -
Complete the statement section:
Do the same on the right side: one striped oval bead followed by one gold spacer bead. -
Add final green accents:
Place one more speckled green stone bead on each strand to bookend the statement section. -
Finish the beaded portion:
Add a small finishing cluster of about 4 or 5 rust heishi beads to each side. This tapers the design nicely back toward the raw cord.
Step 3: Finishing Touches
-
Knot the beads in place:
To prevent beads from sliding up the neck area, tie a tight overhand knot with the suede cord on each side, right above the last heishi bead. I find pulling this knot very tight helps the beads sit straighter. -
Prepare cord ends:
Bring the two loose ends of the suede cord together. Trim them so they are perfectly flush. -
Attach the cord crimp:
Insert both cord ends into a gold coil cord end or fold-over crimp. Use your flat nose pliers to squeeze the crimp tightly shut directly over the suede. -
Secure with glue:
For extra security, place a tiny dab of jewelry glue inside the crimp before squeezing it shut. -
Attach the clasp:
Open the small jump ring attached to your large gold lobster clasp. Loop it through the eye of the cord end you just attached, then close the ring securely. -
Hang the pendant:
Using your pliers, gently open the small jump ring on your raw stone pendant. -
Final assembly:
Hook the pendant onto the large 10mm gold ring that is already hanging at the center bottom of your lanyard. Close the pendant’s ring securely.
Make It Yours
Swap the raw stone pendant for a customized clay monogram charm or a tassel made from matching suede scraps for a softer, lighter look.
Now you have a beautifully textured, boutique-style lanyard ready to keep your phone secure and stylish
Neon Pop With Dark Anchors
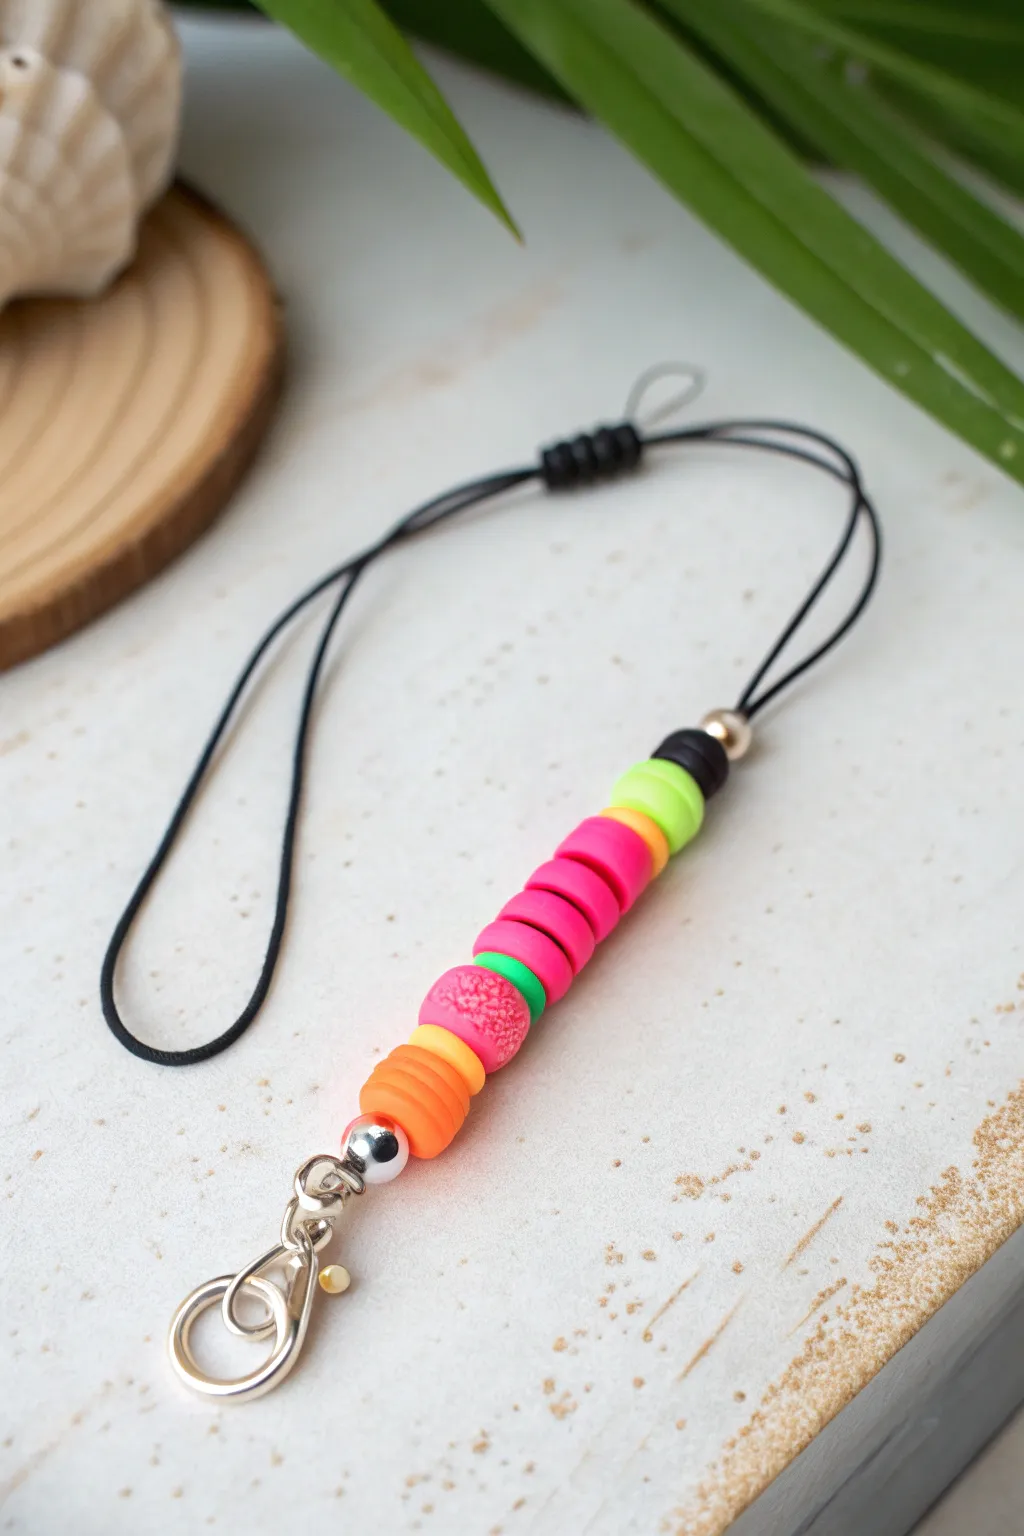
Bring a burst of electric color to your tech accessories with this vibrant phone charm. Combining hot pinks, oranges, and neon greens with sleek black cording creates a striking contrast that is both modern and playful.
Step-by-Step
Materials
- Black nylon craft cord (0.8mm or 1mm thickness)
- Polymer clay heishi beads (flat discs) in orange, hot pink, neon green, and black
- One textured/glitter pink polymer clay bead (optional accent)
- One silver spacer bead (spherical)
- One large silver bail bead (to hide the knot)
- Silver lobster clasp
- Scissors
- Lighter or clear jewelry glue
- Measuring tape
Step 1: Preparation
-
Measure and Cut:
Cut a length of black nylon cord approximately 12-14 inches long. This will give you plenty of room for knotting and attaching the clasp without feeling cramped. -
Fold the Cord:
Fold the cord exactly in half to find the center point. This folded end will eventually become the loop that attaches to your phone case. -
Create the Top Loop:
Tie a simple overhand knot about 2 inches down from the folded end. This creates the loop mechanism. -
Secure the Knot (Optional):
If you have a black crimp bead or a slide knot cover like the one pictured, thread it onto the loose ends and slide it up to cover the knot for a cleaner finish. Otherwise, a tight knot works perfectly well.
Knot Slipping?
Nylon cord can be slippery. If your knots won’t hold, dab a tiny amount of clear nail polish or super glue onto the knot before tightening it fully.
Step 2: Beading Sequence
-
Start with the Top Anchor:
Thread both loose ends of the cord through a single silver bail bead or large-hole decorative bead. This acts as a visual transition from the black cord to the colorful section. -
Add Black Contrast:
I like to start the color pattern with a dark anchor, so thread on 2-3 black heishi beads first. -
Begin the Green Section:
Add 2 neon green heishi beads, followed by one orange-yellow spacer bead if you have one, to start the gradient. -
Transition to Pink:
Thread on 3-4 hot pink heishi beads. Ensure they sit flat against each other. -
Add Texture:
If you have a textured or glittery clay bead (like the speckled pink one shown), add it now as a focal point in the middle of the strand. -
Continue the Gradient:
Add 2-3 more pink heishi beads, perhaps in a slightly lighter shade if you want a subtle ombre effect. -
Finish with Orange:
Complete the colorful section by threading on 4 bright orange heishi beads.
Step 3: Finishing
-
Add the Bottom Accent:
Slide on a silver spherical spacer bead. This metallic accent balances the silver at the top. -
Attach the Clasp:
Thread both cord ends through the small loop at the base of your silver lobster clasp. -
Secure the Structure:
Tie a very tight double knot or surgeon’s knot right against the lobster clasp loop. Pull firmly to ensure there is no slack in the bead line. -
Hide the Ends:
Trim the excess cord close to the knot. Carefully singe the tips with a lighter to melt the nylon and prevent fraying, or apply a drop of clear jewelry glue for security. -
Final Adjustment:
Give the charm a gentle tug to make sure everything is secure and the beads are sitting straight before attaching it to your phone.
Glow Up
Swap the standard white or pink textured bead for a glow-in-the-dark polymer clay bead. It adds a fun surprise when the lights go out.
Hook this onto your phone case and enjoy the pop of neon color every time you text
Terrazzo Speckle Clay Bead Look
Embrace a playful, modern aesthetic with this chunky clay bead phone strap featuring a colorful terrazzo-inspired finish. The organic, white base dotted with bursts of mustard, teal, and terracotta creates a trendy accessory that feels both handcrafted and high-end.
Detailed Instructions
Materials
- White polymer clay or air-dry clay
- Acrylic paints (mustard yellow, teal, terracotta orange, black, navy blue)
- Fine detail paintbrush or toothpick
- Gloss or matte varnish (optional)
- Durable nylon or satin cord (1.5mm – 2mm thick)
- Gold swivel clasp or lobster clasp
- Clay roller or rolling pin
- Skewer or knitting needle (for making bead holes)
- Baking sheet and parchment paper (if using polymer clay)
Step 1: Shaping the Beads
-
Condition the clay:
Start by taking a chunk of white clay and kneading it in your hands until it becomes soft, pliable, and free of cracks. If you’re using polymer clay, the warmth of your hands will help condition it nicely. -
Portion out the clay:
Roll the clay into a log shape about the thickness of a large marker. Slice the log into equal segments, roughly 1/2 inch thick, to ensure your beads will be consistent in size. -
Roll into spheres:
Take each segment and roll it between your palms to form a smooth ball. Don’t worry about being perfectly spherical; a slightly organic, hand-rolled look adds to the charm of this stone-like effect. -
Create the holes:
Hold a bead gently between your finger and thumb. Carefully pierce the center with a skewer or knitting needle. Wiggle the tool slightly to widen the hole enough for your cord to pass through easily later. -
Refine the shape:
Because piercing can sometimes distort the bead, give it a gentle roll or pat-down to regain its round shape while the skewer is still inside or immediately after removing it. -
Cure or dry:
If using polymer clay, bake the beads according to the manufacturer’s instructions (usually around 275°F/135°C for 15-30 minutes). If using air-dry clay, leave them to dry completely for 24-48 hours.
Step 2: Applying the Terrazzo Design
-
Prepare your palette:
Squeeze out small amounts of your acrylic paints: mustard yellow, terracotta, teal, navy, and black. You won’t need much paint for this speckle technique. -
Paint the base speckles:
Dip a fine-tip brush or even a toothpick into your lightest color first, like the mustard yellow. Dab random, irregular spots onto the white beads. Rotate the bead to ensure coverage on all sides. -
Layer the colors:
Repeat the process with the terracotta and teal paints. I like to overlap a few spots slightly or place different colors close together to mimic real terrazzo stone fragments. -
Add contrast:
Using the smallest tip point, add tiny dots of black and navy blue. These darker accents give the pattern depth and make the brighter colors pop against the white clay. -
Seal the design:
Once the paint is fully dry, apply a thin coat of matte or gloss varnish. This protects the paint from scratching and gives the beads a finished, professional sheen.
Paint Smearing?
If your terrazzo dots are smearing, use a hair dryer on a cool setting between each color layer. This sets the paint quickly so you can rotate the bead without ruining the design.
Step 3: Assembly
-
Prepare the cord:
Cut a length of cord approximately 12-14 inches long. Fold it in half to create a loop at one end. -
Attach the clasp:
Thread the loop end through the bottom ring of your gold swivel clasp. Pull the loose ends of the cord through the loop and tighten it to secure the clasp with a lark’s head knot. -
String the beads:
Thread both loose ends of the cord through your first bead. Push it all the way up to the clasp. Continue threading the remaining beads, ensuring the pattern looks balanced as you go. -
Secure the ends:
Once all beads are threaded, tie a secure overhand knot flush against the last bead to hold them in place. Ensure there’s no slack in the cord inside the beads. -
Create the loop handle:
Leave about 4-5 inches of cord free for the handle loop, then tie a decorative knot (like a snake knot or a simple bulky overhand knot) to join the two ends together securely. -
Trim excess:
Trim any excess cord remaining after your final knot. You can carefully singe the tips with a lighter to prevent fraying.
Mix In Texture
For a true stone feel, mix cracked black pepper or dried tea leaves into the white clay before rolling. This creates natural, embedded texture alongside your painted speckles.
Now you have a chic, custom accessory that turns your phone into a statement piece
Marble Swirl Accent Bead Moment
Elevate your phone case with this sophisticated lanyard that combines the natural look of wood with the polished elegance of faux marble and gold accents. This design transitions beautifully from a delicate string of spacers to a chunky, statement-making focal point.
Step-by-Step
Materials
- Nylon beading cord or strong jewelry wire (approx. 24 inches)
- Small peach/tan wooden beads or polymer clay heishi beads (approx. 6mm)
- Gold tone crimp beads or knot covers
- Gold tone jump rings (6-8mm)
- Gold tone lobster clasp
- Large faux marble round bead (white/grey, approx. 14-16mm)
- Textured sandstone round bead (approx. 12mm)
- Shiny white round beads (approx. 10-12mm)
- Matte pink round bead (approx. 10mm)
- Textured glitter/speckled pink round bead (approx. 10-12mm)
- Gold daisy spacer beads
- Jewelry pliers (flat nose and cutting pliers)
- Scissors
Step 1: Planning and Preparation
-
Measure your cord:
Cut a length of nylon cord or jewelry wire that is about 24-26 inches long. This gives you plenty of slack for knotting and finishing the ends without feeling cramped. -
Lay out the focal pattern:
Before stringing anything, arrange your large statement beads on a bead board or soft cloth. The pattern shown runs: marble bead, gold spacer, sandstone bead, gold spacer, white bead, gold spacer, matte pink bead, white bead, gold spacer, and finally the textured pink bead.
Knot Security
If using nylon cord instead of wire, add a dot of clear jewelry glue or superglue to your final knots before trimming the tails to prevent unraveling.
Step 2: Creating the Focal Section
-
Attach the clasp:
Thread one end of your cord through a crimp bead and then through the small loop of your gold lobster clasp. -
Secure the start:
Loop the cord back through the crimp bead. Use your flat nose pliers to squash the crimp bead firmly, securing the clasp. Creating a loop with just the wire is fine, but adding a wire guard here adds extra durability if you have one. -
Add the first focal bead:
String the large faux marble bead first. Slide it all the way down to cover the crimp bead and tail wire if the hole is large enough; otherwise, trim the tail wire carefully. -
Insert spacers:
Add a gold daisy spacer. These act as little metallic separators that make the larger beads pop. -
Continue the pattern:
Thread on the beige sandstone-textured bead followed by another gold daisy spacer. -
Add the mid-section beads:
Slide on a white bead, a gold spacer, the matte pink bead, and the second white bead. -
Finish the focal segment:
Add one final gold spacer and then the textured pink bead to complete the heavy, decorative end of the lanyard.
Step 3: Stringing the Length
-
Begin the main strand:
Switch to your smaller 6mm peach or tan wooden beads. String these continuously for the main length of the lanyard. -
Check the length:
Continue beading until the strand is long enough to drape comfortably around your wrist or neck, depending on your preference. Around 10-12 inches of these smaller beads is usually standard for a wristlet. -
Incorporate occasional accents:
If you like the look in the photo, toss in a single gold spacer or a slightly different shade of bead every few inches to break up the uniformity. -
Add the tiny accent bead:
Near the very end of your strand, add one small mint green or contrasting color bead, followed by three final peach beads.
Stiff Lanyard?
If the finished piece feels too rigid, you likely pulled the cord too tight before crimping. Leave a tiny bit of slack (1-2mm) at the end so beads can rotate.
Step 4: Finishing Touches
-
Prepare the closure:
Thread on a crimp bead at the end of your strand. -
Loop back:
Take the end of the wire and thread it through a jump ring or directly to the connector loop (if you are making a closed circle lanyard), then back down through the crimp bead and the first few wooden beads. -
Secure the end:
Pull the wire tight so there are no gaps between beads, but not so tight that the lanyard becomes stiff. Flatten the crimp bead with your pliers. -
Hide the tail:
Feed the excess tail wire through one or two more beads to hide it, then trim closely with your cutting pliers. -
Attach to phone:
Use the lobster clasp to clip onto your phone case’s existing hardware, or loop a strong jump ring through the mute switch hole of your case if it doesn’t have designated loops.
Clip your new accessory onto your case and enjoy the swirl of textures every time you pick up your phone
Glow-in-the-Dark Night Charm
This elegant phone charm combines classic cream hues with soft coral accents for a sophisticated accessory that shines even when the lights go out. The mix of smooth round beads, textured spacers, and a durable cord creates a tactile and visual delight perfect for securing your device.
Step-by-Step Guide
Materials
- Approximately 40-50 cream/off-white round beads (6mm or 8mm)
- 4 Glow-in-the-dark cream round beads (optional, to match the theme)
- 2 Textured pink/coral rondelle beads (polymer clay or acrylic)
- 4 Gold flat disc spacer beads
- 2 Medium cream round beads (slightly larger than the main strand)
- Beige or light tan nylon cord (1.5mm thickness)
- Scissors
- Lighter (for sealing cord ends)
- Tweezers (optional, for tight knots)
Step 1: Preparing the Cord
-
Measure and Cut:
Start by cutting a piece of beige nylon cord to about 12-14 inches in length. This gives you plenty of room to bead and knot without struggling with short ends. -
Prepare the Loop:
Fold the cord in half effectively doubing it up. The folded end will become the loop that attaches to your phone case. -
Create the Anchor Knot:
Tie an overhand knot about 2 inches down from the folded loop end. Tighten it securely so it forms a solid stopper for your first beads.
Sticky Bead Fix
If the cord frays and won’t go through the beads, apply a drop of clear nail polish or super glue to the cord tip, roll it into a needle shape, and let it dry.
Step 2: Stringing the Design
-
First Threading:
Since you are working with a doubled cord, thread both tail ends together through your first bead. Start with one of the standard cream round beads to sit right against the knot. -
The Main Loop Pattern:
Separate the two cord tails now. We will bead the main loop on a single strand, but for this specific design which often loops back, simply string onto one cord end if you want a linear drop, or use the loop method. Looking at the photo, this is a continuous loop. -
Stringing the First Side:
Thread approximately 15-20 of the standard cream round beads onto the cord. Verify the length by wrapping it around your wrist to ensure a comfortable fit. -
Adding the Feature Section:
Now, slide on one gold flat disc spacer, followed by a slightly larger cream bead, then the textured pink/coral bead, another larger cream bead, and finish this segment with a second gold spacer. -
Center Back Section:
Add about 5-8 more standard cream beads. This section will sit at the bottom of the loop when holding the phone. -
Mirroring the Design:
Repeat the feature pattern in reverse: Gold spacer, large cream bead, textured pink/coral bead, large cream bead, and finally a gold spacer. -
Finishing the Loop:
String the remaining 15-20 standard cream beads to match the first side you created.
Glow Intensifier
To make your night charm really pop, swap the standard cream beads for phosphorescent acrylic beads. Charge them under a lamp for 60 seconds before testing!
Step 3: Securing the Charm
-
Bringing Ends Together:
Bring the beaded strand back up to meet the original anchor knot near the loop. You should now have a complete circle of beads. -
The Joining Knot:
Tie the two tail ends of the cord together with the main stem (below the anchor knot) securely. I like to use a square knot here for extra security. -
The Wrapping Technique:
To achieve the neat coil look seen in the image, take one of the long tail ends and wrap it tightly around all the cords at the base of the loop. Wrap it around 5-6 times to cover the structural knots underneath. -
Securing the Wrap:
Tuck the end of your wrapping cord under the last loop and pull it tight. You may need tweezers to pull this tiny end through. -
Adding the Final Bead:
Thread a single gold bead or a small metallic bead onto the very end of one tail for a polished look. -
Cut and Seal:
Trim any excess cord close to the knot. Carefully use a lighter to melt the nylon tips just enough to prevent fraying, pressing them flat against the knot while warm (be careful not to burn your fingers).
Attach the loop to your phone case toggle and enjoy your stylish new accessory.
Convertible Lanyard-to-Wristlet Design
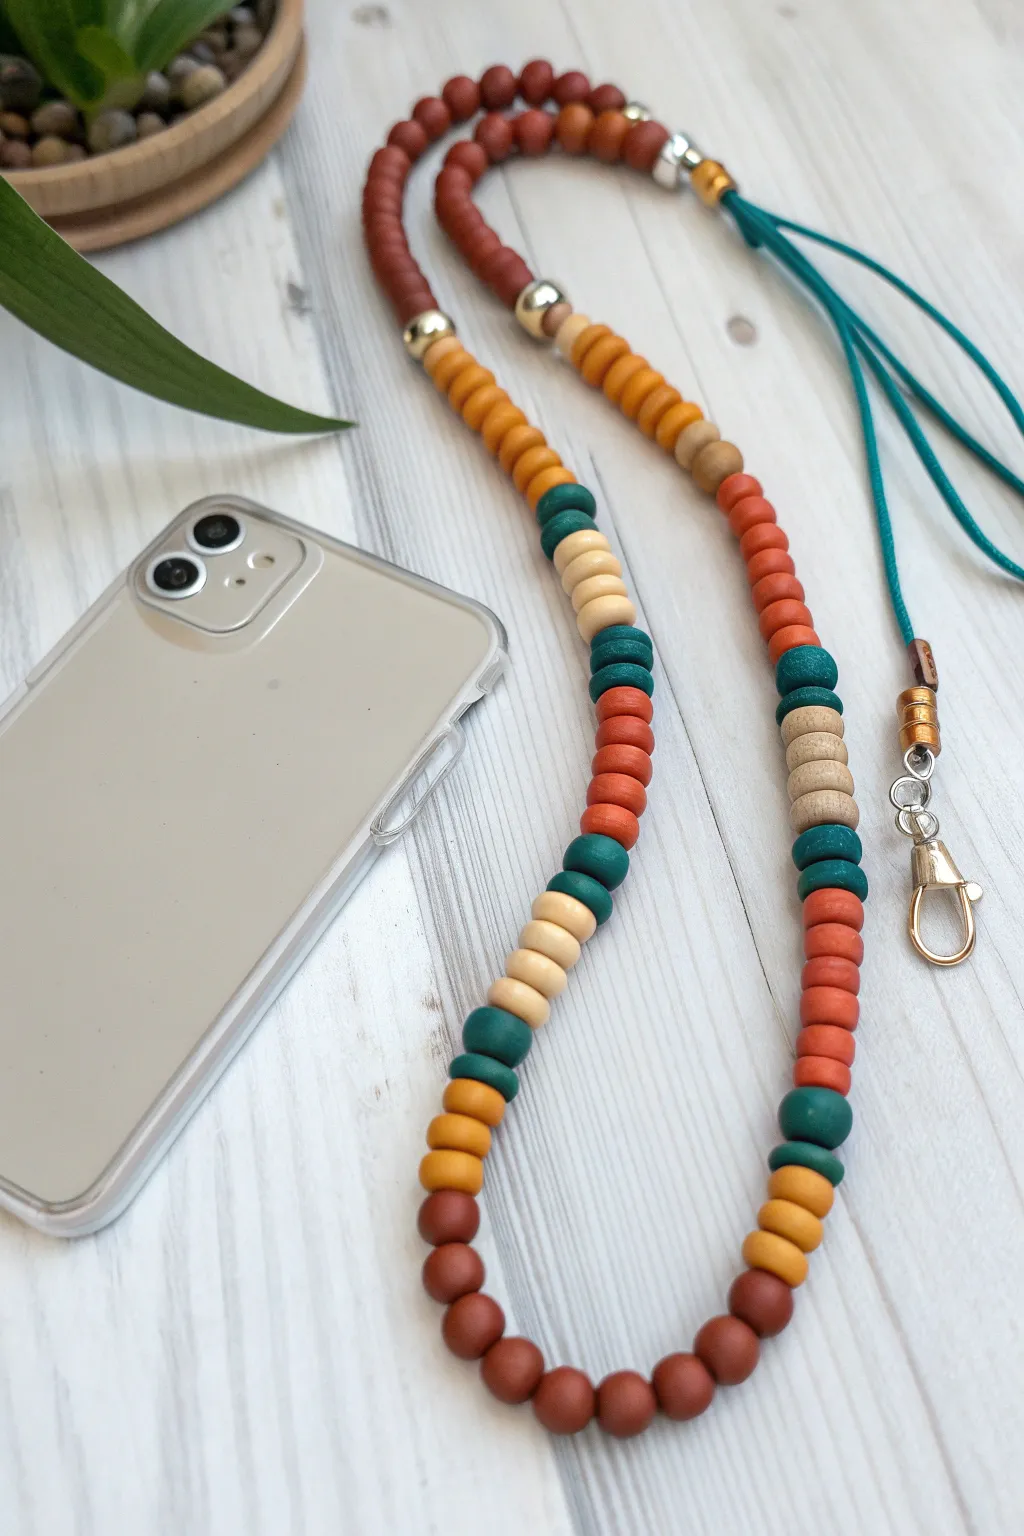
Create a versatile and stylish accessory for your phone with this convertible lanyard design featuring a soothing palette of burnt orange, teal, mustard, and cream. The mix of textures, from smooth clay heishi beads to metallic accents and soft cord, gives this piece a high-end, boutique feel.
How-To Guide
Materials
- Polymer clay heishi beads (burnt orange, teal/dark green, mustard yellow, cream/beige)
- Wooden spacer beads (approx. 6mm-8mm round)
- Small gold or silver metallic accent beads
- Large gold crimp covers or decorative bead caps
- Teal or dark green 1mm waxed cotton cord or creative cord
- Gold swivel lobster clasp
- Jewelry glue (E6000 or similar)
- Scissors
Step 1: Planning and Prep
-
Measure your cord:
Cut a piece of teal waxed cotton cord approximately 40-45 inches long. This generous length allows for a long necklace drop and extra room for knotting securely. -
Prepare the center point:
Fold your cord in half to find the exact center. Slide your gold swivel lobster clasp onto the cord, positioning it right at that midpoint loop.
Step 2: Creating the Focal Section
-
Secure the clasp:
Thread both loose ends of the cord through a large decorative gold bead or crimp cover. Push this bead all the way down until it sits snug against the top loop of the lobster clasp, securing it in place. -
Start the bead pattern:
Treating both cord strands as a single thread, string on three beige heishi beads followed by three burnt orange heishi beads. This creates a solid foundation near the hardware. -
Continue the dual-strand threading:
Add a small section of teal beads, followed by mustard beads. Keep threading both cords together for about 2-3 inches to give the clasp area strength and stability. -
Split the strands:
Once you have that strong base above the clasp, separate the two cord strands. You will now bead firmly onto each side independently to create the necklace loop.
Smooth Stringing Tip
Wrap a small piece of tape tightly around the very tip of your cord to create a stiff ‘needle.’ This prevents fraying and makes threading the small heishi bead holes much faster.
Step 3: Beading the Lanyard Sides
-
Establish the color blocks:
On the left strand, begin a pattern of color blocking. String about 1 inch of burnt orange beads, followed by 1 inch of cream beads. -
Mix in textures:
Intersperse the clay heishi sections with singular wooden spacer beads. I find that adding a wooden bead after every two color blocks breaks up the monotony and adds nice visual weight. -
Add metallic accents:
Occasionally slide on a small gold metallic bead between the clay and wooden beads to catch the light. -
Mirror the design:
Repeat the exact same pattern on the right strand so both sides of the lanyard are symmetrical in length and color sequence. -
Build length:
Continue beading both sides until you have approximately 16-18 inches of beaded length on each side, or until it reaches your desired drop length when worn around the neck.
Pattern Play
Swap the burnt orange for terracotta or dusty rose to shift the palette, or use matte black beads instead of wood for a more modern, urban look.
Step 4: Finishing the Closure
-
Cap the ends:
At the end of your beaded sections on both sides, add a final decorative gold bead or cap to frame the clay work professionally. -
Tie the main knot:
Bring the remaining bare cord ends together at the top. Tie a sturdy overhand knot right against the last beads to prevent them from slipping. -
Add the adjustable mechanism:
Create a sliding knot closure: Lay the two cord ends parallel to each other in opposite directions. Use a separate scrap piece of cord to tie a series of square macramé knots (or a simple barrel knot) around both main cords. -
Secure the knots:
Tighten your sliding knot well. Trim the excess from the scrap cord and apply a tiny dab of jewelry glue to the cut ends of the knot (being careful not to glue the main cords) to prevent fraying. -
Finish the cord tails:
Tie simple overhand knots at the very tips of your main cord tails so they don’t pull through the sliding mechanism. -
Attach to phone case:
Use the lobster clasp to clip onto a dedicated phone lanyard tab or through an open hole on your phone case.
Now you have a functional piece of art that keeps your phone secure and accessible all day