
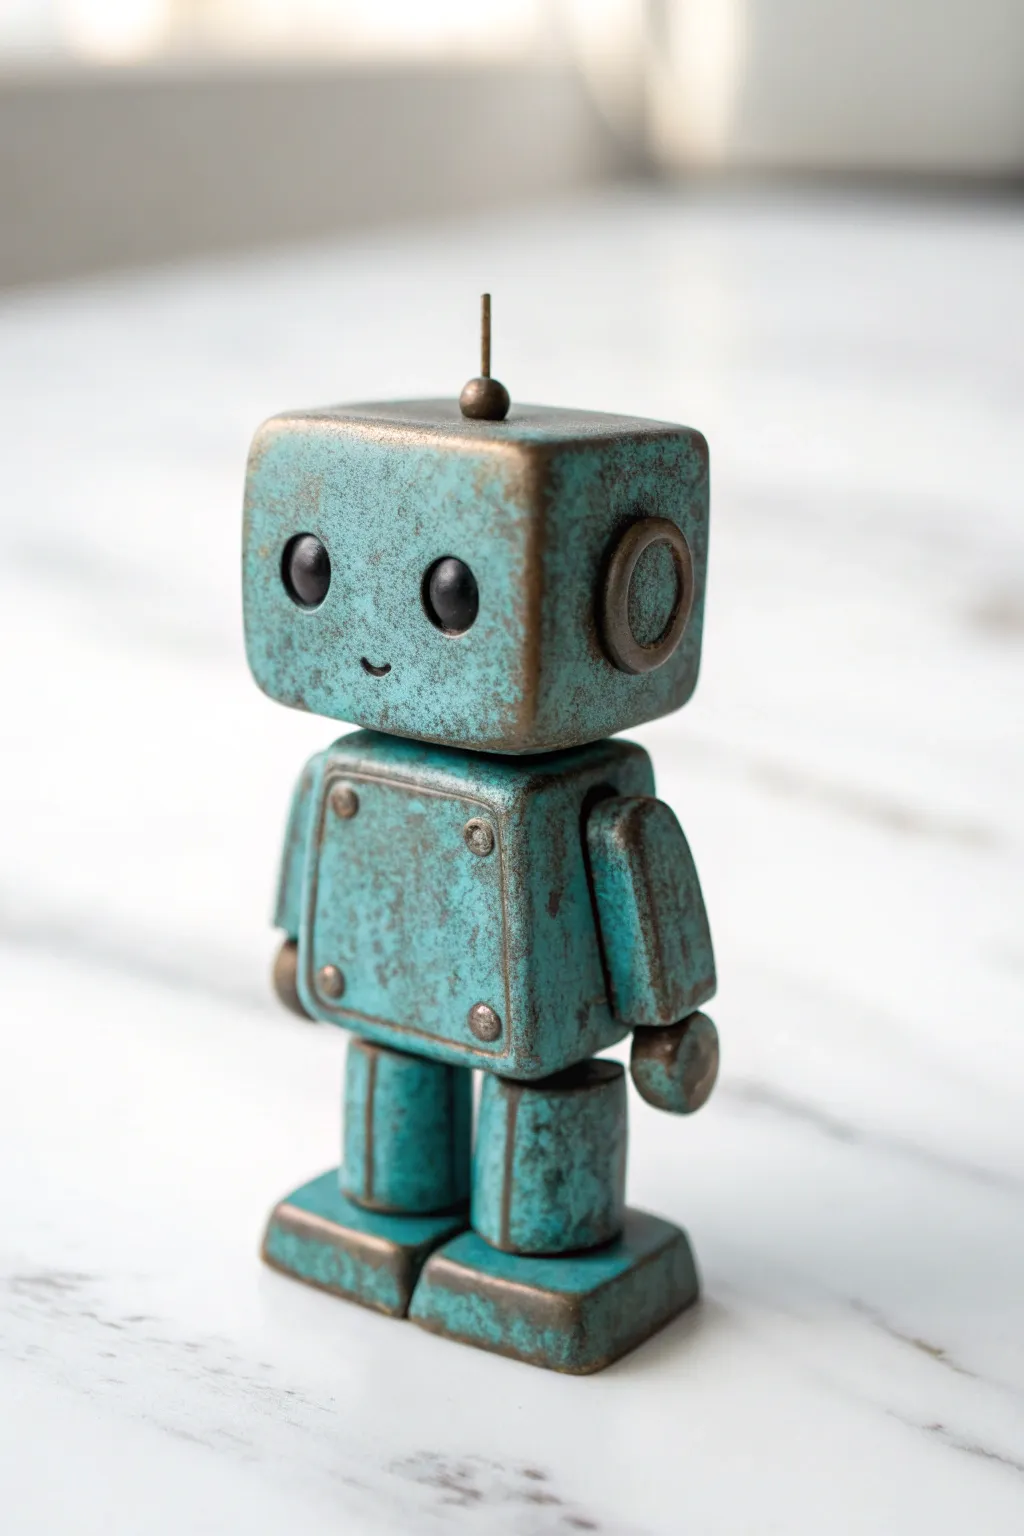
If you’ve been itching to make something cute, quirky, and totally customizable, clay robots are such a fun place to play. I love them because you can keep the shapes simple, then crank up the character with tiny details like antennae, buttons, and metallic finishes.
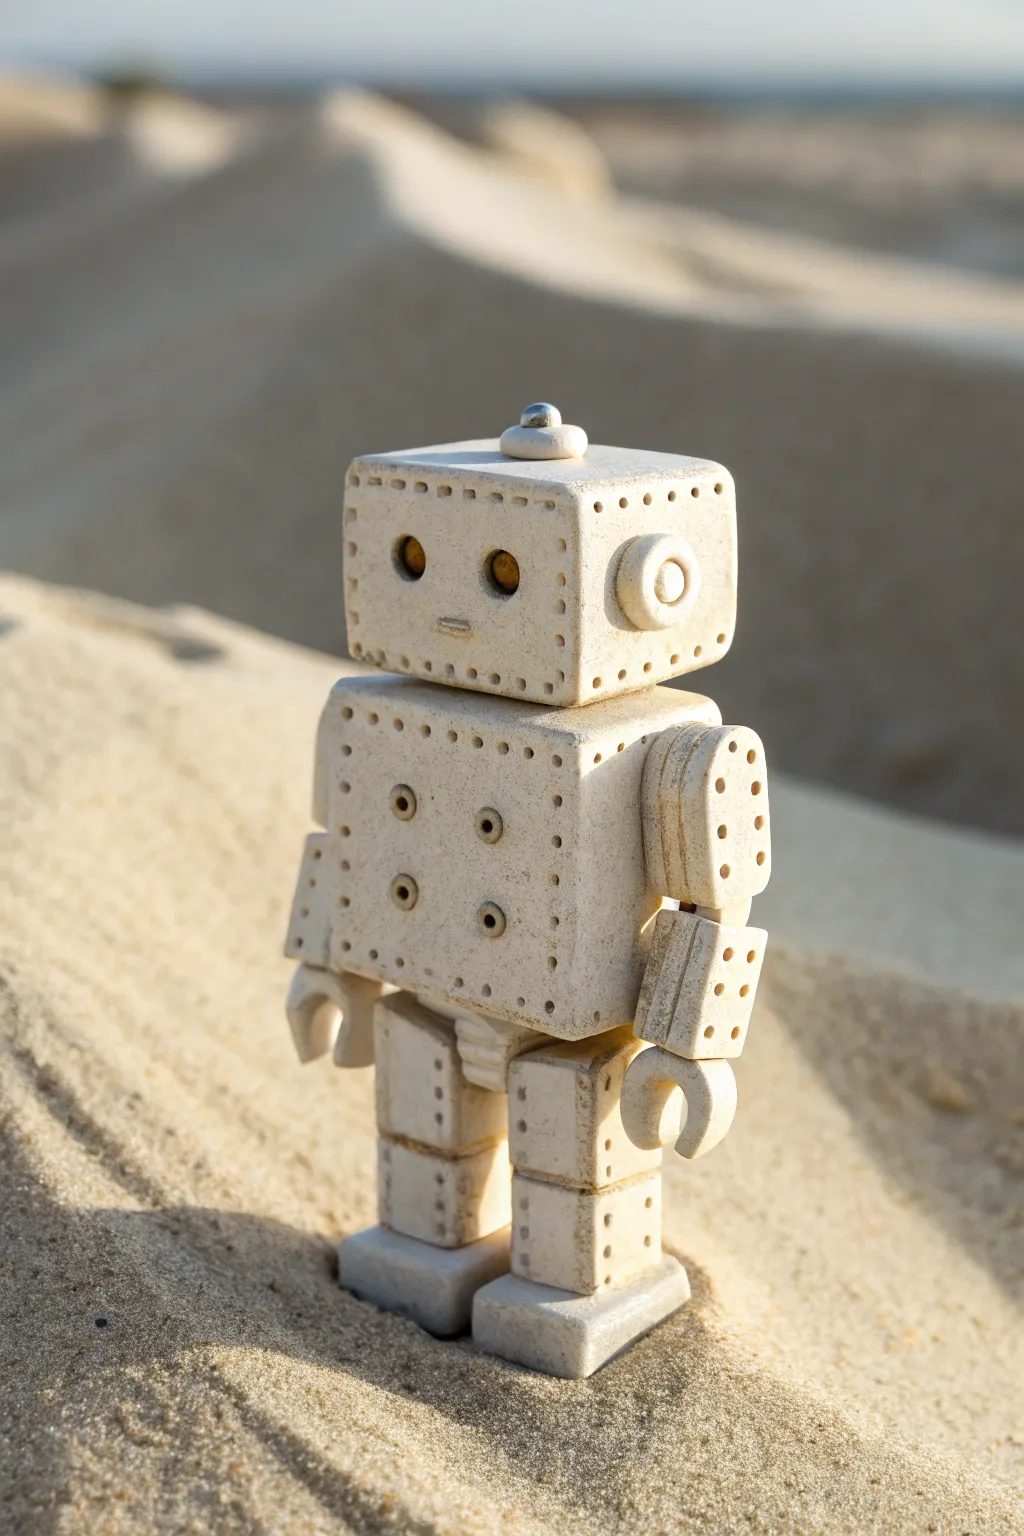
Classic Boxy Mini Robot
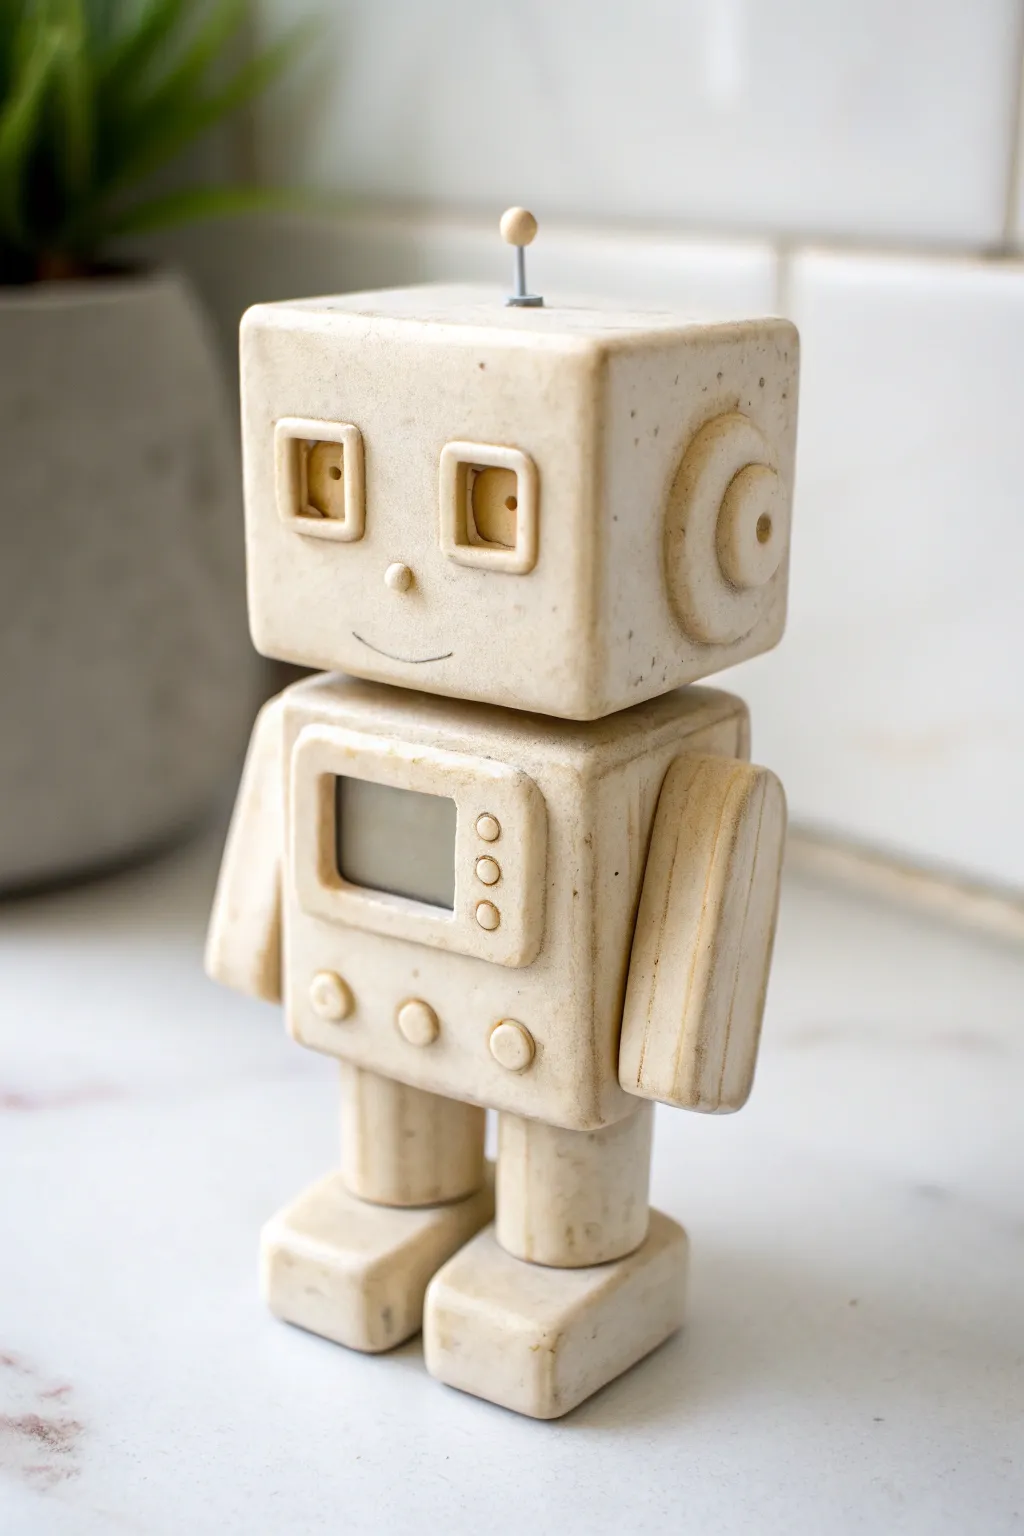
This charming, vintage-style robot figure masters the art of simplicity with its clean, geometric shapes and a unique faux-stone finish. Perfect for desk decor or a quirky gift, its minimalist design relies on subtle texturing to achieve that polished, ceramic-like appearance.
How-To Guide
Materials
- Polymer clay (beige, ecru, or granite effect)
- Aluminum foil (for armature core)
- Clay rolling pin
- Precision craft knife or clay blade
- Small round cutter or a straw
- Needle tool or toothpick
- Short piece of wire or stiff headpin (for antenna)
- Baking sheet and oven (if using polymer clay)
Step 1: Shaping the Core Blocks
-
Prepare the head:
Start by conditioning your beige clay until it is soft and pliable. Form a solid cube approximately 1.5 inches wide, smoothing the sides with your fingers or a flat tool to ensure sharp, crisp corners. -
Form the body block:
Create a second, slightly taller rectangular block for the body. It should be the same width as the head but about 20% taller. Check the proportions by stacking the head on top gently. -
Refine the edges:
Use a straight blade or a flat table surface to gently tap each side of your blocks. This ensures the walls are perfectly flat rather than bulging outward.
Step 2: Adding Facial Features
-
Create the eyes:
Roll out a small slab of clay. Cut two small squares for the eye frames. Gently press these onto the face. Using a tool with a small rounded tip, press an indentation into the center of each square to create depth. -
Add pupils:
Roll two tiny spheres of clay and place them into the indented eye sockets you just made. Use a needle tool to poke a tiny pupil hole in the center of each sphere. -
Form the nose:
Roll a single tiny ball of clay and press it gently into the center of the face, right between and slightly below the eyes. -
Carve the mouth:
Use your needle tool or a very thin blade to gently incise a curved smile line. Keep the cut shallow and clean. -
Detail the ears:
Roll a small ball of clay and flatten it into a thick disc. Attach this to the side of the head. Press a smaller tool into the center to create a concentric circle pattern, mimicking a bolt or speaker. -
Insert the antenna:
Cut a small piece of wire. Insert it into the top center of the head. Add a tiny ball of clay to the very tip of the wire.
Head sliding off?
If the head feels top-heavy or wobbly, insert a piece of raw spaghetti or wire halfway into the body and mount the head onto it before baking.
Step 3: Building the Chest and Limbs
-
Make the screen panel:
Roll a rectangle of clay slightly smaller than the chest width. Press the center with a flat tool to create a recessed screen area, leaving a raised border. -
Add screen buttons:
Roll three incredibly small balls of clay. Press them vertically along the right-hand border of the screen frame you just created. Attach the finished panel to the torso. -
Create lower buttons:
Form three medium-sized flattened discs and arrange them horizontally across the lower part of the robot’s body. -
Shape the arms:
Roll two thick logs of clay. Flatten two sides of each log so they become rectangular prisms with slightly rounded outer edges. Attach them flush against the sides of the body. -
Form the legs:
Create two matching cylinders for the legs. They should be thick enough to support the weight of the body. Place them side-by-side underneath the torso. -
Construct the boots:
Make two rectangular blocks for feet. They needs to be sturdy and flat on the bottom. Press the leg cylinders firmly onto these blocks to ensure a strong bond.
Make it Shine
Mix black pepper or used tea grounds into plain beige clay before shaping. This creates a realistic organic speckle that mimics stone.
Step 4: Assembly and Finish
-
Final connection:
Check that the head sits securely on the body. You might want to insert a toothpick or wire piece between the head and body for internal stability. -
Texture check:
To get that speckled stone look, you can gently lightly brush the surface with an old toothbrush or stiff brush to remove fingerprints, or rely on the granite-effect clay itself. -
Bake carefully:
Place your figure on a baking sheet. I advise following your clay package’s specific temperature instructions exactly, usually around 275°F (130°C) for polymer clay.
Once cooled, your little geometric friend is ready to stand guard on your shelf


Cute Chibi Robot Buddy
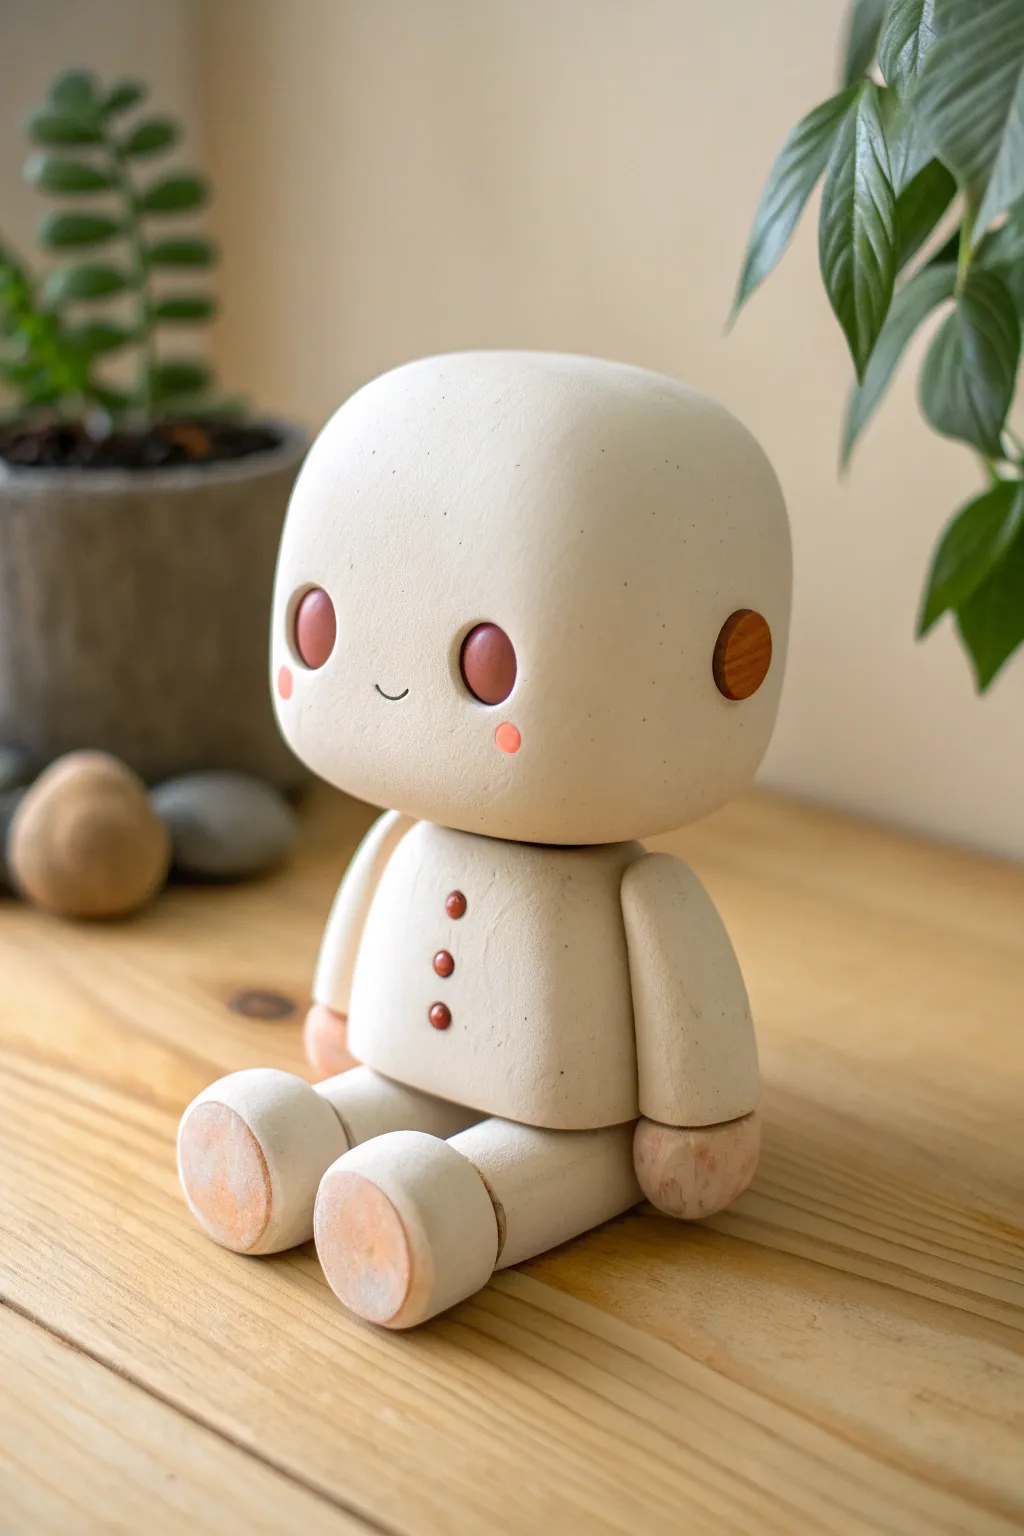
Create a minimalist companion with a smooth, matte finish that mimics unglazed ceramic or bone china. This adorable sitting robot features a clean, creamy white body with subtle terracotta accents, perfect for brightening up a desk or shelf.
Step-by-Step Tutorial
Materials
- White polymer clay (matte or soft finish)
- Terracotta or rust-colored polymer clay
- Sculpting tools (ball styluses, needle tool, clay knife)
- Aluminum foil (for armature)
- Small paintbrush
- Soft pastel chalks (blush pink or peach)
- Matte varnish (optional)
- Baking sheet and parchment paper
- Fine grit sandpaper
Step 1: Sculpting the Head
-
Prepare the core:
Crumple a piece of aluminum foil into a tight ball, slightly flattened into a rounded cube shape. This lighter core saves clay and prevents the heavy head from sagging during baking. -
Cover with clay:
Condition a large portion of your white clay until soft. Flatten it into a sheet and wrap it completely around your foil core, smoothing the seams until invisible. -
Refine the shape:
Roll and gently press the head against your work surface to create a ’rounded square’ silhouette. The top should be slightly domed, while the bottom needs to be flatter to attach to the neck. -
Create eye sockets:
Using a large ball tool or the rounded end of a paintbrush, press two indentations into the face area where the eyes will sit. Space them widely apart for maximum cuteness.
Head Slumping?
If the heavy head is squashing the neck while you work, bake the body first for 10 minutes to harden it. Then, add raw clay to attach the raw head and bake again.
Step 2: Body and Limbs
-
Form the torso:
Roll a cylinder of white clay, slightly wider at the bottom than the top. Flatten the top and bottom surfaces to create sharp, crisp edges that contrast with the round head. -
Make the legs:
Create two thick cylinders for the legs. Gently bend them at a 90-degree angle to create a sitting pose, smoothing the ‘knee’ area so it doesn’t look pinched. -
Sculpt the feet:
Roll two short, stout cylinders for feet. Press them firmly against the ends of the legs. I like to flatten the soles completely so the robot sits stable without tipping. -
Shape the arms:
From two smaller sausages of white clay, form the arms. Round off the shoulder end and flatten the ‘hand’ end slightly into a simple paddle shape. -
Attach the limbs:
Press the legs onto the sides of the torso’s base. Attach the arms to the upper sides of the torso. Blending the clay seams at the ‘shoulder’ and ‘hip’ joints is crucial for strength.
Step 3: Adding Personality
-
Insert the eyes:
Roll two small balls of terracotta-colored clay. Place them into the eye sockets you made earlier and flatten them gently so they sit flush with the face surface. -
Add side details:
Create small flat discs of terracotta clay and press one onto each side of the head, mimicking ear bolts or auditory sensors. -
Button up:
Roll three tiny balls of the terracotta clay. Press them vertically down the center of the chest to create the button details. -
Carve the smile:
Use a needle tool or very fine blade to carefully impress a tiny, curved smile right between the eyes. Keep it shallow and simple. -
Apply blush:
Scrape a little pink pastel chalk into dust. Use a soft, dry brush to gently dub this powder onto the cheeks below the eyes and on the tips of the feet and distinct hand areas for a weathered, rosy look.
Make it Posable
Instead of blending the clay joints, embed small magnets into the limb connections before baking. This lets you detach and rotate the arms and head later.
Step 4: Assembly and Finish
-
Connect head to body:
Insert a short piece of wire or half a toothpick into the neck of the body, then press the head down onto it. This internal support ensures the head doesn’t fall off post-bake. -
Texture check:
Before baking, look over the entire piece. Smooth out any fingerprints. If you want a stone-like texture, you can gently tap the surface with an old toothbrush. -
Bake the robot:
Place your figure on parchment paper and bake according to your polymer clay package instructions (usually 275°F/130°C for 15-30 minutes depending on thickness). -
Final sanding:
Once fully cooled, lightly sand any rough spots with fine-grit sandpaper to achieve that perfect matte, ceramic feel.
Set your new little friend on your desk to keep you company while you work


Tiny Robot Charm With Antenna
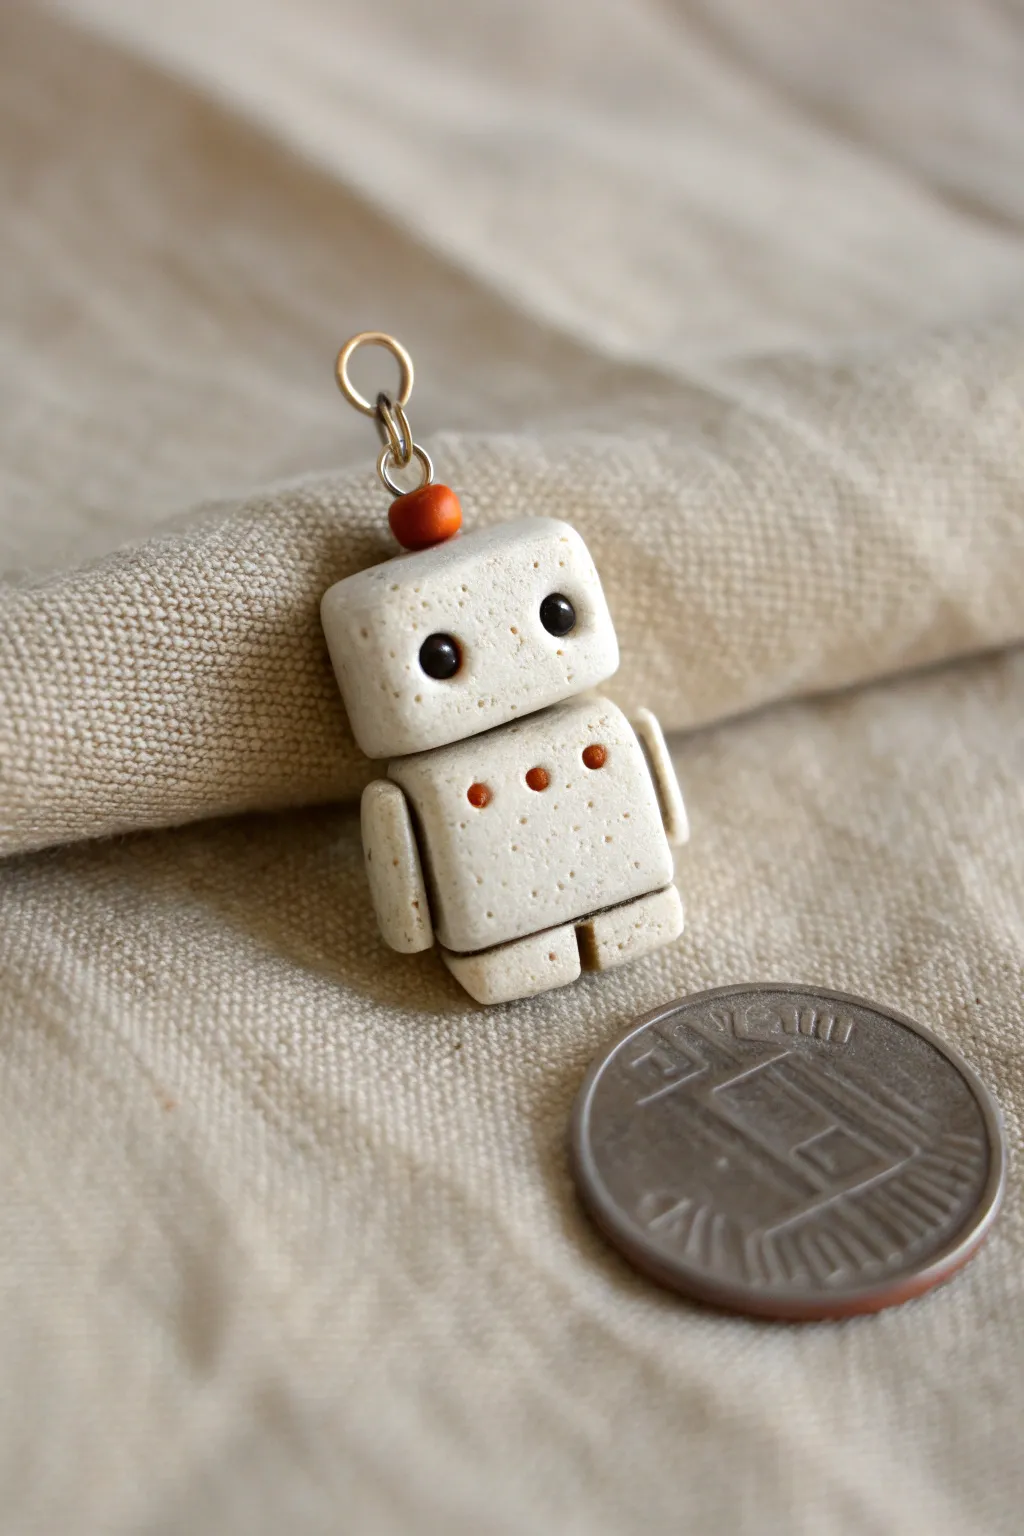
This adorable little robot charm is crafted to look like tiny chiseled stone, complete with an antenna and cheerful button details. Its speckled finish gives it an organic, handmade feel that perfectly balances the robotic design.
How-To Guide
Materials
- Polymer clay (granite or stone effect)
- Small amount of burnt orange polymer clay
- Small amount of black polymer clay
- Silver eye pin (approx. 20mm)
- Small jump ring (4-5mm)
- Clay blade or craft knife
- Ball stylus tool (small)
- Needle tool or toothpick
- Ceramic tile or baking surface
- Oven (for baking clay)
- Gloss glaze (optional)
Step 1: Shaping the Body
-
Condition the clay:
Start by kneading a small amount of the granite-effect polymer clay until it is soft and pliable. This particular clay can be a bit stiffer than standard colors, so give it a good warm-up. -
Form the head:
Roll a piece of the granite clay into a ball about the size of a large pea. Gently flatten the sides against your work surface to create a rounded cube shape. Smooth the edges slightly so it isn’t too sharp. -
Form the torso:
Create a second rounded cube, slightly larger and wider than the head. This will be the robot’s body. Check the proportions by stacking the head on top; the body should look sturdy enough to support it. -
Make the legs:
Roll out a small log of granite clay and cut two short, equal segments. Press these onto the bottom of the body cube. Flatten the bottoms of the feet so the robot can stand upright. -
Create the arms:
Roll two thin logs for the arms. They should be slightly thinner than the legs. Use your blade to cut them to size—they should reach roughly halfway down the torso. -
Attach the limbs:
Press the arms firmly onto the sides of the torso. You can gently blend the clay at the shoulder joint with a rubber tool if you want a seamless look, or leave them distinct for a jointed appearance. -
Connect head and body:
Place the head onto the center of the torso. Press down gently to ensure a good bond without squashing the shapes.
Loose Eye Pin?
If the eye pin pulls out after baking, pull it all the way out, add a drop of superglue to the metal shaft, and slide it back in. It will hold permanently.
Step 2: Detailed Features
-
Indent the eyes:
Using a small ball stylus, press two indented sockets into the head where the eyes will go. Space them widely apart for maximum cuteness. -
Add the eyes:
Roll two extremely tiny balls of black clay. Pick them up with the tip of your needle tool and place them into the sockets. Press them in gently so they are flush with the surface but slightly rounded. -
Create chest buttons:
Use the needle tool to make three small, evenly spaced divots across the chest of the robot. -
Fill the buttons:
Roll three microscopic balls of burnt orange clay. Carefully press one into each chest divot. I like to use the flat side of a blade to gently tap them flat so they look like control panels. -
Prepare the antenna base:
Roll a small ball of the burnt orange clay—slightly larger than the chest buttons—and flatten it slightly. -
Insert the hardware:
Take your eye pin and thread the orange bead onto it. Push the pin down into the center of the robot’s head until the orange bead rests on top like a hat or antenna base. -
Secure the pin:
If the pin feels loose, you can remove it, add a tiny dab of liquid polymer clay (Bake & Bond) to the shaft, and reinsert it for extra security.
Step 3: Finishing
-
Texture check:
Look over the figure for any fingerprints. Since this is stone-effect clay, you can gently tap the surface with a toothbrush or sandpaper to mask prints and enhance the stone texture. -
Bake:
Bake the charm according to the manufacturer’s instructions for your specific brand of clay (usually around 275°F/135°C for 15-30 minutes). Let it cool completely. -
Add the jump ring:
Once fully cool, use pliers to open your jump ring. smooth clamp it through the loop of the eye pin. This allows you to attach your new robot friend to a necklace or keychain.
Rust Effect
Before baking, lightly brush dry brown pastel powder into the creases of the neck and arms. This creates a weathered, vintage robot look.
You now have a durable little companion ready to hang on a bag or necklace


One-Eyed Cyclops Robot
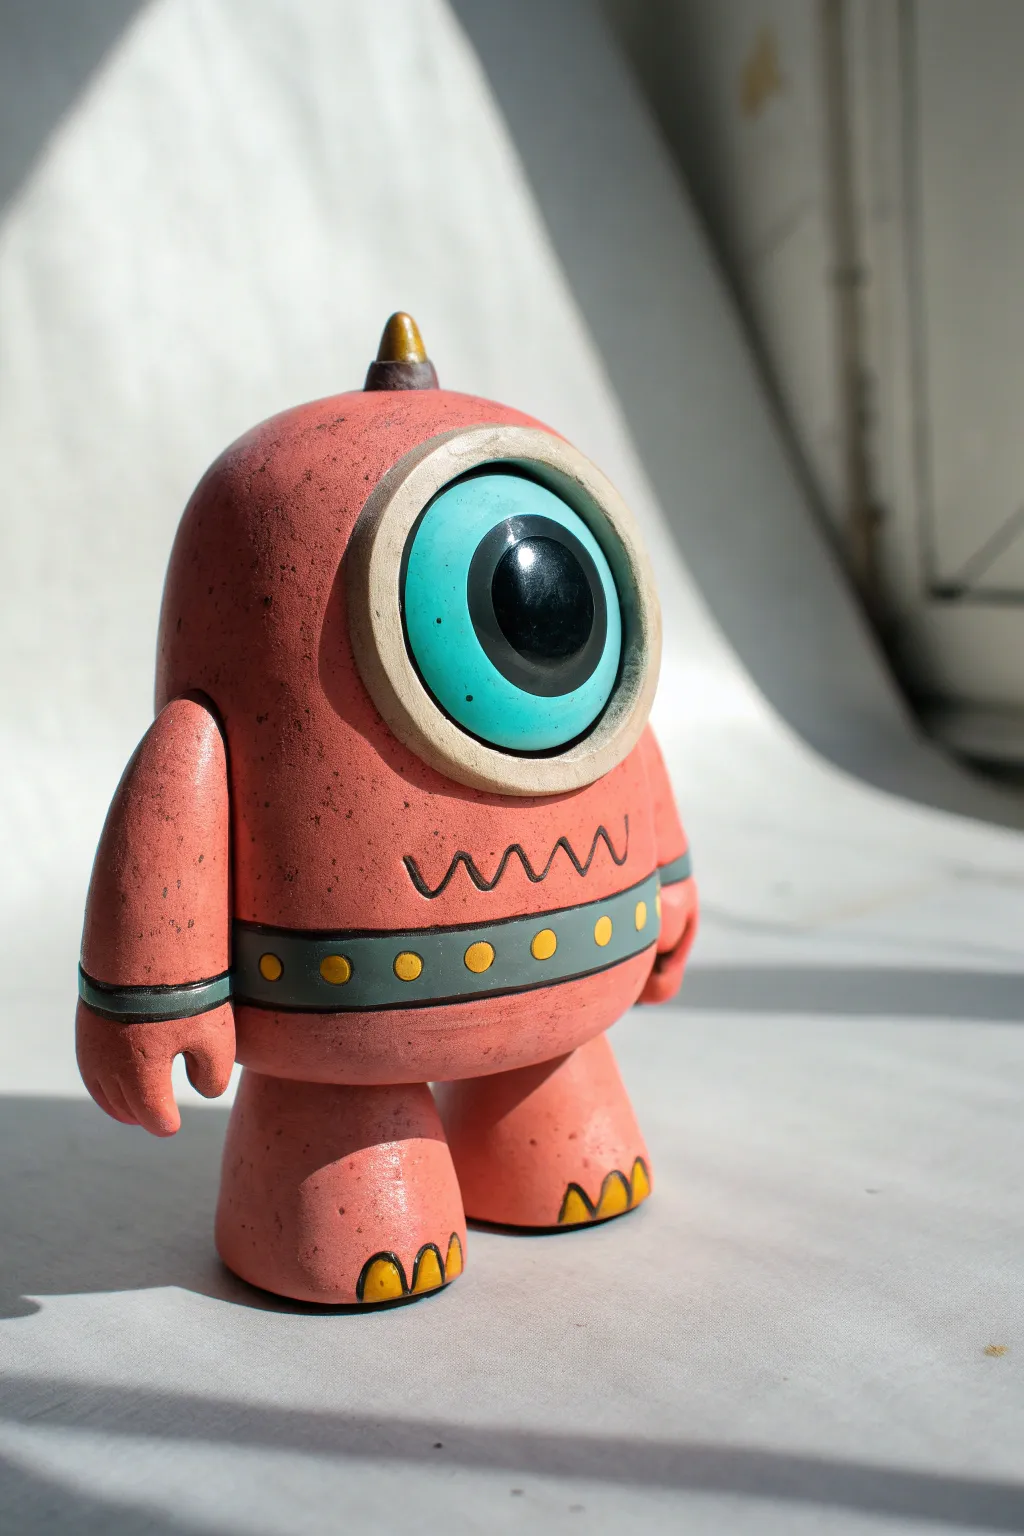
This charming, single-eyed robot figure combines a stylized, chunky aesthetic with subtle weathering effects for a delightful desk ornament. Its smooth, rounded forms contrast beautifully with the geometric details of its belt and eye.
Step-by-Step
Materials
- Polymer clay (coral/muted pink, white, teal, black, grey, yellow)
- Small rolling pin
- Clay sculpting tools (needle tool, ball stylus)
- Circle cutters (various sizes)
- Acrylic paint (black and brown) for weathering
- Matte varnish
- Gloss varnish or UV resin
- Oven
- Aluminum foil (for armature)
- Soft paintbrush
- Paper towels
Step 1: Sculpting the Body
-
Create the core:
Crumple a piece of aluminum foil into a smooth, upright pill shape. This saves clay and keeps the figure lightweight. -
Prepare the base color:
Condition your coral or muted pink clay until it is soft and pliable. If the color is too bright, mix in a tiny amount of grey or brown to desaturate it. -
Cover the armature:
Roll the pink clay into a flat sheet about 3-4mm thick. Wrap it completely around the foil core, smoothing the seams with your fingers until the surface is uniform and seamless. -
Shape the torso:
Refine the shape so it resembles a tall, rounded dome. Gently flatten the bottom so it stands upright on your work surface.
Step 2: Creating the Eye
-
Make the socket:
Roll a ball of white or cream clay and flattening it into a thick disc. This will be the housing for the eye. -
Form the eyeball:
Use a circle cutter to remove the center of the white disc, creating a thick ring. Insert a flat circle of teal clay into this space. -
Add the pupil:
Place a smaller, slightly domed circle of black clay in the center of the teal circle. Press it down gently to bond it without flattening it completely. -
Attach the eye:
Press the entire eye assembly onto the upper front of the body. Blend the outer edges of the white ring slightly into the body clay to ensure a strong bond, or use liquid clay as adhesive.
Clean Clay Pro Tip
Keep baby wipes or hand sanitizer nearby. Clean your hands between colors, especially before handling the white clay eye ring, to avoid color transfer.
Step 3: Adding Details
-
Sculpt the legs:
Create two stout, tapered cylinders from the pink clay. Flatten the bottoms for stability and attach them firmly to the underside of the body. -
Attach arms:
Roll two sausage shapes for arms. Flatten one end of each slightly and cut a simple slit to create a claw-like hand. Attach these to the sides of the body. -
Create the belt:
Roll a thin strip of grey clay. Wrap it around the lower third of the robot’s body. I like to trim the ends at a diagonal where they meet for a cleaner seam. -
Decorate the belt:
Punch out very small circles of yellow clay and press them evenly along the grey belt. -
Add toes and horn:
Place three tiny yellow triangles on the front of each foot for claws. Add a small cone shape on top of the head for a horn, perhaps adding a brown base ring for contrast. -
Carve texture:
Use a needle tool or small sculpting tool to carve a wavy zigzag line just above the belt.
Level Up: Light It Up
Use glow-in-the-dark clay for the teal part of the eye or the yellow belt dots to make your robot visible at night.
Step 4: Finishing Touches
-
Bake:
Bake the figure according to your polymer clay manufacturer’s instructions (usually around 275°F/135°C for 15-30 minutes per 1/4 inch thickness). Let it cool completely. -
Apply a wash:
Water down brown or black acrylic paint heavily. Brush this wash over the entire figure, letting it settle into the carved lines and crevices. -
Wipe back:
Immediately wipe the surface with a damp paper towel. The paint will remain in the textured areas and recesses, creating a weathered, vintage look. -
Seal the work:
Coat the body in a matte varnish to protect the paint. Finally, apply gloss varnish or UV resin specifically to the teal eye and the black pupil to make them look like glass.
Now you have a unique, retro-futuristic friend ready to guard your desk or bookshelf

The Complete Guide to Pottery Troubleshooting
Uncover the most common ceramic mistakes—from cracking clay to failed glazes—and learn how to fix them fast.
Heart-Panel Friendly Robot
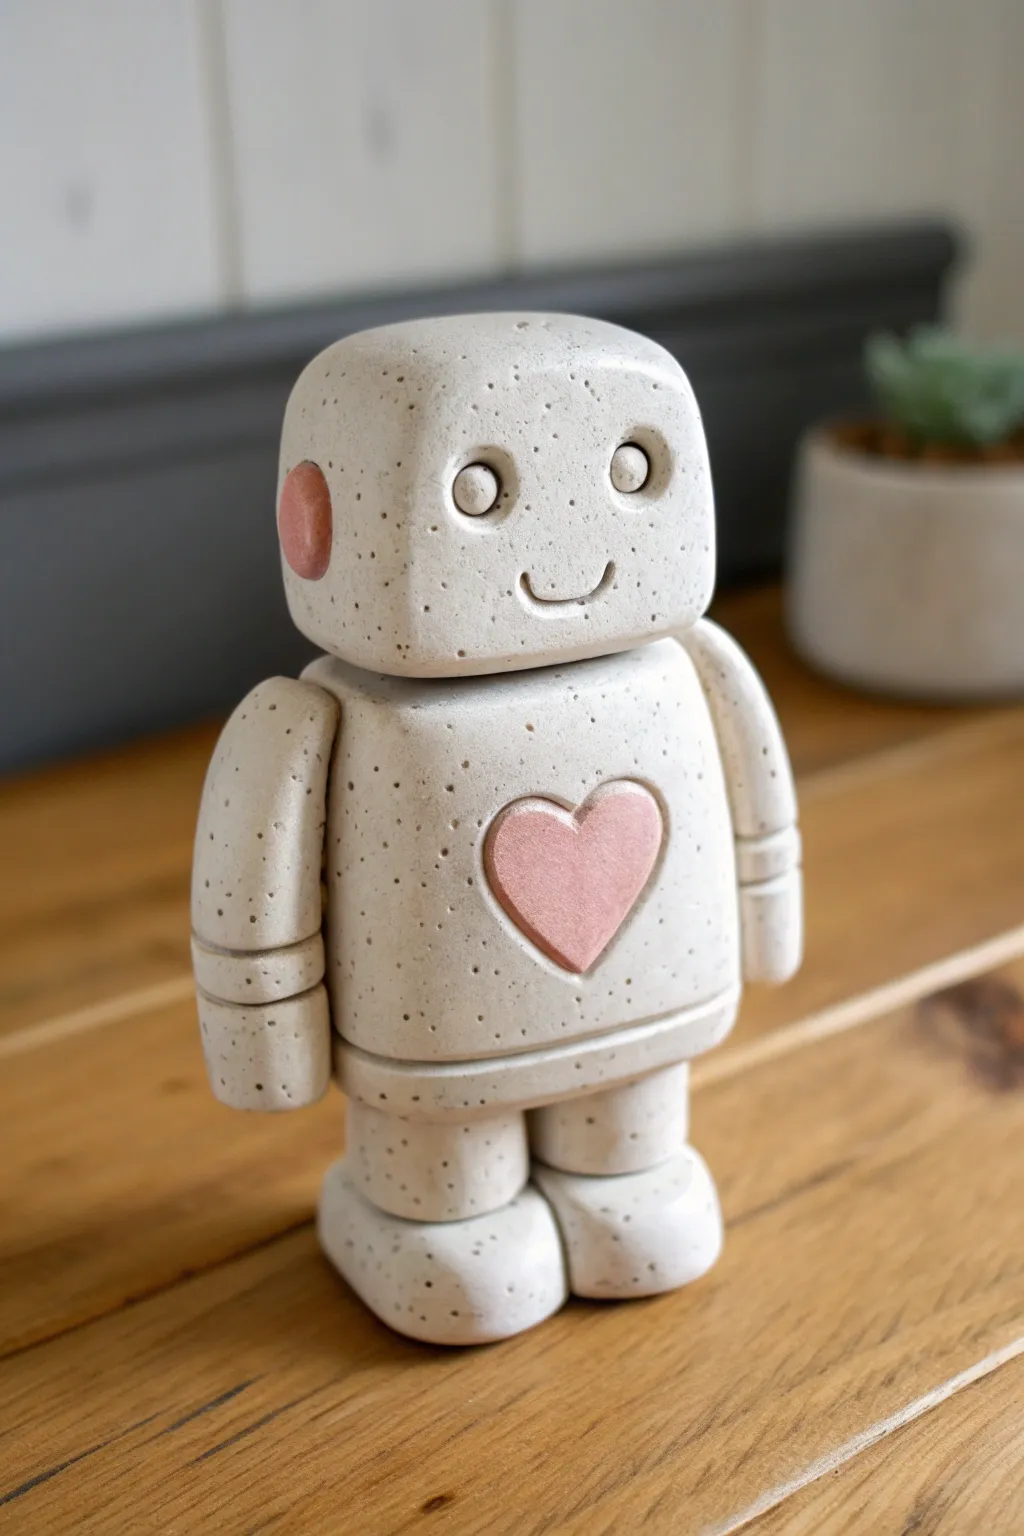
This adorable robot figure combines a minimalist aesthetic with a sweet touch of heart. Using stone-effect clay creates a sophisticated, faux-ceramic finish that makes this friendly bot look right at home on a modern shelf.
Step-by-Step Guide
Materials
- Polymer clay (stone or granite effect, e.g., Fimo or Sculpey)
- Pink polymer clay (pastel shade)
- Clay roller or pasta machine
- Blade or craft knife
- Small heart cutter (approx. 1 inch)
- Small circle cutter (approx. 0.5 inch)
- Dotting tools or ball stylus (various sizes)
- Needle tool
- Aluminum foil (for armature core)
- Baking sheet and oven
Step 1: Shaping the Core Body
-
Prepare the foil core:
Crumple a small amount of aluminum foil into a tight cube shape for the head and a slightly larger rectangular block for the body. This reduces clay weight and ensures even baking. -
Condition the clay:
Condition your speckled stone clay until it is soft and pliable. Roll it out into a sheet about 1/4 inch thick using your roller or pasta machine. -
Cover the body:
Wrap the sheet of clay around your foil body block. Smooth the seams carefully with your fingertip until they vanish, creating a soft-cornered rectangle. -
Cover the head:
Repeat the process for the head block, ensuring the corners are rounded for a friendly look. -
Create the heart inlay:
Use your heart cutter to remove a heart shape from the center of the chest. Roll out a small piece of pink clay to the same thickness, cut a matching heart, and gently press it into the opening so it sits flush. -
Attach the neck:
Roll a small, flat disk of stone clay. Place it between the body and head to act as a neck, then press the head firmly down to secure the bond.
Seamless Smoothness
Use a drop of baby oil or clay softener on your fingertip to buff out fingerprints before baking for that professional stone finish.
Step 2: Arms and Legs
-
Form the arms:
Roll two thick logs of stone clay for the arms. They should be slightly curved to hang naturally at the robot’s sides. -
Detail the joints:
Using a needle tool or the back of a knife, gently press two horizontal distinct lines into the lower half of each arm to simulate elbow and wrist joints. -
Make the legs:
Create two short, thick cylinders for the legs. I find rolling a ball and slightly flattening the top and bottom works best. -
Shape the feet:
Form two rounded, bean-shaped ovals for the feet. Press the leg cylinders firmly onto the back half of these feet. -
Assemble the limbs:
Attach the legs to the bottom of the body. Press the arms firmly onto the sides of the torso just below the neck line.
Posable Look
Before baking, tilt the head slightly to one side or raise one arm higher than the other to give your robot more personality.
Step 3: Face and Finishing Touches
-
Add the ear accents:
Roll two small balls of pink clay and flatten them into disks. Press these onto the sides of the head to create the ear panels. -
Indent the eyes:
Use a medium-sized ball stylus to press two deep, round indentations for the eyes. -
Add the pupils:
Roll tiny balls of stone clay and press them into the center of the eye sockets. Use a smaller tool to add a tiny dimple in the center of each pupil. -
Carve the smile:
Use a needle tool or small curved carving tool to etch a simple U-shaped smile between the eyes. -
Refine the texture:
Before baking, give the whole figure a once-over. You can gently texture the surface with a toothbrush if your clay isn’t speckled enough, but stone clay usually does the work for you. -
Bake:
Bake the figure according to your specific clay manufacturer’s instructions (usually 230°F – 275°F for 30 minutes per 1/4 inch of thickness). Let it cool completely before handling.
Place your little stone robot near a potted succulent for a charming natural display
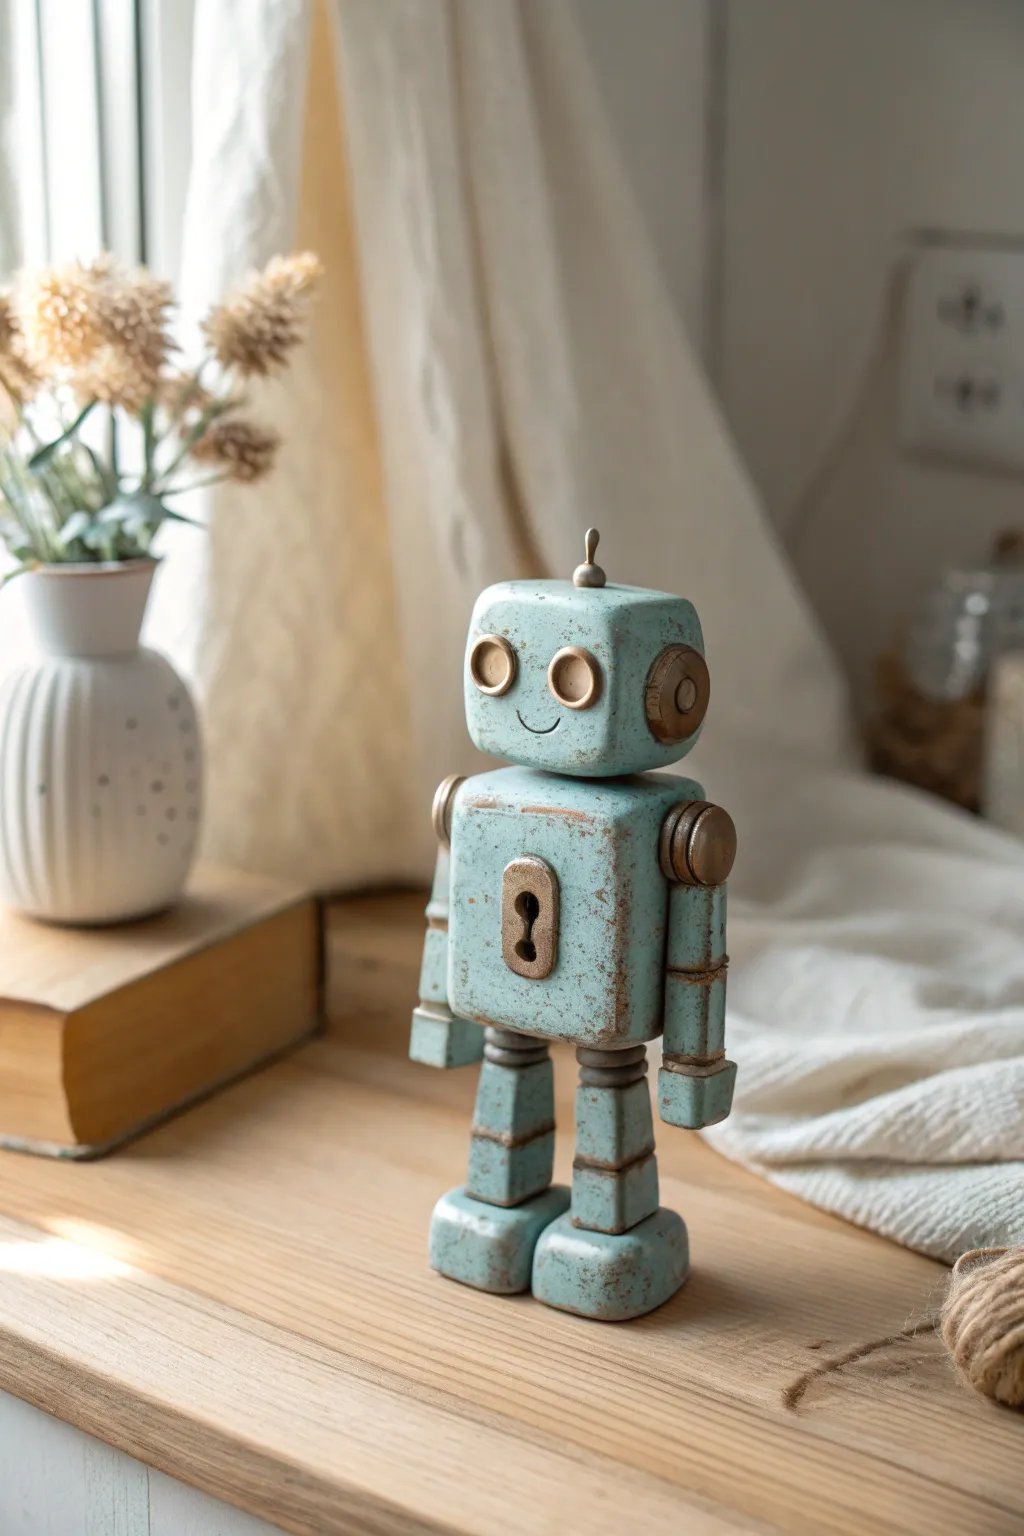
Retro TV-Screen Face Robot
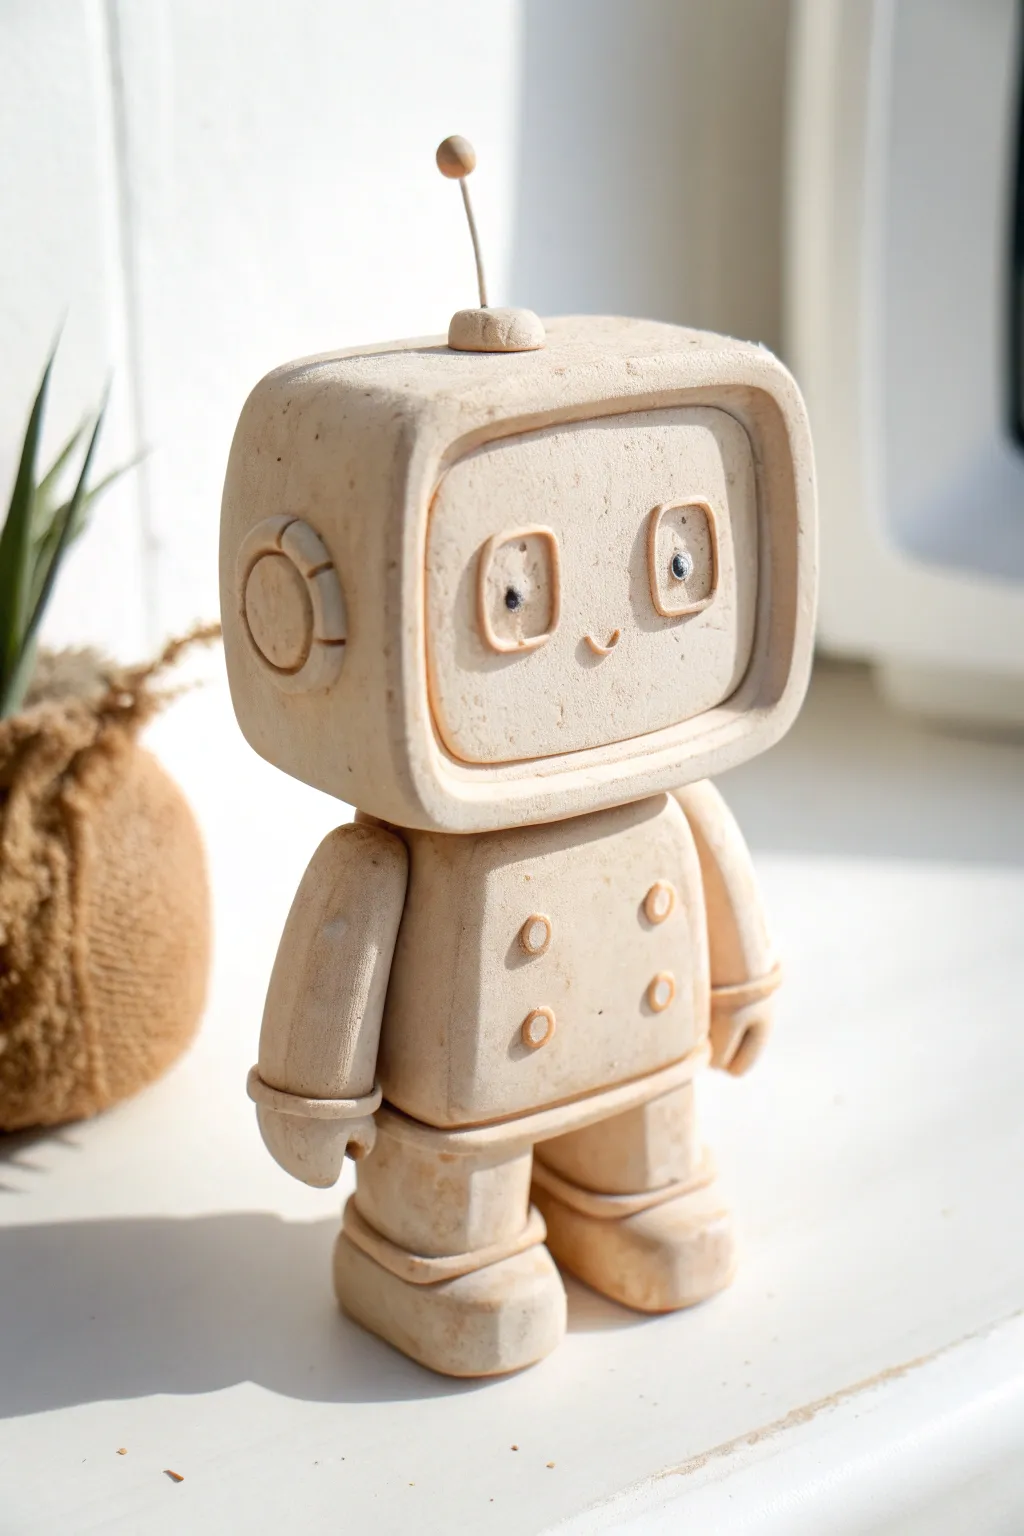
Channel the charm of vintage sci-fi with this delightful beige clay robot, featuring a TV-screen face and chunky, articulated-style limbs. The monochromatic finish gives it a polished, stoneware-like appearance perfect for simple desk decor.
Detailed Instructions
Materials
- Polymer or air-dry clay (beige or sand color)
- Clay modeling tools (sculpting needle, silicone shaper)
- Wire or toothpick (for antenna armature)
- Small black beads or black clay (for pupils)
- Rolling pin
- Circle cutters (various small sizes)
- Sandpaper (fine grit)
- Clear matte varnish (optional)
Step 1: Sculpting the Head and Body
-
Form the head block:
Start by conditioning your clay and shaping a substantial rounded cube for the head. Flatten the sides slightly but keep the edges soft and organic, not sharp. -
Create the screen indent:
Using a smaller square cutter or a modeling tool, press a deep, rounded square indentation into the front face to act as the ‘screen’ border. -
Refine the faceplate:
Smooth the inside of this indentation so it’s flat. This recessed area is where the personality shines, so take time to get it smooth. -
Sculpt the torso:
Form a second, slightly smaller rectangular block for the body. It should be narrower at the top and slightly wider at the bottom, like a trapezoid. -
Add chest buttons:
Roll four tiny spheres of clay and flatten them into discs. Attach them in a square formation on the chest, pressing the centers with a small dotting tool. -
Connect head and body:
Use a small piece of unbaked clay or a hidden toothpick to securely join the head to the body, ensuring the finish remains seamless.
Step 2: Limbs and Details
-
Shape the legs:
Create two stout, cylindrical shapes for the legs. I prefer to make them slightly wider at the base significantly for stability. -
Add boots / feet:
Sculpt oval-shaped feet and attach them to the legs. Add a thin ‘cuff’ or ring of clay around the ankle joint to simulate boots. -
Form the arms:
Roll two sausage shapes for arms. Gently curve them so they hang naturally at the robot’s sides. -
Detail the hands:
Flatten the ends of the arms into mitten-like hands. Use a knife tool to make a single slit for a thumb, keeping the detail minimal. -
Attach the wrist cuffs:
Wrap a thin strip of clay around the wrist area to separate the hand from the arm, matching the ankle style. -
Attach limbs to body:
Score and slip (if using air dry) or blend the clay (if polymer) to attach the legs to the underside and arms to the shoulders.
Stone Effect
Mix black pepper or used coffee grounds into your beige clay before sculpting. This creates a natural speckled texture without needing to paint.
Step 3: Facial Features and Antenna
-
Create the eyes:
Press two square outlines softly into the faceplate. Inside these squares, place two flattened ovals of beige clay for the eyes. -
Add pupils:
Embed tiny black beads or very small balls of black clay into the beige eye ovals to bring the robot to life. -
sculpt the smile:
Use a small, curved tool to press a tiny, subtle ‘u’ shape between the eyes for a minimalist mouth. -
Add the ear dials:
Attach a circular disc to the side of the head. Add detail by pressing segments into it to look like a volume dial. -
Install the antenna:
Place a small dome on top of the head. Insert a piece of wire or stiff monofilament into the center, topped with a tiny clay ball. -
Final texture check:
Before drying or baking, gently dab the surface with a coarse sponge or crumpled foil to give it that stone-like texture. -
Finish:
Bake or dry according to your clay’s instructions. Once cured, you can lightly sand any rough bottoms to ensure it stands perfectly flat.
Antenna Upgrade
Instead of a straight wire, coil thin craft wire around a pencil to create a springy, bouncy antenna for extra kinetic personality.
Place your little retro friend on a sunny windowsill where the shadows can highlight those carved details


What Really Happens Inside the Kiln
Learn how time and temperature work together inside the kiln to transform clay into durable ceramic.
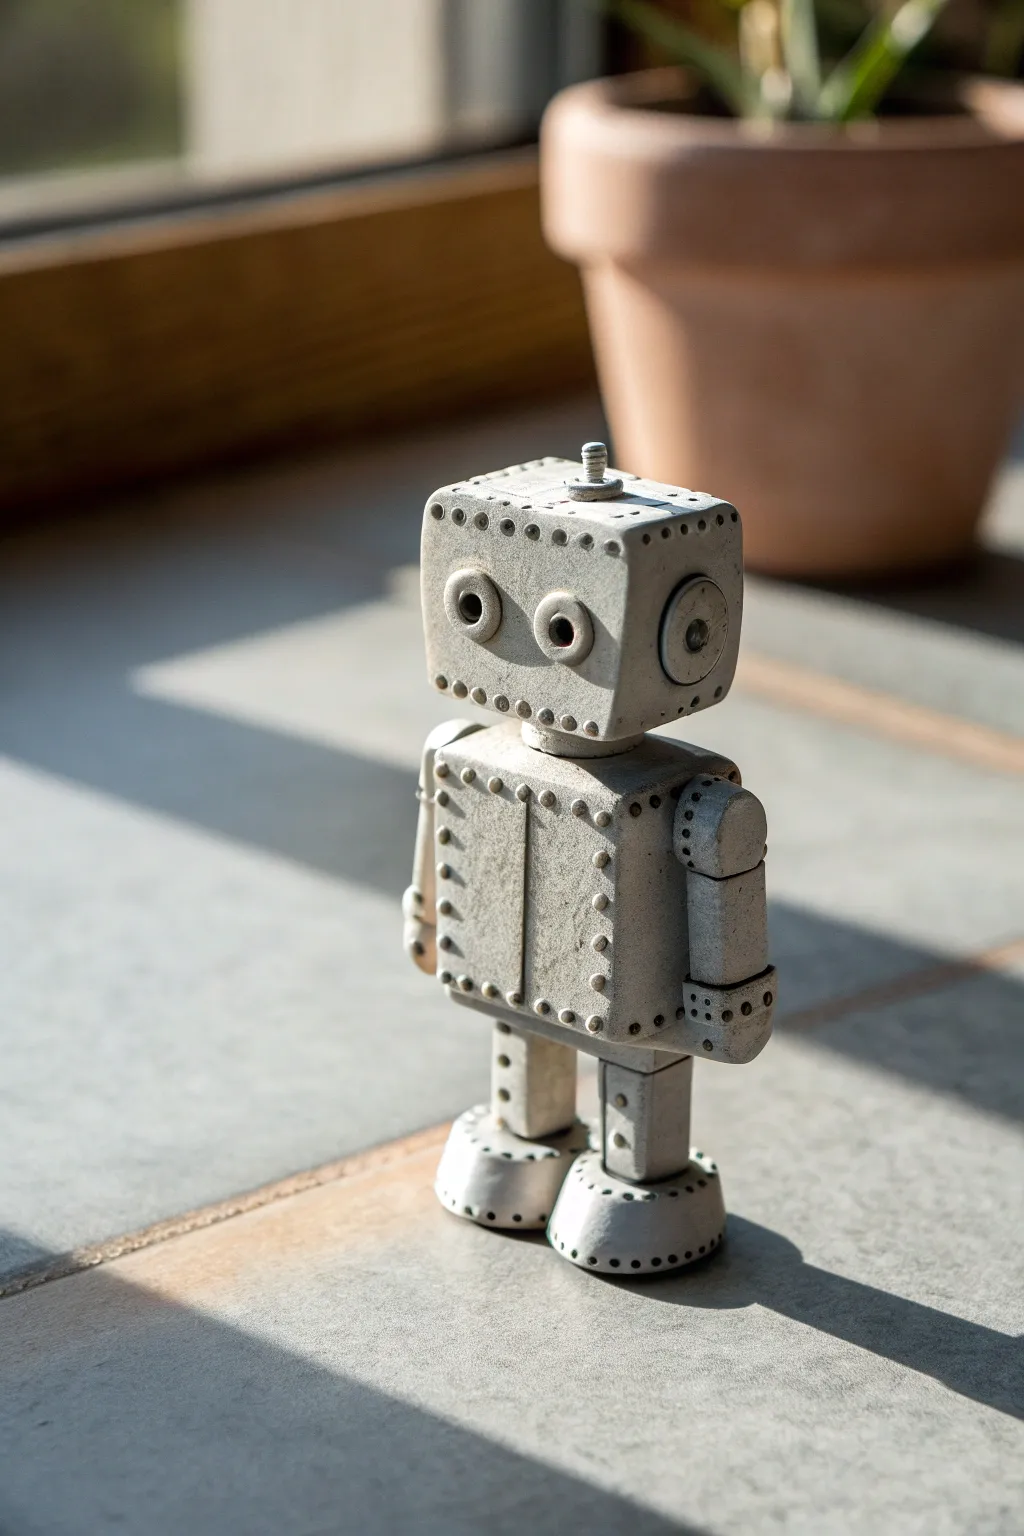
Simple Slab-Built Robot Figurine
This charming, blocky figurine captures the essence of a vintage toy robot made from stone-like clay. Its simple geometric shapes and dotted texture create an endearing, primitive futuristic look perfect for a shelf display.
Step-by-Step
Materials
- Stone-effect polymer clay (e.g., Granite or Limestone) or textured stoneware clay
- Rolling pin or pasta machine
- Sharp craft knife or clay blade
- Needle tool or toothpick
- Small circle cutter (straws work well)
- Two small beads or tiny clay balls (for eyes)
- One small metal bead or rivet (for antenna)
- Liquid clay (TLS) or slip/score tool
- Sandpaper (fine grit)
Step 1: Building the Head and Torso
-
Prepare the Slabs:
Condition your clay until it’s pliable but firm. Roll it out into a slab about 1/4 inch thick. This thickness provides the sturdy, stone-block aesthetic seen in the reference. -
Cut the Cubes:
Using your sharp blade, cut six squares to form the head cube and six slightly larger rectangles/squares for the body. Alternatively, simpler solid blocks can be formed if you want a heavier figurine, just ensure they are squared off cleanly. -
Assemble the Head:
Join your slab pieces to create a hollow cube for the head. Smooth the seams gently with your finger so the corners remain somewhat sharp but unified. If using solid clay, simply sculpt a perfect cube. -
Create the Torso:
Repeat the process for the body, making a slightly larger, rectangular block. Ensure the top surface is flat so the head will sit level later. -
Add the “Rivets”:
Take your needle tool and gently press small indentations along the perimeter of the face and the front of the chest plate. Keep the spacing consistent to mimic industrial rivets. -
Detail the Face:
Press two deep indentations for eye sockets using the back of a pen or a small modeling tool. Insert two small brownish beads or balls of contrasting clay into these sockets. -
Complete the Features:
Scribe a simple horizontal line for the mouth. Attach the ‘ears’ by cutting small circles (or thick cylinders) and pressing a smaller circle into the center of each, then adhering them to the sides of the head.
Step 2: Constructing Limbs and Assembly
-
Form the Chest Detail:
Roll four tiny balls of clay and flatten them into discs. Attach these to the center of the chest in a square formation and pierce the center of each with your needle tool. -
Make the Arms:
Cut two rectangular prisms for the upper arms and two for the forearms. Connect them at a slight angle to simulate an elbow joint. I find scoring the clay helps these hold better. -
Sculpt the Hands:
Fashion two small ‘C’ shapes or claws for the grippers. Attach these to the ends of the forearms, smoothing the connection point. -
Build the Legs:
The legs are segmented. Create two upper thigh blocks and two lower shin blocks. Stack them with a slight overlap or a thin spacer of clay between them to suggest a knee joint. -
Add Leg Rivets:
Continue your rivet pattern down the front of the thigh blocks and shin blocks using the needle tool. -
Attach the Feet:
Create two flat, rectangular slabs for feet. Attach the leg assemblies to these bases, ensuring the robot stands balanced and upright. -
Final Assembly:
Stack the components: attach the legs to the underside of the torso, then center the head on the shoulders. Use a small daub of liquid clay or thoroughly score the surfaces for a permanent bond. -
The Antenna:
For the finishing touch, create a small clay mound on top of the head and press your metal bead or rivet into the center. -
Baking or Firing:
Bake according to your polymer clay package instructions or fire your ceramic clay. If baking polymer, tenting with foil prevents scorching on the ‘stone’ finish. -
Post-Cure Finish:
Once cool, you can lightly sand any rough edges to enhance the weathered stone look. A very subtle matte varnish will protect the surface without making it glossy.
Uneven Standing?
If your robot wobbles, gently sand the bottom of the feet on a flat piece of sandpaper (taped to a table) before baking to ensure perfectly level soles.
Rusty Relic
After baking, dilute burnt umber acrylic paint with water. Wash it over the entire figure and wipe it off immediately. The dark paint will stay in the rivet holes for an aged look.
Now you have a stoic little stone guardian ready to explore your desk or bookshelf
Rounded Capsule Body Robot
Capture the charm of retro tin toys with this delightful clay styling project. This robot features a classic rounded capsule body, articulated-looking limbs, and a perfectly weathered teal finish that suggests years of playful history.
Step-by-Step Tutorial
Materials
- Air-dry clay or polymer clay (needs to be sturdy)
- Acrylic paints (Teal/Robin’s Egg Blue, Gold/Bronze, Dark Brown/Black)
- Small styrofoam ball or foil ball (for the head core)
- Cylindrical armature (cardboard tube or foil log)
- Thick wire or wooden dowels (for connecting limbs)
- Coiled metal springs or flexible ribbed tubing (for legs)
- Sculpting tools (needle tool, smoothing sponge)
- Fine grit sandpaper
- Matte varnish or sealant
Step 1: Sculpting the Head and Body
-
Form the head core:
Start by rolling a ball of foil or using a small styrofoam ball as your base. Cover this core with an even sheet of clay, smoothing it until it forms a perfect dome shape. -
Create the body cylinder:
Roll out a thicker slab of clay and wrap it around a cardboard tube or a dense foil cylinder to create the main body. Ensure the seam is smooth and invisible. -
Add the neck rim:
Between the head dome and the body cylinder, add a thin, flattened disk of clay. This acts as the ‘neck’ joint and adds visual separation. -
Refine the edges:
Use a damp sponge or finger to create a slight bevel or rounded rim at the bottom of the head dome and the top of the body cylinder distinct from each other. -
Embed the eyes:
Press two large, circular indentations into the head. Form two small flat discs of clay for the eye rims and press them in, then add smooth, rounded domes inside these rims for the pupils. -
Detail the rivets:
Roll tiny spheres of clay and flatten them gently onto the chest area in a decorative V-shape pattern. Use a needle tool to press the center if you want a screw-head look, or leave smooth for rivets. -
Add the antenna:
Place a very small bead of clay on the absolute apex to serve as the antenna base.
Weight Distro Tip
Keep the feet solid clay (no foil core) but use a large foil core for the head. This keeps the center of gravity low so your robot stands without tipping.
Step 2: Creating the Limbs
-
Sculpt the arms:
Roll two equal cylinders for the upper arms and two slightly longer ones for the forearms. Connect them with a simple rounded elbow joint made of a clay ball. -
Shoulder joints:
Create rounded caps for the shoulders. Attach these to the sides of the body cylinder using a bit of wire for support if the clay is heavy. -
Leg supports:
This is where mixed media shines. Push your coiled springs or ribbed tubing into the bottom of the soft clay body to create the legs. If using clay for legs, roll a coil and score horizontal lines to mimic a spring. -
Technique note:
I prefer to use actual metal springs or hardware for the legs to give it that authentic mixed-material antique toy feel. -
Square feet:
Form two rectangular blocks for the feet. Slightly bevel the top edges so they aren’t sharp. Press the bottom of the leg springs firmly into the center of each block. -
Drying:
Allow all clay parts to dry completely (24-48 hours for air-dry clay) before assembling or painting. Sand any rough fingerprints lightly.
Step 3: Painting and Weathering
-
Base coat:
Paint the main body components (head, torso, feet, arms) with a solid coat of robin’s egg blue or soft teal acrylic paint. You may need two coats for opaque coverage. -
Metallic accents:
Paint the eye rims, the rivets on the chest, the neck rim, and the antenna with a metallic gold or bronze paint. Paint the pupils solid black. -
Leg coloring:
If you sculpted the legs from clay, paint them a metallic silver or pewter color to simulate raw metal springs. -
Dry brushing for age:
Dip a stiff, dry brush into a tiny amount of dark brown paint. Wipe almost all of it off on a paper towel, then lightly whisk it over the edges and raised surfaces to create a dirty, antique look. -
Scuffed metal effect:
Using a very fine brush or a piece of sponge, dab bits of silver or gold paint specifically on the corners and high-wear areas to make it look like the blue paint has chipped off. -
The final wash:
Mix a very watery black/brown wash. Paint it into the crevices (like around the eyes and rivets) and immediately wipe away the excess, leaving shadows in the deeper areas. -
Seal:
Finish with a matte varnish to protect the paint job while maintaining that non-glossy, vintage toy aesthetic.
Cracked Clay?
If cracks appear as the clay dries, make a ‘slurry’ paste by mixing a small chunk of fresh clay with water. Smear this into cracks and sand smooth once dry.
Place your finished robot on a shelf where its nostalgic charm can be admired by everyone who passes by

TRACK YOUR CERAMIC JOURNEY
Capture glaze tests, firing details, and creative progress—all in one simple printable. Make your projects easier to repeat and improve.
Junk Bot With Mixed Hardware
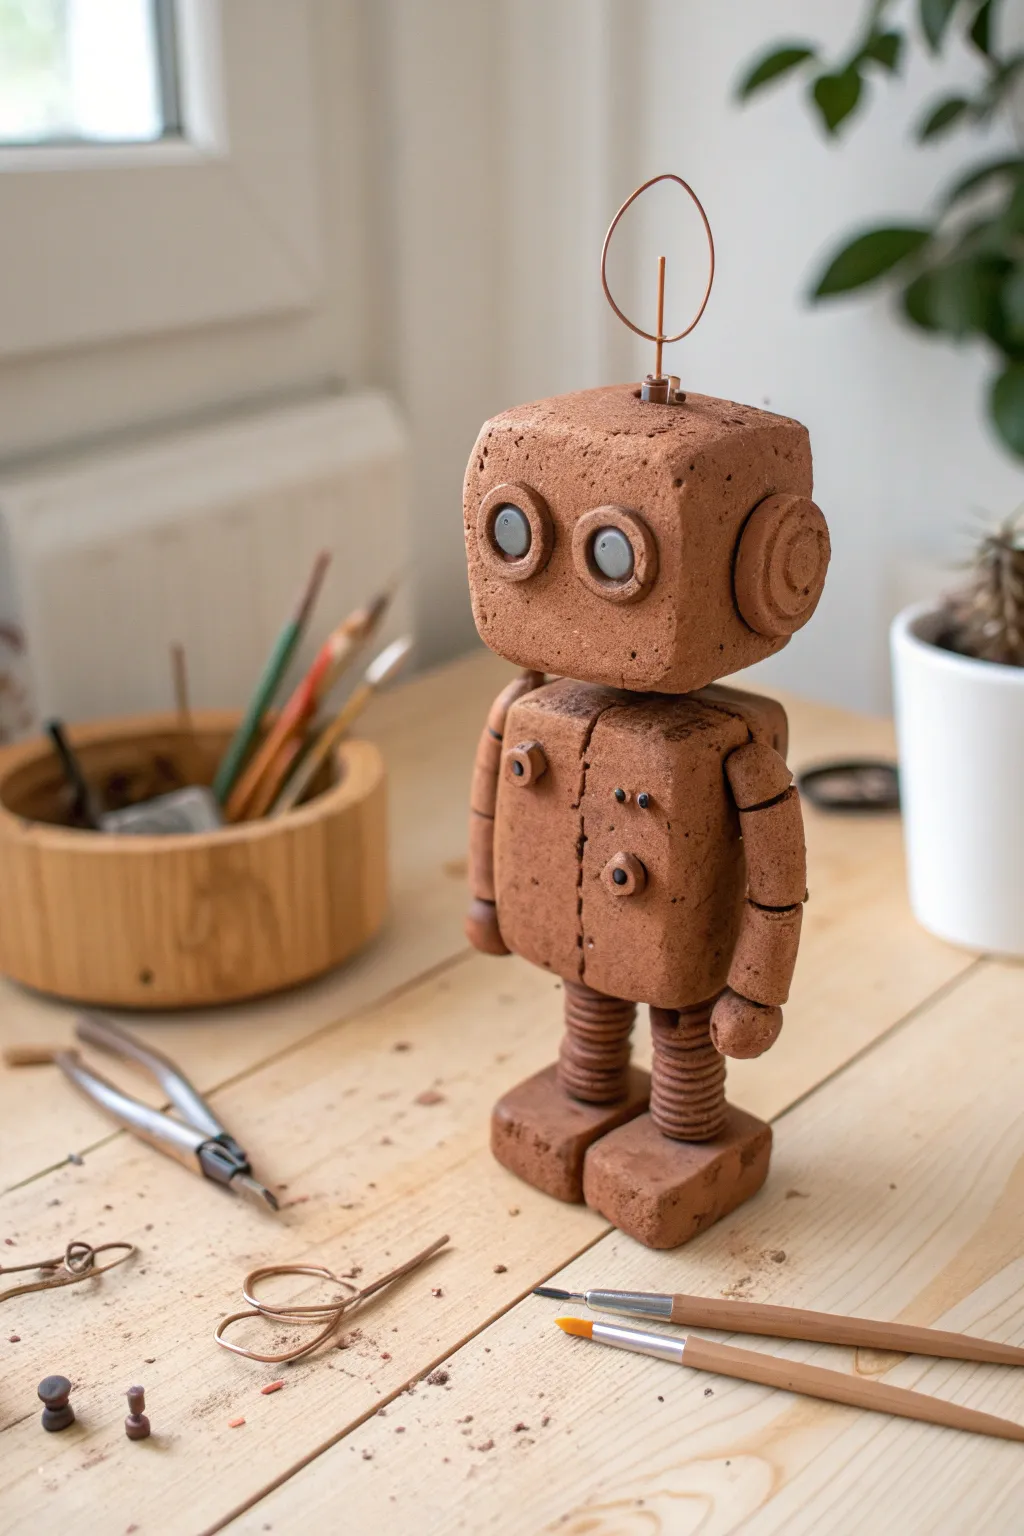
This charming desk companion blends the earthy texture of terracotta clay with subtle industrial details for a unique retro-futuristic look. The blocky, textured finish gives the robot a handmade vintage toy feel that adds warmth to any workspace.
How-To Guide
Materials
- Terracotta-colored polymer clay (or air-dry clay)
- Thick copper wire (for the antenna)
- Small grey buttons or rounded plastic beads (for eyes)
- Small black beads or tiny screws (for chest details)
- Modeling tools (or a toothpick and a dull knife)
- Texturing tool (stiff bristle brush or scrunched aluminum foil)
- Coiled wire or metal springs (for legs)
- Superglue or strong craft adhesive
- Wire cutters
- Acrylic matte varnish (optional)
Step 1: Shaping the Core Body
-
Form the head block:
Start by conditioning a large portion of clay and shaping it into a cube with slightly rounded corners. This will be the robot’s head. -
Create the torso:
Form a second, rectangular block for the body. It should be roughly the same width as the head but taller and slightly thinner. -
Texture the surface:
Gently press a stiff bristle brush or a ball of crumpled foil against all sides of both blocks to create a rough, porous stone-like texture. -
Indent the eye sockets:
Use your thumb or a large ball tool to press two distinct, shallow indentations into the front of the head block for the eyes. -
Attach the neck:
Roll a disk of clay or use a small metal washer to act as a neck, sticking it firmly to the center of the torso’s top surface.
Step 2: Adding Appendages and Details
-
Sculpt the arms:
Roll two thick cylinders of clay for the arms. Use a knife to lightly score horizontal lines around them to mimic segmented joints. -
Form the hands:
At the end of each arm, attach a simple ball of clay and shape it slightly to look like a mitten or a mechanical gripper. -
Make the feet:
Create two small rectangular blocks for feet. Flatten the bottoms so the robot will stand securely and texture them to match the body. -
Prepare the leg connectors:
Cut two pieces of coiled wire or use metal springs. Press these firmly into the top of the feet blocks and the bottom of the torso to create the legs. -
Add ear details:
Roll two small disks of clay and press a smaller circle into the center of each. Attach these to the sides of the head block as auditory sensors. -
Detail the chest:
Using a needle tool, score a vertical line down the center of the torso and a horizontal line across the top to simulate metal plating.
Wobbly Robot?
If the head is too heavy for the neck, insert a toothpick or heavy wire through the torso and up into the head before baking to act as an internal armature spine.
Step 3: Hardware Assembly and Finishing
-
Bake or dry the components:
If using polymer clay, bake the pieces according to package instructions. If using air-dry clay, allow the pieces to dry completely for 24-48 hours. I find it safest to bake the clay parts separately from the metal springs if you aren’t sure they are oven-safe. -
Construct the antenna:
Bend a piece of copper wire into a circle with a straight stem. Insert this into the top of the head, securing with a drop of glue. -
Insert the eyes:
Glue the grey buttons or beads into the recessed eye sockets. They should protrude slightly for a curious expression. -
Add chest rivets:
Glue small black beads or tiny screw heads into the chest plate area to serve as buttons or rivets. -
Final assembly:
Use superglue to permanently attach the head to the neck and the arms to the sides of the body. -
Leg attachment:
If the springs weren’t baked into the clay, glue the metal leg coils securely between the torso and the feet. -
Seal the work:
Brush on a light coat of matte varnish to protect the clay while maintaining that dusty, terracotta appearance.
Gear Up
Embed real metal washers, small watch gears, or computer chip fragments into the wet clay surface for a more complex, high-tech ‘junk bot’ aesthetic.
Place your little terracotta robot on a shelf where its quirky personality can brightly greet you every day
Steampunk Gear-Eye Robot
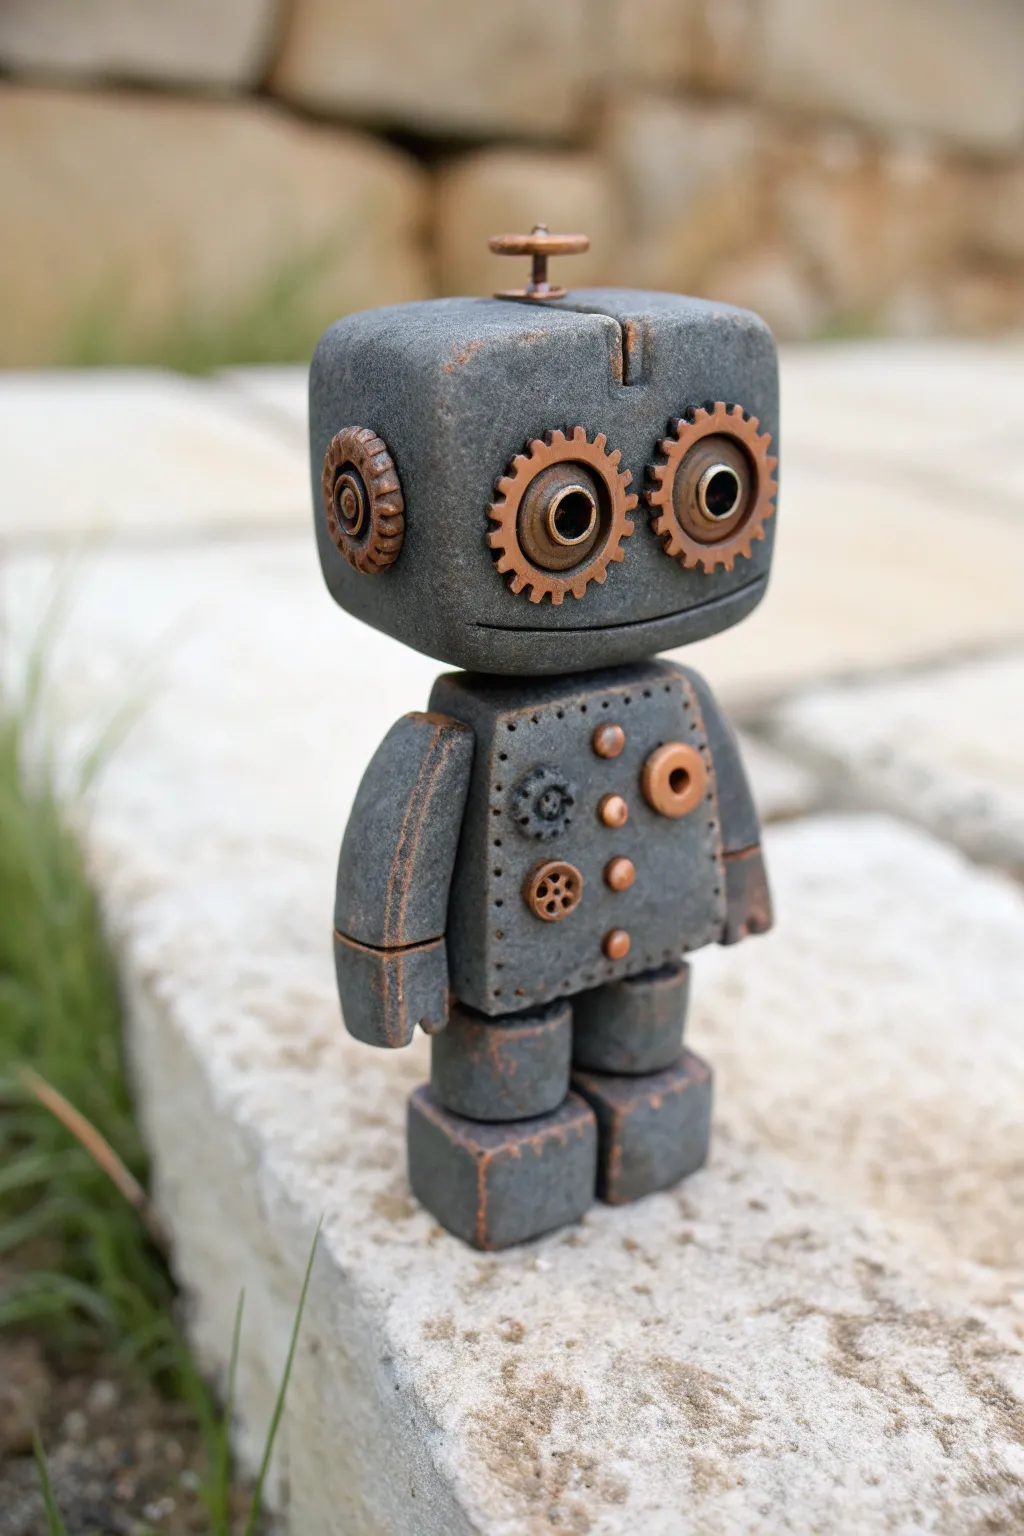
This charming little figurine combines the rugged texture of weathered stone with industrial steampunk aesthetics. Sculpted from polymer clay and finished with faux-finishing techniques, he looks like a heavy, ancient relic despite being lightweight and easy to make.
Detailed Instructions
Materials
- Gray polymer clay (granite or stone effect preferred)
- Bronze or copper colored polymer clay (or metallic acrylic paint)
- Black acrylic paint
- Burnt sienna or rust-colored acrylic paint
- Small metal gears (steampunk charms) or gear molds
- Sculpting tools (needle tool, ball stylus)
- Craft knife
- Wire or toothpicks for armature
- Small brush or sponge for weathering
- Matte varnish
Step 1: Sculpting the Body Parts
-
Form the head:
Start with a block of gray clay and shape it into a soft cube. Round off the edges and corners significantly so it doesn’t look sharp—you want it to look like a tumbled stone. -
Shape the torso:
Create a slightly smaller, rectangular block for the body. Like the head, soften all the edges. Before connecting them, insert a short piece of wire or a toothpick into the top of the body to act as a neck support. -
Create the limbs:
Roll out two thick logs for arms and flatten one side of each so they will sit flush against the body. Create four smaller, chunky cubes for the legs and feet—two for the upper leg segments and two slightly larger ones for the feet. -
Assemble the basic form:
Connect the head to the body using the support you added earlier. Stack the leg segments and attach them to the bottom of the torso. Press the arms firmly onto the sides of the body.
Step 2: Adding Steampunk Details
-
Create the gear eyes:
If you are using real metal gear charms, press two large matching gears deep into the face. If you are sculpting them, make flat discs of bronze clay, indent teeth around the edges with a knife, and press a smaller ring into the center. -
Add pupil details:
Roll tiny tubes of bronze clay to create the protruding ‘telescope’ pupils. Place these directly into the center of the gear eyes. -
Sculpt the rivets:
Make very small balls of bronze clay. Flatten them slightly and press them onto the chest plate in an asymmetrical pattern using your fingertip or a flat tool. -
Detail the mouth and head:
Use a needle tool or knife to carve a simple, straight horizontal line for the mouth. Add a vertical indentation or ‘seam’ at the top of the head. -
Add the antenna:
Create a small ‘T’ shape or a post with a disc on top using bronze clay. Insert a small wire piece into the top of the head and slide this antenna over it to secure it upright. -
Apply ear gears:
Place a smaller gear or a sculpted clay disc on the side of the head to resemble an auditory sensor. Add a small concentric circle inside it for detail. -
Texture the surface:
I find that gently tapping the gray areas with a toothbrush or a ball of crinkled foil gives that perfect pitted, concrete-like texture before baking.
Stone Texture Tip
Mix a pinch of black pepper or craft sand into your gray clay before sculpting. This creates natural speckling that mimics granite without needing to paint it later.
Step 3: Baking and Finishing
-
Bake the sculpture:
Bake the piece according to your polymer clay manufacturer’s instructions, usually around 275°F (135°C) for 15-30 minutes depending on thickness. Let it cool completely. -
Apply a black wash:
Dilute black acrylic paint with water. Brush it over the entire robot, ensuring it gets into the gear teeth, the mouth slit, and the surface texture. Wipe away the excess with a paper towel before it dries, leaving dark shadows in the crevices. -
Add rust effects:
Dry brush a small amount of burnt sienna or rust-colored paint onto the bronze parts and the crevices where metal would meet stone. This simulates oxidation and age. -
Highlight the edges:
Using a very light touch, dry brush a tiny bit of light gray or white paint just on the topmost edges of the stone head and shoulders to make the texture pop. -
Seal the work:
Finish with a coat of matte varnish to protect the paint and unify the sheen, making the clay look even more like real stone.
Level Up: Moving Parts
Instead of gluing the head, embed a small magnet in the neck and one in the body. This allows you to pose the robot’s head at different inquisitive angles.
Now you have a stoic little industrial companion ready to guard your desk
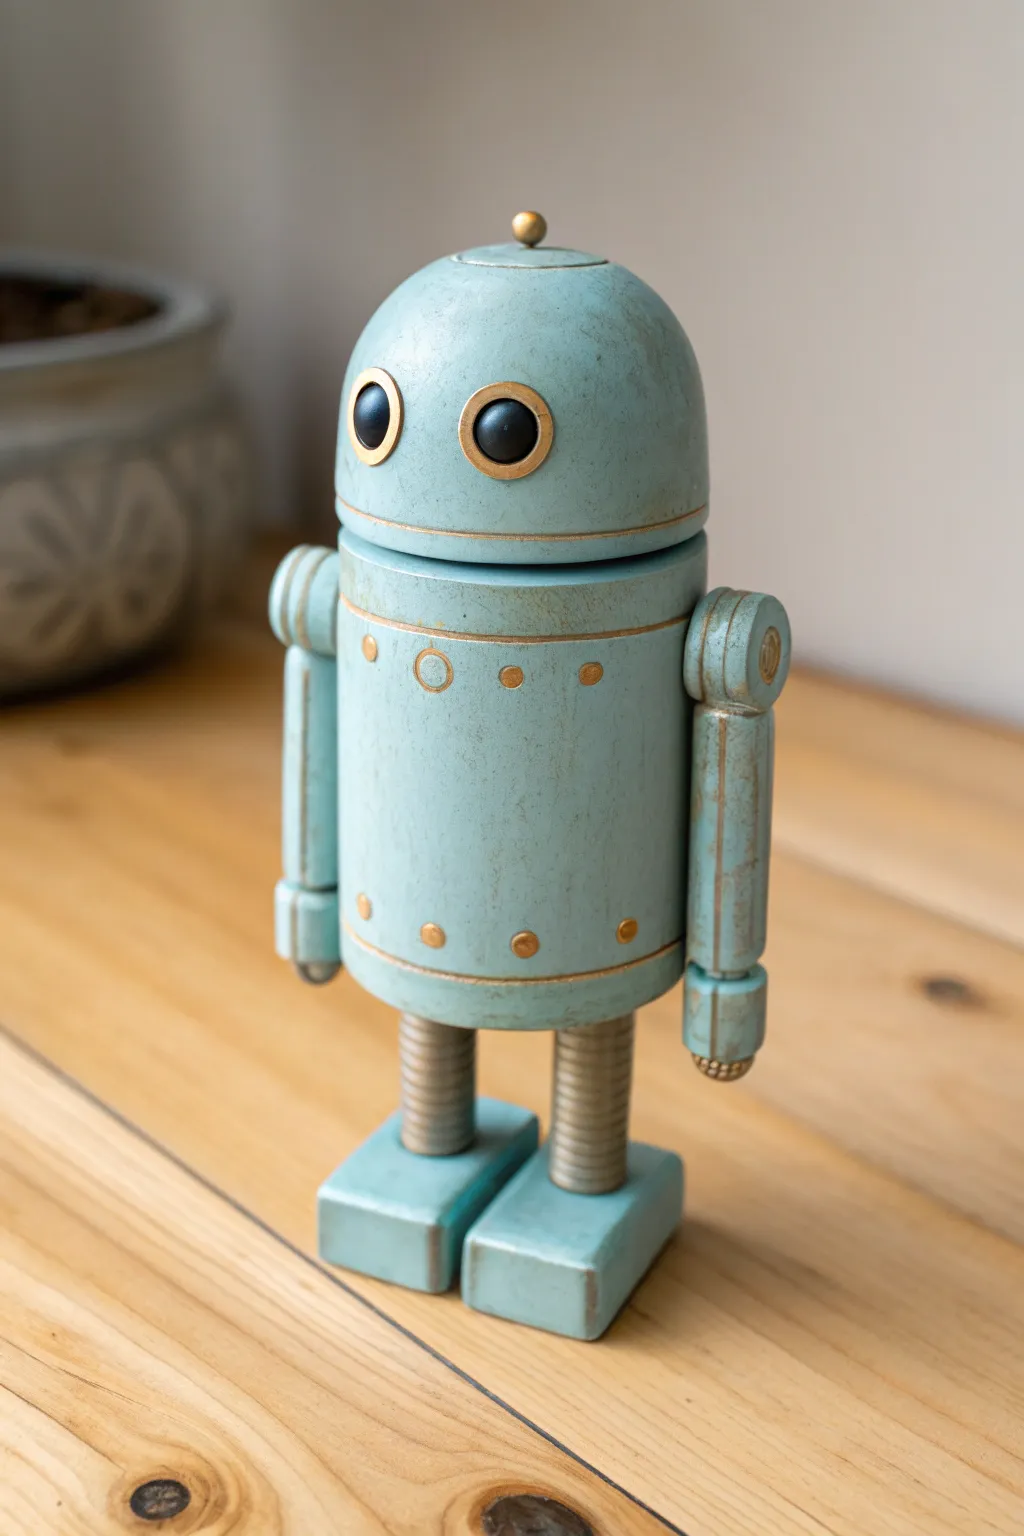
Robot With Key Chest Detail
This charming tabletop companion combines the structure of a vintage toy with a delightfully weathered aesthetic. You’ll create a boxy, jointed-looking robot with a distinct keyhole chest detail, finished with a faux-rust paint job that gives it a century-old feel.
Step-by-Step
Materials
- Polymer clay (light blue/turquoise)
- Polymer clay (scrap clay for core, optional)
- Polymer clay (metallic gold or bronze)
- Acrylic paints (burnt umber, rust, black)
- Gloss glaze or varnish
- Clay blade
- Dotting tools
- Needle tool
- Small textured sponge
- Armature wire or toothpicks (for stability)
- Oven
Step 1: Shaping the Components
-
Form the head:
Start by conditioning your light blue clay. Roll a smooth ball and gently flatten the sides against your work surface to create a rounded cube shape, about 1.5 inches wide. -
Create the torso:
Shape a slightly larger, rectangular block for the body. Ensure the top is flat so the head sits securely, and round the edges slightly to soften the look. -
Make the limbs:
Roll four cylinders of blue clay for the arms and legs. Cut each cylinder in half to create an upper and lower segment for each limb, keeping the edges blunt and squared off. -
Form the feet:
Sculpt two squat, rectangular blocks for feet, making them slightly wider than the leg segments to provide a stable base for standing.
Pro Tip: Hidden Strength
Use crumpled aluminum foil as a core for the head and body. This saves clay and reduces the weight, making the figure less likely to topple over during baking.
Step 2: Adding Joints and Details
-
Create connector joints:
Switch to your metallic gold or bronze clay. Roll small discs to serve as the ‘neck’ and the connectors between the arm and leg segments. -
Assemble the limbs:
Sandwich a metallic disc between the upper and lower arm pieces. Do the same for the legs. I prefer to insert a small piece of wire or toothpick through the center of these stacks for structural strength. -
Shoulder joints:
Create two larger metallic discs for the shoulders. Press them firmly onto the upper sides of the torso. -
Attach the head:
Place a metallic neck disc on the torso, insert a wire for support, and press the head block down firmly. -
Add the feet:
Attach the assembled legs to the feet blocks. Then, press the legs into the bottom of the torso, blending the seam underneath gently.
Troubleshooting: Fingerprints
If you notice fingerprints on the smooth blue clay before baking, lightly brush the surface with a little baby oil or cornstarch to smooth them away instantly.
Step 3: Face and Chest Features
-
Make the eyes:
Roll two small balls of white clay and flatten them. Add a border of metallic bronze clay around each to create circular rims, then press them onto the face. -
Add ear details:
Create small metallic caps or discs and attach them to the sides of the head. -
Sculpt the mouth:
Use a needle tool or small clay carver to etch a simple, curved smile into the face below the eyes. -
Create the keyhole plate:
Flatten a small oval of bronze clay. Using a needle tool, cut out a classic keyhole shape from the center. -
Attach the keyhole:
Press this bronze oval onto the center of the chest. Use a dotting tool to indent tiny ‘screws’ or divots in the bronze plate if desired. -
Add the antenna:
Make a tiny teardrop shape from bronze clay and attach it to the top center of the head.
Step 4: Finishing and Weathering
-
Bake the robot:
Bake your creation according to the polymer clay package instructions. Let it cool completely before painting. -
Apply the rust effect:
Dip a small textured sponge into burnt umber or rust-colored acrylic paint. Dab off most of the paint on a paper towel until the sponge is almost dry. -
Stipple the surface:
Gently dab the sponge over the edges, corners, and joints of the robot to simulate wear and rust. Focus on areas that would naturally get bumped or scratched. -
Darken the details:
Use a very fine brush with diluted black or dark brown paint to fill in the mouth groove and the inside of the keyhole to create depth. -
Seal the work:
Once the paint is fully dry, apply a coat of matte or satin varnish to protect the finish.
Place your finished robot on a shelf where its vintage charm can shine
Long-Limbed Wire-Armature Robot
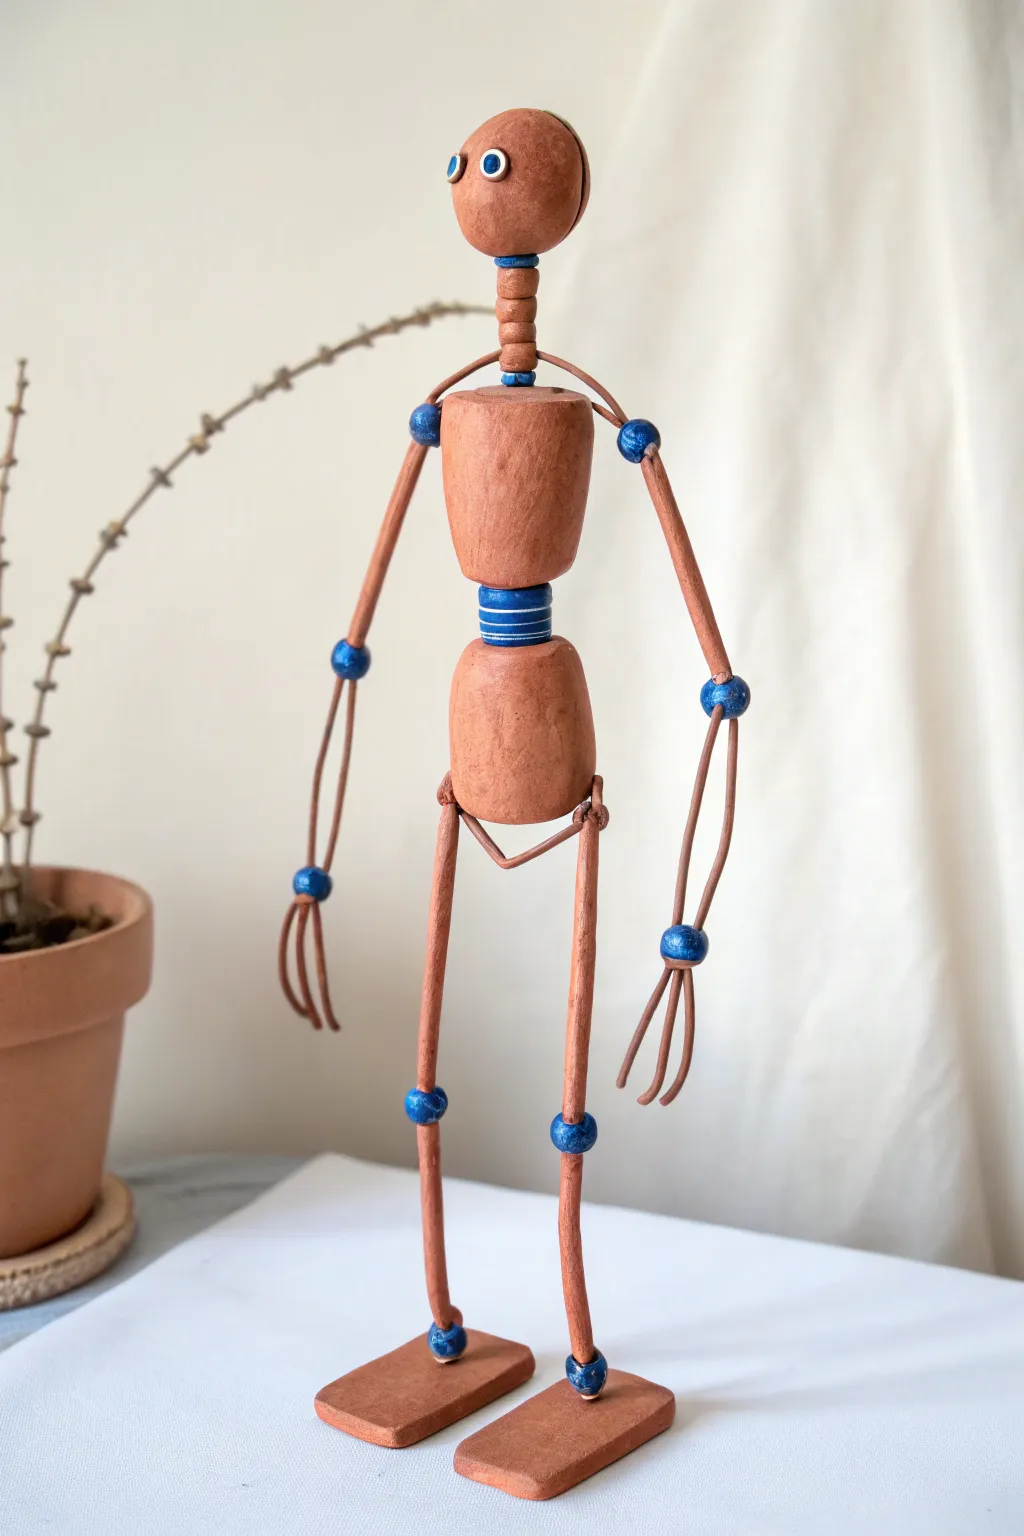
This charming, long-limbed robot figure combines the warmth of terracotta-toned clay with the mechanical aesthetic of visible wire armatures. Standing tall on flat rectangular feet, its segmented body and vivid blue bead joints give it a playful, puppet-like character that feels both ancient and futuristic.
Step-by-Step Tutorial
Materials
- Terracotta-colored polymer clay (or air-dry clay painted terracotta)
- Strong armature wire (14-16 gauge, copper or brown colored)
- Blue wooden or plastic beads (approx. 8-10mm)
- Small white beads (for eyes)
- Deep blue acrylic paint
- Small detail paintbrush
- Wire cutters
- Needle nose pliers
- Superglue or strong craft glue
- Sculpting tools (needle tool, smoother)
- Black fine-tip marker or paint pen
Step 1: Designing the Skeleton
-
Prepare the wire limbs:
Cut two long lengths of wire for the legs and two slightly shorter lengths for the arms. The wire needs to be sturdy enough to hold the clay’s weight, so use a heavier gauge. -
Form the torso spine:
Cut a central spine wire that will run from the head, through the torso, and connect to the hips. Leave plenty of extra length at the top for the neck and head attachment. -
Create the hip connection:
Bend the bottom of your spine wire into a small loop or ‘V’ shape. Attach the two leg wires to this central point by twisting the ends securely around the spine wire so they dangle freely. -
Attach the armatures:
Similarly, twist the arm wires onto the upper part of the spine wire, just below where the neck will be. Ensure the connection is tight so the arms don’t slide down later.
Step 2: Sculpting the Body Components
-
Shape the torso blocks:
Condition your terracotta clay until pliable. Form two distinct shapes: a tapered cylinder for the upper chest (wider at the top) and a rounded barrel shape for the hips/pelvis. -
Form the head:
Roll a smooth sphere of clay for the head. It should be proportional to the torso but slightly smaller than the chest piece. -
Create the feet:
Flatten a slab of clay and cut two identical rectangles. These need to be fairly large and flat to provide a stable base for your standing robot. -
Detail the connector pieces:
Create small, flat discs or rings of clay to serve as the neck segments and the waist connector. For the waist, stack a few discs to create a ribbed look. -
Pierce holes for assembly:
Unlike a standard sculpture built *over* wire, this robot is assembled in sections. Use a spare piece of wire to poke holes vertically through the center of the head, chest, hips, waist discs, and neck beads before baking. -
Make the hands:
For the hands, form two small spheres. Pierce three holes into one side of each sphere to insert wire fingers later, and one hole on the opposite side for the wrist wire. -
Cure the clay:
Bake your clay components according to the manufacturer’s package directions. I like to prop the head up on a bit of batting so it stays perfectly round. Let them cool completely.
Wire Wisdom
Use copper wire if possible. It naturally tarnishes over time, giving your robot a fantastic antique look that matches the terracotta perfectly.
Step 3: Assembly & Painting
-
Paint the details:
Before assembly, paint the ribbed waist connector deep blue. Use a fine brush to add thin white horizontal stripes for detail. Paint the neck segments terracotta if they aren’t already. -
Thread the legs:
Slide a blue bead onto each leg wire (for the hip joint). Then, thread the finished clay hip piece onto the spine wire, capturing the leg connection inside. -
Assemble the torso stack:
Slide the painted waist connector onto the spine wire, followed by the upper chest piece. Glue these sections together if you want a rigid torso, or leave them loose for movement. -
Construct the head and neck:
Thread your clay neck beads onto the spine wire. Top it with a blue bead, then slide on the head. Trim excess wire at the top, bend it into a tiny loop, and press it into the head to secure (add a drop of glue). -
Add joint beads:
Slide blue beads onto the arm and leg wires to act as elbows and knees. Use a tiny dab of superglue to hold them at the correct height on the wire. -
Attach hands and feet:
Slide a blue bead (wrist/ankle) onto the end of each limb wire. Glue the feet onto the leg wires. Glue the hand spheres onto the arm wires. -
Wire fingers:
Cut short, curved pieces of wire for fingers. Dip the ends in superglue and insert them into the pre-drilled holes in the hand spheres. -
Clay coating (optional):
If your wire is too thin, you can coat the straight sections of the limbs with a very thin layer of clay *before* baking, but the exposed wire look in the photo is achieved by leaving the armature bare. -
Final touches:
Glue two small white beads onto the face for eyes. Use a black marker or paint to add tiny pupils. Add a small ‘cap’ of clay or paint on top of the head if desired.
Level Up: Texture
Before baking, roll your clay pieces lightly over sandpaper or concrete. This imitates the porous look of real terracotta pottery.
Place your finished robot on a sunny shelf where his blue joints will catch the light
Bolt-and-Rivet Texture Robot
Capture the charm of vintage sci-fi with this minimalist clay robot, featuring a distinctive heavy-industrial look. The finish mimics weathered concrete or cast iron, achieved through careful texturing and a monochrome palette that lets the rivet details shine.
Step-by-Step Guide
Materials
- Polymer clay (grey or granite effect)
- Acrylic paint (black and white)
- Rolling pin
- Small circle cutters (various sizes)
- Needle tool or toothpick
- Ball stylus or blunt tool
- Small screw (for the antenna)
- Craft knife
- Aluminum foil (for armature)
- Paintbrush (dry brush style)
Step 1: Forging the Body
-
Form the Core:
Start by conditioning your grey clay until it is pliable. Create a solid cube for the head, slightly softening the sharp corners with your fingertips to give it a cast-metal appearance. -
Torso Construction:
Shape a second, slightly taller rectangular block for the body. This should be roughly the same width as the head but taller to accommodate the chest plate details. -
Connect the parts:
Insert a small piece of toothpick or wire into the top of the torso and press the head firmly onto it. This internal support is crucial for structural integrity. -
Define the Chest:
Roll out a thin sheet of clay and cut a rectangle slightly smaller than the front of the torso. Press this ‘plate’ onto the chest, and use a knife to gently score a vertical line down the center for a panel effect.
Slumping Clay?
If the head squishes the body down, bake the legs and torso first for 10 minutes to harden them. Add raw clay parts later and bake again.
Step 2: Component Assembly
-
Create the Eyes:
Make two small balls of clay and flatten them into discs. Press these onto the face. Use the non-writing end of a pen or a large ball stylus to indent the centers heavily, creating deep, shadowed sockets. -
Jointed Limbs:
Roll a snake of clay for the arms. Cut two segments for the upper arms and two slightly thicker, cuff-like segments for the forearms. -
Arm Assembly:
Attach the upper arm to the shoulder area, followed by the forearm. Blend the clay slightly at the seam, or add a small clay disc between them to act as a hinge. -
Heavy Feet:
Form two truncated cones for the feet—wide at the bottom and narrower at the top. These need to be heavy enough to stabilize the standing figure. -
Leg Structure:
Create simple rectangular pillars for legs. Attach them to the feet first, then connect the entire leg assembly to the bottom of the torso. -
Ear Details:
Add small, flat discs to the sides of the head. Use a smaller tool to press a center indentation, mirroring the eye socket style but shallower.
Make It Rusty
For a rusted iron look, dab Burnt Sienna and Orange paint sporadically on the joints and feet before doing your final black wash.
Step 3: The Rivet Texture
-
Top Rivets:
This is the defining step. Using a small blunt tool or a very small straw, press a row of circles around the perimeter of the head’s top surface. Keep the spacing even. -
Face Detailing:
Continue the rivet pattern along the jawline of the robot face. I find doing this slowly helps maintain straight lines. -
Body Hardware:
Add rivet indentations around the perimeter of the chest plate panel and along the cuffs of the arms and feet. More rivets equal a more industrial look. -
The Antenna:
Take a real, small metal screw. Gently push it thread-side down into the center of the head until only the head and a bit of the shaft are visible.
Step 4: Finishing
-
Baking:
Bake the figure according to your polymer clay package instructions. Usually, this is around 275°F (135°C) for 15-30 minutes depending on thickness. -
Stone Wash:
Once cool, mix a very watered-down black acrylic paint. Brush this wash over the entire robot, ensuring the liquid pools in the rivet holes and eye sockets. -
Wipe Back:
Before the paint dries, wipe the surface with a paper towel. The black will stay in the recesses, highlighting the texture. -
Highlighting:
Finally, use a dry brush with a tiny amount of white paint to lightly dust the edges and raised areas, giving it that dusty, weathered concrete finish.
Now you have a stoic little guardian ready to watch over your desk
Patina Paint Robot Finish
Give your clay creation the look of an ancient, weathered artifact with this faux-metal finish. This project combines simple geometric sculpting with a specialized painting technique to achieve a convincing oxidized bronze effect that looks like it was dredged from the deep sea.
How-To Guide
Materials
- Polymer clay (grey or white recommended)
- Foil for armature (optional)
- Small ball stylus tool
- Pointed sculpting tool or toothpick
- Wire (for antenna)
- Black acrylic paint
- Metallic bronze or copper acrylic paint
- Teal or turquoise acrylic paint (matte)
- Baking sheet
- Oven
- Small paintbrush
- Paper towels or sponge
Step 1: Sculpting the Form
-
Form the head:
Start with a block of conditioned clay and shape it into a soft cube. Round off the edges and corners gently with your fingers so it doesn’t look too sharp or manufactured. -
Create the eyes:
Press two indentations into the face area using a medium-sized ball stylus tool. Roll two small balls of clay, flatten them slightly, and press them into the sockets to create the bulging eyes. -
Add facial details:
Use a smaller stylus or sculpting tool to carve a tiny, curved smile just below the eyes. For the ears, shape two small flattened discs and press one onto each side of the head. -
Detail the ears:
Using a tool with a circular end or a small tube, press an indentation into the center of the ear discs to create a mechanical ring effect. -
Build the body block:
Form a rectangular block slightly smaller in width than the head. This will be the main torso. Smooth the sides and attach it to the bottom of the head; you can insert a small piece of toothpick or wire between them for stability. -
Add the chest panel:
Roll out a thin sheet of clay and cut a smaller rectangle. Press this onto the front of the torso to simulate an access panel. Use a small dotting tool to press four ‘rivets’ into the corners of this panel. -
Construct the limbs:
Roll two cylinders for the legs and two slightly flattened, elongated shapes for the arms. Attach the arms to the sides of the torso, blending the clay at the shoulder joint so it looks connected. -
Create hands and feet:
Attach small rounded balls to the ends of the arms for hands. For the feet, sculpt two flat rectangular blocks and attach the leg cylinders on top of them. -
Insert the antenna:
Cut a short length of wire. Push it into the top center of the head. Add a tiny bead of clay at the base where the wire meets the head to secure it. -
Bake the figure:
Bake your robot according to the clay manufacturer’s instructions. Usually, this is around 275°F (135°C) for 15-30 minutes per 1/4 inch of thickness. Let it cool completely before painting.
Too Much Teal?
If the teal paint dries too quickly before you can wipe it back, simply re-wet the area with a damp brush to reactivate the paint, then wipe again to reveal the bronze base.
Step 2: The Patina Finish
-
Base coat black:
Paint the entire robot with black acrylic paint. Ensure you get into every crevice, eye socket, and rivet indentation. Let this dry fully; it acts as a shadow layer. -
Apply the metallic layer:
Dry-brush metallic bronze or copper paint over the black. To do this, dip your brush, wipe most of the paint off on a paper towel, and lightly sweep over the raised surfaces. The black should still show in the deep recesses. -
Mix the patina color:
Prepare a teal or turquoise paint. If it’s too bright, deaden it slightly with a tiny drop of grey or white to make it look like oxidized metal scale. -
Stipple the patina:
Dab the teal paint generously over the metallic surface. I find it works best to work in sections—do the head first, then the body. -
Wipe back:
While the teal paint is still wet, immediately wipe it away with a damp paper towel or sponge. You want the teal to remain in the textured areas and flat surfaces, but reveal the underlying bronze on the edges and high points. -
Refine the edges:
If you wiped off too much teal, just dab a little more on. If you covered too much bronze, you can come back with a tiny bit of metallic paint on your finger and gently rub the corners and rivet heads to make them shine again. -
Detail the eyes:
Paint the eyes solid black to make them pop against the weathered face. You can add a tiny dot of white gloss or varnish later for a lens reflection. -
Final touches:
Check the antenna and ensure it looks weathered too. Let everything dry completely. Ideally, seal with a matte varnish to protect the paint job without making it look plastic.
Level Up: Ancient Ruins
Mix baking soda into your teal paint before applying. This creates a crusty, genuine corrosion texture that looks like heavy oxidation buildup found on actual underwater relics.
Place your finished robot on a shelf where its ancient charm can be admired
Rusty Scrap-Metal Robot Look
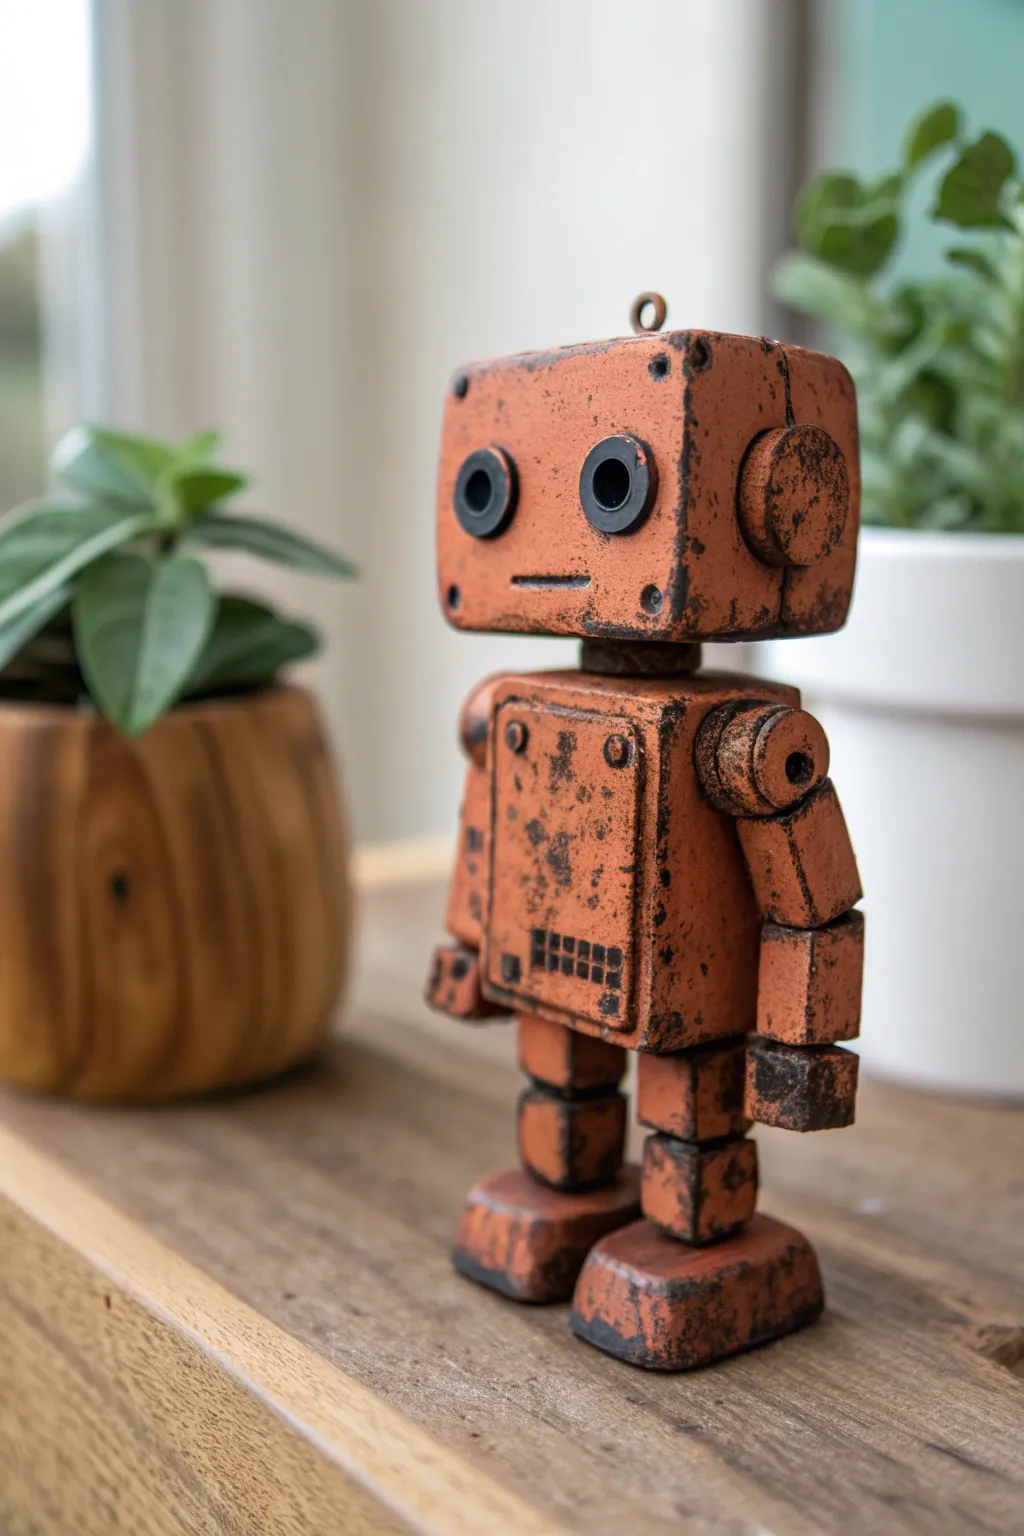
Transform ordinary clay into this charming weather-beaten android that looks like it’s been waiting in a scrapyard for decades. Despite its metallic appearance, this little guy is surprisingly simple to sculpt, relying on smart painting techniques to achieve that convincing rusty patina.
Step-by-Step Tutorial
Materials
- Polymer clay (terracotta or orange)
- Black acrylic paint
- Burnt sienna or rust-colored acrylic paint
- Aluminum foil (for armature)
- Sculpting tools (needle tool, small ball stylus)
- Small eye screws (optional, for antenna)
- Craft knife
- Matte varnish or sealant
- Clean sponge or rag
- Toaster oven (for baking polymer clay)
Step 1: Building the Core Structure
-
Shape the Head:
Start by conditioning a block of terracotta-colored clay until it’s pliable. Form a smooth, rectangular cube with slightly rounded corners to serve as the robot’s head. It should be roughly 1.5 inches wide. -
Form the Torso:
Create a second, slightly smaller rectangular block for the body. Ensure the top face is flat enough to support the head later. -
Create the Neck:
Roll a small, thick cylinder of clay. Gently press this onto the center of the body block to act as the neck connector. -
Add the Eye Sockets:
Using a small circular cutter or the back of a large pen cap, impress two distinct circles into the face area. Make sure they are evenly spaced. -
Install the Eyes:
Roll two small balls of black clay (or paint them black later) and flatten them slightly. Press these into the eye socket indentations you just made so they sit flush. -
Carve the Mouth:
With a needle tool or craft knife, incise a simple, straight horizontal line for the mouth. Keep it minimal to maintain that classic robot expression.
Leaning Tower of Robot?
If your robot keeps tipping over while you sculpt, bake the legs and feet first to create a solid stand, then build the raw clay body on top of the hardened base.
Step 2: Adding Details and Limbs
-
Sculpt the Chest Plate:
Roll out a thin sheet of clay and cut a smaller rectangle. Attach this to the front of the torso to create a maintenance hatch or chest plate. -
Detail the Hatch:
Use a needle tool or very small dotting tool to add four tiny divots in the corners of the chest plate, mimicking screws or rivets. Add a small grid of square indentations near the bottom for a “speaker” grill. -
Form the Shoulder Joints:
Roll two medium-sized balls of clay. Press them firmly onto the upper sides of the torso block to act as shoulder rotation points. -
Construct the Arms:
Create two segmented rectangular prisms for the upper and lower arms. Attach the upper arm to the shoulder ball, and connect the lower arm at a slight angle to suggest movement. -
Build the Legs:
For the legs, create small cube-like segments. You’ll need an upper thigh block and a knee joint block for each leg. Stack them carefully beneath the torso. -
Attach the Feet:
Mold two D-shaped blocks for the feet. Press the leg stacks firmly onto these feet. I find pushing a piece of wire through the leg and into the body helps keep everything stable during baking. -
Add Ear Details:
Create circular discs for the “ears” and attach them to the sides of the head. Add a textured center or a small rim to give them mechanical depth. -
Insert the Antenna Loop:
If you wish to hang the robot later, screw a small metal eyelet into the top center of the head before baking.
Pro Texture Tip
Before baking, gently roll a crumpled ball of aluminum foil over the smooth clay surface. This instantly adds a pitted, cast-metal texture perfect for holding the dark paint wash.
Step 3: Finishing and Weathering
-
Bake the Clay:
Bake your sculpture according to the manufacturer’s instructions for your specific brand of polymer clay. Let it cool completely before painting. -
Apply the Base Wash:
Mix a very watery black acrylic paint (a ‘wash’). Brush this heavily over the entire robot, making sure it gets into every crack, eye socket, and rivet hole. -
Wipe Away Excess:
Before the wash dries fully, take a damp sponge or rag and wipe the surface. The black paint should remain in the crevices and corners, accentuating the details and creating ‘grime’. -
Stipple the Rust:
Dip a dry, stiff-bristled brush or a coarse sponge into burnt sienna or dark brown paint. Blot almost all the paint off on a paper towel. -
Create Texture:
Gently dab this dry brush onto the edges of the head, the corners of the shoulders, and the feet. This dry-brushing technique simulates chipped paint and rust on the high-contact areas. -
Seal the Work:
Once fully dry, coat the robot with a matte varnish. Avoid glossy finishes, as real rust is naturally matte and dull.
Place your little rusty friend near a potted plant for a delightful contrast between nature and machine
Robot Duo With Matching Variations
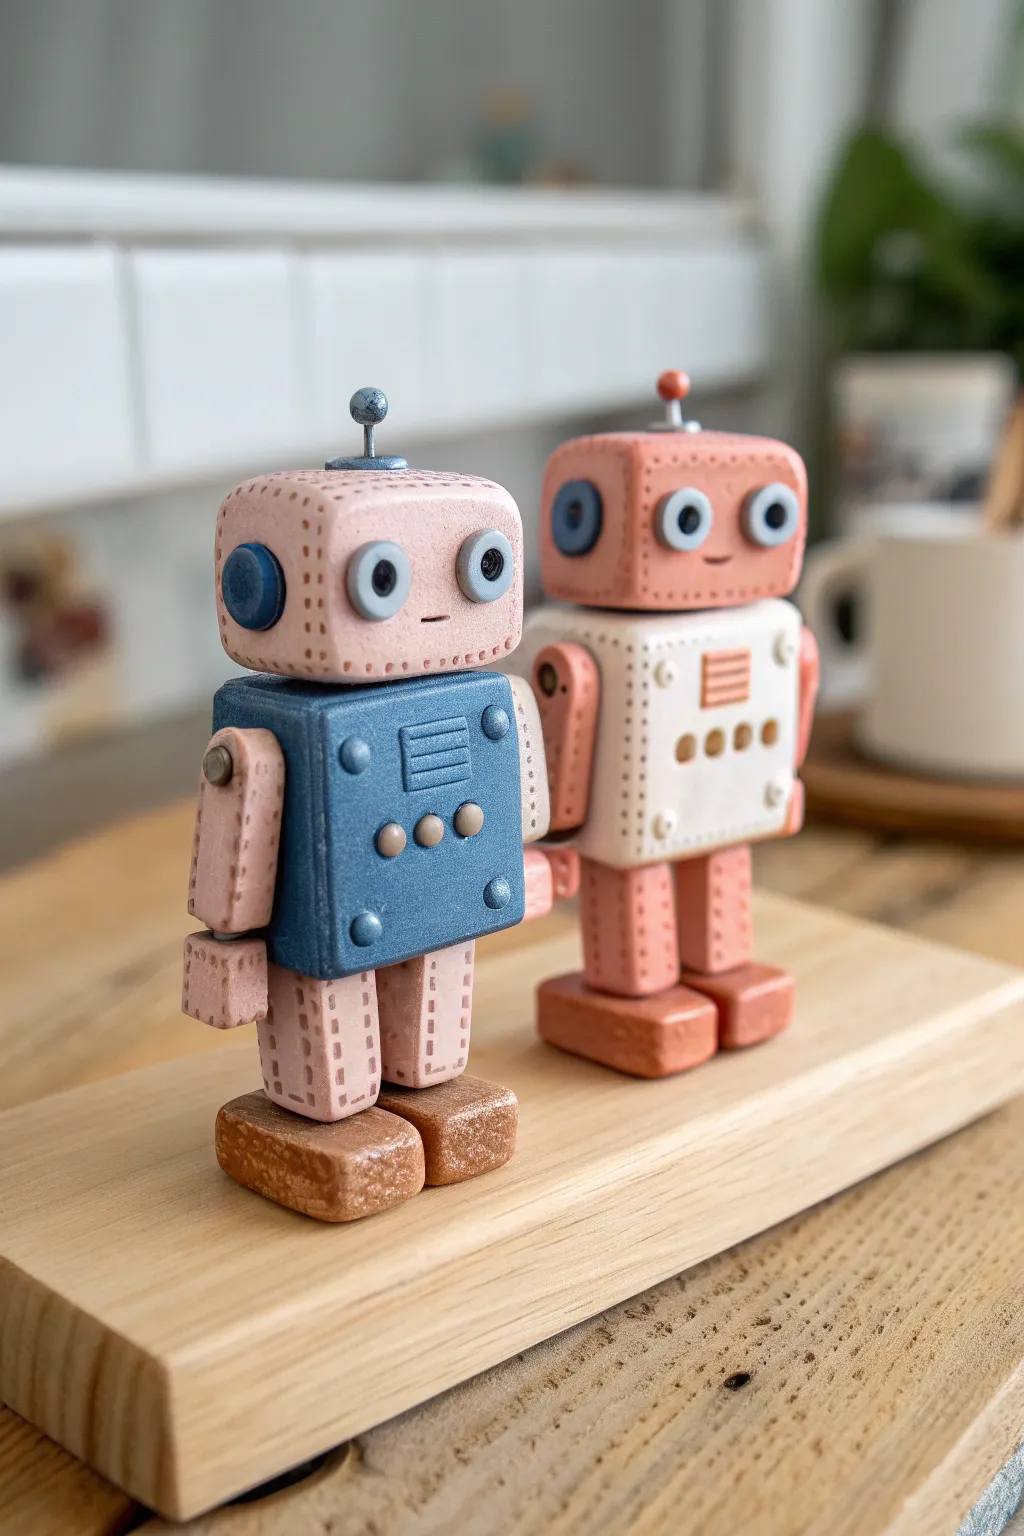
Create this charming pair of retro-futuristic robots using polymer clay in soft pastel hues. With their textured details and distinctive blocky shapes, this duo makes for adorable desk decor or a sweet handmade gift.
Step-by-Step Guide
Materials
- Polymer clay (pale pink, slate blue, off-white, terracotta/brown, grey)
- Clay blade or craft knife
- Needle tool or toothpick
- Small dotting tool
- Aluminum wire or headpins (for antennas)
- Acrylic roller
- Baking sheet and parchment paper
- Oven (for curing)
- Sandpaper (fine grit, optional)
- Matte varnish (optional)
Step 1: Shaping the Core Components
-
Condition the Clay:
Begin by conditioning your clay thoroughly until it is soft and pliable. You’ll need primarily pale pink for the heads and limbs, slate blue for one body, and off-white for the second body. -
Form the Heads:
Roll two equal balls of pale pink clay. Press them gently onto a flat surface and use your fingers or a blade to shape them into soft cubes with rounded corners, about 1 inch wide. -
Create the Bodies:
Fashion two slightly larger cubes for the torsos—one in slate blue and one in off-white. Ensure the top surface is flat so the heads will sit securely. -
Make the Feet:
Using a terracotta or brown clay, shape four small, flat rectangles with rounded edges. These will serve as stable feet for your robots. -
Assemble the Stack:
Gently press the feet onto the bottom of the body cubes. Then, place the pink head cubes on top of the bodies. You can insert a small piece of toothpick or wire between the pieces acting as a hidden armature for extra stability.
Step 2: Adding Limbs and Connectors
-
Shape the Legs:
Roll two cylinders of pink clay for each robot. Flatten the tops and bottoms slightly so they fit snugly between the body and the feet. -
Form the Arms:
Create similar cylinders for the arms. For the hands, simply stamp a small grid pattern into the end of the clay block to suggest fingers or a gripper. -
Attach Limbs:
Press the legs between the body and feet. Attach the arms to the sides of the torso. I find that scoring the clay slightly at the connection points helps them adhere better. -
Add Shoulder Joints:
Roll tiny balls of grey clay and flattening them into discs. Place these at the top of the arms where they meet the body to simulate mechanical joints.
Head Keeps Sliding Off?
If the head won’t stay put while you work, insert a piece of dried raw spaghetti or a toothpick through the neck into the body. This burns off or stays hidden after baking.
Step 3: Detailing and Texturing
-
Create the Eyes:
Make small discs of grey clay and press them onto the face. Add smaller black or dark grey dots in the center for pupils to bring them to life. -
Add Ear Dials:
Place a medium-sized blue or grey disc on the sides of the head to resemble audio receivers or bolts. -
Chest Plate Details:
Roll out a very thin sheet of clay (blue for the blue body, copper/orange for the white body). Cut tiny squares or rectangles and press them onto the chest areas to mimic control panels. -
Stitch Marks:
Use a needle tool to gently press lines of small dashed indentations along the edges of the head and limbs. This stitch-like texture gives the robots their signature handcrafted look. -
Button Accents:
Roll incredibly tiny balls of grey or contrasting clay and press them onto the chest plates to serve as buttons or rivets. -
Insert Antennas:
Cut a short piece of wire or use a metal headpin. Stick it into the top center of the head. Add a tiny ball of clay to the very tip of the wire.
Texture like a Pro
For uniform ‘stitch’ marks, try using a leather stamping tool or a modified gear from a broken watch to roll perfectly spaced indentations.
Step 4: Finishing Touches
-
Smooth Fingerprints:
Before baking, look over your robots carefully. Gently buff out any accidental fingerprints using a drop of baby oil on your finger. -
Bake:
Place the robots on a parchment-lined baking sheet. Bake according to your specific brand of polymer clay instructions (usually around 275°F/135°C for 15-30 minutes). -
Cool Down:
Let the figures cool completely in the oven with the door slightly ajar to prevent thermal shock cracks. -
Seal (Optional):
If desired, apply a thin coat of matte water-based varnish to protect the surface without making it too shiny.
Display your new robotic friends together on a shelf where they can oversee your next creative session
Mini Robot Army Desk Set
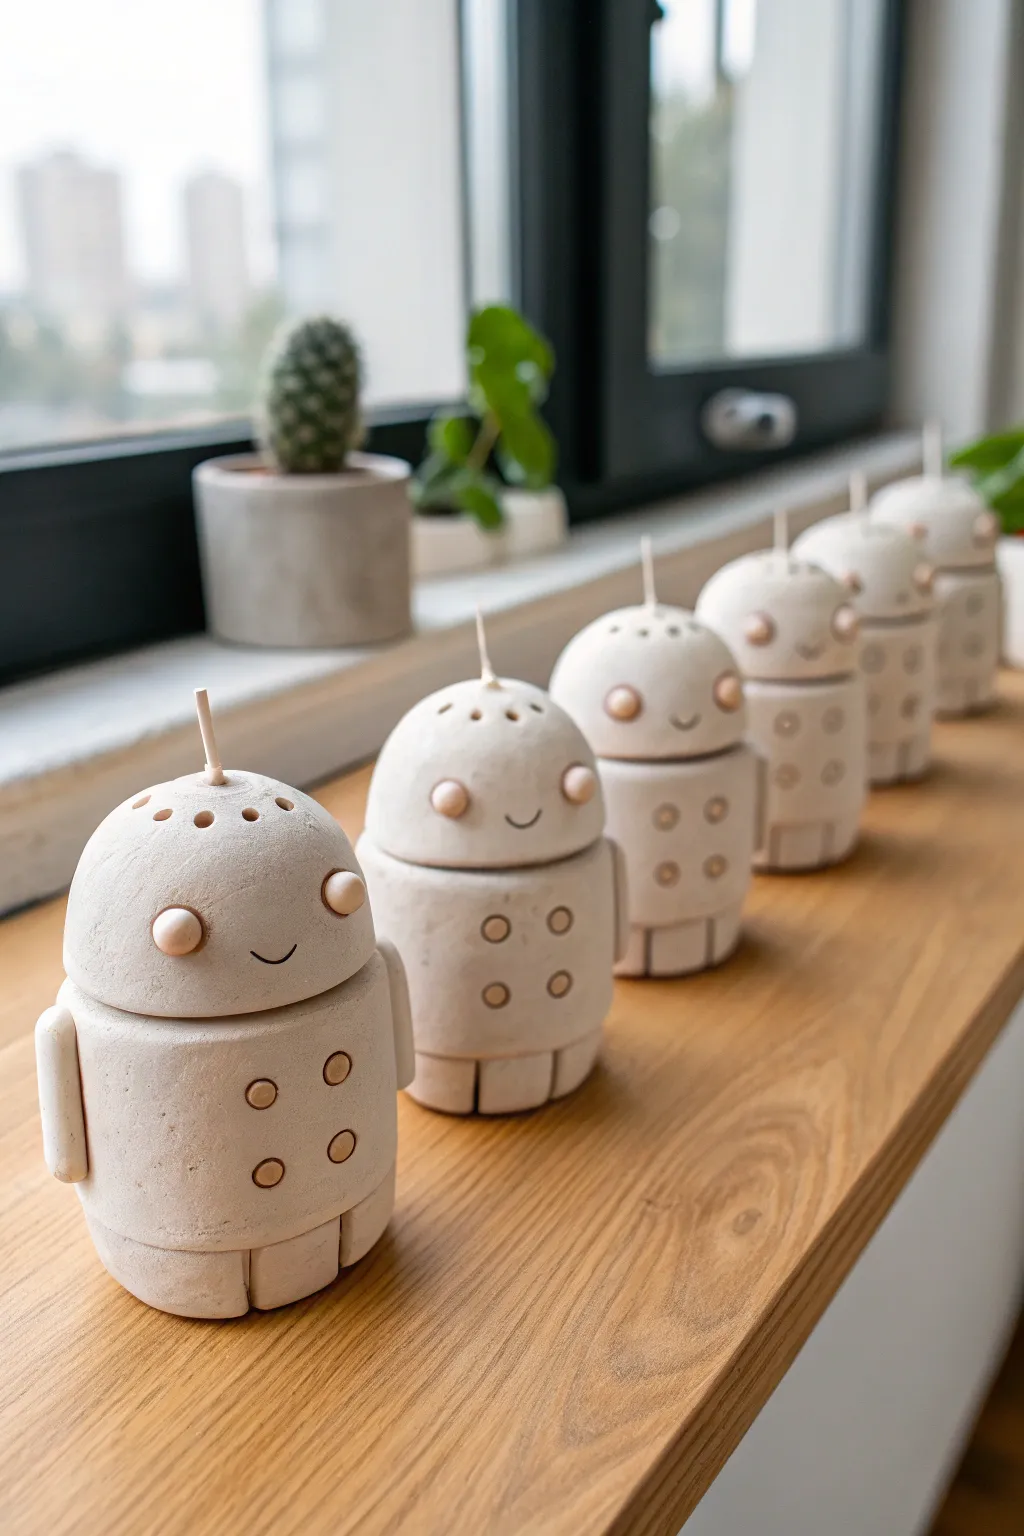
Bring a touch of minimalist charm to your workspace with this marching line of ceramic-style robots. Molded from speckled beige clay, these friendly automatons feature simple geometric shapes and a delightful matte texture that mimics raw stoneware.
Step-by-Step Tutorial
Materials
- Speckled beige polymer clay (e.g., Fimo or Sculpey granite/stone effect)
- Wooden toothpicks or cocktail sticks
- Rolling pin or smooth glass jar
- Circle cutters (approx. 2-inch diameter)
- Small round piping tip or straw (for button details)
- Clay sculpting tool or dull knife
- Aluminum foil (for armature)
- Baking sheet and parchment paper
- Oven (per clay manufacturing instructions)
- Fine grit sandpaper
Step 1: Forming the Body and Head
-
Prepare the core:
Start by scrunching a small amount of aluminum foil into a tight cylinder shape. This will save on clay and keep the robot lightweight without compromising structure. -
Mold the torso:
Roll your speckled beige clay into a sheet about 1/4 inch thick. Wrap this around your foil cylinder, smoothing the seams completely until you have a perfect clay cylinder with a flat bottom. -
Shape the dome:
For the head, roll a solid ball of clay slightly wider than the torso cylinder. Gently press it onto a flat surface to create a hemisphere, shaping it until it looks like a smooth mushroom cap. -
Smooth the surfaces:
Use your fingers to gently rub away any fingerprints. I find that lightly dusting my fingertips with cornstarch helps achieve that buttery smooth, stone-like finish visible in the photo.
Step 2: Adding Features and Details
-
Attach the head:
Place the dome head directly onto the cylinder body. Press down firmly but gently to adhere the clay parts without distorting the shapes. -
Create the eyes:
Roll two tiny spheres of fresh clay. Press them onto the face area, spaced widely apart, and flatter them slightly so they look like rounded rivets or buttons. -
Carve the smile:
Using a needle tool or the edge of a small spoon, press a simple, shallow curve into the clay between the eyes to create a subtle, friendly smile. -
Make the antenna:
Snip a small piece of a wooden toothpick (about half an inch long). Push it into the very top center of the head, leaving a small nub exposed. -
Add head vents:
Use a needle tool to poke a series of small, uniform holes in a circle around the antenna. These mimic speaker vents or sensors on top of the robot’s head. -
Form the arms:
Roll two thick logs of clay. Cut them to size so they run from the ‘shoulder’ area down to the hips. Attach one to each side of the body, blending the clay at the shoulder joint only. -
Detail the chest:
Using the small end of a piping tip or a straw, gently impress distinct circles onto the chest area. Create a grid of four circles (two distinct rows) to look like control buttons. -
Sculpt the feet:
Instead of separate legs, suggest feet by using a dull knife to score a deep vertical line at the very bottom front of the cylinder, creating a split ‘block’ look.
Fixing Cracks
If you see hairline cracks after baking, mix a tiny bit of raw clay with liquid clay designated for polymer. Smear it into the crack, smooth it out, and re-bake for 10 minutes.
Step 3: Baking and Finishing
-
Pre-bake check:
Do a final inspection of your robot army. Ensure all heads are straight and identical, and brush away any stray crumbs of clay. -
Bake the batch:
Place all your robots on a parchment-lined baking sheet. Bake according to your polymer clay package directions (usually around 275°F/130°C for 15-30 minutes depending on thickness). -
Cool down:
Let them cool completely in the oven with the door cracked open. This gradual cooling prevents thermal shock cracks. -
Sanding for effect:
Once fully cold, lightly sand the surface with fine-grit sandpaper. This removes any shine and enhances the matte, stone-like aesthetic.
Planter Heads
Make a hollow divot in the top of the head before baking instead of adding the antenna. Once baked, glue in a tiny air plant for a ‘green’ robot aesthetic.
Line them up on your windowsill and enjoy your new automated workforce
Robot Planter Buddy (Tiny Succulent)
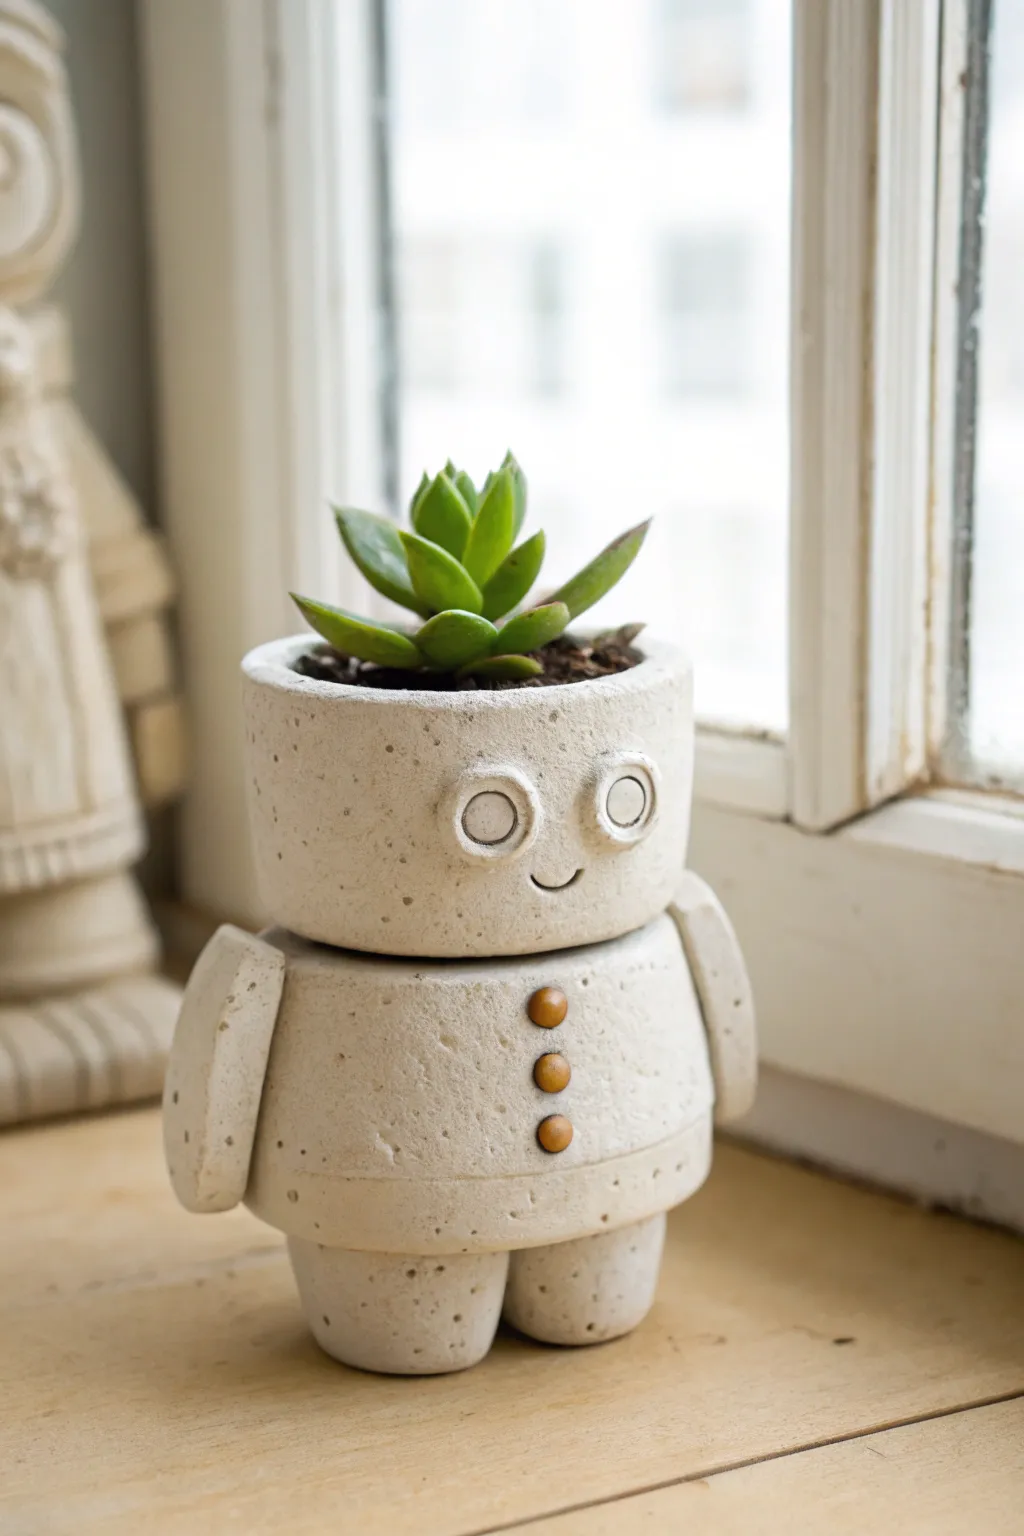
This adorable planter brings character to your windowsill with its minimalist, geometric charm and speckled stone finish. It’s the perfect size for a tiny succulent, doubling as both a home for your plant and a friendly clay companion.
Step-by-Step
Materials
- White stoneware or polymer clay (oven-bake)
- Small succulent cutting
- Rolling pin
- Circle cutters (various sizes)
- Needle tool or toothpick
- Slip (clay slurry) or liquid clay adhesive
- Scoring tool (an old toothbrush works)
- Sponge
- Speckled clay or faux stone spray paint (optional finishing)
- Three small wooden beads or brass brads
- Clear matte varnish
Step 1: Forming the Body
-
Shape the torso:
Begin by wedging a ball of clay roughly the size of a tangerine to remove air bubbles. Flatten the top and bottom gently to create a rounded, barrel-like cylinder for the main body. -
Create the legs:
Roll two smaller spheres of clay, slightly flattening them to form stout, sturdy feet. These will need to support the weight of the entire structure, so ensure they are wide enough for balance. -
Attach the legs:
Score the bottom of the body and the tops of the legs using your needle tool. Apply a dab of slip (or liquid clay) and press them firmly together, smoothing the seam with your finger or a sculpting tool. -
Add the arms:
Fashion two paddle-shaped arms from flattened logs of clay. Attach these to the sides of the torso, allowing them to hang straight down or slightly angled forward for a relaxed posture. -
Detail the torso:
Using a needle tool, lightly incise a horizontal line near the bottom of the torso to simulate a hinged joint or separation plate.
Drainage Tip
Don’t forget to poke a hole through the neck and out the bottom before baking! This allows excess water to escape, keeping your succulent roots healthy.
Step 2: Sculpting the Head
-
Create the head cylinder:
Roll a thick slab of clay and cut a wide strip. Join the ends to form a cylinder that correlates with the width of the torso, smoothing the vertical seam completely so it disappears. -
Make the base:
Cut a circle of clay that fits inside the cylinder you just made. Score and attach it to create the ‘floor’ of the head piece, effectively turning it into a cup shape. -
Add facial features:
Roll two tiny balls of clay, flatten them into discs, and press them onto the face for eyes. Use a smaller circle cutter or straw to impress a ring into each eye for detail. -
Carve the smile:
With your needle tool, carefully crave a small, simple ‘U’ shape for the mouth. Keep the expression minimal to match the modern aesthetic. -
Join head to body:
Score the top of the body and the bottom of the head cup. Apply slip and press them together firmly. I like to double-check the balance here to ensure the head isn’t tilting too far back.
Metallic Accent
Paint the eyes or the perimeter of the ‘goggles’ with metallic gold or copper acrylic paint after baking to give your robot a vintage sci-fi vibe.
Step 3: Finishing and Planting
-
Texture the surface:
Before the clay hardens, tap the entire surface gently with a stiff bristled brush or crumpled foil to create a stone-like texture. -
Add the buttons:
Press three small indentations down the center of the chest. If using clay for buttons, roll tiny balls and attach them here. If using beads later, just leave the indentations for now. -
Bake or fire:
Follow the instructions for your specific clay type. For polymer clay, bake at the recommended temperature; for ceramic clay, let it dry slowly before kiln firing. -
Apply finish:
Once cooled, if you didn’t use speckled clay, you can lightly spritz the piece with a speckled spray paint or flick diluted brown paint from a toothbrush for that organic look. -
Attach hardware:
If you left indentations for the buttons, glue in your small wooden beads or brass details now for a mixed-media touch. -
Seal the piece:
Coat the inside of the head with a waterproof sealant or varnish to protect the clay from moisture during watering. -
Plant the succulent:
Add a small amount of cactus soil into the head cavity and nestle your succulent cutting inside, tamping the soil down gently.
Your stoic little robot is now ready to guard your window ledge and nurture your favorite plant
Stacked Geometric Totem Robot
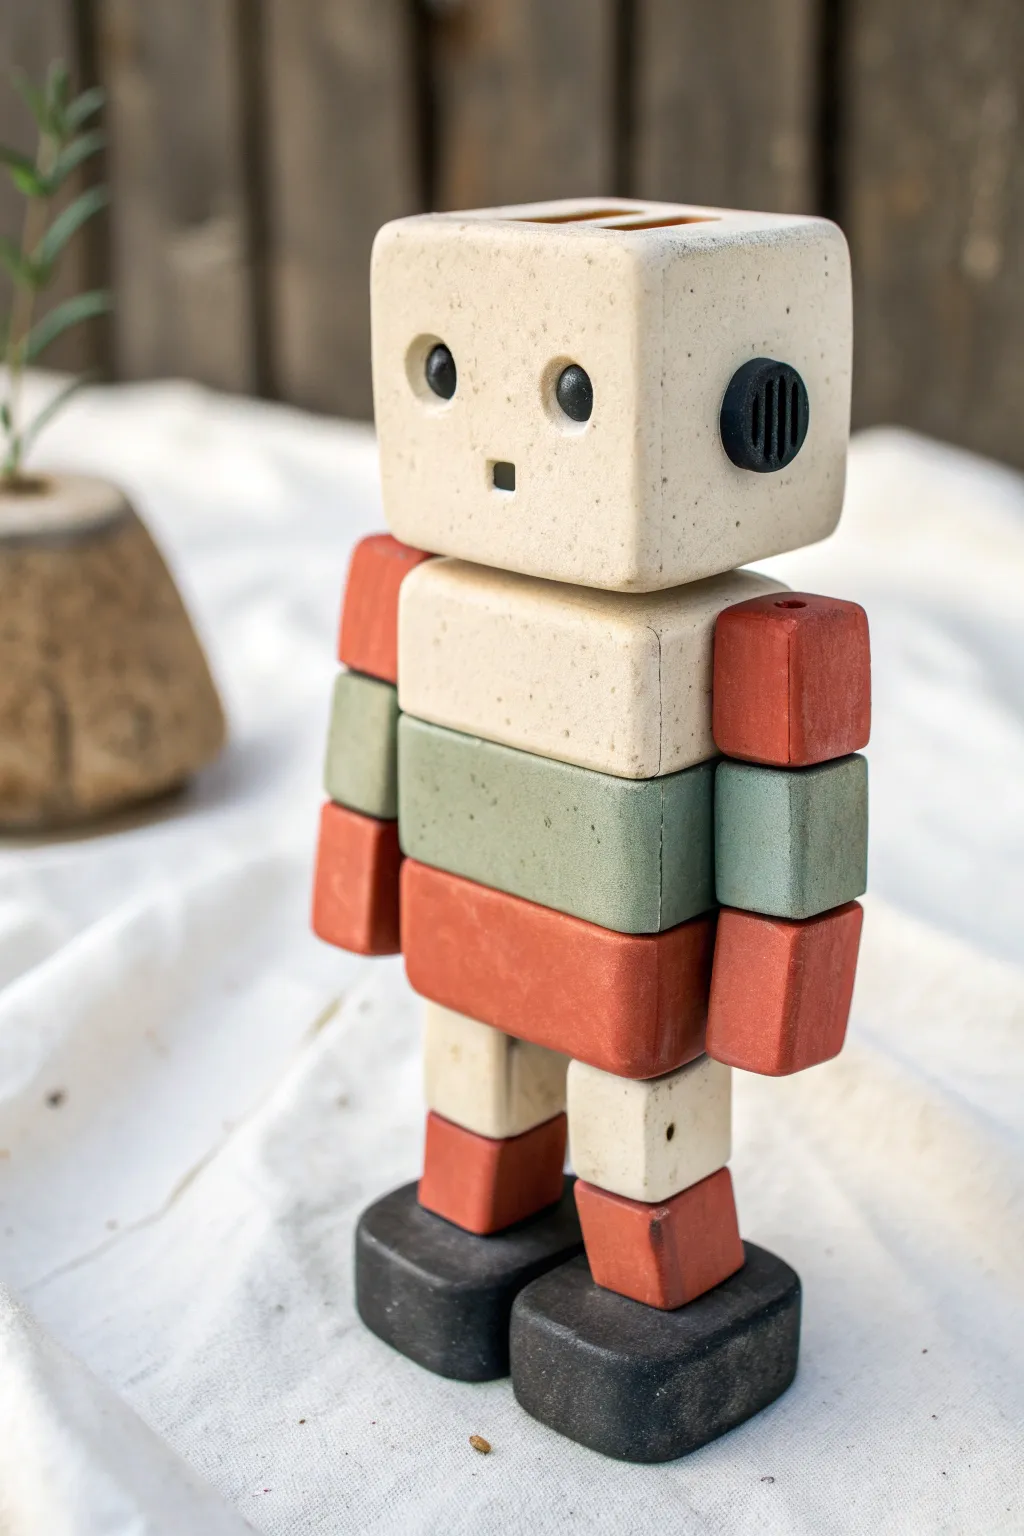
This charming, minimalistic figure brings a modern, geometric aesthetic to your clay collection. Built from simple rectangular blocks with a speckled, matte finish, it resembles a totem of retro technology that is surprisingly easy to assemble.
Step-by-Step Guide
Materials
- Polymer clay (cream/beige with speckles, terracotta red, sage green, and black)
- Clay blade or sharp craft knife
- Rolling pin or pasta machine
- Ruler
- Toothpicks or thin sculpting wire (for internal structure)
- Needle tool
- Small circle cutter
- Texturing sponge or sandpaper (for the matte finish)
- Oven for baking polymer clay
- Strong craft glue (e.g., E6000 or super glue)
Step 1: Creating the Base Blocks
-
Condition the clay:
Start by thoroughly kneading each color of clay separately until pliabile. For this project, the distinct separation of colors is key, so make sure to wash your hands between handling the red, green, and cream/beige clays to avoid smudging. -
Form the head block:
Roll a large chunk of the speckled cream clay into a smooth ball, then form it into a soft cube. Use your ruler to press against the sides to flatten them, creating sharp, clean edges while keeping the corners slightly rounded for a friendly look. -
Create the body segments:
You will need three wide, flat rectangular slabs for the torso. Create one from the speckled cream (top), one from the sage green (middle), and one from the terracotta red (bottom/hips). Ensure they are all the same width so they stack flush. -
Make the limb blocks:
For the arms, create six small cubes: two red, two green, and two red. For the legs, shape two cream rectangular pillars and two angled red feet pieces. -
Sculpt the feet:
Using black clay, form two sturdy, rounded rectangular blocks for the base feet. These need to be heavy enough to support the robot’s standing weight.
Leaning Tower of Robot?
If your robot keeps falling over, bake the black feet first. Once hardened, glue the raw clay legs onto the baked feet—this provides a solid, heavy anchor while you build upward.
Step 2: Refining and Assembling
-
Add facial features:
On the cream head block, press two small indentations for the eyes using a ball tool. Roll tiny balls of black clay and press them into these sockets. Use a small square cutter or knife tip to carve out a tiny, square mouth. -
Create the ears:
Roll out a small amount of black clay and cut two small circles. Press a texture into them using a fine comb or needle tool to simulate a speaker grill, then attach them to the sides of the head. -
Texture the surface:
To achieve that specific stone-like, matte finish seen in the photo, gently pat the surface of all your colored blocks with a coarse sponge or a crumpled ball of aluminum foil before baking. This removes fingerprints and adds realism. -
Stack the torso:
Stack the cream, green, and red body slabs. I like to insert a small piece of wire or a trimmed toothpick vertically through the center of these three pieces to act as a spine, ensuring they don’t slide apart during baking. -
Assemble the arms:
Connect the arm segments (red shoulder, green elbow, red hand) using liquid clay or by scoring the connecting surfaces. You can also use short wire pieces for added durability. -
Position the legs:
Attach the cream leg pillars to the red hip block, angling them slightly if you want a more dynamic stance. Attach the red angled ankle pieces to the bottom of the cream pillars. -
Dry fit the structure:
Before the final bake, gently stack all major components (head, torso, legs to feet) to ensure the robot stands balanced. Make adjustments to the angles of the feet if it leans too far forward or backward.
Step 3: Baking and Finishing
-
Bake the components:
Place your figure on a ceramic tile or baking sheet. Follow the temperature and time instructions on your specific brand of polymer clay. Baking it upright is best, but you may need to prop it up with some scrap clay or foil. -
Cool down:
Let the clay cool completely inside the oven by cracking the door open. This gradual cooling helps prevent cracks in thicker blocks like the head. -
Sand for matte effect:
Once hardened, inspect the edges. If they are too sharp or glossy, lightly sand the surfaces with fine-grit sandpaper to enhance the matte, stone-like texture. -
Final assembly:
If you baked the head, arms, or legs separately to avoid squishing, use strong craft glue or super glue to permanently attach them now. -
Add final details:
Check for any loose connections. A final tiny dab of matte varnish on the eyes can make them look ‘alive’ without making the rest of the robot shiny.
Clean Color Seams
To get crisp lines between the different colored blocks without smearing, slighty refrigerate the clay blocks for 10 minutes before stacking them. This stops the colors from bleeding.
Place your finished geometric bot on a shelf or desk where he can oversee your creative work.