If you’ve got a block of green polymer clay sitting on your table, you’re basically holding instant inspiration. I love how green can swing from sweet and kawaii to earthy and elegant with just a tiny tweak in shade or texture.
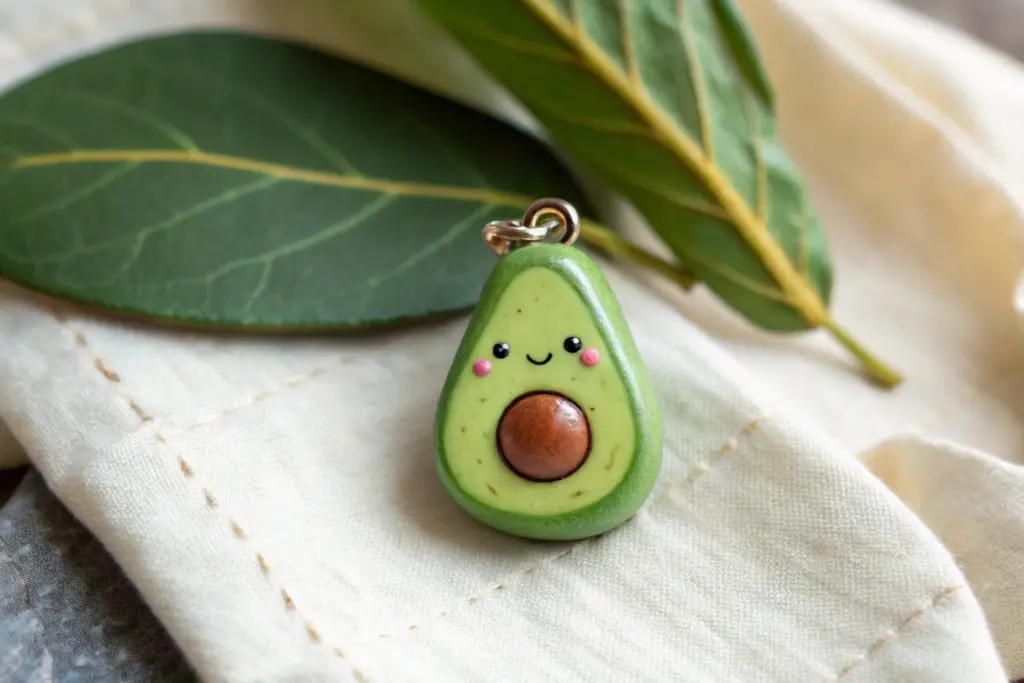
Avocado Best Friend Charms
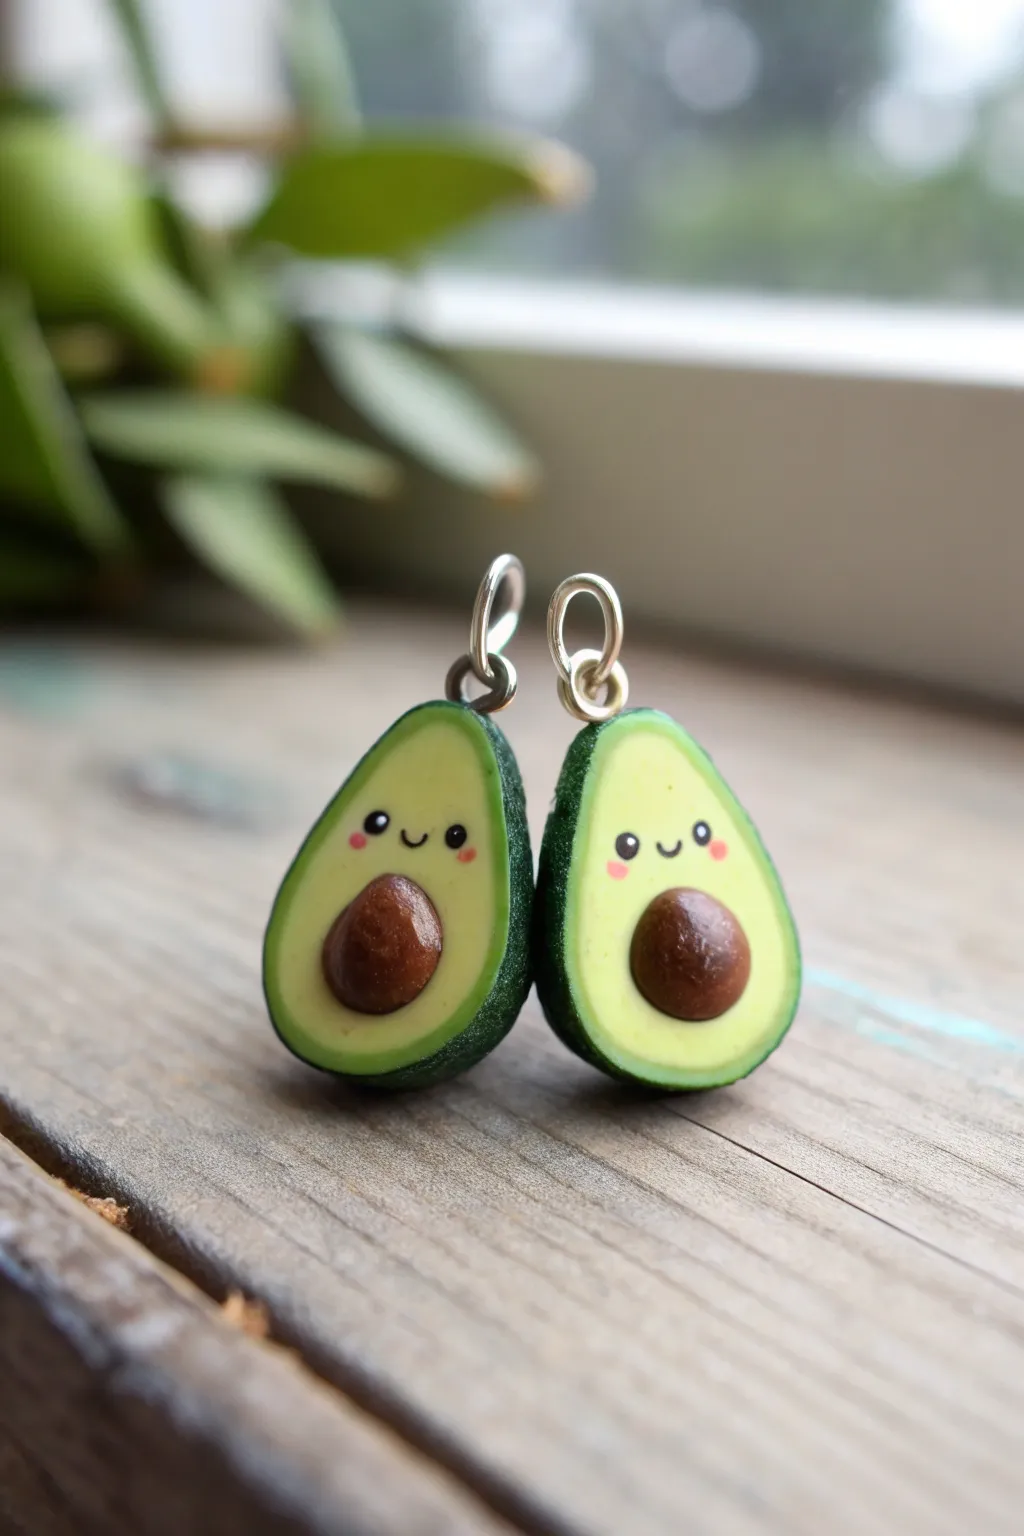
These miniature avocado halves are the perfect symbol of friendship—two halves that make a whole. With their textured skin, adorable faces, and shiny pits, they make charming pendants or earring drops.
Step-by-Step Guide
Materials
- Polymer clay: Light green (flesh), Dark green (skin), Dark brown (pit), Black (eyes)
- Pink acrylic paint or chalk pastel
- Liquid polymer clay (optional)
- Texture tool (toothbrush or stiff brush)
- Needle tool or toothpick
- Dotting tool or small ball stylus
- 2 small eye pins or screw eyes
- Jump rings
- Gloss glaze or polyurethane varnish
- Craft knife or scalpel blade
- Oven for curing
Step 1: Shaping the Avocado Base
-
Condition the Greens:
Begin by conditioning both your light green and dark green polymer clay separately until they are soft and pliable. Ensure your hands are clean between colors to avoid staining the lighter clay. -
Form the Flesh:
Take a marble-sized amount of light green clay and roll it into a smooth ball. Gently flatten it into a thick teardrop shape to mimic the silhouette of an avocado half. -
Create the Skin:
Roll out a thin sheet of dark green clay. It should be just thick enough to be durable but thin enough to look like skin. -
Wrap the Avocado:
Place your light green teardrop onto the dark green sheet. Gently fold the dark green clay up and around the sides of the light green shape. Trim away excess clay at the front, ensuring the front face remains purely light green while the back and sides are covered in dark green. -
Smooth the Seams:
Using your finger, gently smooth the transition where the dark skin meets the light flesh so there are no sharp ridges. The skin should look like it’s naturally hugging the fruit.
Step 2: Adding texture and Details
-
Texture the Skin:
Use an old toothbrush or a stiff stippling brush to tap texture onto the dark green exterior. Avocados have rough skin, so don’t be afraid to press firmly to create that pebbled look. -
Indent for the Pit:
Use a large ball tool or the back of a rounded measuring spoon to press a concave indentation into the lower, wider part of the light green flesh. Do this for both halves. -
Create the Pits:
Roll two small balls of dark brown clay. Press them gently into the indentations you just made. They should bulge out slightly, just like a real avocado stone. -
Make the Faces:
Using a very small dotting tool, pick up a tiny speck of black clay (or use black acrylic paint later) and place two eyes just above the pit. -
Add the Smile:
Roll an incredibly thin snake of black clay—as thin as a thread. Cut a tiny u-shaped section and press it between the eyes to create a smile. A needle tool helps to arrange these tiny features. -
Apply Blush:
Scrape a little pink chalk pastel into powder. Use a small, soft brush or Q-tip to gently dab pink cheeks onto the clay underneath the eyes.
Dirty Green?
Work light to dark! If light green gets dirty, clean with a Q-tip dipped in rubbing alcohol or acetone before baking to remove lint/dust.
Step 3: Finishing Touches
-
Insert Hardware:
Trim your eye pins to the correct length. Insert one pin into the top center of each avocado charm. I find adding a tiny drop of liquid clay or translucent liquid sculpey to the pin helps secure it permanently. -
Bake:
Place the charms on a ceramic tile or baking sheet. Bake according to your brand of polymer clay instructions (usually around 275°F/135°C for 15-30 minutes). -
Cool Down:
Allow the charms to cool completely in the oven or on the counter before handling to prevent fingerprints while the clay is still soft. -
Glaze the Pit:
Using a fine brush, apply a coat of gloss glaze only to the brown pit. This contrast between the matte skin/flesh and the shiny seed makes the piece look much more realistic. -
Assemble:
Once the glaze is dry, use pliers to open a jump ring and attach it to the eye pin loop. You can now hang these on a necklace chain or earring hooks.
Heart Stone
Make them true ‘love’ charms by shaping the brown pit as a heart instead of a circle. It adds an extra sweet detail for a BFF gift.
Now you have a sweet set of charms to keep or share with your favorite person


Chubby Frog Pocket Buddy
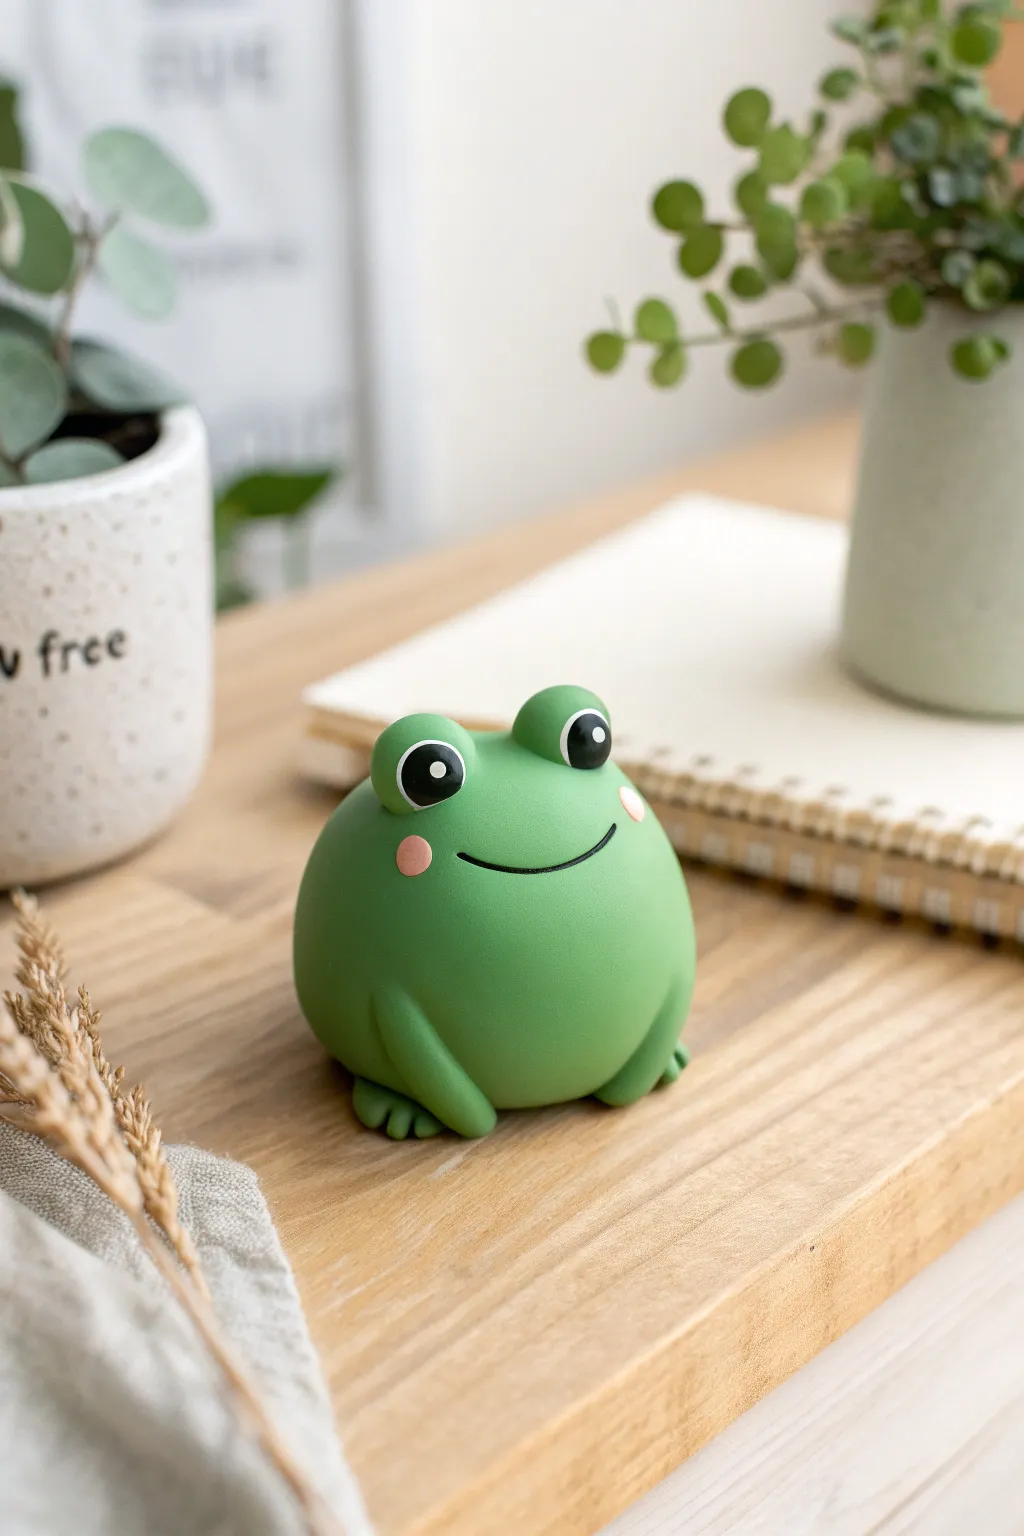
This adorable, round frog figurine is the perfect desk companion or pocket charm. With its minimalist design and smooth, matte finish, it captures a sense of calm whimsy that is surprisingly easy to sculpt.
Step-by-Step Tutorial
Materials
- Green polymer clay (matte finish preferred)
- White polymer clay
- Black polymer clay
- Light pink polymer clay
- Sculpting tools (needle tool and ball stylus)
- Acrylic roller
- Foil for armature (optional but recommended)
- Baking sheet and oven
- Matte varnish (optional)
Step 1: Forming the Base
-
Prepare the clay:
Begin by conditioning your green clay until it is soft and pliable. If the clay is too stiff, add a drop of clay softener or baby oil to help smooth it out. -
Shape the body:
Roll a large ball of green clay, about the size of a golf ball or slightly smaller. I like to gently tap the bottom against my work surface to create a flat base so the frog sits stably without rolling away. -
Refine the shape:
Smooth out any fingerprints by lightly buffing the surface with your finger or a little cornstarch. Ideally, the body should be a slightly squat, perfect sphere.
Step 2: Creating the Face
-
Position the eyes:
Roll two smaller balls of green clay for the eye sockets. Place them on top of the head, spaced slightly apart, and blend the bottom seams into the main body using a modeling tool so they look like organic bumps. -
Add the whites:
Flatten two small discs of white clay. Press these onto the front of the green eye bumps you just created. Ensure they are centered and flat against the green surface. -
Place the pupils:
Take two tiny balls of black clay and flatten them onto the white discs. Position them slightly inward to give the frog a cute, cross-eyed or focused expression. -
Add the sparkle:
For that crucial spark of life, add the tiniest specks of white clay to the upper right corner of each black pupil. -
Carve the smile:
Use a needle tool or a curved clay tool to impress a wide, shallow u-shape into the face for the mouth. Keep the line incredibly thin and clean. -
Make the blush:
Roll two very small balls of light pink clay and flatten them into thin ovals. Press these gently onto the cheeks, just below the outer corners of the eyes.
Fingerprint Eraser
Before baking, liberally brush the raw clay with a soft brush dipped in baby oil or cornstarch. This virtually erases fingerprints and leaves a professional, velvet finish.
Step 3: Limbs and Details
-
Form the front legs:
Roll two thick, short logs of green clay for the arms. Taper one end slightly to blend into the body. -
Attach the arms:
Press the tapered ends of the arms onto the sides of the body, curving the rest of the log down and forward so the ‘hands’ rest on the table surface. -
Sculpt the toes:
Use a needle tool or a small knife to make two small indentations at the end of each arm, creating three simple, rounded toes. -
Add the back feet:
Create flattened teardrop shapes from green clay for the back feet. Tuck these slightly under the sides of the body, just behind the front arms, and mark toes on them as well.
Seasonal Switch
Make tiny accessories! Sculpt a miniature red mushroom hat or a yellow raincoat to place on top, turning your basic frog into a seasonal character.
Step 4: Baking and Finishing
-
Final inspection:
Check the frog from all angles. Smooth out any accidental tool marks with a drop of baby oil on your fingertip. -
Bake the piece:
Bake according to your clay manufacturer’s instructions (usually 275°F / 135°C for 15-30 minutes per 1/4 inch of thickness). Let it cool completely in the oven to prevent cracking. -
Seal (Optional):
If you want extra durability, apply a thin coat of matte varnish. Avoid glossy finishes to maintain the soft, modern look shown in the reference image.
Place your new green friend on your desk for a daily dose of cheer


Tiny Turtle Charm Trio
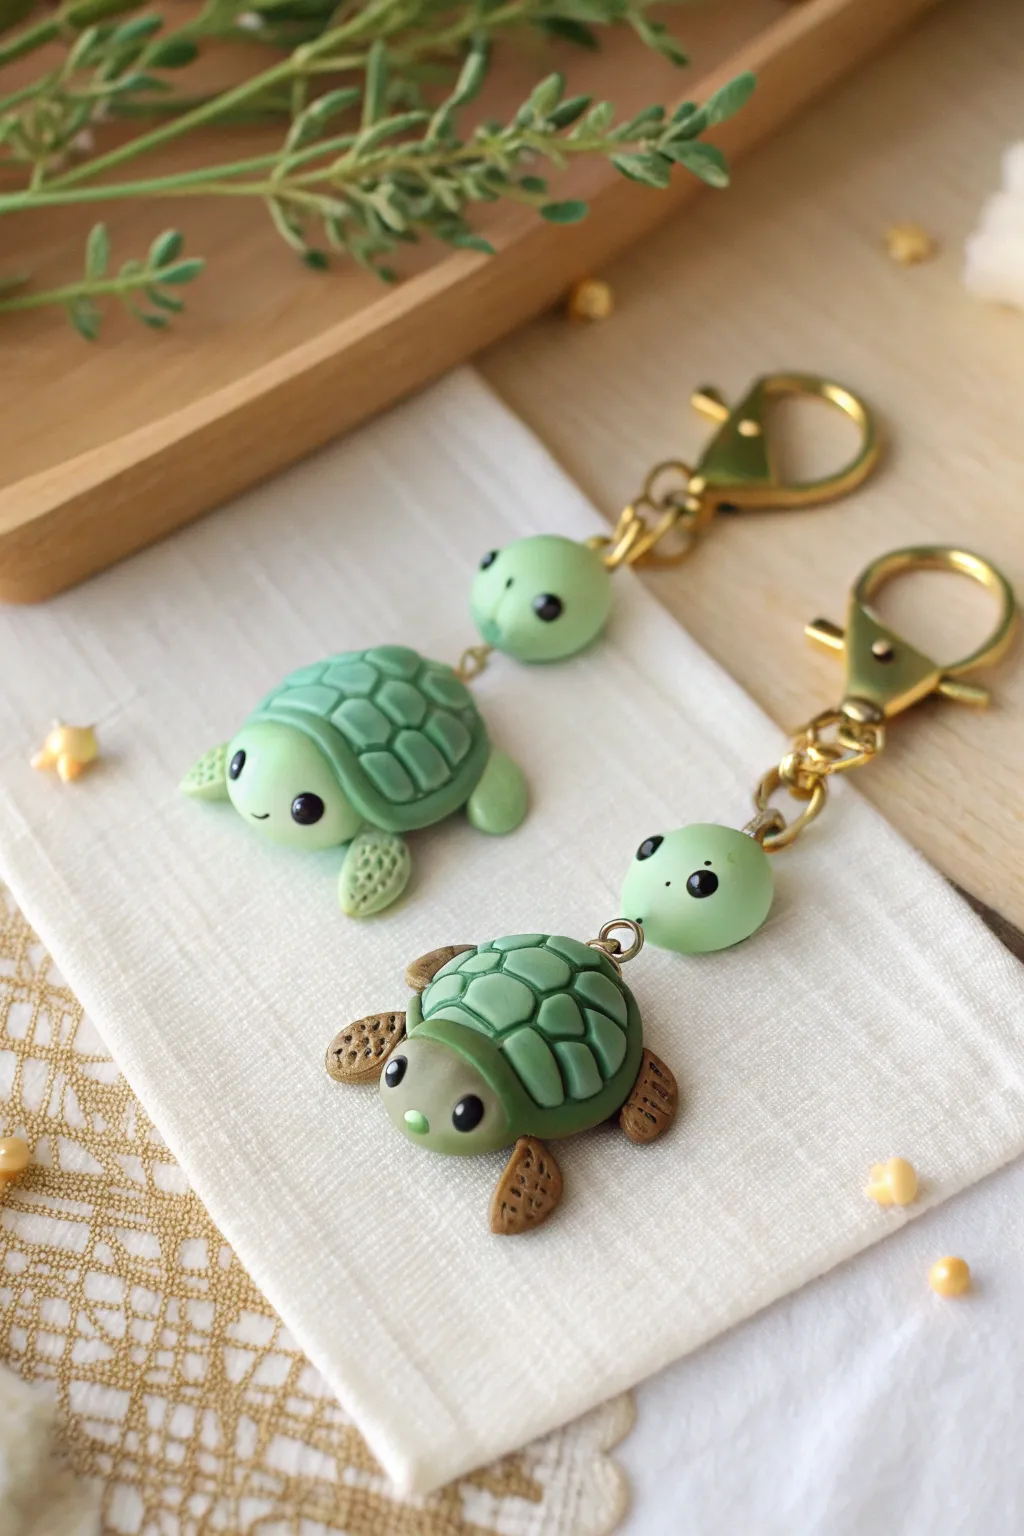
These adorable polymer clay turtle charms feature segmented shells and sweet, oversized eyes that give them a gentle expression. Perfect as a gift or a personal accessory, these durable little friends dangle delightfully from gold-tone hardware accented by a matching bead.
Detailed Instructions
Materials
- Polymer clay in light mint green, forest green, medium brown, and black
- Gold keychain hardware with a lobster clasp
- Gold headpins and eye pins
- Round nose pliers and wire cutters
- Needle tool or toothpick
- Dotting tool or small ball stylus
- Liquid polymer clay (optional, for extra bond)
- Gloss glaze or UV resin (for the eyes)
- Oven for baking
Step 1: Sculpting the Head & Bead
-
Form the head base:
Start with a small ball of light mint green clay, about the size of a pea. Roll it until it is perfectly smooth and slightly oval-shaped. -
Insert the headpin:
Carefully insert a gold headpin through the center of this head piece vertically if you want it to dangle separately, or horizontally if attaching directly to the body later. For the style shown, we are making a separate bead unit, so create a matching distinct sphere of green clay for the top connector bead. -
Add the eyes:
Use a small dotting tool to make two wide-set indentations on the face. Roll two tiny balls of black clay and press them into these sockets. Flatten them gently so they don’t bulge out too much. -
Highlight the gaze:
For that spark of life, take the tiniest speck of white clay (or use white acrylic paint later) and place it on the upper corner of each black eye.
Step 2: Creating the Shell
-
Shape the base shell:
Roll a larger ball of lighter green clay for the shell’s core and flatten the bottom against your work surface to create a dome shape. -
Make the scutes:
Roll out a thin sheet of forest green clay. Use a small round cutter or a knife to cut out a central hexagon and several surrounding pentagons or trapezoids to mimic turtle shell patterns. -
Apply the pattern:
Gently press these darker green shapes onto the lighter green dome. Start with the center piece and work your way out, leaving small gaps so the lighter clay shows through as the dividing lines. -
Create the rim:
Roll a thin snake of the forest green clay. Flatten it slightly and wrap it around the bottom edge of the shell to create a neat rim. -
Refine the texture:
I find that gently rolling the entire shell in the palm of my hand helps flatten the added pieces flush with the base, creating a unified surface.
Secure That Pin
Bend the end of your eye pin into a small zigzag or hook shape before inserting it into the raw clay shell. This acts like an anchor so it won’t pull out after baking.
Step 3: Fin & Body Assembly
-
Prepare the fins:
For the brown turtle, mix medium brown clay; for the green one, use the light mint shade. Create four small teardrop shapes—two slightly larger for the front flippers and two smaller for the back. -
Texture the flippers:
Use a needle tool to press tiny decorative holes or stippling into the fins. This adds a lovely realistic texture that contrasts with the smooth shell. -
Attach the limbs:
Press the fins onto the bottom of the shell. You can add a dab of liquid polymer clay here to ensure they stick permanently during baking. -
Attach the head:
Press the head you made earlier onto the front of the shell, nestled between the front flippers. Ensure the neck area blends slightly for a strong bond. -
Insert hardware:
Insert a gold eye pin into the top center of the turtle’s shell. A bit of liquid clay on the pin shaft helps it grip.
Dirty Clay Fix
If you see lint or fingerprints on your light green clay before baking, dip a Q-tip in rubbing alcohol or nail polish remover and gently wipe the surface clean.
Step 4: Baking & Finishing
-
Bake:
Bake the pieces (turtle body and separate connector bead) according to your clay package instructions, usually around 275°F (135°C) for 15-20 minutes. -
Cool and glaze:
Let the pieces cool completely. Apply a drop of UV resin or gloss glaze to the black eyes to make them shine and look wet. -
Assemble the chain:
Using your pliers, create a loop at the top of the separate connector bead’s pin. Attach the turtle to one side of this bead, and the keychain hardware to the other using jump rings if necessary.
Now you have a charming little companion ready to guard your keys or brighten your bag


Mini Cactus Characters in Pots
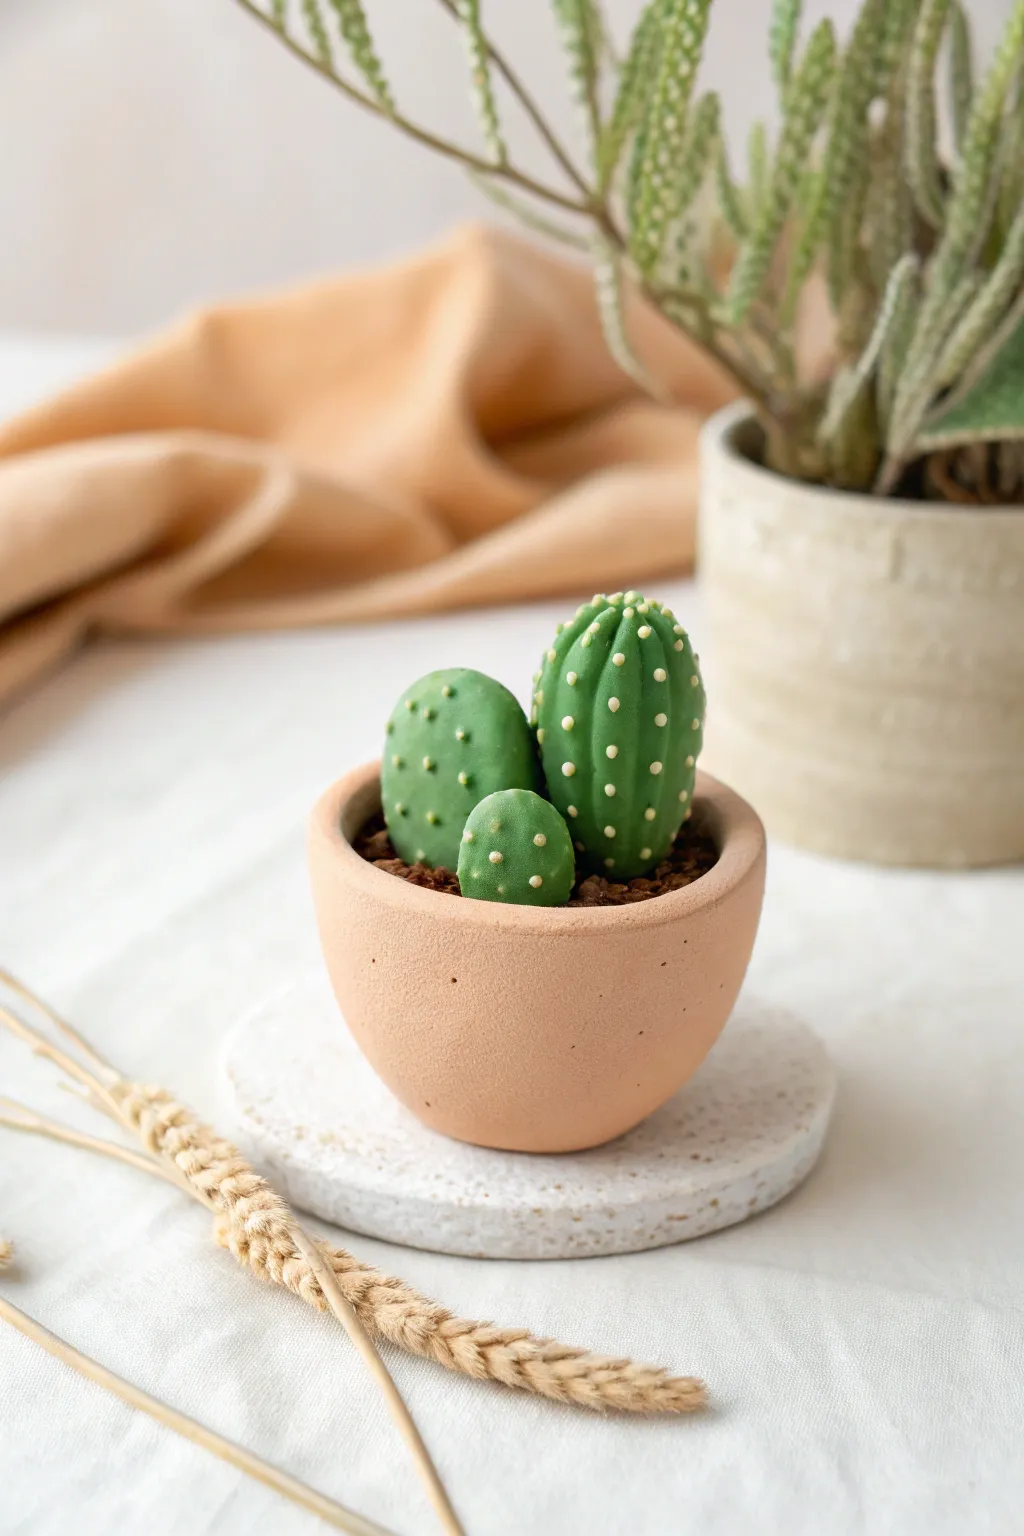
Create a desert-inspired miniature that never needs watering with this adorable polymer clay cactus trio. The soft, rounded shapes and terracotta-style pot give this piece a clean, modern aesthetic perfect for brightening up any small shelf.
Step-by-Step
Materials
- Green polymer clay (medium sage shade)
- Terracotta or light brown polymer clay
- Dark brown polymer clay (for soil)
- White or cream polymer clay (for spines)
- Liquid polymer clay (optional)
- Needle tool or toothpick
- Small ball stylus
- Texture sponge or toothbrush
- Craft knife
- Rolling pin
- Oven
Step 1: Creating the Pot
-
Condition the Clay:
Begin by thoroughly conditioning your terracotta-colored clay until it is soft and pliable. This ensures the pot walls won’t crack during shaping. -
Form the Base:
Roll a ball of terracotta clay about the size of a walnut. Using your thumb, gently press into the center to start forming a hollow, pinch-pot shape. -
Shape the Walls:
Work the clay upwards, creating smooth, rounded walls. Aim for a slightly tapered look where the bottom is narrower than the rim, but keep the overall silhouette round and organic. -
Refine the Rim:
Use your finger to smooth the rim of the pot. It shouldn’t be razor-sharp; a slightly rounded edge looks more like realistic earthenware. -
Texture the Surface:
To mimic the texture of stone or terracotta, gently pat the exterior of the pot with a coarse sponge or an old toothbrush. This removes fingerprints and adds a matte finish.
Needle Tip
Instead of rolling tiny balls for spines, try using white liquid clay. Dip a toothpick into the liquid and dot it directly onto the cactus for instant, uniform spikes.
Step 2: Filling with Soil
-
Prepare the Base Soil:
Take a chunk of scrap clay or dark brown clay and press it into the bottom half of the pot to create a stable foundation for your cacti. -
Create Texture:
Roll out a thin layer of dark brown clay. Use a stiff brush or a crumpled ball of aluminum foil to heavily texture it, simulating loose dirt. -
Place the Soil:
Cut a circle from this textured sheet and place it on top of your foundation clay, tucking the edges neatly against the inside walls of the pot.
Step 3: Sculpting the Cacti
-
Mix the Green:
If you don’t have the perfect sage green, try mixing a standard green with a tiny bit of white and yellow ochre to get that natural, muted plant tone. -
Form the Tall Cactus:
Roll a cylinder of green clay and round off the top. I find gently tapping the bottom against your work surface helps it stand straight. -
Add Ribs:
Use the side of a needle tool to press vertical indentations around the cylinder, creating the ribbed look of a barrel cactus. -
Shape the Prickly Pears:
Roll two smaller balls of green clay—one medium, one small. Flatten them slightly between your fingers to create oval ‘pad’ shapes. -
Attach the Cactus:
Press the tall cactus and the two flat pads securely onto the soil base. You can use a dab of liquid polymer clay here for extra grip. -
Blend the Shapes:
For the flat pads, make sure they overlap slightly or nestle into the soil so they look like they are growing, not just sitting on top.
Dust Trouble?
Polymer clay loves collecting dust. Before baking, use a cotton swab dipped in rubbing alcohol or baby oil to gently wipe the smooth surfaces clean.
Step 4: Detailing and Baking
-
Prepare the Spines:
Roll incredibly tiny, barely-there snakes of white or cream clay. These will become the micro-dots for the spines. -
Apply the Dots:
Slice tiny specks from your white snake. Using the needle tool, gently pick them up and press them onto the green forms. Place them in regular intervals—vertical lines for the tall cactus and scattered patterns for the pads. -
Add Texture to Dots:
Once placed, use the tip of your needle tool to prick the center of each white dot. This secures the clay and gives it a prickly appearance. -
Final Inspection:
Give the whole piece a quick check. Smooth out any accidental tool marks on the pot or cactus bodies before hardening. -
Bake:
Bake the project according to your clay manufacturer’s instructions. Usually, this is around 275°F (130°C) for 15-30 minutes.
Once cooled, your miniature succulent garden is ready to add a touch of greenery to your desk without any maintenance required

The Complete Guide to Pottery Troubleshooting
Uncover the most common ceramic mistakes—from cracking clay to failed glazes—and learn how to fix them fast.
Succulent Rosette Stud Earrings
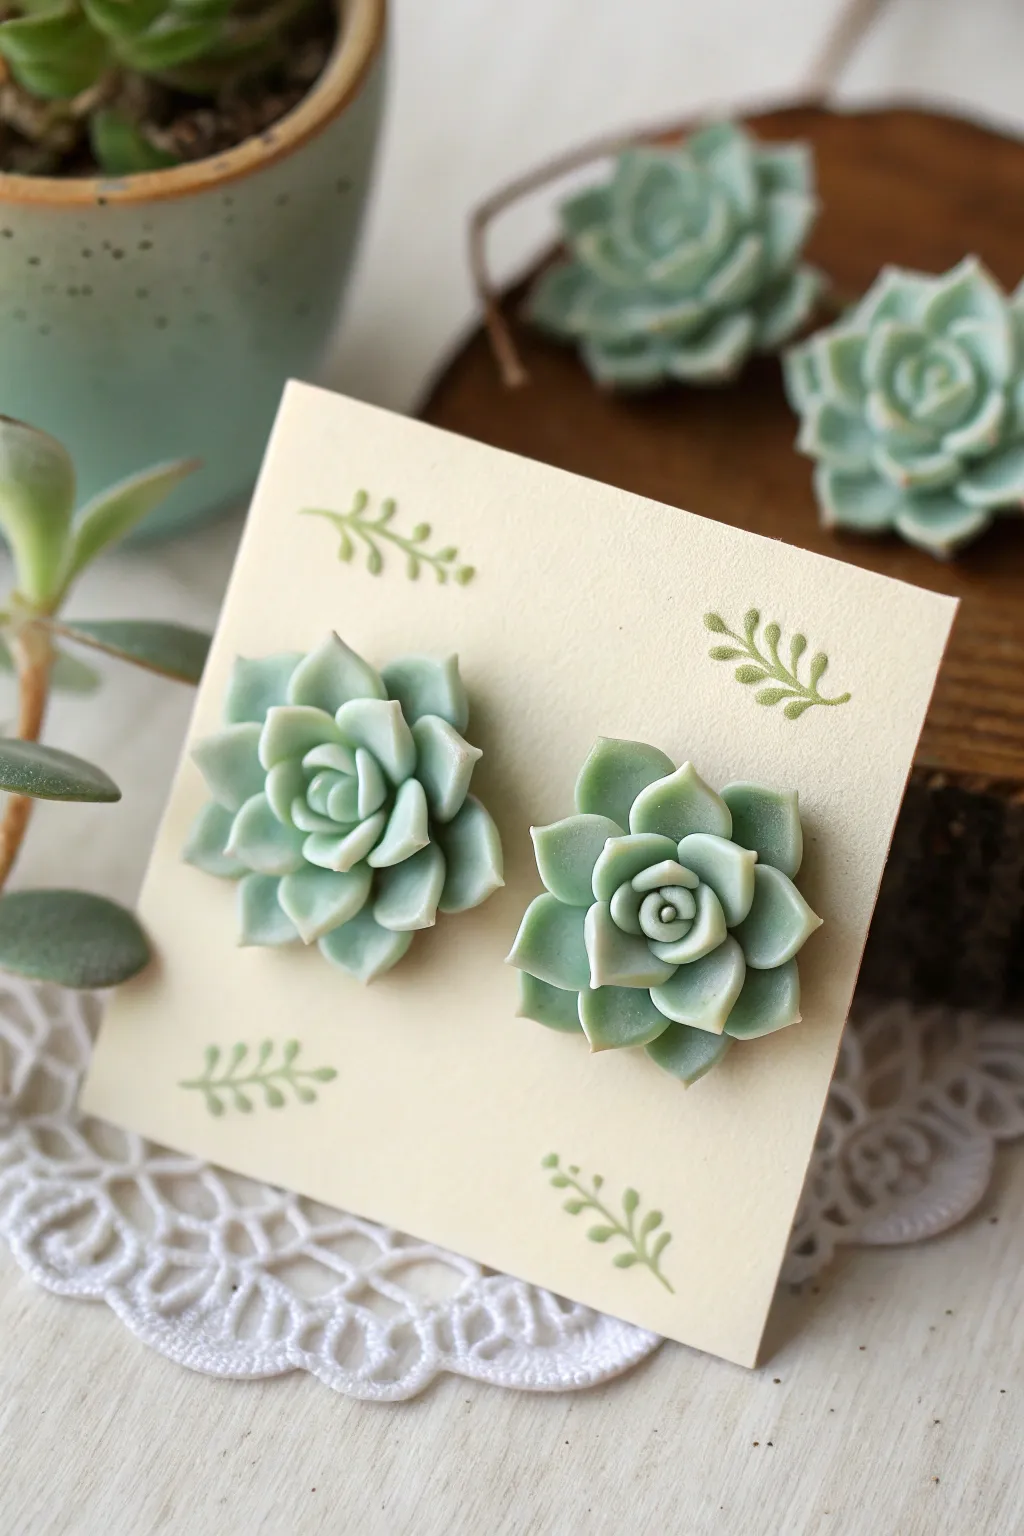
These charming stud earrings capture the delicate beauty of an Echeveria succulent in miniature form. Their soft, dusty green hue and realistic layered petals make them a perfect botanical accessory for nature lovers.
Step-by-Step Guide
Materials
- Polymer clay (translucent white and sap green or olive green)
- White polymer clay (optional, for lightening)
- Dry soft pastels (light pink or peach)
- Small soft paintbrush
- Ball tool or dotting tool
- Needle tool or toothpick
- Flexible clay blade or craft knife
- 2 flat-pad earring posts (surgical steel or sterling silver)
- Strong craft adhesive (like E6000) or liquid polymer clay
- Gloss or matte varnish (optional)
- Ceramic tile or glass work surface
- Oven for baking
Step 1: Mixing the Color
-
Create a translucent base:
Start by conditioning a generous amount of translucent polymer clay until it is soft and pliable. The translucency is key to achieving that realistic, waxy succulent look rather than a flat, plastic appearance. -
Tint the clay:
Add a very small amount of sap green or olive green clay to the translucent base. You want a pale, muted minty color, not a deep forest green. If the color becomes too saturated, mix in more translucent or a pinch of white clay to soften it. -
Check opacity:
Hold a thin piece of your mixed clay up to the light. It should look slightly cloudy but allow some light through, mimicking real plant tissue.
Keep it Clean
Polymer clay loves to pick up lint. Keep a pack of baby wipes or rubbing alcohol nearby to clean your hands and tools often, ensuring your pastel green stays pure.
Step 2: Forming the Rosette
-
Make the center bud:
Roll a tiny ball of clay, about 2mm in diameter, and pinch one side to form a teardrop shape. This will be the very center of your succulent. -
Prepare the petals:
Roll out a thin snake of your green clay and slice it into approximately 15-20 tiny, equal-sized pieces. Roll each piece into a ball. -
Flatten the petals:
Take one of the tiny balls and flatten it between your fingers into a teardrop shape that is thin at the edges but slightly thicker in the middle. Repeat this for all your petal balls. -
Start the first layer:
Wrap three of your smallest flattened petals tightly around the center bud, overlapping them slightly so they hug the center. This creates the tight inner spiral. -
Add the second layer:
Place the next row of petals around the first layer. Position these petals in the gaps between the previous petals. Press the bottom of each petal gently to adhere it to the base. -
Curl the tips:
As you add outer layers, gently pinch the tip of each petal to give it a sharp, defined point typical of Echeveria succulents. You can use your finger or a needle tool to slightly curl the tips outward for an open look. -
Check the size:
Stop adding layers when the rosette reaches your desired earring size, usually about 1cm to 1.5cm in diameter. Ensure the earring isn’t too heavy. -
Trim the back:
Using your flexible blade or craft knife, very carefully slice off the excess clay at the back of the rosette to create a completely flat surface. This flat back is crucial for attaching the earring post later.
Step 3: Details & Assembly
-
Apply shading:
Scrape a small amount of light pink or peach soft pastel into a powder. Using a soft, dry brush, very lightly dust the very tips of the petals and the center of the rosette. This mimics the ‘sun-stressed’ blushing seen in real succulents. -
Attach the posts (Option A: Baking together):
Apply a tiny dot of liquid polymer clay or bake-and-bond to the flat pad of your earring post. Press the post gently into the flat back of the raw clay rosette. I prefer this method as it creates a stronger mechanical bond. -
Attach the posts (Option B: Gluing later):
Alternatively, you can bake the clay pieces first and glue the posts on afterward using a strong adhesive like E6000. -
Bake the earrings:
Place your earrings on a ceramic tile or baking sheet. Follow the temperature instructions on your specific brand of polymer clay packages. Bake for roughly 30 minutes to ensure durability. -
Cool and finish:
Let the earrings cool completely in the oven. Once cool, you can leave them matte for a natural look or apply a very thin layer of satin varnish if you prefer a dewy finish.
Display Card Idea
Use a heavy cream cardstock and a green fine-tip pen to draw simple botanical sprigs around the earring holes, just like in the photo, for a professional gift presentation.
Pop these little botanical gems onto a backing card and they are ready to wear or gift to a plant-loving friend
Monstera Leaf Pendant
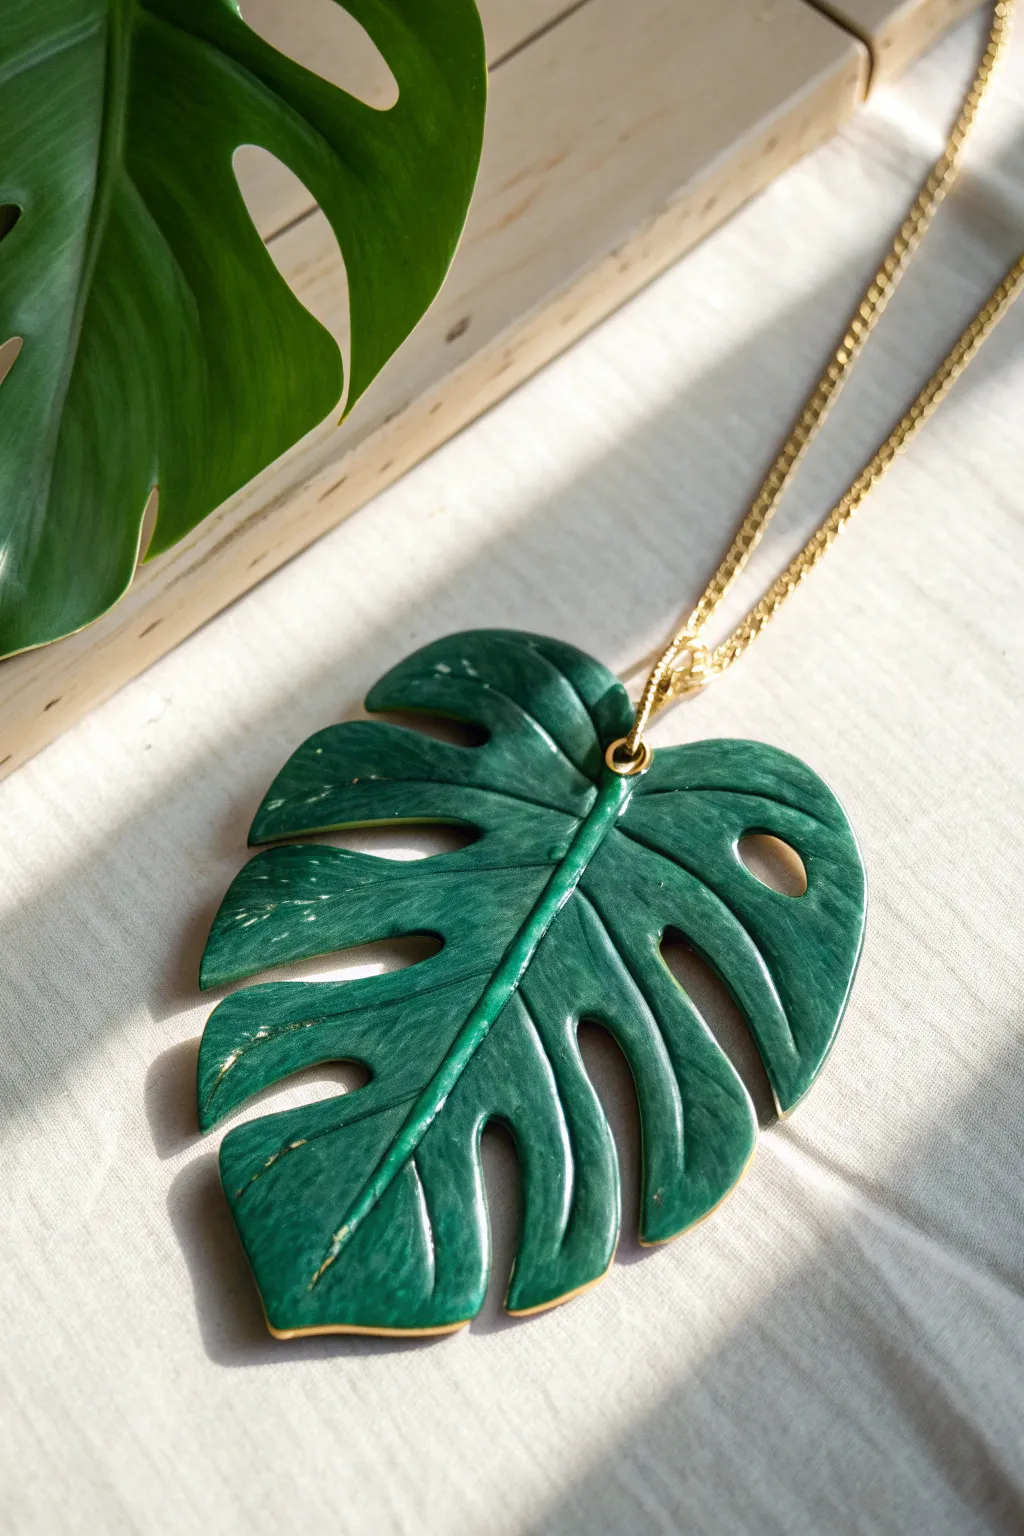
Capture the lush beauty of the jungle with this striking Monstera leaf pendant. Featuring realistic clay veining and a subtle glossy finish, this piece brings a touch of nature to any outfit.
Step-by-Step Tutorial
Materials
- Emerald green polymer clay
- Forest green or black polymer clay (very small amount for mixing)
- Gold polymer clay or gold acrylic paint
- Rolling pin or pasta machine
- Needle tool or X-Acto knife
- Clay sculpting tool with a rounded tip
- Sandpaper (various grits)
- Gloss glaze or resin
- Gold jump ring (large)
- Gold chain necklace
- Small paintbrush
- Parchment paper
Step 1: Shaping the Leaf
-
Condition the Clay:
Start by warming up your emerald green clay in your hands until it’s pliable. If you want a deeper, more realistic shade like the photo, mix in a tiny pinch of black or forest green. -
Roll the Sheet:
Roll the clay out into a sheet approximately 3mm to 4mm thick. You want it sturdy enough to be a pendant but not too heavy. -
Outline the Shape:
Using a needle tool, lightly sketch a heart shape onto the clay surface. This will be the base for your Monstera leaf. -
Cut the Perimeter:
Use your X-Acto knife to cut out the heart shape. Don’t worry about perfect edges yet, as organic shapes are more natural. -
Carve the Fenestrations:
This is the signature Monstera look. Cut out deep notches from the edges toward the center vein. Vary the sizes—some large scoops, some smaller slivers. -
Add Inner Holes:
Cut one or two oval-shaped holes within the leaf body itself, avoiding the edges. This mimics the mature leaves of the plant. -
Smooth the Edges:
Gently run your finger along all cut edges to soften the harsh knife marks. The clay should look rounded and organic, not sharp.
Natural Curve
Before baking, drape your clay leaf over a rounded object (like a lightbulb or soda can) on the baking sheet. This dries it with a natural, organic curve rather than perfectly flat.
Step 2: Adding Texture and Detail
-
Create the Central Vein:
Using a sculpting tool or a dull knife loosely, press an indentation straight down the center of the leaf, stopping just before the bottom tip. -
Texture the Leaf Surface:
Take a fine-grit sandpaper or a stiff toothbrush and gently tap it over the surface of the clay. This gives it a leaf-like, matte texture rather than smooth plastic. -
Add Side Veins:
Use your needle tool to gently scratch fine lines radiating from the center vein out toward the edges of each leaf section. -
Insert the Hanging Hardware:
At the top of the leaf where the lobes meet, attach a large gold jump ring. You can embed it directly into the raw clay or pierce a hole wide enough for it to pass through later. -
Clean Up:
Give the piece a final inspection. Remove any fingerprints by brushing lightly with a bit of baby oil or cornstarch.
Sticky Situation
If your clay gets too soft and sticky while cutting the intricate notches, pop it in the fridge for 10 minutes. The firmer clay will cut cleaner and won’t drag as much.
Step 3: Baking and Finishing
-
Bake the Piece:
Place the pendant on parchment paper and bake according to your polymer clay package instructions (usually around 275°F for 15-30 minutes). -
Cool Down:
Let the pendant cool completely inside the oven or on a wire rack. It creates a stronger final result. -
Highlight Edges (Optional):
For a subtle gilded look, lightly brush the very edges of the leaf with a tiny amount of gold acrylic paint. Wipe most of it off immediately so it just catches the texture. -
Glazing:
Apply a thin layer of gloss glaze or UV resin over the top of the leaf to give it that waxy, botanical shine seen in the photo. -
Assembly:
Once the glaze is dry, slide your gold chain through the jump ring.
Wear your new botanical masterpiece with pride and enjoy the tropical vibes


What Really Happens Inside the Kiln
Learn how time and temperature work together inside the kiln to transform clay into durable ceramic.
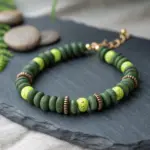
Green Marble Bead Necklace
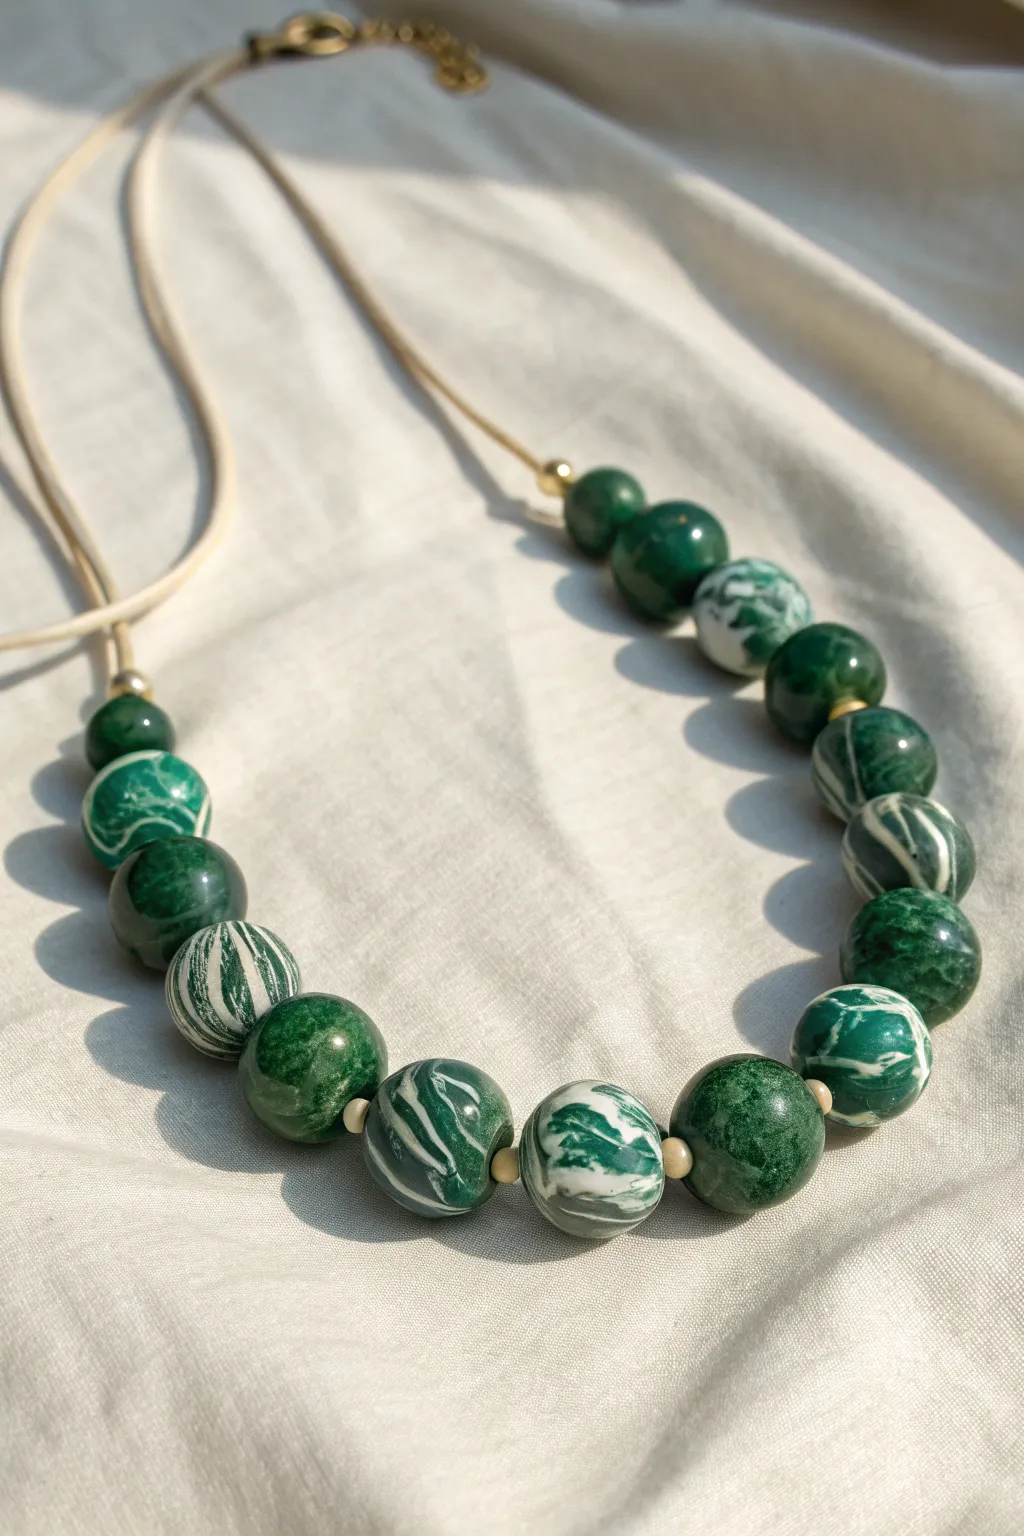
Capture the elegance of natural stone with this striking green marble bead necklace. By swirling deep forest green and crisp white polymer clay, you’ll create a sophisticated accessory that looks heavy but feels light as a feather.
How-To Guide
Materials
- Polymer clay in deep forest green
- Polymer clay in white
- Small gold spacer beads (round)
- Light beige or cream suede/leather cord (approx. 24 inches)
- Gold finish jewelry clasp (lobster claw and ring)
- Two gold ribbon crimp ends or barrel cord ends
- Glossy polymer clay varnish or glaze
- Bead piercing pin or needle tool
- Clay roller or pasta machine
- Oven safe baking tray
- Soft paintbrush
- Needle nose pliers
- Optional: Bead rack for baking
Step 1: Creating the Marble Clay
-
Condition the base:
Start by conditioning the forest green polymer clay until it is soft and pliable. Roll it into a thick log shape, about 4 inches long. -
Prepare the accent:
Condition a smaller amount of white clay, roughly one-third the volume of the green. Roll this into several thin snakes of varying thicknesses. -
Combine colors:
Lay the white clay snakes lengthwise across the green log. Twist the entire log like a candy cane to begin merging the colors. -
Create the marble effect:
Fold the twisted log in half and roll it out again. Repeat this folding and twisting process 3-4 times. Stop as soon as you see nice veins; over-mixing will turn the clay into a solid mint green.
Twist & Tear
For more ragged, natural veins, tear the clay log apart and stack the pieces back together before rolling, rather than just folding it.
Step 2: Forming the Beads
-
Portion the clay:
Cut the marbled log into approximately 15 equal sections. I usually eyeball this, as slight size variations add to the organic, natural stone look. -
Roll the spheres:
Take each section and roll it vigorously between your palms to create a smooth, round sphere. Check for any air bubbles and smooth them out. -
Create solid accents:
For variety, roll 2-3 beads using just the plain forest green clay without the marble effect, keeping them the same size as your marbled ones. -
Pierce the holes:
Using your piercing pin or needle tool, gently bore a hole through the center of each bead. Twist the tool as you push to avoid squashing the sphere shape. -
Smooth the openings:
Inspect the entry and exit points of the hole. Smooth down any rough clay edges with your finger so the bead sits flush later.
Matte Stone Finish
Skip the glaze and instead buff the baked beads with a piece of denim or a buffing wheel for a soft, realistic satin sheen.
Step 3: Baking and Finishing
-
Bake the beads:
Arrange the beads on a baking tray or bead rack. Bake according to your clay package instructions (usually 275°F/135°C for 15-30 minutes). -
Cool down:
Allow the beads to cool completely before handling. They are fragile while warm but harden as they return to room temperature. -
Apply glaze:
Using a soft brush, apply a thin coat of glossy varnish to each bead to replicate the shine of polished marble. Let them dry fully.
Step 4: Assembly
-
Stringing preparation:
Cut your suede cord to the desired length. Tie a loose knot at one end temporarily to stop beads from sliding off while you work. -
Thread the beads:
Begin threading your beads onto the cord. Alternate between the highly marbled beads and the darker, more solid green ones to create a balanced visual rhythm. -
Add spacers:
Place a small gold spacer bead between every few clay beads. These metallic metallic accents break up the green and add a touch of luxury. -
Secure the ends:
Once all beads are strung, remove the temporary knot. Use pliers to attach the cord ends or crimps to the raw tips of the suede cord. -
Attach the clasp:
Connect the jump rings and the lobster clasp to the cord ends using your pliers, ensuring they are closed tightly.
Wear your new statement piece with a simple white top to let those marble patterns truly shine
Mint Checkerboard Slab Earrings
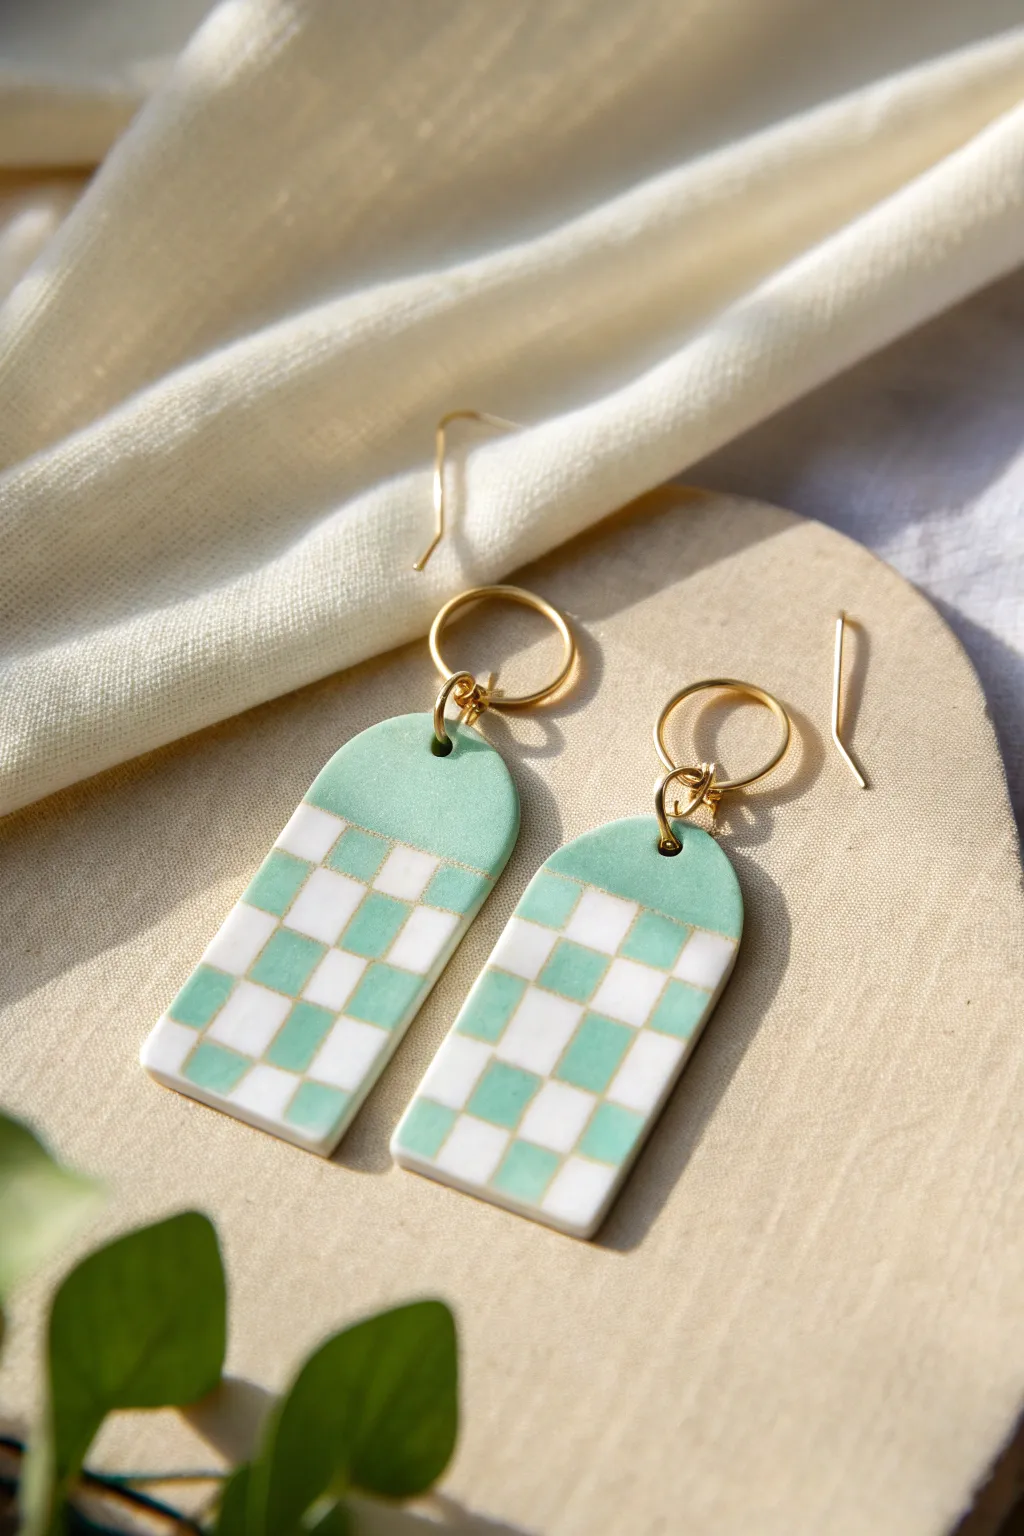
Embrace a retro vibe with these charming mint green and white checkerboard earrings, featuring a classic arch shape and elegant gold accents. The clean geometric pattern pairs perfectly with the soft pastel hue for a modern, playful accessory.
Detailed Instructions
Materials
- Polymer clay (Mint Green)
- Polymer clay (White)
- Clay roller or pasta machine
- Tissue blade or flexible clay slicer
- Grid paper or ruler
- Arch-shaped clay cutter (approx. 1.5 – 2 inches)
- Small circle cutter (for jump ring holes)
- Oven thermometer
- Baking sheet and parchment paper
- Fine grit sandpaper (400-1000 grit)
- UV resin or gloss glaze (optional)
- 2 Large gold jump rings (approx. 10mm)
- 2 Small gold jump rings (approx. 4-6mm)
- Earring hooks or studs
- Jewelry pliers
Step 1: Prepping and Cutting
-
Condition the clay:
Begin by thoroughly conditioning your mint green and white polymer clay separately until they are soft and pliable. This prevents cracking later on. -
Create uniform sheets:
Roll both colors out into sheets of equal thickness. Using a pasta machine on the thickest setting works best for consistency, but a roller with guide rings works too. -
Cut clay strips:
Use your tissue blade to cut long, straight strips from both the mint and white sheets. Ensure every strip is exactly the same width; a ruler or grid paper underneath is very helpful here. -
Assemble the striped slab:
Lay the strips side-by-side on your work surface, alternating colors (mint, white, mint, white) to create a striped sheet. Gently press them together at the seams so they adhere. -
Slice perpendicular strips:
Turn your striped slab 90 degrees. Cut across the stripes to create new strips that consist of alternating mint and white squares. -
Form the checkerboard:
Reassemble these new multi-colored strips, offsetting each row by one square to create the checkerboard pattern. Take your time aligning the corners of the squares for a crisp look.
Keep it Clean
White clay picks up lint easily. Wipe your hands and work surface with a baby wipe before handling the white clay to keep those squares pristine.
Step 2: Shaping and Refining
-
Smooth the surface:
Place a piece of parchment paper over your checkerboard slab and gently burnish it with a roller. This fuses the seams completely without smudging perfectly aligned squares. -
Prepare the backing (Optional):
If your slab is too thin, roll out a thin sheet of scrap or mint clay and adhere your checkerboard slab on top for extra stability. -
Cutting the solid top:
Roll out a small separate sheet of solid mint green clay. Cut a straight line across the bottom of this piece where it will join the checkerboard section. -
Joining the sections:
Cut a straight line across the top of your checkerboard section. Gently press the solid mint clay against the top of the checkerboard clay to form one long, dual-design slab. -
Cut the arch shapes:
Position your arch cutter so the top curve is in the solid mint section and the bottom straight edge captures the checkerboard pattern. Press down firmly to cut two matching shapes. -
Pierce the holes:
Use a small circle cutter or a needle tool to create a hole at the very top center of each arch. Make sure the hole is large enough for your jump rings.
Make it Matte
For a modern, velvety texture instead of a glossy finish, skip the resin and buff the baked clay with denim or a high-grit sanding sponge.
Step 3: Baking and Assembly
-
Bake the clay:
Transfer the pieces to a parchment-lined baking sheet. Bake according to the manufacturer’s instructions for your specific brand of clay, usually around 275°F (130°C) for 30-45 minutes. -
Cool and sand:
Let the earrings cool completely. Use fine-grit sandpaper under running water to smooth out any rough edges or fingerprints on the sides. -
Add a glossy finish (Optional):
For that ceramic-like shine visible in the photo, apply a thin layer of UV resin or gloss varnish to the front and cure it. -
Open the jump rings:
Using two pairs of pliers, twist your large jump rings open sideways (never pull them apart). -
Attach the hardware:
Thread the large jump ring through the clay hole. Attach a smaller jump ring to the large one, and finally, connect the earring hook to the small ring. -
Secure everything:
Close all jump rings securely by twisting them back into place until the ends meet perfectly flush.
Wear your new geometric creations with pride and enjoy the fresh pop of color they add to your outfit

TRACK YOUR CERAMIC JOURNEY
Capture glaze tests, firing details, and creative progress—all in one simple printable. Make your projects easier to repeat and improve.
Lime Slice Citrus Charms
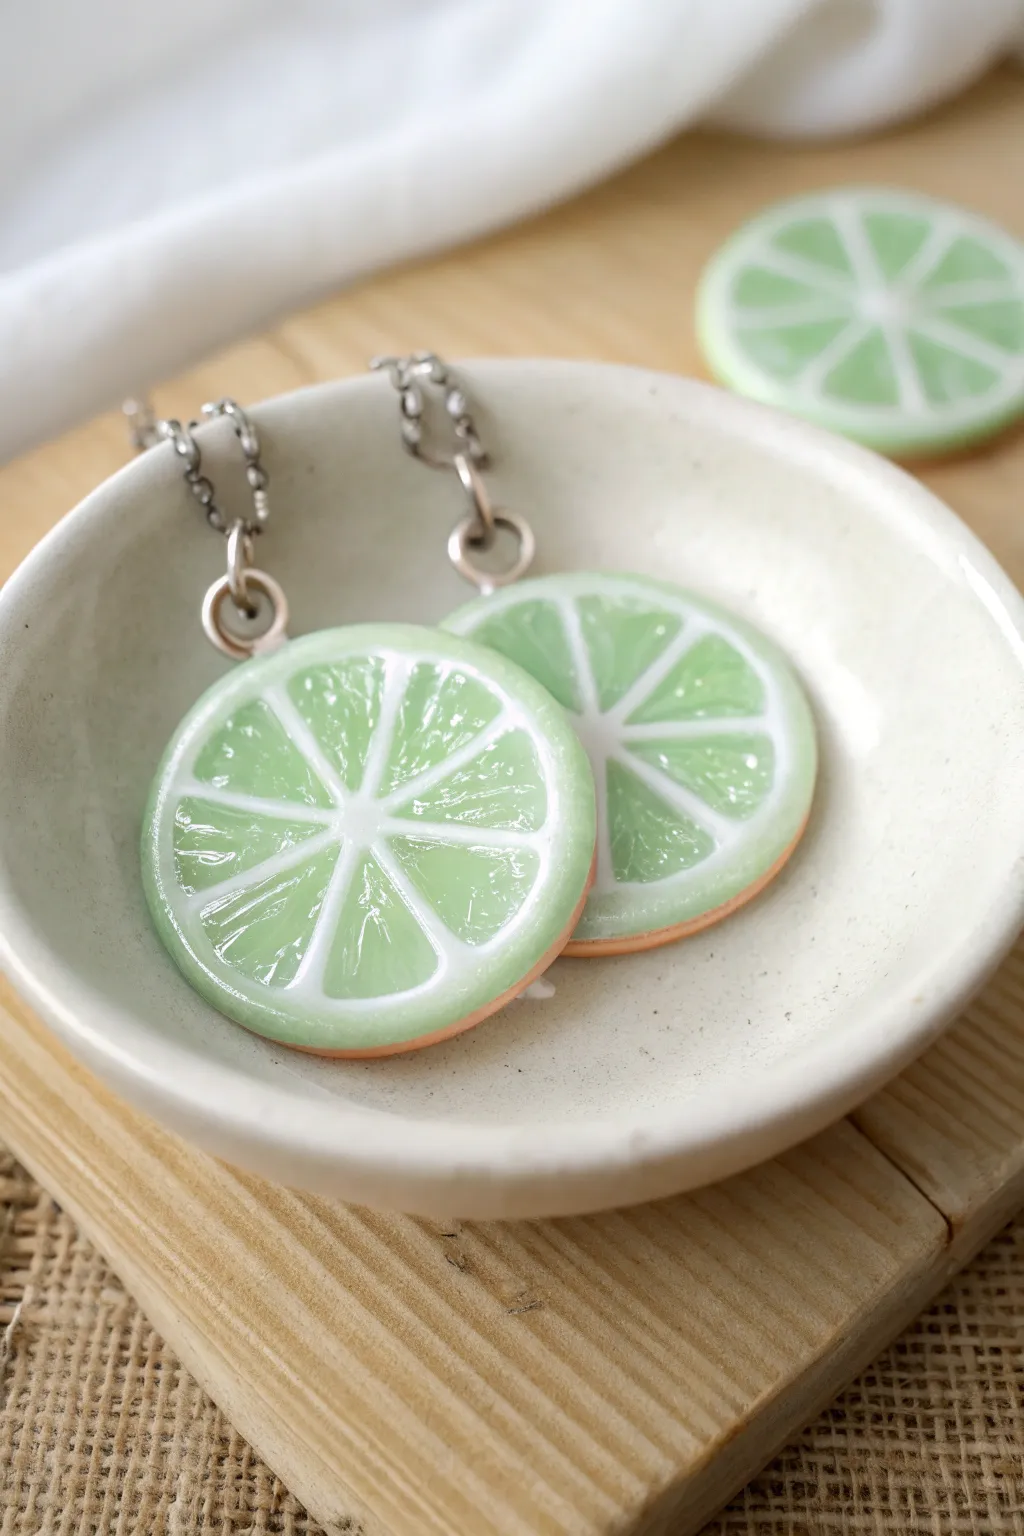
Capture the refreshing look of citrus with these vibrant lime slice charms made from polymer clay. The translucent green segments catch the light beautifully, making them perfect for playful earrings or a summery pendant.
Step-by-Step Guide
Materials
- Translucent green polymer clay
- Opaque white polymer clay
- Translucent yellow polymer clay (optional, for mixing)
- Tan or light brown polymer clay (for the zest/skin)
- Liquid polymer clay (translucent or white)
- Gloss glaze or UV resin
- Clay roller or pasta machine
- Sharp tissue blade
- Needle tool or toothpick
- Circle cutter (approx. 1 inch)
- Eye pins
- Silver chain jewelry findings
Step 1: Creating the Citrus Cane
-
Mix the fruit color:
Start by conditioning your translucent green clay. For a more realistic lime shade, I like to mix in a tiny pinch of translucent yellow to warm it up slightly. -
Form the segments:
Roll the green clay into a thick log, about 1 inch in diameter. This will form the juicy interior of the lime. -
Add the pith:
Roll out a thin sheet of opaque white clay. Wrap this sheet completely around your green log, trimming any excess so the seam meets perfectly without overlapping. -
Reduce to a triangle:
Squeeze and stretch the log to elongate it. Once it’s longer and thinner, pinch the top to form a tall triangular prism shape (like a Toblerone bar), capturing the classic wedge shape of a fruit segment. -
Cut and reassemble:
Cut this triangular log into identical lengths—you will need eight pieces to form a full circle. -
Create the center:
Roll a very thin snake of white clay to act as the central core. Arrrange your eight green shimmering wedges around this central white core so the points meet in the middle. -
Fill the gaps:
If there are slight gaps between the wedges where the white pith meets the center, gently pinch the structure to close them. You want a tight, circular wheel. -
Wrap the outer rind:
Roll a sheet of white clay and wrap it around the entire assemblage to create the inner rind layer. -
Add the skin:
Finally, roll a thin sheet of tan or light brown clay (limes often have a yellowish-tan skin when sliced, rather than pure green) and wrap it over the white layer for the final outer skin.
Smudged Colors?
If your white pith looks smeared into the green after slicing, your clay was too warm. Let the cane rest in the fridge for 20 minutes before slicing for crisp, clean lines.
Step 2: Slicing and Texturing
-
Reduce the cane:
Gently squeeze and roll your large cane to reduce it to your desired diameter. For earrings, a diameter of about 1 inch is usually perfect. -
Slice the charms:
Using a very sharp tissue blade, slice two even distinct discs from the cane. Try to keep the thickness consistent, around 3mm. -
Soften edges:
Gently tap the edges of the slices with your finger to round them slightly, removing the harsh ‘cut’ look. -
Texture the fruit:
Use a needle tool to gently scratch tiny radiating lines into the translucent green areas. This mimics the fibrous texture of real citrus pulp. -
Add hardware:
Insert an eye pin into the top of each slice, pushing it down through the rind and into the center pith for stability.
Step 3: Finishing Touches
-
Bake carefully:
Bake the pieces according to your clay manufacturer’s instructions. Usually, this is around 275°F (130°C) for 15-30 minutes. -
Cool down:
Let the charms cool completely before handling. The translucent clay will look cloudy when hot but clears up as it cools. -
Apply glaze:
Coat the front face of the lime slice with a layer of gloss glaze or UV resin. This significantly enhances the ‘wet’ look of the fruit and clarifies the translucency. -
Cure the finish:
Allow the glaze to dry or cure the resin under a UV lamp until hard and glossy. -
Assembly:
Attach jump rings to your eye pins and thread them onto jewelry chains to complete your accessories.
Make it Sparkle
Before baking, brush a tiny amount of pearl mica powder over the translucent green sections. It adds a sugary, crystallized fruit look to the finished piece.
Enjoy wearing your fresh, handmade citrus slices with any casual outfit for a pop of color
Kiwi Half Miniatures
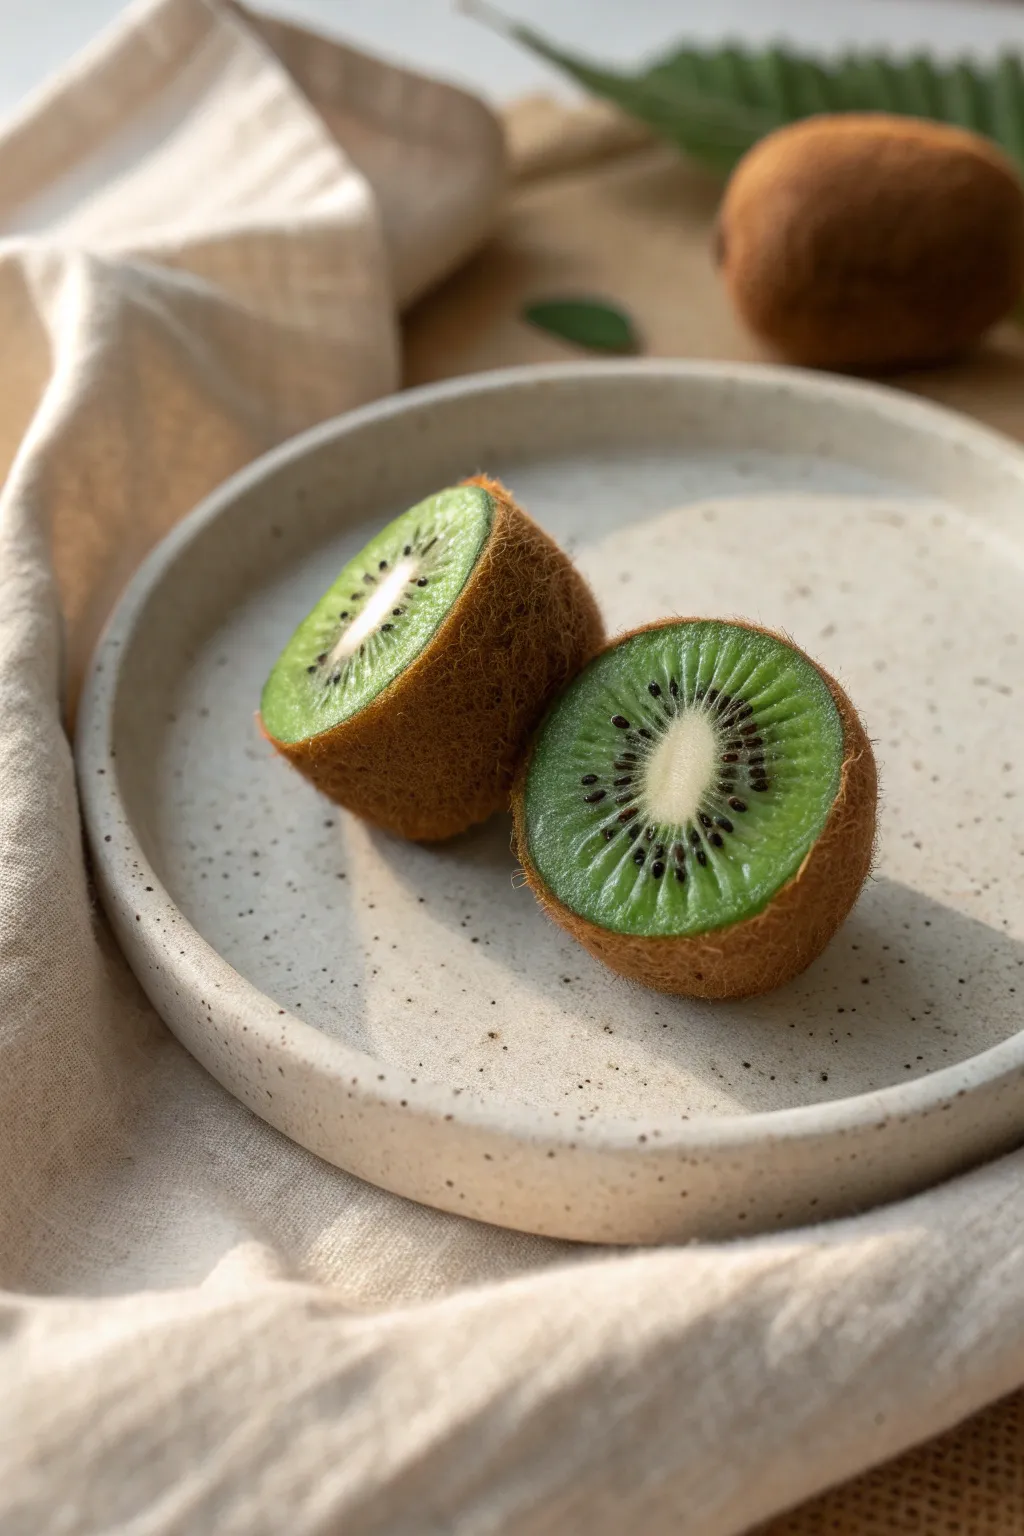
Master the art of illusion with these incredibly lifelike kiwi halves, featuring a textured, fuzzy exterior and a juicy, translucent green interior. This project relies on careful cane-making techniques to achieve those distinct black seeds and radiating white lines.
How-To Guide
Materials
- Translucent polymer clay
- Green polymer clay (leaf green or similar)
- White or cream polymer clay
- Black polymer clay
- Brown polymer clay (medium shade)
- Brown flocking powder (or finely chopped brown yarn)
- Liquid polymer clay (translucent)
- Gloss varnish or UV resin
- Blade or X-Acto knife
- Needle tool
- Soft pastel chalks/powders (brown, yellow, white)
- Toothbrush or texturing tool
Step 1: Creating the Kiwi Cane Center
-
Prepare the core:
Start by rolling a small log of white or cream clay. This will become the central white pith of the kiwi. -
Mix the fruit flesh color:
Mix a large portion of translucent clay with a very small amount of green clay. The goal is a semi-transparent, juicy look, not an opaque solid green. -
Assemble the seed layer:
Roll tiny snakes of black clay for the seeds. Then, create thin sheets of your translucent green mix and wrap them around the white core, alternating with placing the black snakes lengthwise around the center. -
Add radiating lines:
To mimic the white rays, alternate very thin strips of white clay with wider wedges of the translucent green mix. Build this layer around the seeded center until you have a thick log. -
Reduce the cane:
Gently squeeze and roll your large log to reduce its diameter. Start from the middle and work outward to prevent distortion. Reduce it until it’s the realistic size of a kiwi cross-section.
Step 2: Adding the Skin and Texture
-
Wrap the skin:
Roll out a thin sheet of medium brown clay. Wrap this sheet around your reduced green cane, smoothing the seam so it is invisible. -
Slice the halves:
Cut two thick slices from your cane. Since we are making halves, you can gently shape the cut side into a slight dome if you want a whole fruit look, but for the cut half, keep the face flat. -
Shape the body:
Take a scrap ball of clay (any color) and wrap it in the brown skin clay to form the back half of the kiwi. Attach your cane slice to the flat front of this hemisphere, blending the brown edges seamlessly. -
Texturize the skin:
Use a toothbrush or a stiff brush to stipple the brown skin surface. This creates the necessary rough, organic texture before adding the fuzz. -
Apply flocking:
Brush a thin layer of liquid polymer clay over the brown skin areas (avoiding the green face). Dip the piece into brown flocking powder or press the powder onto the liquid clay to create the fuzzy skin effect.
Juicy Realism Trick
Mix a tiny drop of yellow glass paint or alcohol ink into your final UV resin glaze. This warms up the ‘juice’ color for a riper look.
Step 3: Finishing Touches and Baking
-
Detail the center:
Use a needle tool to gently drag tiny lines from the white center outward into the green flesh. This breaks up the perfect geometry of the initial cane. -
Shade with pastels:
I like to brush a tiny bit of yellow or white pastel dust near the center of the green flesh to enhance the depth and ripeness. -
Bake the clay:
Bake your pieces according to your clay manufacturer’s instructions. Usually, this is around 275°F (130°C) for 15-30 minutes. -
Cool and clean:
Let the pieces cool completely. If any flocking powder got onto the cut face, gently brush it away with a soft, clean brush. -
Add the juice:
Coat the cut face of the kiwi with a layer of gloss varnish or UV resin. This is the most crucial step for realism, as it simulates the wet, juicy texture of fresh fruit.
Smeared Cane?
If your seeds are smearing when you slice the cane, chill the raw clay log in the fridge for 20 minutes before cutting to firm it up.
Enjoy displaying your amazingly deceptive fruit miniature on a tiny plate or as a unique jewelry charm
Grape Cluster Dangle Earrings
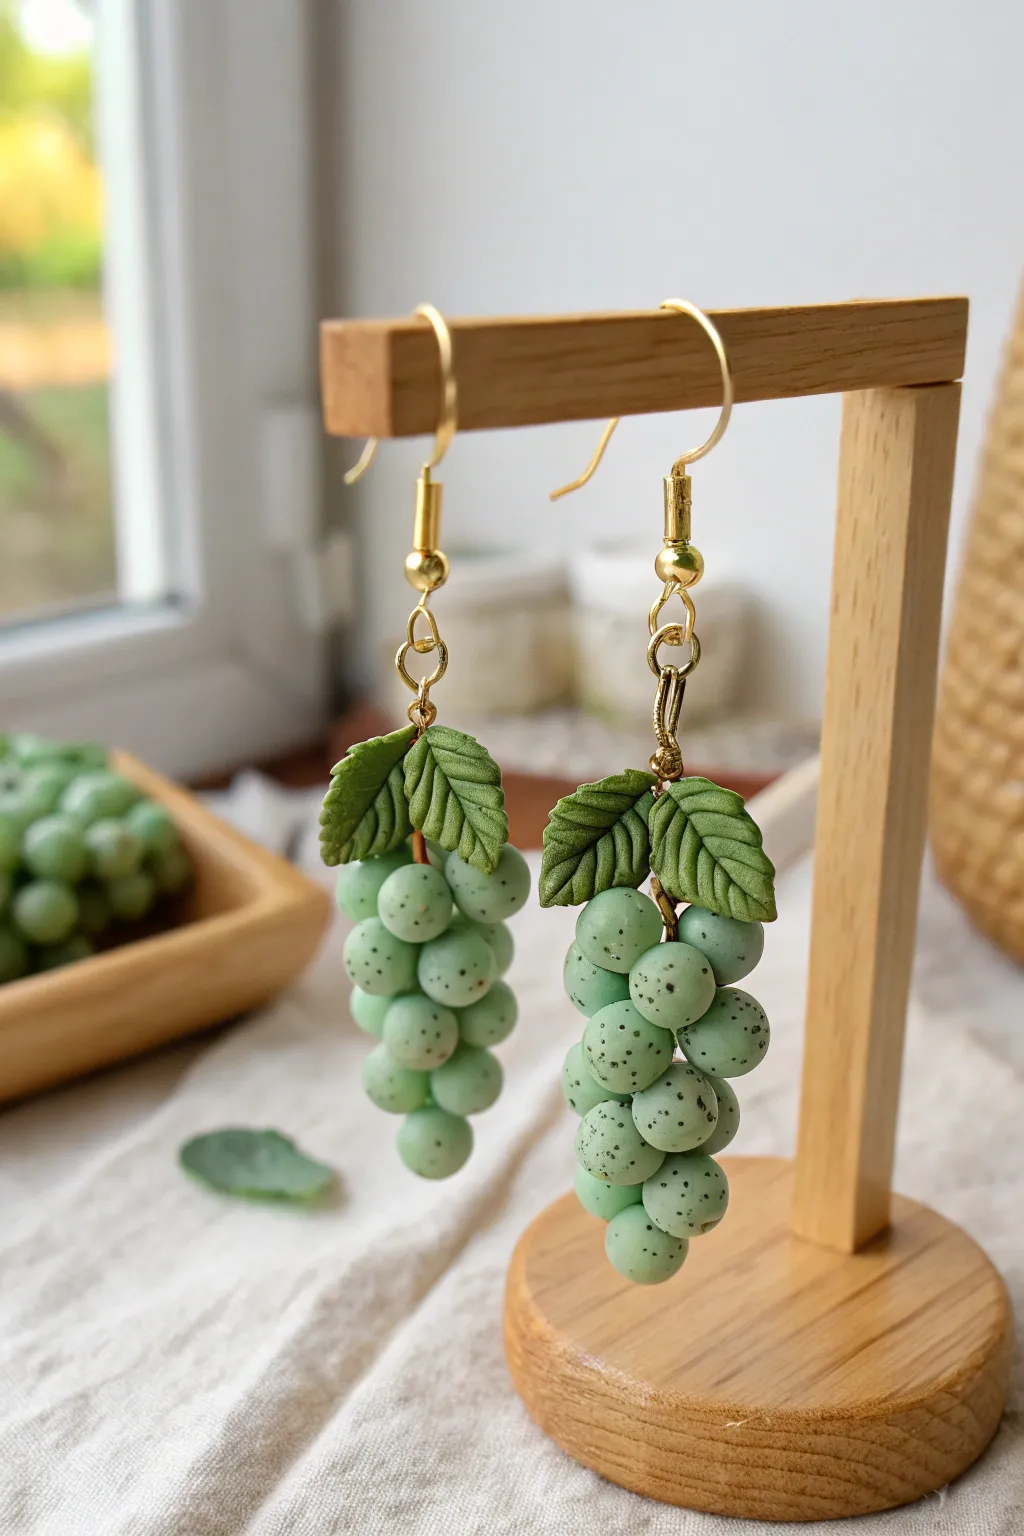
These charming dangle earrings capture the fresh look of green grapes right off the vine, complete with tiny textured leaves. The translucent green clay and delicate speckling technique give them a realistic, organic finish perfect for nature lovers.
Step-by-Step
Materials
- Translucent or jade green polymer clay
- Leaf green polymer clay
- Clean ceramic tile or glass work surface
- Headpins (gold tone)
- Jump rings and earring hooks (gold tone)
- Black acrylic paint
- Old toothbrush or stiff bristle brush
- Needle tool or toothpick
- X-acto knife or clay blade
- Clear gloss glaze (optional)
- Small paintbrush
- Jewelry pliers (round nose and chain nose)
Step 1: Creating the Grape Cluster Base
-
Prepare the headpin:
Start by taking a gold-tone headpin. Using your round nose pliers, create a small loop at the very bottom end if it doesn’t already have a stopper, or simply ensure the existing head is flat. This will anchor your grapes. -
Form the core structure:
Take a small snake of your green clay and wrap it around the bottom half of the headpin to build a tapered cone shape. This acts as the invisible core that the grapes will stick to. -
Condition the clay:
Thoroughly knead your translucent or jade green clay until it is soft and pliable. Warm clay helps adhesion, which is crucial for this clustering technique.
Step 2: Forming the Grapes
-
Make the berries:
Roll many small balls of the green clay. Vary the sizes slightly, making some tiny (about 3mm) for the bottom and some larger (about 5-6mm) for the top of the cluster. -
Attach the bottom tier:
Begin attaching the smallest clay balls to the bottom of your core shape on the headpin. Press them gently against the core and each other so they bond without squishing their round shape. -
Build upwards:
Work your way up the headpin, adding slightly larger clay balls as you go. Create a natural, irregular conical shape that resembles a real bunch of grapes. -
Check density:
Inspect the cluster from all sides. Fill in any large gaps with smaller clay balls to ensure the underlying core is completely hidden.
Pro Tip: Translucency
Mix semi-translucent clay with a tiny pinch of green. This mimics the way light passes through real grape skins better than opaque clay.
Step 3: Adding Leaves and Detail
-
Shape the leaves:
Using a slightly darker leaf green clay, shape two small teardrops for each earring. Flatten them gently to form the leaf base. -
Texture the veins:
With a needle tool or an X-acto knife, carefully score a central vein down the middle of each leaf, followed by diagonal veins branching out to the edges. -
Create serrated edges:
I like to gently press the side of a toothpick into the edges of the leaves to create a natural, serrated look rather than a smooth outline. -
Attach the foliage:
Press the two leaves onto the very top of the grape cluster, concealing where the wire exits the clay. Curve the tips slightly for movement. -
Speckle the surface:
Dilute a drop of black acrylic paint with a tiny bit of water. Dip an old toothbrush into the mix and flick the bristles with your thumb to spray a fine mist of black speckles over the unbaked grapes. -
Bake the pieces:
Place the earrings on a ceramic tile. Bake according to your polymer clay manufacturer’s instructions, typically around 275°F (130°C) for 15-20 minutes.
Level Up: Varied Tones
Make a gradient effect by using lighter green balls at the bottom of the cluster and slightly darker green ones near the top leaves.
Step 4: Assembly
-
Trim the wire:
Once cooled, trim the excess headpin wire sticking out of the top of the leaves to about 1cm. -
Create the top loop:
Use round nose pliers to bend the remaining wire into a secure loop just above the leaves. -
Attach hardware:
Open a jump ring with your pliers (twist sideways, don’t pull apart). Thread it through the headpin loop and the loop of your earring hook. -
Final touches:
Close the jump ring securely. If desired, you can add a coat of satin or matte glaze to protect the paint speckles, though the raw clay finish looks very natural.
Enjoy wearing your fresh, vineyard-inspired accessories
Pear With Blush Cheeks Charm
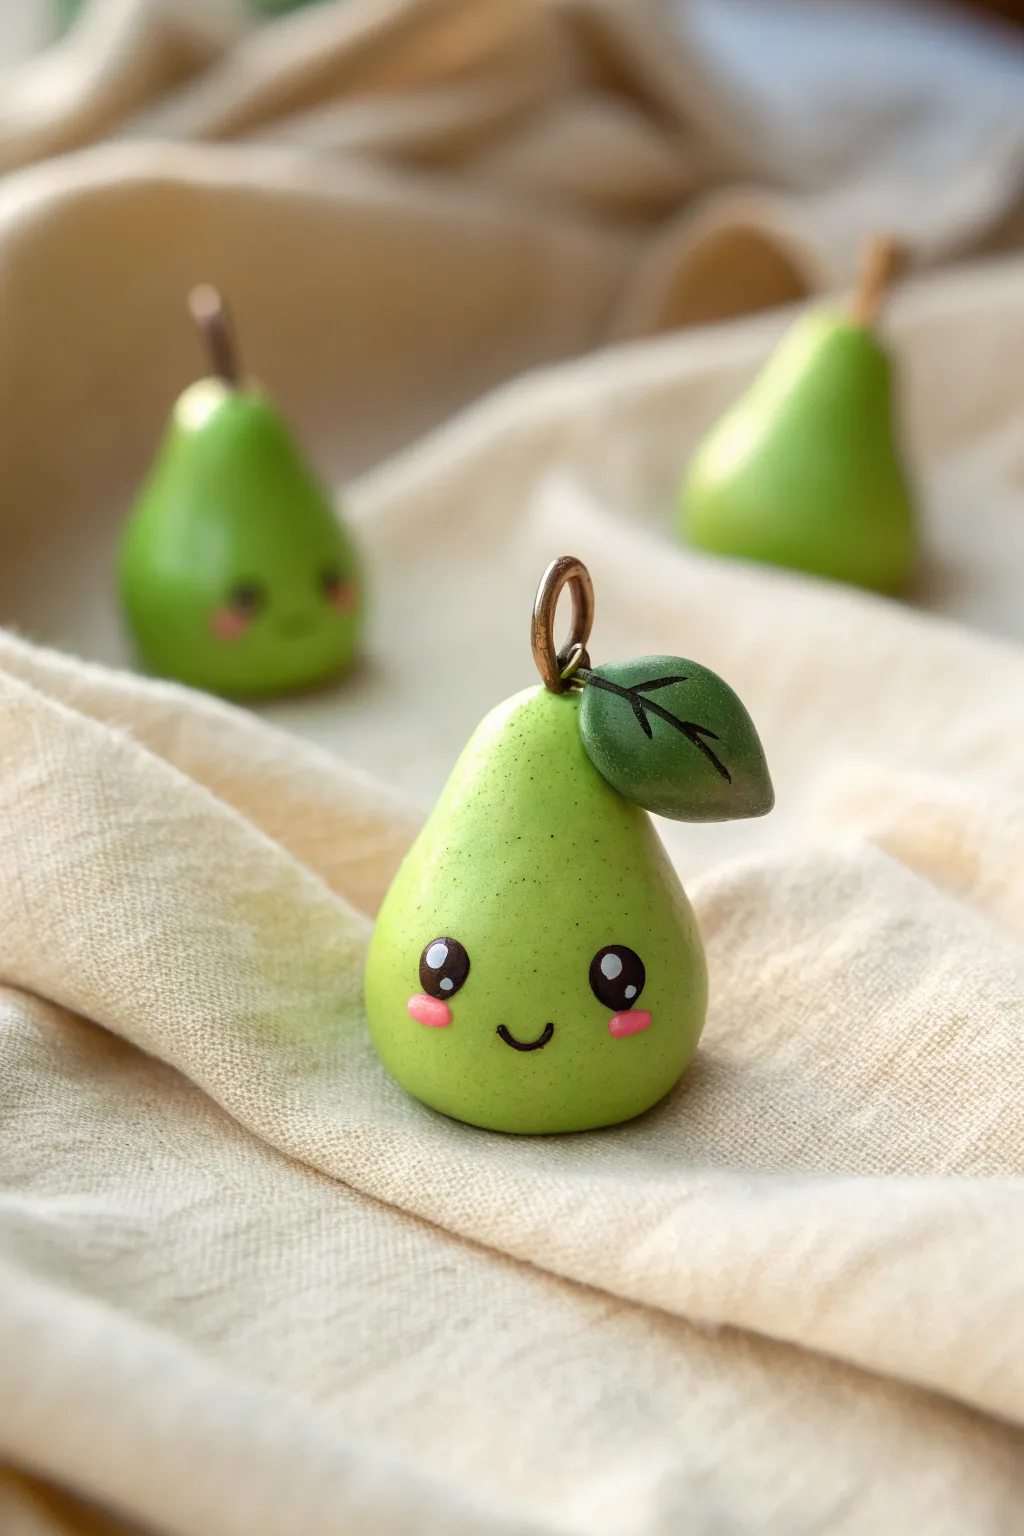
Create a cheerful, bright green pear charm with this adorable polymer clay tutorial. With its kawaii expression and tiny blushing cheeks, this little fruit is perfect for turning into a necklace pendant or a charming keychain.
Step-by-Step Tutorial
Materials
- Light green polymer clay
- Dark green polymer clay
- Pink polymer clay (or chalk pastel)
- Black acrylic paint
- White acrylic paint
- Jump ring (bronze or gold tone)
- Eyepin (match jump ring color)
- Small dotting tool or toothpick
- Fine detail paintbrush
- Gloss glaze or UV resin
- Needle tool
- Hobby knife
Step 1: Shaping the Base
-
Condition the clay:
Start by thoroughly conditioning your light green polymer clay until it is soft and pliable. Roll it into a smooth ball free of cracks. -
Form the pear shape:
Gently roll the top half of the ball between your fingers and thumb to taper it, creating the classic teardrop pear silhouette. The bottom should remain round and plump for a cute look. -
Flatten the bottom:
Tap the bottom of the pear lightly on your work surface so it can stand up on its own without rolling over. -
Insert hardware:
Take your metal eyepin. If the stem is too long, trim it with wire cutters. Insert the straight end into the top center of the pear, pushing it down until only the loop is visible.
Step 2: Adding the Leaf
-
Shape the leaf:
Take a tiny pinch of dark green clay. Roll it into a small teardrop shape, then flatten it gently between your fingers. -
Add texture:
Here I prefer to use a needle tool to lightly press a central vein line down the leaf, adding tiny angled veins branching off for realism. -
Attach the leaf:
Press the finished leaf against the side of the pear near the top, right next to the eyepin loop. Blend the clay slightly at the connection point if needed to secure it.
Fingerprint Fix
Work surface getting messy? Before baking, lightly brush the unbaked clay with a little baby oil or cornstarch to smooth away any accidental fingerprints.
Step 3: Creating the Face
-
Mark eye placement:
Before painting, visualize where the face will go. It should be situated on the lower, wider part of the pear. You can make tiny indentations with a needle tool to plan the spacing. -
Add blush cheeks:
Take two minuscule balls of pink clay, flatten them into discs, and press them onto the pear’s face area. Alternatively, brush on pink chalk pastel dust for softer cheeks. -
Bake the charm:
Bake your piece according to your specific clay manufacturer’s instructions (usually around 275°F/130°C for 15-30 minutes). Let it cool completely before painting.
Make it a Trio
Create a whole fruit salad necklace! Make a reddish apple and a yellow lemon using this same teardrop shaping technique for a complete summer set.
Step 4: Painting & Finishing
-
Paint the eyes:
Using black acrylic paint and a dotting tool, create two solid circles just above the pink cheeks. -
Add the smile:
With an extremely fine detail brush or a fine-tip paint marker, draw a tiny, U-shaped mouth centered between the eyes. -
Leaf details:
To make the leaf pop like the photo, carefully trace the indented vein lines with a tiny amount of watered-down black paint or a fine marker. -
Add whimsical highlights:
Dip a toothpick in white paint. Add two tiny dots inside each black eye—one largish dot at the top right and a tinier one at the bottom left—to create that sparkling kawaii look. -
Glaze:
Once all paint is dry, coat the entire pear in a gloss glaze or UV resin. This protects the face and gives it the shiny finish seen in the example. -
Final assembly:
Open a sturdy bronze jump ring using pliers. Thread it through the eyepin loop at the top of the pear and close it securely.
You now have a delightful little fruit friend ready to wear or gift.
Smiley Caterpillar Wiggle Charm
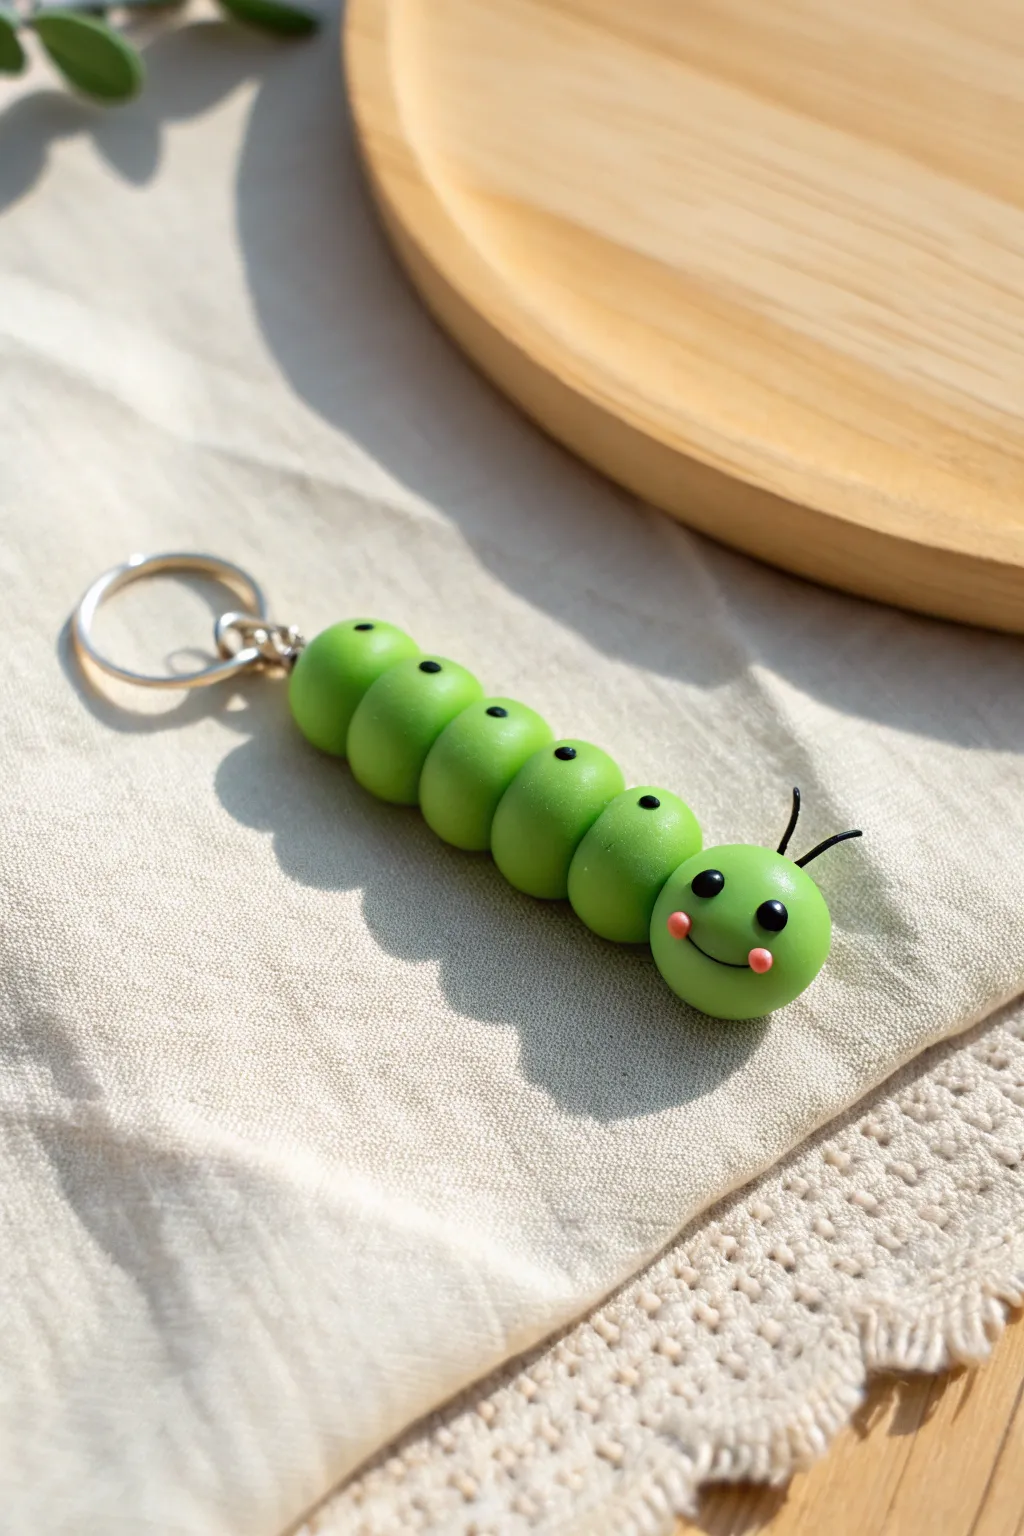
This adorable polymer clay caterpillar charm features a segmented green body that gets progressively larger towards the head. With its sweet blushing cheeks, tiny antennae, and sturdy keychain attachment, it makes a cheerful companion for your keys or bag.
How-To Guide
Materials
- Polymer clay (bright apple green)
- Polymer clay (black)
- Polymer clay (soft pink or coral)
- Keychain ring with screw eye pin attachment
- Pointed detailing tool or toothpick
- Ball stylus tool (small)
- Flexible blade or craft knife
- Short length of black crafting wire or monofilament (for antennae)
- Gloss glaze (optional)
- Oven for baking
Step 1: Forming the Body Segments
-
Condition the green clay:
Start by kneading your green polymer clay until it is soft, pliable, and free of air bubbles or cracks. This ensures a smooth finish later. -
Portion the clay:
Pinch off six pieces of green clay. You need varying sizes: one very small piece for the tail, four pieces that gradually increase in size for the body, and one slightly larger piece for the head. -
Roll the spheres:
Roll each piece of green clay between your palms or on your work surface to create perfectly smooth balls. Make sure there are no visible seams. -
Arrange the lineup:
Line the balls up on your work surface from smallest to largest to check the size progression. The difference should be subtle but noticeable. -
Begin assembly:
Take the smallest sphere (the tail) and the next size up. Press them gently together so they stick. Don’t squash them flat; you want to maintain the round shape of each segment. -
Build the body:
Continue attaching the spheres in ascending order of size. Press each new segment firmly against the previous one to create a strong bond. -
Attach the head:
Before attaching the largest sphere (the head), gently flatten the back side of it slightly where it will meet the body to ensure a good surface area for connection, then press it onto the chain.
Fingerprints?
If you see fingerprints on your round segments, brush them lightly with a tiny bit of baby oil or cornstarch before baking to smooth them out completely.
Step 2: Adding Details and Hardware
-
Add dorsal spots:
Take a tiny amount of black clay and roll five very small, equal-sized micro-balls. Flatten them slightly with your fingertip. -
Place the spots:
Place one black dot on the top center of each body segment, leaving the head clear. Press them down gently so they are flush with the green surface. -
Create the eyes:
Roll two small spheres of black clay for the eyes. Position them on the upper half of the head face, spacing them wide apart for a cute look. -
Make the cheeks:
Roll two small pieces of pink or coral clay. Flatten them into tiny discs and press them onto the face, just below and slightly completely outside the width of the eyes. -
Sculpt the smile:
Using a thin needle tool or blade, carefully impress a curved line connecting the two pink cheeks to form the smiling mouth. You can also lay down a tiny thin snake of black clay if you prefer a raised look. -
Insert the hardware:
Take the screw eye pin from your keychain kit. Gently twist it into the center of the tail segment (the smallest ball). If it feels loose, add a dab of liquid clay or Bake & Bond. -
Prepare for antennae:
Use a needle tool or pin to poke two small holes on the top of the head where the antennae will go. Do not insert the wire yet if it is plastic-coated; wait until after baking. -
Bake the piece:
Place your caterpillar on a ceramic tile or baking sheet. Bake according to your clay manufacturer’s instructions (usually 275°F/135°C for 15-30 minutes). -
Cool and finish:
Allow the piece to cool completely. Cut two short pieces of black wire, dip the ends in super glue, and insert them into the pre-made holes on the head. -
Glazing (Optional):
For extra durability and shine, brush a thin coat of gloss glaze over the eyes and body spots, or the entire charm if you prefer a wet look.
Make it Wiggle
Instead of pressing the balls directly together, connect them internally with a piece of strong cord or thick fishing line before baking to create a flexible, wiggly toy.
Now you have a cheerful little companion ready to hang out on your backpack or keys
Sage Green Dino Desk Minis
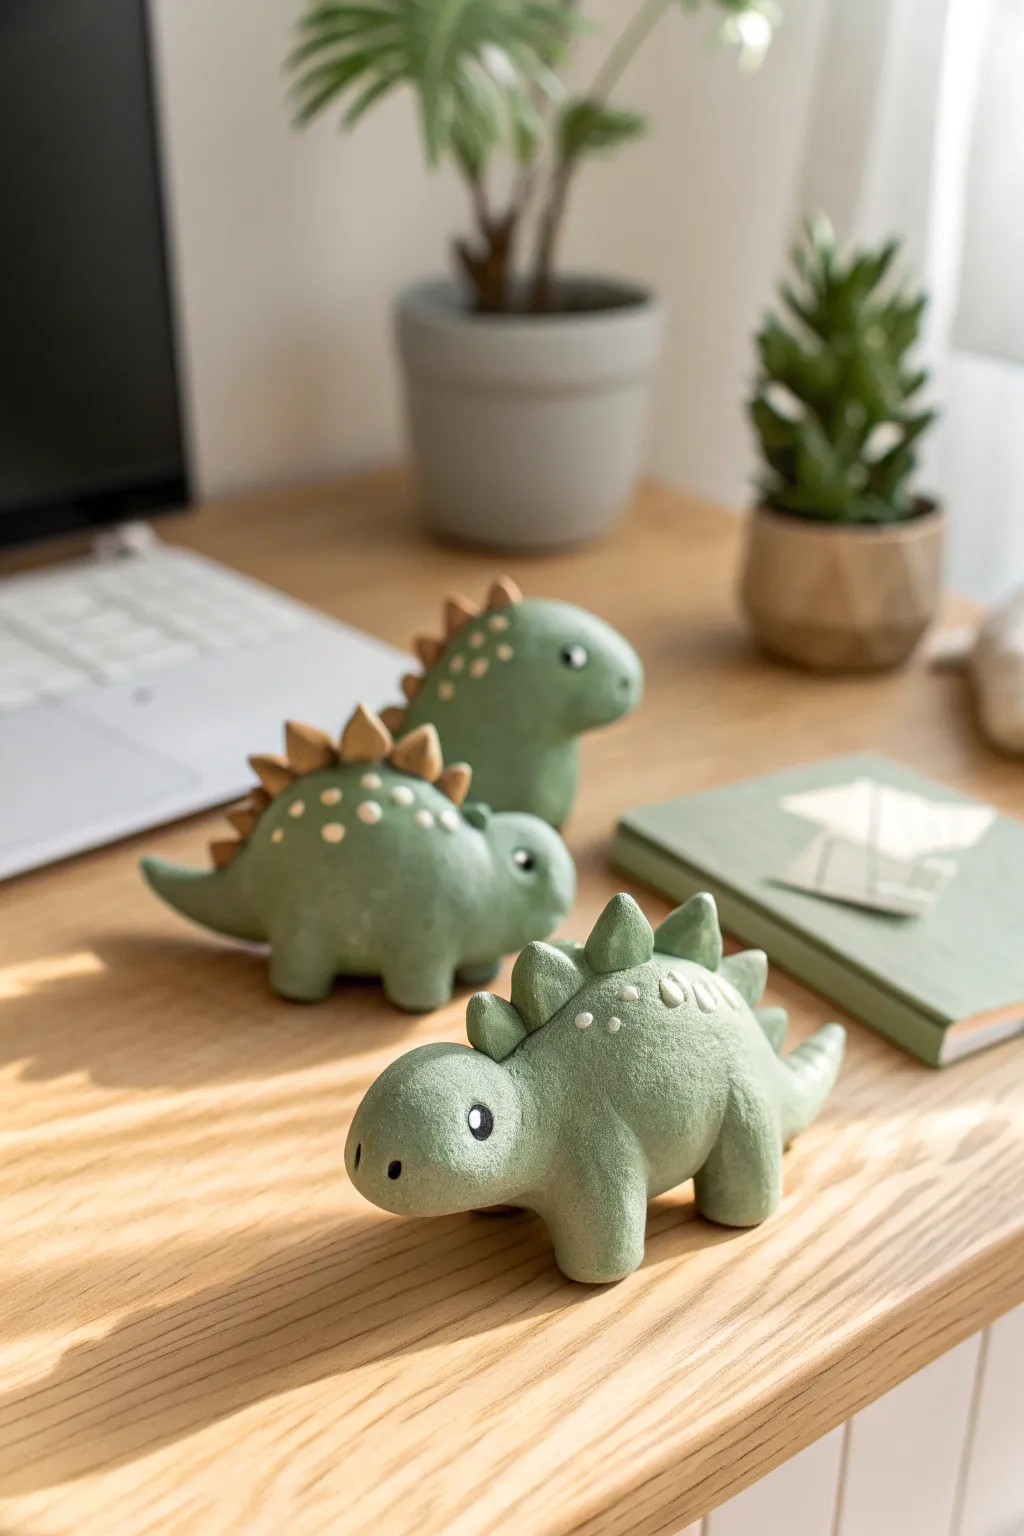
These charming little stegosaurus-inspired figures bring a prehistoric pop of color to any workspace with their soothing sage green hue. Modeled from polymer clay, these minis feature distinct, chubby silhouettes and playful triangular plates that are surprisingly simple to sculpt.
Step-by-Step
Materials
- Sage green polymer clay
- Tan or beige polymer clay
- White acrylic paint
- Black acrylic paint
- Small ball stylus or toothpick
- Fine detail paintbrush
- Clay blade or craft knife
- Silicone sculpting tools
- Oven for baking
Step 1: Shaping the Bodies
-
Condition the clay:
Start by kneading your sage green polymer clay until it is soft, pliable, and free of cracks. Warm clay is much easier to smooth later on. -
Form the base shape:
Roll a smooth ball of green clay, roughly the size of a golf ball or slightly smaller depending on your desired dino size. -
Create the head and tail:
Gently pinch and pull one side of the ball to elongate it into a blunt, rounded head. Pull the opposite side into a tapered tail that curves slightly upward. -
Smooth the transition:
Using your thumb, smooth the neck area so it flows seamlessly into the body, keeping the overall shape chubby and rounded rather than realistic. -
Shape the legs:
Roll four small, equal-sized logs of sage green clay. These should be short and stout to support the dino’s weight. -
Attach the legs:
Press the legs firmly onto the underside of the body. Use a silicone tool to blend the seams completely so the legs look like they are growing out of the body, not just stuck on.
Clean It Up
Before baking, wipe your raw clay with a little rubbing alcohol or baby oil on a finger. This removes fingerprints and dust for a professional finish.
Step 2: Adding Spikes and Details
-
Create tan spikes:
Roll a thin sheet of tan or beige clay. Cut small triangles out of it using your craft knife. -
Create green spikes:
Repeat the process with the sage green clay to make a complementary set of spikes, varying the sizes slightly for a natural look. -
Attach the spine plates:
Starting from the neck and moving down to the tail, press the triangular spikes onto the dino’s back. I like to alternate colors or group them for different character looks. -
Secure the plates:
Use the tip of your silicone tool to gently blend the base of each triangle into the main body so they don’t fall off during baking. -
Add texture dots:
Roll tiny micro-balls of white or very light green clay. Flatten them onto the sides of the dinosaur’s body to create patchy skin patterns. -
Sculpt the face:
Use a small ball stylus to make shallow indentations where the eyes will go. Use a toothpick to poke two tiny nostrils on the snout.
Go Prehistoric
Mix granite-effect polymer clay into your sage green to give the dinos a stony texture, or use glow-in-the-dark clay for the spikes.
Step 3: Finishing Touches
-
Bake the clay:
Place your dinos on a baking sheet and bake according to the manufacturer’s instructions for your specific brand of clay. Let them cool completely. -
Paint the eyes:
Dip a fine detail brush or a larger ball stylus into black paint and fill the eye indentations. -
Add a highlight:
Once the black paint is dry, add a tiny dot of white paint to the upper corner of each eye to bring your dinosaur to life. -
Seal (Optional):
If you want a different finish, apply a matte varnish to protect the paint, though the natural matte of the baked clay often looks best for this project.
Arranging your trio on your desk creates an adorable scene that makes work a little more fun
Multi-Eyed Green Alien Charms
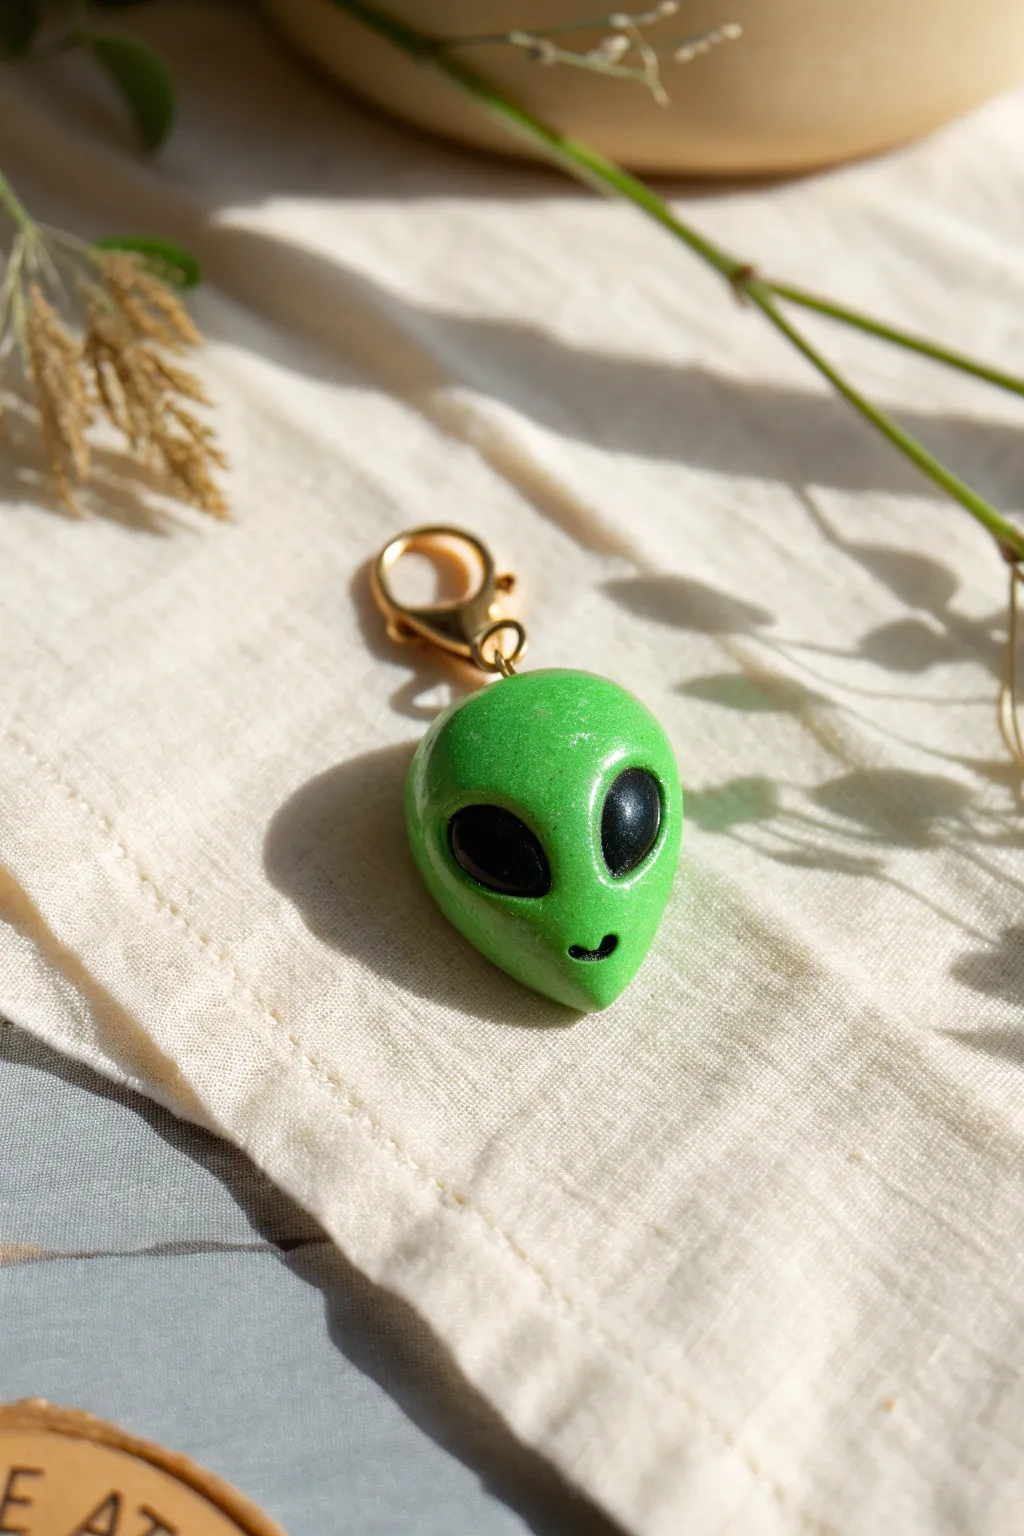
This quirky little alien charm is simply out of this world, featuring a classic elongated head shape with a sparkly green finish and deep black eyes. It makes for a perfect sci-fi keychain or stitch marker that’s fun to sculpt and even more fun to wear.
Step-by-Step Tutorial
Materials
- Green polymer clay (pre-mixed with glitter or plain)
- Black polymer clay
- Fine glitter (if using plain clay)
- Gold eye pin
- Gold lobster clasp
- 10mm jump ring (gold)
- Sculpting tool with a small ball end
- Needle tool or toothpick
- Gloss glaze or UV resin (optional for shine)
- Wire cutters
- Chain nose pliers
- Oven for baking
Step 1: Sculpting the Head
-
Prepare the Green Clay:
Start by conditioning your green polymer clay until it is soft and malleable. If you are using plain green clay, knead in a generous pinch of fine glitter to achieve that cosmic sparkle. -
Form the Base Shape:
Roll the conditioned clay into a smooth ball free of any cracks or lines. -
Taper the Chin:
Gently pinch and roll one side of the ball between your fingers to create a teardrop shape. You want the top to remain round and bulbous while the bottom tapers into a pointed chin. -
Flatten Slightly:
Press the teardrop shape gently against your work surface to flatten the back, then smooth the front with your thumb to create a slightly domed face profile.
Step 2: Adding Facial Features
-
Mark Eye Sockets:
Use your thumbs or a large ball tool to press two large indentations into the upper, wider part of the face. These should be angled outward slightly to give that classic alien look. -
Prepare the Eyes:
Take a small amount of black polymer clay and divide it into two equal pea-sized balls. -
Shape the Eyes:
Roll each black ball into a teardrop shape, then flatten them slightly into almond shapes. -
Place the Eyes:
Press the black almond shapes into the indentations you made earlier. Smooth the edges gently so the black clay sits flush with the green skin. -
Create the Mouth:
Using a needle tool or a very small ball tool, press a tiny, curved line near the bottom of the tapered chin to form a small smile. I find a slight upward curve adds a friendly personality. -
Refine the Shape:
Look over the piece and smooth out any fingerprints. You can use a drop of baby oil on your finger to buff away stubborn prints.
Fixing Wonky Eyes
If the black eyes smudge onto the green clay during placement, use a cotton swab dipped in rubbing alcohol or acetone to gently wipe the green areas clean before baking.
Step 3: Hardware and Baking
-
Trim the Eye Pin:
Use your wire cutters to trim a gold eye pin to about half an inch in length. -
Insert the Pin:
Coat the end of the pin in a tiny dab of liquid clay or bake-and-bond for security, then insert it straight down into the center top of the alien’s head. -
Bake:
Place your alien on a tile or parchment paper and bake according to your clay manufacturer’s instructions. Usually, this is around 275°F (135°C) for 15-30 minutes. -
Cool Down:
Allow the charm to cool completely before handling, as the clay is still fragile when hot. -
Glaze (Optional):
For a wet, extraterrestrial look, brush a coat of gloss glaze or UV resin over the entire charm (or just the black eyes) and cure/dry as directed.
Cosmic Textured Skin
Before baking, gently dab a textured sponge or toothbrush over the green clay (avoiding the eyes) to create a pitted, realistic skin texture instead of a smooth surface.
Step 4: Assembly
-
Open the Jump Ring:
Using two pairs of pliers, twist open the gold jump ring sideways. -
Attach Components:
Slide the loop of the eye pin (embedded in the alien) and the gold lobster clasp onto the open jump ring. -
Close the Ring:
Twist the jump ring closed securely, ensuring there is no gap where the charm could slip out.
Now you have a glittery galactic companion ready to guard your keys or decorate your bag
Mossy Green Mushroom Friends
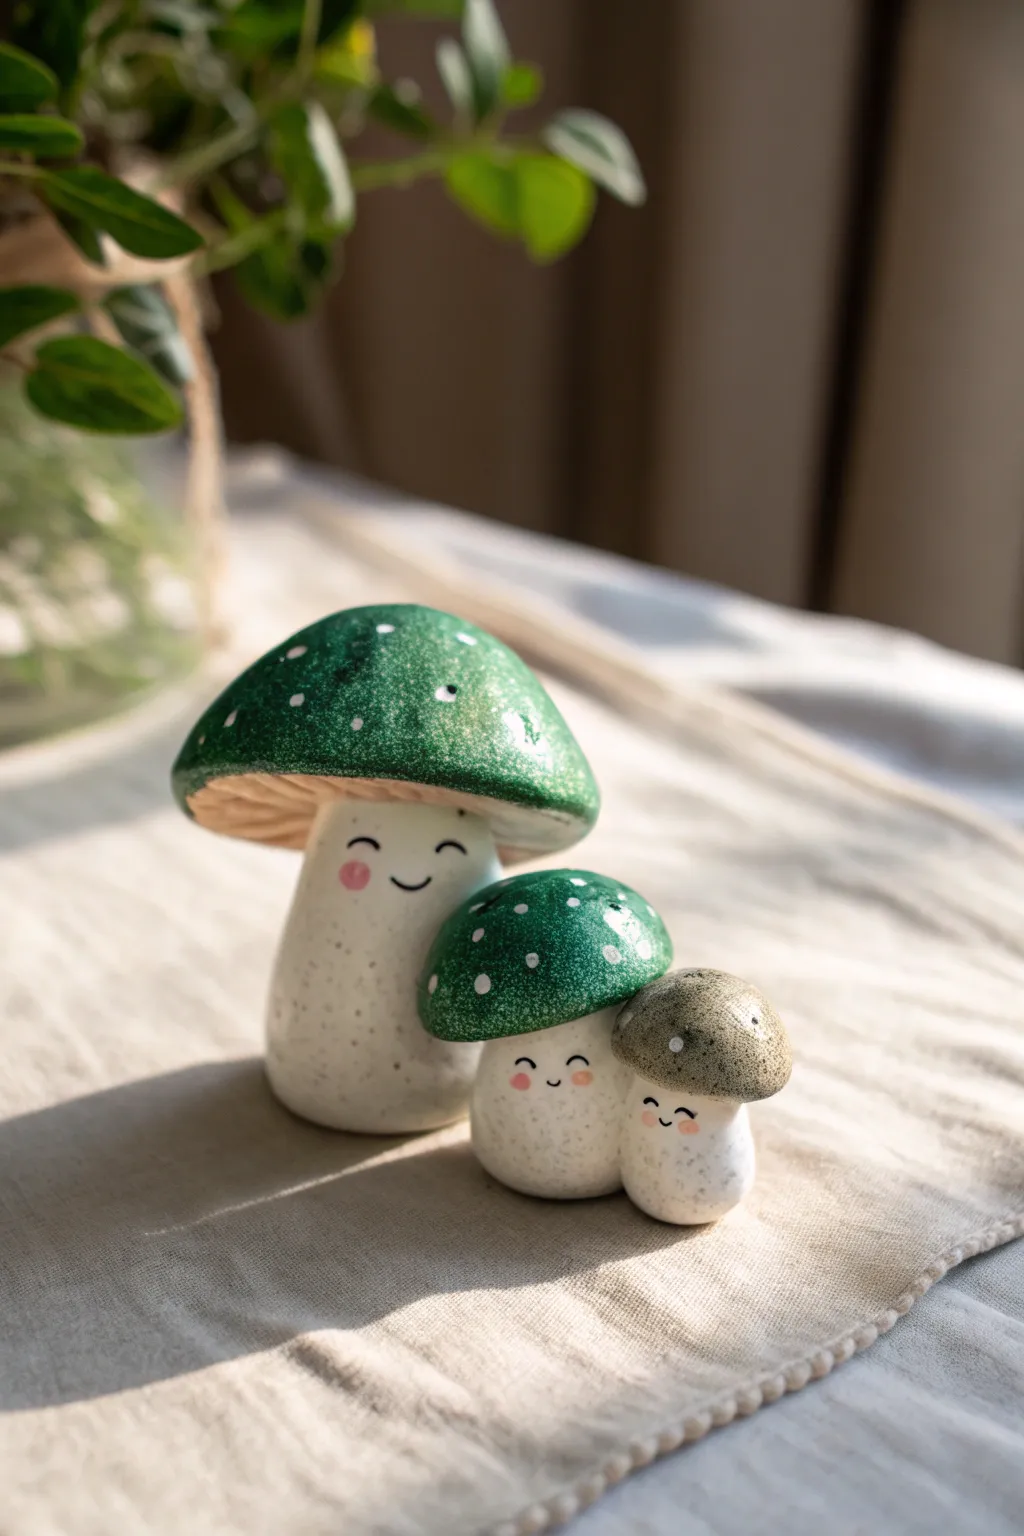
Create a charming family of three polymer clay mushrooms featuring glittering moss-green caps and sweet, cheerful expressions. These whimsical figures have a soft, speckled stoneware look that adds an organic touch to their cute kawaii faces.
Detailed Instructions
Materials
- Polymer clay (White, Translucent, Moss Green, Beige)
- Fine glitter or mica powder (Gold/Green)
- Acrylic paint (Black, Pink, White)
- Doting tools or toothpicks
- Fine detail paintbrush
- Needle tool or craft knife
- Gloss glaze or UV resin (optional)
- Aluminum foil (for armature)
- Texture sponge or toothbrush
Step 1: Shaping the Stems
-
Prepare the clay base:
Mix white polymer clay with a very small amount of translucent clay and a tiny pinch of black or brown specks (or use pre-mixed ‘granite’ or ‘stone’ effect clay) to achieve that stoneware pottery look. -
Form the large stem:
Roll a generous ball of your stone-effect clay into a thick cylinder. Gently taper the top so it’s slightly narrower than the base, creating a sturdy seated shape for the largest mushroom. -
Create the smaller stems:
Repeat the process to make two smaller stems in descending sizes. The smallest one should be quite round and chubby, almost like a pebble. -
Add texture:
Lightly tap the surface of all three stems with a toothbrush or texture sponge to remove fingerprints and enhance the organic, matte stone feel. -
Flatten the bases:
firmly press the bottom of each stem onto your work surface to ensure they stand upright without wobbling.
Step 2: Creating the Caps
-
Mix the green cap color:
Prepare your green clay. To get the sparkly deep green shown in the photo, mix moss green clay with a dusting of gold or green mica powder. For the smallest mushroom, mix beige clay with a little translucent and gold mica. -
Form the cap shapes:
Roll balls for each cap size. Flatten them into thick discs, then gently press your thumb into the center of one side to dome the top, creating a classic mushroom cap curve. -
Create the gills:
Roll out a thin sheet of plain beige clay. Cut circles slightly smaller than your green caps. Press these beige circles into the hollow underside of the caps. -
Texture the gills:
Using a needle tool or craft knife, score lines radiating from the center of the beige underside to the outer edge to mimic mushroom gills. -
Attach caps to stems:
Score the top of the stems and the center of the gills. Apply a tiny drop of liquid clay or bake-and-bond, then gently press the caps onto the stems. I find a slight tilt makes them look more ‘alive’. -
Add the white spots:
Roll tiny, almost microscopic balls of white clay. Press these randomly onto the green caps, flattening them so they become flush with the surface.
Clean Lines
To get perfectly round cheek dots without brush strokes, use the head of a pin or a ball stylus tool dipped in paint, rather than a brush.
Step 3: Face Details & Finishing
-
Pre-bake check:
Give your mushrooms a final inspection for lint or fingerprints. Smooth away imperfections with a drop of baby oil on your finger if needed. -
Bake the trio:
Bake the mushrooms according to your clay package instructions (usually 275°F/135°C), for about 30 minutes depending on thickness. Let them cool completely. -
Paint the eyes:
Using a very fine detail brush and black acrylic paint, paint two small, curved ‘U’ shapes for closed, smiling eyes. Keep them low on the stem for maximum cuteness. -
Add the mouth:
Paint a tiny, simple curve between the eyes to create a sweet smile. -
Apply rosy cheeks:
Dip a dotting tool or the non-brush end of your paintbrush into pink acrylic paint. Dab generous circles on the outer edges of the face, right next to the eyes. -
Glaze the caps:
To make the caps look wet and shiny like the photo, apply a coat of gloss glaze or UV resin only to the colored dome, leaving the stems matte.
Level Up: Forest Floor Base
Make a textured base using brown clay and glue on real dried moss or tiny pebbles to create a permanent mini diorama for your trio.
Arranging these little friends on a shelf or windowsill brings a quiet magic into your home
Seaweed Wavy Hoop Earrings
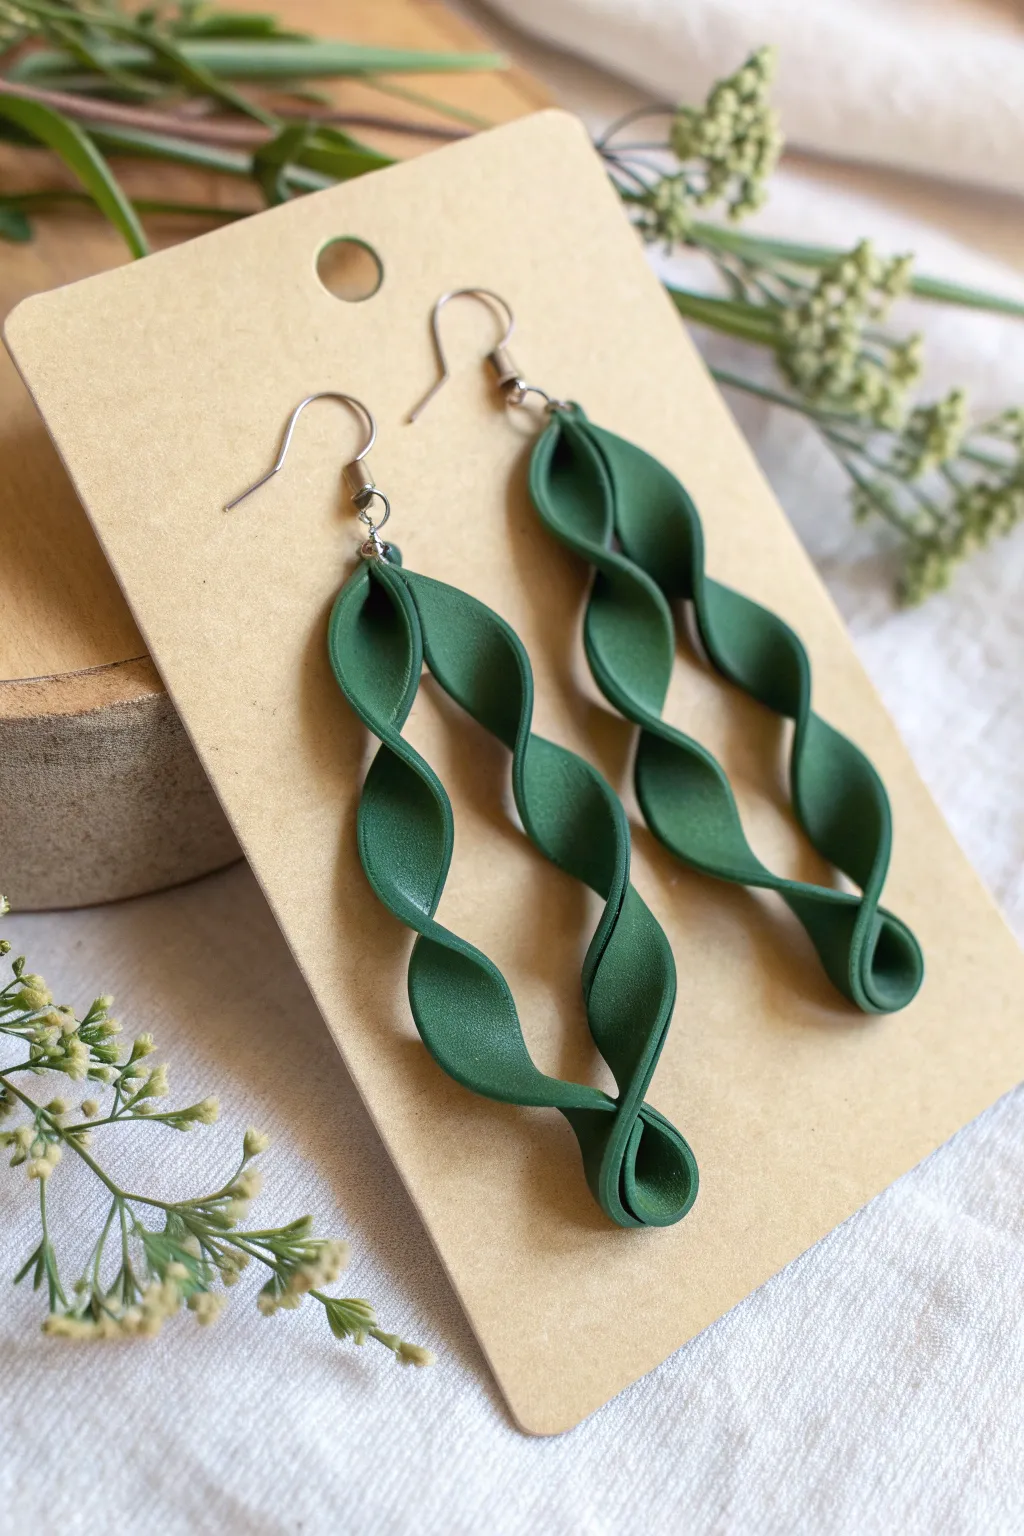
Capture the fluid elegance of the ocean with these stunning twisted ribbon earrings. Their sculptural, helical shape mimics the sway of underwater flora while maintaining a modern, sophisticated aesthetic perfect for everyday wear.
Step-by-Step
Materials
- Dark green polymer clay (e.g., forest or olive tone)
- Acrylic rolling pin or pasta machine
- Flexible tissue blade or craft knife
- Ruler
- Small round jump rings (4-6mm)
- Earring hooks (silver or gold)
- Jewelry pliers (round nose and flat nose)
- Optional: Hand drill or pin vise with small bit
- Smooth ceramic tile or glass standard for baking
- Oven thermometer
Step 1: Preparation & Shaping
-
Condition the Clay:
Start by taking a block of your dark green polymer clay and warming it in your hands. Knead it thoroughly until it is soft, pliable, and free of any air bubbles or cracks. -
Create a Sheet:
Using your acrylic rolling pin or a pasta machine on a medium setting, roll the clay out into a long, even sheet. Aim for a thickness of about 1.5mm to 2mm—thick enough to be sturdy, but thin enough to twist gracefully. -
Cut the Strips:
Place the clay sheet on your work tile. Using your ruler and tissue blade, cut two long, narrow rectangular strips. Each strip should be approximately 1cm wide and 10-12cm long. -
Refine the Edges:
Gently run your finger along the cut edges of the fresh clay strips. This smooths out any sharpness or burrs left by the blade, giving the final piece a more polished, professional look. -
Begin the Twist:
Pick up one strip. While holding both ends gently, rotate one hand clockwise and the other counter-clockwise to start forming a loose spiral. -
Form the Helix:
Continue twisting slowly, ensuring the loops are relatively even. I find it helps to let gravity assist by holding the strip vertically and letting it naturally coil as you guide the shape. -
Secure the Ends:
Once you are happy with the spiral tightness, bring the two ends of the clay strip together. Overlap them slightly or pinch them together neatly to create a closed, elongated loop shape. -
Check Symmetry:
Repeat the twisting process with the second strip. Place them side-by-side on your baking tile to ensure they are mirror images or at least visually balanced in length and twist density. -
Pierce Hole (Pre-Bake Option):
If you prefer not to drill later, use a needle tool or toothpick to carefully poke a hole at the very top of the pinched loop where the jump ring will go. Wiggle it slightly to ensure the opening is large enough.
Step 2: Baking & Assembly
-
Bake the Clay:
Place the tile with your shaped earrings into a preheated oven. Bake according to the manufacturer’s instructions for your specific brand of clay—usually 275°F (130°C) for 15-30 minutes. -
Cool Down:
Once bakes, turn off the oven and let the pieces cool completely inside, or carefully remove the tile. Do not handle the clay while hot, as it can be fragile until fully cooled. -
Drill (Post-Bake Option):
If you didn’t make holes earlier, use a small hand drill or pin vise to carefully bore a hole at the top center of each earring piece. Go slowly to avoid cracking the hardened clay. -
Open Jump Rings:
Using your flat nose and round nose pliers, twist your jump rings open. Remember to twist the ends away from each other sideways rather than pulling them apart, which weakens the metal. -
Connect Hooks:
Thread an open jump ring through the hole in the clay piece. Before closing it, slide the loop of your earring hook onto the jump ring as well. -
Close the Ring:
Use your pliers to twist the jump ring back into a closed circle, ensuring the ends meet perfectly so the hook doesn’t slip out. -
Final Polish:
Give the earrings a quick wipe with a soft cloth to remove any fingerprints or dust. If you want extra shine, you could apply a very thin layer of satin glaze, though the matte look is naturally chic.
Keep the Loops Open
To prevent the clay loops from collapsing while baking, lay the earrings on a bed of polyester fiberfill or cornstarch. This supports the 3D shape in the oven.
Fixing Fingerprints
If you see fingerprints on your raw clay before baking, lightly brush the surface with a little baby oil or cornstarch to smooth them away instantly.
Now you have a stunning, lightweight pair of statement earrings ready to complement any outfit
Dark Emerald Shimmer Clay Mix

Capture the depth of natural stone with this rich, faux-emerald pendant. The dark green base features subtle marbling and delicate golden inclusions, all sealed under a glass-like finish for a truly luxurious accessory.
Step-by-Step Guide
Materials
- Emerald green polymer clay
- Translucent polymer clay
- Black polymer clay (very small amount)
- Gold leaf flakes (fake or real)
- UV resin or gloss varnish
- UV lamp (if using resin)
- Teardrop clay cutter (approx. 1.5 inch)
- Gold tone jump rings (large and small)
- Pliers
- Needle tool or hand drill
- Acrylic roller or pasta machine
- Wet/dry sandpaper (400-1000 grit)
Step 1: Mixing the Clay Body
-
Condition the Green:
Start by thoroughly kneading a block of emerald green polymer clay until it is soft and pliable. This is the primary color, so ensure there are no air bubbles. -
Prepare the Translucent Base:
Condition an equal amount of translucent clay. This will give the faux stone depth rather than a flat, solid color. -
Create the Dark Veining Mix:
Take a tiny pinch of black clay—less is more here—and mix it into a small portion of your emerald green clay to create a deeper, darker shade for contrast. -
Initial Marble:
Roughly chop the emerald, translucent, and dark green clays into small, uneven chunks. -
Add the Gold:
Sprinkle gold leaf flakes generously over the pile of chopped clay. Don’t worry about being neat; random placement looks more natural. -
Form a Log:
Press the chopped pieces together into a rough ball, then roll it into a thick log. Twist the log like a candy cane to begin swirling the colors. -
Refine the Marble:
Fold the log in half and roll it out again. Repeat this twist-and-fold process 2-3 times, but stop before the colors completely blend into a single muddy hue. You want visible streaks.
Fixing Cloudy Resin
If your resin finish looks cloudy after curing, wipe it with rubbing alcohol. If it remains dull, apply a second very thin coat of resin and cure for slightly longer.
Step 2: Shaping and Baking
-
Flatten the Slab:
Using your acrylic roller or pasta machine, flatten the marbled clay to a thickness of about 4-5mm. Thicker pieces feel more like real stone. -
Select the Best Spot:
Look closely at your slab to find an area where the gold flakes and dark veins create an interesting pattern. -
Cut the Shape:
Press your teardrop cutter firmly into the chosen spot. Give it a little wiggle before lifting to ensure a clean cut. -
Smooth the Edges:
Gently run your finger along the cut edges to soften any harsh lines or burrs left by the cutter. -
Pierce the Top:
Use a needle tool to create a hole near the top point of the teardrop. Ensure the hole is wide enough for your jump ring. -
Bake:
Place the pendant on a ceramic tile or parchment-lined baking sheet. Bake according to your clay manufacturer’s instructions (usually 275°F/135°C for 30-45 minutes).
Keep the Gold Visible
When mixing the clay log, keep the gold leaf pieces near the surface. If they get buried deep inside the clay, slice thin layers off the top of your slab to reveal them.
Step 3: Finishing Touches
-
Sand for Smoothness:
Once cooled, wet sand the edges and surface lightly with 400 grit, moving up to 1000 grit sandpaper. This creates the perfect surface for glazing. -
Clean the Piece:
Wash the pendant with soap and water to remove any sanding dust and oils. Let it dry completely. -
Apply Resonance:
Apply a generous, domed layer of UV resin to the front surface. Use a toothpick to guide the resin to the very edges without spilling over. -
Cure:
Place under a UV lamp for 2-3 minutes until hard and glossy. If using varnish instead, apply two coats, letting the first dry completely before adding the second. -
Assemble:
Open a large gold jump ring with your pliers using a twisting motion. Thread it through the hole in the pendant. -
Attach the Bail:
Add a second, smaller jump ring or a dedicated bail to the large ring before closing it securely.
Wear your new emerald piece with pride or gift it as a sophisticated, handmade treasure
Mini Matcha Cup Charms
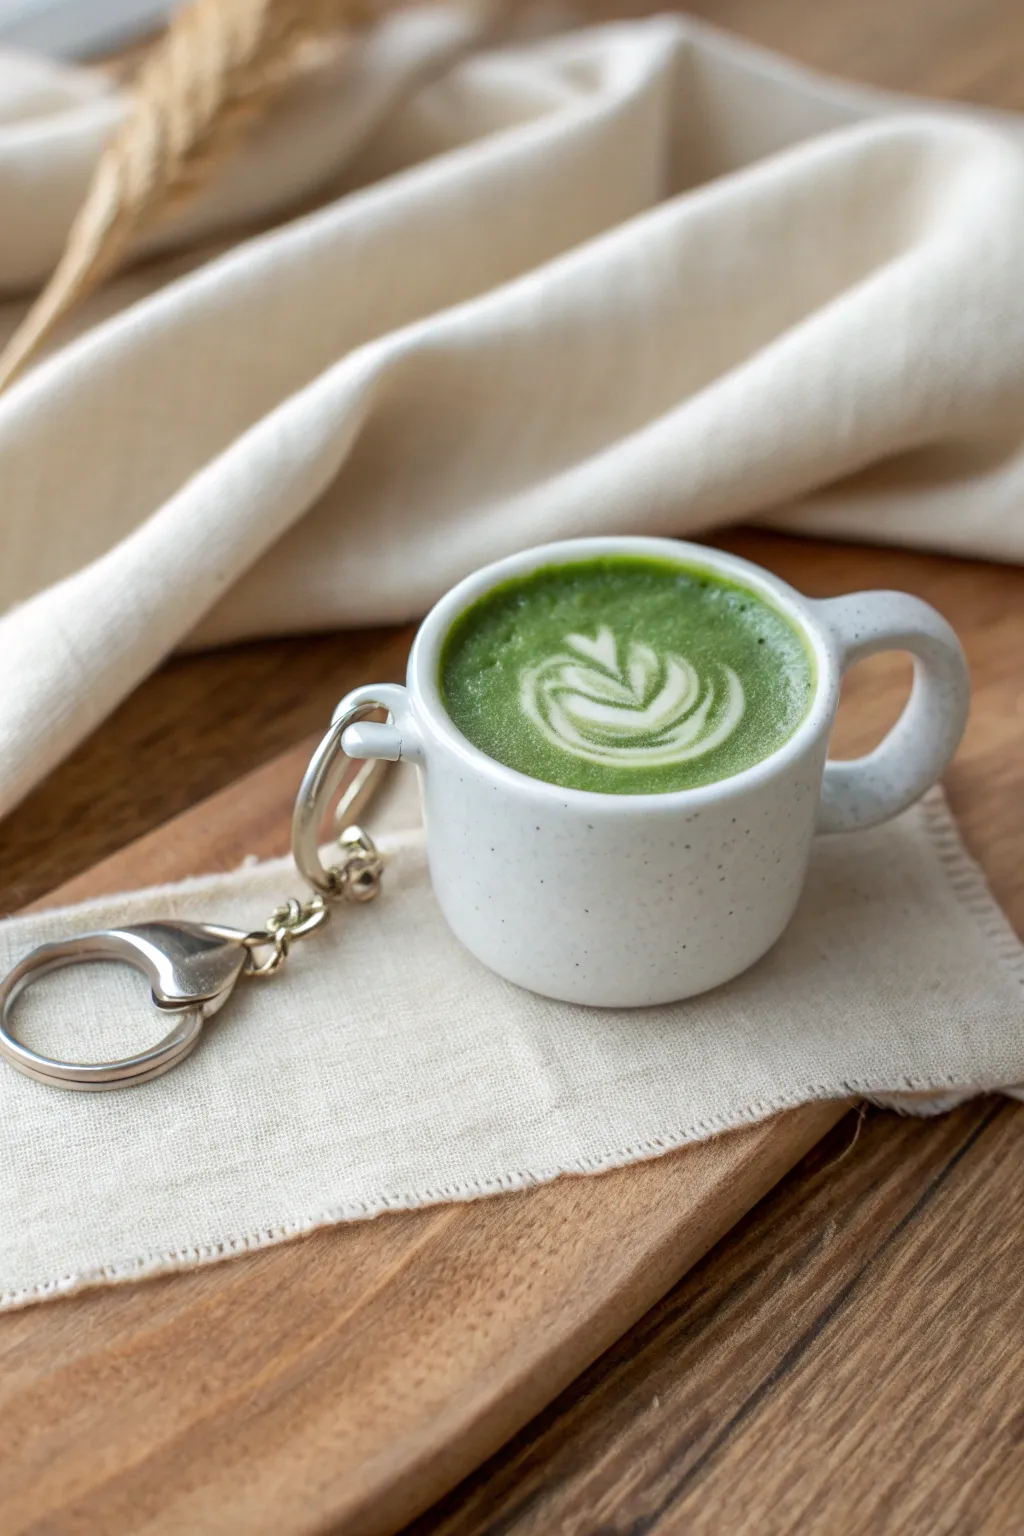
Capture the cozy vibes of a coffee shop with this ultra-realistic matcha latte charm. Featuring a speckled ceramic-style mug and delicate foam art, this tiny accessory is perfect for attaching to your keys or bag.
Step-by-Step Tutorial
Materials
- White polymer clay
- Translucent polymer clay
- Black pepper or dried vanilla bean specks
- Liquid polymer clay (translucent or white)
- Green chalk pastel or matcha-colored alcohol ink
- White acrylic paint
- Needle tool or toothpick
- Dotting tool
- Small eye screw
- Keychain hardware (jump rings and clasp)
- Gloss glaze (UV resin or polyurethane)
- Paintbrush (fine tip)
Step 1: Sculpting the Ceramic Mug
-
Prepare the speckled clay:
Start by conditioning your white polymer clay until it is soft and pliable. To create the speckled ceramic look, mix in a very small pinch of black pepper or tiny scrapings from a dried vanilla bean. Knead thoroughly until the specks are evenly distributed. -
Form the cup base:
Roll a marble-sized ball of your speckled clay. Place it on your work surface and gently flatten the bottom so it sits upright. Use the handle of a paintbrush or a large ball tool to press an indentation into the center, hollowing out the cup shape while keeping the walls relatively thick and sturdy. -
Shape the rim:
Refine the top edge of the cup. You want it to look like thick, hand-thrown pottery, so smooth out any sharp edges with your fingertip. Ensure the opening is wide enough to show off the latte art later. -
Create the handle:
Roll a small snake of the same speckled clay. Cut a short segment and gently curve it into a ‘C’ shape. Attach this to the side of the cup, blending the clay where it joins the body using a rubber sculpting tool or your finger to ensure a strong bond. -
Add the hardware mount:
On the side of the cup opposite the handle (or wherever you prefer), add a tiny molded tab of clay or simply pierce a small hole near the rim if you prefer a different hanging style. However, for the look in the photo, insert a metal eye screw directly into the clay wall now, or create a small loop with clay to hold a jump ring later. -
Pre-bake the cup:
Bake the empty cup according to your clay package’s instructions (usually around 275°F/135°C for 15-20 minutes). This hardens the shell so you can add the liquid filling without distorting the cup’s shape.
Foam Sinking?
If the white dots sink, your green base is too thin. Let the green liquid clay sit for 10 minutes to thicken slightly before adding the white art on top.
Step 2: The Matcha Filling
-
Mix the matcha base:
While the cup cools, prepare your liquid clay. Pour some translucent or white liquid clay into a small cup. Scrape green chalk pastel into a fine dust (or use a drop of alcohol ink) and mix it into the liquid clay until you achieve a rich, matcha-tea green. -
Fill the cup:
Carefully pour the green liquid clay mixture into your baked cup. Fill it almost to the brim, leaving just a tiny bit of space to account for surface tension so it doesn’t overflow. -
Prepare the foam color:
Mix a separate, smaller batch of liquid clay with plain white chalk pastel or white acrylic paint. This needs to be opaque to stand out against the green tea background.
Step 3: Latte Art & Assembly
-
Drop the foam dots:
Using a needle tool, carefully place a few drops of the white liquid clay onto the center of the wet green surface. For a heart or tulip pattern, place dots in a vertical line, getting progressively smaller. -
Drag the design:
Clean your needle tool, then gently drag the tip through the center of the white dots. The motion drags the white into the green, creating that classic barista ‘heart’ or leaf shape. I find holding my breath for a second helps steady my hand for this delicate step. -
Final bake:
Place the filled cup back into the oven. Bake for another 15-20 minutes to cure the liquid clay. Keep an eye on the temperature to ensure the white clay doesn’t yellow. -
Glazing:
Once fully cooled, brush a coat of gloss glaze or UV resin over the surface of the liquid ‘tea’ to make it look wet and shiny. Leave the ceramic outside of the cup matte for a realistic pottery texture. -
Attach keychain:
Open a jump ring using pliers and thread it through the eye screw or clay loop you created earlier. Attach your keychain clasp and close the jump ring securely.
Realistic Froth
Tap the cup gently on the table after pouring the green liquid. This brings tiny air bubbles to the surface, mimicking real milk foam texture.
Now you have an adorable miniature drink to keep your keys company all day