Teal is one of those colors that instantly makes a clay bead bracelet feel fresh, beachy, and put-together. Here are my favorite teal clay bead bracelet ideas, from classic stack staples to a few fun twists that always get compliments in the studio.
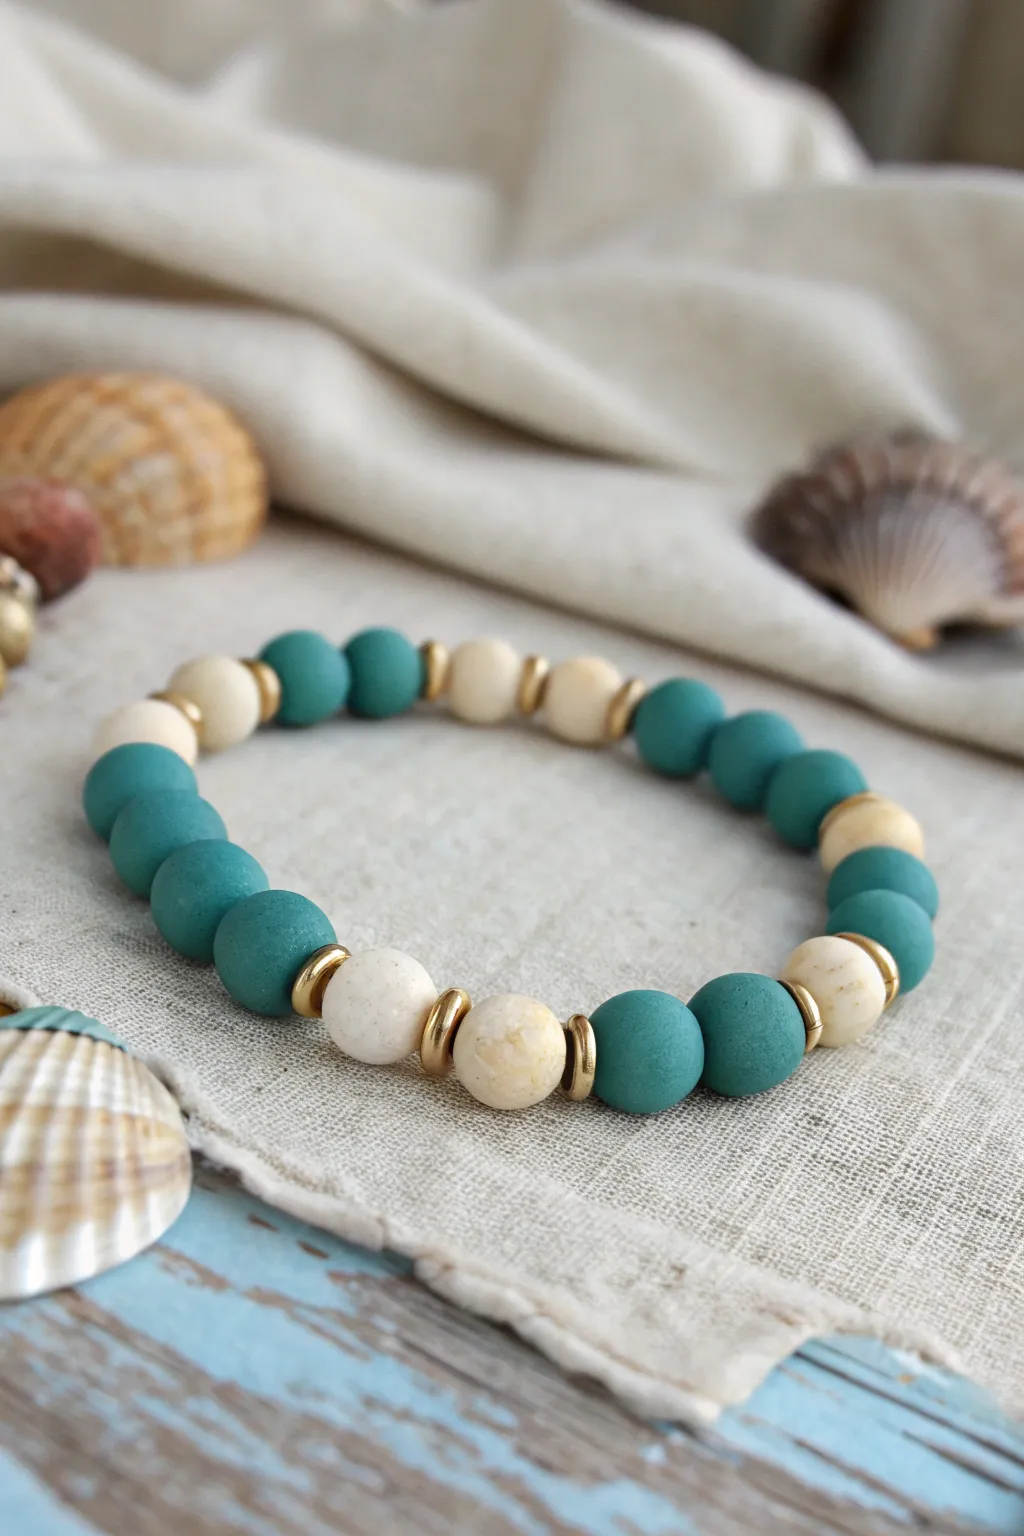
Classic Teal and White Color-Block Stack
Channel the serene vibes of a sandy beach meeting turquoise waters with this trio of stretch bracelets. This stack combines vibrant teal heishi beads, natural wood tones, and crisp white discs accented with gold for a timeless, textured look.
How-To Guide
Materials
- Teal vinyl heishi clay beads (6mm)
- White vinyl heishi clay beads (6mm)
- Natural light wood heishi beads or beige clay beads (6mm)
- Gold daisy spacer beads (4-6mm)
- Small gold bumpy/textured spacer beads (4-6mm)
- Strong elastic cord (0.8mm or 1mm transparent)
- Jewelry glue or clear nail polish
- Scissors
Step 1: The Teal Solitaire
-
Measure your wrist:
Before cutting anything, wrap the elastic coming off the spool around your wrist to find the desired length. Add about 3-4 inches excess for comfortable knotting later. -
Pre-stretch the cord:
Give the elastic a few firm tugs. This pre-stretching prevents the bracelet from loosening up significantly after the first wear. -
String the base color:
Thread on your teal heishi beads one by one. I find it therapeutic to pick up five or six on the needle (if using one) before sliding them down. -
Check the fit:
Wrap the strand around your wrist occasionally. You want a snug fit but enough room for the beads to roll slightly. -
Secure the strand:
Tie off the teal bracelet using a surgeon’s knot (right over left, left over right, and loop the top strand through twice). Add a dab of jewelry glue to the knot before pulling it tight and trimming the excess.
Step 2: The Natural Wood Band
-
Prepare the second cord:
Cut a new length of elastic, matching the length of your first turquoise bracelet. -
String the wood beads:
Begin threading the natural wood or beige clay heishi beads. The slight variation in texture here adds warmth to the stack. -
Consider accents:
While the reference image keeps this strand plain to let the texture shine, you can sneak in a single gold bead here if you want to tie the look together. -
Finish the second piece:
Tie a secure knot as before, apply adhesive, and trim the tails closely.
Needle Knowledge
Using a collapsible eye beading needle makes stringing heishi beads infinitely faster than trying to thread the soft elastic through manually.
Step 3: The White & Gold Accent Piece
-
Plan the pattern:
For the bottom bracelet, you’ll be creating sections. Plan to switch from white beads to a gold accent every 2 to 3 inches. -
Start with white beads:
Thread a substantial section of the white heishi beads, covering roughly a third of the bracelet’s circumference. -
Add first gold spacer:
Slide on a gold daisy spacer, followed by a bumpy gold bead, and another daisy spacer. This creates a rich, textured metallic station. -
Repeat the pattern:
Continue with another section of white beads, followed by another gold cluster station. You should aim for 2 or 3 gold stations total. -
Closing adjustments:
Ensure the ends meet neatly without interrupting the pattern too abruptly. If needed, remove one or two white beads to make the symmetry perfect. -
Final knot:
Tie your final surgeon’s knot. Hide the knot by gently tucking it inside the hole of one of the larger beads if possible.
Level Up: Charm it
Add a single pearl or sea turtle charm to the gold spacer section on the white bracelet for an extra touch of beachy flair.
Enjoy wearing your new shoreline-inspired stack that looks great with any casual outfit


Teal Heishi With Gold Spacer Rhythm
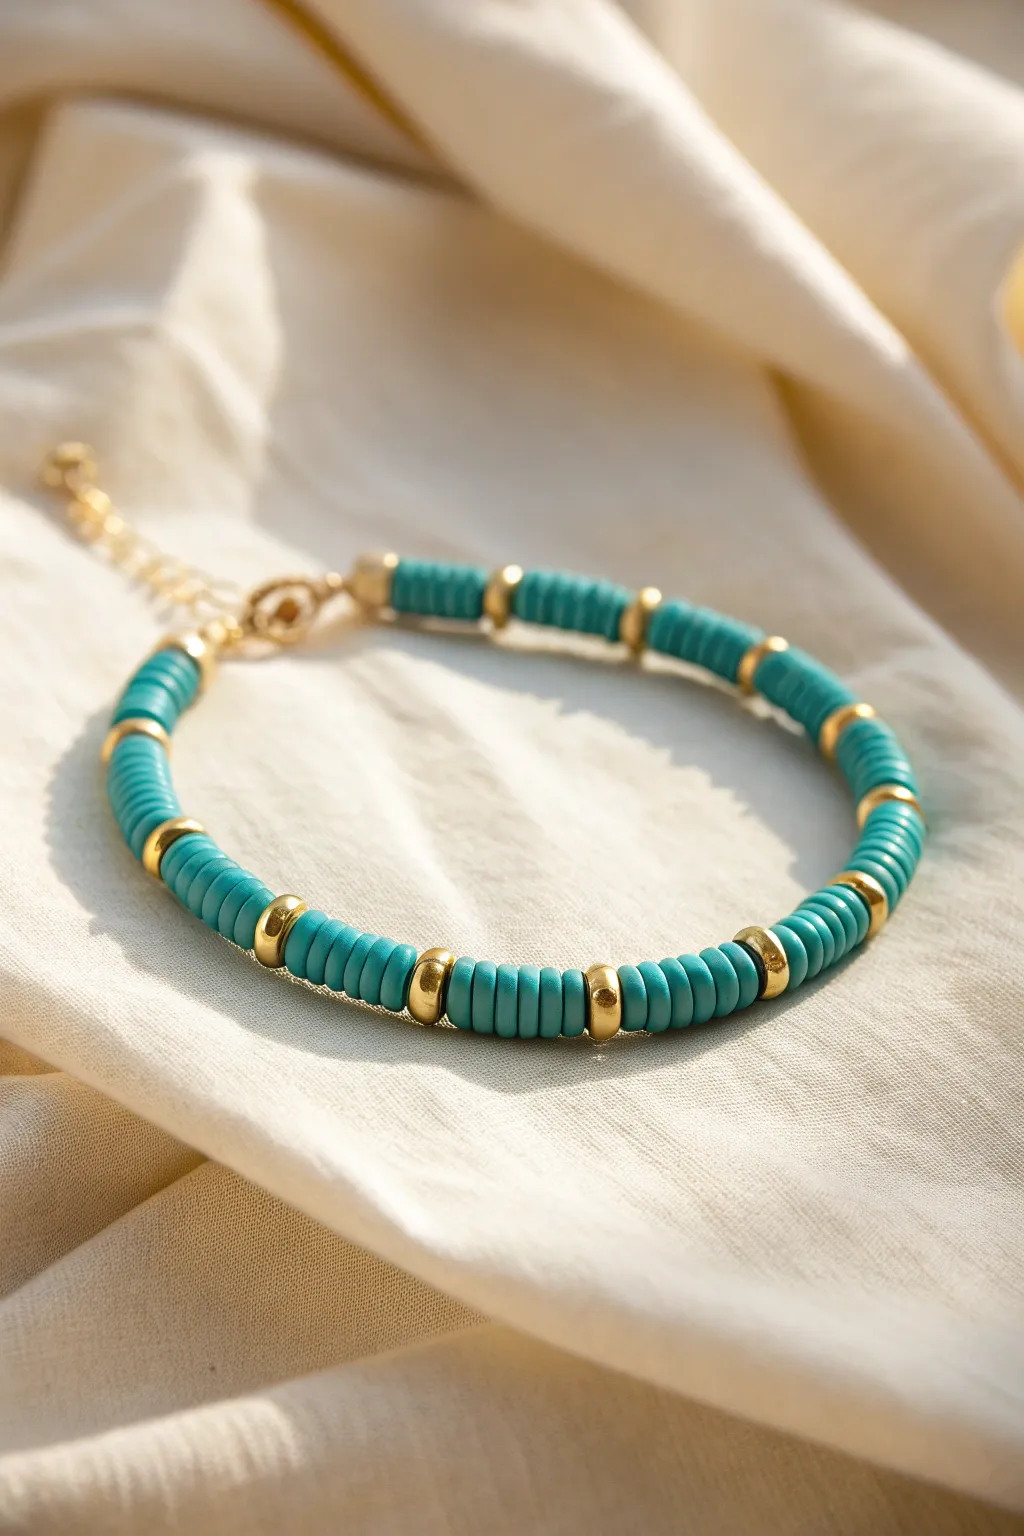
This elegant design captures the essence of a serene beach day, pairing vibrant teal heishi beads with the sophisticated gleam of gold spacers. The repeating pattern creates a satisfying rhythm that elevates a simple stringing project into a boutique-worthy accessory.
Step-by-Step Guide
Materials
- Teal vinyl heishi beads (approx. 4-6mm)
- Gold tone metal spacer beads (smooth rounded or donut shape, approx. 4mm)
- Flexible beading wire (0.38mm or 0.45mm)
- 2 Gold crimp beads
- 2 Gold wire guardians (optional but recommended)
- 2 Gold crimp covers (3-4mm)
- Gold lobster clasp
- Gold extension chain (approx. 2 inches)
- Jewelry wire cutters
- Crimping pliers
- Chain nose pliers
- Bead stopper or sturdy tape
Step 1: Preparation & First Termination
-
Measure your wire:
Cut a length of beading wire approximately 10 inches long. This gives you plenty of extra room to manipulate the ends without struggling. -
Secure one end:
Attach a bead stopper to one end of the wire to prevent beads from sliding off while you work. If you don’t have a stopper, a piece of masking tape works perfectly well. -
Plan your pattern:
Lay out a small section of your beads on a mat to visualize the spacing. For this specific look, you will be alternating sections of teal beads with single gold spacers.
Consistent Counting
Pre-stack your heishi beads into piles of 5 or 7 before stringing. This makes the stringing process much faster and ensures your gold spacers create perfectly even intervals.
Step 2: Creating the Bead Rhythm
-
Start the sequence:
Thread on your first set of teal heishi beads. Aim for a stack of about 5 to 7 beads; count them out so your sections remain consistent. -
Add the accent:
Slide on one gold spacer bead. Ensure it sits flush against the clay stack to see if you like the proportion. -
Repeat the pattern:
Add another stack of 5-7 teal beads, followed by another gold spacer. Continue this simple 1-2 rhythm. -
Check the length:
Periodically wrap the wire around your wrist. Since heishi beads are flat, they pack tightly, so you may need more beads than you initially expect. -
Maintain consistency:
Keep an eye on your pattern as you go. It’s easy to accidentally slip on an extra teal bead, which disrupts the visual rhythm. -
End symmetrically:
Finish the beading with a stack of teal beads so the design looks balanced on both ends near the clasp.
Step 3: Finishing the Clasp
-
Prepare the first crimp:
Remove the bead stopper. On one end, slide on a crimp bead, followed by a wire guardian. Thread the wire through the loop of the lobster clasp and back down through the guardian and crimp bead. -
Secure the clasp:
Use your crimping pliers to flatten the crimp bead securely. I like to give a gentle tug on the wire to ensure it won’t slip. -
Cover the mechanics:
Place a gold crimp cover over the flattened crimp bead. Gently use your pliers to close the cover until it looks like a round gold bead. -
Prepare the second crimp:
Move to the other end of the bracelet. Slide on a crimp bead and a wire guardian. -
Attach the extension chain:
Loop the wire through the last link of your extension chain, then back through the guardian and the crimp bead. -
Tighten the slack:
Pull the wire end taut so the beads sit snugly against each other, but not so tight that the bracelet becomes stiff and rigid. It needs a little movement to drape nicely. -
Final crimp:
Flatten the second crimp bead securely with your pliers. -
Add the final cover:
Place the second crimp cover over the crimp bead and close it carefully with your pliers. -
Trim excess wire:
Using your flush cutters, trim the excess wire tails as close to the crimp covers as possible without nicking the main wire.
Stiff Bracelet?
If the finished piece feels rigid or kinks up, you pulled the wire too tight before the final crimp. Leave a tiny gap (0.5mm) of slack to allow the beads to rotate and drape.
Enjoy styling your new bracelet solo or as part of a beautiful beach-inspired stack


Monochrome Teal Ombré Bracelet
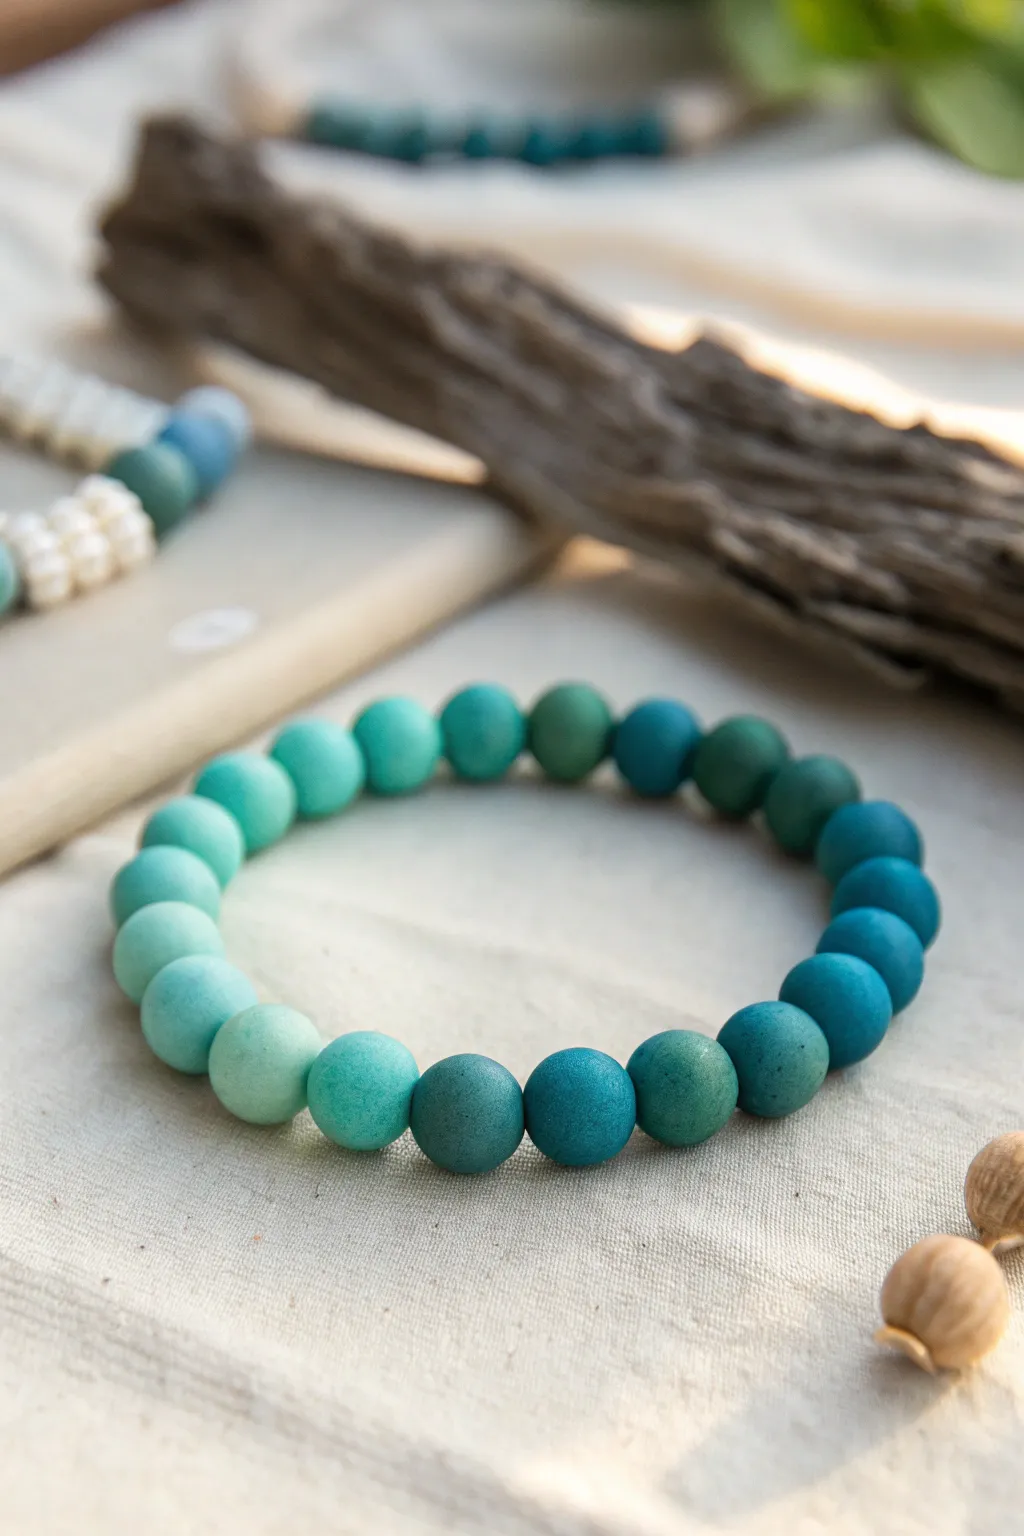
Capture the shifting hues of the ocean with this serene, monochrome ombré bracelet. Using polymer clay allows you to custom-mix a perfect gradient from pale aqua to deep emerald, creating a sophisticated accessory with a soft, matte finish.
Detailed Instructions
Materials
- Polymer clay (white, teal, and emerald green)
- Stretch magic elastic cord (0.7mm or 0.8mm)
- Bead roller tool (optional but recommended for uniformity)
- Needle tool or toothpick
- Ceramic tile or glass baking sheet
- Oven
- Super glue (gel type)
- Fine grit sandpaper (400 and 800 grit)
- Ruler
Step 1: Mixing the Gradient
-
Prepare base colors:
Begin by conditioning your polymer clay blocks. You will need a significant amount of white, a standard teal, and a smaller amount of emerald green to deepen the darkest shades. -
Establish the extremes:
Create your lightest color by mixing a tiny pinch of teal into a large ball of white clay. This should be a very pale, milky aqua. -
Create the darkest shade:
For the opposite end of the spectrum, mix equal parts teal and emerald green to create a deep, rich sea-green tone. -
Blend the mid-tones:
To achieve a smooth transition, you need at least 3-4 intermediate shades. Take a portion of your lightest mix and a portion of your darkest mix and blend them together in varying ratios. -
Arrange the palette:
Line up your mixed clay balls from lightest to darkest. You should have about 5 or 6 distinct shades total to create the full ombré effect shown in the photo.
Step 2: Shaping and Baking
-
Measure equal portions:
Pinch off equal-sized pieces from each colored ball. Aim for pieces that are roughly 1cm in diameter. I find a small circular cookie cutter or a clay extruder ensures every piece has the exact same volume. -
Roll the beads:
Roll each piece between your palms to form a smooth sphere. If you have a bead roller tool, use it now to get perfectly round, uniform shapes. -
Pierce the holes:
Gently hold a bead without squishing it and use a needle tool to pierce the center. Rotate the bead to ensure the hole is straight and wide enough for your elastic. -
Refine the surface:
Check for fingerprints. If you see any, lightly buff them away with your fingertip. The goal is a smooth, matte finish like sea glass. -
Bake the beads:
Place your beads on a ceramic tile or baking sheet. Bake according to your brand’s specific instructions (usually 275°F/135°C for 15-30 minutes). Let them cool completely before handling.
Fixing Wonky Holes
If holes deform while piercing, refrigerate the raw clay beads for 15 minutes before piercing. The firmer clay holds its shape better against the needle’s pressure.
Step 3: Assembly
-
Sand for texture:
Once cool, briefly rub the beads with fine-grit sandpaper if you want to enhance that soft, matte stone look visible in the image. -
Layout the gradient:
Lay your beads on a layout board or towel. Arrange them in order from the palest aqua to the deepest teal. Depending on your wrist size, you will likely need about 20-22 beads. -
Create the loop:
If you want a continuous gradient cycle (light-dark-light-dark), arrange them as such. For a linear gradient (light to dark one way), ensure your darkest bead will meet your lightest bead when tied. -
String the beads:
Cut a piece of elastic cord about 10 inches long. Pre-stretch it to prevent sagging later. String your beads carefully in the order you laid them out. -
Tie the knot:
Secure the bracelet with a surgeon’s knot (loop the thread twice on the first pass, then once on the second pass). Pull firmly. -
Secure and finish:
Add a tiny drop of gel super glue to the knot. Let it dry for a minute, then tuck the knot inside the hole of the nearest bead and trim the excess cord.
Varnishing Options
To keep the matte ‘stone’ look, skip the glaze. However, buffing with denim fabric after baking gives a subtle, satin sheen without looking plastic.
Enjoy the calming effect of your new wristwear


Teal, Cream, and Sand Neutrals Mix
Evoke the soothing vibes of a beach day with this elegant bracelet featuring matte teal beads paired with speckled cream accents and flashes of gold. The combination of soft clay textures and metallic shine creates a sophisticated yet relaxed accessory perfect for stacking or wearing solo.
Step-by-Step Tutorial
Materials
- Matte teal polymer clay (or gemstone) round beads, approx. 8mm
- Speckled cream or beige round beads (ceramic or stone), approx. 8mm
- Gold tone metal spacer beads or heuristic rings
- Strong elastic stretch cord (0.7mm or 0.8mm transparent)
- Jewelry glue (e.g., G-S Hypo Cement)
- Scissors
- Bead stopper or tape
- Bead design board (optional)
Step 1: Preparation & Design
-
Measure your wrist:
Wrap a flexible measuring tape around your wrist where you want the bracelet to sit. Add about 0.5 to 1 inch to this measurement depending on how loose you prefer the fit. -
Cut the cord:
Cut a length of elastic cord about 10-12 inches long. This extra length provides ample room for stringing and tying the final knot without struggling. -
Pre-stretch the elastic:
Hold the ends of the cord and give it a few firm tugs. I always do this to prevent the bracelet from stretching out and becoming loose after the first few wears. -
Secure the end:
Attach a bead stopper or simply tape one end of the cord to your work surface to stop beads from sliding off while you work.
Step 2: Stringing the Pattern
-
Plan the sequence:
Lay out your beads on a design board or soft cloth. The pattern shown generally follows groups of color separated by gold spacers. A key motif is: Gold Spacer, 2 Cream Beads, Gold Spacer, 2 Teal Beads. -
Examine the focal sections:
Notice that the pattern isn’t perfectly symmetrical. One section features a run of four or five teal beads together for a bold block of color. -
Bead the first section:
Thread on two speckled cream beads followed by a gold spacer disc. This lighter section acts as a nice contrast to the bold teal. -
Add the teal accents:
Slide on two matte teal beads. Follow immediately with another gold spacer to frame this color block. -
Create the long teal run:
Add a longer sequence of teal beads—about 4 or 5 in a row—to replicate the solid color section seen on the left side of the bracelet photo. -
Continue the pattern:
Resume the alternating sequence: gold spacer, two cream beads, gold spacer, two teal beads. Repeat this rhythm until you reach your desired length. -
Check the fit:
Wrap the strung beads around your wrist. The ends should meet comfortably without pulling the elastic too tight or leaving large gaps.
Knot Security Tip
Use a ‘surgeon’s knot’ for extra security. It’s like a square knot, but you loop the cord through twice on the first pass before tightening.
Step 3: Finishing Touches
-
Pre-knot tension check:
Bring the two ends of the cord together and gently pull tight to remove any slack between the beads. Ensure the pattern creates a continuous loop. -
Tie the knot:
Tie a standard square knot (right over left, left over right). Pull the elastic strands firmly to secure the knot tight against the beads. -
Secure with glue:
Apply a tiny drop of jewelry glue directly onto the knot. Be careful not to get glue on the neighboring beads, as it can ruin the matte finish. -
Hide the knot:
While the glue is still slightly tacky but not wet, slide the knot inside the hole of the nearest large bead if the hole is wide enough. -
Trim the excess:
Once the glue is fully dry (wait at least 15 minutes), use sharp scissors to trim the excess cord ends as close to the bead as possible.
Design Variation
Swap the teal clay beads for matte amazonite or frosted agate stones to add natural weight and a cooling sensation to the finished piece.
Now you have a serene, beach-inspired accessory ready to complement any summer outfit

The Complete Guide to Pottery Troubleshooting
Uncover the most common ceramic mistakes—from cracking clay to failed glazes—and learn how to fix them fast.
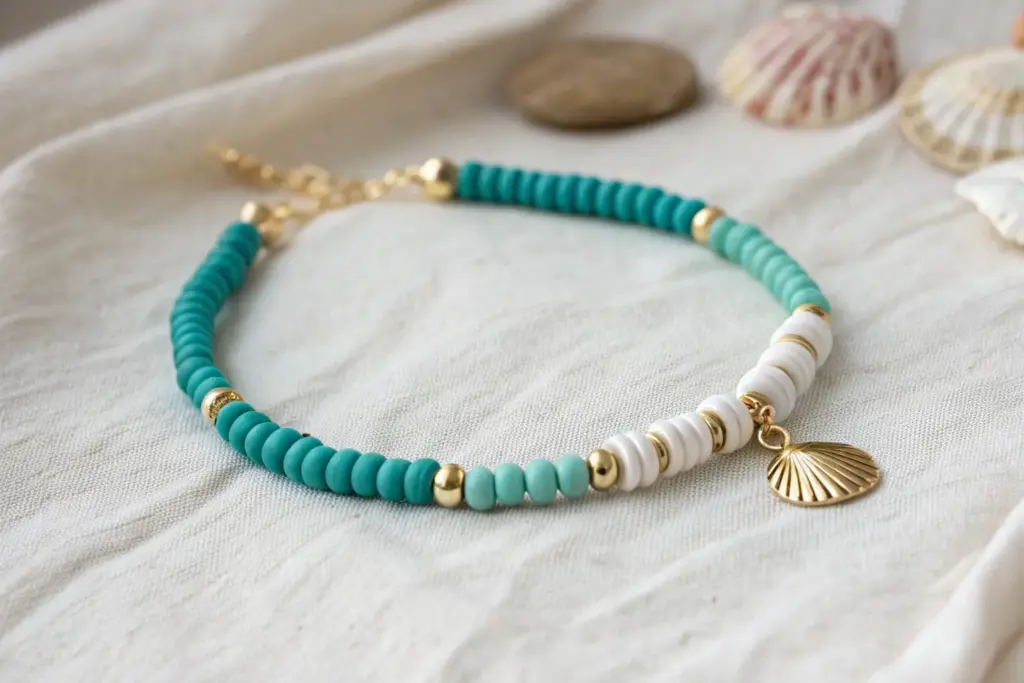
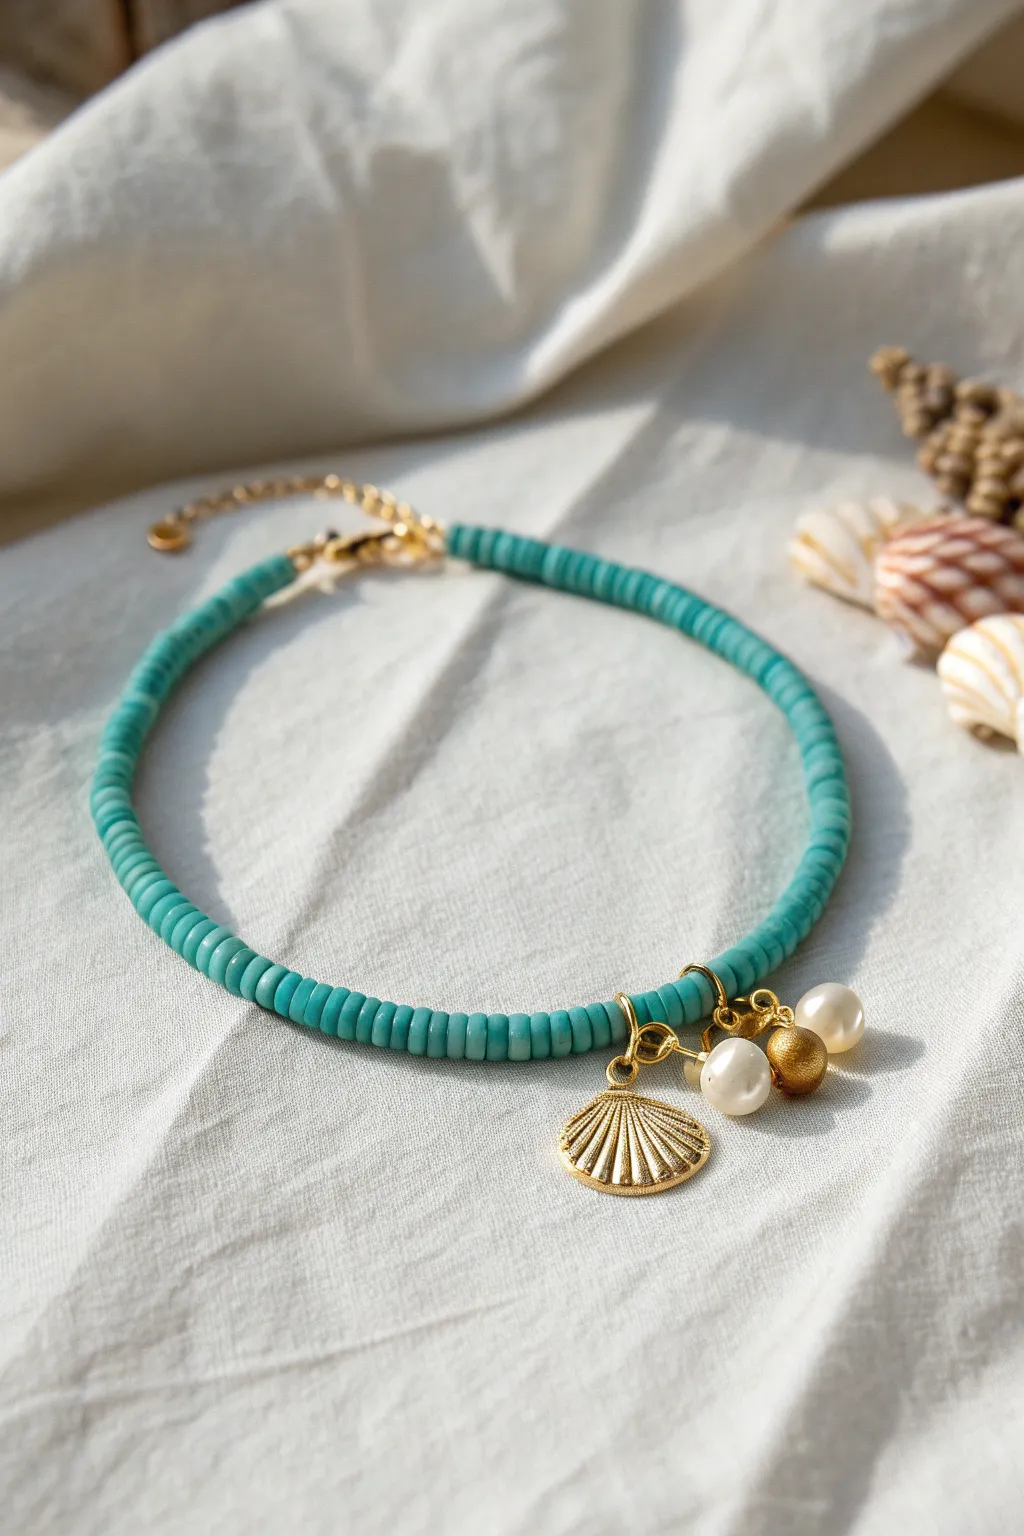
Teal Bracelet With Center Shell Accent
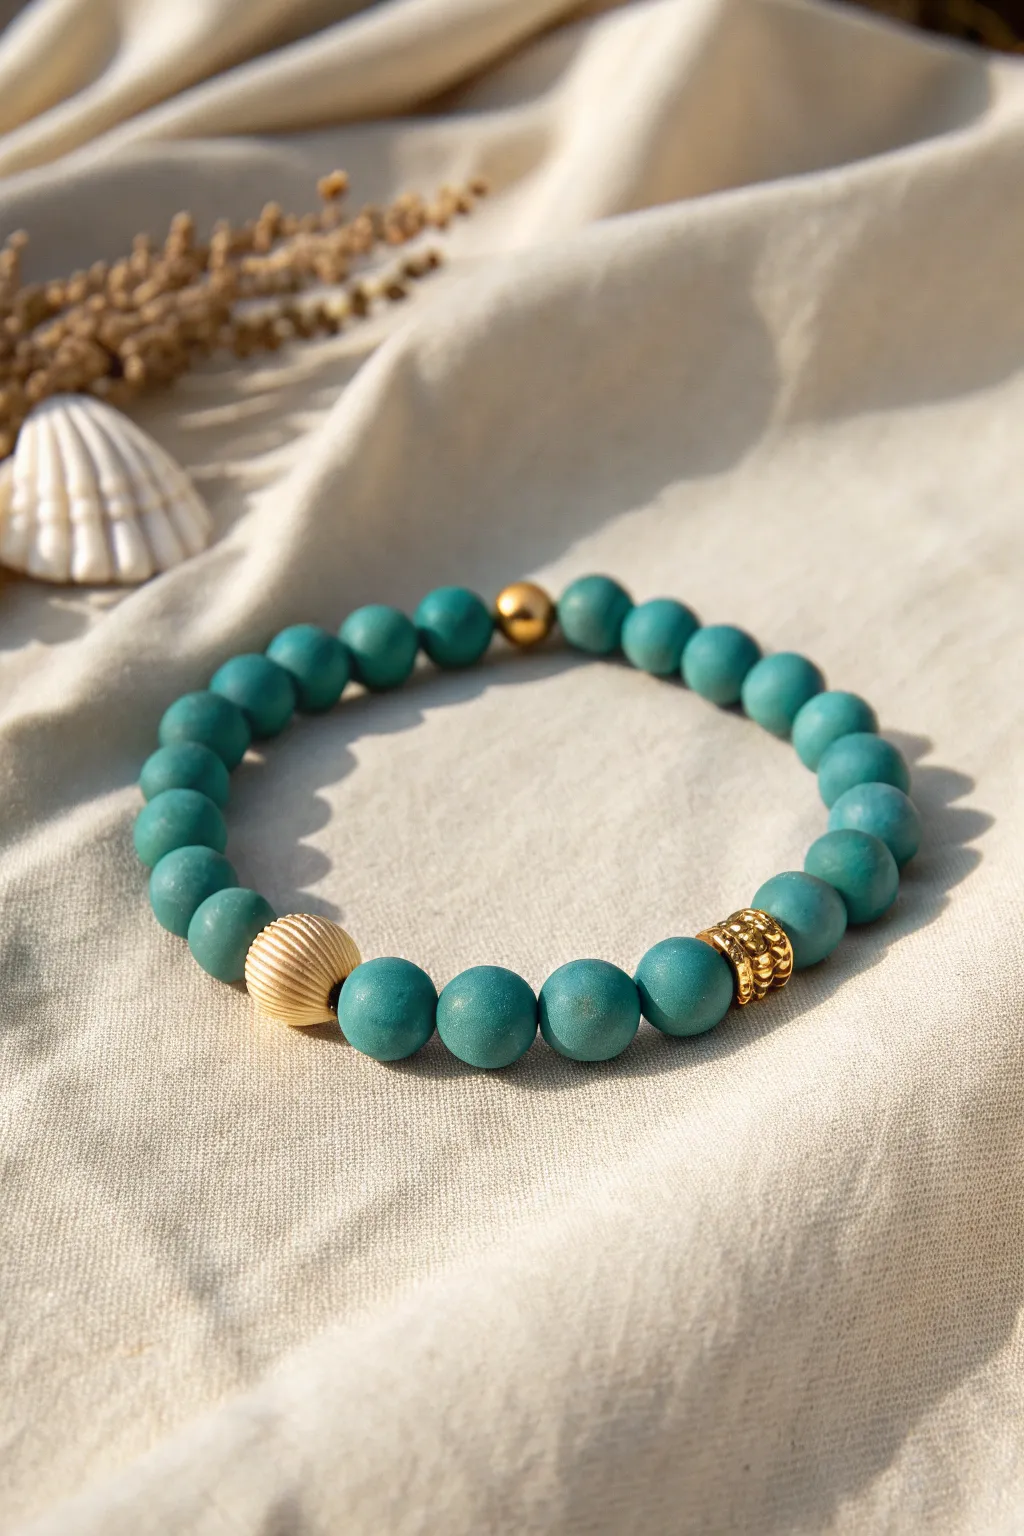
Capture the essence of a tranquil shoreline with this elegant teal clay bracelet featuring gold focal points. The combination of matte turquoise-hued beads and a striking gold shell charm creates a piece that feels both luxurious and beach-ready.
Detailed Instructions
Materials
- Matte teal clay beads (approx. 8mm)
- Small gold round spacer bead (approx. 4-5mm)
- Gold seashell shaped focal bead (approx. 10mm)
- Gold textured cylinder or lantern spacer bead
- Elastic stretch cord (0.8mm or 1mm)
- Jewelry adhesive or clear nail polish
- Scissors or jewelry nippers
- Bead stopper or tape
- Measuring tape
Step 1: Preparation
-
Measure your wrist:
Wrap a measuring tape loosely around your wrist to determine the desired length. Add about half an inch to this measurement to ensure the bracelet sits comfortably without pinching. -
Prepare the cord:
Cut a length of elastic cord about 10-12 inches long. Having this extra length makes tying the final knot much easier than struggling with short ends. -
Pre-stretch the elastic:
Gently pull closely on sections of the elastic cord several times. This pre-stretching step helps prevent the bracelet from loosening up and sagging after you wear it for the first time. -
Secure the end:
Place a bead stopper or a piece of tape on one end of your cord to stop your beads from sliding right off while you work.
Hiding the Knot
Plan your design so the knot lands next to a bead with a large hole. If the teal beads are too tight, start and end your stringing next to the gold cylinder bead to hide the knot inside it.
Step 2: Stringing the Design
-
Start the base:
Thread approximately 10 to 12 teal clay beads onto the cord. Since wrist sizes vary, you may need to adjust this number, but aim to cover almost half the bracelet length. -
Add the first accent:
Slide on the small, simple gold round bead. This subtle accent breaks up the teal pattern without overpowering the other larger gold elements. -
Continue the pattern:
Add another section of teal beads. Use roughly 6 to 8 beads for this segment to slightly offset the symmetry. -
Place the centerpiece:
Thread your showstopper bead: the gold seashell. Orient it so the textured side faces outward or whichever way creates the most pleasing silhouette. -
Add flanking beads:
Add exactly four teal beads next to the shell. This short run of color separates the shell from the next gold accent. -
Insert the textured spacer:
Slide on the gold textured cylinder or lantern bead. The intricate surface of this bead adds a nice contrast to the smooth matte finish of the clay beads. -
Close the loop design:
Finish stringing by adding the remaining teal beads until the strand reaches your measured bracelet length. I like to double-check the fit by wrapping it around my wrist before tying.
Variation Idea
Swap the teal for matte white or sandy beige beads to create a ‘white sands’ version, or mix in a few natural pearl beads alongside the gold accents for extra ocean texture.
Step 3: Finishing Touches
-
Remove the stopper:
Carefully remove the tape or bead stopper from the end, ensuring you keep a firm grip on both ends of the elastic. -
Tie the first loop:
Cross the ends and tie a simple overhand knot, pulling it gently but firmly so the beads sit snugly together without bunching up. -
Secure with a surgeon’s knot:
Tie a surgeon’s knot for extra security. To do this, cross the ends again, but wrap the top strand through the loop twice instead of once before pulling tight. -
Apply adhesive:
Dab a tiny drop of jewelry glue or clear nail polish directly onto the knot. This prevents the elastic from slipping over time. -
Hide the knot:
While the glue is still tacky, gently pull the elastic so the knot slides inside the hole of the nearest large bead (ideally one of the teal clay beads with a larger opening). -
Trim the excess:
Once the glue is dry and the knot is hidden, trim the excess cord ends carefully with your scissors, getting as close to the bead hole as safety allows.
Slip on your new bracelet and enjoy carrying a little piece of summer with you everywhere you go
Sea Turtle Charm on Teal Heishi

Transport yourself to calm waters with this charming teal bracelet, featuring consistent clay heishi beads accented by warm gold tones. The central sea turtle charm acts as a delightful focal point, making this piece perfect for stacking or wearing solo on beach days.
Step-by-Step Tutorial
Materials
- Teal polymer clay heishi beads (approx. 4-6mm)
- Gold tone metal sea turtle charm
- Gold textured round spacer beads (approx. 4mm)
- Gold ball spacer beads (smooth, approx. 3mm)
- Gold jump ring (approx. 5-6mm)
- Beading wire (nylon coated, 7 strand .015″ or similar)
- 2 Crimp beads
- 2 Wire guardians (gold, optional but recommended)
- 2 Crimp covers (gold, optional)
- Lobster clasp and extension chain (gold)
- Flush cutters
- Chain nose pliers
- Crimping pliers
Step 1: Preparing the Strand
-
Measure and cut:
Cut a length of beading wire approximately 9-10 inches long. This gives you plenty of extra room to work with the clasps without beads falling off the ends. -
Secure the start:
Attach a bead stopper or a piece of tape to one end of your wire to prevent your beads from sliding off while you design your pattern. -
Prepare the charm:
Use your chain nose pliers to gently twist open the gold jump ring. Slide the sea turtle charm onto the ring and close it securely, ensuring the gap is tight so the charm won’t slip off.
Charm Orientation Pro-Tip
When stringing the charm, hold the bracelet in a circle to check which way the turtle hangs. You want it facing ‘up’ or outward when worn, not flipping onto its back against your skin.
Step 2: Creating the Bead Pattern based on the Image
-
String the first section:
Begin stringing your teal heishi beads. Thread on approximately 1.5 to 2 inches of plain teal beads to start the side that will sit near the clasp. -
Add the first accent:
Slide on one of the smooth gold ball spacer beads followed by about 5 or 6 teal beads. -
Add the textured gold bead:
Thread on a larger, textured gold spacer bead. This adds a nice visual break and a touch of intricacy to the simple clay strand. -
Continue the pattern:
Add another segment of roughly 10-12 teal beads. This creates the visual space leading toward the center focal point. -
Add the second textured bead:
Place another textured gold spacer bead, followed by about 6 to 8 more teal beads. This section brings you close to the center of the bracelet. -
Place the centerpiece:
Slide the jump ring holding your gold sea turtle charm onto the wire now. Ensure the turtle is facing outward so it sits correctly on your wrist. -
Mirror the design:
Now, recreate the pattern in reverse. Add 6-8 teal beads, then a textured gold spacer bead. -
Extend the second side:
Thread on 10-12 teal beads, followed by the second textured gold spacer bead for this side. -
Finish the bead run:
Add the small segment of 5-6 teal beads, the smooth gold ball spacer, and finally fill the rest of the strand with teal beads until the bracelet reaches your desired length (usually about 6.5 to 7 inches total for an average wrist).
Step 3: Finishing the Clasp
-
Prepare the crimp:
Remove your bead stopper. Thread a crimp bead onto one end of the wire, followed by a wire guardian (threading up through one side and down the other). -
Attach the clasp component:
Hook the loop of your lobster clasp onto the wire guardian. Pass the tail of the wire back down through the crimp bead and pull it snug against the wire guardian. -
Crimp securely:
Use your crimping pliers to flatten or fold the crimp bead securely. I always give a gentle tug here to make sure the wire doesn’t slip. -
Finish the other end:
Repeat the crimping process on the other end of the bracelet, attaching the extension chain instead of the lobster clasp. Be sure to pull the wire tight enough to remove gaps between beads, but loose enough that the bracelet remains flexible. -
Clean up:
Trim any excess wire tails with your flush cutters as close to the crimp bead as possible without cutting the main wire. If using crimp covers, close them over the crimps now for a professional finish.
Stiff Bracelet Troubleshooting
If the finished bracelet feels stiff rather than fluid, you likely crimped it too tightly. Leave a tiny bit of slack—about 1-2mm of bare wire—before the final crimp to allow beads to rotate.
Now you have a serene, ocean-inspired accessory ready to wear on your next adventure


What Really Happens Inside the Kiln
Learn how time and temperature work together inside the kiln to transform clay into durable ceramic.
Starfish Charm With Teal and White Beads
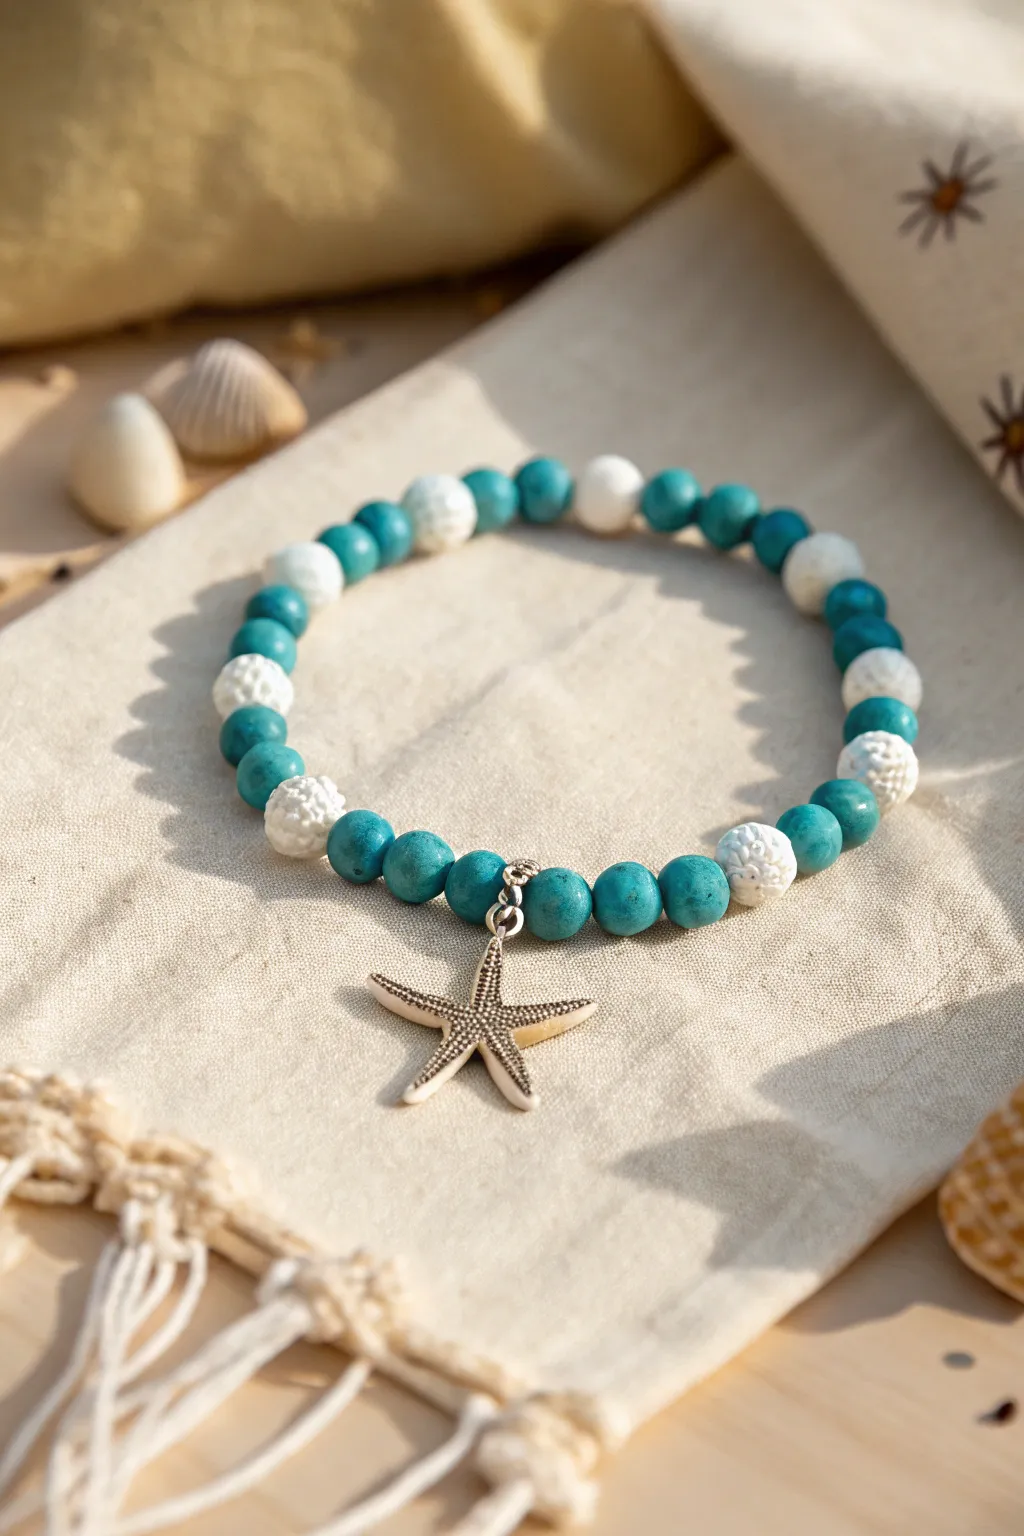
Capture the essence of a beach day with this ocean-inspired bracelet featuring cool teal hues and sandy whites. The silver-tone starfish charm acts as a charming focal point, making this piece perfect for summer wear or as a coastal gift.
How-To Guide
Materials
- Teal round beads (approx. 8mm, speckled or matte finish)
- White lava rock or textured round beads (approx. 8mm)
- Silver-tone starfish charm with bail or jump ring
- Elastic stretch cord (0.7mm or 0.8mm)
- Jewelry glue (GS Hypo Cement recommended)
- Scissors
Step 1: Preparation
-
Measure the Cord:
Cut a piece of elastic cord about 9-10 inches long. This gives you plenty of slack for knotting later on. -
Pre-stretch:
Give the elastic cord a few gentle tugs. Pre-stretching helps prevent the bracelet from sagging or loosening after you’ve worn it a few times. -
Secure the End:
Attach a bead stopper or simply place a piece of tape on one end of the cord to keep your beads from sliding off while you design.
Loose Charm?
If the starfish charm won’t hang facing forward, attach it using a small jump ring between two beads rather than stringing it directly.
Step 2: Stringing the Pattern
-
Start at the Center:
Thread the silver starfish charm onto the center of your cord. This will help you keep the design symmetrical as you add beads to either side. -
Flank the Charm:
Slide one teal bead onto the cord on each side of the starfish. These two beads will frame your charm perfectly. -
Build the Teal Section:
Continue adding teal beads to both sides. Based on the photo, string about two more teal beads on the left and two more on the right. -
Introduce the White Texture:
Thread one white textured bead (resembling lava stone or coral) onto each side. The contrast here really makes the blue pop. -
Resume the Pattern:
Add two teal beads to each side, followed by another single white textured bead. Repeat this 2-1 pattern or adjust slightly to fit your specific wrist size. -
Check the Fit:
Wrap the unfinished strand carefully around your wrist to check the sizing. If it feels too tight, add another teal bead or two near the ends. aim for a comfortable fit that isn’t too snug. -
Final Bead Placement:
Ensure your pattern ends symmetrically so the knot will be hidden inconspicuously at the back of the wrist, opposite the charm.
Step 3: Finishing Up
-
Prepare the Knot:
Remove the tape or bead stopper carefully while holding both ends of the elastic tight. -
Tie the Surgeon’s Knot:
Cross the ends, wrap one end around and through the loop twice, then pull tight. This extra pass creates more friction than a standard overhand knot. -
Secure with Glue:
Dab a tiny drop of jewelry glue directly onto the knot. Wait a moment for it to tack up slightly before moving on. -
Hide the Knot:
While the glue is still tacky but not wet, pull the knot gently inside one of the adjacent beads to hide it completely. -
Trim:
Once the glue is fully dry, trim the excess cord ends close to the bead hole with sharp scissors.
Scent Infusion
Use white lava stone beads for the textured parts. Add a drop of essential oil to them, and your bracelet becomes a wearable diffuser.
Now you have a refreshing accessory that brings a bit of the ocean to your everyday style
Pearl and Teal Clay Bead Alternation
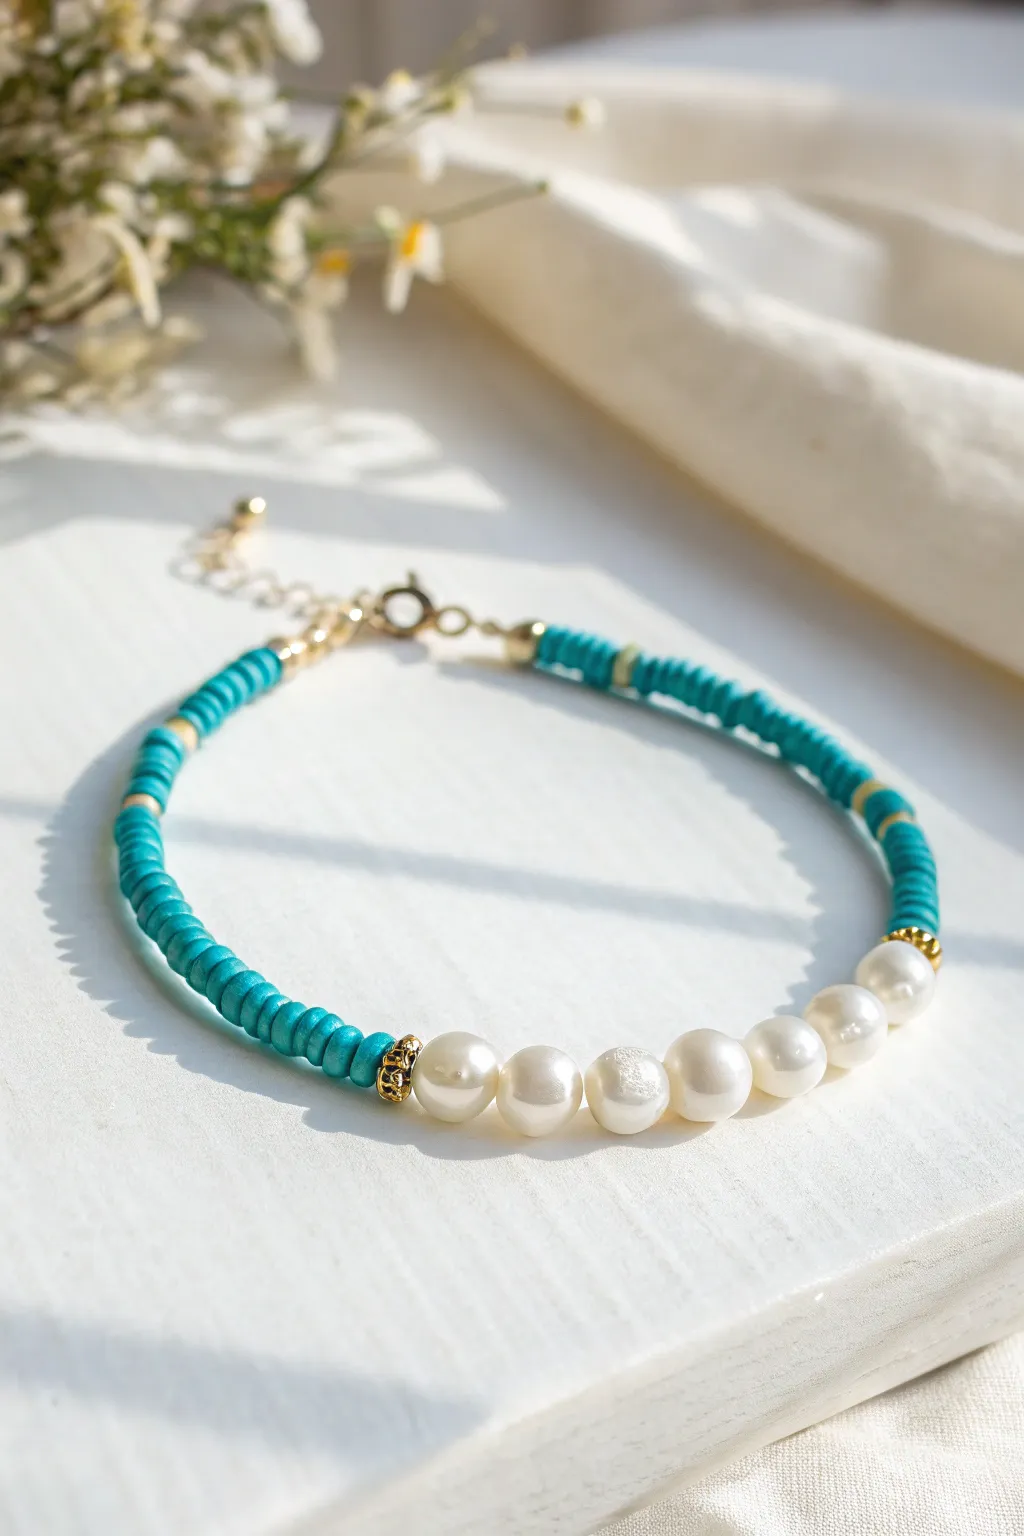
This elegant design merges the casual vibe of teal clay heishi beads with the timeless sophistication of freshwater pearls. It creates a stunning juxtaposition of textures that feels like a breezy day at the seaside.
Step-by-Step Tutorial
Materials
- Teal polymer clay heishi disc beads (approx. 4-6mm)
- 6-8mm round white glass pearls or freshwater pearls (approx. 6 beads)
- Small gold spacer beads (flat disc or rondelle shape)
- Two gold textured bead caps or fancy spacers (for the transition)
- Beading wire (such as Tiger Tail)
- Two gold crimp beads
- Two gold wire guardians (optional but recommended)
- Gold lobster clasp
- Gold extension chain (optional)
- Jewelry pliers (crimping pliers and wire cutters)
Step 1: Preparation
-
Measure your wrist:
Before cutting any wire, wrap a measuring tape around your wrist to find your size. Add about 1 inch to this measurement to allow room for the clasp and the bulk of the larger pearl beads. -
Cut the wire:
Cut a length of beading wire roughly 10-12 inches long. Having this extra length makes it much easier to handle the ends when attaching the clasp later. -
Plan your pattern:
Lay out your beads on a bead board or a piece of felt. The design centers around a row of 6 pearls, flanked by gold fancy spacers, then extending out into teal heishi beads on both sides.
Smooth Moves
When tightening the final crimp, curve the bracelet into a circle first. If you crimp it while it’s lying straight flat, the bracelet will be stiff and rigid when worn.
Step 2: Stringing the Centerpiece
-
Start the center:
Thread one of the gold textured bead caps or fancy spacers onto the wire. This will act as the visual bracket for your pearl section. -
Add the pearls:
String on six white pearls. Check them for uniformity; if you are using real freshwater pearls, try to arrange them by size with the largest slightly towards the center. -
Cap the section:
Add the second gold textured bead cap after the last pearl. This completes the focal point of the bracelet.
Texture Twist
Swap the uniform round pearls for baroque pearls or nugget-shaped freshwater pearls. Their irregular shapes add an organic, high-end boutique feel to the design.
Step 3: Creating the Sides
-
Begin the teal sections:
On the left side of your pearl centerpiece, start threading the teal clay heishi beads. Add about 10-12 teal beads. -
Insert a spacer:
Slide on a small gold flat spacer bead. This breaks up the color and adds a touch of shine. -
Continue the pattern:
Add another segment of 10-12 teal beads, followed by another gold spacer. Repeat this pattern until you have reached roughly half of the remaining length needed for your wrist size on this side. -
Secure the side temporarily:
Place a piece of tape or a bead stopper on the end of the wire so your work doesn’t slide off while you switch to the other side. -
Mirror the design:
Repeat the exact same pattern on the right side: 10-12 teal beads, a gold spacer, and so on. Ensure both teal sections are equal in length to keep the pearls perfectly centered.
Step 4: Finishing the Clasp
-
Prepare the first crimp:
Thread a gold crimp bead onto one end of the wire, followed by a wire guardian (if using) and one half of the clasp assembly (either the lobster claw or the jump ring). -
Loop back:
Thread the wire back through the crimp bead and pull it tight, creating a small loop that holds the clasp component securely. -
Secure the crimp:
Use your crimping pliers to flatten the crimp bead firmly. I like to give a gentle tug to ensure it is rock solid. -
Repeat on the other end:
Move the beads down so they are snug against the finished end. Thread on the second crimp bead, wire guardian, and the other part of the clasp (or extension chain) onto the remaining wire end. -
Tighten and crimp:
Pass the wire back through the crimp bead and through the first few teal beads. Pull tight to remove slack but keep the bracelet flexible enough to drape, then crimp the bead shut. -
Trim excess wire:
Use your flush cutters to trim the tail of the beading wire as close to the beads as possible so no sharp ends poke out.
With the clasp secured, your new accessory is ready to add a splash of ocean-inspired color to your wrist stack

TRACK YOUR CERAMIC JOURNEY
Capture glaze tests, firing details, and creative progress—all in one simple printable. Make your projects easier to repeat and improve.
Teal Bracelet With Letter Bead Name Bar
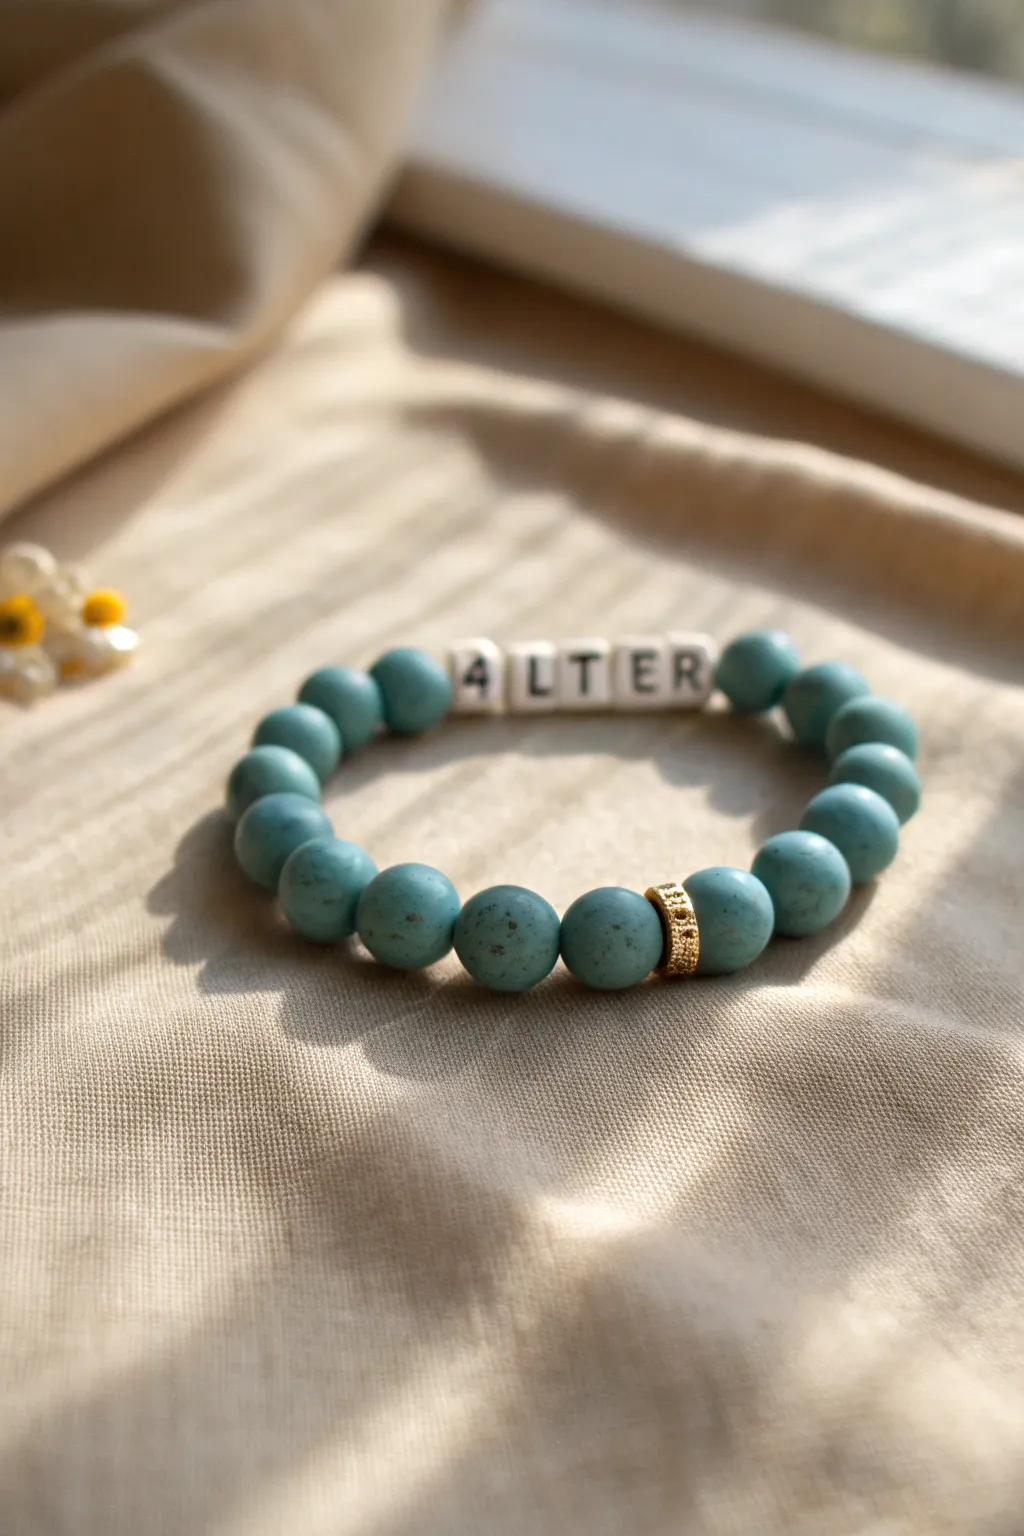
This personalized accessory combines the rustic charm of speckled teal beads with the clean look of letter cubes. The golden spacer ring adds just the right touch of warmth to this earthy, harmonious design.
Detailed Instructions
Materials
- Speckled teal round beads (approx. 8mm or 10mm, stone or clay look)
- White cube letter beads (spelling your chosen word, e.g., ‘WALTER’ or ‘4LTER’)
- Gold-tone spacer ring with rhinestone or textured detail
- Strong elastic stretch cord (0.7mm or 0.8mm)
- Scissors
- Bead stopper or tape
- Jewelry glue or clear nail polish
Step 1: Preparation & Planning
-
Measure your wrist:
Before you begin, wrap a piece of string around your wrist to find a comfortable fit. Add about half an inch to this measurement to account for the bulk of the larger beads. -
Cut the cord:
Cut a length of elastic cord about 10-12 inches long. Having this extra length makes tying the final knot significantly easier than struggling with short ends. -
Secure the end:
Attach a bead stopper or simply place a piece of tape on one end of your cord. This prevents your beads from sliding off while you design your pattern. -
Select your word:
Locate the white cube letter beads needed for your name or phrase. In our example, we are using five letter blocks.
Knot Security
If you can’t hide the knot inside a bead, place it next to the gold spacer ring. The texture and shine of the ring will help camouflage the transparent knot effectively.
Step 2: Stringing the Design
-
Start the sequence:
Begin by stringing about half of your teal speckled beads onto the cord. Count them to ensure you can balance the bracelet symmetrically. -
Add the focal ring:
Slide on the gold spacer ring. This metallic accent acts as a visual anchor at the bottom of the bracelet, directly opposite the name bar. -
Finish the bottom half:
String the remaining teal beads needed to complete the bottom curve of the bracelet. You want the gold ring to sit exactly in the middle of this teal section. -
Position the name:
Thread your letter beads onto the cord in the correct order. Since you are working in a circle, double-check that the word reads correctly from left to right when worn. -
Check the symmetry:
Hold the two ends of the cord together to form a circle. I like to check here if the letter beads sit comfortably opposite the gold ring spacer. -
Adjust the fit:
Wrap the unfinished strand around your wrist. If it feels too tight, add one teal bead to each side of the letter bar; if too loose, remove one from each side.
Step 3: Securing & Finishing
-
Pre-stretch the cord:
Gently pull on both ends of the elastic cord a few times. This pre-stretching step helps prevent the bracelet from sagging or loosening after the first few wears. -
Tie the first knot:
Remove the bead stopper and crossover the ends. Tie a simple overhand knot and pull it tight, bringing the beads snugly together. -
Tie a surgeon’s knot:
For the second knot, make another loop but pass the end through the loop twice instead of once. This friction creates a much more secure hold. -
Tighten securely:
Pull firmly on all four strands—the two tail ends and the main bracelet loop parts—to ensure the knot is compact and tight. -
Apply adhesive:
Dab a tiny drop of jewelry glue or clear nail polish directly onto the knot. Be careful not to get glue on the beads themselves, just on the cord fiber. -
Hide the knot:
While the glue is still tacky, gently slide the knot inside the hole of the nearest teal bead if the hole is large enough. This creates a seamless, professional finish. -
Trim the excess:
Once the glue has fully dried, use sharp scissors to trim the excess cord ends close to the bead, being careful not to nick the main knot.
Add Variety
Enhance the earthy vibe by sandwiching the gold ring between two tiny flat wooden disc spacers or black lava stones for extra texture contrast.
Now you have a custom piece of jewelry that balances personalization with a sleek, natural aesthetic perfect for stacking
Teal and Black Pop for a Sporty Look
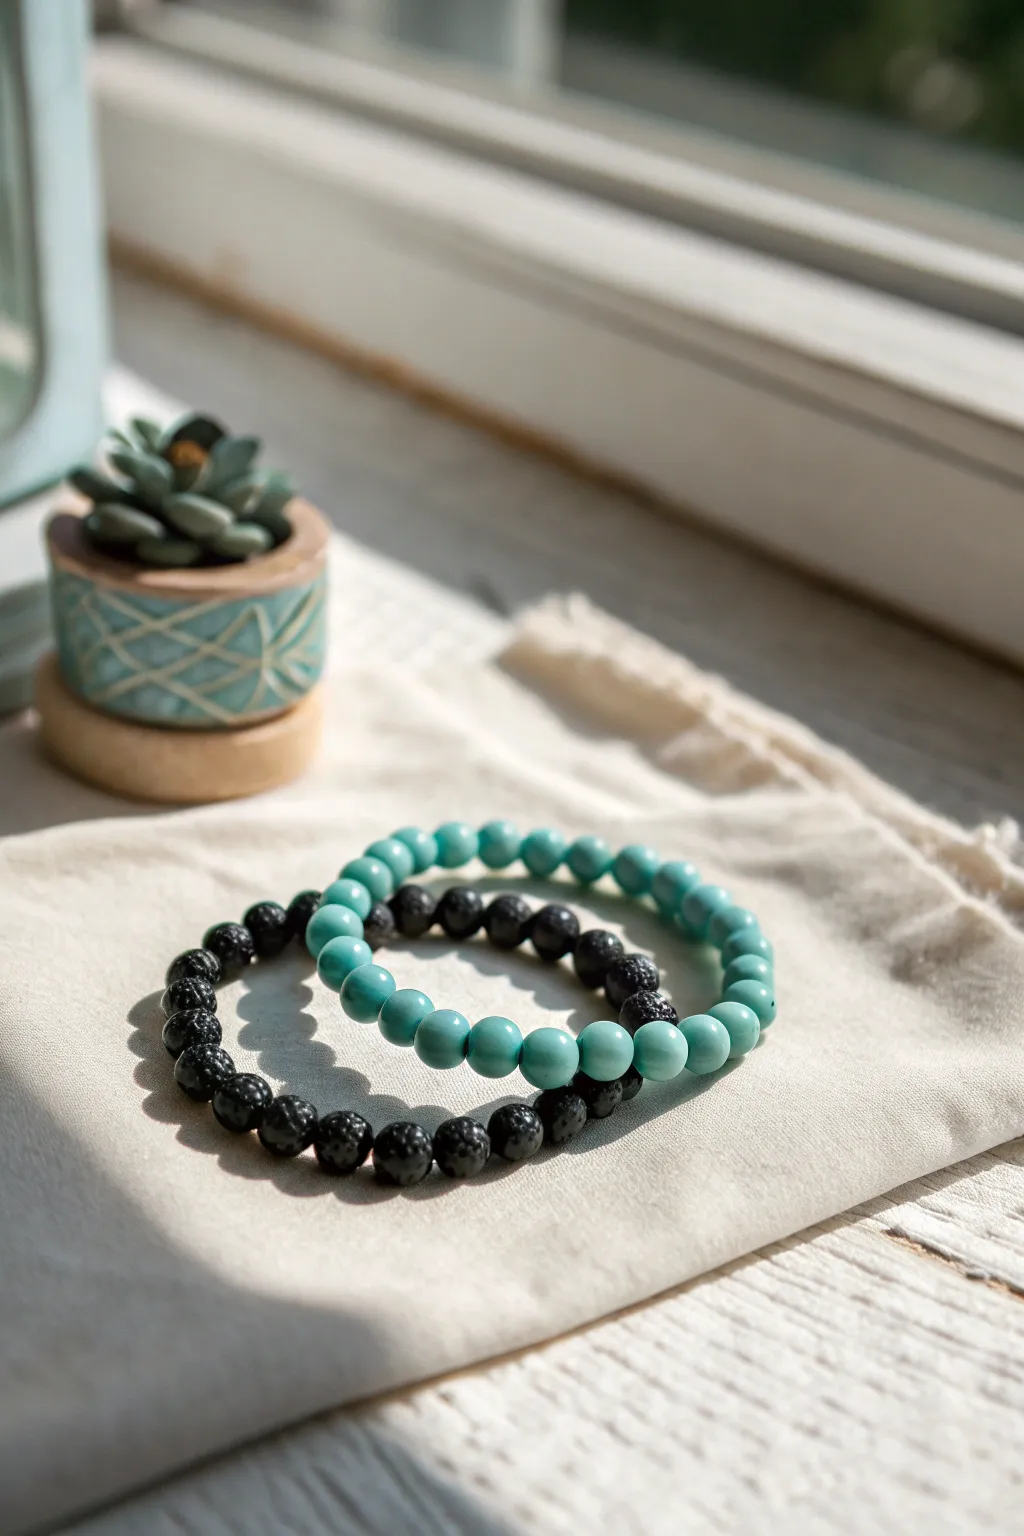
Contrast is king with this striking set that pairs the rugged, porous texture of black lava rock with the smooth, cool finish of teal turquoise-style beads. The result is a grounded yet vibrant accessory stack that feels equally at home at the gym or a casual brunch.
How-To Guide
Materials
- 8mm black lava rock beads (approx. 22-24 beads)
- 8mm teal turquoise or dyed stone rounds (approx. 22-24 beads)
- 0.8mm clear elastic stretch cord
- Hypo-cement or jewelry glue
- Scissors
Step 1: Preparation
-
Measure your wrist:
Wrap a measuring tape loosely around your wrist to find your size, then add about half an inch for a comfortable fit. -
Pre-stretch the cord:
Cut a piece of elastic cord about 12 inches long. Before threading any beads, give the cord a few gentle tugs to pre-stretch it; this helps prevent the bracelet from slowly sagging over time. -
Secure the end:
Place a piece of tape or a bead stopper on one end of your cord so your beads don’t slide right off while you work.
Step 2: Creating the Black Lava Bracelet
-
Select your lava beads:
Inspect your black lava beads. I try to pick ones with relatively uniform pitting for a cleaner look, though the variation is part of the charm. -
String the beads:
Thread the black lava beads onto the elastic cord one by one. -
Check the length:
Periodically wrap the strand around your wrist. You want the ends to touch without gaps, sitting comfortably against the skin without squeezing. -
Tie the knot:
Once the size is right, remove the tape/stopper. Tie a surgeon’s knot (a standard overhand knot, but loop the end through twice before pulling tight). -
Secure the knot:
Pull the knot tight from all four sides (the two loose ends and the two bracelet sides). Dab a tiny drop of hypo-cement or super glue onto the knot. -
Hide the knot:
While the glue is still slightly tacky, slide the knot inside the hole of the nearest lava bead to hide it completely. -
Trim excess:
Once dry, trim the excess cord ends carefully with sharp scissors, ensuring you don’t nick the main knot.
Knot Slipping?
If your elastic knot feels slick and wants to undo itself, wipe the ends with a tiny bit of rubbing alcohol before tying. This removes manufacturing oils.
Step 3: Creating the Teal Bracelet
-
Prepare the second cord:
Cut another 12-inch length of elastic, pre-stretch it, and secure the end just like before. -
String the teal beads:
Thread your smooth teal beads onto the cord. Pay attention to any color variations or veins in the stone to arrange the most attractive sides outward. -
Verify sizing:
Compare the length of this strand against your finished lava bracelet to ensure they will stack perfectly together. -
Knot and glue:
Tie a secure surgeon’s knot, tighten it firmly, and apply your dot of glue. -
Conceal and finish:
Tuck the knot inside a teal bead—this might be a tighter fit than the lava rock, so patience is key—and trim the excess cord.
Aromatic Upgrade
Add 1-2 drops of essential oil (like peppermint or lavender) directly onto the black lava beads. The porous rock acts as a natural diffuser for hours
Enjoy wearing your new sporty stack individually or together for a balanced look
Teal With Pink Coral Accent Beads
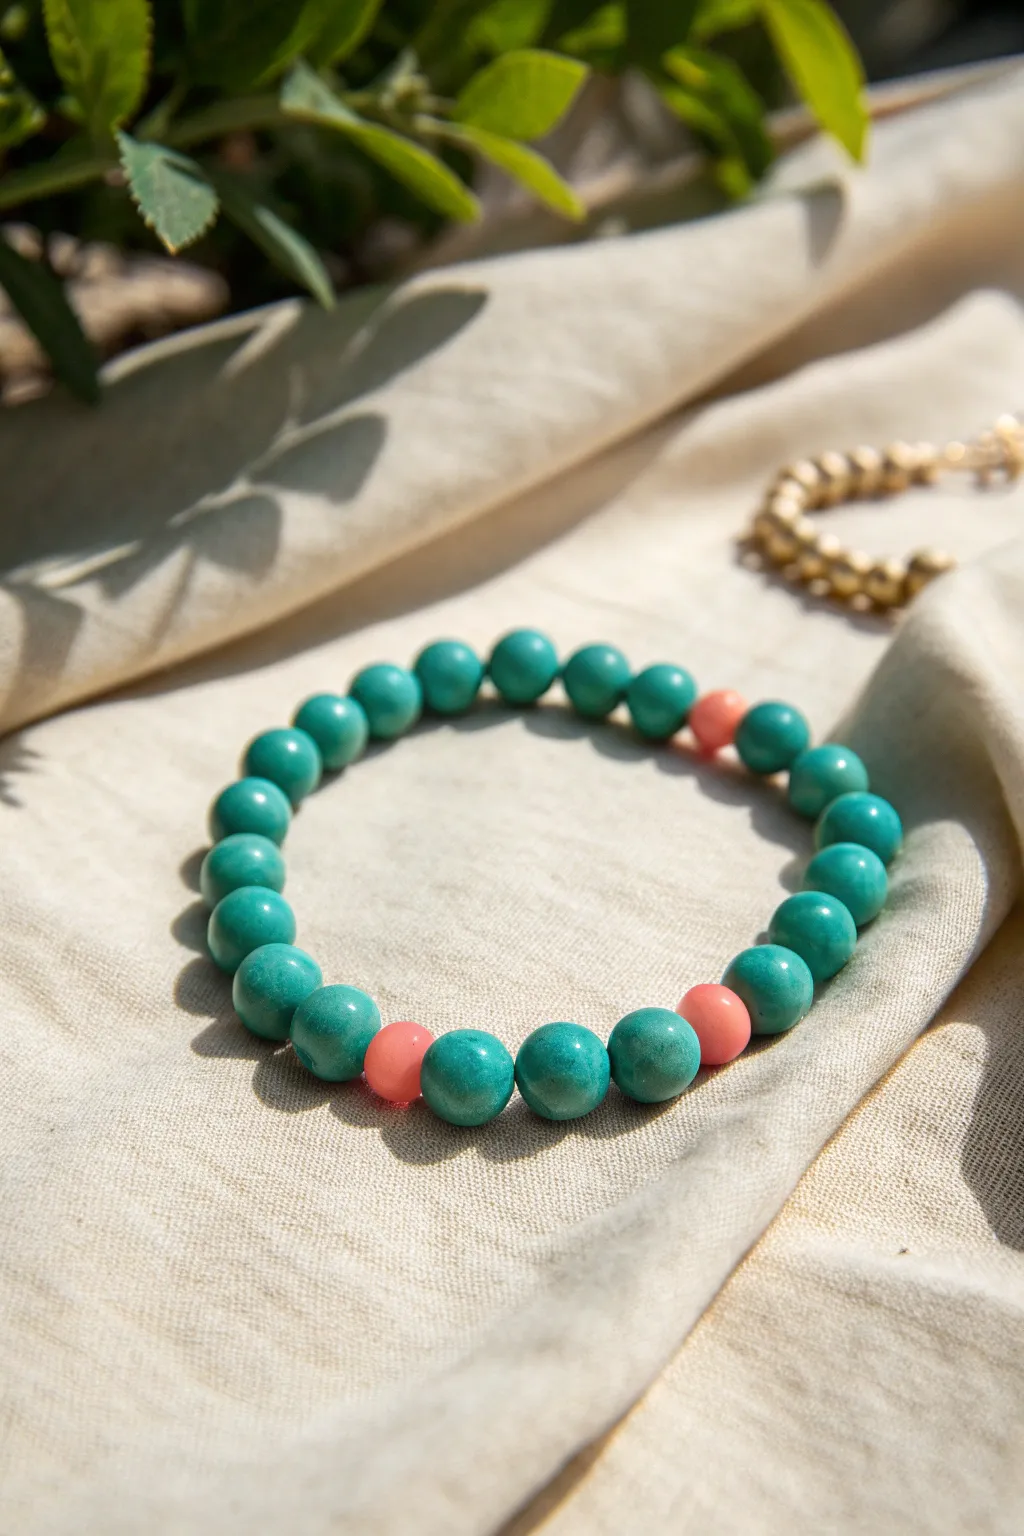
Capture the essence of a serene beach day with this beautiful bracelet, featuring smooth teal beads interrupted by warm pops of pink coral. The interplay of cool blues and soft pinks creates a balanced, calming accessory perfect for layering or wearing solo.
Step-by-Step
Materials
- Teal round beads (approx. 8mm-10mm, stone or polymer clay)
- Pink coral round beads (same size as teal beads)
- Elastic beading cord (0.8mm or 1mm clear)
- Bead glue or clear nail polish
- Scissors
- Tape or bead stopper
- Ruler or measuring tape
Step 1: Preparation & Planning
-
Measure your wrist:
Begin by wrapping a measuring tape comfortably around your wrist where you want the bracelet to sit. Add about half an inch to this measurement to ensure the finished piece isn’t too tight. -
Cut the cord:
Cut a piece of elastic cord about 10-12 inches long. Having this extra length makes tying the final knot much easier without fumbling. -
Pre-stretch the elastic:
Hold the cord firmly at both ends and give it a few gentle tugs. This pre-stretching step helps prevent the bracelet from loosening up after you’ve worn it a few times. -
Secure the end:
Attach a piece of tape or a bead stopper to one end of your cord so your beads don’t slide right off while you work.
Natural Texture
If you are making clay beads by hand, gently roll a textured sponge over the raw clay spheres before baking to mimic the mottled surface of real stone.
Step 2: Stringing the Design
-
Start with teal:
Thread on approximately 4 or 5 teal beads to start the foundation of your pattern. -
Add first accent:
Slide on your first pink coral bead. This provides that crucial pop of warmth against the cool teal tones. -
Create the main sequence:
Add a long sequence of teal beads. In the reference image, the majority of the bracelet is teal, occupying about two-thirds of the loop. -
Check sizing:
Wrap the strand around your wrist to check the length. You want the main teal section to cover the back and sides of your wrist. -
Add second accent:
Thread another pink coral bead onto the cord. -
Create the spacing:
Add exactly three teal beads. This small group separates two of the pink accents, creating an asymmetrical focal point. -
Add final accent:
Place your third and final pink coral bead on the string. -
Finish the loop:
Add final teal beads if necessary to reach your desired total length, matching the start of your pattern so the connection looks seamless.
Step 3: Finishing Touches
-
Prepare to knot:
Bring both ends of the elastic together and carefully remove your tape or bead stopper, ensuring no beads escape. -
Tie the first knot:
Tie a simple overhand knot, pulling the elastic taut so the beads sit snugly against each other without any gaps. -
Tie the surgeon’s knot:
For extra security, follow up with a surgeon’s knot. Loop the cord through the knot twice before pulling it tight. -
Secure the knot:
Apply a tiny dab of bead glue or clear nail polish directly onto the knot. I usually let this dry for a minute before trimming. -
Trim the excess:
Once the glue is tacky or dry, use your scissors to trim the excess cord ends close to the knot. -
Hide the knot:
Gently pull adjacent beads to slide the knot inside one of the bead holes, hiding it from view for a professional finish.
Metallic Flair
Sandwich each pink coral bead with thin gold spacer discs or tiny brass rondelles to elevate the look and add a touch of shine.
Enjoy wearing your new handcrafted accessory that brings a splash of color to any outfit
Teal With Lime or Citrus Brights
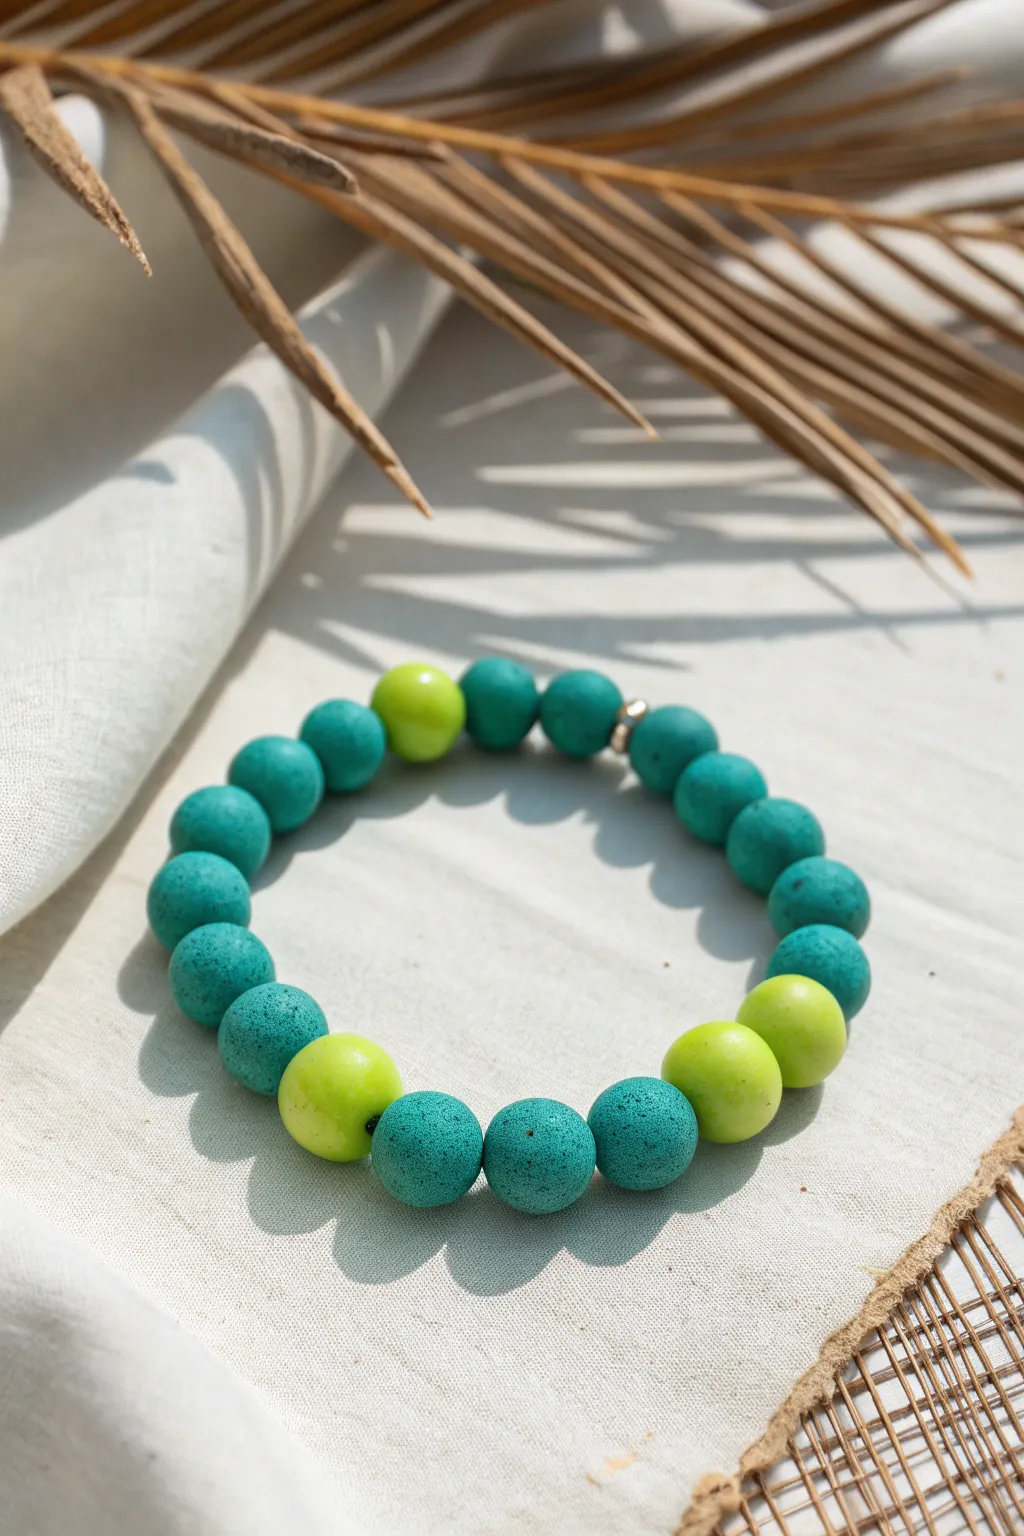
Evoke the refreshing vibes of a tropical getaway with this vibrant bracelet that pairs matte teal texture with pops of glossy citrus lime. This design balances earthy clay tones with bright, energetic accents for a perfect summer accessory.
Step-by-Step Guide
Materials
- Teal polymer clay (or pre-made 10mm matte teal clay beads)
- Lime green polymer clay (or pre-made 10mm glossy lime glass/ceramic beads)
- Stretch cord (0.8mm or 1mm thickness)
- Jewelry glue or clear nail polish
- Beading needle (optional but helpful)
- Ruler or measuring tape
- Scissors
- Toothpick or skewer (if making beads from scratch)
- Gloss glaze (if making lime beads from scratch)
- Texture sponge or sandpaper (if making teal beads from scratch)
- One small gold spacer bead
Step 1: Creating the Beads (If DIY-ing)
-
Condition the clay:
Start by warming up your teal and lime green polymer clay separately in your hands until they are soft and pliable. -
Form the spheres:
Roll approximately 16 balls of teal clay and 4 balls of lime green clay. Aim for a diameter of about 10mm for a chunky look. -
Texturize the tea:
To get that porous, stone-like look on the teal beads, roll the unbaked spheres gently over a piece of coarse sandpaper or dab them with a rough texture sponge. I find using a clean concrete surface works well in a pinch too. -
Smooth the lime:
Ensure the lime green beads are perfectly smooth. Roll them lightly between your palms to remove any fingerprints. -
Pierce holes:
Using a toothpick or a piercing pin, carefully bore a hole through the center of each bead. Rotate the bead as you push to keep the shape round. -
Bake the beads:
Arrange your beads on a baking sheet or tile. Bake according to your polymer clay package instructions (typically 275°F/135°C for 15-30 minutes). -
Finish the surfaces:
Once cool, leave the teal beads matte. Coat the lime green beads with a high-gloss glaze or resin to create a shiny contrast against the matte teal.
Step 2: Stringing the Design
-
Measure your cord:
Cut a piece of stretch cord about 10-12 inches long. This gives you plenty of extra slack for tying the final knot comfortably. -
Pre-stretch the elastic:
Give the cord a few firm tugs. This is a crucial step that prevents the bracelet from sagging or stretching out permanently after the first wear. -
Secure the end:
Attach a piece of tape to one end of the cord or use a bead stopper to prevent your beads from sliding off while you work. -
Plan your pattern:
Arrange your beads on a flat surface. For the look in the photo, create an asymmetrical pattern: a long run of teal beads, followed by one lime, three teal, two lime, three teal, and one lime. -
Begin stringing:
Thread the beads onto the cord following your planned sequence. If the holes are tight, a flexible beading needle can speed this up significantly. -
Add the accent:
Slide on the single small gold spacer bead. Place it between two teal beads somewhere in the main teal section to add a tiny hint of metallic shine. -
Check the fit:
Wrap the strung beads around your wrist. The ends should meet comfortably without gaps, but shouldn’t feel tight against the skin. Add or remove teal beads if necessary.
Salt Texturing
For ultra-realistic porous texture on the teal beads, roll raw clay in coarse sea salt. Bake, then soak in water to dissolve the salt, leaving deeper craters.
Step 3: Finishing Touches
-
Tie the knot:
Remove the tape/stopper. Tie a surgeon’s knot (a standard overhand knot, but loop the end through twice before pulling tight) to secure the bracelet. -
Secure with glue:
Ideally, place a tiny drop of jewelry glue or clear nail polish directly onto the knot. Pull it tight again and let it dry for a few minutes. -
Hide the knot:
Trim the excess cord tails close to the knot, leaving about 1mm. Gently tug the cord so the knot slides inside the hole of the nearest large bead, hiding it completely.
Scent Diffuser
Since the matte teal beads have a porous texture, add a drop of essential oil to them. They will act as a personal aromatherapy diffuser while you wear them.
Slip on your colorful new accessory and enjoy the fresh pop of color it adds to your outfit
Teal Beads With Tiny Charm Cluster
Capture the essence of a serene beach day with this elegant teal heishi bead necklace featuring a delightful cluster of ocean-inspired charms. The cool blue tones paired with warm gold accents and pearls create a sophisticated yet relaxed accessory perfect for summer styling.
How-To Guide
Materials
- Teal polymer clay heishi beads (approx. 4mm-6mm)
- Gold-plated seashell charm
- 2 small freshwater pearls or pearl beads
- 1 textured gold spacer bead or round accent bead
- Gold beading wire or strong jewelry cord
- Gold lobster clasp
- Gold extender chain
- Gold jump rings (mixed sizes: small for clasp, medium for charms)
- 2 gold crimp beads
- 2 gold wire guards (optional but recommended)
- Flat nose pliers
- Wire cutters
Step 1: Preparing The Base
-
Measure your wire:
Cut a length of beading wire approximately 18-20 inches long. This gives you plenty of slack to work with for a choker-style fit, which typically sits around 14-16 inches when finished. -
Secure the first end:
Thread a crimp bead onto one end of the wire, followed by a wire guard if you’re using one. Loop the wire through the last link of your extender chain, then back through the crimp bead. -
Crimp it tight:
Use your flat nose pliers to flatten the crimp bead firmly. Give it a gentle tug to ensure the chain is secure, then trim the excess short tail of wire. -
Begin beading:
Start stringing your teal heishi beads. I like to string about an inch of beads and then slide them down to cover the crimped end for a cleaner finish.
Stiff Necklace?
If your beads are buckling or the necklace feels rigid, you crimped too tightly. Leave a tiny 1-2mm gap of bare wire before crimping to allow the beads to roll and drape naturally.
Step 2: Creating the Charm Cluster
-
Find the center:
Continue stringing the teal beads until you seek to have reached the halfway point of your desired necklace length. Hold the strand up to your neck to double-check the placement. -
Attach the shell:
Open a medium-sized jump ring with your pliers. Slide the gold seashell charm onto it, then slide the jump ring directly onto the main beading wire so it hangs freely between the clay beads. -
Add the first pearl:
Prepare your first pearl. If it doesn’t have a loop, thread it onto a headpin and create a loop, or simply string it directly if the hole is large enough. Here, we attach it using a small jump ring placed right next to the shell. -
Add the gold accent:
Thread or attach the textured gold bead. This acts as a visual separator and adds a bit of warmth to the cluster. -
Attach the final pearl:
Add the second pearl charm using another jump ring. This creates a slightly asymmetrical, organic ‘cluster’ look rather than a perfectly lined-up row.
Jump Ring Pro Tip
When opening jump rings for the charms, always twist them laterally (north-south) with two pairs of pliers. Never pull them apart (east-west), or you will weaken the metal.
Step 3: Finishing Touches
-
Complete the beading:
Resume stringing the teal heishi beads on the other side of the charm cluster. Continue until this side matches the length of the first side perfectly. -
Prepare the closure:
Thread on your second crimp bead and wire guard. Loop the wire through the small attachment ring of your gold lobster clasp. -
Loop back:
Pass the wire back through the crimp bead and through the first few teal beads on the strand. Pull the wire until the loop is snug against the clasp but still has movement. -
Final crimp:
Flatten the final crimp bead securely with your pliers. Make sure to check that the tension of the necklace isn’t too stiff; it needs to drape naturally. -
Trim and polish:
Cut off the remaining tail of the wire flush against the beads so no sharp ends are poking out. -
Test the movement:
Shake the necklace gently to ensure the charms in the center settle nicely and don’t bunch up awkwardly against the clay beads.
Enjoy wearing your handcrafted piece of the ocean that pairs beautifully with breezy linen shirts
Teal Spacer Pattern With Mini Disc Breaks
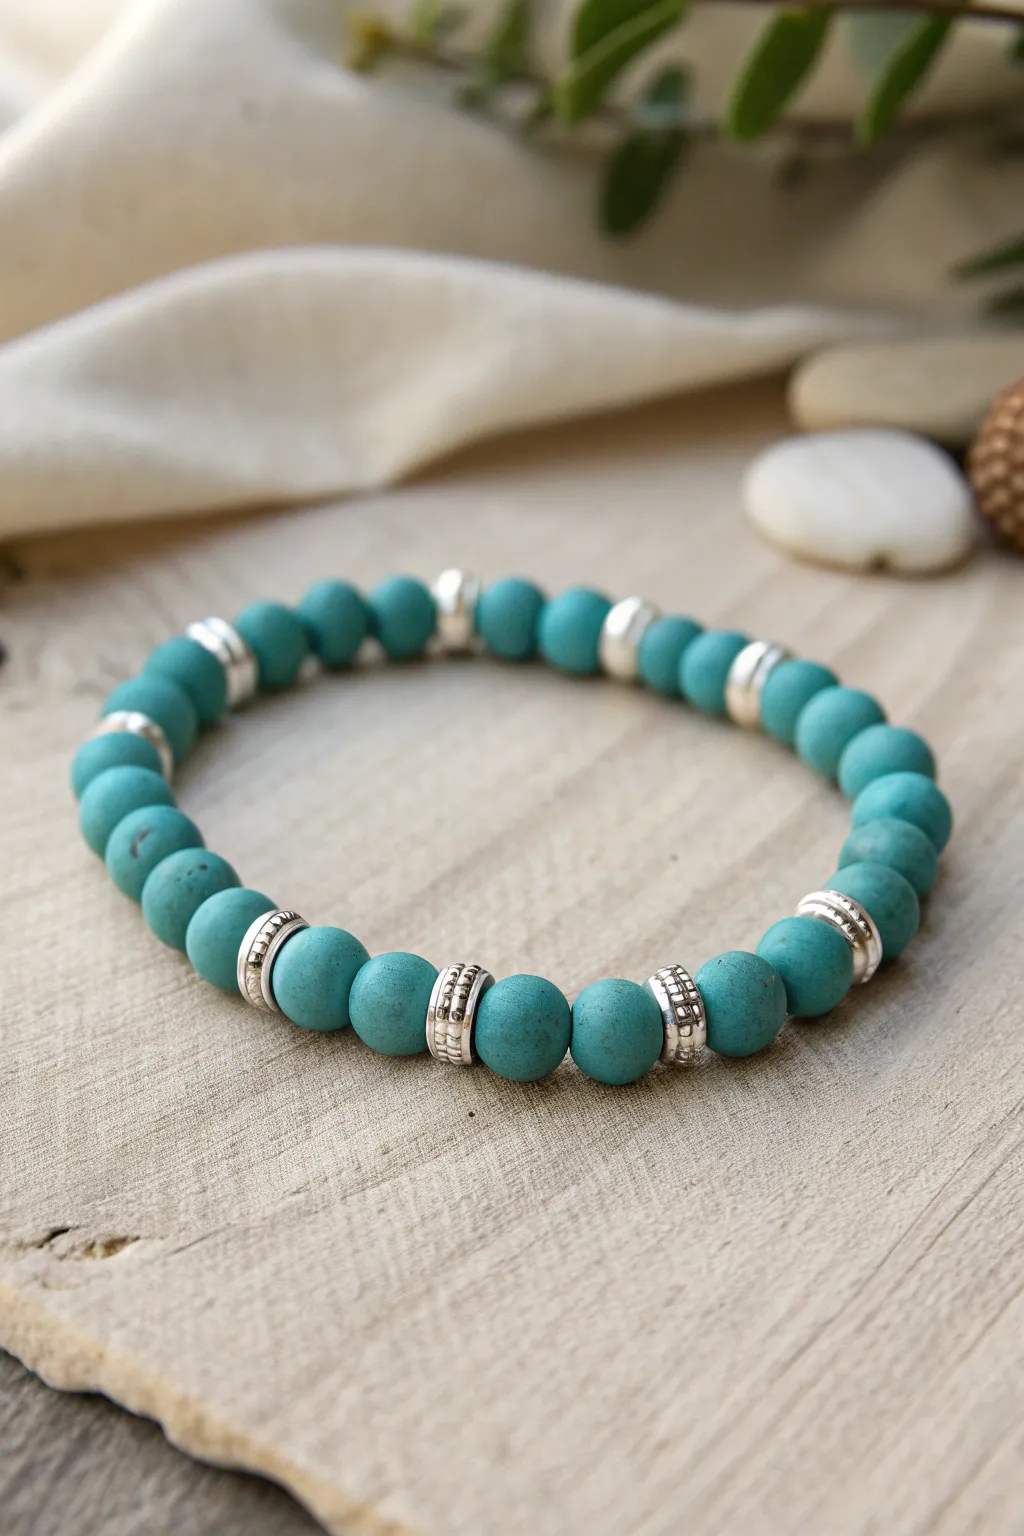
This earthy yet elegant bracelet features matte teal stone beads interspersed with textured silver discs, creating a satisfying rhythm around the wrist. The cool tones of the beads contrast beautifully with the bright metallic spacers, making it a perfect everyday accessory.
Detailed Instructions
Materials
- 8mm matte teal turquoise, amazonite, or clay composite round beads (approx. 20-25 depending on wrist size)
- 6mm silver-tone filigree or textured disc spacer beads (heishi style)
- 0.8mm clear elastic stretch cord
- Hypo-cement or jewelry glue
- Scissors or wire cutters
- Bead stopper or a small clip
- Bead design board (optional but helpful)
Step 1: Preparation
-
Pre-stretch the cord:
Cut a piece of elastic cord about 10-12 inches long. Before you start stringing, give the cord a few gentle tugs to pre-stretch it. This helps prevent the bracelet from sagging later on. -
Secure the end:
Attach a bead stopper or a piece of tape to one end of your cord. This ensures your beads won’t slide off while you are working on your pattern. -
Sort your beads:
Lay out your teal beads and silver spacers on a bead board or a soft cloth. Check the holes of the teal beads to ensure they are clear of debris.
Knot Hiding Trick
If the hole of the teal bead is too small for the knot, always try to hide the knot inside the silver spacer, as metal beads often have larger openings.
Step 2: Creating the Pattern
-
Start the sequence:
Begin by stringing three of the teal round beads onto the cord. -
Add a spacer:
Slide on one silver disc spacer. Ensure the textured edge is facing outward if it has a specific design, though most are uniform. -
Continue the rhythm:
Add another set of three teal beads, followed by another single silver spacer. This 3-to-1 ratio is the core of this design. -
Check the fit:
Continue repeating the pattern—three teal beads, one silver spacer—until you have about 6 or 7 repeating sections. -
Measure against wrist:
Wrap the strung beads around your wrist to check the size. Ideally, the ends should meet comfortably without gaps, but not be tight. -
Adjust the pattern:
If the bracelet is too short, I sometimes add a ‘hidden’ pattern adjustment at the back, perhaps doing a section of four beads instead of three, or simply continuing the pattern for another full segment. -
Verify symmetry:
For the cleanest look, try to end the strand with a silver spacer so that when you tie it, the pattern (3 beads, 1 spacer) remains continuous across the knot.
Loose Spacers?
If the silver discs are wobbling or flipping over, add a tiny 2mm seed bead on either side of the disc to stabilize it against the round beads.
Step 3: Finishing the Bracelet
-
Prepare to tie:
Remove the bead stopper carefully, holding both ends of the elastic firmly. -
The first knot:
Cross the left end over the right and pull tight to bring the beads together into a circle. Eliminate any slack in the cord. -
The surgeon’s knot:
Cross the ends again, but this time loop one end through the circle twice before pulling tight. This extra loop creates a secure surgeon’s knot. -
Secure with glue:
Dab a tiny drop of jewelry glue or Hypo-cement directly onto the knot. Be careful not to get glue on the visible surface of the beads. -
Hide the knot:
While the glue is still slightly tacky, pull the elastic so the knot slides inside the hole of the nearest teal bead or silver spacer. -
Let it cure:
Allow the bracelet to sit undisturbed for at least 15 minutes (or as recommended by your glue manufacturer) to let the bond set completely. -
Trim the excess:
Once dry, use your scissors to trim the remaining tail ends of the elastic cord as close to the bead hole as possible without cutting the knot itself. -
Final stretch test:
Give the finished bracelet a gentle stretch to ensure the knot is holding and the beads settle into a perfect circle.
Slip your new custom bracelet on and enjoy the effortless style it adds to your outfit
Teal and Translucent Bead Mix for a Watery Look
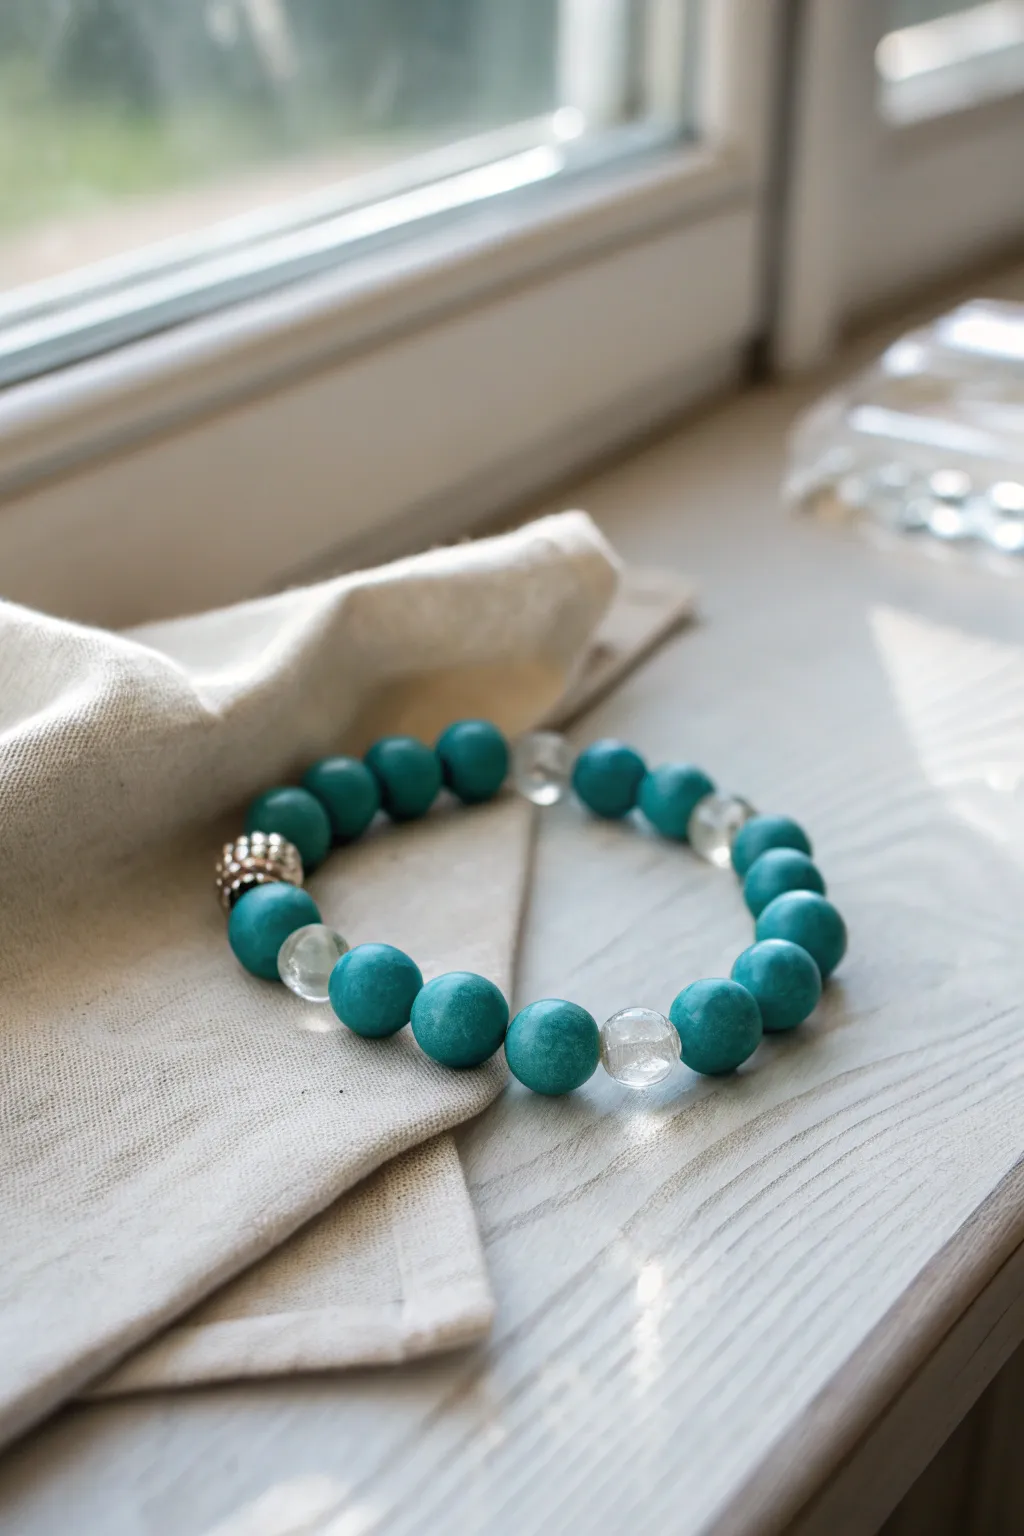
Capture the serene feeling of water droplets on a turquoise sea with this elegant bracelet design. By combining matte teal clay beads with crystalline translucent accents, you create a piece that feels both grounded and light-catching.
How-To Guide
Materials
- 12mm matte teal polymer clay beads (approx. 15)
- 10mm clear quartz or glass beads (approx. 4)
- One large decorative metal focal bead (silver or gold tone, textured)
- 0.8mm elastic stretch cord
- Super glue or jewelry cement
- Scissors
Step 1: Preparation and Design
-
Measure your wrist:
Start by measuring your wrist with a flexible measuring tape or a strip of paper. Note the circumference and add about half an inch for a comfortable fit. -
Cut the cord:
Cut a piece of elastic cord about 10-12 inches long. Having extra length makes tying the final knot much easier than fighting with short ends. -
Pre-stretch the elastic:
Hold the cord firmly at both ends and give it several gentle tugs. This pre-stretching prevents the bracelet from drooping or loosening shortly after you wear it. -
Plan your pattern:
Lay your beads out on a bead board or a towel to prevent rolling. The pattern in this design relies on asymmetry for a natural look, grouping the teal beads and spacing the clear ones irregularly.
Knot Security Tip
When tightening your knot, pull the elastic taut while the glue is wet. This pulls the knot deeper into itself for a smaller, stronger bond.
Step 2: Stringing the Beads
-
Secure the end:
Place a piece of tape or a binder clip on one end of your elastic cord so the beads don’t slide right off as you work. -
Start with the focal bead:
Thread the large textured metal bead onto the cord first. This will serve as a visual anchor and hides the knot later if the hole is large enough. -
Add the first teal group:
Slide on three of the matte teal clay beads. Notice how their solid color contrasts immediately with the metal texture. -
Insert a clear accent:
Add one clear glass or quartz bead. This translucent element breaks up the color block and adds that ‘watery’ light reflection. -
Continue the pattern:
Add another group of teal beads—try four or five this time. Varying the number of colored beads between the clear ones makes the design feel organic. -
Add the second clear bead:
Thread next clear bead. I find that spacing these out unevenly mimics the random sparkle of water better than a rigid pattern. -
Complete the circle:
Continue alternating groups of teal beads with single clear beads until you reach your desired length. Check the fit by wrapping it around your wrist before tying.
Step 3: Finishing Touches
-
Prepare to knot:
Remove the tape or clip from the end. Bring the two ends of the cord together, ensuring there is no slack between the beads. -
Tie the surgeon’s knot:
Cross the ends like a normal knot, loop one end underneath twice, and pull tight. Repeat this process to secure the bracelet firmly. -
Apply adhesive:
Place a tiny drop of jewelry glue or super glue specifically on the knot. Be careful not to get glue on the beads themselves, as it can ruin the matte finish. -
Let it cure:
Allow the glue to dry completely according to the package instructions. Patience here ensures your bracelet won’t pop open later. -
Hide the knot:
Once dry, trim the excess cord ends close to the knot. Gently tug the cord to slide the knot inside the hole of the adjacent metal bead or one of the teal beads to conceal it.
Texture Twist
Sand a few of the clear beads lightly with fine-grit sandpaper to give them a ‘frosted’ sea glass look that matches the matte clay texture.
Enjoy wearing your refreshing, water-inspired accessory that brings a touch of calm to any outfit
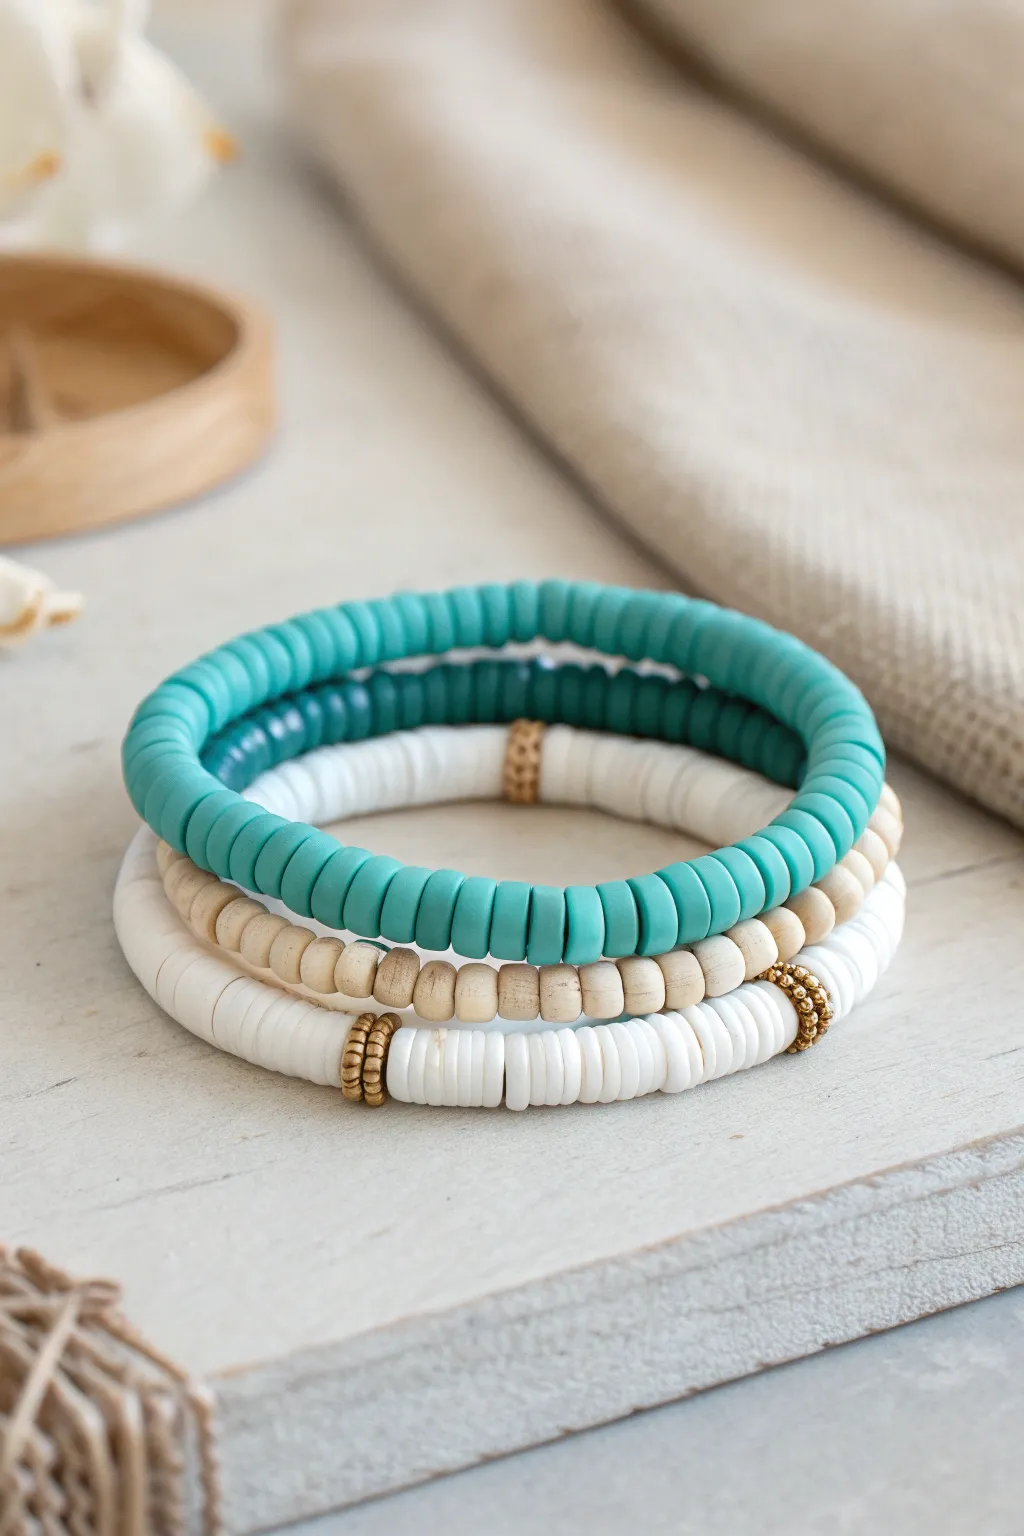
Mismatch Teal Stack With Mixed Shapes
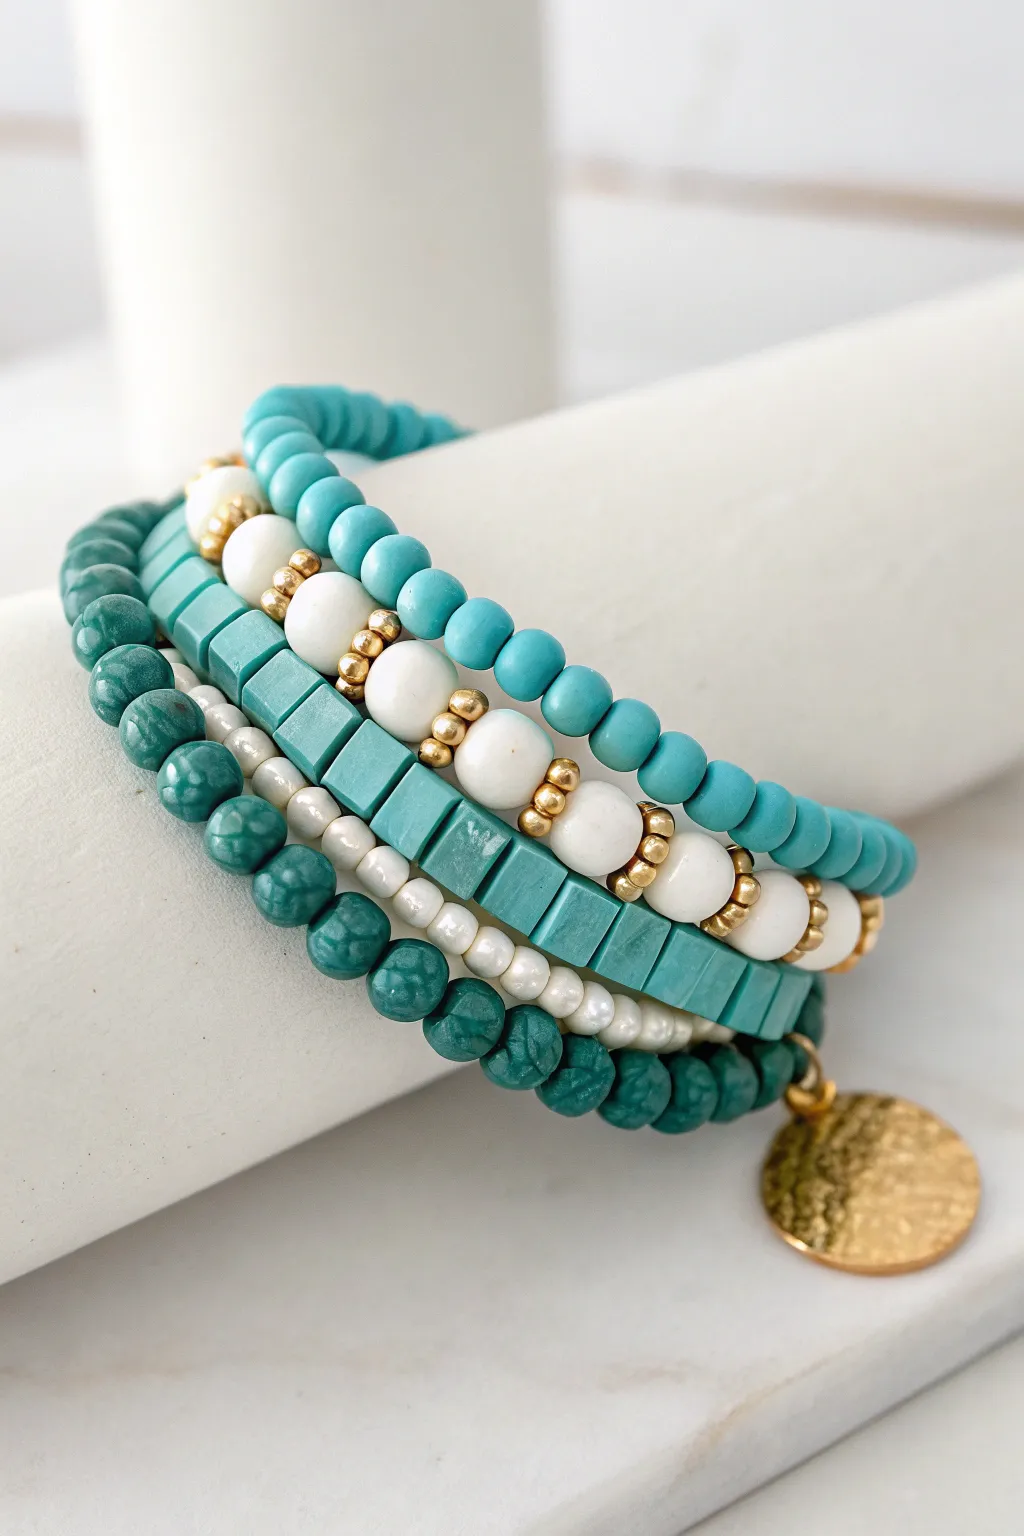
This mismatched set combines varied teal tones and textures with classic white and gold accents for a curated, effortless look. The mix of heishi beads, round stones, and smooth spacer beads creates a dynamic stack perfect for summer styling.
Step-by-Step
Materials
- Teal polymer clay heishi beads (square or flat tile shape)
- 6mm Round turquoise or teal stone beads (matte finish)
- 8mm White howlite or ceramic beads
- 4mm Matte teal round beads (smooth finish)
- 3mm White seed beads or tiny spacer beads
- Small gold spacer beads (smooth round)
- Small gold spacer beads (faceted or daisy style)
- Gold hammered coin charm
- Gold jump ring (6mm or 8mm)
- Elastic beading cord (0.7mm or 0.8mm)
- Jewelry adhesive or super glue
- Scissors
Step 1: The Tile & Seed Bead Bracelet
-
Prepare the cord:
Cut a piece of elastic cord about 10-12 inches long. Pre-stretch it gently by pulling on both ends to prevent the bracelet from loosening later. -
Start the pattern:
Begin stringing with your flat, square teal heishi (tile) beads. Thread on approximately 10-12 of these beads to form a solid block of color. -
Add the contrast section:
Switch to the small white seed beads. Thread a long section of just white seeds, covering about one-third of the bracelet’s total circumference. -
Attach the charm:
Before closing the loop, slide a gold jump ring onto the cord between the teal tiles and white seeds. Use pliers to attach the hammered gold coin charm to this jump ring. -
Tie it off:
Complete the circle by tying a strong surgeon’s knot. Pull tight, add a dot of glue to the knot, let it dry, and trim the excess cord.
Knot Strength
When tying elastic, pull the cord tightly *after* the first loop of your knot but *before* the second. This tension locks the first half in place.
Step 2: The White & Gold Statement Strand
-
Set the pattern:
Cut another length of pre-stretched elastic. This strand focuses on the larger 8mm white beads. -
String the beads:
Thread on one large white bead, followed by two small gold spacer beads. I prefer using the faceted gold spacers here to catch the light. -
Continue the rhythm:
Repeat this pattern—one white bead, two gold spacers—until you reach your desired wrist size. Ensure the beads sit snugly against each other. -
Close the strand:
Check the fit against your wrist. Tie a secure square knot or surgeon’s knot, apply a tiny drop of adhesive, and trim the tails close to the bead hole.
Step 3: The Matte Teal Stone Strand
-
Select your stones:
For this layer, use the 6mm round teal stone beads. The matte finish provides a great textural contrast to the shiny gold and smooth tiles. -
Simple stringing:
String these beads continuously onto your elastic cord. This is the simplest strand in the stack, relying on the natural variance of the stone for interest. -
Finish the loop:
Once the length matches the previous bracelets, tie your finishing knot securely. Hide the knot inside one of the bead holes if the opening is large enough.
Mix It Up
Add pattern variety by inserting random single gold beads into the solid teal strands to break up the color blocks and unify the gold theme.
Step 4: The Petite Teal Spacer Strand
-
Prepare the final cord:
Cut your last piece of elastic. This layer uses the smallest 4mm smooth teal beads. -
Thread the beads:
String the beads one by one. This delicate strand adds volume to the stack without adding too much weight. -
Final check:
Wrap the unfinished strand around your wrist alongside the finished ones to ensure the size is consistent. Adjust the number of beads if necessary. -
Secure the stack:
Tie your final knot, glue, and trim. Let all the glue cure completely (usually 24 hours) before wearing the stack to ensure maximum durability.
Slide these bracelets on together for an instant pop of coastal color and texture