I love turning Native American–inspired color stories and bold geometry into easy, modern clay bead bracelet designs—especially with flat Heishi beads. Here are my favorite bracelet ideas to help you build patterns that feel graphic, earthy, and totally wearable.
Native American–Inspired Turquoise Stack
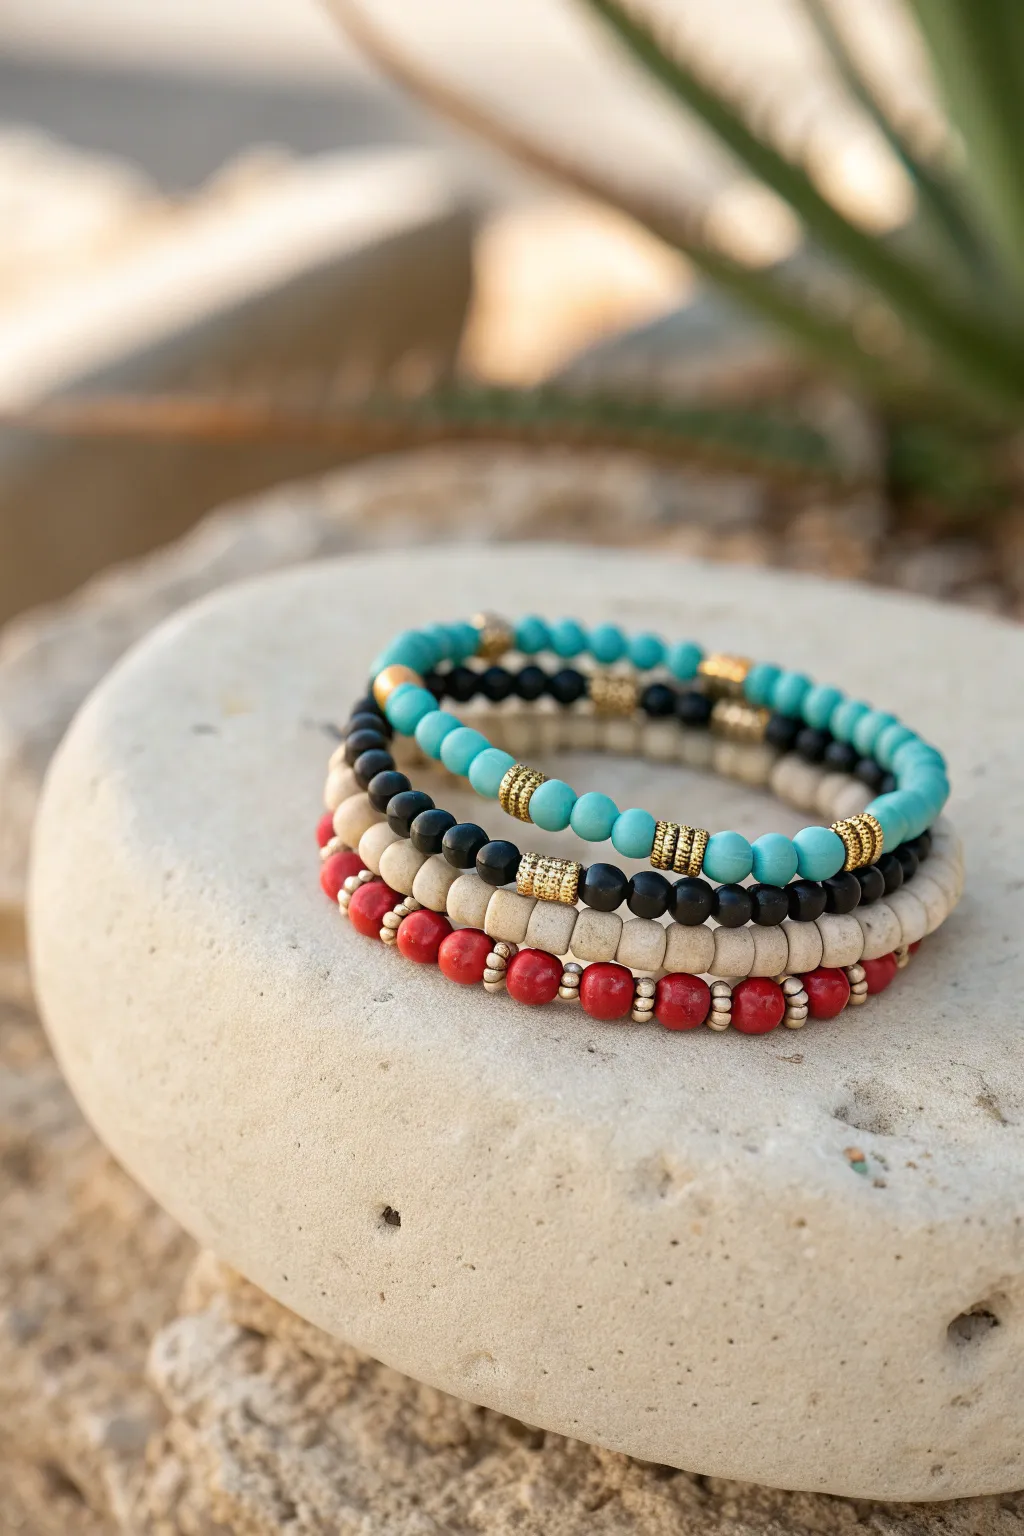
Capture the essence of the desert with this coordinated stack of four beaded bracelets, featuring a harmonious blend of turquoise, deep onyx, sandy cream, and vibrant coral tones. Accented with textured gold spacers, these pieces are elastic-strung for a comfortable, versatile fit that looks effortlessly bohemian.
Step-by-Step Tutorial
Materials
- Turquoise gemstone or dyed howlite beads (6mm or 8mm)
- Black onyx or matte black agate beads (6mm or 8mm)
- Cream wooden or bone beads (often called ‘white wood’ or ‘mammoth’ beads, roughly 8mm)
- Coral red beads (dyed bamboo coral or red jasper, 6mm or 8mm)
- Gold tone tube spacer beads (textured or filigree)
- Gold tone disc spacer beads (heishi style)
- Gold tone crimp covers (optional, used as design elements)
- Strong elastic stretch cord (0.8mm or 1mm)
- Jewelry adhesive (e.g., G-S Hypo Cement or E6000)
- Scissors
Step 1: Planning and Measuring
-
Measure your wrist:
Wrap a flexible measuring tape around your wrist bone to find your exact size. Add about half an inch to this measurement to ensure the bracelets sit comfortably without pinching. -
Pre-stretch the cord:
Cut four lengths of elastic cord, each about 10-12 inches long. Before you begin stringing, hold each end of a cord and give it a few firm tugs; this pre-stretching prevents the bracelets from sagging later. -
Prepare your layout:
Lay out a bead design board or a soft towel to keep your beads from rolling away. You will be creating four distinct patterns, so it helps to visualize the final stack before you start stringing.
Step 2: The Turquoise & Black Strands
-
String the turquoise strand:
Start with the top turquoise bracelet. String about 5 turquoise beads, then add a textured gold tube spacer. I like to alternate sections of 4-6 stone beads with these gold accents to create a rhythmic pattern. -
Add detail to the turquoise:
For extra detail, you can place a tiny gold heishi disc on either side of the tube spacers. Continue this pattern until the strand reaches your desired length. -
Tie off the first bracelet:
Tie a surgeon’s knot (right over left, left over right) to secure the loop. Pull it tight, dab a tiny dot of glue on the knot, let it dry for a moment, and trim the excess cord. Ideally, hide the knot inside a gold tube bead. -
Create the black onyx strand:
For the second bracelet, use the black beads. Create a similar pattern to the first, stringing sections of black beads separated by the gold tube spacers. -
Vary the spacing:
To make the stack look organic, try slightly different spacing on this black strand—perhaps doing longer runs of beads between the gold accents than you did on the turquoise one. -
Finish the black strand:
Secure this bracelet with a surgeon’s knot and adhesive just like the first one, ensuring the tension is tight but the beads still move freely.
Knot Slipping?
If your elastic knots won’t hold, try a double surgeon’s knot. Loop the cord through the first crossover twice instead of once before pulling tight.
Step 3: The Cream & Coral Strands
-
String the cream wood bracelet:
The third bracelet uses the larger cream wooden beads. Since these beads are typically simpler, you can choose to make this a solid strand of just wood for texture, or add just one or two focal gold spacers. -
Check for visual balance:
Hold this wooden strand up against the first two. The larger, matte texture of the wood should provide a nice contrast to the smoother stone beads above it. -
Design the coral accent strand:
For the bottom bracelet, use the vibrant red coral beads. Instead of tube spacers, use small gold metal seed beads or tiny gold heishi discs between every single red bead or every other bead. -
Create the intricate pattern:
This ‘bead-spacer-bead’ pattern creates a more intricate, metallic look that anchors the bottom of the stack beautifully. -
Finalize the set:
Tie off the final two bracelets securely. Allow the glue on all four knots to cure completely (usually 24 hours for full strength) before wearing them.
Design Pro Tip
To make hiding knots easier, ensure at least one bead in your pattern has a slightly larger hole, like the metal tube spacers or the wooden beads.
Now you have a stunning set of textured bracelets ready to add a pop of color to any outfit


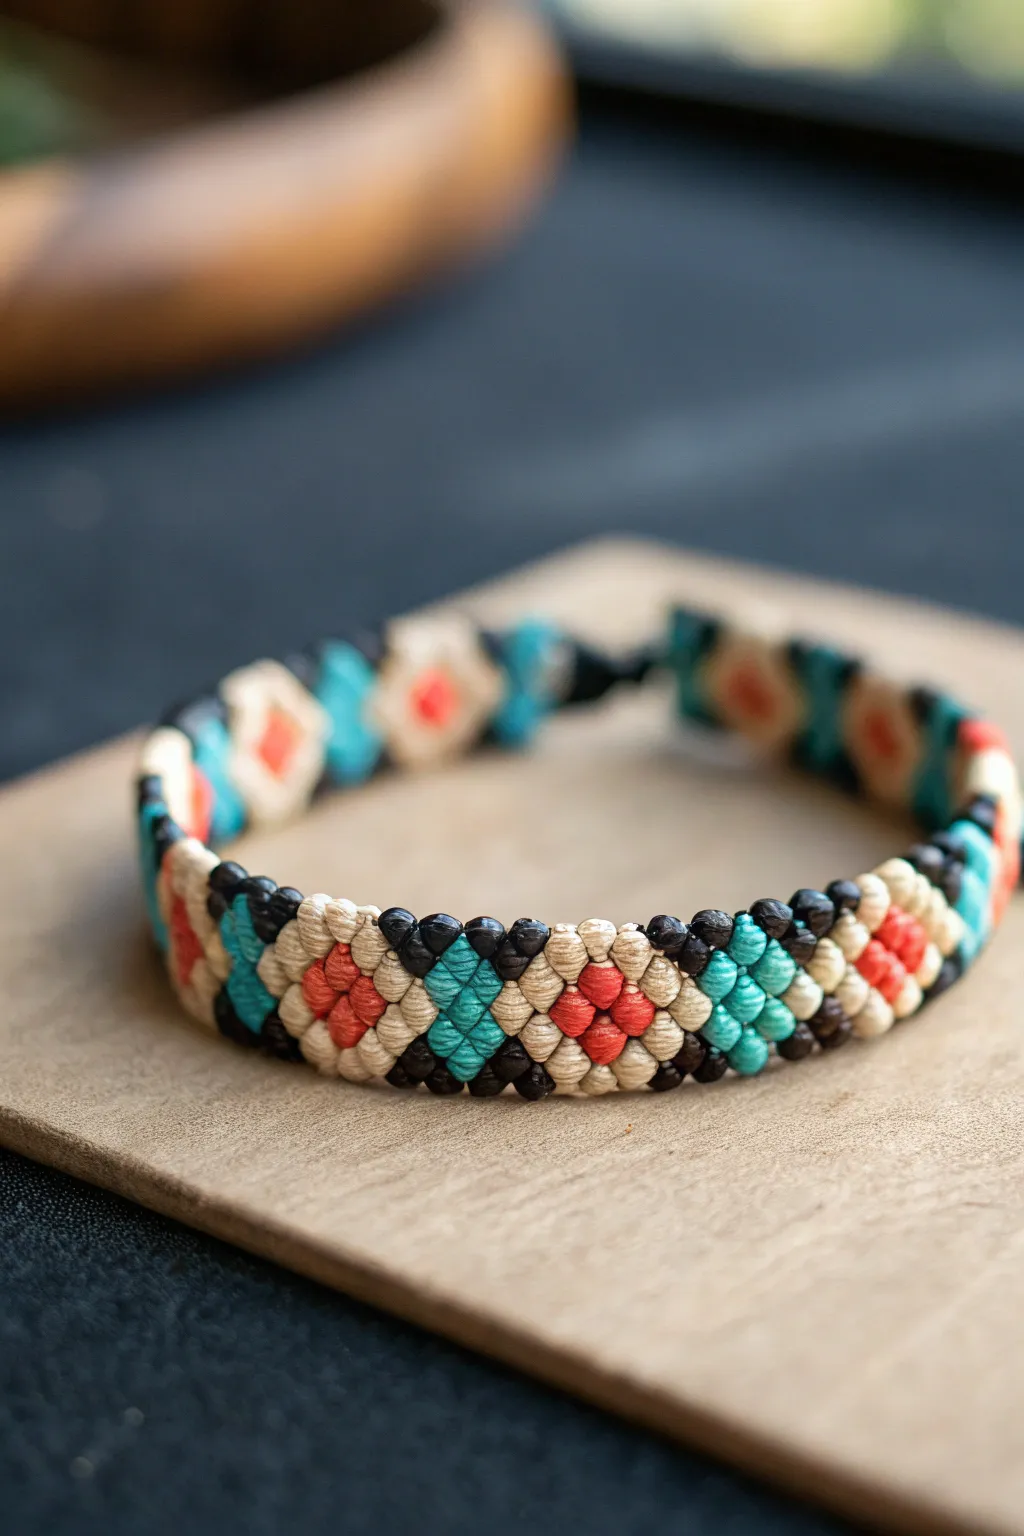
Native American–Inspired Color-Block Stripes

This striking bracelet uses the classic heishi bead silhouette to create a bold, Native American–inspired aesthetic with distinct color blocking. The vibrant turquoise, deep red, and crisp whites are punctuated by elegant gold accents, making for a sophisticated yet casual accessory.
Step-by-Step Guide
Materials
- Polymer clay heishi disc beads (6mm or 8mm): Turquoise, Red/Coral, Black, White
- Gold tone spacer beads (metal or hematite discs)
- Stretch cord (0.8mm or 1mm, clear elastic)
- Jewelry glue or clear nail polish
- Scissors or jewelry snips
- Bead stopper or a binder clip
- Tape measure
- Beading needle (optional but helpful)
Step 1: Preparation & First Section
-
Measure the cord:
Cut a length of stretch cord about 10-12 inches long. This gives you plenty of extra room for tying knots later without struggling with a tight cord. -
Secure the end:
Attach a bead stopper or a simple binder clip to one end of your stretch cord to prevent beads from sliding off while you work. -
Start the gold accent:
Begin threading by adding one small gold spacer bead, followed by a larger stack of white heishi beads. Use about 8-10 white discs to create a solid block of neutral color at what will be the back or side of the bracelet. -
Transition to color:
Add a single gold spacer bead after the white block to act as a separator before introducing the vibrant colors. -
Create the first pattern block:
Thread on a pattern of: one turquoise, one black, one white, one red, one black, and three turquoise beads. This initiates the rhythmic stripe pattern seen in the design.
Keep it Taut
When tying your final knot, pull the elastic quite tight. The beads should press firmly against each other so no cord shows, but not so tight that the bracelet buckles.
Step 2: Building the Core Pattern
-
Establish the stripe sequence:
Continuing from the previous step, add a small separator pattern: one black, one white, one black. This high-contrast trio makes the adjacent colors pop. -
Add the red block:
Thread on three to four red (or coral) heishi beads. These blocks of solid color are key to the design’s bold look. -
Repeat the separator:
Add the contrast trio again: one black, one white, one black. -
Insert the turquoise block:
Add a stack of three to four turquoise beads. I like to double-check that this block is roughly the same width as the red block for visual balance. -
Central gold feature:
Slide on a textured gold spacer bead or a small stack of 3-4 flat gold discs. This often serves as a focal point on the wrist. -
Mirror the pattern:
After the gold center, reverse your previous steps: one black, one white, three turquoise beads, one black, one white, one black. -
Continue the sequence:
Add the next red block (3-4 beads), followed by a separator of black, white, black. -
Final color accents:
Finish the main colored section with a stack of turquoise beads and a final separator pattern, mirroring the start of the bracelet.
Uneven Blocks?
Clay heishi beads vary slightly in thickness. Instead of counting beads, measure the height of your color blocks (e.g., 5mm each) to ensure the stripes look symmetrical.
Step 3: Finishing the Bracelet
-
Close the loop:
End the beading with a matching stack of white heishi beads (about 8-10) and a final gold spacer to mirror the beginning. -
Check the fit:
Wrap the unfinished strand around your wrist. Ideally, the ends should meet comfortably without gaps or stretching the cord excessively. Add or remove white beads at the ends if resizing is needed. -
Pre-stretch the cord:
Gently pull on both ends of the elastic cord a few times. This pre-stretching prevents the bracelet from becoming loose immediately after you wear it. -
Tie the knot:
Remove the bead stopper and tie a surgeon’s knot (a square knot with an extra loop through) to secure the ends tightly together. -
Secure with glue:
Place a tiny drop of jewelry glue or clear nail polish directly onto the knot. Allow this to dry for a few minutes to ensure it doesn’t slip. -
Trim excess cord:
Once the glue is tacky or dry, use your scissors to snip off the excess cord tails, getting as close to the knot as possible without cutting the knot itself. -
Hide the knot:
If distinct holes allow, gently tug the bracelet so the knot slides inside the bore of one of the adjacent white beads to hide it from view.
Now you have a vibrant, custom accessory ready to stack or wear solo.


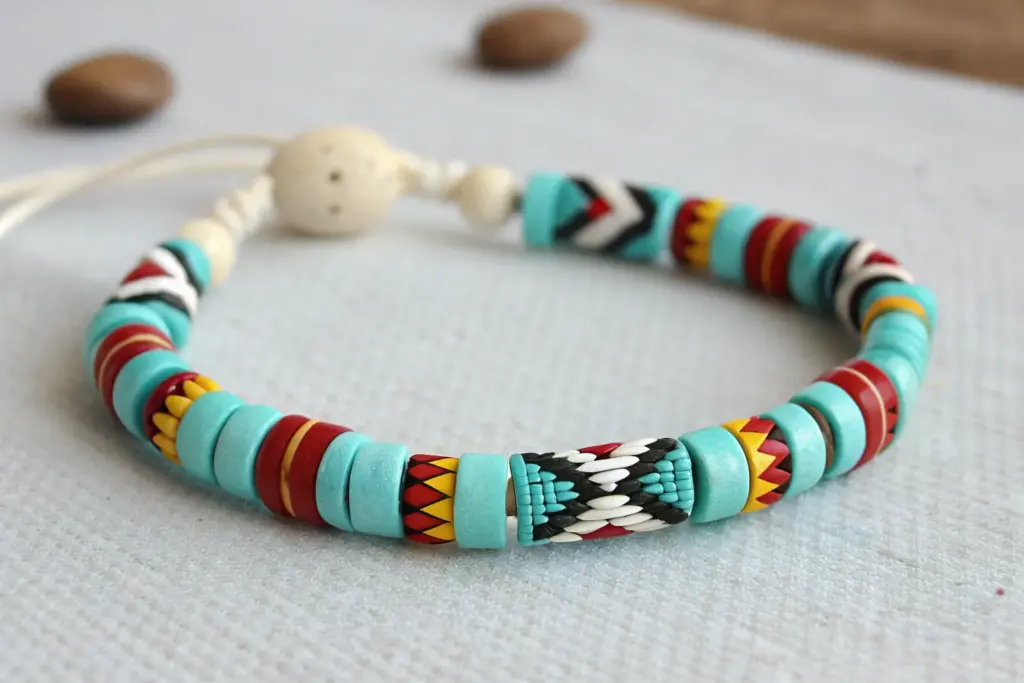
Native American–Inspired Chevron Center
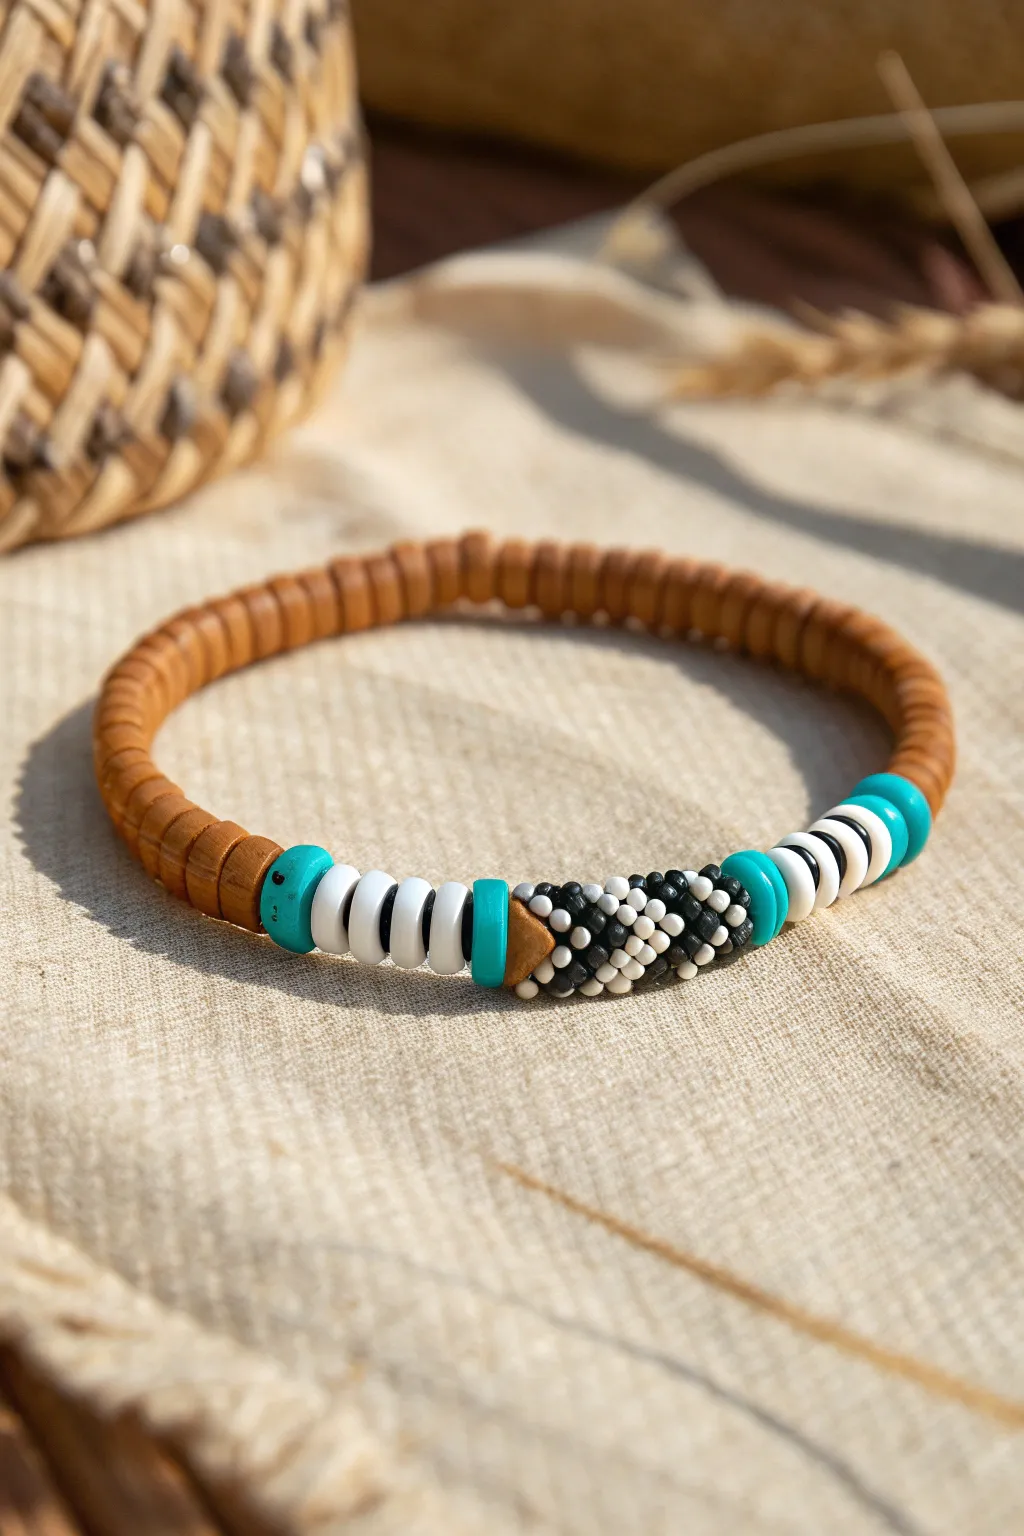
This rustic piece combines the earthy warmth of clay or wooden disc beads with a striking, patterned focal point reminiscent of traditional beadwork. It features a central beaded bead flanked by turquoise and white accents for a look that is both relaxed and detailed.
Detailed Instructions
Materials
- Light brown Heishi clay beads (6mm)
- White Heishi polymer clay beads (6mm)
- Turquoise Heishi polymer clay beads (6mm)
- Black glass seed beads (size 11/0)
- White glass seed beads (size 11/0)
- Small wooden or clay spacer bead (cone or disc shape) for transitions
- .8mm stretchy jewelry cord
- Beading needle (optional but helpful)
- Jewelry glue or clear nail polish
- Scissors
- Tape or bead stopper
Step 1: Creating the Central Beaded Bead
-
Prepare the core:
Cut a separate piece of thread about 12 inches long. You will need a large-hole bead (like a wooden round bead) to serve as the core form, or you can create a woven tube using peyote stitch without a core if you are an advanced beader. For this guide, we’ll cover the core method. -
Start the peyote stitch:
Thread your needle and pick up enough black seed beads to wrap around the middle of your core bead. Pass through the first bead again to form a ring. -
Build the first rows:
Using the peyote stitch technique (picking up a bead and skipping a bead), create a row of black beads. Keep your tension tight so the mesh hugs the core bead. -
Introduce the pattern:
Begin incorporating white seed beads to create the diamond or chevron pattern seen in the center. I find it easiest to draft the pattern on graph paper first. -
Complete the tube shape:
Continue stitching until you have a cylinder of beadwork that is approximately 1.5cm long. The ends should taper slightly if you are following the bead count reduction method, but a straight tube works too. -
Secure the beadwork:
Weave your thread ends back into the beadwork to secure them and trim any excess. Your focal bead is now ready.
Step 2: Assembling the Bracelet Strand
-
Prepare the cord:
Cut a length of stretchy cord about 10-12 inches long. Stretch the cord firmly a few times to ‘pre-stretch’ it; this prevents the bracelet from sagging later. -
Anchor the end:
Attach a piece of tape or a bead stopper to one end of the cord so your work doesn’t slide off. -
Begin the sequence:
Thread on your brown Heishi beads until you have covered about one-third of your desired bracelet circumference. -
Add the first transition:
Thread on two turquoise Heishi beads, followed by one white Heishi bead. -
Create the white stripe section:
Add a thin black spacer or dark clay bead, then two more white Heishi beads. -
Add the focal connector:
Place a single turquoise bead, followed by a small triangular or cone-shaped brown spacer bead. This helps the large focal bead sit nicely. -
thread the focal bead:
Slide your handmade black and white seed bead focal onto the cord. -
Mirror the pattern:
Reverse the sequence on the other side: brown triangle spacer, turquoise bead, two white beads, black spacer, one white bead, two turquoise beads. -
Finish the strand:
Fill the rest of the cord with brown Heishi beads until the bracelet reaches your desired wrist size.
Loose Stitching?
If your peyote stitch feels loose on the focal bead, try running your thread through the entire finished cylinder one extra time to reinforce tension.
Step 3: Finalizing the Knot
-
Check the fit:
Wrap the unfinished strand around your wrist to ensure it sits comfortably. Add or remove brown beads as necessary. -
Tie the knot:
Remove the tape/stopper. Tie a surgeon’s knot (a regular overhand knot with an extra loop through) and pull the cords tight. -
Secure with glue:
Apply a tiny dab of jewelry glue or clear nail polish to the knot. Let it dry for a few minutes before trimming the excess cord. -
Hide the knot:
Gently tug the bracelet so the knot slides inside the hole of one of the larger Heishi beads, hiding it from view.
Add Texture
Replace the plain brown Heishi beads with genuine coconut shell disc beads to give the project an even more authentic, natural feel.
Now you have a beautifully detailed accessory that looks complex but comes together with simple patterns


Native American–Inspired Diamond Repeat
This stunning macramé bracelet captures the spirit of traditional geometric weaving with a striking pattern of repeating diamonds. Using earthy tones of cream, coral, and teal against a dark border, the knotted texture creates a durable and beautiful accessory perfect for everyday wear.
Step-by-Step
Materials
- Waxed polyester cord (0.8mm or 1mm thickness) in four colors: Black/Dark Brown, Cream/Beige, Turquoise/Teal, Coral/Orange
- Macramé clipboard or cork board
- T-pins (if using a cork board)
- Scissors
- Lighter (for sealing cord ends)
- Tape measure or ruler
- Clipboard clamp or heavy tape
Step 1: Setting Up the Strings
-
Measure and Cut:
Cut your cords depending on wrist size, but generally, you will need roughly 30-40 inches per strand. You need a total of 10 strands for this pattern width. I recommend cutting 2 Black, 4 Cream, 2 Turquoise, and 2 Coral strands. -
Arrange the Order:
This pattern relies entirely on symmetrical setup. Fold your strands in half if using the loop start method, or simply knot them together at the top leaving a 3-inch tail. Arrange them in a mirrored color order from left to center and right to center: Black, Cream, Cream, Turquoise, Coral (Center) Coral, Turquoise, Cream, Cream, Black. -
Secure the Workspace:
Clamp your knot or loop securely to your clipboard. If using a cork board, pin through the knot so the tension is firm. Having tight tension at the start is crucial for straight rows.
Knot Tension is Key
Make each knot twice! In macramé, a knot creates a ‘stitch.’ The first loop secures it, the second locks it in place. Keep tension consistent.
Step 2: Knotting the Diamonds
-
Start the Chevron:
To create the V-shape that forms the top of the diamond, take your outermost Black string on the left. Make forward knots over the next four strings until it reaches the center. -
Complete the V:
Take the outermost Black string on the right side. Make backward knots over the next four strings moving inward until it meets the other Black string in the center. Knot the two Black strings together to close the point. -
Second Layer:
Repeat this chevron process with the next color (Cream), knotting inward from both sides until they meet in the middle. -
Third Layer:
Repeat again with the next Cream strand, bringing them to the center. -
Forming the X:
Now, instead of bringing colors to the center, we will reverse direction to open the diamond shape. Take the two strings currently in the center (likely Coral or the core color) and make outward knots. -
Expanding the Diamond:
Take the next inner string (Turquoise) and knot it outward over the Cream strings creating an expanding diagonal line. -
Filling the Center:
As your diamonds open up, you’ll need to fill the void. This pattern alternates central diamonds. For the red diamond shown, ensure your Coral strings are knotting toward the center to create that small inner diamond focus. -
Closing the Main Diamond:
Once you have the widest part of the diamond formed with your Black border strings on the outside edges, begin knotting them inward again (Forward knots from left, Backward knots from right). -
Creating the Border:
Notice the black beads/knots along the edge. The Black string acts as your ‘traveling’ string that outlines the entire diamond shape. Keep your knots tightest on these outlining rows to define the geometry. -
Switching Colors:
The pattern alternates the center color. In the photo, one diamond has a Coral center, and the next creates a Turquoise diamond shape. Simply alternate which color strands you prioritize for the centerfill.
Add Texture
Try sliding small metallic seed beads onto the center strings before closing a diamond for a touch of sparkle in the geometric pattern.
Step 3: Finishing Touches
-
Check Length:
Continue the pattern until the knotted section covers your wrist comfortably. A standard bracelet length is about 6 inches of pattern, but measure against your own wrist. -
Create the End Design:
End the bracelet by bringing all strings to a V-point (triangle) shape, ending with the Black strings meeting in the very center. -
Braid the Tails:
Separate the remaining loose strings into three groups and braid them tightly for about 2-3 inches. This forms the tie closure. -
Knot and Trim:
Tie an overhand knot at the end of your braid. Cut off the excess string carefully. -
Seal the Ends:
Using your lighter, carefully melt the very tips of the cut strings at the end of the braid to prevent fraying. Tap the melted ends with the metal part of the lighter to flatten them.
Tie on your new handmade creation and enjoy the intricate patterns you’ve woven by hand

The Complete Guide to Pottery Troubleshooting
Uncover the most common ceramic mistakes—from cracking clay to failed glazes—and learn how to fix them fast.
Native American–Inspired Four-Color Rhythm
Embodying a classic and striking palette, this bracelet weaves together red, turquoise, black, and white beads in a rhythmic pattern. The matte finish of the clay beads gives the piece an earthen, timeless quality that pairs beautifully with natural textures.
Step-by-Step Tutorial
Materials
- Matte round clay or magnesite beads (8mm or 10mm): Turquoise blue
- Matte round clay or magnesite beads (8mm or 10mm): White
- Matte round clay or magnesite beads (8mm or 10mm): Black
- Matte round clay or magnesite beads (8mm or 10mm): Red
- Strong elastic cord (0.8mm or 1mm thickness)
- Beading glue or clear jewelry cement
- Scissors
Step 1: Planning and Stringing
-
Determine your size:
Before cutting any cord, wrap a measuring tape loosely around your wrist to find your size. Add about 0.5 inches (1.2 cm) to this measurement so the beads sit comfortably without pinching. -
Prepare the cord:
Cut a piece of elastic cord about 10-12 inches long. Having this extra length makes the final knot-tying process significantly easier than fighting with short ends. -
Pre-stretch the elastic:
Gently pull tightly on the elastic cord several times. This pre-stretching step helps prevent the bracelet from loosening up and sagging shortly after you start wearing it. -
Establish the pattern rhythm:
The specific pattern shown relies on small clusters. Look closely at the image: the dominant sequence often groups two colors together or alternates singly to break monotony. -
Begin the primary sequence:
Start by threading a black bead, followed by a white bead, then a red bead. This establishes a high-contrast base. -
Add the turquoise accent:
Follow your red bead with a turquoise one. In some sections of the photo, you’ll notice adjacent colors, like two turquoise or two reds—feel free to mimic this variance to keep the eye moving. -
Repeat the core motif:
Continue stringing beads. A common pattern visible here is Black, White, Red, Turquoise. However, disrupt this occasionally by placing a white bead next to a turquoise one, or a black next to a red. -
Check the variation:
Midway through, pause and check your pattern against the photo. Notice the segment with the white-red-turquoise-black sequence? Ensure you aren’t just repeating one block perfectly; the slight randomness gives it character. -
Test the length:
Wrap the strung beads around your wrist. The ends should touch comfortably with no gaps, but the elastic shouldn’t be stretched out yet.
Step 2: Finishing the Bracelet
-
Prepare for the knot:
Once you are happy with the length and pattern, bring the two ends of the elastic together carefully to avoid dropping any beads. -
Tie the first knot:
Make a simple overhand knot (like the first step of tying a shoelace) and pull it tight to bring the beads into a circle. -
Secure with a surgeon’s knot:
For the second knot, loop the elastic through twice before pulling tight. This creates a surgeon’s knot, which is much less likely to slip on slick elastic material. -
Tighten securely:
Pull the cords firmly. You want the beads to be snug against each other, but not so tight that the bracelet puckers or kinks. -
Apply adhesive:
Place a tiny drop of jewelry cement or beading glue directly onto the knot. I like to let this dry briefly for a minute or two while holding the strands apart so the glue doesn’t touch the beads. -
Hide the knot:
If hole size permits, gently tug on the elastic to pull the glued knot inside the nearest bead hole. This hides the mechanics and creates a seamless finish. -
Trim the ends:
Once the glue is fully cured (check your glue instructions), trim the excess elastic cord close to the bead, being careful not to nick the main knot.
Knot Hiding Tip
If your beads have small holes, choose the bead with the largest opening (often the black or white clay ones vary slightly) to place next to your knot for easier hiding.
Stiff Elastic?
If your bracelet feels stiff and kinks up instead of forming a circle, you’ve pulled the knot too tight. The beads need a tiny bit of breathing room to curve.
Wear your new bracelet stacked with leather bands or solo to let those bold, earthy colors speak for themselves
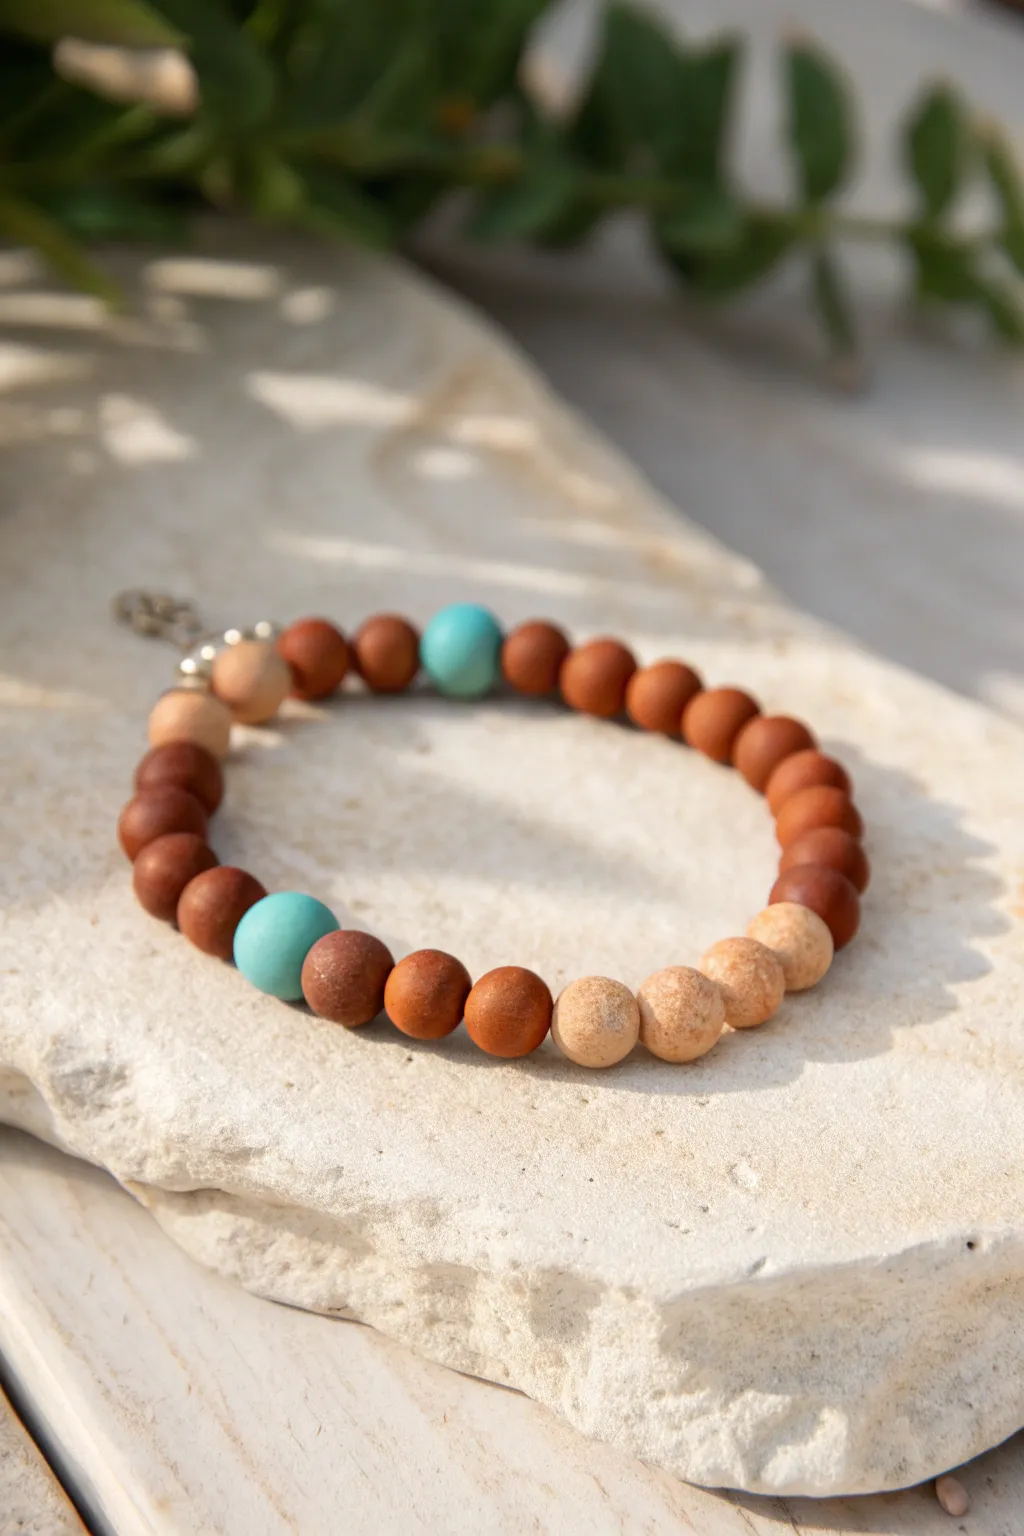
Native American–Inspired Red Rock Palette
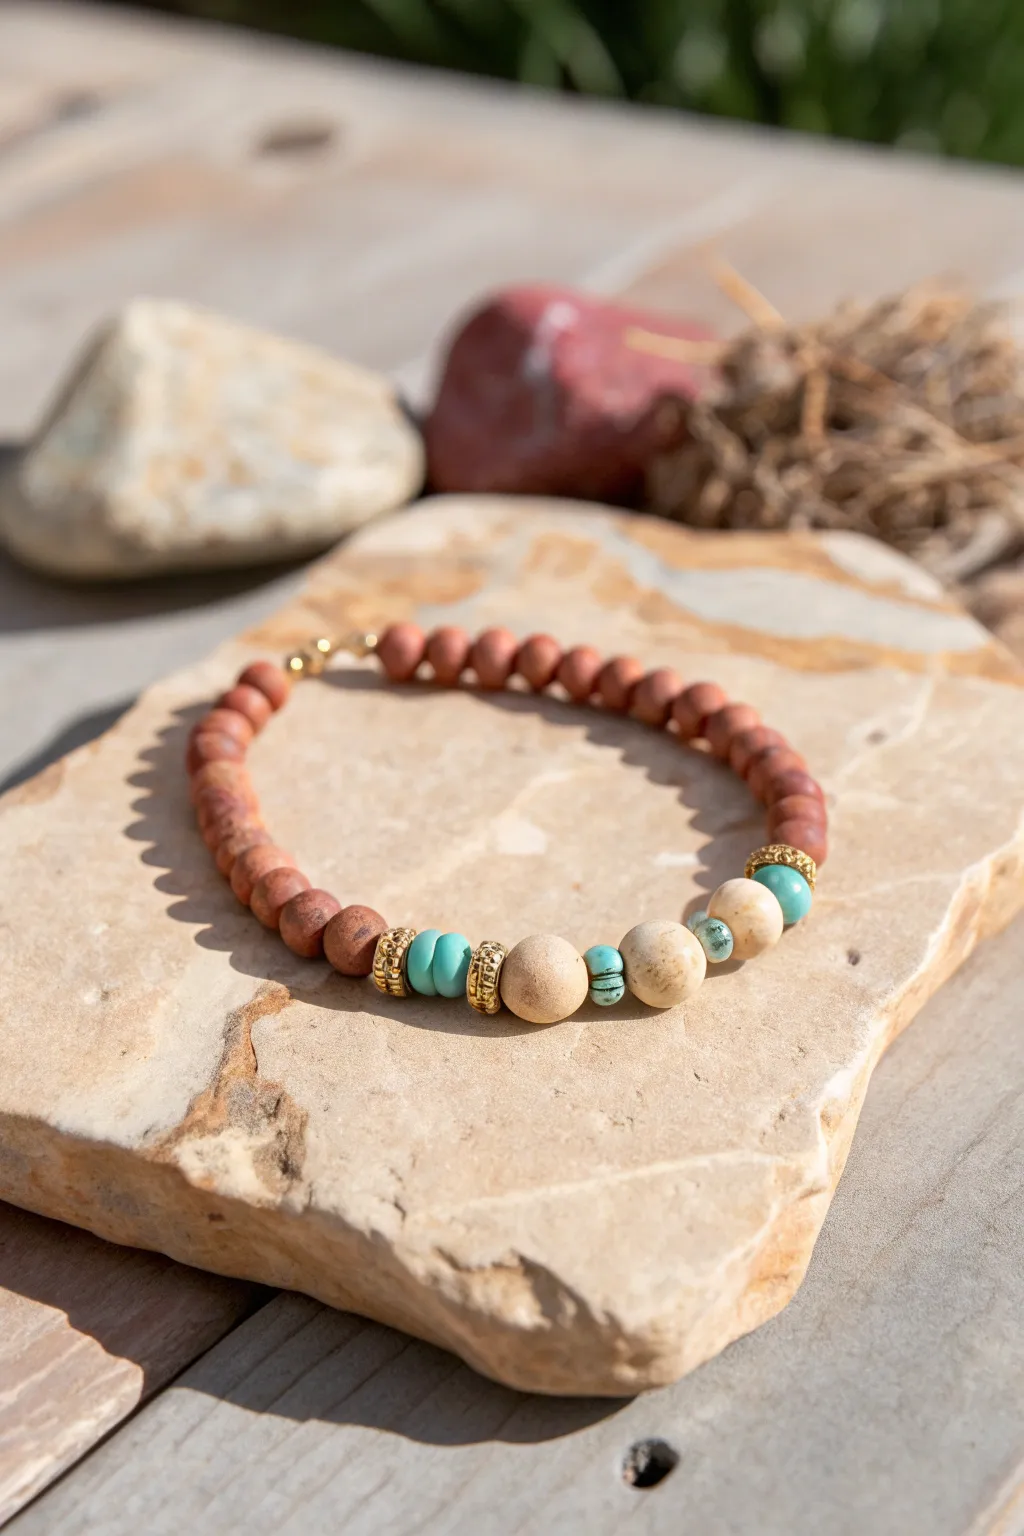
Capture the warmth of desert sandstone and open skies with this earthy beaded bracelet. Combining terracotta tones with splashes of turquoise and cream creates a piece that feels both grounded and spirited.
Step-by-Step Guide
Materials
- Reddish-brown matte jasper or clay beads (6mm or 8mm)
- Cream or beige matte river stone beads (8mm or 10mm)
- Turquoise heishi or disc beads (small)
- Turquoise round beads (6mm)
- Gold tone textured spacer beads (drum or ring shape)
- Gold crimp beads
- Gold finish lobster clasp and jump ring
- Beading wire (flexible, 49-strand recommended)
- Crimping pliers
- Wire cutters
- Bead stopper or decorative tape
Step 1: Planning the Design
-
Measure your wrist:
Before cutting any wire, wrap a measuring tape around your wrist to find your size. Add about half an inch to this measurement to ensure the bracelet fits comfortably without being too tight against the skin. -
Cut the wire:
Cut a length of beading wire approximately 10-12 inches long. This gives you plenty of extra room to work with the clasp attachments without struggling with short ends. -
Secure one end:
Attach a bead stopper to one end of your wire to prevent your beads from sliding off while you work. If you don’t have a stopper, a piece of masking tape folded over the end works perfectly. -
Lay out the pattern:
On a bead board or a soft towel, arrange your beads to mimic the pattern in the photo. The focal point is asymmetrical, so laying it out first is crucial to getting the balance right.
Loose Beads?
If the bracelet feels floppy, you likely didn’t pull the wire tight enough before crimping. Ensure no gaps exist between beads before crushing the crimp.
Step 2: Stringing the Core
-
Start with the base color:
Begin stringing the reddish-brown earthy beads. You will need about roughly two-thirds of the bracelet to be this single color to create that deep ‘red rock’ foundation. -
Add the first gold accent:
Slide on one gold textured spacer bead. This marks the transition from the simple back section to the detailed focal front section. -
Insert turquoise discs:
Thread on two small turquoise heishi (disc) beads. These flat beads provide a nice pop of color and a break in texture. -
Place the second gold spacer:
Add another gold spacer bead to sandwich the turquoise discs.
Step 3: Creating the Focal Point
-
Add cream stone beads:
Slide on the first large cream-colored stone bead. This lighter color helps brighten the palette. -
Thread small turquoise spacers:
Add two extremely small turquoise spacers or heishi beads next. I like to use slightly irregular ones here to keep the organic feel. -
Second cream bead:
Add the second cream stone bead. -
Add a turquoise round bead:
Next, string a single round turquoise bead. This varies the shape profile of the bracelet slightly. -
Third cream bead:
Place the third and final cream stone bead. -
Final gold contour:
Finish the focal section by adding a single turquoise round bead followed immediately by a gold spacer bead.
Natural Texture
Use matte or unpolished stone beads for the main red and cream sections. The lack of shine mimics the dry, natural texture of desert rocks.
Step 4: Finishing the Project
-
Complete the loop:
If you need more length to fit your wrist measurement, add more of the reddish-brown base beads to the end until the size is perfect. -
Prepare the crimp:
Slide a gold crimp bead onto the wire, followed by a jump ring. -
Loop back:
Thread the wire back through the crimp bead and pull it snug, creating a small loop that holds the jump ring secure. -
Crimp firmly:
Use your crimping pliers to flatten the crimp bead securely. Give it a gentle tug to ensure it holds. -
Attach the clasp:
Remove your bead stopper from the starting end. Repeat the crimping process on this side, but this time thread the loop through the lobster clasp instead of a jump ring. -
Hide the tails:
Thread the excess wire tails back through two or three adjacent beads to hide them, then trim the wire flush with your cutters.
Wear your new bracelet stacked with others or alone to bring a touch of the Southwest to your daily style


What Really Happens Inside the Kiln
Learn how time and temperature work together inside the kiln to transform clay into durable ceramic.
Native American–Inspired Minimal Black With a Pop
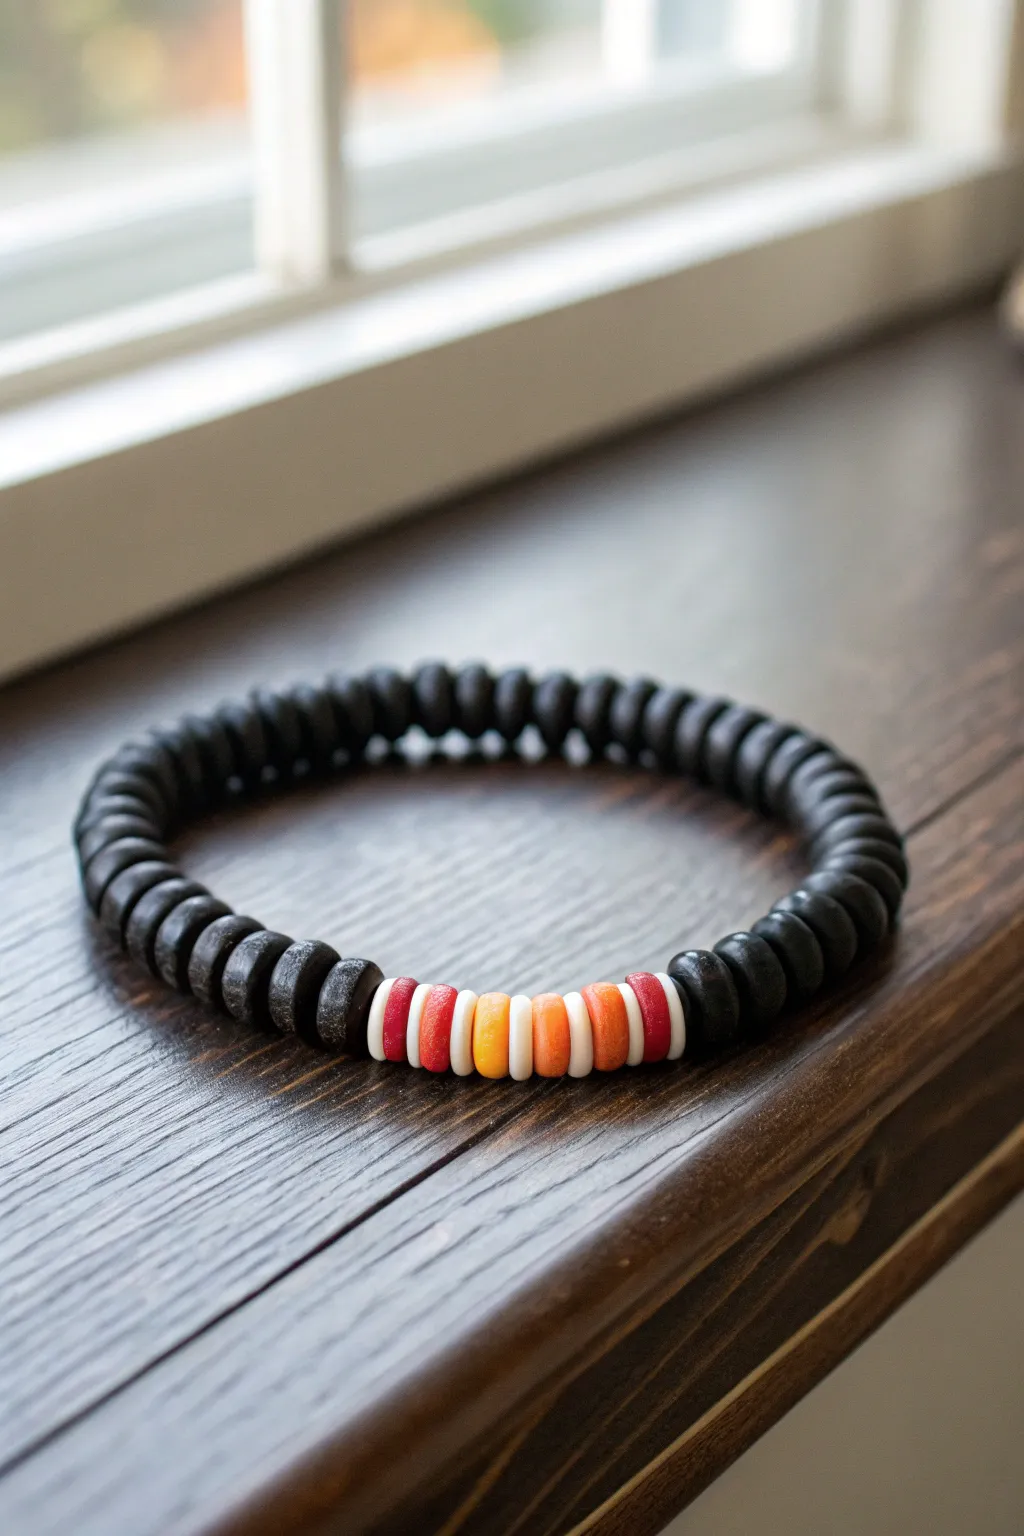
This understated yet striking bracelet creates a powerful visual impact by contrasting deep matte black discs with a vibrant burst of sunset-inspired hues. It captures the essence of Southwestern palettes in a simple, wearable design perfect for stacking or wearing casually on its own.
How-To Guide
Materials
- 6mm matte black polymer clay heishi beads (approx. 1 strand)
- 6mm polymer clay heishi beads in: white, deep red, burnt orange, and mustard yellow
- 0.8mm elastic stretch cord (clear or black)
- Super glue or jewelry adhesive (E6000)
- Scissors or jewelry snips
- Bead stopper or masking tape
- Ruler or measuring tape
Step 1: Preparation & Planning
-
Measure your wrist:
Wrap a flexible measuring tape comfortably around your wrist where you want the bracelet to sit. Note the measurement. -
Add ease:
Add about 0.5 to 0.75 inches to your wrist measurement depending on how loose you prefer the fit. This is your total strand length. -
Cut the cord:
Cut a piece of elastic cord roughly 10 inches long. You want plenty of excess on both ends to make tying the knot easier later. -
Secure the end:
Attach a bead stopper clip to one end of the cord. If you don’t have one, simply fold a piece of masking tape over the end to prevent beads from sliding off as you work. -
Prepare the elastic:
Pre-stretch your elastic cord by giving it a few gentle firm tugs. This helps prevent the bracelet from stretching out permanently after the first wear.
Knot Slipping?
If your elastic knot feels slick and won’t hold, try rubbing the cord ends with a little sandpaper or an emery board. The rougher texture helps the knot grip tightly.
Step 2: Creating the Focal Point
-
Start the center pattern:
We will build the colorful section first. Slide on one white heishi bead, followed by a deep red bead, and then another white bead. -
Add the transition colors:
Next, thread on one burnt orange bead. This acts as a bridge to the center color. -
Place the center bead:
Thread on a single mustard yellow bead. This serves as the bright ‘sun’ in the center of your pattern. -
Mirror the pattern:
Now, work backwards to complete the symmetry. Thread on another burnt orange bead. -
Finish the focal section:
Complete the colorful segment by adding one white bead, one deep red bead, and a final white bead. You should now have a centered strip of 9 colorful beads. -
Center the design:
Slide this colorful group to the rough center of your cord so you can add black beads evenly to both sides.
Pro Tip: Seamless Texture
For a truly sleek look, inspect your clay discs before stringing. Use fingernail clippers to trim any jagged plastic flashing or uneven edges from the beads.
Step 3: Completing the Band
-
Fill the first side:
Begin threading the matte black heishi beads onto the right side of the colorful section. Continue until you’ve covered about half of the remaining length needed for your wrist measurement. -
Fill the second side:
Repeat the process on the left side of the colorful section with the remaining black beads. I find that alternating sides keeps the focal point perfectly centered without needing to adjust later. -
Check the fit:
Wrap the unfinished strand around your wrist to check the size. Ideally, the two ends of black beads should touch comfortably without gaps or stretching the cord.
Step 4: Finishing Touches
-
Remove the stopper:
Carefully remove the bead stopper or tape while pinching the ends of the cord firmly. -
Tie the first knot:
Tie a simple overhand knot (like the first step of tying shoelaces) and pull it tight, bringing the beads together snugly. -
Secure with a surgeon’s knot:
Tie a second knot, but loop the end through twice before pulling tight. This is a surgeon’s knot and is much more secure for elastic. -
Apply adhesive:
Place a tiny dot of super glue or jewelry adhesive directly onto the knot. Be careful not to glue the beads to the cord. -
Hide the knot:
While the glue is still slightly tacky but not wet, slide a black bead over the knot to hide it inside the bead’s hole. -
Trim the excess:
Once the glue is fully dry, use your scissors to snip off the excess cord tails as close to the bead as possible.
Slip on your new bracelet to add a subtle, stylish touch of color to your daily outfit
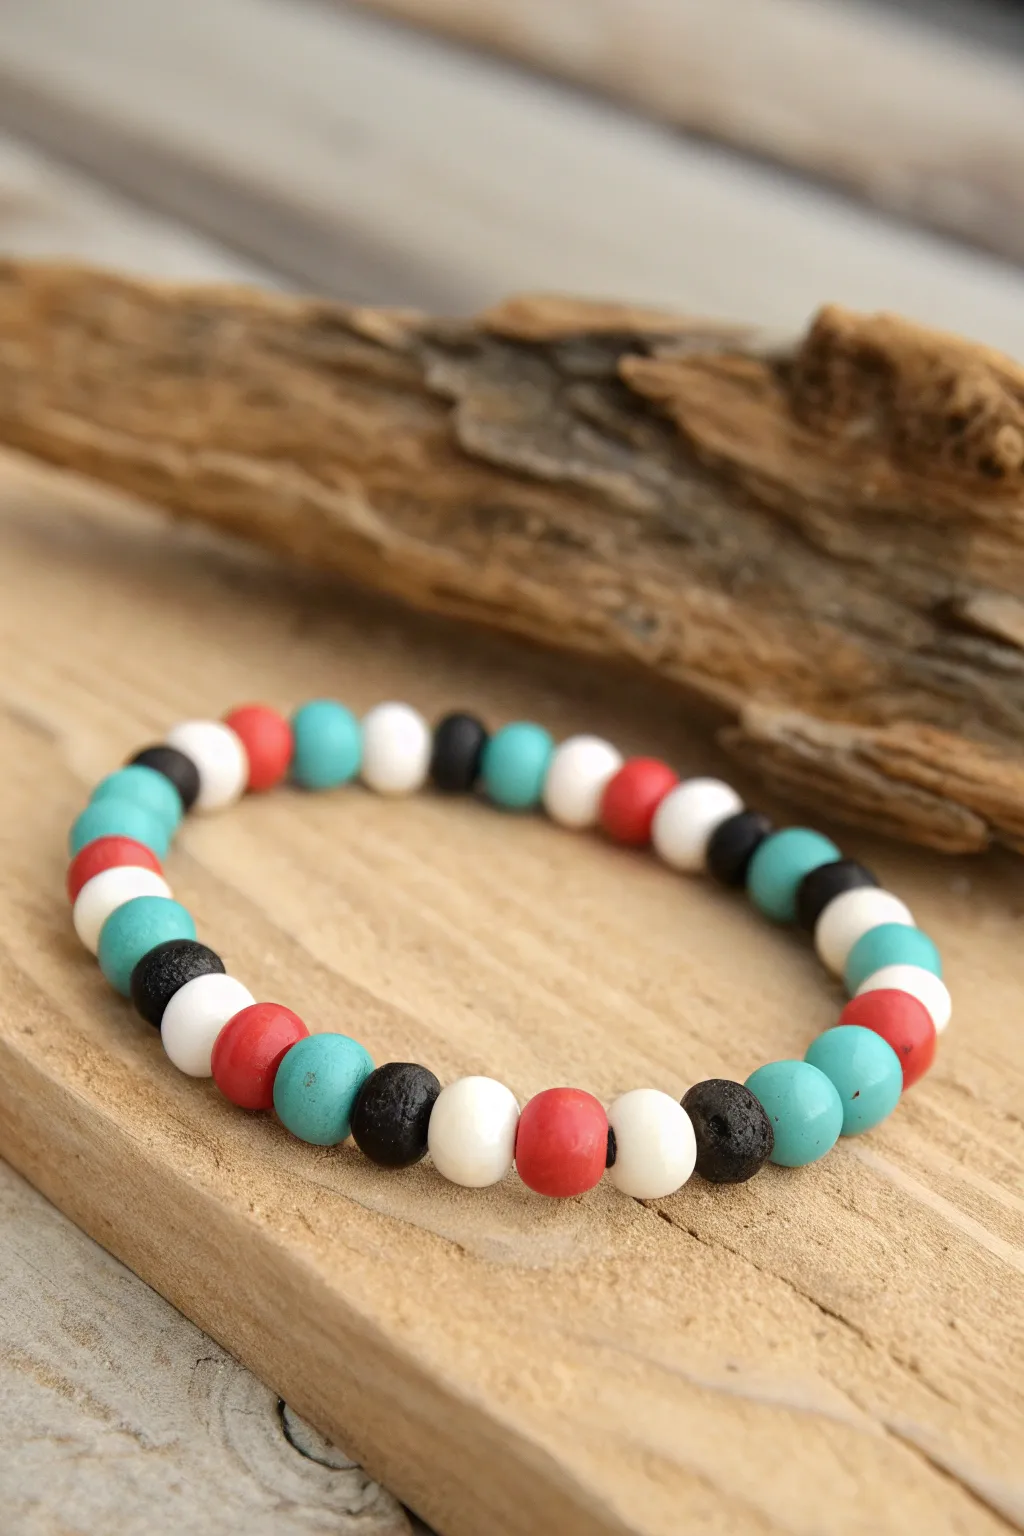
Native American–Inspired Neutral Earth Strand
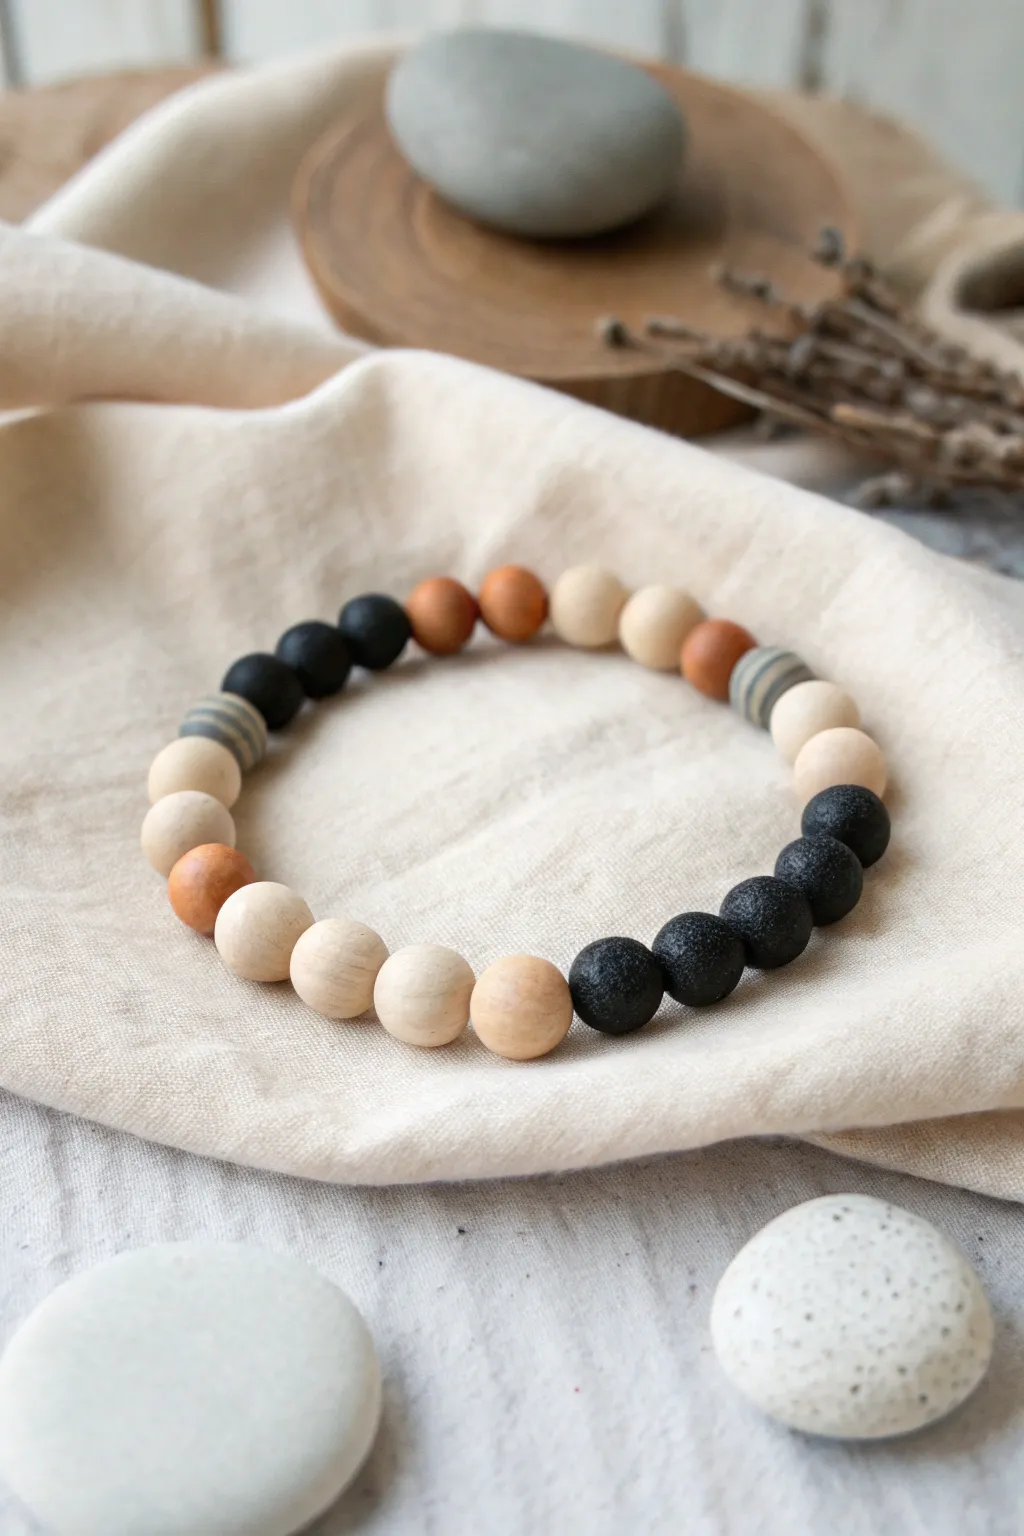
Capture the grounded beauty of the desert with this simple yet striking Earth Strand bracelet. Using a mix of matte textures, natural wood tones, and porous lava stone, this accessory brings a calming, organic touch to any outfit.
Step-by-Step Tutorial
Materials
- 8mm or 10mm round wooden beads (light natural finish)
- 8mm or 10mm round wooden beads (terracotta or reddish-brown stain)
- 8mm or 10mm round lava stone beads (black)
- 8mm or 10mm round polymer clay beads (grey with dark grey stripes)
- Strong elastic cord (0.8mm or 1mm thickness)
- Jewelry adhesive or clear nail polish
- Scissors
- Bead stopper or masking tape
Step 1: Planning the Pattern
-
Measure your wrist:
Before you begin, wrap a piece of string around your wrist to find your comfortable size. Add about half an inch to this measurement to ensure the bracelet isn’t too tight once beads are added. -
Lay out the beads:
Visualize your design by arranging the beads loosely on a bead board or a soft towel. This prevents them from rolling away. -
Create the black section:
Start by grouping approximately five to six black lava stone beads together. This block of dark texture will serve as a strong anchor point for the asymmetric design. -
Follow with light wood:
To the right of the lava stones, place a single light wood bead, followed by a terracotta bead, then two more light wood beads. -
Insert the accent bead:
Add one of your grey striped polymer clay beads next. This subtle pattern break adds a handcrafted, pottery-style feel to the strand. -
Continue the pattern:
Following the striped bead, place a small pattern of alternating earth tones: two light wood, one terracotta, and two light wood beads. -
Complete the circle:
Finish the layout by adding a second striped bead, followed by three black lava beads to connect back to the starting block. Adjust the number of light wood beads in the middle sections if you need to increase the size.
Aromatic Touch
The porous black lava beads are perfect natural diffusers. Add a drop of cedarwood or sage essential oil to them for a lasting, earthy scent.
Step 2: Stringing and Finishing
-
Prepare the cord:
Cut a length of elastic cord about 10-12 inches long. This extra length makes tying the final knot much easier than fighting with short ends. -
Secure the end:
Attach a bead stopper or simply tape one end of the cord to your table. This is a crucial step to prevent beads from sliding off while you work. -
String the beads:
Transfer your laid-out design onto the cord one by one. I usually recommend stringing the light wood beads first so that the knot can eventually be hidden inside one of the larger-holed lava beads later. -
Check the fit:
Once all beads are added, carefully lift the strand and wrap it around your wrist. It should sit comfortably without pinching your skin or drooping too low. -
Pre-stretch the elastic:
Gently pull on both ends of the elastic cord a few times. This pre-stretching prevents the bracelet from loosening up significantly after the first few wears. -
Tie the knot:
Remove the tape or stopper. Tie a simple overhand knot, followed by a double surgeon’s knot (loop the cord through twice) to ensure it holds tight. -
Secure with glue:
Apply a tiny drop of jewelry adhesive or clear nail polish directly onto the knot. Let it dry for a minute to bond fully. -
Hide the knot:
Trim the excess cord ends, leaving about 2mm. Gently tug the cord to pull the knot inside the hole of the adjacent bead (ideally a lava stone, as their holes tend to be larger and more forgiving).
Textural Contrast
Mix in a single turquoise or raw copper spacer bead between the wood and lava sections to add a pop of color typical of Southwestern styles.
Wear your new bracelet alone or stacked with others for a grounded, earthy look

TRACK YOUR CERAMIC JOURNEY
Capture glaze tests, firing details, and creative progress—all in one simple printable. Make your projects easier to repeat and improve.
Native American–Inspired Coral-Turquoise Alternation
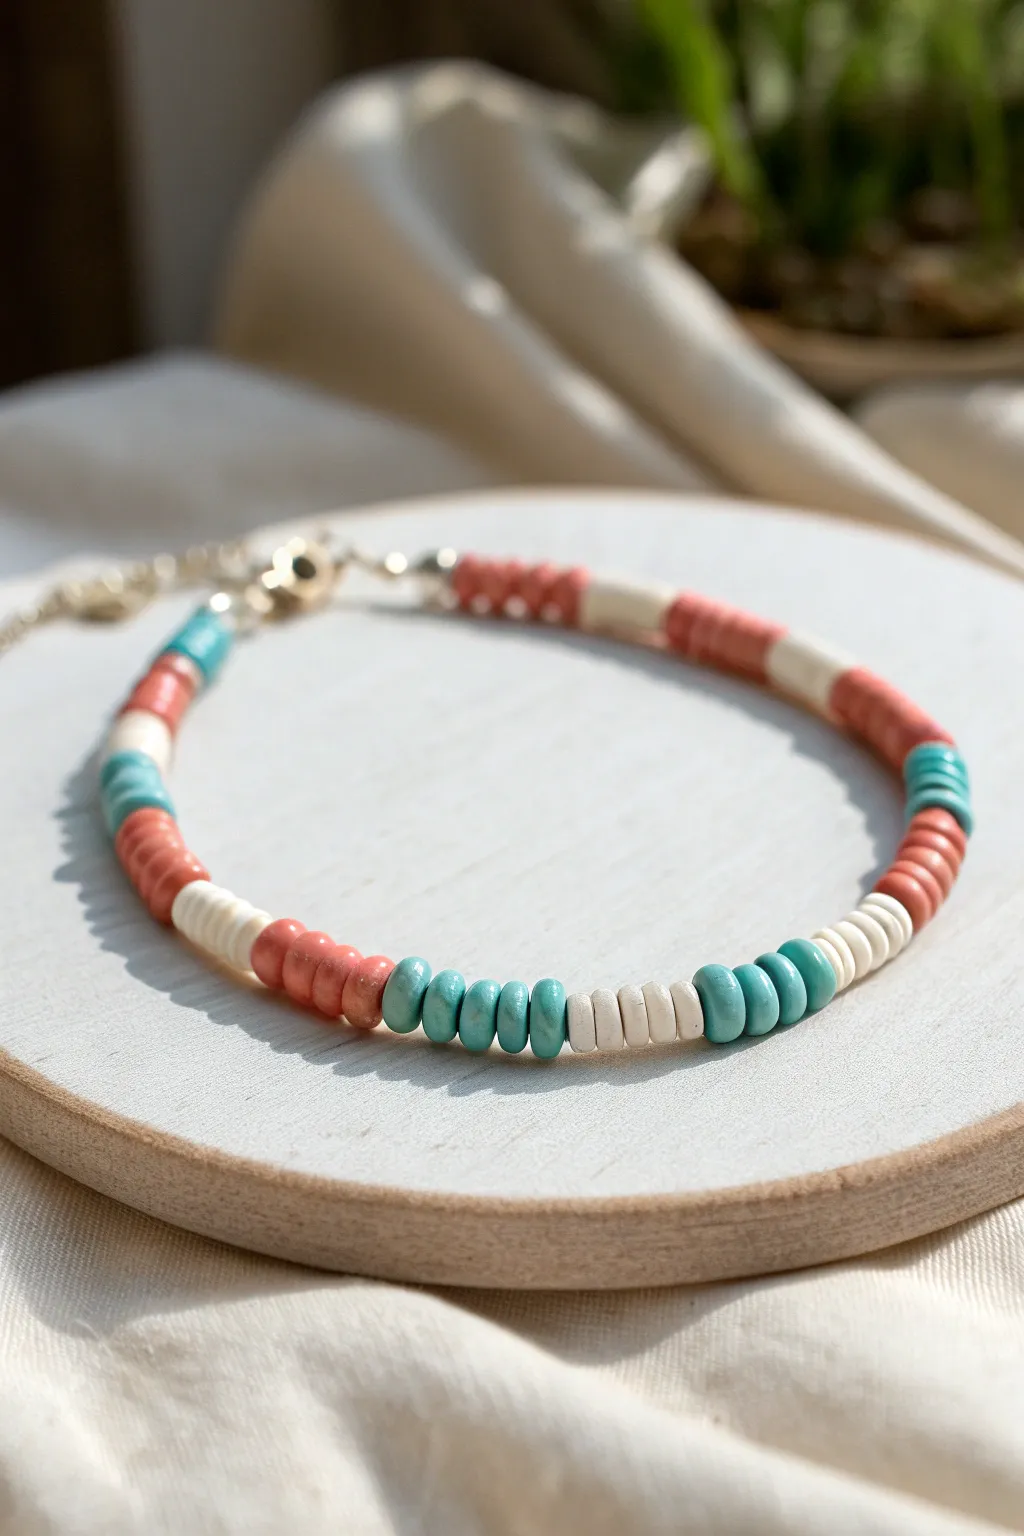
Capture the warm, earthy tones of the Southwest with this simple yet striking heishi bead bracelet. The alternating rhythm of coral pinks, turquoise blues, and milky creams creates a balanced pattern perfect for stacking or wearing solo.
Step-by-Step
Materials
- 4mm-6mm polymer clay or stone heishi beads: Coral/Salmon color
- 4mm-6mm polymer clay or stone heishi beads: Turquoise/Teal color
- 4mm-6mm polymer clay or stone heishi beads: Cream/Off-white color
- Beading wire (flexible, 49-strand preferred for durability)
- 2 Crimp beads (gold or silver)
- 2 Wire guardians (optional but recommended)
- Lobster claw clasp and jump ring (gold or silver finish)
- Crimp pliers
- Wire cutters
- Bead stopper or masking tape
Step 1: Planning and Setup
-
Measure the wrist:
Begin by measuring your wrist with a flexible tape measure. Add roughly half an inch to this measurement to allow for the thickness of the beads and ease of movement. -
Cut the wire:
Cut a length of beading wire about 3-4 inches longer than your final bracelet size. This extra length ensures you have plenty of room to finish the ends without frustration. -
Secure one end:
Attach a bead stopper to one end of the wire. If you don’t have one, a folded piece of masking tape works perfectly to keep beads from sliding off while you work.
Loose Beads?
If spaces appear between beads after crimping, hide the wire gap by squeezing a crimp cover over the exposed wire.
Step 2: Creating the Pattern
-
Start with turquoise:
Begin your pattern by threading on 3 turquoise heishi beads. -
Add the cream transition:
Follow the turquoise with 4 cream-colored heishi beads. This acts as a neutral separator that makes the colors pop. -
Introduce the coral:
Thread on a longer section of coral beads—about 8 to 10 beads. This will be the dominant color block in this specific sequence. -
Repeat a cream section:
Add another set of 4 cream beads to bookend the coral section. -
Establish the rhythm:
Repeat the sequence: 3 turquoise, 4 cream, 8-10 coral, 4 cream. Observe your pattern as it grows; variations in bead thickness mean you might need to adjust counts by one or two to keep the lengths visually consistent. -
Center point variation:
When you reach the middle of the bracelet, you can create a focal point by adding a longer section of turquoise beads (about 6-8) flanked by cream beads. -
Continue the pattern:
Continue stringing beads in your established pattern until you reach your target length. -
Check the fit:
Wrap the unfinished strand around your wrist to verify the size. Remember that the clasp assembly will add a small amount of length (about 1/2 inch).
Step 3: Finishing the Ends
-
Prepare the crimp:
Slide a crimp bead onto the end of the wire, followed by a wire guardian. -
Attach the clasp:
Thread the wire through the loop of the lobster clasp, then back down through the wire guardian and the crimp bead. -
Secure the crimp:
Slide the crimp bead snug against the clasp (but not too tight—leave a tiny bit of wiggle room). Use your crimp pliers to flatten or fold the crimp bead securely. -
Hide the tail:
Feed the excess wire tail back through the first 3-4 beads of your design for extra security. -
Finish the second end:
Remove the bead stopper from the starting end. Repeat the crimping process, adding a jump ring instead of a clasp. -
Tighten correctly:
I like to pull the wire taut before crimping the second end, but be careful not to make the bracelet stiff; it should still drape fluidly. -
Final trim:
Using flush cutters, trim any remaining wire tails close to the beads so nothing pokes your skin.
Level Up Style
Add tiny gold spacer beads between color changes to give the bracelet a more high-end, polished metallic finish.
Enjoy the rhythmic, earthy vibe of your new handmade jewelry piece
Native American–Inspired Spacer-Stripe Bracelet
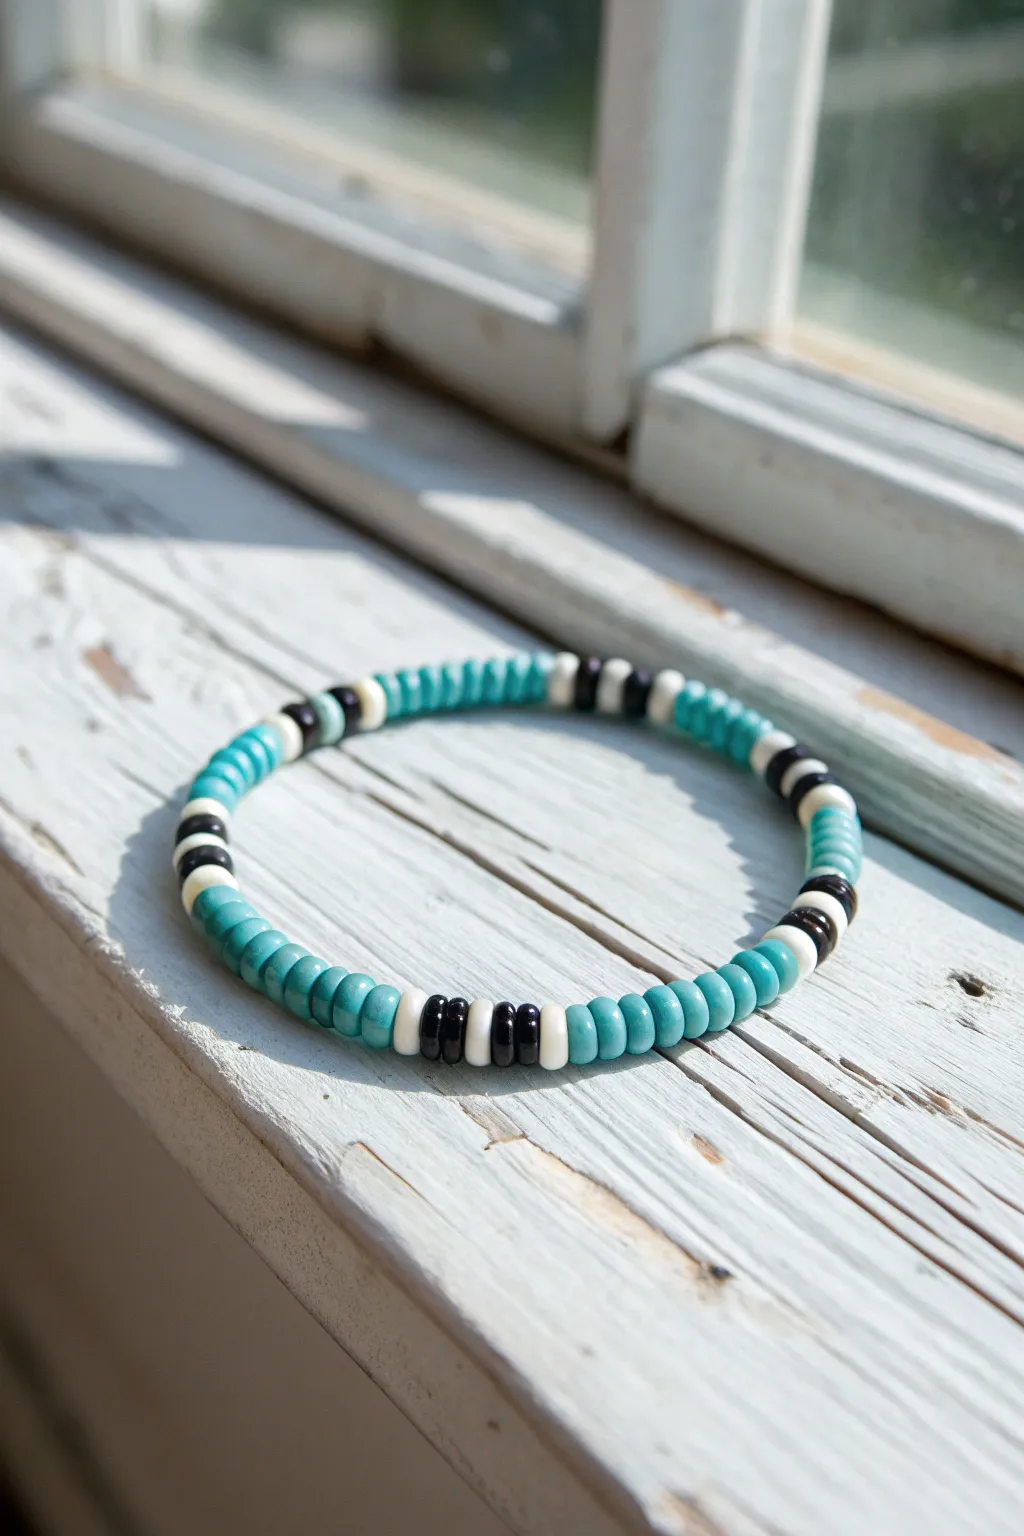
This rustic, minimalist bracelet captures the spirit of the Southwest with its striking turquoise hue intersected by bold black and white spacer beads. The simple repeater pattern makes it a perfect introductory project for working with heishi or polymer clay disc beads.
How-To Guide
Materials
- 4mm or 5mm Turquoise polymer clay heishi beads (disc beads)
- 4mm or 5mm Black polymer clay heishi beads
- 4mm or 5mm White polymer clay heishi beads
- 0.8mm clear elastic stretch cord
- Hypo-cement or strong jewelry glue
- Scissors
Step 1: Preparation
-
Measure your wrist:
Wrap a flexible tape measure around your wrist to determine your circumference. Add about 0.5 inches to this measurement to ensure the bracelet fits comfortably without pinching. -
Cut the cord:
Cut a piece of elastic stretch cord roughly 10 inches long. I always like to have plenty of excess string on both ends to make tying the final knot much easier. -
Pre-stretch the cord:
Gently pull tightly on both ends of your elastic cord several times. This pre-stretching step prevents the bracelet from sagging or expanding permanently after you wear it for the first time. -
Secure the end:
Place a bead stopper or simply a piece of tape on one end of the cord to stop your beads from sliding off while you work.
Step 2: Creating the Pattern
-
Start the main color block:
Begin stringing your turquoise beads. Thread on approximately 10 to 12 turquoise discs. This forms the main ‘body’ color between the patterned sections. -
Begin the spacer sequence:
Now for the contrast. Slide on one white bead, followed by two black beads. -
Finish the stripe:
Complete the spacer stripe by adding one more white bead. Your pattern unit should now look like: White-Black-Black-White. -
Repeat the pattern:
Return to your main color by adding another set of 10 to 12 turquoise beads. Try to keep the number consistent for a symmetrical look, or vary them slightly for a more organic feel. -
Continue stringing:
Keep repeating this sequence (Turquoise block -> White -> Two Blacks -> White) until you have reached your desired bracelet length roughly measured against a ruler. -
Check the fit:
Wrap the unfinished strand around your wrist to verify the size. Add or remove a few turquoise beads from the final section to get the perfect fit.
Knot Security
When trimming elastic, leave about 1-2mm of a tail rather than cutting flush against the knot. If the knot slips slightly inside the bead, the tail prevents it from unraveling completely.
Step 3: Finishing the Bracelet
-
Prepare for the knot:
Remove the tape or bead stopper carefully. Ensure your beads are pushed together snugly so there are no large gaps of exposed string, but not so tight that the bracelet buckles. -
Tie the first knot:
Cross the two loose ends and tie a simple overhand knot, pulling it tight against the beads. -
Tie the surgeon’s knot:
For the second knot, loop the end through twice instead of once before pulling tight. This is a surgeon’s knot and prevents slipping particularly well with elastic cord. -
Secure with glue:
Apply a tiny dab of hypo-cement or jewelry glue directly onto the knot. Let it dry for a few minutes to ensure the bond is permanent. -
Hide the knot:
Once the glue is tacky or dry, trim the excess cord ends close to the knot. Carefully slide an adjacent bead over the knot to hide it inside.
Metal Accents
Replace the two inner black beads with small silver or brass spacer beads. Since turquoise and silver are traditional partners, this adds an authentic jewelry-store finish to the piece.
Step 4: Final Touches
-
Inspect the tension:
Give the bracelet a gentle tug all around to distribute the elastic tension evenly among the beads. -
Wear and enjoy:
Your Southwestern-style bracelet is now ready to wear alone or stack with other favorite pieces.
Now you have a striking accessory that perfectly balances bold contrast with timeless color
Native American–Inspired Wood and Clay Mix
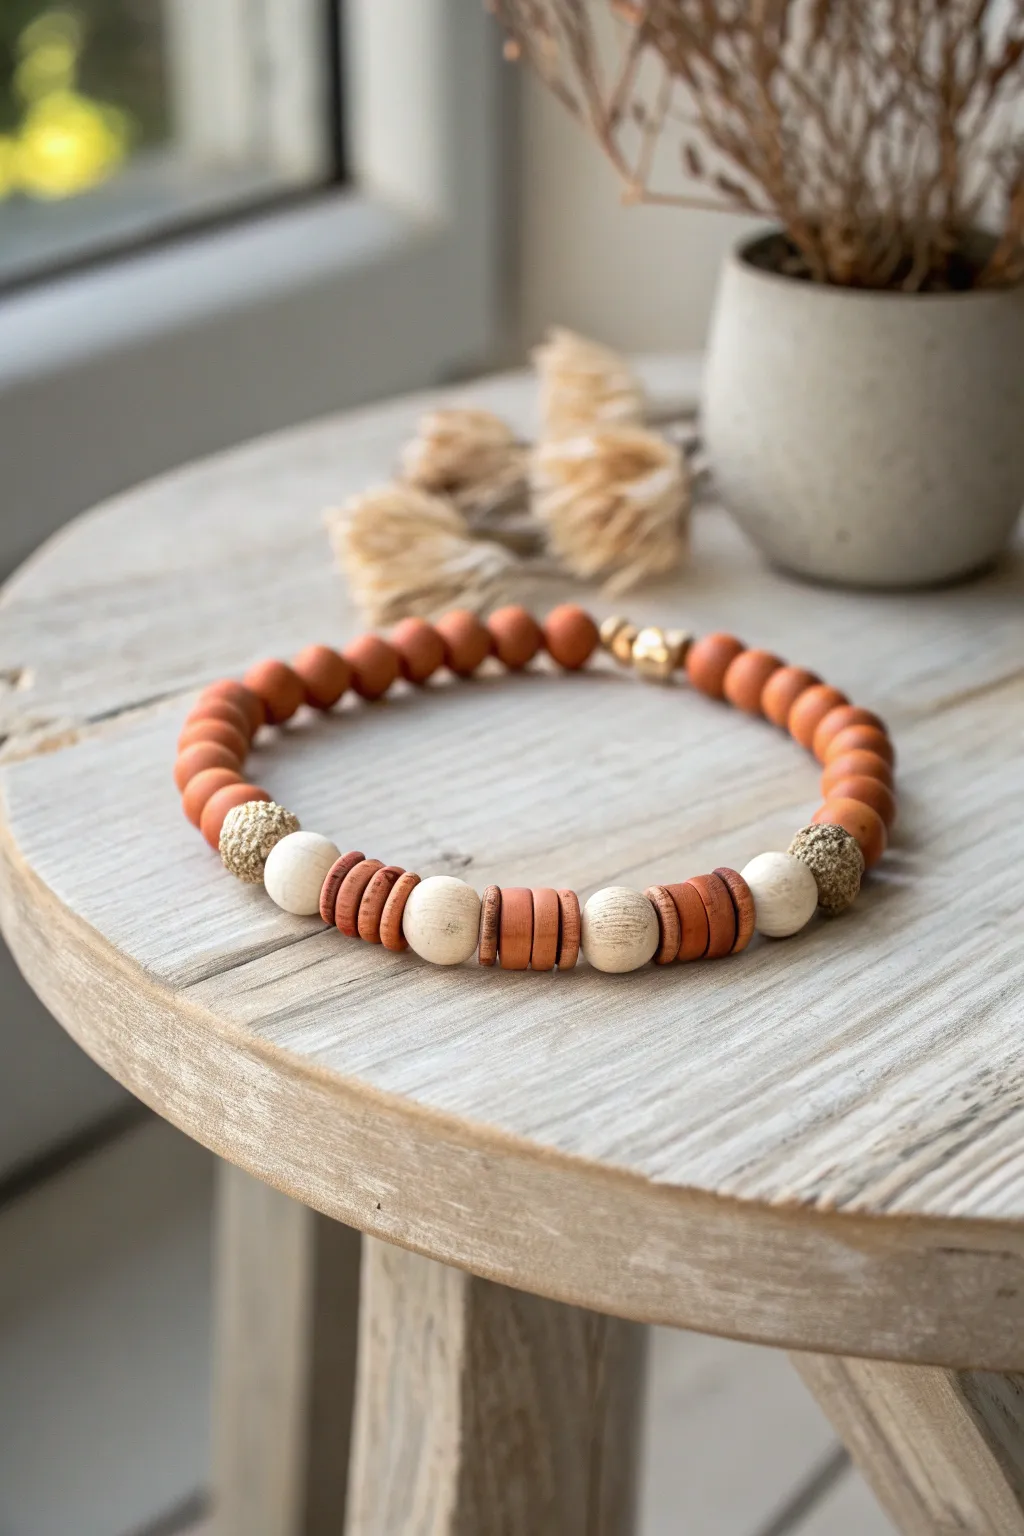
This earthy bracelet combines the warmth of terracotta-toned clay with the organic texture of natural wood for a grounded, Native American–inspired aesthetic. The mixed bead shapes—round, flat heishi, and textured spacers—create a rhythmic pattern that feels both ancient and modern.
Step-by-Step
Materials
- Terracotta polymer clay (or pre-made terracotta round beads, approx 8mm)
- Beige polymer clay (or natural unfinished wood beads, approx 10mm)
- Gold polymer clay or textured gold spacer beads (large hole)
- Flat heishi/disc beads in terracotta/reddish-brown wood (approx 6-8mm)
- Strong elastic beading cord (0.8mm or 1mm)
- Super glue or jewelry adhesive
- Bead stopper or masking tape
- Scissors
- Toothpick or bead reamer
- Optional: Clay roller and small circle cutters (if making beads from scratch)
Step 1: Preparation & Bead Selection
-
Measure your wrist:
Wrap a piece of string around your wrist to find your comfortable size, adding about half an inch for a comfortable fit that isn’t too tight. -
Sort your beads:
Lay out your materials on a bead mat or towel. You will need about 20-25 round terracotta beads for the back section, and a specific mix for the focal front section: 4 large cream wood beads, 2 textured gold spacers, and roughly 12 flat terracotta heishi discs. -
Prepare the cord:
Cut a length of elastic cord about 10-12 inches long. This gives you plenty of extra room for tying knots later. -
Secure the end:
Attach a bead stopper or simply tape one end of the cord to your table so your beads don’t slide off while you work.
Knot Hiding Trick
Plan your stringing so the knot lands next to a larger-hole bead (like the wood or gold). It makes hiding the knot much easier than forcing it into a small clay bead.
Step 2: Creating the Focal Section
-
Start the center sequence:
Begin threading the center pattern. I like to start right in the middle to ensure symmetry. Slide on two flat terracotta heishi beads. -
Add a cream accent:
Next, thread on one of the large cream-colored wooden beads. These act as the primary contrast against the red clay tones. -
Build the side transition:
Add three flat terracotta heishi beads next. This small stack creates a nice separation between the larger round beads. -
Place the second cream bead:
Thread on another large cream wooden bead. This completes one half of the central focal design. -
Add the gold texture:
Slide on one textured gold spacer bead. This metallic element adds a touch of elegance and separates the focal section from the main bracelet body. -
Repeat for symmetry:
Now, go back to the other side of your starting point (or simply continue the pattern in reverse order if working linearly) to create the mirror image: flat discs, cream bead, flat discs, cream bead, and finally the second gold spacer.
Step 3: Completing the Band
-
Fill the length:
On both remaining ends of the cord (outside the gold spacers), begin threading the round terracotta beads. -
Check the fit:
Continue adding round beads until the bracelet reaches your desired length. Wrap it around your wrist occasionally to check the fit; the beads take up space, so it fits tighter than the bare string measurement. -
Pre-stretch the cord:
Once all beads are strung, gently pull on both ends of the elastic cord to ‘pre-stretch’ it. This crucial step prevents the bracelet from loosening up permanently the first time you wear it. -
Tie the knot:
Tie a surgeon’s knot (a square knot with an extra loop through) to secure the bracelet. Pull it tight, but be careful not to snap the elastic. -
Secure with glue:
Place a tiny drop of super glue or jewelry adhesive directly onto the knot. Let it dry for a few moments to ensure it won’t slip. -
Hide the knot:
Trim the excess cord ends to about 2mm. Carefully slide one of the beads (preferably a large-hole bead like the gold spacer or wood bead if near the knot) over the knot to conceal it.
Sticky Situation
If glue gets on the beads, wipe immediately with a damp cloth or use a tiny bit of acetone on a Q-tip, but test on a spare bead first to ensure it won’t strip the color.
Enjoy the rhythmic, earthy feel of your new handcrafted accessory on your wrist
Native American–Inspired Stone-Look Accent Beads
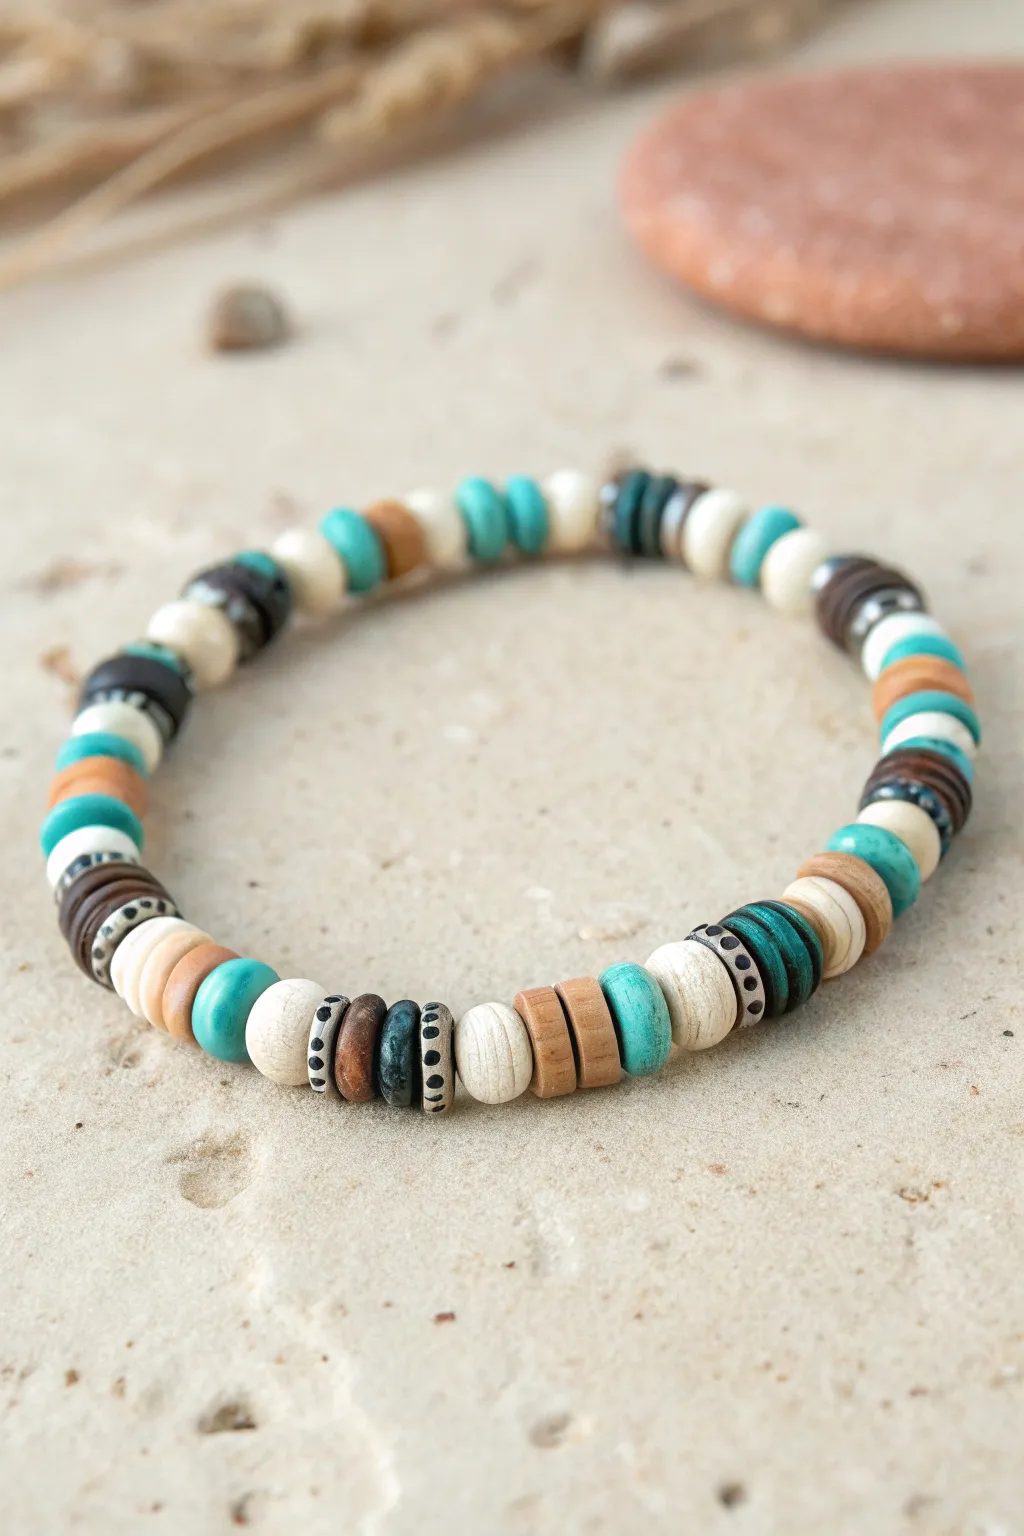
This earthy, bohemian design combines the rustic warmth of wooden heishi beads with cool splashes of turquoise-dyed stone. It features unique spacer beads with etched details that give it a distinct, handcrafted Native American–inspired aesthetic.
Step-by-Step Tutorial
Materials
- Stretch cord (0.8mm or 1mm thickness)
- Hypo-cement or jewelry glue
- 4-6mm wooden heishi beads (natural/tan)
- 4-6mm wooden heishi beads (dark brown)
- 4-6mm turquoise-dyed stone or polymer clay heishi beads
- 4-6mm white bone or polymer clay rondelle beads
- Silver-tone spacer beads with black etched dots or patterns
- Bead stopper or painter’s tape
- Scissors
Step 1: Preparation
-
Measure your wrist:
Before cutting anything, wrap a measuring tape comfortably around your wrist. Add about half an inch to this measurement to ensure the bracelet isn’t too tight once the beads are added. -
Cut the cord:
Cut a length of stretch cord about 10-12 inches long. Having extra length makes tying the final knot much less frustrating than working with short ends. -
Pre-stretch the cord:
Hold both ends of your cut cord and give it a few firm tugs. This pre-stretching technique helps prevent the bracelet from sagging or loosening permanently after the first time you wear it. -
Secure the end:
Attach a bead stopper to one end of the cord. If you don’t have one, a small piece of painter’s tape folded over the tip works perfectly to keep beads from sliding off.
Knot Strength Tip
When tightening your final knot, pull on the bead strand itself, not just the cord ends. This seats the knot firmly against the beads.
Step 2: Creating the Pattern
-
Start with neutral tones:
Begin your threading pattern with a small section of neutral beads. Thread on one dark brown wooden bead followed by a white rondelle bead. -
Add the first accent:
Slide on a single turquoise heishi bead. This pop of color sets the rhythm for the bracelet’s design. -
Incorporate texture:
Add a natural tan wooden bead next. The variation in wood tones creates that organic, gathered look essential to this style. -
Place the etched spacer:
Thread one of the silver-tone spacers with the black etched dots. These special beads act as the focal points that separate the repeating color blocks. -
Repeat the core sequence:
Continue building the pattern: White bead, turquoise bead, natural wood bead, then another etched spacer. I like to occasionally flip the order (e.g., Natural wood, turquoise, white) to make it look less manufactured. -
Group similar beads:
Occasionally, place two similar beads together—like two natural wood discs side-by-side—to break up the perfect symmetry. This adds to the rustic charm. -
Check the fit:
Periodically wrap the strand around your wrist. You want the ends to meet comfortably without stretching the cord yet. Stop adding beads when you have reached your desired length.
Step 3: Finishing Touches
-
Prepare the knot:
Remove the bead stopper or tape carefully, holding both ends of the elastic firmly so no beads escape. -
Tie the first loop:
Cross the left end over the right and pull it through to make a simple overhand knot. Pull it tight to bring the beads together, eliminating any gaps. -
Secure with a surgeon’s knot:
Now, tie a surgeon’s knot: cross the ends again, but loop the tail through the circle twice instead of once. Pull this knot firmly down on top of the first one. -
Apply adhesive:
Dab a tiny drop of jewelry glue or Hypo-cement directly onto the knot. Wait a moment for it to tack up before letting go completely. -
Hide the knot:
Once the glue is dry, trim the excess cord ends close to the knot. If possible, gently pull the beads apart slightly to slide the knot inside the hole of a neighboring bead.
Design Variation
Swap the white bone beads for genuine shell heishi or irregular coconut shell discs for an even more organic, beachy texture.
Slip your new bracelet on and enjoy the rugged, natural texture it adds to your daily style
Native American–Inspired Leather-Tie Bracelet
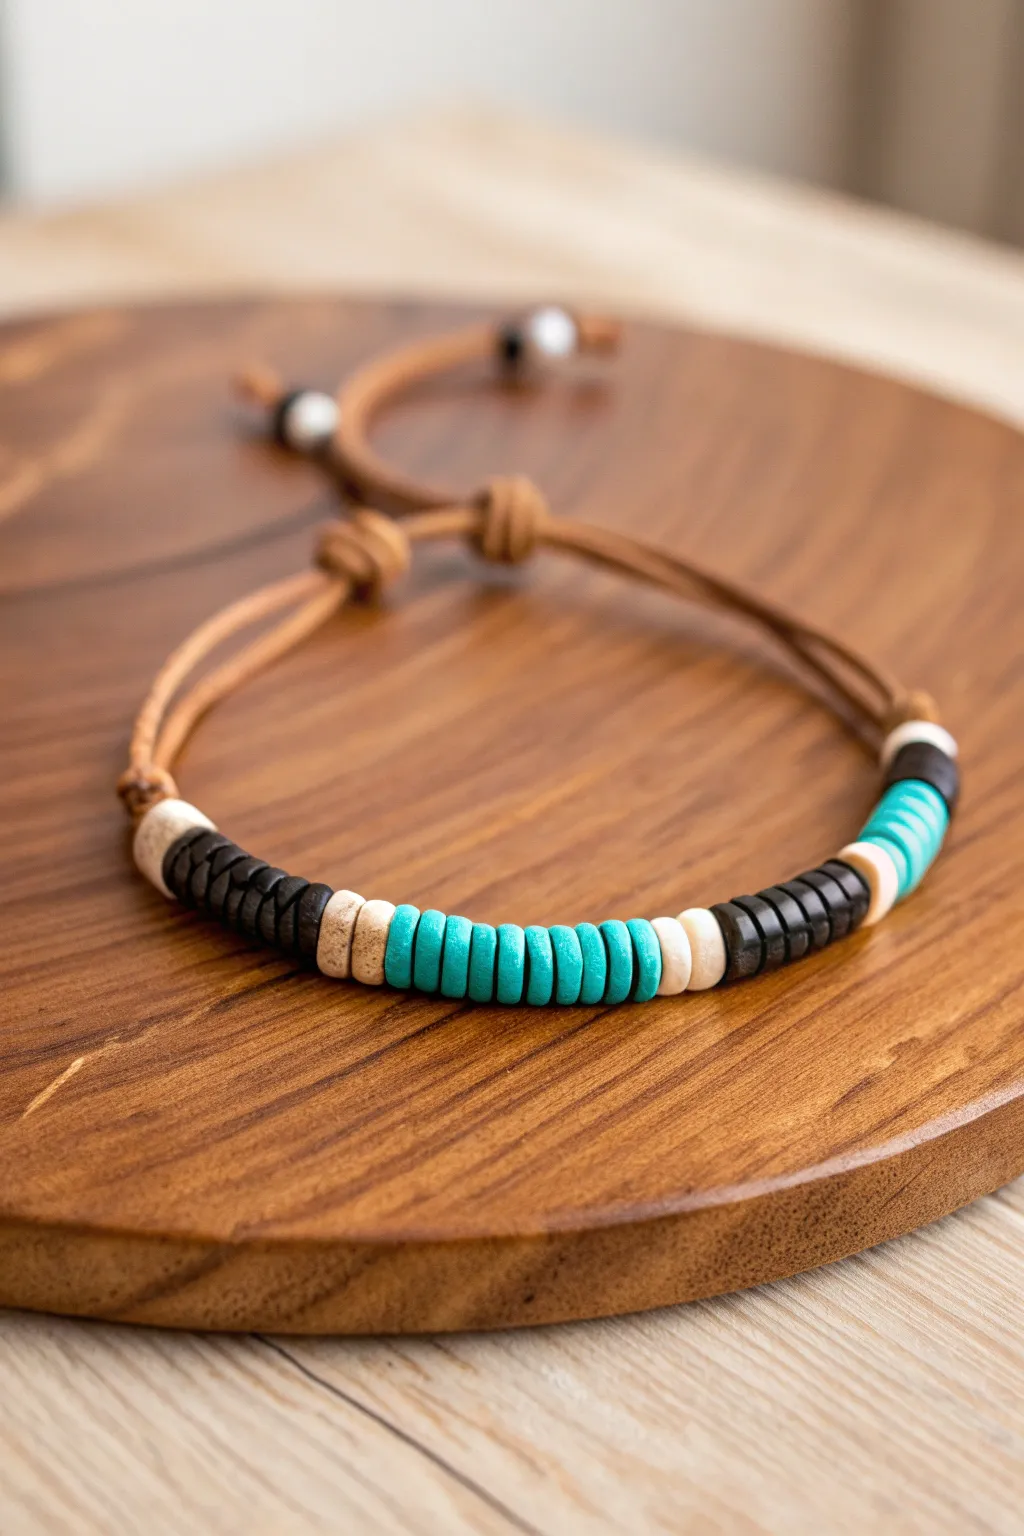
Capture the spirit of the Southwest with this simple yet striking beaded bracelet featuring a classic leather cord tie. The combination of black, bone-white, and vibrant turquoise clay disc beads creates a timeless Native American–inspired look that pairs perfectly with casual wear.
Detailed Instructions
Materials
- 1.5mm round natural leather cord (approx. 20 inches)
- 6mm polymer clay disc beads (heishi beads) in turquoise/teal
- 6mm polymer clay disc beads in matte black
- 6mm polymer clay disc beads in cream/bone white
- 2 large hole accent beads (glass or ceramic) for cord ends
- Tape or clipboard
- Scissors
Step 1: Preparing the Cord
-
Measure and Cut:
Cut a piece of your round leather cord to approximately 20 inches in length. This generous length accounts for the decorative knots and the sliding mechanism later. -
Fold and Knot:
Fold the cord exactly in half to find the center point. About 3 inches down from the fold, form a simple overhand knot using both strands together. This knot acts as the stopper for your beads on one side. -
Secure the Workspace:
Tape the looped end (above the knot) to your table or clip it into a clipboard. Keeping the cords taut makes threading much easier, especially with flexible leather.
Step 2: Beading the Pattern
-
Start with Black:
Thread both strands of leather through the beads simultaneously. Begin by sliding on about 8 to 10 black disc beads. Push them snugly against the starting knot. -
Add White Accents:
Next, add 2 cream/bone-white disc beads. These provide a high-contrast transition into the colorful center section. -
Create the Turquoise Center:
Thread on approximately 10 to 12 turquoise beads. This is the focal point of the bracelet, so I like to count them twice to ensure I have enough center length for the top of the wrist. -
Mirror the Pattern:
Finish the bead sequence by reversing your steps: add 2 more cream/bone-white beads, followed by the matching set of 8 to 10 black beads. -
Secure the Beads:
Once all beads are threaded, push them tightly together to remove gaps. Tie another overhand knot with both leather strands directly against the final black bead to lock everything in place.
Sticky Beads?
If the leather cord is too thick for the bead holes, cut the leather tip at a sharp diagonal angle to create a ‘needle’ point for easier threading.
Step 3: The Sliding Closure
-
Form the Circle:
Remove the tape. Bring the two ends of the leather cord around to overlap with the initial looped end, forming a circle shape. -
First Sliding Knot:
Take the loose tail ends and lay them parallel to the looped section. Tie a ‘sliding knot’ (or barrel knot) around the looped section using the tail ends. Wrap the tail around the loop twice, then tuck it back through its own coils before tightening. -
Second Sliding Knot:
Repeat the process on the other side if you prefer a symmetrical double-slider, or simply utilize the natural friction of the leather loop inside the knot you just made. -
Check the Fit:
Gently pull the knots apart and push them together to test the sliding mechanism. It should be firm but movable.
Make It Rustic
Swap the polymer clay discs for genuine bone or horn heishi beads. The slight irregularities in natural materials add authentic character.
Step 4: Finishing Touches
-
Add End Beads:
On each of the two loose leather tails extending from the sliding mechanism, thread a single decorative large-hole bead. -
Knot the Tips:
Tie a small, tight overhand knot at the very tip of each leather tail to keep the accent beads from falling off. -
Trim Excess:
Snip off any extra leather extending past the final knots for a clean, professional finish.
Slip your finished bracelet on and enjoy the earthy texture and vibrant color pop on your wrist
Native American–Inspired Multi-Strand Cuff Look
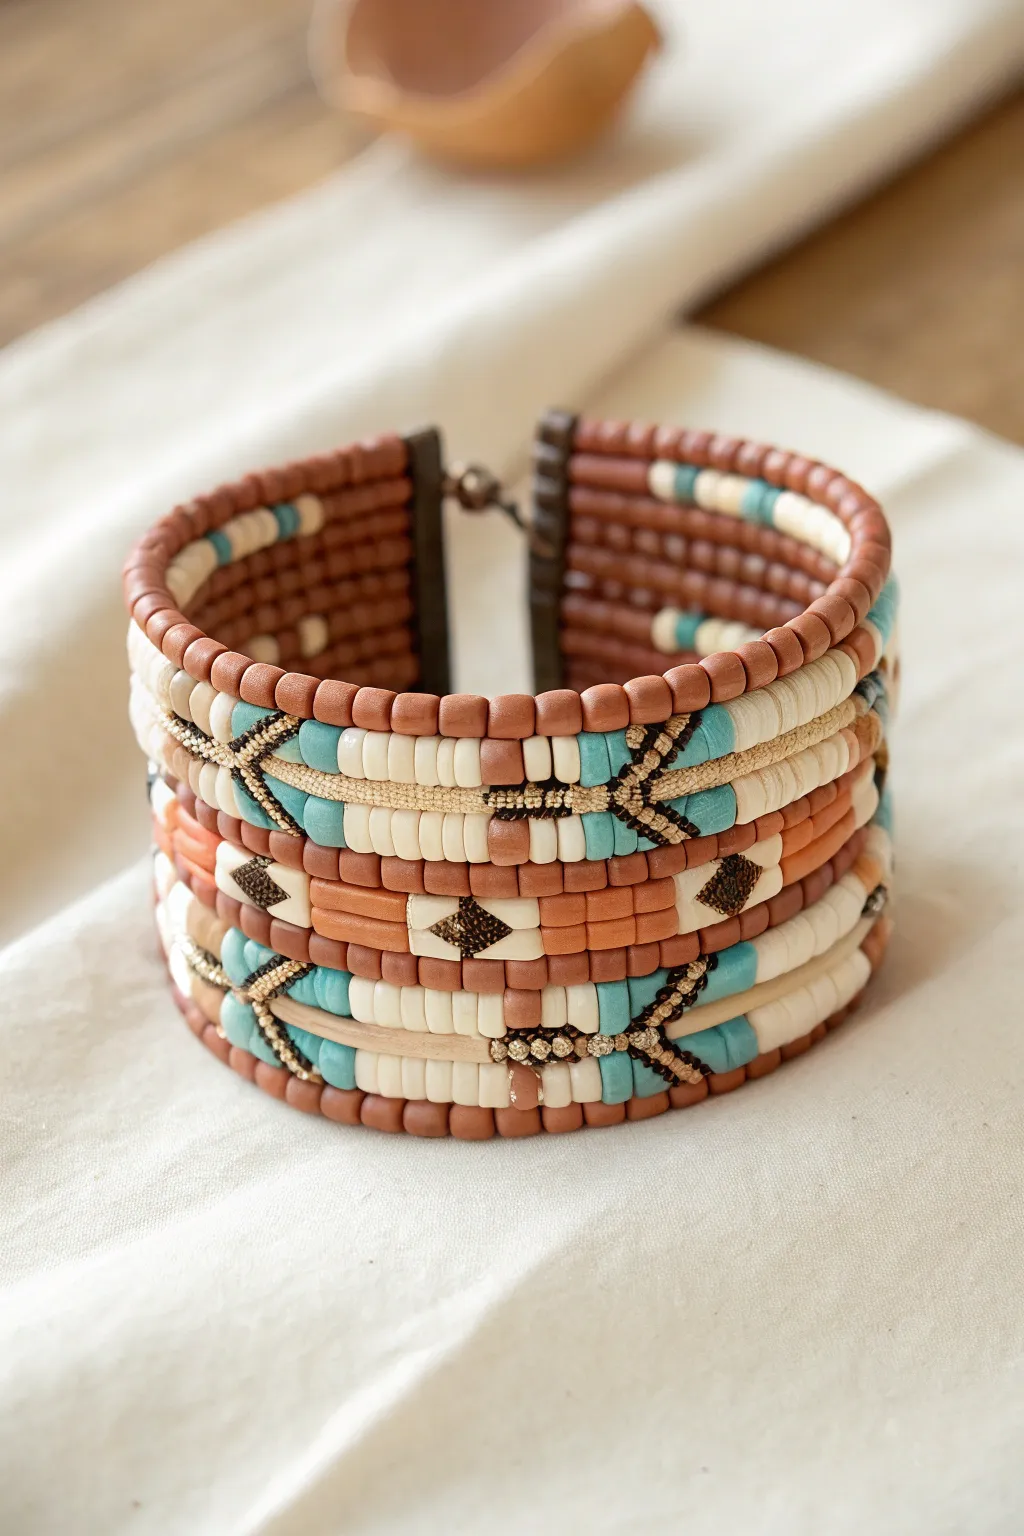
Capture the spirit of desert landscapes with this stunning multi-strand cuff, featuring a structured design inspired by traditional patterns. The mix of terracotta, turquoise, and cream polymer clay beads creates a warm, earthy palette perfect for a statement accessory.
Step-by-Step Guide
Materials
- Polymer clay in terracotta/burnt sienna, turquoise, cream/white, and black
- Extruder tool with small circle disc
- Beading wire (heavy duty) or memory wire (cuff size)
- Leather or faux leather strip (approx. 1.5 inches wide for ends)
- Two multi-strand slide clasps or a hook-and-eye closure system
- Strong jewelry glue (E6000)
- Creating tools: clay blade, acrylic roller, needle tool
- Oven for baking clay
- Small gold seed beads (for the arrow accents)
- Beading needle and thin thread (for weaving accents)
Step 1: Crafting the Clay Beads
-
Condition the clay:
Start by conditioning your terracotta, turquoise, and cream polymer clay blocks until they are soft and pliable. This prevents cracking later on. -
Extrude snakes:
Using a clay extruder with a small circular disc, push out long, even snakes of each color. You’ll need significantly more terracotta and cream than turquoise. -
Cut the beads:
Line up your clay snakes and use a sharp tissue blade to cut them into uniform lengths. Aim for short cylinders or disk shapes, approximately 3-4mm long. -
Pierce the holes:
Gently pierce each bead with a needle tool or toothpick. To keep the shape round, I find it helpful to twist the needle as I push through rather than just pressing straight down. -
Create special focal beads:
For the patterned diamond sections, form small rectangular blocks of cream clay. Apply tiny triangles of black clay or use a needle to texture a diamond shape, baking them slightly longer if they are thicker. -
Bake carefully:
Arrange all your beads on a baking sheet lined with cardstock. Bake according to the manufacturer’s instructions for your specific brand of clay, usually at 275°F (135°C) for 15-30 minutes.
Uneven Beads?
If your hand-cut clay beads vary too much in size, string them tightly together on a skewer before baking and gently roll the whole skewer on a table to unify their shape.
Step 2: Assembling the Strands
-
Plan the pattern:
Lay out your bead design on a bead mat. The bracelet consists of about 5-6 parallel strands. The top and bottom strands are solid terracotta, while the inner rows alternate cream and turquoise sections. -
String the base rows:
Cut lengths of heavy-duty beading wire. String the top and bottom rows completely with the terracotta beads. Secure the ends temporarily with tape. -
Construct the pattern rows:
For the middle rows, string your pattern. Create blocks of color: 10 cream beads, followed by 4 turquoise, then your focal diamond bead, repeating the rhythm to match the image. -
Add woven accents:
Once the main beads are strung, take a separate needle and fine thread. Weave between the rows at the turquoise sections, adding small gold seed beads in a ‘V’ or arrow shape on top of the clay beads to simulate embroidery.
Step 3: Finishing the Cuff
-
Prepare the leather ends:
Cut two strips of leather, slightly wider than the height of your stacked bead rows. These will serve as the structural ends of the cuff. -
Punch holes:
Using an awl, punch evenly spaced holes along one edge of each leather strip—one hole for each strand of beads. -
Attach strands to leather:
Thread the wire ends of each strand through the corresponding holes in the leather. Pull tight so the beads sit flush against the leather. -
Secure the wires:
On the back side of the leather strip, twist the wire ends together or crimp them flat. Trim excess wire. I like to add a drop of glue here for extra security. -
Fold and glue:
Fold the leather strip over to cover the raw wire ends, sandwiching them inside. Glue the leather shut with strong adhesive like E6000 and clamp until dry. -
Attach the closure:
Finally, attach your hook-and-eye clasp or slide clasp to the outer edge of the leather ends using jump rings or by stitching it directly into the leather depending on your hardware.
Leather Alternative
No leather? Use bead end bars or multi-strand slide clasps directly for a sleeker, more modern metal finish without the rustic leather caps.
Wear your new handcrafted cuff with pride, knowing you’ve built a complex piece of art from scratch
Native American–Inspired Mesa Ombre Gradient
Capture the warm, shifting hues of a desert canyon with this simple yet striking beaded bracelet. Using matte, earthy beads in a carefully planned gradient, you’ll create a piece that feels both grounded and vibrant.
How-To Guide
Materials
- Matte round clay or jasper beads (8mm): dark rust/terracotta
- Matte round clay or jasper beads (8mm): medium earthy brown
- Matte round clay or jasper beads (8mm): light beige/sand
- 2 Turquoise or turquoise-colored howlite beads (8mm)
- Strong elastic bead cord (0.8mm or 1mm)
- Jewelry glue or clear nail polish
- Scissors
- Beading needle (optional but helpful)
- Crimping pliers (if using crimp finish, though knotting is standard for elastic)
- Bead design board or a small towel
Step 1: Planning the Gradient
-
Lay out the palette:
Begin by separating your beads by color. You will need your darkest rusty browns, medium browns, light sandy beiges, and the two pop-color turquoise beads. -
Establish the focal points:
Place your two turquoise beads on your design board or towel. These will sit directly opposite each other on the finished bracelet, acting as anchors for the color shift. -
Create the dark section:
Between the two turquoise beads on one side, arrange your darkest rust-colored beads. You’ll want a solid run of about 8-10 of these beads to create the ‘night’ side of the mesa. -
Draft the ombre side:
On the other side of the turquoise anchors, start laying out the gradient. Place 2-3 dark rust beads next to one turquoise bead. -
Transition to medium:
Next to those dark rust beads, place 3-4 medium earthy brown beads. This bridges the gap between the deep red and the light sand colors. -
Finish with light:
Complete the circle by placing 3-4 of the lightest beige beads next to the medium ones, connecting back to the second turquoise bead. Adjust the count until the length matches your wrist size.
Knot Security
Use a flexible adhesive like G-S Hypo Cement rather than super glue. Super glue destroys elastic over time, making it brittle and prone to snapping.
Step 2: Stringing and Finishing
-
Prepare the cord:
Cut a piece of elastic cord about 12 inches long. Is usually like to give myself plenty of extra slack so tying the knot isn’t a struggle later. -
Pre-stretch the elastic:
Hold the cord firmly at both ends and give it a few gentle tugs. This pre-stretching prevents the bracelet from sagging or becoming loose after you wear it a few times. -
Start stringing:
Thread your beads onto the elastic one by one, following the pattern you laid out. If you’re using a large-hole bead, you might not need a needle, but a collapsible eye needle makes this faster. -
Check the fit:
Once all beads are strung, carefully bring the ends together and wrap the circle around your wrist. It should sit comfortably without pinching or slipping off. -
Tie the first knot:
Remove the bracelet from your wrist and tie a simple overhand knot to bring the beads together, pulling tight enough to remove slack but not so tight the beads bunch up. -
Secure with a surgeon’s knot:
For the main securing knot, tie a surgeon’s knot: cross the ends like a standard knot, but loop the end through twice before pulling tight. -
Add adhesive:
Apply a tiny drop of jewelry glue or clear nail polish directly onto the knot. This is crucial for elastic cord, which can be slippery. -
Hide the knot:
While the glue is still slightly tacky but not wet, pull the elastic so the knot slides inside the hole of the nearest bead. -
Final trim:
Once the glue is fully dry (wait at least 15 minutes), use sharp scissors to trim the excess cord ends as close to the bead hole as possible.
Texture Twist
Swap the two smooth turquoise beads for rough-cut raw turquoise nuggets or faceted stones to add an organic, tactile contrast to the smooth clay.
Slip on your new bracelet and enjoy the desert-inspired colors on your wrist
Native American–Inspired Tiny Tile Focals
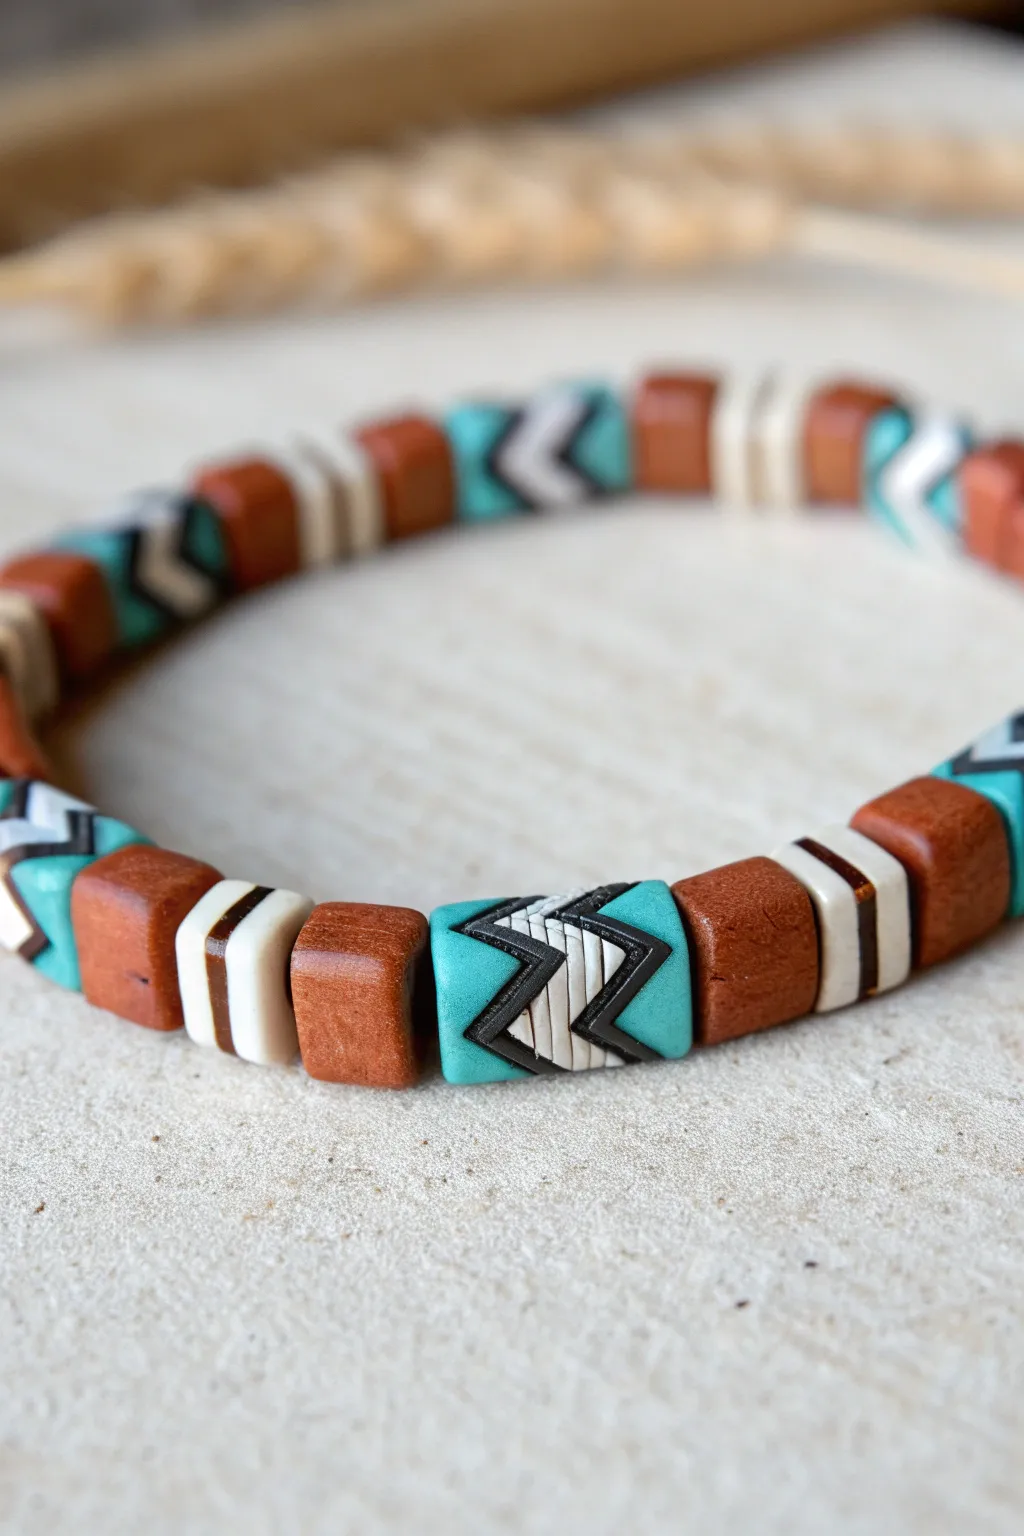
This rustic, earthy bracelet mimics the look of tiny ceramic tiles or carved bone, featuring geometric patterns in turquoise, terra cotta, and bone white. The secret lies in creating your own custom polymer clay cane to achieve that intricate, repeating zigzag design on a miniature scale.
Step-by-Step
Materials
- Polymer clay in turquoise, white, black, and terra cotta/brown
- Tissue blade or rigid clay slicer
- Rolling pin or pasta machine
- Bead piercing pins or a thick needle
- Elastic beading cord (0.8mm or 1mm)
- Wet/dry sandpaper (400 and 800 grit)
- Small square clay cutter (approx. 8-10mm) or a ruler and craft knife
- Oven for baking
- Super glue (cyanoacrylate) for knot security
Step 1: Creating the Zigzag Cane Block
-
Prep the layers:
Condition your turquoise, white, and black clay. Roll out sheets of equal thickness for the black and white clay using a #3 setting on a pasta machine or rolling to about 2mm thick. -
Stack the stripes:
Create a ‘striped’ stack by layering black, white, black, white, and so on. Aim for a block about 1 inch high. Trim the edges to make a neat rectangular block. -
Make the diagonal cut:
Cut the striped block in half diagonally. Reposition one half so that the stripes meet at a 90-degree angle, creating a chevron or ‘V’ shape, and press them back together firmly. -
Add the turquoise base:
Form a thick block of turquoise clay that matches the width of your chevron stack. Cut a ‘V’ groove into the turquoise block or manipulate the chevron stack to nestle into the turquoise, creating a square profile where the chevron sits inside. -
Reduce the cane:
Gently squeeze and elongate the square cane to reduce its size. I prefer to start from the center and work outward to prevent distortion. Reduce it until the square cross-section is the size you want your final beads to be.
Smudged Stripes?
If your black and white lines are bleeding into each other during slicing, your clay is too soft. Pop the cane in the fridge for 20 minutes before cutting for crisp, clean lines.
Step 2: Forming the Beads
-
Slice the focal beads:
Use your tissue blade to slice square segments from your geometric cane. Aim for a consistent thickness of about 5-6mm for a chunky, tile-like feel. -
Create the spacer beads:
Roll out a slab of the terra cotta brown clay to the same thickness (height) as your focal beads. Use your small square cutter to punch out plain square tiles. -
Make the striped spacers:
Create a simple stack of white and black clay layers. Slice thin vertical sections from this stack to create the striped ‘bone’ spacer beads seen between the brown tiles. -
Pierce the holes:
While the clay is raw, gently pierce a hole through the center of each bead using a bead pin. Rotate the pin as you push to avoid squashing the square shape. -
Refine the edges:
Smooth any fingerprints or rough cutting marks with your fingertip. You can gently tap the sides of the beads against your work surface to ensure they remain perfectly square.
Texture Twist
Before baking, gently press the brown ‘wood’ beads with coarse sandpaper or a stiff toothbrush to give them a pitted, organic texture reminiscent of real wood or lava stone.
Step 3: Finishing and Assembly
-
Bake the beads:
Arrange the beads on a tile or parchment-lined baking sheet. Bake according to your polymer clay manufacturer’s instructions, typically 275°F (135°C) for 30-45 minutes. -
Cool and sand:
Let the beads cool completely. Use wet sandpaper to buff the flat sides of the beads for a smooth, stone-like finish. This removes any shiny spots and enhances the matte, natural look. -
Layout the pattern:
Arrange your beads on a layout board. The pattern in the image follows a sequence: one geometric focal, one brown tile, one striped spacer, one brown tile, and repeat. -
String the beads:
Cut a length of elastic cord about 10 inches long. Pre-stretch the cord by pulling it firmly a few times; this prevents the bracelet from loosening later. -
Thread firmly:
String the beads according to your pattern. Ensure there are no gaps between the flat sides of the tiles so they sit flush against one another. -
Tie the knot:
Tie a surgeon’s knot (right over left, left over right, loop through twice). Pull tight. -
Secure and hide:
Add a tiny drop of super glue to the knot. Once dry, trim the excess cord and gently pull the knot inside the hole of one of the larger beads.
Wear your stackable geometric bracelet solo or layer it with leather cuffs for a complete boho look
Native American–Inspired Stamped Geometric Discs
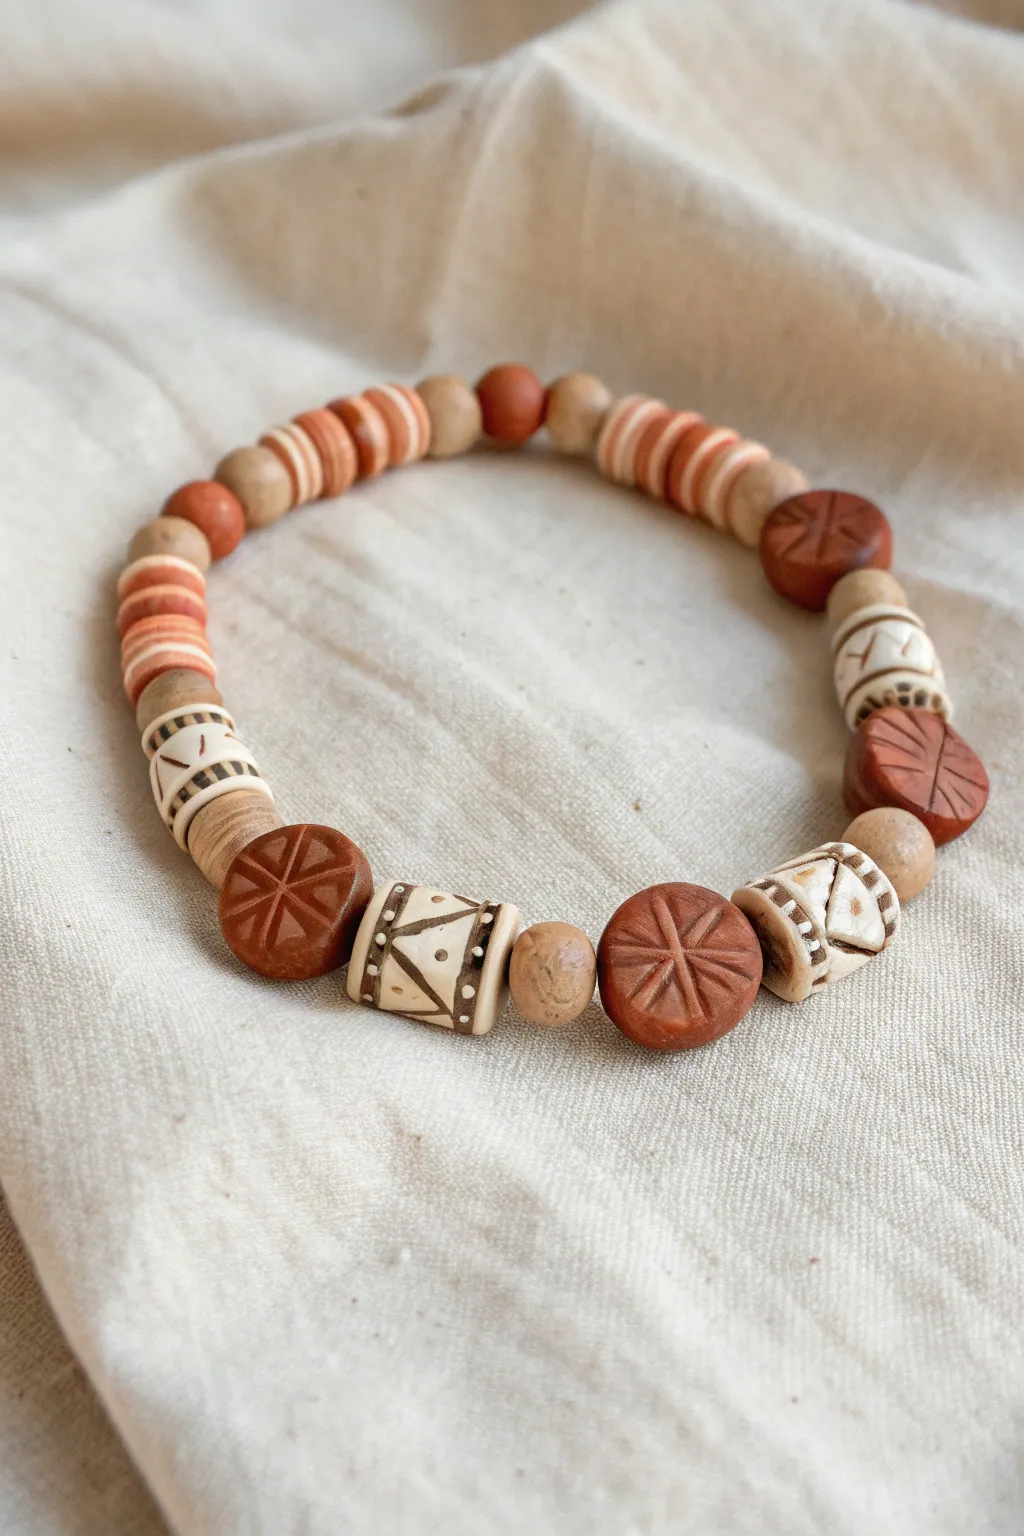
This rustic bracelet combines the warmth of terracotta tones with intricate geometric stamping for a piece that feels both ancient and modern. By hand-rolling and stamping your own polymer clay beads, you create a completely unique accessory where no two pieces are exactly alike.
Detailed Instructions
Materials
- Polymer clay (terracotta or rust color)
- Polymer clay (cream or beige color)
- Small round wooden spacer beads (approx. 4-6mm)
- Acrylic paint (dark brown or burnt umber)
- Elastic beading cord (0.8mm or 1mm)
- Small geometric stamps (starburst or wheel patterns)
- Needle tool or toothpick (for piercing)
- Fine-grit sandpaper
- Paper towel or baby wipes
- Rolling pin or clay machine
- Flat spacer beads (Heishi style, orange/terracotta mix)
Step 1: Crafting the Stamped Disc Beads
-
Condition the rust clay:
Begin by warming the terracotta-colored polymer clay in your hands until it is soft and pliable. Roll it into a smooth, consistent log. -
Form the discs:
Cut equal-sized segments from your log and roll them into spheres about the size of a large pea. Gently flatten each sphere between your thumb and forefinger to create a thick, coin-like disc shape. -
Apply the stamp:
Take your geometric starburst or wheel stamp and press it firmly into the center of the flat disc. Ensure the impression is deep enough to hold paint later, but not so deep that it distorts the bead’s shape. -
Create the holes:
Using a needle tool, carefully pierce a hole through the side of the disc (parallel to the flat faces). I find rotating the needle slightly as I push helps prevent the clay from squishing.
Fixing Smudged Paint
If the acrylic paint dries too fast on the bead surface, lightly sand the high points with fine-grit sandpaper (400+) to remove the excess and reveal the clean clay color underneath.
Step 2: Making the Cylinder Beads
-
Shape the cream cylinders:
Condition your cream-colored clay and roll it into a thick snake. Cut segments approximately 1/2 inch to 3/4 inch long. -
Refine the shape:
Roll each segment gently on your work surface to ensure it is perfectly cylindrical with flat ends. Pierce a hole lengthwise through the center of each cylinder. -
Carve the patterns:
Use your needle tool or a fine blade to carve geometric patterns into the cylinders. Create varied designs like zig-zags, triangles, dotted lines, or parallel stripes. -
Bake the beads:
Arrange all your custom clay beads on a baking sheet or ceramic tile. Bake according to your specific polymer clay manufacturer’s instructions (usually around 275°F for 15-30 minutes). Let them cool completely.
Level Up: Texture Play
Before baking, roll your cream cylinder beads over a piece of coarse sandpaper or fabric. This adds a subtle, stone-like texture that makes the antiquing phase look even more authentic.
Step 3: Antiquing and Assembly
-
Apply the wash:
Dilute a small mount of dark brown acrylic paint with water. Brush this wash over the baked beads, ensuring it gets into all the stamped crevices and carved lines. -
Wipe back the paint:
Before the paint dries fully, use a damp paper towel or baby wipe to vigorously wipe the surface of the beads. This leaves the dark paint only in the recessed areas, highlighting the designs. -
Prepare the cord:
Cut a length of elastic cord about 10-12 inches long. Is helpful to prestretch the elastic by pulling on it gently a few times to prevent sagging later. -
Plan your pattern:
Lay out your beads on a beading board or mat. A balanced pattern works best: try alternating a focal bead (stamped disc or cylinder) with a wooden spacer or a small stack of Heishi beads. -
String the beads:
Thread the beads onto the elastic. I like to start with a section of Heishi beads or wooden spacers, which can hide the knot later. -
Check the fit:
Wrap the strung beads around your wrist to check the size. Add or remove spacers as needed until it fits comfortably without large gaps. -
Tie the knot:
Tie a secure surgeon’s knot (right over left, left over right, loop through twice). Pull the elastic tight to secure. -
Secure and hide:
Place a tiny dot of super glue or jewelry cement on the knot. Once dry, trim the excess cord and gently tuck the knot inside one of the larger-holed beads.
Wear your handcrafted bracelet proudly or stack it with others for a beautiful bohemian look
Native American–Inspired Matte-and-Gloss Pattern Play
This native-style bracelet balances deep, matte textures with vibrant pops of color, perfect for an understated yet striking accessory. The design pairs the organic feel of dark clay or coconut shell beads with smooth, glossy turquoise-colored stones for a classic contrast.
Step-by-Step
Materials
- Matte black/dark brown round clay or coconut shell beads (approx. 6mm)
- Turquoise-colored round gemstone beads (approx. 6mm)
- Flat, dark spacer beads (heishi style) in wood or coconut shell
- Thick black nylon or leather cord (1mm – 1.5mm diameter)
- Scissors
- Super glue or jewelry cement
- Measuring tape
- Tape or clipboard (to hold the cord)
Step 1: Preparation and Cord Setup
-
Measure and cut:
Begin by cutting a length of your thick nylon or leather cord. A length of about 12-14 inches (30-35 cm) is usually sufficient for an adjustable bracelet, allowing plenty of room for knots. -
Seal the end:
Since you are threading beads onto a relatively thick cord, fraying can be a nightmare. I like to stiffen one end of the cord with a tiny dab of super glue or by carefully melting the tip with a lighter to create a needle-like point. -
Create the anchor knot:
Tie a simple overhand knot about 3 inches from one end of the cord. This will act as the stopper for your beads so they don’t slide off while you work.
Natural Texture Tip
To enhance the rustic look, lightly sand the dark coconut or wood beads with fine-grit sandpaper. This removes factory sheen and creates a true matte finish.
Step 2: Beading the Pattern
-
Start with the dark matte beads:
Thread on approximately 14 to 18 of the dark matte beads. The exact number depends on your wrist size, but this section should cover about half to two-thirds of the bracelet’s circumference. -
Add the transition spacer:
Slide on one of the flat, dark heishi-style spacer beads. This structural element marks a clear visual break before the color section begins. -
Insert the first turquoise bead:
String your first turquoise-colored bead. Notice how the bright blue-green contrasts immediately against the dark spacer. -
Create the focal pattern:
Follow that turquoise bead with two of the flat dark spacers. This creates a sandwich effect that separates the colors. -
Repeat the sequence:
String another turquoise bead, followed by two more flat spacers. Repeat this until you have added four or five turquoise beads in total, maintaining the spacing pattern. -
Finish the color section:
After your last turquoise bead, add one final flat dark spacer to mirror the beginning of this section. -
Check the fit:
Wrap the beaded strand around your wrist to check the size. If it’s too short, add a few more of the dark matte round beads to the end until it meets comfortably.
Level Up: Stone Variance
Use genuine turquoise nuggets with distinct dark matrix veins rather than uniform dyed beads. The irregularities add authentic character to the piece.
Step 3: Finishing the Adjustable Closure
-
Tie the second stopper knot:
Once you are happy with the length, push all beads together snugly (but not so tight the bracelet kinks) and tie a second overhand knot right up against the last bead to lock everything in place. -
Cross the cords:
Bring the two tail ends of the cord together so they overlap and run parallel to each other, forming a circle with the bracelet. -
Prepare for the sliding knot:
Cut a separate piece of the same cord, about 8 inches long. This will be used to tie the sliding macramé square knot or ‘cobra’ stitch over the overlapped tails. -
Tie the sliding knot:
Center the new cord piece under the two overlapped tails. Tie a series of square knots (macramé style) for about half an inch. Ensure these are tight enough to hold but loose enough to slide. -
Secure the slider:
Trim the excess ends of the knotting cord (not the bracelet tails!) close to the knot. Carefully dab a speck of glue on the cut ends to prevent the knot from unraveling. -
Finish the tails:
Tie a small knot at the very end of each bracelet tail cord. You can add a small bead before the knot for extra grip if you like. -
Final trim:
Trim any excess cord past the tail knots and seal the tips again to prevent fraying.
Slip on your new bracelet and enjoy the earthy elegance of your handcrafted design
Native American–Inspired Pottery-Shard Texture Beads
Capture the spirit of ancient artistry with this rustic polymer clay bracelet that mimics the look of weathered pottery shards and natural stone. The textured, earthy beads in terracotta, cream, and slate hues create a timeless piece that feels like a discovered treasure.
Step-by-Step Guide
Materials
- Polymer clay (terracotta, white, black, translucent, and beige/tan)
- Coarse black pepper or dried coffee grounds (for speckling)
- Sandpaper or a rough stone (for texturing)
- Acrylic roller or pasta machine
- Various circle cutters (small size)
- Thick needle tool or toothpick
- Stretch magic cord (0.7mm or 1mm)
- Super glue or jewelry cement
- Oven for baking
- Baking sheet and parchment paper
- Acrylic paint (burnt umber/dark brown) and old toothbrush (optional for more aging)
Step 1: Creating the Clay Custom Blends
-
Terracotta base:
Start by conditioning a large block of terracotta polymer clay. If the color is too bright, mix in a tiny pinch of black or brown to mute it down to a natural, fired-earth tone. -
Speckled granite blend:
Mix white clay with a small amount of beige and translucent clay. Here I like to knead in a generous pinch of coarse black pepper or dried coffee grounds to create realistic mineral inclusions and speckles. -
Slate grey blend:
Create a dark grey stone color by mixing black and white clay. Don’t mix it completely thoroughly; leaving slight streaks adds to the natural rock appearance. -
Desert sand blend:
Mix beige, white, and a tiny bit of yellow ochre or gold clay to create a warm sandstone color.
Step 2: Shaping the Beads
-
Rolling the heishi logs:
Roll your terracotta, slate, and sand blends into long, thin snakes or logs. aim for a diameter of about 8-10mm, but slight variations make it look more handmade. -
Slicing the discs:
Using a sharp tissue blade, slice the logs into consistent discs. They shouldn’t be wafer-thin; aim for a chunky ‘shard’ thickness of about 3-4mm. -
Rounding the edges:
Take each disc and gently tap the sharp cut edges with your finger to soften them. They should look like tumble-worn stones, not perfect cylinders. -
Forming round focal beads:
Using the speckled granite blend, roll several larger round balls (approx 10-12mm). These will serve as visual breaks in the pattern. -
Creating varied shapes:
For added interest, flatten a few of the round granite beads slightly into ‘lentil’ shapes or rounded squares to mimic uneven pottery fragments.
Sticky Situation?
If your clay is sticking to the needle tool when piercing holes, dust the needle with a little cornstarch or baking powder before pushing it through the bead.
Step 3: Texturing and Drilling
-
Adding surface texture:
Before baking, gently roll your beads over a piece of coarse sandpaper or press a rough stone against them. This removes fingerprints and imparts a porous, earthen texture. -
Piercing the holes:
Use a thick needle tool to pierce a hole through the center of every bead. Twist the needle as you push through to prevent squashing the bead’s shape. -
Checking the exit:
Once the needle pokes through, flip the bead and insert the needle from the other side to ensure a clean, smooth hole opening.
Ancient Relic Effect
Mix a tiny amount of baking soda into your clay before baking. It reacts slightly to create a more porous, faux-pumice texture perfect for ‘ancient’ designs.
Step 4: Baking and Assembly
-
Baking the beads:
Arrange the beads on a parchment-lined baking sheet. Bake according to your brand of clay’s instructions (usually 275°F/135°C for 30 minutes). Let them cool completely. -
Optional aging wash:
If your beads look too ‘new,’ water down some burnt umber acrylic paint. Brush it over the beads and immediately wipe it off with a paper towel, leaving dark paint only in the textured crevices. -
Planning the layout:
Lay out your design on a bead board or towel. Create sections of 5-8 terracotta discs, interrupted by a grey disc, a sand disc, and a focal speckled bead. -
Stringing the beads:
Cut a piece of stretch cord about 10 inches long. Pre-stretch the cord by pulling it gently a few times. Thread your beads onto the cord in your desired pattern. -
Checking the fit:
Wrap the strand around your wrist to check the size. Usually, about 7 inches covers an average wrist, but add or remove terracotta discs as needed. -
Tying the knot:
Tie a secure surgeon’s knot (right over left, left over right twice). Pull tight. -
Securing the finish:
Add a tiny drop of high-quality jewelry glue to the knot. Let it dry before trimming the excess cord tails close to the knot.
Now you have a stunning, earth-toned accessory that carries the warmth of the desert wherever you go
Native American–Inspired Story Stack Trio
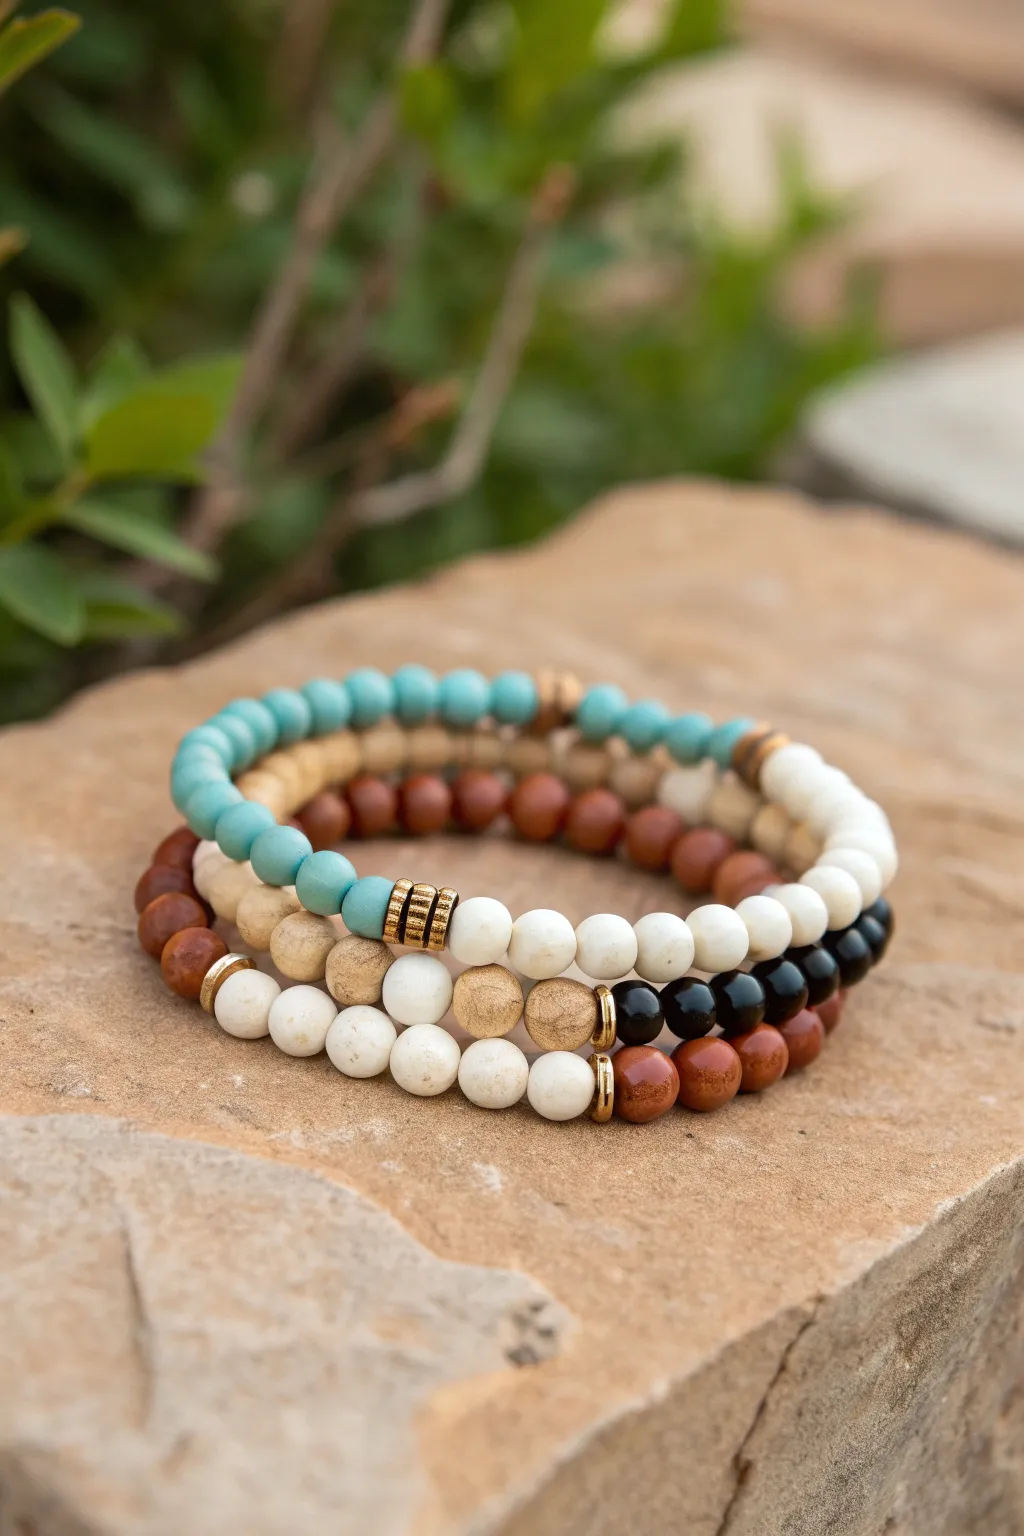
Capture the essence of earthy storytelling with this beautiful set of three stretch bracelets. Featuring a blend of matte turquoise, white howlite, warm wood, and striking accents, this stack evokes a grounded, natural aesthetic perfect for everyday wear.
Step-by-Step
Materials
- Matte turquoise stone beads (6mm or 8mm)
- White howlite or magnesite beads (8mm)
- Natural wood beads (sandalwood or bayong, 8mm)
- Brown jasper or carnelian beads (8mm)
- Black onyx or obsidian beads (8mm)
- Gold-tone metal spacer beads (flat disc shape)
- Gold-tone brass heishi spacer beads
- Strong elastic cord (0.8mm or 1.0mm)
- Beading needle (optional but helpful)
- Scissors or jewelry snips
- Jewelry glue (GS Hypo Cement recommended)
- Bead design board or masking tape
Step 1: Planning Your Designs
-
Measure your wrist:
Before you begin, wrap a flexible measuring tape around your wrist to determine your size. Add about half an inch to this measurement for a comfortable fit. -
Prepare the workspace:
Lay out a bead design board or simply place a piece of felt on your table. This prevents beads from rolling away while you plan the patterns. -
Visualize the three strands:
Look closely at the photo: one bracelet is primarily turquoise and wood, one is white and wood with gold accents, and the third mixes white, black, and brown stones. Planning helps you balance the colors across the stack.
Step 2: Bracelet 1: The Turquoise Horizon
-
Cut the cord:
Cut a piece of elastic cord about 12 inches long. Pre-stretching the elastic gently by pulling on both ends helps prevent the bracelet from loosening later. -
String the base:
Thread approximately half of your bracelet length with the matte turquoise beads. -
Add the contrast section:
Transition to the natural wood beads for the second half of the loop. I like to add a single small brass heishi spacer between the turquoise and wood sections for a subtle metallic pop. -
Tie the knot:
Once the length is correct, maximize tension and tie a surgeon’s knot (right over left, left over right twice). -
Secure the finish:
Apply a tiny dot of jewelry glue to the knot, let it dry partially, trim the excess cord, and tuck the knot hiding inside a larger wood bead.
Knot Slipping?
If your elastic knots won’t hold tight while gluing, try a ‘square knot’ followed by a ‘granny knot’ on top. Pull the cords very tight to lock the elastic into itself.
Step 3: Bracelet 2: The Golden Earth
-
Start the pattern:
Cut your second cord. Begin stringing with about 5-6 white howlite beads. -
Create the focal point:
Add three gold-tone brass heishi spacers in a row. Follow this with a few more white beads, then transition into light tan wood beads. -
Add metallic dividers:
Place a flat gold disc spacer. String three large textured wood beads (or cork beads if available) as a feature section, followed by another gold disc spacer. -
Complete the loop:
Finish stringing with more white howlite beads until you reach the desired length. Tie, glue, and trim this strand just like the first one.
Add Texture
Swap smooth round beads for faceted gemstones or raw-cut wood beads in one section. This adds tactile variety that makes the stack feel more organic.
Step 4: Bracelet 3: The Tri-Color Stone
-
Section one: White:
Cut your third cord. Start by threading a segment of white howlite beads, covering roughly one-third of the bracelet’s circumference. -
Section two: Black:
String a segment of black onyx or shiny obsidian beads. This segment should be slightly shorter than the white section. -
Section three: Brown:
Finish with earthy brown jasper or carnelian beads to complete the remaining third of the circle. -
Insert gold accents:
To elevate the look, place a single gold disc spacer between each color transition (White/Black, Black/Brown, Brown/White). -
Final assembly:
Double-check that this bracelet is the same size as the previous two before tying your final surgeon’s knot and securing it with glue.
Slide these onto your wrist and enjoy the serene, earthy connection they bring to your outfit